

Coffin nails represent one of the most versatile and statement-making shapes in modern nail art, and when you’re going for that undeniable baddie aesthetic, they’re practically non-negotiable. The elongated, tapered silhouette flatters almost any finger length and provides the perfect canvas for bold designs that command attention. Whether you’re drawn to edgy metallics, intricate patterns, or moody jewel tones, coffin nails give you the real estate to make your manicure truly unforgettable.
The beauty of the baddie coffin nail is that it walks the line between sophisticated and daring. This isn’t about playing it safe—it’s about deliberate choices that reflect confidence and style. The coffin shape itself enhances whatever design you choose, making colors appear richer, details sharper, and your overall look instantly more polished. Long coffin nails elongate your fingers and create an elegant silhouette that works whether you’re heading to a night out or just want to feel powerful during your everyday routine.
What makes baddie coffin nails so compelling is their ability to transform a simple manicure into a statement piece. The extended length gives you options that shorter nails simply can’t deliver—multi-dimensional designs, intricate layering, negative space techniques, and detailed artwork all become realistic. Even minimalist designs feel more impactful stretched across a coffin shape.
The designs that follow represent the most sought-after baddie aesthetic variations, each one designed to make you feel like the main character in your own story. From subtle sophistication to full-blown drama, you’ll find ideas that match your vibe and inspire your next appointment.
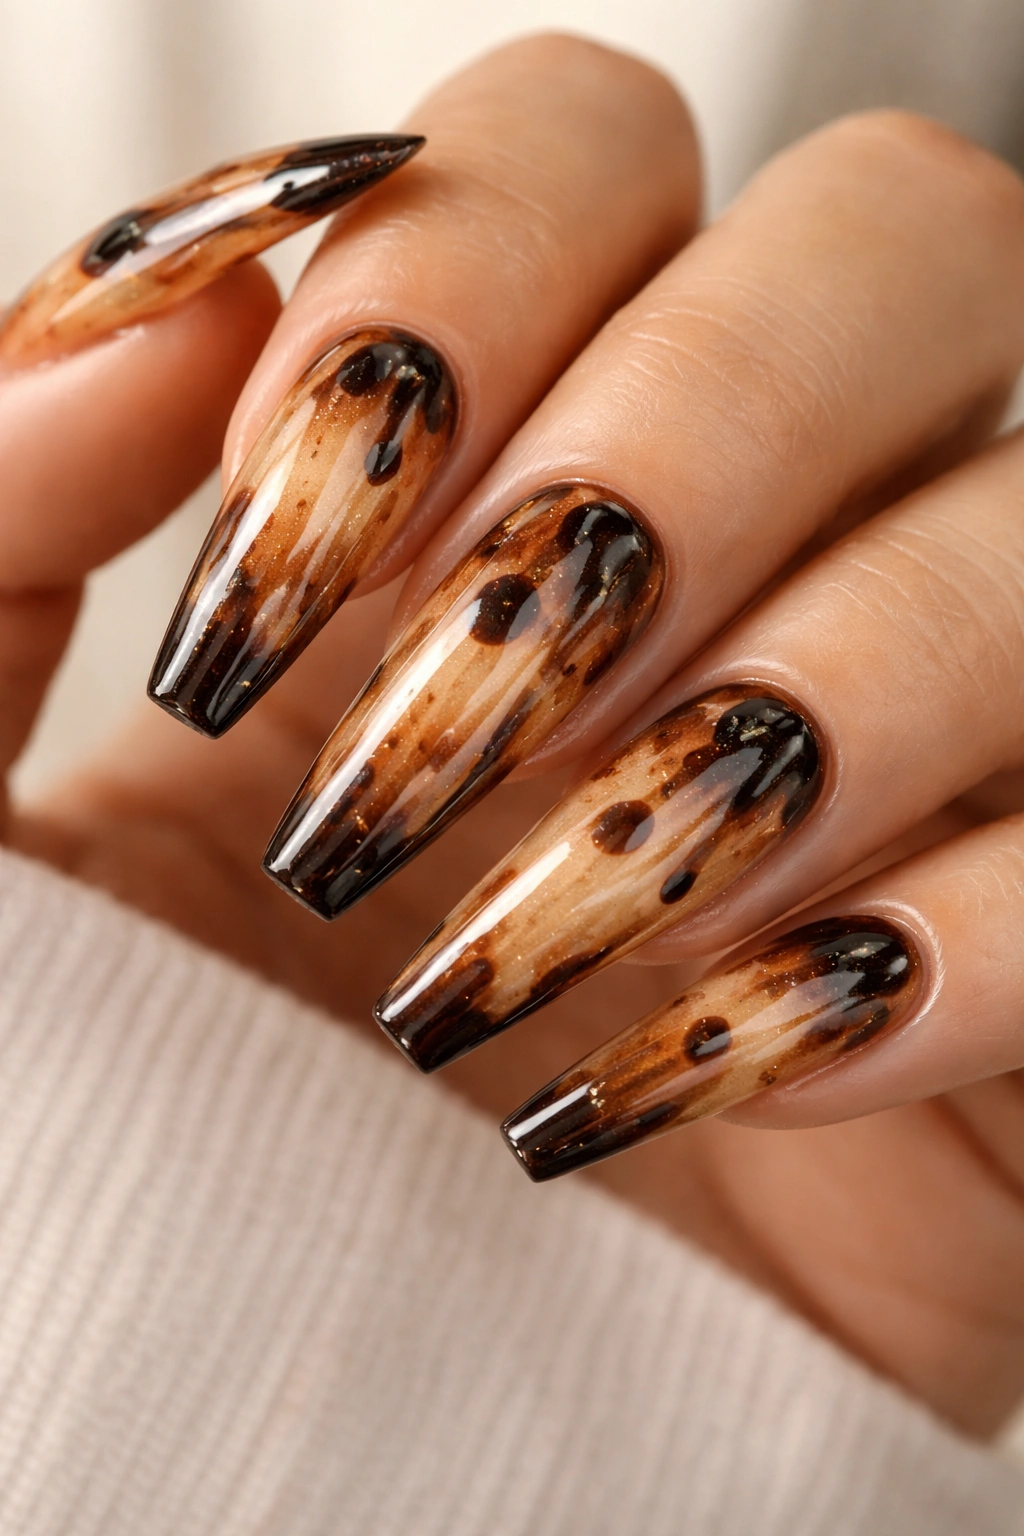
1. Glazed Donut Nails with Dark Accents
Glazed donut nails bring that effortless luxury aesthetic to your coffin shape, and when you swap out the typical nude for deeper, richer tones, they instantly transform into something edgy and intentional. This design combines a translucent caramel or honey-colored base with strategic dark spots and drips that create an almost marbled effect, giving you that “expensive and unbothered” energy that defines baddie style.
Why This Works for the Baddie Aesthetic
The glazed donut trend plays beautifully with the coffin nail shape because the elongation emphasizes the dimensional depth of the glaze effect. Dark accents—whether charcoal, espresso brown, or deep plum—prevent the look from reading as too delicate or sweet, keeping it firmly in power-move territory. The finish reflects light in a way that instantly reads luxury, and the semi-translucent quality creates an almost jewel-like appearance that photographs incredibly well.
How to Get This Look
- Start with a clear or slightly tinted base in warm caramel or honey tone
- Use a thin brush or dotting tool to apply strategic dark spots and small drips across the nail
- Create definition by concentrating darker accents near the cuticle and scattered across the tip
- Seal with a high-gloss top coat that emphasizes the dimension
- Keep the shape perfectly tapered at the tip for maximum impact
Pro tip: Layer a subtle shimmer or chrome powder over sections of your glazed base for an elevated dimension that catches light constantly.
2. Black and Gold Geometric Patterns
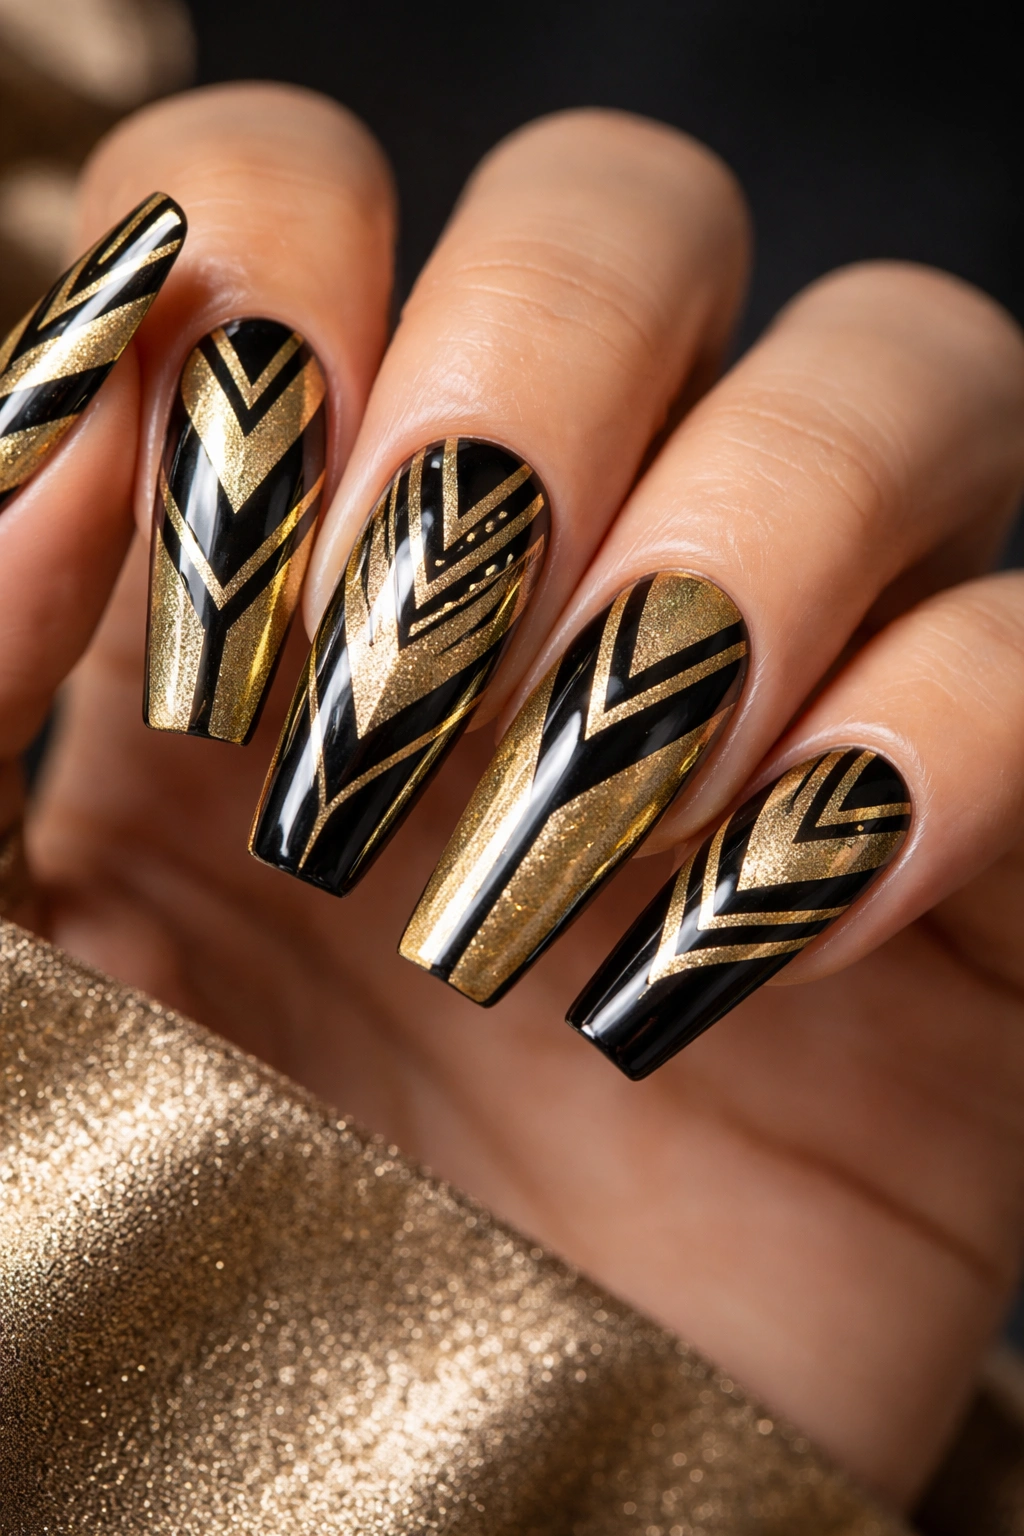
Geometric designs in black and gold are the quintessential baddie statement, and coffin nails provide the perfect platform for precise, eye-catching patterns. Think sharp triangles, clean lines, bold stripes, and angular shapes in high-contrast black against a rich gold base—this combination screams confidence and intention.
Why This Works for the Baddie Aesthetic
Black and gold represent power, luxury, and dominance—emotions that sit at the absolute center of baddie energy. The geometric precision required makes these designs feel intentional and calculated, not accidental. Coffin nails allow you to create larger geometric blocks and patterns that remain visually balanced, whereas shorter nails might make the same design feel cramped or chaotic. The contrast between matte black lines and shimmering gold creates depth.
How to Get This Look
- Apply a gold base coat (metallic foil, shimmer, or glitter-embedded finish all work beautifully)
- Use a thin striping brush or nail pen to draw precise black geometric patterns
- Consider creating a negative space section where the nail shape itself becomes part of the design
- Block out large triangles, chevrons, or abstract angular shapes for maximum impact
- Finish with a matte top coat on the black sections and gloss on the gold for contrasting textures
Worth knowing: Map out your design lightly in pencil on the nail before committing with polish—precision is what elevates this from cute to undeniably baddie.
3. Smoky Gradient with Rhinestone Details
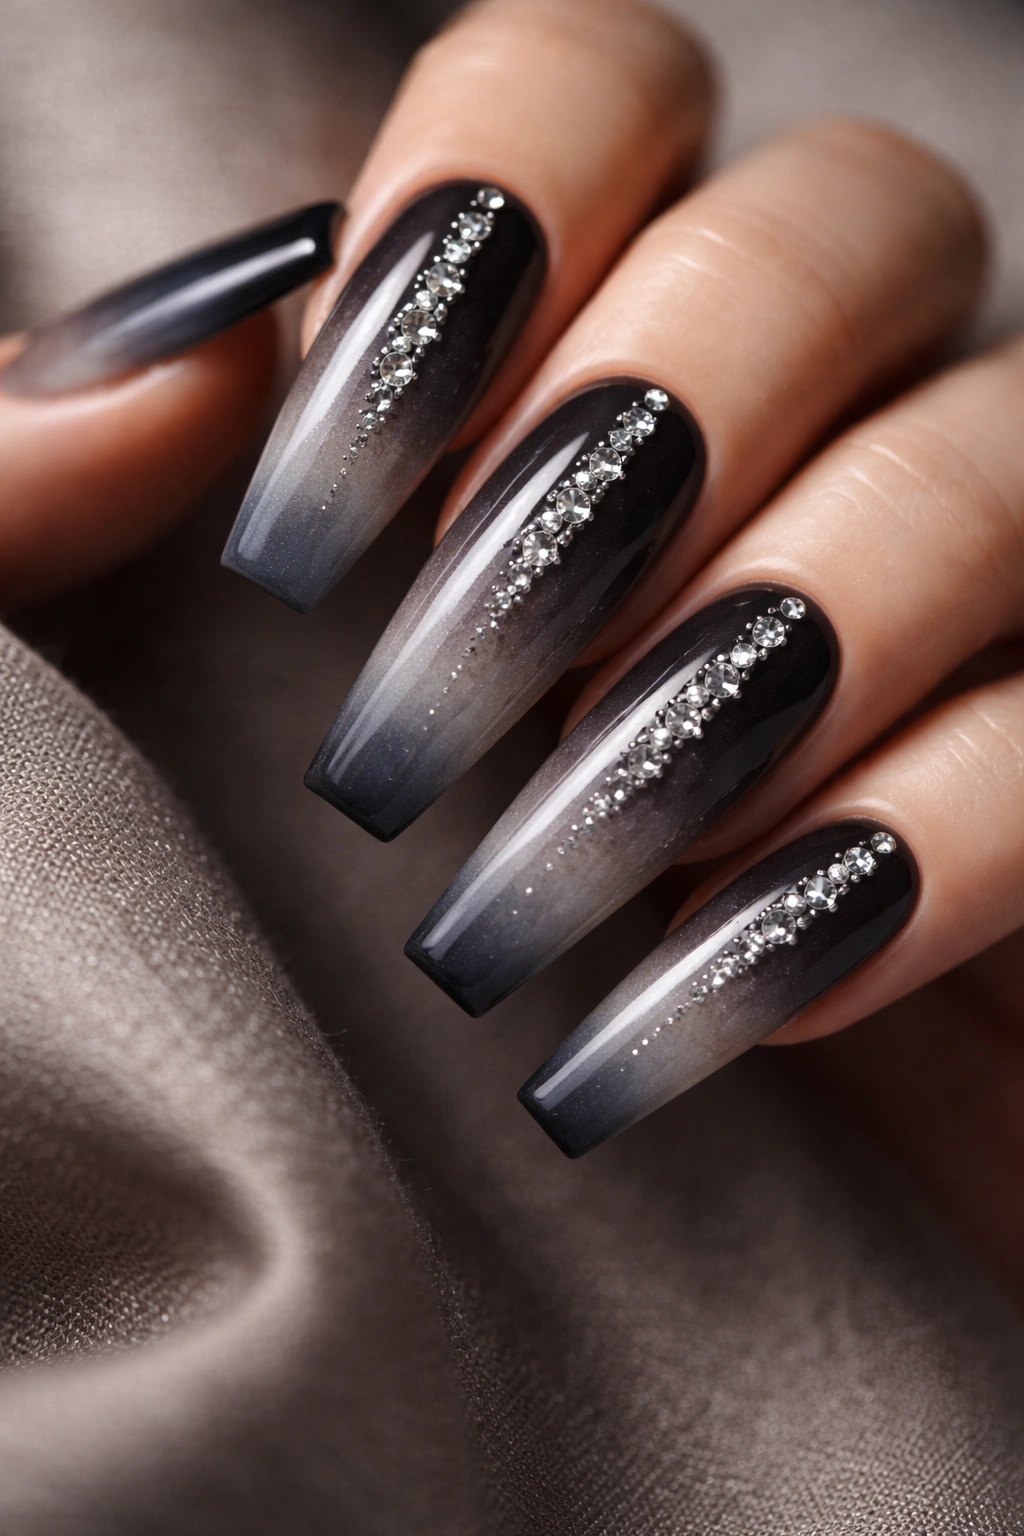
A smoky gradient in charcoal, gray, and black tones creates an absolutely moody, mysterious foundation that’s pure baddie energy, especially when you layer in strategic rhinestone placement. The gradient technique gives you movement and depth, while diamonds add that unmissable sparkle that catches light from every angle.
Why This Works for the Baddie Aesthetic
Smoky gradients communicate sophistication and mystery, which are core elements of baddie style. The neutral-to-dark color progression is endlessly flattering on all skin tones and doesn’t compete with other elements of your look. Rhinestones placed strategically along the gradient (rather than covering the entire nail) keep the focus sharp and prevent the design from reading as costume-y. The sparkle adds drama without sacrificing that polished, intentional feel.
How to Get This Look
- Apply a charcoal or black base polish to your entire nail
- Using a sponge or blending brush, apply lighter gray tones in the middle section of the nail
- Blend the colors by dabbing with the sponge so there are no hard lines, creating a hazy transition
- Once dry, place individual rhinestones in strategic spots—along the center line, around the cuticle, or scattered across the tip
- Use a gel top coat or rhinestone adhesive to ensure the stones stay put
Pro tip: Choose stones in varying sizes (mix large accent stones with tiny detail stones) for a more luxe, curated appearance rather than uniform placement.
4. Blood Red with Chrome Details
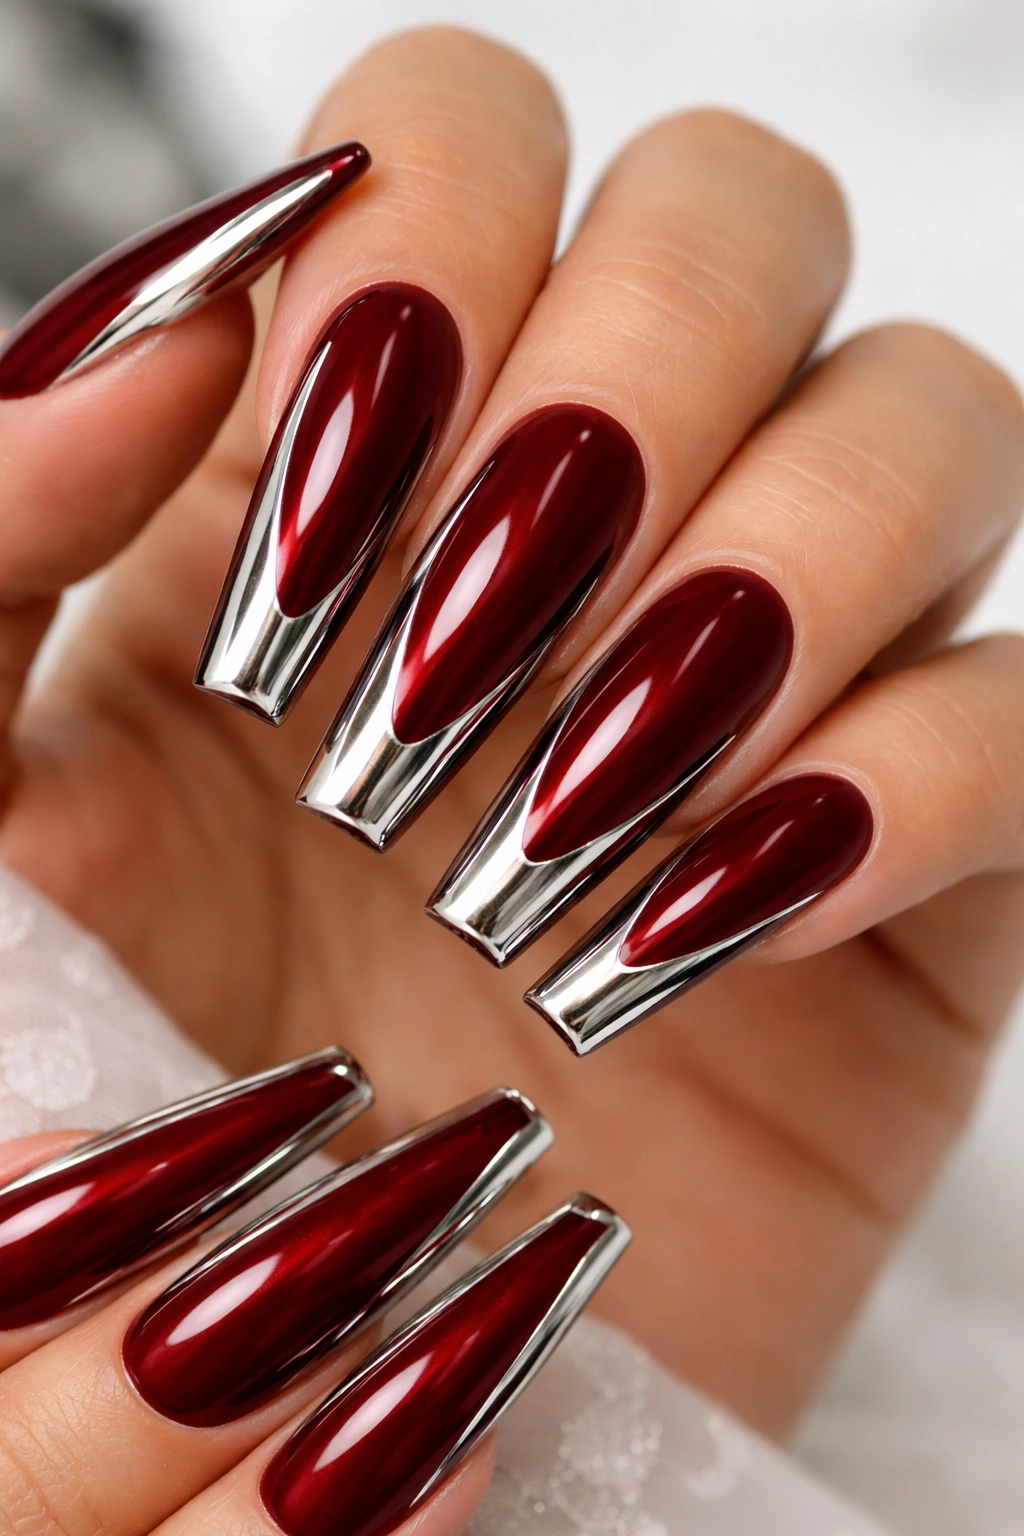
Deep blood red coffin nails are inherently dramatic, and when you add chrome—whether as accent lines, tip detailing, or geometric sections—you create something that’s both undeniably bold and undeniably sophisticated. The warm depth of blood red paired with the cool reflective quality of chrome creates an unexpected, captivating contrast.
Why This Works for the Baddie Aesthetic
Red has always been a power color, and blood red specifically reads as intentional and slightly dangerous—exactly what baddie style communicates. Chrome brings an ultra-modern, almost metallic edge that prevents the look from feeling dated or costume-like. The combination feels simultaneously classic and cutting-edge, which is the sweet spot for designs that transcend trends. The elongated coffin shape makes this statement even bolder.
How to Get This Look
- Start with two to three coats of a deep blood red polish for opaque color
- Apply chrome powder using a rubbing motion with a soft brush or applicator over sections of the nail
- Consider creating a half-chrome effect (chrome only on the tip, or only on one side of the nail for asymmetrical interest)
- Alternatively, use a thin brush to paint chrome lines down the center or along the edges
- Seal with a glossy top coat to emphasize both the depth of the red and the reflective quality of the chrome
Worth knowing: Chrome powder requires a sticky base or tacky top coat to adhere properly—don’t skip this step or your chrome will fade within days.
5. Matte Black with Swarovski Crystals
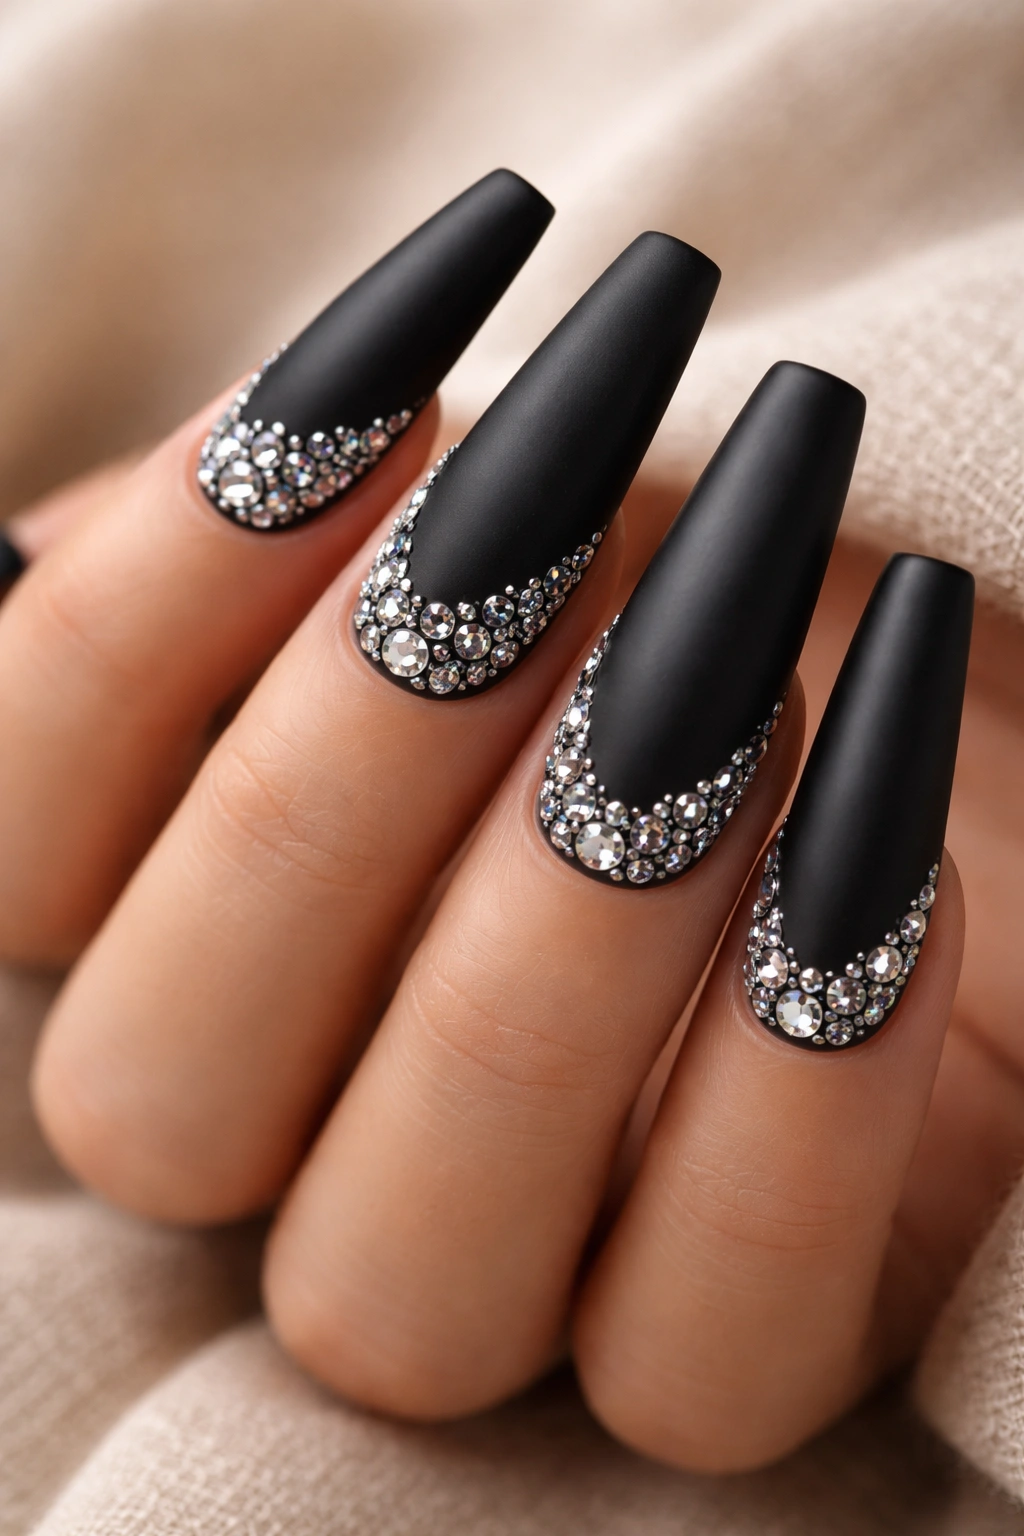
Pure matte black coffin nails are already a statement, but adding high-quality Swarovski crystals elevates the entire aesthetic into luxury territory. The contrast between the flat, sophisticated matte finish and the light-catching sparkle of premium crystals is absolutely captivating.
Why This Works for the Baddie Aesthetic
Matte black is the neutral that says “I’m effortlessly cool”—it pairs with any outfit and never feels wrong. By keeping the base minimal and letting crystals do the talking, you’re displaying confidence in understated luxury. Swarovski crystals specifically (rather than cheaper rhinestones) communicate that you invest in quality details, which is core baddie philosophy. The long coffin shape provides enough space to create interesting crystal placements without overwhelming the design.
How to Get This Look
- Apply two coats of matte black gel or traditional polish with a matte top coat
- Plan your crystal placement before committing—consider a gradient effect (more crystals at the tip), a diagonal line, or a scattered luxury approach
- Use nail glue or gel to secure each Swarovski crystal individually for professional results
- Allow adhesive to fully cure before wearing
- If using a matte top coat as your final layer, apply it carefully around crystals to avoid dulling them
Pro tip: Mix crystal sizes and placement styles on different nails for a cohesive but non-uniform look that reads even more intentional.
6. Marble Print in Navy and White
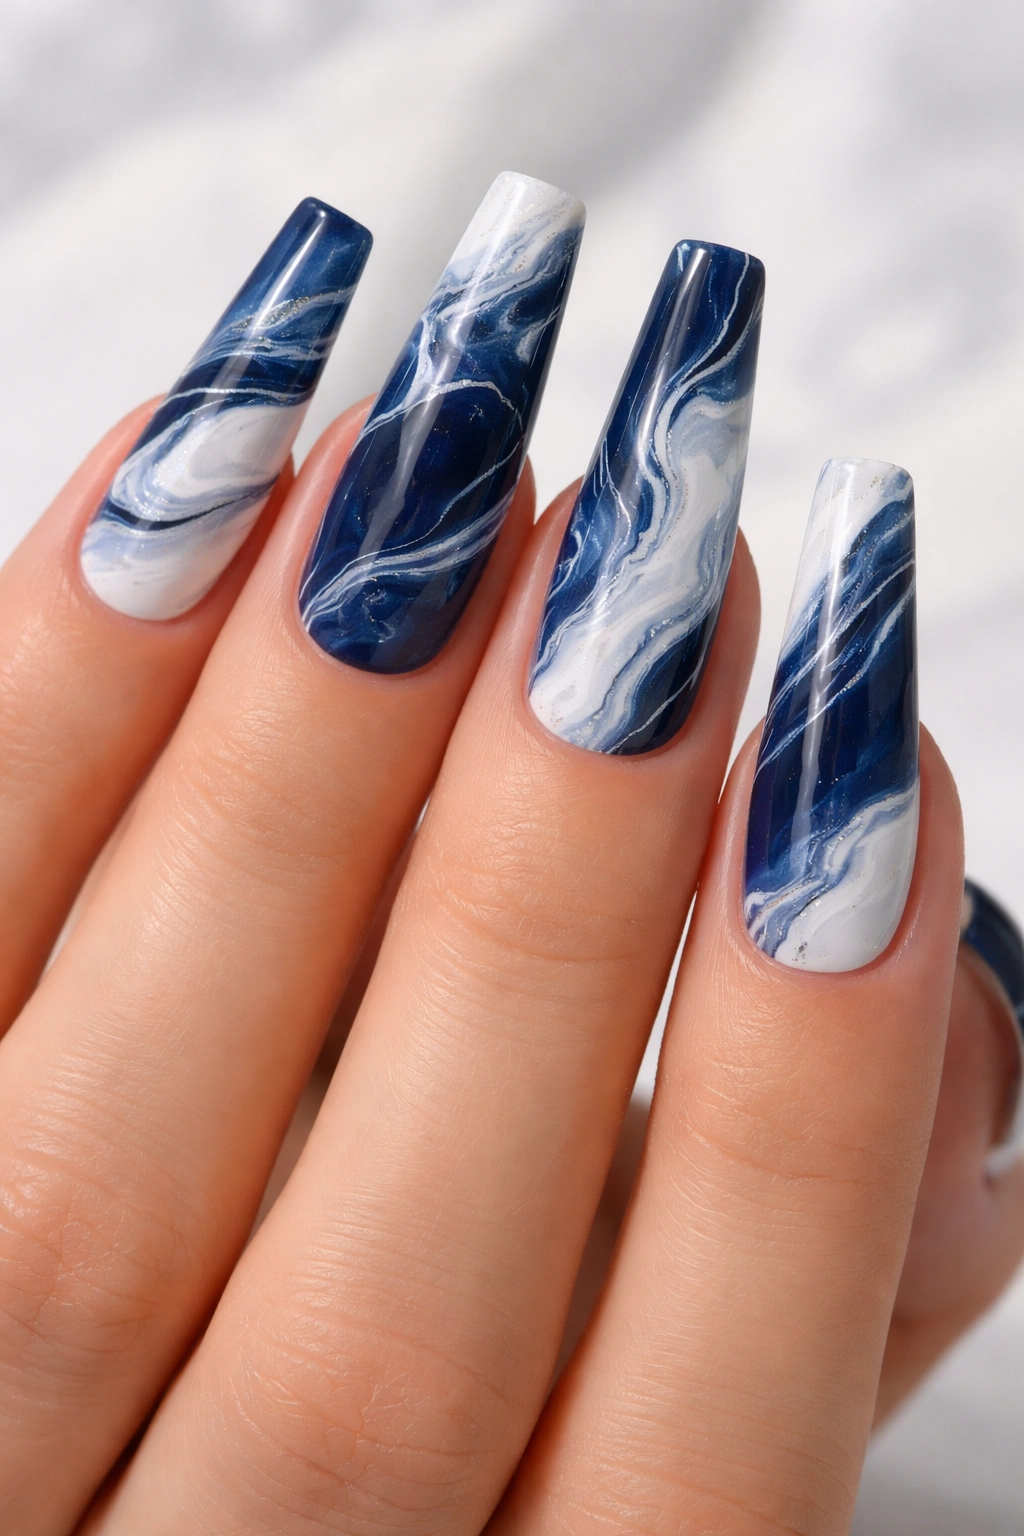
Navy and white marble instantly evokes that effortless luxury aesthetic, and when executed on coffin nails, it becomes a sophisticated canvas that reads expensive and intentional. The natural veining pattern of marble is infinitely complex, meaning every set is genuinely unique.
Why This Works for the Baddie Aesthetic
Marble is traditionally associated with wealth, luxury, and sophistication—it’s the pattern that appears on high-end products and luxury buildings. Navy keeps it grounded and wearable rather than trendy, while white provides contrast that makes the marble pattern pop. The coffin shape gives you enough surface area to capture the organic, flowing nature of real marble veining without the pattern feeling cramped. It reads polished rather than playful.
How to Get This Look
- Apply a clean white base coat as your foundation
- Use a thin brush or marble tool with navy blue polish to create organic, flowing lines across the nail
- Make lines irregular and flowing—perfection will make it look less like real marble
- Add fine lines of black or dark gray to some areas to enhance depth and authenticity
- Seal with a glossy top coat that emphasizes the luxe finish
Worth knowing: If brush work feels intimidating, water marble techniques (dropping polish into water and creating a pattern to dip your nails into) can achieve marble effects with a different skill set.
7. Deep Emerald with Gold Foil Accents
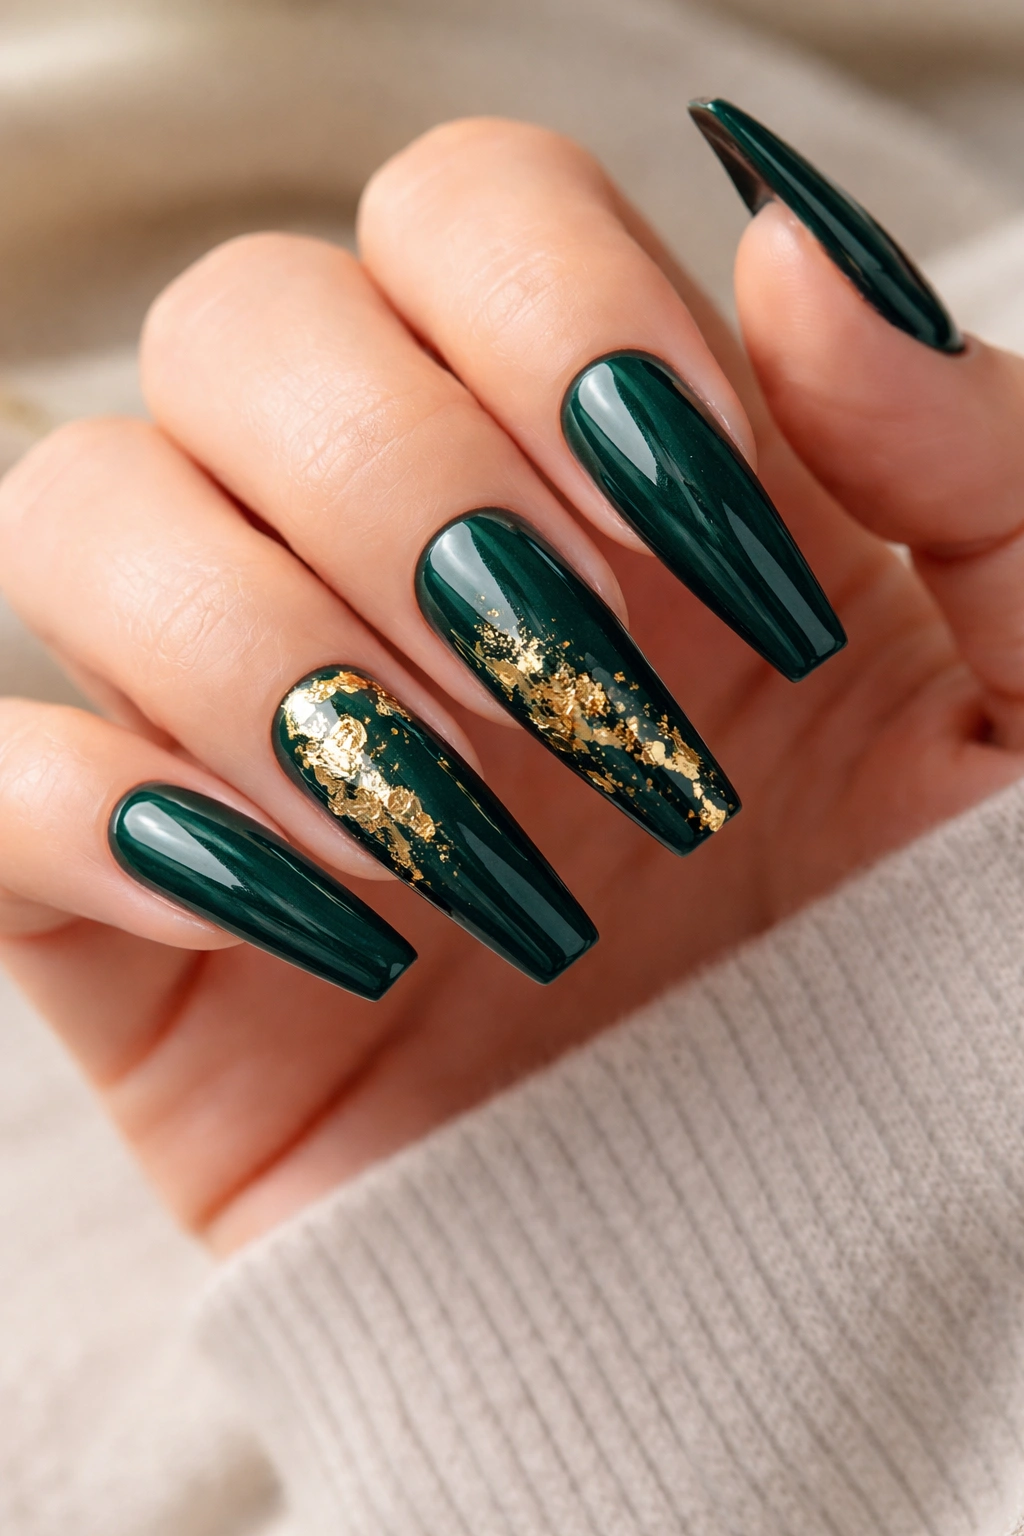
Emerald green represents wealth, power, and sophistication—it’s the color of precious stones and old money energy. Combined with gold foil accents on long coffin nails, you’re creating something absolutely regal and undeniably baddie.
Why This Works for the Baddie Aesthetic
Emerald is surprisingly wearable despite its boldness because it’s inherently luxurious and timeless. Gold foil (especially scattered or applied as geometric accents rather than covering the entire nail) adds glamour without tipping into costume territory. The combination reads “expensive” immediately, and the deep richness of emerald flatters virtually all skin tones. On coffin nails, the color appears even more jewel-like and valuable.
How to Get This Look
- Apply two to three coats of deep emerald green polish for full opacity and richness
- Tear small pieces of gold foil and place them on a sticky base or wet top coat before it fully dries
- Alternatively, use a thin brush to apply gold foil polish in geometric patterns or scattered accents
- Create a focal accent nail by covering one entire nail with gold foil while keeping others primarily emerald
- Finish with a high-gloss top coat to enhance the gem-like quality
Pro tip: Place foil accents more densely near the tip and more sparingly near the cuticle for a sophisticated gradient effect.
8. Nude Base with Black Cat Eye Details
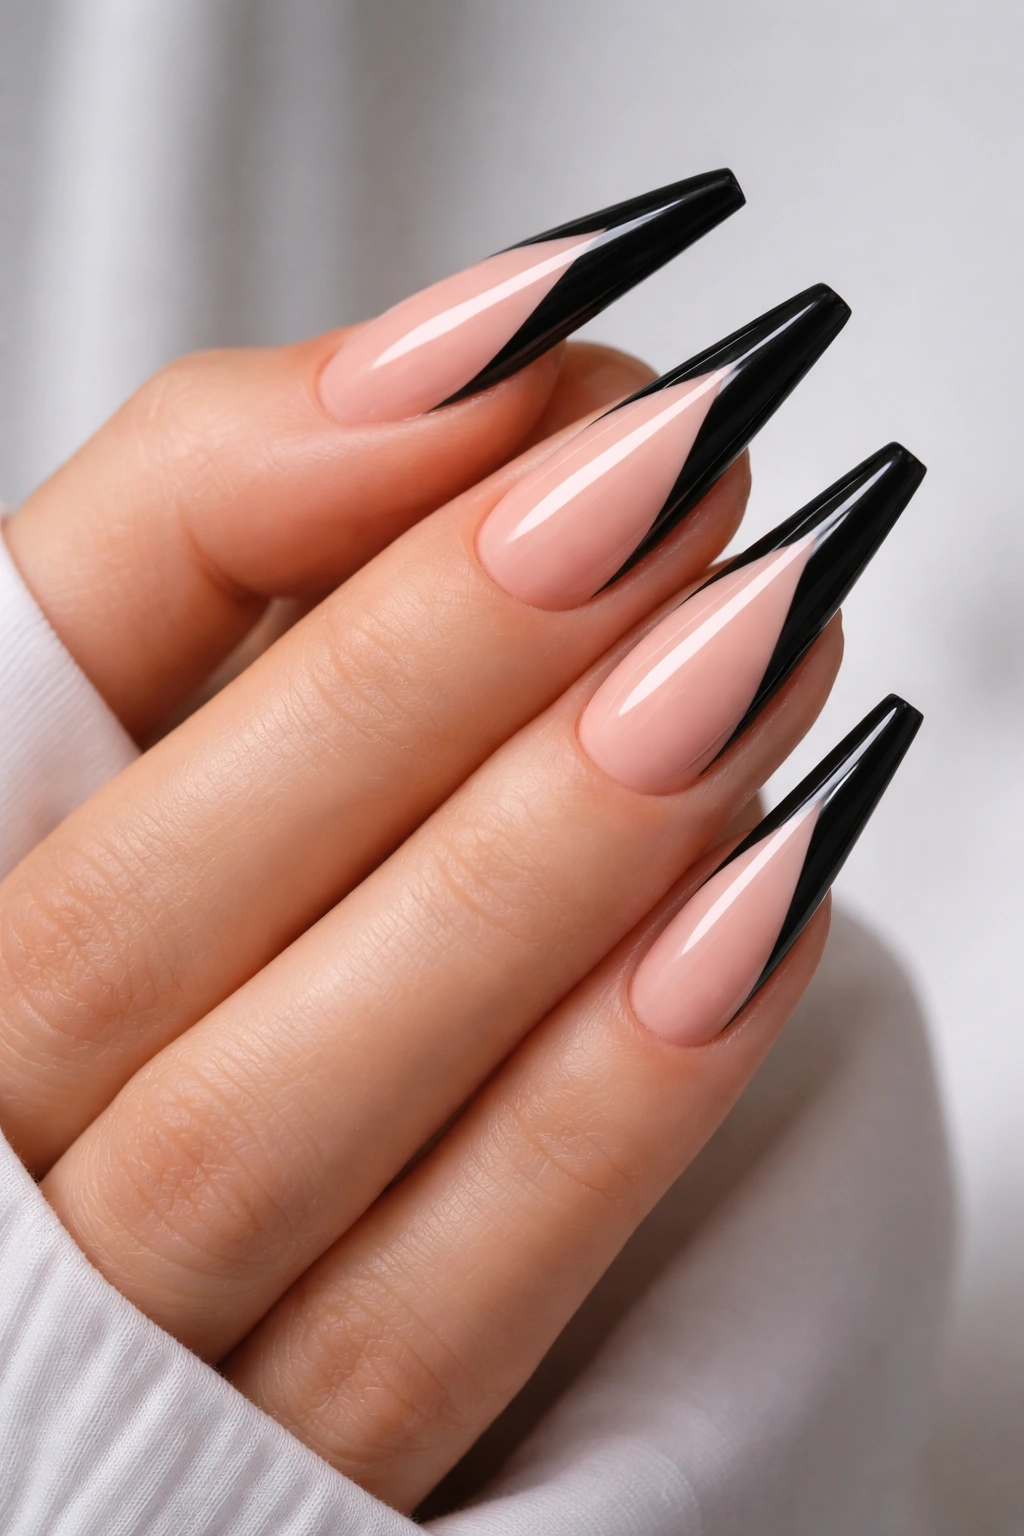
A nude or nude-pink base creates a clean, elongating foundation, and when you add sharp black cat eye designs (precise lines creating that signature feline shape), you’re merging elegance with edge. This design walks the line between sophisticated and playful while maintaining undeniable baddie vibes.
Why This Works for the Baddie Aesthetic
The nude base keeps the focus on your actual nail shape and skin tone, creating an elongating, elegant effect that reads expensive. Black cat eye designs bring the drama and the edge that prevents this from reading as boring or basic. The precision required makes the design feel intentional and calculated rather than whimsical. Cat eyes specifically reference feline confidence and power, which align perfectly with baddie energy.
How to Get This Look
- Start with a nude or slightly pink-toned base that matches or complements your skin tone
- Using a thin brush or eyeliner brush, draw precise black lines starting from the inner corner and extending toward the tip
- Create the classic cat eye angle by raising the line as it extends toward the outer corner
- Keep the lines sharp and clean—this is where precision elevates the design
- Add a thin black line along the tip edge for definition
- Seal with a high-gloss top coat for professional finish
Worth knowing: Practice your cat eye design on a nail wheel before attempting it on your actual nails—precision takes practice, but it’s absolutely learnable.
9. Ombré Burgundy to Black
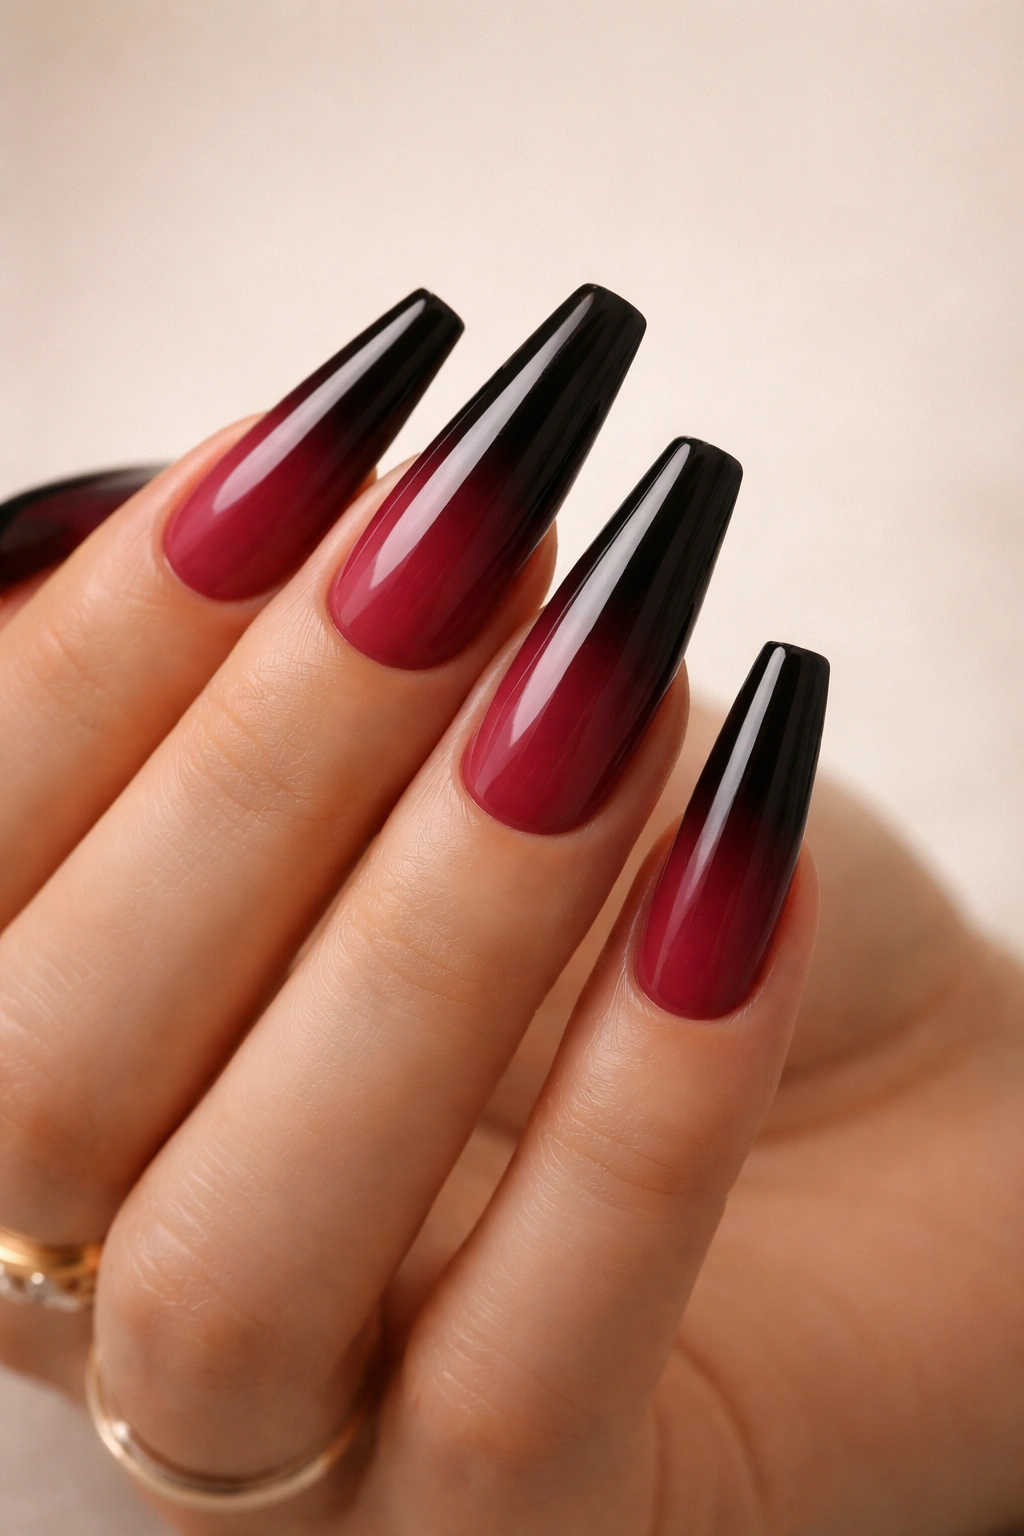
An ombré that transitions from rich burgundy at the base to deep black at the tip creates a gradient that’s endlessly flattering and absolutely captivating on long coffin nails. This design captures depth, dimension, and drama in one cohesive effect.
Why This Works for the Baddie Aesthetic
Ombré creates visual movement and complexity without requiring intricate designs or detailed artwork—it’s sophisticated but achievable. Burgundy grounds the design in warmth and richness, while black at the tips adds edge and intensity. The coffin shape allows the ombré to flow naturally from the wider base to the tapered tip, making the gradient feel organic and intentional. This is an especially great option if you want something bold but still professional.
How to Get This Look
- Apply a burgundy base coat as your foundation
- Using a makeup sponge, apply thin layers of increasingly darker burgundy as you move toward the tip
- Transition to a dark wine tone, then gradually introduce black
- Dab and blend with the sponge to create smooth transitions rather than hard lines
- The key is building color gradually in thin layers rather than trying to do it all in one application
- Finish with a glossy top coat to emphasize the gradient
Pro tip: Practice on a makeup sponge first with actual polish to understand how the colors blend before applying to your nails.
10. Sheer Nude with Abstract Black Linework

Sheer nude creates an almost skin-like base that elongates the fingers, and when you layer abstract black linework on top, you’re adding artistic intention without overwhelming the design. This is minimalist baddie—understated but completely intentional.
Why This Works for the Baddie Aesthetic
Sheer nude reads elegant and expensive because it creates an almost-extension of your finger, making them appear longer and more refined. Abstract black lines add artistic credibility and prevent the design from reading as boring—it demonstrates that you have a creative vision. The negative space (the sheer areas showing through) becomes part of the design itself, which is a hallmark of sophisticated nail art. This works on every skin tone and pairs with literally any outfit.
How to Get This Look
- Apply a sheer nude polish that lets the nail bed show through while adding subtle warmth and color
- Using a thin black brush or eyeliner pen, create abstract linework—this can be geometric, organic, or a mix of both
- Let some lines cross the nail vertically, some horizontally, some diagonally for visual interest
- Leave plenty of negative space so the sheer nude remains the dominant visual element
- Consider concentrating more linework on one or two accent nails while keeping others mostly sheer
- Seal with a matte or natural-finish top coat to avoid looking too shiny
Worth knowing: You can achieve different effects by varying line thickness—some thick and bold, some hair-thin—which adds sophistication to the overall design.
11. Midnight Blue with Scattered Stars and Moon
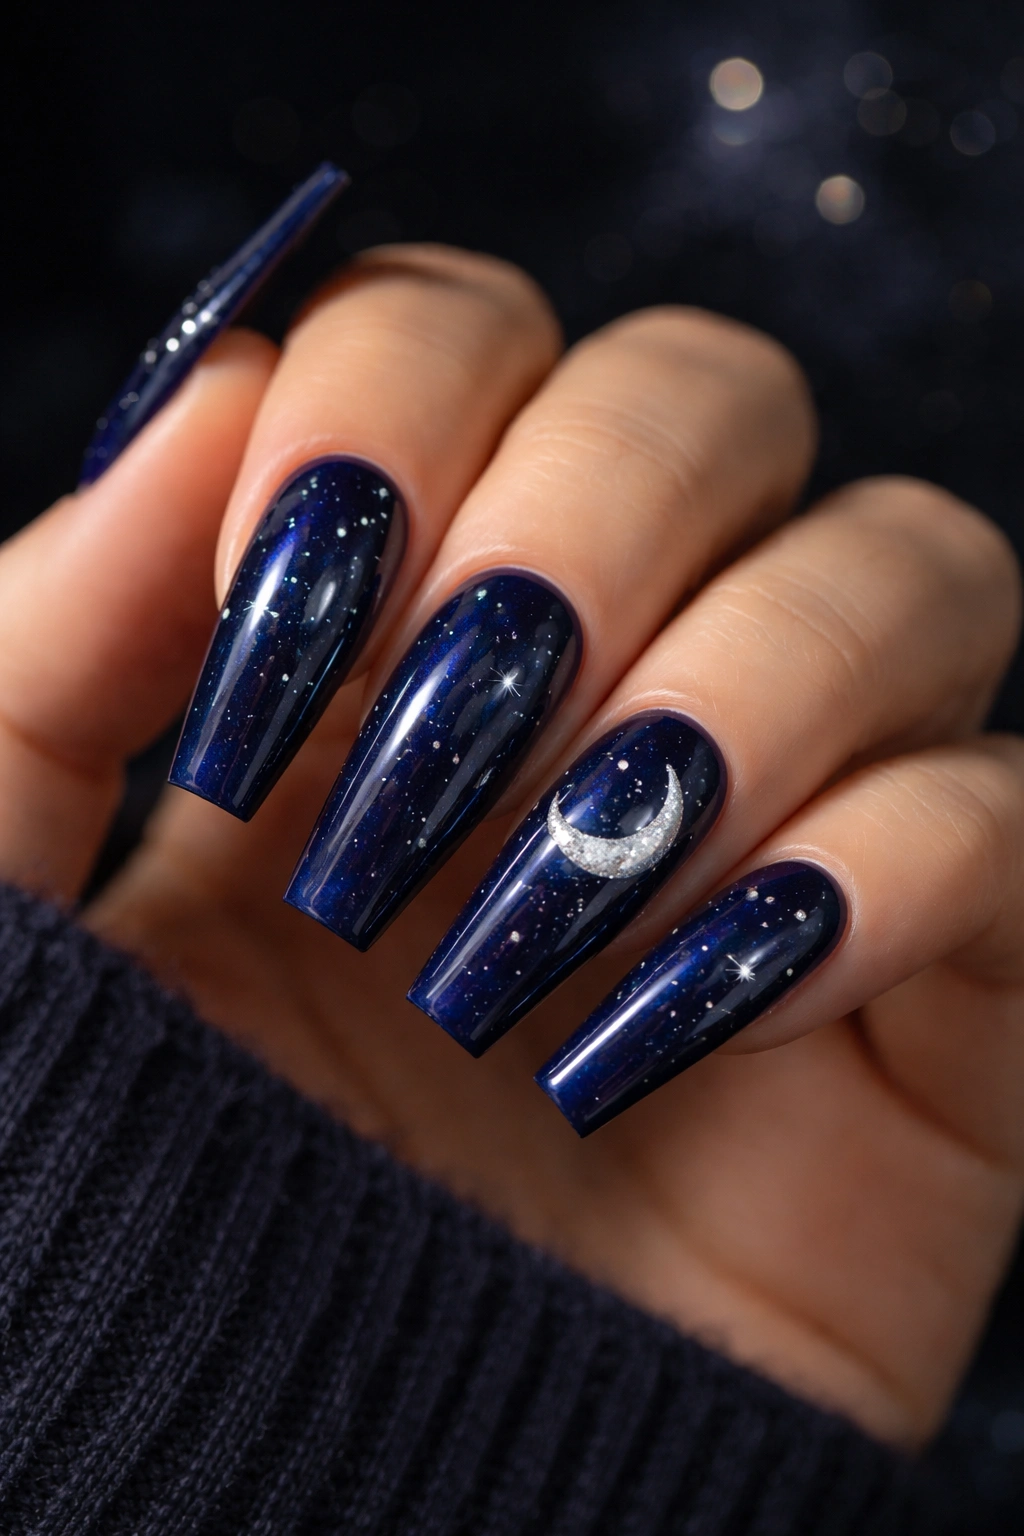
Deep midnight blue coffin nails with celestial elements (scattered stars and a moon motif) create something magical and moody that’s absolutely baddie. The combination is dreamy but intentional, luxurious but slightly mystical.
Why This Works for the Baddie Aesthetic
Midnight blue is a color associated with mystery, power, and the unknown—perfect for baddie energy. Stars and moons bring a touch of magic and intentionality to the design without making it feel costume-y or childish. The celestial theme works because it’s both timeless and personal—it’s been trending but also speaks to something deeper. On coffin nails, celestial motifs create a sense of exploration and abundance that matches the extended shape perfectly.
How to Get This Look
- Apply two coats of a deep midnight blue base for full opacity
- Use white or silver polish and a thin brush to paint small stars scattered across the nail
- Create a larger moon motif (crescent or full moon) as an accent element—consider placing it near the cuticle or at the tip
- Add fine white lines or small dots around the moon for added detail and magic
- Mix matte and glitter elements for texture variation (matte stars, glittery moon, or vice versa)
- Finish with a glossy top coat that makes the midnight blue appear even richer
Pro tip: Use a toothpick dipped in white polish to create tiny, perfectly uniform stars quickly—precision without the brush work.
12. Leopard Print in Brown and Black
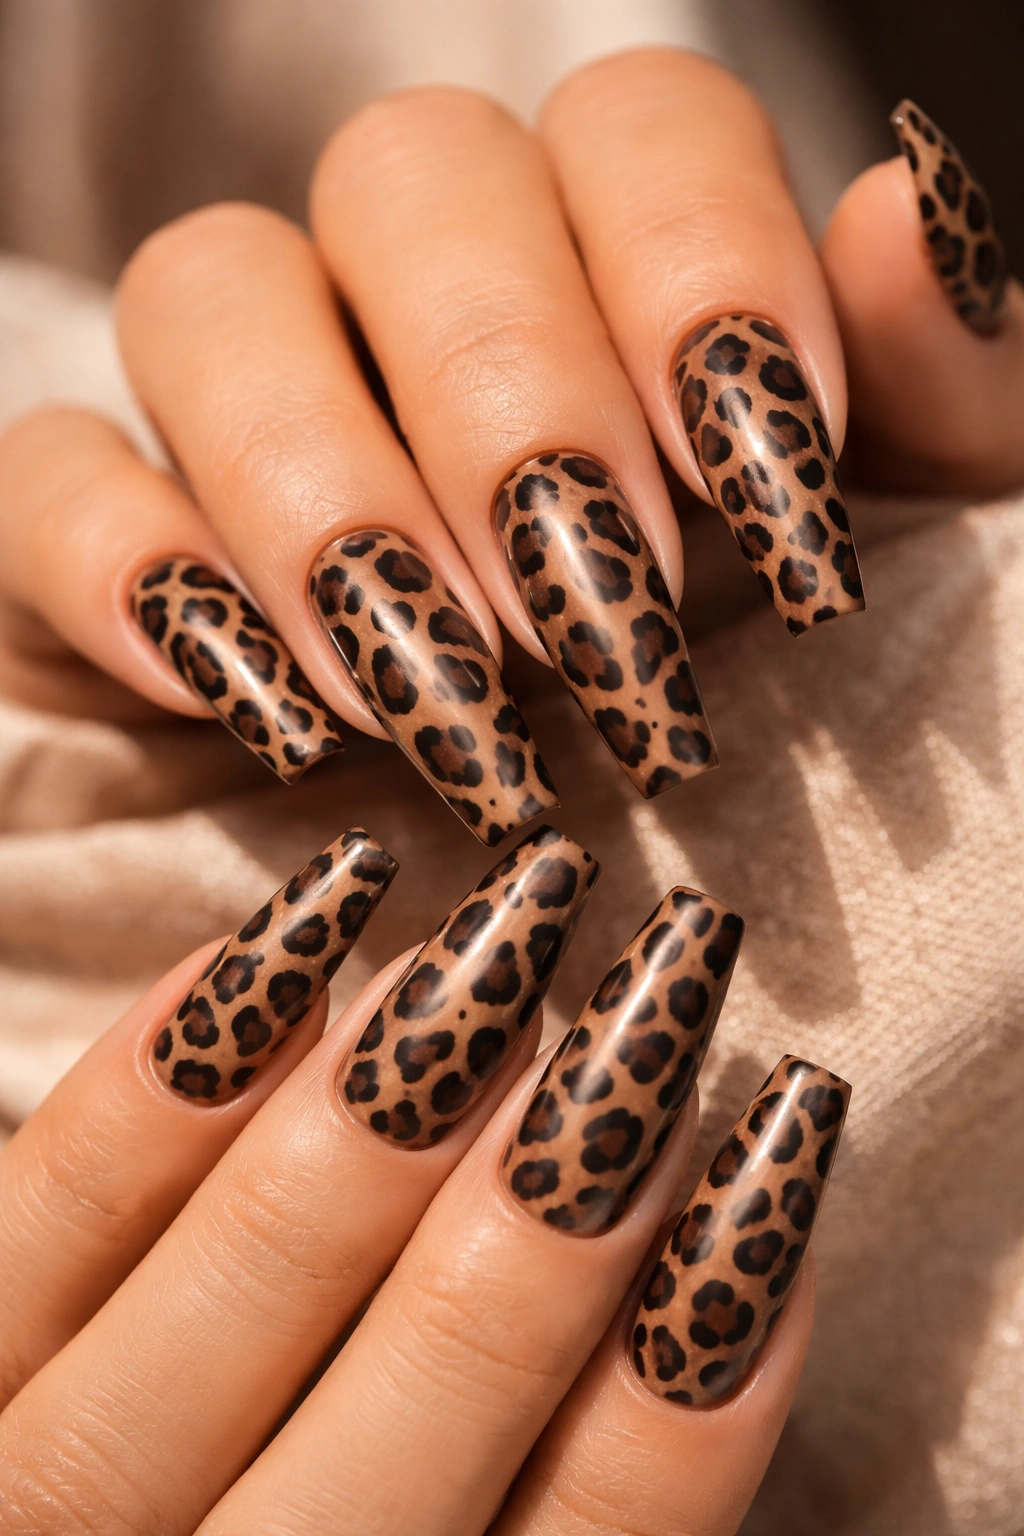
Leopard print on coffin nails is an absolute classic baddie statement—it’s bold, recognizable, and communicates predatory confidence. Brown and black leopard maintains sophistication while delivering serious edge.
Why This Works for the Baddie Aesthetic
Leopard print is inherently associated with confidence, wildness, and unapologetic boldness. Unlike other animal prints, leopard reads sophisticated rather than costumey, especially in a classic brown and black color story. The organic, natural pattern of leopard spots is forgiving—it doesn’t require perfect precision because the pattern is supposed to look organic. The extended coffin shape gives you enough space to capture the essence of true leopard print rather than a simplified version.
How to Get This Look
- Apply a warm brown or nude-brown base coat
- Using a thin brush or dotting tool, create black spots and shapes across the nail
- Make spots irregular and organic—some connected, some isolated, creating the natural leopard pattern
- Vary spot size for authenticity and visual interest
- Leave some areas of the brown base visible to balance the design
- Consider adding thin black outlines around some spots for definition
- Seal with a glossy top coat that makes the pattern pop
Worth knowing: If hand-painting leopard feels daunting, leopard print nail decals exist in every color combination and are surprisingly elegant.
13. Glossy Black with Silver Glitter Ombre
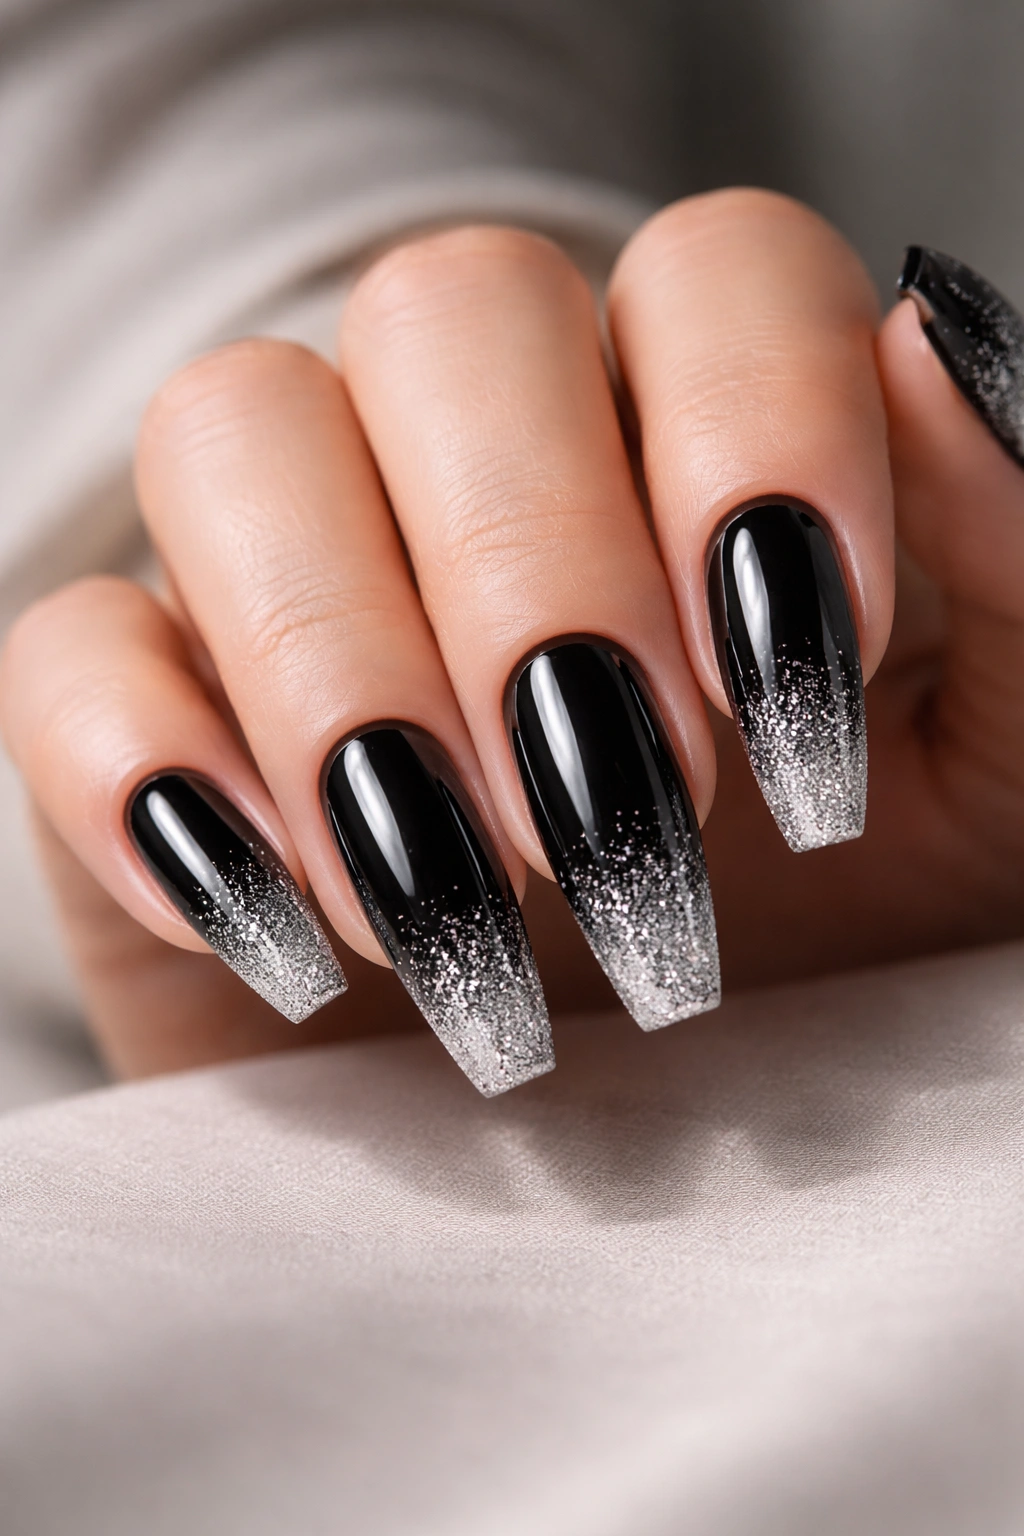
Pure black coffin nails are already a power move, but adding a silver glitter ombre that concentrates at the tip transforms them into something absolutely luminous. The contrast between deep black and sparkling silver is unbeatable.
Why This Works for the Baddie Aesthetic
Black is the ultimate baddie foundation—it’s sophisticated, timeless, and pairs with everything. Silver glitter adds glamour and brightness without diluting the power of the black base. By creating an ombré (more glitter at the tip, gradually less toward the cuticle), you’re adding dimension and visual interest while maintaining a cohesive design. The glossy finish makes everything appear more expensive and intentional, and the glitter catches light constantly.
How to Get This Look
- Apply two to three coats of deep glossy black polish for full opacity
- Using a makeup sponge, apply silver glitter polish (or glitter-embedded polish) to the tip area
- Dab and blend upward to create an ombré effect where silver gradually diminishes toward the cuticle
- The transition should feel natural, with glitter concentrated at the tip
- Ensure complete coverage with a final glossy top coat that seals in the glitter and creates shine
- The final effect should look like your nails are fading into starlight
Pro tip: Let each layer of glitter dry slightly before adding the next for more control over the ombré intensity.
14. French Ombre with Reversed Tip Design
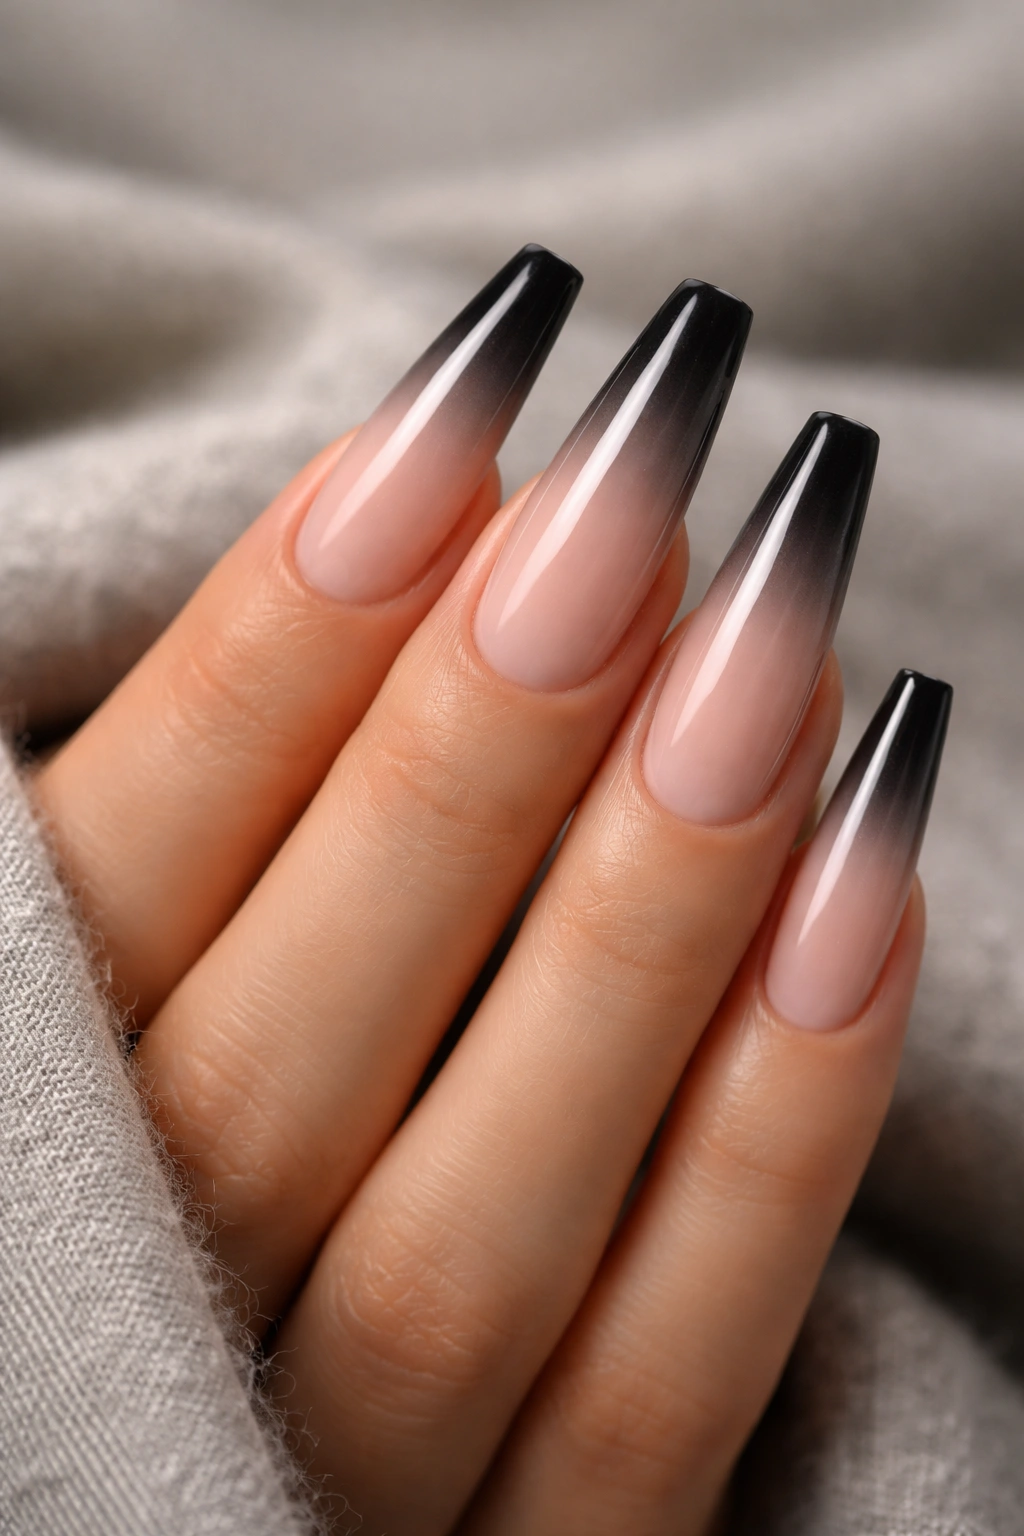
A French ombre reverses the traditional French manicure concept by gradating the color from light to dark across the entire nail, then finishing with a dramatic dark tip in a contrasting shade. On coffin nails, this creates a striking modern aesthetic.
Why This Works for the Baddie Aesthetic
French ombré maintains the elegance and sophistication of a classic French manicure while adding dimension and modern complexity that prevents it from looking dated. By reversing the traditional white-tip concept and making the tip a bold, dark statement, you’re subverting expectations in a way that feels intentional and baddie. The gradient creates visual movement and makes your fingers appear even longer on an already-elongated coffin shape.
How to Get This Look
- Choose a base color in a light nude, beige, or soft pink
- Apply the base color to the entire nail
- Create an ombré by gradually introducing a darker shade (taupe, warm brown, deep burgundy) as you move from the middle toward the tip
- The tip should transition fully to a deep, contrasting color (charcoal, navy, or black)
- Use a sponge to blend the colors smoothly at transition points
- The overall effect is a gradient from light base to dark tip
- Seal with a high-gloss top coat for polish and dimension
Worth knowing: This design is especially flattering because the light base elongates your fingers while the dark tip adds definition and drama.
15. Holographic Chrome Gradation
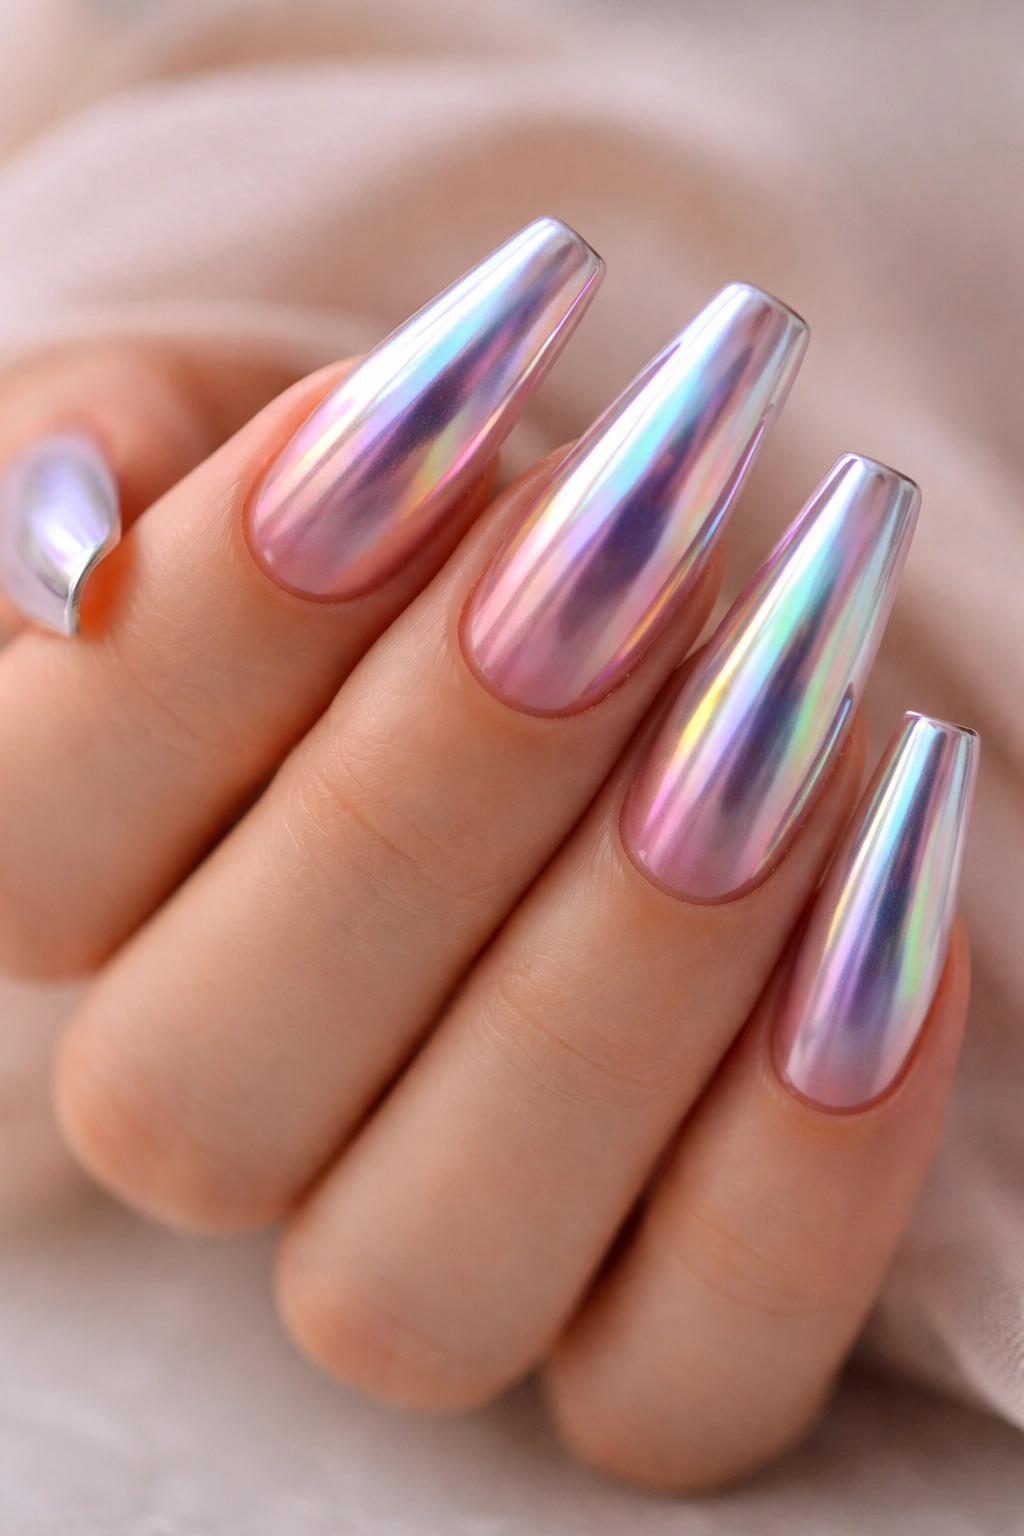
A holographic chrome effect that gradates from one side of the nail to the other creates an absolutely mesmerizing, multidimensional effect. The coffin shape allows this effect to showcase perfectly as light hits from different angles.
Why This Works for the Baddie Aesthetic
Holographic and chrome finishes represent cutting-edge, futuristic baddie energy—they’re not traditional or safe, they’re boldly modern. The way holographic chrome reflects light and changes color depending on the angle is hypnotic and commands attention. This isn’t a design that requires artwork or precision—the chrome itself is the art. On extended coffin nails, the gradation flows naturally from one corner to the other, creating movement and dynamism.
How to Get This Look
- Apply a clear or slightly tinted base coat to create grip for the chrome powder
- Using a soft brush or applicator, apply holographic chrome powder to one side of the nail
- Gradually transition to a different chrome shade (rainbow to silver, or blue-toned to pink-toned) across the nail
- Work in layers, building the chrome effect gradually for a smoother transition
- The key is patience—multiple thin applications look better than one thick application
- Seal with a generous glossy top coat to lock in the chrome and maximize shine
Pro tip: Tilt your hands under different lighting while the chrome is curing to see how the colors shift and refract—it’s genuinely mesmerizing.
16. Deep Plum with Gold Geometric Framework

Deep plum is an absolute luxury color that reads expensive and intentional, and when you add thin gold geometric linework that frames sections of the nail, you’re creating something gallery-worthy. The contrast between rich plum and bright gold is naturally stunning.
Why This Works for the Baddie Aesthetic
Plum represents luxury, creativity, and power—it’s regal without being costume-y, especially when applied in a deep, rich tone. Gold geometric framework adds precision and intentionality, showing that you have a specific vision rather than just choosing a color. The framework approach (rather than covering the entire nail with geometric patterns) keeps the focus on the rich color while adding artistic detail. On coffin nails, thin gold lines create elegant definition that enhances the shape.
How to Get This Look
- Apply two to three coats of deep plum polish for full opacity and richness
- Using a thin gold brush or gold nail pen, create geometric frameworks—consider vertical lines, horizontal lines creating rectangles, or abstract geometric shapes
- Keep lines thin and precise for elegance
- Leave significant negative space (visible plum) so the color remains dominant
- You can concentrate framework details on accent nails and keep others solid plum for balance
- Seal with a glossy top coat that makes both the plum and gold appear jewel-like
Worth knowing: Gold foil can also be used instead of gold polish for a different light-catching effect—experiment to see which finish you prefer.
17. Matte Charcoal with Neon Pink Accents
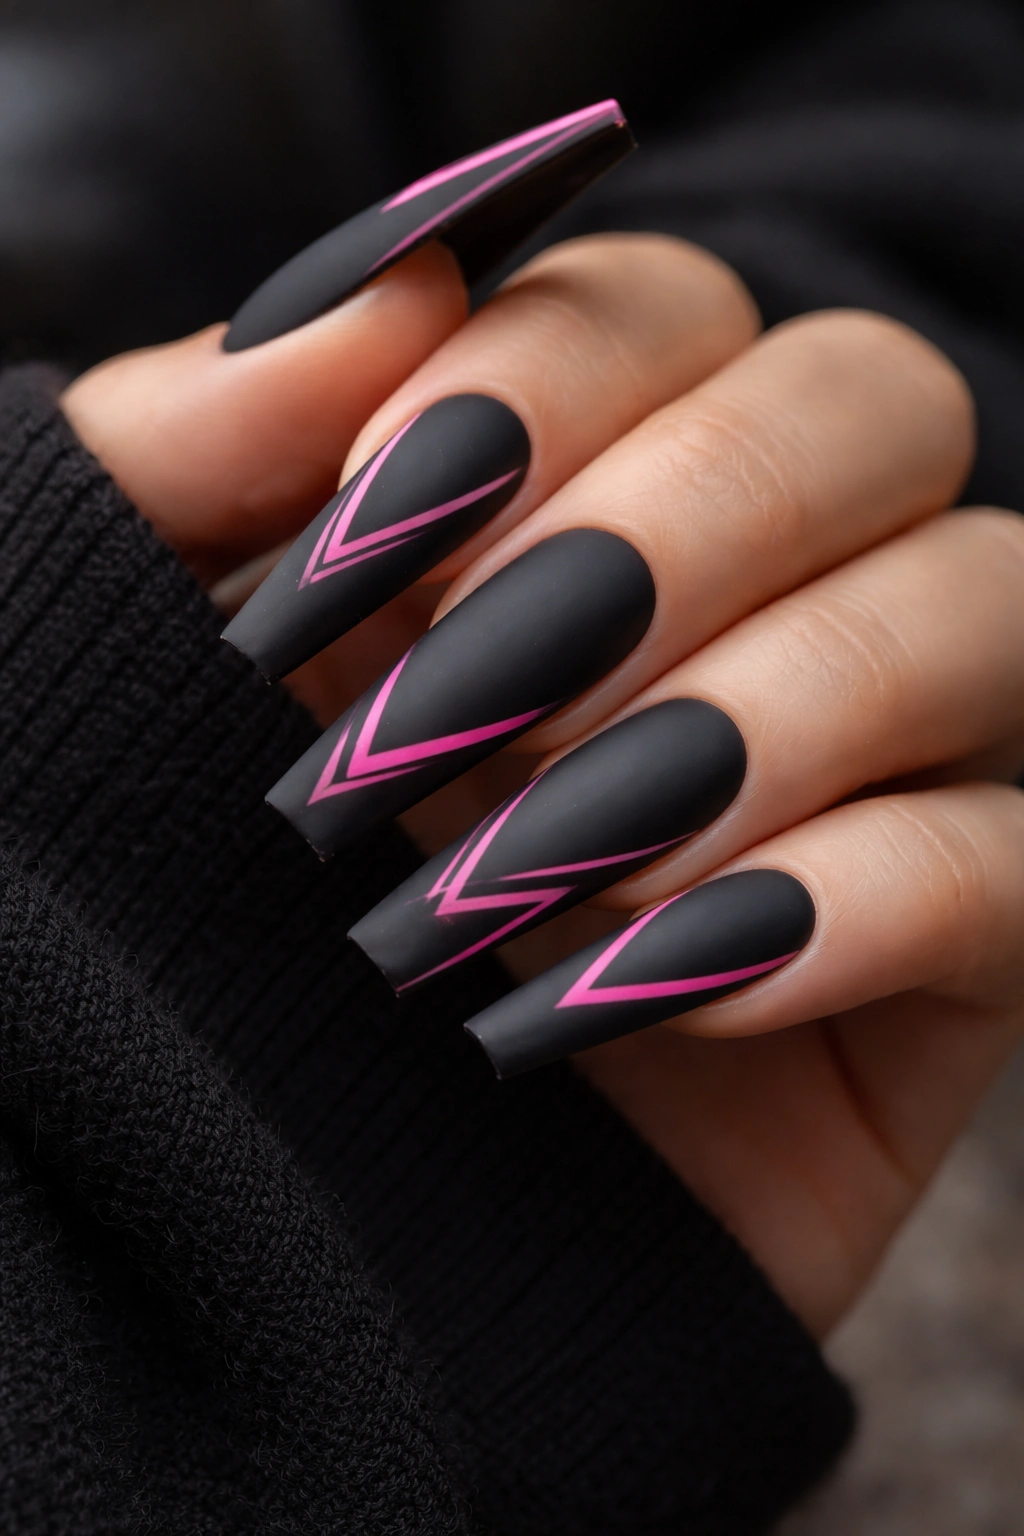
Matte charcoal creates a sophisticated, understated base, and when you layer neon pink accents (whether as geometric elements, stripes, or splatter effects), you’re creating an unexpected, eye-catching contrast. This is modern baddie—unexpected and cool.
Why This Works for the Baddie Aesthetic
Charcoal gray is the neutral that says “I’m cool and unbothered,” while neon pink adds boldness and personality. The contrast between these two extremes creates visual interest and shows that you’re confident enough to mix styles that typically don’t go together. The matte finish keeps everything grounded and sophisticated, so the neon doesn’t read as costume-y. Coffin nails give you enough space to create interesting neon patterns without overwhelming the design.
How to Get This Look
- Apply a matte charcoal base coat and allow it to fully cure
- Using a thin brush or nail pen, add neon pink accents—this could be geometric shapes, corner details, or abstract splatter effects
- Consider creating a gradient where neon concentrates at one area of the nail
- Keep most of the nail matte charcoal with strategic pops of neon for maximum impact
- The final top coat is crucial: use a matte coat on the charcoal to maintain that sophisticated feel while using gloss only where neon is applied
- This creates texture contrast that makes the design even more interesting
Pro tip: Neon colors photograph incredibly well under certain lighting, so test your design under different light sources to see which you prefer.
18. Nude with Tiny Gold Filigree Details
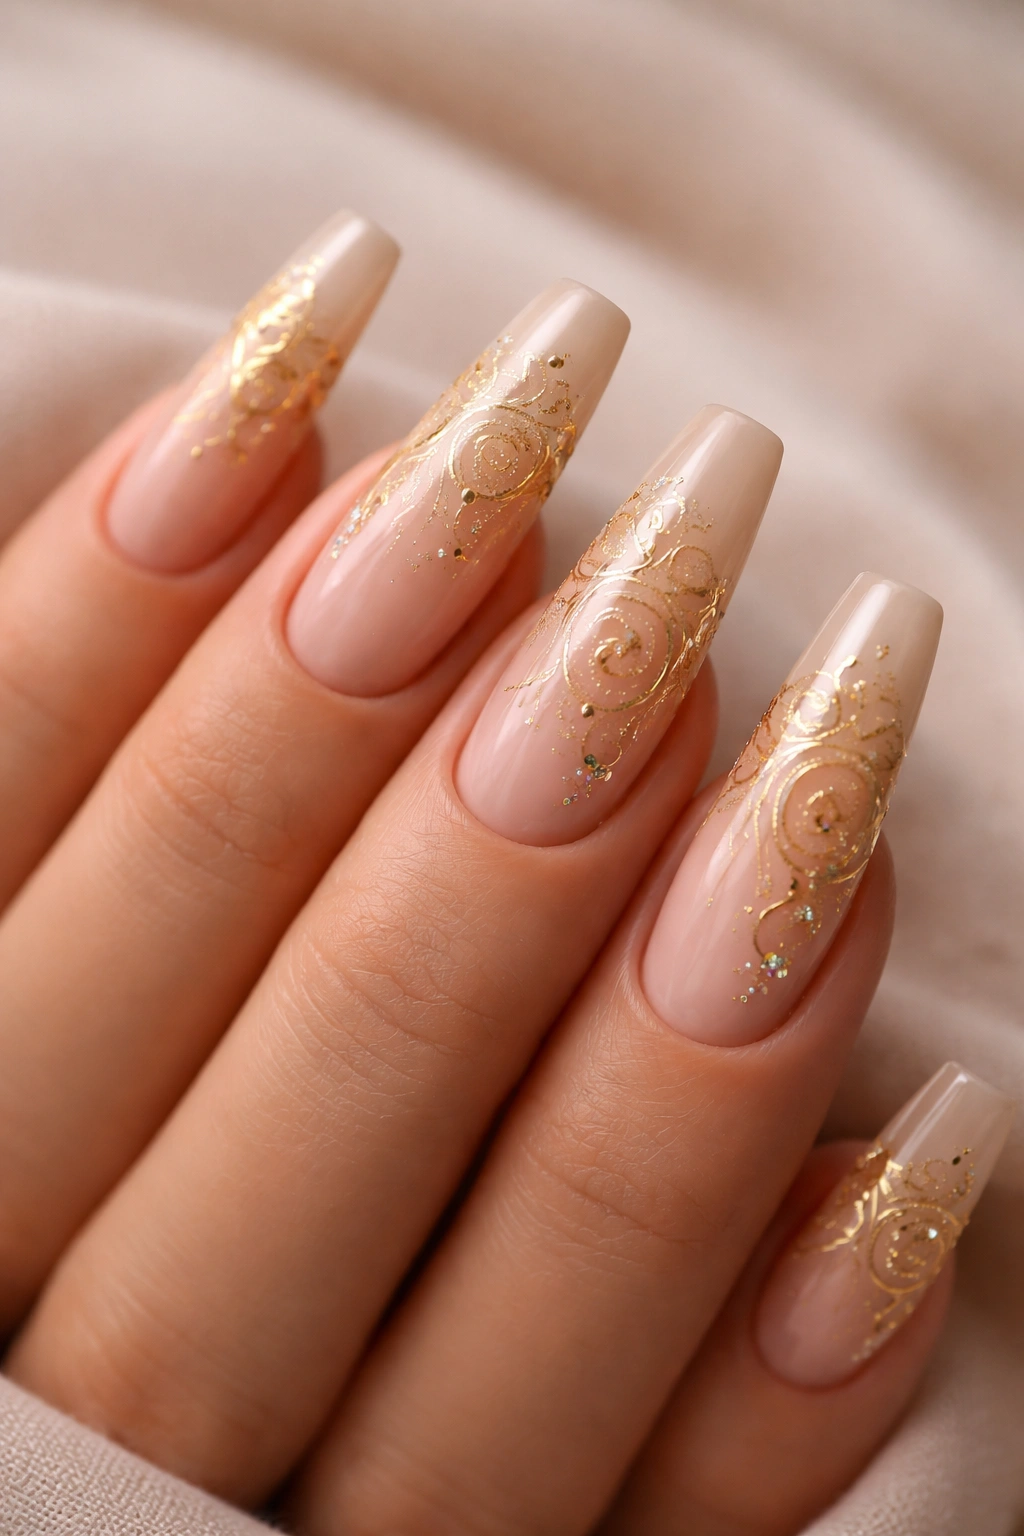
A nude base creates an elongating, elegant foundation, and when you add delicate gold filigree detailing (intricate, lacy gold linework), you’re combining simplicity with sophistication. This is understated luxury baddie.
Why This Works for the Baddie Aesthetic
Nude is the ultimate elegant base because it creates visual continuity with your skin and makes your fingers appear longer and more refined. Gold filigree brings artistic detail and craftsmanship to the design—it’s the opposite of minimal or boring because the detail is just refined enough to read luxurious. Filigree specifically references ornate, expensive jewelry and fine art, immediately communicating that you have cultivated taste. The coffin shape allows the filigree to flow beautifully across the extended nail surface.
How to Get This Look
- Apply a nude shade that matches or complements your specific skin tone
- Using an ultra-thin brush and gold polish, create delicate filigree patterns—think lace, ornate swirls, and connected dots
- Start practicing filigree on paper or a nail wheel before attempting your actual nails—the detail is delicate
- You can concentrate filigree on just one or two accent nails while keeping others solid nude
- Alternatively, create a subtle filigree pattern across all nails for cohesion
- Seal with a glossy top coat that makes the gold shimmer against the nude
Worth knowing: Gold gel pens made for nail art are easier to control than traditional brushes for creating fine filigree details.
19. Jet Black with Negative Space Moon Details
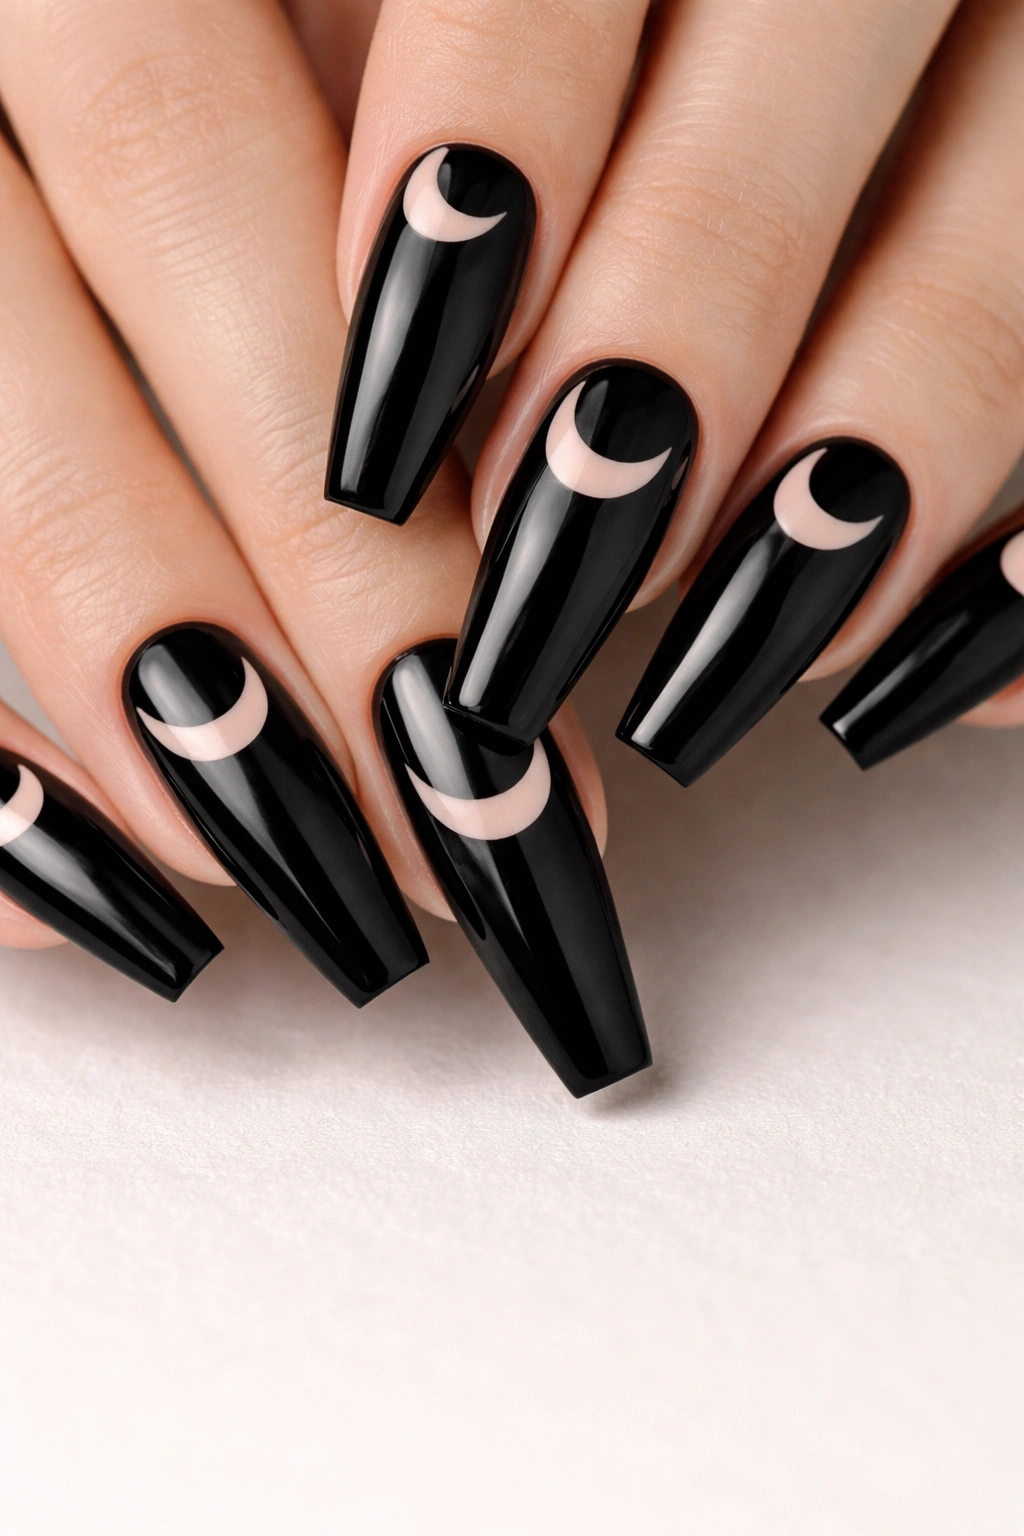
Pure jet black coffin nails with negative space moon designs create something darkly beautiful and intentional. By leaving the nail bare (revealing skin) in moon or crescent shapes, you’re creating an artistic, celestial design that reads sophisticated.
Why This Works for the Baddie Aesthetic
Jet black is powerful and timeless, while negative space (using the bare nail as part of the design) demonstrates design sophistication and intention. Moon imagery brings mystique and intentionality without being costume-y. The combination reads artistic and editorial rather than trendy, which is exactly what baddie energy is about. Coffin nails make the negative space moon particularly striking because the elongated shape gives the design room to breathe.
How to Get This Look
- Apply jet black polish to your entire nail, but plan where your moon shapes will be
- Use a thin brush to carefully paint around moon shapes, leaving them bare (negative space)
- Moon shapes can be crescents, full moons, or even abstract moon phases
- Keep the black lines crisp and clean around the negative space for definition
- Some people prefer to outline the moon shapes in a metallic color (gold or silver) for added definition
- Seal with a glossy top coat on the black areas while keeping the negative space bare
Worth knowing: Practice your moon shapes lightly in pencil first to ensure they’re positioned perfectly before committing with black polish.
20. Burgundy Base with Scattered Diamond Accents
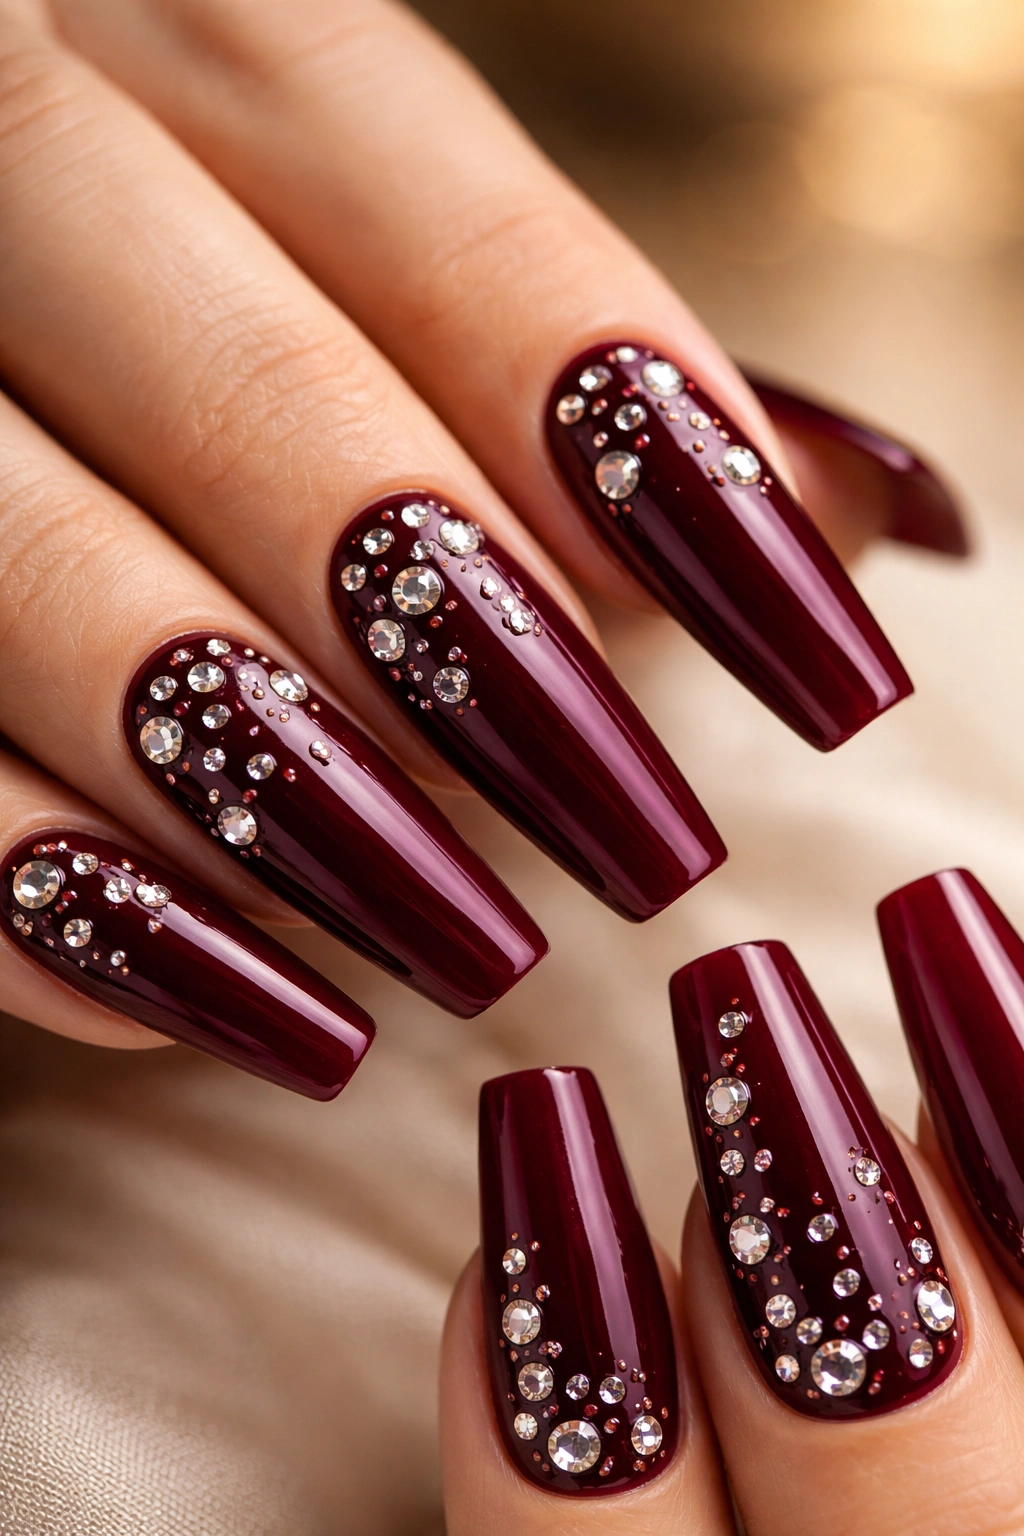
Deep burgundy coffin nails with strategically scattered diamond (crystalline) accents create something luxurious and powerful. The warmth of burgundy combined with cold, bright sparkle is absolutely magnetic.
Why This Works for the Baddie Aesthetic
Burgundy reads expensive, powerful, and intentional—it’s a color associated with wine, luxury, and sophistication. Scattered diamonds (especially when they vary in size) add glamour and luxury without making the design feel costume-y or over-the-top. The contrast between the warm, matte (or satin) burgundy base and the bright, reflective diamonds creates visual interest from every angle. On coffin nails, the elongated shape showcases both the rich color and the sparkle beautifully.
How to Get This Look
- Apply two to three coats of deep burgundy polish for full opacity and richness
- Allow the base to fully cure, then apply a sticky gel base or dot a small amount of clear gel where each diamond will go
- Place individual diamonds or crystals on the sticky base before it cures
- Vary diamond sizes (mix large focal stones with tiny accent stones) for sophistication
- Concentrate diamonds more densely in certain areas (along the tip, down the center, or around the cuticle) rather than covering the entire nail
- Seal carefully with top coat, ensuring diamonds are fully secured
- The final effect should showcase burgundy as the star with diamonds as supporting sparkle
Pro tip: Use tweezers to place tiny diamonds precisely—your fingers are too clumsy for this level of detail.
Final Thoughts
The baddie coffin nail aesthetic is about confidence, intention, and refusing to do anything halfway. Whether you’re drawn to the moody luxury of deep jewel tones, the edgy precision of geometric designs, or the unexpected contrast of unexpected color combinations, there’s a coffin nail design that matches your power-move energy. The extended length of coffin nails gives every design room to make a statement—even simple color combinations feel more intentional and sophisticated.
The beauty of this collection is that it demonstrates how infinitely adaptable the coffin shape is. You’re not limited to one vibe or one approach; you can lean into glamorous sparkle one week and minimalist geometry the next. The coffin shape remains flattering, elongating, and undeniably powerful regardless of what design you choose. What matters is that your choice feels authentic to you—that it reflects how you want to feel when you look down at your hands.
When you sit down for your next appointment, bring reference photos and be specific about what draws you to each design. The best baddie nails are the ones that make you feel like the absolute main character every single time you see them. Your manicure should be a daily reminder that you’re intentional, you’re powerful, and you absolutely refuse to blend in.
