

Soft pastels have a way of making everything feel more polished and intentional, and when it comes to coffin nails, pastel shades elevate the entire aesthetic without screaming for attention. Coffin nails—also called ballerina nails—have that natural, elongated elegance that makes them incredibly flattering on medium-length canvases, and pastels are the perfect complement to that refined shape. The combination of soft, muted tones with the structured geometry of a coffin nail creates something that feels both modern and timeless, whether you’re reaching for pale pink, powdery blue, or whisper-soft mint.
The beautiful part about working with pastels on medium coffin nails is that you get enough surface area to really play with design and depth without the commitment or maintenance demands of longer nails. Medium length is that sweet spot where nail art actually lasts through your daily routine, the designs show up clearly, and you can actually do things without accidentally knocking them on doorframes. Pastels, with their inherent softness and subtlety, work especially well at this length because they don’t feel heavy or over-the-top—they feel sophisticated.
What makes pastel coffin nails so versatile is how easily they transition between seasons and occasions. Pair them with minimalist outfits for a modern, clean aesthetic, or layer them under bold colors and patterns for something more editorial. They read professional in an office setting, playful at a brunch, and absolutely romantic for date night. The right pastel design becomes an extension of your personal style rather than a trend you’re following.
If you’ve been looking for nail inspiration that feels elevated but achievable, these fifteen pastel coffin nail ideas deliver exactly that—each one detailed with specific techniques, color combinations, and styling suggestions so you know exactly how to bring them to life.
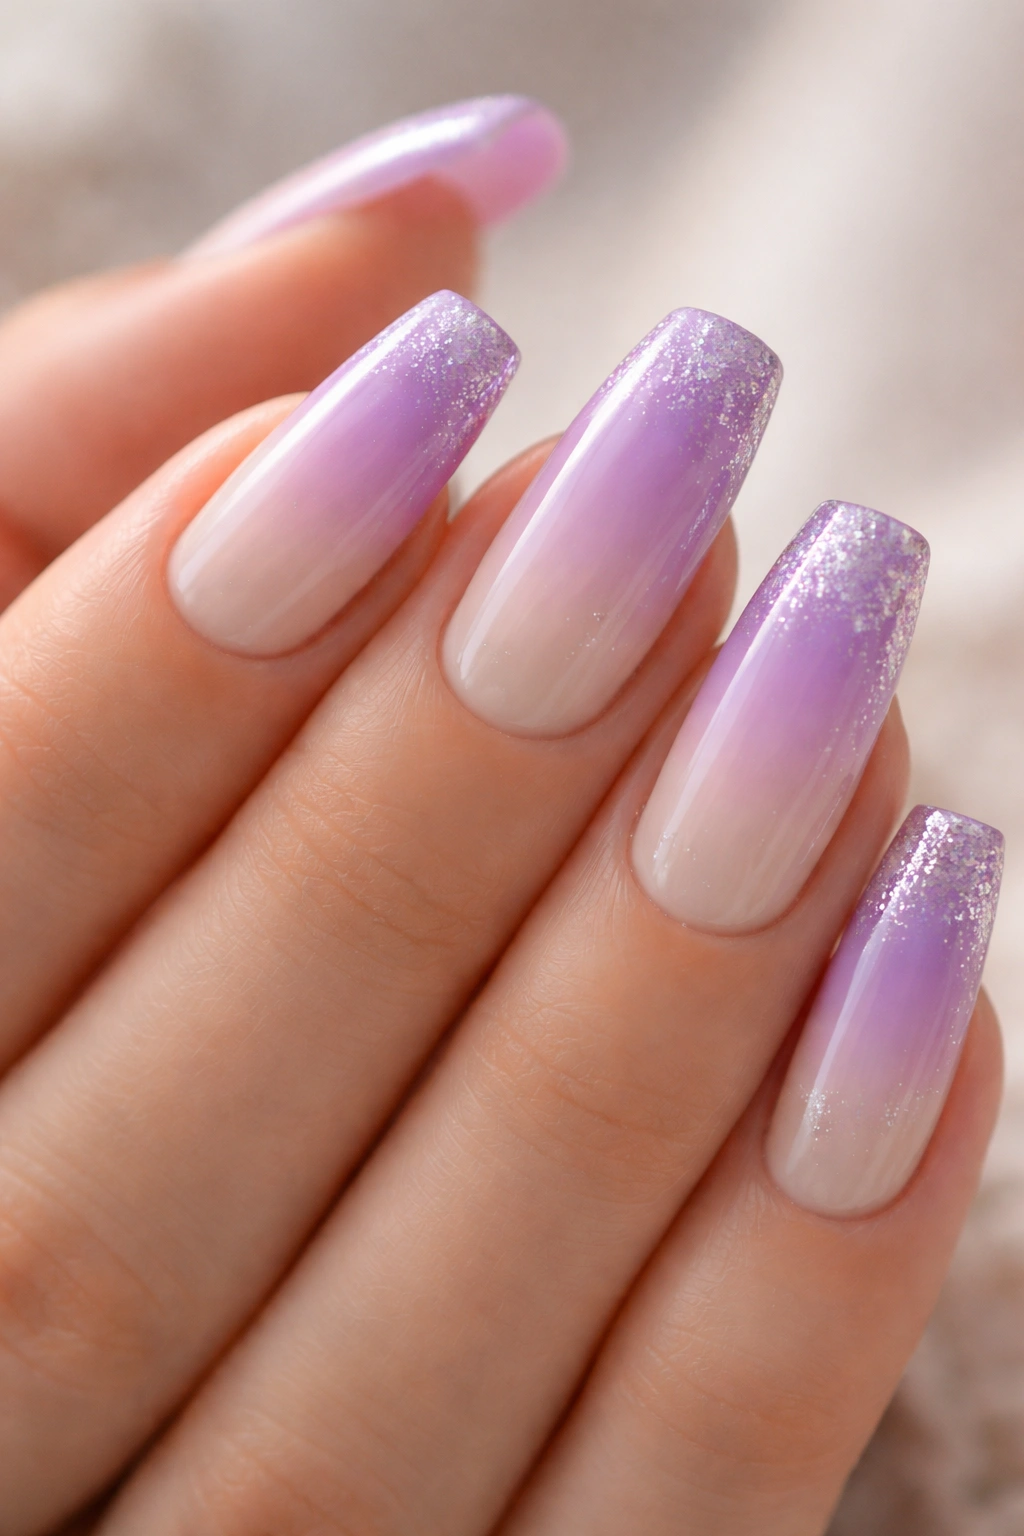
1. Soft Lavender Ombre with Glitter Tips
Lavender ombre coffin nails create an immediate sense of calm and sophistication, especially when you blend the color from a deeper lavender base into a barely-there white or cream at the tip. The ombre gradient should be soft enough that it reads as one cohesive color from a distance, but has clear depth and dimension when you look closely. To achieve this, you’ll use a sponge dabbing technique—apply your deeper lavender shade to the sponge, then gently stipple it onto the nail in the middle section, then use a lighter lavender for the mid-section, and finally blend a cream or off-white at the very tip.
Why This Works for Medium Coffin Nails
Ombre designs are particularly flattering on coffin nails because the gradient follows the natural taper of the shape, creating visual flow that makes your nails look longer and more refined. The soft lavender base keeps things understated while the gradient adds the kind of depth that prevents the design from feeling flat or one-dimensional. Medium length means the ombre has enough room to breathe without looking cramped or muddled.
Application Tips and Variations
- Use a makeup sponge for ombré blending rather than trying to blend with a brush—it gives you softer, more feathered transitions
- Seal everything with a quality top coat before adding glitter to the very tip
- For the glitter tip, use fine iridescent or holographic glitter mixed with clear gel, applied only to the final 2-3mm of the nail
- If you want more glitter payoff, do a gradient of glitter intensity rather than concentrating it only at the very tip
Pro tip: Apply a thin layer of matte top coat over the entire nail first—this gives the ombre colors something to grip and prevents the sponge from disturbing your base colors while you’re blending.
2. Peachy Blush with Negative Space Design

Peachy blush is that universally flattering shade that sits somewhere between coral, pink, and nude—warm enough to feel energetic but soft enough to look refined. A negative space design on peachy blush coffin nails means leaving portions of the nail bare (showing your actual nail bed or a clear base) while creating geometric or organic shapes with the color. This could be a solid peachy blush on the bottom two-thirds of the nail with the top third left completely clear, or diagonal stripes of color alternating with negative space for a modern, architectural feel.
Why This Design Elevates Medium Coffin Nails
Negative space designs make medium nails feel intentional and editorial rather than just “a manicure”—they suggest you’ve thought carefully about the aesthetic rather than simply choosing a color. The combination of peachy blush with clear space creates breathing room that prevents the design from looking heavy, and the defined geometric lines emphasize the coffin nail shape beautifully.
How to Execute This Design
- Apply your peachy blush base color first, then let it dry completely
- Use thin strips of painter’s tape or nail guides to create clean lines where you want the negative space
- The key is pressing your tape down firmly so polish doesn’t seep underneath—seal the edges by running a dry brush along the tape line
- Remove tape immediately after applying polish, before it dries, for the cleanest edge
- Consider adding a thin line of metallic gold or chrome powder along the edge between the color and negative space for subtle sophistication
Worth knowing: Negative space designs work best when the edges are crisp and intentional. Fuzzy or uneven edges between the color and bare nail make the design look accidental rather than architectural.
3. Pale Mint Green with Delicate Line Art
Pale mint—the kind that’s barely tinted, almost whisper-soft—provides a serene backdrop for intricate line art designs that would otherwise feel too busy. Delicate line art on coffin nails could mean thin hand-drawn flowers, minimalist botanical outlines, geometric patterns, or abstract flowing lines. The pale mint base keeps the design from feeling chaotic because there’s so much breathing room between the lines and the soft green color becomes almost neutral, letting the line work be the hero of the design.
The Technique Behind Elegant Line Work
Creating fine line art requires a steady hand, proper tools, and the right consistency of polish. You’ll want to use a thin liner brush (often labeled as a 0 or 00 size) and either diluted polish or a dedicated nail art pen. If you’re using regular polish, thin it slightly with nail thinner so it flows smoothly without pooling or dragging. Test your line weight on a practice nail or piece of paper first—you want lines that are visible but delicate, not heavy or thick.
Design Ideas Within This Concept
- Minimalist line drawings of leaves, branches, or wildflowers (one simple botanical per nail or a cohesive pattern across all five)
- Geometric line patterns like connected dots, simple line mazes, or abstract angular designs
- Negative space line art where you’re drawing only outlines with no fill, creating an almost sketch-like appearance
- Celestial themes with tiny moons, stars, and constellation patterns in fine lines
Insider note: If you’re not confident in your hand-drawing abilities, you can use thin nail decals or stamping plates with line art designs and apply them over your mint base—the result looks identical but requires zero artistic skill.
4. Soft Pink with Rhinestone Accent Nail
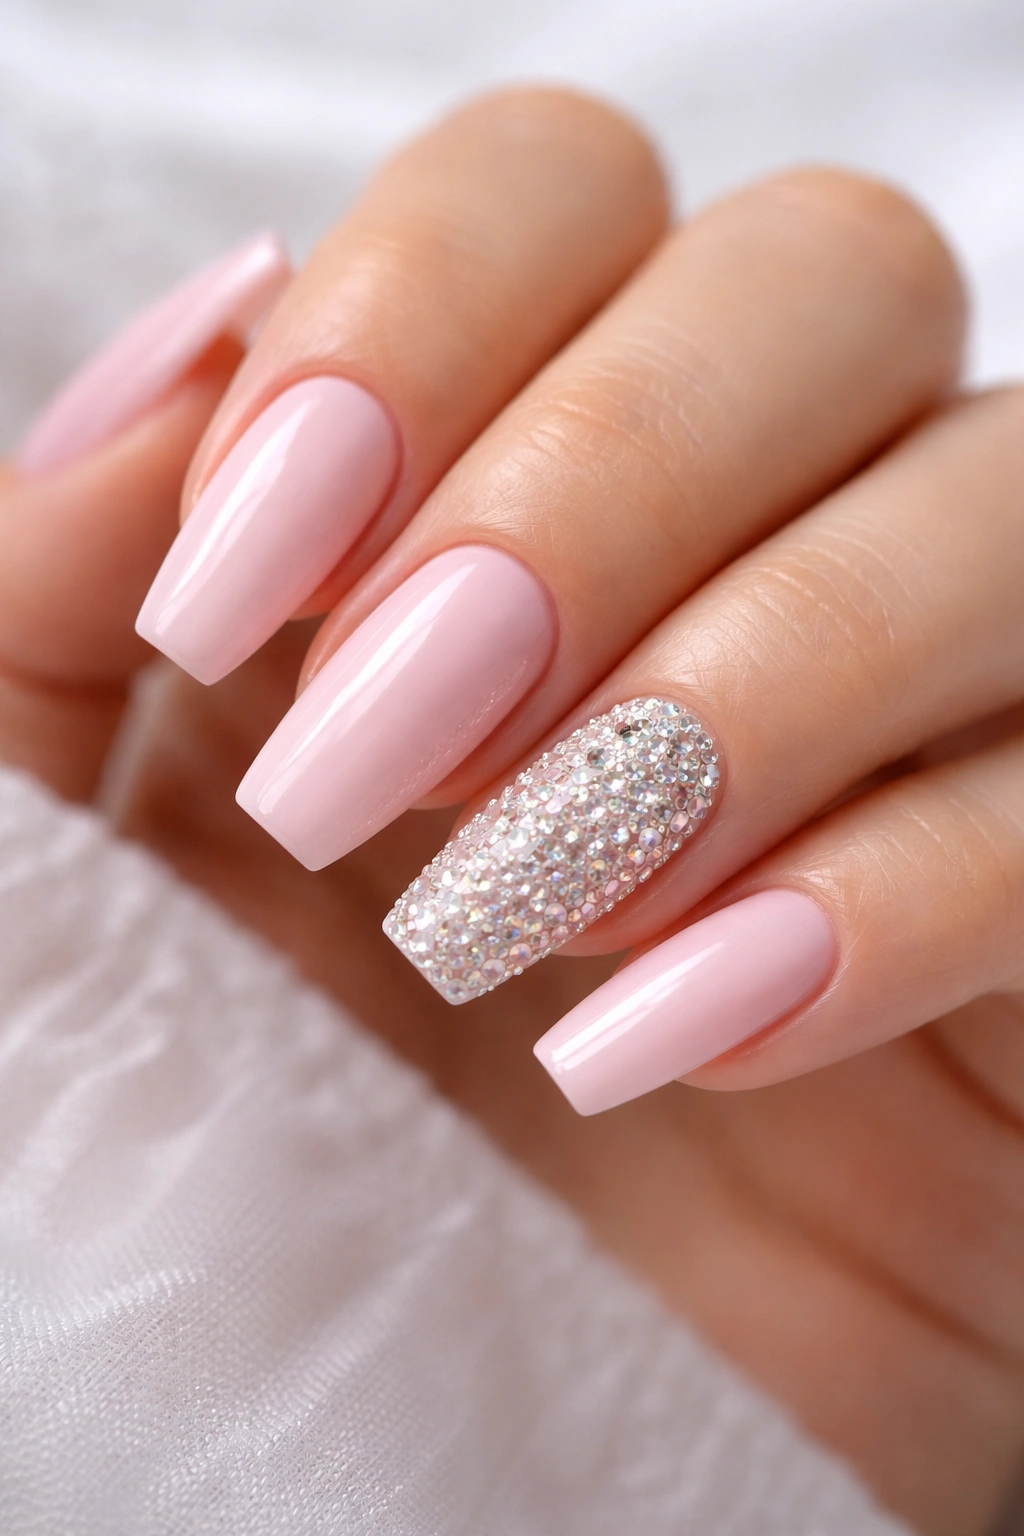
Soft pink is perhaps the most universally flattering nail color, and on medium coffin nails, it becomes the perfect canvas for a jeweled accent nail. One nail—typically the ring finger or index finger, your choice—becomes the statement piece while the other four nails remain a clean, simple pale pink. The accent nail should be completely covered in small to medium-sized rhinestones, either arranged in a geometric pattern, scattered randomly for sparkle, or concentrated more heavily toward the tip with a gradient effect fading toward the cuticle.
Building the Accent Nail with Proper Adhesion
Rhinestones need a sticky base to adhere properly and hold throughout the life of your manicure. Apply your soft pink base color, then while it’s still wet or after it dries (depending on your preference), apply a thin layer of thick, syrupy base coat or a specialized rhinestone adhesive gel. This tacky layer gives the stones something to grip. Pick up each rhinestone with a dotting tool or tweezers and place it intentionally on the nail. Once all stones are placed, seal everything with a thick top coat, making sure to encapsulate all the rhinestones so they’re protected and won’t snag on fabric.
Rhinestone Application Strategies
- Larger rhinestones (4-6mm) create more impact with fewer stones and look more elegant on medium nails than tiny micro-rhinestones
- Mixing rhinestone sizes—a few larger stones with smaller ones filling in gaps—creates visual interest without feeling overdone
- Concentrating rhinestones toward the tip leaves your cuticle area clean and modern-looking
- For a gradient effect, use larger stones at the tip and progressively smaller stones as you move toward the base
Pro tip: Use a rhinestone picker (a sticky-tipped tool designed specifically for this) rather than tweezers—it’s faster, more precise, and far less likely to drop stones or damage them.
5. Powder Blue with Ombré to White Tips
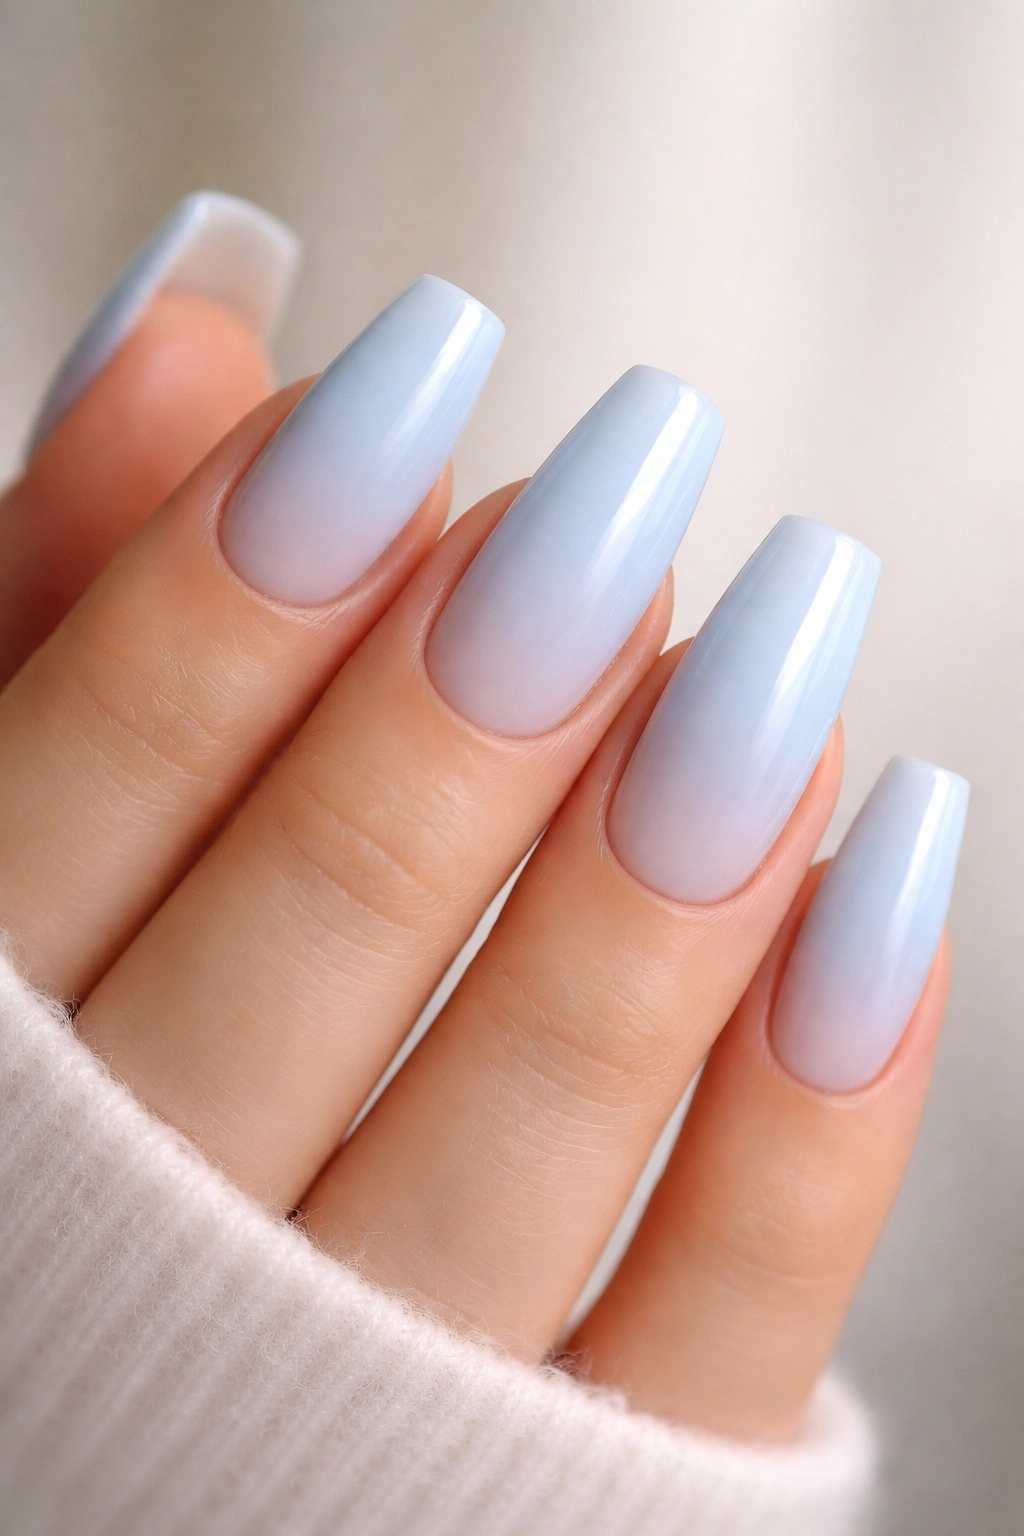
Powder blue—soft enough that it’s almost gray-toned—paired with an ombré gradient toward crisp white creates a clean, airy aesthetic that feels both calm and polished. This design uses the same sponge-dabbing technique as the lavender ombre but with cooler undertones. The key is making sure your powder blue isn’t so light that it disappears against your skin tone; it should be visible as a distinct color while still maintaining that soft, powdery quality that makes it feel sophisticated rather than bold.
Why This Gradient Works on Coffin Nails
The gradient direction matters on coffin nails. When you fade from color to white moving toward the tip, it creates the visual illusion of extra length and brightness, and it complements the natural taper of the coffin shape perfectly. The white tip also makes your nails appear cleaner and more groomed, a timeless aesthetic that pairs well with literally any outfit or occasion.
Perfecting Your Ombré Blend
- Start with a clean base coat on all nails
- Apply your powder blue to the base section with a regular brush (the section closest to your cuticle)
- Using a makeup sponge, dab powder blue in the middle-to-upper section, creating overlap and gradual transition
- Switch to a lighter blue or pale blue-gray for the next layer, sponging it in the upper-middle area
- Finish with pure white at the very tip, blending where it meets the lighter blue
- The entire sponging process should take 2-3 applications per area for smooth transitions
Worth knowing: Patience is everything here. Rushing the blending will result in harsh lines or muddy colors. Each layer should dry slightly before the next sponge application, so you’re not just smooshing all the colors together into a gray.
6. Pale Yellow with Fine Gold Leaf Details
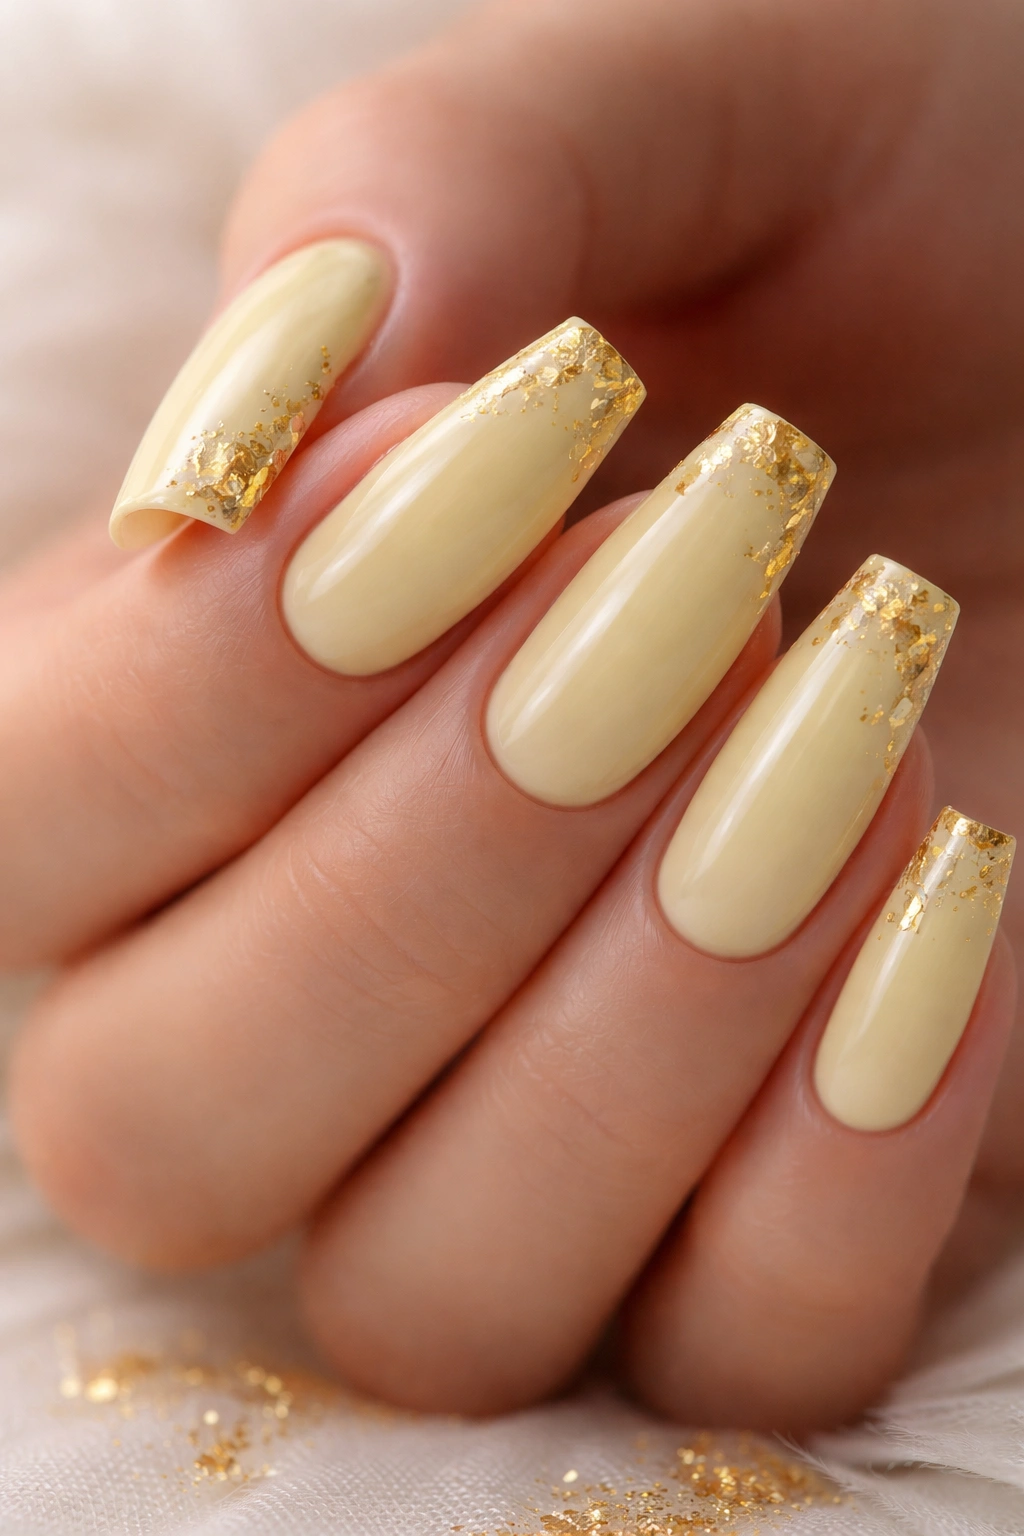
Pale yellow—creamy, soft, almost buttery—feels joyful without being loud, and it’s the perfect base for delicate gold leaf accents that catch the light. Gold leaf is actual thin sheets of real gold (or gold-toned metal) that adheres to your nail using a specialized adhesive or sticky base coat. You can apply leaves in scattered clusters for an organic, natural look, or place them strategically along the edges or in geometric patterns for something more structured. The translucency of the leaf combined with the pale yellow underneath creates a sophisticated shimmer that’s far more elegant than regular glitter.
Working with Gold Leaf for Flawless Results
Gold leaf requires a delicate touch because the sheets are incredibly thin and tear easily. Apply a sticky base coat or special adhesive to the areas where you want the leaf to adhere, then use a soft brush or specialized leaf applicator to gently place the leaf, working in sections. Once all the leaf is applied, seal everything—absolutely everything—with a strong top coat, preferably a thick gel or a traditional polish top coat applied generously. This sealing step is crucial because exposed gold leaf will oxidize and darken over time, and loose edges will catch on fabric and unravel.
Design Placement Ideas
- Gold leaf scattered randomly across all nails for an organic, natural appearance
- Concentrated in the cuticle area, gradually fading as you move toward the tip
- Along one or both side edges of each nail for a framing effect
- Clustered on just the accent nail (like your ring finger) while keeping other nails solid pale yellow
Pro tip: Gold leaf is forgiving in ways that other embellishments aren’t—small tears or imperfect placement actually add to the organic, handcrafted aesthetic. Perfection isn’t the goal; movement and light-catching are.
7. Blush Pink with Tiny Pearl Accents
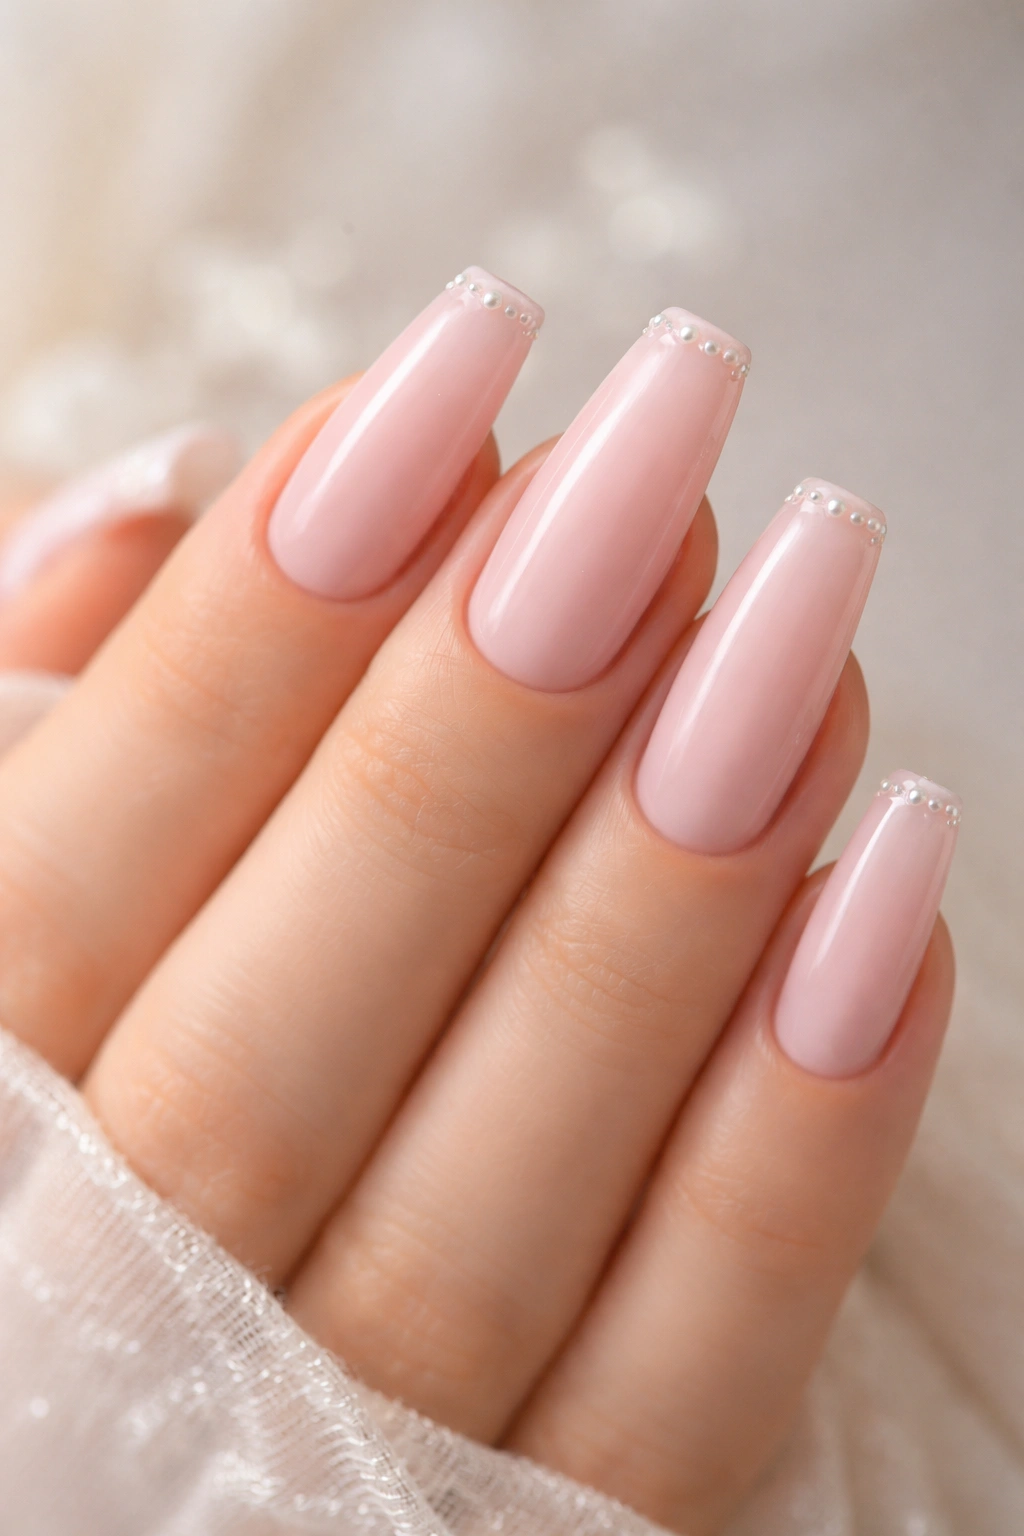
Blush pink—warmer than pale pink, with more depth and richness—becomes absolutely stunning when paired with tiny pearl beads or micro pearls applied strategically along the tip or in delicate patterns. Real or faux pearls create a dimensional, almost organic texture that feels luxurious and bridal-appropriate but also works beautifully in everyday settings when applied with restraint. The pearls should be small enough (1-2mm) that they don’t feel bulky or make the tips of your coffin nails blunt, and they should be spaced with intention rather than covering the entire nail.
Applying Micro Pearls Without Bulk
Micro pearls need to be adhered carefully to avoid shifting or falling off. Use a thick base coat or nail adhesive as your sticky layer, then use a tiny dotting tool or a specialized applicator to place each pearl individually. Allow the adhesive to set slightly between placements so the pearls don’t roll around. Once all pearls are placed, seal everything with a generous layer of top coat, ensuring you’re not just painting over them but actually encapsulating them in a protective layer of shine.
Tasteful Pearl Placement Patterns
- A delicate line of pearls along the tip edge, creating an almost jewelry-like frame
- Scattered pearls concentrated more heavily toward the outer corners and edges, fading toward the center
- A small cluster of 3-5 pearls positioned at the center of the tip, like an accent stone
- Pearls arranged in a subtle gradient pattern, more concentrated at the tip and sparse toward the base
Insider note: Pearl finish varies—matte pearls create a softer, more understated look, while iridescent pearls shift color depending on the light and create more visible dimension. Choose based on your preference for subtlety versus statement-making.
8. Pale Peach with Negative Space Half-Moon Design
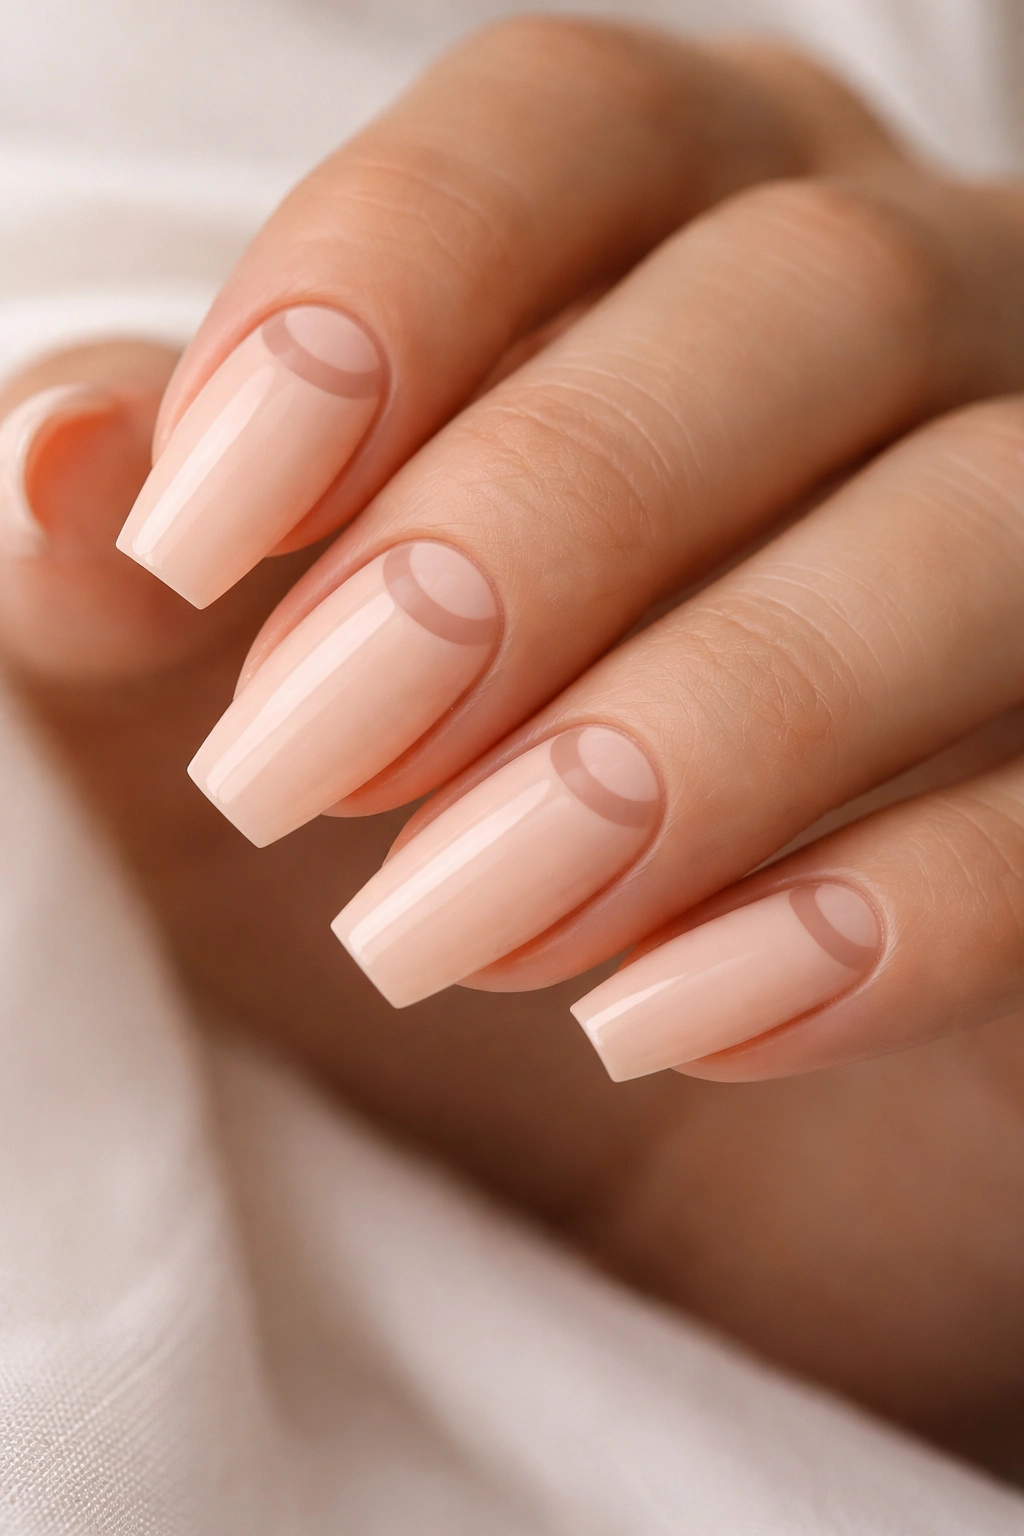
The half-moon design—where the cuticle area remains clear or a different color while the rest of the nail is filled in—is a classic nail art shape that looks especially clean and modern on coffin nails. Use pale peach as your primary color with true negative space (your natural nail or a clear base) showing through in a perfect crescent at the cuticle. This design is incredibly flattering because it mirrors the natural shape of your cuticle and creates visual interest without requiring any drawing skills or artistic ability. The simplicity is actually what makes it so elegant.
Creating Crisp Half-Moon Lines
The edge between your pale peach and the negative space needs to be completely clean and defined. Use a curved nail guide or stencil designed specifically for half-moon designs, or if you’re confident with a brush, use thin painter’s tape to mark your line before applying polish. The curve should follow your actual cuticle line relatively closely—not too far down the nail, which would look disproportionate, but far enough that it’s clearly intentional. Once your tape is in place, apply your pale peach polish smoothly and evenly, right up to the tape line. Remove the tape immediately after application, before the polish sets.
Color Pairing Options Within This Design
- Pale peach with clear negative space (showing your natural nail)
- Pale peach with white negative space (apply a thin coat of white polish to just the crescent area)
- Pale peach with rose gold in the negative space for extra glamour
- Pale peach with a metallic accent line running along the edge of the half-moon design
Pro tip: Half-moon designs look best when the curve is consistent across all five nails—it should look intentional and uniform, not like you freehand each one differently. Using a template or guide ensures perfect replication across your entire manicure.
9. Lilac with Ombre to Purple Tips and Glitter Gradient
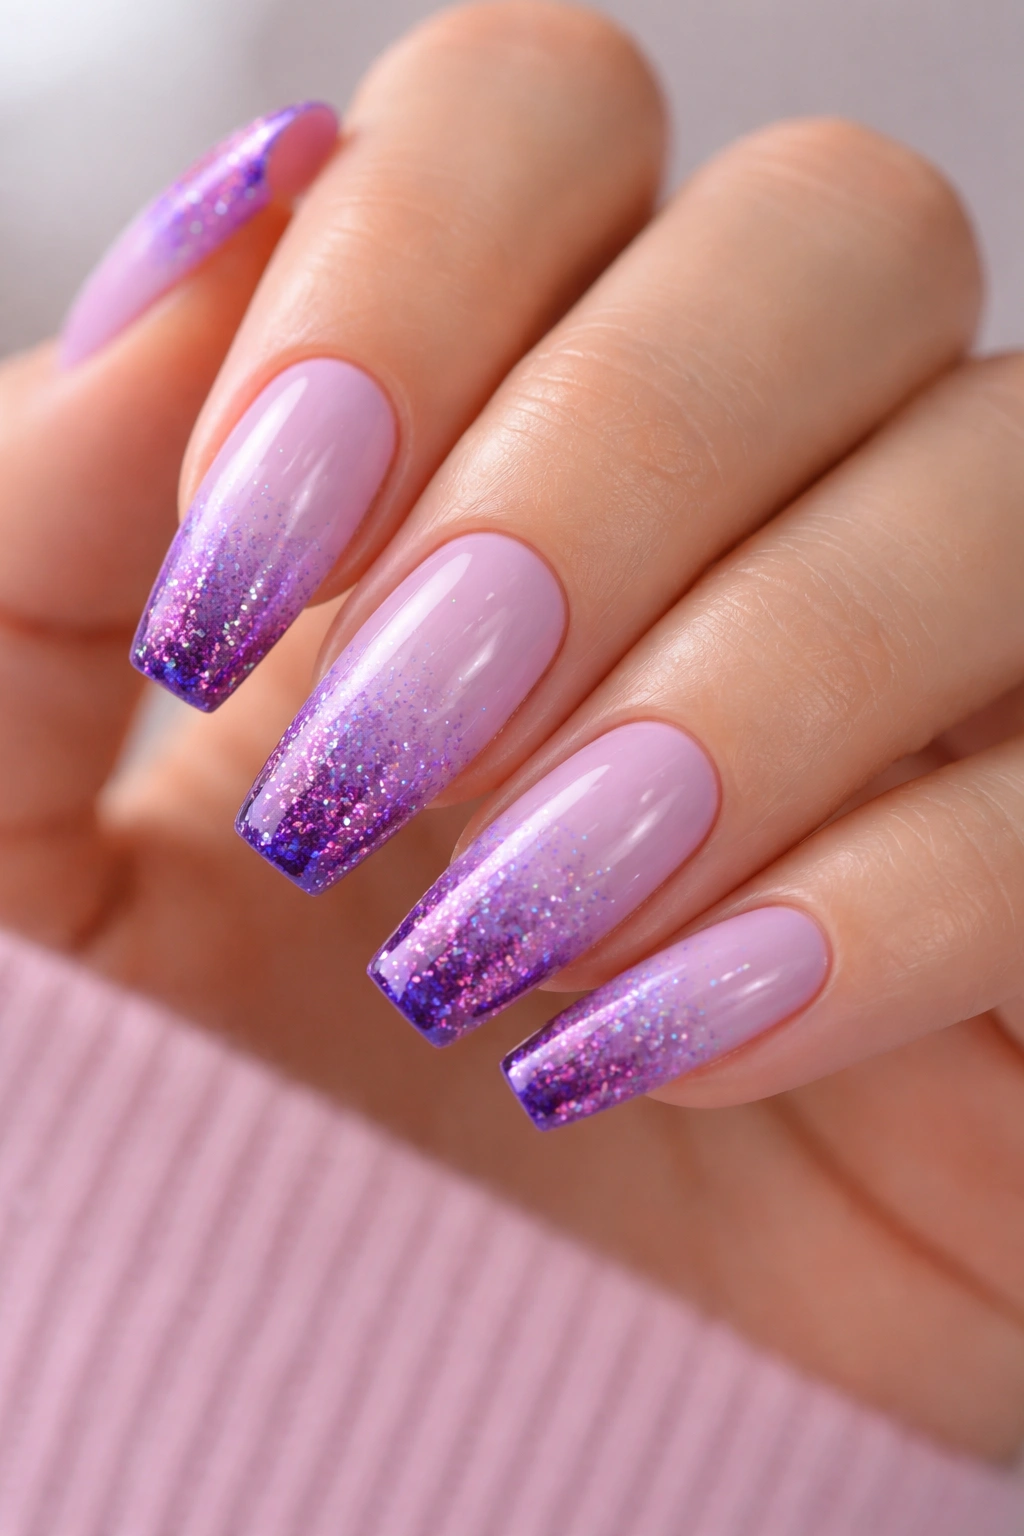
Lilac—that soft, almost dusty purple—creates an ombré with deeper purple tones and a glitter gradient that builds from subtle to statement-making as you move toward the tip. This design combines multiple techniques: an ombré shift in color plus a separate glitter gradient that builds intensity. Start with lilac at the base, shift through deeper purples or mauve in the middle, transition to a deeper grape or eggplant at the tip, and layer increasingly more glitter as you move toward the tip, so the nail transitions from solid color to a glittery finish.
Layering Color and Glitter Ombré Successfully
Build this design in sections. First, create your color ombré using the sponge-dabbing technique with lilac, mauve, and purple shades. Allow this to dry completely. Then, using a thin brush, apply a small amount of clear gel or polish mixed with fine glitter to just the very tip, seal it with a top coat, and let it dry. Next, apply a slightly more concentrated glitter-polish mixture to the upper third, seal and dry. Finally, add the most glitter concentration to the final 2-3mm of the tip. This builds gradually rather than looking muddy or overwhelming.
Glitter Types That Work Best for This Design
- Fine iridescent glitter for subtle sparkle that shifts color depending on the light
- Holographic glitter for maximum rainbow effect and brightness
- Matching glitter in purple or lilac tones rather than contrasting colors
- Micro-glitter (tiny pieces) for a sophisticated shimmer rather than large pieces that feel costume-y
Worth knowing: The thicker your top coat layer over the color ombré before you add glitter, the easier it is to create defined lines between the no-glitter and increasingly glittery sections. Too-thin of a seal and your glitter will scatter into areas where you don’t want it.
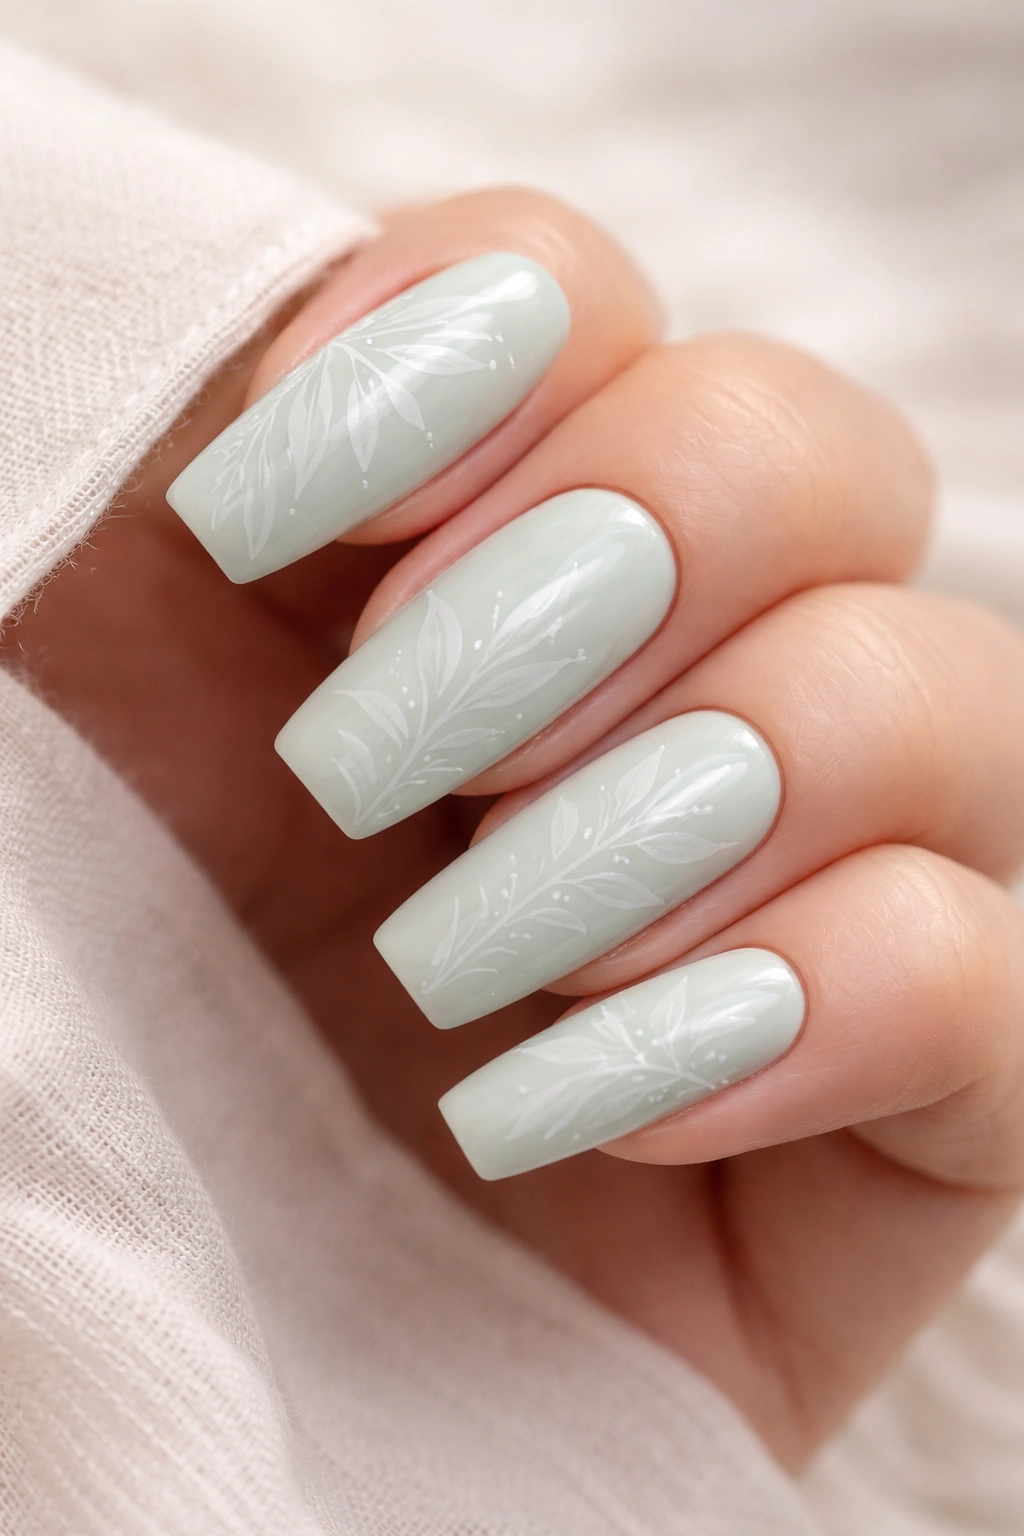
10. Sage Green with Botanical Line Drawing
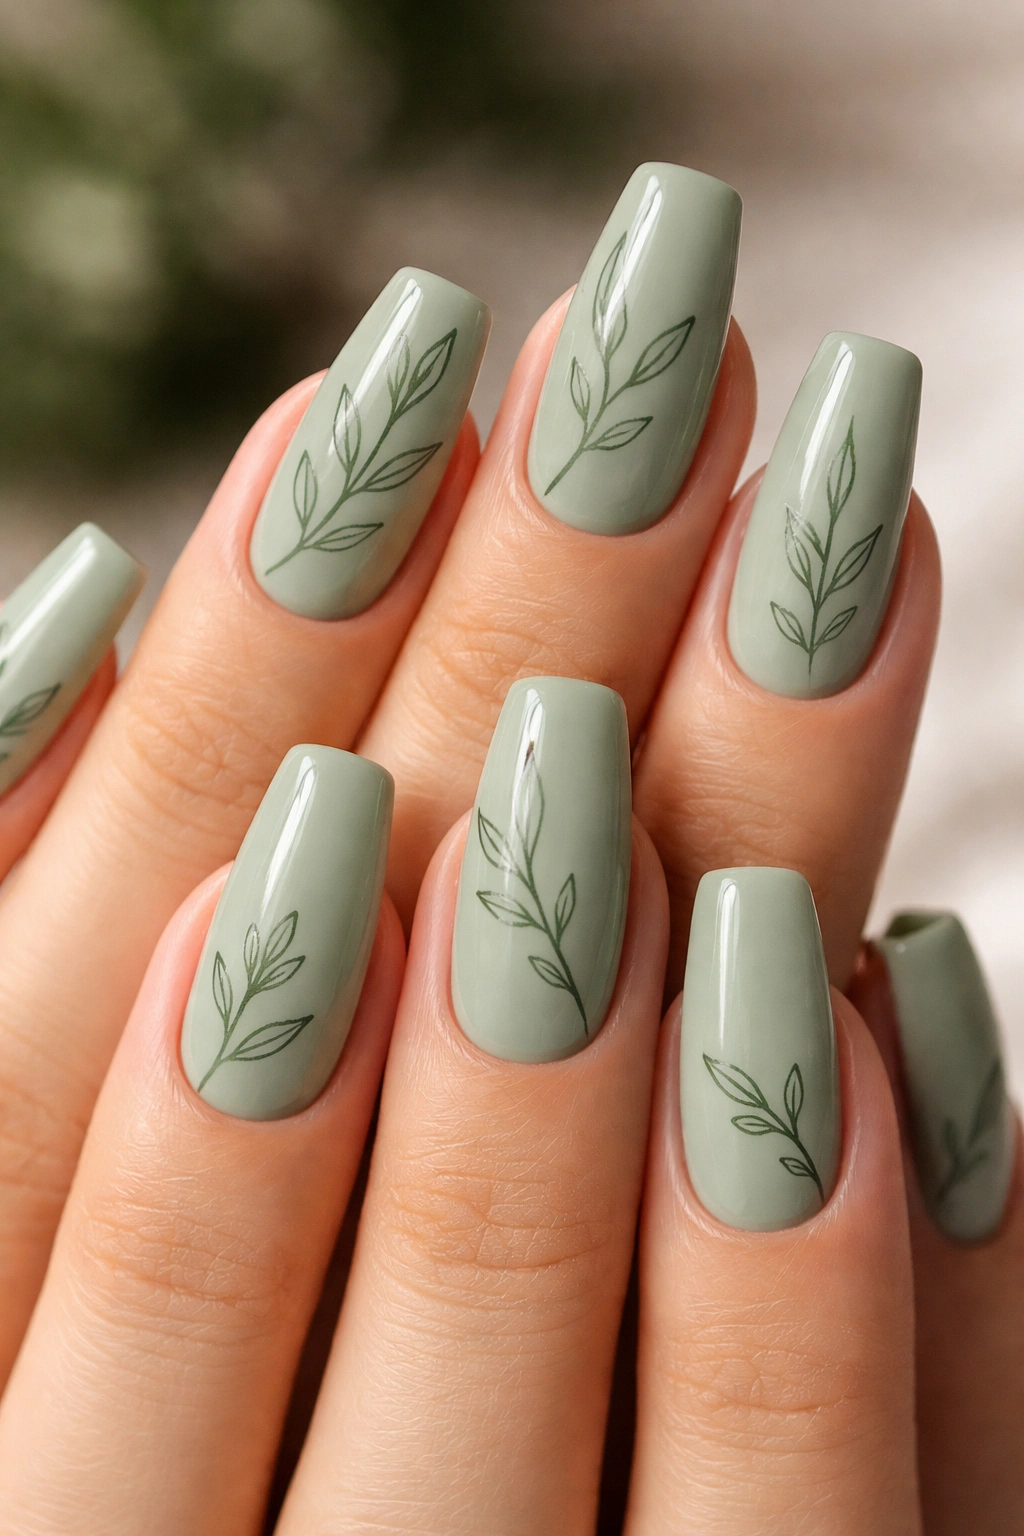
Sage green—muted, earthy, almost gray-toned with green undertones—provides a calming backdrop for botanical line drawings that feel organic and grounded. A botanical design could be a simple fern leaf, scattered wildflowers, minimalist leaves, or an interconnected pattern of vines and foliage. The soft green acts as a neutral-toned base that doesn’t compete with your line work, and the combination feels naturally sophisticated, like something you’d see in a luxury wellness brand aesthetic.
Drawing Botanicals That Feel Intentional
Botanical drawings don’t need to be photorealistic to be beautiful—in fact, simple line drawings feel more modern and artistic than detailed renderings. Focus on creating flowing, organic lines that suggest the shape of plants without filling them in completely. Thin lines in dark green, black, or even white create contrast against the sage base. The key to making your botanical designs feel professional is consistency—all your line weights should be similar, all your curves should flow smoothly, and your spacing should feel deliberate rather than random.
Botanical Imagery Ideas for Medium Coffin Nails
- A single detailed fern leaf centered on each nail, creating a cohesive look across all five nails
- Different botanical elements on each nail (one has a leaf, one has a flower, one has a branch, etc.) creating a botanical story across your hand
- Interconnected vines running along the tips or sides of your nails in a frame-like pattern
- Minimalist outlines where you draw only the perimeter of flowers or leaves without internal detail
Pro tip: Practice your botanical designs on paper first using the same brush and consistency of paint you’ll use on your nails. This lets you develop a feel for the line weight and flow before committing to your actual manicure.
11. Pale Coral with Negative Space Marble Effect
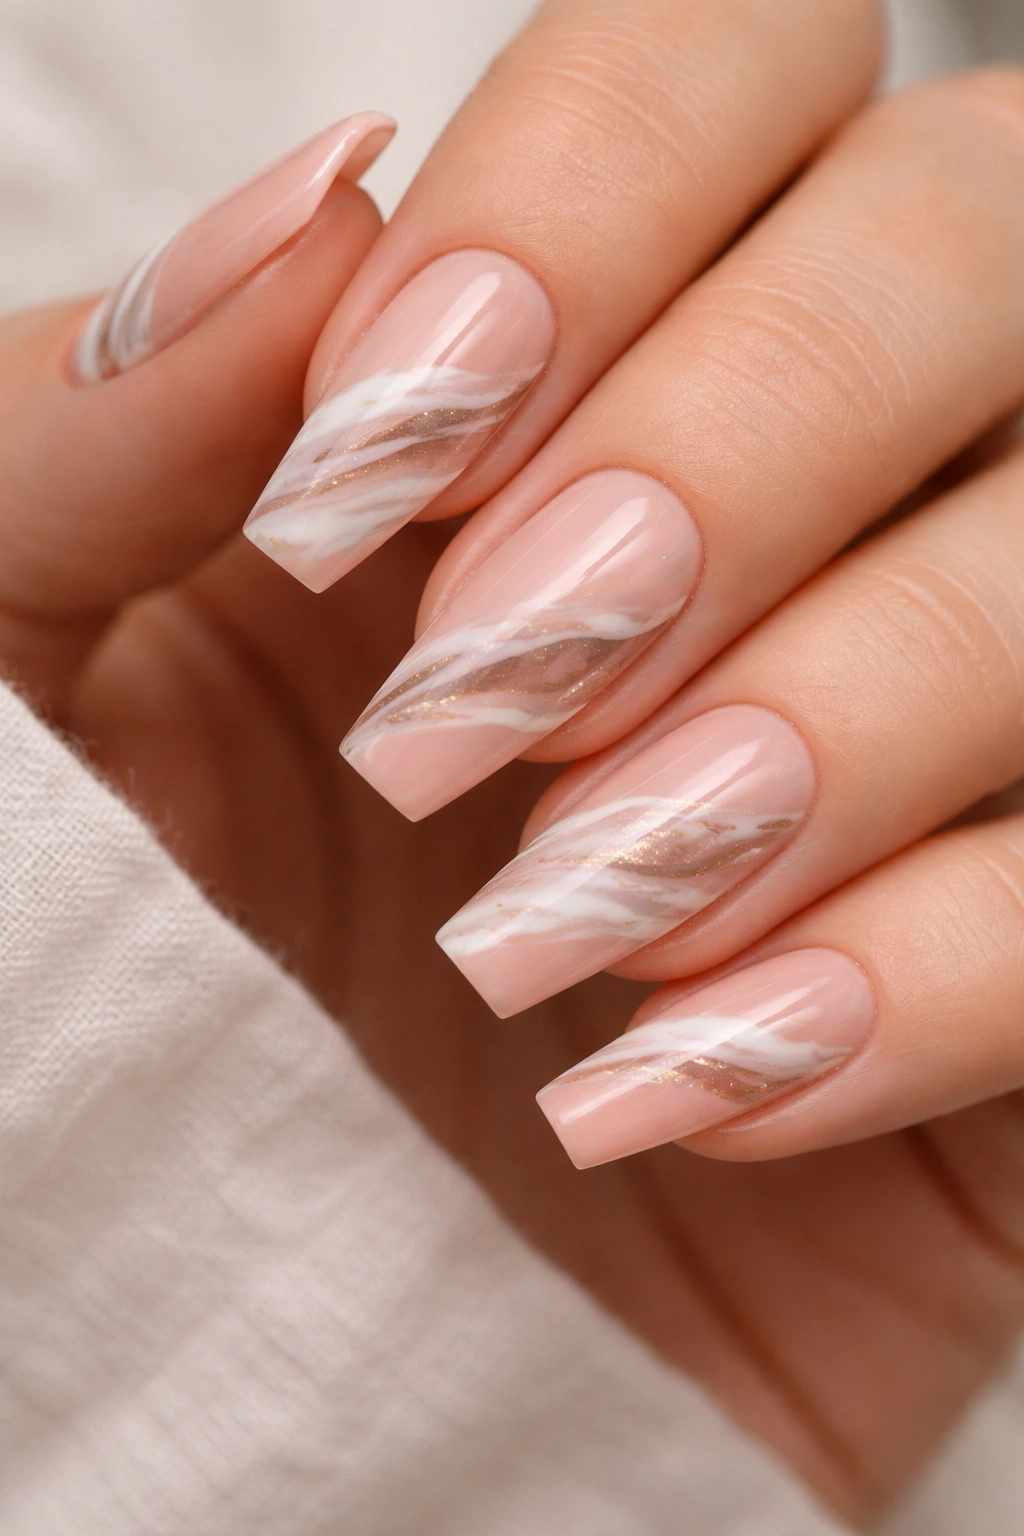
Pale coral—warm, beachy, and soft without being pink—pairs beautifully with a negative space marble effect that creates the illusion of marble stone texture visible through clear areas of the nail. This hybrid design uses marble painting techniques (swirling different shades together with a toothpick or thin brush) but leaves portions of the nail bare or clear, so you’re not creating a full marbled surface but rather pockets of marble pattern integrated with clean negative space.
Creating a Marble Effect with Negative Space
Apply your pale coral base to roughly 60-70% of the nail. In the clear areas (perhaps the tip or sides), create a marble effect by dropping different colors of polish (try pale coral, white, and pale taupe or mauve) directly on the bare nail and swirling them together with a toothpick before they dry. The marble pattern should look organic and random, never uniform. Seal everything with top coat once dry. The combination of solid color, negative space, and subtle marble texture creates visual depth without feeling overdone.
Color Combinations for the Marble Sections
- Pale coral base with white and taupe swirled marble in the negative space
- Pale coral base with white and pale pink marble sections
- Pale coral base with mauve and pale yellow creating an earthy marble effect
- Pale coral base with iridescent or chrome marble sections for maximum shimmer
Insider note: Marble effects are forgiving because they’re meant to look organic and imperfect—uneven swirls and unexpected color blending are actually what make marble look authentic, so don’t stress about creating perfect patterns.
12. Baby Blue with Delicate Snowflake or Star Details
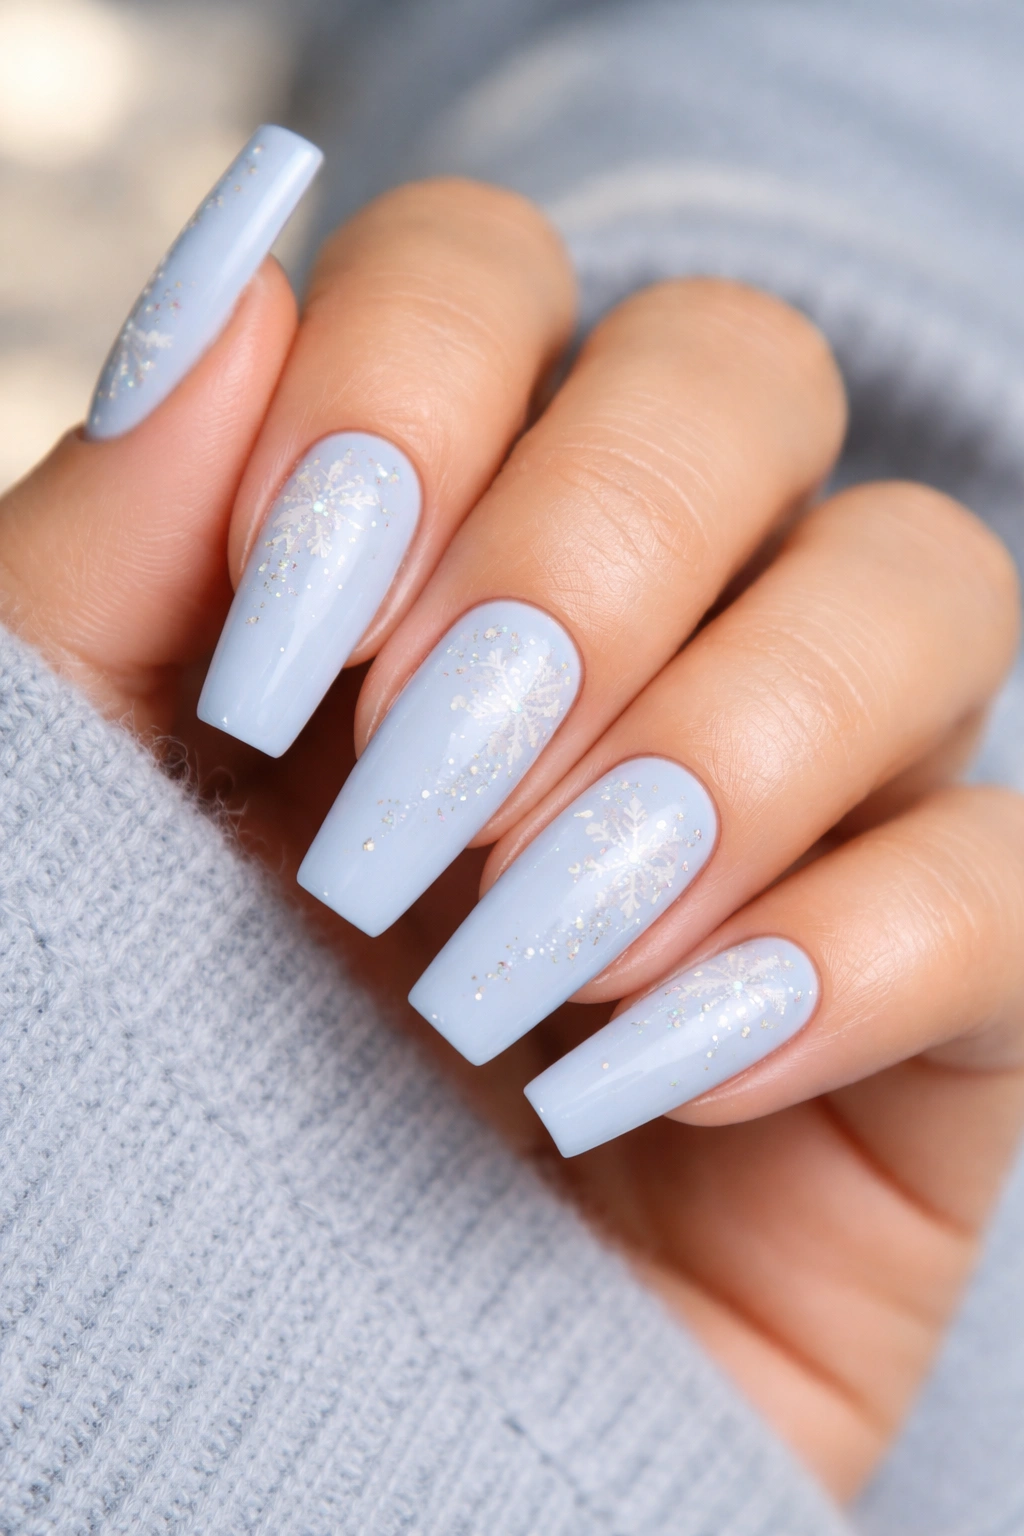
Baby blue—that soft, almost powder-toned blue—becomes wonderfully whimsical with carefully placed snowflake or star designs using thin white or silver lines. Snowflakes work especially well on medium coffin nails because the shape of the design complements the geometric taper of the nail shape. You can create a simple design with one snowflake per nail or multiple smaller snowflakes arranged across the nail. Stars offer a similar aesthetic but feel more versatile across different seasons and occasions—less wintry, more timeless.
Painting Precise Snowflake or Star Designs
Snowflakes and stars require a steady hand, thin brush, and some practice, but they’re more achievable than free-form botanical designs because they follow a mathematical pattern. A six-pointed snowflake is essentially a six-pointed star with additional branches added at angles. A star is typically five or six points radiating from a central point. Start by lightly marking your center point with a pencil or very thin line, then paint out from that center, creating even points. Use white or silver polish thinned slightly so it flows smoothly without dragging.
Simplified Designs for Easier Execution
- Simple five-pointed stars (five straight lines radiating from center) rather than complex snowflakes
- Minimalist starbursts with just thin lines radiating outward, no additional detail
- One large snowflake or star centered on each nail rather than multiple designs
- Outline-only designs where you draw the perimeter of the snowflake without filling in internal detail
Pro tip: If hand-painting feels too risky, snowflake and star decals or stamping plates exist in countless variations—apply them over your baby blue base for the same aesthetic with zero risk of shaky lines.
13. Peachy Pink with Gradient Glitter and Chrome Accent

Peachy pink—that warm, universally flattering hybrid of coral and rose—becomes absolutely luminous when paired with a glitter gradient that builds from opaque to translucent and includes touches of chrome powder for metallic dimension. This design uses layered finishes: a solid peachy pink base, increasing concentrations of fine glitter toward the tip, and a strategic placement of chrome powder for an almost mirror-like accent at the very tip or along one edge.
Building Glitter Gradients with Precision
Start with your peachy pink base coat and allow it to dry completely. Using a thin brush, apply a small amount of clear gel or thick top coat mixed with fine pink or neutral glitter to the upper third of the nail, extending about halfway. Seal with top coat and allow to set. Next, apply a slightly more concentrated glitter mixture to the upper quarter of the nail, overlapping slightly with your previous layer. Seal again. Finally, apply the most concentrated glitter to just the tip (the final 2-3mm), and while this layer is still tacky, apply chrome powder with a specialized brush, pressing gently so it adheres to the glitter layer.
Chrome Powder Application Without Overload
Chrome powder is incredibly pigmented and a little goes a very long way. Use a tiny amount on a soft, fluffy brush and apply with a pressing motion rather than a brushing motion—you’re almost pressing the powder onto the nail rather than sweeping it on. Build the intensity gradually; you can always add more chrome, but you can’t easily remove it once it’s applied. Consider applying chrome only to one side or corner for a more subtle, sophisticated look rather than covering the entire tip.
Worth knowing: Chrome powder shows every fingerprint and imperfection, so make sure your glitter layer underneath is completely smooth and sealed before adding chrome—any bumps or inconsistencies in your glitter will be exaggerated by the reflective powder.
14. Soft Gray with Rose Gold and White Line Art Geometric Patterns
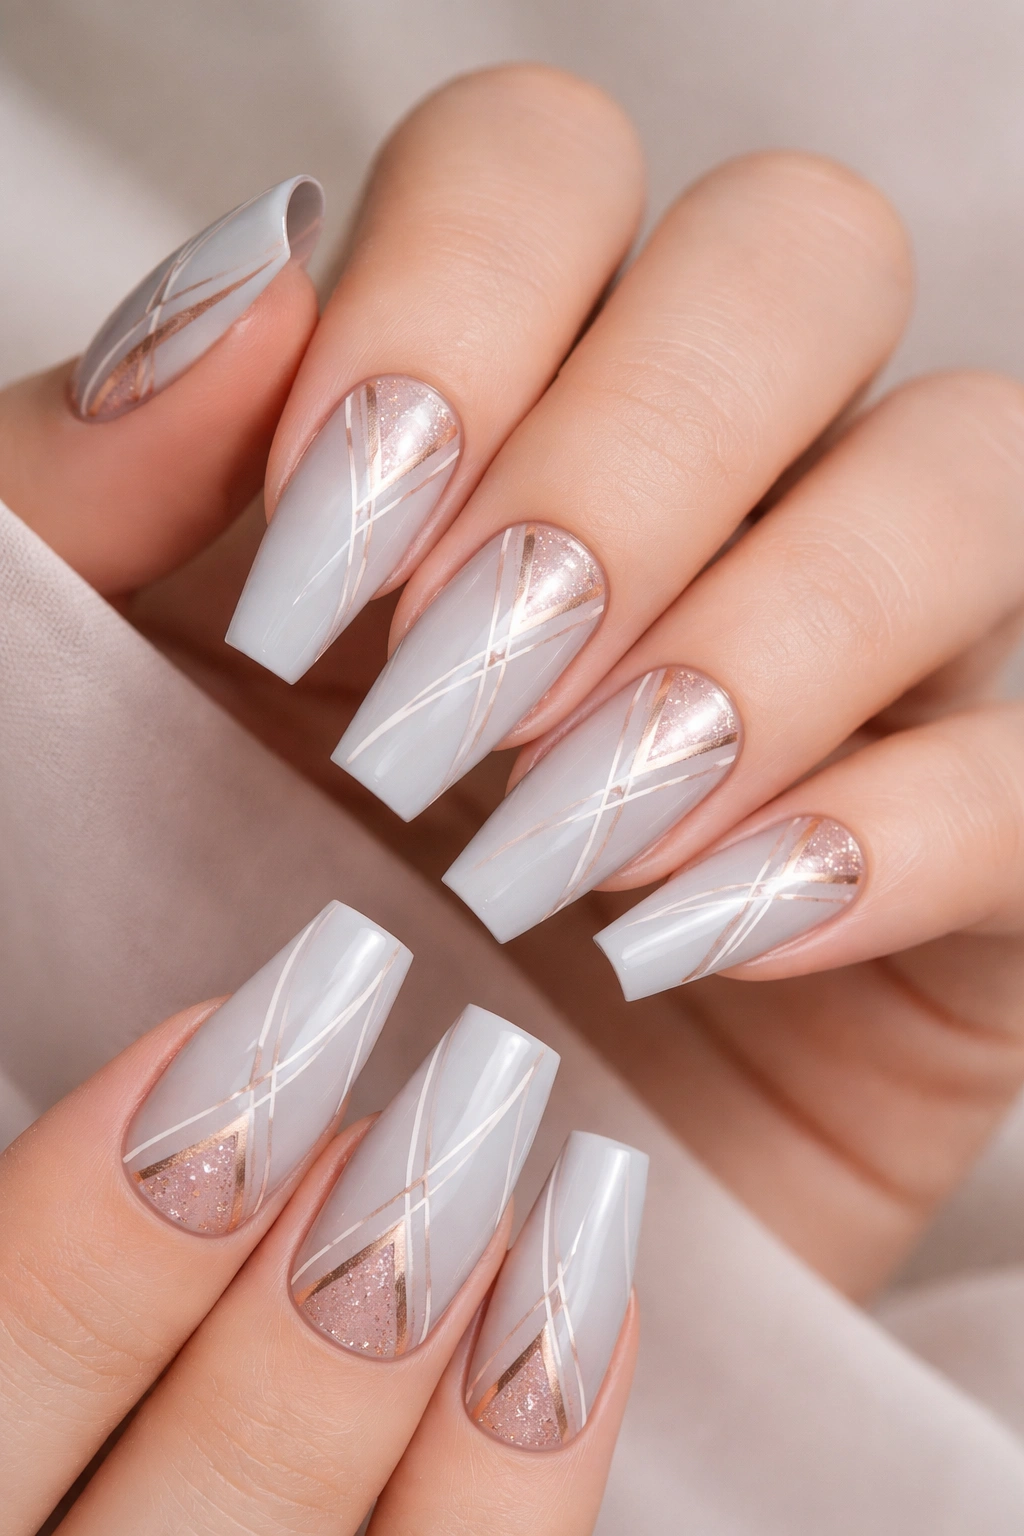
Soft gray—the kind that’s barely tinted, almost neutral with just a whisper of color—becomes incredibly sophisticated when paired with rose gold and white geometric line patterns. Gray creates visual calm, while rose gold adds warmth and luminosity, and white lines create definition and structure. Geometric patterns could be angular designs, interlocking shapes, minimalist line grids, or abstract forms. The key is creating a balance between the three elements: enough gray that it feels cohesive, enough rose gold for warmth and shine, and enough white lines for definition.
Creating Geometric Patterns Without Looking Chaotic
Geometric designs require planning—sketch out your pattern on paper first so you know exactly what you’re painting before you commit to your nails. Keep your lines thin and clean, your angles precise, and your spacing consistent. Vary the pattern slightly across your five nails (each nail doesn’t need to be identical, but they should feel like they belong together as a set). Use painter’s tape and guides where necessary to ensure straight lines and crisp edges.
Pattern Ideas for This Color Combination
- Connected triangles or hexagons creating a honeycomb pattern across the nail
- Diagonal lines in white with rose gold triangular or angular shapes filling alternating sections
- Minimalist grid or crosshatch pattern in white with rose gold accents at intersections
- Abstract angular lines radiating from one corner or the center point
Pro tip: If geometric patterns feel intimidating, negative space geometric designs are far more forgiving—you’re working with tape guides and painting solid colors within the lines rather than trying to draw perfect lines freehand. This requires zero artistic skill but delivers the same sophisticated geometric aesthetic.
15. Pale Blush with Gradient Ombré to Iridescent Shimmer
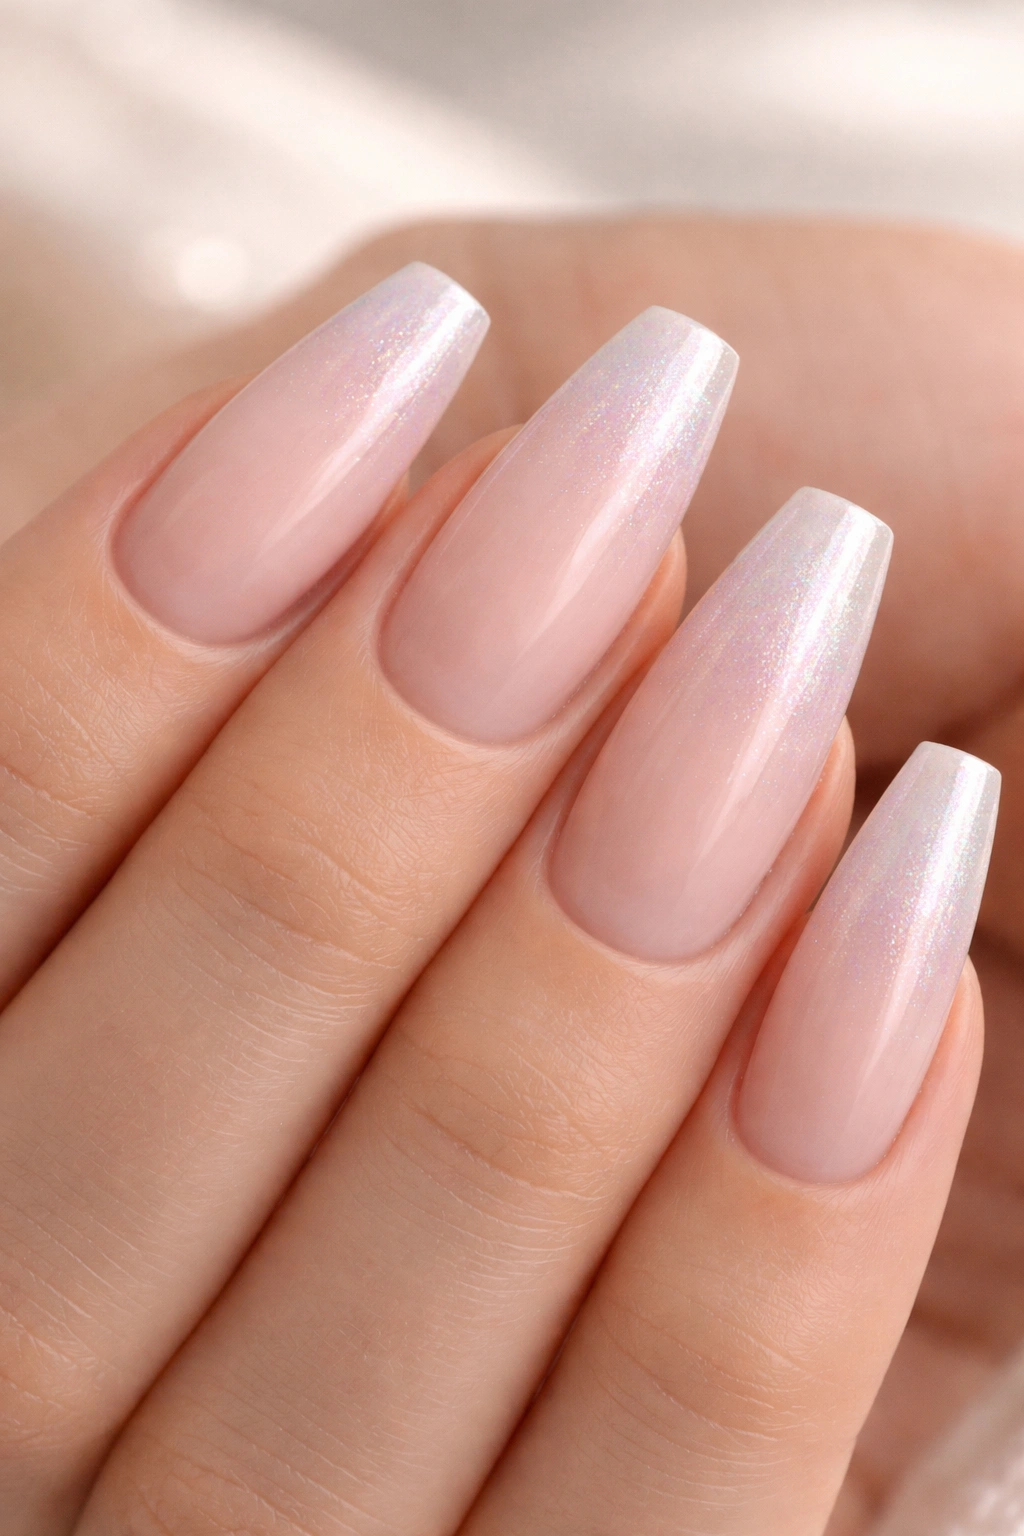
Pale blush—that barely-there rosy tone that’s more about warmth than color—becomes absolutely magical when paired with an ombré gradient that transitions into an iridescent shimmer finish. This design is the epitome of modern elegance: soft enough to feel romantic and subtle, but with enough dimension and shine to feel special and intentional. The ombré starts with pale blush at the base and gradually introduces iridescent glitter or shimmer, creating a gradient from solid color to increasingly sparkly as you move toward the tip.
Blending Solid Color into Iridescent Shine
Build this design by applying your pale blush base first, allowing it to dry completely. Then, using a specialized iridescent top coat or clear polish mixed with iridescent glitter, apply a thin layer to just the final quarter of the nail. Allow this to set slightly, then apply a second, more concentrated layer to the final 2-3mm. The graduation from blush to shimmer should feel natural and smooth, not like you’ve painted on two distinct layers. A thick, shiny top coat over everything ties the entire look together.
Why Iridescent Shimmer Works on Coffin Nails
Iridescent finishes are particularly flattering on medium-length coffin nails because they create the illusion of movement and light without bulk or weight. The color shifts depending on the angle and lighting, so your nails look different (always beautiful) whether you’re indoors, outdoors, or under various lighting conditions. It’s subtle enough for professional settings but special enough for evening occasions.
Finish Options for the Shimmer
- Iridescent glitter for visible sparkle with gentle movement
- Holographic powder for maximum rainbow effect and brightness
- Duochrome pigment that shifts between two colors depending on the angle
- Pearl finish for a creamy, luminous shimmer without glitter texture
Insider note: Iridescent finishes photograph beautifully—these nails look even more stunning in photos than in person because cameras capture the color-shifting properties in ways the human eye sometimes misses. Perfect for anyone who loves sharing their manicure on social media.
Final Thoughts
Pastel coffin nails offer endless possibilities for expressing your personal style while maintaining an air of sophistication and restraint. The key to making any of these designs work is choosing colors that genuinely make you feel good, applying techniques with intention and patience, and understanding that medium-length coffin nails are actually the ideal canvas—long enough for real nail art but short enough for practicality and longevity.
The beauty of pastel shades is their versatility. Whether you’re drawn to soft florals like lavender and blush, creamy peachy and coral tones, cool dusty greens and blues, or warm buttery yellows, there’s a pastel palette that speaks to your aesthetic. Mix and match these design ideas with your own color preferences—a soft pink with the negative space design, a pale mint with glitter tips, a sage green with your own botanical twist. The specific designs matter less than the combination of color, technique, and execution that feels authentically you.
Most importantly, remember that nail art is forgiving. If your lines aren’t perfectly straight, if your ombré blending isn’t flawless, if your glitter placement is slightly off-center—it all adds to the handcrafted, human quality that actually makes nail art beautiful. Medium coffin nails in soft pastels aren’t about achieving perfection; they’re about creating something that makes you feel polished, intentional, and genuinely happy every time you look at your hands.
