

Coffin nails have become a statement look that instantly elevates your entire aesthetic. Their distinctive tapered, squared-off shape creates an edgy, sophisticated silhouette that’s flattering on most hand shapes and instantly commands attention. Whether you’re drawn to bold colors, intricate nail art, or understated elegance, extra-long coffin nails offer the perfect canvas for expressing your personal style. The elongated shape naturally emphasizes the nail bed and creates an illusion of longer, more graceful fingers — which is part of why this style has become such a beloved choice for anyone wanting to make a fashion-forward statement with their manicure.
The key to rocking extra-long coffin nails is finding a design that genuinely works with your lifestyle while making you feel confident and beautiful. A style might photograph beautifully, but if it chips within two days or drives you crazy because it interferes with your daily tasks, it’s not the right choice. That’s why we’ve curated this collection focusing on designs that look stunning and hold up well in real life. You’ll find everything from classic, timeless options that never go out of style to more adventurous looks that let your personality shine.
The versatility of coffin nails means you can switch up your look as often as you want without committing to the shape itself. Once you find the length and shape that feels right for you, the design possibilities become endless. Let’s explore 15 extra-long coffin nail designs that work beautifully, break down what makes each one special, and help you figure out which styles align with your personal taste and lifestyle.
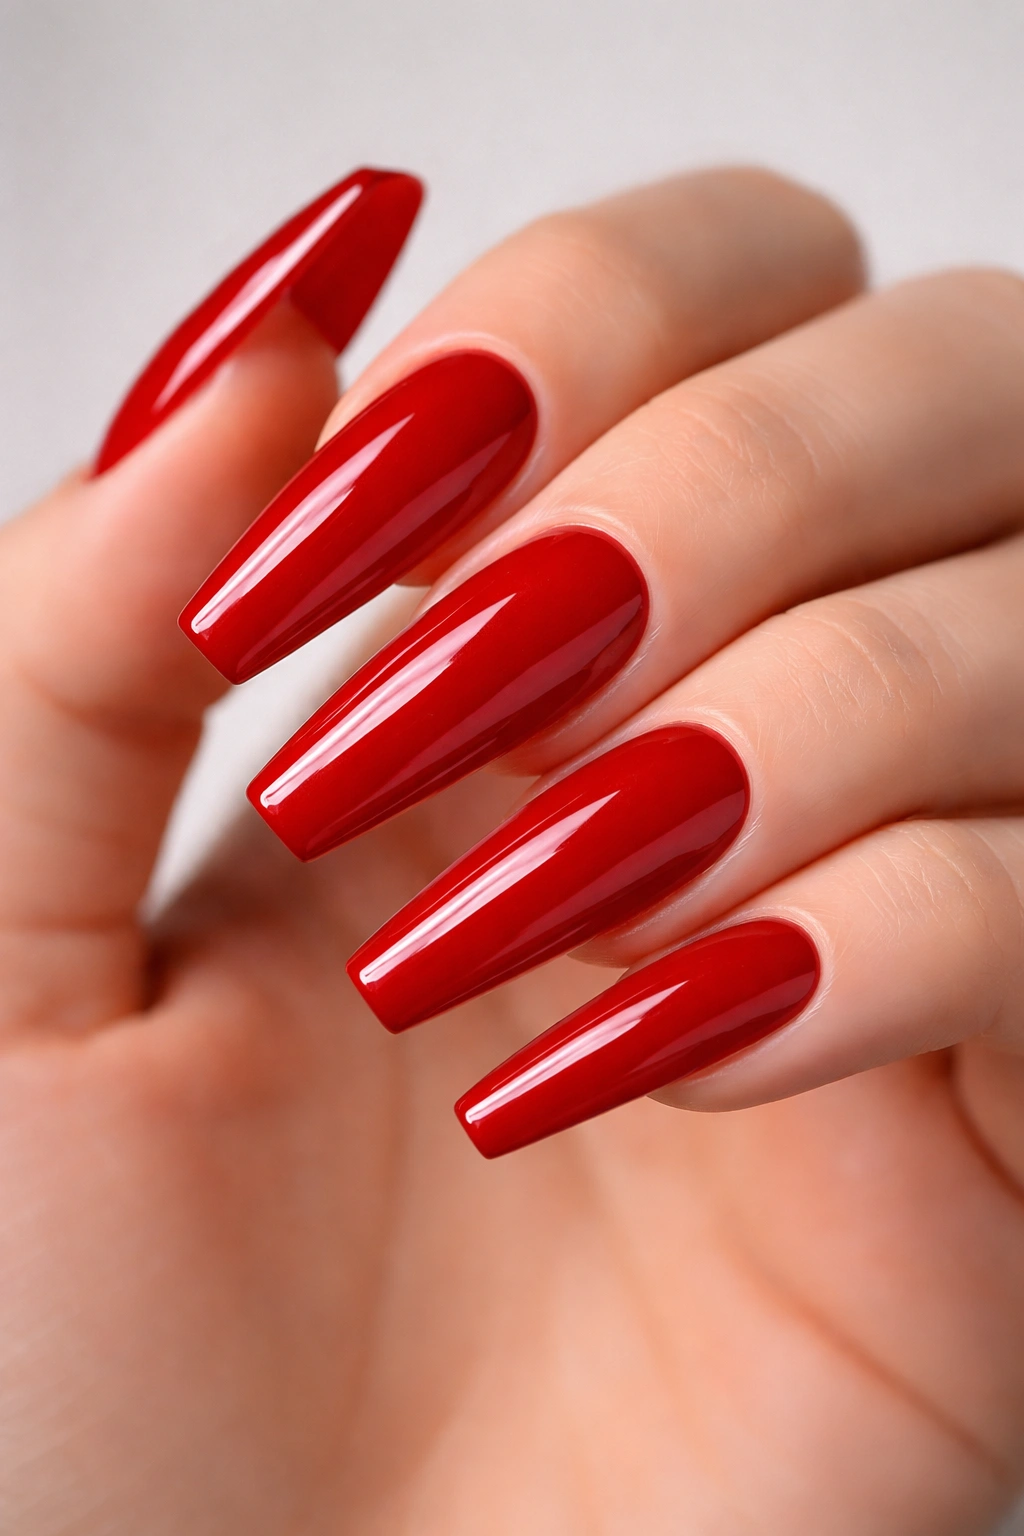
1. Classic Red Glossy Coffin Nails
There’s a reason red nails have remained the gold standard of timeless elegance for generations — this color simply works. A true red (not orange-leaning or blue-leaning, but a true red) on extra-long coffin nails creates an instantly polished, put-together look that works for every season and every occasion. The glossy finish amplifies the shine and creates a glass-like effect that makes the nails look even more luxurious and intentional. This design proves that sometimes the most impactful choices are the simplest ones.
Why This Design Stands Out
Red coffin nails radiate confidence and sophistication in a way that feels modern rather than retro. The shape elongates your fingers visually, and the bold color draws the eye in all the right ways. Whether you’re heading to the office, a night out, or just want to feel put-together on a Tuesday afternoon, this design delivers that elevated energy without being over-the-top.
Essential Details to Know
- Application matters most: A true red requires at least two coats to avoid streaking, and the glossy topcoat needs to be applied generously for that high-shine finish that makes red nails look their absolute best
- Color undertone makes a difference: Warmer reds with orange undertones suit warmer skin tones and golden undertones, while cooler reds with blue undertones look stunning on cooler skin tones and silver jewelry
- Maintenance is non-negotiable: Glossy red shows every speck of dust and water spots, so you’ll want to touch up the topcoat weekly to maintain that mirror-like shine
- Longevity with gel or acrylics: This design holds beautifully in gel polish (typically 3-4 weeks) or acrylic (4-6 weeks depending on growth)
Pro tip: If you’re worried about red nails looking too formal, pair this classic with a super casual outfit — the contrast actually makes the whole look feel more modern and intentional, not stuffy.
2. Soft Nude Matte Coffin Nails
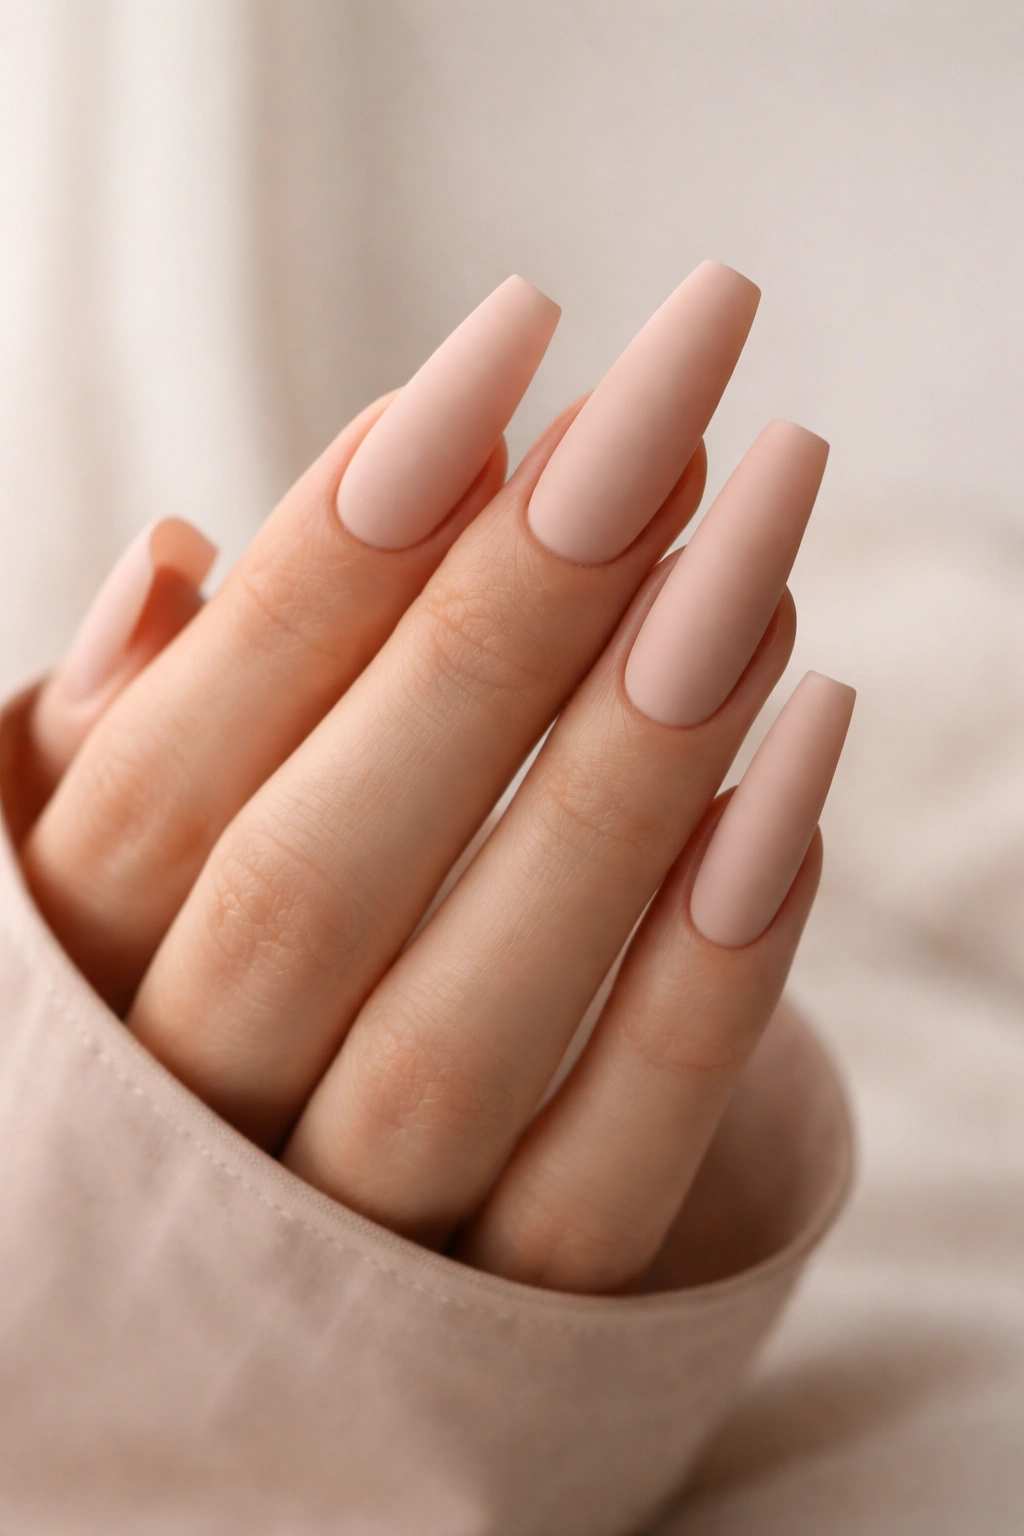
Nude matte coffin nails represent the ultimate in understated sophistication. The matte finish eliminates shine entirely, creating a velvety, almost skin-like appearance that feels luxurious in a quiet, confident way. This is the design that makes a statement through restraint rather than boldness — it’s elegant, wearable every single day, and somehow makes your hands look more refined and elongated than practically any other style. The simplicity of this look is deceptive because it requires more precision to look actually good.
Why This Design Remains a Favorite
A soft nude — one that’s slightly lighter than your skin tone rather than matching it exactly — creates an optical illusion of longer nail beds and more delicate fingers. The matte texture feels modern and expensive, like something you’d get from a high-end salon rather than a quick commercial manicure. This design pairs with literally everything in your wardrobe and never feels out of place, making it perfect for anyone who wants beautiful nails without constant design changes.
What Makes the Matte Finish Work
- The right shade is crucial: Too dark and your nails disappear against your hand; too light and they look washed out. A shade that’s one to two shades lighter than your natural skin tone creates the ideal effect
- Finish quality matters deeply: A cheap matte topcoat can look chalky or uneven, while a quality matte top coat has a smooth, refined appearance that genuinely looks like a professional salon manicure
- Matte texture requires different care: Matte finishes are more prone to visible water spots and dust, so keep a buffer handy if you want to maintain that pristine look
- Layer your topcoat thin: One thick coat of matte topcoat looks better than two thin ones — this prevents that overly chalky appearance some matte nails develop
Worth knowing: If you want to add tiny amount of dimension without losing the matte effect, a single thin matte coat over a nude shimmer base (rather than a pure matte color) creates an almost imperceptible glow that reads as “well-lit skin” rather than “shiny.”
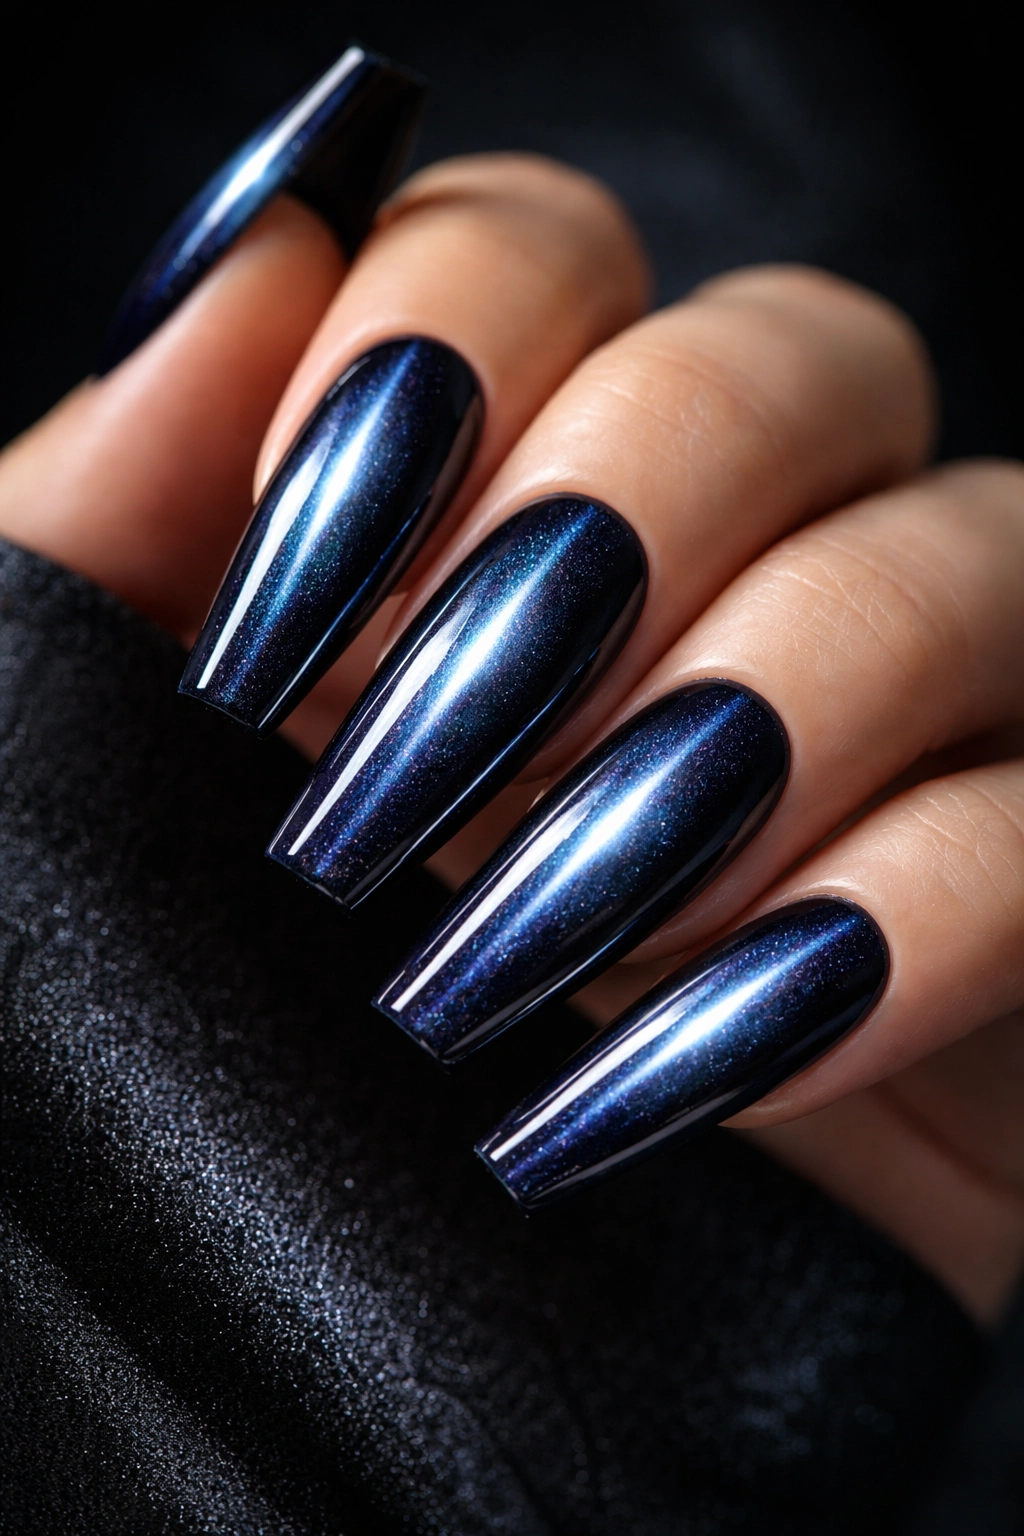
3. Deep Black Glossy Coffin Nails
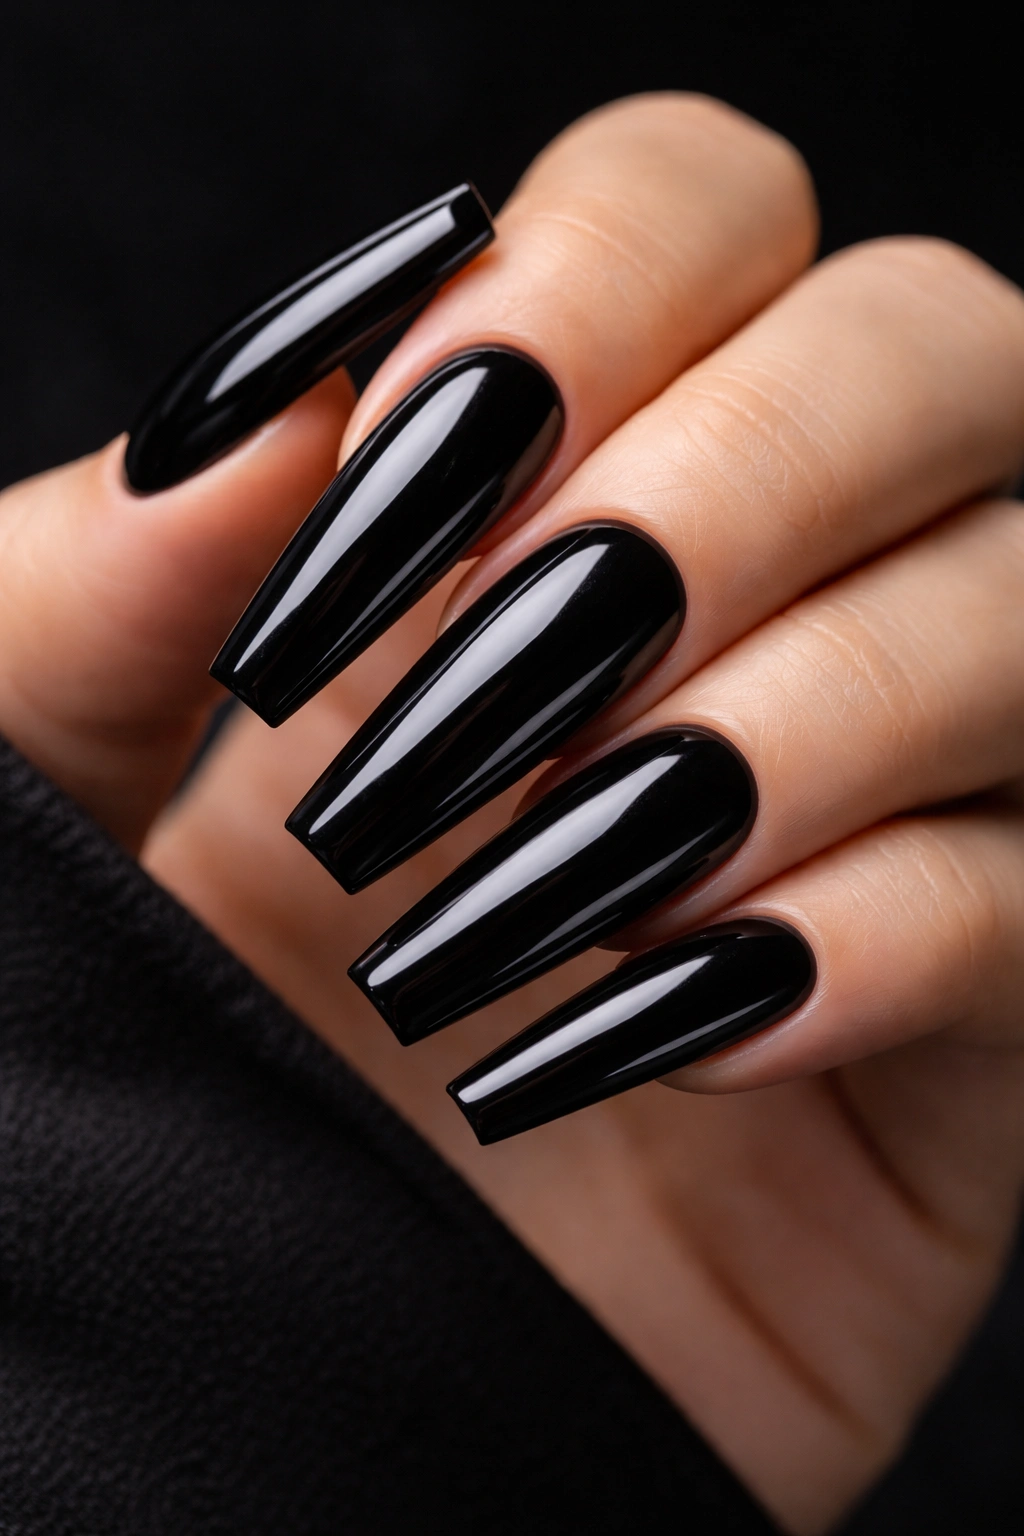
Black glossy coffin nails command attention with an edgy, dramatic energy that’s somehow both bold and elegant. The deep color against the elongated coffin shape creates a striking contrast that makes even your hands look more interesting. A high-gloss black is crisp and clean-looking rather than heavy or gothic, especially when paired with the coffin shape’s modern aesthetic. This design works year-round and actually suits more occasions than you’d initially think.
What Makes Black Nails Feel Modern
The coffin shape prevents black nails from feeling costume-y or overly dramatic — instead, it reads as intentional and fashion-forward. Black glossy nails work beautifully for anyone, regardless of skin tone, because the contrast between the color and your skin actually makes your hands look more elegant. This design pairs surprisingly well with casual, colorful outfits where it becomes an accent that adds sophistication without competing.
Practical Points About Maintenance
- Glossy black shows every imperfection: Dust, smudges, and water spots are visible on black gloss, so expect to buff and shine these nails more frequently than lighter colors
- Chipping is more visible: A tiny edge chip on black reads more obviously than the same chip on a nude or patterned nail, so you’ll notice when maintenance is needed sooner
- Application technique matters: Black polish requires thin, even coats (usually three total) to avoid streaking and to achieve that uniform, rich black color that looks intentional rather than muddy
- The topcoat is your friend: Multiple topcoat applications — reapplied weekly — keep black glossy nails looking freshly done and prevent that dull, scratched appearance
Real talk: If you love black nails but worry about the high-maintenance aspect, switching to matte black eliminates the visibility of dust and water spots entirely, making this design significantly easier to live with.
4. Ombre Gradient Coffin Nails
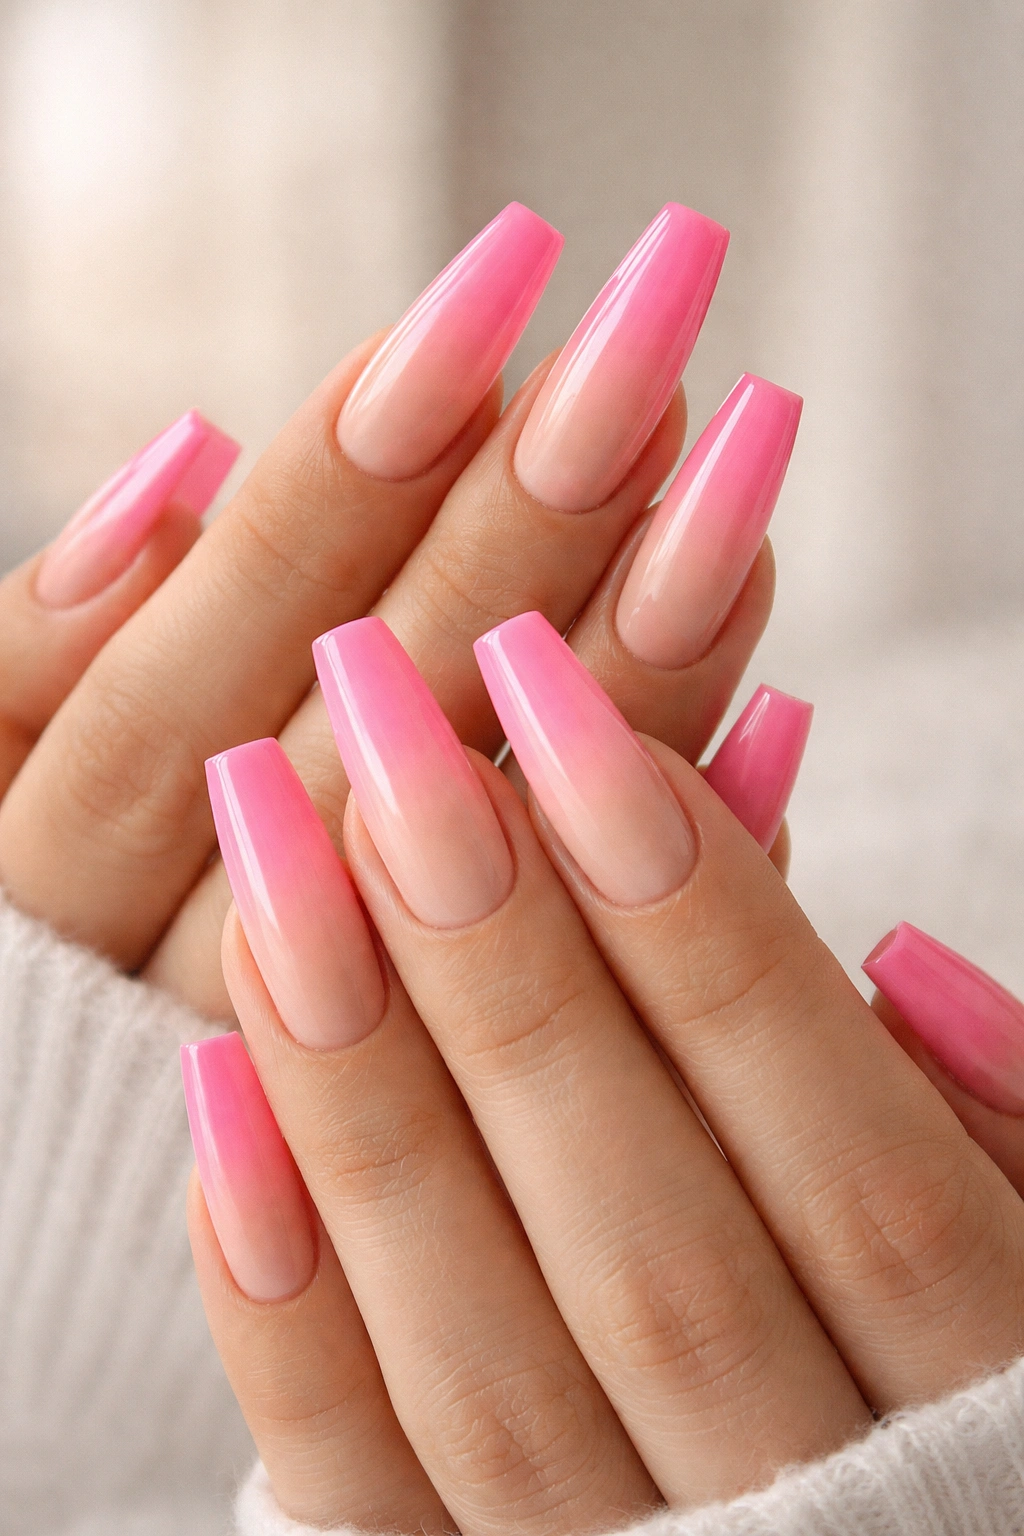
Ombre nails — where color transitions gradually from one shade to another — look absolutely stunning on the elongated coffin shape. The gradient creates movement and dimension that catches light beautifully from every angle. A classic ombre flows from white or nude at the base to pink at the tips, creating the illusion of additional length. More adventurous ombre combinations might shift from gold to rose gold, or from deep burgundy to pale pink, giving you endless creative possibilities.
Why the Coffin Shape Enhances Ombre
The coffin nail’s length creates more real estate for the gradient to develop, making the color transition smoother and more visually impactful than the same ombre on shorter nails. The tapered shape actually helps the color flow feel intentional and deliberate rather than accidental. This design flatters virtually every skin tone because you can customize which colors you use in your gradient.
Making Ombre Look Professional
- Blending method matters: Sponging creates softer, more blended ombres; airbrushing creates cleaner transitions; hand-painting requires more skill but offers precise control
- Color selection is key: Ombre works best with colors that are noticeably different in tone or undertone — too-similar colors look muddy rather than intentional
- Seal with precision: A glossy topcoat over ombre creates shine that enhances the gradient effect, while matte topcoat softens it and creates a more subdued appearance
- Upkeep timeline: Ombre grows out more noticeably at the base than solid color (because you see the color shift change as your natural nail grows), so plan for fills every 2-3 weeks if you want to maintain the effect
Pro tip: If you’re attempting ombre at home, use a makeup sponge cut into a small wedge shape and tap (never drag) the sponge onto your nail in quick, light motions — this creates a more blended effect than swiping.
5. Glitter and Sparkle Coffin Nails
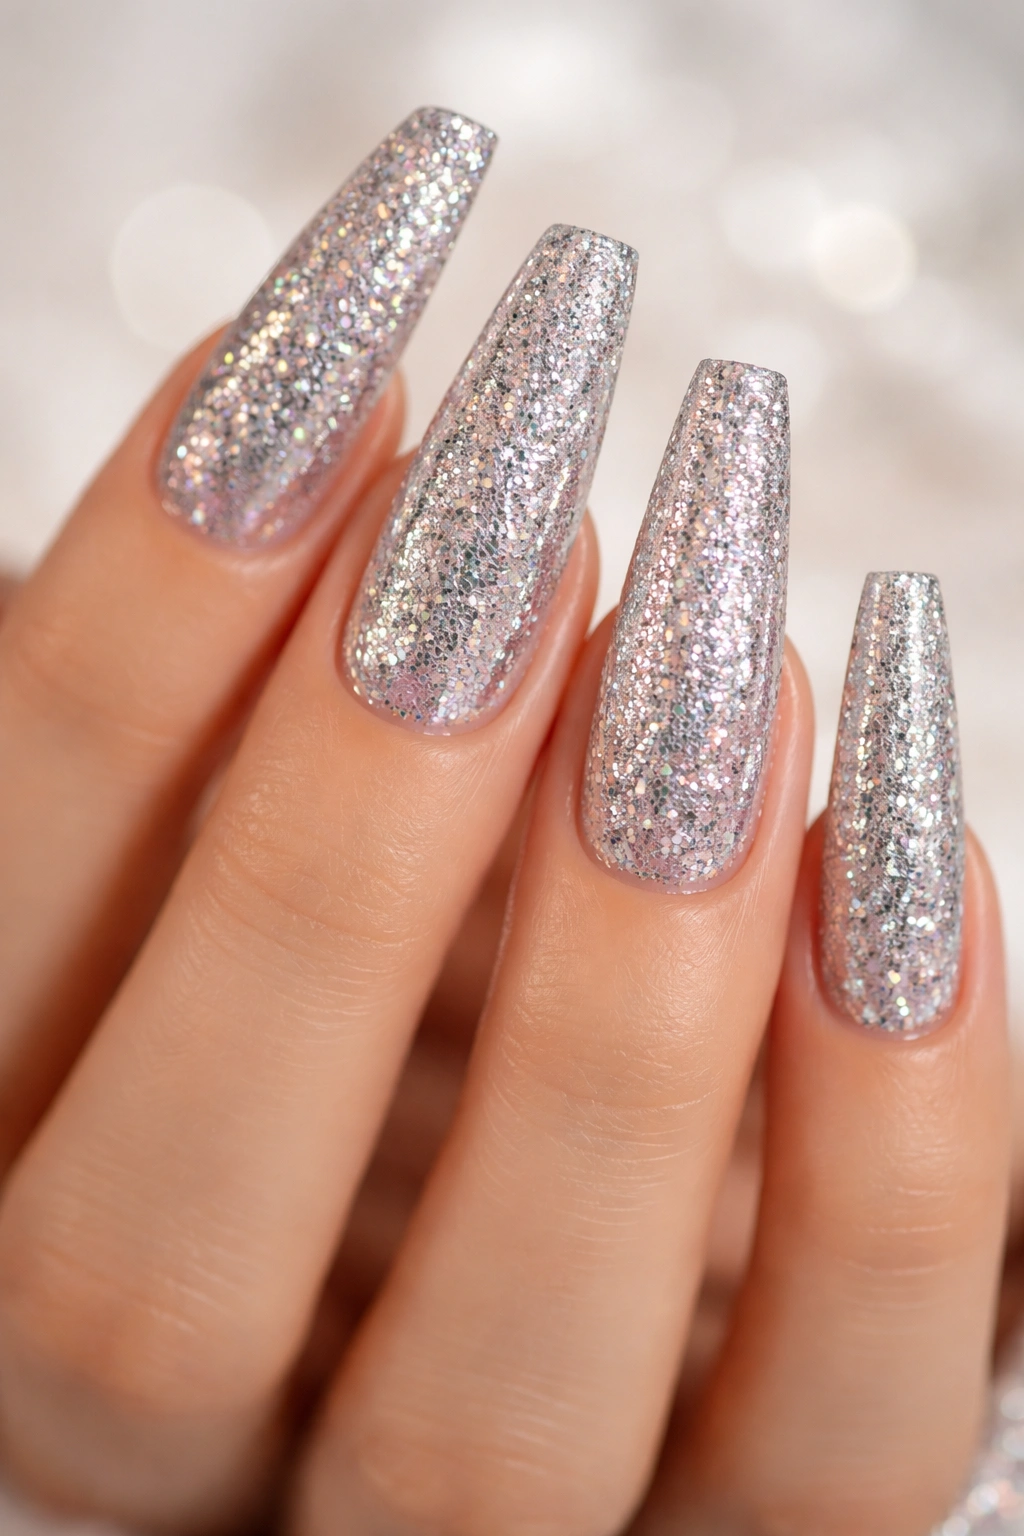
Glitter and sparkle designs on extra-long coffin nails are pure joy — they catch light, create visual interest, and honestly make you feel a little more special every time you look at your hands. You can go full glitter coverage (your entire nail is sparkle), gradient glitter (starts clear and fades to dense glitter at the tips), or glitter accents (solid color base with glitter details). The elongated coffin shape gives glitter plenty of space to shine and sparkle in a way that feels glamorous rather than costume-like.
Different Glitter Approaches That Work
A full glitter nail works best with larger, more substantial glitter particles (often called flakes or shards) that create visible shimmer rather than looking dusty. Fine glitter works beautifully in gradient applications where it fades from clear to dense. Combination glitter — mixing metallic and iridescent particles — adds complexity and depth. Color-matched glitter (silver glitter on white nails, gold glitter on nude nails) feels more sophisticated than high-contrast glitter.
Practical Considerations for Glitter Nails
- Glitter removal is genuinely challenging: Glitter polish requires soaking in acetone longer than regular polish, or using foil wraps that seal acetone-soaked cotton pads directly to the nail — it’s not a quick removal
- Finish underneath matters: Glitter over a dark, opaque base looks more dramatic; glitter over nude or white feels more delicate; glitter over shimmer creates maximum sparkle
- Durability depends on particle size: Larger glitter particles stay embedded longer; fine glitter can shed slightly during daily activities if not sealed well under thick topcoat
- Topcoat application is critical: The glitter must be fully sealed under a smooth topcoat, or the particles catch on clothing, hair, and other things throughout your day
Worth knowing: If you hate the removal process for traditional glitter, try glitter gel polish or press-on coffin nails with glitter designs — both remove much more easily than regular glitter polish.
6. Marble Effect Coffin Nails
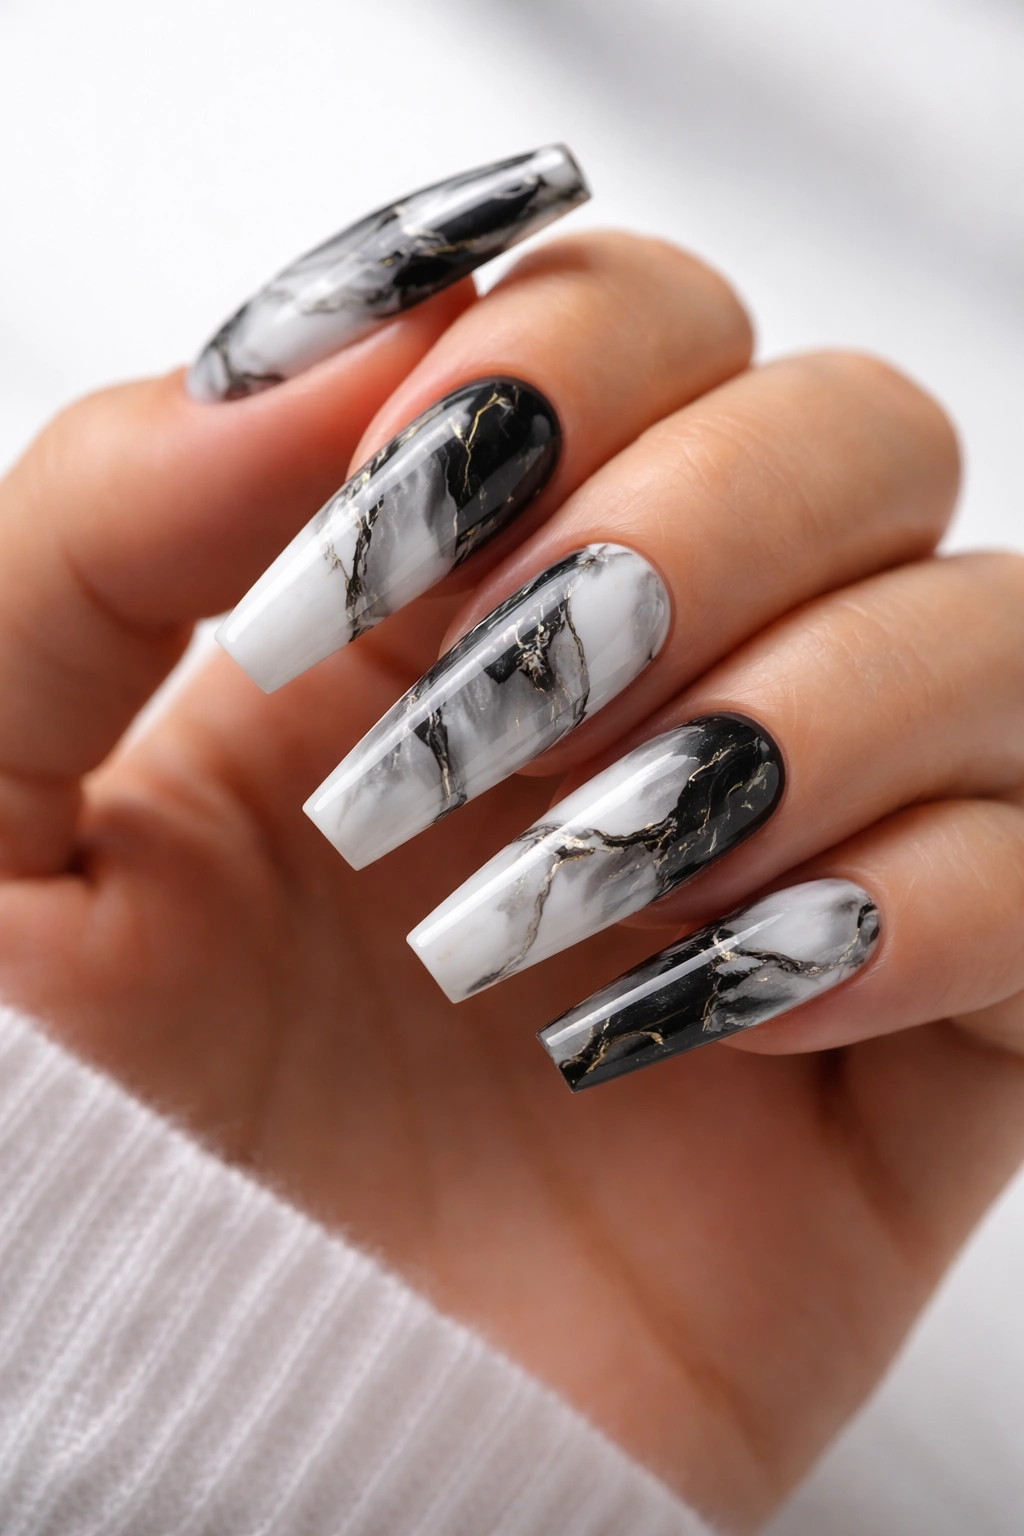
Marble-effect nails create an artsy, sophisticated look that feels gallery-worthy on elongated coffin nails. The veined, organic patterns of marble look modern and expensive, like you’ve turned your nails into tiny works of art. A classic marble effect uses black and white with gray veining, but you can create marble looks in virtually any color combination — blush and gold, navy and white, forest green and copper. The organic nature of marble patterns means each nail looks unique, which adds to the artisanal feel.
Creating Authentic-Looking Marble
Marble is traditionally created using a water-marble technique (dropping polish into water and swirling it, then dipping your nail into the pattern) or hand-painted with fine brushes and thin polish lines. Water-marble requires practice and creates more organic, truly random patterns. Hand-painting offers more control and allows you to intentionally create balanced, aesthetically pleasing designs. Either method looks beautiful on coffin nails because the length gives you a large canvas to work with.
Maintaining Marble Designs
- Marble works in both glossy and matte: Glossy emphasizes the depth and light-catching quality of the pattern; matte creates a more refined, minimalist aesthetic
- Pattern visibility depends on base color: Light base colors (white, cream, blush) make dark veining pop; dark bases require contrasting or metallic veining to be visible
- Longevity of hand-painted details: If your marble is hand-painted (not water-marbled), seal it carefully — the thin, detailed veins can chip if not properly protected under thick topcoat
- Simplicity actually works best: Marble with minimal veining and larger areas of solid color looks more intentional than overcomplicated, heavily veined patterns
Pro tip: For easier at-home marble nails, try using a thin brush to paint organic veining lines onto a solid color base rather than attempting the water-marble technique — it’s forgiving, looks intentional, and actually makes the design look more modern.
7. Chrome and Metallic Coffin Nails
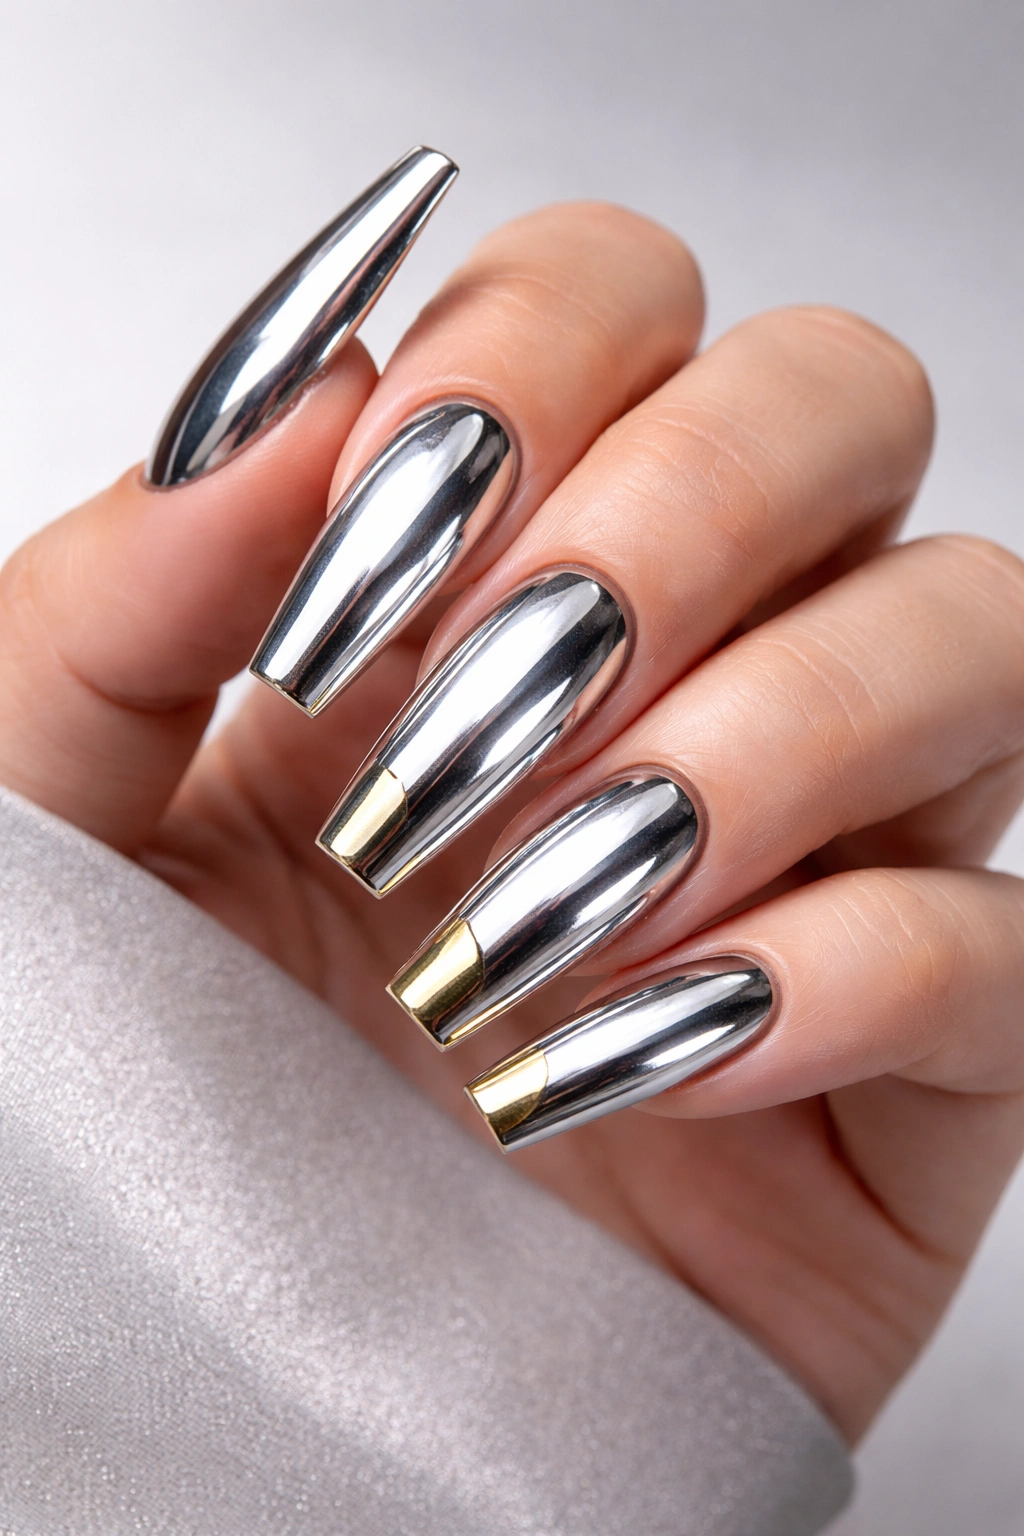
Chrome and metallic coffin nails feel futuristic, sleek, and undeniably luxurious. Chrome creates a mirror-like, liquid metal effect that’s almost hypnotic to look at — your nails literally become reflective surfaces. Metallic finishes (gold, rose gold, silver, copper) create rich, shimmer-heavy looks that catch light and add serious sparkle. Both approaches make your nails look longer and more striking, especially in the highly-reflective chrome version.
Different Metallic Approaches
Chrome typically comes as a special powder or polish that requires specific application techniques (often magnetic for a multi-dimensional effect). Metallic polishes offer a more accessible option that delivers similar visual impact with less technical application. Holographic or iridescent metallics shift color depending on lighting and angle, creating an even more complex, eye-catching effect. Combination metallics — layering different metallic shades — create depth and visual richness.
Making Metallic Designs Last
- Preparation is crucial: Metallics show every imperfection in your base, so use a smooth, even base coat and allow it to fully dry before applying metallic polish
- Thin application is key: Thick metallic polish looks goopy and uneven; thin, multiple coats create a smooth, refined appearance that looks intentional
- Buffing for shine: Some metallic finishes benefit from light buffing between coats to create an ultra-smooth surface that maximizes the reflective effect
- Topcoat selection matters: A clear, non-yellowing topcoat preserves the true color of your metallics; older yellow-tinted topcoats can make metallics look slightly off
- Durability: Metallic and chrome finishes are surprisingly durable because they’re applied over solid base layers, often lasting 3-4 weeks before chipping becomes noticeable
Real talk: True chrome requires special powders and can be tricky to apply at home — if you love the chrome look but want easier application, metallic and iridescent polishes deliver similar impact with much less technical difficulty.
8. Geometric Pattern Coffin Nails
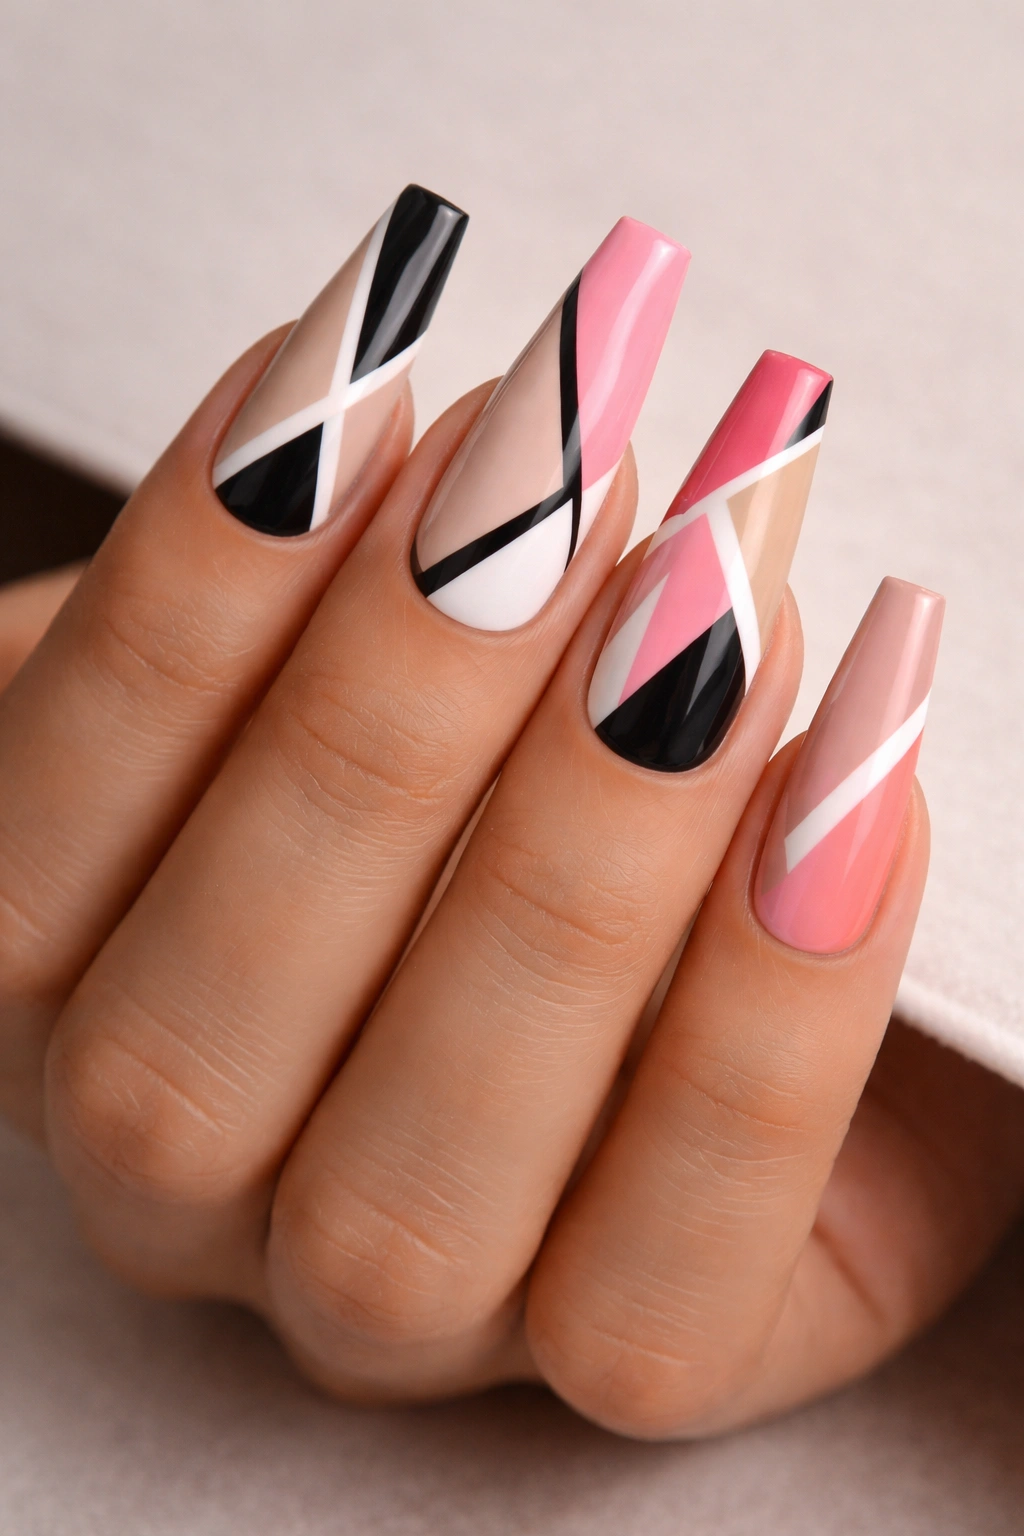
Geometric patterns — stripes, color blocks, triangles, hexagons, abstract shapes — transform coffin nails into miniature art installations. The elongated shape is perfect for displaying geometric designs because it provides ample space for patterns to develop and be appreciated. A simple two-color stripe pattern feels modern and chic; more complex geometric designs show off artistic flair. The key is that geometric patterns feel intentional and contemporary rather than cluttered.
Pattern Styles That Work Best
Horizontal stripes are easiest to execute and look incredibly modern — thin alternating stripes or bolder blocks both work beautifully. Diagonal or angled patterns create movement and visual interest. Color-blocking (using 2-3 colors in distinct sections) looks sophisticated and works well for showing personality. Minimalist geometric designs (perhaps just one geometric element on each nail) feel more refined than dense all-over patterns.
Executing Geometric Designs
- Tape is your best friend: Painter’s tape or striping tape creates clean, straight edges that make geometric patterns look professional and intentional
- Precision matters: Geometric patterns look good when lines are clean and edges are sharp — imprecise lines read as sloppy rather than artistic
- Color selection: High-contrast color combinations make patterns pop; tonal combinations feel more sophisticated and subtle
- Glossy finish shows patterns best: Matte finishes can make geometric patterns harder to see, while glossy creates definition and makes the design stand out
- Avoid overcomplication: Two to three colors in geometric patterns look intentional; too many colors create visual chaos
Worth knowing: If precision isn’t your strength, look for geometric nail stamping plates — they transfer detailed patterns onto your nail instantly, eliminating the need for hand-painting.
9. Floral Design Coffin Nails
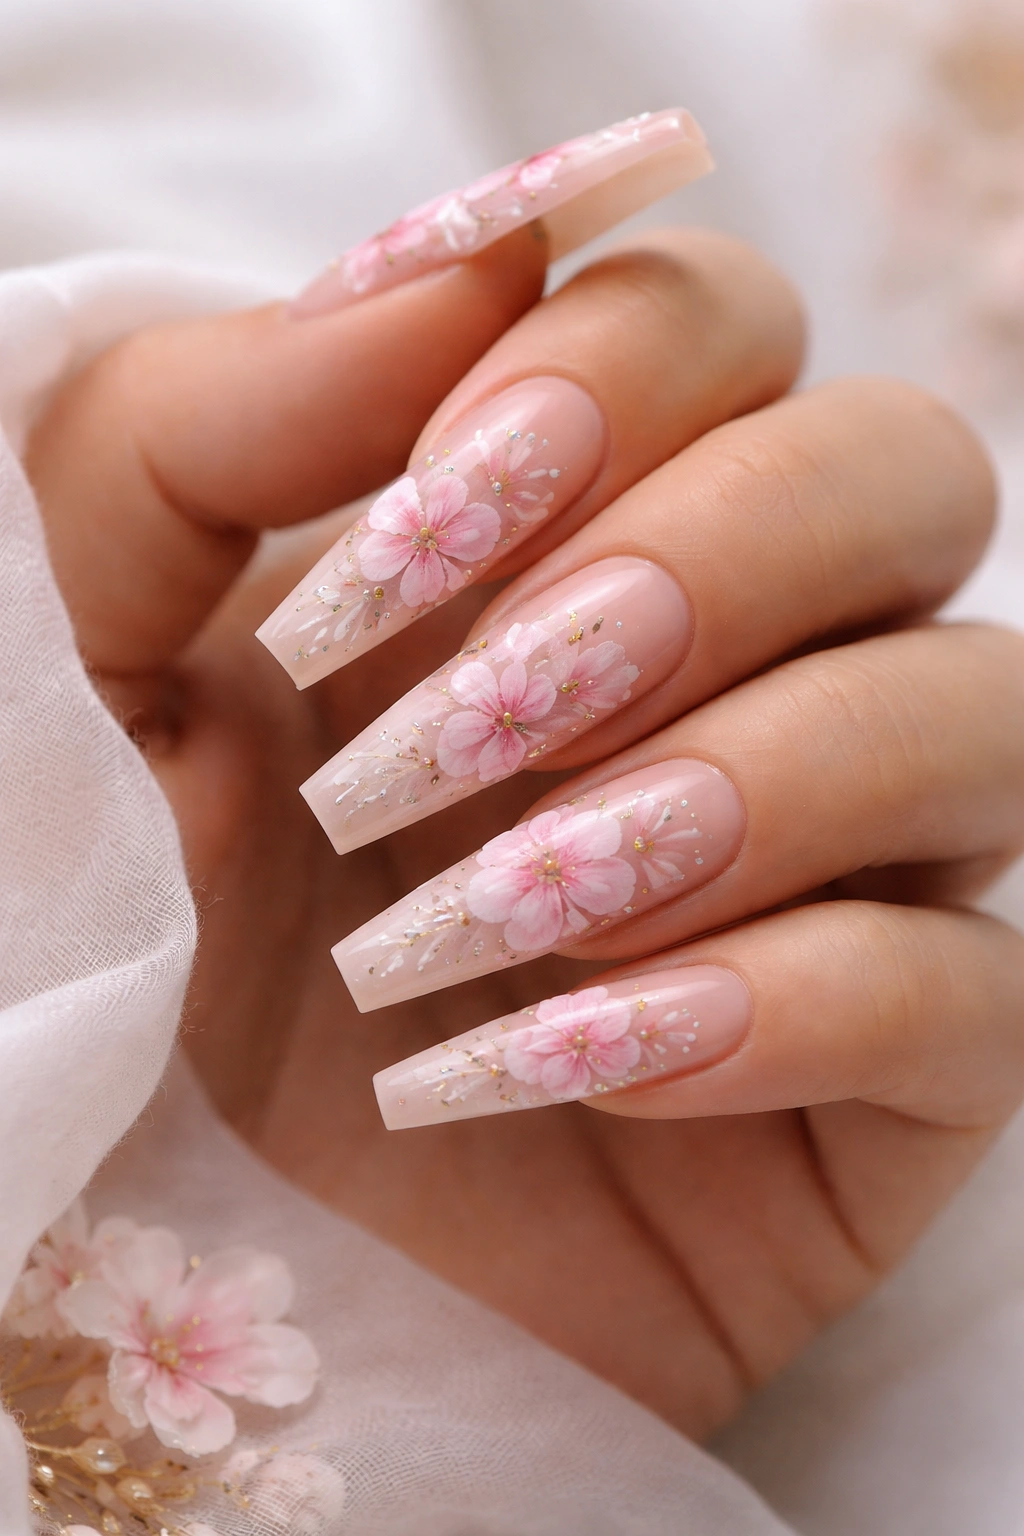
Floral patterns on extra-long coffin nails feel romantic, feminine, and surprisingly versatile. Florals can be delicate and subtle (a single small flower on a few nails) or bold and artistic (intricate painted flowers covering the entire nail). A blush or white base with pink and red florals feels classic; nude base with monochromatic florals in shades of the same color feels sophisticated; dark base with contrasting flowers creates drama. Florals work year-round and honestly suit most aesthetics when executed well.
Floral Design Approaches
Hand-painted flowers offer unlimited customization — you can create exactly what you envision. Stamped florals transfer detailed flower designs instantly and are more accessible for at-home manicures. Dried flower embedments create three-dimensional texture and look genuinely unique. Combination approaches (perhaps stamped stems with hand-painted blooms) allow you to layer techniques.
Making Floral Designs Look Polished
- Scale matters: Tiny delicate flowers feel feminine and romantic; larger, bolder flowers feel more artistic and modern
- Negative space is important: Leaving areas of your nail free from flowers prevents designs from feeling busy or overcrowded
- Detail in centers: Flowers with defined centers (stamens, pollen details, color variations in petals) look infinitely more professional than simple outline flowers
- Base color harmony: Choose a base color that allows your floral design to stand out — high contrast reads more clearly than similar tones
- Glossy over floral designs: Sealing floral designs under a thick, glossy topcoat protects hand-painted details and makes colors appear more vibrant
- Botanical accuracy is optional: Realistic-looking flowers feel more sophisticated than stylized or cartoon-style flowers
Pro tip: If you love florals but find hand-painting intimidating, start with stamped designs as your base and hand-paint just the centers or shadows to add dimension — this hybrid approach delivers impressive results with less skill required.
10. Velvet and Textured Coffin Nails
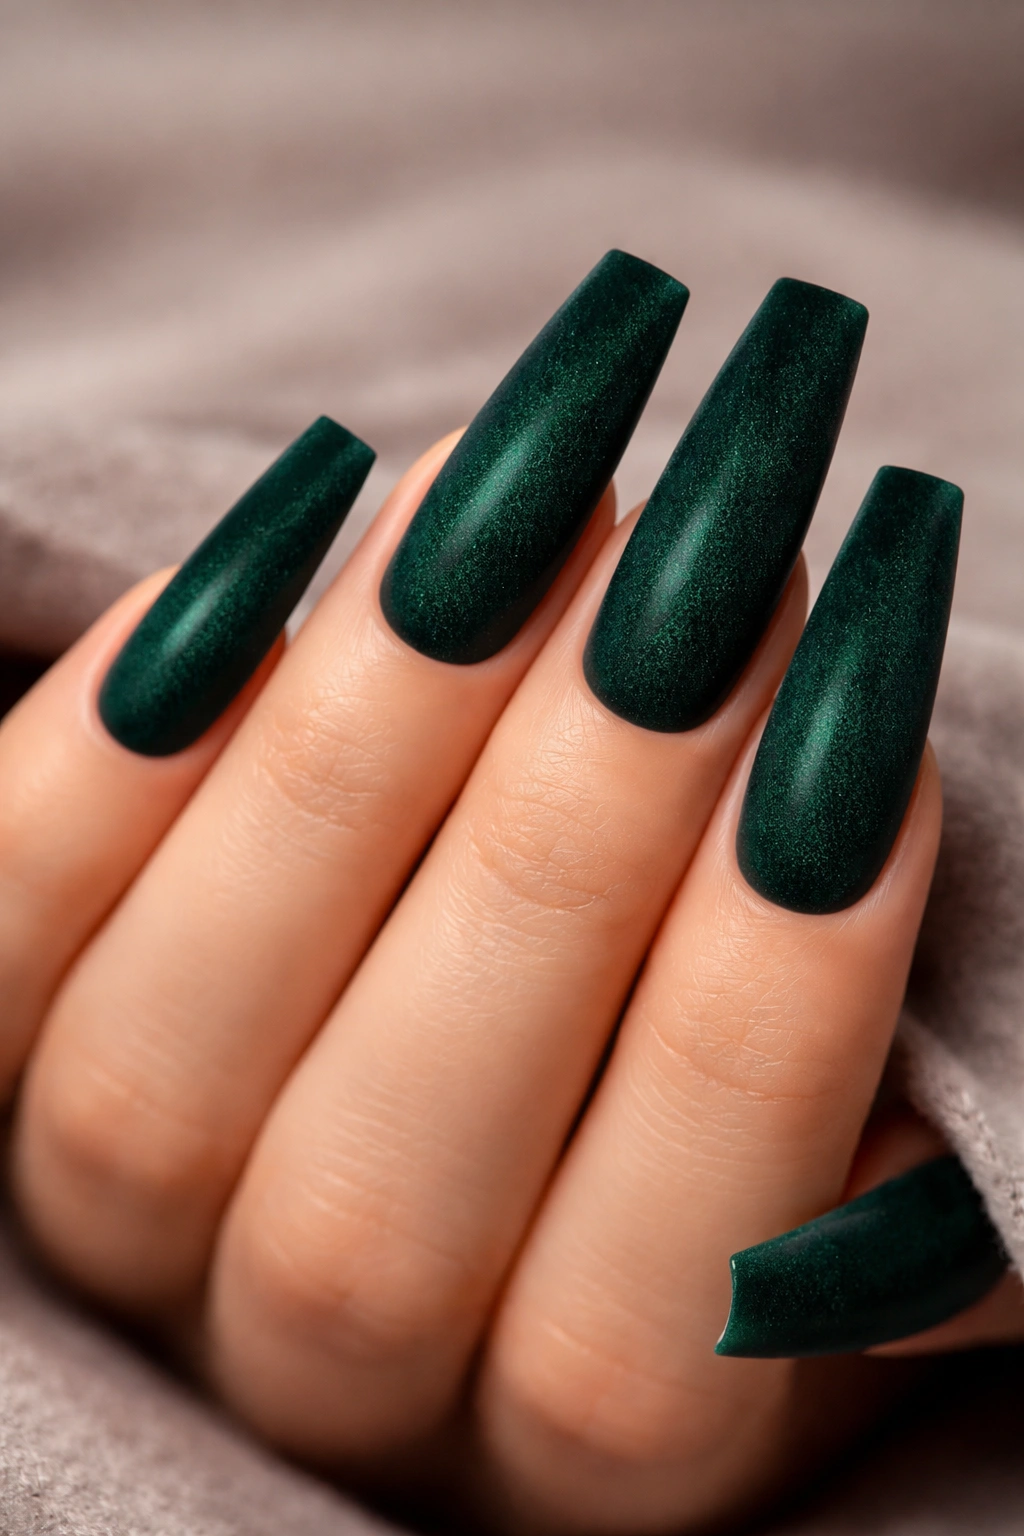
Velvet nails — created using special velvet powders — feel soft, luxurious, and look absolutely captivating on elongated coffin nails. The matte, velvety texture catches light differently than regular polish and creates an almost tactile appearance (though actually touching velvet nails is a funny experience because they’re not actually soft). This trend shows no signs of disappearing because the effect is genuinely stunning. You can use velvet powders in jewel tones (emerald, sapphire, amethyst), neutrals (black, gray, taupe), or playful colors.
Texture Options Beyond Velvet
Sand or sugar textures create a slightly grainy appearance that feels modern and tactile. Rubber (gummy) finishes are becoming popular — they feel squishy to touch (despite not being actually squishy) and photograph incredibly well. Flocked finishes create a soft, fuzzy appearance similar to velvet but slightly different in effect. Caviar textures use tiny beads to create texture and sparkle simultaneously.
Working With Textured Finishes
- Application method is critical: Velvet powders require careful application to the tacky basecoat — sprinkling, pressing, and allowing to dry fully before topcoating
- Topcoat considerations: Some textured finishes work with glossy topcoat (creating a hybrid look), while others work better with matte or no topcoat to preserve texture
- Longevity: Textured finishes can shed or wear unevenly during daily activities, so expect these designs to last 2-3 weeks rather than 4+ weeks
- Removal challenges: Textured finishes require patient soaking because the texture can trap polish particles — removal takes longer than smooth polish
- Visual impact: The texture is more noticeable in person than in photos, so these designs create a stronger real-world impression than they do photographically
Real talk: Textured nails feel amazing in person but photograph less impressively than smooth, shiny designs — if you’re primarily photographing your nails for social media, smooth finishes create more visual impact.
11. Minimalist Coffin Nails with Accent Details
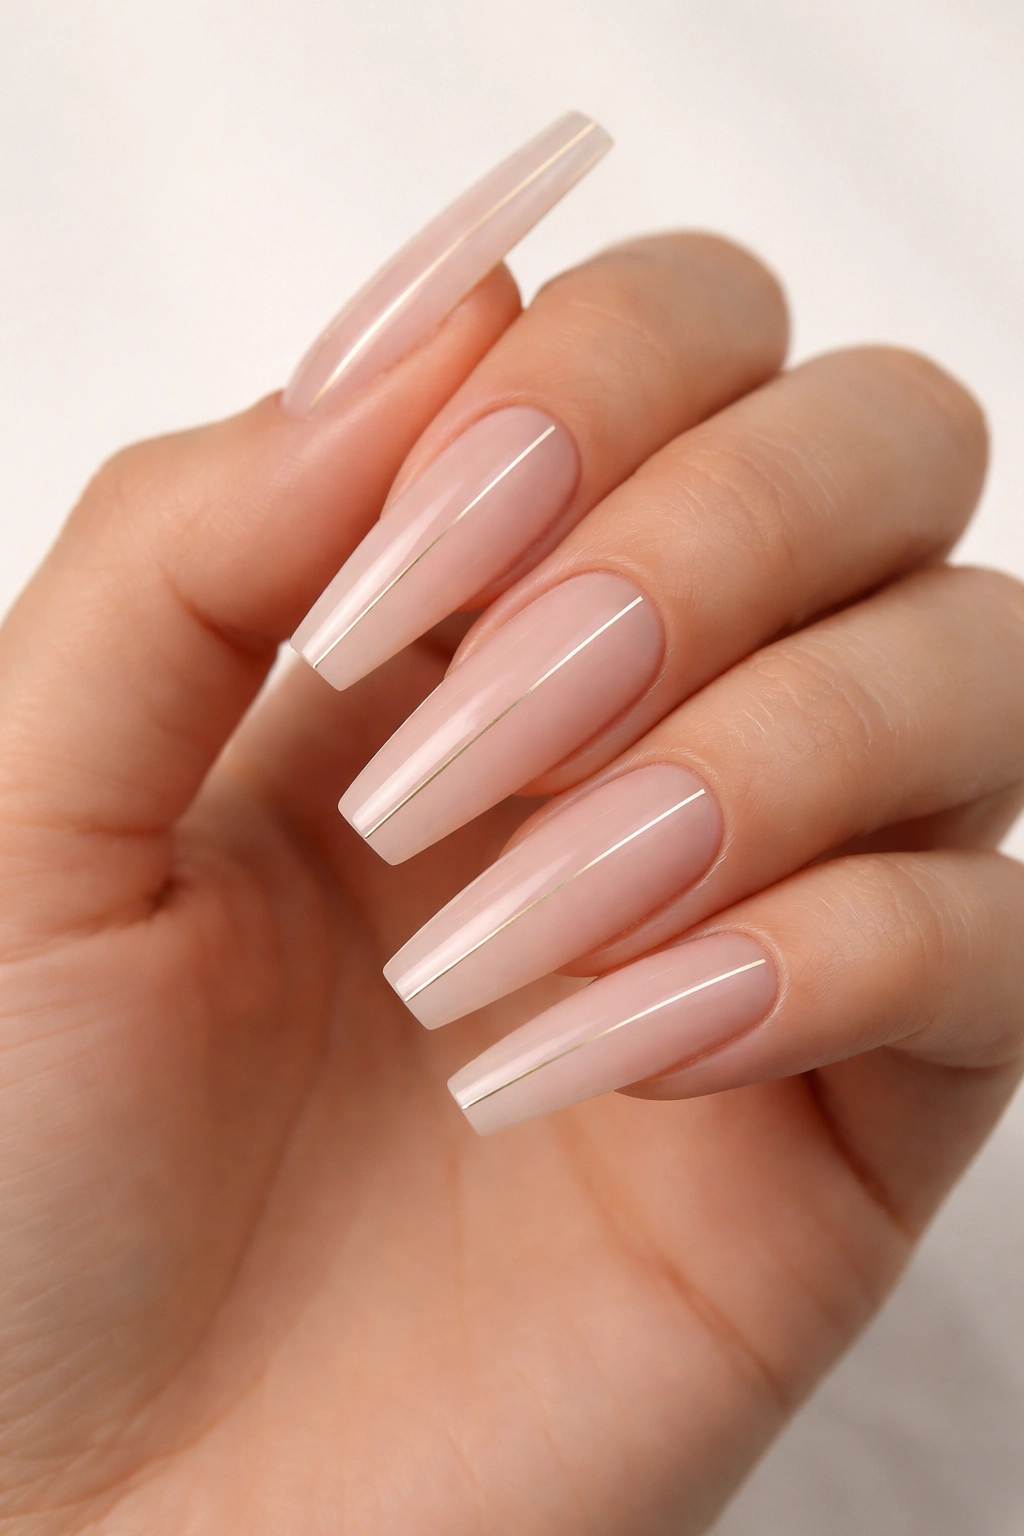
Minimalist coffin nails embrace “less is more” with mostly solid color and small, intentional accent details. Perhaps a single thin gold line down the center of each nail, a tiny dot in the corner, a minimal geometric shape, or a single small diamond. The beauty of minimalist design on coffin nails is that the shape itself is already a statement, so the design can be incredibly subtle. This approach feels modern, sophisticated, and wearable every single day without feeling overdone.
Minimalist Design Approaches
A nude base with a single metallic detail works on everyone and feels expensive. Solid color with a contrasting thin line creates visual interest without complexity. Strategic small accents (one element per nail, positioned identically on each nail) create cohesion and intentionality. Negative space designs (where unpainted areas create the design) feel particularly sophisticated and modern.
Executing Minimalist Designs Well
- Precision is non-negotiable: Minimalist designs live or die on cleanliness and precision — a slightly wonky line reads as imperfect rather than intentional
- Thin lines require proper tools: A thin striping brush or striping tape creates clean lines; attempting with a regular nail brush often results in thick, clumsy lines
- Symmetry across nails: For designs with identical elements on each nail, placing them consistently (same position, same size) creates a professional, intentional appearance
- Limited color palette: Stick to 1-2 accent colors maximum to maintain that minimalist aesthetic
- High-quality finishes: Even subtle designs feel luxurious when created with quality polish and topcoat
Worth knowing: Minimalist designs actually look more impressive in person than in photos because the subtle details create an impression of intentionality and taste that reads as more sophisticated than bolder designs.
12. Rainbow and Multi-Color Coffin Nails
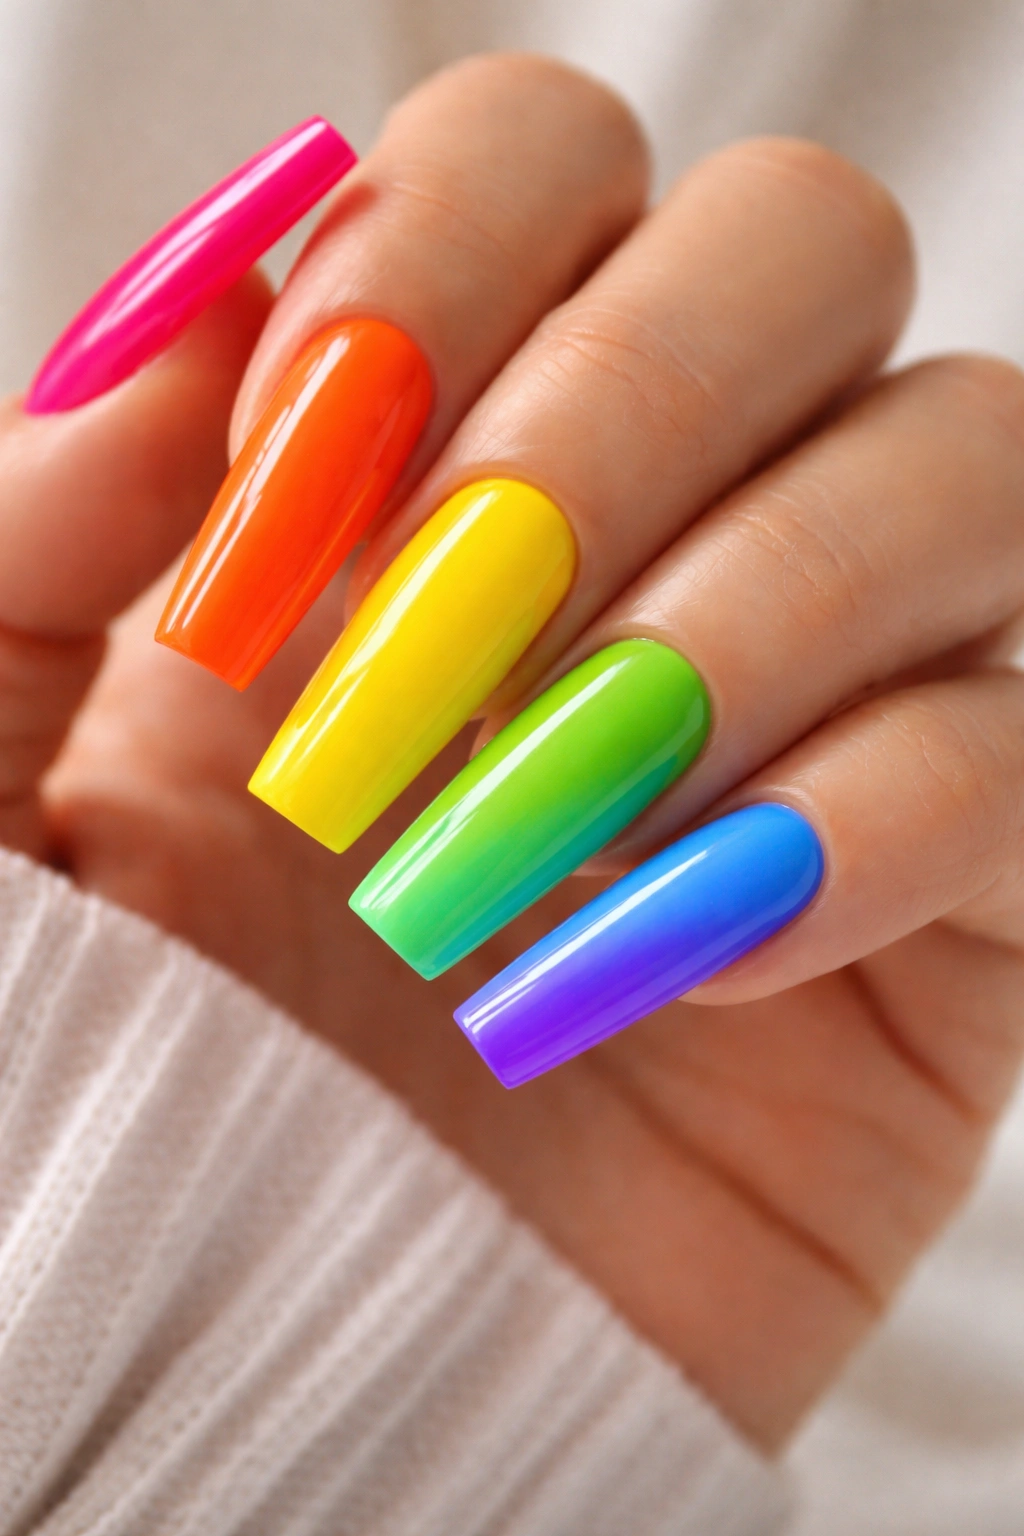
Rainbow nails on extra-long coffin nails are joyful, bold, and genuinely fun to wear. You can assign a different color to each nail for maximum color variety, create an ombre that progresses through rainbow colors, or do an abstract multi-color design with bold blocks or swirls of color. Rainbow designs work best with high-contrast, vibrant colors that each stand out distinctly from one another. These nails make a confident statement and genuinely brighten your mood every time you look at your hands.
Rainbow Design Variations
Single-color-per-nail creates the most obvious rainbow effect and works beautifully on the thumb and four fingers. Gradient rainbow shifts through colors smoothly from pinky to thumb. Abstract rainbow combines multiple colors in organic, artistic ways rather than traditional rainbow order. Two-tone combinations of colors on each nail (creating 10 distinct combinations across both hands) feel more sophisticated than pure single-color-per-nail rainbows.
Making Rainbow Designs Look Polished
- Color saturation matters: Bright, saturated colors look much better than pastels in rainbow designs — the colors need to read distinctly from one another
- Finish consistency: Using the same finish (all glossy or all matte) across all colors creates cohesion; mixing finishes makes the design feel less intentional
- Balance through the hand: Distribute lighter and darker colors evenly across your nails rather than clustering them, so no single nail feels too heavy visually
- High-quality colors: Rainbow requires multiple colors, so invest in quality polish for each color to ensure they look rich and intentional
- Clean base work: Each color requires careful application to avoid bleeding into adjacent nails — use a clean brush or consider using tape boundaries
Pro tip: If you love rainbow energy but find multi-color application challenging, try a rainbow gradient (one color transitioning through the spectrum) instead — it achieves rainbow impact with fewer color applications and less precision required.
13. Rose Gold and Warm Metallic Coffin Nails
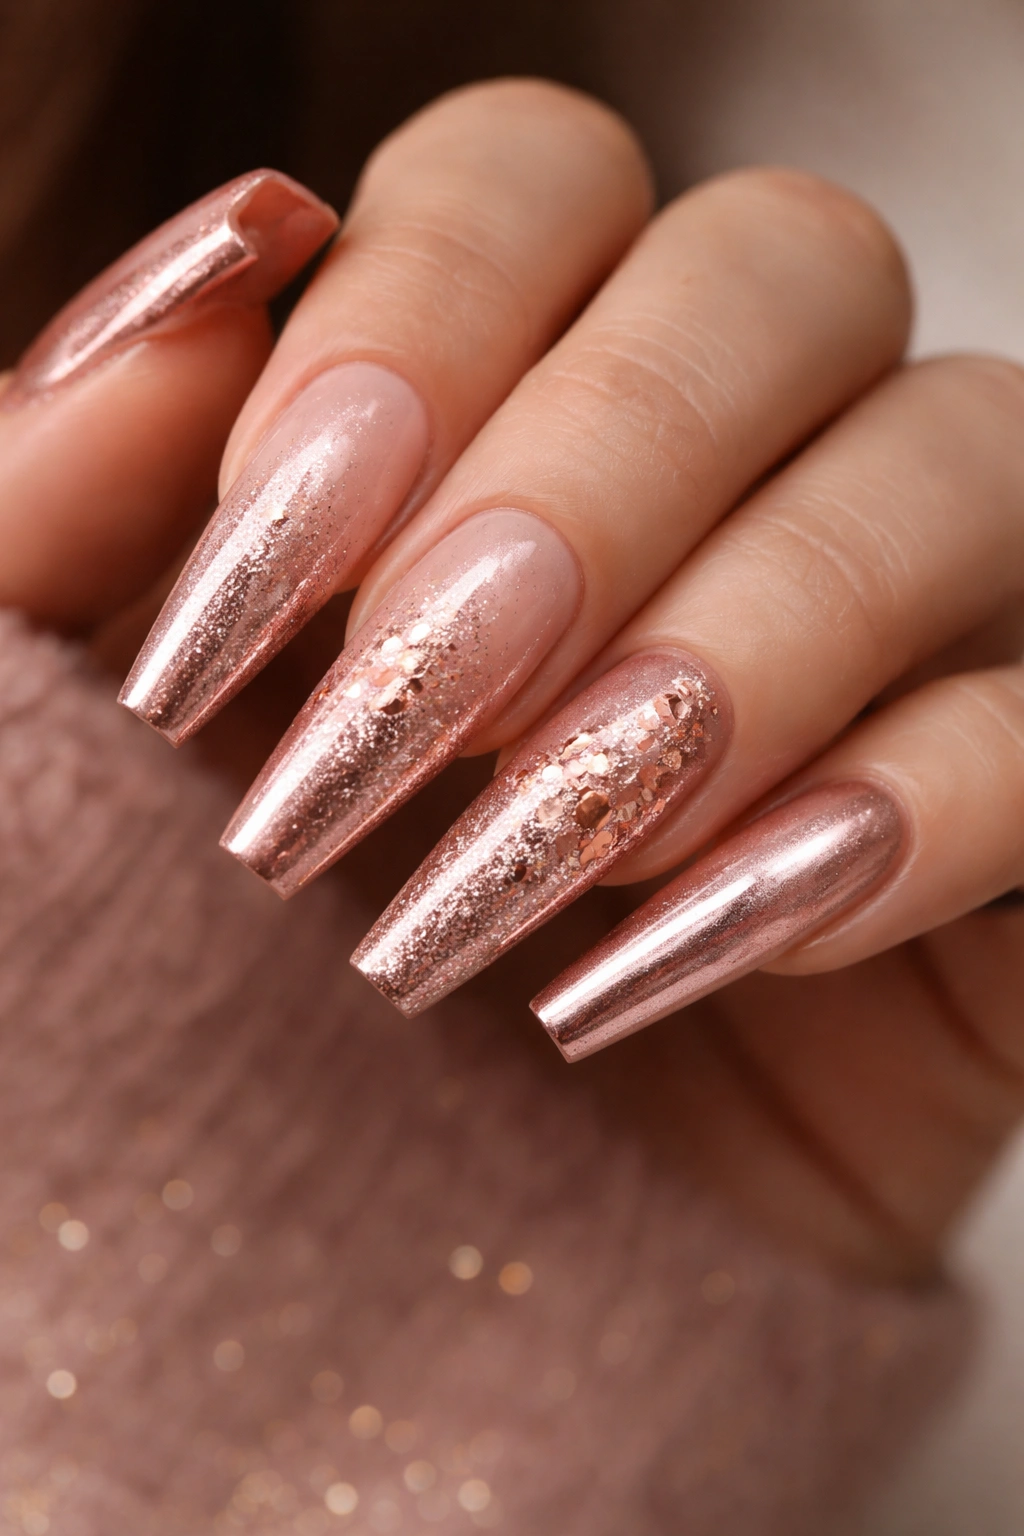
Rose gold coffin nails feel warm, feminine, and luxurious in a way that suits most skin tones and pairs beautifully with most outfits. The warm metallic shimmer adds sophistication without the full-on drama of chrome or bright silver. Rose gold works with other colors too — a rose gold glitter gradient over blush base, rose gold accents on white nails, or rose gold with champagne combination creates truly elegant manicures. This design bridges the gap between understated and sparkly.
Rose Gold Application Methods
Rose gold polish creates a solid, shimmery base color. Rose gold glitter or shimmer adds texture and dimension over a nude or white base. Rose gold foil or leaf adds dimensional sparkle. Rose gold metallic powder (applied to tacky base) creates a mirror-like effect similar to chrome but in warm, glowing rose gold tones.
Styling With Rose Gold
- Undertone matching: Rose gold looks best on warm skin tones and with gold-toned jewelry, though it works beautifully on all skin tones when paired with the right supporting colors
- Base color combinations: Rose gold over white feels crisp and modern; rose gold over blush feels romantic; rose gold over nude feels understated and chic
- Glossy finish amplifies warmth: A glossy topcoat makes rose gold look more lustrous and glowing than matte finishes
- Layering for depth: Rose gold glitter over a solid shimmer base creates more depth than solid rose gold alone
- Longevity: Rose gold metallic finishes are quite durable, typically lasting 3-4 weeks before showing significant wear
Worth knowing: Rose gold complements almost every other color, making it a perfect accent color if you’re not ready to commit to an entirely rose-gold manicure.
14. Cat Eye and Magnetic Finish Coffin Nails
Cat eye nails (created with magnetic polish) create a sleek, otherworldly line of “light” that looks like a cat’s pupil running vertically down your nail. The effect is created using magnetic particles in special polish and a magnet held above the nail as the polish dries. Cat eye designs work beautifully in dark colors (black, deep green, navy) where the effect is most visible, and the elongated coffin shape emphasizes the vertical line of the effect. This design is undeniably eye-catching and genuinely impressive in person.
Cat Eye Design Variations
Classic vertical cat eye (a thin or thick line running center of the nail) is the traditional style. Multi-directional cat eye uses the magnet at angles to create non-vertical lines or patterns. Color cat eye applies the magnetic effect over colored (not black) bases, creating subtler, more tonal effects. Combination designs layer cat eye effects with other designs (cat eye over glitter, or cat eye with additional details).
Achieving Perfect Cat Eye Results
- Magnet quality matters significantly: Quality magnetic poles create defined, sharp cat eye lines; cheap magnets create blurry, unfocused effects
- Polish formula: Cat eye polish has specific magnetic particle sizes — regular metallic polish won’t create the effect even if you hold a magnet near it
- Magnet positioning and timing: The magnet must be held at the right distance (usually ¼ inch above the nail) and at the right angle, and the nail must be perfectly still — slight movements ruin the line
- Practice and patience: Creating cat eye requires practice, and even experienced nail artists sometimes need multiple attempts to get perfect results
- Glossy finish is mandatory: Cat eye only works over glossy finishes — matte finishes eliminate the light-reflecting effect entirely
Real talk: Cat eye is genuinely difficult to master at home — if you love the effect, it’s worth investing in a professional manicure to see it executed properly.
15. Nude with Metallic or Pearl Accent Nail
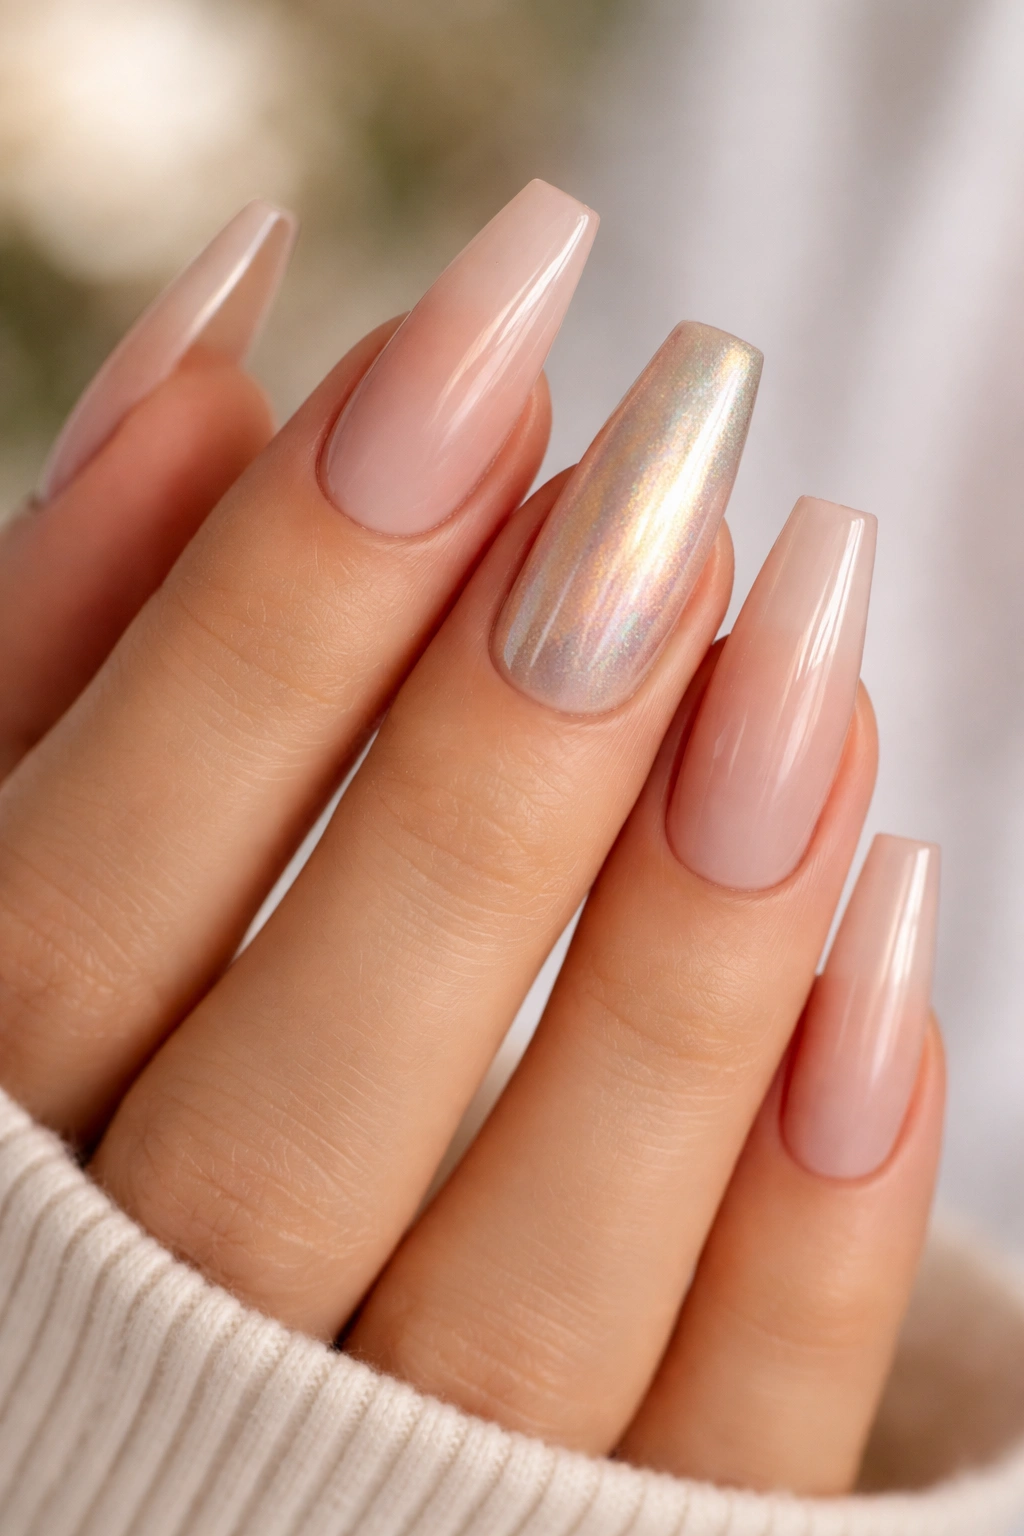
The nude-with-accent-nail approach uses mostly neutral nude across most nails and reserves one accent nail for sparkle, color, or design. This design feels refined and balanced — the nude keeps everything wearable and subtle while the accent nail adds a moment of personality or glamour. Choose one nail (usually the ring finger) to feature a metallic, pearl, glitter, or jeweled accent. This approach works beautifully because it’s bold enough to feel intentional but subtle enough for everyday wear.
Accent Nail Ideas
Metallic accent nails (gold, silver, rose gold, or chrome) add luxury without overwhelming. Pearl or opal finishes create a delicate, shimmering effect. Single-stone or small cluster details (tiny diamonds, gems, or rhinestones) add focal-point glamour. Glitter or foil accents add sparkle and dimension. Abstract design accents (geometric pattern, floral detail, or artistic element) showcase creativity while maintaining simplicity.
Creating Balanced Nude-Plus-Accent Design
- Nude base consistency: Use the same nude shade on all non-accent nails for cohesion and clean aesthetic
- Accent nail contrast: The accent nail should be noticeably different from the nude base so it reads as intentional rather than matching
- Strategic placement: Ring finger is traditional, but any single nail works — choose placement that you’ll notice and enjoy
- Size consideration: Larger accent designs work on longer nails; keep designs proportional to avoid looking out-of-balance
- Glossy finish: Use glossy finishes to let accents shine — matte nudes with glossy accents creates nice contrast
- Longevity: Because most nails are simple nude, this design actually looks great as it grows out — no obvious line of demarcation like multi-color designs
Pro tip: If you’re not sure which accent idea appeals to you, start with a simple metallic accent nail — it’s easiest to execute, looks expensive and intentional, and pairs with everything.
Final Thoughts
Extra-long coffin nails are genuinely versatile enough to express virtually any aesthetic you’re drawn to. Whether you’re minimalist, maximalist, artistic, classic, or constantly changing your mind, coffin nails work beautifully because the shape itself is already a confident statement. The key to rocking this nail style isn’t choosing the “right” design — it’s choosing something that genuinely makes you feel good when you look at your hands.
The beauty of nails is that they’re temporary, which means you can experiment liberally. If a design doesn’t feel right, you can change it in a few weeks. This means there’s no real risk in trying something bold, artistic, or unexpected. Start with designs that genuinely appeal to you rather than chasing trends, and you’ll feel more confident wearing them. The most stunning nails are always the ones that feel authentic to the person wearing them.
Your nail investment (whether money spent at a salon or time spent on DIY manicures) should bring genuine joy every single time you catch your reflection on a coffee cup or keyboard. If a design checks that box, it’s the right choice for you — regardless of whether it matches other people’s preferences or follows current trends.
