

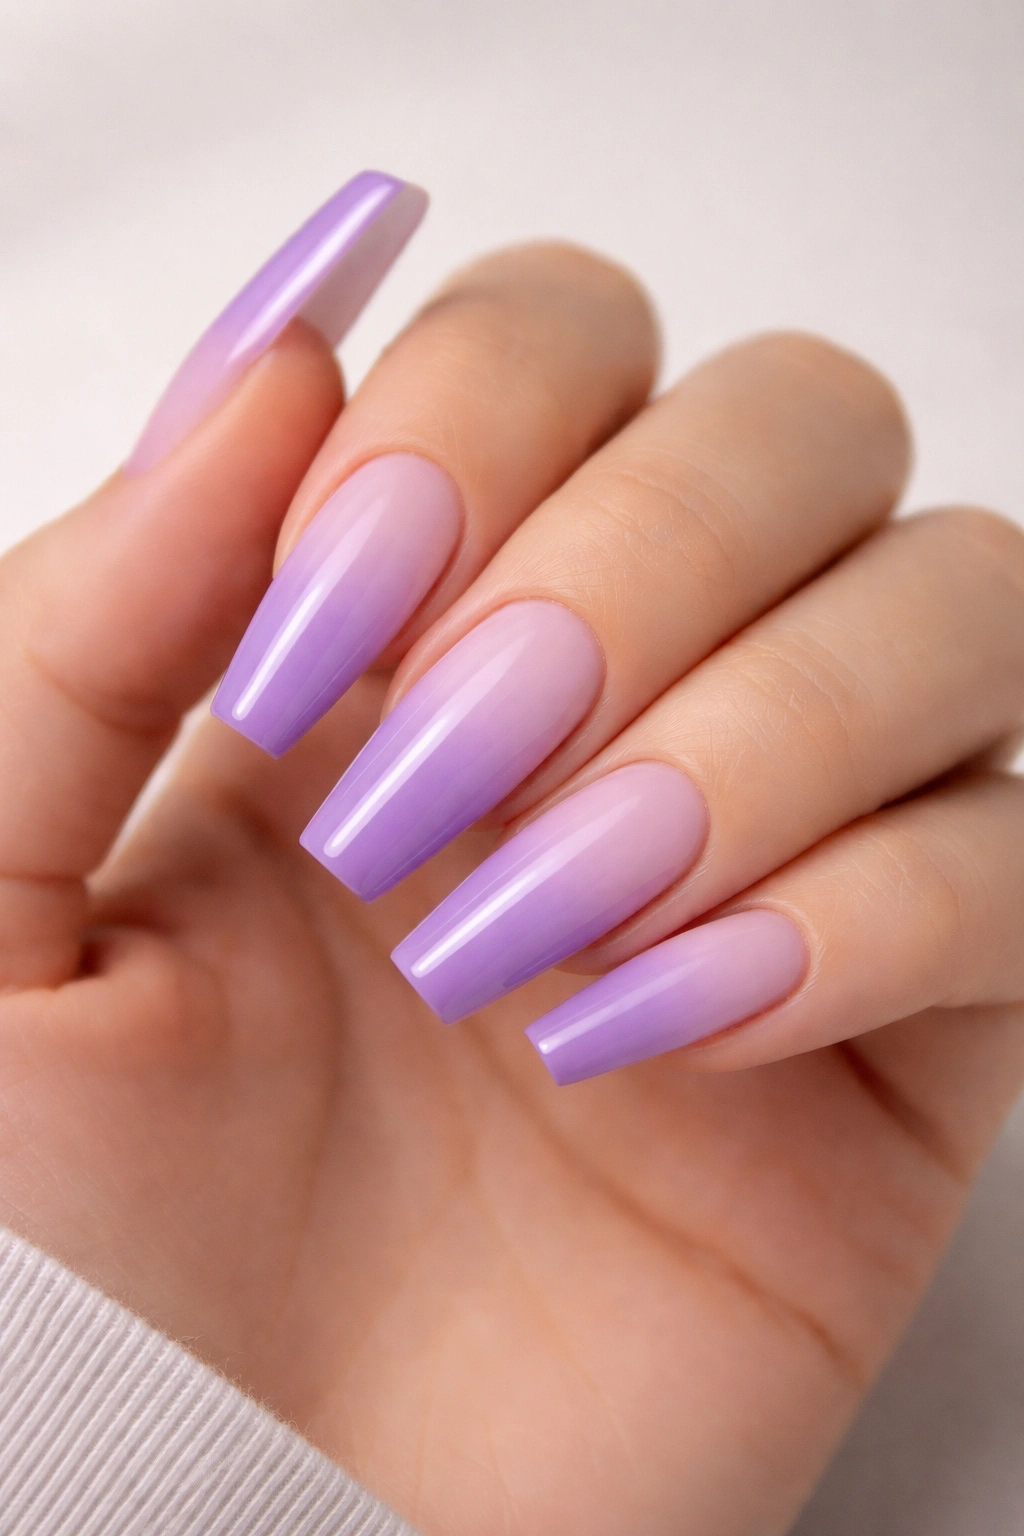
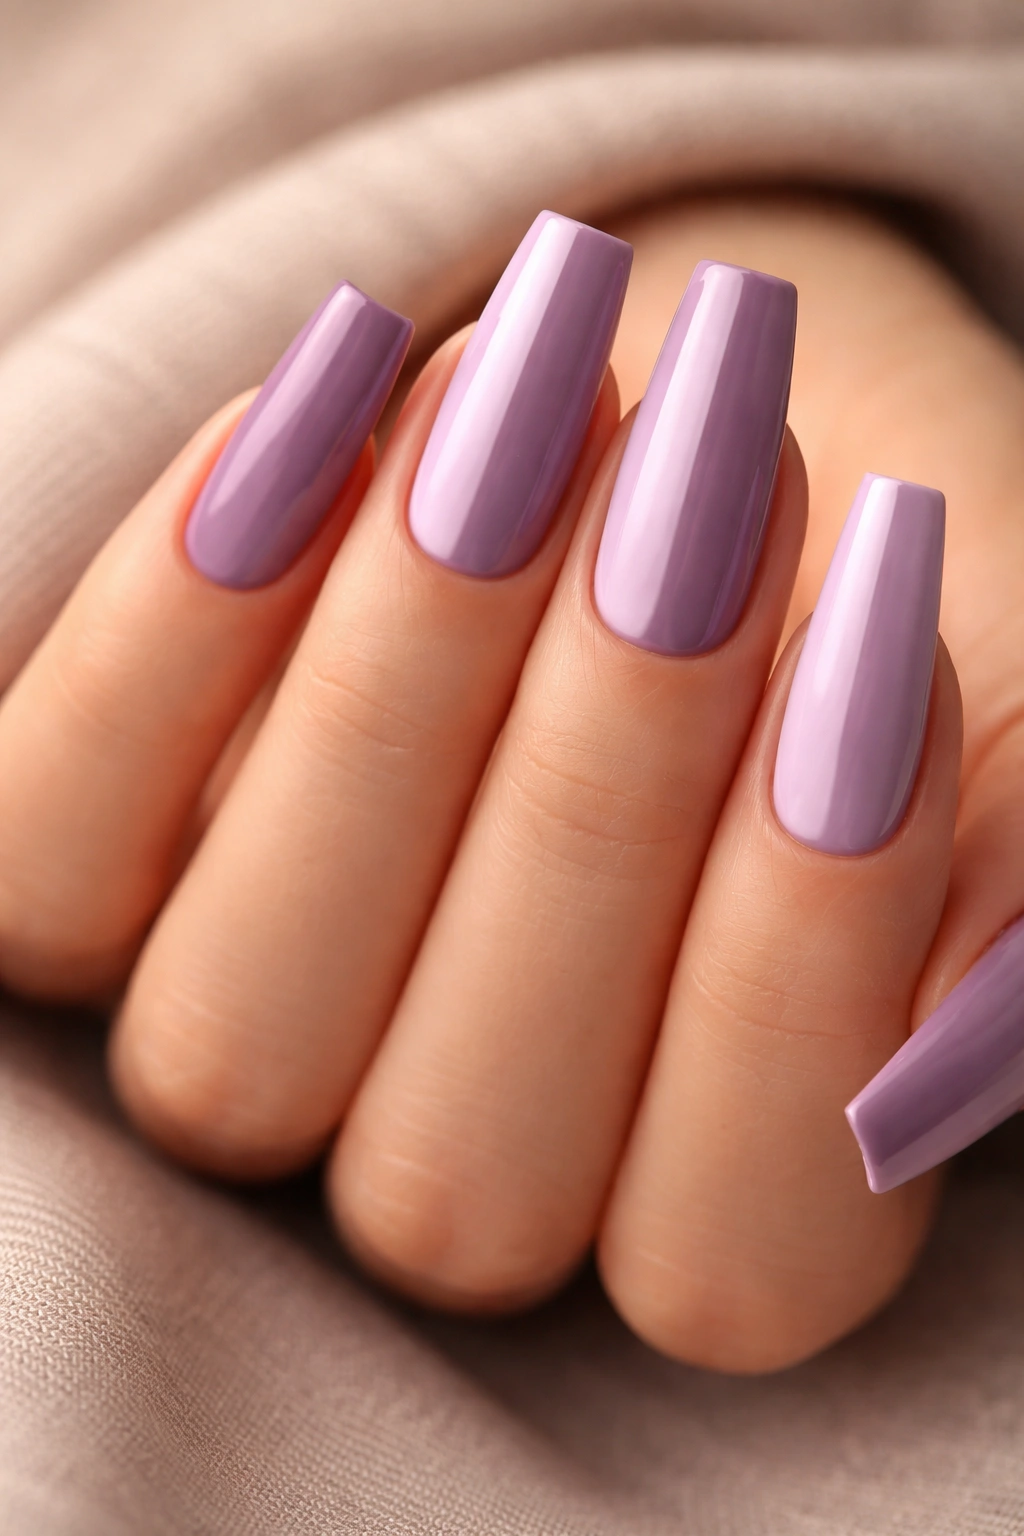
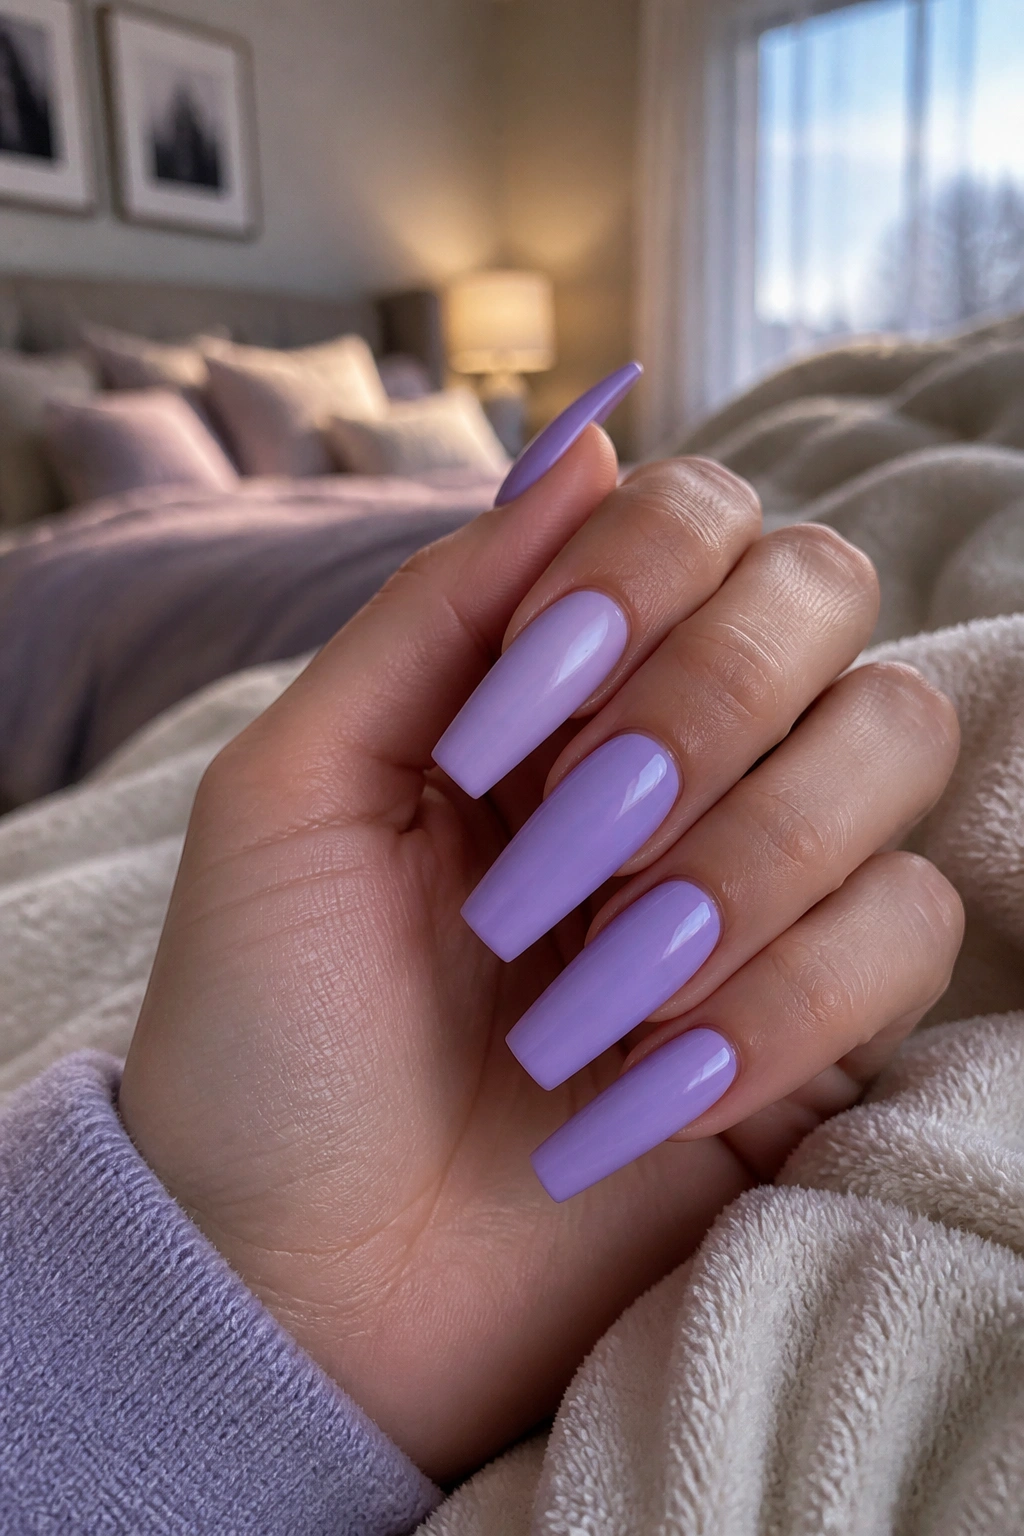
Lavender coffin nails represent the perfect intersection of elegance and modern edge—a soft color that somehow feels both romantic and fiercely sophisticated. The coffin shape, with its tapered sides and blunt square edge, gives lavender an entirely different personality than it would have on a round or oval nail. Where lavender might feel traditionally feminine on other shapes, coffin nails transform it into something bold and unapologetically trendy. Long coffin nails amplify this effect even further, creating that coveted dramatic silhouette while the lavender keeps the overall look wearable and refined.
The beauty of lavender for coffin nails is its versatility. A single shade can be styled a dozen different ways—soft and minimalist one day, glittery and glamorous the next, or paired with intricate nail art that makes your nails look like tiny canvases. Whether you’re drawn to pastels, deeper mauve tones, or shimmering lavender metallics, there’s a design approach that fits your personal style. What makes lavender particularly special is that it’s simultaneously trendy and timeless—it won’t feel dated in three months, and it flatters virtually every skin tone.
Long coffin nails demand designs with visual impact. The extended length gives you real estate to work with, whether you’re creating geometric patterns, delicate florals, ombré effects, or sophisticated marble designs. Each of these 20 lavender coffin nail ideas takes advantage of that length and the unique shape to create something that genuinely turns heads.
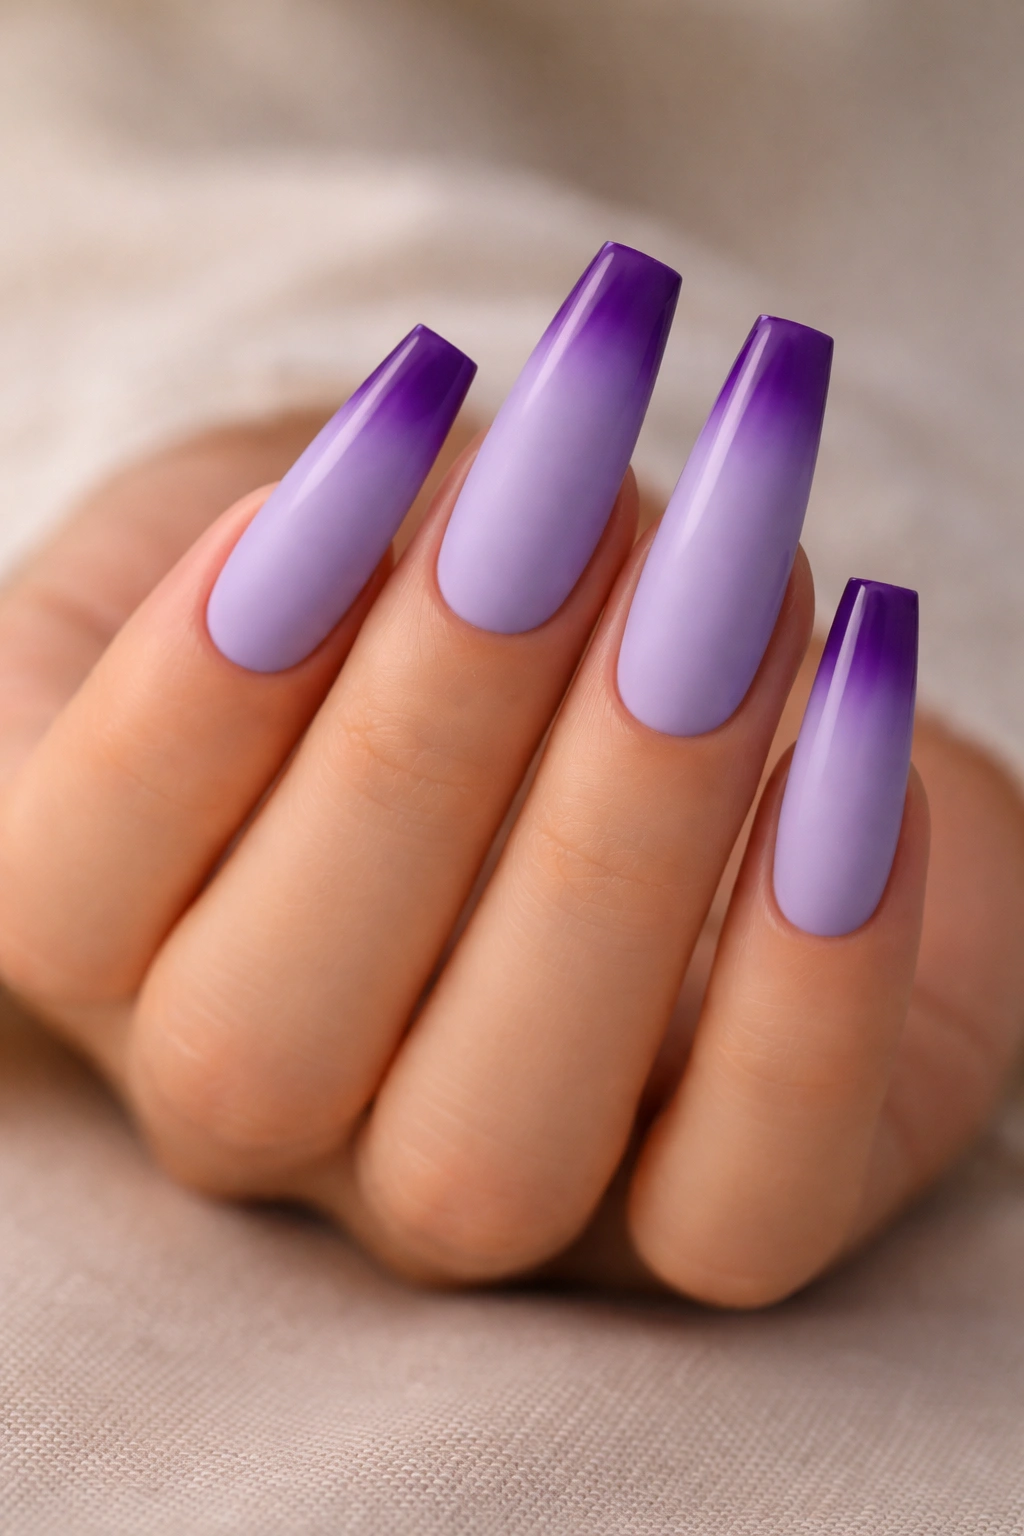
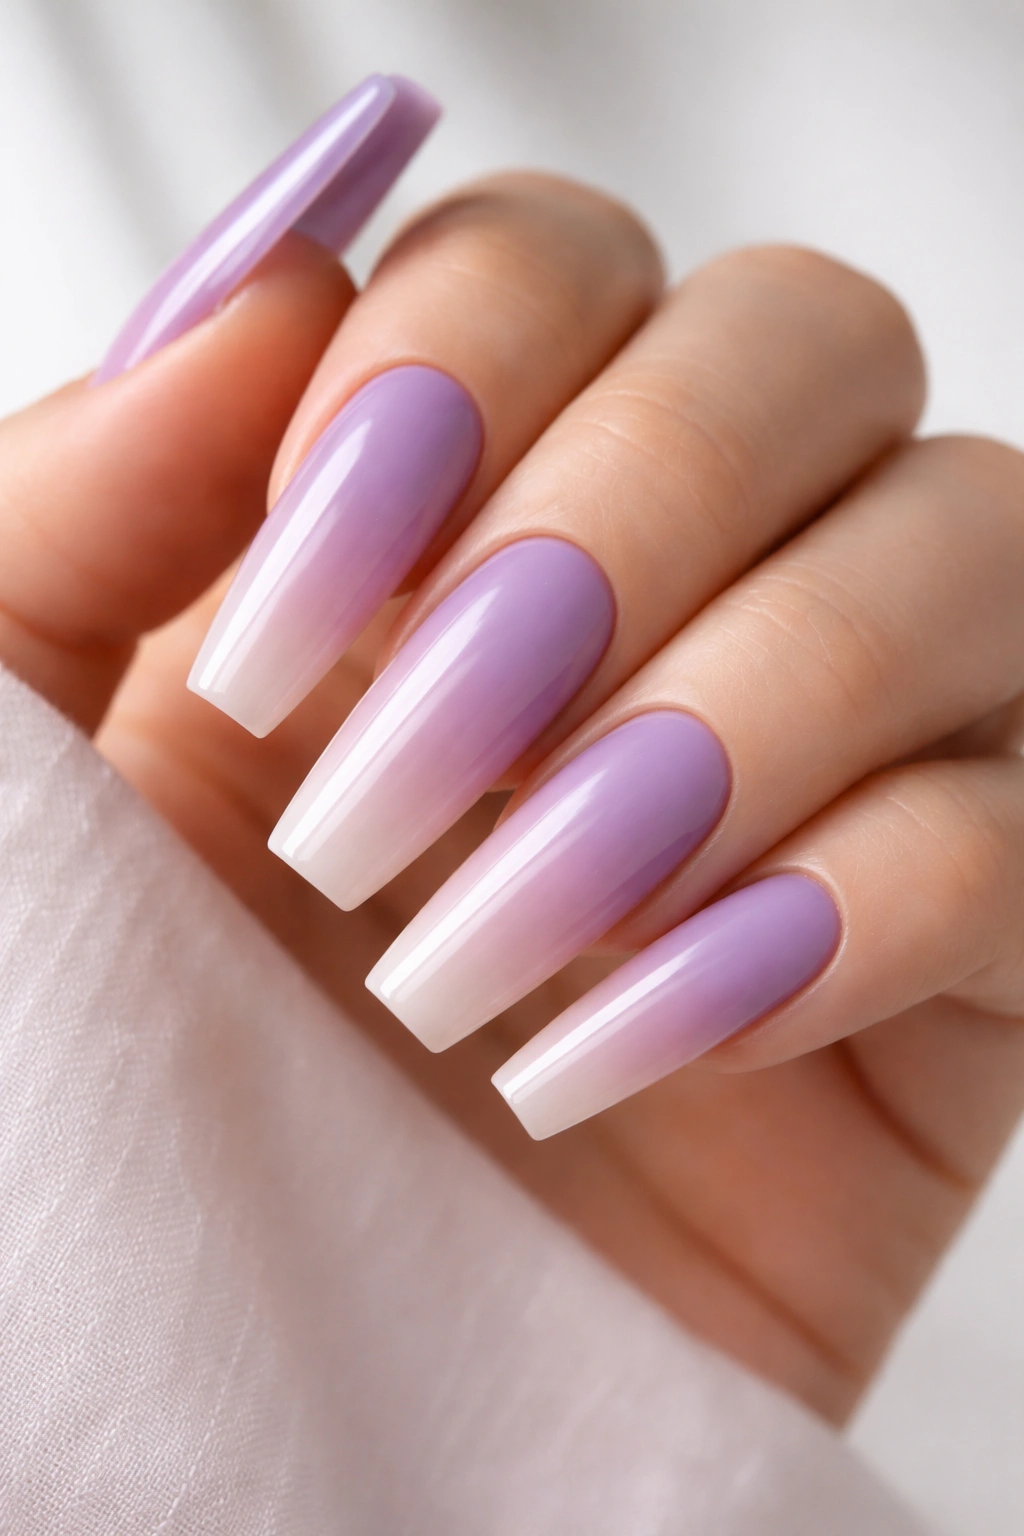
1. Soft Lavender Ombre on Coffin Base
This design layers a gradient from pale lavender at the cuticle to a deeper, more saturated purple at the tips. The ombré effect creates depth and dimension while keeping the overall look cohesive and flowing. On long coffin nails, the gradient has room to develop naturally, making the transition smooth and seamless rather than abrupt.
How to Achieve the Ombré Effect
The ombré technique works best when you use a makeup sponge to dab and blend multiple shades of polish onto the nail surface. Start with 2-3 complementary lavender shades—light, medium, and deep—and work from light at the base to dark at the tip. The key to a professional-looking ombré is patience with the blending; don’t rush the sponging process, and apply multiple thin layers rather than one thick coat.
Styling and Finish Options
- Seal with a gloss topcoat for a high-shine finish, or matte topcoat for a velvety modern look
- This design pairs beautifully with simple, minimal jewelry to let the nails be the statement
- The longer the nail, the more dramatic the ombré appears—coffin length maximizes this effect
- Works especially well during spring and summer months when lighter shades feel appropriate
Pro tip: Invest in a quality makeup sponge with a dense texture; cheap sponges shed fibers onto your nails and create an uneven result.
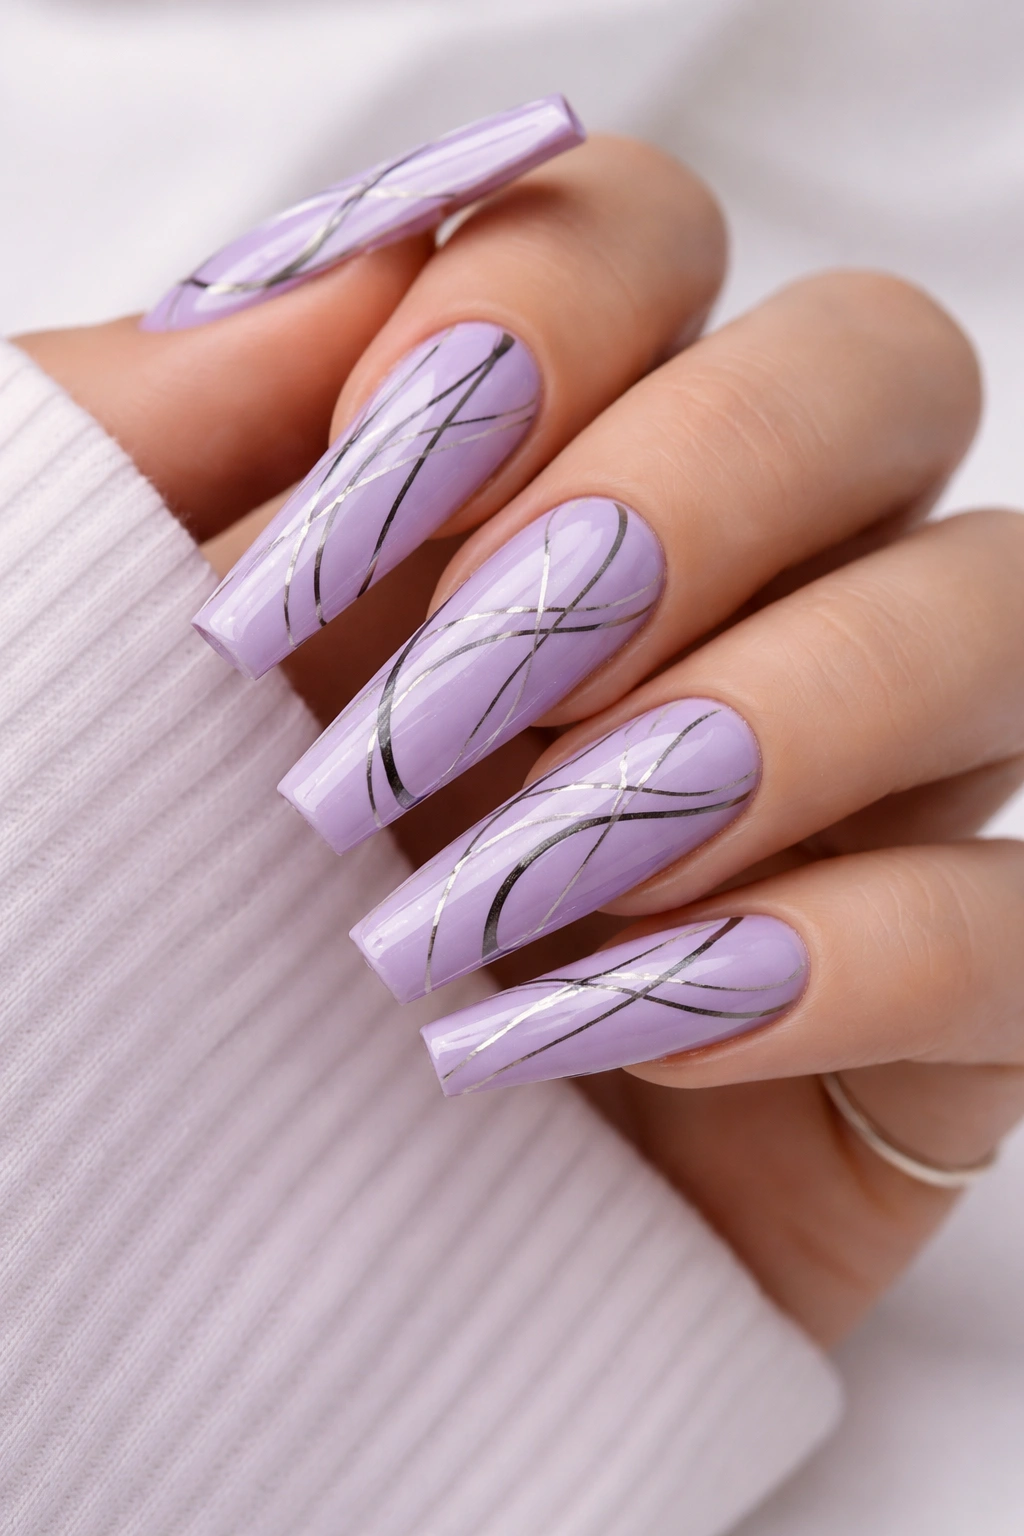
2. Lavender with Thin Gold Striping Tape
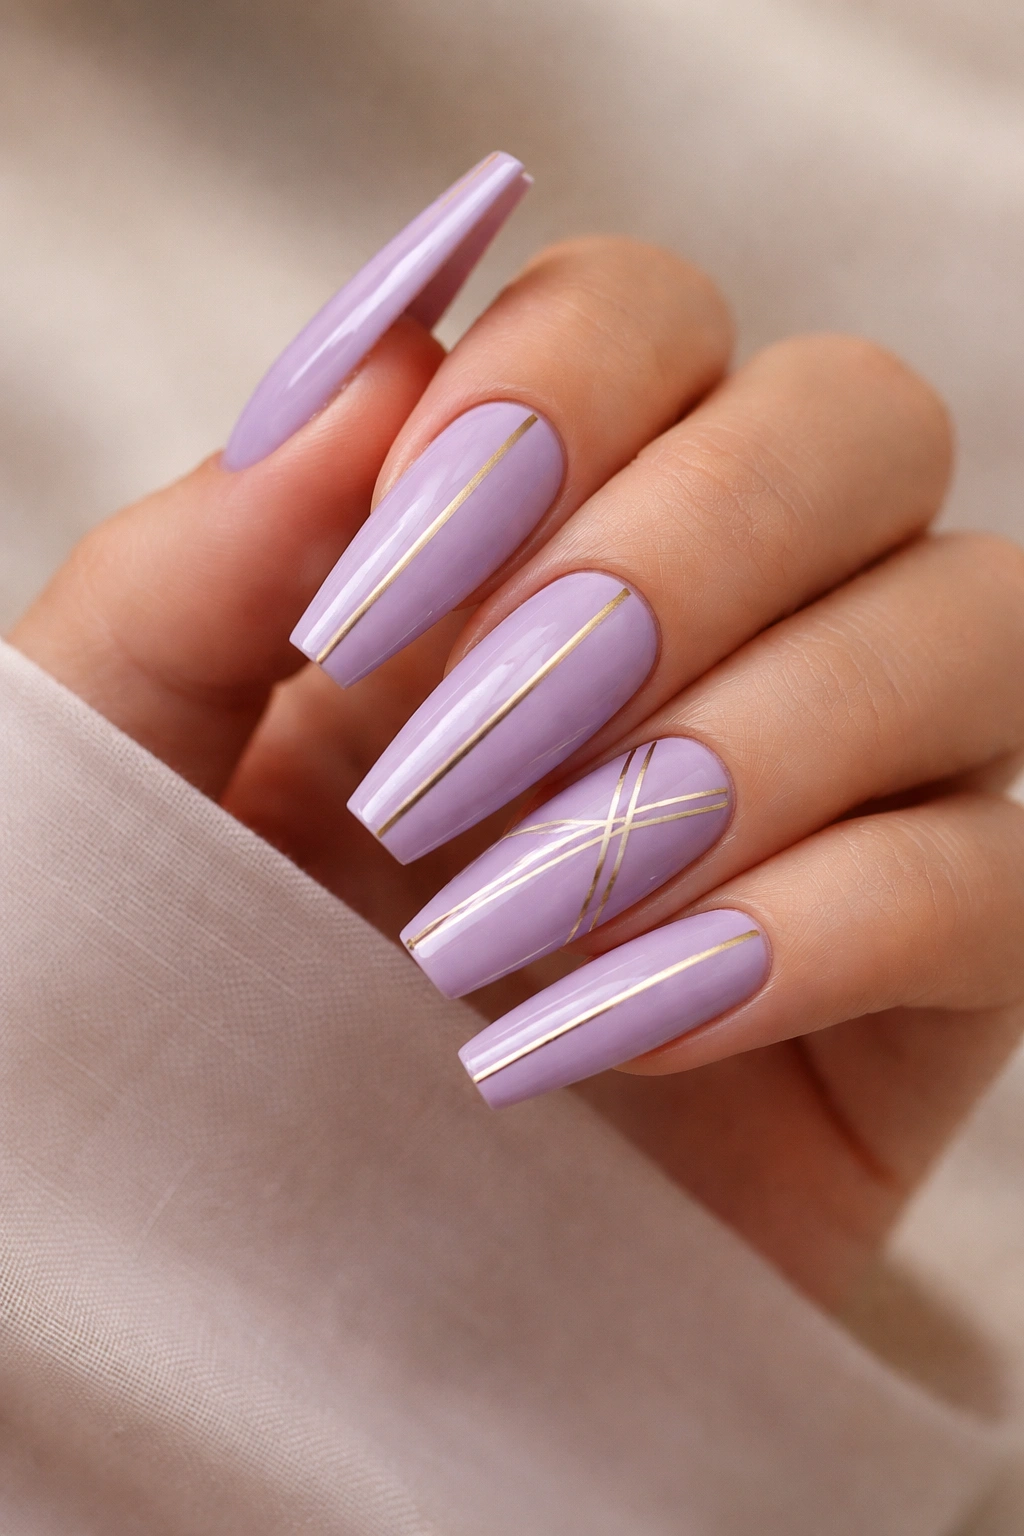
Geometric precision meets soft color in this minimalist design. Thin gold striping tape creates clean vertical lines, diagonal crosses, or even abstract geometric patterns across the lavender base. The metallic gold against soft lavender feels simultaneously delicate and high-impact.
Application Technique
After your lavender base dries completely, apply thin gold striping tape in whatever pattern appeals to you—vertical lines spaced ¼-inch apart, diagonal crossing lines, or asymmetrical placement. Press the tape firmly so it adheres properly, then seal everything under a glossy topcoat. The tape should be applied after your base color has fully set to prevent smudging.
Design Variations
- Use multiple thin lines versus single thick lines for different visual effects
- Create a French ombre by starting with thin gold lines at the tip and spacing them further apart as you move toward the cuticle
- Combine gold tape with matte and glossy finishes in alternating sections for added texture
- This style works on both long and extra-long coffin nails without feeling overwhelming
- The gold adds just enough sparkle to elevate the soft lavender without making it feel costume-like
Worth knowing: High-quality striping tape costs slightly more than budget versions but applies cleaner and lasts longer without peeling.
3. Matte Lavender with Glossy Ombre Tips
This design reverses the typical ombré concept—the main body of the nail stays matte lavender, while a glossy darker purple gradient emerges at the tips. The contrast between matte and glossy textures creates visual interest and makes the tips feel like they’re glowing forward.
Creating the Texture Contrast
Paint your entire nail with matte lavender polish and seal with a matte topcoat. Once fully dry, apply a glossy topcoat only to the upper third of the nail, blending into the matte section with a small brush. You can graduate from clear gloss through semi-transparent darker lavender to solid deeper purple for a subtle yet sophisticated effect.
Why This Works on Coffin Nails
- The matte finish on the nail body provides a modern, understated base
- The glossy tips draw attention to the edge of the nail shape, emphasizing the coffin’s structural lines
- The length of a coffin nail gives the glossy gradient plenty of room to develop
- This design reads as intentional and sophisticated rather than simply half-finished
- Pairs well with warm undertones in your skin, as the matte lavender becomes more flattering than high-gloss would be
Pro tip: Use a thin, pointed brush to create a clean line between matte and glossy sections; this precision is what separates professional-looking designs from rushed ones.
4. Lavender with Encapsulated Gold Leaf
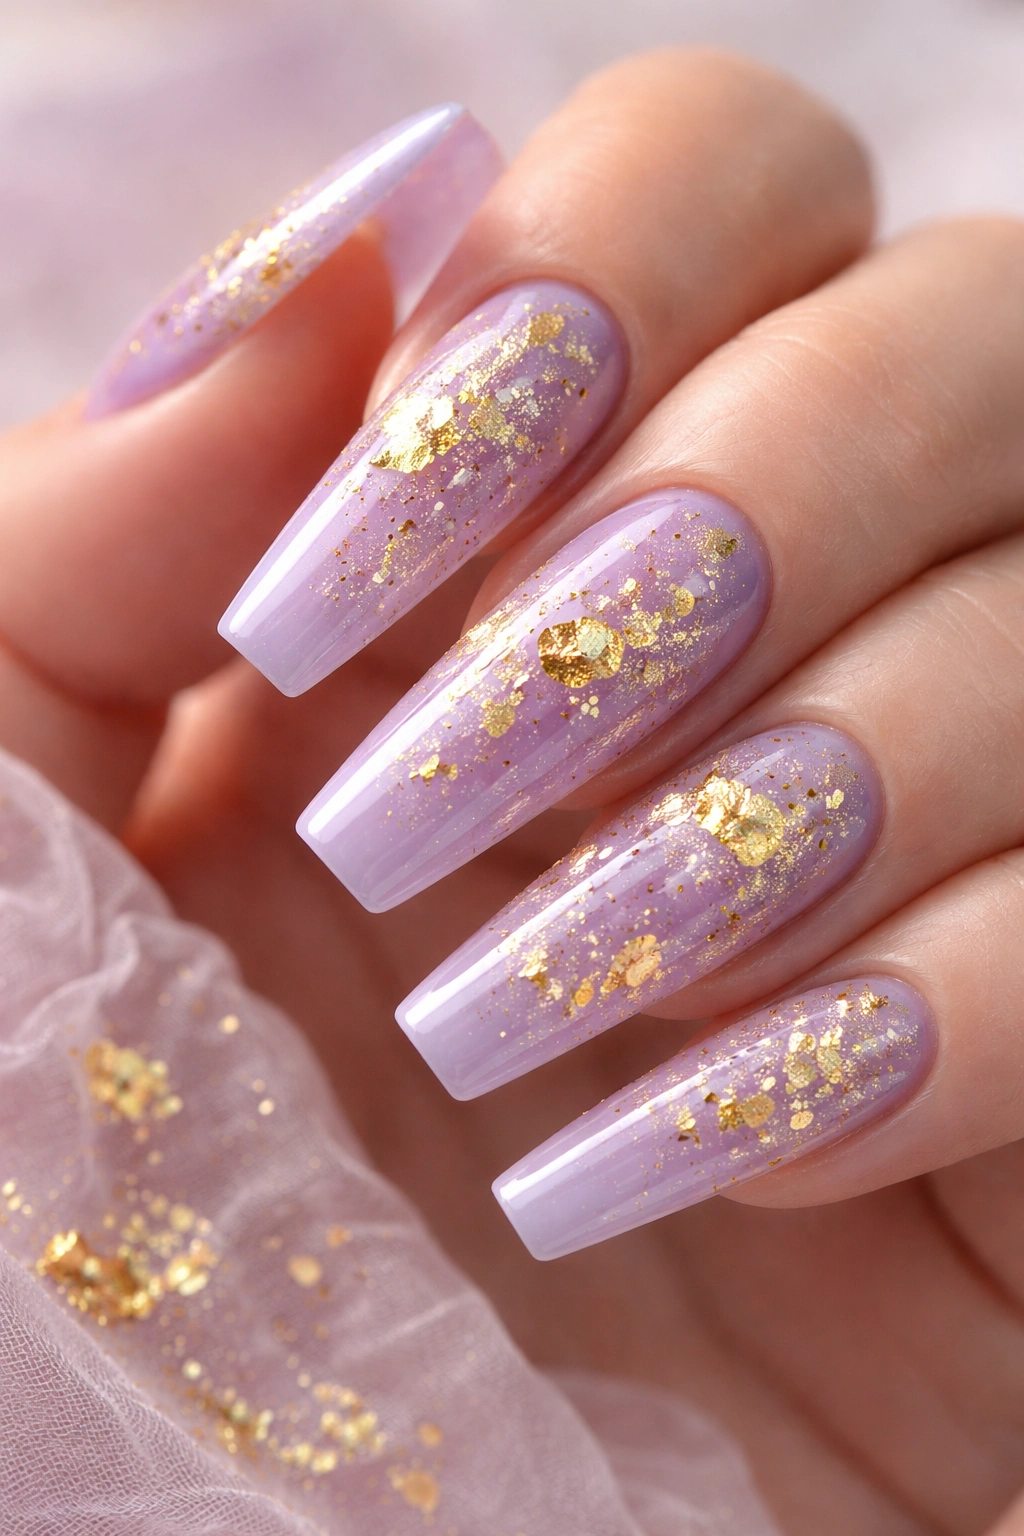
Pressing real 24-karat gold leaf into wet topcoat creates an organic, luxurious look that feels far more expensive than it actually is. The gold catches light and moves across the nail surface in unpredictable, beautiful ways. This design skews elegant and works equally well on everyday nails and special occasions.
Technique for Perfect Gold Leaf Application
Paint your lavender base and seal with a glossy topcoat while it’s still slightly tacky—this is crucial, as completely dry topcoat won’t hold the gold. Carefully press small pieces or flakes of gold leaf onto the wet topcoat, pressing gently with a clean brush to adhere them. Once dry, apply a final clear topcoat to seal the gold underneath and prevent flaking.
Gold Leaf Placement Ideas
- Scatter small pieces randomly across the entire nail for an ethereal, organic look
- Concentrate the gold leaf at the tips of the nail, fading toward the cuticle
- Create a focal point by clustering gold leaf on the center of each nail
- Use larger sheets of gold leaf on some nails and tiny flecks on others for visual variety
- This works beautifully on extra-long coffin nails where the surface area accommodates the design
Worth knowing: Not all “gold leaf” products are created equal; real gold leaf is pricier but worth it for the authentic shimmer and durability.
5. Two-Tone Lavender Split Design
Divide each long coffin nail vertically down the middle, painting one half a pale lavender and the other half a deeper mauve or purple. This bold, graphic design feels modern and artistic while staying true to the lavender color family.
Executing a Clean Split
Use painter’s tape or a thin straightedge to create a clean vertical line down the center of each nail. Apply your lighter lavender shade to one half, let it dry, then carefully apply your deeper shade to the other half. Remove the tape slowly and carefully to reveal a crisp division between the two colors.
Design Enhancements
- Add a thin gold or silver line exactly down the center to frame the division
- Create asymmetrical splits by positioning the dividing line off-center for a more artistic feel
- Use the split as a base and add different patterns to each half—matte on one side, glitter on the other
- The coffin shape’s width provides plenty of space for this design to feel impactful
- Horizontal splits work equally well if you prefer a different directional emphasis
Insider note: The key to a professional-looking split design is patience with the tape application and removal; rushing this step ruins the crisp edge.
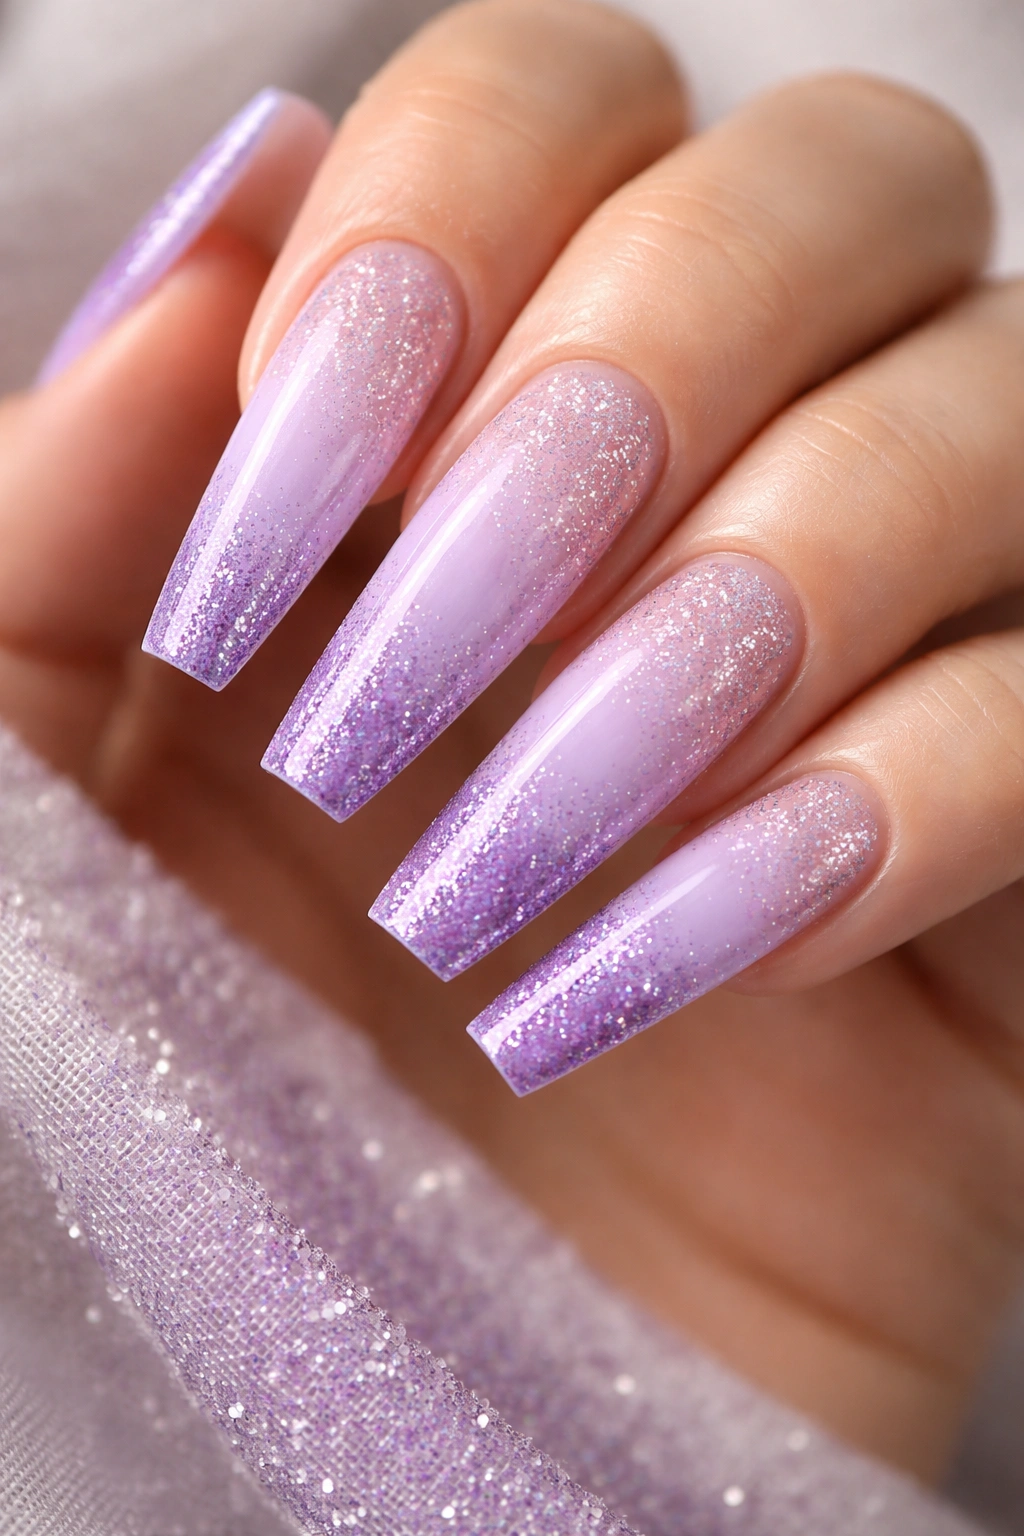
6. Lavender Glitter Gradient from Sheer to Dense
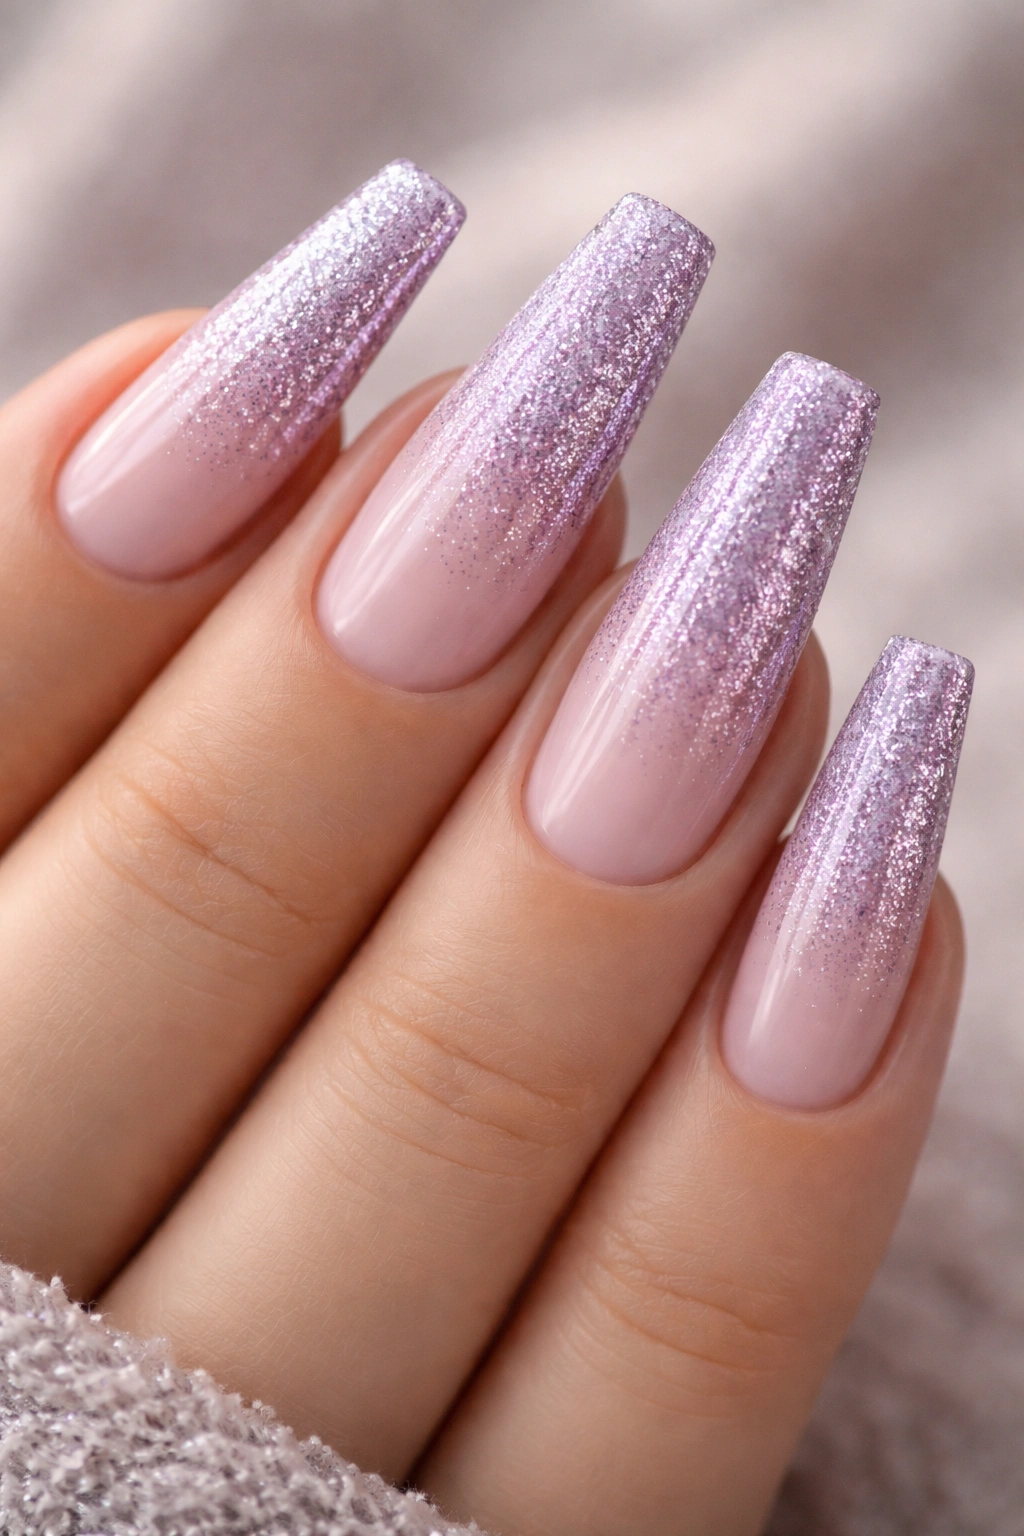
This design starts with a clear or sheer lavender base at the cuticle and gradually increases the concentration of glitter particles toward the tips, creating a gradient from almost solid color to heavily sparkled. The effect feels luxurious and catches light beautifully on long nails.
Building the Glitter Gradient
Paint your entire nail with a sheer lavender base and let it dry. Create a loose glitter mix by combining loose glitter particles with clear gel or topcoat. Starting about a quarter-inch from the tip, apply this mixture to the nail in a line, then use a brush to create a gradient effect by pulling the glitter toward the center of the nail. Add more concentrated glitter as you approach the very tip. Each layer should dry before the next is applied.
Glitter Options and Finishes
- Use fine glitter for a more refined, subtle effect or chunky glitter for dramatic impact
- Mix multiple glitter colors within the lavender family for depth
- Holographic glitter creates rainbow effects as light hits the nail
- Matte or glossy topcoat over the glitter changes how light reflects across the nail
- This design elongates the already-lengthy coffin nail, making them appear even more dramatic
Pro tip: Loose glitter can be unpredictable; for more control, use pre-mixed glitter polishes or gel glitters designed specifically for nail art.
7. Lavender Marble Design with Dark Veining
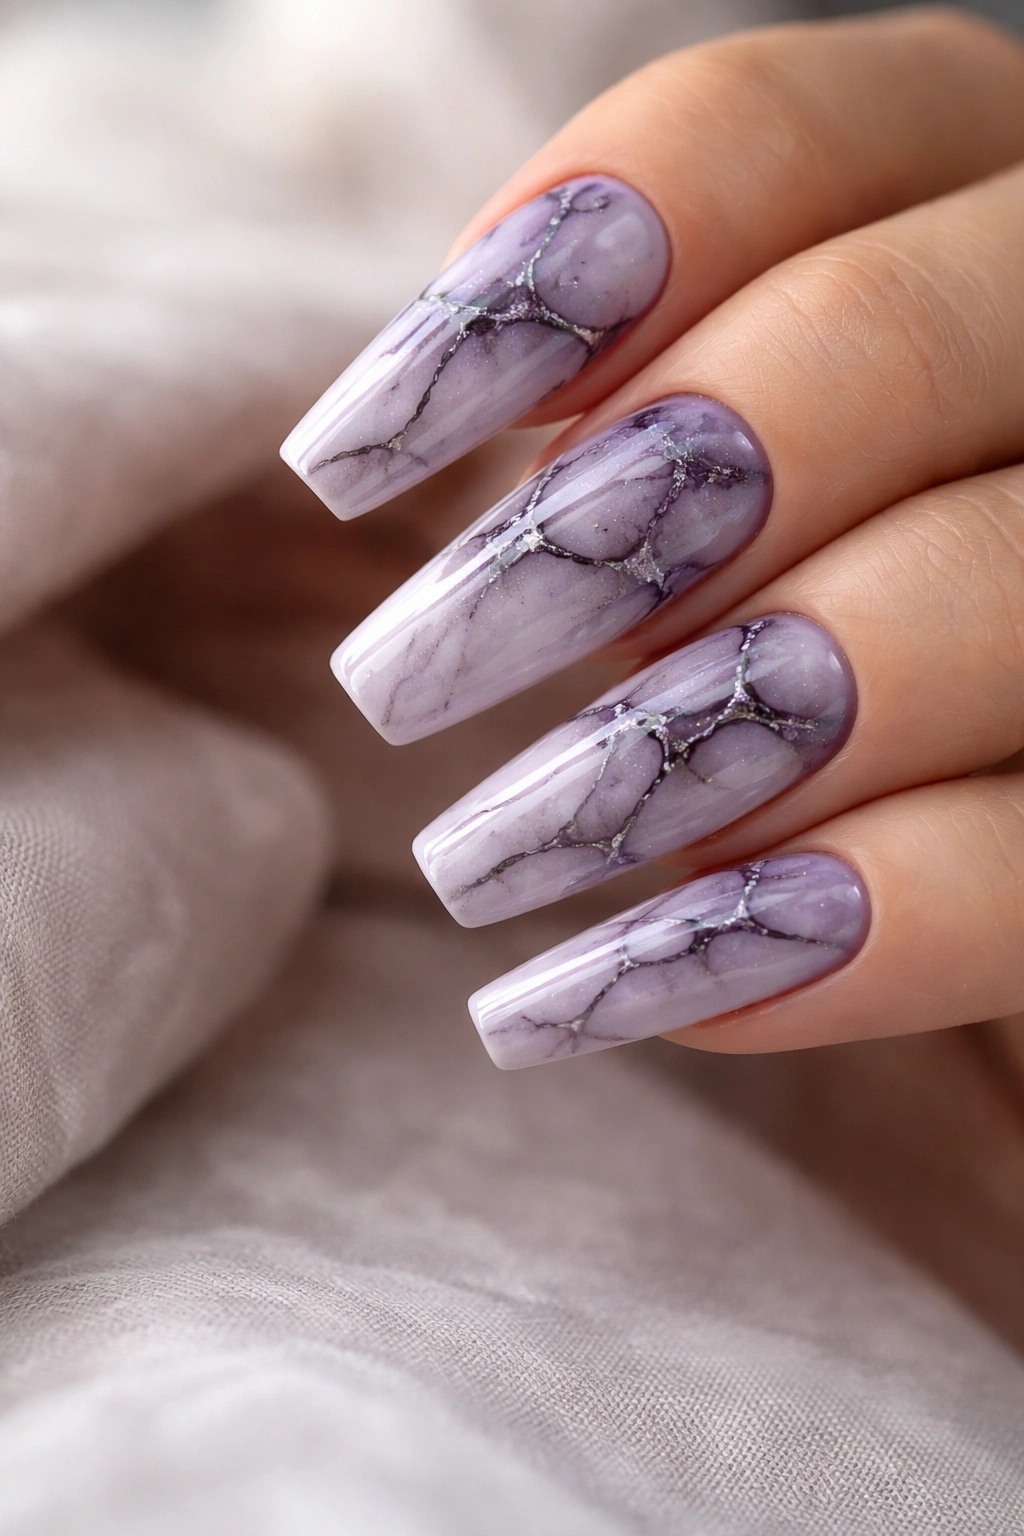
Create an organic marble effect using multiple shades of lavender plus darker purple or charcoal for veining. The marble pattern feels elevated and works particularly well on long coffin nails where the pattern has room to develop across the nail surface.
Marble Technique for Nails
Start with a pale lavender base. While still wet, drop small amounts of darker purple or mauve onto the surface, then use a fine brush or toothpick to drag the colors through the wet polish, creating web-like veins. The key is working quickly before the polish dries and not being too precious about perfect symmetry—marble is meant to feel organic and slightly unpredictable.
Marble Variations
- Create bold, dramatic veining or delicate, subtle lines depending on your preference
- Use just two shades (light and dark lavender) for a monochromatic marble or add complementary colors
- Seal with either matte or glossy topcoat; matte gives a stone-like appearance, glossy feels more refined
- This design benefits from the coffin shape’s width, which showcases the marble pattern beautifully
- Works equally well on various skin tones and nail lengths within the coffin family
Fun fact: Real marble comes in virtually every color family imaginable, so researching actual marble patterns can inspire your nail art direction.
8. Lavender Coffin Base with Handpainted Wildflower Art
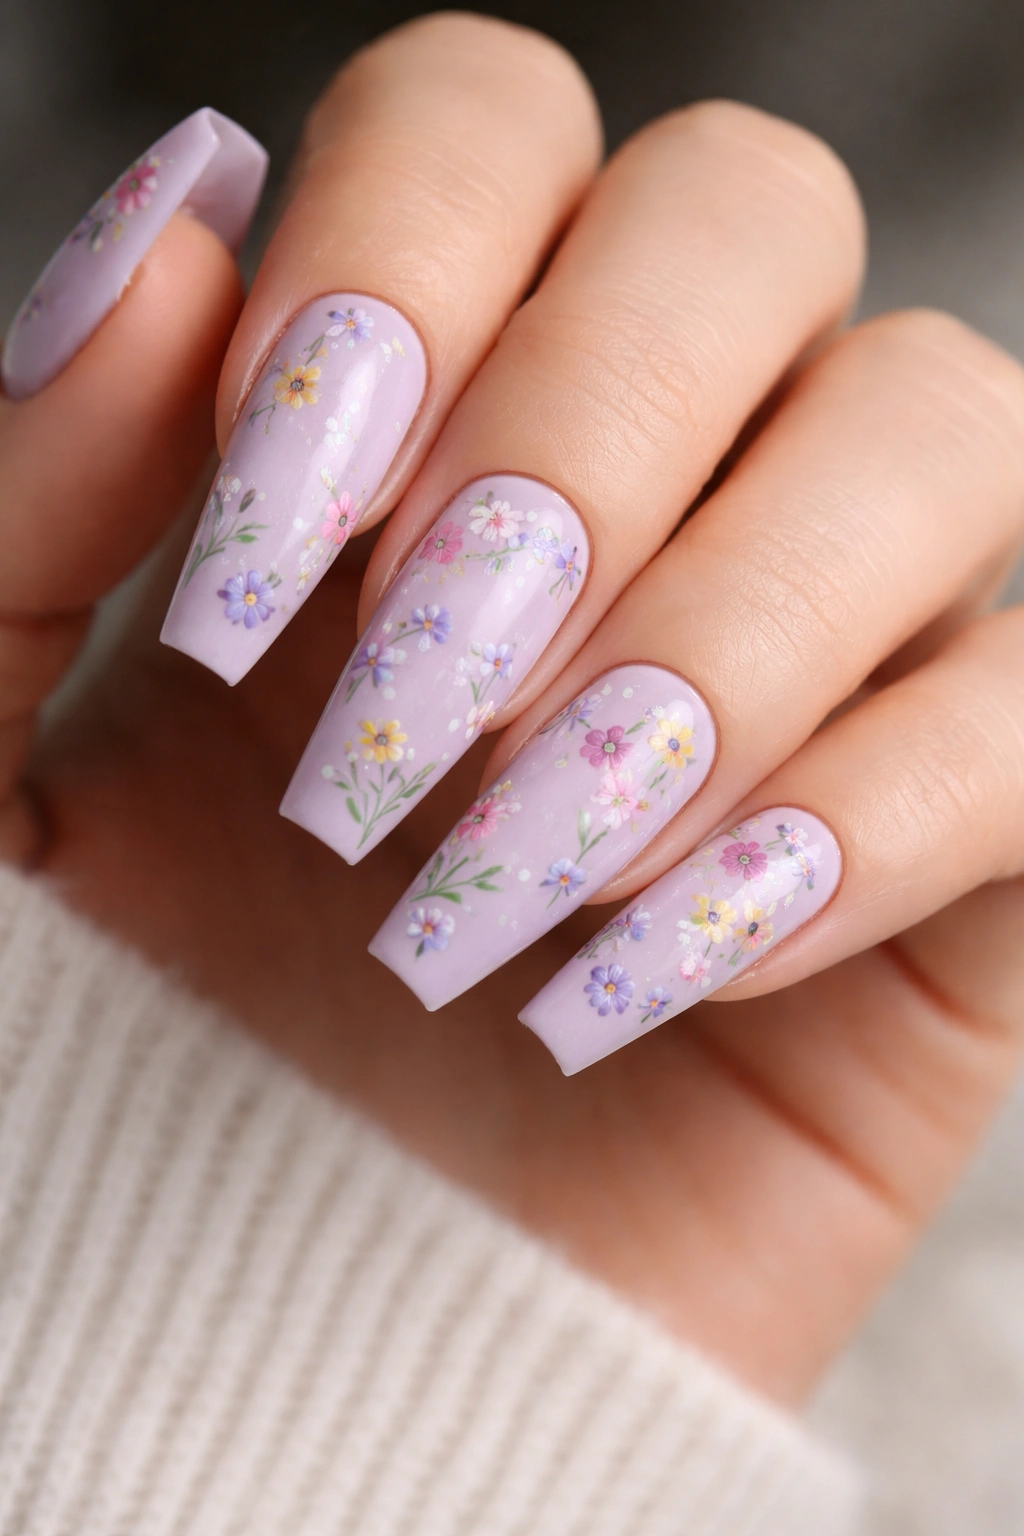
Paint tiny handpainted wildflowers in whites, yellows, pinks, or complementary purples across a solid lavender base. This design feels artistic and botanical while the lavender provides a cohesive backdrop that doesn’t compete with the details.
Painting Detailed Wildflowers
You’ll need a very thin brush (0 or 00 size) and steady hands. Sketch faint pencil outlines on the nail if needed, then paint delicate flower shapes using acrylics or gel polish. Small daisies, tiny roses, or abstract flower shapes work equally well. Keep the flowers small enough that they feel like a scattered pattern rather than a crowded design.
Design Placement and Balance
- Scatter flowers across the entire nail or concentrate them in specific areas (like a bouquet effect)
- Create a focal point with one larger flower on each nail
- Leave some negative space so the lavender base remains visible and breathable
- Long coffin nails provide excellent canvas space for detailed botanical art without feeling cramped
- This design appeals particularly to people who appreciate nature-inspired aesthetics
Worth knowing: Acrylic paints dry faster and are easier to work with than gel for detailed hand-painted art, but gel adheres more securely to nail surfaces and lasts longer.
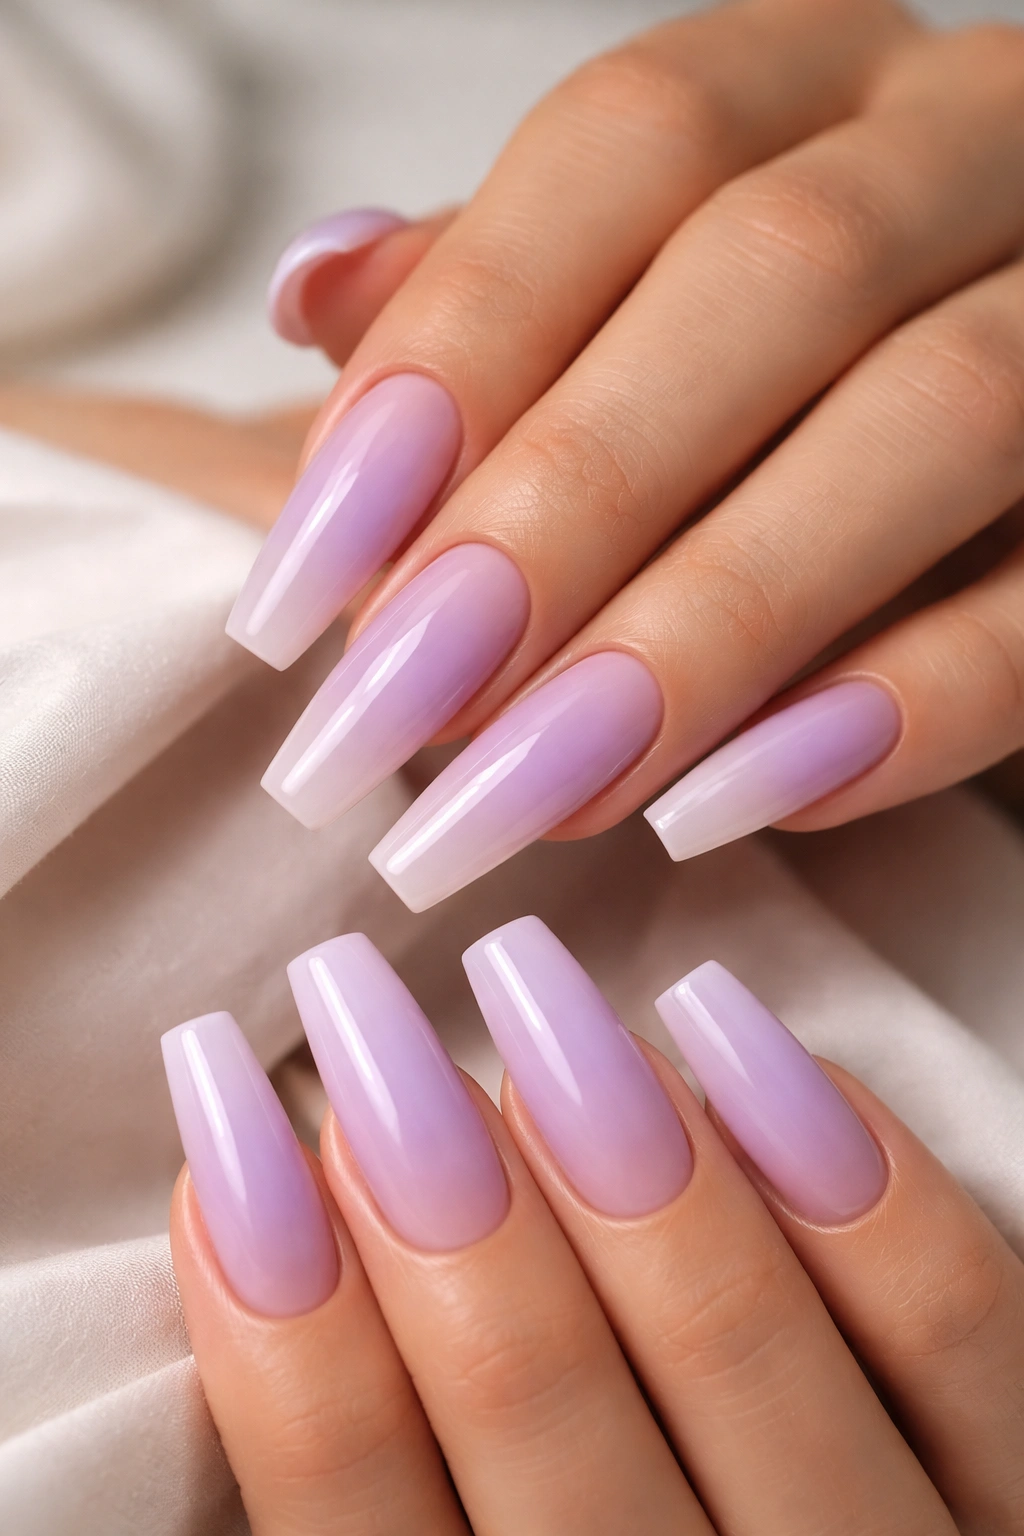
9. Ombré Lavender to Nude Transition
Create a soft gradient that moves from rich lavender at the cuticle through pale mauve to a nude or skin-tone shade at the tips. This design feels elegant and elongates the nail while the nude tips create a subtle French-inspired look.
Building the Ombré Gradient
Use three to four polish shades that transition smoothly from lavender to mauve to nude. Apply these in thin layers using a makeup sponge, blending carefully at each color transition. The gradient should feel seamless, with no harsh lines where colors meet.
Styling Considerations
- This design works beautifully with minimal jewelry since the nails themselves are quite striking
- The nude transition makes the nail appear even longer than it actually is
- This design is work-appropriate while still feeling special and intentional
- Matte topcoat gives a sophisticated, understated finish; gloss creates more visual impact
- The coffin shape becomes almost invisible in this design because of the blended colors, creating a sleek, elongated effect
Pro tip: The smoother your sponge blending, the more professional and expensive the design looks—take time with this step.
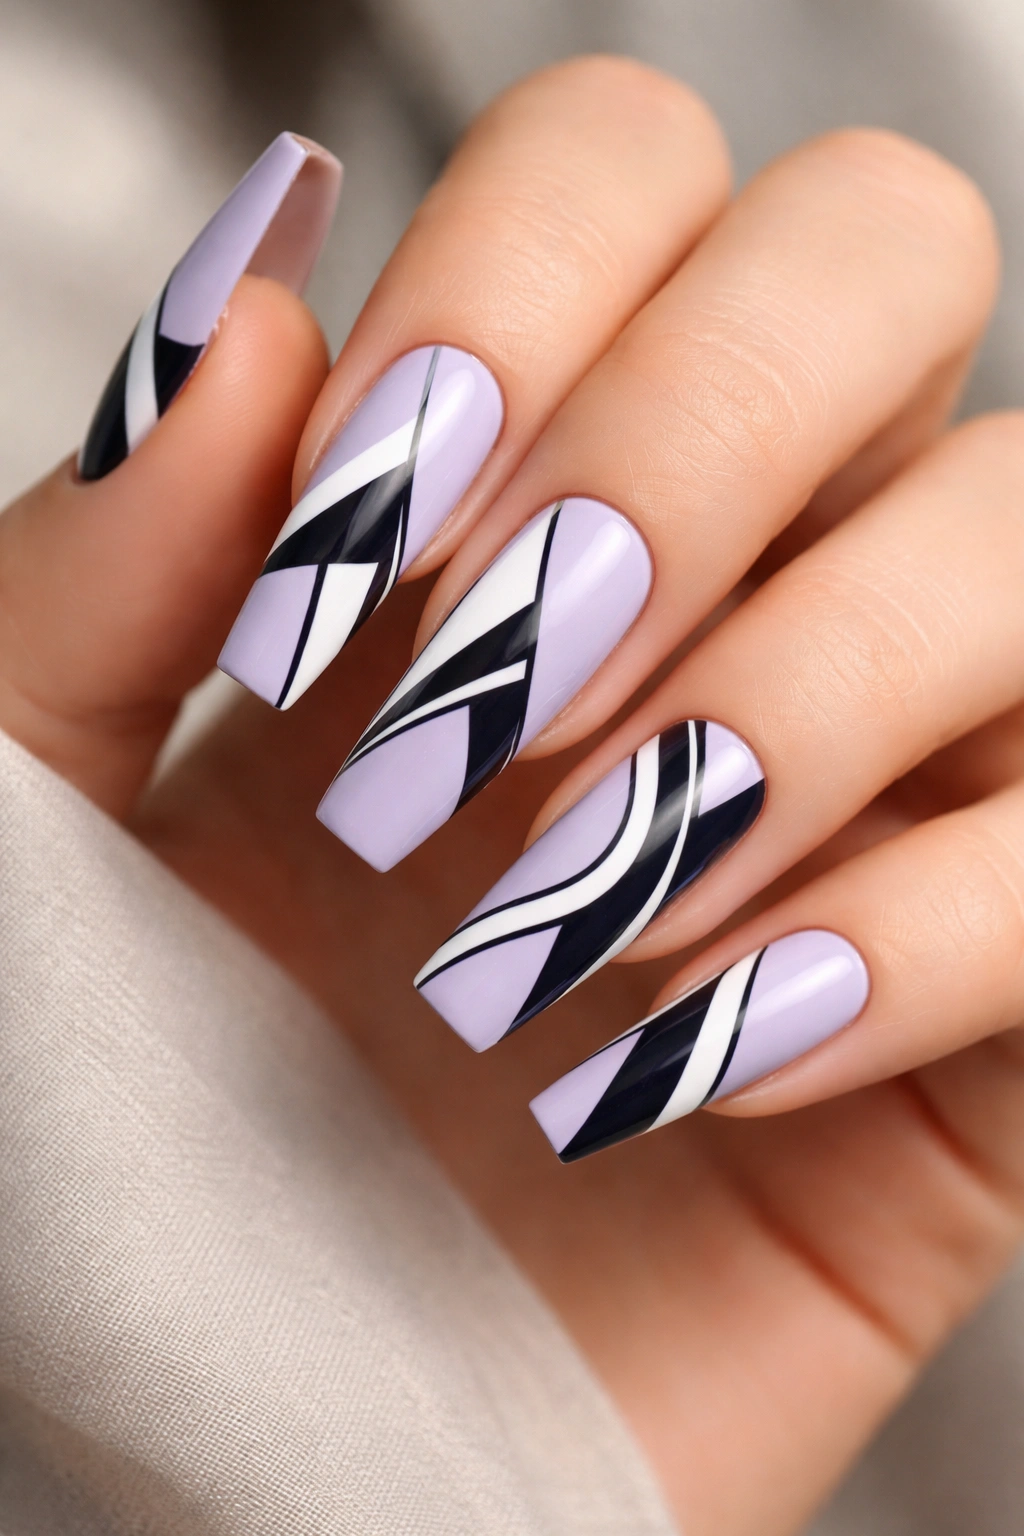
10. Lavender with Abstract Line Art
Simple abstract lines in black, white, or metallic shades create a minimalist design that feels modern and artistic. The lines can be geometric, flowing, or completely free-form—the beauty of abstract art is its interpretive nature.
Creating Abstract Line Patterns
Using a thin brush or striping tool, paint simple lines across the lavender base. These could be bold geometric shapes, delicate continuous lines, scattered abstract marks, or any pattern that appeals to you visually. The coffin nail’s length allows the design to flow naturally from the cuticle to the tip.
Line Work Inspiration
- Bold diagonal lines create dynamic movement and visual interest
- Horizontal lines feel calm and balanced
- Crossing geometric shapes create complexity without looking chaotic
- Single continuous lines create a meditative, flowing aesthetic
- White lines feel crisp and clean; black lines appear bolder; gold or silver lines feel luxurious
Pro tip: Practice your line work on a nail wheel or practice tips first if hand-painting isn’t your strength; imperfect lines often look intentionally artistic rather than sloppy.
11. Reverse French Manicure in Lavender and White
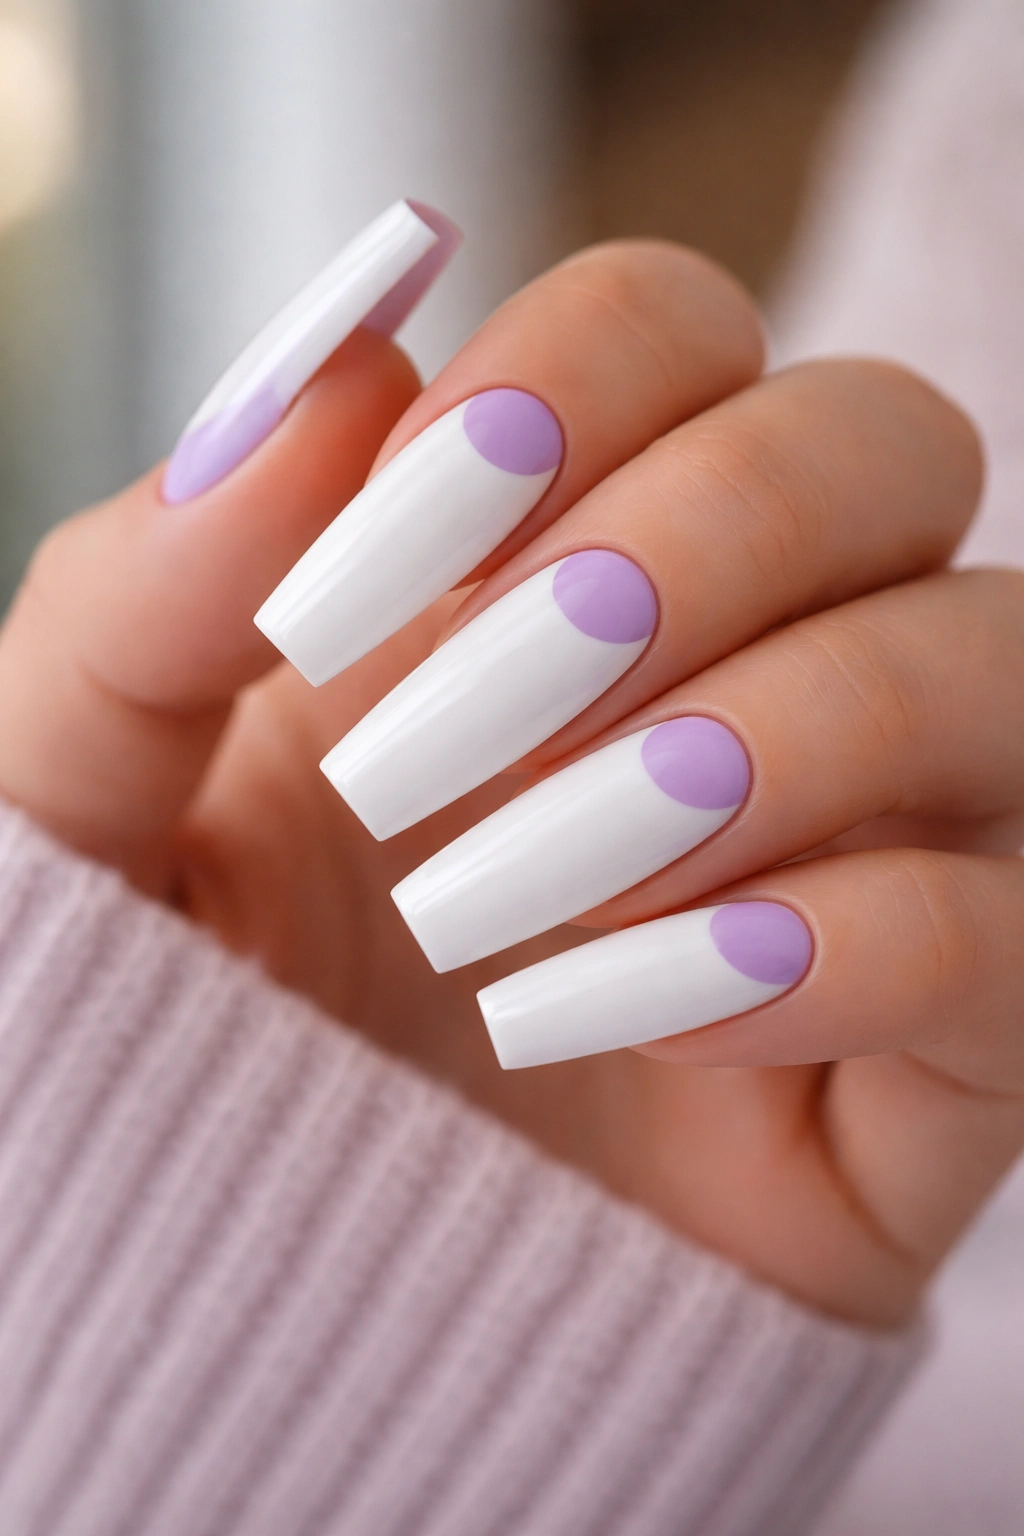
Instead of a traditional French manicure with color on the tips, reverse the concept by painting the nail white and creating a lavender design at the cuticle or as a half-moon shape at the base.
Reverse French Application
Paint the entire nail white and seal with topcoat. Once dry, create a half-moon or curved shape at the base of the nail using lavender polish. Use either a thin brush or a half-moon nail stencil for clean, precise lines. Alternatively, paint a full lavender base at the cuticle area that fades into white toward the tips.
Why This Works on Coffin Nails
- The white provides a bright, clean backdrop that makes the lavender feel even more vibrant
- The half-moon shape emphasizes the curve of the coffin’s base
- This design is timeless without feeling dated or overly trendy
- Works year-round and pairs well with virtually any style or outfit
- The simplicity of the design belies its sophisticated, refined appearance
Insider note: Half-moon stencils are inexpensive and make this design achievable even if you’re not confident with freehand line work.
12. Lavender Velvet or Flocking Texture

Velvet powder or flocking creates a suede-like texture on the nail that feels luxurious and looks incredibly unique. A solid lavender velvet nail has visual interest without requiring detailed artwork.
Applying Velvet or Flocking Powder
Paint your lavender base and seal with a tacky topcoat while it’s still wet. Sprinkle velvet powder onto the nail, coating the entire surface. Once dry, brush away excess powder gently. The result is a textured, matte finish that feels soft to the touch and looks strikingly different from standard polish.
Texture Design Options
- Solid lavender velvet on all nails for a cohesive, luxurious look
- Alternate velvet and glossy nails for visual variety and texture contrast
- Create a gradient from velvet at the cuticle to glossy at the tips
- Apply velvet to specific areas (like geometric shapes) rather than the entire nail
- The coffin shape accommodates this texture beautifully without looking overwrought
Worth knowing: Velvet nails require a bit more care during daily wear; the texture can snag on fabrics, so this design works best if you’re relatively gentle with your nails.
13. Lavender with Negative Space Geometric Designs
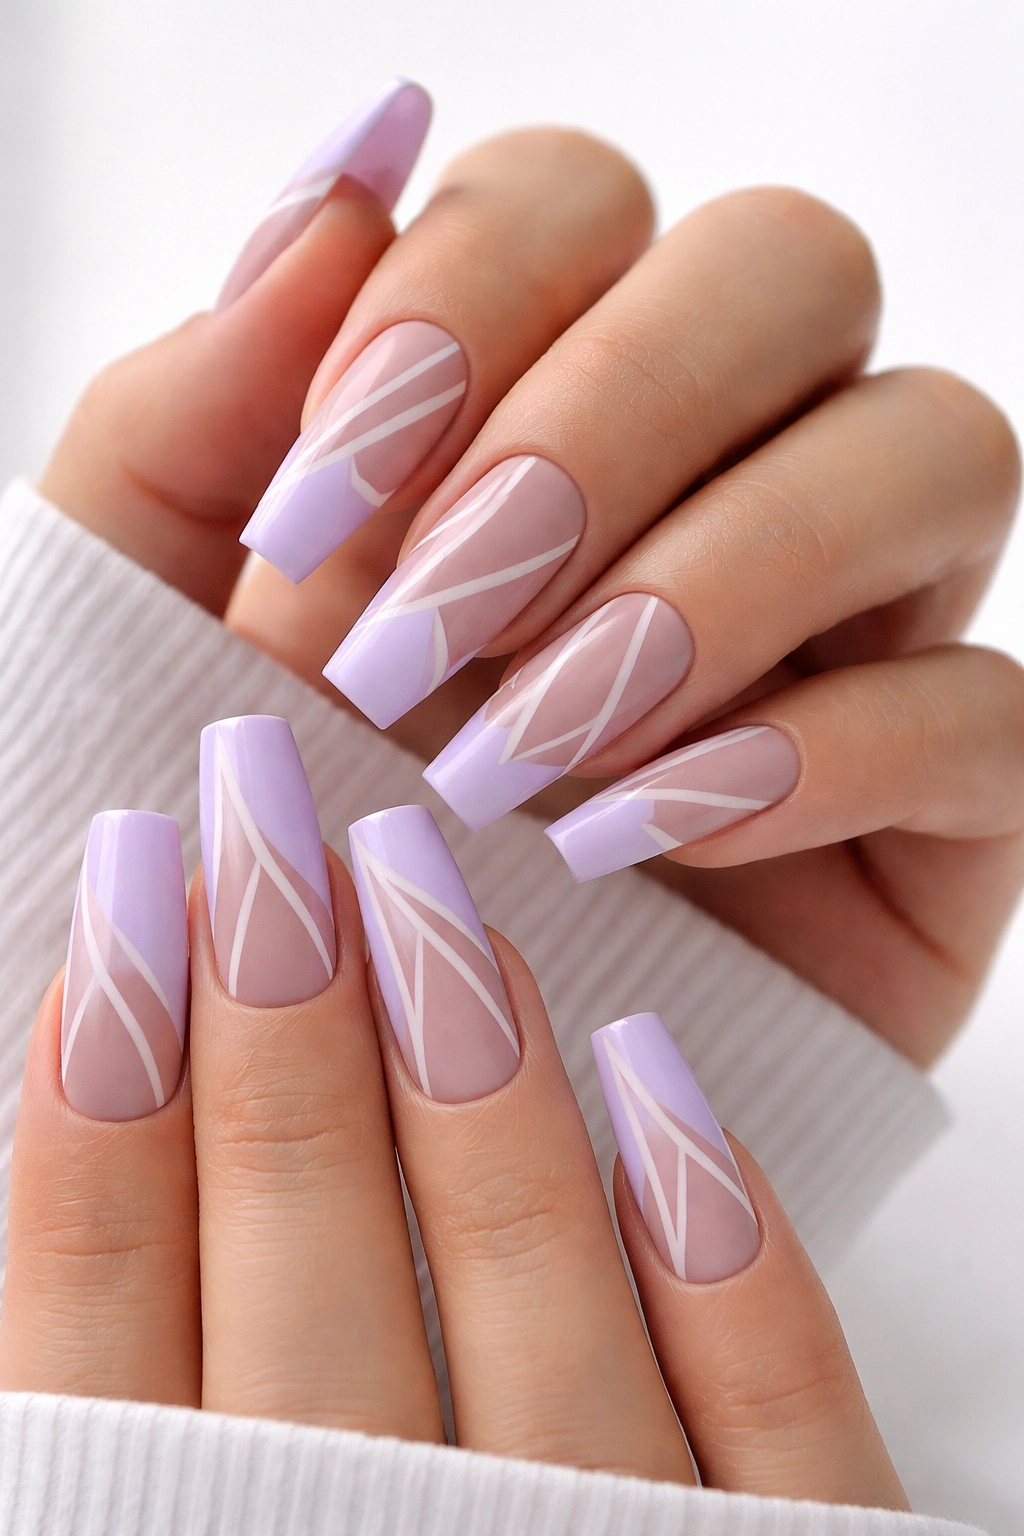
Leave portions of the nail bare or unpainted, creating geometric negative space designs in combination with solid lavender areas. This modern design feels intentional and artistic.
Creating Negative Space Patterns
Use painter’s tape to create geometric shapes (triangles, hexagons, stripes, or asymmetrical sections) and paint around them, leaving the natural nail or base color showing through. Remove the tape carefully for crisp edges. This design works best on nude or pale-colored natural nails that provide good contrast with the lavender.
Geometric Shape Ideas
- Diagonal stripes alternating between lavender and bare nail
- Triangle shapes pointing toward the tips
- Hexagonal patterns creating a honeycomb effect
- One large asymmetrical section of lavender on each nail
- The coffin shape’s defined edges make negative space designs feel even more intentional and structured
Pro tip: If your natural nails are darker, apply a white or nude base before creating the negative space design to ensure good contrast and visibility.
14. Ombre Lavender to Glitter Ombre Hybrid
Combine a color ombre (light to dark lavender) with a glitter ombre (sparse glitter at the base to dense glitter at the tips) for a multi-dimensional design that catches light beautifully.
Layering Both Ombres
Start with your color ombre as described in a previous section. Once fully dry, create a separate glitter ombre on top, keeping the glitter sparse near the cuticle and dense toward the tips. This creates depth—you see the color ombre underneath while the glitter sparkle sits on top, creating a sophisticated, luxurious effect.
Visual Impact
- The dual ombres create movement and dimension that holds attention
- Light catches both the color graduation and the glitter, creating multiple focal points
- This design works beautifully on extra-long coffin nails where you have space for both effects
- More effort-intensive than single-layer designs but worth it for special occasions or when you want maximum impact
- Matte topcoat over this design creates a softer look; glossy topcoat amplifies the sparkle
Pro tip: Keep the color ombre subtle and the glitter ombre more pronounced, rather than competing for attention with both effects equally strong.
15. Lavender Chrome or Mirror Finish
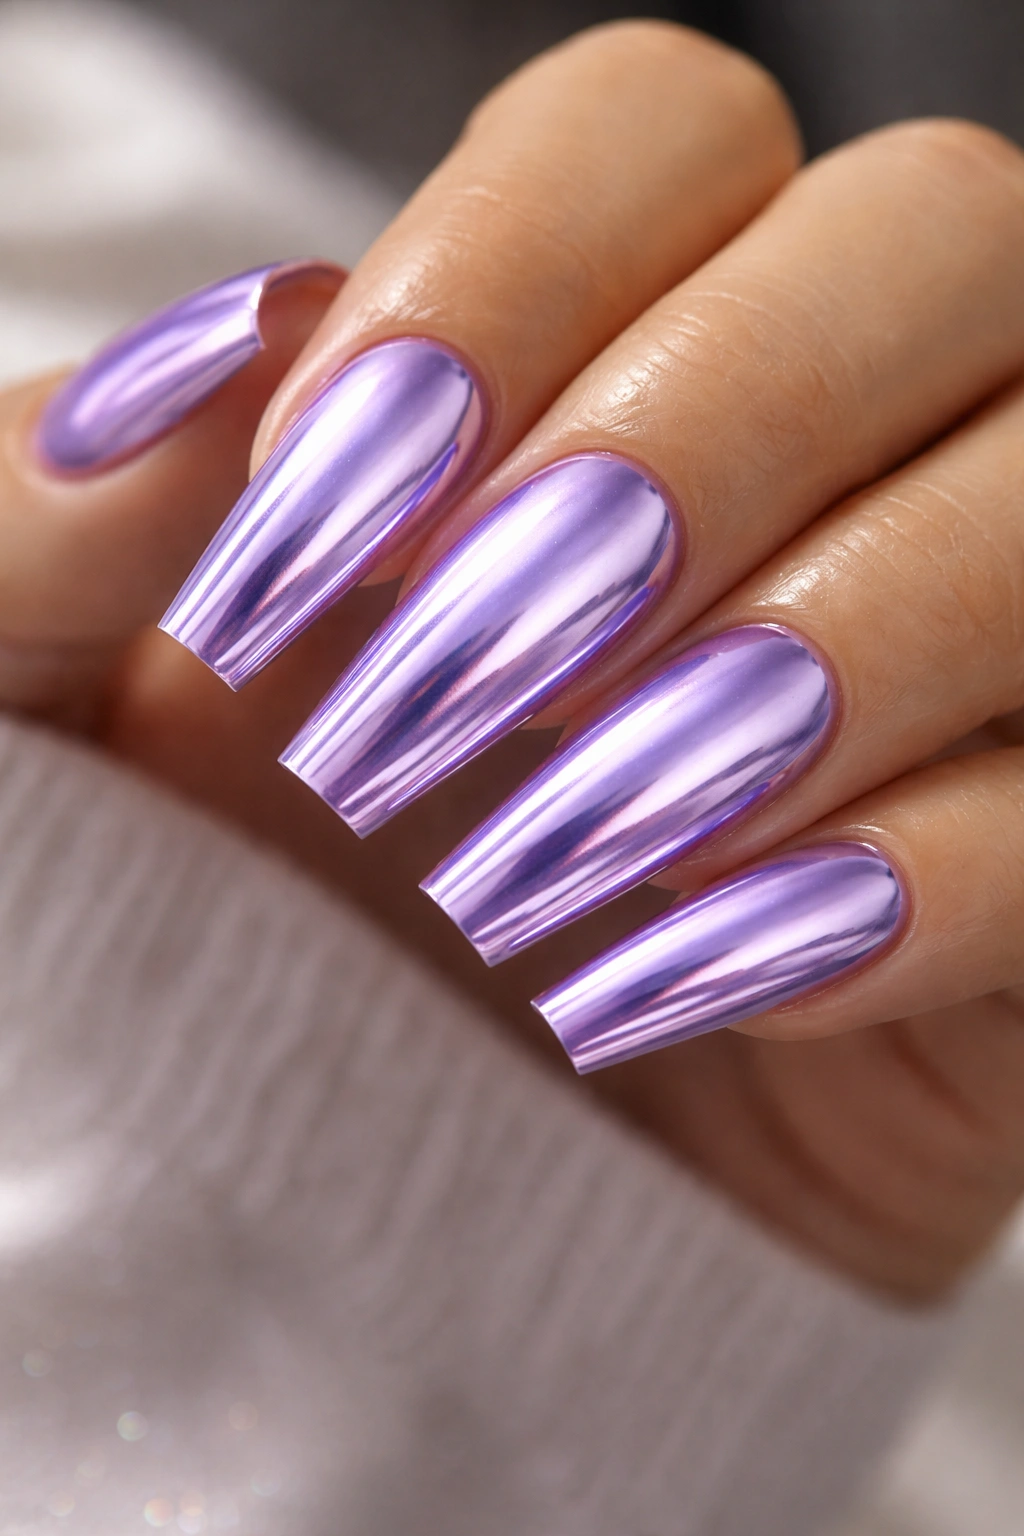
Chrome powder creates a mirror-like, reflective metallic finish that feels futuristic and high-fashion. A full lavender chrome look is bold but absolutely stunning on long coffin nails.
Applying Chrome Powder
This technique requires gel polish and a UV lamp. Paint your lavender gel base and cure. Apply a tacky top coat while still wet. Using a velvet-textured applicator, rub chrome powder onto the wet topcoat using circular motions. The powder adheres to the sticky surface, creating a reflective metallic finish. Once you’ve achieved the coverage you want, cure again under the UV lamp.
Chrome Design Options
- Full-coverage chrome on all nails for a bold statement
- Chrome tips with a solid lavender base for a modern French ombre
- Partial chrome coverage creating abstract shapes or patterns
- Multi-tone chrome using lavender-chrome, silver-chrome, and rose-chrome for depth
- The reflective quality of chrome amplifies the coffin shape’s geometric lines beautifully
Insider note: Chrome powder can be tricky to apply evenly; practice on a few nails before committing to the full set.
16. Lavender with 3D Embellishments and Rhinestones
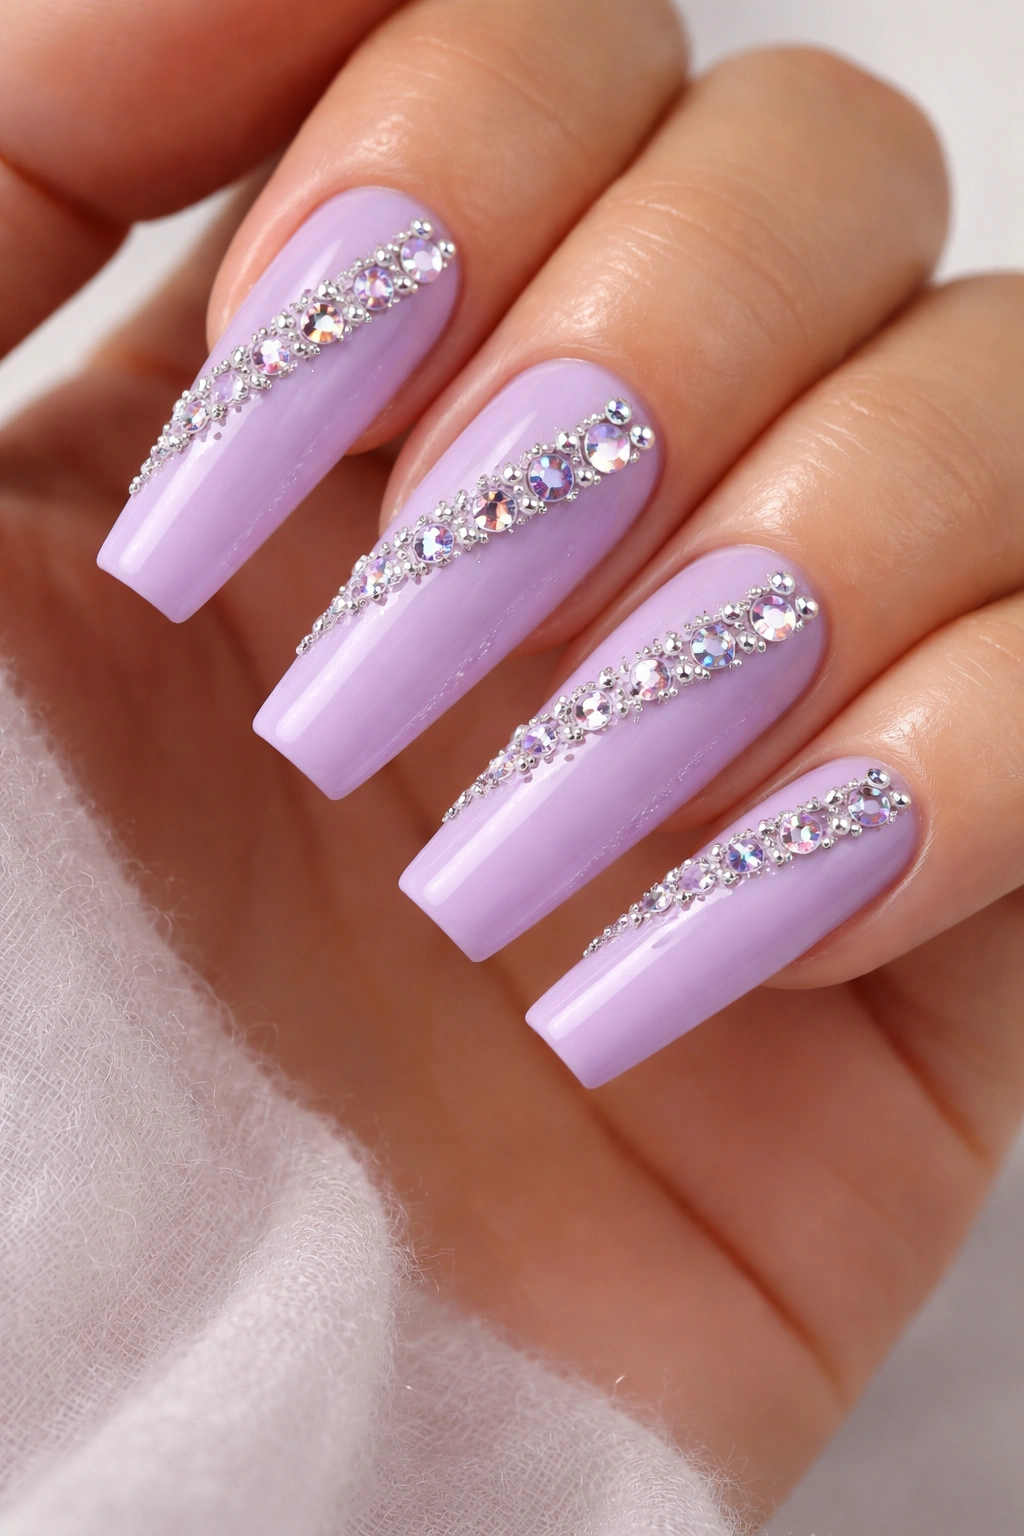
Elevate your lavender coffin nails with strategically placed rhinestones, micro beads, or 3D embellishments. This design reads as particularly special and works beautifully for events or when you want maximum visual impact.
Placing Rhinestones Effectively
Apply rhinestones and embellishments to slightly tacky topcoat, pressing gently to secure them. Create patterns rather than random placement—a diagonal line of rhinestones across each nail, a cluster at the tips, or a scattered constellation pattern. The coffin nail’s width provides plenty of real estate for thoughtful placement.
Embellishment Ideas
- Mix rhinestone sizes for visual depth and interest
- Use complementary colors (clear, pink, purple) rather than mismatched embellishments
- Create a focal point with heavier embellishment on one nail per hand
- Rhinestone patterns should follow the nail’s natural lines or create intentional geometric shapes
- This design works best with a solid lavender base that allows embellishments to stand out
- Long coffin nails accommodate embellishments without looking cluttered or overwhelming
Worth knowing: Higher-quality rhinestones adhere better and sparkle more brilliantly than cheap alternatives; this investment is worth it for embellished designs.
17. Lavender Satin Finish with Pearl Accents
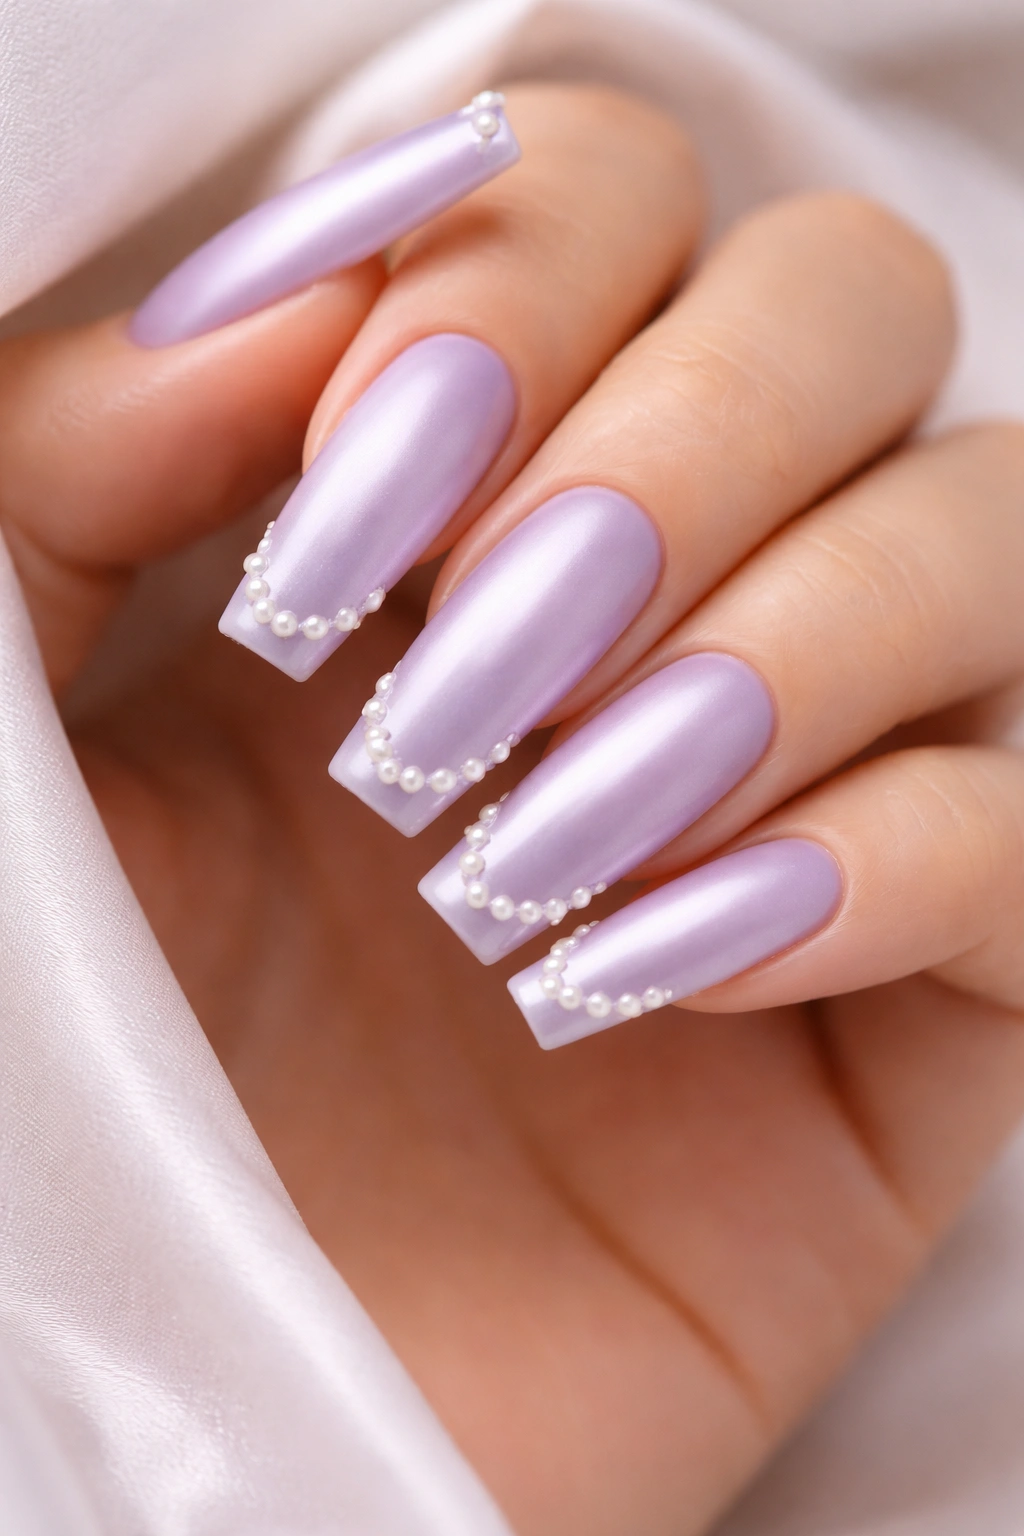
A satin finish (somewhere between matte and glossy) combined with subtle pearl accents creates a sophisticated, refined look that’s less bold than high-gloss but more polished than completely matte.
Achieving Satin Finish
Satin topcoats are designed specifically for this effect and dry to the perfect middle-ground finish. Paint your solid lavender base, seal with satin topcoat, and once dry, add pearl accents—either small pearl rhinestones, pearl nail art supplies, or swirls of pearl-finish gel.
Pearl Accent Placement
- Small pearl embellishments at the tips or scattered across the nail
- Pearl dust mixed into topcoat for subtle overall shimmer
- Pearl-tone nail art creating delicate patterns on the lavender base
- The coffin shape benefits from the refined, understated nature of this design
- Works beautifully as an everyday elegant look that feels special without being costume-like
- Satin finish photographs beautifully and catches light in flattering ways
Pro tip: Satin finish shows smudges and fingerprints more easily than glossy, so this design requires more frequent maintenance to stay looking fresh.
18. Lavender Base with Hand-Painted Geometric Nail Art
Use fine geometric shapes—triangles, hexagons, or abstract forms—painted in black, white, navy, or complementary colors to create a cohesive artistic design.
Painting Geometric Shapes
Sketch your design lightly on the nail first if needed. Paint geometric shapes using thin brushes and either acrylics or gel polish. Geometric designs can be perfectly symmetrical or intentionally asymmetrical and artistic. The key is clean lines and purposeful placement rather than random marks.
Geometric Pattern Ideas
- Gradient pattern of triangles pointing in the same direction
- Interlocking geometric shapes creating a complex, sophisticated look
- One focal geometric pattern on the accent nail, simpler patterns on others
- Abstract geometric shapes that feel more artistic than strictly mathematical
- The coffin nail’s length and width accommodate complex geometric designs beautifully
Pro tip: Use a ruler or straight edge if you want perfectly geometric lines; hand-drawn lines that are slightly imperfect often look more artistic than forced perfection.
19. Lavender Fades into Translucent Nude at Tips
Paint a full-coverage lavender base that gradually becomes more and more translucent as it approaches the tips, eventually revealing natural nail or a nude base color showing through.
Creating Translucent Fade
Paint your lavender base. Using a makeup sponge, apply increasingly diluted lavender polish (mix with a little clear polish or use watered-down polish) from the mid-nail toward the tips, creating a gradient from opaque to nearly transparent. This creates an ethereal, soft-focus effect that feels incredibly modern and refined.
Design Appeal
- The translucent fade creates a barely-there, barely-polished aesthetic
- Works beautifully on long coffin nails where the fade has space to develop
- This design feels light and airy, making it appropriate for professional settings
- The translucent effect creates the illusion of length since the tips blend into skin tone
- Matte topcoat amplifies the soft, refined effect
- This design shows off the natural nail shape without the weight of solid color
Insider note: The key to a successful translucent fade is patience and multiple thin, blended layers rather than one thick application of diluted polish.
20. Lavender with Metallic Accent Nails
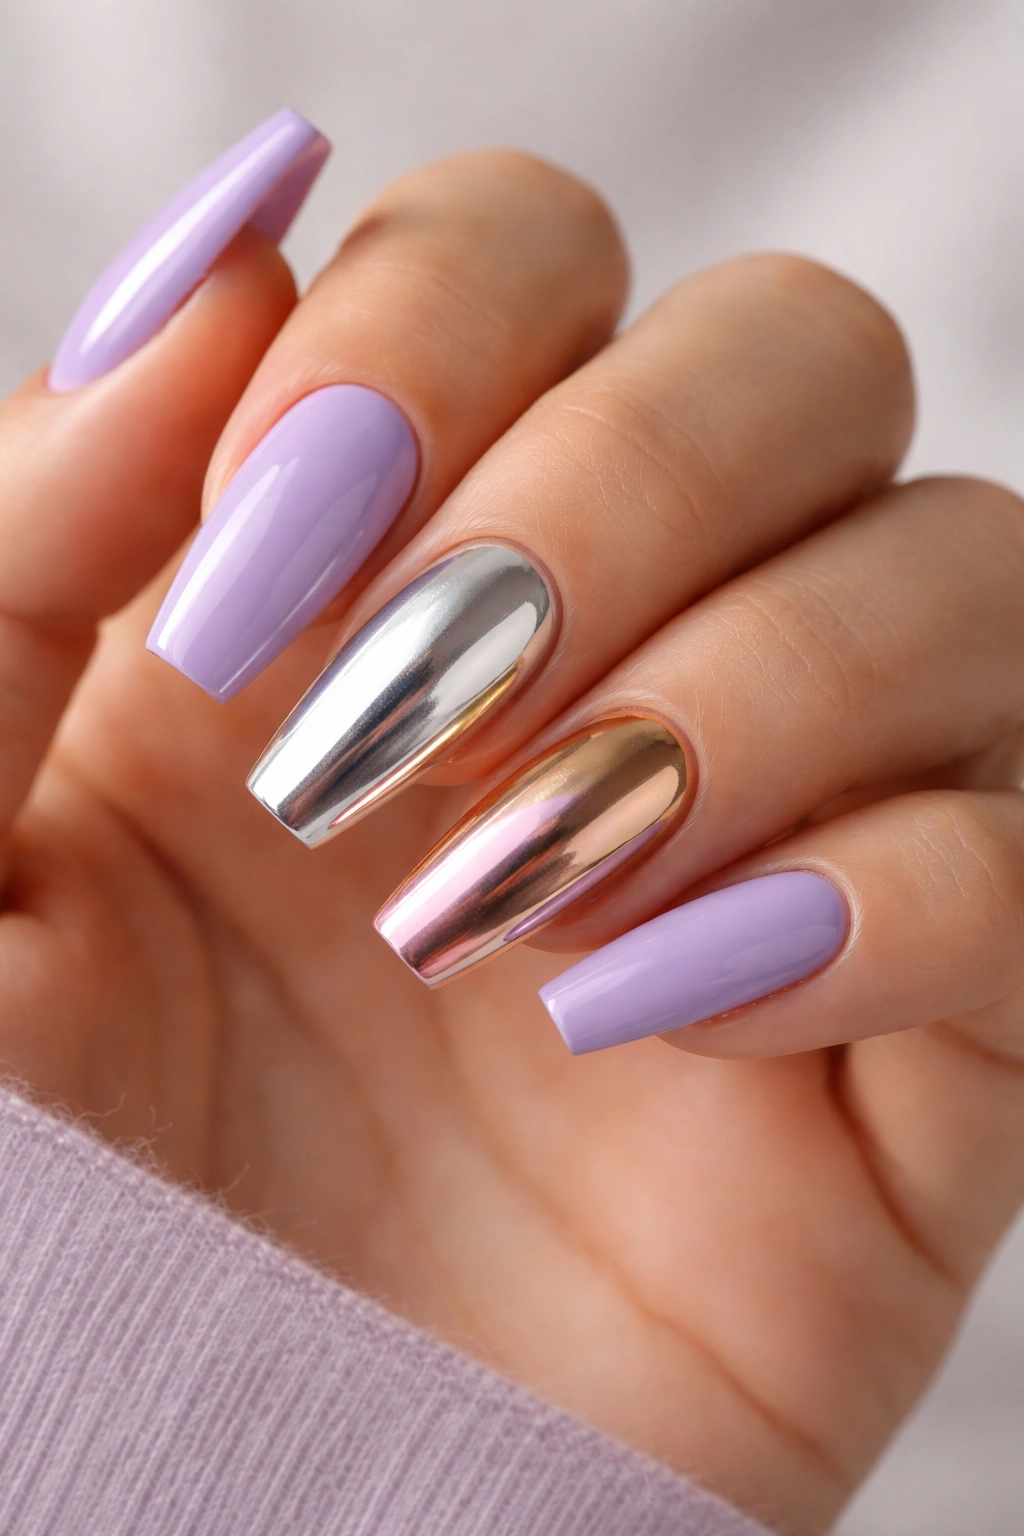
Paint most of your nails a solid, elegant lavender while designating one or two accent nails for a metallic finish—gold, silver, rose gold, or holographic.
Creating Accent Nail Contrast
Paint your main color on most nails, then apply metallic polish to your chosen accent nails (typically the ring finger or middle finger). The solid lavender base on surrounding nails makes the metallic accent feel like a deliberate design choice rather than a mismatched element.
Metallic Accent Options
- Solid metallic finish on the accent nail for maximum contrast
- Metallic ombré fading into lavender on the accent nail
- Metallic geometric patterns or stripes on the accent nail against a lavender base
- Mix multiple metallic finishes for visual interest (gold and rose gold together)
- The coffin shape’s defined structure makes single-accent-nail designs feel balanced and intentional
- This design works year-round and feels equally at home in professional or casual settings
Worth knowing: Metallic polishes vary significantly in quality; splurge on premium brands for finishes that truly reflect light and appear luxurious rather than flat or dull.
Final Thoughts
Lavender coffin nails offer endless creative possibilities, and the 20 designs above represent just the beginning of what you can achieve with this color and shape combination. The beauty of lavender is its versatility—it pairs beautifully with virtually every complementary color, finish, and embellishment imaginable.
The coffin shape itself elevates lavender beyond what you’d create on a round or almond nail. The defined edges, the dramatic length potential, and the geometric structure of the shape transform soft lavender into something bold and contemporary. Whether you choose a minimalist single-shade design or a complex multi-layered creation with embellishments, the coffin shape ensures your nails feel intentional and fashion-forward.
Start with whichever design resonates most with your personal style, then feel free to adapt and customize. Mix elements from multiple designs—combine the marble pattern from design seven with the rhinestones from design sixteen, or layer the glitter gradient from design six over the two-tone split from design five. The coffin nail canvas is large enough to accommodate creative experimentation without looking cluttered.
Remember that nail art is fundamentally about personal expression. These 20 ideas provide structure and inspiration, but your unique interpretation and the way you execute each design is what transforms them from designs into your signature style.
