

Coffin nails have become the go-to shape for anyone wanting to make a bold statement with their manicure. Their elongated, tapered silhouette creates the perfect canvas for gradient designs, and when you combine that shape with the mesmerizing dimension of ombre effects, you get nail art that’s genuinely stunning. The beauty of ombre on coffin nails isn’t just about the color transition itself — it’s about how the elongated shape lets that gradient flow naturally from the cuticle to the tip, creating an almost hypnotic visual effect.
What makes ombre coffin nails so versatile is that they work for virtually any occasion and aesthetic. Whether you’re going for something sophisticated and office-appropriate, edgy and moody, or playful and colorful, ombre on long coffin nails delivers impact. The shape elongates your fingers, the gradient adds visual interest and depth, and the whole combination feels elevated without requiring intricate nail art skills. Most of these designs rely on smooth color transitions and blending techniques that don’t demand a steady hand or tiny brushes — just patience and the right approach.
The best part? Long coffin nails with ombre effects photograph beautifully and genuinely catch light differently than other nail shapes. When you’re scrolling through inspiration or showing off your nails to friends, they immediately stand out. Let’s dive into eleven ombre coffin nail designs that you can recreate at home or take as inspiration to your nail technician.
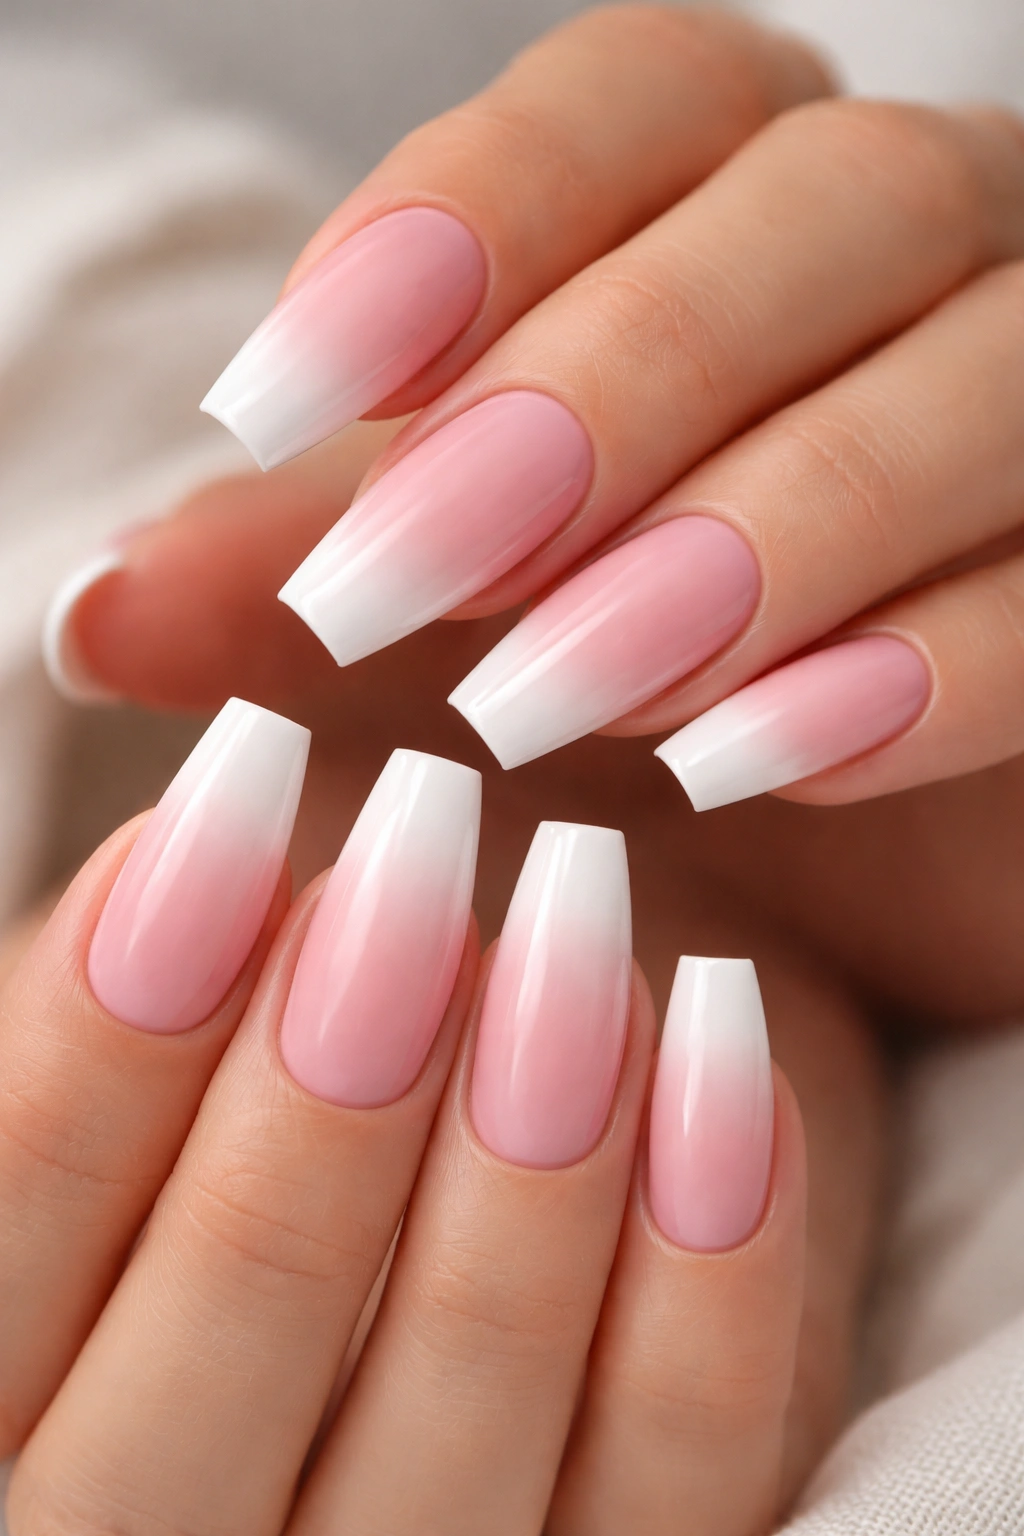
1. Classic Pink-to-White Ombre with French Tips
The pink-to-white gradient is a timeless choice that works for literally everyone. This design starts with a soft, pale pink at the base of your nail and gradually transitions into crisp white at the tips, giving you that elevated, fresh-from-the-salon look that never goes out of style. On coffin nails, this design is particularly elegant because the elongated shape allows the color transition to span a greater distance, making the gradient feel smooth and intentional rather than abrupt.
Why It’s a Foolproof Choice
This pink-to-white combo is genuinely flattering on all skin tones — warm undertones glow with peachy-pink shades, while cool undertones look stunning with rosy or mauve pinks. The design also suits any season and pairs with literally any outfit in your closet. The white tips add that fresh, clean element that feels both polished and approachable.
How to Create the Look
- Use a pale pink base coat or gel as your starting shade — something in the ballet pink or rose family
- Blend white polish or gel gradually onto the upper half and tip using a sponging method with a makeup wedge
- Build the white coverage in thin layers, blending each layer to avoid harsh lines
- Seal with a high-gloss top coat to enhance the seamless gradient effect
- Consider adding subtle sparkle with a nude shimmer top coat for added dimension
Pro tip: This design looks fresher longer if you keep your white tips clean and sharp. A quick touch-up with white polish on the very tip every few days maintains that bright, fresh appearance that makes this design so appealing.
2. Deep Purple-to-Lavender Twilight Ombre
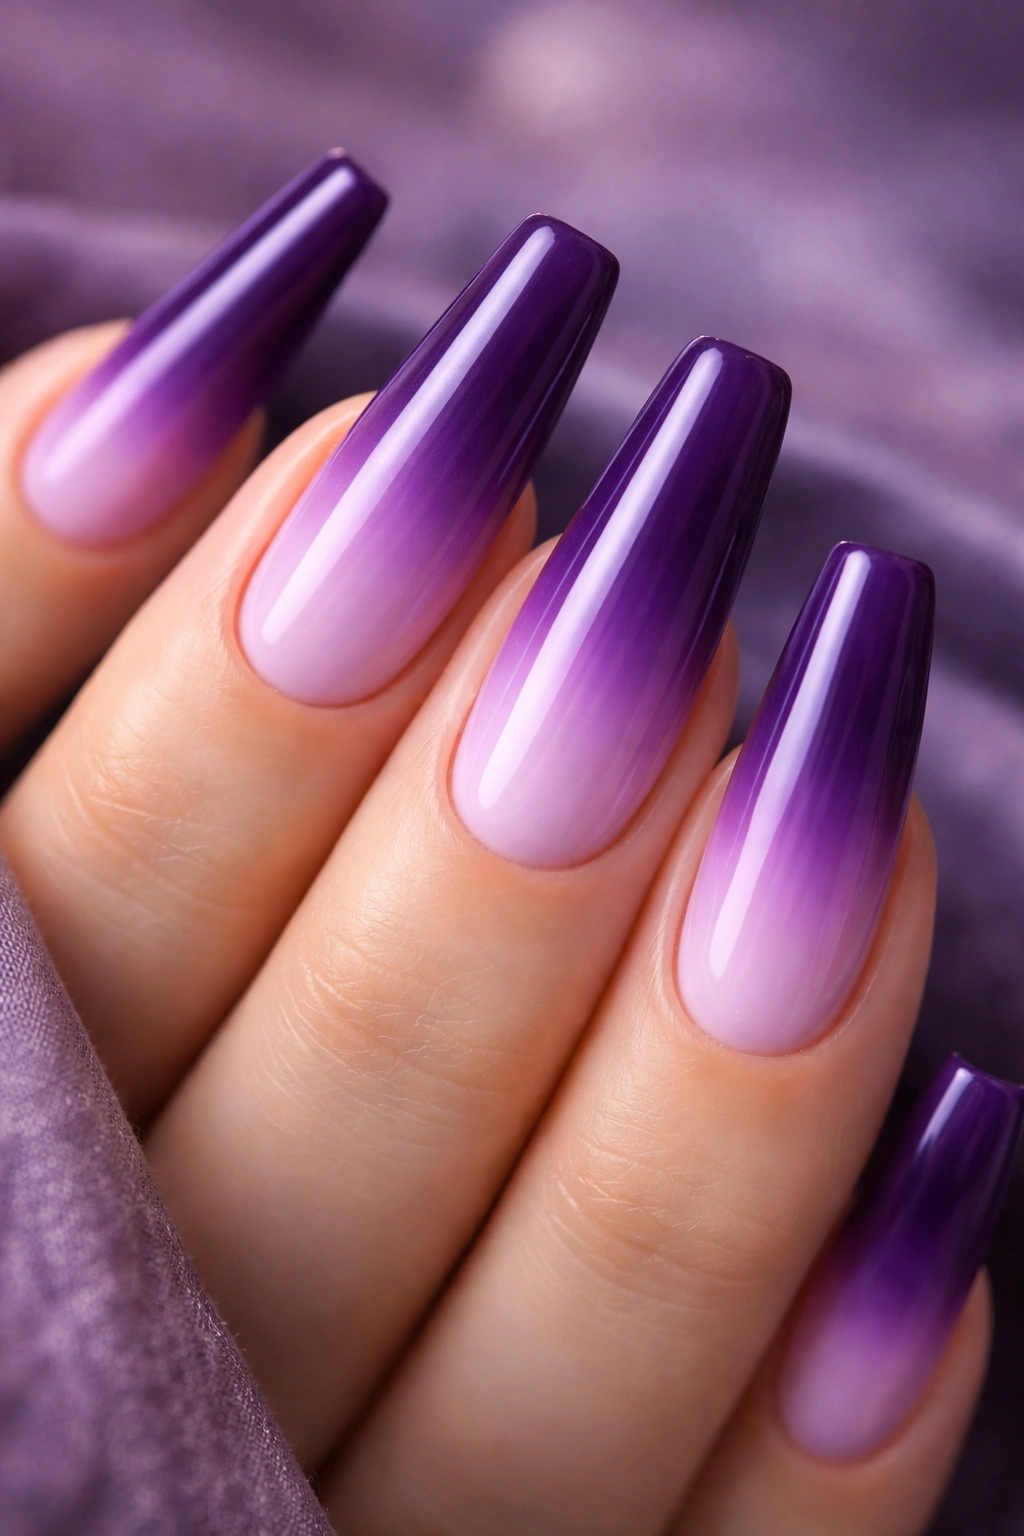
Purple is having a moment, and for good reason — it’s moody, sophisticated, and uniquely flattering on a wide range of skin tones. This particular design starts with a deep, rich purple (almost plum) at the base and gradually transforms into a soft, dreamy lavender at the tips. On long coffin nails, the effect feels almost ethereal, like watching a sunset fade into twilight.
The Depth and Dimension Factor
What makes this design particularly striking is the drama of the color shift. You’re moving from a bold, saturated color to something much lighter and more delicate, which creates genuine visual interest. The design works beautifully because the deep purple grounds the nail while the lavender tips keep it feeling light and wearable.
Application Tips for Success
- Select a deep plum or eggplant purple as your base shade
- Have a true lavender polish ready for blending — not too light, not too muted
- Use a makeup sponge to dab and blend the lavender gradually into the purple base
- Apply thin layers to avoid a streaky appearance; building up is better than applying too much at once
- A matte top coat actually enhances this design, though glossy also works beautifully
Worth noting: If your undertone is warm, lean toward purple shades with red undertones rather than blue undertones, which can look slightly muddy on warmer skin.
3. Nude-to-Rose Gold Shimmer Gradient
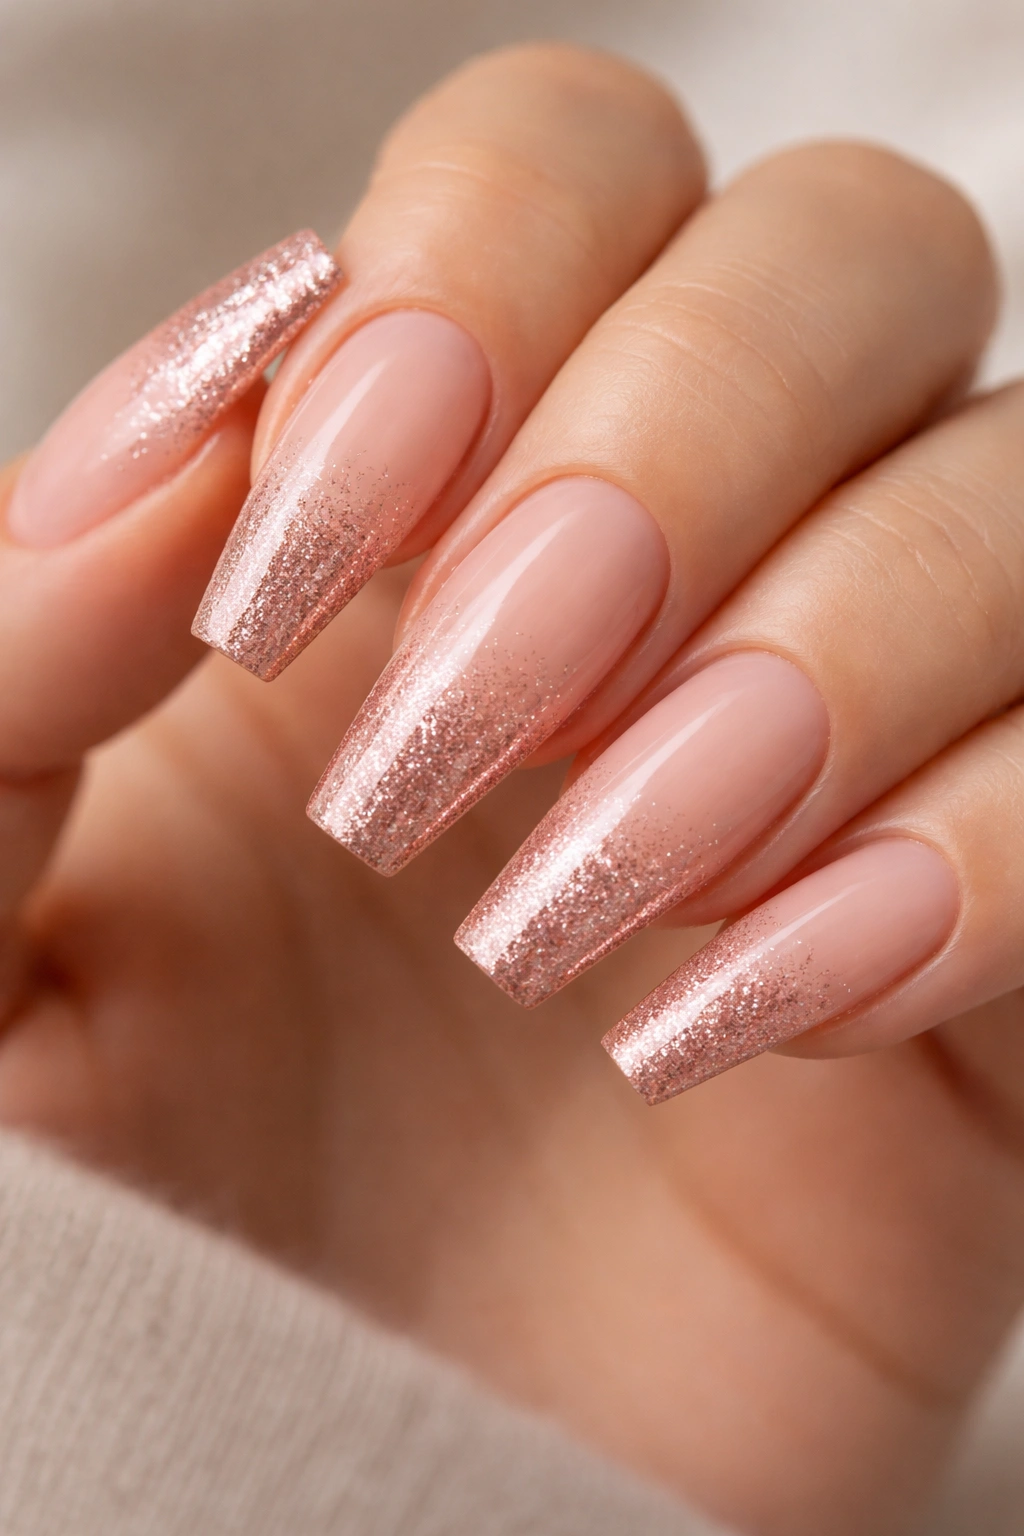
This design combines the universally wearable nude base with the subtle sparkle of rose gold, creating something that’s both understated and absolutely captivating. The gradient moves from a warm, creamy nude at the cuticle to a soft rose gold shimmer at the tips, and the addition of metallic shimmer adds luxury without overwhelming the nail.
Why Shimmer Transforms the Whole Design
Ombre with shimmer adds dimension that plain ombre sometimes lacks. The nude acts as a neutral anchor, while the rose gold shimmer catches light and creates subtle sparkle that feels fancy but not overdone. On coffin nails, this design elongates your fingers while the shimmer draws attention to your hands in the best possible way.
Creating a Cohesive Shimmer Blend
- Start with a warm nude base — something in the sand, taupe, or soft peachy-nude family
- Apply the nude as your full base coat, making sure coverage is even
- Mix a rose gold shimmer polish with a clear base to create a buildable, blendable shade
- Sponge the shimmery mixture onto the upper third and tip of your nail
- Blend gently where the nude and shimmer meet using a clean, slightly damp brush
- Finish with a glossy top coat to amplify the shimmer effect
Pro tip: A touch of pure rose gold shimmer applied directly to the very tip creates extra shine and makes the gradient feel more intentional.
4. Burgundy-to-Nude Sophisticated Fade
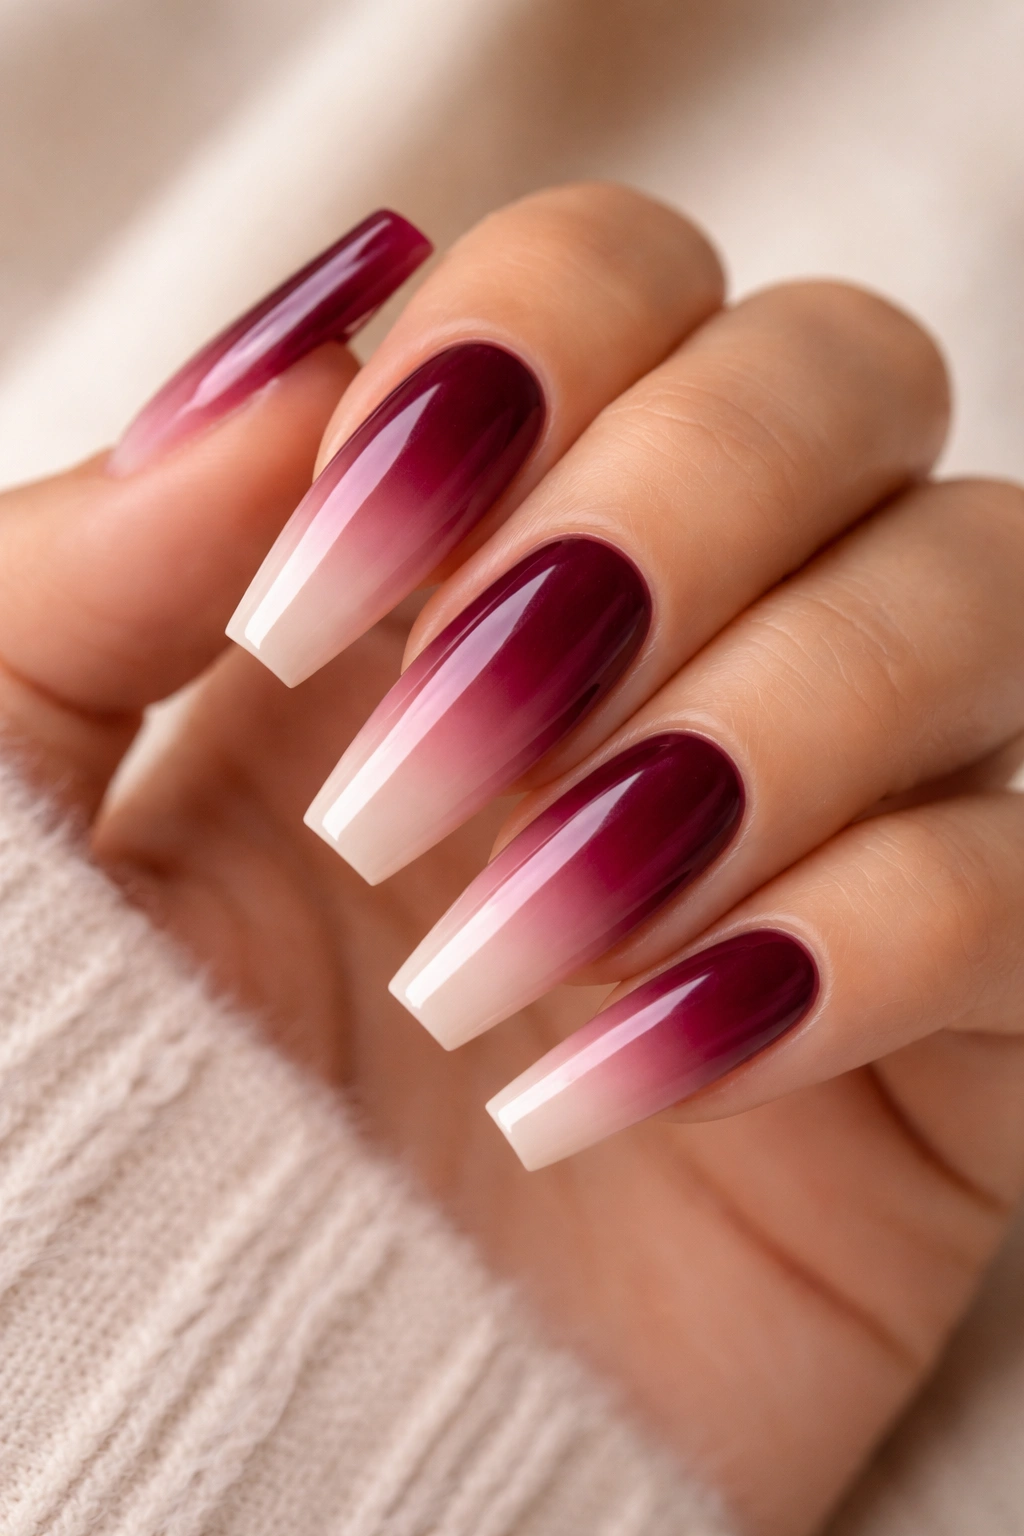
Burgundy is the color of power and elegance, and when you fade it into a light nude, you get a design that’s appropriate for any professional setting while still feeling creative and polished. This ombre moves from a deep, wine-like burgundy at the base to pale, warm nude at the tips, creating a sophisticated transition that doesn’t feel casual.
The Professional Appeal
This design works brilliantly for anyone in a client-facing role, corporate environment, or any situation where you want your nails to look intentional and elevated without being loud. The burgundy base adds personality, while the nude transition keeps it refined. On coffin nails, the effect is particularly striking because the length gives the gradient room to develop naturally.
Achieving Smooth Burgundy-to-Nude Transitions
- Choose a true burgundy or wine shade for your base — avoid anything too brown or muddy
- Select a nude that’s lighter than your skin tone for maximum contrast with the burgundy
- Apply the burgundy as your complete base coat
- Use a makeup sponge to apply the nude gradually, starting at the middle of the nail and working toward the tip
- Blend the middle zone where colors meet by dabbing gently with a clean, damp sponge
- The gradient should feel gradual, not like a hard line between two colors
Worth knowing: The key to this design is choosing a burgundy and nude that complement each other. Warm nudes pair better with burgundies that have red undertones, while cool nudes work with burgundies that lean slightly purple.
5. Teal-to-Mint Green Ocean Vibes

If you love color and want something that feels fresh and unexpected, teal-to-mint is absolutely stunning on coffin nails. This design starts with a deeper, more saturated teal at the base and gradually becomes a soft, pale mint at the tips, creating an effect that feels like gazing into tropical waters.
The Color Psychology and Impact
Teal and mint represent calm, creativity, and confidence — and they look especially beautiful during spring and summer, though honestly, they work year-round. On long coffin nails, the color transition feels smooth and intentional. The design is vibrant enough to make a statement but not so bold that it feels inappropriate for everyday wear.
Blending Two-Tone Greens Smoothly
- Start with a true teal polish as your base — something that’s blue-green and saturated
- Have a pale, creamy mint ready for the tips — the lighter the better
- Apply teal to your entire nail first, ensuring even coverage
- Using a makeup sponge, apply mint to the upper third and tip area
- The blend zone should span roughly the middle third of your nail
- Layer and blend multiple times if needed to create a seamless transition
Pro tip: A gloss top coat really brings out the vibrancy of teal and mint, making the colors feel richer and more dimensional than they would with a matte finish.
6. Black-to-Silver Edgy Metallic Ombre

For anyone who loves a darker aesthetic, black fading to silver is absolutely striking. This design starts with deep, rich black at the cuticle and gradually transitions to shimmering silver at the tips, creating an edgy, high-fashion look that feels both mysterious and glamorous. On long coffin nails, this design has serious visual impact.
The Drama of Dark-to-Metallic
Black-to-silver works beautifully because you’re pairing opacity with shimmer, which creates natural visual interest. The black grounds the design and adds drama, while the silver tips catch light and feel elevated. This design photographs incredibly well and looks equally stunning in person.
Creating Black-to-Silver Dimension
- Apply a solid black base coat, ensuring full opacity and even coverage
- Use a silver shimmer or silver glitter polish for the tip area
- Create a gradient by applying silver to the upper portion of your nail
- Use a sponge to blend where black and silver meet, working the silver downward into the black
- Consider adding extra sparkle by applying pure silver shimmer to just the tip for emphasis
- A high-gloss top coat enhances both the depth of black and the brightness of the silver
Worth knowing: If you want more of a true gradient effect rather than a stark contrast, consider mixing your black with clear polish or using a charcoal gray as an intermediate shade.
7. Coral-to-Peach Sunset Ombre
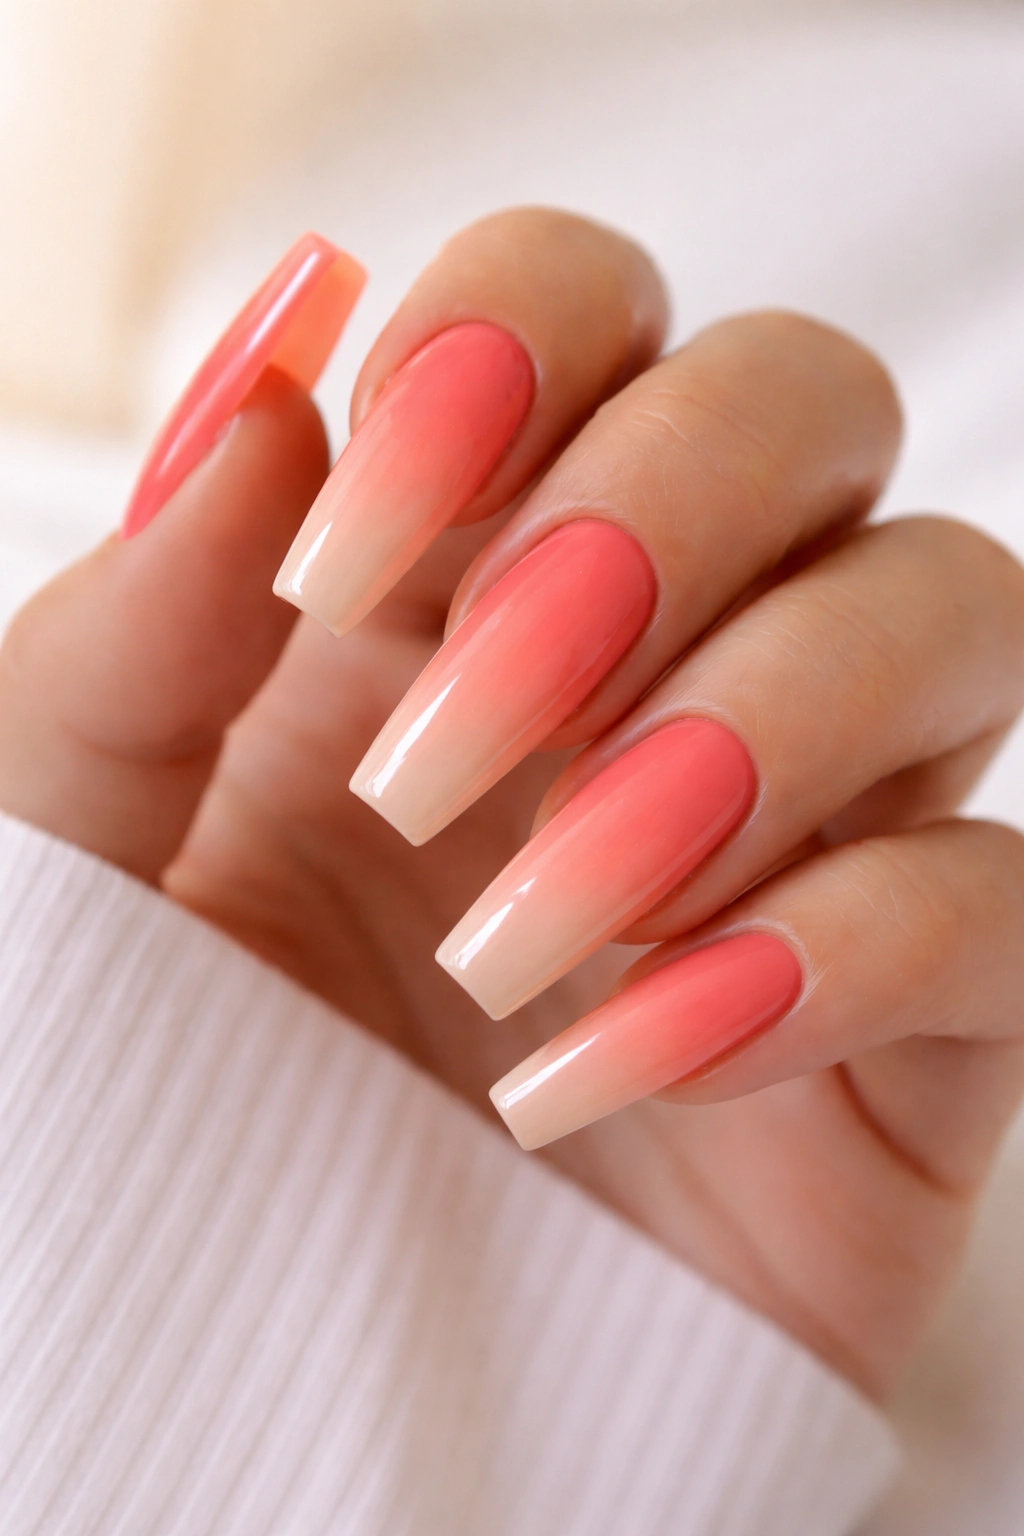
This warm, joyful design captures the essence of a gorgeous sunset and feels universally flattering. The ombre moves from a deeper, more saturated coral at the base to a soft, pale peach at the tips, creating warmth and dimension. On coffin nails, this design feels both playful and sophisticated.
Why Warm Peachy Tones Work on Every Tone
Coral and peach are magic colors because they flatter virtually every skin tone when you choose the right shades. Deeper skin tones look stunning with saturated, true corals. Medium skin tones glow with peachy-corals. Lighter and cooler skin tones look best with more muted, peachy-coral shades. The gradient nature of this design means you’re using a range of shades, so you can hit the right tone for your skin.
Blending Coral and Peach Seamlessly
- Select a vibrant, true coral as your base shade
- Choose a pale, creamy peach for your tip shade
- Apply the coral as your full base coat with even coverage
- Sponge the peach onto the upper portion and tip of your nail
- Blend in the middle zone by dabbing gently with a clean makeup wedge
- Build up the peach gradually to avoid a splotchy appearance
- Finish with a glossy top coat to enhance the warmth and dimension
Pro tip: A subtle gold shimmer mixed into the peach makes this design feel even more sunset-like without overwhelming the gradient.
8. Navy Blue-to-Sky Blue Coastal Ombre
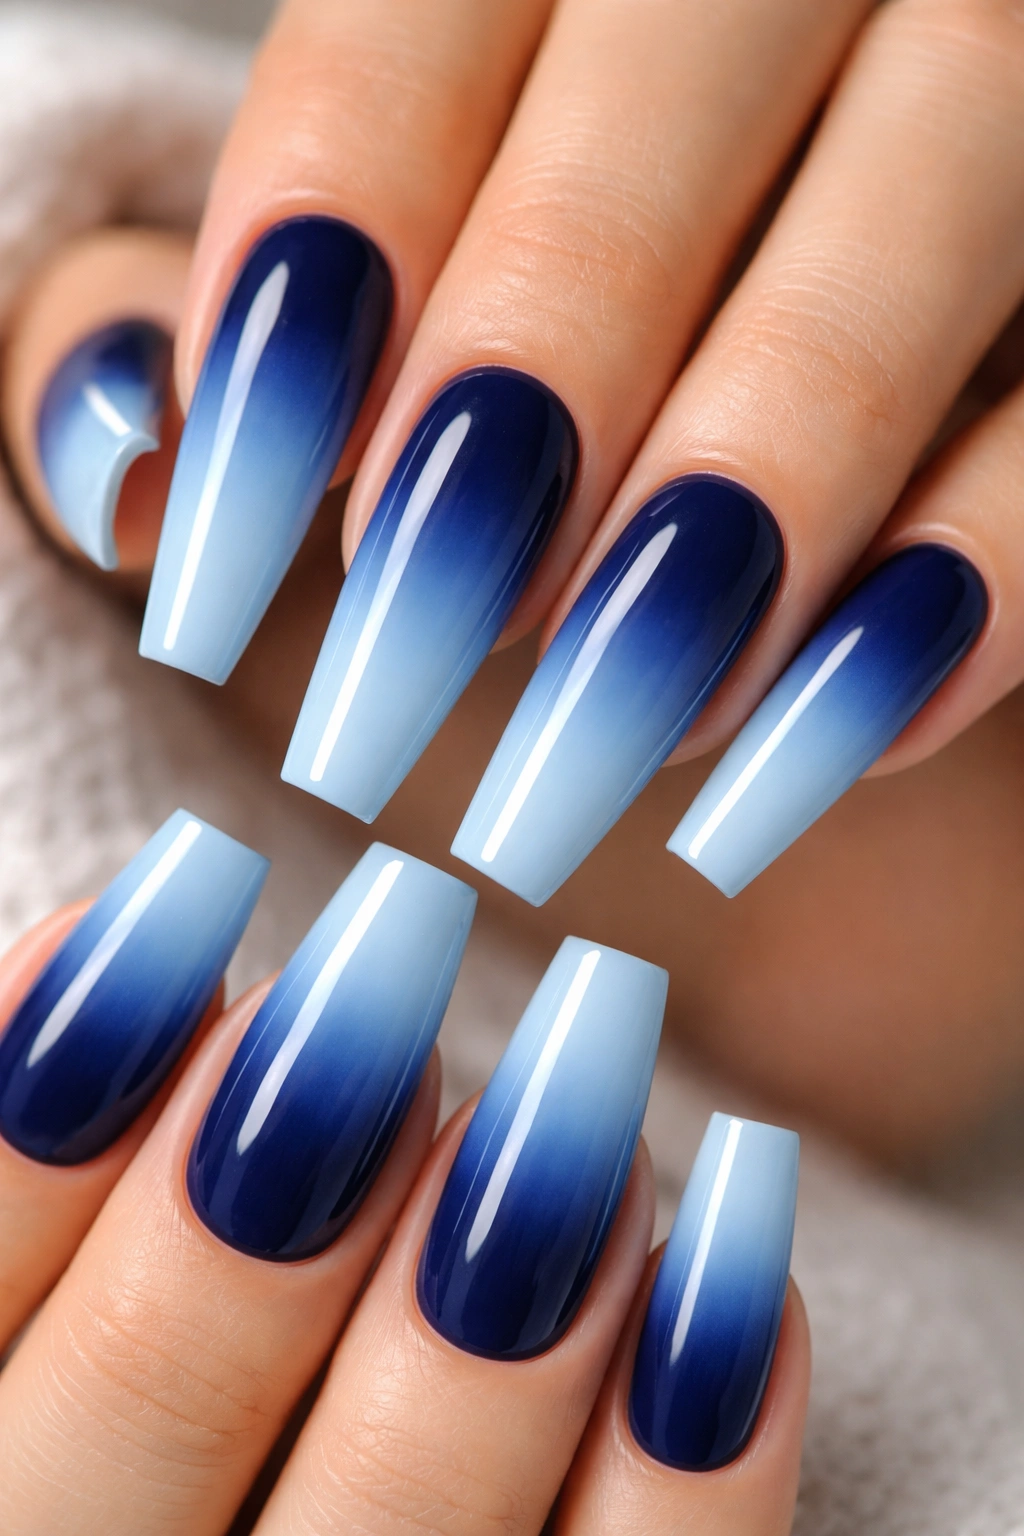
Navy-to-sky blue is a design that feels fresh, serene, and endlessly wearable. The gradient moves from a deep, rich navy at the cuticle to a light, clear sky blue at the tips, creating an effect that feels calm and sophisticated. On long coffin nails, the color transition feels natural and elongating.
The Appeal of Blue Gradients
Blue is one of the most universally loved colors, and a gradient from deep to light blue works across seasons and occasions. Navy is professional and grounding, while sky blue is approachable and friendly. Together on coffin nails, they create something that’s both interesting and wearable.
Achieving Navy-to-Sky Blue Perfection
- Use a true navy blue as your base — not too purple, not too dull
- Select a pale, clear sky blue for the tip area
- Apply navy to your entire nail first
- Using a makeup sponge, dab sky blue onto the upper half and tip
- Work the sponge gently to blend where the two blues meet
- The transition zone should feel gradual, showing all the in-between shades
- A gloss top coat enhances the depth and makes the colors feel richer
Worth noting: If your navy leans too purple, it can look muddy when blended with sky blue. Choose a navy with more gray undertones for the clearest, most beautiful gradient.
9. Blush Pink-to-Deep Rose Romantic Ombre
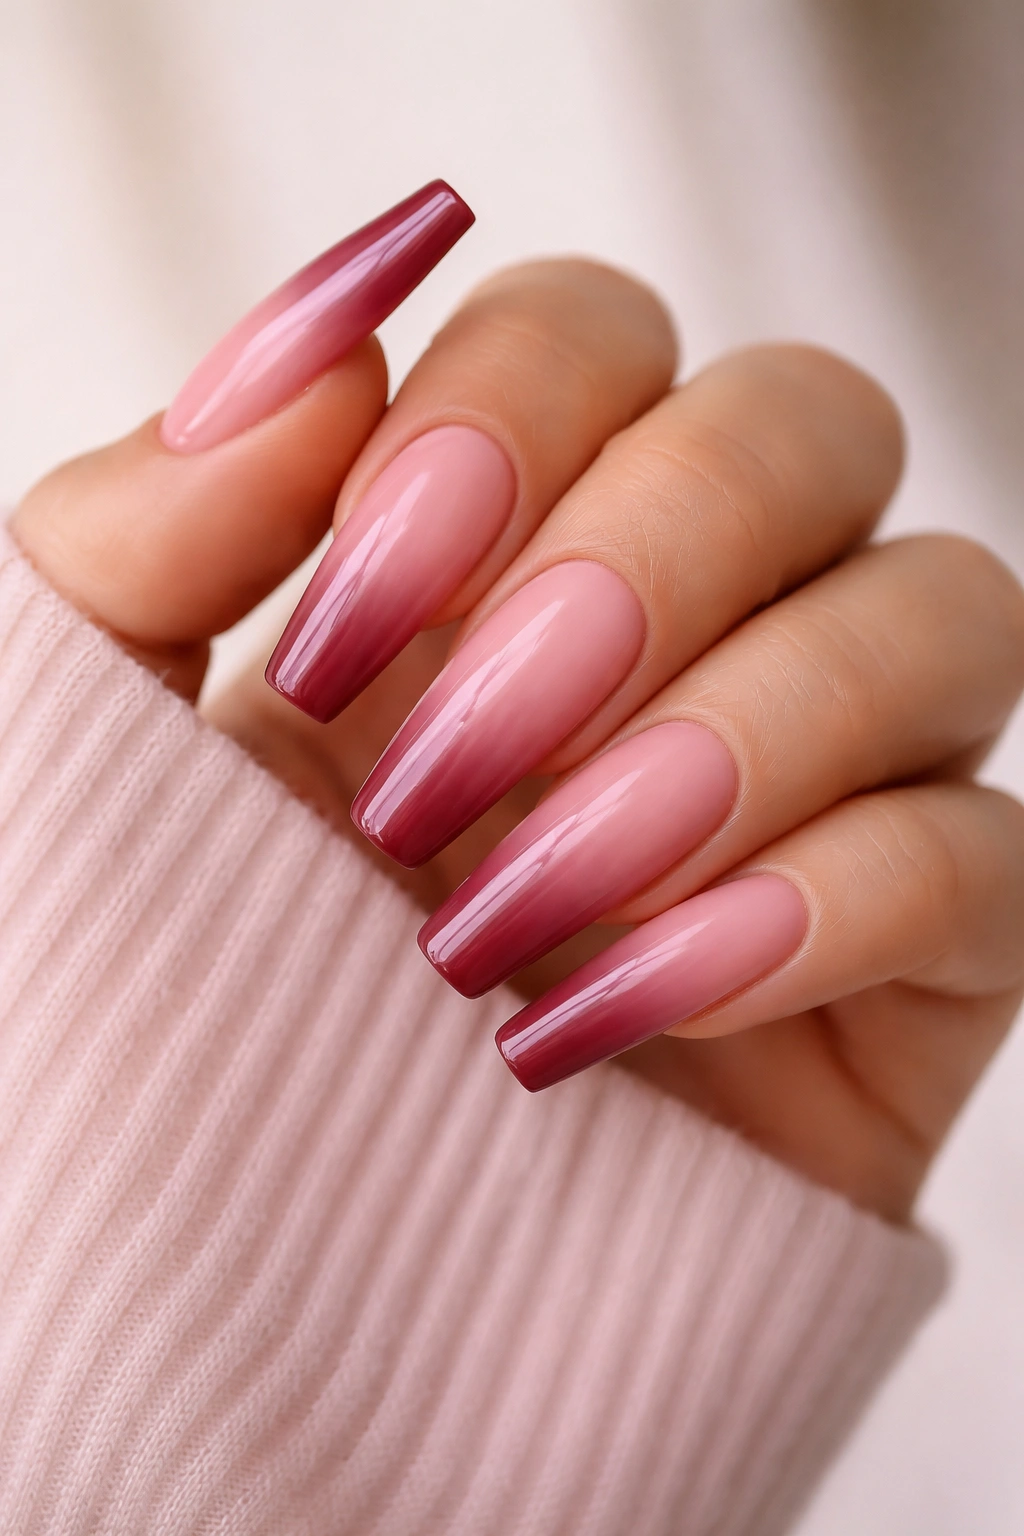
This design is pure romance — it starts with a delicate blush pink at the cuticle and deepens into a rich, jewel-toned rose at the tips. The effect is deeply feminine and elegant, and on long coffin nails, it feels utterly sophisticated. This ombre works for engagements, weddings, anniversaries, or literally any time you want your nails to feel extra special.
The Elegance of Pink Deepening
Unlike ombre designs that move toward lighter shades, this one goes deeper and richer toward the tips, which creates a different visual impact. The progression from light to dark feels intentional and draws attention downward along your elongated nails. The colors are universally flattering and add romance without being over the top.
Building Blush-to-Rose Transitions
- Start with a pale blush pink — something barely-there and soft
- Select a deeper rose shade that’s jewel-toned and rich, not brown or muddy
- Apply blush pink as your full base coat
- Using a makeup sponge, apply the deeper rose to the middle and tip area of your nail
- Blend gently where the two pinks meet by dabbing with a clean sponge
- You want to see a clear gradient of pink tones as you move from cuticle to tip
- A glossy top coat makes the colors feel more saturated and romantic
Pro tip: A tiny amount of rose shimmer at the very tip creates extra elegance and makes the transition feel more intentional.
10. Olive-to-Cream Earthy Minimalist Ombre
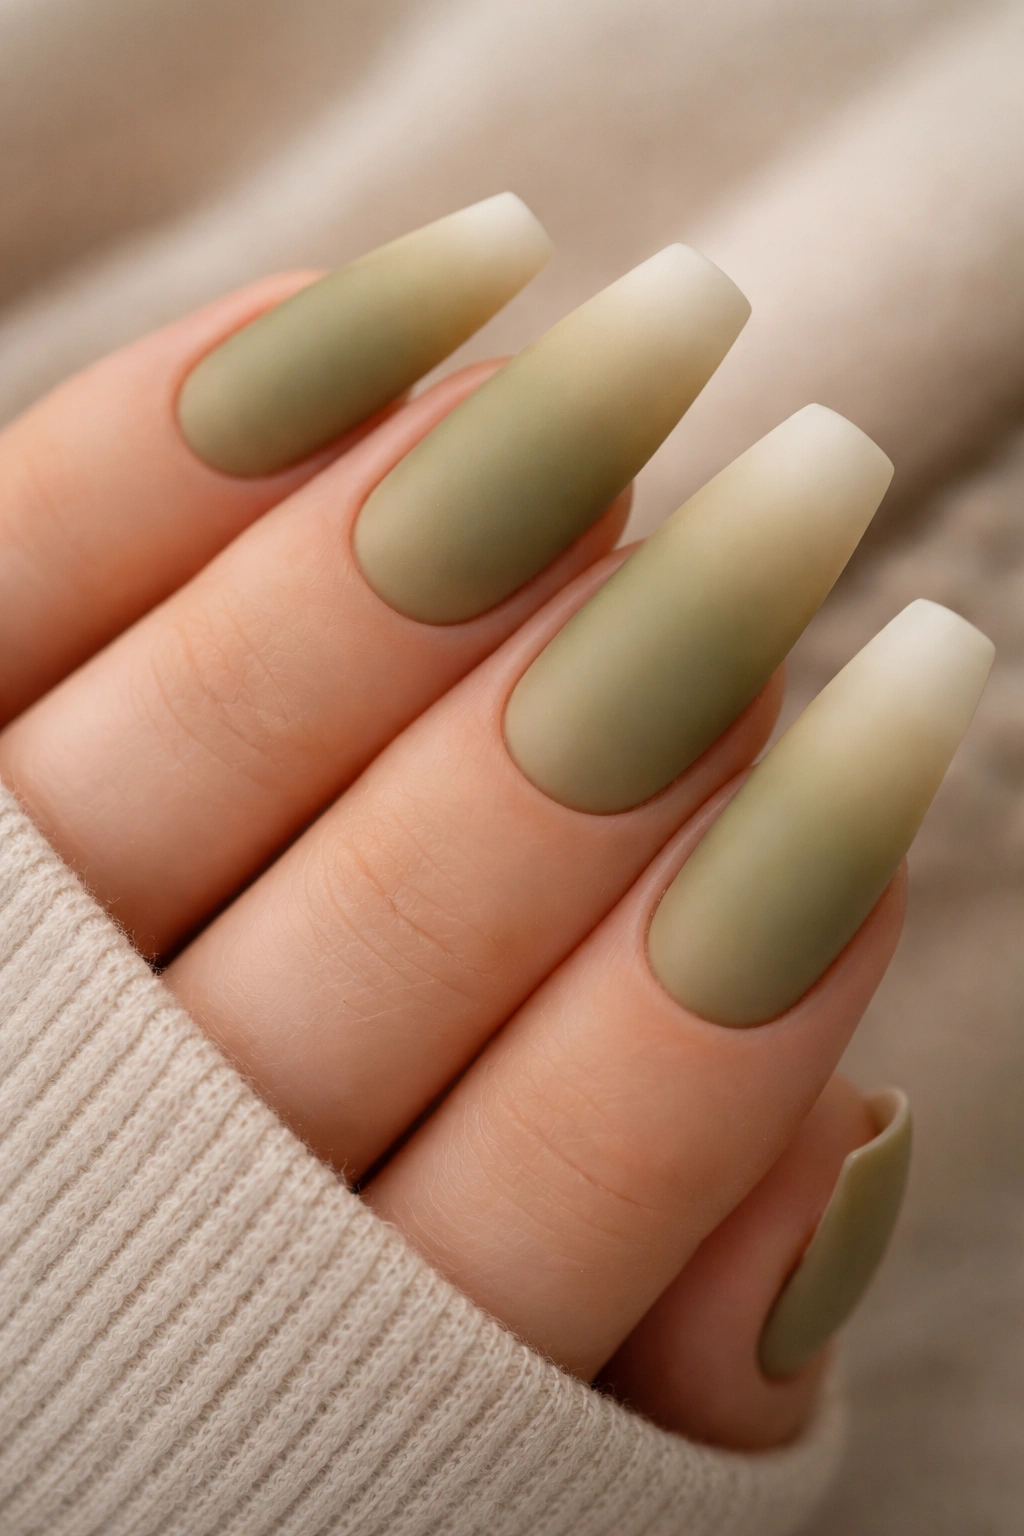
For anyone who loves earthy, natural tones, olive-to-cream is absolutely gorgeous. This design moves from a sophisticated olive green at the base to a soft, warm cream at the tips, creating something that feels grounded, natural, and effortlessly chic. On long coffin nails, this design feels both minimal and intentional.
Why Olive Works for Minimal Aesthetics
Olive is having a major moment in beauty and fashion, and for good reason — it’s sophisticated, unexpected, and deeply flattering on a huge range of skin tones. When paired with warm cream, it creates an ombre that feels understated but absolutely intentional. The design works year-round and pairs beautifully with natural, minimal aesthetics.
Creating Smooth Olive-to-Cream Gradients
- Choose a muted, true olive as your base — not too yellow, not too brown, but balanced
- Select a warm, creamy off-white for your tip shade
- Apply olive to your entire nail, ensuring even coverage
- Using a makeup sponge, apply cream to the upper third and tip
- Blend the middle zone where olive and cream meet
- Layer and build up the cream gradually to create a seamless transition
- A matte top coat actually complements this earthy palette beautifully, though glossy works too
Worth knowing: Olive can look slightly muted without proper lighting, so consider a gloss finish to make the color feel richer and more dimensional.
11. Charcoal-to-Dusty Rose Moody Romance
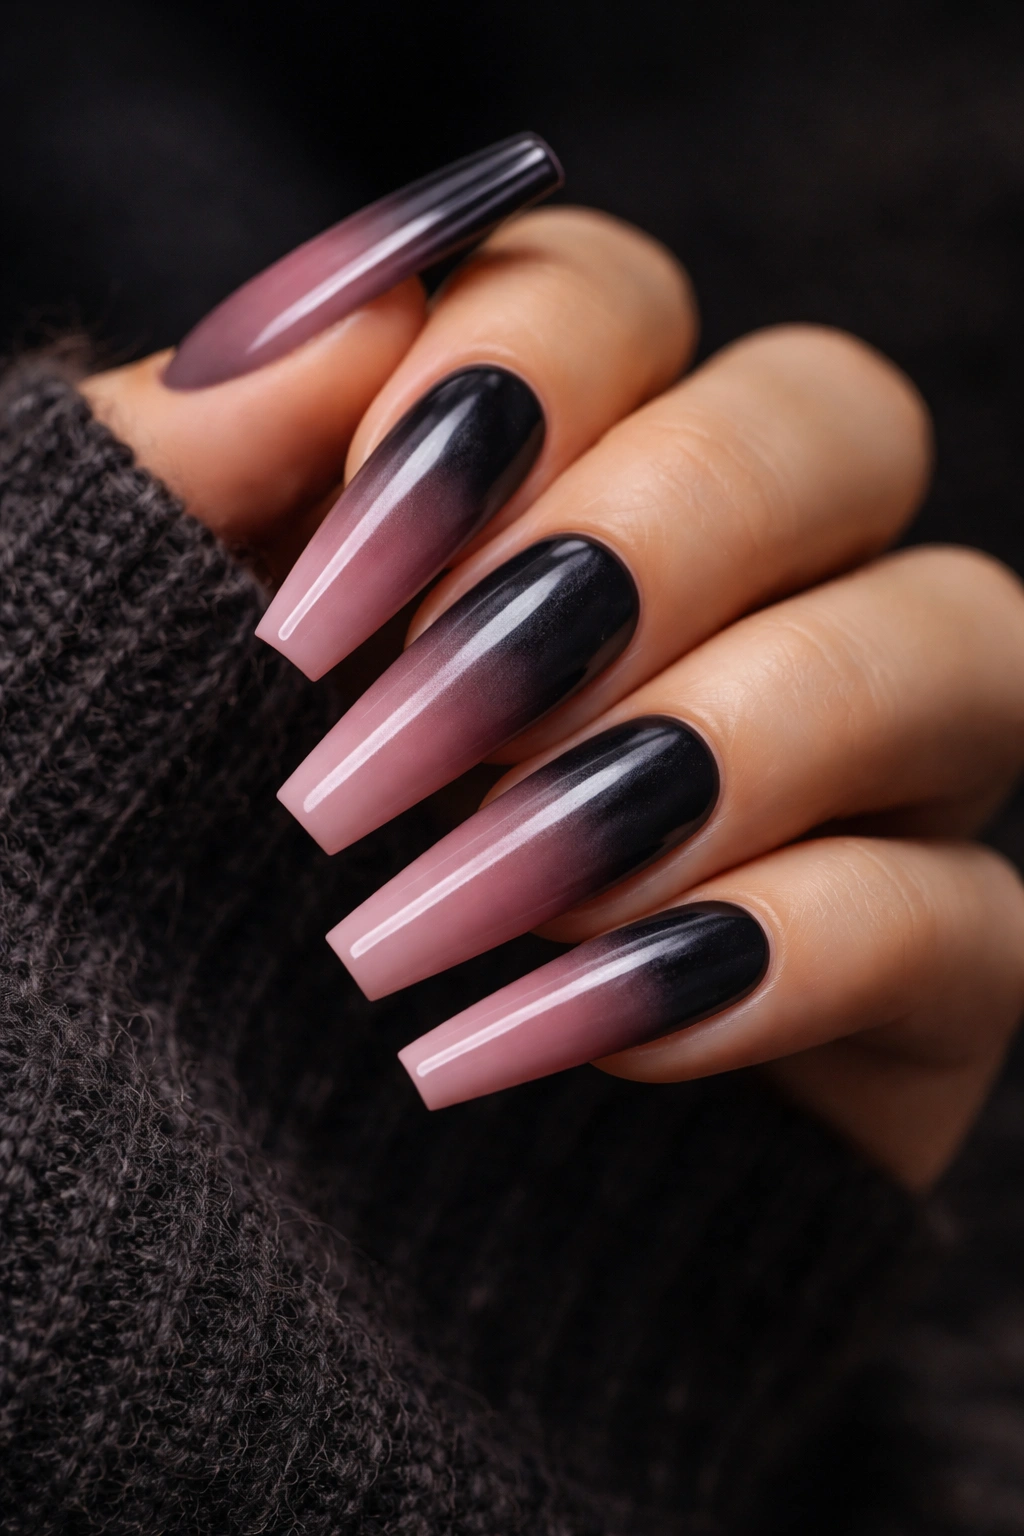
This final design combines moody sophistication with soft romanticism — it starts with deep charcoal at the base and gradually transitions into dusty rose at the tips. The effect is genuinely stunning, feeling both edgy and elegant simultaneously. On long coffin nails, this ombre feels high-fashion and introspective.
The Unexpected Beauty of Charcoal-to-Rose
This combination works because you’re balancing dark, moody tones with something softer and more romantic. The charcoal grounds the design and adds drama, while the dusty rose brings warmth and approachability. It’s a pairing that feels unexpected but completely harmonious.
Mastering Charcoal-to-Dusty Rose Transitions
- Use a true charcoal gray as your base — something dark but not pure black
- Select a dusty rose that’s muted and warm, not bright or neon
- Apply charcoal as your complete base coat with even coverage
- Using a makeup sponge, apply dusty rose to the upper portion and tip
- Blend gently where the colors meet, building up the rose gradually
- The transition should show shades in between — muted purple-grays and mauve tones
- A glossy top coat enhances both the depth of charcoal and the subtlety of the dusty rose
Pro tip: This design looks particularly striking if you add a subtle hint of sparkle — a tiny amount of rose shimmer at the very tip catches light without overwhelming the moody aesthetic.
Final Thoughts
Ombre coffin nails offer something special that other nail shapes and designs sometimes struggle to deliver — they combine elegance with personality, and they work for virtually any occasion and aesthetic you can imagine. The key to nailing (pun intended) any of these designs is patience with the blending process and choosing colors that genuinely complement your skin tone and personal style.
Whether you’re drawn to classic combinations like pink-to-white, bold statements like black-to-silver, or unexpected pairings like charcoal-to-dusty rose, the elongated coffin shape ensures that your gradient will have room to develop beautifully. The length of the nail lets the ombre effect truly shine, creating dimension and visual interest that shorter nails sometimes can’t quite achieve.
The best part about all these designs is that they’re genuinely achievable at home with a bit of practice and patience. A makeup sponge, some thoughtfully chosen polish colors, and time to build up thin layers will get you results that rival what you’d pay for at a professional salon. And if DIY isn’t your thing, these designs make perfect inspiration to show your nail technician — they’re specific enough to communicate exactly what you want, but flexible enough that your technician can adapt them based on the colors and products they have available.
