

Gold can go wrong fast on coffin nails. On the right set, gold coffin nails look like wearable jewelry: sharp edges, clean shine, a little attitude. On the wrong set, the color turns flat, the placement feels heavy, and the whole manicure starts leaning costume instead of polished.
That’s why this combo is more technical than people think. Coffin nails already have a strong shape—straight sidewalls, a tapered body, squared-off tip—so every line you add gets noticed. Metallic polish also shows bumps, brush marks, and uneven apex placement faster than a sheer pink or soft nude ever will.
I keep coming back to gold on coffin nails because the shape gives the metal room to breathe. A short round nail can make foil or chrome look cramped. A medium or long coffin gives you real space for a razor-thin French tip, a cuticle crescent, a marble vein, or a full mirrored surface that looks closer to metal hardware than regular nail polish.
A good set isn’t about piling gold onto every finger. It’s about placement, contrast, and knowing when to stop half a design earlier than you planned.
Picking the Right Gold Tone for Coffin Nails
Not all gold reads the same on a nail. Yellow gold, champagne gold, antique gold, and brushed gold each shift the mood of the manicure, and coffin nails amplify that shift because the surface area is larger and more geometric than a rounded shape.
If your skin has warm or olive undertones, richer yellow gold usually looks cleaner than pale silver-gold blends. Cooler undertones tend to pair well with champagne or soft metallic beige because the finish sits closer to the skin instead of jumping out in a hard stripe. Deep skin tones can wear nearly every gold family, though I’m especially fond of burnished gold and old-coin shades on a long coffin set. The contrast is sharp, not harsh.
Match the metal to the base color
A nude or milky pink base asks for a softer gold—think champagne, pale foil, or a brushed metallic gel paint. Black, emerald, navy, and burgundy can handle a denser, warmer gold because the background is doing some of the visual work.
White is its own category. A stark white nail beside warm yellow gold can look crisp and graphic, almost porcelain-like, while ivory or cream with gold feels softer and more dressed-up.
Match the finish to the nail length
- Short to medium coffin nails do well with thin gold detailing, cuticle lines, micro-French tips, and glitter fades.
- Medium to long coffin nails can carry full chrome, marble veining, foil placement, and encapsulated glitter.
- Extra-long coffin shapes need restraint somewhere—either fewer accent nails or one quieter base color—so the set still looks intentional.
And yes, finish matters as much as color. A mirror chrome feels sleek. Gold leaf feels broken and organic. Fine glitter looks more festive. Striping gel reads crisp and graphic. Same metal family, different personality.
Nail Prep That Keeps Metallic Polish Looking Smooth
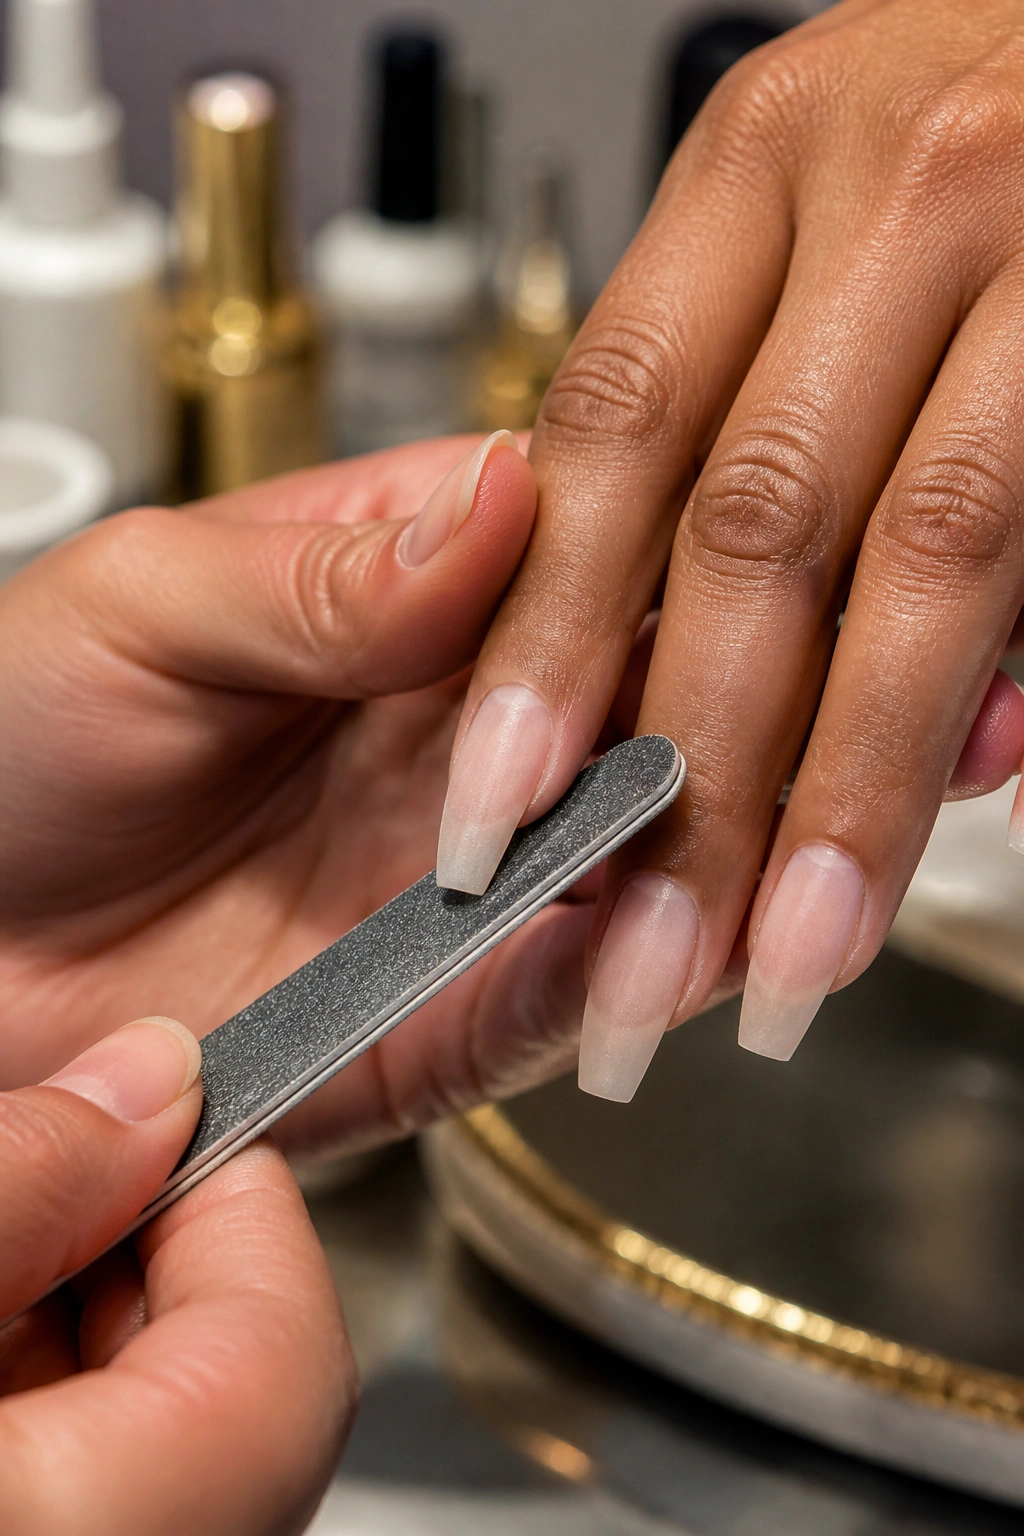
Metallics are unforgiving. A ridge that disappears under sheer pink can show up under chrome like a speed bump.
That starts before the design even begins. If you’re wearing gel, acrylic, or Gel-X, ask for the surface to be refined with a fine-grit file and then buffed smooth before color goes on. A lumpy base under gold doesn’t get hidden later; it gets framed.
Dermatologists with the American Academy of Dermatology have long advised against cutting cuticles too aggressively, and I’m with them on that one. Pushing softened cuticles back after a shower or after a cuticle remover has sat for about 30 seconds is usually enough. Once the skin is torn, metallic polish or foil near the cuticle can make that irritation more visible.
A few prep steps matter more than people realize:
- Dehydrate the nail plate with alcohol or a salon nail prep solution before base coat.
- Cap the free edge with color and top coat, especially on coffin nails where corners take hits.
- Use a ridge-filling base under metallic lacquer.
- Choose a no-wipe top coat if you’re applying chrome powder.
- Seal foil edges well, or they’ll start lifting at the sides first.
Skip one of those, and the manicure may still look good under salon lights. Three days later is another story.
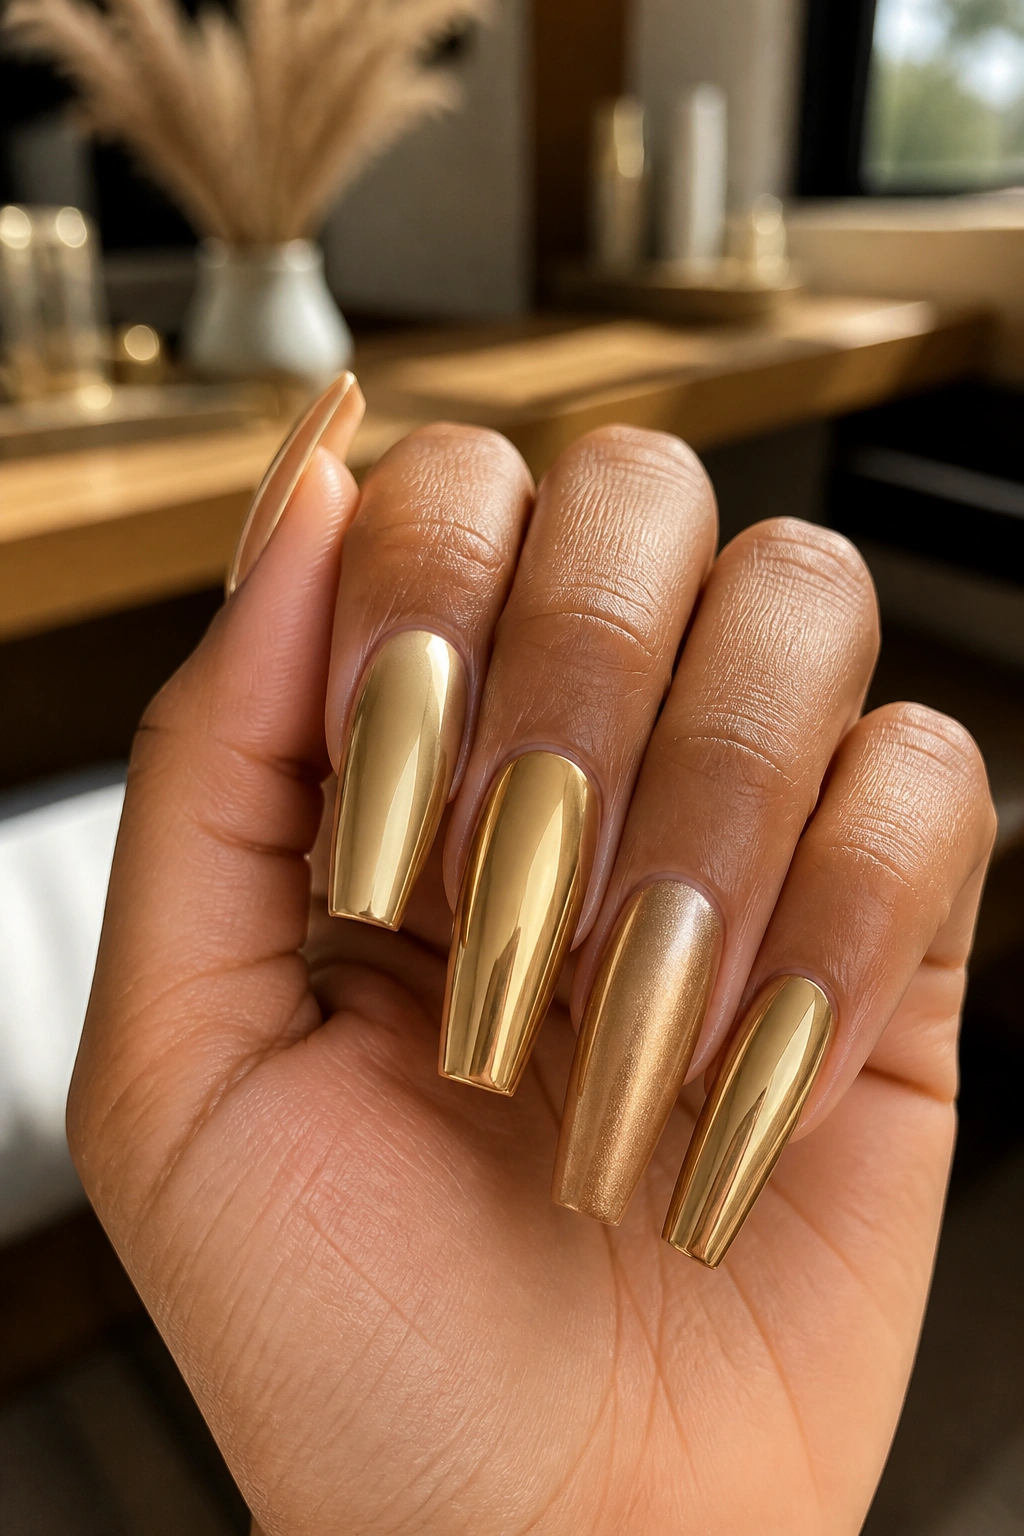
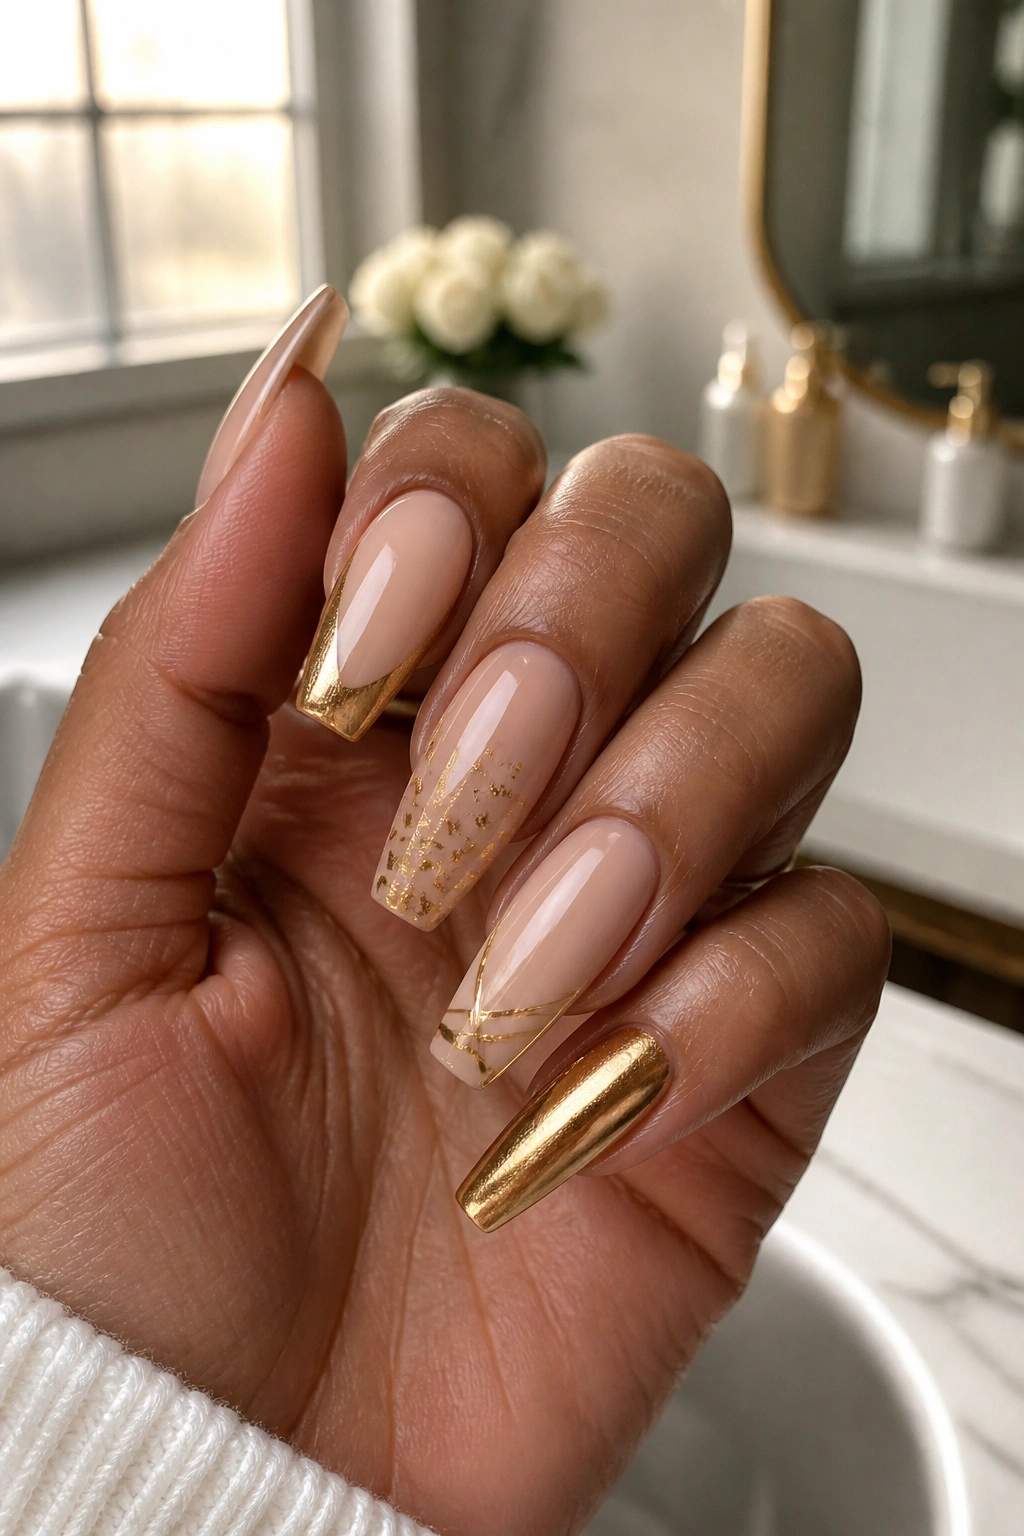
1. Mirror-Finish Gold Chrome Coffin Nails
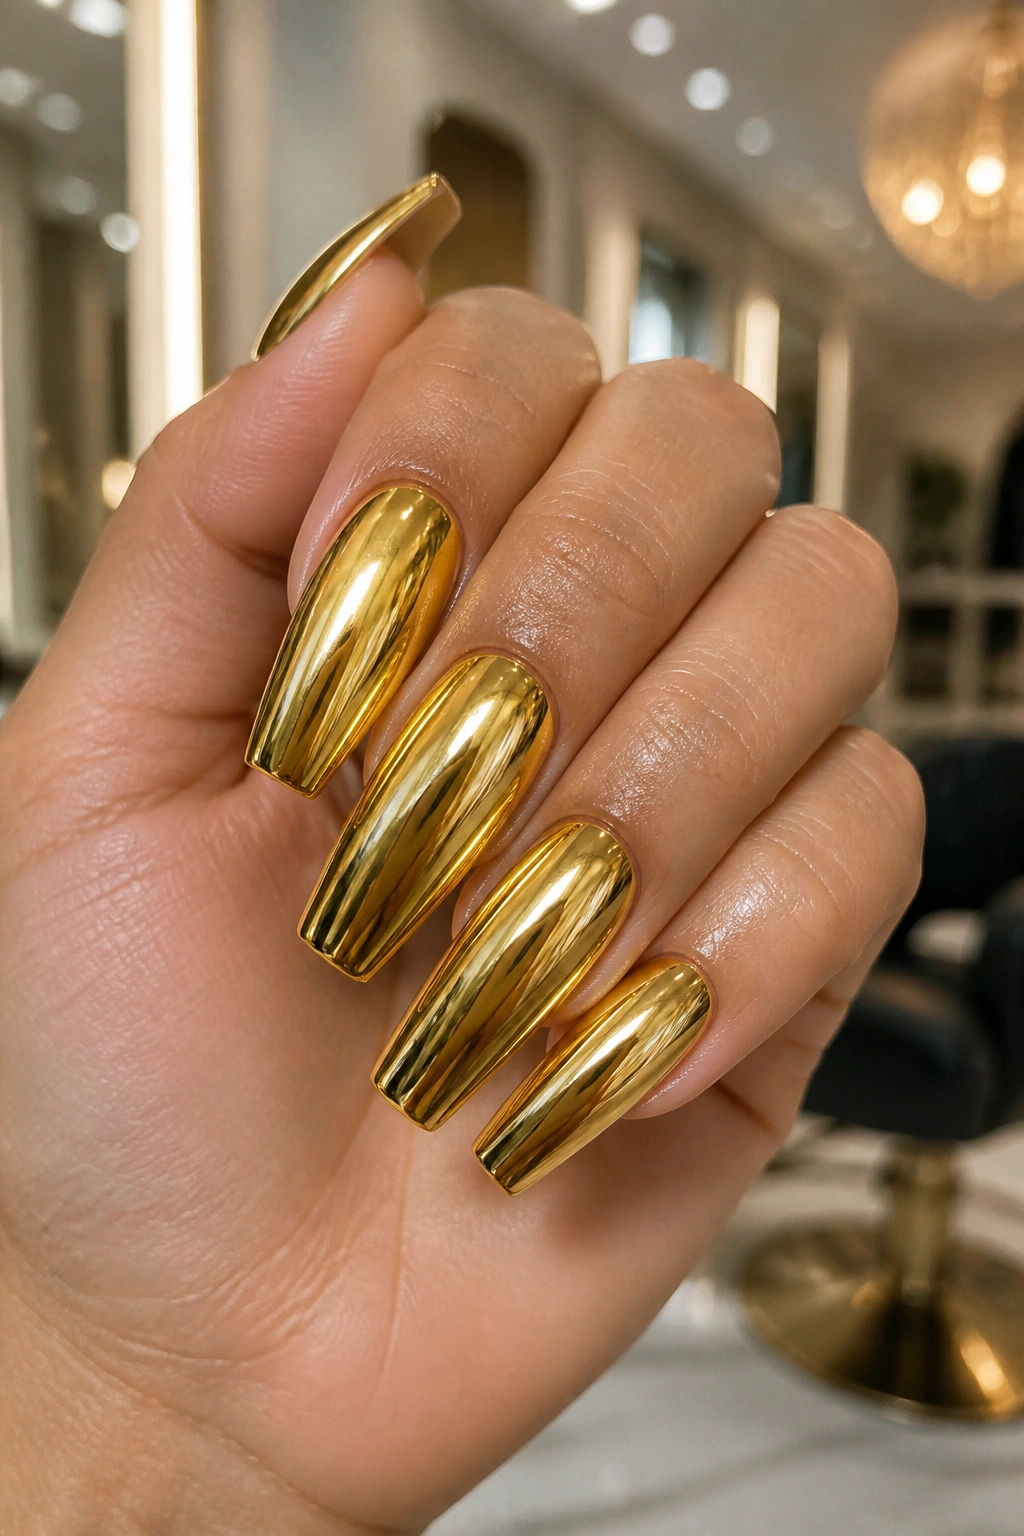
If you want gold coffin nails that look closest to actual metal, chrome is still the set to beat. A proper gold chrome surface reflects hard, almost like a tiny sheet of polished hardware fitted onto each nail.
Coffin shape helps here because the flat sides and squared tip make the reflection look clean rather than warped. On almond nails, chrome can feel softer. On coffin nails, it turns architectural.
Why chrome hits harder on coffin nails
A gold chrome manicure needs a smooth foundation, usually builder gel or a carefully filed acrylic overlay, followed by a black, nude, or caramel gel base. Black under chrome gives the richest molten effect. Nude underneath softens it and makes the metal look lighter.
The application matters. Chrome powder should be rubbed onto a cured no-wipe top coat with a silicone tool or fingertip applicator, then sealed again with gel. If the surface isn’t sealed around the sidewalls and tip, you’ll see wear first at the corners.
Quick details that make the set look cleaner
- A medium coffin length shows the mirror effect well without making daily tasks annoying.
- Ask for a slightly tapered sidewall, not an extreme taper, so the reflection stays broad.
- A high apex helps the nail hold its shape, though too much bulk will make chrome look puffy.
- Gold chrome looks sharper with minimal extra art—maybe one accent nail, not five.
Best move: keep one or two nails plain chrome and let the rest carry subtle detail, like a nude base or a single strip of foil.
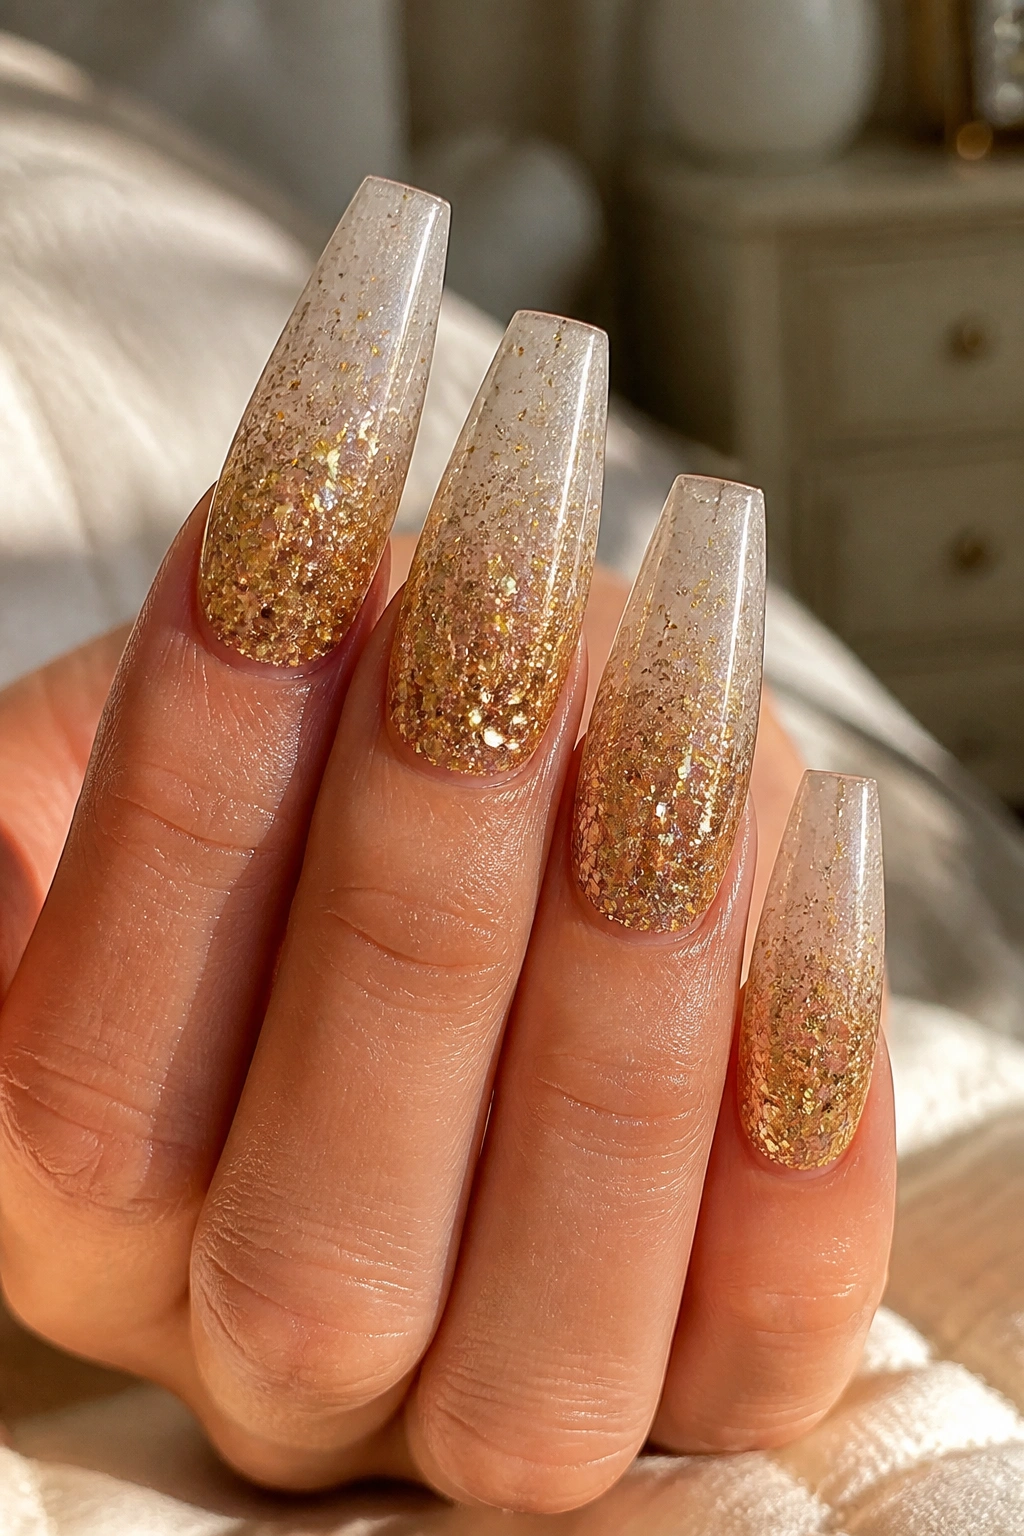
2. Soft Champagne Ombré Coffin Nails
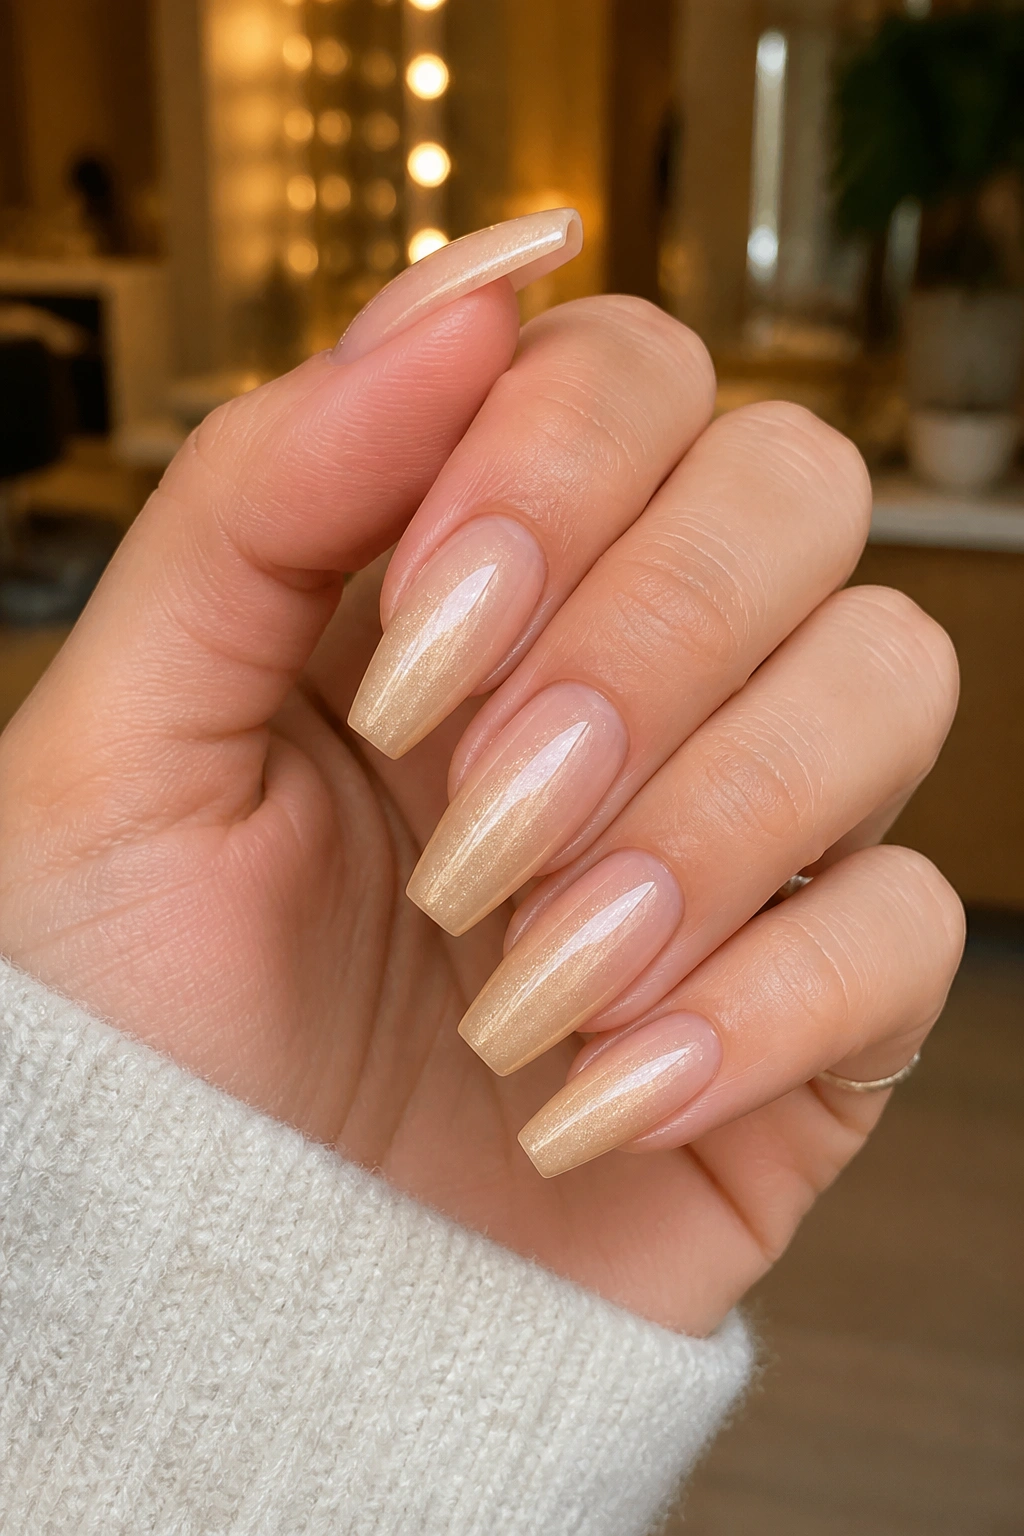
This is the version I reach for when full metallic gold feels like too much surface. A champagne ombré starts soft at the cuticle and builds toward the tip—or reverses that order—and because the shift is blurred, the set grows out more gracefully than a hard gold line.
The nicest versions use fine champagne glitter or airbrushed metallic pigment over a sheer pink, milky beige, or pale peach base. A chunky glitter mix can still work, though it changes the mood. Fine particles look smoother and dressier; chunky glitter feels more playful and a bit louder.
Medium coffin nails are the sweet spot. Shorter lengths can lose the fade because there isn’t enough runway for the blend. Long lengths look good too, though the fade needs to start lower on the nail so the transition doesn’t look abrupt.
I like this design on clients who want gold but still need a manicure that makes sense with work clothes, denim, knitwear, and the random black blazer almost everybody owns. The fade keeps the metal from reading as one solid block. You still get warmth, shine, and enough flash when your hand turns, though the base peeks through and breaks it up.
One more thing: ask for the glitter density to stay thinner near the edges of the fade. Heavy packing in the middle creates a thick stripe instead of a gradient, and once you notice that mistake, you cannot unsee it.
3. Black and Gold Foil Coffin Nails
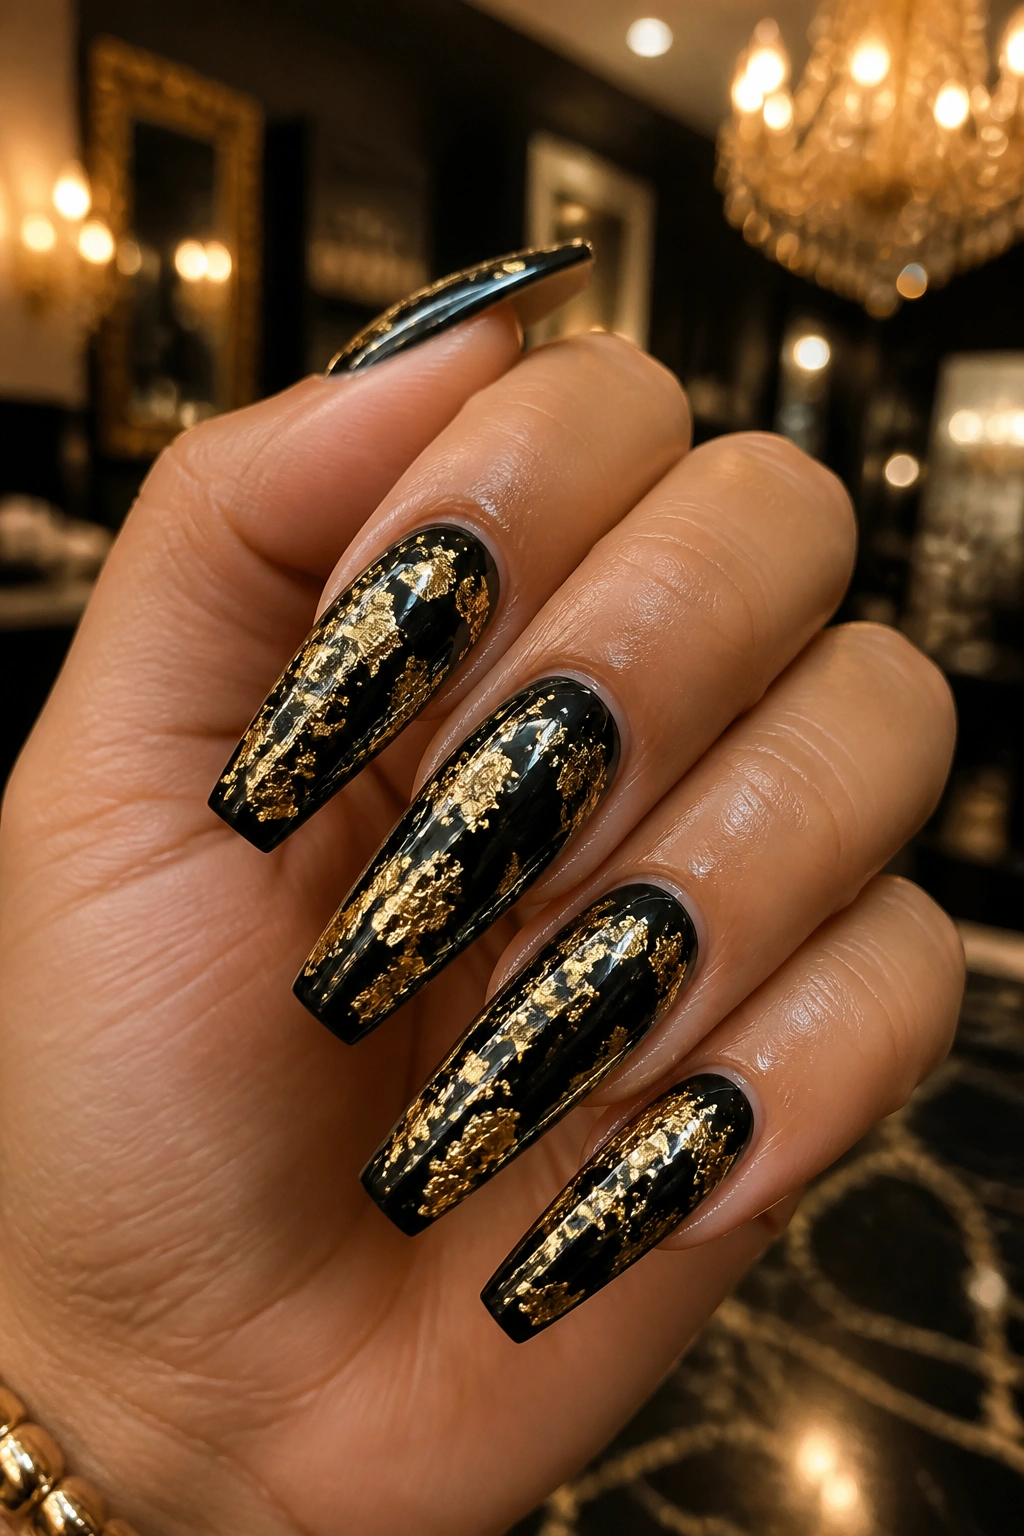
The first time you see this set done well, it lands hard. Black and gold foil on coffin nails has that expensive-lighter, lacquered-box, vintage-bar-cart energy—clean shape, dark backdrop, flashes of torn metal.
Foil is less rigid than chrome. That’s the point. You want irregular edges, broken pieces, tiny gaps where the base color shows through. A neat square of foil pasted onto the center of the nail looks flat and a little lazy.
The mechanic behind it is simple: gold transfer foil or loose foil flakes sit on a cured foil gel or tacky gel layer, then get pressed and sealed. Black gel polish gives the highest contrast, though espresso brown or deep plum can soften the look if plain black feels too stark for your style.
A few placement rules help:
- Put foil on 2 to 4 nails, not every finger.
- Leave negative space around some foil edges so the design has air.
- Mix large torn pieces with tiny fragments for a less uniform pattern.
- Seal twice if the foil edges feel raised.
I’d keep the rest of the set plain black, glossy nude, or a single gold stripe. Once you add rhinestones, glitter, chrome, and foil together, the manicure starts arguing with itself.
4. Matte Nude Coffin Nails With Gold Cuticle Lines
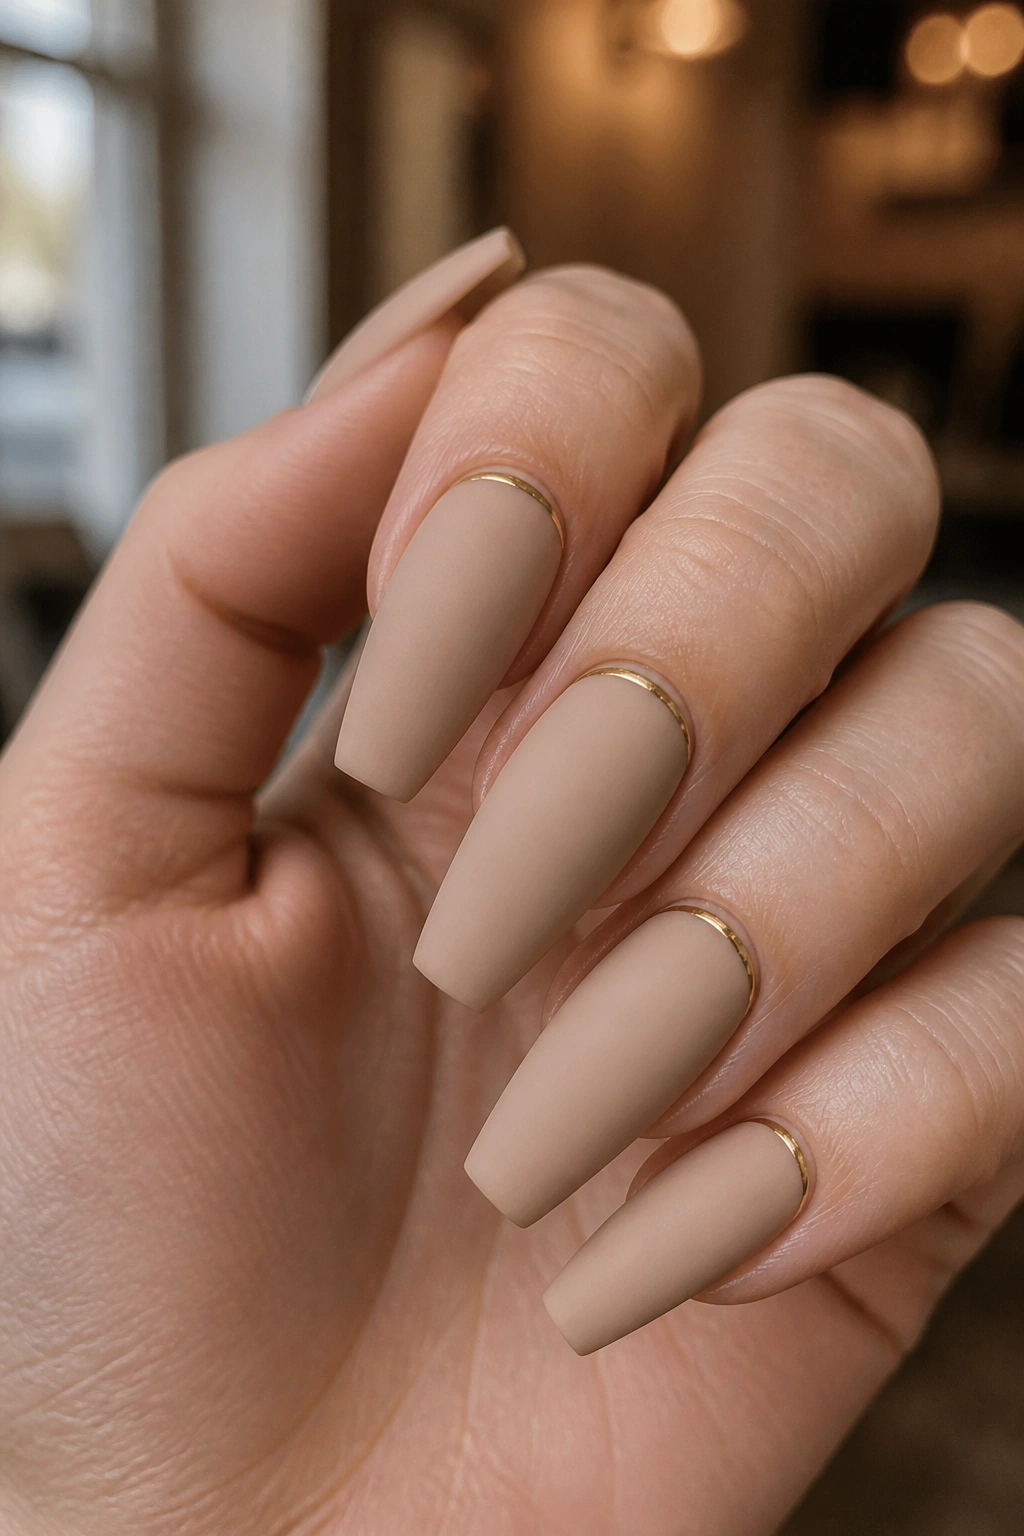
Want something graphic without covering the whole nail in metal? A matte nude coffin nail with a thin gold cuticle line is one of the smartest ways to wear gold.
The line sits like jewelry at the base of the nail. Because it follows the natural half-moon shape, it draws the eye upward and makes medium-length coffin nails look a touch longer.
Why this one looks so clean
Matte top coat removes glare from the nude base, so the gold line does all the talking. That contrast matters. Glossy nude with metallic gold can still look nice, though matte gives the design a sharper edge and keeps it from blending together.
Placement is everything here. The metallic line should be hair-thin, painted with a detail brush or applied with slim metallic tape and then sealed. Once the line gets thick, the design shifts from crisp to heavy.
What to ask your nail tech for
- A nude base that matches your skin depth closely
- A soft matte finish, not chalky
- A gold line placed 1 to 2 millimeters from the cuticle, not touching the skin
- Coffin tips with a straight free edge, so the minimal design still has structure
This is also one of the easiest gold nail designs to wear with rings. The manicure doesn’t fight your jewelry. It echoes it.
5. White Coffin Nails With Gold Leaf Tips
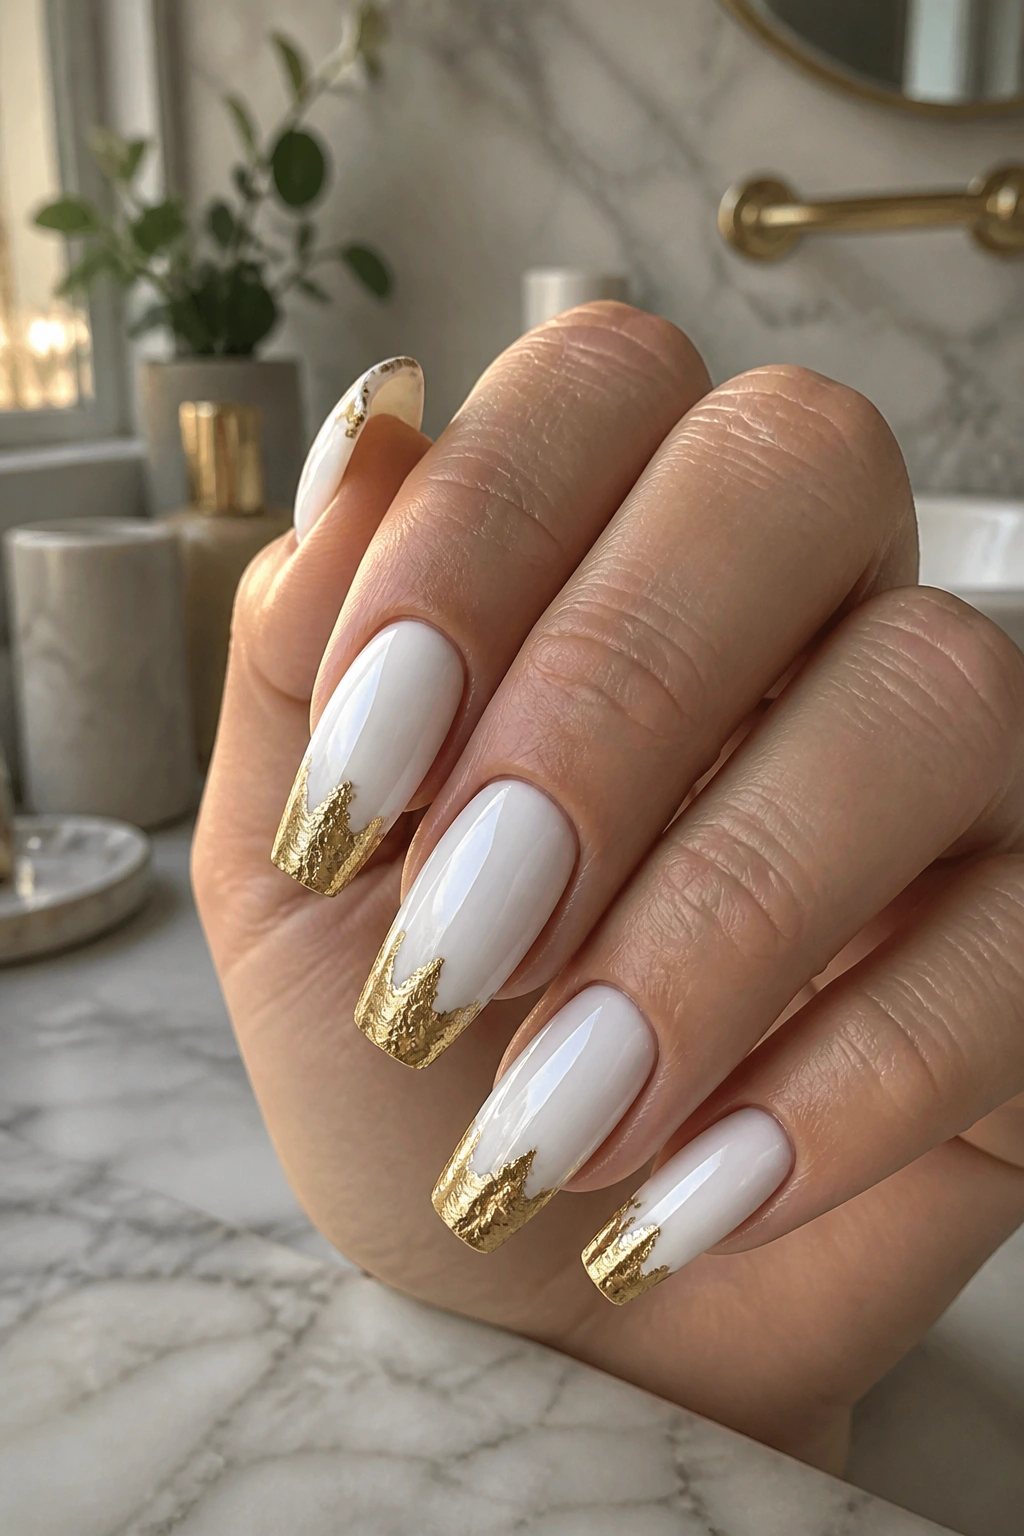
Unlike a standard French tip, gold leaf tips are jagged, imperfect, and a little broken-looking in the best way. On a white coffin base, that torn edge feels hand-done rather than stamped out.
I prefer a milky white or soft ivory here instead of correction-fluid bright white. A gentler base lets the leaf stay the focal point. Sharp paper-white paired with thick yellow gold can tilt icy, which some people love, though the softer version has more range across outfits and makeup looks.
The key is resisting the urge to make the gold edge too even. Leaf is supposed to fracture. The line where the white meets the gold should ripple a bit, with tiny gaps and irregular peaks. That roughness is what keeps the manicure from looking like a basic glitter French.
This design also makes sense on press-ons, which is worth saying because not every gold set survives the jump from salon chair to at-home application. Leaf tips usually do. Press-on makers can encapsulate the edge under gel or top coat, and because the design sits at the free edge, small grow-out isn’t an issue. If you switch sets often, this one is a good place to start.
Pair it with glossy top coat, not matte. The tiny crinkles in the leaf need shine so the texture shows.
6. Gold French Tip Coffin Nails With a Sharp Smile Line
A gold French tip is cleaner than full glitter and sharper than a nude-with-rhinestones set. It gives you that gold hit right where coffin nails naturally want to show off: the squared tip.
There’s a reason this design sticks around. It’s hard to mess up conceptually, though it’s easy to mess up in execution. The smile line has to be smooth, even, and placed at the same height on every nail. If one tip sits 2 millimeters higher than the others, the whole hand looks off.
I like this most on medium coffin nails with a sheer pink, milky nude, or beige base. A thick gold tip on a short coffin can shrink the nail bed. A thinner French line keeps the shape lean.
You can go two directions. One is a classic curved smile line with metallic gold gel paint. The other is a sharper, almost V-shaped French that leans more modern and suits the geometry of coffin nails. Both work. I tend to prefer the V on longer nails and the classic smile line on medium lengths.
If you’re doing this at home, use a 9 mm liner brush and turn the finger—not the brush—when tracing the curve. It’s a small trick, though it helps keep both sides even.
7. Milky Pink Coffin Nails With Gold Flakes Suspended in Builder Gel
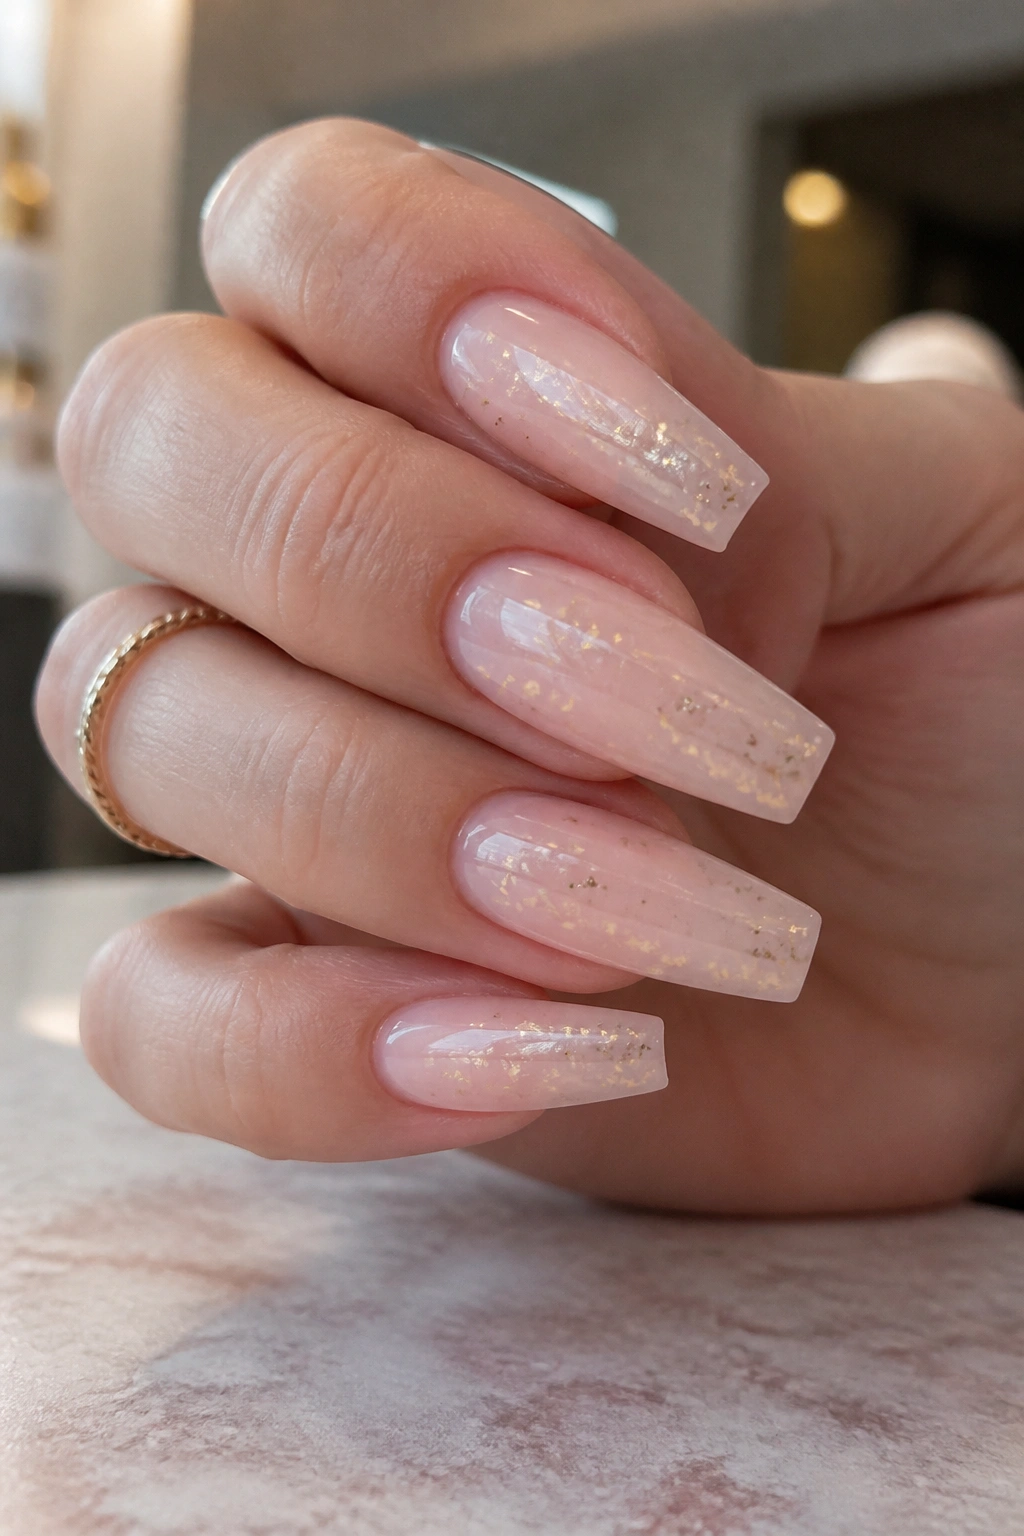
This is the set people stare at up close. From a distance, it looks soft and glossy. Then your hands move, and you see gold flakes floating inside the nail instead of sitting on top of it.
That encapsulated look comes from layering thin builder gel or clear hard gel over scattered foil flakes, usually on a milky pink or sheer beige base. It’s quieter than full chrome. It also lasts well because the metallic pieces are buried under product rather than exposed at the surface.
Why the layering matters
If the flakes all sit in one thick patch, the nail looks bulky. Good placement means tiny pieces spread across the nail at different heights, almost like you paused a swirl in the middle. A little near the sidewall, a little through the center, maybe one larger shard closer to the tip.
I’d skip giant foil chunks here. Smaller pieces read more refined and sit flatter under gel.
Ask for these details
- A milky pink base, not opaque baby pink
- Thin foil shards, not chunky glitter hexes
- Builder gel filed smooth after curing
- A final shape refinement so the coffin tip stays crisp
This design also hides minor grow-out better than hard tip art. The foil looks suspended in the nail, so the eye doesn’t lock onto the cuticle line right away.
8. Tortoiseshell and Gold Coffin Nails
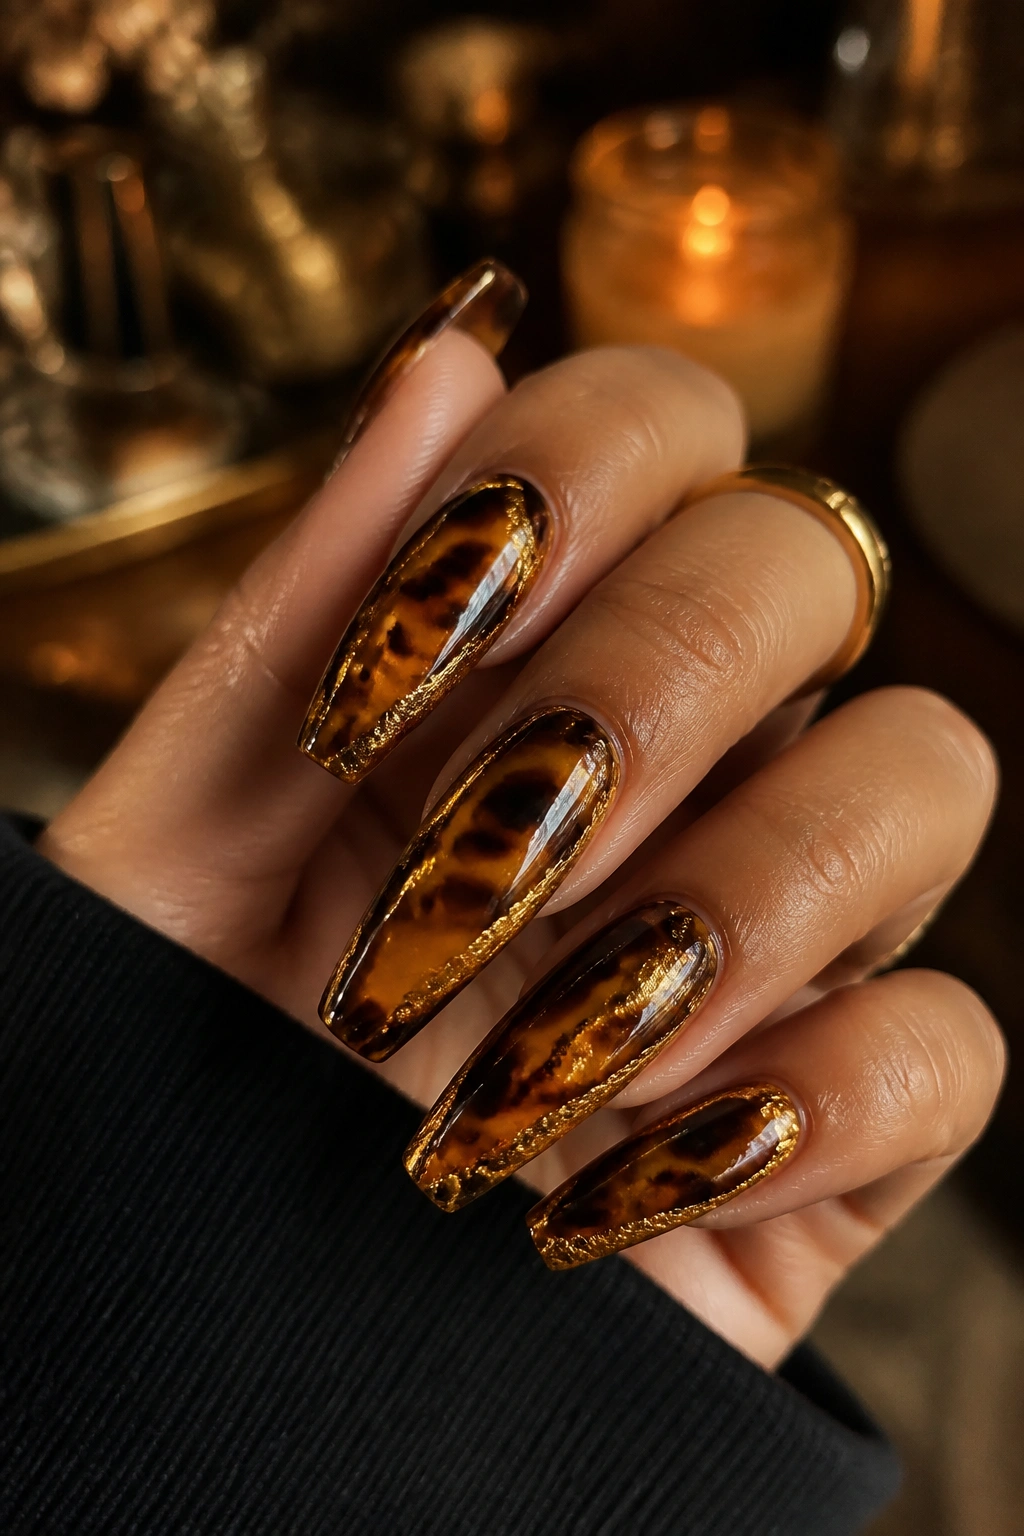
Tortoiseshell nails can go muddy fast. Gold is what saves them.
A good tortoiseshell pattern uses a warm amber or caramel jelly base, patches of medium brown and deep espresso, and then a touch of translucency so the layers show through each other. On coffin nails, that pattern gets enough space to read like actual tortoise acetate instead of a random brown smudge.
Gold foil or hand-painted metallic lines work best as accents, not coverage. One strip near the side, a small foil crack through the center, maybe a gold-framed cuticle on one nail. That’s enough. If every tortoiseshell nail is wrapped in gold, the pattern gets buried and the design loses the thing that made it interesting.
I like tortoiseshell most as a mixed set: two tortoise nails, two caramel or nude nails, one gold detail nail. You can also pair it with a matte caramel accent, though glossy top coat on the tortoise itself is non-negotiable. The depth comes from the shine and the layered jelly look.
This one feels especially good during colder months when darker neutrals start making more sense again. Still, it isn’t tied to one time of year. A short camel coat, gold hoops, tortoise frames—done.
9. Emerald Green Coffin Nails With Brushed Gold Accents
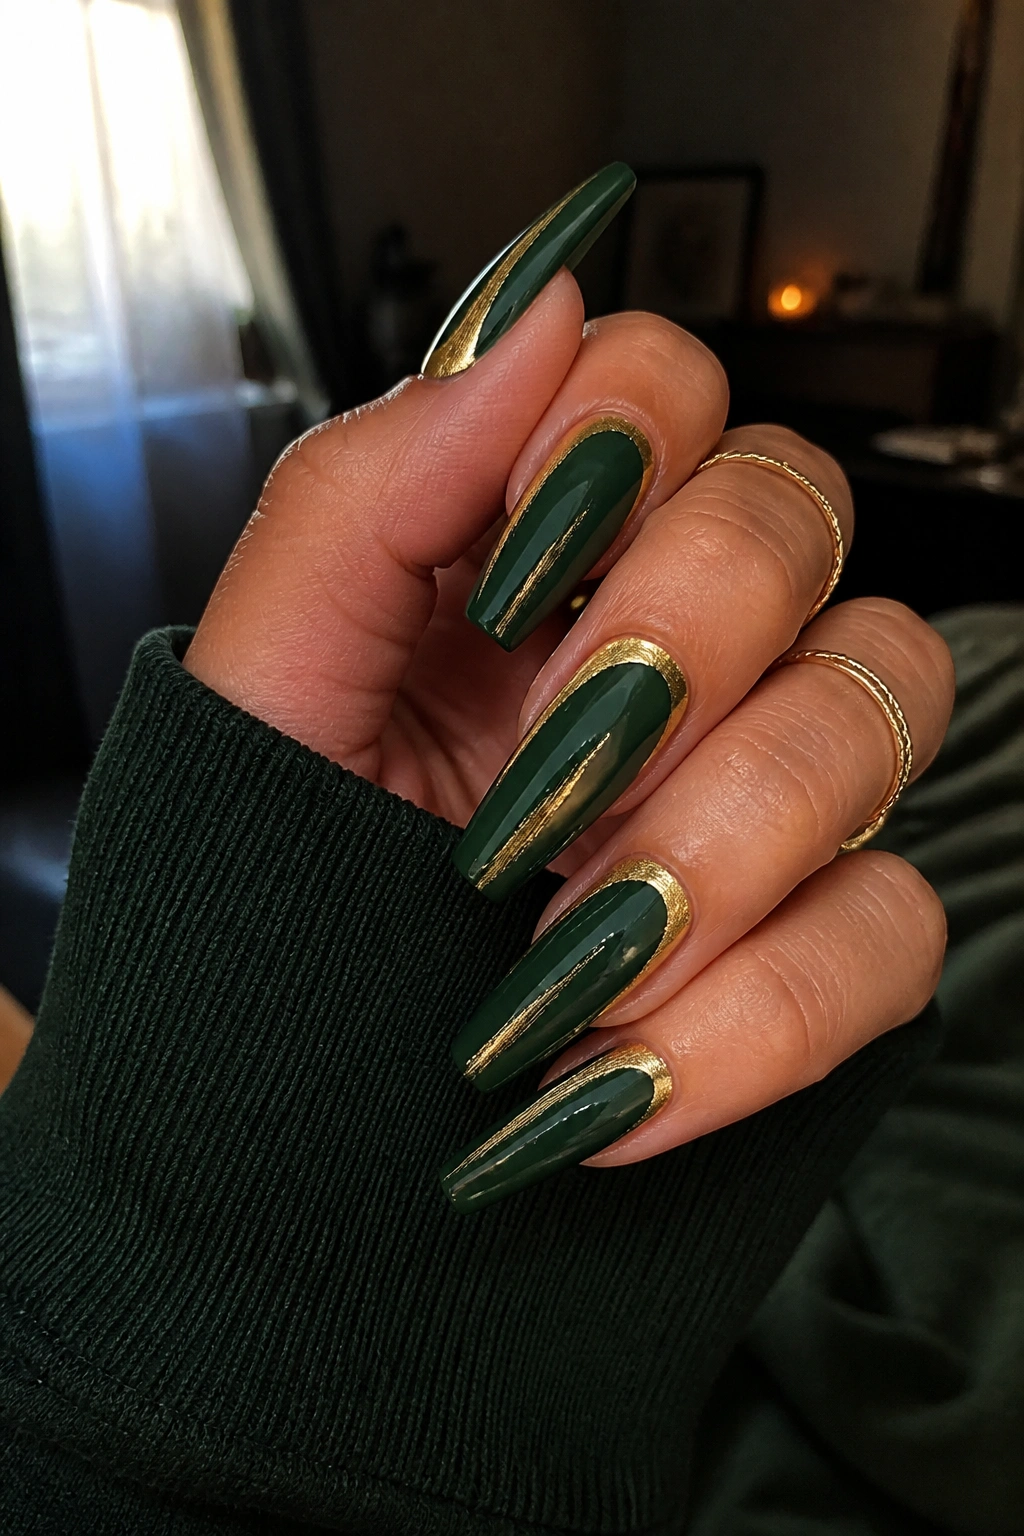
Green and gold can look rich or costume-y, and the line between those two outcomes is thinner than people admit. The trick is the green. Choose a deep emerald, forest, or bottle green with some depth to it. Skip the bright shamrock shades unless you’re after something playful on purpose.
Brushed gold accents suit this color pair better than mirror chrome in most cases. A brushed finish looks more like worn metal hardware; chrome can push the set too shiny, too fast. That softer metallic texture gives the green space to stay the lead color.
You’ve got options with placement. A vertical gold stroke down one side of the nail looks modern. A cuticle crescent in brushed gold feels dressier. A marbled green accent with a gold vein running through it can be gorgeous if the rest of the set stays simple. I’m using that word carefully—this one earns it.
Long coffin nails give this combo a moody, editorial feel. Medium lengths make it easier to wear day to day. If you’re not used to dark nails, start with emerald on three fingers and use a sheer nude plus gold detail on the rest. That split keeps the manicure grounded and lets the gold repeat across the hand instead of sitting only on one accent nail.
10. Clear Coffin Nails With Encapsulated Gold Glitter

How do you wear gold coffin nails and still keep them airy? Go clear.
A clear base changes everything because the gold doesn’t read like wall-to-wall color. It reads like suspended pieces in glass, especially when the glitter is encapsulated in layers of acrylic or gel rather than dumped on top and sealed.
What makes clear-and-gold sets look expensive
The cleanest versions use mixed glitter sizes with restraint: micro glitter for a soft glow, a few medium particles, maybe one or two foil shards on accent nails. If every nail is packed edge to edge, the design loses its transparency and turns into a full glitter manicure.
Placement helps too. Keep the glitter heavier near the tip, along one sidewall, or floating through the center line with empty space around it. Empty space is doing real work here.
Keeping the clear base from turning cloudy
Clear product shows everything—dust, bubbles, rough filing, yellowing top coat. Ask for:
- Fresh clear gel or acrylic
- Careful dust removal before encapsulation
- A top coat that doesn’t yellow
- No milky builder gel unless you want that haze on purpose
This set looks especially good on long coffin nails, though a medium length still carries the effect. Short clear coffins can feel a little abrupt because the transparency ends too quickly at the tip.
11. Burgundy Coffin Nails With Fine Gold Striping Tape
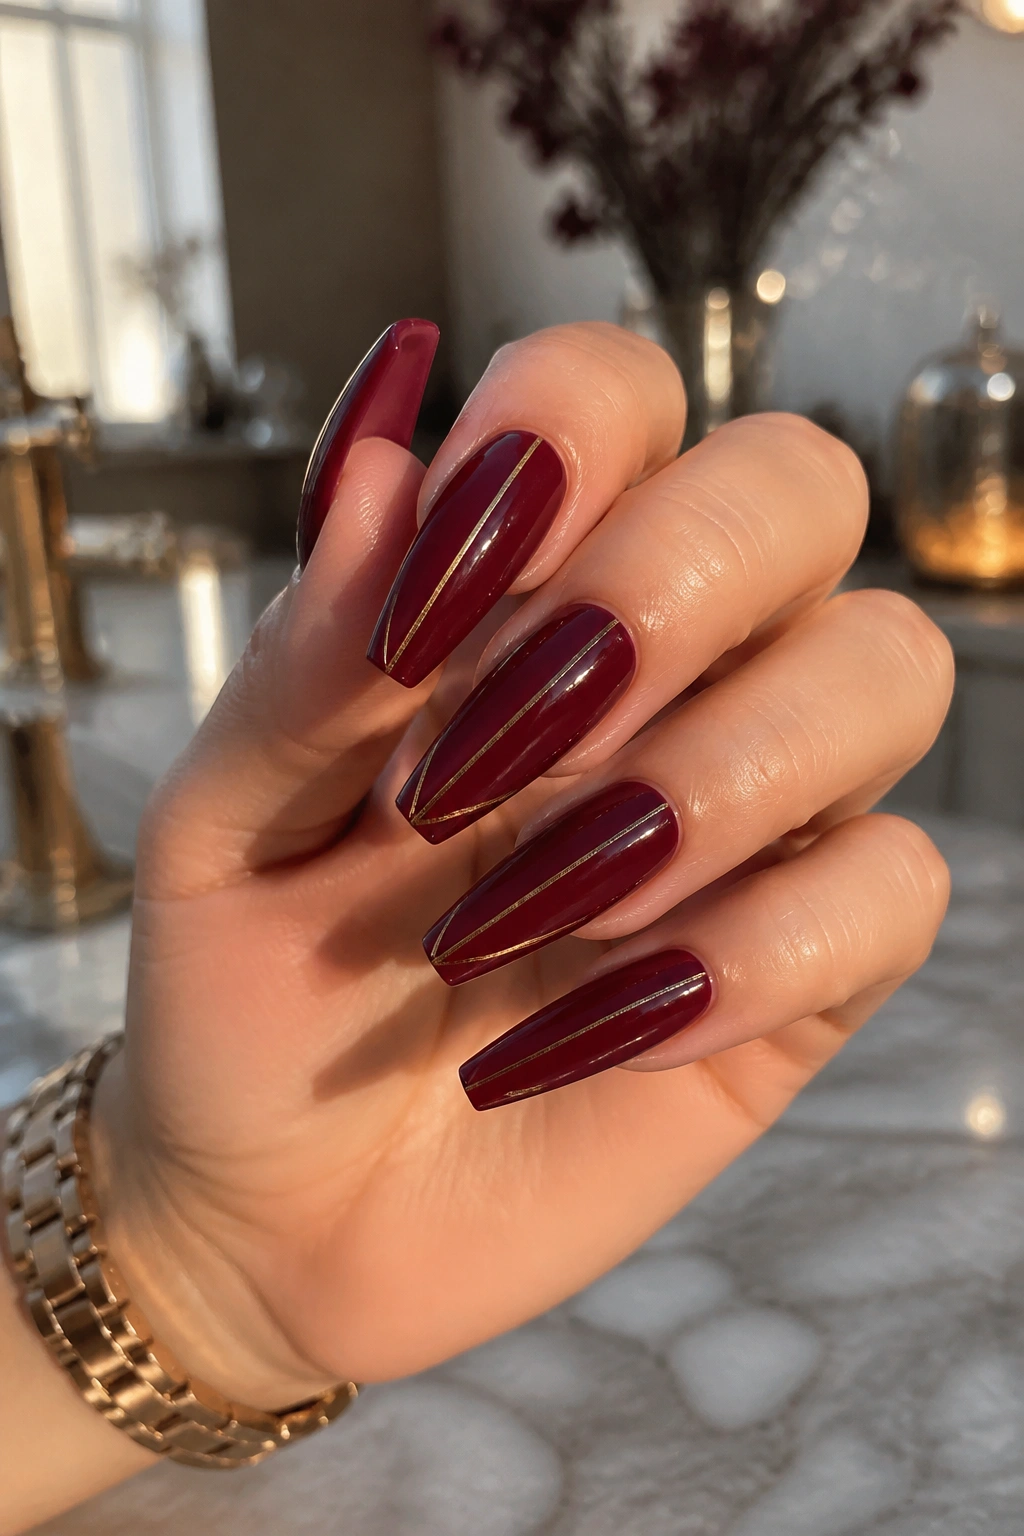
Unlike foil, which is loose and irregular, fine gold striping gives burgundy coffin nails precision. The mood shifts from soft wine-red polish to something closer to tailored fabric with metal hardware.
Burgundy already has depth, so the gold should be thin. One stripe down the center, two diagonal lines crossing near the tip, or a narrow half-frame around the cuticle is enough. Thick lines can make the nail look boxed in.
You can use actual striping tape, though I only recommend that for a short-wear set or press-ons. On a salon manicure that needs to last, gold gel paint sealed under top coat is usually the smarter route. Tape edges can catch hair and lift if they aren’t buried properly.
A few line ideas that suit coffin nails:
- Vertical center line to emphasize length
- Diagonal corner line for a sharper, fashion-heavy look
- Double side stripe along one edge of the nail
- Half-moon frame near the cuticle on one accent finger
The base color matters too. Go for oxblood, black cherry, or brown-red burgundy rather than a bright cherry tone. The darker versions make the gold feel richer and less holiday-coded.
12. Gold Marble Coffin Nails on a Cream Base
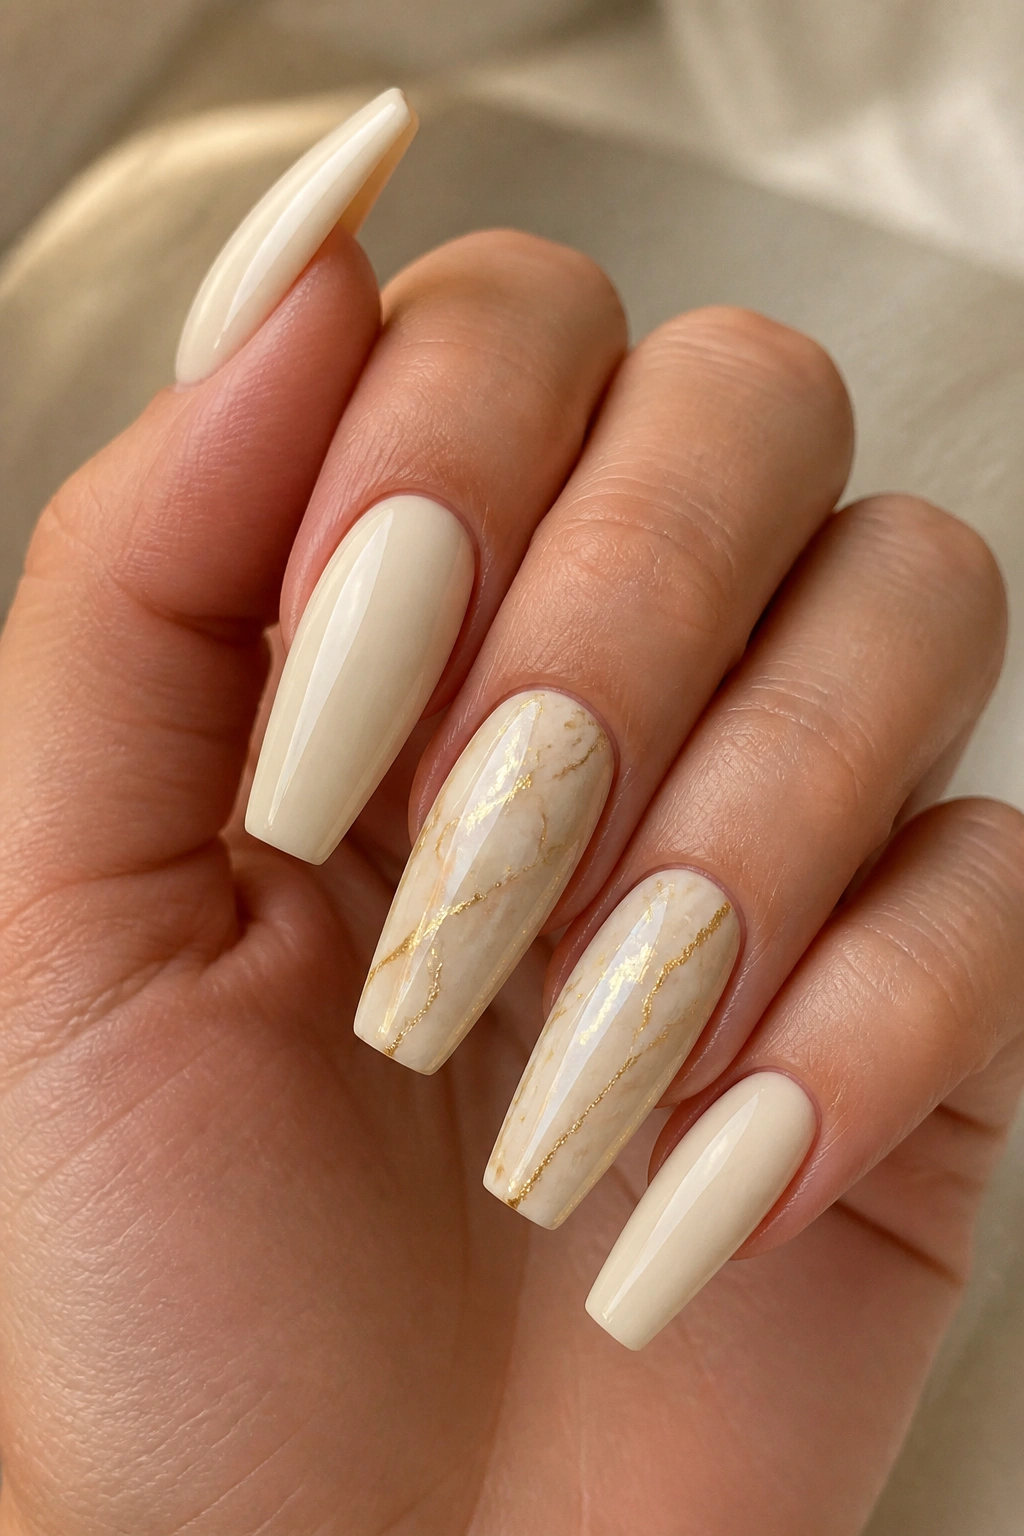
Gold marble can look like stone, porcelain, or a cappuccino gone right depending on the colors underneath it. On coffin nails, I like it best over cream, soft beige, or warm ivory.
The trick is restraint. Marble needs movement, not clutter. A cream base with two or three blurred taupe swirls and a single thin gold vein usually looks better than six colors fighting for space.
What keeps marble from turning muddy
Marble works when the colors have room between them. If you’re using blooming gel, drop the secondary colors in small amounts and let them spread before you add the metallic line. If you’re working with gel paint and a detail brush, keep the swirls loose and broken. Hard outlines ruin the illusion.
Gold should be the punctuation mark, not the paragraph.
I also like marble most as an accent design. Two marbled nails, two solid cream nails, one gold French or glitter fade—it’s a smarter set than ten fully marbled nails. The eye gets a place to rest, which matters more on coffin nails because the shape is already bold.
You can take this warmer with caramel and gold or cooler with taupe and pale metallic champagne. Both look good. Cream plus warm gold is the version I save to my own photo folder most often.
13. Glitter Fade Coffin Nails With Dense Gold at the Cuticle
This design does something practical that many pretty nail ideas don’t: it hides grow-out well. Pack the glitter near the cuticle, feather it upward, and the new growth line doesn’t scream at you after a week.
That reverse fade works well on coffin nails because the squared tip keeps the rest of the nail looking neat even when the sparkle is concentrated at the base. It’s a smart pick if you stretch appointments or wear press-ons for several days at a time.
Use fine glitter mixed with a few medium particles. Chunky glitter alone can create a lumpy ridge near the cuticle, and once top coat settles around those pieces, the surface stops feeling smooth.
A few ways to keep the fade clean:
- Start the dense glitter 1 millimeter away from the skin
- Pull the sparkle upward with a dry detail brush or makeup sponge
- Keep the middle of the nail semi-sheer so the fade reads clearly
- Pair it with nude, soft pink, or sheer beige bases
I’ve seen people combine this with full glitter tips too. Nope. The whole point of the design is the gradient from dense to sparse. Once both ends are loaded with glitter, the fade disappears and the nail looks crowded.
14. Matte Black Coffin Nails With a Single Gold Charm
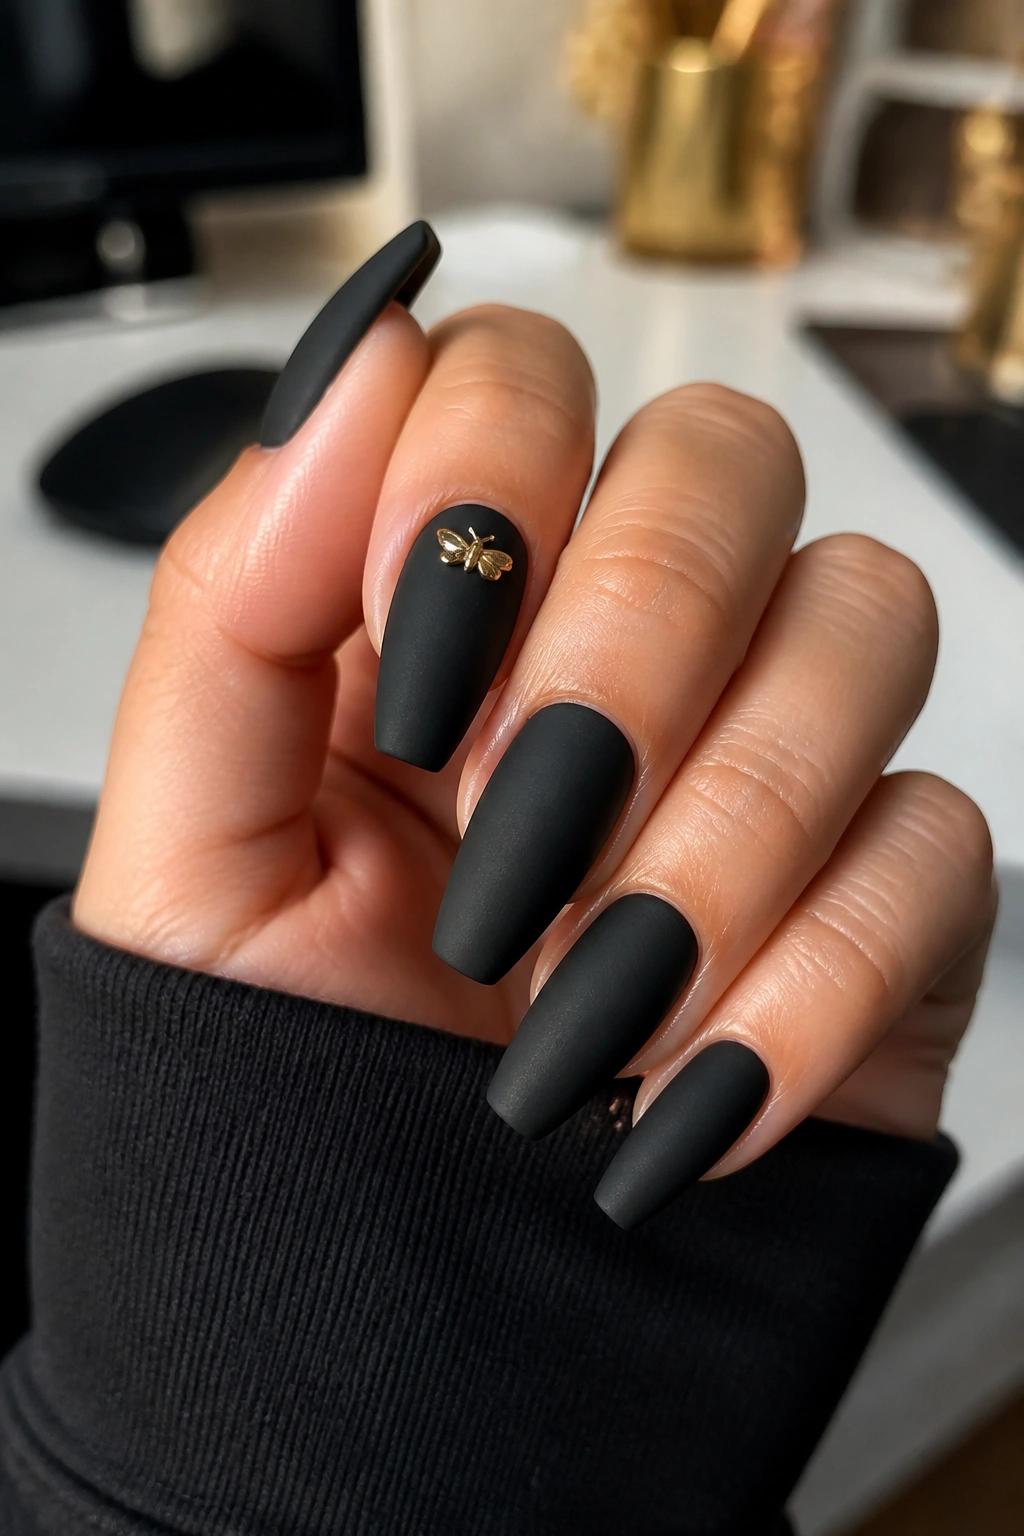
Less. That’s the whole argument for this set.
A matte black coffin manicure with one gold charm—one, maybe two on the whole hand—has more bite than a fully jeweled set. The matte finish pulls the black flat and velvety, while the charm sits on top like a piece of hardware.
Charm choice matters. Small dome studs, tiny bars, slim crosses, chain sections, and flat-backed metal shapes tend to wear better than tall gems or oversized 3D pieces. Coffin nails already have a strong outline. You don’t need a tower glued on top of them.
Placement is half the mood. A charm near the cuticle feels cleaner. One placed off-center near the sidewall looks more directional. A tiny chain laid diagonally across one accent nail can work too, though that’s the point where you start noticing your typing speed. I’m not kidding. If you spend your day on a laptop, bulky charms get old by noon.
Use builder gel or thick gem gel to set the charm, then frame the edges with top coat if the piece allows it. Matte top coat should go on after the black color but before the charm placement, so the metal keeps its own shine against the flat base.
15. Mixed-Finish Gold Coffin Nails With Chrome, Glitter, and Foil
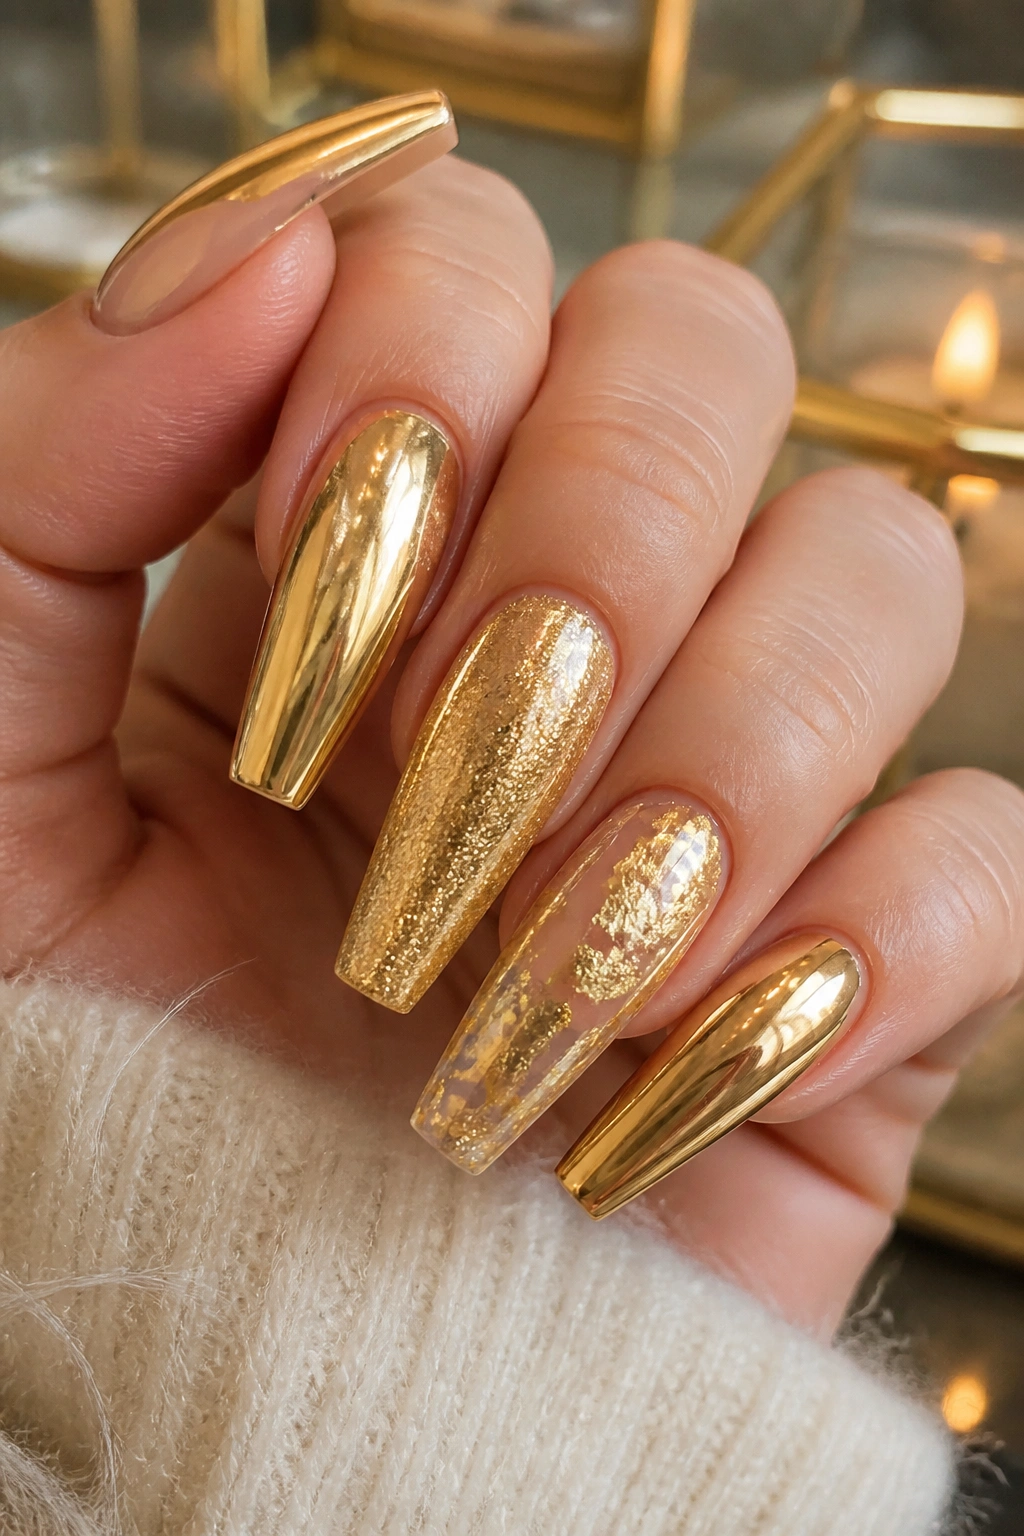
If you can’t choose one gold finish, don’t. The trick is editing the mix before it starts looking chaotic.
A good mixed-finish set might use chrome on two nails, loose foil on one, fine glitter fade on one, and a nude or milky base to tie the rest together. The common thread can be the same tone of gold, the same base color, or the same placement zone—tips, cuticles, sidewalls. Pick one anchor and repeat it.
How to keep the set cohesive
Too many finish changes turn into a sample board. A cleaner mixed set follows a few guardrails:
- Stick to one gold family, like warm yellow gold or soft champagne
- Repeat one base color on at least 3 nails
- Limit heavy art to 2 or 3 nails
- Balance shiny nails with calmer ones so the hand still looks edited
This is where coffin nails earn their keep. The uniform shape makes a multi-finish design feel organized even when the textures shift from nail to nail. If you tried the same mix on uneven lengths or mixed shapes, it would lose structure fast.
I’d wear this for a trip, a party, or any stretch where you want your manicure to do a bit more than sit quietly in the background. Still, the cleanest mixed sets are never the busiest ones. Leave one nail plain. Trust me.
Small Choices That Keep Gold Nail Designs From Looking Cheap
You can ruin good gold with bad editing. That sounds harsh, though it’s true.
The first mistake is using too many competing details. Gold already reads like a statement finish, especially on coffin nails. Once you stack rhinestones, foil, chrome, glitter, decals, charms, marbling, and a bold base color all in one set, the eye has nowhere to land.
The second mistake is the wrong undertone mix. A cool silver-gold chrome beside a yellow foil and then a rose-gold stripe can look accidental unless the mismatch is done on purpose and repeated consistently. Pick your gold family and stick to it across the whole hand.
A few more details separate a clean manicure from one that feels thrown together:
- Keep sidewalls crisp. Blobby shape makes even expensive art look off.
- Use top coat generously but not thickly. Too much product rounds out the coffin tip.
- Make sure gold lines are even in width from nail to nail.
- Leave some empty space. Not every nail needs full coverage.
- Match the set to your ring color if that matters to you—yellow gold with yellow gold, champagne with mixed-metal jewelry, antique gold with warmer pieces.
I’ll add one opinionated note here. Cheap-looking gold is often not about the gold itself; it’s about placement that feels random. A slim metallic crescent placed with care can look stronger than a whole nail painted in glitter.
Final Thoughts
Gold and coffin shape belong together when the design respects the shape. That’s the part people miss. Coffin nails already make a statement through silhouette alone, so the gold should support that line, not smother it.
If you want the safest bet, start with a gold French tip, a champagne ombré, or a matte nude set with a cuticle line. If you want more drama, chrome, black-and-gold foil, or a mixed-finish set will get you there fast. The smart move is choosing one strong idea and giving it enough room to breathe.
And if you’re sitting in the salon chair torn between three designs, pick the one you’d still like on day nine, not only under the lamp in the first ten minutes. That little bit of restraint is where the best manicures usually start.
