

A floral manicure can turn tacky fast.
Give a coffin shape six full bouquets, three glitter colors, and a rhinestone border, and the whole set starts looking crowded. The floral coffin nails that stay on my mood board do the opposite: they leave air around the petals, keep the color story tight, and use the nail shape like a long little canvas instead of a dumping ground for every cute idea.
Coffin nails help more than people think. The tapered sides slim down the design, while the straight tip gives flowers a clean place to sit, trail, or spill off the edge. When the bloom size matches the nail length, the manicure starts to feel less like decoration and more like a tiny painted garden.
I’m picky about flower nail art because it can look one way in a salon photo and another way under grocery-store lights. A milky nude base softens daisies. A hard, bright white base can make the same petals look pasted on. Matte top coat changes the mood. So does placement—centered bouquets on every nail almost never look as good as scattered clusters, side blooms, or one strong focal nail.
Once you notice those details, the good sets jump out.
Why Floral Coffin Nails Work So Well on This Shape
Coffin is one of the easiest long nail shapes for flower work. Almond nails are elegant, no doubt, but the point narrows your usable space. Square nails give you room, though the blunt corners can make soft petals look stiff. Coffin sits right between those two, which is why flower coffin nails tend to photograph and wear so well.
That flat tip matters. A daisy chain, rose border, tulip row, or diagonal blossom branch all sit more naturally on a squared-off edge than on a sharp point. Even a medium coffin length—about 5 to 7 millimeters past the fingertip—gives an artist enough room for two petals, a stem, and a little negative space without cramming the design.
The taper keeps florals from looking bulky
Long floral sets can get heavy-looking fast. The inward angle on coffin nails trims that visual weight, so even fuller designs still feel neat. That’s a big reason hand-painted botanicals, dried flowers, and layered gel petals all work so well on this shape.
Negative space behaves better here too. Leave the center of the nail sheer, tuck the bloom near one sidewall, and the shape still looks balanced. On shorter rounded nails, that move can feel accidental. On coffin nails, it looks planned.
Nude Bases, Sheer Milky Colors, and Matte Top Coats That Help Petals Stand Out
Ask ten nail artists what base makes florals look softer, and you’ll hear some version of the same answer: sheer beats opaque more often than not. When the background lets a little light through, painted petals look sunk into the nail instead of sitting on top like craft stickers.
A few base choices keep showing up for good reason:
- Milky nude gives white daisies, pink blossoms, and green stems a soft edge.
- Sheer blush works well with cherry blossoms, roses, and tiny vintage florals.
- Clear jelly pink lets brighter tropical flowers float instead of shouting.
- Muted sage or olive makes wildflowers and cream petals feel earthy.
- Glossy black turns red, cream, and gold florals into something darker and dressier.
Finish changes the whole mood
Gloss top coat sharpens detail. Petal outlines look cleaner, colors read deeper, and dried flowers under clear gel get that glass-case effect people love. Matte top coat does the opposite. It mutes shine, softens contrast, and makes the whole set feel more like fabric, paper, or pressed botanicals.
Neither one is better across the board.
If the design has 3D acrylic petals, foil centers, or encapsulated flowers, glossy usually wins. If the set leans dusty, leafy, or meadow-like, matte often makes it look more believable.
A Balanced Thumb-to-Pinky Layout Keeps Floral Coffin Nails From Looking Crowded
Here’s where floral sets either get expensive-looking or messy. Not because of the painting itself. Because of the layout.
A garden does not bloom the same way in every square inch, and your manicure shouldn’t either. The strongest coffin nail designs use one or two nails as the focal point, a couple of nails as support, and at least one nail as visual rest. I keep coming back to that because it matters more than most people realize.
A layout that rarely fails
Try this simple distribution across one hand:
- One statement nail with the fullest bloom or most detail.
- Two supporting nails with partial florals, vines, or scattered petals.
- One texture nail with a sheer wash, soft glitter, chrome center, or plain color.
- One quiet nail that holds the palette together without more flowers.
Thumbs can carry detail, but they do not need to match the ring finger. In practice, I like the thumb to echo the design rather than copy it. A tiny branch, one pressed flower, a single leaf outline—that’s enough.
Too many full bouquets flatten the set. Your eye has nowhere to land.
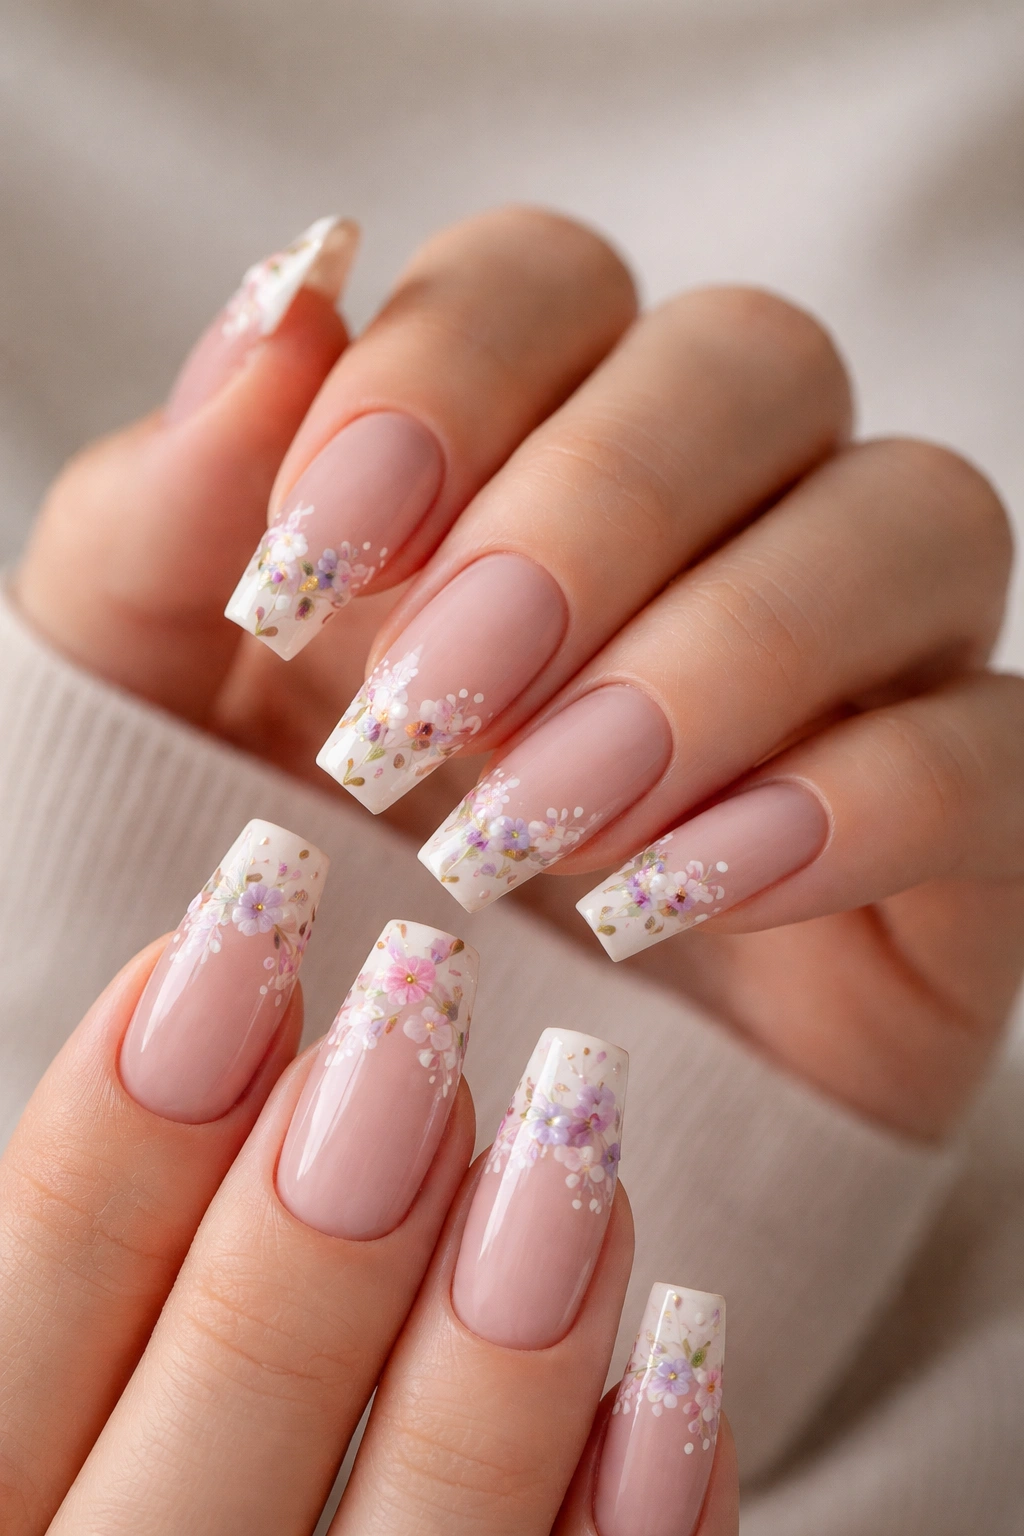
1. Milky Nude Coffin Nails With Tiny White Daisies
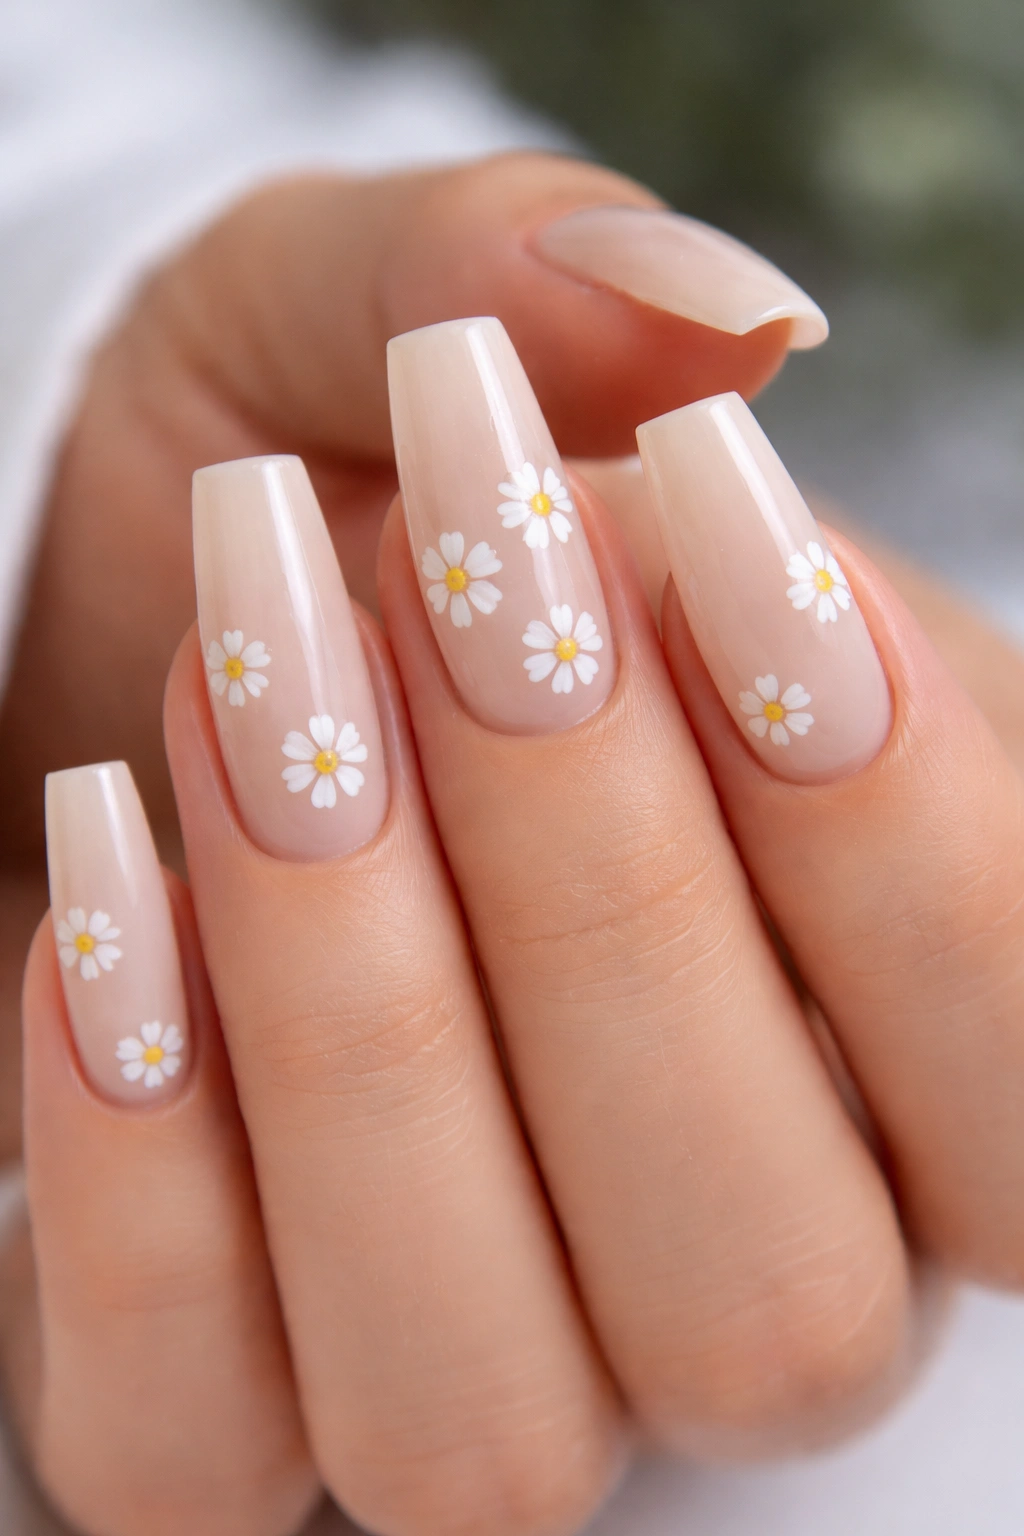
Nothing says “garden” faster than a field of small daisies on a soft nude base. This design works because the flowers stay tiny. On a coffin nail, each daisy should sit around 3 to 5 millimeters wide, not half the nail.
The milky background does half the job. It blurs the edge between natural nail and polish, so the white petals don’t look stark. Add small butter-yellow centers and a few slim green stems, and the whole set feels airy instead of sugary.
Why It Works
Daisies have a shape that reads clearly at miniature scale. Roses can get muddy when painted too small. Peonies need layering. Daisies? A good artist can build them with a dotting tool and a liner brush in a few strokes, which keeps the petals crisp.
This is a strong choice for medium coffin nails if you do not like extra-long length. The flowers still show up, and the shorter canvas keeps the manicure easy to wear at work, on a keyboard, opening cans, living your life.
Design notes
- Put full daisies on the ring and middle fingers, then use half blooms near the sidewalls on the rest.
- Keep at least 30 to 40 percent of each nail clear or lightly colored so the set still breathes.
- Use a glossy top coat if you want the petals to look fresh; use matte if you want a pressed-flower effect.
Salon note: Ask for a few daisies turned at different angles. Perfectly identical flowers can make hand-painted work look stamped.
2. French Tip Coffin Nails With Climbing Rose Vines
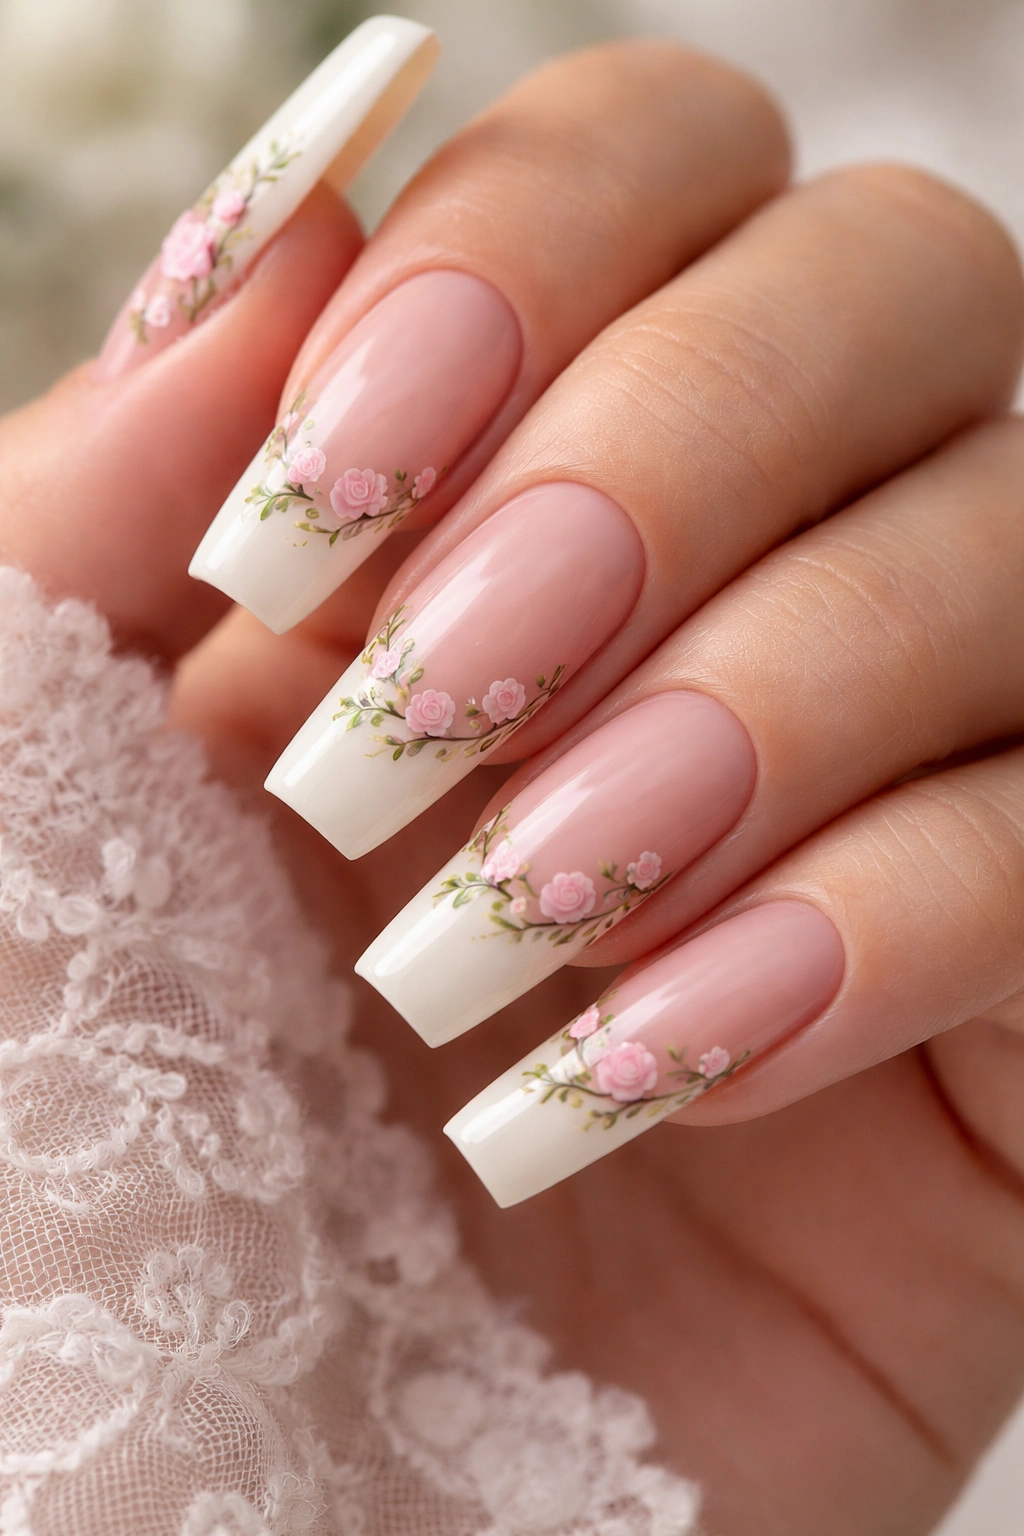
A rose design gets better the moment you stop painting full roses on every nail. That is my blunt opinion, and I will stick with it.
On coffin nails, the smartest version is a French tip with thin rose vines climbing along the smile line or one side of the nail. You keep the structure of a classic manicure, then layer in pink or red roses where the eye already expects contrast. It feels cleaner than an all-over floral print and a lot more grown-up than giant rose decals.
Color matters here. Soft ivory or pale nude tips with dusty rose blossoms look romantic without tipping into bridal cliché. Deep green stems should stay narrow—think hairline brush strokes, not chunky leaves. When the vine hugs the tip, the coffin shape frames it in a way round nails cannot.
And there’s another advantage: grow-out is kinder. Since part of the design sits at the tip instead of the cuticle area, the manicure stays balanced longer between fills. If you want flower coffin nails that still feel polished in an office, at a dinner, or with plain gold rings, this one earns its keep.
3. Clear Coffin Nails With Encapsulated Pressed Flowers
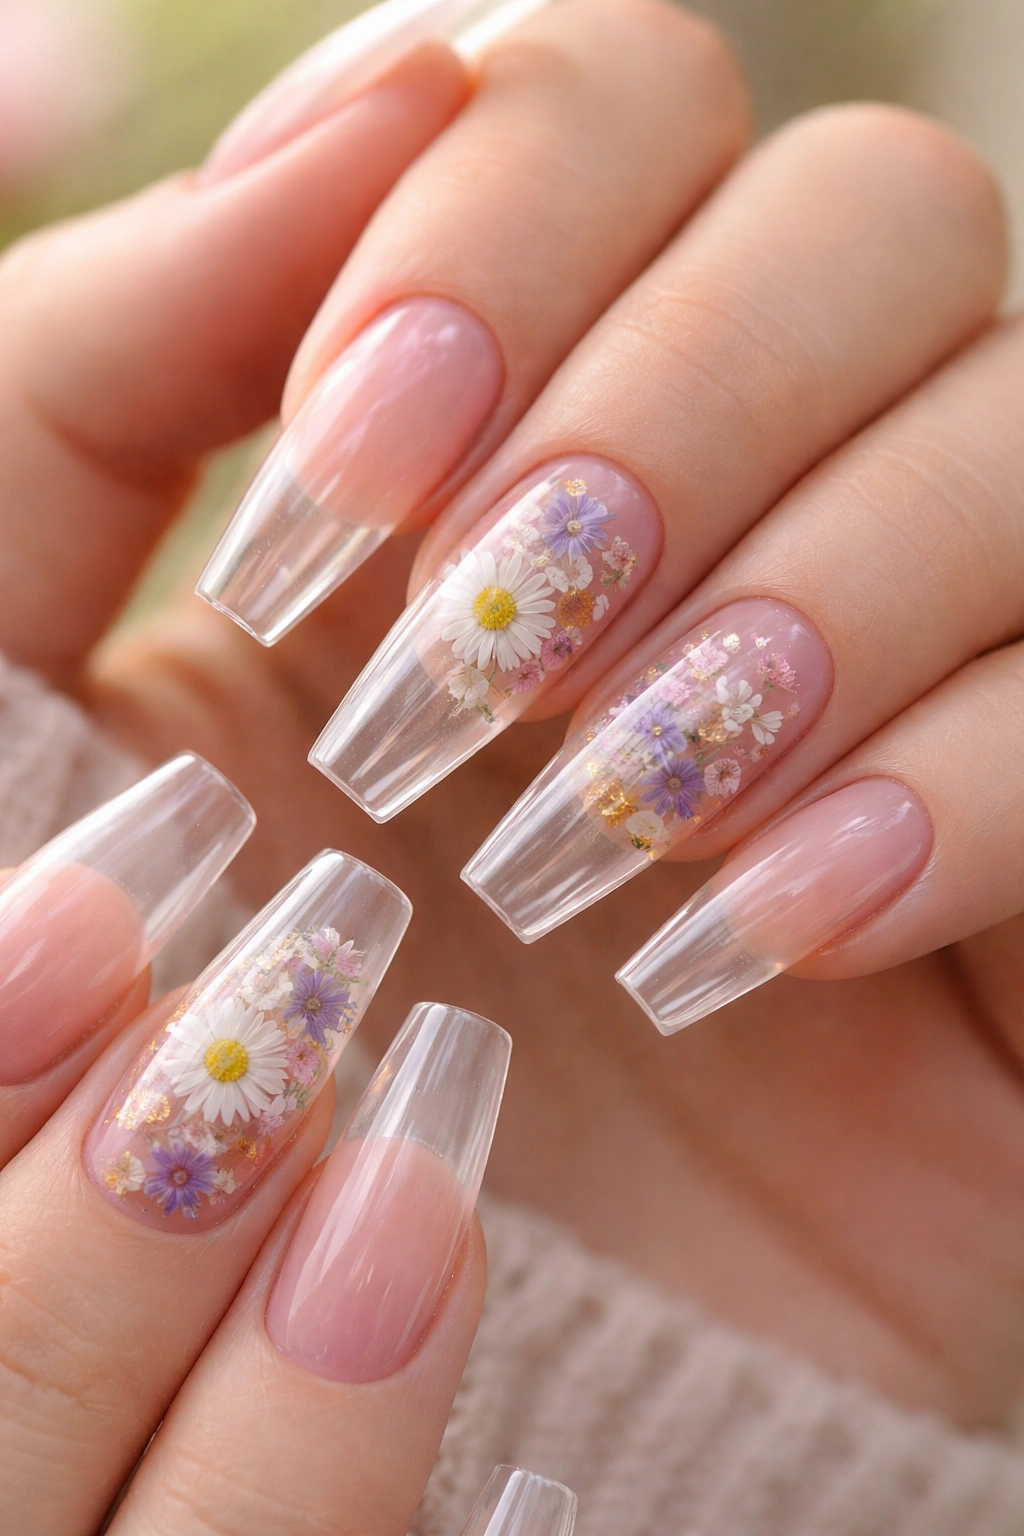
Want the set that comes closest to carrying an actual garden on your hands? Go clear and encapsulated.
This design sandwiches thin dried flowers between layers of builder gel or acrylic, so the petals look suspended under glass. Done well, it’s stunning in a quiet way. You see the texture, the stems, the faded little color shifts that hand painting cannot quite copy. Tiny purple statice, slivers of baby’s breath, flattened daisies, miniature fern leaves—they all read like something collected and preserved.
The catch is thickness. Real dried flowers have body, even when sliced thin, and bulky encapsulation can make long coffin nails look clunky. The best sets use two or three accent nails, not ten. Pair those with sheer nude, clear pink, or plain milky nails so the botanical details get space.
How to ask for it
Tell your nail tech you want wafer-thin dried flowers fully sealed under clear product, with the surface filed smooth before top coat. If they place whole flowers that are too tall, you’ll feel the bumps and the edges can lift.
I also like this design on a slightly tapered medium-long coffin rather than the longest length in the salon book. The clearer the nail, the more every bit of bulk shows. Keep the structure clean, and it looks like a little greenhouse panel.
4. Matte Sage Coffin Nails With Wildflower Sprigs
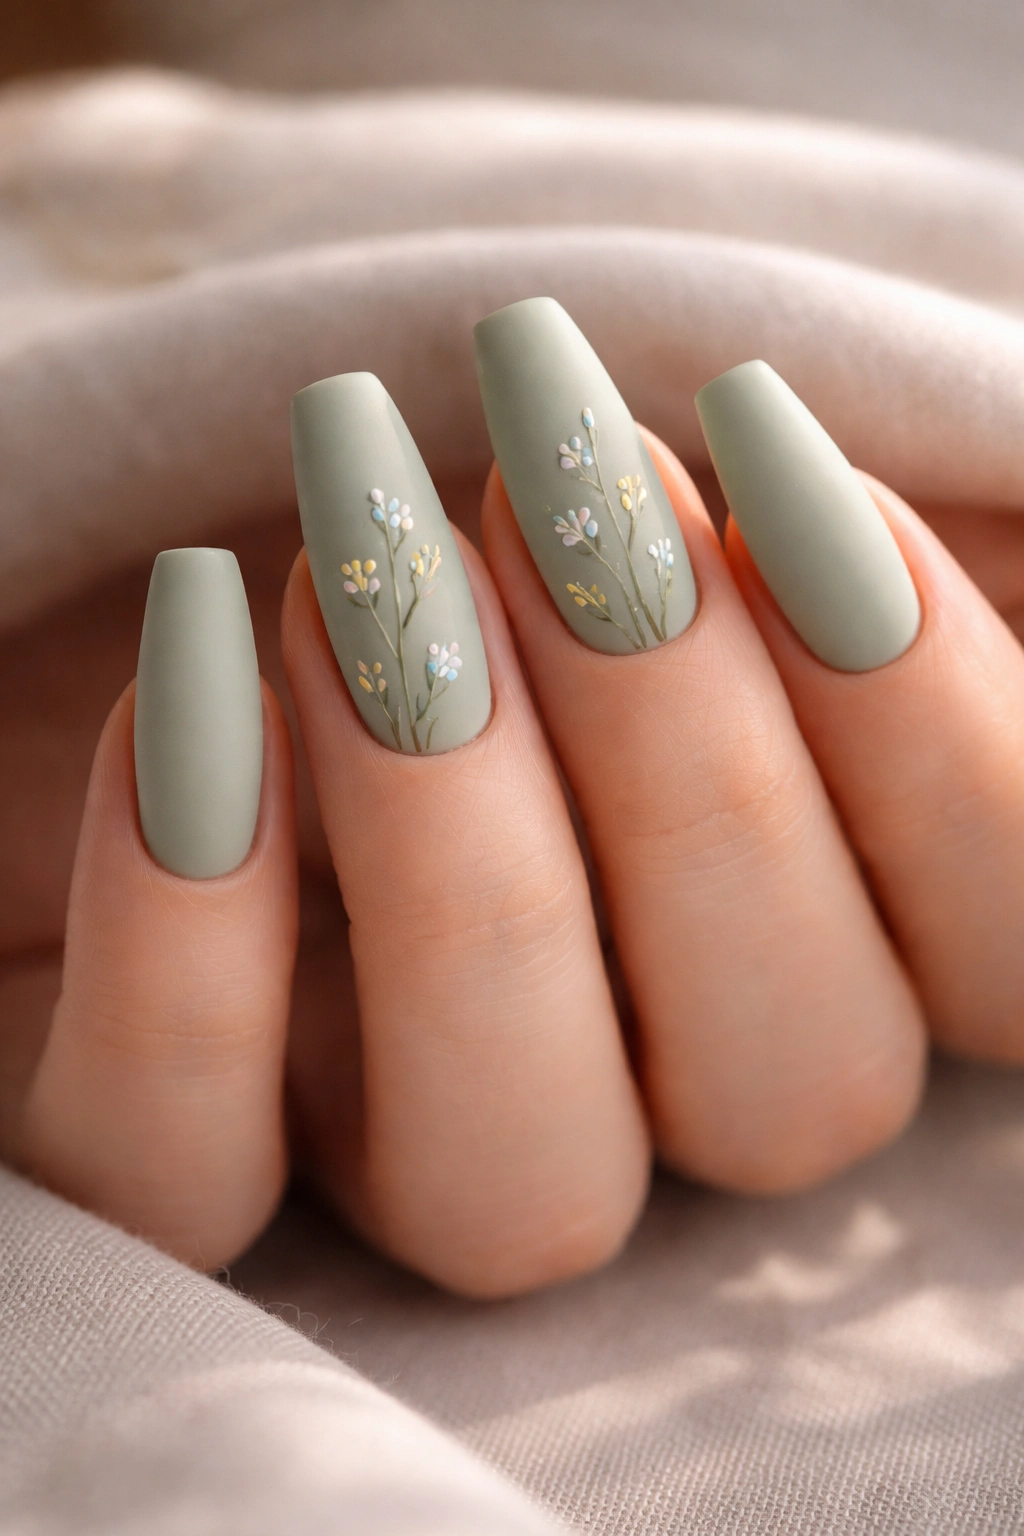
Picture a bunch of meadow flowers wrapped in brown paper from a roadside stand. That’s the mood here.
Sage green gives floral nail art an earthy backbone, and matte top coat takes away the candy shine that can make painted flowers feel toy-like. Add thin sprigs of white, blue, and pale yellow wildflowers across a few coffin nails, and the set starts feeling loose and botanical instead of polished to death.
This design works best when the flowers are small and stem-forward. Wildflowers are not tight, symmetrical blooms. They lean, scatter, and leave gaps. If the artist paints them in perfect round clusters, the whole point disappears.
A few details make this set stronger:
- Use muted sage, not neon green or mint.
- Keep stems olive or moss-toned, with slight bends rather than ruler-straight lines.
- Add tiny filler blooms on one or two nails, not every finger.
- Choose matte on at least the floral nails, even if the plain nails stay glossy.
I like this manicure most on medium to long coffin acrylics with a softer taper. It looks lived-in, a little artsy, and far less sweet than the floral sets people usually bring to the salon.
5. Blush Pink Coffin Nails With Cherry Blossom Branches
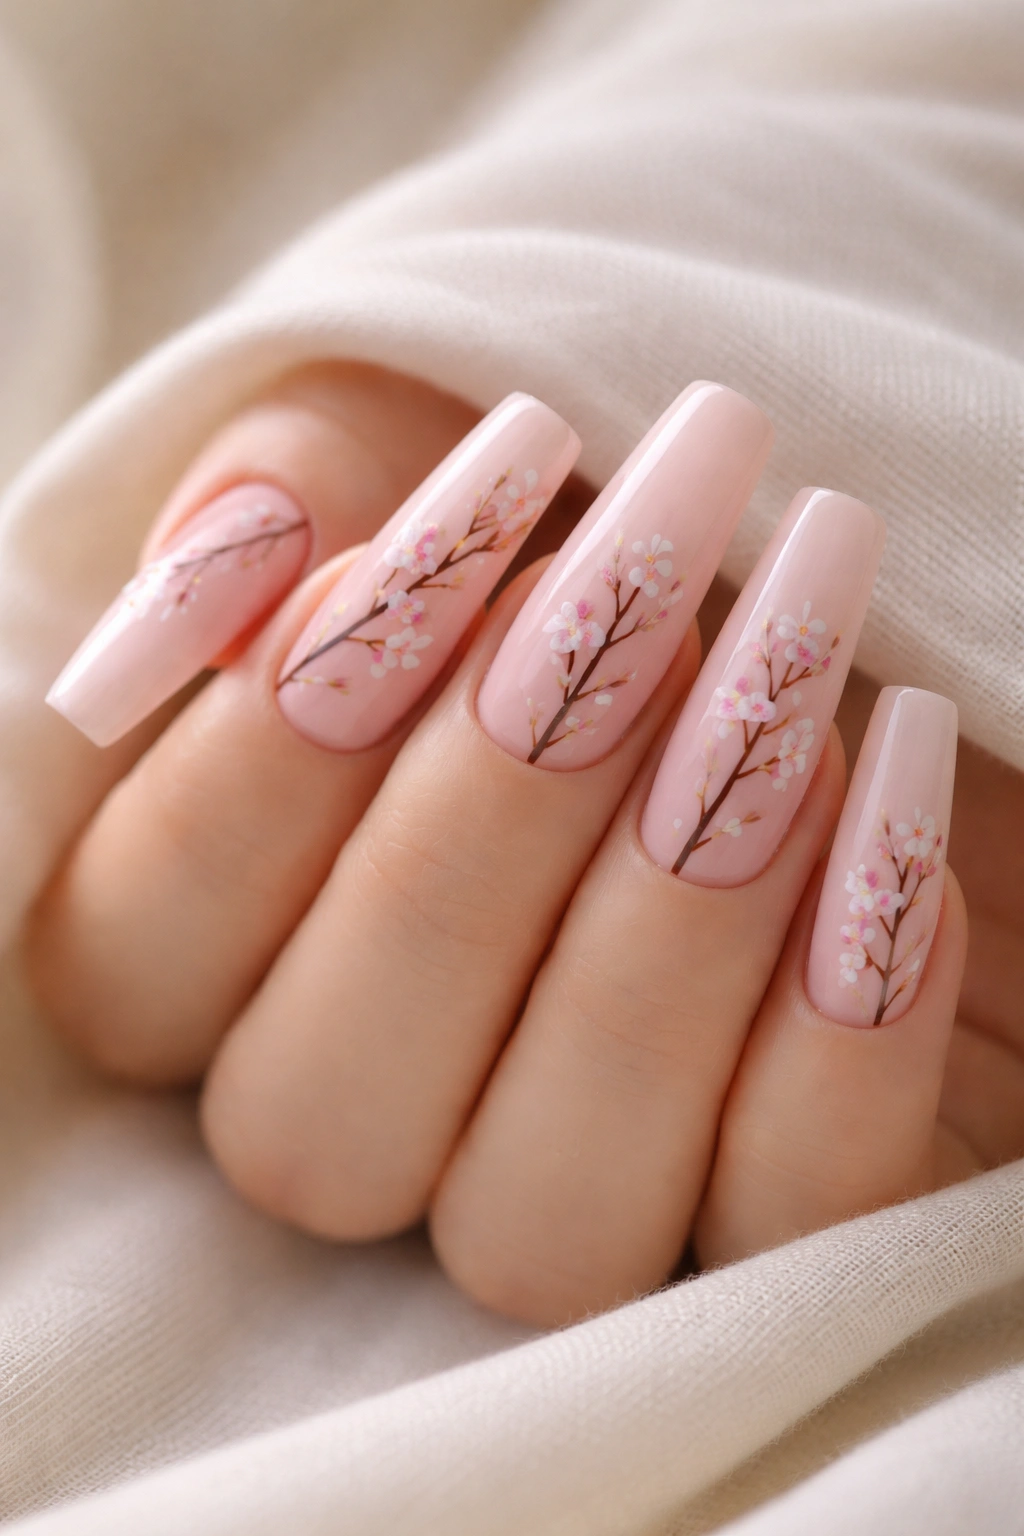
Cherry blossom nail art can go wrong in one of two ways. The first is making the branches too dark and heavy. The second is painting petals that are too big and too pink. Both mistakes pull the design away from the airy look that makes blossom branches so appealing in the first place.
A blush or translucent pink base fixes half of that. It keeps the whole manicure inside one soft color family, so even a darker brown branch line will not feel harsh. I like the branch drawn diagonally from one lower corner toward the tip, with small five-petal blossoms opening off the line rather than floating all over the nail.
Space matters here. You want the branch to feel like it’s moving across the nail, not pinned in the center. A little empty background is what sells the idea of lightness.
Tiny petal fall helps too. One or two loose blossoms on the neighboring nail can make the whole set feel connected, almost like the branch keeps traveling from finger to finger.
Gloss is usually the stronger finish for this design because it sharpens the branch detail and keeps pale pink petals from fading into the base. If you wear rose gold jewelry, this set plays well with it.
Shorter coffin nails can carry cherry blossoms, but medium-long length gives the branch line room to breathe. That extra strip of nail makes a difference.
6. Black Coffin Nails With Deep Red Botanical Painting
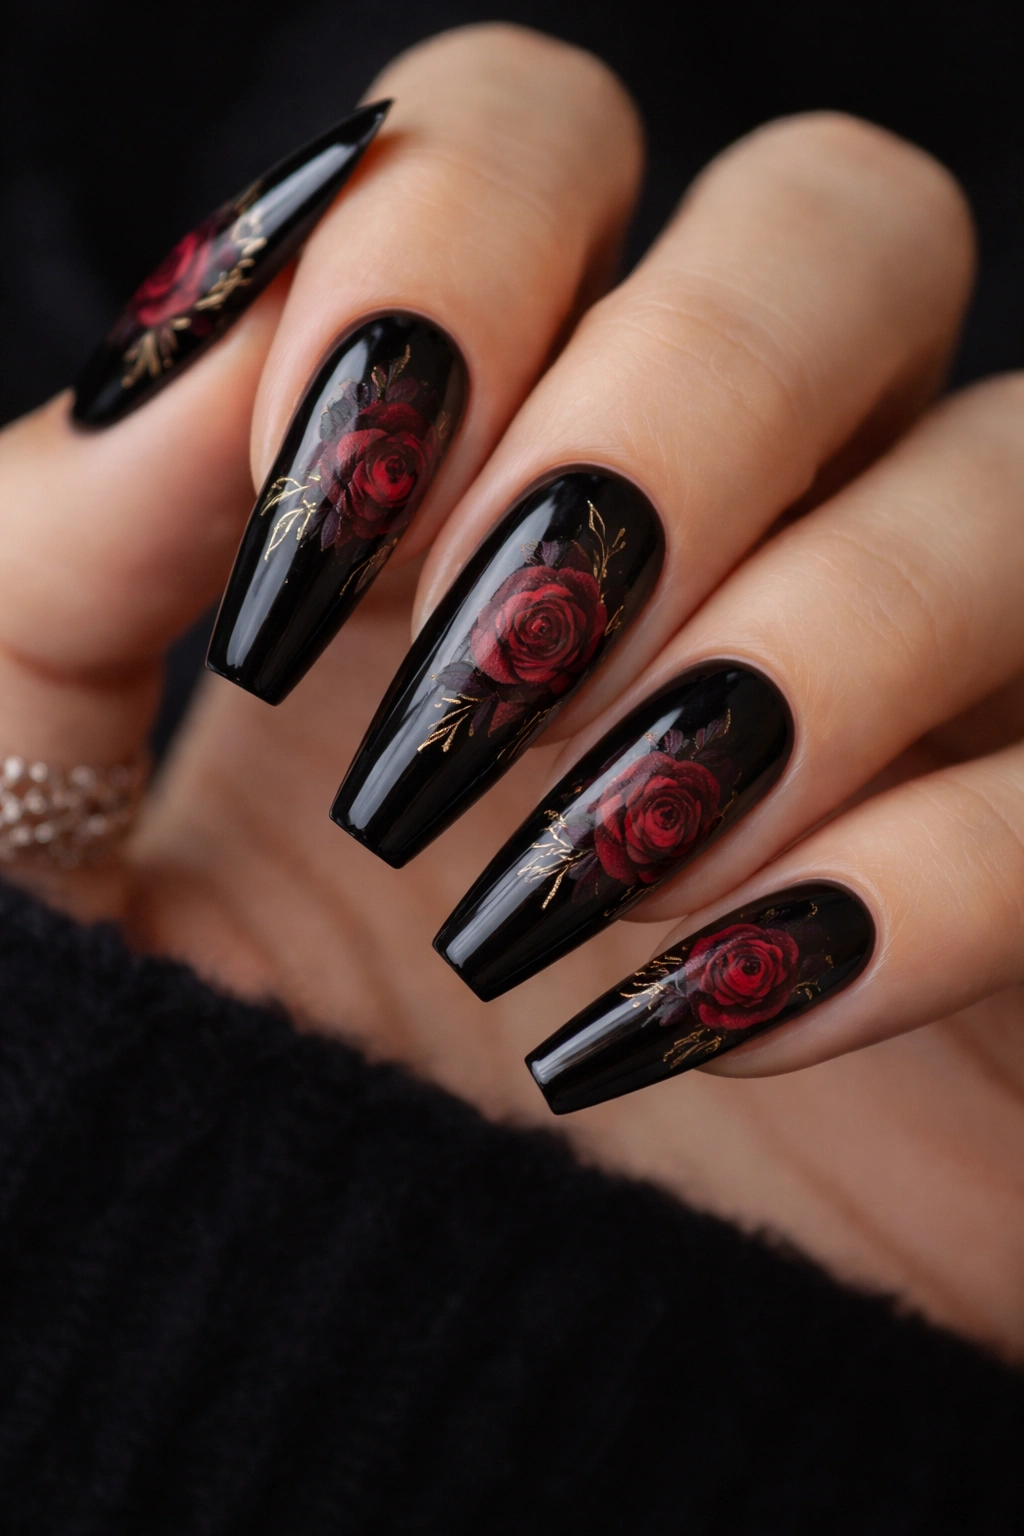
Unlike nude floral sets, which lean soft and airy, black coffin nails with red florals feel moody, dressy, and a little dramatic. That contrast is the whole appeal.
Black gives red petals instant depth. Burgundy, oxblood, crimson, and wine tones all stand out against it, while olive or deep forest leaves keep the design from turning into holiday colors. I like this most when the flowers are painterly rather than cartoon-sharp—slightly blurred inner petals, darker centers, thin gold touches if you want a bit of light.
There’s discipline involved. Put full red roses on every nail and the set gets heavy. Place one large bloom on the ring finger, a partial botanical sketch on the thumb, maybe a petal outline on the middle finger, and leave the rest mostly black or lightly detailed. Much better.
Long coffin nails handle this design best because the dark base shortens the look of the nail. A high-gloss top coat almost always beats matte here. Light bouncing off the black gives the manicure depth, while matte can flatten the red paint unless the artist layers a lot of shading.
If you like floral nail art but hate anything that feels sugary, this is the one I’d point you toward first.
7. Lavender Ombre Coffin Nails With Violet Petals
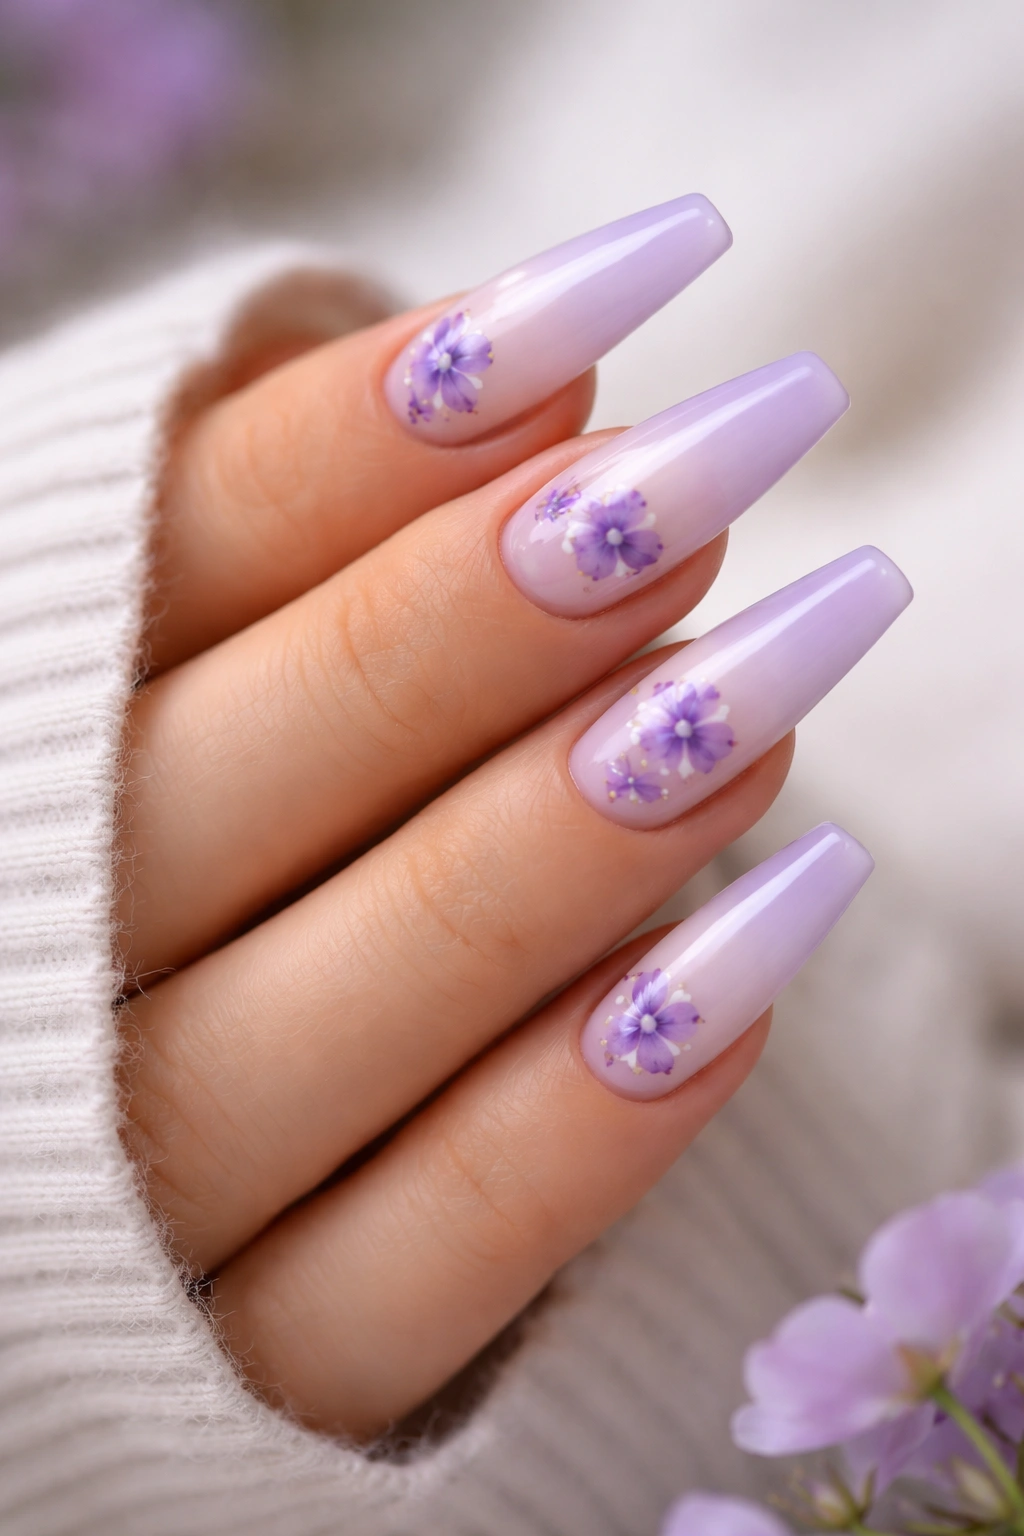
Soft purple can look chalky if it’s laid down as one flat block. Fade it into an ombré, though, and suddenly the whole set gets lighter.
A lavender-to-milky-white gradient makes a smart background for violet petals because the flowers can sit in the darker portion near the tip or cuticle and still stand out. The fade gives you depth without needing extra glitter, foil, or rhinestones. That restraint matters with florals.
The gradient does part of the flower work
Violets are small, layered flowers with a darker center and rounded petals that overlap. On a single-color base, they can disappear unless the outlines are sharp. An ombré background builds contrast into the nail, so the artist can paint softer petals and still get definition.
This design shines on medium-long coffin nails with a glossy finish. A chrome top coat would be too much. Plain glassy shine is enough.
Details worth asking for
- Keep the ombré diffused, with no hard line between white and lavender.
- Use two purple tones in the petals so the flower has depth.
- Add tiny yellow or white centers to break up the purple.
- Place the heaviest cluster on one or two nails, then switch to single blooms elsewhere.
One smart tweak: a sheer lavender base on the pinky and thumb keeps the full set from feeling too floral if you want a lighter touch.
8. Baby Blue Coffin Nails With Forget-Me-Not Clusters
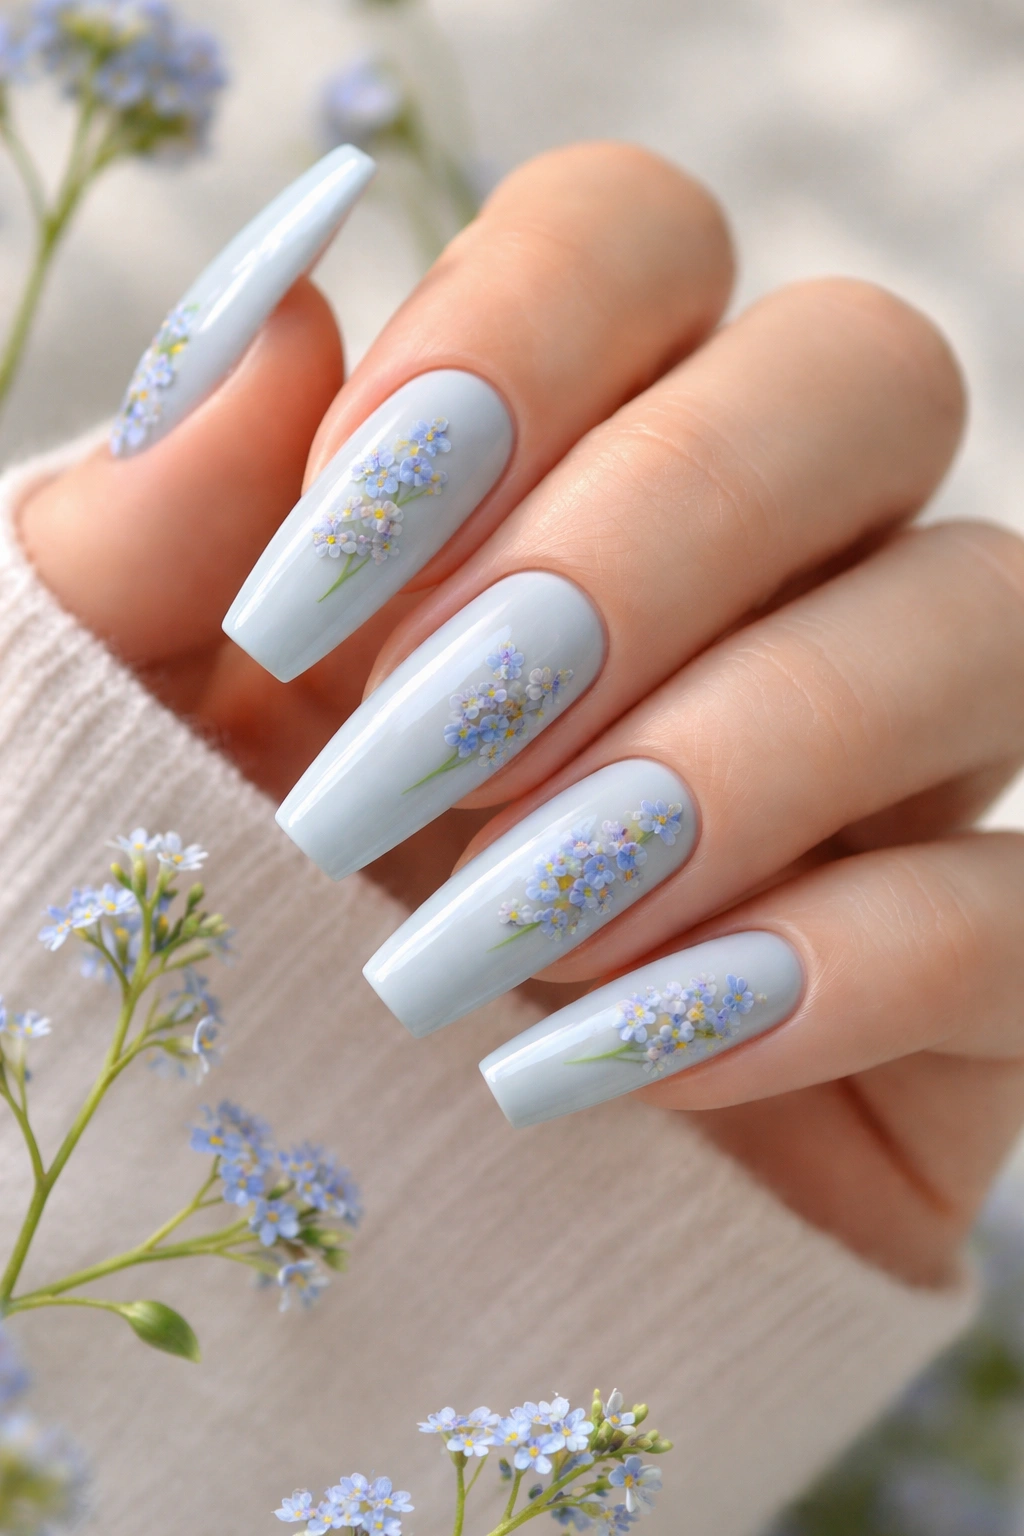
These tiny blue flowers look better when they are off-center. Center them, and they start reading like decals on a toy manicure.
Forget-me-nots have a small face and a bright little center, which makes them a great fit for coffin nails if you want detailed flower art without big blooms. A baby blue or cloudy sky-blue base keeps the palette coherent, though I prefer a base that’s a shade paler than the flowers themselves. That little contrast is what lets the cluster show up.
Placement does the heavy lifting. A small bunch near one sidewall, trailing upward with thin green stems, feels like a real patch of flowers. Scatter the same cluster across the middle of every nail and it loses all charm. These are meadow flowers, not wallpaper.
This set suits people who like a cooler color story. Silver rings, denim, white shirts, crisp cotton—baby blue florals sit nicely with all of that. If you want a touch more texture, one nail with a sheer milky overlay and a single blue cluster under gloss can tie the set together without dragging it into full encapsulation territory.
9. Nude Coffin Nails With Low-Profile 3D Acrylic Petals

Think 3D flower nails are always bulky? They are—unless the artist keeps the petals low, uses them sparingly, and stops before the whole set turns into raised wedding cake icing.
A nude or pink-beige base is the right starting point because it lets the acrylic petals cast a soft shadow. White flowers look cleanest here, though pale pink or cream also work. The trick is scale. You want one raised flower on one or two nails, not a raised bouquet everywhere.
The nicest version places a 3D bloom near the cuticle or off one side, then lets the rest of the nails carry flat painted leaves, micro flowers, or no floral detail at all. That mix of raised and flat elements gives the design shape without making it hard to wear.
Placement matters more than petal count
Ask for low-profile petals with no more than about 1 millimeter of lift at the highest point. Tall petals catch hair, scratch fabrics, and chip faster at the edges. A good tech can press acrylic petals thin enough that they still read as sculpted without becoming annoying by day three.
If you use stones in the center, keep them tiny. One small crystal or metal bead is enough. Anything bigger starts competing with the flower instead of finishing it.
10. Buttercream Yellow Coffin Nails With Sunflower Accents
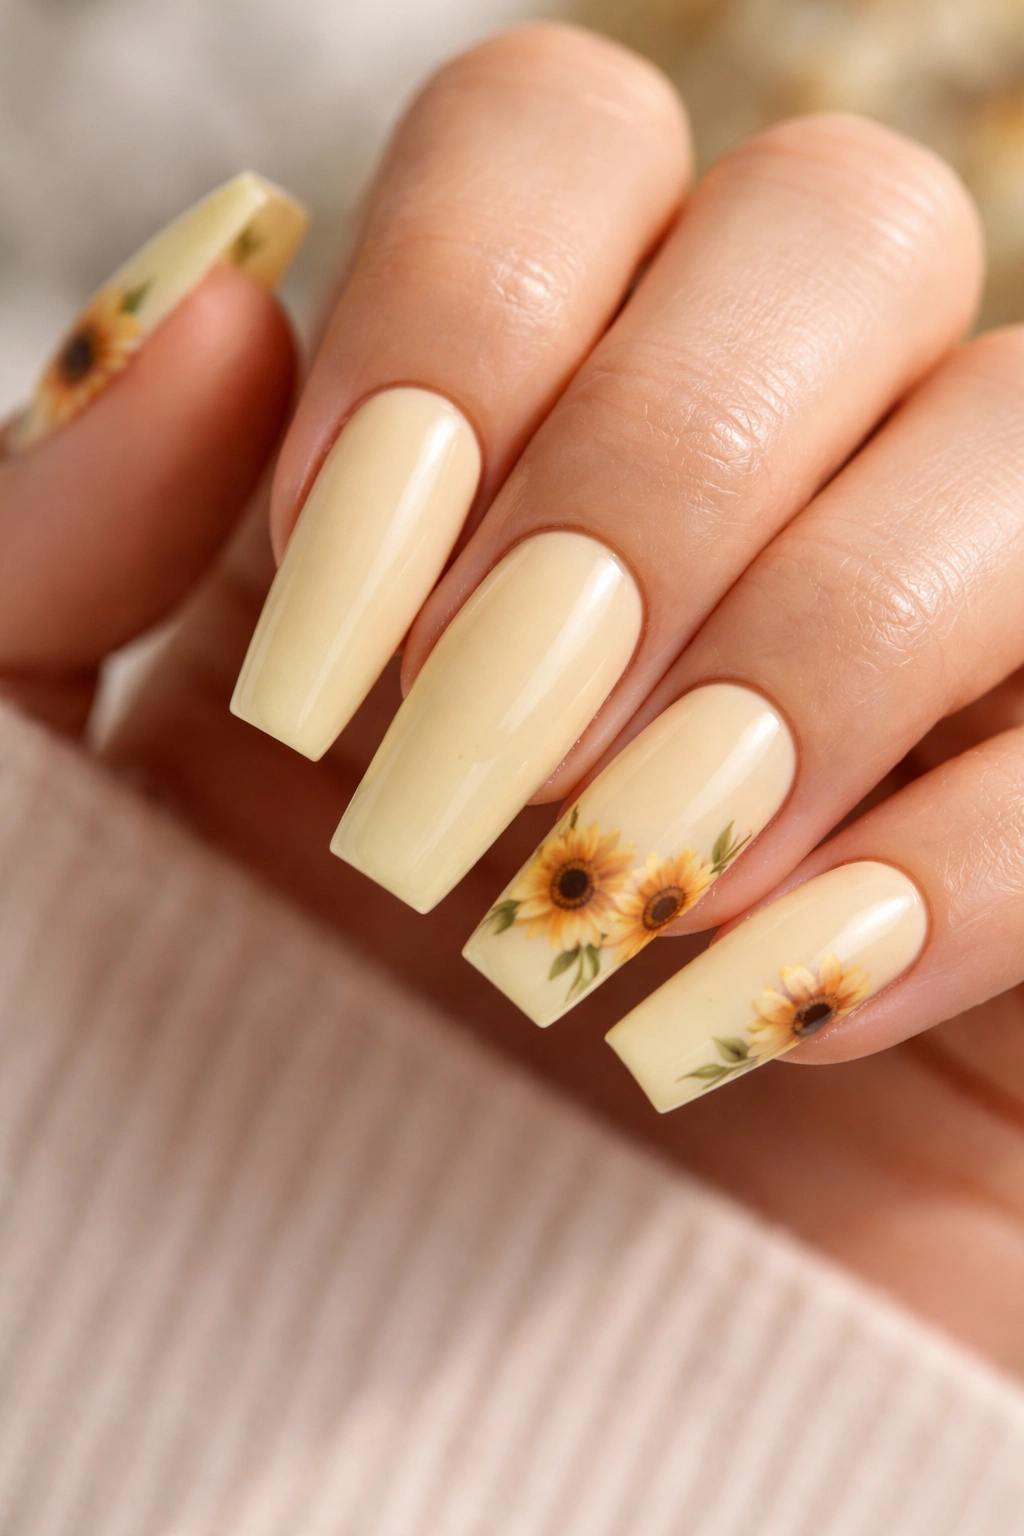
Sunflower nail art often leans cartoonish. Thick black rings, oversized petals, bright yellow slapped on every nail—you’ve seen it. A better version pulls the flower apart and uses only the pieces that matter.
Buttercream yellow is softer than primary yellow, so it already gives the design a more natural base. From there, use partial sunflower arcs at the tip or corner of the nail instead of full front-facing flowers on every finger. A close crop of golden petals around a dark brown center can look striking on a coffin shape because the straight tip acts like the edge of a photograph.
A few choices keep this set from going novelty:
- Use muted golden petals, not neon yellow.
- Paint seed centers in brown with tiny black specks for texture.
- Pair the flowers with one or two plain cream or nude nails.
- Keep leaf accents minimal; sunflowers do not need a jungle of greenery.
I like this design under gloss, though a satin top coat can work if you want the yellow toned down a touch. It has warmth without feeling sugary, and it looks good against deeper skin tones because that butter shade stays rich instead of chalky.
11. Crisp White Coffin Nails With Blue Porcelain Florals
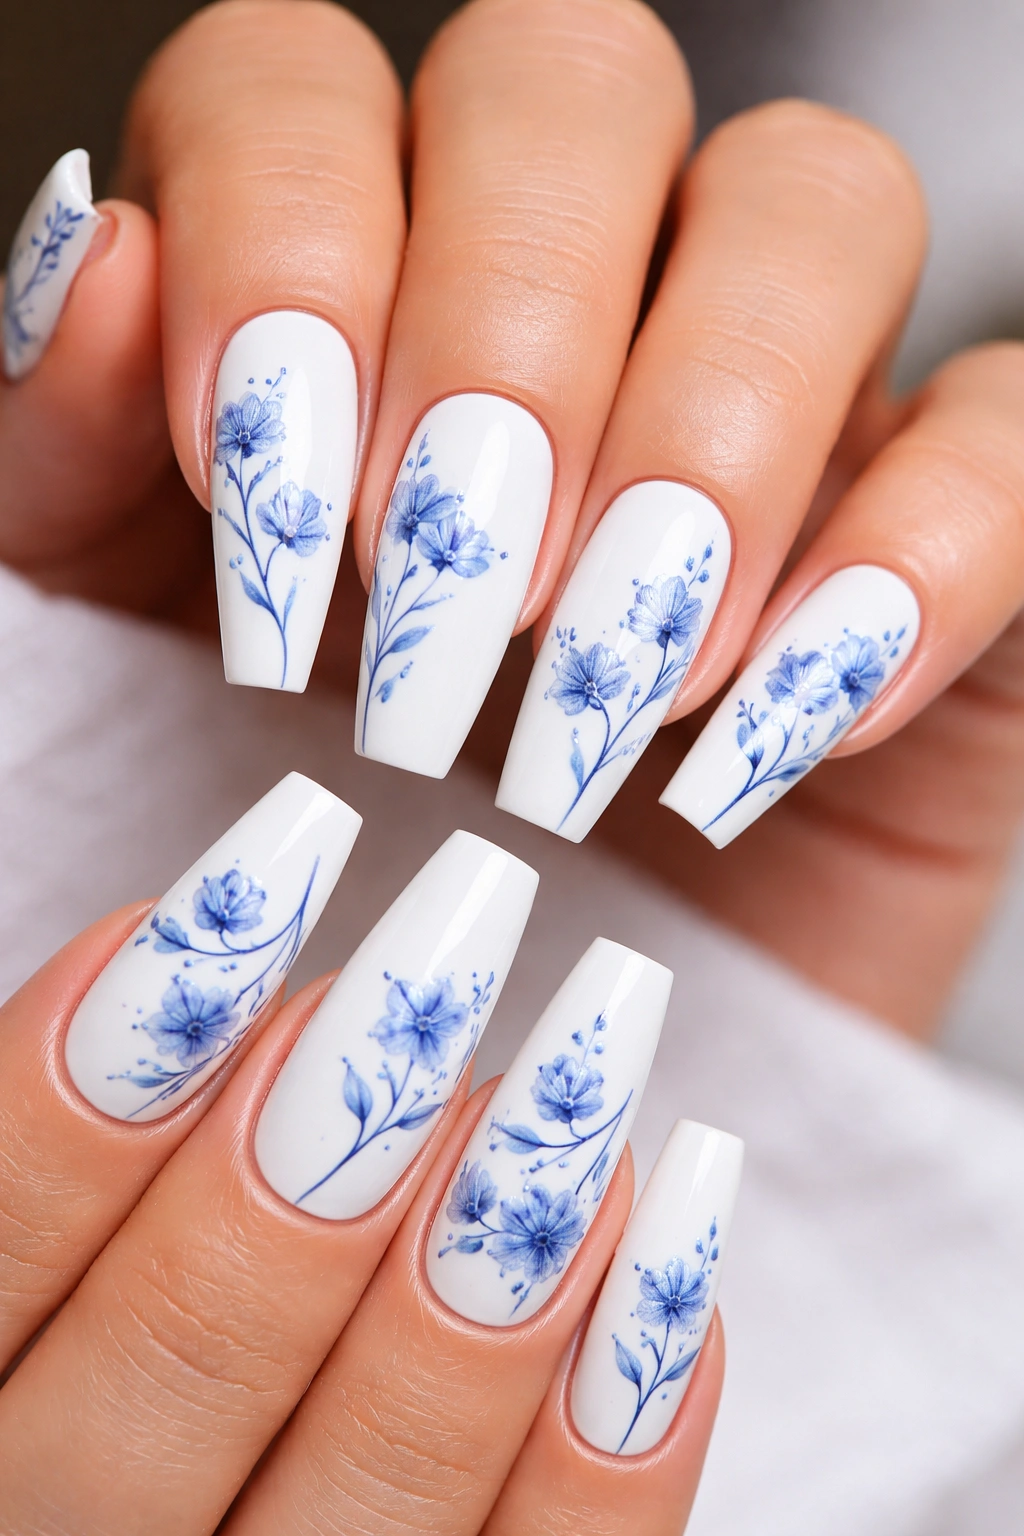
There’s a reason blue-on-white floral patterns keep showing up on plates, vases, tiles, and old textiles. The contrast is clean. The line work reads from a distance. And when you move that look onto coffin nails, the shape gives it a neat little panel-like structure.
This is not a loose garden manicure. It is more disciplined than that—botanical, yes, but with a decorative edge. Thin cobalt stems, tiny blue petals, curved leaves, and occasional dotted detailing can turn a bright white or milky base into something that feels half floral, half porcelain print.
I prefer a white that is crisp but not correction-fluid opaque. A softer milk white lets the blue sit into the surface a bit more. Pure bright white can work, though it pushes the design closer to ceramic than flower bed.
One of the best things about this set is its sharpness. Even small flowers show clearly because the blue line work has so much contrast. You do not need long claws for it either. A medium coffin still gives enough room for a stem cluster or corner floral spray.
Keep the finish glossy. Porcelain without shine loses its whole reference point.
12. Jelly Pink Coffin Nails With Floating Hibiscus Blooms
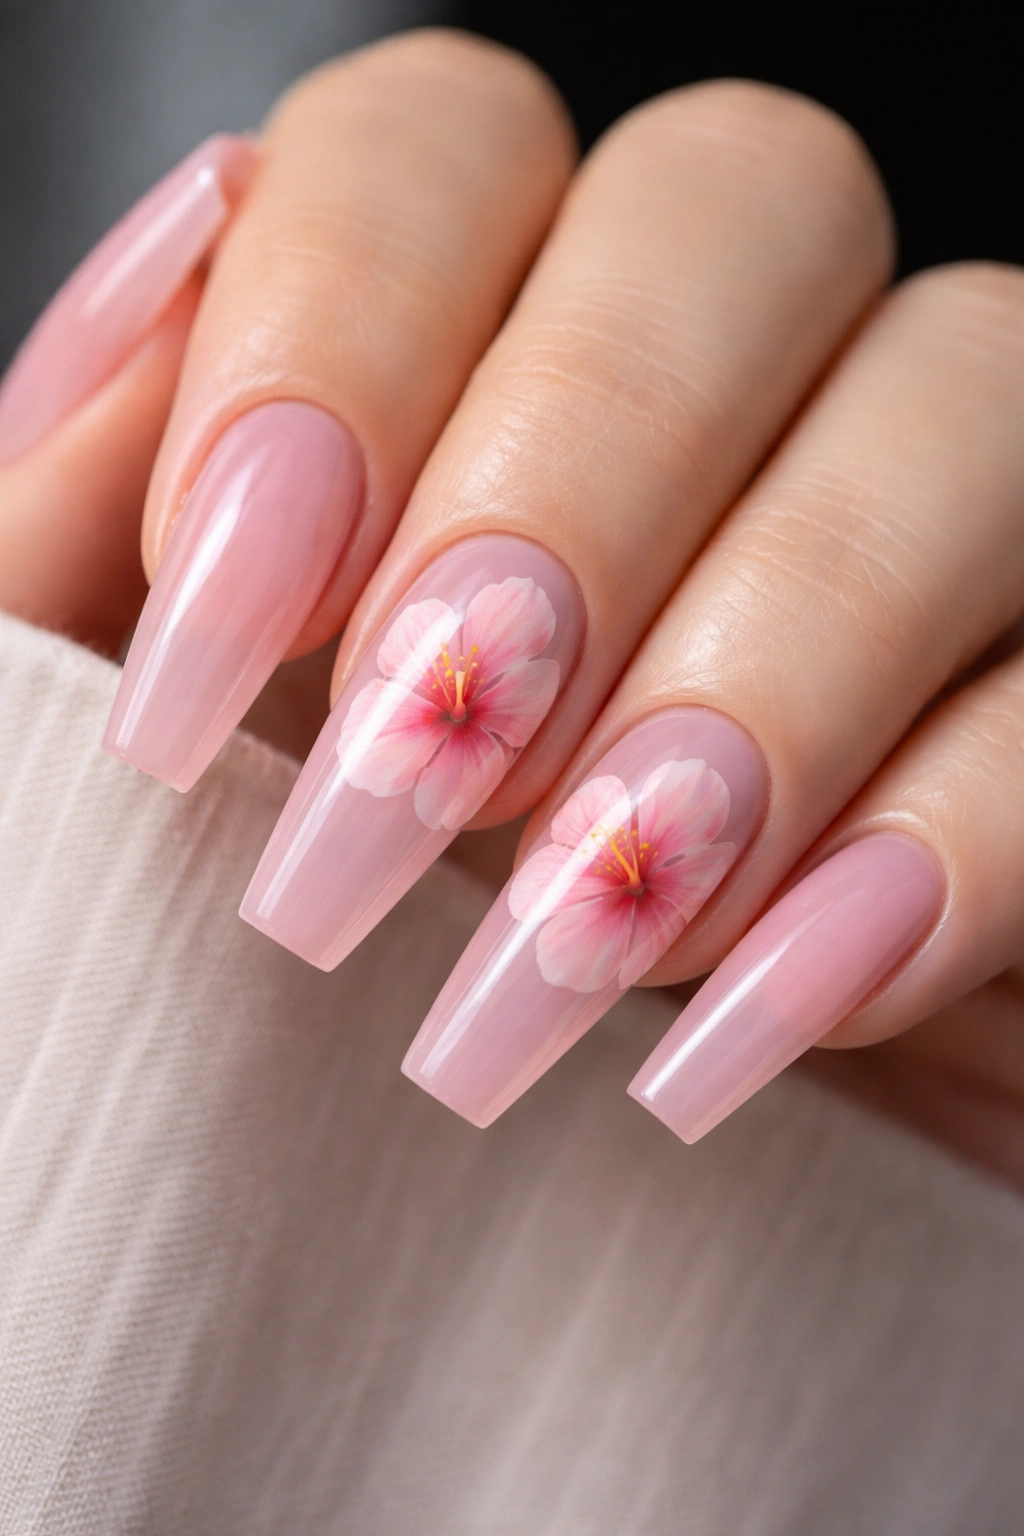
Unlike dense acrylic florals, jelly pink hibiscus nails feel light, translucent, and warm-weather ready without needing neon color. The jelly base is doing crucial work here. It lets light pass through the nail color, which makes the flowers look suspended rather than pasted on.
Hibiscus blooms need room. They are broad, open flowers with five visible petals and a stronger center than a daisy or violet. That means they suit longer coffin nails better than shorter ones. Give the artist enough canvas and the petals can stretch a little, overlap, and still leave negative space around the bloom.
Color choice matters more than people expect. Coral, watermelon pink, pale red, or peachy fuchsia all work better than flat hot pink because hibiscus petals look richer when the edges and center shift tone slightly. Add a deeper throat at the middle and a slim stamen line, and the flower reads instantly.
I would not put hibiscus on every nail. One or two floating blooms, a couple of jelly nails with no art, maybe one accent with a tiny leaf or petal shadow—that is enough. Too many full tropical flowers start fighting the coffin shape instead of working with it.
13. Sage and Cream Coffin Nails With Botanical Line Art
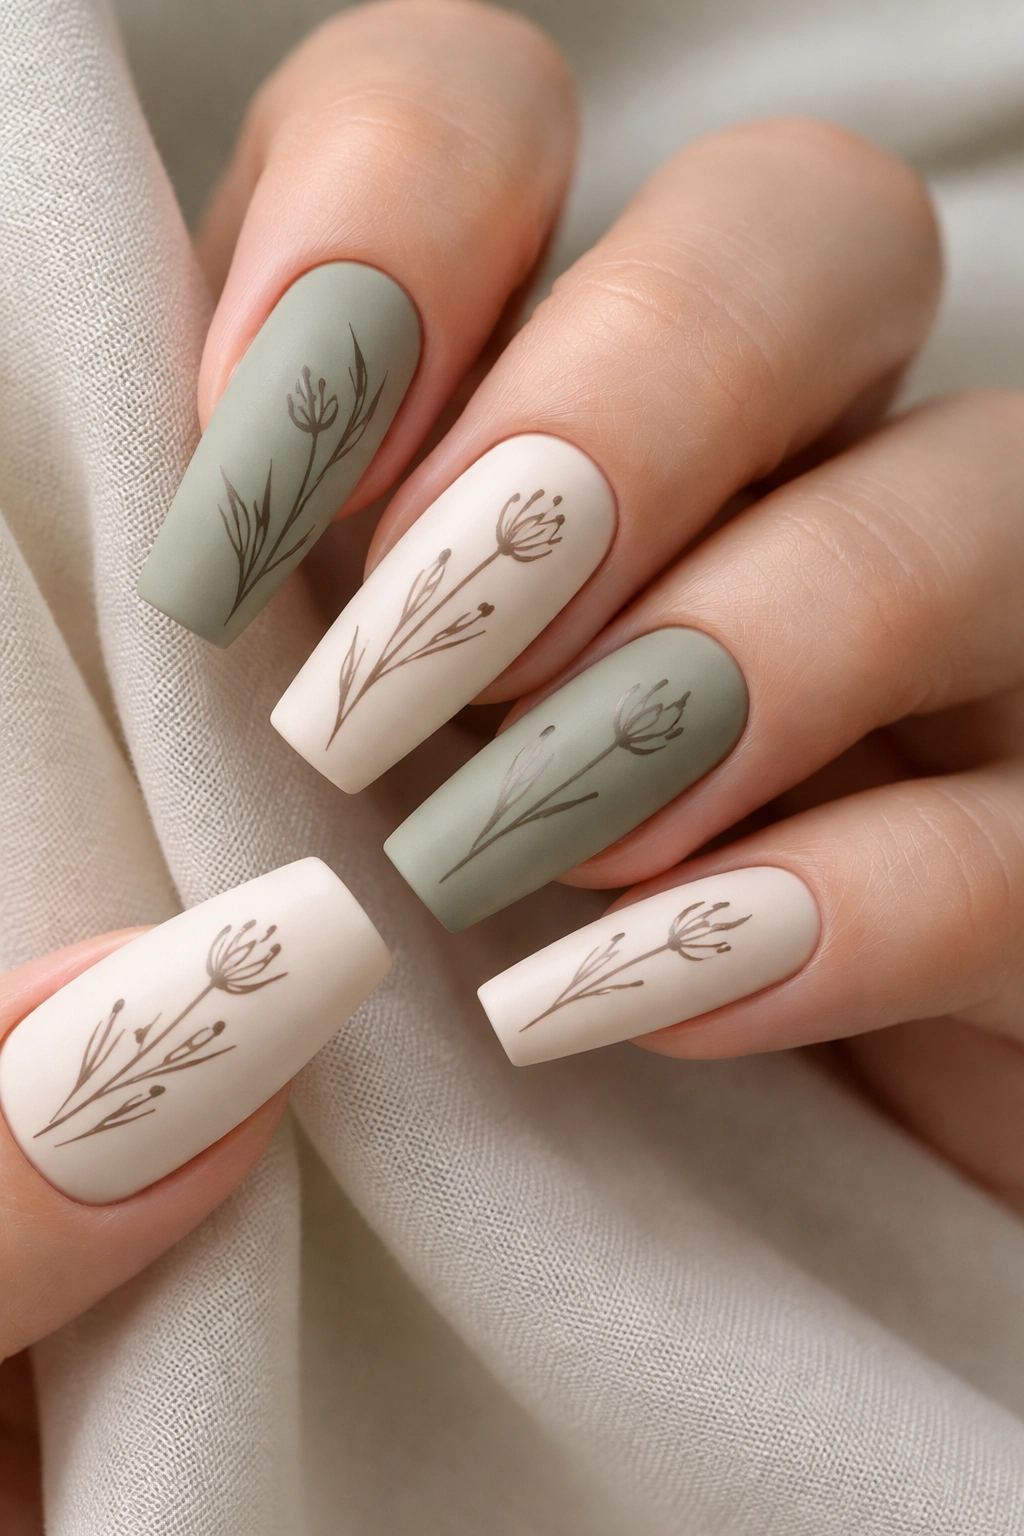
If full painted flowers feel like too much, this is the off-ramp. Botanical line art gives you the floral mood without dense color on every finger.
A sage and cream palette keeps the set grounded. One nail might be solid sage, one soft cream, one sheer nude, then two accent nails carry single-line stems, buds, or petal outlines in dark olive or warm brown. The result feels calmer than a bouquet manicure but still reads floral from arm’s length.
Why line art changes the mood
Line art leaves more blank space, which means the coffin shape itself stays visible. That is a big deal. Some floral sets are lovely as paintings yet hide the nail silhouette under too much detail. Thin botanical drawing lets the taper and crisp tip do their job.
It also wears well. Tiny chips or tip wear are less obvious on sparse line work than on a dense painted bloom with six colors packed into one corner.
Small moves that make it stronger
- Use one-line stems with one or two breaks, not heavy outlines all the way through.
- Keep cream soft, not bright white.
- Add a matte top coat if you want a paper-sketch feel.
- Let one nail stay plain nude so the art has somewhere to rest.
Best for: people who want floral coffin nails that look polished, graphic, and a little less expected.
14. Burgundy Coffin Nails With Moody Peonies
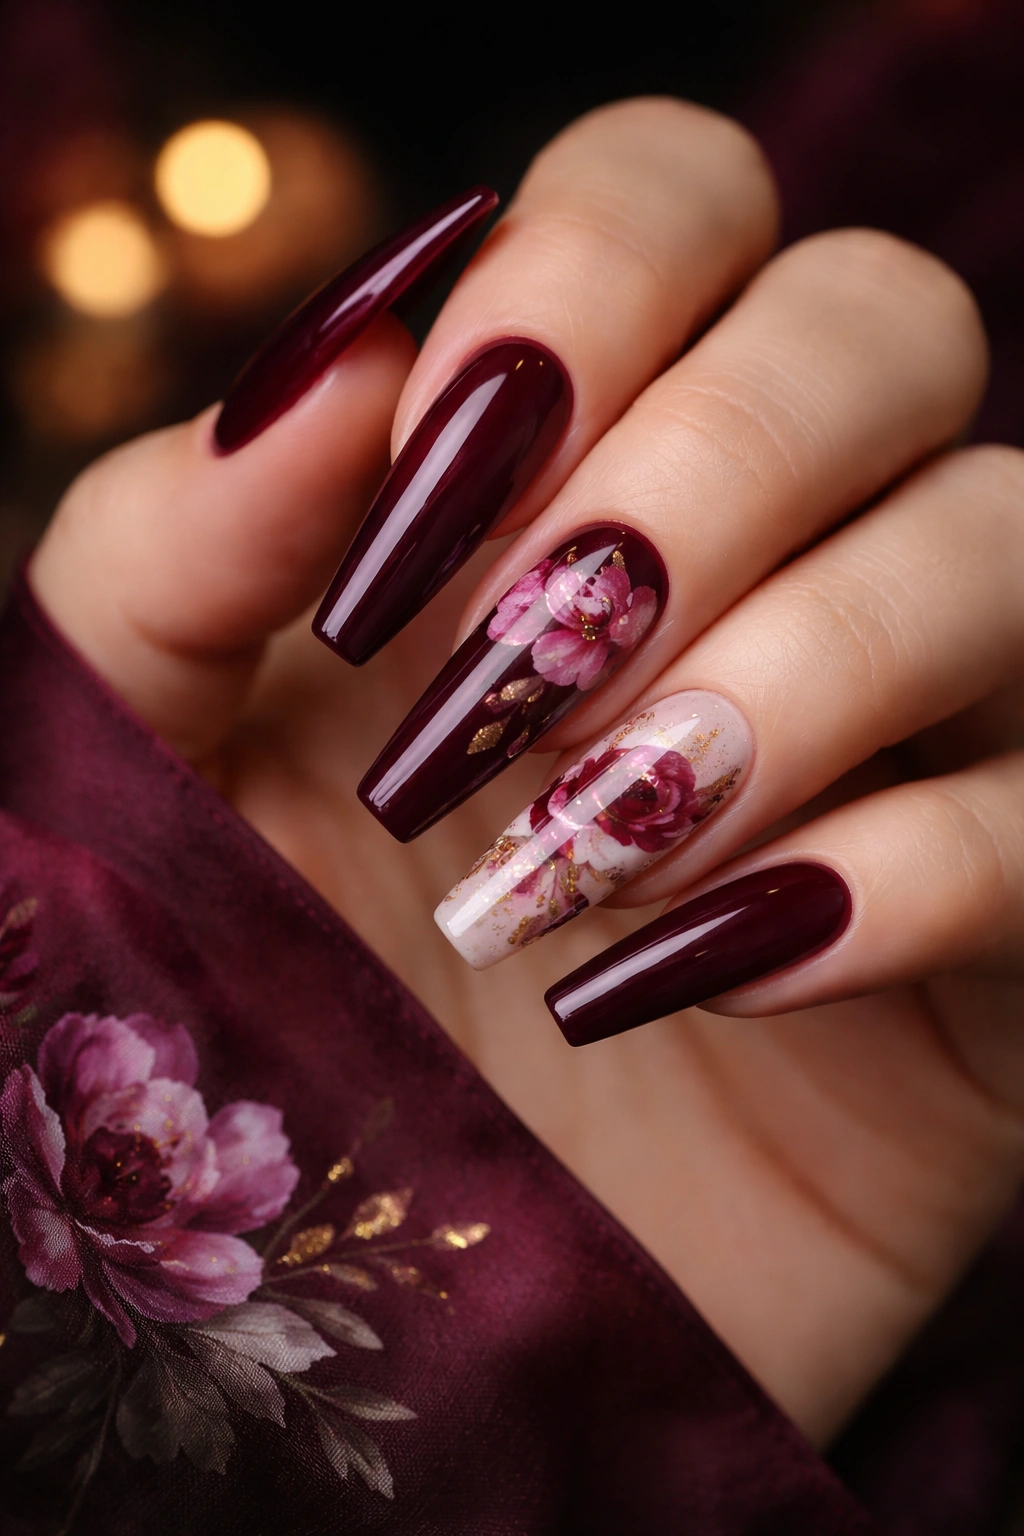
Peonies need drama, or they look like blobs. Burgundy gives them that drama without forcing you into black.
A peony has layers on layers of petals, which means it needs shading to make sense on a nail. Burgundy, wine, plum, dusty mauve, and a touch of cream can build that depth in a way pale pink often cannot. I like using a deep burgundy base on two or three nails, then painting the fuller peony on a lighter accent nail—milky beige or translucent blush works well—so the bloom does not disappear.
These are not tiny flowers. Let them spread. A half-open peony sitting across the side of a long coffin nail can look lush and painterly, while a tiny peony squeezed into the center usually looks muddy. Bigger petals, fewer nails, cleaner result.
Gold foil in the smallest amount can work here, though I’d skip chunky glitter. Peonies already carry enough visual weight. What they need is contrast and shape, not more noise.
This set leans evening, dinner, velvet blazer, cool-weather mood. Still, it doesn’t feel costume-y if the palette stays within that wine-and-cream lane.
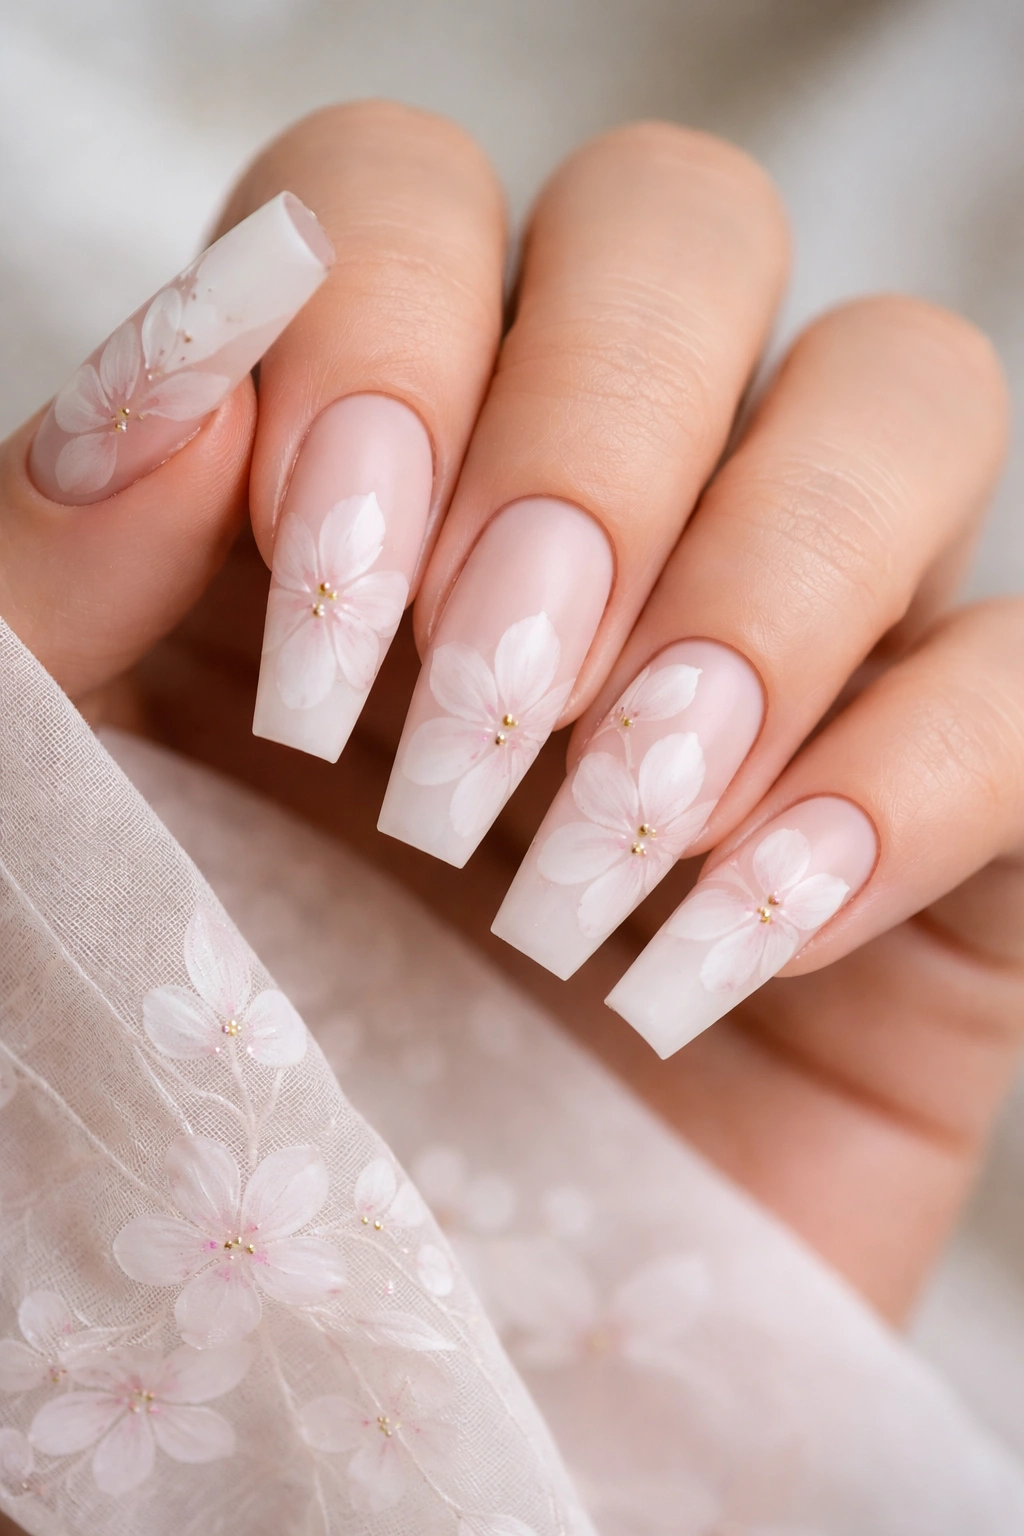
15. Soft Nude Coffin Nails With Micro Flowers and Dewdrop Crystals

Want a manicure that looks like flowers after a light mist? This is the one.
A soft nude base with scattered micro florals—tiny white, pink, yellow, or blue blossoms no bigger than 2 to 3 millimeters each—already has that meadow effect. Add a few clear gel droplets or tiny crystal accents placed like dew near the petals, and the whole set picks up dimension without becoming a rhinestone design.
The reason it works is restraint. Dewdrops should be scarce. One small droplet on two or three nails is enough. Tiny flowers should cluster in irregular patches, not sit in neat rows. A good tech will vary the flower size a little, tilt some petals, and leave wide areas of the nail bare.
How to keep the droplets from taking over
Ask for clear domed gel droplets or the smallest crystal size available, placed off-center and sealed well around the base. Large stones ruin the illusion. You want morning moisture, not pageant jewelry.
This design is stronger under gloss because shine helps the droplets read as water. It looks fresh, detailed, and a bit whimsical, though not in a childish way. If you like floral coffin nails that feel delicate from up close and still clean from across the room, micro florals with dewdrops are hard to beat.
Final Thoughts
The floral sets that look most like a garden usually follow one rule: not every nail needs to bloom at full volume. One nail carries the headline flower, another carries a stem or petal echo, and one nail does almost nothing at all. That empty space is doing work.
If you’re saving ideas before your next appointment, do yourself a favor and screenshot with a purpose. Do not save “flowers.” Save one base color, one flower type, one finish, and one placement idea. That gives your nail tech something clear to build from, and it keeps the final set from drifting into a mash-up.
Coffin nails give florals room to stretch. The smart part is knowing when to stop painting.
