

The coffin nail shape has become a go-to for anyone wanting a modern, elongated look that sits perfectly between edgy and elegant. Curved coffin nails take this trend even further—they soften the sharp lines of traditional coffin designs with gentle arcs and flowing contours, creating something that feels both sophisticated and effortlessly cool. Medium-length nails hit a sweet spot: they’re practical enough for daily life, dramatic enough to showcase intricate nail art, and they photograph beautifully without looking extreme.
What makes curved coffin nails so appealing is their versatility. The gentler angles work with everything from minimalist monochromatic designs to bold, artistic statements. They flatter a wider range of hand shapes than straight-edged coffin nails, and they’re less likely to feel heavy or overwhelming if you prefer understated elegance. Whether you’re drawn to nail art that makes a statement or something more understated and refined, the curved coffin shape gives you a gorgeous foundation to work with.
Medium-length curved coffin nails also strike a practical balance. They’re long enough to really display a design, but short enough that you’re not struggling with everyday tasks. The medium length paired with the curved shape actually makes these nails feel more durable and less prone to breakage than longer, more angular styles. This guide covers 14 of the most stunning curved coffin nail designs that work beautifully on medium nails—each one with specific application tips, color recommendations, and real-world styling advice.
1. Soft Ombre Gradient Blush to White
This design transitions smoothly from a warm blush pink at the nail bed to crisp white at the tips, creating an ethereal gradient that looks airbrushed. The soft color progression feels romantic and refined, making it perfect for everyday wear that still feels special. The curved coffin shape enhances the ombre effect by allowing the gradient to flow naturally along the nail’s contours.
Why This Design Works
The ombre gradient is forgiving on application and incredibly flattering to most skin tones. Unlike stark French tips, the soft blush base keeps this feeling warm and approachable, while the white tip maintains definition and visual lift. The gradient effect creates the illusion of length on medium nails, making them appear more elongated than they actually are.
Application and Color Tips
- Use a makeup sponge to dab and blend the transition zone between colors—this creates that seamless gradient instead of harsh lines
- Start with a strong base coat; ombre designs are easier to execute on a smooth, even foundation
- The blush pink should be warm and creamy, like rose or dusty mauve, not hot pink
- Seal everything with a glossy top coat to enhance the gradient’s luminous quality
- If you prefer more definition, add a thin white line at the very tip before the ombre fully transitions
Best For
Anyone wanting an elegant design that works for professional environments and casual settings alike. This design is particularly flattering for shorter to medium nail beds and elongated hand shapes.
Pro tip: This gradient works even better when you keep the white area slightly thinner than traditional tips—it feels more modern and refined than the classic French ombre.
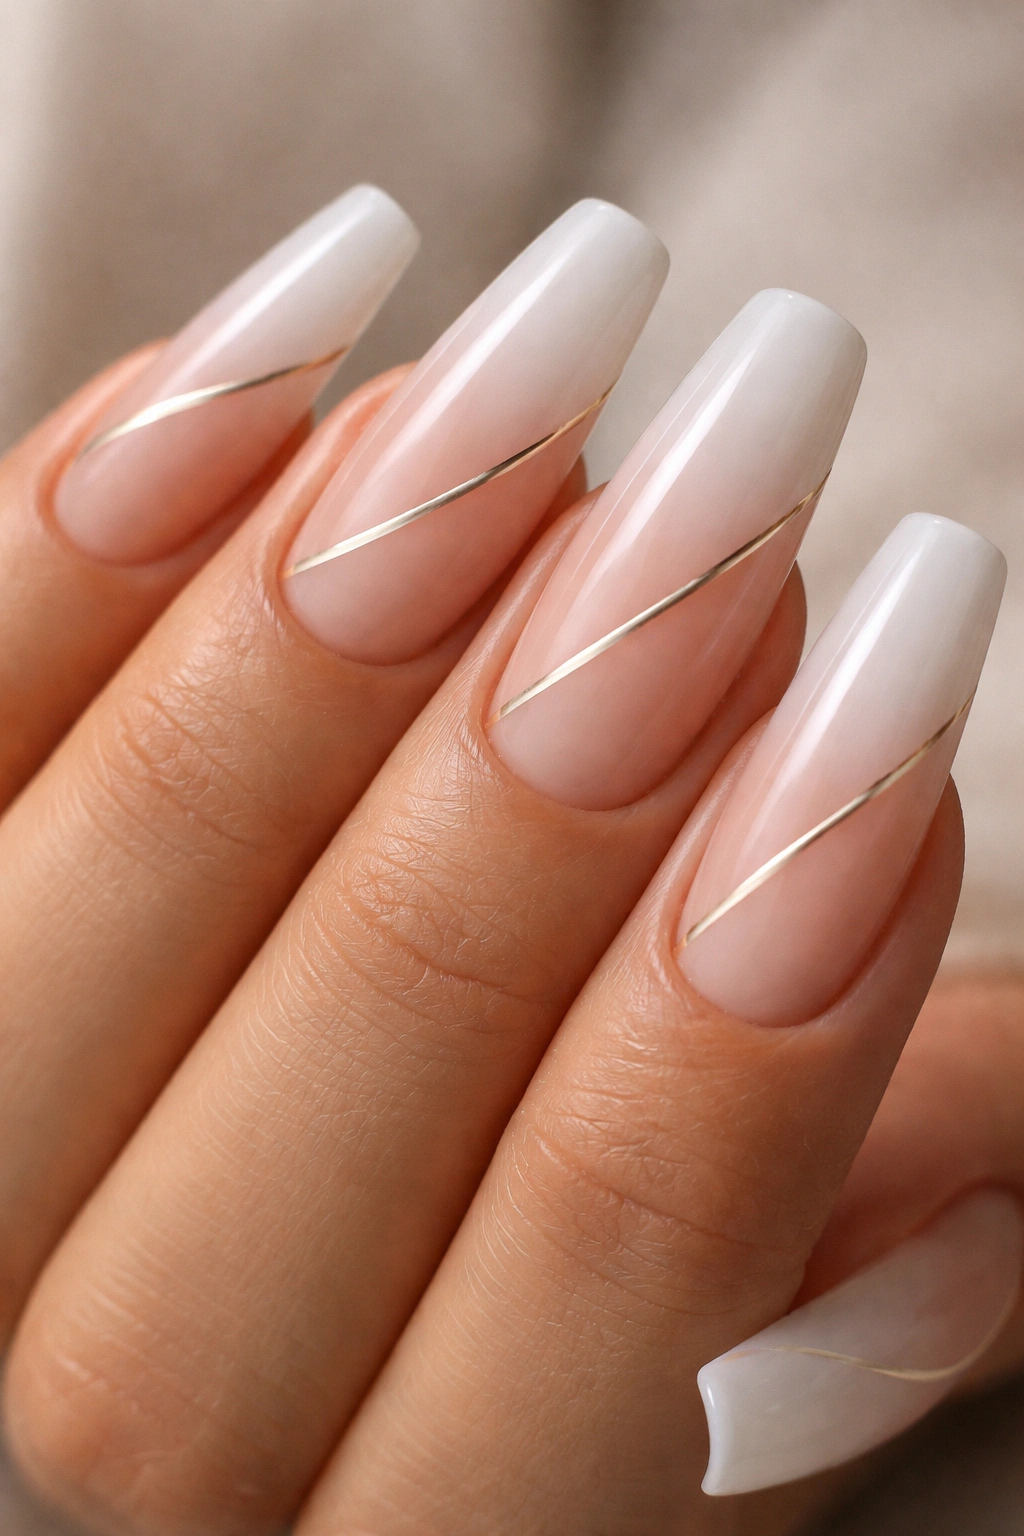
2. Negative Space Geometric Lines
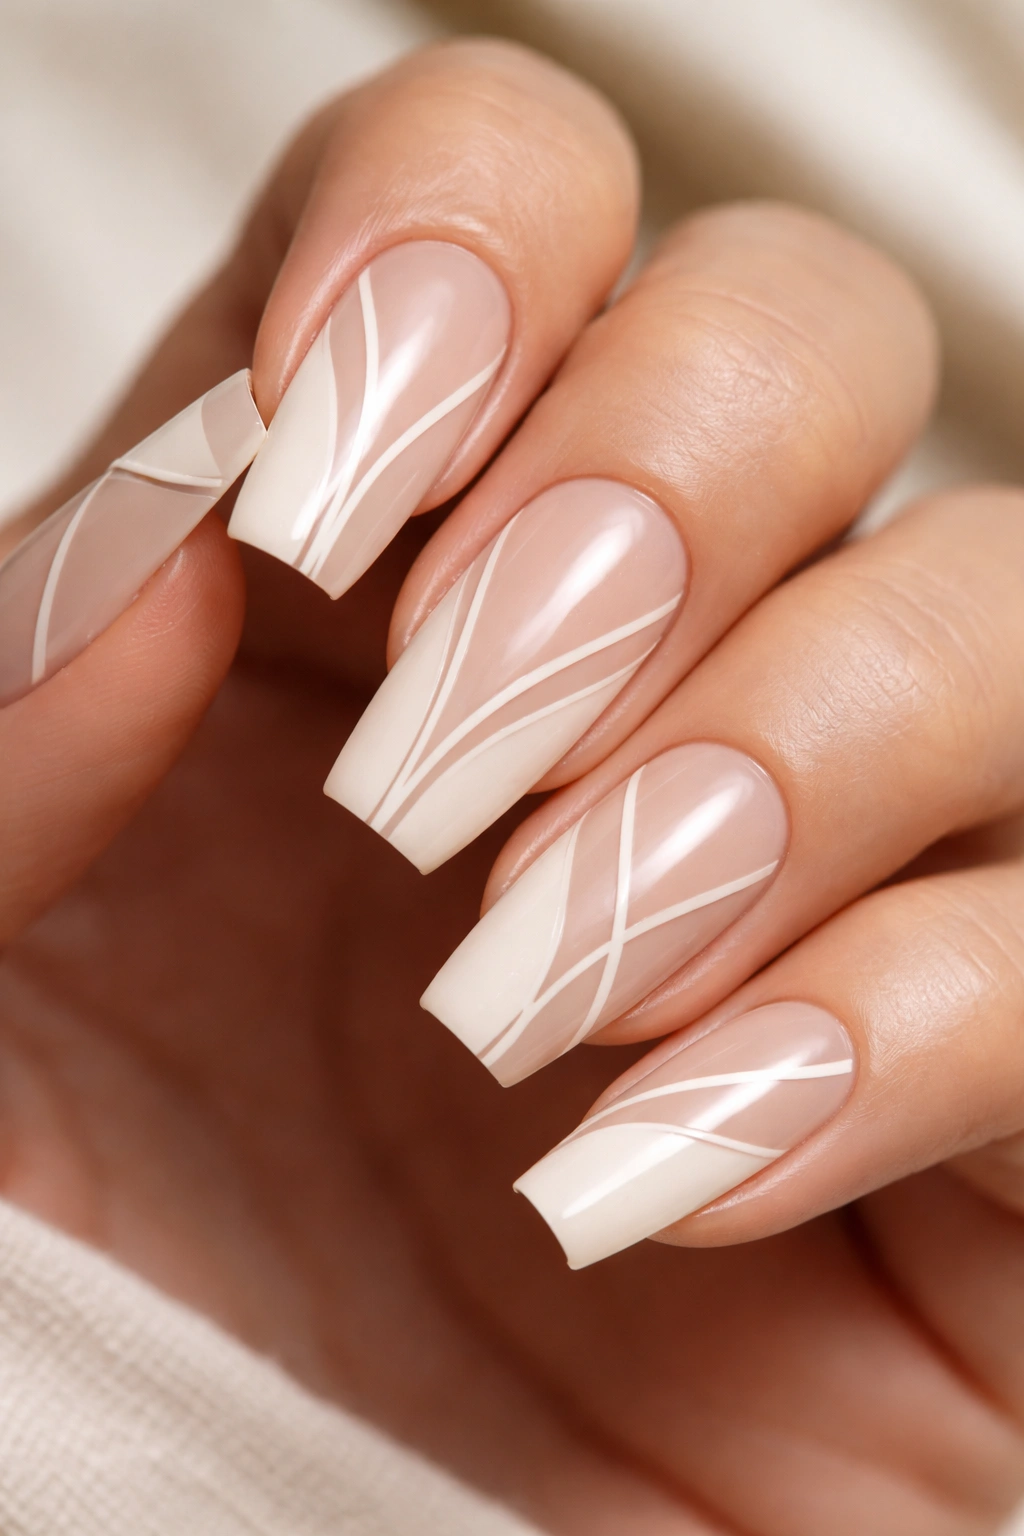
This minimalist design uses negative space (your natural nail showing through) to create clean geometric lines, angles, and shapes across the curved coffin nail. Negative space designs look incredibly modern and architectural, especially against a neutral base color like cream or soft taupe. The curved shape becomes part of the design itself—the geometric lines can follow or contrast the nail’s contours.
Why This Design Works
Negative space designs are low-maintenance once applied and don’t require intricate hand-eye coordination. They photograph beautifully because the contrast between the polish and exposed nail creates sharp visual definition. The curved coffin shape makes these geometric patterns feel softer and more organic than they would on straight-edged nails.
Application and Color Tips
- Use thin striping brushes or nail tape to create precise lines; tape removal is key to clean edges
- A creamy, opaque base color (ivory, sand, cool gray, or soft beige) works best to show off the negative space clearly
- Paint the entire nail first, then carefully remove polish in the geometric pattern using a thin brush and rubbing alcohol or a dotting tool
- Alternatively, use nail tape before polishing to create perfect geometric lines
- Seal with a matte or glossy top coat depending on your preference; matte feels more minimalist, glossy feels more polished
Best For
Minimalist lovers and anyone who appreciates architecture-inspired design. This works beautifully on professional nails and for people with busy lifestyles who want something visually interesting but understated.
Worth knowing: These designs look sharper and more intentional if you keep the line thickness consistent throughout. Wobbly lines read as accidents rather than artistic choice.
3. Marble Swirls with Gold Accents
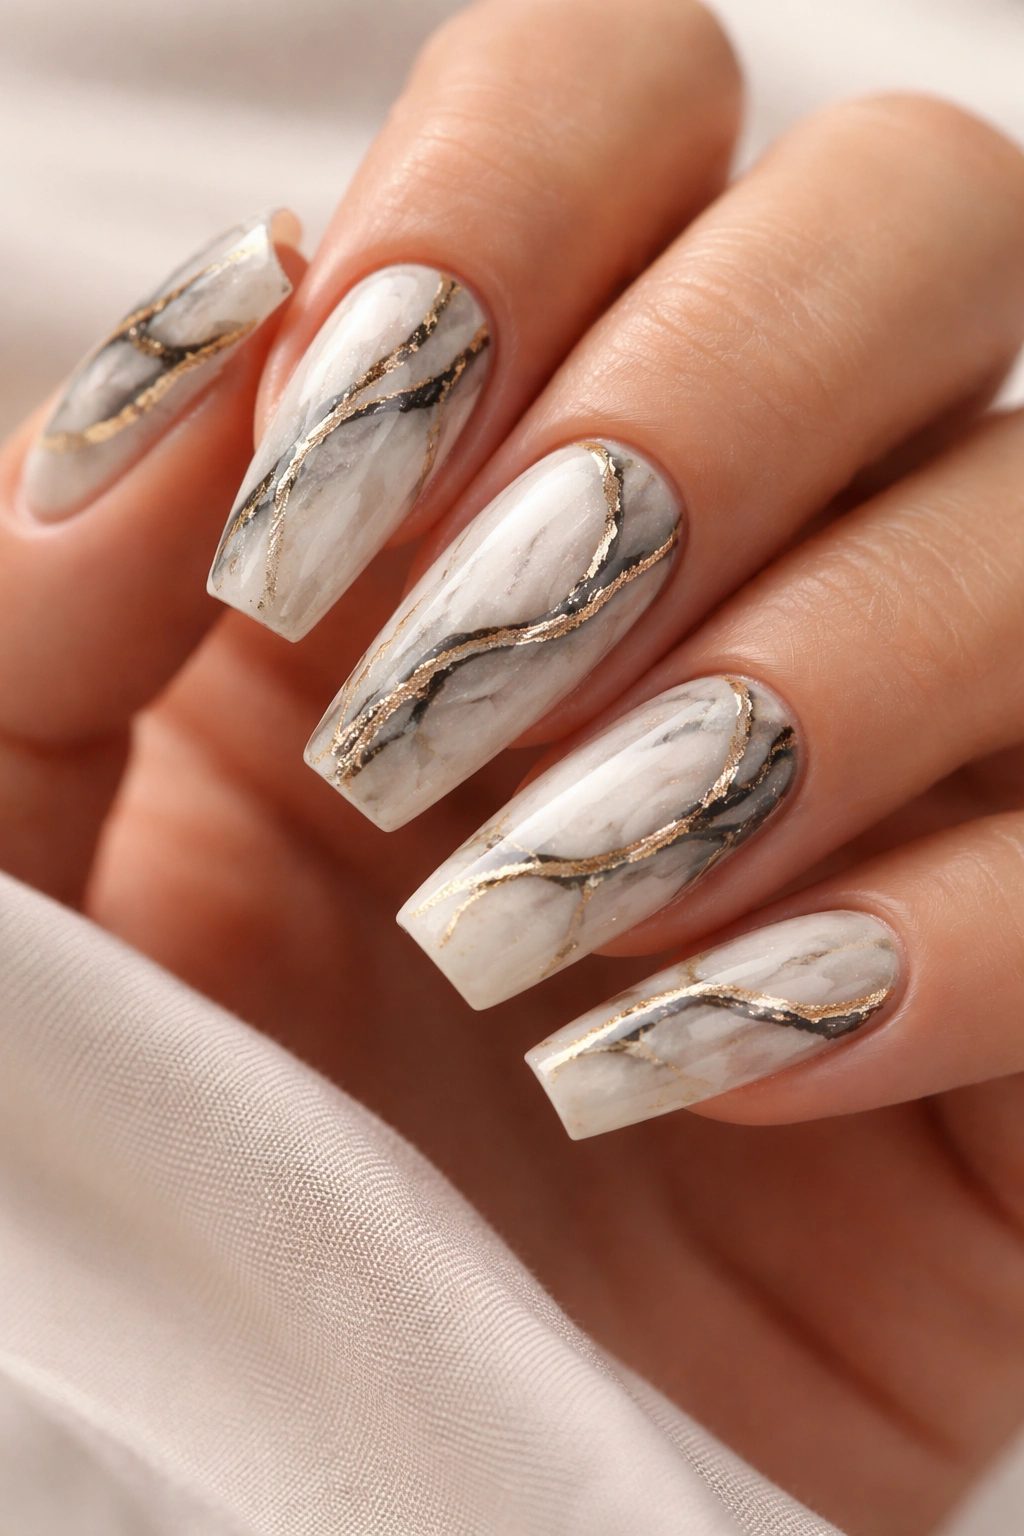
Marble designs mimic natural stone patterns with swirled veining in black, gray, or navy over a light cream or white base. Gold accents—thin striping lines, dots, or small geometric shapes—add luxury and warmth to the design. The curved coffin shape creates natural flow lines that work beautifully with marble’s organic, flowing patterns.
Why This Design Works
Marble is endlessly forgiving because it’s supposed to look organic and imperfect. No two marble nails look identical, which means small imperfections only add to the authentic stone effect. The gold accents elevate a simple marble design into something genuinely luxe-looking without being overdone. Medium-length curved coffin nails showcase marble beautifully because you have enough surface area to see the full pattern.
Application and Color Tips
- Start with an opaque white or cream base and let it dry completely
- Use a thin striping brush and black or dark gray polish to create organic veining patterns—think flowing lines, not straight strokes
- Soften some edges by going over them lightly with a light gray to create dimension
- Add gold accents after the marble is completely dry; use gold striping polish or gold leaf application
- Finish with a high-shine glossy top coat to mimic the reflectivity of real stone
Best For
Anyone wanting an upscale, sophisticated look that reads “intentional design” rather than experimental. This works for special occasions and everyday wear alike. It’s particularly striking on medium curved coffin nails because the surface area is substantial enough to showcase the marble’s full beauty.
Insider note: Add just a few gold accents, not a lot. Restraint is what makes marble with gold feel luxe rather than busy.
4. Sunburst or Radiating Lines Design
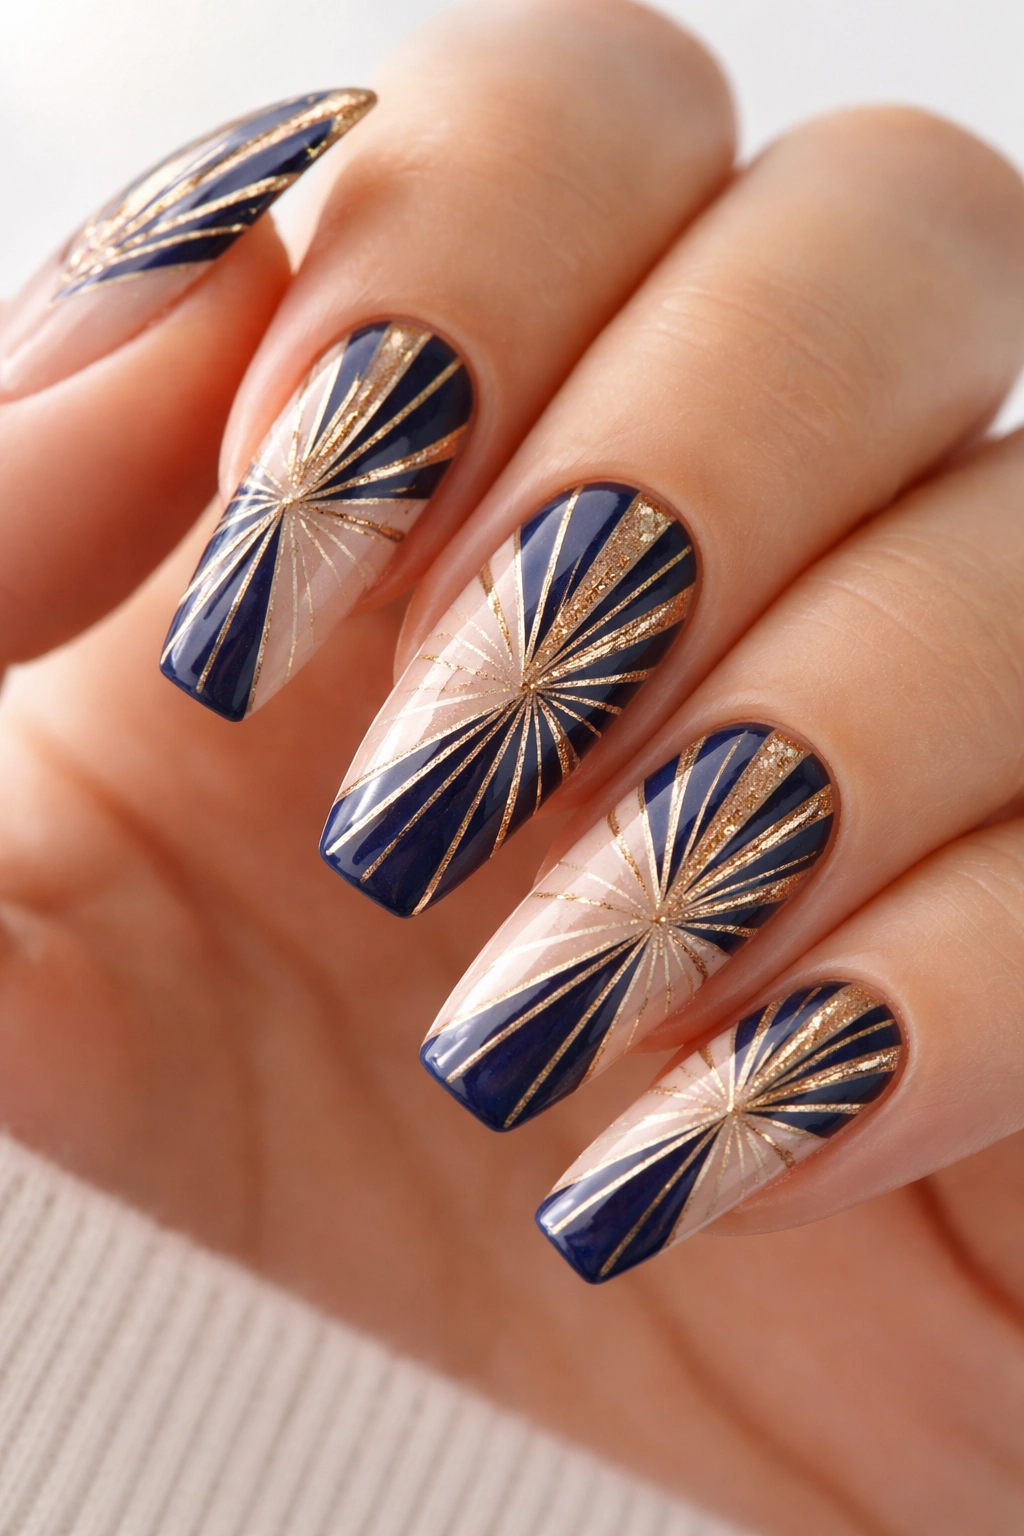
This design features thin striping lines that radiate outward from the center of the nail bed toward the edges and tips, creating a sunburst or starburst effect. Use contrasting colors like navy with gold lines, burgundy with rose gold, or black with white to make the radiating pattern really pop. The curved coffin shape creates natural pathways for the radiating lines to follow.
Why This Design Works
Sunburst designs create the illusion of movement and are visually dynamic without being chaotic. The radiating pattern naturally follows the shape of medium curved coffin nails, making the design feel custom-fitted to the nail shape rather than slapped on top of it. This design works on every skin tone and pair with almost any outfit.
Application and Color Tips
- Paint a solid base color first and let it dry completely
- Use a thin striping brush or nail art pen to draw lines from approximately the nail bed’s center outward toward the edges
- Keep lines evenly spaced for a polished look; uneven spacing reads as accidental
- The lines don’t need to be perfectly straight—slightly curved lines that follow the nail’s natural arch feel more organic
- Space out your lines around the entire nail, not just across the top
- Use a high-contrast color combo to make the sunburst visible from a distance
Best For
Anyone wanting something visually interesting that still maintains a clean, organized feel. This works beautifully for creative professionals, event styling, and anyone who loves geometric design.
Quick fact: Sunburst designs can be done with 2-3 colors (a base, striping color, and optional accent) and still look intentional and sophisticated.
5. Floral Clusters with Foil Details
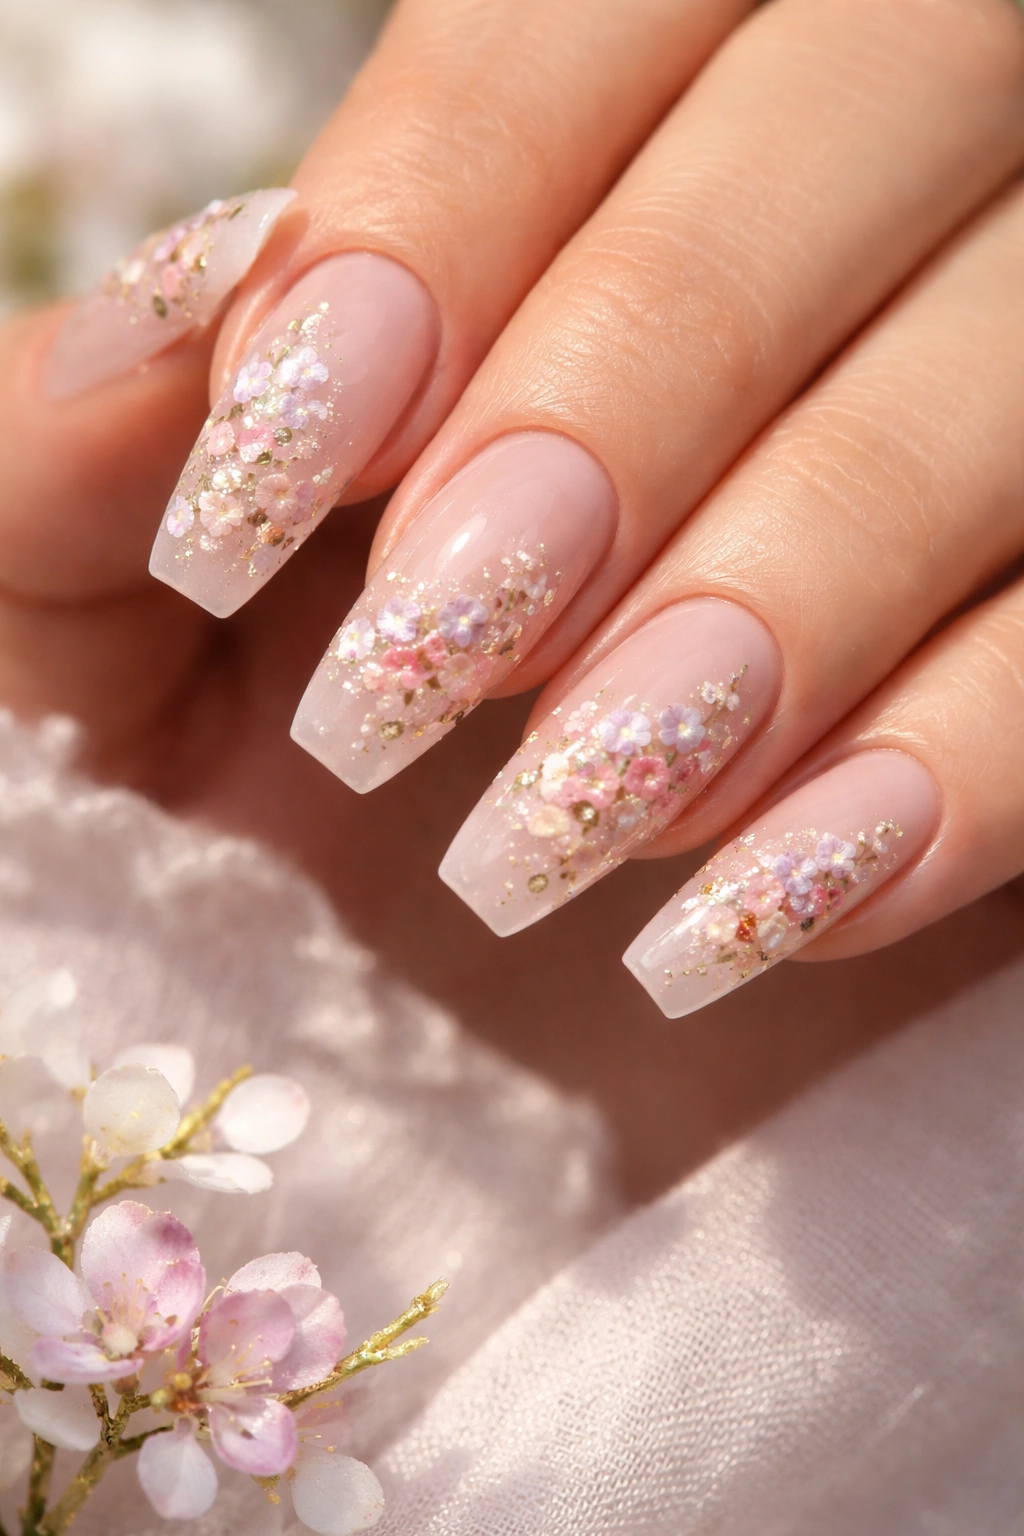
Small, delicate floral arrangements scattered across a neutral base—think tiny painted flowers in soft pinks, lilacs, or spring colors paired with metallic foil accents. The curved coffin shape provides a perfect canvas for 2-3 small flower clusters along the nail, creating a garden-like aesthetic without overwhelming the design. Foil details catch light and add dimension.
Why This Design Works
Floral designs feel feminine and romantic without being juvenile, especially when you keep the flowers small and the color palette soft. The curved coffin shape naturally accommodates small floral arrangements along the nail’s length. Medium nails have just enough real estate to fit beautiful florals without looking crowded. Foil accents elevate the design from “cute” to “refined.”
Application and Color Tips
- Start with a light neutral base (soft pink, cream, pale yellow, or light nude)
- Use a thin detail brush to paint tiny flower shapes; simple 5-petal flowers are easier than complex botanicals
- Add delicate green stems connecting the flowers for a cohesive look
- Use floral foil or thin metallic striping to frame the flowers or create connecting details
- Keep the flower clusters to 2-3 small groupings per nail rather than scattered all over
- Seal with a glossy top coat to make the foil really shine
Best For
Anyone wanting romantic, garden-inspired nails that still feel current and sophisticated. This works for special occasions, spring styling, and everyday wear if kept soft in color and scale.
Pro tip: The smaller your painted flowers, the more polished the design looks. Intricate tiny details read as more refined than large, bold florals.
6. Reverse Ombre with Chrome Tips
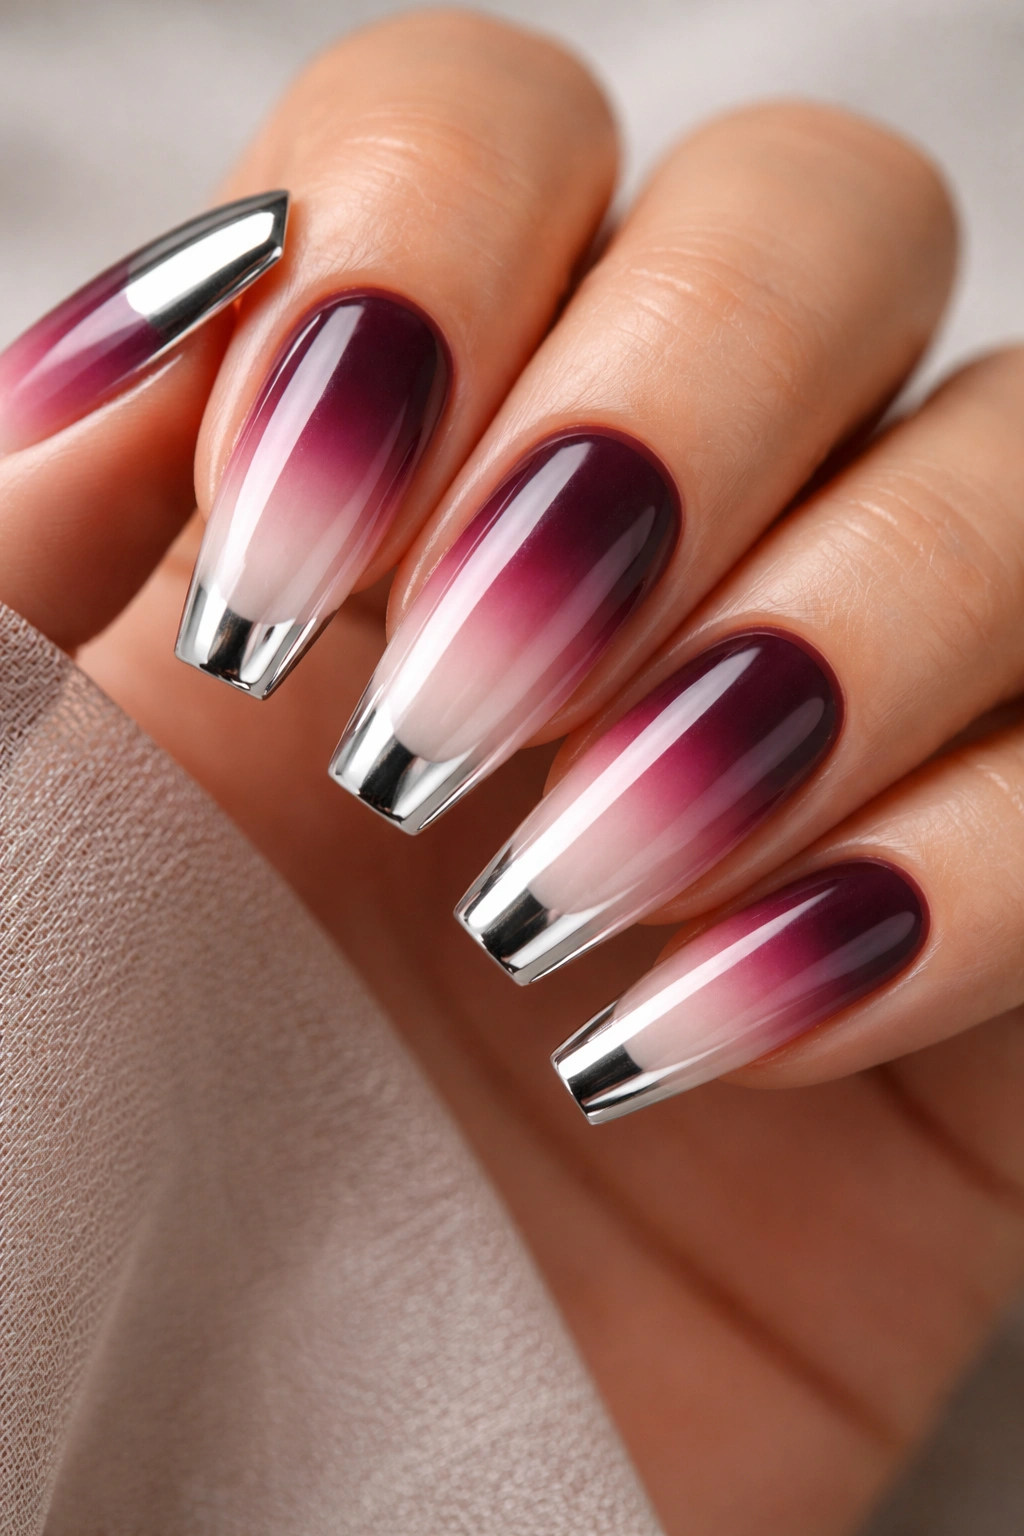
A reverse ombre starts with a darker, richer color (deep burgundy, forest green, chocolate brown) at the nail bed and gradually lightens toward the tip, finishing with a chrome or mirror finish at the very edge. Chrome tips add a futuristic, high-tech edge to the soft ombre transition. The curved coffin shape guides the color gradient beautifully.
Why This Design Works
Reverse ombre is less common than traditional ombre, making it feel more current and interesting. The chrome tip adds unexpected shine and luxury without looking costume-like on medium nails. The gradient creates visual length and dimension, especially on medium curved coffins where the shape already elongates the nail bed. This design bridges the gap between classic and trendy.
Application and Color Tips
- Paint your darker base color and let it dry completely
- Sponge on progressively lighter shades moving toward the tip; use a makeup sponge for smooth blending
- The chrome finish should be applied as the final step over the completely dry ombre
- Use chrome powder with a clear gel base and seal it completely—chrome needs proper sealant to stay pristine
- Alternatively, use chrome liquid polish or stick-on chrome wraps for easier application
- The transition zone should be soft and blended, not harsh
Best For
Anyone wanting a design that looks expensive and considered. This works for fashion-forward professionals, event styling, and anyone who loves the intersection of classic and modern.
Worth knowing: Chrome shows every fingerprint and dust particle, so this design requires slightly more maintenance than standard polish. Wipe down your nails regularly to keep the chrome pristine.
7. Two-Tone Split Design
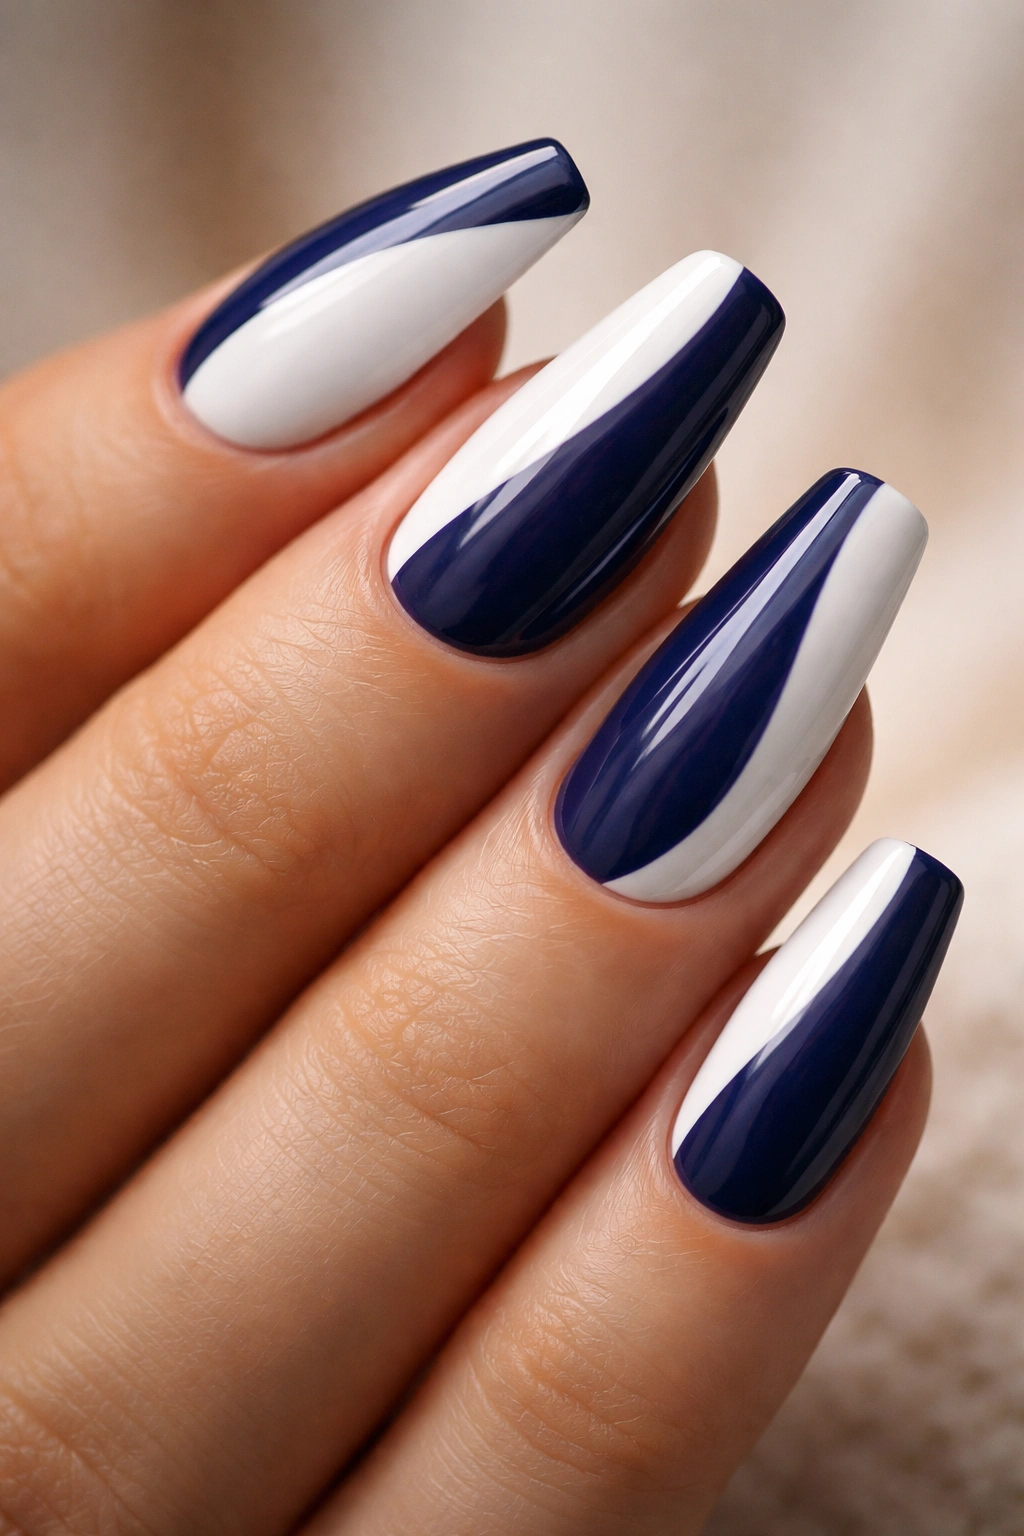
This design divides each nail into two distinct color sections—vertically, diagonally, or by some other geometric split—creating a bold color block effect. Use complementary or contrasting colors like navy and white, sage and mauve, or black and champagne. The curved coffin shape creates natural flow lines that make the two-tone split feel intentional rather than stark.
Why This Design Works
Two-tone designs are bold without being busy. The color blocking is simple to execute once the tape is placed correctly, and the result looks professional and considered. The curved coffin shape softens what could feel harsh about a stark split, making it work beautifully on medium nails. This design works for virtually every occasion and pairs well with any outfit.
Application and Color Tips
- Decide on your split direction before you start—vertical splits feel slimming, diagonal splits feel more dynamic
- Use nail tape to create a precise dividing line between colors
- Paint one section completely, let it dry, remove the tape carefully, then paint the other section
- The cleanest results come from painting the lighter color first, then the darker color
- Both colors should be fully opaque and evenly applied
- Remove tape while the second color is just barely dry—this prevents peeling
Best For
Minimalist lovers and anyone wanting high impact with minimal fuss. This works beautifully for professional settings, creative environments, and everyday wear.
Pro tip: The most striking two-tone designs use colors with similar saturation levels—if one color is very bright and the other is muted, the split can feel unbalanced.
8. Confetti or Speckle Finish
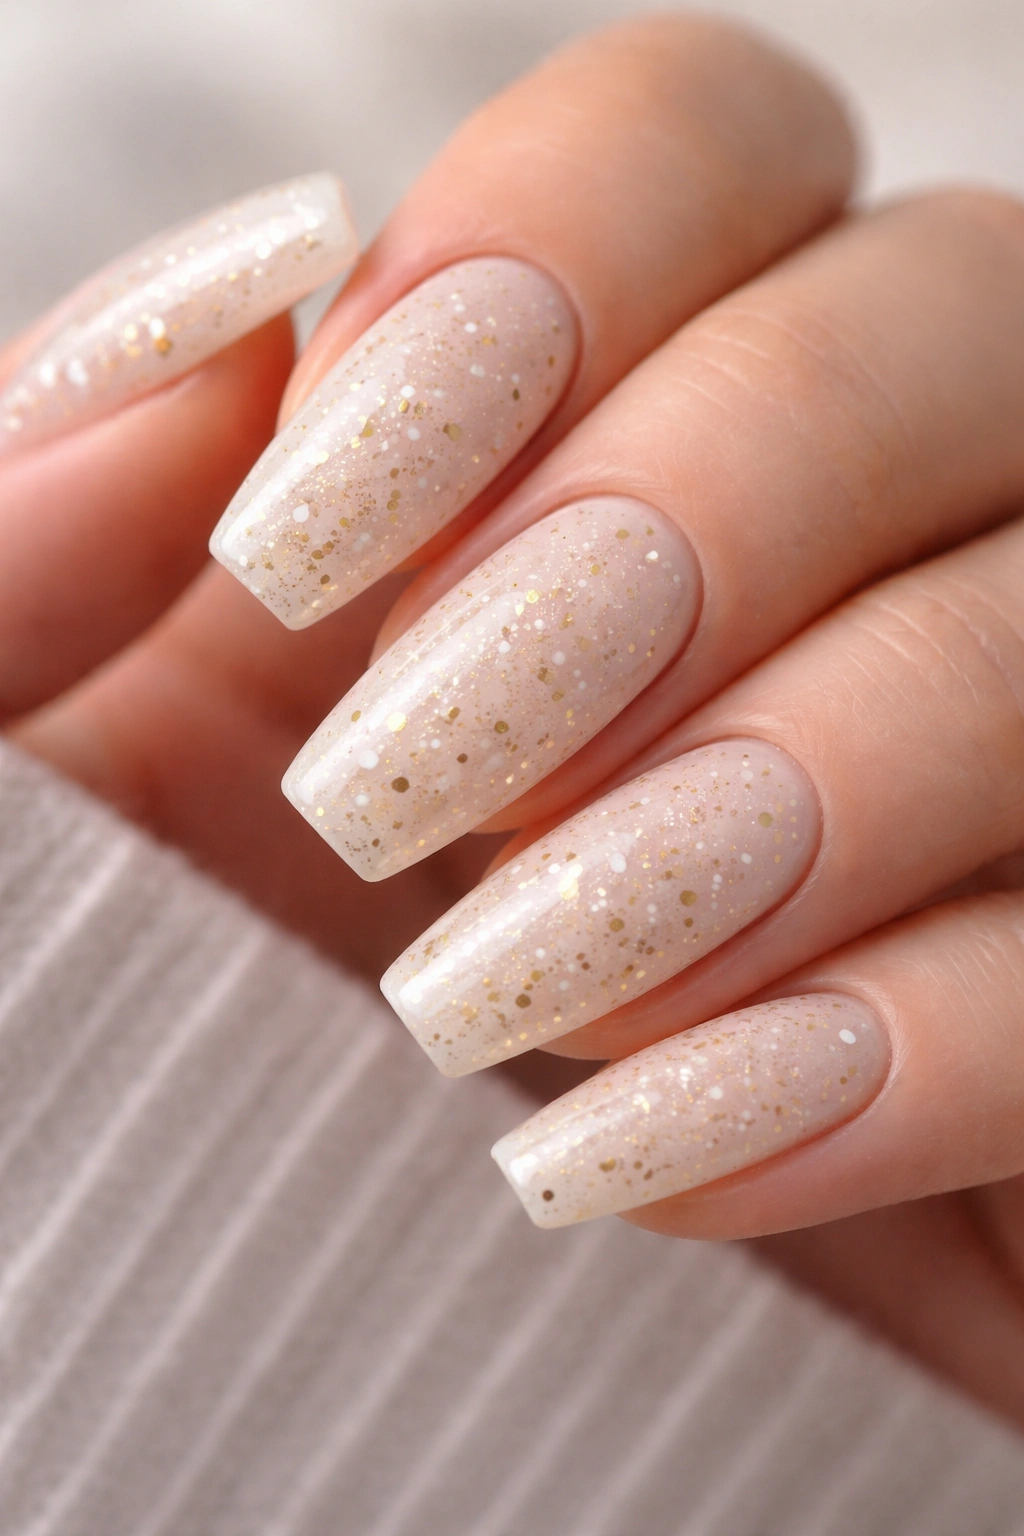
This design covers a neutral or colored base with tiny dots, specks, or “confetti” in contrasting colors, creating a celebratory, playful aesthetic. Use a base in cream, blush, sage, or soft gray and add speckles in gold, silver, white, or dark colors using a dotting tool or detail brush. The curved coffin shape keeps confetti looking intentional and contained rather than chaotic.
Why This Design Works
Confetti designs hide imperfections beautifully because irregularity is part of the design. They read as festive and fun without looking juvenile, especially when you keep the color palette sophisticated. The curved coffin shape provides a beautiful canvas for scattered confetti without it feeling lost or overwhelming. Medium nails have just enough real estate to showcase the confetti pattern clearly.
Application and Color Tips
- Choose a neutral, creamy base color that lets the confetti really stand out
- Use a dotting tool of various sizes to create different-sized speckles—all one size looks uniform and less organic
- Apply confetti densely enough that you see a clear pattern, but leave some base color showing
- Gold or silver confetti on soft base colors feels elevated; white or dark colors feel playful
- Vary the confetti color—use 2-3 metallic or contrasting colors to prevent monotony
- Seal with a shiny top coat that makes the speckles pop
Best For
Anyone wanting something celebratory and fun that still feels refined. This works for party styling, everyday wear, and anyone who likes visual interest without heavy-handed design. Confetti is particularly forgiving for nail art beginners.
Worth knowing: Random placement looks more organic and intentional than perfectly distributed speckles. Don’t overthink the spacing.
9. Gradient with Embedded Glitter
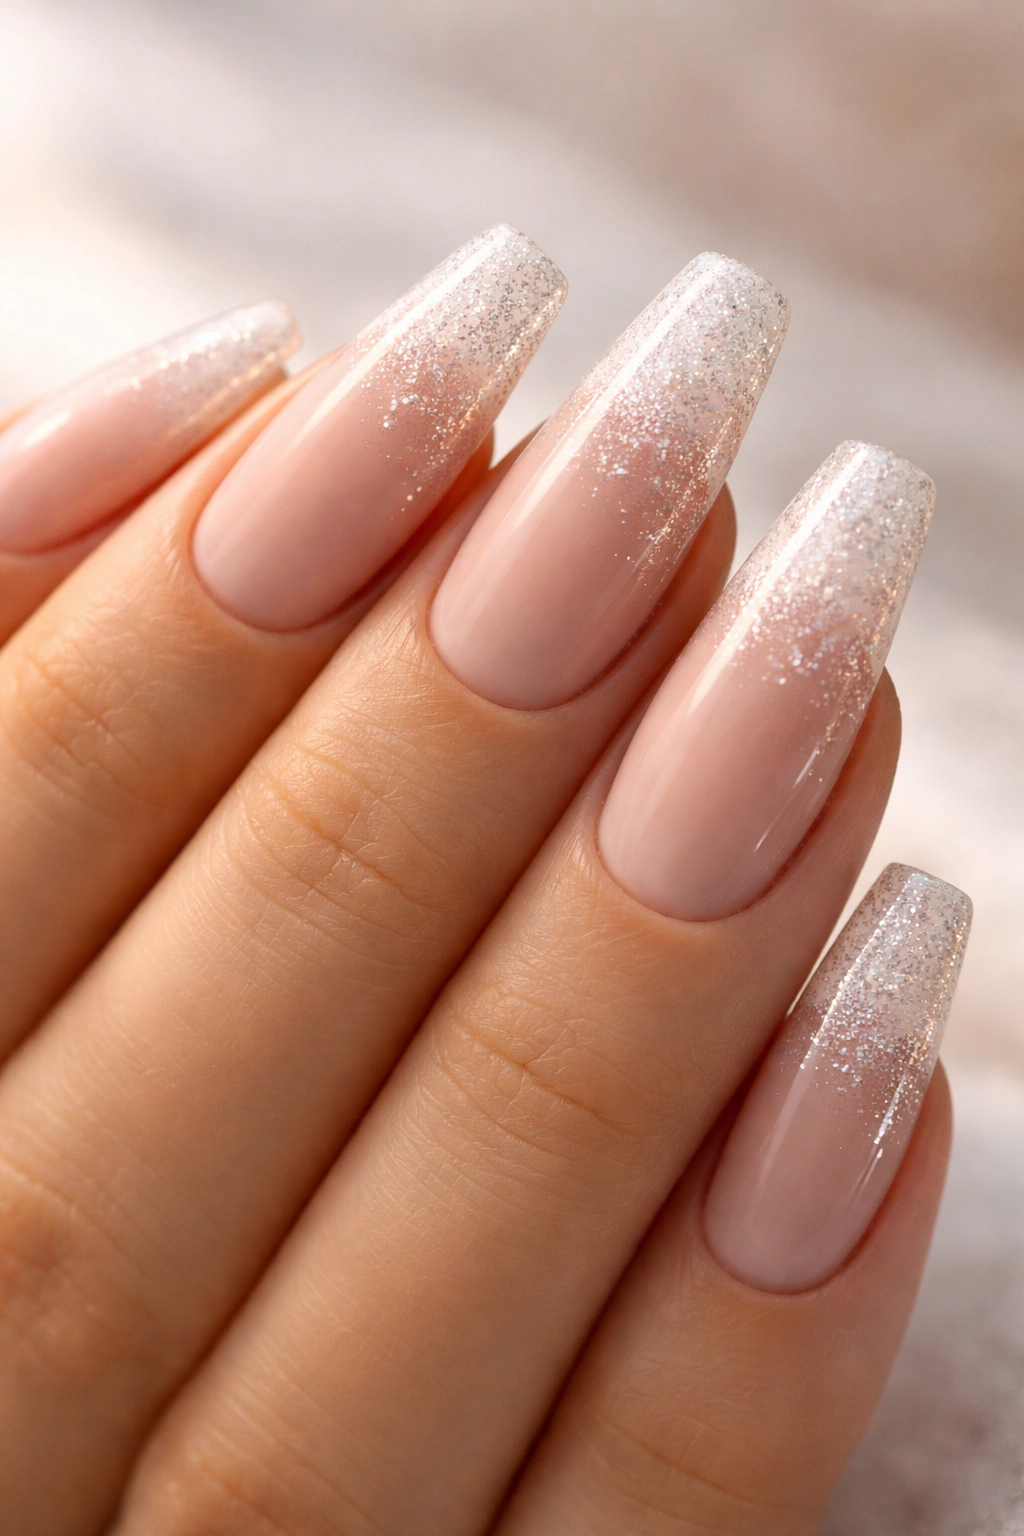
This design combines a smooth color gradient with embedded glitter particles concentrated near the tips or throughout the design, creating dimension and sparkle. Use a nude-to-white gradient or any color gradient you prefer, then embed fine or chunky glitter into the wet polish during the gradient application. The curved coffin shape showcases the glitter beautifully along the nail’s contours.
Why This Design Works
Glitter adds luxury and movement to a gradient design without the gradient feeling basic. The combination of smooth ombre with textured sparkle creates visual interest and depth. The curved coffin shape provides enough surface area that the glitter catches light beautifully. Medium nails showcase glitter well without looking overwhelming. This design reads as intentional and upscale, not costume-like.
Application and Color Tips
- Create your gradient first using the sponge-dabbing method
- While the gradient is still wet, use a detail brush to place fine glitter particles where you want them
- Press the glitter gently into the wet polish—it will set as the polish dries
- Alternatively, embed glitter into a clear gel top coat for more control and sparkle
- Use fine glitter throughout for an elegant effect or chunky glitter concentrated at the tips for more drama
- Seal everything with a glossy top coat to create seamless, blended finish
Best For
Anyone wanting sparkle that looks intentional and elegant. This works for special occasions, evening styling, and everyday wear if you use fine glitter and keep the color palette neutral.
Insider note: The key to glitter feeling luxe rather than costume is using high-quality glitter and not overdoing it. Less glitter in intentional placement beats heavy glitter coverage every time.
10. Striped Pattern with Metallic Lines
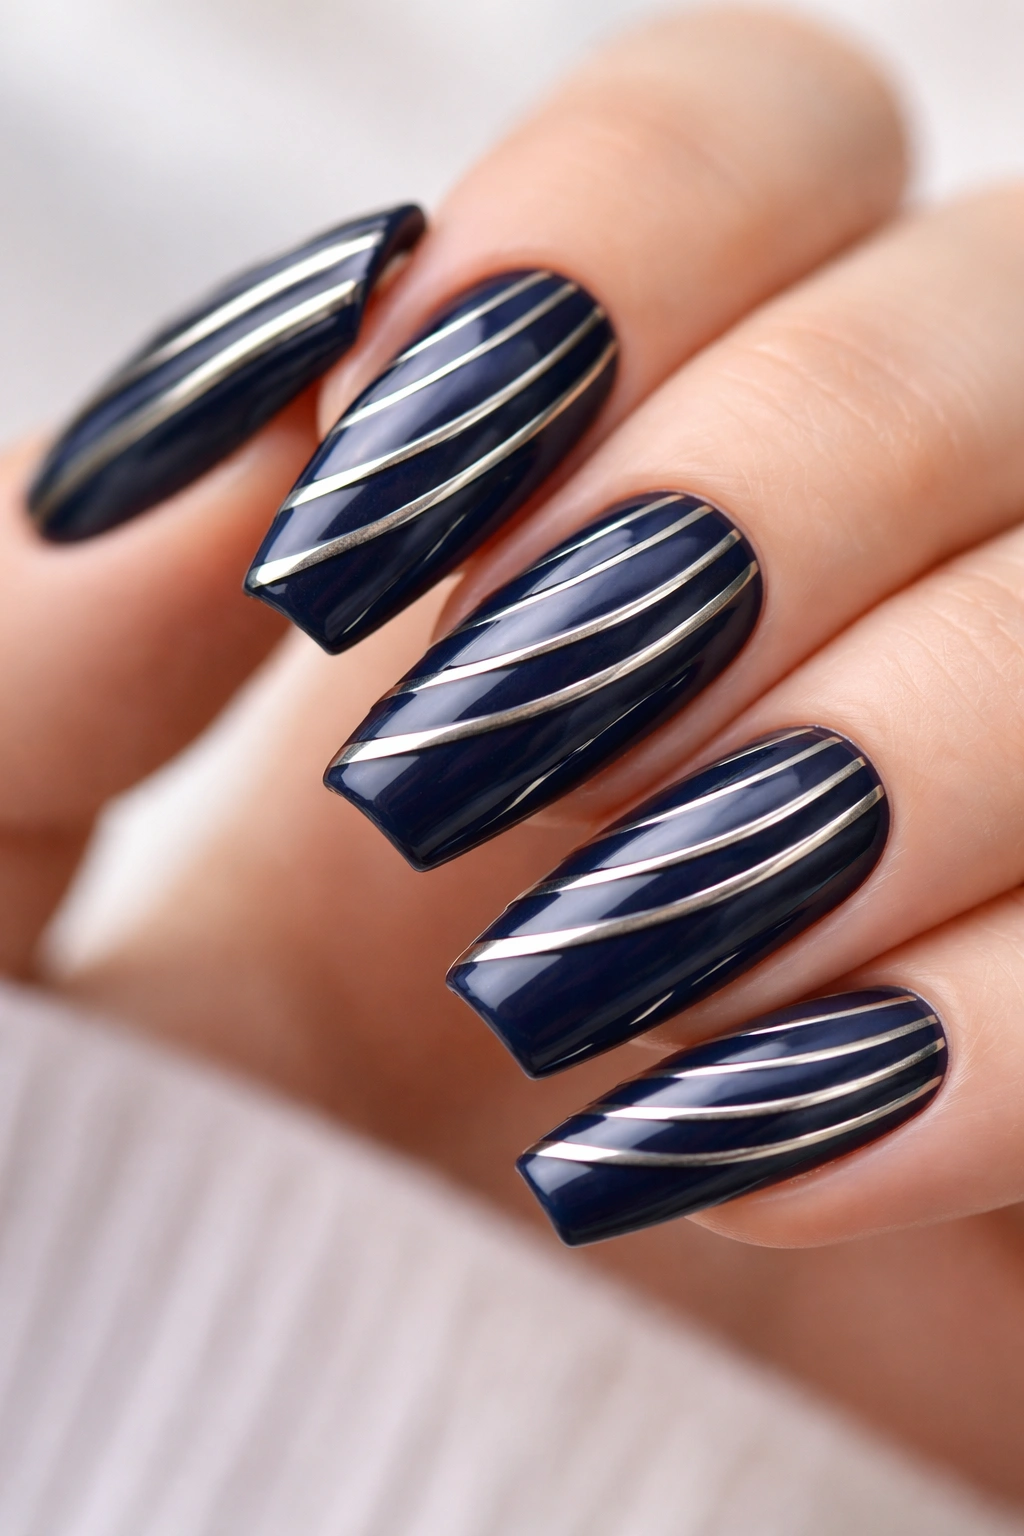
This design features evenly spaced stripes running horizontally, vertically, or diagonally across the curved coffin nail in a contrasting color or metallic finish. Use combinations like white stripes on navy base, rose gold stripes on blush pink, or black stripes on cream. The curved coffin shape creates natural visual flow lines that complement straight striping beautifully.
Why This Design Works
Stripes are timeless, versatile, and can feel either casual or formal depending on your color choice. Striped patterns create visual elongation on medium nails, and the curved shape prevents stripes from feeling too geometric or harsh. Metallic striping adds shine and sophistication that regular polish can’t match. This design is relatively forgiving to execute once you use proper tape guidance.
Application and Color Tips
- Paint your base color evenly and let it dry completely
- Use thin nail tape or striping tape to map out your stripe placement before painting
- For straight stripes, tape should run parallel; for diagonal stripes, tape should angle at approximately 45 degrees
- Paint over the tape with your stripe color, let it dry slightly, then remove tape carefully
- Metallic striping looks particularly beautiful with matte or satin base colors
- The spacing between stripes should be consistent for maximum visual impact
Best For
Minimalist lovers and anyone wanting a classic, timeless design. Stripes work for professional environments, creative settings, and everyday wear. They’re particularly flattering on medium curved coffin nails.
Quick fact: Vertical stripes feel elongating and slimming; horizontal stripes feel more playful and modern. Choose your direction based on the visual effect you want.
11. Ombré with Hand-Painted Accent Line
This design combines a smooth gradient in one direction with a single, precise hand-painted accent line running in a contrasting direction—like a nude-to-white ombré with a single metallic or dark line running diagonally. The accent line draws the eye and adds visual interest without making the design feel busy. The curved coffin shape becomes part of the design’s visual flow.
Why This Design Works
The combination of soft ombré with one precision accent line feels balanced and considered. The accent line adds just enough visual interest to elevate the gradient beyond basic, but not so much that the design feels cluttered. The curved coffin shape naturally accommodates an accent line that flows along the nail’s contours. Medium nails have enough real estate that both the ombre and the accent line are clearly visible.
Application and Color Tips
- Create your gradient first using the sponge-dabbing method; let it dry completely
- Use a thin striping brush with metallic, dark, or contrasting color polish to paint your accent line
- The line can be perfectly straight, slightly curved, or diagonally angled—whatever feels most balanced on your nail
- One line is all you need; additional lines risk making the design feel complicated
- Paint the accent line confidently without overthinking; slight imperfection often reads as intentional brushwork
- Seal everything with a glossy top coat that makes the line pop against the gradient
Best For
Anyone wanting elegant simplicity with a modern twist. This works beautifully for professional settings, everyday wear, and event styling. It’s particularly flattering on medium curved coffin nails where both elements are clearly visible.
Pro tip: Position your accent line to create visual balance; a line running down the center feels different than a line offset toward one edge.
12. Jewel-Toned Base with Minimal Line Work
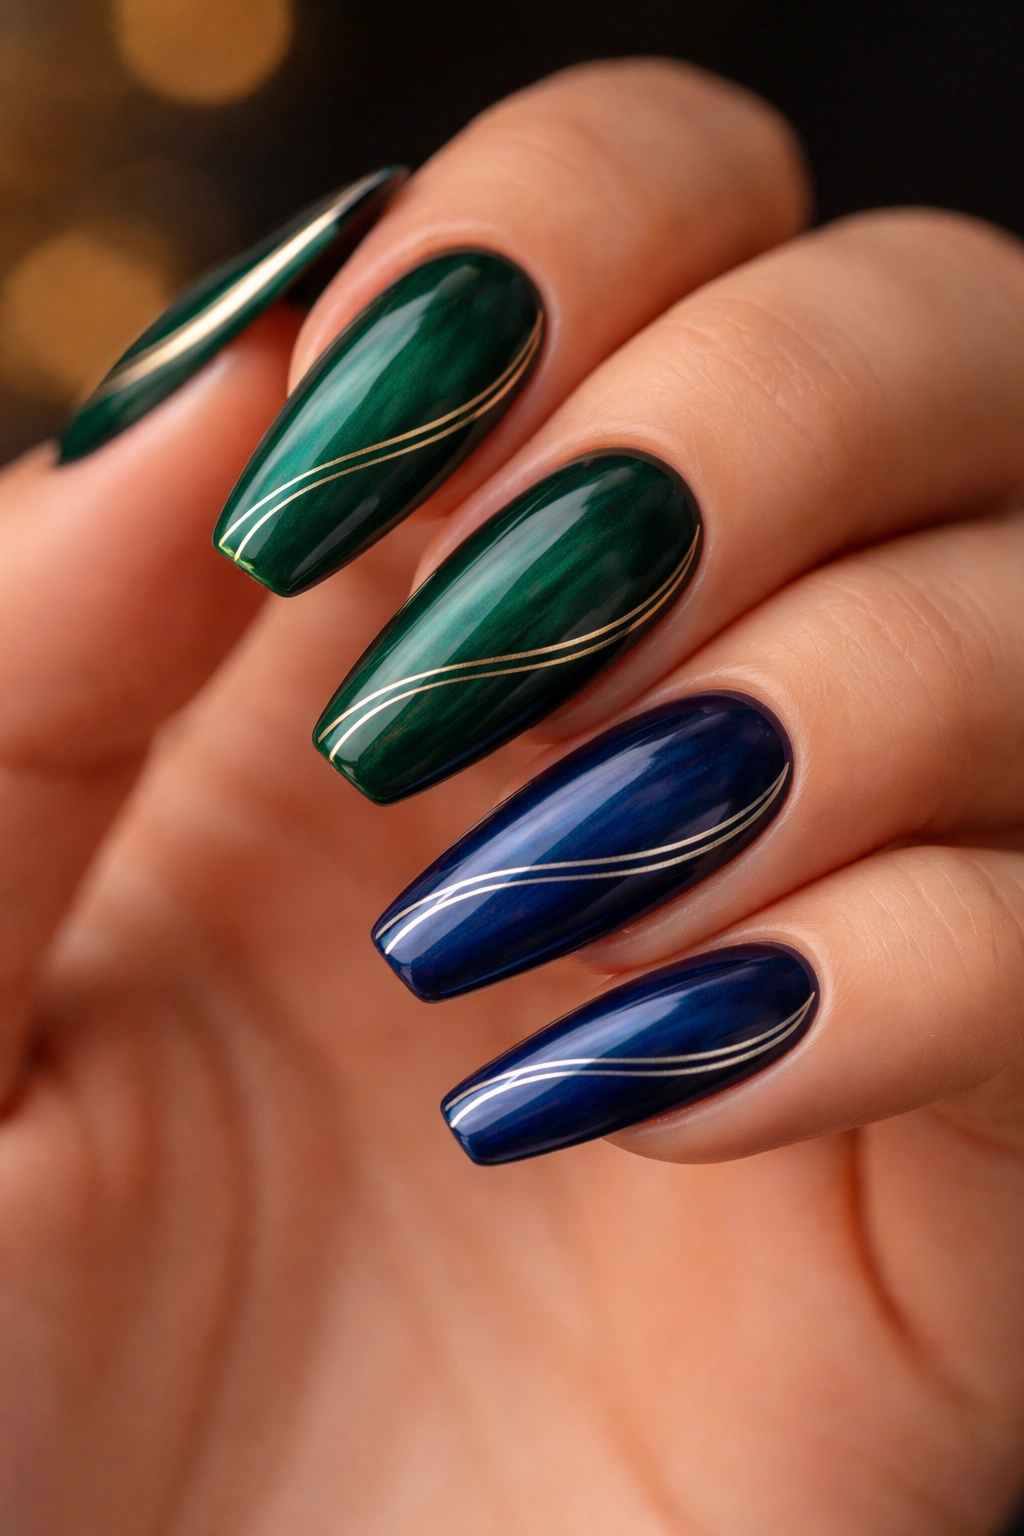
This design features a rich, jewel-toned base color (emerald, sapphire, amethyst, or deep burgundy) paired with minimal line work in gold, silver, or a contrasting color. Simple geometric lines, tiny dots, or delicate striping prevent the jewel tone from feeling heavy while adding sophistication. The curved coffin shape provides a perfect backdrop for jewel tones, which look incredibly rich on medium nails.
Why This Design Works
Jewel tones are inherently luxurious and sophisticated; minimal line work prevents them from feeling dark or heavy. The curved coffin shape makes jewel tones feel elegant rather than dramatic, even on medium-length nails. Metallic line work catches light and adds dimension to what could otherwise feel flat. This combination reads as high-end and intentional without requiring complicated techniques.
Application and Color Tips
- Choose a deep, saturated jewel tone with good opacity; you may need two coats for full coverage
- Let the base color dry completely before adding any line work
- Keep metallic line work minimal—think 2-3 thin lines or small grouped details, not comprehensive coverage
- Metallic polish adheres best to completely dry base, so allow extra drying time
- White or pale metallic lines stand out more; gold feels warmer; silver feels cooler
- Seal with a glossy top coat that enhances the jewel tone’s depth and the metallic’s shine
Best For
Anyone wanting upscale, sophisticated nails that feel intentional and current. Jewel tones work beautifully for evening styling, special occasions, and anyone who loves deep, rich color. This design is particularly flattering on all skin tones.
Worth knowing: Jewel-toned nails photograph beautifully and look particularly striking in person under natural light. The depth and saturation of the color create visual luxury.
13. Soft Pink with White Tips and Gold Detailing

This design pairs a creamy soft pink base with white tips (traditional French style or softer gradient transition) and adds delicate gold detailing like thin striping lines or small geometric accents. The combination feels romantic yet modern, feminine yet sophisticated. The curved coffin shape enhances the elegant proportions of this classic-meets-contemporary design.
Why This Design Works
This design is the perfect marriage of timeless elegance and current style. The soft pink base is flattering to all skin tones and pairs with virtually any outfit. White tips provide clarity and definition without feeling stark against the warm pink. Gold detailing adds just enough modern touch to make the design feel current rather than dated. The curved coffin shape makes the overall look feel balanced and refined.
Application and Color Tips
- Choose a soft, warm pink—peachy blush, dusty rose, or warm mauve—not hot pink
- Paint the entire nail with pink and let it dry completely
- Create your white tip line using either a crisp straight edge or a soft gradient transition (sponge-blending technique)
- Add gold detailing after the white tip is completely dry; use thin striping lines or tiny geometric accents
- Keep gold detailing minimal and precise—the point is to enhance, not overwhelm
- Seal with a glossy top coat that makes the gold and white really pop against the pink
Best For
Anyone wanting nails that work for virtually every occasion. This design is appropriate for professional settings, casual everyday wear, and special events. It’s particularly flattering on medium curved coffin nails because it showcases elegant proportions beautifully.
Quick fact: This design feels fresh and current because of the curved coffin shape and the minimal gold detailing. On straight-edged nails, it would feel more traditional.
14. Abstract Watercolor Wash Effect
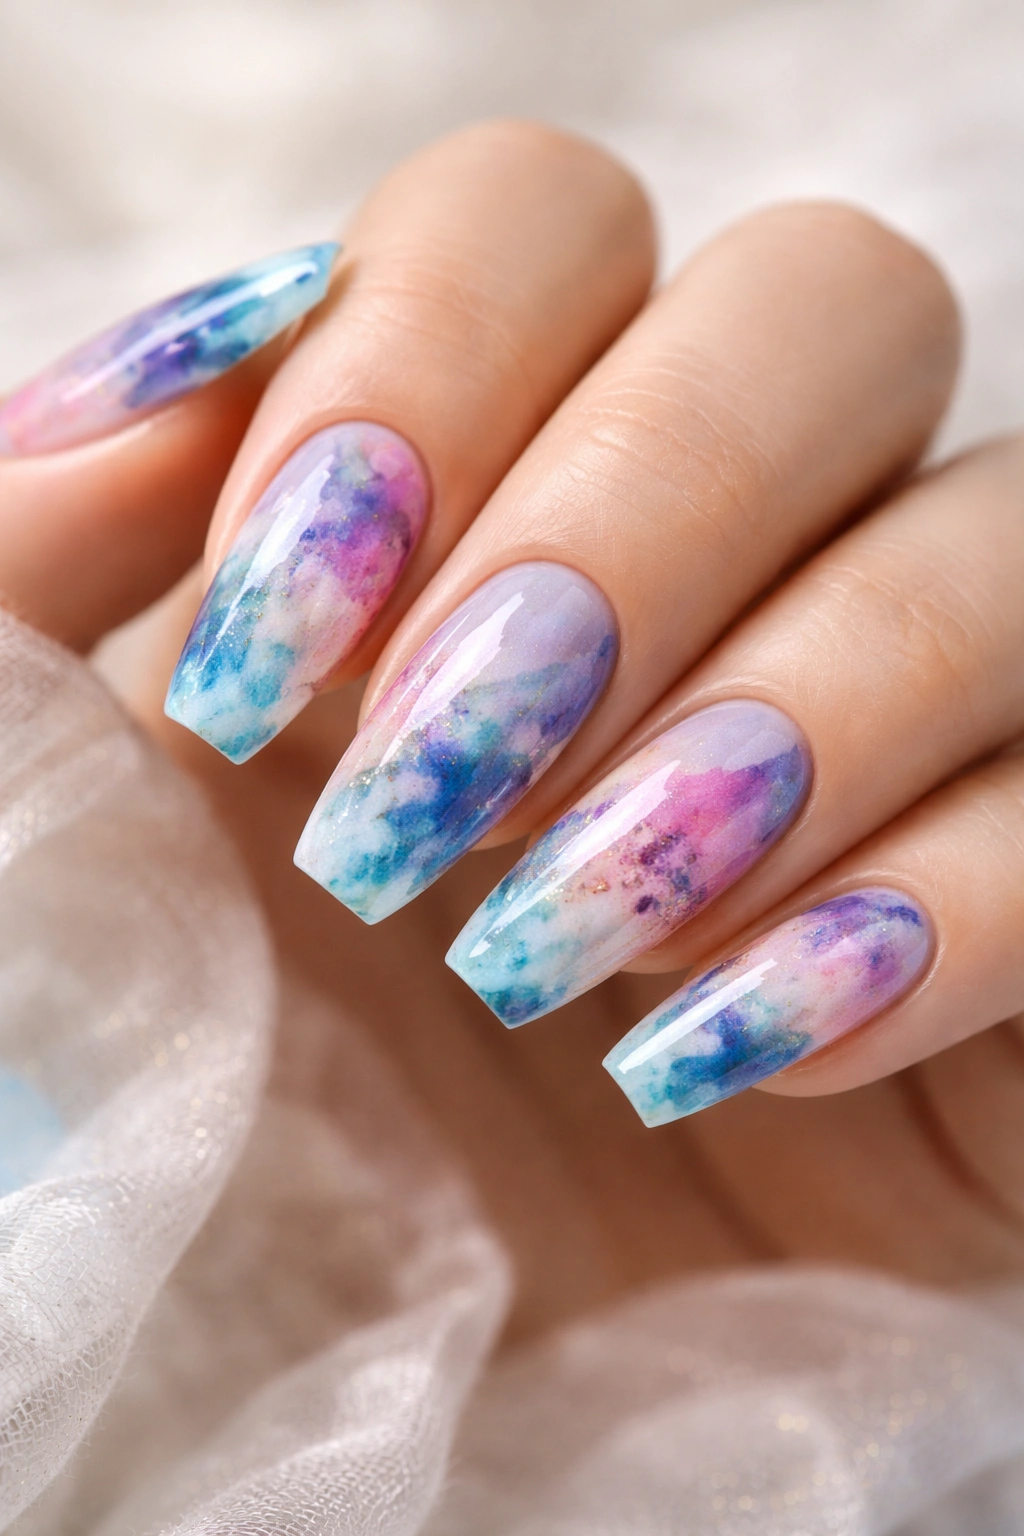
This design mimics the soft, organic quality of watercolor painting using multiple colors blended and layered directly on the nail to create an artistic, abstract composition. Use colors that blend well together (blues and teals, pinks and purples, earth tones) and let them blend naturally on the nail rather than trying to create a specific image. The curved coffin shape provides a beautiful canvas for abstract watercolor effects.
Why This Design Works
Watercolor designs look effortlessly artistic and feel personal rather than templated. Because they’re abstract and intentionally imperfect, small mistakes blend into the artistic effect rather than looking like failures. The curved coffin shape softens what could feel chaotic about watercolor patterns, making them look intentional and refined. Medium nails have just enough real estate to showcase beautiful color blending without the design feeling cramped.
Application and Color Tips
- Use gel polish or traditional polish thinned slightly with gel medium or top coat for better blending
- Paint one color at a time, allowing slight overlap and natural blending between colors
- Use a damp brush to soften edges and encourage colors to blend where they meet
- Apply colors in layers rather than all at once; let each layer dry slightly before adding the next for more control
- Earth tones and cool tones blend more harmoniously than contrasting bright colors
- Seal with a top coat that protects the blended design
Best For
Artistic individuals and anyone wanting a design that feels personal and unique. Watercolor designs work beautifully for creative professionals, event styling, and anyone who appreciates abstract art. No two watercolor nails look identical, which makes them feel custom.
Pro tip: Watercolor nails look more refined when the colors have visual coherence—choose a color family (all cool tones, all warm tones, or all jewel tones) rather than random color combinations.
Final Thoughts

Curved coffin nails on medium length are genuinely the sweet spot for showcasing beautiful nail design. They’re long enough to display intricate art, short enough for daily practicality, and the curved shape is flattering on virtually every hand and nail bed. Whether you’re drawn to minimalist geometry, romantic florals, rich jewel tones, or artistic effects, the designs covered here give you plenty of direction for creating nails that feel polished and intentional.
The beauty of medium curved coffin nails is that they don’t require extensive maintenance or complicated application techniques. Most of these designs use basic tools—a dotting tool, striping brush, makeup sponge, and good quality polish—and rely on thoughtful color choices and clean technique rather than advanced nail art skills. Start with designs that match your comfort level and gradually experiment with more intricate options as your confidence grows.
Remember that the most striking nail designs come from clean execution and restraint, not complexity. A perfectly executed two-tone split or gradient will outshine a busy design with too many elements competing for attention. Take your time with application, use high-quality products, and invest in proper tools. Your medium curved coffin nails will look salon-quality every single time.
