

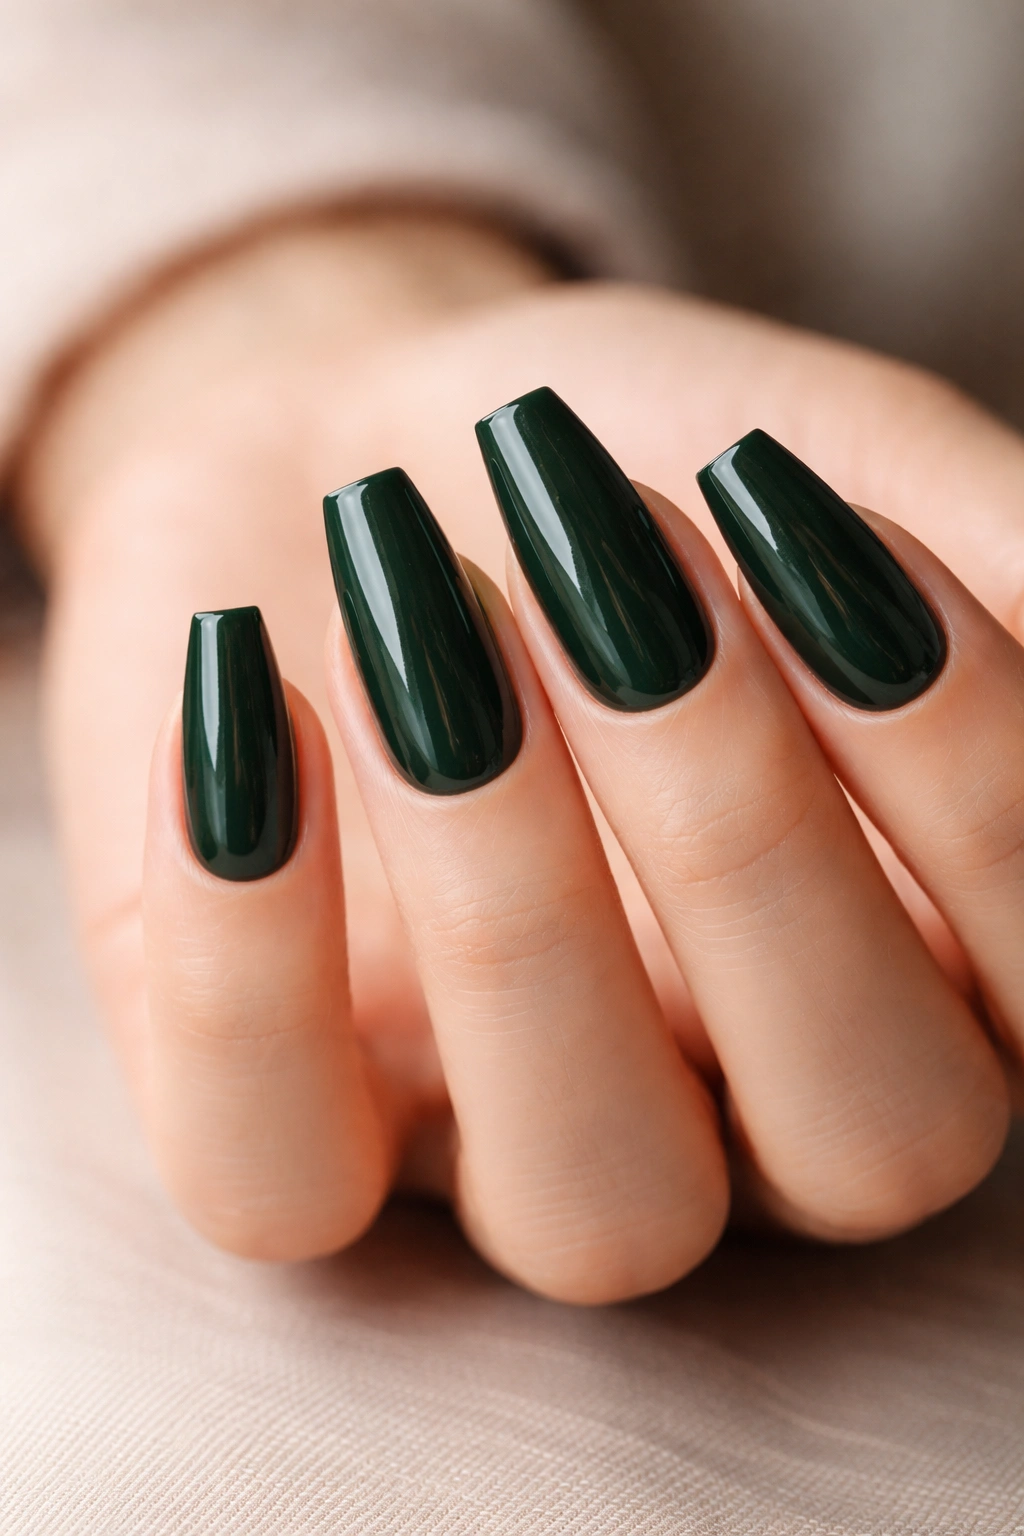
Dark green coffin nails solve a style problem that plain black polish never quite fixes: they still look sharp and moody, but they carry more color, more depth, and more personality. On a coffin shape, that depth stretches the nail visually and makes the taper look cleaner, especially when the sidewalls are crisp and the tip is filed into that soft, squared-off finish.
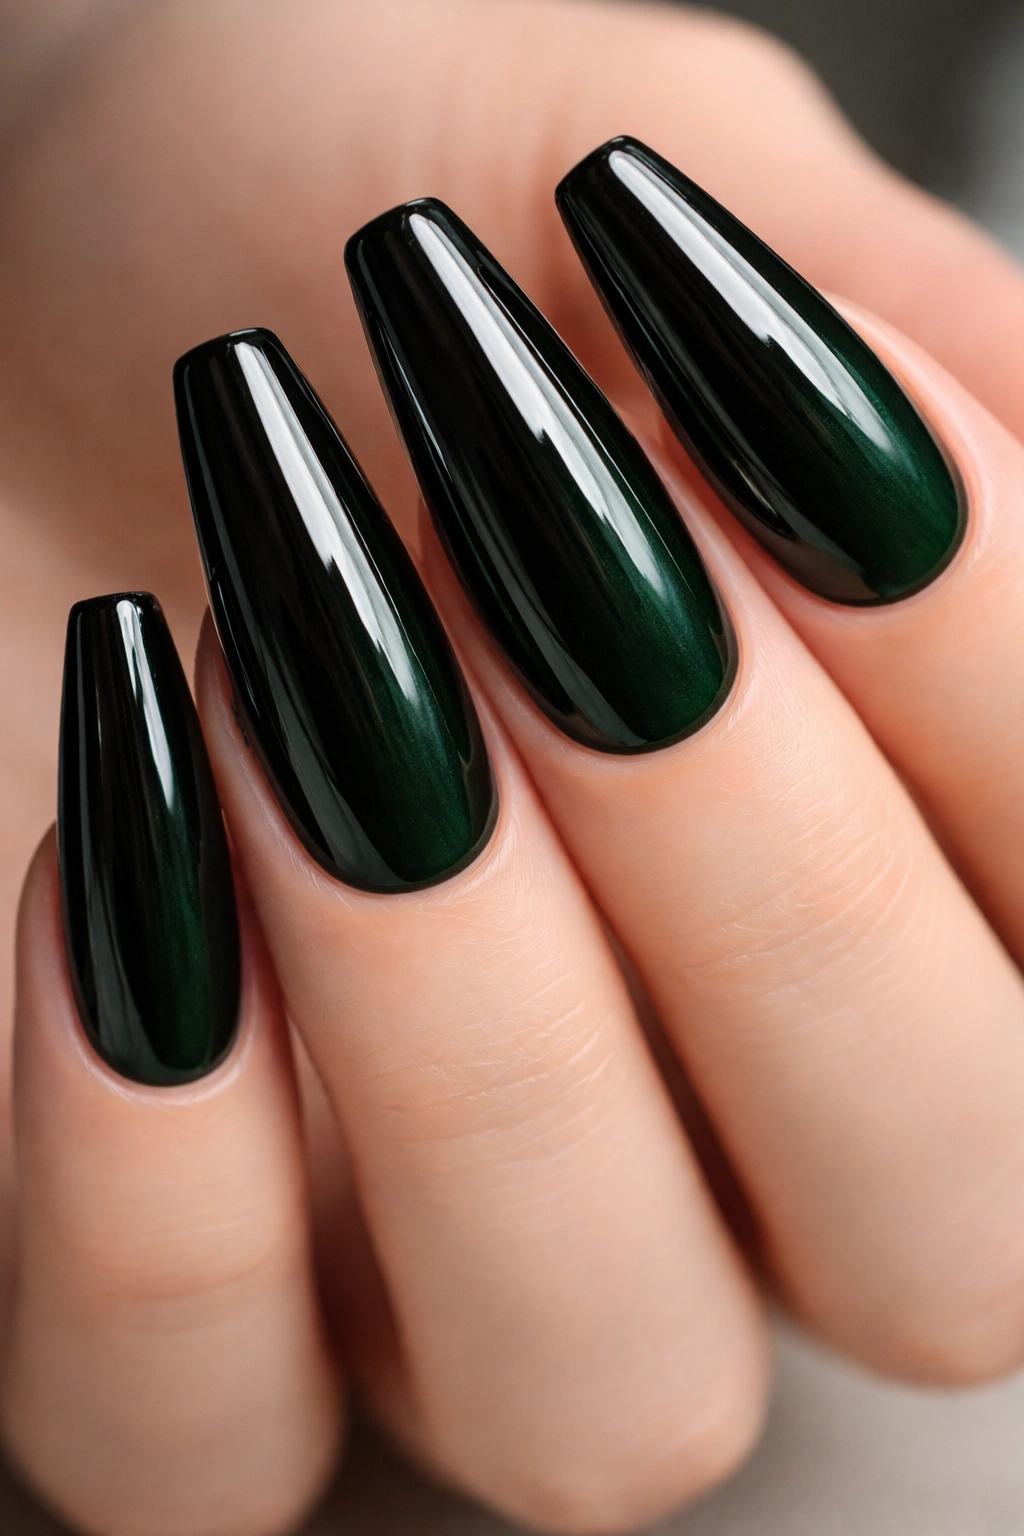
I keep coming back to this color family because it changes with the light. Under cool indoor bulbs, a forest green manicure can read almost black. Walk into daylight and the olive, emerald, or pine undertone wakes up. That shift is the whole charm. Get the shade wrong, though, and dark green can turn flat, swampy, or dull in a hurry.
Coffin nails help more than people realize. A medium coffin length — around 4 to 8 millimeters past the fingertip — gives deep shades room to breathe. On a shorter round nail, the same polish can look dense. On a long stiletto, it can drift into costume. Coffin hits the sweet spot.
The sets that look expensive tend to nail three things: undertone, finish, and editing. Pile on too much art and the color disappears. Pick the wrong top coat and the richness goes muddy. Choose well, and dark green stops reading like themed nail art and starts reading like someone knew exactly what they were doing.
Why Dark Green Works So Well on Coffin Nails
Deep green has more flexibility than people give it credit for. It can lean earthy, cold, glossy, metallic, smoky, almost-black, or jewel-toned depending on what sits under it. That makes it one of the few dark shades that can feel polished without feeling harsh.
The shape gives the color room to show up
Coffin nails have a longer central panel than almond nails, and that matters. Rich colors need surface area. When your nail tech tapers the sidewalls too aggressively, dark polish bunches visually in the middle and the set looks thick. A balanced coffin shape keeps the color looking sleek instead of heavy.
There is also a practical edge here. Chips along a coffin tip are easier to spot and repair than chips on a sharply pointed stiletto, and dark green tends to hide fine wear better than black. Black polish often shows every scratch across the top coat. Green softens that a bit.
Undertone does the heavy lifting
Not all dark green shades flatter the same way. Blue-leaning emeralds look crisp against cooler skin tones and silver jewelry. Olive and moss shades carry more warmth and pair well with gold. Blackened pine greens sit in the middle and work on almost anyone, which is one reason salons keep circling back to them.
Lighting matters too — more than most manicure mood boards admit. A shade that looks rich in direct flash can look flat in restaurant lighting. If you are choosing from a swatch wall, tilt the sample under warm light and white light before you commit. Two seconds. Worth it.
Picking the Right Finish, Length, and Salon Details Before You Commit
A dark green manicure can look polished or clumsy based on details that have nothing to do with the color itself. Length, structure, and finish decide whether the set feels clean or crowded.
Medium coffin is the easiest length to wear. It gives room for chrome, marble, French tips, or aura shading without forcing you into extra-long nails. If you type all day, cook a lot, or use contact lenses, short-to-medium coffin tends to age better than a long set with heavy embellishment.
Gel polish gives the richest dark green payoff on natural nails. Acrylic or hard gel makes more sense if you want a long coffin extension, a raised texture, or stones that need extra support. Ask for a visible apex if your nails extend more than 8 millimeters past the fingertip. Without that structure, a dark set can look thick near the tip and weak at the stress point.
When I think someone is about to over-design a green manicure, it usually comes down to this: they are trying to use every finish at once. Pick one lead texture and let the rest support it.
A nail tech will understand your idea faster if you tell them these five things up front:
- Base shade: forest, hunter, olive, emerald, sage, bottle green, or blackened green
- Finish: glossy, matte, chrome, velvet cat-eye, sheer, jelly, or glitter
- Length: short coffin, medium coffin, or long coffin
- Accent ratio: all ten nails the same, two accent nails, French tips only, or full art on one hand
- Metal direction: gold, silver, or none
Bring two reference photos, not a whole album. One photo for color. One photo for shape. After that, let the nail tech do their job.
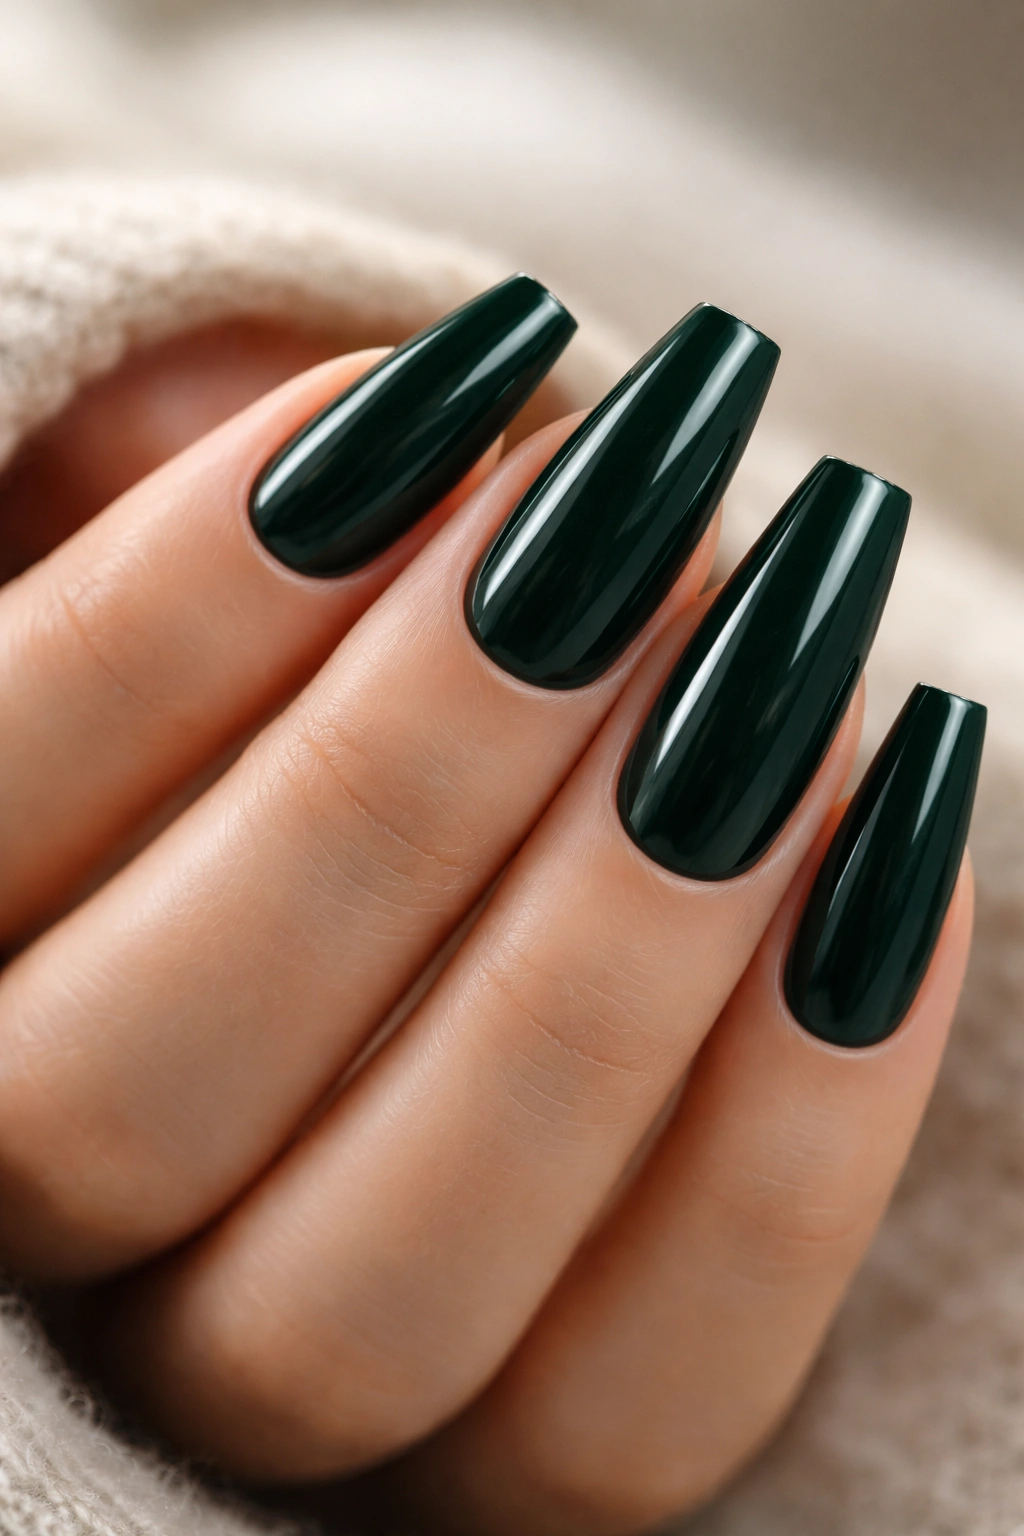
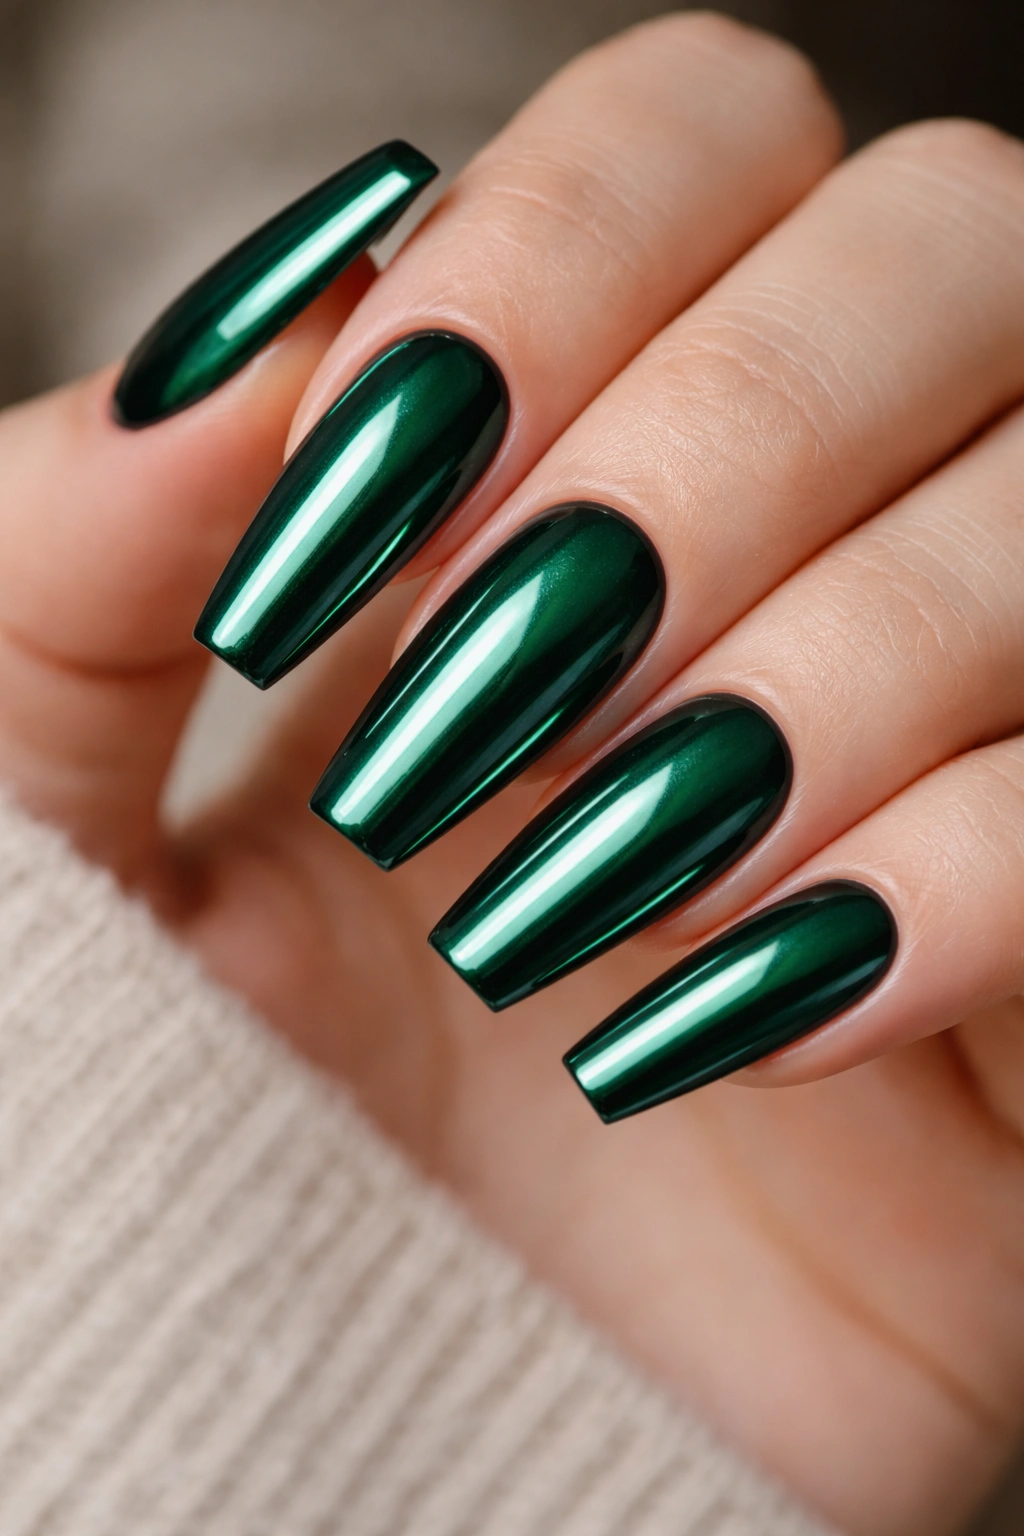
1. Glossy Black-Forest Green
If you want one dark green coffin nail design that rarely misses, start here. A glossy black-forest green sits right on the line between green and black, which gives it that expensive, almost liquid look on a coffin shape. It feels cleaner than glitter, less severe than straight black, and easier to wear than chrome if you are testing dark green for the first time.
Why it works
The shine does most of the work. With a high-gloss top coat, black-forest green reflects light across the full width of the nail, so the shape looks smoother and the taper looks sharper. Matte versions of this shade can go chalky. Gloss keeps the depth alive.
This is also one of the easiest shades to match with clothes and jewelry. It sits comfortably with charcoal, cream, denim, camel, burgundy, and soft gray without fighting for attention. A lot of deeper greens struggle next to warm browns. Black-forest green doesn’t.
Quick notes before you book it
- Ask for a two-coat gel application over a dark base, not a sheer green polish that needs four coats.
- On medium coffin nails, this shade looks strongest with a squared tip softened at the corners, not a blunt box.
- Tiny surface scratches show under salon lights, so a fresh top coat every 7 to 10 days helps.
- If your nail beds are short, keep the length modest. The color already brings enough drama.
Wear tip: pair this set with a short gold ring stack or plain silver bands, not oversized rhinestones on the nails. The polish is already doing the talking.
2. Matte Hunter Green with Sharp Coffin Edges
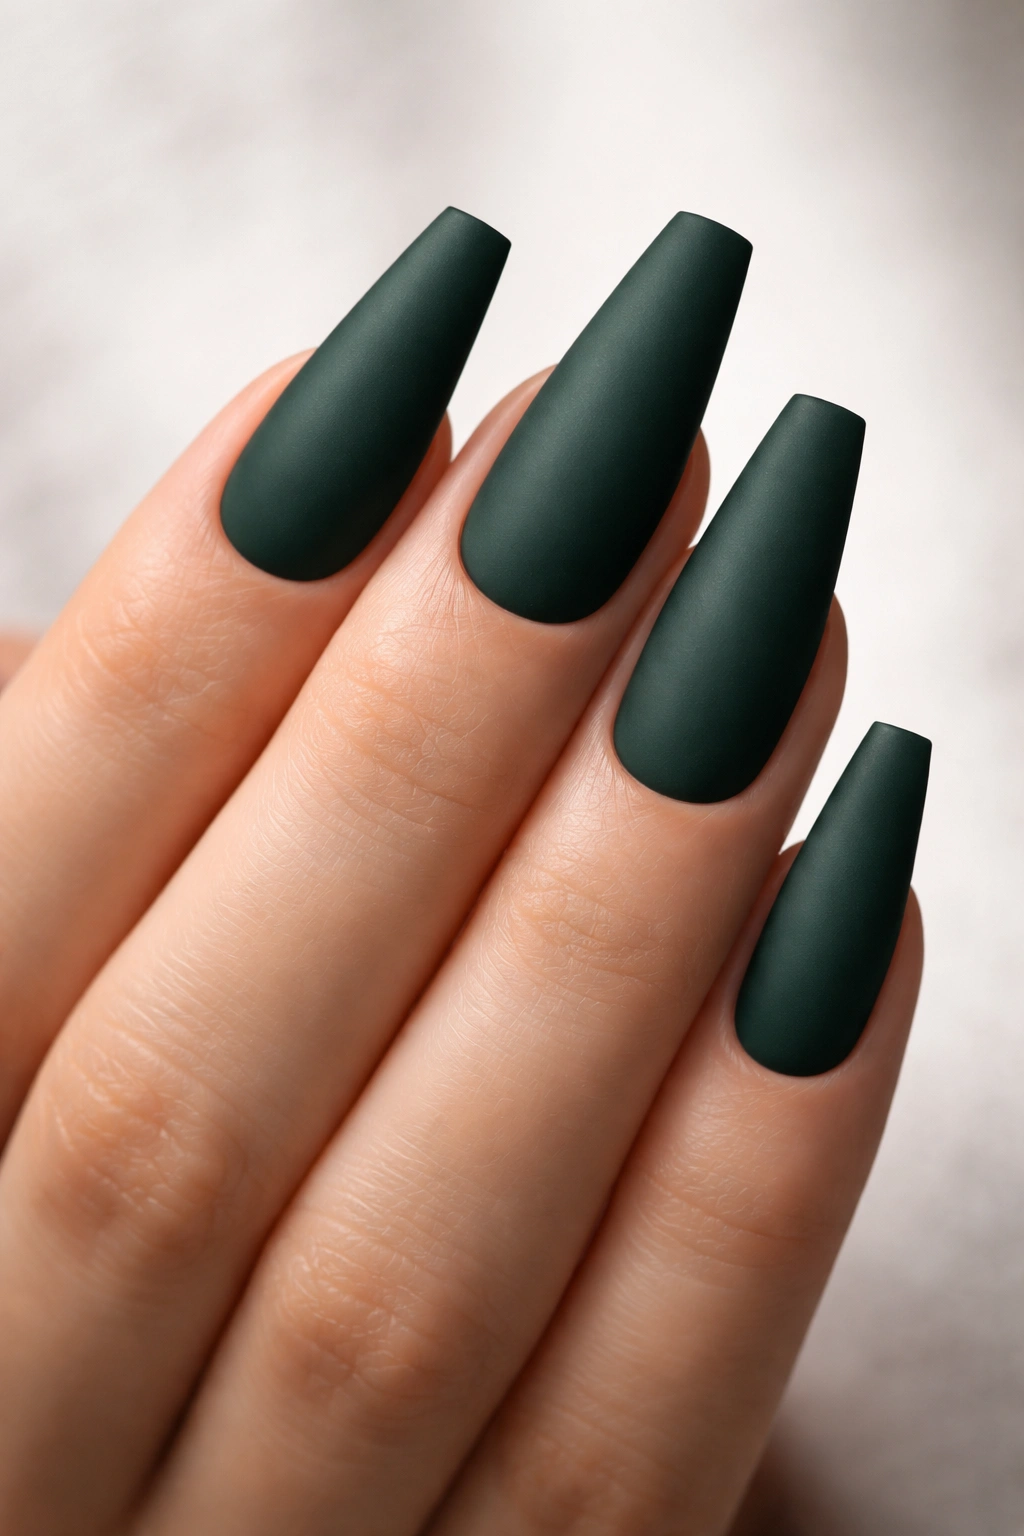
Matte hunter green has a dry, velvety finish that feels a little stricter, a little more editorial, and a lot less sweet than glossy polish. On a clean coffin shape, it turns your nails into blocks of color. No sparkle. No visual chatter. Just strong lines.
The catch is that matte shows shape errors fast. If one sidewall is wider than the other, you will see it. If the apex is too flat, the nail can look cheap even when the color is good. This design only lands when the filing is precise and the surface is fully smooth before the matte top coat goes on.
I like this set most on medium or long coffin nails. Short matte coffin can still work, though it needs sharper taper and a richer green — something closer to hunter or deep pine, not dusty sage. Pale greens lose bite under a matte finish. Dark ones hold it.
Skip chunky gems here. They break the mood. If you want detail, add one tiny metal stud near the cuticle on each ring finger or leave all ten nails solid. That restraint is what makes matte hunter green hit harder than people expect.
And yes, this one needs upkeep. Matte top coats pick up makeup, self-tanner, and cooking oils faster than gloss. Wipe the surface with alcohol on a lint-free pad if the finish starts looking cloudy.
3. Emerald Chrome Coffin Nails
Chrome over dark green looks richer than chrome over black. That is the trick.
Black chrome can lean steel-gray. Emerald chrome keeps more color in motion, especially when the base coat has a jewel-toned green underneath the powder. On coffin nails, that reflective surface stretches from cuticle to tip like a mirror panel, which makes the shape look longer than it is.
There is a salon detail worth paying attention to here. Ask what base the tech plans to use under the chrome powder. A black base gives a moodier, almost petrol effect. A true emerald base gives a brighter green flash. If you want that glassy beetle-wing shine you keep seeing in close-up photos, a saturated green base is the better call.
This style earns its place on medium length. Too short, and the chrome effect feels cramped. Too long, and the manicure can start to look heavy unless the extension is thin and well-balanced. Keep the cuticle area clean, avoid stones, and let the metal finish carry the whole set.
How to keep it from looking bulky
Chrome needs a smooth foundation. Any dip, lump, or thick edge catches light in a bad way. Tell your nail tech you want:
- a thin structure layer
- full buffing before the top coat
- no raised decals under the chrome
- sealed edges, especially along the tip
When it is done right, emerald chrome does not look loud. It looks slick, cold, and deliberate.
4. Deep Olive with Gold Foil
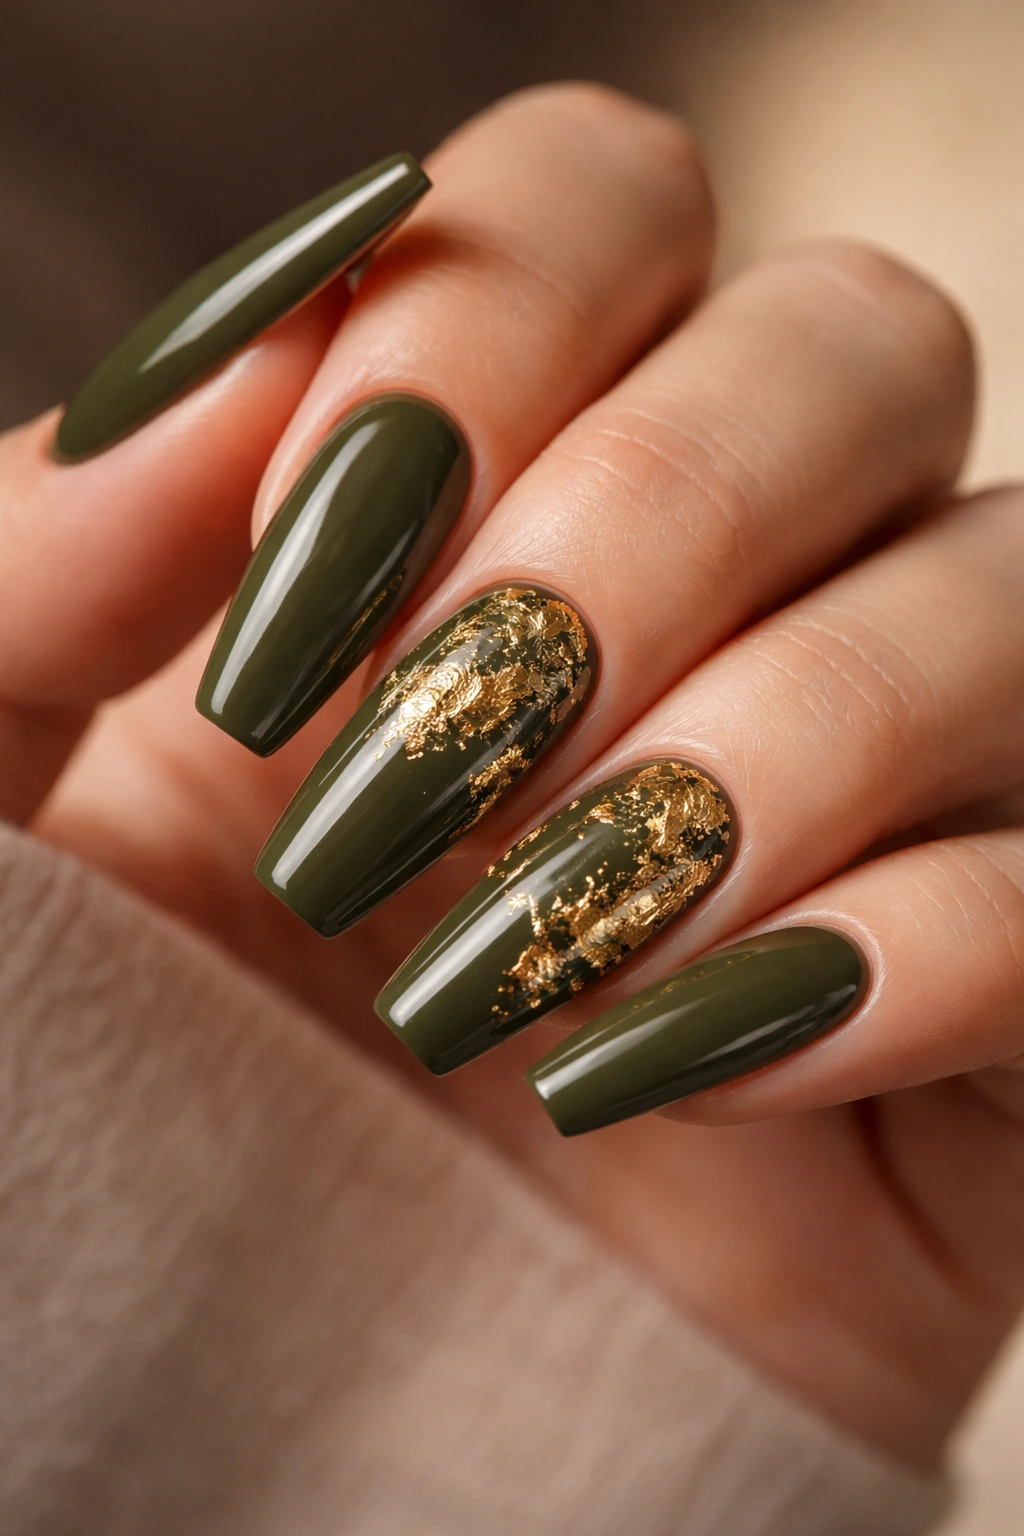
This is the set I point to when someone wants dark green nails with warmth instead of chill. Deep olive has a softer, earthier cast than emerald or pine, and gold foil gives it movement without turning the manicure into full glitter.
Picture a dark olive base with irregular flecks of crinkled gold pressed into two accent nails per hand. Not full coverage. Think scattered foil near the sidewall or cuticle, with enough empty space for the olive to stay visible. That imbalance is what makes the design work. If every nail is foiled edge to edge, the green gets lost.
Gold foil also hides wear better than flat metallic striping tape. Tape can lift. Foil, once sealed under builder gel or a thick top coat, sits down nicely and looks part of the nail instead of glued on top.
A few details matter:
- Olive looks richer with a creamy opaque finish, not a jelly base
- Pale yellow gold suits this design better than icy champagne gold
- Medium coffin length keeps the foil from bunching visually at the tip
- One foil-heavy accent nail is easier to maintain than four
I would skip this one if you wear mostly silver jewelry and cool-toned makeup. Deep olive and yellow gold want some warmth around them — camel coats, tan knits, brown leather, tortoiseshell sunglasses. They do not need a costume, but they do like a little company.
5. Dark Green French Tips on a Milky Nude Base
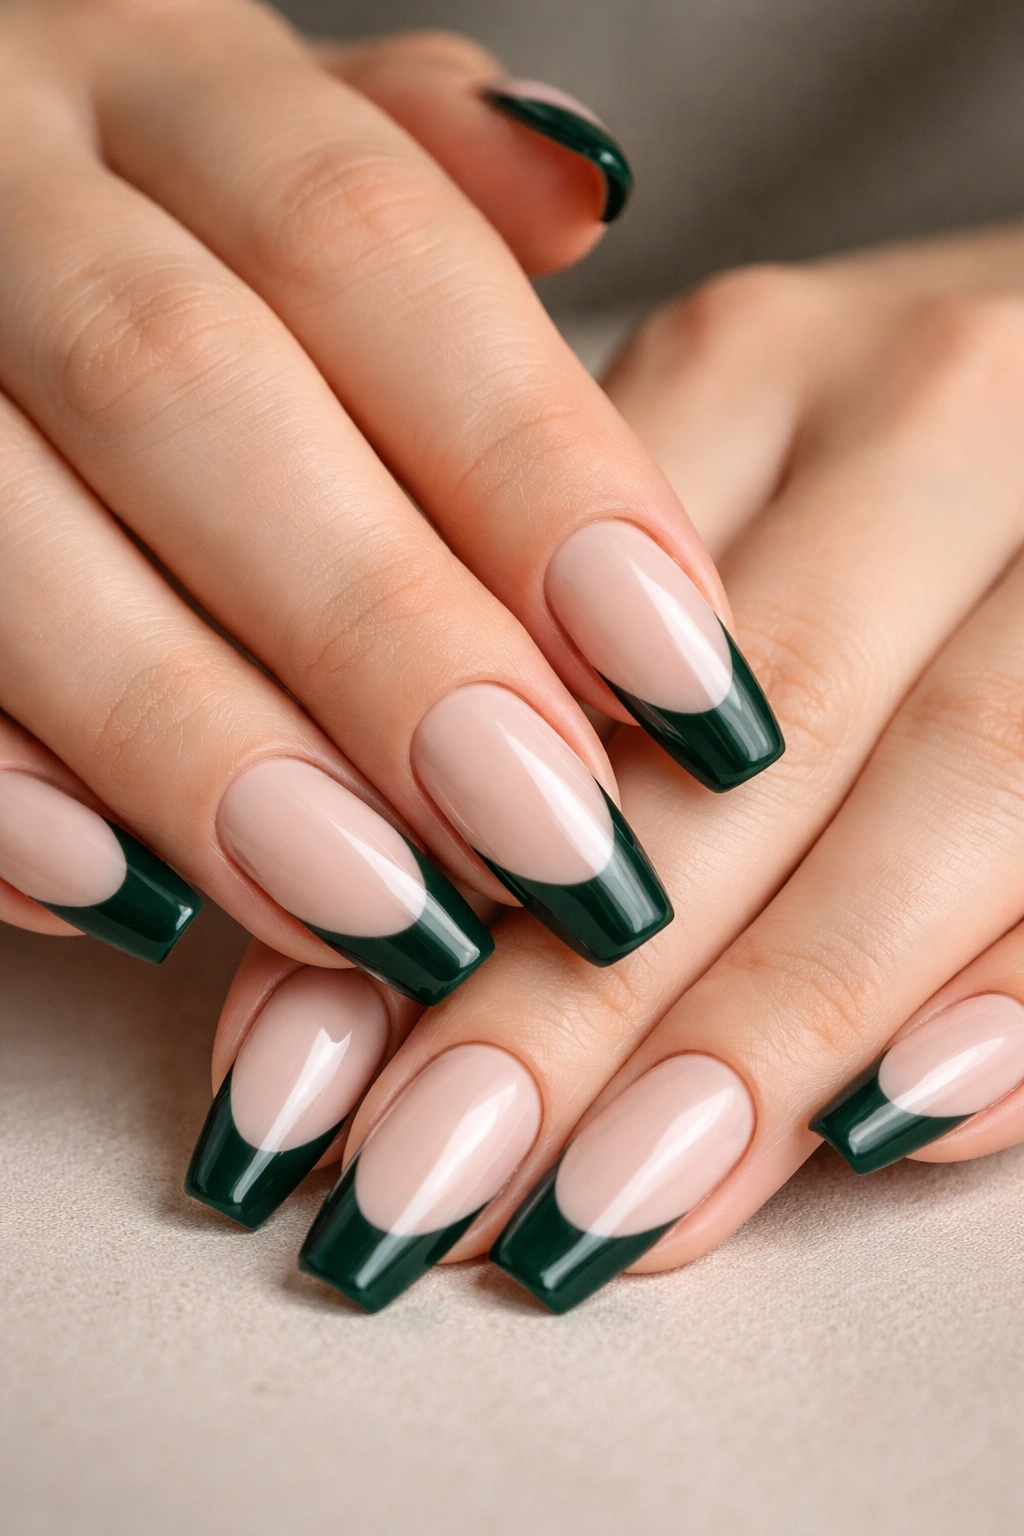
Unlike a full dark manicure, a green French tip leaves breathing room. You get the mood of dark green coffin nails without covering the whole nail plate, which makes this design easier to wear if you are hard on your hands or you usually lean neutral.
The base matters more than the tip. Go for a milky nude or sheer beige-pink that is close to your skin tone but one notch brighter. If the base is too peachy, the green tip can look muddy. If the base is chalk-white, the whole set starts veering into holiday territory.
I like a deep bottle green tip here, shaped in a sharp smile line rather than a soft rounded arc. Coffin nails already have those straight side edges, so a crisp French line echoes the shape and keeps the manicure looking tidy. You can make the tip thick — around 3 to 5 millimeters — if your nail bed is long. Shorter nail beds usually look cleaner with a slimmer edge.
This is also one of the best options if you want regrowth to stay less obvious. A solid dark set shows the gap at the cuticle fast. A sheer base buys you more time between fills, especially with builder gel underneath.
If you want one extra detail, add a fine gold outline under the green tip on two nails only. More than that starts to crowd the look.
6. Velvet Cat-Eye Pine Green
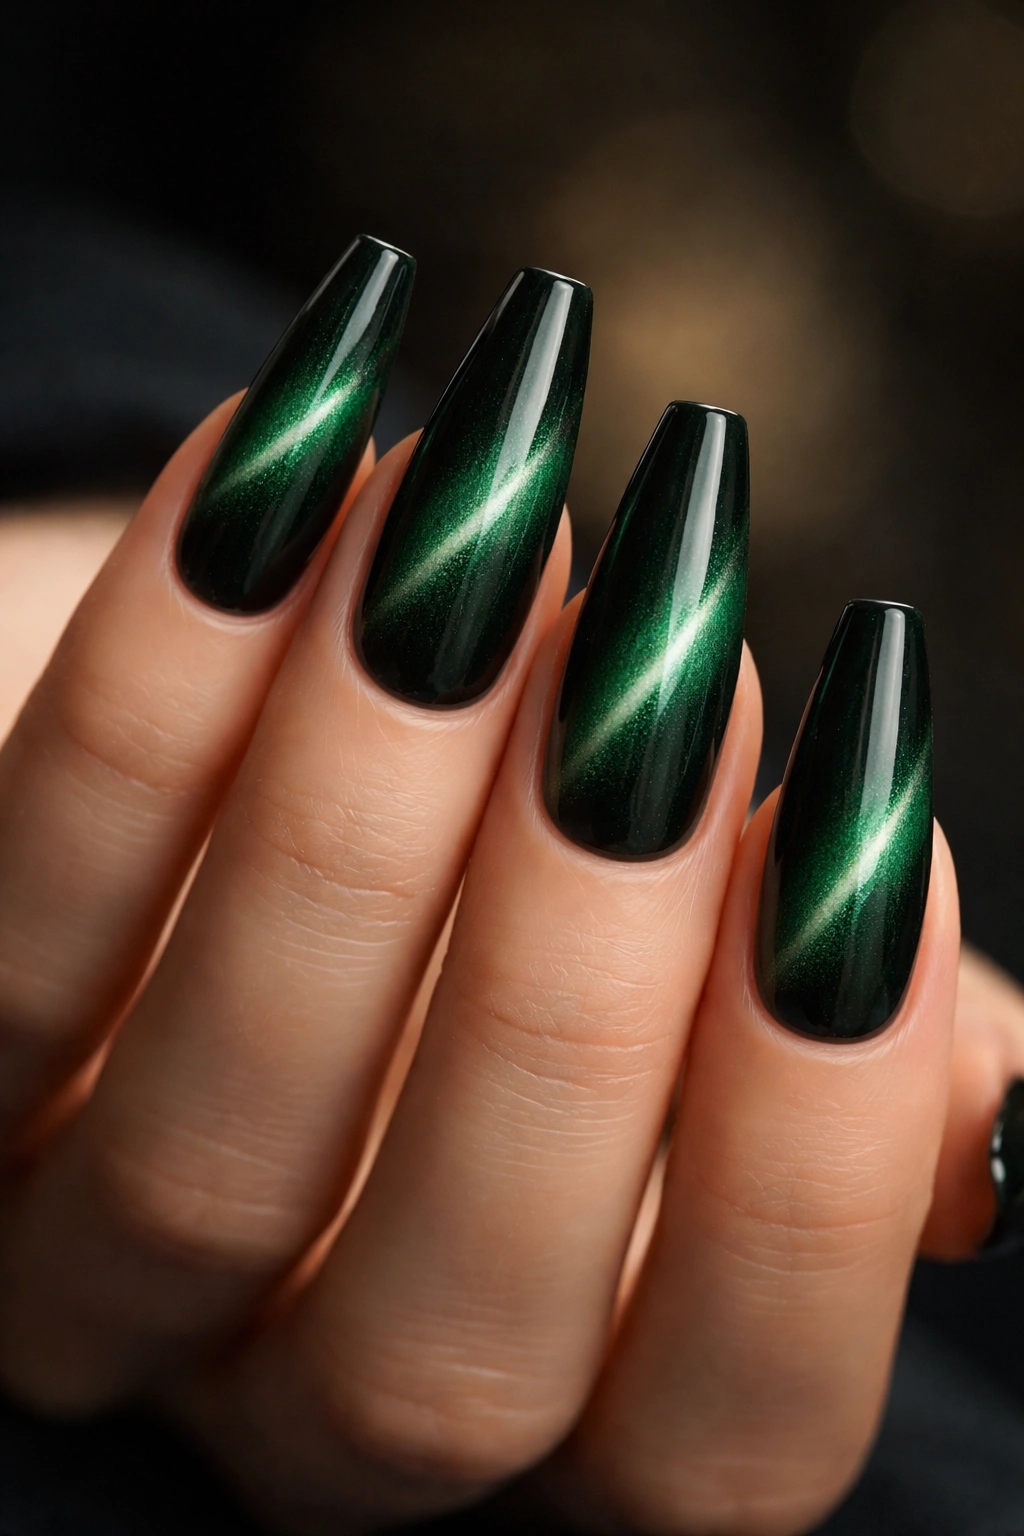
Why does cat-eye polish look so good in dark green? Because green already has depth, and the magnetic shimmer pushes that depth around instead of flattening it.
With a pine green cat-eye gel, the nail can shift from near-black at the edges to a bright diagonal ribbon through the center. It gives that soft velvet glow people love in close-up videos, but it reads richer in person when the base color is dark enough. A weak base makes cat-eye look dusty. Pine, fir, and deep spruce keep it dense.
This is one of the few flashy finishes I like on all ten nails. You do not need accent art. The pattern itself is the decoration.
What to ask your nail tech for
Ask whether they can shape the magnetic line into a slim diagonal slash, a centered vertical beam, or a soft diffused bloom. My favorite on coffin nails is the diagonal pull because it flatters the taper and makes the nail look slimmer. A straight horizontal magnet line can cut the nail in half visually, which is not what you want.
There is one downside. Cat-eye polish is unforgiving if the gel layers are thick. The magnetic pigment sits better in thin coats, and the finished nail should still look sleek from the side. If the profile is bulky, the shimmer turns clumsy.
Under dim light, this set looks dark and moody. Step under a lamp and it wakes up. Hard not to stare at it.
7. Green Marble with Fine Black Veining

Marble can go wrong fast. Most sets fail because the lines are too heavy or the colors are too high contrast, so the nails end up looking busy instead of stone-like. A good dark green marble manicure keeps the veining thin and the color family tight.
Start with a moss, pine, or blackened green base. Blend in one lighter green and a touch of smoky white, then drag in a few hairline black veins with a detail brush. That is enough. You do not need silver foil, glitter flakes, chrome, and rhinestones on top of marble. Stone already has texture built into the pattern.
I like this design best when marble appears on two or three nails, with the rest painted solid dark green. Full marble on all ten coffin nails can feel noisy, especially on long extensions. A mixed set gives your eye a place to rest, which makes the patterned nails look stronger.
Choose glossy top coat here. Matte kills the stone illusion and can make the white streaks look chalky. The shine helps the layers blur into each other so the design reads as polished mineral rather than hand-painted swirls.
If you wear a lot of black, green marble with fine veining is one of the easiest ways to add color without changing your whole style. It still feels dark. It still feels sharp. It just has more life in it.
8. Tortoiseshell and Moss Green Accent Set
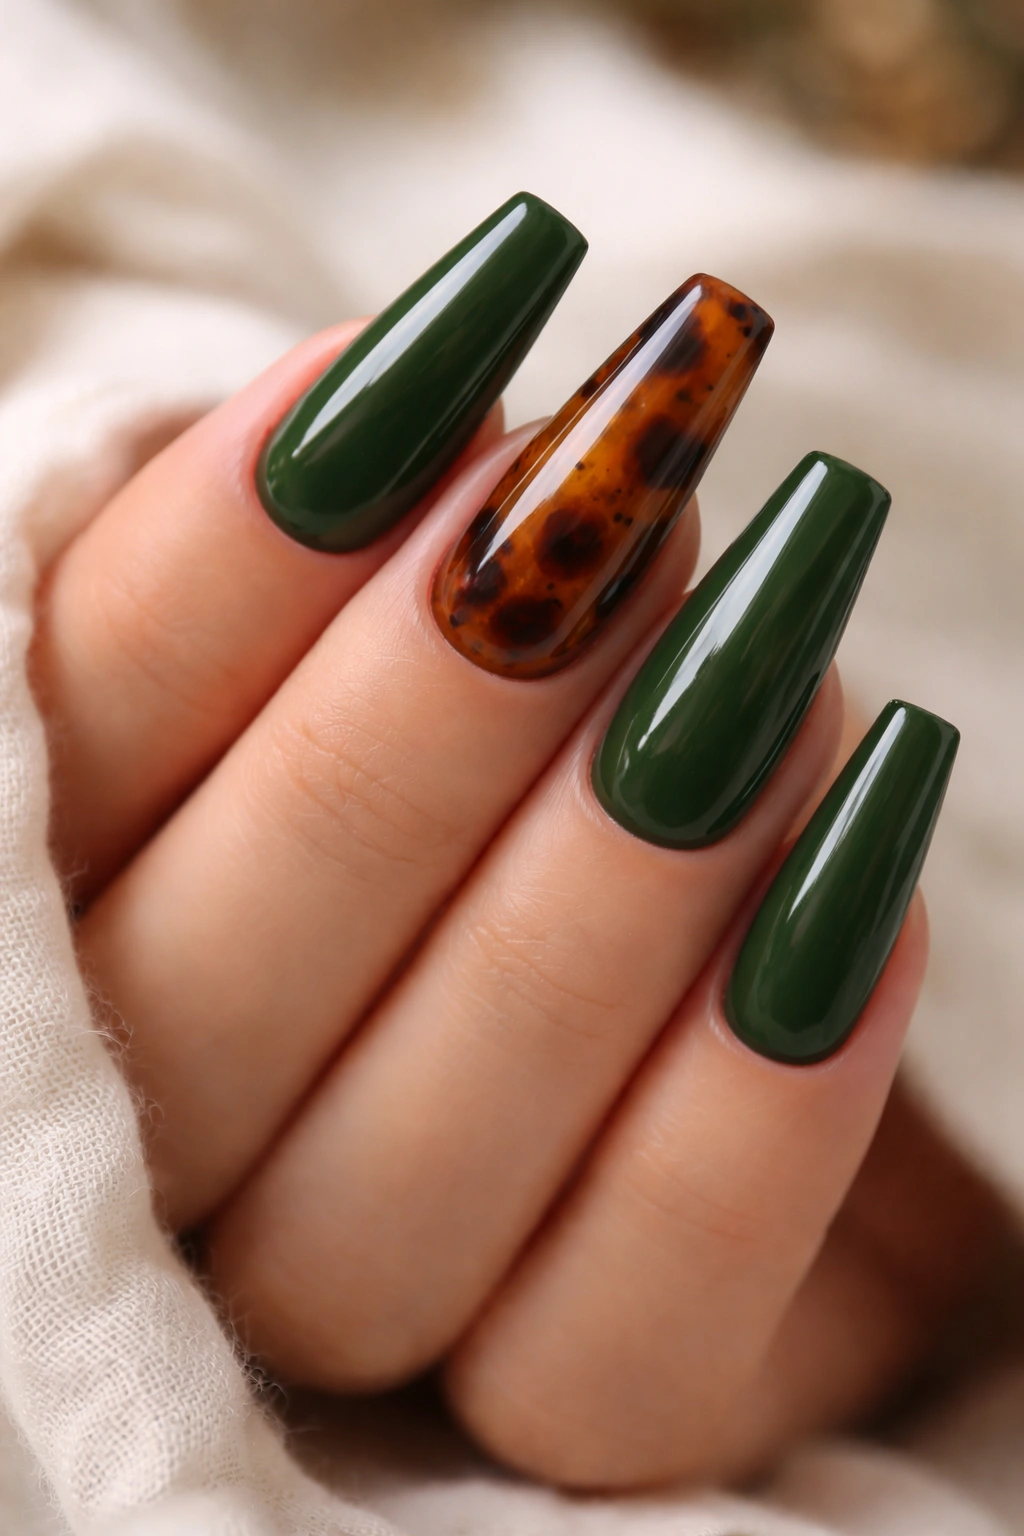
A good tortoiseshell nail has that amber-brown depth you see in old acetate sunglasses, and moss green is one of the few dark shades that can sit next to it without getting swallowed. Done well, this combination feels warm, glossy, and expensive in a slightly old-school way.
What makes this pair click
The tones share enough earthiness to look related. Moss green has yellow and brown undertones, tortoiseshell has caramel and black, and both colors like a high-gloss finish. That common warmth keeps the manicure from feeling split into two random ideas.
Use tortoiseshell as the accent, not the main story. Two accent nails per hand is plenty. Ring finger and thumb works well on coffin shape because the thumb gives the pattern more space and the ring finger keeps it visible when your hand is relaxed.
Placement that tends to look cleaner
- Thumb + ring finger tortoiseshell, the rest solid moss green
- Thin tortoiseshell French tips over a moss base
- Half-moon tortoiseshell near the cuticle on one nail per hand
- One tortoiseshell nail, one gold foil nail, then stop there
Small warning: tortoiseshell needs translucency. If the amber base is too opaque, it loses that layered depth and starts reading like spotted brown polish. Ask for jelly layers if you can.
This design loves gold rings, brown leather bags, and cream knitwear. Silver can work, though it cools the whole thing down more than I usually want.
9. Short Coffin Nails in Dark Sage Gel
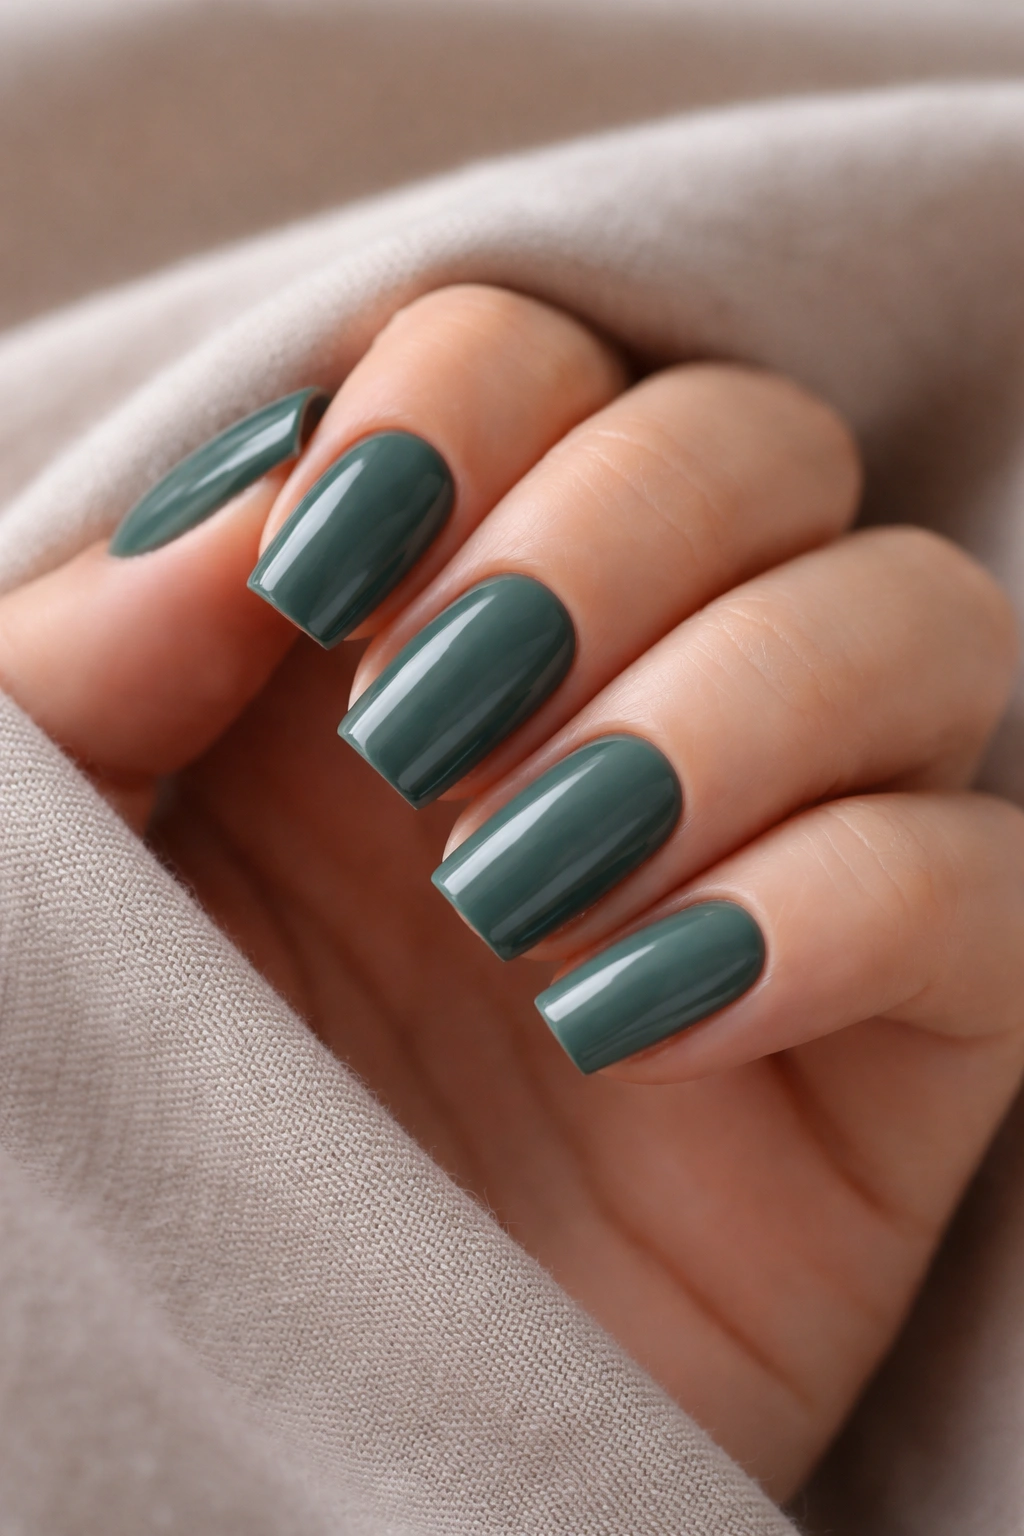
Not every dark green manicure needs long extensions. Short coffin nails in a dark sage gel are proof of that. They look neat, earthy, and grown-up without feeling heavy, which makes them a smart choice if you need your hands to stay practical.
Dark sage is softer than hunter green and less flashy than emerald. It carries gray underneath, which gives it a muted finish that plays well with short length. On a long nail, that same muted tone can feel a little flat. On a short coffin, it looks tidy and intentional.
This is one of my favorite choices for people who want dark green coffin nails but hate the high-maintenance feel of extra length. Keep the free edge extending 2 to 4 millimeters past the fingertip, ask for crisp side taper, and skip chunky art. A single glossy top coat is enough.
It also ages well between appointments. Short shapes snag less, muted greens hide tiny surface wear better than black, and regrowth does not look as stark as it does with chrome or glitter. If you want one subtle accent, a micro French line in black or a single tiny gold dot near the cuticle can work. Anything more starts fighting the whole reason this set is good.
Quiet? Yes. Boring? Not even close.
10. Black and Green Aura Coffin Nails
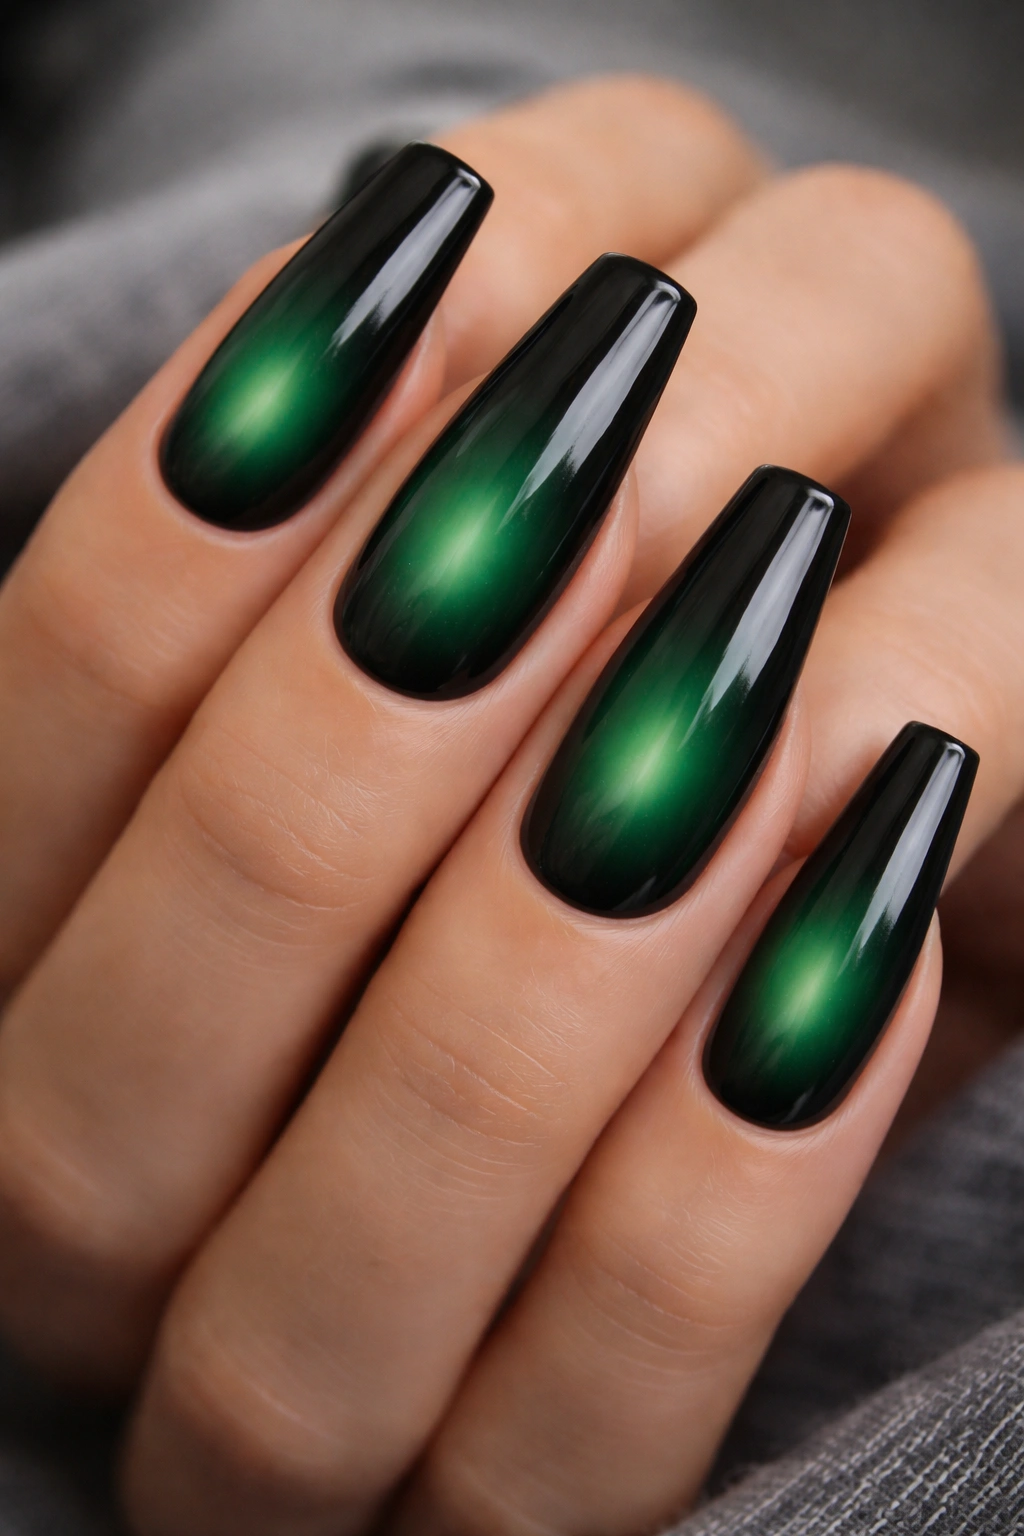
Aura nails can look soft and hazy or flat-out muddy depending on the color pairing. Black and green is one of the better combinations because the dark edge frames the glow instead of washing it out.
Think of a smoky black base diffused into a rich green center, almost like a dim light behind tinted glass. On coffin nails, that glow sits nicely in the middle panel and makes the shape look longer. You do not want the green too bright here. Neon kills the mood. A deep emerald, bottle green, or toxic-slime green darkened with black keeps the set looking intentional.
Airbrushing gives the smoothest aura blend, though sponge blending can still work if the tech has a soft hand. The key is the gradient. Hard circles look dated fast. A blurred center that fades out before the sidewalls looks cleaner and more expensive.
A few rules help:
- Keep the aura on all ten nails or make only one or two nails solid black
- Skip glitter on top of the blend
- Use glossy top coat so the center glow stays visible
- Choose medium or long coffin; short nails can crowd the fade
This one is moodier than a French tip and less metallic than chrome. If you like darker nail art but do not want raised texture or stones, black and green aura hits a sweet spot.
11. Deep Green Ombre Fade to Sheer Nude
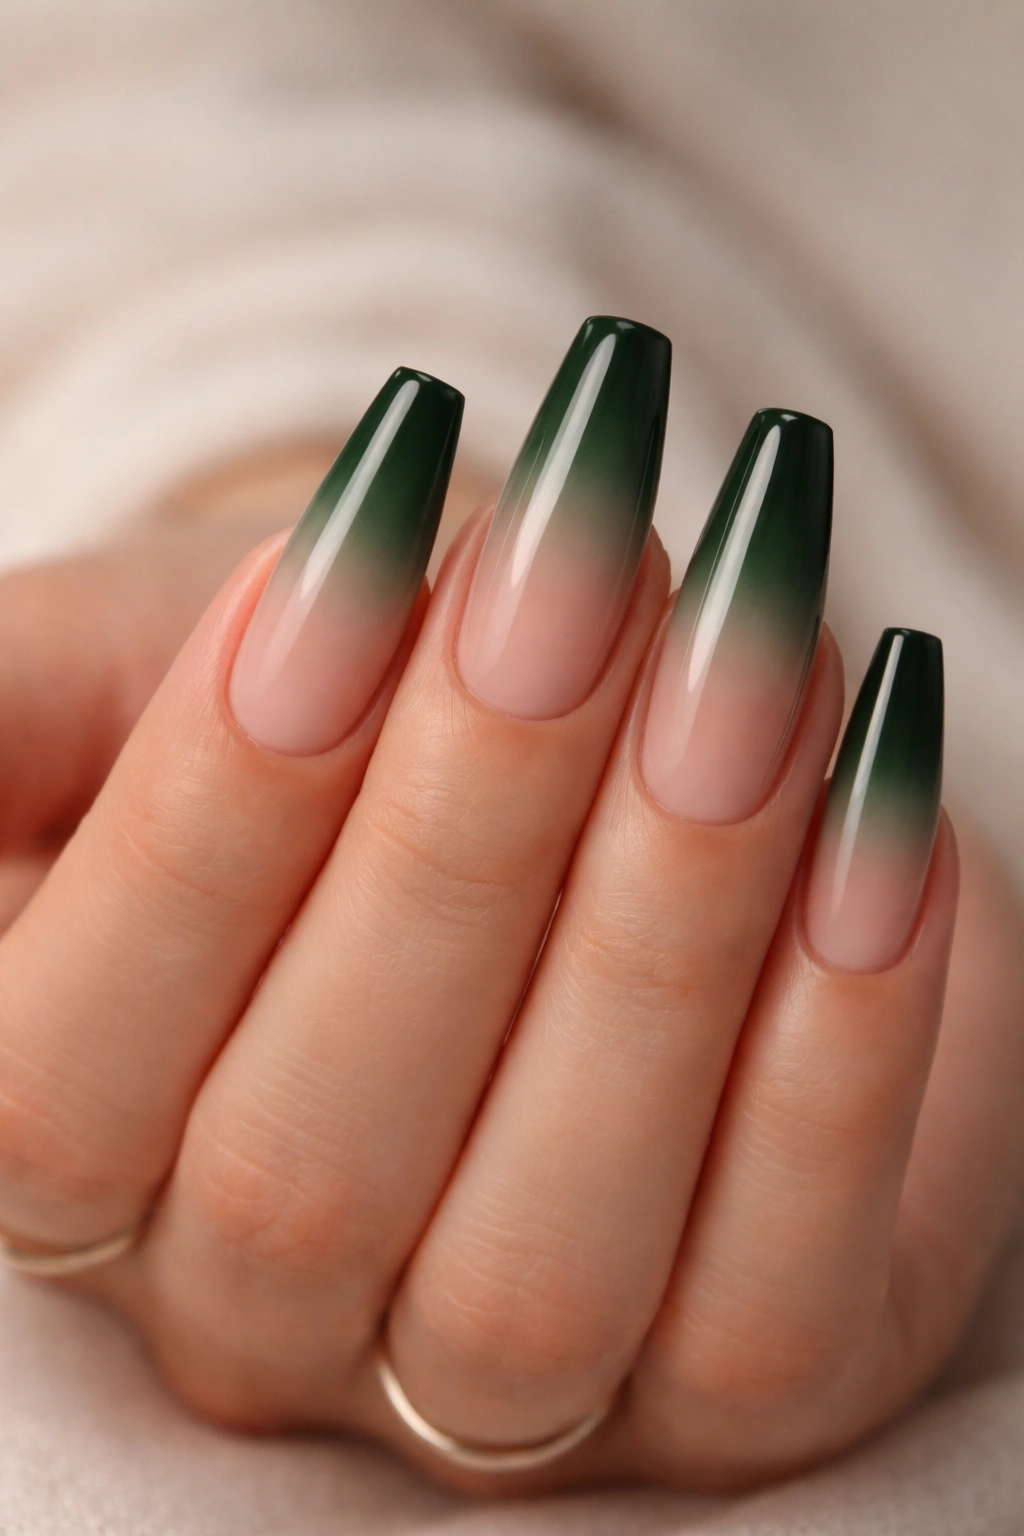
If you want dark green without the full weight of a solid dark manicure, an ombre fade is hard to beat. A sheer nude at the cuticle melting into deep green at the tip keeps the set airy near the base and rich at the edge, which flatters coffin nails in a way solid color sometimes does not.
Compared with a green French tip, ombre looks softer and more blended. Compared with a full-coverage manicure, it grows out with less drama. That makes it a strong pick if you want your appointments spaced a little farther apart or you tend to notice regrowth early.
The best version uses a base nude that matches your skin tone closely, then fades into pine, hunter, or blackened emerald through the last half of the nail. I prefer the green concentrated more heavily at the tip rather than spread evenly from middle to edge. That extra depth at the end sharpens the coffin shape.
This design also gives you room to add a touch of detail without clutter. A dusting of micro glitter over the green end can work. One chrome line down the center can work. Full crystals, raised decals, and heavy foil usually do not.
Who is this best for? People who want dark green coffin nails to feel elegant rather than strict. It softens the color without watering it down.
12. Dark Green Nails with Tiny Gold Studs

Want detail without full nail art? Tiny gold studs are the move. Not large gems. Not chunky chains. Tiny metal points placed with purpose.
A solid dark green base gives the studs something to sit against, and coffin shape keeps the placement looking sharp rather than random. I like bottle green, hunter, or blackened olive for this because the gold pops cleanly against those shades. Bright emerald can work too, though the contrast is louder.
Placement decides whether this manicure looks polished or fussy. One stud near the cuticle on each ring finger is enough for a clean look. A vertical row of three micro studs down one accent nail can also work, though I would stop there. Once every nail has metal on it, the whole set starts to feel crowded.
Where studs tend to look best
- centered at the cuticle line
- lined along one sidewall on a single accent nail
- stacked in a short vertical line
- paired with a matte base for texture contrast
One caution: studs catch on knitwear if they are not sealed well. Ask your tech whether the edges will be encapsulated or left exposed. Exposed metal looks sharper, but it can snag. Encapsulated studs wear longer, though they lose a little crispness.
This is a smart middle ground if you want a manicure with jewelry built into it, minus the weight of heavy rhinestones.
13. Crocodile Texture in Bottle Green
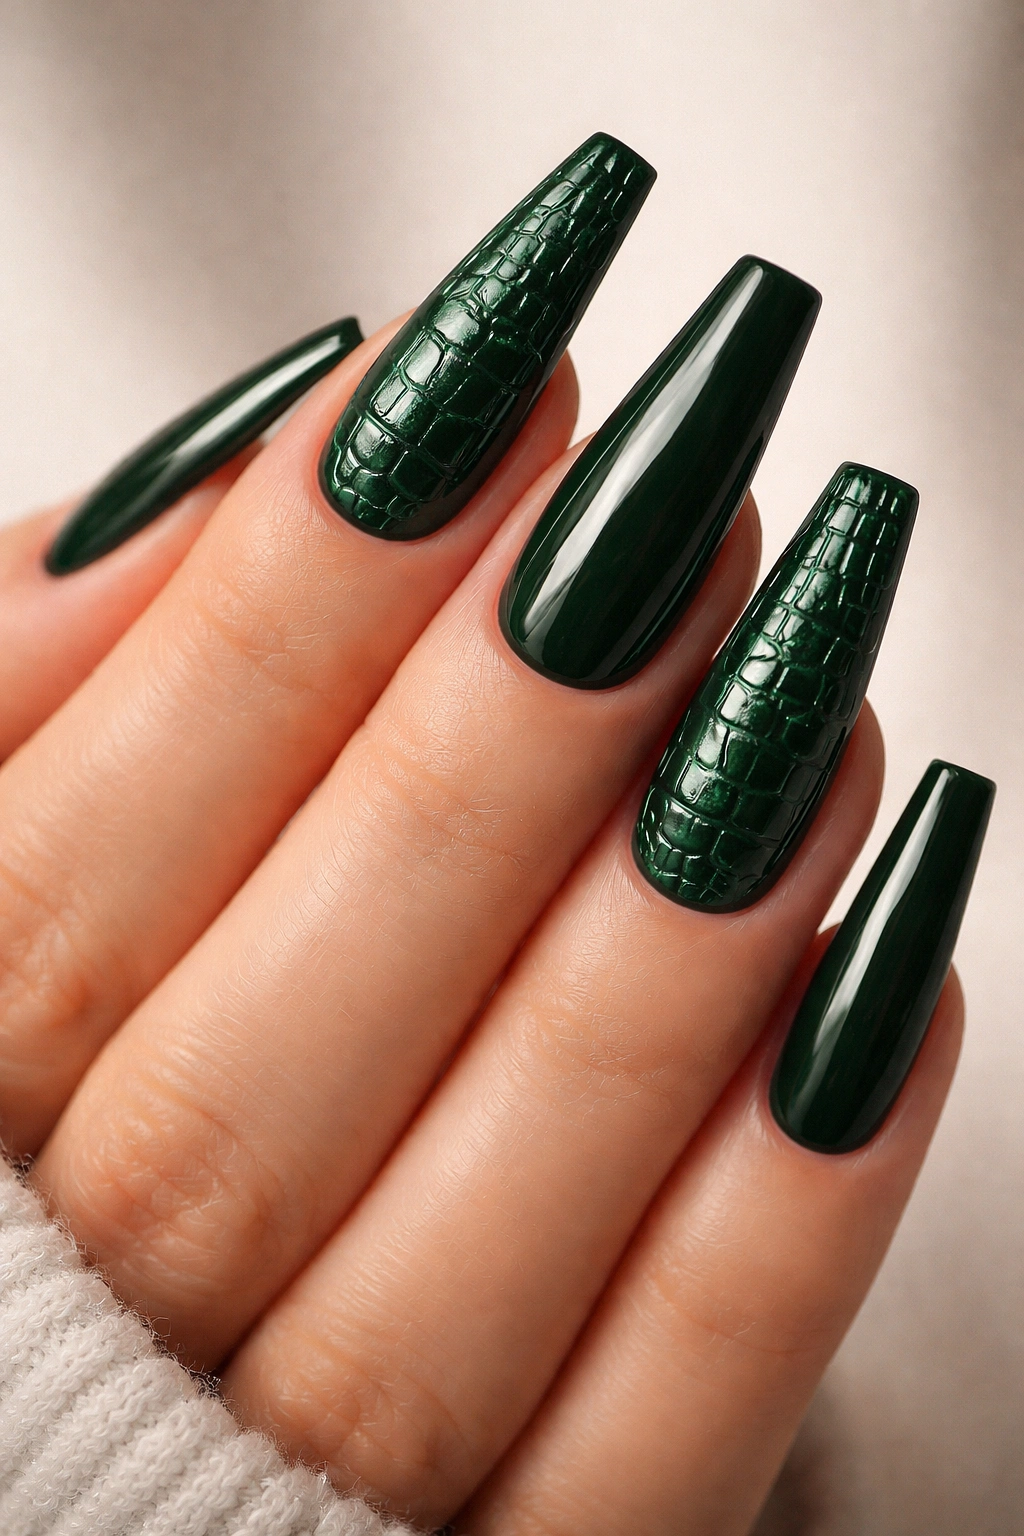
Croc texture is bold, and I would not pretend otherwise. If you want a soft, office-safe manicure, skip this and move on. If you want something with real surface interest that still stays in a dark, polished color family, bottle green croc nails can look fantastic on a coffin shape.
The texture works because bottle green already has that rich leather-adjacent feel. Add a raised reptile pattern or a 3D gel imprint and the color suddenly makes more sense. Black croc can feel obvious. Green gives it more character.
This design looks strongest as a partial set. Two crocodile-texture nails, six or eight solid glossy nails, and maybe one chrome accent if the tech has a steady hand. Full croc on all ten nails is a lot to live with, and the raised pattern can trap makeup or hand cream near the edges if it is too pronounced.
Gloss is the better finish here because it makes the pattern look like embossed leather. Matte can work, though it flattens the texture and takes away some of the richness. Keep the length medium to long so the print has enough room to read. Tiny short croc nails can end up looking blotchy.
This is one of those manicures that looks stronger in person than in a flat photo. Your hands move, the light catches the raised pattern, and the texture finally makes sense.
14. Forest Green Glitter Fade
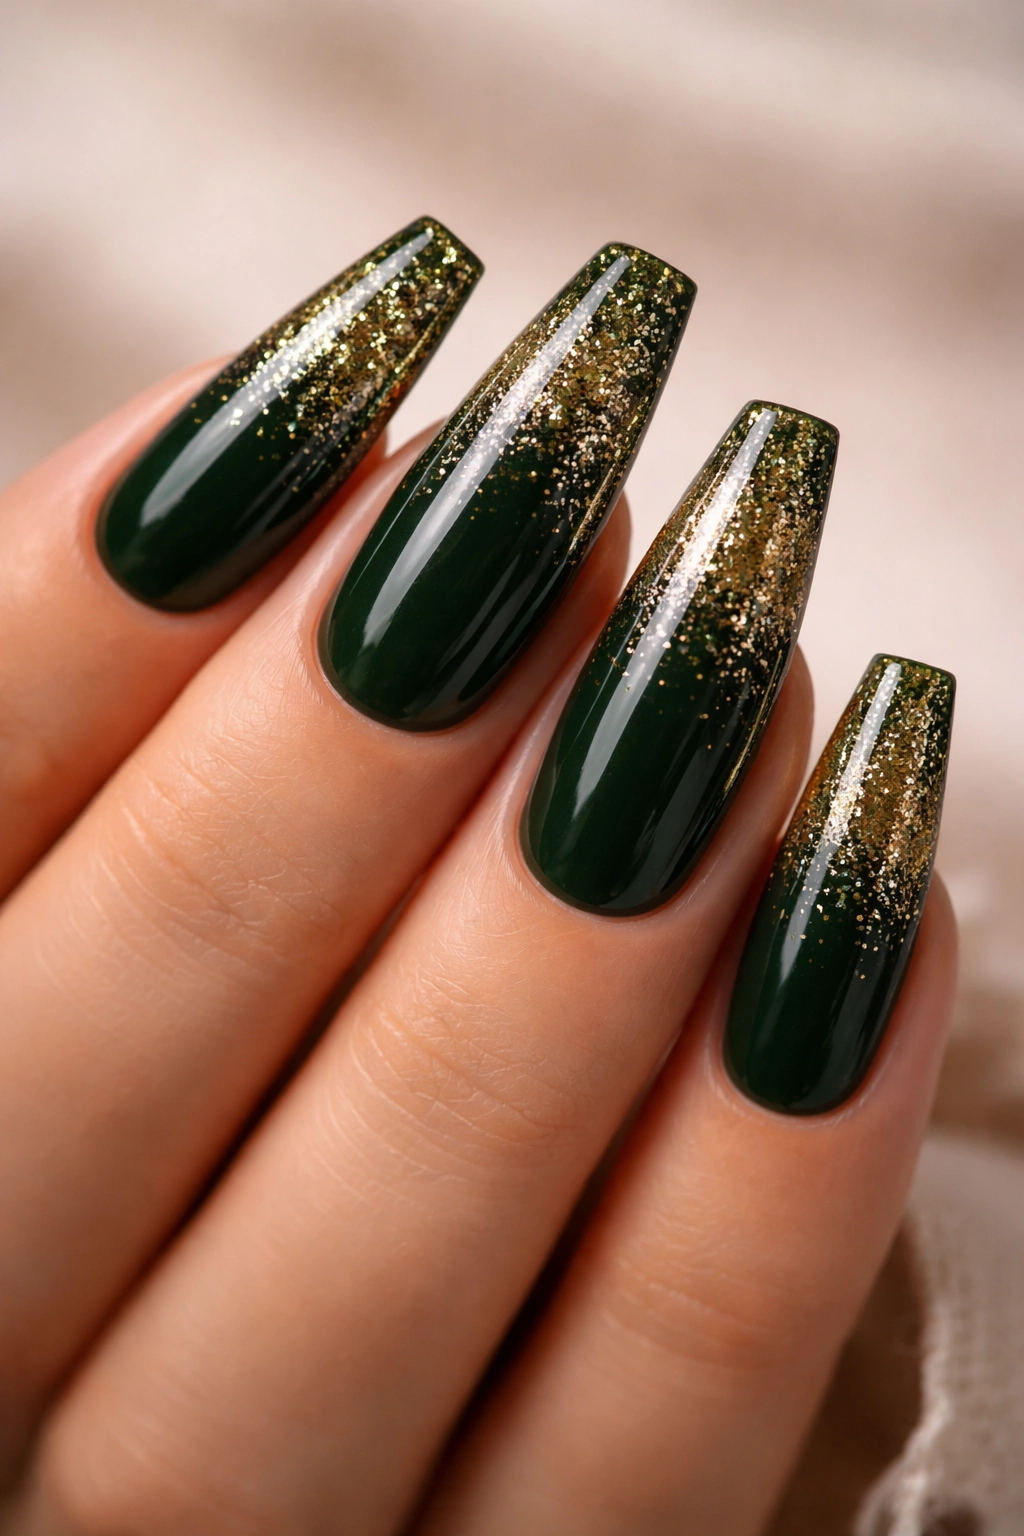
Glitter fades are easy to overdo. The trick is to treat the sparkle like light mist, not a wall of sequins. Over a dark forest green base, a fine glitter fade can add movement near the tip without erasing the depth of the color underneath.
Why this version feels cleaner than full glitter
A full green glitter nail can look thick, especially on coffin shape. A fade leaves the solid base visible, so the eye still reads color first and sparkle second. Fine glitter also wears better than chunky mixed glitter because the surface stays smoother under top coat.
Use micro glitter in gold, green, or a mixed olive-gold tone. Silver can work on cooler greens, though gold usually warms forest green in a nicer way. Start the glitter at the tip and taper it downward about one-third to halfway down the nail. Past that point, the fade starts looking dense.
A few ways to wear it
- glitter fade on all ten nails over solid forest green
- glitter on ring finger and thumb only
- sheer nude base with a dark green glitter ombre tip
- matte solid nails with one glossy glitter accent
My preference: keep the glitter fine and the rest of the manicure clean. Once you add stones, foil, and chrome to a glitter fade, the polish loses its depth and starts reading cluttered.
Done with restraint, this set catches the light in a softer way than chrome and gives dark green a little movement.
15. Dark Green Coffin Nails with Silver Stars and Celestial Art
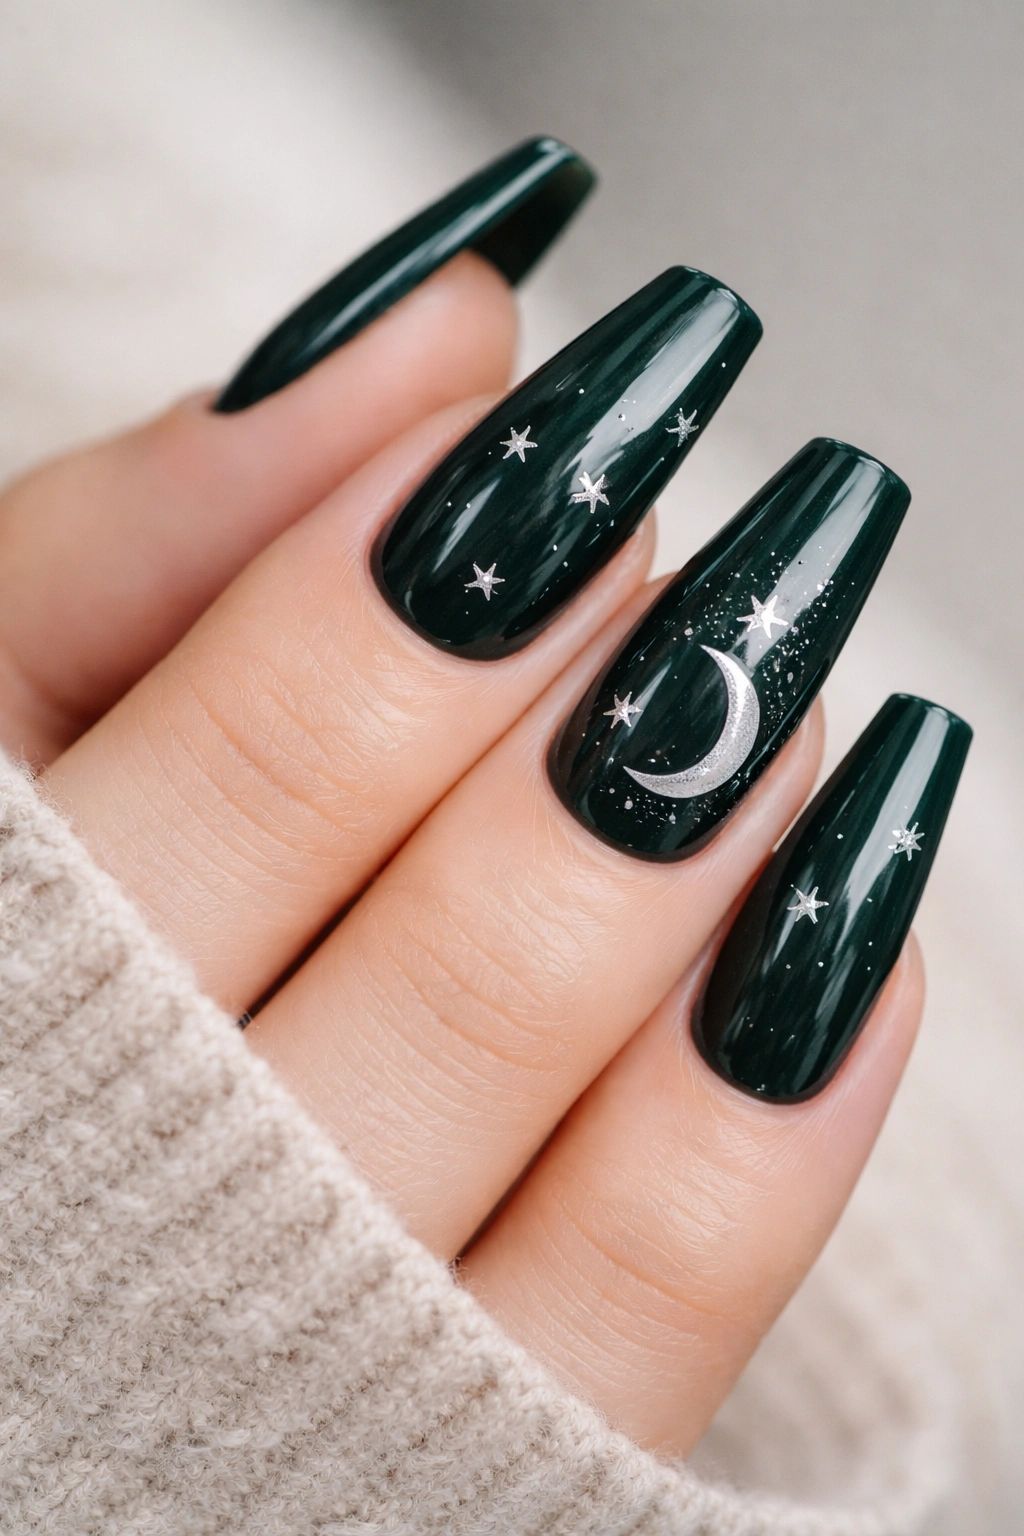
There is a thin line between celestial nail art and costume nail art. Silver stars over dark green can cross that line fast if the base is too bright, the decals are too large, or every empty space gets filled with moons, dots, and sparkles.
The version I like uses a blackened emerald or midnight pine base with small silver starbursts, tiny dots, and maybe one crescent moon on each hand. Keep the art fine. Think detail brush work or micro decals, not chunky charms. Coffin nails give you enough room for the stars to breathe, which is why this design lands better here than it does on short round nails.
A glossy top coat suits this manicure best because it gives the silver a clean contrast. Matte can make the stars look dusty. If you want a little extra depth, add a sheer smoky aura under one or two starbursts so the art looks layered instead of pasted on top.
This set pairs nicely with silver rings and black clothing, though it does not need either to work. What it does need is editing. One moon, a few stars, some empty space, done. Nail art often improves when you stop ten minutes earlier than planned, and celestial green nails are a textbook case.
Final Thoughts
Dark green is one of the rare nail colors that can go earthy, polished, metallic, or edgy without losing itself. On a coffin shape, it has enough space to show depth, and that is why the finish matters almost as much as the shade.
If you want the safest starting point, go with glossy black-forest green, a milky-base French tip, or a deep green ombre. If you want more drama, cat-eye velvet, emerald chrome, and croc texture bring it fast. Matte hunter green sits in its own lane — clean, strict, no fluff.
One last thing I always tell people: when you save nail inspiration, save a close-up side angle too. Color photos help, but the side profile tells your tech whether the set looks sleek or bulky. On dark green coffin nails, that difference shows up immediately.
