

The hardest part about choosing coffin nails is not the shape. It is the overload that hits once you realize how many directions that shape can go.
If you have been saving screenshots of trendy coffin nails, you already know the pattern: one set looks clean and soft, another looks sharp and dramatic, and a third somehow lands right in the middle. Same outline. Totally different mood. That flat, tapered tip gives nail art a little stage to stand on, which is why coffin nail designs can handle tiny French lines, moody dark shades, chrome powders, jelly finishes, foil, pearls, marble swirls—pretty much the whole menu.
There is also a technical reason this shape keeps getting requested. A well-filed coffin nail has straight sidewalls, a gentle taper, and a blunt free edge. Get that balance right and the hand looks longer. Push the taper too far and the nail starts looking thin, pointy, and more likely to crack at the sides. Good coffin nails always look intentional, even when the design itself is simple.
A strong set does not need ten charms and six colors. Sometimes a sheer nude base and a razor-thin tip line do more for this shape than a pile of extras ever could. That is where the fun starts.
Why Coffin Nails Make Color and Nail Art Look Sharper
Coffin nails give structure to a design in a way rounder shapes do not. The flat tip creates a stop point for the eye, so even a plain color feels crisp. Put a French tip, ombré fade, or chrome finish on that shape and the lines read faster and cleaner.
Medium length is where coffin nails often look best. You get enough room to see the taper, but you are not forced into the long acrylic look unless you want it. Short coffin nails can work too—more on that in a bit—but they need careful filing. If the nail is too short and too wide, the shape can drift into square territory.
Placement matters here. A vertical detail, like a side French line or a marble vein running from cuticle to tip, helps the hand look longer. A horizontal block of color across the middle can make the nail look stubby, especially on shorter natural nails.
One more thing. Dark polish tells on bad shaping fast. So does nude polish. If the sidewalls are uneven or the tip leans left, glossy black and sheer beige will expose it in two seconds. That sounds harsh, but it is useful. When you ask for coffin nails, ask your tech to check the shape from straight on, from above, and with the palm facing you. That quick angle check fixes a lot.
How to Pick Trendy Coffin Nails for Your Length, Job, and Budget
A design that looks smart on a long acrylic set can feel annoying on day three if you type all day, button shirts, open cans, or wear gloves for work. Nail inspiration is one thing. Daily life is another.
Short to medium coffin nails are the sweet spot for most people. Think 2 to 5 millimeters of free edge past the fingertip. That is enough length to show the tapered shape without making every task a little slower. If you want longer coffin nails, hard gel or acrylic will usually hold the shape better than standard gel polish on natural nails.
Your finish changes the mood more than most people expect.
- Glossy top coat makes dark shades look richer and sheers look cleaner.
- Matte top coat softens bright colors and turns muted shades, like sage or mocha, into something more fashion-forward.
- Chrome powder magnifies every bump, so the base has to be smooth before the powder goes on.
- Jelly and syrup finishes look best when the nail bed underneath is even and the extension is clear.
Budget plays a part too. A single-color coffin manicure is easier to maintain than layered art with chrome, velvet magnet polish, stones, and 3D pieces. If you want a set that still looks good after two weeks of grow-out, soft ombré, milky nude, foil placed away from the cuticle, and tortoiseshell accents usually age better than hard graphic lines sitting right at the base.
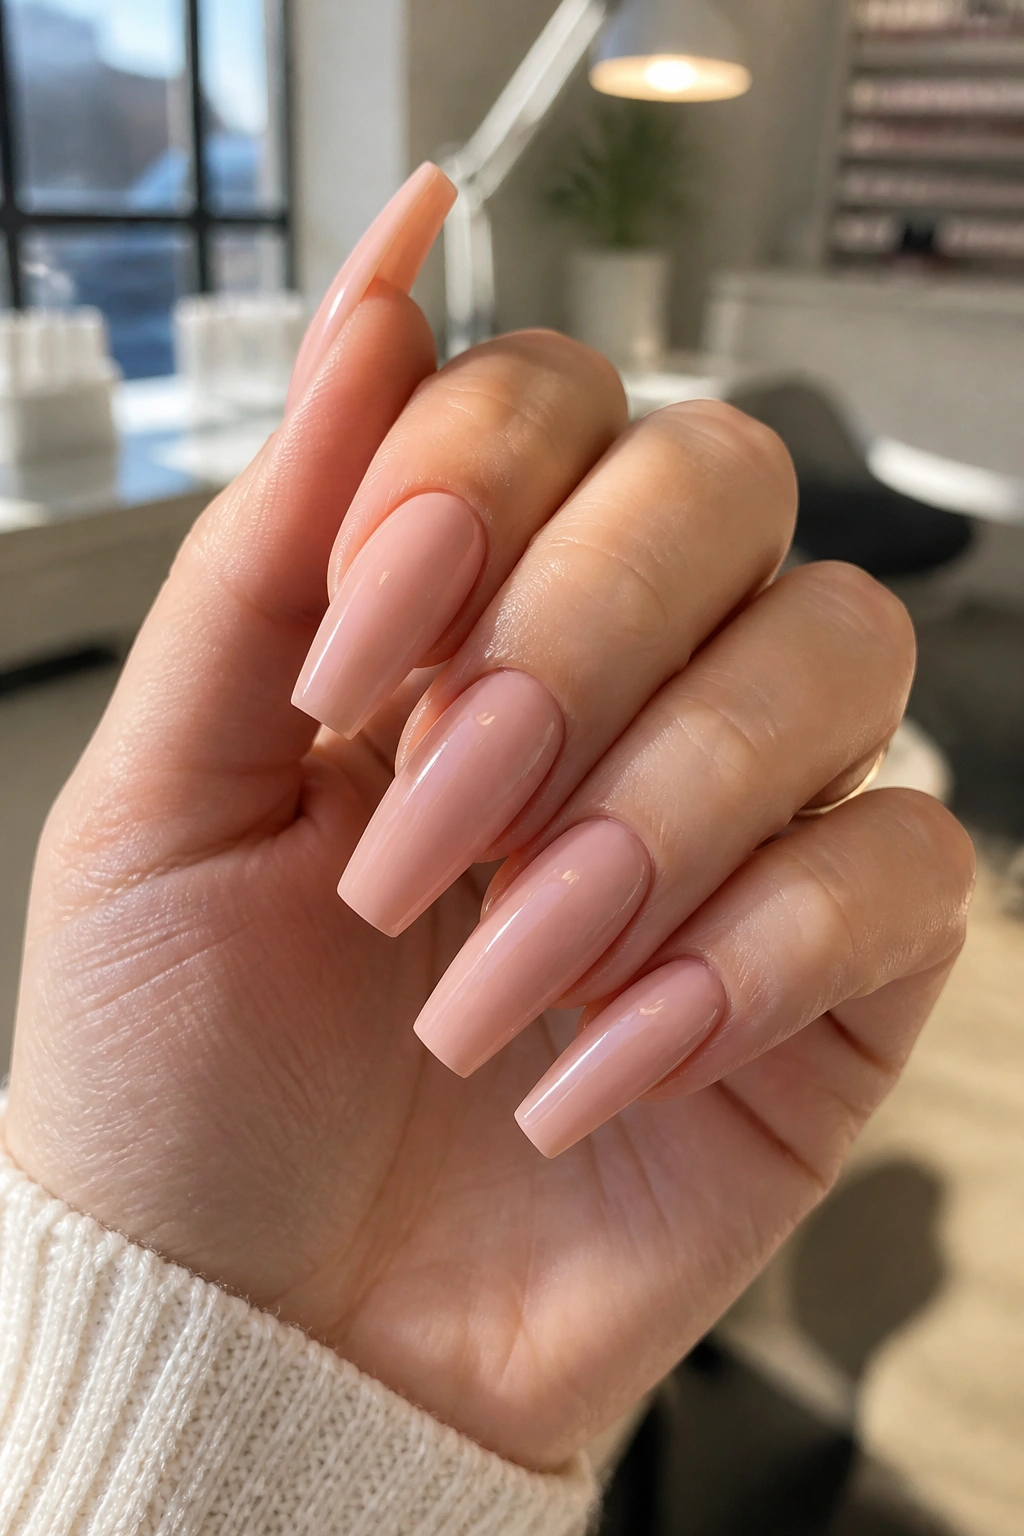
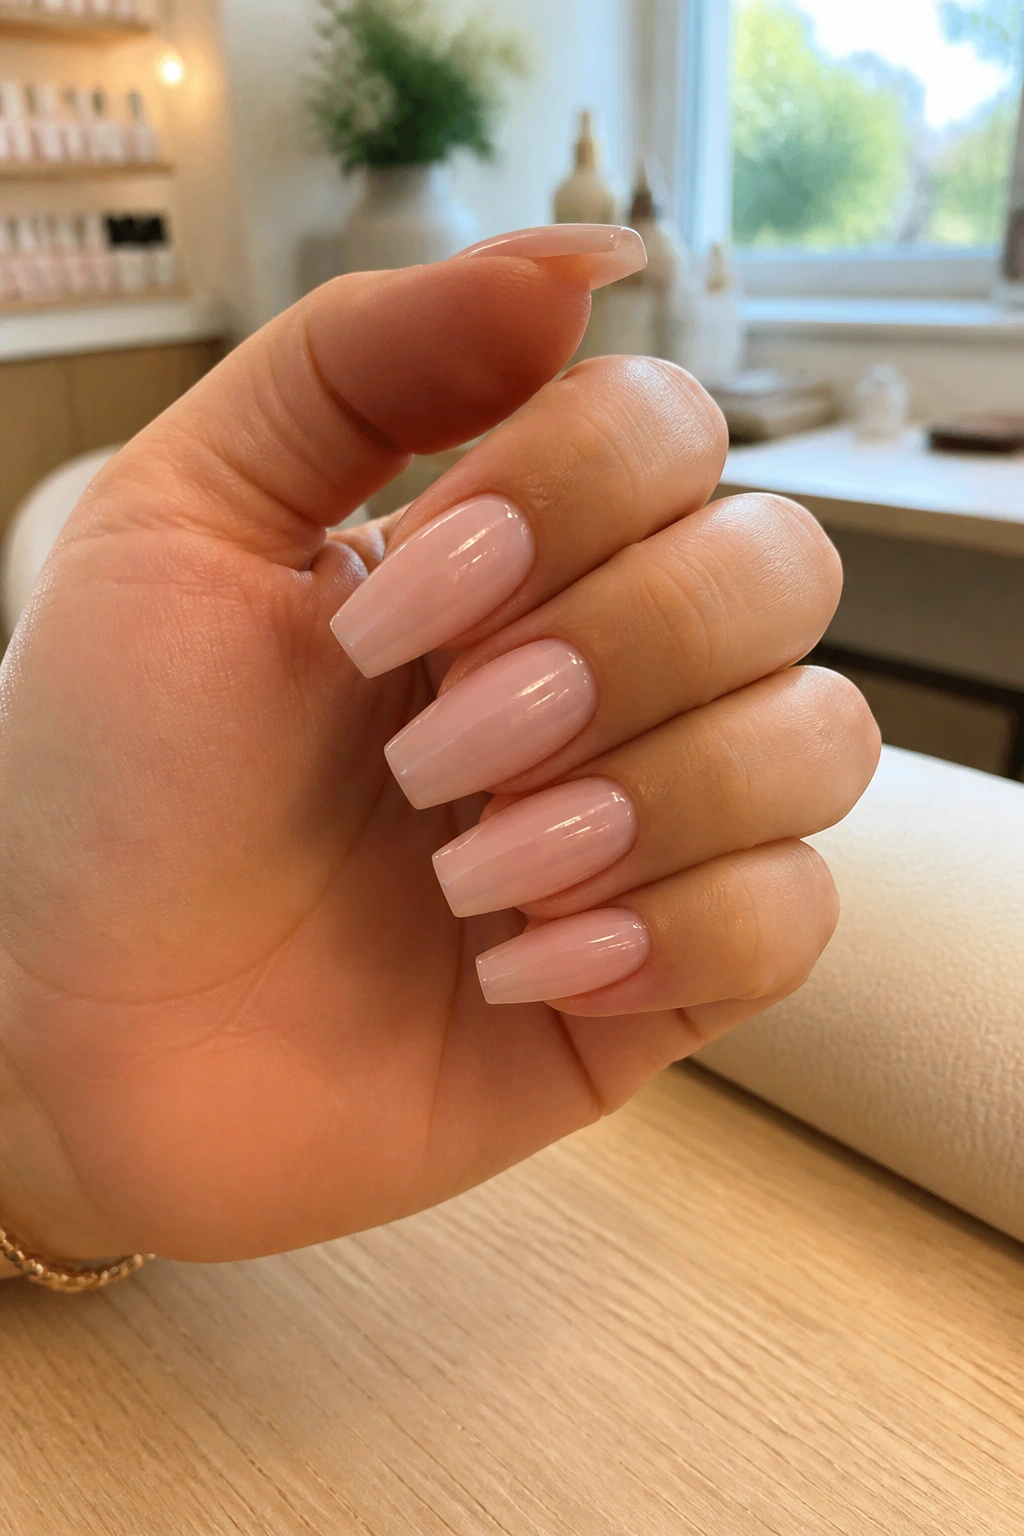
1. Milky Nude Coffin Nails With Micro French Tips

If you want one coffin nail idea that almost never feels out of place, start here. Milky nude with a micro French tip gives you the sharpness of a French manicure without the thick white band that can swallow the nail.
The base should look soft and slightly cloudy, not opaque like correction fluid. Think sheer beige, pink-beige, or a creamy nude that lets a little natural nail tone show through. Then add a tip line that sits around 1 to 2 millimeters thick. On coffin nails, that thin line mirrors the flat edge and makes the shape look cleaner.
Why This One Works So Well
A thicker French tip can shorten the nail visually. The micro version does the opposite. It leaves more negative space on the nail bed, which helps the fingers look longer and keeps the whole set light.
It also grows out well. Because the drama sits at the edge rather than the cuticle, you do not get that harsh regrowth line after ten days.
Best Details to Ask For
- A milky nude base with two thin coats instead of one thick coat
- A white tip line that follows the natural smile line, then straightens slightly at the sidewalls
- Medium coffin length if you want the shape to read clearly
- High-gloss top coat rather than matte, which can make nude shades look chalky
Best salon note: ask for the French line to be hair-thin from the front view. If it looks thick when your palm faces you, it is already too wide.
2. Glossy Black Coffin Nails With a Glassy Finish
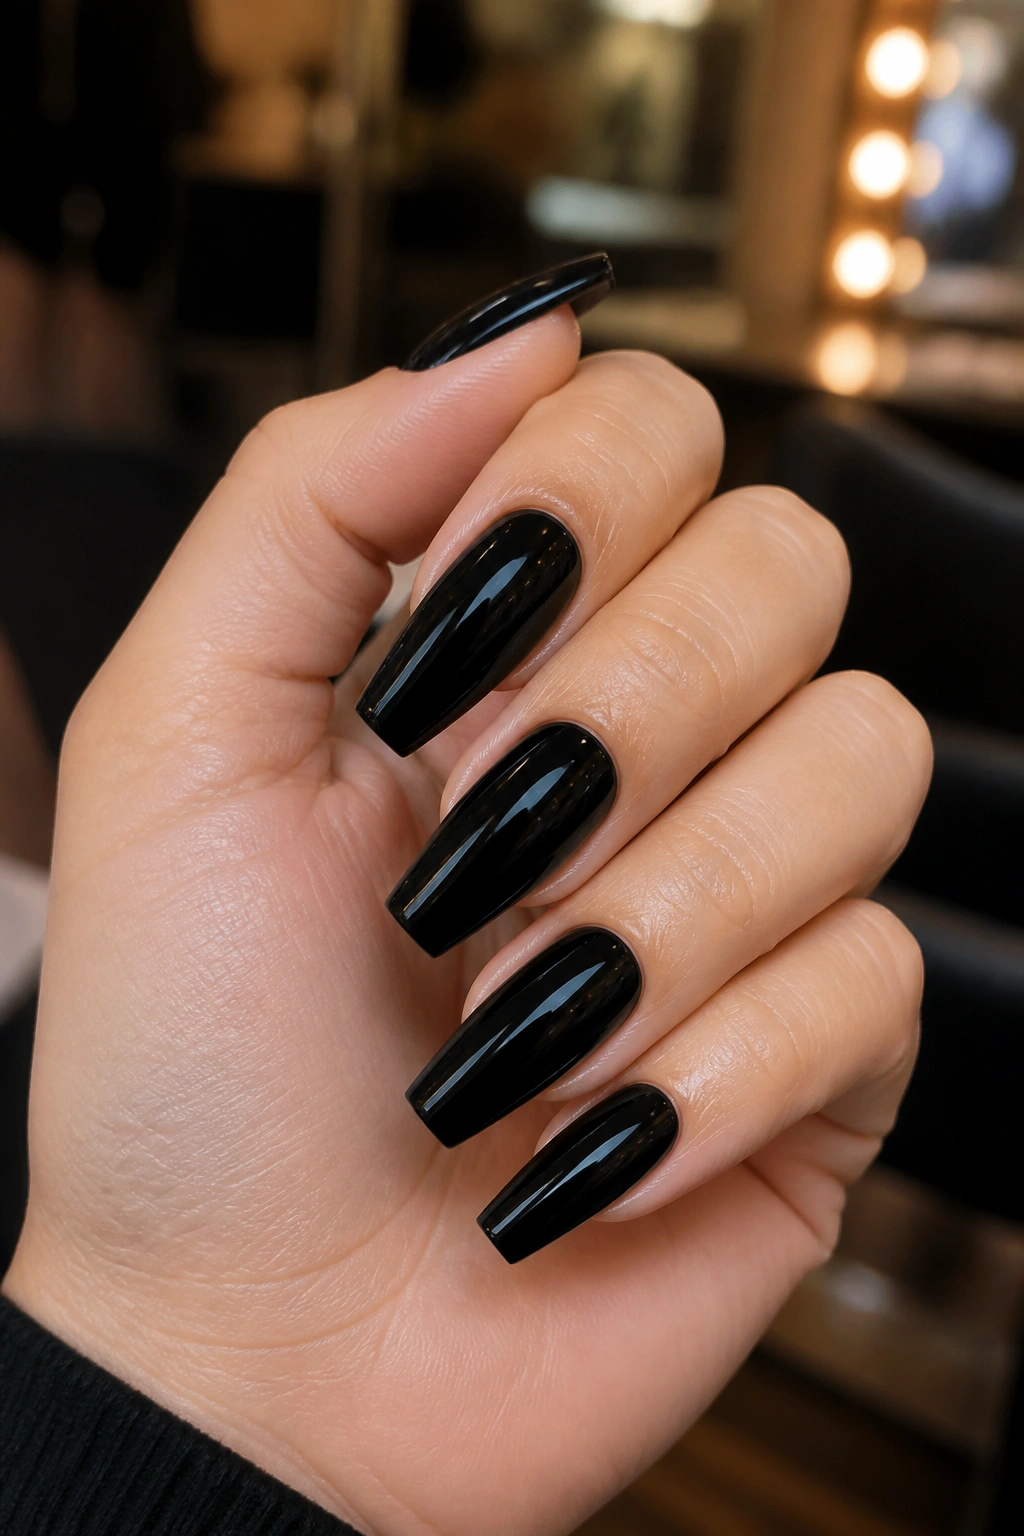
Black polish does not forgive sloppy filing. That is exactly why it looks so good on coffin nails when the shape is done right.
There is something almost architectural about glossy black on a coffin shape. The tapered sides sharpen the color, and the blunt tip keeps it from drifting into stiletto territory. You get edge without the costume effect. On medium or long lengths, black coffin nails look polished and deliberate. On short lengths, they feel tighter and more practical, like a leather jacket cut to fit.
The finish is the whole story here. Skip matte unless you want a softer effect. A thick, high-shine top coat gives black that wet-ink look, and it makes the shape stand out from across the room. If the nail surface has ripples, though, black will show them. Your base has to be smooth—buffed lightly, dust removed, ridge-filling base if needed, then color.
This is also one of the easiest coffin nail designs to wear with different clothes and jewelry. Silver, gold, denim, cream knitwear, a plain white tee, a black blazer—it all makes sense. Black nails can also make hands look a touch lighter by contrast, which some people like and some do not. Worth knowing before you commit.
Chip placement matters. Tiny chips along the free edge show up fast on black. Cap the tip with color and top coat, and keep a small bottle of matching polish at home if you are rough on your hands.
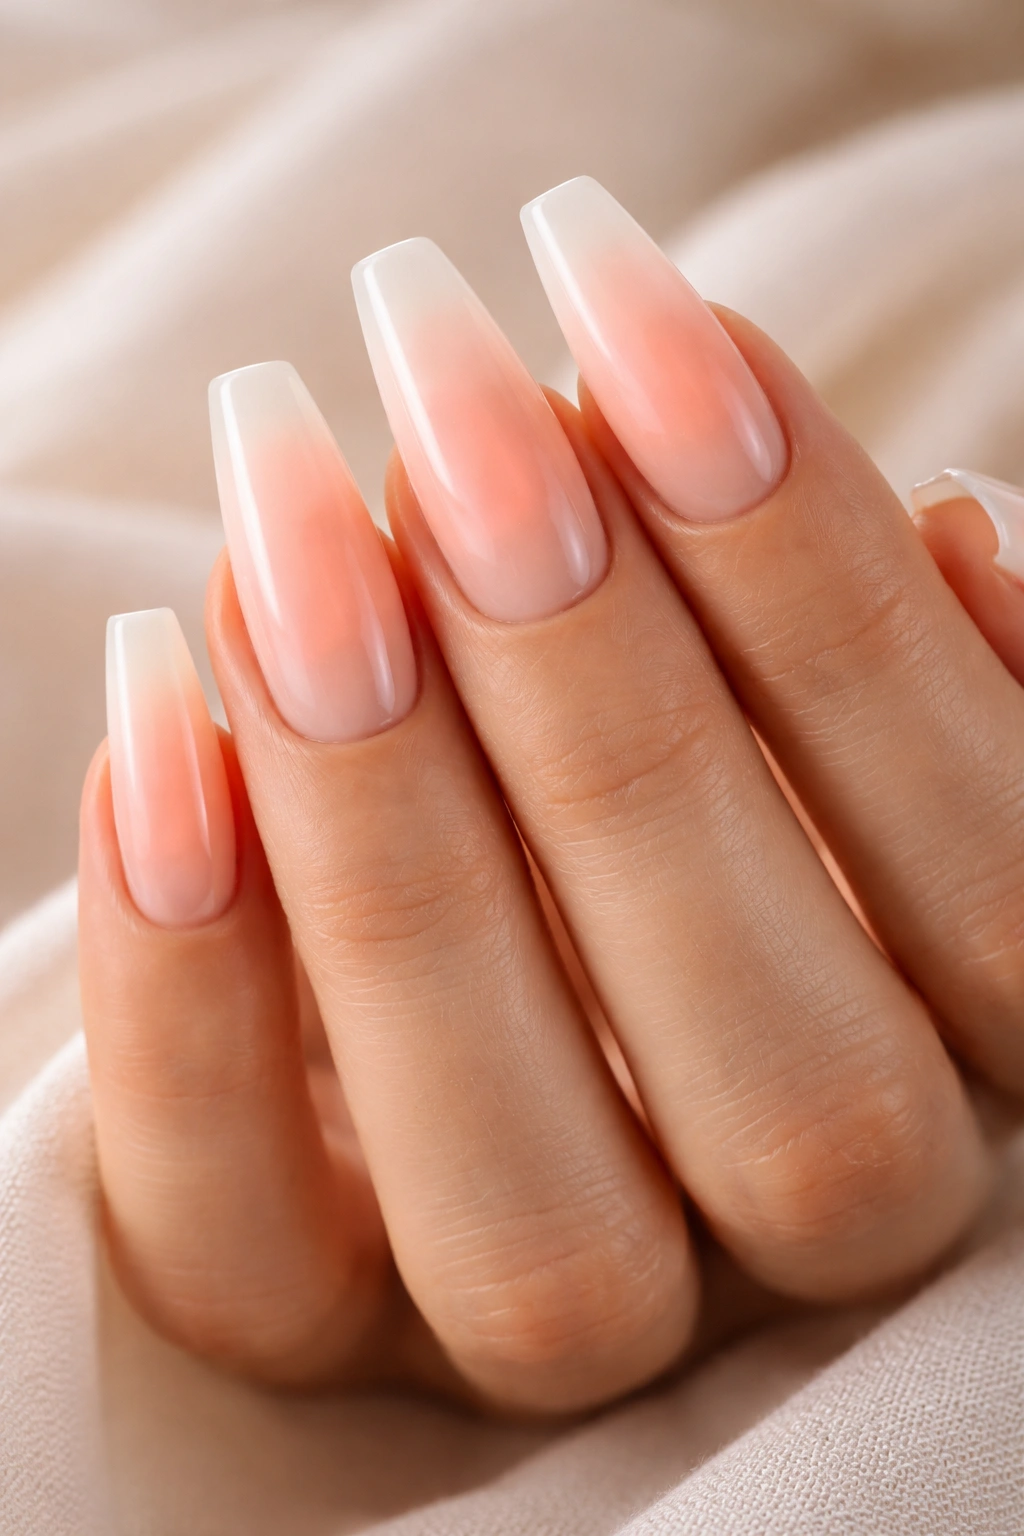
3. Soft Pink Ombre Coffin Nails

Why does a soft pink ombré set keep surviving every mood shift in nail art? Because it flatters the coffin shape without fighting it.
This design—often called baby boomer nails—fades from a rosy or nude pink base into a milky white tip. The transition should look hazy, not striped. When it is blended well, the nail looks longer than it is because your eye travels upward without hitting a hard line.
It is also one of the safest choices if you want acrylic coffin nails that still feel low-drama. Harsh French tips can look strict on some hands. Soft ombré feels more forgiving. It hides grow-out better than a crisp smile line, and it works on both short and long coffin lengths.
A sponge blend can do the job, though an airbrush or a skilled gel blend gives the smoothest fade. The white should sit strongest at the tip, then melt about halfway down the nail. If the pink base is too cool and pale, the set can look washed out. A neutral pink or peach-pink usually reads warmer on the hand.
How to Ask for a Better Fade
Tell your nail tech you want more blur than contrast. That wording helps. Ask for the white to stay soft and milky rather than bright paper white. On coffin nails, the prettiest version usually has a touch of transparency at the base and a stronger fade toward the last third of the nail.
4. White Chrome Coffin Nails
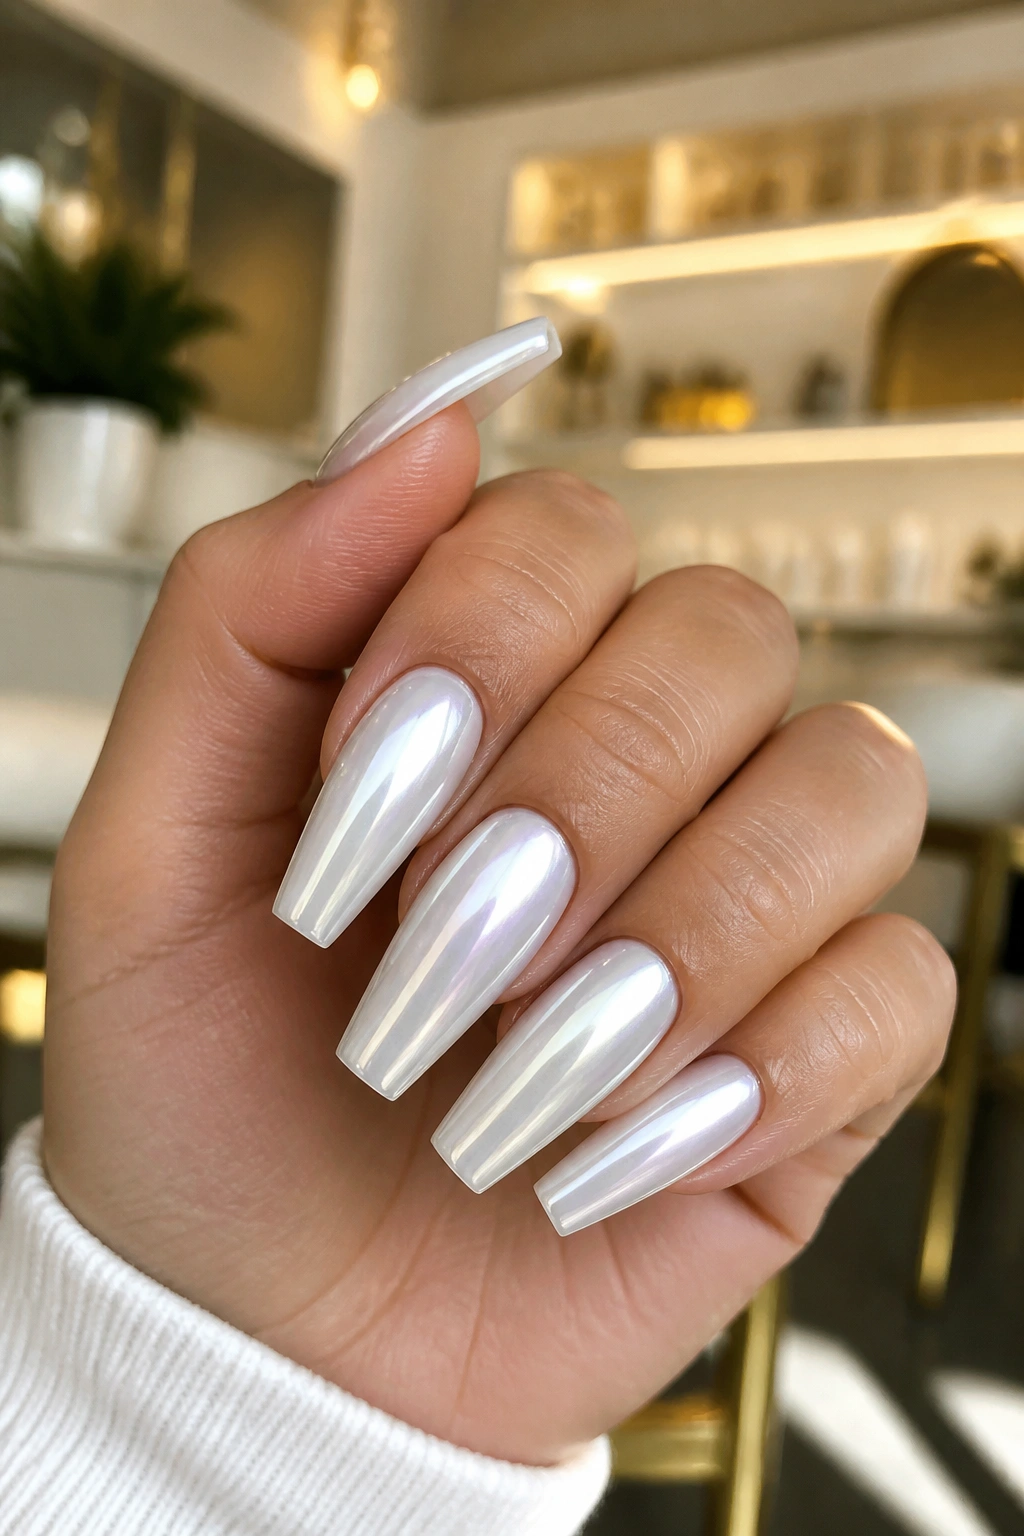
Turn your hand a little and white chrome changes from soft pearl to icy gray. That shifting surface is the whole appeal.
I like this design on coffin nails more than on almond, if I am being blunt. The shape gives the chrome a clean edge, almost like a polished tile. On a rounded tip, the effect can look sweeter. On a coffin tip, it looks cooler and more directional.
Application matters more than color choice here. Chrome powder needs a smooth base, a cured no-wipe top coat, and even pressure when the pigment is rubbed in. One dent, one bump, one stray lint fiber—you will see it.
What to Ask For
- A milky white or pale pink-white base, not stark white
- Fine pearl chrome instead of mirror silver if you want a softer result
- Coffin length at least medium, so the finish has room to show
- A final top coat sealed carefully around the free edge
One small warning: chrome tends to wear faster at the tips if the sealing step is rushed. If you are paying for white chrome coffin nails, make sure the tip is capped well.
5. Brown Tortoiseshell Coffin Nails
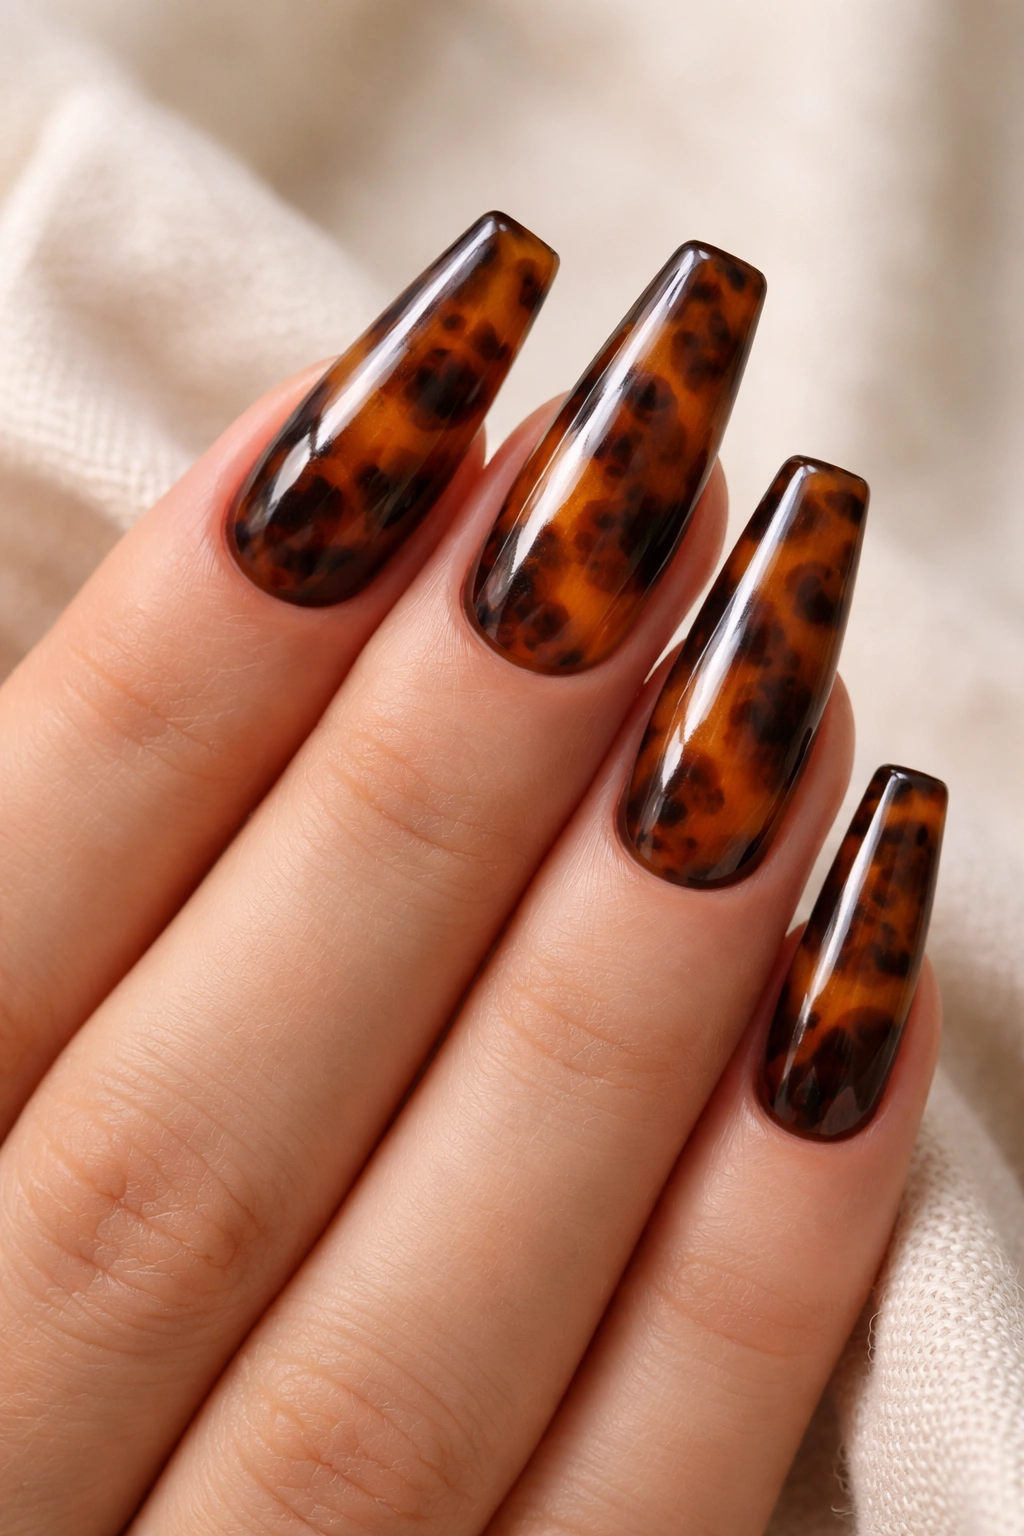
Tortoiseshell nails look expensive when the color mix is right. Get the tones wrong and they turn muddy fast.
The best coffin version uses three translucent shades layered in patches: honey amber, caramel brown, and a deeper espresso or near-black. The color should not sit flat. You want little pockets of warmth and shadow, almost like looking through tinted resin. A sheer jelly base keeps the design alive.
Coffin nails suit this look because the broad tip gives the pattern more room. On a tiny rounded nail, tortoiseshell can turn into a brown blur. With a medium coffin shape, each patch has space to breathe, and the layered spots look intentional rather than crowded.
Accent placement makes a difference. I prefer tortoiseshell on all ten nails if the pattern stays sheer and warm, or on two to four nails mixed with glossy caramel or nude if you want less visual weight. Gold jewelry pairs well with these tones, though a thin black line or dark brown frame around the edges can sharpen the design if your style leans cleaner.
This is one of those sets that rewards depth. Ask for the darker spots to be placed under or between layers instead of painted all on top at once. That is what gives tortoiseshell its glassy, dimensional look instead of a flat animal print feel.
And yes, medium length beats extra-long here. Too much length can push tortoiseshell into costume territory.
6. Deep Red Velvet Coffin Nails
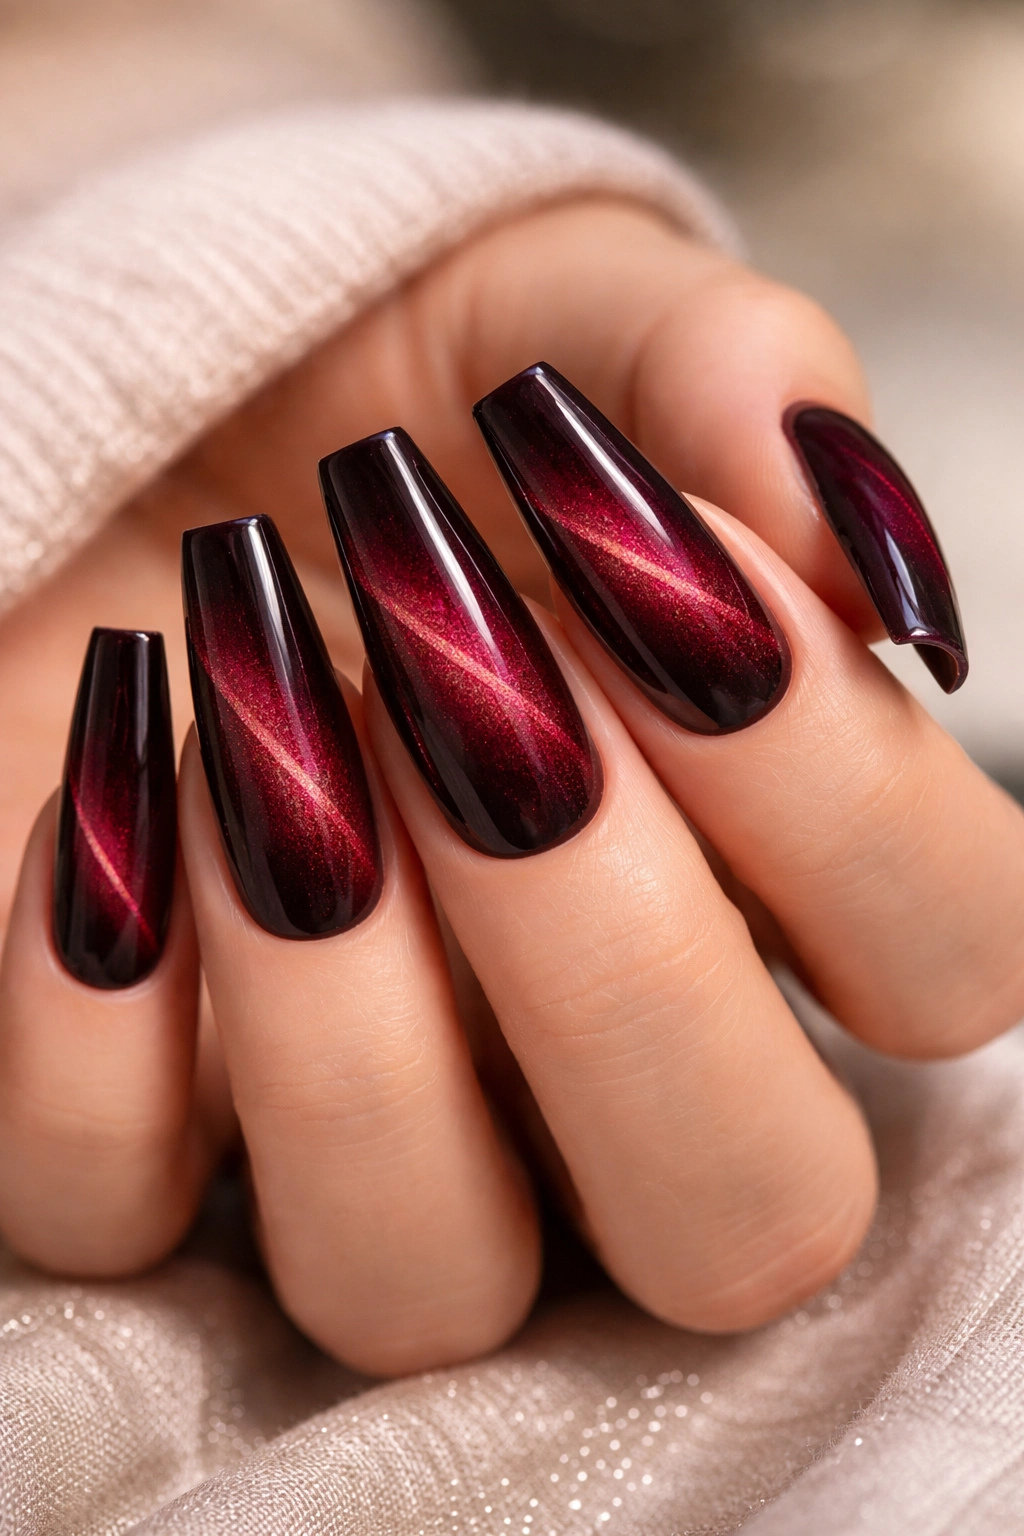
Unlike plain burgundy polish, velvet red nails move. A magnet pulls the shimmer into a soft beam or halo, so the color shifts as your hand turns.
That movement sits beautifully on coffin nails because the flat tip gives the eye a clean finish line. A diagonal magnetic stripe can make the nail look longer. A centered cat-eye line feels more dramatic. I lean toward deep wine, black cherry, or a cool garnet base rather than bright fire-engine red, which can fight with the magnetic shimmer.
This set works best with gel magnet polish and a tech who knows how to hold the magnet steady for 5 to 10 seconds per nail. Rush that step and the effect goes fuzzy. Use too much shimmer and the set starts looking frosty instead of velvety.
Who gets the most from this look? People who want dark coffin nails with more personality than a flat crème polish. It still reads polished. It just has more life in it.
If you wear silver rings, try a cooler red. If your jewelry leans yellow gold, a warmer oxblood shade ties in nicely. One small design tweak I keep coming back to: velvet red on eight nails, with two plain glossy oxblood accent nails. The contrast makes the magnetic effect stand out more.
7. Matte Sage Green Coffin Nails With Fine Gold Lines
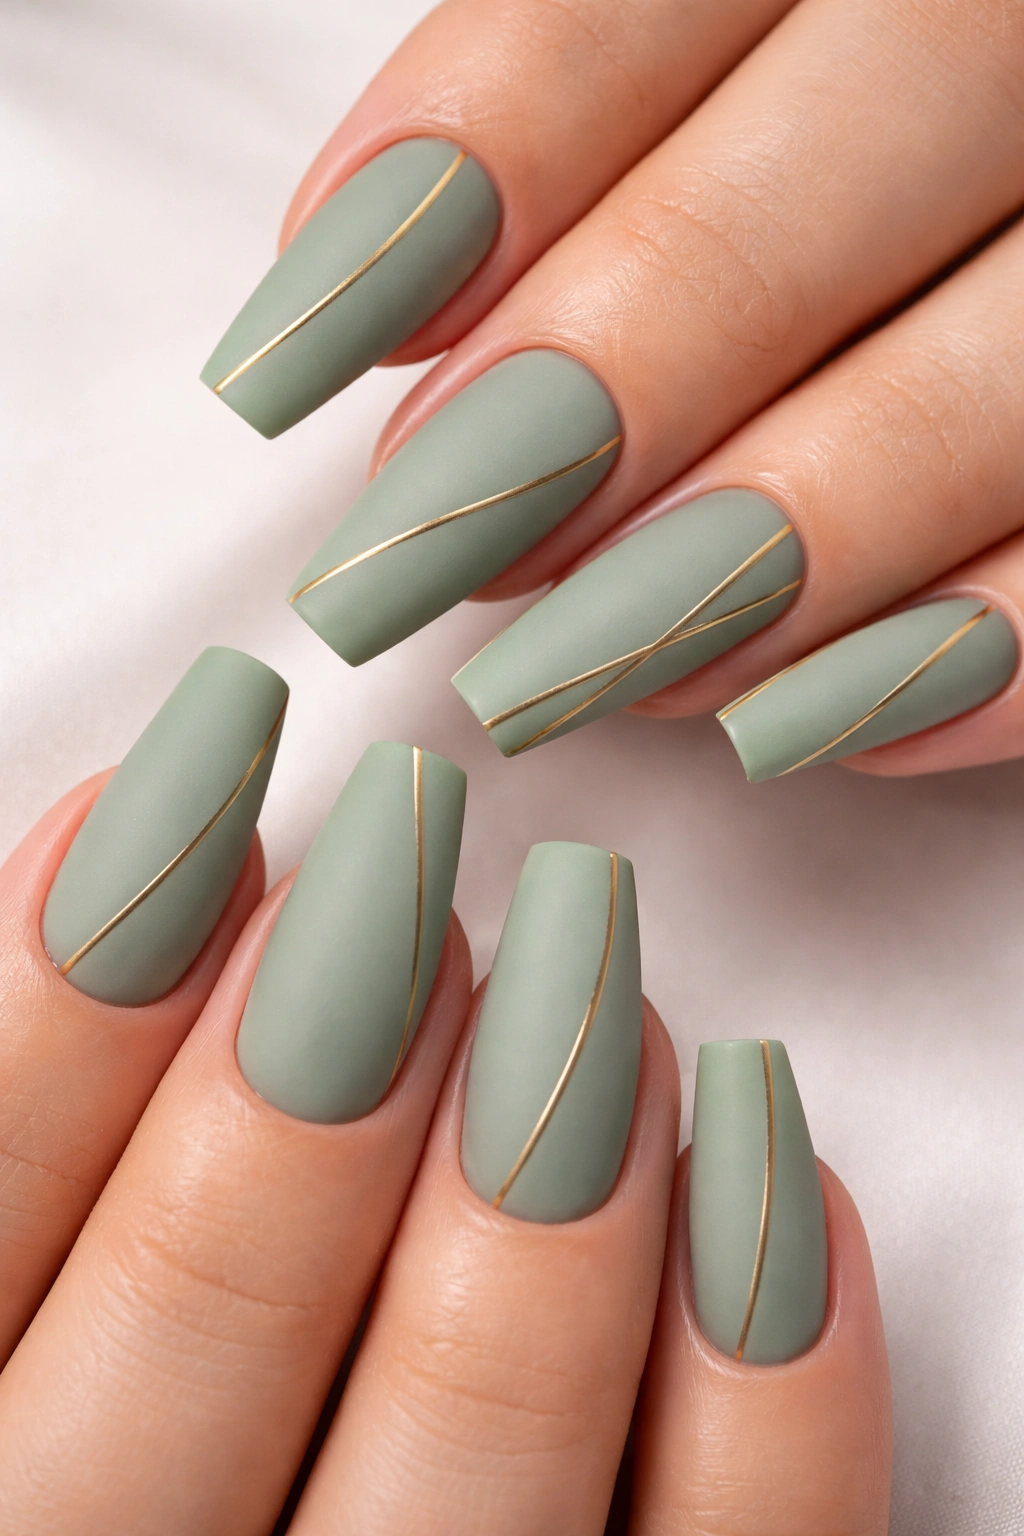
Muted green can go wrong fast. Too gray and it looks dusty. Too bright and it loses the calm, tailored feel that makes it work on coffin nails.
The sweet spot is a sage with a soft olive undertone. Once you cover that color with a matte top coat, it takes on a powdery finish that looks modern without screaming for attention. Coffin nails give the shade a stronger outline, which keeps it from reading too soft.
Why the Gold Line Matters
A thin metallic line adds structure. It could run vertically near one sidewall, sweep diagonally from cuticle to tip, or frame half the nail. The keyword here is thin. If the line gets chunky, the design loses its precision.
Gold sits better against sage than silver does in most cases because the warmth of the metal echoes the green’s earthy base.
Small Details That Make This Set Better
- Keep the gold line around 0.5 to 1 millimeter wide
- Use matte on the green nails, then leave the gold glossy for contrast
- Pick medium coffin length so the line has room to travel
- Limit line art to two or three nails if you want the set to stay clean
This design looks sharp with short jackets, knitwear, cream tones, and soft brown makeup. It has a quiet fashion-editor energy without trying too hard.
8. Espresso Marble Coffin Nails
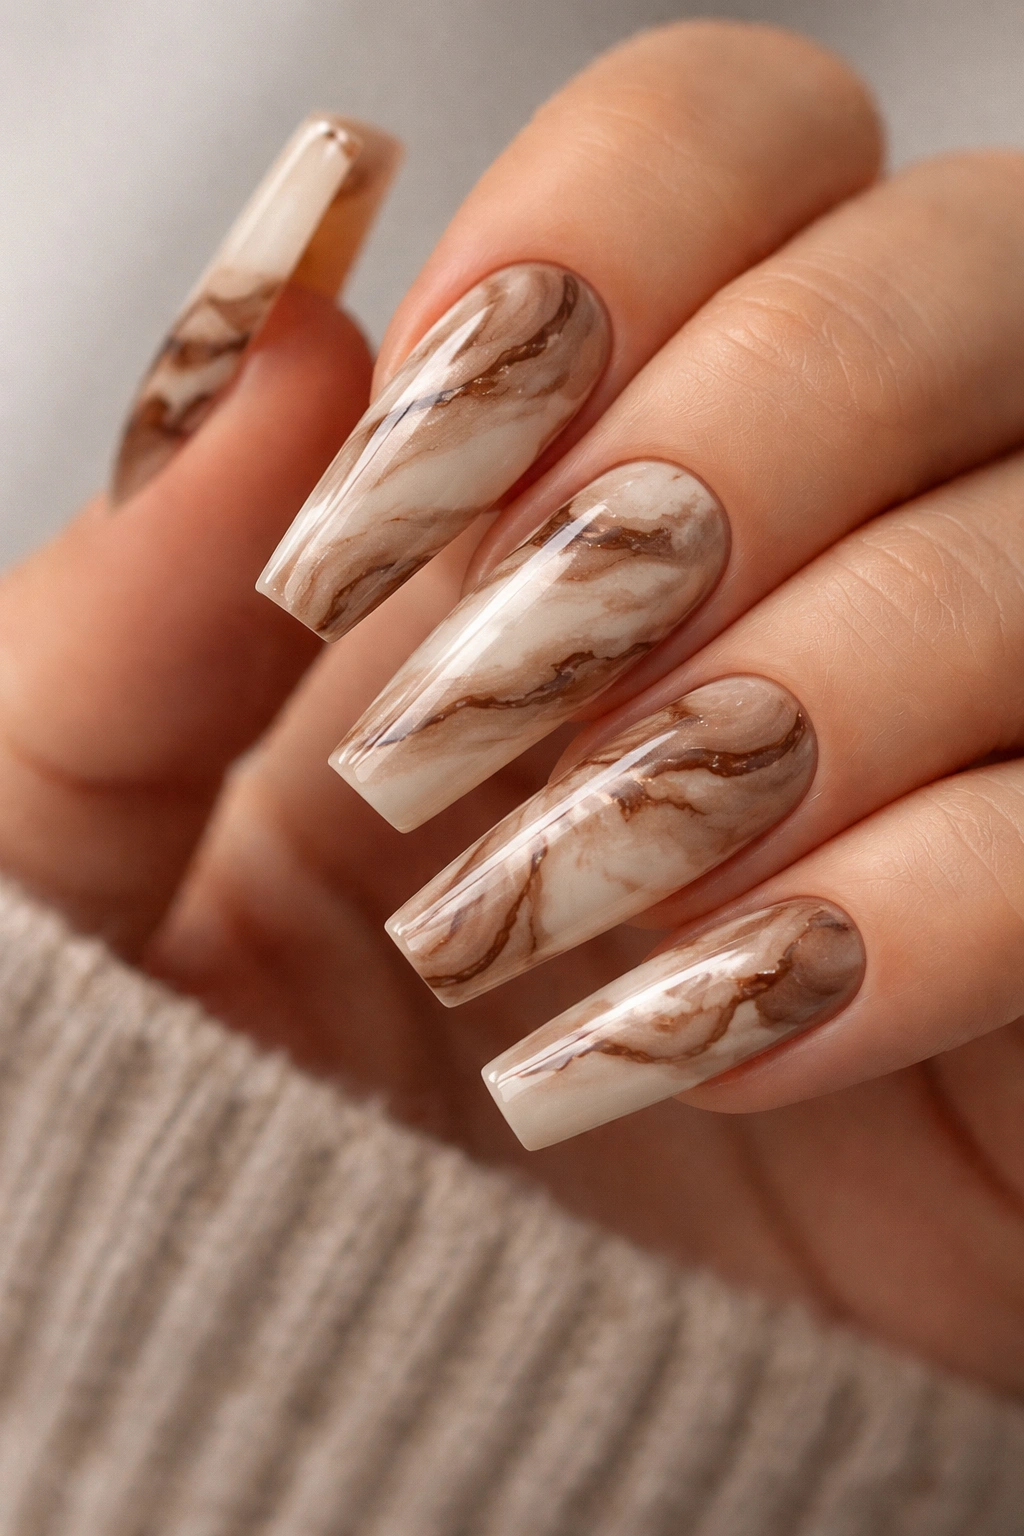
Marble nail art gets overdone when every nail looks like a busy countertop. Espresso marble avoids that by sticking to a tight color story: cream, latte, mocha, and dark coffee brown.
I like this look most when the base starts sheer or milky, then the darker veins are feathered through with a liner brush or blooming gel. You do not need ten lines on each nail. Two or three soft swirls, one deeper vein, and a little negative space usually look stronger. Coffin nails help because the longer vertical shape gives those veins direction.
The color mix is what sells it. Bright white with pure black gives a colder marble look. Swapping those for warm cream and espresso turns the design richer and softer. Add a whisper of gold ink if you want, though I would keep it scarce—one broken accent vein on two nails is enough.
This is also a smart pick if you like neutral coffin nails but want more texture than plain beige. Marble has movement without needing rhinestones or 3D pieces. It looks detailed, though the palette stays grounded.
Ask for glossy top coat here. Matte can flatten the veining and make the creamy base look dusty.
9. Clear Coffin Nails With Floating Glitter

There is a clean way to do glitter and a messy way. Embedded glitter in clear coffin nails is the clean way.
The trick is to place the sparkle inside the extension or builder layer instead of piling chunky glitter on top of polish. That keeps the nail surface smooth and lets the particles look suspended, almost like they are sitting in glass. Fine holographic pieces, iridescent flakes, tiny silver shards—this design works with all of them if the placement stays controlled.
Longer coffin nails show this off best, though medium length can still carry it. I would skip heavy glitter at the cuticle and concentrate it from the mid-length down, or scatter a few pieces so the distribution looks airy rather than packed solid.
Best Ways to Wear It
- Clear base with silver micro-glitter for a cold, clean finish
- Clear base with opal flakes if you want a softer color shift
- Nude base on some nails, clear glitter on others, for contrast
- One glitter-dense accent nail per hand if you prefer a quieter set
This is one of the stronger options for party nails that do not feel clunky. The coffin shape keeps the look sleek. The clear base stops it from becoming too heavy.
10. Peachy Aura Coffin Nails
Aura nails make more sense on coffin shapes than people think. The flat tip and straight sides keep the airbrushed center from looking too cloudy or shapeless.
A peachy aura set usually starts with a pale nude, soft pink, or milky base. Then a warmer peach, apricot, or coral-peach shade is diffused into the center of each nail, leaving the edges lighter. The result should look like a soft glow from the middle outward, not a hard circle stamped on the nail.
Color choice matters a lot. If the center is too orange, the set can tip cartoonish. A muted peach with a little pink in it tends to sit better on the hand. This is one design I prefer on medium coffin nails because the blend has enough room to soften.
Airbrush gives the smoothest finish, but sponge blending can work if the tech uses thin layers and keeps the pigment concentrated in the center. Add chrome and the aura effect can disappear. Leave this one glossy and clean.
What I like about peach aura nails is that they read playful without feeling juvenile. The softness of the blend offsets the sharpness of the coffin silhouette, which is a smart pairing.
11. Short Coffin Nails With Silver Side Tips
If long extensions annoy you after two days, short coffin nails with silver side tips deserve a look. This design has the attitude of a longer set without the same hassle.
A side tip is exactly what it sounds like: a fine metallic line that runs along one or both side edges of the nail instead of across the whole tip. On a short coffin shape, that line pulls the eye upward and makes the nail look narrower and longer. It is a clever trick, and it works.
I would keep the base sheer pink, soft beige, or milky nude. Then use silver chrome gel, foil gel, or metallic paint for the side detail. One side tip gives a more asymmetrical, editorial feel. Two side tips frame the nail and look cleaner.
This design is strong for anyone who uses their hands a lot. The length can stay close to the fingertip—2 to 3 millimeters past the edge is plenty—so you can still open a can, type, handle contact lenses, and live your life. You still get that coffin taper, though, which is why the set looks sharper than a plain short square manicure.
Short coffin nail ideas sometimes fall flat because they do not lean into the shape enough. This one does.
12. Lilac Jelly Coffin Nails
Jelly nails have a translucent, candy-like finish, and lilac might be the nicest shade of the bunch. It gives color without blocking all the light from the nail.
The look depends on transparency. You want to see a little depth through the color, not an opaque cream polish pretending to be jelly. That usually means two to three syrup-thin coats of lilac jelly gel over a clear or even-toned base. On coffin nails, the tinted transparency highlights the shape in a softer way than solid pastel does.
Why This Shade Lands Well
Purple can go chalky fast. Lilac avoids that if it stays sheer and cool-toned. It feels fresher than plain pink, though it is still easy to wear.
The glossy finish is non-negotiable for me. Matte jelly loses the point.
Quick Tips for a Better Set
- Ask for a clear extension base if you are getting added length
- Keep the lilac sheer enough that the apex still shows through slightly
- Pair it with one or two tiny silver studs if you want detail
- Skip heavy white art over the top, which hides the jelly effect
This is a smart choice when you want color and shine but do not want a dense, fully painted look.
13. Gold Foil Nude Coffin Nails
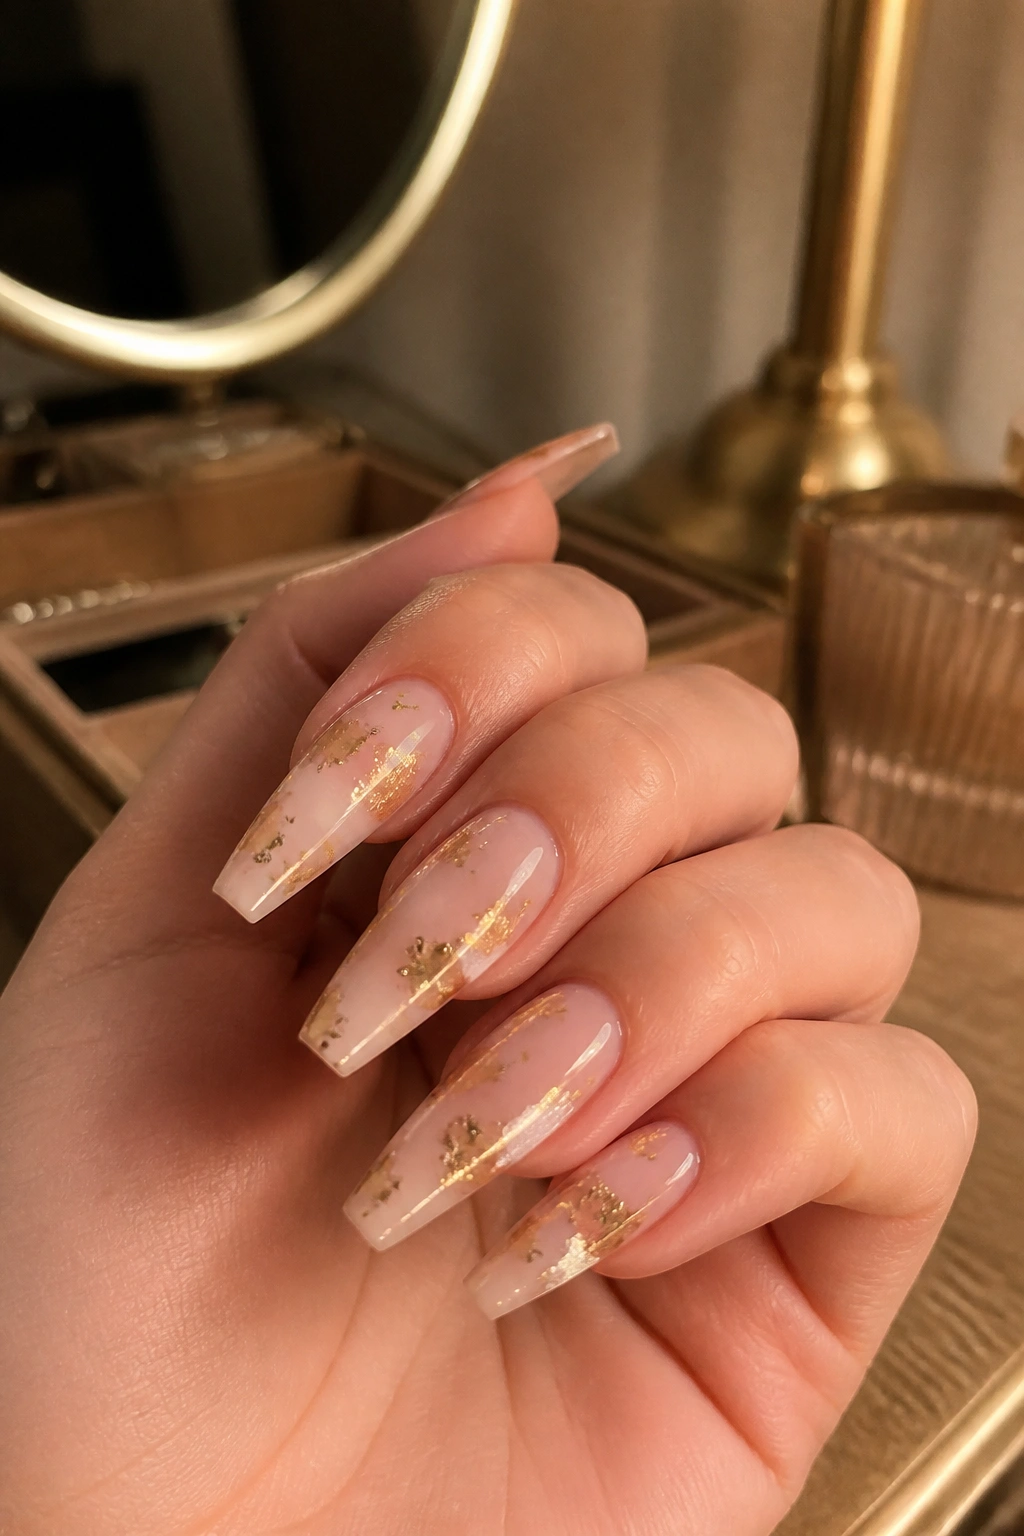
Gold foil has a messy side and a clean side. The clean version is much better.
On nude coffin nails, torn pieces of gold foil look best when they are placed with space around them. A sheer beige, blush nude, or pink-nude base gives the foil room to stand out. Then the foil can be floated near the cuticle, scattered diagonally across one corner, or broken up into thin shards on accent nails.
The reason this design works on coffin nails is the contrast between the sharp shape and the irregular foil edges. The nail itself looks controlled. The foil adds a little disorder. That tension is where the style comes from.
Do not overload every nail. Two foil-heavy nails per hand can be enough, with the rest getting a tiny fleck or staying plain nude. If the foil covers half the nail, you lose the lightness that makes this set useful. I also prefer warm champagne gold over bright yellow gold here. It blends into nude tones more naturally and looks less brassy.
This is one of the easier nail art ideas to refresh at fill appointments because the foil placement can shift slightly without anyone noticing. That is a practical win.
14. Denim Blue Coffin Nails With Tiny Star Details
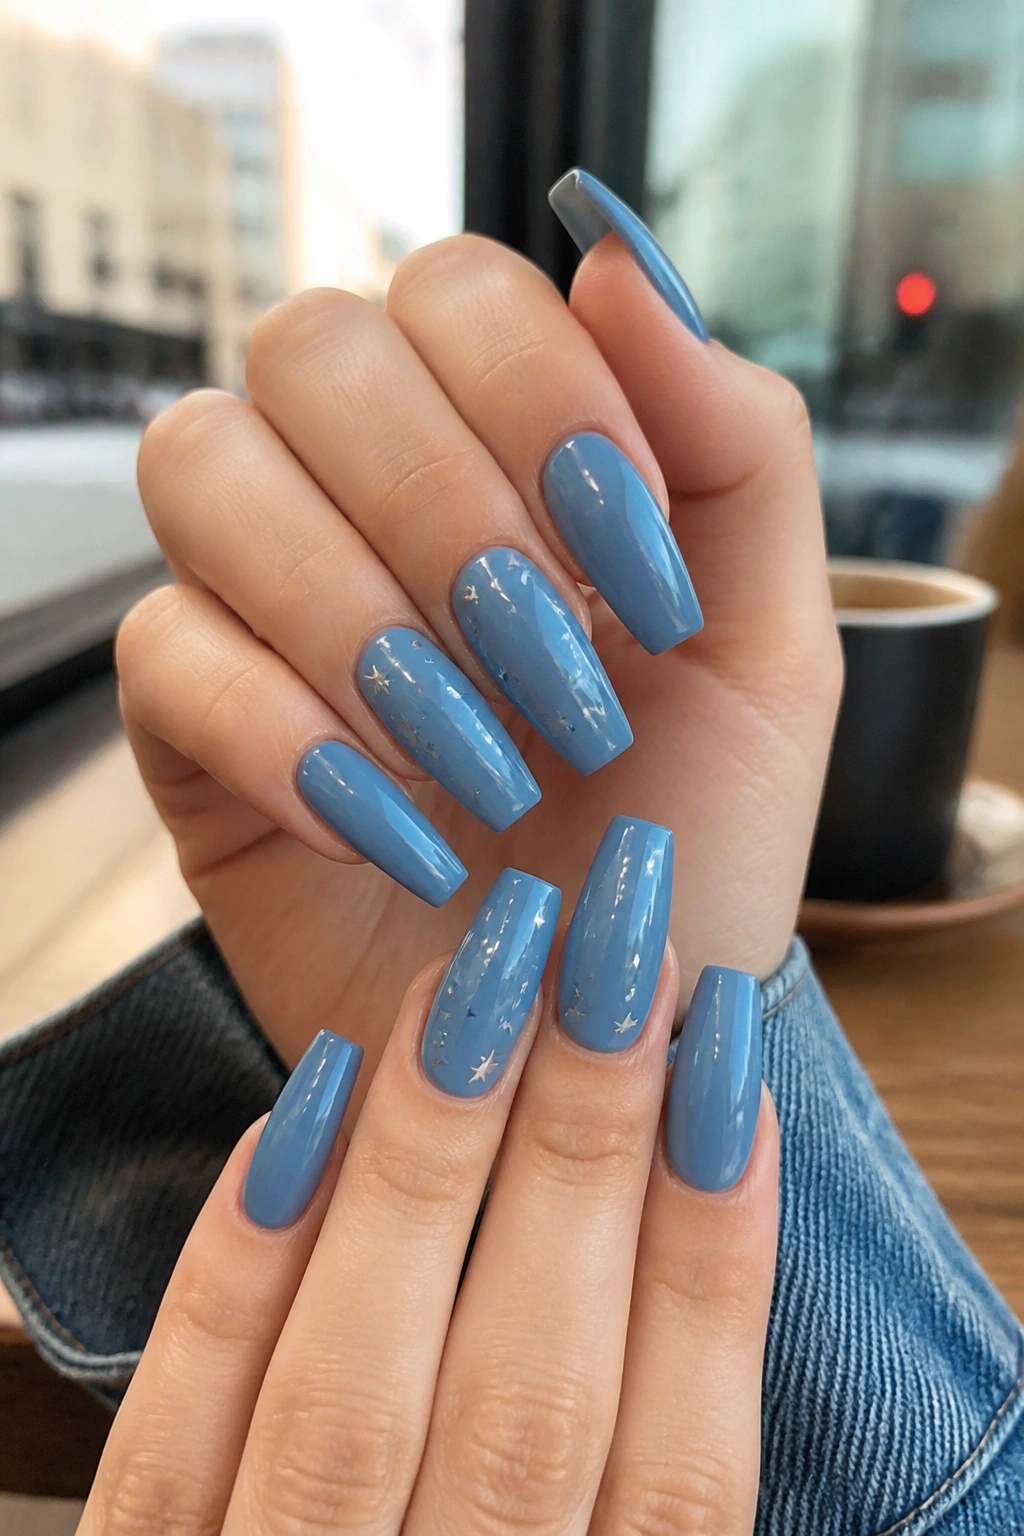
Denim blue has a worn-in, muted quality that bright navy does not. That is the whole reason to pick it.
A good denim nail color sits between dusty blue and slate. It has enough gray to feel grounded, enough blue to stay clear. Put that shade on coffin nails and it suddenly looks a little cooler, a little more styled. Add tiny stars—hand-painted, stamped, or done with decals—and the set gets a playful edge without turning into costume nail art.
I would not scatter stars over all ten nails. Better idea: keep six to eight nails solid denim blue and reserve the stars for two or four accent nails. White stars feel crisp. Silver stars look sharper. Tiny dots around one star can help it read as intentional rather than random.
Best Version of This Design
- Medium coffin length
- Glossy finish on the blue nails
- Small stars, no larger than 3 millimeters
- One or two stars per accent nail, not a full sky scene
This design suits people who want color but are bored with pinks, nudes, and reds. It has personality. It still feels wearable.
15. French Fade Coffin Nails With 3D Pearl Accents
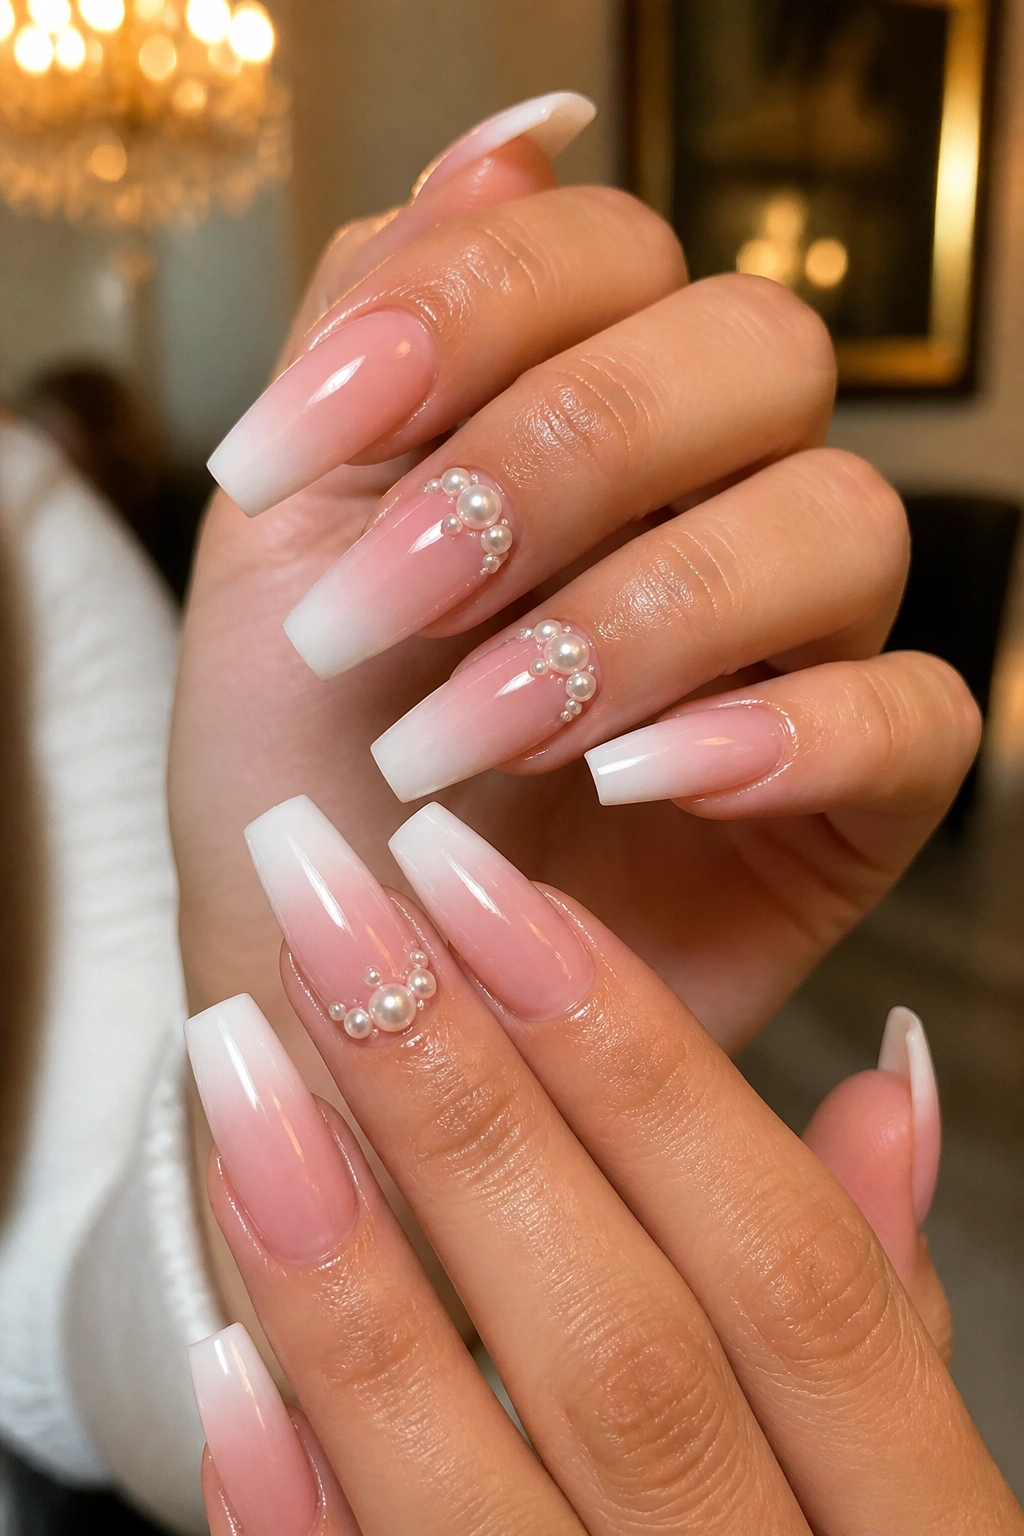
There is a narrow line between tasteful pearl accents and nails that snag on every sweater you own. Stay on the right side of that line and this set looks polished, soft, and expensive.
Start with a French fade base—a pink-to-white ombré or a milky nude fading into soft white. Then add small flatback pearls, usually 1.5 to 3 millimeters, near the cuticle or clustered along one side of the nail. I would keep the pearls on two or three nails per hand, max. More than that and the whole set gets busy fast.
Where Pearls Work Best
Pearls look strongest when they frame the natural crescent near the cuticle or sit as a tiny cluster off-center. A full line across the middle of the nail cuts the shape in half. Coffin nails need length, visually speaking, so the pearl placement should support that.
Use builder gel or gem gel to hold them in place, then seal around—not over—the edges. If top coat floods the pearl surface, the luster dulls down.
This design earns its keep at weddings, dinners, parties, photo shoots, and any time you want a softer coffin set with texture. It is still wearable outside those moments too. You just need restraint. Pearls are one of those details where less looks smarter.
How to Make Trendy Coffin Nails Last Longer Between Appointments
Nail design gets the attention. Maintenance is what decides whether your set still looks good after twelve days.
The American Academy of Dermatology gives pretty sensible nail-care advice: keep nails clean and dry, moisturize nails and cuticles, and avoid rough cuticle trimming. That sounds basic because it is basic. It also works. Repeated acetone soaking, aggressive buffing, and peeling off gel polish can leave the nail plate dry, thin, and rough, which makes future manicures look worse.
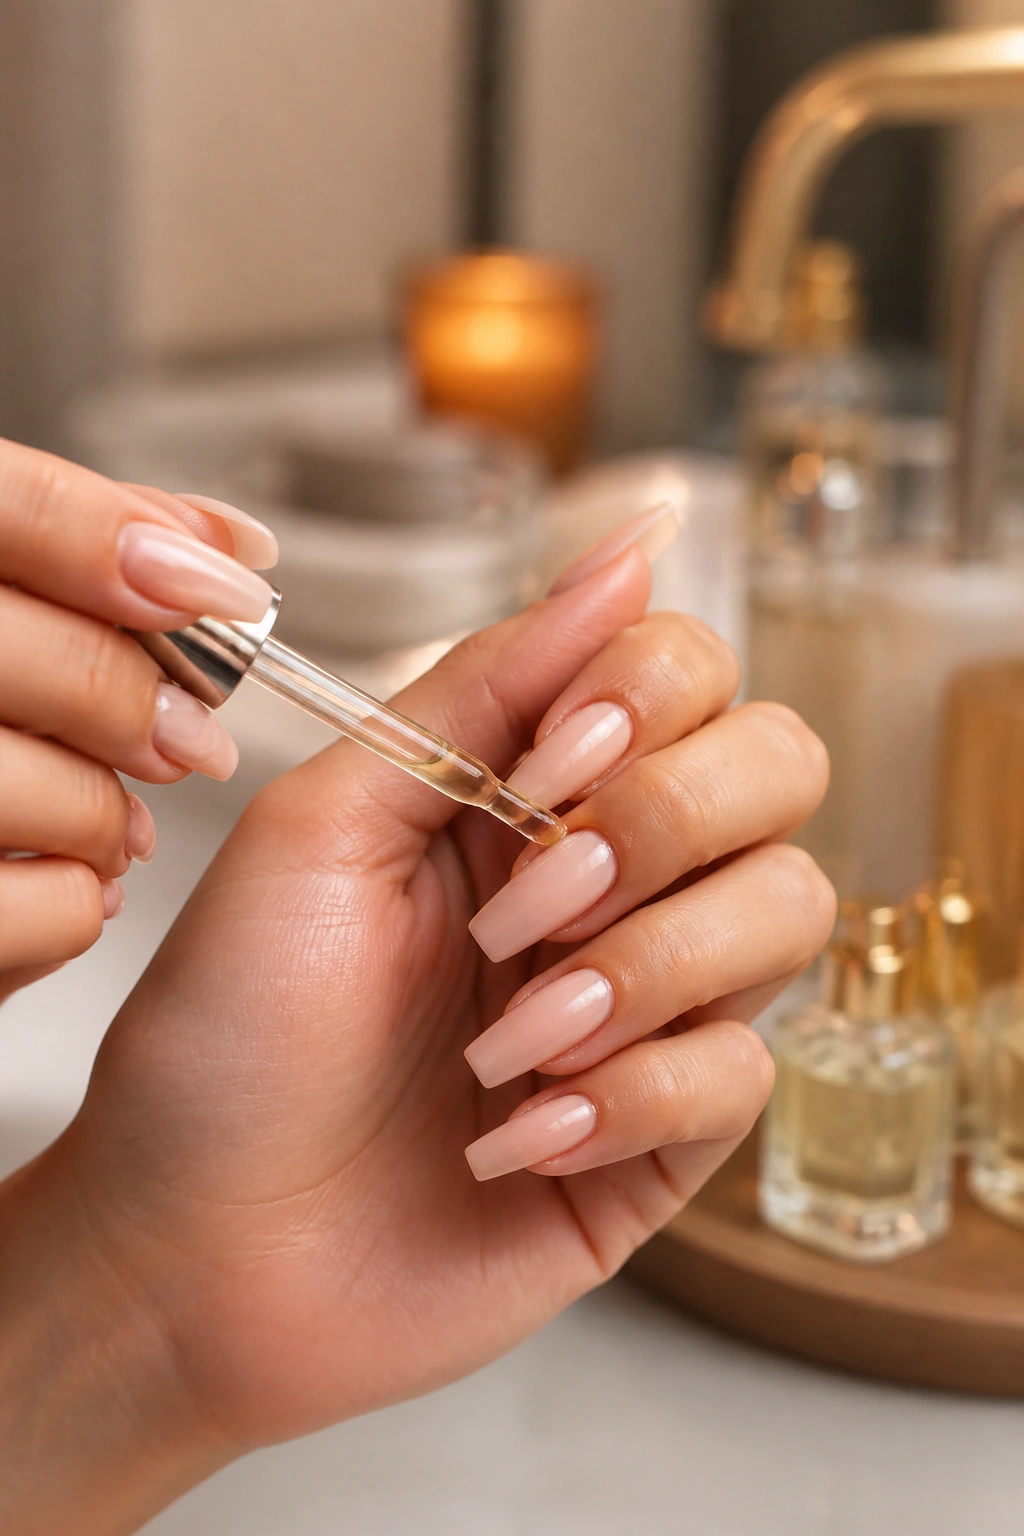
Cuticle oil does more than make your hands look polished. A drop massaged into each nail twice a day helps the skin stay flexible, and it can make enhancements look fresher between fills. Use gloves when washing dishes. File tiny snags with a fine file instead of pulling at them. If you wear long acrylic coffin nails, book fills every 2 to 3 weeks before the apex grows too far forward and the nail loses balance.
A few habits save a lot of trouble:
- Use the side of your knuckle, not your nail tip, to pop can tabs
- Open drawers and seat belts with your finger pads
- Avoid scraping labels off jars with your nails
- Ask for repairs fast if you feel lifting near the cuticle
Lifted product traps moisture. That is not something you want to ignore.
Final Thoughts
The best coffin nails are not always the loudest set on the board. A slim French line, a dense glossy black, a warm tortoiseshell patch, a little pearl cluster—those details often do more for the shape than a design trying to do six things at once.
If I had to narrow this list down to the strongest all-around winners, I would point to milky nude micro French, soft pink ombré, white chrome, and short coffin nails with silver side tips. Those four cover a lot of ground. Clean. Sharp. Easy to wear. Hard to regret.
Then again, coffin nails are at their best when they match your own habits. Pick a design that suits how you dress, how rough you are on your hands, and how often you are willing to book fills. When the shape, color, and upkeep all line up, the manicure stops feeling like a costume and starts feeling like part of you.
