

Lavender coffin nails have become one of the most versatile and elegant nail shapes for anyone looking to elevate their manicure game without going too extreme. The coffin shape—wider at the base and tapered to a blunt edge—flatters medium-length nails perfectly, giving your hands an elongated, sophisticated appearance while remaining practical for daily wear. Lavender, with its calming purple undertones and soft, romantic appeal, offers endless possibilities for nail art that feels both trendy and timeless.
What makes lavender such a powerful choice for coffin nails is its incredible range. Soft, muted lavender works beautifully for a minimalist aesthetic, while deeper lavender shades create drama and personality. You can layer lavender with metallics, pair it with negative space designs, add florals, incorporate glitter, or experiment with ombre effects—the color is genuinely adaptable to every style and occasion. Whether you’re someone who prefers understated elegance or bold nail art statements, there’s a lavender coffin nail design waiting for you.
The medium length is particularly smart for coffin nails because it strikes that perfect balance between being substantial enough to showcase nail art details and short enough to be functional and manageable. You won’t struggle with everyday tasks, yet your nails will still have enough surface area to really make a design impact. This guide walks you through fifteen distinct lavender coffin nail designs that prove this color and shape combination is genuinely one of the best decisions you can make at the nail salon.
1. Soft Lavender Matte Base with Glossy Topcoat Gradient
This design starts with a creamy, muted lavender base applied in a completely matte finish—no shine, just pure soft color that feels modern and sophisticated. The magic happens with a glossy topcoat applied in a gradient pattern from the base of the nail upward, creating a subtle shine that transitions from matte to glossy as it reaches the nail tip. The effect is understated but incredibly striking once you see how light catches the nails at different angles.
Why This Design Works
The matte-to-glossy gradient creates dimension and visual interest without relying on bright colors or complex nail art. This design reads as intentional and polished, making it perfect for professional environments or anyone who prefers minimalist aesthetics. The matte portion keeps the design calming, while the glossy tips add a contemporary edge.
Application Tips
- Use a matte topcoat specifically designed for nail polish (not a regular glossy topcoat dulled down)
- Apply the glossy topcoat starting at the tip and blend it upward using a soft brush with gentle dabbing motions
- The transition works best when you allow a few millimeters of overlap rather than a sharp line
- Seal everything with a clear glossy topcoat to protect both finishes
2. Lavender with Delicate White Marble Swirls
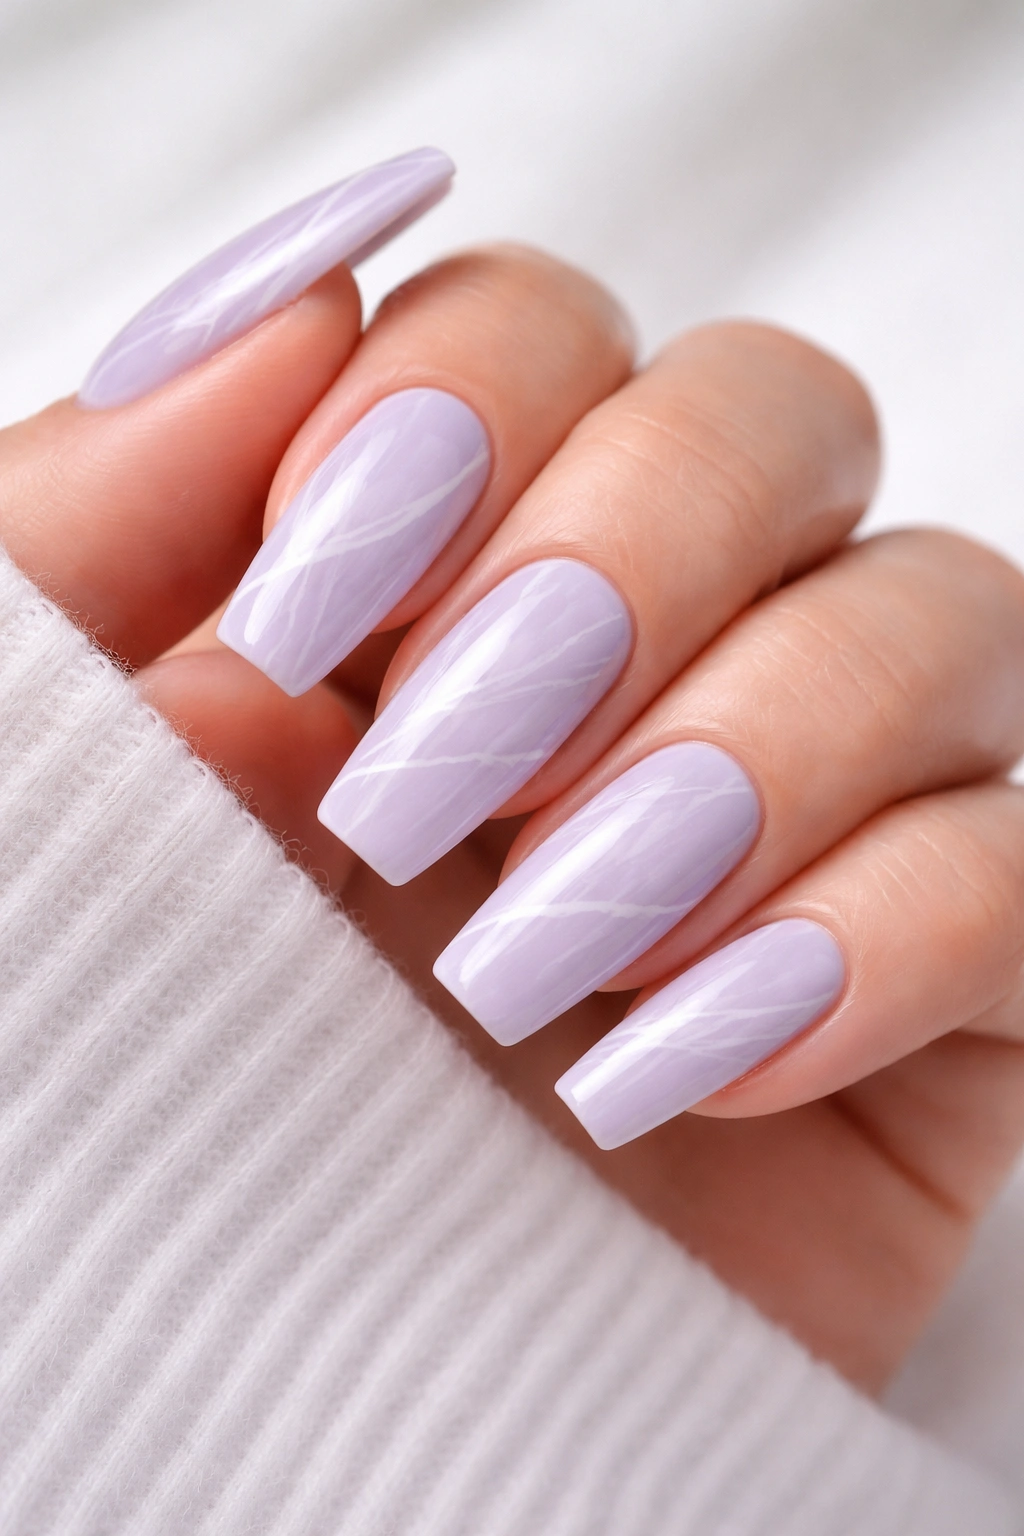
Imagine a pale lavender base with thin, organic white lines that look like marble veining running across each nail. The white swirls should feel natural and unplanned rather than perfect—this gives the design an artisanal, high-end nail salon quality. The coffin shape provides the perfect canvas for these flowing lines to move and breathe across the nail surface.
The Marble Technique Explained
White marble swirls are created by mixing white polish with a tiny amount of lavender, then using a thin liner brush or striping brush to draw irregular lines. The lines should vary in thickness and direction, avoiding any symmetry. Some artists use a toothpick or dotting tool dipped in white to create more organic patterns that resemble actual marble.
Design Variations
- Stick to just 2-3 thin white lines per nail for minimalist marble vibes
- Use light gray instead of pure white for a softer look
- Create concentrated swirls on the middle of the nail with clean sides
- Extend swirls from the cuticle area toward the tip for dramatic effect
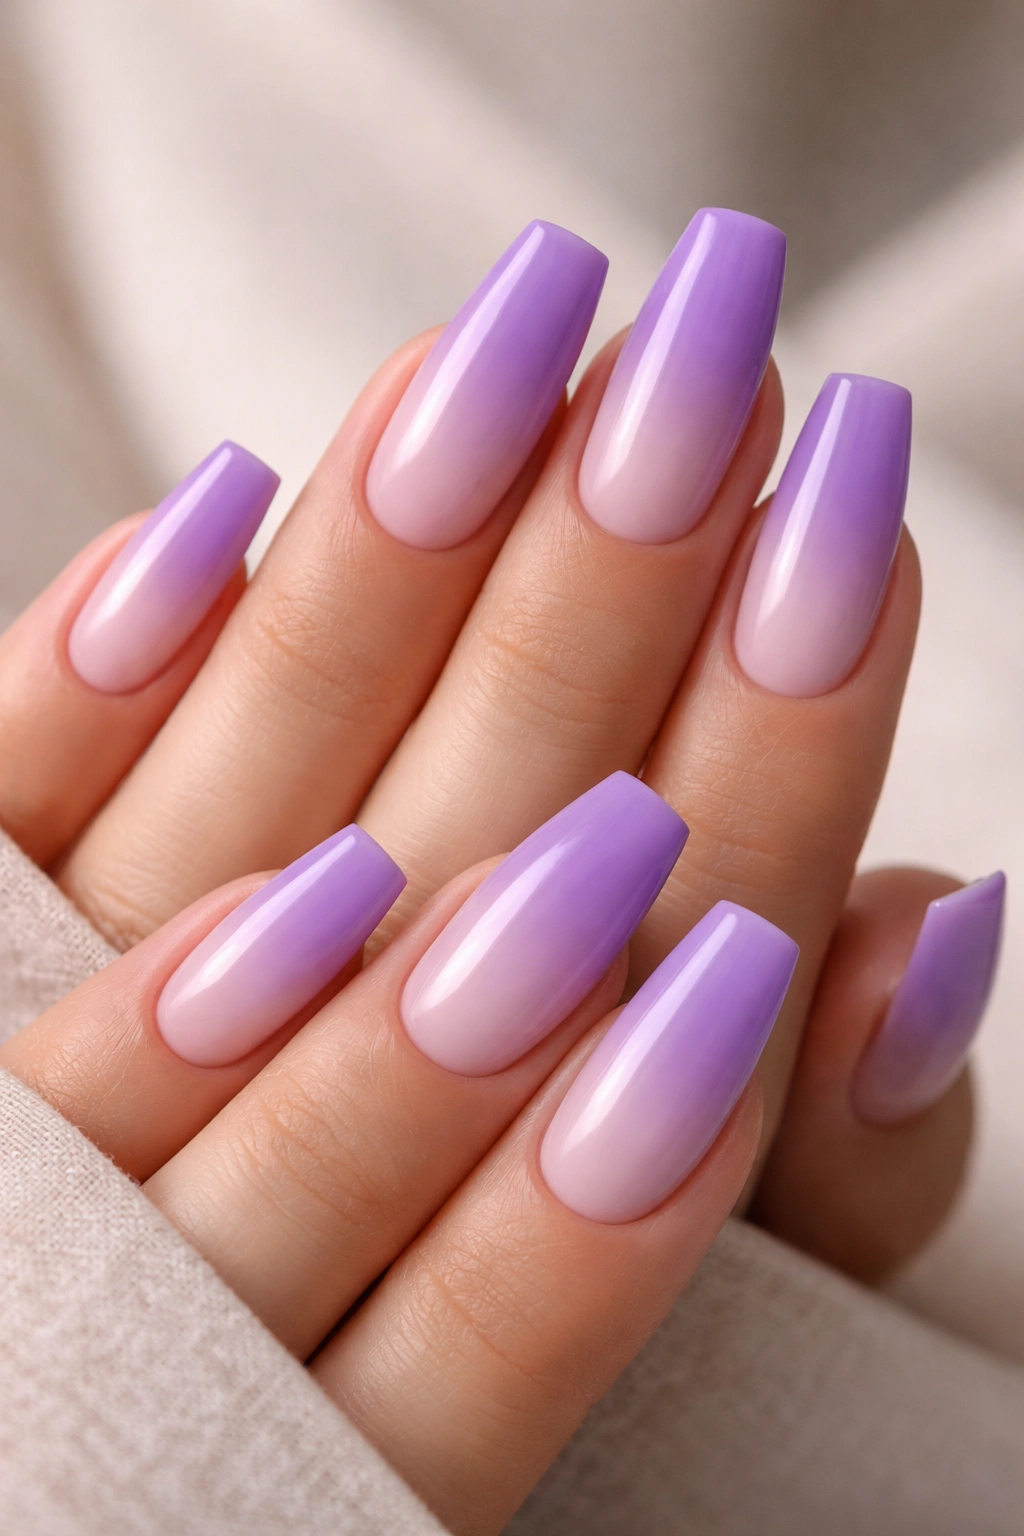
3. Dual-Tone Lavender: Light and Dark Ombré
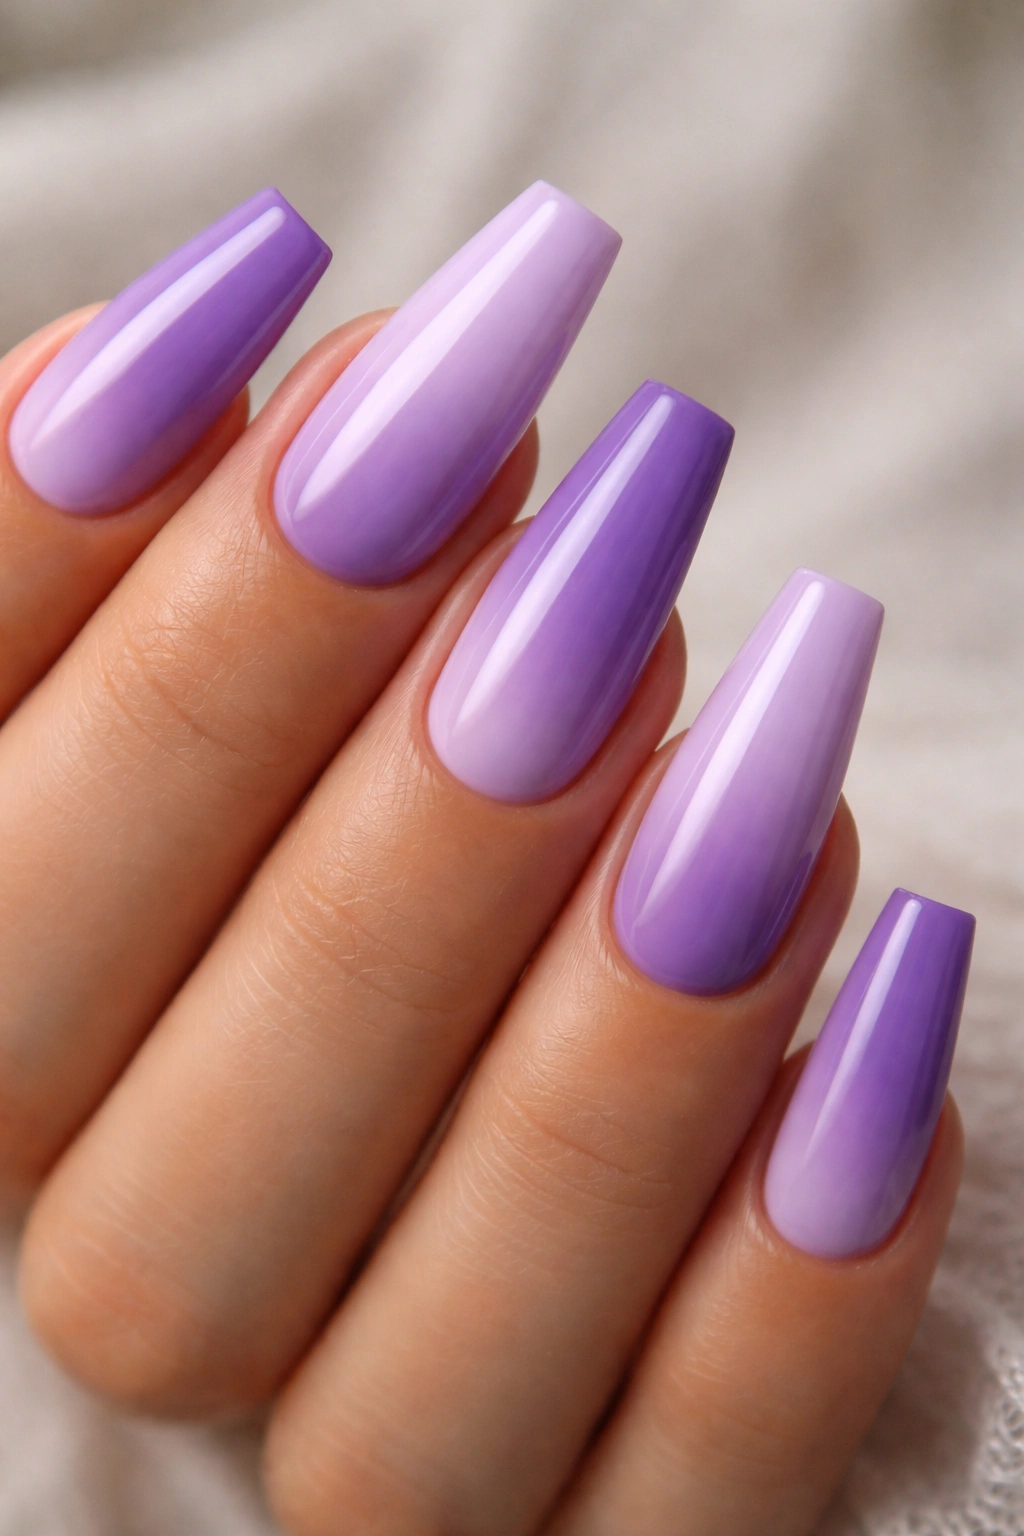
Split your coffin nail into two distinct lavender zones—a pale, milky lavender on one half that transitions into a rich, deep purple-lavender on the other half. The color transition should happen gradually across a middle band, creating an ombré effect that feels luxurious and dimensional. This design works particularly well on medium nails because there’s enough surface area to really showcase both shades.
Creating the Ombré Blend
Apply the light lavender as your full base coat and let it dry completely. Paint the darker lavender starting at the tip of the nail, bringing it approximately one-third of the way up. While the edge is still slightly wet, use a dry makeup sponge or blending sponge to bounce along the transition zone, allowing the two colors to merge and blur together naturally.
Color Pairings That Shine
- Pale lilac blending into deep plum
- Soft mauve transitioning to dusty purple
- Almost-white lavender deepening to rich eggplant
- Baby lavender shifting to lavender-gray
4. Coffin Nails with Lavender Base and Negative Space Geometric Design
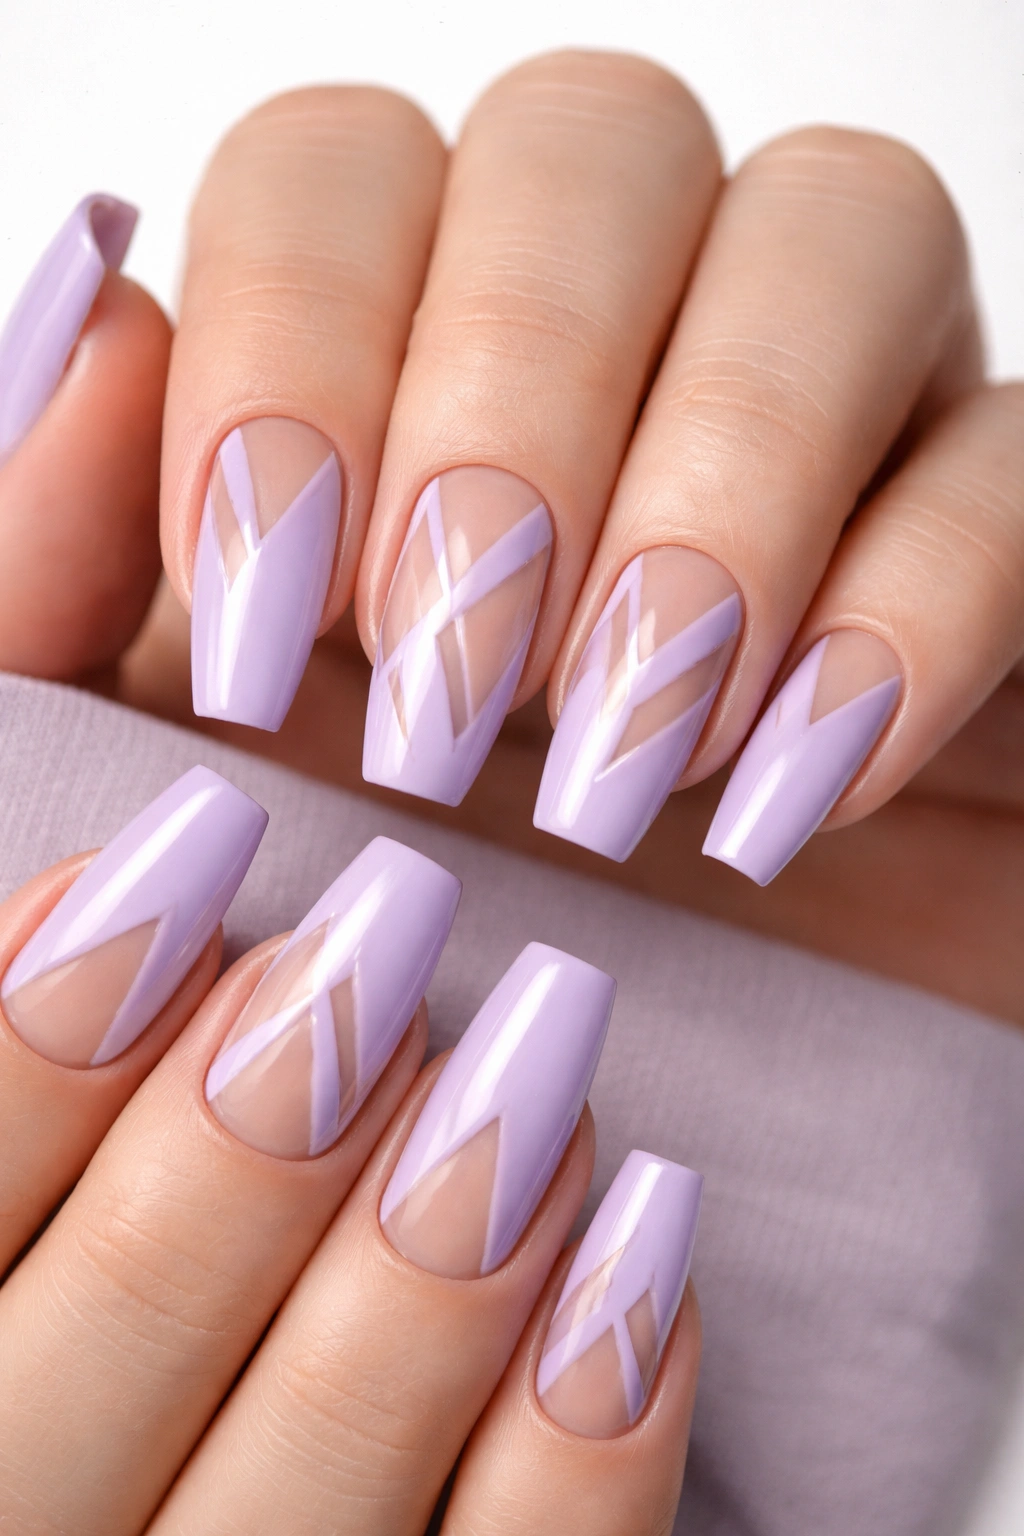
Start with your lavender base and then strategically remove polish in geometric patterns—triangles, thin vertical lines, or diagonal stripes that reveal your natural nail or a contrasting color underneath. Negative space designs on coffin nails feel modern and artistic without requiring complex hand-painting skills. The geometric shapes themselves become the focal point rather than intricate details.
Why Negative Space Works on Medium Coffin Nails
The elongated shape of coffin nails makes geometric negative space designs particularly striking. Vertical lines extend the visual length of your nail, while angular shapes create movement and visual dynamism. Negative space also tends to read as more minimalist and chic than heavily decorated designs.
Popular Negative Space Patterns
- Thin vertical stripes running from cuticle to tip
- A triangular cutout at the tip pointing downward
- Diagonal lines creating a striped or lattice effect
- Half-moons at the tip or cuticle area
- Geometric frames that border the nail edge
5. Lavender Coffin Nails with Tiny Pearl Accents at the Tip
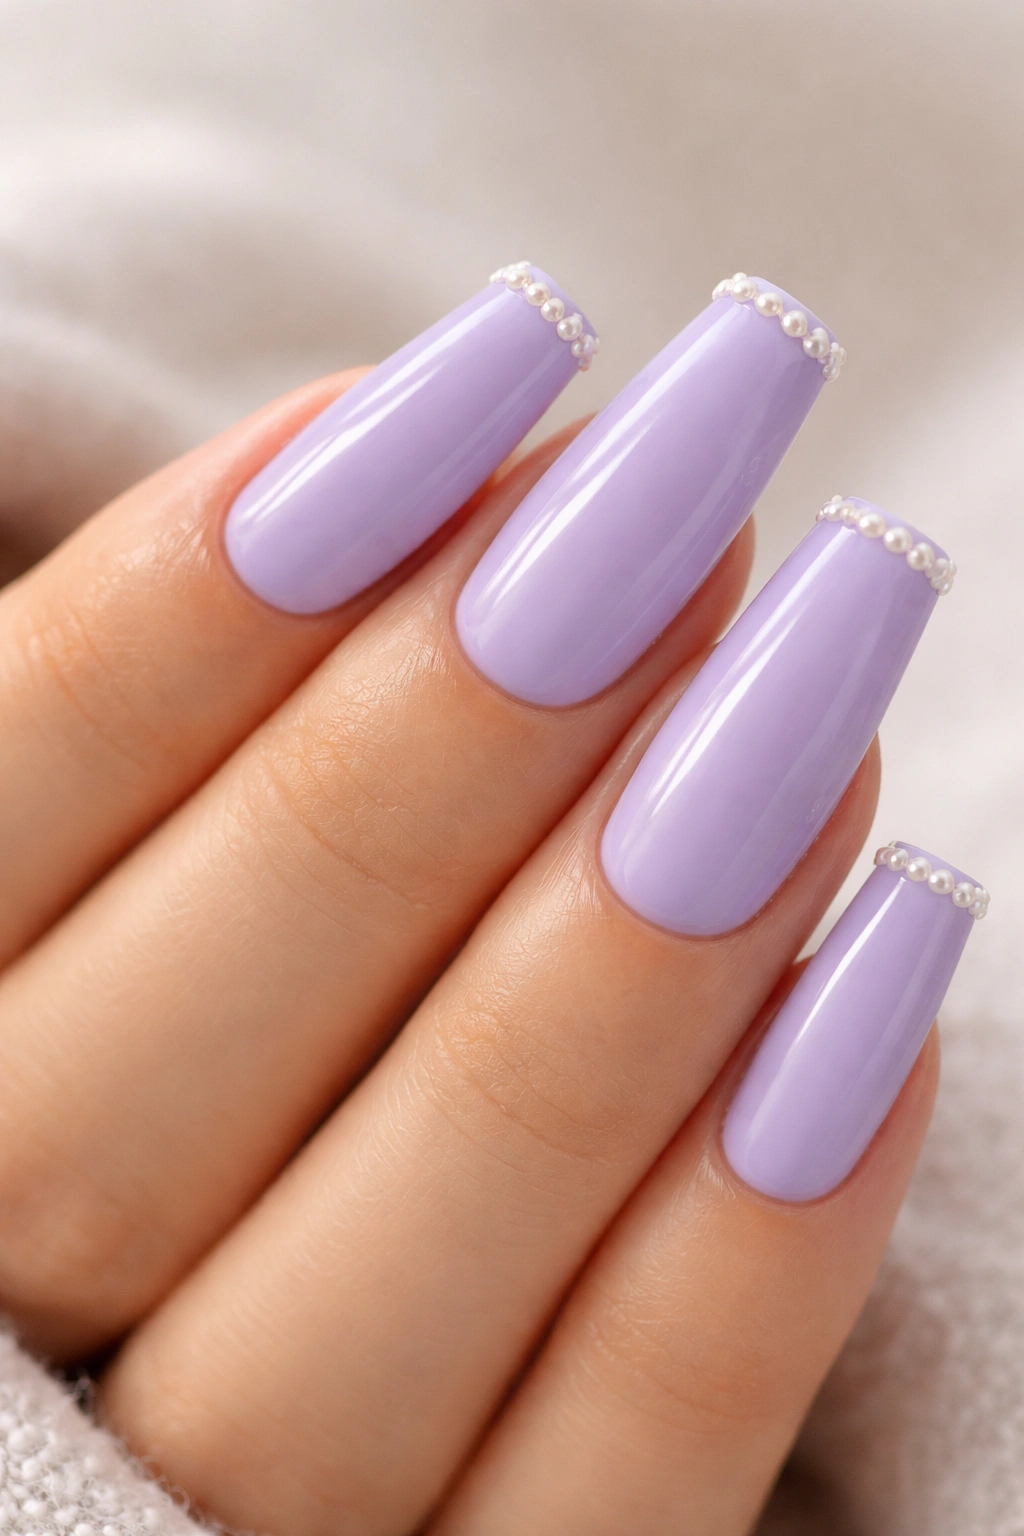
Apply a soft lavender polish across the entire nail, then add a delicate row of tiny pearl or opal beads along just the very tip of the coffin shape. The pearls should be modest in size and spaced evenly, creating a subtle sparkle without overwhelming the design. This adds just enough texture and light-catching detail to feel special while maintaining an elegant, wearable aesthetic.
Applying Pearl Accents Properly
Use a clear gel or a nail adhesive designed specifically for nail gems. Place each pearl individually with a dotting tool, making sure they’re pressed firmly into place. Seal everything with a thick layer of clear topcoat so the pearls are completely encased and won’t catch on anything. The pearls should sit slightly above the surface of the polish, catching light beautifully.
Pearl Placement Ideas
- A single concentrated line of pearls at the very tip
- Scattered pearls across just the upper third of the nail
- Pearls graduating in size from larger at the center to tinier at the sides
- A circular halo of pearls clustered on one nail only (accent nail style)
6. Lavender with Hand-Painted Tiny Floral Details
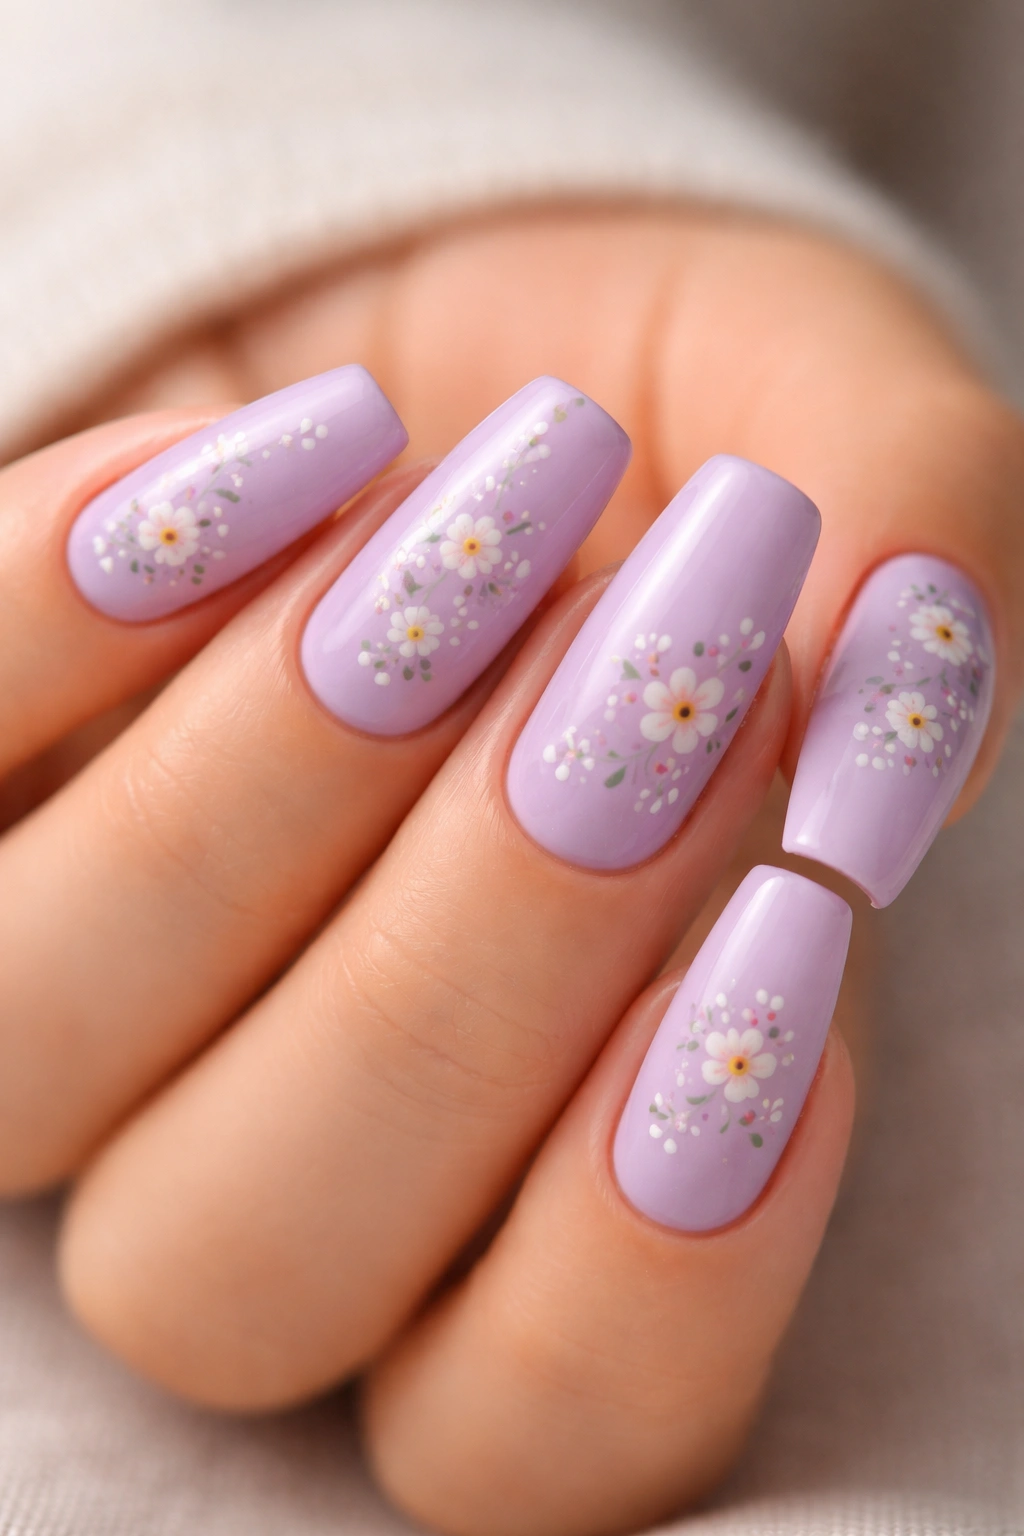
This design features a crisp lavender base with delicate hand-painted flowers—think miniature roses, forget-me-nots, or simple wildflowers—scattered across each nail. The flowers should be small enough that they don’t overpower the nail but detailed enough to be recognizable. This is where a talented nail artist really shines, as the tiny brushwork creates an almost vintage, romantic aesthetic.
Floral Design Elements
Start with your lavender base coat and let it dry completely. Using a very fine liner brush and white, pale pink, or deep purple polish, paint tiny flower shapes. Keep details minimal—a few petals, a tiny center dot, maybe a single leaf. The goal is suggestion rather than photorealism. Space flowers organically across the nail so some overlap slightly and others sit in white space.
Flower Types Perfect for Tiny Details
- Simple five-petal flowers (generic wildflower style)
- Delicate roses with just three or four petal curves
- Forget-me-nots (tiny, clustered flowers)
- Lilac flowers matching or contrasting the base
- Daisies with a yellow center and white petals
7. Lavender Coffin Nails with Metallic Gold Leaf Details

Apply your soft lavender base, then incorporate actual gold leaf pieces pressed onto the nail surface. The gold leaf adds luxury, dimension, and a subtle shimmer that catches light beautifully. You can go full coverage with gold leaf scattered across the entire nail, or use it more sparingly—perhaps creating a gold-leaf accent just on the lower half or in specific geometric patterns.
Applying Gold Leaf Professionally
Paint a thin layer of clear gel or sticky base polish on the areas where you want the gold leaf to adhere. Using tweezers, carefully lift and position small pieces of gold leaf, pressing them gently into place. The pieces don’t need to be perfect—slightly torn or imperfect gold leaf actually looks more organic and artistic. Seal everything with several coats of clear topcoat so the gold leaf doesn’t flake away.
Gold Leaf Application Patterns
- Scattered pieces across the entire nail surface
- Concentrated gold leaf around the tip only
- Gold leaf in the corners and edges, leaving the center clean
- A gradient of gold leaf from concentrated at the tip to sparse at the base
- Gold leaf creating intentional shapes or frames
8. Soft Lavender with Ombré Shimmer to Clear Top
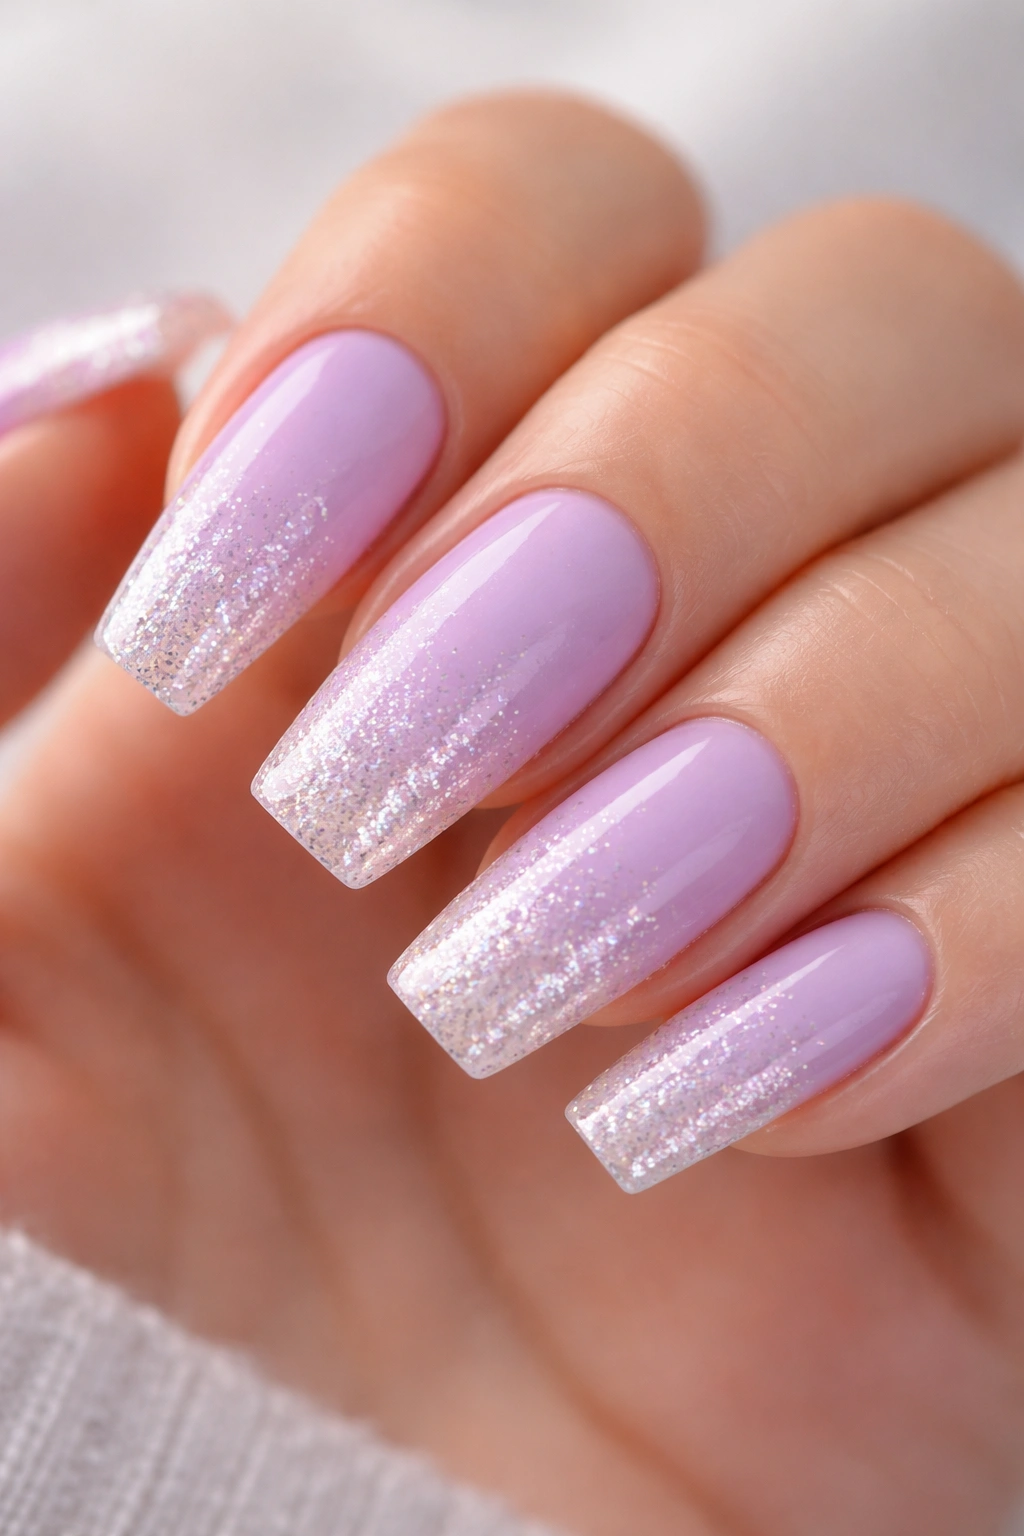
Begin with your pale lavender base and gradually add more and more shimmer or glitter as you move toward the nail tip. The lower portion should be relatively clean lavender, while the tip area becomes progressively more sparkly and glittery until it transitions to almost clear with just shimmer. This creates a gradient effect where the nail literally seems to fade from solid color to transparent sparkle.
Creating the Shimmer Gradient
Apply your lavender base across the entire nail. Starting at approximately the middle of the nail, begin adding clear polish mixed with fine glitter or shimmer. Blend each layer upward, adding progressively more shimmer in each layer. By the time you reach the tip, you should be applying mostly clear with heavy shimmer concentration. The blending should be gradual enough that no harsh lines appear.
Shimmer Choices
- Ultra-fine holographic glitter for a rainbow shimmer effect
- Silver or white shimmer for cool-toned elegance
- Champagne or gold shimmer for warmth
- Iridescent shimmer that changes color depending on the light angle
- Large glitter flakes mixed with fine shimmer for texture contrast
9. Lavender Base with Purple Gel Pen Line Art
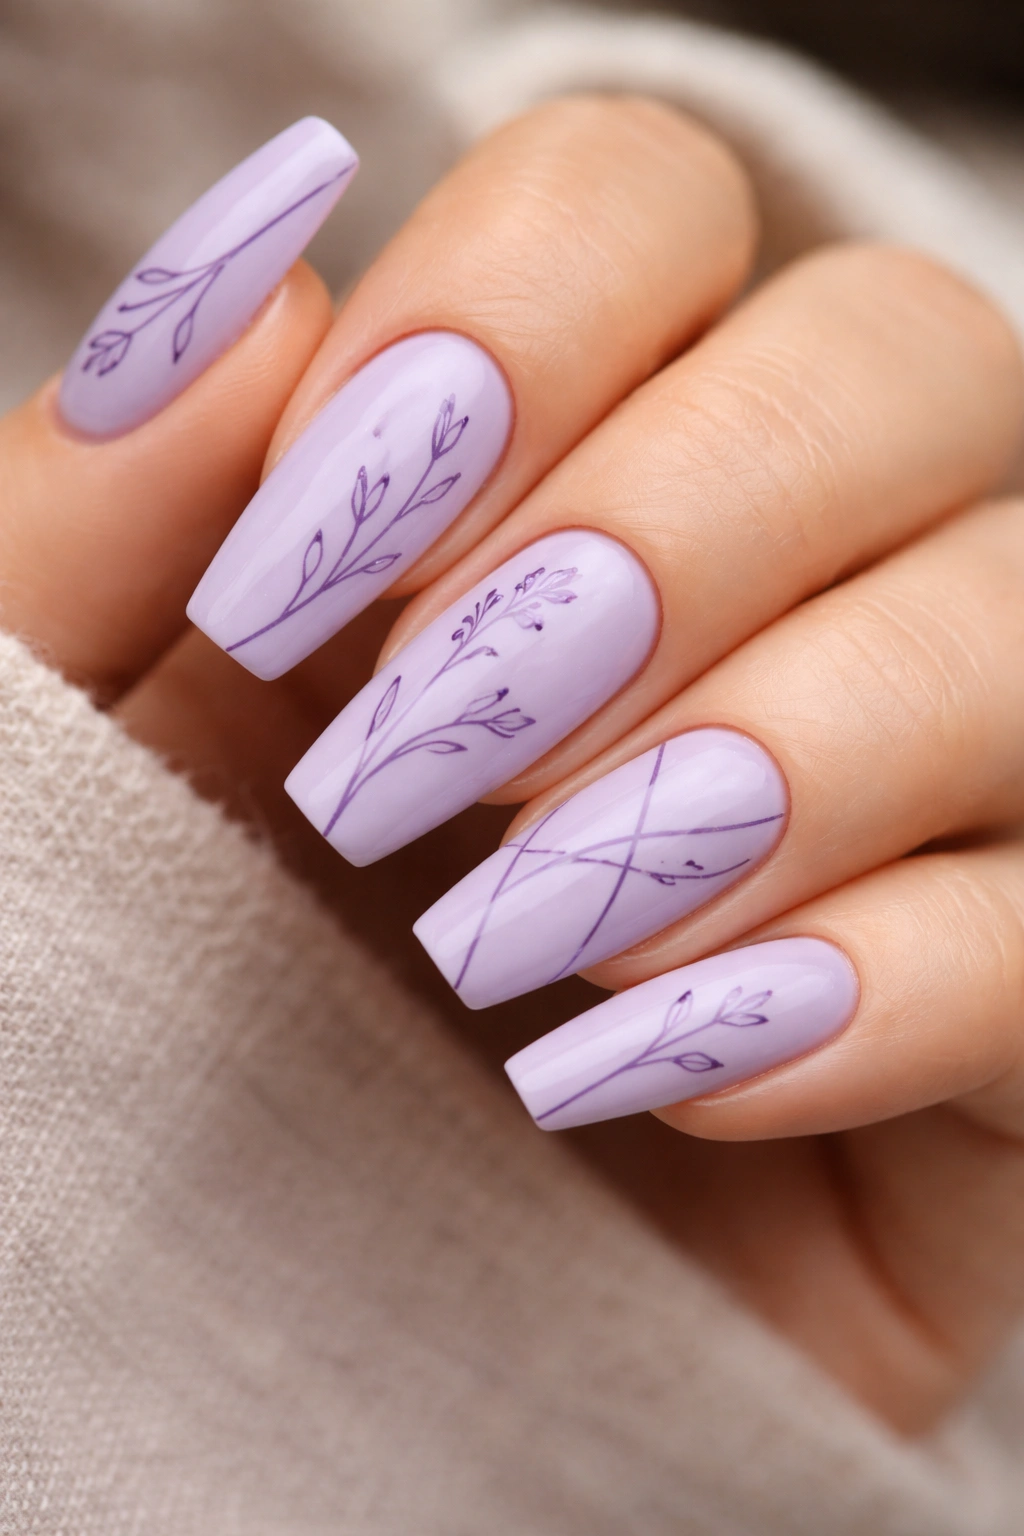
Using a purple gel pen or a very fine brush and darker purple polish, create delicate line art across your lavender base. Think thin, minimalist line drawings—abstract shapes, botanical line drawings (stems and leaves), geometric patterns, or even tiny faces and expressions. The contrast between the soft lavender and the darker purple lines creates visual interest and feels contemporary and artistic.
Line Art Inspiration
The beauty of line art is that perfection isn’t required—in fact, slightly imperfect lines feel more authentic and hand-drawn. You might create minimalist botanical designs with a few curved lines suggesting plant stems, abstract geometric patterns with intersecting straight and curved lines, or tiny figures and expressions. The key is keeping lines thin and intentional rather than thick or heavy.
Line Art Ideas Perfect for Nails
- Abstract wavy lines that flow across the nail surface
- Tiny botanical drawings (stems, leaves, flowers outlined only)
- Geometric line patterns (triangles, hexagons, grids)
- Minimalist faces or expressions
- Constellation or dot-to-dot style patterns
10. Lavender Coffin Nails with French Tip in Contrasting Color
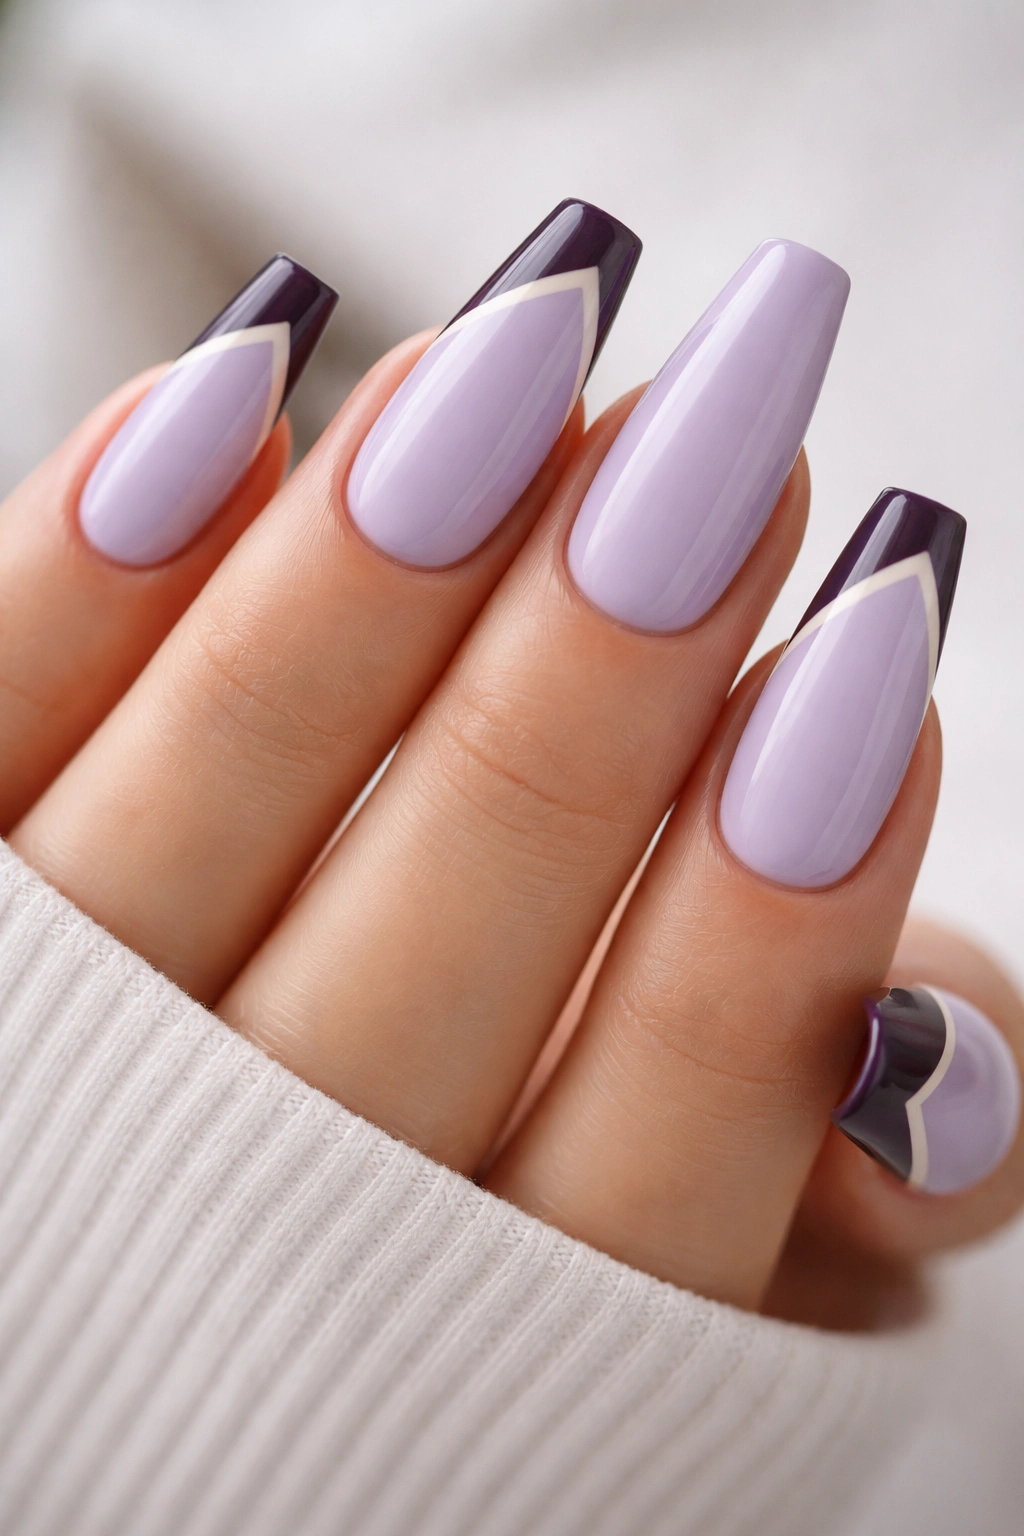
Take your soft lavender and add a French tip (the traditional white tip, or a contrasting color like deep purple, nude, or even black) along the coffin edge. The coffin shape makes French tips particularly striking because the diagonal angles of the coffin tip create a more interesting frame than traditional square nails. A thick, bold French tip line feels contemporary, while a thinner, more subtle line reads classic and timeless.
Achieving a Perfect French Tip on Coffin Nails
Apply your lavender base and let it dry completely. Use a thin curved brush and your contrasting polish to paint along the edge of the coffin tip. Because the coffin shape has angled corners, follow those angles naturally rather than fighting them. You can either create a straight line across the tip or follow the natural angle of the coffin shape, which creates a more modern look.
French Tip Color Options
- Classic white for a refined, timeless look
- Deep plum or eggplant for moody elegance
- Nude or pale pink for subtle sophistication
- Black for high contrast and modern edge
- Metallic gold or silver for luxury feel
11. Gradient Coffin Nails from Lavender to Pale Pink
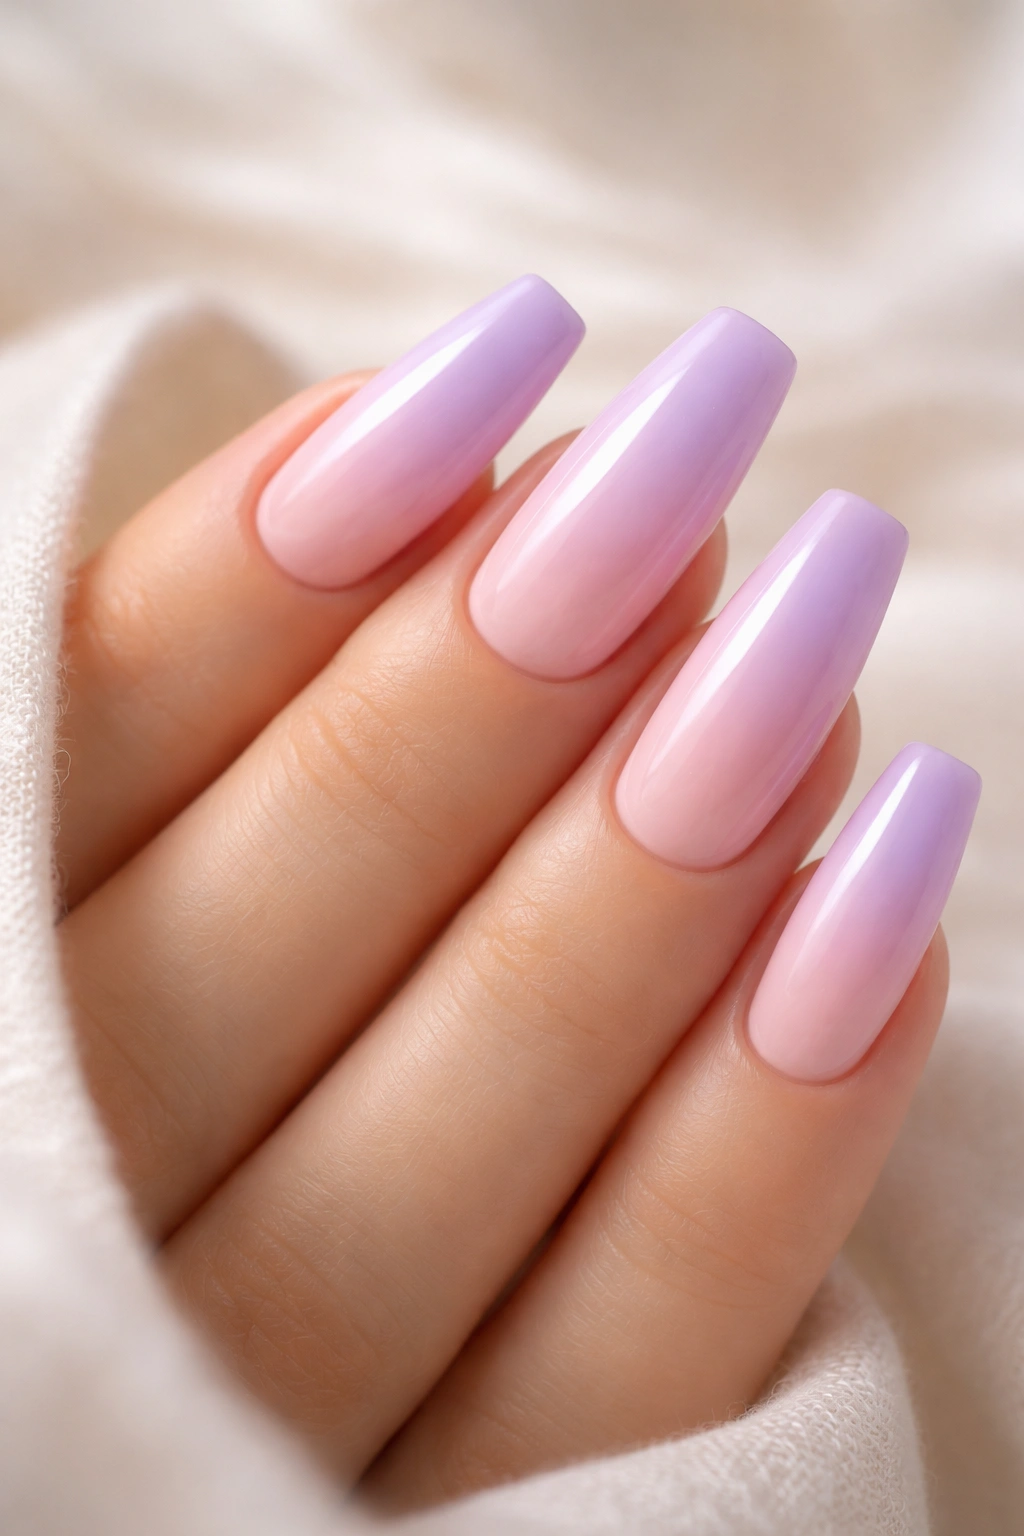
Create a soft gradient that transitions from lavender at the base to a delicate pale pink at the tip. This design feels romantic and dreamy, perfect for anyone who loves soft, feminine aesthetics without going full-on princess vibes. The gradient should be subtle and blended smoothly rather than featuring obvious color blocks or harsh lines.
Blending Lavender and Pink Smoothly
Apply lavender as your full base coat. Starting at approximately the middle of the nail, begin mixing in increasing amounts of pale pink polish. Using a damp makeup sponge, gently bounce along the transition area while the polish is still slightly wet, creating a gradual blend. The sponge should pick up both colors simultaneously and merge them together naturally. Seal with a clear topcoat.
Gradient Variations
- Soft mauve-lavender to blush pink
- Deep lavender to pale rose
- Dusty purple-lavender to peachy-pink
- Cool-toned lavender to warm beige-pink
- Multi-color gradient from lavender through pink to pale peach
12. Lavender with Minimalist Chrome or Mirror Effect Accent
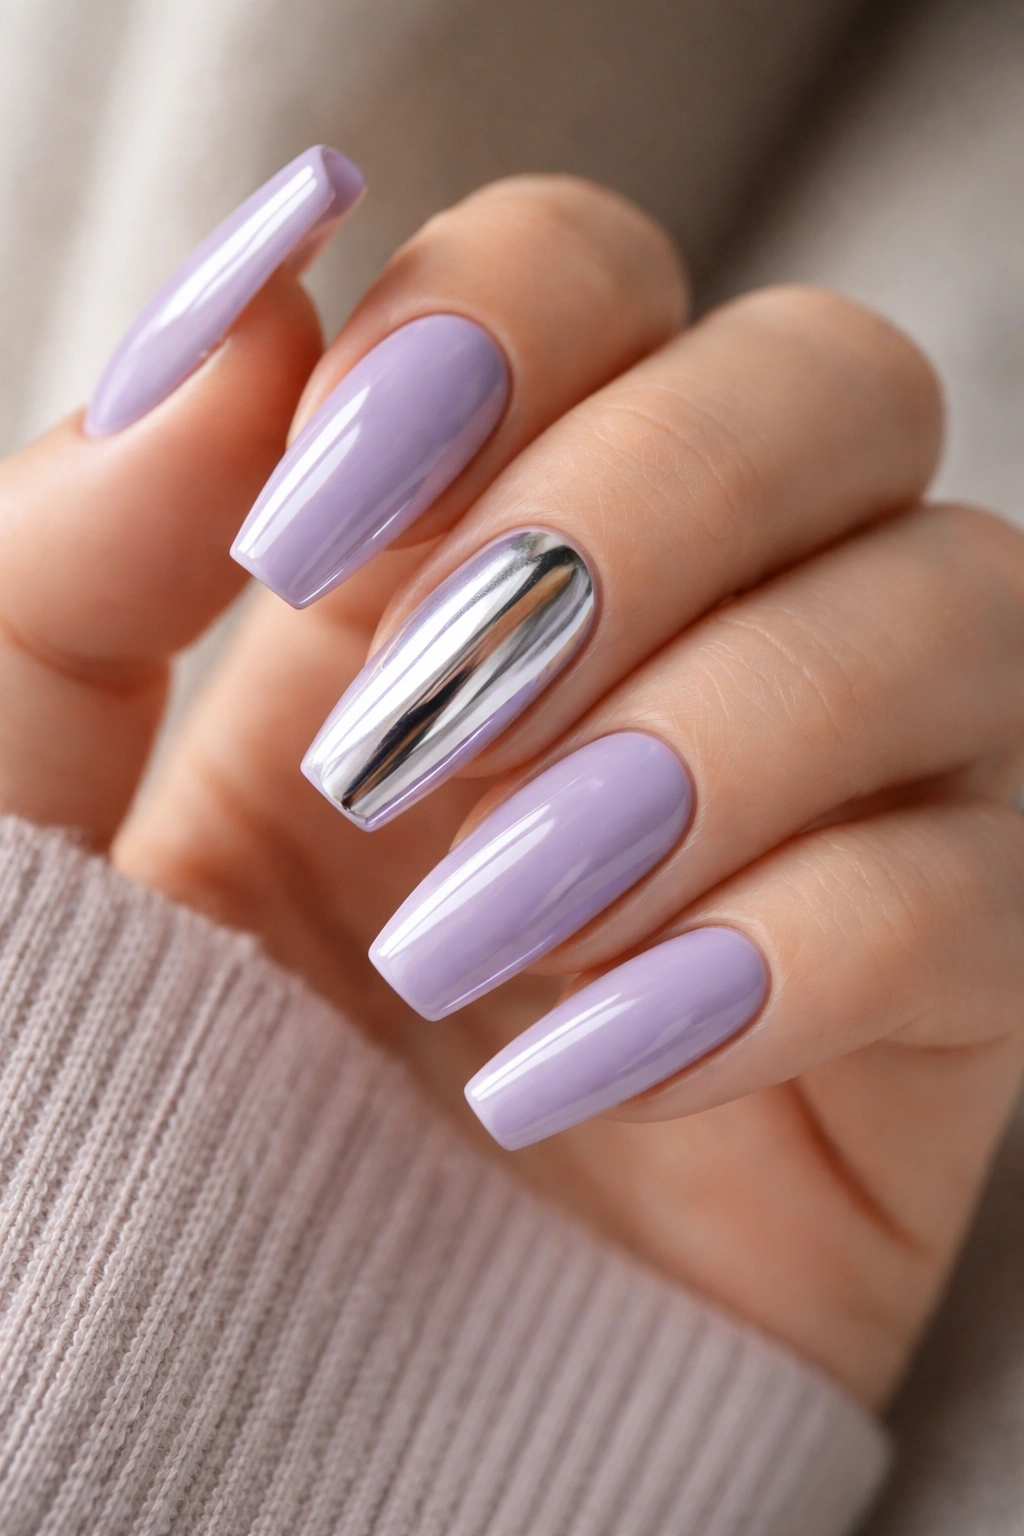
Apply a clean lavender base, then add a chrome or mirror powder accent to just one or two nails (typically the accent nail approach) or create a thin metallic stripe running down the center of each nail. Chrome powder creates that futuristic, reflective mirror-like finish that’s become incredibly popular. The contrast between matte or satin lavender and ultra-shiny chrome creates serious visual impact.
Applying Chrome Powder Correctly
Chrome powder must be applied over a sticky gel base (not regular polish). Paint your sticky gel base on the area where you want the chrome effect, then use a soft fluffy brush to apply the chrome powder in a pressing motion—don’t brush it back and forth, just press it into the sticky gel. Remove excess powder, then seal with clear gel. The result should be a mirror-like, reflective finish that’s absolutely stunning.
Chrome Placement Ideas
- A vertical stripe down the center of each nail
- Chrome on the entire tip portion (top third of the nail)
- Chrome concentrated on just the accent nail
- A horizontal chrome line at the middle of the nail
- Chrome creating a frame or border around the nail edge
13. Lavender Coffin Nails with Subtle Texture or Speckled Effect
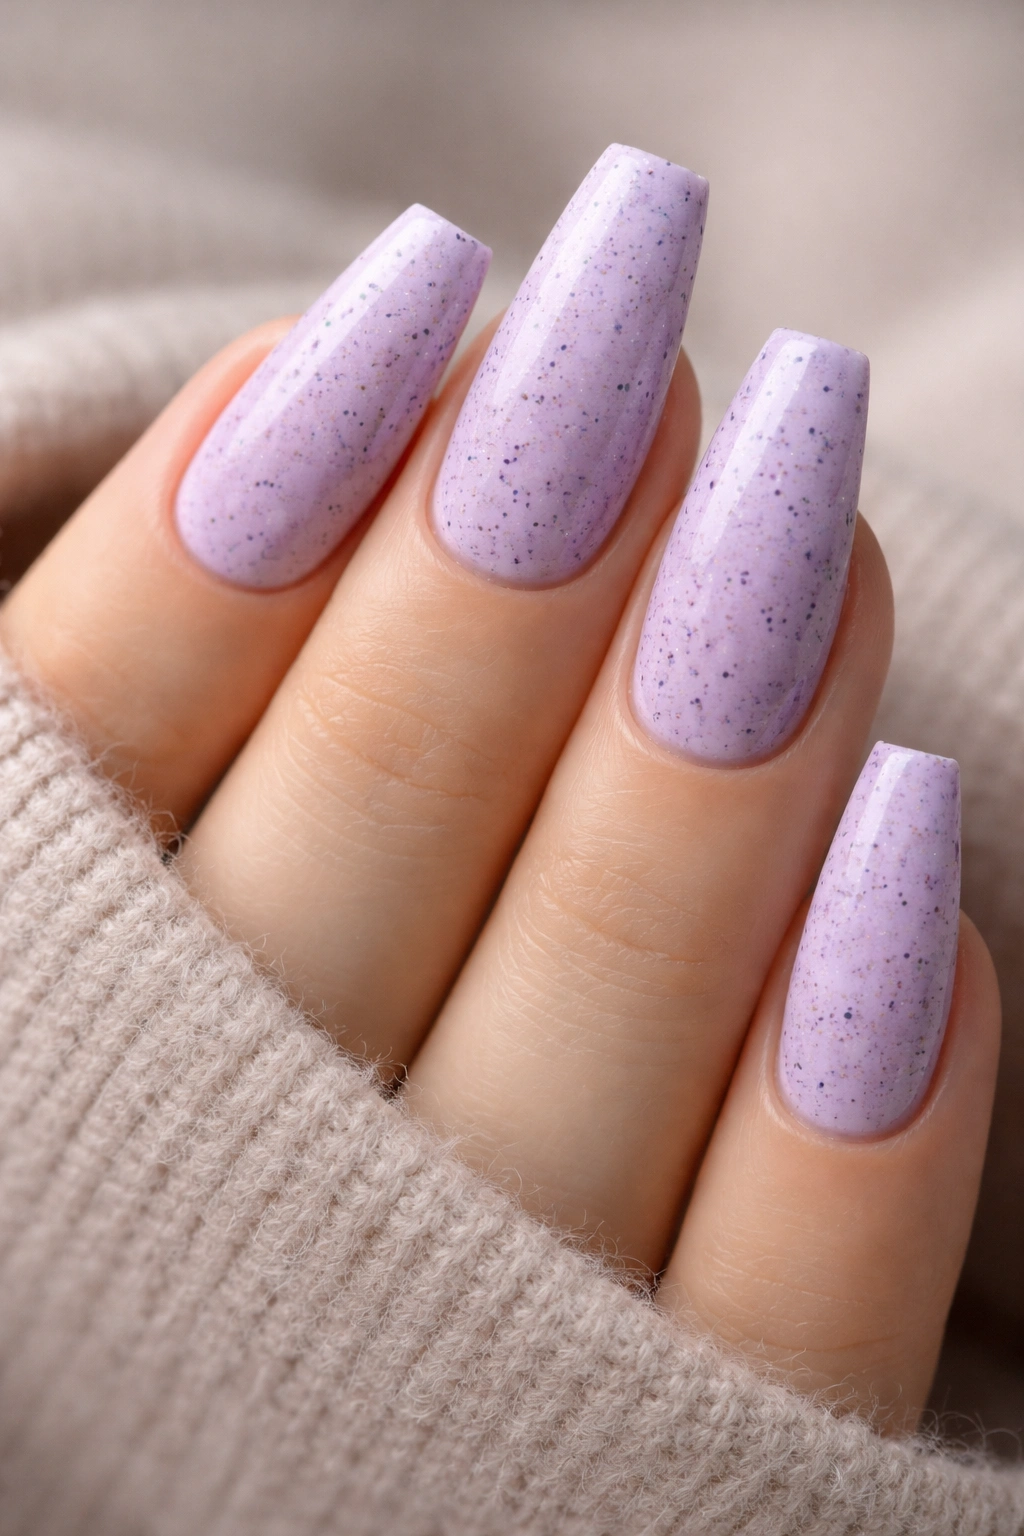
Rather than a smooth, glossy finish, create a speckled or textured effect by adding tiny dots of darker purple, navy, or even black throughout your lavender base. Think of it like stars scattered across a twilight sky—the speckles should feel random and organic rather than perfectly placed. This adds depth and visual interest without requiring complex nail art skills, and the texture works beautifully on medium coffin nails.
Creating the Speckled Effect
Apply your lavender base coat and let it dry. Using a very thin liner brush or toothpick dipped in a contrasting color, gently tap tiny dots randomly across the nail surface. The dots should vary slightly in size and placement, creating an organic, unperfected look. This works particularly well with colors like deep purple, navy, or charcoal that create contrast against the lavender.
Speckle Options
- Tiny dark purple dots across the entire nail
- Navy blue speckles for a cosmic effect
- Black dots for high contrast and modern feel
- White or pale gold speckles on darker lavender
- Mixed-color speckles using multiple contrast colors
14. Lavender Ombre Coffin Nails Darker Toward the Cuticle
Flip the typical ombre direction—instead of the tip being darker, start with a rich, deep lavender at the cuticle and gradually lighten toward the pale, almost-white lavender at the tip. This reverse ombre creates a sophisticated, grown-up aesthetic that feels less typical than traditional tip-focused ombré. It also works beautifully with the coffin shape because it draws attention upward along the nail bed.
Executing Reverse Ombré
Apply your deepest lavender shade to the base of the nail, concentrating color near the cuticle. Gradually lighten the shade as you move toward the tip by mixing in white or clear polish. Apply each progressively lighter shade, blending with a makeup sponge as you go. The transition should be smooth and gradual with no obvious color blocks or harsh lines between shades.
Reverse Ombré Color Progressions
- Deep eggplant to pale lavender
- Rich plum to almost-white lavender
- Dusty purple to creamy lilac
- Slate lavender to pale mauve
- Dark purple-gray to soft lilac
15. Lavender Coffin Nails with Thin Gold or Silver Striping Tape
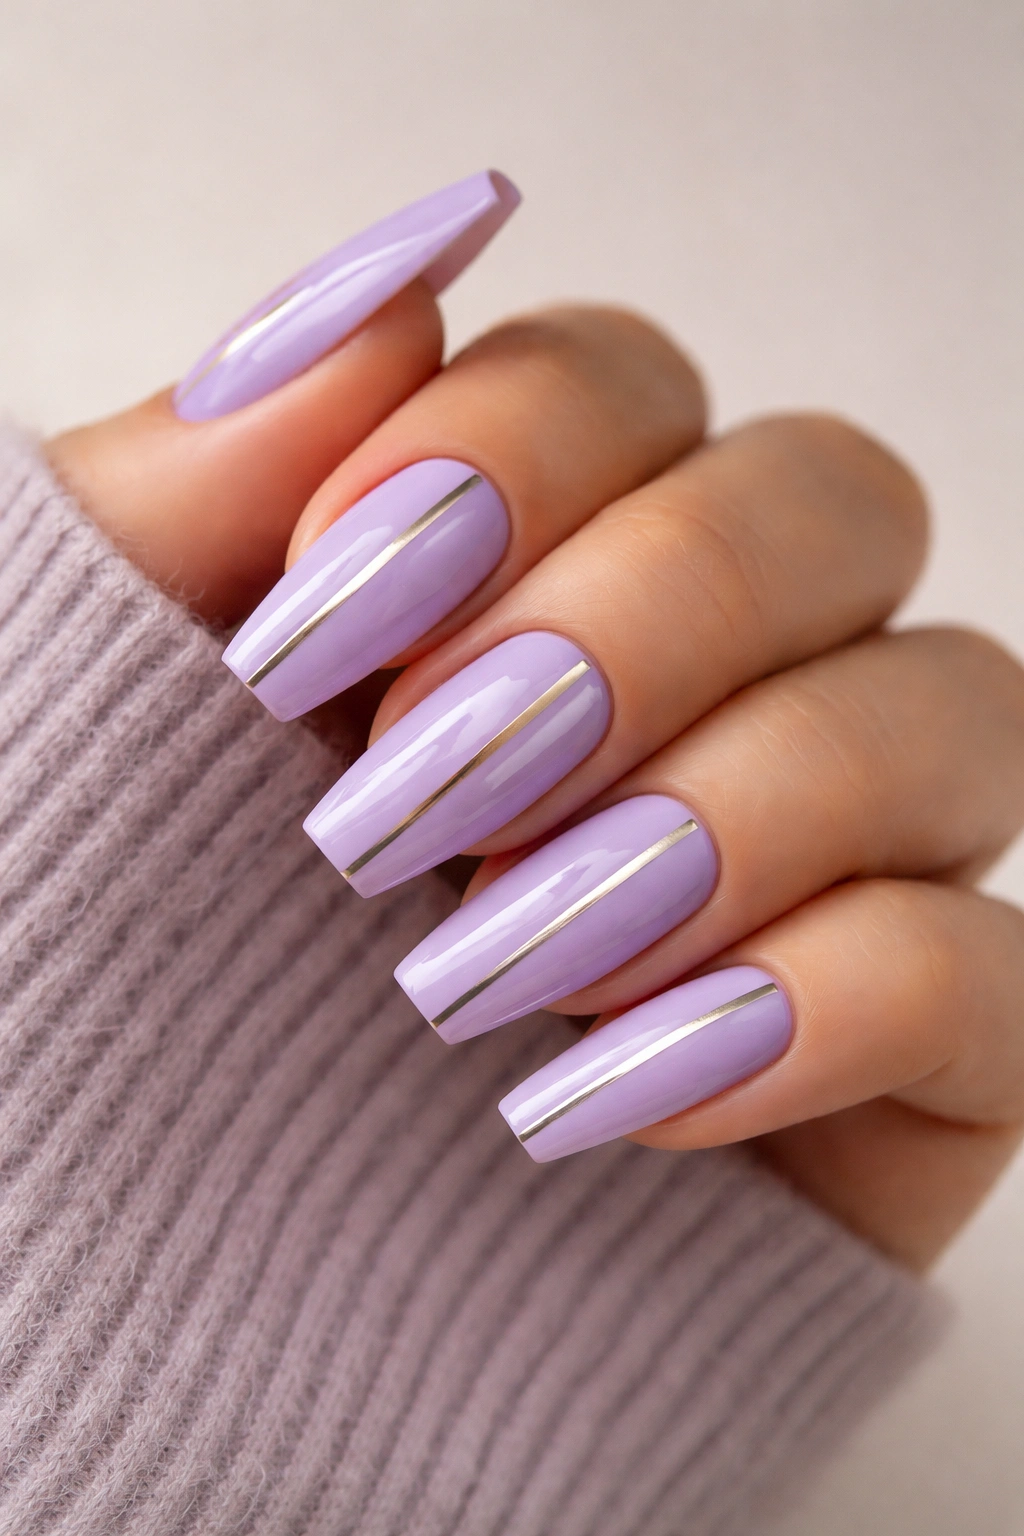
Apply your lavender base, then add thin metallic striping tape (available at most beauty supply stores) in gold or silver. You can create various patterns—vertical lines running the length of the nail, diagonal stripes, horizontal bands, or even geometric shapes. The striping tape is self-adhesive, reusable in some cases, and creates perfectly clean lines without requiring steady hands or precision brushwork.
Using Striping Tape Like a Pro
Apply your lavender base and let it dry completely. Carefully peel metallic striping tape from its backing and position it on the nail exactly where you want it. Press firmly along the entire length to ensure good adhesion. You can create multiple stripes by applying several pieces of tape, or create geometric patterns by layering tape at angles. Seal everything with a clear topcoat to protect the tape and ensure it stays in place.
Striping Tape Patterns
- Three or four evenly spaced vertical lines
- Diagonal stripes running from corner to corner
- Horizontal bands across the middle of the nail
- An X pattern created by crossing diagonal stripes
- A geometric frame created by striping around the nail edges
Final Thoughts

Lavender coffin nails offer genuine versatility for anyone looking to express their personal style while maintaining a sophisticated, polished appearance. The fifteen designs covered here barely scratch the surface of what’s possible—you could combine multiple techniques, layer different effects, or use these as inspiration for your own custom creations. Medium-length coffin nails strike that ideal balance between being substantial enough for detailed nail art and practical enough for everyday life, which is why they’ve become such a popular choice.
The beauty of working with lavender is that it’s forgiving. Whether you choose a completely minimalist single-color design or something more complex with multiple elements, lavender reads as intentional and elegant. Start by picking whichever design speaks to you most, then don’t hesitate to modify it based on your preferences—swap colors, adjust placement, or combine elements from different designs. A good nail technician will work with you to customize any of these looks to match your exact vision.
