

Coffin nails have become a signature silhouette for anyone who wants their manicure to make a statement. The distinctive tapered sides and squared-off tip create the perfect canvas for creativity, and medium-length coffin nails strike that ideal balance between dramatic impact and practical wearability. You get all the visual power of the coffin shape without the fragility that comes with extra-long extensions, making these nails perfect for people who actually need to use their hands while still wanting seriously gorgeous nail art.
The beauty of freestyle nail designs on coffin nails is that they work with the natural geometry of the shape rather than against it. The wider base of the coffin gives you plenty of room to build intricate designs, while the tapered sides naturally frame and highlight detailed artwork. Whether you’re drawn to abstract minimalism, bold geometric patterns, delicate florals, or dimensional techniques, medium coffin nails can handle it all. The real game-changer is understanding which designs maximize the unique properties of this nail shape and how to adapt trending ideas specifically for medium-length proportions.
This guide breaks down fifteen freestyle coffin nail ideas that work beautifully on medium lengths. Each idea includes specific design techniques, color combinations that genuinely complement the coffin silhouette, and practical tips for achieving the look at home or describing it to your nail tech. Whether you’re prepping for a special occasion or just want to elevate your everyday manicure, these designs offer something for every skill level and personal style.
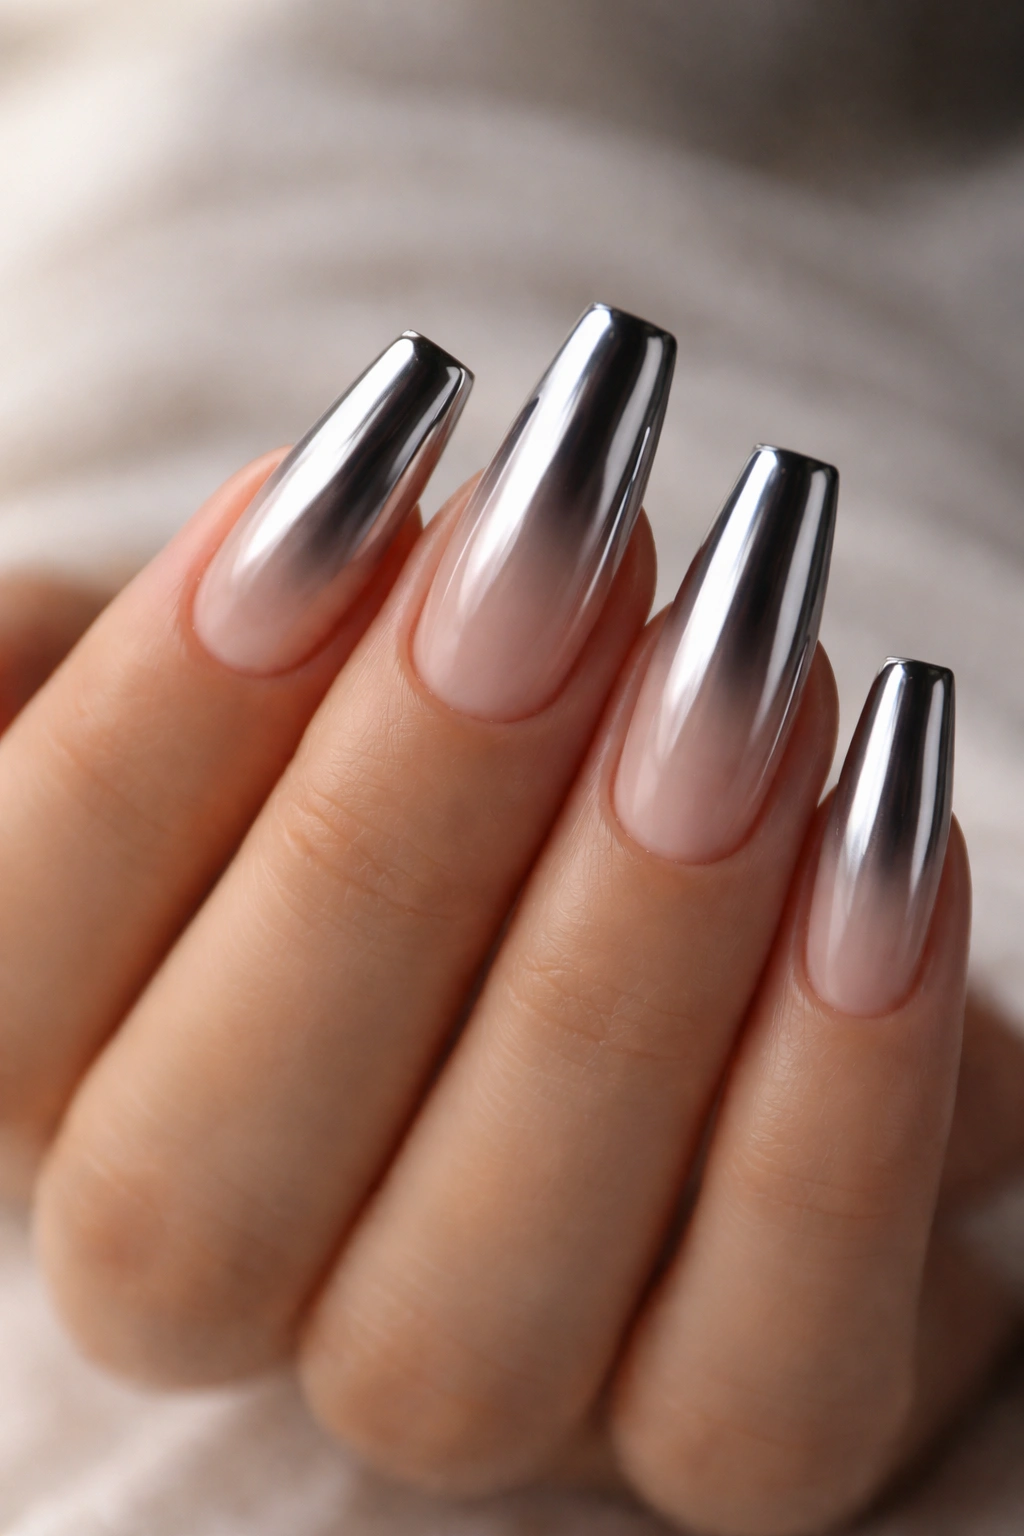
1. Liquid Chrome with Gradient Fade
Liquid chrome finishes create a mirror-like effect that’s absolutely stunning on the wider base of coffin nails. The magic happens when you layer a chrome powder over a gel base and then add a color gradient that fades from deep into light. On medium coffin nails, start the darker shade at the cuticle area and gradually transition to a lighter tone or clear at the tip, letting the chrome effect shift as it travels across the nail.
Why This Design Elevates Medium Coffin Nails
The gradient creates depth and movement across the nail’s surface while the chrome gives it an ultra-modern, luxury feel. The tapered sides of the coffin shape naturally draw the eye toward the center of the design, which is exactly where the chrome effect shines brightest. This combination makes even a simple color gradient feel sophisticated and intentional rather than basic.
Application Tips and Color Combinations
- Layer chrome powder over a nude or soft pink base for an elegant, wearable version
- Combine rose gold chrome with warm peachy tones for a sunset-inspired effect
- Try holographic chrome fading into a jewel-tone green for something more dramatic
- Use a matte topcoat on just the tips to break up the shine and add texture contrast
- Apply chrome powder with a soft, dry brush in circular motions rather than patting it on — this creates a more even, reflective finish
Pro tip: Let the chrome powder sit on the surface for a few seconds before buffing; this helps it adhere more evenly and prevents patchy application.
2. Abstract Watercolor Wildflowers

Watercolor techniques create soft, organic designs that feel artistic without being overly precious. On medium coffin nails, paint loose floral shapes using multiple shades of the same color family — think purples and lavenders, or pinks and corals. The beauty is in the imperfection; bleeding edges and translucent layers are exactly what make watercolor nail art feel authentic and intentional.
Why This Design Works for This Nail Shape
Watercolor flowers naturally complement the coffin silhouette’s elegant lines. The soft, flowing nature of watercolor designs balances the structured geometry of the coffin tip. The wider base gives you space to create full blooms while the tapered sides add sophistication to the overall look. This design reads as artistic and intentional, not chaotic, even when technique is loose.
How to Build the Design
- Start with a white or cream base coat as your canvas
- Drop multiple shades of nail polish (use slightly thinner consistency than normal) onto the nail and let them blend naturally
- Drop a toothpick or thin nail art brush through the wet polish to create petal shapes
- Add thin green stems with a detailed brush once the flowers partially dry
- Seal with a glossy topcoat that enhances the watercolor effect without flattening it
Insider note: Keep a brush dampened with just a tiny amount of clear topcoat nearby — use it to soften any harsh edges while the design is still drying for a more blended, authentic watercolor appearance.
3. Negative Space Geometric Lines
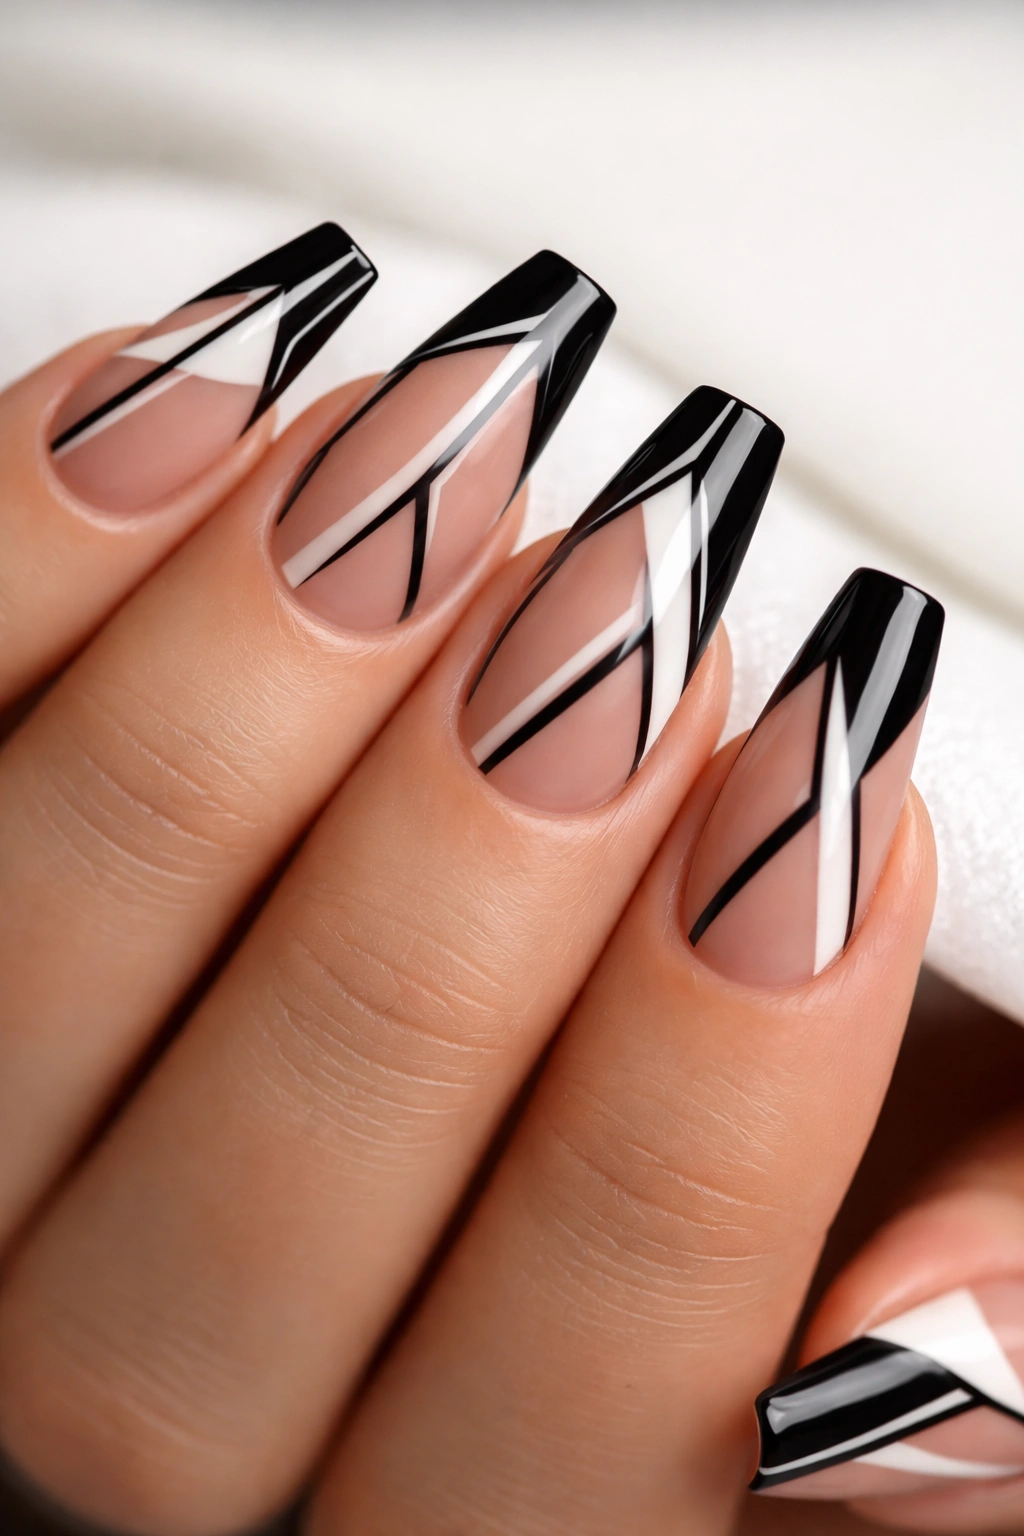
Negative space designs let your natural nail peek through, creating visual interest through what you don’t paint rather than what you do. For coffin nails, create bold geometric patterns using clean lines — think triangles, trapezoids, or angular shapes — leaving strategic sections of natural nail exposed. The coffin shape’s sides become natural guides for your line placement.
Why This Minimalist Approach Suits Coffin Nails
The structured geometry of the coffin shape was basically made for geometric designs. Your nail’s natural tapered silhouette becomes part of the design rather than a canvas you’re covering. Negative space designs also feel modern and intentional, and they require less product and maintenance than full-coverage designs. On medium nails, this creates maximum visual impact with minimal fuss.
Execution and Design Options
- Use thin striping tape to create perfectly clean lines without a steady hand
- Try an asymmetrical triangle design with one color blocking the upper portion
- Create angled stripes that run parallel to the coffin’s tapered sides
- Combine metallic accent lines (gold or silver) with one solid color for elevated minimalism
- Layer geometric shapes in complementary colors for a more complex look
Worth knowing: Remove striping tape while the polish is still slightly tacky (not fully dry) for the cleanest possible edges. Completely dry polish can peel away with the tape.
4. Ombré Glitter Fade
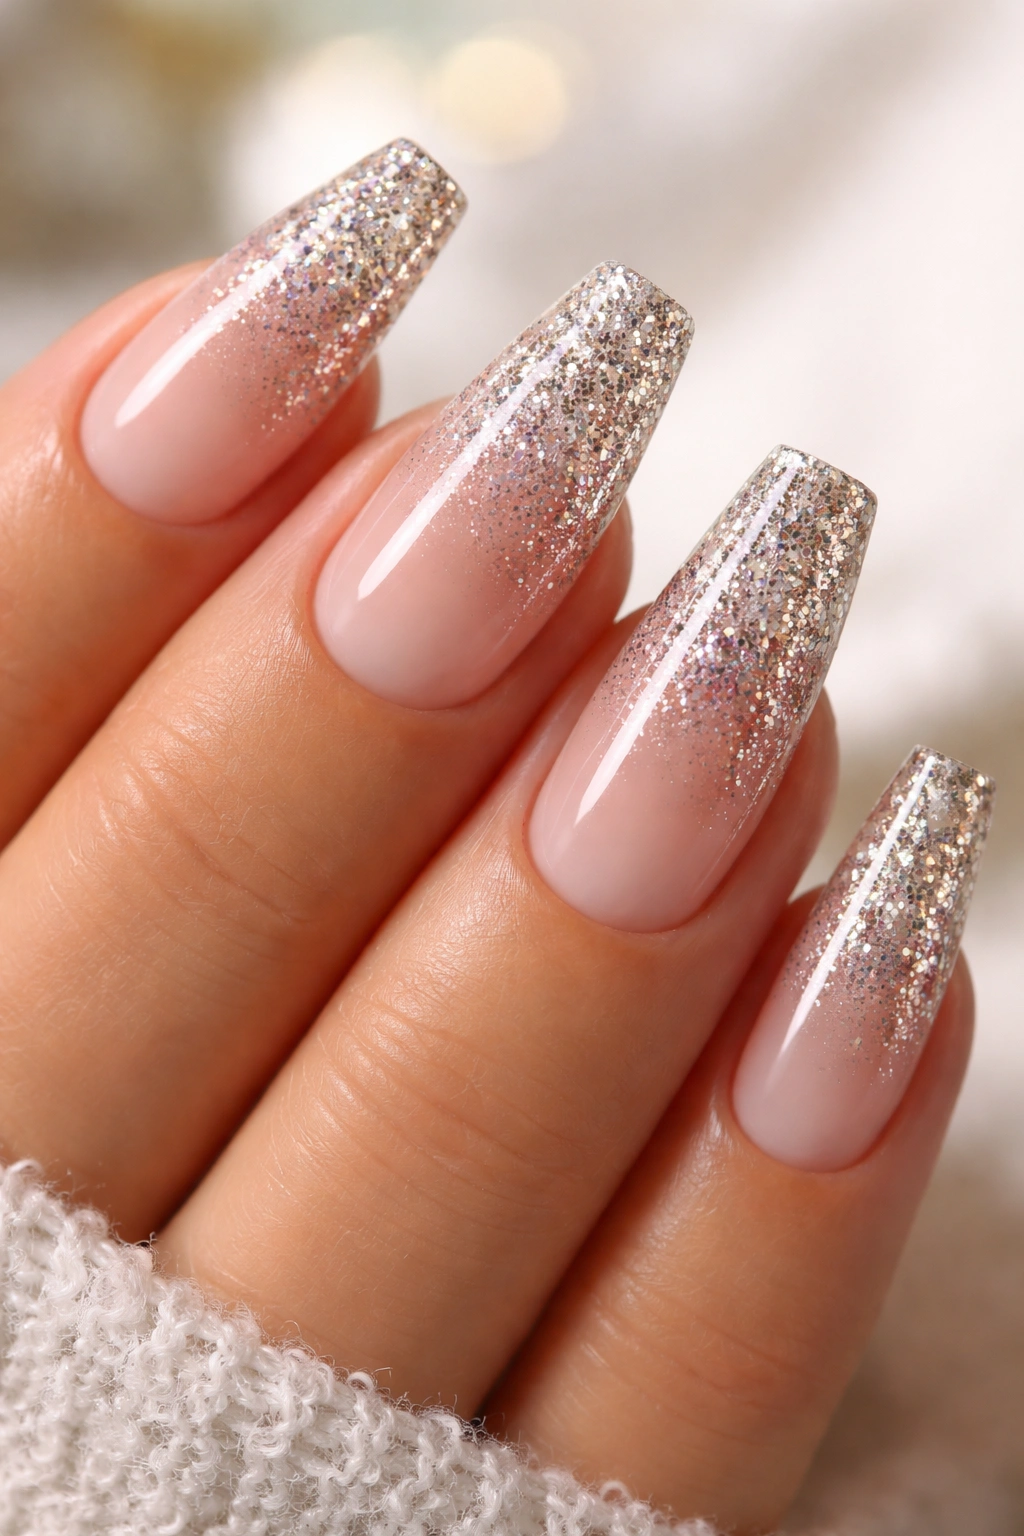
Glitter ombre creates dimension and movement by gradually increasing glitter density from the cuticle to the tip. On medium coffin nails, this technique maximizes the nail’s natural taper — start with a solid color at the base and layer progressively coarser or more densely packed glitter as you move toward the tip. The coffin shape means the glitter naturally concentrates where you want the most visual drama.
Why Medium Coffin Nails Perfect This Technique
The length gives you enough space to create a gradual, noticeable transition without the design feeling cramped. The wider base of the coffin accommodates solid color beautifully, while the narrowing sides naturally showcase the glitter concentration building toward the tip. This creates an optical illusion of length and elegance. The result looks intentional and sophisticated rather than haphazard.
Building Your Ombré Glitter Effect
- Apply a solid gel color base across the entire nail (nude, blush, or deep jewel tones work best)
- Mix fine glitter with gel polish in a 1:3 ratio and apply to just the outer third of the nail
- Mix medium glitter with gel at the same ratio and apply to the outer half
- Use chunky glitter mixed with gel and apply only to the tips
- Seal everything with a clear glossy topcoat that protects the glitter without flattening the dimension
Pro tip: Layer your glitter from finest to coarsest rather than mixing everything together — this creates a more refined, intentional gradient that reads as high-end rather than cluttered.
5. Marble Stone Effect with Gold Veining
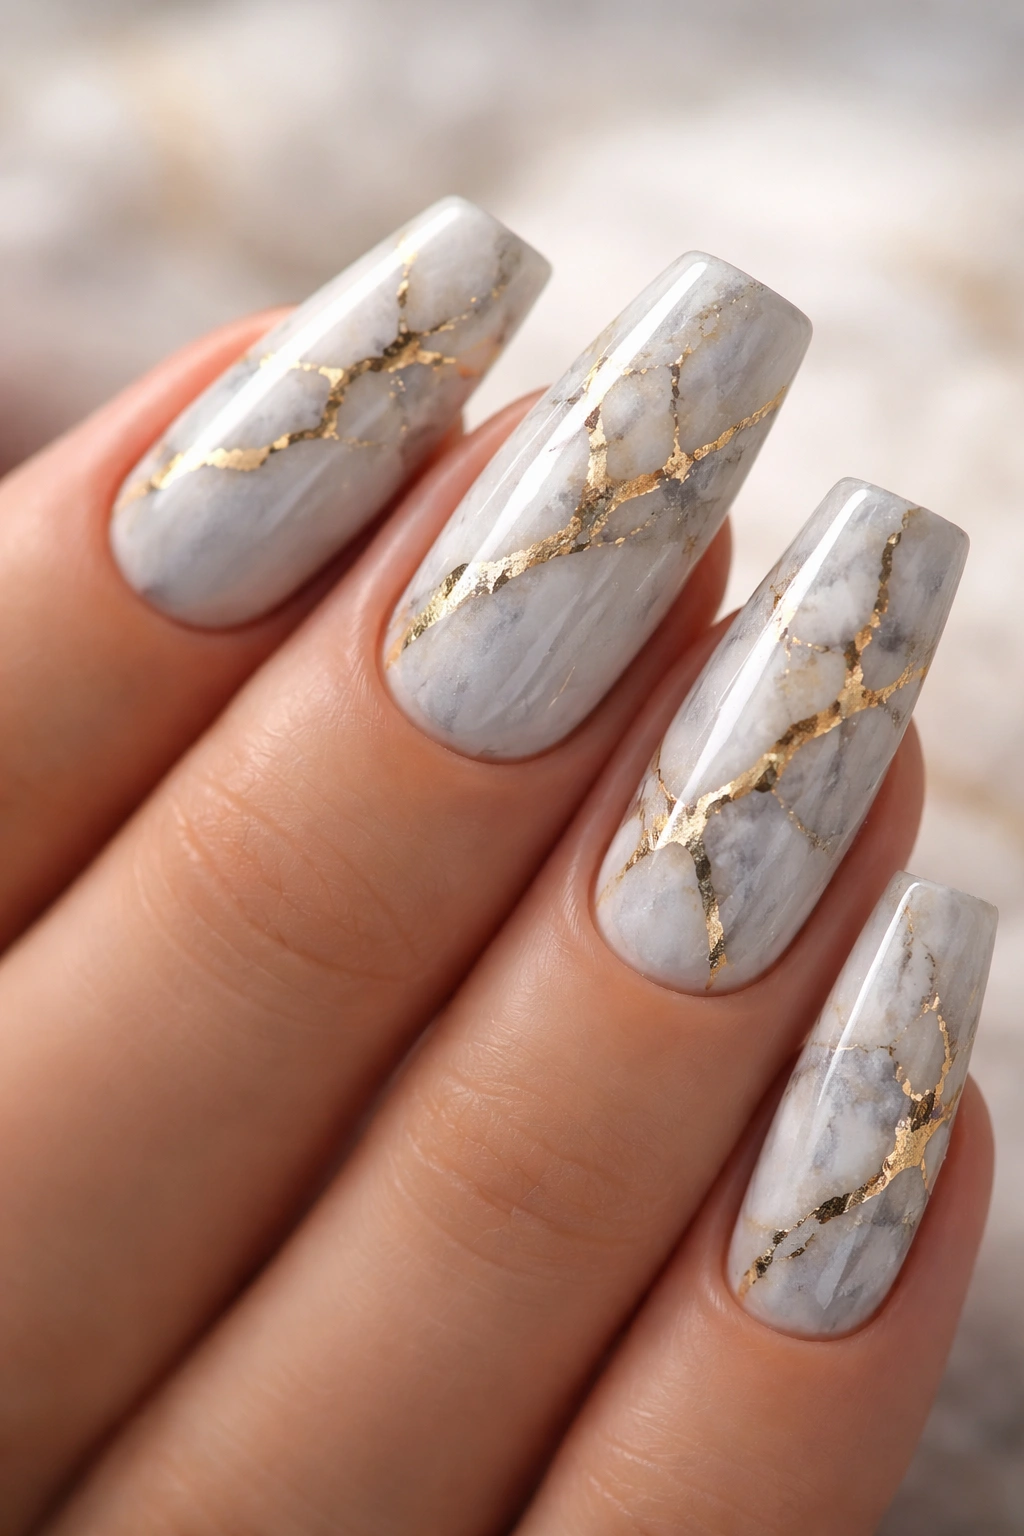
Marble nail designs mimic the natural patterns of stone, creating sophisticated, textured looks that feel luxe. For medium coffin nails, use a base of soft gray, black, or even blush, then add irregular veining using thin gold or silver stripes. The veins should follow no particular pattern — just like real marble — creating organic, naturalistic movement across the nail’s surface.
Why Stone Patterns Enhance the Coffin Shape
Marble designs naturally feel expensive and polished, which complements the elegant geometry of coffin nails perfectly. The veining creates visual interest without being busy or chaotic. The coffin’s width provides plenty of space for complex marble patterns while maintaining readability. This design bridges the gap between minimalist and decorated — it’s visually interesting but still understated enough for professional settings.
Creating Authentic Marble Veining
- Start with a neutral base color (soft gray, warm beige, or pale pink)
- Mix a second shade slightly darker than your base
- Use a thin detail brush to paint irregular, branching lines that occasionally connect
- Go back with thin gold or silver lines alongside some of the darker veins
- Add some very fine detail lines that fade out partway across the nail
- Finish with a matte topcoat for true stone authenticity, or glossy for modern elegance
Insider note: Real marble has both thick veins and delicate hairline details — varying your line thickness makes your design look far more authentic and intentional than uniform veining.
6. Celestial Moon Phases Design

Moon phase designs tap into the growing love of celestial and mystical nail art. On medium coffin nails, create a series of small moons across the nail in various phases — new moon, waxing crescent, full moon, waning crescent — using fine detail work. Pair this with a deep navy or midnight blue base and add tiny stars scattered around the moons for depth. The coffin’s space allows you to fit this intricate design without it feeling crowded.
Why This Design Works Particularly Well on Coffin Shape
The structured, geometric nature of the coffin complements the precise circular shapes of moon phases. Your nail’s natural taper naturally guides the placement of moon phases from base to tip, creating visual flow. The design is trendy without being overdone, and it works across both minimalist and ornate styling preferences depending on how many stars and details you add.
Step-by-Step Moon Phase Execution
- Paint a deep navy, midnight blue, or black base coat as your backdrop
- Use a white gel pen or thin brush with white polish to draw small circles
- For each circle, partially fill with white or metallic polish to show different moon phases
- Add tiny gold or silver dots around the moons as stars
- Consider adding a delicate gold line running through the moons as an optional detail
- Seal with glossy topcoat for that celestial shine
Pro tip: Use a dotting tool dipped in white polish to create perfectly round moons — this is way more reliable than trying to hand-draw circles, even with a thin brush.
7. Two-Tone Split Design with Metallic Separator
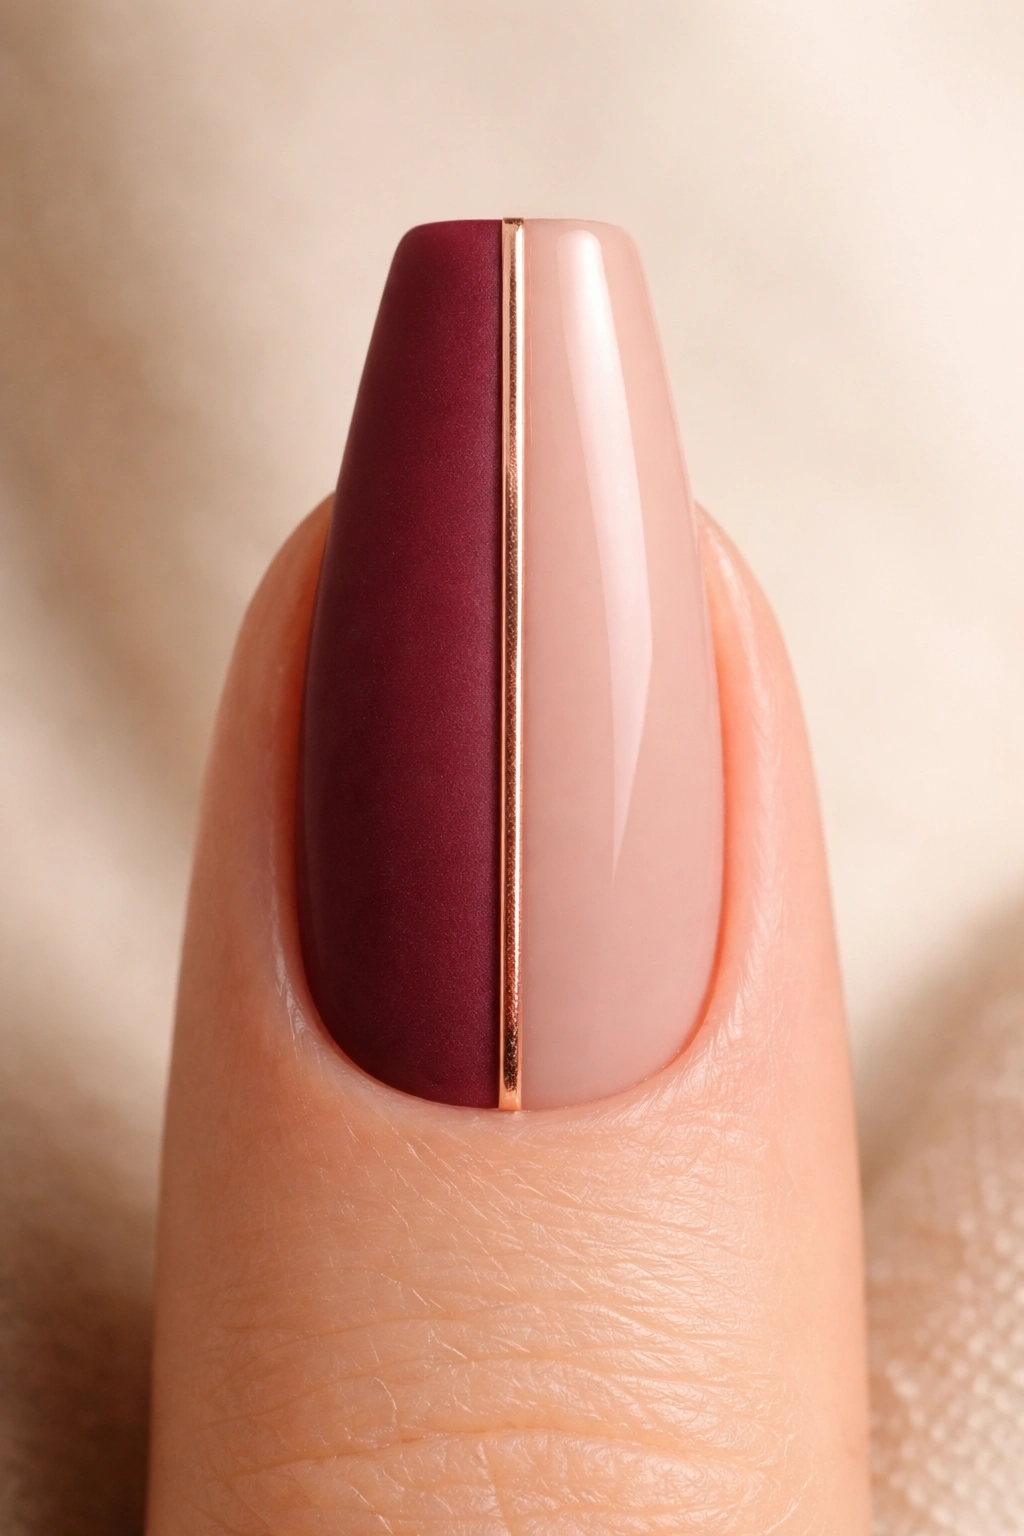
Two-tone splits create striking visual contrast by dividing the nail into two distinct color sections using a metallic or contrasting line down the center. On medium coffin nails, run a thin gold, silver, or holographic line vertically down the middle, then paint one half one color and the other half a complementary shade. The coffin’s tapered sides naturally frame this division beautifully.
Why Split Designs Enhance Medium Coffin Proportions
The vertical division creates an optical illusion of additional length on medium nails. The metallic separator line catches light and adds luxury without being overwhelming. The coffin’s natural symmetry makes this split design feel balanced and intentional. The design is bold enough to make a statement but sophisticated enough for any setting.
Color Combinations That Work Beautifully
- Matte burgundy and glossy nude with rose gold separator
- Deep navy and soft pink divided by a holographic line
- Forest green and cream with a gold separator
- Black and warm beige with rose gold metallic
- Dusty purple and champagne with a silver line
Worth knowing: Seal your metallic separator line with topcoat first before painting the adjacent colors — this prevents the colors from bleeding into the metallic line and muddying the crisp division.
8. Textured Glitter Base with Stamped Design
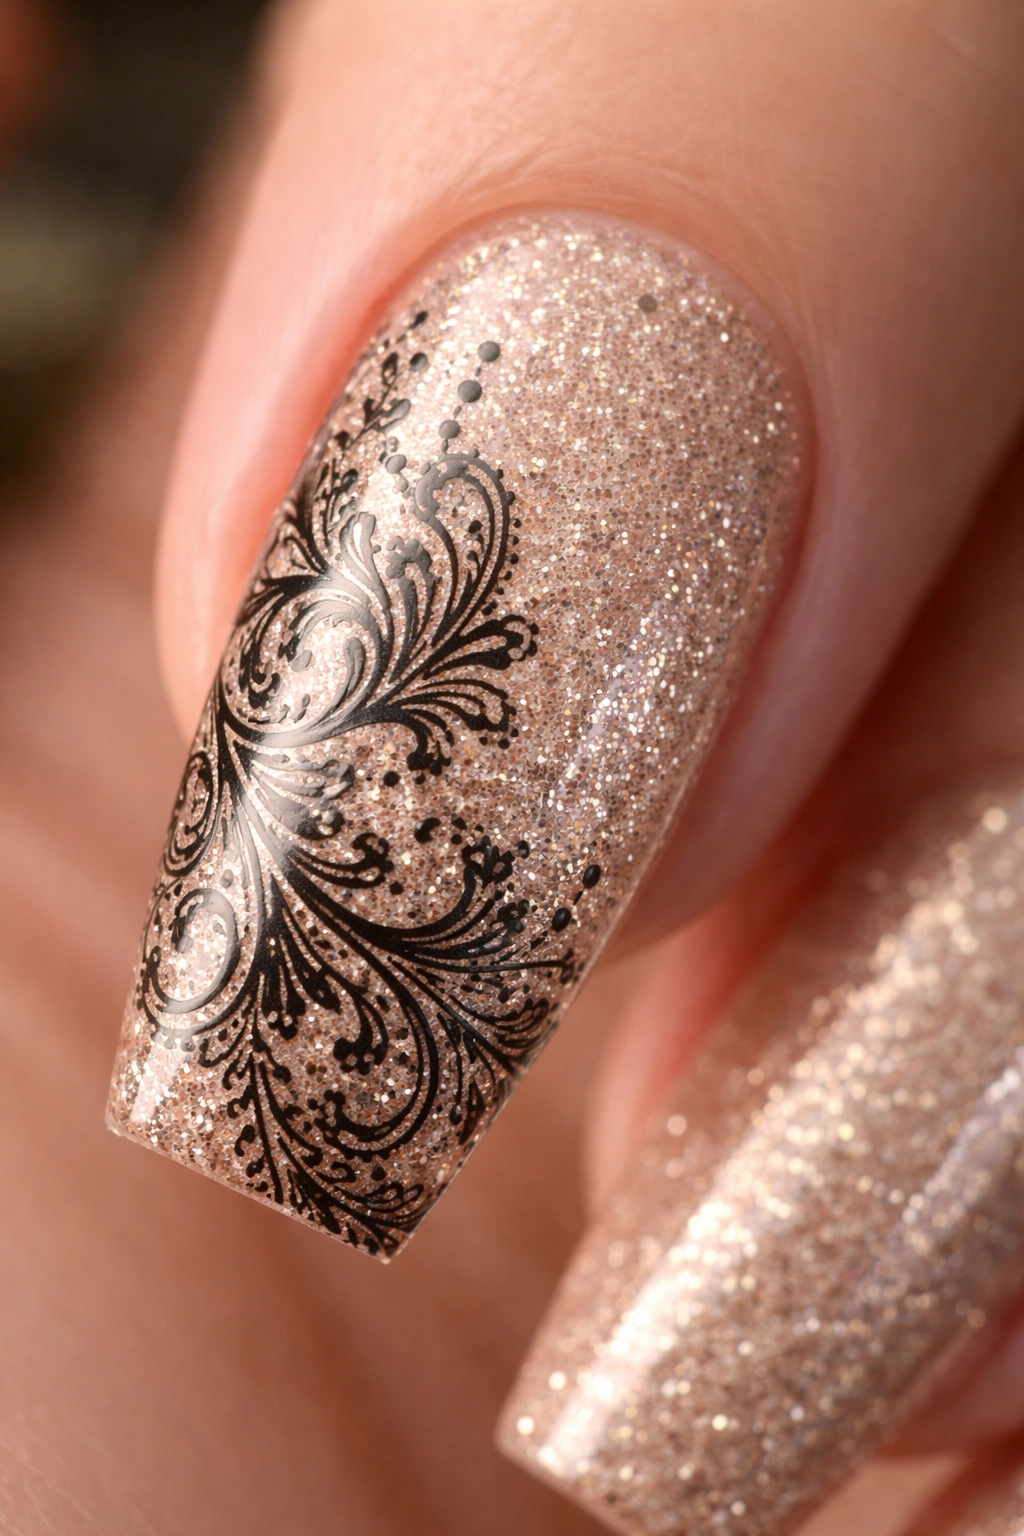
Combining textures creates dimension that photographs beautifully and feels luxe in person. Start with a full glitter base in one color, then stamp detailed designs over top using a contrasting shade. On medium coffin nails, the wider base accommodates both the glitter texture and the stamped pattern without either element fighting for attention. The coffin shape provides the perfect canvas for stamped nail art patterns designed specifically for wider nails.
Why Texture Layering Works on This Shape
Glitter bases catch light and create shimmer, which pairs perfectly with the sophisticated geometry of coffin nails. Stamped designs add fine detail and complexity that elevates the overall look from simple glitter to curated art. The coffin’s size allows both elements to coexist without the design feeling cluttered or chaotic. The result feels intentional and professional rather than accidental.
Building Your Textured Stamped Design
- Apply a neutral or nude gel base coat first
- Mix fine glitter with gel and apply across the entire nail for subtle texture
- Choose a stamper and nail art plate with designs that appeal to you
- Use a contrasting color (metallic or dark shade) to stamp over the glitter
- Try multiple stamps on different areas of the nail rather than one centered design
- Add small hand-painted details with a thin brush between stamped sections if desired
- Seal carefully with topcoat
Pro tip: Don’t apply topcoat too heavily over stamped designs — it can blur the crisp lines. Use thin layers and cure between applications for sharpness.
9. Minimalist Line Art Florals
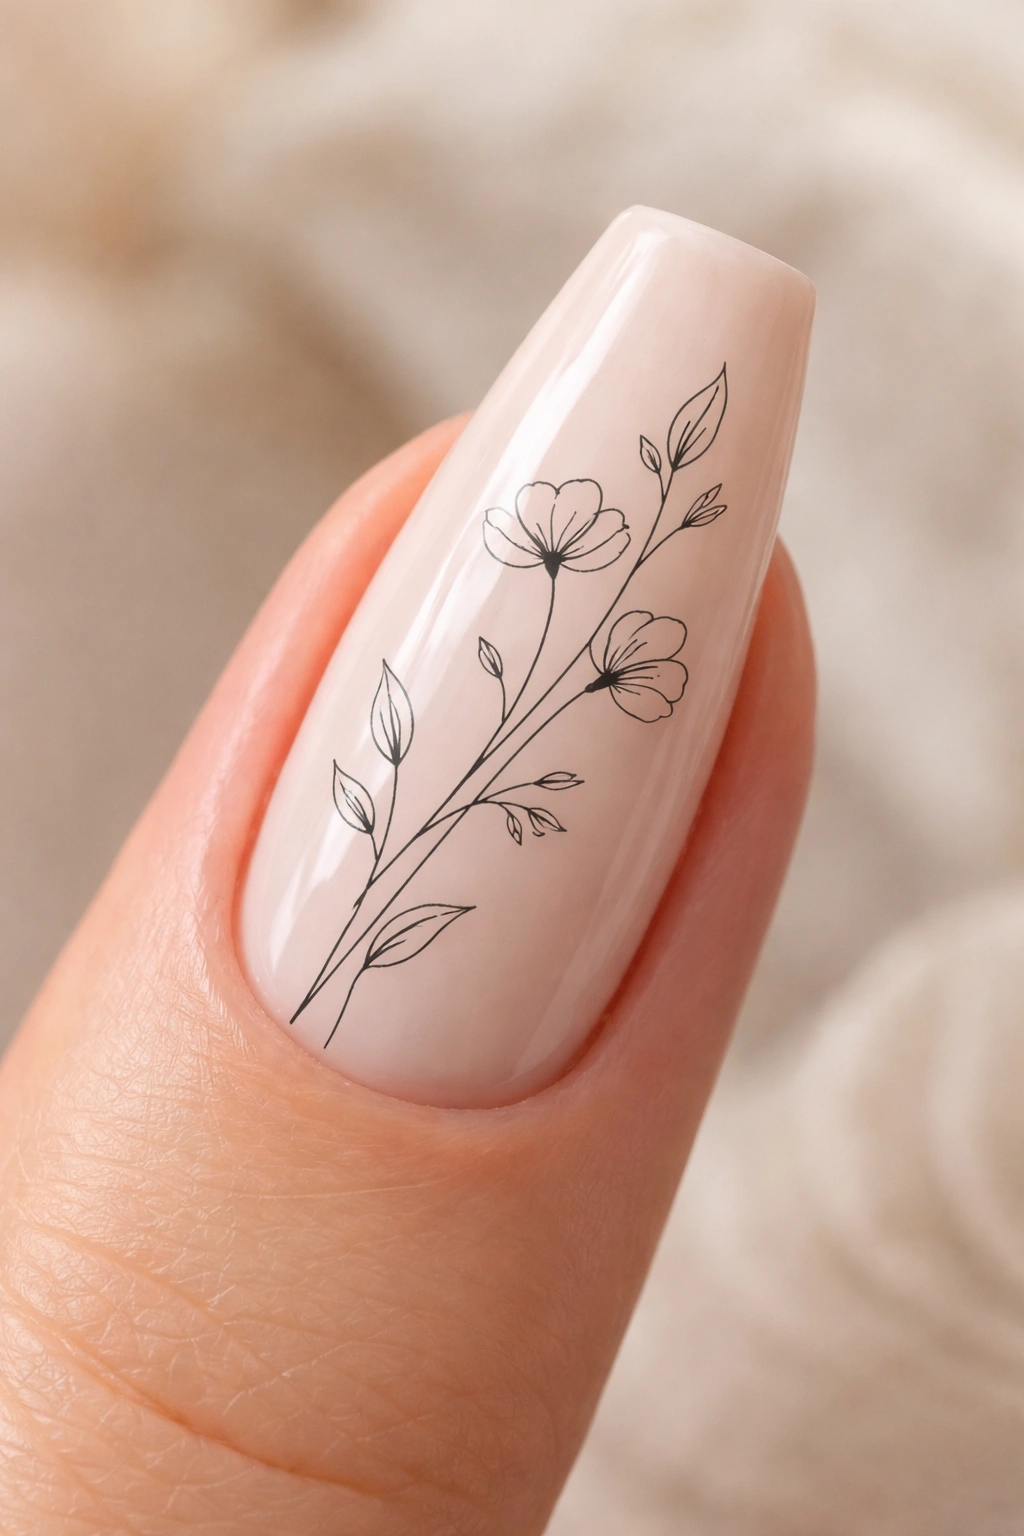
Line art creates elegant designs using just thin outlines and minimal color. For medium coffin nails, draw simple flower shapes, leaf details, and stems using a single dark color or metallic on a light background. The design should feel sketch-like and intentional, with clean lines that aren’t overly ornate. The coffin’s space allows your line work to be visible without crowding the design.
Why This Approach Suits Coffin Nails Perfectly
Line art is inherently elegant and sophisticated — it reads as intentional and artistic rather than decorative. The minimal approach pairs beautifully with the refined geometry of coffin nails. The design is delicate enough for everyday wear but interesting enough to command attention. This style works across personal aesthetics from minimalist to artistic, making it universally flattering.
Creating Clean Line Art
- Use a white, cream, or pale nude base
- Choose a thin detail brush and dark gel or polish (black, deep navy, or forest green)
- Draw simple botanical outlines rather than filled shapes
- Add delicate stems and leaves that flow naturally across the nail
- Include tiny details like stamens or leaf veins with an ultra-thin brush
- Keep the design asymmetrical and organic-looking rather than perfectly centered
Insider note: Sketch your design lightly with pencil on the nail first if you’re unsure — you can erase with a rubber eraser or just paint over it once you’re happy with the layout.
10. Reverse Ombre with Jewel Tones

Reverse ombre inverts the traditional gradient by starting light at the cuticle and building to darker, more saturated color toward the tip. On medium coffin nails, try a reverse gradient using jewel tones — start with pale champagne or cream, transition through mid-tone emerald or sapphire, and deepen to rich jewel-tone at the tips. The coffin’s taper naturally guides this color progression.
Why Reverse Ombre Stands Out on Coffin Shape
Reverse ombre creates visual movement from base to tip that’s the opposite of what people expect, making it feel fresh and intentional. The darker tips naturally draw focus to the nail’s elegant pointed silhouette. The jewel-tone gradient reads as luxe and sophisticated. On medium coffin nails, the effect creates the illusion of additional length without being overdone or fragile.
Building the Reverse Jewel-Tone Gradient
- Start with a pale champagne or nude base
- Create a midpoint where you begin blending in your chosen jewel tone
- Use a sponge or blending brush to gradually deepen the color toward the tips
- Build the color slowly with multiple thin layers rather than one heavy application
- The deepest jewel tone should concentrate at the very tip of the coffin shape
- Seal with glossy topcoat for that luminous jewel-tone shine
Worth knowing: Jewel tones photograph beautifully and look even more striking in person — they’re genuinely worth trying even if you usually prefer lighter shades.
11. Gold Foil Accents with Solid Color Base
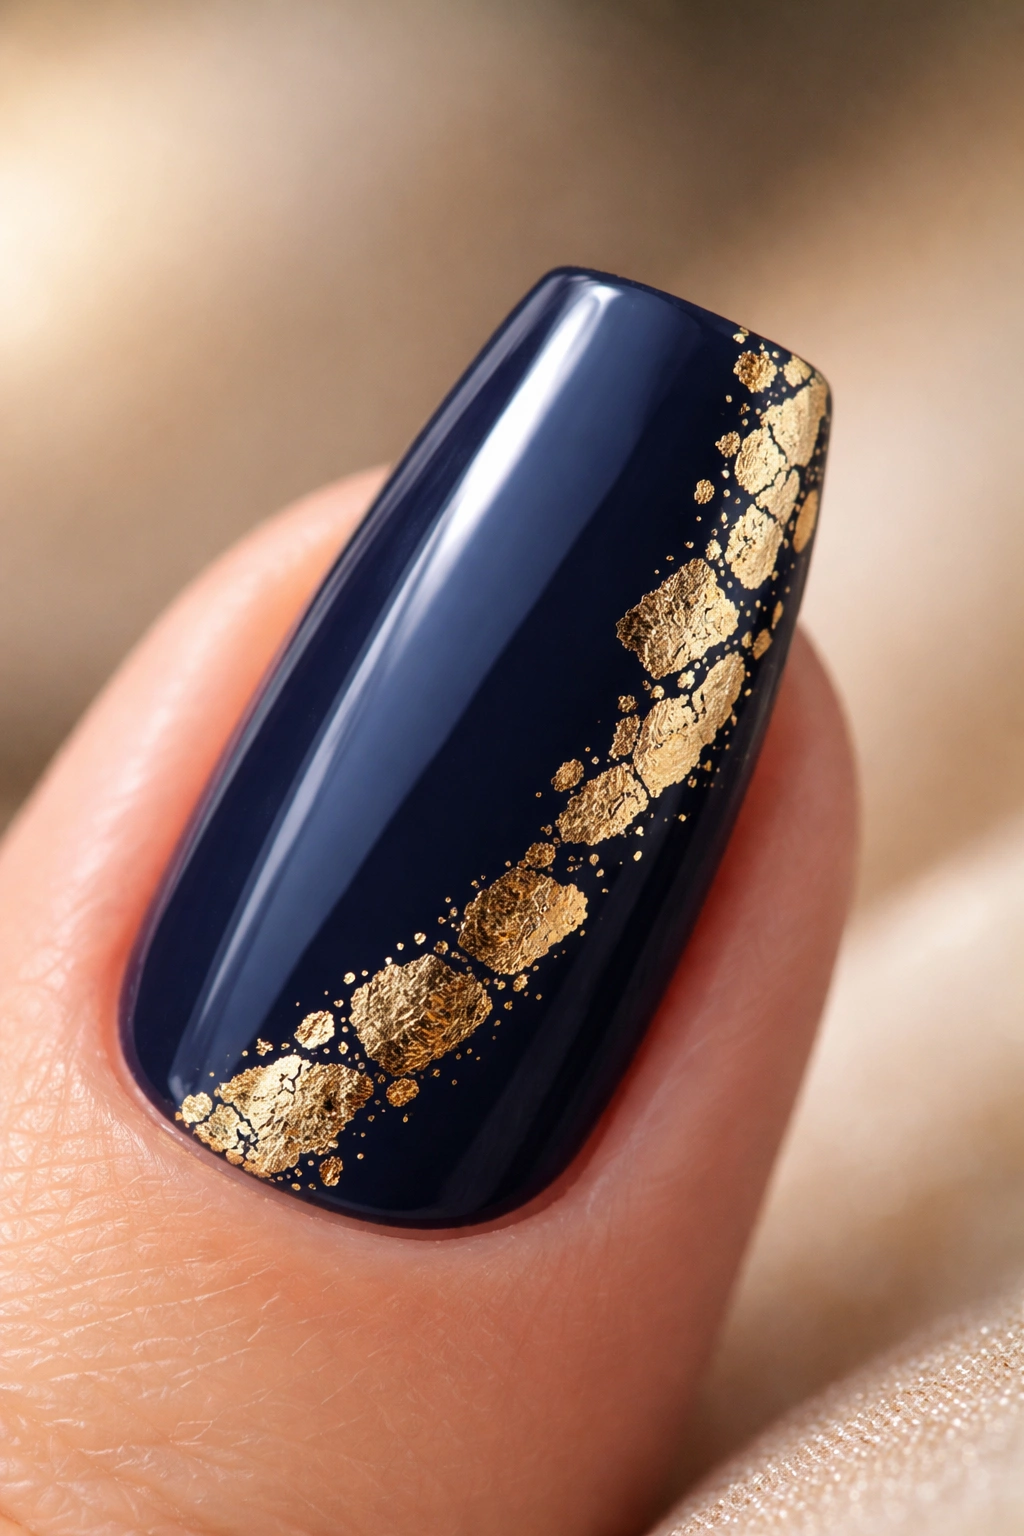
Gold foil creates texture and sparkle with a dimensional, elevated look that’s distinctly different from glitter. On medium coffin nails, apply a solid gel color base, then strategically place pieces of gold foil on select sections — maybe just the tips, maybe along one side, or perhaps in a geometric pattern. The foil’s reflective quality creates luxury without the full-coverage commitment of a glitter design.
Why Foil Details Enhance the Coffin Silhouette
Gold foil catches light beautifully and creates dimension that makes even a simple solid color base feel designed and intentional. The strategic placement means the foil emphasizes the coffin’s natural structure rather than covering it. This technique feels modern and upscale while remaining practical for everyday wear. The coffin’s size accommodates foil placements without them looking accidental or unbalanced.
Applying Gold Foil Effectively
- Paint your chosen solid color base across the entire nail
- Allow the base to cure if using gel
- Cut small pieces of gold foil or use pre-cut foil pieces designed for nails
- Apply a thin layer of sticky gel or foil adhesive where you want the foil to stick
- Press the foil firmly onto the adhesive and hold for several seconds
- Seal with topcoat to secure the foil and create a smooth, finished surface
- Consider adding a second foil piece on an adjacent nail for balance across your mani
Pro tip: Use foil on just your accent nails (ring and pinky fingers) with solid color on the others for a more wearable, balanced look.
12. Gradient French with Ombre Tips
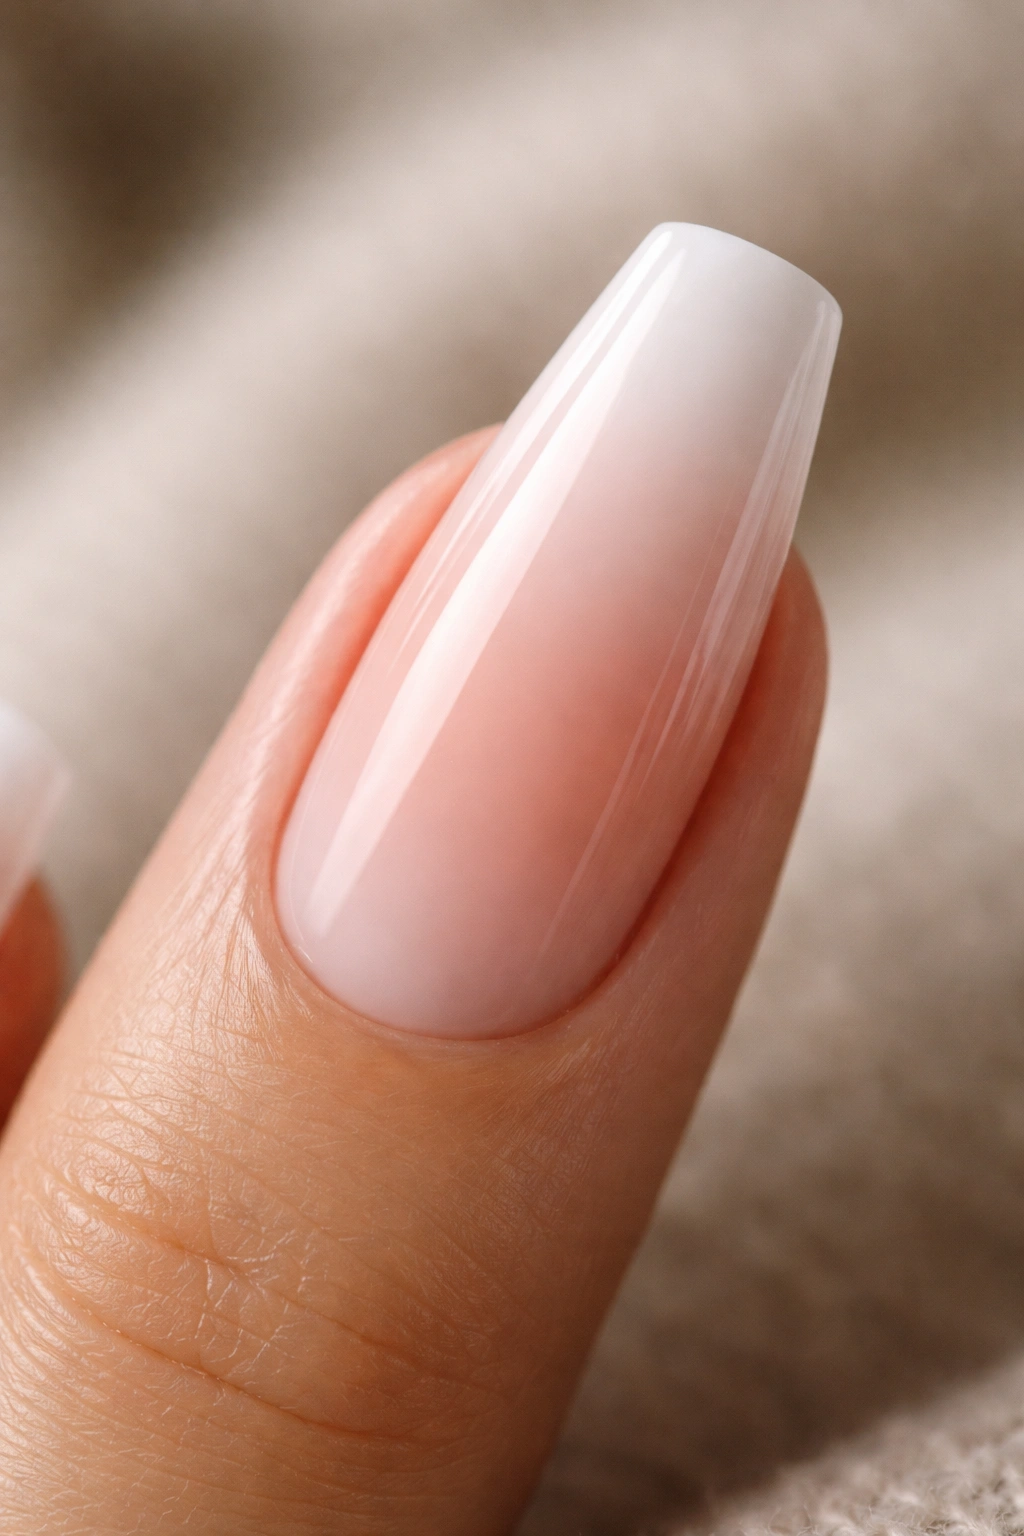
Gradient French designs blend the classic French manicure with modern ombre techniques. On medium coffin nails, keep the traditional white tip but create an ombre effect where the tip color fades gradually into your chosen base shade. The transition should happen gradually across the wider base of the nail, creating soft movement from base to tip. The coffin shape naturally showcases this transition beautifully.
Why This Hybrid Design Works for Coffin Shape
Gradient French nails feel modern while maintaining the elegance of a classic French tip. The ombre transition creates visual interest without being busy or trendy in a way that ages quickly. The coffin’s natural taper guides the gradient effect perfectly. The design is sophisticated enough for professional settings while still feeling intentional and designed rather than basic.
Creating Your Gradient French Ombre
- Select your base color and a white or pale shade for the tips
- Paint the entire nail with your chosen base color base coat
- Using a sponge or blending brush, gently dab white at the very tips
- Blend the white toward the base using a clean, slightly damp blending sponge
- Create multiple passes with the sponge for a gradual, soft transition
- Optional: add a thin gold or metallic line at the precise tip for extra definition
- Seal with glossy topcoat for a polished, elegant finish
Insider note: The key to believable gradient French is patience — multiple thin blending passes create a smoother transition than one heavy application.
13. Constellation Dot Design with Connected Stars
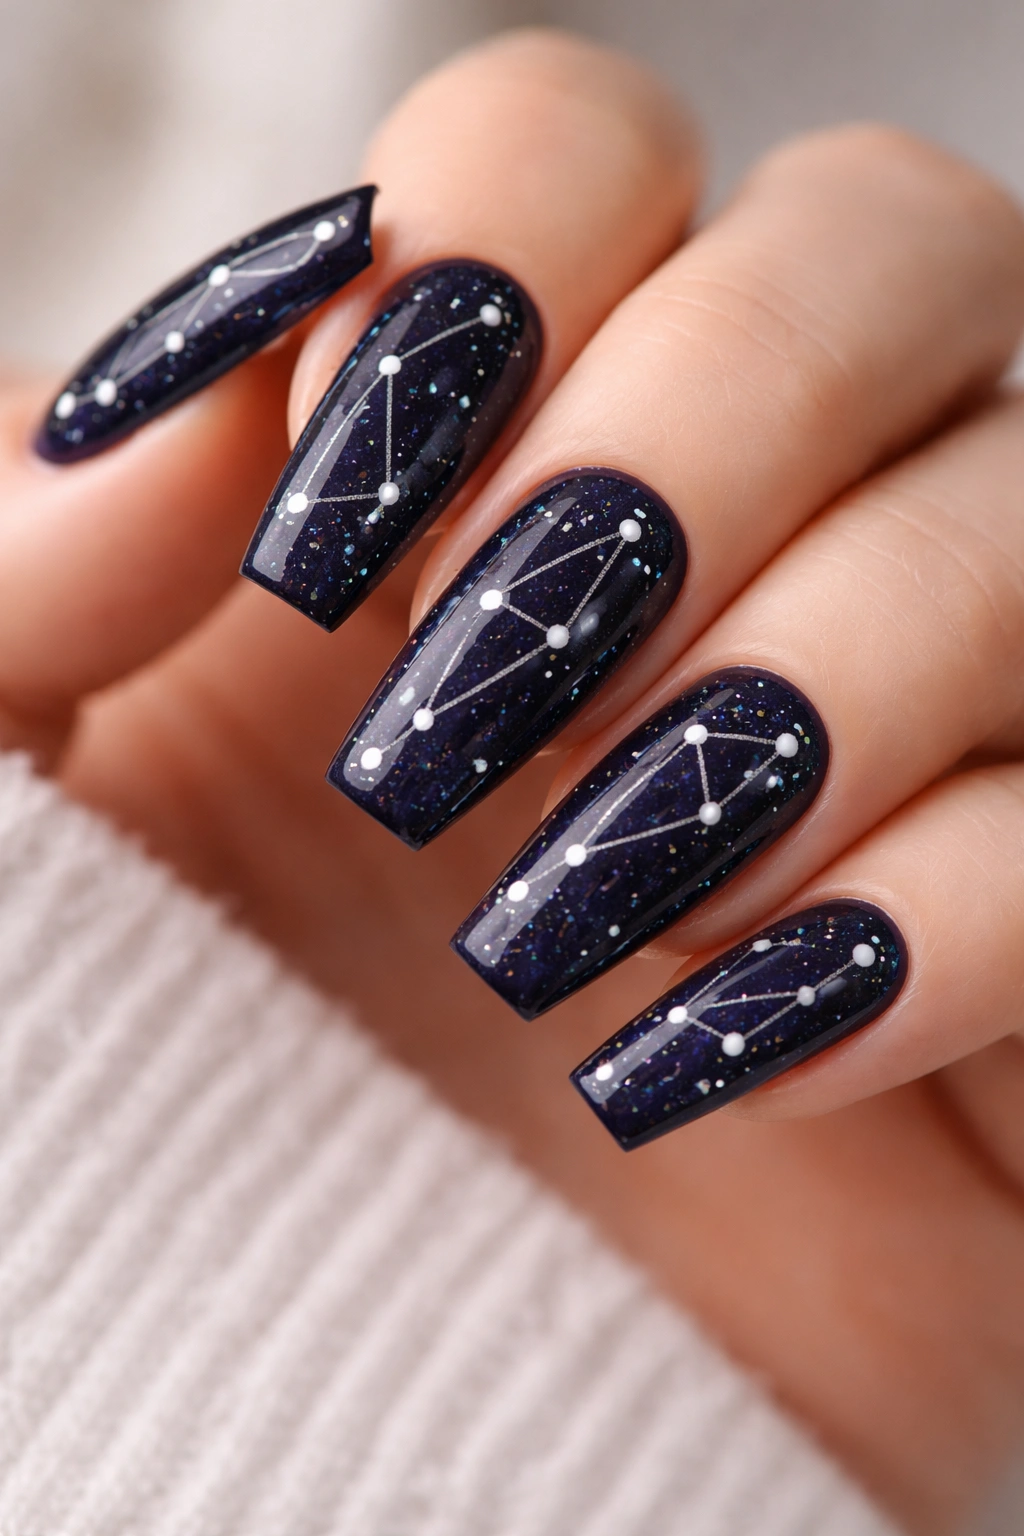
Constellation designs create a sense of wonder and movement by connecting tiny dots with delicate lines. On medium coffin nails, create a simple constellation pattern using a dark or metallic base and dot the stars in contrasting color, then connect them with barely-there lines. The coffin’s space allows the constellation to sprawl naturally without feeling cramped or cluttered.
Why Constellation Designs Suit Coffin Nails
Constellation designs feel whimsical and artistic without being overly busy or hard to maintain. The scattered dot placement works beautifully with the coffin’s natural proportions. The design reads as intentional and trendy without being date-specific. Medium coffin nails provide enough surface area to create recognizable constellations without the design feeling too small or hard to see.
Building a Constellation Design
- Choose a dark base color (black, deep navy, or dark teal) or a light shade if you prefer
- Use a dotting tool or the end of a thin brush dipped in white, gold, or silver
- Create small dots scattered across the nail representing stars
- Connect selected dots with extremely thin lines using a thin detail brush
- Vary the line thickness slightly for a more organic, hand-drawn appearance
- Add an extra-thin outline around some dots for emphasis if desired
- Seal with glossy topcoat
Pro tip: Look up actual constellation patterns and recreate one you love — this makes the design feel more intentional and interesting than random dot placement.
14. Ombré Glitter with Pearl Accents
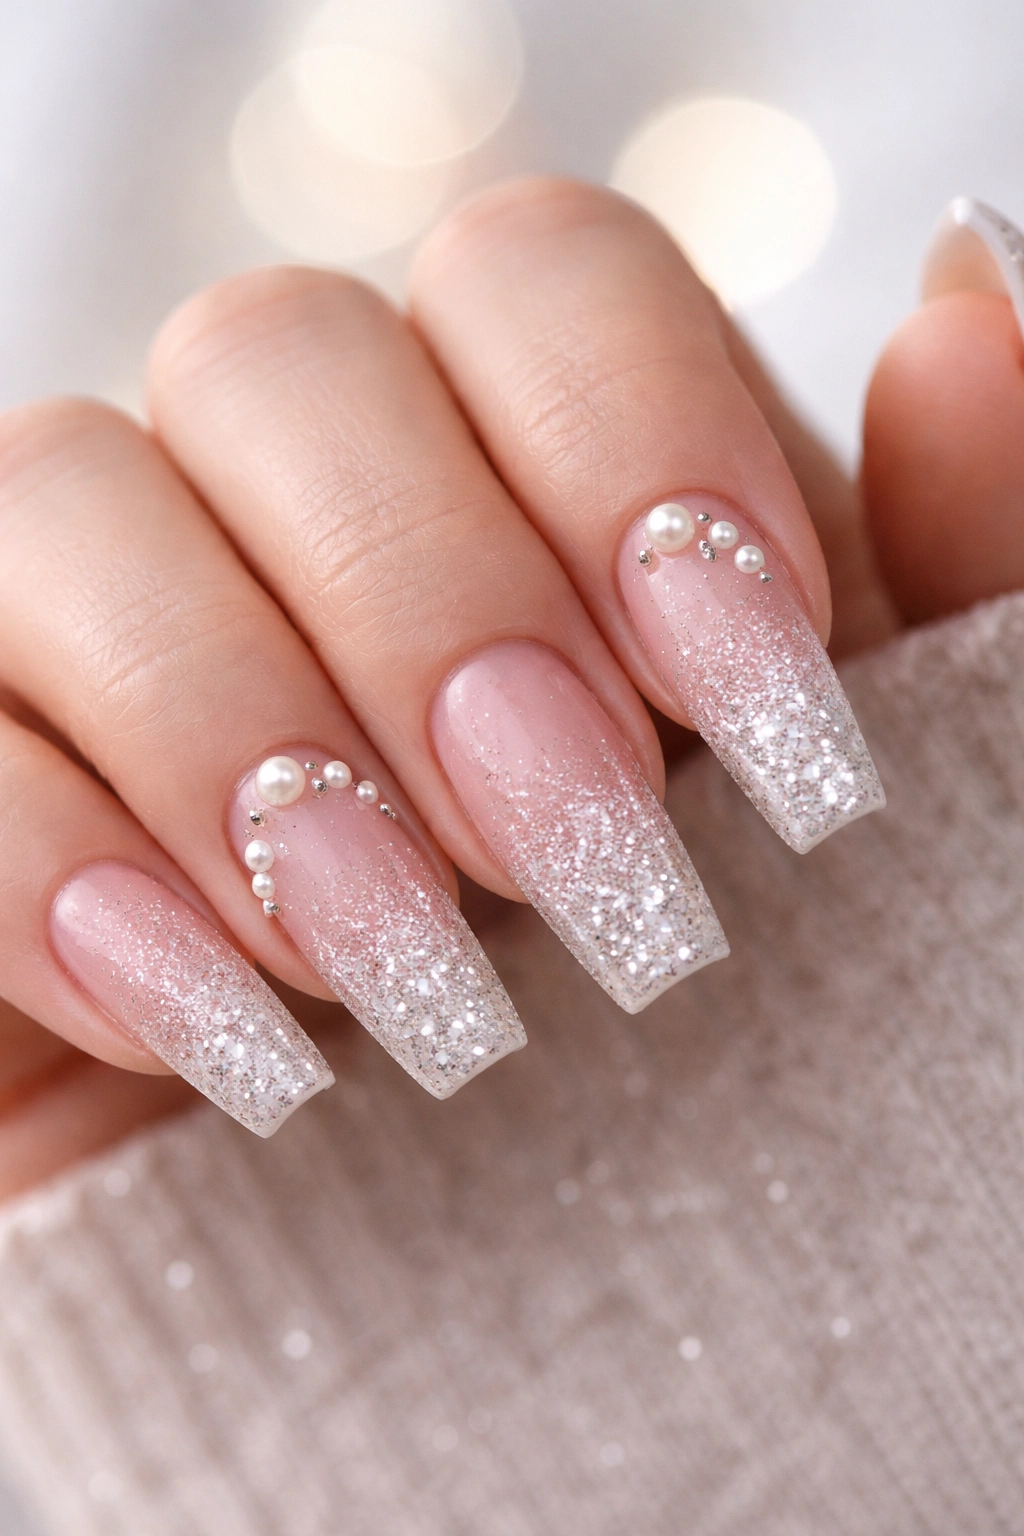
Combining glitter ombré with pearl elements creates sophisticated dimension and catches light in multiple ways. On medium coffin nails, create an ombré glitter effect as a base, then layer pearl powder or pearl elements over specific sections — maybe just the tips, maybe in small concentrated areas. The combination of sparkle and shimmer creates a genuinely luxe finish that feels high-end.
Why This Combination Elevates Medium Coffin Nails
Glitter and pearl reflect light differently, creating dynamic visual interest from every angle. The combination feels upscale and intentional without being chaotic. The coffin’s size allows both elements to coexist without overpowering each other. The design works equally well in neutral or jewel-tone color palettes, making it universally flattering and wearable.
Layering Glitter and Pearl
- Create your ombré glitter base first (refer to design #4 for detailed steps)
- Allow the glitter to cure fully
- Mix pearl powder with clear or tinted gel in a 1:2 ratio
- Apply the pearl mixture to select areas — tips, side portions, or scattered across the base
- Use a thin brush or dotting tool to create patterns or scattered placement
- Layer multiple very thin applications of pearl rather than one heavy coat
- Seal everything with clear glossy topcoat that enhances the iridescence
Worth knowing: Pearl accents work best when you use a light touch — less is more, and you can always add more if needed.
15. Negative Space Geometric Base with Stamped Detail
Combining negative space structure with stamped details creates visual complexity that feels intentional and designed. On medium coffin nails, block in geometric sections using negative space (leaving some nail exposed), paint those sections with solid colors or subtle textures, then stamp coordinating designs over the colored sections. This creates a frame within a frame effect that’s visually sophisticated.
Why This Combination Works Beautifully on Coffin Shape
The geometric framing naturally complements the coffin’s structured silhouette. Stamped details add fine pattern and interest without the overall design feeling chaotic. The negative space keeps the design from feeling heavy while the stamped details prevent it from feeling too minimal. The coffin’s size accommodates both elements without cramping. The result looks like intentional nail art rather than random decoration.
Building Your Geometric Stamped Design
- Use thin striping tape to create geometric sections (triangles, trapezoids, or angular shapes)
- Paint some sections with solid color and others with subtle texture or glitter
- Remove the tape carefully while polish is still slightly tacky
- Select a stamper plate with detailed designs that coordinate with your color palette
- Stamp designs within the colored sections using a contrasting color
- Add hand-painted details or accent lines between stamped areas if desired
- Seal with topcoat, applying carefully to avoid smudging the detail work
Pro tip: Plan your geometric layout on a piece of paper first — this prevents mistakes and ensures balanced, intentional placement of both the tape layout and the stamped designs.
Final Thoughts
Medium-length coffin nails hit a sweet spot between bold visual impact and everyday practicality, making them the perfect foundation for freestyle designs. The key to maximizing this nail shape is choosing designs that work with the coffin’s natural geometry rather than fighting against it — the width at the base, the gradual taper, and the squared-off tip all become assets when you select designs intentionally.
The freestyle concepts here run the full spectrum from minimalist and professional to bold and artistic, which means you can adapt them to match your personal style, lifestyle, and comfort level. A conservative ombre French gradient works beautifully in corporate settings, while a celestial moon phase design or constellation pattern lets you express more creative personality in casual environments. The medium length also makes these designs maintainable without constant touch-ups — you don’t sacrifice durability for artistry.
Remember that freestyle doesn’t mean freehand or difficult. Using tools like striping tape, dotting tools, stamping plates, and stencils removes the technical barrier and lets you focus on the creative choices. Whether you’re painting these yourself at home or describing them to a nail professional, the specific combinations and techniques in this guide give you the language and framework to communicate exactly what you want. Start with one design that calls to you, perfect your technique, and then experiment from there — your medium coffin nails are genuinely ready for whatever creative direction you choose.
