

Red and black have always been the ultimate power couple in nail design. The combination is bold, edgy, and undeniably striking — it works for everyone from rock-and-roll enthusiasts to sophisticated minimalists. What makes this pairing especially compelling on medium-length coffin nails is how the elongated coffin shape amplifies the drama of these two colors working together. Medium nails give you enough canvas to play with intricate patterns, ombre effects, and detailed accents without the fragility concerns that come with extremely long nails. If you’ve been scrolling through nail inspiration and wondering exactly how to style coffin nails in red and black, you’re about to discover 16 genuinely different approaches — each one distinctly its own aesthetic, from ultra-glossy and glamorous to matte and moody.
1. Classic Red and Black Ombre
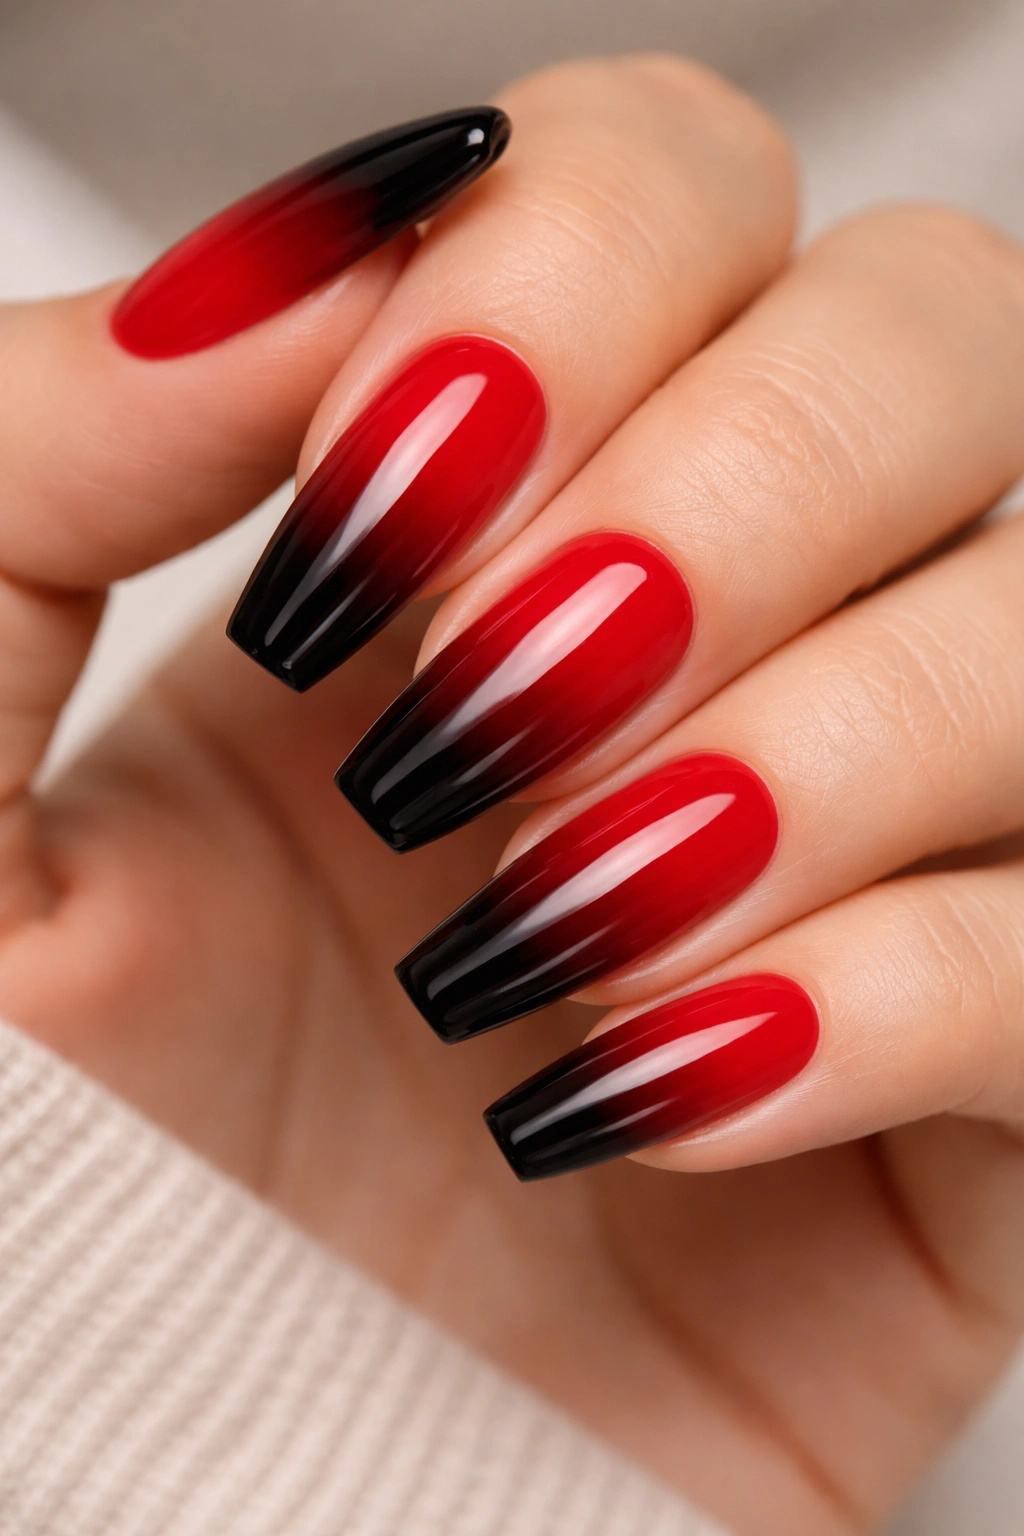
The ombre effect has remained a staple for good reason — it’s visually stunning and works across virtually every color combination you can imagine. With red transitioning into black, you create a gradient that feels sophisticated yet undeniably bold. This works best when the red dominates the base and nail bed, gradually deepening as it moves toward the tips, with black taking over at the very edge. The medium coffin length lets the ombre gradient show clearly without looking cramped or overly concentrated.
Why This Design Works
The beauty of an ombre effect lies in how it creates movement and depth. Rather than having two stark colors battling for attention, the gradient bridges them together seamlessly. On coffin nails, the natural elongation of the shape lets the color transition flow naturally from base to tip, which is precisely how ombre effects are meant to look. The result feels more intentional and artistic than having a hard line dividing colors.
How to Achieve This Look
- Use a cosmetic sponge to dab the red and black polish onto the sponge, overlapping them slightly in the middle
- Press the sponge gently onto your nail in a dabbing motion (not a dragging motion) to avoid streaks
- Start with lighter pressure and build up gradually to create a smooth blend
- Set with a glossy topcoat for a seamless, blended appearance
- Apply 2-3 coats if the ombre looks patchy after the first application
Pro tip: A high-quality topcoat makes the difference between an amateur-looking ombre and a salon-quality gradient. Invest in a smooth, self-leveling topcoat to blur any visible transitions between colors.
2. Geometric Half-and-Half Design
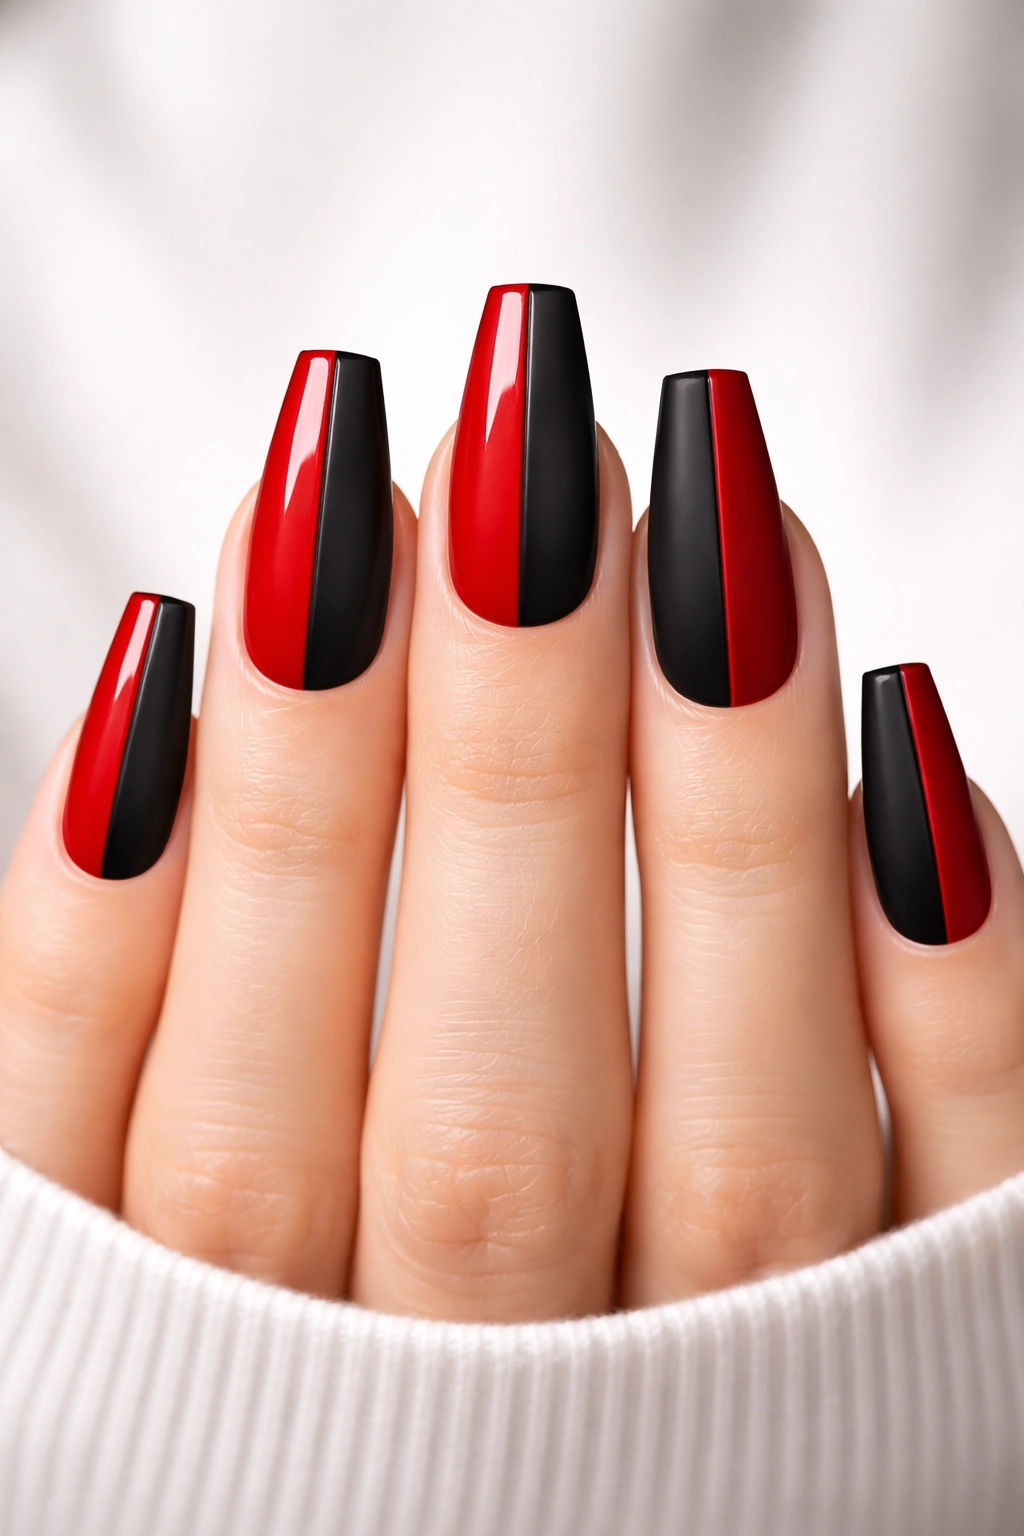
If you prefer clarity and bold graphic contrast, the geometric half-and-half split is your answer. This design divides the nail vertically straight down the middle — one side glossy red, the other side matte black. The stark division creates visual interest through pure contrast and symmetry. On medium coffin nails, this geometry feels modern and intentional without looking too extreme or hard-edged.
Why This Design Works
Geometric designs work because they feel deliberate and architectural. There’s something satisfying about the perfect vertical line dividing two colors — it’s bold without being chaotic, and it photographs exceptionally well. The medium length of coffin nails means the division line runs long enough to be the clear focal point without disappearing into a sea of extra length.
How to Achieve This Look
- Paint one full nail in glossy red and allow it to dry completely
- Use a thin nail art brush or striping brush to paint a precise vertical line down the center with matte black
- Alternatively, use a nail striping tape to create the division line, then fill each side with its respective color
- Seal the glossy side with a glossy topcoat and the matte side with a matte topcoat
- Clean up the center line with rubbing alcohol on a thin brush if there’s any overlap
Worth knowing: The precision of this design is everything. Take your time with the center line — an unsteady line will make the whole design look less intentional, no matter how perfect the colors are.
3. Red Base with Black Matte Accents
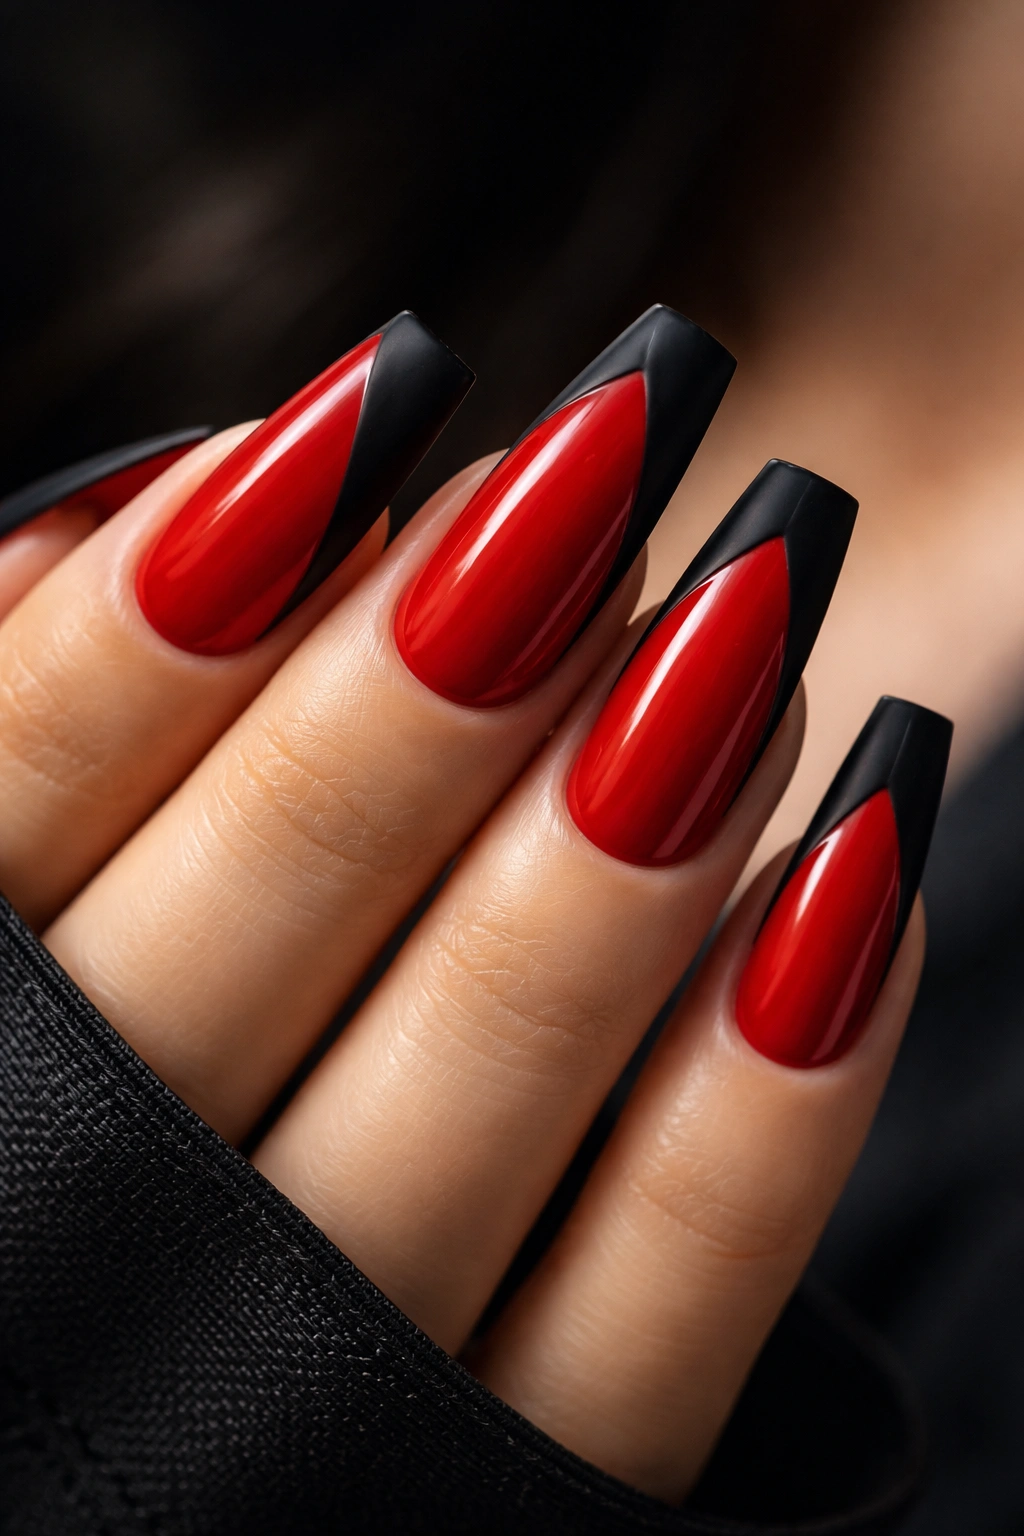
This design keeps red as the dominant color while using black as a supporting player. The entire nail starts as a glossy red base, and then matte black accents are added as details — perhaps on the tips, as a frame around the edges, or as small geometric shapes. The contrast between the glossy red and matte black creates subtle but significant visual depth. Medium coffin nails make these accents visible without overwhelming the base color.
Why This Design Works
This approach appeals to people who love red but want something a bit more interesting than solid color. The matte black accents add complexity and texture variation, which keeps the design from feeling flat or one-dimensional. The glossy-matte combination is inherently interesting because it catches light differently in different areas of the nail.
How to Achieve This Look
- Paint all nails with two coats of glossy red polish
- Once dry, use a thin brush to apply matte black polish to create your chosen accent pattern
- Black tips create a French-ombre effect; black frames create a border; black geometric shapes add modern flair
- Apply matte black carefully — it doesn’t need to be perfectly pristine, as some slight imprecision can add to the artistic quality
- Seal with a clear, glossy topcoat over everything to even out the finish (or use a matte topcoat if you want the matte effect to dominate)
Insider note: If you’re not confident in freehand brush work, use a thin striping tape to create precise lines or shapes before applying the matte black.
4. Black Base with Red Gold-Foil Details
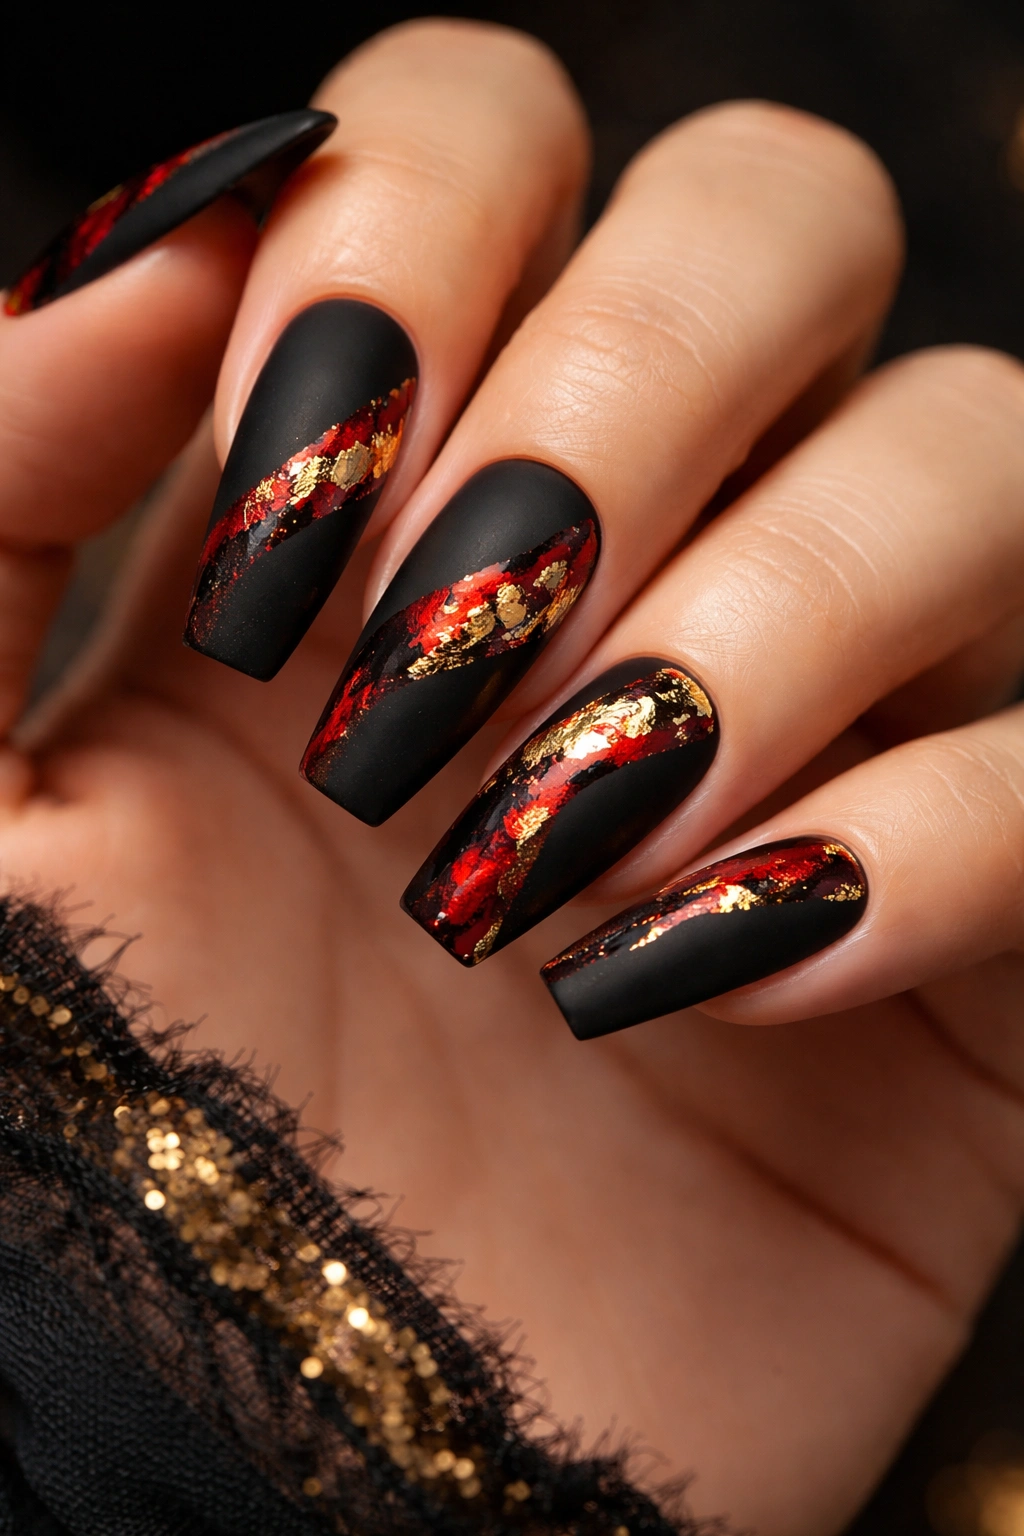
This inverted approach starts with a deep matte black as the primary color, then incorporates red through metallic gold-foil accents. Gold foil catches light beautifully and creates a luxurious feel that elevates the red-and-black combination from edgy to glamorous. You might apply gold-foil details in geometric patterns, scattered randomly, or concentrated at the tips and edges. Medium coffin nails showcase foil details beautifully without the details getting lost.
Why This Design Works
Gold foil is a game-changer for adding dimension and luxury to any nail design. It’s not just red and black anymore — it’s red, black, and metallic gold creating a more sophisticated palette. The matte black provides the perfect backdrop for foil to shine without competing with shine from the base. This design reads as intentionally glamorous rather than just combining two dark colors.
How to Achieve This Look
- Paint nails with two coats of matte black polish
- Use a nail art adhesive (found in nail supply kits) on areas where you want to place foil
- Press gold foil onto the adhesive-covered areas, then brush away loose foil with a soft brush
- Add thin lines of red using a striping brush or thin nail art brush to accent the gold foil
- Seal everything with a glossy topcoat
Real talk: Not all gold foils are created equal. Invest in high-quality foil from beauty supply stores rather than craft foil — the difference in adherence and appearance is noticeable.
5. Marble Effect Red and Black
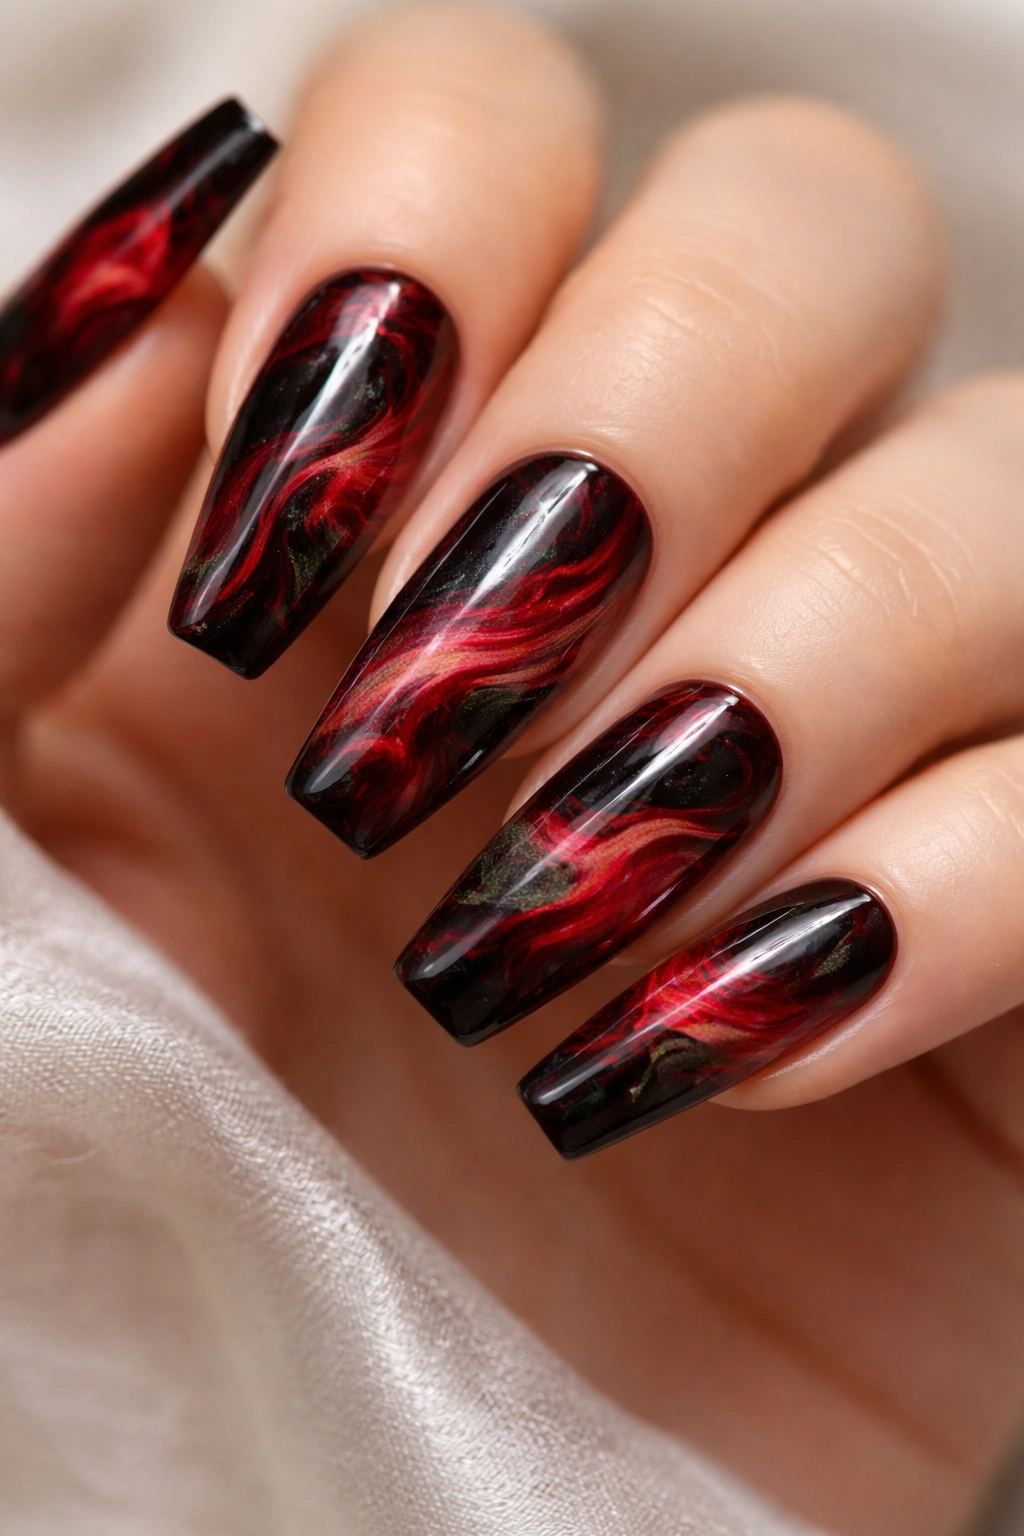
A marble or watercolor effect with red and black creates an organic, flowing design that feels artistic and less structured than geometric patterns. The colors swirl together naturally, creating the appearance of stone or ink in water. This effect works exceptionally well on coffin nails because the elongated shape gives the marble pattern room to move and flow. The result is dramatic without feeling overdone.
Why This Design Works
Marble effects are enduringly popular because they feel sophisticated yet approachable. Unlike geometric patterns that demand precision, marble effects actually improve if they’re slightly imperfect — that’s what makes them look natural and organic. Red and black create especially striking marbling because the contrast is high, making the effect highly visible and dramatic.
How to Achieve This Look
- Start with a glossy white or nude base for best color visibility (optional, but improves the marble effect)
- Using a water cup, drop alternating dots of red and black polish into the water, then swirl with a toothpick
- Dip your nail into the water at the edge of the design pattern at a slight angle
- Roll your finger to ensure the entire nail surface touches the design
- Immediately dip your nail into warm water to remove excess polish, then dry and seal
- Apply a topcoat to protect the design
Pro tip: The water marble technique takes practice. Try it on practice nails or use stencils designed for water marbling until you get the technique down.
6. Striped Red and Black Pattern
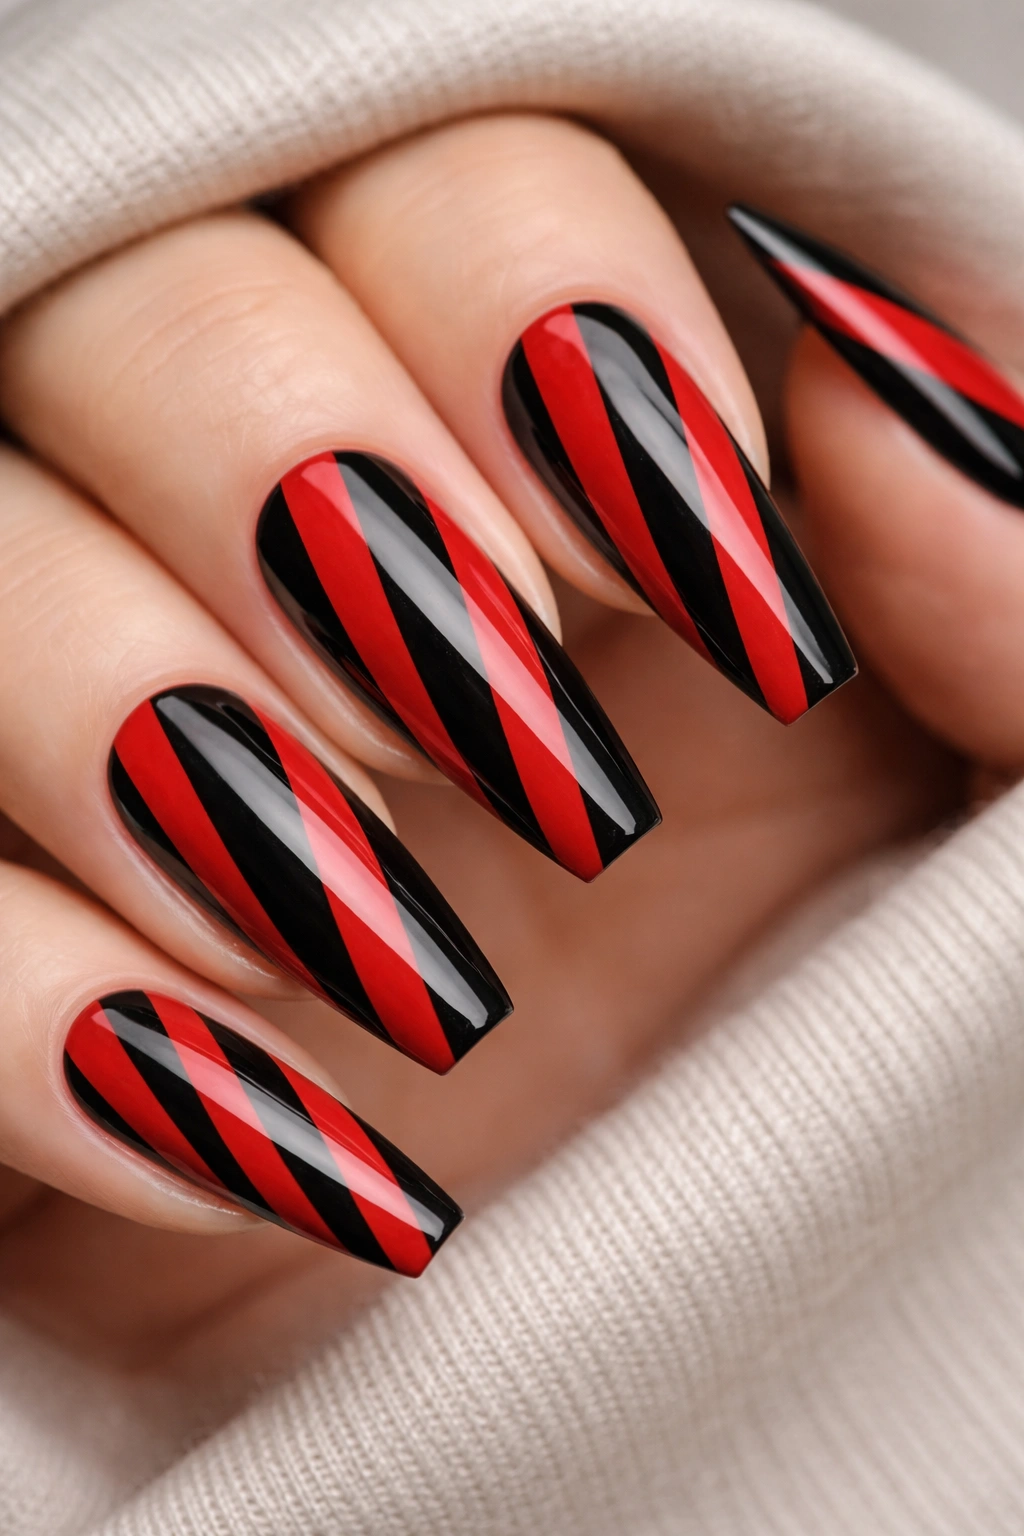
Bold, confident stripes in alternating red and black create an eye-catching design that’s both retro and modern depending on stripe width and angle. Thin stripes feel delicate and intricate; thick stripes feel bold and graphic. Diagonal stripes add movement; vertical stripes feel structured. On medium coffin nails, stripes run the length of the nail without looking cramped or too busy.
Why This Design Works
Stripes are iconic for a reason — they’re universally flattering and work across virtually every aesthetic. The red-and-black combination in stripe form looks rock-and-roll, circus-inspired, or art deco depending on how thick the stripes are and what angle you paint them. Medium coffin nails let stripes be the clear focal point without the design feeling overwhelming.
How to Achieve This Look
- Paint a base in one color (let’s say glossy red) and allow to dry completely
- Use nail striping tape to create evenly spaced lines, or freehand stripes with a thin striping brush
- Paint black polish over the tape or freehand lines
- For diagonal stripes, rotate the nail slightly as you apply tape or paint for a dynamic angle
- Remove tape carefully to reveal clean, sharp stripe lines
- Seal with a glossy topcoat
Worth knowing: Striping tape gives you much cleaner lines than freehand painting, especially if precision is important to the design you’re envisioning.
7. Glossy Red with Black Negative Space
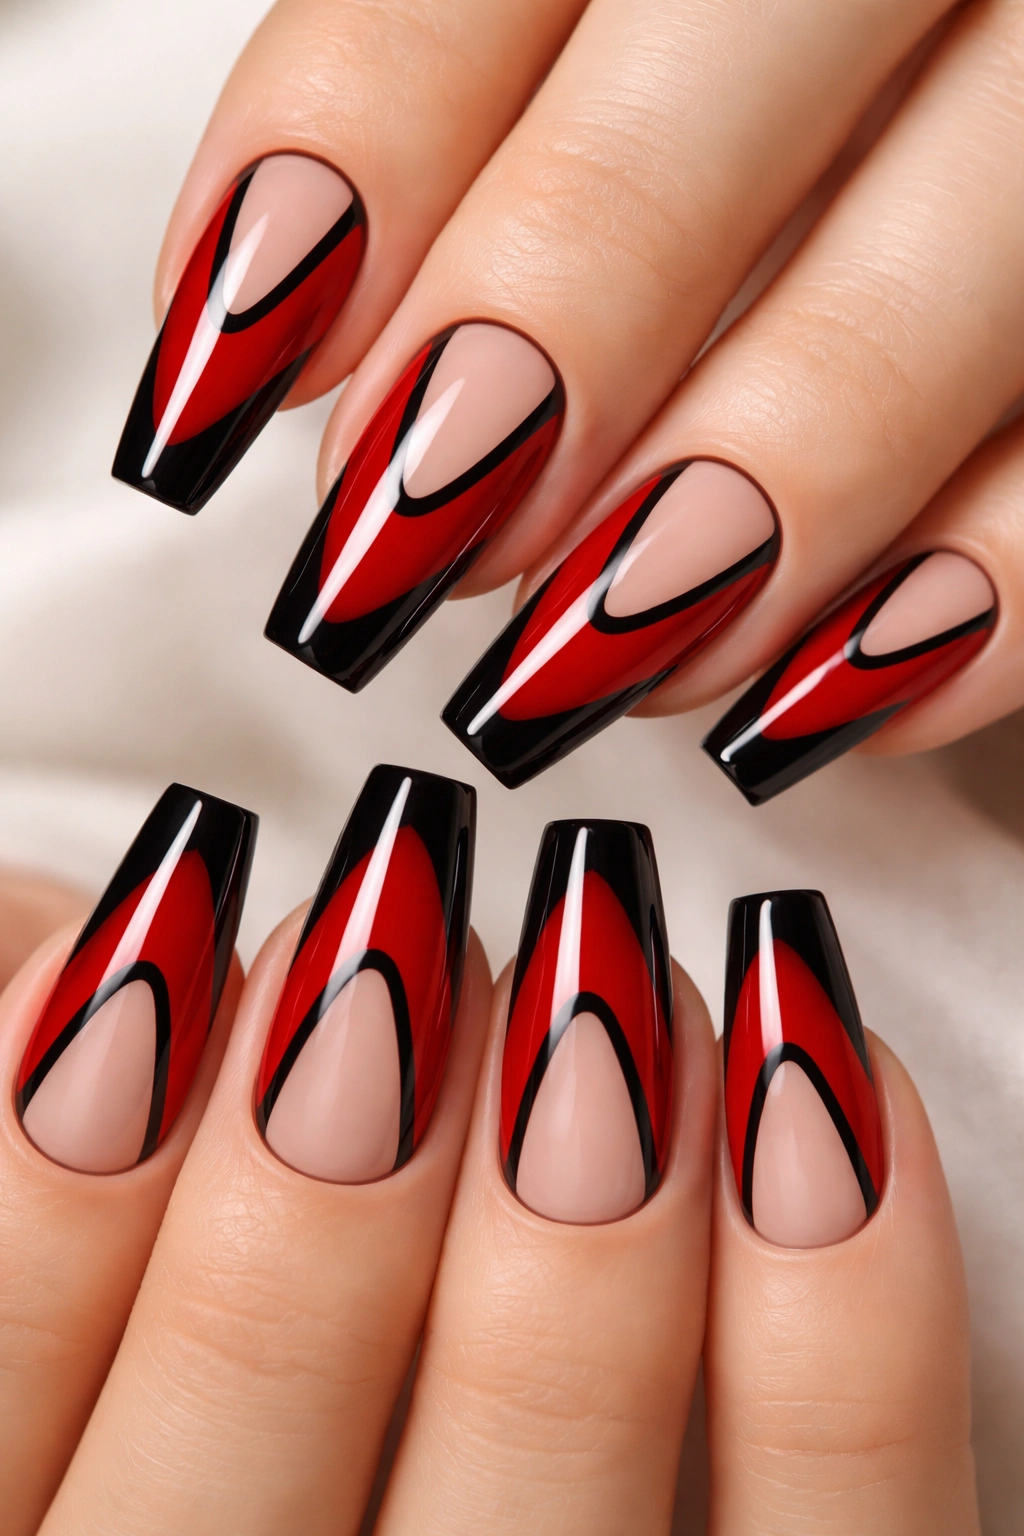
Negative space designs use the natural nail as part of the pattern — you intentionally leave areas unpainted, letting the nail bed show through. With this approach, the coffin nail outline itself becomes visible as a design element, creating a skeleton or outline effect in black while red fills strategic areas. This creates an incredibly modern, minimalist aesthetic that feels high-fashion and intentional.
Why This Design Works
Negative space designs are having a major moment because they feel fresh, contemporary, and artistic. By leaving portions of the nail bare, you’re actively using empty space as a design tool rather than assuming every inch needs polish. Red and black with negative space creates visual intrigue — the eye tracks the outline and the color together, creating movement and sophistication.
How to Achieve This Look
- Sketch your negative space pattern lightly with a pencil to plan where bare nail will show
- Paint the red sections with glossy polish, carefully avoiding the negative space areas
- Once dry, use a thin black brush to outline the negative space areas and create design elements
- Or apply black to the outline of the coffin shape and red in geometric shapes within
- Seal with a topcoat
Pro tip: Use a thin nail art brush or even a toothpick dipped in polish for ultra-precise negative space outlines.
8. Black and Red Glitter Gradient
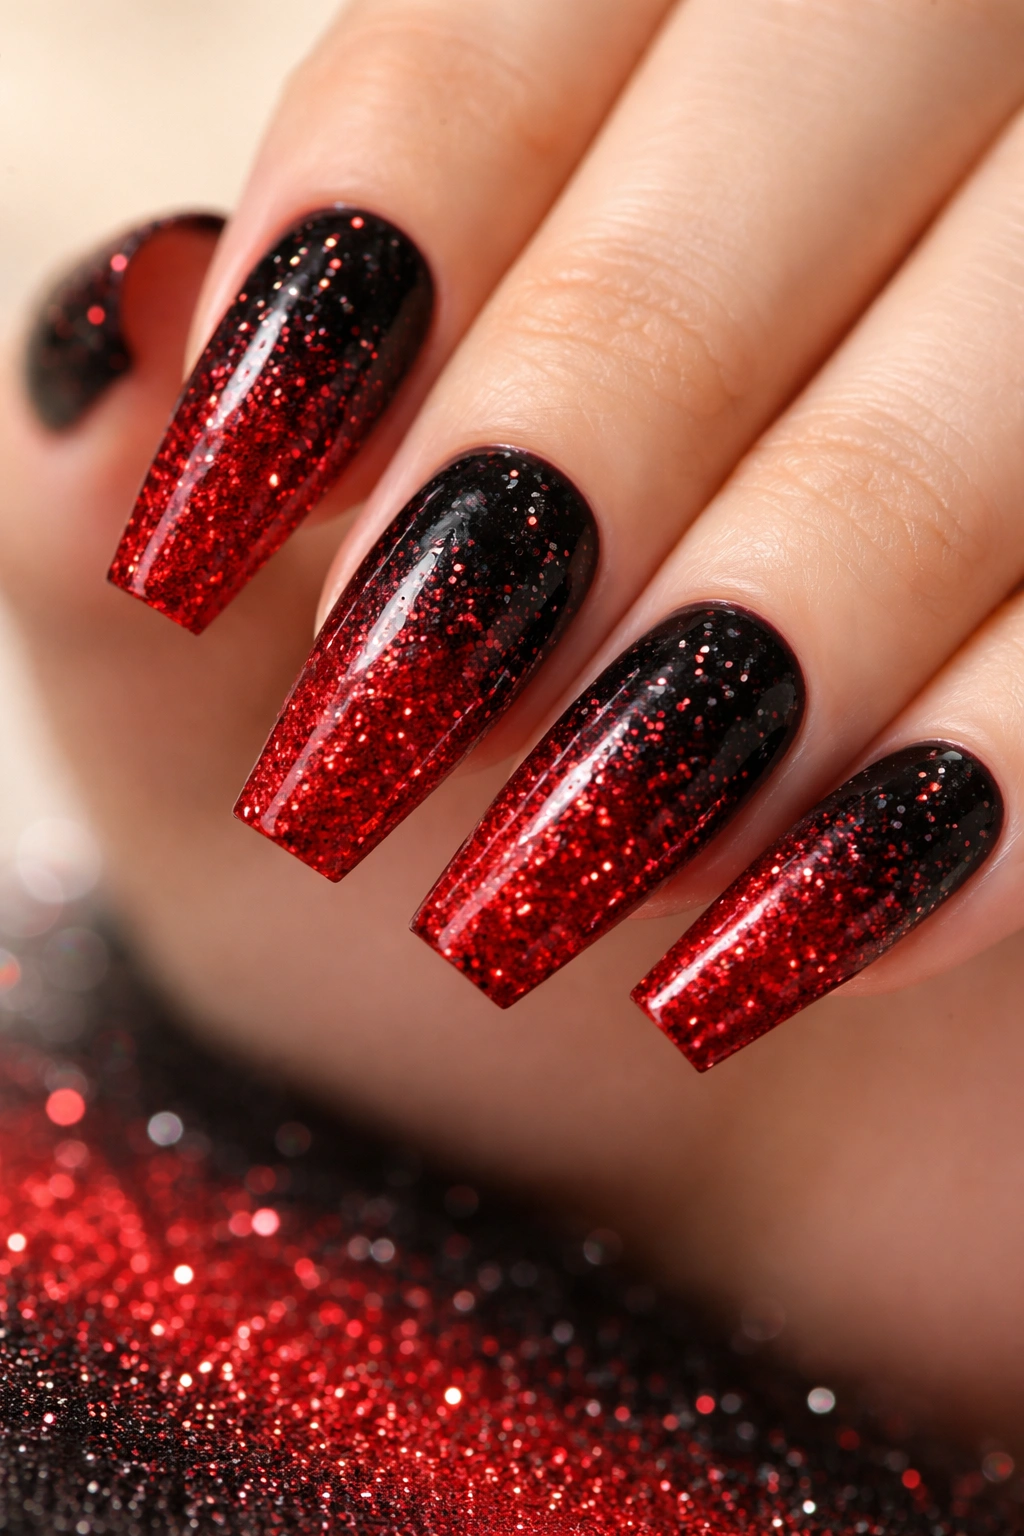
Layer glitter particles over an ombre base to add sparkle and texture. Start with black at the tips and transition to red toward the base, then add a gradient of glitter that mirrors the color gradient below. Red glitter concentrates near the red section, black glitter near the tips, with a mixed glitter gradient in the middle. This creates dimension on multiple levels — color, texture, and light reflection.
Why This Design Works
Glitter adds glamour and catches light constantly, which makes any design feel more special and celebratory. A glitter gradient feels more intentional and sophisticated than random glitter scattered across a solid color. The medium coffin length shows off the glitter gradient beautifully without the nails looking overstuffed with too much texture.
How to Achieve This Look
- Create an ombre base transitioning from black tips to red base as described in design #1
- Using a sponge, dab loose glitter particles onto each section while the base is still slightly tacky
- Alternatively, mix glitter into a clear gel base and apply it as a gradient overlay
- Use red holographic glitter where the nail is red, black glitter where the nail is black
- Seal everything with a glossy topcoat to lock glitter in place and create a smooth surface
Worth knowing: Loose glitter can be unpredictable — some particles will stay, others will shift. Using pre-made glitter-embedded polishes or mixing glitter into gel gives more controlled results.
9. Red with Black Lace Details
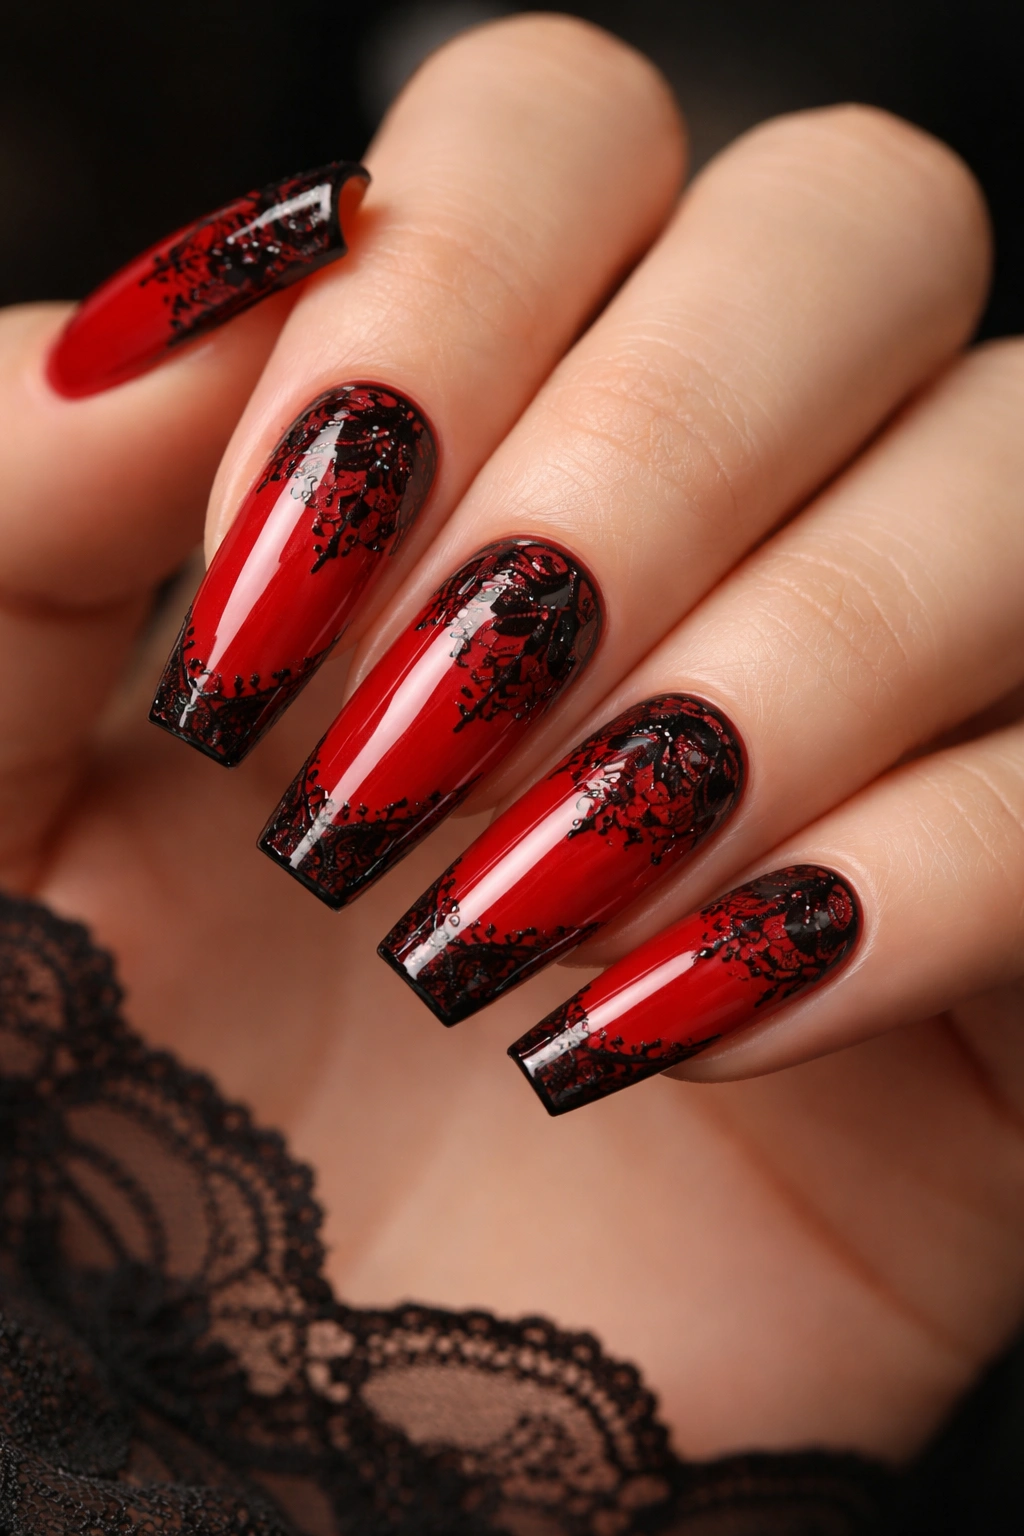
Bring elegance and femininity to the red-and-black combination with lace-inspired details. Using a thin black brush, paint delicate lace patterns across a glossy red base. Lace can be concentrated at the tips like a lace overlay, scattered across the entire nail, or used as a border frame. The intricate line work feels romantic yet still maintains the edginess that red and black together provide.
Why This Design Works
Lace details transform red and black from pure edge into something more nuanced and elegant. The delicate line work creates texture and intricacy without being chaotic. On medium coffin nails, lace details are intricate enough to be impressive without becoming unreadable or visually overwhelming.
How to Achieve This Look
- Paint all nails with two coats of glossy red polish
- Using a very thin nail art brush, paint fine black lines in lace-like patterns — think delicate curves, loops, and flourishes
- Study actual lace patterns or find lace nail decals online to use as reference for your line work
- You can also use lace nail stickers (available at beauty supply stores) — apply over the red base and seal with topcoat
- Let black paint dry completely before applying final topcoat
Real talk: Freehand lace line work takes patience and a very steady hand. If that’s not your strength, lace decals or stickers give you the same effect with less stress.
10. Matte Red with Black Drip Design
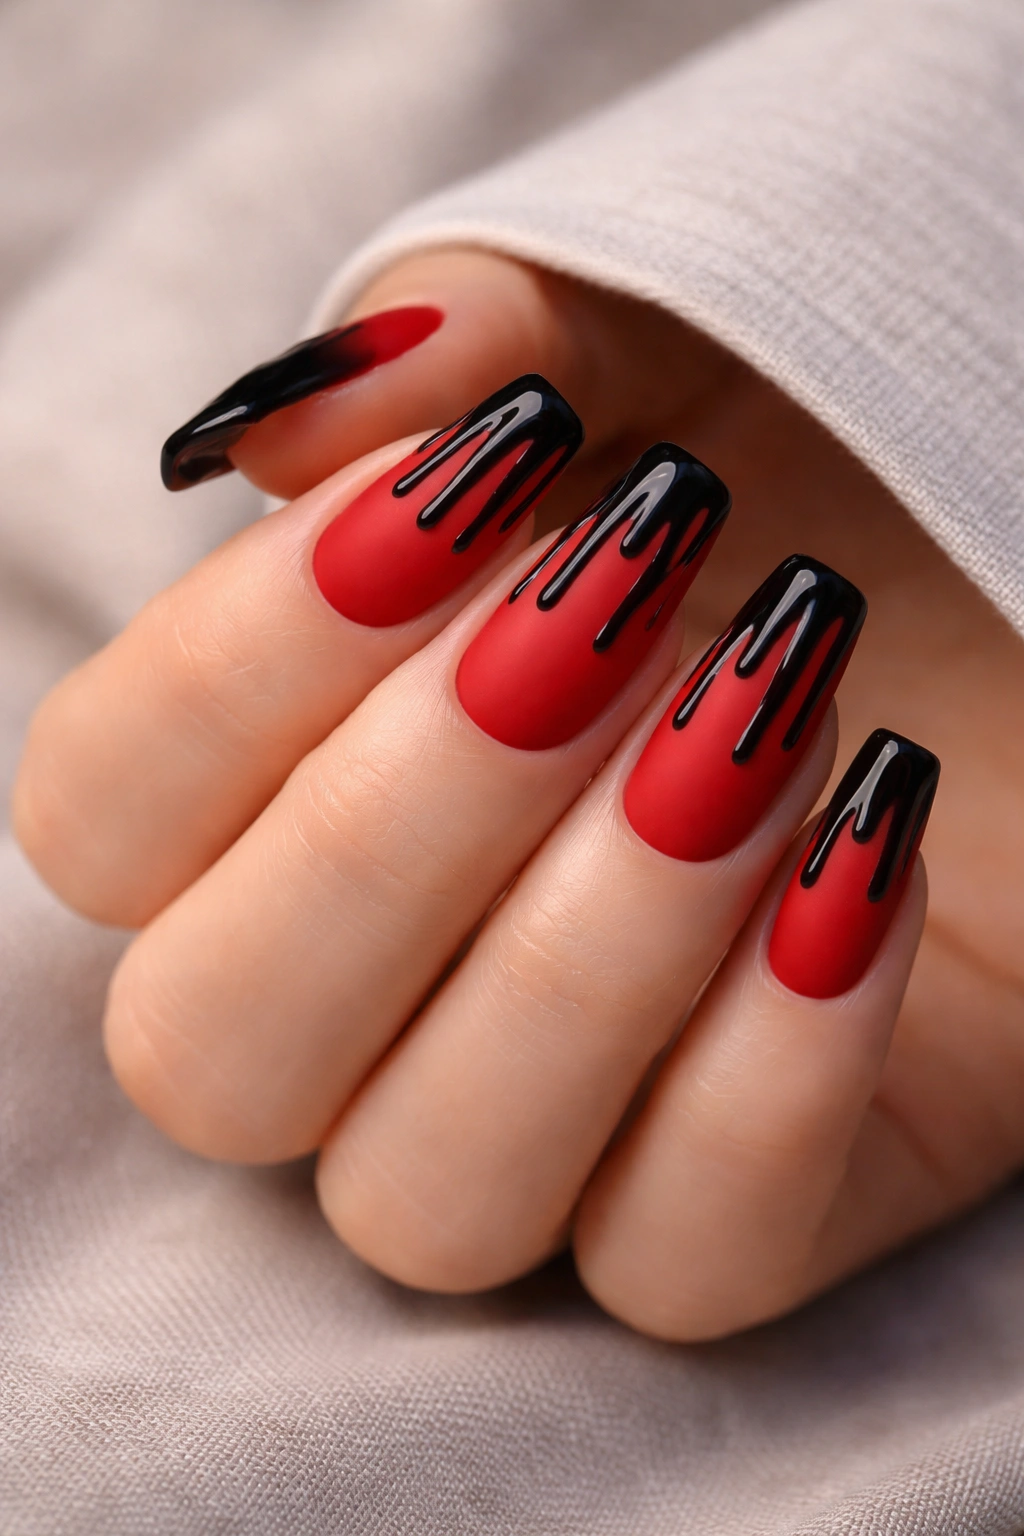
This design combines matte texture with a playful drip effect. The entire nail is painted matte red, and then glossy black polish is applied in a drip pattern flowing from the tips downward. Drips can be thin and delicate or thick and bold depending on your preference. The matte-to-glossy contrast adds depth, and the drip effect adds movement and personality. Medium coffin nails give the drips enough length to be clearly visible.
Why This Design Works
Drip designs feel modern, artistic, and a bit rebellious. The matte base keeps things sophisticated, while the glossy drips add an element of surprise and playfulness. The contrast between the two finishes creates visual interest that keeps the design from feeling static or boring. This is perfect for someone who wants red and black but with a twist.
How to Achieve This Look
- Paint all nails with two coats of matte red polish
- Using a thin brush or a toothpick, apply thin lines of glossy black polish starting from the tip and letting them flow naturally downward
- Black drips can be thin and minimal (one or two per nail) or more artistic and irregular
- Don’t overthink the drip pattern — some irregularity makes it look more intentional and artistic
- Allow glossy black to dry before applying a matte topcoat (if you want the matte finish to remain dominant) or glossy topcoat (for shine)
Pro tip: Thin glossy lines over matte look especially striking. The shine contrasts beautifully with the matte background.
11. Red and Black Checkerboard
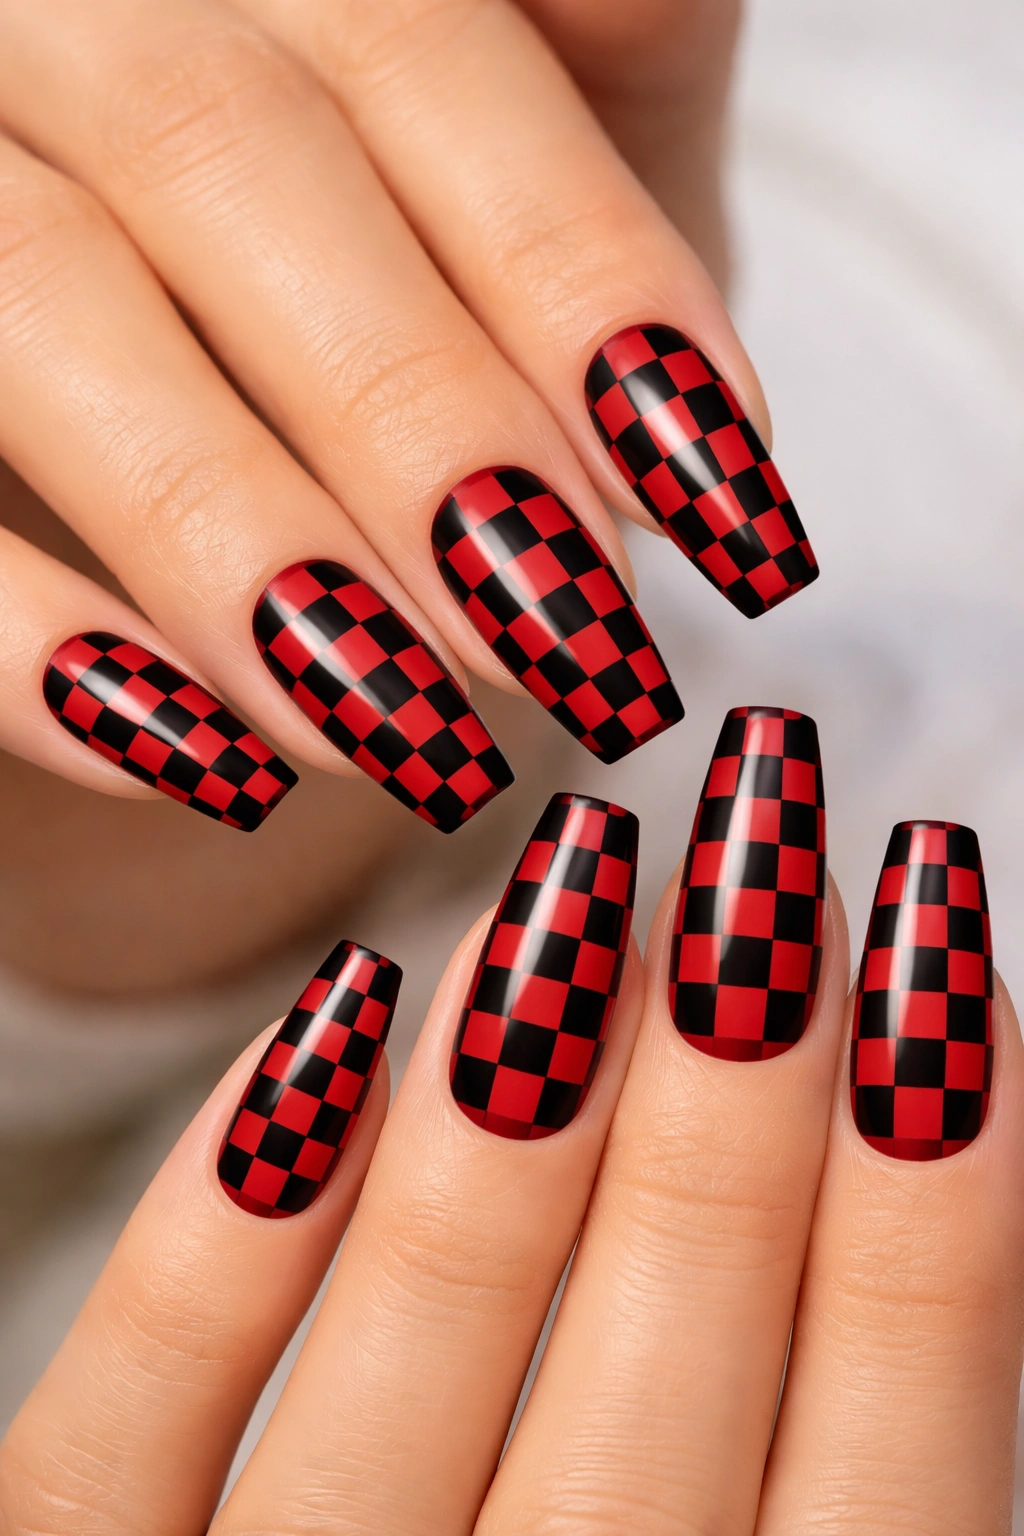
A classic checkerboard pattern never goes out of style, and in red and black it’s absolutely timeless. Small squares alternate between red and black, creating a grid pattern that feels graphic, retro, and undeniably bold. On medium coffin nails, a checkerboard pattern is intricate enough to impress without the squares becoming so tiny they’re hard to execute. This design appeals to people who love structured, geometric patterns.
Why This Design Works
Checkerboard patterns are universally recognizable and immediately draw the eye. The regularity of the pattern feels satisfying and intentional. Red and black checkerboard specifically has a vintage, sophisticated vibe — think 1950s diners or classic racing imagery. On coffin nails, the pattern flows down the nail naturally and looks intentionally styled.
How to Achieve This Look
- Paint all nails with a base color (white or nude works well to let the colors pop)
- Use nail striping tape to create a grid pattern, or freehand thin lines in one color
- Carefully fill in alternating squares with red polish, then fill other squares with black
- For perfect precision, use a nail art dotting tool to create small squares without tape
- Remove any tape carefully and seal with a glossy topcoat
Worth knowing: Checkerboard requires patience and a steady hand, but the payoff is a design that looks professionally done and gets compliments immediately.
12. Burgundy Red and Black Ombre
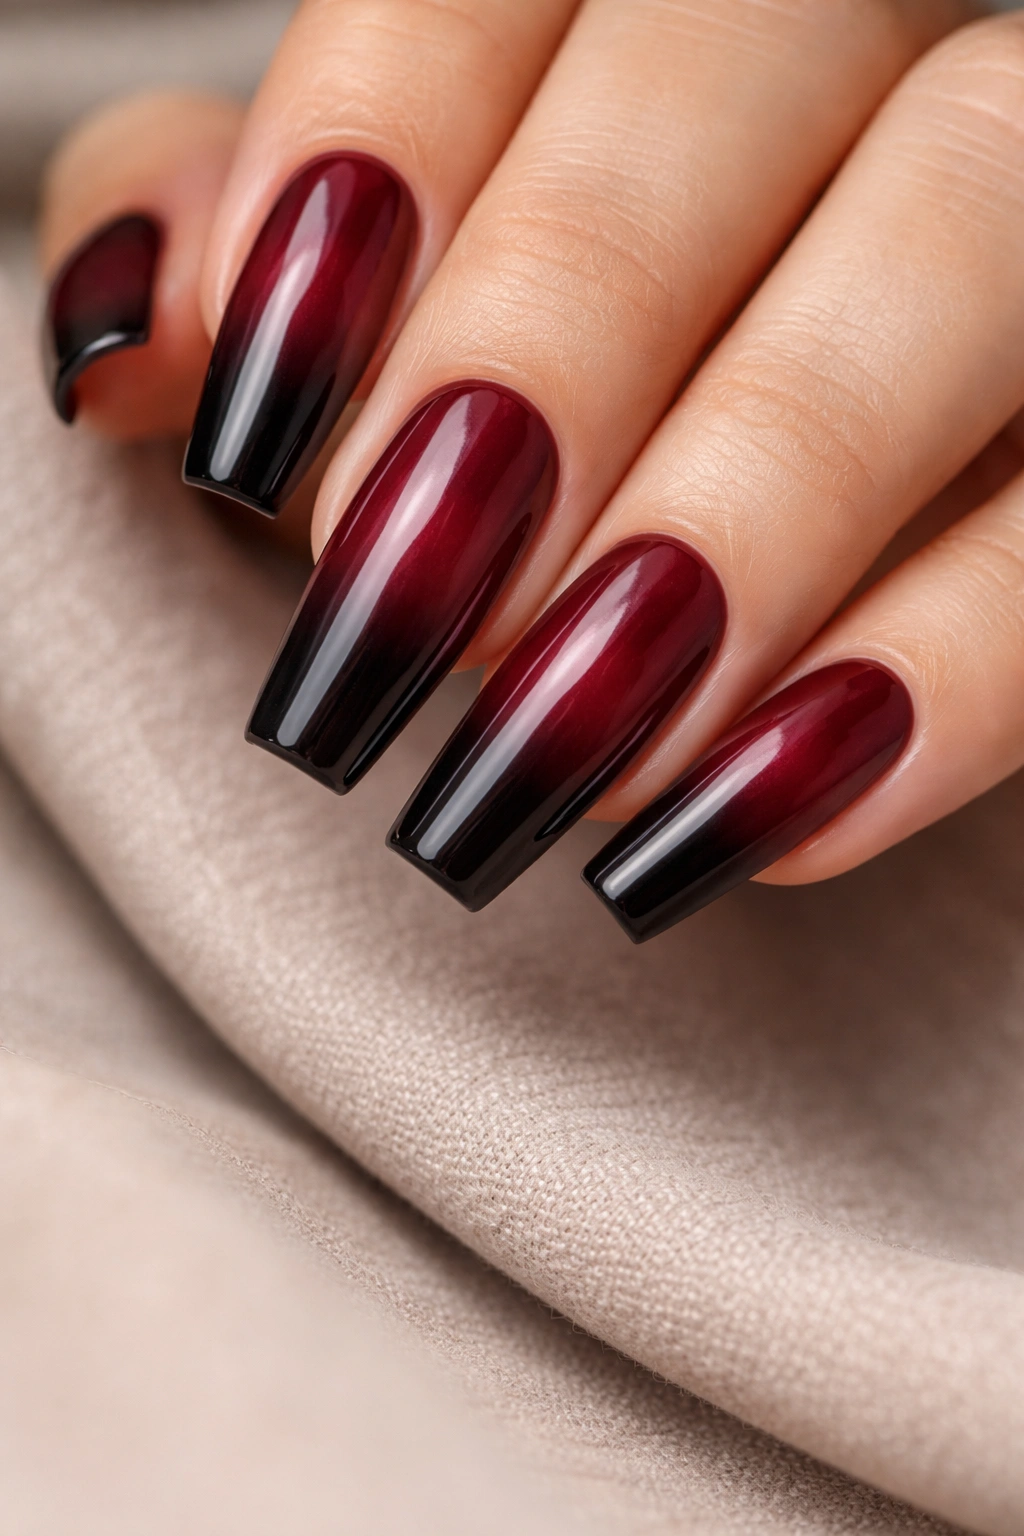
If true red feels too bright or primary for your taste, burgundy offers a deeper, more sophisticated alternative. A burgundy-to-black ombre creates an elegant gradient that feels moody and refined. This works especially well for people who love the red-and-black combination but want something less dramatic and more wearable for professional or formal settings. The deep tones are inherently more subtle than bright red.
Why This Design Works
Burgundy is a chameleon color — it’s still red, but it’s a red with complexity and depth. When ombréd into black, it creates a gradient that feels expensive and intentional. This is the red-and-black combination for sophisticated minimalists and people who prefer deeper, richer tones over bright primaries. On medium coffin nails, the ombre really shows the depth of both colors.
How to Achieve This Look
- Use the same sponge ombre technique as the classic red-to-black ombre (design #1)
- Dab burgundy and black polish onto a cosmetic sponge with slight overlap in the middle
- Press gently onto nails, building up layers for a smooth gradient
- Start with burgundy as the dominant color at the base, transitioning to black at the tips
- The beauty of burgundy-to-black is that it blends more seamlessly than bright red, creating a naturally smoother transition
Pro tip: If you’re not sure what shade of burgundy to use, look for burgundy polishes marketed as “wine” or “oxblood” — these offer the right depth for a sophisticated ombre.
13. Black Base with Red Splatter Art
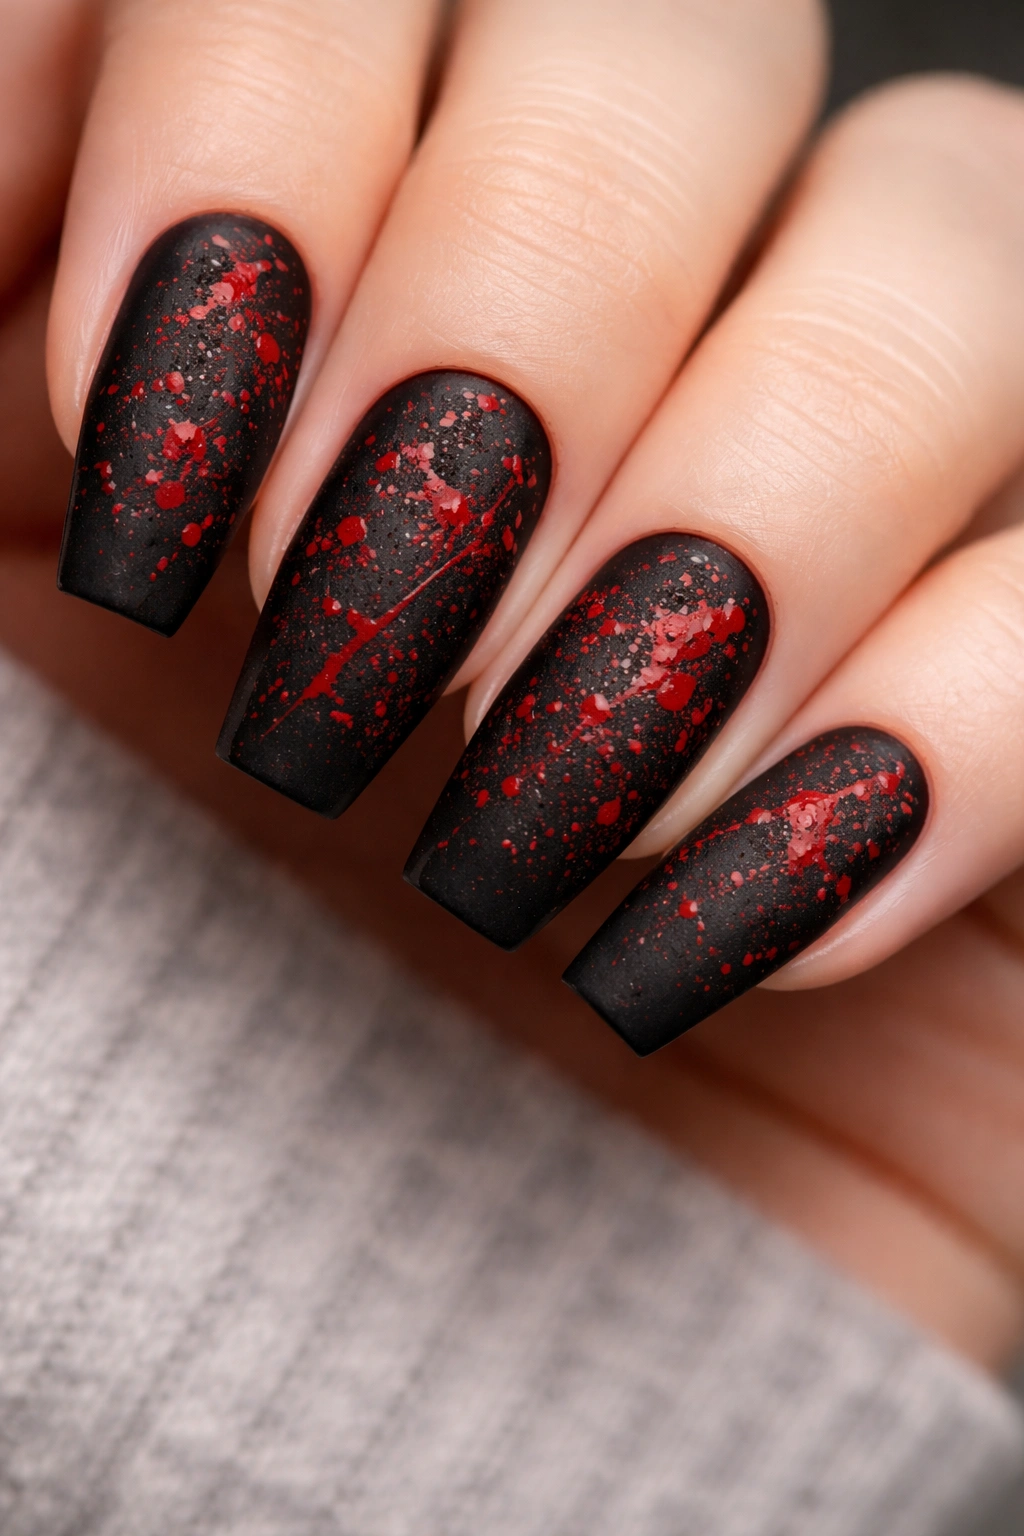
Splatter art takes red and black from pristine and controlled to artistic and expressive. Begin with a matte black base, then use a thin brush or splatter tool to flick and drop red polish across the nails in random patterns. The splatter effect feels spontaneous and creative while still maintaining the sophistication of the red-and-black pairing. This appeals to artistic personalities who want a design that looks intentional but not overly structured.
Why This Design Works
Splatter designs feel energetic and artistic without being childish. Red splatters on black create high contrast that makes every splat visible and impactful. The randomness of splatters means imperfection is actually part of the design — you’re not aiming for perfection but for authentic artistic expression. Medium coffin nails give you enough space for the splatters to be clearly visible.
How to Achieve This Look
- Paint all nails with two coats of matte black polish
- Dip a thin brush into red polish and flick it across your nails from a distance, or use a splatter tool/old toothbrush and drag your fingernail across the bristles
- Build up splatters gradually — start light and add more until you’re satisfied with the coverage
- Let red splatters dry completely before applying a glossy or matte topcoat depending on your desired finish
Real talk: Splatter is harder to control than it looks. Protect your skin and work surface, wear an old shirt, and accept that some splatters won’t land exactly where you envisioned — that’s part of the appeal.
14. Red French Tips with Black Base
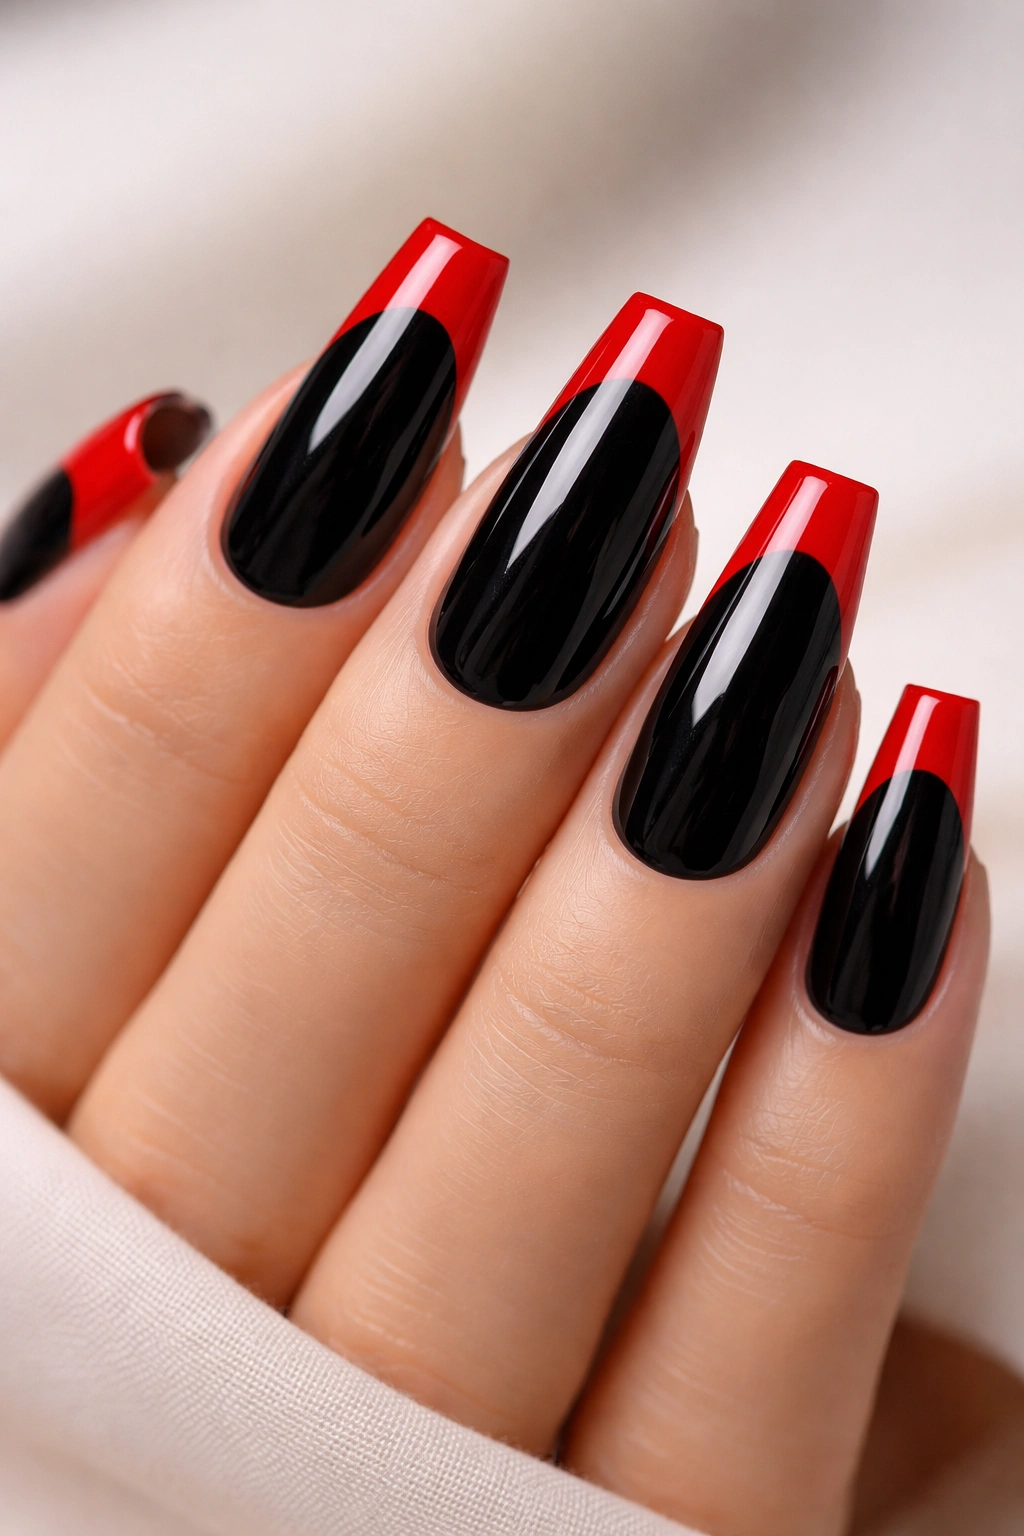
A twist on the classic French manicure, this design keeps the coffin-nail base black and reserves red for the tips. The crisp line between black and red creates definition and draws attention to the nail tips, which is especially flattering on medium coffin nails. The red tips feel playful and bright while the black base keeps things grounded and edgy. This is perfect for someone who wants the iconic red-and-black look but prefers something more streamlined.
Why This Design Works
French tip designs work because they’re universally flattering and visually extend the nail slightly. By inverting the colors — black base instead of nude — you make the design bolder and more contemporary. The contrast between black and red at the tip line is crisp and graphic, creating a clear focal point on each nail.
How to Achieve This Look
- Paint all nails with two coats of glossy black polish
- Using a thin brush, paint a glossy red tip across the very end of each coffin nail
- Or use nail striping tape to create a precise line separating the black and red sections
- Keep the red tip area clean and crisp — this is where precision matters most
- Seal everything with a glossy topcoat for a polished finish
Pro tip: The French tip line should follow the natural slope of your nail tip, not be perfectly horizontal. This follows the natural nail shape and looks more sophisticated.
15. Red and Black Neon Contrast
If you love bold, eye-catching designs, neon red against matte black creates an almost electric visual effect. The brightness of neon red makes an immediate visual impact — glossy neon red over matte black is impossible to ignore. This design works as an all-neon-red base with matte black accents, or matte black with neon red geometric shapes or patterns. The neon shimmer adds a contemporary edge that feels modern and fashion-forward.
Why This Design Works
Neon colors are having a lasting moment in nail design and fashion. Neon red is bright enough to be exciting without veering into costume territory. Against black, the neon effect is maximized — the contrast makes the red appear even brighter. This is the choice for people who want their nails to make a statement.
How to Achieve This Look
- Paint all nails with two coats of matte black polish
- Apply neon red polish in your chosen pattern — full coverage, geometric shapes, stripes, or abstract design
- The glossiness of neon red against matte black is already striking, so keep the pattern relatively simple
- Look for neon polishes specifically labeled as “neon” or “neon bright” at beauty supply stores — regular reds won’t have the same effect
- Seal with a glossy topcoat to enhance the neon glow
Worth knowing: Neon polishes often need 2-3 coats to reach full neon intensity, and they work best over a light base or white polish for maximum brightness.
16. Vintage Red and Black with Rhinestones
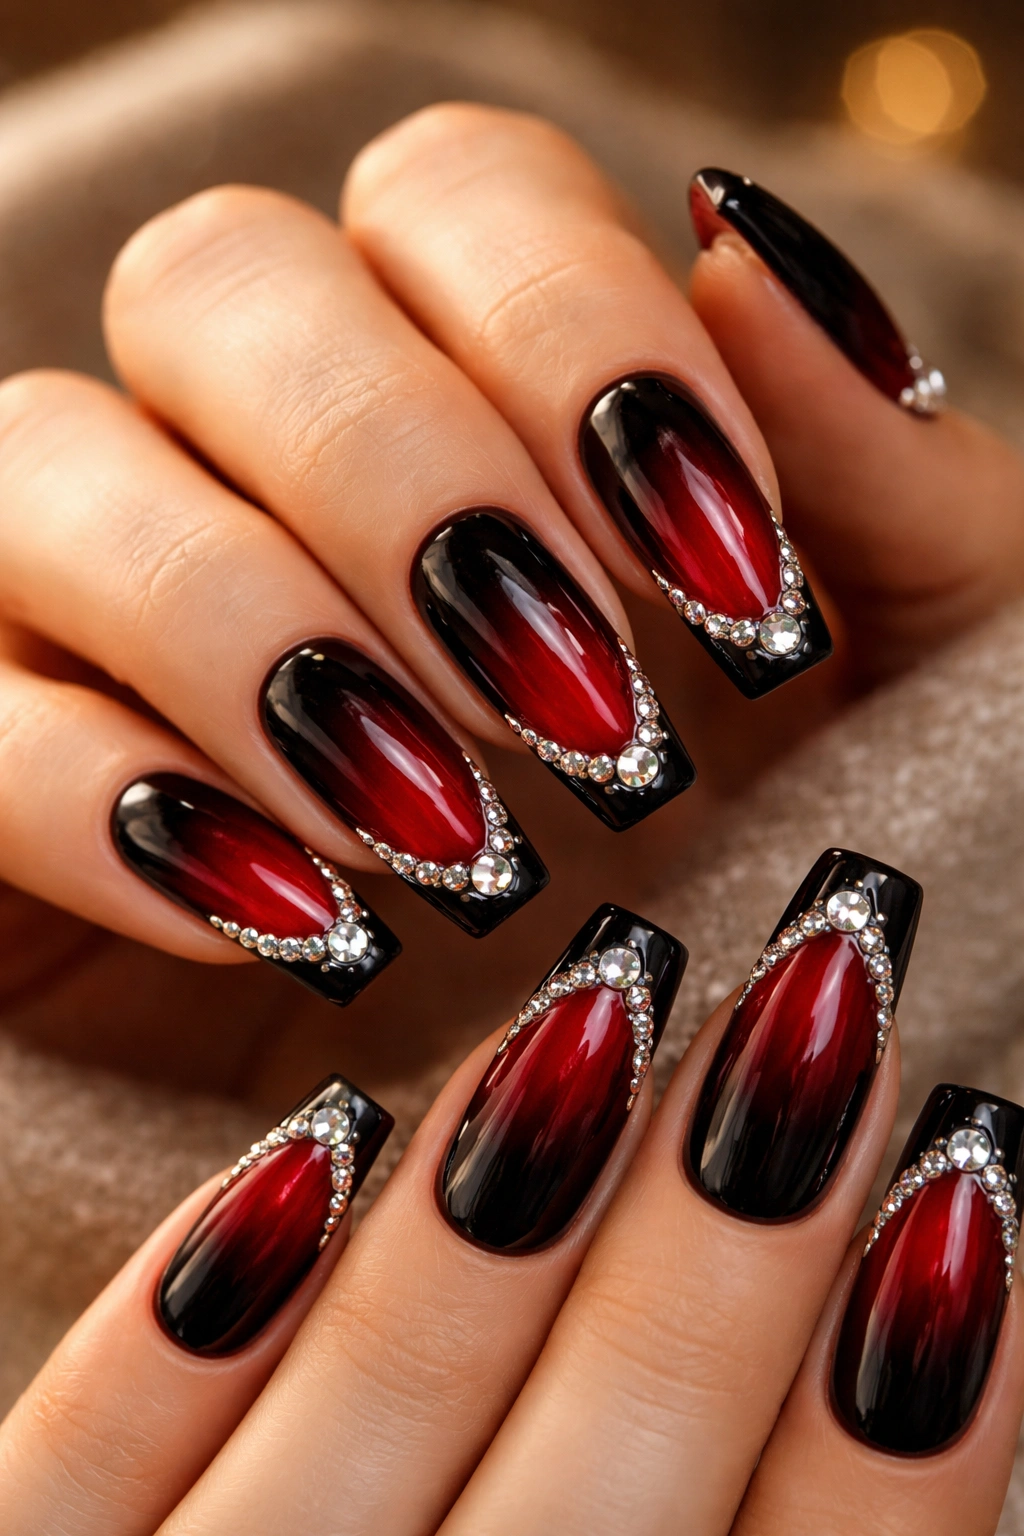
Combine the timeless red-and-black palette with rhinestone embellishments for maximum glamour and sophistication. Create a base with your chosen red and black pattern (ombre, geometric, French tips, whatever appeals to you), then strategically place rhinestones along the tips, edges, or as clustered accents. The sparkle and dimension from rhinestones elevate any base design from everyday to special-occasion-ready. On medium coffin nails, rhinestones are perfectly proportioned — visible and impactful without looking overwhelming.
Why This Design Works
Rhinestones are pure glamour. They catch light, add texture, and immediately elevate a design’s perceived level of effort and elegance. The vintage vibe comes from the combination of classic red and black with the timeless sparkle of rhinestones. This design reads as intentionally special — perfect for events, celebrations, or anyone who simply loves maximum sparkle.
How to Achieve This Look
- Create your chosen base design (any of the 15 designs above work beautifully with rhinestones)
- Using a nail art glue or the sticky residue of a gel base, carefully place rhinestones on your nail
- Concentrate rhinestones at the tips and edges for a glamorous frame effect, or scatter them randomly for an artistic feel
- Press each rhinestone firmly to ensure it stays secure
- Seal everything with a topcoat — this locks the rhinestones in place and creates a smooth surface
- Use a dotting tool or tweezers for precise rhinestone placement
Real talk: Quality matters with rhinestones. Invest in genuine crystal rhinestones from beauty supply stores rather than craft rhinestones — they’re more durable and sparkle significantly better.
Final Thoughts

Red and black is one of those color combinations that never gets old because it works across so many different aesthetics and moods. Whether you gravitate toward the glossy sophistication of an ombre gradient, the bold geometry of a checkerboard, the artistic expression of splatter art, or the maximum glamour of rhinestone accents, there’s a red-and-black coffin nail design that’s exactly right for your style.
Medium-length coffin nails are genuinely the sweet spot for these designs. They’re long enough to showcase intricate patterns and color transitions clearly, but short enough to feel manageable and practical for daily life. The coffin shape itself — tapered at the sides, squared at the tips — adds an element of edginess that complements the drama of red and black perfectly.
The best way to choose your next design is to consider not just what looks beautiful, but what matches your current mood and lifestyle. Something matte and moody for a grounded, minimalist week; something sparkly and glamorous when you need an extra dose of confidence; something geometric and clean when you want pure polish and precision. Red and black gives you permission to be bold, and medium coffin nails give you the perfect canvas to express exactly who you are.
