

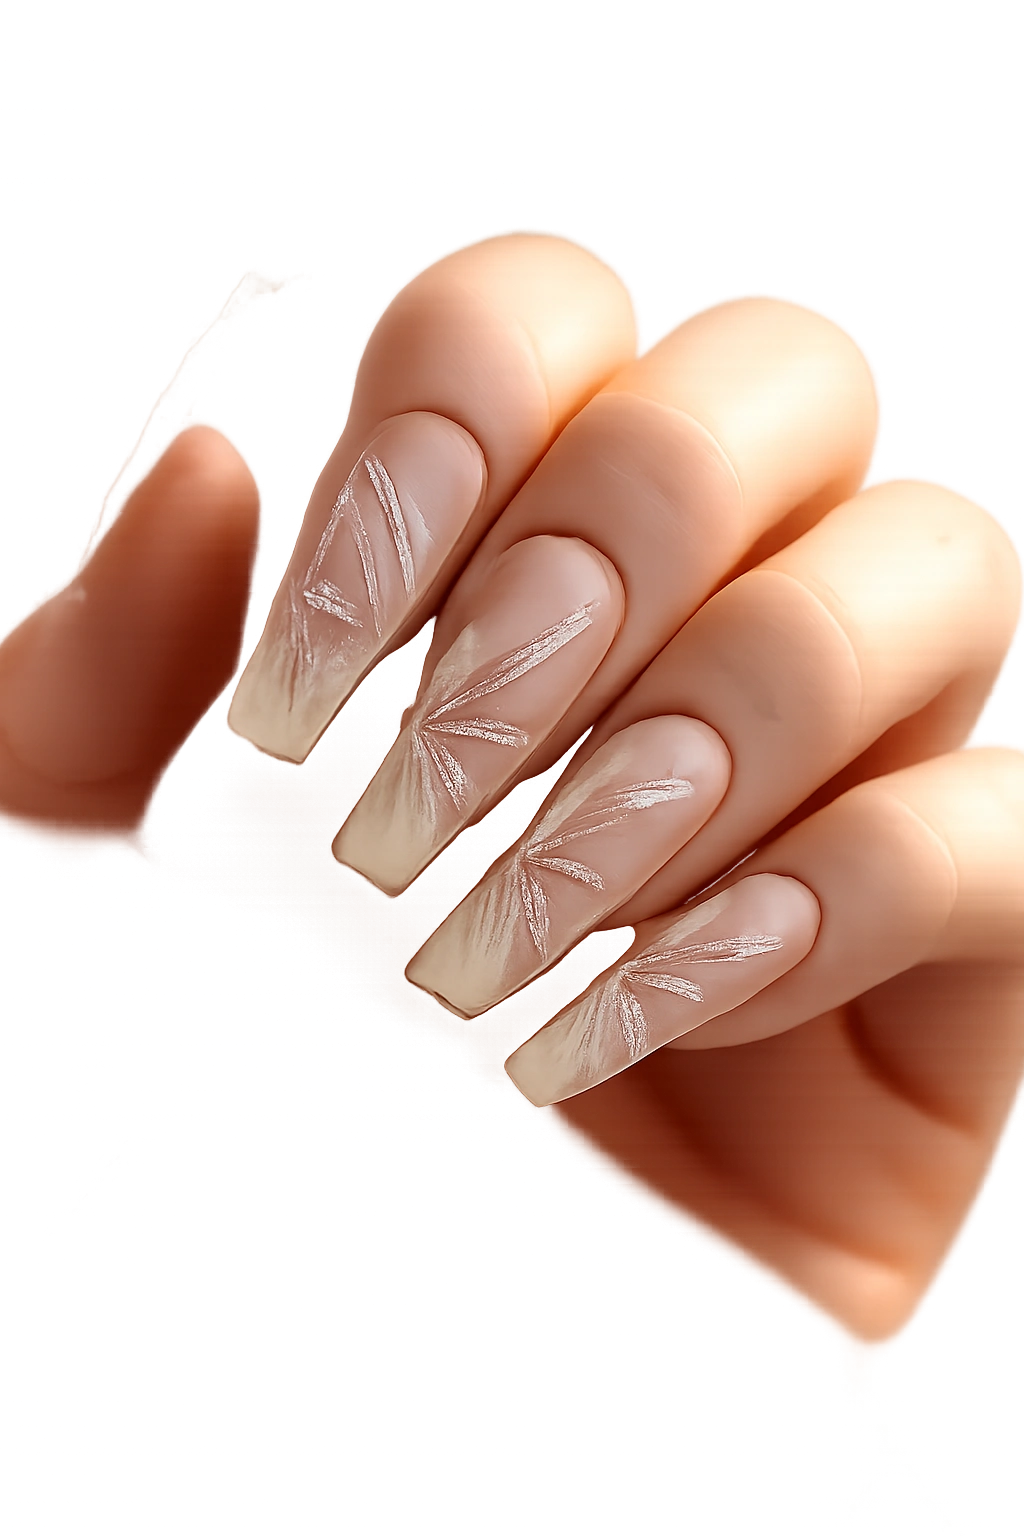
Coffin nails have become the go-to choice for anyone looking to make a bold statement with their manicure. The distinctive tapered shape—wide at the base and narrowed toward the tip with squared-off edges—creates the perfect canvas for intricate nail art. When you combine this dramatic silhouette with butterfly designs, you get something truly special: a nail style that’s both elegant and eye-catching, with enough visual interest to turn heads every time you move your hands.
Butterfly motifs have made a massive comeback in nail design over the years, and for good reason. There’s something inherently beautiful and symbolic about butterflies—they represent transformation, freedom, and grace. Whether you’re drawn to realistic, detailed butterfly artwork or prefer something more playful and stylized, butterfly coffin nails offer endless creative possibilities. The length and shape of coffin nails give butterfly designs room to truly shine, allowing artists to add intricate details, layered wings, and complementary elements that wouldn’t fit on shorter nail beds.
If you’ve been scrolling through nail inspiration and wondering which butterfly coffin nail design is right for you, you’re in exactly the right place. We’ve curated nineteen stunning designs that showcase the diversity and artistry possible when you combine butterflies with coffin-shaped nails. Each design represents a different aesthetic and skill level, so whether you’re a nail art newcomer or a seasoned manicure enthusiast, you’ll find something here that speaks to your style. Let’s dive into these gorgeous designs and find your next nail inspiration.
1. Delicate Wing Details with Gradient Base
This design strips butterfly artwork down to its most elegant form. Instead of heavy color blocking, the wings feature thin, delicate line work that creates the impression of intricate veining. The base typically uses a soft gradient—think soft pink fading to white, or peachy tones blending into cream. The butterfly itself is rendered in fine black or dark brown lines that look almost sketch-like against the gradient background.
Why This Design Works So Well
The minimalist approach to the butterfly allows the gradient base to take center stage. This design feels sophisticated without being over the top, making it perfect for professional settings or anyone who prefers subtlety. The delicate line work requires a steady hand or a skilled nail technician, but the payoff is a truly refined look that photographs beautifully.
Execution Tips and Variations
- Use a thin liner brush or nail art pen for the butterfly outlines—precision is everything here
- Layer the gradient with a sponge for a smooth, blended transition
- Add a glossy top coat to enhance the gradient’s depth and make the line work pop
- Try different color combinations: nude-to-white, blush-to-champagne, or even soft lavender-to-pale pink
2. 3D Butterfly Embellishments
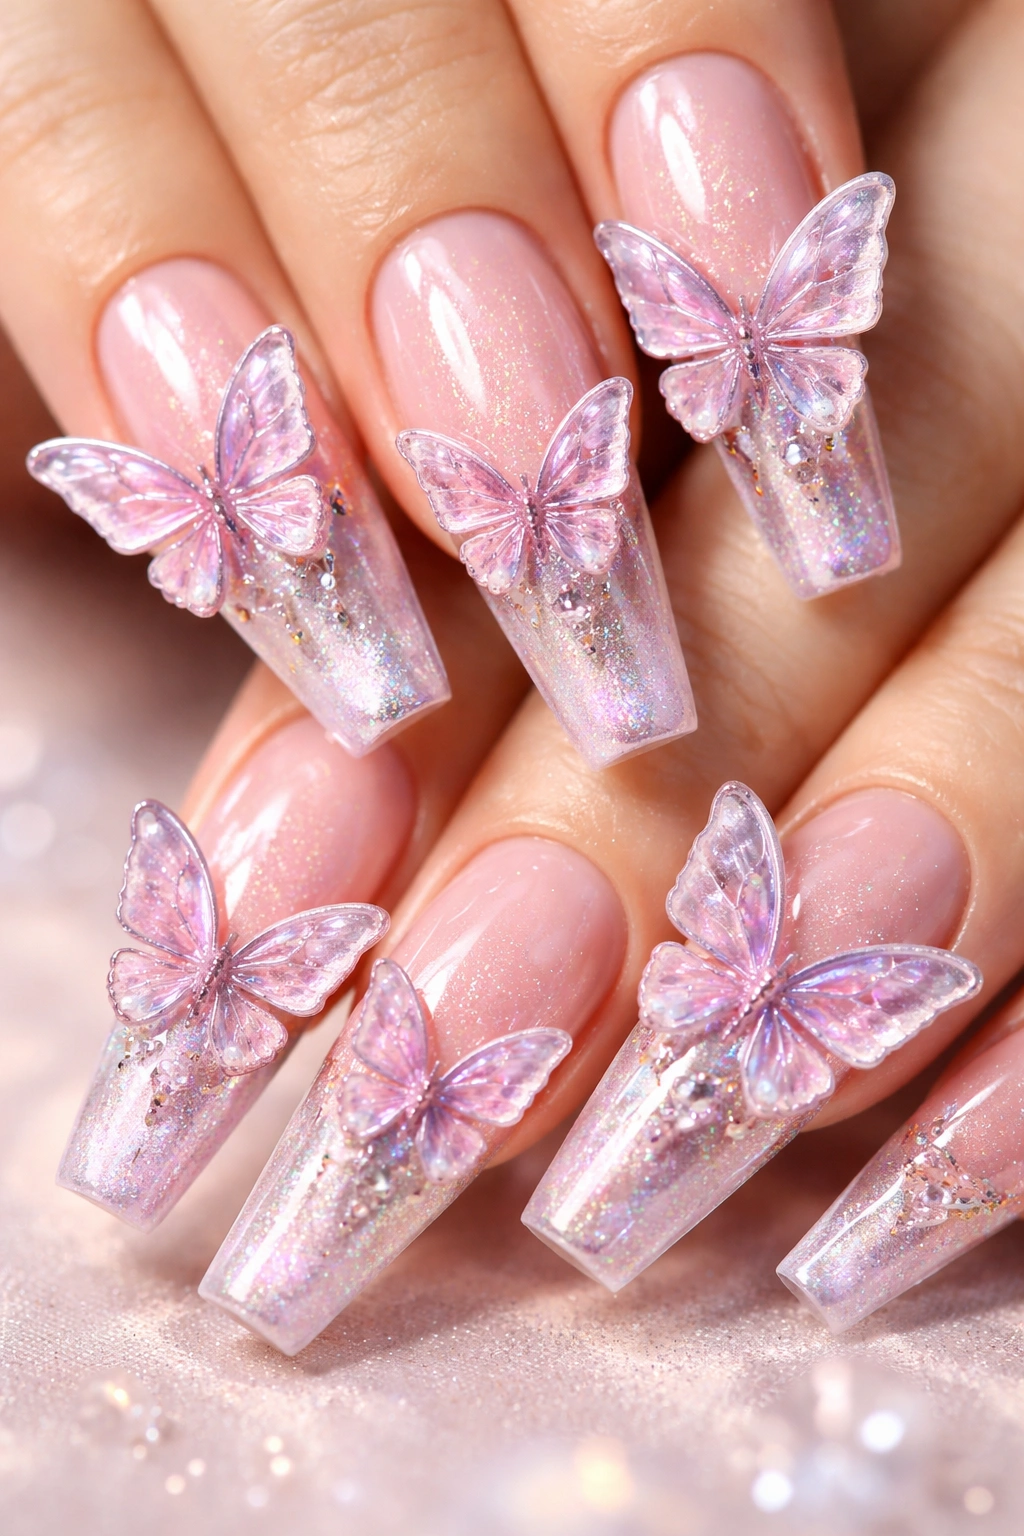
Three-dimensional nail art has revolutionized how we think about manicures, and 3D butterflies on coffin nails are a game-changer. These designs feature butterflies created with acrylic or gel sculpting that literally rise off the nail surface. The wings have dimension and shadow, creating a striking visual effect that looks incredible in person and photographs like a dream.
What Makes 3D Nails Stand Out
The tactile quality of 3D designs transforms a simple butterfly motif into a wearable sculpture. When light hits the raised wings at different angles, they catch and create dynamic shadows that make the design come alive. These nails demand attention in the best way possible—they’re conversation starters.
Building Your 3D Butterfly
- Use thick acrylic or builder gel as the base for sculpted wings
- Shape each wing individually with sculpting tools before the material sets
- Add fine details like vein patterns once the wings are structurally sound
- Consider adding tiny rhinestones or metallic dust to catch the light on the wings
- Keep the base nail polish relatively simple so the 3D element remains the focal point
3. Ombre Butterfly Design
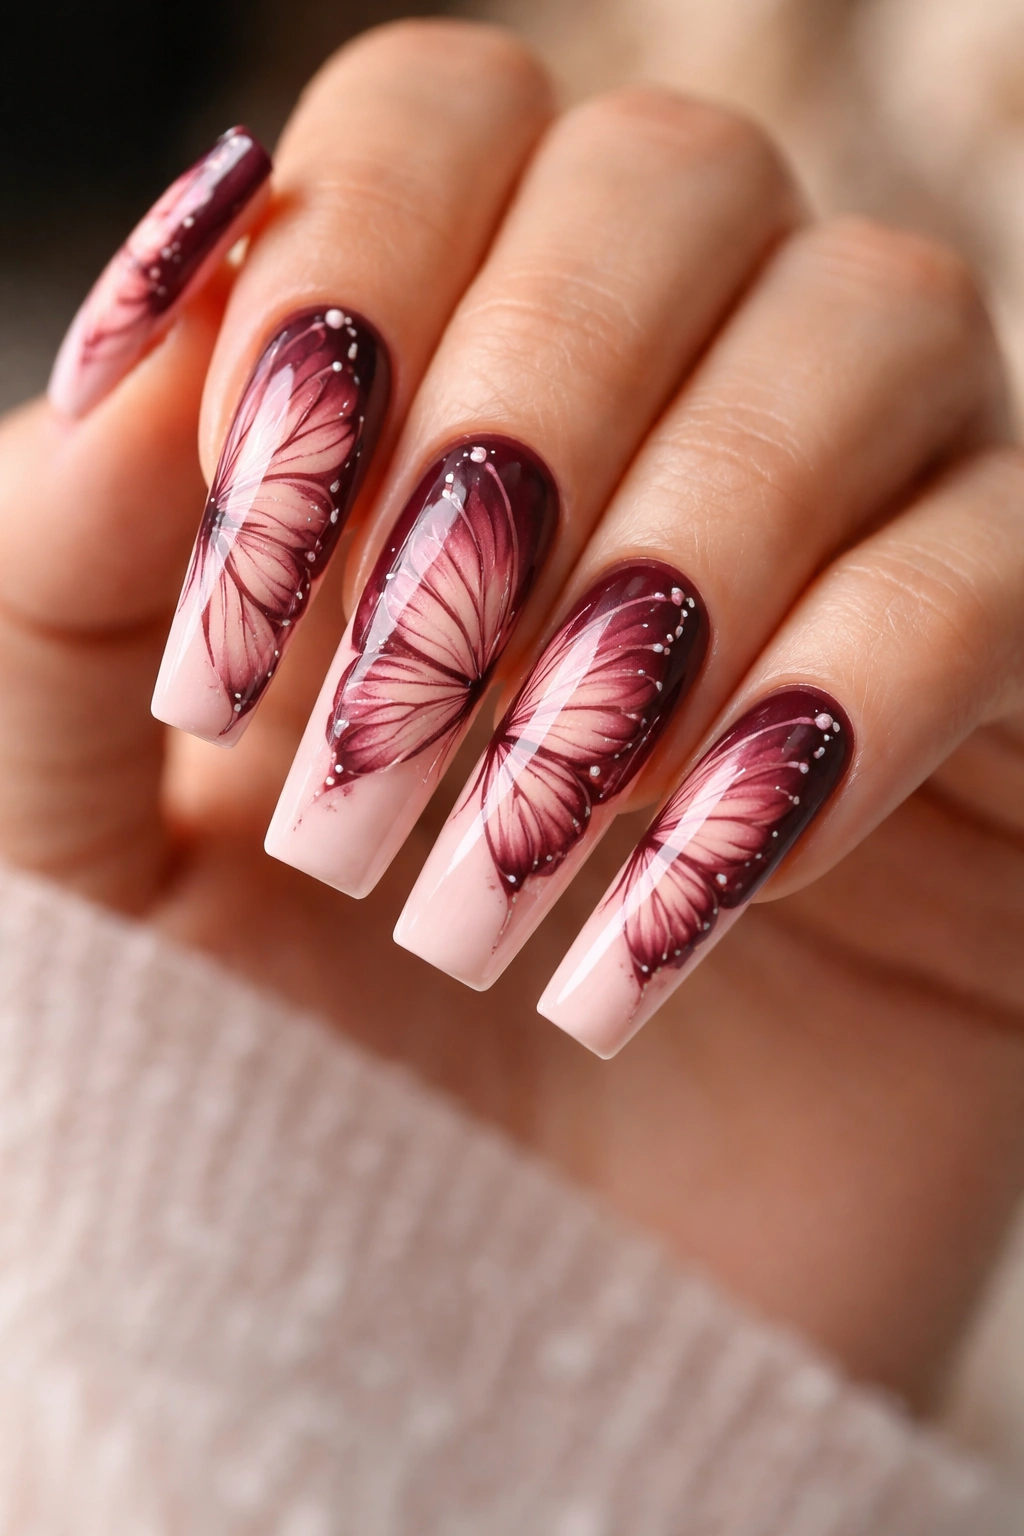
The ombre technique creates a seamless color transition from one shade to another, and when you apply it to a butterfly design, it’s absolutely mesmerizing. Picture a butterfly whose wings shift from a deep burgundy to soft blush pink, or from navy blue to pale periwinkle. The ombre can cover the entire nail or focus specifically on the butterfly wings while keeping the base color solid.
Creating Depth with Color Gradients
Ombre designs on coffin nails work particularly well because the width of the nail bed allows enough space for the color gradient to truly display its beauty. The transition draws the eye across the entire nail, and when the butterfly wings are positioned to take advantage of this gradient, the effect is stunning. The visual flow feels natural and intentional rather than accidental.
Technique and Material Choices
- Use a sponge to blend two or three colors together for smooth transitions
- Apply the ombre effect first, then carefully paint or stamp the butterfly outline over it
- Gel polish works beautifully for this technique—the shine enhances the gradient effect
- Try unexpected color combinations: teal-to-pink, purple-to-green, or gray-to-coral for something truly unique
- Seal everything with a glossy top coat to preserve the color blending
4. Butterfly with Floral Accents
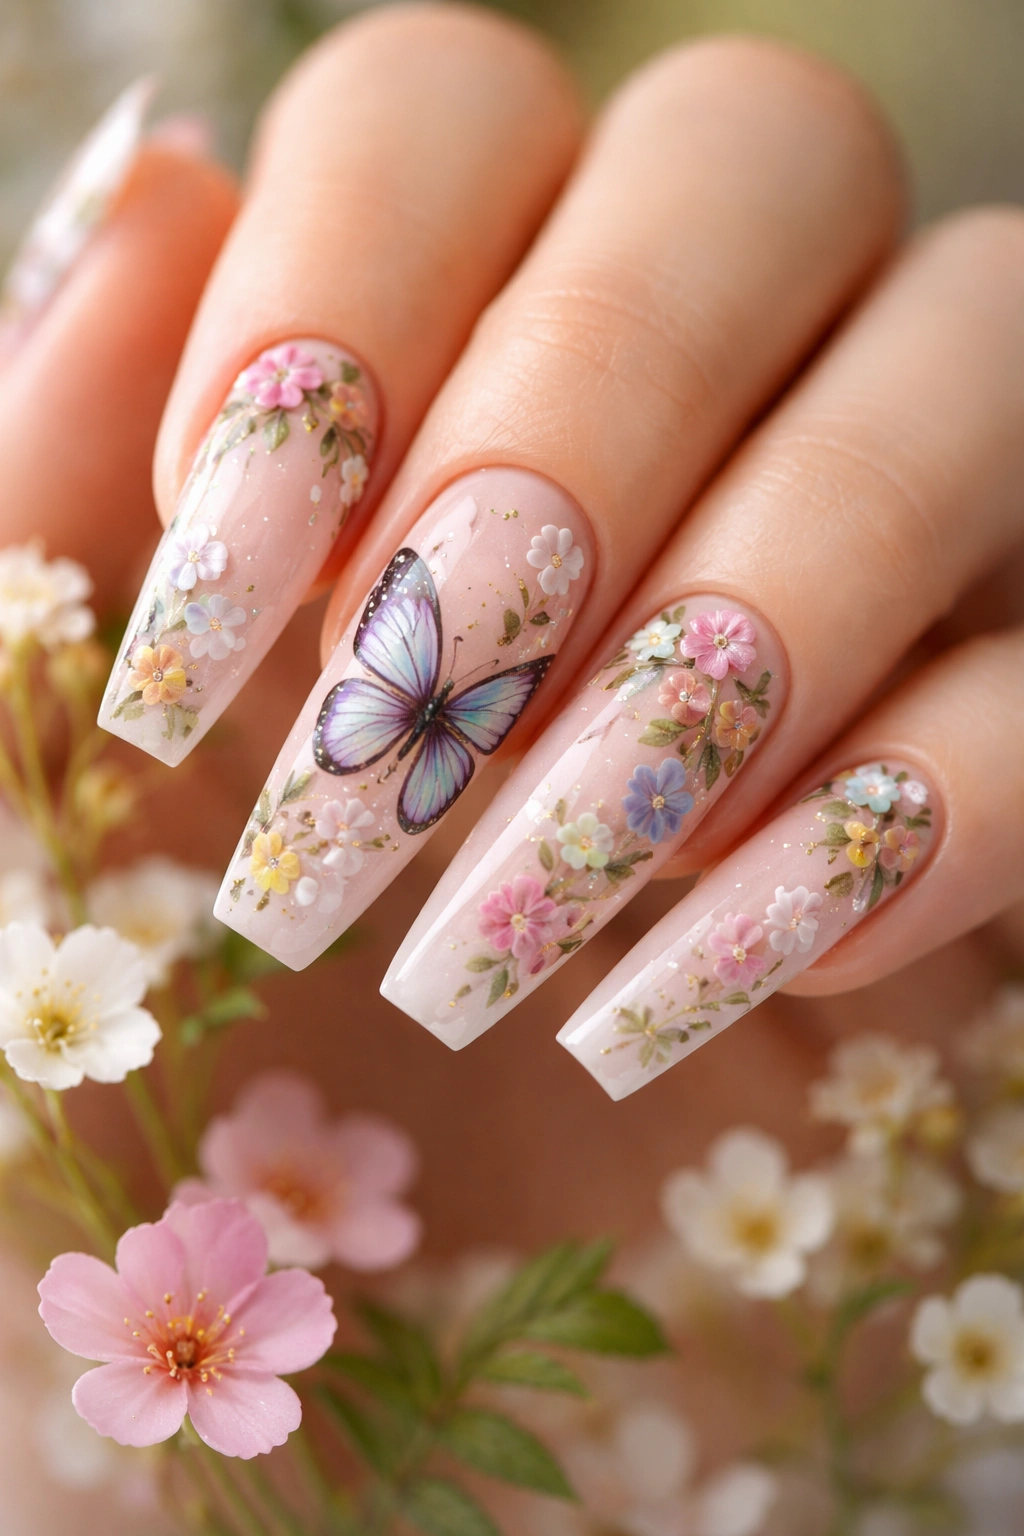
Butterflies and flowers are a natural pairing, so why not celebrate that connection? This design features a beautifully rendered butterfly as the main focal point, surrounded by complementary flowers, leaves, or botanical elements. The flowers might be tiny roses, simple daisies, delicate cherry blossoms, or abstract floral shapes that create a cohesive garden scene on your nail.
Building a Botanical Narrative
When you combine butterflies with flowers, you’re not just creating a pretty design—you’re telling a visual story. The butterfly becomes part of an ecosystem, and that context makes the design feel richer and more thoughtful. It’s the perfect choice if you love nature-inspired aesthetics or want your nails to feel like a miniature work of botanical art.
Design Layout and Balance
- Position the butterfly off-center so flowers can fill negative space without overwhelming the design
- Use multiple flower shapes in different sizes to create visual interest and depth
- Add thin stems and leaves to connect the elements and create flow across the nail
- Consider one or two accent nails with full garden scenes, while keeping other nails simpler
- Use a color palette of two to four colors maximum to keep the design cohesive and readable
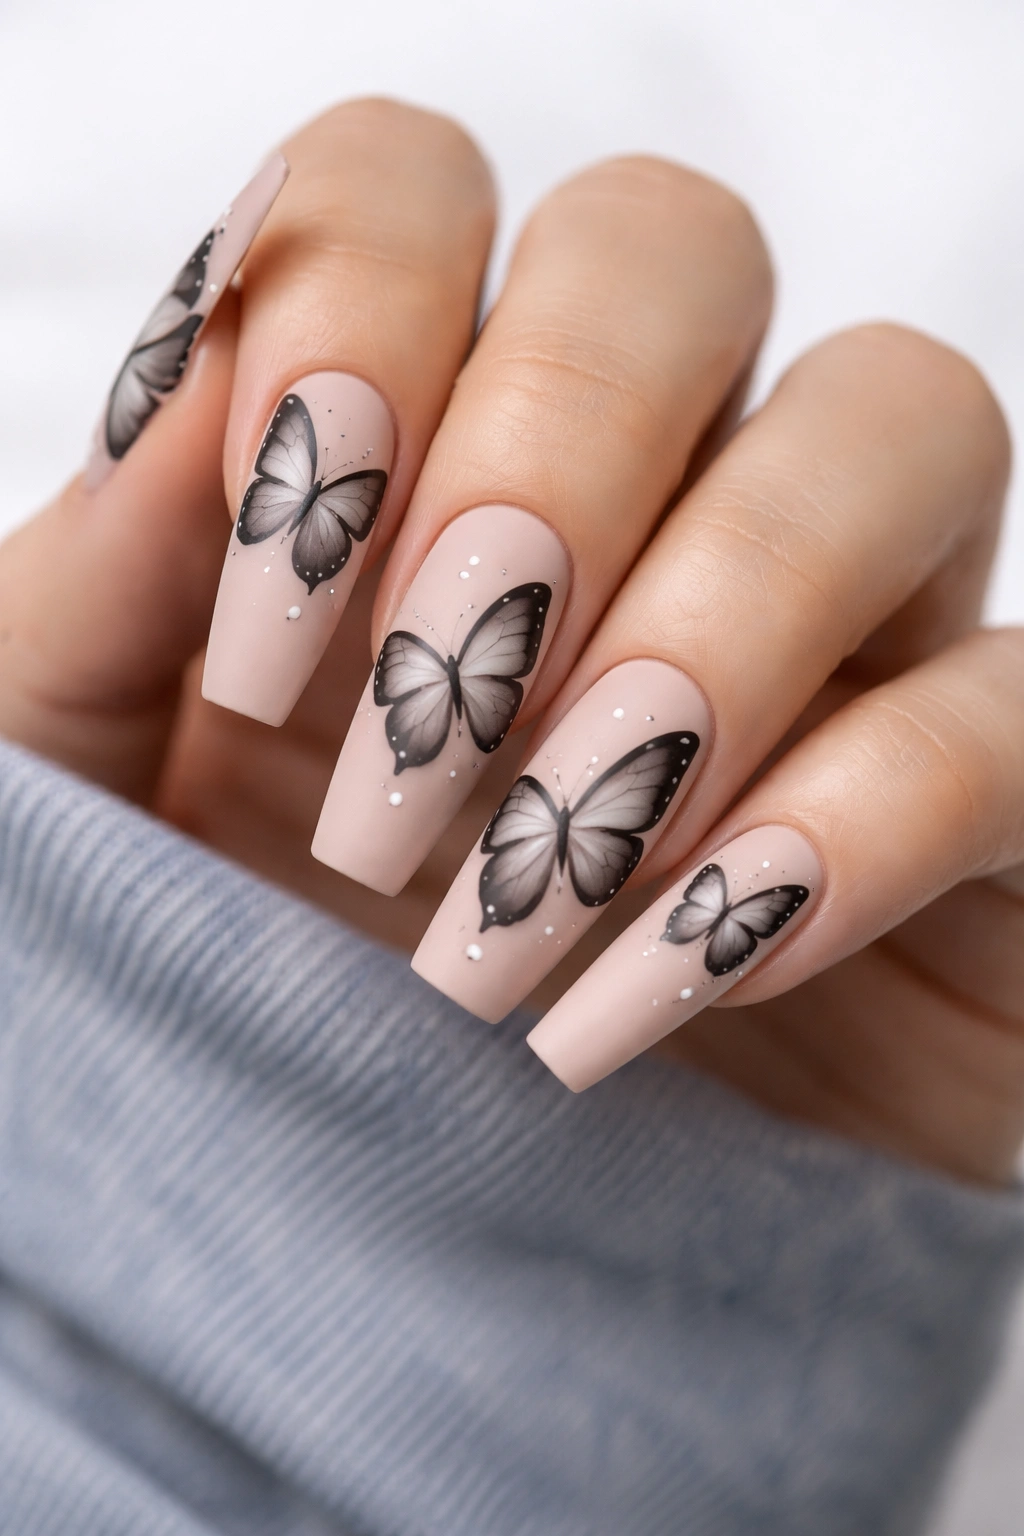
5. Minimalist Black Butterfly

Sometimes the most striking designs are the simplest ones. A minimalist black butterfly on a nude, white, or pale pink coffin nail is pure elegance. The butterfly is rendered in solid black with clean lines and simple wings—no gradients, no embellishments, no fuss. It’s a design that proves you don’t need complexity to make an impact.
The Power of Negative Space
Black butterfly designs work precisely because they create such strong contrast against light-colored bases. The negative space around the butterfly becomes part of the design, and the simplicity of the composition is what makes it striking. This aesthetic appeals to people who appreciate modern design principles and clean lines.
Styling and Application
- Use true black polish for maximum contrast and definition
- Paint the butterfly freehand for an authentic, hand-drawn quality, or use a stamp for perfect symmetry
- Keep the base color absolutely solid and unblemished to let the butterfly shine
- Add just one or two accent nails with the butterfly design; the other nails can be solid color
- Consider a matte finish instead of glossy for a more contemporary, editorial feel
6. Colorful Butterfly Wings
This design celebrates color in all its glory. Each section of the butterfly’s wings features a different vibrant hue—one wing might be coral, another peachy, another yellow. Some designs create rainbow butterflies with every color of the spectrum represented. The base is usually a neutral shade like white or nude, allowing the multicolored butterfly to take center stage without competing colors.
The Joy of Bold Color
Colorful butterfly designs work best when the color choices feel intentional rather than random. Whether you’re creating a rainbow effect, using analogous colors from the color wheel, or choosing colors based on your favorite palette, the design should feel cohesive rather than chaotic. This is the perfect nail style if you want something that feels playful, youthful, and full of personality.
Execution for Maximum Impact
- Use quality nail polish or gel in bright, true colors—muddy or muted tones will look flat
- Paint each wing section separately and let each color dry completely before applying the next
- Use a thin brush or nail art pen to create clean lines between color sections
- Add fine black outline work around the butterfly for definition and polish
- Seal with a glossy top coat that really makes the colors pop and sing
7. Sparkle and Glitter Butterfly
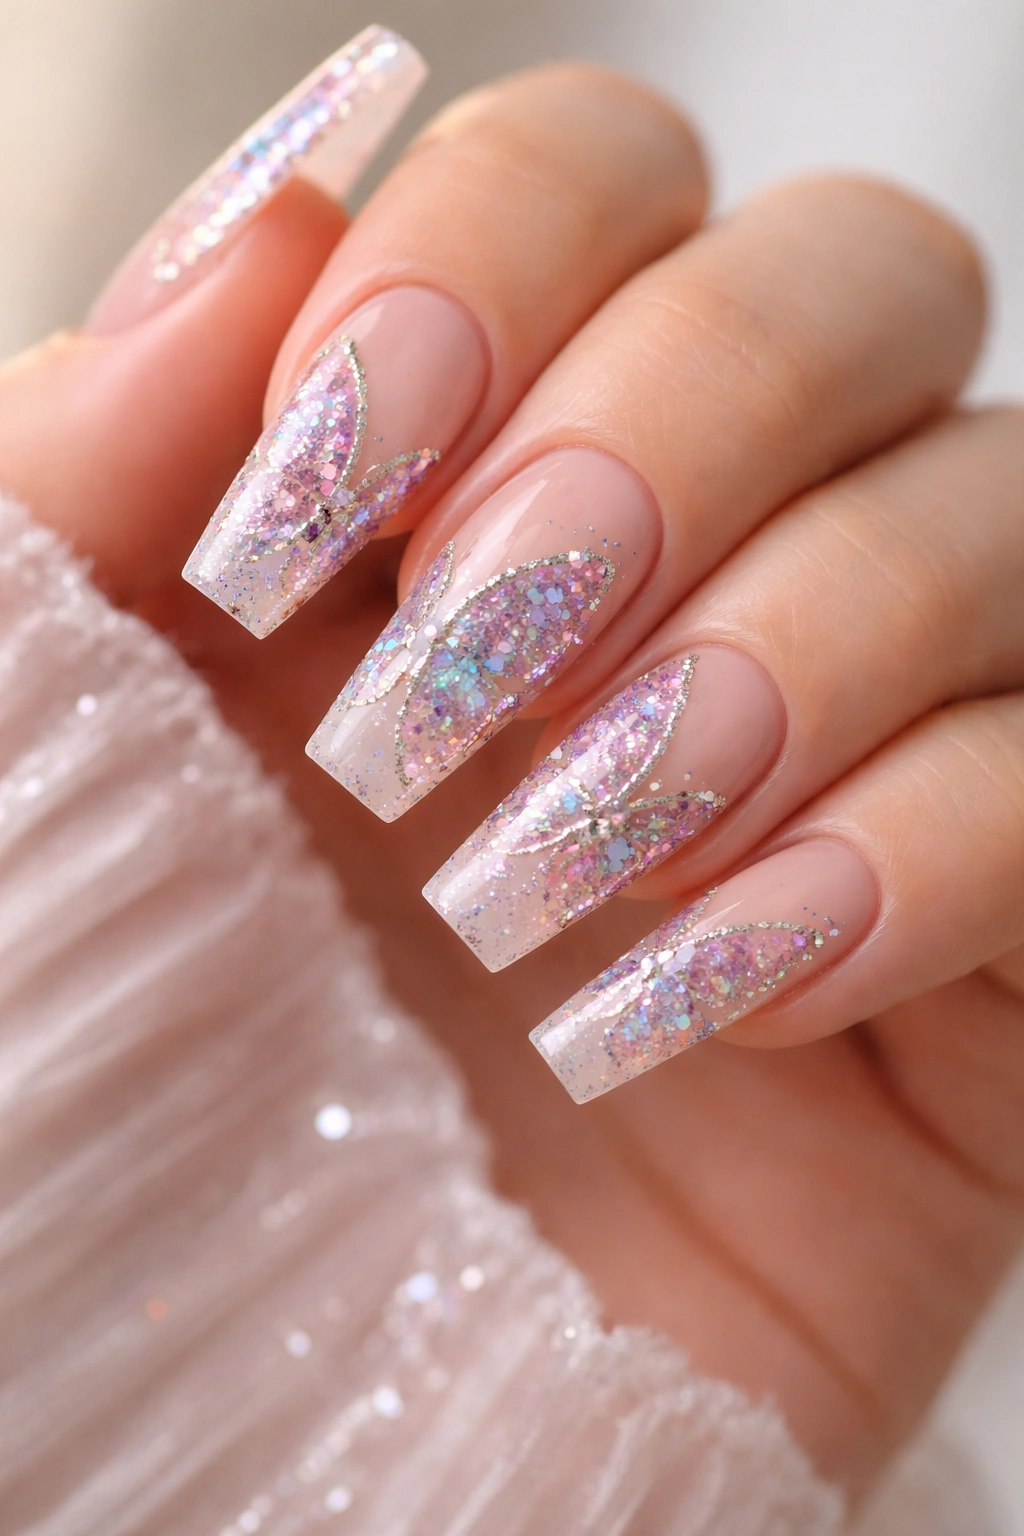
If you believe that more sparkle is always better, the glitter butterfly design is calling your name. This style features a butterfly covered partially or entirely in fine glitter, chunky glitter, or holographic sparkle effects. The glitter might create an ombre effect across the wings, or it might cover just the outer edges for a shimmering halo effect. The base nail is typically a solid color that complements the glitter’s finish.
Creating Dimension with Sparkle
Glitter designs on coffin nails are particularly effective because the nail shape provides enough real estate for the sparkle to really shine. A strategically placed glitter butterfly catches light beautifully, and the reflection becomes part of the design’s appeal. Whether you choose fine iridescent sparkle or chunky glitter pieces, the effect is instantly glamorous.
Glitter Application and Removal
- Use a sticky base coat designed for glitter application—it helps pieces stay exactly where you place them
- Apply glitter over gel polish for durability, or in a gel top coat for easier future removal
- Build up the glitter density gradually so you can control where it’s most concentrated
- Use a toothpick to position individual chunky glitter pieces while the base is still wet
- Consider combining fine glitter with a few strategic rhinestones for mixed-media sparkle
- Plan for a longer removal process when using traditional glitter—soaking and gentle rolling works better than picking
8. Butterfly with Crystal Stones
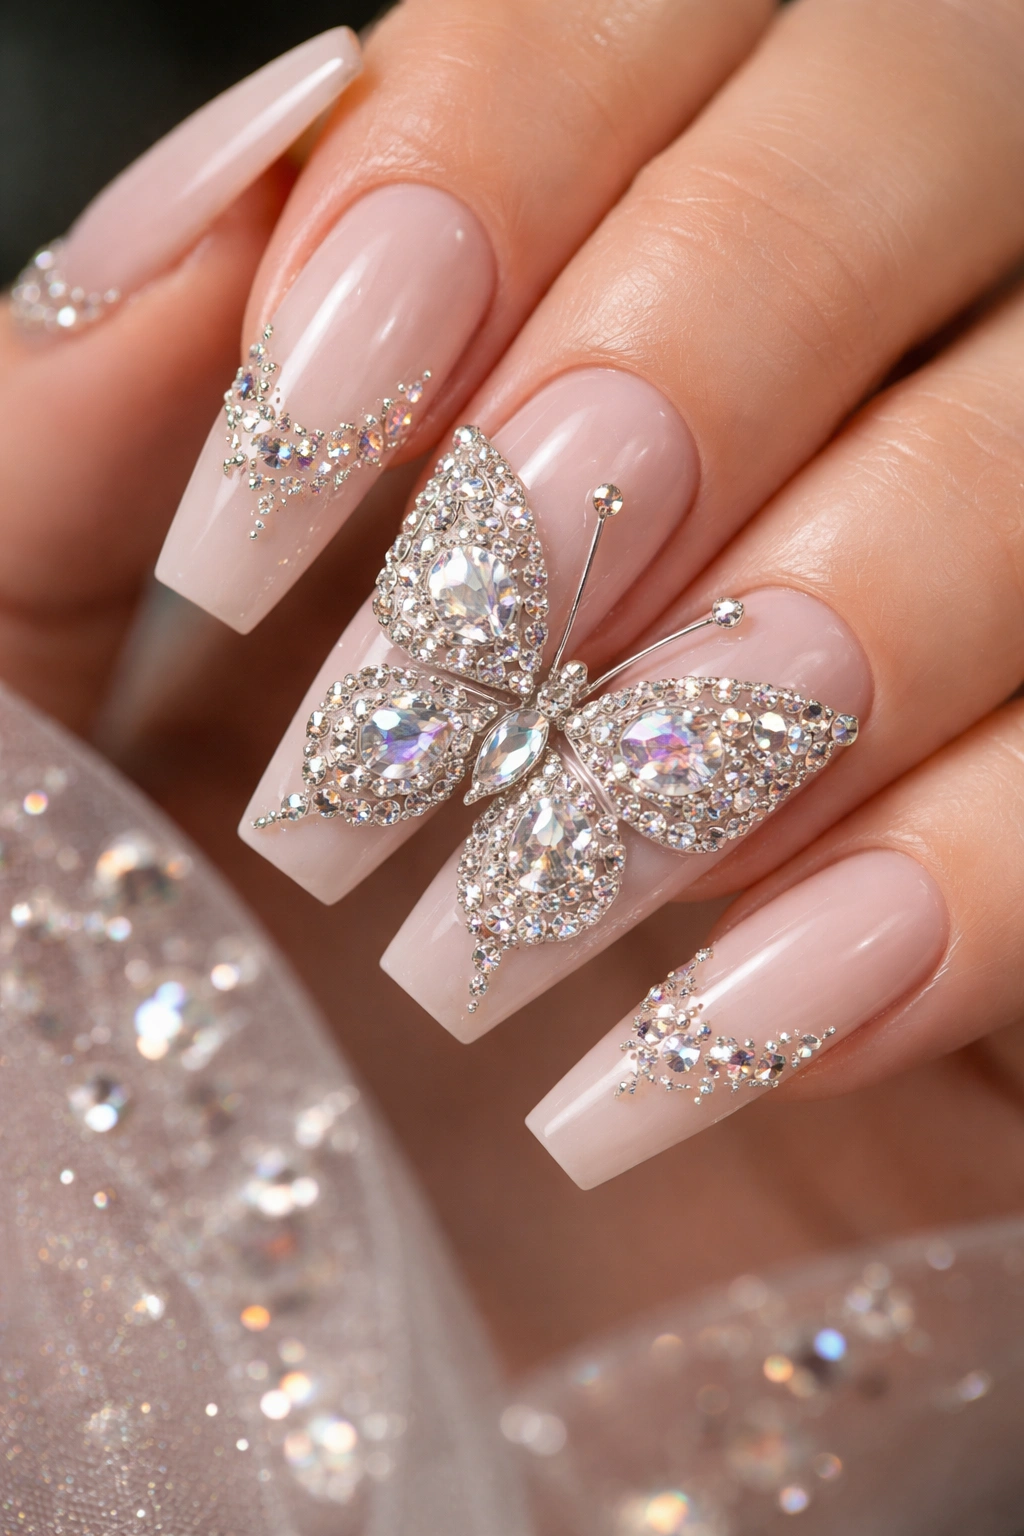
Rhinestones, crystals, and gemstones transform any nail design from pretty to absolutely luxurious. This style features a butterfly outlined or partially covered in sparkling crystals and stones. Some designs create a fully jeweled butterfly with stones covering the entire wing surface, while others use stones to accent specific areas—the body, the wing tips, or where the wings connect.
The Luxury Factor
Crystal-studded butterfly nails feel special and elevated. The way crystals catch light creates an almost hypnotic effect, especially when you use high-quality Swarovski stones. This design is perfect for weddings, special occasions, or any time you want your nails to feel like jewelry.
Stone Placement and Durability
- Use nail glue specifically formulated for applying rhinestones—regular top coat won’t hold them securely
- Plan your design before applying stones; mark placement with a soft pencil if needed
- Start with the largest stones first, then fill in gaps with smaller ones for visual flow
- Apply the base polish or gel, then stones, then seal with a thick top coat
- Be mindful that crystal designs don’t snag on fabrics; they’re beautiful but require slightly more careful handling
- Consider mixing crystal shapes—round, oval, and marquise stones create more visual interest than one shape alone
9. Pastel Butterfly Dreams
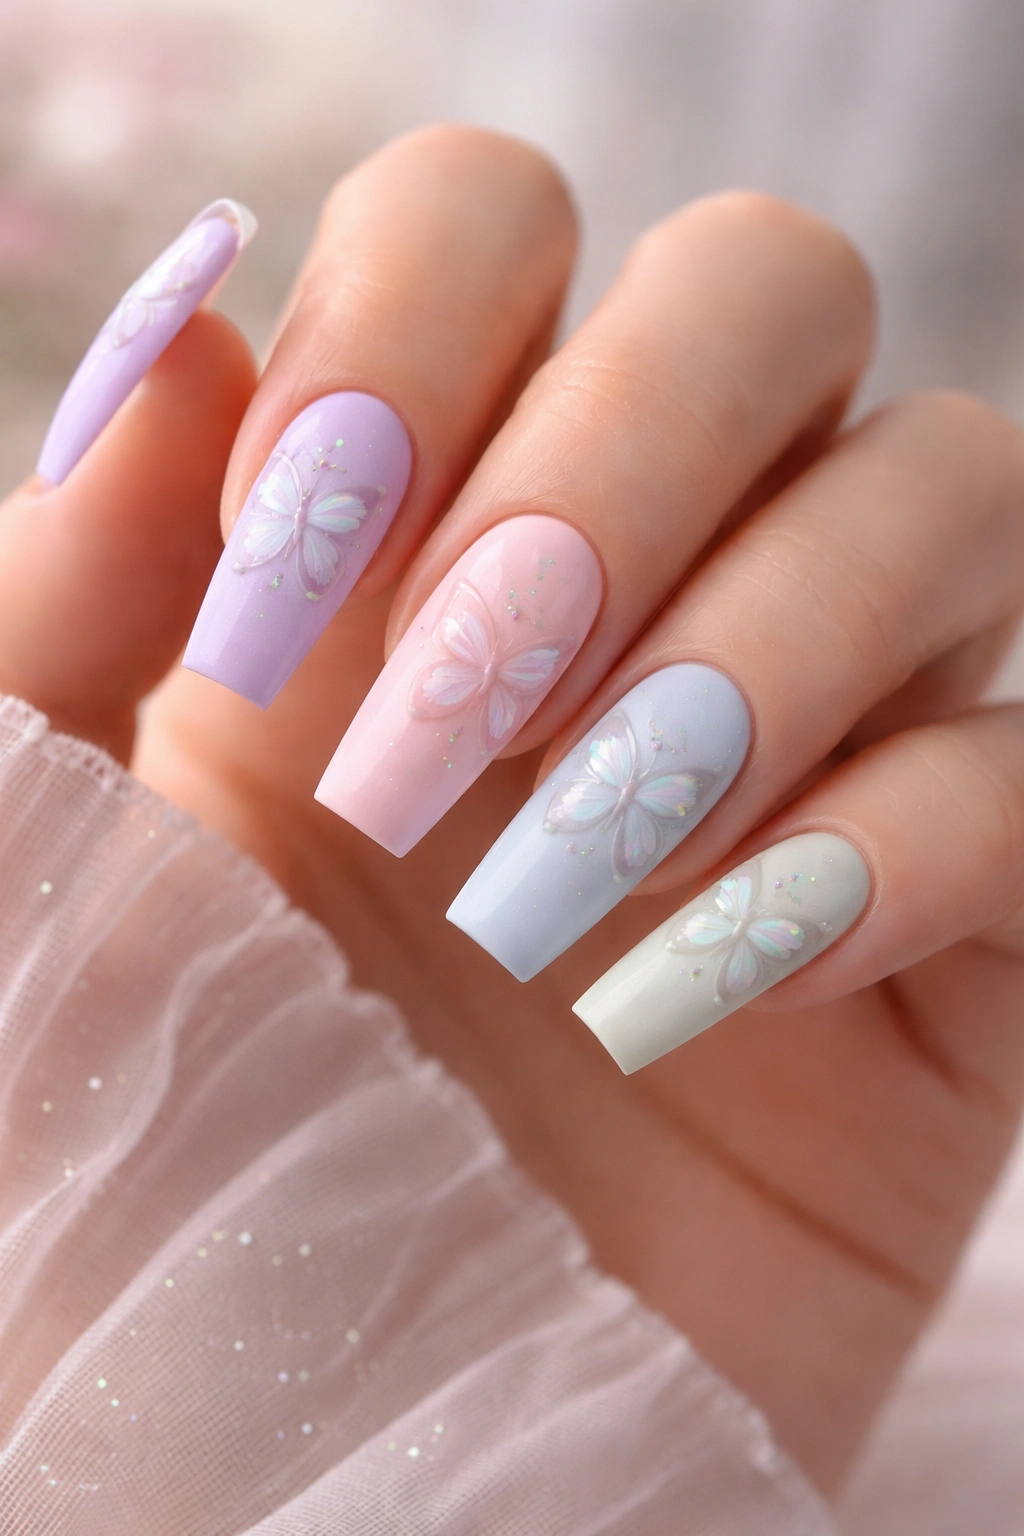
Soft, dreamy pastel colors create the perfect aesthetic for butterfly designs. This style uses pale, muted versions of classic colors: soft lavender, baby pink, pale yellow, powder blue, mint green. The butterfly itself might be rendered in a different pastel shade than the base, creating a gentle contrast that feels soothing rather than jarring.
The Soft, Romantic Aesthetic
Pastel butterfly designs appeal to people who love gentle, feminine aesthetics. The color palette creates a dreamy, almost nostalgic feeling—think cottagecore, soft girl aesthetic, or romantic garden vibes. These nails feel fresh and springlike regardless of the season, making them a perennial favorite.
Creating Pastel Magic
- Invest in quality pastel-shade polishes or gels—cheap pastels often look chalky or uneven
- Apply pastel colors in thin, even layers to avoid opacity issues
- Consider a matte finish for pastel designs—it enhances the soft, dreamy quality
- Use fine detail work for the butterfly: thin lines, delicate patterns, or subtle shading
- Add small accents like tiny dots, leaves, or sparkle to elevate the design from basic to beautiful
- Layer pastels for subtle color variations—pale pink base with an even paler white gradient, for example
10. Metallic Gold Butterfly
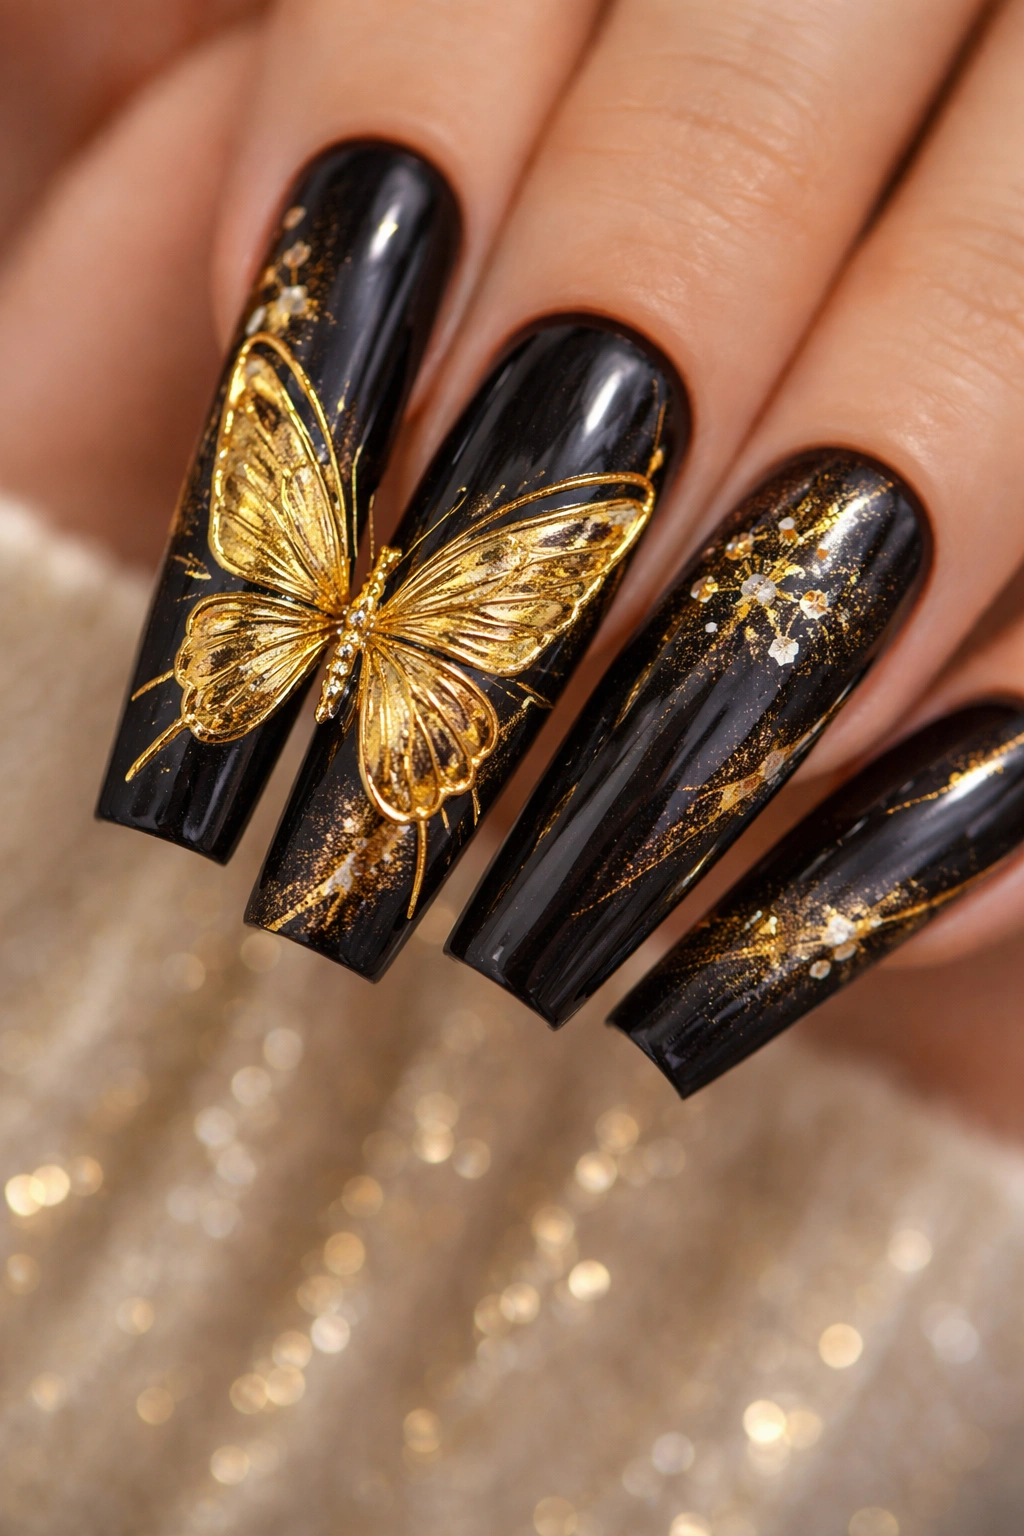
There’s something undeniably sophisticated about gold. A butterfly rendered in shimmering gold against a darker base creates instant elegance and luxury. The gold might be solid and reflective, or it might have a brushed, matte finish for a more understated take. Some designs feature gold butterfly outlines over colorful bases, while others use solid gold for the wings with fine black detailing.
Gold as a Design Element
Gold works beautifully on coffin nails because the shape’s elegance mirrors the richness of the metallic finish. Whether you’re going for modern glam, art deco vibes, or timeless sophistication, a gold butterfly delivers. This is a design that works for both everyday wear and special occasions, making it versatile despite its glamorous appearance.
Achieving the Perfect Gold Finish
- Use gold gel polish or metallic foil transfers for the brightest, most reflective finish
- Pair gold with jewel-tone bases: deep emerald, sapphire blue, rich burgundy, or black
- Create dimension by combining matte and glossy finishes—gold wings with matte detailing, for example
- Add fine black line work or negative space around the gold butterfly for definition
- Consider a rose gold variation for a warmer, slightly softer interpretation of metallic elegance
- Layer gold over a slightly darker shade to make the metallic quality pop even more
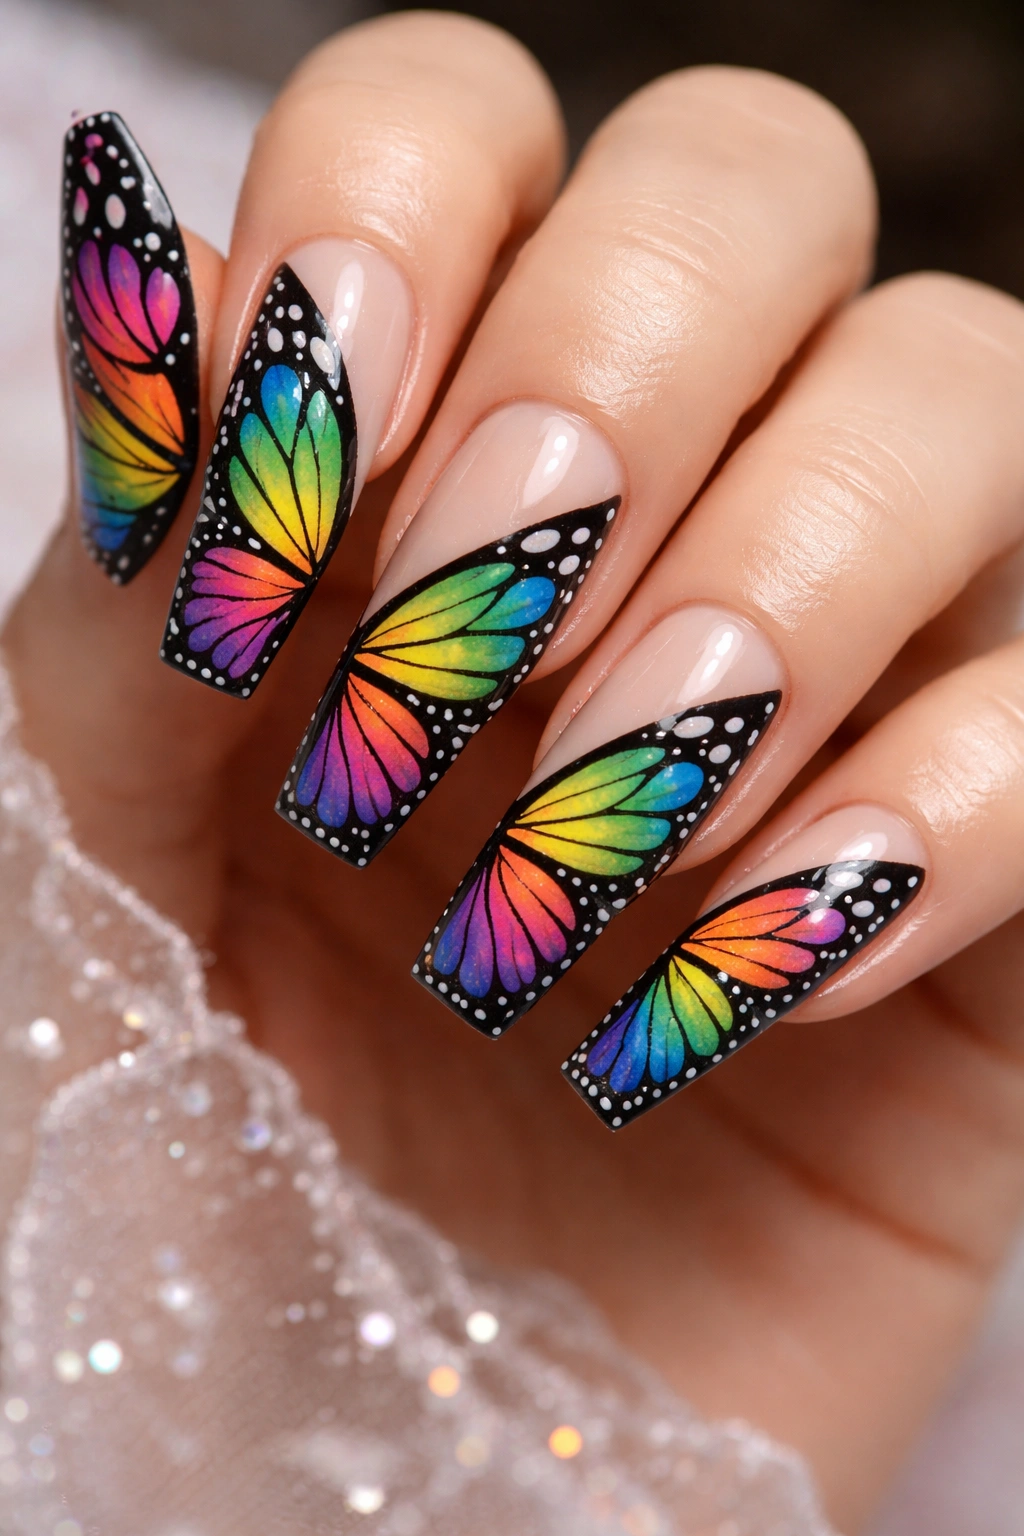
11. Rainbow Butterfly Design
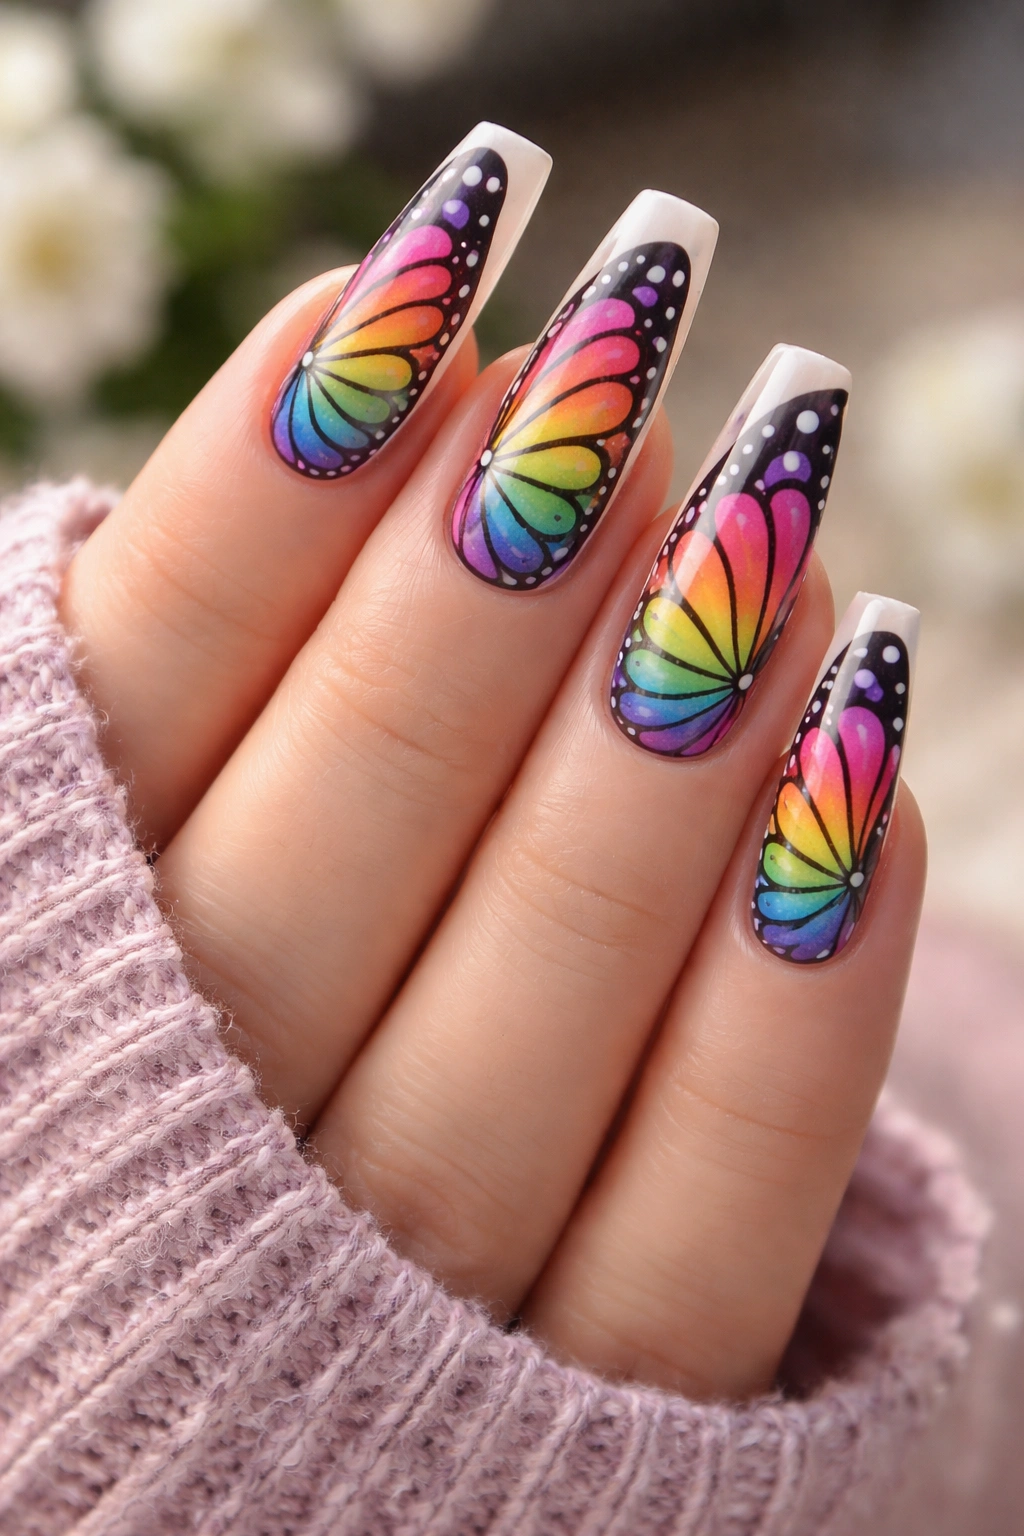
The ultimate expression of colorful joy, the rainbow butterfly design features wings that showcase every color of the visible spectrum. This is bold, celebratory, and undeniably eye-catching. The base is typically neutral—white, nude, or pale pink—so the rainbow butterfly becomes the undeniable focal point. Each wing section features a different color, and sometimes the color gradient continues smoothly from one hue to the next.
Celebrating Color and Individuality
Rainbow butterfly nails represent playfulness, optimism, and self-expression. They’re perfect if you love color, want to celebrate Pride, or simply want nails that make people smile. The design works particularly well on coffin nails because the wing shape naturally accommodates multiple color sections without feeling cramped or confused.
Building Your Rainbow Butterfly
- Map out your color order before starting—follow traditional rainbow order (red, orange, yellow, green, blue, purple) or create your own unique sequence
- Use high-quality polishes in true, vibrant colors for the best visual impact
- Apply each color carefully with a thin brush to create clean lines between sections
- Let each color dry between applications to prevent muddying
- Add black outline work to define the butterfly shape and separate the color sections
- Consider adding a tiny rainbow ombre gradient on the body of the butterfly to tie everything together
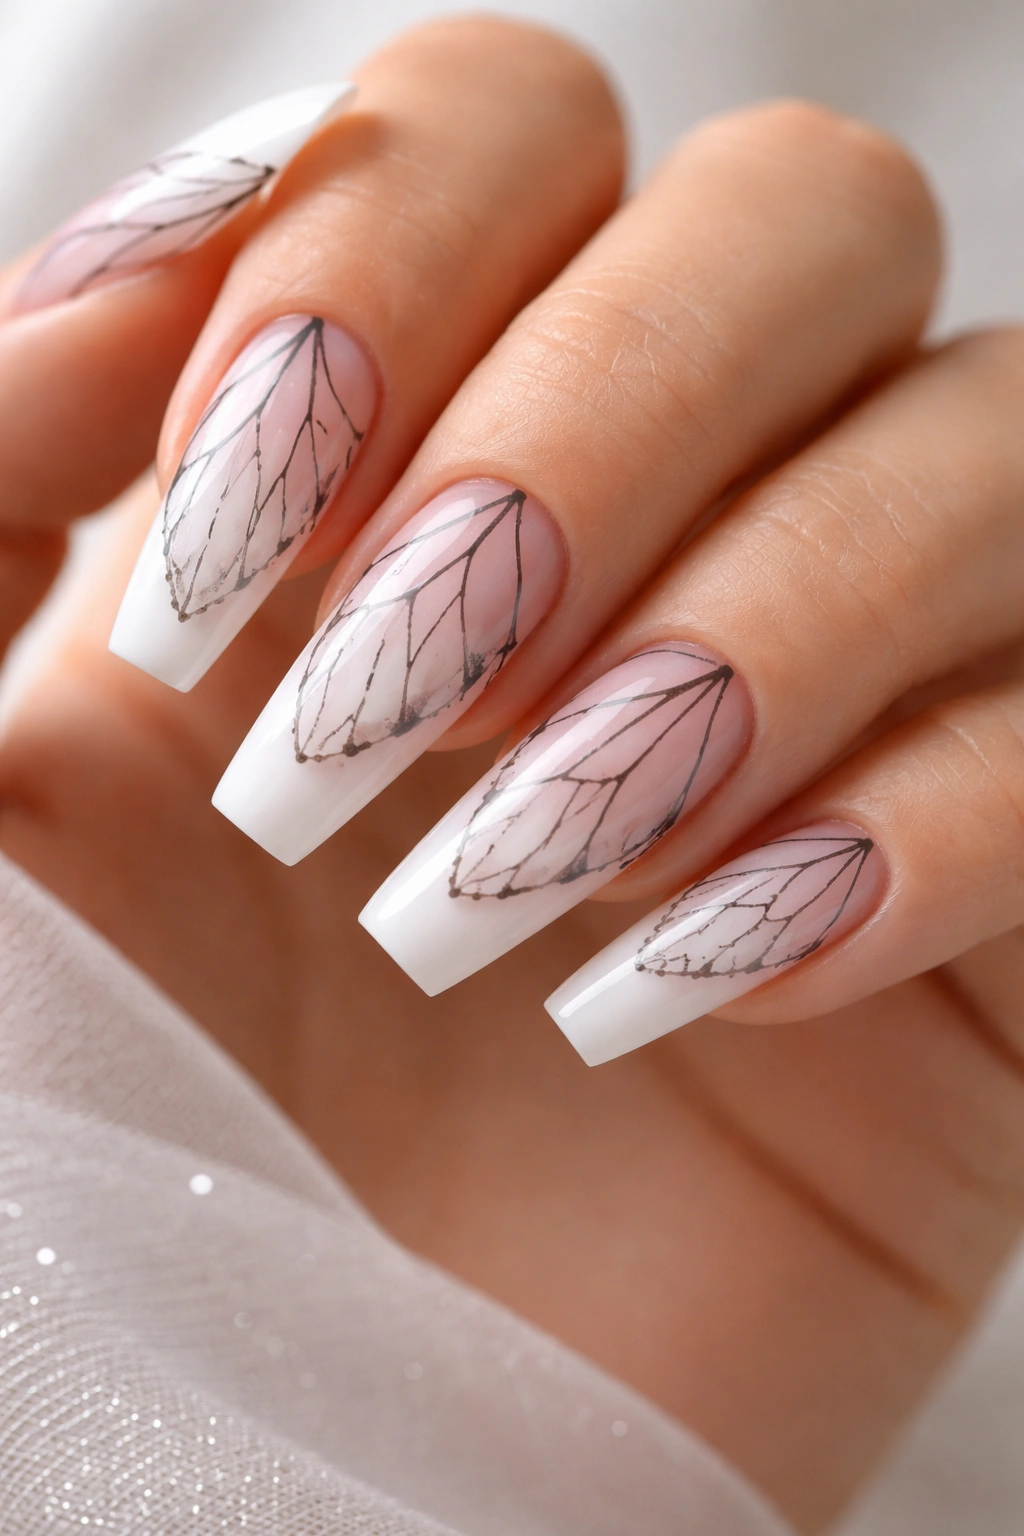
12. Butterfly with Negative Space
Negative space design uses the natural nail color or base coat strategically as part of the overall composition. A negative space butterfly might feature only the wing outlines in color or glitter, while the wing interior remains bare nail or base color. This creates an airy, modern aesthetic that feels clean and intentional.
The Art of Strategic Emptiness
Negative space designs prove that you don’t need to fill every inch of your nail to create something beautiful. By leaving areas bare, you actually create visual impact through contrast and negative space. This approach works wonderfully on coffin nails, where the elongated shape gives you plenty of room to play with balance and composition.
Negative Space Execution
- Paint only the outline of the butterfly in your chosen color or glitter
- Leave the interior of the wings completely bare—just your base or natural nail color
- Use thin, precise line work for the outline to maintain the design’s elegance
- Consider adding small accent details inside the outline: a few delicate lines or tiny dots
- Combine negative space with other design elements: a solid colored base with a negative space butterfly on top, for example
- Pair negative space butterfly designs with solid color on your other nails for contrast
13. Double Butterfly Pattern
Why have one butterfly when you can have two? The double butterfly design features two butterflies positioned symmetrically or asymmetrically across the nail. They might be mirror images of each other, flying toward each other, or positioned one above the other. This design creates visual movement and complexity that’s more interesting than a single butterfly.
Creating Movement and Flow
Two butterflies create a sense of motion and storytelling. They suggest flight, partnership, or duplication in a way that feels dynamic. On coffin nails, paired butterflies create beautiful compositional balance, filling more of the nail’s surface area while still leaving room for breathing space and negative area.
Designing Twin Butterflies
- Position butterflies at slight angles to create the sense of movement through the air
- Use symmetrical placement for a more formal, balanced aesthetic
- Try asymmetrical placement for a modern, artistic feel
- Color the butterflies identically or use complementary colors for variation
- Add connecting elements like flowers, leaves, or sparkle trails between the butterflies
- Use different sizes—one large, one small—for visual interest and depth
- Consider incorporating negative space around the butterflies for a clean, contemporary look
14. Butterfly with Chrome Finish
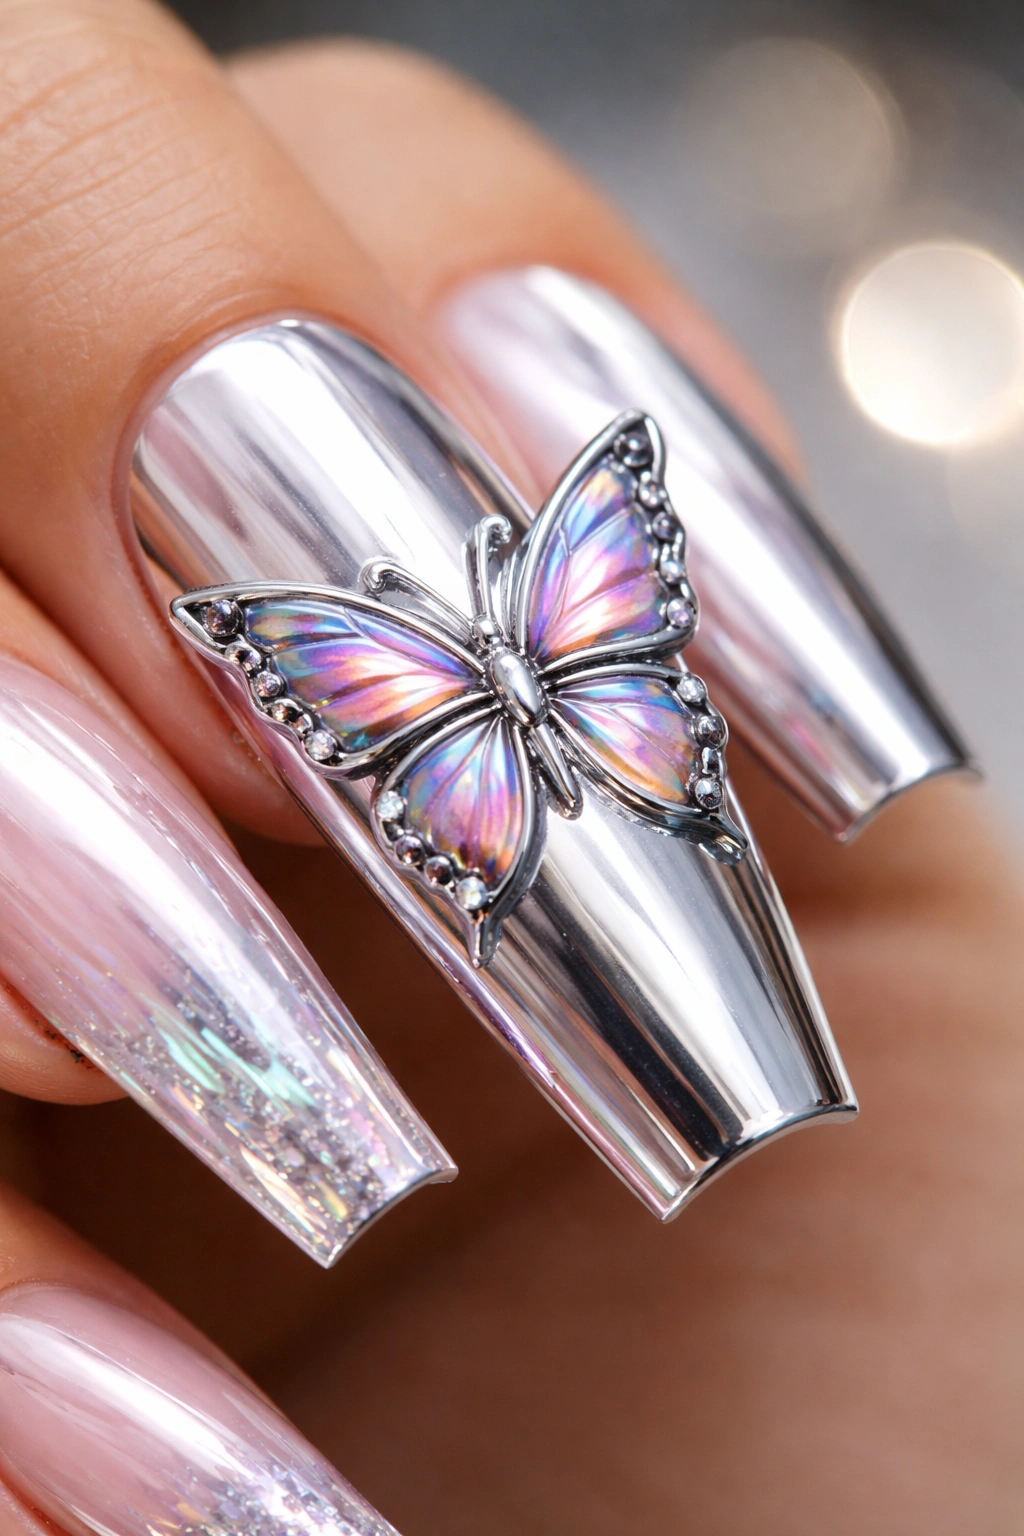
Chrome and mirror finish nail polishes create an otherworldly, futuristic effect. A butterfly design combined with chrome creates something truly striking—the butterfly might be fully chromed for a sleek, metallic appearance, or outlined in chrome while the wings feature color or pattern inside. The result is modern, edgy, and absolutely gorgeous.
The Future-Forward Look
Chrome finishes on coffin nails create a high-fashion, editorial aesthetic. This design appeals to people who want something that looks expensive, contemporary, and a little bit rebellious. The reflective quality of chrome makes the butterfly almost holographic, capturing light in surprising ways.
Working with Chrome Polish
- Chrome powder requires a sticky base coat and a special application technique—follow your specific product’s instructions carefully
- Apply a solid base color first, then apply chrome powder over it for the most vibrant effect
- You can apply chrome to just the butterfly shape using a stencil or careful freehand work
- Seal chrome with a thick, quality top coat to protect the delicate finish
- Consider mixing chrome with other finishes: chrome butterfly outline with colored wings, for example
- Be aware that chrome finishes require careful maintenance and may need touch-ups more frequently than traditional polish
- Pair chrome butterfly designs with solid color or simple pattern on other nails
15. Butterfly with Pearl Details
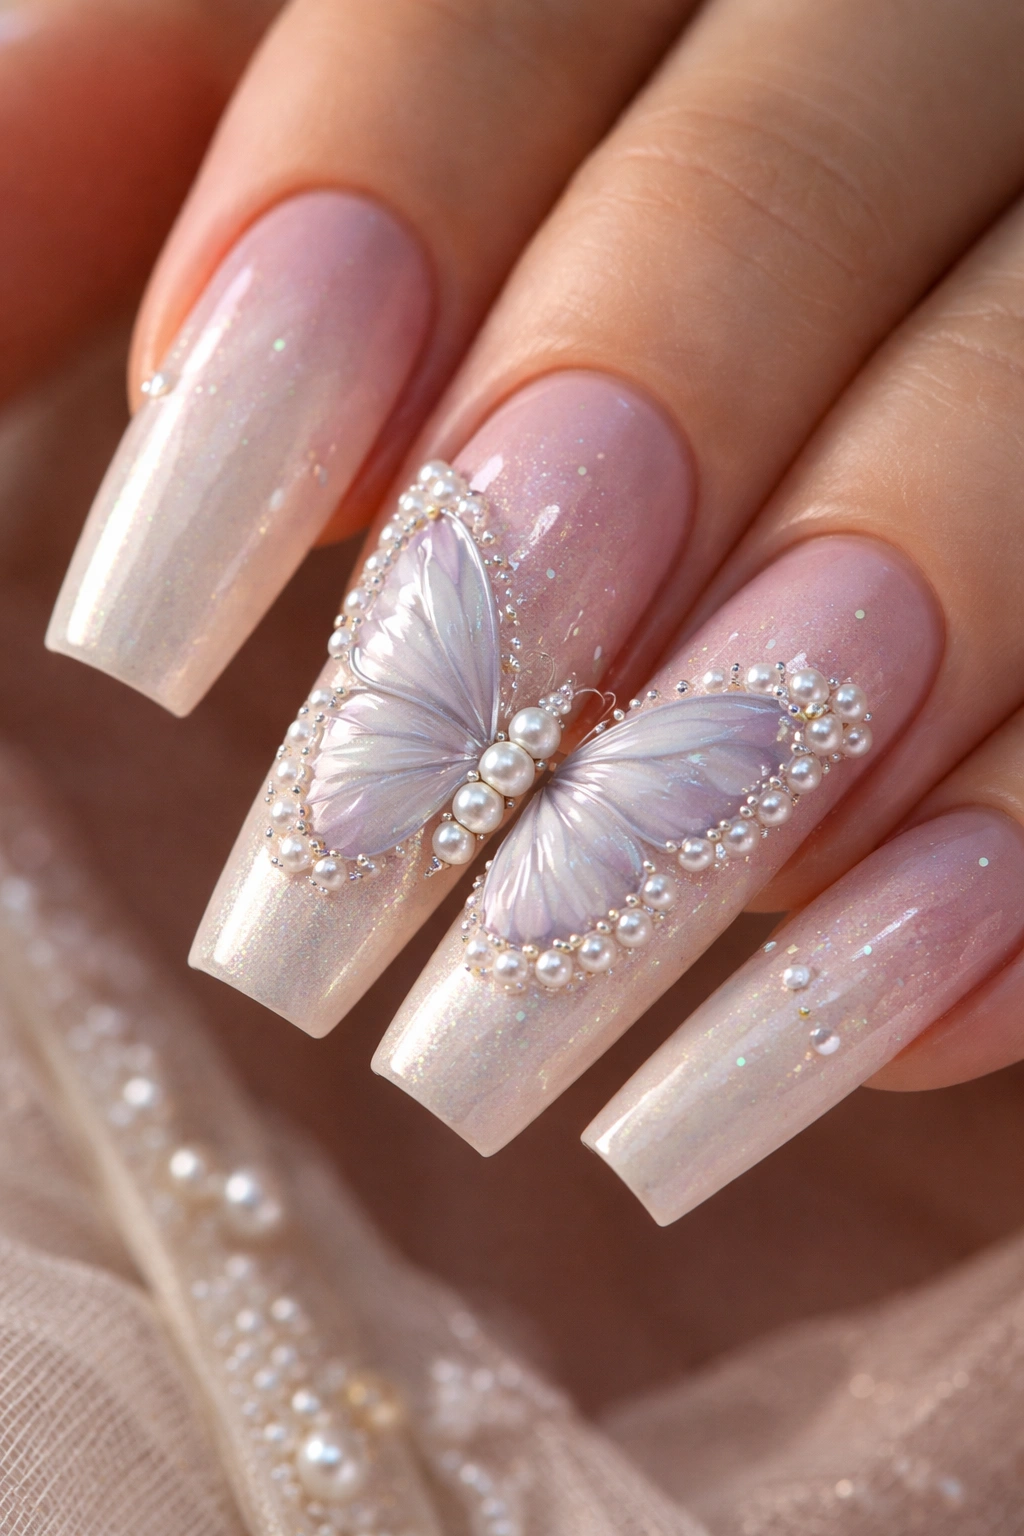
Pearls add an elegant, sophisticated dimension to nail art. This design features a butterfly complemented by small pearl accents—perhaps pearls outline the wings, form the butterfly’s body, or scatter across the nail as decorative elements. Pearls can be created using pearl-finish nail polish or by applying actual pearl beads or microbeads to the nail.
Pearl Elegance and Refinement
Pearl details elevate any design automatically. There’s something inherently luxurious about pearls, and they work beautifully on coffin nails. Whether you choose warm cream pearls, cool silver pearls, or iridescent versions, the effect is refined and upscale.
Incorporating Pearls
- Use pearl beads carefully adhered with nail glue for a genuinely luxurious look
- Apply pearl-finish polish as the base and paint the butterfly over it
- Create a butterfly outline using pearl details on a solid color base
- Mix pearl accents with other embellishments: pearls plus small rhinestones for maximum luxury
- Use pearl dust or flakes mixed into a clear top coat for subtle, all-over shimmer
- Keep pearl accents concentrated in one area—the butterfly’s body, for example—rather than scattered randomly
- Pair with elegant, understated colors like soft pink, cream, gold, or champagne
16. Whimsical Cartoon Butterfly
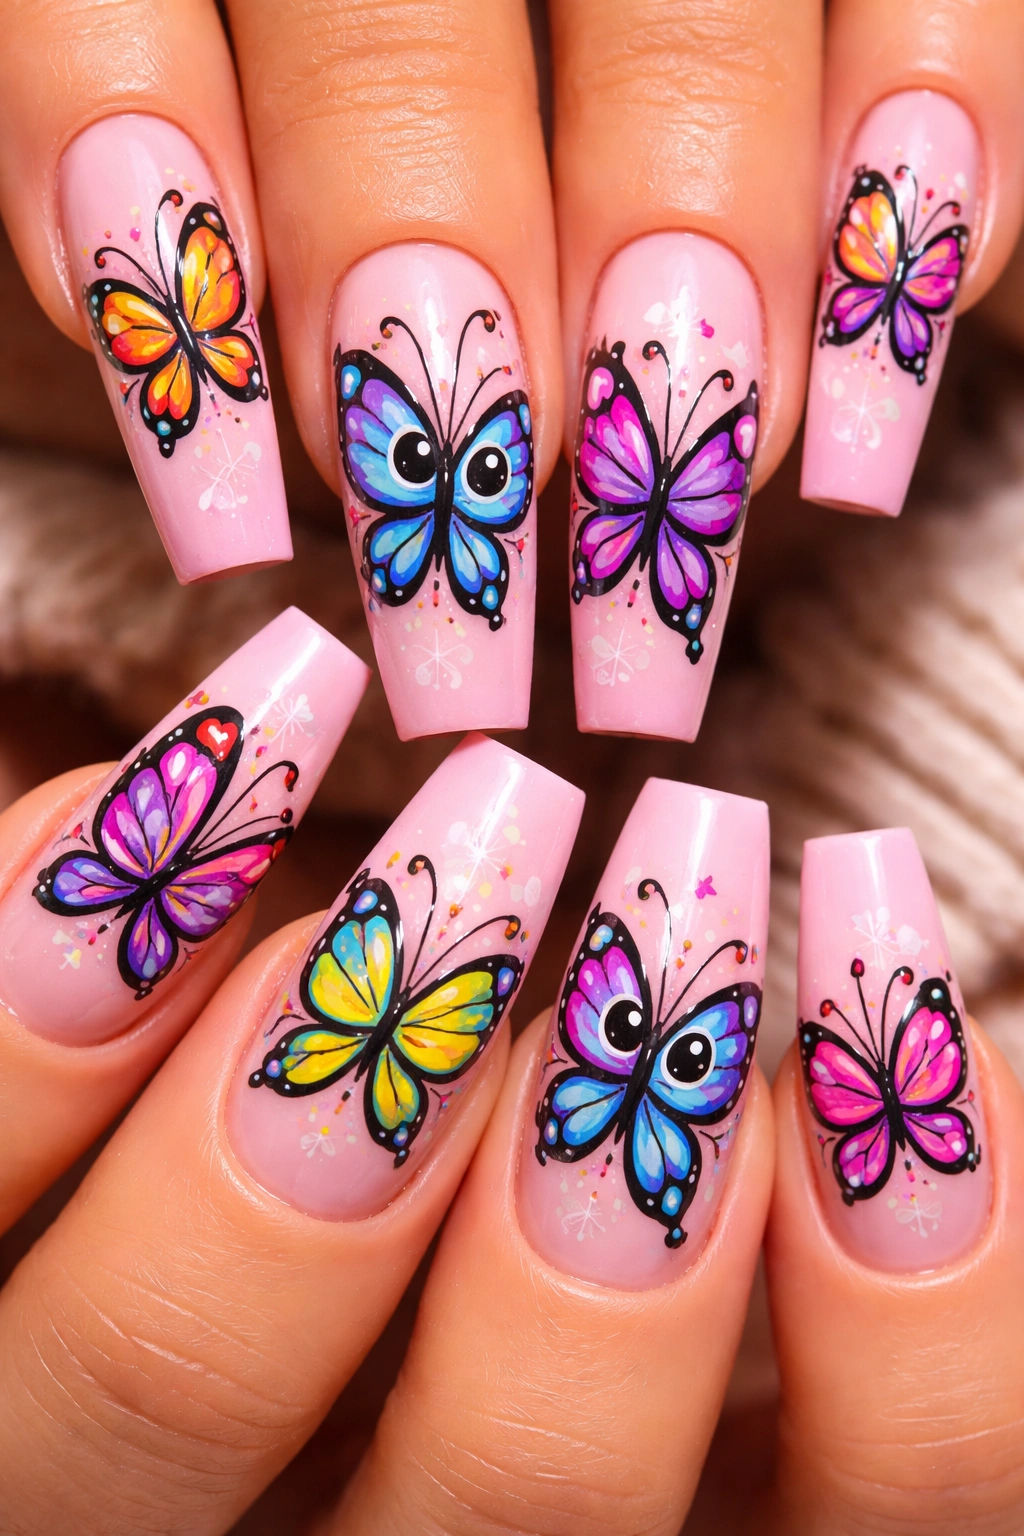
Not all butterfly designs need to be realistic or sophisticated. Whimsical, cartoon-style butterflies bring playfulness and fun to your manicure. These butterflies might have exaggerated features, cute expressions, or stylized shapes. They often include fun colors and a lighthearted energy that makes people smile.
Fun and Personality
Cartoon butterfly designs are perfect if you want your nails to reflect your sense of humor and personality. These designs work across age groups and can be tailored to match your specific vibe—whether that’s kawaii cute, retro inspired, or modern quirky. On coffin nails, the elongated shape actually accommodates character details beautifully.
Creating Cartoon Magic
- Give your butterfly simple, expressive features: large round eyes, a small smile, antennae that bend adorably
- Use bold, outline-heavy line work characteristic of cartoon art
- Choose a limited color palette—two to four colors works best for cartoon aesthetics
- Exaggerate proportions: oversized wings relative to the body, for example
- Add tiny accessories if it matches your vision: flowers in the butterfly’s “hands,” small clouds around it
- Use matte or semi-matte finishes for a more authentic cartoon look
- Mix cartoon butterflies with simple solid-color nails, or create a full nail scene
17. Butterfly with Stripe Accents
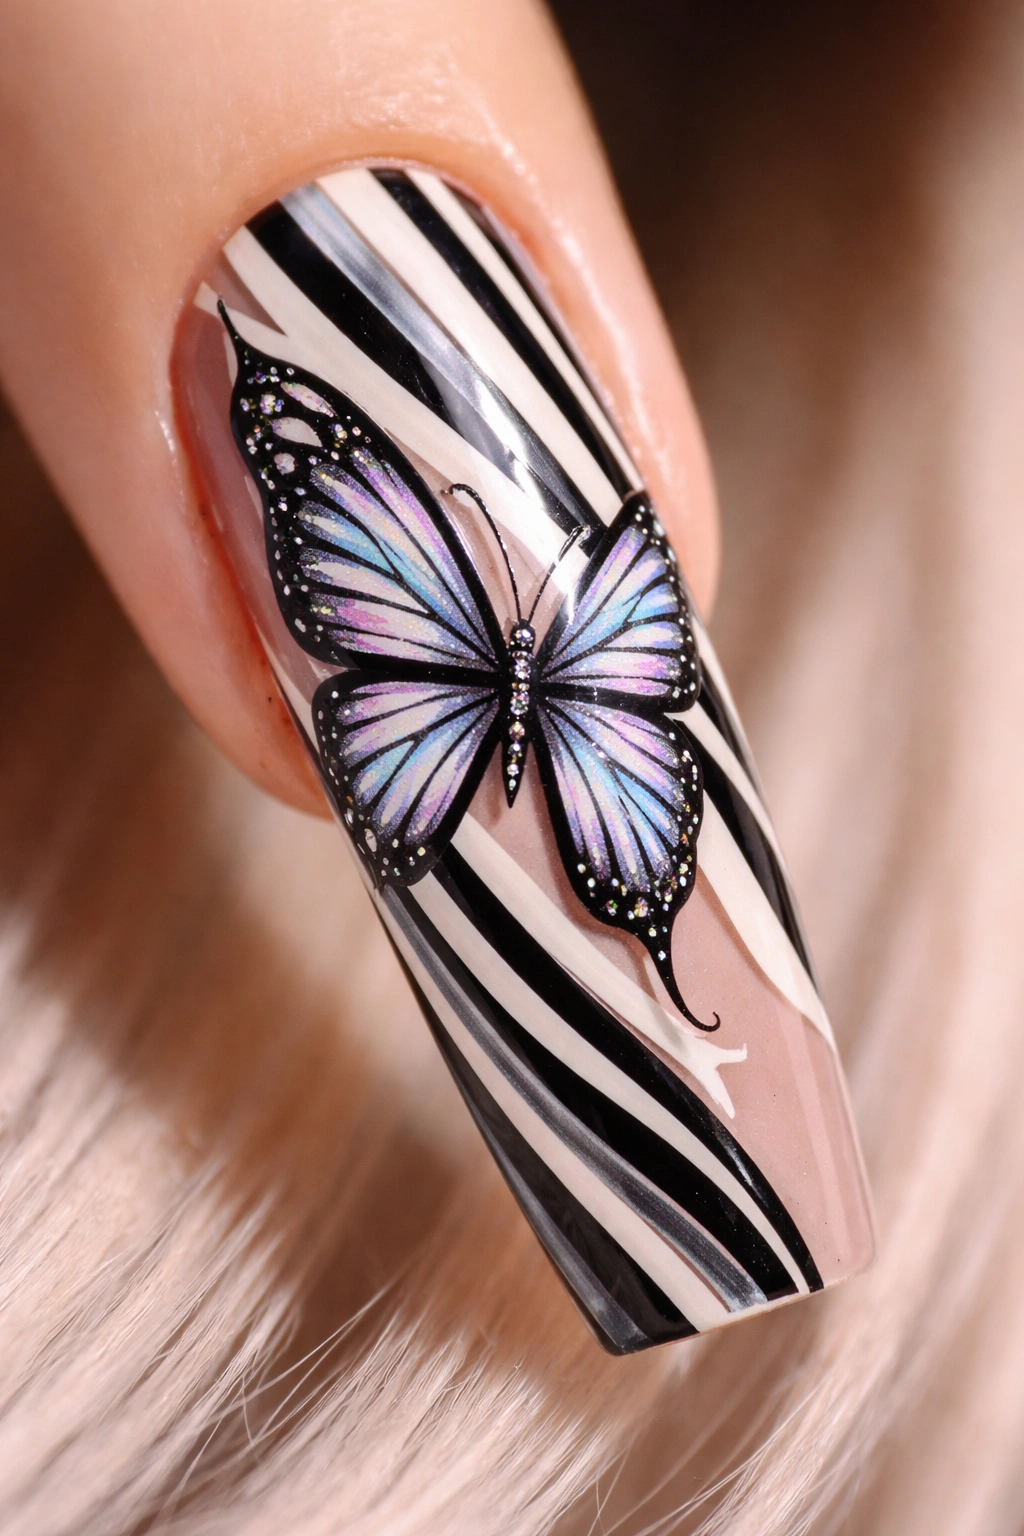
Stripes add graphic interest and movement to butterfly designs. This style features a butterfly rendered against a striped background or with stripes incorporated into the butterfly’s wings themselves. The stripes might be thin and delicate, bold and graphic, or arranged in a pattern that follows the wing shape.
Geometry Meets Nature
Combining organic butterfly shapes with geometric stripe patterns creates visual tension and interest. The structured element of the stripes contrasts beautifully with the flowing, curved lines of the butterfly wings. This design appeals to people who love both artistic and structured aesthetics.
Creating Striped Butterfly Designs
- Paint horizontal, vertical, or diagonal stripes as the base, then carefully paint or stamp the butterfly over them
- Create stripes within the butterfly’s wings—different colors or directions for each wing
- Use thin, precise stripes for an elegant look, or wider stripes for a bolder effect
- Combine stripes with solid color sections: striped wings with a solid-color body
- Try ombre stripes where the thickness or color intensity changes across the nail
- Keep stripe colors complementary rather than clashing for a cohesive final look
- Use negative space around the butterfly to make both the stripes and the butterfly visible and distinct
18. Matte Butterfly Design
There’s something inherently modern and chic about matte finishes. A matte butterfly design—whether it’s a bold black butterfly, a colorful creation, or a glitter butterfly rendered matte—feels artistic, contemporary, and undeniably sophisticated. Matte finishes also make colors appear richer and more saturated than glossy versions of the same polish.
The Contemporary Edge
Matte finishes have become increasingly popular in nail art because they feel current, editorial, and intentional. A matte butterfly design reads as curated and artistic rather than simply pretty. The texture adds another sensory dimension to the manicure.
Achieving Perfect Matte Finishes
- Apply regular polish and finish with a matte top coat for glossy polish conversion
- Use matte gel polish or matte builder gel for durability and longer wear
- Consider a hybrid approach: matte butterfly design with a glossy accent nail
- Pair matte butterflies with glossy bases for contrast, or go full matte for uniformity
- Matte finishes show detail beautifully, so fine line work and delicate designs shine with matte
- Combine matte with texture: matte butterfly design with glitter scattered across the nail
- Remember that matte finishes can be slightly more prone to smudging during application—work carefully
19. Butterfly with Marble Background
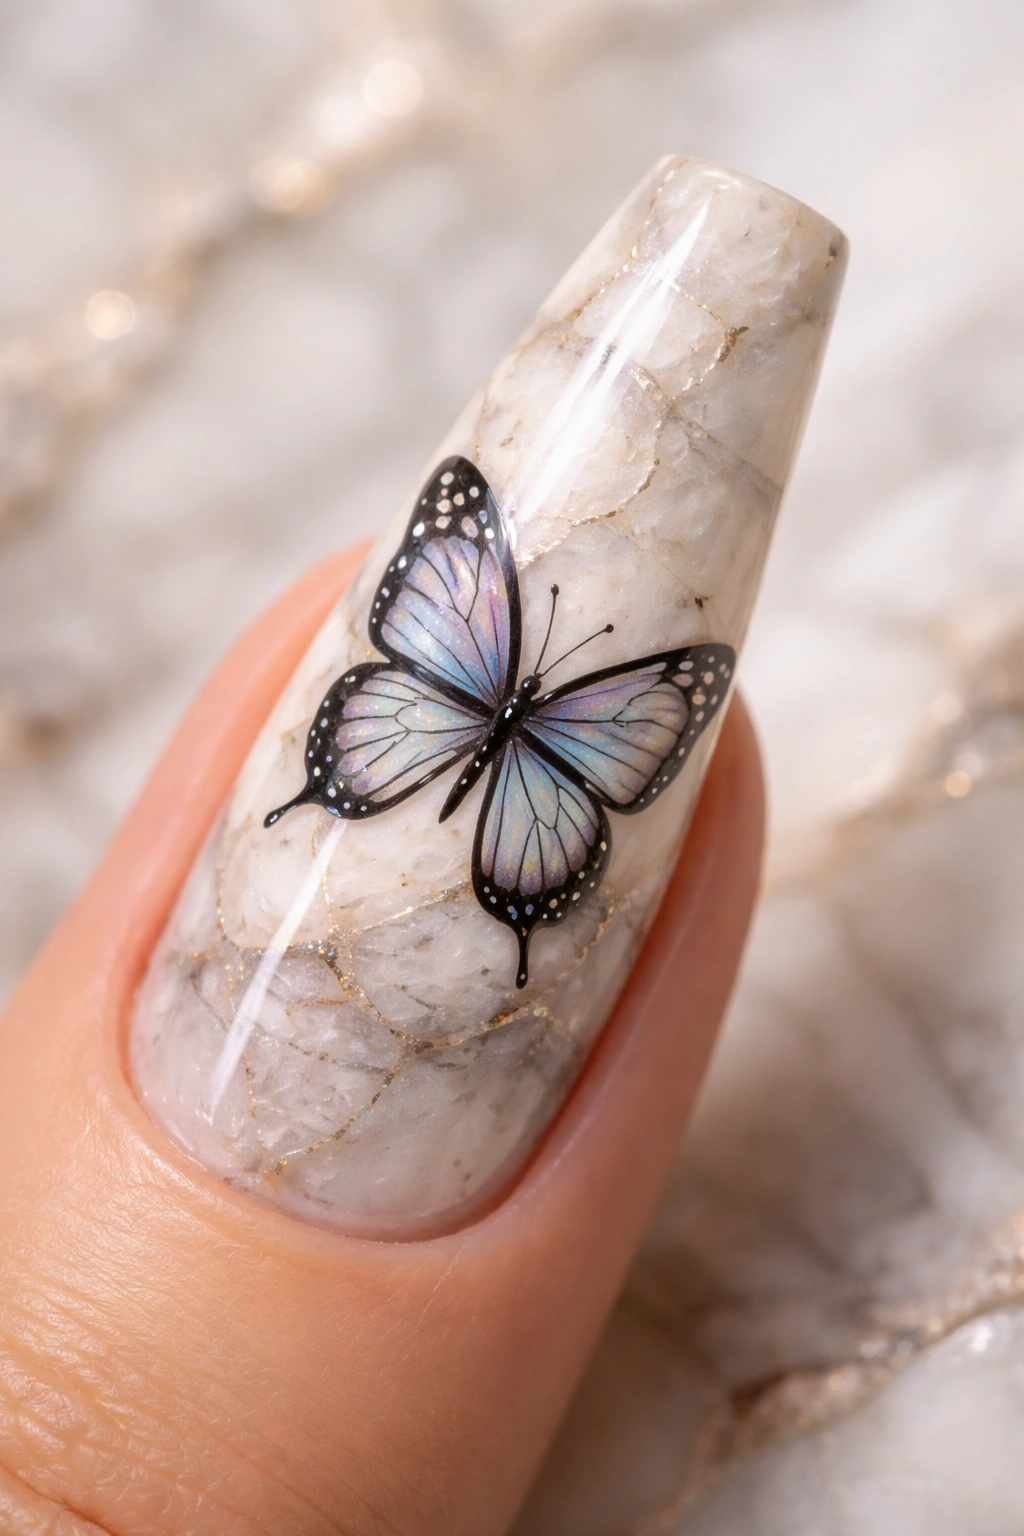
Marble patterns create an elegant, sophisticated backdrop for any design. This style features a butterfly design layered over a marbled nail base. The marble might be created using traditional water marble technique, polish drops and dragging, or specialized marble-effect nail wraps. The result is a nail that looks both artistic and refined.
Artistic Sophistication
Marble backgrounds add depth and visual interest without overwhelming the butterfly design. The natural variations in marble patterning make each nail slightly unique, adding an artisanal quality to your manicure. This design works beautifully on coffin nails, where the larger surface area allows the marble pattern to fully display.
Creating Marble and Butterfly Combinations
- Create your marble base first using your preferred marble technique, then carefully paint the butterfly over it
- Use a marble effect in neutral tones (black and white, gray and white, or cream and taupe) as the base
- Ensure your butterfly color contrasts enough to read clearly against the marble background
- Consider a semi-transparent butterfly design that partially reveals the marble beneath
- Add fine black outline work around the butterfly to define it against the detailed background
- Use marble on just one or two nails with solid color on the others for balance
- Pair marble butterfly designs with simple, elegant elements—no excessive additional embellishment needed
Final Thoughts
Butterfly coffin nail designs offer something for every style, preference, and occasion. Whether you gravitate toward delicate and minimal designs or prefer bold, sparkly, statement-making artwork, there’s a butterfly design that perfectly captures your aesthetic. The beauty of butterflies as a nail art subject is that they’re endlessly adaptable—the same motif can feel romantic, edgy, playful, sophisticated, or artistic depending on how you execute it.
When choosing your butterfly coffin nail design, consider not just what appeals to you visually, but what feels authentic to your personal style. The best nail design is one that makes you smile every time you look at your hands, that feels like an accurate expression of who you are. Whether you’re visiting a professional nail technician or attempting these designs at home, take your time, invest in quality products, and don’t hesitate to reference inspiration photos as you work.
The most important thing is to have fun with your manicure. Nails are a fantastic way to express creativity, celebrate your style, and treat yourself to something beautiful that’s entirely your own. Your butterfly coffin nails are a miniature canvas for art, personality, and confidence—so choose the design that speaks to you and wear it with joy.
