

Yellow coffin nails are having a genuine moment right now, and honestly, they deserve all the attention. There’s something about this shape—those sharp, sophisticated angles paired with the warmth of yellow—that just works. Coffin nails (also called ballerina nails) have that elongated, tapered silhouette that flatters virtually every hand shape, and yellow is one of the most versatile colors in the nail design palette. It can swing from cheerful and vibrant to deep, moody, and sultry depending on the shade and the designs you pair with it.
The beauty of yellow coffin nails is that they bridge the gap between statement-making and wearable. Unlike some nail trends that feel temporary or overly trendy, yellow nails have this enduring appeal—they look fresh, they feel intentional, and they work for everything from a casual weekend to a polished professional setting (depending on the design you choose). Long coffin nails give you real estate to work with, meaning you can go minimal with a solid creamy yellow, or you can get creative with accents, gradients, metallics, or intricate nail art.
What makes this particular combination so compelling is the contrast between the edgy, modern coffin shape and the warm, optimistic energy of yellow. The shape reads bold and contemporary, while the color keeps things feeling approachable and bright. We’ve put together eighteen distinct approaches to yellow coffin nails for long nails—everything from simple, elegant monochromatic looks to detailed designs with metallic accents, marble effects, and intricate artwork. Whether you’re drawn to soft buttery yellows or high-impact neon, there’s a style here that’ll work with your aesthetic.
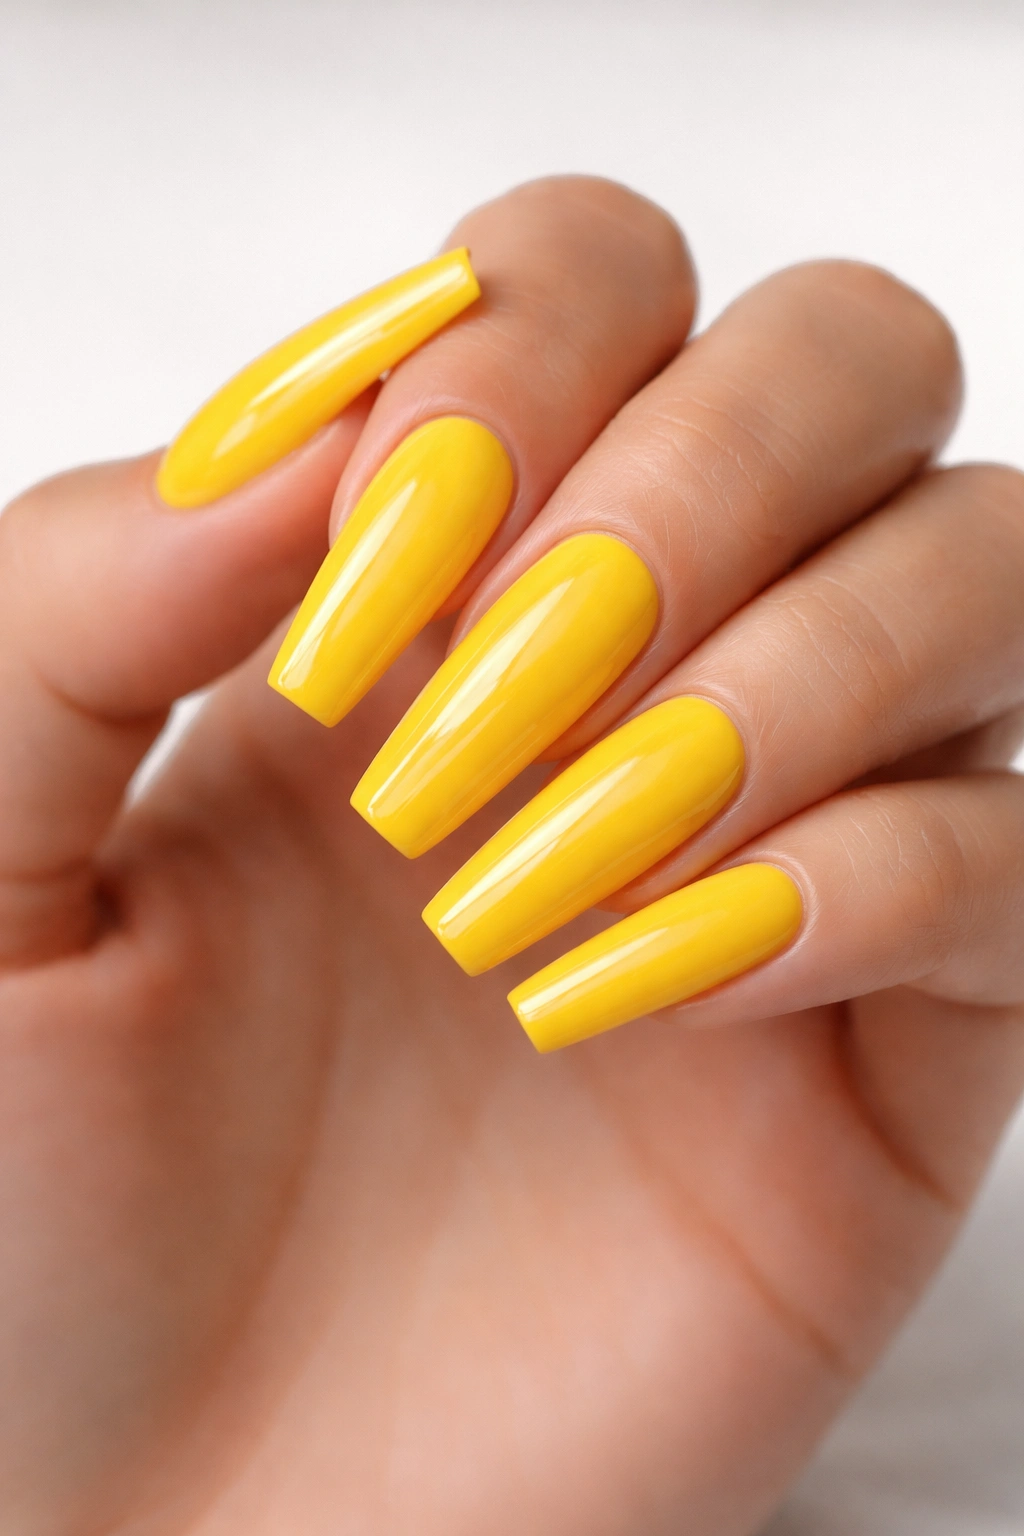
1. Bright Sunshine Yellow with Glossy Finish
This is the purest expression of yellow coffin nails—a true, saturated sunshine yellow with a high-gloss topcoat that catches light from every angle. The simplicity is actually what makes it powerful. A solid, expertly applied yellow base on long coffin nails creates immediate visual impact without feeling overdone. The key to nailing this look is using a yellow that sits right in the middle of the spectrum (not too pale, not too orange-toned), and applying thin, even coats to avoid streaking.
Why This Works So Well
A single-color coffin nail in a vibrant yellow relies entirely on the shape and finish quality. The glossy topcoat amplifies the color’s brightness, making it look fresh and expensive. This design works beautifully on its own, but the coffin shape’s natural elegance means you’re not creating visual noise—you’re just highlighting the color and the silhouette. It’s the kind of manicure that photographs beautifully and looks polished from both close up and across a room.
Application Tips and Shine
- Use a base coat to prevent staining and improve wear time—yellows can be temperamental with longevity without proper prep
- Apply two thin coats rather than one thick coat to avoid visible brush strokes
- Seal with a quality glossy top coat in two layers for maximum shine and durability
- If you prefer extra mirror-like shine, apply a gel topcoat instead of regular polish for a glass-like finish
Pro tip: Yellow nails look brightest against deep or neutral clothing—pair them with blacks, grays, navy, or jewel tones to let the yellow absolutely pop.
2. Soft Butter Yellow with Matte Finish
If bright sunshine yellow feels too loud, butter yellow is your answer. This shade is warm, creamy, and deeply approachable—think the color of softened butter or pale daffodils. On long coffin nails with a matte topcoat, it becomes almost velvety, which adds a level of sophistication that high-gloss doesn’t quite reach. The matte finish softens the warmth of yellow without making it disappear, creating an effect that’s both calming and intentional.
The Sophistication of Matte
Matte finishes on yellow can actually feel more refined than glossy, especially when you’re using a creamy, softer shade. The lack of shine draws attention to the color itself and the impeccable shape of the coffin nails rather than light reflection. This is particularly effective for professional settings or anyone who finds high-gloss too attention-grabbing. The finish also hides minor imperfections better than glossy topcoats do.
Building the Perfect Matte Look
- Start with two coats of butter yellow—this shade is typically more transparent than bright yellows and needs good coverage
- Use a quality matte topcoat, applying it evenly to avoid any glossy patches
- If your matte topcoat feels thick or gummy, you can lightly buff the surface with a soft buffer to refine the finish
- Keep cuticles hydrated and polished since the matte finish puts focus on the nail bed skin rather than shine
- Reapply matte topcoat as it wears—it tends to develop a patchy, unintended semi-gloss look before it chips
Worth knowing: Butter yellow with a matte finish pairs exceptionally well with minimalist jewelry and neutral makeup—it becomes the focal point rather than competing with other details.
3. Yellow Ombre Gradient with Gold Transition
An ombre effect on coffin nails creates dimension and visual interest while keeping the overall color family unified. A yellow-to-gold gradient (or yellow fading into a deeper mustard gold) gives you a subtle color story that flows down the nail. The gradient sits perfectly on coffin nails because the shape’s length provides space for the color transition to actually be visible and not compressed. This design uses a sponge-dabbing technique or a commercial gradient tool to blend two yellow-adjacent shades seamlessly.
Creating Dimension Through Gradient
The ombre effect transforms a solid yellow manicure into something that feels more dynamic and thoughtful. By bleeding yellow into gold, you’re creating depth—the tips appear slightly darker, which actually makes the nail look longer and more sculpted. The gradient technique also catches light differently at various angles, so the nails never look quite the same from one moment to the next. This movement is part of what makes gradient designs so visually compelling.
Technique Breakdown for Gradient Success
- Select two shades (a bright or pale yellow and a gold or deeper mustard yellow that reads cohesive)
- Apply a base coat, then paint the entire nail with your lighter yellow shade and let it dry completely
- Cut a small makeup sponge into a point or use a gradient-blending tool
- Sponge the darker shade onto the sponge, then dab it gently onto the tip area of the nail, overlapping slightly with the lighter shade
- Blend the overlapping area gently with a clean, slightly damp sponge until the transition looks smooth
- Seal with a glossy or matte topcoat depending on your preferred finish
Insider note: If you’re doing ombre at home, practice on a nail wheel first—the blending technique is forgiving once you get a feel for pressure and angle, but rushing it looks blotchy.
4. Pale Yellow with Delicate Gold Leaf Accents
This design pairs a pale, almost whisper-soft yellow base with real or faux gold leaf scattered across one or two nails (or along accent nails). The contrast between the pale, almost creamy yellow and metallic gold creates elegance without heaviness. Gold leaf catches light beautifully and adds just enough dimension to keep the design from feeling too flat or one-dimensional. This works especially well if you apply the gold leaf to just your ring finger and pinky (or your statement nails) while keeping the rest solid pale yellow.
Why Gold Leaf Elevates Yellow
Gold leaf isn’t just decorative—it adds value and intentionality to a simple yellow base. The metallic shine against the matte or satin quality of pale yellow creates a subtle but noticeable contrast. Because gold and yellow exist in the same warm color family, the pairing feels natural rather than clashing, but the addition of metal gives the design sophistication that solid color alone doesn’t quite achieve. This is the kind of manicure that looks expensive and thoughtfully designed.
Application Method for Gold Leaf
- Paint two coats of pale yellow base and let dry completely
- Apply a thin layer of clear gel or a sticky topcoat to the areas where you want gold leaf to adhere
- Tear pieces of gold leaf (or use gold leaf flakes if that’s easier) and press gently onto the sticky surface with a clean tool or toothpick
- Press carefully to secure the leaf without smudging the nail art
- Seal everything under a clear, glossy topcoat to protect the gold leaf and create a smooth surface
- If you want gold only on certain nails, apply topcoat to those nails last to avoid getting sticky residue on the others
Pro tip: Gold leaf works better with slightly thicker, longer nails because the surface area stays stable—coffin nails are ideal for this technique.
5. Classic Yellow French Tip with Extended Edge
A French tip design feels timeless, but when you apply it to long coffin nails, it becomes modern and striking. Instead of a thin line of white or nude across the tip, extend the white line deeper down the nail (sometimes covering the top third of the nail rather than just the very tip). This extended French tip on yellow creates a bold, graphic look that’s still technically understated—it’s just white and yellow, but the proportions make it feel designed and intentional. The coffin shape’s angles make the French tip lines appear even more precise.
Why Extended French Tips Work on Coffins
The length of coffin nails means you have space to play with French tip proportions. A traditional, thin white tip can look lost on a really long nail, but an extended French tip (sometimes called a reverse French or American-influenced French) uses the space effectively. The graphic quality of the extended line also complements the geometric precision of the coffin shape itself. This design reads modern and editorial rather than traditional.
Executing a Perfect French Tip
- Paint two coats of yellow base and let dry completely
- Use a French manicure tape or stripe tape to mark where you want the white edge to begin
- Paint your white shade (pure white, off-white, or even cream depending on your preference) above the tape line
- Apply two thin coats, letting the first dry before the second for clean, opaque color
- Remove the tape carefully (while the polish is still slightly tacky is often easiest) to reveal a clean edge
- Seal with topcoat and inspect for any cleanup needed along the edge
- If lines aren’t perfectly clean, use a thin brush dipped in acetone to carefully sharpen the edge
Worth knowing: The width of your extended French tip should be proportional to your nail length—longer nails can handle a thicker white edge without looking unbalanced.
6. Yellow with Black Geometric Line Art

Geometric line art in black creates a stark, modern contrast against yellow on coffin nails. Think clean diagonal lines, parallel stripes, triangles, or angular patterns that follow the shape of the coffin nail. The black provides visual weight and structure, while the yellow background keeps the overall effect bright rather than dark. This design works beautifully if you apply the geometric pattern to accent nails (ring finger and pinky, for instance) while keeping the other nails solid yellow, or you can create matching geometry across all nails for a fully coordinated look.
Geometric Design Principles
Black line art against bright yellow creates maximum contrast and visual interest. Geometric patterns have an inherent sense of control and intention—they’re not random, they’re designed. On coffin nails, geometric art feels especially at home because the shape itself is angular and modern. The geometry can be simple (just a few clean lines) or more complex (interlocking triangles, stripes, or nested shapes), depending on your comfort level with detail work.
Creating Clean Geometric Patterns
- Paint two coats of yellow base and let it dry completely
- Use thin striping tape or nail guide tape to mark out your geometric design if you want to ensure straight, clean lines
- Apply black polish with a thin striping brush or angled nail art brush, following your tape guides
- Let each line or section dry before moving to the next to prevent smudging
- Remove guide tape carefully while polish is still slightly tacky
- Seal with glossy topcoat
- If you’re freehand painting lines, a thin nail art brush and slow, steady hand movements are your best friend
Pro tip: Start with simple geometric designs (just one or two lines on an accent nail) before committing to all-over geometric coverage.
7. Pale Yellow with Soft Pink Ombre Blend
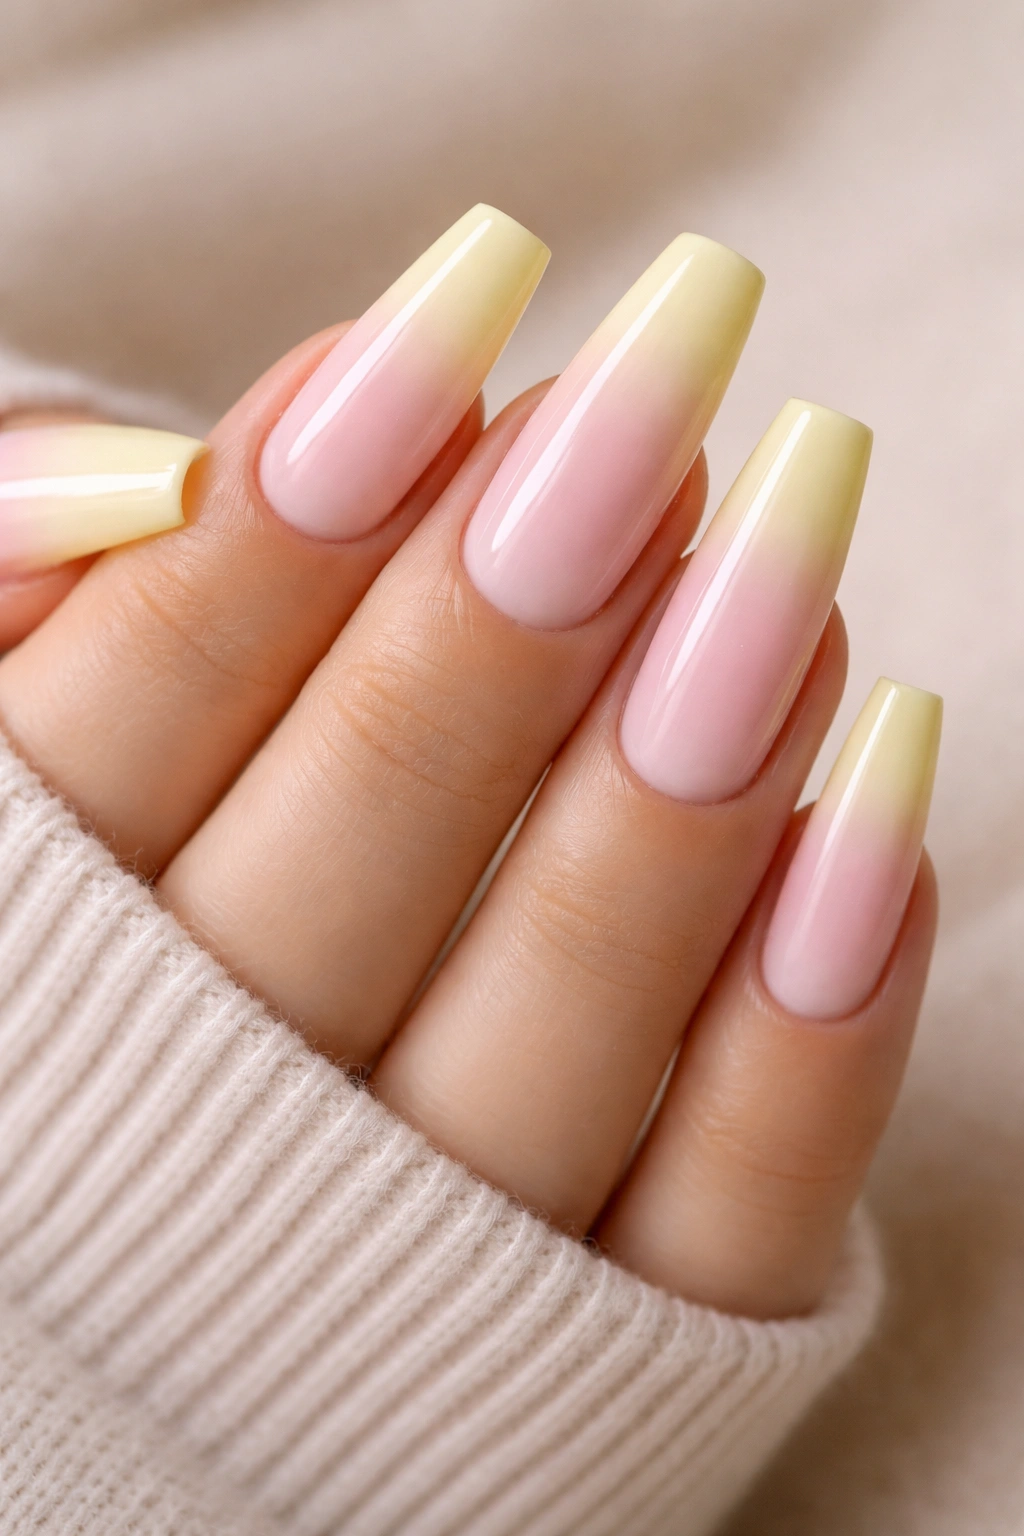
This design bridges two soft, romantic colors by blending pale yellow into a pale pink, creating a sunset-like gradient that feels both fresh and sophisticated. The ombre technique (sponge-blending two polish shades) creates a soft transition from yellow on the nail base to pink at the tip. This is an especially beautiful design for spring and summer, though the soft color palette means it works year-round. The coffin shape provides enough vertical space for the color transition to be visible and not compressed, making the gradient effect genuinely noticeable.
Soft Color Blending for Elegant Results
Pale yellow and pale pink sit adjacent on the color wheel, making them naturally harmonious. When you blend them together, you create a visual effect that’s more interesting than a solid color but still feels cohesive and intentional rather than chaotic. The softness of both shades means the ombre never feels harsh or jarring—it’s a gentle color story. This is the kind of gradient that looks sophisticated in professional settings and beautiful in casual contexts too.
Executing a Soft Ombre Blend
- Paint all nails with pale yellow base (two coats) and let dry completely
- Cut a small makeup sponge into a tapered point
- Dab pale pink polish onto your sponge in a concentrated area
- Press the sponge gently onto the tip of the nail, allowing the pink to transfer
- Dab once more slightly overlapping your first dab to ensure full coverage at the tip
- Switch to a slightly dampened clean sponge and gently blend the overlapping area where yellow meets pink
- Use a light bouncing motion rather than dragging to blend smoothly
- Clean up any excess polish around the edges with acetone and a thin brush
- Seal with a quality topcoat (glossy or matte depending on preference)
Worth knowing: Gel polish blends slightly differently than regular polish—if you’re using gel, do your ombre technique, then cure under the UV lamp, rather than trying to blend already-cured gel.
8. Sunny Yellow with Tiny Daisy Chain Design

For anyone who wants a bit of delicate detail without going full-on nail art, a simple daisy chain works beautifully on yellow coffin nails. Paint tiny white or pale yellow daisies with a thin brush and a dot tool, connecting them with thin green stems across one or two nails (typically accent nails). The design feels feminine and sweet without being overly precious—the simplicity of the daisies means the design reads as charming rather than childish. This works especially well if the background yellow is bright enough to make white daisies stand out clearly.
Simple Botanical Details for Visual Interest
A daisy chain is technically detailed work, but it’s made accessible by the fact that daisies are forgiving shapes—white petals with a yellow center (fun full-circle color moment here). The pattern doesn’t have to be perfect; actual daisies aren’t perfectly symmetrical, so slight irregularities in your painted daisies read as charming rather than amateur. The green stems create flow and movement across the nail, making it feel like a living design rather than a static pattern.
Painting Daisies and Stems
- Paint two coats of bright sunny yellow and let dry
- Use a thin brush or dotting tool to paint tiny white circles in small clusters across the accent nails (these are your petals)
- Add a slightly larger yellow dot in the center of each white petal cluster to create the daisy center
- Switch to an even thinner brush and paint thin green lines connecting the daisies in a flowing pattern (these are your stems)
- Add tiny green dots or leaves along the stems if desired for extra detail
- Let everything dry, then seal with a glossy topcoat
- If your daisies don’t look perfectly round, a dotting tool makes much cleaner circles than trying to hand-paint petals
Pro tip: Practice your daisy design on a nail wheel before committing to your actual nails—once you do three or four, the motion becomes intuitive and the design speeds up considerably.
9. Deep Mustard Yellow with Copper Metallic Swirls

Deeper, more muted mustard yellow paired with copper metallics creates a warm, autumnal feeling even in other seasons. Instead of bright sunshine yellow, mustard reads as more sophisticated and grounded. Apply copper metallic polish in swirling, organic patterns across the nails (use a thin brush to create flowing curves rather than geometric shapes) and the overall effect feels artistic and intentional. The copper and mustard combination is inherently warm and works beautifully for those who prefer deeper color palettes.
Depth and Richness in Yellow
Mustard yellow is yellow’s more grown-up sibling. It has the warmth of bright yellow without the cheerfulness—it feels more grounded, more earthy, more intentional. Pairing it with copper (which exists just adjacent to mustard in the warm color family) creates a monochromatic color story that feels incredibly sophisticated. The metallic quality of the copper adds shine and dimension without introducing contrasting colors.
Creating Copper Swirls on Mustard Base
- Paint two or three coats of mustard yellow (mustard often needs slightly more opaque coverage than bright yellows)
- Let the base dry completely
- Dip a thin nail art brush into copper metallic polish
- Create flowing, organic curves and swirls across the nails—no particular pattern, just movement
- Some nails can have more copper, others less, for variety
- Pay special attention to the tips and tips of the coffin nails, where metallics naturally catch light
- Let swirls dry and seal with a glossy topcoat (glossy will make the copper absolutely gleam)
- If you want extra dimension, apply copper swirls only to accent nails and leave others solid mustard
Worth knowing: Copper metallics photograph beautifully and look especially striking under warm lighting or sunlight.
10. Canary Yellow with Negative Space Half-Moon Design
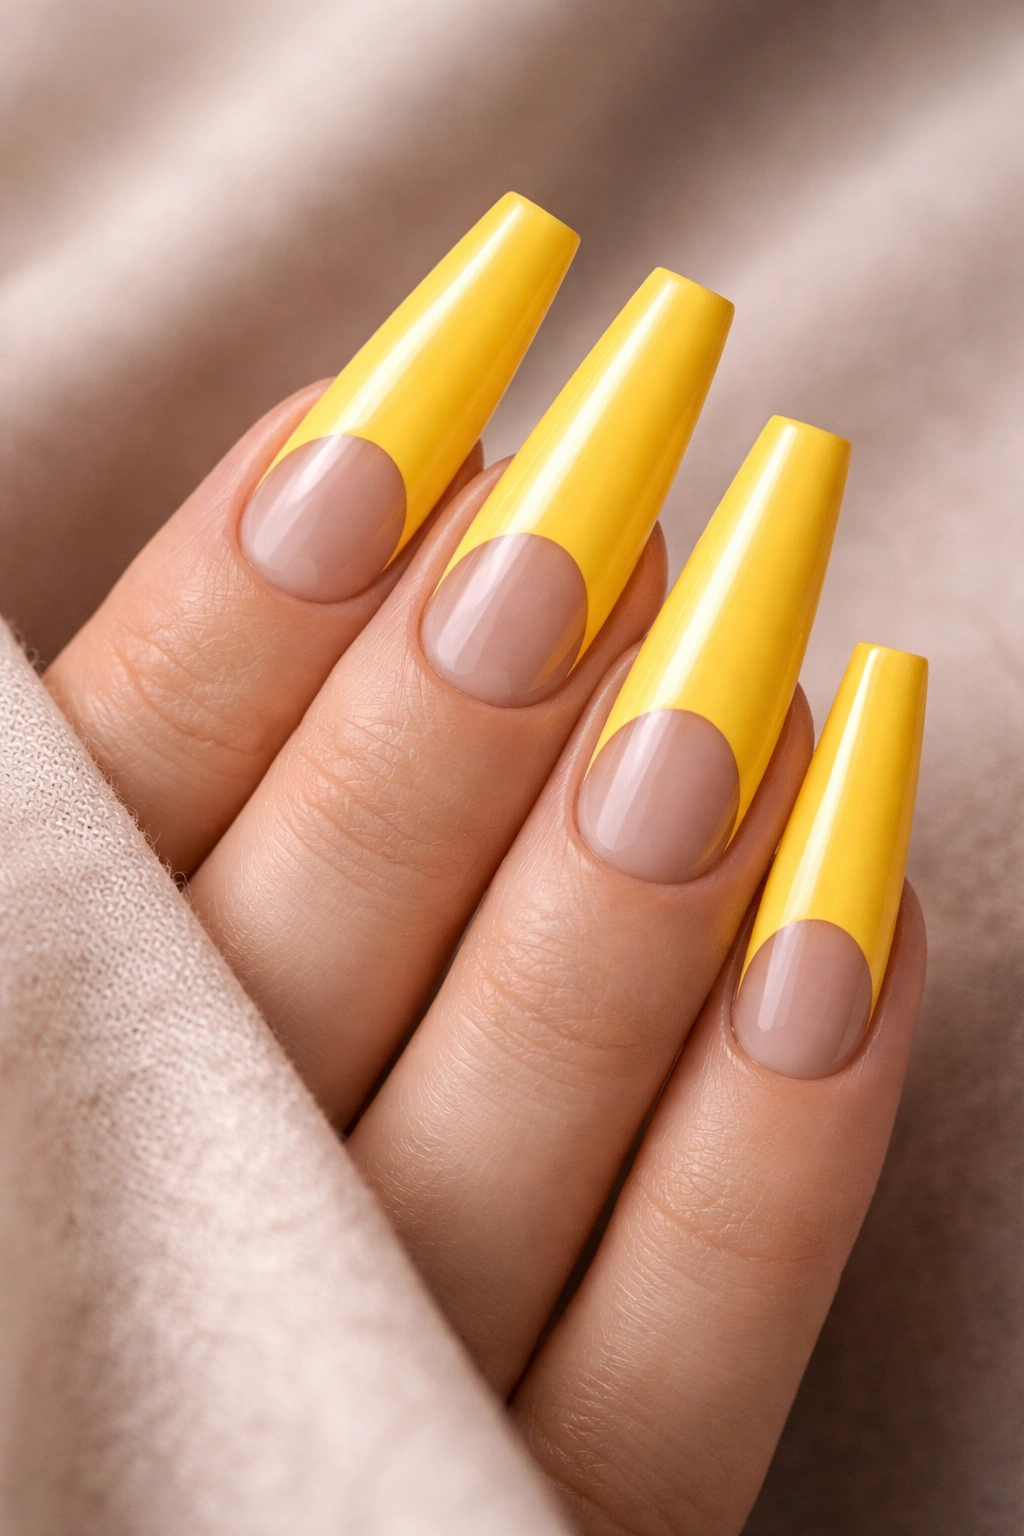
A negative space design on yellow coffin nails uses the natural nail (or a nude base) in a specific shaped area rather than covering the entire nail with color. A half-moon design—where the half-circle area at the base of the nail or the tip of the nail remains bare (or painted nude)—creates striking visual contrast. Paint the yellow on the rest of the nail, and the exposed nail or nude section creates a shape that’s graphic and modern. This works beautifully on long coffin nails because the shape’s length makes the negative space area particularly noticeable.
Negative Space as Design Element
Negative space (what you don’t paint) is just as important as what you do paint. A half-moon negative space design tricks the eye into creating shapes and movement even though you’re really just leaving part of the nail bare. On yellow, the contrast is clean and editorial. This is an especially great technique if you’re growing out natural nails or if you prefer a less coverage-heavy manicure—it maintains that aesthetic while still creating a designed, intentional look.
Creating Perfect Half-Moon Negative Space
- Paint two coats of canary yellow on the majority of the nail
- Use a curved nail guide or semicircular sticker to mask off the half-moon area you want to leave bare
- The guide can sit at the base of the nail (covering that half-moon area) or at the tip (leaving the rest bare)
- Press the guide down firmly so polish doesn’t seep underneath
- Paint your canary yellow right up to and over the edge of the guide
- Remove the guide carefully while the polish is still slightly tacky
- If you want the negative space to be a specific color (nude, white, or a contrasting shade), paint that into the exposed area once the yellow is fully dry
- Seal the entire nail with topcoat
- Clean up any imperfect edges with a thin brush dipped in acetone
Pro tip: Half-moon designs work especially well on accent nails (ring finger) while keeping other nails solid yellow for balance.
11. Soft Yellow with Intricate Lace Pattern Overlay
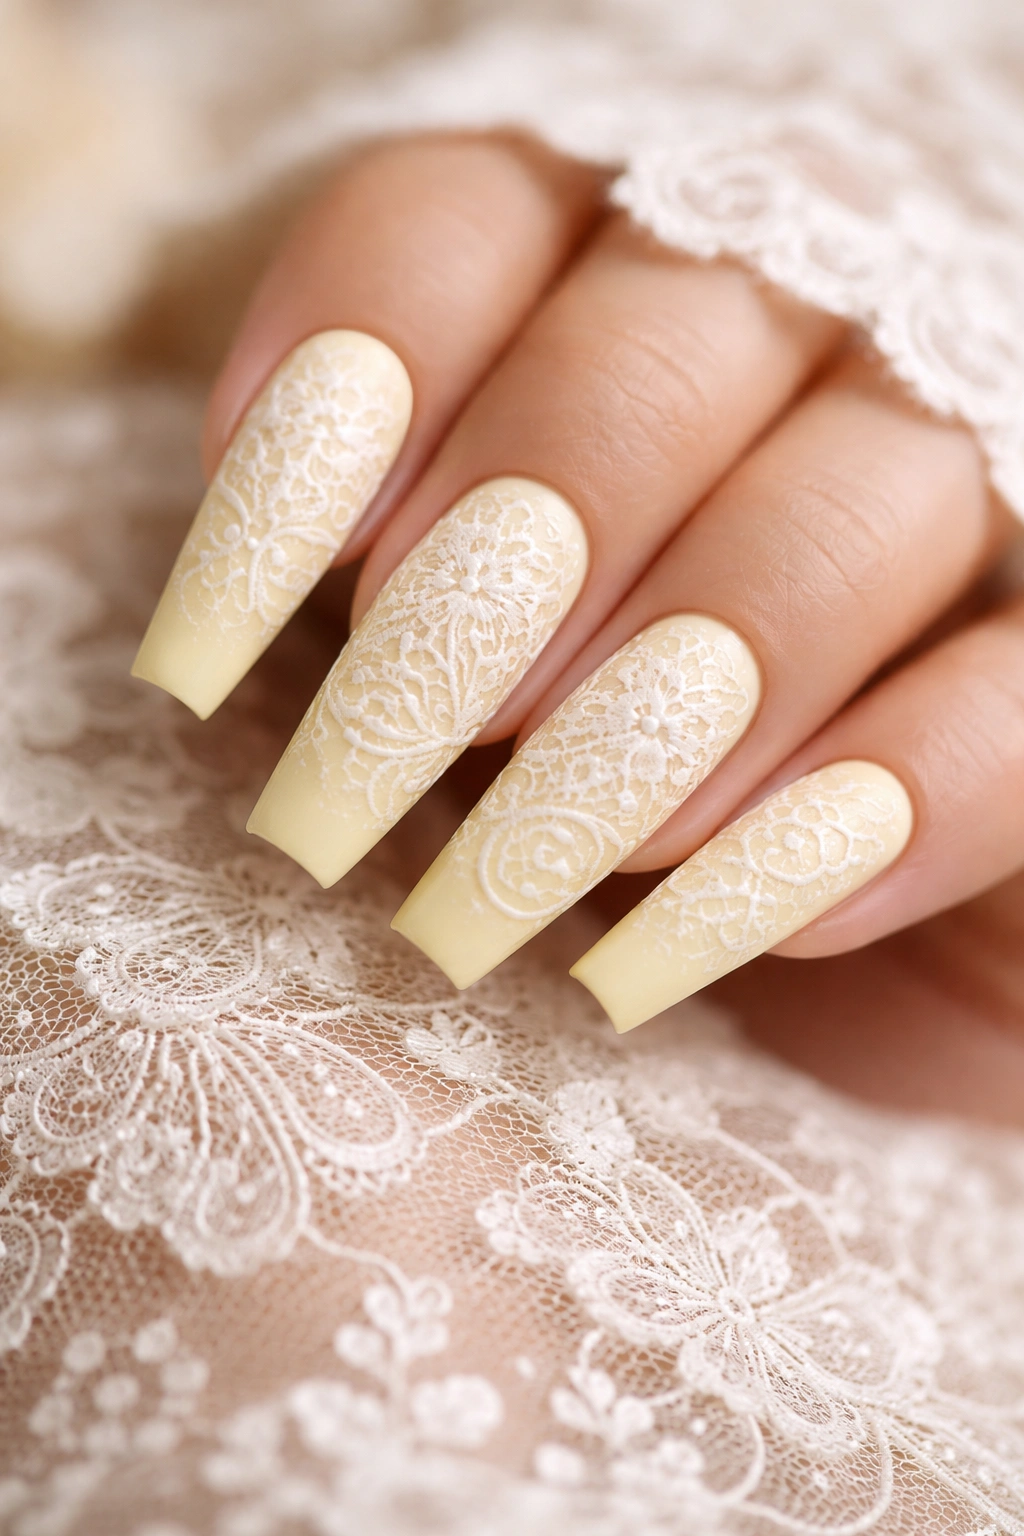
Lace is one of the most detailed nail art patterns, but on yellow coffin nails, white lace detail can be absolutely stunning. Paint a soft, pale yellow base and then use a very thin brush (or needle-point lace stamping plate if you have one) to create intricate lace-like patterns. The design needs real detail work, but the visual payoff is significant—it reads elegant, feminine, and thoughtfully designed. Lace patterns work beautifully across all nails or just on accent nails depending on how labor-intensive you want the manicure to be.
Elegance Through Intricate Detail
Lace nail art elevates yellow from simple to absolutely sophisticated. The intricate details of lace create visual interest without introducing additional colors—it’s a monochromatic story with incredible textural variation. Lace feels romantic and detailed without being overly girly. This is the kind of manicure that photographs beautifully in close-up and reads as expertly designed.
Painting Fine Lace Details
- Start with two coats of soft pale yellow base and let dry completely
- Use the finest nail art brush you own (or even a 0 or 000 brush) and white polish
- Study a lace pattern image for reference before you start painting
- Paint thin, flowing lines that connect and create the lace pattern—start with the overall structure and fill in details after
- Lace traditionally includes scalloped edges, small loops, and delicate connections, so aim for that organic flow
- Let the first pass dry, then add fine details and adjustments with a second pass if needed
- Seal with a quality glossy topcoat (glossy makes fine detail lines appear sharper and more defined)
- If hand-painting lace feels too ambitious, look for lace stamping plates, which provide pre-designed patterns you can stamp onto the nail
Worth knowing: Lace nail art takes time and patience but is incredibly gratifying—the first time you finish a full lace design, you’ll understand why so many people love this style.
12. Bright Yellow with Small Pearl Studs Along the Edge
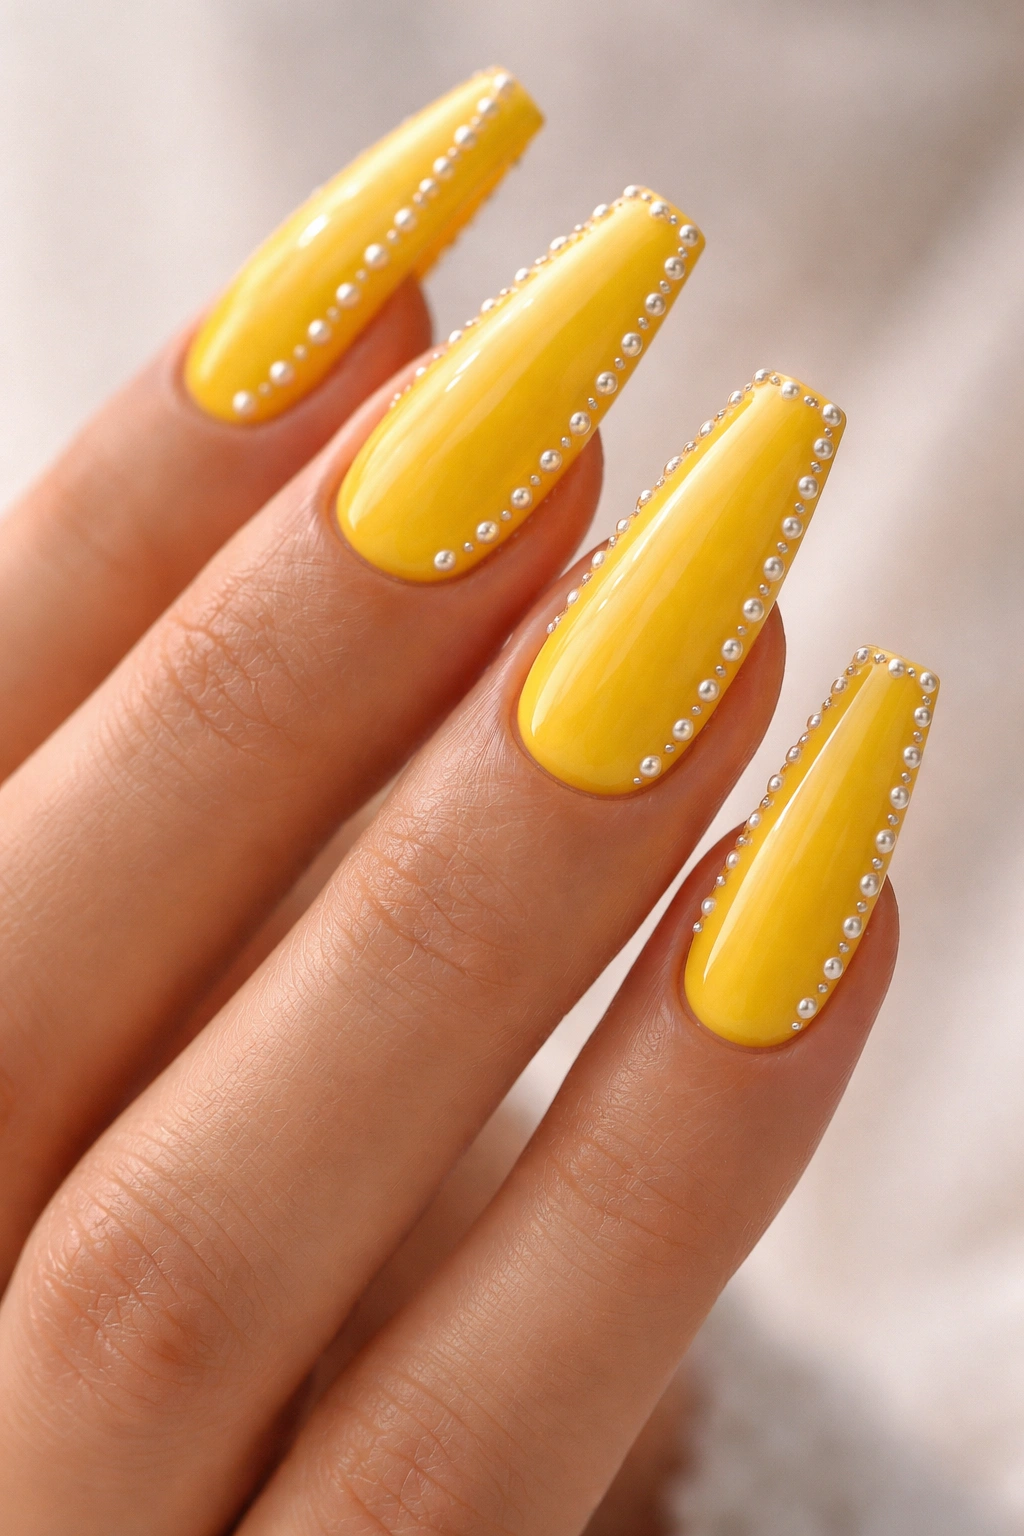
For a subtle touch of texture and sparkle, add small pearl studs or rhinestones along the edge of the coffin nail (creating a line of embellishment down the side or along the tip area). Use clear topcoat or a sticky gel base to adhere small pearls or studs to the nail before sealing everything under a final protective coat. Pearls against bright yellow create an interesting contrast of matte (the pearl) against glossy (the topcoat), and the studs add genuine dimension and tactile interest to an otherwise flat surface.
Adding Texture and Dimension
While most nail designs are visual, adding actual three-dimensional elements like pearls or studs brings something different to the table. You’re adding texture that you can feel, which changes how the manicure reads and wears. Pearls have a softness that plays beautifully against bright, warm yellow. The understated elegance of pearls means even though you’re adding embellishment, it never feels over-the-top.
Applying Pearls to Long Coffin Nails
- Paint two coats of bright yellow base and let dry completely
- Prepare your pearls or studs—clear, small ones work best for coffin nails
- Use a sticky topcoat or clear gel (if using gel, cure it first) to create a surface for the pearls to adhere to
- Use a dotting tool or toothpick to place each pearl exactly where you want it
- Apply pearls in a line along one edge of the coffin nail, or create a scattered pattern—whatever feels balanced
- Once all pearls are placed, allow any sticky base to dry or cure
- Seal everything under a final topcoat (glossy works best for shine), taking care to topcoat over the pearls without knocking them off
- The topcoat will create a smooth, sealed surface that protects the pearls and makes them feel integrated into the manicure
- Avoid bumping these nails for 24 hours after application to ensure everything sets properly
Pro tip: Use tweezers to handle small pearls—your fingers can shift their placement and make application harder.
13. Pale Yellow with Burgundy Accent Tips and Gold Stripes
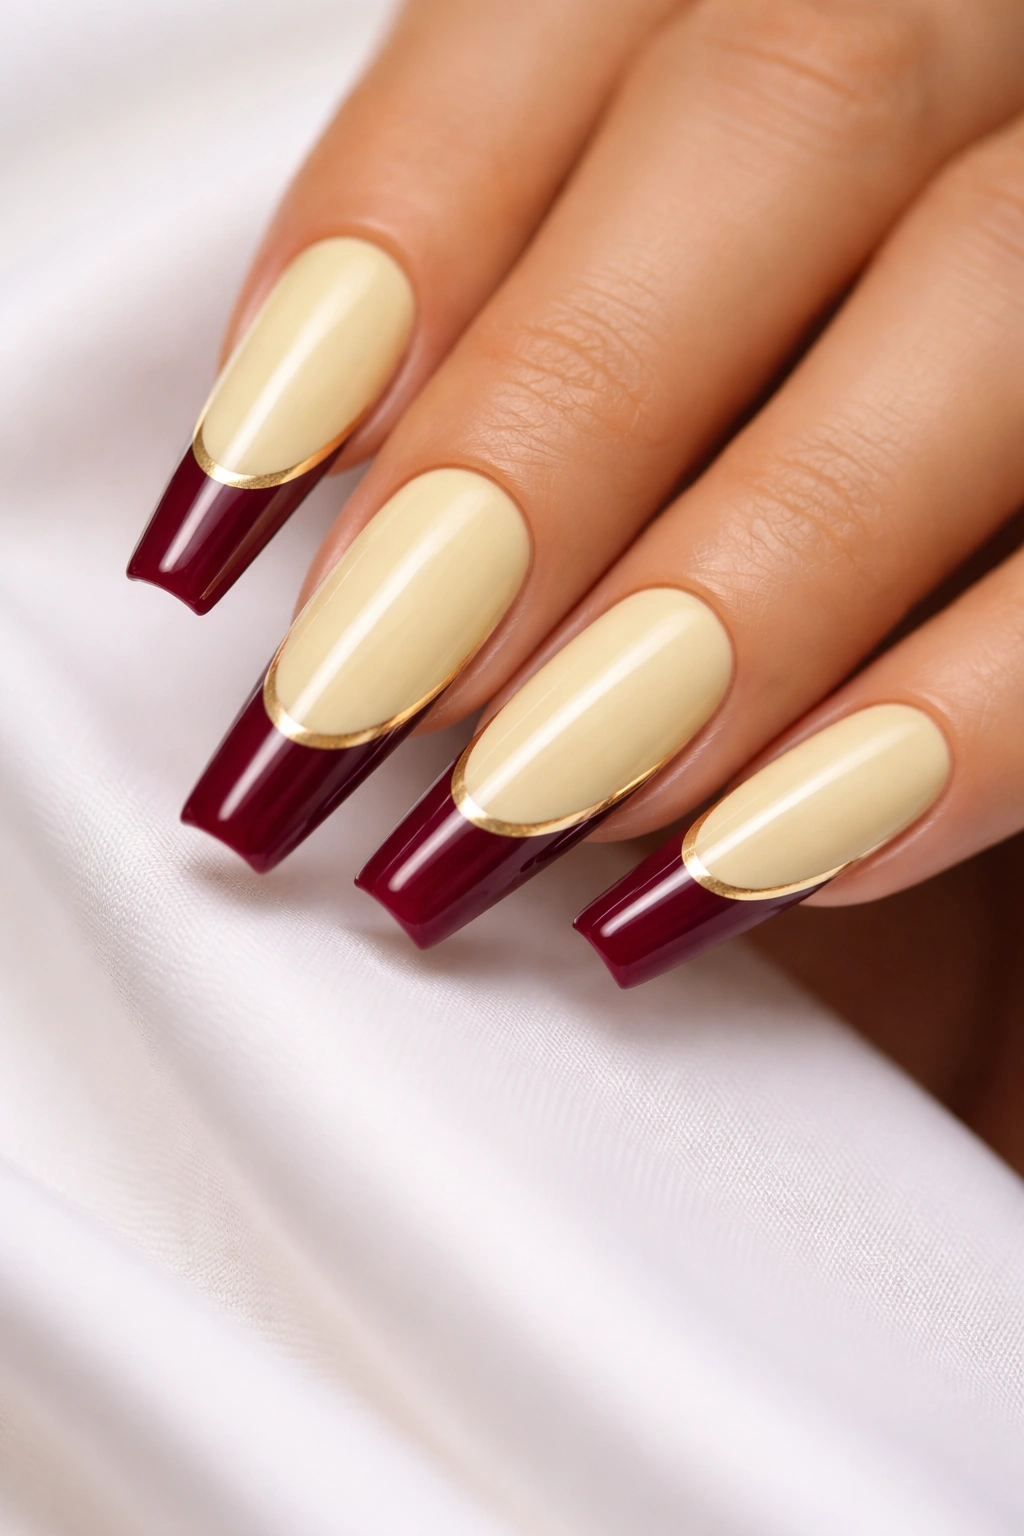
This color-blocking design uses pale yellow as the base, adds a burgundy accent at the tips, and separates the two colors with thin gold stripes for extra sophistication. The burgundy (dark, wine-colored red) provides depth and contrast while the pale yellow keeps the overall effect light and wearable. Gold stripes add just enough metallic shimmer to make the design feel elevated. This works especially well with a horizontal color division or a chevron shape that uses the coffin nail’s natural angles.
Strategic Color Blocking for Visual Impact
Color blocking—using distinct, solid color sections rather than gradient blending—creates a graphic, editorial look. The burgundy provides a moment of drama without taking over because it’s contained to the tips. The pale yellow keeps the overall effect approachable and not too heavy. Gold stripes serve as a refined separator between colors, preventing the transition from feeling abrupt while adding luxury.
Creating Clean Color Blocks
- Paint two coats of pale yellow and let dry completely
- Use a nail guide tape or striping tape to mark where your burgundy block begins (typically at the tip, covering the top third of the nail)
- Paint burgundy carefully above your tape line, using two coats if needed for opacity
- Once dry, remove the tape to reveal a clean color separation
- Take a thin gold striping brush and paint a thin line of gold metallic polish directly at the border where yellow meets burgundy
- Add a second gold line just above if you want the stripe to be thicker (this is optional)
- Seal the entire nail with a glossy topcoat for maximum shine and to integrate the colors visually
- If you want the design on all nails matching, use guides on each nail for consistency
Worth knowing: Burgundy and yellow are technically a complementary color pair (opposite on the color wheel), so they create striking visual contrast without looking matchy.
14. Golden Yellow with Minimalist Fine Line Art
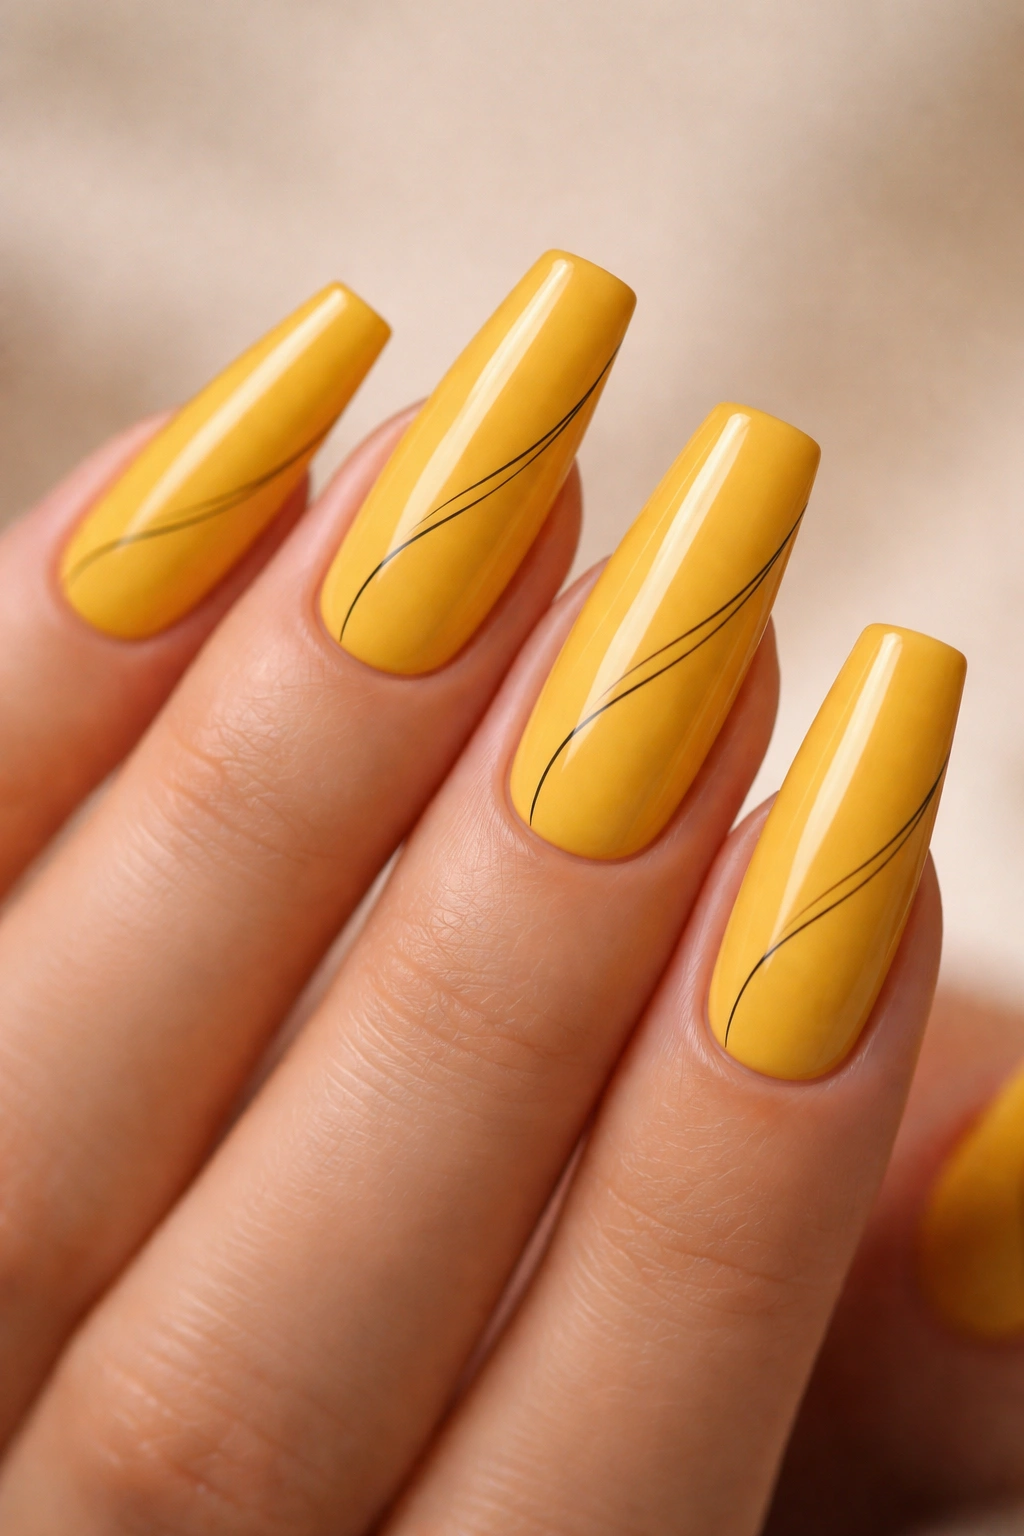
Sometimes less is more, and minimalist line art on golden yellow coffin nails proves it. Using just a very thin black or dark gray line, create simple, artistic marks—a single curved line, a geometric angle, or small abstract marks that suggest rather than depict an image. The simplicity means the design stays elegant and readable, while the artistic element means it’s not just a solid color. This style appeals to anyone who loves nail art’s concept but prefers subtlety in execution.
Artistic Restraint as Sophistication
Minimalist line art relies on the idea that you don’t need complexity to create something meaningful. A single, well-executed line can read as more sophisticated than an intricate, busy design. The coffin shape itself is a strong visual element, and minimalist art complements rather than competes with that shape. This design works beautifully in professional settings where you want your nails to be noticeable but not demanding.
Creating Confident Minimalist Lines
- Paint two coats of golden yellow and let dry
- Use the thinnest brush you own and black or dark gray polish
- Take a breath and paint your chosen line or mark with confidence—hesitation creates wobbly lines, while intentional brushstrokes look controlled
- Start at one point and move your hand smoothly to the endpoint rather than trying to correct as you go
- Simple curved lines, thin triangles, or small abstract marks all work beautifully
- Let dry and seal with topcoat
- If a line doesn’t go exactly where you wanted, clean it up with a thin brush dipped in acetone before topcoating
Pro tip: Practice your design on paper or a nail wheel first—once you know the motion and the line shape, executing it on actual nails becomes much easier.
15. Neon Yellow with White Polka Dot Pattern
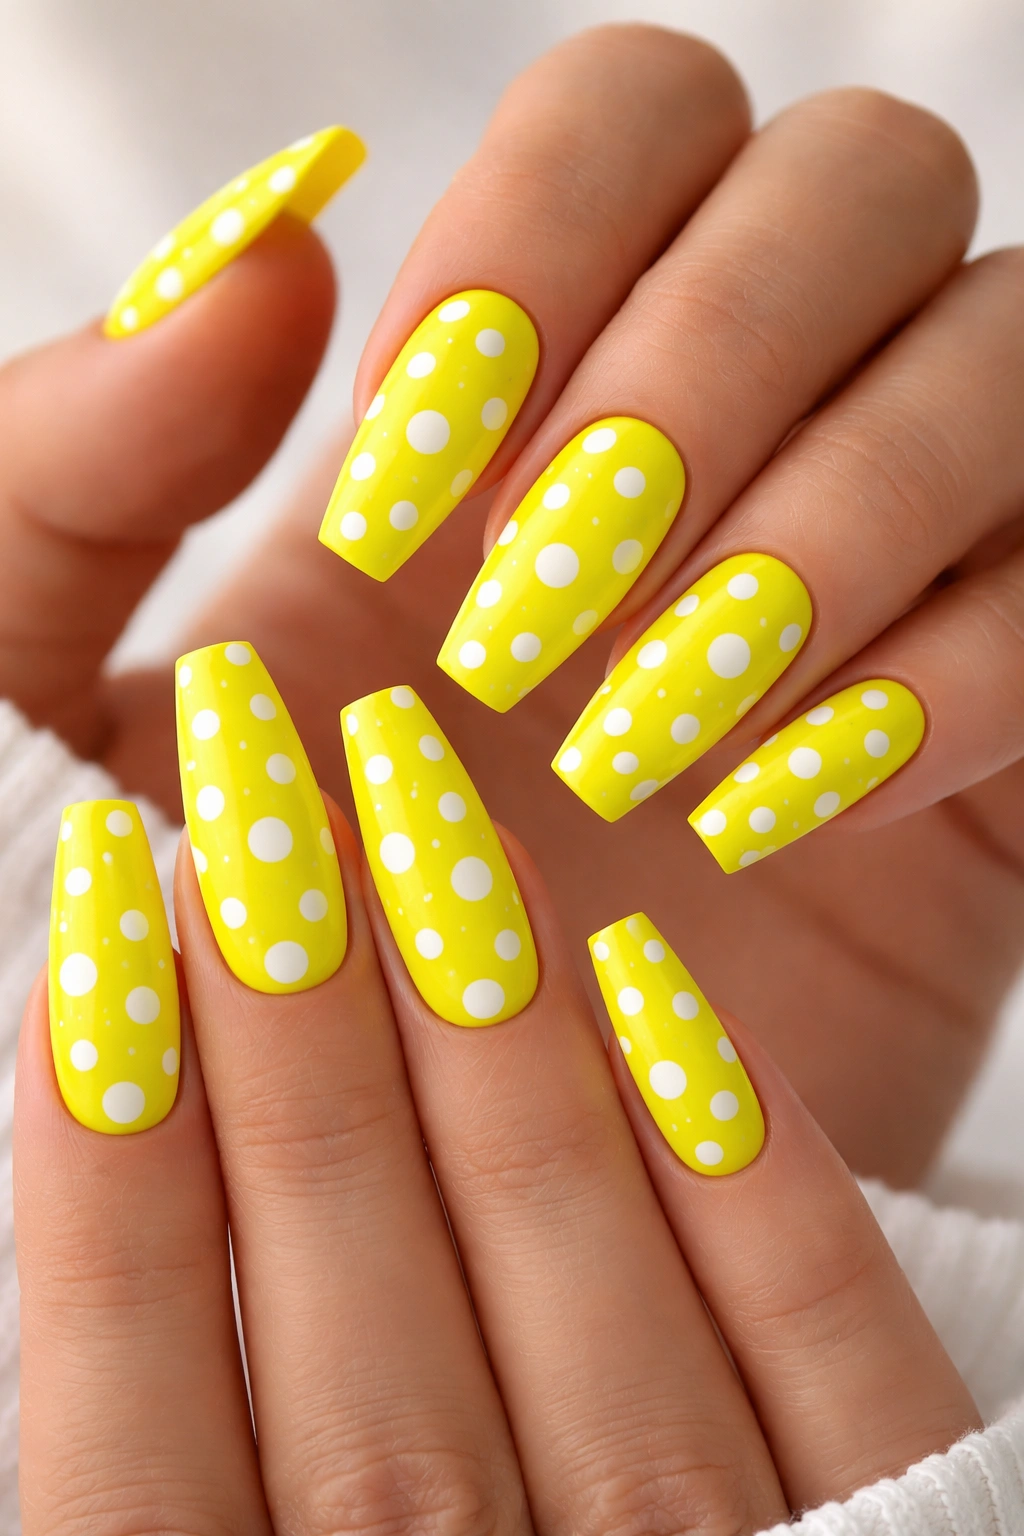
Go for maximum cheerful impact with neon or electric yellow paired with an all-over white polka dot pattern. This design reads young, playful, and confident—it’s not subtle, but it’s undeniably fun. Use a dotting tool to create perfectly round white dots across all nails in a random scattered pattern (not in perfect rows, which can look too structured and less charming). The contrast between neon yellow and white is high and reads even more vibrant because of the coffin nails’ length.
Cheerful Confidence in Design Choice
Neon yellow is bold—you’re essentially announcing that you’re not afraid of color. Paired with white polka dots, the design becomes playful and intentional rather than chaotic. This is the kind of manicure that works for fun occasions, creative fields, or anyone who simply loves bold color. The polka dots add visual interest without introducing additional colors, keeping the palette clean even though the overall effect is unmissable.
Creating Uniform Polka Dots
- Paint two or three coats of neon yellow (neon shades often need extra coats for true color)
- Let dry completely
- Choose a dotting tool size (medium works best for neon yellow polka dots on coffin nails—not too small to be hard to see, not so large they overwhelm the design)
- Dip the dotting tool into white polish and create dots in a scattered, random pattern across each nail
- Avoid perfectly organized rows; scattered placement feels more charming
- Dot the entire nail or concentrate dots more heavily in certain areas
- Let all dots dry before applying topcoat
- Seal with glossy topcoat—the shine makes the white dots pop against the neon base
Worth knowing: Polka dots photograph beautifully and the high color contrast makes them look crisp and intentional.
16. Pale Yellow with Subtle Rainbow Stripes at the Tips
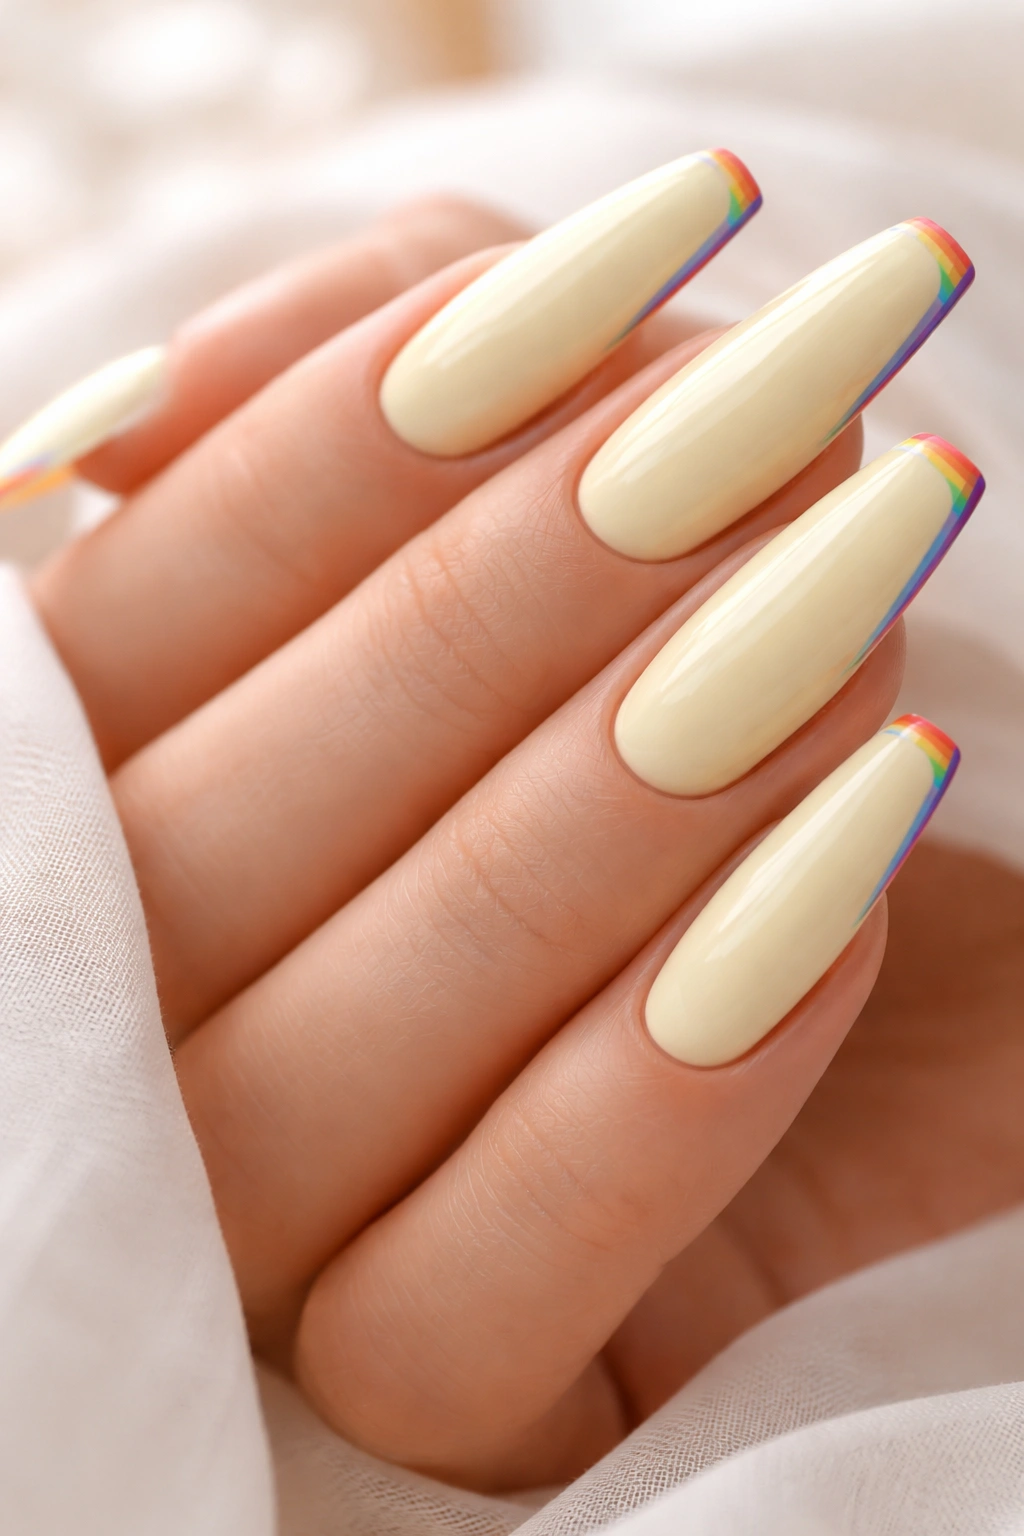
For anyone who wants color play without committing to a fully rainbow manicure, paint pale yellow as your base and create thin rainbow stripes only at the tips of the coffin nails. Use thin striping tape or careful hand-painting to create stripes in all rainbow colors (red, orange, yellow, green, blue, purple) stacked horizontally at the tips. The pale yellow provides a calm, unified base while the rainbow tips add personality and playfulness. This design strikes a balance between subtle and expressive.
Controlled Color Expression
Rainbow stripes are a commitment, but concentrating them only at the tips makes the design more wearable and less overwhelming than an all-over rainbow. The pale yellow unifies everything and prevents the stripes from feeling chaotic. This is an especially great design if you want something that reads differently from different angles—straight-on it’s fairly subtle, but when you flip your nails you see the rainbow stripe surprise.
Painting Thin Rainbow Stripes
- Paint two coats of pale yellow base and let dry
- Use thin striping tape to mark off your stripe area at the tips (or freehand paint thin lines if you’re confident)
- Use the finest striper brush and select your rainbow colors
- Paint stripes starting with red, then orange, yellow (darker than your base), green, blue, purple
- Keep stripes thin and evenly spaced for a polished look
- Let each stripe dry slightly before adding the next to prevent colors from bleeding together
- Once all stripes are dry, remove tape and seal with topcoat
- The topcoat will blend the stripes slightly, creating a more integrated look
Pro tip: If you mess up a stripe, let it dry and carefully paint over it with your pale yellow base color using a fine brush—minor corrections are invisible once topcoated.
17. Mustard Yellow Matte with Thin Metallic Gold Outline
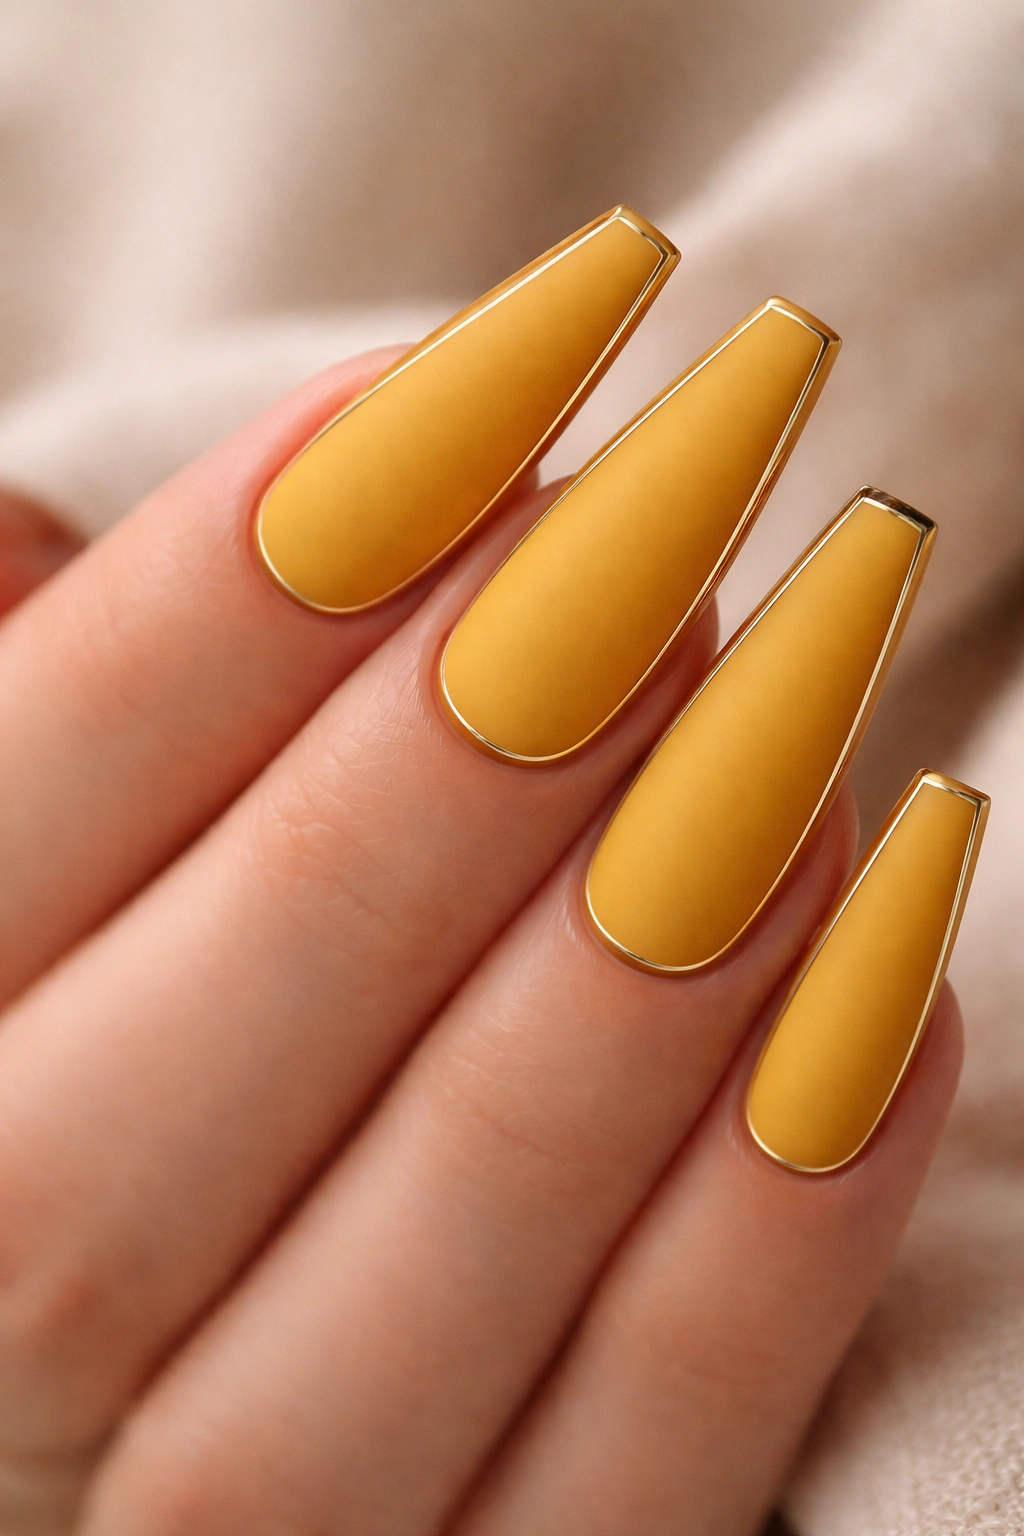
Create a modern, graphic look by painting mustard yellow in a matte finish and then outlining the edge of each coffin nail with a thin, perfect gold metallic line. The gold outline frames the nail and emphasizes the coffin shape’s angles and curves. The matte base prevents the gold from getting lost in shine, and the metallic outline adds just enough glimmer to elevate the look from simple to designed. This is a subtle embellishment with maximum impact.
Outlining as Design Enhancement
An outline changes how we perceive a shape—it adds definition and emphasis. Outlining coffin nails in metallic gold does exactly this, making the coffin shape even more striking. The outline technique is particularly powerful on matte finishes because the contrast between matte and metallic becomes very clear. This design reads expensive and intentional.
Creating a Perfect Metallic Outline
- Paint two or three coats of mustard yellow in matte topcoat
- Let dry completely
- Use the thinnest brush you own (a 0 or even a 00 brush) and gold metallic polish
- Starting at the cuticle, paint a thin line following the outer edge of the nail—this will mean painting along both long sides of the coffin and around the tapered tip
- Move slowly and carefully; an even, consistent line looks polished while a wobbly one looks amateur
- The line should just trace the very edge, not cover any actual nail color
- Once you’ve completed the outline, let it dry fully before applying topcoat
- Apply a clear topcoat over everything to seal the outline and create a smooth surface
- If your outline has slight wobbles, they’ll be less noticeable once sealed under topcoat
Worth knowing: This design is especially stunning on long coffin nails because the outline length emphasizes the nail shape.
18. Creamy Yellow with Rose Gold Floral Stamping
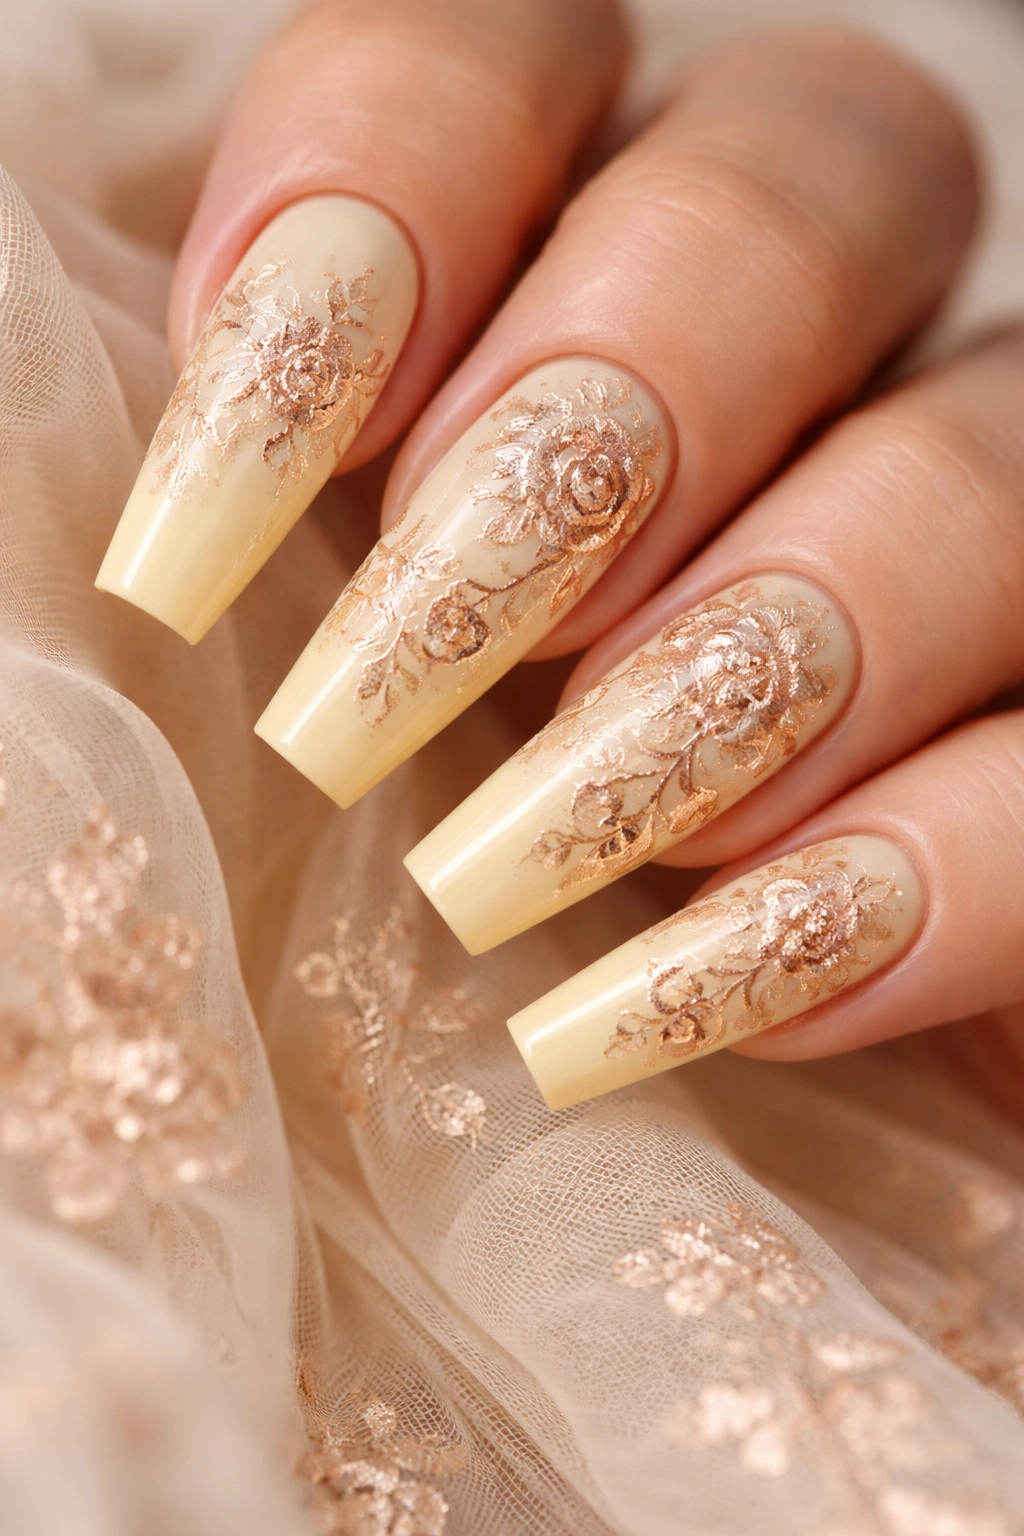
Create a soft, romantic design by combining a creamy yellow base with rose gold floral stamping. Use a nail stamping plate with floral designs (roses, peonies, or wildflowers) and rose gold stamping polish to transfer an intricate floral pattern onto the creamy yellow nails. Rose gold is slightly warmer than regular gold and reads as romantic and upscale when paired with soft creamy yellow. This design is particularly beautiful on longer coffin nails because the length provides space for the floral details to breathe and not feel crowded.
Stamping as Detailed Art Access
Not everyone has the fine motor skills to paint intricate flowers by hand, but stamping plates make that level of detail accessible to everyone. A quality stamping plate and rose gold stamping polish create detailed florals in seconds that look beautifully crafted. The combination of creamy yellow and rose gold feels soft, feminine, and deliberately designed rather than accident-based.
Using Nail Stamping Plates for Florals
- Paint two coats of creamy yellow base and let dry completely
- Select a floral stamping plate with designs you love
- Paint rose gold stamping polish across the engraved design on the plate with a stamping brush
- Use a silicone or metal stamper to press onto the inked design with even pressure
- Immediately press the stamper onto your nail and hold for a second without twisting
- Lift straight up to reveal the transferred image
- Repeat for each nail, re-inking the plate between stamps
- Let stamped design dry completely
- Apply topcoat to seal and finish the design
- Rose gold stamping polish tends to be translucent, so the design will show over creamy yellow beautifully
Pro tip: Buy a quality stamper and scraper specifically for stamping—cheap tools make the transfer less crisp and the edges less clean.
Final Thoughts
Yellow coffin nails are incredibly versatile, and these eighteen approaches really just scratch the surface of what’s possible. Whether you go for a simple glossy sunshine yellow, experiment with ombre gradients, add metallic accents, or commit to detailed nail art, the coffin shape gives you a modern, elongated canvas that makes every design feel intentional and polished.
The beauty of yellow is that it genuinely works across seasons and settings—bright yellows feel summery and cheerful, while deeper mustards and butter yellows work beautifully in fall and winter. You can wear yellow coffin nails to a casual weekend outfit, a professional work environment, or a special occasion event. Pair them with neutrals to let the nails be the statement, or combine them with other warm tones for a coordinated, fashion-forward look.
When choosing your yellow coffin nail design, think about what speaks to your personal style. Do you prefer simplicity or detail? Are you drawn to bold statement nails or subtle embellishment? How much maintenance are you willing to commit to? Once you identify those preferences, pick a design from this list and make it your own. The most important thing is that your nails feel like an authentic expression of how you want to present yourself to the world. Yellow is joyful, warm, and intentional—your coffin nails should feel exactly the same way.
