

Some nail ideas look cute in a screenshot and flat-out awkward on an actual hand. Bow coffin nails are not one of them—when they’re done with the right placement, scale, and finish, they hit that rare balance between soft and sharp that makes a manicure feel styled rather than random.
That contrast is the whole appeal. A bow is delicate, almost dressy. The coffin shape has straight sidewalls, a tapered body, and a squared tip that gives even pale colors some edge. Put those two together and the design stops feeling sugary. It starts feeling intentional.
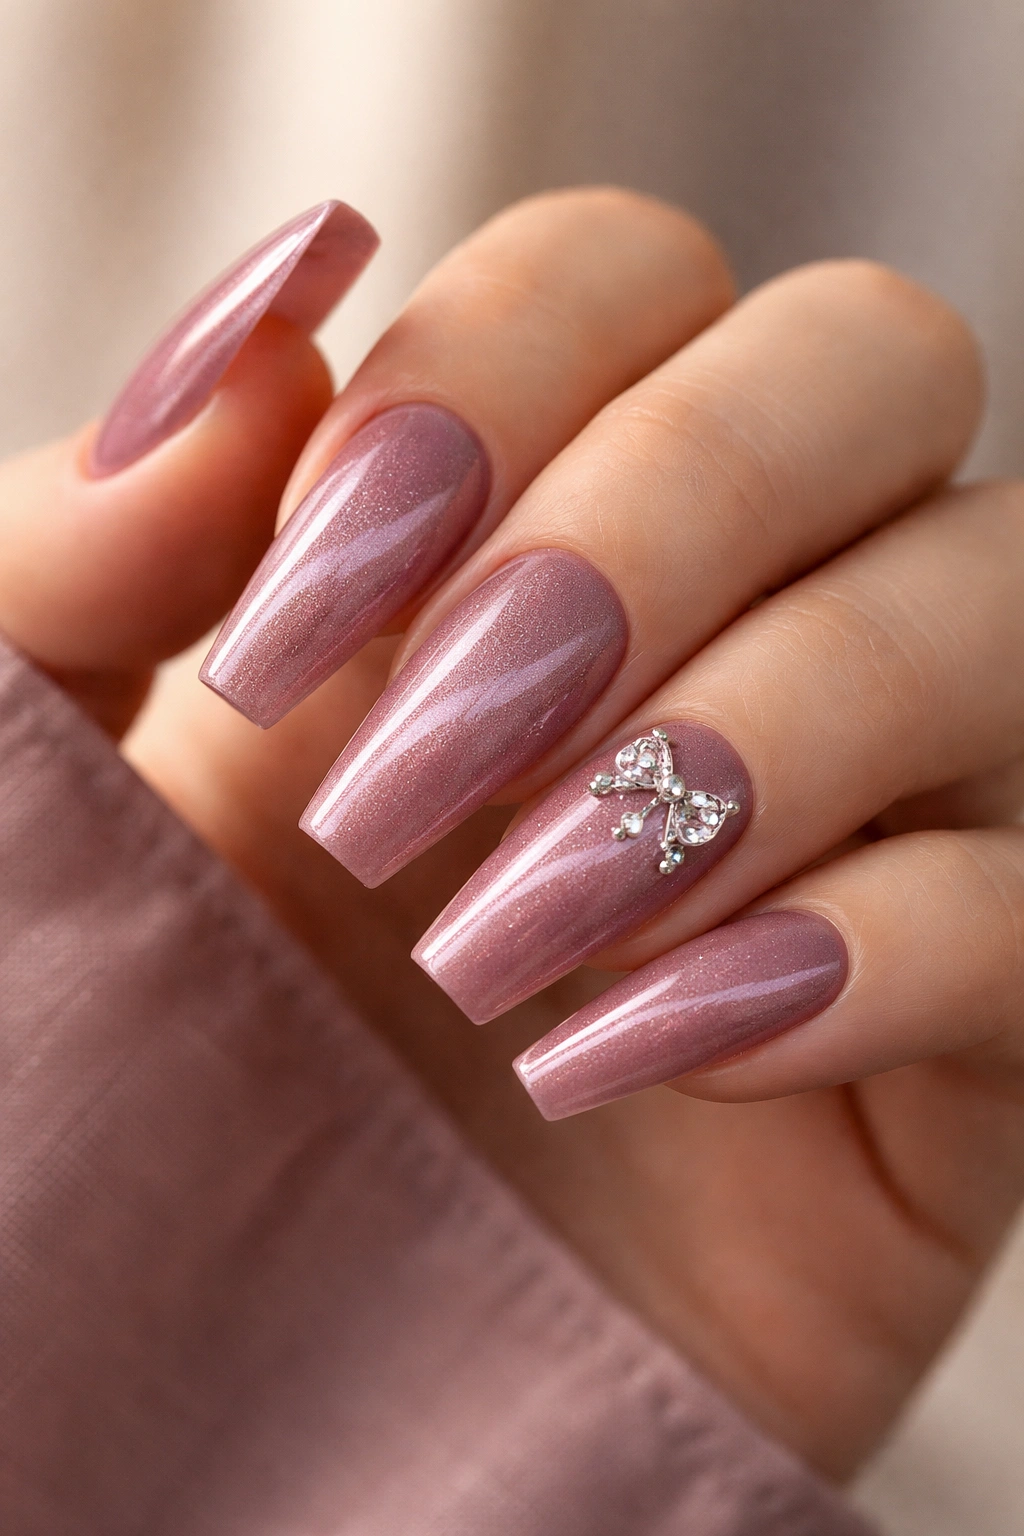
I’ve seen the same bow design look expensive on one set and cheap on another, and the difference usually comes down to three things: how thick the bow is, where it sits on the nail, and how much room the shape gives it. Push a chunky charm too close to the free edge and the nail looks crowded. Drop a tiny painted bow one-third down the nail on a medium coffin shape, and the whole set relaxes.
That’s why this style keeps working. There’s room to go sweet, graphic, bridal, moody, glossy, matte, chrome, sheer—pick your lane. Or don’t. The fun starts once you see how many directions a bow can take on a coffin silhouette.
Why Bow Coffin Nails Work So Well on a Tapered Shape
The coffin shape does half the design work before any polish touches the nail.
A good coffin nail gives you a long center line, straight sides, and a blunt tip that reads clean from a distance. That structure matters because bow details have loops, tails, and a center knot—all tiny parts that need breathing room. On a round nail, those details can bunch together. On a coffin shape, they sit flatter to the eye and look easier to read.
The soft-detail, sharp-shape contrast
That contrast is the reason bow nail art doesn’t feel childish here. The shape gives the manicure a bit of attitude. The bow pulls it back. You end up with tension, and tension is what makes a design feel styled rather than safe.
Medium coffin length usually gives the best balance for this trend. Short coffin nails can still wear a bow well, though painted bows or tiny decals work better than bulky charms. Longer sets can handle 3D gel bows, layered ribbon details, crystal centers, and double-accent placement without looking cramped.
Placement matters more than bow size
A bow near the cuticle feels polished and jewelry-like. A bow in the center of the nail becomes the main event. A bow near the tip can work, though it needs a clean base underneath—micro French lines, clear jelly, or a soft ombré help keep it from feeling heavy.
One more thing. Bow nails usually look better when not every finger is shouting. Two or three statement nails in a set often beat ten identical bows, especially on a coffin shape where the silhouette already draws attention.
Choosing Between Painted Bows, Charms, and Sculpted Gel
Want the bow look without snagging every knit sweater you own? Start with the material, not the color.
Flat hand-painted bows sit under top coat and are the easiest to wear day to day. A nail tech can paint them with a fine liner brush—usually in the 7 mm to 12 mm range—using gel paint thick enough to hold a crisp loop. These are the safest pick if you type all day, wear gloves for work, or know you’ll get annoyed by texture.
Sculpted gel bows sit higher, often 1 to 2 mm above the nail surface, and give a soft raised look that feels more custom than a sticker or charm. They’re great for one accent nail or a bridal set. Resin, pearl, or metal bow charms sit even higher and give the boldest read from across the room, though they need a strong anchor. Thin top coat alone will not hold them well for long wear.
The quick breakdown
- Painted bows: flat, clean, low-maintenance, easy to seal
- 3D gel bows: raised but lighter than metal, custom-looking, best on medium to long coffin nails
- Charms: strongest visual impact, more snag risk, need builder gel or resin support at the base
The American Academy of Dermatology has warned against peeling or picking off nail products because the top layers of the natural nail can lift with them. That matters here. If a charm starts lifting, file the rough edge down and book a fix. Do not yank it off in the car five minutes before dinner. Your nail plate pays for that later.
How to Make Bow Coffin Nails Last Past the First Week
A cute set that lifts on day four is a bad set.
Prep carries this style. If the nail plate still has cuticle stuck to it, or there’s lotion hanging around near the sidewalls, the neatest bow in the salon will not save the set. A careful e-file prep, a dehydrator, a bonding layer, and a balanced apex under longer coffin shapes make more difference than the ribbon detail itself.
Daily habits matter too. Cuticle oil once or twice a day helps the enhancement stay flexible instead of dry and brittle, especially if you wash your hands often. Gloves for dishes are worth it. Using the side of your finger instead of the tip of your nail to open a soda can is worth it too.
Raised bows need extra caution around textured fabrics, hair, pockets, and seat belts. If you know you’re hard on your hands, ask for painted bows or low-profile sculpted gel instead of metal charms. There’s no shame in choosing the version you’ll still like on day ten.
File snags early. A fine 180-grit file can smooth a lifted edge on a charm in seconds, and that small fix can stop a bigger peel from starting.
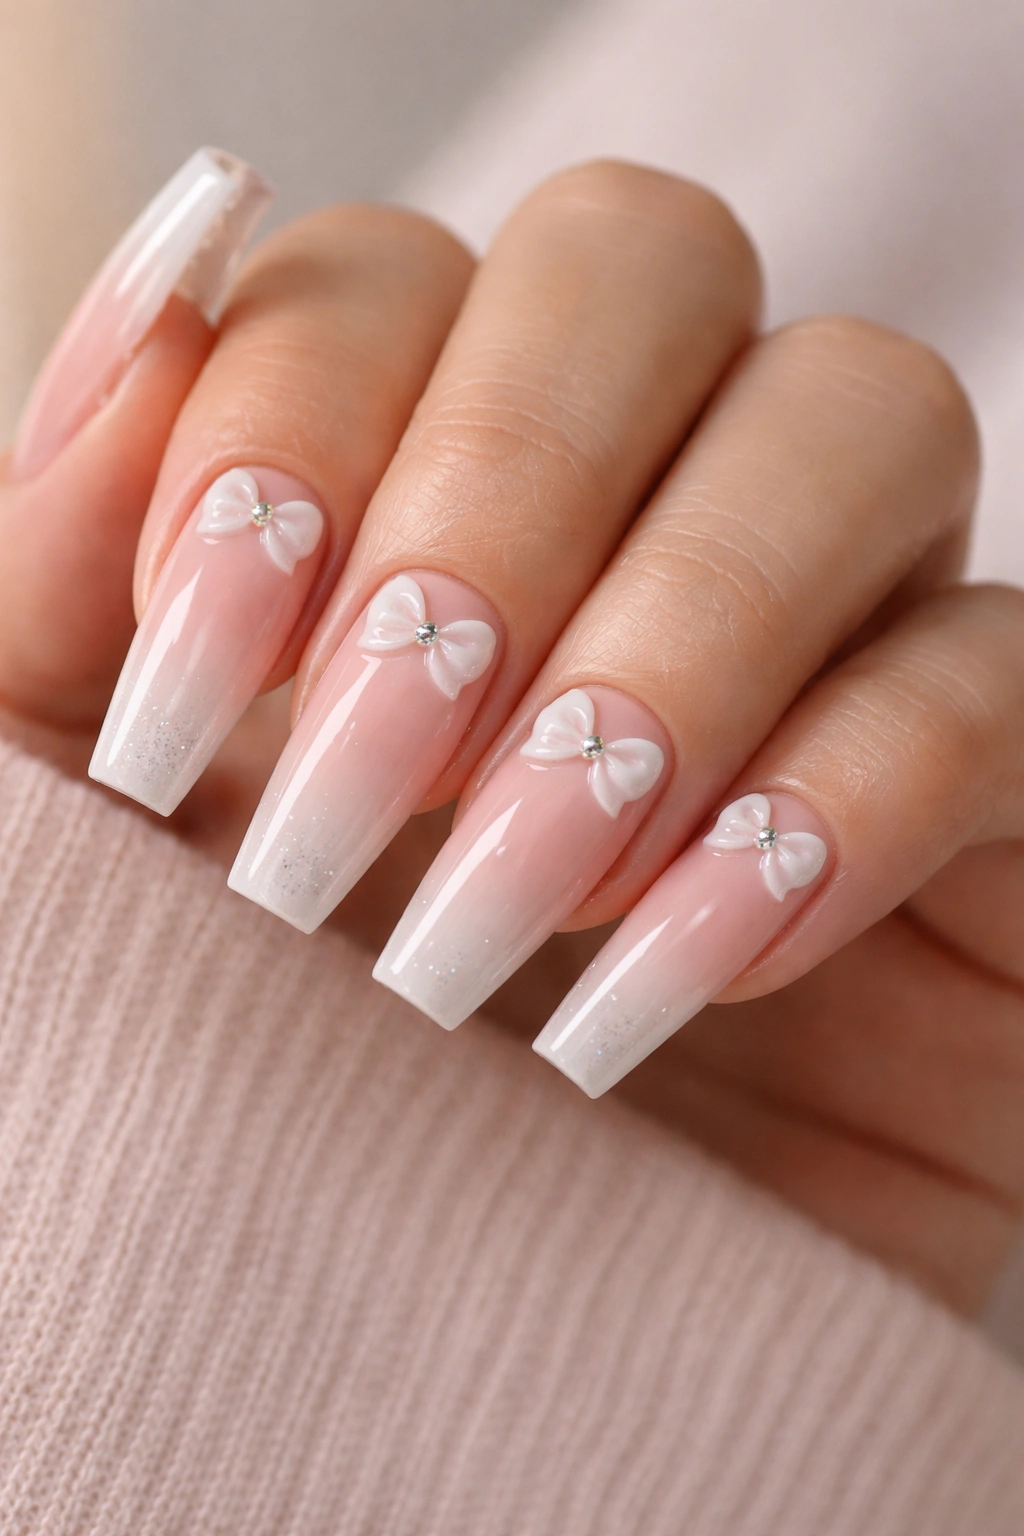
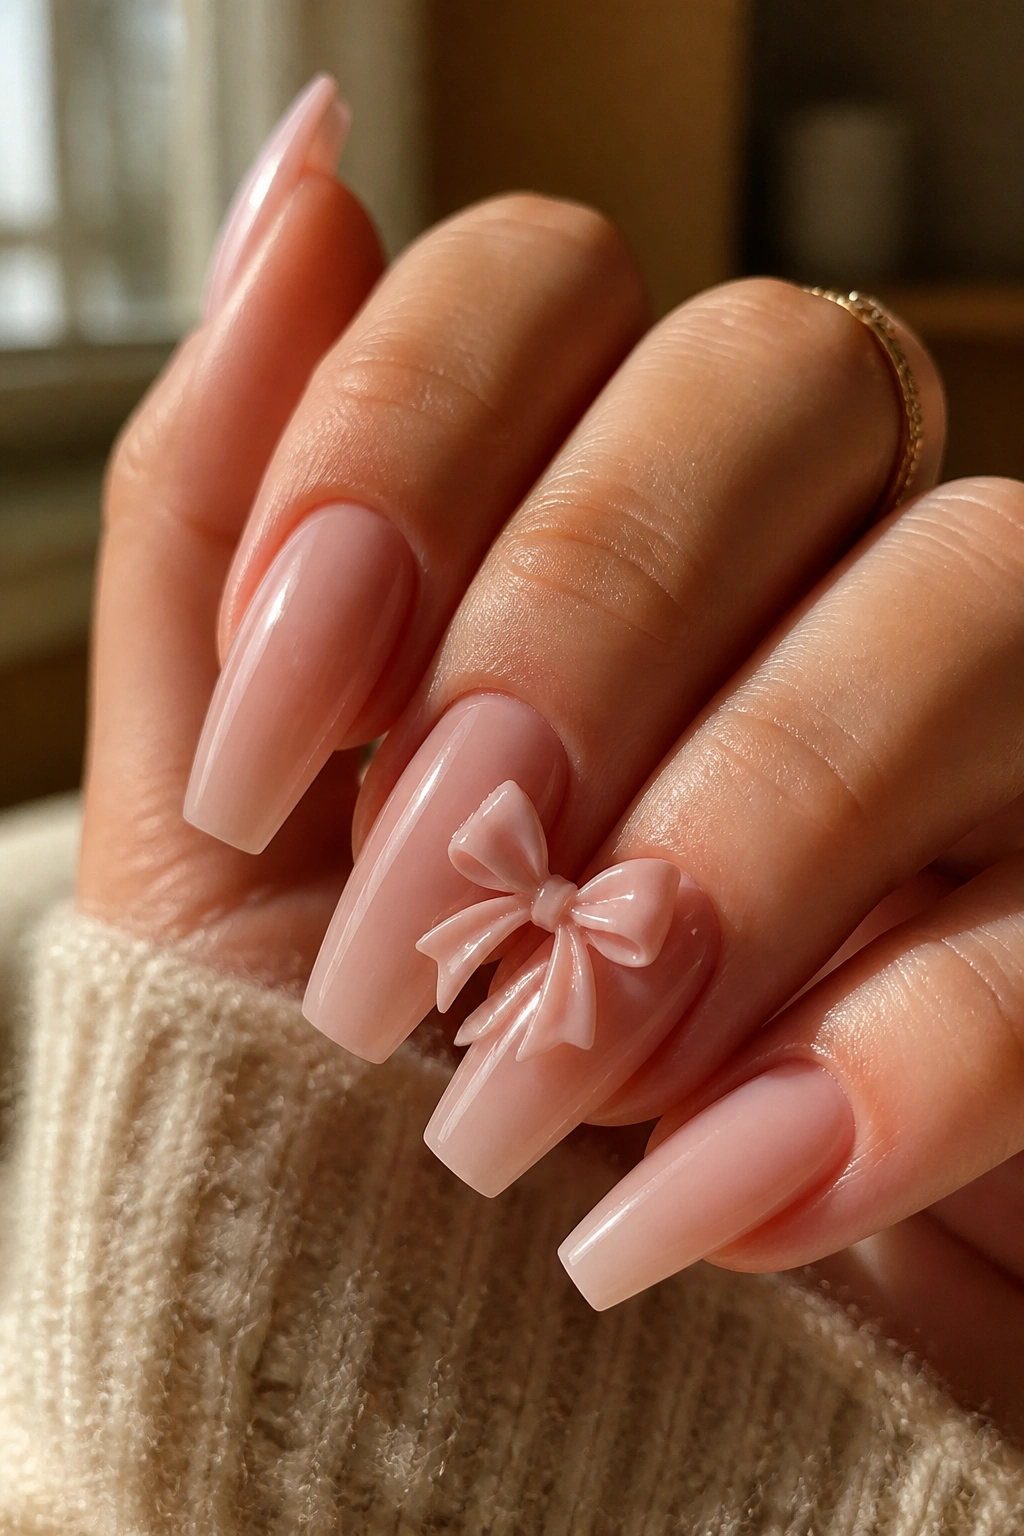
1. Milky Pink Coffin Nails With Tiny White Bows
Picture a sheer milky pink base that softens the whole hand, then add two tiny white bows—one on the ring finger, one on the thumb—and stop there. This is one of the cleanest ways to wear bow coffin nails because the base does not compete with the art. It acts like a soft-focus filter.
Why this set keeps working
Milky pink has enough opacity to blur ridges and enough transparency to stay airy. White bow details show up without looking harsh, especially when the loops are painted thin and the tails stay short. On a medium coffin shape, that balance feels polished instead of fussy.
The trick is scale. A bow that takes up half the nail starts to look cartoonish on this base. A bow that covers about one-quarter to one-third of the nail width lands better and leaves enough negative space around it.
Quick details to ask for
- Base color: sheer pink or milky rose, 2 coats over a nude builder base
- Bow style: hand-painted white outline or soft gel white with a tiny center dot
- Best length: medium coffin, though long works too
- Accent count: 2 nails is usually enough
My take: if you want a bow manicure that won’t feel tired after three days, start here.
2. Black French Coffin Nails With a Satin Bow Accent
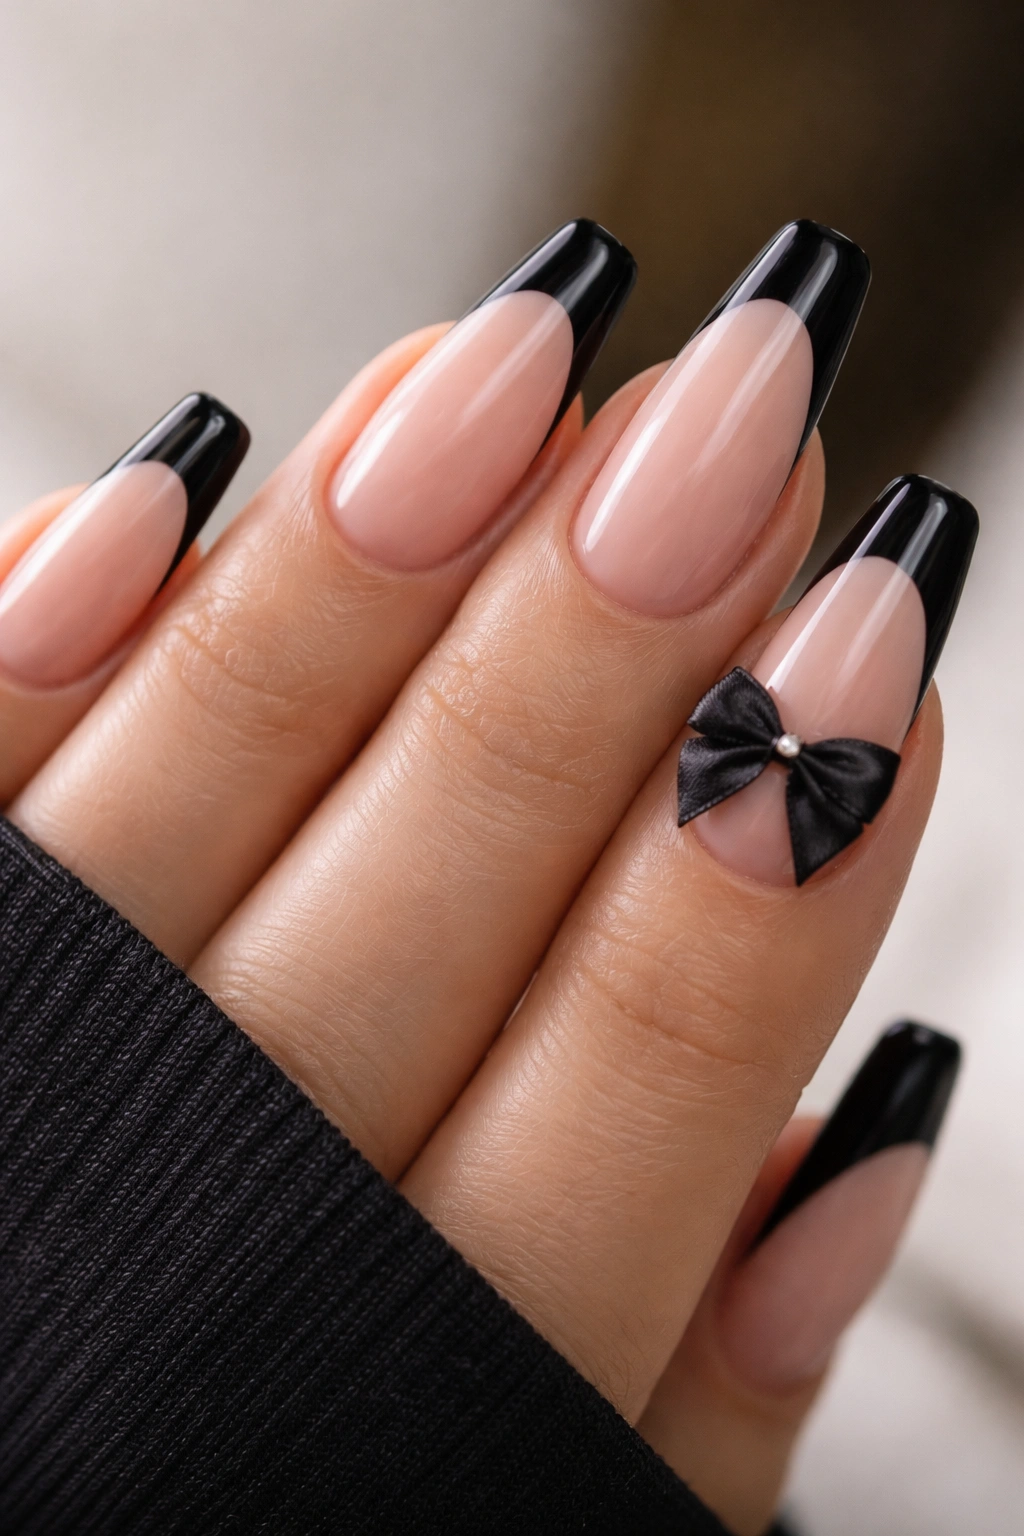
This is the set I’d point to if you like bows but hate anything that reads sugary.
Start with a glossy nude or beige-pink base, then add black French tips that stay slim—think 2 to 3 mm at the edge, not a thick block of color. One accent nail gets a black bow placed near the cuticle, and the bow itself looks best in a satin or velvet-matte finish over a glossy base. That texture shift keeps the black from looking flat.
A full glossy black bow can work, though the satin version looks smarter on a coffin shape because it echoes fabric. The design starts to feel less like a cute motif and more like a tiny accessory.
Keep the bow on one nail, maybe two. More than that, and the set starts leaning costume. This one earns its keep through restraint.
I also like this look on shorter coffin lengths, where black French tips can sharpen the nail without asking for extra length. Add a tiny silver stud at the bow center if you want one detail to break up the black, though I’d skip stones on every nail.
3. Pearl Chrome Coffin Nails With Raised Gel Bows
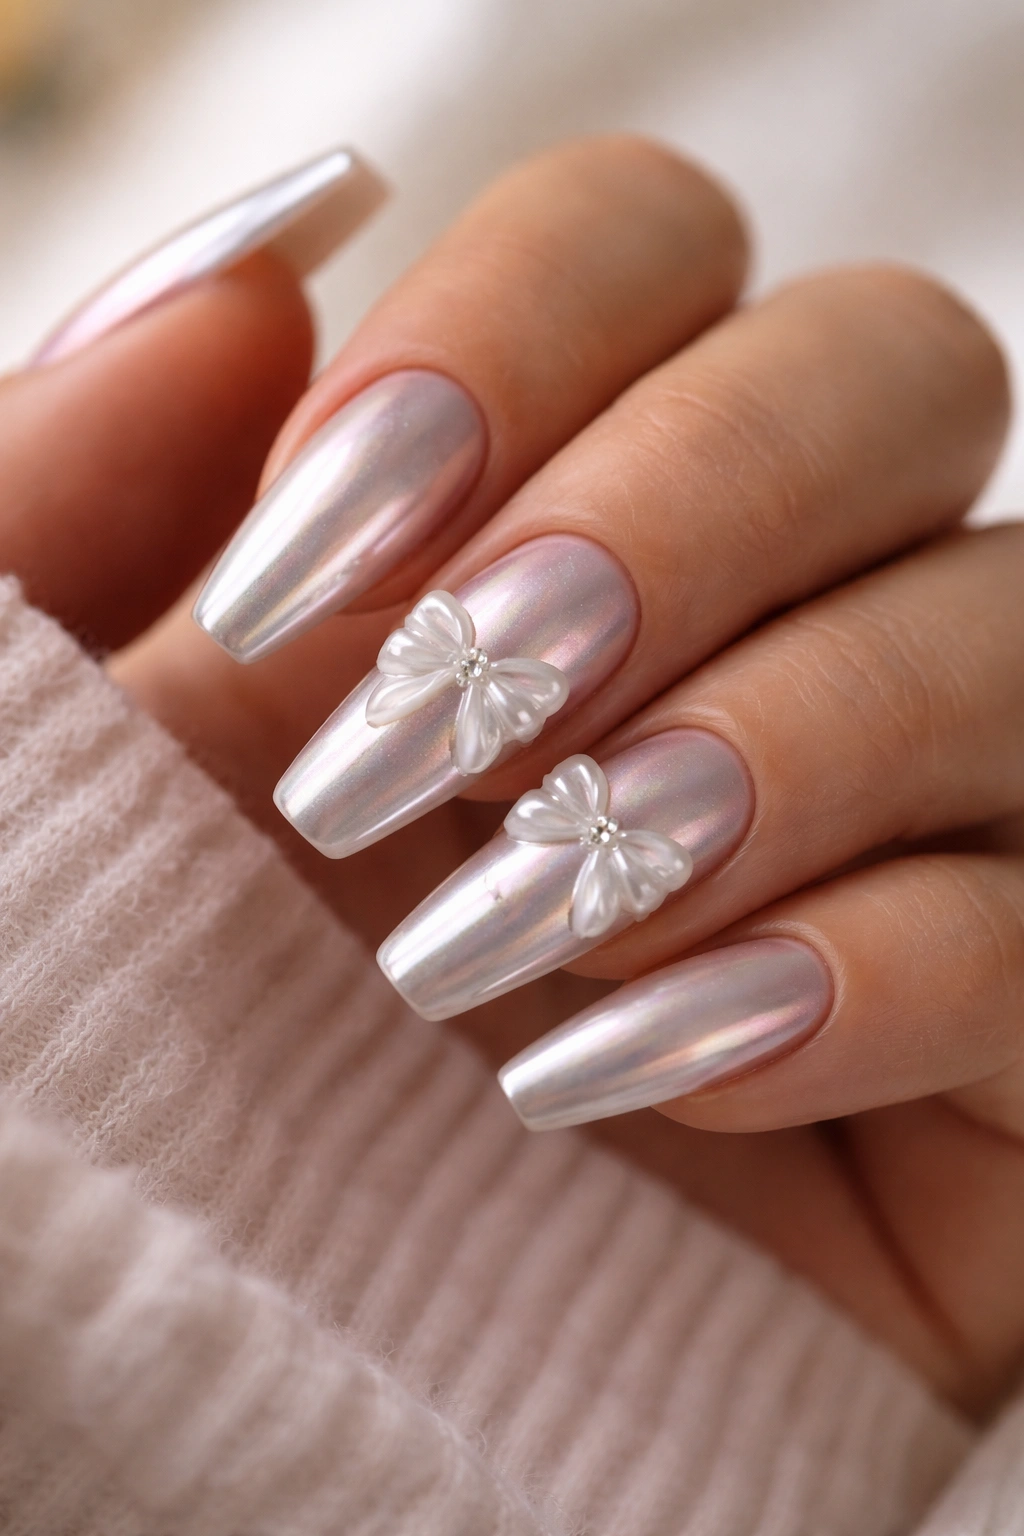
Why does pearl chrome make even a small bow look richer? Because the base shifts as your hand moves, so the flat nail never looks flat.
A pearl chrome finish over a sheer pink, beige, or soft ivory base gives the nail a glazed sheen that feels dressy without using chunky glitter. Add a sculpted gel bow on one or two nails, and you get texture on top of motion. That layering gives the manicure depth without stuffing each finger with detail.
How to wear it without tipping too far
Keep the chrome soft. Mirror-silver chrome can overpower a bow fast, especially if the bows are raised. Pearl, opal, or soft pink chrome sits better with the ribbon idea because the finish reads smooth and luminous rather than loud.
Placement matters here. A 3D gel bow looks best slightly above the midpoint of the nail or close to the cuticle, where it won’t make the free edge feel heavy. I’d also ask for rounded bow loops instead of sharply pinched ones—on a chrome base, softer shaping usually looks more refined.
If your nail tech builds the bows from clear sculpting gel, a dusting of pearl powder over the top can tie them into the base. That tiny move makes the bow feel like part of the set instead of something dropped on after the fact.
4. Sheer Nude Coffin Nails With Micro Bow Linework
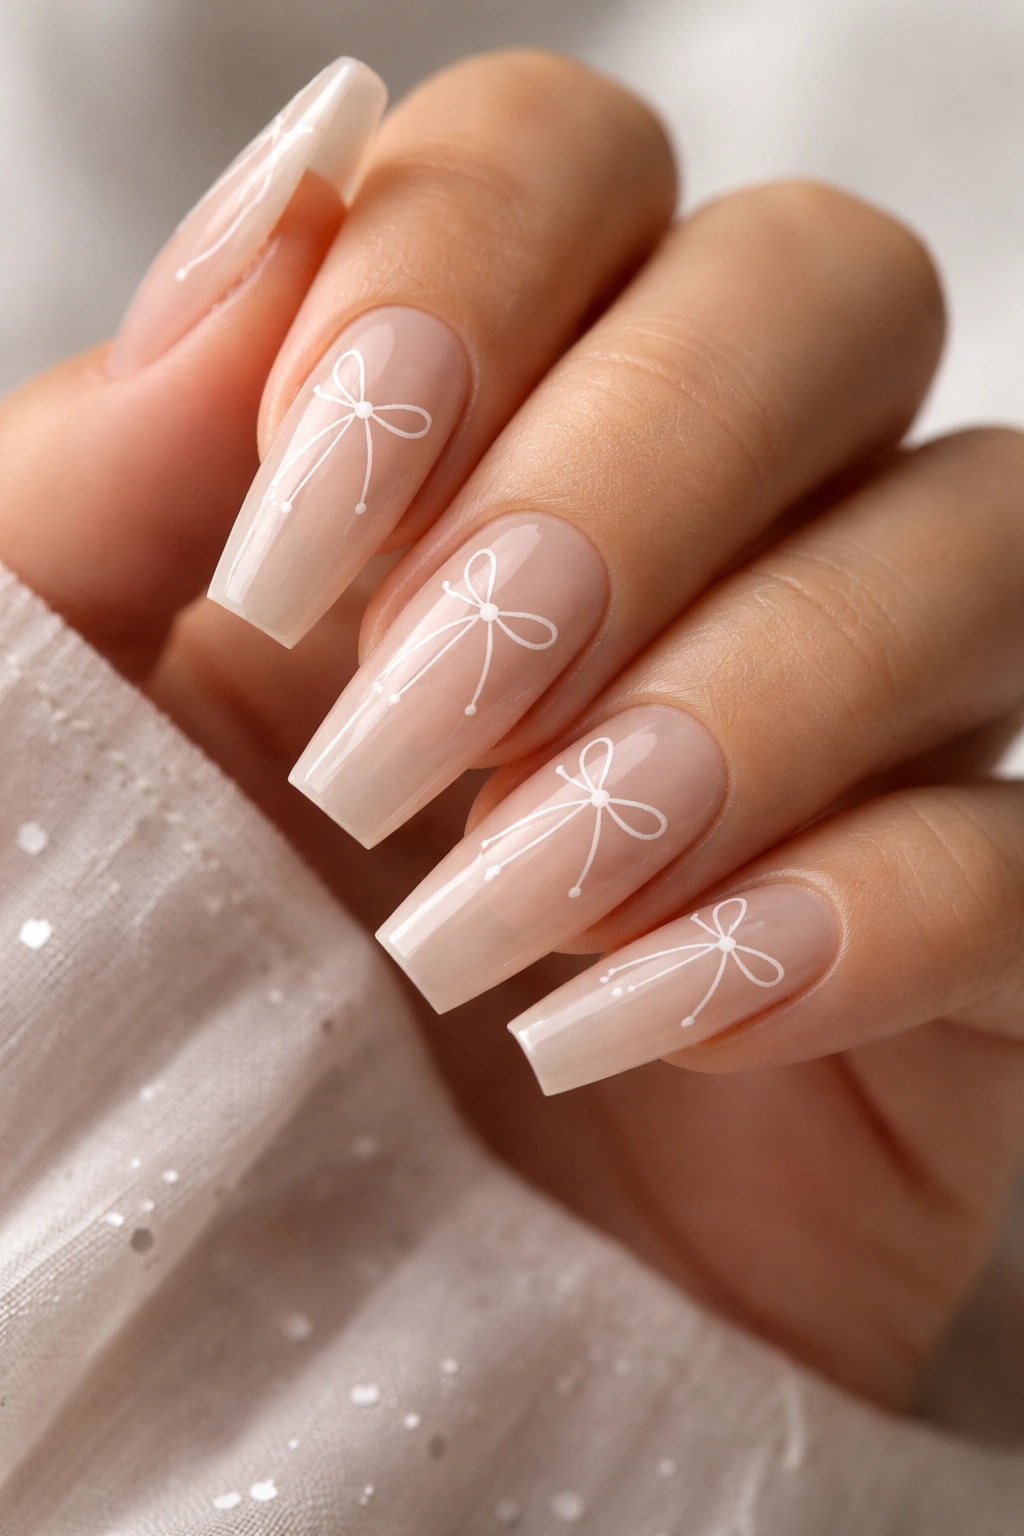
I’ve watched nail art go sideways when the tech tries to make every detail visible from six feet away. Micro linework fixes that.
This set uses a sheer nude base and tiny bow outlines drawn with a long liner brush, often in white, soft brown, black, or muted pink. The loops stay narrow, the knot is little more than a dot, and the tails flick out in short strokes. On a coffin shape, those fine lines read crisp without chewing up space.
You do need a steady hand for this one. Or a nail tech with one.
Here’s what makes the design land:
- Keep the bows flat and outlined, not filled in, so the manicure stays light
- Use 1 to 3 bows total across the whole set, not one on every nail
- Choose a base close to your skin tone so the linework looks airy rather than pasted on
- Add one micro crystal at the center only if the rest of the set is plain
A small set like this is one of the better office-friendly options because it reads neat up close and almost minimalist from a distance.
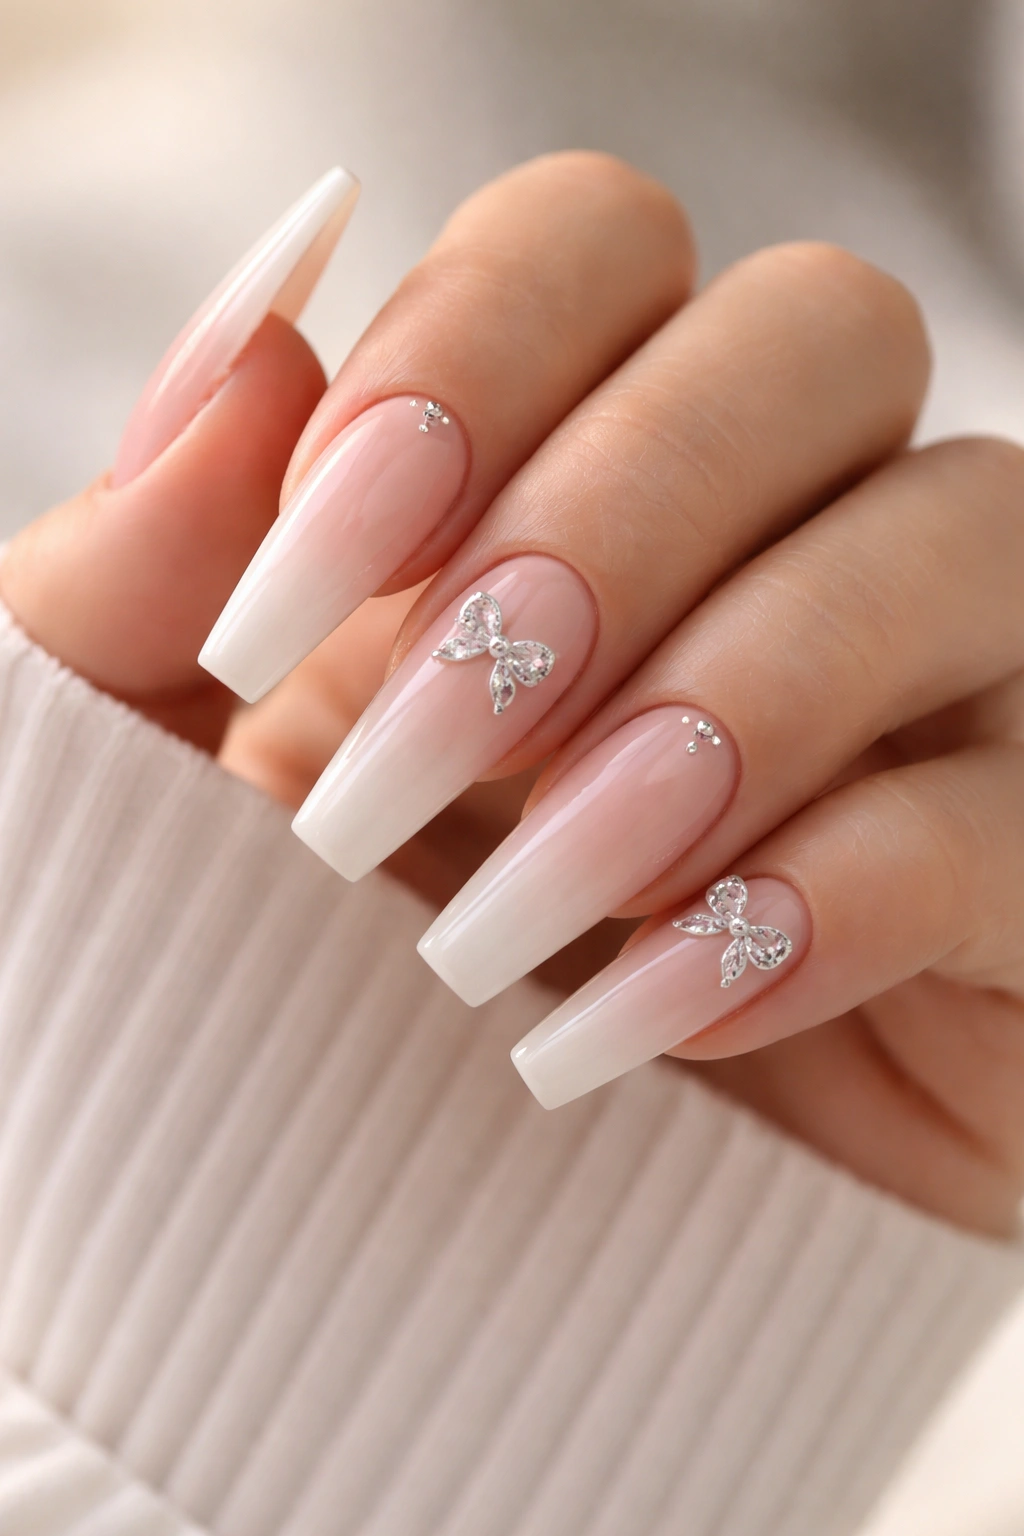
5. Baby Blue Coffin Nails With Silver Bow Charms
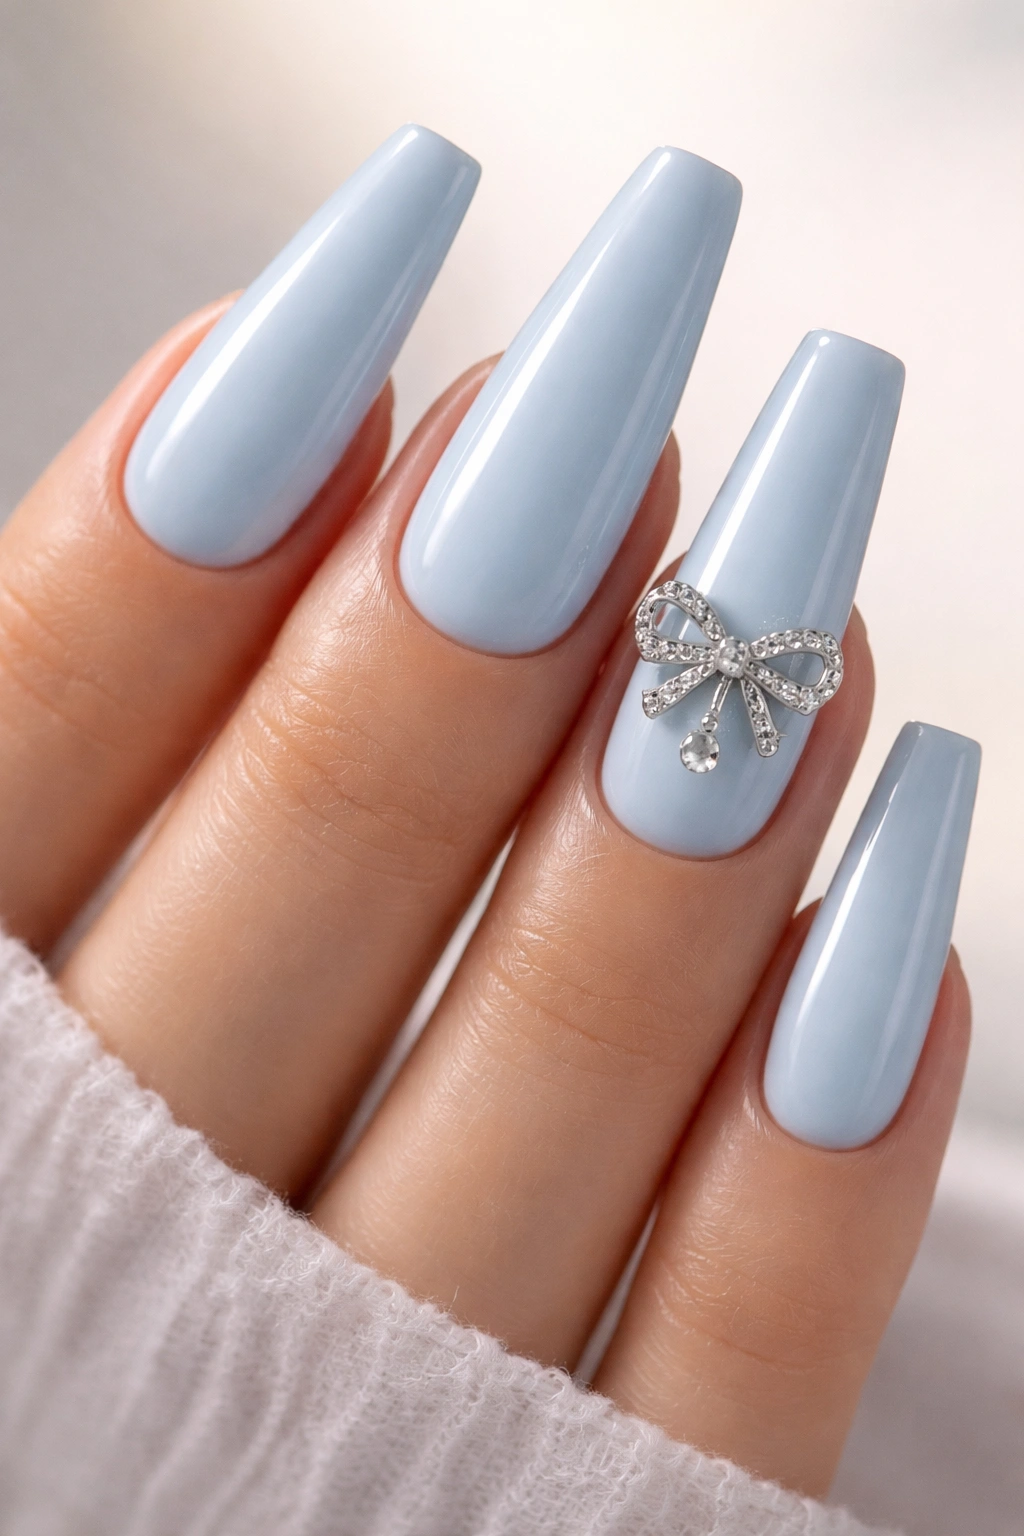
Baby blue can go one of two ways: crisp and expensive-looking, or flat and chalky. The difference usually sits in the undertone. I’d lean toward a blue with a drop of gray in it rather than a sugary pastel straight from a candy aisle. That cooler base gives silver bow charms a cleaner home.
This is one of those manicure ideas that likes a bit of length. On a long or medium-long coffin shape, a silver bow charm on the ring finger has enough runway around it. On a short nail, the same charm can eat the whole design. If you love the color but want less texture, swap the charm for a chrome silver painted bow and keep the rest of the nails solid.
Builder gel matters here. A metal charm needs to sit in a bead of thicker gel, then get sealed around the base without drowning the bow itself. Good techs know that balance. Bad ones flood top coat around the charm and send you home with a snag waiting to happen.
One accent charm is usually enough. Two can work if the set is clean everywhere else—no extra stones, no heavy glitter, no marble, no foil. Baby blue and silver already do the talking.
6. Classic Red Coffin Nails With Cuticle Bow Details
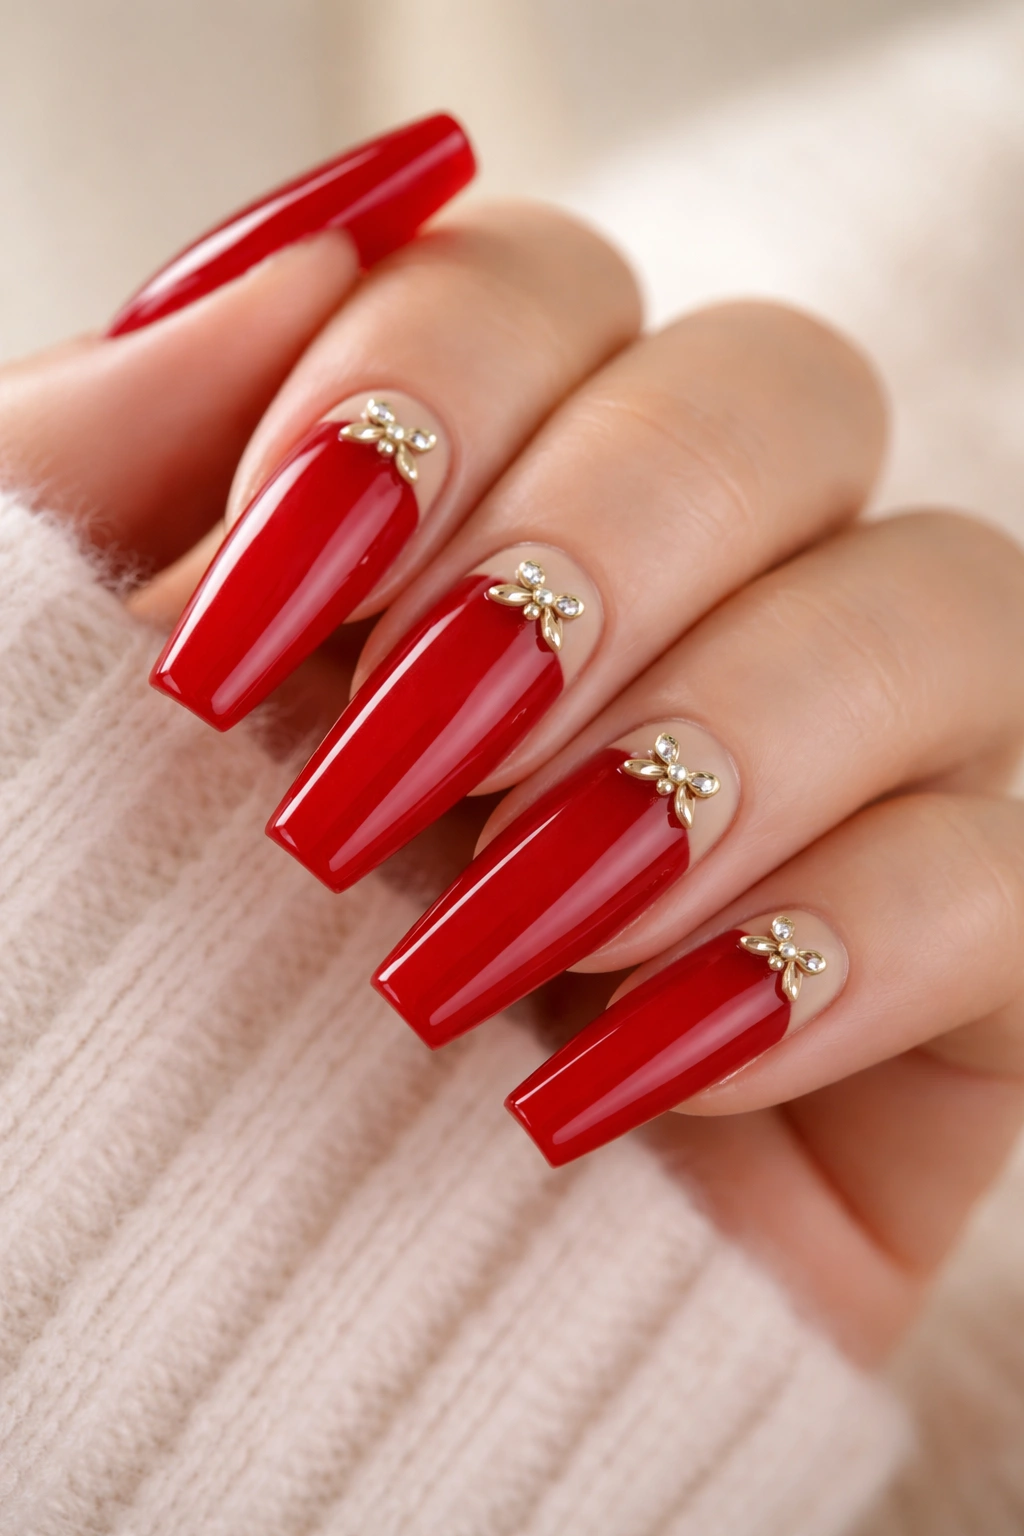
Unlike tip placement, a cuticle bow grows out more gracefully because the art starts where the eye expects detail. That makes this design smarter than it first appears.
A glossy cherry red or blue-red base gives the manicure weight. Then a tiny bow sits near the cuticle area, often on a nude half-moon or a slim negative-space pocket. The bow can be gold, black, or tone-on-tone red, though I like gold most here because it feels like a piece of jewelry rather than another graphic element.
Who does this suit? Anyone who wants a bow manicure with edge. Red already carries its own mood, so the bow reads less “cute” and more “styled.”
One practical note: if your red is opaque and deep, ask for a small bow, not a medium one. Big red-on-red bows can blur into the base under indoor lighting. A tiny metallic center or slim outline helps the shape stay visible.
This is also a smart holiday-party set without screaming holiday. That alone gives it staying power.
7. Pink Ombré Coffin Nails With Airbrushed Ribbon Swirls
Some bow sets try too hard to prove the theme. This one doesn’t need to. A soft pink ombré base already sets the mood, and ribbon-like airbrushed swirls hint at a bow without drawing the same symbol ten times.
Why the airbrushed look helps
Airbrush or aura-style fading gives the nail a clouded center and softer edges, which pairs well with ribbon trails and looped linework. You can place a full bow on one nail, then let the others carry curved ribbon strokes that echo the shape. The result feels coordinated, not repetitive.
If your salon doesn’t airbrush, a sponge-blended ombré with gel linework can still get close. The base should shift from pale pink to a deeper rose or blush, though keep the gradient soft. Hard stripes kill the mood.
What to ask for
- A pink ombré base with the deepest color at the center or tip
- One full bow accent, usually on the ring finger
- Ribbon swirls on 2 to 3 nails, not every finger
- Glossy top coat, since matte can flatten the fade
This is the coquette-leaning version of bow coffin nails, though a clean one. It looks strongest on medium to long lengths where the ribbon lines have room to curve.
8. Matte Mocha Coffin Nails With Glossy Bow Art
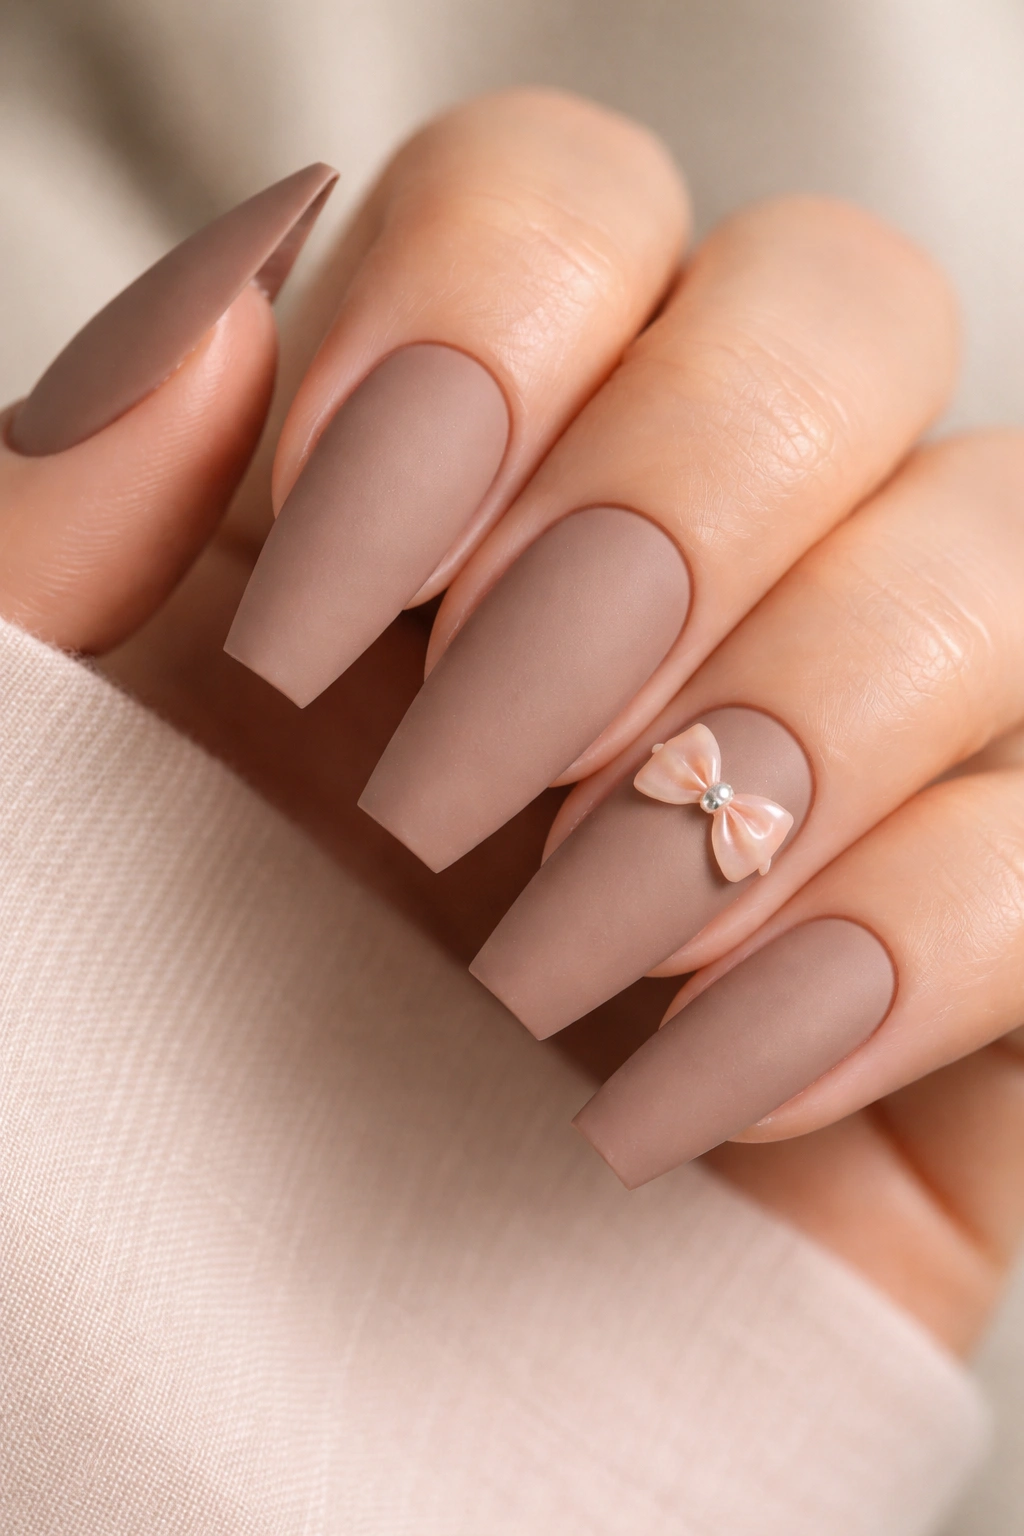
Brown nails do not get enough credit.
A soft mocha, cocoa, or café-au-lait base on a coffin shape looks calm and expensive, especially in matte. Then you lay a glossy bow over the top in the same color family—or in clear builder gel tinted by the base underneath—and the design shows itself by texture first, color second. That’s why this one feels grown rather than sweet.
The bow doesn’t need to be large. In matte-versus-gloss nail art, the eye already has something to chase. A medium bow on one nail or tiny glossy bows on two nails usually give enough contrast. You can even skip a center knot detail and let the silhouette do the work.
This is one of my favorite bow sets for cooler months, office settings, and anyone who wears gold rings every day. Mocha sits well beside skin, denim, black knitwear, camel coats, all of it. And unlike pale pinks, it hides minor wear a bit better around the edges.
Matte top coats can mark up faster than glossy ones, though. If you use self-tanner, hair dye, or strong cooking spices, ask your tech for a stain-resistant matte top or keep this one for a shorter wear window.
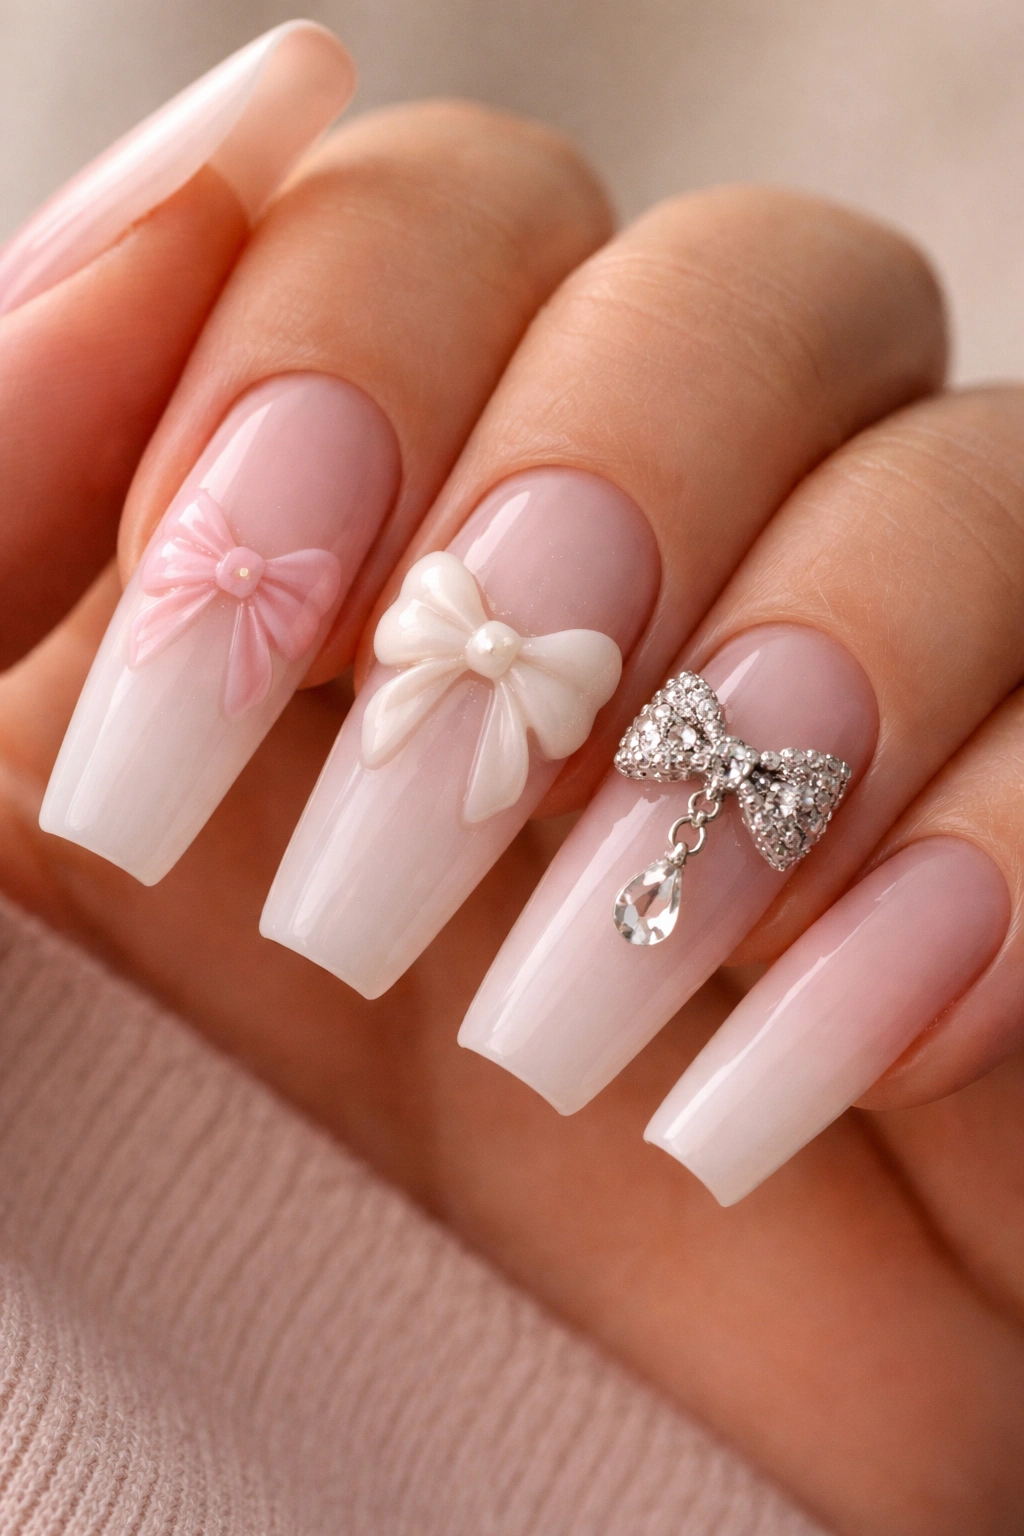
9. French Fade Coffin Nails With a Crystal Bow Accent
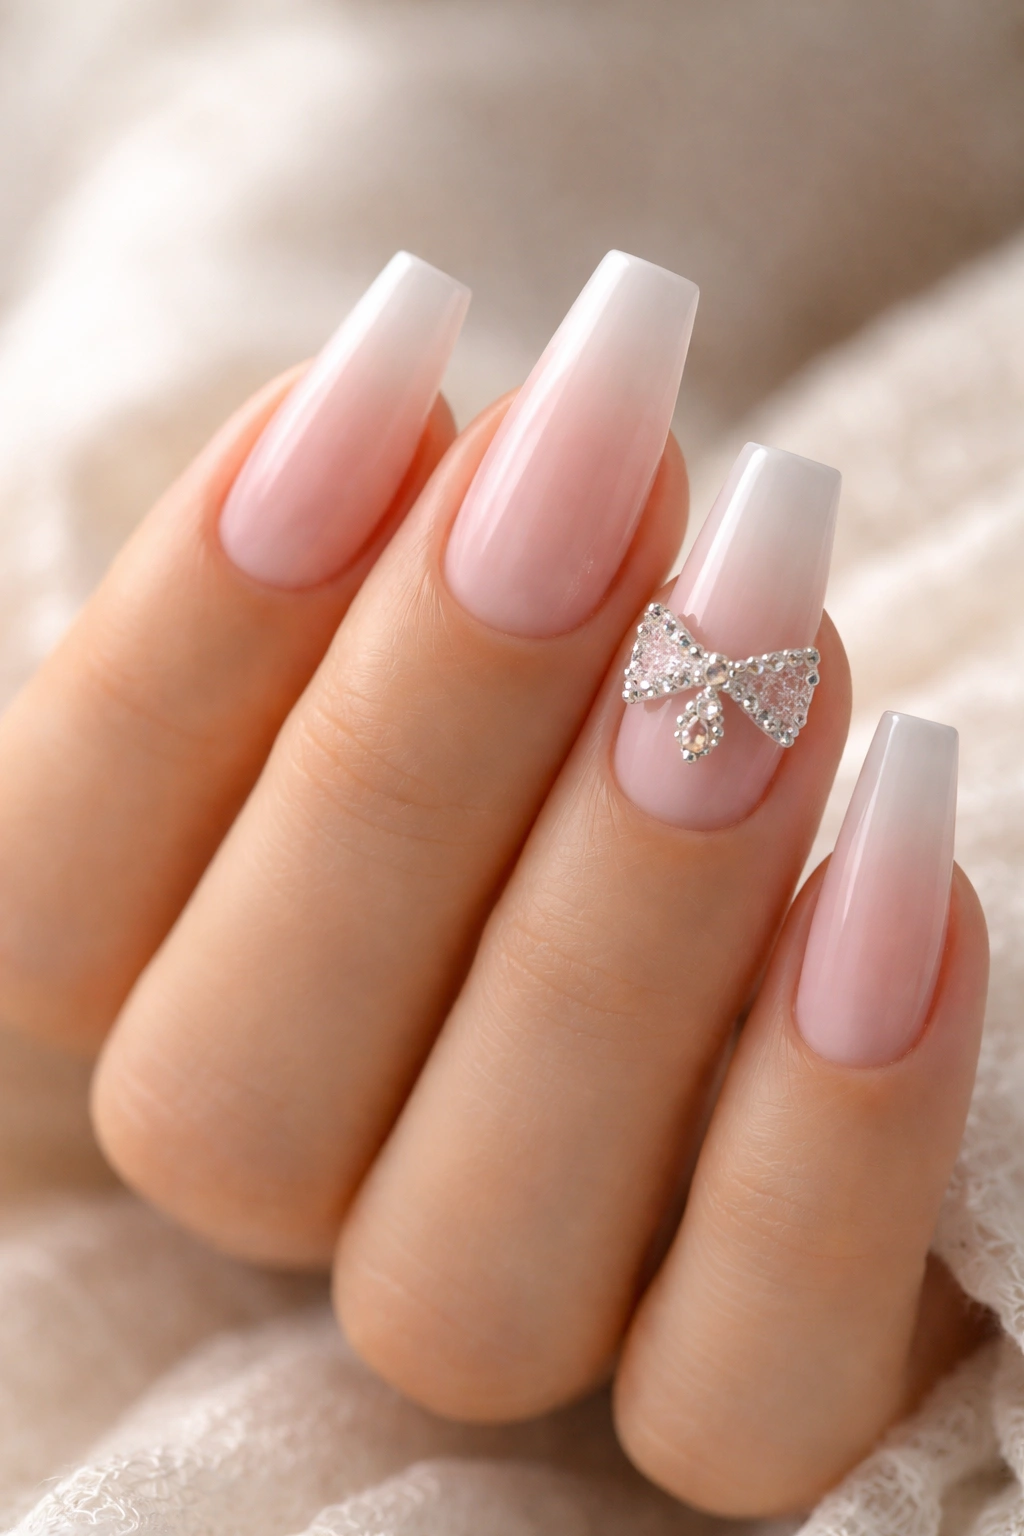
Can a crystal bow look bridal without sliding into costume? Yes—if the rest of the nail stays quiet.
A French fade, often called a baby boomer base, blends soft pink into milky white with no hard smile line. That haze gives you a polished backdrop for a single crystal bow, usually on the ring finger or middle finger. The best version uses a small crystal cluster arranged in a bow shape, not a giant premade charm that towers off the nail.
Placement that keeps it clean
Keep the crystal bow low on the nail, close to the cuticle, so the fade stays visible. If the bow sits in the center, the eye loses that smooth white-to-pink transition and the whole point of the base gets buried.
I’d pair this with almond-shaped crystals or tiny round stones no bigger than SS5 to SS7 size for most nail beds. Bigger stones can still work on long coffin extensions, though they need tight spacing and a clear plan. Random rhinestones around a bow ruin the discipline of this set fast.
For wedding nails, engagement photos, or any manicure where you’ll be holding a glass and staring at your own hands all evening, this one earns its spot.
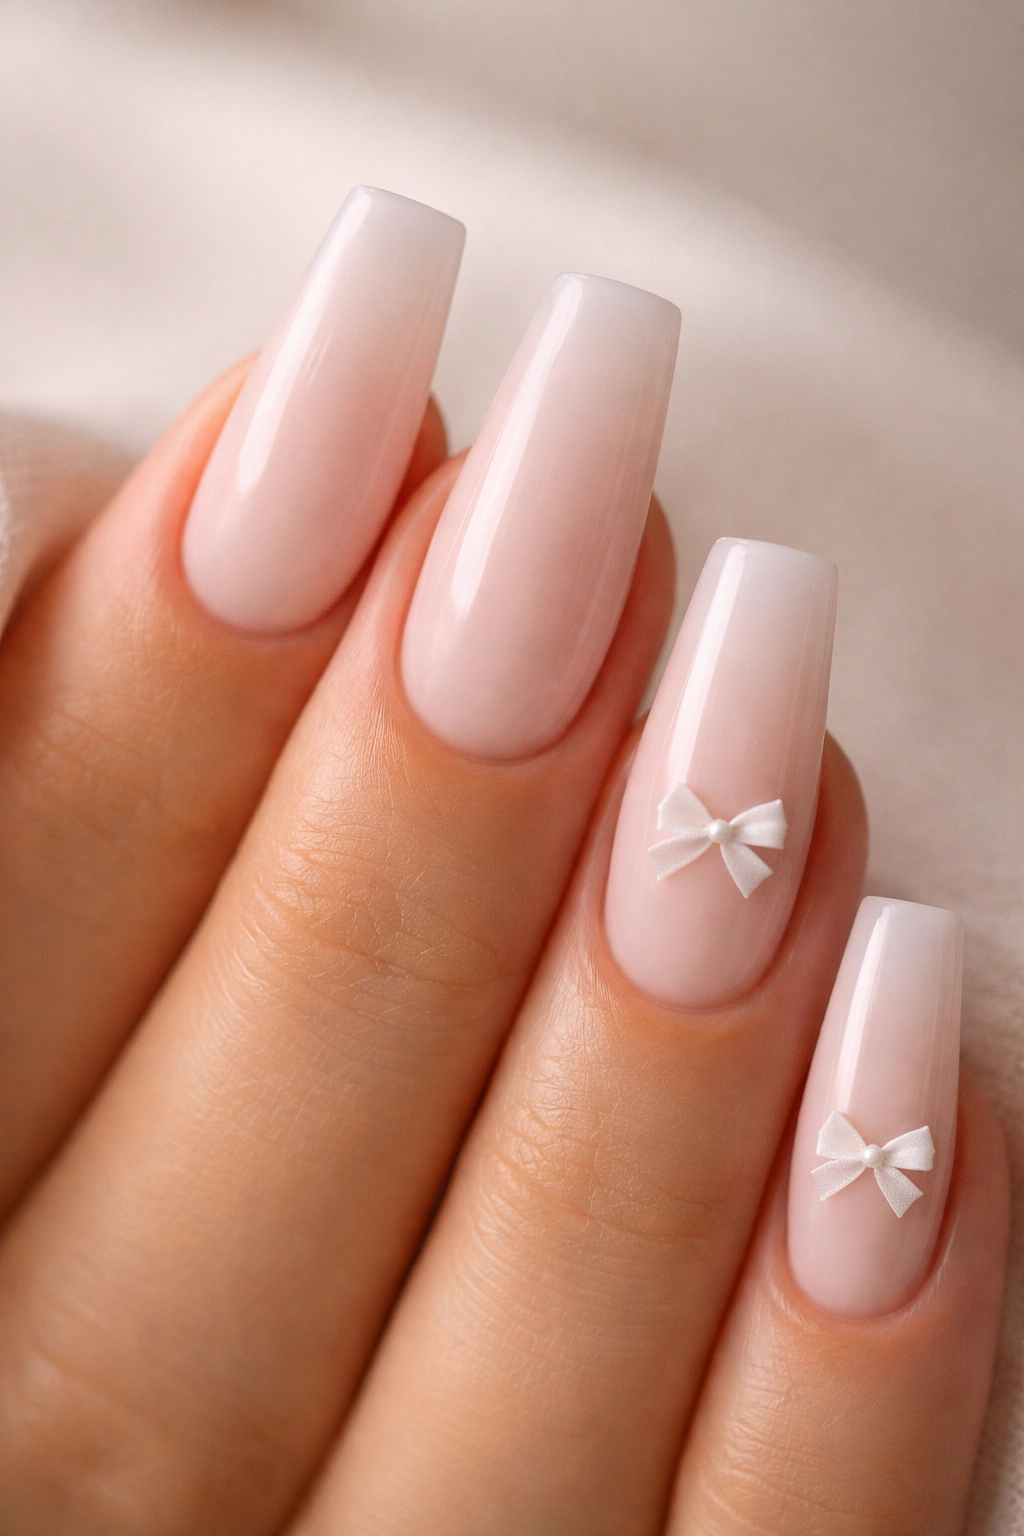
10. Lavender Coffin Nails With Lace and Bow Details
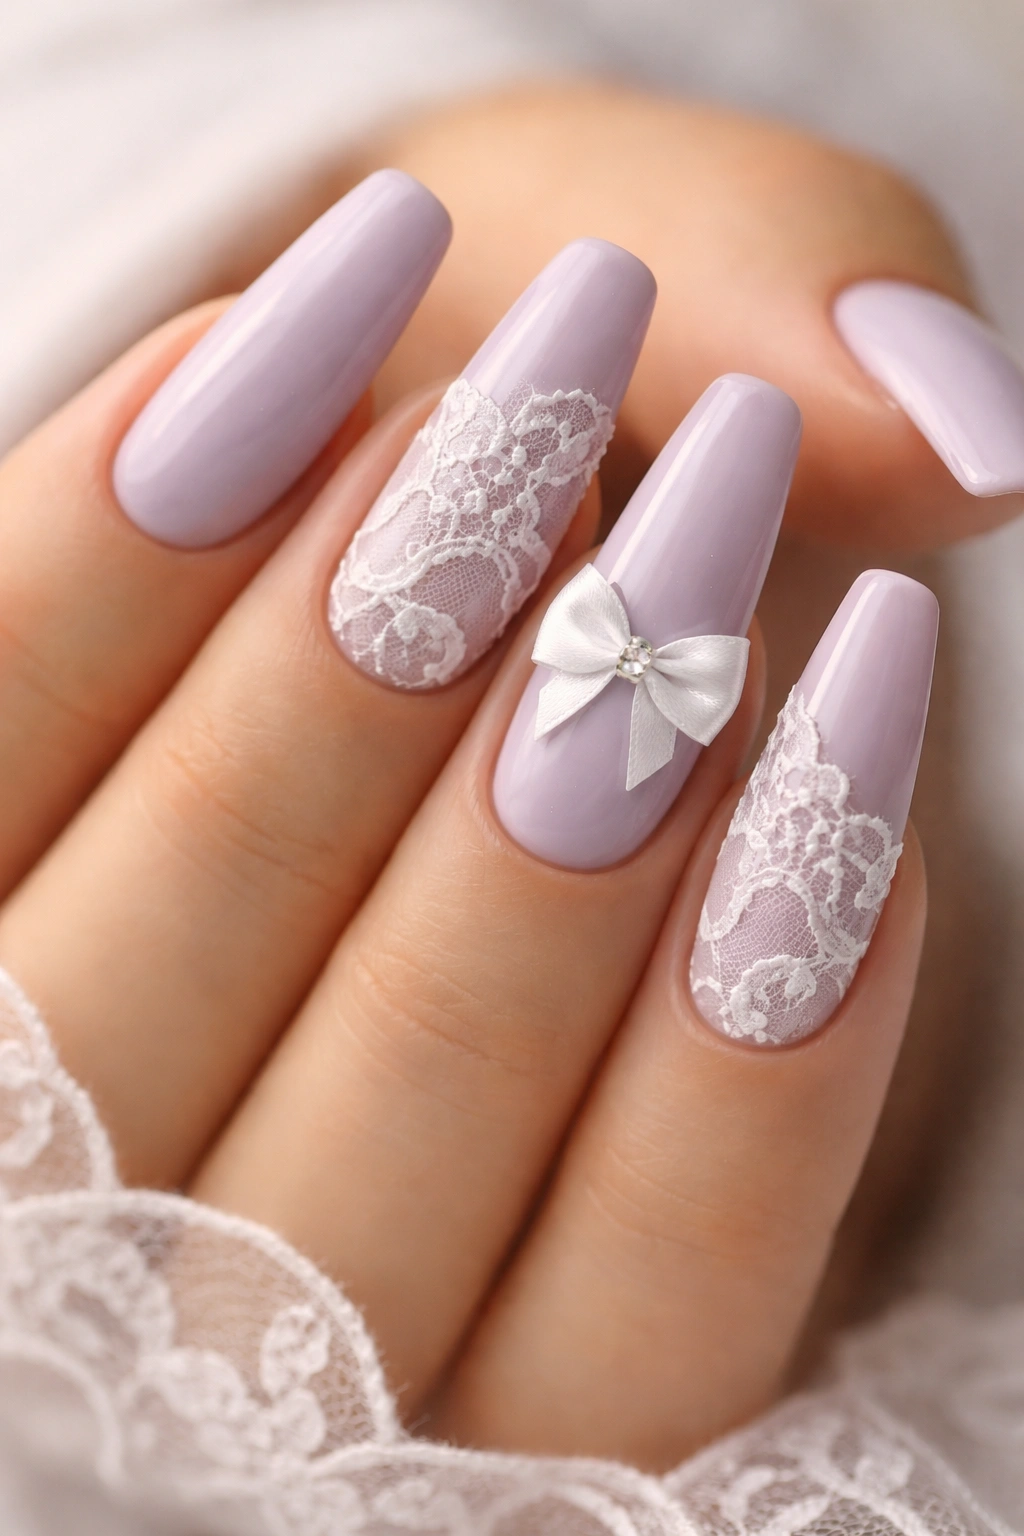
I’ve seen lace nails turn muddy because every finger was trying to be the feature nail. Lavender saves them when you edit hard.
Use a cool lavender or lilac base—creamy, not neon. Add fine white lace on one or two nails, then place a bow on a separate accent nail so the motifs don’t sit on top of each other. When lace and bows share the same nail, the details can knot together and lose shape.
That separation is the whole game here.
A few specifics help:
- Choose a dusty lavender, not a sugary purple, if you want the white lace to stay crisp
- Keep lace to 1 or 2 nails and the bow to 1 nail
- Use a liner brush for the lace, then a dotting tool for tiny scallops if needed
- Skip chunky gems, because the lace already brings enough texture
This set leans romantic, though it does not need a formal event to make sense. Medium coffin length wears it best. Long nails can carry more lace, though I’d still keep the bow separate from the lace pattern. Discipline beats excess here.
11. Clear Jelly Coffin Nails With Floating White Bows
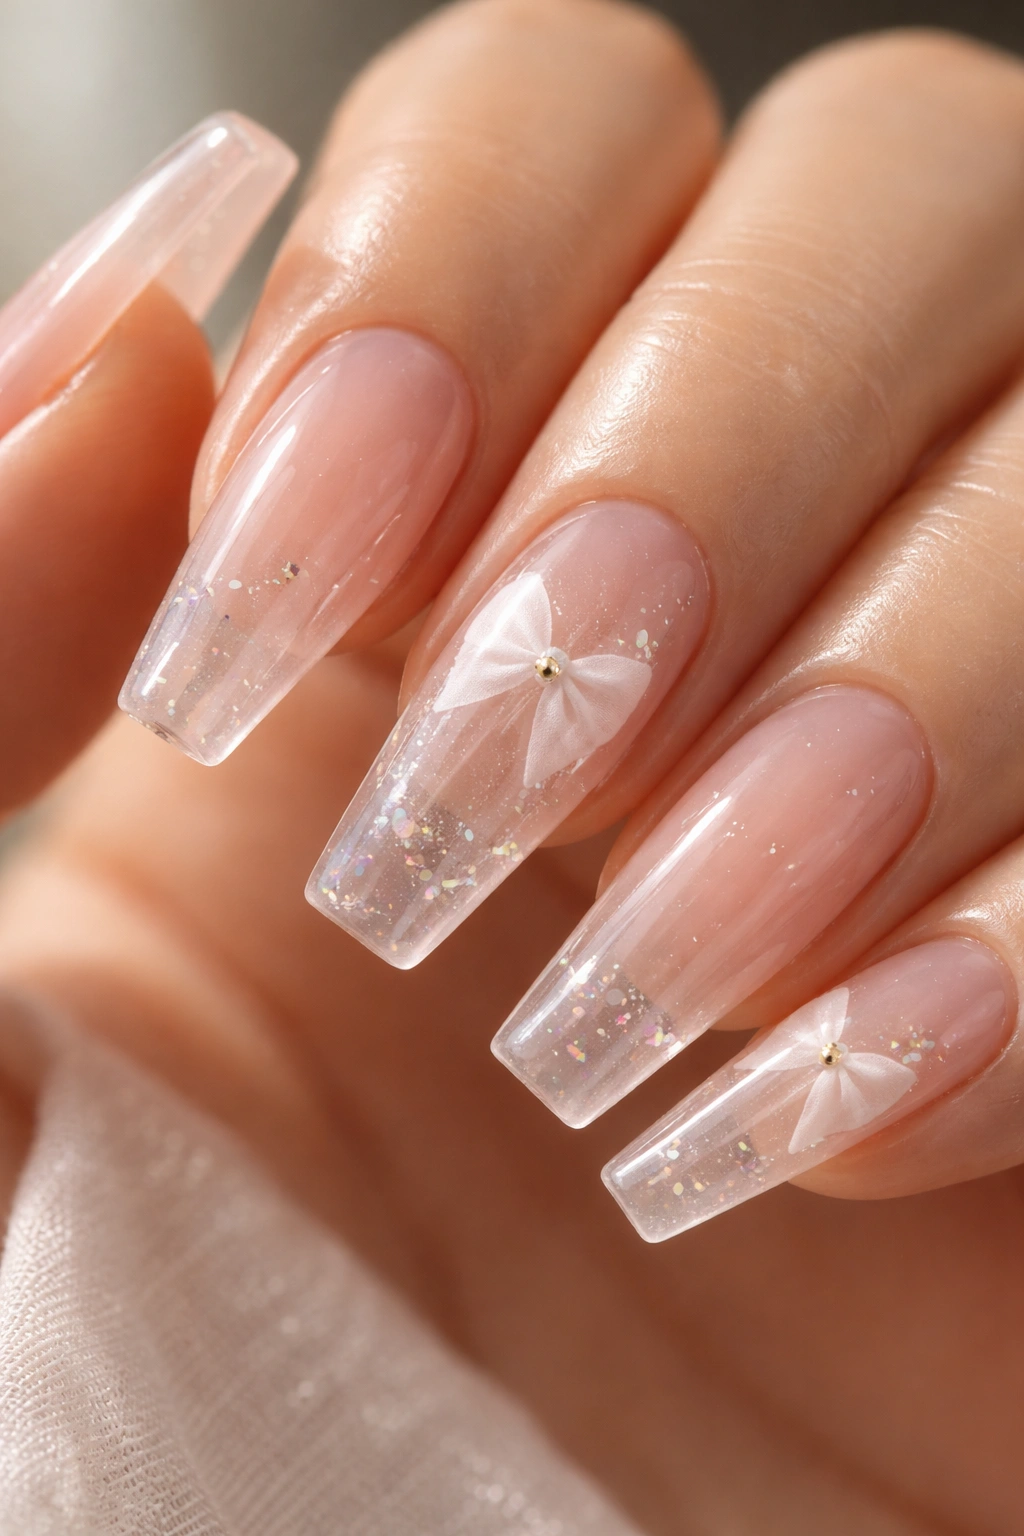
Clear jelly nails have that glossy, candy-window look that makes even plain color seem playful. Add floating white bows between layers of gel, and the manicure starts to feel light, almost suspended.
The trick is encapsulation. A decal, sticker, or hand-painted bow sits over a clear or faintly pink jelly base, then gets sealed under another layer of builder or hard gel. That second layer matters because it smooths the surface and protects the art. You keep the image of a floating bow without the drag of a raised charm.
This set looks best when the base stays translucent. If the jelly turns cloudy or too milky, the floating effect disappears. I like one or two encapsulated bows and maybe a whisper of silver foil or micro glitter on one nail, though I’d stop there. Clear jelly already has a playful mood. It doesn’t need confetti.
Heat also changes how this style feels. In bright sun, the clear finish looks glassy and fresh. Under indoor lamps, the white bows show up more sharply, almost graphic. Same set. Two moods.
12. Tuxedo Black-and-White Coffin Nails With Center Bows
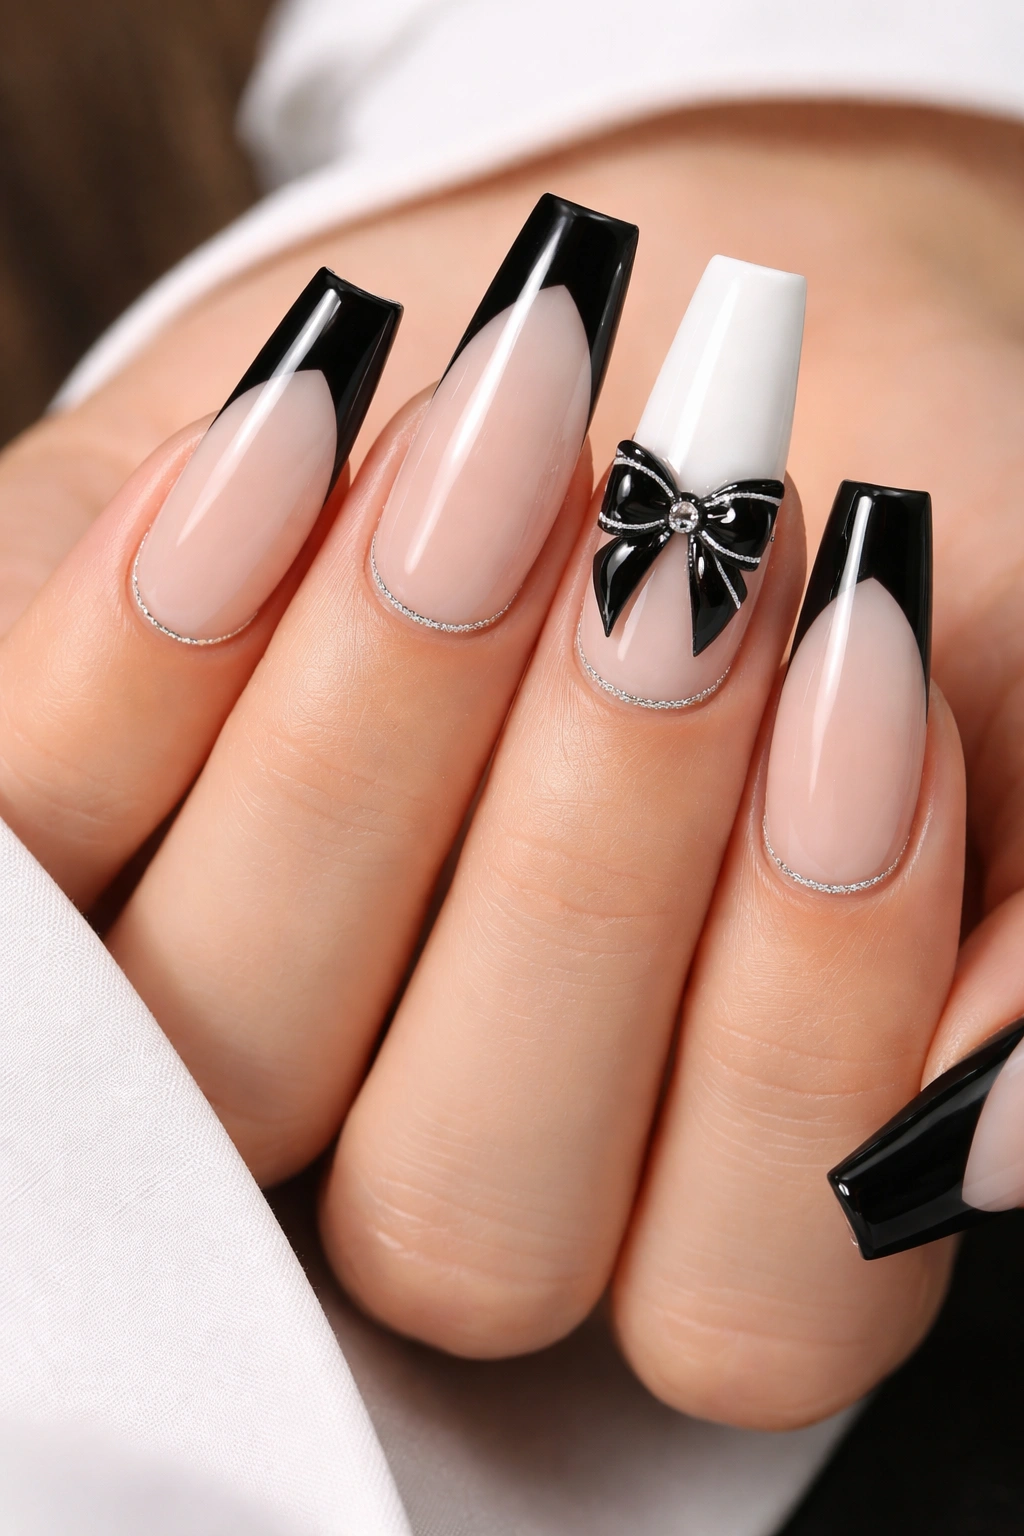
Unlike soft pink bow nails, this version has bite from the first glance.
A tuxedo palette—true black, crisp white, and a sheer nude or milky base—turns the bow into a graphic element rather than a sweet one. You can alternate black French tips and white full-color nails, then place a black-and-white bow on a center accent nail. Or flip it: white base, black bow, thin black side outlines. Either route works because the contrast is doing the heavy lifting.
This is one of the few bow sets that can handle shorter coffin nails without losing clarity. Strong color blocking keeps the shape sharp, and the bow motif reads quickly even on less length.
Who should try it? Anyone who wears black daily, anyone who wants nail art that feels dressed up but not soft, and anyone tired of pink-based coquette sets.
A glossy top coat suits the tuxedo mood better than matte. Gloss makes the black look inkier and helps the white stay crisp. If you want one small extra detail, use a single silver bead at the center knot—one bead, one nail, done.
13. Soft Peach Coffin Nails With Gold Outline Bows
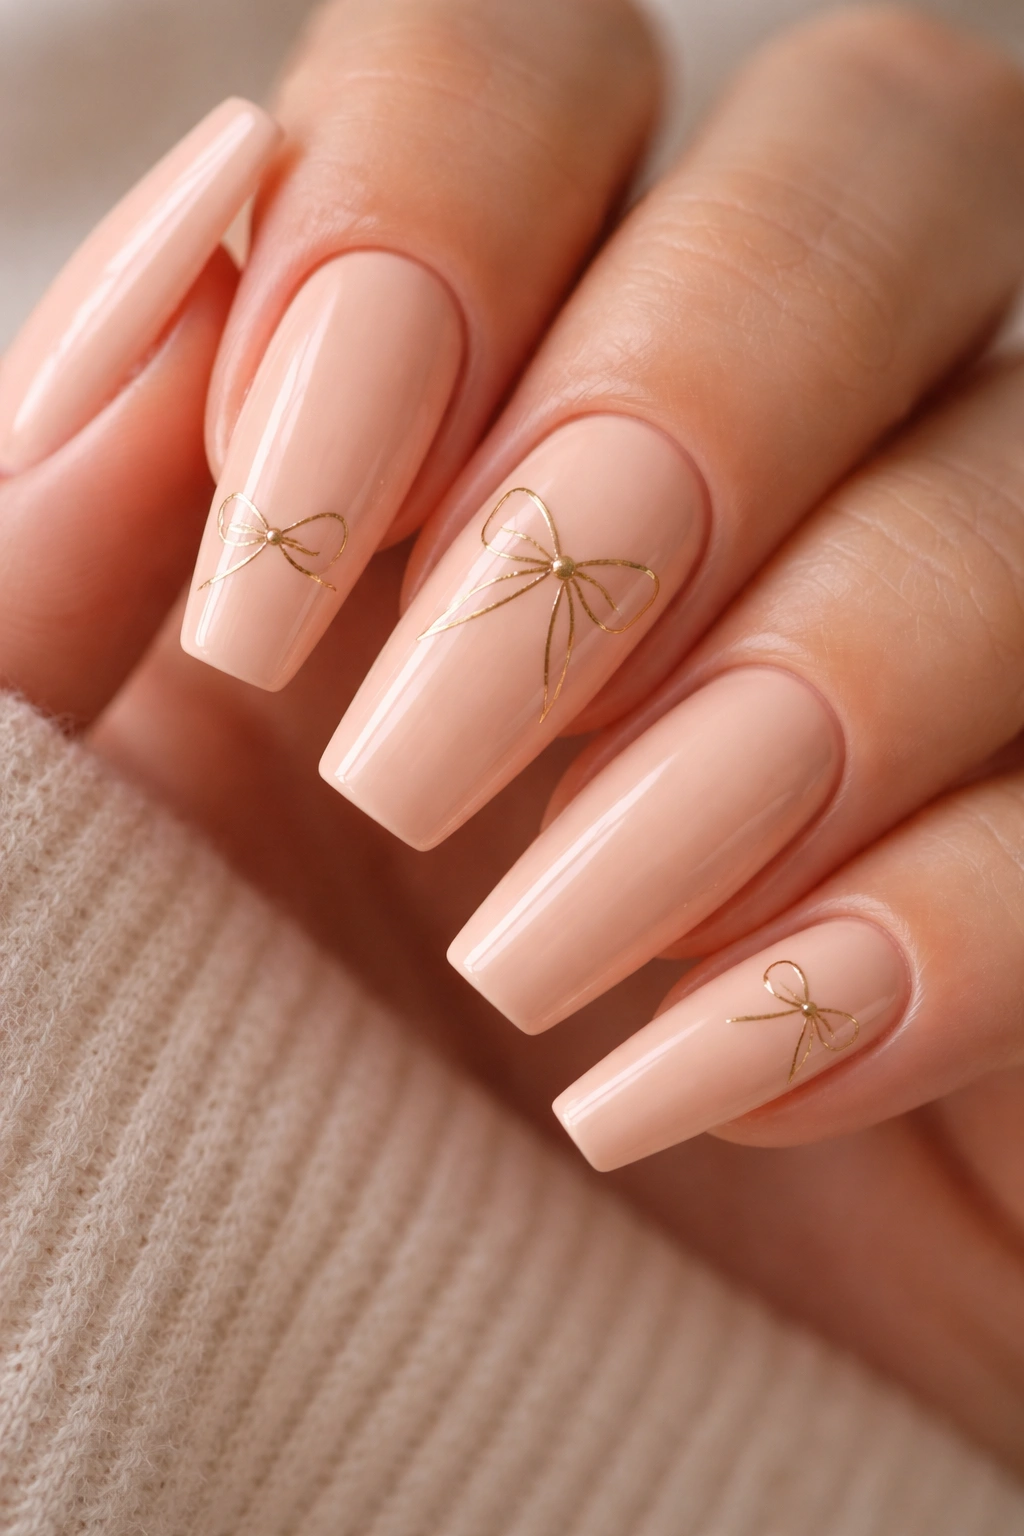
Warm peach can be a sleeper hit in a way pale beige never is. It wakes up the hand without shouting, and gold outline bows sit on top of it like little pieces of jewelry.
Where this color lands best
Peach works especially well when it leans muted rather than orange. Think apricot milk, soft coral-beige, or warm blush with a touch of cream. Against that base, a thin gold bow outline feels crisp and dressy, especially if your rings are yellow gold.
The bow should stay fine-lined here. Thick gold gel turns heavy fast on a warm base, while a delicate metallic outline keeps the manicure light. I like this most on medium coffin nails with one full bow and maybe one half-bow peeking in from a corner on another nail.
Details worth keeping tight
- Use a soft peach cream, not shimmer, so the gold lines stay clear
- Ask for foil gel or chrome-lined art for the bow outline
- Keep line thickness narrow, around the width of a thin striping stroke
- Match the bow metal to your jewelry if you care about that kind of detail—I do
Good call if: you want a bow manicure that looks warmer than pink and less stark than nude.
14. Cat-Eye Rose Coffin Nails With a Tiny Bow Cluster
Magnetic cat-eye polish gives you movement without glitter fallout, and that makes it a smart base for a bow detail. Tilt your hand and the reflective stripe shifts across the nail, which means the manicure keeps changing even if the art stays minimal.
Rose, mauve, dusty pink, and muted berry cat-eye shades work best for this idea. Then you place a tiny bow cluster—one mini bow, or two micro bows set diagonally—on a single accent nail. The cluster should be small enough that the magnetic line still shows around it. If the accent covers the whole center, you lose the point of choosing cat-eye in the first place.
I’d keep the rest of the set clean. No heavy French tips, no foil flakes, no lace, no marble. Magnetic polish already throws enough motion when the hand turns, and bow clusters should sit on top of that movement, not fight with it.
This one suits evening wear better than a plain cream bow set. It has more drama. Still, because the palette stays muted, it doesn’t feel loud. That balance is hard to pull off, which is why this design sticks with people.
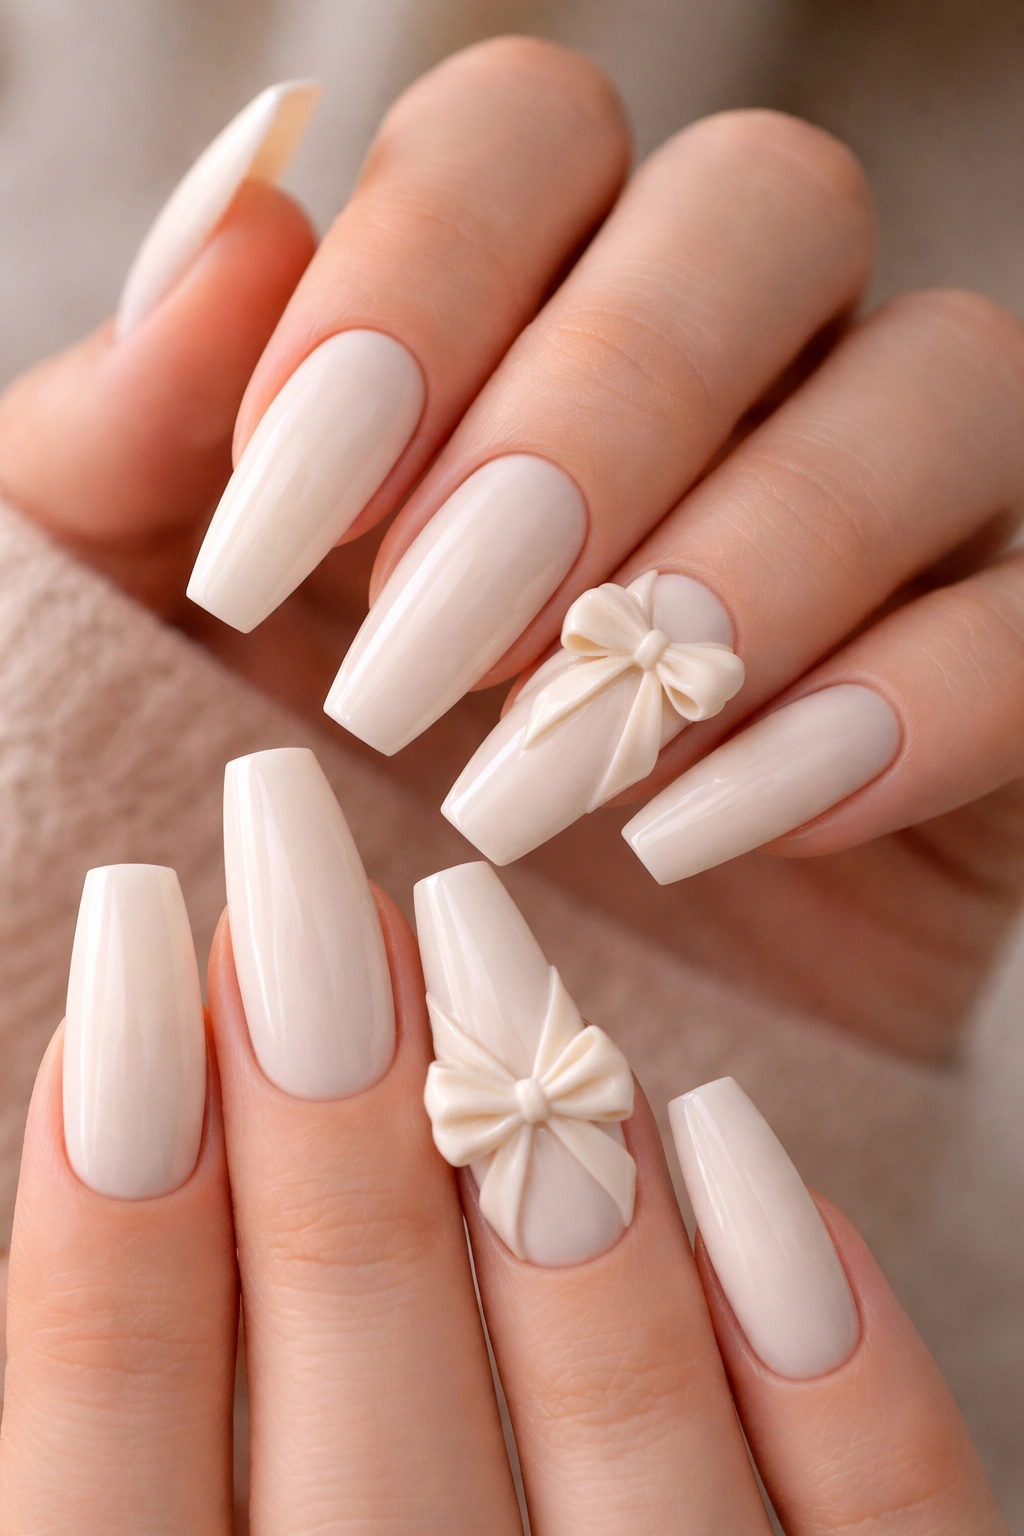
15. Ivory Coffin Nails With Sculpted 3D Ribbon Bows
If you want the full statement set, this is the one.
An ivory or soft cream base gives sculpted 3D ribbon bows room to show every loop, fold, and tail. Good techs build these from thicker sculpting gel, cure each section as they go, then refine the shape so the loops look ribbon-like instead of blobbed on. You want definition in the center knot and clean tails that taper as they drop.
What makes this version look custom
The base color matters more than you’d think. Bright white can make 3D bows look stark. Ivory, milk, soft cream, or pale blush-ivory gives the set warmth and lets shadows around the sculpted gel show up better. Those shadows are what make the bow look like a bow.
Placement needs discipline. One large 3D bow on each hand—often ring finger only—can be enough. Two accent nails per hand can still work on long coffin extensions, though I would not load every nail with a raised bow unless the set is for a short event and practicality is not part of the plan.
A few hard-earned notes
- Ask for low-profile sculpting if you wear your hair down often
- Keep bow height around 1 to 2 mm for better wearability
- Use a strong apex underneath long coffin nails, since the extra top weight changes balance
- Skip this design if you know you pick at edges
This is the bridal, editorial, dressed-up version of bow coffin nails. Done well, it looks deliberate and rich. Done badly, it looks like craft supplies. The difference is in the sculpting.
Final Thoughts
The best bow manicure is not always the biggest one. Most of the time, the set that gets the most compliments is the one with one strong idea and enough empty space around it for your eye to register the shape.
Bring reference photos, though bring them with purpose. One photo for color, one for bow placement, one for finish—matte, chrome, jelly, sculpted gel. That gives your nail tech something usable instead of a camera roll full of mixed signals.
And be honest about your hands. If you work, type, lift, clean, cook, button jackets, wrestle with tote bags, or forget and use your nails as tools, flat painted bows will make you happier than raised charms. Save the chunky 3D ribbon moment for when you want the manicure to be the outfit.
Coffin nails already have structure. A bow gives them contrast, and contrast is what makes the whole look land.
