

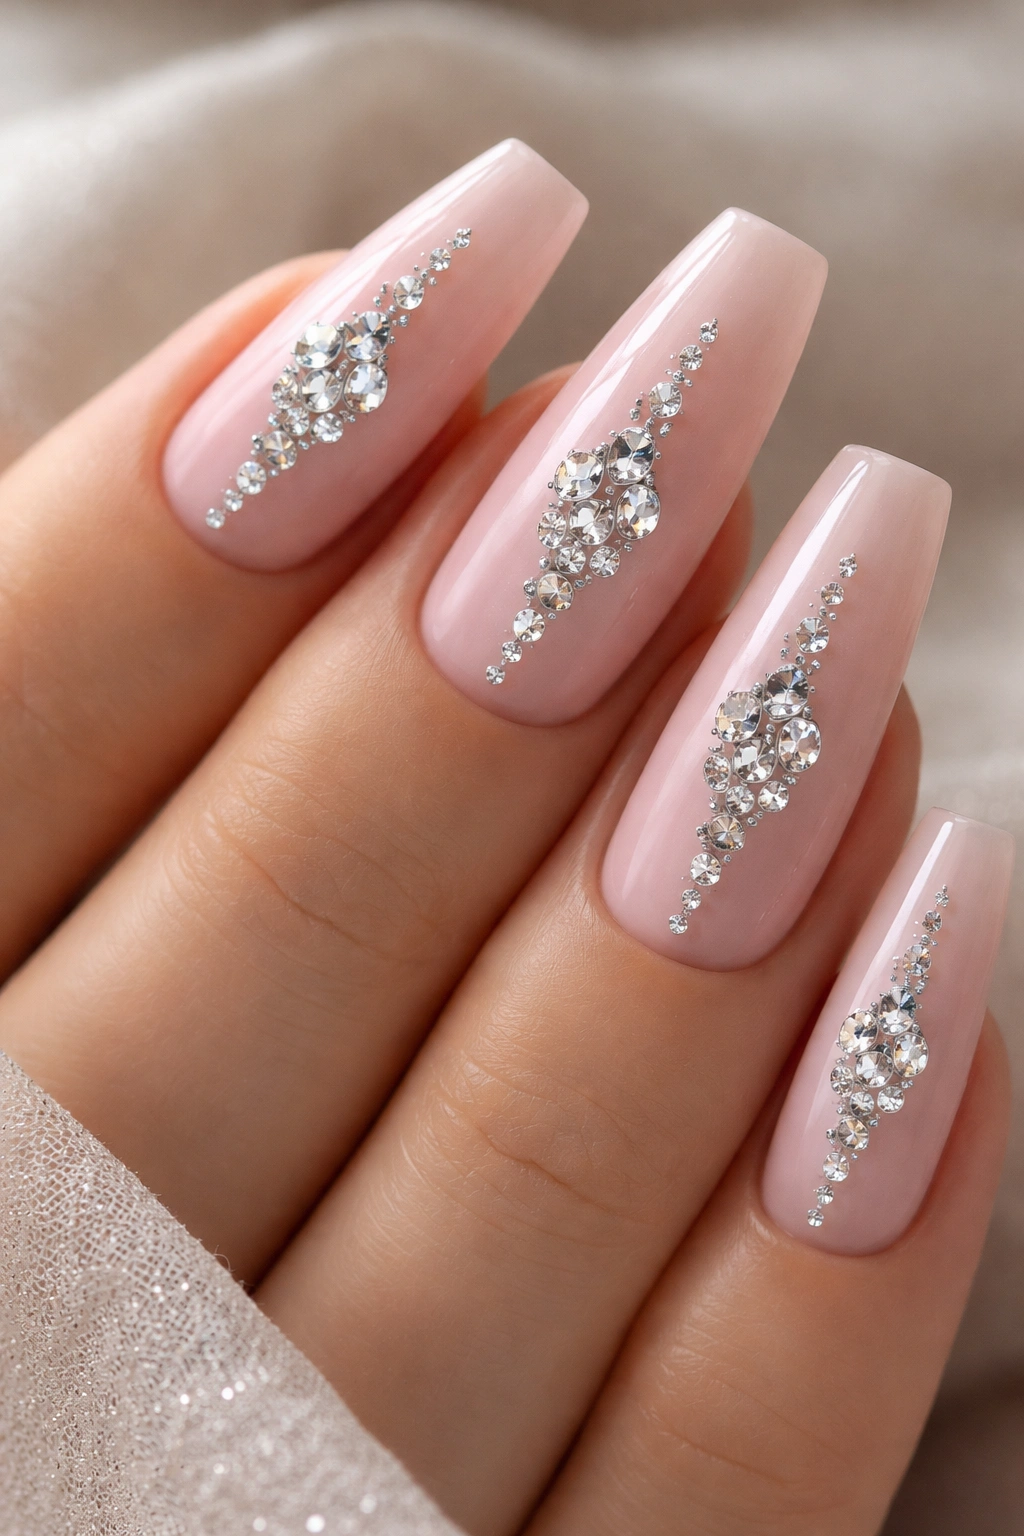
The coffin nail shape—with its tapered sides and broad, flat top—has become the go-to silhouette for anyone who wants a sophisticated, contemporary look without committing to super-long stilettos. Medium-length coffin nails hit that perfect sweet spot: long enough to make a statement and showcase intricate designs, but practical enough for daily life. Add rhinestones to the equation, and you’ve unlocked an entirely new dimension of glamour.
Rhinestones on coffin nails create that instant wow factor. Whether you’re going for understated elegance with a few strategically placed stones or full-on sparkle with cascading crystals, the coffin shape provides an ideal canvas. The wider nail bed gives you room to arrange stones without feeling cramped, while the tapered edges naturally frame the design. The real magic happens when you combine rhinestones with complementary colors, finishes, and nail art techniques—suddenly your nails become wearable art that catches light from every angle.
What makes medium coffin nails with rhinestones so appealing is their versatility. You can dress them up for a wedding, tone them down for professional settings, or lean all the way into party mode with holographic accents and chrome. The length is forgiving too—long enough for detailed rhinestone placement, but not so long that they interfere with typing or daily tasks. If you’ve been searching for coffin nail inspiration that balances elegance with that coveted sparkle factor, these 15 designs will give you exactly what you need to book your next appointment or recreate the look at home.
1. Soft Pink with Diamond-Shaped Rhinestone Array
Soft pink serves as the ultimate neutral canvas for rhinestone nail art, and when you arrange crystals in a diamond pattern down the center of medium coffin nails, the effect is timelessly chic. The pale blush tone keeps the overall look refined while the stones catch and reflect light with every hand movement.
Why This Design Works
The beauty of soft pink with rhinestones lies in its adaptability. It reads as romantic for date nights, polished for work settings, and celebratory for special occasions—all depending on what you wear with it. Pink is flattering against most skin tones, and the diamond arrangement adds structure and intentionality to the design rather than feeling randomly scattered. The crystals pick up warmth from the pink base, creating a subtle gradient effect that draws the eye.
Design Techniques to Master
- Apply a creamy soft pink base coat (two coats for opacity) and seal with a clear topcoat before placing stones
- Map out your diamond pattern lightly with a dotting tool or pencil first to ensure symmetry
- Use tweezers or a picking tool designed specifically for rhinestone placement—never use your fingers, as the oils transfer and affect adhesion
- Press each stone firmly into the uncured topcoat using a rhinestone glue or nail-specific adhesive, holding for 2-3 seconds
- Once stones are placed, seal everything with a final thick topcoat or gel, making sure no edges of the stones are exposed
- This design works beautifully with size variation—use larger stones near the cuticle area and progressively smaller ones toward the tip for visual flow
Pro tip: Mix crystal and rose gold rhinestones in alternating rows for added depth and dimension.
2. Nude Base with Ombre Rhinestone Gradient
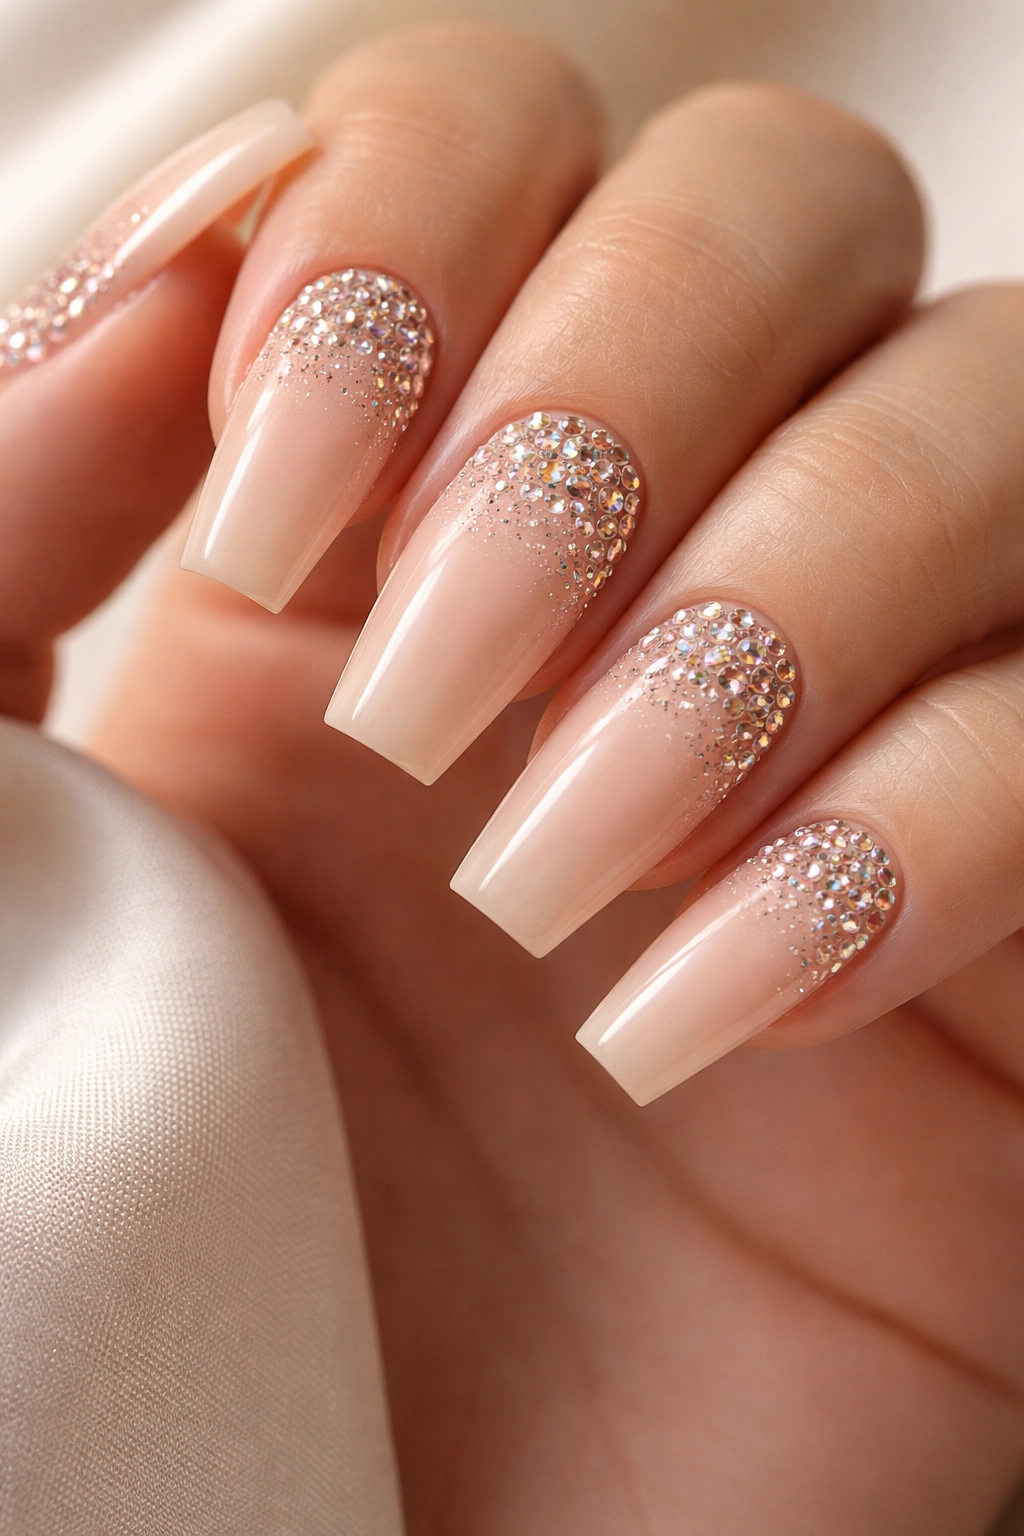
This style combines the elegance of a nude nail base with a gradient effect created entirely through rhinestone placement. The stones transition from concentrated density at the cuticle to sparser placement at the tip, creating a subtle gradient that’s more sophisticated than traditional ombre polish.
The Appeal of Gradient Rhinestones
An ombre rhinestone gradient accomplishes something that solid rhinestone coverage can’t: it gives your nails movement and visual interest without overwhelming the design. The nude base keeps things professional, while the gradient effect of stones adds dimension. This approach works for any professional setting, special events, or anyone who wants sparkle without maximum boldness. Medium coffin nails give you enough surface area to really showcase how the density shifts from one end to the other.
Application Steps
- Start with two coats of a neutral nude polish that complements your skin tone
- Seal with a clear topcoat layer
- Working from the cuticle area, place your largest and most densely packed rhinestones (using tweezers and adhesive as always)
- As you move toward the middle of the nail, reduce the number and size of stones slightly
- By the time you reach the tip, use only occasional single crystals or small clusters
- Apply a final protective topcoat once everything is set
- This design truly shines when you use a mix of stone sizes and potentially two complementary crystal colors (like clear and champagne)
Worth knowing: The gradient works best when each stone is touching or nearly touching in the dense area, then gradually creates white space as you move toward the tip. This intentional spacing makes the gradient obvious.
3. Classic White with Geometric Rhinestone Pattern
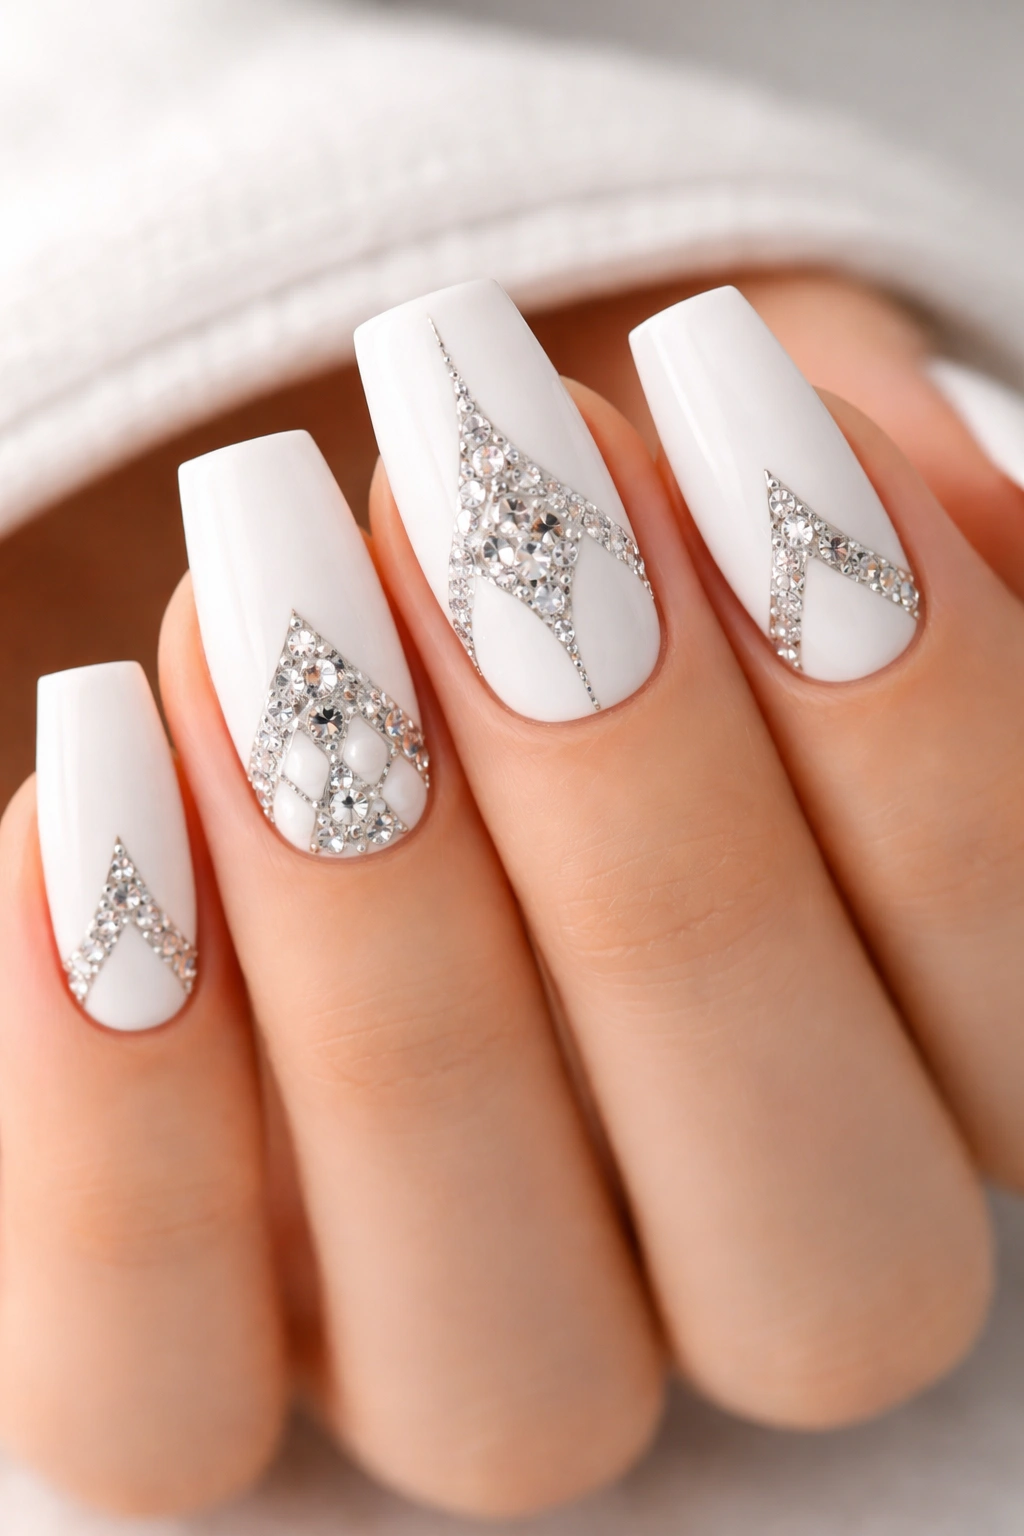
White coffin nails with rhinestones arranged in geometric shapes—triangles, squares, or hexagons—delivers pure sophistication. White is a neutral backdrop that allows rhinestones to become the true focal point without color competition.
Geometric Design Philosophy
Geometric patterns satisfy the eye because they feel planned and deliberate. When you place rhinestones in distinct geometric shapes on white nails, you’re communicating precision and intention. The coffin shape itself is geometric, so pairing it with geometric rhinestone patterns creates a cohesive visual story. This style works for minimalists who love sparkle but don’t want loud colors, and it’s equally at home at an office, formal event, or date night.
Creating Crisp Geometric Shapes
- Paint your base white (three coats might be necessary for true opacity) and seal with clear topcoat
- Decide on your geometric shape—simple triangles are beginner-friendly, while hexagons feel more complex
- Use a thin brush or nail art pen to lightly outline the shape in a coordinating color (nude, gray, or even dark brown work beautifully) so you have a guide
- Place your rhinestones along these lines using tweezers and adhesive
- The lines don’t have to be perfectly straight in real life—slight imperfections add handmade charm
- Once stones are set, you can remove the pencil guideline with a gentle swipe using a brush dipped in acetone
- Seal everything with a thick final topcoat
Insider note: Varying the size of stones within your geometric shape creates visual interest—large stones for the main shape outline, tiny accent stones in the corners.
4. Deep Burgundy with Gold Rhinestone Accents
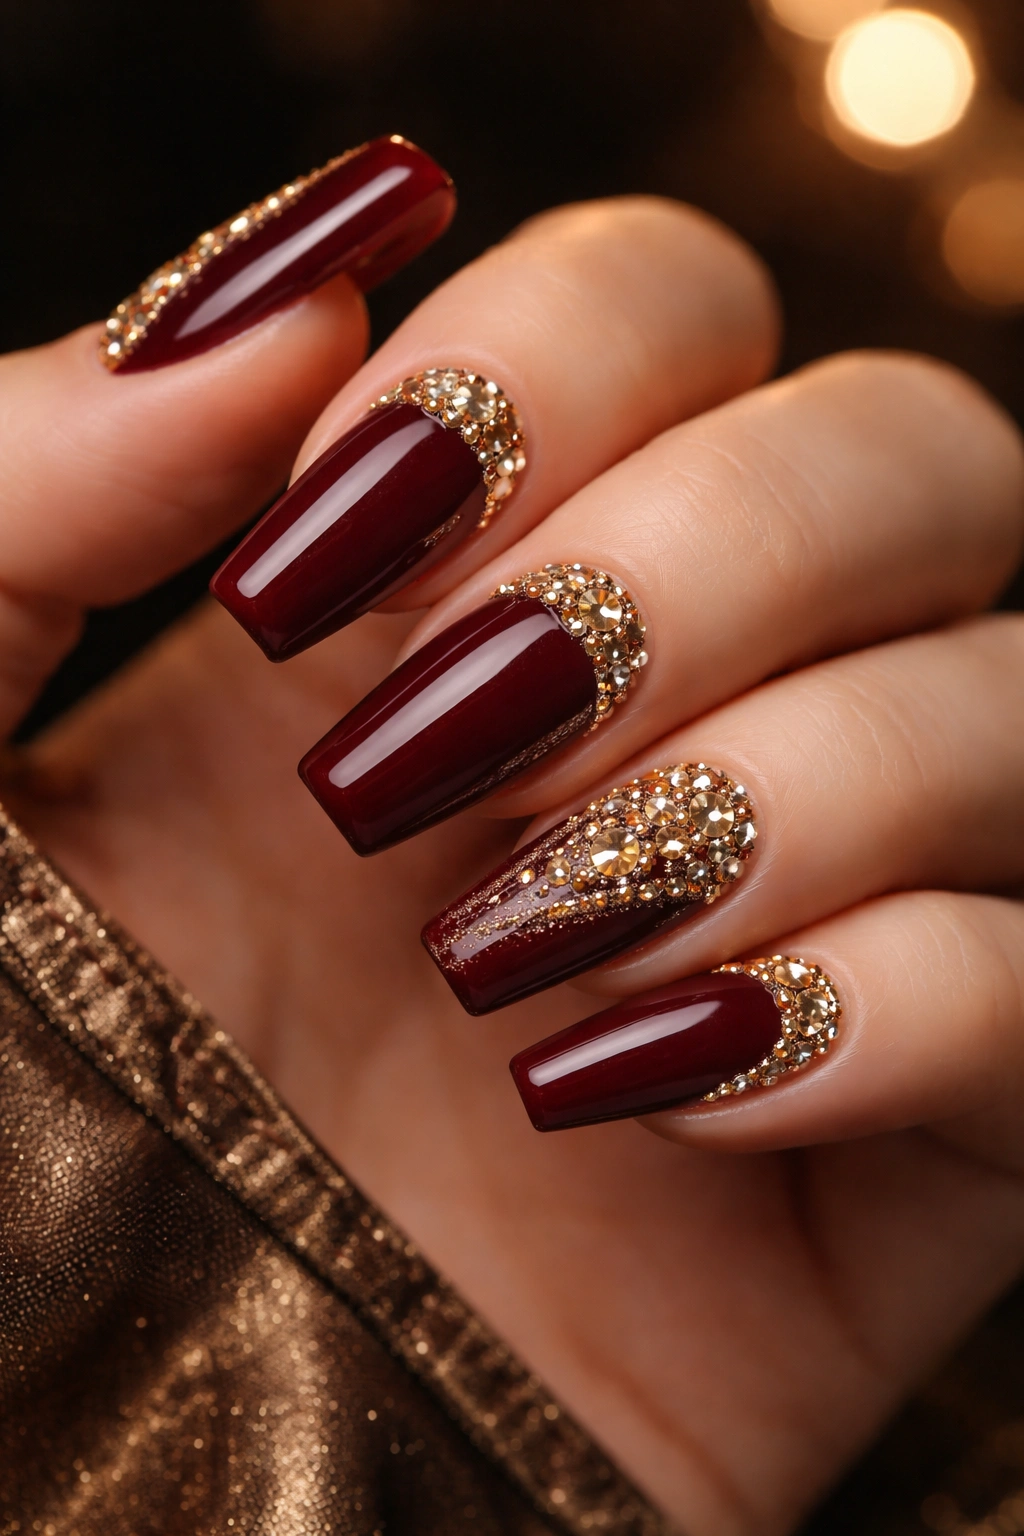
Burgundy is richly sophisticated, and when you add champagne or gold-toned rhinestones, you’ve created a color combination that screams luxury. This design feels instantly upscale and works year-round for anyone who appreciates jewel-tone elegance.
Why Burgundy and Gold Click Together
Burgundy contains warm undertones that pair naturally with gold metallics. The combination reads as warm, rich, and undeniably elegant—think wine, velvet, and candlelight. Medium coffin nails in burgundy with gold rhinestones feel like a statement without being over-the-top. This color combo is forgiving with different skin tones and works across all seasons and occasions. The depth of the burgundy makes the gold stones pop even more dramatically than they would on lighter backgrounds.
Placement Strategy
- Two coats of deep burgundy base (test the shade on a light surface first—some burgundies can appear almost brown indoors)
- Clear topcoat seal layer
- Place larger gold rhinestones in a strategic pattern—either scattered across all nails, concentrated on one accent nail, or arranged in a border along the cuticle and tip
- Burgundy is dark enough to allow you to place stones more densely without visual chaos
- Mix champagne and true gold-toned stones for warmth variation
- Final protective topcoat when stones are fully set
Fun fact: This color combination was popularized in luxury jewelry and fashion—now you’re wearing that same elegance on your nails.
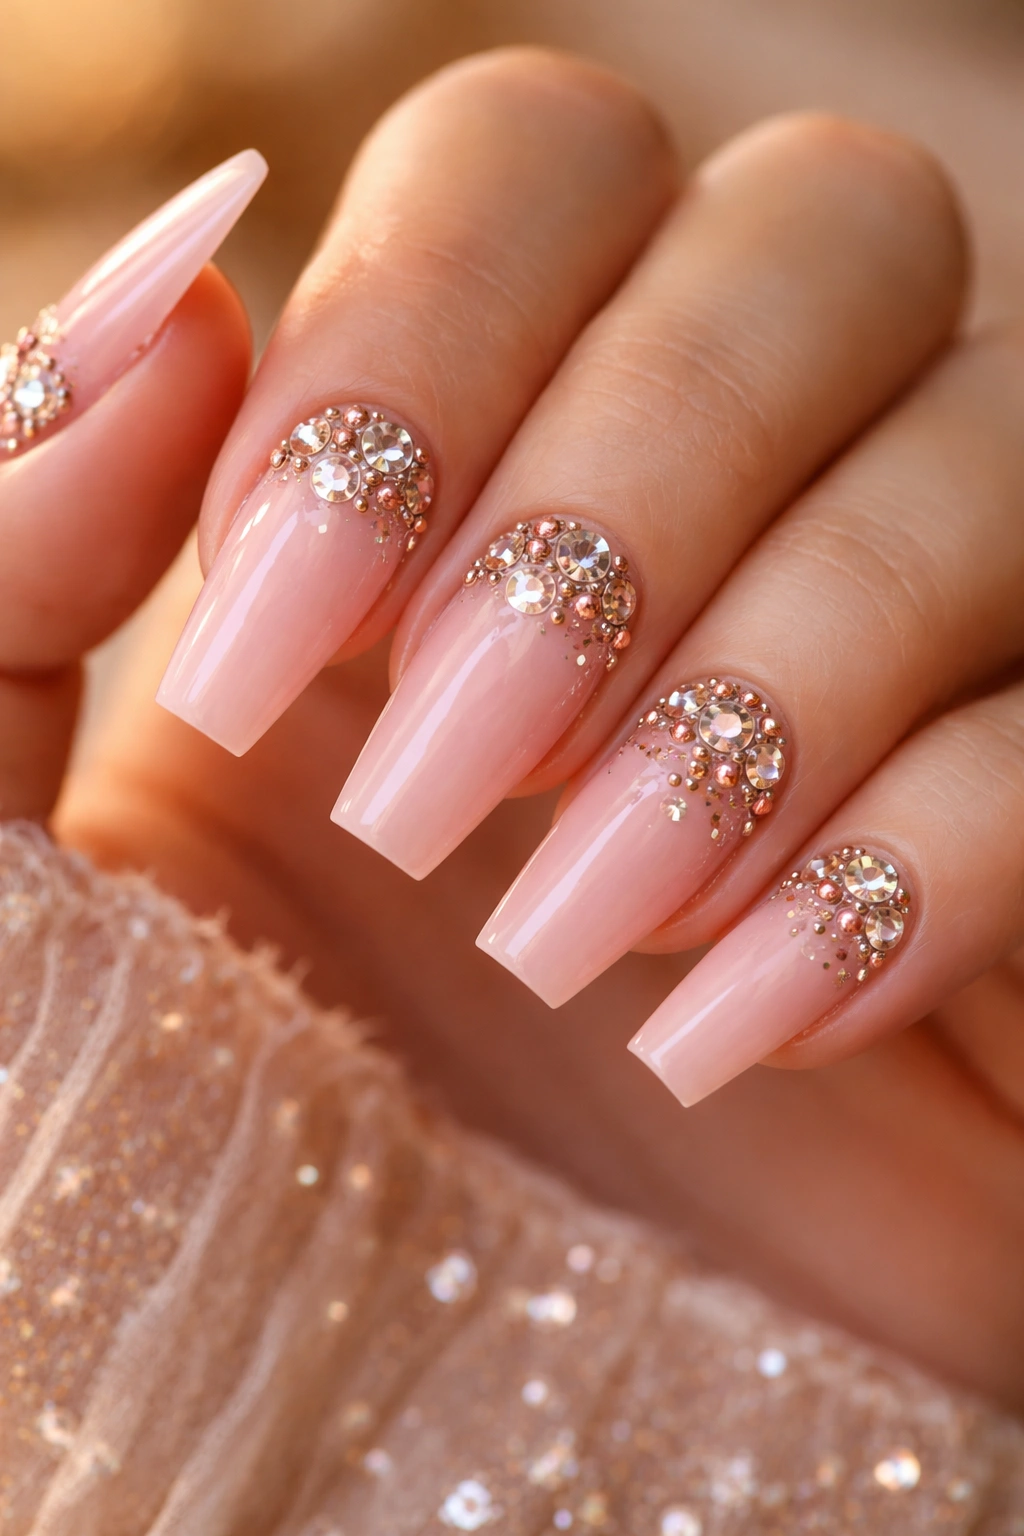
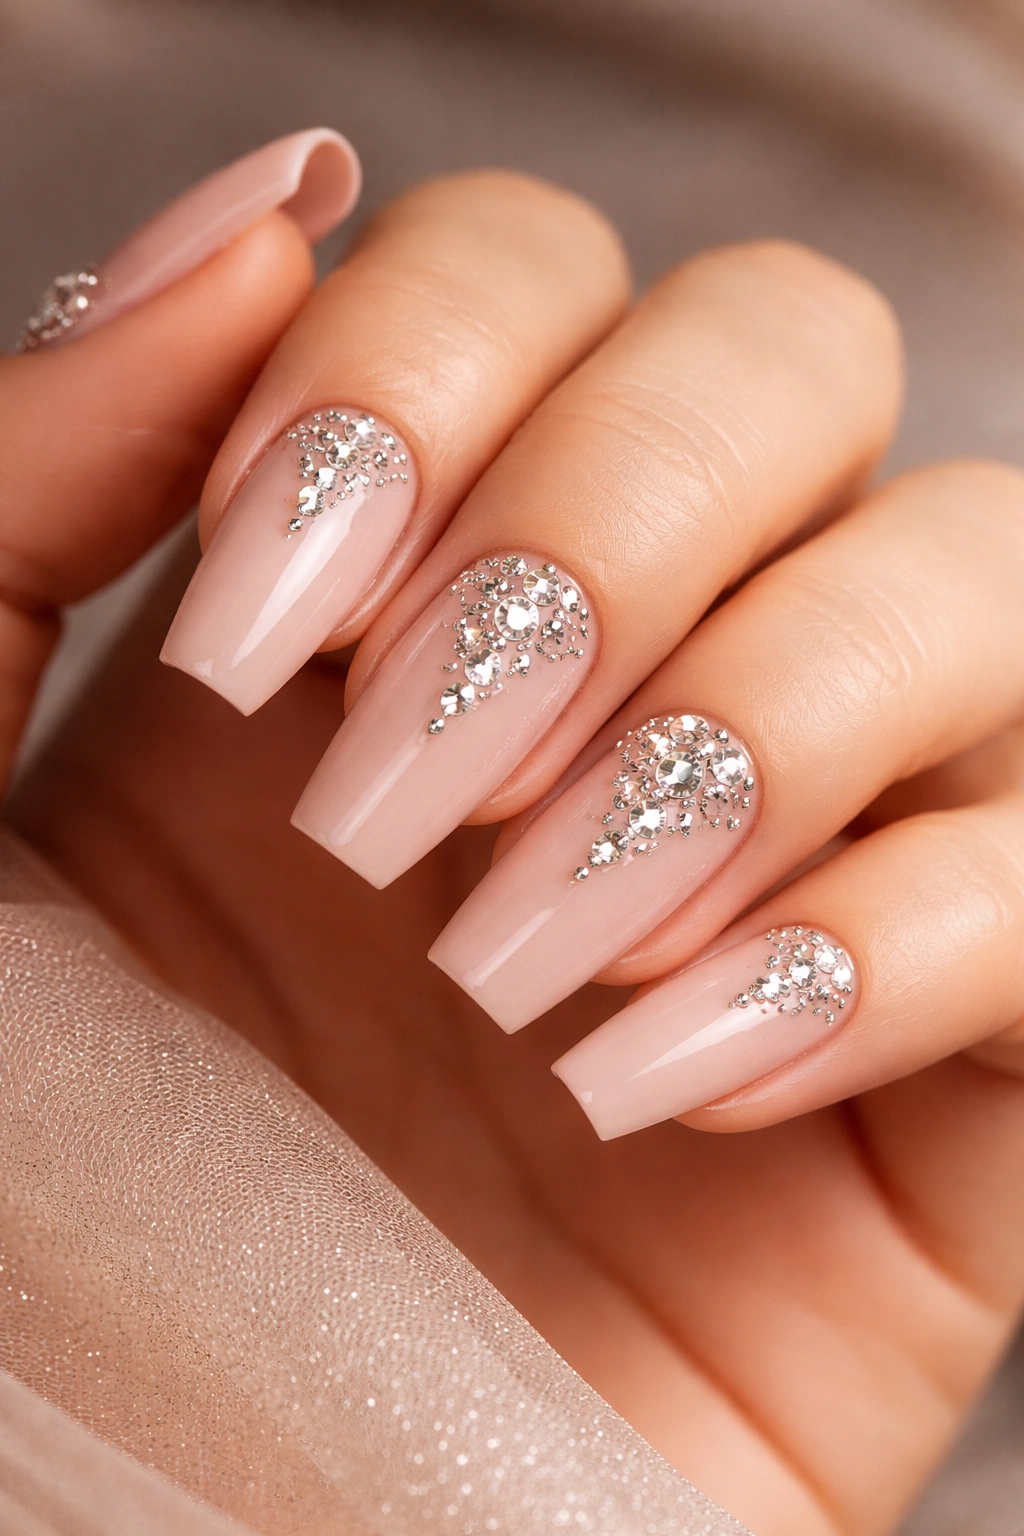
5. Blush Pink with Scattered Diamond Rhinestones
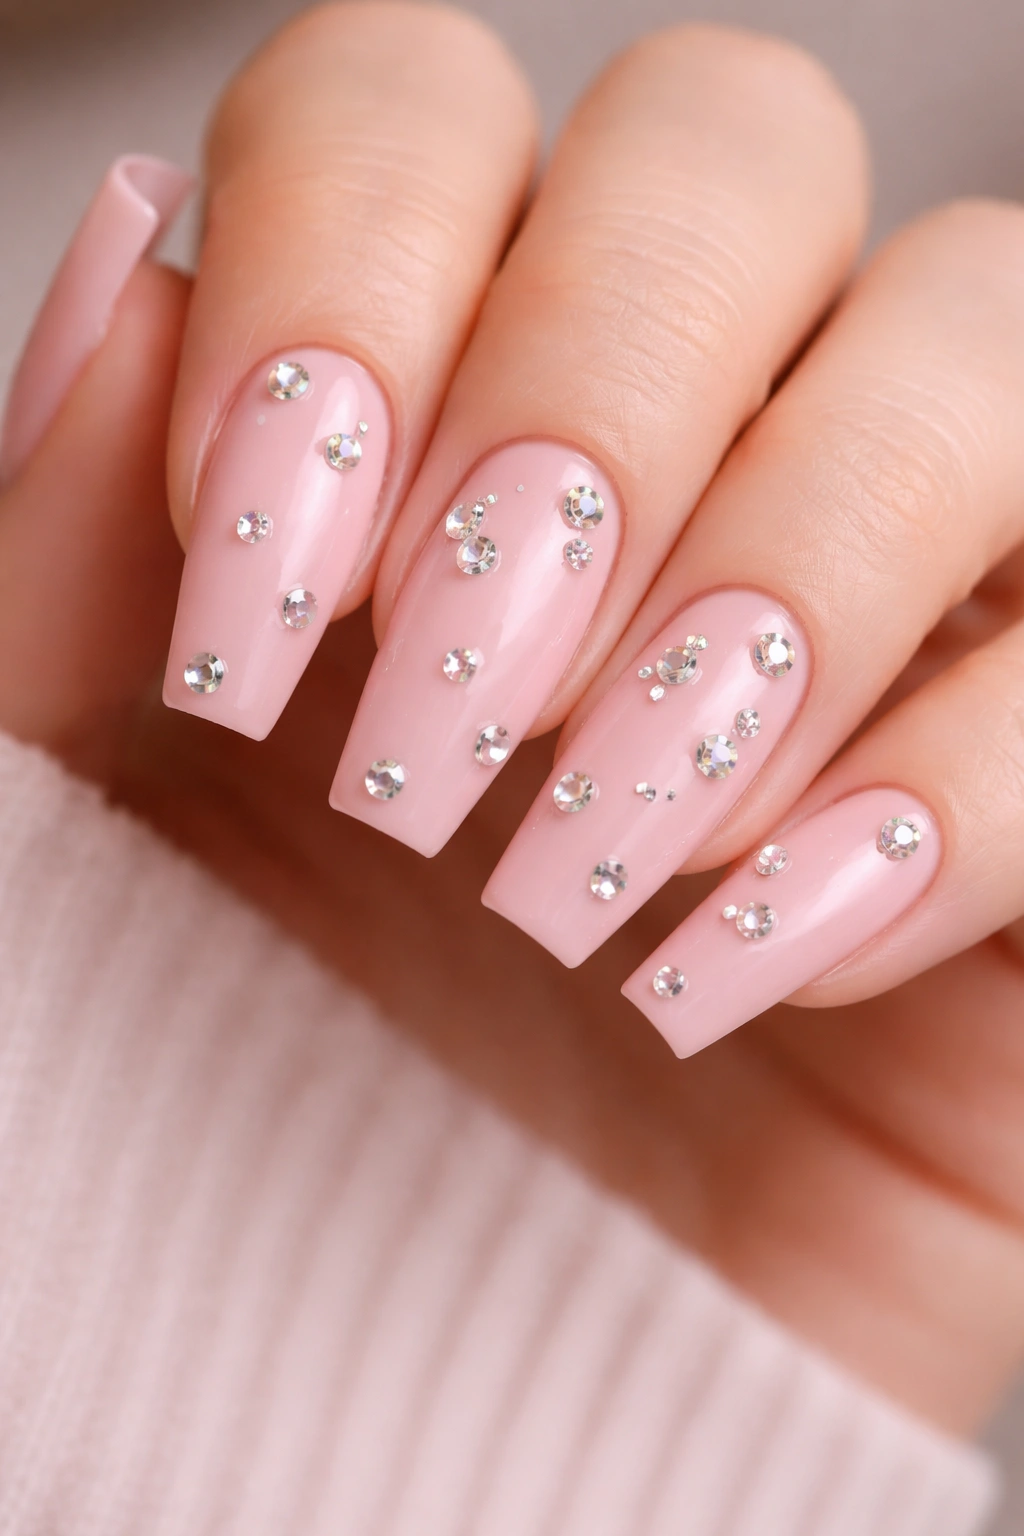
Unlike the structured diamond pattern of design #1, this approach scatters individual diamond-shaped rhinestones randomly across blush pink nails. The result feels whimsical while maintaining elegance—playful without being cartoonish.
The Charm of Scattered Design
Scattered rhinestones feel more organic and less formal than perfectly arranged patterns. They work beautifully on medium coffin nails because the longer nail bed gives you more room to distribute stones naturally without them feeling bunched or sparse. Blush pink as a base keeps the overall effect soft and romantic, perfect for anyone who loves sparkle but prefers understated elegance. The randomness paradoxically makes this design feel more personal and less formulaic.
Creating Natural-Looking Scatter
- Apply two coats of blush pink and seal with clear topcoat
- Rather than planning placement ahead, scatter your diamond rhinestones intuitively across all five nails
- Aim for roughly 5-8 stones per nail, but vary this slightly—maybe one nail has three, another has seven
- Ensure stones are spread across the whole nail surface rather than clustered in one area
- Leave negative space intentionally—this makes the design feel curated, not crowded
- Mix sizes if possible (larger and smaller diamonds) for visual variety
- Once all stones are placed and set, apply a final protective layer
Pro tip: Step back and look at your hands with arms extended after placing stones on each nail—this gives you a realistic view of how the design will look when your nails are at rest, not just when you’re holding them at an awkward angle.
6. French Ombre with Rhinestone Tip Gradient
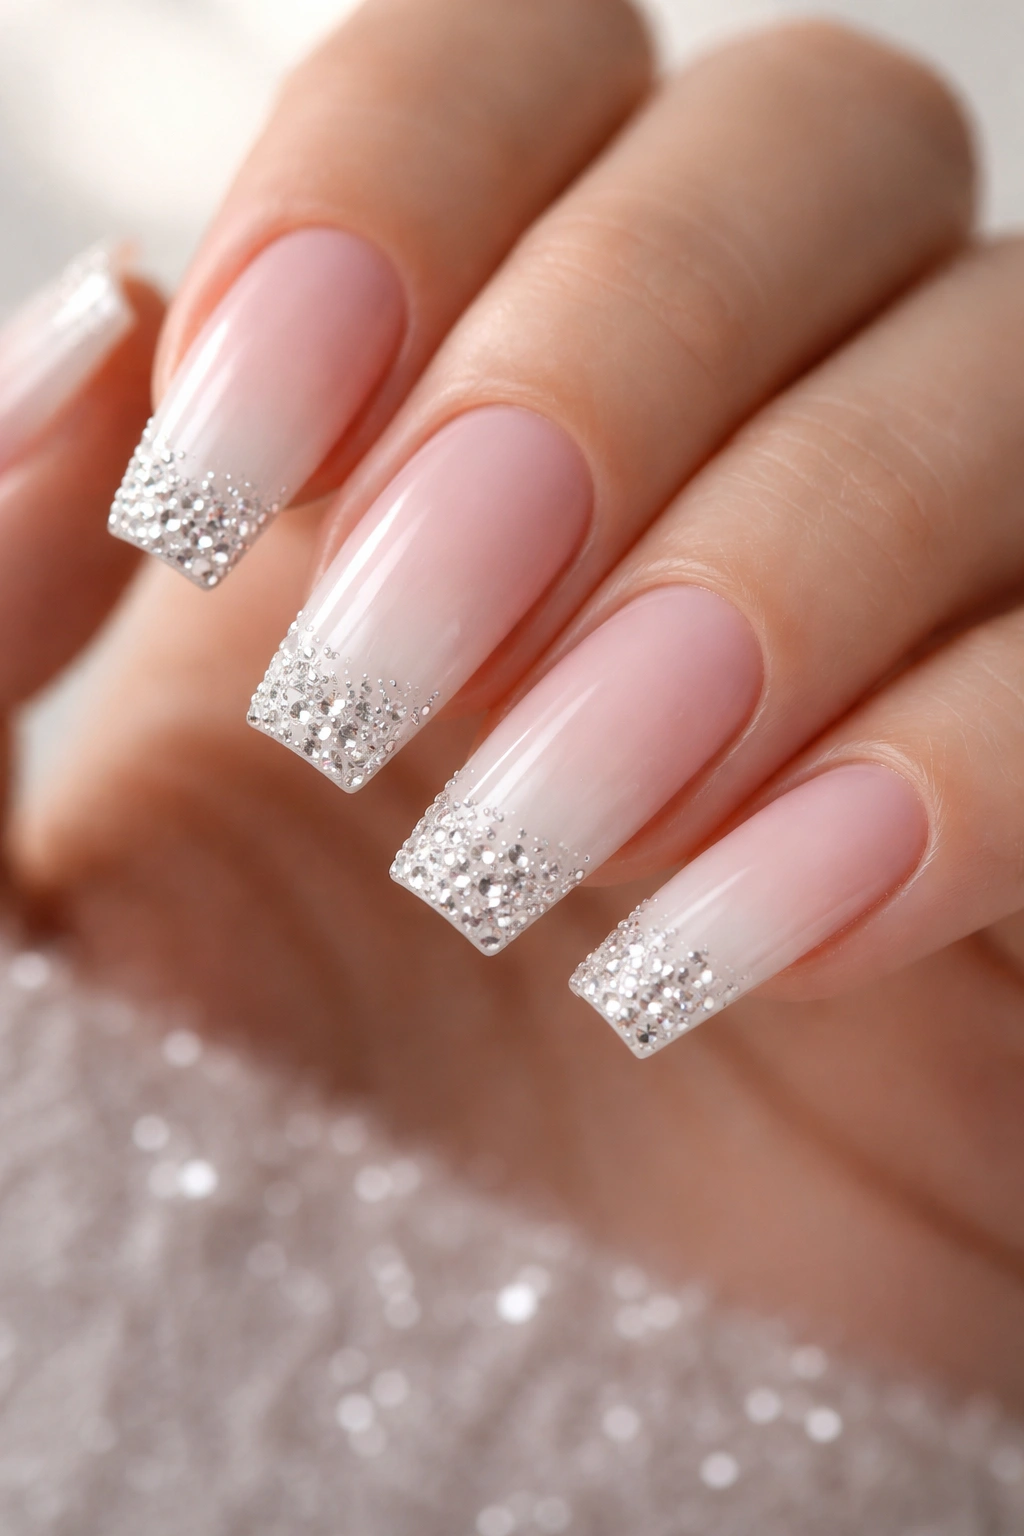
The French manicure gets a modern upgrade when you combine ombre shading with rhinestone accents concentrated at the tips. Cream or pale pink in the nail bed transitions to white or champagne at the tip, where rhinestones cluster for maximum sparkle.
Modernizing the French Manicure
The traditional French manicure is timeless, but it can feel predictable. Adding an ombre effect and rhinestones transforms it into something contemporary and exciting while maintaining that clean, elegant feel. The rhinestone concentration at the tip emphasizes the coffin shape’s unique geometry and creates a focal point that draws attention downward—making nails look gracefully lengthened. This design balances classic and trendy beautifully.
Ombre Rhinestone Application
- Start with a pale pink or cream base coat (two coats)
- Using a makeup sponge or brush and white or pale pink polish, blend an ombré effect from the middle of the nail toward the tips—this should look soft and gradient, not harsh
- Seal with clear topcoat
- Begin placing your rhinestones at the very tip of each coffin nail
- Use the densest concentration of stones at the extreme tip, then gradually reduce density as you move back toward the middle
- Larger stones at the outermost edge, smaller stones as the gradient diminishes
- Finish with a thick protective topcoat that securely encases all stones
Worth knowing: This design is easier to execute if you have steady hands for blending the ombre. If blending feels challenging, try using a gradient sponge applicator designed specifically for ombré nails.
7. Nude with Cuticle Line Rhinestone Border
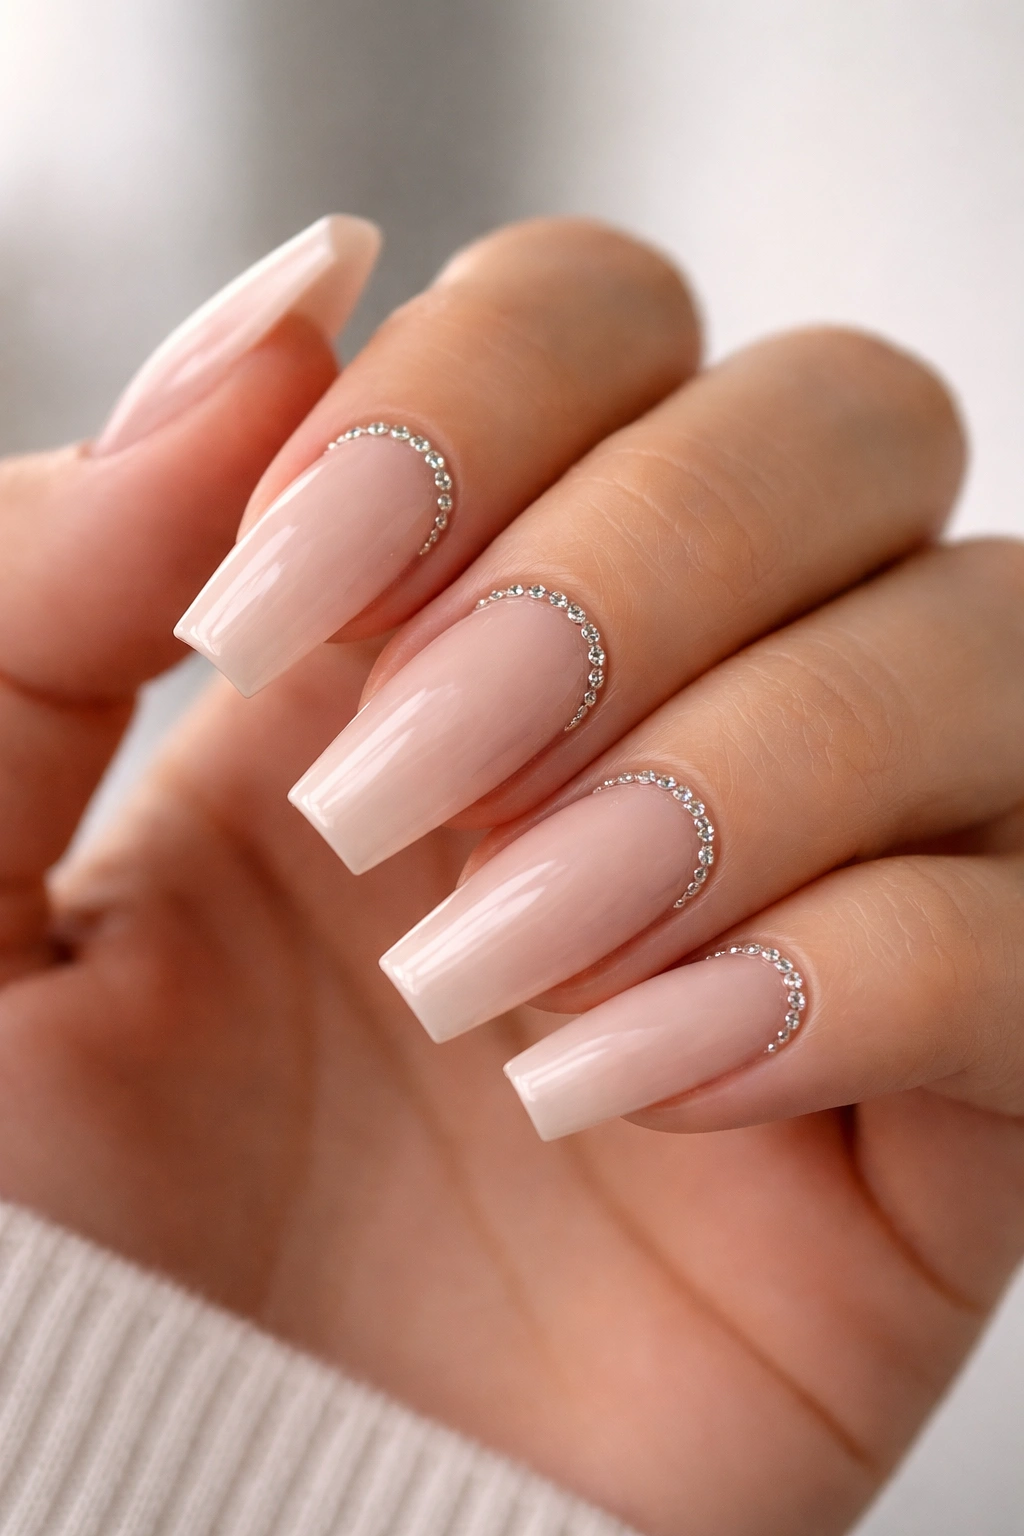
A delicate border of rhinestones running along the cuticle line creates an elegant frame that draws attention to the cuticle area and elongates the visual line of the nail. Nude polish on medium coffin nails with this accent feels refined and jewelry-like.
The Psychology of Border Placement
Rhinestones along the cuticle create a “halo” effect that frames the nail bed beautifully. This placement works with the natural growth pattern of nails and feels intentional rather than arbitrary. On medium coffin nails, a cuticle border doesn’t compete with the nail’s shape—it complements it. This is an excellent choice for anyone who wants sparkle that’s visible and impactful but concentrated in a specific area rather than scattered across the entire surface.
Creating a Clean Cuticle Border
- Apply two coats of your chosen nude shade and seal with clear topcoat
- Measure out your border placement by placing a few stones first to establish the width (typically 3-5mm wide)
- Use a thin rhinestone placement tool or tweezers to position stones one by one along the cuticle line
- Ensure stones are placed as close to the actual cuticle as possible without overlapping skin—you’re creating a line, not a thick band
- Keep stones relatively uniform in size for a cohesive, professional border appearance
- The rhinestones should touch or nearly touch each other, creating an unbroken line of sparkle
- Once the border is complete and set, seal with a final thick topcoat
Insider note: You can make this design even more special by alternating stone sizes (large, small, large, small) for subtle visual rhythm.
8. Champagne with Starburst Rhinestone Pattern
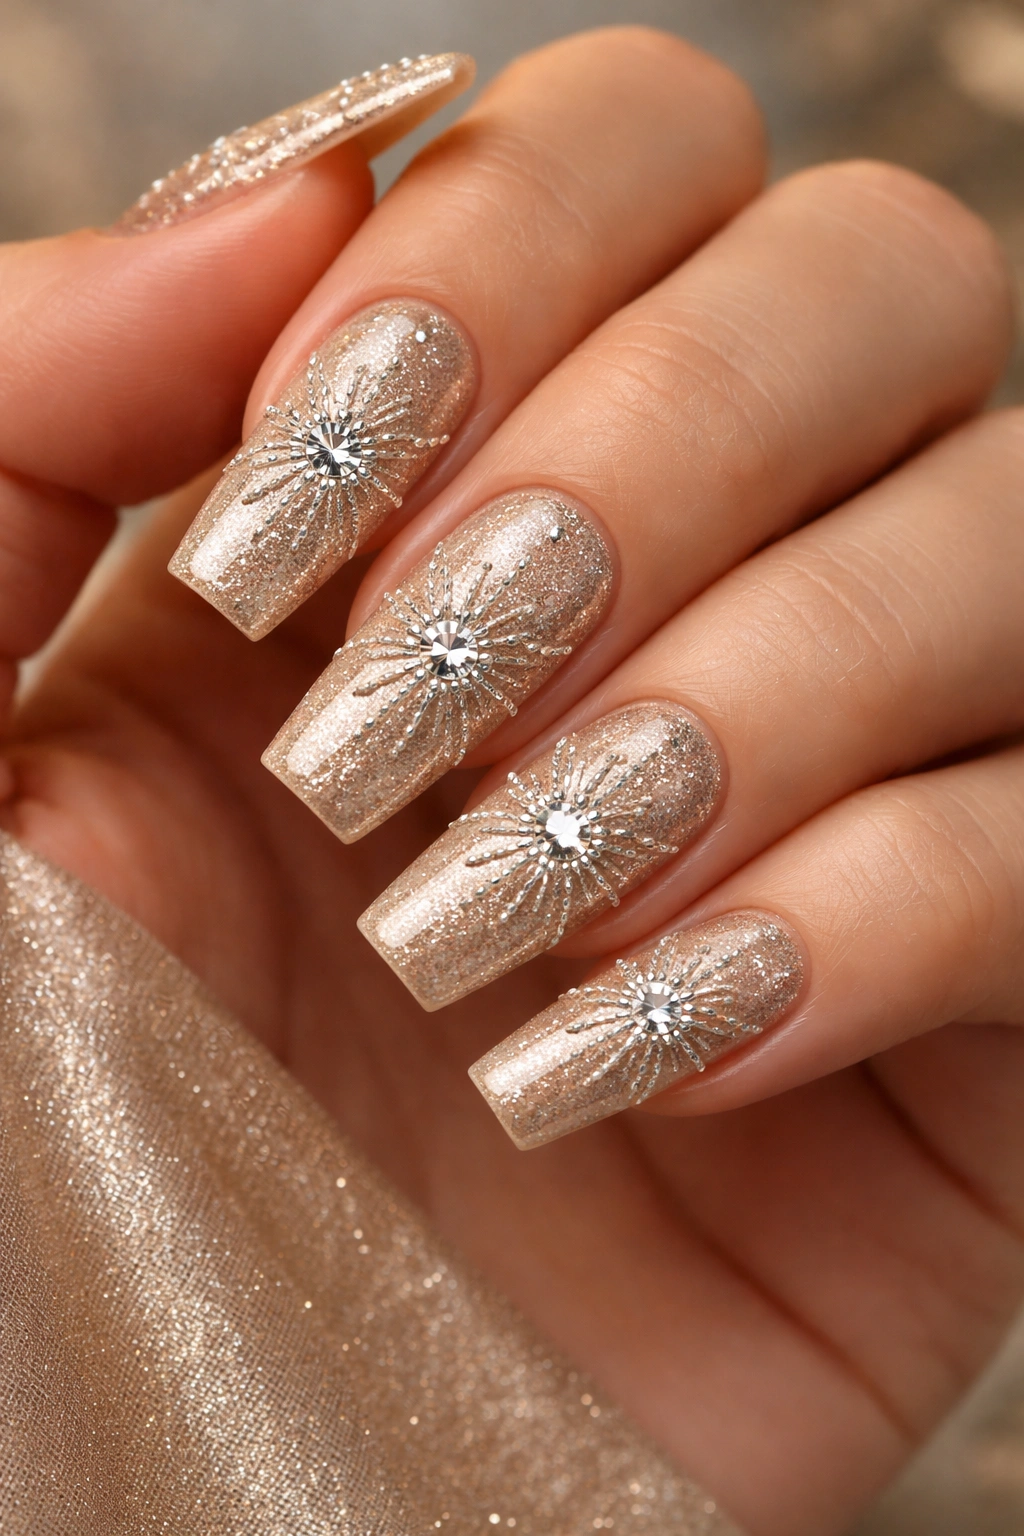
Champagne polish (pale gold with a hint of shimmer) paired with rhinestones arranged in starburst patterns across each nail creates an effect that’s maximalist without being jarring. The starburst has a central focal point with rhinestones radiating outward—think jewelry, think luxury.
Starburst Design Appeal
A starburst centers the eye on a specific point and radiates outward, creating natural focal points across each nail. This arrangement feels sophisticated and artistic rather than random. Champagne as a base amplifies the luminous quality of the rhinestones because the polish already has reflective qualities. Medium coffin nails give you enough space to create a satisfying starburst with 7-9 radiating points without the design feeling cramped.
Executing Starburst Patterns
- Two coats of champagne polish, sealed with clear topcoat
- Decide where your starburst center will be on each nail (could be slightly off-center for visual interest)
- Mark this point with a tiny dot of polish or simply remember its location
- Place your largest, most impactful rhinestone at this center point
- Arrange smaller rhinestones around this center stone, radiating outward in 7-8 directions like spokes on a wheel
- Each spoke should have 2-3 additional stones getting progressively smaller as they move away from center
- Once all starbursts are placed and set, apply final protective topcoat
- This design shines when you mix stone sizes deliberately
Pro tip: Create starbursts on all five nails in the same position (center of nail, for example) for a cohesive, intentional appearance.
9. Soft Nude with Minimalist Single Accent Stone
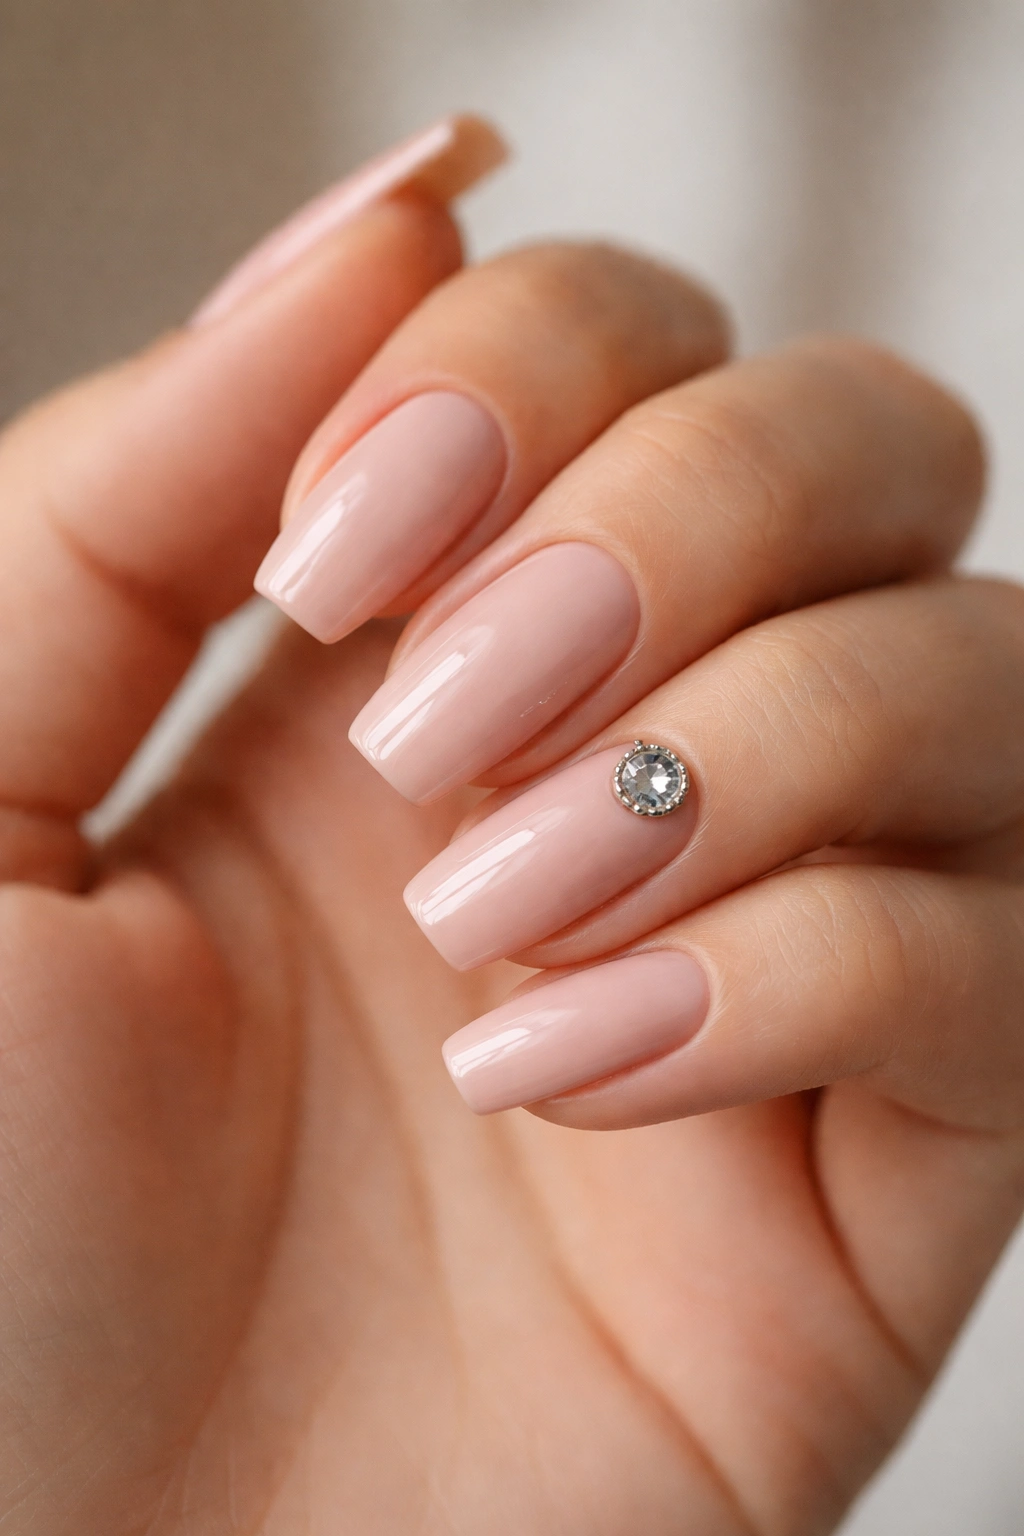
Sometimes less is infinitely more. A single large rhinestone placed strategically on one accent nail against a soft nude base on the remaining four nails delivers maximum impact with sophisticated restraint. This design works for anyone who loves sparkle but prefers subtle elegance.
The Power of Singular Focus
Placing one statement rhinestone creates a focal point that draws the eye without demanding attention. On medium coffin nails, a single large stone feels like jewelry rather than decoration. This approach works beautifully for professional environments, everyday wear, or anyone whose personal style skews toward minimalism. The contrast between the plain nails and the one sparkly accent creates visual interest through restraint rather than abundance.
Placing Your Statement Stone
- Apply two coats of soft, warm nude to all five nails
- Seal with clear topcoat on all five nails
- On your chosen accent nail (typically the ring finger or index finger), place a single large rhinestone in a strategic spot
- This could be: centered on the nail, positioned slightly off-center toward the cuticle area, or even placed on the tip for an asymmetrical look
- The stone should be noticeably larger than what you’d use in busier designs—think 4-5mm diameter minimum
- Press firmly and allow to set thoroughly before applying final protective topcoat
- The final layer should completely encapsulate the stone edge
Worth knowing: The larger the stone, the simpler the execution—there’s no pattern to worry about getting perfect, just one beautiful focal point.
10. Blush with Rose Gold and Clear Rhinestone Mix
Blush pink with a combination of rose gold and clear rhinestones creates a layered sparkle effect. Some stones catch light as cool, icy reflections while others throw warm rose-gold glints—the combination is endlessly captivating and more complex than single-tone stone selections.
Why Mixed Stone Tones Work
When you combine warm rose gold stones with cool clear crystals, you create visual complexity that keeps the design interesting at every angle. The two different stone finishes interact with light differently—clear stones are more like traditional diamonds with icy sparkle, while rose gold stones are warm and glowing. On blush pink, this combination feels romantic, luxurious, and impossibly chic. Medium coffin nails give you enough surface area to really showcase how these different stones play with each other.
Mixing Stone Types
- Two coats of blush pink base and clear topcoat seal
- Plan your placement ahead or scatter stones naturally—both approaches work beautifully with mixed tones
- Place stones in a ratio of approximately 60% clear to 40% rose gold, or adjust based on your preference
- Alternate stone placement so clear and rose gold stones are interspersed rather than grouped by color
- You can create geometric patterns with this mix (alternating rows of colors) or scatter them randomly for organic flow
- Ensure even distribution across all five nails for cohesive appearance
- Final protective topcoat when all stones are set
Fun fact: Rose gold has become increasingly popular in jewelry, making this color combination feel very current and on-trend while still being timeless.
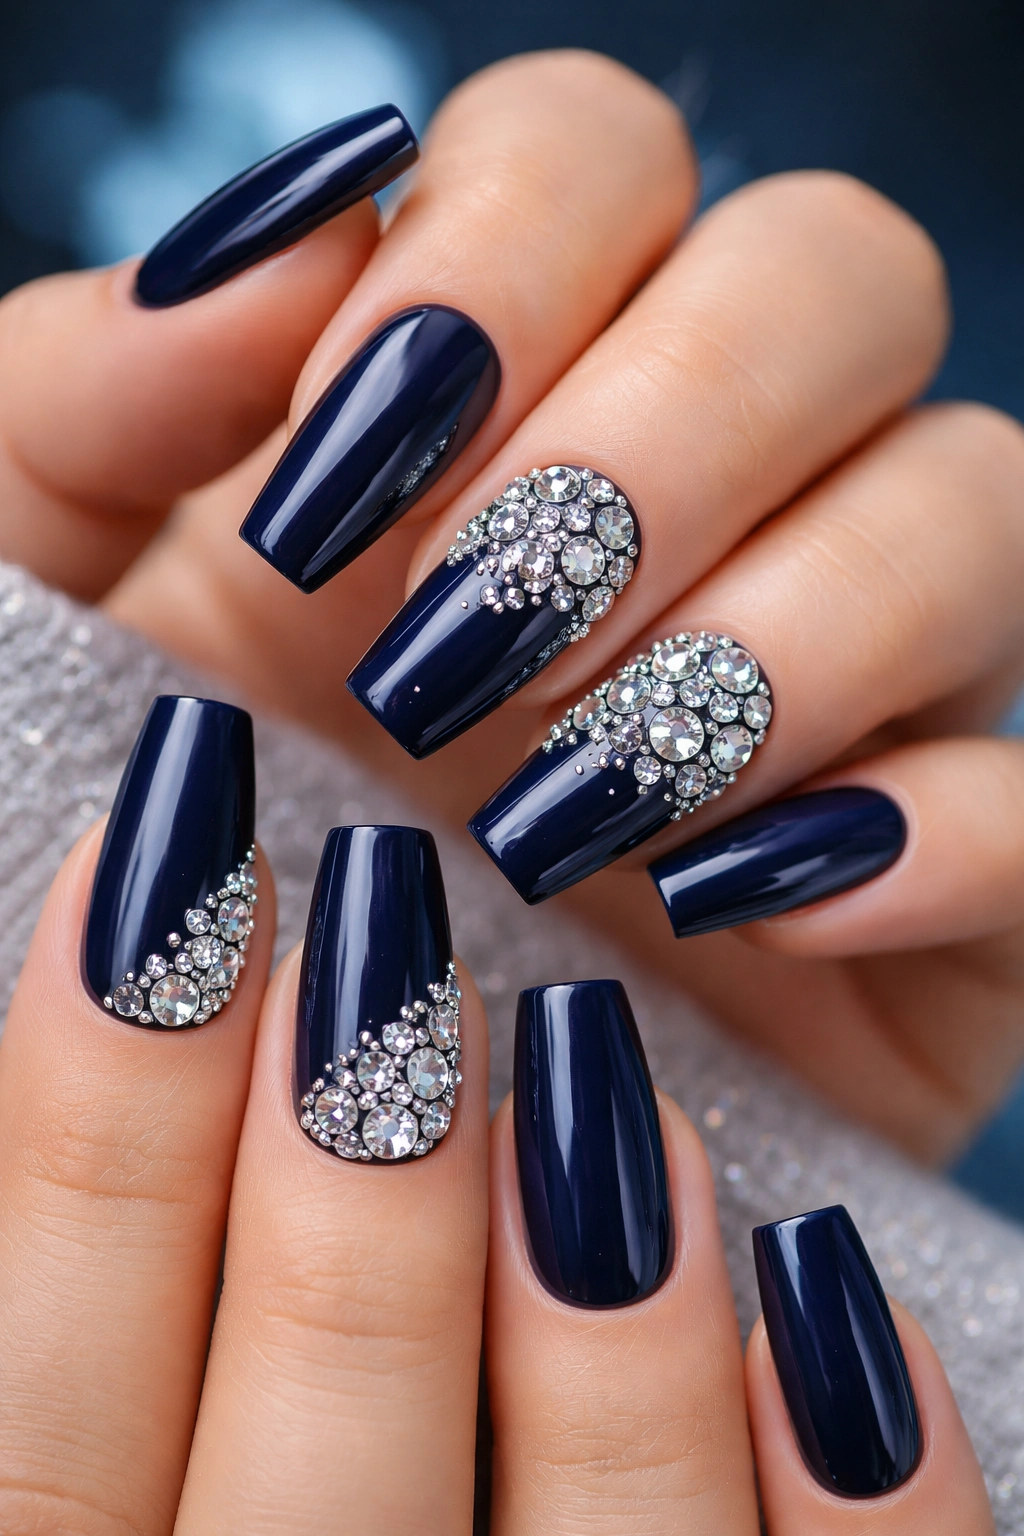
11. Deep Navy with Crystalline Rhinestone Cluster
Deep navy blue coffin nails with rhinestones clustered together in specific areas create a jewel-box effect. This design feels formal, elegant, and distinctly upscale—perfect for events where you want your nails to be noticed.
Navy as the Perfect Backdrop
Navy is formal without being as stark as black, and it’s sophisticated without being predictable. The depth of navy makes rhinestones appear brighter and more luminous by comparison. Unlike lighter backgrounds where you might worry about cluttered designs, navy can handle dense rhinestone clustering beautifully. Medium coffin nails are the ideal length for navy with stones—short enough to feel professional, long enough to display detailed rhinestone work.
Creating Crystalline Clusters
- Two coats of deep navy polish with clear topcoat seal
- Decide on cluster placement—options include: all five nails clustered identically, one accent nail with a large cluster while others have smaller ones, or a gradient of cluster sizes from pinky to thumb
- Pack rhinestones closely together within the cluster area, overlapping slightly or touching edge-to-edge
- Use a mix of crystal sizes within each cluster for three-dimensional effect—larger stones in the middle, smaller ones around the perimeter
- The cluster should feel dense and intentional, not sparse or accidental
- Leave significant negative space around the cluster to let the navy background be part of the design
- Seal everything thoroughly with a thick final protective topcoat
Insider note: Clusters look most impactful when they’re placed slightly off-center on each nail—this creates visual tension that feels intentional and artistic.
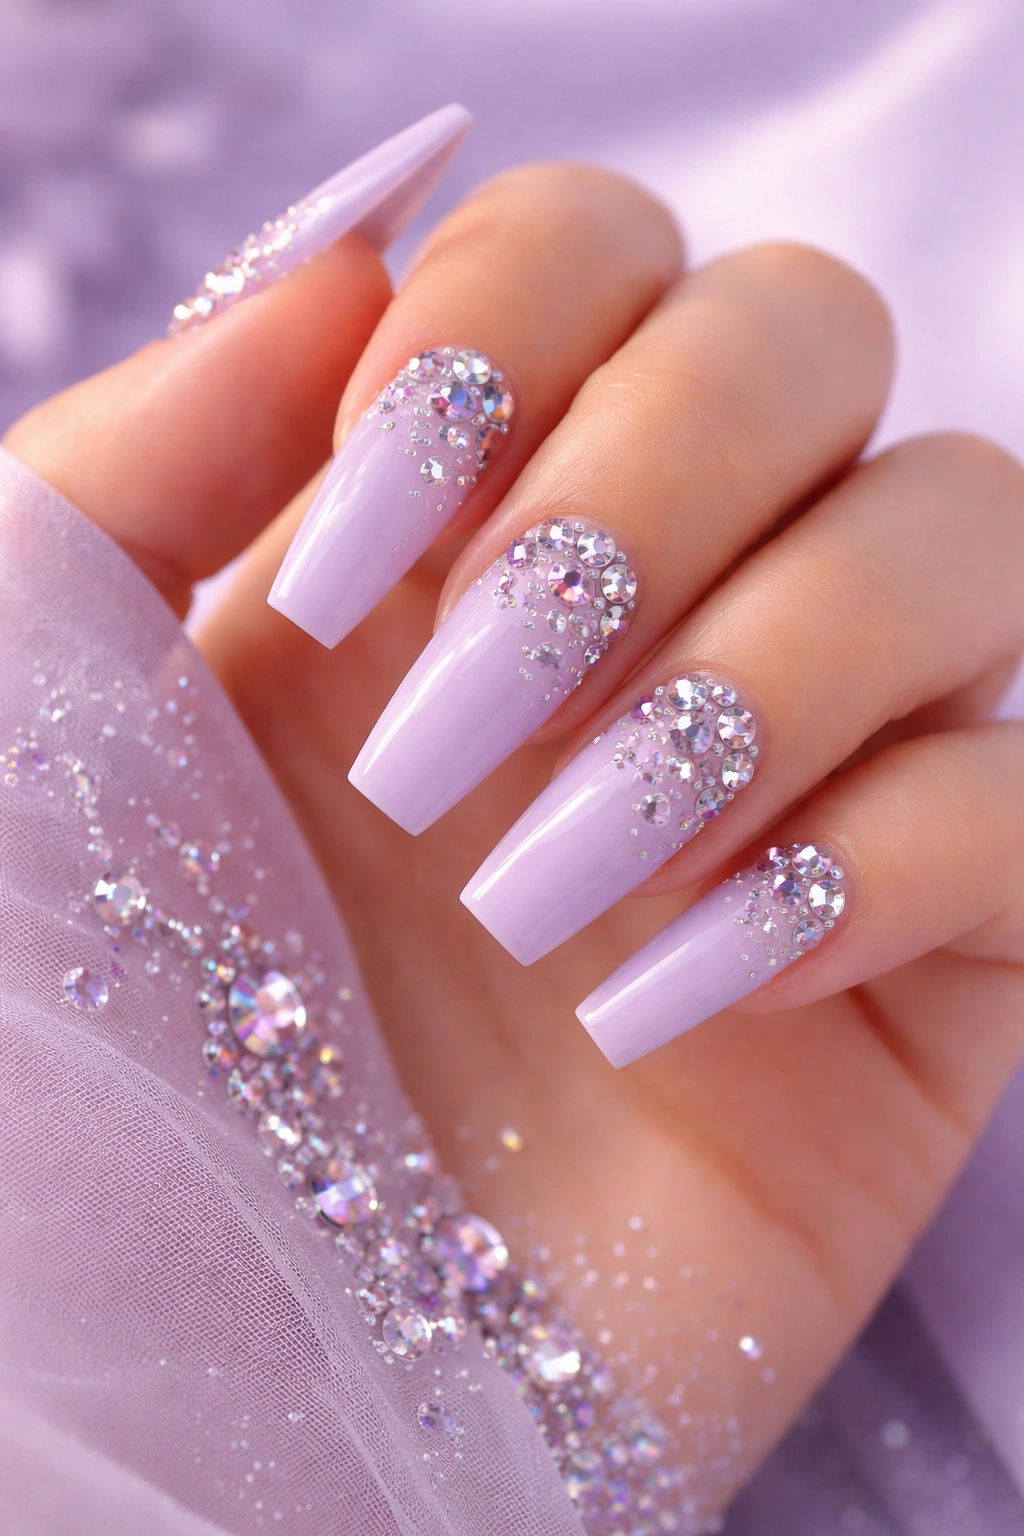
12. Pale Lavender with Purple and Crystal Rhinestone Blend
Pale lavender nails with a blend of purple-tinted and clear rhinestones create a magical, almost mystical aesthetic. This color combination is unexpected, beautiful, and distinctly memorable—perfect for anyone with a creative, distinctive style.
The Lavender-Purple Harmony
Lavender is soft and approachable, while purple rhinestones add richness and depth. Clear crystals keep the design from feeling too monochromatic while the purple stones add personality. This color story works for all seasons and all occasions—it reads as romantic and artistic. On medium coffin nails, this combination allows you to create designs that are both delicate and impactful. The purple stones feel like they belong within the lavender context naturally.
Blending Complementary Purples
- Two coats of pale lavender base with clear topcoat seal
- Mix clear rhinestones with purple or amethyst-toned stones in roughly equal proportion
- Scatter stones across nails in a loose, artistic pattern rather than geometric arrangement
- Place some stones in clusters (3-4 purple stones together) and scatter clear stones around them
- Allow some negative space so the lavender background contributes visually to the design
- The overall effect should feel artistic and curated, not chaotic
- You can create an ombre effect by concentrating more stones at tips and fewer at cuticles, or distribute evenly
- Final protective topcoat once all stones are set
Pro tip: This design truly shines under varied lighting—fluorescent office lighting, natural daylight, and evening lighting will all reveal different facets of the rhinestones.
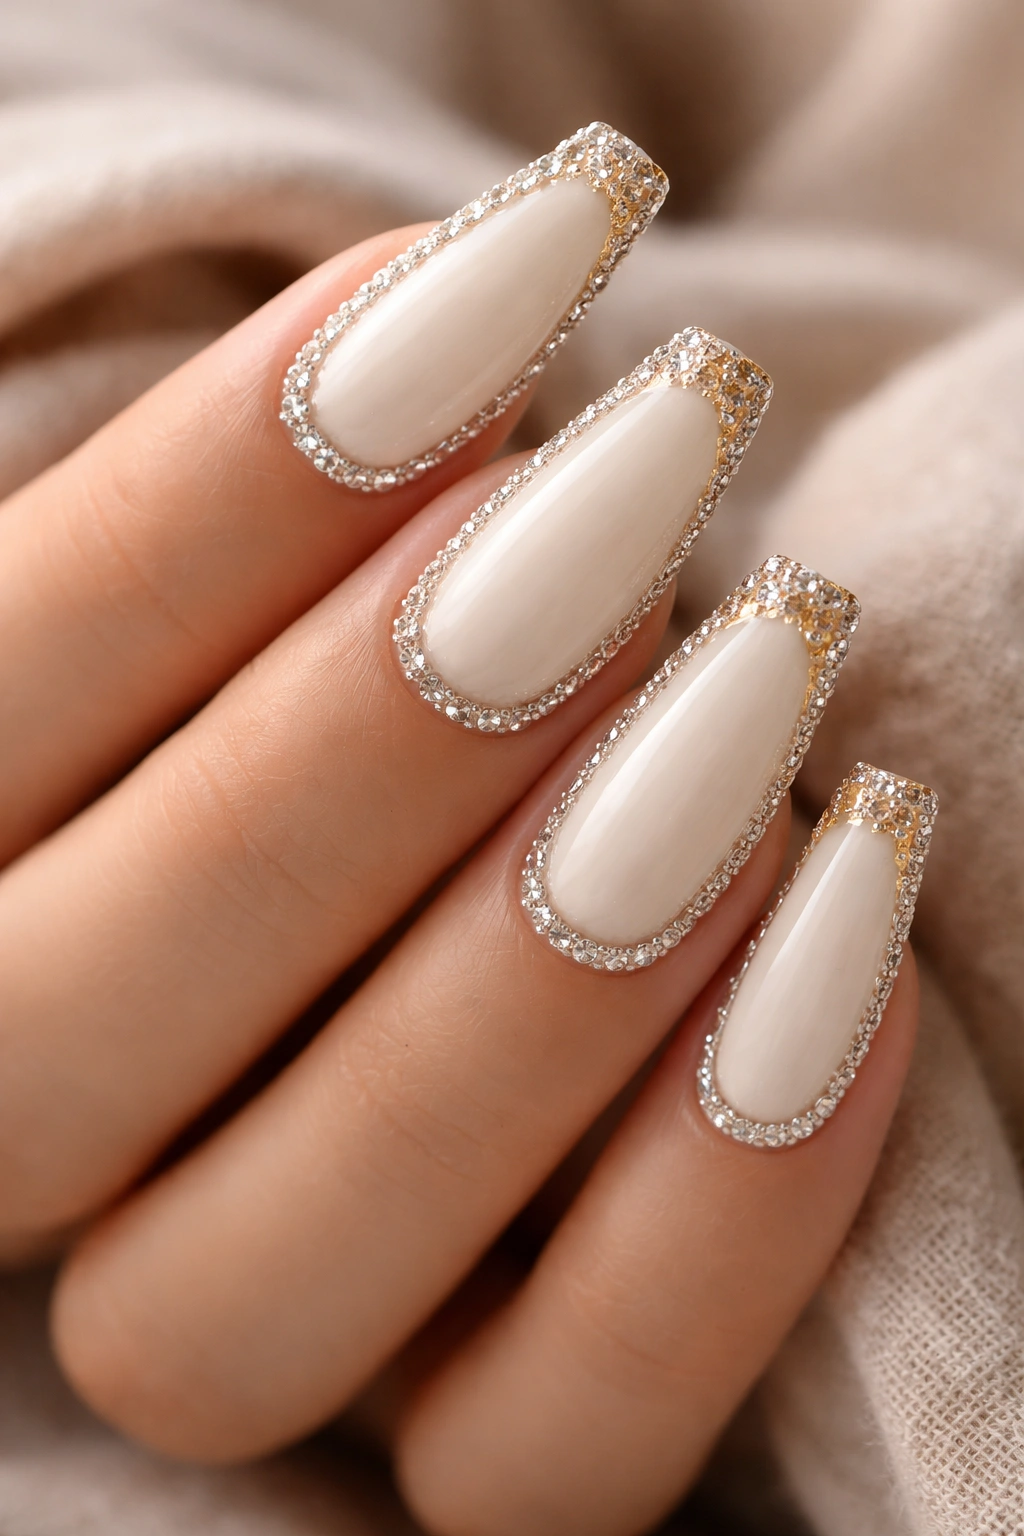
13. Ivory with Gold Foil and Rhinestone Border
Ivory polish with fine gold foil details combined with a rhinestone border creates a luxury aesthetic that’s genuinely difficult to achieve without professional nail artistry. The foil adds warmth and texture while the rhinestones provide glamorous definition.
Building Sophisticated Texture
Combining multiple textures and elements (polish, foil, rhinestones) elevates the overall design from pretty to downright stunning. Gold foil creates a warm, luxe foundation that complements warm skin tones beautifully while looking elegant on cool undertones too. The rhinestone border then adds sparkly definition that frames the foil work. This is an advanced design that rewards attention to detail and coordination of multiple materials.
Executing Multi-Layer Design
- Two coats of ivory polish with clear topcoat seal
- While the topcoat is still slightly tacky (not completely cured), apply gold foil pieces by carefully placing them on the nail surface using foil-specific adhesive or the sticky topcoat layer itself
- Pat down gently with a silicone tool or your finger covered in a plastic wrap
- Allow to dry completely
- Once foil is fully set, place rhinestones in a border pattern around the edges of the nail or along specific sections
- The rhinestones should frame or highlight the foil work—perhaps running alongside a foil accent or creating a border that contains foil within it
- Seal everything together with a thick final topcoat, ensuring all foil edges are fully encapsulated
Worth knowing: Gold foil can be delicate—the final topcoat must be thick and curing properly to protect the foil from peeling or lifting at the edges.
14. Taupe Beige with Scattered Nude and Clear Mix
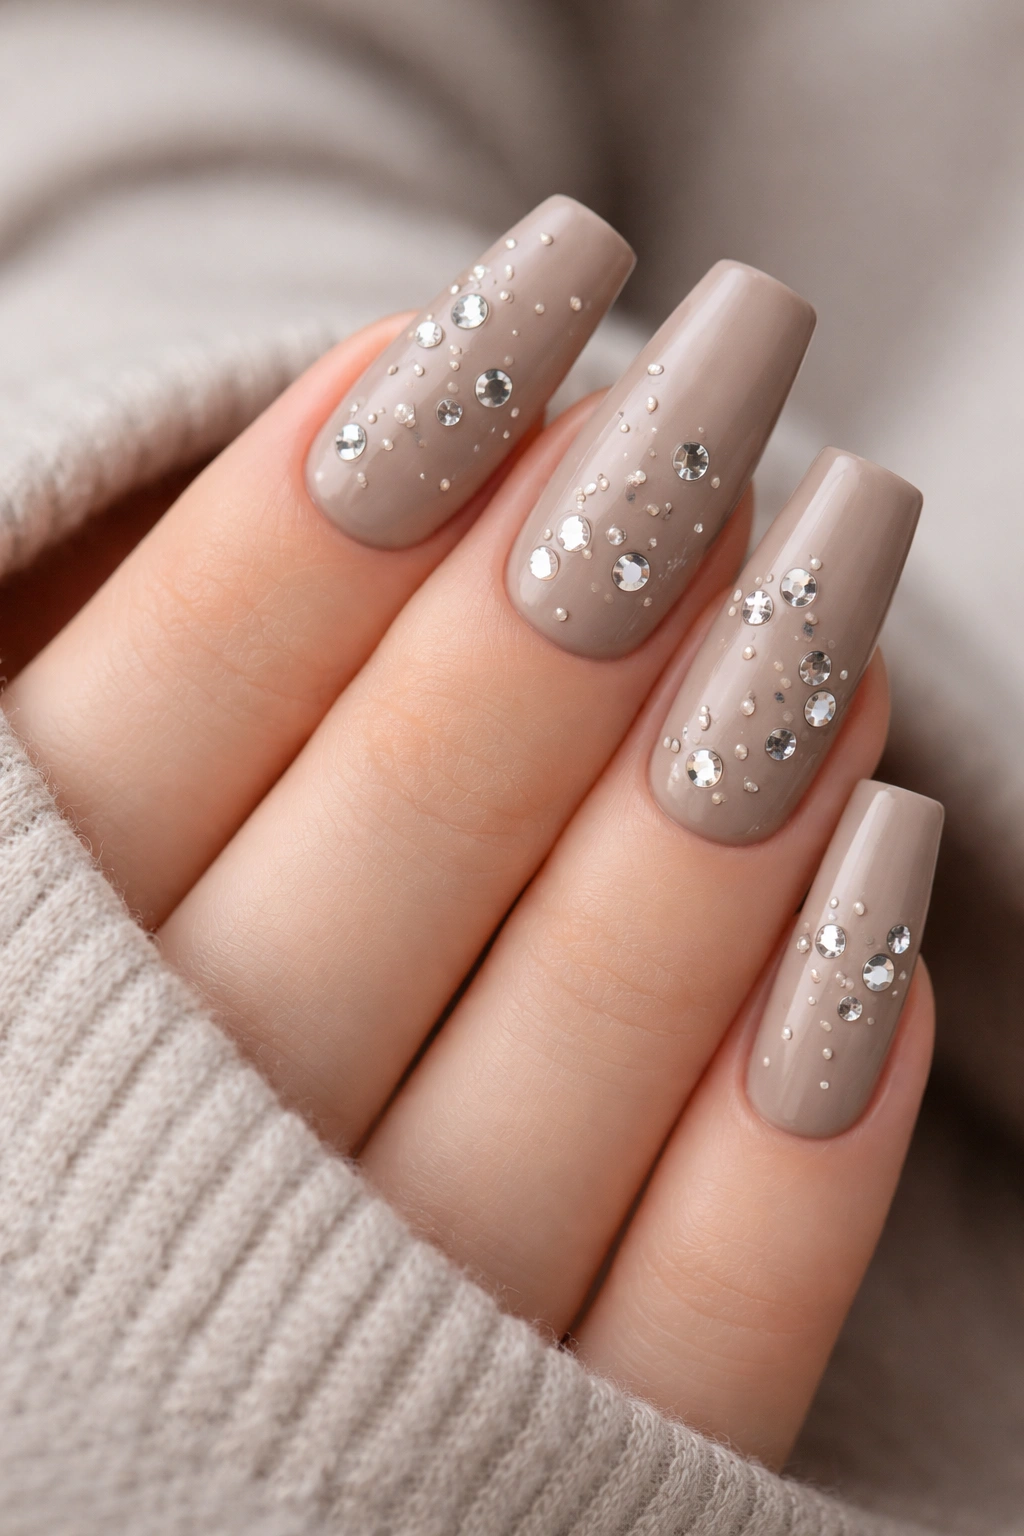
Taupe beige as a base (a sophisticated warm neutral) paired with scattered rhinestones in nude-tinted and crystal clear stones creates an effect that’s luxuriously subtle. This design appeals to anyone who wants undeniable sparkle that still reads as understated and wearable.
Subtle Sophistication Through Restraint
Taupe is one of those colors that’s elegant precisely because it doesn’t demand attention. When you add rhinestones in complementary cool and warm tones, you create visual interest without the design feeling loud or attention-grabbing. This is perfect for professional environments, everyday wear, or anyone whose personal aesthetic leans toward “effortless luxury.” Medium coffin nails let you scatter enough stones to catch light and create sparkle without the design feeling over-designed.
Scattering for Natural Effect
- Two coats of taupe beige base, sealed with clear topcoat
- Rather than planning placement, scatter rhinestones intuitively across all nails
- Alternate between nude-tinted stones (which nearly match the base and feel warm) and clear stones (which provide icy contrast)
- Aim for roughly 4-6 stones per nail, distributed across the entire surface
- Vary the sizes slightly to create visual interest—mix 2mm, 3mm, and 4mm stones
- The overall effect should feel like you didn’t overthink it—scattered, organic, naturally elegant
- Step back frequently to assess whether the distribution looks balanced across all five nails
- Final protective topcoat once you’re satisfied with the stone placement
Insider note: This design reads differently at different angles—from certain perspectives the stones nearly disappear into the taupe, while from others they sparkle noticeably. This variation is actually what makes it so appealing.
15. Ballet Nude with Diamond-Cut Rhinestone Elegance
Ballet nude (that warm, skin-tone matching shade popularized in high-end nail artistry) paired with diamond-cut rhinestones in strategic patterns creates an utterly refined, wearable luxury aesthetic. This is the design for anyone who understands that true elegance requires restraint and precision.
The Ballet Nude Advantage
Ballet nude is arguably the most universally flattering nail color because it extends the visual line of the nail and hand, making everything look elongated and elegant. When you pair this with diamond-cut rhinestones (which have more facets than standard round stones and therefore sparkle more dramatically), you’ve created something that looks effortlessly sophisticated. Medium coffin nails in ballet nude with diamond-cut stones read as professional, elegant, and just slightly special—appropriate for any occasion.
Placing Diamond-Cut Stones
- Two coats of ballet nude base (test the shade to ensure it truly matches your undertone) with clear topcoat seal
- Diamond-cut rhinestones can be placed more densely than regular stones because their faceted surfaces create interesting light play even when clustered
- Create your pattern: options include a full ombre gradient (dense at tips, sparse at cuticles), a cuticle border, scattered placement, or geometric patterns
- Diamond-cut stones have slightly more pronounced edges, so handle carefully during placement to avoid fingerprints or smudging the surrounding polish
- The multi-faceted nature of these stones means they catch light spectacularly—even minimal placement will create visible sparkle
- Once all stones are placed and fully set, apply a thick, protective final topcoat ensuring no stone edges are exposed
- This design is worth the extra attention to detail because the payoff is genuinely stunning
Pro tip: Diamond-cut stones work beautifully in odd-number groupings (3 stones, 5 stones, 7 stones)—this creates natural visual flow that geometric even numbers sometimes can’t achieve.
Final Thoughts
Medium coffin nails with rhinestones represent some of the most wearable glamour you can achieve. The coffin shape’s unique geometry—wider at the tip, tapered at the sides—actually makes it easier to showcase rhinestone designs because you have space without excessive length. Whether you prefer scattered minimalism or dense, glittering patterns, understated elegance or bold statement designs, there’s a rhinestone aesthetic that matches your personal style.
The key to making any of these designs truly sing is precision in execution. Invest in proper rhinestone placement tools—tweezers designed for nail art, a picking tool or dotting pen, and quality rhinestone adhesive specifically formulated for nails. These materials matter because they directly affect how your design looks and how long the stones stay secure. Take your time with placement; rushing typically shows, while patience creates visibly polished results.
Remember that rhinestone nail art isn’t precious or fragile. These designs are meant to be worn, touched, and shown off. Proper sealing with a thick final topcoat protects your stones and makes them last through daily activities. Whether you’re creating these designs at home or booking a professional appointment, you now have concrete inspiration for exactly what you want to communicate to your nail artist or to yourself as you work through the placement process.
