

Milky white coffin nails are having a serious moment, and for good reason. There’s something about that soft, creamy opacity combined with the elongated coffin shape that feels sophisticated yet effortlessly cool. Unlike the sharp edges of stiletto nails or the rounded charm of classic almond shapes, coffin nails give you a nail bed that’s long enough to make a statement but still maintains a wearable, proportional silhouette—especially when you’re working with medium-length nails rather than extreme length extensions.
The beauty of milky white on medium coffin nails is that it works for virtually any occasion. You can dress it up with minimalist gold accents for a gallery opening, keep it clean and simple for a professional environment, or layer it with intricate nail art for a more playful vibe. The creamy, semi-opaque quality of milky white polish sits somewhere between the dramatic boldness of pure white and the understated elegance of nude, making it incredibly versatile. It photographs beautifully, photographs even more beautifully on coffin shapes because the angular sides catch light in interesting ways, and it photographs best of all on medium nails because you get enough canvas to see details without the weight that ultra-long nails can feel.
If you’re considering making the jump to milky white coffin nails or you’re looking to refresh your current set with new design ideas, these seventeen designs showcase the range of what’s possible. Some lean minimal and modern. Others add texture, dimension, or subtle embellishments. All of them prove that you don’t need extreme length or maximum color saturation to create nails that feel intentional, polished, and exactly right.
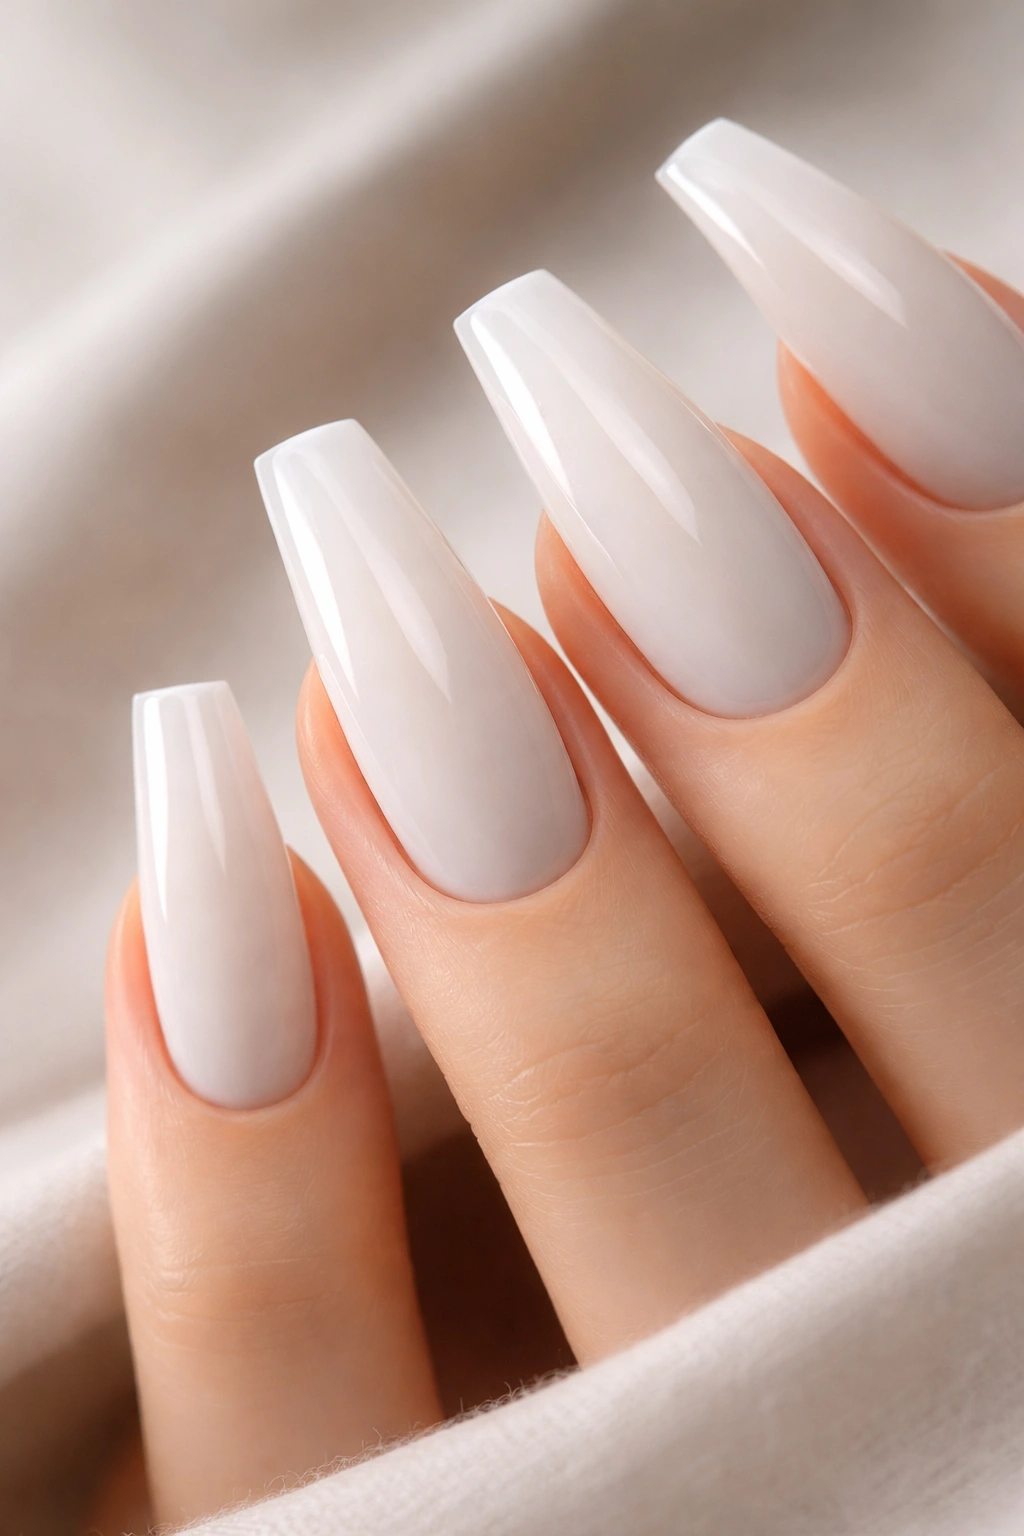
1. Pure Milky White Minimalist
Sometimes the most striking nail design is the simplest one. A flawless coat of milky white polish with no additional design elements lets the coffin shape itself be the statement. The beauty here is in the execution—a smooth, even application with a subtle sheen that catches light as your hands move.
Why This Works for Medium Nails
The clean simplicity of a single-color manicure feels more elevated than busy designs, especially when executed on medium coffin nails where the shape is already doing visual work. There’s confidence in simplicity, and medium length allows the coffin shape to be proportional and approachable rather than extreme.
Execution Tips for Best Results
- Use a high-quality milky white polish with good opacity—typically two coats achieves that creamy, semi-opaque finish that reads as intentional rather than thin or sheer
- Invest in a good base coat to prevent yellowing and create a smooth application surface
- Seal with a glossy top coat for subtle shine and longevity
- File your nails into a true coffin shape with sharp, defined angles at the sides—this shape becomes the entire visual focal point
- Keep your cuticles clean and pushed back so the nail itself commands attention
Pro tip: This look requires healthy, well-maintained nails. If you’re growing them out naturally, start with a good nail strengthening polish underneath to prevent breakage.
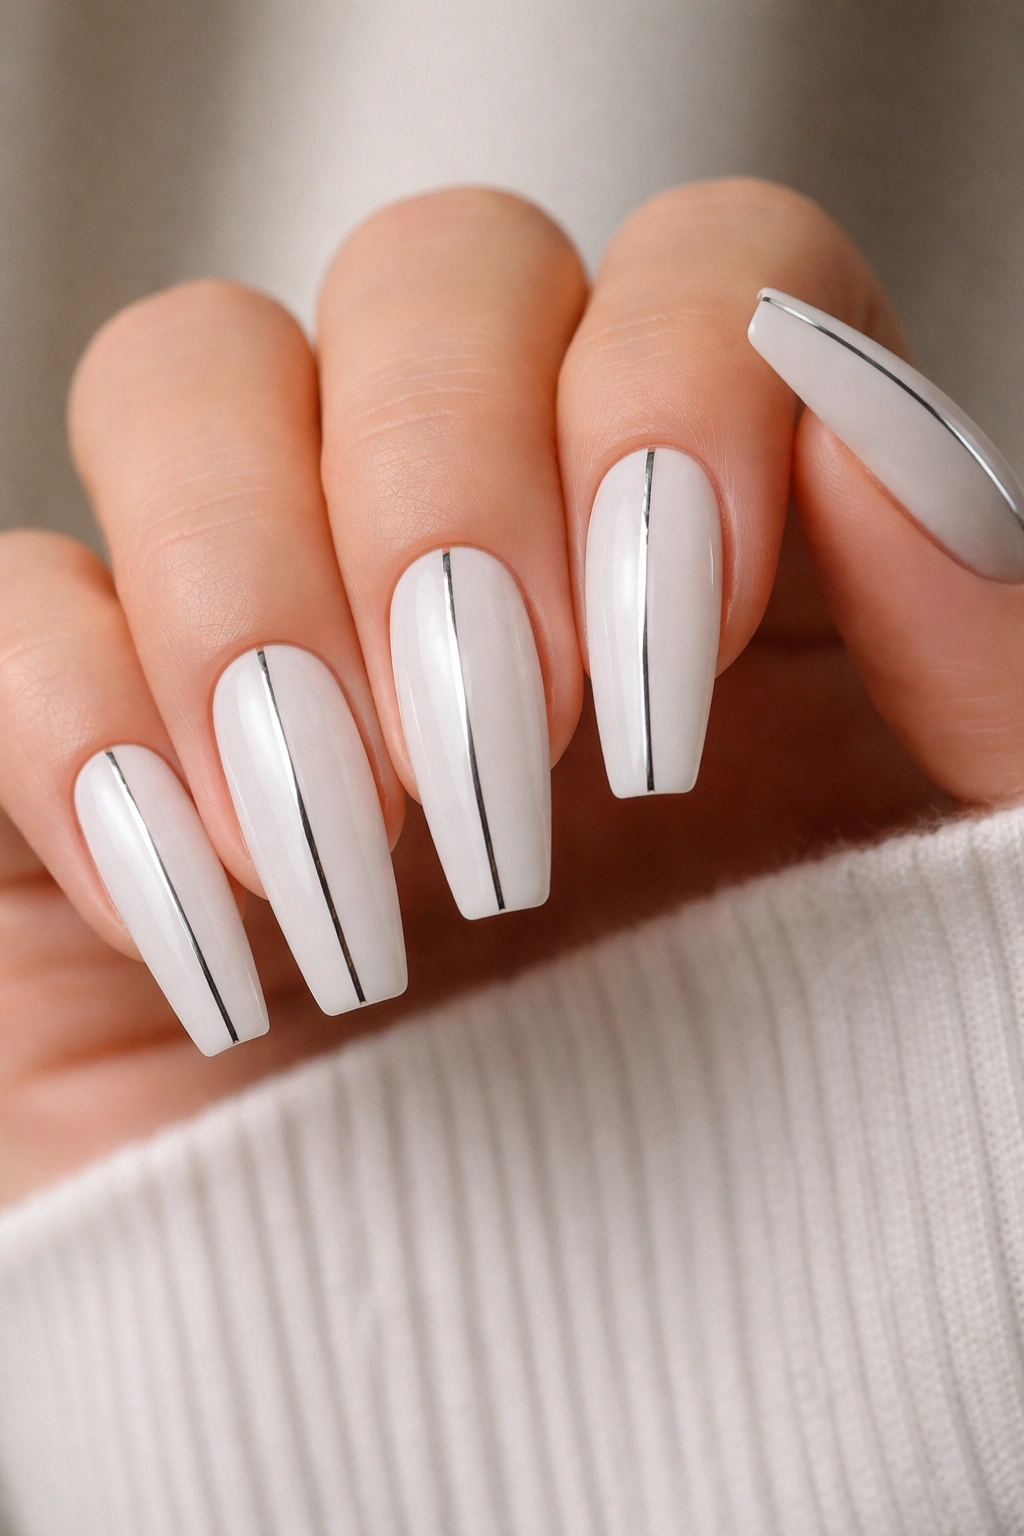
2. Milky White with Thin Gold Geometric Lines
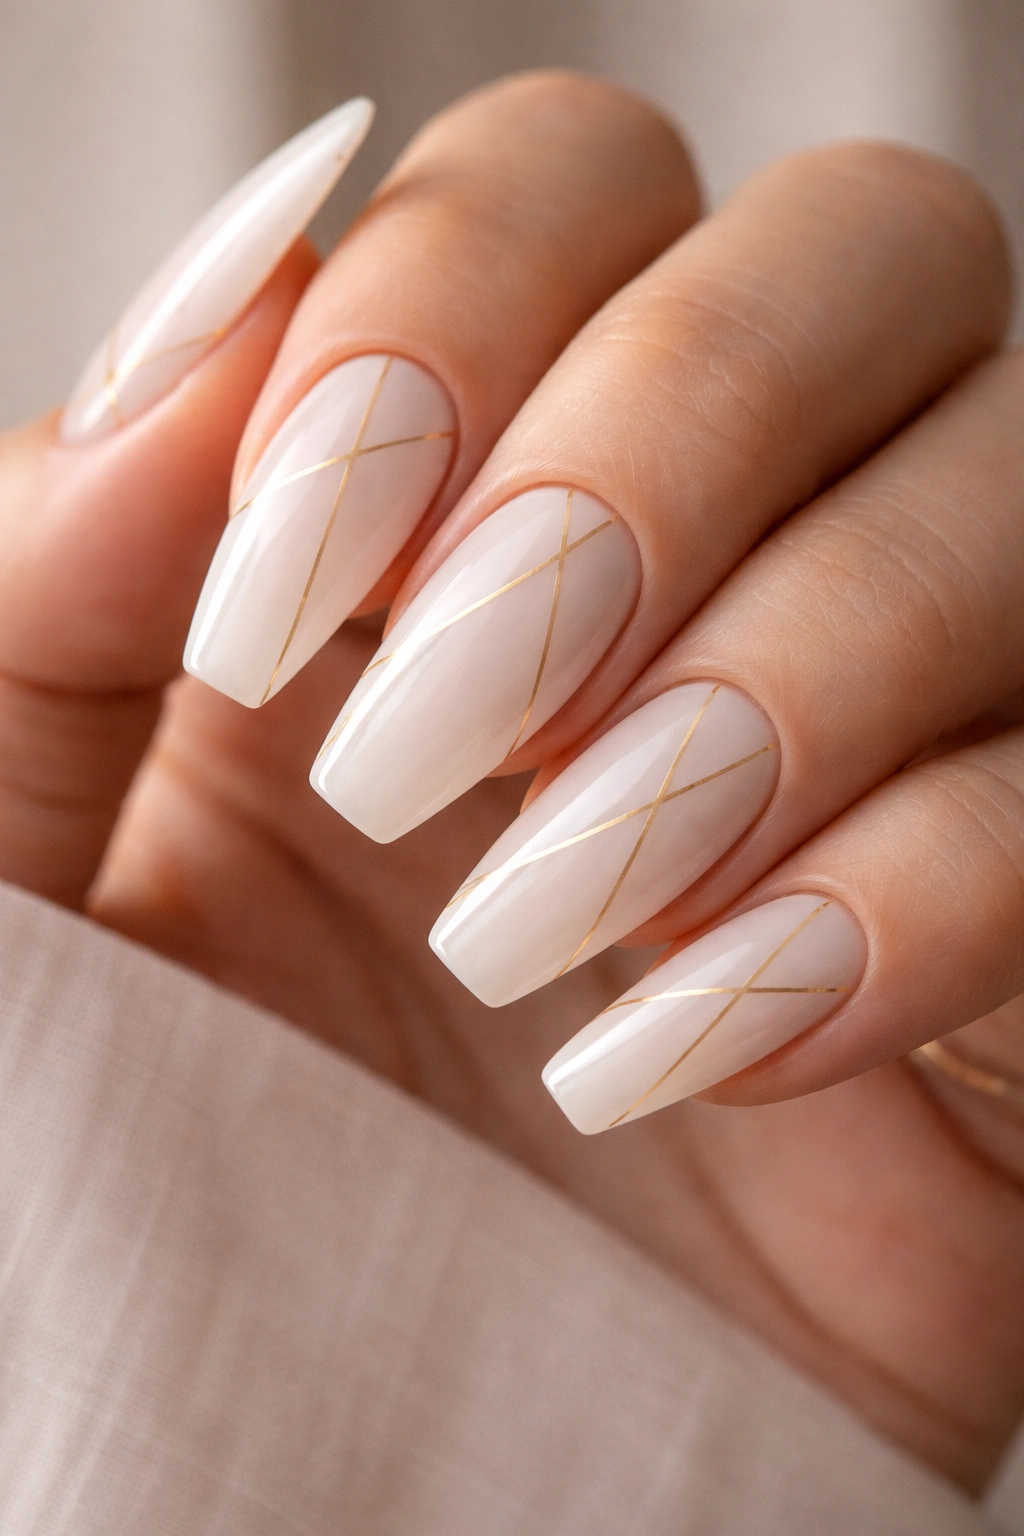
Introduce subtle geometry into your milky white base with thin, clean gold lines that create angular patterns across the nail surface. Think sharp triangles pointing inward from the corners, or thin vertical lines that echo and emphasize the coffin shape itself.
The Power of Minimal Metal Accents
A single metallic accent in the right proportions can elevate a simple base without overwhelming it. Gold feels warm and sophisticated against milky white, and thin geometric patterns add intentionality and visual interest without veering into busy territory.
Design Application Techniques
- Use a thin gold striping brush or nail art pen to create clean, controlled lines—the precision makes these designs work
- Start with a full base of milky white and let it cure completely before adding gold details
- Create geometric patterns that follow the coffin shape’s natural angles rather than fighting against them
- Seal everything with a clear top coat to protect the metallic details and extend wear time
- Keep spacing consistent—even thin lines look more intentional when they’re measured and deliberate
Worth knowing: If you’re not confident with freehand thin lines, nail stencils or striping tape can help you achieve clean geometry without the artistic skill requirement.
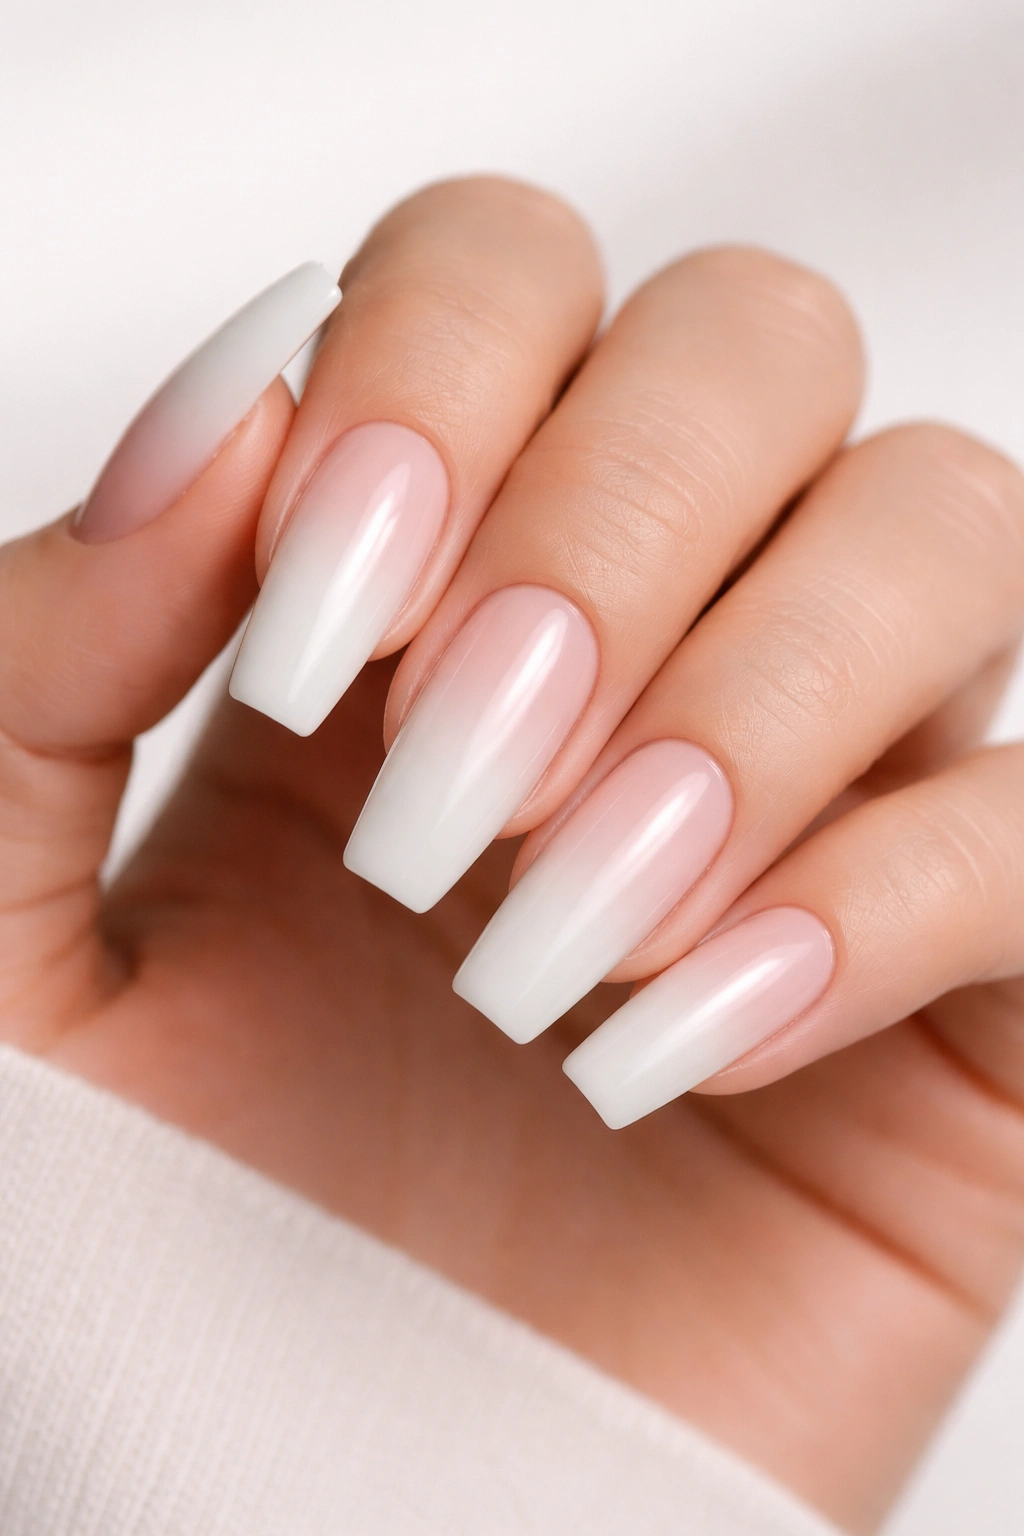
3. Milky White Gradient with Nude at the Tips

Create a subtle gradient that transitions from pure milky white at the base to a softer nude tone at the nail tips. The gradient should be gradual and blended, creating a watercolor-like effect rather than a harsh color block.
Why Gradient Designs Enhance Medium Coffin Nails
Gradients add visual depth and dimension without introducing an entirely new design. On medium coffin nails, a vertical gradient emphasizes length while maintaining the clean, modern aesthetic of the coffin shape itself.
Creating a Gradient Effect
- Apply your base milky white coat and let it dry completely
- Use a makeup sponge or specialized gradient sponge to dab and blend your nude shade at the tip area
- Work in light layers, adding more color gradually until you achieve the opacity and gradient you want
- Use a darker shade of white or taupe to deepen the gradient at the very tip for more definition
- Seal with a glossy top coat that will help blur any visible sponge marks and create a seamless, professional finish
- Consider using a makeup sponge with a slightly damp texture—this helps blend more smoothly than a completely dry sponge
Pro tip: Practice your gradient on a makeup sponge first to get a feel for the amount of polish needed and the right pressure for smooth blending.
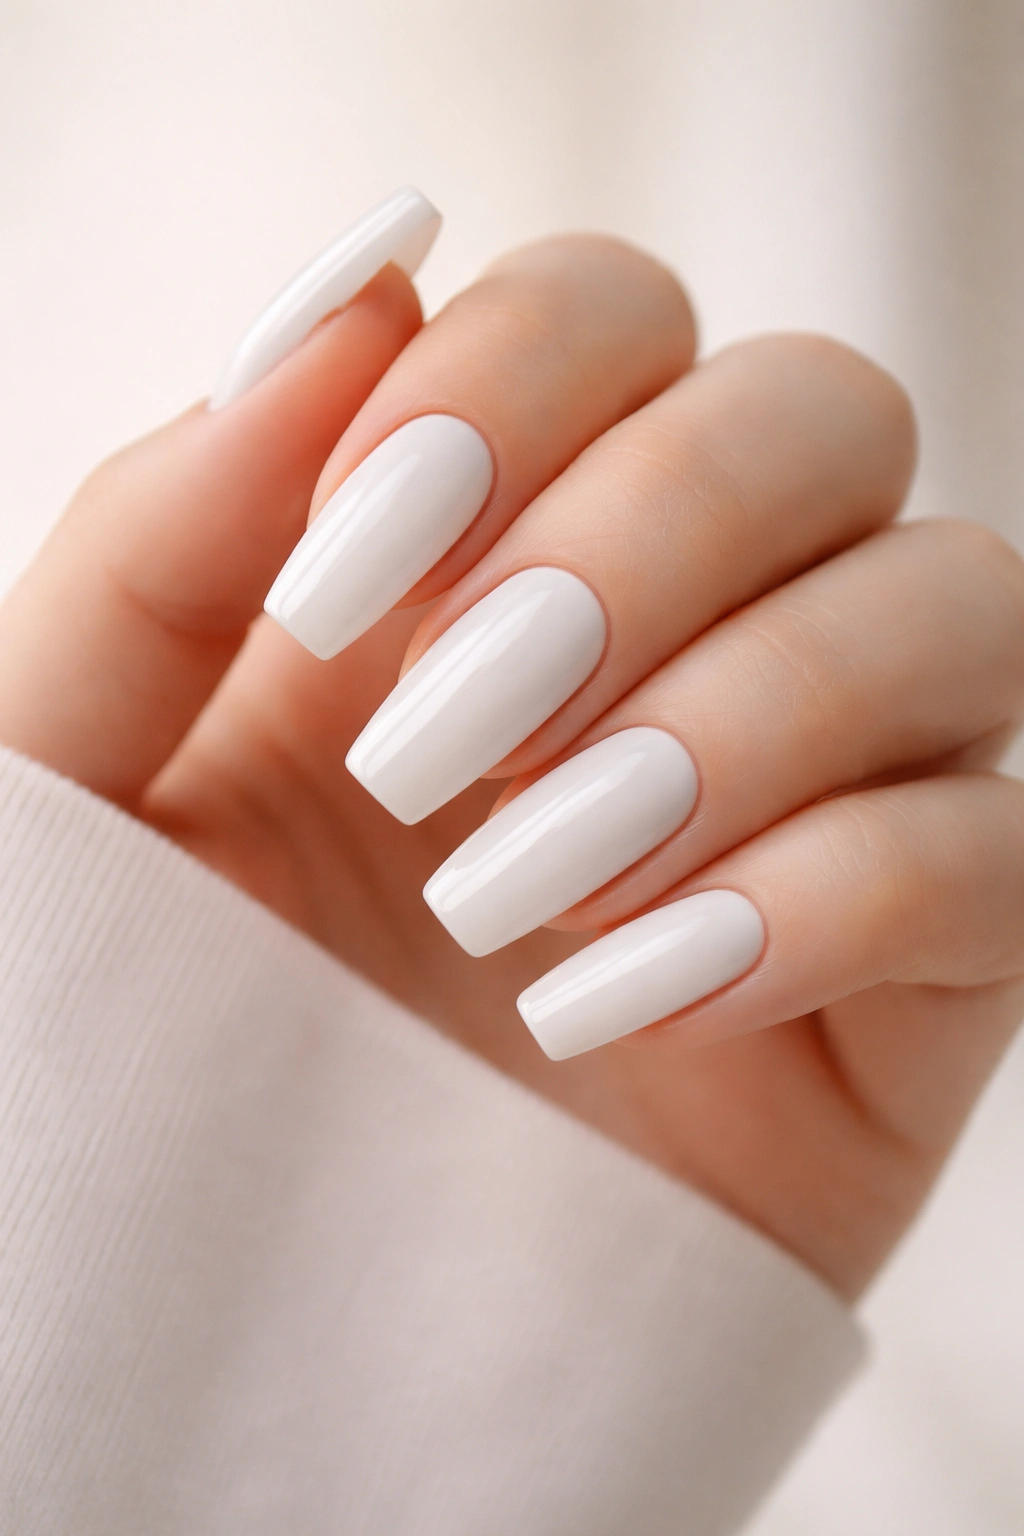
4. Milky White with Matte Finish Overlay
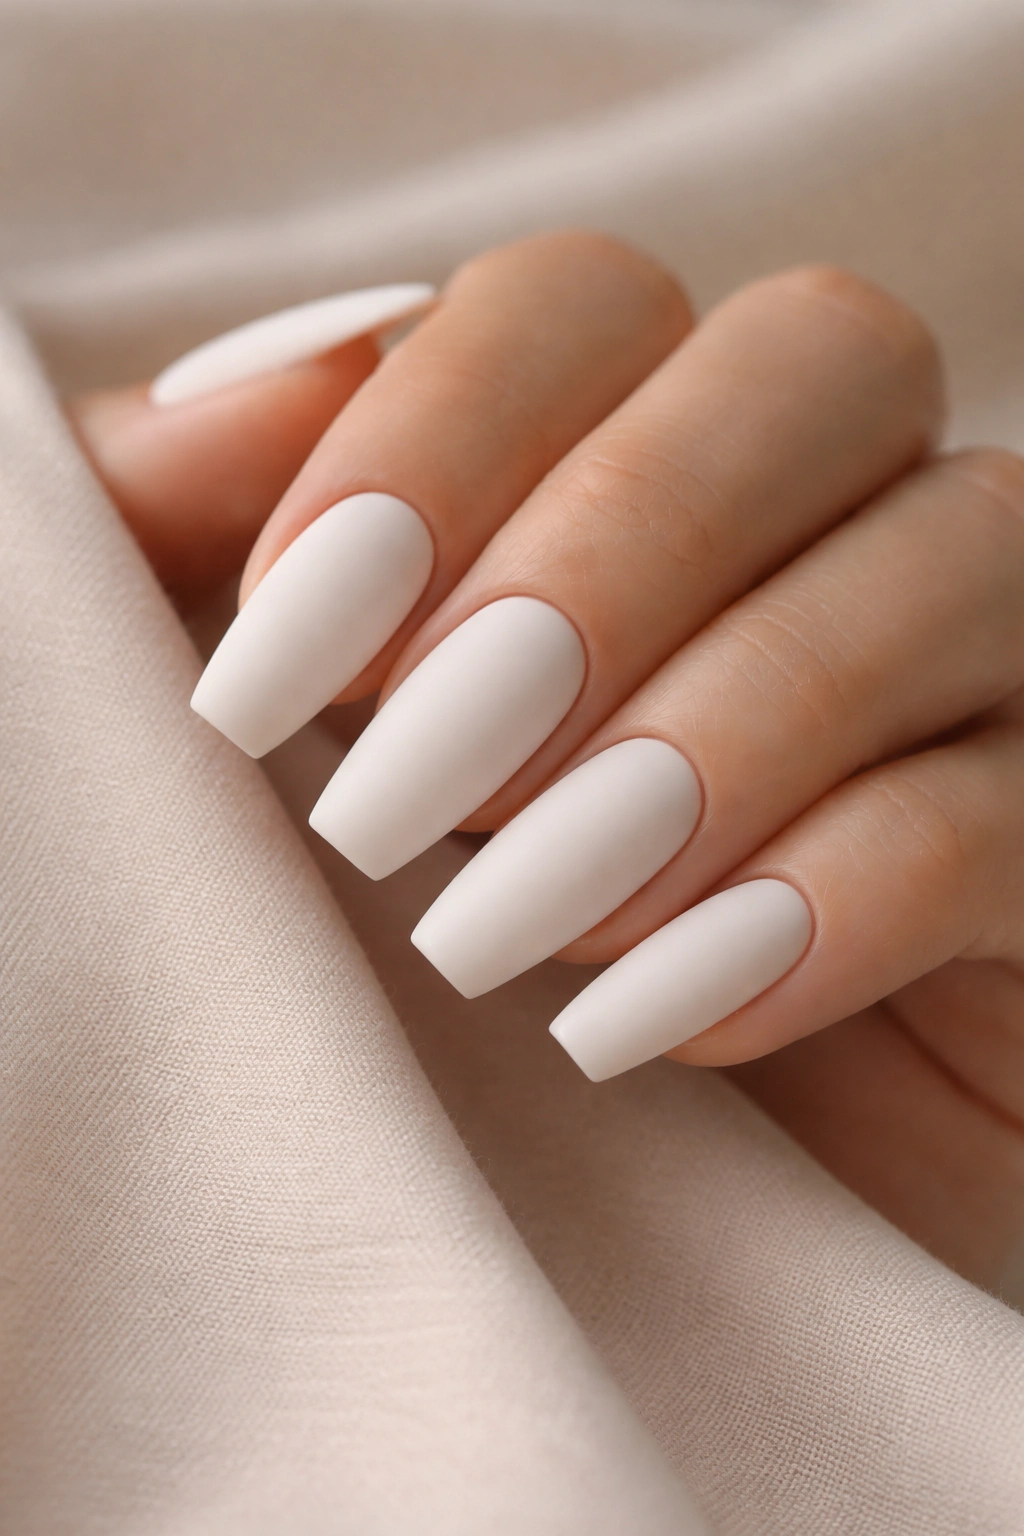
Keep your milky white base but add a matte top coat for a completely different aesthetic. The semi-opaque milky quality becomes even more prominent when you remove the shine, creating a soft, velvety appearance.
The Psychology of Matte Nails
Matte finishes feel more modern and artistic than glossy finishes, and they pair beautifully with milky white because the color becomes less bright and more sophisticated. The lack of shine also means any minor imperfections are less visible, making this a forgiving option.
Application and Maintenance
- Apply your milky white polish as normal with base and glossy top coat
- Once fully cured, apply a dedicated matte top coat over the entire nail surface
- Matte finishes show fingerprints and oils more readily than glossy, so expect to touch up more frequently
- A matte finish is more prone to chipping, so ensure your top coat is applied generously and evenly
- You can achieve a matte finish with a matte top coat or sometimes with a specially formulated matte polish itself
- To refresh the matte finish between manicure appointments, use a dry cosmetic sponge to gently buff the surface and restore the velvety appearance
Insider note: Some people love the way matte finishes feel to the touch—it’s a different tactile experience than glossy nails.
5. Milky White with Black Negative Space Lines
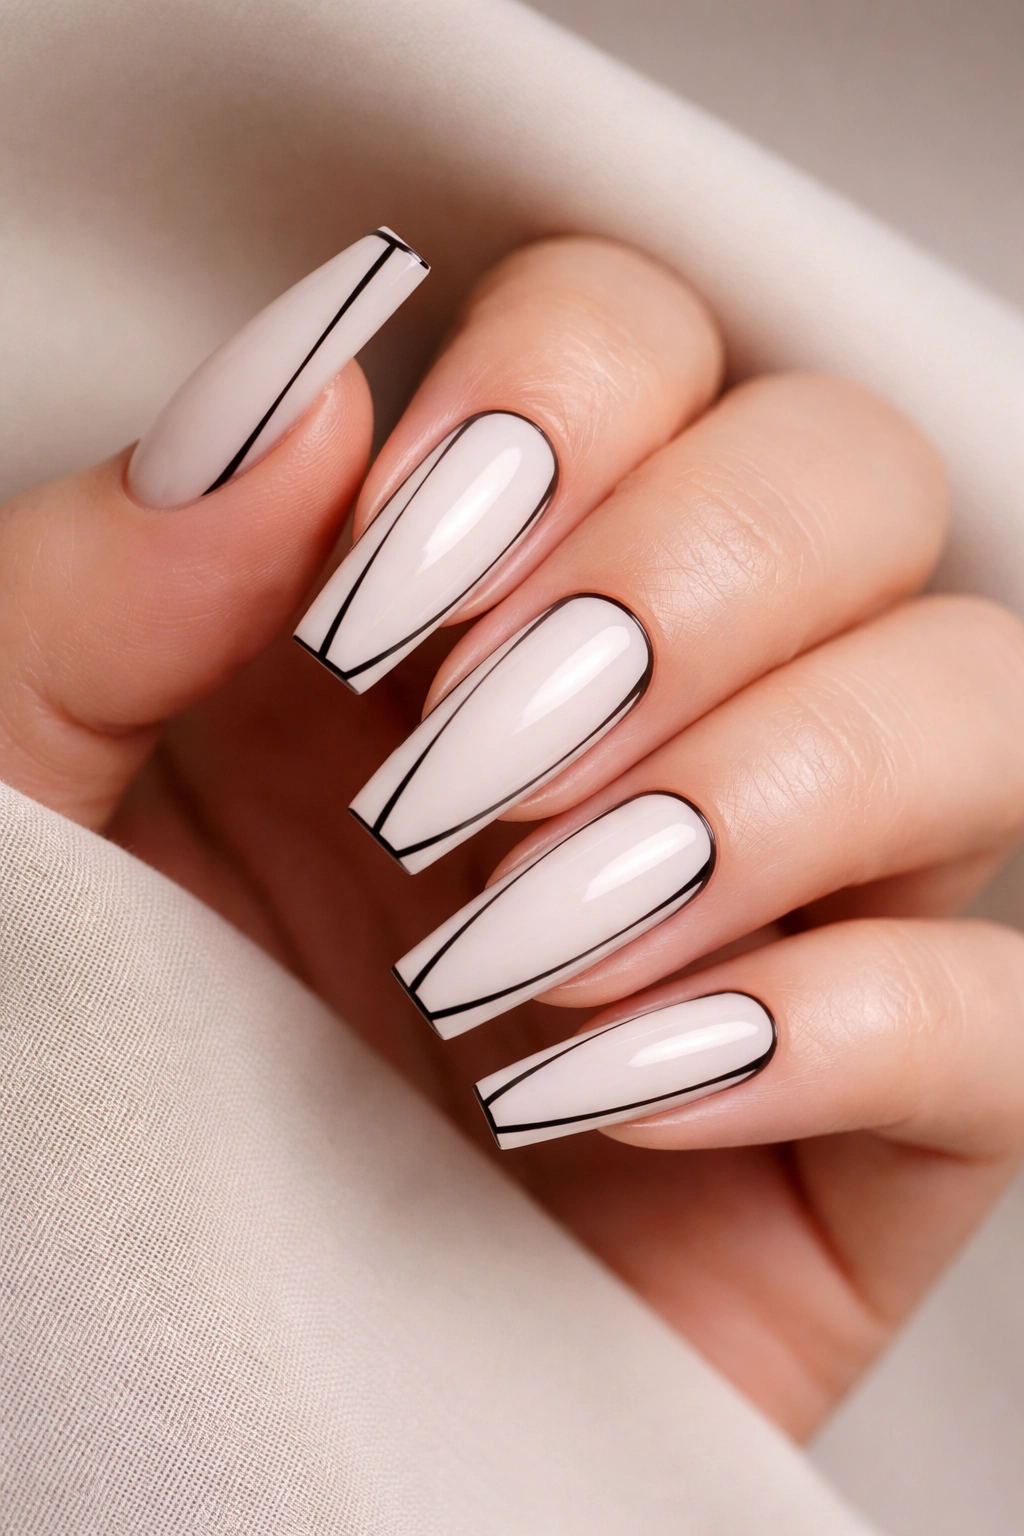
Create striking contrast by leaving thin, strategic negative space (bare nail or black outline) along certain areas of the nail. A thin black line could follow the coffin shape’s perimeter, create a minimalist frame, or form an abstract linear pattern.
Negative Space as Design Element
Negative space—deliberately leaving areas bare or using the nail’s natural tone—creates visual impact through contrast rather than addition. On milky white coffin nails, thin black lines create modern geometric interest without adding heavy design elements.
Creating Clean Negative Space Designs
- Map out your design lightly with a pencil or dry brush before committing
- Apply milky white polish to the main nail area
- Use thin striping tape or a thin nail art brush to create precise black lines—the precision is critical for this design to read as intentional rather than accidental
- Black and white contrast reads as sharper and more dramatic than other color combinations, so placement matters
- Ensure clean, sharp edges where your black lines meet the milky white polish
- A glossy top coat will enhance the contrast between matte black lines and shiny white nails
Design idea: A thin black outline following just the coffin shape’s side angles creates a modern frame effect that looks unexpectedly sophisticated.
6. Milky White with Rose Gold Dust Effect
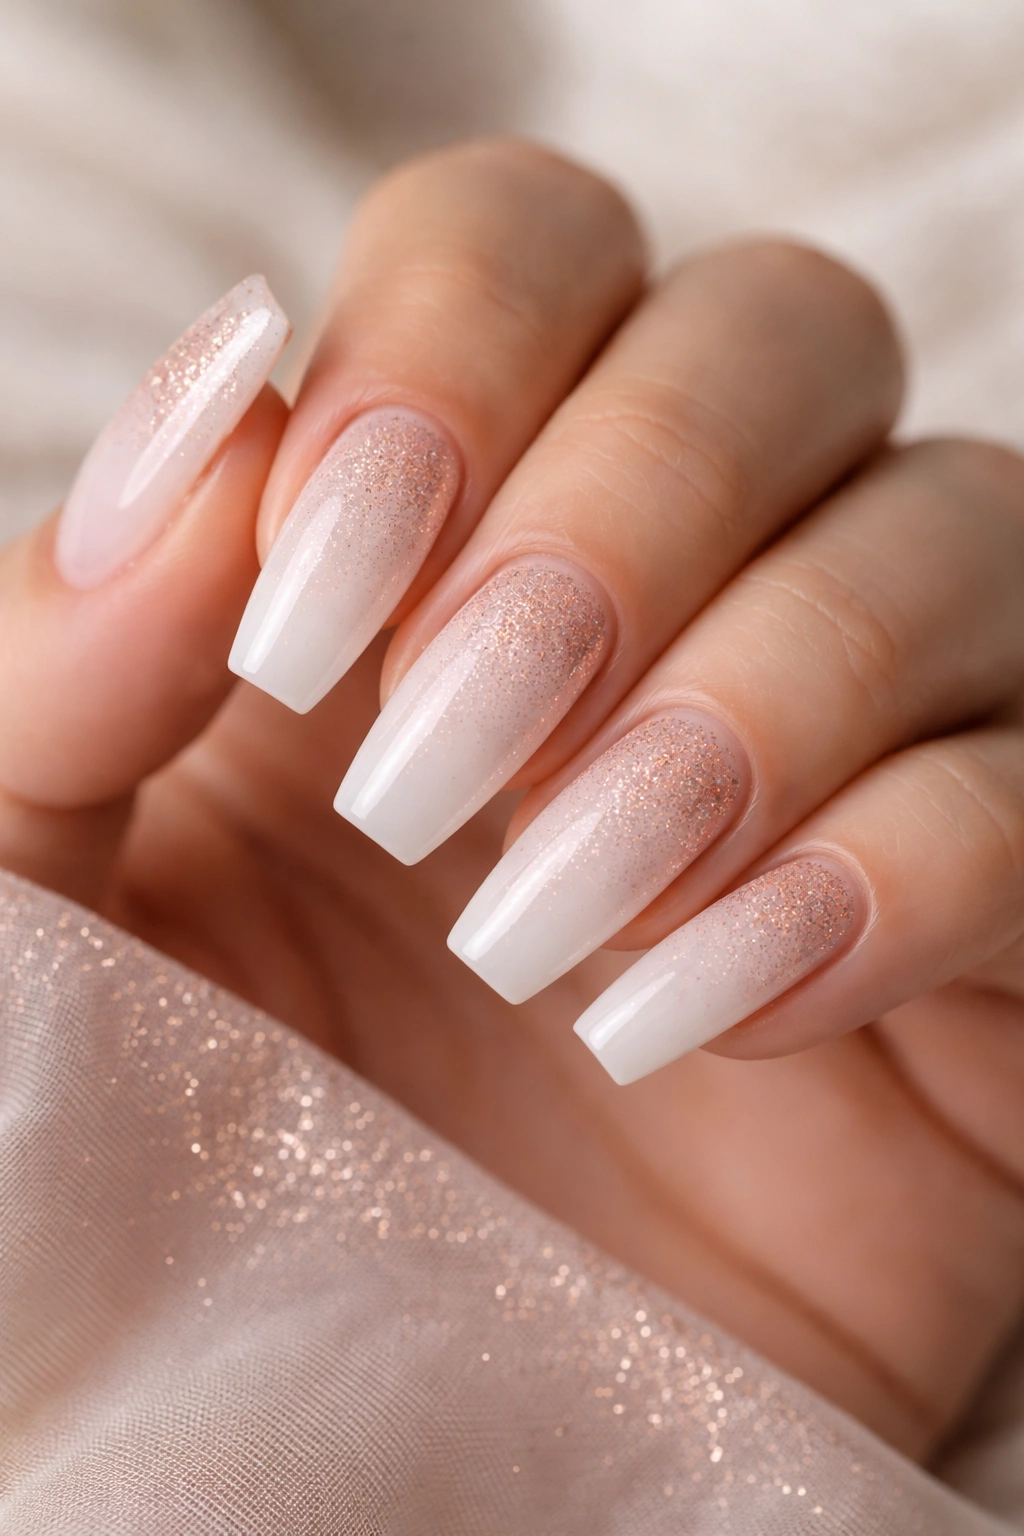
Dust rose gold powder or glitter onto a wet milky white base for a soft, diffused sparkle effect. The rose gold sits on top of rather than being mixed into the polish, creating a textured, three-dimensional look.
Why Dust Effects Work on Medium Nails
The coffin shape’s flat surface area provides a perfect canvas for catching light, and medium nails are long enough to showcase sparkle without looking overdone. The soft rose gold tone against milky white feels warm and feminine without being saccharine.
Applying Dust and Sparkle Effects
- Paint your base milky white and cap the free edge (paint the very tip) to prevent chipping
- While the base is still tacky (not fully dry), use a makeup brush or specialized brush to apply rose gold dust across the nail surface
- Press the dust gently into the wet polish so it adheres rather than sitting loosely on top
- You can create a concentrated sparkle at the tip and fade it toward the base, or distribute it evenly across the entire nail
- Seal with a glossy top coat to lock everything in place
- Be aware that dust and sparkle effects are more prone to showing wear, so expect to touch up more frequently than with a solid polish
Pro tip: If your rose gold dust is very fine, you might need to apply it in light layers to build up the intensity without creating a gritty texture.
7. Milky White with Thin Chrome Accent Stripes
Incorporate ultra-thin chrome or silver striping to create a modern, futuristic aesthetic. Place these lines vertically along the nail to emphasize length, or create a geometric pattern that complements the coffin shape.
Chrome and Metallic Accents on Medium Nails
Chrome and highly reflective metallics create an illusion of extra length and shine, making medium nails appear more dramatic. The coffin shape’s angular geometry pairs beautifully with angular metallic designs.
Executing Chrome Striping
- Use a specialized chrome or metallic striping polish or liquid chrome that applies like normal polish
- These products often require a very thin application, so use a fine striping brush rather than a regular polish brush
- Start with your milky white base and let it fully cure
- Add your chrome stripes while the nail is completely dry for maximum precision
- If using liquid chrome, follow product-specific instructions about curing time (some require UV curing)
- The reflective quality of chrome makes even thin lines read as prominent and noticeable
- Seal with a glossy top coat compatible with chrome finishes
Worth knowing: Chrome and metallic finishes sometimes don’t play well with certain top coats, so test your top coat with your chrome product on a nail wheel or practice nail before applying to your manicure.
8. Milky White Ombre to Sheer at the Base
Reverse the typical gradient by starting with a very sheer, barely-there milky tone at the base and gradually increasing opacity as you move toward the tip, creating an ombre effect that’s opposite of most gradient designs.
The Reverse Gradient Aesthetic
This approach creates visual movement from subtle to more prominent, drawing the eye along the length of the nail. It’s a sophisticated take on the gradient concept that feels unexpected and artistic.
Building a Reverse Ombre
- Start with a thin, sheer application of milky white at the nail base—your nail bed should show through slightly
- Add a second coat in the middle section, building opacity gradually
- Apply full-opacity milky white at the tip area
- You might need 3-4 layers total to create a smooth, gradual transition rather than visible color blocks
- Build gradually with thin layers rather than trying to achieve everything in two thick coats
- Seal with glossy top coat once fully cured
- The goal is a seamless transition where the eye follows the color shift naturally
Pro tip: If you’re working with a milky white polish that’s very opaque, mix a few drops with clear polish to create a more sheer base shade for the lower part of your nail.
9. Milky White with Minimalist Dot Pattern
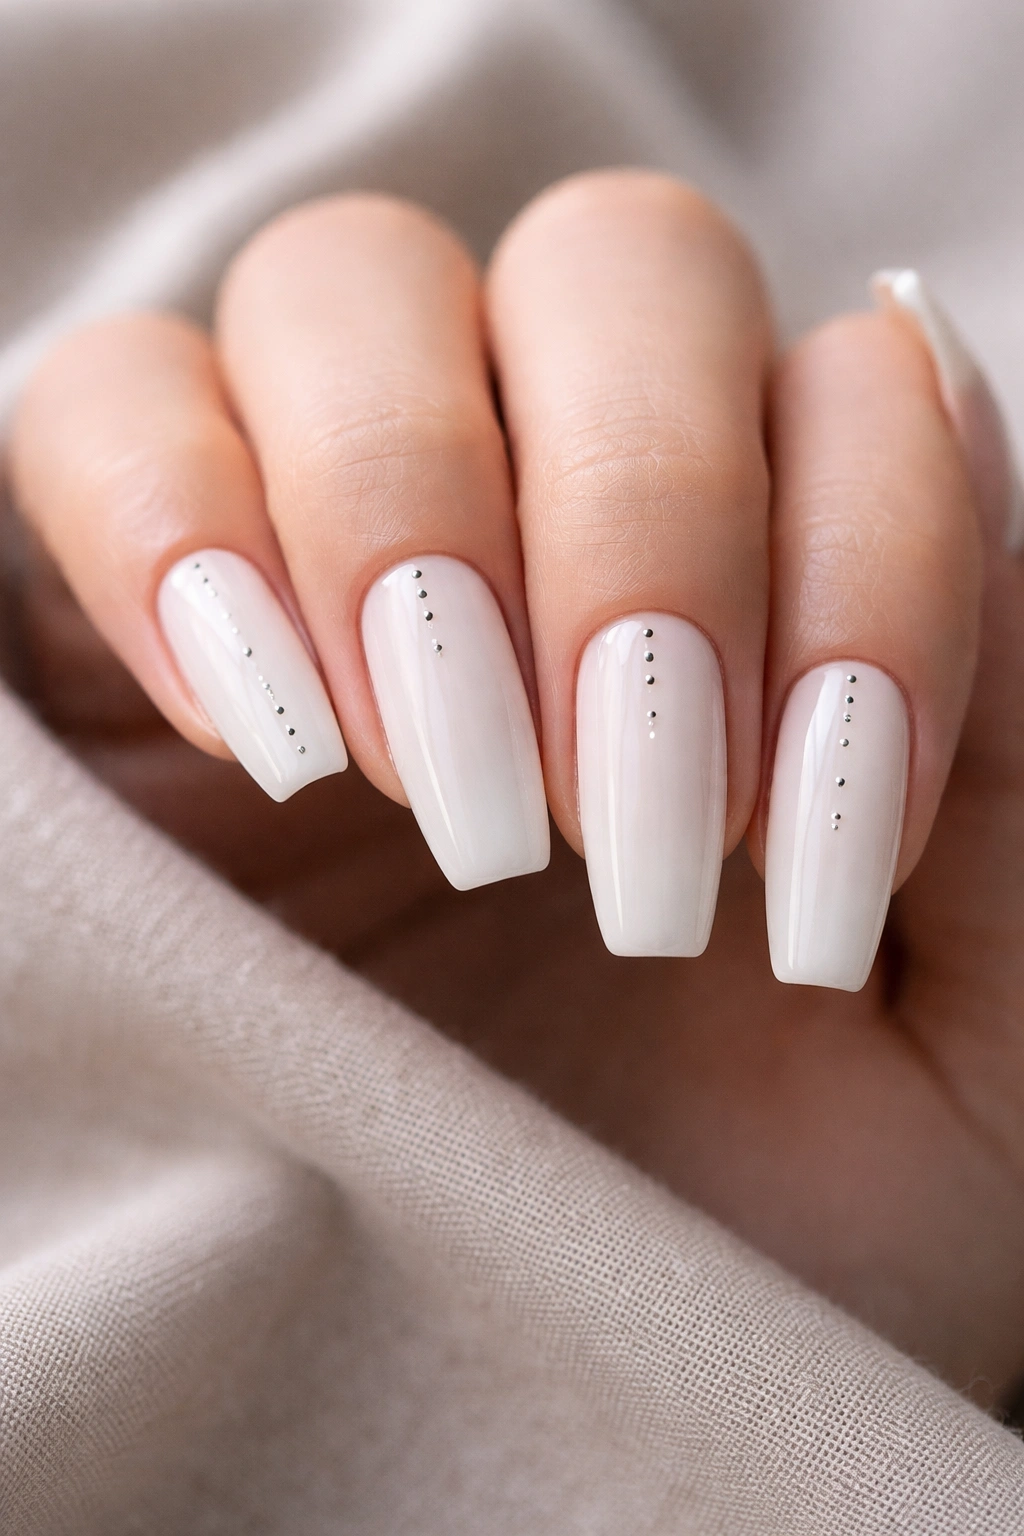
Add tiny dots in a strategic pattern—perhaps a line of dots down the center, or a few dots at the tip in a constellation pattern. The dots should be small enough to feel delicate rather than bold.
Dots as Subtle Embellishment
Dots are one of the easiest nail art designs to execute while still looking intentional and thoughtful. On milky white, small dots in contrasting colors (black, gold, silver, or even a slightly darker shade of white) add visual interest without overwhelming the clean base.
Creating Precise Dot Patterns
- Use a dotting tool or the sharp end of a toothpick dipped in your chosen polish color
- Create your pattern lightly in pencil first if you’re not confident about placement
- Small dots (smaller than the head of a pin) read more elegantly than large dots
- Space dots consistently—even dots that are slightly irregular in size look fine if spacing is consistent
- Let each dot dry before touching the nail or applying top coat to prevent smudging
- A line of dots running down the center of the nail creates visual length and suits the coffin shape perfectly
- Seal everything with clear top coat
- Dots work beautifully in gold, black, white (slightly brighter or darker than your base), or even a complementary accent color
Design variation: A small cluster of three to five dots at the tip corner creates the look of an earring or accent without committing to an entire design pattern.
10. Milky White with Soft Lavender Tips
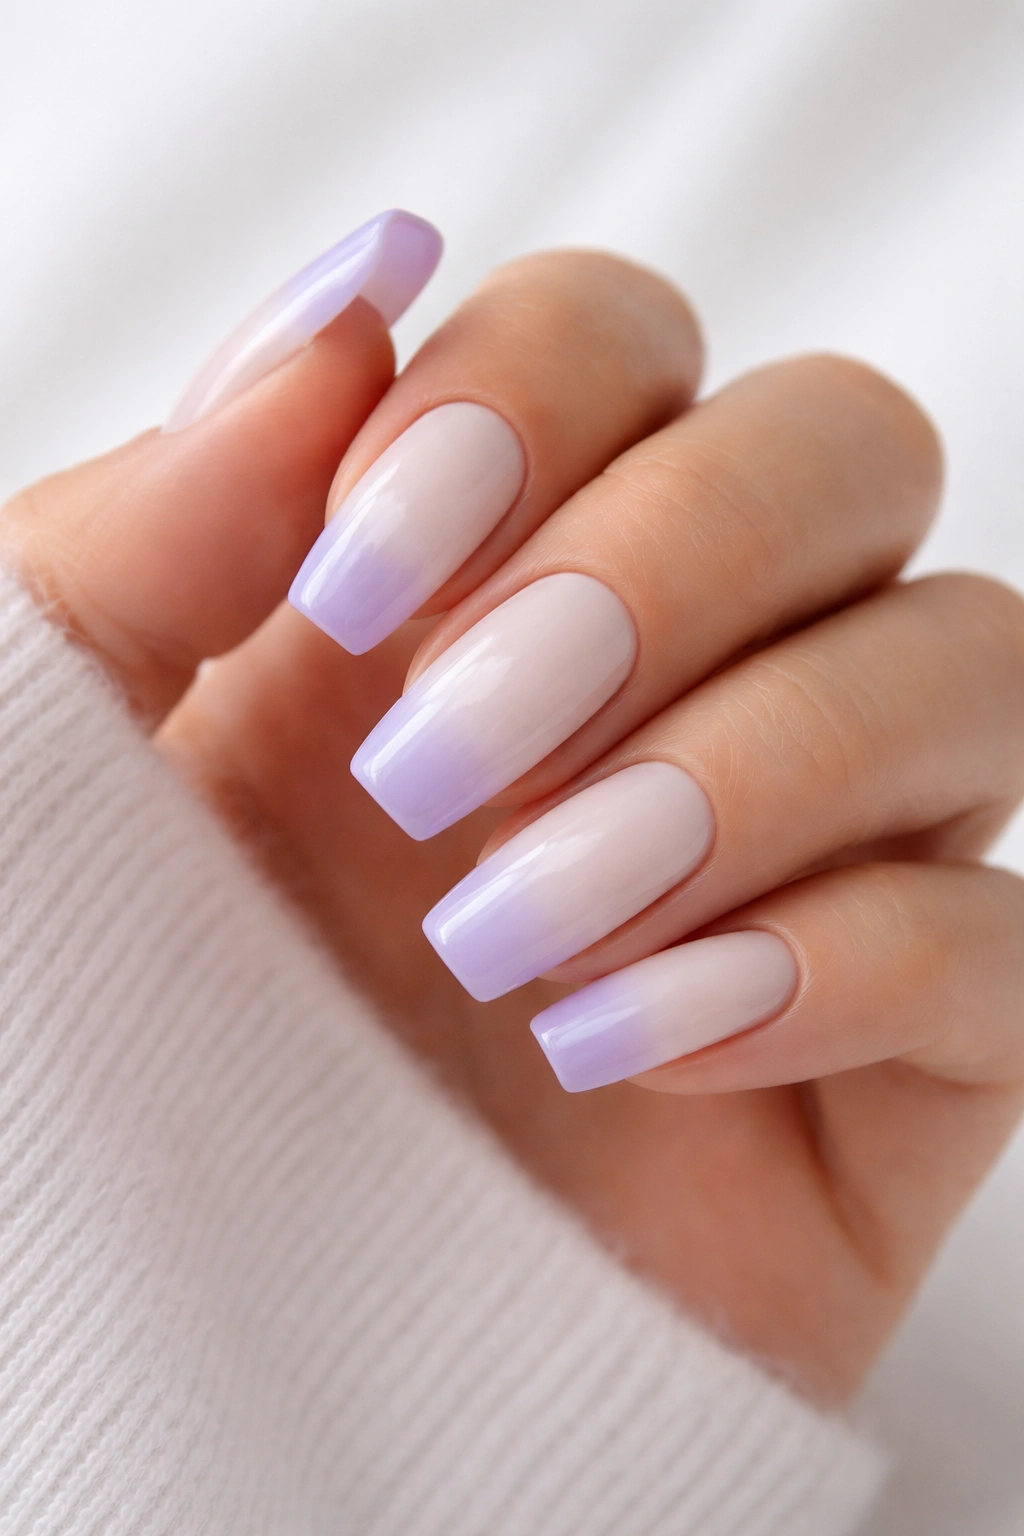
Create a gentle, two-tone design where milky white occupies most of the nail and soft lavender appears only at the very tip. The transition should be subtle and soft rather than a stark color block.
Why Soft Pastels Complement Milky White
Lavender is cool-toned like most whites, making it a harmonious pairing rather than a jarring contrast. The softness of both colors together creates an ethereal, romantic aesthetic that still feels modern on the coffin shape.
Creating Soft Two-Tone Tips
- Apply milky white as your full base and let it cure
- Using a thin brush or sponge, apply soft lavender to just the tip area—roughly the top third of the nail
- Blend the color boundary slightly so it’s not a hard line, creating a soft fade from white to lavender
- You can blend by running a clean, slightly damp makeup sponge over the color boundary while the lavender is still wet
- Two to three thin coats of lavender will give you the color depth you want
- Seal with glossy top coat
- Keep your lavender shade soft and muted rather than bright and saturated—the goal is harmony, not contrast
Pro tip: If you don’t have the perfect soft lavender shade, try mixing a brighter lavender with white or nude polish to create a custom, softer tone.
11. Milky White with Delicate Floral Nail Art
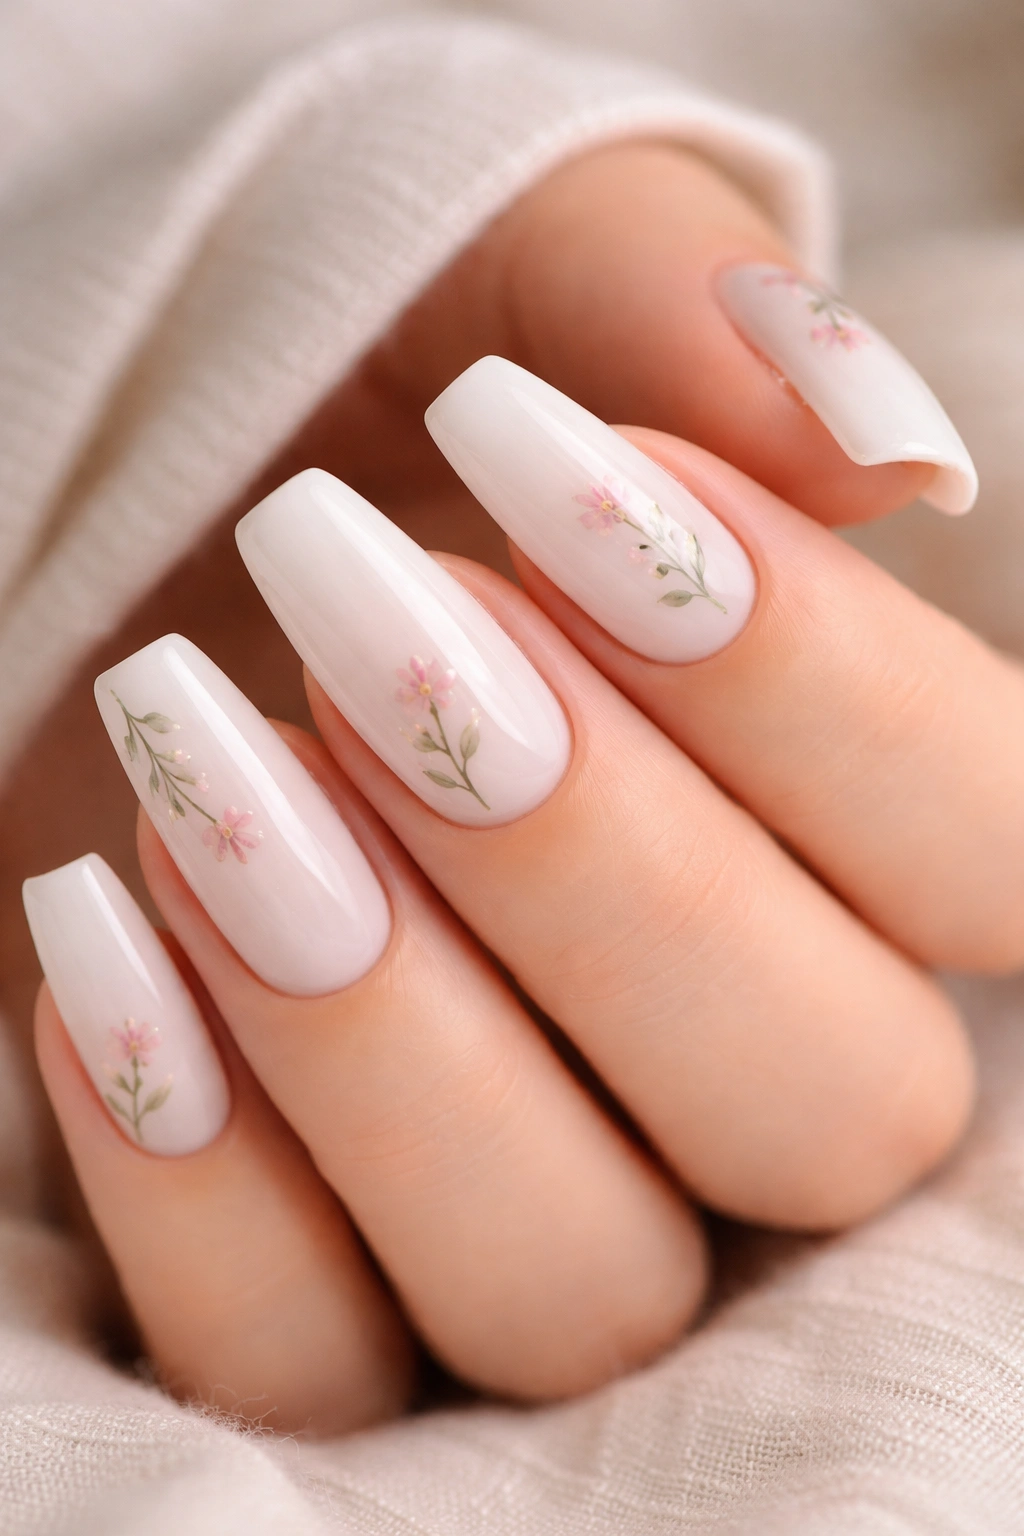
Add tiny, minimalist floral designs in one corner of each nail or scattered across the base in a balanced pattern. The flowers should be small and delicate—think botanical illustration rather than statement florals.
Florals on Clean Bases
Floral designs on milky white feel fresh and romantic without being overly feminine. The clean base keeps the design feeling modern, and the coffin shape gives you adequate space to showcase small botanical details.
Executing Delicate Florals
- Using a very thin brush or specialized nail art pen, sketch tiny flower outlines—simple shapes work best (five-petal flowers, minimalist stems)
- Create a color palette of two to three complementary shades (consider soft pinks, greens, or earth tones)
- Fill in your flower outlines with thin layers of color, building opacity gradually
- Tiny leaves and delicate stems can be added in green or even a darker shade of your base white
- Place flowers asymmetrically rather than perfectly centered for a more natural, artistic look
- Seal everything with clear top coat once fully cured
- The smaller your flowers, the more intentional and elegant they appear
- If freehand florals feel intimidating, consider using nail decals or stickers designed for this aesthetic
Design idea: Place one small cluster of flowers at the tip corner of each nail for a subtle, jewelry-like accent.
12. Milky White with Black Micro-Lines
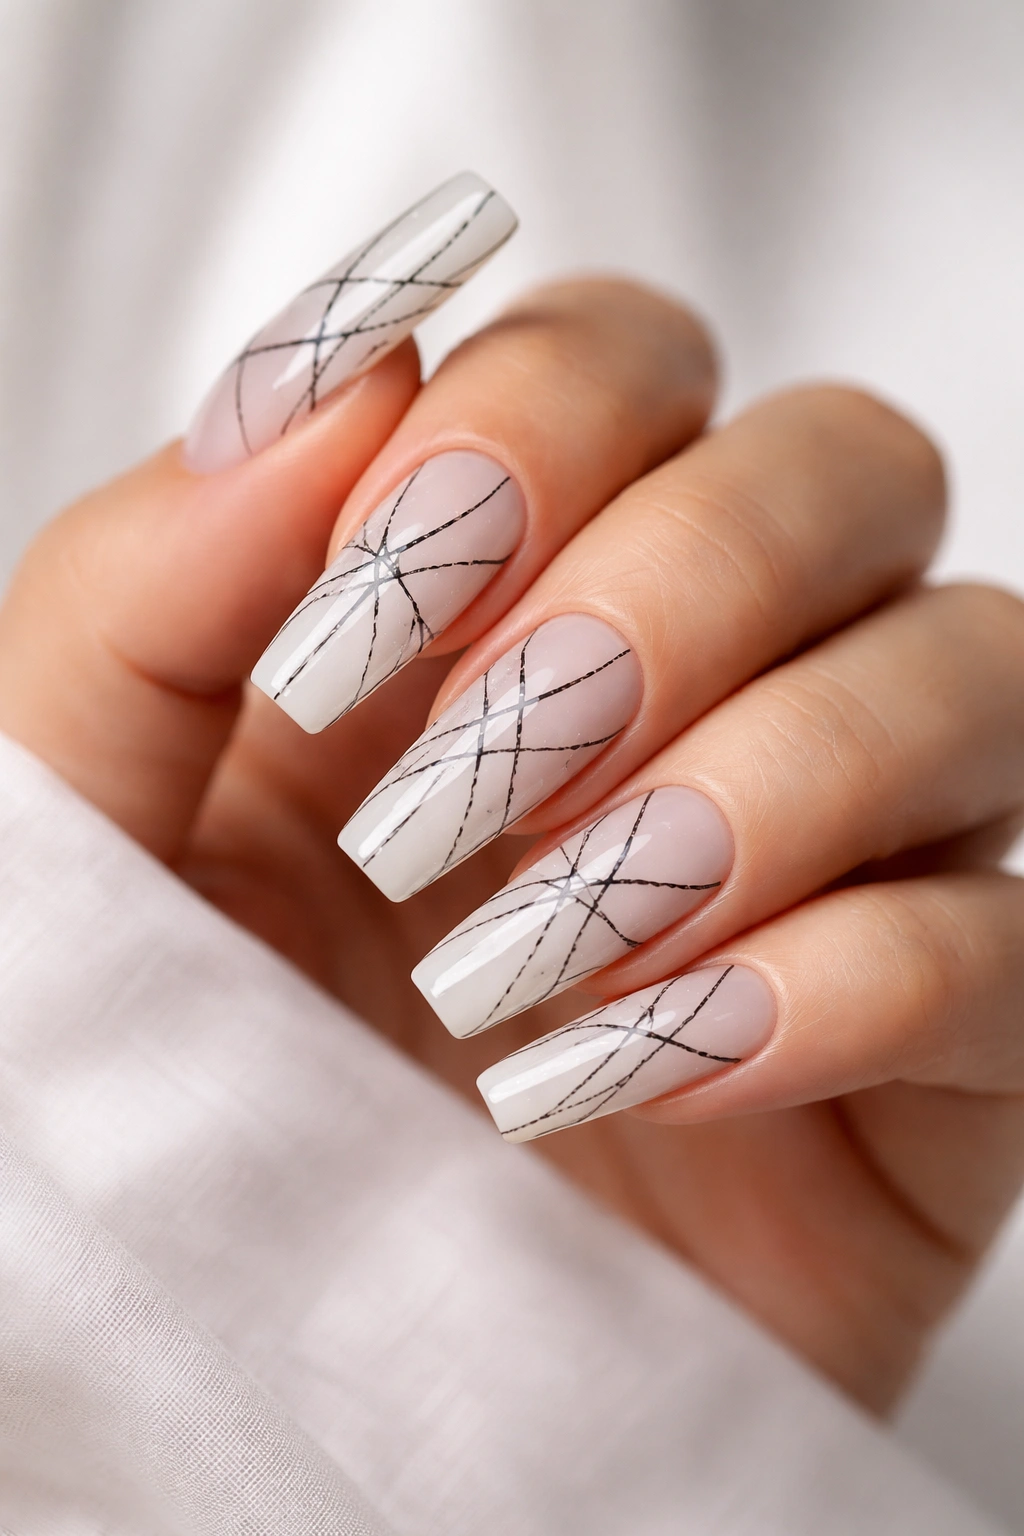
Create texture and visual interest using very fine black lines that create a crosshatch, geometric, or organic web pattern across the nail surface. The lines should be thin enough to feel delicate rather than heavy.
Texture Through Line Work
Line-based designs create the illusion of texture and depth without actually adding physical texture to the nail. On milky white, black lines create sharp graphic interest that reads as intentional and artistic.
Creating Micro-Line Patterns
- Use a very thin striping brush or nail art pen with black polish
- Create your pattern as light pencil marks first if you’re not confident about spacing
- Thin, evenly-spaced lines look more intentional than random line work
- Crosshatch patterns (parallel lines crossed by another set of parallel lines) create geometric interest
- Organic line patterns that seem to flow naturally across the nail can feel more artistic and modern
- Keep lines consistent in thickness—uneven thickness reads as less intentional
- Seal with glossy top coat to enhance the graphic quality
- The coffin shape’s angles naturally complement angular line-based designs
Pro tip: If you’re worried about wobbly lines, use a fine-tipped nail art pen instead of a brush—pens often offer more control than brushes.
13. Milky White with Holographic Shimmer Top Coat
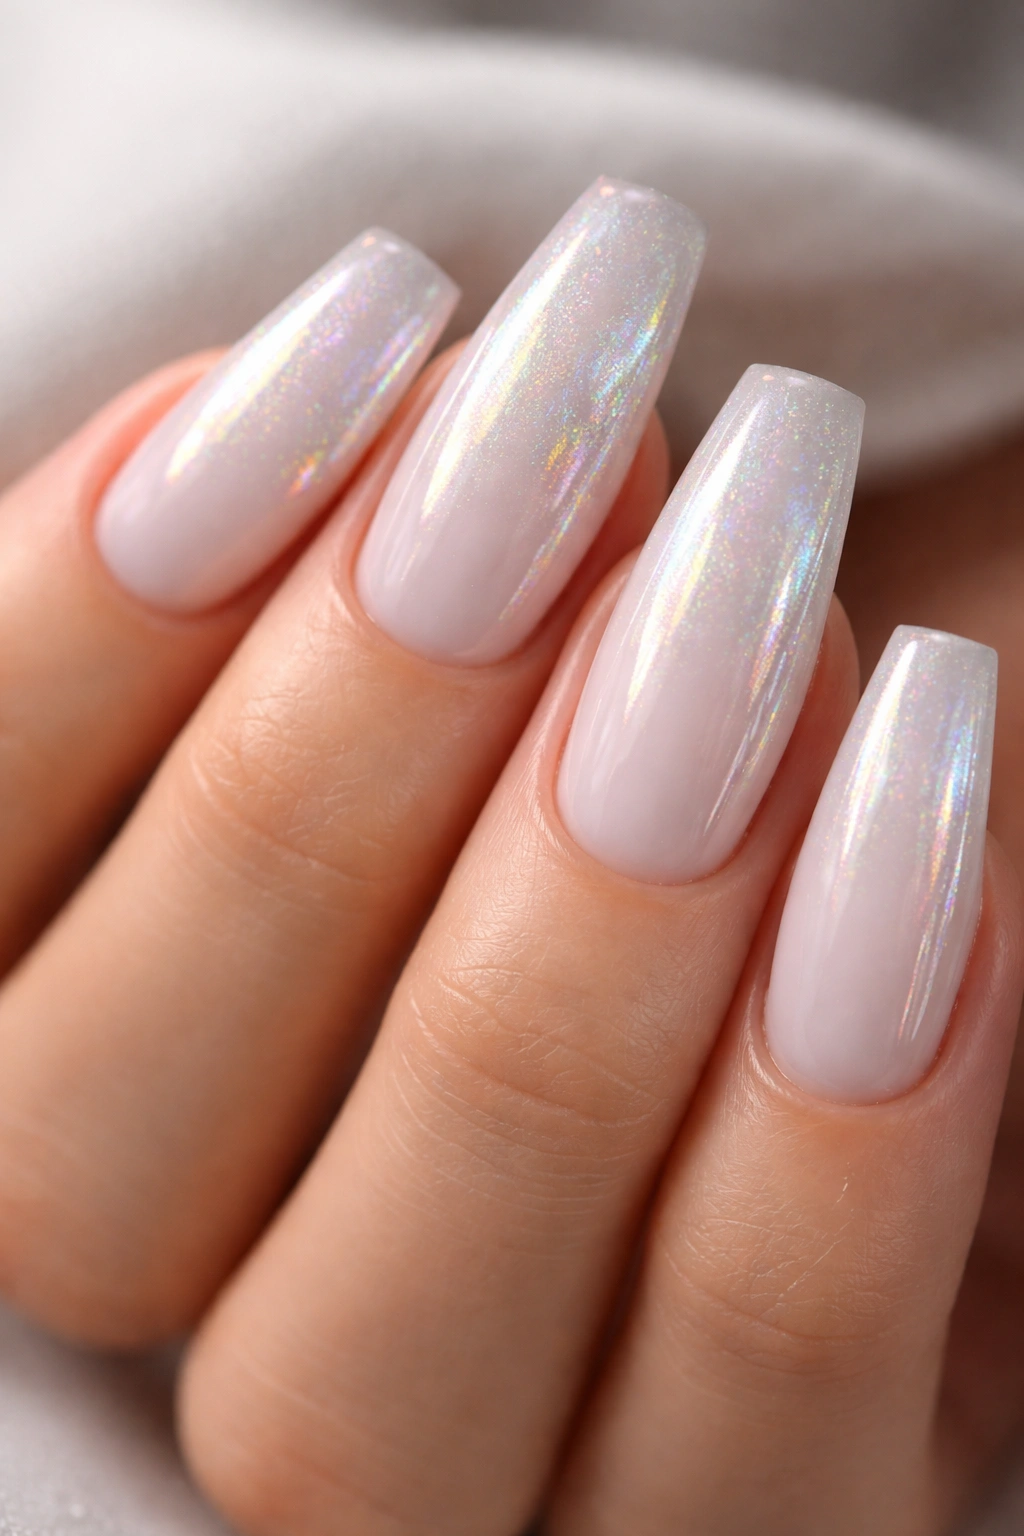
Apply a clear or slightly tinted holographic top coat over your milky white base. This creates an iridescent effect that shifts colors subtly as light hits the nail from different angles.
Holographic Effects for Modern Appeal
Holographic finishes add dimension and movement without changing the fundamental milky white color. In different lighting, the nail appears to shift slightly in color, creating an interesting visual effect that photographs beautifully.
Using Holographic Top Coats
- Apply your milky white base in two coats with capping of the free edge
- Choose a holographic top coat that’s compatible with regular polish (check product compatibility)
- Apply the holographic top coat in thin, even layers—holographic products often show application streaks if applied too thickly
- One to two layers of holographic top coat is usually sufficient
- The holographic effect will be most noticeable in natural light and under UV light
- Some holographic top coats are very shimmery, others are subtle—choose based on your preference
- The effect creates a modern, almost-futuristic aesthetic that’s still wearable
Worth knowing: Holographic products can sometimes be tricky to photograph well—the effect might look more subtle in photos than it appears in person.
14. Milky White with Nude Glitter Tips
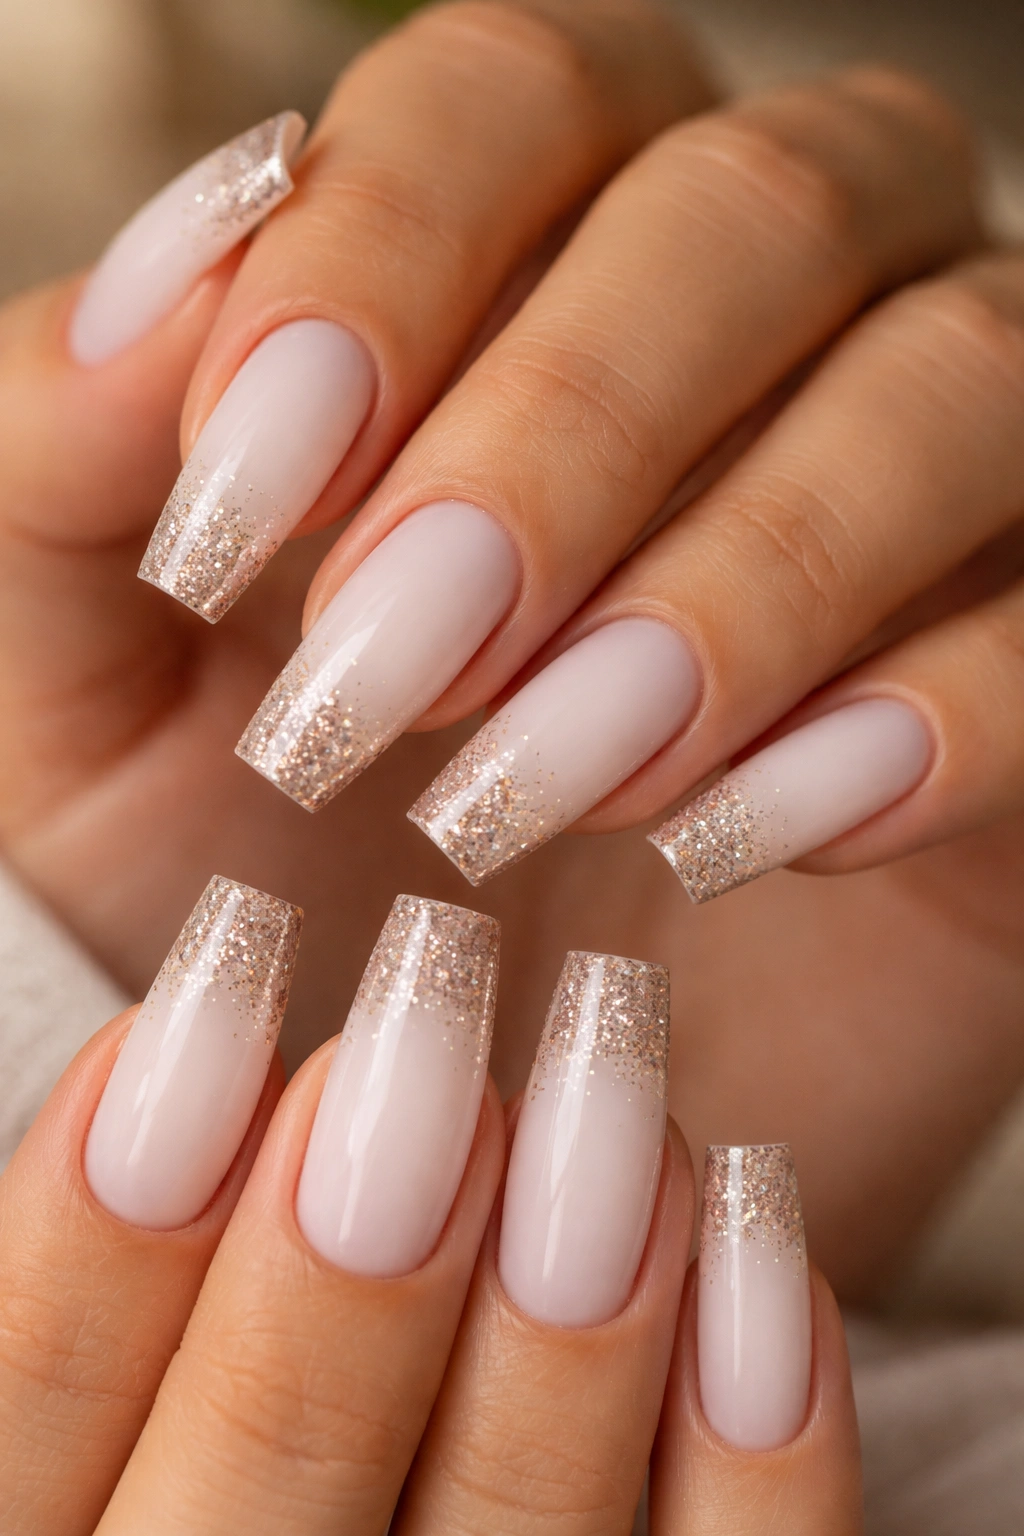
Blend glitter into your milky white base, concentrating glitter density at the tips for a gradient effect. Use neutral, nude-toned glitter that complements rather than contrasts with your milky white base.
Glitter for Subtle Sparkle
Glitter tips add celebration without requiring a complete design overhaul. When you use neutral glitter tones on a neutral base, the effect feels sophisticated rather than costume-y.
Incorporating Glitter Tips
- Apply your milky white base with proper base coat
- While still wet, apply glitter to the tip area using a brush or applicator—you can apply directly from the glitter bottle’s applicator
- Concentrate glitter density at the very tip and fade toward the middle for a gradient effect
- Use enough top coat to seal the glitter smoothly and prevent catching
- Some people prefer to mix glitter into clear polish for a more blended effect versus glitter applied to the wet base
- Nude glitter includes shades like champagne, rose gold, bronze, gold, and silver
- The subtle sparkle reads as more elegant than holographic glitter or chunky glitter
- Nude glitter against milky white reads almost like your nails are naturally catching light
Pro tip: Allow each layer to fully dry before applying the next—this prevents glitter from shifting around and getting into unwanted areas.
15. Milky White with Marbled Accent Nail
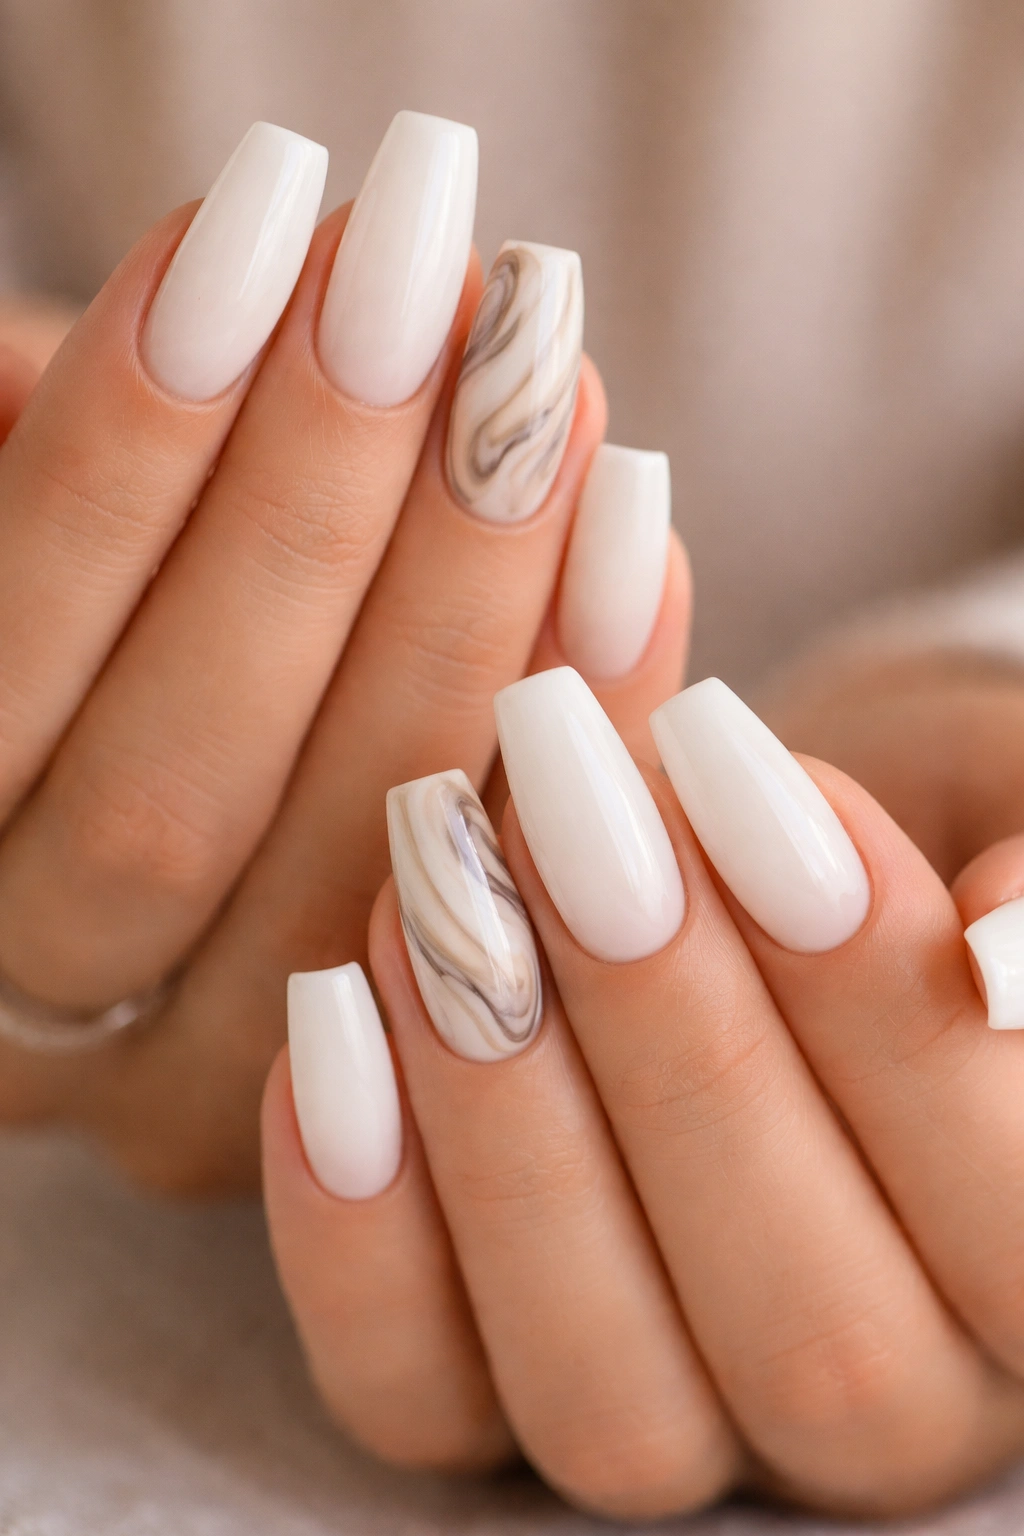
Keep most nails milky white and solid, but designate one accent nail per hand to feature a marbled or swirled pattern. Create abstract swirls in white, cream, gray, or taupe that blend into each other.
Accent Nails as Design Focus
Marbling on a single accent nail creates visual interest without committing the entire manicure to a complex design. This approach is perfect for people who like the idea of nail art but want to keep their overall look minimal.
Creating Marble Effects
- Use a specialized marbling tool or create your own by swirling polish on a non-porous surface
- Drop small amounts of white, cream, gray, and taupe polish onto a ceramic tile or glass surface
- Swirl the colors together using a toothpick or thin tool until you create an abstract pattern
- Working quickly before polish dries, use a special marbling tool or silicone stamper to pick up the pattern
- Transfer the pattern to your accent nail in one swift motion
- It typically takes a few practice attempts to get the timing and transfer right
- Once transferred, seal with glossy top coat
- Marbled patterns read as intentional and artistic while still being relatively simple to create
- The abstract nature of marbling means there’s no “perfect” outcome—variation is part of the appeal
Design alternative: If marbling feels too complicated, simply swirl two or three coordinating colors together on your accent nail using a thin brush for a similar effect.
16. Milky White with Subtle Shadow Effect
Create dimension by using a slightly darker shade of milky white or a cool gray-white to create subtle shadow lines along certain parts of the nail—perhaps following the coffin shape’s edges or creating an abstract shadow pattern.
Shadows for Subtle Dimension
Shadow effects add depth and sophistication without introducing a totally different color into the design. When shadows are subtle, they read as artistic rather than stark.
Creating Shadow Effects
- Choose a shade that’s only slightly darker than your base milky white—think cool gray-white or taupe-tinted white
- Using a thin brush, apply this shadow shade in strategic areas: along the side edges of the coffin shape, creating a subtle “outline” effect
- You can also create abstract shadow patterns that follow the nail’s natural contours
- Keep your hand extremely steady and your lines clean for a professional effect
- The shadow should look like it was created by light and dimension, not like you painted a dark line on your nail
- Blend the edges of your shadow slightly using a clean, slightly damp brush or sponge
- Seal with glossy top coat
- This effect works especially well on coffin nails because the shape’s angles naturally create shadow opportunities
Pro tip: Stand in natural light while creating shadow effects so you can see how light is hitting your nail and where natural shadows would logically appear.
17. Milky White with Embedded Pearl or Gem Accents
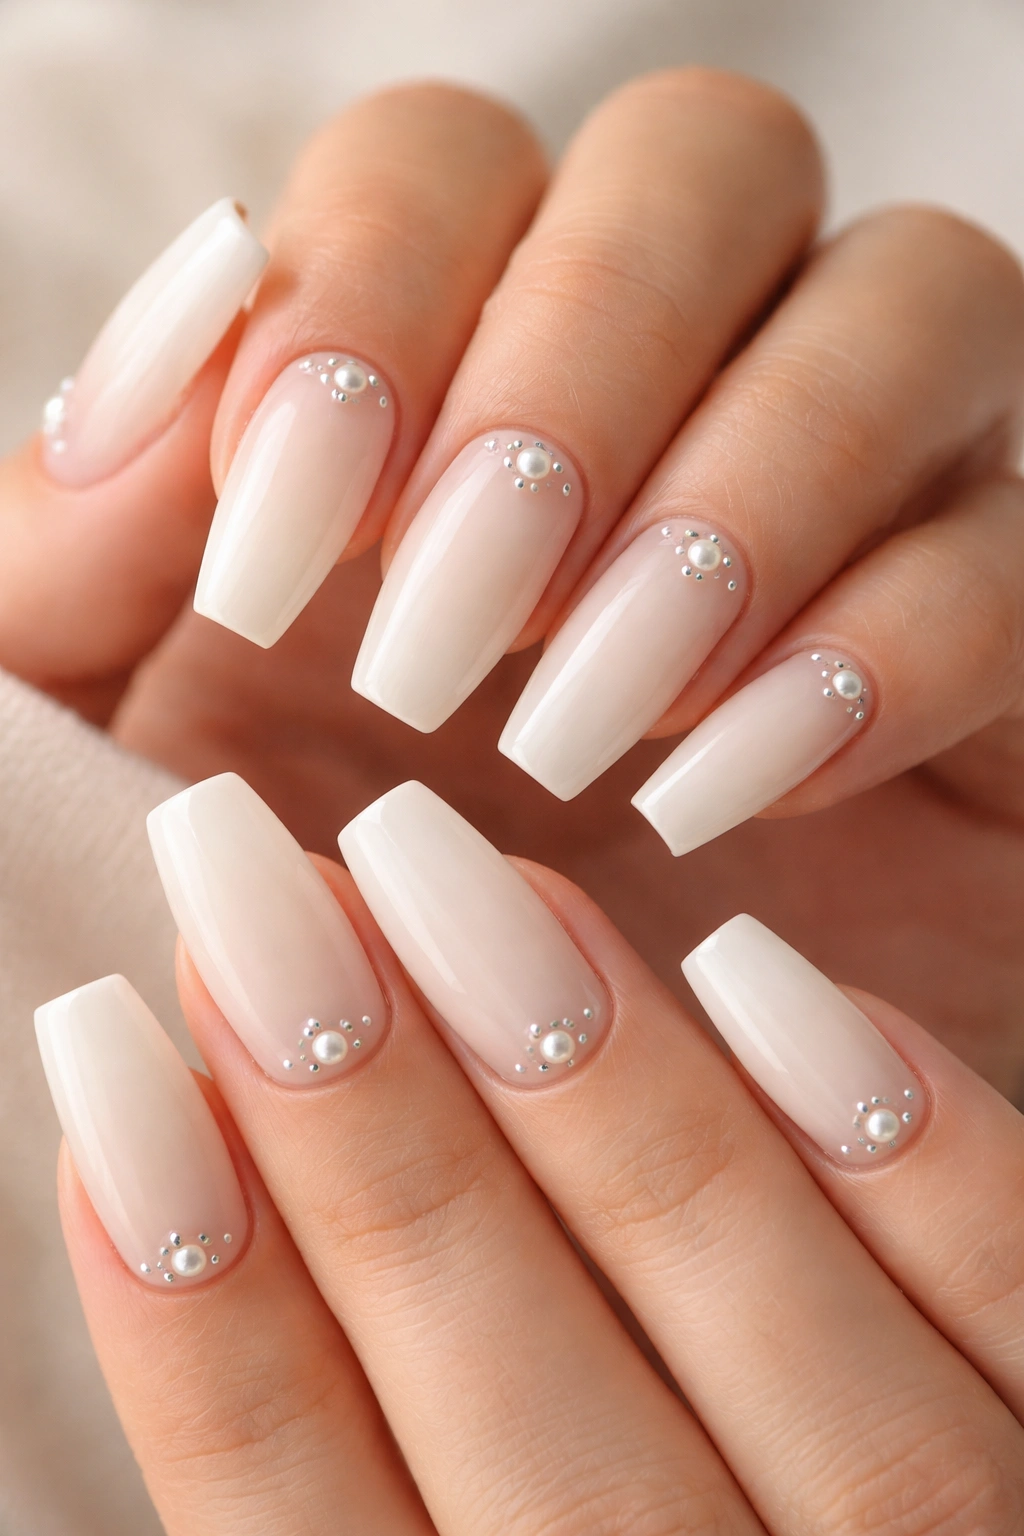
Embed small pearls, crystals, or rhinestones into your nails for a glamorous, dimensional effect. Place them sparingly—perhaps one pearl at the tip corner, or a small cluster near the cuticle—to avoid overwhelming the clean aesthetic.
Gems for Elevated Elegance
Embedded gems add instant sophistication and luxury without requiring complex design skills. When placed thoughtfully on medium coffin nails, gems create a jewelry-like accent that elevates your entire look.
Embedding Gems Securely
- Prepare your nails with milky white polish, capped and fully cured
- Apply a small amount of clear gel or dedicated gem adhesive to the back of your pearl or crystal
- Press the gem firmly into place and hold for several seconds to ensure adhesion
- Position gems at the nail tip corner, along the edge, or in a small clustered pattern
- Less is more—one or two gems per nail looks elevated, while many gems can look costume-y
- Seal with a thick layer of glossy or builder gel top coat around the gem to protect it from catching and ensure longevity
- Pearls, crystals, and rhinestones all work beautifully—choose based on the vibe you want
- UV-cured gel adhesives tend to hold gems more securely than regular nail glue
- If you prefer minimal gems, concentrate them on just two nails (your ring fingers) for subtle emphasis
- Gems will eventually fall out—this is normal wear, and loose gems are easily replaced with fresh ones
Insider note: Gems add weight to your nails, so some people find them slightly less comfortable for everyday wear, but the visual payoff is worth it for special occasions.
Final Thoughts
Milky white coffin nails work because they occupy a unique space in nail aesthetics—modern and intentional without feeling extreme. Medium length keeps the look wearable, and the creamy opacity of milky white reads as both sophisticated and approachable. Whether you’re drawn to the simplicity of a single-color base or you want to layer in metallic accents, delicate art, or subtle embellishments, these designs showcase the flexibility of this timeless combination.
The coffin shape itself is having a real moment because it’s flattering on most nail beds and it photographs beautifully, creating an almost automatic sense of intention and polish. Add the versatility of milky white—which complements every skin tone and works for formal occasions, casual everyday wear, and everything in between—and you’ve got a nail style that truly works.
Start with whichever design resonates most with your personal style and skill level. If you’re new to nail art, begin with the minimalist or dot designs that require less precision. Once you’re confident in your base application and have some experience, experiment with the more complex designs like marbling or gemstone embedding. The best part about milky white nails is that you can refresh your design frequently without committing to something permanent—you’ve got endless combinations to explore.
