

The fastest way to make a coffin manicure look sharper is to strip the color story down to two extremes. Black and white coffin nails do that with zero fuss. No shimmer distracting from the shape, no soft nude base trying to calm things down—only hard contrast, crisp edges, and that flat coffin tip showing off.
Coffin nails already have built-in attitude. The sidewalls taper, the free edge stays blunt, and the whole shape asks for clean design work. Put black next to white and every detail gets louder: the line thickness, the symmetry, the topcoat, even whether the nail tech kept the apex in the right spot. A crooked smile line that might disappear in beige polish will scream at you in monochrome.
That’s why I like black-and-white sets so much. They leave nowhere to hide. White polish has to be opaque instead of streaky, black has to look inky instead of gray, and the art placement needs to respect the width of the nail. When it all clicks, the manicure looks deliberate in a way busy color combos rarely do.
Some of these sets lean sleek. Some look punk. A few have that graphic, editorial feel that makes your hands look dressed even when you’re wearing a plain black tee and old jeans.
1. Matte Black and White Coffin Nails With Razor French Tips
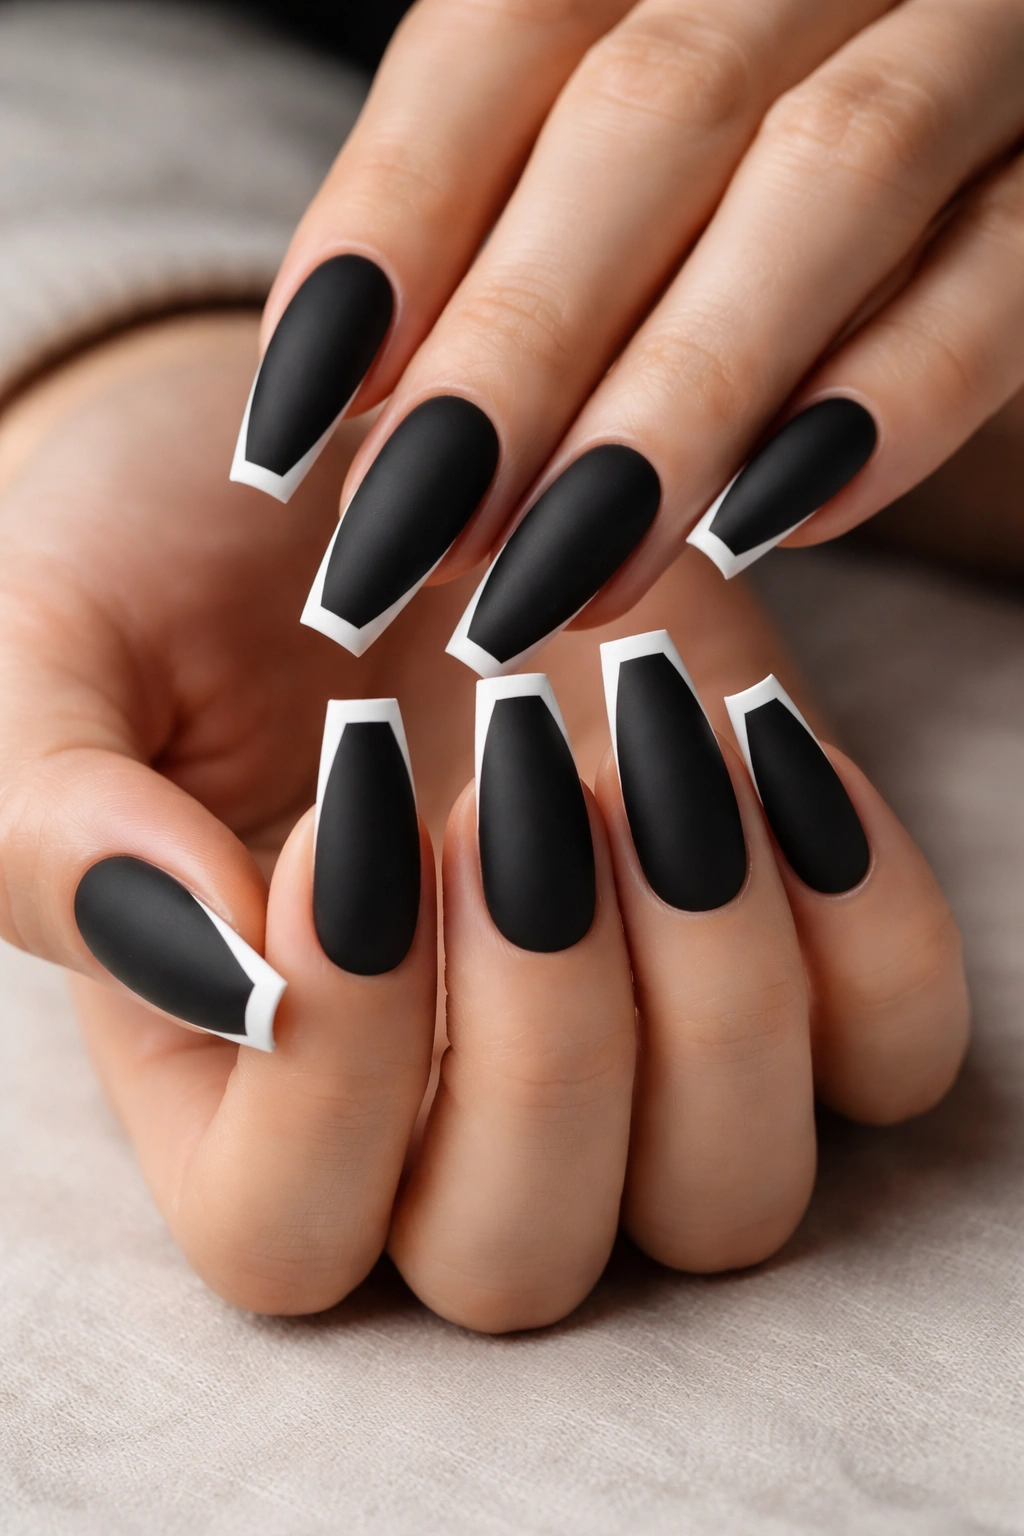
A matte black base makes a white French tip hit harder than a full set of rhinestones ever could. The trick is scale. If the white tip gets too thick, the set starts looking chunky and the coffin shape loses its edge. Keep that line narrow—about 1 to 2 millimeters on a medium-long nail—and the contrast stays sharp.
What I like here is the finish clash. Matte black absorbs light, while a crisp white tip looks almost cut out against it. On coffin nails, that flat free edge gives the French line a clean landing spot, so you get structure without the sweetness that classic pink-and-white French sets tend to carry.
Why it lands so well on the coffin shape
A rounded almond nail can take a deep smile line. Coffin nails usually look better with a shallower curve or even a near-straight micro tip, because the shape already has enough drama in the side taper. Push the curve too deep and the nail starts pulling in too many directions at once.
A good tech will also keep the sidewalls tight. Black polish on a bulky shape can make the whole set look wider than it is.
- Ask for a matte topcoat over the black base and a glossy seal only over the white tip if you want the contrast to pop even more.
- Keep the nails at least a medium coffin length so the French line has room to breathe.
- Choose paper-white polish, not a sheer milky white, if you want the set to read cold and graphic.
- Skip extra art on all ten nails; one solid white accent nail is plenty if you want more contrast.
Best move: pair this set with slim silver rings and stop there.
2. Glossy White Coffin Nails With Black Drip Tips
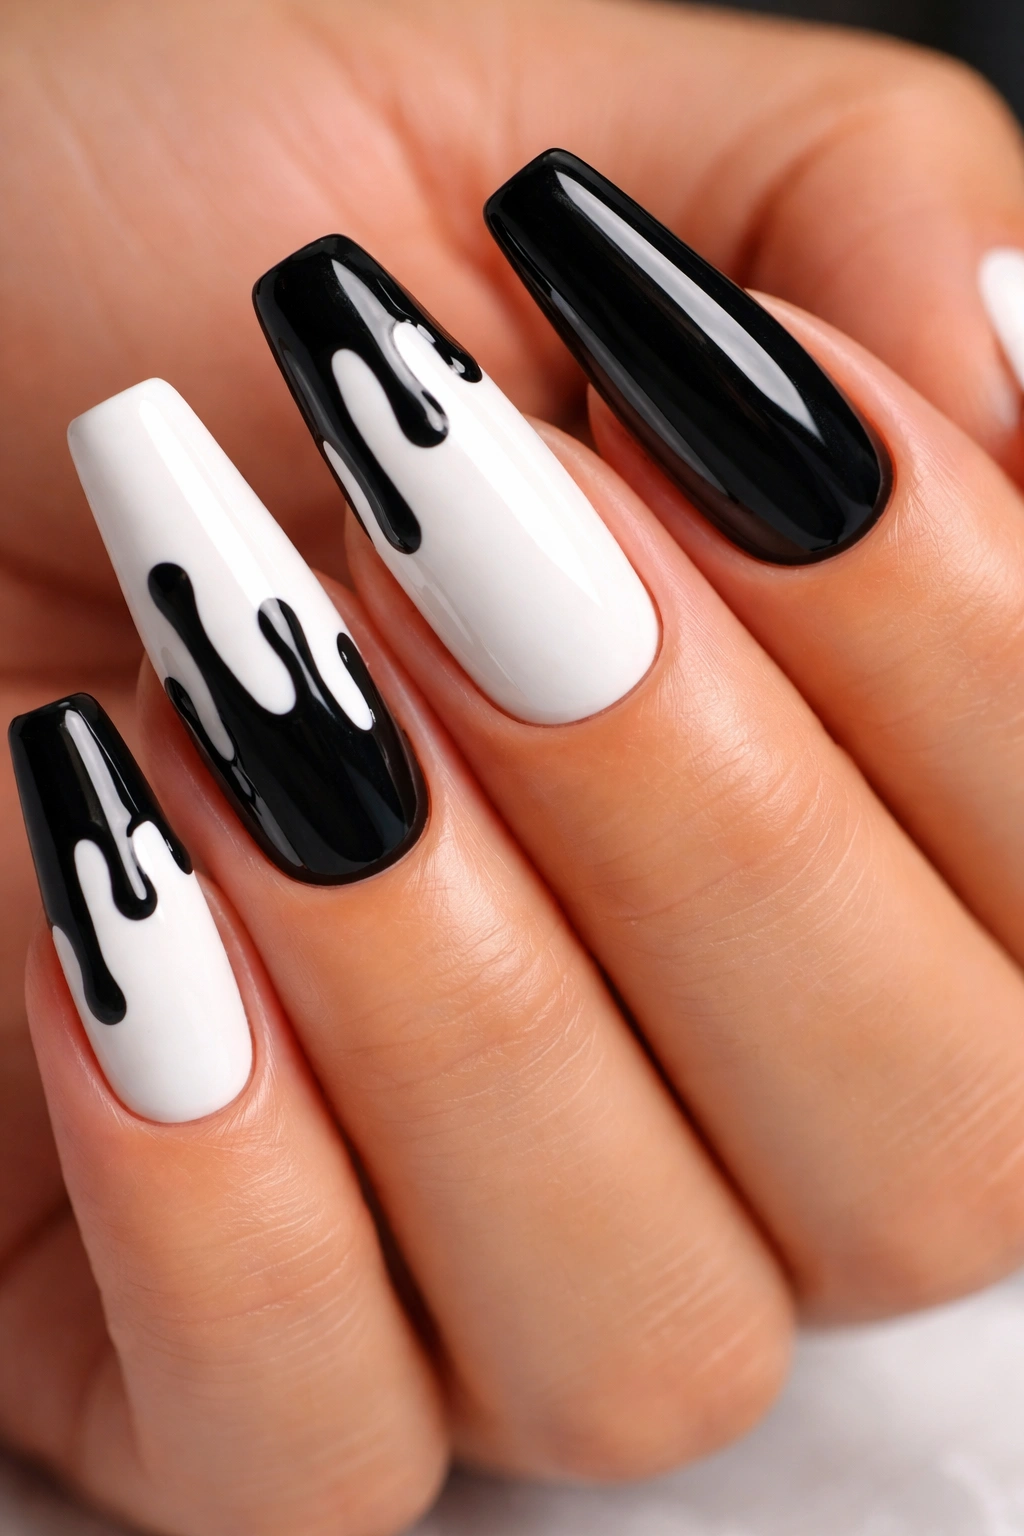
Nothing turns a clean white set meaner faster than black drips crawling over the tip. Done well, the drips look fluid and deliberate, like wet ink rolling down the nail. Done badly, they look like melted Halloween plastic. The difference comes down to shape and spacing.
Start with a white base that is solid and smooth, not chalky. I prefer a slightly creamy white over a blue-white here, because the black drip art already brings enough bite. A stark, correction-fluid white can make the whole set feel flat. You want depth, even in a two-color manicure.
The drips should begin at the free edge and fall unevenly toward the center of the nail. Uneven matters. If every drip is the same width and length, the art feels stamped on. I like two long drips, one medium, one short, with rounded ends so the design still feels liquid. A high-gloss topcoat helps a lot, because shine gives the black that fresh-paint look.
You do not need drips on all ten nails. I’d use them on two or three fingers per hand, then keep the rest solid black or solid white. Too many drip nails can crowd the eye, and coffin nails already have strong geometry carrying the set.
One more thing: keep the drips above the stress area if you want the design to stay readable after a fill. Once grow-out kicks in, overloaded designs can slide downward and look tired fast.
3. Checkerboard Accent Coffin Nails With Alternating Solids
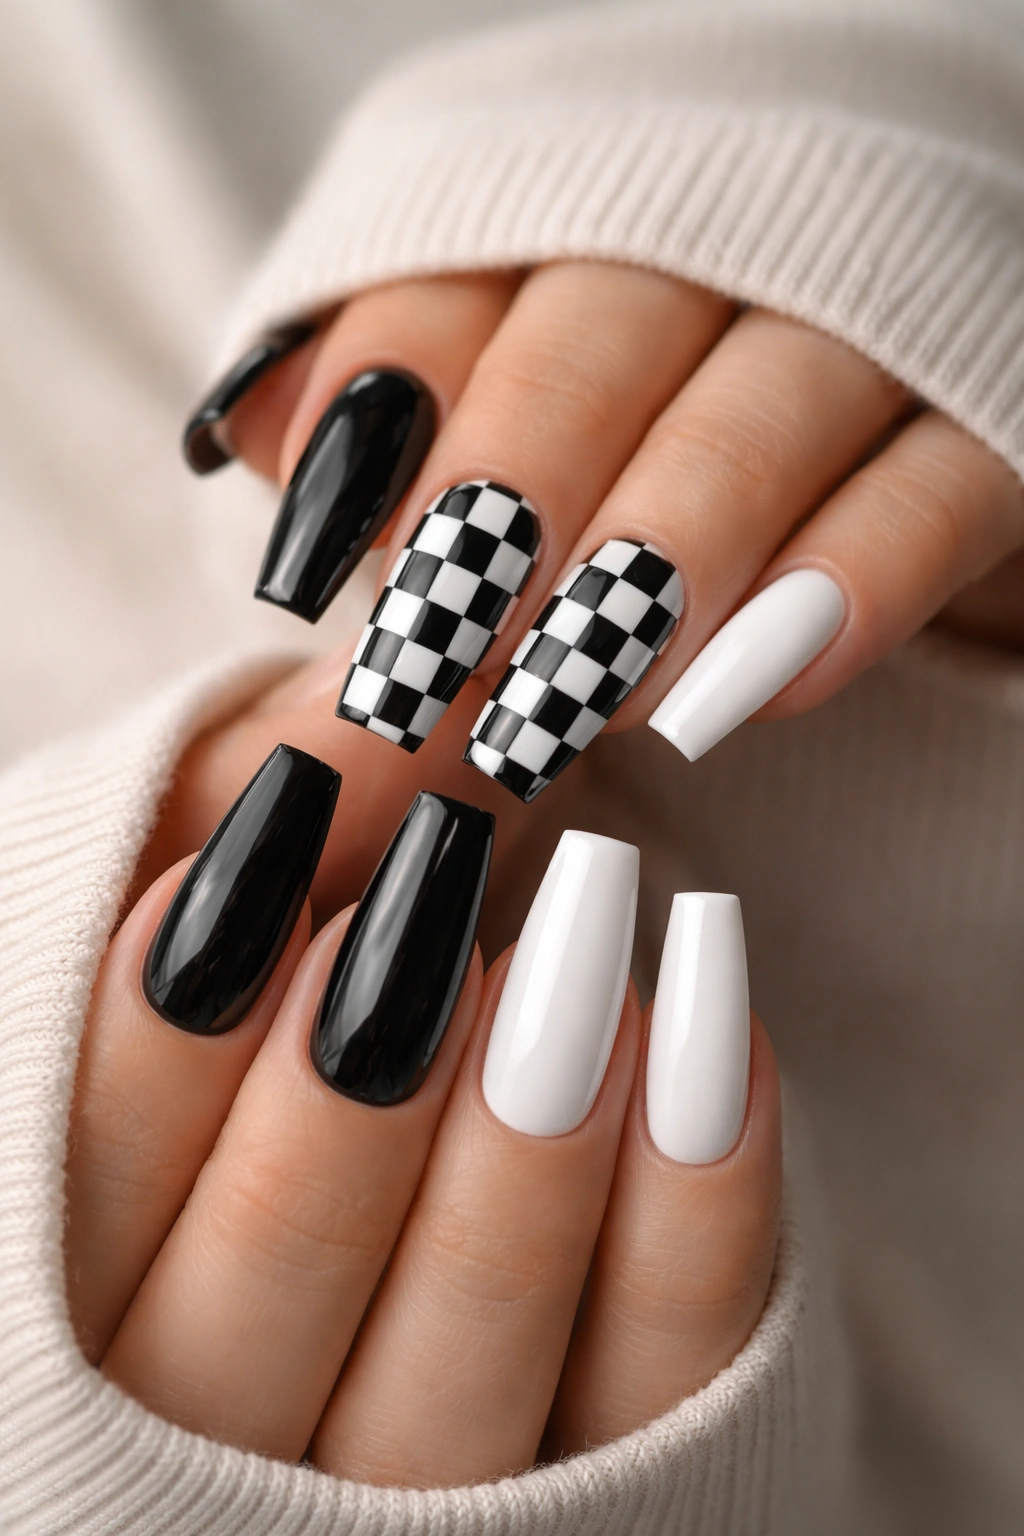
I’ve seen checkerboard sets go wrong in one predictable way: people put the pattern on every nail. Ten full checkerboards on long coffin tips can read costume before you’ve even left the salon. Two checker accents, though? That lands.
Checkerboard works because the coffin shape gives you straight edges and a flat tip, which helps the squares look clean rather than warped. Still, square-by-square placement matters more than people think. If the pattern follows the taper of the nail too aggressively, the checks near the tip get stretched and the whole thing starts looking wobbly.
My favorite version uses two checkerboard nails, six solid nails, and maybe two nails with a half-checker corner if you want a little echo without crowding the set. That mix gives the pattern room to breathe.
- Keep each square around 2 to 3 millimeters wide on a medium coffin nail.
- Ask your tech to make the lower checks slightly rectangular near the sidewalls so the design still looks straight once the nail tapers.
- Use a glossy topcoat if you want the checkerboard to feel crisp and slick.
- Matte can work, though it tends to soften the graphic bite.
Short coffin tips can wear checkerboard, but the squares need to get larger and fewer. Tiny checks on a short nail blur together from arm’s length, which defeats the whole point.
Two accents. That’s the sweet spot.
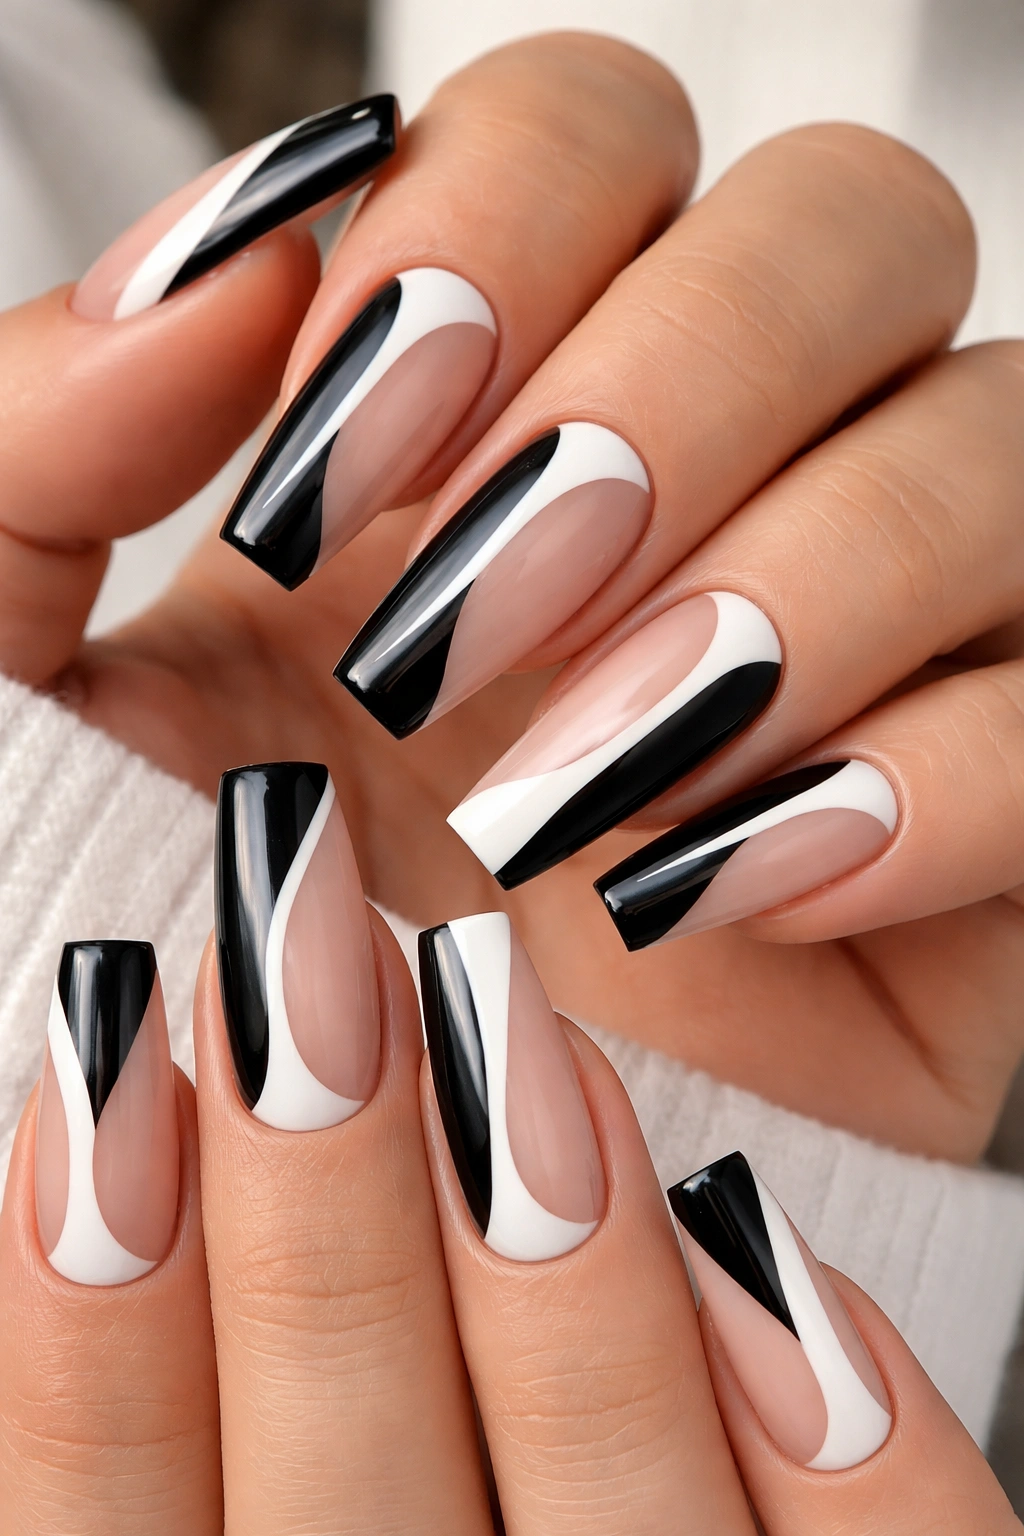
4. Split Down the Middle Black-and-White Nails
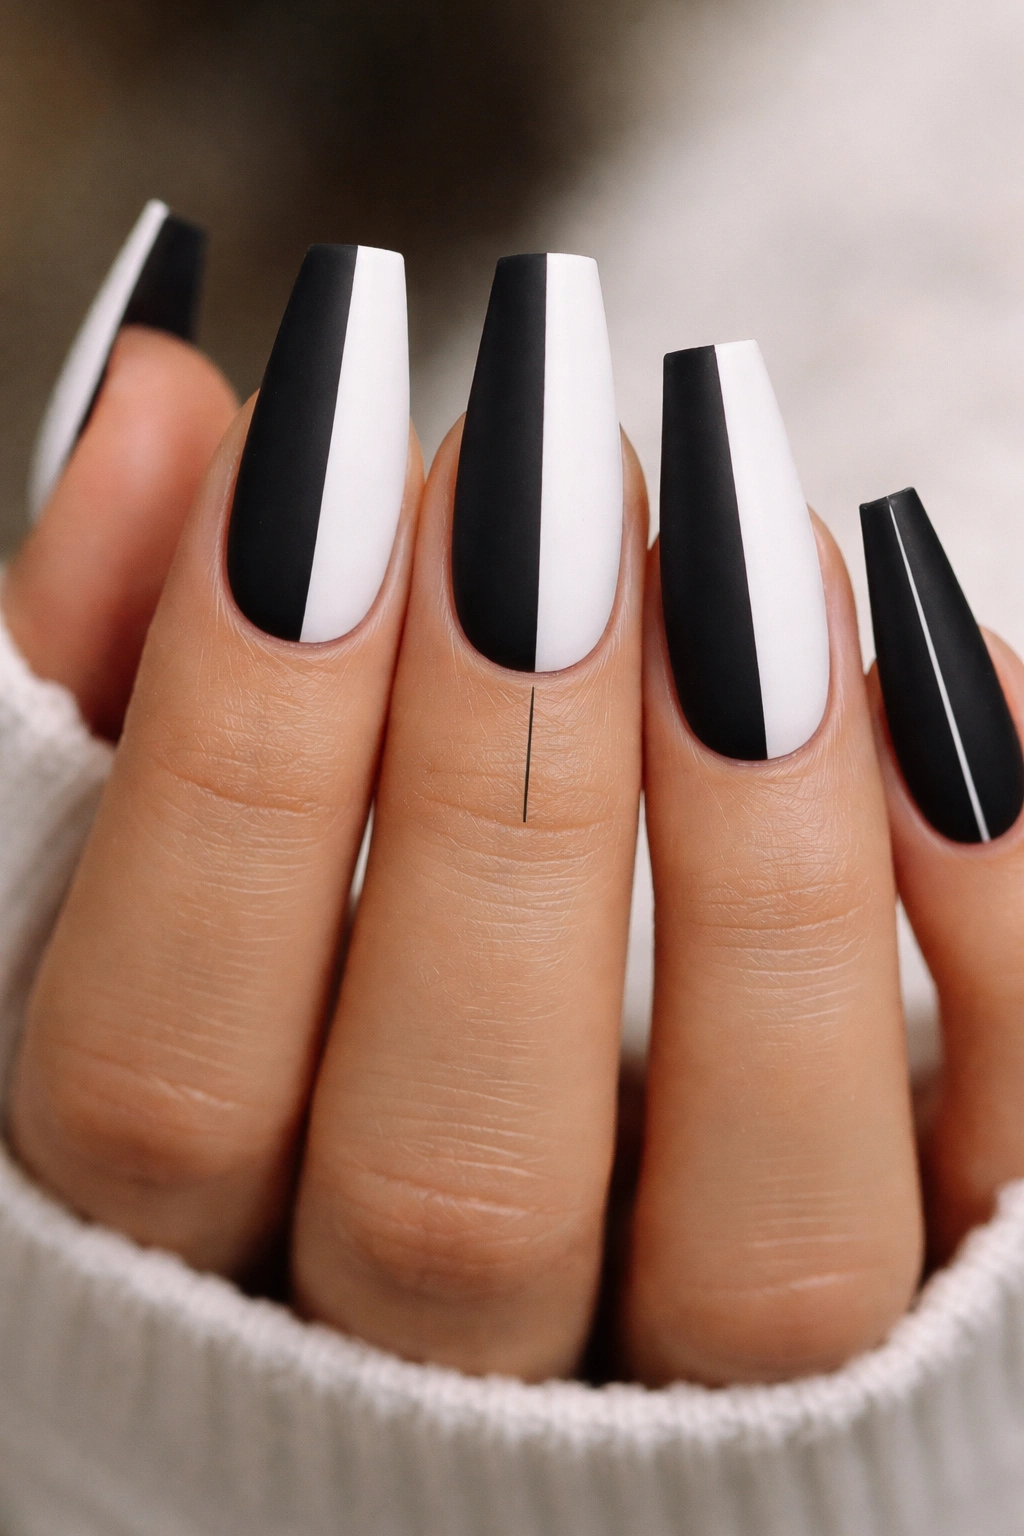
Symmetry is not the whole game here.
Alignment is. A center split manicure only looks sharp when the dividing line follows the visual center of the nail, not the cuticle, not the finger, and not where your tech guessed it might land after a quick glance. Coffin nails make that line easy to admire—and easy to spot when it’s off by a hair.
I like a dead-center vertical split on some sets and a slightly off-center split on others. A true center line looks clean and almost architectural. Shift it a bit, maybe 60 percent black and 40 percent white, and the nail gets more movement. One side feels heavier, which can make the whole set look bolder.
A thin negative-space gap between the colors can sharpen the effect even more. I’m talking less than 1 millimeter—a sliver, not a stripe. That tiny clear line gives each color a hard border and keeps the two shades from looking muddied where they meet under topcoat.
You can mirror the split from hand to hand if you want balance, or reverse the color placement nail by nail for a more graphic look. Both work. What does not work is mixing random split directions without a plan.
Matte finish makes this design feel stern. High gloss turns it slick and dressy. If you wear a lot of black tailoring, leather jackets, square-toe boots, or silver jewelry, this one slips right into that look without trying too hard.
5. Milky White Coffin Nails With Black Flame Outlines
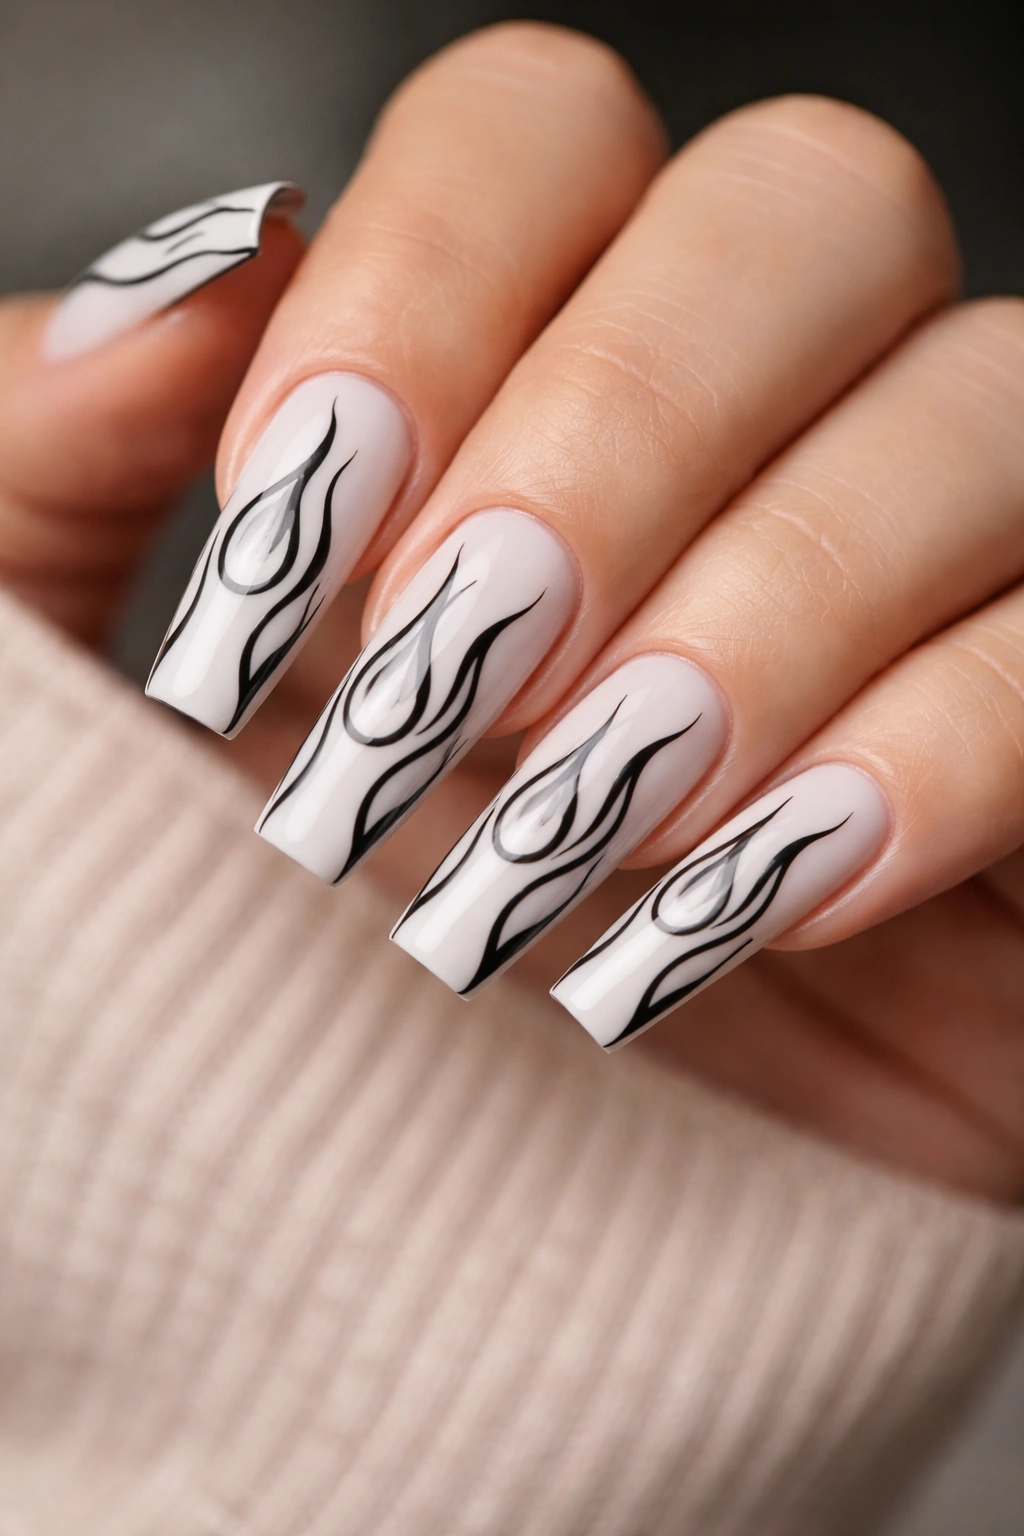
Why do flame nails still hold up when so many themed designs burn out fast? Because flames are more about movement than novelty. On a coffin nail, those upward curves echo the taper of the shape, so the design feels built into the structure instead of pasted on top.
A milky white base keeps the art from looking harsh. Straight bright white can work, though it tends to flatten the design. Milky white gives the black outlines a little softness around the edges, which helps the flames read as smoky rather than cartoonish. I’d keep the flames thin near the cuticle, then wider toward the middle of the nail, tapering again before they hit the tip.
You only need three to five flame tongues per nail. More than that and the art starts tangling into itself.
Asking for flames that stay sharp
Tell your nail tech you want outlined flames, not filled-in blobs. That wording matters. Filled flames can swallow the nail and make the set feel heavy, while outline work keeps more white showing through.
I also like this design best on medium or long coffin tips. Short nails don’t give the flames enough runway, so the curves get cramped.
Gloss topcoat looks slick here, but matte has a burned-charcoal mood that suits black flame art in a different way. Neither is wrong. I lean gloss because it keeps the line work crisp from a distance.
6. Patent Black Coffin Nails With White Spiderweb Lines
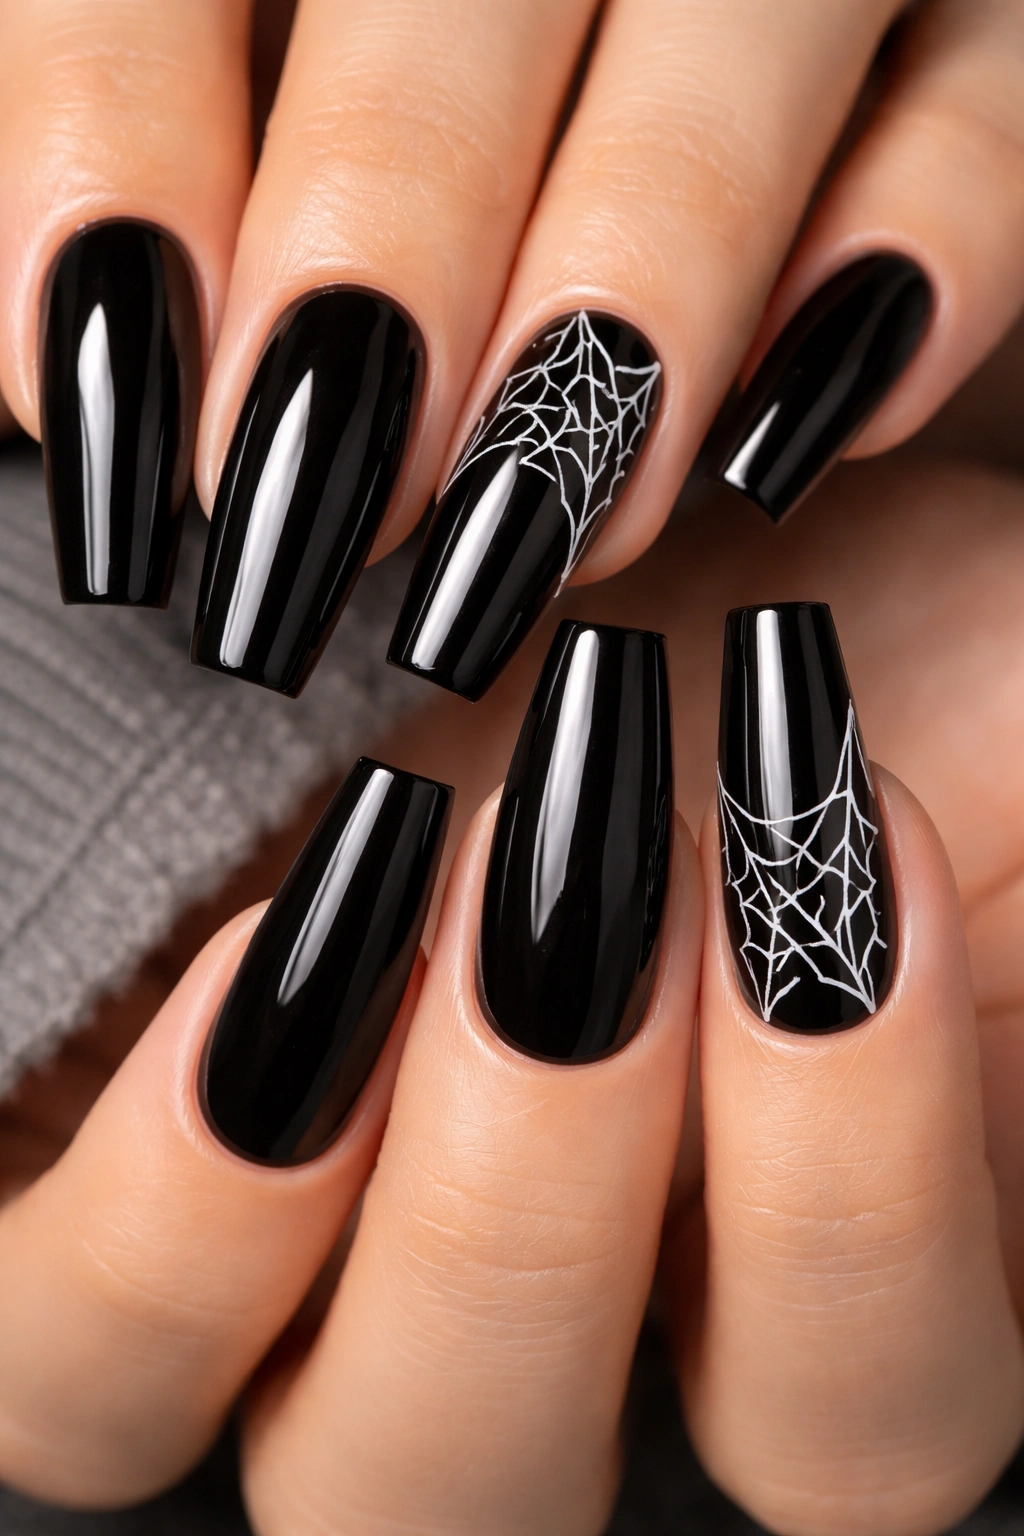
Dark. Slick. Slightly sinister.
A glossy black base with fine white spiderweb lines has a hard, lacquered look that matte sets can’t quite match. The web pattern gives you detail, while the black underneath keeps the whole set from drifting into costume territory. That balance matters. Spiderweb nails can look cheesy fast if the lines get thick or if every nail carries the same full web design.
I’d use the web art on one or two accent nails per hand, usually the ring finger and thumb, then keep the rest solid black or black with a small white corner detail. The cleanest version starts the web from a top corner or sidewall rather than the center of the nail. Full centered webs are harder to pull off on coffin tips and can look crowded near the free edge.
Thin line work is everything here. A liner brush that lays down hairline white arcs will make the set feel sharp. Thick gel paint will make it feel heavy. You want the web to look drawn, not piped.
This design also needs a glassy topcoat. A dull shine kills the effect. If the finish is right, the black base looks like patent leather and the white lines sit on top with crisp contrast. If you want one tiny extra detail, a single black crystal in the center of one web can work. One. Stop there.
7. Diagonal Tuxedo Panels on Coffin Nails
Two diagonal blocks and one slim white line can fake the look of a tuxedo lapel. That’s the charm here. Unlike a straight French tip, a diagonal black panel pulls the eye upward, which makes the fingers look longer and the coffin shape look leaner.
Picture a white or nude-toned base with a black panel cutting across the nail at about a 45-degree angle, starting near one sidewall and finishing at the opposite corner of the tip. Add a narrow white strip along the edge of that black panel and the whole manicure feels dressed up without losing its bite.
I like this design on people who want edgy nails but still need them to look polished with a blazer, a button-down, or office clothes that lean clean and dark. It has structure. It has attitude. It doesn’t need skulls, flames, or studs to make its point.
A glossy finish makes it read sleek. Matte turns it moodier and a little more severe. I’d keep the color blocking on most nails, then maybe add one solid black nail and one solid white nail to stop the set from getting too matchy.
If you bring this idea to a salon, ask for crisp diagonal color blocking with thin pinstriping, not “tuxedo nails” and hope the tech reads your mind. That phrase gets interpreted in too many ways. Clear instructions save you from awkward redesign time halfway through the appointment.
8. Black and White Coffin Nails With Smoke Marble Swirls
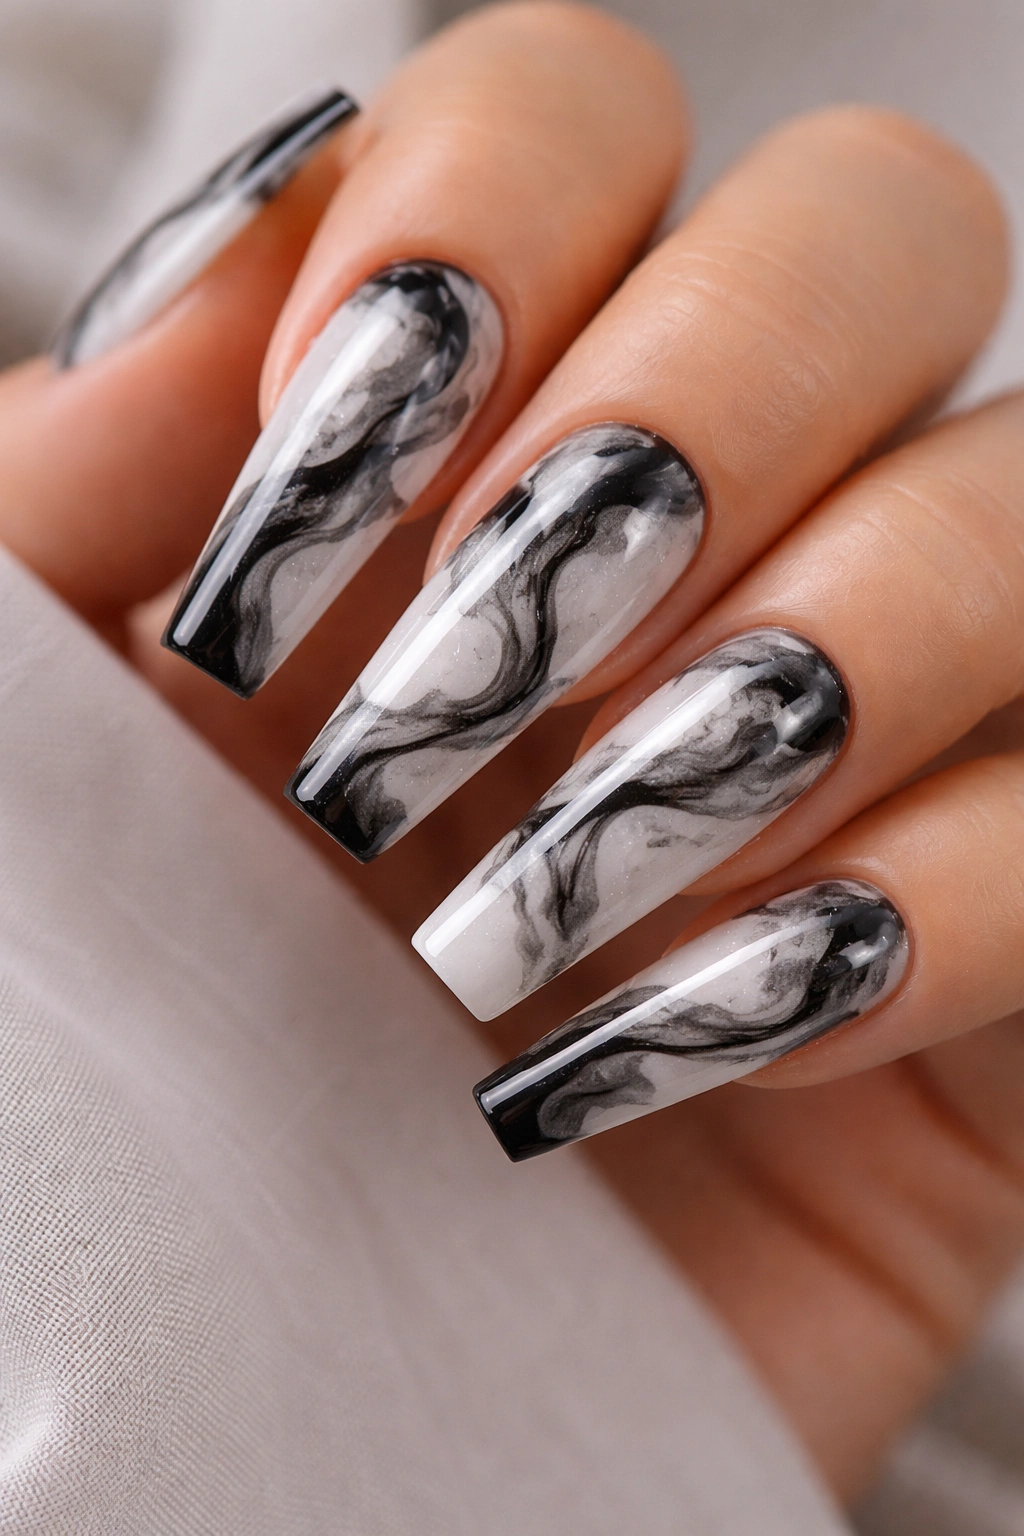
Marble can drift into countertop territory fast, which is why I only like it when the black looks like ink in water, not stone with heavy veins. On coffin nails, smoke marble gives you motion without losing the hard monochrome palette. The result feels moody instead of stiff.
The base should stay milky or sheer white, not opaque chalk white. That little bit of translucence helps the black swirls blur at the edges, which is where the smoke effect lives. A blooming gel can do this well. Alcohol ink can too, though it needs a patient hand and a clean topcoat to keep the finish smooth.
What makes the veining look expensive
Too many lines ruin marble. Leave open space.
You want two or three main swirls, maybe one soft gray shadow vein, and then stop. When every inch of the nail gets filled, the design turns busy and the coffin shape disappears under it.
- Ask for the black to fade into soft charcoal edges, not solid branch-like cracks.
- Keep marble art on two accent nails if you want the set to stay sharp.
- Pair those accent nails with solid black, solid white, or one split nail for structure.
- A glossy topcoat usually looks best, though a velvet-matte finish can give the smoke a dry, stone-like edge.
My preference: one hand with more black in the marble, the other with more white. That tiny mismatch keeps the set from looking copied and pasted.
9. Negative-Space Coffin Nails With Black and White Cutout Bars
Leave part of the nail bare and the contrast gets louder.
Negative space works so well on coffin nails because the shape already has hard outer lines. Add black bars, white blocks, or angled cutouts over a clear or sheer pink base and the empty space becomes part of the design, not dead space you forgot to paint. That sounds obvious, yet this is where many sets go sideways. If the blank areas are random, the manicure looks unfinished. If the clear windows are placed with intent, the whole set feels graphic and modern without leaning soft.
I like long vertical bars near the sidewalls, white half-moons near the cuticle, and black corner blocks near the tip. Those shapes echo the coffin silhouette instead of fighting it. Tiny triangles can work too, though they need crisp points. Muddy corners ruin geometric art faster than any bad color choice.
Another upside: negative-space nails grow out more gracefully than full-coverage art. You still need fills—once the apex shifts forward, the set stops looking clean—but the grow-out line doesn’t hit as harshly as it does on a solid black manicure.
Skip giant clear sections at the free edge. They can make long coffin nails look thin and unfinished.
One more practical note. If you wear gel extensions or acrylics, do not pry off a lifting corner because “it’s only one nail.” Moisture trapped under product is where trouble starts, and dark designs can hide lifting until it has moved farther than you think.
10. Croc-Texture Black Nails With Flat White Accent Fingers
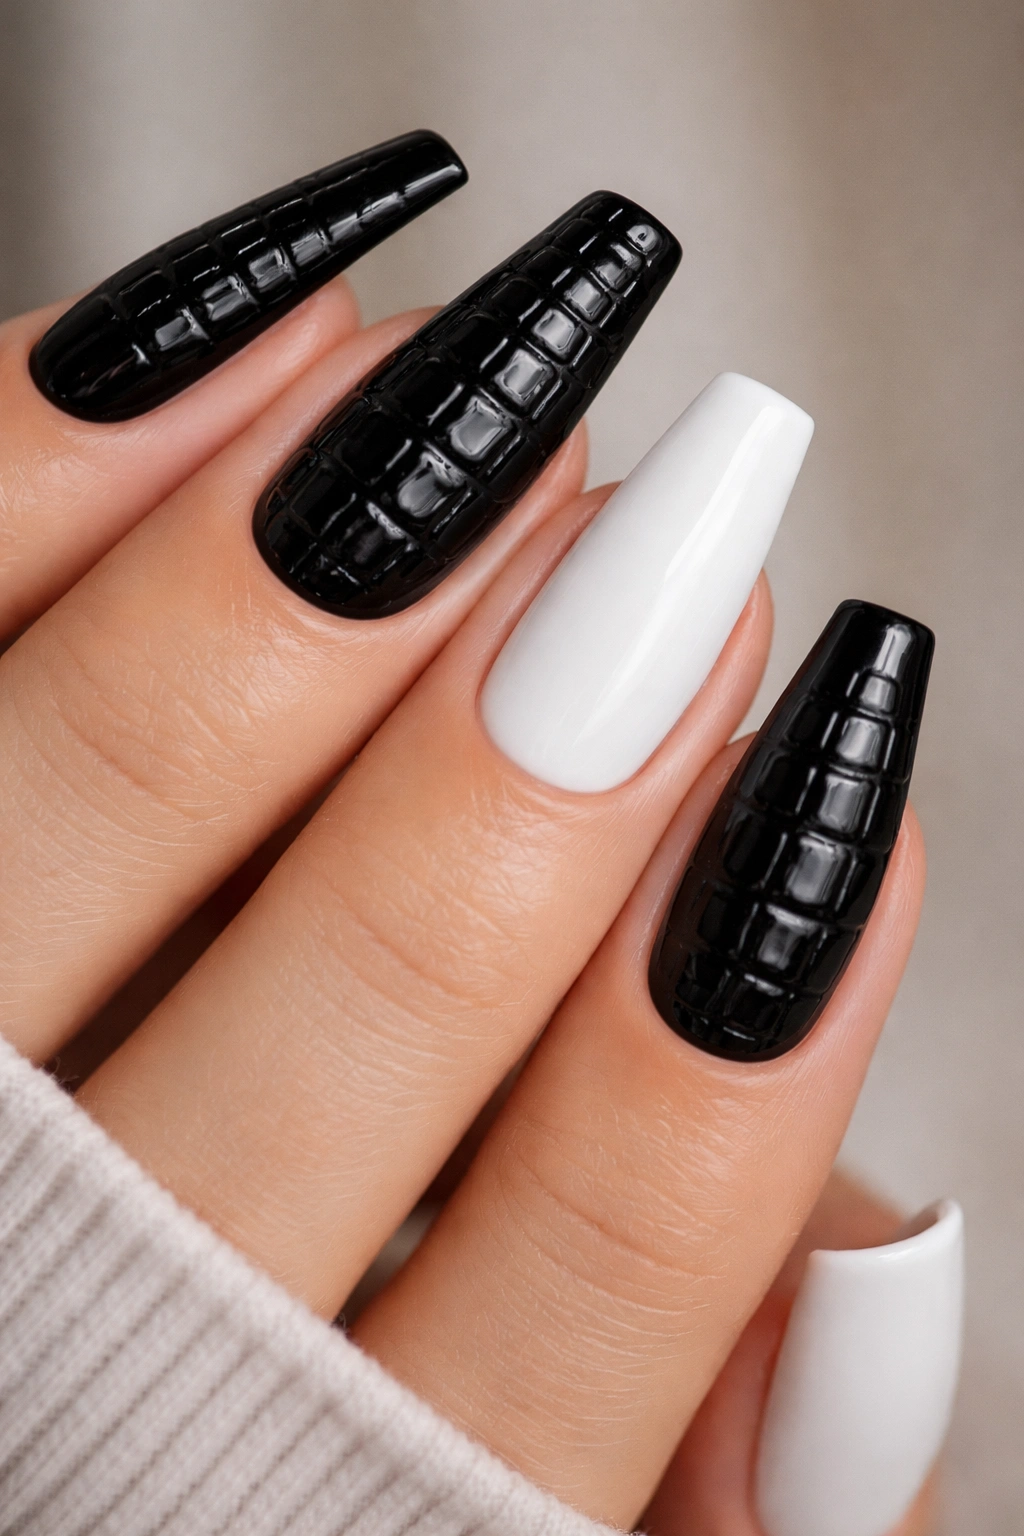
Texture does half the work.
A croc-texture black nail next to a flat white accent finger has more bite than a lot of complicated hand-painted art. The embossed pattern catches tiny shadows across the surface, so even a pure black nail looks layered. On a coffin shape, that texture feels heavier and more grounded than it does on a rounded tip.
I would not put croc texture on all ten nails. Two textured black nails per hand is enough. Ring finger and thumb usually carry it well, while the other nails stay solid white or white with a slim black outline. That mix keeps the set readable from a distance.
- Keep the scales small and tight. Oversized croc pattern can make the nail look bulky.
- Use high gloss over the textured black nails so the raised pattern shows up.
- Put a matte topcoat on the white nails if you want stronger contrast between textures.
- Ask for a proper apex under the texture, because extra gel without structure can make long coffin nails look puffy.
This design wears best when the surface stays clean. Hand cream, cuticle oil, and lint can settle into deep texture more than people expect, so a soft brush and a quick rinse keep the black looking sharp. A small maintenance price. Worth it.
11. Graffiti-Scribble White Coffin Nails With Black Marker Art
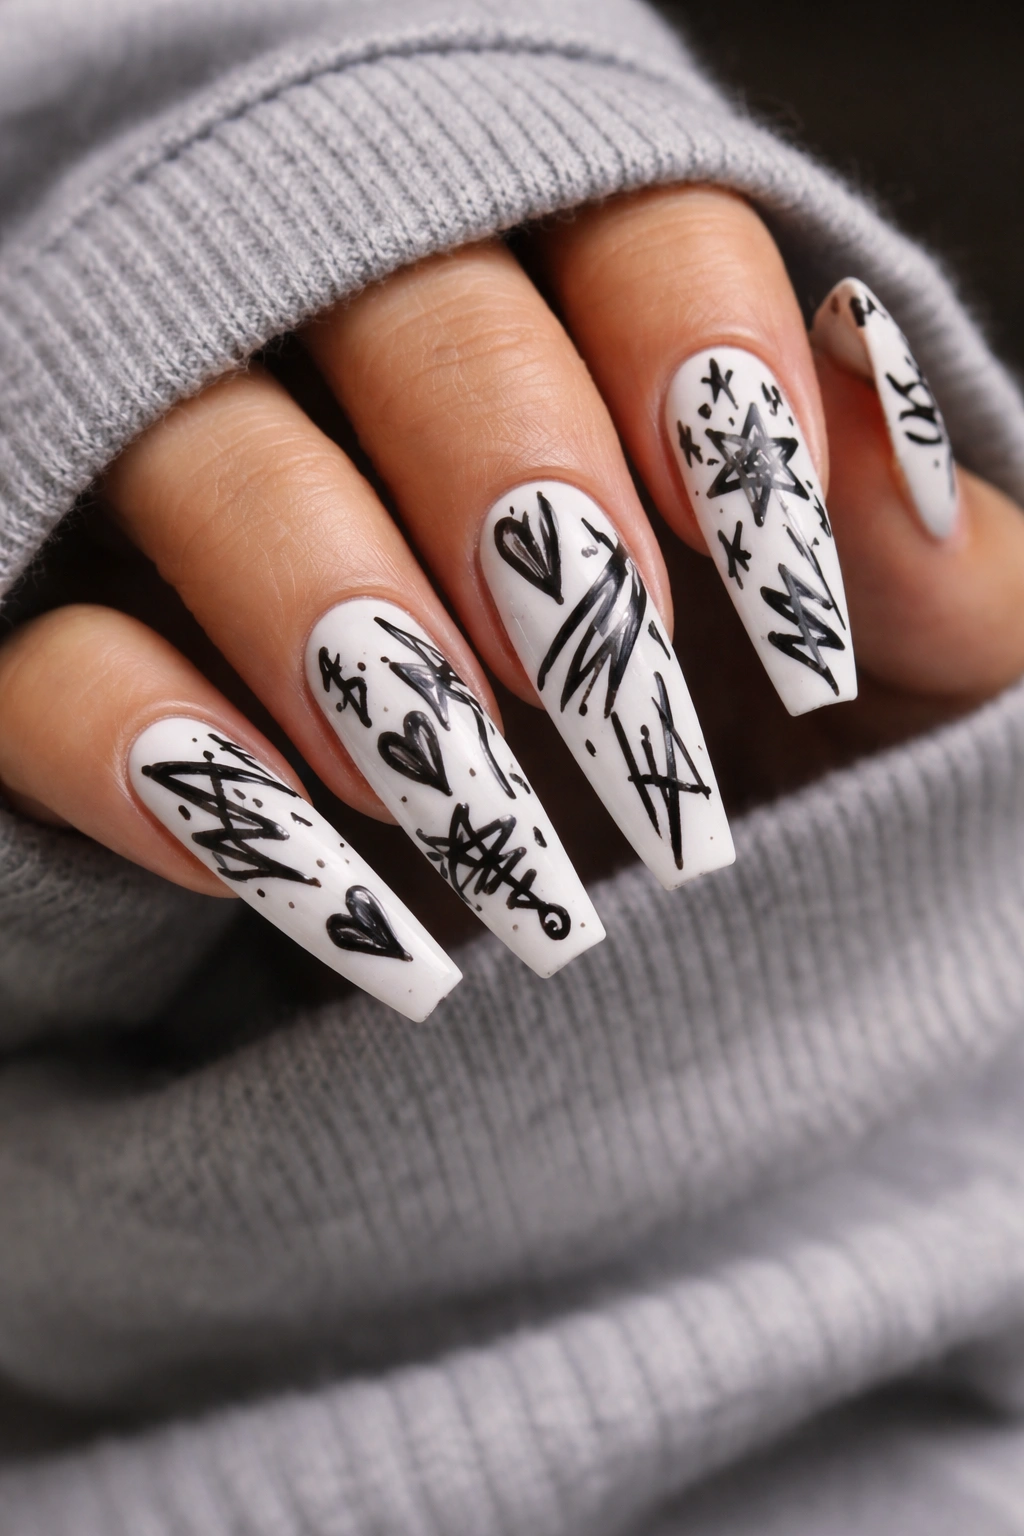
If you want a set that looks like it belongs at a basement gallery opening, graffiti-scribble nails are hard to beat. White base. Black marker-style lines. Broken stars, rough X marks, uneven arrows, maybe one abstract face or warped heart if your taste runs messy in a smart way.
The line quality is what sells it. You want strokes that look hand-drawn, not polished into perfection. That does not mean sloppy. It means the marks should have energy—some thin, some thicker, one slash cutting across another, a few tiny dots where the brush lifted. When every symbol is balanced and identical, the set loses its raw feel.
I’d keep this design matte. Gloss can make marker art look trapped under plastic. Matte leaves it looking more like ink on paper, which fits the whole attitude better. A soft white base works better than a cold bright white here, too. Stark white can push the set into sticker territory.
Do not add words unless you are ready to live with them for two or three weeks. Short phrases on nails often sound cooler in theory than they look on the hand. Symbols age better. So do abstract lines.
This is one of those manicures that looks best with restraint, which sounds odd for graffiti art, but it’s true.
12. White Chrome Coffin Nails With Black Starbursts
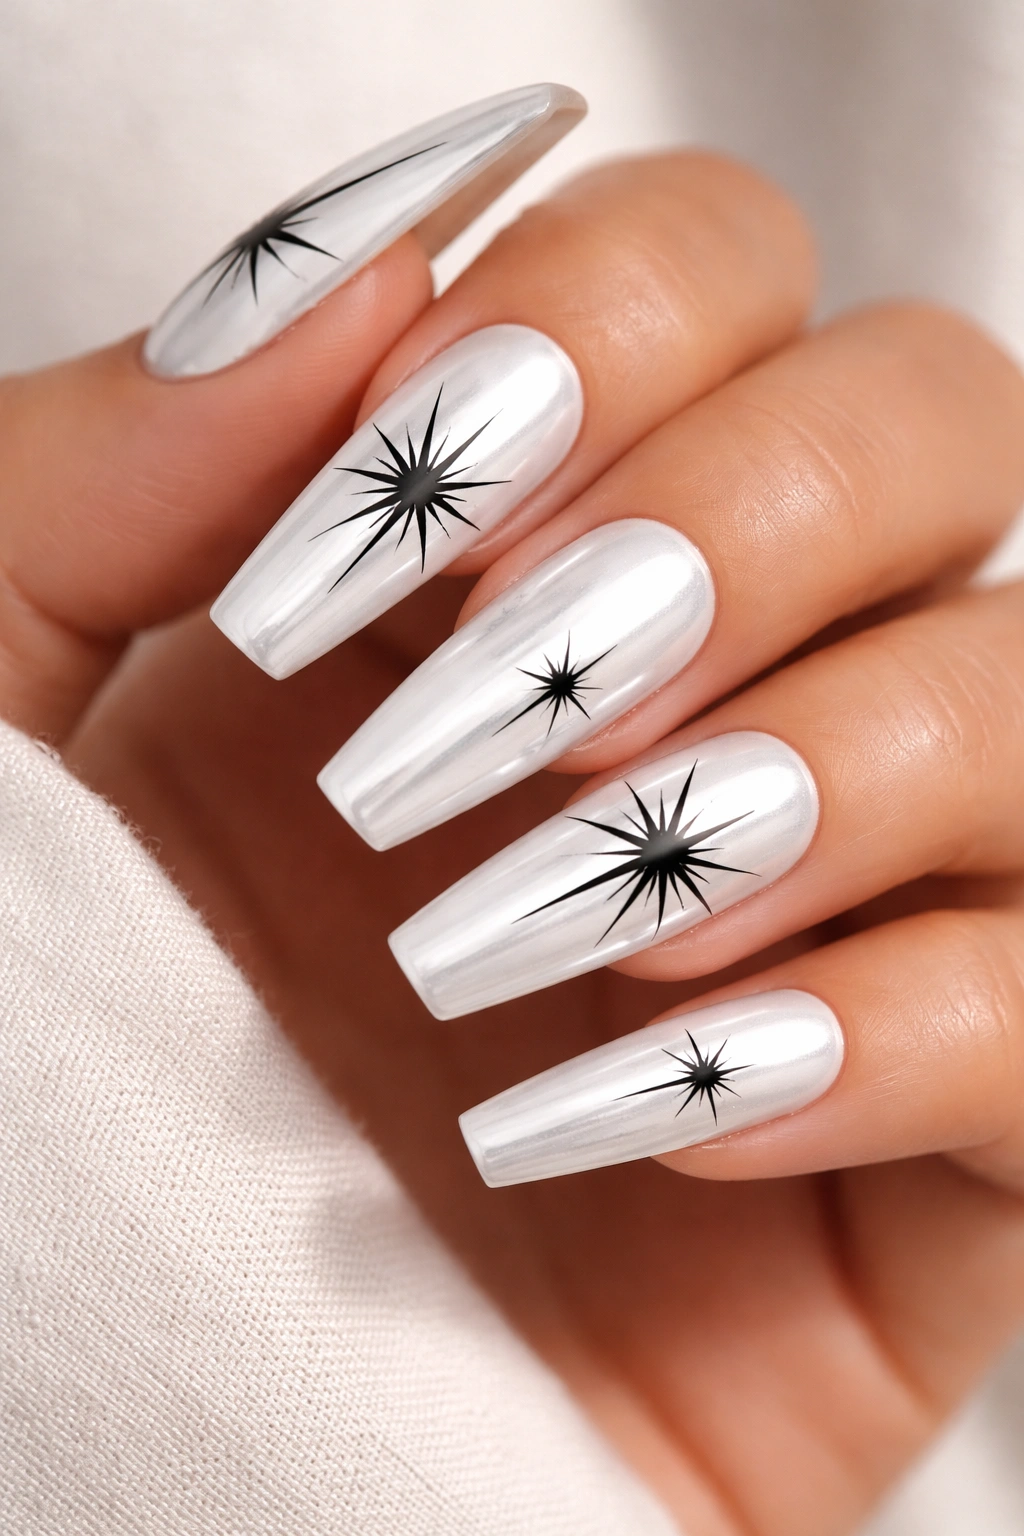
Need something bright that still feels sharp? White chrome with black starbursts does that job better than glitter ever will. The pearly surface reflects light in a cool, icy way, while the black star shapes cut through that sheen and keep the set from going soft.
The chrome layer matters. You want a white base under the powder, not beige, so the pearl finish stays clean and silver-toned rather than warm. Then the black starbursts should be thin and spiky, usually six to eight points, with a dot or two nearby if you want extra detail. Thick stars look cartoonish. Fine stars look graphic.
Placement that keeps the stars crisp
Give each star room. One large starburst on one nail often looks stronger than four tiny ones fighting for space.
I like to place the main starburst slightly off center, then add one mini version near the cuticle or sidewall on another nail. That staggered layout feels more intentional than stamping the same symbol in the same spot on every finger.
Chrome also shows scratches faster than flat cream polish, so seal it well and keep your topcoat fresh at fill time. Tiny detail, big difference. When this set is done right, the white surface has that pearl-shell flash and the black line art slices straight through it.
13. Airbrushed Black-to-White Ombré With Glossy Outlines
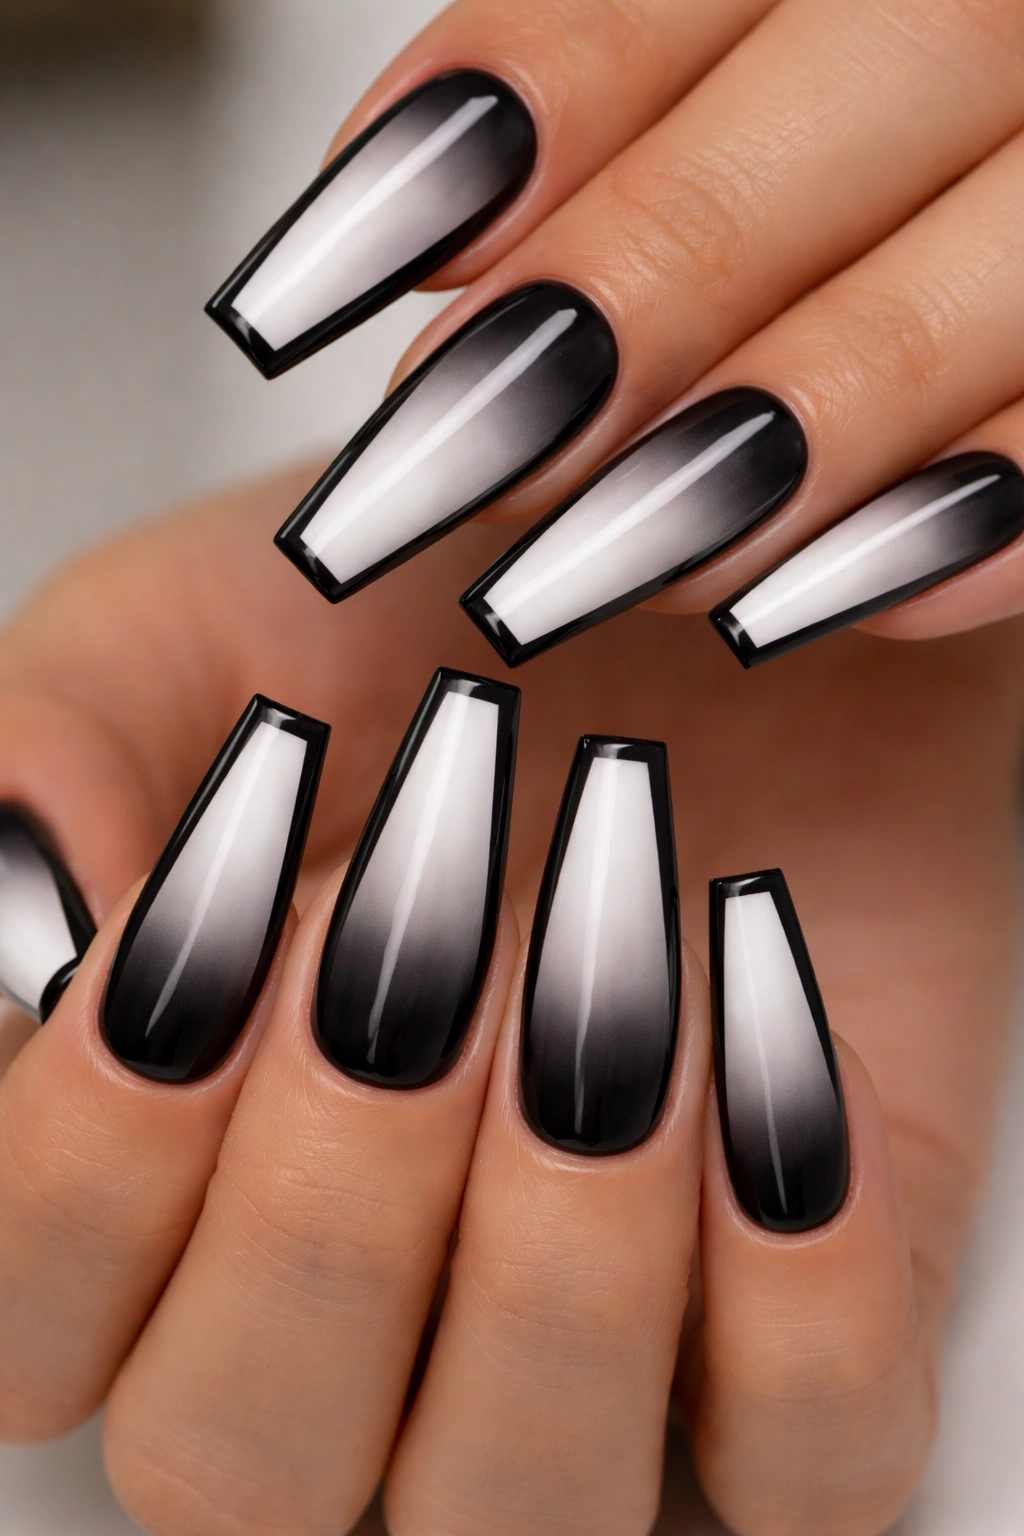
Soft ombré often reads romantic. Push that fade from black into white on a coffin tip and frame it with a glossy outline, and the mood changes completely. This version feels blunt, smoky, and a little industrial.
Airbrush beats sponge here. A sponge can leave a grainy fade, which muddies the black and makes the white look dusty. An airbrushed blend gives you a cleaner gradient—black strongest at the tip, fading through gray, then melting into white or sheer milky base toward the cuticle. That direction works best on coffin nails because it keeps weight at the flat edge.
The glossy outline is the part that wakes the whole thing up. Picture a matte ombré base with a thin black gloss border tracing the sidewalls and free edge, or a glossy cuticle crescent sitting over the fade. That finish contrast brings structure back into a design that could otherwise look too soft.
Unlike classic baby-boomer fades, this set suits people who want ombré without sweetness. Leather jacket people. Tailored-coat people. Anyone whose wardrobe lives in black, charcoal, white, and metal hardware.
My recommendation: keep the fade on all nails, then put the glossy outline on only four or six nails. Too much outlining can make the set feel boxed in. A little edge goes farther than you think.
14. Abstract Face Line Art With Black and White Blocks
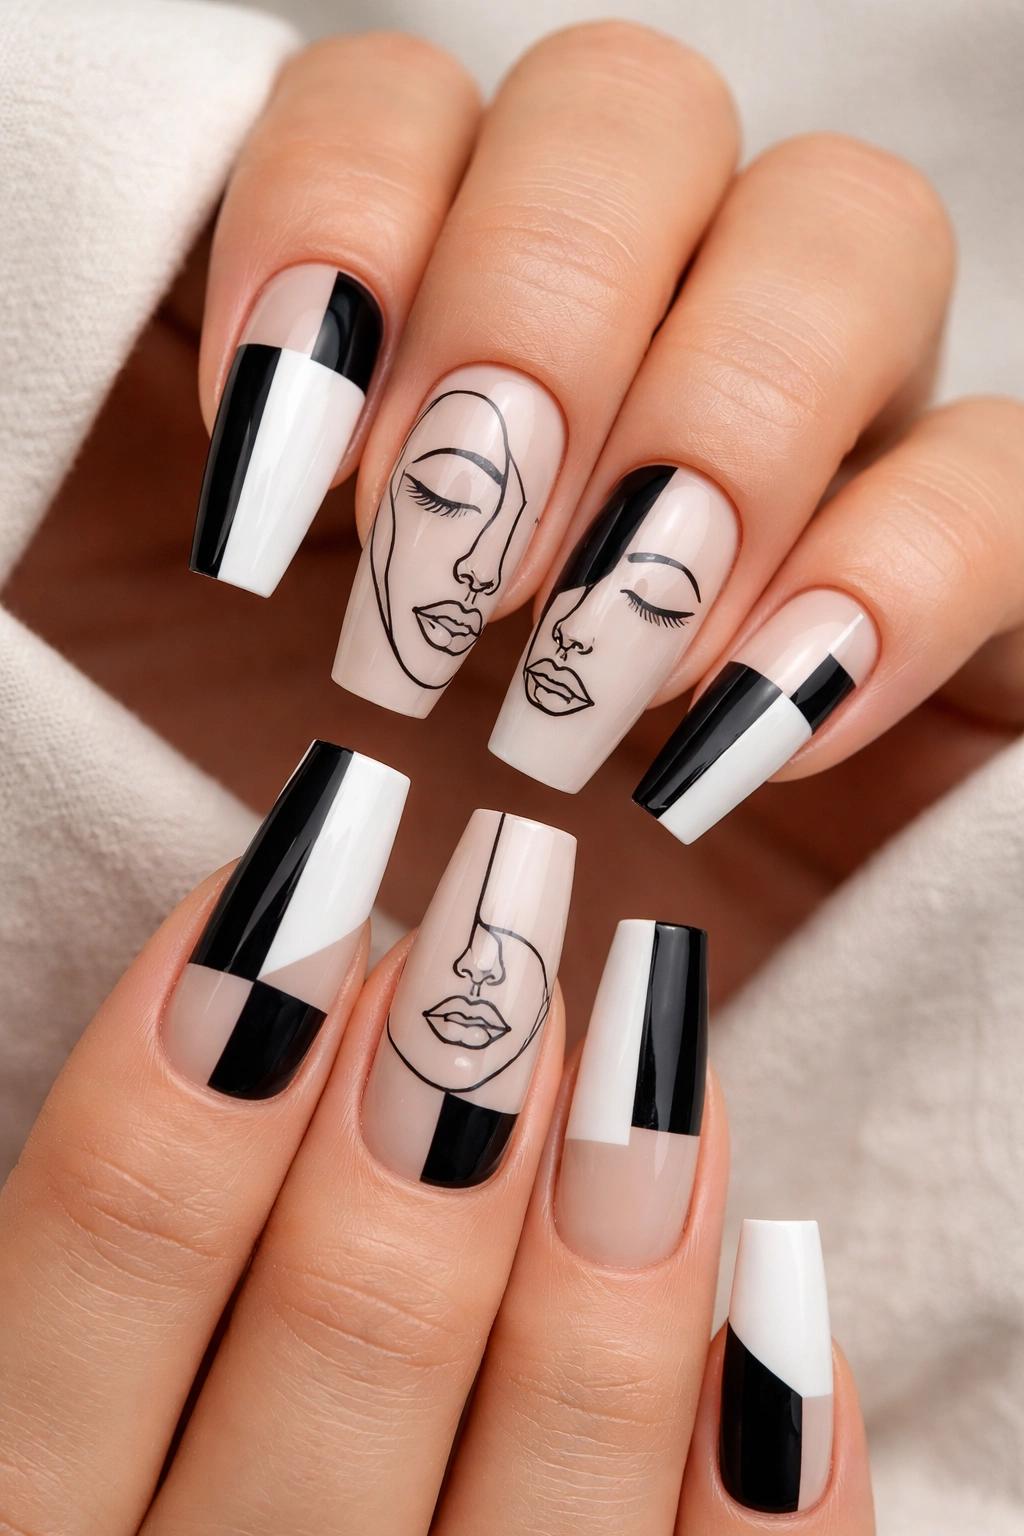
Line-art face nails are either chic or a mess; there isn’t much middle ground. The winning version uses restraint: one or two accent nails with a single black face outline, then neighboring nails with white blocks, black side panels, or half-painted cuticle moons that echo the same graphic mood.
The face itself should stay abstract. One eye, the bridge of a nose, a mouth line, maybe a jaw sweep. That’s enough. Full portraits on coffin nails tend to get crowded fast, and once the features get tiny, they stop looking artistic and start looking fuzzy. Negative space is your friend here. Leave room around the drawing.
I like this set on a sheer nude or milky base more than on solid white, because the line work feels lighter and more editorial. Then bring the black and white color blocking onto the other nails so the set still honors the monochrome idea. A solid black pinky next to a line-art ring finger and a white index nail can look stronger than ten nails all trying to tell the same story.
Brush control matters more here than on almost any other design in this list. Ask for an ultra-fine liner brush and hand-painted art, not decals, if you want that thin, wandering line quality. Decals can look flat at the edges once topcoat settles over them.
This one isn’t loud in the same way barbed wire or checkerboard is loud. It’s quieter. Still sharp. Still edgy.
15. Black and White Coffin Nails With Barbed Wire Details
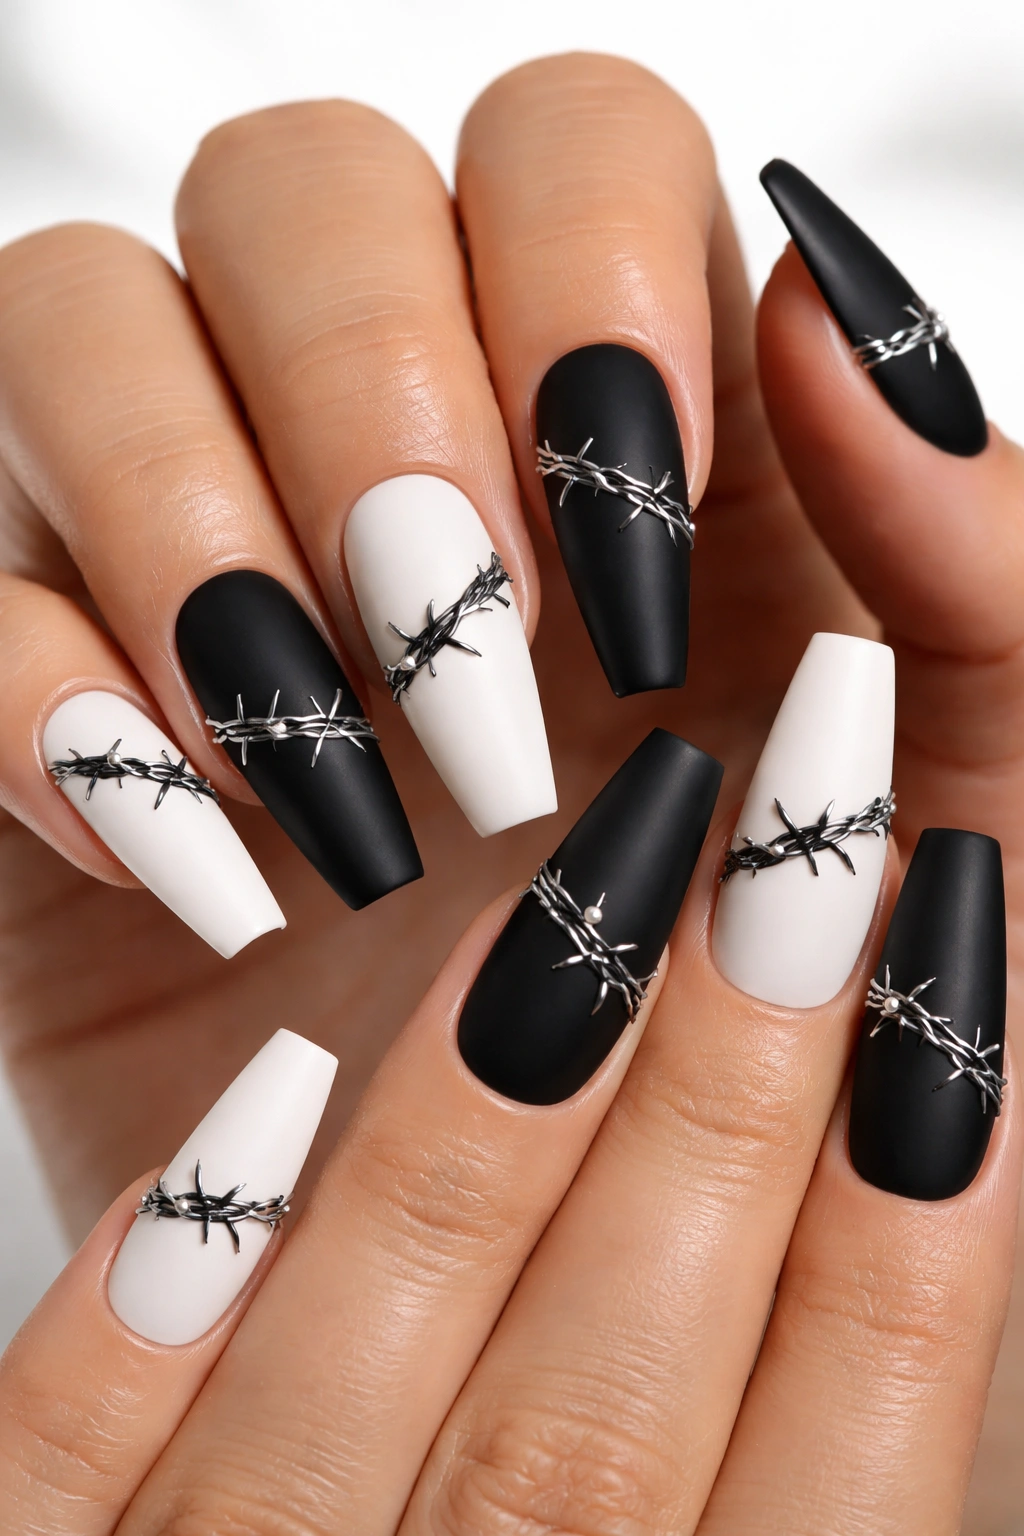
Barbed wire belongs on coffin nails more than almost any other shape. The blunt tip gives the wire somewhere to wrap, and the long sidewalls let the loops stretch without getting cramped. If you want a manicure that looks a little punk without turning into a costume set, this design gets there fast.
I like alternating the barbed wire color: white wire over black nails, then black wire over white nails. That switch keeps the set lively while sticking to the same theme. The wire itself should stay thin, with small twisted loops and tiny diagonal barbs spaced every 4 to 6 millimeters. Large barbs look cartoonish. Small ones look sharp.
A matte finish gives the design a dry, inked look. Gloss makes the wire feel more metallic, even without adding silver.
- Wrap the wire around two or three nails, not all ten.
- Keep one nail solid black and one solid white on each hand so the eye can rest.
- Ask for the wire to follow the nail’s curve near the tip instead of running as one stiff straight line.
- If you want one extra detail, add a single micro stud at the center of one twist and leave it there.
This is one of my favorite black-and-white sets because it knows exactly what it is. No softening. No apology. It looks best when the shape is filed crisp and the design stays lean.
Final Thoughts
Black and white coffin nails look edgy when the shape stays clean and the art has a clear point of view. That’s the whole thing. You do not need ten loud nails, five textures, and a bag of charms to make a monochrome set hit. One strong idea, placed well, usually wins.
If you’re taking inspo to a salon, bring more than one screenshot if you can. Show the nail tech the finish you want, the line thickness, and which fingers should carry the detail. Black and white exposes rushed work fast, so clear direction helps.
And keep the upkeep honest. Fill the set before the apex drifts too far forward, use cuticle oil, and do not peel off lifting acrylic or gel because you’re bored with the design. A crisp monochrome manicure ages well when the structure underneath stays sound.
Pick the set that matches your mood, not the one that shouts the loudest. On coffin nails, sharp contrast already does plenty.
