

Purple is having a major moment in the nail world, and if you’re rocking medium-length coffin nails, you’re in the perfect position to explore the full spectrum of what this versatile color can do. Coffin nails—those tapered, squared-off tips that look sharp and sophisticated—pair beautifully with purple because the shape gives you a strong canvas that can handle everything from subtle, barely-there lavenders to deep, moody plums. The medium length keeps things wearable and elegant without the dramatic commitment of extra-long nails, making it ideal for anyone who wants impact without sacrificing functionality.
What makes purple particularly exciting for nail art is how it shifts depending on undertones, finishes, and embellishments. A matte plum reads totally different from a glossy lavender with chrome, which reads completely different again from a deep eggplant with glitter accents. You can go minimalist and clean, or stack on texture, patterns, and dimension. Medium coffin nails give you just enough real estate to experiment with designs that would feel cramped on shorter nails, while still keeping things practical for daily life.
Whether you’re drawn to pastels, jewel tones, or nearly-black purples, there’s a design here that fits your style. These ideas range from quick, doable-at-home designs to more intricate looks worth a trip to the salon. Think of them as inspiration to customize—the best nail art is always the version that speaks to you, whether you follow these exactly or use them as a jumping-off point for your own creation.
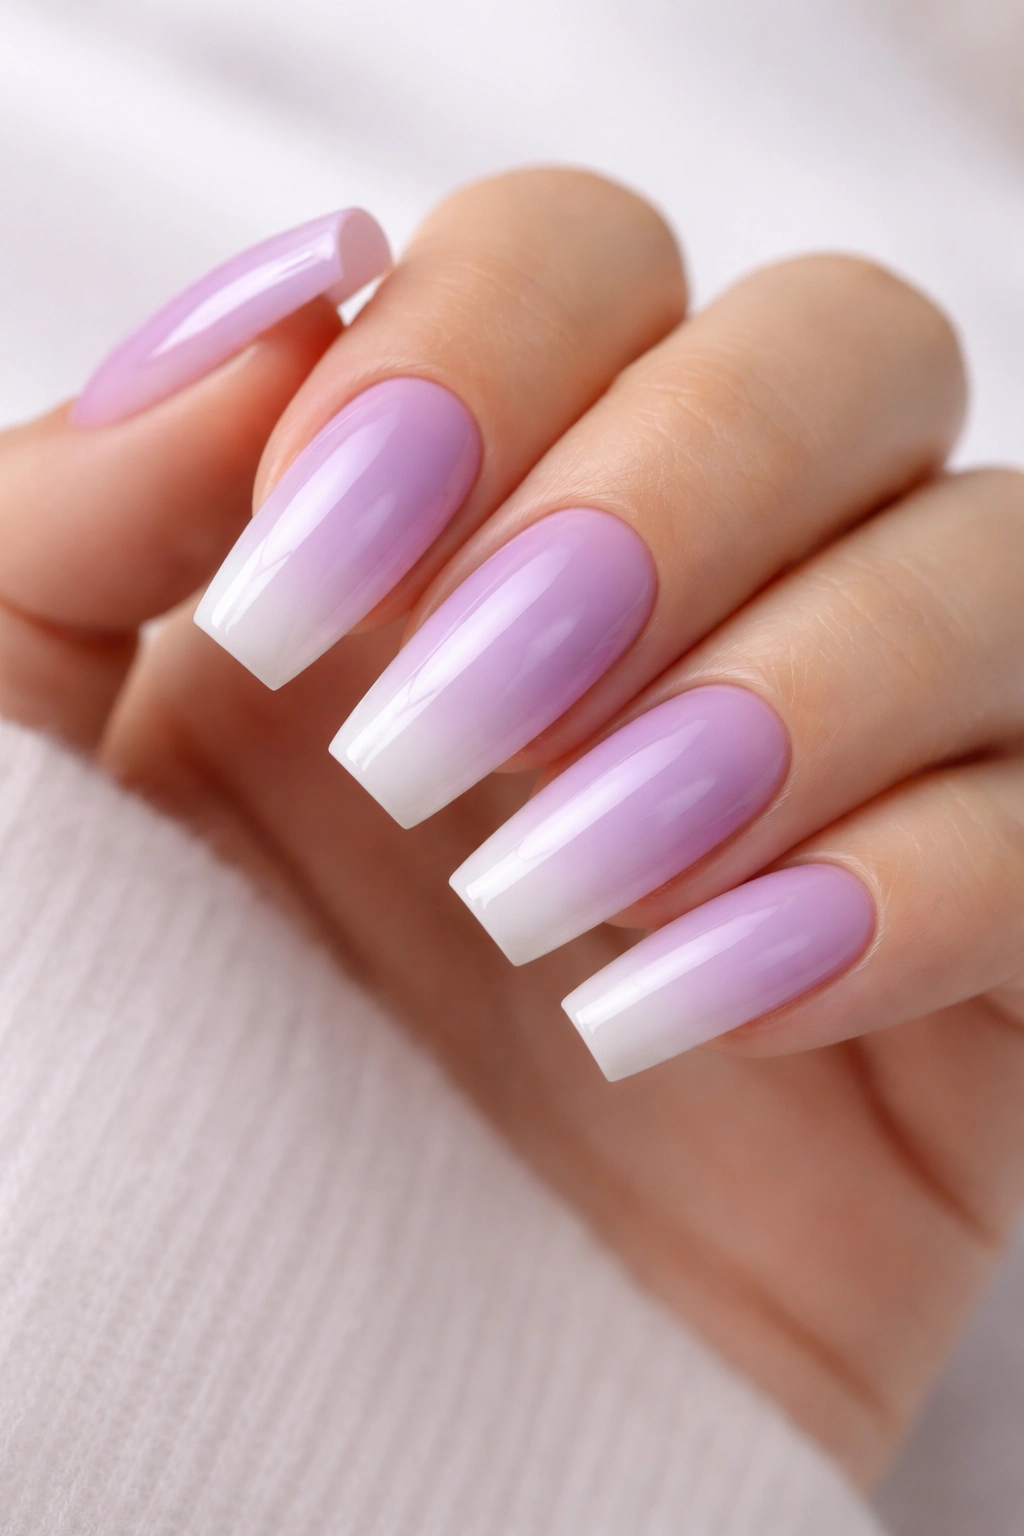
1. Glossy Lavender Ombre
A smooth gradient from soft lavender at the tips to nearly white at the base creates an ethereal, almost ethereal look that catches the light beautifully. This design works because ombre naturally flatters the coffin shape, drawing the eye down the length of the nail and creating an illusion of even more length than you already have.
Why It’s a Timeless Choice
This design never feels dated because it’s fundamentally about showcasing nail shape and color flow rather than relying on trendy motifs. The soft lavender-to-white gradient is flattering on every skin tone—warm undertones translate it into a rosy mauve, while cool undertones lean into true lavender territory. It’s the kind of manicure that looks intentional without screaming for attention.
How to Get This Look
- High-quality base coat to prevent staining (lavender can tint light nails)
- Soft lavender gel or polish as your primary color
- White gel or polish for the ombre end point
- Ombre brush or makeup sponge to blend the transition smoothly
- Glossy top coat for that liquid, polished finish
- Optional: add one coat of a shimmer top coat for subtle dimension
Pro tip: The transition zone from lavender to white should take up the middle third of your nail—not too chunky, not too faint. Practice on one nail first to nail the gradient before committing to all ten.
2. Matte Plum with Metallic Gold Drip
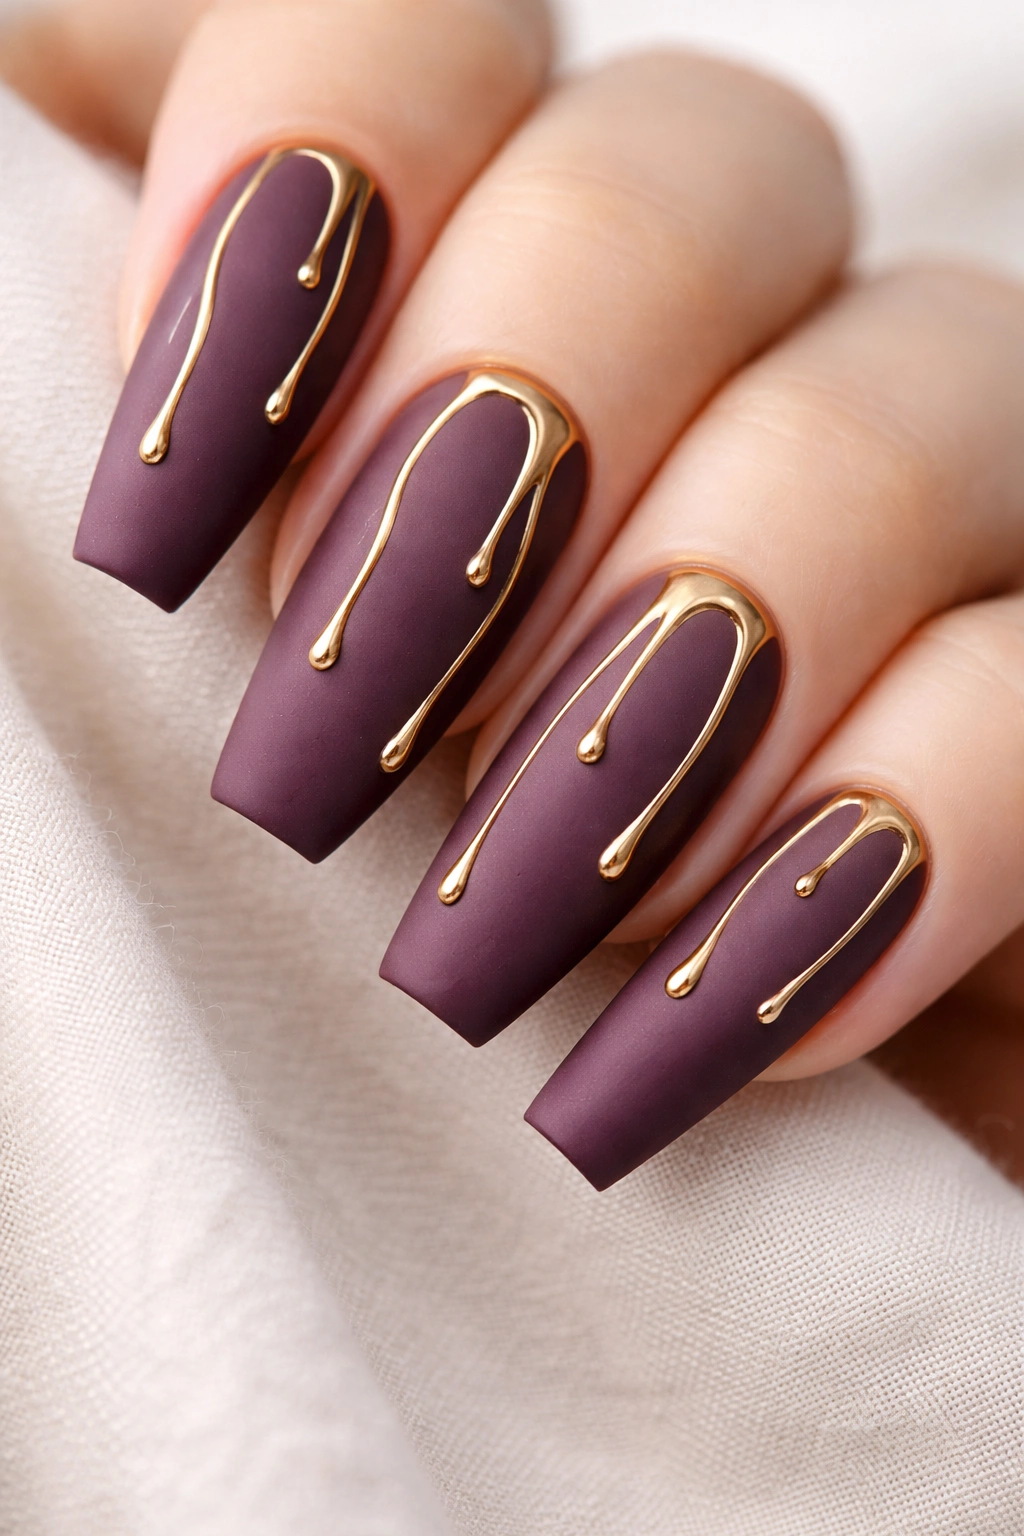
Deep, moody plum in a matte finish becomes instantly modern when you add a thin metallic gold drip or two flowing down the nail like melting gold leaf. Matte plum is sophisticated on its own, but the gold adds just enough playfulness to keep it from feeling too serious.
What Makes This Design Pop
The contrast between matte and metallic is where the magic happens—the plum absorbs light while the gold reflects it, creating visual depth and movement. This combination suggests luxury and artistic flair without needing intricate nail art skills. It’s the kind of detail that makes people say, “Wait, did you do that yourself?”
Design Details to Consider
- Start with a true plum base (not too red, not too blue—somewhere in the middle for versatility)
- Use a metallic gold polish or pen that flows smoothly without dragging
- Drips can be as minimal as two thin lines down the center, or more artistic with multiple irregular paths
- Seal with a matte top coat before adding the gold (so the gold stands out against the matte background)
- Consider adding a second drip line in a slightly different direction for asymmetrical movement
Worth knowing: Metallic golds vary widely in tone—warm golds work best with plums that lean slightly red, while cooler champagne metallics complement plums with blue undertones.
3. Lavender with Tiny White Daisies
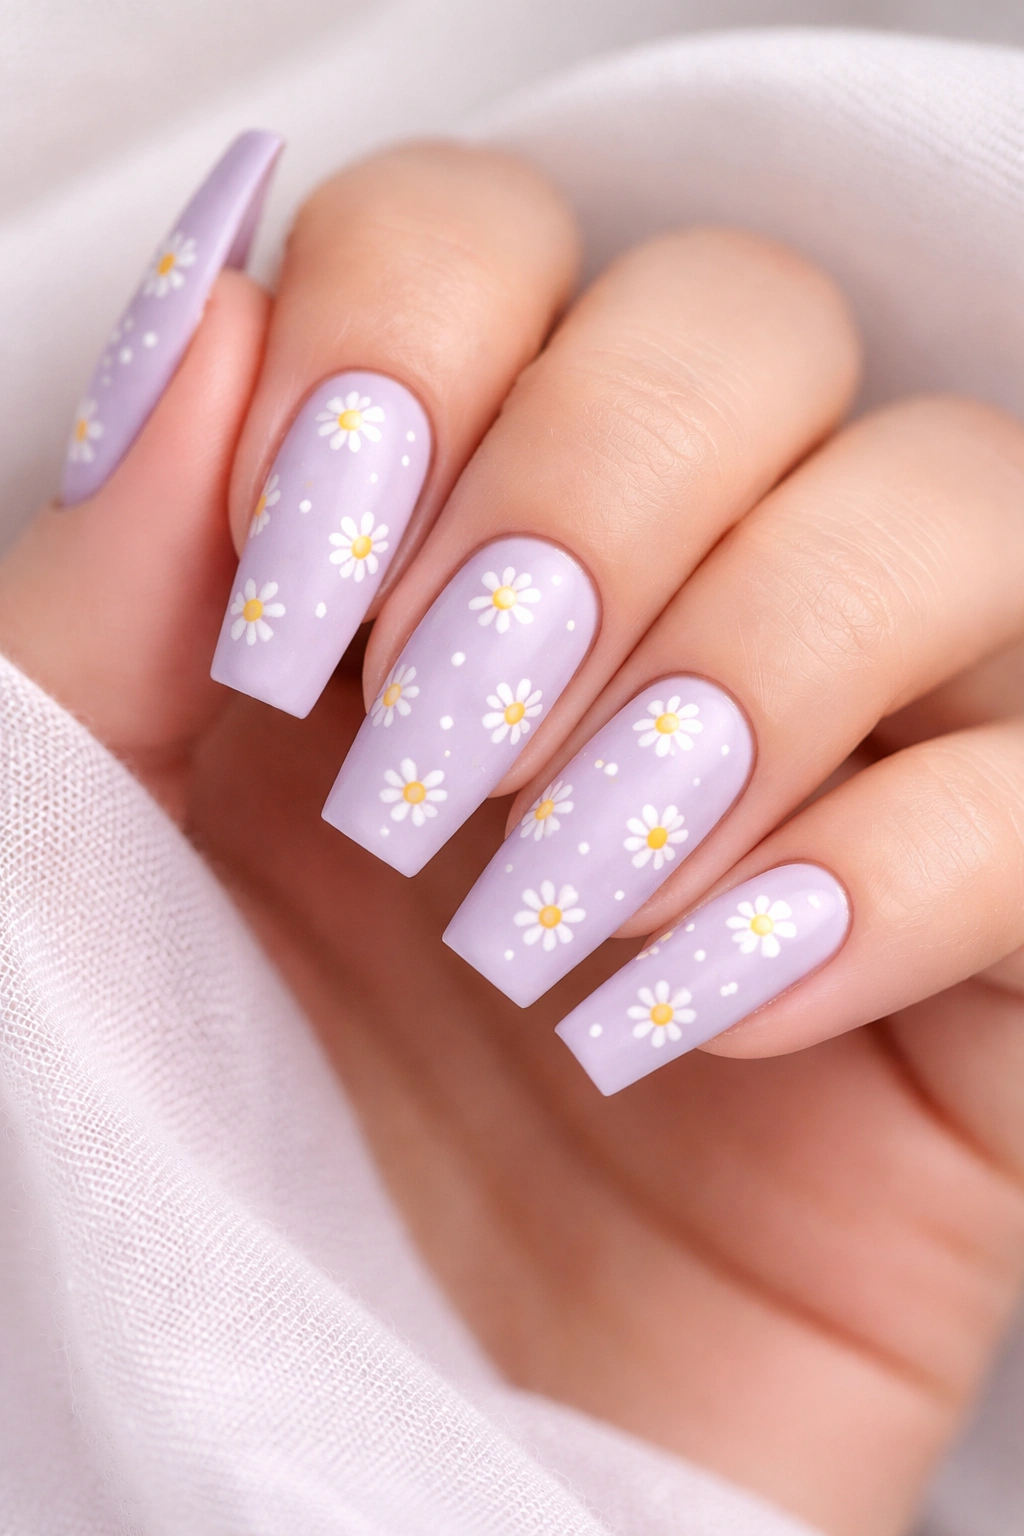
Pale lavender serves as a soft, calming base for miniature white daisies scattered across the nails in a loose, natural pattern. This design feels charming and feminine without being childish, especially in the coffin shape which adds an edgy counterbalance to the delicate florals.
Why Small Details Matter
Tiny daisies (not oversized ones) feel appropriate for medium nails because they maintain proportion and leave room for your actual nail to shine through. The scattered pattern means imperfection is part of the design—no two daisies need to be identical or perfectly positioned. This gives you freedom if you’re hand-painting rather than getting them done at a salon.
Building This Design
- Sheer or opaque lavender polish depending on how subtle you want the base
- Thin brush or dotting tool for painting daisy petals (five tiny white petals per flower)
- Tiny yellow center for each daisy using a thin liner or dotting tool
- Glossy top coat to give the daisies subtle dimension and smoothness
- Roughly 3-5 daisies per nail spread across the nail in varied positions
- Leave some nails (usually your ring finger and maybe your middle finger) daisy-free for a balanced look
Quick fact: White daisies on lavender remind people of spring and gardens, which is why this design works year-round—it’s never seasonal because flowers bloom in our minds any time of year.
4. Deep Purple with Rose Gold Confetti
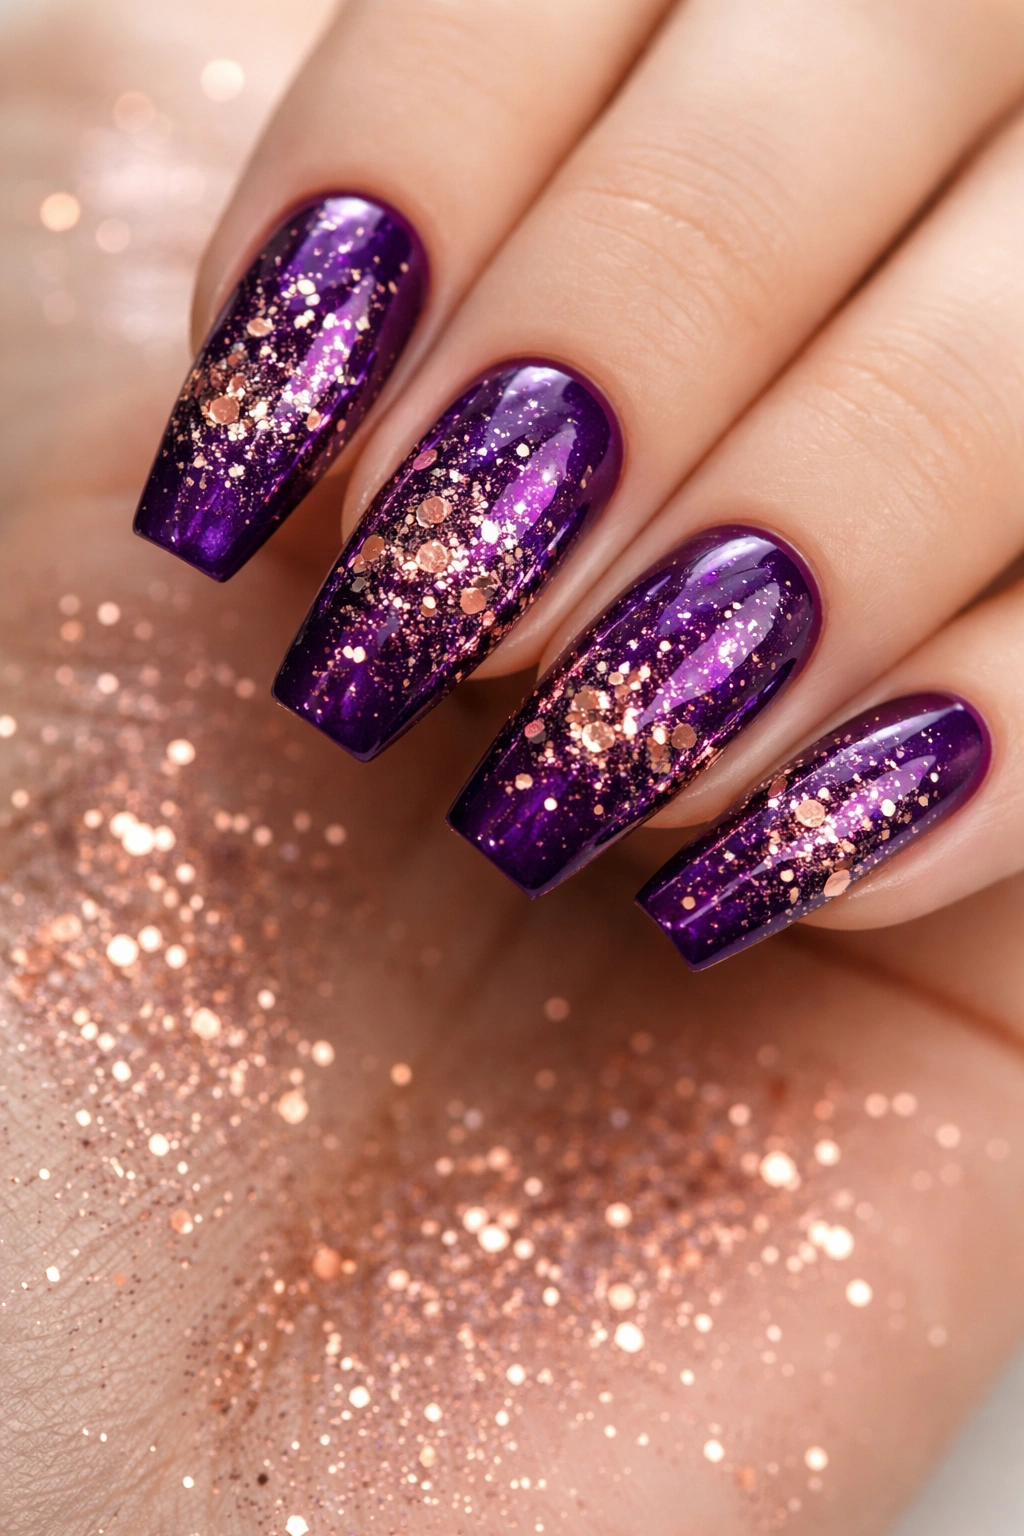
A rich, nearly-black purple becomes playful when topped with scattered rose gold confetti pieces—tiny geometric shapes, stars, or abstract confetti that catch light and add festive sparkle. This pairs formality with celebration, making it perfect for occasions that are just slightly fancy.
The Visual Balance
Deep purple on its own reads serious and elegant, which is exactly what makes the rose gold confetti work so well—it disrupts the solemnity in a joyful way. On medium coffin nails, you’re not covering the entire nail with pattern, so the confetti feels like deliberate decoration rather than visual overload.
How to Create It
- Deep purple base (gel or regular polish, depending on your preference—gel will last longer)
- Rose gold confetti pieces applied while polish is still tacky, or pressed in with tweezers
- Pre-made confetti sheet with small geometric shapes in rose gold (available at most nail supply stores)
- Alternatively, hand-paint tiny stars, triangles, or abstract shapes in rose gold using a thin brush
- Seal with glossy or glitter top coat to lock everything in place
- Distribute confetti pieces unevenly for an organic, celebratory feel
Insider note: If you’re using nail art confetti pieces, apply them to just a few nails (typically ring finger, pinky, and maybe accent nails) rather than all ten to avoid overwhelming the design.
5. Gradient Purple to Pink
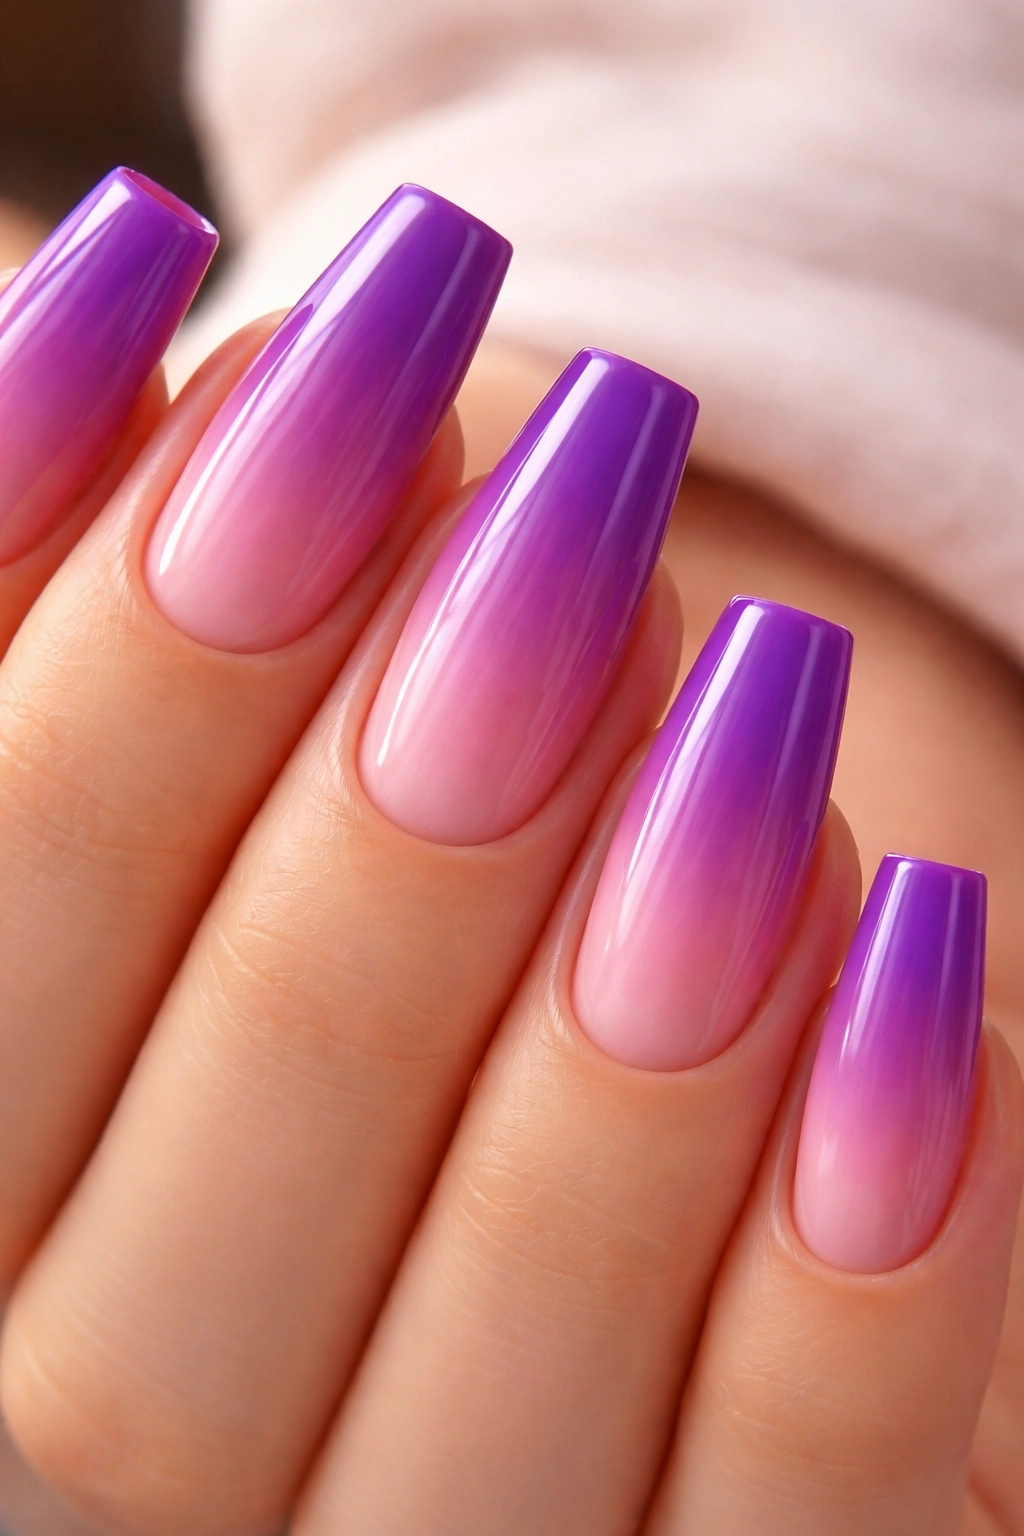
A gradient that moves from deep purple at the cuticle through mid-tone purple, transitioning into pink at the tips creates a romantic, sunset-inspired aesthetic. This design works beautifully on coffin nails because the gradient naturally follows the elongated shape, emphasizing the nail’s length and point.
Why This Color Story Works
Purple and pink are neighbors on the color wheel, so the transition between them feels natural and harmonious rather than jarring. The gradient creates visual interest without requiring separate nail art—it’s all about color flow and smooth blending. Depending on your undertones, you can choose cool purples and magentas, or warm plums and coral pinks.
Achieving a Smooth Gradient
- Purple gel or polish for the base
- Mid-tone purple that bridges between your deep purple and pink
- Pink polish for the tips
- Ombre brush or soft makeup sponge to blend the transitions
- Work with one nail at a time and blend while the polish is still slightly wet or tacky
- Glossy top coat to seal and create a cohesive, smooth appearance
- Consider adding a subtle shimmer top coat for dimension without pattern
Pro tip: If hand-blending feels intimidating, some salons offer gradient services using airbrush techniques that create pixel-perfect transitions.
6. Matte Plum with Rhinestone Accent Border
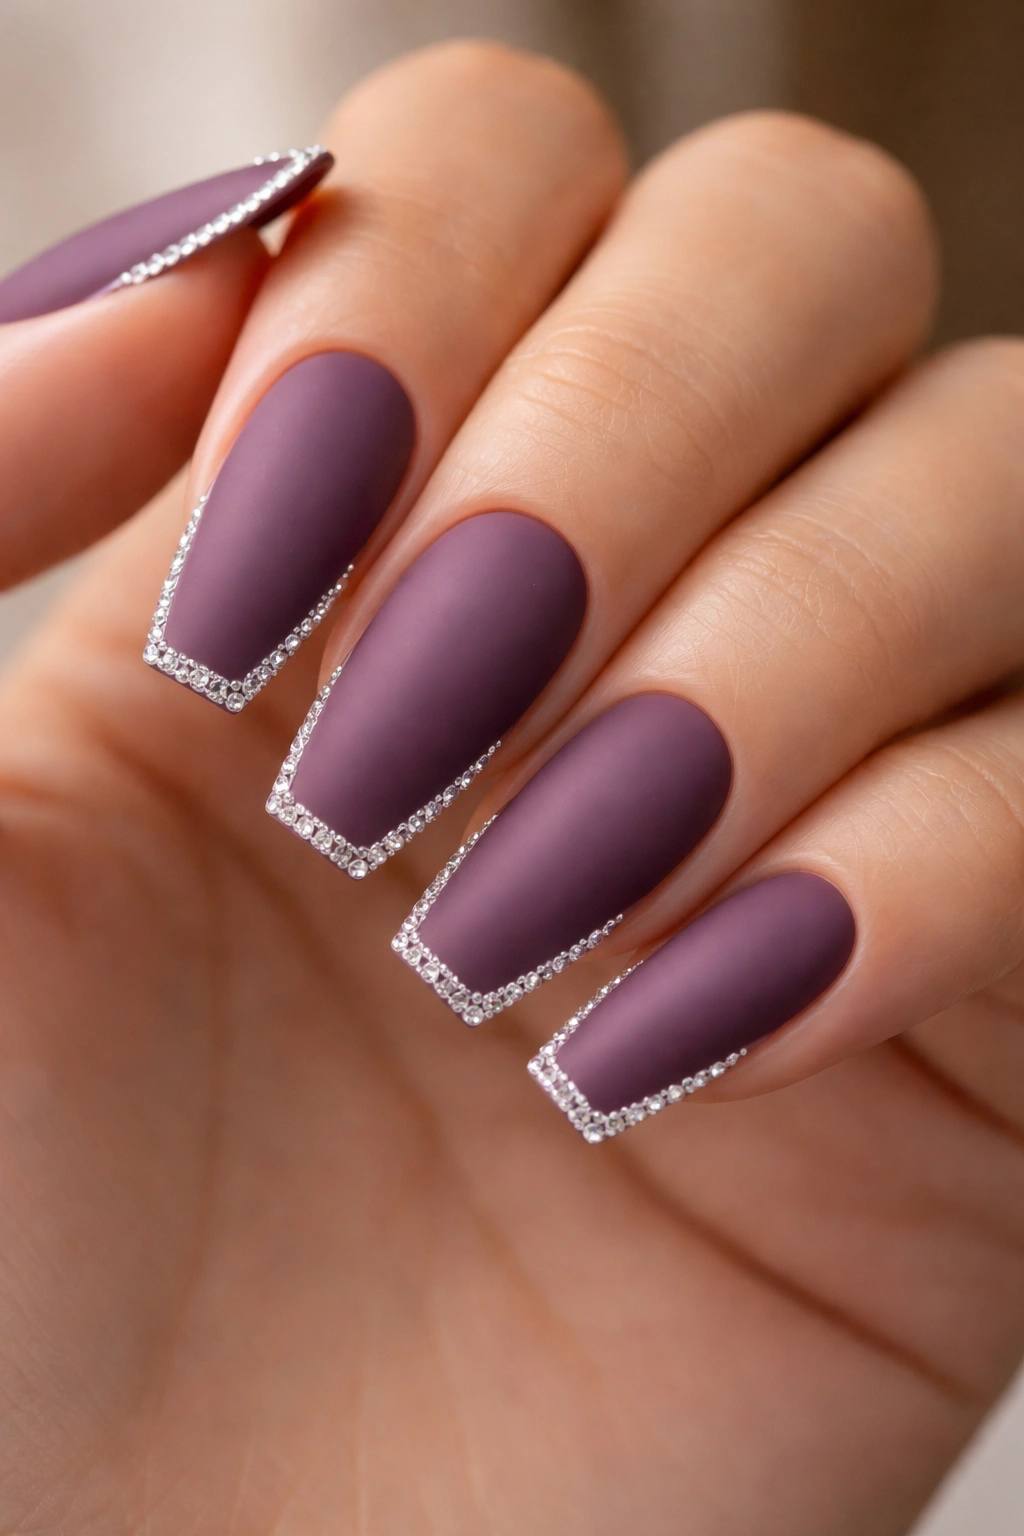
A solid matte plum base becomes dramatic when you add a thin, glittering border of small rhinestones along the edge where the nail meets the tip. This design is minimal yet striking—most of the nail is clean matte color, but a single line of sparkle changes the entire energy.
The Elegance of Restraint
Using rhinestones strategically rather than covering the entire nail keeps the focus on the shape and color. The matte finish makes the rhinestones pop even more because there’s no competing sparkle elsewhere on the nail. It’s the nail art equivalent of a statement necklace against a simple outfit.
Rhinestone Placement Steps
- Glossy base coat as an adhesive layer for rhinestones to grip
- Matte plum polish covering the entire nail
- Matte top coat (this is important—rhinestones don’t adhere well to glossy surfaces)
- While the matte top coat is still slightly tacky, carefully place rhinestones using tweezers
- Create a thin line of rhinestones along the tip edge, or position them in a thin accent line near the cuticle
- Seal with a non-tacky top coat, being careful not to dislodge the stones
- Medium-sized rhinestones work better than tiny ones at this scale
Worth knowing: Rhinestones on matte polish are more durable if you use a semi-matte top coat rather than completely non-gloss—the slight tackiness helps adhesion without compromising the matte aesthetic.
7. Lavender with Black Geometric Lines
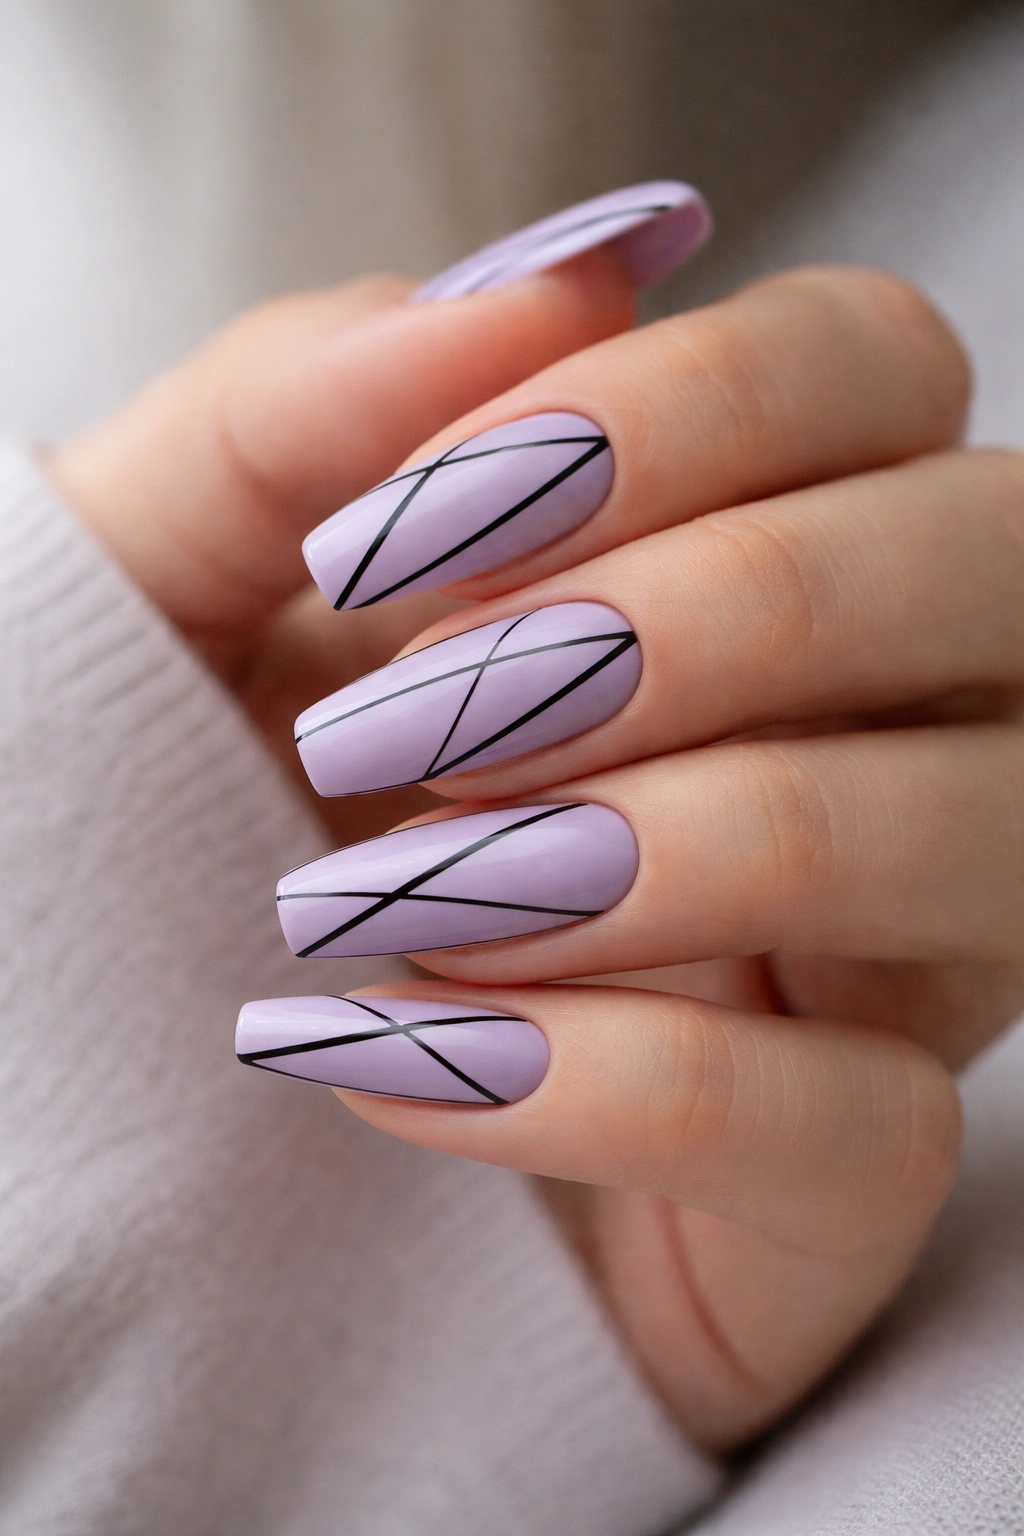
Soft lavender becomes architectural and modern when you add thin, precise black lines creating geometric patterns—perhaps diagonal lines, triangles, or abstract angular shapes. The coffin nail shape amplifies the geometry, making sharp angles feel intentional and balanced.
The Power of Contrast
Black lines on lavender create maximum visual contrast without feeling harsh because lavender itself is a soft, approachable color. The geometry prevents the design from feeling casual or playful—it lands firmly in sophisticated territory. This is the kind of manicure that works equally well at a professional conference or a night out.
Creating Clean Geometric Designs
- Opaque lavender base (light enough that black lines read crisply against it)
- Black gel or polish in a thin brush or pen for precise lines
- Decide on your geometric pattern: parallel lines, intersecting angles, triangles, or abstract shapes
- Sketch lightly with a pencil or use striping tape to keep lines straight
- Draw slowly and carefully—rushing creates wobbly lines that break the sophisticated illusion
- Keep the pattern consistent across all nails or vary it intentionally for an artistic feel
- Glossy top coat to protect the crisp lines
Quick fact: Geometric patterns on nails actually appear more complex than they are—even two or three thin lines can create a striking design.
8. Royal Purple Chrome

A rich royal purple with a chrome or mirror finish transforms the color into something almost otherworldly—shimmery, multidimensional, and impossible to miss. Chrome powder applied over purple creates that liquid, metallic effect that photographs beautifully and catches light from every angle.
Why Chrome Changes Everything
Chrome isn’t just sparkle—it’s a finish that makes color seem three-dimensional. A flat purple becomes a glowing, almost holographic surface that reads completely different depending on lighting. On medium coffin nails, the chrome emphasizes the nail’s dimension and shape without any additional nail art.
Getting That Chrome Glow
- Royal purple base (preferably a color specifically designed to take chrome well—ask your technician)
- Gel base and color coats as usual
- Chrome powder applied while the gel is still tacky using a velvet applicator
- The powder creates the mirror effect by catching and reflecting light
- Seal with a clear top coat that locks in the chrome effect
- Some salons offer holographic chrome that shifts between colors as you move your hand
- Avoid touching the fresh chrome or it will lose its mirror quality
Pro tip: Chrome finishes are most impressive in natural daylight—indoor fluorescent lighting can make them appear flat and dull.
9. Dusty Purple with Nude Ombre Tips
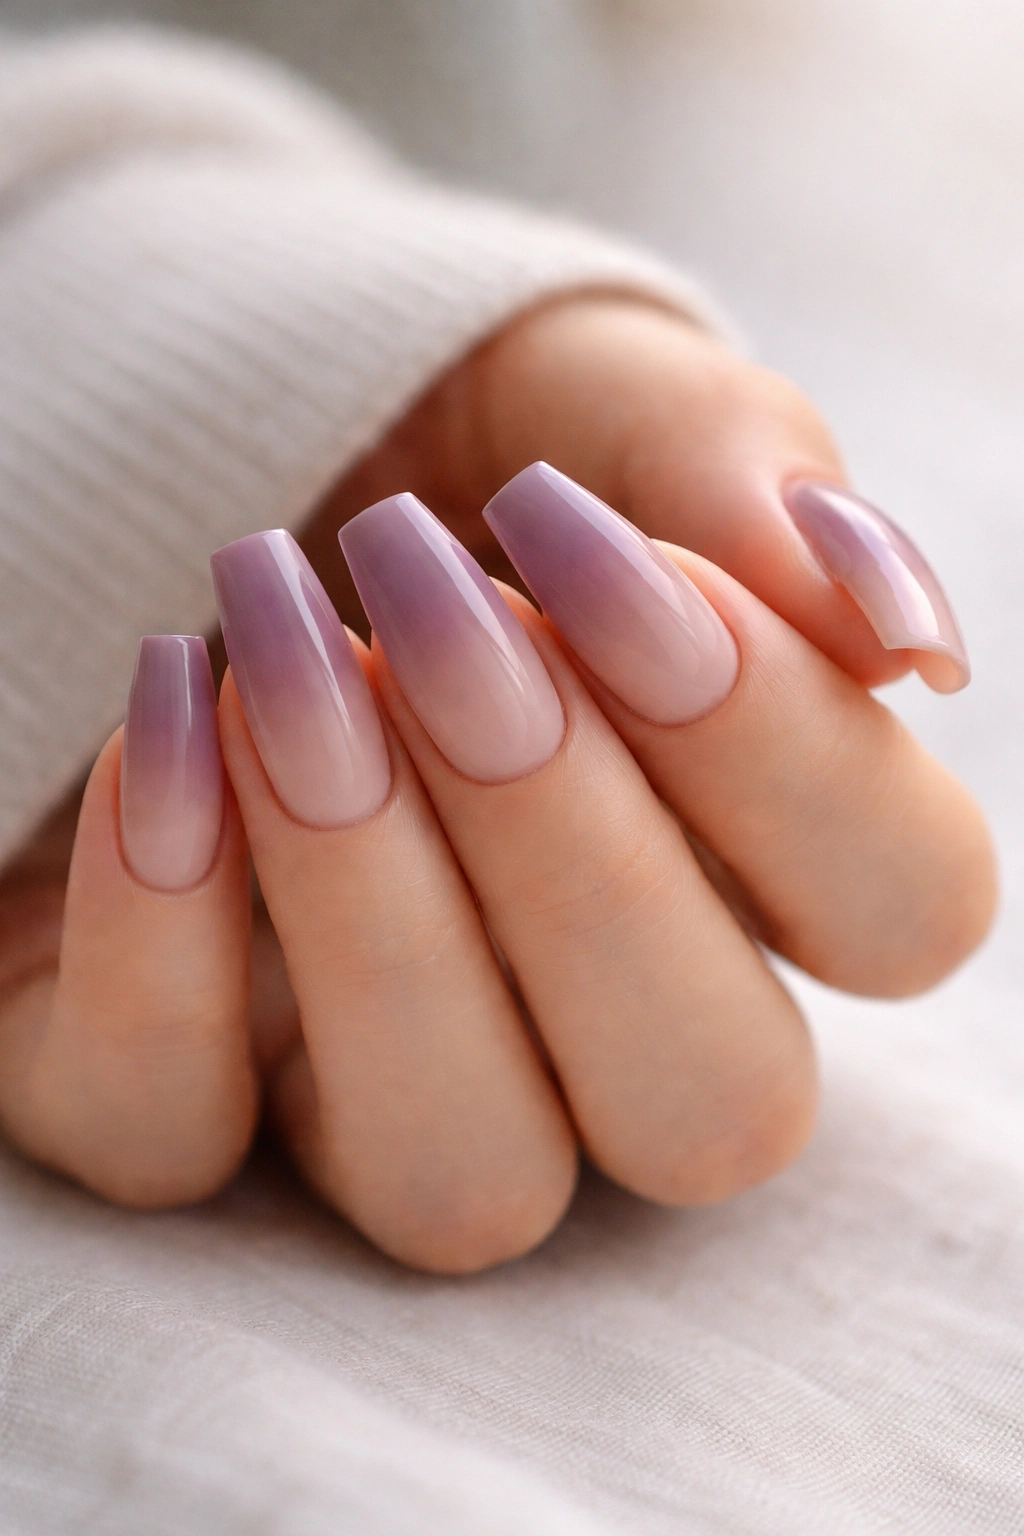
Dusty purple that gradually fades to a neutral nude at the tips creates an ultra-modern, almost minimalist look that bridges neutral and color. This design is sophisticated without being bold, making it perfect for anyone who wants to dip their toes into purple without full commitment.
The Subtlety That Reads as Elegant
Dusty purple is muted and slightly grayed—it feels more wearable than bright purples for some people. The transition to nude keeps the design soft and blended rather than creating sharp contrast. This manicure reads as refined and expensive because it prioritizes harmony over drama.
Achieving This Subtle Transition
- Dusty mauve or dusty purple as your primary color
- Nude or beige shade that’s approximately your skin tone (or slightly warmer/cooler depending on preference)
- Blend the transition gradually from purple to nude across the tips
- Use an ombre sponge or brush for smooth, imperceptible blending
- The midpoint should be a blend of both colors that looks intentional
- Glossy top coat for a polished, unified finish
- Consider a neutral shimmer if you want just a hint of sparkle
Worth knowing: The key to this design is choosing a dusty purple rather than a saturated one—bright purples don’t blend gracefully into neutrals.
10. Plum with White Marble Swirls
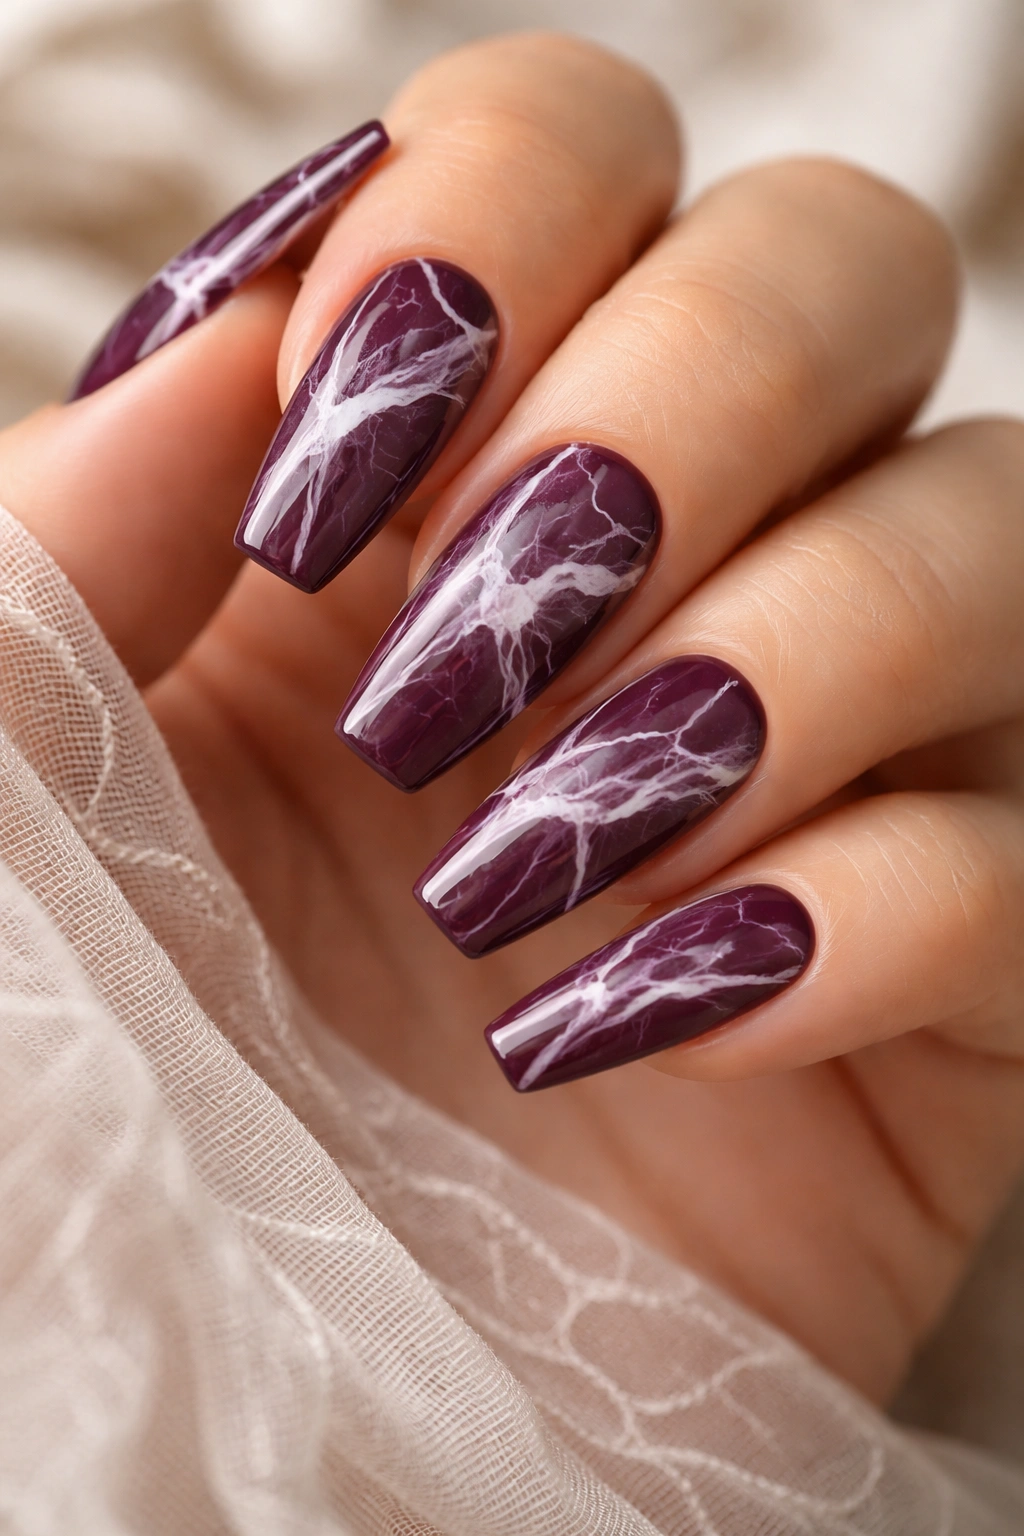
Deep plum with irregular white marble patterns swirled across the nails creates a look that’s organic, artistic, and entirely unique each time you create it. The marble effect mimics natural stone, making the design feel more like pattern than nail art.
Why Marble Never Feels Dated
Marble has been a design element for thousands of years, which is why marble nail designs feel timeless rather than trendy. The white veining on plum creates contrast that’s sophisticated without being jarring. No two marbled nails are identical, which adds to their appeal and makes each manicure feel custom.
Creating Marble Effect
- Deep plum base coat
- White gel or polish
- Thin brush or needle tool to create irregular white lines and veins
- Work while the white polish is wet or tacky—this helps lines flow naturally
- Create a network of intersecting white lines rather than one perfect pattern
- Soften some lines by dragging the brush through them partially
- The pattern should look random but not accidental—like nature created it
- Seal with glossy top coat that enhances the stone-like appearance
Quick fact: Marble nail designs work on any length but look especially sophisticated on medium and longer nails where there’s room for the pattern to develop.
11. Lavender with Pearl Accents

Soft lavender with subtle pearl finishes—either small pearl-coated areas or a pearl top coat that creates a luminous, slightly iridescent quality—adds sophisticated shimmer without sparkle. This design feels understated and refined, letting the color be the star while pearls add gentle depth.
The Difference Between Pearls and Glitter
Pearls create a soft, matte shimmer that catches light subtly and diffuses it evenly. Glitter throws sharp points of light. On medium coffin nails, pearls keep the focus on the nail’s shape while adding visual interest without being distracting. This is the manicure for someone who wants dimension but not drama.
Applying Pearl Finishes
- Lavender gel or polish base
- Pearl top coat, or small pearl-colored foil pieces applied to the tips
- Alternatively, use a semi-sheer pearl shade layered over lavender for a delicate effect
- Apply pearls to just the tips (creating a subtle gradient) or all-over for a more cohesive look
- Glossy clear top coat to seal and amplify the pearlescent quality
- The pearl finish should look integrated with the color, not like a separate layer
Pro tip: Apply pearls while the base color is still tacky for better adhesion—they’ll look more integrated than if applied to a fully set surface.
12. Vibrant Purple with White Chevron Tips
Bright, vibrant purple becomes contemporary and playful with white chevron patterns across the tips in a geometric pointing-inward design. The chevron shape echoes and amplifies the coffin shape, creating a unified, cohesive look that’s fashion-forward.
Why Chevrons Work on Coffin Nails
Chevrons are angles pointing in a direction, and coffin nails have that natural point at the tip—they were essentially made for each other. The pattern doesn’t fight the shape; it enhances it. This design reads modern and intentional rather than cutesy.
Creating Sharp Chevron Patterns
- Vibrant purple base covering the nail completely
- White polish or gel for the chevron pattern
- Thin brush, striping tool, or striping tape to create clean chevron lines
- Position chevrons to point downward toward the tip of the nail
- Chevrons can cover just the bottom third of the nail or extend further
- Keep lines crisp and even for a polished look rather than hand-drawn casual appearance
- Glossy top coat to protect the crisp white lines
- Test the design on one or two nails before committing to all ten
Worth knowing: If hand-painting chevrons feels challenging, nail strip stickers with chevron patterns are available and can look just as sharp if applied carefully.
13. Eggplant with Gold Leaf Flecks
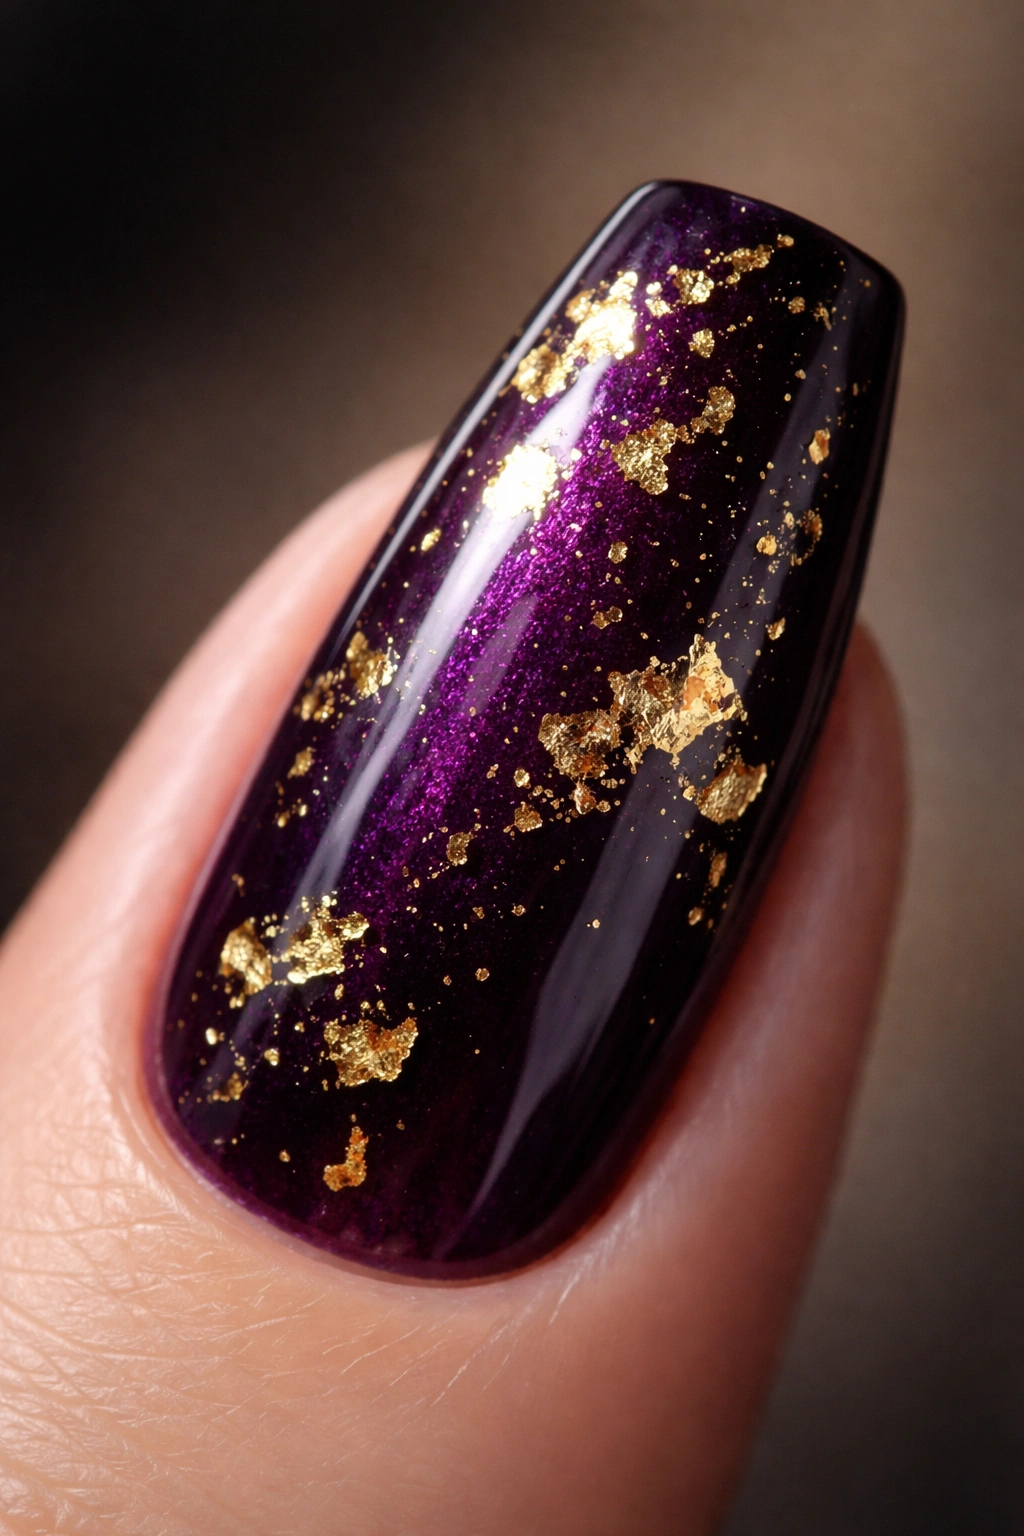
Nearly-black eggplant purple becomes luminous when you add irregular gold leaf flecks scattered across the nail surface. The gold catches light and creates movement while eggplant provides a rich, dark background that makes gold appear even more precious.
The Luxury of This Combination
Gold and deep purple have been paired for centuries in luxury design—it’s inherently elegant. The flecks keep it from reading as heavy or oppressive; they break up the dark color and add visual interest. This is grown-up and sophisticated while still being visually interesting.
Applying Gold Leaf Effects
- Eggplant base coat (can be matte or glossy depending on your preference)
- Gold leaf flecks or a gold leaf sheet torn into small, irregular pieces
- Use a thin brush or tweezers to position pieces while the base is tacky
- Alternatively, use gold flake polish or a gold fleck top coat brushed over the eggplant
- Position flecks unevenly and organically rather than in a controlled pattern
- Seal with glossy top coat that locks the flecks in place
- Consider a gel finish for durability and a more integrated appearance
Pro tip: Real gold leaf looks more luxurious than painted gold, but it’s also more delicate—gel sealing is essential to keep pieces from lifting.
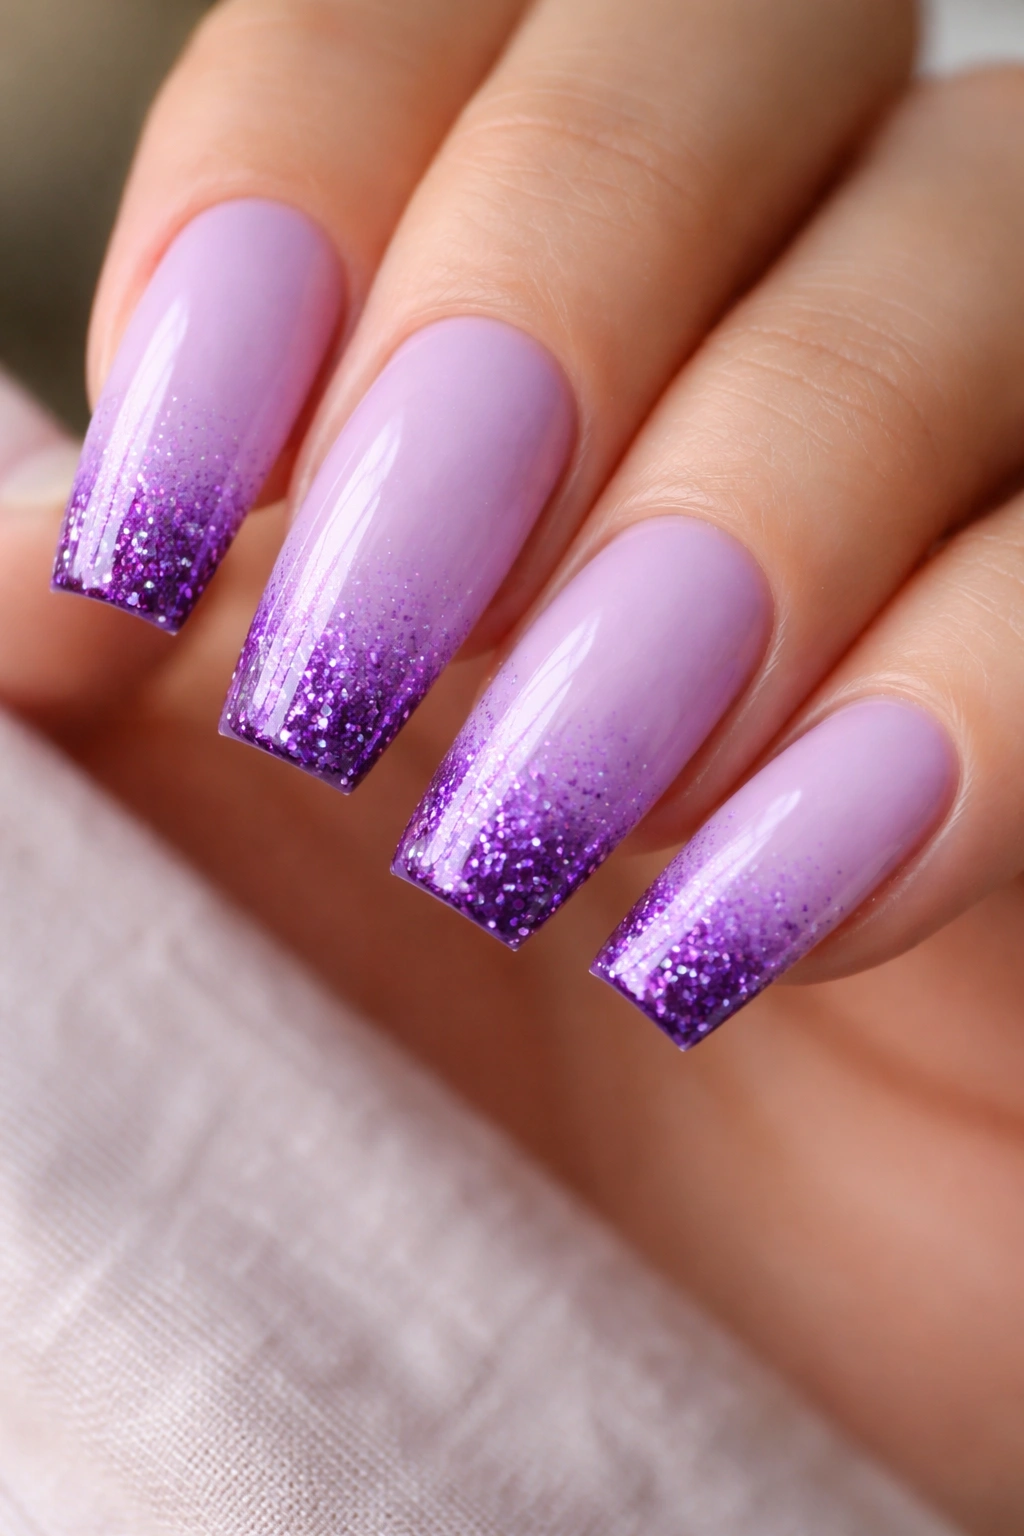
14. Pastel Purple with Glitter Fade
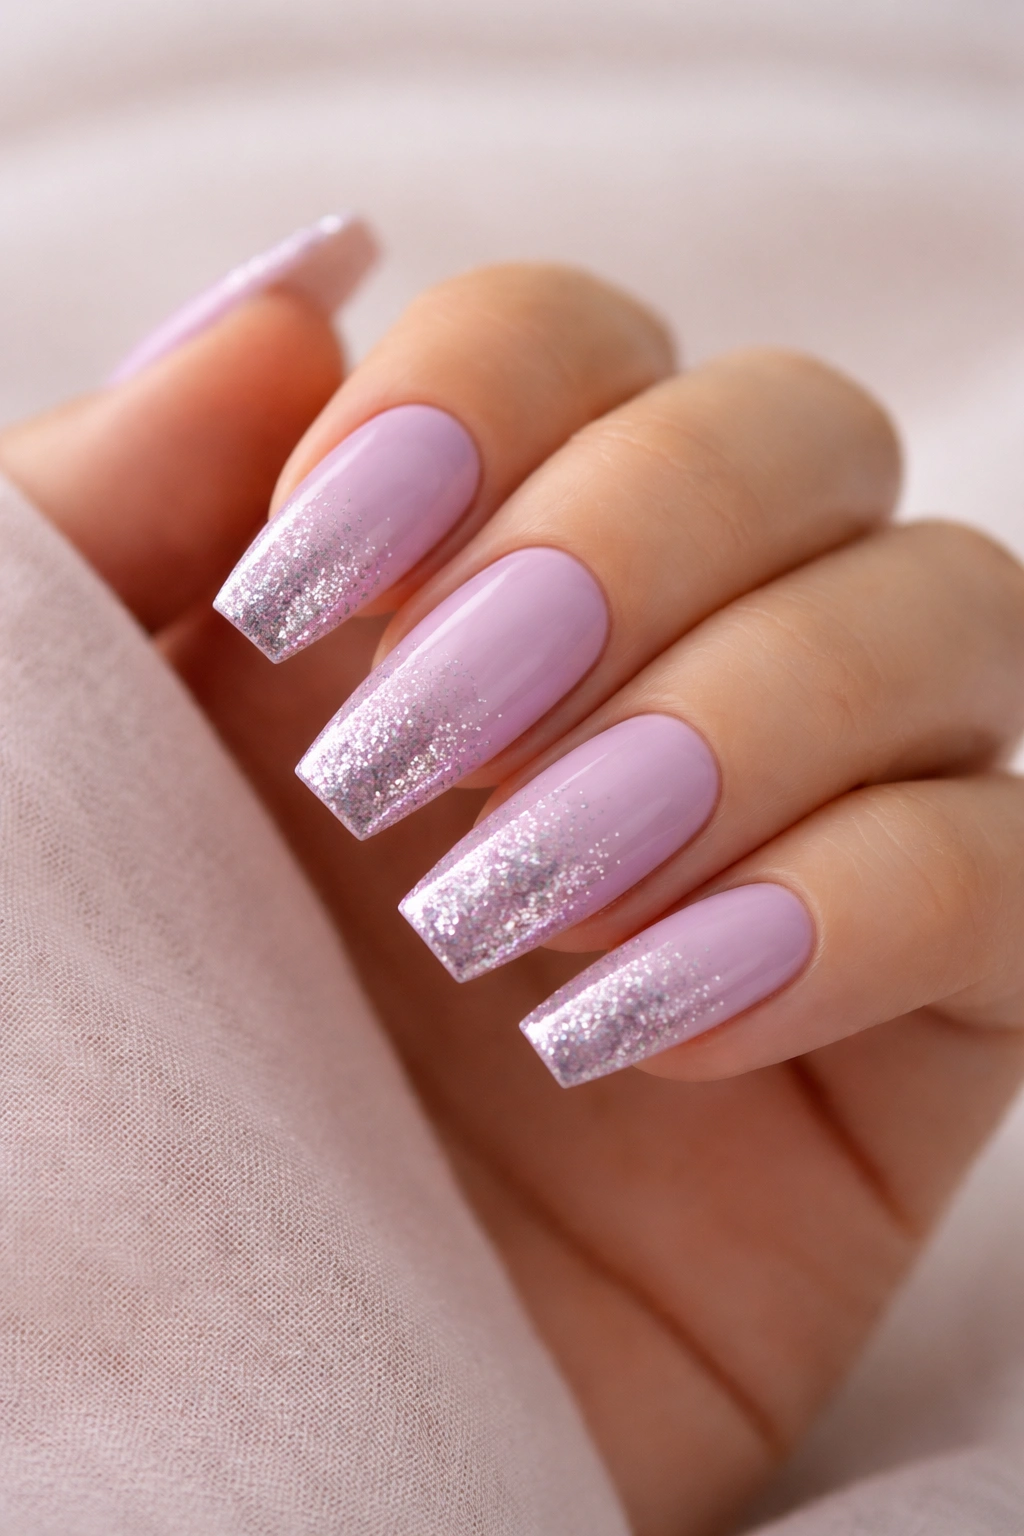
Pale, almost washed-out purple that gradually fades into concentrated glitter at the tips creates a magical, almost dreamlike quality. The coffin shape amplifies this effect—the glitter draws focus to the pointed tips while the pastel base keeps the overall look soft and wearable.
Why Glitter Fades Are Irresistible
A concentrated glitter tip draws the eye naturally to the point of the nail, which emphasizes the coffin shape beautifully. The fade from solid to sparkle feels more sophisticated than glitter-all-over. This design appeals to anyone who wants noticeable sparkle but with subtle elegance.
Creating a Glitter Gradient
- Pastel purple gel or polish as your base
- Glitter top coat or loose glitter suspended in clear gel
- Apply glitter densely to the tips and gradually reduce concentration as you move toward the cuticle
- Use a damp brush to blend the transition between sparse and dense glitter
- Work while the layers are still tacky for seamless blending
- Seal with a thick, clear top coat that protects the glitter
- The transition should look intentional—you’re not trying to hide the glitter, you’re showcasing it
Worth knowing: The type of glitter matters—chunky holographic glitter creates different impact than fine shimmer powder.
15. Matte Purple with Nude Ombre Accent Nails
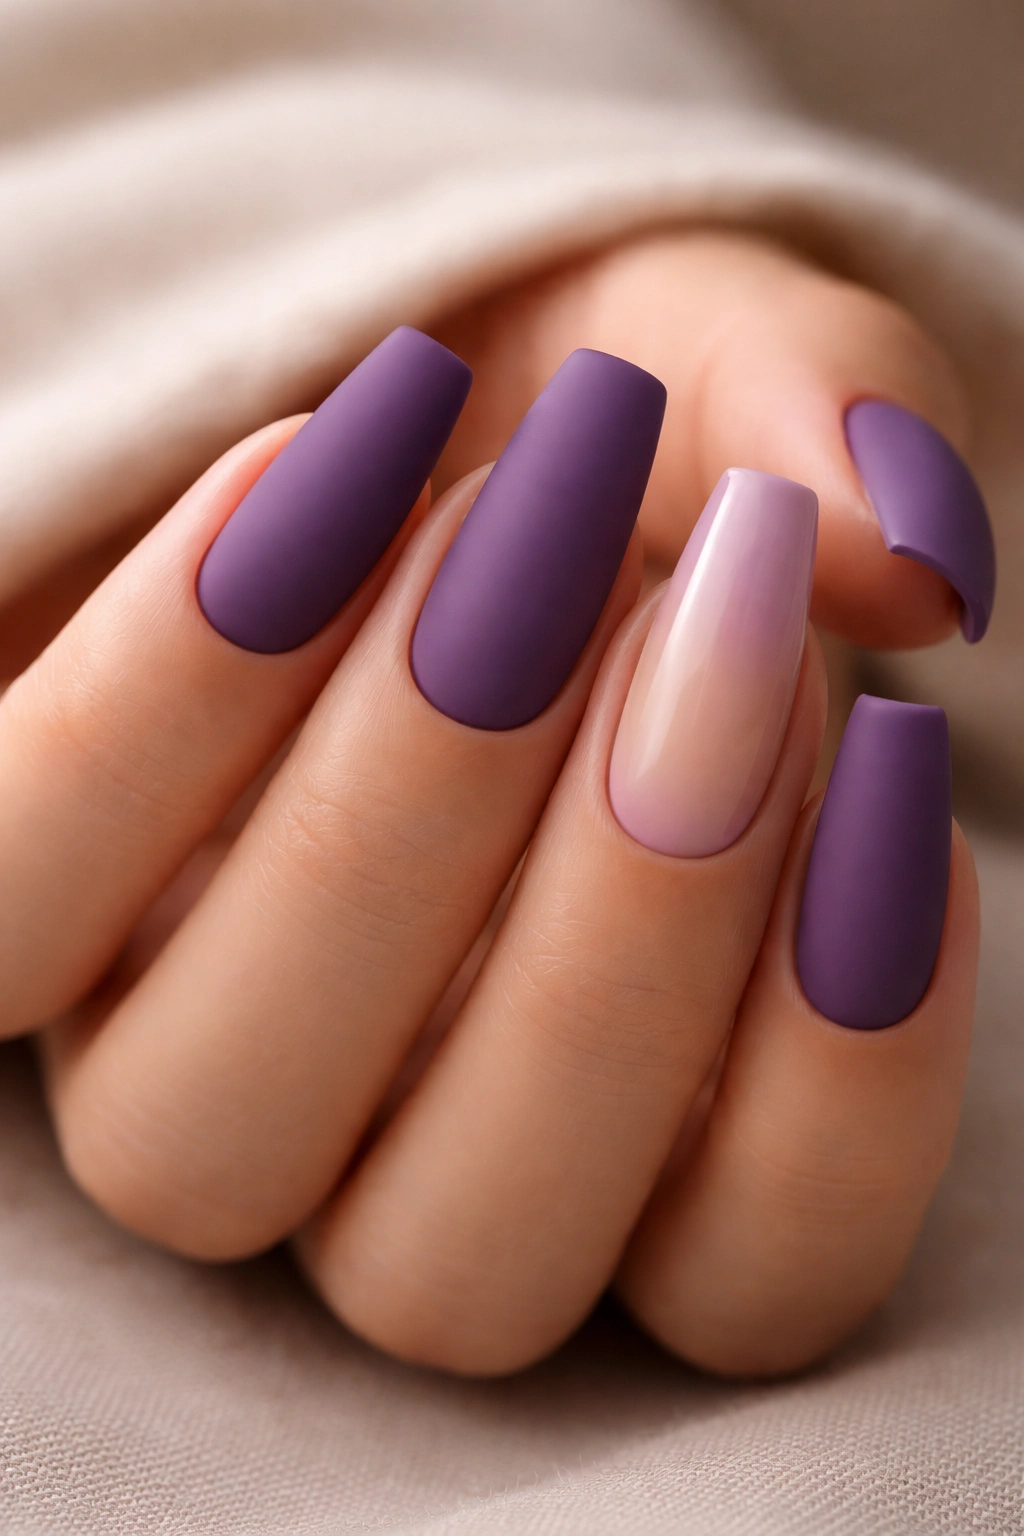
Most nails are solid matte purple (your primary statement), while one or two accent nails feature a soft ombre from nude to purple. This mixed approach gives you both color and neutrality, making the design more versatile for different contexts.
Strategic Accent Nail Placement
Accent nails typically land on your ring finger (or both ring and pinky fingers if you’re doing two accent nails). This placement creates balance and draws attention to your hands in a flattering way. The matte purple on most nails stays bold and sophisticated while the ombre accent softens the overall look.
Building This Mixed Design
- Matte purple on eight nails (if you’re doing two accent nails) or nine nails (if doing one accent nail)
- Matte top coat to seal the purple and prepare for accent nail design
- On accent nails: nude base at the cuticle
- Ombre transition from nude to purple at the tips on accent nails
- Blend using an ombre sponge or brush
- Glossy top coat on accent nails only (to create a visual distinction between matte and glossy nails)
- The contrast between matte and glossy surfaces makes this design visually dynamic
Quick fact: Having some nails matte and others glossy is a subtle technique that makes a manicure feel more intentional and higher-end.
16. Purple with Thin Silver Striping
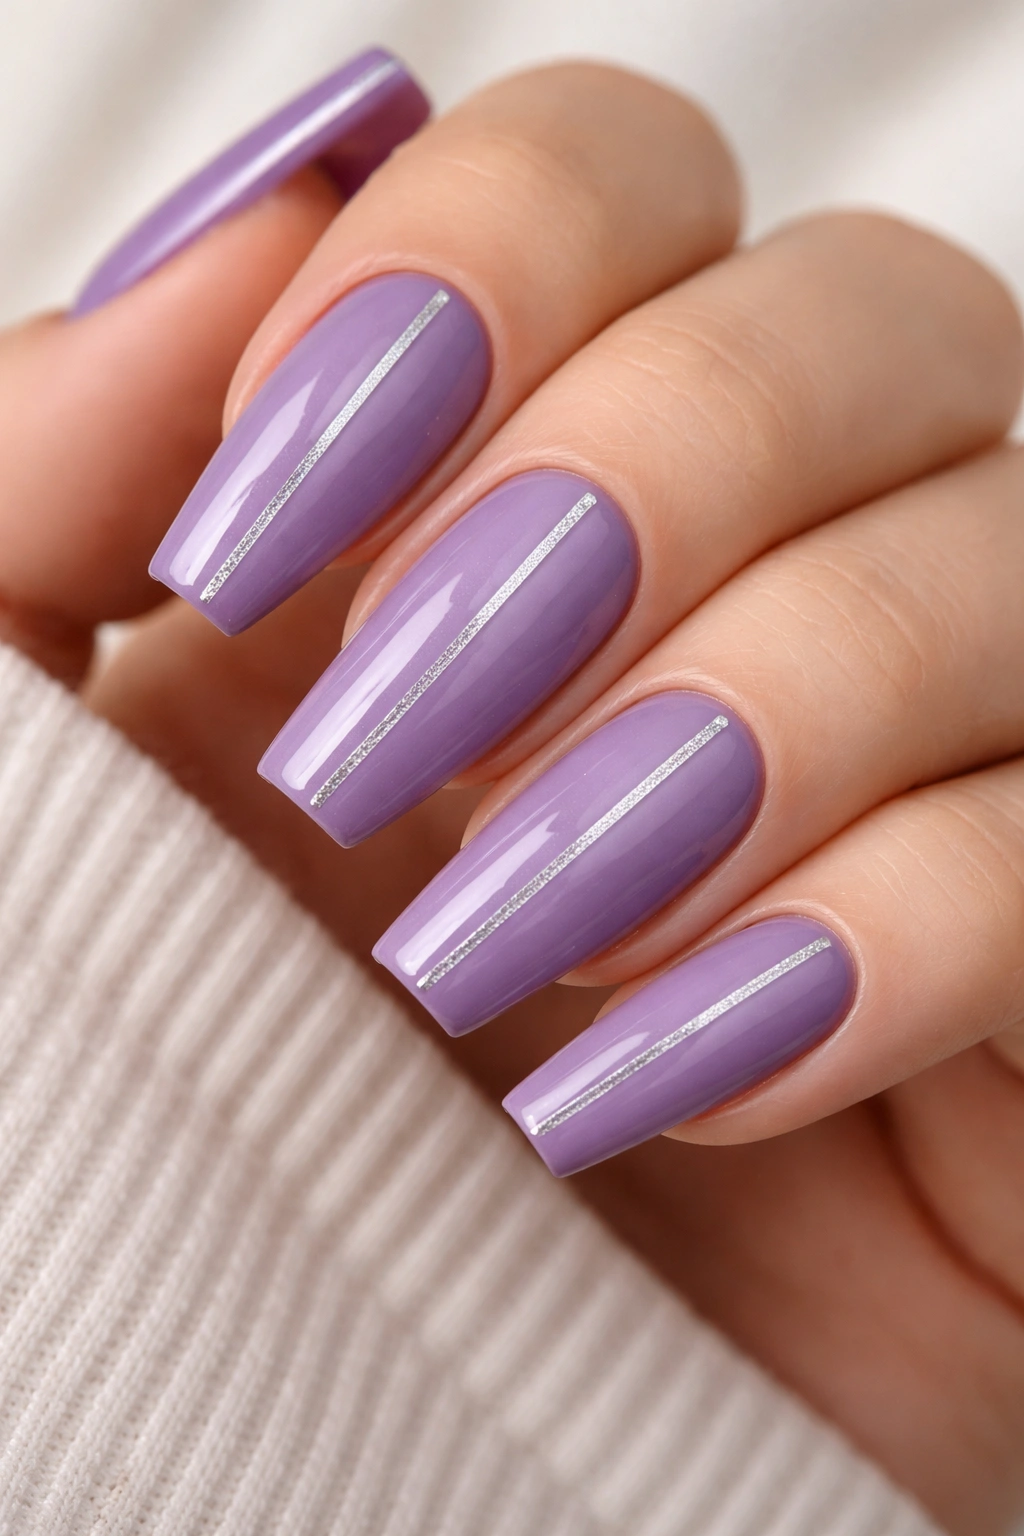
Sleek, medium-toned purple with thin silver lines creating geometric patterns or simple stripes across the nail delivers a minimalist, modern aesthetic. The silver reads as metallic-and-crisp against purple, creating precision and contemporary style.
Why This Feels Designer
Thin metallic lines suggest restraint and confidence—you don’t need to cover every surface to make a statement. The coffin shape emphasizes these lines, especially if they run vertically down the length of the nail. This design reads gallery-opening rather than party-ready, in the best way.
Creating Precise Striping
- Medium purple base (not too light, not too dark—aim for true purple tone)
- Silver gel or polish in a thin brush or striping pen
- Create either vertical lines running down the nail, or geometric patterns like triangles or offset horizontal stripes
- Keep lines equally spaced for a intentional, ordered feeling
- Silver shows up better on medium to darker purples, so base color matters
- Glossy top coat to protect lines and create uniformity
- Striping tape can help if freehand lines feel risky—just press tape down, polish, and peel
Pro tip: Pull striping tape away at a 45-degree angle rather than straight up to avoid dragging fresh polish.
17. Plum with Negative Space Design

Deep plum with intentional empty space—leaving portions of your nail bare or showing your natural nail—creates a contemporary, artistic look that feels deliberately avant-garde. The empty space makes the plum feel less heavy and adds unexpected sophistication.
The Power of What You Don’t Paint
Negative space designs force the viewer to complete the image themselves, which makes them feel more artistic and less costume-like. On coffin nails, negative space creates interesting geometric variations without requiring intricate nail art. It’s the ultimate minimalist approach that still makes a clear statement.
Designing Negative Space
- Plum gel or polish applied selectively rather than covering the entire nail
- Leave a thin band of natural nail at the cuticle, showing off your actual nail color
- Or create a plum “frame” around a clear center panel
- Or paint plum in geometric shapes (triangles, stripes) that don’t cover the whole nail
- This design works best with gel polish that has crisp edges
- Use tape or stencils to create clean borders between plum and bare nail
- Glossy top coat over the plum areas only (clear areas stay bare)
Worth knowing: Negative space designs look more intentional on medium and longer nails where there’s enough surface area for the design to read clearly.
18. Lavender with Purple Ombre and Glitter Tips
Pale lavender that deepens into richer purple with concentrated glitter at the tips combines color graduation with sparkle for a design that’s both elegant and celebratory. The gradual darkening feels cohesive while glitter adds the wow factor.
The Sophistication of Layered Effects
This design uses multiple techniques (ombre + glitter) but in a way that feels balanced because each technique lives in its own zone. The ombre creates visual interest while glitter adds targeted sparkle. On medium coffin nails, the design reads as thoughtfully executed rather than over-decorated.
Building This Layered Design
- Pale lavender gel or polish at the cuticle
- Mid-tone purple as your ombre middle zone
- Richer purple gel at the tips
- Blend using an ombre sponge while layers are tacky
- Once blended, apply concentrated glitter (silver, purple, or champagne) over the darkest purple at the very tips
- The glitter shouldn’t extend more than halfway down the nail
- Seal everything with glossy top coat that locks in the ombre and glitter
- The effect should feel like a natural progression from light to dark to sparkly
Pro tip: Allow each ombre layer to set slightly before applying the next to prevent colors from blending too much into muddy tones.
19. Royal Purple with Negative Space Marble
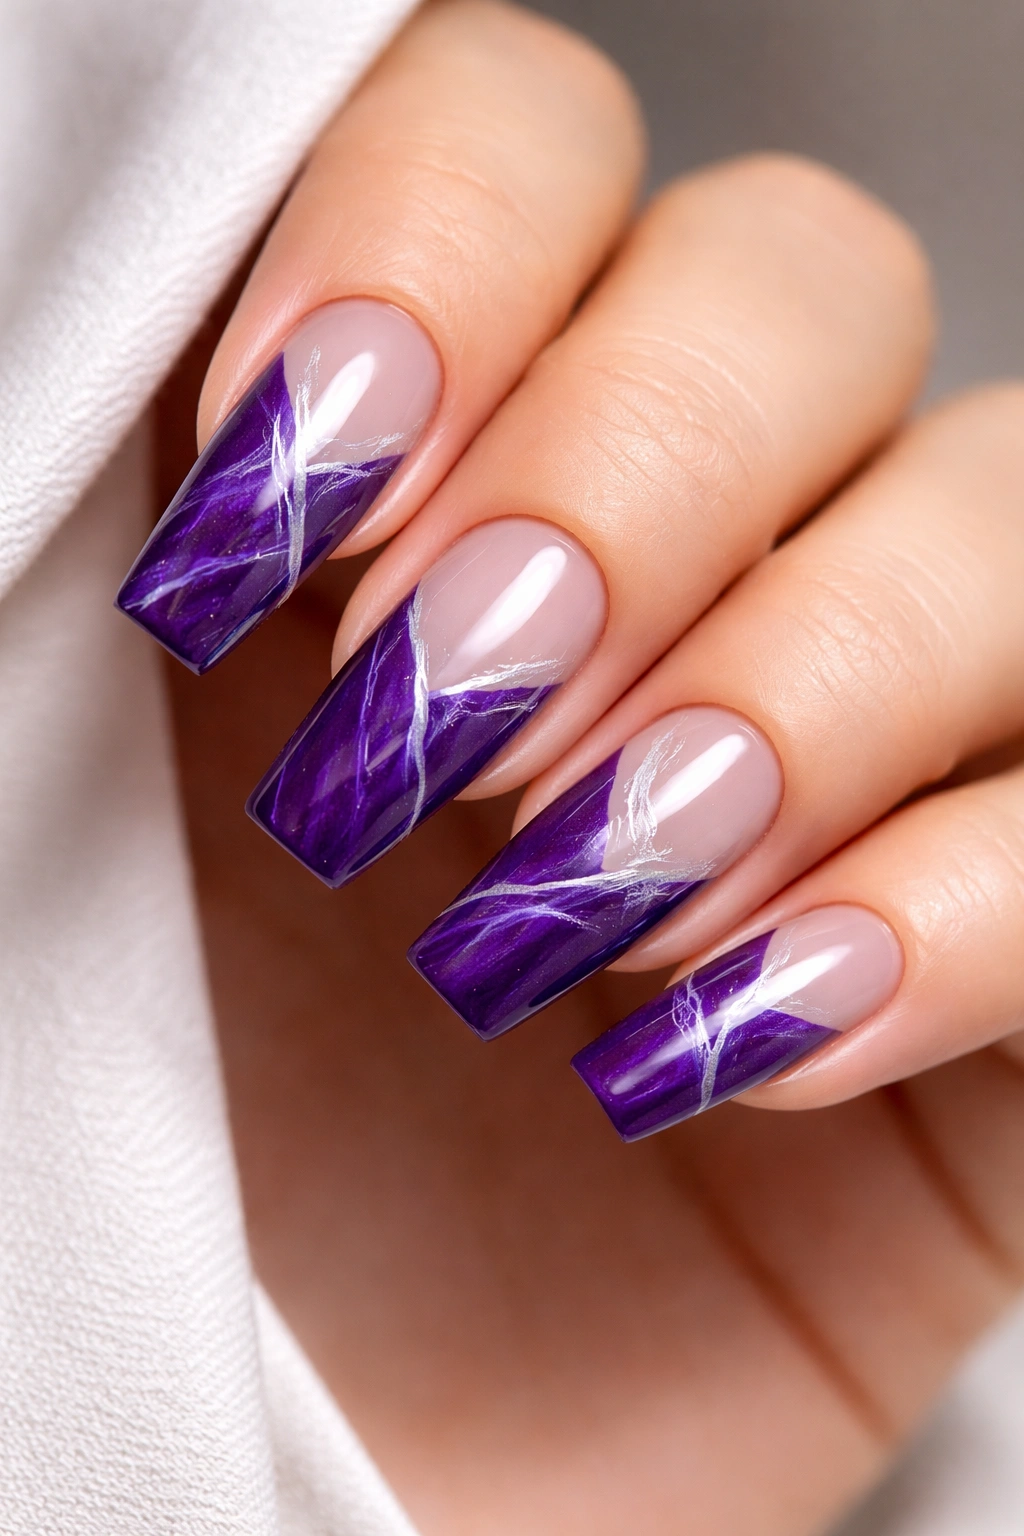
Royal purple with intentionally bare sections showing your natural nail, and white marble veining filling the purple areas, creates a complex design that’s organized and artistic. This combines negative space sophistication with marble’s organic beauty.
Design Complexity That Reads as Elegant
This design is technically complex but conceptually clean—it’s not chaotic because the negative space gives it structure. The marble adds texture and visual interest while the bare areas prevent it from feeling heavy. It’s the kind of design that makes people ask, “Where did you get that done?”
Executing This Intricate Design
- Map out negative space areas (perhaps a stripe on one side or geometric shapes) before painting
- Paint royal purple on designated areas
- Create white marble veining within the purple areas using thin brush strokes
- The white lines should look natural and random
- Leave planned negative space bare to showcase your natural nail
- Glossy top coat over the purple and marble areas only
- The contrast between bare nail and decorated areas should be crisp and intentional
- This design is easier with gel polish due to the control and precision needed
Worth knowing: This design is ambitious but absolutely worth the effort—it’s genuinely one-of-a-kind and impressive.
20. Soft Purple with Rhinestone Gradient
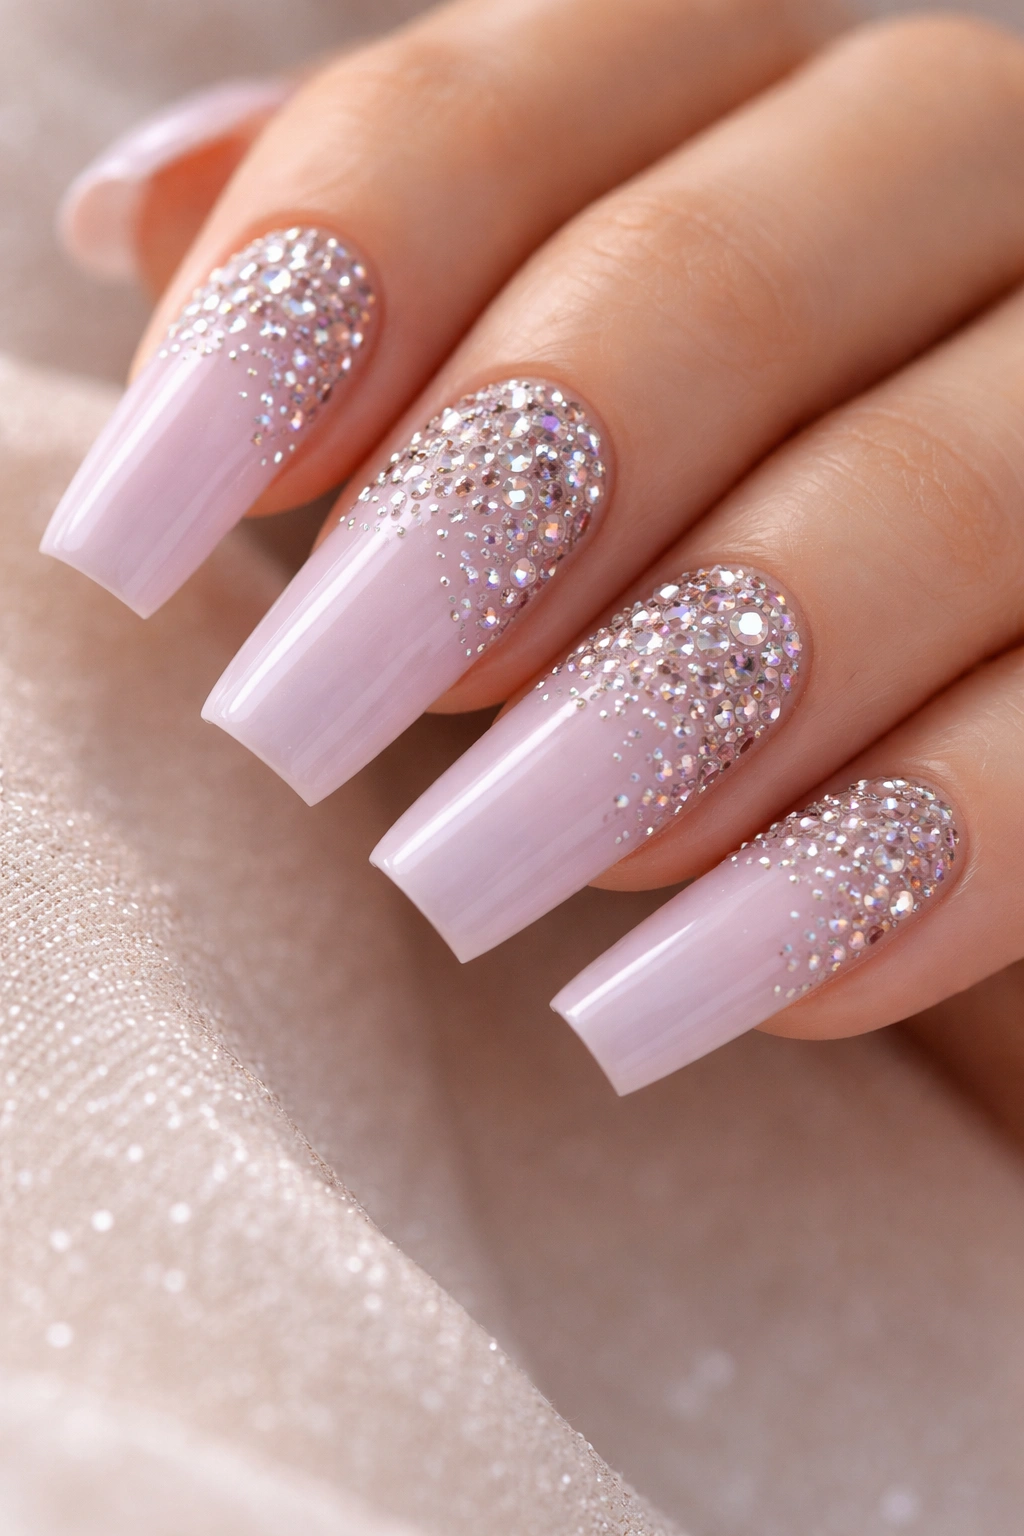
Soft, milky purple with a subtle gradient of rhinestones increasing in concentration from cuticle to tip creates sparkle that feels integrated rather than applied. This design is the sweet spot between sparkly and sophisticated.
Why Gradient Application Works
Instead of placing all rhinestones at the tips (which can feel like a afterthought), a gradient creates intentional, artistic sparkle that enhances the nail shape. On coffin nails, rhinestones concentrated toward the point naturally draw the eye to the tip’s elegant angle. It’s sparkle used strategically.
Creating a Rhinestone Gradient
- Soft purple gel or polish base covering the entire nail
- Glossy base coat as an adhesive layer
- Place 1-2 rhinestones near the cuticle
- Gradually increase rhinestone density toward the tip
- By the tip area, have a concentrated cluster of rhinestones
- Use medium-sized rhinestones for visibility and balance on medium nails
- Seal with a thick, non-tacky top coat that locks stones in place
- Position stones while the base is tacky—they’ll adhere better than on a fully set surface
- Tweezers make precise placement much easier than fingers
Pro tip: Mixing rhinestone sizes creates more visual interest than using identical sizes—a few large stones mixed with smaller ones feels more deliberately designed.
Final Thoughts
Purple is genuinely one of the most versatile colors for coffin nails because it straddles sophistication and playfulness depending on which shade and finish you choose. Medium length keeps these designs wearable and practical while still giving you enough canvas to play with patterns, gradients, and embellishments. Whether you’re going matte and minimalist, glossy and glamorous, or somewhere in between, there’s a purple coffin nail design here that matches your aesthetic and skill level.
The best part about exploring purple nails is that you can start simple—a solid glossy lavender is already stunning—and gradually add complexity as you gain confidence. Try one of these designs, see what resonates with you, and feel free to remix elements from multiple designs to create something entirely your own. Your nails are the perfect place to experiment with color and creativity without major commitment.
