

White coffin nails have become the go-to choice for anyone seeking an elegant, elongated nail shape that feels both modern and timeless. The coffin (or ballerina) nail shape gets its name from its distinctive silhouette—wider at the nail bed, tapered toward the free edge, creating a sophisticated look that flatters most hand shapes. When you pair this flattering shape with crisp white polish, you unlock an incredible canvas for endless design possibilities. Whether you prefer minimalist chic, ornate glamour, or artistic nail art, white coffin nails offer the perfect foundation for expressing your personal style while maintaining an air of polished sophistication.
The beauty of white coffin nails lies in their versatility. White serves as both a blank slate and a statement in itself—it’s fresh, clean, and works for virtually any occasion, from casual everyday wear to formal events. The elongated coffin shape gives you ample surface area to showcase intricate designs, and the stark white background makes even the smallest details pop visually. Long nails in this shape draw attention to your hands and create an impression of elegance and intentionality. You’re not just growing out your nails; you’re cultivating a canvas for deliberate, beautiful artistry.
What makes white coffin nail designs so compelling is that they transcend trend cycles. Unlike trend-driven colors that come and go, white remains eternally relevant. This means the designs you fall in love with won’t feel dated in a few months, and you can invest in learning the techniques and products that work best with white polish without worrying about its lasting appeal. Let’s explore eighteen stunning white coffin nail designs that showcase exactly why this combination has earned its place as a nail art staple.
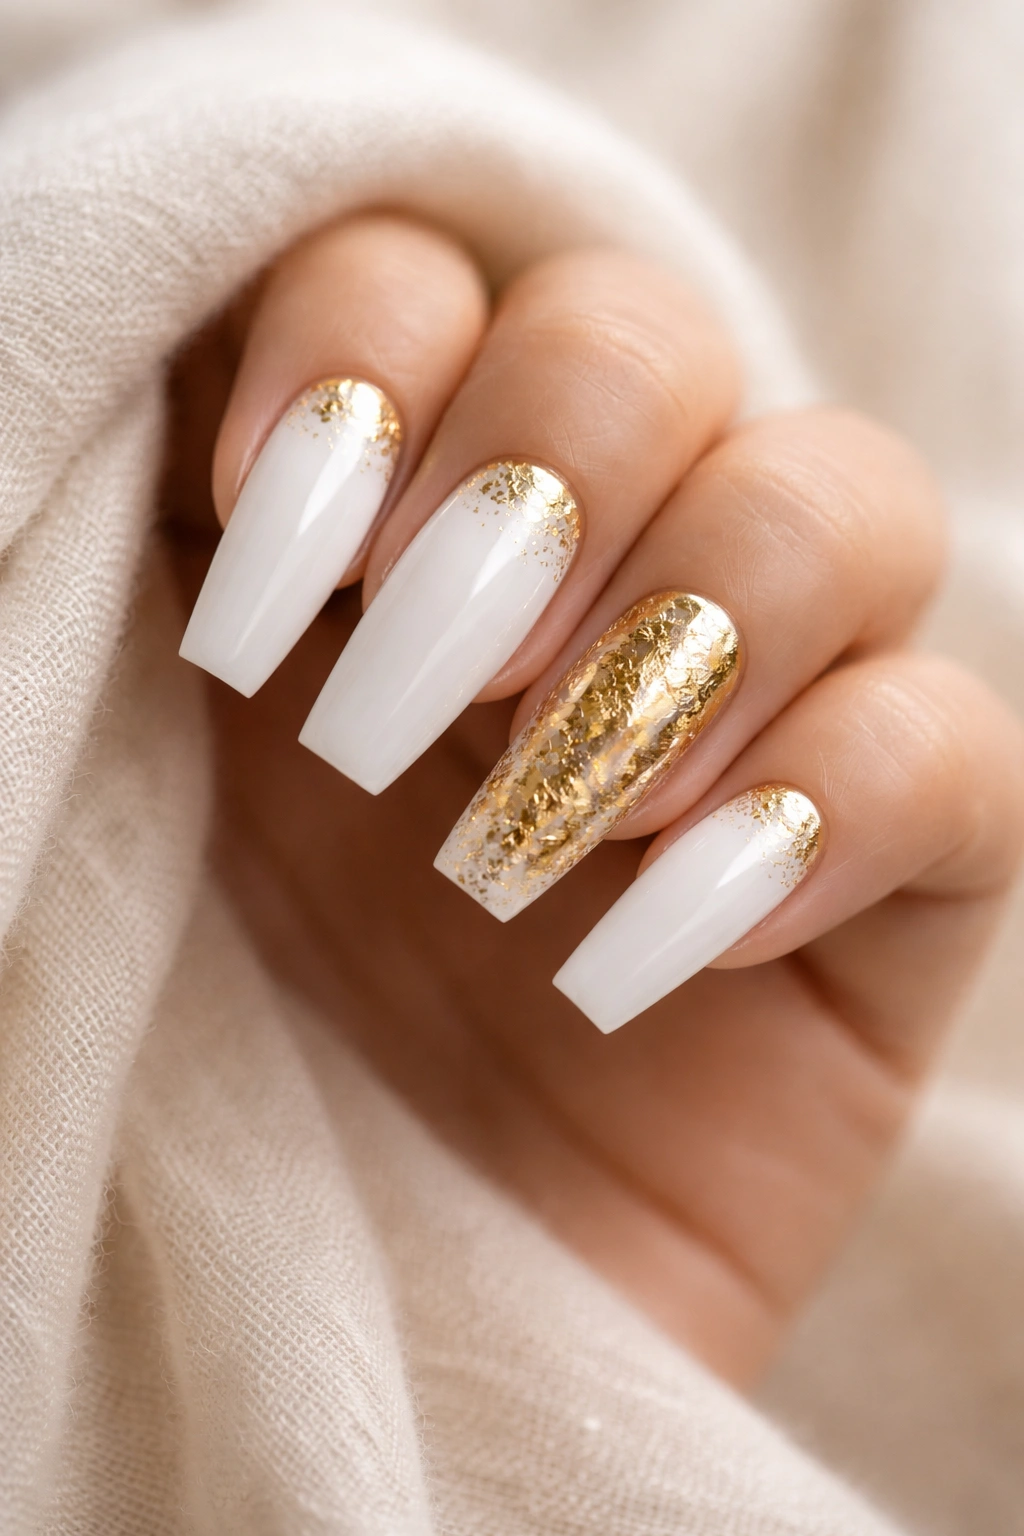
1. Pure White with Gold Foil Accents
There’s something inherently luxurious about pairing a clean, pristine white base with strategically placed gold foil details. This design starts with a smooth, glossy white polish applied in two coats for full opacity and a flawless finish. Once the white base is completely dry, gold foil accents are placed on select nails—typically one accent nail that features bold gold coverage, while the surrounding nails get subtle gold flecks near the cuticle or along the tips.
How to Execute This Design
The key to making this design look high-end rather than chaotic is restraint and intentional placement. File your nails into a coffin shape with smooth edges, ensuring the tips have that characteristic flat-to-pointed transition. Apply your white base in thin, even coats, allowing each coat to dry completely. Once fully cured, use either adhesive foil sheets that you press onto the nail surface or apply a thin layer of gel base, then press foil into it before sealing with a top coat. The gold catches light beautifully and creates dimension without overwhelming the clean white aesthetic.
Foil accents work especially well on the ring finger or as a French tip accent, where the gold starts a few millimeters down from the tip and gradually fades into the white. This creates a transitional effect that feels intentional and elevated. The contrast between matte white and reflective gold is what makes this design sing—the white keeps it sophisticated, while the gold injects glamour and movement.
The longevity of foil designs depends heavily on your top coat. A quality gel top coat will seal the foil and keep it from lifting or peeling for two to three weeks. If you’re using regular polish, expect the foil to maintain its appearance for about a week before edges start to curl slightly, which is actually part of the charm for some people.
Pro tip: Apply foil to just two or three nails rather than all five—this creates visual interest while maintaining a wearable elegance that translates across different settings.
2. White Ombre Gradient
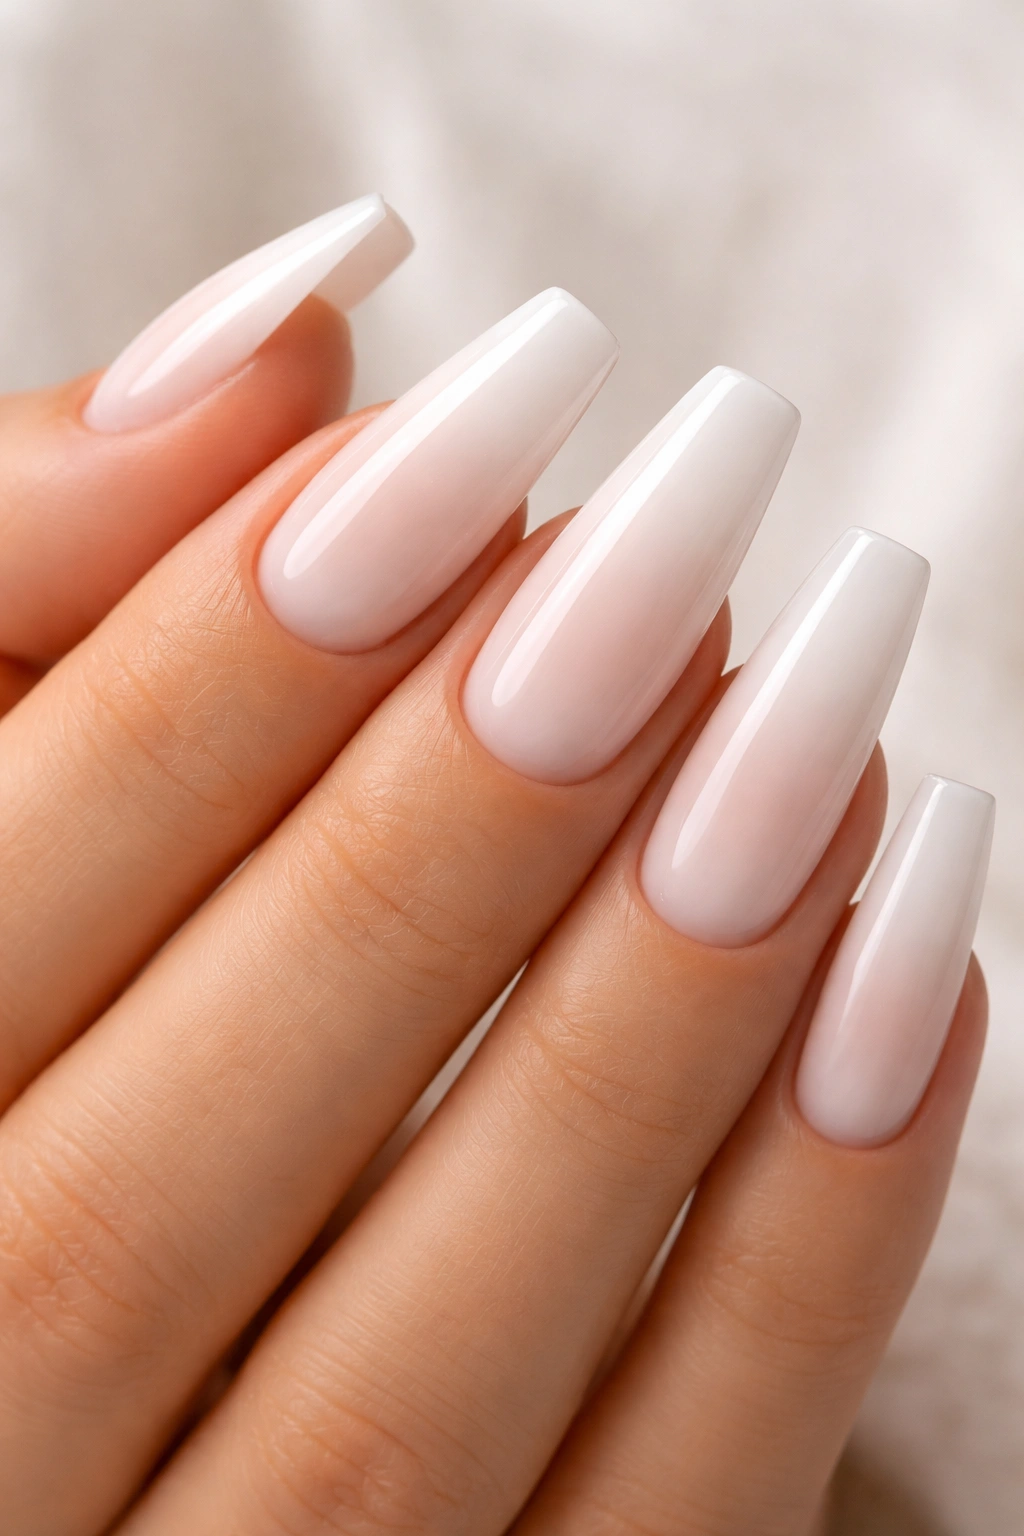
An ombre gradient design on white coffin nails creates a sophisticated, flowing effect that feels both modern and artistic. This design layers white polish from opaque at the base to nearly transparent at the tips, creating a soft gradient that looks like the color is dissolving into air. The effect is achieved by blending multiple shades of white (from bright white to off-white to barely-there white) or by blending white into a nude or ivory base for a more subtle transition.
Creating Seamless Color Transitions
The technique for achieving a perfect ombre requires either a sponge application method or a wet blending approach. Using a makeup sponge, apply your base color to one corner and your lighter shade to another, then press and dab the sponge onto your nail while the polish is still wet, which causes the colors to blend naturally into each other. With five coats and strategic sponging, you create that coveted gradient effect. The coffin shape’s tapered edges work beautifully with ombre because the tips naturally show more of the lighter color as they’re narrower.
What makes an ombre gradient on white nails so appealing is the subtlety of it. Unlike bold color-to-color gradients, a white ombre feels elegant and understated even though the execution is technically demanding. The design photographs beautifully because the gradient catches light differently depending on the angle, creating depth and movement in a single color story.
The biggest challenge with ombre is keeping the gradient smooth without visible lines or streaks. This is where having thin polish and patience during application becomes critical. You’re essentially creating layers of semi-transparent color, and each layer needs time to set slightly before adding the next. The payoff is a design that looks airbrushed and professional, making it perfect for anyone seeking that high-end nail salon aesthetic.
Pro tip: Practice your ombre technique on a practice wheel or artificial nails before attempting it on your natural nails—once you nail the sponging motion, the real application becomes much easier and more consistent.
3. Minimalist White with Negative Space
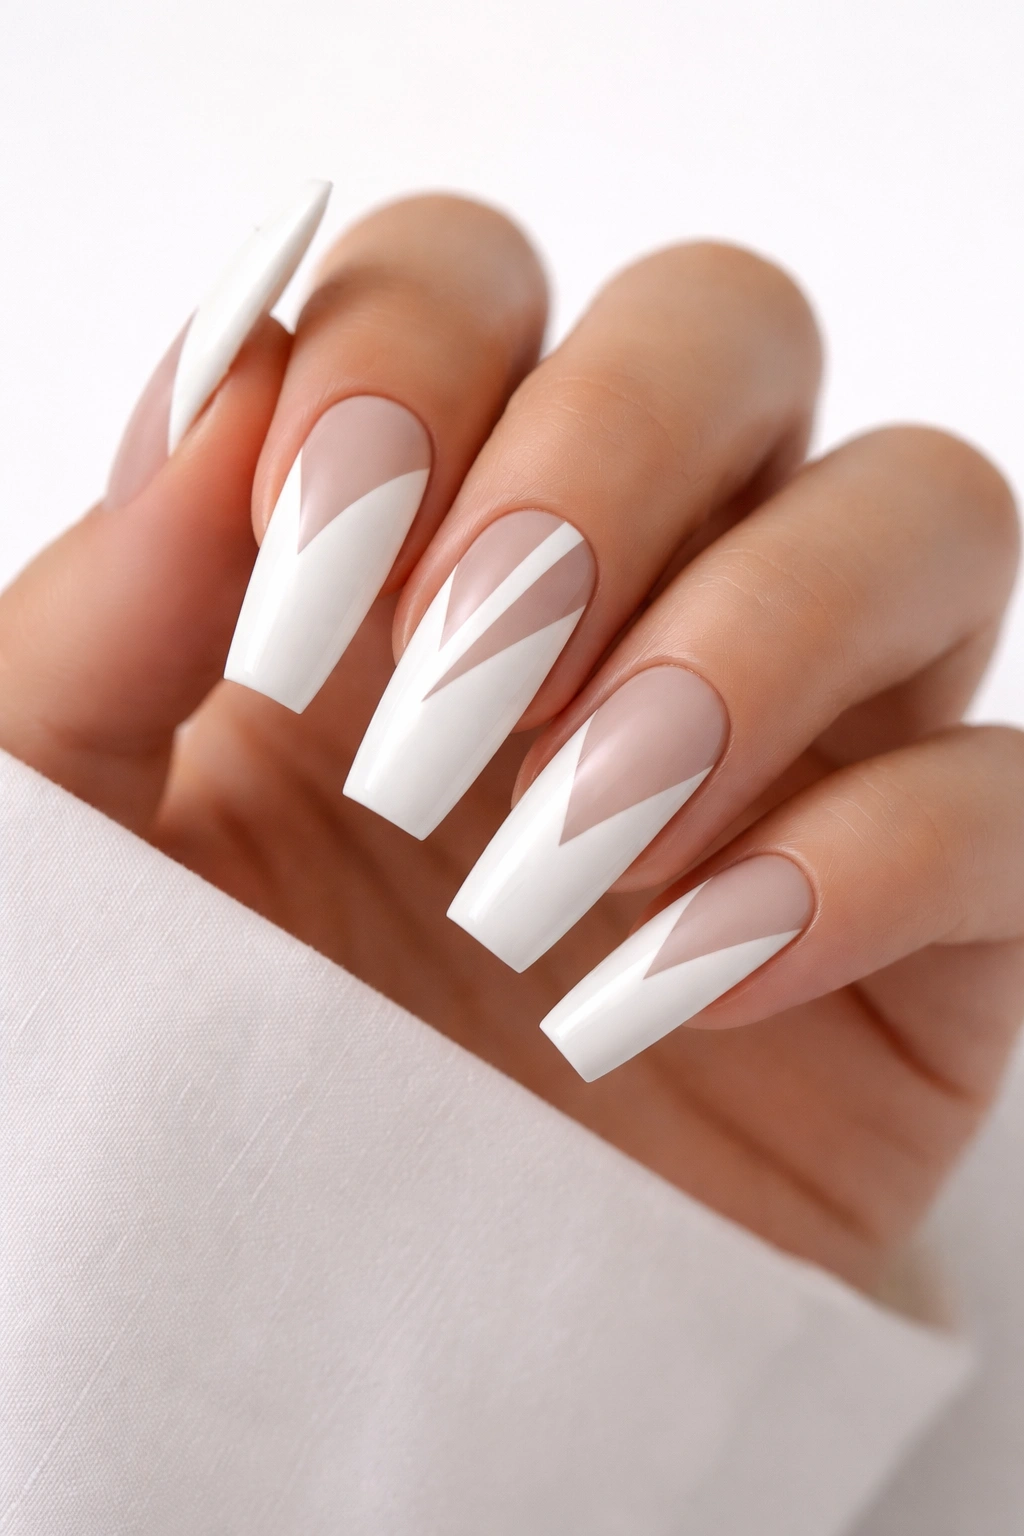
Negative space designs leverage the actual nail surface (your natural nail color showing through) to create striking visual patterns, and this approach pairs beautifully with white polish. This design involves strategically leaving portions of your nail unpainted, creating geometric shapes, lines, or patterns that stand out in stark contrast to the white. A coffin-shaped nail provides the perfect frame for negative space work because the shape itself is already bold and architectural.
Why Negative Space Works Here
A simple version might feature white coverage on the outer edges of the nail with a clean geometric shape left bare in the center—a triangle, circle, or angular shape that exposes your nail bed. The contrast between white and the natural peachy-pink of your nail creates a striking, minimalist aesthetic that feels current and intentional. This design works whether you prefer symmetrical, perfectly centered negative space or asymmetrical, playful placements.
The beauty of negative space is its simplicity and elegance. You’re not adding elements; you’re strategically removing them, which requires precision and planning. This approach appeals to people who love clean lines and understated sophistication. It also photographs incredibly well because the contrast reads clearly in any lighting.
Creating negative space requires either careful free-hand painting or using nail vinyls (thin stickers that mask off areas while you apply polish). Vinyls make the process significantly easier and more consistent, allowing you to achieve perfectly straight lines and symmetrical shapes without the steady hand of a practiced nail artist. Once the vinyl is in place and the white polish is fully dried, you simply peel away the vinyl to reveal the clean negative space underneath.
Pro tip: Add a thin metallic accent line along the edge of your negative space shape using a fine liner brush and gold or silver polish—this frames the design beautifully and adds just enough detail to elevate it from minimalist to sophisticated.
4. Classic French Coffin Nails
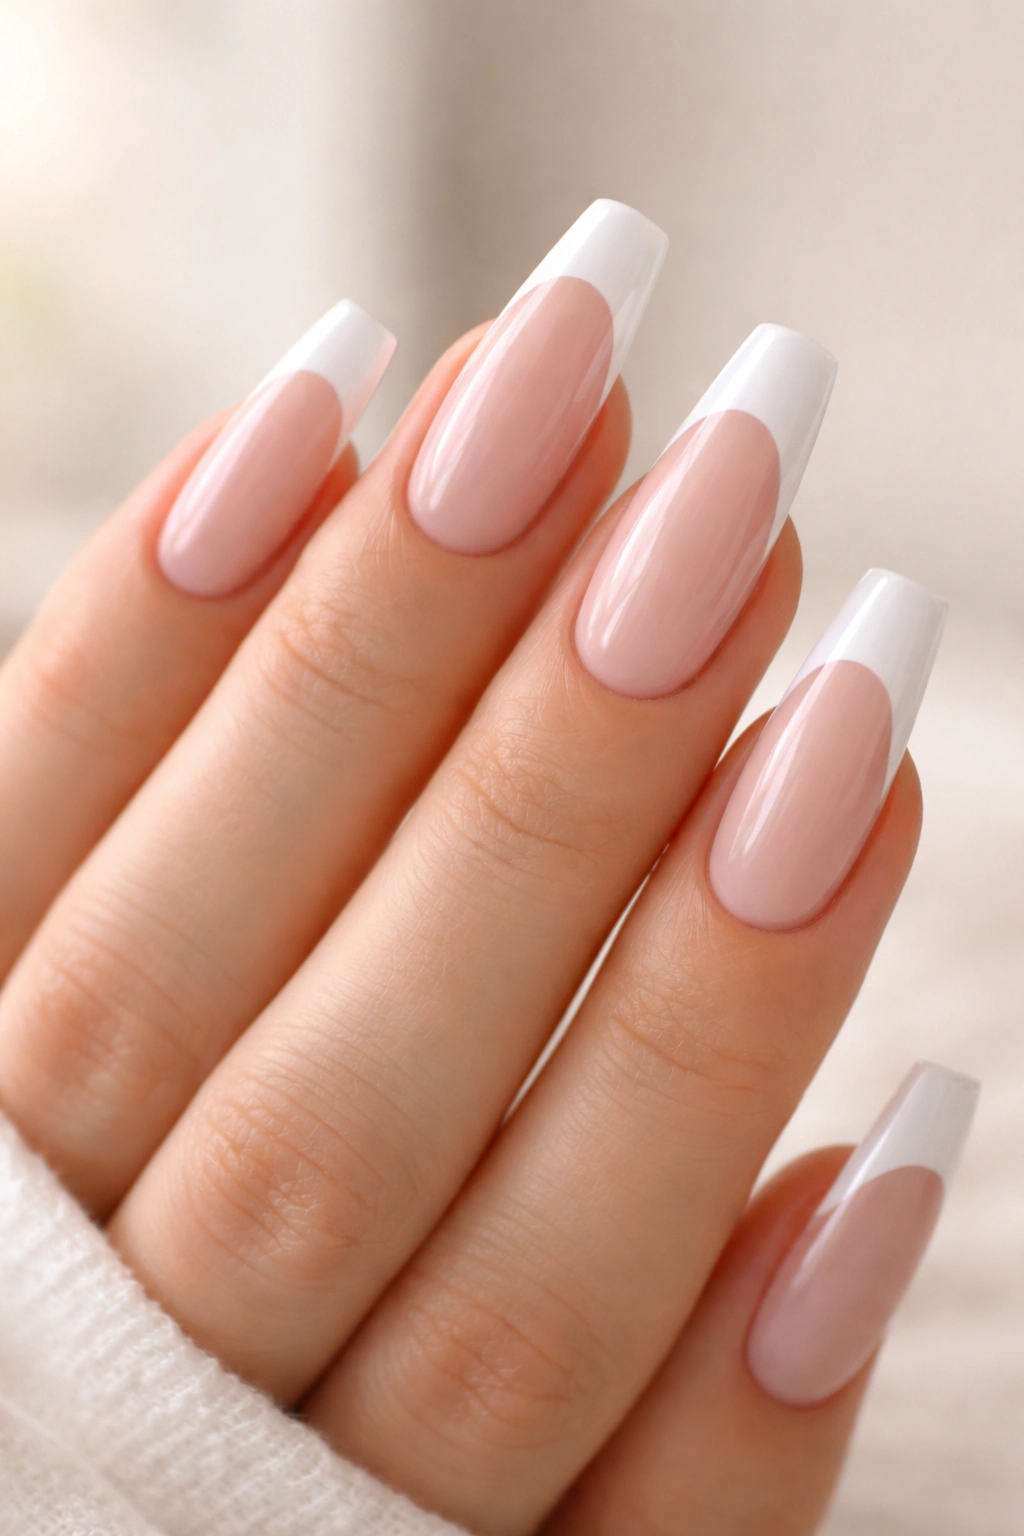
The French manicure is the ultimate timeless nail design, and adapting it to the coffin shape creates an elegant, elongated version that feels fresh while honoring the iconic original. This design features a white nail bed with a clean, contrasting tip—typically in white-on-white for a subtle, barely-there look, or white base with a thin nude or translucent band near the tip for traditional French dimensions.
Executing the Perfect French Line
The defining feature of a French manicure is the clean line separating the nail bed color from the tip color. On a coffin-shaped nail, this line follows the natural curve of the tapered tip, creating a graceful arc that’s more dramatic than on a standard round nail. The line should be thin but clearly defined—thick lines read as dated, while a properly proportion line (about 1-2mm) feels current and refined.
For a classic white-on-white French, apply opaque white to the entire nail and allow it to dry completely. Then, use a fine liner brush or a nail art pen with precise control to paint a thinner white (or very pale off-white) along the tip area, creating that subtle dimensional effect. The contrast is minimal but visible—catching light shows the two-tone effect without being obvious at first glance.
An alternative approach uses nude or ivory on the tip instead of white, which creates more visual separation and reads as a more traditional French manicure. This variation bridges classic elegance with modern sensibilities, making it perfect for professional settings or formal occasions where you want polish without boldness.
The hardest part of executing a perfect French line is keeping it even across all five nails and getting the width consistent. Practice on less-visible nails first (pinkies and thumbs) before perfecting it on your dominant hand. With a steady hand and a quality thin brush, you can achieve salon-quality results at home.
Pro tip: If your hand isn’t steady enough for freehand work, invest in a French manicure guide—a sticky template that adheres to your nail and guides your brush to create a perfect, even line every time.
5. White Marble Nail Art
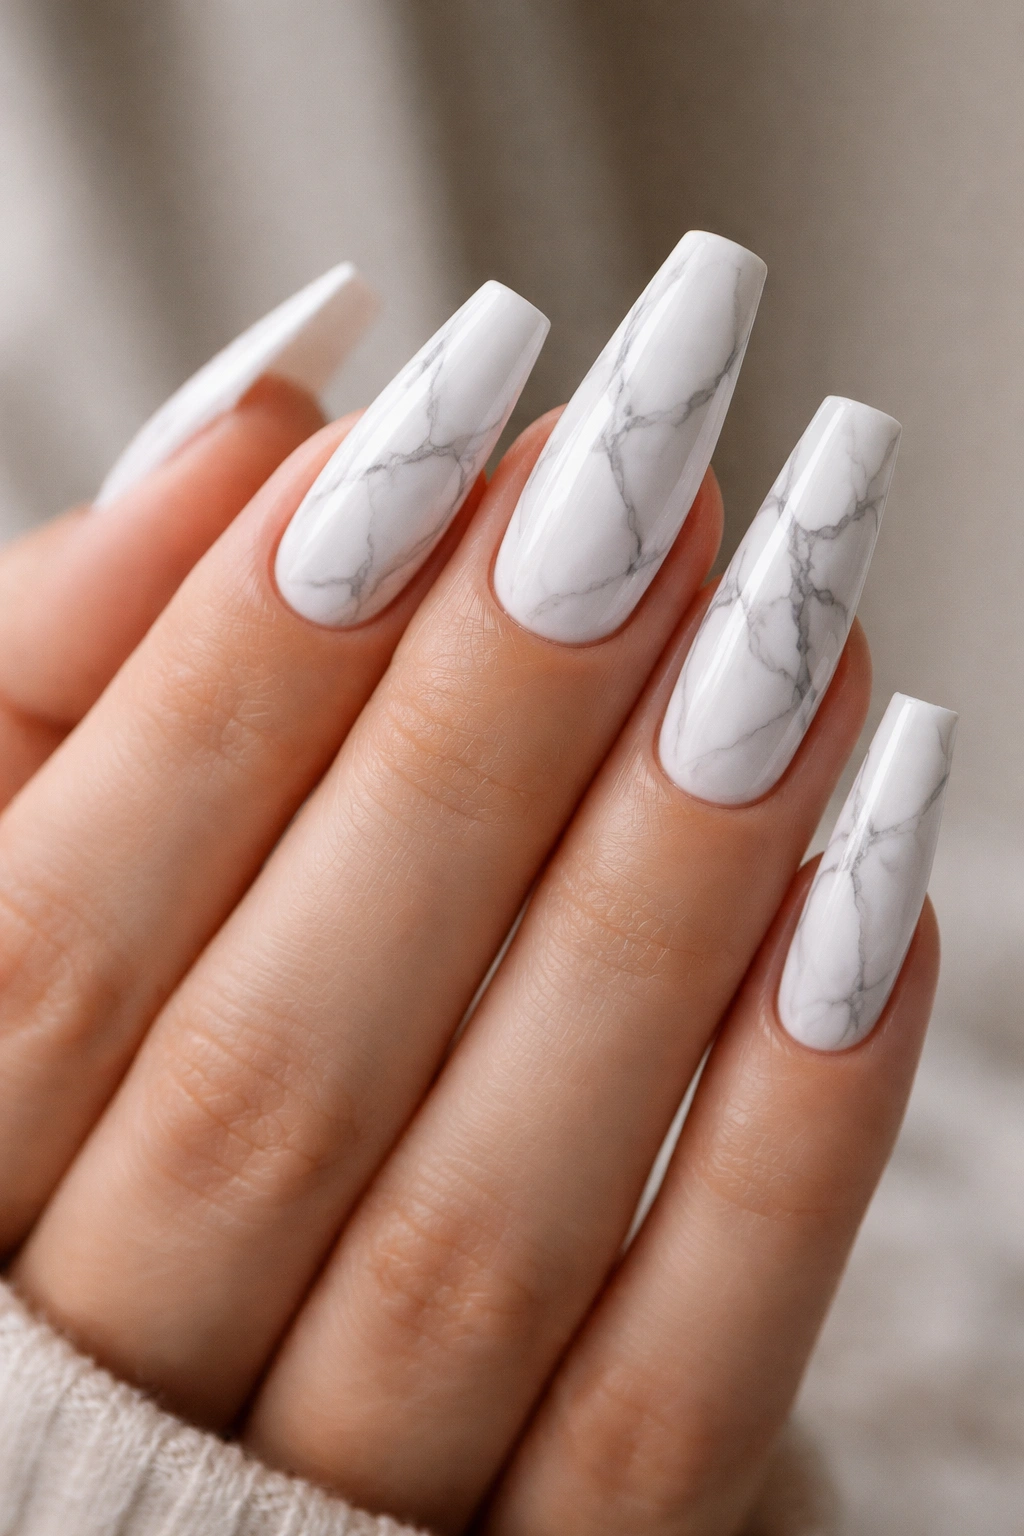
Marble patterns create organic, sophisticated designs that feel artistic without being loud. White marble designs use variations of white, gray, and sometimes pale pink or nude swirled together to mimic natural marble stone, creating a design that’s both abstract and grounded in nature. On coffin nails, this design has room to showcase the full marble pattern, making it particularly striking.
Creating Authentic Marble Effects
The most common technique for marble involves water marbling—mixing white and gray polish in a cup of room-temperature water, then swirling the colors together with a toothpick before dipping your nail into the pattern. The polish floats on the water’s surface, creating organic swirls that transfer onto your nail when you dip it in at the right angle. The beauty of this method is that no two nails are identical, creating a natural, handcrafted aesthetic.
An alternative approach uses a sponge or swiping technique, where you apply white and gray polish to your nail and use a clean sponge or tool to blend and swirl them together before the polish dries. This gives you more control over the pattern than water marbling and allows you to deliberately place colors where you want them on the nail canvas.
The key to making marble look refined rather than chaotic is using a cohesive color palette. White as your base with just gray and perhaps one additional accent color (like pale pink or champagne) keeps the design from becoming too busy. The muted tones feel sophisticated and wearable, appropriate for both casual and professional settings.
Coffin nails’ elongated shape means you have more surface area to showcase the marble pattern, and the tapered edges actually frame the design beautifully. A marble design that might look busy on a round nail feels balanced and artistic on the coffin shape.
Pro tip: Seal your marble design immediately with a quality top coat—the swirled polish layers create a textured surface that needs protection from chipping.
6. White with Delicate Flower Designs

Hand-painted flowers in soft colors on a white coffin nail create a garden-inspired aesthetic that feels romantic and artistic. This design involves carefully painting tiny flowers (think daisies, roses, or wildflowers) directly onto the white base using thin brushes and nail art colors in coordinating shades. The white background makes delicate flowers pop, and the coffin shape gives you room to create small floral clusters or a single statement flower.
Hand-Painting Flowers with Precision
Creating hand-painted flowers requires patience, a steady hand, and thin brushes designed specifically for nail art. Start with your white base and allow it to dry completely. Then, lightly sketch the flower placement with a pencil to guide your brush work. Using thin brushes and highly pigmented nail art colors, paint flowers—simple five-petal flowers require just a few brushstrokes, while more detailed roses involve more layering and shading.
The beauty of hand-painted flowers is their uniqueness. Even if you’re not a naturally talented artist, slightly imperfect flowers actually read as more authentic and charming than perfectly symmetrical designs. A flower with slightly uneven petals feels handmade in the best way, conveying intention and care.
Consider the placement carefully. Flowers concentrated on one accent nail feel artistic and intentional, while smaller flowers scattered across multiple nails create a cohesive garden-inspired look. Many nail artists place a larger focal flower on the ring finger with coordinating smaller flowers on the surrounding nails, creating visual hierarchy and interest.
Pairing white with soft greens, blush pinks, or pale yellows creates a cohesive palette. The white background keeps everything looking fresh and elegant rather than busy or childish, no matter how many flowers you paint. Add tiny green leaves or stems for botanical authenticity without overcomplicating the design.
Pro tip: Allow each color layer to dry completely before adding shadows or details—wet-on-wet application on small nails is difficult, so layering gives you more control and prevents colors from muddying together.
7. Glossy White with Rhinestone Details
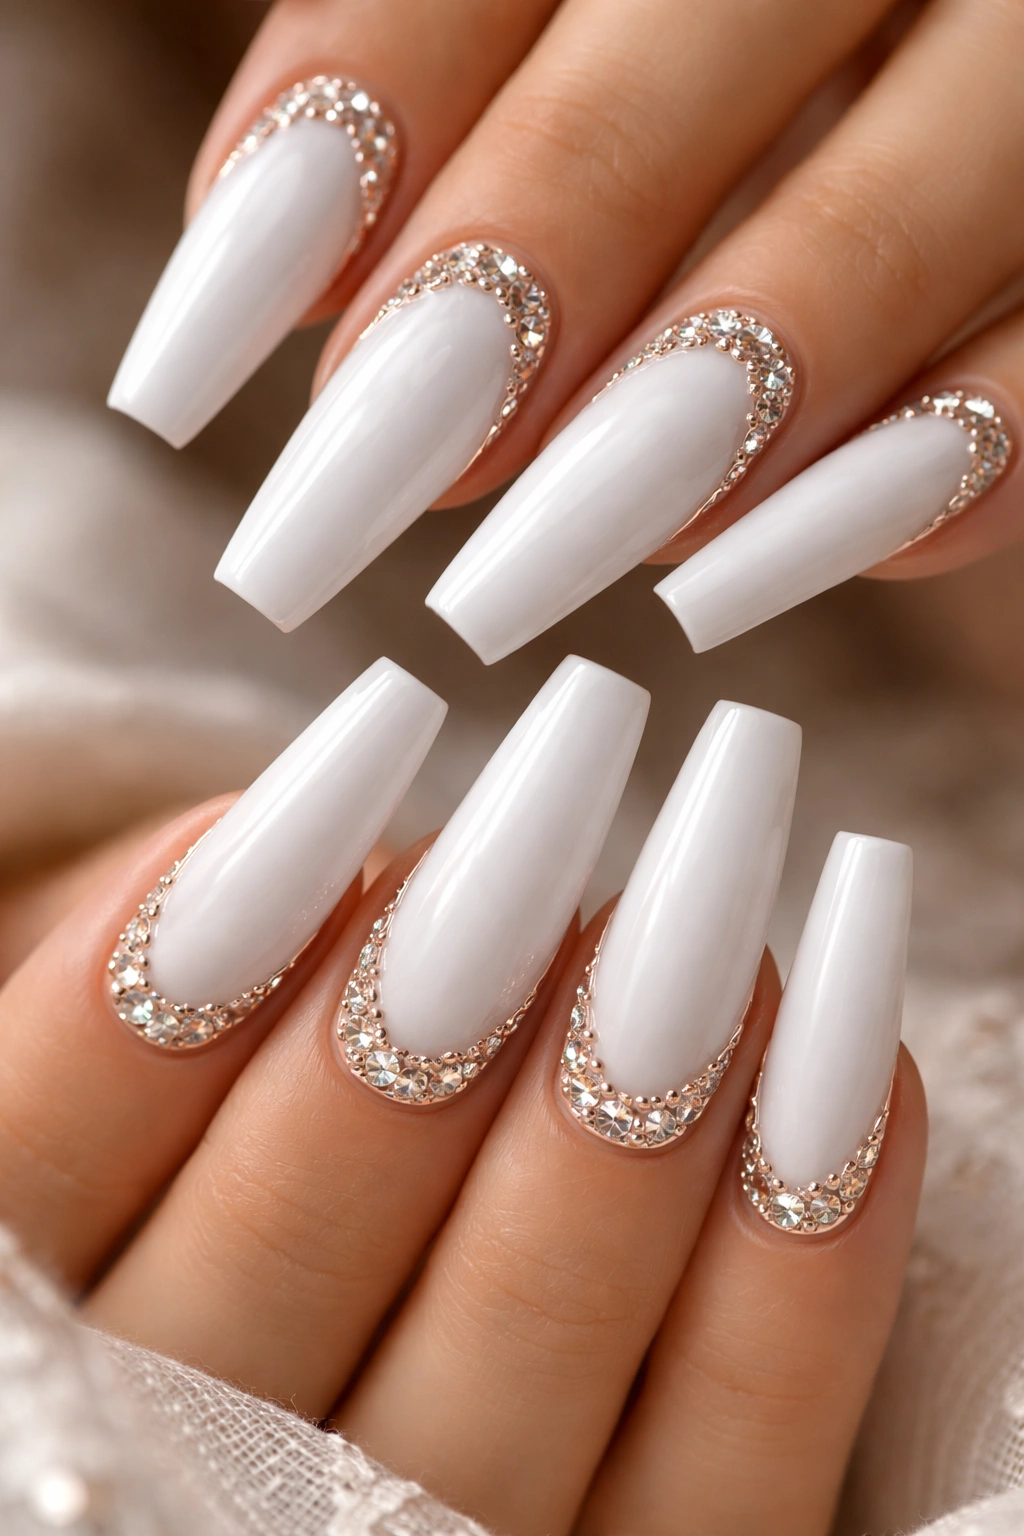
Rhinestones elevate white nails into glamorous, eye-catching designs that sparkle and catch light beautifully. This design pairs a high-shine glossy white base with strategically placed rhinestones—either in classic clear crystals or colored rhinestones in complementary tones like rose gold or soft pink. The coffin shape’s elongated surface is perfect for showcasing rhinestone placements without the design feeling cramped or chaotic.
Strategic Rhinestone Placement
The key to making rhinestones look luxe rather than costume-y is restraint and intentional placement. Rather than covering the entire nail in stones, place them strategically—perhaps creating a frame around the perimeter, a diagonal line across the nail, or a small cluster near the cuticle area. This approach creates visual interest while maintaining sophistication.
Rhinestones adhere using specialized nail glue or adhesive designed specifically for nail decorations. After applying your glossy white polish and allowing it to cure completely, apply a small dab of adhesive, then press the rhinestone into place using a rhinestone picker tool (a double-ended tool with a wax tip that allows you to precisely place stones). Once the adhesive is set, seal everything with a thick top coat that encapsulates the stones and protects them from lifting.
The contrast between glossy white and sparkling rhinestones is maximally elegant because the glossy base amplifies the sparkle effect. Where a matte finish might dull the stones slightly, high-gloss polish acts like a mirror, bouncing light around the rhinestones and making them appear larger and more brilliant.
Different nail occasions call for different rhinestone intensities. For everyday wear, stick to small accent stones on one or two nails. For special events or nights out, feel free to use larger or more numerous stones. The beauty is that you can adjust the intensity to match the occasion while keeping the elegant white base consistent.
Pro tip: Invest in a rhinestone picker tool—trying to place tiny stones with your fingers or tweezers is frustrating and often leads to misalignment. A proper picker makes precise placement possible and actually faster.
8. Matte White with Geometric Patterns
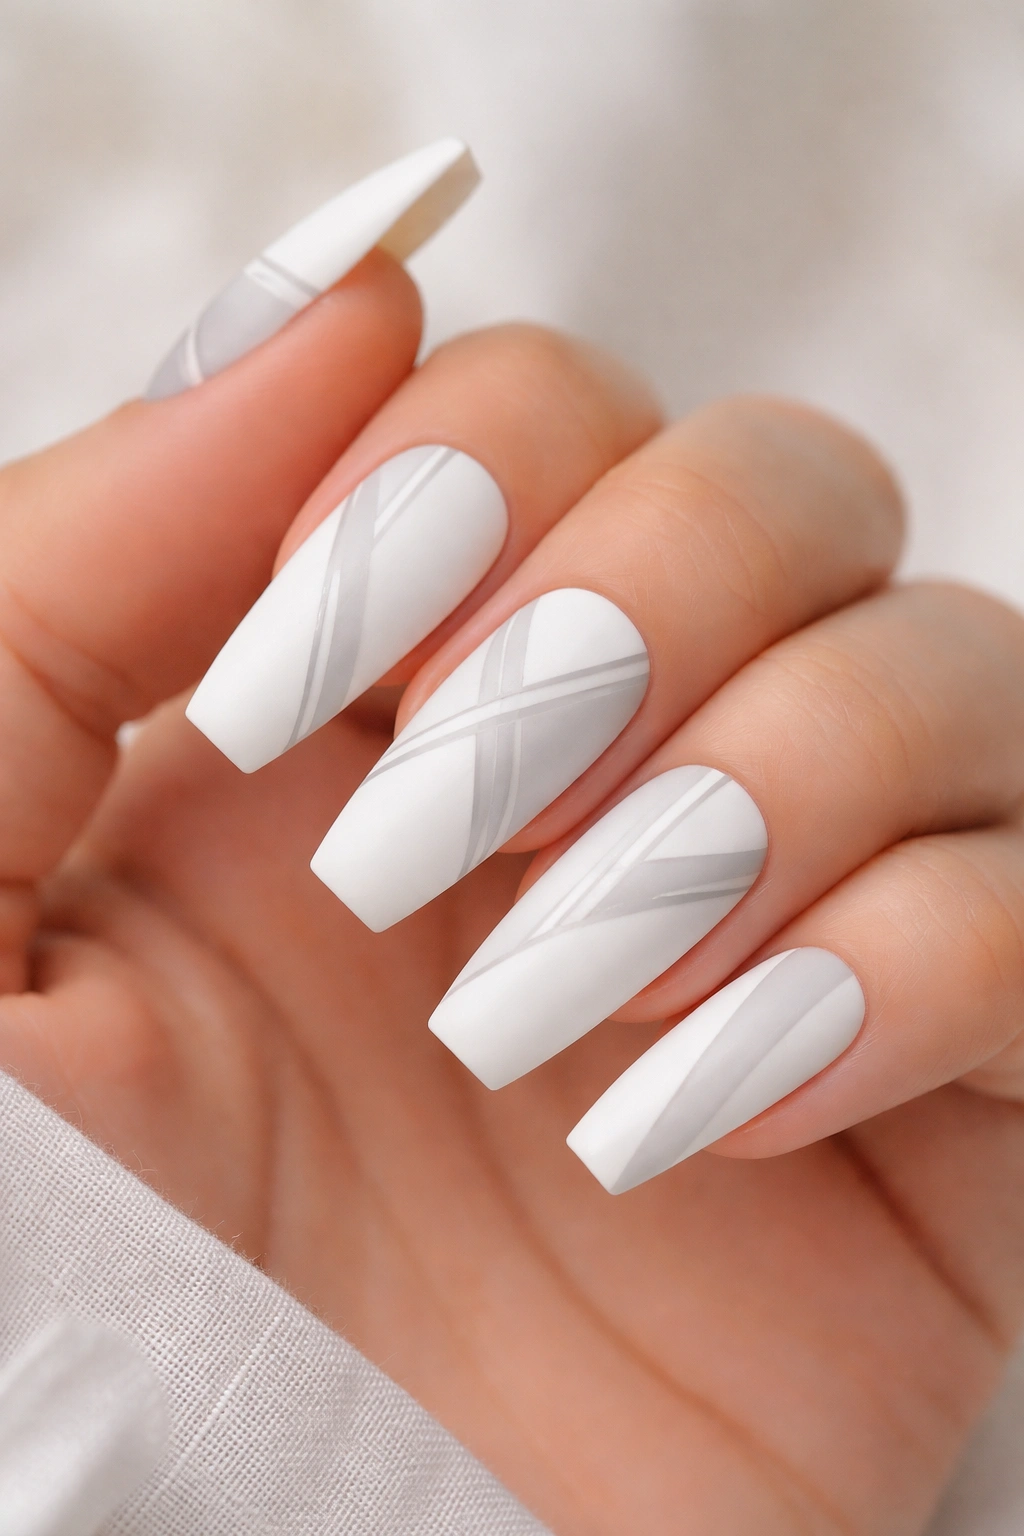
Matte white nails provide a softer, more understated canvas than glossy white, and when paired with geometric patterns, they create a modern, minimalist aesthetic that feels intentional and artistic. Geometric patterns—think angular lines, triangles, hexagons, or chevrons—painted in white over white or white with accent colors create visual interest while maintaining a cohesive, sophisticated look.
Creating Clean Geometric Lines
Geometric designs require precision, and using nail vinyls or stickers makes creating perfect lines significantly easier. Apply your matte white base, allow it to cure, then apply vinyls that mask off your desired geometric shapes. Paint over the vinyls with your accent colors (perhaps a pale gray, soft pink, or nude tone), then peel away the vinyls to reveal clean geometric shapes with crisp edges.
If you’re comfortable painting freehand, use a ruler or thin brush to create straight lines that form geometric shapes. The key is planning your design ahead of time—mentally divide your nail into sections and decide which will be white and which will be accent colors. Even with practice, geometric designs are easier to execute if you’ve mapped them out mentally or sketched them lightly first.
What makes geometric designs feel modern is their departure from curved, organic shapes. Instead of flowers or swirls, you’re working with angles and precision, which feels very current and intentional. Paired with matte finish, geometric designs have an understated elegance that appeals to people with minimalist design sensibilities.
The coffin shape’s sharp, angular tip actually complements geometric designs beautifully. You can extend geometric patterns all the way to the tip, allowing the nail’s natural shape to be part of the design. A geometric pattern that runs vertically down the nail—alternating white and accent colors in vertical stripes or chevrons—feels elongated and sophisticated on the coffin shape.
Pro tip: Use a mat top coat with a slightly dusty or velvety texture—it makes geometric lines read more clearly and creates a more intentional, polished look than a standard matte finish.
9. White with Fine Line Art
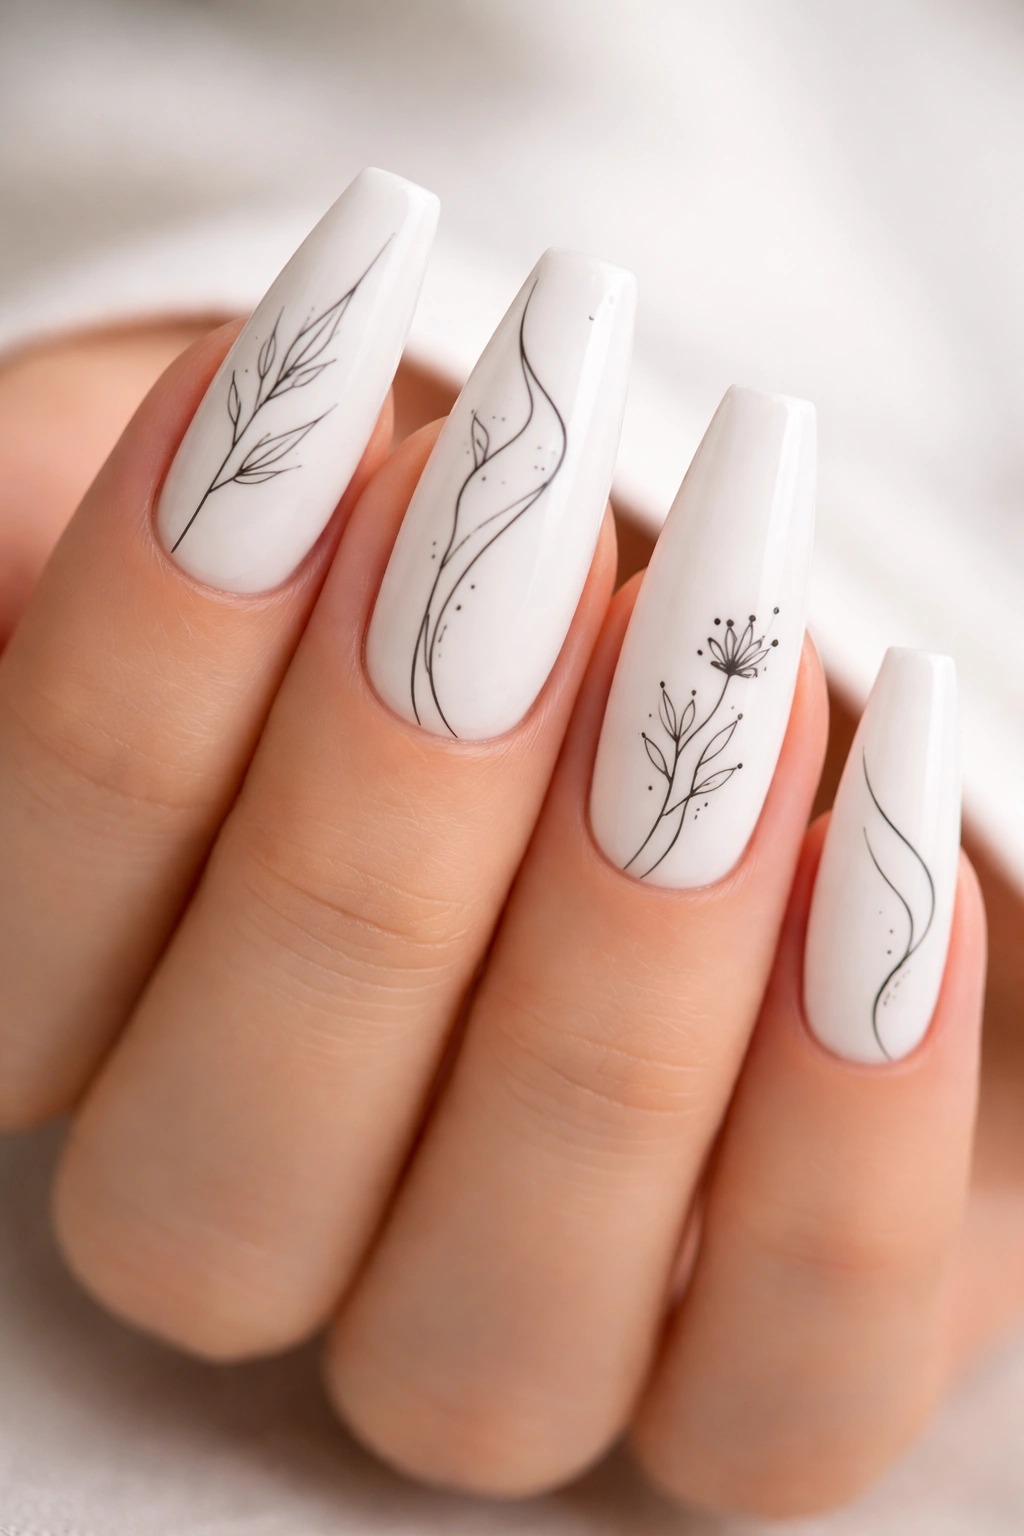
Fine line art designs involve detailed, precise line work that creates images, patterns, or abstract art directly on the white nail surface. These designs showcase intricate detail and artistic skill—think minimalist cityscapes, abstract line drawings, delicate linework forming animals or flowers, or geometric patterns that appear hand-drawn. On coffin nails, there’s enough surface area to showcase detailed line work without it feeling cramped.
Executing Intricate Line Work
Fine line art requires exceptional brush control, a very thin brush, and nail art polish with strong pigmentation. Using black, navy, or dark gray polish (colors that provide stark contrast against white), paint your line art designs using only lines—no fills, shading, or solid areas. The design lives entirely in the linework itself, which requires confidence in your brush strokes.
Popular fine line art includes abstract faces created with minimal lines, botanical illustrations like leaves or branches, geometric patterns formed entirely by thin lines, or small detailed scenes. The key is that every line is intentional and contributes to the overall image. Extraneous or tentative lines read immediately, so practice your design on paper first until you can execute it with confident, decisive strokes.
For those without steady hands, look for fine line art stickers or nail decals designed specifically for this aesthetic. These pre-made designs come in countless styles and allow you to achieve intricate line art without the years of practice required for freehand execution. The decal aesthetic is slightly different from hand-painted work, but quality nail decals look remarkably detailed and professional.
What makes fine line art so appealing is its intellectual, artistic quality. It’s a design that rewards close-up observation—someone has to look closely to appreciate the detail and precision of your line work. It’s an understated way to showcase artistry and personality on your nails.
Pro tip: Use a very fine, flexible brush meant specifically for nail art—regular paintbrushes are too thick and lack the precision you need for detailed line work.
10. Nude-to-White Ombre
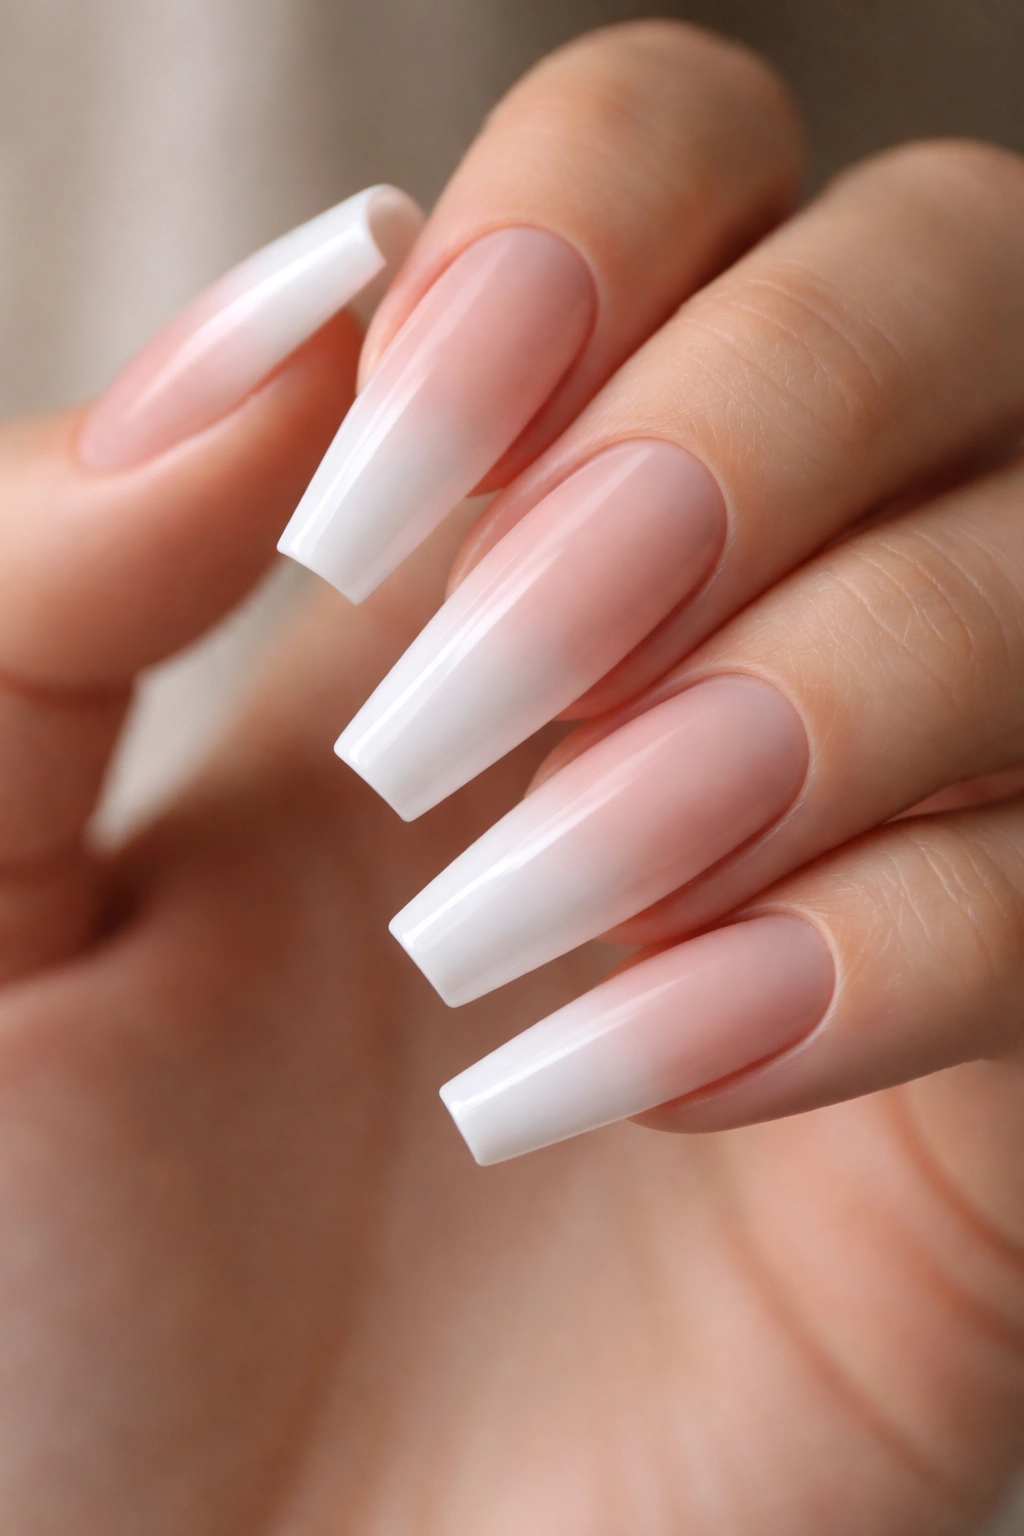
A subtle ombre that transitions from nude or peachy at the cuticle to pure white at the tips creates an elongating effect that’s particularly flattering on the coffin shape. This design is more subtle than white-on-white ombre because it spans a broader color range, creating more obvious gradient and visual movement while still maintaining a sophisticated, elegant aesthetic.
Building a Seamless Nude-to-White Gradient
This design uses the sponge application method. Start by selecting a nude or warm peachy shade that complements your skin tone, then prepare your white polish. Apply the nude to one corner of a makeup sponge and white to another, then gently press and roll the sponge across your nail in one direction, creating a gradient from nude-heavy at the base to white-heavy at the tip. This mimics how light naturally plays across a nail, creating an almost 3D effect.
The coffin shape is particularly flattering with this design because the gradient naturally follows the nail’s taper. As the nail gets narrower toward the tip, the white coverage naturally increases, which is exactly what happens in your gradient application. This harmony between shape and design creates a cohesive, intentional look.
What makes nude-to-white gradient so versatile is that it works in virtually any setting. The nudish base makes it appropriate for professional environments where you want polish but prefer neutral tones, while the white tips add just enough modernity and interest to keep it from feeling boring. It’s a design that elevates your hands without making a bold statement.
Many people find that nude-to-white ombre actually makes their nails appear longer than they are. The color progression creates an optical illusion where your eye follows the gradient from base to tip, effectively extending the visual line of the nail. Even if your natural nails are only moderately long, this design can make them feel elongated and refined.
Pro tip: Invest in a quality nude base color that actually matches your undertone—this allows the gradient to start seamlessly with your own skin tone, creating a more cohesive, elegant effect.
11. White Coffin Nails with Glitter Tips
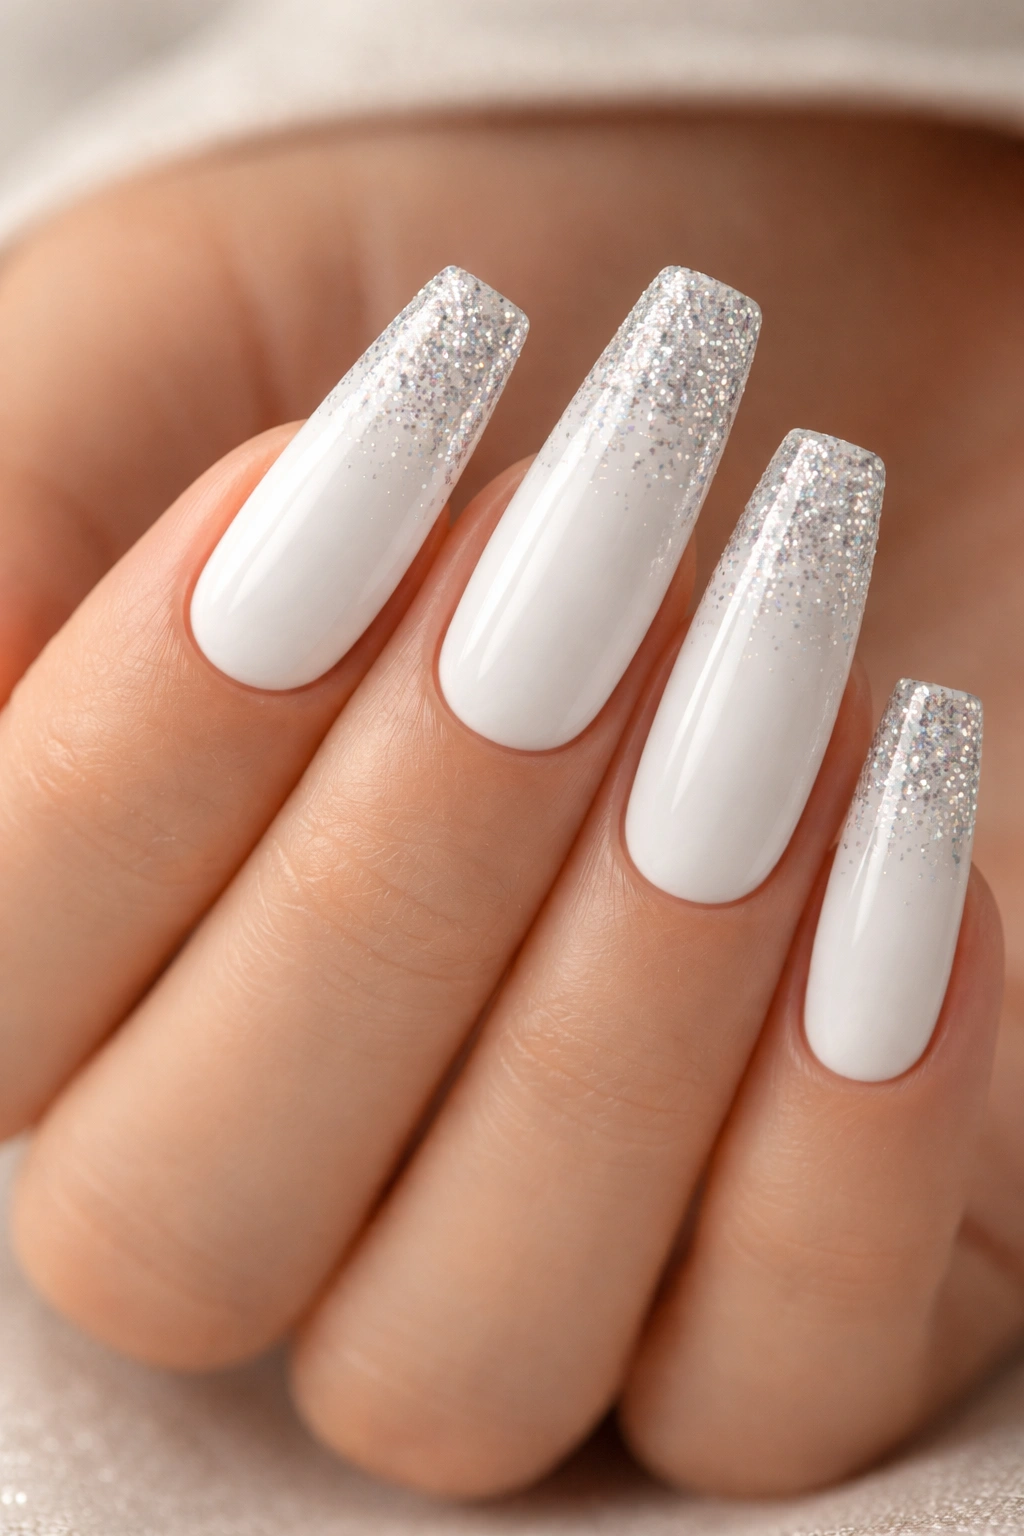
Adding glitter to just the tips of white coffin nails creates a celebratory, eye-catching design that’s still grounded by the clean white base. This design features a solid white nail bed with glitter concentrated at the tips—either a fine glitter for subtle sparkle or chunky glitter for maximum drama. The coffin shape’s tapered tips are perfect for showcasing glitter graduation.
Layering Glitter for Impact
There are two main approaches to adding glitter to tips. The first involves applying white base polish, then while it’s still wet, sprinkling fine glitter into the wet polish on the tip area and allowing it to dry with the glitter incorporated into the wet polish. This creates a glitter-embedded effect that’s part of the polish rather than sitting on top.
The second approach involves applying white base polish and allowing it to cure completely, then applying a clear or white glitter top coat just to the tip area, creating a distinct glitter line that graduates from glitter-heavy at the tips to white at the gradient point. This method gives you more control over exactly where the glitter begins and how concentrated it is.
For coffin nails, a glitter tip that starts about a quarter to a third of the way down the nail looks proportional and balanced. If glitter covered less, it might feel stingy on such an elongated nail; if it covered more, it might overwhelm the white base. The gradual transition from white to glitter is what makes this design feel intentional rather than accidental.
Glitter tips work beautifully for celebrations, nights out, or any time you want to add shimmer and joy to your manicure without sacrificing elegance. The white base keeps the design sophisticated, while the glitter ensures you catch light and sparkle with every hand gesture.
Pro tip: If you’re using chunky glitter, apply it to a very sticky base (either sticky base coat or polish that hasn’t fully cured) to ensure the glitter adheres properly and doesn’t shed during the week.
12. White with Chrome Powder Accents
Chrome powder creates a mirror-like, metallic finish that catches light dramatically, and when applied to select areas of a white coffin nail, it creates a futuristic, high-impact design. Chrome accents might cover the entire tips, create a stripe down the center of the nail, or form abstract shapes on the white base—the reflective quality makes even simple placements look extraordinary.
Applying Chrome for Maximum Shine
Chrome powder requires a specific base for adhesion—typically a sticky gel base or a special chrome base designed specifically for this purpose. After applying your white polish and sticky base, gently buff a small amount of chrome powder onto the designated area using a specialized chrome applicator (a soft brush or velvet-textured tool that picks up and applies the powder evenly). The powder clings to the sticky base, creating that intense metallic finish. Once applied, seal it with a glossy top coat.
The dramatic nature of chrome means a little goes a long way. Even a thin line of chrome powder creates significant visual impact because of its reflective quality. Where you’d need substantial coverage of regular polish to create a similar visual effect, chrome powder achieves it with minimal application, keeping the design balanced and wearable.
What’s remarkable about chrome powder on white nails is the contrast. White is clean and minimalist, while chrome is bold and futuristic. This juxtaposition creates a design that’s both contemporary and visually striking. Many people associate chrome with high-fashion nail design, and that luxe feeling translates whenever you pair it with refined white.
The coffin shape’s sharp tips are a perfect canvas for chrome accents. A chrome powder application that covers just the tips creates a gleaming, almost metallic nail extension effect that feels expensive and intentional. Even just one or two accent nails with chrome powder while the rest remain white creates a focal point that draws attention.
Pro tip: Invest in quality chrome powder and a proper applicator—cheap chrome powder often applies patchily and doesn’t achieve that seamless mirror finish. The quality difference is immediately visible.
13. White Nails with 3D Embellishments

3D embellishments transform flat nails into dimensional art pieces. This design involves adding sculptural elements to white nails—think tiny 3D bows, beads, rhinestone clusters, metallic accents formed from gel, or textured applications that create actual height and dimension on the nail surface. The white base showcases these dimensional elements beautifully while the coffin shape provides the framework for displaying them without looking cartoonish.
Building Dimensional Designs
3D embellishments can be created several ways. Pre-made 3D nail decorations (tiny bows, charms, or ornaments) adhere to cured white polish using strong nail glue, creating instant dimension. Alternatively, you can build 3D elements using builder gel or hard gel, sculpting tiny shapes directly onto the nail before curing. For someone with no building experience, pre-made decorations are far easier and yield professional results.
The key to making 3D embellishments look refined rather than costume-y is placing them strategically. Rather than covering the entire nail, concentrate 3D elements on one or two accent nails. A single 3D bow on the ring finger with coordinating embellishments on the pinky creates visual interest and focus without overwhelming your look. The surrounding nails remain clean white, which balances the dimensionality of the decorated nails.
White provides the perfect neutral background for any 3D embellishment color or style. Rose gold bows, pearl accents, metallic beads—all read beautifully against white without clashing or competing for visual attention. The white almost disappears, allowing the 3D elements to be the focal point.
The main consideration with 3D embellishments is durability. Items glued to the nail surface can catch on clothing or hair, so they need strong adhesive and careful handling. Builder gel elements fused to the nail during application are more durable since they’re actually part of the nail structure. For everyday wear, smaller embellishments are more practical than large statement pieces.
Pro tip: Apply 3D embellishments to nails where they’re less likely to snag—ring finger and pinky are typically safest, while index finger and thumb (which do more grabbing) are riskier for breakage.
14. Minimalist White Stripes
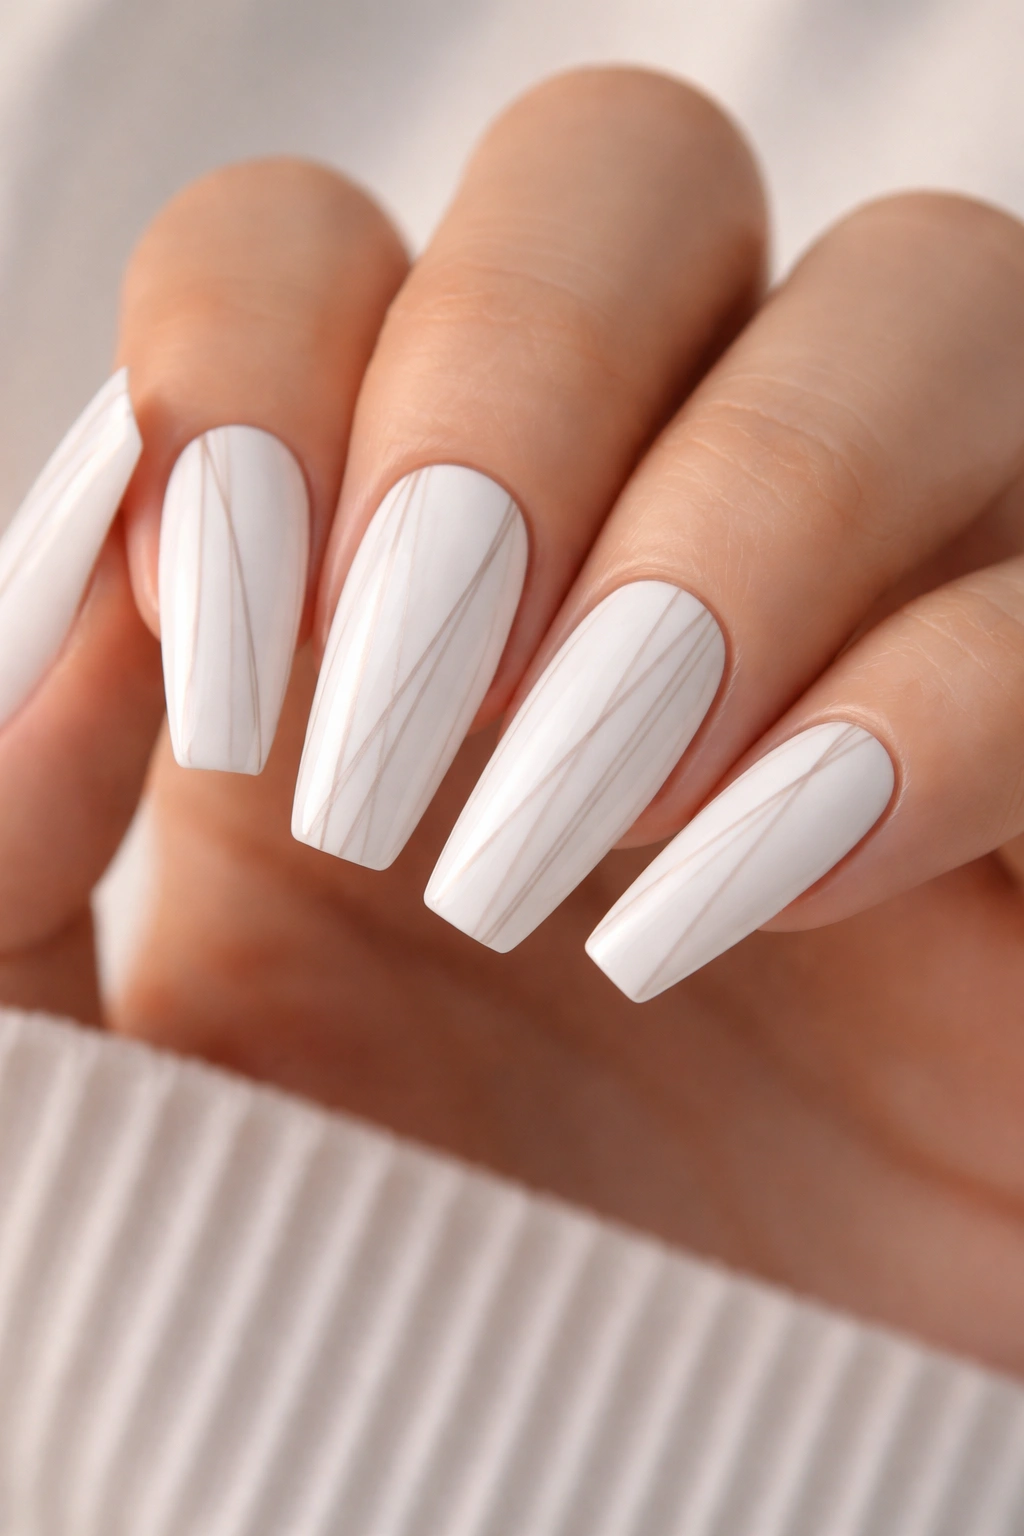
Thin, precise stripe patterns in white and complementary colors create a modern, graphic design that feels both playful and sophisticated. Vertical stripes, horizontal stripes, diagonal stripes, or mixed stripe directions all work beautifully on coffin nails, and the stripes can be evenly spaced or in varying widths to create visual interest.
Creating Perfectly Even Stripes
Consistent, even stripes require either striping tape (thin, sticky tape that masks off areas while you paint) or exceptional freehand control. Using striping tape is significantly easier—apply your white base, allow it to cure, then apply thin striping tape in your desired pattern and paint a contrasting color (pale nude, light pink, or soft gray) over the entire nail. When you remove the tape, you reveal crisp white stripes separated by your accent color.
Alternatively, use striping brushes (tools with very thin, flat bristles designed specifically for line work) to paint stripes directly onto your white base. This requires a steady hand and practice, but it’s achievable for anyone willing to spend time developing the technique. The benefit is that you have flexibility with stripe width and direction that tape doesn’t provide.
What makes minimalist stripes feel current and refined is their geometric simplicity and precise execution. This design appeals to people who love clean lines and understated pattern. The stripes create visual texture and interest without being busy or overwhelming—they add something to look at without demanding attention.
The coffin shape’s tapered sides actually present a small challenge with stripe designs—stripes that look even on the wider nail base might appear slightly off-proportion on the narrower tips. Professional mailers often adjust stripe width and spacing as the nail tapers to maintain visual balance. This level of refinement isn’t necessary for an attractive design, but it does elevate it from good to exceptional.
Pro tip: Use a very light accent color with white—pale gray, barely-there pink, or nude creates more refined stripes than bold color contrasts. The subtlety reads as more sophisticated and wearable.
15. White with Pearl Finish
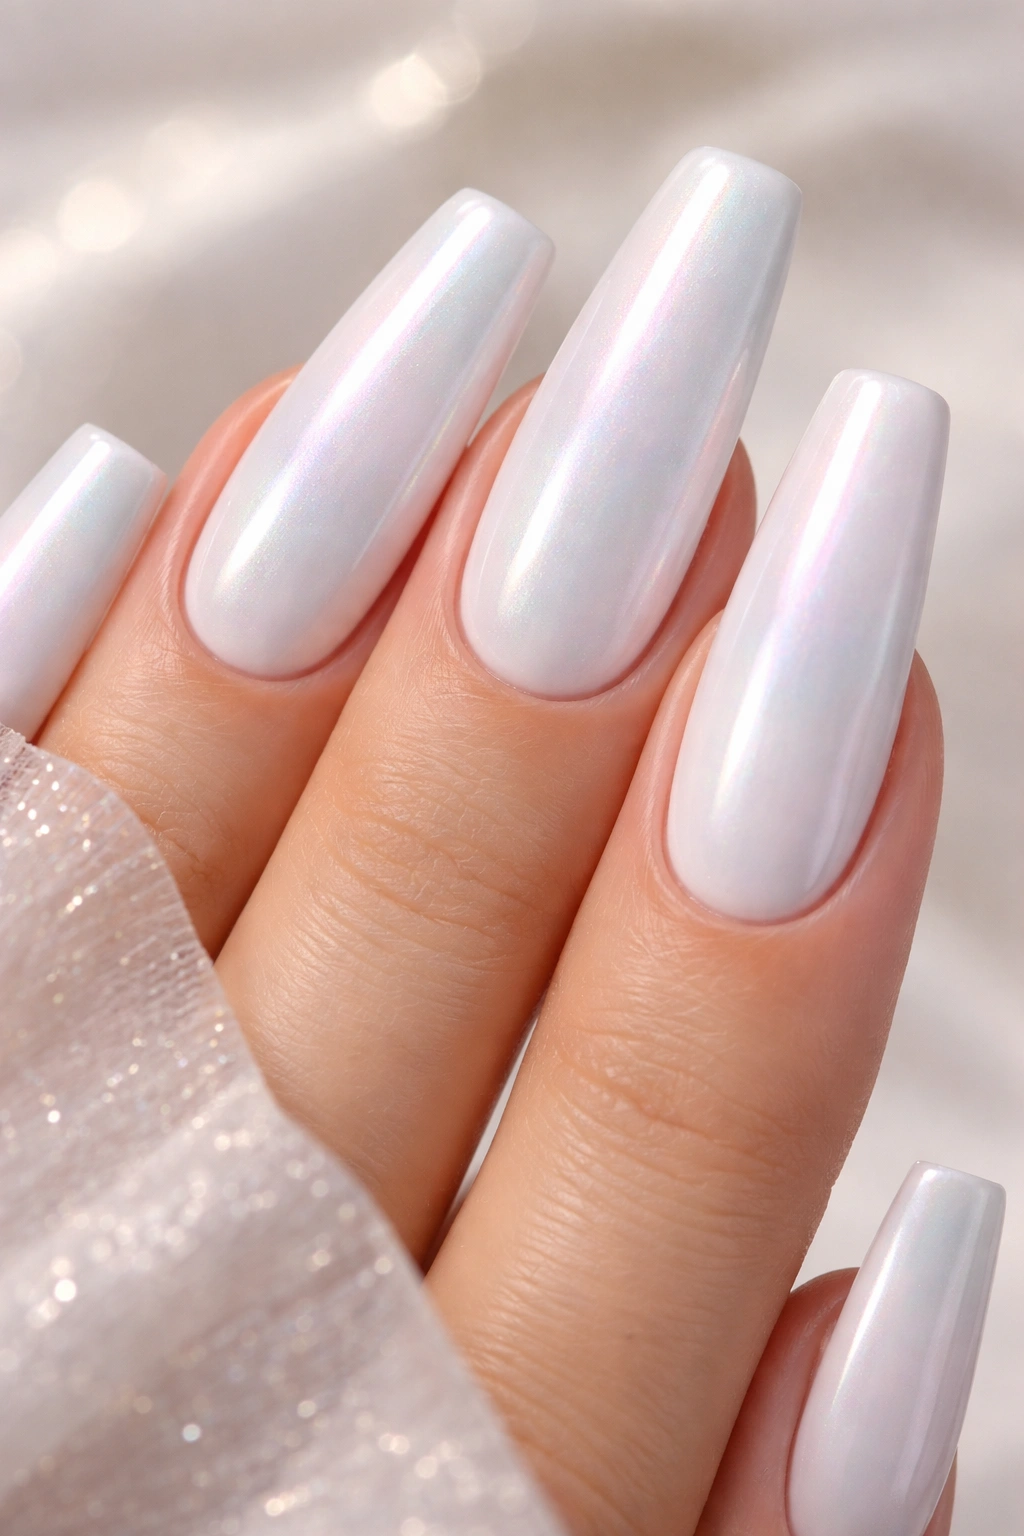
Pearl finishes create a luminous, iridescent quality that shifts between colors as light plays across the surface. A pearl-finish white nail has a soft shimmer that’s less intense than metallic chrome but more interesting than flat matte white. This design works beautifully when you apply pearlescent polish over your white base or use a special pearl-effect top coat that transforms white into a shimmering surface with subtle color shifts.
Achieving Pearl Luminosity
Pearl finish comes in multiple formulas. Pearl-effect polishes are applied directly as your color and create the shimmery finish inherently. Pearl top coats sit over your white base and add luminosity while preserving the white color underneath. Builder gels with pearl pigments can be applied in a thick layer to create a dome effect that intensifies the pearl appearance. Each method produces slightly different results, from subtle shimmer to obvious iridescence.
What makes pearl finishes so appealing is their transformative quality. Under different lighting—natural sunlight, indoor lighting, fluorescent lights—the pearl shifts subtly, revealing different undertones and adding life to what might otherwise be a static white nail. This movement keeps your nails interesting to look at and makes them catch attention in ways solid color doesn’t.
The coffin shape showcases pearl finish beautifully because the tapered tips naturally catch light differently than the wider nail base. As you move your hands, light dances across the pearl surface in constantly changing ways, creating an almost animated effect. This is particularly noticeable on longer nails where the surface area is larger.
Pearl finishes work across all settings—they’re refined and elegant enough for professional environments because the shimmer is subtle and sophisticated, while they’re festive enough for celebrations or special events. Unlike bold glitter, pearl doesn’t feel exclusively celebratory; it’s a refined way to add shimmer and light-catching quality to your everyday nails.
Pro tip: Apply pearl finishes over a clean, smooth white base—any bumps or ridges in the base will be magnified by the reflective quality of the pearl, making imperfections immediately visible.
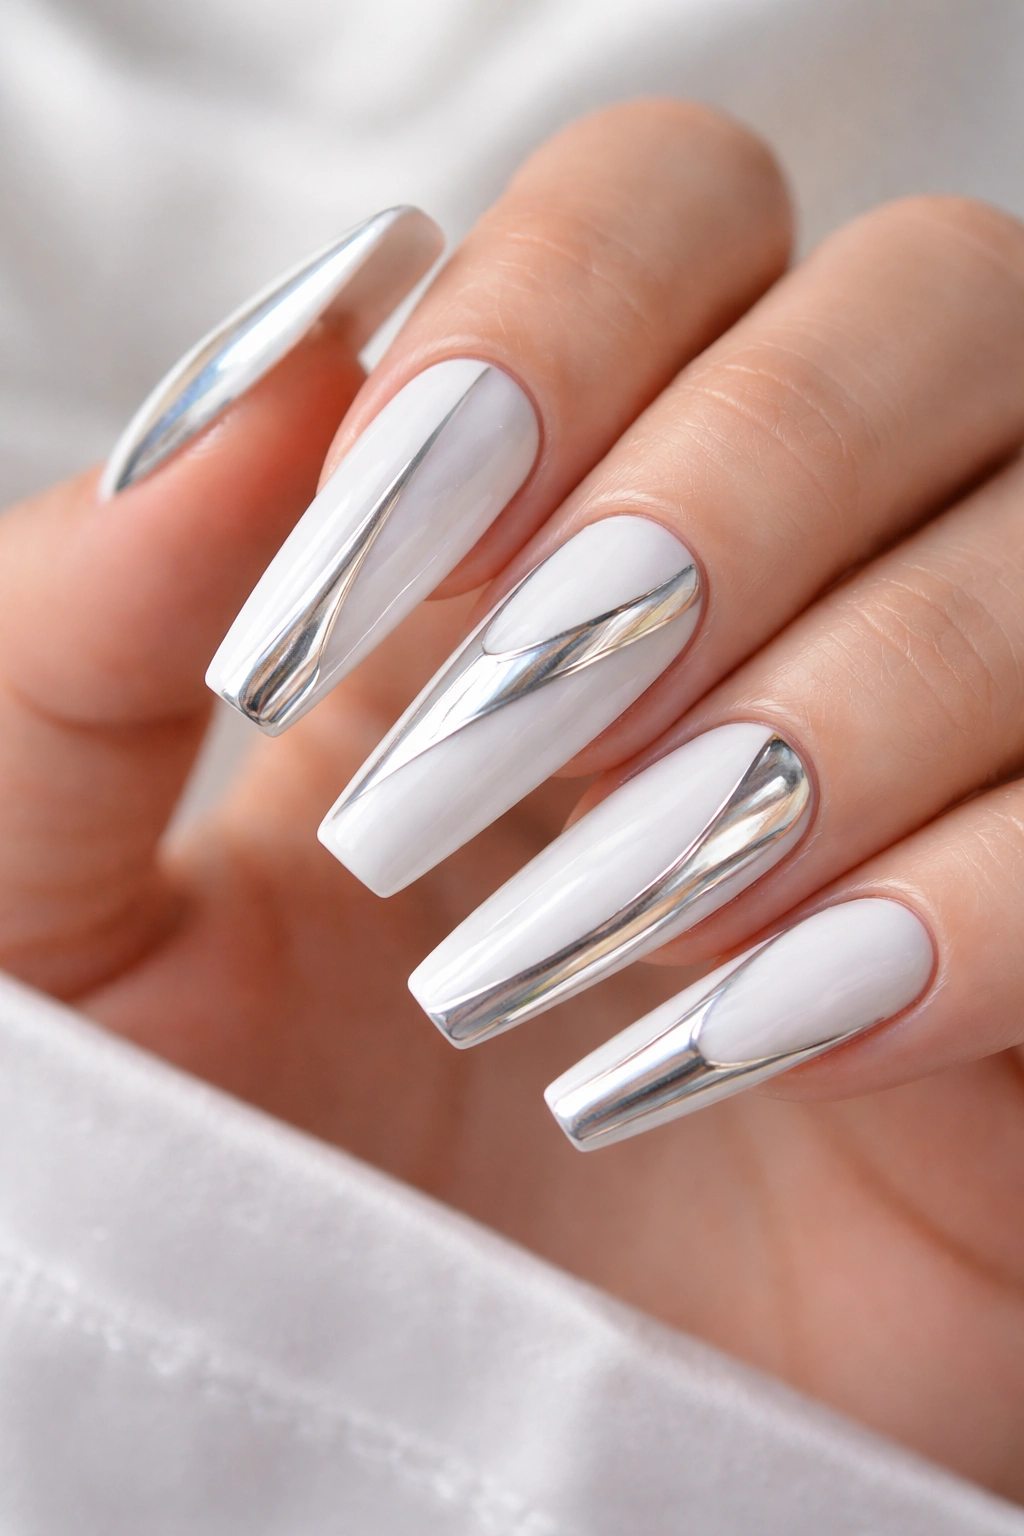
16. White and Silver Two-Tone Design

Two-tone designs split your nail into distinct color sections, typically combining white with silver or another metallic shade. This design might feature half the nail in white and half in silver, a vertical split down the center, or a more creative division like white on the top section and silver on the bottom tip. The contrast between the cool tones creates a sophisticated, modern look.
Creating Clean Two-Tone Divisions
Achieving a clean line between two colors requires either careful freehand painting or using striping tape to mask off the division line. For a classic half-and-half split, apply your white base and allow it to cure. Then apply striping tape diagonally, vertically, or horizontally across the nail—wherever you want your division line to be. Paint your silver over the entire nail, which adheres to both the white and the exposed tape. Once the silver cures, remove the tape to reveal a crisp line between white and silver.
For a more organic division, you might create a diagonal gradient-like transition between white and silver rather than a crisp line. This requires overlapping the two colors where they meet and blending them slightly, creating a softer two-tone effect that still clearly shows both colors.
What makes white-and-silver two-tone so appealing is the interplay of contrast and harmony. Both are cool, neutral tones, so they harmonize with each other even as they create visual distinction. This prevents the design from feeling chaotic or clashing, which can happen with more disparate color combinations. The design feels intentional and refined.
The coffin shape’s already-architectural form is enhanced by geometric two-tone designs. A vertical split down the center of the nail emphasizes the nail’s length, while a diagonal split creates dynamic visual movement. The nail shape and color combination work together to create a cohesive design that feels more sophisticated than either element alone.
Pro tip: If you find striping tape difficult to apply straight, use a nail guide tool or ruler placed against your nail as a physical boundary for your brush—this helps you paint straight lines more easily than freehand.
17. White Coffin Nails with Lace Details
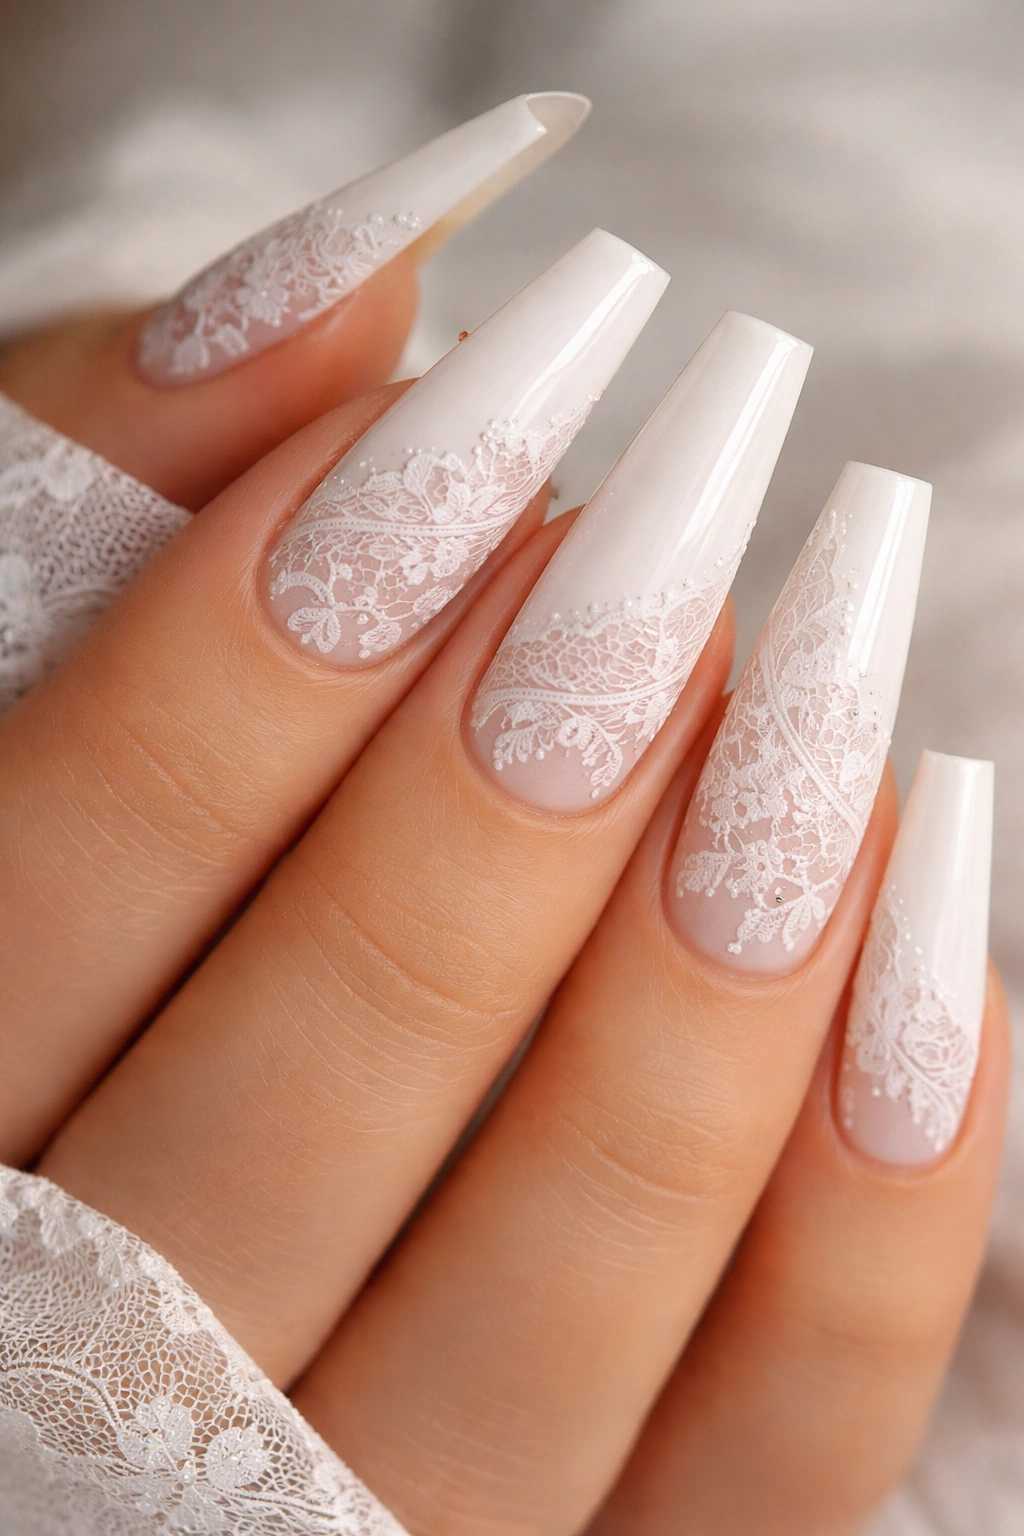
Lace-inspired nail art creates romantic, delicate designs using thin white polish over a white base, creating a subtle lace pattern that requires close observation to fully appreciate. This design involves painting intricate lace motifs—delicate lines forming floral patterns, filigree designs, or lace borders—using very fine brushes and high-contrast polish (like black or dark gray) or ultra-thin white-on-white lace details.
Hand-Painting Lace with Finesse
Creating lace designs requires patience, fine motor control, and a very thin brush. For white-on-white lace, use white gel or polish slightly darker or more opaque than your base, allowing the pattern to be visible but still harmonious with the white aesthetic. For higher contrast (easier to paint), use black or dark gray thin polish to paint intricate lace patterns directly onto the white base.
Reference actual lace patterns or use lace nail decals as guides for your design. Many nail artists photograph physical lace, then use it as inspiration for their nail art. The intricate nature of lace requires that you approach it slowly, potentially doing a little bit each day rather than trying to complete the entire design at once.
What makes lace designs special is their romantic, vintage-inspired quality paired with the modern coffin nail shape. This creates an interesting juxtaposition between classic femininity and contemporary style. Lace designs work beautifully for special occasions, weddings, or when you want nails that feel artistic and intentional.
The coffin shape’s elongated surface is actually a beautiful canvas for lace designs—you have enough room to showcase intricate patterns without them feeling cramped. A lace border around the edges of the nail, lace patterns trailing down from the cuticle, or a single large lace motif on an accent nail all showcase beautifully on the coffin shape.
Pro tip: Use a magnifying lamp while painting lace details—the intricate nature means being able to see your fine line work clearly makes the process significantly easier and produces more accurate, refined results.
18. Frosted White Candy Cane Style
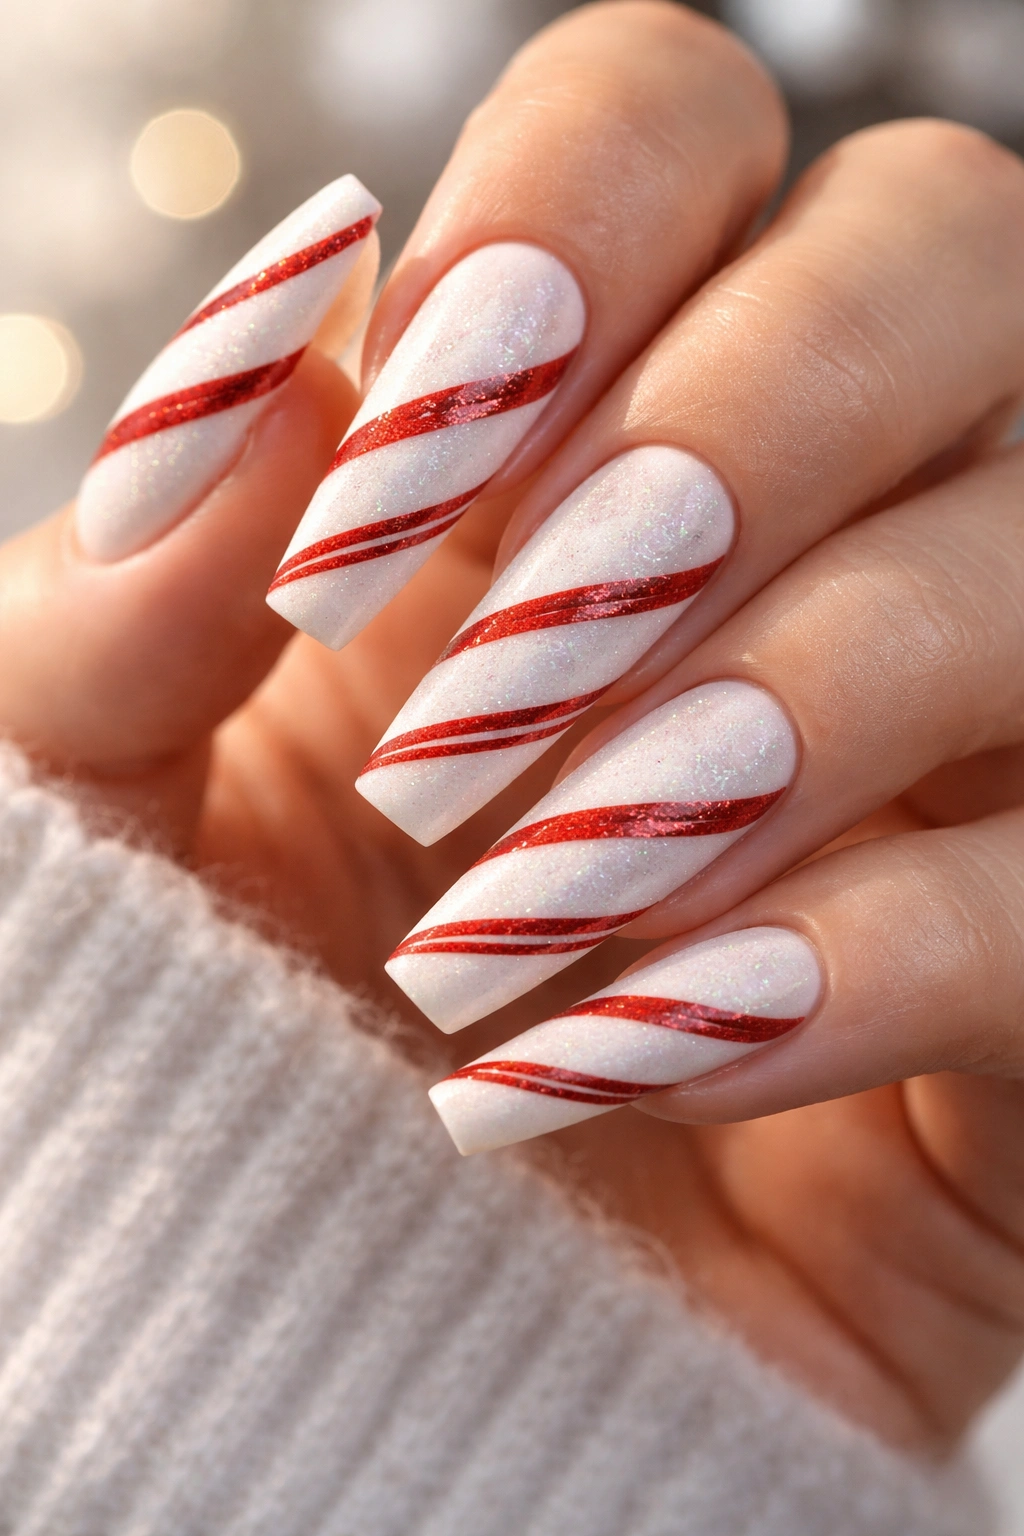
A frosted white base with red or pink stripes creates a playful, festive design inspired by candy cane aesthetics—but the use of white as the primary color and frosted matte finish keeps it feeling sophisticated rather than childish. This design features a frosted or textured white finish with thin red or pink stripes spiraling around the nail, creating a dynamic, dimensional look.
Creating the Frosted Effect and Stripe Pattern
A frosted finish can be achieved using textured top coats designed specifically for a frosted look, or by using matte polish over a white base. The texture adds visual interest and keeps the design from feeling too simple. Once you have your frosted white base, apply thin red or pink striping (using striping tape or a thin brush) in a diagonal spiral pattern down the nail, creating that candy cane effect.
What makes this design more sophisticated than a literal candy cane is the color palette and finish choices. Using pale pink instead of bright red, combined with frosted rather than glossy white, creates a design that reads as modern and intentional rather than novelty. The muted colors and textured finish elevate what could easily become costume-y.
The spiral stripe pattern creates movement and visual interest that carries the eye down the elongated coffin nail. The diagonal direction of the stripes combined with the nail’s natural taper creates a cohesive, unified design where shape and pattern work in harmony.
This design bridges playfulness with sophistication beautifully. You get visual interest and personality without sacrificing elegance or wearability. It’s perfect for anyone who wants nails that are fun without being juvenile, or for seasonal occasions when you want subtle thematic nails that still maintain your everyday style.
Pro tip: The frosted texture works best when it’s achieved through a specialized frosted top coat rather than matte polish, as true frosted finishes have more dimension and catch light more beautifully than flat matte.
Final Thoughts
White coffin nails represent the intersection of timeless elegance and modern artistry. What makes this combination so enduring is its fundamental versatility—whether you prefer minimalist designs that whisper sophistication or ornate details that announce your artistic side, white coffin nails accommodate both approaches beautifully. The elongated coffin shape provides a generous canvas for whatever design speaks to you, and white serves as both a neutral backdrop and a statement in its own right.
The designs across these eighteen options showcase how one color paired with one shape can be interpreted in endless ways. From subtle gradients that shift almost imperceptibly from white to nude, to bold chrome accents that catch light dramatically, to hand-painted details that reward close observation—there’s genuinely something here for every aesthetic preference and occasion. What matters most is choosing a design that genuinely excites you rather than selecting based on what you think you should like.
Your white coffin nails are a reflection of your personal style and attention to detail. Whether you’re maintaining them yourself at home or visiting a professional nail artist, the time and intention you invest in your nails sends a message about how you value presentation and self-care. These designs aren’t frivolous; they’re an accessible form of personal expression and artistry that literally travels with you wherever you go, visible in every gesture, every typed message, every photo. Choose designs that make you feel confident, elegant, and authentically yourself.
