

Walk into any salon with a photo of silver nails, and you’ll see the same problem fast: half the sets look sleek and expensive, and the other half look thick, flat, or weirdly costume-like. Silver ballerina nails sit right on that line. When the shape is crisp and the finish is chosen well, they look like jewelry for your hands. When the taper is off by a few millimeters, silver turns harsh.
That’s why the ballerina shape matters so much here. A good ballerina nail has slim sidewalls, a softened flat tip, and enough length to show the taper without drifting into stiletto territory. Silver loves that geometry. It catches along the straight edges, flashes at the flat tip, and gives even simple designs a colder, sharper look than the same polish would have on a round or square nail.
I keep coming back to silver because it does something most neutrals cannot do: it reads clean and dramatic at the same time. Chrome silver feels almost liquid. Glitter silver feels icy. Gunmetal has that smoky depth that black polish wishes it had. But metallics are fussy—every ridge, every lumpy apex, every flooded cuticle line shows up.
Get the structure right, though, and silver becomes one of the smartest choices you can put on a ballerina set.
Why Silver Ballerina Nails Look So Sharp on a Flat-Tip Shape
Silver loves structure.
The ballerina shape gives it structure in a way softer shapes do not. Almond nails blur the light into a rounded highlight. Square nails can make metallic polish look blocky, especially on wider nail beds. A ballerina shape hits the middle ground: tapered enough to look refined, flat enough to give silver a clean stopping point at the tip.
That flat edge matters more than people think. When silver chrome or foil reaches a blunt tip, the finish looks intentional and architectural. You get a neat visual line at the free edge, almost like the polish was cut with a ruler. On a sloppy taper, silver loses that edge and starts to read cheap.
Length changes the effect too. A medium ballerina—about 4 to 8 mm past the fingertip—is often the sweet spot for silver. Shorter than that, and the shape can start to look square unless the sidewalls are filed narrow. Longer than that, and bright mirror silver can lean flashy fast, which is fine if that’s what you want, less fine if you need something that works from office to dinner.
Ballerina vs. Coffin, Since Salons Use Both Names
Some techs use ballerina and coffin like they mean the same thing. Close enough, usually. I still think there’s a tiny difference worth caring about: ballerina looks a touch softer at the tip, while coffin often has a flatter, squarer finish. If you want silver to look sleek rather than chunky, ask for a soft ballerina taper and make sure the tip is not too wide.
A good checkpoint: the tip should look slimmer than the widest part of the nail bed, but not pinched.
Picking the Right Silver Finish Before You Book the Set
Ever notice how one silver polish looks icy and another leans almost charcoal? That’s not your imagination. Silver comes in more than one mood, and picking the wrong finish is where a lot of people go sideways.
Here’s the fast breakdown I give friends before they sit in the chair:
- Mirror chrome silver: High reflection, smooth as glass, strongest shine under direct light. Best on a smooth gel surface with no ripples.
- Pewter or gunmetal silver: Darker, moodier, easier to wear if bright chrome feels too loud on your hands.
- Fine glitter silver: Gives sparkle without a mirror finish. Better at hiding small scratches and daily wear.
- Foil silver: More broken, irregular shine. Good if you want texture and movement instead of a flat metallic sheet.
- Pearl silver: Softer flash with a white or cool-pink shift. Less sharp, more airy.
- Cat-eye silver: Magnetic depth that moves across the nail when the light changes. Best on medium or long ballerina shapes.
Skin tone plays a part, too—though not in the rigid way beauty advice often claims. Bright blue-based silver can look crisp on fair skin and striking on deep skin, but on some medium olive tones it can pull a bit stark. Pewter, champagne-silver, or smoky chrome often sit more naturally there. Try jewelry as a clue. If clean silver rings already suit you, full chrome nails usually will too.
Lifestyle matters more. Mirror chrome shows dents, dull spots, and tiny surface scratches faster than fine glitter or foil. If you open boxes all day, work with tools, or type hard enough to make your keyboard nervous, a softer silver finish may wear better.
Nail Prep Details That Make Metallic Polish Look Expensive
Chrome is unforgiving.
A sheer pink can hide a slightly uneven surface. Silver cannot. Metallic pigments bounce light back at you, which means every ridge, dip, or bulky sidewall gets highlighted. That’s why the prep under silver ballerina nails matters almost more than the design on top.
The Structure Under the Color
Ask for a clean apex placed in the stress area, not a mound drifting toward the cuticle. On medium-length ballerina nails, that usually means the highest point sits around the upper third of the nail, with a smooth slope toward the tip. If the nail is thick at the free edge, silver looks clumsy.
Sidewalls matter too. Straight sidewalls make the shape look longer and cleaner. If they flare out, even a nice silver finish can start to look wide.
The Product Choices That Help
For a metallic set that looks smooth up close, these details make a difference:
- Builder gel or a carefully refined acrylic base gives chrome a flatter, more even surface than thin, wavy natural nails.
- A no-wipe gel top coat is usually what chrome powder needs before burnishing, cured according to the system your tech uses.
- Thin color layers beat thick coats every time. Thick metallic polish can wrinkle, pool near the sidewalls, or create that swollen look nobody asks for.
- A crisp cuticle line matters more with silver than with beige or pink. Flooding near the cuticle stands out fast.
Press-ons can work too, by the way. A good press-on set with a snug sidewall fit and a hand-filed ballerina tip can look sharp. The trouble is sizing. If the press-on is too wide, silver makes that mismatch obvious.
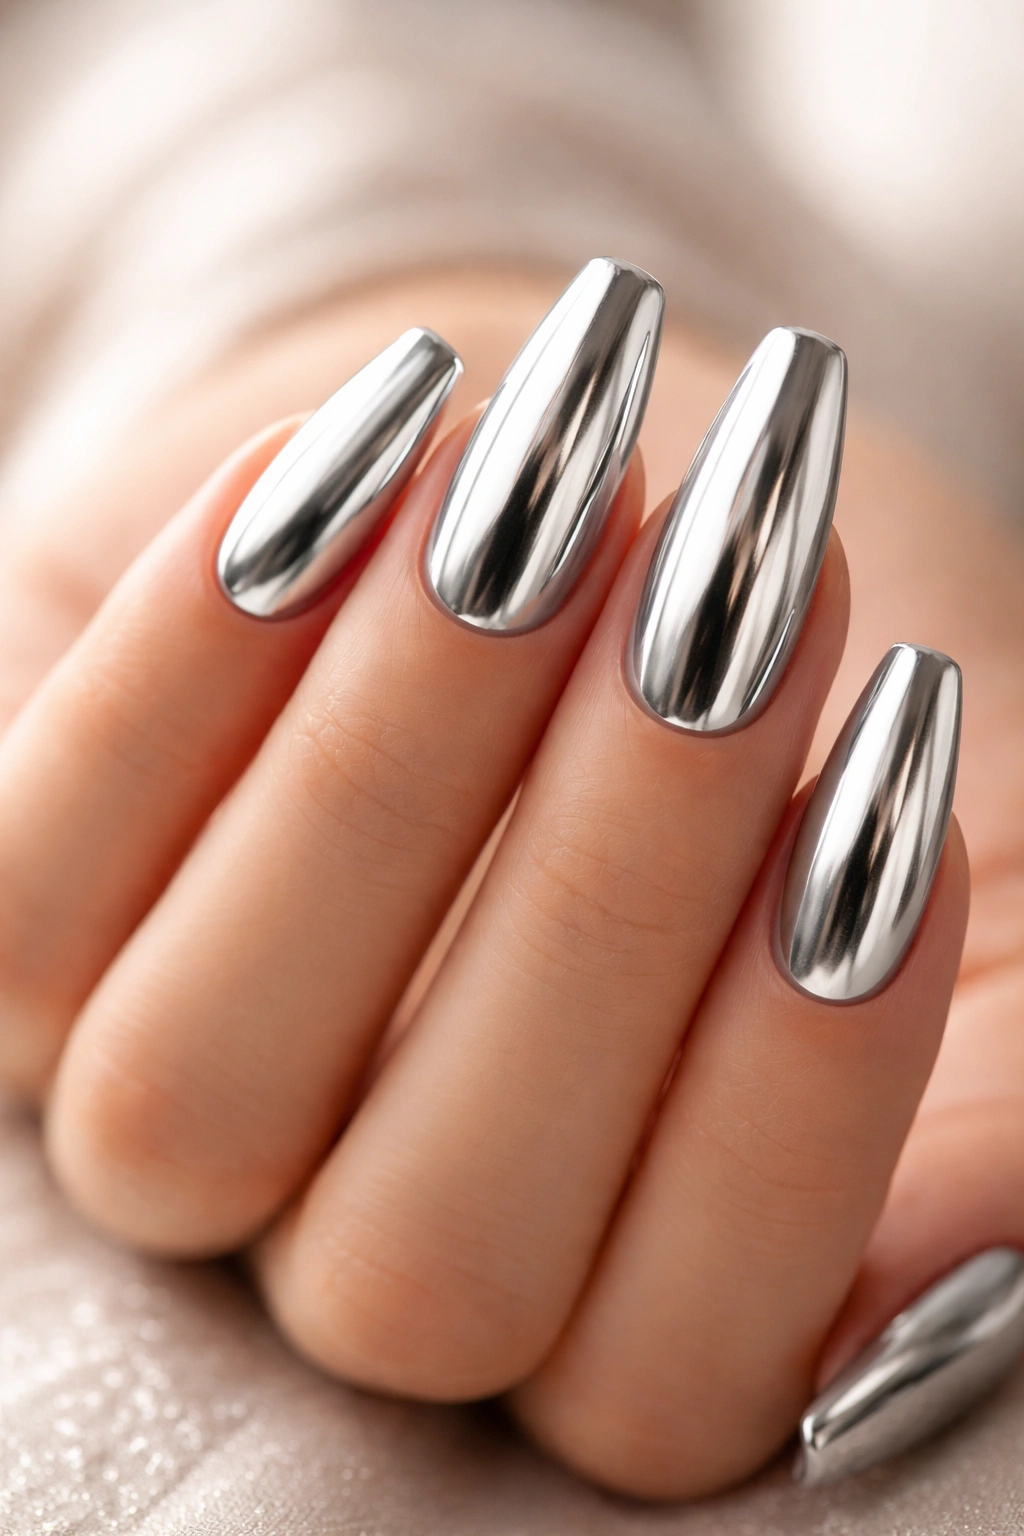
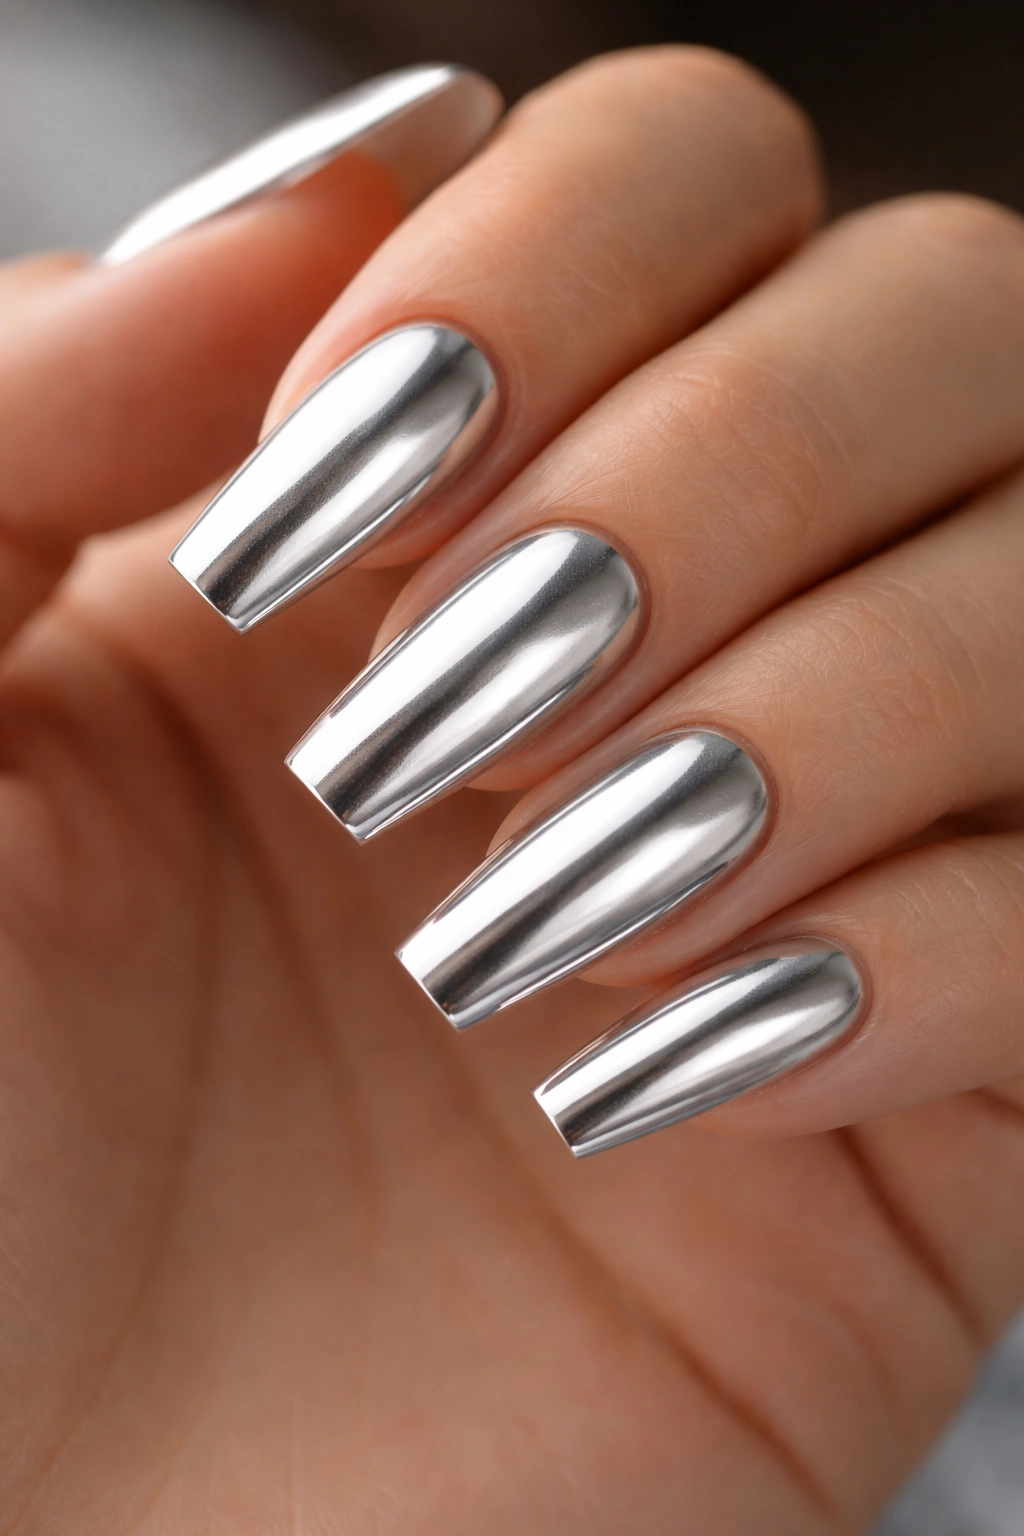
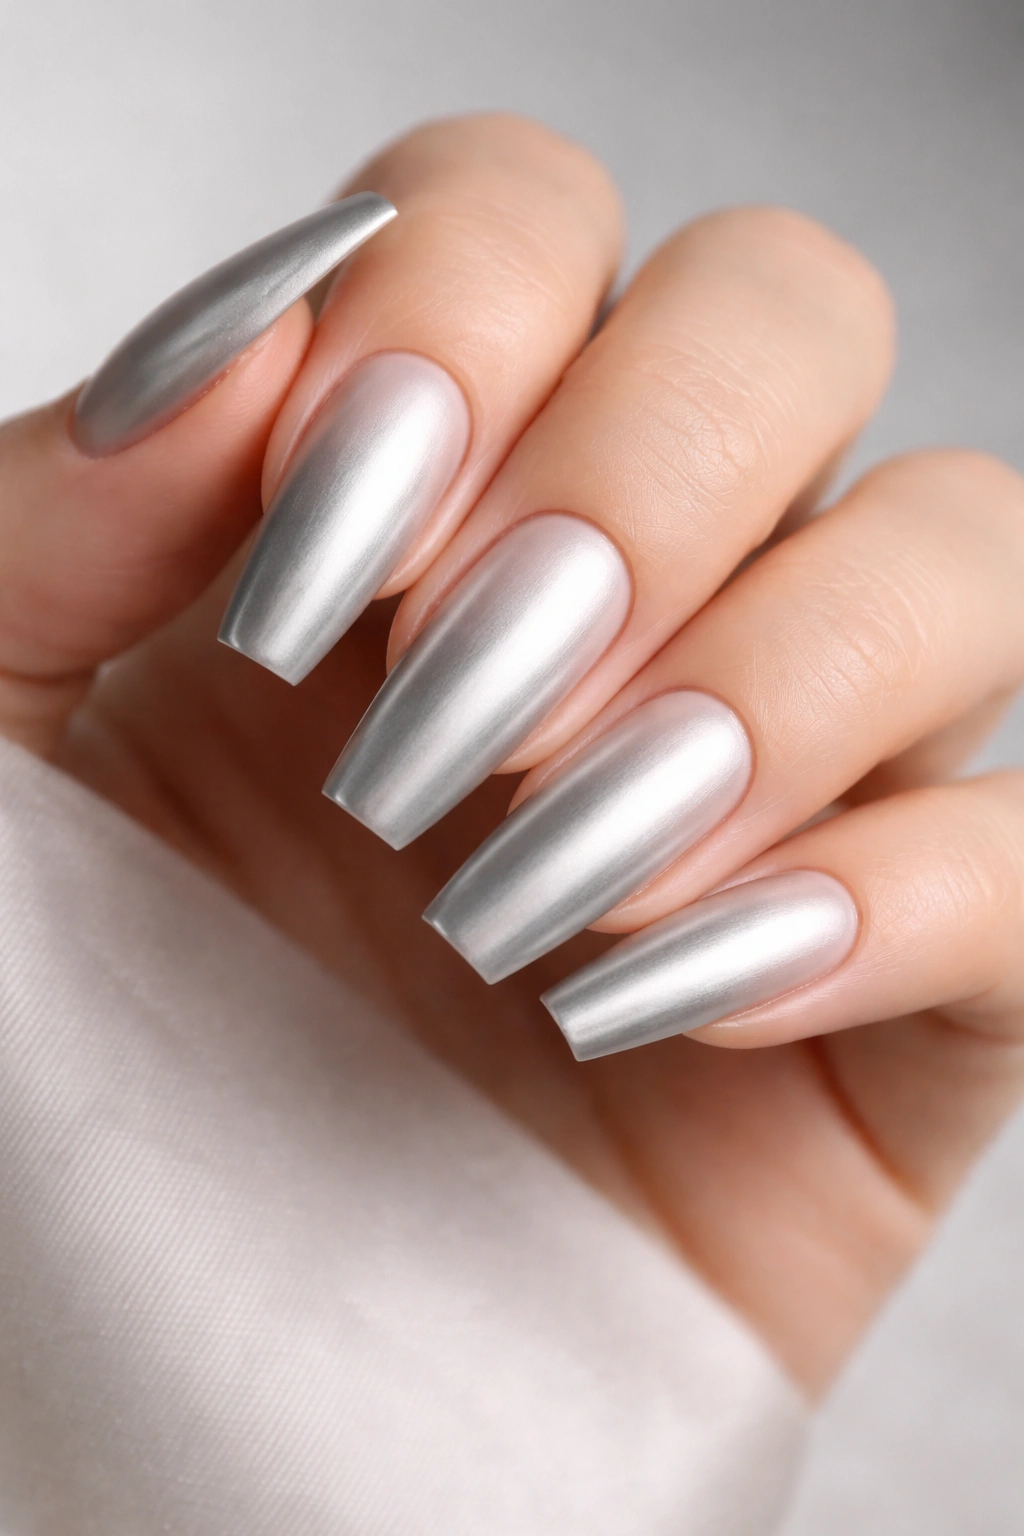
1. Mirror Chrome From Cuticle to Tip

Picture a full set that looks almost poured from liquid metal. That’s the appeal of mirror chrome silver on a ballerina shape. No art, no stones, no extra tricks—just a hard, bright reflection that turns every finger movement into a flash.
Why It Works So Well
The ballerina shape gives mirror chrome a clean runway. The tapered sides pull the eye forward, and the flat tip stops the shine in a crisp line, which makes the whole manicure look sharper than the same chrome on oval nails. On medium to long extensions, it has that polished, almost futuristic feel without needing any extra decoration.
Base color changes the outcome more than most people expect. A pale gray or bright white base under chrome keeps the finish closer to true silver. A darker base pushes it toward steel or gunmetal. If you want that bright, cold, almost reflective-spoon look, go light underneath.
Quick Design Notes
- Best length: medium to long ballerina, usually 5 to 10 mm past the fingertip
- Best base: pale gray, white, or cool nude depending on how bright you want the chrome
- Best texture: ultra-smooth gel surface with no visible file lines
- Wear note: mirror finishes show dents and scratches sooner than glitter or foil
A full mirror set is not subtle. That is the point. It works best when the shape is neat, the cuticle work is precise, and the rest of the styling stays clean.
Salon tip: ask for “thin chrome, no bulky tip, soft ballerina taper, and a double top-coat seal at the free edge.”
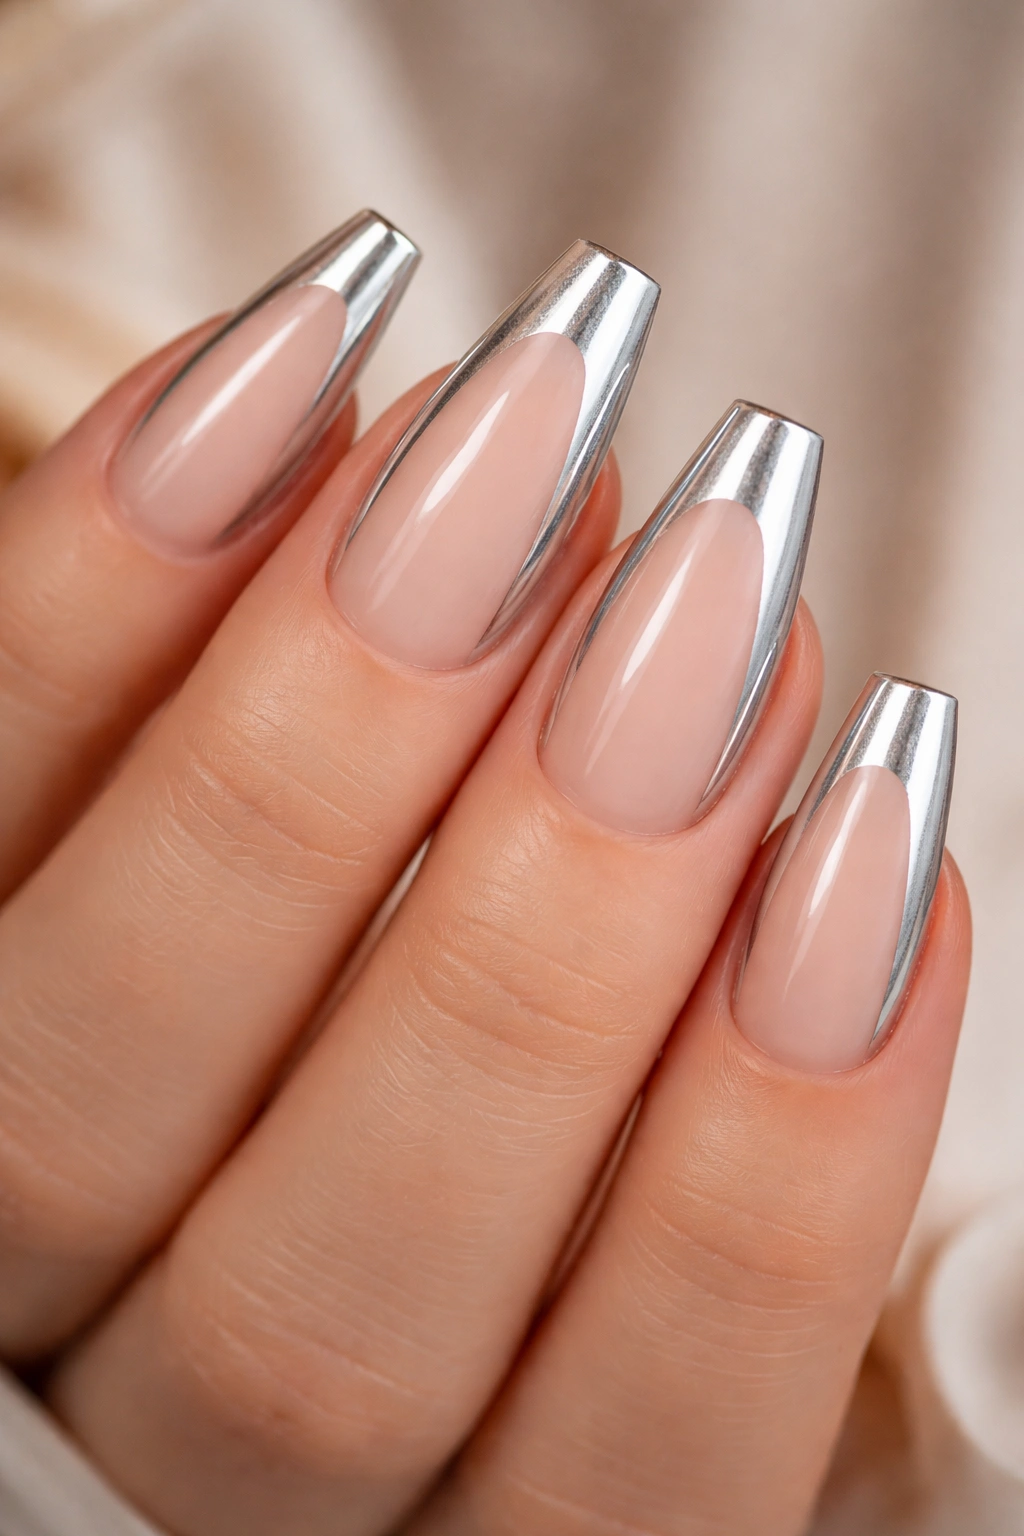
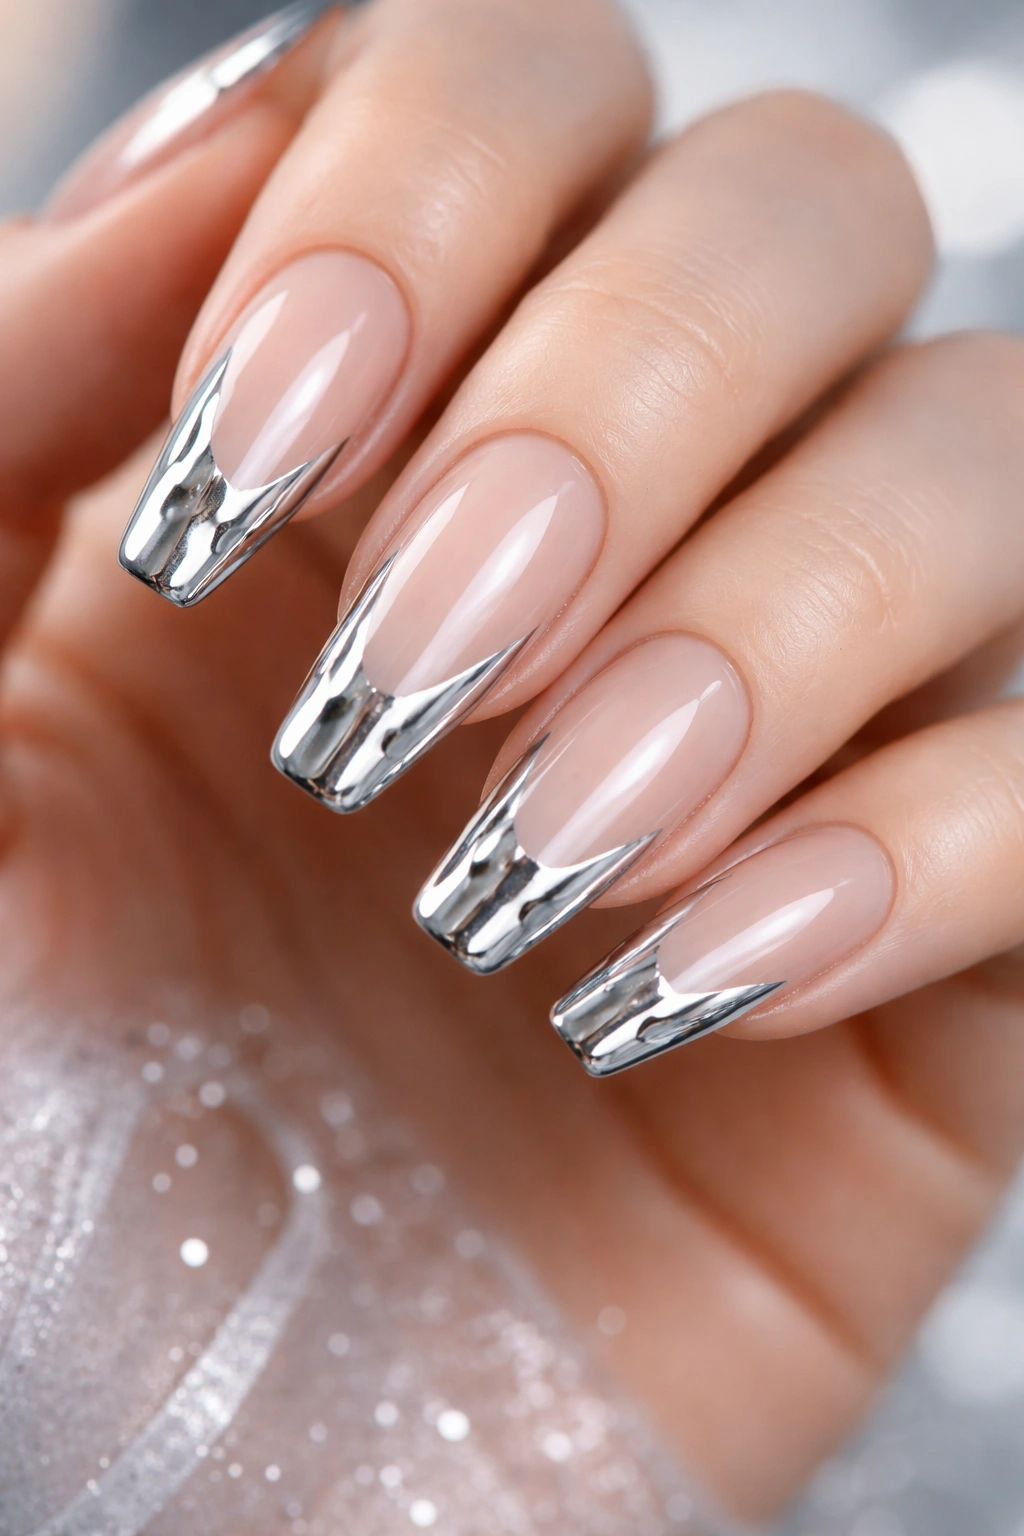
2. Nude Base With a Thin Silver Micro French
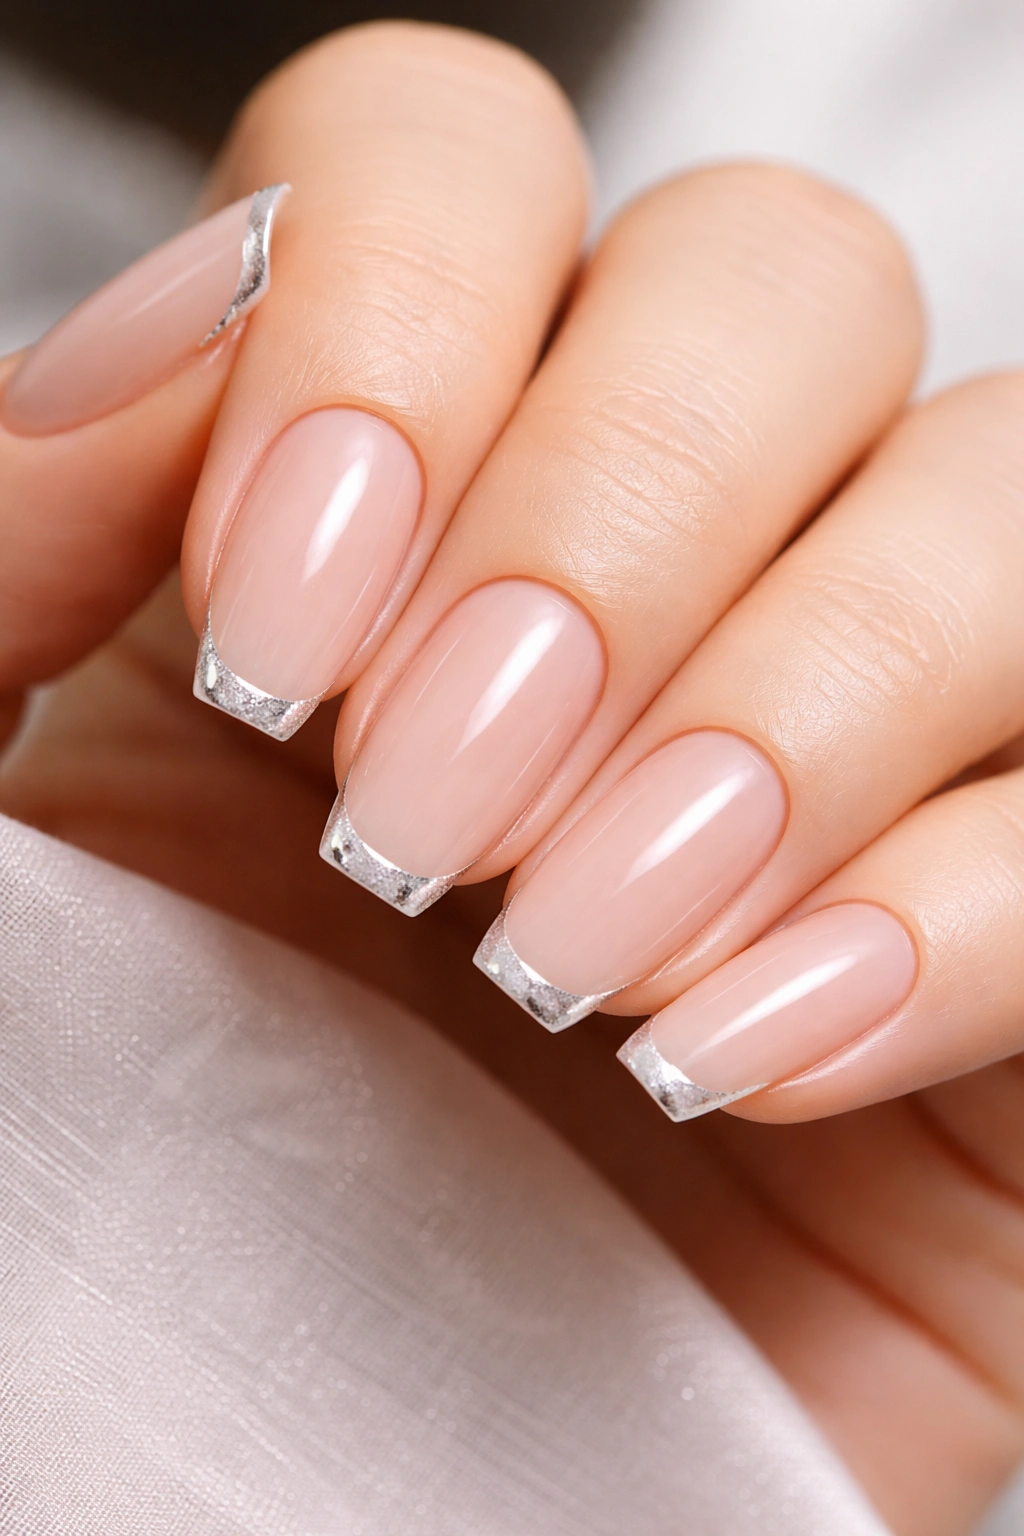
A thin silver French tip can do more for ballerina nails than a full coat ever will.
The trick is scale. Instead of flooding the whole nail with metallic shine, the silver sits in a narrow line—often 1 to 2 mm wide—right along the flat tip. Because ballerina nails already have that sharp edge, the line looks clean and tailored rather than cute or retro. Think less old-school French manicure, more sleek metal trim.
This design earns its keep because the grow-out is easier to live with. Your nail bed stays sheer pink, beige, or milky nude, so the silver does not shout from day one to day fourteen. If you use your hands hard, that matters. Full chrome is gorgeous, but a micro French hides wear better and does not show every tiny scratch.
Color balance is where people get sloppy. A cool pink base gives the silver a crisp feel. A peachy nude can work too, though it warms the set and softens the edge. On deeper skin tones, a caramel nude with a bright silver tip looks especially good because you get contrast without needing glitter, stones, or extra art.
I also like this one for shorter ballerina nails. You do not need dramatic length. You need a straight tip, slim sidewalls, and a silver line drawn with control. If the line wobbles, the whole design loses its power, so this is one of those sets where a fine liner brush and a patient tech matter more than extra embellishment.
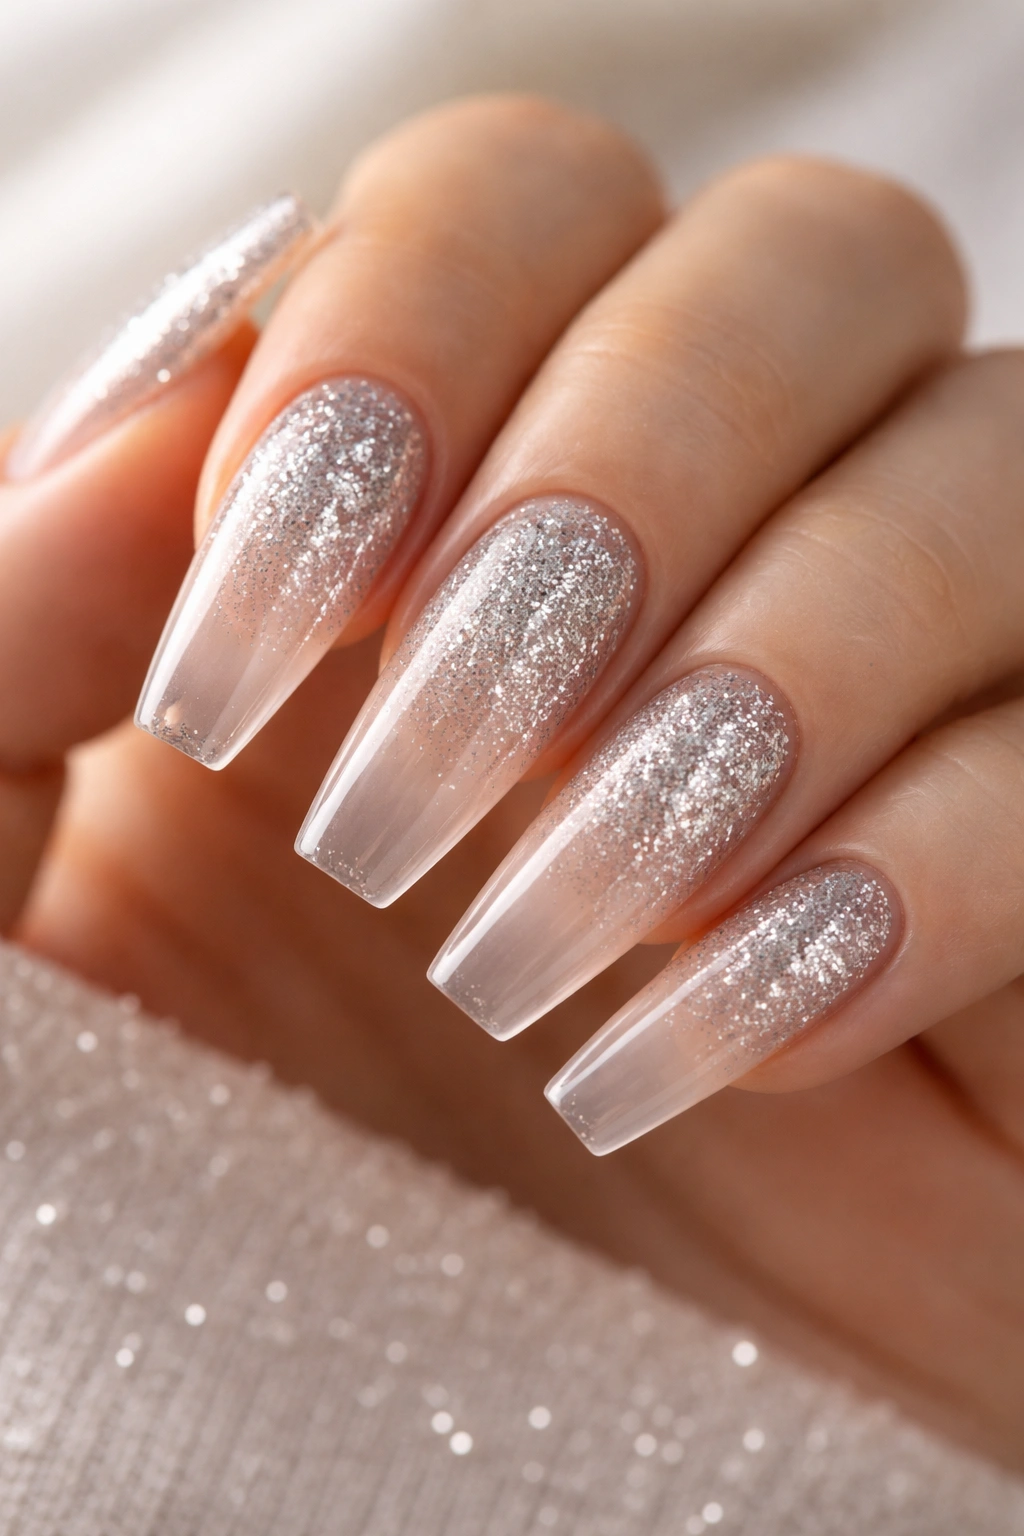
3. Icy Silver Ombré That Fades From Sheer to Reflective
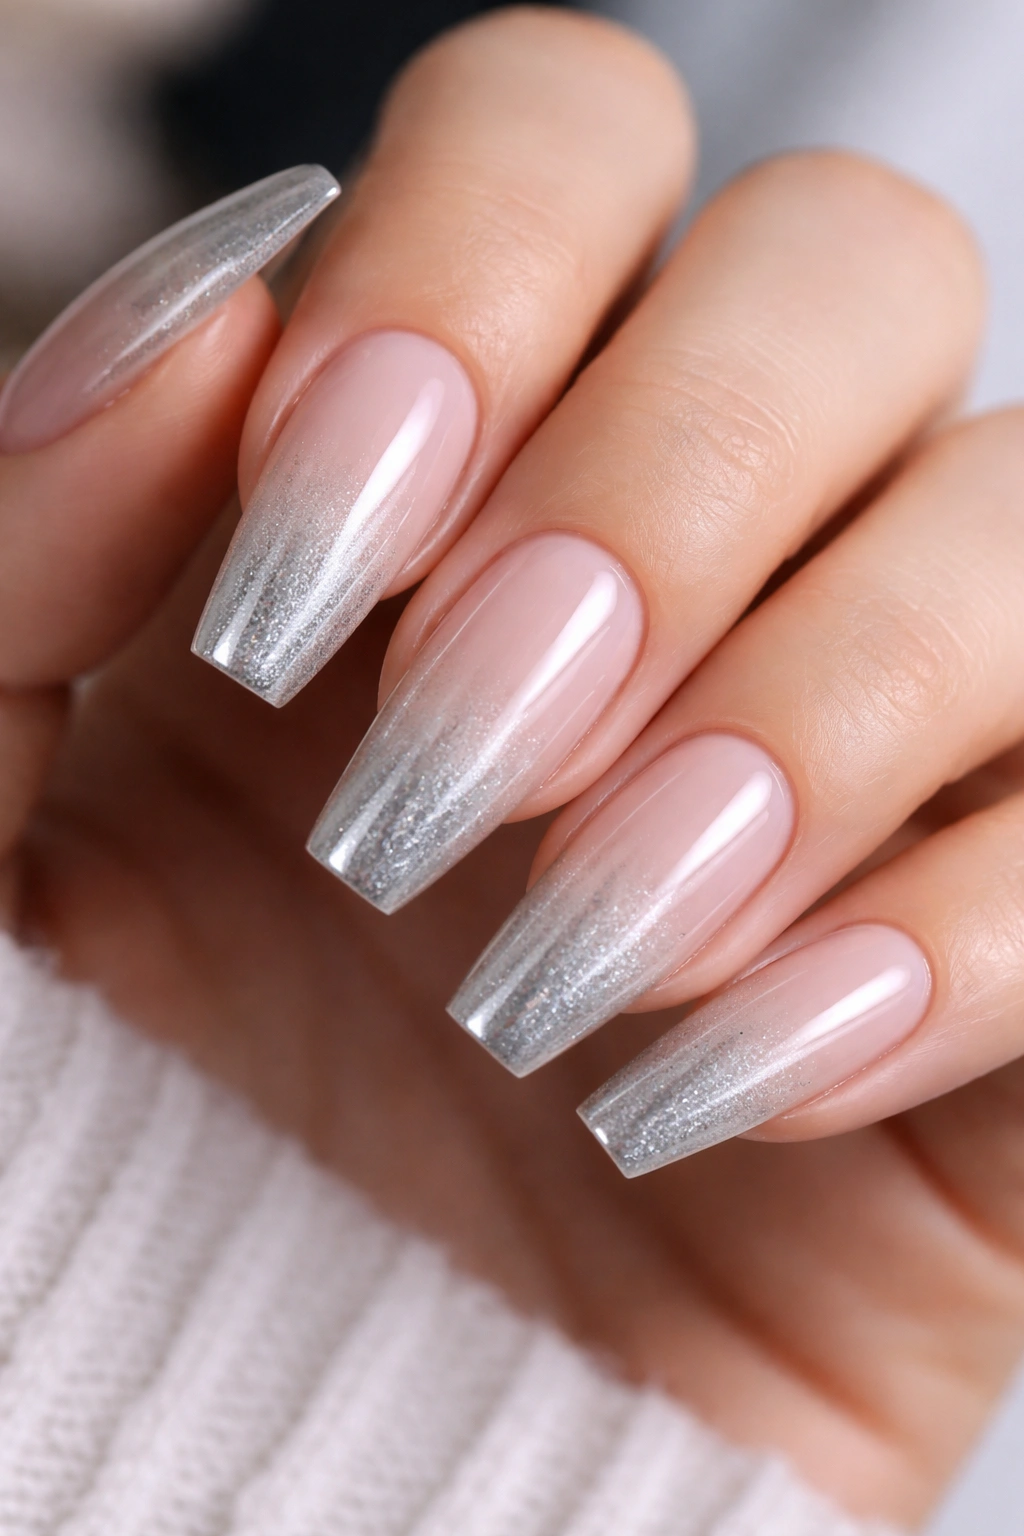
Why does a silver ombré look softer than full chrome even when the tips are bright enough to catch light from across the room? Because your eye still gets a place to rest. The root of the nail stays sheer or milky, and the silver builds slowly toward the free edge instead of hitting all at once.
That gradient suits ballerina nails in a different way than a French tip does. A French line cuts across the nail. An ombré pulls forward. It stretches the shape, which is handy if your fingers are shorter or you want the set to look longer without adding extra length.
Application matters here. A good silver fade uses fine glitter, chrome pigment, or airbrushed metallic gel blended in thin layers. Dense chunky glitter can look grainy, and a grainy fade on ballerina nails loses that smooth, cool finish that makes silver so satisfying in the first place.
How to Wear It Without Losing the Shape
Keep the fade strongest in the last third of the nail. If silver creeps too far toward the cuticle, the set starts looking cloudy instead of intentional. I also prefer this design with a milky nude or soft gray base, not a warm beige. Cooler bases keep the silver clean.
A glossy top coat usually wins here. Matte kills the icy feel.
For anyone who wants shine without the full commitment of mirror chrome, this is one of the easiest yeses on the list.
4. Crushed Silver Foil Floating Under Milky Gel
The first time you see crushed silver foil sealed under milky gel, it looks a little like frost trapped under ice. There’s shine, but it breaks and shifts instead of reading as one flat surface. That movement is what makes it special on a ballerina shape.
Foil gives silver some texture without adding actual thickness—assuming the tech encapsulates it neatly. Tiny irregular pieces sit inside the gel, which means the light hits from different angles and the manicure changes as you move your hands. On cloudy days, it looks soft and hazy. Under direct light, the flakes throw sharp flashes.
This design suits people who like silver but do not love the hard finish of chrome.
- Ask for small foil fragments, not giant shards that pile up near the tip
- A milky white, sheer gray, or cool nude overlay keeps the foil suspended-looking instead of harsh
- Medium ballerina length works best because it gives the foil room to spread without crowding
- Encapsulation matters; if you can feel foil edges, the finishing layer is too thin
I also like how forgiving this one is after a week of wear. Minor surface marks do not show the same way they do on a pure mirror set. There’s already movement in the design, so the eye doesn’t lock onto every little flaw.
5. Gunmetal Cat-Eye Ballerina Nails
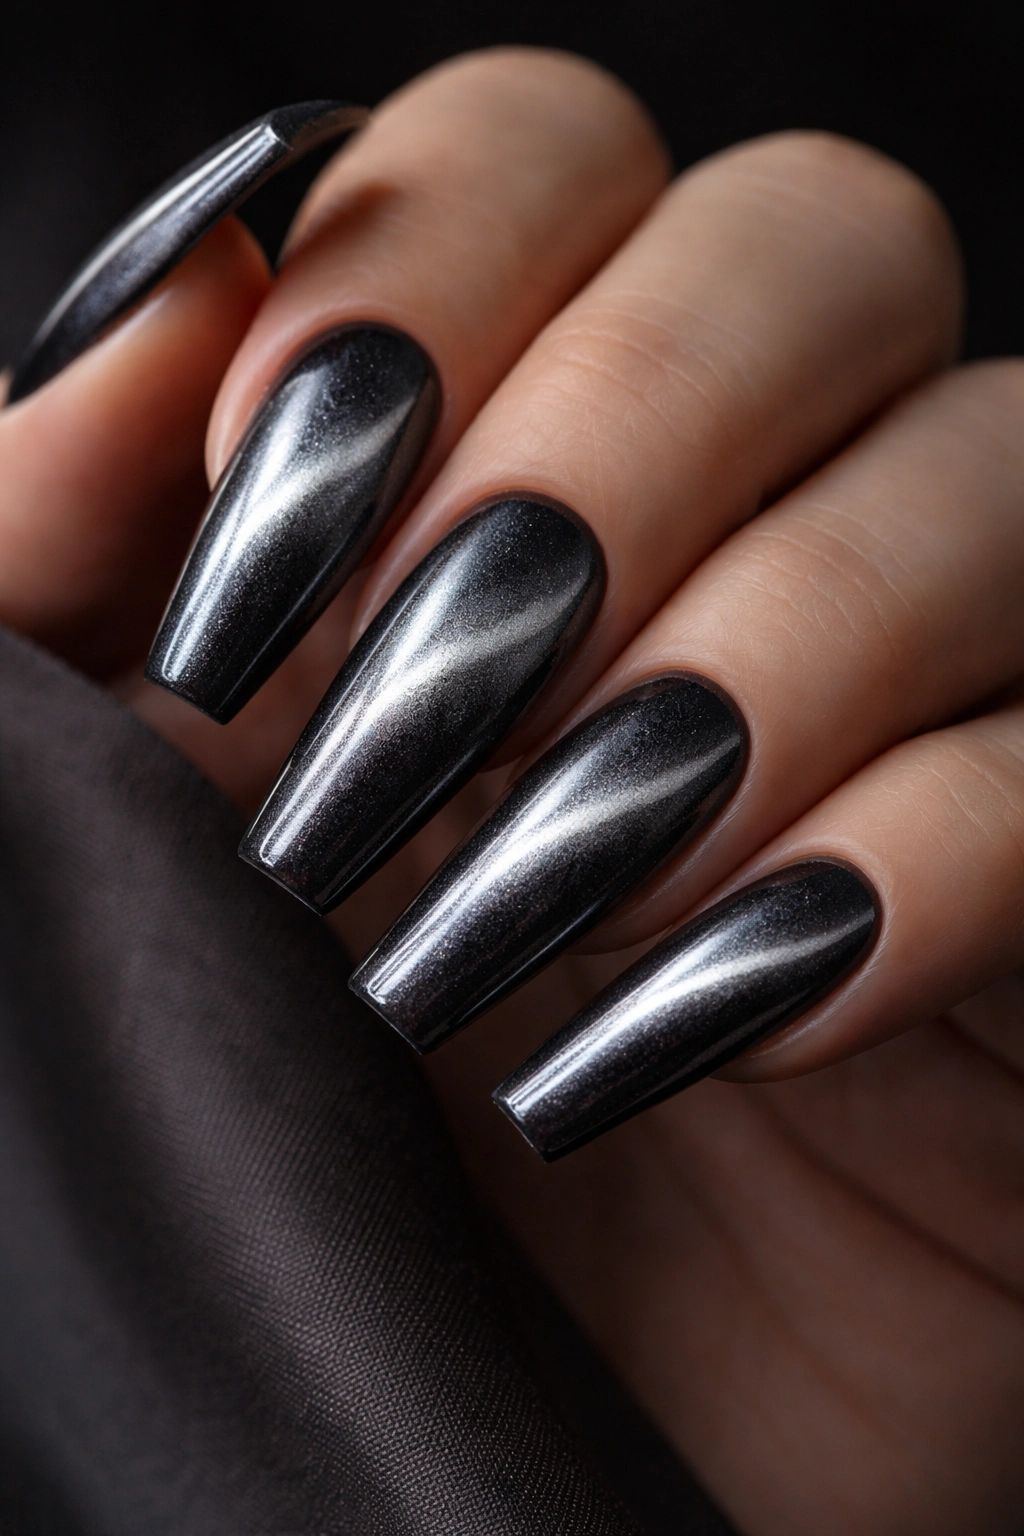
Darker silver deserves more love.
Gunmetal cat-eye nails take the reflective pull of silver and add depth, which is why they can look richer than bright chrome on a ballerina shape. The base tends to sit somewhere between charcoal and steel, and the magnetic stripe throws a moving beam across the nail. When the shape is long enough, that beam looks almost stretched, like light sliding over brushed metal.
This is one of the few silver looks that gets better with moodiness. A rainy afternoon, dim indoor light, black knitwear, silver rings—the whole thing clicks. Bright chrome grabs attention right away. Gunmetal cat-eye draws you in a second later, and I think that delay makes it more interesting to wear.
Magnet placement changes the result. Hold the magnet for 10 to 15 seconds per nail and you can create a diagonal stripe, a center beam, or a soft velvet pull. On ballerina nails, a diagonal or centered line usually flatters the shape more than a scattered effect because it follows the taper.
There is a catch. Cheap cat-eye polish can look muddy. If the magnetic particles are sparse, you get gray shimmer instead of that deep, moving silver flash. Ask for a formula with a dark base and dense metallic pull.
If bright silver feels too blunt on your hands, this is where I’d start.
6. Negative-Space Side Panels in Bright Silver
Unlike mirror chrome, negative-space silver side panels let your natural-looking base do half the work. You keep the center sheer or nude, then run bright silver along the outer edges, sometimes meeting at the tip, sometimes stopping short. The result is graphic and lean.
That placement does something clever on ballerina nails: it sharpens the taper without filling the whole surface. The eye reads the silver rails along the sides and sees a slimmer nail, even if your natural nail bed runs wider. It’s a neat visual trick, and it works.
Who is this best for? Anyone who likes a cleaner manicure, wants silver, but does not want full metal on every finger. It also suits medium-short ballerina lengths better than some of the bigger silver ideas on this list, because the design is doing shape work rather than relying on pure length.
A couple of specifics make it sing. Keep the center panel sheer and the silver edges thin enough to look deliberate—usually 1.5 to 2 mm on most nail widths. Too wide, and the design starts eating the whole nail. Too thin, and it disappears from normal viewing distance.
If you book this set, tell your tech you want “silver side frames with a nude center and a crisp ballerina taper.” That wording tends to prevent the shape from turning into a square with metallic stripes.
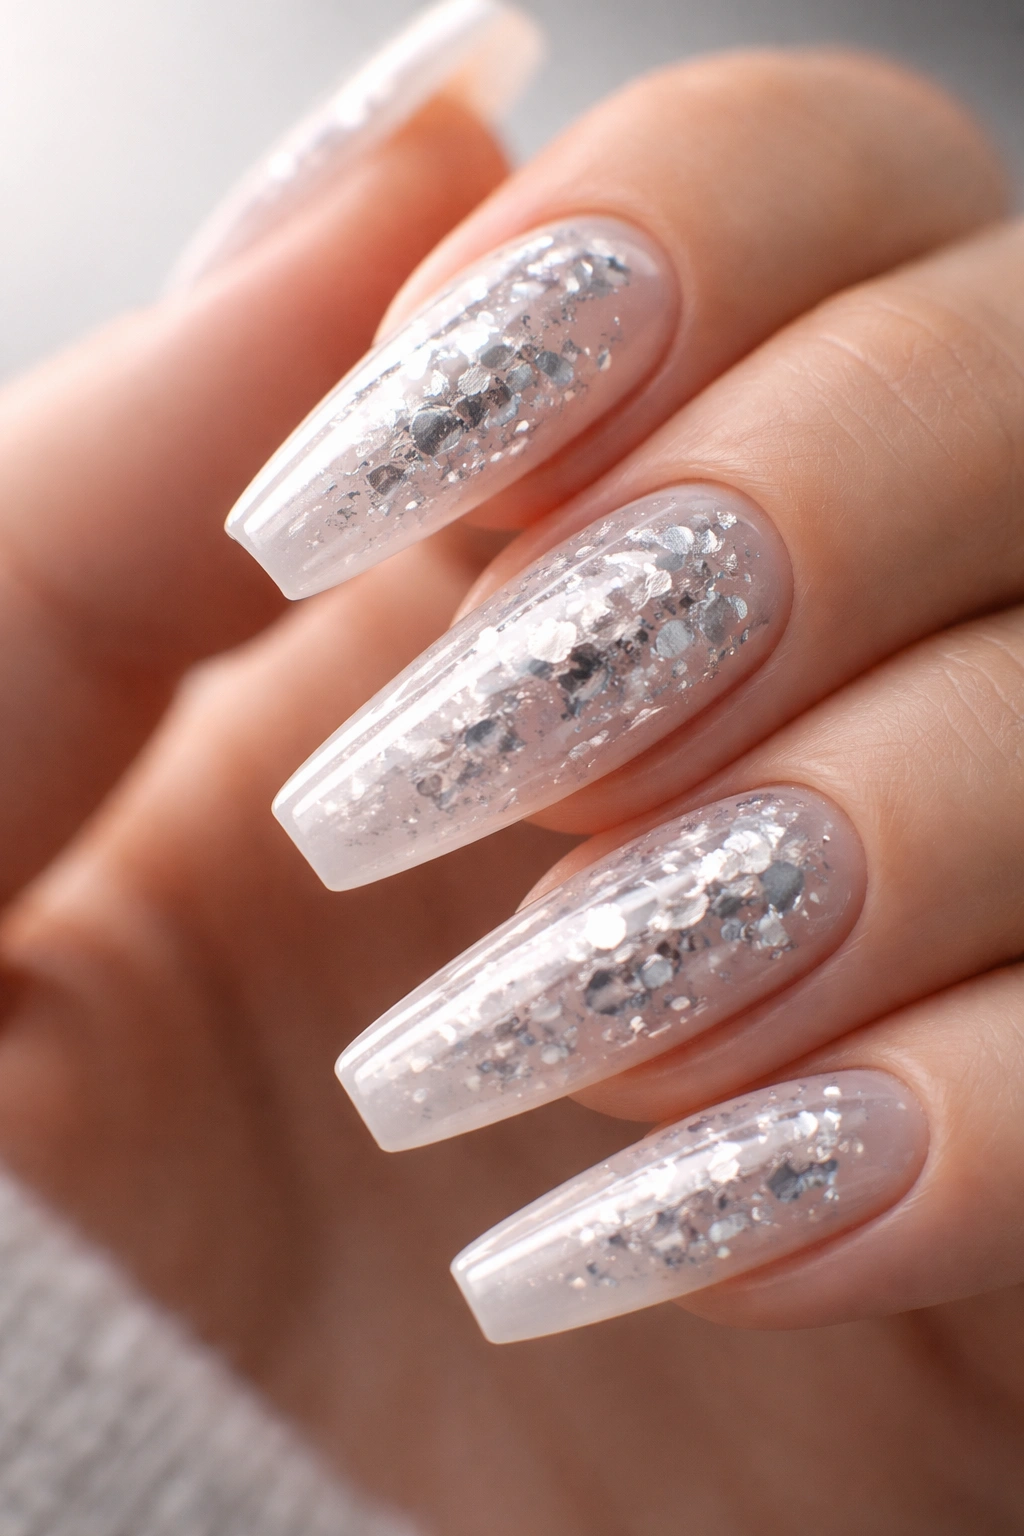
7. Silver Glitter Fade With Translucent Ends
Glitter gets dismissed fast. On the wrong set, fair enough. Chunky craft-looking glitter can make ballerina nails feel busy and dated. A fine silver glitter fade with translucent ends, though, is a different animal.
What Makes It Look Cleaner
The placement flips the usual gradient. Instead of packing the shine at the cuticle and fading down, you can concentrate fine silver through the midsection and let the tip stay glassy and clear, or run the fade from the base into a jelly-like end. That transparency keeps the manicure light, which helps if you like sparkle but hate visual weight.
Quick Styling Notes
- Use micro-glitter, not chunky hex pieces, if you want a smooth finish
- A clear or smoky translucent tip gives the set more depth than an opaque silver end
- Best on medium ballerina shapes where the clear section has room to show
- Pair with silver jewelry, not mixed metals, if you want the set to read colder and cleaner
I like this set when someone wants shine that feels playful without tipping into party-only territory. The glitter catches in lower light, and the translucent edge keeps the whole thing airy.
Best add-on: one fully clear accent nail with suspended silver specks can tie the set together without making every finger compete.
8. Platinum Marble With Fine White Veining

Stone effects go wrong when the lines are thick and gray turns muddy. Done well, platinum marble ballerina nails feel crisp, expensive, and a little colder than standard white marble sets.
Start with a pale gray, icy white, or milky silver base. Then add soft smoke lines, hair-thin white veining, and a few controlled streaks of reflective silver. The word there is controlled. Marble needs restraint. If every nail has ten lines crossing like a road map, the design loses the clean polish that silver does so well.
This look benefits from asymmetry. One nail can have a strong diagonal vein. Another can stay almost bare with one silver streak near the tip. A third can carry the main movement through the center. That unevenness keeps the set from looking stamped on, which happens more than people admit.
I’d skip bulky crystals here. Marble already has pattern. Adding stones on top can crowd it. If you want extra shine, a touch of chrome powder rubbed over a few veins works better because it stays inside the design language instead of sitting on top of it.
The ballerina shape helps by giving the veins somewhere to travel. On a short rounded nail, marble can bunch up. On a tapered flat tip, the lines can stretch and narrow, which makes the whole set feel more refined.
9. Liquid-Metal Drip Tips Over a Bare Nude Base
Want something sharper than a French tip but less busy than full chrome? Go for liquid-metal drip tips. The idea is simple: a nude base with silver dripping down from the tip in a few rounded, elongated trails.
The beauty of this design is balance. The base stays calm, almost bare, while the silver gathers where the ballerina shape already has structure—at the flat tip. Those drips can be subtle, ending after 3 to 5 mm, or bolder, sliding halfway down the nail. Either way, you get movement without filling the whole surface.
Placement matters more than color here. Too many drips on each nail, and the design turns messy. I prefer two to four drips per nail, with a bit of spacing between them and slight variation in length so the line does not look stamped. On a full set, even alternating between heavy drip nails and cleaner tip-only nails gives the manicure some breathing room.
How to Keep the Design Clean
Keep the nude base cool-toned and sheer enough to look skin-like, not chalky. Use a silver with a smooth metallic finish rather than chunky glitter, since the whole point is that melted-metal effect. If your tech can sculpt a raised drip in gel and chrome over it, even better—though a flat painted version still works.
This one looks especially good on medium-length ballerina nails where the tip is visible in motion.
10. Silver Outline Frames That Trace the Whole Nail

A silver frame around the edges of a ballerina nail makes the shape look almost drawn with a technical pen. It’s a smart design because it shows off the silhouette first and the color second.
Frame nails can be done a couple of ways. The cleanest version traces the sidewalls and tip with a thin chrome or metallic line, leaving the center nude, milky, or sheer smoky pink. Another version outlines the whole perimeter and adds a cuticle arc, almost like the nail is bordered in silver wire.
The line thickness changes the mood fast.
- Ultra-thin frames look sharp and tailored, especially on medium-short ballerina sets
- Slightly thicker borders feel bolder and more graphic, better on longer lengths
- A nude or milky center keeps the silver from overwhelming the nail
- One or two full chrome accent nails can anchor the frame design if the set feels too airy
This is one of the best silver ideas if you care about shape. Any wobble in the filing will show, because the border follows the edge exactly. Still, when the lines are crisp, nothing makes a ballerina silhouette look cleaner.
I’d choose this over a French tip if your main goal is to make the nail shape stand out from across the room.
11. Brushed Satin Silver With a Soft Steel Finish
Soft light changes this one.
A brushed satin silver manicure skips the mirror flash and goes for a softer steel look, almost like a piece of metal that’s been hand-finished rather than polished to a high shine. On ballerina nails, that muted glow can feel more grown-up than chrome, especially if you wear silver jewelry often and want your nails to sit in the same family.
The surface can be created with a satin metallic gel, a chrome powder sealed under a soft-matte top, or a brushed effect painted into the polish itself. Horizontal brush texture is risky on wide nails, so I prefer a fine linear texture that follows the length or a soft velvet finish that blurs the reflection without killing it.
This is also one of the rare silver looks that does not mind a bit of restraint. No stones. No giant charms. No overloaded accent art. The finish is the design. Add too much and you lose the whole point.
One thing to watch: some matte top coats turn a clean silver cloudy. If the satin effect looks dusty instead of silky, the finish is off. You want soft steel, not sidewalk chalk.
I like this set on shorter ballerina lengths, especially when long mirror chrome feels like too much metal all at once.
12. Mixed-Texture Silver Nails With One Finish on Each Finger
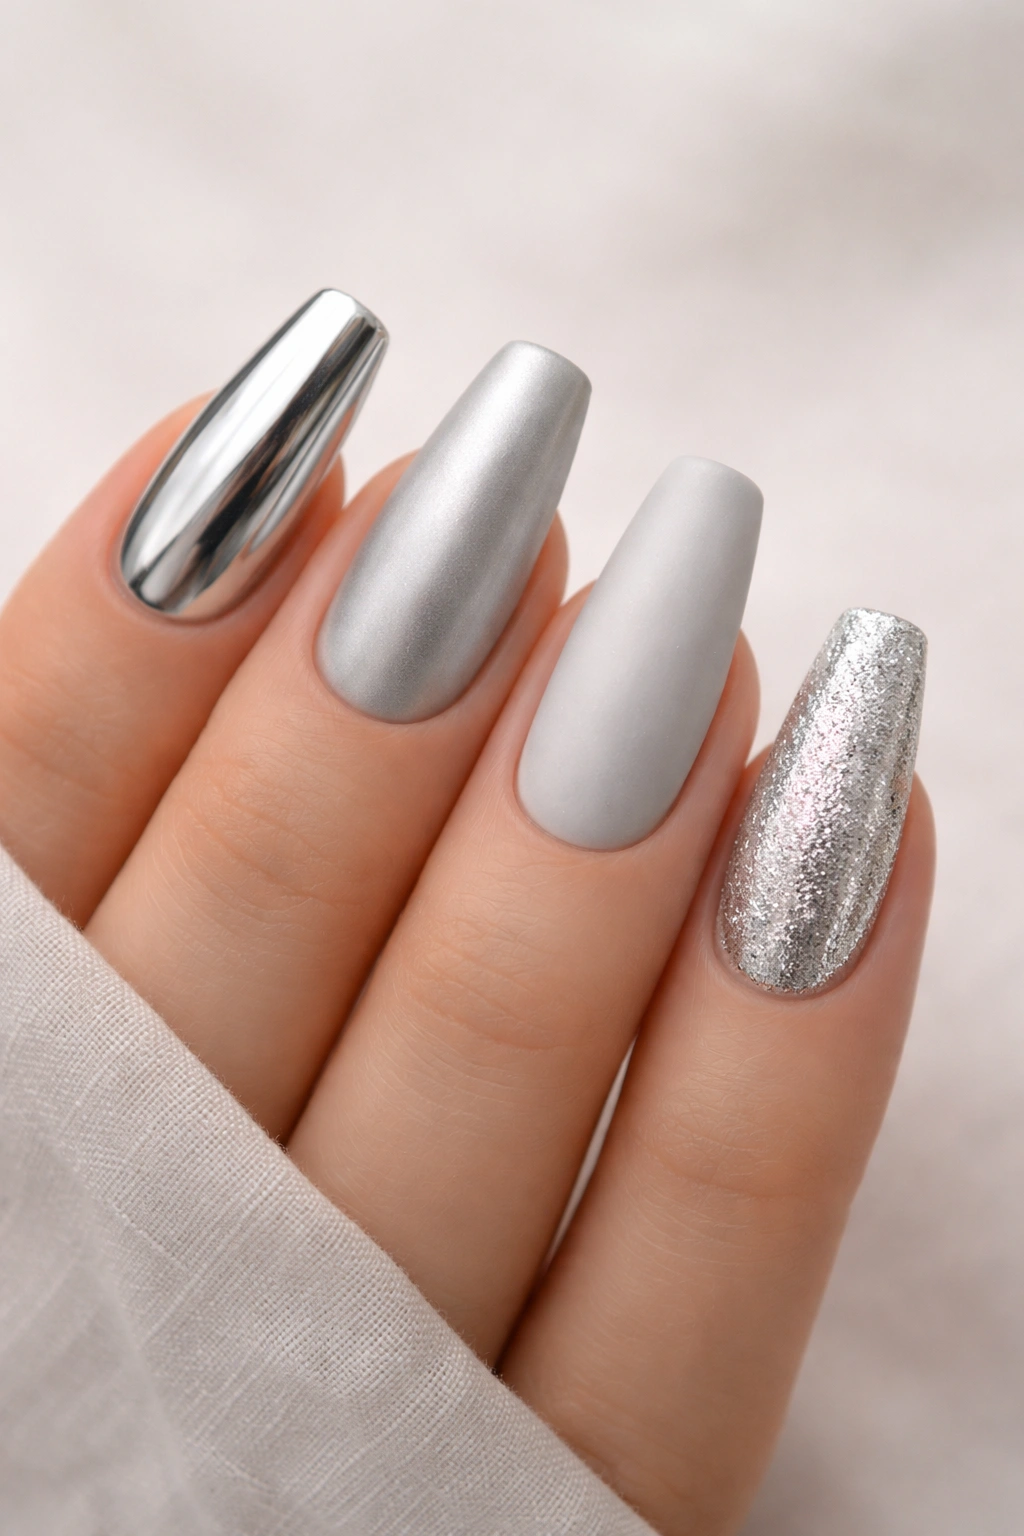
If you cannot decide between chrome, glitter, and matte silver, do not force yourself into one finish. A mixed-texture silver set can look better than a single-finish manicure—as long as the palette stays tight.
This works because silver already carries a unifying undertone. You can put mirror chrome on one nail, fine glitter on another, a milky foil design on the next, and a satin steel finish on the ring finger, and the hand still looks cohesive if the shades sit in the same cool family. The mistake is adding five different silvers and black and white and rhinestones. Then the set loses discipline.
Who should try this? Anyone who gets bored with uniform manicures or wants each finger to do a slightly different job. It’s also smart for content shoots, events, or anyone who enjoys a more editorial nail look.
My favorite layout is simple:
- Thumb: mirror chrome
- Index: silver French or outline frame
- Middle: cat-eye gunmetal
- Ring: foil or glitter fade
- Pinky: satin or jelly silver
That combination gives contrast without chaos. Keep the shape consistent, keep the undertone cool, and the set looks thoughtful instead of random.
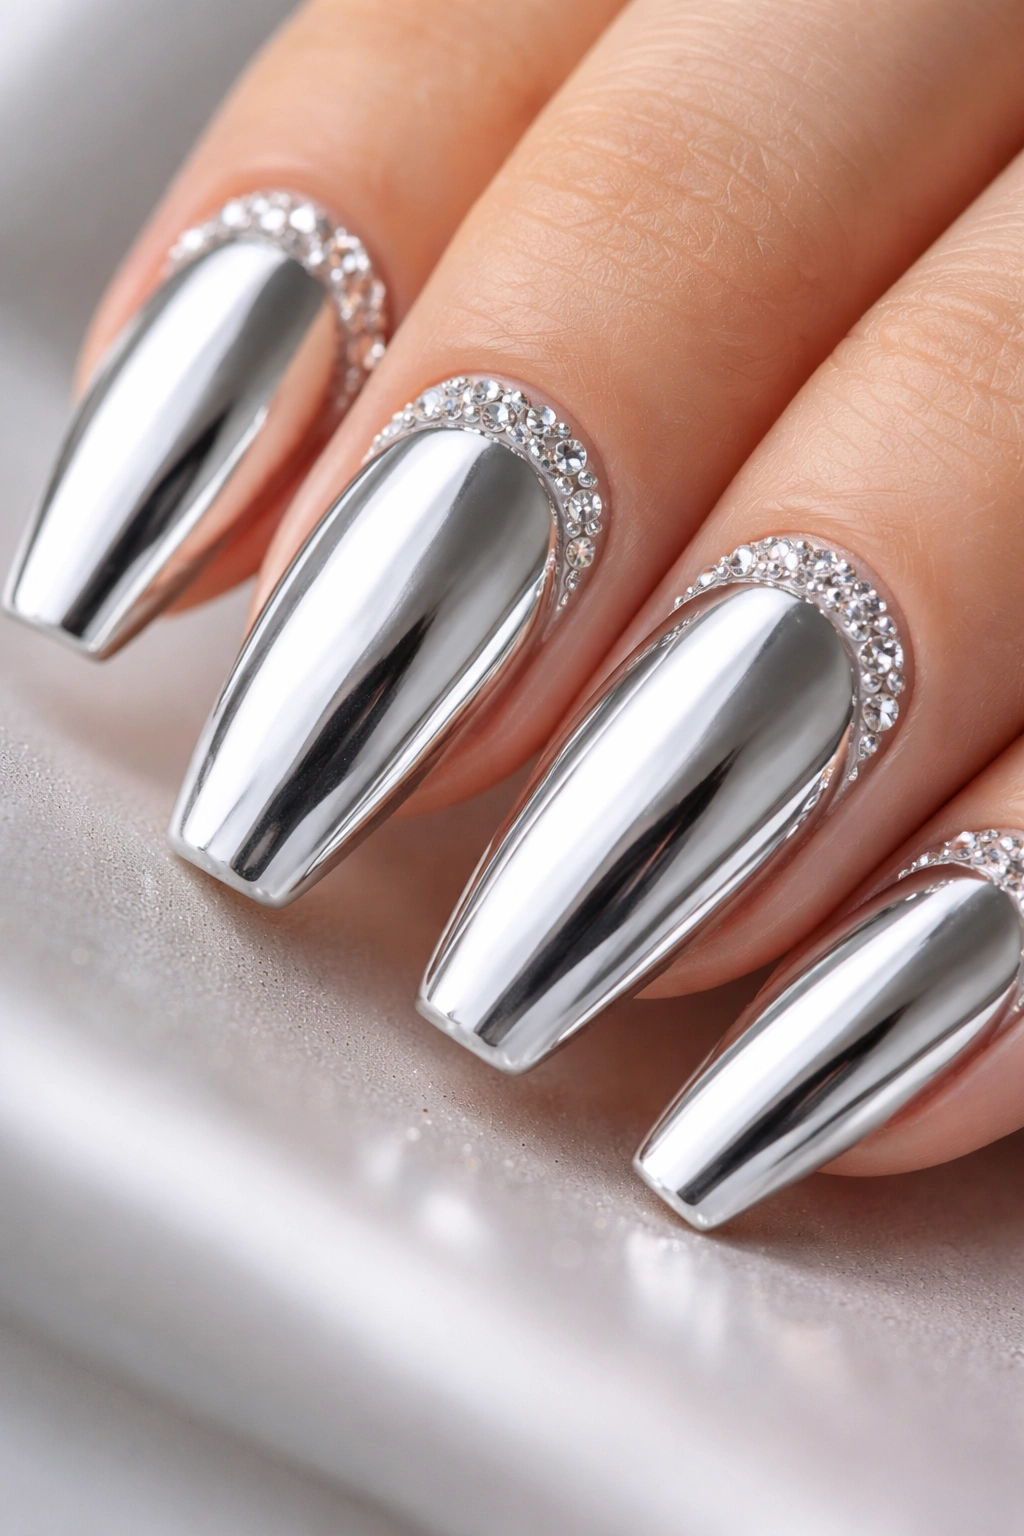
13. Crystal Cuticle Arcs on a Mirror Silver Base
Rhinestones are where silver sets can slide into costume territory. The fix is placement. Put the stones in a small cuticle arc instead of scattering them across the whole nail, and the manicure keeps its edge.
Why the Placement Works
A cuticle arc follows the natural curve at the base of the nail, which means the crystals act like punctuation rather than decoration sprayed everywhere. On a full silver or chrome base, that little half-moon of light reads polished and intentional. It also keeps the flat ballerina tip clean, which matters. Too much happening at both ends makes the nail feel crowded.
Stone Sizes That Behave Better
- Use flatback crystals around 1.5 to 3 mm for a neat cuticle curve
- Keep the biggest stone in the center and taper outward with smaller ones
- Limit full crystal arcs to two accent nails per hand if you want balance
- Pair with a mirror silver or smooth metallic base, not heavy marble or dense glitter
I’d skip giant gems here. They catch hair, add bulk, and can push the set into pageant territory fast. Smaller stones, placed tight to the cuticle line, give you the same flash with far less fuss.
Best version: silver chrome on every nail, crystal arcs on ring fingers only, and one tiny stone at the cuticle on the thumbs.
14. Smoked Silver Jelly Ballerina Nails
Jelly silver is what I reach for when mirror chrome feels too hard-edged. It has depth, but it still lets light pass through, so the manicure looks lighter on the hand even when the tone is dark.
The base here is usually a sheer smoky gray or charcoal jelly, layered until it looks glassy rather than opaque. Then silver shimmer, foil flecks, or a faint chrome veil is added inside or over the top. The final effect feels like tinted glass with metal suspended in it.
This design is especially good on medium ballerina nails. Full coverage dark metallics can make short nails look stubby. A jelly finish avoids that because the eye can still read through the nail a little. You keep depth without losing air.
I also think this one looks better in motion than in still photos. The transparency shows when you reach for a cup, type on a keyboard, or move your hand under side lighting. There’s a layered quality there that flat silver polish cannot fake.
If you want silver that feels moodier, less blunt, and a touch mysterious without going straight to black, smoked jelly is a strong pick.
15. Sculpted 3D Silver Swirls Over a Chrome Base
Raised gel swirls look best when you can feel them.
That tactile part is what makes 3D silver swirls over chrome stand out from painted line art. The pattern is built with sculpting gel or thick art gel, cured, then often dusted with chrome or painted in metallic silver so the raised lines catch the light above the base layer. On a ballerina shape, those curves can run diagonally, hug the sidewalls, or sweep from cuticle to tip like molten ribbons.
The key is editing. One or two accent nails with raised detail often look stronger than ten fully sculpted nails. Too much texture across the whole hand can become clunky, especially if the base shape is already long. I prefer a chrome base on every nail, then 3D swirls on the middle and ring fingers, maybe the thumbs if you want more impact.
How to Keep the Texture Wearable
Keep the raised lines narrow and smooth. Thick blobs of gel collect lint and make top-coating harder. A slim, rope-like line gives you texture without turning the nail into a relief sculpture. Ask your tech to place the swirls where they flatter the taper instead of fighting it.
This is the set for someone who wants silver nails to feel like nail art, not only color.
How to Keep Silver Ballerina Nails Shiny for the Full Wear Time
Three days in, silver nails tell you how well the manicure was built.
Mirror finishes lose their charm fast if the free edge chips, the cuticles dry out, or the top coat starts looking scratched. The fix is not glamorous, but it works: oil your cuticles daily, do not use your nails as tools, and file small snags before they spread. A tiny edge crack on a silver set shows sooner than it would on sheer pink.
If you wear chrome, be a little gentler than usual with rough tasks. Opening soda cans, scraping labels, digging through keys in a packed bag—those things leave marks. Glitter, foil, and jelly finishes hide wear better, which is part of why I recommend them to people who are hard on their hands.
One salon trick helps too. Ask for the free edge to be capped and sealed well, especially on longer ballerina shapes. That small step keeps the tip from wearing down early, and with silver, the tip is where the whole shape lives.
Press-ons need the same care, maybe more. Keep glue away from the top surface, avoid soaking them in hot water for long stretches, and carry a small nail file. A thirty-second touch-up can save a whole set.
Final Take
Silver works on ballerina nails because the shape gives the color something to bounce off of. That flat tip, those tapered sides, the clean length—they make metallic finishes look sharper, colder, and more deliberate than they do on softer shapes.
If you like clean nails, go micro French, outline frames, or negative-space panels. If you want shine that hits harder, mirror chrome, foil, and cat-eye do the job. And if you want something moodier, smoked jelly or gunmetal is where silver gets more interesting than plain black ever manages.
Pick the finish that matches how you use your hands, not only the photo you saved. Silver rewards good structure, thin product, and smart placement, and when those pieces line up, the manicure does not need much help.
