

Pink glitter can look expensive or cheap in about three seconds. On pink glitter ballerina nails, the difference usually comes down to scale: the taper has to stay clean, the tip has to stay flat, and the sparkle has to match the length of the nail instead of swallowing it.
Ballerina nails—often called coffin nails—give glitter more room to move than a round or squoval shape. That sounds small. It is not. A fine shimmer can stretch the eye and make the nail look leaner, while a chunky hex mix can make the same set look thick at the sidewalls, especially once top coat starts building up around the edges.
I keep coming back to this shape for one reason: light hits the blunt tip first. Typing, holding a coffee cup, tapping a phone screen, reaching for your keys—the flat end flashes before the rest of the nail does. One thin glitter line can sharpen the whole set. One bulky layer can make it look like craft glitter stuck to wet polish.
Pink helps because it gives you room to play. You can go milky, jelly, rose, dusty mauve, hot pink, chrome, cat-eye, aura. Some sets look soft and glassy. Others hit harder. The fifteen looks below all sparkle, but they do it in different ways, and that difference is what makes a manicure feel chosen instead of copied.
Why Pink Glitter Ballerina Nails Look Better With a Clean Taper
Shape first. Always.
A ballerina nail should narrow through the sides and finish with a straight, squared tip, not a point and not a wide block. If the sidewalls pinch too sharply, glitter makes the shape look cramped. If the tip stays too wide, the sparkle can read heavy and flat, especially under bright indoor light.
Length Changes the Whole Design
Short ballerina nails can work, but they need restraint. On a shorter set, micro glitter, shimmer top coats, and slim French details usually look sharper than thick glitter placement. Once you have at least 1/4 inch of free edge past the fingertip, you can start getting away with ombré fades, layered flakes, and deeper cut lines.
Longer nails invite more drama, though they also expose mistakes faster. A crooked glitter fade on a long coffin shape is hard to ignore because the straight edges act like rulers.
Glitter Size Matters More Than Color
This is where a lot of sets go wrong. Fine glitter sits flatter, reflects light in smaller flashes, and keeps the nail surface smoother. Chunky glitter throws more sparkle, but it also adds height, which means more filing, more top coat, and a bigger chance of snagging hair if it is not sealed under gel or acrylic.
A quick rule I use: the shorter the nail, the finer the glitter. Medium and long ballerina nails can handle bigger sparkle, but even then, I would keep chunky pieces to accent nails or encapsulated tips instead of covering all ten.
Ask for a side view before the top coat goes on. If the apex looks balanced and the tip does not bulge, the glitter will read clean instead of clumsy.
How to Make Pink Glitter Ballerina Nails Last Longer Between Fills

Glitter manicures do not fail because glitter is fragile. They fail because texture gets left exposed, the free edge is not sealed, or the nail shape is too thin at the corners.
Gel polish can hold fine shimmer with no problem, but once you move into chunky glitter, flakes, chrome-glitter mixes, or encapsulated layers, builder gel or acrylic gives you a stronger frame. That matters on ballerina nails because the corners of the tip take little hits all day—drawers, keyboards, steering wheels, zippers, all the boring stuff that chips polish faster than people expect.
A few habits make a visible difference:
- Use cuticle oil twice a day, especially after hand washing, so the enhancement stays flexible instead of dry and brittle.
- Cap the free edge with top coat every 5 to 7 days if you are wearing gel polish over natural nails.
- Wear gloves for cleaning, because long exposure to hot water and cleaners dulls glitter top coats faster than cold air ever will.
- File only in one direction if a corner starts catching; sawing back and forth can crack the seal along the edge.
- Book fills every 2 to 3 weeks for acrylic or hard gel. Ballerina nails lose their balance quickly once the apex grows out.
One more thing—small but worth saying. If your glitter catches in your hair, do not keep coating it with more top coat at home. That only makes a lumpy bump bigger. Get the surface lightly refiled and resealed instead.
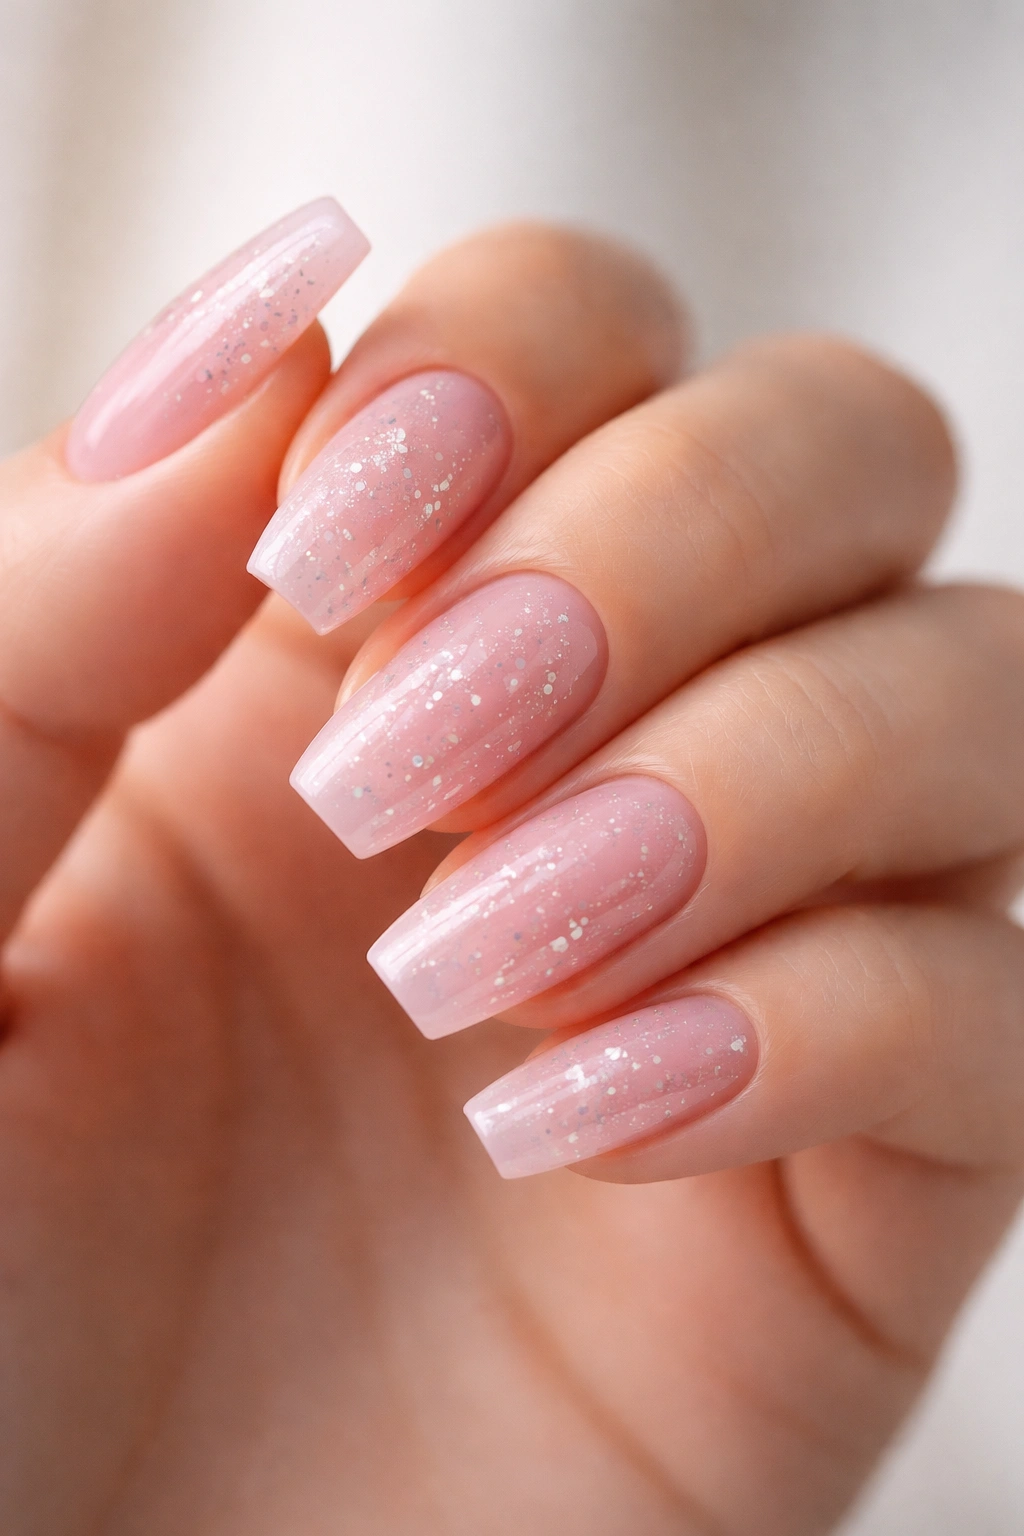
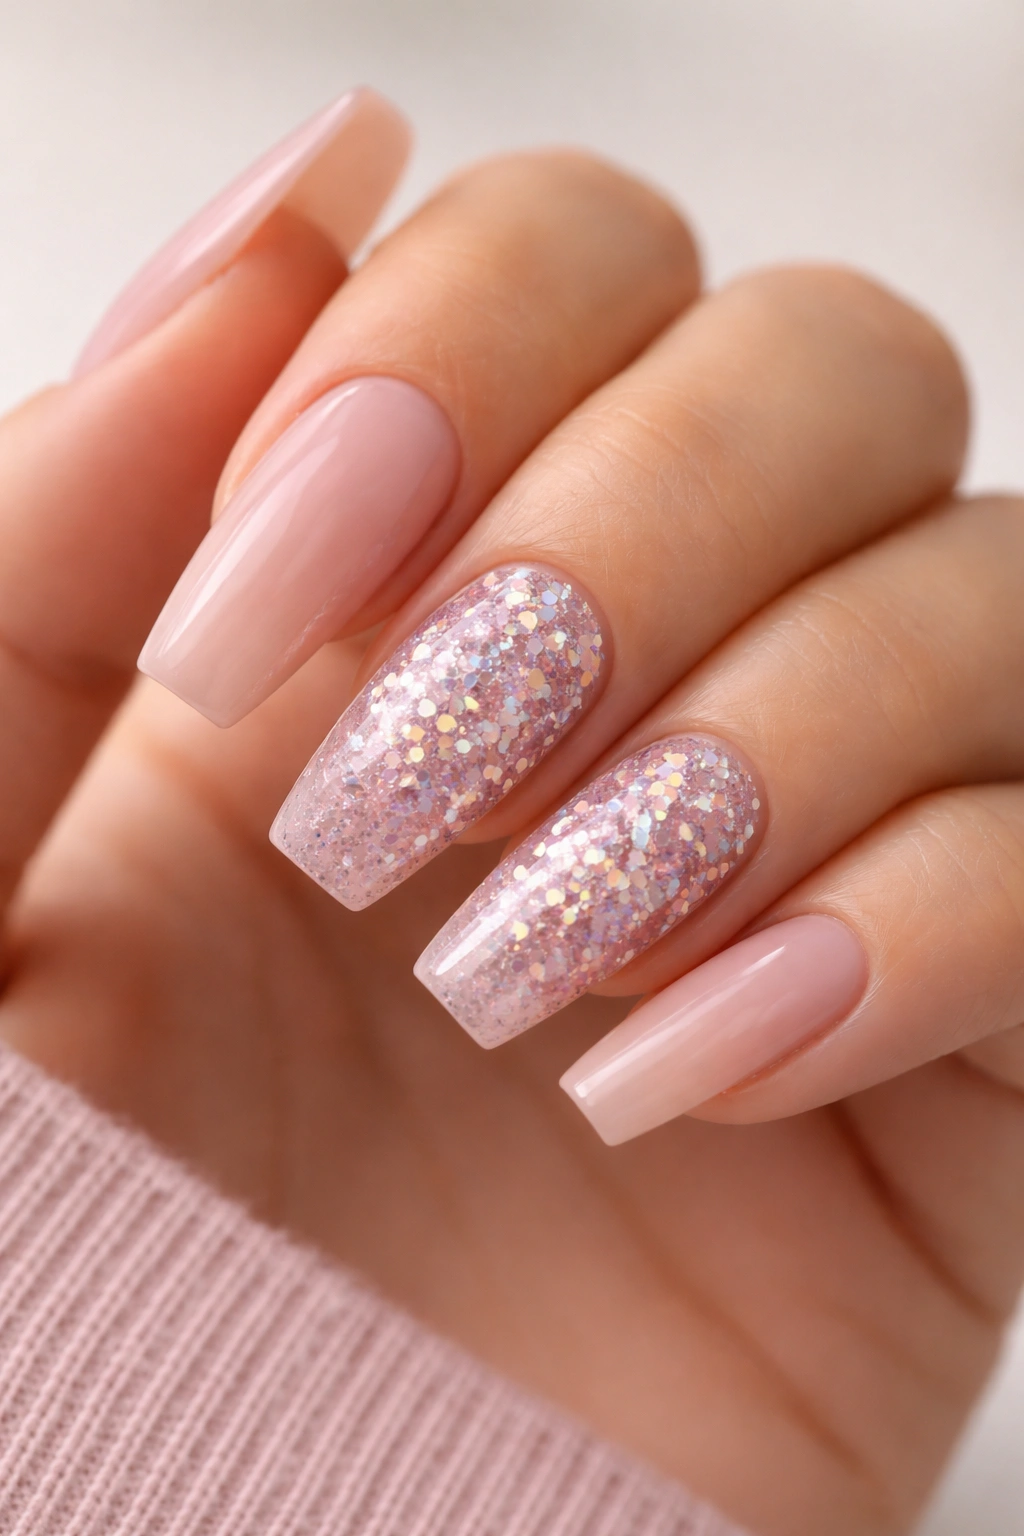
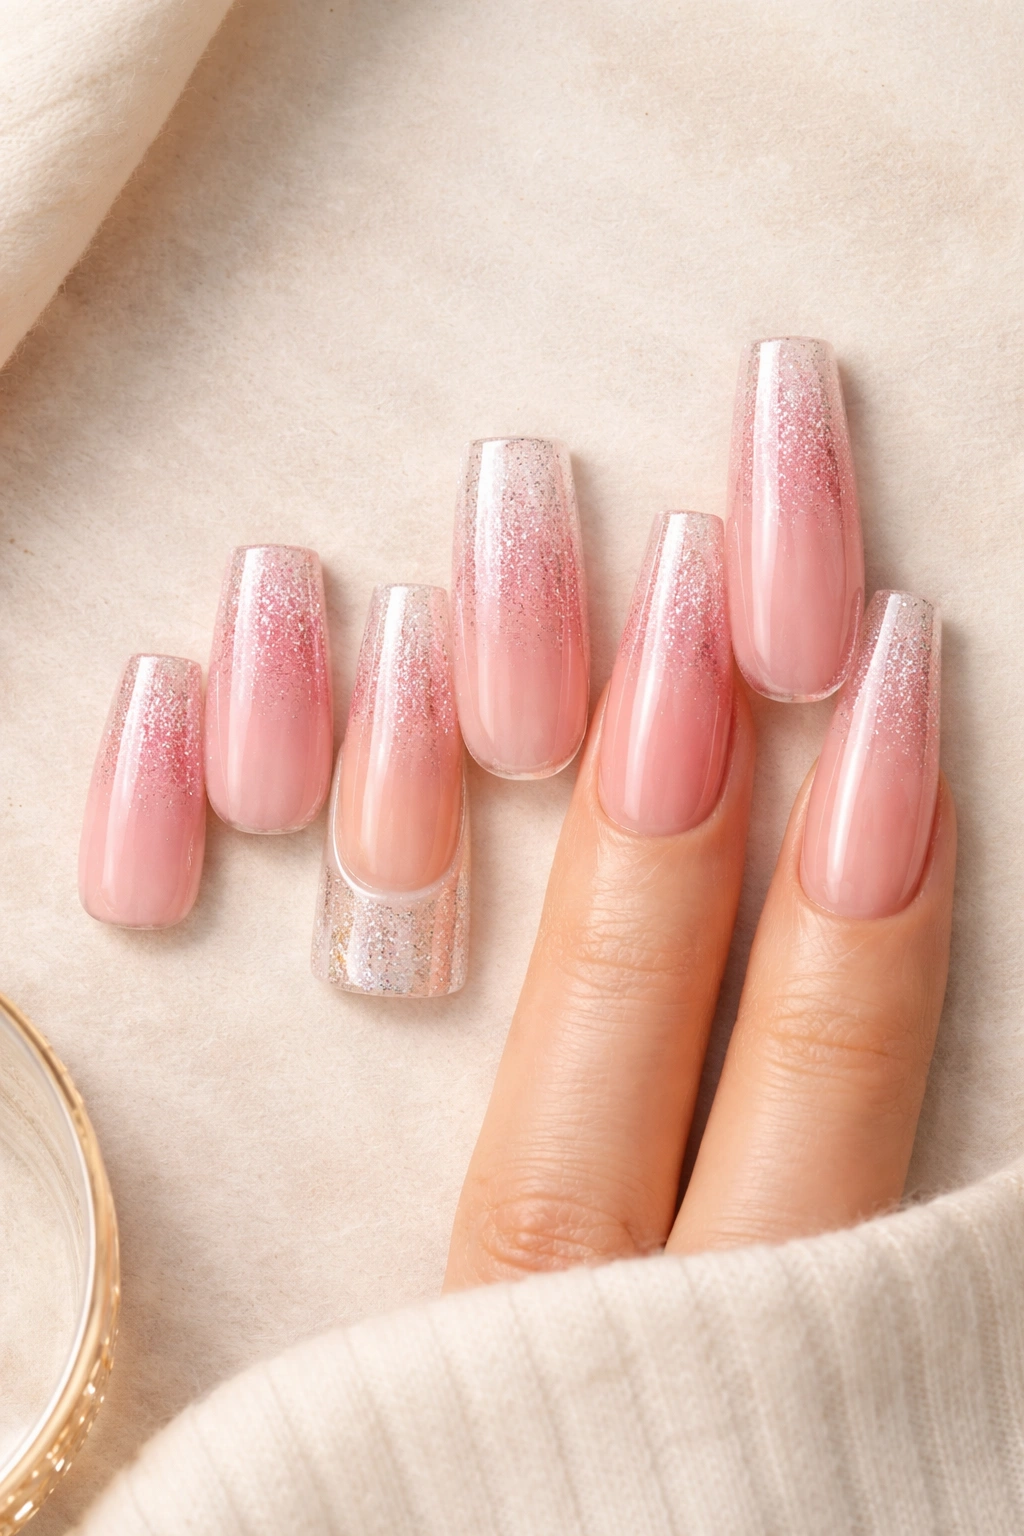
1. Milky Pink Base With Sugar-Fine Silver Glitter
Soft milk-bath pink with ultra-fine silver glitter is the set I would hand to almost anyone who wants sparkle without a hard, flashy finish. It looks clean from far away, then starts twinkling when the light shifts.
Why It Works on Ballerina Nails
Milky pink blurs the line between your natural nail bed and the enhancement, which makes the tapered shape look longer. Sugar-fine glitter adds reflection without thick texture, so the surface stays smooth and glassy. On a coffin shape, that smoothness matters. You want the eye to travel down the sides and land on that crisp tip.
Quick Design Notes
- Ask for a semi-sheer pink, not an opaque baby pink, so the glitter has depth instead of sitting on top like dust.
- Keep the glitter density light through the cuticle area and a touch heavier at the free edge for a stretched look.
- Choose silver or icy pink sparkle, not yellow gold, if you want the milky base to stay cool and fresh.
- Use a high-gloss top coat, because matte kills the floating effect this look depends on.
Best on: short-to-medium ballerina nails where you want shine, but not bulk.
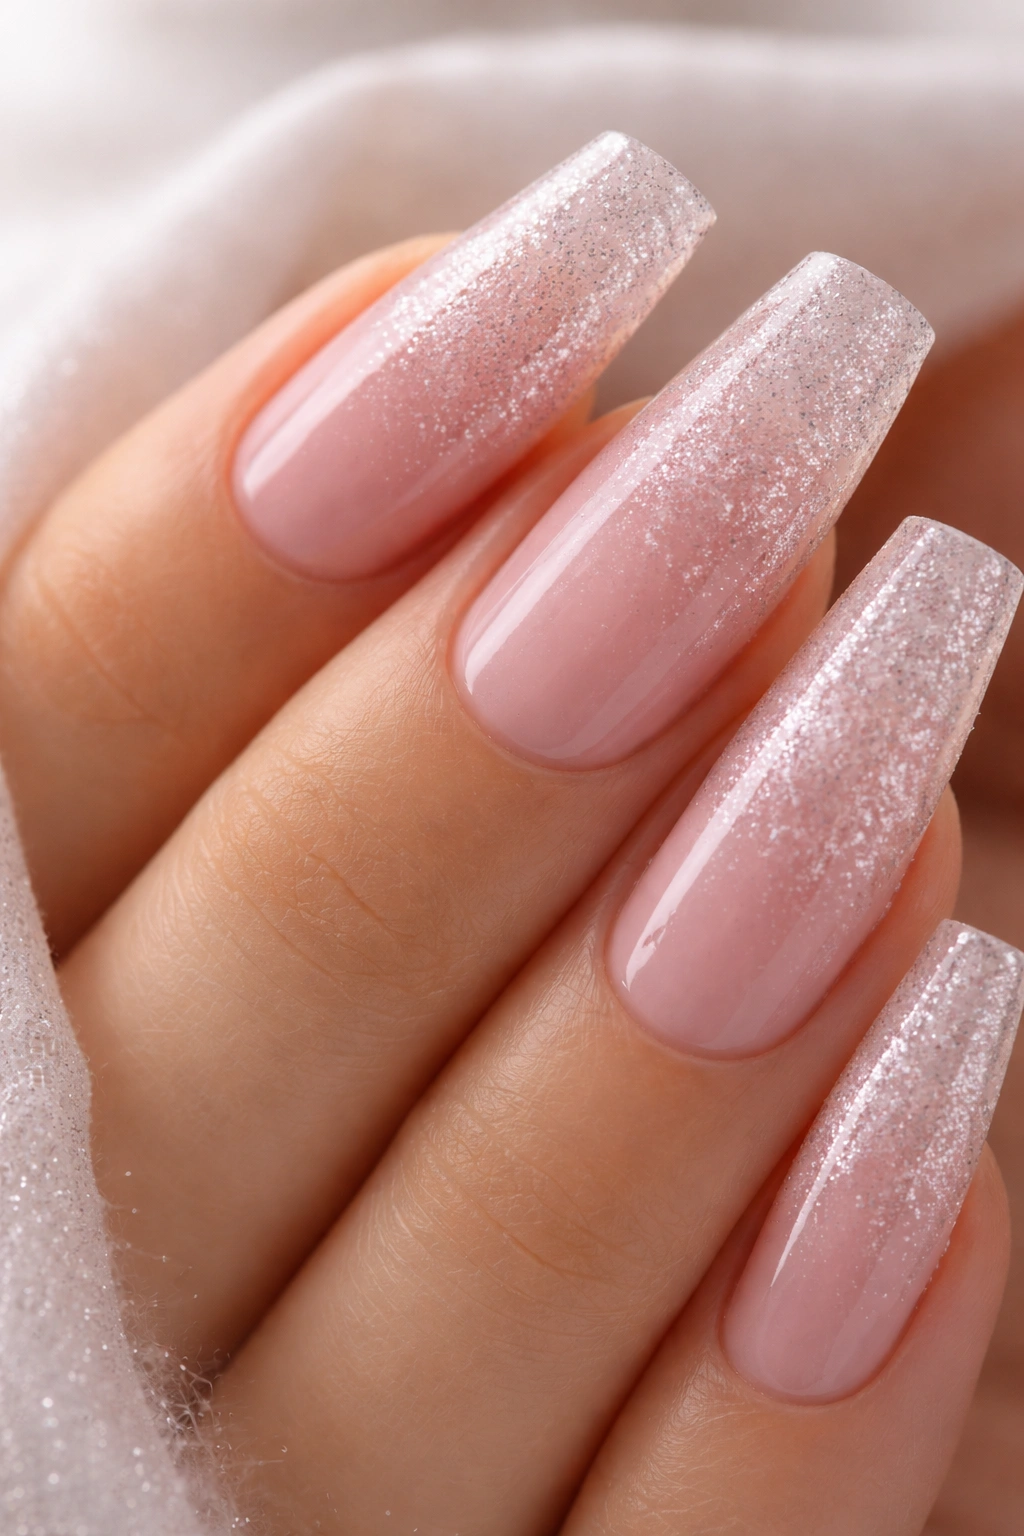
2. Blush Ombré Glitter Fade
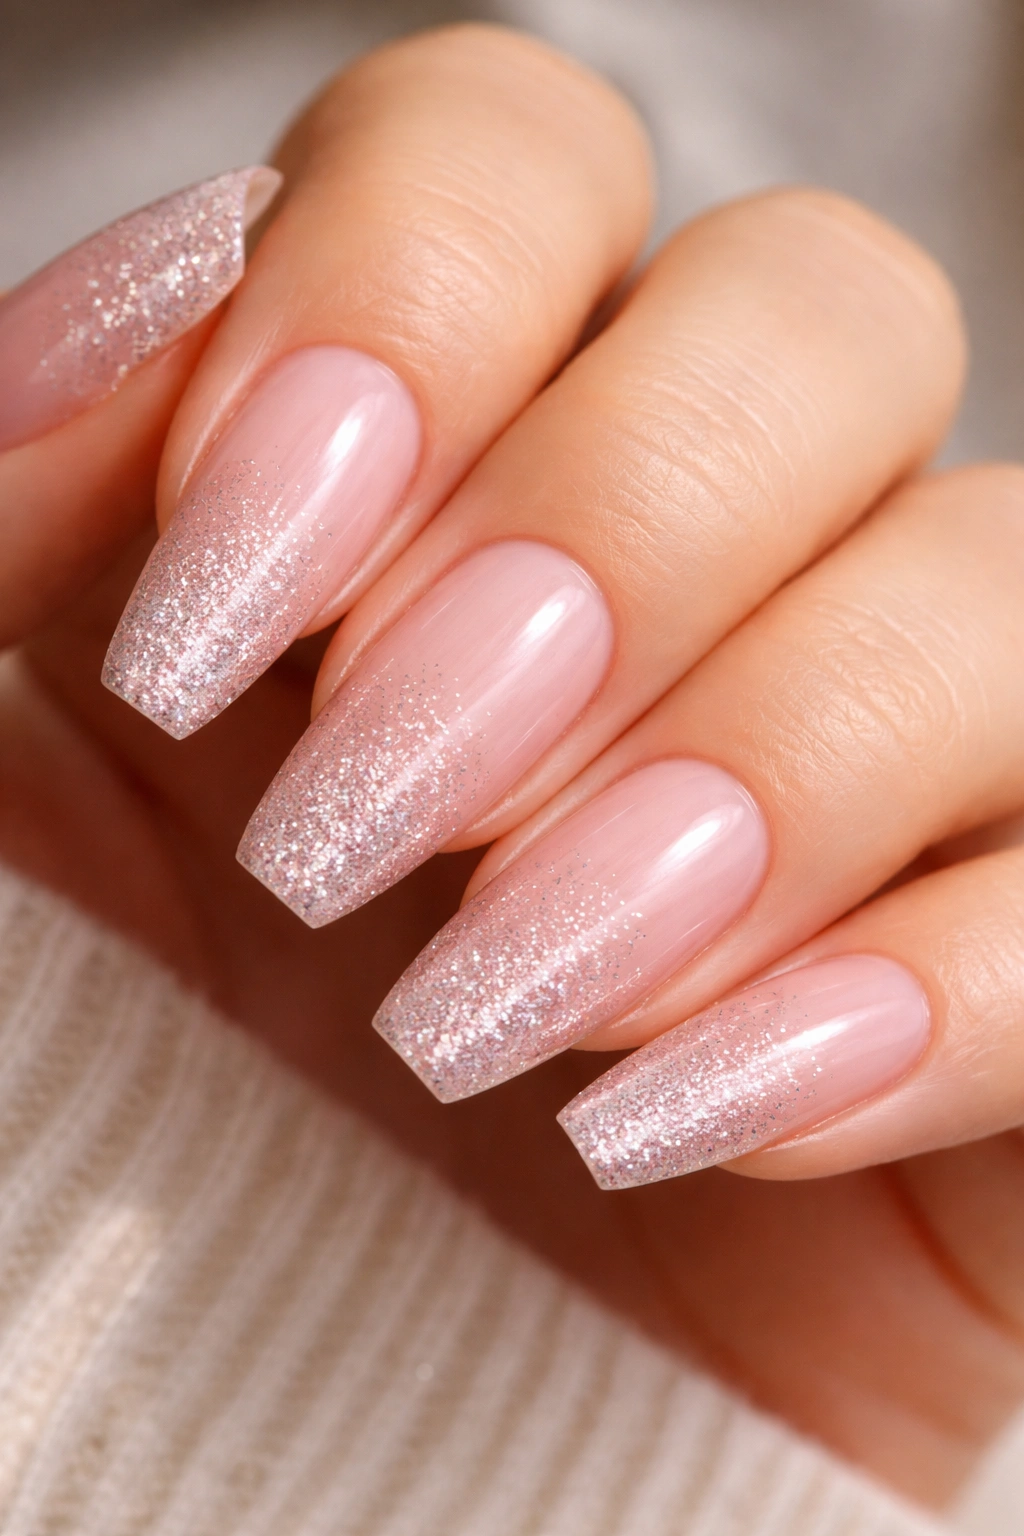
If you wear your nails for three weeks at a time, this is one of the smartest pink glitter choices. A blush base with glitter packed at the tip and diffused toward the middle hides grow-out better than a full glitter coat or a sharp cuticle design.
The trick is density. You want the sparkle strongest on the last third of the nail, then scattered more lightly as it travels upward. When the fade starts too high, the whole set can look cloudy. When it starts too low, you lose the ombré effect and end up with plain glitter tips.
Blush pink works because it softens the edge between natural nail bed and enhancement. A candy pink can do the same job, though it reads brighter and more playful. I prefer micro glitter mixed with a few slightly larger reflective pieces, because it keeps the fade alive under indoor light instead of turning into one flat metallic patch.
Salon tip: a sponge blend can work for polish, but airbrushed glitter gel or a tapped loose-glitter fade under clear builder gel usually looks smoother and lasts longer on a ballerina shape. You can tell when it is done right because the nail still looks slim from the side.
3. Rose Quartz Pink With Encapsulated Sparkle
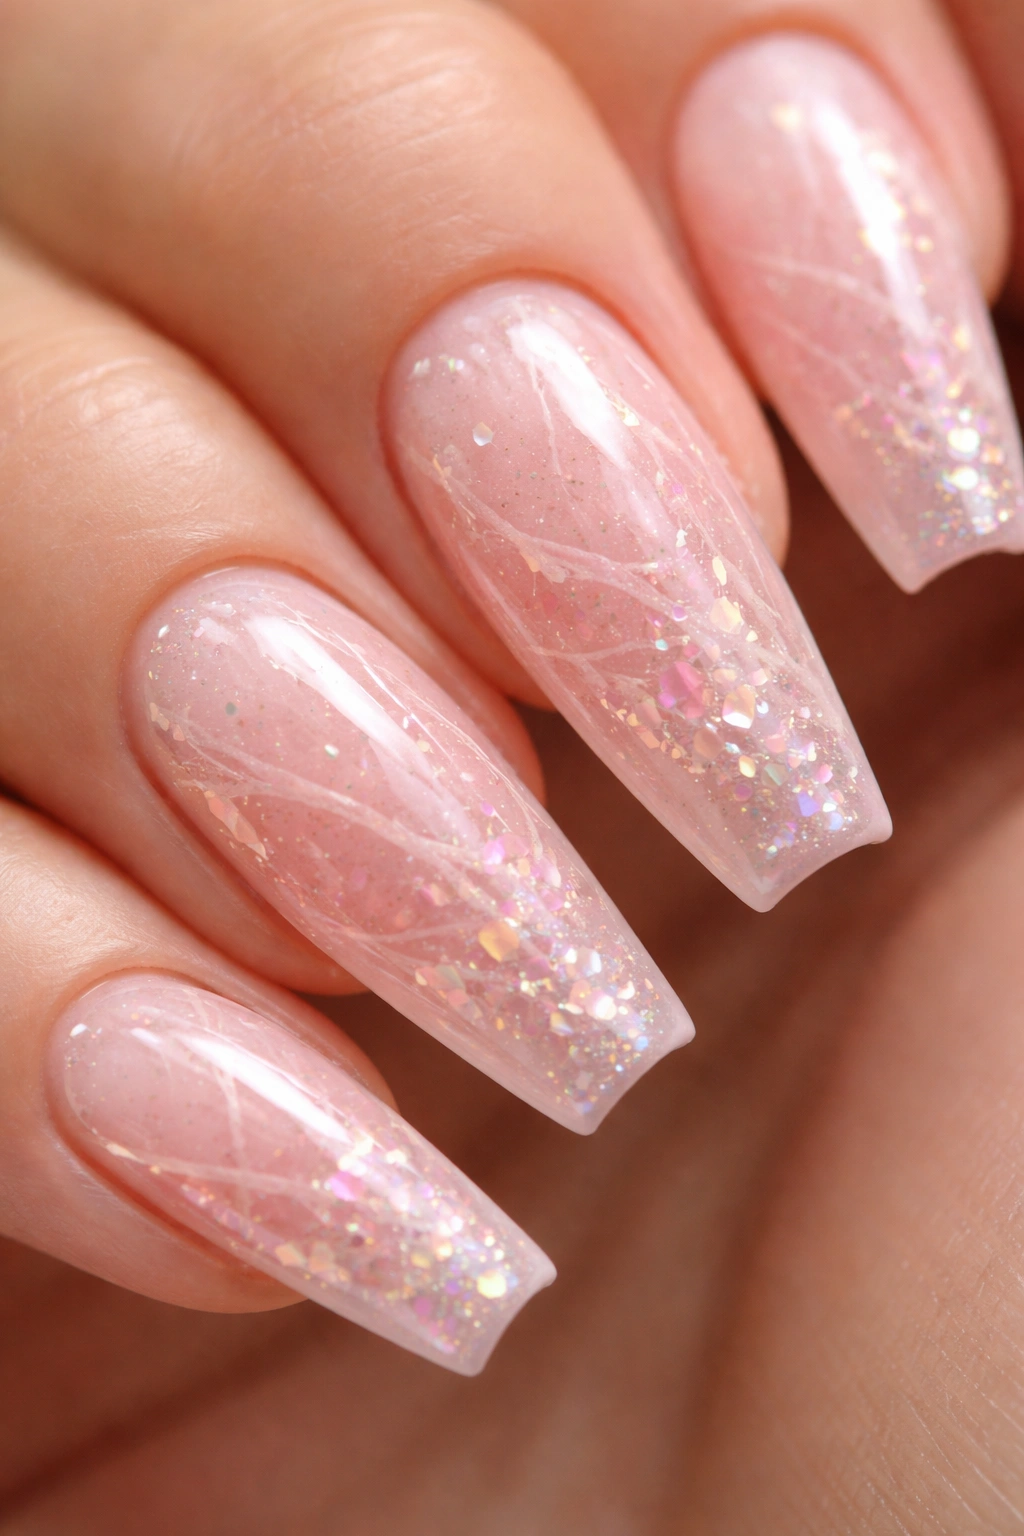
Why does rose quartz nail art often look richer than plain pink glitter polish? Because it gives the eye layers to look through.
A rose quartz design starts with a sheer pink base, then adds wispy white veining and a few translucent reflective pieces under clear gel. Instead of sparkle sitting on top, it looks suspended inside the nail. On ballerina nails, that layered depth works especially well because the long tapered surface gives the “stone” pattern room to spread out.
Done badly, rose quartz can look muddy. Too many white lines and the nail turns chalky. Too much glitter and the marble disappears. The sweet spot is thin, broken veining—almost hairline—and small iridescent flakes or fine pink-silver glitter placed where the lines cross.
How to Build the Look
Start with 1 to 2 coats of sheer rose pink. Add white veining with a liner brush while the gel is still workable, then soften a few lines with a flat brush dipped in clear gel. After that, place the reflective pieces sparingly and encapsulate everything under a builder layer so the surface cures smooth.
This is one of those sets that rewards close-up attention. It is not loud. It is detailed.
4. Hot Pink French Tips With Glitter Cut Lines
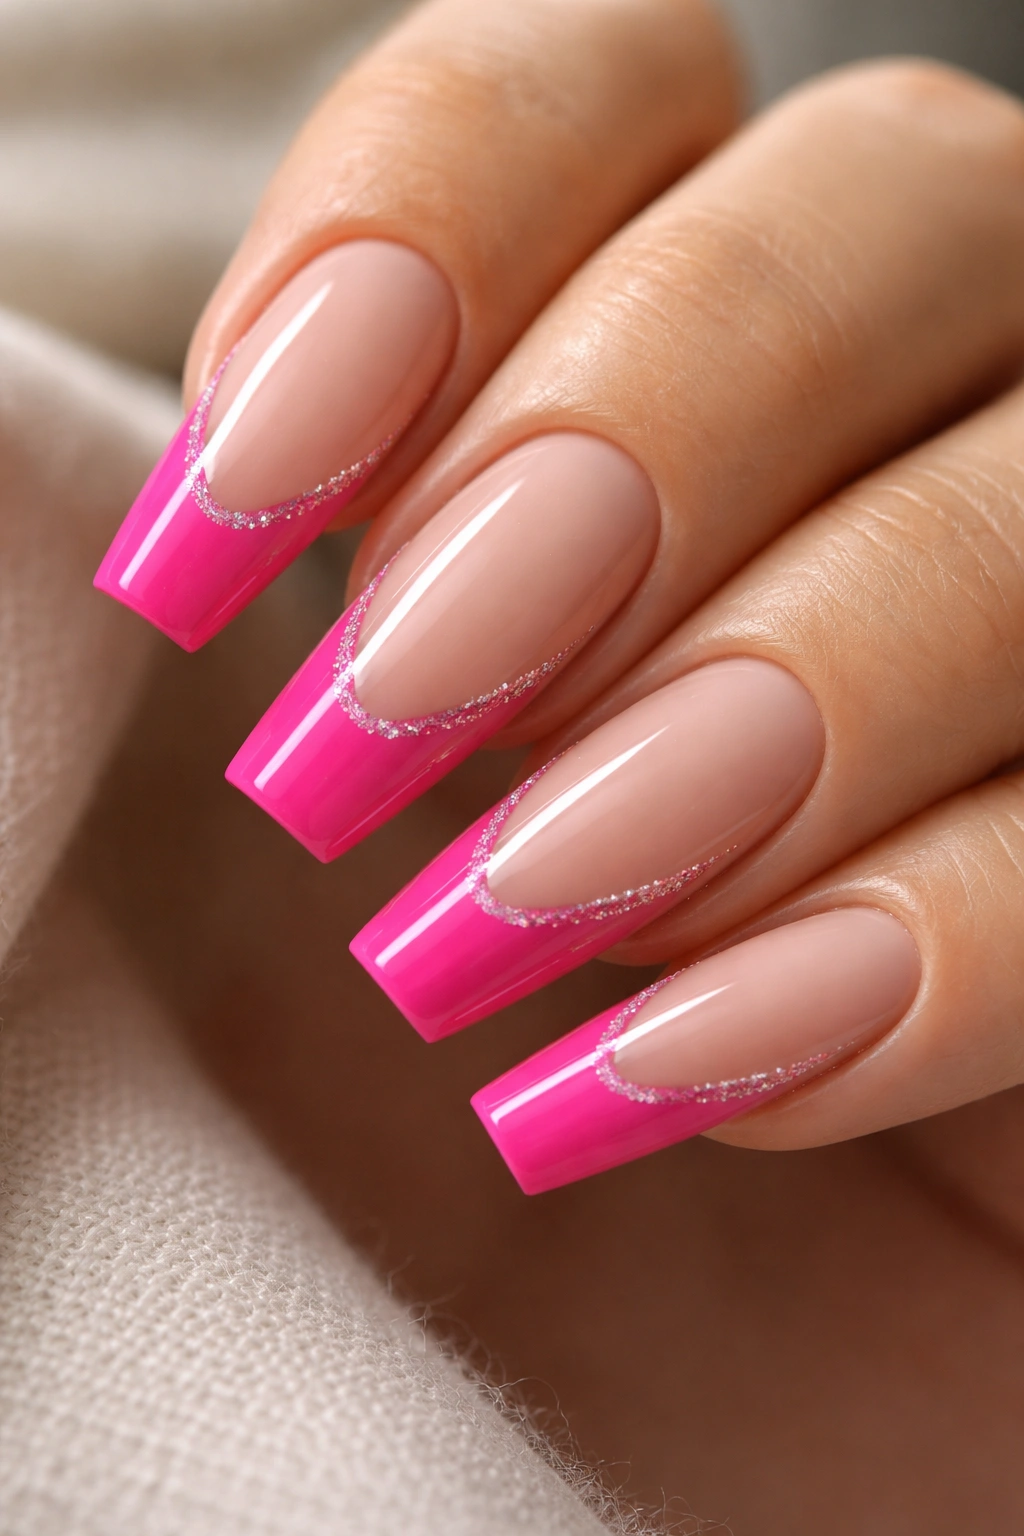
Across a table, this set hits first.
A hot pink French on a ballerina shape already has attitude because the tip is straight and graphic. Add a thin glitter divider line where the French color meets the base, and the whole manicure looks sharper, like someone took a ruler to it. I love this design when you want pink glitter without covering the whole nail in sparkle.
The cut line matters more than the glitter itself. A line that is too thick eats into the base color and makes the nail look shorter. One that stays around 1 millimeter wide keeps the look crisp.
A few details make this one land:
- Use a nude-pink or sheer blush base so the hot pink tip has contrast.
- Keep the smile line deep, closer to a modern V-French or elongated curve, so the shape still looks long.
- Pick fine holographic glitter gel or a striping glitter liner, not chunky flakes.
- Match the glitter to the undertone of the pink—cool silver for blue-based pink, rose-gold sparkle for warmer magenta.
If you like a manicure that reads neat before it reads sparkly, this one earns its place fast.
5. Sheer Baby Pink Jelly Nails With Floating Glitter
Jelly nails have a syrupy look that standard cream polish cannot fake. Light passes through them. That matters.
On a ballerina shape, a baby pink jelly base with scattered glitter feels lighter than an opaque glitter set because you can still see through the color a little. The nail does not turn into a solid block. It looks more like tinted glass with sparkle drifting inside it.
Placement is what keeps this design from tipping into toy-like territory. I would skip dense glitter coverage here. A better move is to use fine iridescent glitter mixed with a few tiny shards or stars, then suspend them unevenly through the nail so the result feels airy. Not messy—airy. There is a difference.
Short and medium lengths wear this look best because the transparency already adds visual length. On long ballerina nails, jelly pink can start looking too soft unless you sharpen it with a stronger taper or a higher-gloss top coat.
You do need a smooth overlay. That is non-negotiable. Any dip or bump in a jelly glitter nail shows up faster because the eye can see through the layers.
One more thing: this set looks best in motion. Hold your hand still and it is sweet. Turn it slightly and the glitter starts swimming.
6. Matte Pink Nails With Glossy Glitter Tips
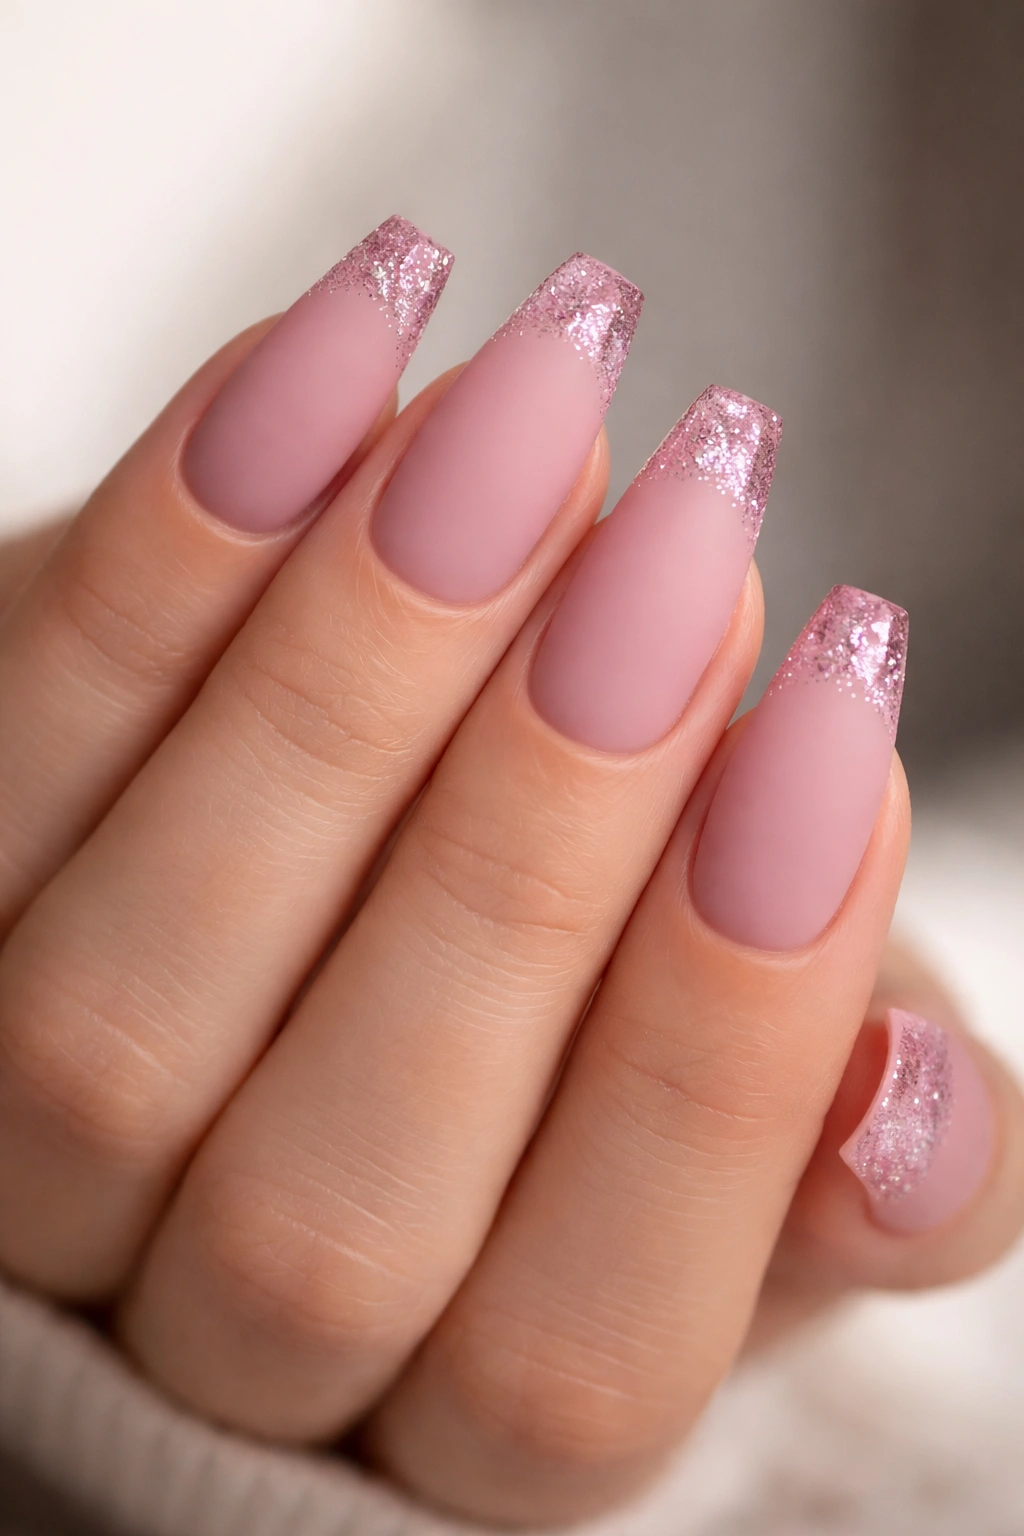
Unlike a full-shine manicure, matte pink with glossy glitter at the tips plays with texture first and sparkle second. That contrast gives the design more edge than a standard glitter fade.
The base should stay velvety and even—think muted blush, dusty pink, or a soft mauve-rose rather than bright bubblegum. Then the last 4 to 5 millimeters of the nail get sealed with glossy glitter gel or fine loose glitter under a clear top coat. Because the shine is isolated to the tip, the ballerina shape reads sharper and more architectural.
This one is not for someone who loves a wet-glass finish on every nail. Matte top coats show wear sooner, and body oils can make them look patchy after several days unless you wipe them down with alcohol now and then. Still, the payoff is worth it when the shape is clean. The matte base makes the glitter look brighter by contrast, almost like the sparkle has been switched on at the edge.
Who wears this well? Anyone who wants pink glitter nails that feel a little less sweet and a little more graphic. I would choose fine silver-pink glitter over chunky confetti here. Bigger pieces break the smooth matte-versus-gloss idea.
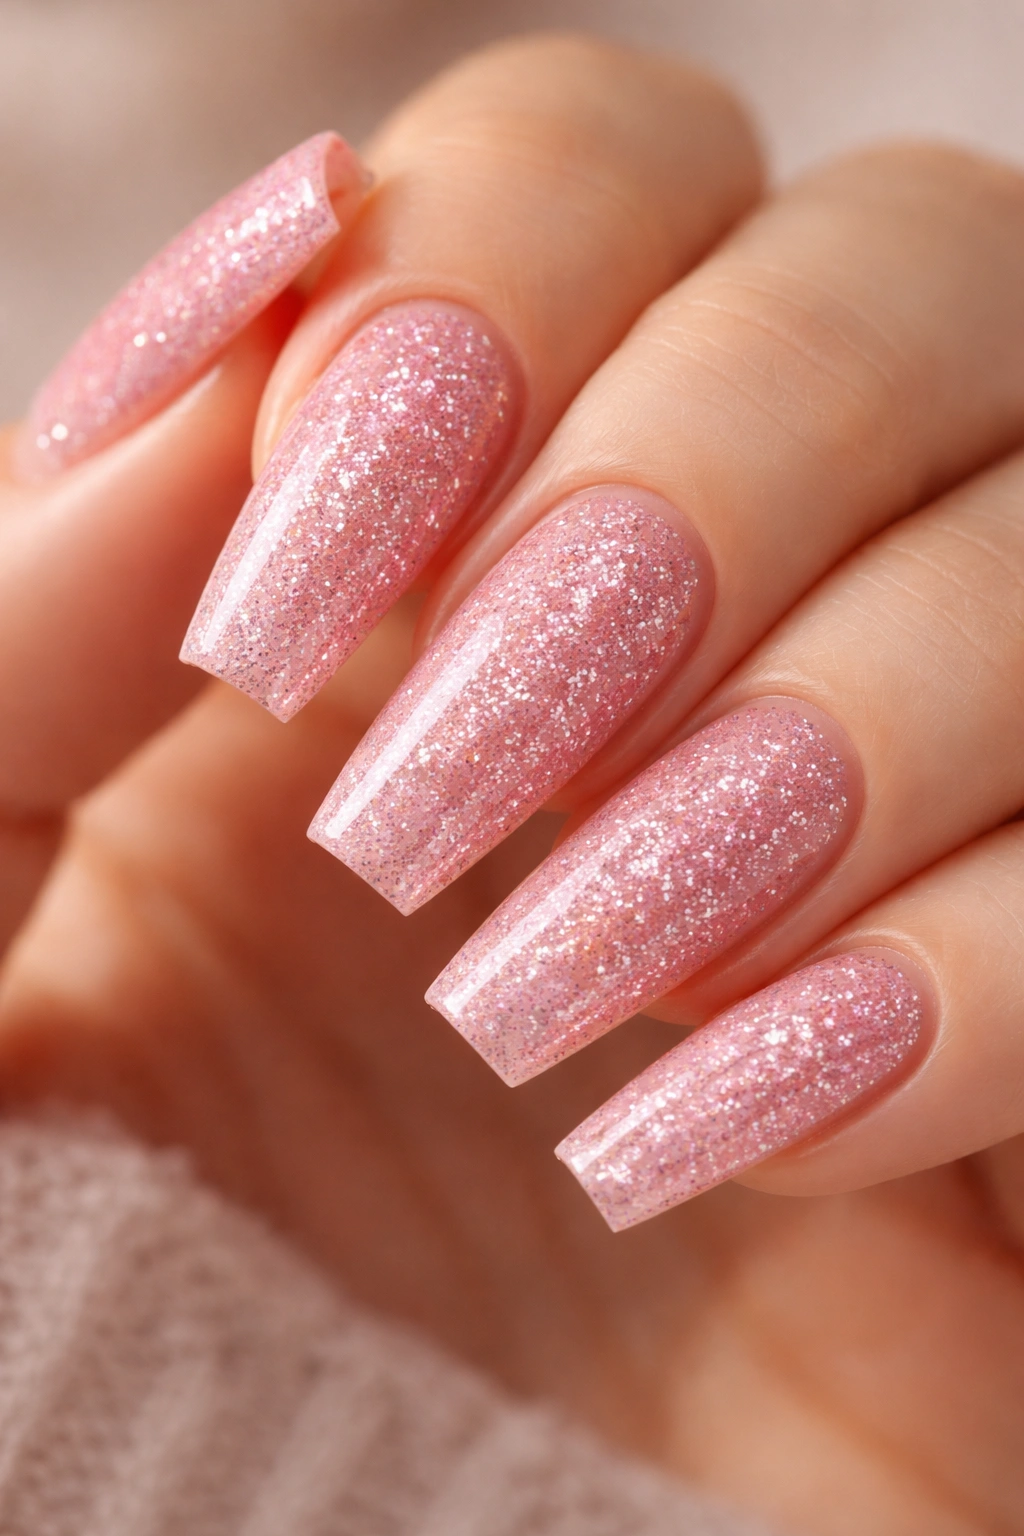
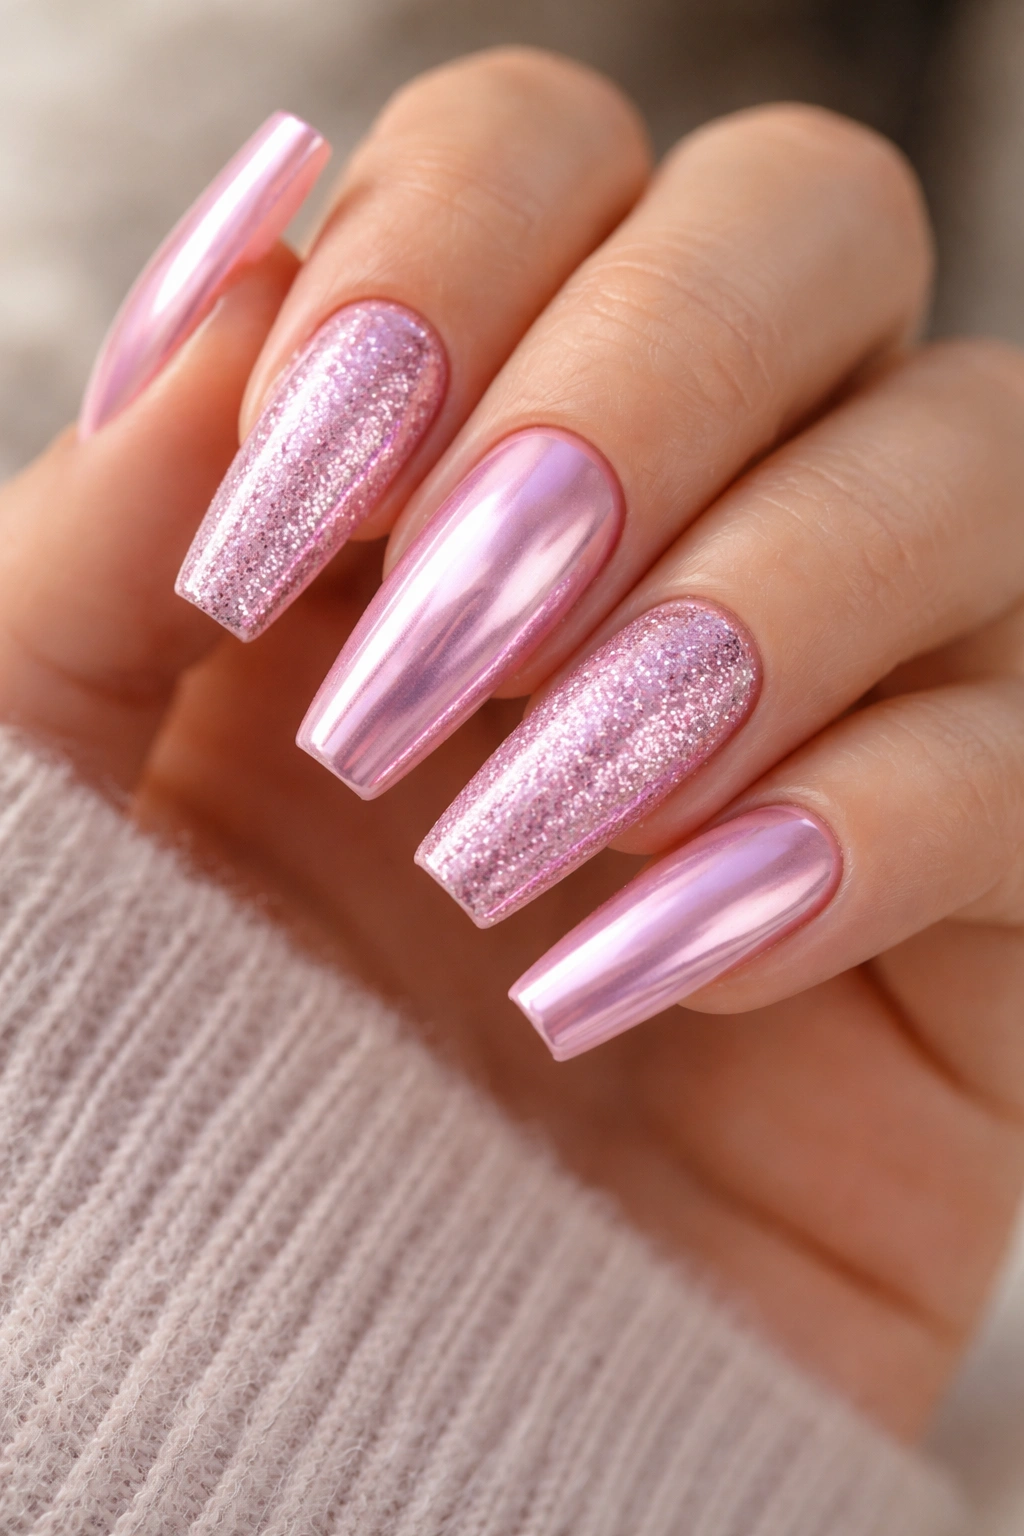
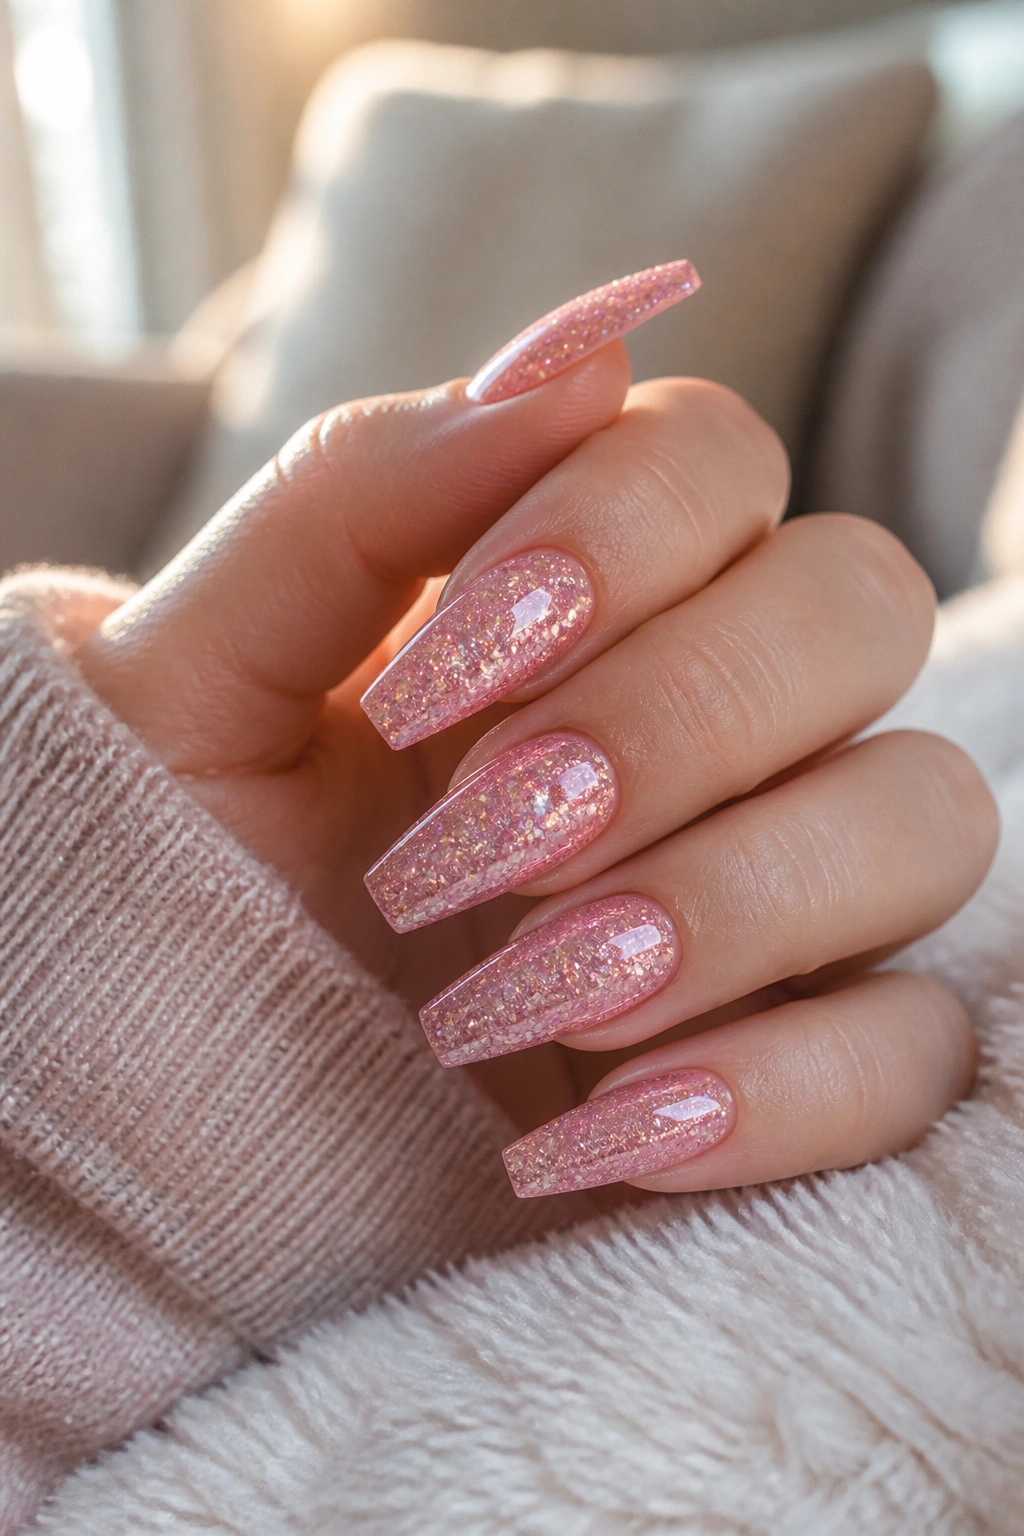
7. Ballet Slipper Pink With Full-Cover Micro Glitter
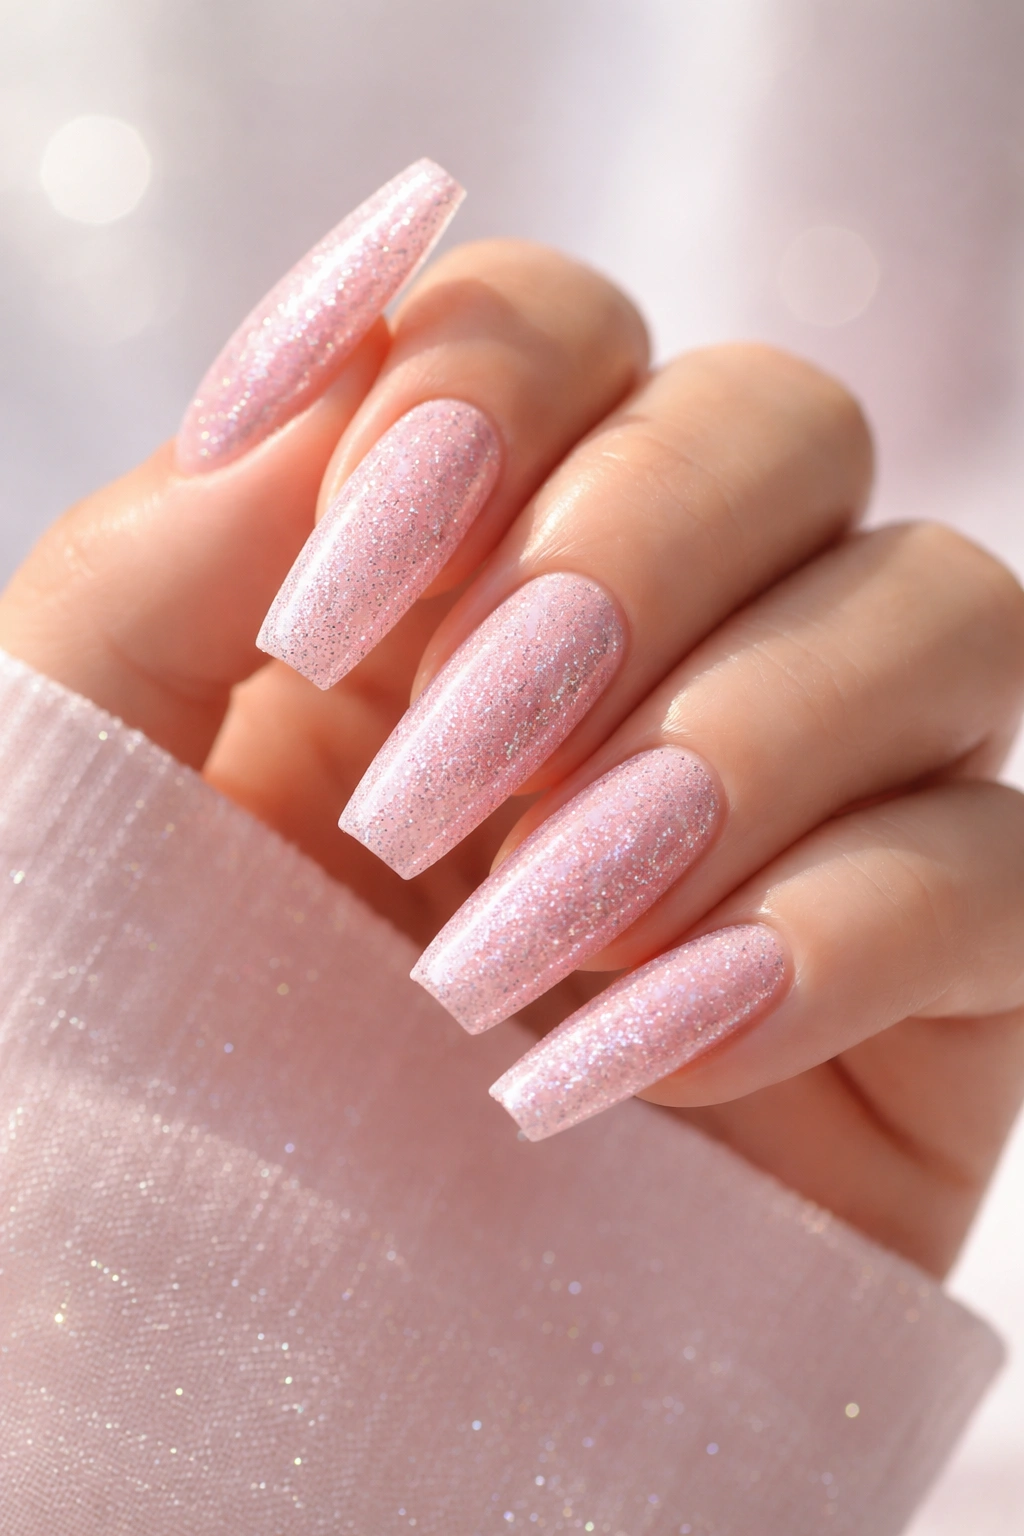
Full glitter can work on ballerina nails. You just need the right scale.
A ballet slipper pink base flooded with micro glitter gives you all-over sparkle without the chunky, raised look that ruins a clean coffin shape. Think tiny reflective particles, almost like frost, packed across the whole nail so the surface still looks flat.
What Makes This One Different
Because the glitter is so fine, the nail color still shows through. That keeps the manicure from looking like a solid metal foil. You get shimmer from every angle, but the pink remains visible beneath it, which softens the effect.
Where It Wears Best
- Medium and long ballerina nails give this design enough room to show the shape under all that sparkle.
- Cool pinks and neutral pinks tend to read cleaner with silver micro glitter.
- Warm ballet pinks can take champagne micro sparkle if you want a softer flash.
- A thin builder layer over the glitter keeps the surface smooth and cuts down on tip wear.
My take: if you want every nail to sparkle but you hate chunky texture, this is the safer route by a mile.
8. Nude-Pink Base With Chunky Holographic Accent Nails
One accent nail can save a busy idea.
Chunky holographic glitter is fun, but on all ten ballerina nails it can blur the shape and make the whole set look thicker than it is. A better plan is two accent nails with chunky holographic sparkle, then a nude-pink shimmer or gloss base on the remaining eight. Ring fingers work. Middle fingers can work too if you like a bolder center focus.
The reason this layout succeeds is balance. Your eye gets the big prism flashes from the accent nails, then rests on the cleaner pink nails around them. That stop-and-start rhythm keeps the manicure lively without turning into visual noise. I know that sounds dramatic for nails, but hold a full chunky holographic set next to a mixed set and the difference is obvious.
Placement matters here more than people think. I prefer chunky pieces fully encapsulated under hard gel or acrylic so the top stays smooth. If the glitter sits too close to the surface, the nail can feel rough within days and start catching on knit fabric or hair.
A small warning: do not mix three different glitter sizes on the accent nails unless your base stays sheer and simple. Too many shapes in one nail makes the design look random instead of deliberate.
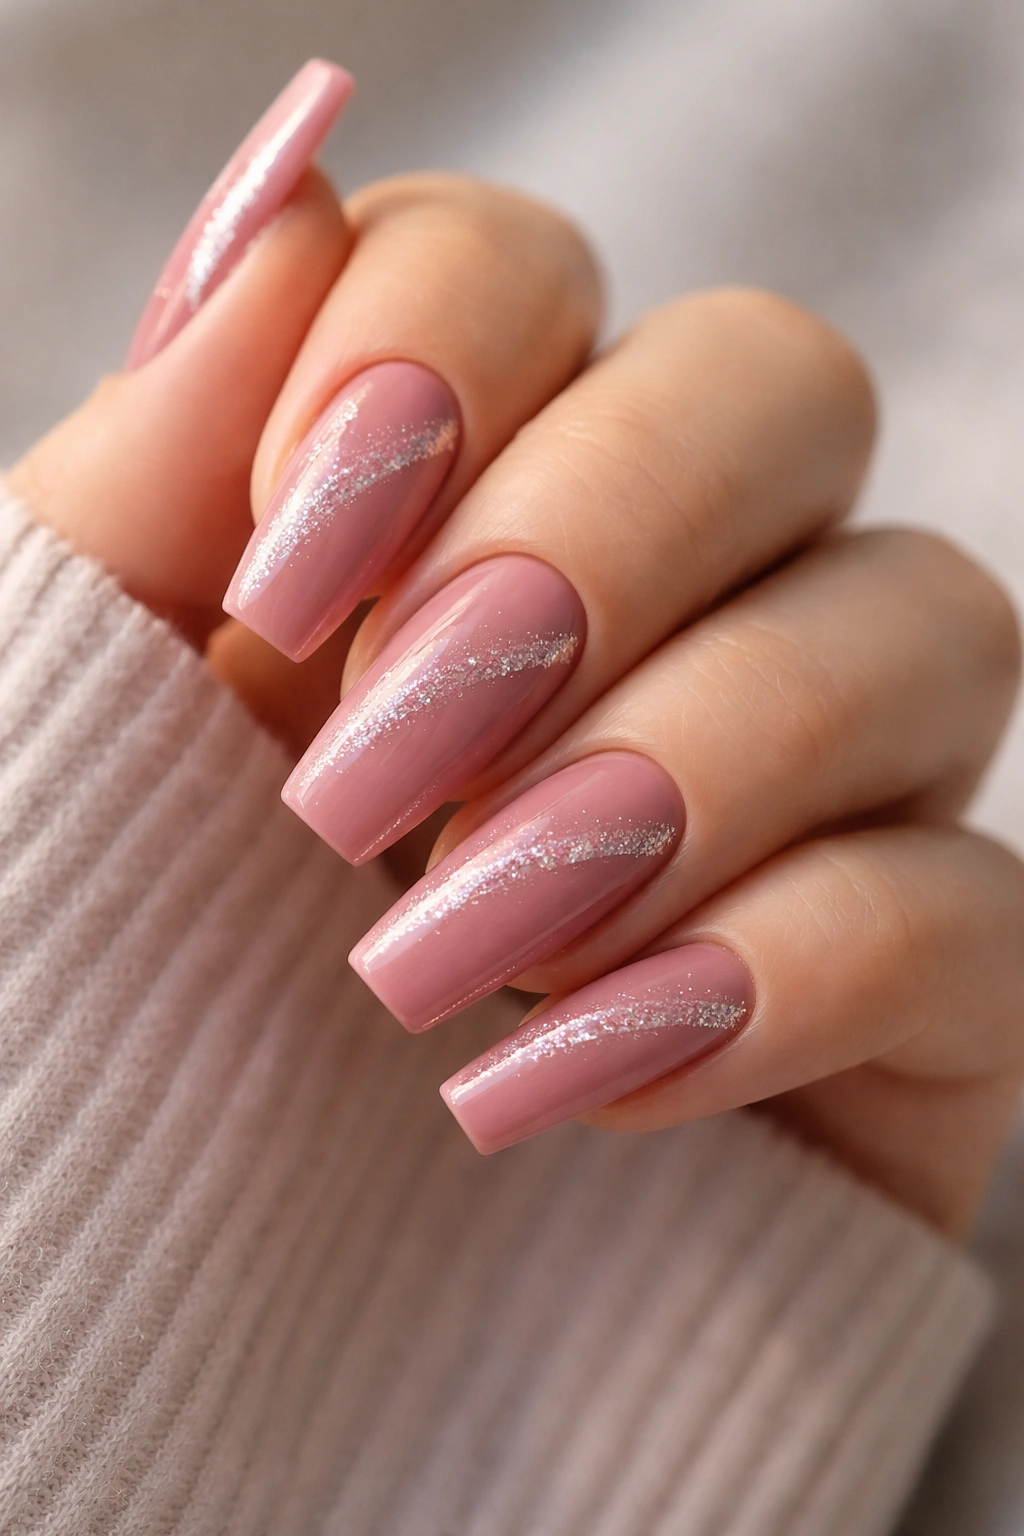
9. Dusty Rose Pink With a Diagonal Glitter Sash
A diagonal element changes the whole silhouette of a nail. Fast.
Dusty rose is already a smart pink for ballerina shapes because it has enough gray in it to look grounded, not sugary. Add a slanted glitter band running from one sidewall toward the opposite tip, and the nail suddenly looks longer and slimmer. Straight-across details can widen a nail bed. Diagonal lines usually do the opposite.
This design works best when the band stays narrow—around 2 to 3 millimeters—and sharp at the edges. I like a dense glitter stripe bordered by thin painted lines, though a soft diffused sash can look good on a more translucent base.
A few placement rules keep it clean:
- Start the sash a little above the cuticle instead of at the skin line.
- Let the stripe travel toward the tip, not the center, so it follows the coffin shape.
- Use fine glitter or tiny reflective foil pieces, because bulky glitter distorts the edges of the stripe.
- Leave at least half the nail plain dusty rose so the design can breathe.
There is something quietly confident about this set. Not soft. Not loud. Precise.
10. Pink Cat-Eye Ballerina Nails With Glitter Depth
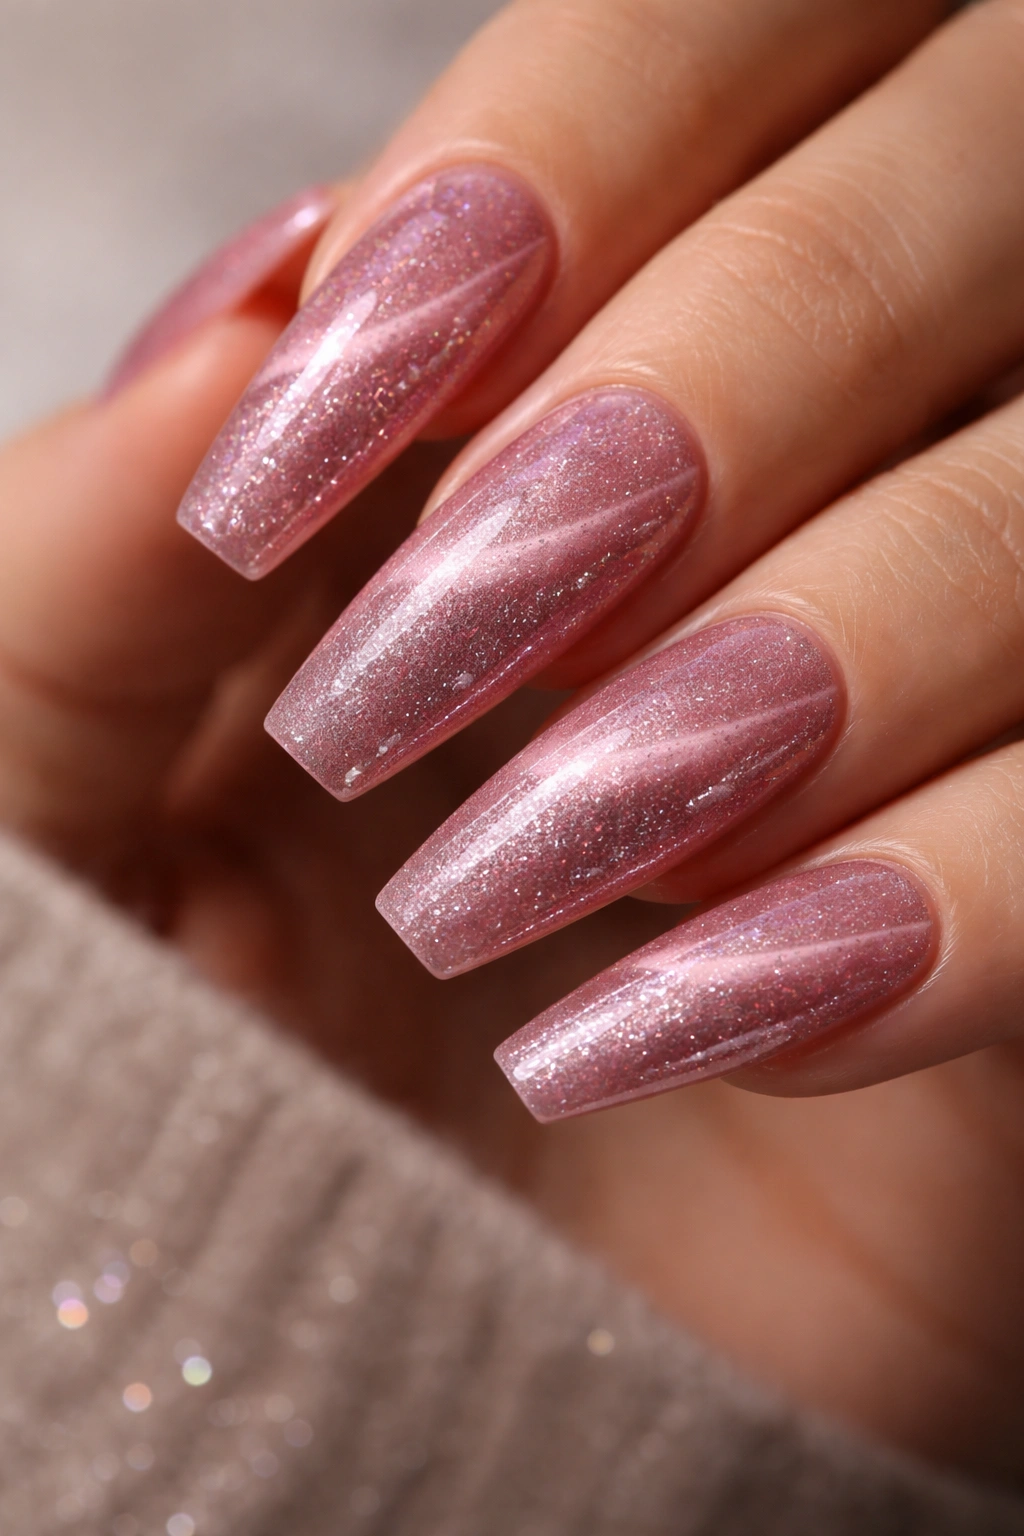
Cat-eye polish on a ballerina shape can look almost liquid when it is done well. The magnet pulls shimmer into a band or soft halo, and on that long tapered nail, the light seems to slide as you move your hand.
A pink cat-eye set gets even better when there is a second level of sparkle under or over the magnetic shimmer. I like a mauve-pink or berry-rose base with a silver-pink magnetic gel over it, then a dusting of fine reflective glitter sealed beneath the final top coat. You end up with depth instead of one single flash line.
This is not the easiest design to do at home. The magnet has to be held close and steady, usually for 5 to 10 seconds per nail before curing, and the effect changes based on the angle. If the shimmer band lands too wide, the nail loses that sleek beam of light. Too narrow, and it can disappear under indoor lighting.
Where cat-eye shines—pun intended, and yes, I know—is evening light and low, warm interiors. Under harsh overhead light, the design looks sharper and more metallic. By a window, it softens and starts shifting. That movement is the whole point.
If you want glitter that feels moody instead of sweet, this one is hard to beat.
11. Soft Pink Marble With Glitter Veins
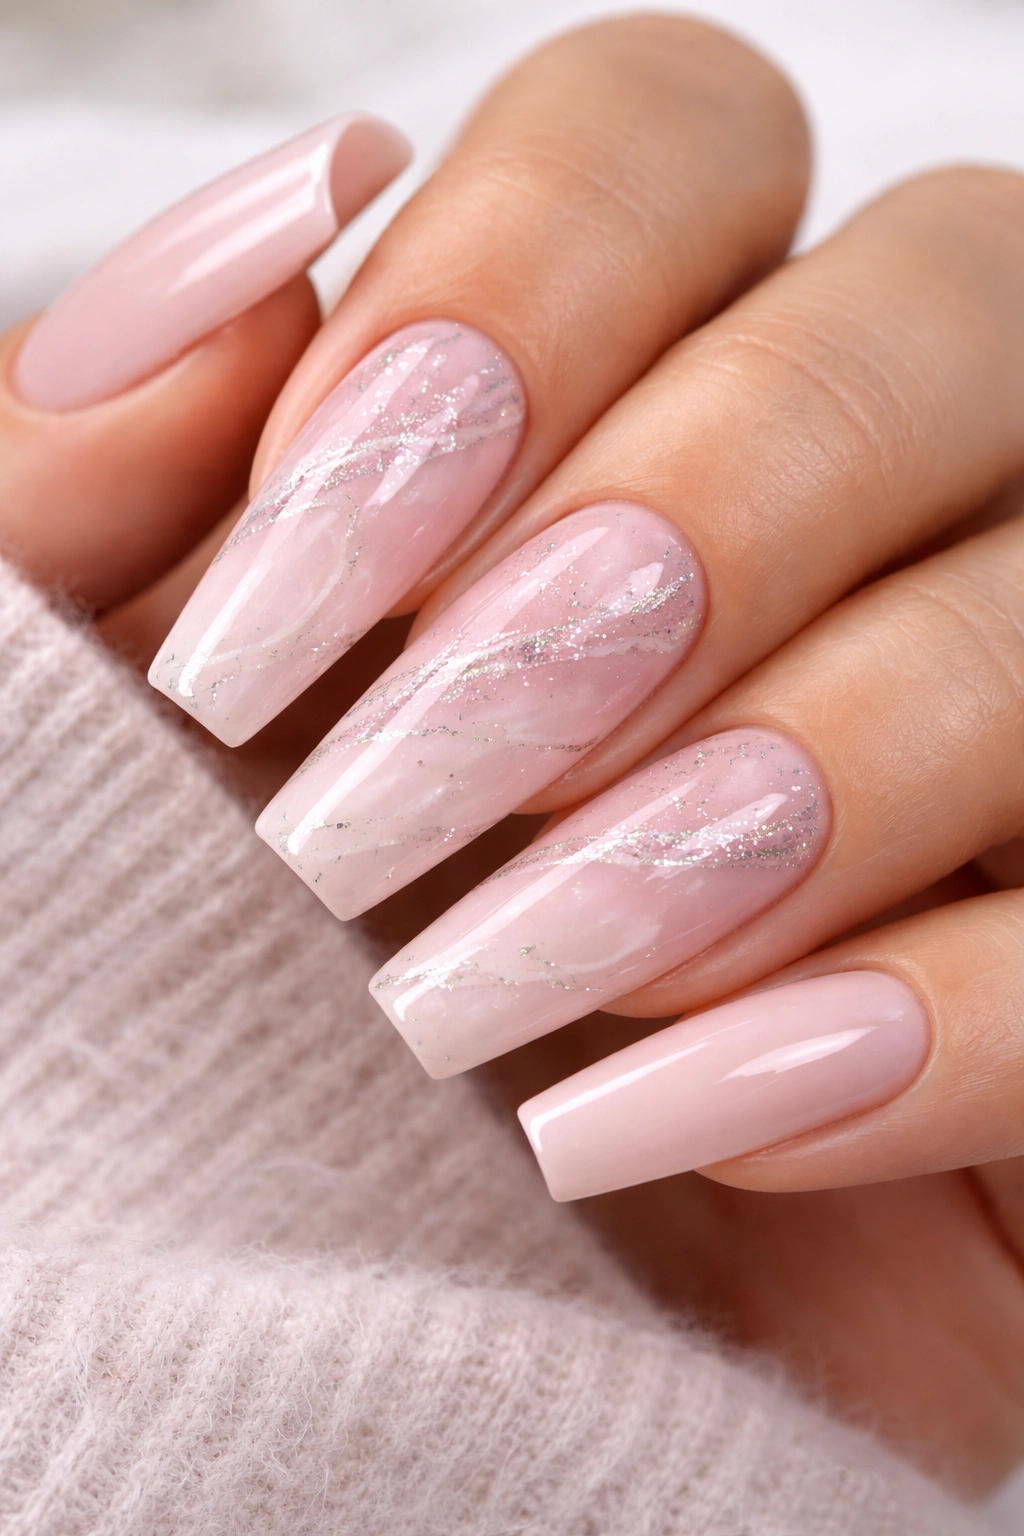
Why do glitter veins look better in marble than a full glitter top coat? Because marble needs open space to look like stone.
A soft pink marble base uses at least two pink tones—usually a milky blush and a slightly deeper rose—plus white ribbons dragged through wet gel. Once the swirl is there, thin glitter veins can be added where the colors meet. Those veins should look like tiny fractures, not stripes.
The design falls apart when every nail gets the full marble treatment. On ballerina nails, I would keep 2 to 4 accent nails marbled and leave the rest in one coordinating pink. That break gives the eye somewhere to rest and keeps the shape from feeling cluttered.
How to Ask for the Right Finish
Ask for fine glitter veins, not a chunky foil line, unless you want a more cracked-mineral effect. Silver works on cool pink marble. Rose-gold or pink-champagne can warm up a beige-pink base. A glossy top coat pulls the whole thing together because marble art needs a smooth, stone-like surface.
This one can lean soft, but it is not boring. The detail work carries it.
12. Cotton Candy Pink Chrome and Glitter Mix
Unlike plain chrome nails, which can flatten out a pink manicure into one reflective sheet, a chrome-and-glitter mix gives you contrast from nail to nail. One or two fingers catch light like polished metal. The others sparkle in a softer, grainier way.
Cotton candy pink is a strong shade for this because it stays playful without turning neon. I like chrome on the index and pinky, fine glitter on the ring finger, and glossy cream or shimmer pink on the middle and thumb. That layout sounds odd on paper. On the hand, it keeps the set from looking repetitive.
Technique matters here. Chrome powder needs a no-wipe gel surface and a smooth buff before application, or the finish will look patchy around the sidewalls. Glitter nails next to chrome should stay refined—micro glitter or reflective gel, not giant hex pieces—so the textures feel related instead of random.
Who should pick this one? Anyone who loves shine but gets bored when every nail looks identical. It has more movement than a straight chrome set, and more edge than a standard pink glitter manicure.
13. Clear-and-Pink Layered Glitter Tips
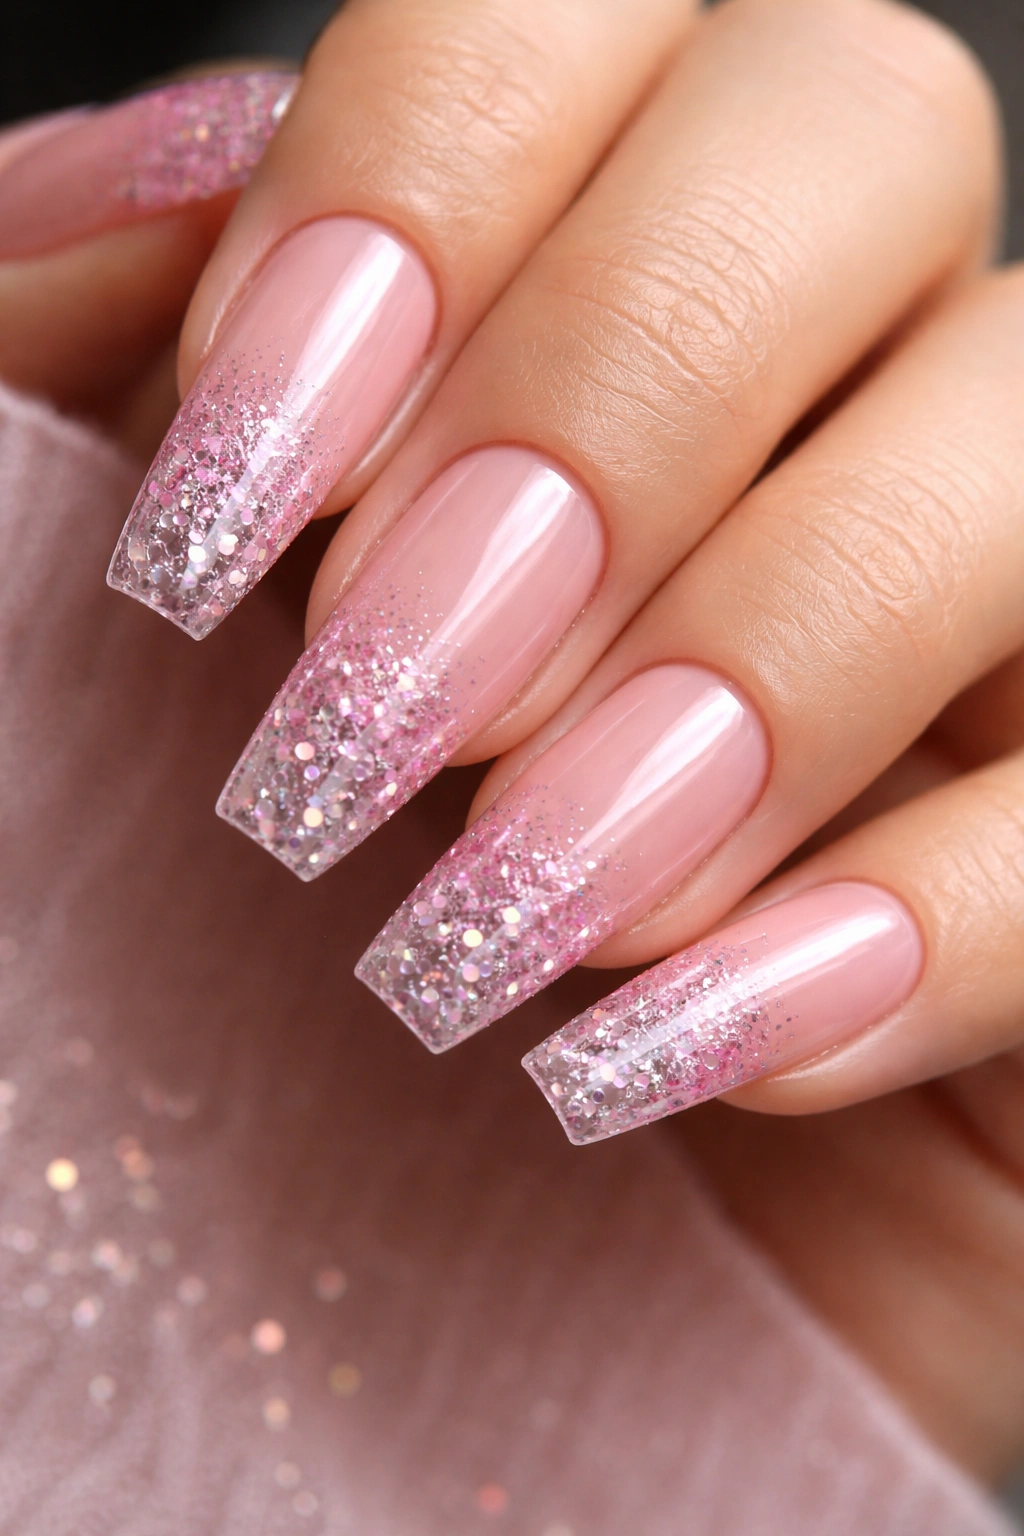
This is the set for people who want the length to show.
A clear-and-pink layered tip keeps the lower part of the nail soft pink or nude, then builds transparent glitter depth toward the free edge. On a ballerina extension, that can look almost like crushed glass trapped inside clear acrylic or hard gel.
The Build Makes the Design
The cleanest version uses a sheer pink base, then clear product at the tip with fine glitter, iridescent flakes, or tiny reflective shards encapsulated inside. Because the end of the nail stays see-through, the square tip stands out more. You notice the shape first, then the sparkle.
Details Worth Getting Right
- Use this on medium-to-long extensions, because short natural nails do not give the clear tip enough room to read.
- Keep the glitter concentration strongest at the edge, fading slightly upward so the transition looks intentional.
- Choose one reflective family—icy silver, pink iridescent, or champagne—rather than mixing all three.
- File the underside cleanly, because transparent tips show everything.
Small obsession of mine: a neat underside on clear tips makes the whole manicure look more expensive.
14. Deep Rose Pink With Fine Glitter Half-Moons
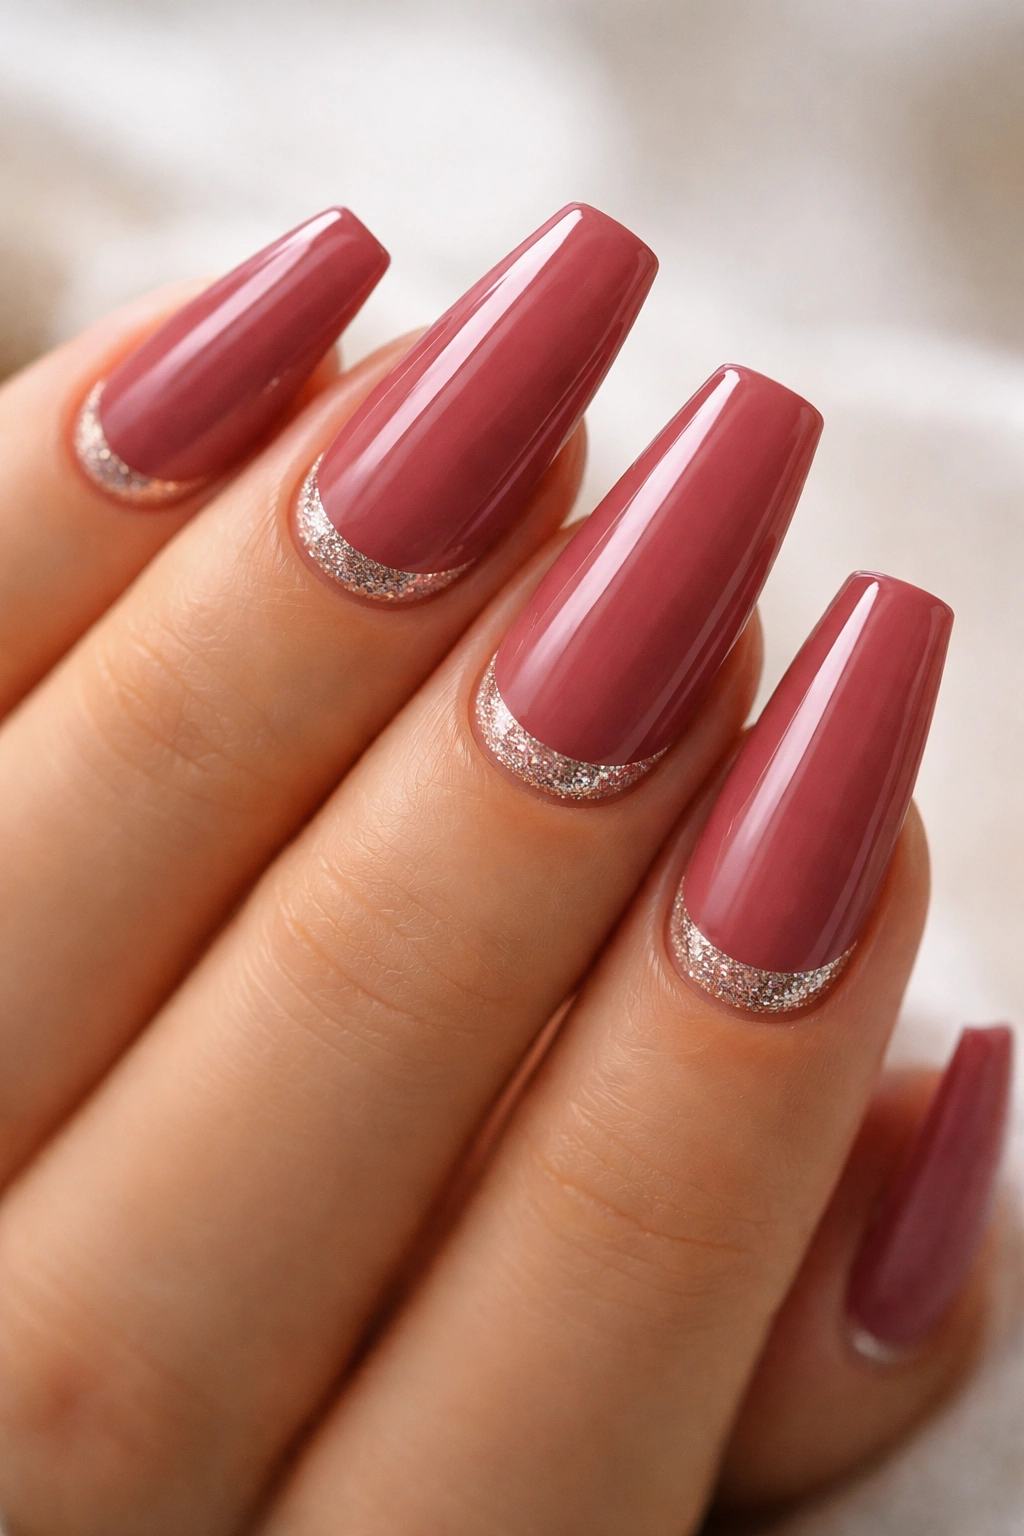
Glitter near the cuticle can look cleaner than glitter at the tip when it is controlled. The word there is controlled.
A deep rose base gives this design enough weight to anchor a tiny half-moon of fine glitter near the cuticle, following the natural curve of the lunula. Because the sparkle stays close to the base, the rest of the nail can remain smooth and rich, which suits the long lines of a ballerina shape.
The half-moon should stay slim. Around 1 to 2 millimeters is enough. Any wider and the design starts crowding the cuticle area, which can make grow-out look sloppy sooner. I would choose fine reflective glitter gel painted with a liner brush rather than trying to place loose glitter in a curved band by hand. Clean edges matter too much here.
This look has a dressier feel than a glitter tip, though it still works for everyday wear if the pink stays muted instead of candy-bright. One thing I like about it: when the nails grow, the glitter band still reads as a deliberate design for a while, especially if the base color is close to your natural nail-bed tone.
Subtle? Not quite. Controlled sparkle with a darker pink base has more presence than that.
15. Pink Aura Ballerina Nails With a Sparkle Center
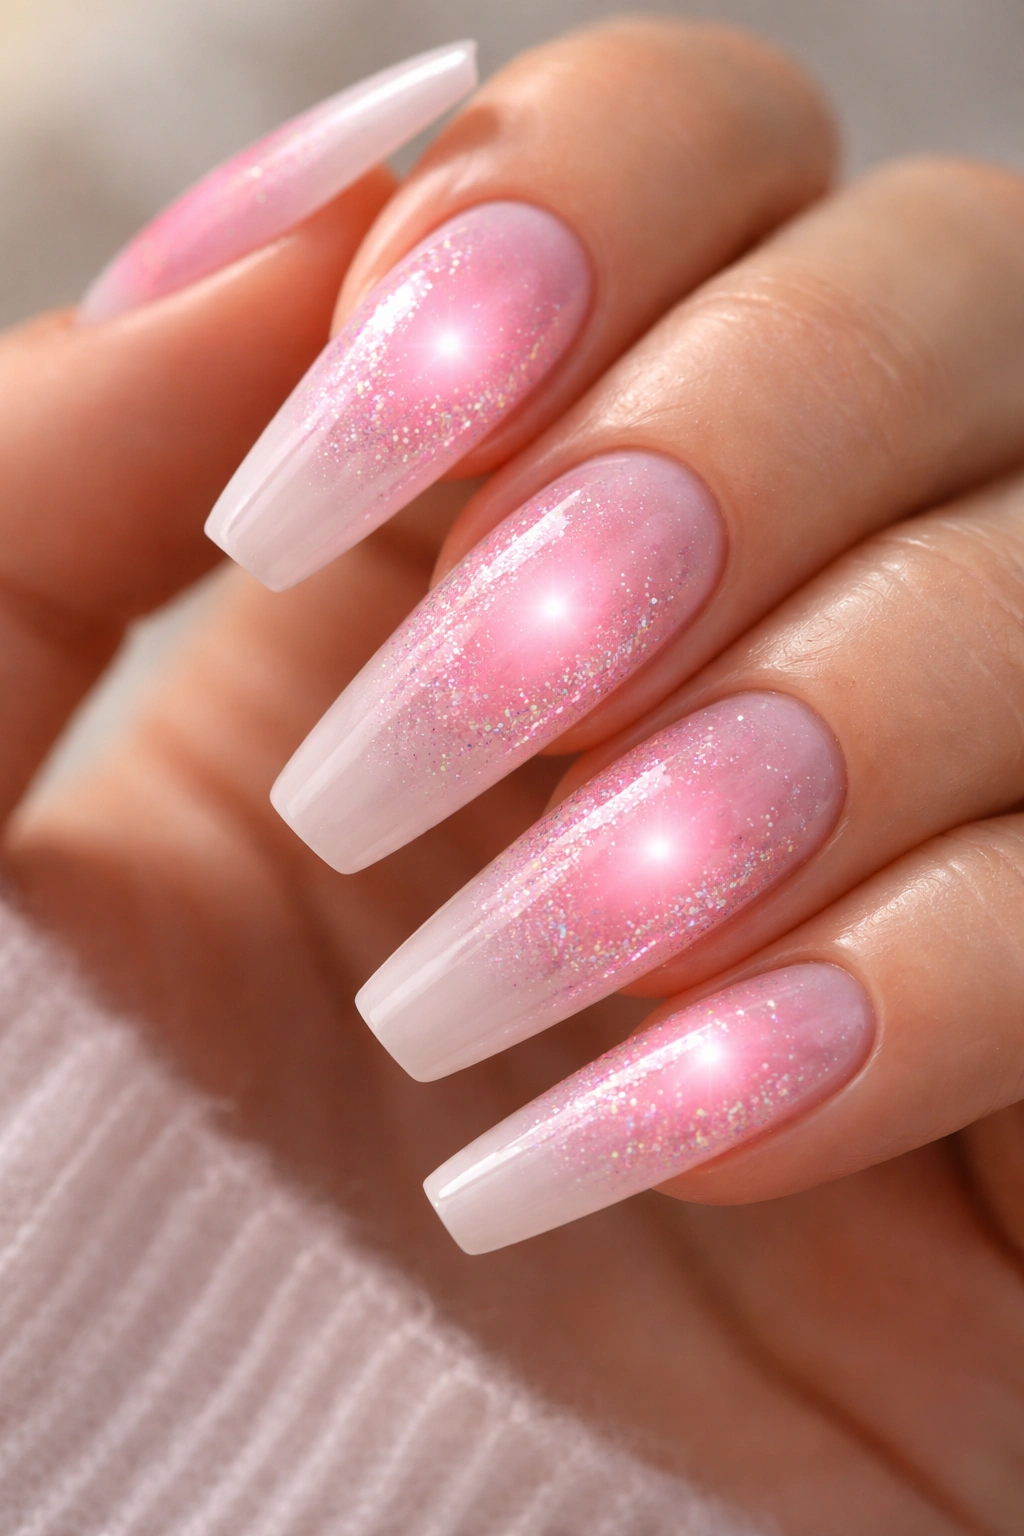
Aura nails can go cloudy fast, which is why placement matters more than color choice here. On a ballerina shape, the glow needs to sit in the center of the nail, with the edges left softer and cleaner, or the taper disappears.
The prettiest pink aura versions start with a milky or sheer blush base. Then a stronger pink gets diffused into the middle of the nail—airbrushed, sponged, or softly blended with gel—until it looks like a lit center rather than a hard circle. Glitter comes last, and it should be concentrated near that inner glow, not thrown all over the nail.
A fine reflective glitter works better than chunky sparkle for this design because aura art relies on haze and diffusion. Heavy glitter breaks that softness. I like a ring of scattered micro sparkle around the center blush, almost like frost around a light source. Not too neat. Not messy either.
Medium and long ballerina nails wear this look best because the aura has room to bloom without crowding the sidewalls. Shorter nails can still do it, though the glow should be smaller and tighter.
This is one of the few pink glitter sets that looks softer the longer you stare at it. First glance: glow. Second glance: shape. Third glance: all those tiny flashes at the center doing quiet work.
Matching the Design to Your Nail Length and Daily Routine
Pretty is one thing. Wearable is another.
If you type all day, open boxes, wash dishes without thinking, or use your nails as tools—which you should stop doing, but we all know how that goes—then micro glitter, ombré fades, slim French lines, and encapsulated details will age better than surface-level chunky glitter. They stay smoother, hold their shine longer, and chip less at the flat tip.
Short ballerina nails usually look strongest with:
- milky pink micro glitter
- jelly pink with floating fine sparkle
- hot pink French tips with glitter cut lines
- deep rose half-moons
Medium and long ballerina nails can carry more visual weight:
- layered clear tips
- rose quartz art
- cat-eye depth
- chrome-and-glitter mixes
- aura blends with center sparkle
Skin tone matters too, though not in the tired, rule-heavy way beauty advice often frames it. Cooler pinks and silver sparkle tend to look crisp on rosy or neutral undertones. Peachier pinks, rose gold, and champagne glitter often sit better on warmer undertones. Then again, contrast can be the whole point. A cool icy pink on warm skin can look sharp and deliberate when the shape is clean.
What to Ask for at the Salon So the Sparkle Looks Intentional

A good nail photo helps. Better still, know the words.
If you want a set that looks close to the designs above, asking for “pink glitter ballerina nails” is only the start. You will get a better result if you mention finish, glitter size, placement, and structure. Those four details tell a nail tech far more than color alone.
Try language like this:
- “I want a soft coffin shape with straight sidewalls and a crisp flat tip.”
- “Please use fine glitter, not chunky pieces, and keep the surface smooth.”
- “I want the glitter encapsulated under builder gel so it does not snag.”
- “Keep the base milky and sheer, not opaque.”
- “Place the sparkle at the tip only,” or “I want a center glow with scattered sparkle.”
One more useful question: ask how the design will look from the side. That side profile tells you whether the apex is balanced, whether the glitter is making the tip too thick, and whether the manicure will still look clean after a week or two of wear.
That detail gets skipped a lot. It should not.
Final Thoughts
The strongest pink glitter ballerina nails do not rely on glitter alone. Shape, scale, and placement do most of the heavy lifting, and the sparkle finishes the job.
If you want something easy to wear, start with milky pink micro glitter or a blush ombré fade. If you want a set with more mood, cat-eye pink, deep rose half-moons, or layered clear glitter tips have more edge without losing that clean coffin silhouette.
And if you are stuck between two ideas, go smaller on the glitter and sharper on the structure. That choice almost always ages better on the hand, especially once real life gets involved—texting, washing, typing, grabbing, living.
