

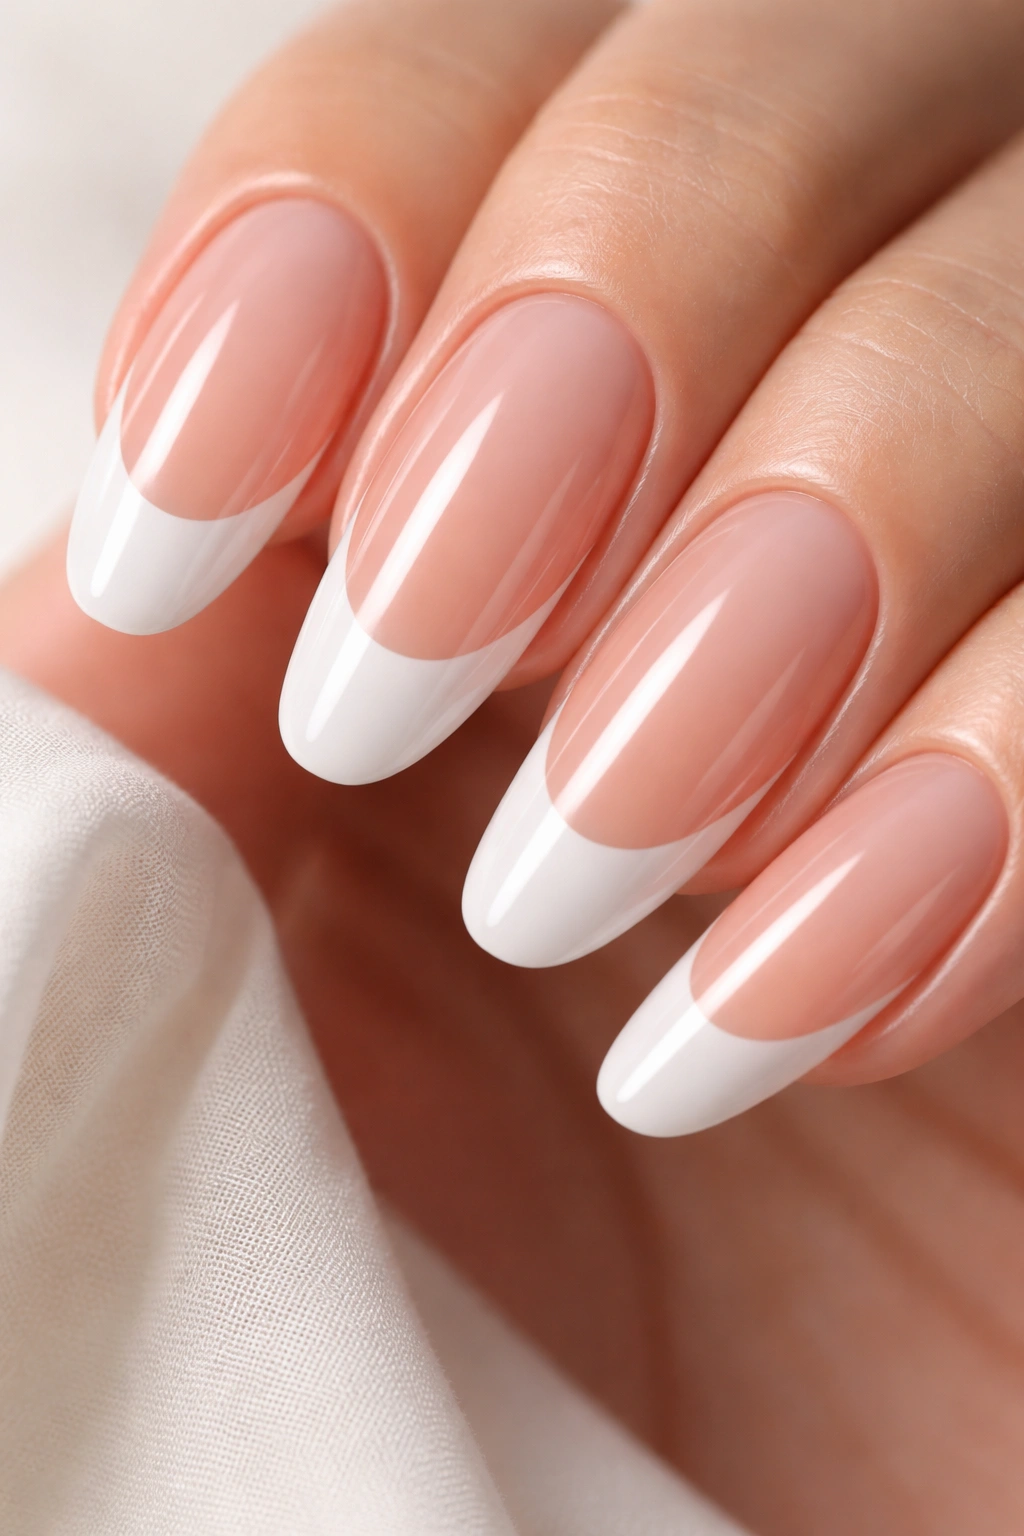
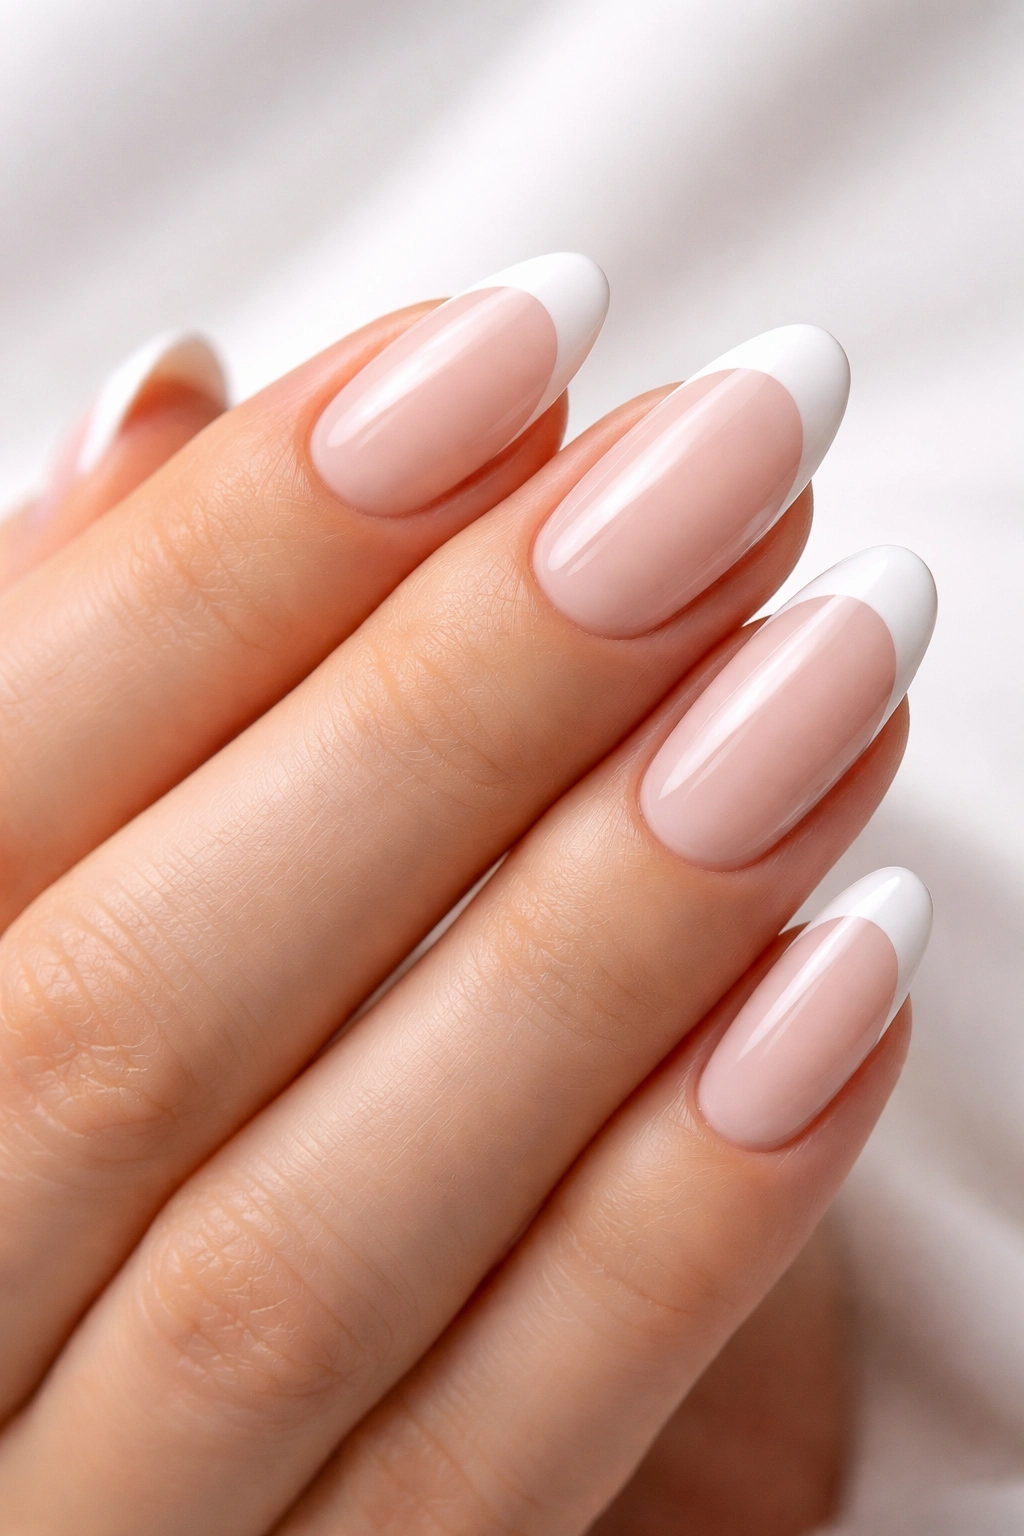
Long round nails with French tips strike that perfect balance between elegant and edgy—sophisticated enough for the office, bold enough to turn heads. There’s something about a clean white tip on a soft, rounded nail bed that just feels right, whether you’re keeping it minimalist or adding your own creative twist. The beauty of this nail style is its versatility; it works with virtually any aesthetic, from understated to show-stopping. If you’ve been scrolling through inspiration feeds looking for French tip designs worth actually saving and recreating, you’re in the right place. These fifteen designs showcase the range of what’s possible when you combine the timeless French tip formula with long, rounded edges and a little personality. Each one of these designs brings something different to the table—whether that’s a fresh color combo, an unexpected texture, or a clever design detail that makes the classic shape feel completely new.
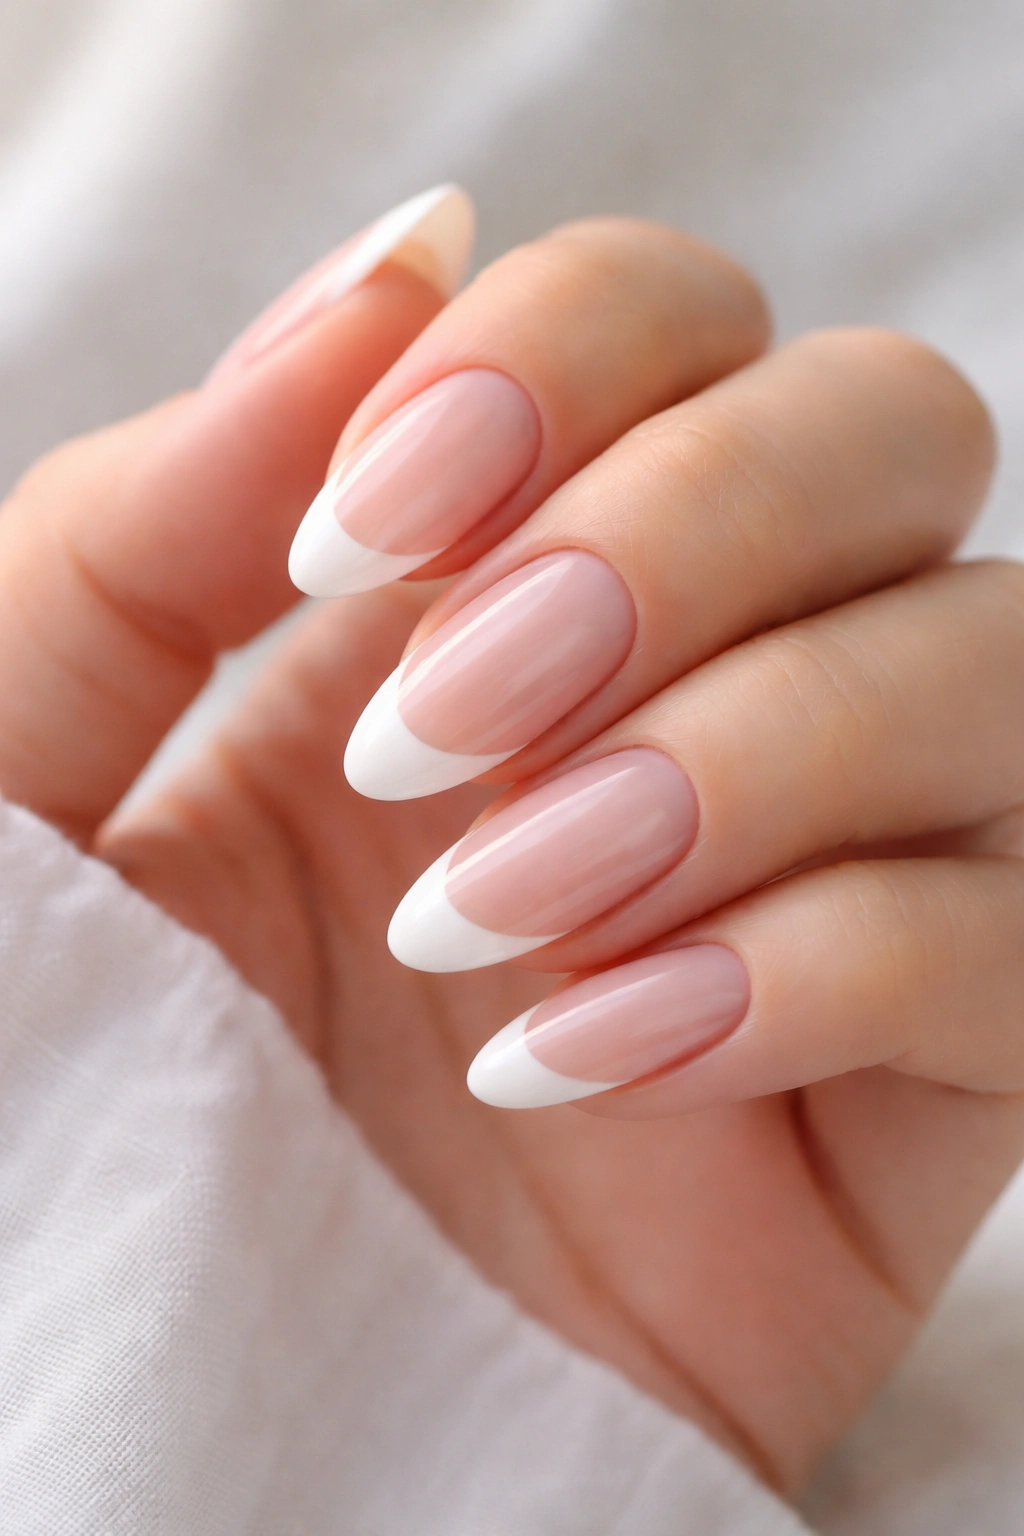
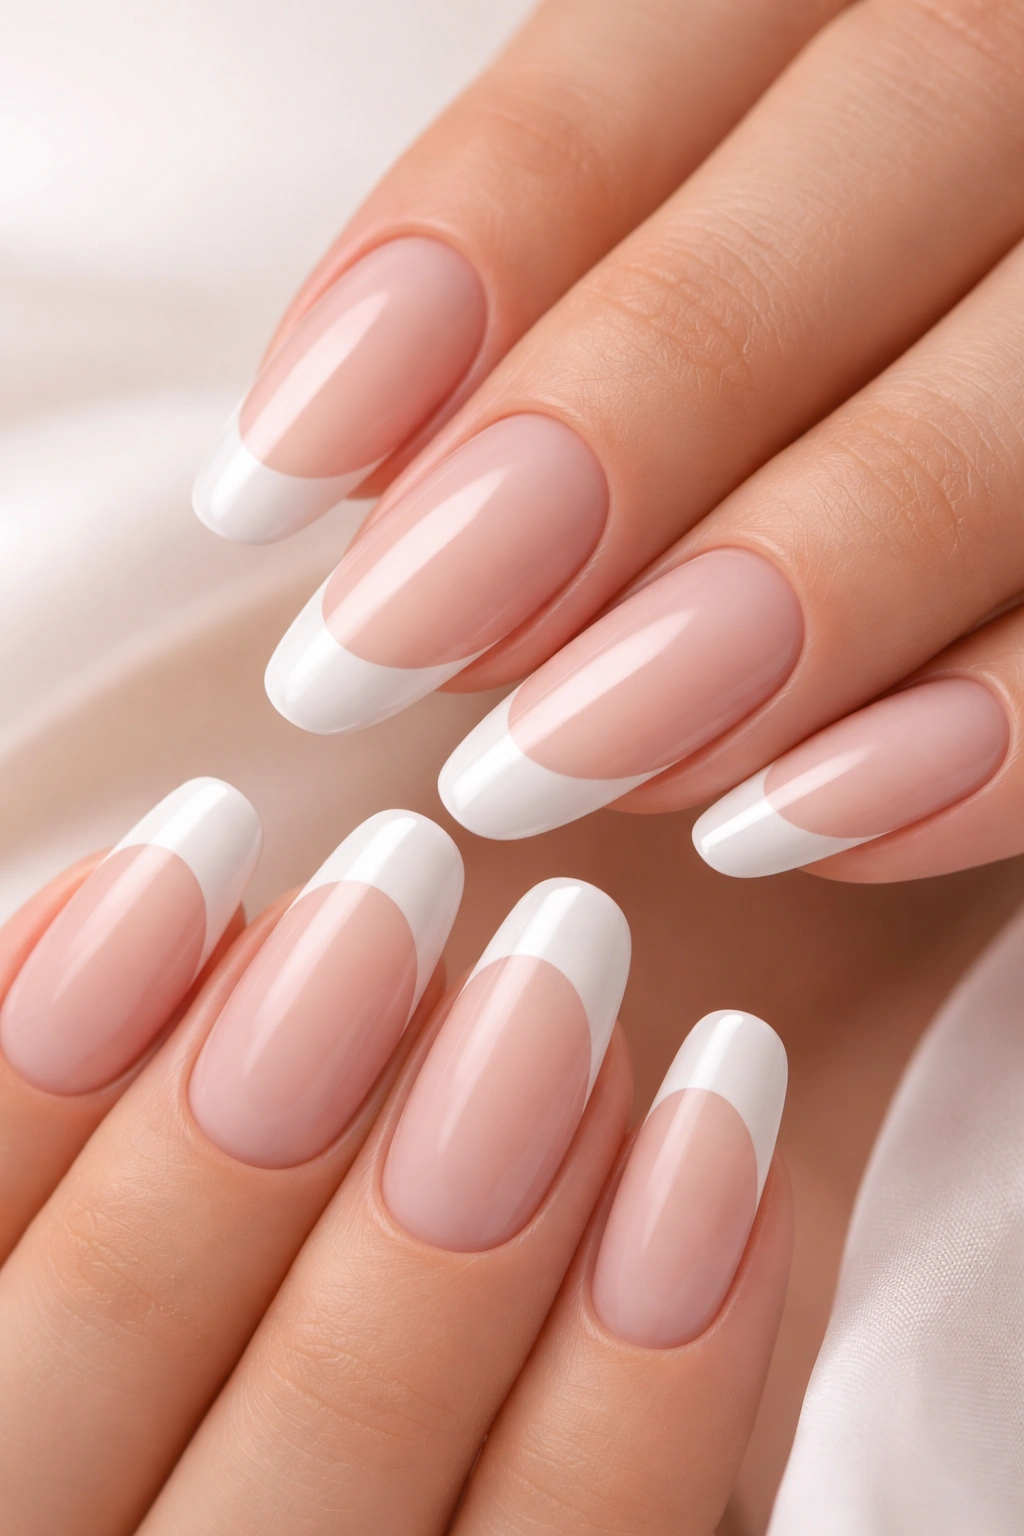
1. Classic White Tip with Subtle Shimmer
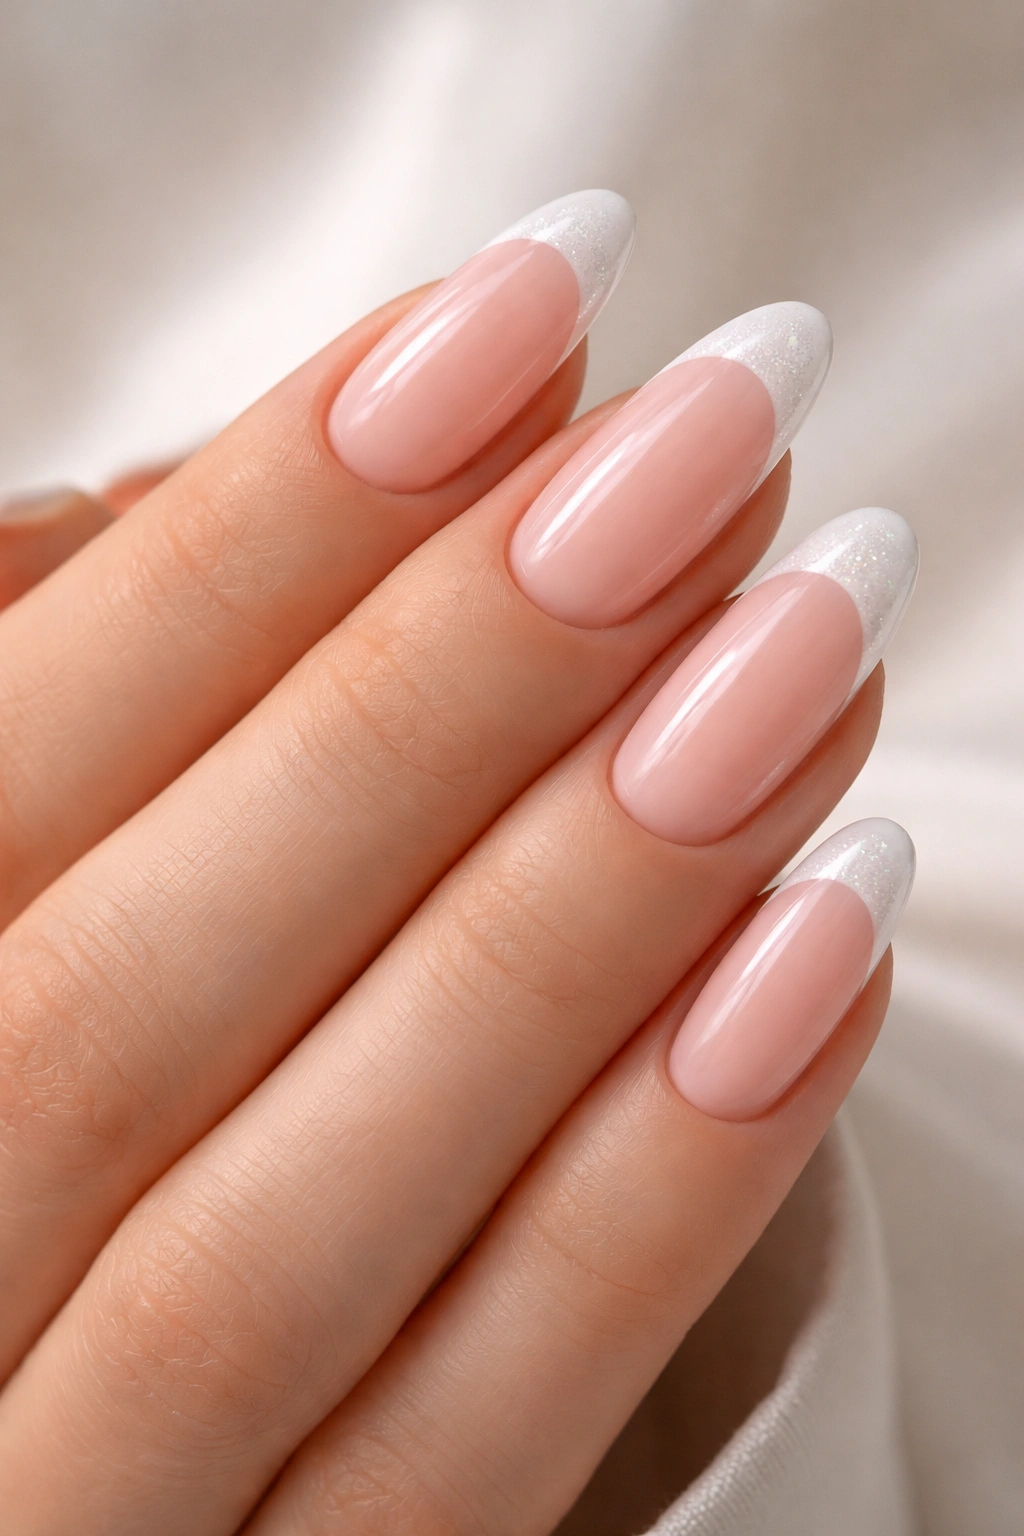
This is the design you come back to again and again because it simply works. The formula here is straightforward: a pale pink or nude base coat paired with a crisp white tip, finished with a light shimmer across the white tip line only. What makes this version memorable is the restraint—the shimmer is barely-there, catching light only when your hands move. It feels more luxe than glittery, and it photographs beautifully in natural light.
Why It’s a Timeless Choice
This design works because it respects the power of subtlety. The shimmer adds depth and dimension without overwhelming the clean geometry of the French tip shape. Long round nails with this treatment look elongated and refined, drawing the eye along the length of your nail bed rather than breaking it up with heavy pattern or color.
How to Recreate It Perfectly
- Use a sheer nude or pale pink base coat as your foundation, building it to full opacity with two coats
- Apply white gel or polish in a precise straight line, leaving about one-eighth inch from the free edge of the nail
- Once the white is completely cured or dry, lightly brush a fine shimmer formula over the white tip only, keeping it away from the base color
- Seal everything with a glossy top coat for maximum shine and longevity
Pro tip: Save this design for dates, professional events, or whenever you want nails that feel elevated without trying too hard.
2. Ombré Blush to White Gradient
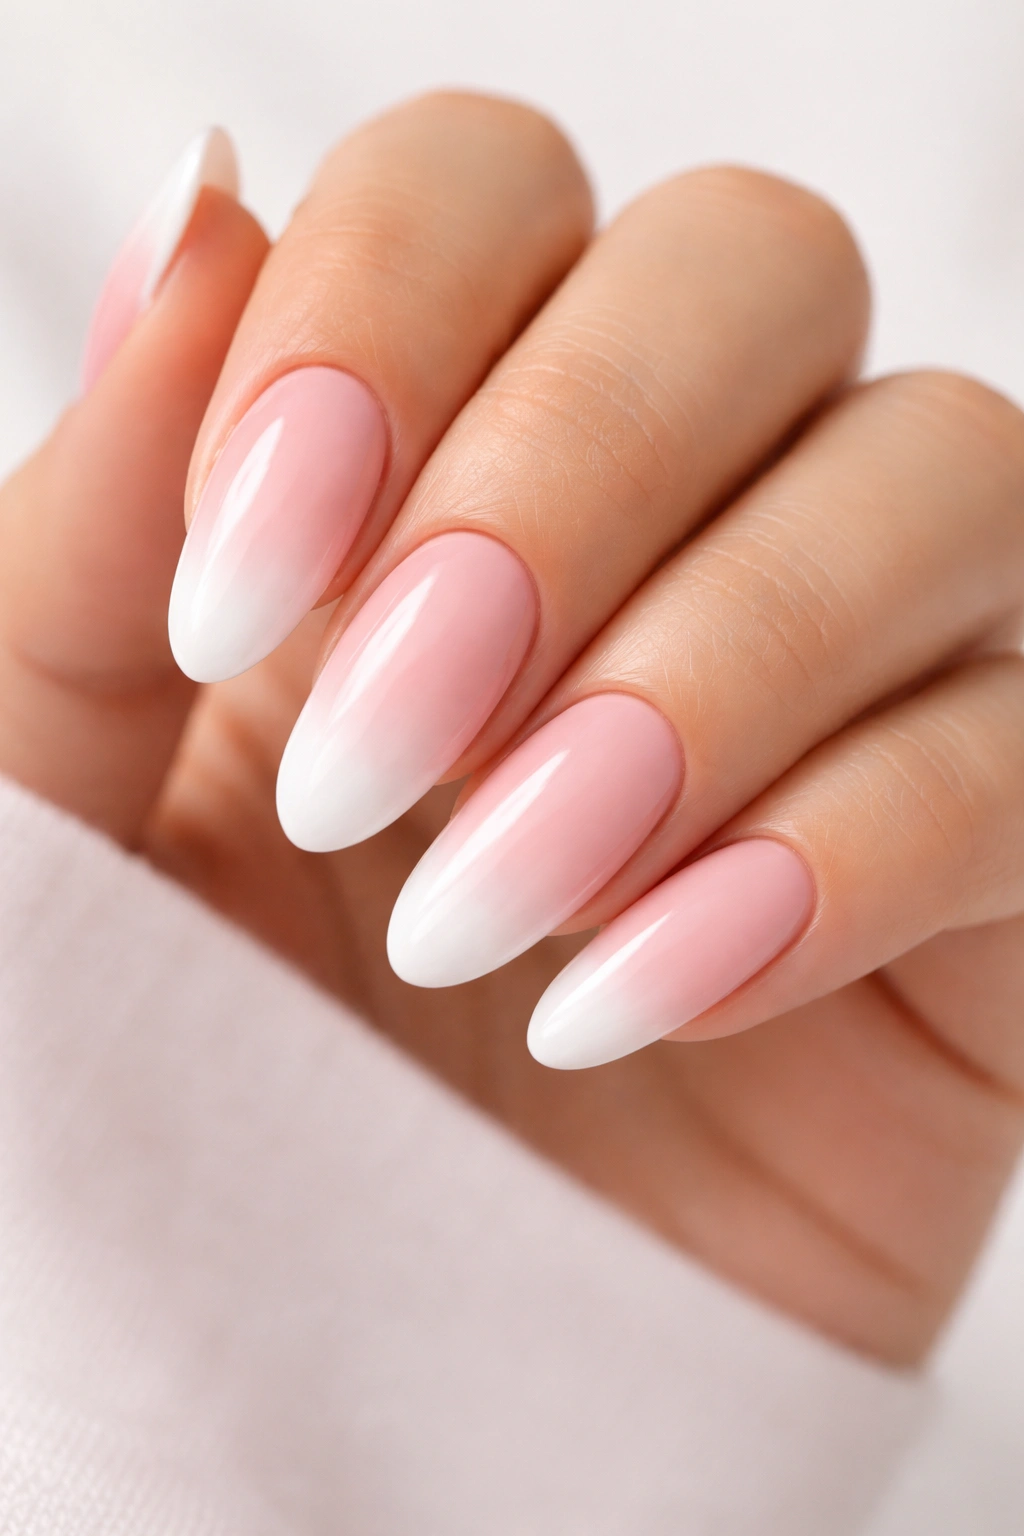
Here’s where the French tip gets a modern update: instead of a solid white line, the entire gradient transitions from a soft blush pink at the base to pure white at the tip. The transition is intentional and blended, creating depth that makes your nails look longer and more sculpted. This design works especially well on actual long round nails because the elongated shape gives the gradient room to breathe.
The Gradient Magic
The beauty of this ombré approach is how it plays with the eye. Rather than stopping at a defined line, the color gradually lightens as it reaches the tip, creating an almost three-dimensional effect. It’s more complex than a traditional French tip, but the execution is surprisingly accessible with the right technique.
Steps to Nail the Ombré Effect
- Apply a creamy blush pink base coat to your entire nail, curing or drying completely
- Using a blending sponge (the same kind used for makeup), dab white gel or polish onto the sponge
- Press the sponge gently onto the tip area of each nail, working from the tip toward the middle
- Repeat with lighter pressure two or three times to build a seamless transition, moving further up the nail each time
- Finish with a glossy seal coat and cure or dry completely
This design feels sophisticated and takes French tips into territory that’s entirely your own.
3. Geometric Gold-Lined Tips
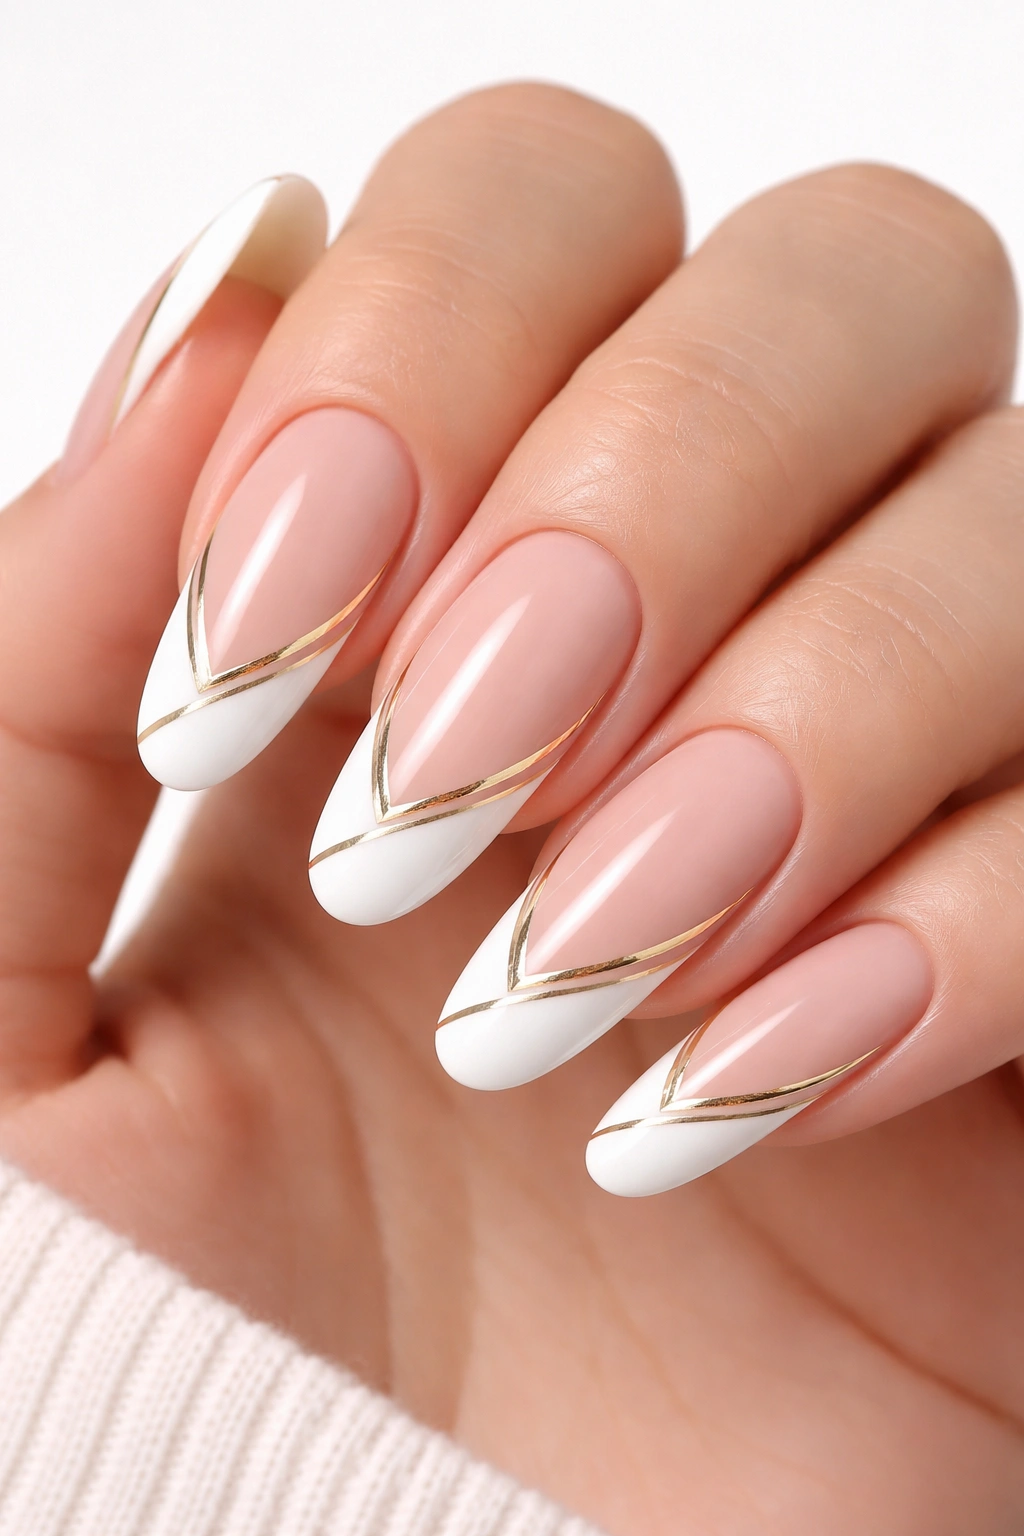
For anyone who loves a bit of personality with their elegance, this design delivers. The white tip remains crisp and clean, but instead of a straight line, it’s accented with thin geometric lines in metallic gold. These could be angular lines running along the tip edge, small triangles at the corners, or even abstract shapes clustered near the white-pink junction. The geometric element transforms the design from classic to contemporary.
Why Metallics Elevate the Whole Look
Gold-lined details catch light differently than the nails themselves, creating visual interest without adding bulk or complexity. On long round nails, these thin lines feel delicate rather than heavy, and they draw attention to the length and shape of your nail bed in a subtle way.
Design Application Techniques
- Start with your standard French tip base: nude or pale pink base with white tips
- Using a thin striping brush or nail art liner, carefully draw your geometric pattern in metallic gold along the white tip line, the sides of the nail, or in intentional clusters
- Keep lines thin and intentional—this isn’t about coverage, it’s about accent
- Top everything with a glossy finish to make the gold really pop against the white
A single accent line on just one nail per hand is just as striking as a full geometric pattern on all of them—consider what feels right for your style.
4. Minimalist Pink and Pearl
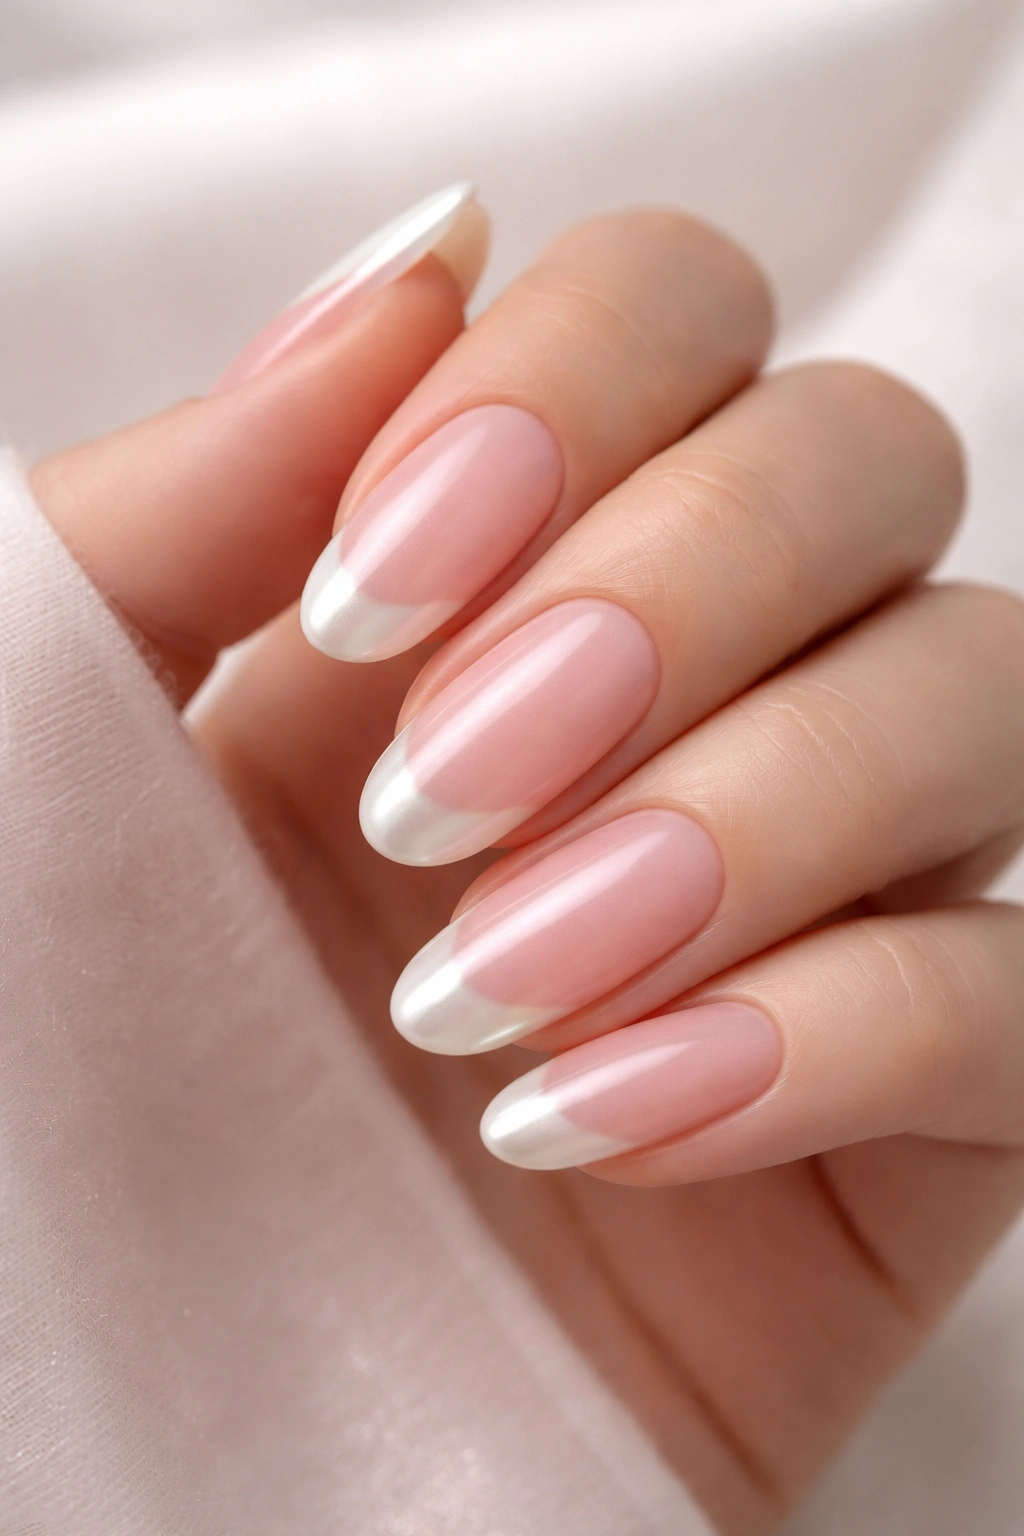
Strip it back to basics with a soft pink base and an iridescent pearl tip instead of classic white. This variation softens the traditional contrast and creates a more ethereal, gentle aesthetic. The pearl catch es light and shifts color slightly depending on the angle, making it endlessly interesting without being loud. Round nails with this treatment look almost cloud-like.
The Quiet Luxury Angle
This design proves that French tips don’t need to be high-contrast to be striking. The subtle shift from pink to pearl feels more sophisticated in many ways than a stark white line, and it reads as quietly confident rather than attention-seeking.
Application Guide
- Begin with two coats of a soft pink gel or polish, choosing a shade that’s slightly warmer than your actual skin tone
- Apply pearl or iridescent white polish to create the tip, using the same precision line as you would with bright white
- The pearl base coat does the work here—keep everything else clean and minimal
- Seal with a glossy top coat to enhance the pearlescent shimmer
This design pairs beautifully with minimal jewelry and natural makeup. It’s the nail equivalent of a perfect white linen shirt.
5. Bold Chrome Metallic Tips

If you want to make a statement, go chrome. The entire tip area becomes a mirror finish, creating an almost futuristic effect against your base color. Chrome nails are dramatic without being chaotic, and they work surprisingly well in professional settings because the geometry remains clean. The contrast between the pale pink base and the reflective chrome tip is visually striking.
Why Chrome Feels Both Modern and Timeless
Chrome finishes have become a mainstay of contemporary nail art, but they work equally well with classic shapes. The metallic quality feels luxe and cutting-edge, transforming your round nails into a work of art.
Getting a Perfect Chrome Finish
- Apply a smooth base coat in your chosen pink or nude shade
- Use a specialized chrome powder over a tacky gel base, rubbing it on with a soft brush or applicator pad—the buildup creates that mirror effect
- Work in thin layers rather than one thick application for the cleanest, most reflective result
- Seal with a matte or glossy top coat depending on whether you want the chrome to have a subtle or shiny finish
Worth noting: Chrome powders require a quick learning curve, but once you get the technique down, you’ll wonder how you ever did nails without it.
6. Soft Almond Shape Adaptation
Here’s a pro move: keeping the core French tip design but subtly adapting the nail shape from perfectly round to just slightly more tapered toward the tip. This creates the illusion of even greater length while maintaining that elegant, grown-up feel. The white tip becomes even more striking on a nail with just a hint of angle.
The Shape Shift Strategy
By filing the sides of your nails at the very slightest angle—barely noticeable to the casual observer—you create a shape that’s still categorically “round” but feels more refined. It’s the difference between a circle and an elegant oval, and it changes how the French tip reads.
Achieving the Right Shape
- Start with long round nails as your baseline
- Using a nail file with a fine grit, angle the sides very slightly, filing at roughly a 5-10 degree angle from the tip toward the base
- The change should be subtle—you’re not going full almond, just softening the pure roundness
- Apply your standard French tip design once you’re happy with the shape
This adaptation works best when you’re growing your nails out or having them done professionally, as maintaining a consistent shape becomes easier with regular fills or touch-ups.
7. Glitter Accent Nail Design
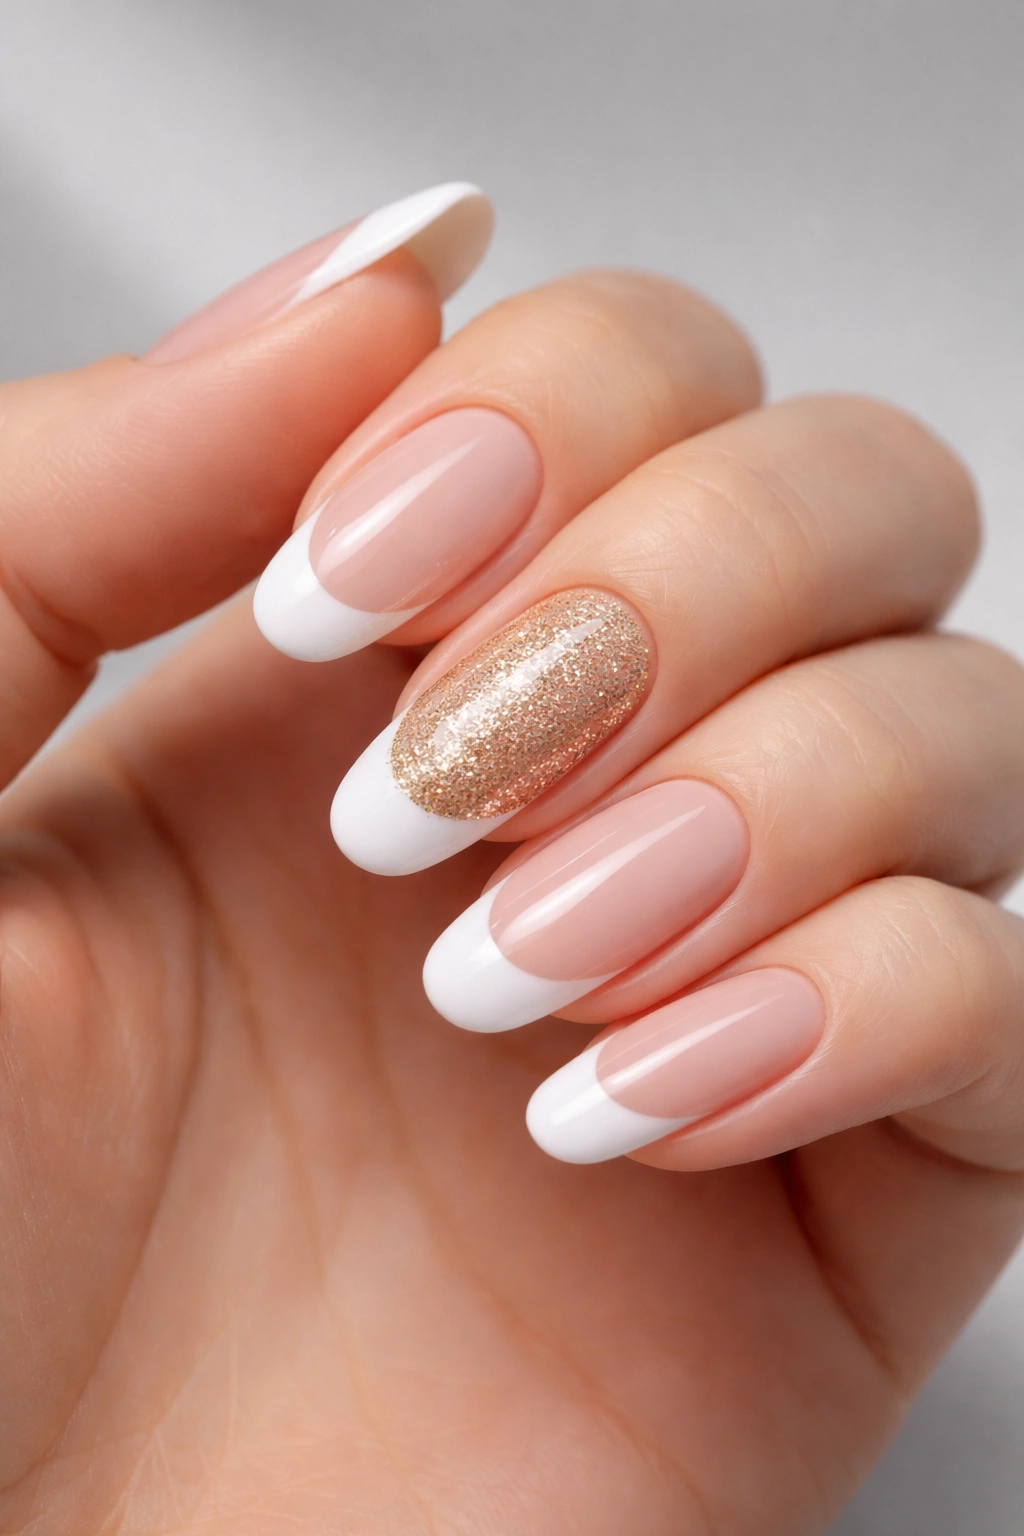
Keep most of your nails as a clean French tip, then transform one accent nail into something special by filling the white tip area completely with fine glitter. Choose a glitter color that complements your base—gold for warmth, silver for cool tones, or even colored glitter for a more playful vibe. The contrast between the minimalist French tips and the sparkly accent nail creates visual balance and interest.
The Power of Strategic Glitter
Placing glitter on just one or two nails prevents your design from feeling overwhelming, while still giving you that fun, celebratory feeling. On long round nails, a single glittery accent draws the eye and becomes a natural focal point.
Glitter Application Method
- Paint your base coat and white French tips on all nails
- On your accent nail(s), while the white is still wet or tacky, brush on a thin layer of clear gel base coat
- Apply your chosen glitter color, using a medium-sized brush to pack glitter into the wet base
- Build glitter density to your preference, then seal with a top coat to lock everything in place
This design is perfect for celebrations, nights out, or whenever you want a touch of extra sparkle without committing to full glitter nails.
8. Classic Red and White Statement
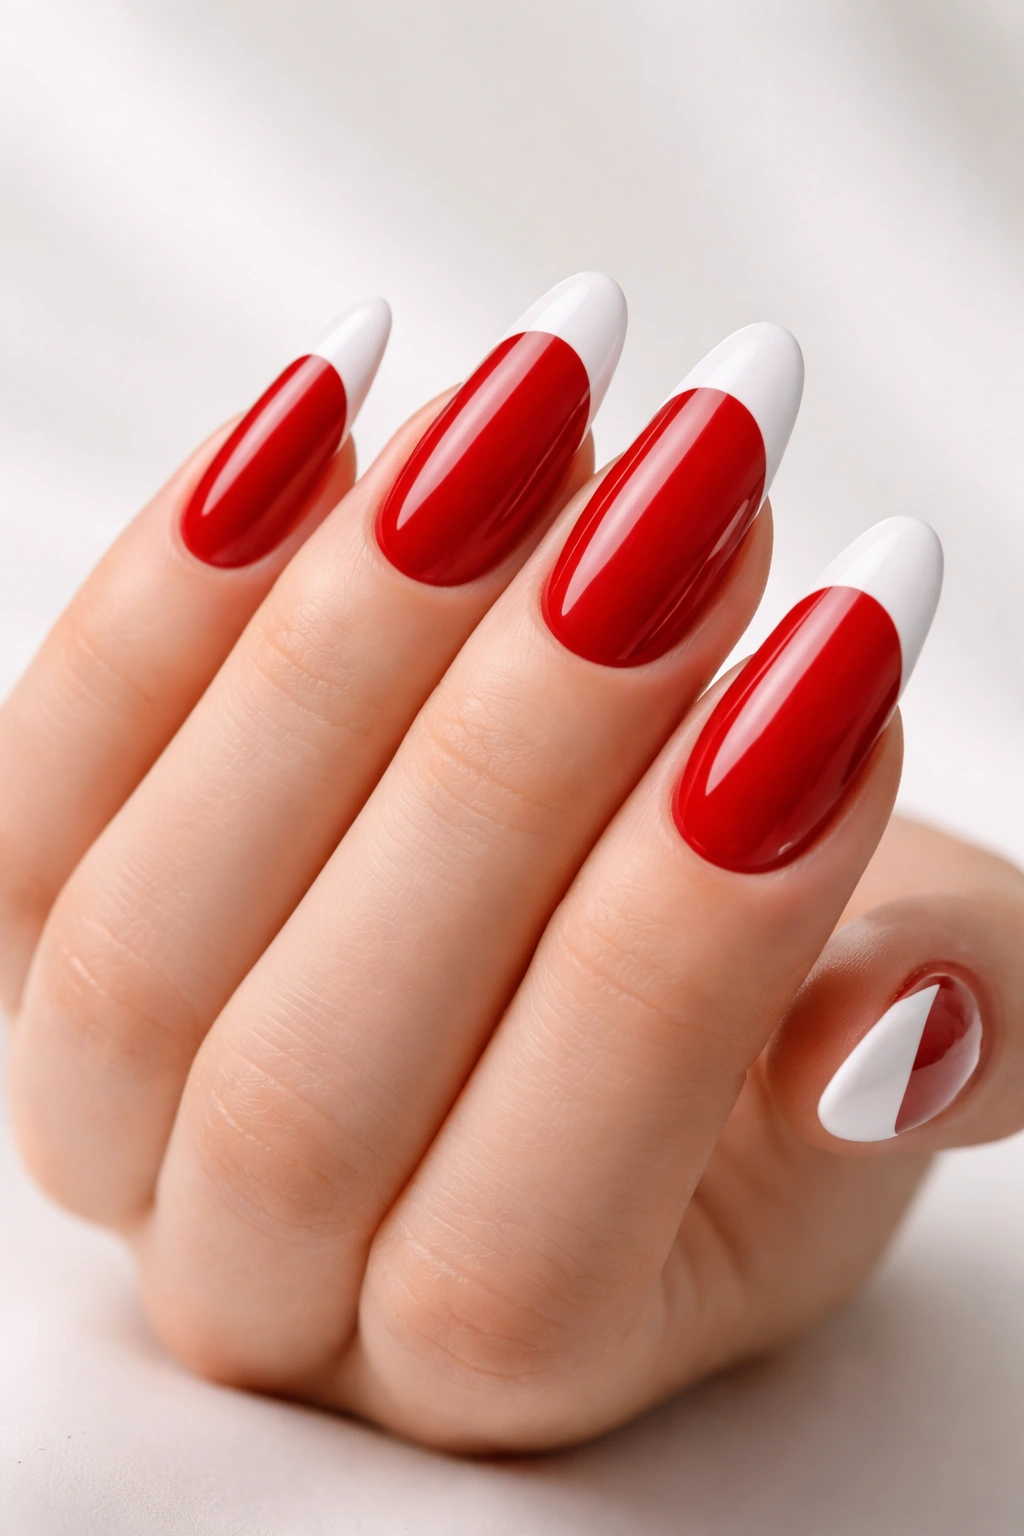
Red and white French tips are pure power. Rather than the traditional pale pink or nude base, go bold with a true red—cranberry, cherry, or even a deep burgundy. The white tip becomes even more striking against the red background, and the overall effect reads as confident, polished, and unapologetically bold. Long round nails in red and white are a choice, and that choice says something.
Why Red Works So Well
Red is the ultimate power color, and French tips allow you to wear it in a way that still feels refined and controlled. The structured geometry of the design tempers the boldness of the red, making it work even in conservative settings.
Red and White Execution
- Apply two coats of your chosen red, building to full opacity
- Allow to cure or dry completely before moving to the white tips
- Create a precise white tip line using traditional French tip technique or a guide
- The contrast will be dramatic and clear—there’s no subtlety here, which is part of the appeal
- Seal with a high-gloss finish to maximize the impact
This design pairs beautifully with classic red lipstick, creating a coordinated look that feels intentional and put-together.
9. Neutral Beige with Artistic Lines
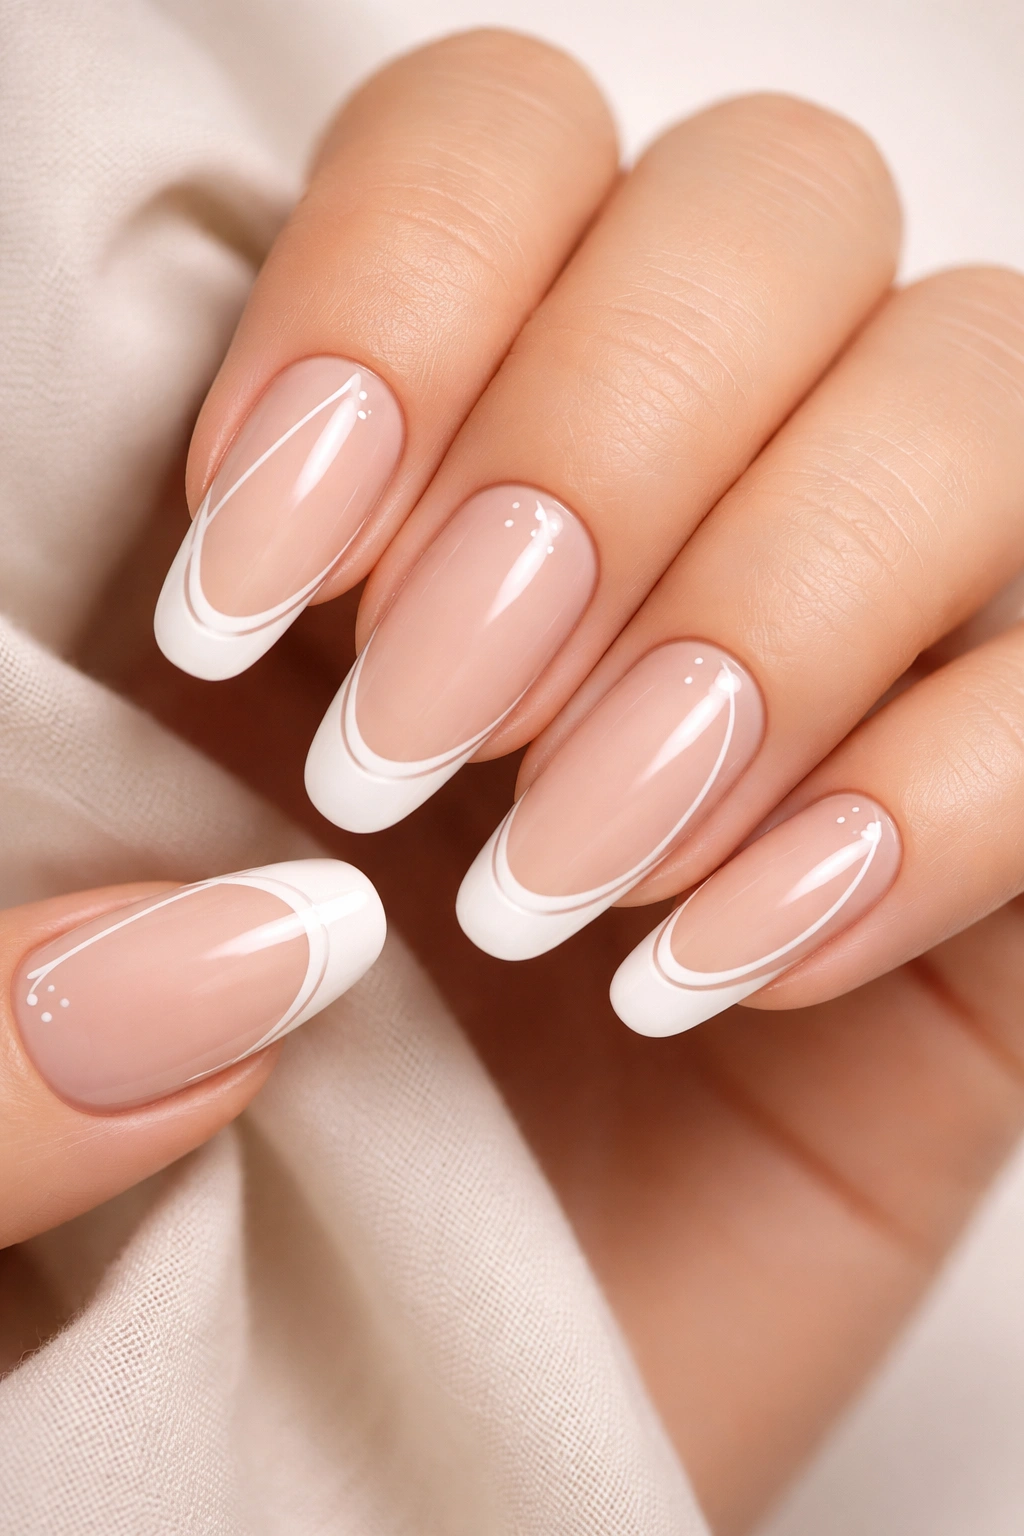
Start with a warm, creamy beige base and keep the white tips clean, then add a detail layer: thin artistic lines that run along the outer edge of the nail bed, perhaps with small dots or abstract marks near the base. These artistic touches are minimalist enough to feel sophisticated but detailed enough to show off your creativity. On long round nails, these fine details become mini focal points.
The Artistry Element
This design celebrates the fact that French tips are a canvas. You can honor the traditional formula while adding your own artistic voice through small, intentional details.
Artistic Detail Technique
- Apply beige base coat in two coats until fully opaque
- Create your standard French white tips
- Using a thin nail art brush, sketch your artistic details: perhaps a thin line that follows the contour of your nail, small abstract shapes, or even initials if you’re feeling playful
- Keep the design subtle and on the smaller side—this is about accents, not taking over the whole nail
- Seal everything securely with a top coat
The beauty of artistic details is that they’re uniquely yours. Your marks don’t need to be perfect; slight imperfections often read as more interesting and intentional.
10. Translucent Milky Base with White Tips
This variation swaps the opaque base for something sheer and cloudy: a translucent milky polish that lets a hint of your actual nail peek through. Over long round nails, this creates an almost ethereal effect, like your nails are made of semi-frosted glass. The white tips remain crisp and defined, but the base feels lighter and airier than traditional French tips.
The Ethereal Effect
Translucent and milky finishes are having a major moment because they feel modern and sophisticated. Combined with clean white tips, this approach gives you the elegance of French nails with a contemporary edge.
Creating the Milky Base
- Look for translucent or milky gel polishes or regular polish in your preferred brand
- Apply one to two coats, depending on how opaque you want the effect to be—one coat for maximum sheerness, two for a softer look
- White tips are applied over this base using standard French tip technique
- The opacity difference between the sheer base and white tips creates automatic dimension
This design works especially well if you have naturally beautiful nails—the sheerness shows off the health and shape of your nail bed while still giving you that French tip polish and polish.
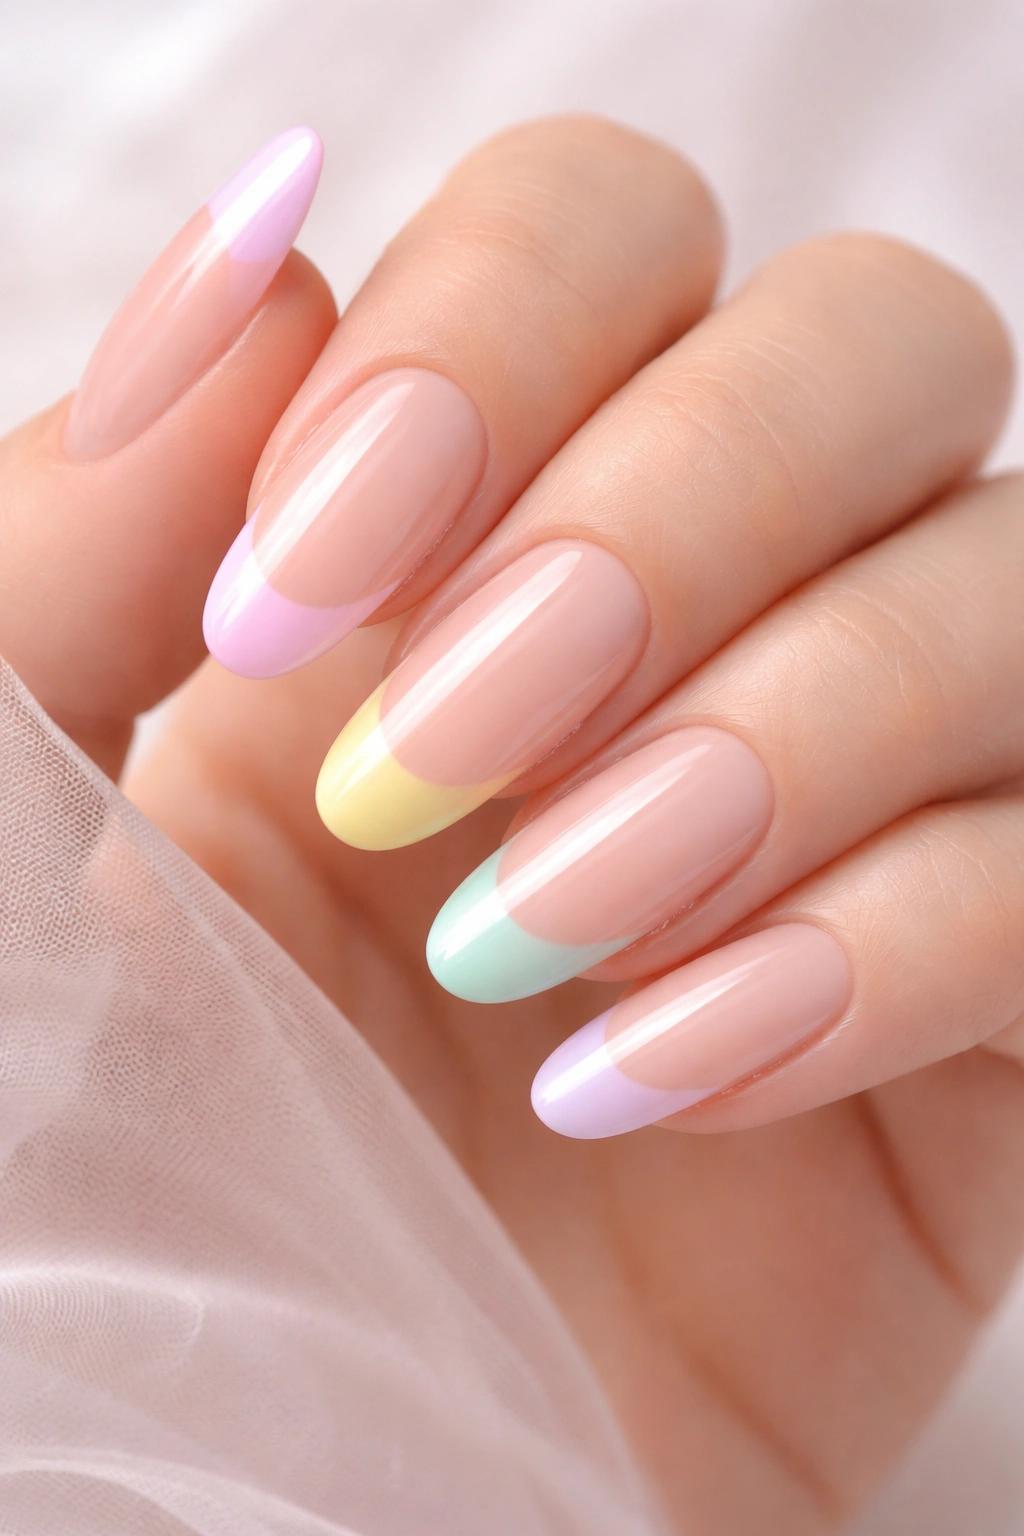
11. Pastel Rainbow Tips
For the adventurous soul who loves color but respects structure: keep your base pale and neutral, then create a French tip with a gradient or pattern using pastel versions of multiple colors. One nail might have a soft pink-to-white gradient tip, the next a pale peach-to-white transition, another a soft lavender-to-white tip. Each nail is slightly different, but the palette remains cohesive and the formula stays true to French tip aesthetics.
Why Multi-Color Tips Work
This design proves that French tips can be playful without being juvenile. By using pastels instead of bold colors and maintaining the clean tip line, you keep the overall effect elegant and intentional.
Rainbow Tip Application
- Start with a pale neutral base coat on all nails
- Decide which color gradient each nail will feature
- Using the sponge-blending technique, create a gradient from your chosen pastel color to white for each nail
- Work nail by nail, allowing each one to dry completely before moving to the next
- Seal everything with a glossy finish to blend the gradients smoothly
This design is perfect for spring and summer seasons, or anytime you want your nails to reflect a bit of color without overwhelming your overall aesthetic.
12. Jeweled and Embellished Tips
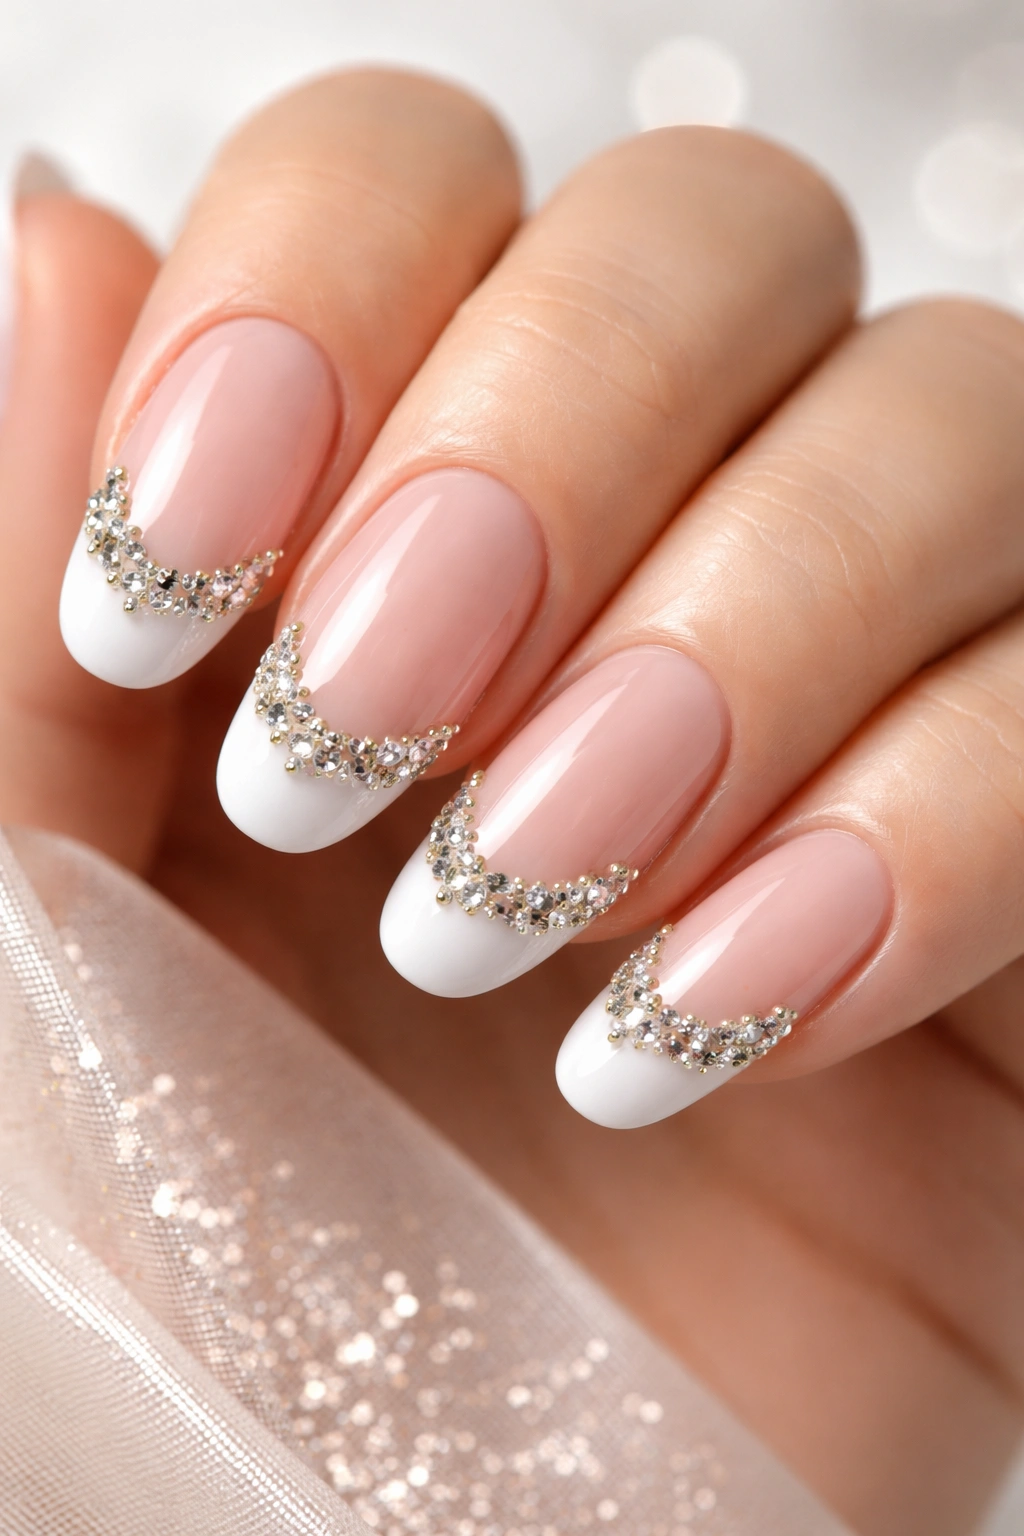
Transform your white tips into something tactile and dimensional by adding small rhinestones, gems, or metallic studs along the tip line or clustered at the corners. This is French tips for special occasions—nails that catch light in multiple ways and demand attention. The long round shape provides the perfect canvas for gem placement without looking crowded.
Why Dimension Elevates Everything
Adding physical embellishments to your nails transforms them from beautiful to almost sculptural. On long nails, gems and studs feel luxe rather than over-the-top.
Gem Application Technique
- Create your standard French tip design: pale base with white tip
- While the white tip is still slightly tacky or using a dedicated gel adhesive, carefully place your chosen gems or studs using a stylus or dotting tool
- Space them thoughtfully—a line of smaller gems along the tip edge, or a cluster of mixed-size gems at the inner corner of each nail
- Allow adhesive to cure completely before sealing with a top coat that secures everything in place
- A matte finish sometimes works better with gems than a glossy one, preventing a plastic appearance
Pro tip: Gems and studs look especially stunning under soft lighting, making them perfect for evening events or night-time occasions.
13. Matte Finish French Ombre

Swap the glossy seal for a matte top coat and you completely change the vibe of your French tips. A soft pink base that transitions to a white ombré tip in matte finish feels modern, tactile, and surprisingly luxurious. Matte nails have that cool-girl aesthetic that feels effortless, even though the ombré requires intentional technique.
The Texture Story
Matte finishes change how light interacts with your nails, creating an almost velvety appearance. When combined with the soft transition of an ombré, the result is nail art that feels expensive and considered.
Matte Ombré Execution
- Create your standard blush-to-white ombré using the sponge-blending technique described earlier
- Once fully cured, apply a matte top coat instead of glossy
- Work with a high-quality matte finish that doesn’t leave a chalky appearance—this is important for achieving the luxe effect
- A second matte coat can build opacity and true matte finish
Matte French tips work especially well with minimalist jewelry and fresh, natural makeup. They pair beautifully with linen clothing and have that quiet-luxury aesthetic that never goes out of style.
14. Nude Base with Colored Tips
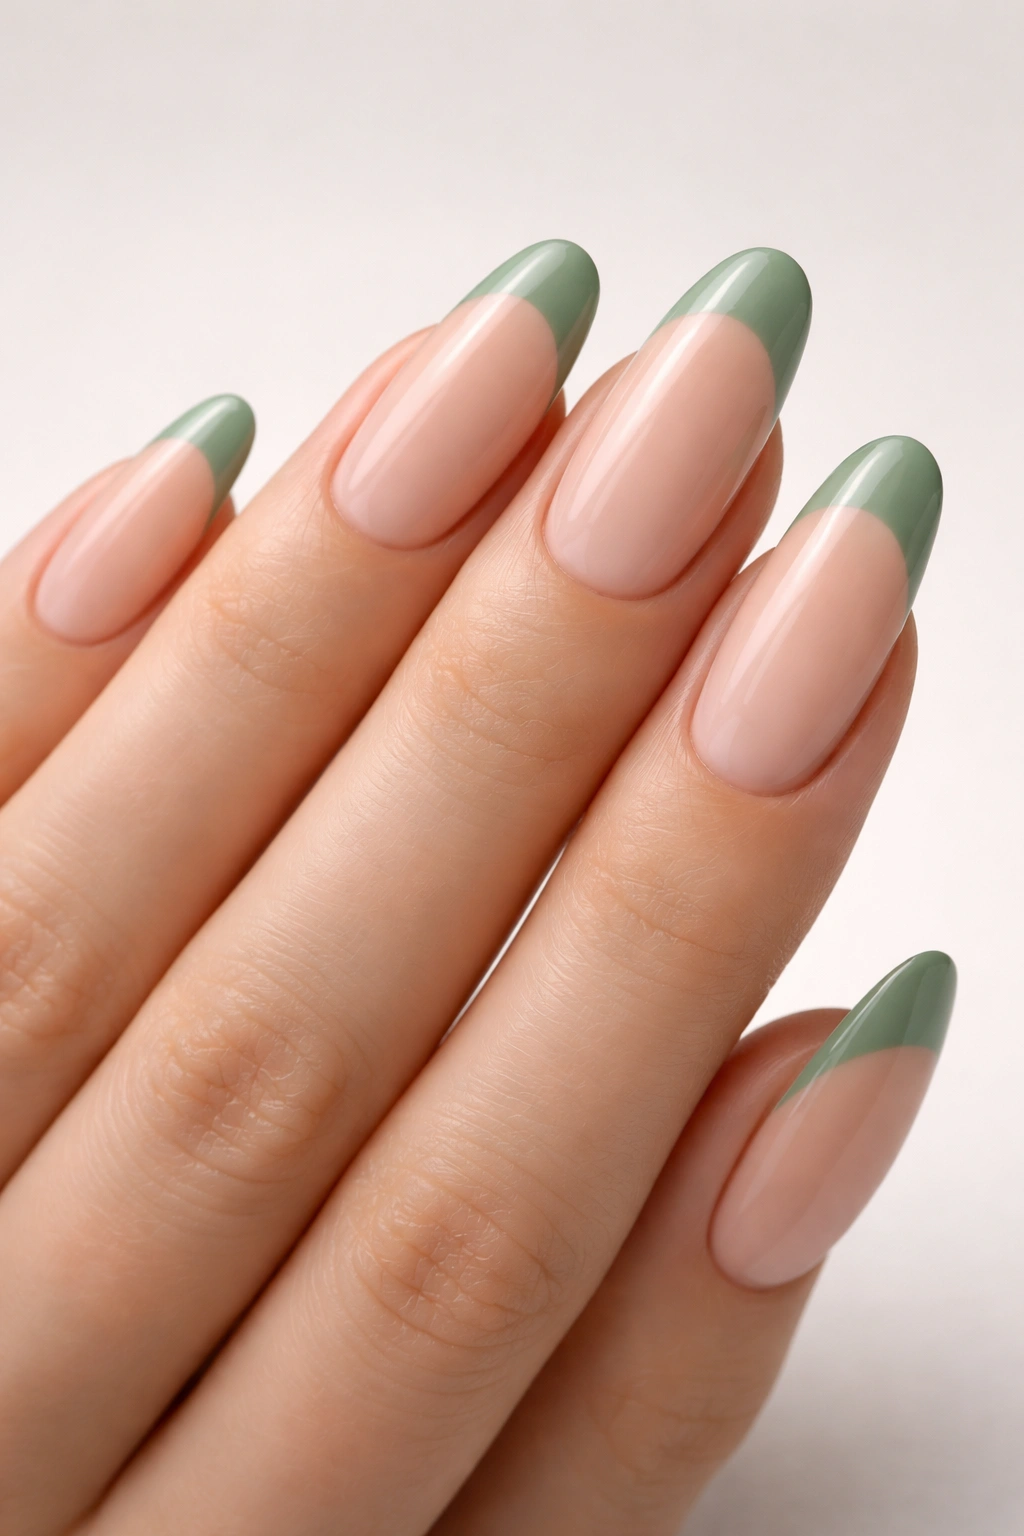
Flip the traditional formula: keep your base a true nude that matches your skin tone perfectly, then make the tips a pop of color instead of white. Think soft sage green tips, dusty blue, warm terracotta, or even a barely-there blush. This approach maintains the structure and elegance of French tips while allowing you to play with color in a controlled way.
The Psychology of Reversed Color
Moving color to the tips rather than the base changes how the design reads. Your nails look like you’re wearing a very specific, intentional design rather than just polish. It feels modern and curated.
Colored Tip Application
- Find a nude base that matches your natural nail color as closely as possible—this is worth spending time on, as a perfect match makes the design sing
- Apply two coats of this neutral base
- Use your chosen tip color with the same precision you’d use for white, creating a crisp line
- The color will pop against the neutral background exactly the way white does, but with your chosen tone
- Finish with a glossy seal coat
This design is perfect for those who want color and personality but don’t want their whole nail to read as “colored”—it’s a more subtle way to express preference without commitment.
15. Long-Lasting Gel Formula Tips
The secret weapon for any French tip design that actually lasts: using gel formulas and proper application technique from the start. Gel French tips with long round nails can last 3-4 weeks with zero chipping, making them practical as well as beautiful. The longevity means your design stays perfect through your entire wear period, which is honestly half the appeal.
Why Gel Changes Everything
Gel formulas cure harder, adhere better, and withstand daily life with grace that regular polish simply cannot match. For French tips, this means that crisp white line stays crisp, your base color stays vibrant, and your whole design remains gallery-worthy for weeks.
Proper Gel Application for Maximum Longevity
- Start with clean, properly filed long round nails
- Apply a quality gel base coat and cure for the time recommended by your brand
- Build your color (nude or pink) in thin layers, curing between coats, rather than applying one thick coat
- Apply white gel for your tips using the same thin-layer approach, curing between coats for maximum adhesion
- Finish with a gel top coat that bonds properly to your white tip color
- A properly applied gel manicure will last its full wear period without separation or cloudiness
The difference between a gel French tip that lasts four weeks and one that chips after one week often comes down to application technique. Invest in professional application if you’re new to gel, or take time to master the technique if you’re doing it yourself.
Final Thoughts
French tip nails represent the intersection of timeless elegance and personal expression. Whether you’re keeping things classic with subtle shimmer, going bold with chrome and color, or adding artistic details that show off your creativity, the formula adapts to whatever aesthetic calls to you. Long round nails give you the perfect foundation—they’re inherently flattering, universally wearable, and they make whatever design you choose look intentional and polished.
The designs in this collection aren’t meant to be replicated exactly; they’re meant to spark ideas. Mix and match elements that appeal to you: try the ombré technique from one design with the color combination from another, or use the gem-placement strategy with a color palette that speaks to you. The beauty of working with French tips is that the structure is flexible enough to accommodate your vision while still maintaining that refined, elevated quality that makes these nails so desirable.
Save the designs that make you stop and stare. The one that’s calling you right now—the color, the texture, the detail that makes you think “yes, that’s exactly what I want”—that’s the one worth actually creating. French tips are proof that sometimes the most striking designs are the ones that respect simplicity while allowing just enough room for your own style to shine through.
