

Squoval nails have become the go-to shape for people who want the sophistication of an oval with the practicality of a square edge. They’re longer than a basic square but less dramatically pointed than a full almond — which means they’re actually wearable for everyday life without snagging or breaking constantly. Add a French tip design to that shape, and you’ve got something that reads elegant, polished, and endlessly versatile. Acrylic is the ideal medium for pulling off these looks because it gives you sharp, clean lines at the tip, full control over color gradients, and the structural integrity to keep those tips looking perfect for 3-4 weeks.
The beauty of short squoval French tips is that they work for basically everyone. Shorter nail beds? This shape flatters them. Prefer minimal maintenance? French tips hide growth beautifully. Want something that looks expensive without demanding constant touch-ups? You’ve found it. Whether you’re drawn to classic white tips, bold geometric designs, or subtle sophisticated embellishments, the squoval shape provides the perfect canvas.
The designs below range from timeless and understated to modern and artistic — each one is specific enough that you can show it directly to your nail technician and actually get what you’re envisioning. Short acrylic squovals take 45 minutes to an hour to apply, and most nail technicians work with this shape regularly, so finding someone who can execute these looks cleanly shouldn’t be difficult. Let’s explore 15 nail designs that prove short squoval French tips are anything but boring.
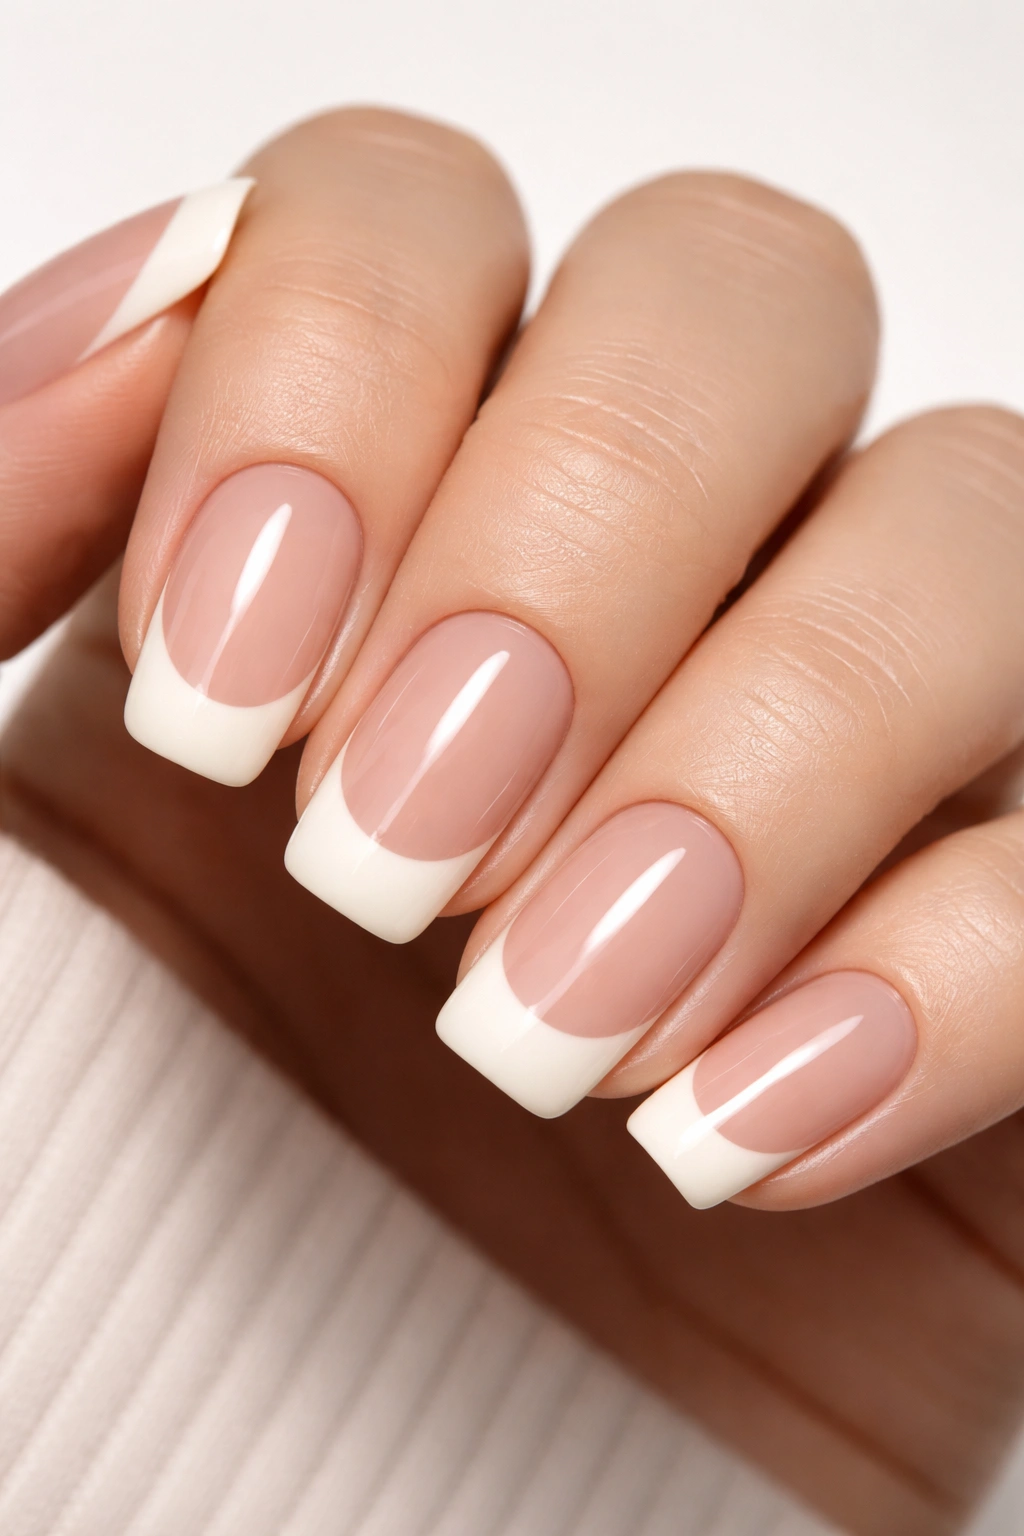
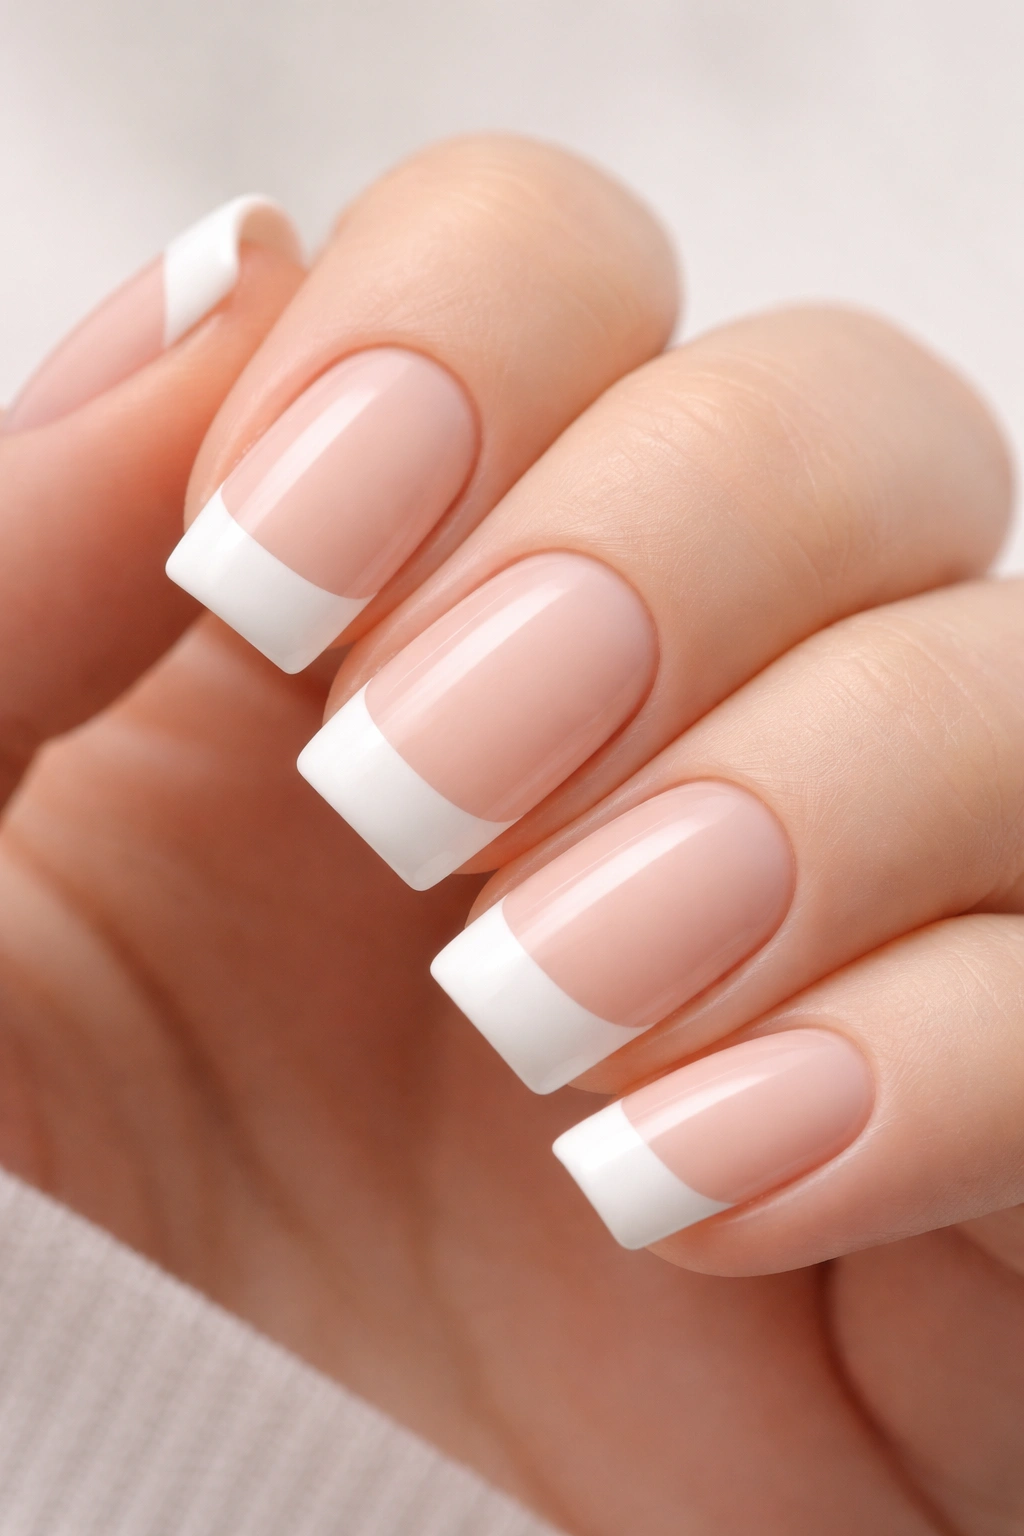
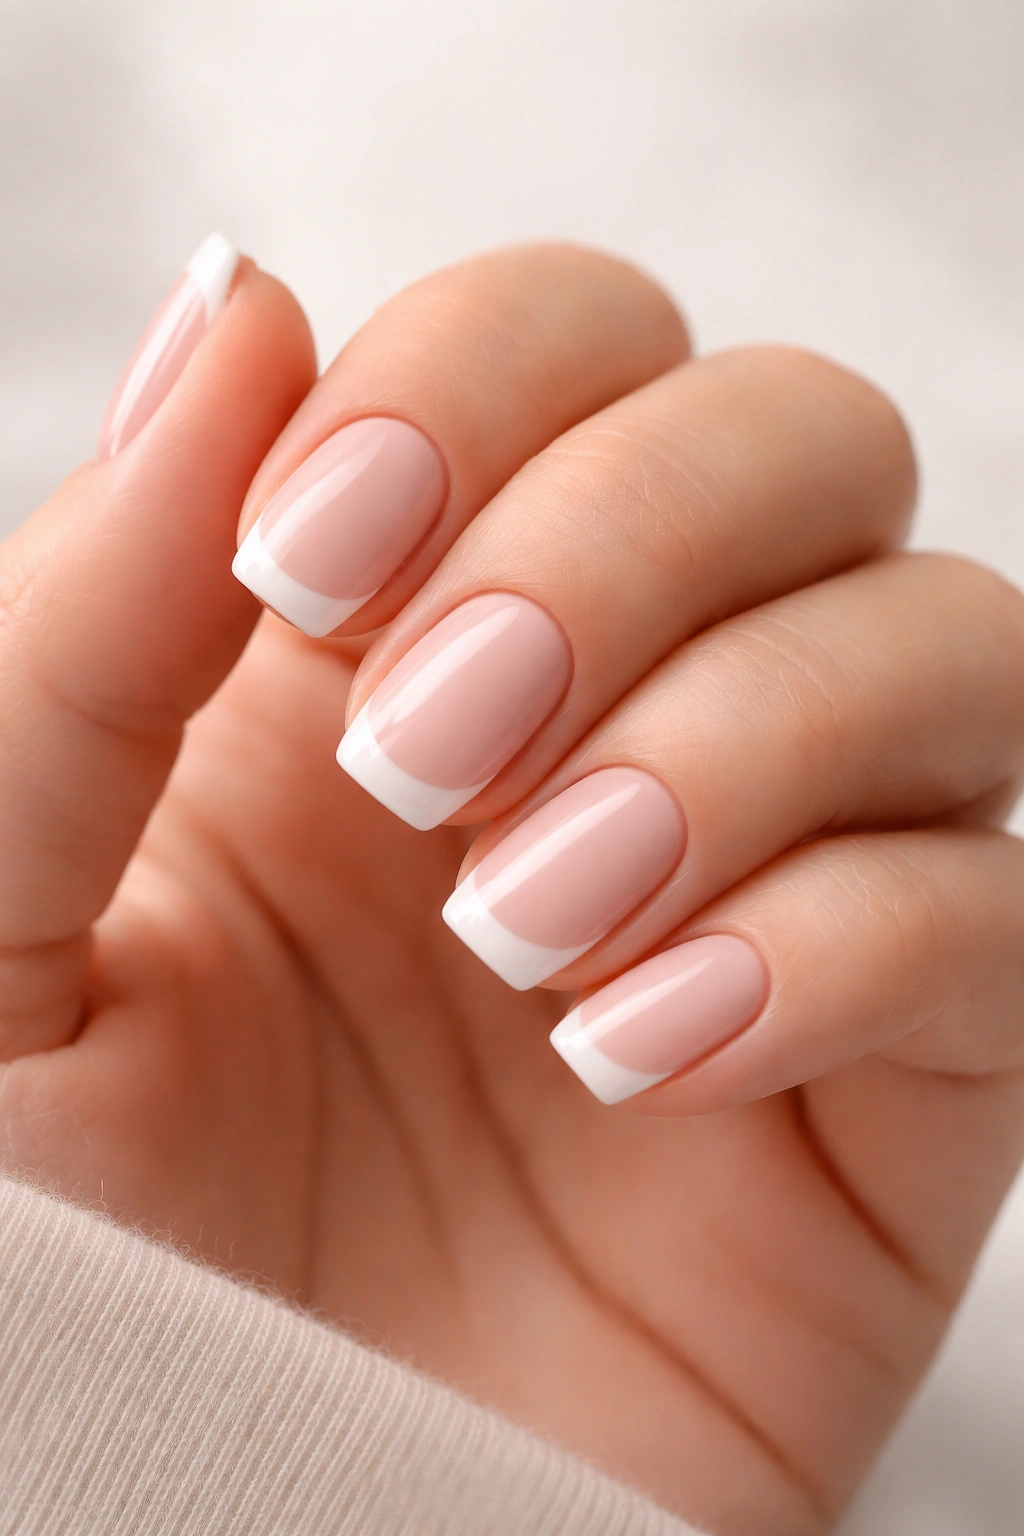
1. Classic White Tip with Soft Pink Base
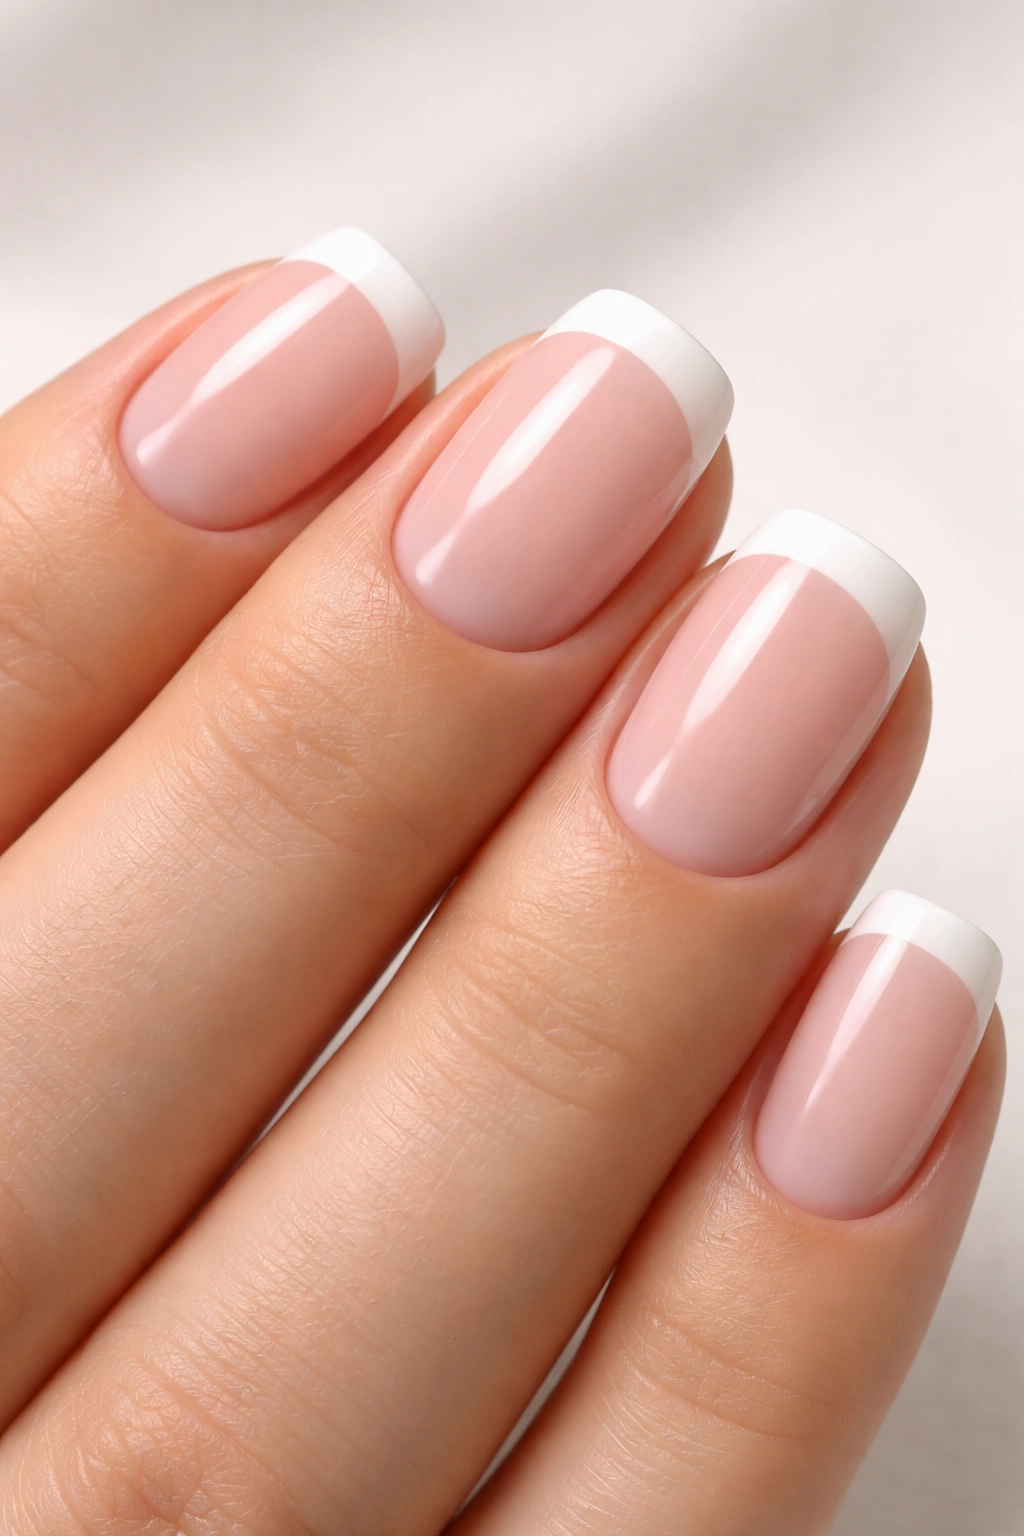
This is the French tip that never dates because it simply works. A creamy pale pink base transitioning into a clean, bright white tip at the edge creates an effect that’s professional, feminine, and flattering on virtually every skin tone. The key to nailing this look is making sure the white tip is opaque and crisp — no see-through sections or smudged edges.
Why This Design Endures
The soft pink base elongates the nail bed visually while the white tip adds brightness and definition. This combination is specifically chosen because it flatters nail shape and creates the illusion of length, which is exactly what you want on a short squoval. The color pairing feels timeless because it mimics the natural gradient many people chase with nude manicures.
How to Perfect This Classic
- Request a pale pink (sometimes called blush or ballet pink) that’s slightly warmer than your skin tone — this creates subtle definition without looking costume-like
- Ask your technician to apply the white tip with a clean, straight line at about the 1/4 mark from the edge
- The transition zone between pink and white should blend smoothly with no harsh line — this takes a steady hand and good brush control
- Choose a glossy topcoat to maximize the clean, polished appearance
Pro tip: This design photographs beautifully and works equally well for formal events, everyday wear, or professional settings — it’s your neutral that’s also a statement.
2. Ombre Gradient French Tips
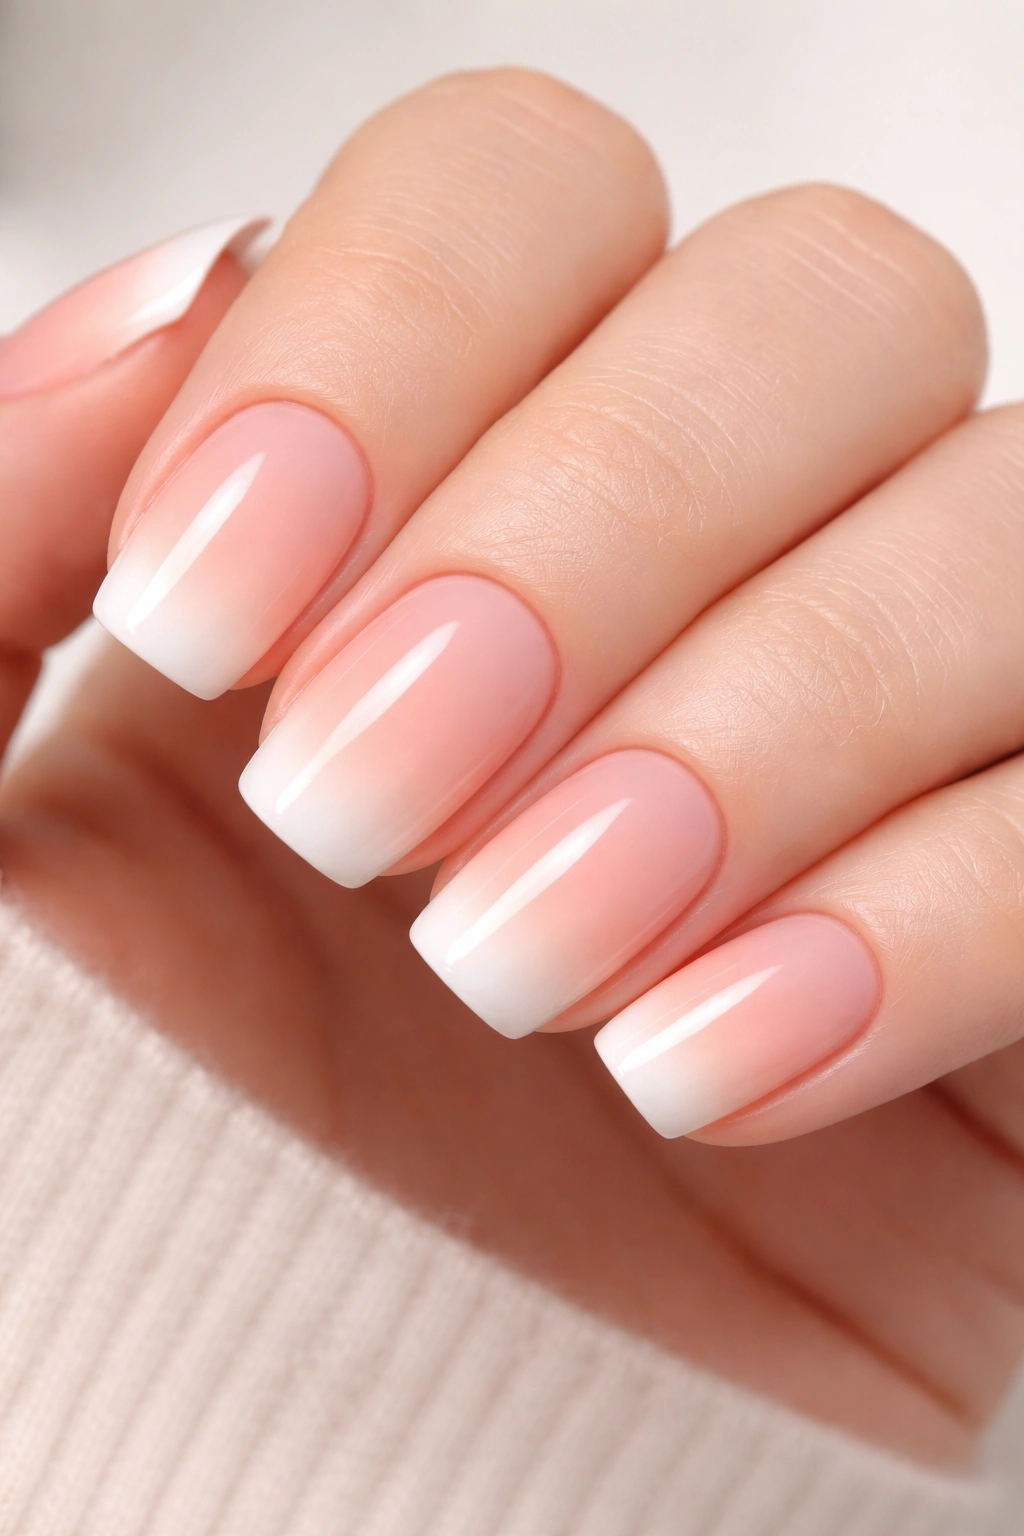
Instead of a sharp color transition, an ombre French tip gradually blends from a darker base shade to a lighter tip. Picture a deep nude at the base fading through peachy tones into a soft white at the very tip. This approach feels more artistic and contemporary than a traditional French tip, yet it’s still technically a French manicure.
What Makes Gradient Design Stand Out
Ombre requires layering and blending multiple shades with a damp brush or sponging technique to create that seamless transition. On short squovals, this gradient naturally emphasizes the nail’s length without making the tip look heavy or overdone. The softer transition feels more modern than stark color blocks, and it photographs with beautiful depth.
Tips for Flawless Blending
- Choose three colors: a base shade (nude or soft taupe), a midtone (peachy or light tan), and a white or pale cream for the tip
- Your technician should apply thin layers and blend with a slightly dampened brush or makeup sponge between coats
- The gradient should be gradual across the entire nail, not just concentrated at the tip
- Seal with a glossy topcoat to enhance the blended effect
Insider note: Ask your technician if they prefer brush blending or sponge blending — different techs have different strengths, and skilled blenders make all the difference.
3. Reverse French with Metallic Accents
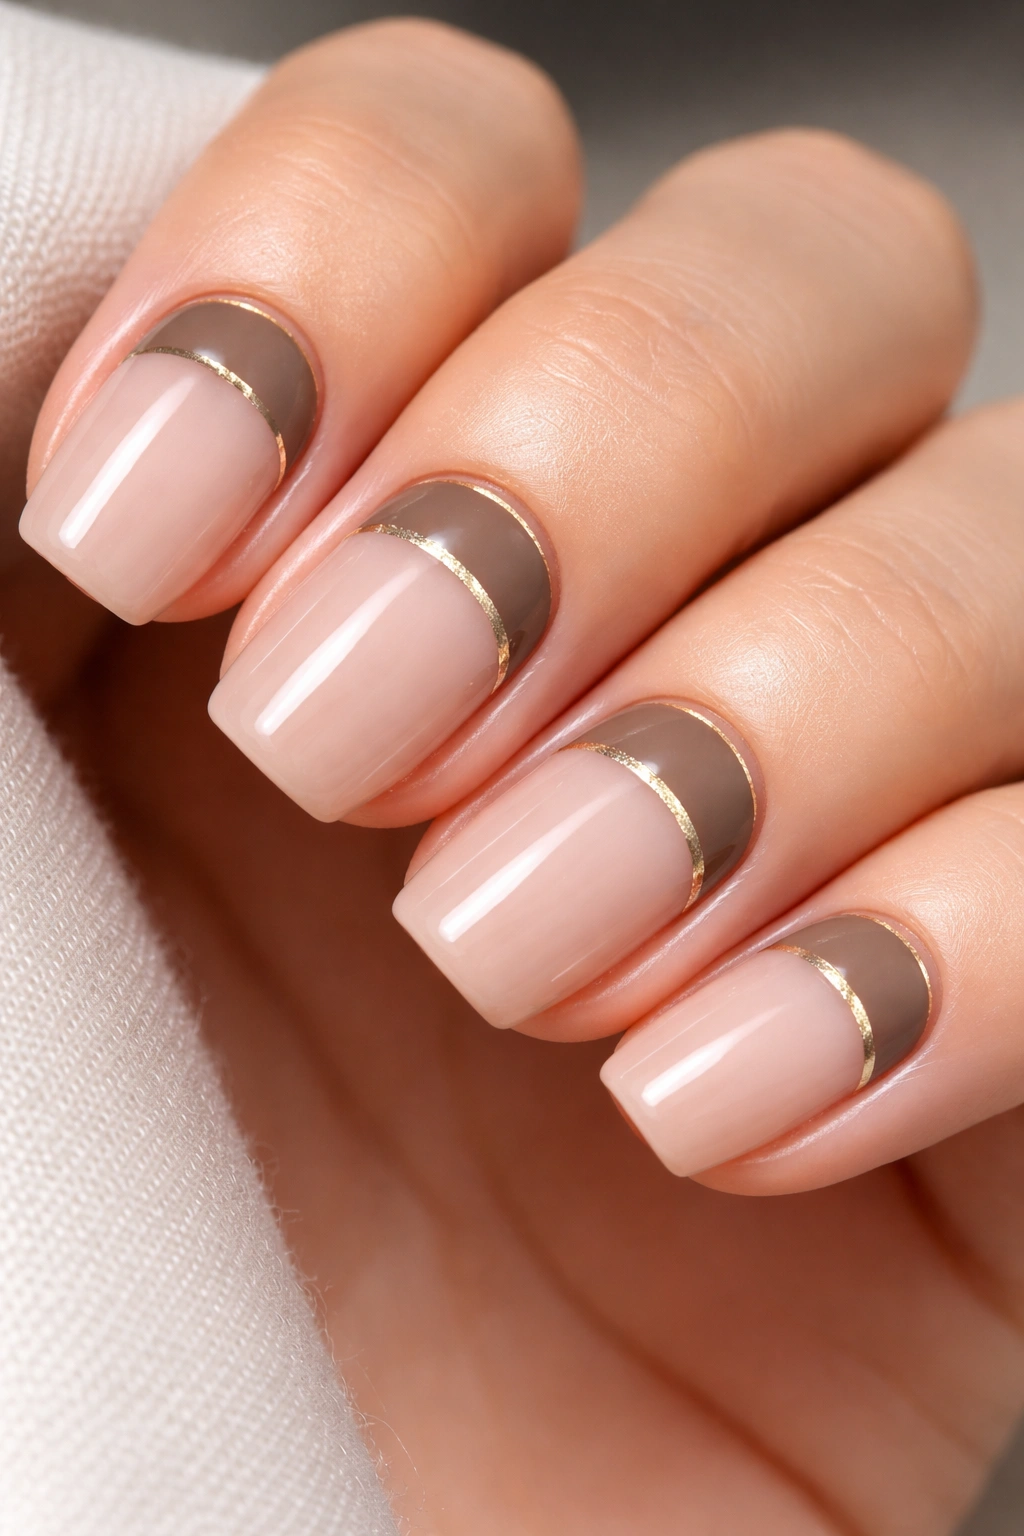
Reverse French (also called an inverted French) puts the color block at the base of the nail instead of the tip. On a squoval, this means a bold color at the cuticle area fading or sharply transitioning to a sheer nude or white throughout most of the nail. Adding a thin metallic line where the two colors meet creates unexpected sophistication.
How Reverse French Changes the Game
Reverse French works beautifully on short nails because it adds visual interest without extending the tip with color, which can make short nails feel stubby. The metallic accent line — whether gold, rose gold, or champagne — draws the eye horizontally across the nail, which feels more modern and editorial than a traditional French tip. This look pairs especially well with minimalist fashion or modern aesthetic preferences.
Executing Reverse French Cleanly
- Choose a base color with impact — deep burgundy, forest green, or dusty mauve create stunning reverse effects
- Keep the color block to about the bottom third of the nail
- The metallic line should be thin (just 1-2mm) and perfectly straight — this is where precision matters most
- Use a metallic gel or foil application for the line to ensure it catches light and doesn’t dull over time
Worth knowing: Reverse French needs a sheer or nude top section to work visually — if you try to reverse French with two dense colors, it can look like a growth line rather than intentional design.
4. Glitter-Faded French Tips
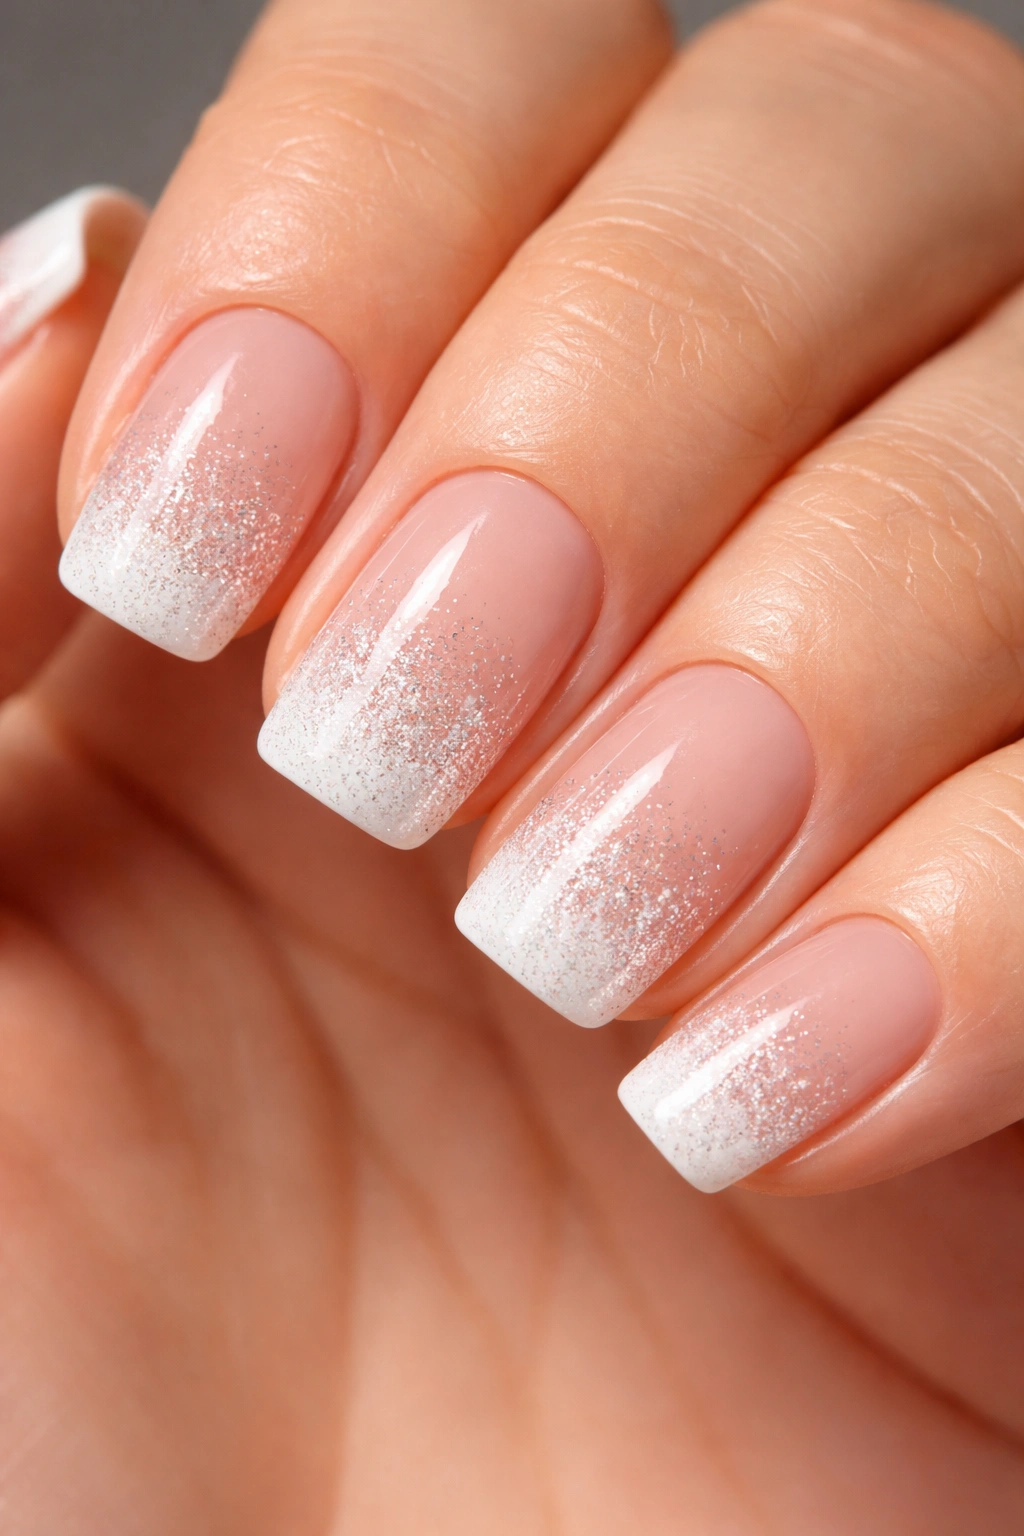
This design starts with a solid white tip that gradually fades to a lighter and lighter concentration of glitter as it moves down the nail, eventually disappearing into a clean nude base. It’s playful, catches light beautifully, and feels modern without being juvenile. The squoval shape keeps this sparkly design looking refined.
Why Glitter Fade Works on Short Nails
Glitter concentrated entirely at the tip can look heavy on a short nail, but when it’s scattered and fading toward the base, it becomes an accent rather than the whole story. This creates a sophisticated gradient effect that reads “done intentionally” rather than “I had glitter polish and applied it everywhere.” On short squovals, the faded effect elongates the visual line of the nail.
Applying Glitter Fade Successfully
- Use a white gel base applied to the entire tip area
- Mix a small amount of glitter gel with clear gel to create a diluted glitter mixture
- Apply this mixture to the tip and gradually blend it down the nail, using less glitter in each layer as you move toward the base
- Finish with a thick glossy topcoat to seal the glitter and create a smooth, bump-free surface
- The base 1/3 of the nail should be solid nude with no visible glitter
Pro tip: Chrome or holographic glitter shows up more dramatically on short nails than fine iridescent glitter — consider your light environment when choosing glitter type.
5. Two-Tone Nude and Cream Tips
Two distinct colors with a sharp, intentional line between them create bold graphic interest. Imagine a warm tan or caramel nude covering about 70% of the nail, then a creamy vanilla or off-white covering the final 30% at the tip. The line between them should be clean and deliberate.
What This Design Communicates
This modern twist on French tips reads more architectural and intentional than traditional white tips. The two nudes are close enough in value that the design feels cohesive and wearable, but different enough that the color block is immediately noticeable. On short squovals, this design structure actually makes the nail appear longer because the horizontal line creates division.
Creating Precise Color Blocking
- Choose your two shades first and test them together — they should be adjacent on the color wheel but noticeably different in depth
- Map the line at about the 1/4 mark from the tip using a light pencil on the acrylic before painting
- Paint the base color first and let it cure fully before applying the tip color
- Use a thin liner brush or nail art brush to create your dividing line — a sharp edge is essential for this design
- Consider a matte topcoat on the lighter shade for textural contrast if you want extra visual interest
Insider note: This design works especially well for work environments because it’s creative without being loud — it reads professional with personality.
6. Nude with Thin Gold Lines
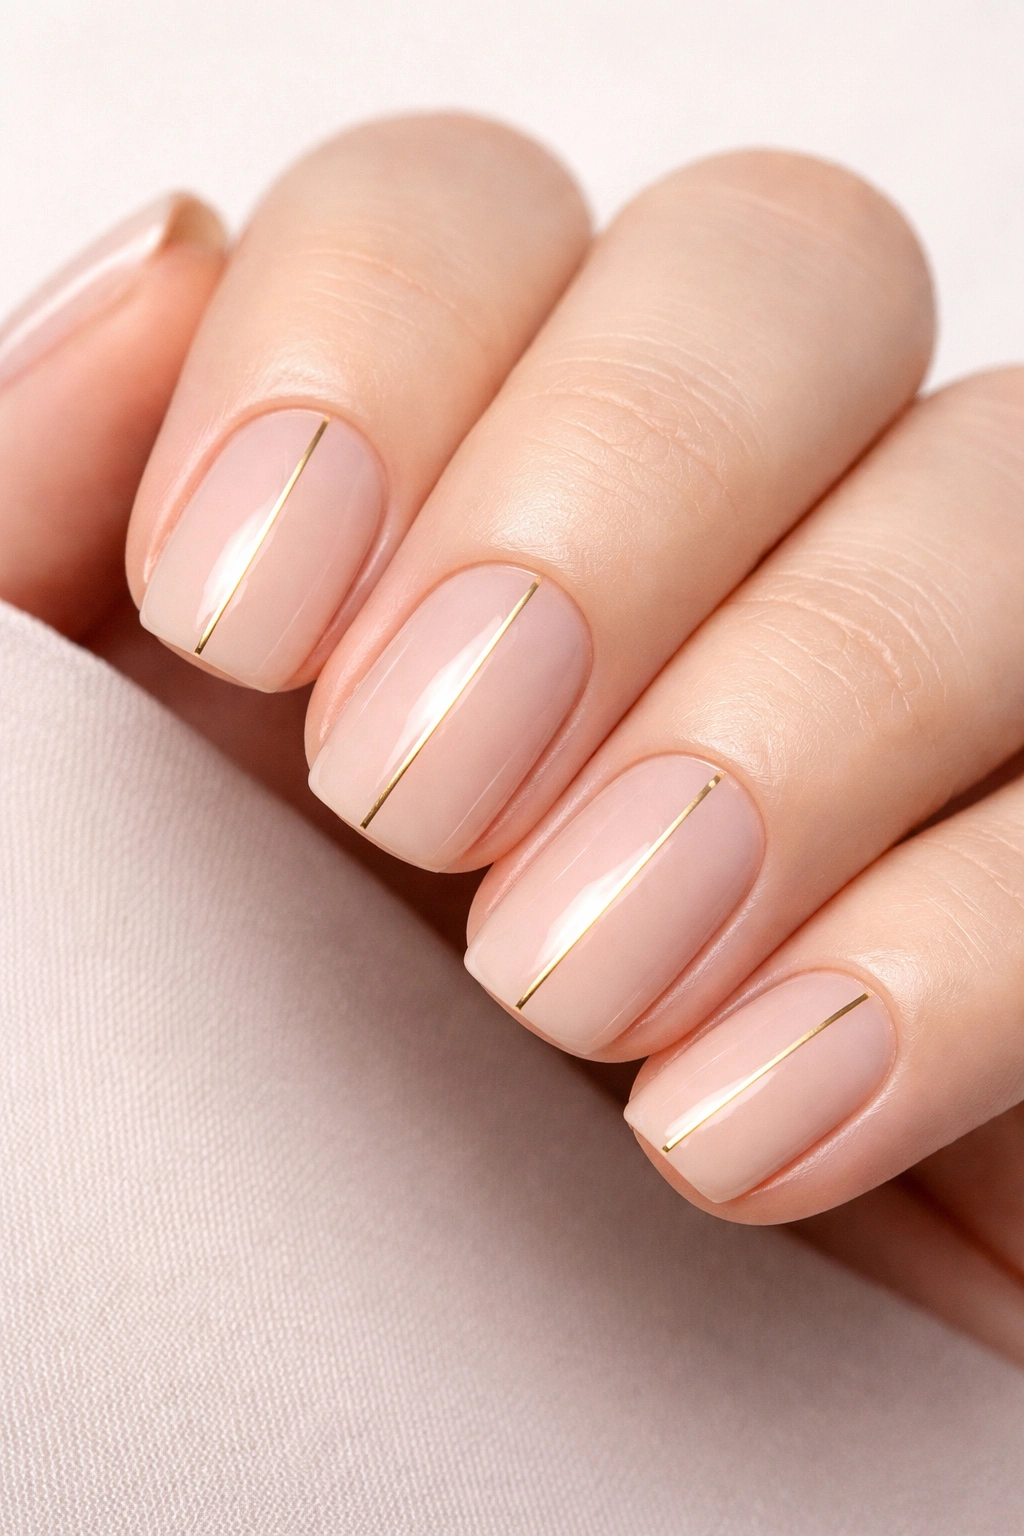
A minimalist approach that combines the practicality of an all-nude squoval with the visual lift of geometric line work. A single thin gold line might run down the center of each nail, or you could do thin lines at the cuticle and free edge creating a frame effect. The geometry should be precise and intentional.
The Psychology of Minimalist Nail Art
Thin metallic lines on a monochromatic base feel expensive and intentional because they require steady-hand application and restraint. On short squovals, this approach reads “sophisticated” rather than “trying too hard.” The gold creates subtle shine and catches light with movement, so even though it’s minimal, it’s still eye-catching.
Applying Metallic Line Work Precisely
- Use a thin liner brush or a fine nail art brush (sizes 000 or smaller work well)
- Chrome or metallic gel tends to apply more cleanly than metallic polish — if possible, request gel
- Practice the line on a paper template first if you’re working with a technician who’s new to your vision
- One thin line down the center of the nail works beautifully and is easier to execute than multiple lines
- Seal over the line work with a thick glossy topcoat to keep the metallic from chipping
Worth knowing: Gold looks warm and approachable on cool skin tones when paired with rose nude. On warmer skin tones, pure gold or champagne gold tends to glow. Choose based on your undertone.
7. Soft White Tips with Minimalist Design
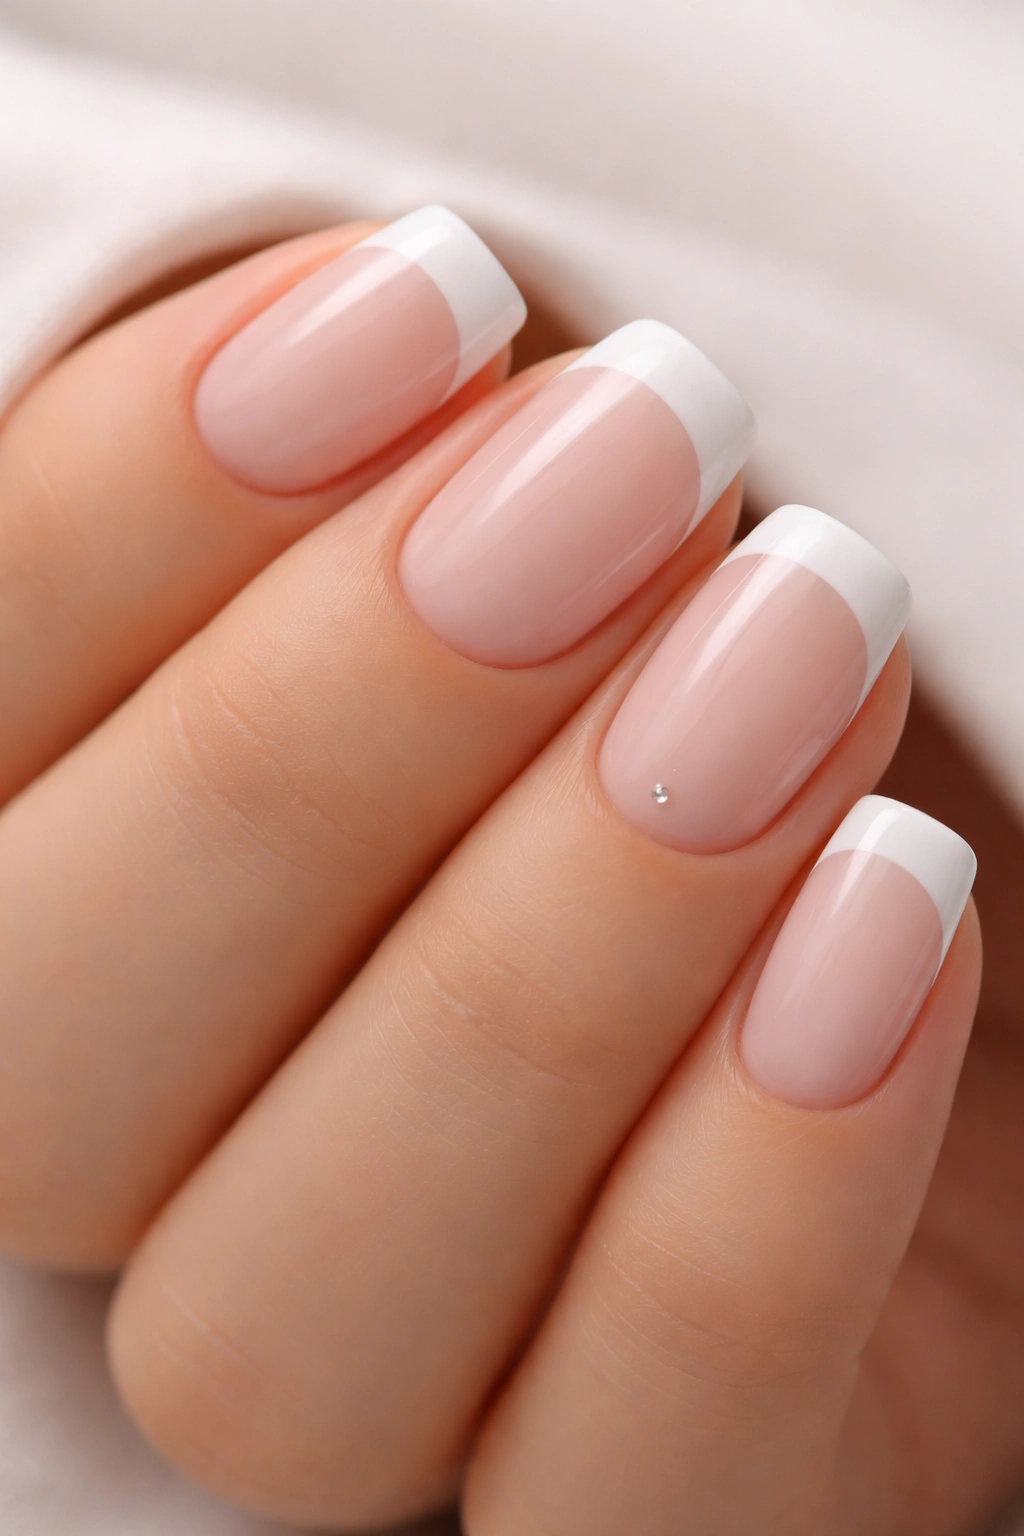
Start with a traditional white-tipped squoval on a pale pink base, then add the absolute smallest amount of intentional design detail. This could be a single tiny dot at the base of each nail, a minimalist line somewhere off-center, or perhaps a barely-there ombre fade within the white tip itself. The design element should feel like a secret detail rather than the main event.
Why Subtlety Reads as Luxury
Nail designs that are quiet and require a second glance to notice them actually read as more expensive and intentional than busy designs. On a short nail, a single thoughtful detail feels sophisticated. Many high-end manicurists specialize in exactly this level of restraint — design that feels present without demanding attention.
Executing Understated Detail Work
- Choose one very small detail: a single 2-3mm accent, a subtle ombre within the white, or a thin line somewhere unexpected
- The detail should be visible but require proximity to notice
- A hand-painted dot requires a thin liner brush and a very steady hand
- If you’re nervous about precision, a decal or sticker accent (sealed under topcoat) works beautifully
- Keep the rest of the nail completely clean with no other embellishment
Pro tip: Photograph this design in good lighting before the topcoat cures — the detail might be so subtle that it disappears in certain light, and you want to confirm it reads the way you intended.
8. Marble French Tips on Natural Base
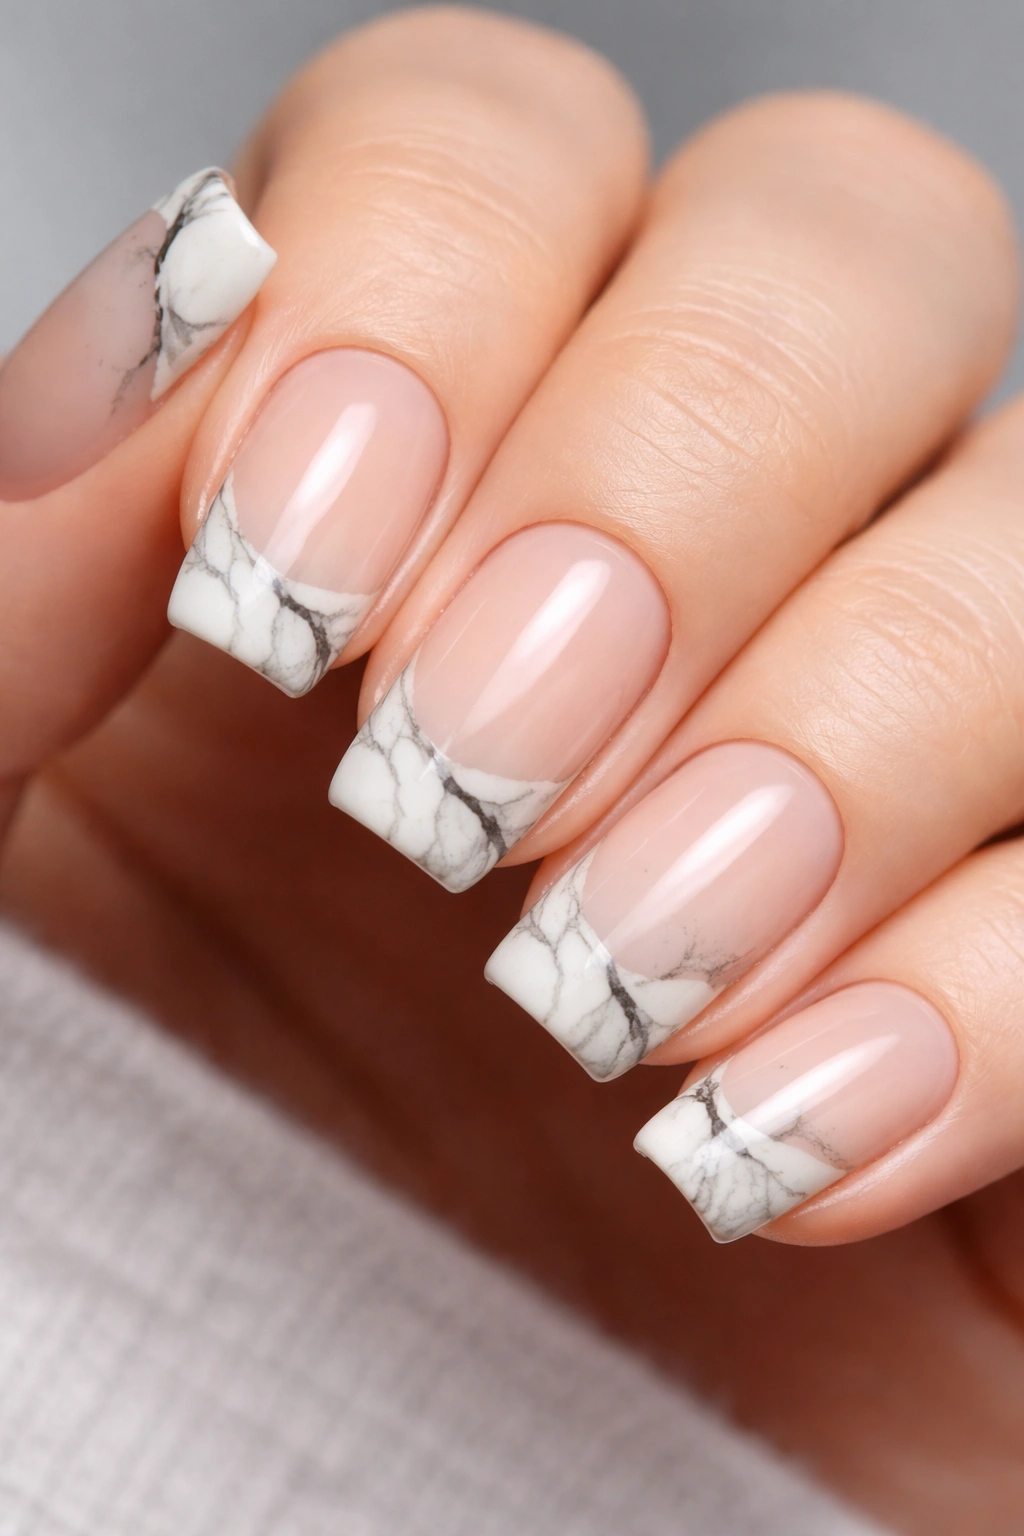
Real marble stone has organic veining and color variation. Recreating this effect in nail art means building a white or cream tip with delicate gray and black lines running through it, all over a pale nude or natural nail base. The veining should look random and organic, not geometric or controlled.
How Marble Creates Visual Interest Without Complexity
Marble pattern is complex to look at but conceptually simple — it’s just freehand line work over a colored base. On short squovals, marble tips add visual richness and texture that make the nail look more sophisticated. Because the design is organic rather than geometric, small imperfections actually enhance rather than detract from the effect.
Painting Marble Effect Successfully
- Apply your nude or natural base color first and cure it
- Create thin marble veins using a dark gray or black gel and a very thin brush — the lines should be wispy and organic, not straight
- The veins should be concentrated in the white tip area but maybe extend 1-2mm into the base color for a seamless effect
- Use varying line thickness for a more natural marble appearance
- Seal with glossy topcoat for a polished finish
Insider note: Some technicians use a toothpick or a thin blade tool to drag through partially-set gel to create veining — this can actually create a more naturalistic effect than hand-painting.
9. Matte White Tips with Glossy Nude Base
A textural contrast where the nude base is polished and shiny while the white tip is completely matte and velvety. This unexpected combination of finishes creates visual depth and interest that pure matte or pure glossy can’t achieve alone. The contrast is especially striking on short nails where the design difference is more noticeable.
Why Textural Contrast Elevates a Simple Design
When you shift finish between sections of the nail, you’re creating dimension without adding complexity. Matte and glossy reflect light completely differently, so even though the colors are simple and classic, the overall effect feels more curated. This is the kind of detail that separates “nice manicure” from “intentionally designed manicure.”
Achieving Perfect Matte-Glossy Contrast
- Apply your nude base with glossy topcoat and cure it
- Apply your white tip section and cure it
- For the matte effect, use a matte topcoat (not matte polish, which often chips faster) and apply it only to the white tip section
- Be precise at the line between matte and glossy — any overlap will create a muddy appearance
- Matte topcoats are slightly less durable than glossy, so you may need a retouch sooner
Worth knowing: Matte finishes show fingerprints and dust more visibly than glossy, and they can feel slightly chalky if you touch them frequently. You need to really love the aesthetic to commit to maintaining it.
10. Blush Pink Ombre to White Tip
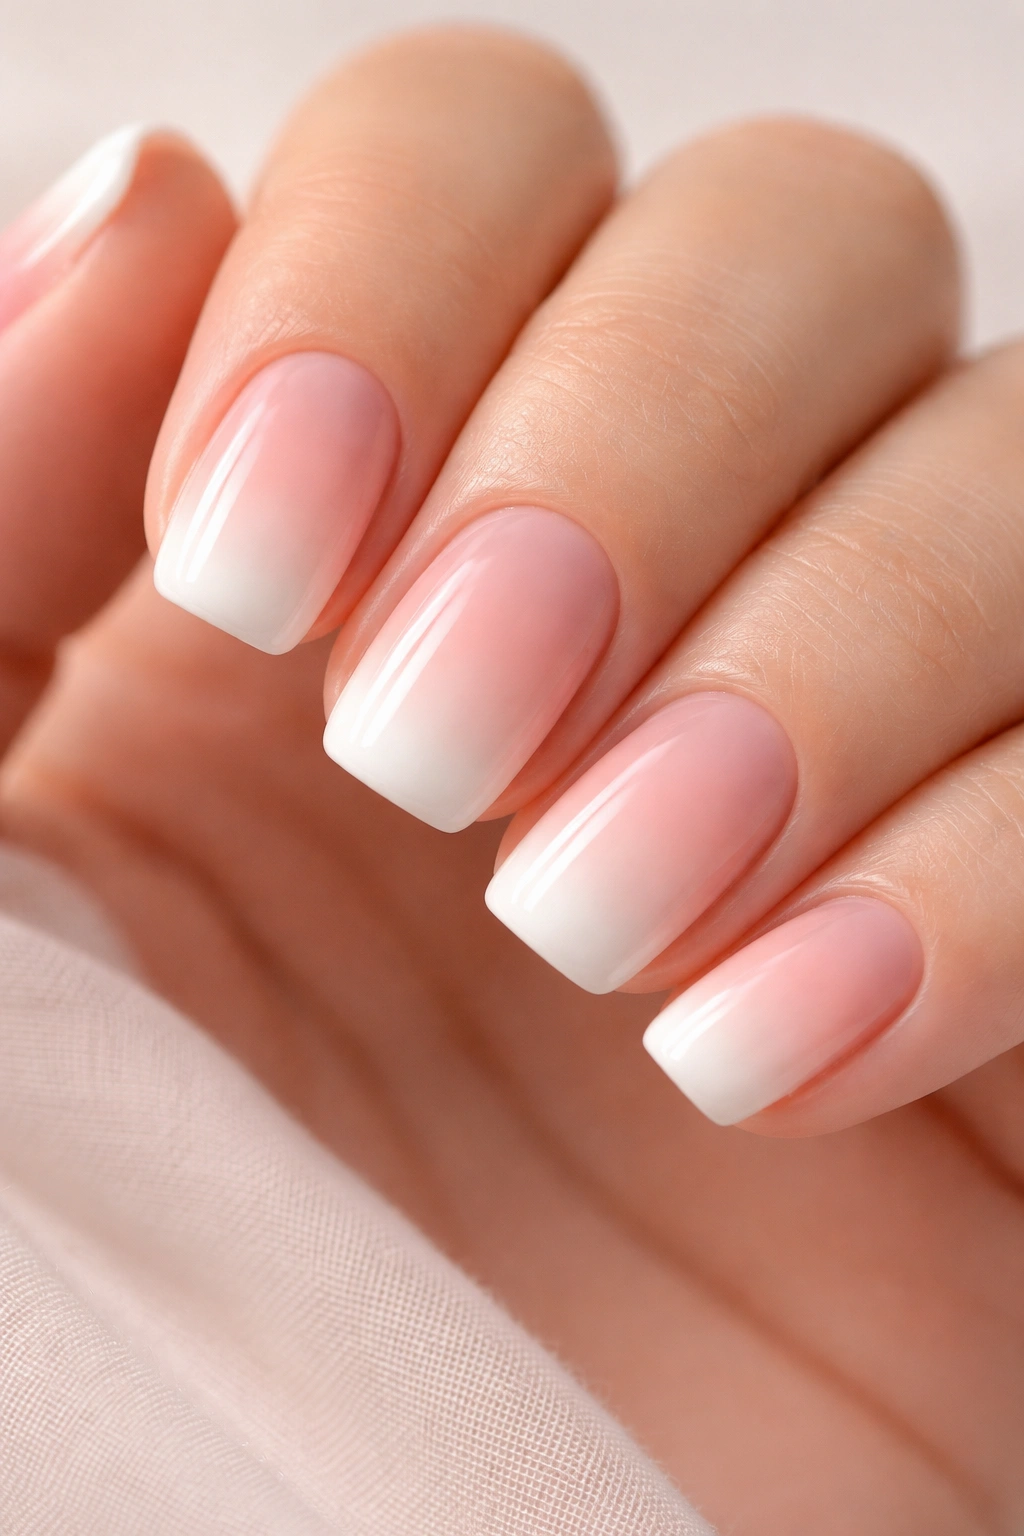
A subtle gradient that starts with deeper blush pink at the base, gradually lightens through mid-nail, and fades into white or pale cream at the tip. This is French tip design that flows seamlessly rather than showing a sharp color transition. The effect is soft, romantic, and flattering on almost every skin tone.
How Ombre French Tips Modernize a Classic
Traditional French tips have a defined line. Ombre French tips have that soft, artistic sensibility of modern nail design while still honoring the French tip concept. On a short squoval, the gradient creates the illusion of length because your eye travels along the color progression rather than stopping at a defined tip line.
Building a Perfect Ombre Gradient
- Select three gel colors: deep blush pink, medium blush pink, and white or pale cream
- Apply the deepest color to the base and blend it up about 1/3 of the nail
- Apply medium pink to the middle section, blending upward and downward
- Apply white to the tip, blending down into the medium pink
- Use a damp brush or makeup sponge between colors to create soft transitions
- Each transition zone should be gradual across about 5-7mm of nail
Pro tip: Don’t try to make the blend perfectly smooth on the first coat — build it gradually over 2-3 layers, blending more gently each time. This creates a more natural, sophisticated gradient than trying to perfect it in one application.
11. Chrome French Tips Over Nude
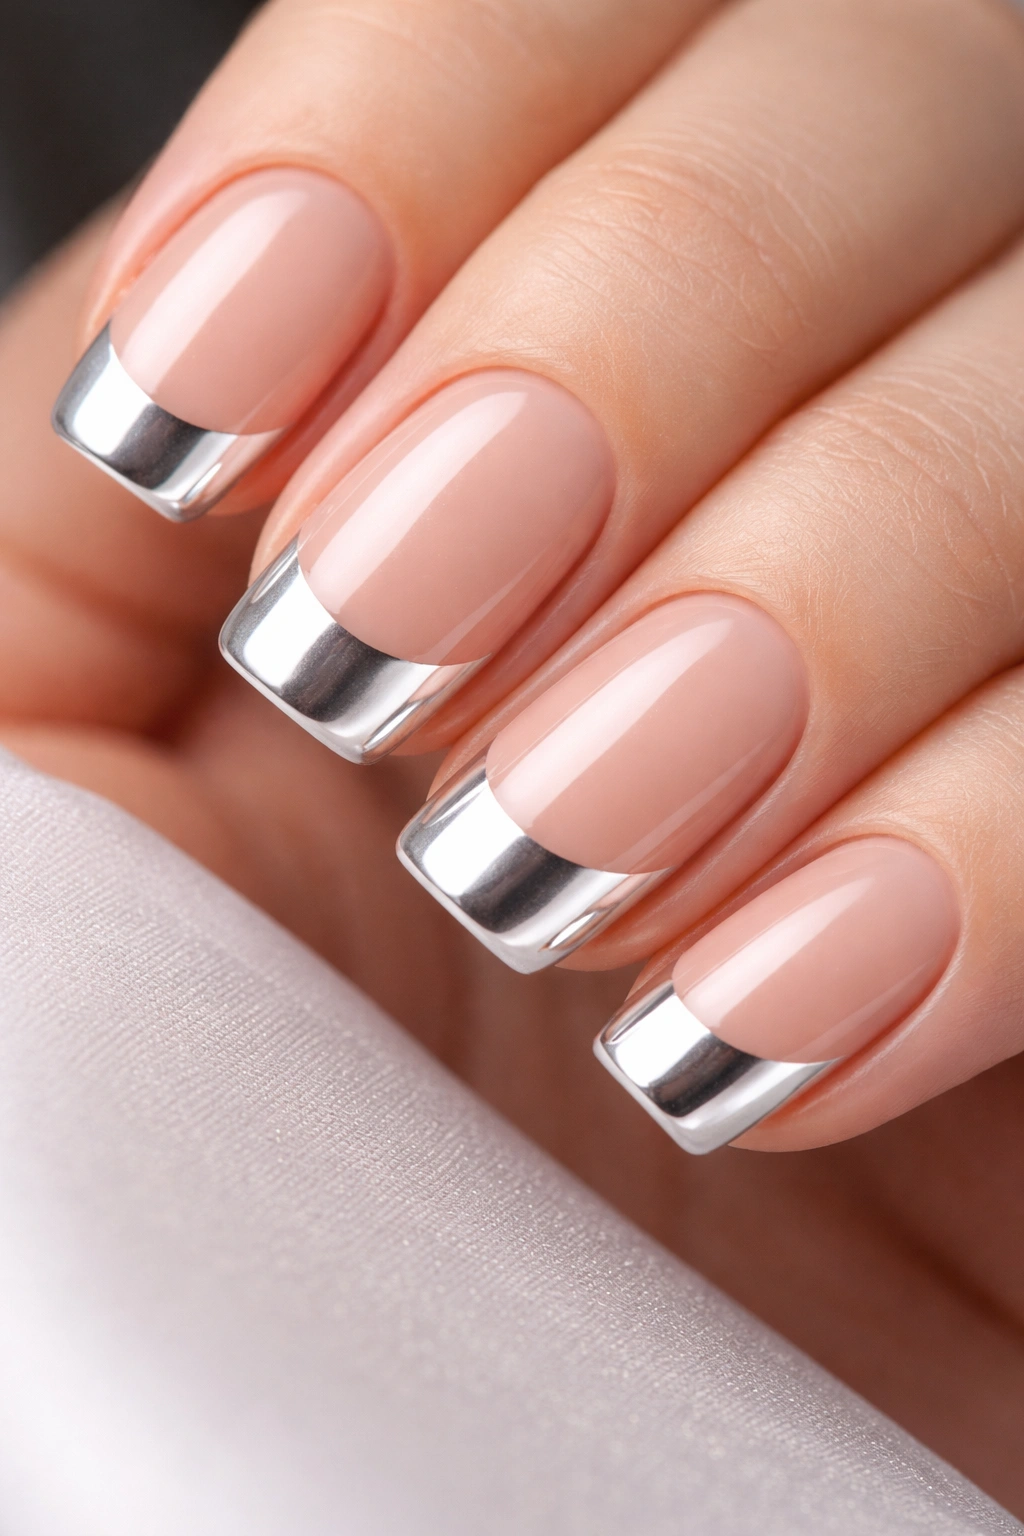
Chrome powder creates a mirror-finish metallic effect that’s unlike anything else in nails. Applied only to the white tip area over a warm nude or beige base, chrome creates futuristic sophistication. The mirror finish catches light at every angle, creating an effect that reads expensive and modern.
Why Chrome Feels High-End
Chrome has serious visual impact because it genuinely looks reflective and three-dimensional. On short squovals, chrome tips create a striking focal point without overwhelming the nail. Because chrome is applied as a powder over gel (not as a built-up layer), it doesn’t add actual thickness or compromise the nail’s durability.
Applying Chrome for Maximum Effect
- Build your nude or warm beige base and cure it fully
- Create a white or pale yellow base in the tip area (chrome shows up best over light colors)
- Apply a tacky gel layer over the white tip
- Rub chrome powder over the tacky layer using a soft brush or applicator pad — use even pressure in all directions
- Seal with a thick topcoat and cure
- The chrome shouldn’t have streaks or bald spots — if it does, that’s usually an application error worth addressing
Insider note: Chrome powder requires a specific sealing technique to look perfect. Ask your technician if they have experience applying chrome — there’s definitely a learning curve.
12. White Tips with Black Geometric Lines
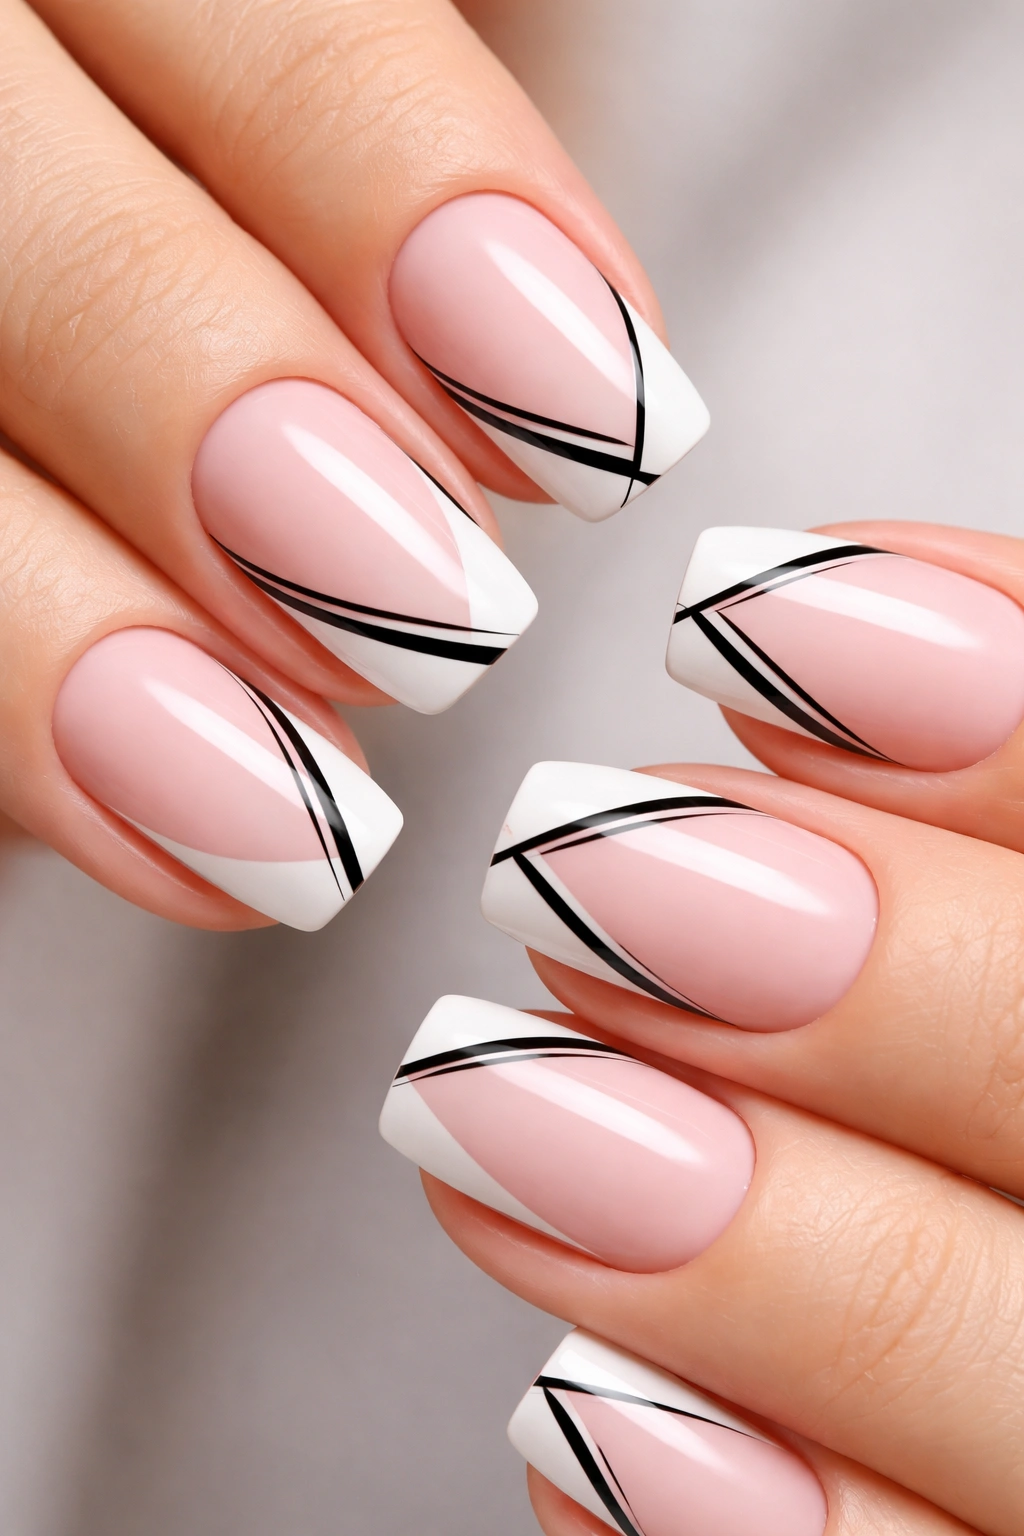
High-contrast graphic design on a white tip paired with a pale pink or soft beige base. The black lines could form a grid, a minimalist triangle, or simple parallel lines — the key is that the design is geometric and intentional. This creates a bold, artistic look that reads creative without being maximalist.
How Geometry Creates Visual Impact
Geometric line work reads modern and intentional because clean lines require steady-hand application and careful planning. On short squovals, black lines on a white tip create strong contrast that reads clearly. This design works beautifully if you want something that feels artistic but still professional.
Applying Black Geometric Design
- Plan your design beforehand — sketch it on a nail wheel or paper template
- Apply your pale base color to the entire nail and cure
- Apply clean white to the tip area and cure
- Use a thin liner brush and black gel to paint your geometric design
- Black gel should be opaque in one coat, but if needed, apply a second layer for deeper color
- Seal with glossy topcoat
- Straight lines should be painted in one smooth motion if possible — trying to correct a wobbly line usually makes it worse
Worth knowing: Black on white is high-contrast and reads bold. If you want something less dramatic, consider dark gray or navy instead — it still reads intentional but feels slightly softer.
13. Pearlescent Shimmer French Tips
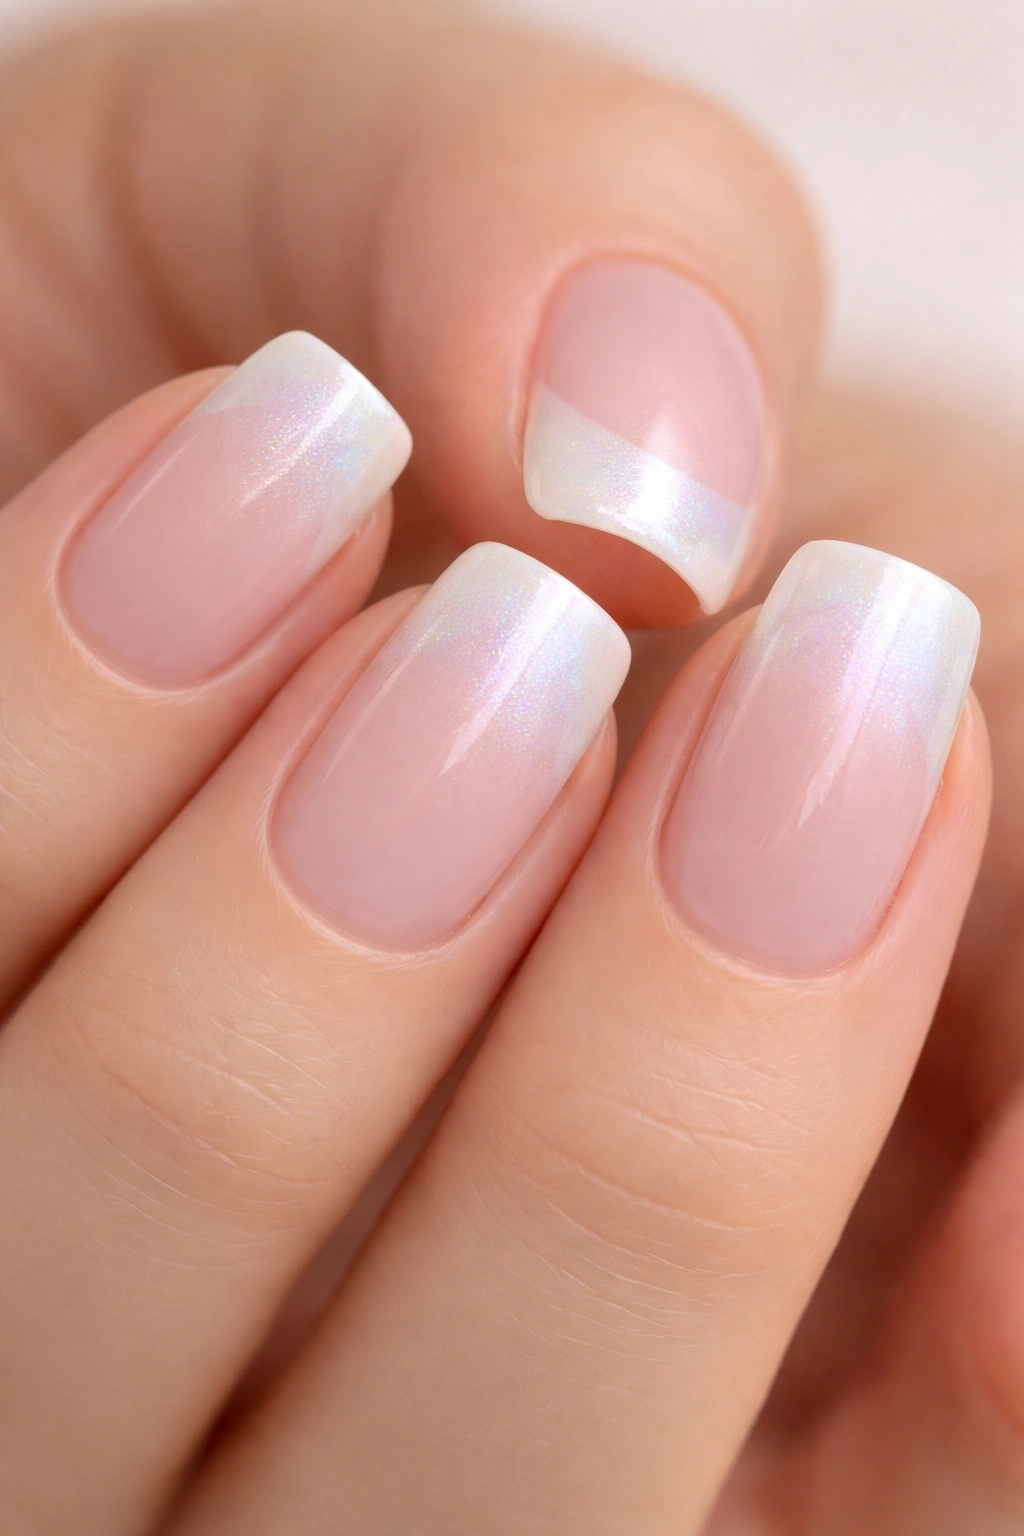
A white or nude tip area infused with pearlescent shimmer rather than flat color. Pearlescent creates a subtle, shifting iridescence that catches light differently depending on angle and lighting. This effect is sophisticated and catches light beautifully without reading as glittery or costume-like.
Why Shimmer Works Better Than You Might Think
Pearlescent effects look clean and refined rather than sparkly because the shimmer is contained within the color rather than being a separate element. On short squovals, pearlescent tips add visual interest and luminosity. From certain angles the tips might show hints of pink or blue; from other angles they’re pure white — this shifting quality makes the nails more engaging to look at.
Creating Pearlescent Effects
- Use pearlescent gel specifically (not regular shimmer gel) — the particles are smaller and create a more sophisticated effect
- Apply a white or pale cream base to the tip area first
- Mix pearlescent gel into clear gel (about 1 part pearlescent to 3 parts clear) for a sheer, luminous effect
- Or apply pure pearlescent gel for maximum shimmer intensity
- Seal with glossy topcoat to enhance the pearlescent quality
- The effect should look like the polish itself is iridescent, not like you added sparkle on top
Pro tip: Pearlescent tends to show up best in natural light or under LED lighting — under warm incandescent light, the effect can get lost. Consider where you spend most of your time when choosing shimmer intensity.
14. Warm Caramel and Vanilla Swirl
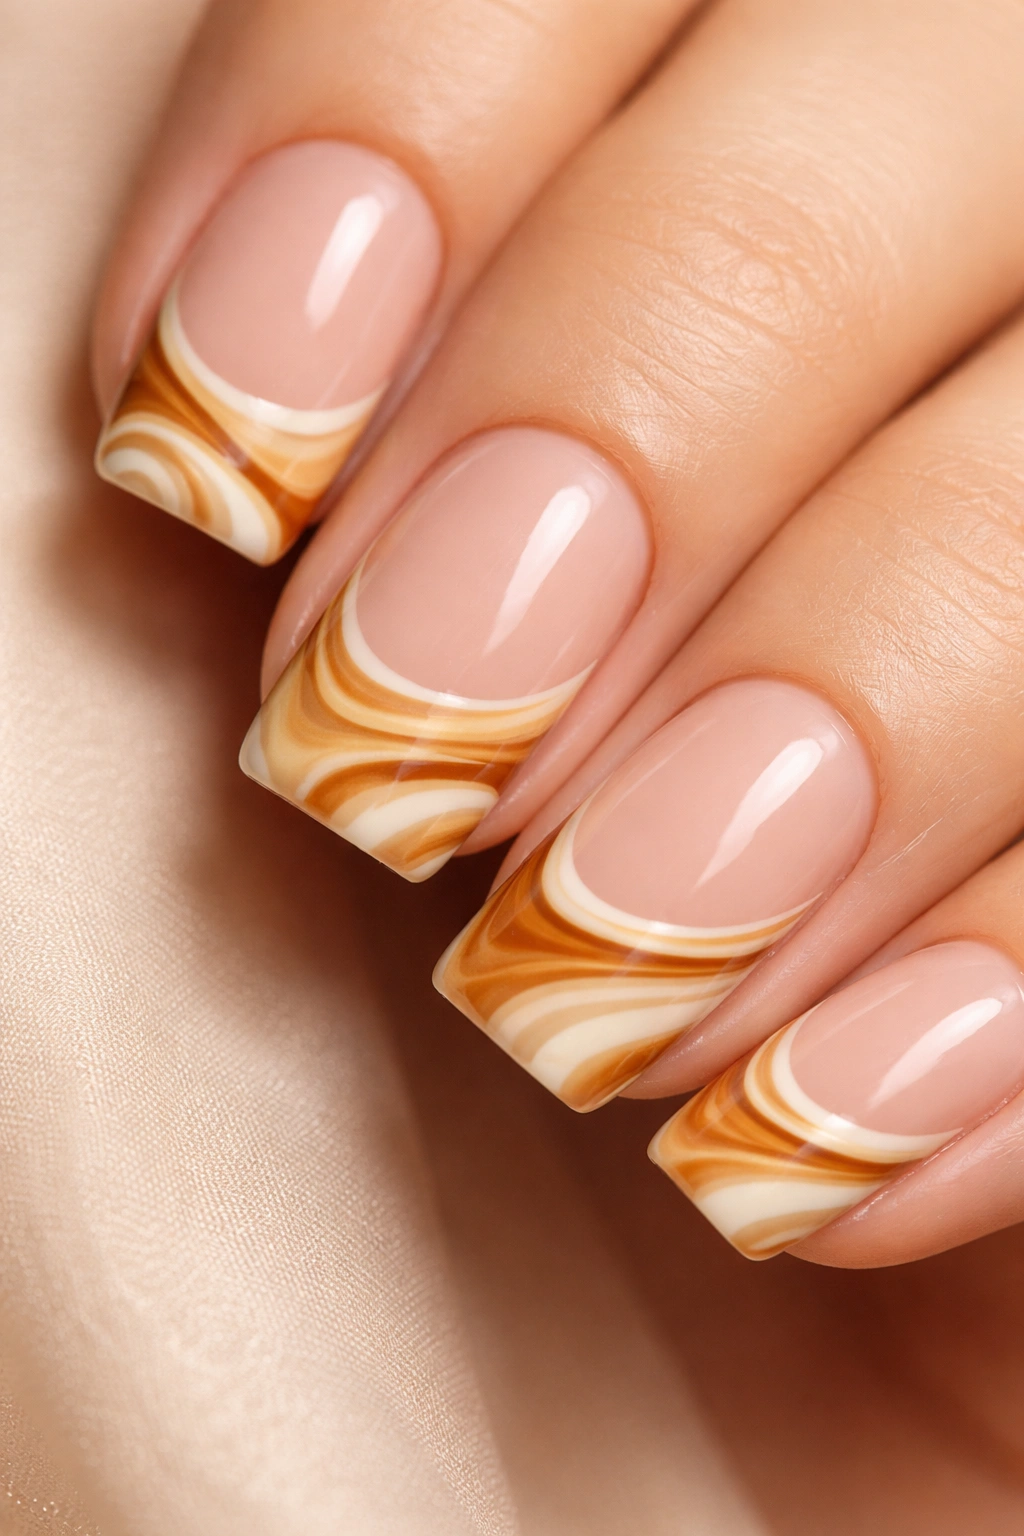
A playful blend of warm caramel and creamy vanilla creating a swirled effect at the tip. Rather than defined color blocks, caramel and vanilla are painted together with dragging and swirling motions to create organic, flowing patterns. This reads fun and artistic while staying in the classic warm neutral color family.
How Swirled Design Balances Playfulness and Sophistication
Swirled nail design feels artistic and whimsical, but when executed with elegant colors like caramel and vanilla, it reads sophisticated rather than childish. On short squovals, the swirled pattern creates visual motion and interest. The warm neutral tones mean this design works in professional and casual settings equally well.
Executing the Swirl Effect
- Choose your two gel colors (warm caramel and creamy vanilla work beautifully together)
- Apply both colors to the tip area in separate sections
- Use a thin brush or toothpick to drag and swirl the colors together, creating organic veining and blending
- Work quickly before the gel sets — once partially set, it’s hard to move the color around
- The swirl shouldn’t be perfectly symmetrical or controlled — organic imperfection is actually the goal
- Seal with glossy topcoat
Insider note: Tell your technician to embrace the imperfection — overworking a swirl trying to perfect it usually ruins the organic quality. This is one design where “happy accident” is actually the ideal outcome.
15. Sheer Nude with Gold Leaf Tips
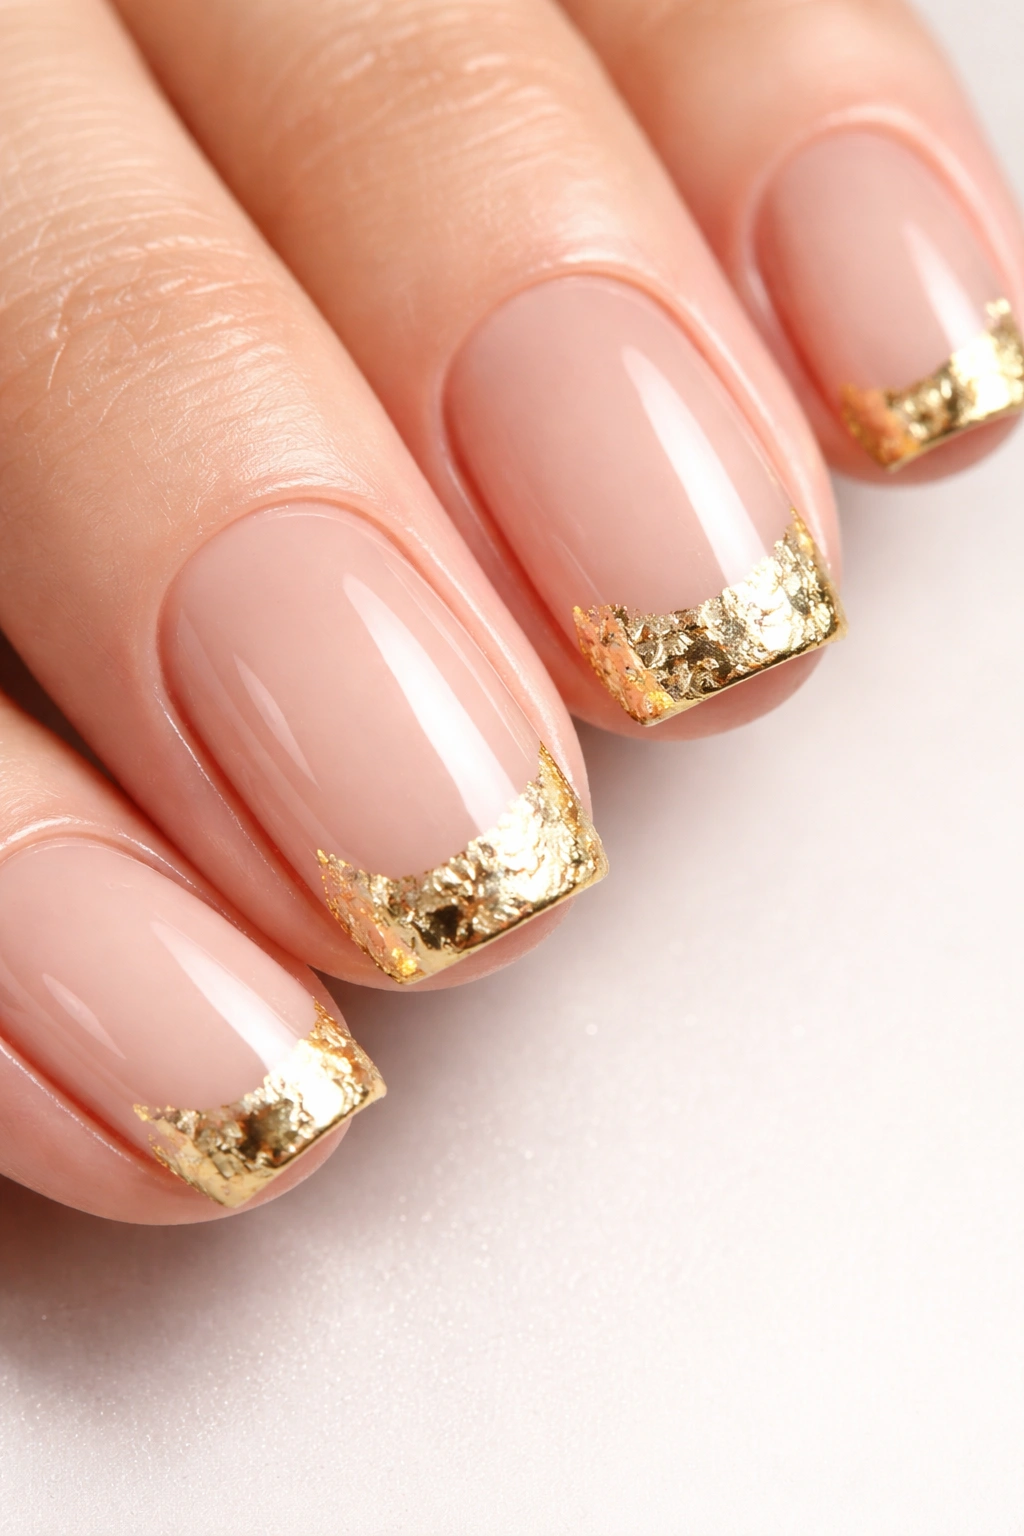
This design combines naked or sheer nude acrylic (so you can still see the nail bed through it) with actual gold leaf applied at the tip. The combination feels botanical and luxury. Gold leaf catches light like no other element and creates an expensive, curated appearance that makes short nails look intentional and designed.
Why Gold Leaf Creates Legitimate Luxury
Gold leaf is genuinely reflective and dimensional in a way that painted gold can never quite achieve. Applied to the tip of a sheer nude squoval, it reads high-end and editorial. This design requires a technician with specific experience applying leaf, but the results are worth seeking out.
Applying Gold Leaf Successfully
- Sheer nude acrylic (sometimes called “builder gel” or “clear-based acrylic”) should be applied to create a natural nail appearance with slight coverage
- The entire nail should look nearly transparent with just a hint of color and smoothness
- Gold leaf is applied to the white tip area using a specific adhesive layer and careful positioning
- The leaf should be sealed completely under glossy topcoat to prevent flaking
- Application requires a gentle hand and patience — rushing this step causes the leaf to tear or wrinkle
Worth knowing: Gold leaf on sheer nude is genuinely a luxury manicure — expect to pay premium pricing for this design because the technique is specialized and requires real skill. The results justify the cost.
Final Thoughts
Short squoval French tips occupy this magical space where elegance meets practicality. They’re sophisticated enough for any setting yet durable enough for real life. Whether you choose something timeless like a classic white tip or go bold with marble veining or gold leaf, the squoval shape carries the design beautifully. The designs above represent different aesthetics and skill levels — some can be executed by any experienced nail technician, while others require someone with specific expertise. When you find a technician you trust, showing them these specific descriptions helps ensure you get exactly what you’re envisioning.
The versatility of these designs means you can switch between looks every few weeks without ever getting bored. One month you might prefer the minimalist sophistication of a gold line on nude, and the next month you’re ready for the artistic boldness of marble veining. That’s the real strength of this shape and style combination — it grows with your preferences and mood while always reading as thoughtfully designed. Your nails deserve that kind of intentionality.
