

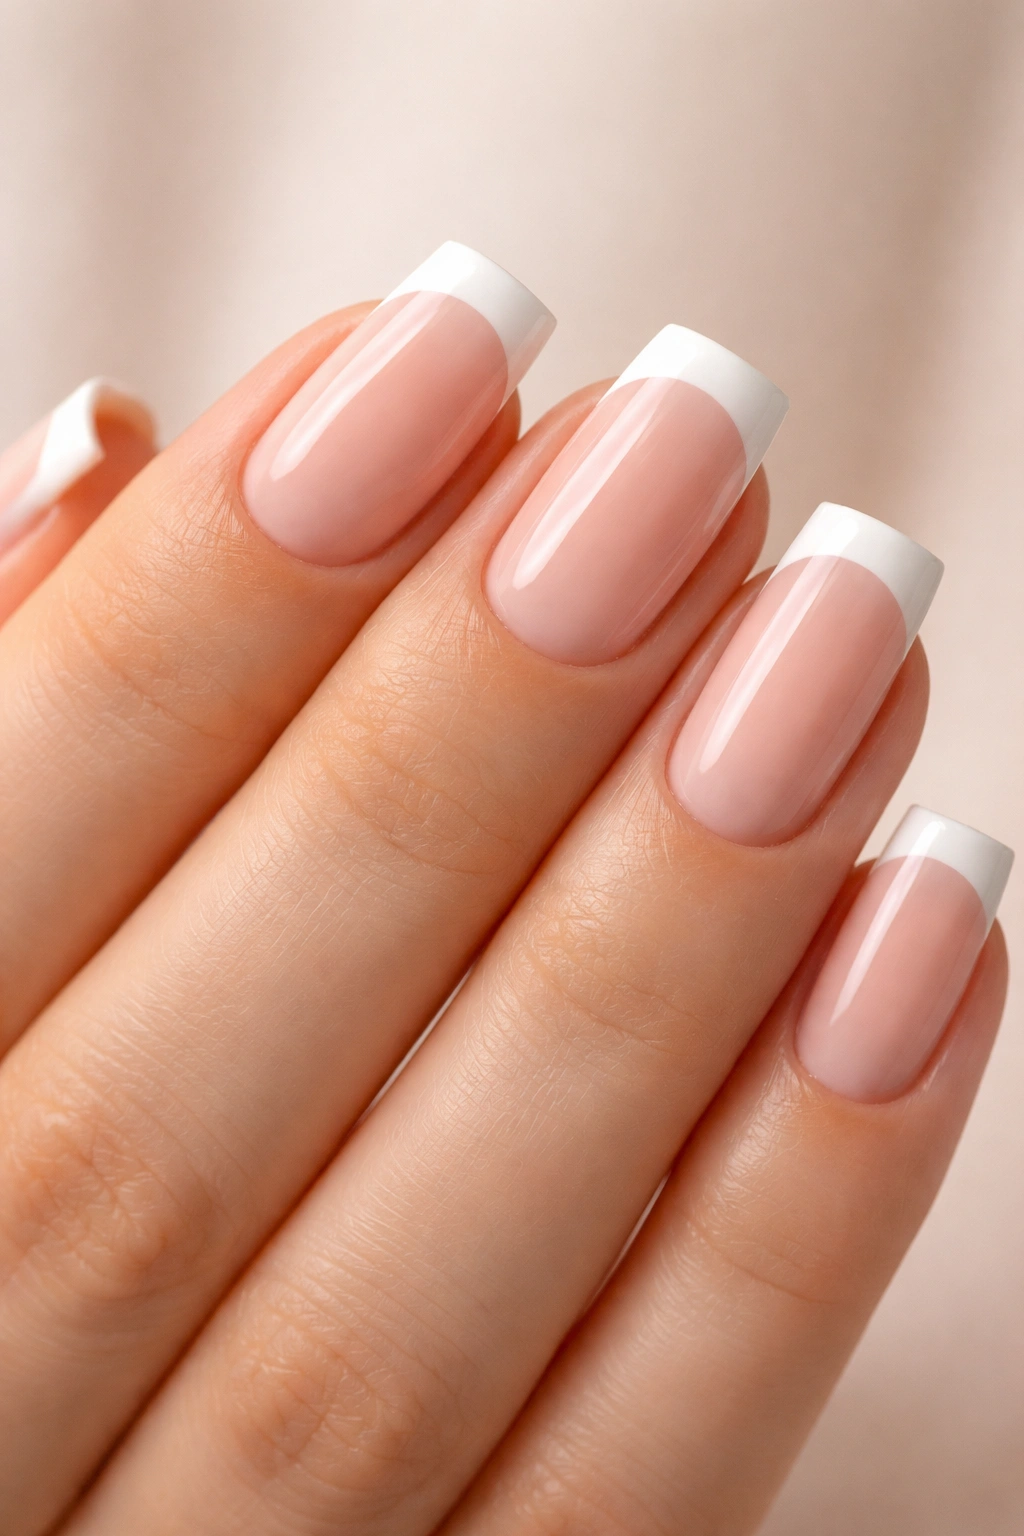
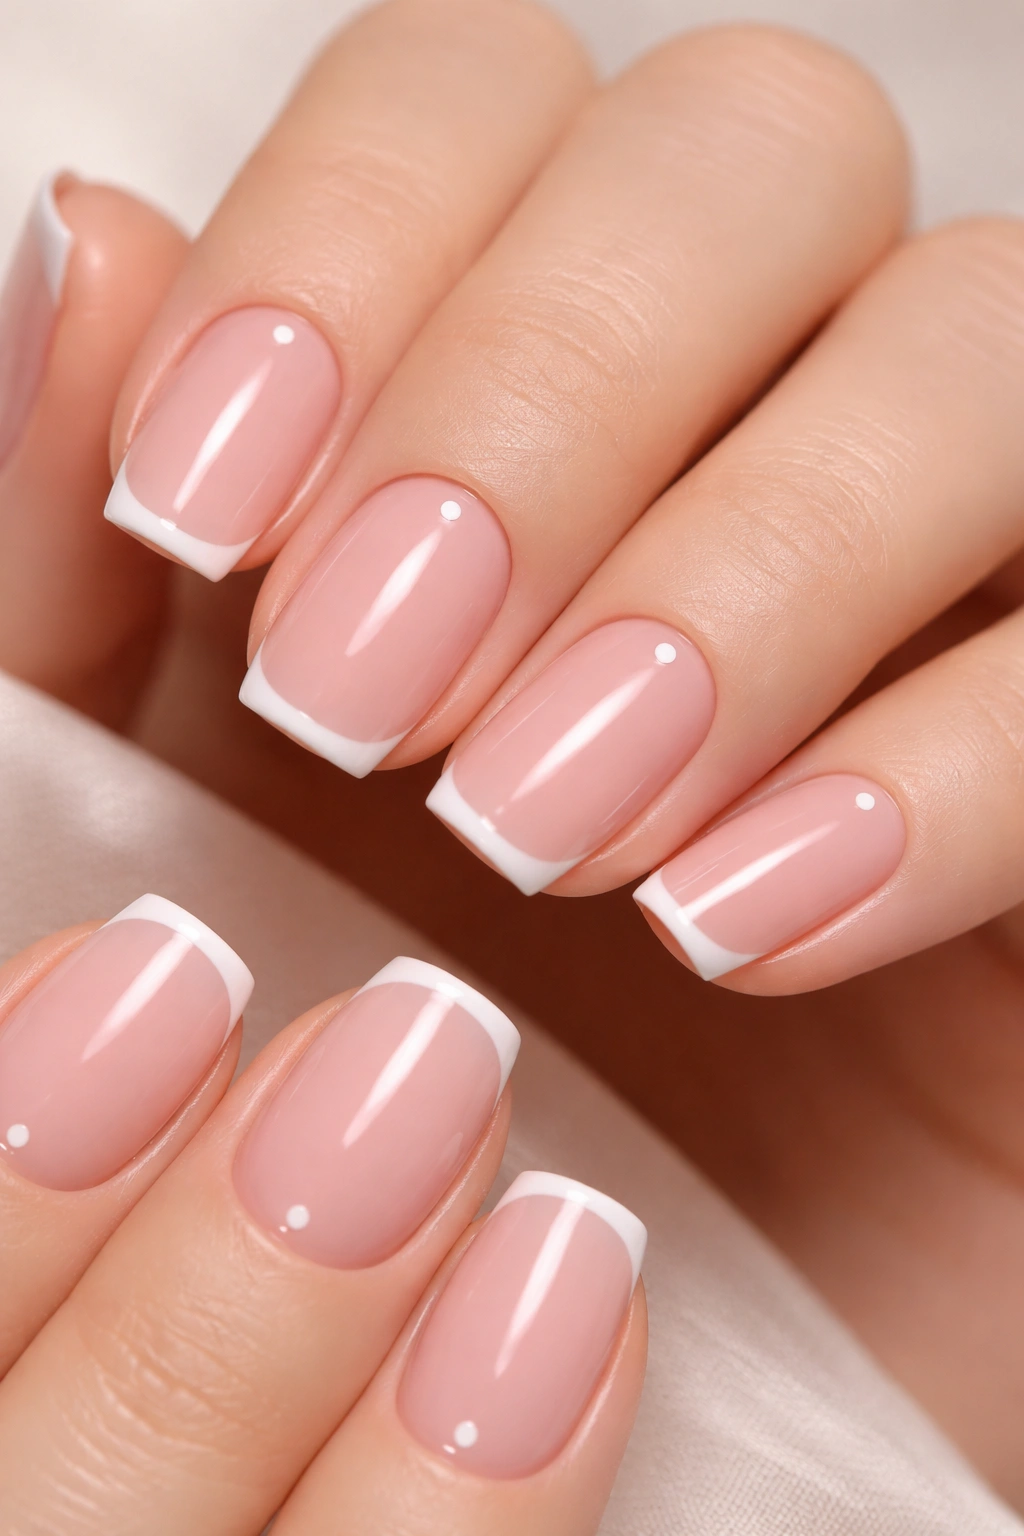
There’s something about a soft square nail in soft pink with delicate white French tips that just says “I have my life together”—even if you absolutely don’t. This aesthetic has completely dominated the nail world over the past few years, and for good reason. It’s elegant without being pretentious, it elongates your fingers without the drama of stilettos, and it works for literally every occasion from a board meeting to brunch to your cousin’s wedding. The soft pink base creates this incredibly soothing, sophisticated canvas, while the white tips add just enough definition and contrast to keep things interesting. Square nails in particular have this perfect balance: they’re not as edgy as coffins, not as safe as rounds, and they somehow make your hands look more elegant without requiring actual effort.
But here’s the thing—there are so many ways to execute this look, and the variations can take you from barely-there minimalist chic to something with more personality and dimension. Whether you want something with shimmer, gold accents, ombré effects, or clever negative space details, soft square pink French tips are incredibly versatile. The key is knowing which direction resonates with your own style and what actually works with your lifestyle.
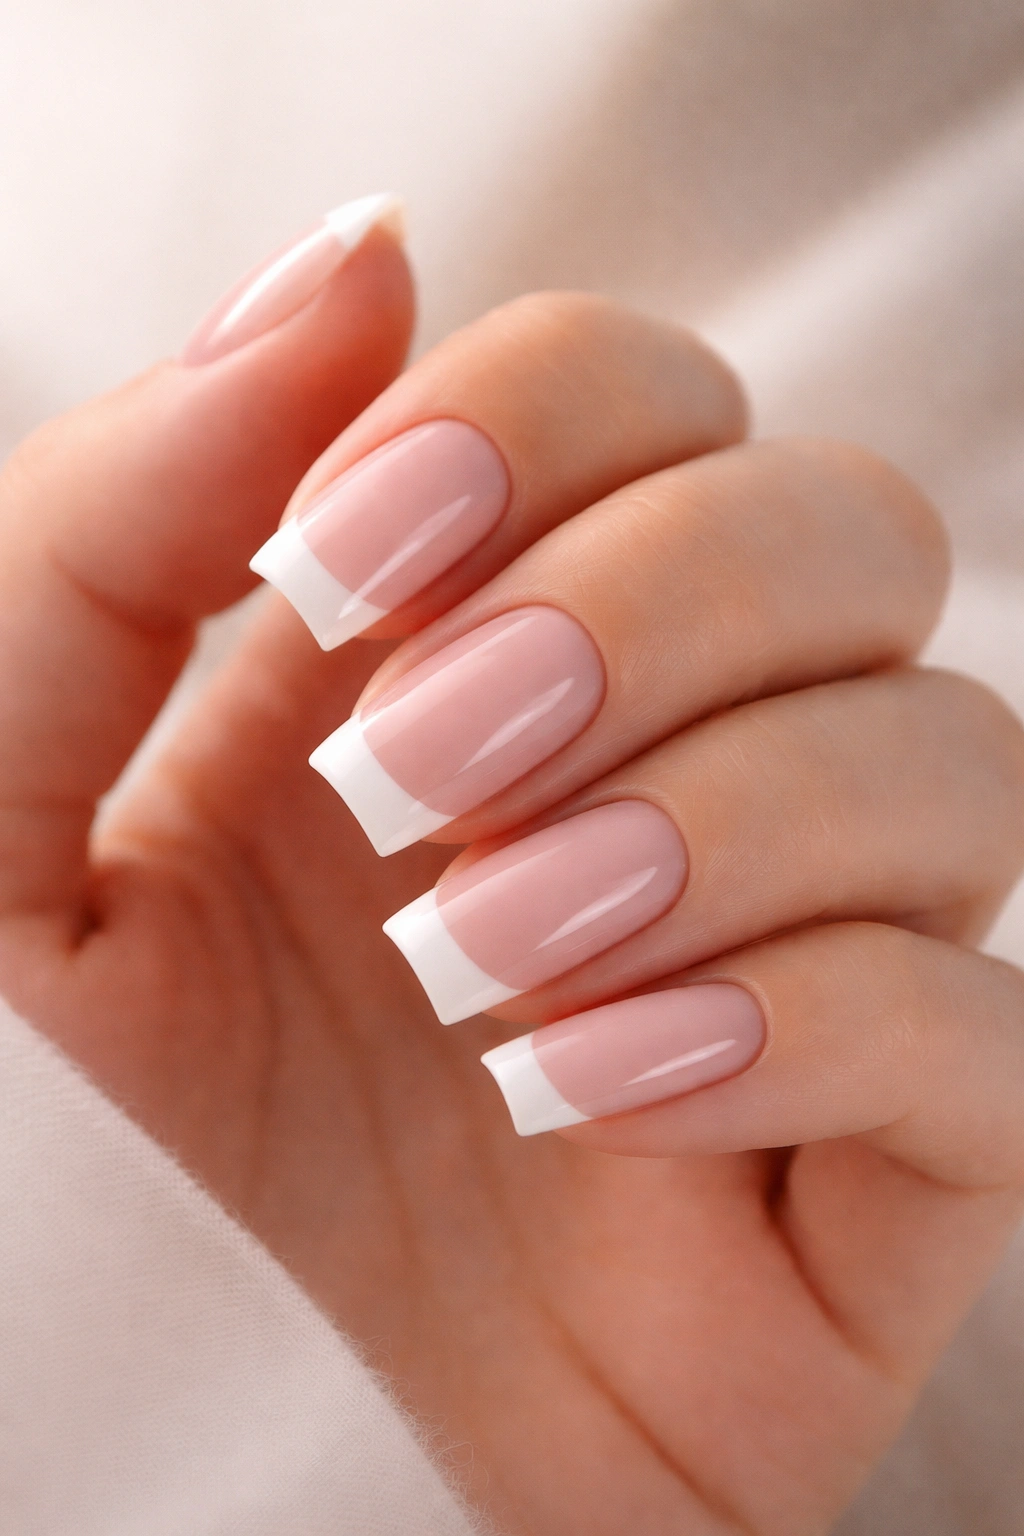
1. Classic Blush and White
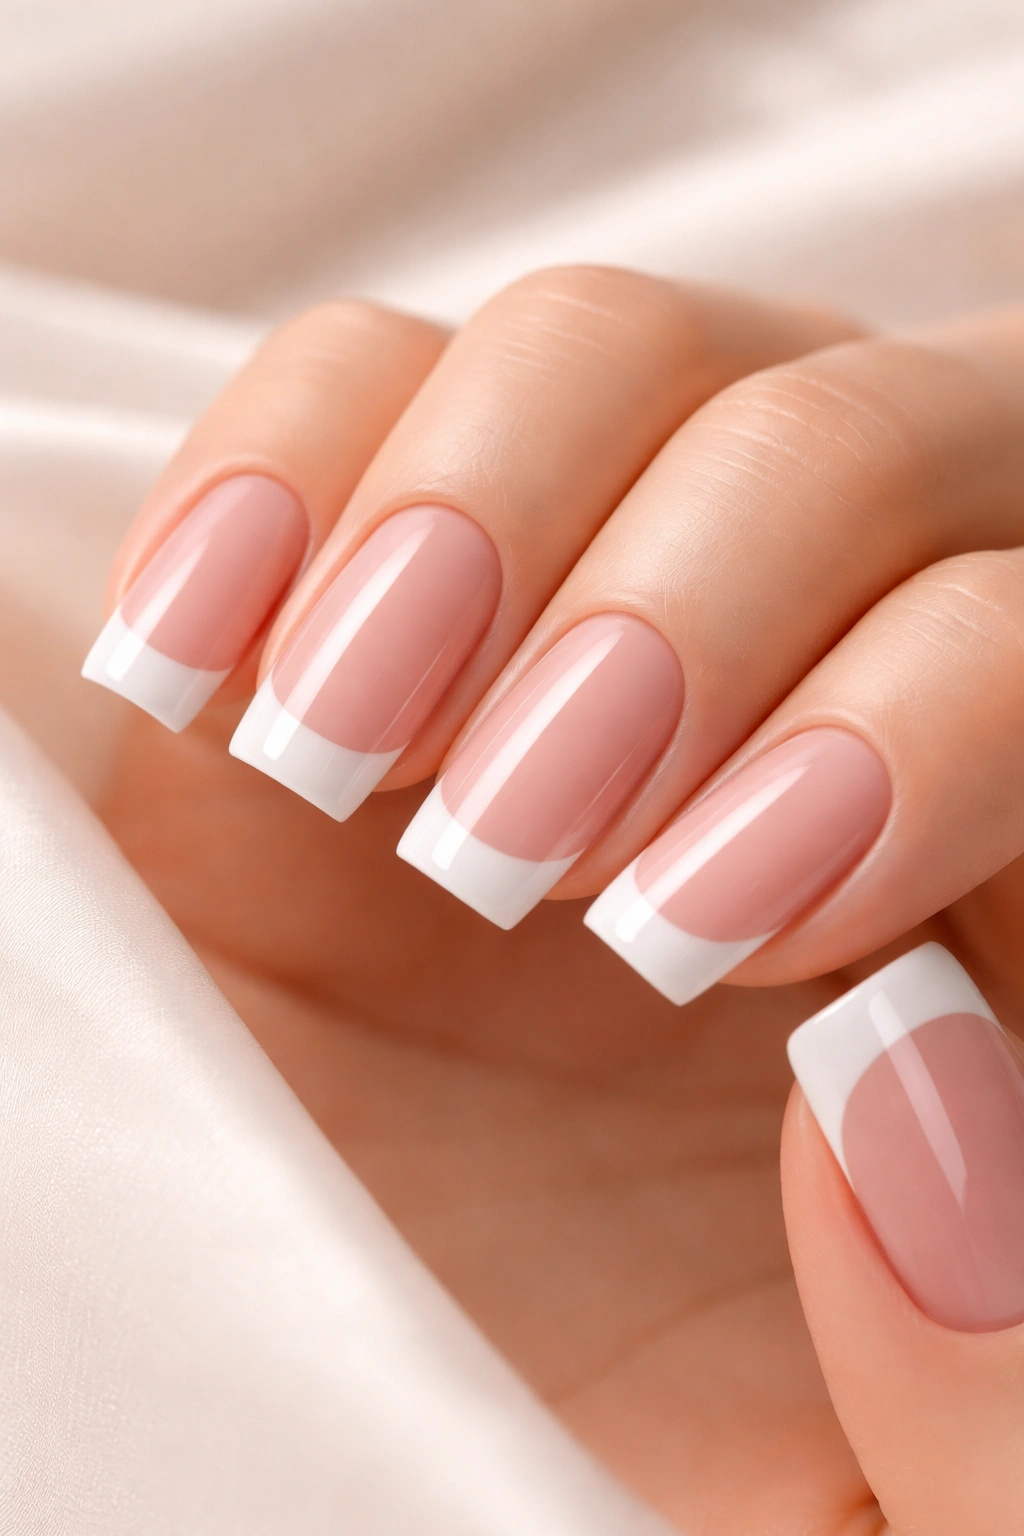
Let’s start with the purest version of this trend: a warm blush pink base with a crisp white French tip. This isn’t trendy for no reason—it’s genuinely flattering on virtually every skin tone, because blush pink sits right in that warm-but-neutral sweet spot that feels both timeless and current.
Why This Design Works So Well
The magic here is in the proportions. A traditional French tip covers roughly the top eighth of your nail, and on a square shape, that ratio looks incredibly balanced and professional. The blush pink (which sits somewhere between ballet and dusty rose) has just enough warmth to feel present without being loud, while the white tip creates clear, graphic contrast. This combination literally tricks the eye into making your fingers look longer and more elegant—there’s actual science to the geometry of negative space and color blocking that makes this work.
How to Achieve the Look
The base should be smooth, creamy, and opaque enough that you need just two coats to cover completely. A quality soft pink from brands that specialize in nail color will be your best bet—you want something with good pigment that doesn’t go streaky or patchy. For the white tips, you have two options: use a thin striping brush to hand-paint the line with precision, or use a guide tape to create perfectly clean edges. If hand-painting feels intimidating, guide tape is absolutely your friend and creates sharper lines than most people can freehand anyway. Finish with a glossy top coat for that professional shine.
Pro tip: The blush-to-white ratio matters. Paint your white tips slightly thinner than you think they should be—it reads as more intentional and sophisticated than chunky tips.
2. Dusty Rose with Pearl Accents
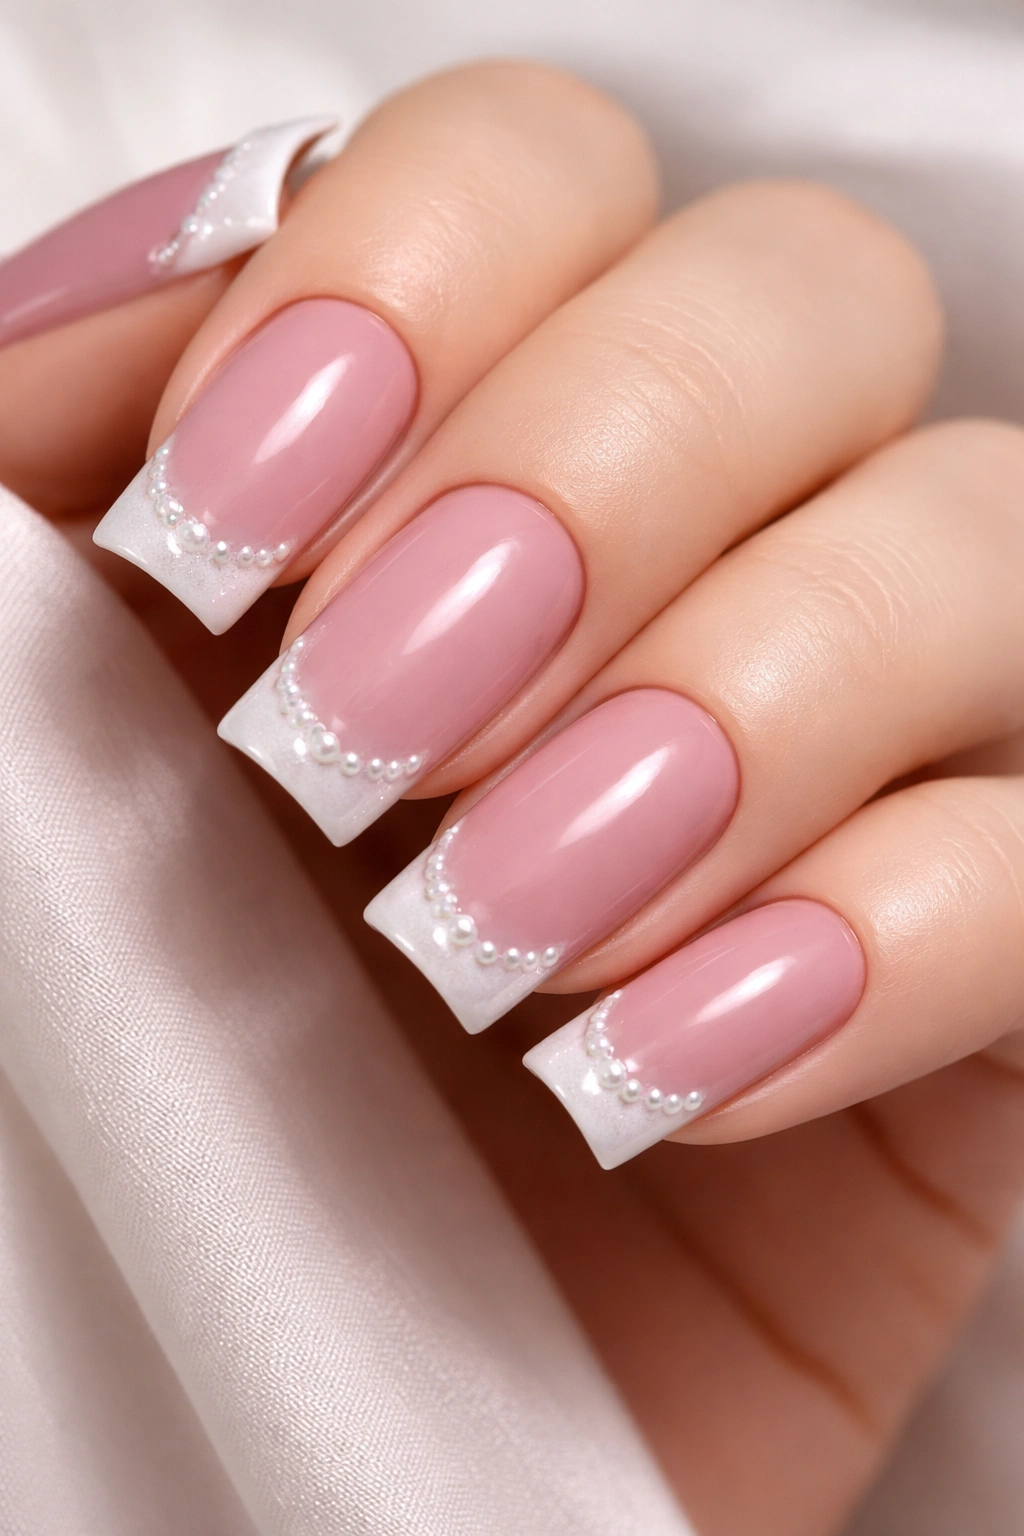
This version takes the classic French tip concept and adds a whisper of luxury in the form of subtle pearl shimmer. Dusty rose (also called mauve-pink or muted rose) is slightly deeper and more sophisticated than blush, which makes it feel a little more editorial and modern.
The Appeal of Pearl Elements
Pearl pigment catches light in a way that’s completely different from glitter—it’s softer, more ethereal, and genuinely flatters the nail without overwhelming the design. By placing pearl accents specifically on the white tip area, you’re adding dimension and a subtle luxury feel without making the manicure look overdone. The effect is especially beautiful under indoor lighting, where it picks up tiny gleams that make your hands look healthy and well-cared-for.
Application Tips
Start with a creamy dusty rose base coat (two thin coats works better than one thick coat). Once that’s fully cured, paint the white French tips. While the white tip polish is still tacky, you can either dust pearl pigment powder onto specific areas, or use a pearl-embedded polish as your tip color. If using powder, a light hand is crucial—you want scattered pearl particles, not a dense coating. The white creates the structure, and the pearl acts like jewelry for your nails.
Worth knowing: Pearl accents show up best under certain light conditions. They’re beautiful under cool overhead lighting but truly spectacular in natural daylight. If you spend a lot of time indoors, you might prefer something with more visible sparkle.
3. Milky Pink Base with Thin White Tips
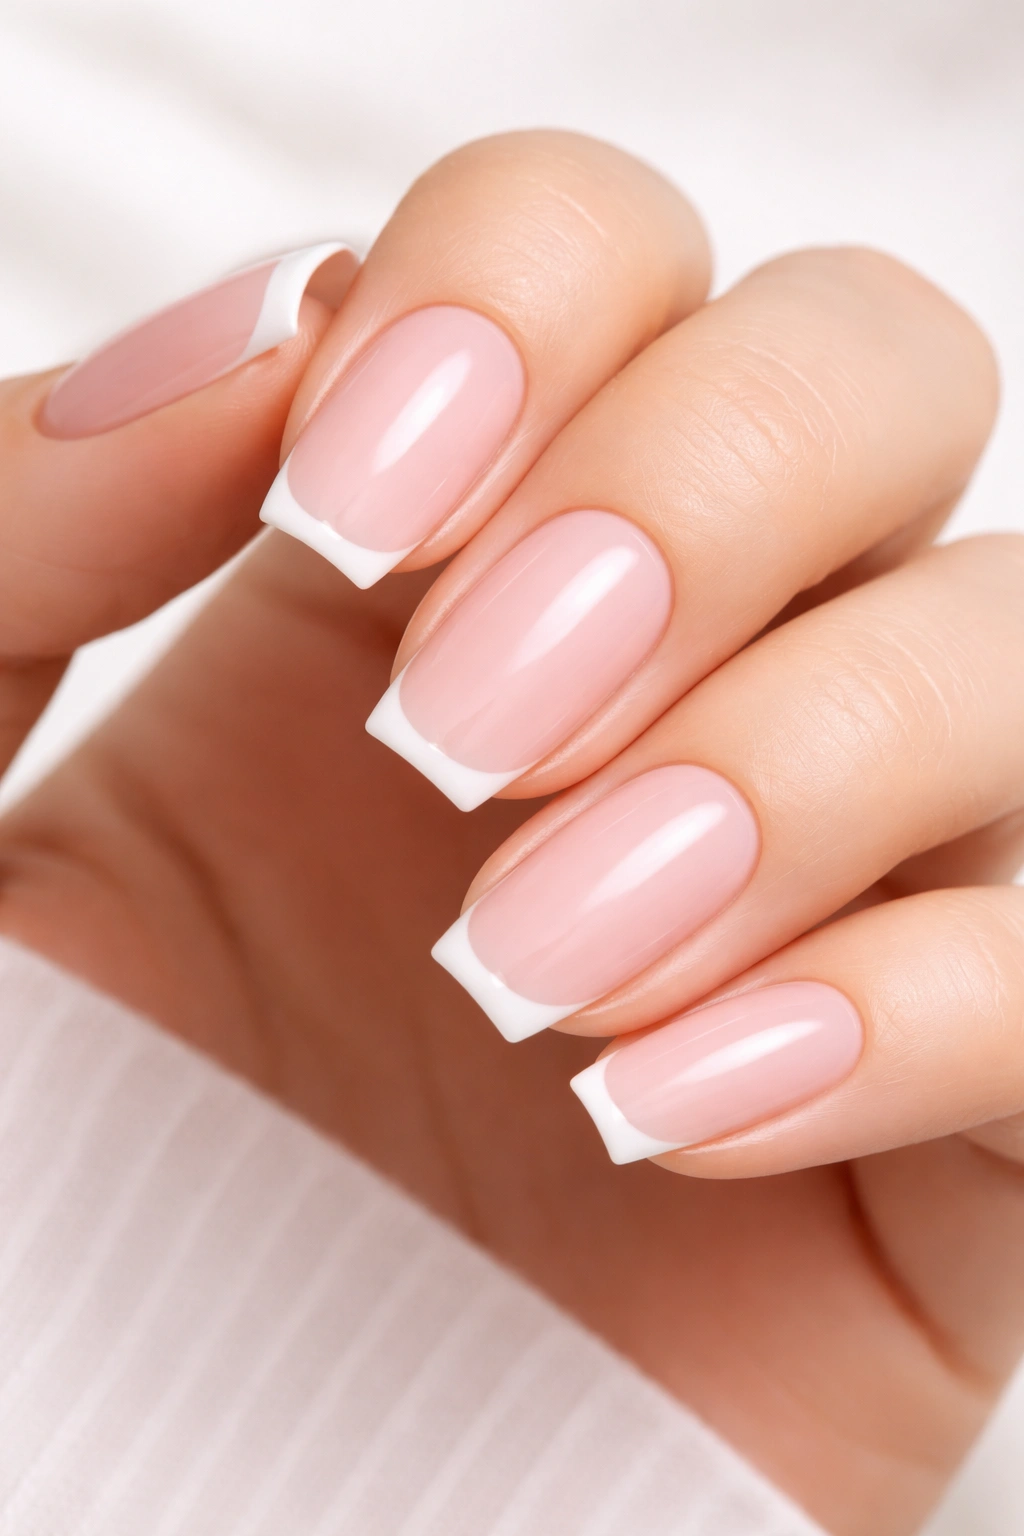
Sometimes less is more, and this design proves it. By going with a milky, almost translucent soft pink base and keeping the white tip incredibly thin—almost like a hairline—you create something that feels effortlessly chic and barely-there without looking incomplete.
Why Thin Tips Read as More Sophisticated
There’s a psychological component to design proportions. Thin, precise lines read as intentional and refined, while thick lines can sometimes read as safer or less fashion-forward. By choosing a thin white tip (maybe one-sixteenth of an inch), you’re creating a design that looks editorial and deliberate. The milky pink base, which lets a tiny bit of the nail bed show through, creates a subtle gradient effect that adds dimension without requiring actual ombré technique.
Execution Strategy
This look requires really good nail preparation. File your nails into perfect squares with smooth edges—any imperfection will be more visible with this minimalist approach. The milky pink base should be sheer enough to see skin tone through it but opaque enough to register as intentional color. Use a very thin striping brush or a toothpick to create your white tip line. The thinner and straighter your line, the more intentional and expensive this look will appear. Finish with a matte or satin top coat for an ultra-modern feel, or glossy if you want more shine.
Insider note: This design pairs beautifully with very clean cuticles and well-manicured hands. Since there’s no visual distraction, everything else has to be perfect.
4. Soft Pink Ombré to White
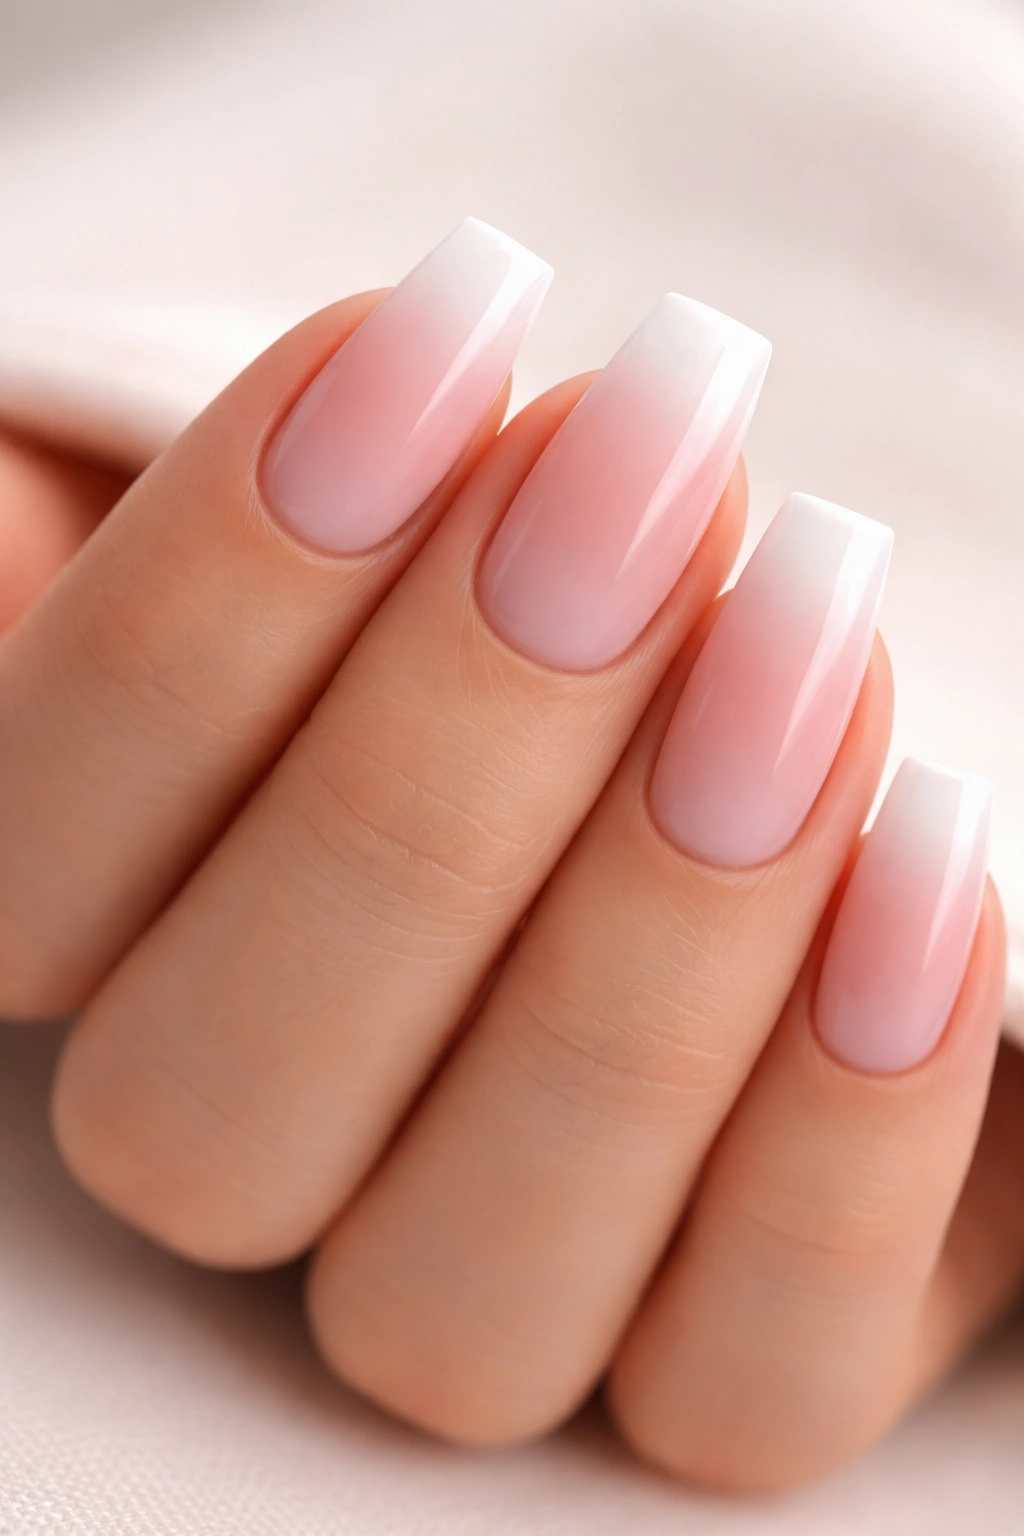
This version replaces the graphic line of a traditional French tip with a gradient—your soft pink base slowly fades into white at the tip. It’s more modern, more dimensional, and honestly just feels a little more artistic than a straight line.
Creating the Ombré Effect
There are several techniques for achieving this: you can use a sponge to dab colors where they overlap and create a blend, you can use a dry brush technique where you load pink and white separately and blend them on the nail, or you can use an ombré powder applied to a sticky base layer. Each method creates slightly different results—sponge tends to look more gradual and blended, while dry brush can look more artistic and textured. The key is practicing the technique on a practice nail or even a piece of cardboard first, because the learning curve is real.
Design Variations
Depending on how you execute the ombré, you can create different moods. A very gradual, subtle gradient reads as soft and romantic. A gradient that’s concentrated more at the tip (where the color shift happens quickly) feels more modern and bold. Some people even do a reverse ombré—white base that fades to pink at the tips—which is unusual but stunning on the right skin tone.
Pro tip: Use a high-quality glossy top coat to seal in your ombré and add shine. The shine helps the gradient look more intentional and blended rather than streaky.
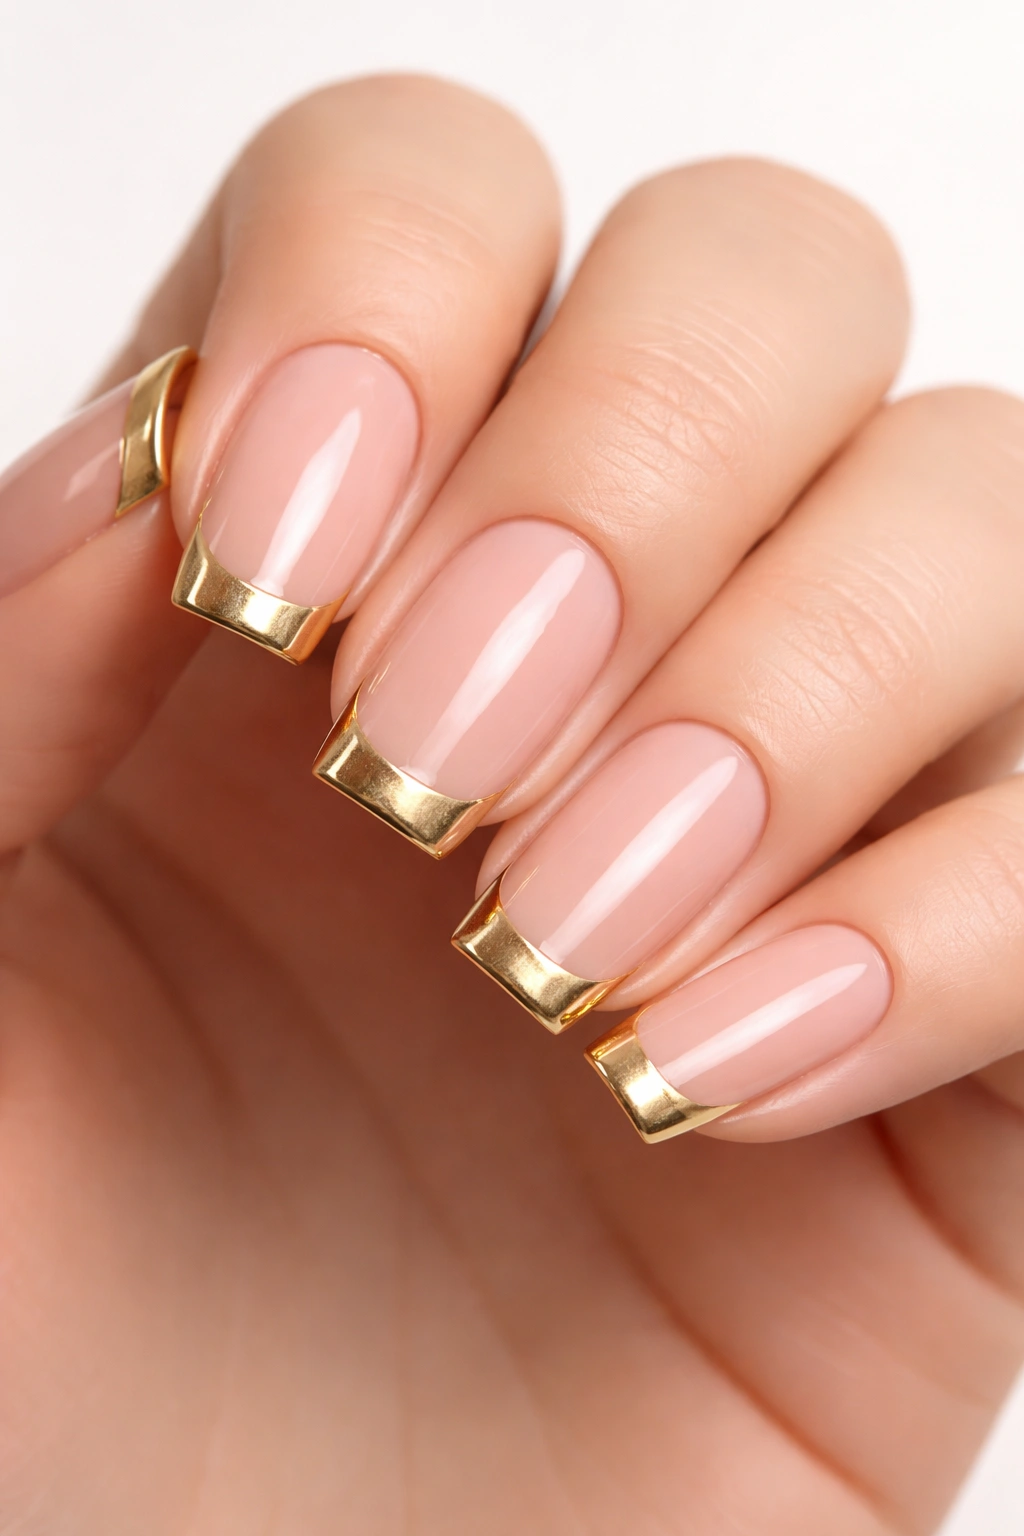
5. Nude Pink with Gold French Tips
Swap out the white for gold, and suddenly you have something that reads as significantly more glamorous and intentional. Nude pink (which is almost exactly your natural nail tone, but slightly warmer or more saturated) pairs beautifully with gold accents because the contrast is subtle but sophisticated.
Why Gold Changes Everything
Gold is inherently warmer and more luxurious than white, which means this design automatically feels more elevated. The nude-to-gold combination creates a look that bridges minimalism (because your base is barely-there) and luxury (because of the gold detail). It’s the nail equivalent of a simple outfit elevated with good jewelry. This color combo is also incredibly flattering on warm skin tones, and it reads beautifully across all seasons—it never looks summery or wintry, just perpetually elegant.
Achieving the Gold Detail
For the gold French tip, you have several options. You can use a metallic gold polish with a thin striping brush, which gives you precise control over the line width. You can use a thin gold foil strip—yes, actual foil—applied with a special adhesive base, which creates an almost liquid-metal effect. Or you can use a gold gel polish with a striping brush, which tends to be more forgiving than regular polish because the consistency is thicker and more controlled. Finish with a top coat that won’t dull the gold shine.
Worth knowing: Metallics show fingerprints and smudges more readily than cremes. If you’re prone to touching your face or your nails tend to show wear quickly, you might want to go with a more subtle version like champagne instead of true gold.
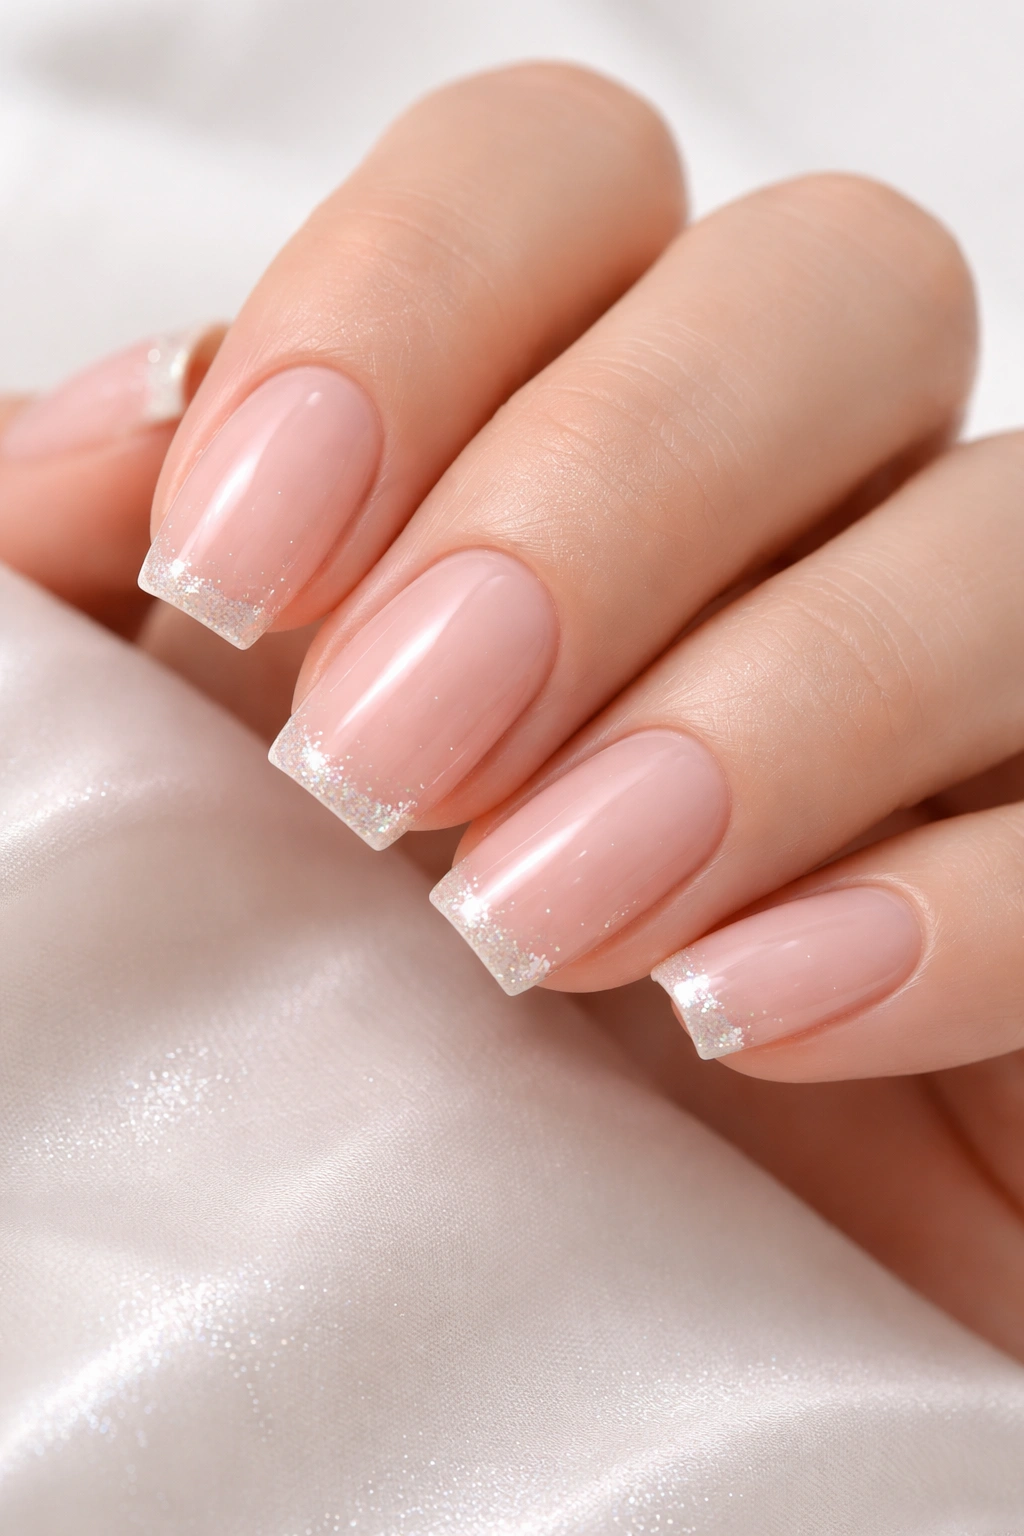
6. Ballet Pink with Glitter Fade

If you love the idea of adding sparkle but you hate the idea of full-glitter nails, a glitter fade is the answer. Your base stays a soft, creamy ballet pink, but as you move toward the tip, glitter gradually becomes more prominent—almost like the pink is dissolving into shimmer.
Building the Glitter Fade
Start with your ballet pink base coat (two coats). Once cured, apply a thin layer of clear gel or a sticky base layer to the tip area where your glitter will go—this helps the glitter particles stick instead of sliding around. Using a makeup sponge or a dotting tool, apply fine glitter particles, starting with just a few at the very tip and gradually increasing density as you move up. You’re creating a visual gradient from no glitter to moderate glitter. Once you’re happy with the distribution, seal everything with a glossy top coat.
Glitter Choices That Work
Not all glitter is created equal. Fine microglitter reads more elegantly than chunky glitter, which can look costume-y. Champagne glitter, soft pink glitter, or white holographic glitter all work beautifully with a ballet pink base. The key is using restraint—you want an accent of shimmer, not a full sparkle bomb. This design works particularly well for people who want some personality and shine but still need to look professional in formal or corporate settings.
Pro tip: Apply glitter over a base coat layer rather than directly to wet polish. This gives you more control and makes the glitter easier to apply without creating clumps.
7. Barely-There Pink with Sparkle Tips
This is essentially the minimalist version of the glitter fade. Your base is almost non-existent—so pale and sheer that it’s barely visible—but your tips are edged with a fine sparkle that catches the light beautifully.
The Art of Barely-There Color
Some nail polishes are specifically designed to be translucent or barely tinted. What you’re looking for is a polish that’s so sheer you can see your nail bed clearly, but with just enough tint to register as intentional pink rather than clear. This creates a look that feels incredibly modern and editorial—your nails look perfectly healthy and natural, but with a whisper of color and a touch of glamour from the sparkle accent.
Creating the Sparkle Edge
With such a minimal base, your sparkle detail becomes the focal point. You can create this with fine holographic glitter applied to just the tip, a thin line of champagne-colored glitter polish, or even a sparkly gel top coat applied only to the tip area. The contrast between the barely-visible base and the obvious shimmer at the tip creates visual interest without feeling overdone. This design is perfect if you’re in a very conservative dress code but still want to express some personality through your nails.
Insider note: This look requires perfect nail health to really work. Since there’s almost no color, any yellowing or imperfection shows. If your nails tend to stain easily, this might not be your best option.
8. Mauve Pink French with Matte Finish

Want something that feels completely different from the glossy shine of traditional French tips? A matte finish transforms the entire vibe—it goes from polished and professional to modern and artistic.
How Matte Changes the Aesthetic
Mauve pink is slightly cooler and more purple-toned than blush pink, which makes it feel more sophisticated and mature. When you pair that with a matte finish, you get something that reads as intentional, editorial, and genuinely high-fashion. Matte finishes make colors look deeper and more complex than they actually are, which means your mauve pink will appear richer and more luxurious than it would with a glossy top coat. The white French tip (glossy while the base is matte) creates an interesting juxtaposition that keeps the design from feeling flat.
Application and Longevity
A matte finish requires either a matte top coat applied over regular polish, or a matte gel polish. Regular matte top coats are easier to apply but slightly less durable than gel. The white tip can either match the matte finish of the base, or you can keep it glossy for a mixed-finish look that feels more intentional and modern. Matte finishes do require slightly more careful maintenance—they show dust and debris more readily than glossy finishes—but the aesthetic payoff is absolutely worth it.
Worth knowing: Matte finishes can feel a bit more casual than glossy, depending on your workplace. If you’re in a very formal environment, glossy might read as more polished. But if your workplace is creative or contemporary, matte definitely reads as more elevated.
9. Pale Pink with Negative Space Design

This is where you get creative beyond just the white French tip. Instead of a traditional tip line, you leave strategic portions of your nail bare (showing the actual nail bed), creating geometric or organic negative space patterns that play with the pink color.
Negative Space Design Ideas
You could create clean geometric lines (stripes, triangles, or abstract shapes), scattered dots where the base is visible through a clear layer, or even a half-moon design (which is a throwback to the original manicure style). The negative space works because it breaks up the color field and adds visual complexity without requiring additional colors. With a pale pink base, the contrast between the pale pink and the natural nail bed is subtle but definitely noticeable and intentional.
Execution Methods
The cleanest way to achieve negative space is with guide tape and a steady hand—apply painter’s tape in your desired shape, paint your pale pink over the tape, let it dry completely, and remove the tape to reveal the bare nail beneath. Or you can freehand the design if you’re comfortable with a striping brush. Some people use negative space as a foundation and then add thin white tips as well, creating a hybrid design that combines the traditional French tip with the modern negative space element.
Pro tip: Negative space designs photograph beautifully and feel surprisingly modern. They’re a great choice if you want something that will stand out in photos while still being workplace-appropriate.
10. Soft Pink with Delicate Line Details
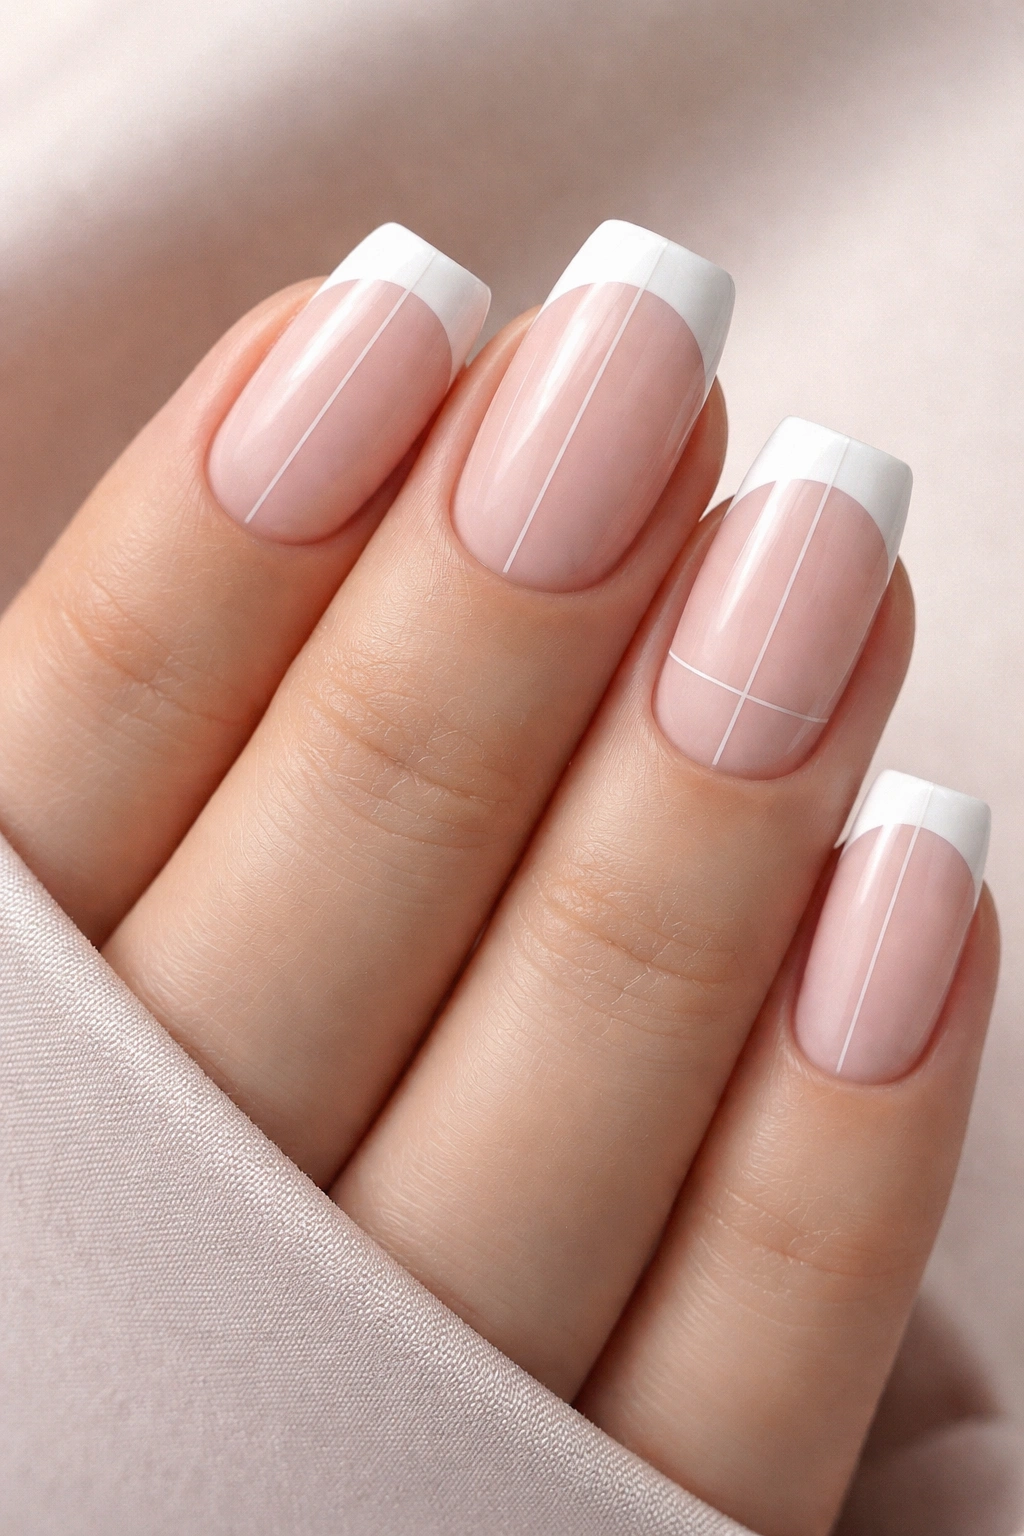
Move beyond just the French tip by adding thin, delicate line work on the nail bed itself. This could be a thin gold or white line running vertically down the center of the nail, thin lines creating a striped pattern, or even thin lines in a grid pattern—basically, fine details that add interest without overwhelming the design.
Choosing Your Detail Lines
The lines should be thin enough that they feel elegant and intentional, not thick enough to dominate the design. Gold lines feel more luxurious and glamorous, while white lines feel clean and modern. You could also use a soft nude that’s slightly deeper than your base color for an ombré-adjacent effect. The key is subtlety—you want someone to notice there’s something special about your nails when they look closely, but from a distance they read as a simple, elegant soft pink French tip.
Application Technique
Use a thin striping brush or an even thinner detail brush to hand-paint your lines. This requires a steady hand and some practice, but it’s absolutely learnable. You can also use thin nail decals (pre-made strips) if freehand feels too intimidating, though custom painted lines will look more high-end and intentional. Paint the lines before you apply your French tip, then apply the white tip lines over top. Finish with a glossy top coat to smooth everything out.
Insider note: Delicate line work elevates the entire manicure because it reads as custom and carefully thought-out rather than standard.
11. Peachy Pink French Tips
If you find that traditional blush or dusty pink doesn’t quite match your undertone, peachy pink might be your perfect middle ground. It has more warmth and slightly more saturation than blush, which makes it feel more vibrant while still being soft and feminine.
Why Peachy Pink Is Underrated
Peachy pink is incredibly flattering on warm and olive skin tones, where it creates a harmonious, almost monochromatic effect that makes hands look elegant and well-coordinated. It’s more playful than dusty rose but still professional and appropriate for any setting. The warmth in peachy pink means it photographs beautifully in natural light—it looks fresh and healthy in photos, which is a huge bonus if you’re the type to photograph your nails for social media.
Styling the Peachy Pink Base
With such a warm, present color, white French tips create crisp, intentional contrast. You could also try nude or gold tips for something slightly softer, or even a thin line of bronze or rose gold for a warmer, more cohesive look. Peachy pink pairs beautifully with rose gold jewelry, warm gold jewelry, and copper tones, so think about your preferred metal when deciding on accent colors. A glossy finish emphasizes the warmth of the color and makes it look jewel-like, while a more natural satin finish reads as softer and more relaxed.
Pro tip: Peachy pink shades can be tricky to find because they sit in a specific part of the color spectrum. If you’re struggling to find the perfect shade, look for colors labeled as “apricot nail,” “coral-pink,” or “warm rose.”
12. Cameo Pink with Minimalist Accents
Cameo pink is a very specific shade—it’s that soft, romantic, vintage-inspired pink that you see in old cameo jewelry. It’s muted, slightly dusty, and incredibly elegant. For minimalist accents, think tiny details: a hair-thin white line at the very edge of the tip, a single small dot, or even just a slight white gradient at the very tip that’s barely noticeable.
The Cameo Pink Aesthetic
This color is timeless in a way that trendier pinks aren’t. It pairs beautifully with vintage-inspired outfits, delicate jewelry, and romantic aesthetics. Cameo pink has a softer, more muted quality than blush or dusty rose—it’s like someone took a rosy pink and muted it just slightly so it feels less saturated and more sophisticated. The minimalist accent approach keeps the design from feeling dated or too “grandmotherly” and instead lands it firmly in the editorial and intentional camp.
Accent Ideas That Work
The white line accent at the very tip edge (almost like the French tip line is just barely visible) feels incredibly modern and subtle. A single thin gold stripe down the center of the nail adds just enough detail without breaking the serene, romantic vibe of the color. You could even do a very thin clear or nude gradient at the tip, where the color fades almost imperceptibly to clear—it’s barely noticeable but adds dimension that keeps the design from feeling flat.
Worth knowing: Cameo pink is perfect if you love romance and elegance but want to avoid anything that feels overly cute or cartoonish. It’s the color choice of someone with very specific, refined taste.
Final Thoughts
Soft square pink French tips are having a genuine moment in the nail world because they check all the boxes: they’re professional enough for any workplace, elegant enough for special occasions, and flattering on virtually every skin tone and age. The beauty of this trend is that there’s genuinely something for everyone, whether you want barely-there minimalism or a bit more personality and sparkle.
The real secret to making any of these designs work is going with quality products and taking your time with application. A soft pink base that’s creamy and opaque, white tips that are crisp and clean, and a good glossy top coat are the foundation of every version of this trend. From there, you can play with metallics, glitter, matte finishes, and creative details depending on your mood and your personal style.
Start with the design that speaks to you most—if you love simplicity, go classic. If you want a touch of glamour, add gold. If you’re craving something modern and artistic, experiment with ombré or negative space. The best part about nail design is that if you don’t love your choice, you can change it in two weeks and try something completely different. This trend is here to stay, so you have plenty of time to figure out which version makes you feel most like yourself.
