

There’s something undeniably elegant about long oval nails that just makes your hands look graceful and polished. Add an ombre gradient to that shape, and you’ve got a nail design that’s both sophisticated and eye-catching. Ombre nails work beautifully on the elongated oval shape because the gradient transitions have so much surface area to shine—literally and figuratively. Whether you’re going for subtle and wearable or bold and statement-making, ombre designs have this magical way of making your nails look like a professional manicure every single time.
What makes ombre so appealing is that it’s far more forgiving than a solid color. If your gradient isn’t perfectly blended, it actually adds to the artistic, intentional look. The longer oval canvas gives you room to play with multiple color transitions, experiment with metallic accents, and create depth that shorter nails simply can’t showcase. You can go two-tone or multi-color, glittery or ultra-matte, warm or cool-toned—the possibilities genuinely feel endless.
The best part? Most of these designs work whether you’re painting them at home or getting them done professionally. If you’re a DIYer, an ombre sponge technique is way more forgiving than you’d think. If you’re heading to a salon, you’ve got tons of inspiration to show your nail technician. Either way, these twelve designs cover every aesthetic and color preference you might be craving right now.
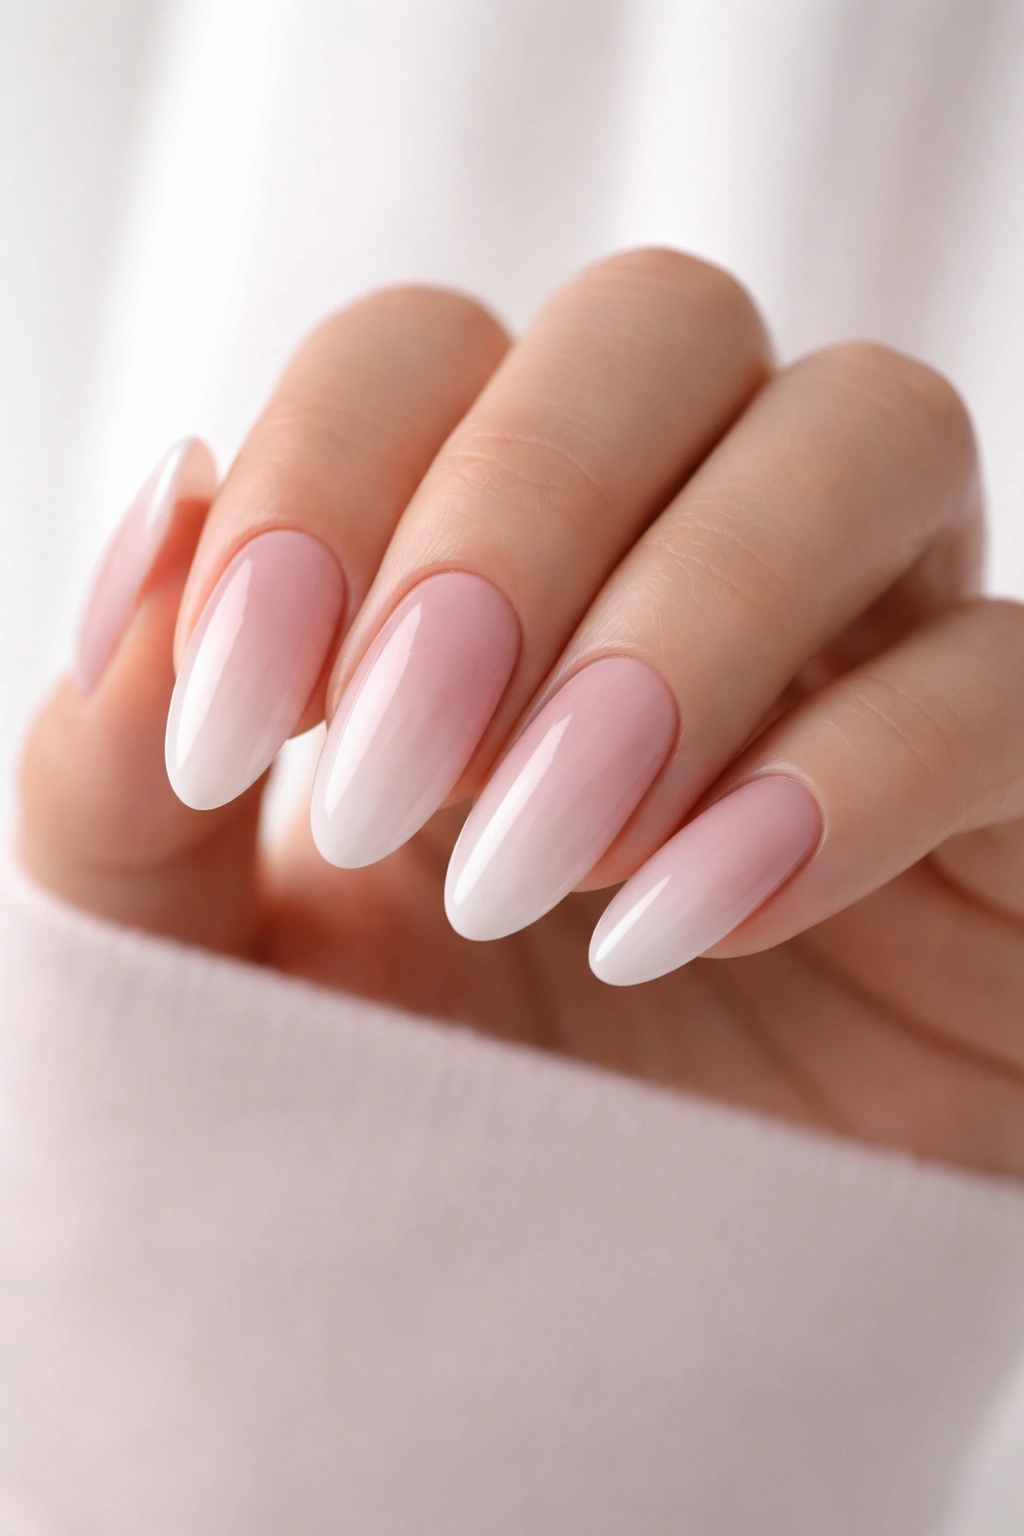
1. Soft Pink to White Ombre
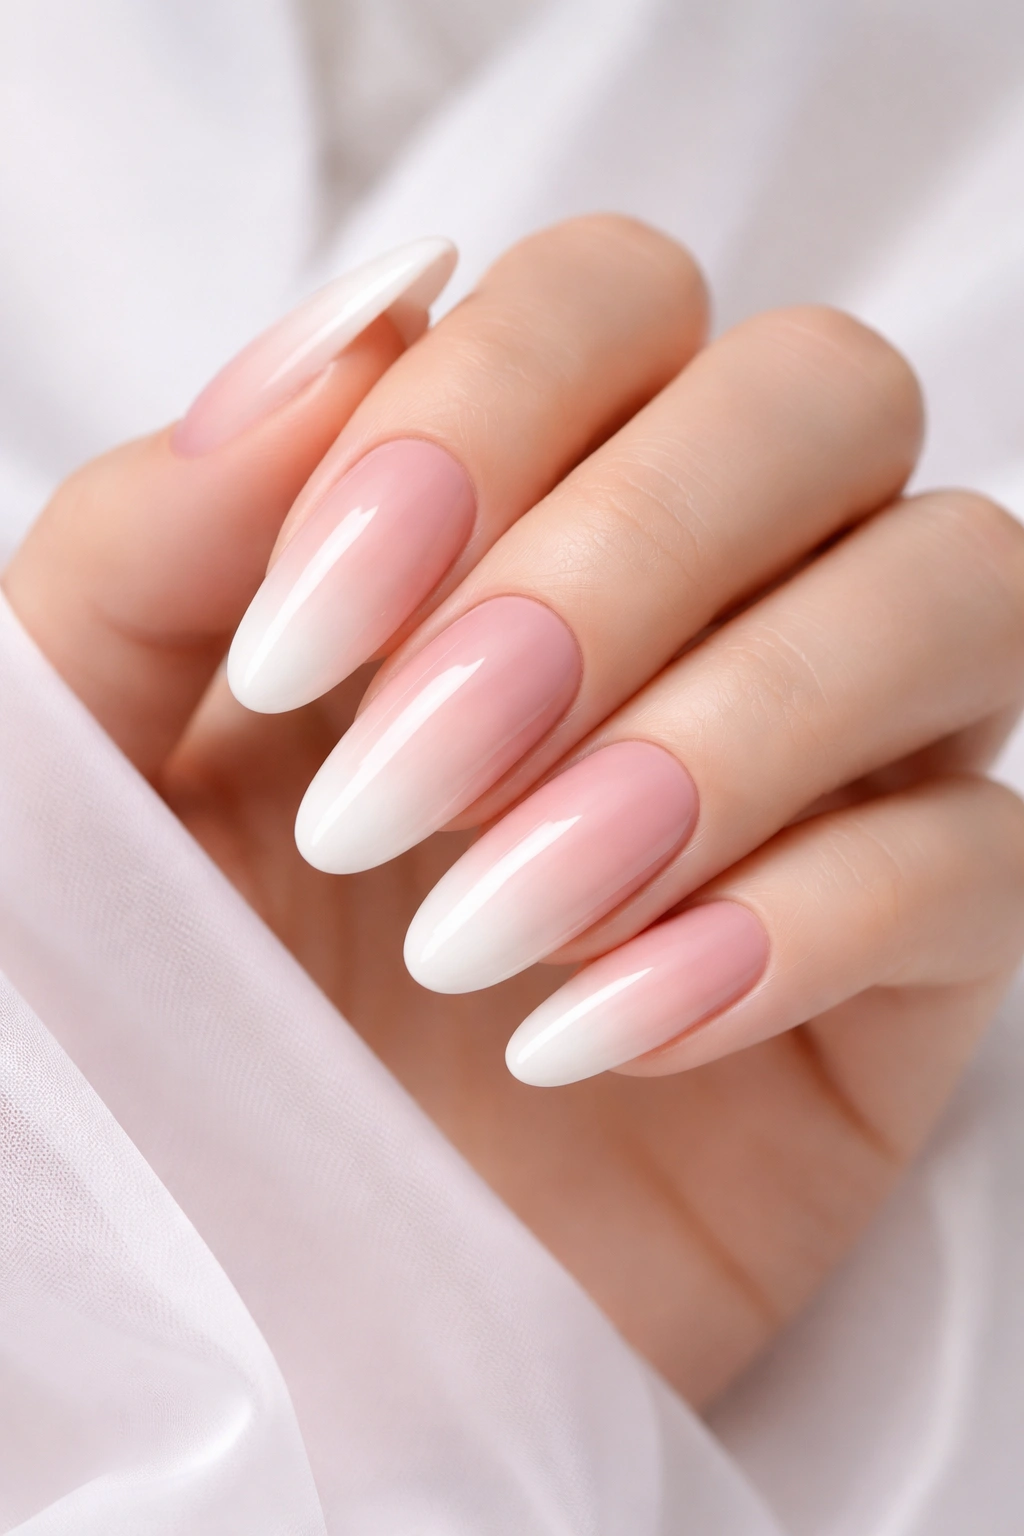
This is the nail design that works for literally everyone and every occasion—it’s the bridesmaid option, the office option, and the everyday option all rolled into one. The transition from a delicate blush pink into pure white is so universally flattering that it basically becomes a neutral, but with so much more dimension than a solid color could ever give you.
Why This Design Works So Well
The pink-to-white gradient is inherently romantic without being over-the-top feminine. On long oval nails, this ombre creates the illusion of even longer, more slender fingertips because the white naturally elongates the nail bed visually. The softness of the colors means it pairs with absolutely everything in your wardrobe—business casual, evening wear, casual jeans and a t-shirt, it all works.
How to Achieve This Look
- Use a pale pink base (something like a millennial pink or dusty rose)
- Sponge white nail polish onto a makeup sponge and dab it onto the top third of the nail
- Blend where the two colors meet by dabbing gently with a clean, damp sponge
- Seal with a glossy topcoat for a soft, almost creamy finish
- Consider adding a tiny dot of rhinestone on the ring finger for subtle sparkle
Pro tip: If you want more pink-to-white ombre saturation without it looking heavy, do multiple thin layers of the blush pink before you add the white, then blend carefully. This gives you better control over where the gradient happens.
2. Deep Purple to Silver Ombre
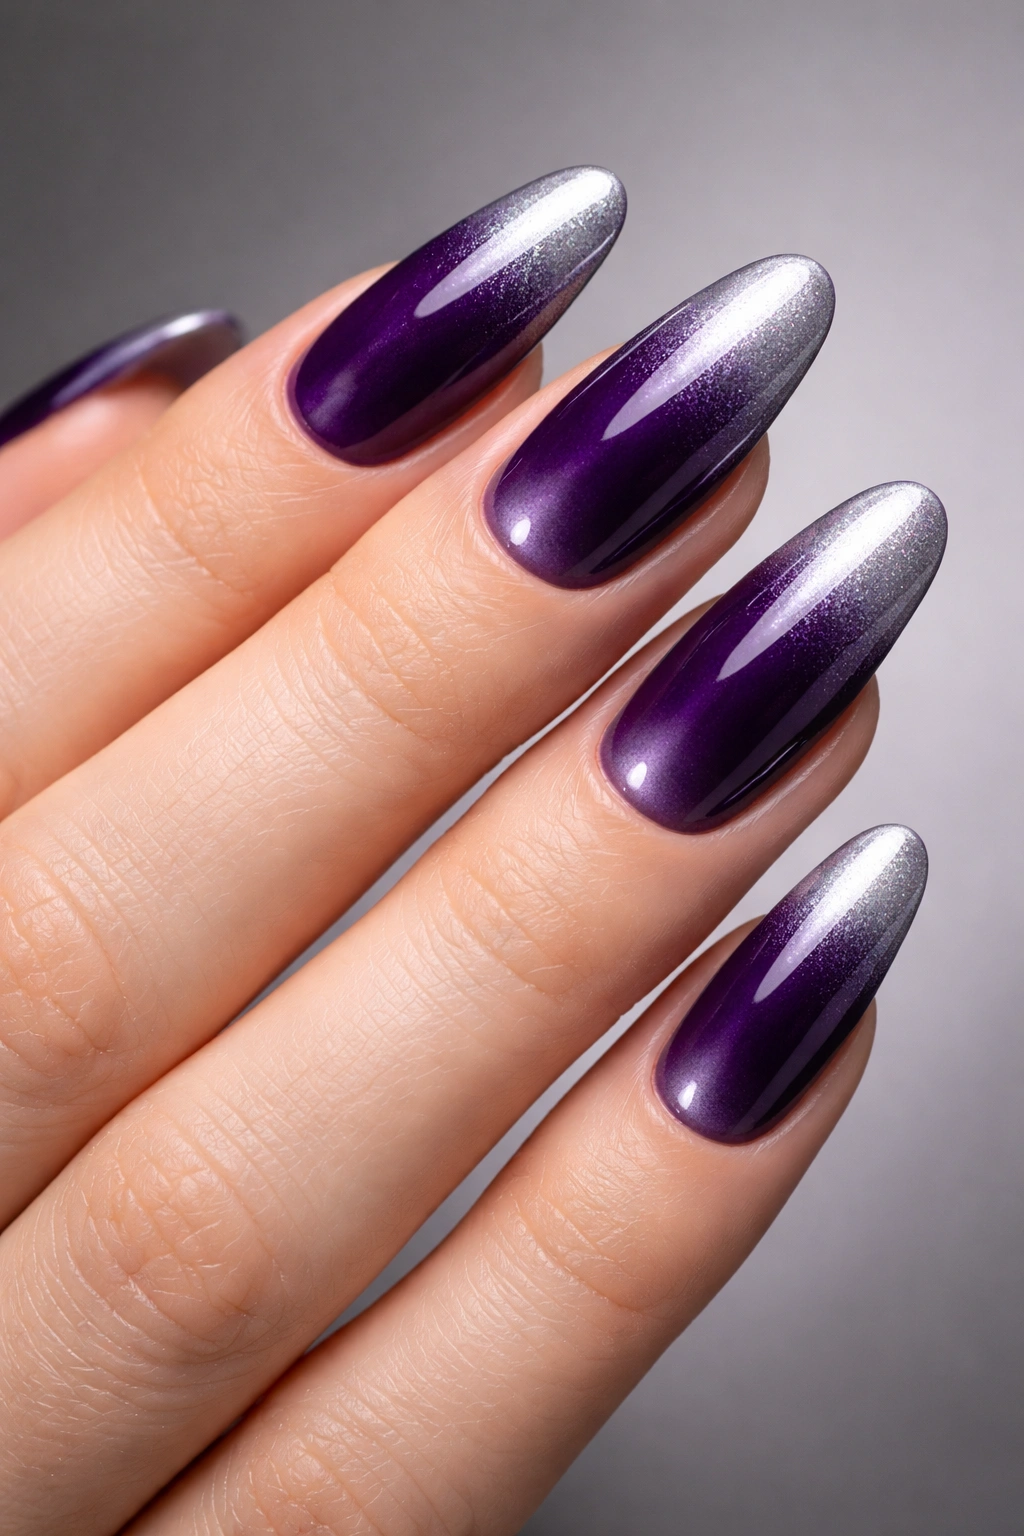
Now we’re stepping into moodier, more dramatic territory—this is the ombre for anyone who loves deep jewel tones but doesn’t want to commit to a solid dark color year-round. The gradient from a rich, moody purple down to gleaming silver feels luxurious and modern at the same time.
What Makes This Design Stand Out
Deep purple to silver has an almost cosmic, magical vibe to it. The purple grounds the look with sophistication while the silver tips give it a futuristic edge. On long oval nails, this combination feels especially editorial and polished. It’s the kind of manicure that makes you want to photograph your hands constantly.
Application Technique Tips
- Start with a deep amethyst or eggplant purple as your base color
- Create the ombre by sponging silver or light metallic gray onto the tip
- Use a sponge technique or a dry brush blending method, depending on your comfort level
- For extra shine, use a chrome or mirror powder on just the very tip
- Add a high-shine topcoat to maximize the reflective quality
Worth knowing: This design pairs beautifully with matte topcoat on the purple section and glossy on the silver for a mixed-finish look that adds visual interest.
3. Nude to Champagne Ombre
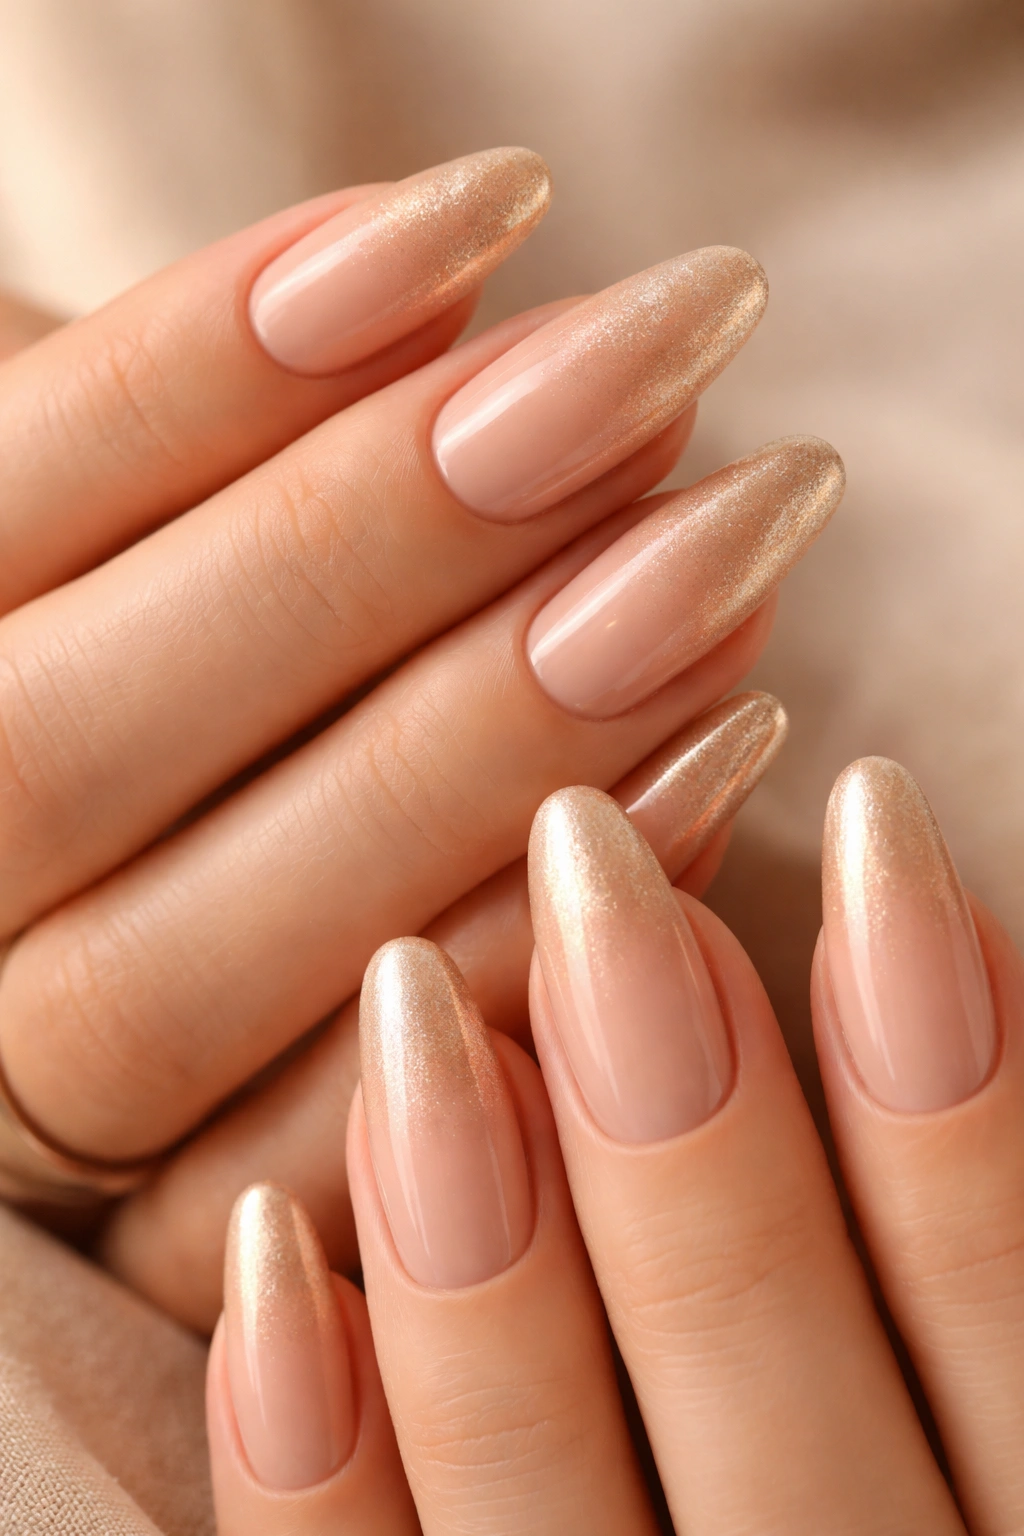
If soft pink feels a bit too pink for you, nude to champagne is the elegant answer. This gradient feels expensive and understated in the best way—it’s the kind of manicure that doesn’t announce itself but makes people think you just had a professional mani at an upscale salon.
The Psychology of This Color Combination
Nude and champagne together create what’s sometimes called a “nude-lusion” effect—your nails seem to blend seamlessly with your skin tone at first glance, then reveal their gradient beauty up close. On oval nails, this creates an extra-elongating effect that’s flattering for every skin tone. It’s also the manicure that goes with literally everything, all year round.
Best Application Method
- Choose a true nude that’s one or two shades lighter than your skin tone
- Sponge a champagne or pale gold shade starting from the tip
- The blend should be gradual and soft—think gentle sunrise, not sharp line
- Use a warm champagne shimmer rather than a cool silver for this one
- Finish with a glossy topcoat to catch the light beautifully
Insider note: Adding a micro glitter gradient (tiny champagne sparkles) can give this understated design just enough personality without making it feel less elegant.
4. Navy to Light Blue Ombre
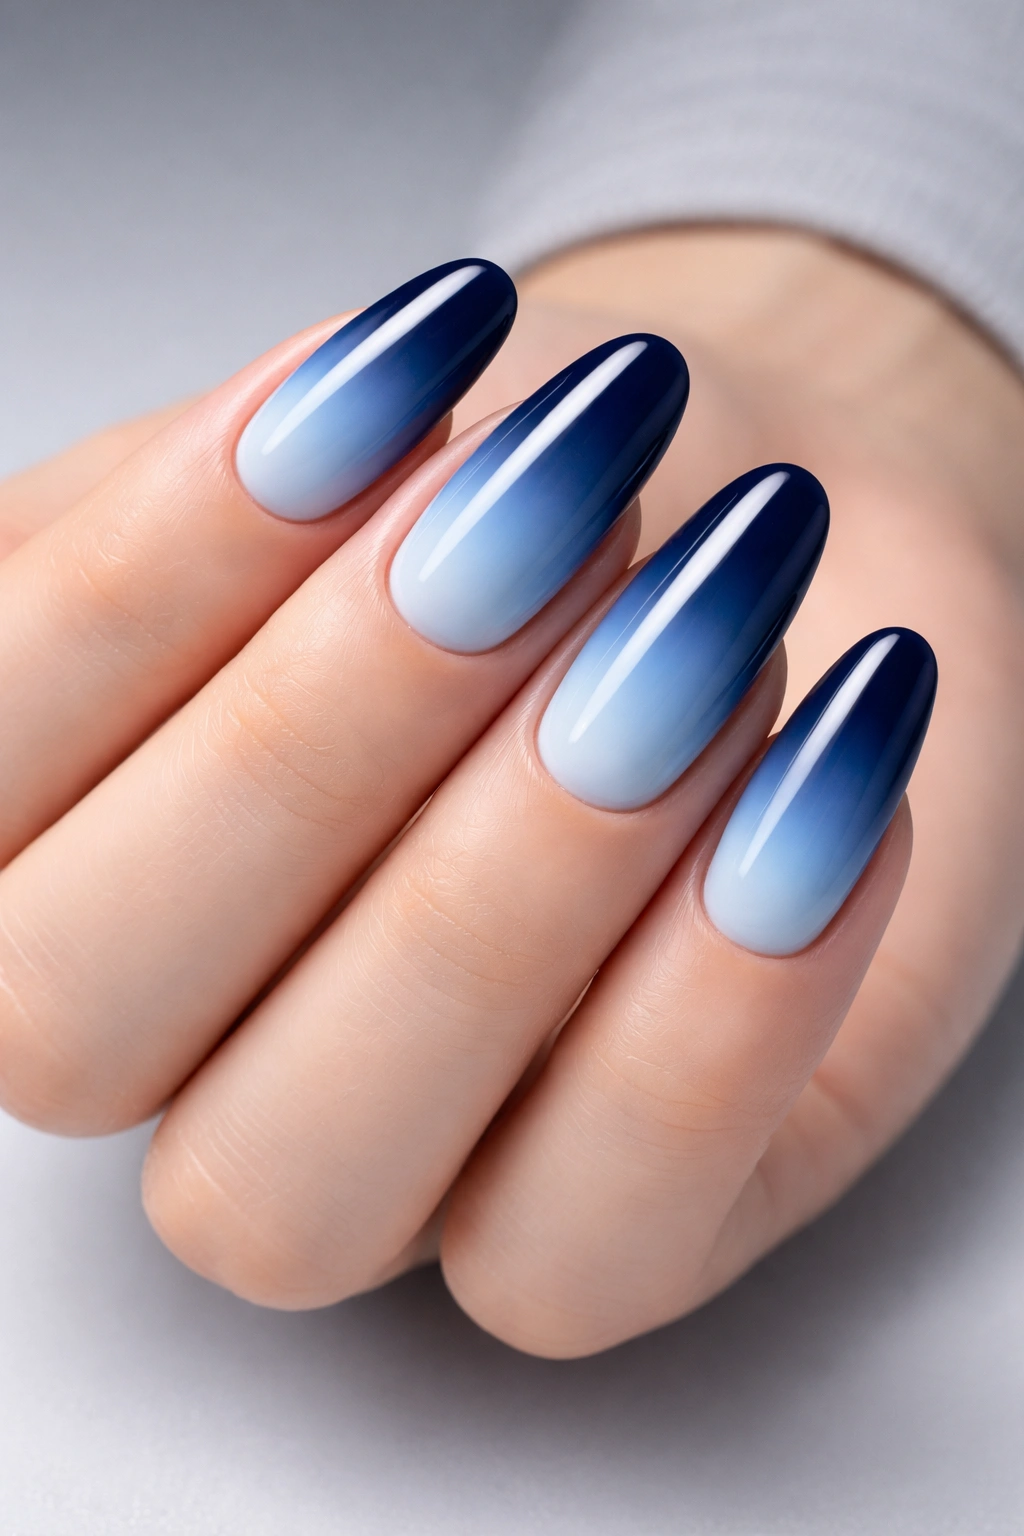
For anyone who loves cool tones, navy to light blue is the ombre that delivers sophistication with a fresh, modern edge. The gradient mimics the feeling of water deepening from the shore, and it works beautifully on long oval nails that give you plenty of space to show off the transition.
Why This Color Story Works
Navy and light blue together feel crisp and clean without being cold. It’s professional enough for any setting but interesting enough to make you happy when you look at your hands. The long oval shape ensures the gradient has room to be visible and intentional rather than getting lost on shorter nails.
Technique for Best Results
- Use a true navy blue as your base—not purple-navy, but ocean-navy
- Sponge a pale sky blue or periwinkle onto the top half
- Blend with gentle dabbing motions for a soft transition
- This gradient looks especially nice with a glossy finish that reflects light
- Consider adding white tips for an ombre that goes three-tone
Real talk: This design looks even better a few days after application when the gloss starts to dull slightly—it develops this soft, lived-in elegance that’s actually more wearable than the fresh-mani shine.
5. Red to Coral Ombre
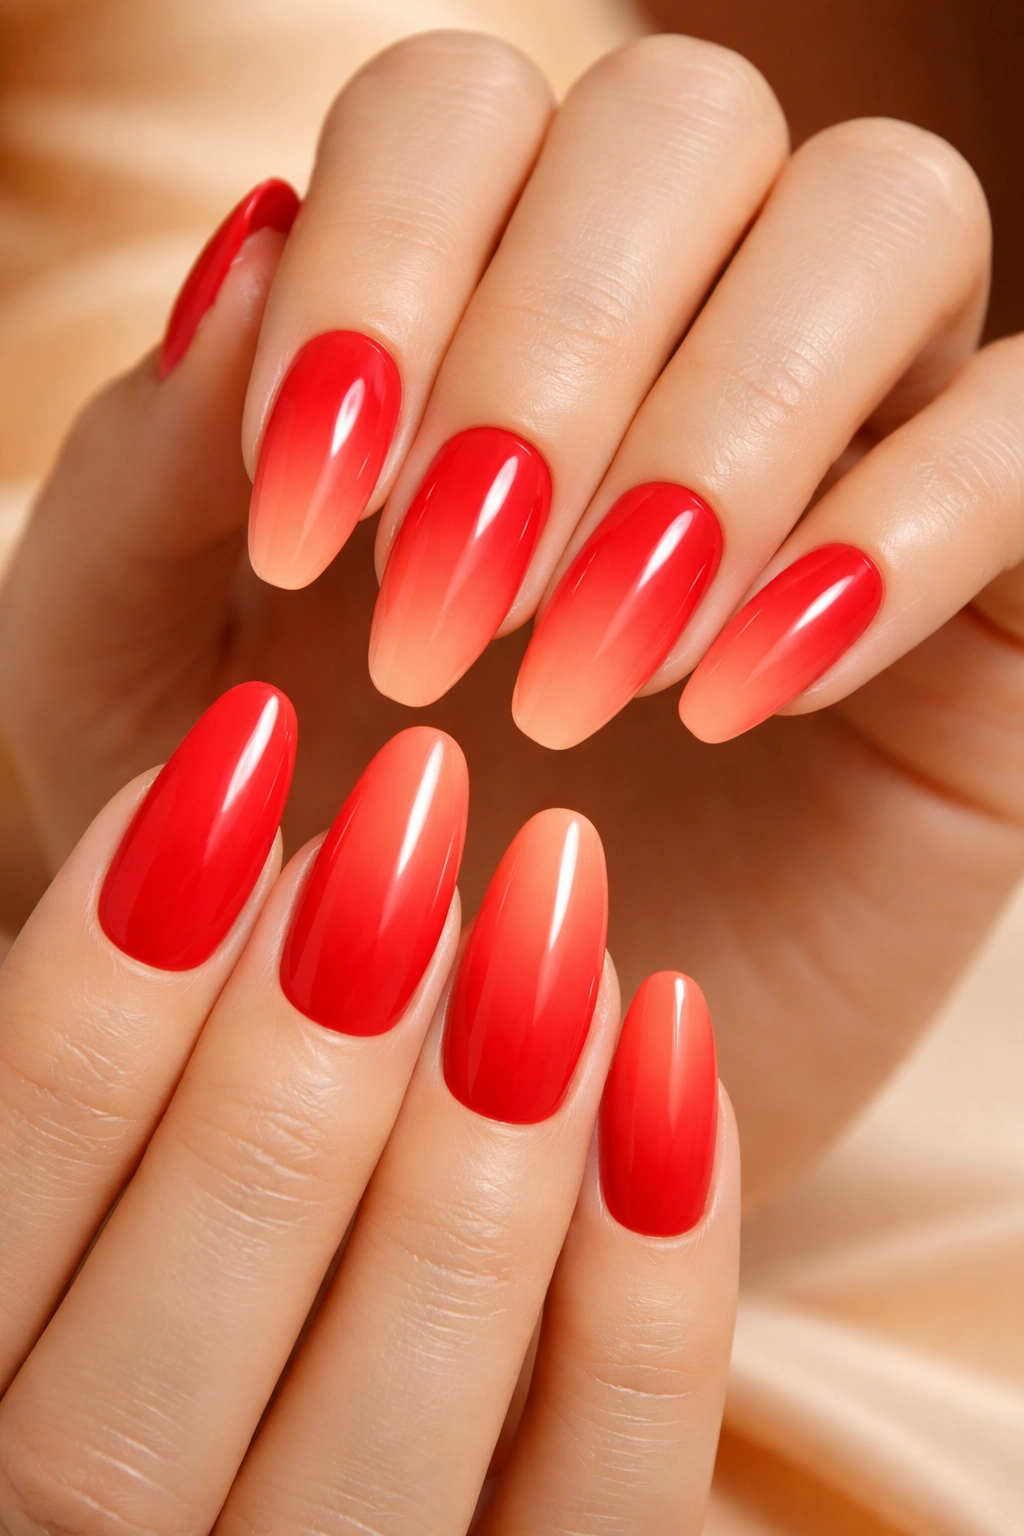
If you want warmth and energy, red to coral ombre delivers that without being too loud or overwhelming. On long oval nails, this gradient reads as intentional and fashion-forward rather than accidental color fading. It’s the design that makes a statement but stays wearable.
The Impact of Warm Ombre
Red to coral creates visual warmth and movement across your nails. The gradient naturally draws attention to your hands because our eyes are drawn to warm colors and gradients inherently. On the oval shape, this means your hands automatically look more elegant and expressive. It works for warm and cool skin tones equally well—the shades just shift slightly.
How to Build This Ombre
- Start with a true red base—a blue-toned red rather than an orange-red
- Transition to coral in the mid-nail area, then pure coral at the tip
- You’re essentially creating a three-tone gradient here for maximum impact
- Use a dry brush technique or sponge to blend between the colors
- Add a glossy topcoat and consider chrome powder on just the very tip for extra dimension
Pro tip: This design works especially well if you add a thin black line at the cuticle to frame the design and create more visual interest.
6. Black to Gold Ombre
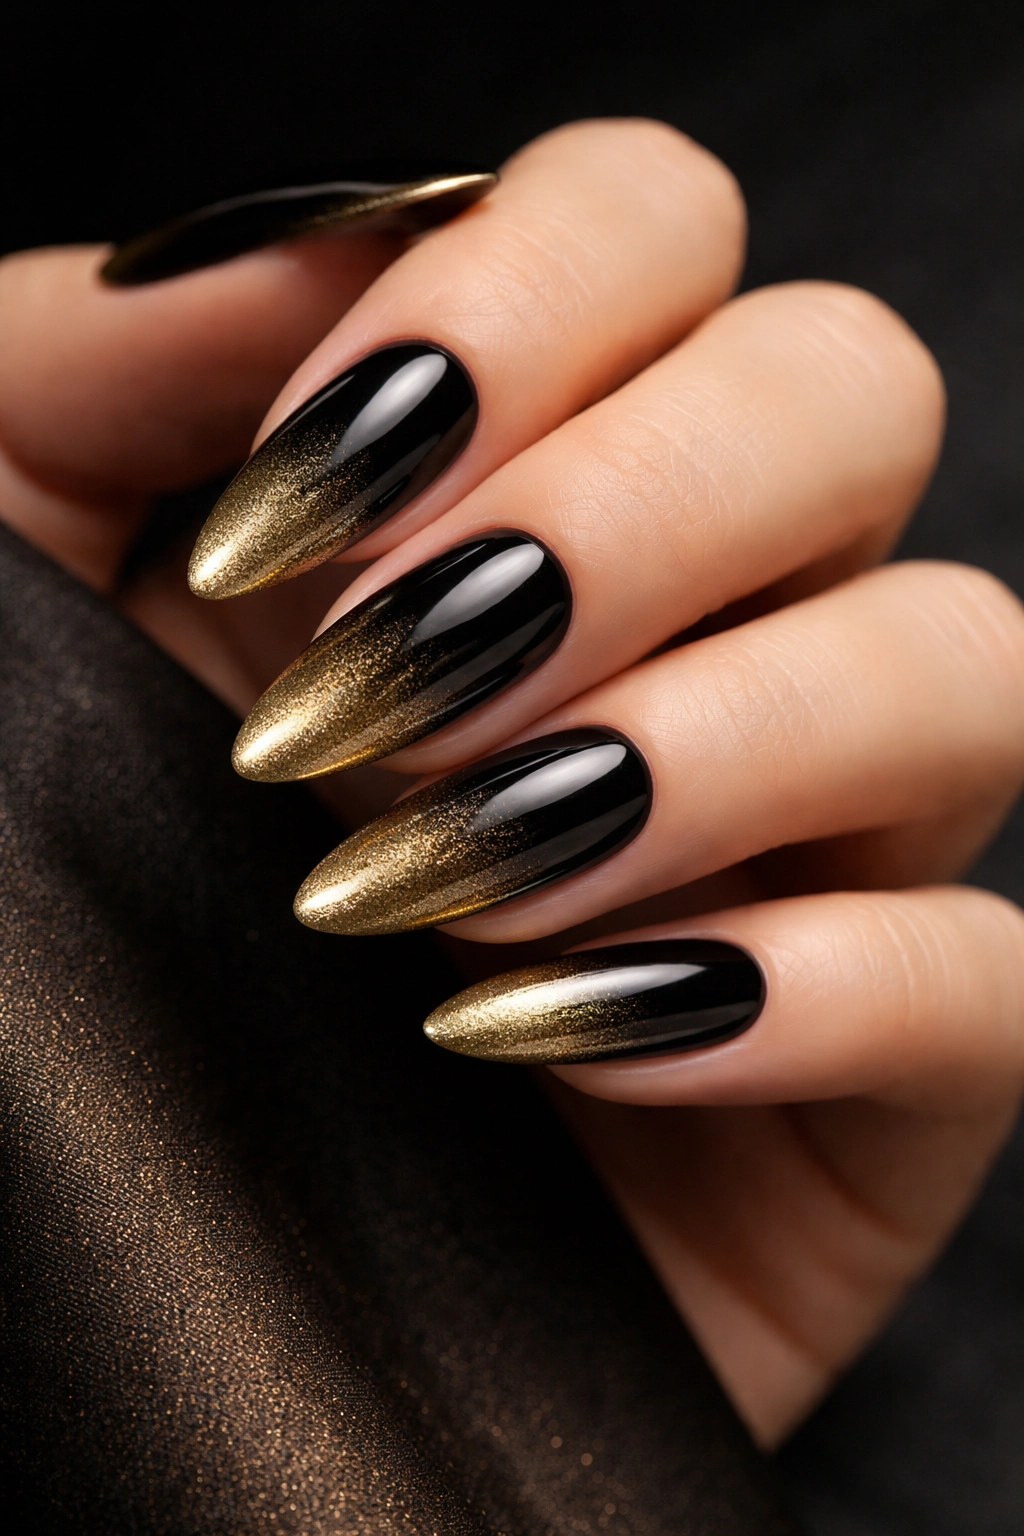
When you want maximum glamour and drama, black to gold ombre delivers luxury in a way few other color combinations can match. On long oval nails, this gradient feels expensive and intentional—like something you’d see on a red carpet.
The Drama and Elegance Factor
Black to gold reads as instantly sophisticated, celebratory, and bold without being in-your-face. The gradient from nearly black to luminous gold happens gradually across the long nail canvas, creating depth and dimension that solid colors simply can’t achieve. This is the ombre for special occasions and anyone who loves making an entrance.
Best Practices for This Design
- Use a very dark charcoal or black as your base color
- Blend in a dark gold or bronze in the mid-section
- Move to a bright, shimmery gold at the tips
- A sponge technique works better than dry brush for this one because you need smooth blending
- Use a shiny topcoat to emphasize the gold’s reflective quality
- Consider adding a pinch of gold glitter gradient for extra sparkle
Worth knowing: This design pairs beautifully with matte black at the cuticle transitioning to glossy gold at the tips—the mixed finish adds sophistication.
7. Burgundy to Rose Gold Ombre

Burgundy to rose gold is the design for anyone who loves depth and warmth together. It’s more subtle than some of the bolder options on this list, but it has so much personality. On long oval nails, this gradient creates an almost jewel-like quality that’s absolutely stunning.
Why Burgundy and Rose Gold Are Perfect Together
Both colors contain warm undertones, so they harmonize beautifully rather than clashing. The burgundy provides richness and grounding while the rose gold adds lightness and luminosity. For long oval nails, this combination creates visual flow and elegance. It works for professional settings and fun occasions equally well.
Application Steps for Success
- Begin with a deep burgundy—wine-colored rather than brown
- Create a gradient that moves through a dusty rose midway
- End with a shimmery rose gold at the tips
- Sponge blending works beautifully for this color story
- Use a rose gold chrome powder on just the very tip for extra shine
- Seal with a glossy topcoat to enhance the metallic quality
Insider note: This design looks especially beautiful in natural daylight because the warm tones catch the sun gorgeously without being reflective in a way that feels overwhelming.
8. Mint to White Ombre
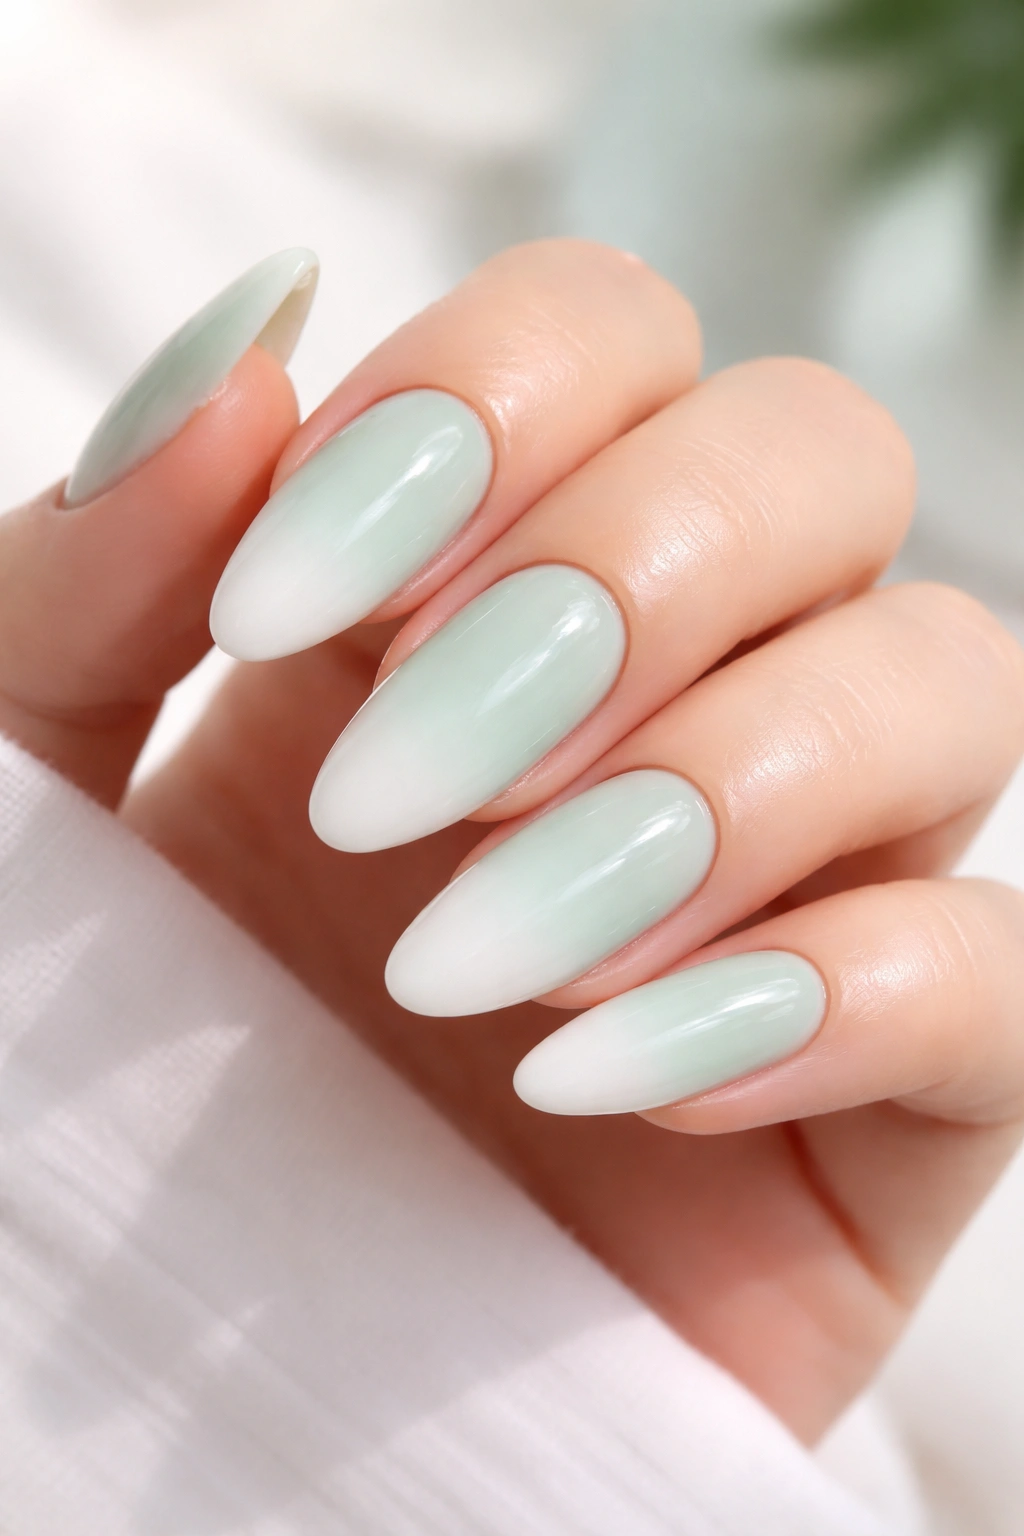
For anyone who wants something fresh, modern, and slightly unexpected, mint to white ombre is your answer. It’s not as neutral as some options on this list, but it’s not overly trendy either—it’s that perfect middle ground. On long oval nails, the pale mint creates a soft, airy aesthetic that feels very current.
The Appeal of Cool Pastel Ombre
Mint to white feels inherently fresh and spa-like without being juvenile or bubblegum-sweet. The transition from a gentle mint green to pure white is calming to look at and surprisingly versatile. Long oval nails give you plenty of space to make the gradient visible and intentional rather than subtle to the point of being invisible.
Technique Breakdown
- Use a pale, almost milky mint green—not a true bright mint
- Create your ombre by sponging white onto the top portion
- The blend should be incredibly soft and gradient-focused
- This design works best with a glossy finish for a clean, modern feel
- Consider adding a single fine line of darker teal at the very edge for definition
Pro tip: If you’re nervous about the mint being too pale to see, add just a tiny amount of shimmer to the mint portion—it makes the gradient more visible without changing the overall effect.
9. Blush to Pearl Ombre
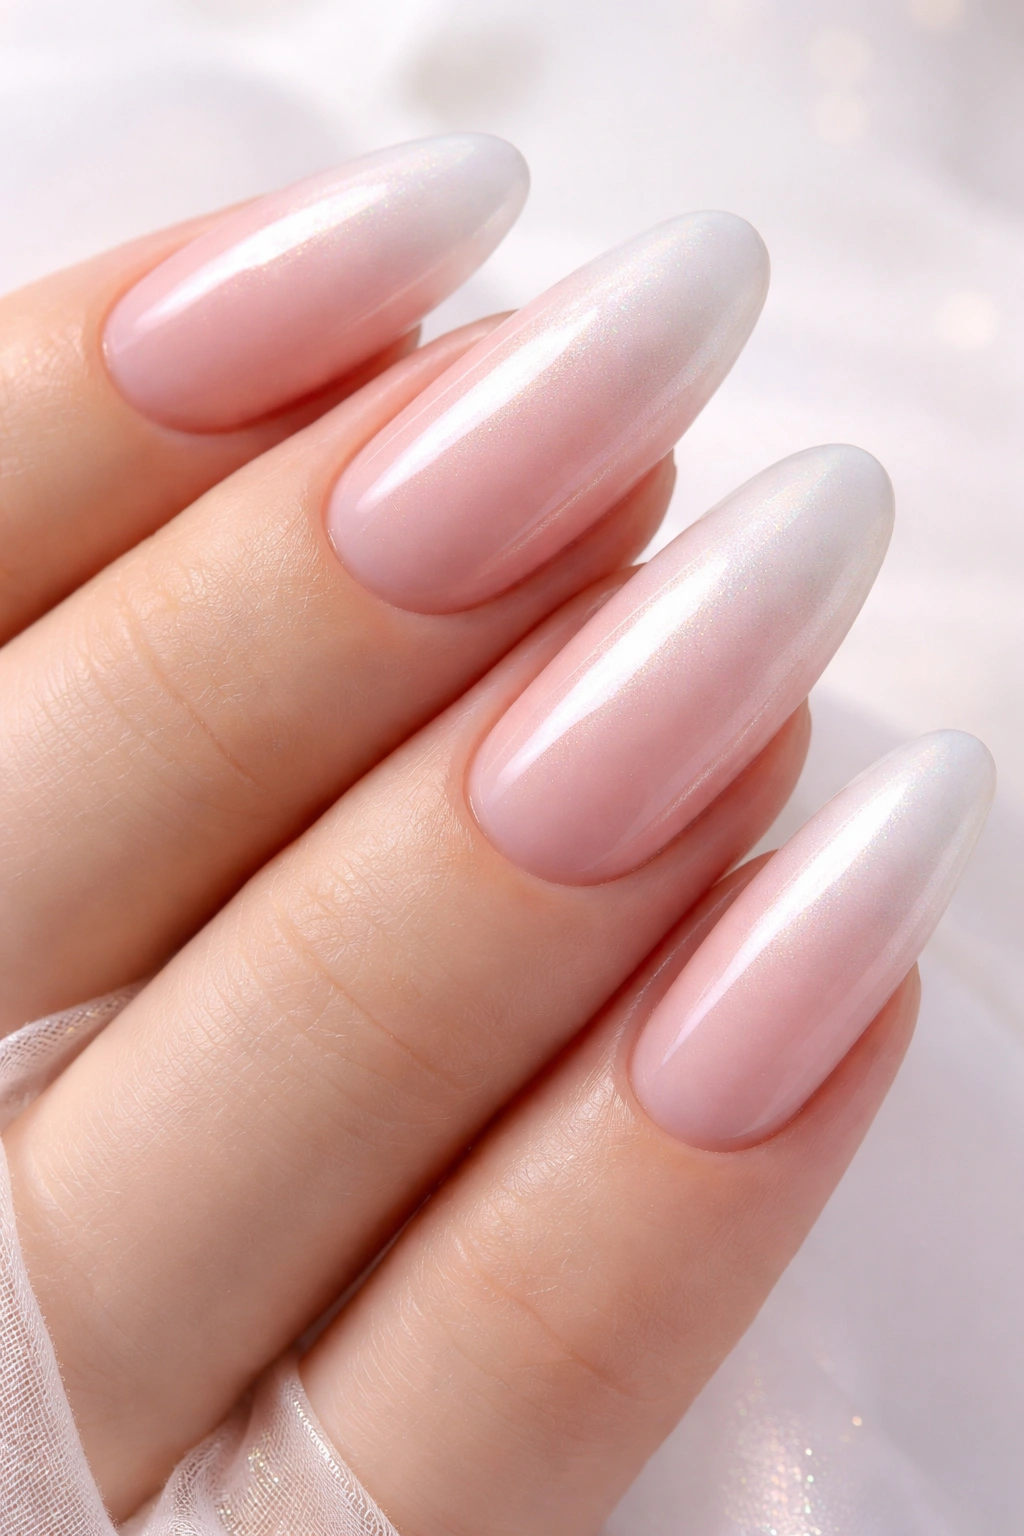
Blush to pearl is the epitome of soft, romantic elegance. The gradient from a rosy blush tone into iridescent pearl is the kind of manicure that makes you feel like a bride or royalty. On long oval nails, the pearl shimmer creates this magical, reflective quality that’s genuinely mesmerizing.
The Magic of Pearl Ombre
Pearl contains multiple color reflections depending on the angle and light, so this ombre actually changes appearance throughout the day. From blush into pearl, the gradient reads as romantic and ethereal. The long oval shape gives the pearl shimmer maximum surface area to shine and shift. It’s wearable but definitely special.
How to Create This Effect
- Start with a true blush or rose pink base
- Sponge a pearl or champagne shimmer starting from the mid-nail
- Blend gently so the transition is soft and dreamy
- Use a high-quality pearl polish or add pearl powder to create the iridescent effect
- Multiple thin topcoats actually enhance the pearl effect better than one thick coat
- Consider a matte topcoat on the blush section and glossy on the pearl for mixed finish appeal
Worth knowing: This design photographs beautifully and looks even better in person because the pearl shifts in the light—people will constantly ask you about it.
10. Teal to White Ombre
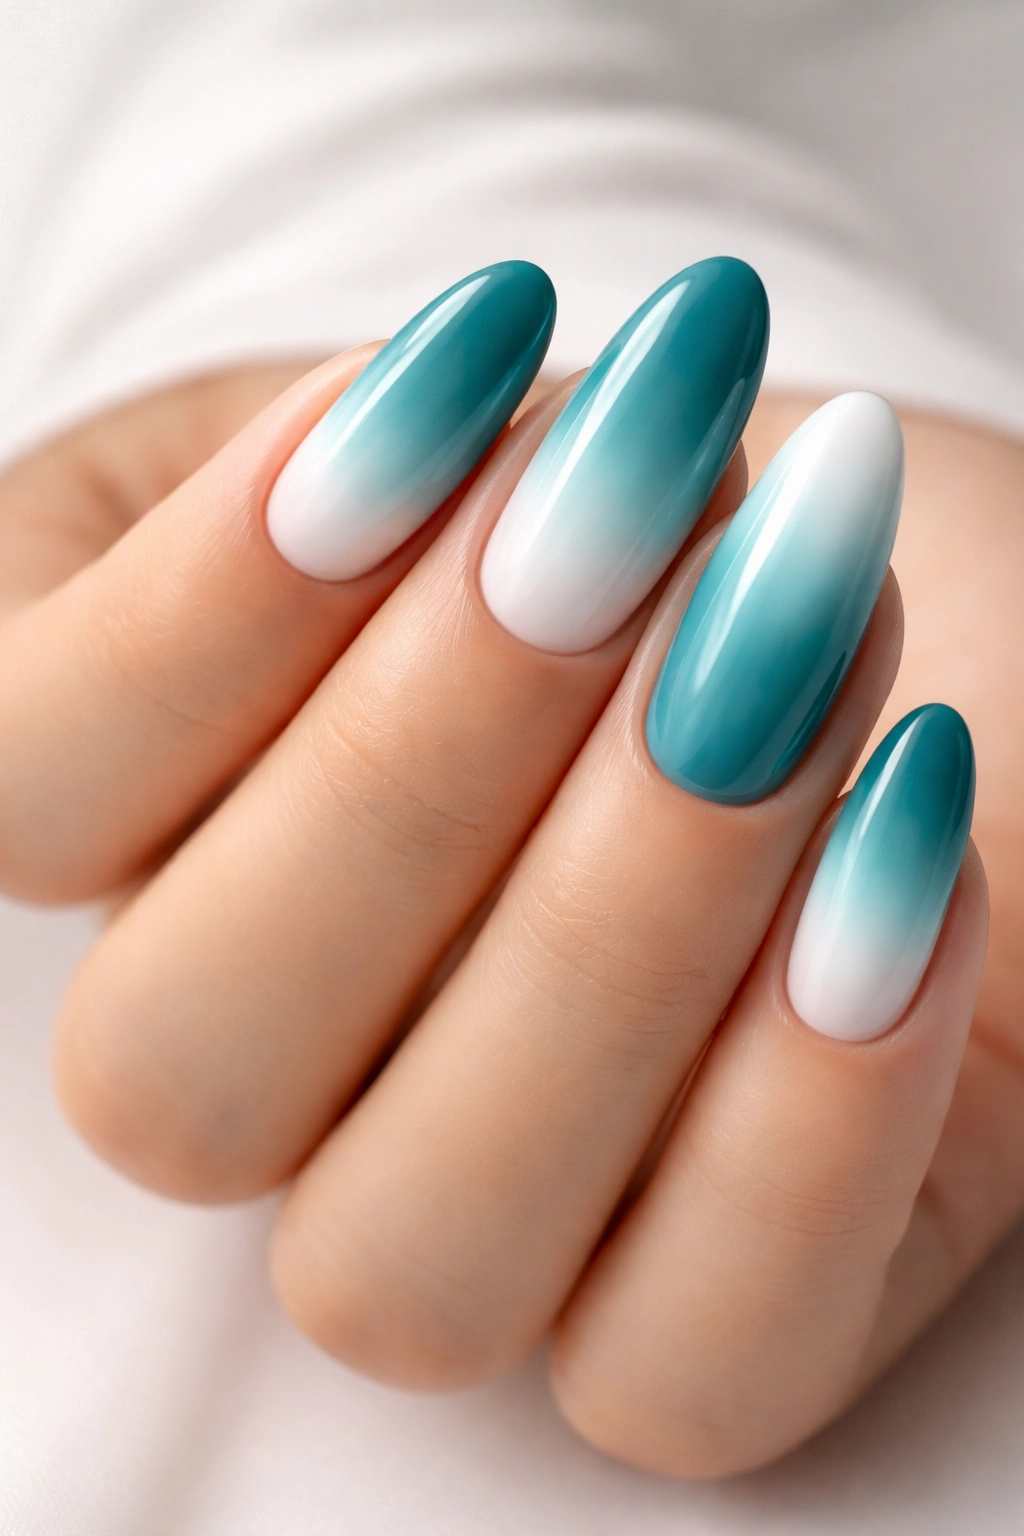
If you want a bold ombre that’s still cool and collected, teal to white is perfection. Teal is that rare color that feels both creative and professional, and when you ombre it into white, you get something that’s visually striking on long oval nails without feeling overwhelming or costume-like.
The Sophistication of Teal Ombre
Teal sits in that beautiful middle ground between blue and green, making it feel modern and slightly unexpected. The gradient from a saturated teal into white creates strong visual impact, especially on nails with elongated surface area like ovals. This is the design that looks amazing in photos and even better in person.
Building the Teal to White Gradient
- Choose a true teal—rich but not muddy or too dark
- The white should be pure and bright, not cream or off-white
- Sponge technique is ideal because you’re going from saturated color to white
- The gradient should happen across the upper two-thirds of the nail for visibility
- A glossy finish emphasizes the color separation and looks modern
- Consider adding a thin line of darker teal at the very edge for definition
Pro tip: This design works especially well if you alternate the nail direction—some nails ombre left-to-right, others right-to-left, creating visual interest across your hand.
11. Peach to Cream Ombre
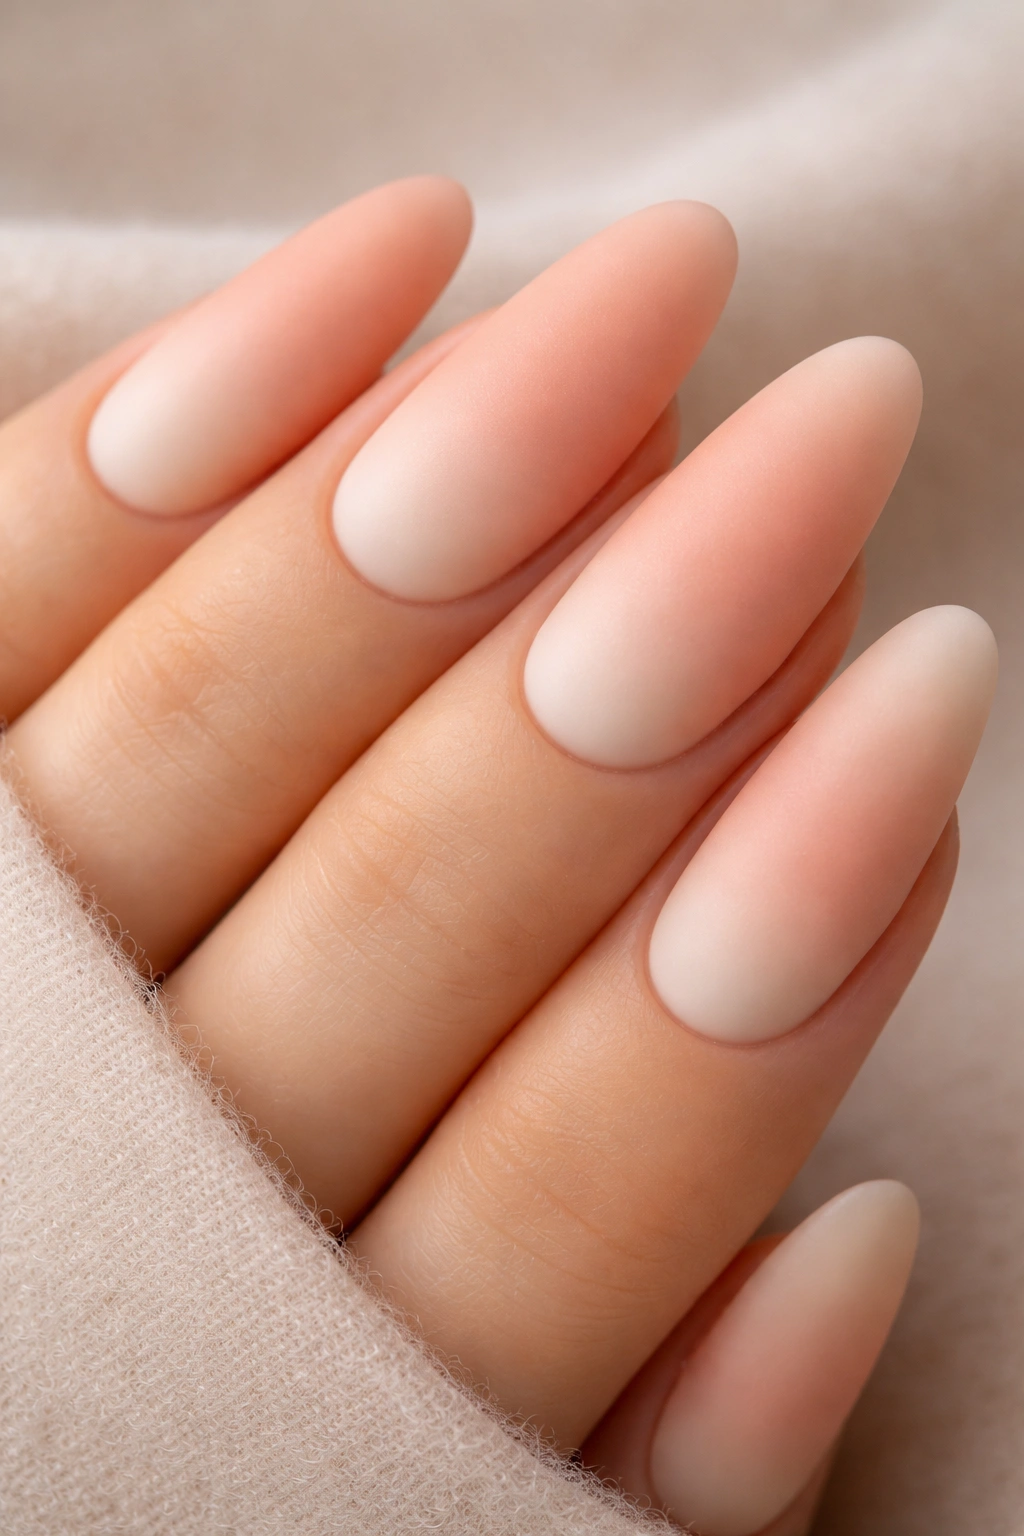
Peach to cream is the warm, gentle ombre that feels eternally wearable. It’s the color combination that works across seasons, works with every skin tone, and looks good whether you’re at work or at play. On long oval nails, the peach-to-cream gradient creates an almost edible, pretty aesthetic that’s genuinely lovely.
Why This Combination Feels So Right
Peach and cream together hit a perfect balance between warmth and subtlety. Neither color is too bold, but together they create a gradient that’s clearly intentional and beautiful. The long oval nail shape is perfect for showcasing this soft gradient because you have enough space to see the transition clearly without it overwhelming your hands.
Step-by-Step Application
- Begin with a warm, muted peach tone—more dusty peach than bright
- Transition to a creamy ivory or off-white at the tips
- Sponge blending creates the softest transition for this gentle color story
- This one looks particularly nice with a matte topcoat for a velvety feel
- Consider adding a hint of shimmer to just the cream portion if you want subtle dimension
- If you prefer glossy, a satin finish splits the difference beautifully
Insider note: This design gets better with age—after a few days when the topcoat dulls slightly, it develops a soft, refined quality that’s actually more beautiful than the fresh mani.
12. Plum to Lavender Ombre
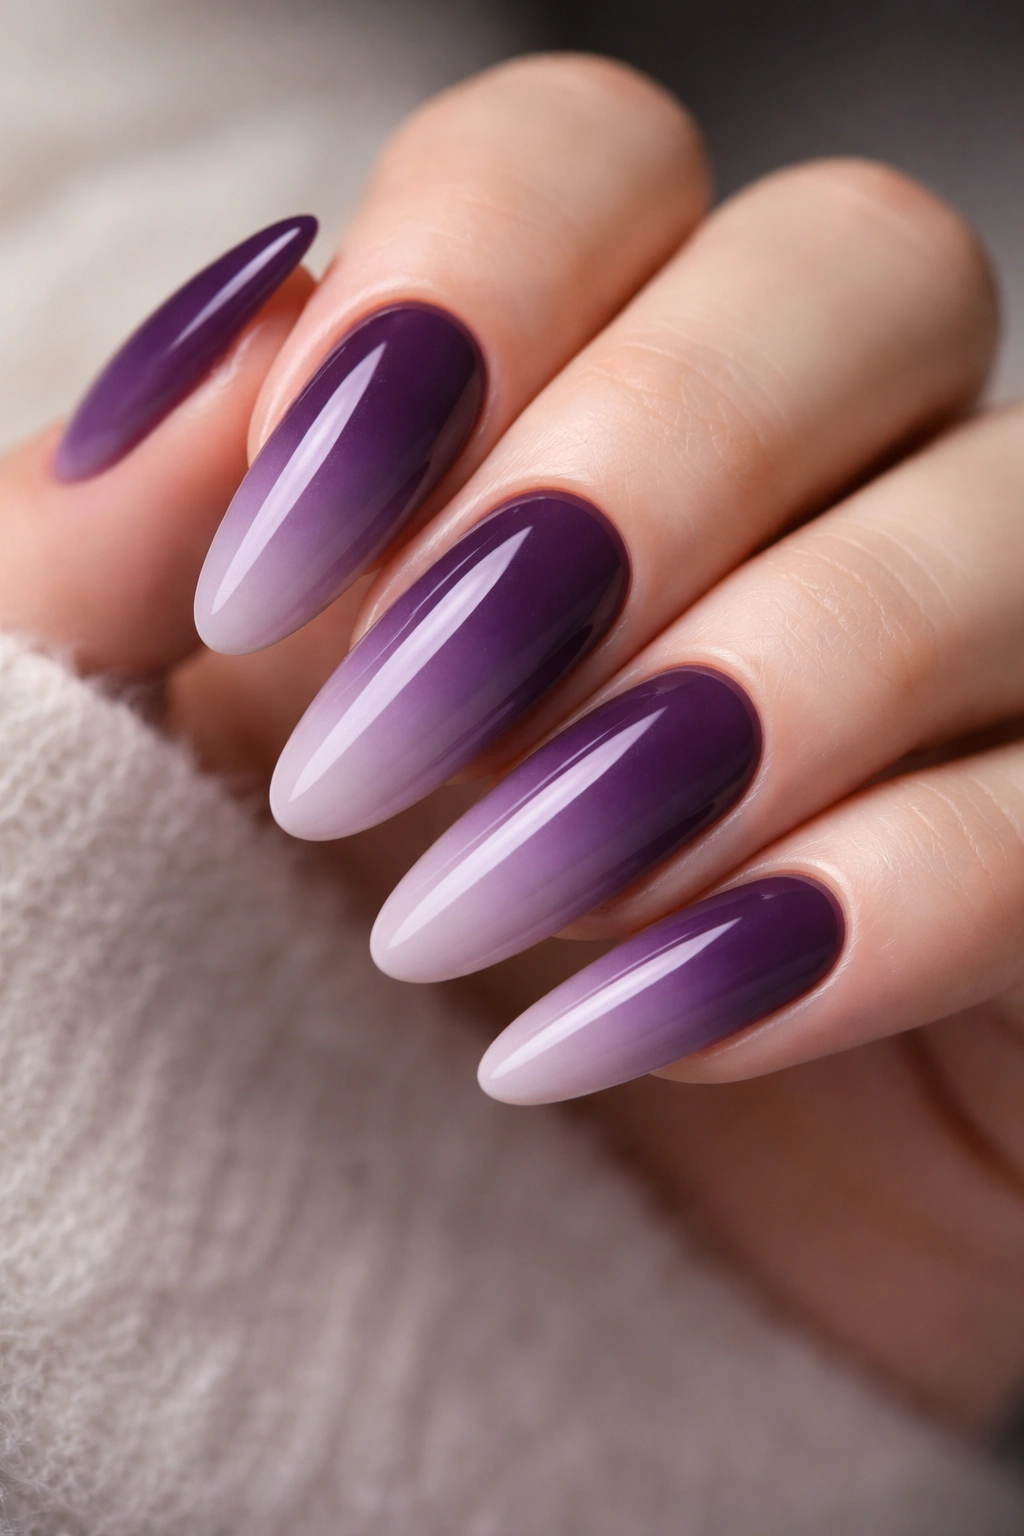
Close out your ombre collection with plum to lavender—a gradient that feels creative, artistic, and surprisingly wearable. This color story works for anyone who loves purple in all its forms. On long oval nails, plum to lavender creates an ombre that’s moody yet soft, sophisticated yet playful.
The Artistry of Purple Ombre
Plum brings depth and richness while lavender brings lightness and airiness. Together on long oval nails, they create a gradient that feels more artistic and intentional than a solid color ever could. This is the design that draws compliments because it’s unexpected but absolutely beautiful in execution.
Technique for Plum to Lavender
- Start with a true plum—deep purple with slightly red undertones
- Create your gradient by introducing a softer, dustier lavender in the mid-nail
- Move to a pale, almost dusty lavender at the tips
- Sponge blending is ideal because these colors have similar undertones and blend beautifully
- This design works well with either matte or glossy finish—try matte for a sophisticated look
- Consider adding a single tiny dot of glitter at the base of each nail for subtle sparkle
Real talk: This design looks especially stunning if you add a thin navy or deep purple line at the cuticle area to frame the gradient and create more dimension.
Key Takeaways
The beauty of ombre nails on long oval shapes is that you’ve got endless options depending on your mood, aesthetic, and occasion. Whether you’re drawn to soft, romantic gradients like blush to pearl or bold statements like black to gold, every single one of these designs works because the elongated oval canvas gives the gradient room to shine.
The technique itself is more forgiving than you might think—whether you’re using a sponge, a dry brush, or mixing topcoats strategically, the softness of an ombre gradient hides tiny imperfections that would show on a solid color. You can absolutely achieve salon-quality results at home with patience and the right tools.
Pick the color story that speaks to you, gather your supplies, and give it a try. Your hands are about to become your favorite thing to look at.
