

Abstract nail art has absolutely taken over the beauty world, and for good reason. Unlike traditional manicures that follow strict patterns or realistic designs, abstract nails give you complete creative freedom. You can throw random splashes of color on your canvas, create wild squiggles, layer geometric shapes, or let your imagination run completely loose—and it’ll look intentional and chic. The beauty of this trend is that there’s genuinely no “wrong way” to do it, which makes it perfect whether you’re a seasoned nail art enthusiast or someone picking up a brush for the very first time.
What makes abstract nail art so magnetic right now is its versatility across every lifestyle and aesthetic. You can go minimalist with just a few lines and dots, or you can go maximalist with a riot of colors and textures. It works on short nails, long nails, natural nails, gel manicures, and even press-on nails. You can wear it to the office paired with neutral clothing, to a festival with bold outfits, or to literally anywhere in between. The trend celebrates individuality in a way that other nail designs simply can’t match—your abstract design is yours alone, unrepeatable and entirely personal.
The tools you’ll need are surprisingly simple: nail polish in whatever colors call to you, a few basic brushes or even a toothpick, maybe a dotting tool, and a steady hand (or at least, a willingness to embrace the imperfection). We’ve gathered fifteen stunning abstract nail ideas that run the entire spectrum, from elegant and understated to bold and boundary-pushing. Each one is absolutely achievable at home, though you can also bring these inspirations to your favorite nail professional who’ll execute them with their own artistic flair. Let’s dive in.
1. Geometric Marble Swirls
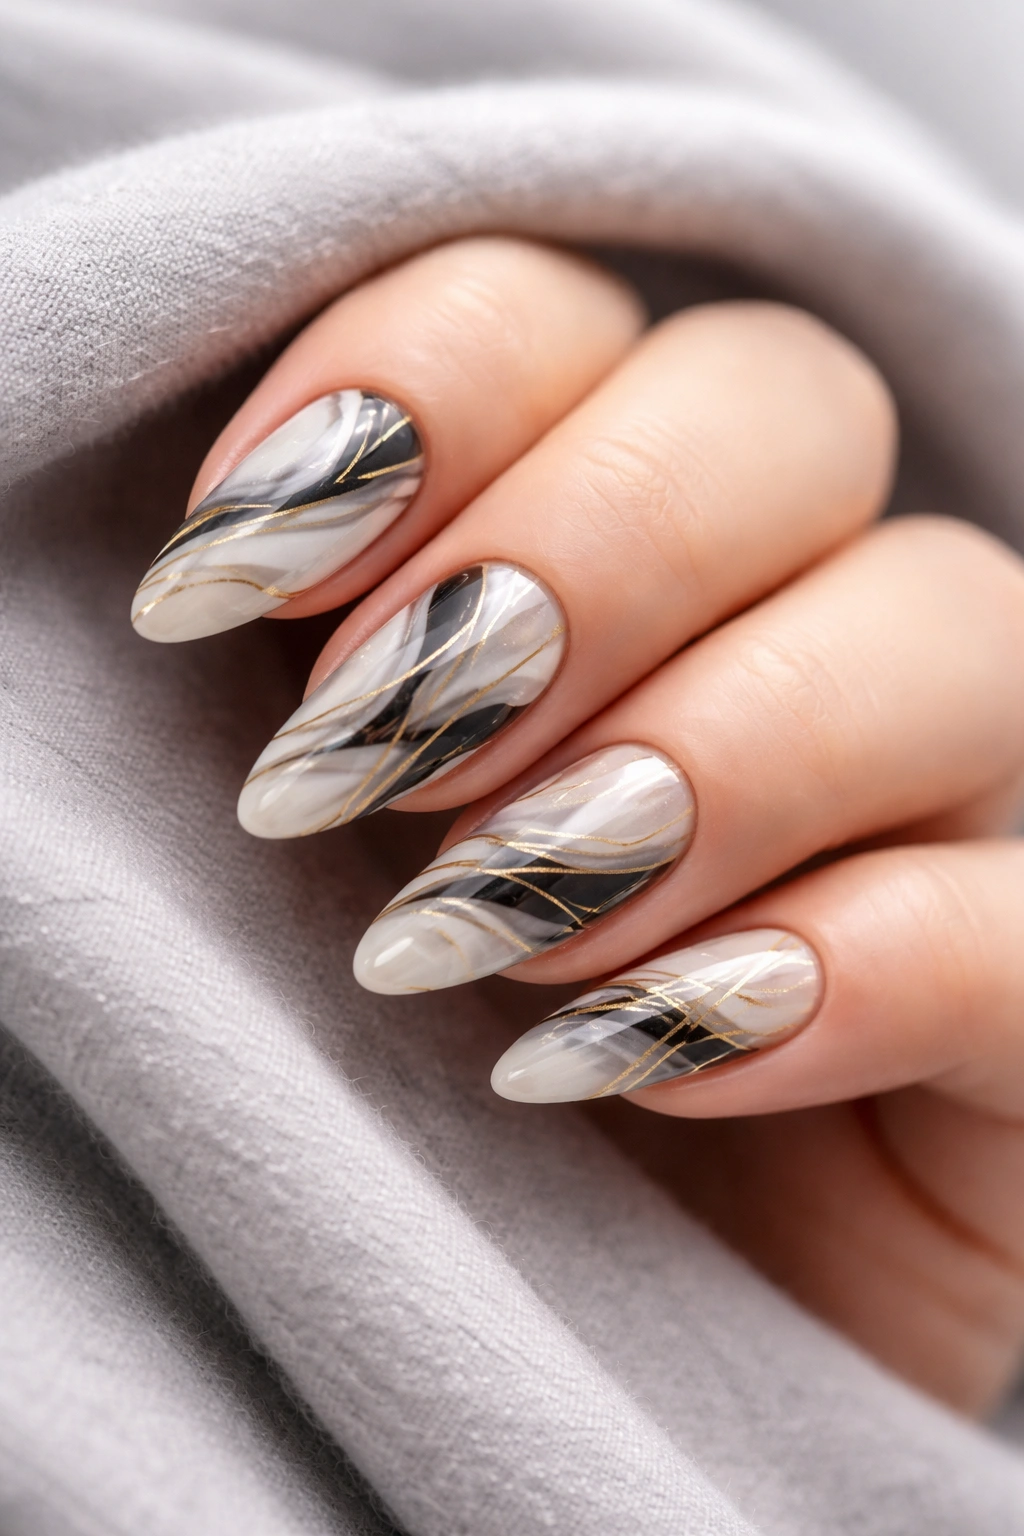
Combining marble effects with geometric abstraction creates a look that feels both modern and sophisticated. Start with a light neutral base—soft white, cream, or pale gray works beautifully—then use a thin striping brush to paint flowing swirls in contrasting colors. The key to nailing this style is letting your swirls move freely without worrying about perfect symmetry. Use two to three colors maximum so the design reads clearly; black with white and gold, or navy with white and rose gold, create striking contrast that makes the swirls pop.
Why It Stands Out
This design bridges the gap between structured geometry and organic flow, which gives it mass appeal. The marble element adds depth and sophistication that elevates a simple abstract design into something gallery-worthy. People often assume marble nails are complicated, but when you pair them with loose swirls rather than trying to create realistic marble veining, the whole thing becomes forgiving and fun.
How to Create It
- Apply your base color in two thin coats, allowing each to dry completely
- Use a thin brush or toothpick to paint 3-4 curved lines in your first accent color, creating loose S-shapes or waves across the nail
- Add your second color in similar swirling motions, letting them intersect and overlap
- Add metallic accents (gold foil, chrome, or shimmer powder) along some of the swirl edges for depth
- Finish with a glossy topcoat to seal everything and create that signature marble shine
Pro tip: Work slowly and let each color dry slightly before adding the next one. This prevents your colors from bleeding together into an unintended muddy blend.
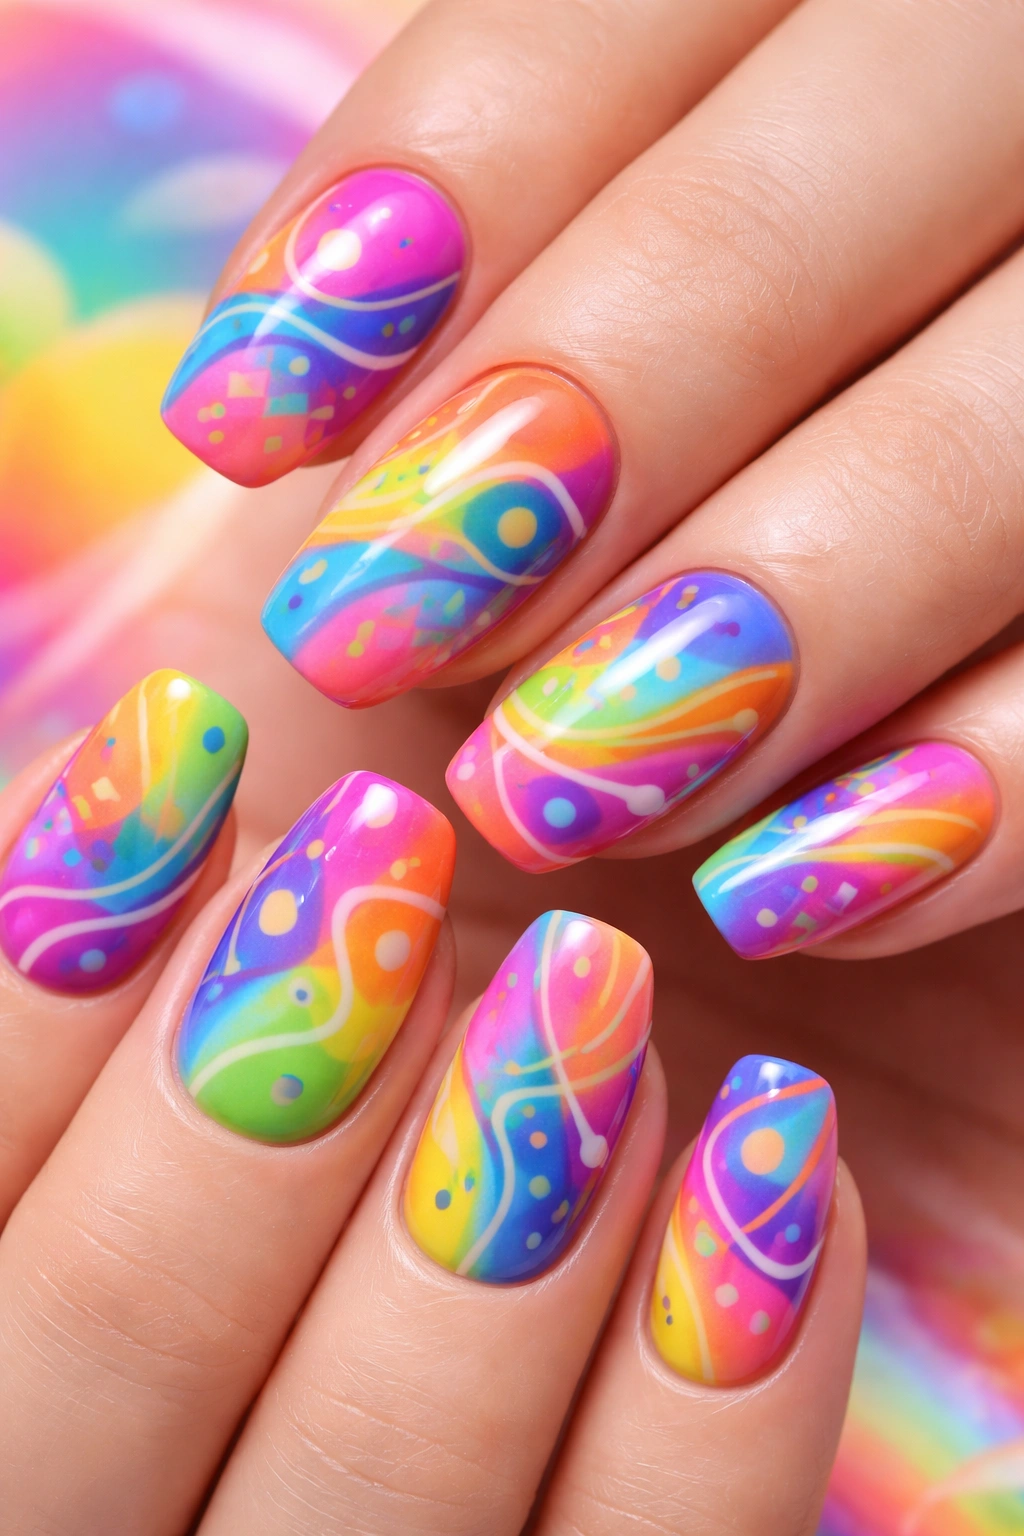
2. Neon Color Blocking
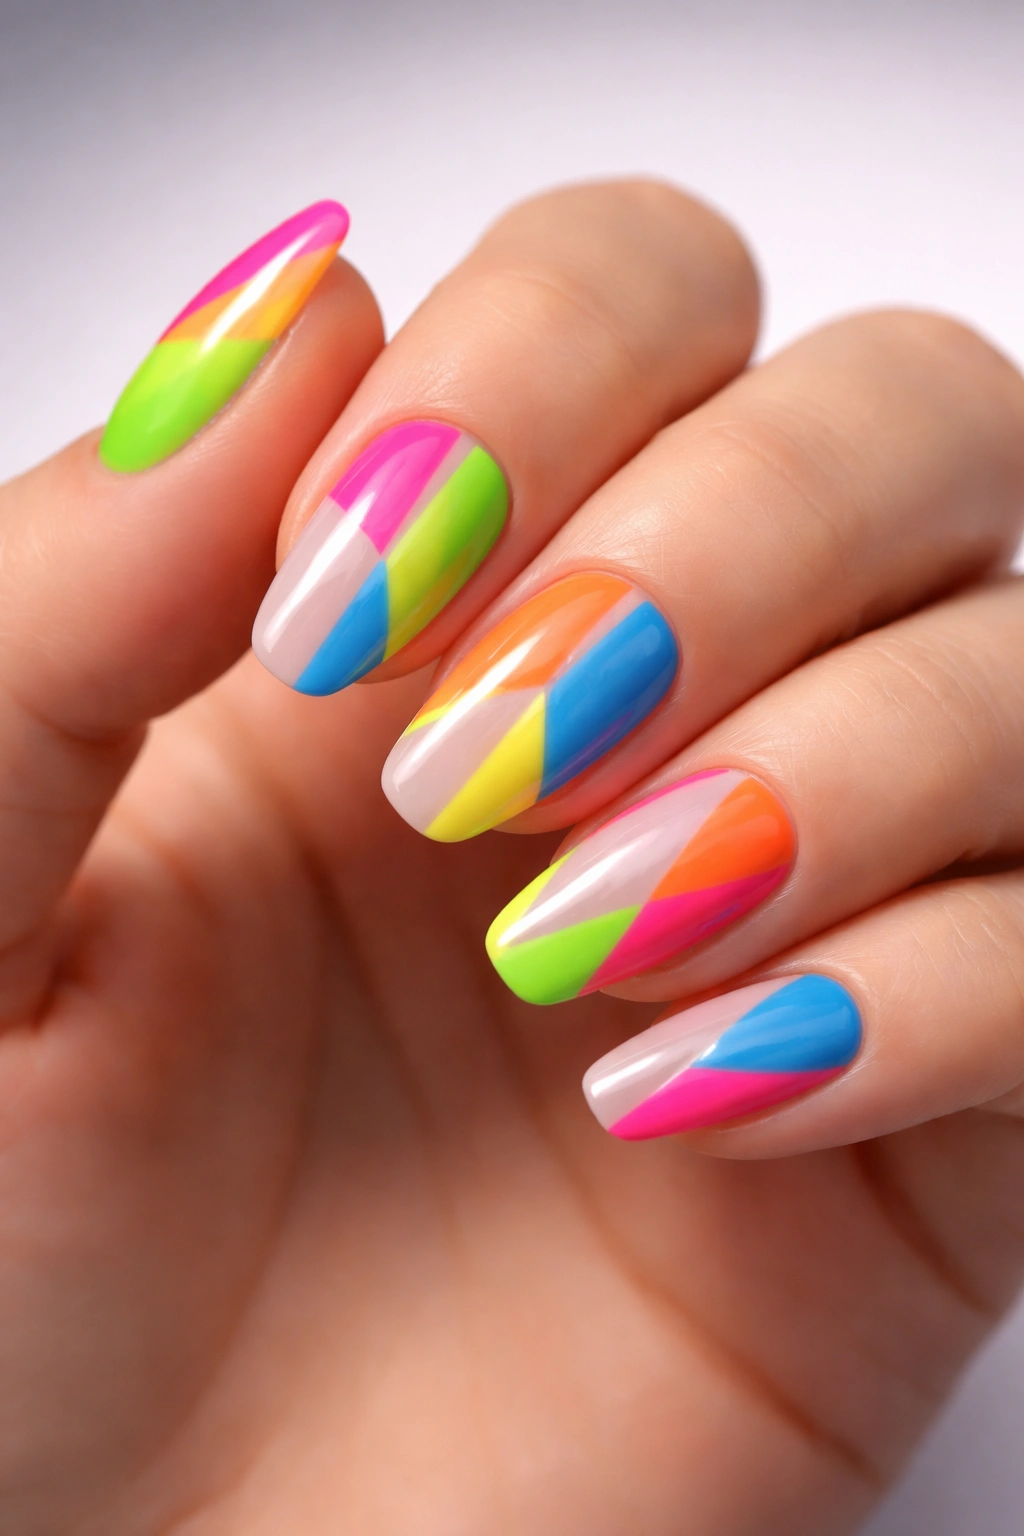
Bold, unapologetic neon colors create maximum impact when used in abstract color-blocking designs. Choose two to four neon shades—think hot pink, electric lime, vibrant orange, and electric blue—then paint solid blocks of each color on different sections of your nails. Some nails might be split vertically, others diagonally, and some might have smaller geometric blocks layered on top. The chaos is the point here; the more unpredictable the layout, the more authentically abstract it feels.
Why It Stands Out
Neon color blocking photographs incredibly well and makes a statement even from across a room. This style is perfect if you love bold fashion choices and aren’t afraid to have your nails be the main character. It’s also surprisingly versatile despite its intensity—pair it with neutral clothing to let your nails shine, or wear it with equally bold outfits for a coordinated vibe.
What You Need to Know
- Neon polishes often need three coats to reach full vibrancy, so give yourself extra drying time
- The neon effect is most striking with glossy finishes rather than matte
- Use nail tape or sticker guides if you want sharp lines between colors, or free-hand it for a more organic, wonky look
- These designs work best on medium to long nails where you have enough real estate to play with multiple color sections
- Neon colors can stain lighter base coats, so consider a white base or dark base depending on your neon shades
Worth knowing: Neon nails are attention-getters, which some people love and others find too loud for their daily routine. If you’re hesitant, try this design on just one or two accent nails first to test the vibe.
3. Minimalist Line Work
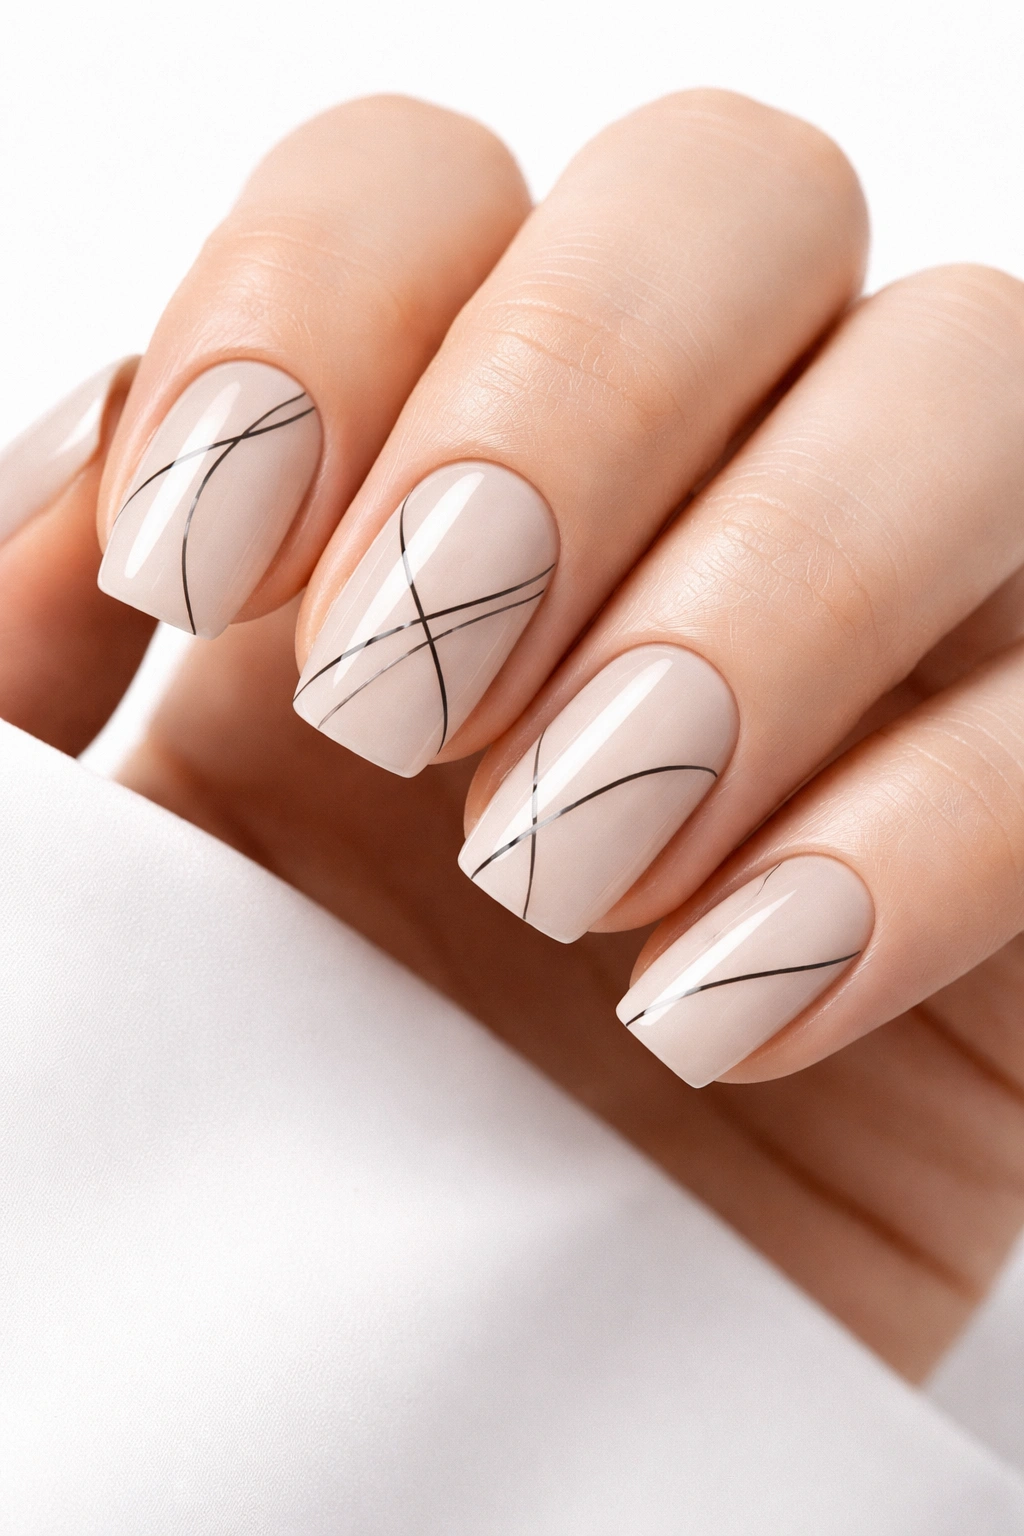
Sometimes less is genuinely more. Minimalist abstract lines rely on precision and intentional placement rather than volume. Paint your nails a neutral nude, cream, or soft gray, then use a thin brush or striping tool to paint delicate black, navy, or deep charcoal lines across the surface. These lines can be straight and geometric, gently curved, or a mix of both. The spacing matters here—you want enough white space (or negative space of your base color) so that the lines feel intentional rather than rushed or unfinished.
Why It Stands Out
This approach appeals to people who love nail art but prefer an understated aesthetic. Minimalist line work is office-appropriate, pairs with any outfit, and feels somehow more intentional than busier designs because every line is visible and deliberate. It’s the kind of manicure that looks effortlessly elegant, like you weren’t even trying to be fashionable—but obviously you were, and it worked.
How to Get It Right
- Choose a very thin brush or use a striping brush made specifically for nail art
- Practice your line placement on a piece of paper first if you’re nervous
- Let your base coat dry completely before adding lines to prevent smudging
- Create varying line weights by using different pressure with your brush
- Consider adding just one or two tiny dots with a dotting tool to break up the linear design
- A matte topcoat actually enhances minimalist designs by reducing shine and emphasizing the graphic quality of the lines
Real talk: This design is easier to execute at home than it looks because imperfections read as intentional in abstract art. A slightly wobbly line? That’s artistic. A dot that’s not perfectly round? Charming.
4. Watercolor Dreamy Pastels
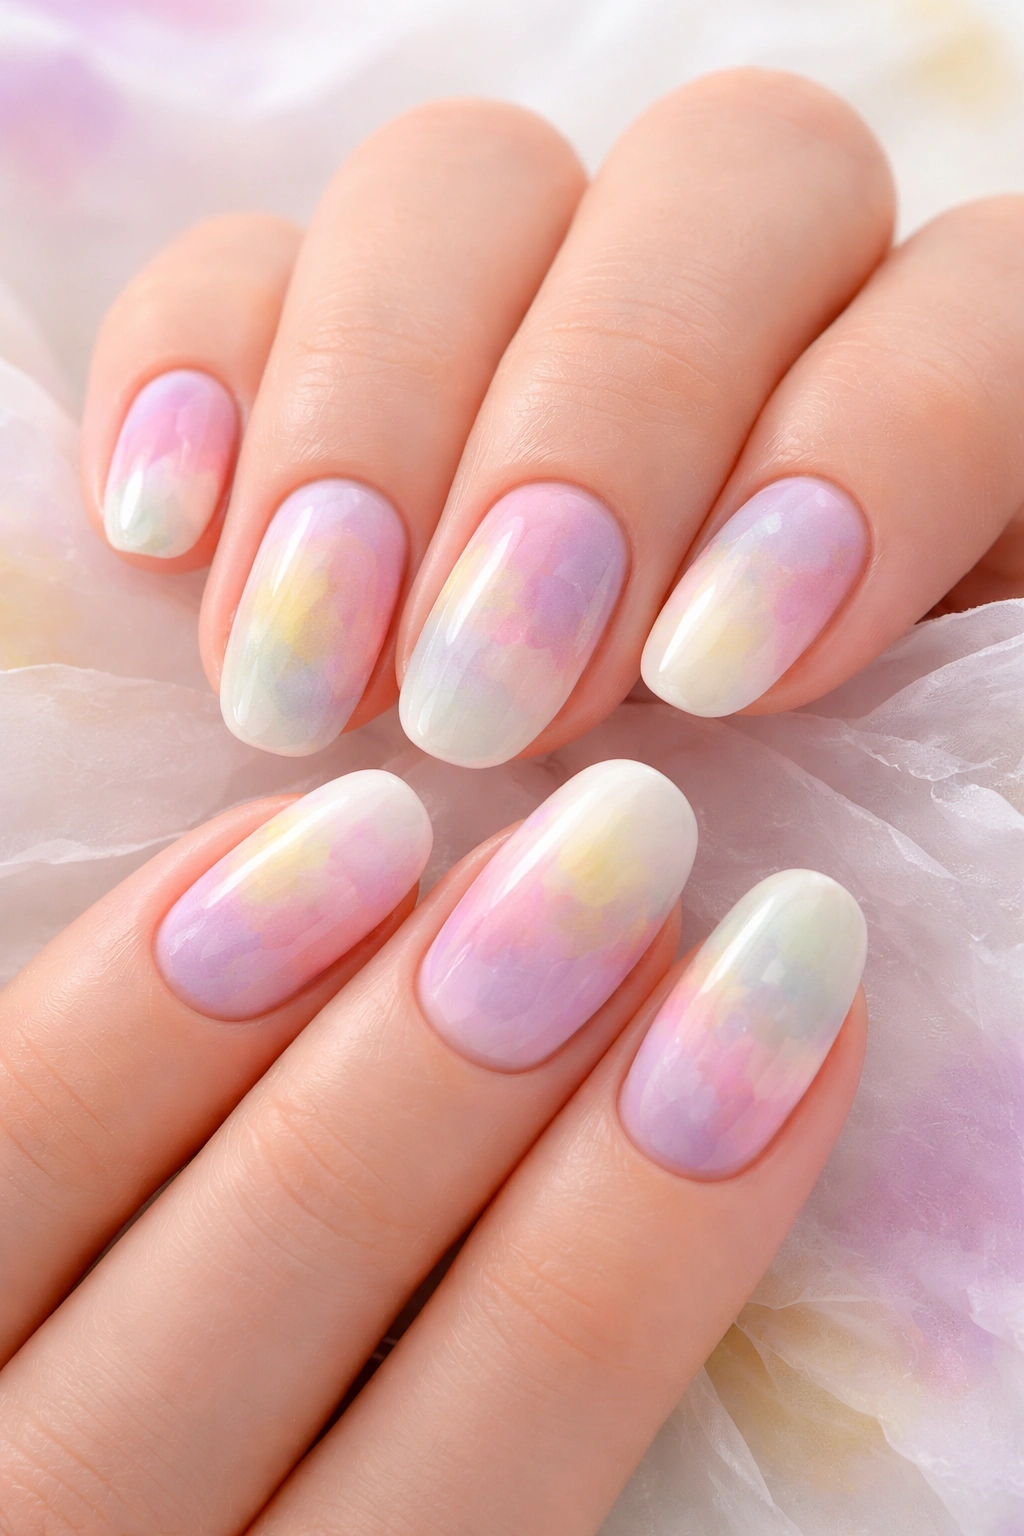
Create a soft, romantic watercolor effect using pale, washed-out colors that blend seamlessly into each other. Choose three to four pastel shades—blush pink, lavender, pale yellow, soft sage green—and use a damp sponge or soft brush to dab them onto your nails, letting the colors naturally merge and blur at their edges. The goal isn’t sharp definition but rather a dreamy, diffused look, as if you’ve painted your nails and then immediately blurred them with water.
Why It Stands Out
Watercolor pastels feel artistic and intentional in a gentle way. This design reads as expensive and spa-like rather than DIY, even when you make it yourself. It’s perfect for spring and warm weather but honestly works year-round because pastels are universally flattering and feel calming rather than seasonal.
Creating the Effect
- Use a makeup sponge or blending sponge rather than a traditional nail brush
- Apply your base pastel color first, then while it’s still slightly wet, dab your other colors onto the nail
- The moisture in the wet polish allows colors to blend naturally without you having to work hard
- If your colors aren’t blending smoothly, lightly mist the sponge with water and tap it onto the nail to help the colors flow
- Use matte topcoat rather than glossy to enhance the soft, watercolor painting aesthetic
- This design actually looks better with some imperfection—perfect blending reads as a sticker or decal rather than hand-painted
Pro tip: Watercolor pastels look stunning with chrome or holographic accent nails as a contrast element, or keep them entirely within the pastel family for a cohesive, calming look.
5. Bold Squiggles and Swirls in Contrasting Colors
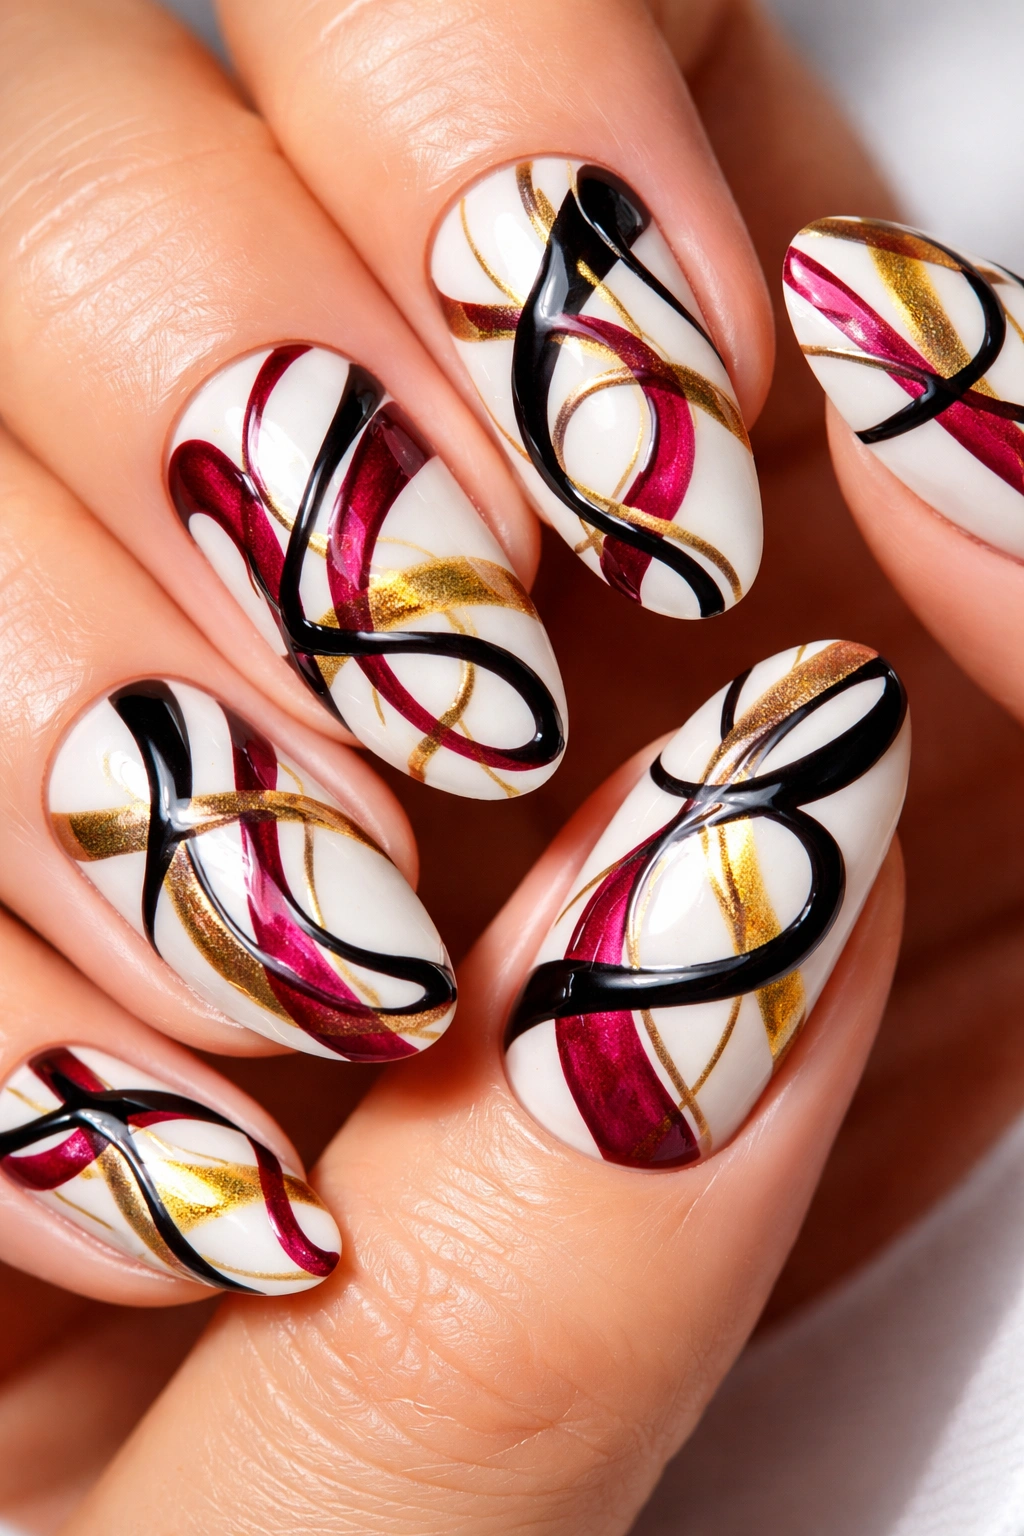
Channel pure artistic freedom with random squiggles and swirls layered in bold contrasting colors. Start with a white, black, or neutral base, then use a thin brush to paint confident, looping lines in colors that pop against your background. Don’t overthink the design—let your hand move intuitively and create swirls that overlap, intersect, and fill the nail somewhat haphazardly. The imperfection is entirely the point and what makes it feel authentically abstract rather than premeditated.
Why It Stands Out
This design is pure personality. Wearing squiggle nails says you’re creative, confident, and don’t need designs to make sense to anyone but you. The style works on every nail length and actually looks better when it’s a little imperfect. It’s also one of the easiest abstract designs to execute because there’s genuinely no rules—your hand controls the outcome, and whatever comes out is correct.
Making It Work
- Choose two colors that truly contrast—black with white, burgundy with gold, navy with neon pink
- Use a medium-thickness brush so your swirls are visible but not so thick they overwhelm the nail
- Don’t try to plan the design beforehand; let it happen naturally as you paint
- It’s okay if the swirls don’t fill the entire nail or if they cover every inch—both are valid
- Allow the first color to dry before adding the second to prevent muddying
- Glossy topcoat enhances the boldness; matte topcoat makes it feel more artistic and graphic
Insider note: This is the perfect design to try if you have shaky hands or feel intimidated by nail art. Squiggles are supposed to look organic and imperfect, so your “mistakes” are actually features of the design.
6. Geometric Shapes with Negative Space
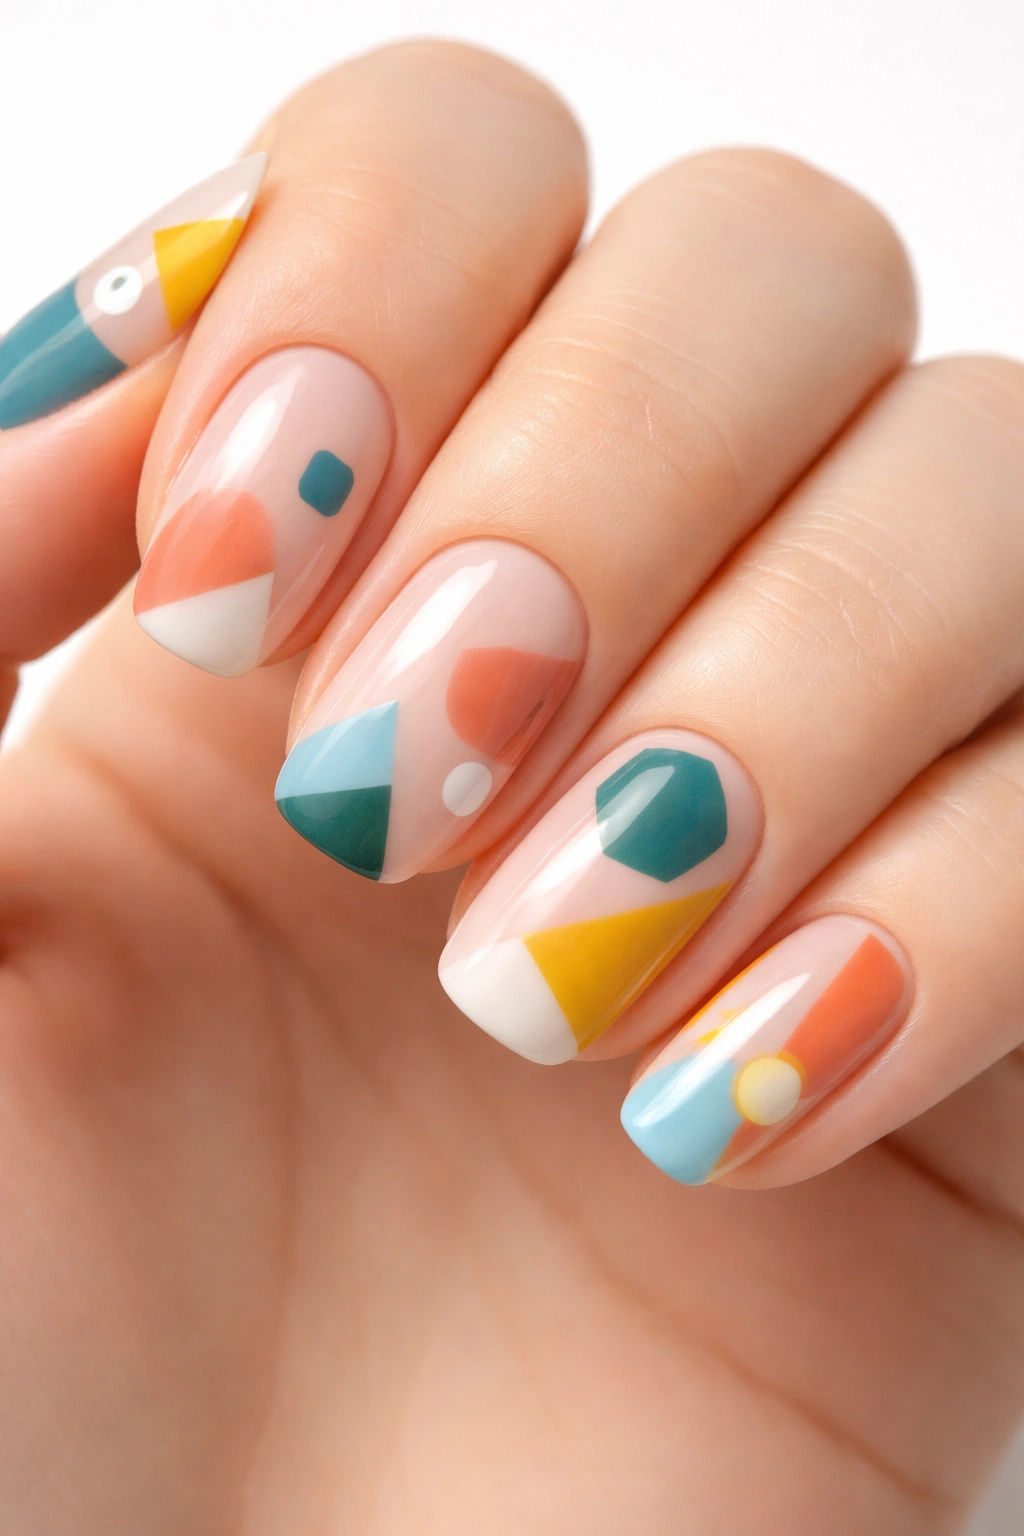
Create a clean, modern abstract design using geometric shapes—triangles, circles, rectangles, hexagons—while leaving plenty of your natural nail color or base coat visible. Use painter’s tape or carefully hand-paint clean lines to create your shapes in two to three colors, then leave the rest of the nail bare. This approach feels very intentional and considered, quite different from the chaos of other abstract styles. It’s abstract because the shapes don’t represent anything specific; they’re just beautiful geometric forms arranged artfully.
Why It Stands Out
Negative space designs feel very “current” and fashion-forward. They showcase restraint and intentionality, which reads as sophisticated and polished. This style works beautifully across all nail lengths and is especially striking on short nails where you don’t have vast space to fill. It photographs exceptionally well and translates beautifully across different skin tones.
How to Execute It
- Decide whether you want shapes on every nail or just on accent nails
- Use painter’s tape for perfectly clean lines, or free-hand if you prefer a slightly looser look
- Paint your shapes in colors that complement your skin tone and wardrobe
- Consider mixing matte and glossy finishes—matte shapes on a glossy base or vice versa creates visual interest
- Metallic accents (gold, silver, copper) work beautifully to define shape edges
- Keep your color palette limited (two to three colors maximum) so the focus stays on the geometric composition
Worth knowing: This design requires a bit more planning than free-form swirls, but it’s still absolutely achievable at home. Take a photo of your inspiration and reference it while you paint.
7. Retro ’70s Swirls and Color Mixing
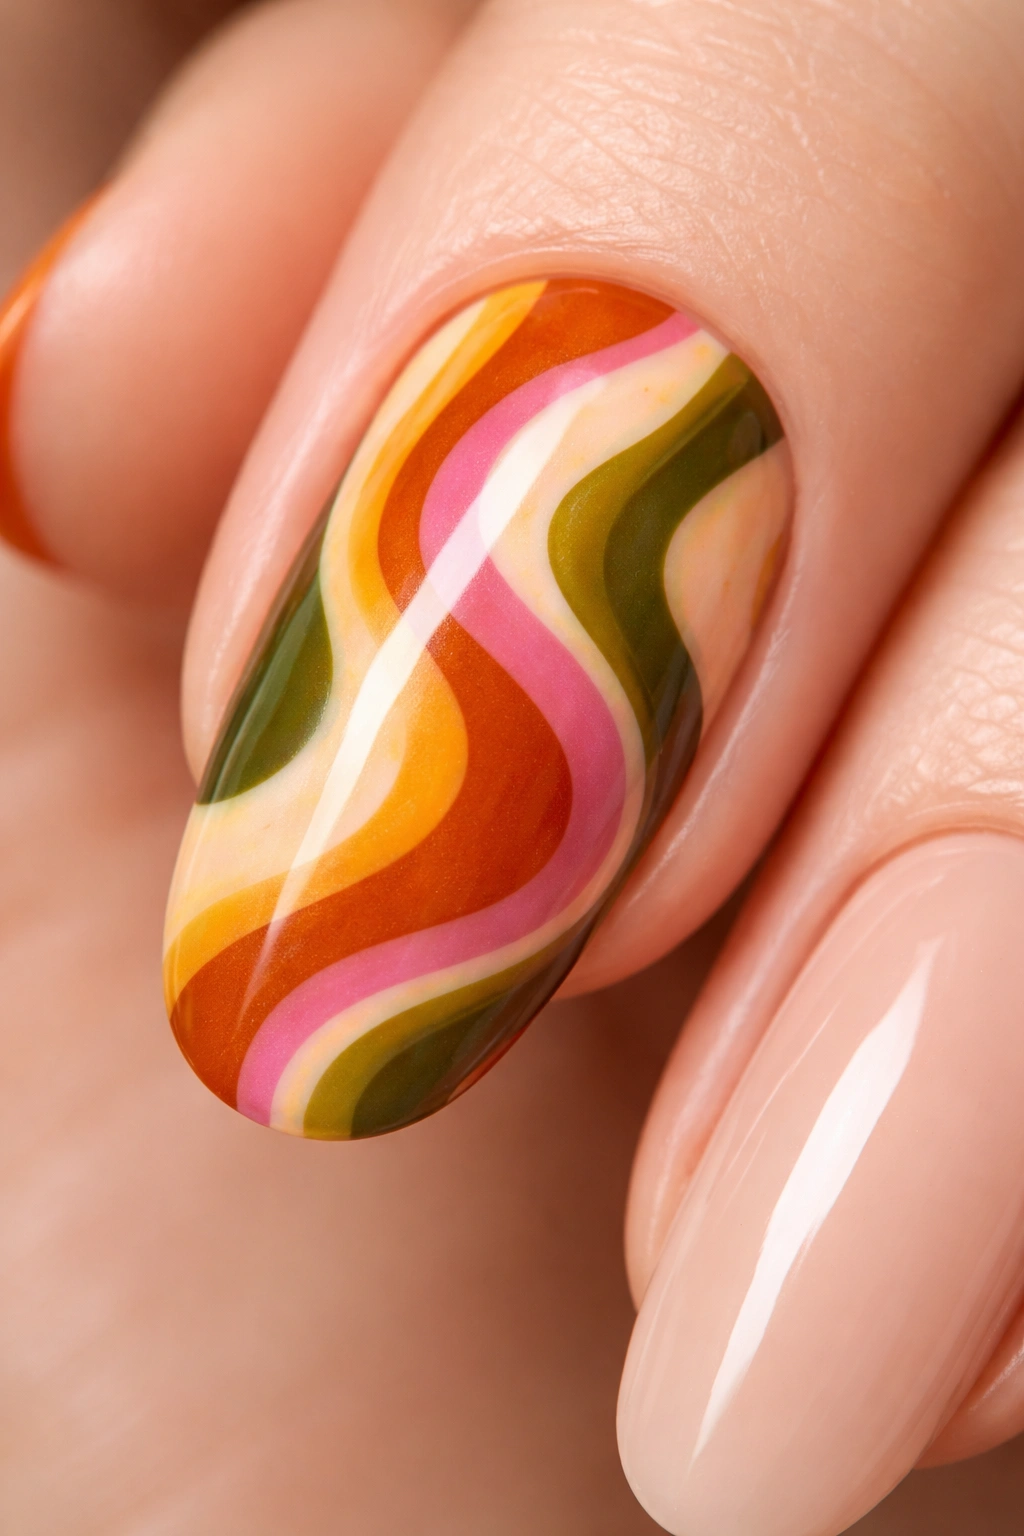
Bring back the groovy vibe with ’70s-inspired abstract swirls featuring warm, earthy tones blended with bold accent colors. Think burnt orange, mustard yellow, olive green, cream, and touches of hot pink or magenta. Create flowing swirls that wind across the nail, and don’t worry if colors slightly blend into each other—that’s very on-brand for this retro aesthetic. The key is embracing warm color families while adding unexpected pops of brightness.
Why It Stands Out
Retro ’70s aesthetics have serious staying power in fashion and beauty right now. This design feels nostalgic without being costume-y, and the warm color palette is flattering on virtually every skin tone. It’s playful and fun while still feeling intentional and artistic. Plus, if you’re even slightly off with your execution, it just reads as more authentically vintage rather than as a mistake.
Creating That Groovy Feeling
- Start with a cream or pale base to let your warm colors really sing
- Use a medium brush to paint flowing S-curves and swooping lines
- Layer your colors slightly while they’re still wet to create natural blends
- Add small daisy flowers or simple dot patterns to enhance the ’70s vibe without overthinking it
- Matte topcoat enhances the retro feeling more than glossy
- Consider painting different designs on different nails rather than matching them all—the mismatched retro aesthetic is very on-trend
Pro tip: Reference actual ’70s art and color palettes for inspiration. The era had a specific approach to color harmony that feels instantly recognizable, and even if your execution isn’t perfect, the color choices will make people get it.
8. Marble and Metallic Foil Accent
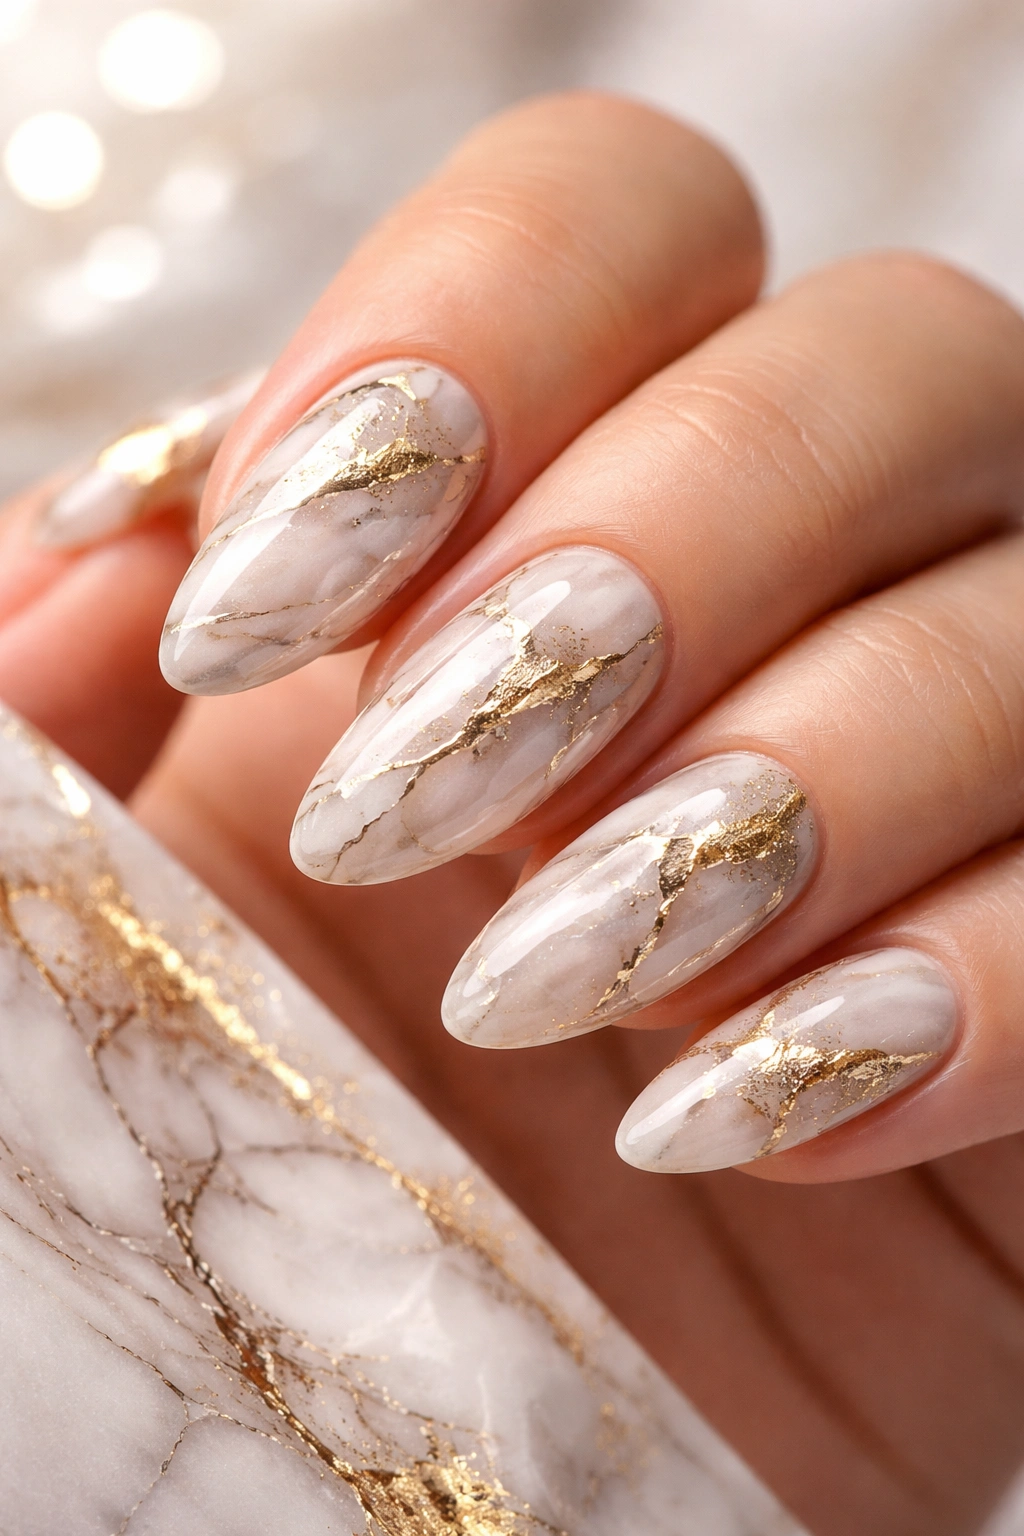
Combine actual nail foil (available at any beauty supply or online) with abstract marble swirls for a design that feels expensive and intricate. Paint your base in a neutral shade, create loose marble veining in white or black, then apply metallic foil to certain sections of the nail for shine and dimension. The foil catches light beautifully and transforms what could be a simple abstract marble design into something that looks like gallery-quality nail art.
Why It Stands Out
Foil accents make any nail design look more sophisticated and expensive, even if it took you fifteen minutes to create. The combination of matte marble with shiny metallic foil creates visual interest and texture that draws the eye. This design works beautifully for special occasions but is subtle enough for daily wear when you’re not overdoing the foil coverage.
Using Foil Successfully
- Ensure your base polish is completely dry before applying foil
- Use the sticky side of a foil nail transfer or cut foil into small pieces
- Press the foil firmly onto the designated nail section and hold for 3-5 seconds
- Use a small brush to gently press foil into all the crevices
- Seal foil thoroughly with a strong topcoat so it doesn’t lift at the edges
- Gold foil feels warm and luxe; silver foil feels modern and cool; copper feels earthy and unique
Real talk: Foil application has a learning curve, but even imperfect foil application looks intentional on abstract nails. A few rough edges or slight peeling are part of the artistic charm.
9. Black and White Op Art
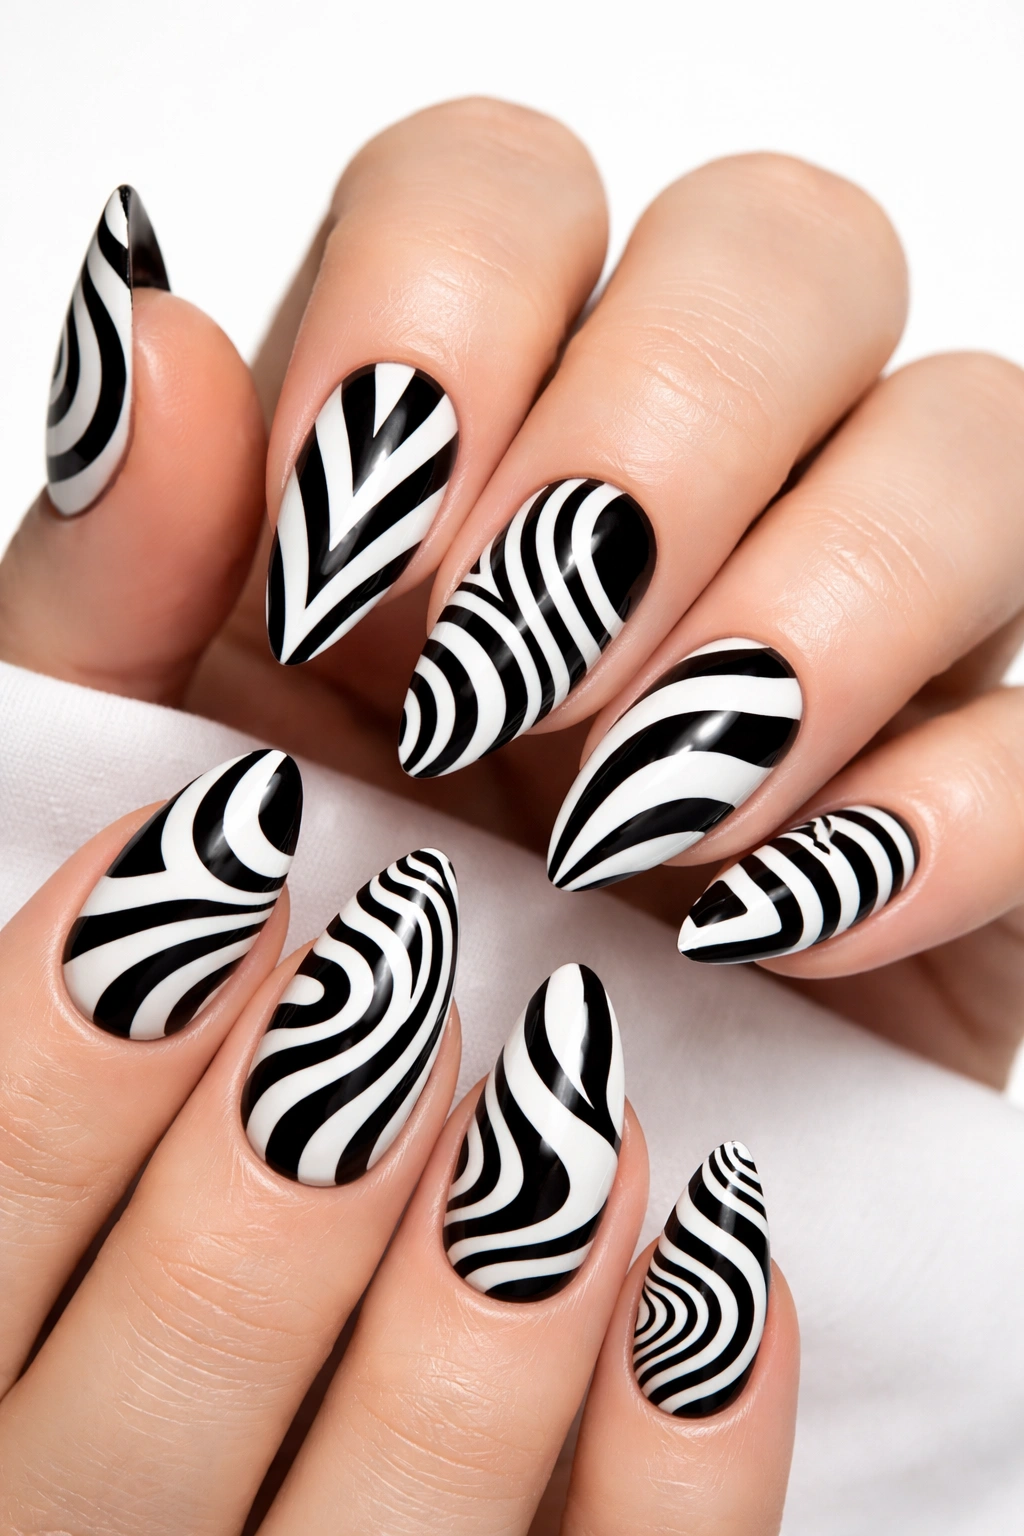
Create an optical illusion effect using bold black and white in geometric patterns and swirls. Paint thick black lines on a white base, or reverse it with white lines on black. The high contrast naturally creates a mesmerizing effect that feels very “fine art” and intellectual. This style works beautifully with straight lines, curves, or a mix of both, and it photographs beautifully because the contrast is so striking.
Why It Stands Out
Op art (optical art) feels more elevated than simple graphic design because it deliberately plays with perception and movement. Black and white op art nails make a statement without relying on trendy colors, so they feel timeless and sophisticated. This design is perfect if you love minimalist aesthetics but want something with more visual impact than simple lines.
Executing Op Art Successfully
- Use thick brushes to create bold lines rather than delicate ones
- The pattern should be confident and graphic rather than timid or fussy
- Avoid patterns that are too busy or complex—simpler is always more striking with op art
- Play with the direction of patterns—vertical, horizontal, diagonal, or swirling
- Ensure your lines are clean and relatively straight for maximum optical impact
- Glossy topcoat enhances the graphic quality and makes the contrast even more striking
Worth knowing: Op art feels very intentional and artistic, so even a slight wobble in your line work reads as a deliberate artistic choice rather than a mistake.
10. Pastel Color Blocking with Gold Accents

Divide your nails into color blocks using soft pastel shades—pale pink, lavender, mint green, soft peach—and define the sections with thin gold lines. This design feels both playful and refined, combining the structured approach of color blocking with the softness of pastels and the luxury of gold details. Each nail can have a different color blocking pattern, or you can create a matching set with the same layout on each nail.
Why It Stands Out
This design bridges the gap between minimalist and maximalist aesthetics. It’s structured enough to feel intentional and planned, but soft enough to feel artistic and dreamy. The gold accents elevate simple pastel colors into something more sophisticated and special-occasion-appropriate. It works beautifully on both short and long nails.
How to Create It
- Apply your base pastel color first
- Use painter’s tape to section off areas where your second pastel color will go
- Paint your second (or third, or fourth) pastel color in the designated section
- Remove tape carefully before the polish is completely dry to prevent chipping
- Use a very thin brush or gold pen to draw thin lines between your color sections
- Consider making different nails have different color blocking patterns for visual interest
- Glossy topcoat makes pastels look creamy and luxurious
Pro tip: This design actually looks better if your color sections aren’t perfectly even. Slightly asymmetrical color blocking feels more intentionally abstract.
11. Dots and Minimal Linework Combo
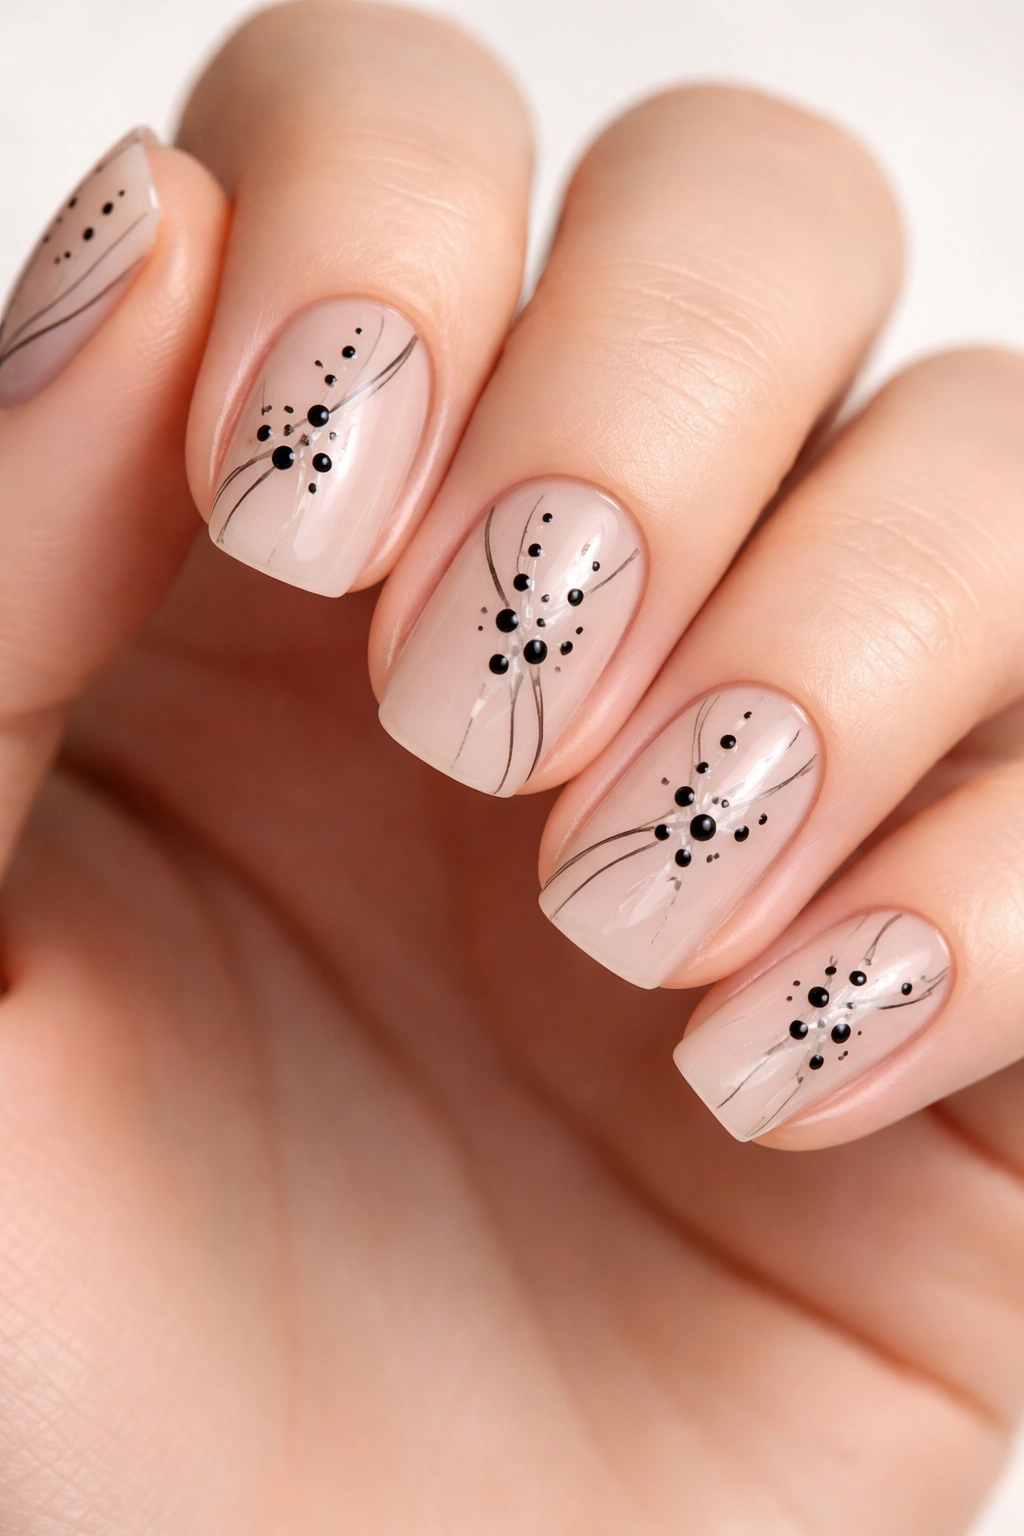
Combine two simple elements—small dots and thin lines—to create a design that feels graphic and playful. Paint a neutral base, then use a dotting tool to create clusters of dots in one color (black, deep burgundy, forest green, or navy work beautifully), and add thin lines with a striping brush in either the same color or a complementary shade. The dots and lines can be randomly distributed or arranged in a vaguely intentional pattern. Either way, the combination creates visual interest without overwhelming the nail.
Why It Stands Out
This design uses the most basic nail art tools (dotting tool and thin brush) to create something that feels intentional and artistic. It’s achievable for absolute beginners while still looking sophisticated on experienced nails. The combination of two simple elements creates complexity and visual rhythm that’s genuinely pleasing to the eye.
Making It Work
- Apply your base coat in white, cream, nude, or a soft color
- Use a dotting tool to create clusters of 3-5 dots scattered across the nail
- With a thin brush, draw lines that connect some dots, frame them, or exist independently
- Vary the line weight and direction to avoid a rigid, robotic appearance
- Let the design be asymmetrical and slightly random—that’s what makes it abstract
- Matte topcoat emphasizes the graphic quality; glossy topcoat softens it
Real talk: This is the easiest abstract design to execute at home and honestly looks better when it’s slightly imperfect. A wobbly dot? Charming. A line that’s not perfectly straight? Artistic.
12. Rainbow Gradient with Abstract Shapes
Create a rainbow gradient as your base, then layer abstract shapes—swirls, lines, geometric forms—on top in contrasting colors. The gradient provides visual energy and color abundance, while the abstract shapes add definition and prevent the rainbow from feeling chaotic. This design is joyful and celebratory while still feeling thoughtfully composed.
Why It Stands Out
Rainbow nails are inherently happy and celebratory, but adding abstract shapes prevents them from looking childish or costume-y. The shapes add intentionality and artistic merit to what could otherwise read as very literal. This design is perfect for Pride celebrations, joyful life moments, or whenever you just want your nails to radiate happiness.
Creating a Rainbow Gradient
- You can create a gradient using the sponge method (dampen a makeup sponge and dab colors onto the nail, blending as you go) or the wet brush method (apply colors while they’re still wet and blend with a clean, damp brush)
- Work with rainbow colors in order (red, orange, yellow, green, blue, purple) or mix them randomly for a more chaotic effect
- Let the gradient dry completely before adding your abstract shapes
- Use black or a dark color for your abstract shapes so they’re visible against the colorful background
- Consider adding gold or silver foil accents to enhance the celebratory energy
- Glossy topcoat makes rainbows look vibrant and alive
Worth knowing: Rainbow gradients can look busy, so keep your abstract shapes relatively simple and sparse to let the gradient shine through.
13. Earthy Tones with Hand-Painted Botanical Elements
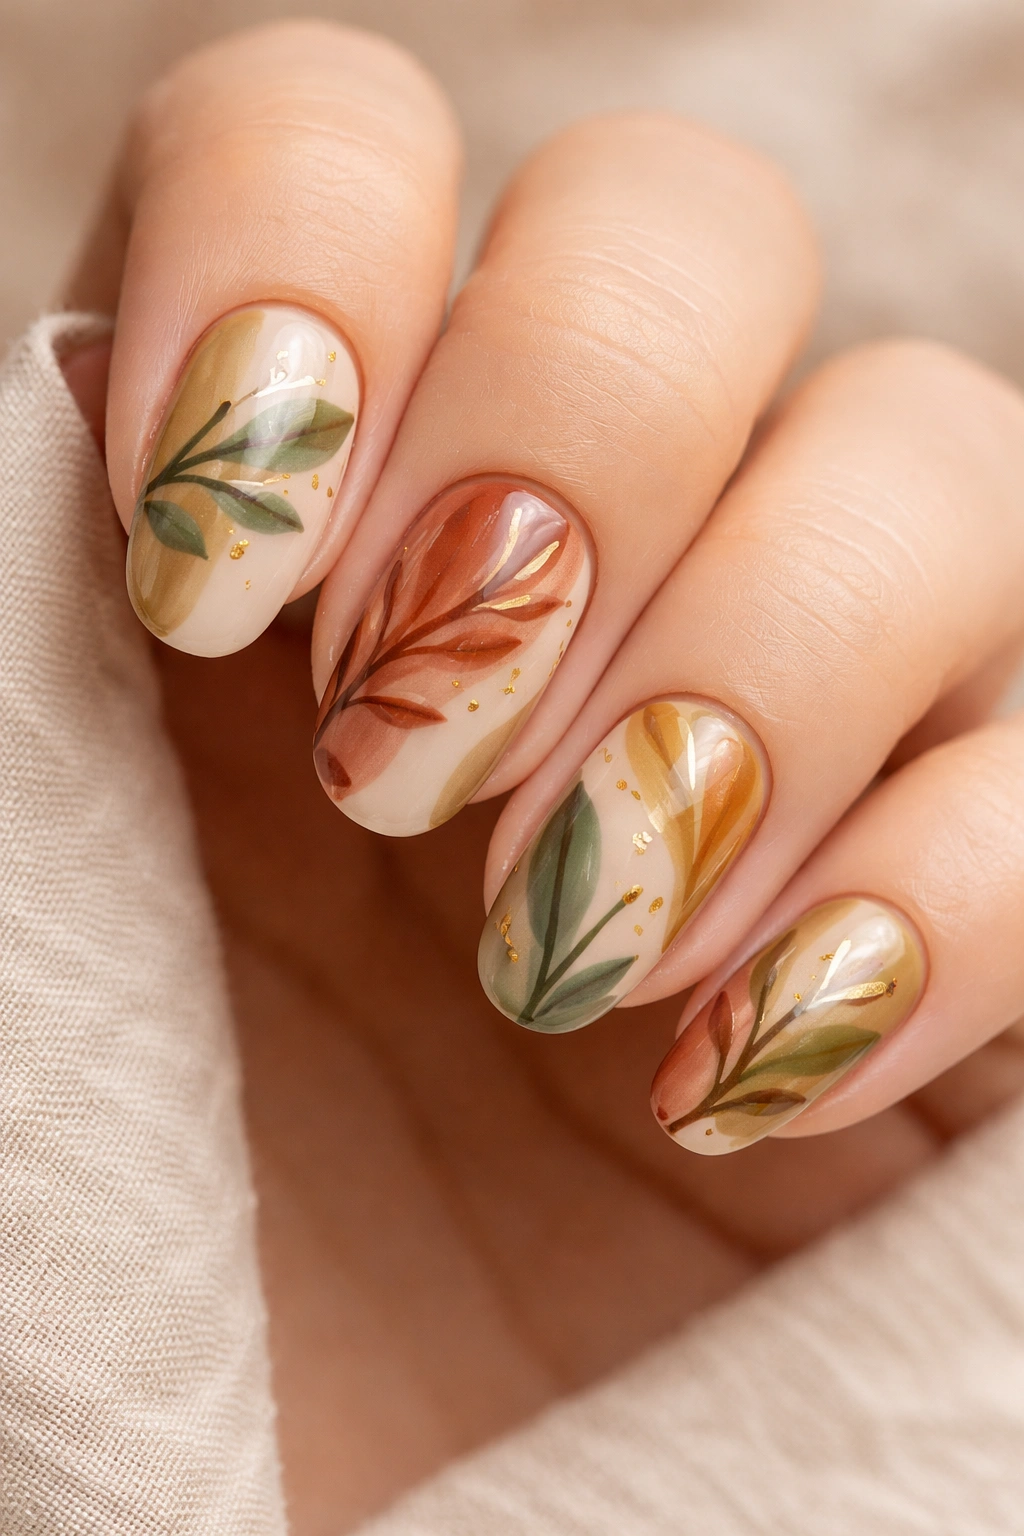
Embrace warm, earthy colors—terracotta, olive, cream, warm brown, gold—and add loose, hand-painted botanical elements like abstract leaves, branches, or flower shapes. This design feels organic and natural while still being abstract because the botanical elements don’t need to be realistic or identifiable. A few curved lines can suggest a leaf; a small dot with a couple of lines becomes a minimalist flower.
Why It Stands Out
Botanical abstract designs feel artistic, mindful, and connected to nature. They work beautifully with earthy autumn and winter color palettes, and they’re forgiving because botanical lines are supposed to be loose and organic. This design appeals to people who love nature, art, and a more understated aesthetic than neon or maximalist alternatives.
Executing Botanical Abstracts
- Choose 3-4 colors in the earthy family and apply them as your base, either all one color or color-blocked sections
- Use a thin brush to paint simple botanical shapes: curved lines for stems and branches, oval shapes for leaves, simple dots or circles for flower centers
- These don’t need to look realistic—they’re abstract interpretations of plant life
- Consider adding small gold or copper foil accents to mimic seeds or morning dew
- Matte topcoat enhances the natural, organic feeling
- This design works beautifully on short or long nails and translates well across all skin tones
Pro tip: Reference actual botanical illustrations for inspiration, then simplify and abstactify the designs. Even if your execution isn’t perfectly realistic, the artistic intent will be clear.
14. Abstract Faces and Body Forms
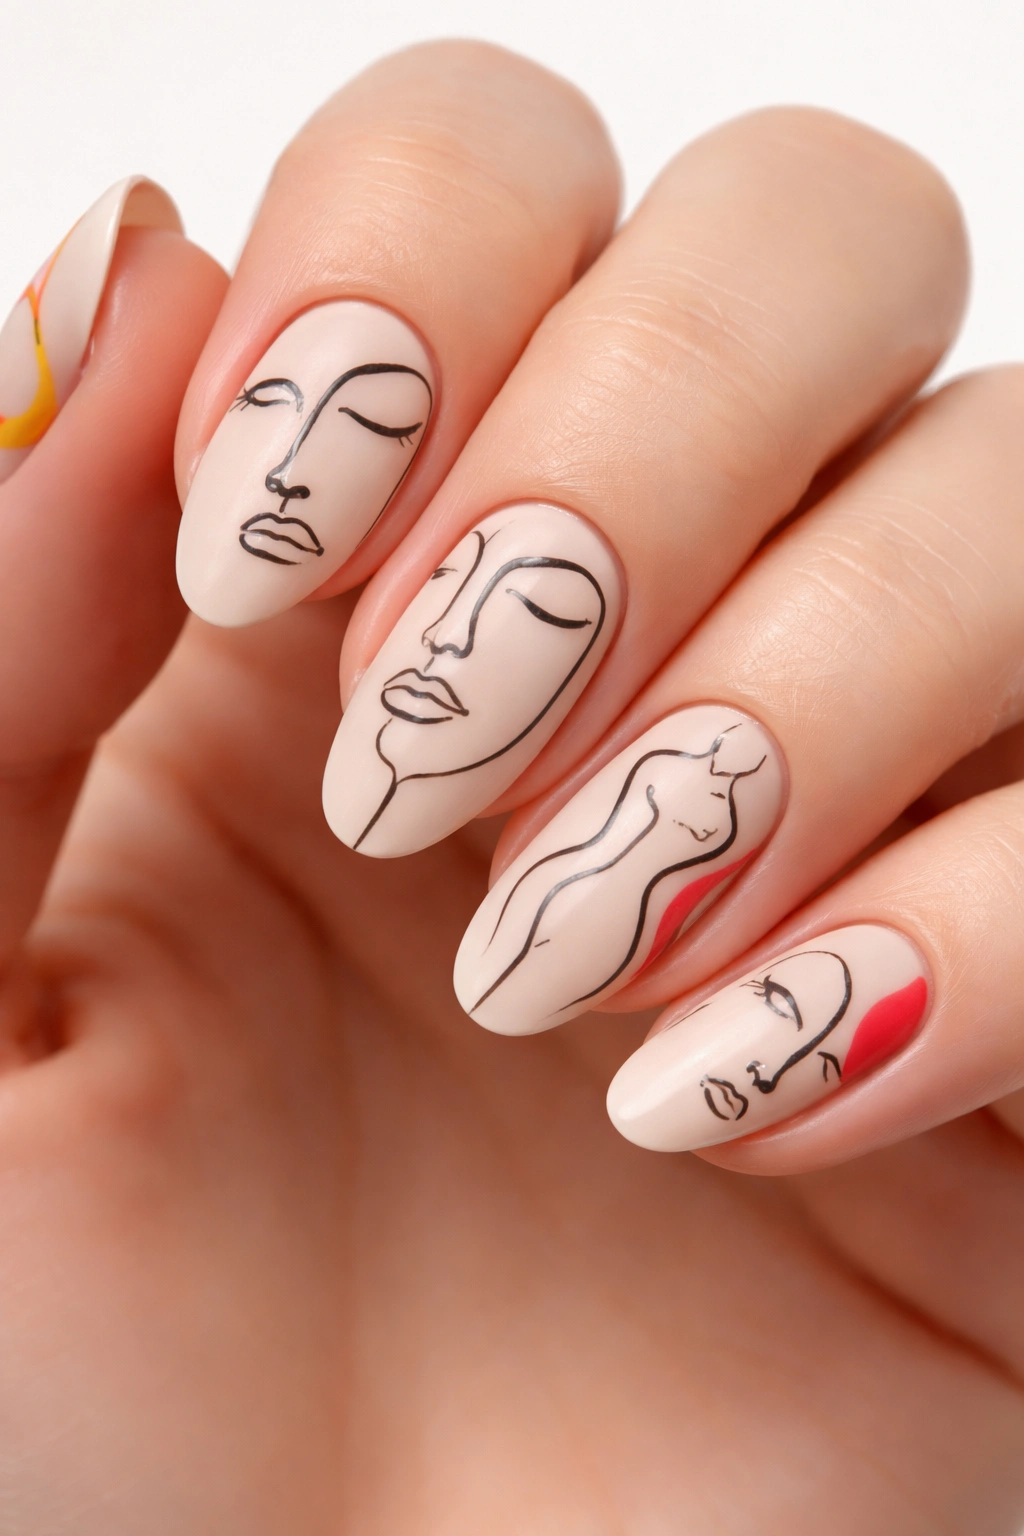
Channel modern art with simplified, abstract interpretations of human faces or body forms using minimal lines and shapes. These don’t need to be recognizable as specific people—they’re more about capturing the essence of a face or figure through minimalist linework. Use black or a dark color on a nude or neutral base to create the graphic quality, or use contrasting colors for more impact. This design feels conceptual and artistic in a truly fine-art way.
Why It Stands Out
Abstract faces and forms elevate nail art into fine art territory. This design appeals to people who love contemporary art, conceptual thinking, and fashion-forward aesthetics. Wearing face nail art is a statement piece that says something about your artistic sensibilities and willingness to be different. It photographs exceptionally well and generates genuine conversation.
Creating Minimalist Faces
- Start with a neutral or nude base color
- Use a thin brush to paint simple facial features with minimal lines: one line for each eye, a simple curved line for the nose, a swooping line for the mouth
- Don’t try to create realistic proportions—exaggeration and abstraction are the point
- Consider adding simple neck lines or shoulder shapes to suggest the body
- Each face should be slightly different, with varying proportions and expressions
- Glossy topcoat makes the linework pop; matte topcoat gives it a more artistic, gallery-like quality
- This design works best on longer nails where you have space to create recognizable (if abstract) forms
Real talk: These designs read as very intentional and artistic, so even if your execution isn’t perfect, people will assume you meant it that way and admire your creativity.
15. Glitter and Shimmer Abstract Splatter
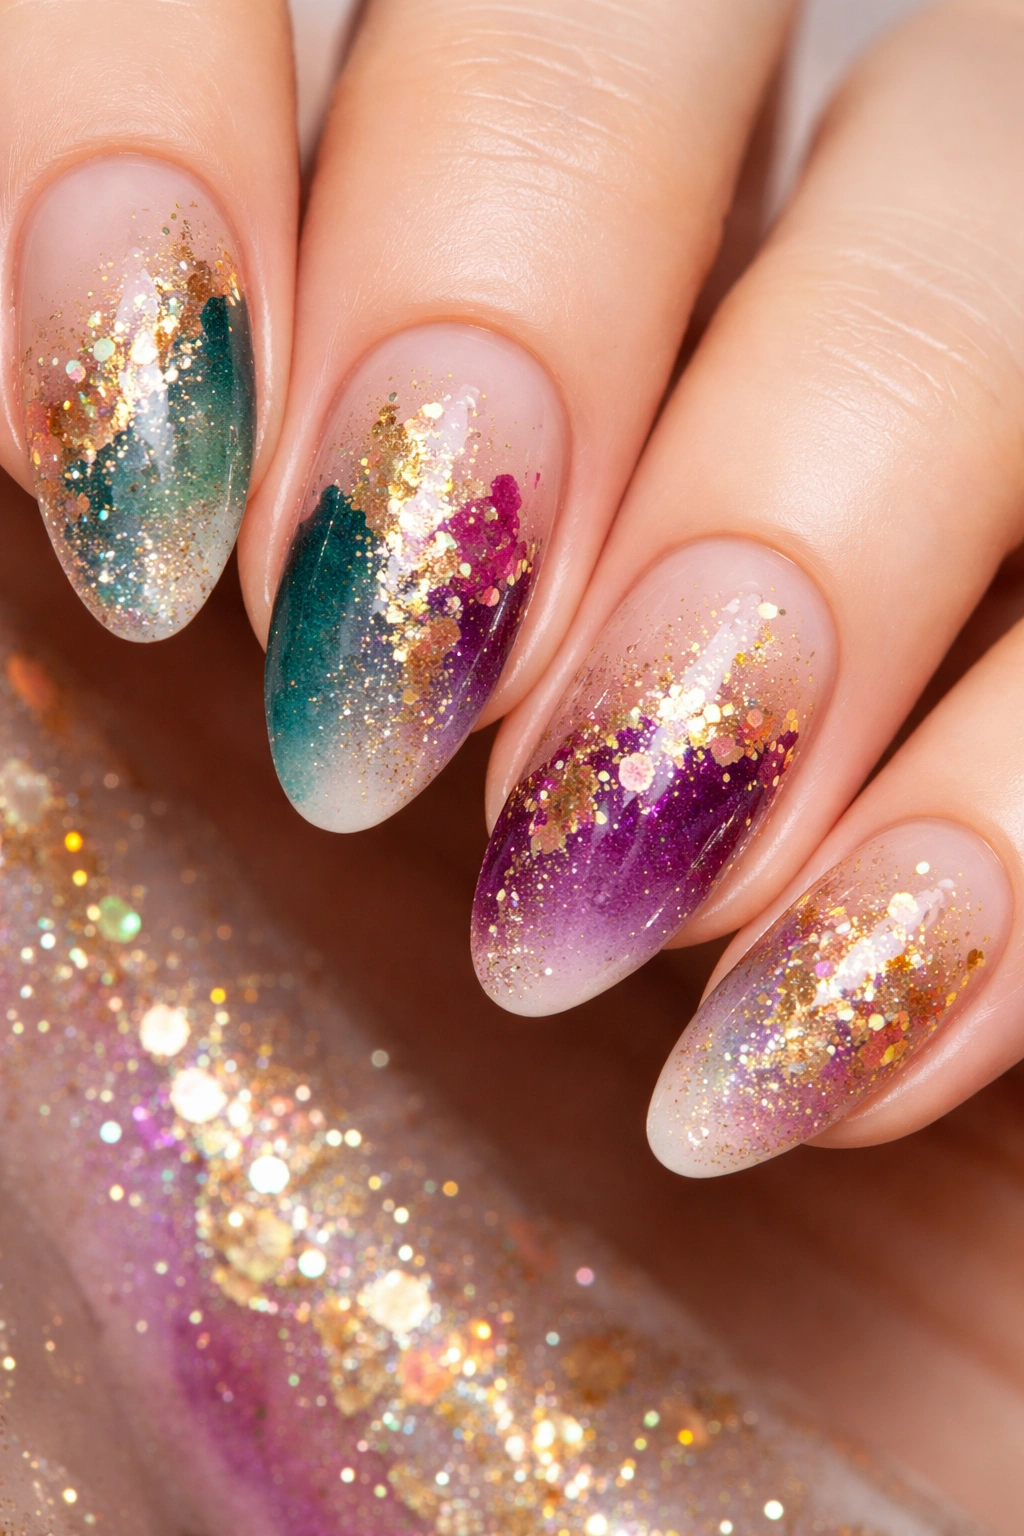
Create an abstract design using glitter polish, shimmer accents, or loose glitter applied strategically over a solid base color. Apply a neutral or jewel-toned base, then splatter or dab glitter onto certain sections of the nail, or use a glitter brush to create abstract splashes and streaks. The combination of solid and sparkle creates visual interest and catches light beautifully without requiring precise technique.
Why It Stands Out
Glitter and shimmer abstracts feel celebratory and special-occasion-ready while remaining wearable for everyday occasions, depending on your base color choice. The sparkle adds dimension and luxury without requiring artistic skill. This design works on every nail length and actually looks better with an imperfect, slapdash application because “accidental” glitter splatter is part of the charm.
Using Glitter Effectively
- Start with a solid base in a color that complements your glitter choice
- Apply glitter polish directly using the brush, or use loose glitter scattered onto a tacky base
- Consider creating glitter gradients—heavy glitter concentration at the tip that fades toward the base
- Don’t apply glitter to the entire nail; negative space makes it more striking
- Gold, silver, and holographic glitters work with virtually any base color
- Seal glitter very thoroughly with a strong topcoat to prevent shedding
- Matte topcoat over glitter creates an interesting textured effect; glossy topcoat makes it more seamlessly integrated
Worth knowing: Glitter can be difficult to remove, so consider using glitter polish rather than loose glitter, or apply loose glitter over a sticky base layer that you can lift off in one piece rather than having glitter embed into your topcoat.
Final Thoughts
Abstract nail art democratizes nail design in the most beautiful way possible. There’s no right or wrong approach, no specific techniques you must master, and no rules about what colors or patterns belong together. Whether you’re drawn to minimalist sophistication or maximalist chaos, whether you love pastels or neons, geometric precision or organic flow, there’s an abstract nail style that speaks to your aesthetic and personality.
The best part? You don’t need expensive tools, professional training, or years of practice to create abstract designs that look genuinely impressive. A toothpick, a few nail polishes, and your own creativity are genuinely all you need. Start with whichever design resonates with you most, embrace the imperfections as part of the artistic process, and enjoy the freedom of creating something that’s entirely yours. Your nails are the perfect tiny canvas for your artistic expression, and abstract nail art is the permission you need to let your creativity absolutely soar.
