

If you’ve been scrolling through nail art inspiration lately, you’ve probably noticed one design absolutely dominating the scene: swirl nails. These mesmerizing, flowing designs have captured everyone’s imagination, from nail enthusiasts to salon professionals. There’s something undeniably satisfying about the way swirls move across the nail surface—they’re artistic enough to feel special but accessible enough that you can attempt them at home with the right tools and patience.
What makes swirl nail designs so irresistible is their incredible versatility. You can go bold and colorful or soft and subtle. You can match them to your mood, your outfit, or the season. They work beautifully on long nails, short nails, natural nails, or extensions. The design trend has become a canvas for self-expression, allowing people to break free from traditional manicure patterns and embrace something more creative and abstract.
The best part? Swirl nails are forgiving in the most wonderful way. Because they’re inherently abstract, there’s no such thing as a “perfect” swirl—the imperfections actually add to the artistic charm. Whether you’re a beginner testing out nail art for the first time or a seasoned enthusiast looking for your next inspiration, swirl nails offer something for everyone. Keep reading to discover twelve stunning swirl nail ideas that everyone’s getting right now.
1. Pastel Swirl Nails With Soft Color Gradients
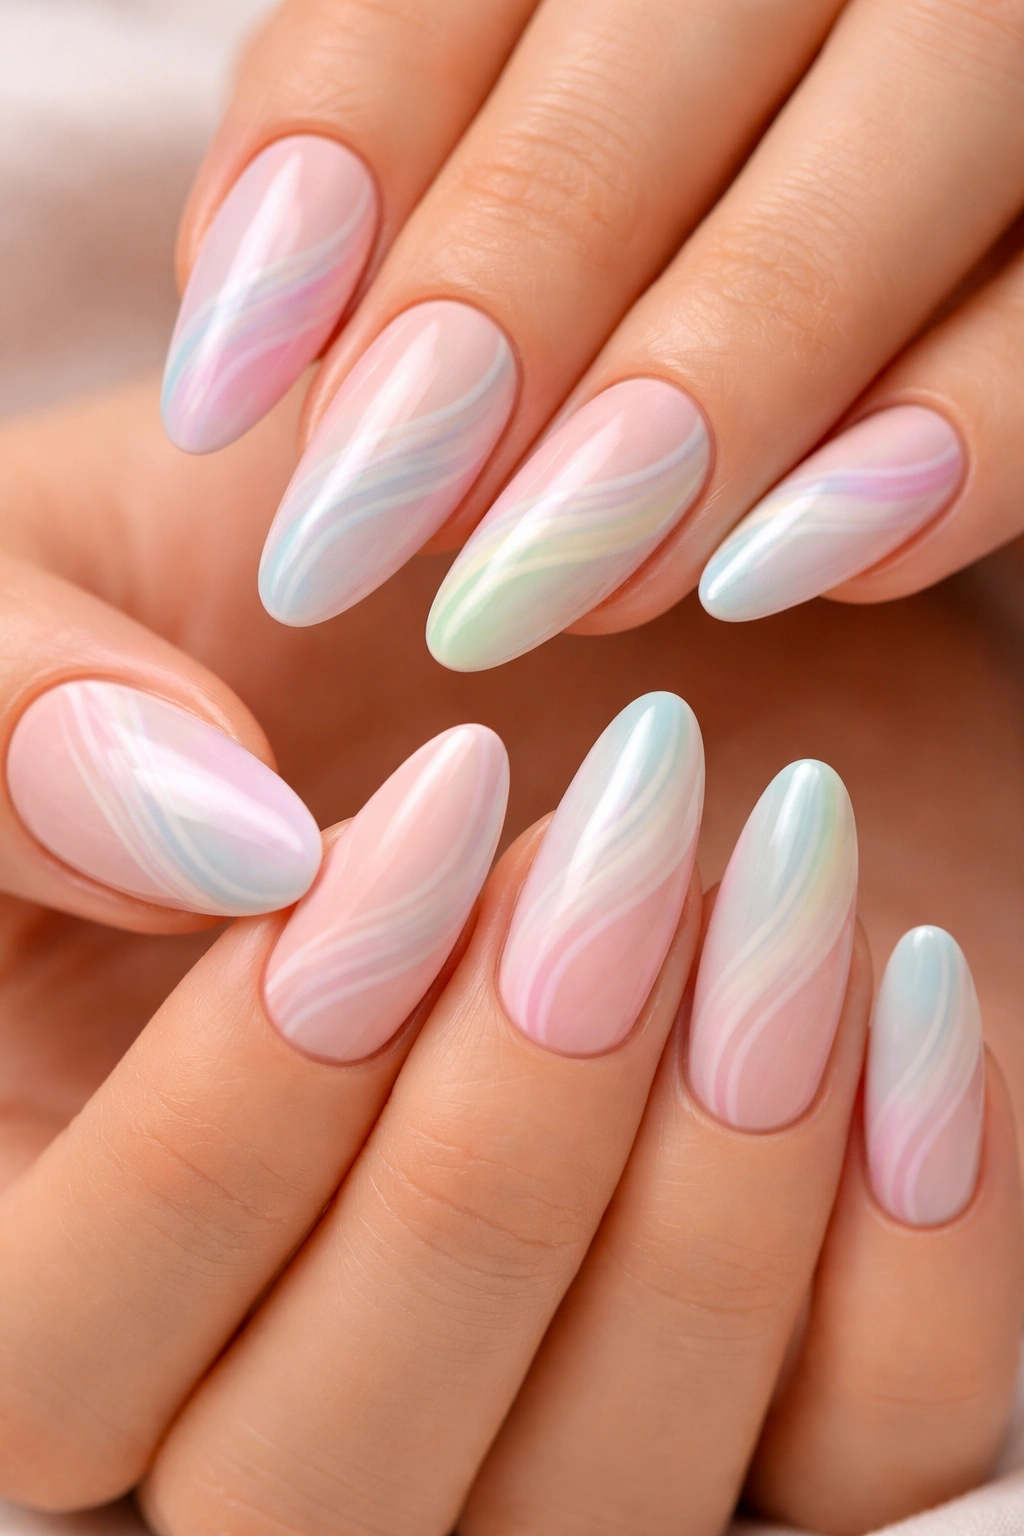
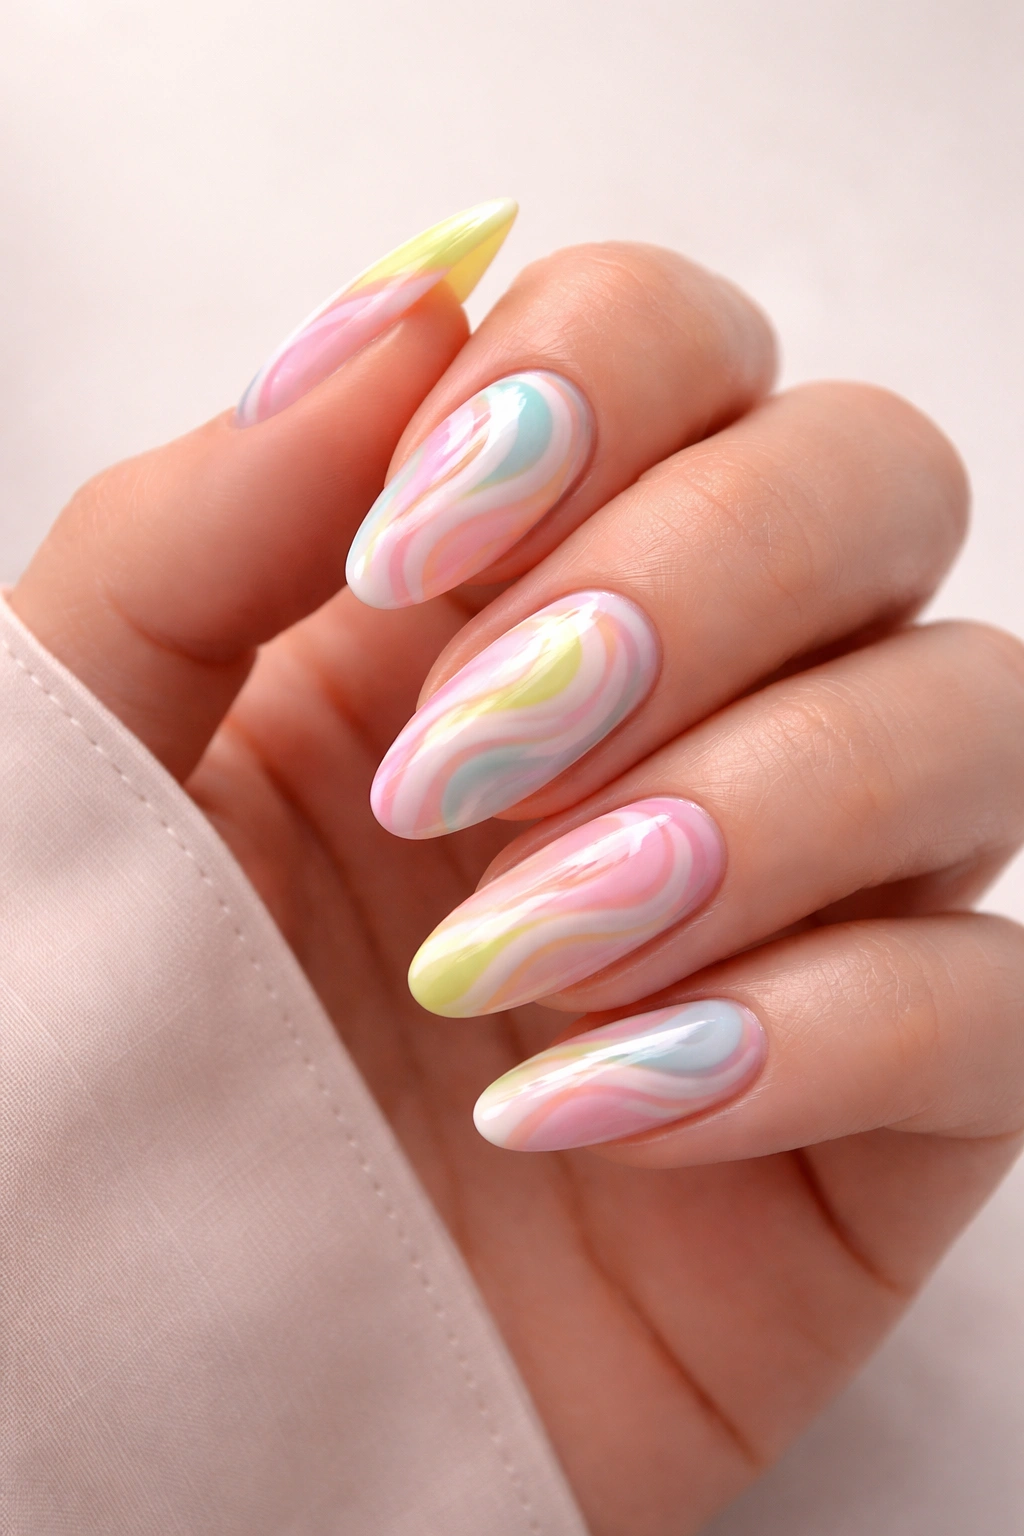
Pastel swirl nails are the definition of dreamy and gentle. This style takes those flowing, curved lines and executes them in soft, muted tones—think baby pink, soft lavender, pale mint green, and sky blue. The beauty of this approach is that the lighter color palette makes even the most intricate swirl patterns feel calming rather than busy.
Why Pastels Work So Well for Swirls
Pastel colors have a naturally soothing quality that translates beautifully to abstract nail art. When you use three or four complementary pastel shades together, each swirl line stands out clearly without creating visual chaos. The soft hues blend harmoniously, which is especially forgiving if your swirl lines aren’t perfectly precise—any small imperfections just add to the whimsical, watercolor-like effect.
How to Create the Look
- Start with a white or nude base coat—this helps the pastels pop and creates a clean canvas
- Choose 2-4 pastel shades that complement each other (avoid colors that are too similar in tone, or they’ll blend together)
- Use a fine-tipped striping brush to paint thin, flowing swirl lines across each nail
- Apply your lightest color first, then layer darker pastels on top
- Finish with two coats of glossy topcoat for that luminous, professional finish
Pro tip: Pastels photograph beautifully in natural lighting, so this design is perfect if you love taking nail selfies or posting your manicure on social media.
2. Neon Swirl Nails for Maximum Impact
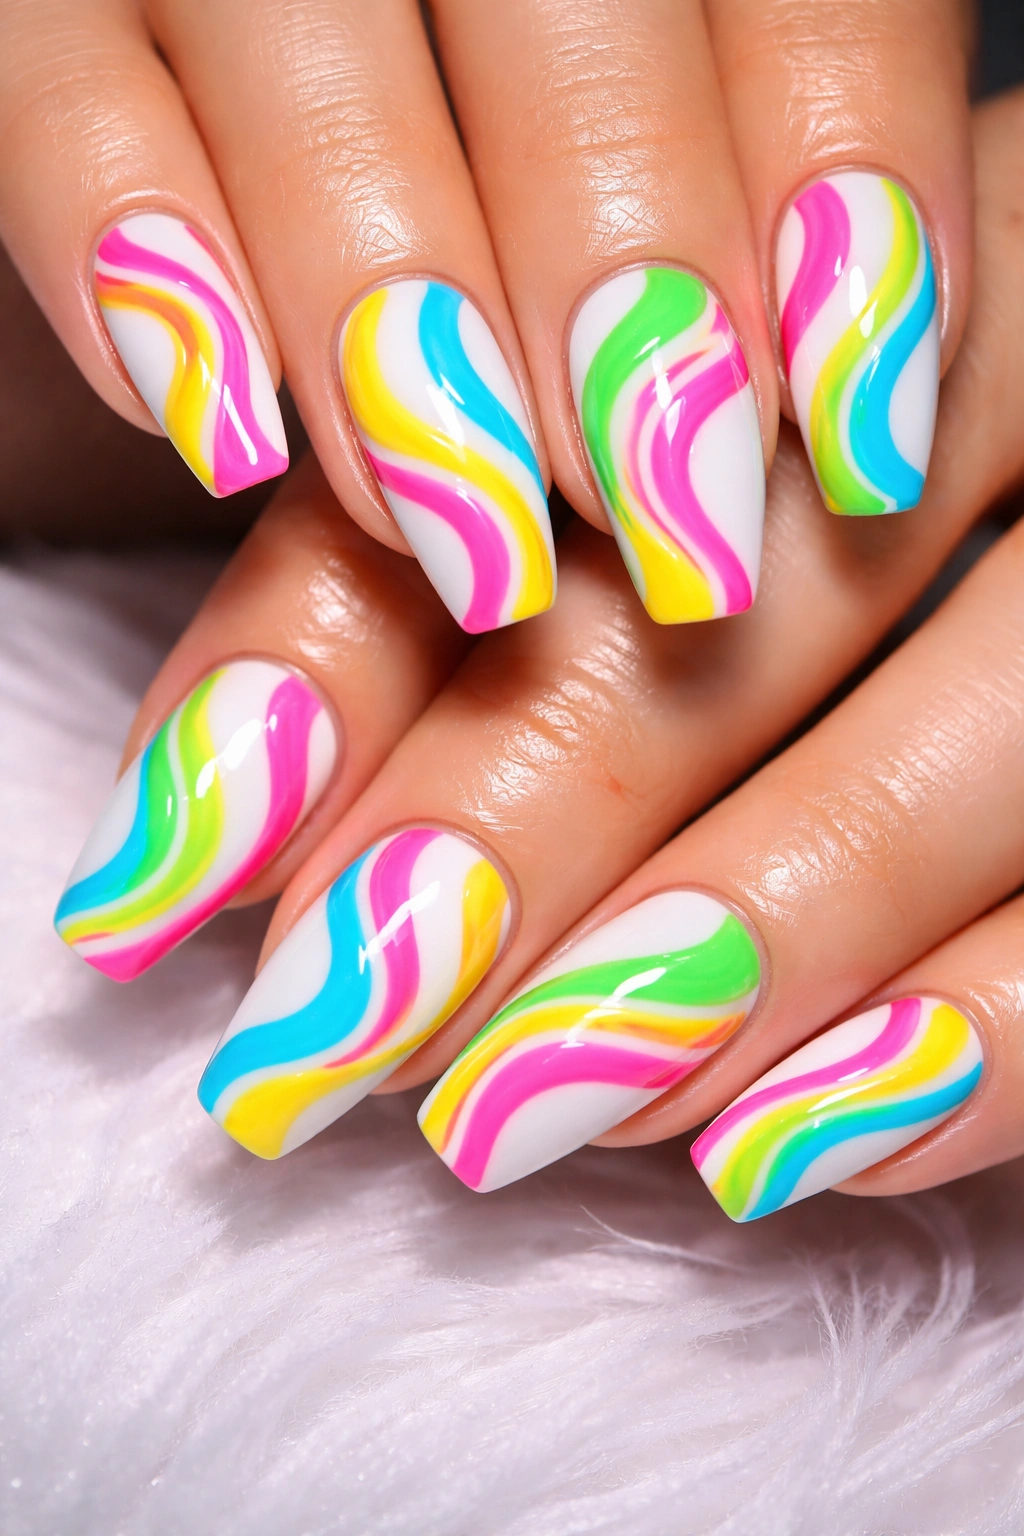
Want nails that demand attention? Neon swirl nails are your answer. These designs combine electrifying bright shades—neon pink, neon yellow, neon green, neon blue—in bold, chunky swirls that practically glow off your fingertips. The high-contrast nature of neon colors means every line is crystal clear and impossible to miss.
What Makes Neon Swirls Stand Out
Neon polishes have a unique reflective quality that makes them appear to shimmer and glow. When you layer multiple neon shades on top of each other with swirl patterns, the result is almost three-dimensional. The colors seem to vibrate against one another, creating an energetic, almost psychedelic effect that’s pure visual excitement. These nails say “I’m confident, I’m bold, I’m not afraid to be noticed.”
Application Tips for Success
- Use a clean white or light neutral base to make neons appear even brighter
- Neon polishes can sometimes be sheer, so apply extra coats to get full opacity
- Paint your swirls with thicker strokes for neon—delicate lines can look washed out with these colors
- Let each layer dry completely between applications to prevent colors from bleeding into each other
- A matte topcoat can actually enhance the neon effect by toning down the glossiness
Worth knowing: Neon swirls photograph best under natural or warm lighting, as harsh artificial light can sometimes dull the vibrant effect.
3. Marble Swirl Nails With Watercolor Effect
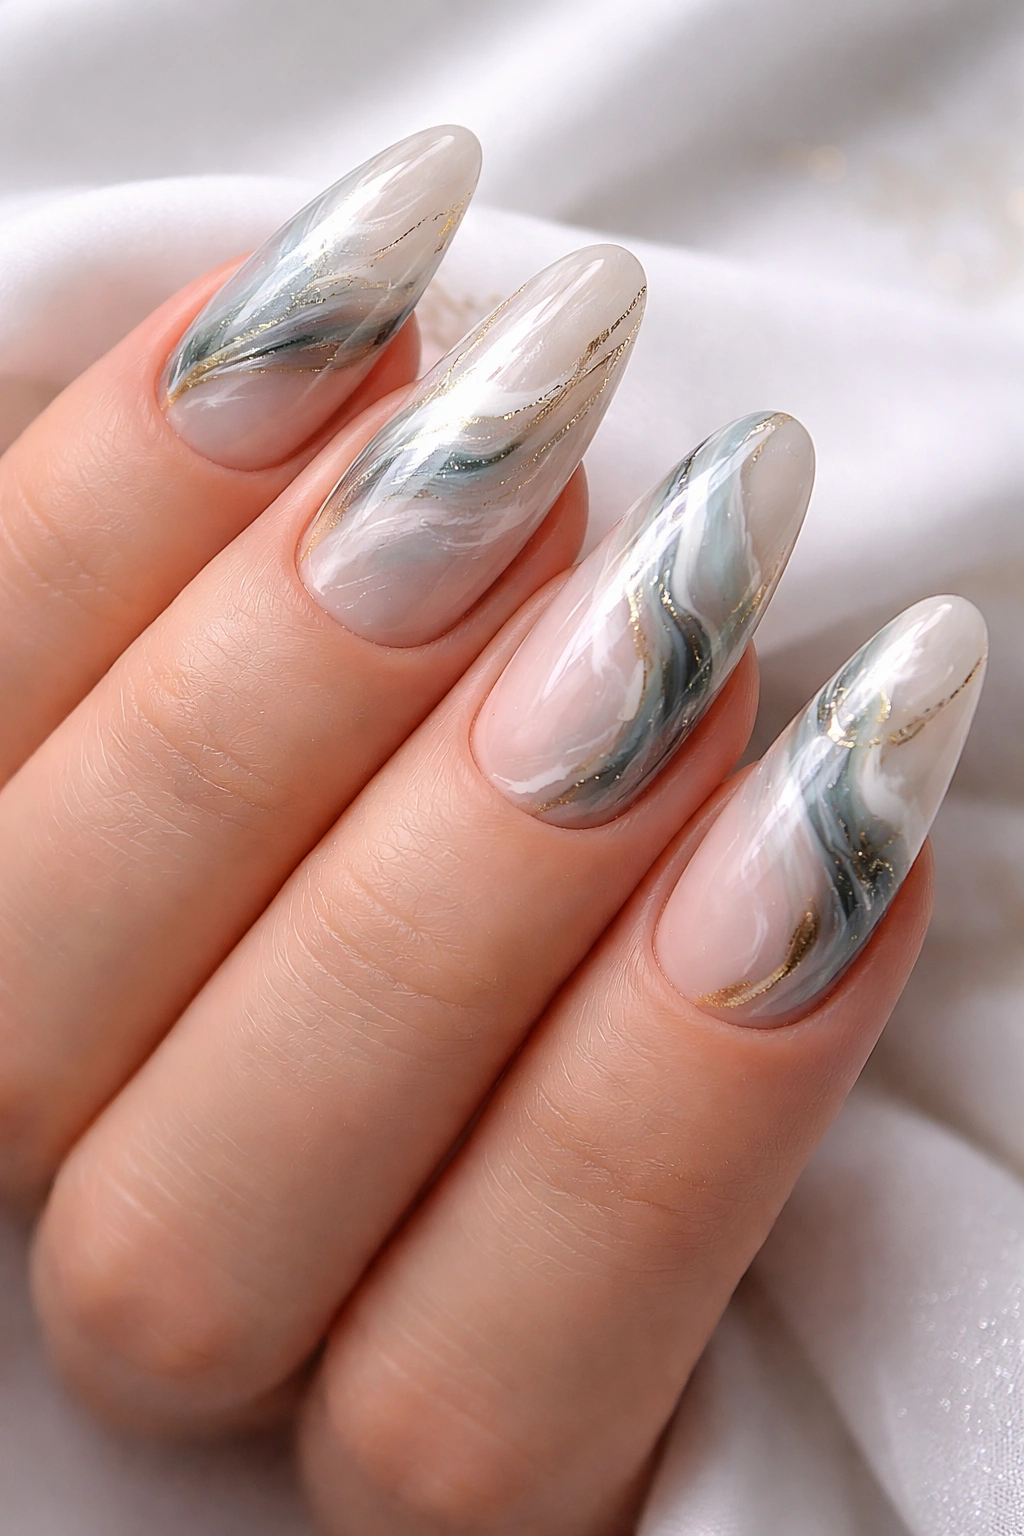
Marble swirl nails take inspiration from natural stone patterns and translate them into fluid, organic nail art. This style combines swirling lines with soft blending techniques to create a look that resembles actual marble or watercolor paintings. You’ll see layers of color bleeding into each other, creating depth and movement across the nail.
The Beauty of Marble Textures
Marble swirl nails feel luxurious and expensive-looking, even when you create them at home. The key is using complementary colors that naturally blend well together—think gold with white and gray, or deep blue with white and soft teal. The swirls become almost secondary to the organic color gradients, giving the overall effect a naturally sophisticated appearance that works for any occasion.
Creating Your Marble Masterpiece
- Choose 3-4 colors that work well together in a gradient (analogous colors work beautifully)
- Apply your base color first and let it fully dry
- Use different sized brushes to create both thick and thin lines—this adds dimension
- While one color is still slightly wet, drag another color through it with a clean brush for blending
- Work quickly—marble effects look best when you can blend colors while they’re still tacky
- Seal with a glossy topcoat to enhance the stone-like appearance
This design works particularly well on square or oval nail shapes, where you have more surface area to work with the marble pattern.
4. Monochromatic Swirl Nails in Single-Color Sophistication
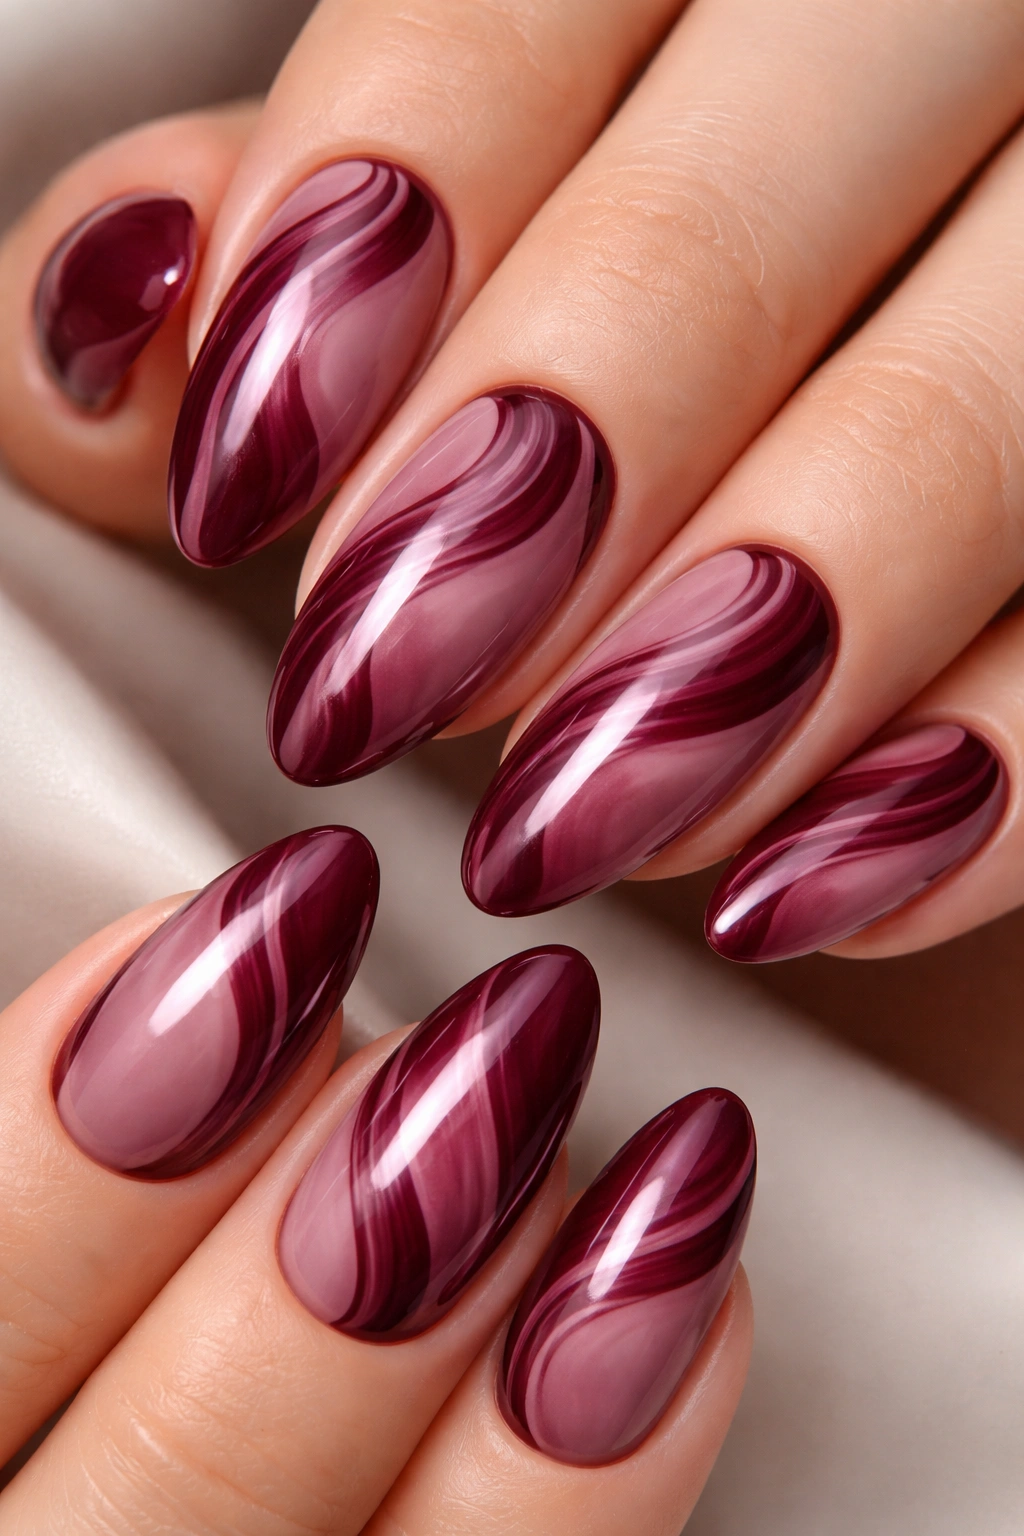
Who says swirl nails need to be colorful? Monochromatic swirl nails prove that you can create stunning visual interest using just one color family. Picture deep burgundy swirls on a lighter mauve base, or black swirls on a soft gray background. The variation comes from using different shades and finishes of the same hue rather than introducing multiple colors.
Why Monochromatic Works for Swirls
Monochromatic designs have inherent elegance and sophistication. By limiting your palette, you create a refined look that feels intentional and curated. The swirl pattern becomes almost meditative to look at—your eye follows the flowing lines without the distraction of clashing colors. It’s minimalist without being boring, and it works beautifully in professional settings where you want nail art without overt boldness.
Technique for Monochromatic Depth
- Select a base shade, then choose two darker (or lighter) versions of the same color family
- Start with your mid-tone base and let it dry completely
- Create swirls using your darkest shade first with a striping brush
- Layer lighter or darker shades over top to create dimension and depth
- Consider mixing matte and glossy finishes—a matte swirl over a glossy base creates interesting texture contrast
- The interplay between different depths of the same color is what makes this look work
Pro tip: Monochromatic swirls photograph beautifully in black and white, making them ideal if you appreciate high-contrast, artistic nail documentation.
5. French Tip Swirl Nails With Modern Twist
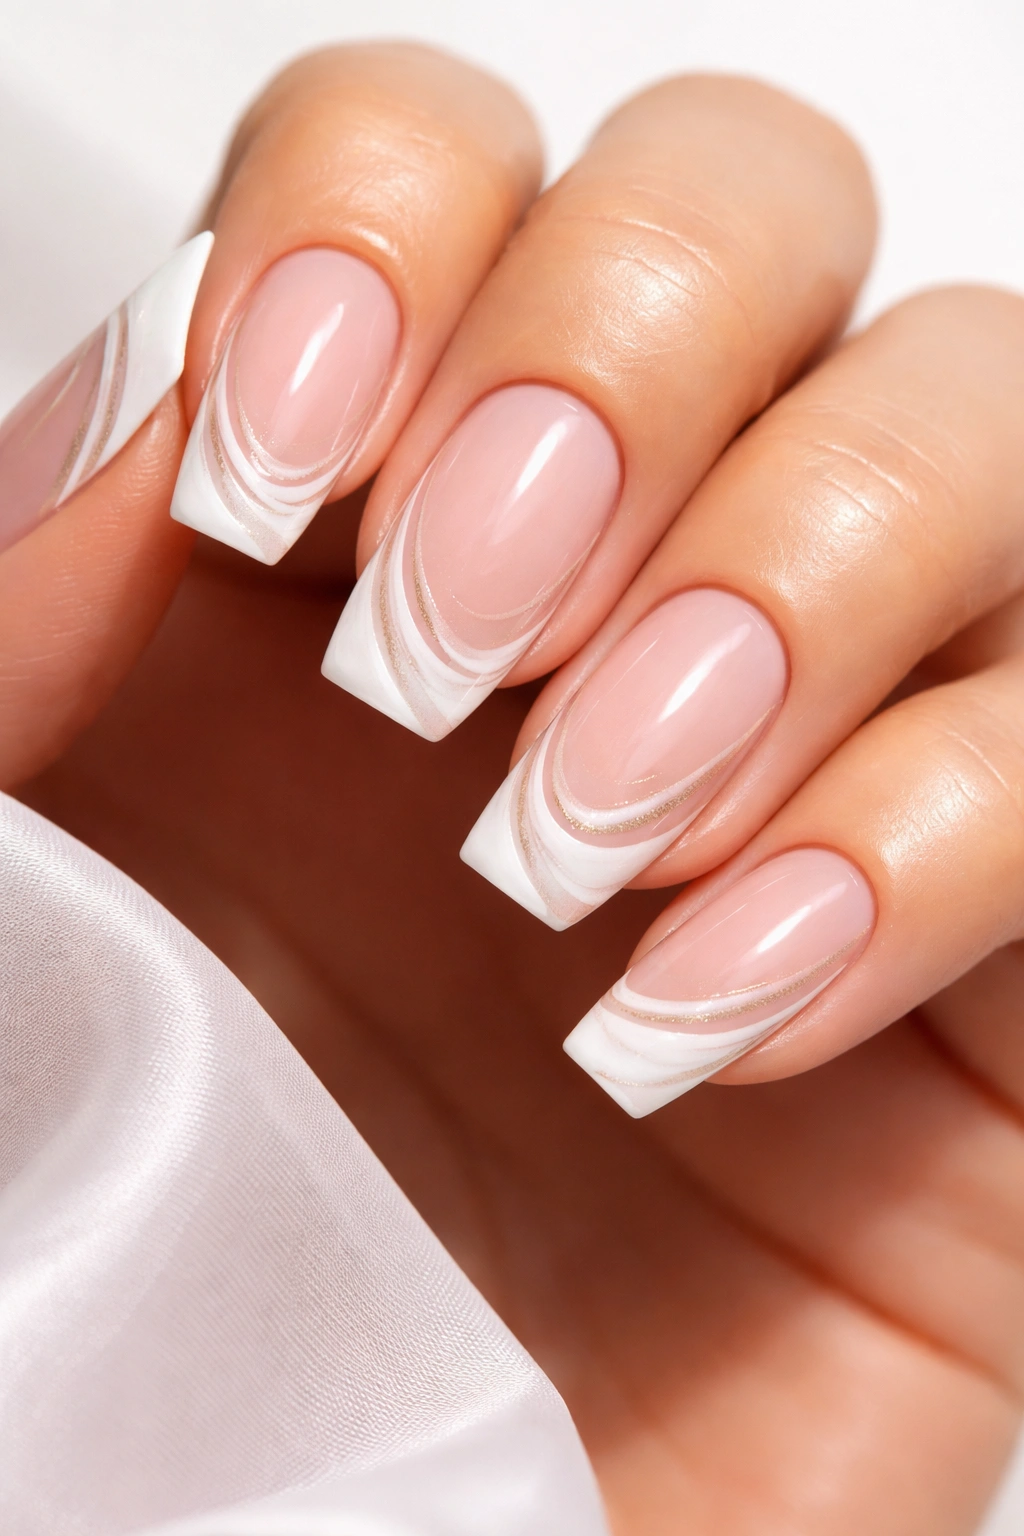
Traditional French manicures meet contemporary swirl art in this hybrid design that’s taking over salons everywhere. Instead of a straight line at the tip, you get flowing, curved swirls that start from the tip and dance across the nail. Some versions deconstruct the French tip entirely, turning it into abstract swirled patterns that maintain that classic French aesthetic but with modern flair.
The Appeal of French Tip Swirls
French manicures are timeless for good reason—they’re elegant, versatile, and work with everything. But let’s be honest, they can feel a bit expected. Swirl French tips take that familiar elegance and inject personality and creativity. The design feels fresh while still maintaining that sophisticated vibe that makes French tips so enduringly popular. It’s the perfect bridge for people who love classic aesthetics but want something more interesting than a standard tip.
How to Execute This Design
- Paint your entire nail with a sheer pink or nude base (this is your classic French foundation)
- Instead of creating a straight line at the tip, use a fine brush to paint curved, flowing swirl lines
- You can create swirls just along the tip area or have them flow across the entire nail
- Use white or a contrasting color for maximum definition
- Some versions use multiple colors within the swirl pattern, while others stick to crisp white swirls
- Finish with a glossy topcoat for that polished, salon-quality appearance
This design works gorgeously on long nails with squared or almond shapes, where the tip area is prominent enough to showcase the swirls.
6. Negative Space Swirl Nails for Minimalist Appeal
Negative space swirl nails flip the traditional script—instead of painting swirls onto a solid base, you leave parts of the nail bare and paint the background around the swirls. This approach creates a strikingly modern aesthetic that feels artistic and intentional. The unpainted areas become part of the design rather than empty space.
Why Negative Space Changes Everything
Negative space designs feel sophisticated and contemporary. They work beautifully with any skin tone because the bare nail acts as a neutral element that complements your natural nail color. This technique also uses less polish, making it more economical, and it can actually be easier to execute than traditional swirls since you’re focusing on painting around shapes rather than creating precise swirl lines.
Creating Negative Space Swirls
- Paint only the areas you want color, leaving strategic parts of the nail bare
- Decide in advance where your swirls will be and which areas will show your natural nail
- Use your base color sparingly, focusing on creating flowing swirl shapes
- The contrast between painted and unpainted areas is what makes this design work
- Pair with fall-inspired colors like terracotta, olive, and mustard, or spring-ready shades like mint and blush
- Finish with a matte topcoat for a more modern, editorial feel
This design looks particularly striking on short to medium-length nails where every detail is visible.
7. Glitter Swirl Nails for Extra Sparkle and Dimension
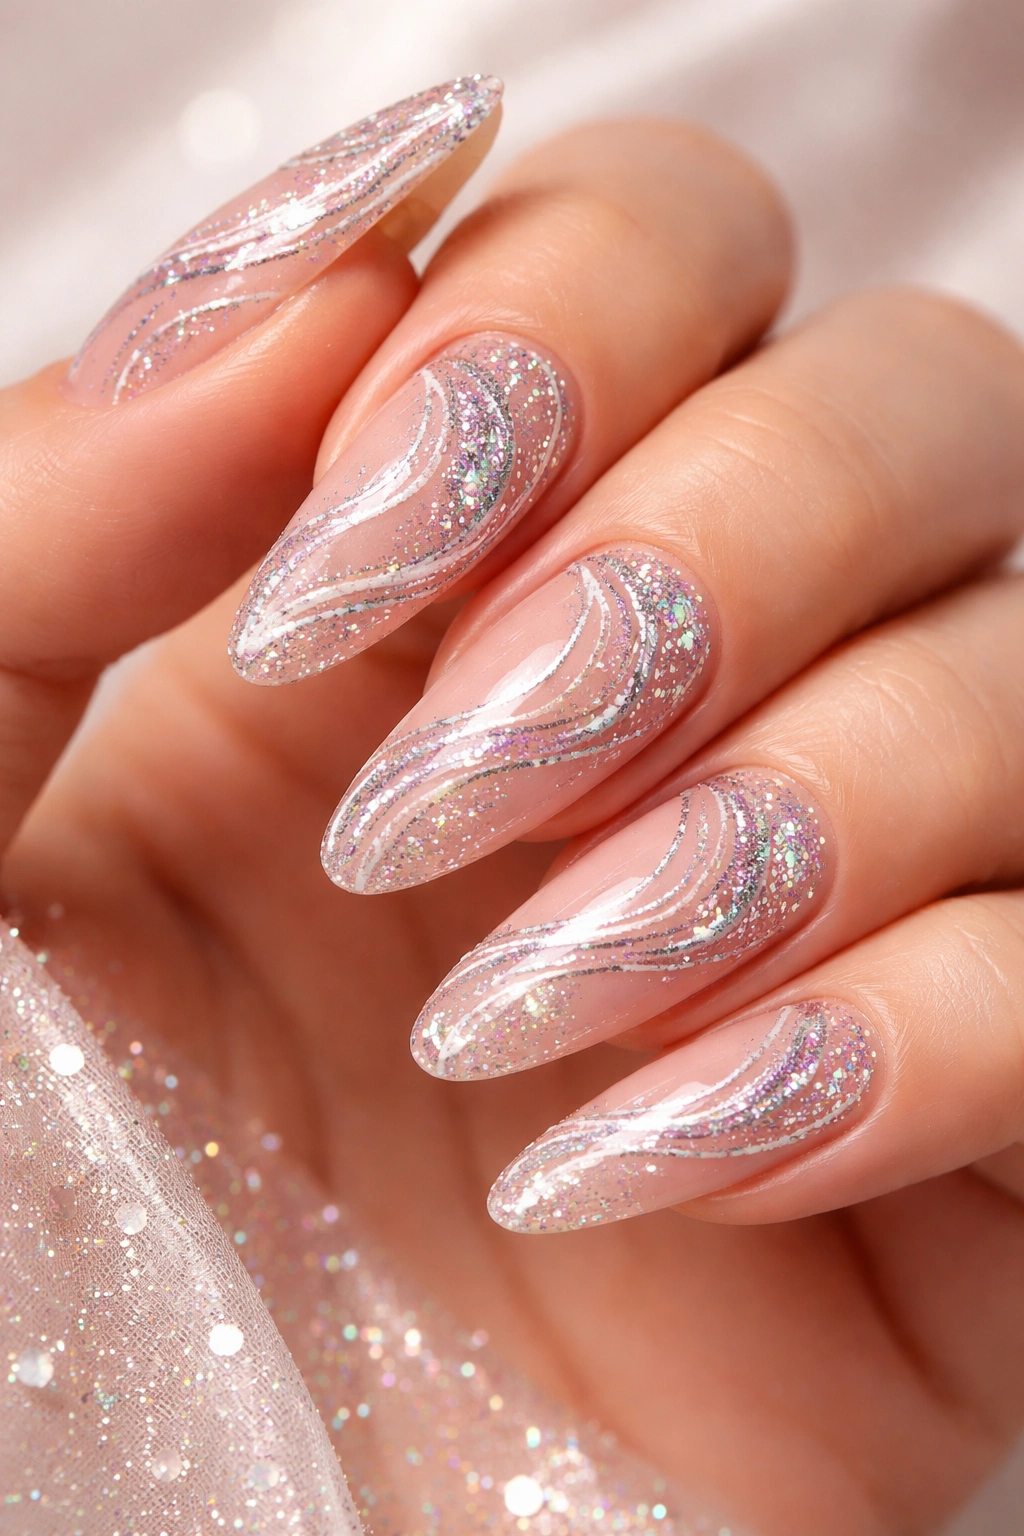
Sometimes swirls need a little extra glamour, and that’s where glitter comes in. Glitter swirl nails take the basic swirl concept and elevate it with sparkly, shimmering accents. You might create swirls with traditional polish and then add glitter along the swirl lines, or incorporate glitter directly into the swirl patterns for a more integrated effect.
How Glitter Transforms Your Swirls
Glitter adds dimension, movement, and light-reflecting properties that draw attention to your nail art. Even simple swirl designs feel more special and celebratory with glitter elements. The sparkle creates little focal points that guide the eye through the design, which actually makes complex swirl patterns feel more organized and intentional. Plus, glitter has a way of making nails feel more dressed-up and occasion-ready.
Application Methods for Glitter Success
- Paint your swirls using regular polish first—establish your swirl pattern clearly
- While the swirl polish is still slightly tacky, apply glitter along the swirl lines using a brush or your finger
- Alternatively, mix glitter directly into your base color for an all-over sparkly effect
- Use loose glitter held in place with a gel topcoat, or opt for glitter nail polish for easier application
- Confetti-style glitter particles work better for swirl designs than ultra-fine glitter, which can disappear
- Seal everything with multiple coats of glossy topcoat to encapsulate the glitter and create a smooth finish
Worth knowing: Glitter can be challenging to remove, so consider using a gel polish base that requires acetone removal if you’re using heavy glitter applications.
8. Pink and Purple Swirl Nails for Dreamy Romance
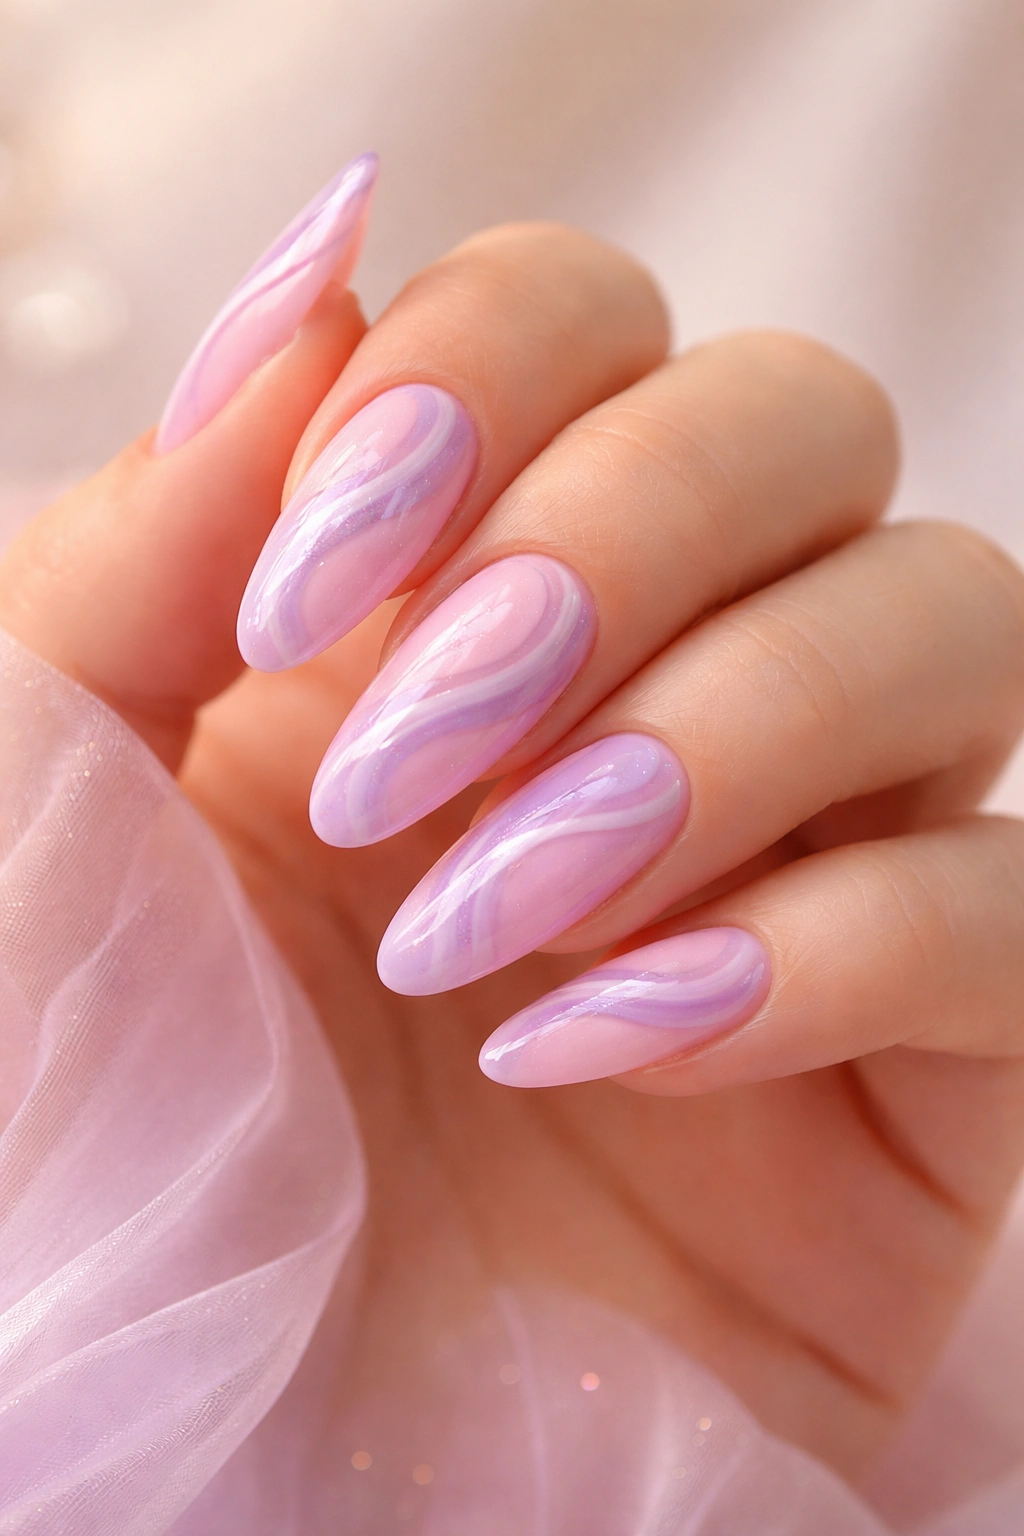
This color combination has become iconic for swirl nails, and for good reason. Pink and purple are naturally complementary in certain shades—soft baby pink with pale lavender, hot fuchsia with deep plum, or coral pink with dusty mauve. Together, they create a romantic, slightly dreamy aesthetic that feels both playful and sophisticated.
Why Pink and Purple Is the Perfect Duo
Pink and purple share warm undertones that make them harmonize beautifully. This color combination appeals to people of all ages and looks lovely on all skin tones. The colors work well together whether you’re going pastels or jewel tones, and they’re flattering whether you prefer soft, romantic aesthetics or bold, vibrant statements. Pink and purple swirls have become the go-to choice for anyone wanting nail art that’s pretty but not overly cutesy.
Creating Beautiful Pink and Purple Swirls
- If going pastel, use baby pink and soft lavender in equal visual weight
- For a bolder look, try hot pink with deep plum or burgundy
- Layer the colors by applying lighter pink swirls first, then adding purple details on top
- Let colors slightly overlap and blend where they meet—this creates a gradient effect
- Use a fine-tipped brush to keep swirl lines clean and intentional
- This combination works particularly well on almond or coffin-shaped nails
Pink and purple swirl designs photograph beautifully and have universal appeal, making them perfect if you’re not sure what direction to take your nails.
9. Blue Swirl Nails in Cool, Calming Tones

Blue swirl nails capture a serene, ocean-inspired feeling that’s utterly mesmerizing. Whether you’re working with sky blue, navy, teal, or midnight blue, blue-based swirls create a cohesive, calming aesthetic. You can create monochromatic blue swirls or combine multiple shades of blue ranging from pale pastels to deep jewel tones.
The Psychology of Blue Swirls
Blue is universally calming and associated with water, sky, and stability. Blue swirl nails make a statement that you’re organized, trustworthy, and thoughtful—which is why they’re increasingly popular in professional settings. The flowing nature of swirls combined with the serene quality of blue creates a uniquely soothing nail design. Even bold, dark blue swirls feel less aggressive than black or red alternatives, making them endlessly wearable.
Executing Blue Swirl Designs
- Pair light and dark blues together for maximum contrast and visual interest
- Consider adding white or silver swirls to complement the blue tones
- Blue swirls look stunning on both cool and warm skin tones
- Experiment with navy swirls on a sky blue base, or teal swirls on a white base
- The ocean-inspired quality of blue lends itself well to wave-like swirl patterns
- Finish with a glossy topcoat to enhance the water-like appearance
Blue swirl nails work beautifully on any nail shape and length, making them universally accessible.
10. Gold Swirl Nails for Luxe, High-End Appeal
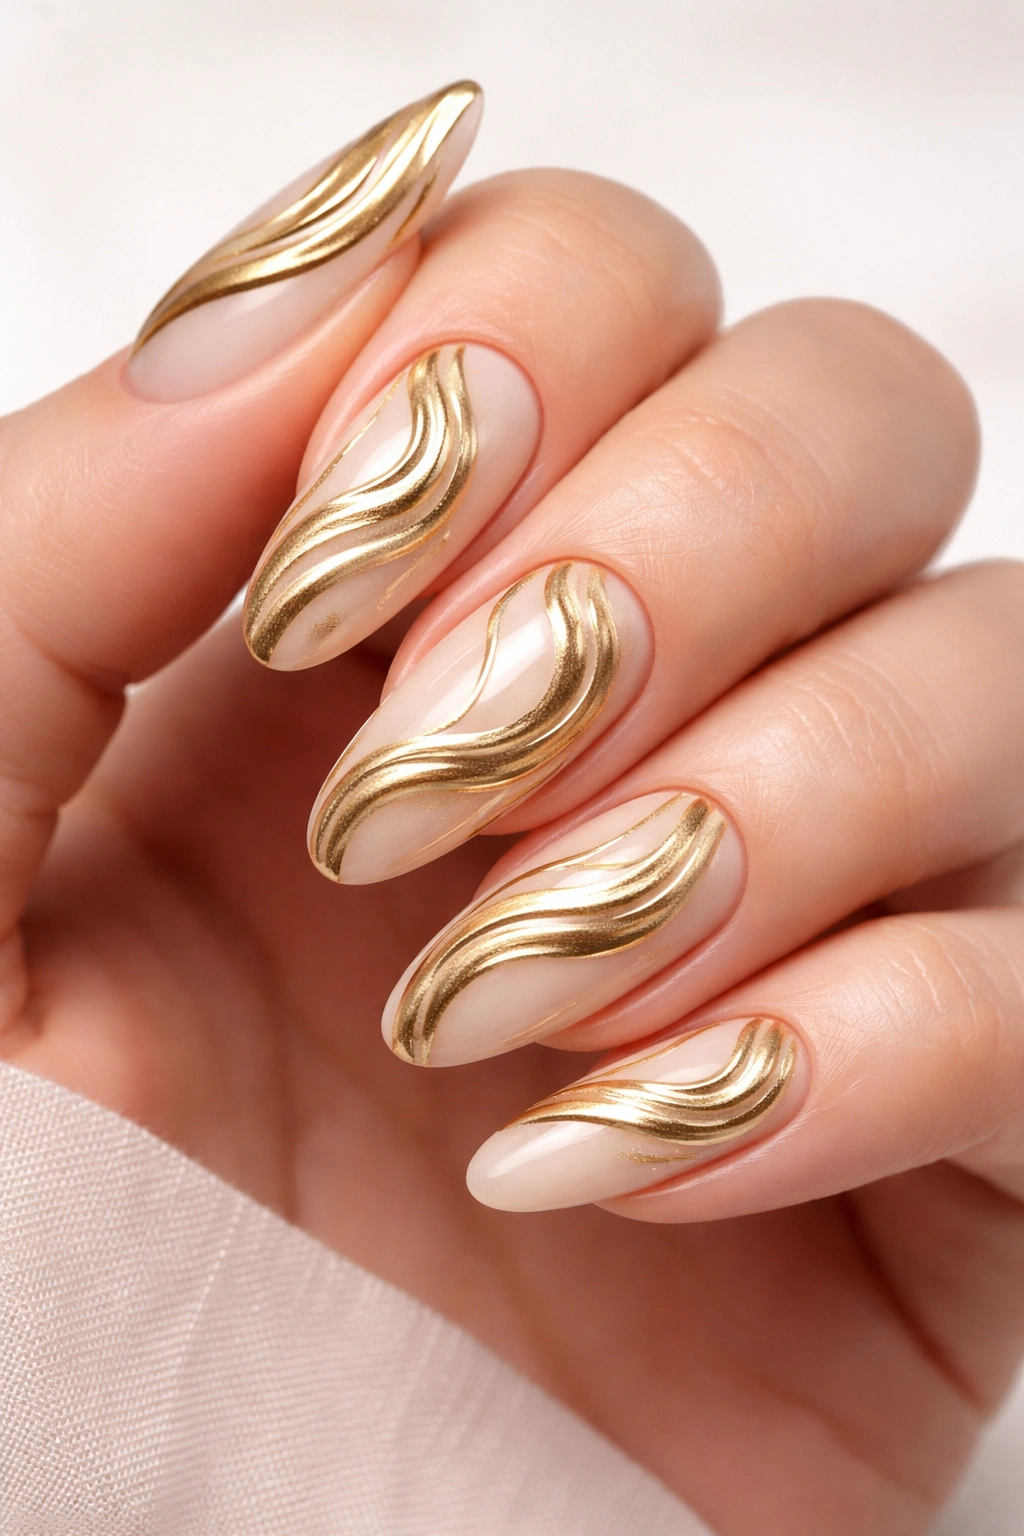
Want your nails to look expensive? Gold swirl nails deliver that high-end, luxurious aesthetic every single time. Whether you’re using metallic gold polish to create swirls on a neutral base or combining gold with jewel tones for a more opulent effect, gold swirls automatically elevate your manicure to look salon-quality and refined.
Why Gold Communicates Luxury
Gold has long been associated with wealth, sophistication, and timelessness. Gold swirl nails instantly convey a put-together aesthetic. The metallic properties of gold polish make swirls appear to have depth and movement, catching light as you move your hands. Combined with neutral bases like white, cream, taupe, or even soft pink, gold swirls create an undeniably elegant aesthetic that works for everything from casual everyday wear to formal events.
Creating Your Gold Swirl Masterpiece
- Use a neutral base color—white, cream, soft taupe, or pale pink all work beautifully with gold
- Apply your base color first and let it dry completely
- Using a fine-tipped brush, create swirling lines with metallic gold polish
- The key is using a gold shade with sufficient pigmentation that it shows up boldly
- Consider mixing gold with touches of rose gold or bronze for variation
- Finish with glossy topcoat to enhance the metallic sheen and create a smooth, professional surface
This design works particularly well on square or oval nails where you have a clean canvas for the gold swirls to stand out.
11. Minimalist White Swirl Nails for Subtle Sophistication

Sometimes less truly is more, and minimalist white swirl nails prove this beautifully. This design uses only white polish to create delicate, thin swirl lines on a soft, neutral base—usually pale pink, beige, soft gray, or nude. The result is elegant, understated, and timelessly sophisticated.
The Power of Subtlety
Minimalist white swirls appeal to people who love nail art but prefer a refined, quietly beautiful aesthetic. These nails don’t scream for attention; instead, they whisper sophistication. They’re appropriate for any setting—work, formal events, casual everyday wear—yet they still showcase your appreciation for thoughtful design. The simplicity of white on neutral makes this design feel intentional and curated rather than busy or chaotic.
How to Achieve Minimalist Perfection
- Choose an ultra-neutral base that complements your skin tone
- Use pure white or off-white polish for your swirl lines
- Keep swirls thin and delicate—the design works because of its restraint
- Paint just 2-3 swirl lines per nail rather than covering the entire surface
- Position swirls asymmetrically for a more natural, artistic feel
- Perfect polish application is important here—any streaks or uneven coverage will be visible, so take your time
This design is especially beautiful on natural nails or short to medium-length manicures where the focus stays on the clean, simple design.
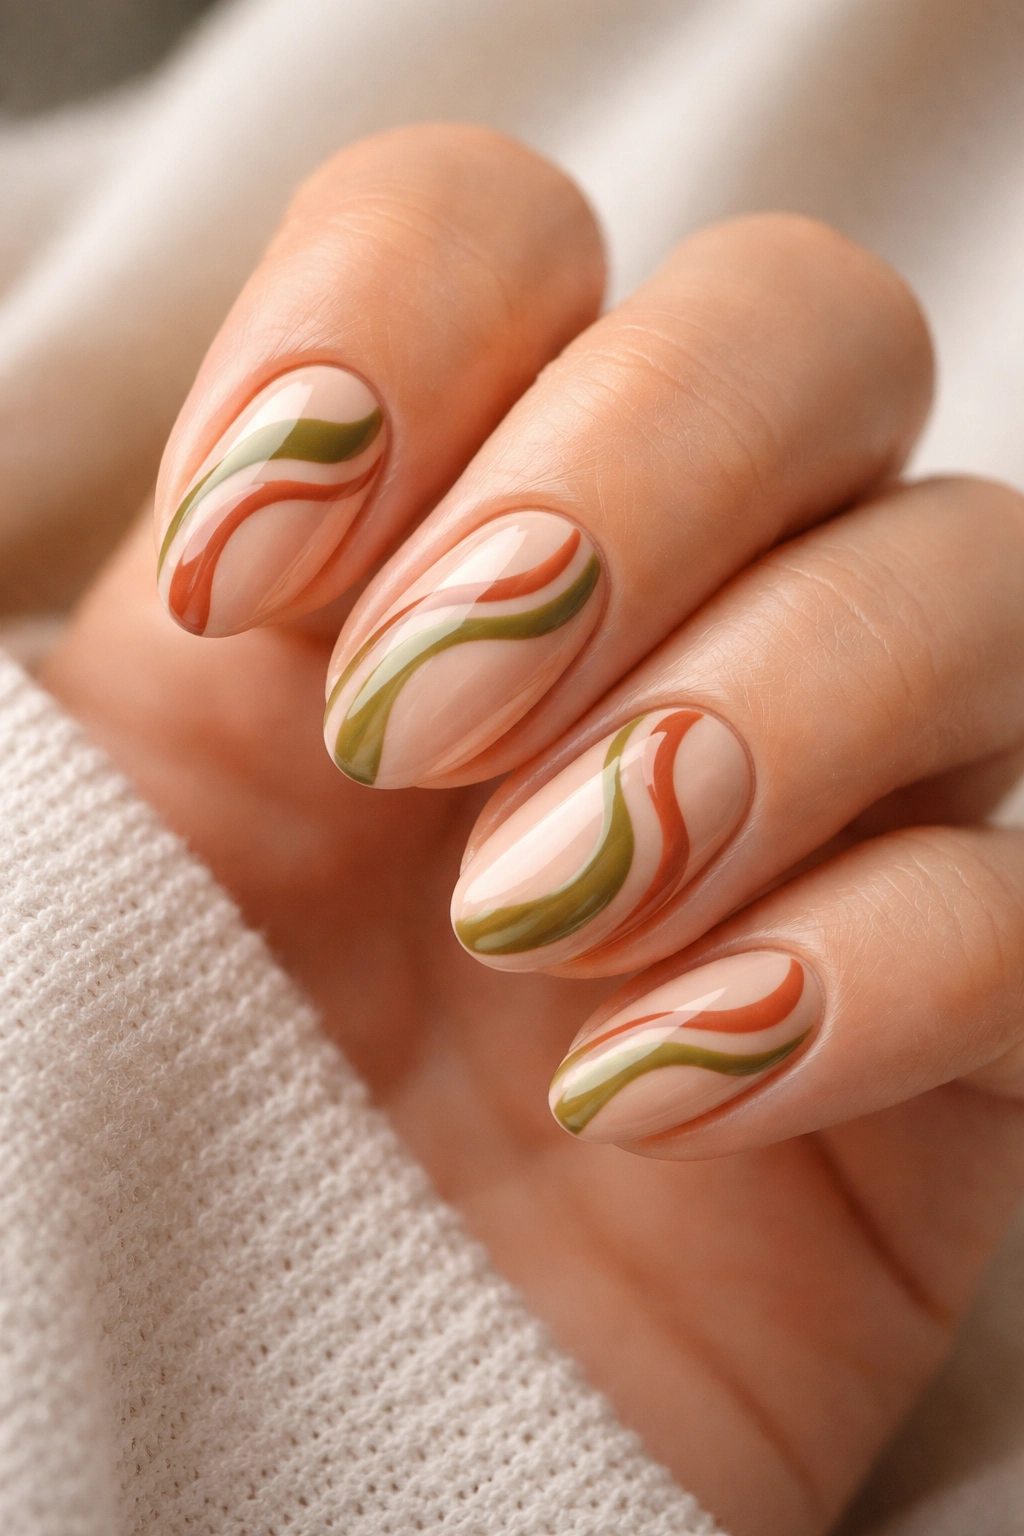
12. Retro and Groovy Swirl Nails With Warm, Earthy Tones
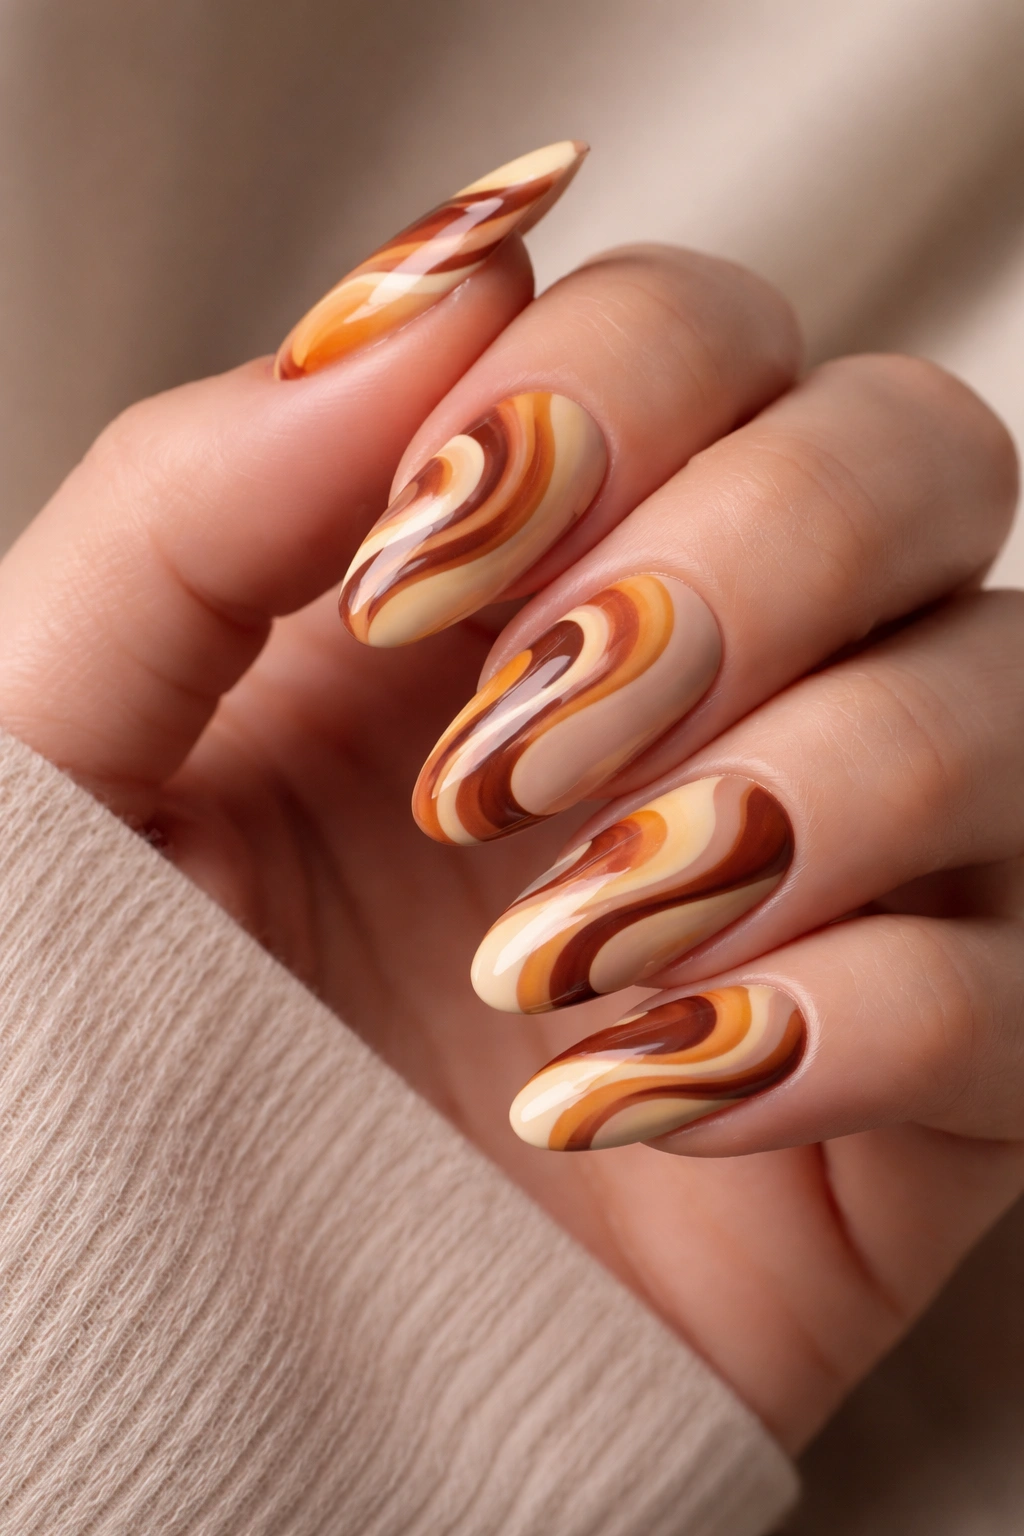
Retro swirl nails transport you straight back to the ’70s with warm, earthy color palettes and that unmistakable groovy aesthetic. Think burnt orange, mustard yellow, olive green, terracotta, and chocolate brown all swirling together in one harmonious, vintage-inspired design. These nails feel nostalgic, artistic, and unexpectedly trendy.
Why Retro Swirls Feel Fresh Again
There’s something endlessly cool about embracing retro aesthetics in modern contexts. Retro and groovy swirl nails feel artistic and thoughtful—like you’re making a deliberate style choice rather than just following trends. The warm color palette is flattering on most skin tones, and the nostalgic quality gives your nails personality and conversation-starting appeal. These designs work beautifully if you want something bold but not neon-bright, colorful but cohesive.
Creating Groovy Retro Swirls
- Choose 3-4 warm, earthy tones that all complement each other (think autumn harvest colors)
- Use a cream or light beige base to let the warmer tones show up clearly
- Create chunky, flowing swirls that feel organic and artistic rather than precise
- Layer colors generously—retro swirls look best when they’re bold and visible
- Consider adding simple daisy flowers or geometric shapes within or around the swirls for extra retro flair
- Matte or satin finishes often enhance the retro aesthetic more than high gloss
These designs look particularly striking on longer nails or almond-shaped tips where there’s plenty of room for the groovy patterns to really shine.
Final Thoughts
Swirl nails have rightfully become one of the most beloved nail art trends because they offer something for everyone. Whether you gravitate toward minimalist white swirls or bold neon designs, whether you prefer soft pastels or rich jewel tones, there’s a swirl nail style that reflects your personal aesthetic. The beauty of this trend is that it celebrates individuality—no two swirl nails are ever exactly the same, and that’s precisely what makes them so special.
The best part about swirl nail art is that it’s genuinely more forgiving than it appears. Those flowing lines don’t need to be perfectly symmetrical or mechanically precise. The organic, abstract nature of the design means your unique hand-painted imperfections actually add character and authenticity to your manicure. You don’t need professional-level skills to create beautiful swirl nails at home—just a decent striping brush, a couple of colors you love, and willingness to experiment.
Whether you’re booking an appointment with a professional manicurist or grabbing your favorite polishes for a DIY session at home, these twelve swirl nail ideas give you endless inspiration. Pick one that speaks to you, gather your supplies, and get ready to create nail art that’s as individual and expressive as you are.
