

If soft square nails are your aesthetic but you’re tired of the same solid colors and basic designs, abstract nail art might be exactly what you’re looking for. The beauty of abstract designs on soft square tips lies in their ability to feel both artistic and wearable—they don’t need to look like anything in particular to look absolutely stunning. The shape itself, with its gentle rounded edges and substantial canvas, provides the perfect foundation for creative, freeform designs that catch the light and spark conversation.
Abstract nail art on soft square shapes has a distinctly modern appeal. Unlike stiletto or coffin shapes that demand bold, structured designs, soft squares embrace softer color transitions, organic patterns, and artistic expression that feels less “done” and more like intentional artistry. You can go minimal or intricate, pastel or jewel-toned, and the design will still feel cohesive with the shape’s overall vibe. The best part? Most of these designs don’t require advanced technique—they actually benefit from an imperfect, hand-drawn quality that makes them look genuine and personal.
The following ideas range from watercolor-inspired techniques to geometric abstracts to dreamy, cloud-like patterns. Each one works beautifully on soft square nails and can be adapted to match your skill level, color preferences, and the occasion. Whether you’re doing your own nails at home or bringing these ideas to your nail technician, you’ll find options that range from beginner-friendly to more advanced—but all of them prove that abstract nail art on soft squares is endlessly versatile.
1. Watercolor Abstract on Cream Base
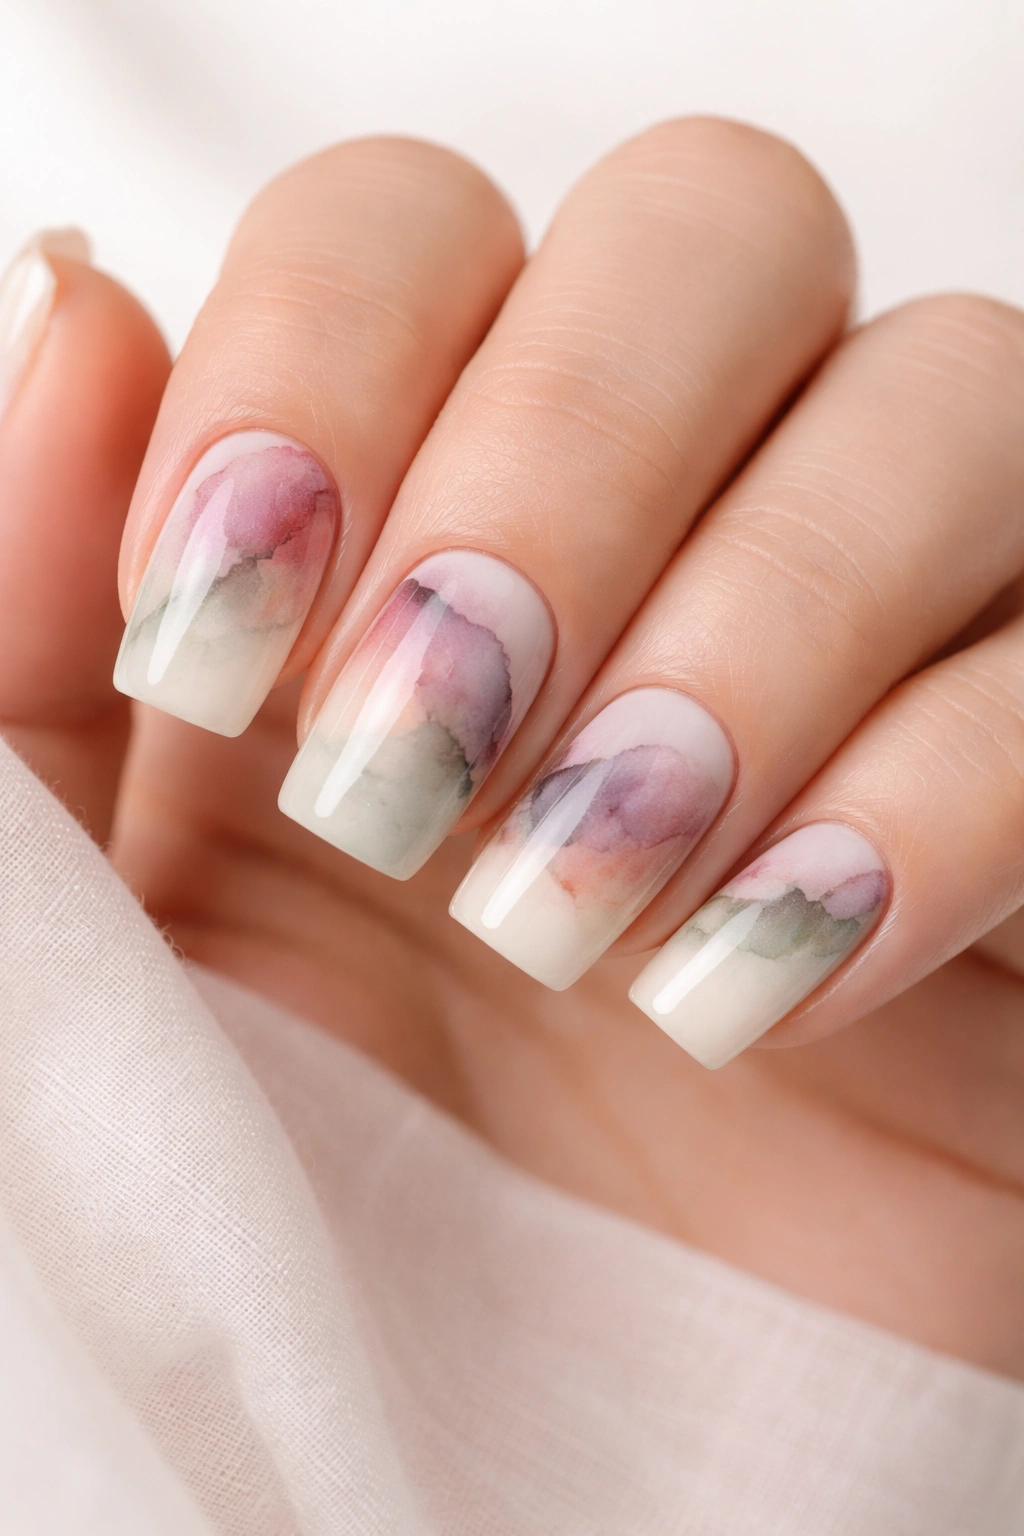
This design captures that beautiful, unpredictable quality of watercolor paint bleeding and blending across the nail. Start with a soft cream or off-white base that serves as your canvas, then drop small amounts of diluted nail polish in warm or cool tones—think dusty rose, muted sage, soft lavender, or warm peach—directly onto the nail. While the base is still slightly wet, use a makeup sponge or a damp brush to gently feather and blend the colors where they meet.
The Watercolor Magic
What makes watercolor abstract so forgiving is that perfection isn’t the goal—the more organic and unpredictable the color flow, the more authentic and artistic it looks. You’re aiming for that moment where colors seem to naturally find their edges, creating soft gradients and unexpected color intersections. The cream base keeps everything feeling soft and sophisticated, rather than high-contrast or graphic. Each nail can be slightly different, which actually adds to the handmade charm.
How to Nail the Technique
- Use nail polish thinned with a mixing medium or clear polish so it flows more easily across the base
- Apply the base coat in two thin layers for opacity without thickness
- Drop color onto the wet base and let gravity do some of the work before you start blending
- A barely damp beauty sponge creates softer transitions than a brush
- Seal everything with a glossy top coat once completely dry
Pro tip: If you’re nervous about color choices, stick to a monochromatic palette first—different shades of pink, or different shades of blue. It’s almost impossible to mess up when colors are naturally harmonious.
2. Geometric Marble Effect with Soft Square Tips
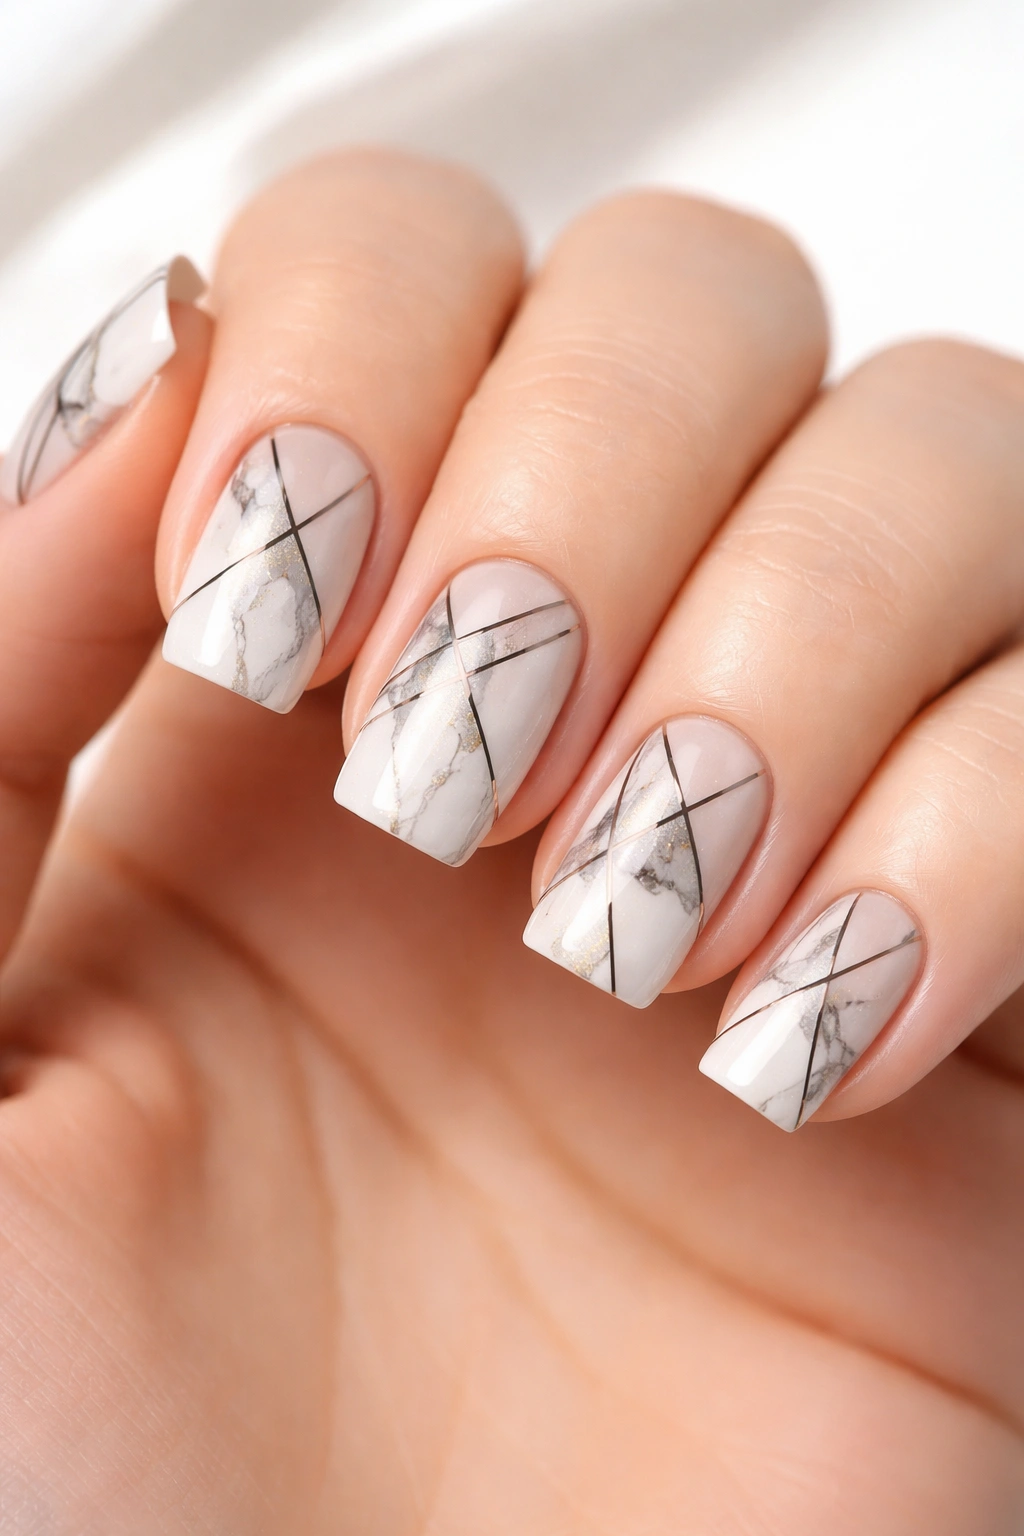
Geometric shapes combined with marble veining creates a sophisticated, modern look that feels both intentional and artistic. This design uses thin lines—created with a fine nail art brush or striping tool—to form abstract geometric shapes (triangles, hexagons, irregular polygons) across the nail, then fills some shapes with actual marble veining using black, gray, or metallic lines over a white, cream, or nude base.
Why Geometry Meets Marble
The geometric framework gives structure to what could otherwise feel chaotic, while the marble veining inside some shapes softens the overall effect and adds organic movement. Soft square nails provide enough width that you can create meaningful geometric divisions without the design feeling cramped. The marble element prevents the design from looking too technical or cold—it’s structured but still artistic and flowing.
Creating the Perfect Composition
- Start with a clean white or soft cream base in two coats
- Lightly sketch your geometric divisions in pencil (yes, actual pencil on the nail—it washes off)
- Use a thin striping brush and black or gray polish to draw the geometric outline
- Fill selected shapes with marble veining using a thin, wavering hand and gray or black polish
- Leave some shapes solid and others empty for visual balance
Insider note: Soft square nails have just enough surface area that you can fit 3-4 geometric shapes per nail without overwhelming the design.
3. Pastel Ombre Abstract Blend
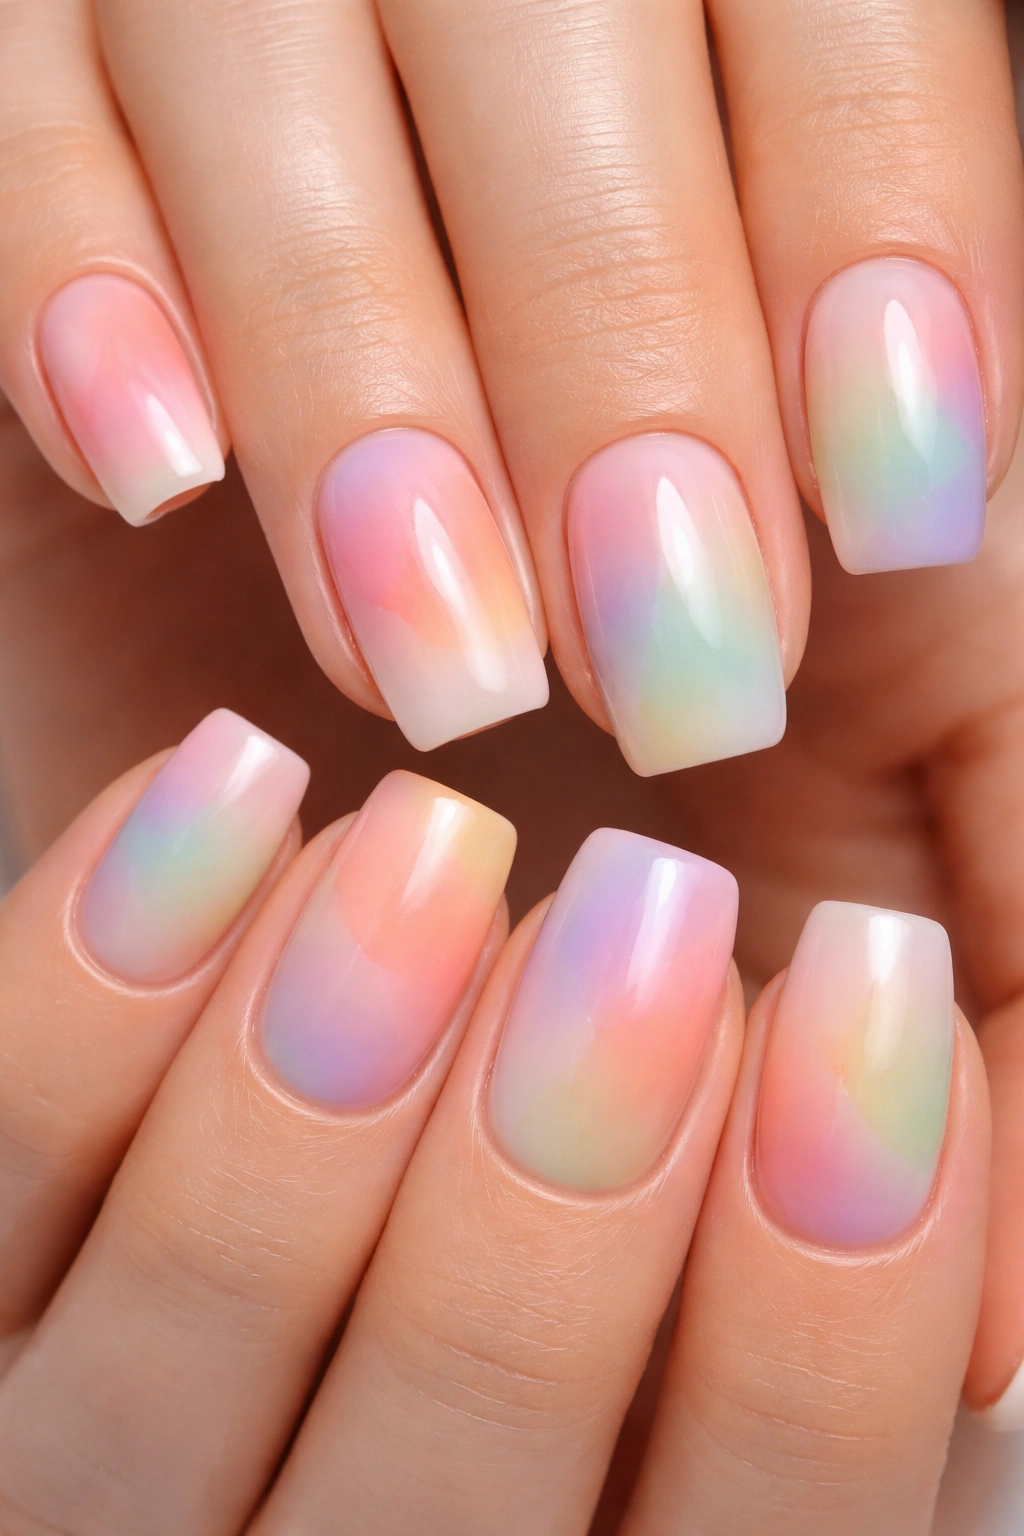
This design layers soft, complementary pastel colors that transition gradually across the nail, creating an ombre effect that feels abstract rather than structured. Unlike traditional ombre that moves from one side of the nail to the other, this version uses irregular placement of soft pink, peach, lavender, and mint across the entire nail surface, creating a dreamy, multidirectional color flow.
The Psychology of Pastel Layering
Soft pastels on soft square nails feel inherently soothing and elegant. The abstract placement—where colors blend in unexpected places rather than following a predictable gradient—makes the design feel more artistic and less “manicure.” The key is using pastels that are close in saturation and lightness, so no single color dominates. The result is a nail that shifts subtly in color depending on how light hits it.
Technique for Seamless Blending
- Apply a white or clear base for color accuracy
- Using a damp beauty sponge, apply three pastel shades in overlapping patches across the nail
- Dab gently rather than swipe to create soft edges where colors meet
- Use a clean, damp sponge edge to soften any harsh lines
- Build the blend gradually—you can always add more color, but removing it is harder
- Seal with a thick, glossy top coat that will self-level and enhance the blend
Worth knowing: This technique actually hides imperfections beautifully because the slight variations in color density make the whole thing look more intentionally artistic.
4. Brush Stroke Minimalism in Neutrals
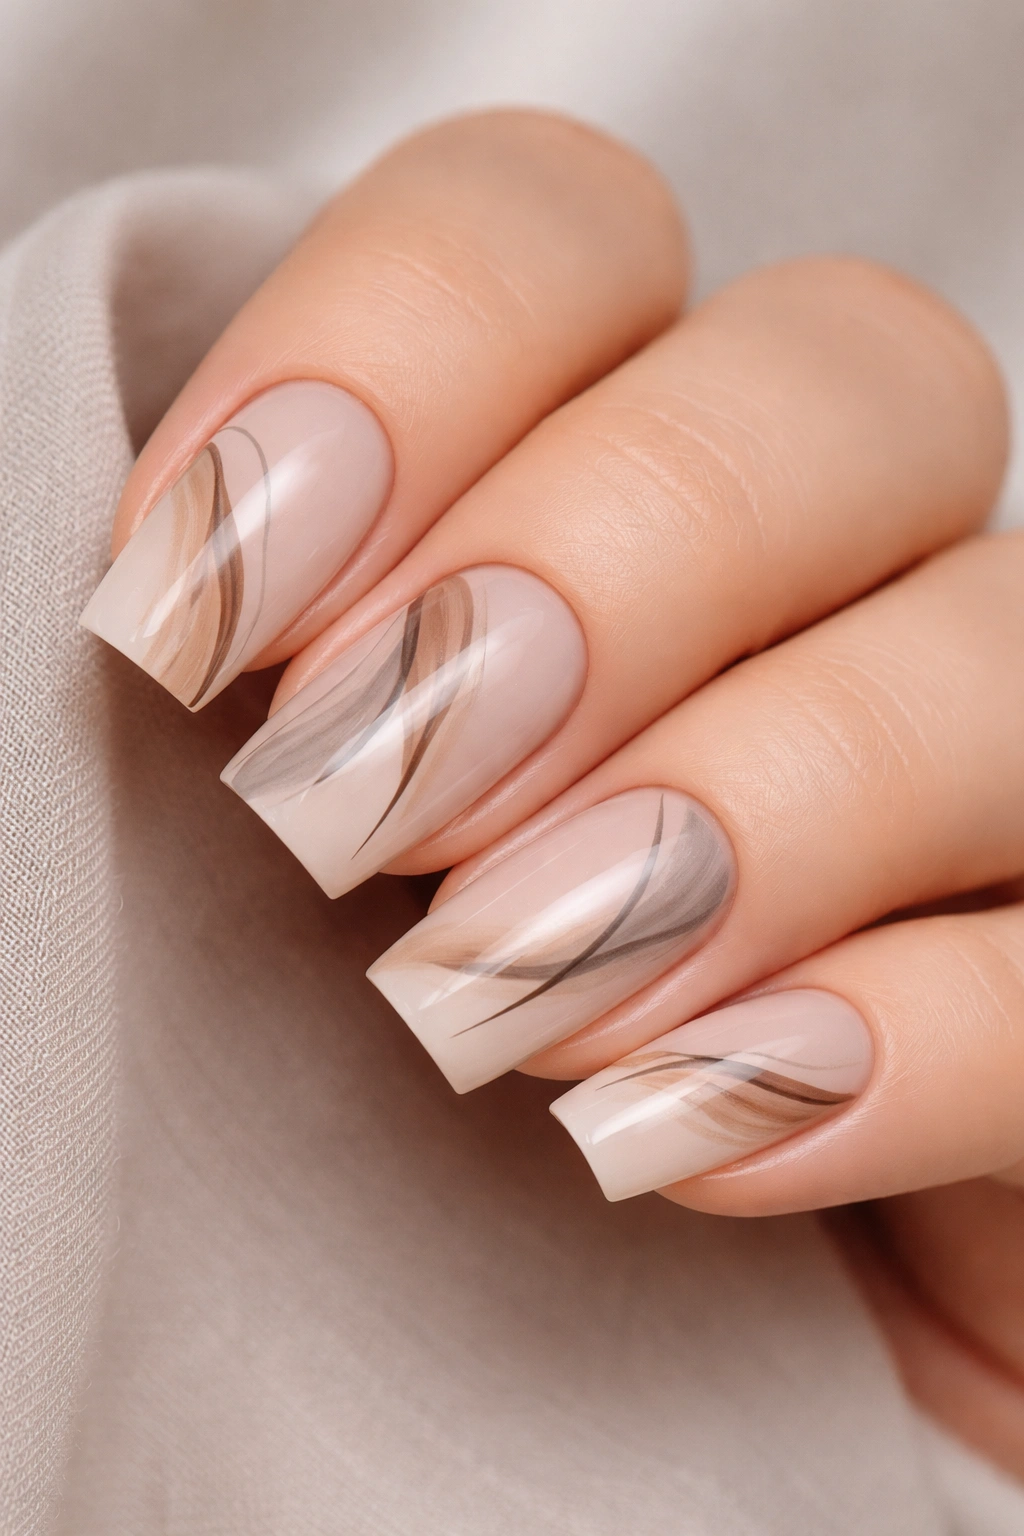
Sometimes the most striking abstract design is one with restraint. This style uses loose, confident brush strokes in warm or cool neutrals—soft grays, warm taupes, cool beiges, and barely-there black lines—to create organic shapes that suggest movement without being literal. Think more like modern art brush strokes than specific imagery.
Why Less Is More
Minimalist abstract designs on soft square nails feel incredibly sophisticated because they rely on composition and execution rather than visual complexity. A couple of carefully placed brush strokes feel intentional and artistic, while the negative space (the base color showing through) is as important as the strokes themselves. This approach works across every skin tone and complements both casual and formal settings.
Creating Confident Brush Strokes
- Start with a warm or cool neutral base (soft taupe, warm beige, cool gray)
- Use a thin to medium round brush with a contrasting neutral or black
- Make 2-3 deliberate strokes per nail that flow across the surface organically
- Some strokes can be thick, others thin—variation makes it feel less rigid
- Leave plenty of base color visible between strokes
- One thin coat of matte or satin top coat can enhance the artistic effect, or use glossy for sophistication
Real talk: The hardest part of minimalist design is resisting the urge to add more. Trust that two good strokes beat three mediocre ones every time.
5. Soft Focus Blurred Lines Design
This design uses heavily diluted polish applied in thin, slightly blurred lines across the nail, creating the effect of looking through frosted glass or seeing something slightly out of focus. The lines can be straight or curved, thick or thin, and can overlap in abstract patterns. The soft square shape gives you enough surface to create visual interest while maintaining that soft, dreamy quality.
The Psychology Behind Blur
Blurred abstract lines feel inherently calming and modern. They’re technically simple—just lines applied with very thin polish and slightly smudged or softened—but they create a sophisticated, artistic effect that reads as intentional rather than accidental. On soft square nails, the softness of the shape mirrors the softness of the blurred edges, creating visual harmony.
How to Achieve the Blur Effect
- Thin your nail polish with clear polish or a mixing medium until it’s nearly translucent
- Use a very fine brush to apply thin lines in organic directions across the nail
- While still wet, lightly drag a clean, barely damp brush across the line to soften and blur the edges
- You can layer multiple thin blurred lines, letting each layer dry before adding the next
- Use complementary or tonal colors so the blur effect is visible but not harsh
- Finish with a glossy top coat that enhances the soft, wet appearance
Pro tip: Practice on a test nail first—the thinness of the polish means you need a light touch, and the blurring step is key to making it look intentional rather than like a mistake.
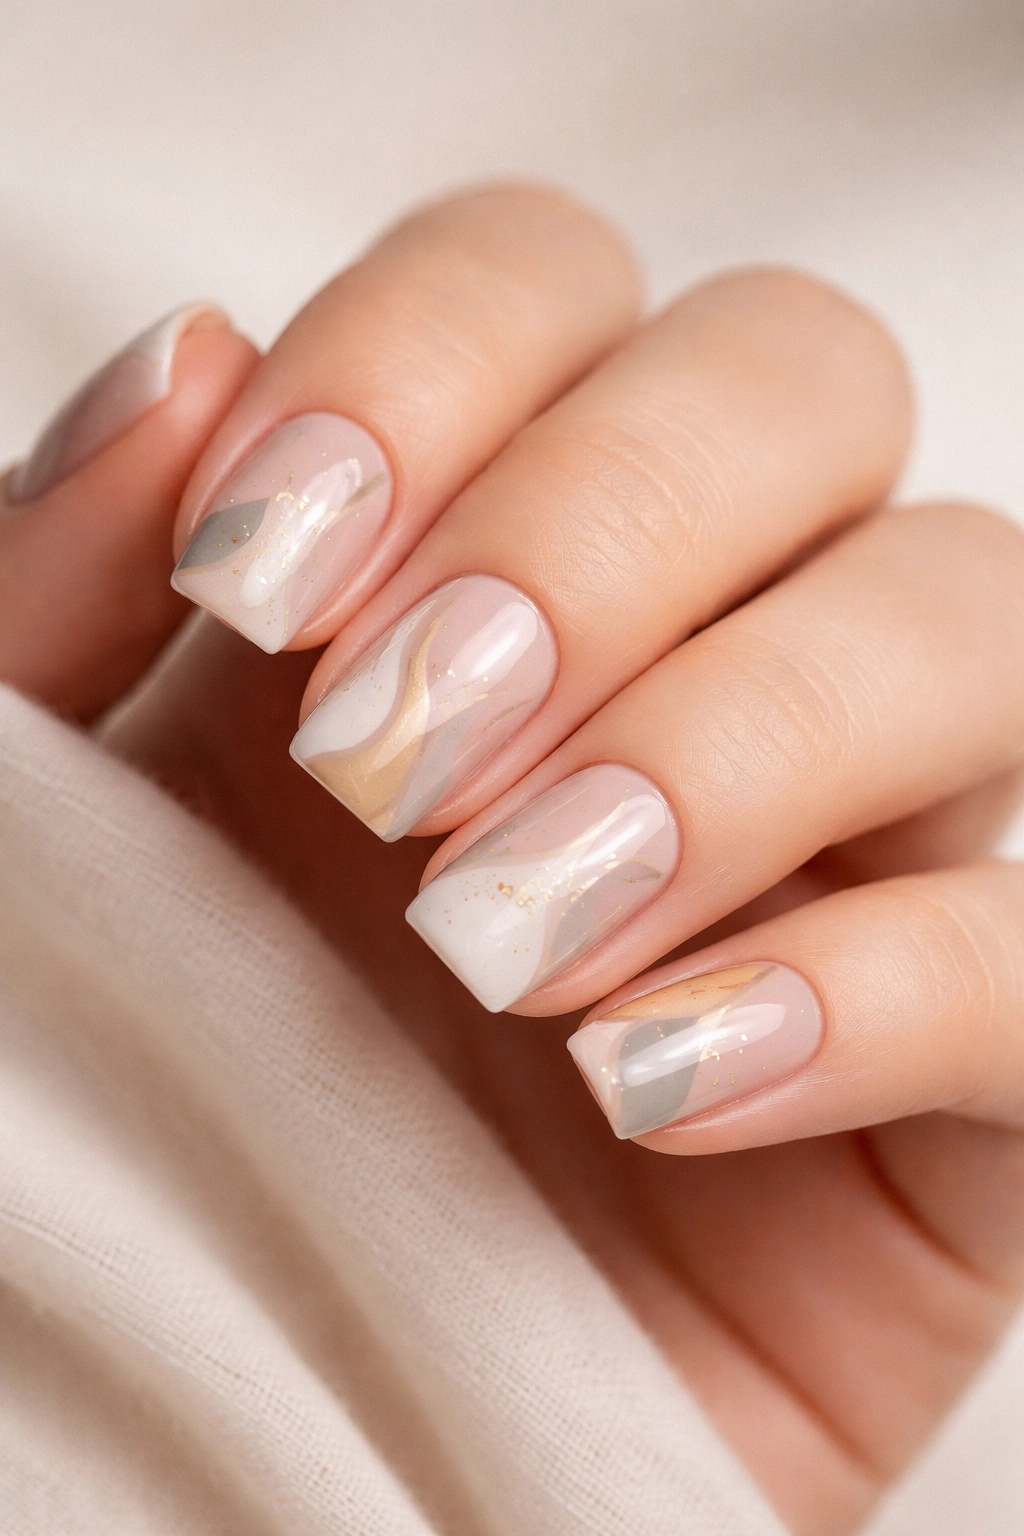
6. Dusty Floral Abstract Patterns
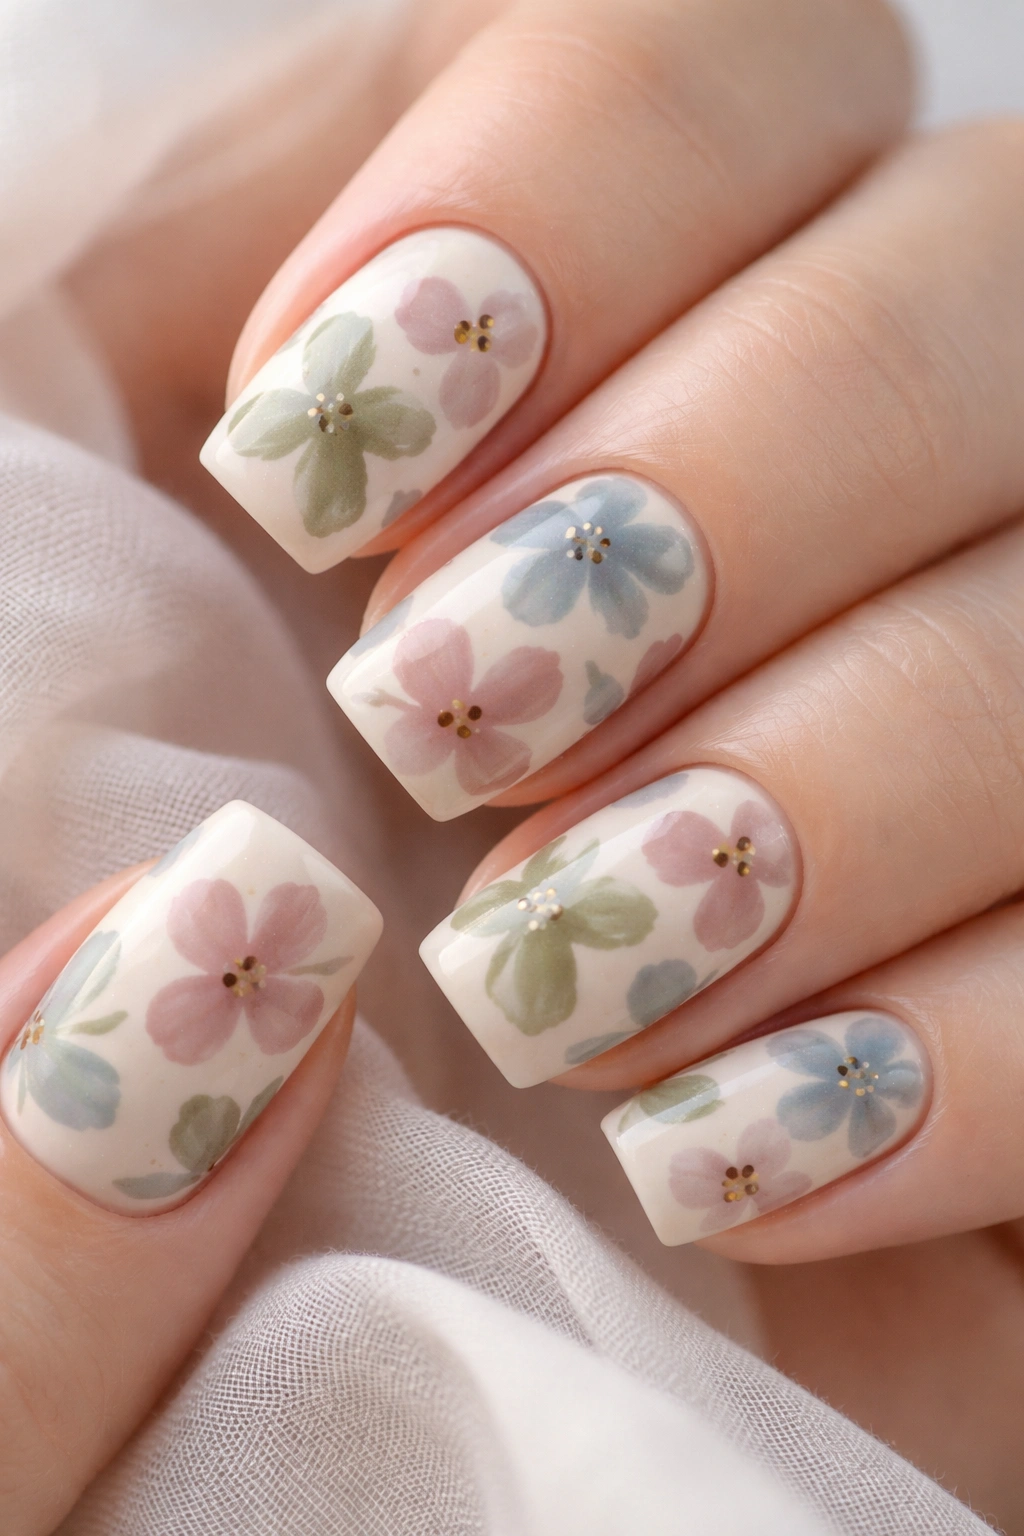
Rather than realistic florals, this design uses abstract shapes inspired by flowers—think petals as loose organic curves, flower centers as tiny dots or swirls, and leaves as simple curved lines. The entire design is rendered in dusty, muted colors (dusty rose, dusty olive, dusty blue, warm gray) on a soft cream or pale pink base, so it feels like a vintage botanical illustration rather than a literal depiction.
Why “Abstract” Floral Works Better
Soft square nails are ideal for floral designs because the shape is feminine without being delicate, and there’s enough surface area for pattern placement without feeling cramped. Abstract florals eliminate the pressure of making flowers look “realistic”—instead, the focus is on composition, color harmony, and that beautiful dusty aesthetic. Each nail can have slightly different arrangements, creating a cohesive but non-repetitive manicure.
Painting Dusty Florals
- Start with a soft cream or pale pink base in two opaque coats
- Mix your dusty colors by adding white to regular polish, creating muted shades
- Use a fine round brush to paint abstract petal shapes (simple curves, not detailed)
- Add tiny dots for flower centers and simple curved lines for leaves and stems
- Spread the flowers organically across the nail rather than trying for perfect symmetry
- Each nail should be slightly different in placement but consistent in color palette
- Finish with a glossy top coat or matte for a softer, more vintage appearance
Insider note: Dusty colors are incredibly forgiving—slight imperfections just look more handmade and charming.
7. Paint Splatter Art on Soft Nude
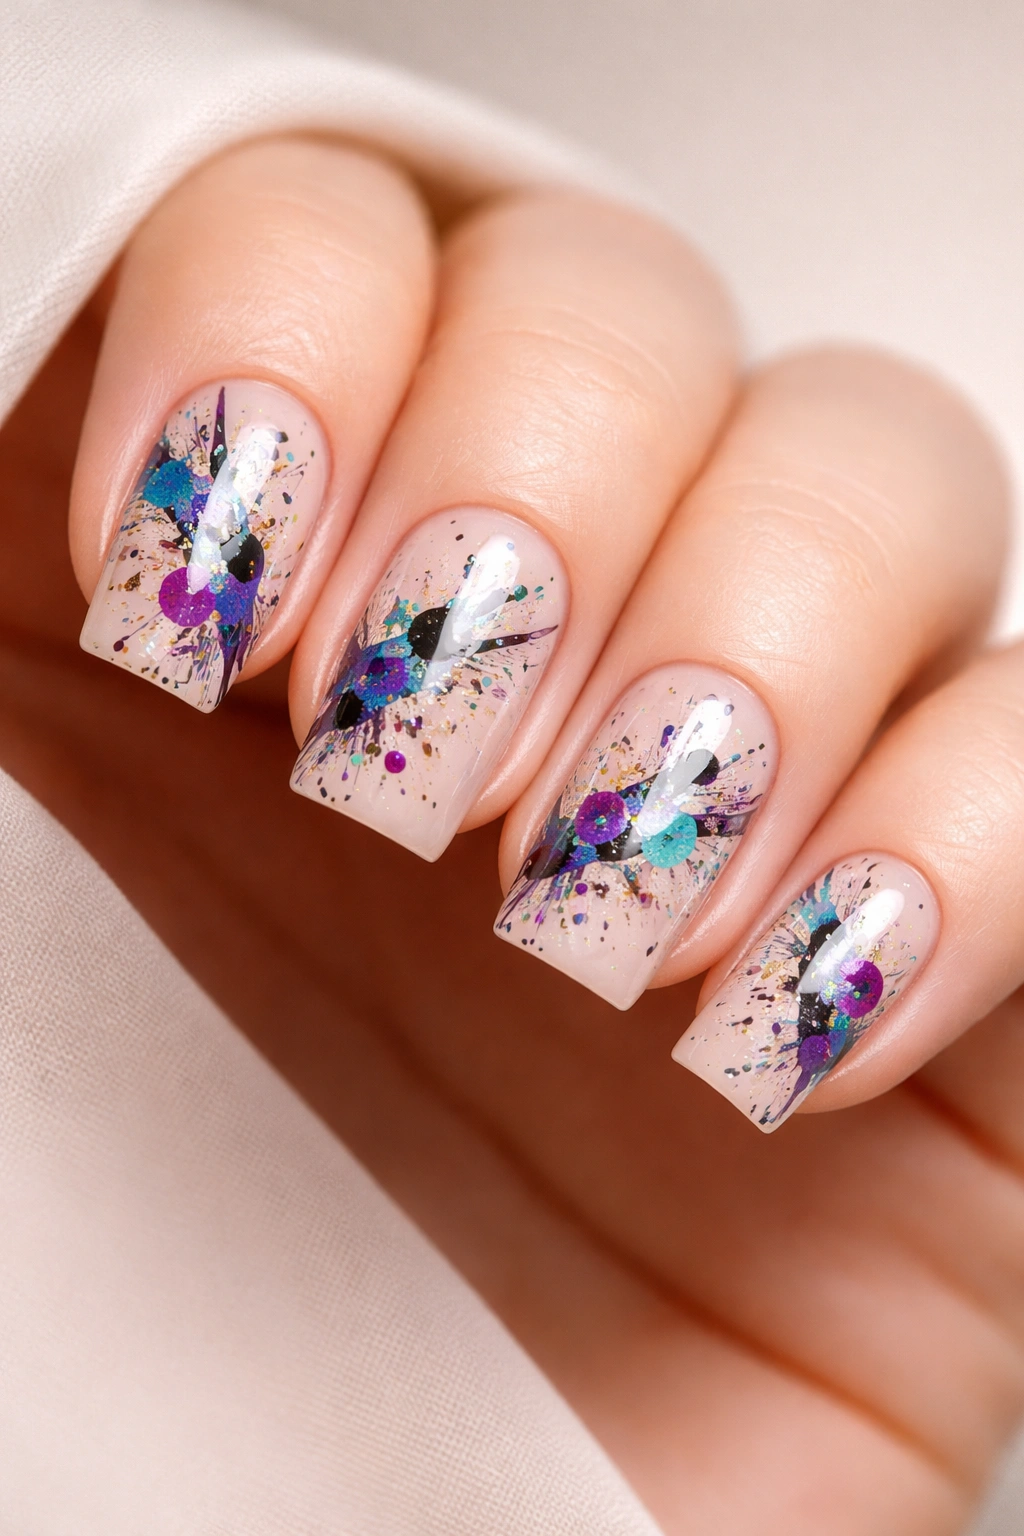
This design mimics the look of paint being flicked or splattered across the nail, creating an energetic, artistic effect. Start with a soft nude base and use a toothbrush, straw, or old brush to flick thin lines of contrasting color—black, deep gray, or a jewel tone—across the surface in random patterns. The soft square shape contains the splatter nicely without it feeling chaotic.
The Appeal of Controlled Chaos
Paint splatter designs feel youthful and artistic without being unprofessional. On a soft nude or warm beige base, the splatter reads as intentional artistic expression rather than accident. The neutral base keeps the design sophisticated, while the splatter adds energy and personality. It’s one of the most forgiving abstract designs because irregularity is actually the point.
Creating Splatter Patterns
- Apply a soft nude or warm beige base in two thin, opaque coats
- Use an old toothbrush or nail art splatter brush dipped in thinner polish
- Hold the brush 2-3 inches above the nail and flick the bristles with your finger to send polish flying
- Start with just a few splatters and assess—you can always add more
- Create more density in some areas and less in others for visual interest
- Let each layer dry before adding more splatters if you’re layering colors
- Finish with a top coat to seal and protect
Worth knowing: The thinner your polish is for splattering, the more delicate and artistic the effect looks. Thick polish creates globs instead of fine flicks.
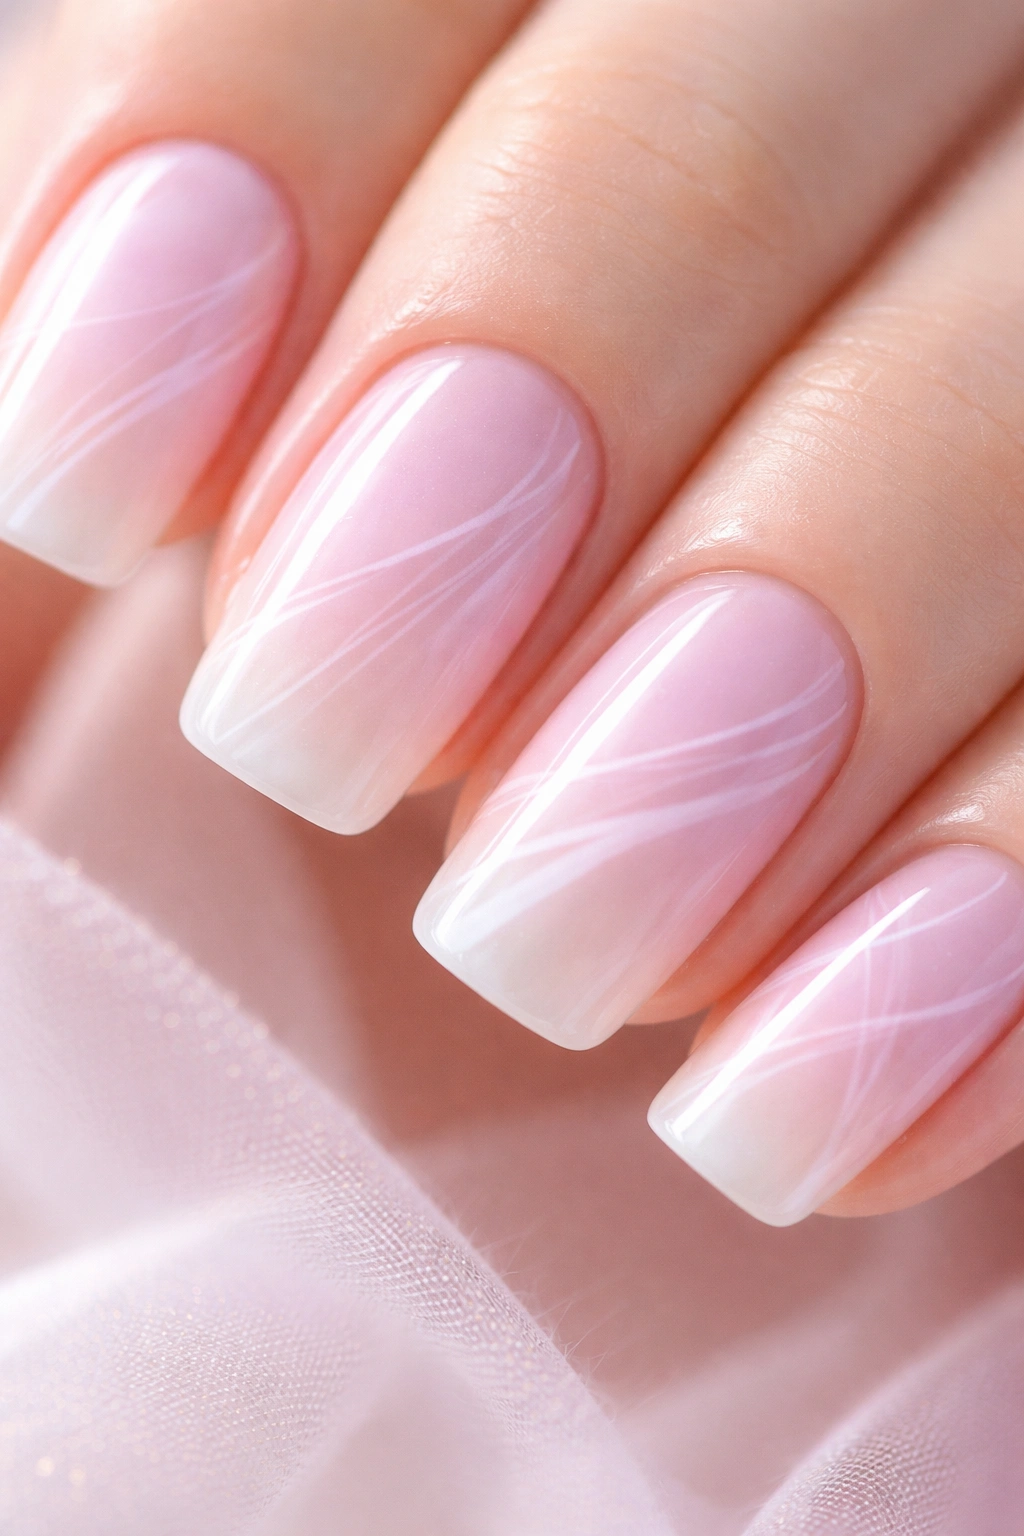
8. Wavy Line Illusion Nails
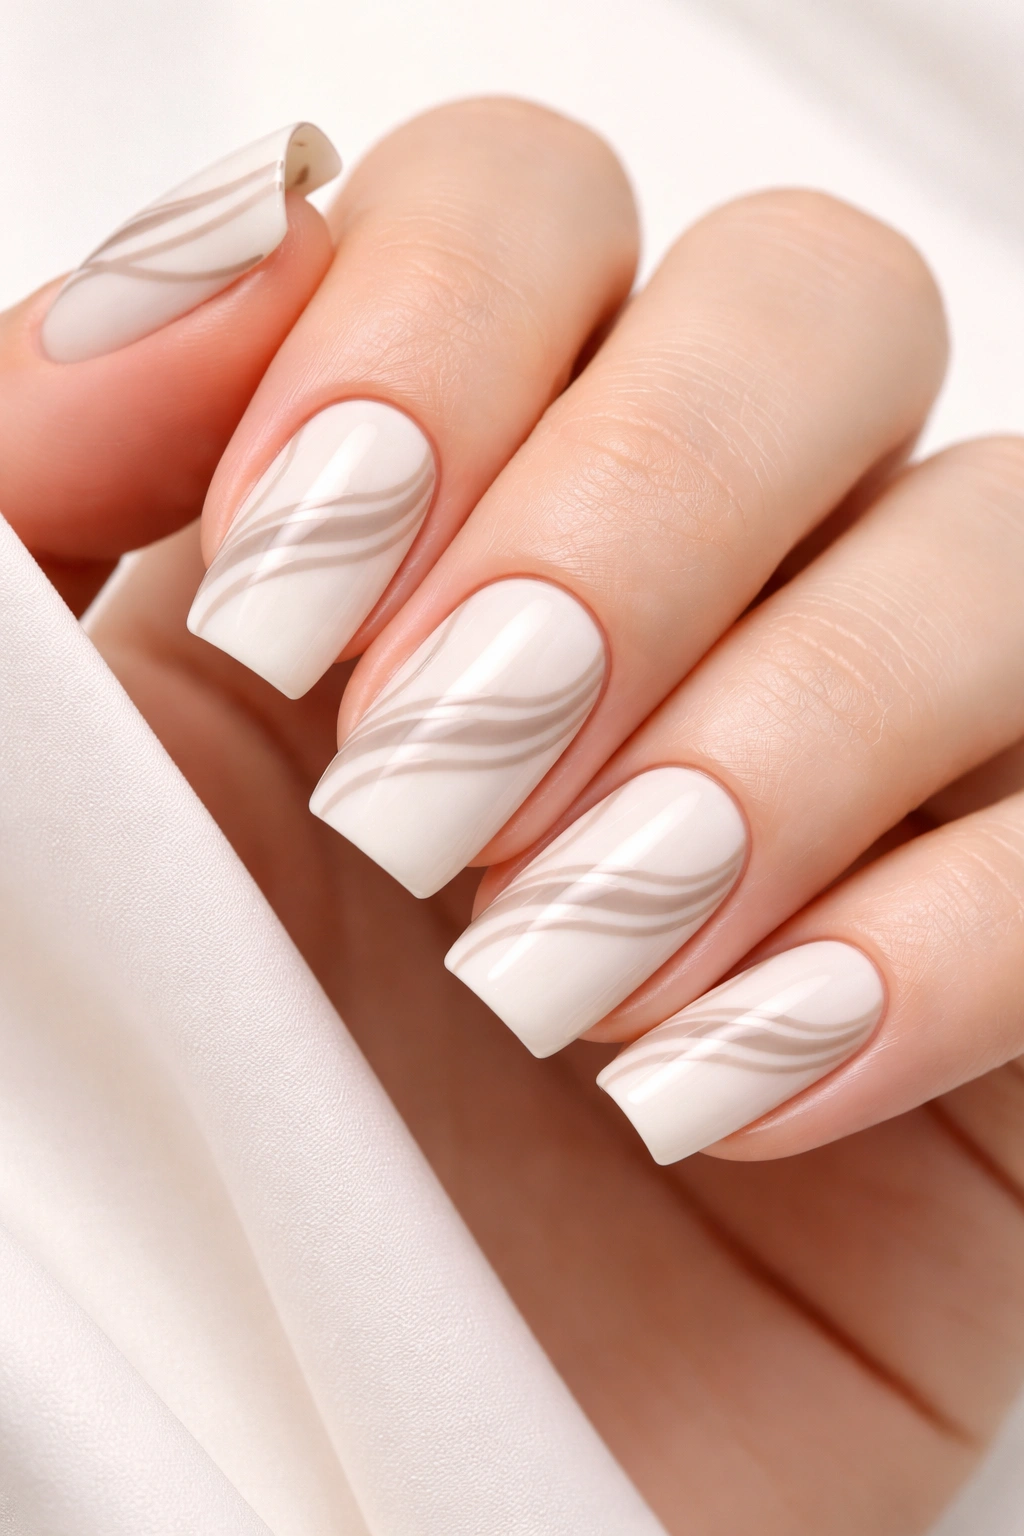
This design creates an optical illusion using wavy, parallel lines that make the nail appear to have movement and dimension. Lines undulate gently across the nail in repeating wave patterns, creating the illusion of soft, rolling motion. Using two tonal colors—like white and soft gray, or cream and taupe—keeps the effect subtle but visually interesting.
Why Waves Feel Modern
Wavy line designs tap into something inherently soothing and contemporary. The repeating pattern creates visual rhythm without feeling rigid or geometric. On soft square nails, the waves can undulate in any direction—horizontally, vertically, diagonally—and still feel balanced. The optical illusion element makes the design feel more sophisticated than it actually is to execute.
Painting Wavy Line Patterns
- Start with your lighter color (white, cream) as the base in two thin coats
- Using a thin brush and contrasting color, paint gently wavy lines across the nail
- Keep the waves consistent in width and rhythm—this is what creates the illusion
- You can do horizontal waves, diagonal waves, or create a subtle current effect
- The spacing between lines matters—too close feels busy, too far feels sparse (aim for roughly the width of the line itself as your spacing)
- Paint two to three waves per nail for subtle effect or more for bolder impact
- Finish with a glossy top coat that will make the lines appear almost wet
Pro tip: Using a toothpick or extremely fine brush makes straighter waves easier—the thinner your tool, the more control you have.
9. Cloud-Like Swirled Abstract Design
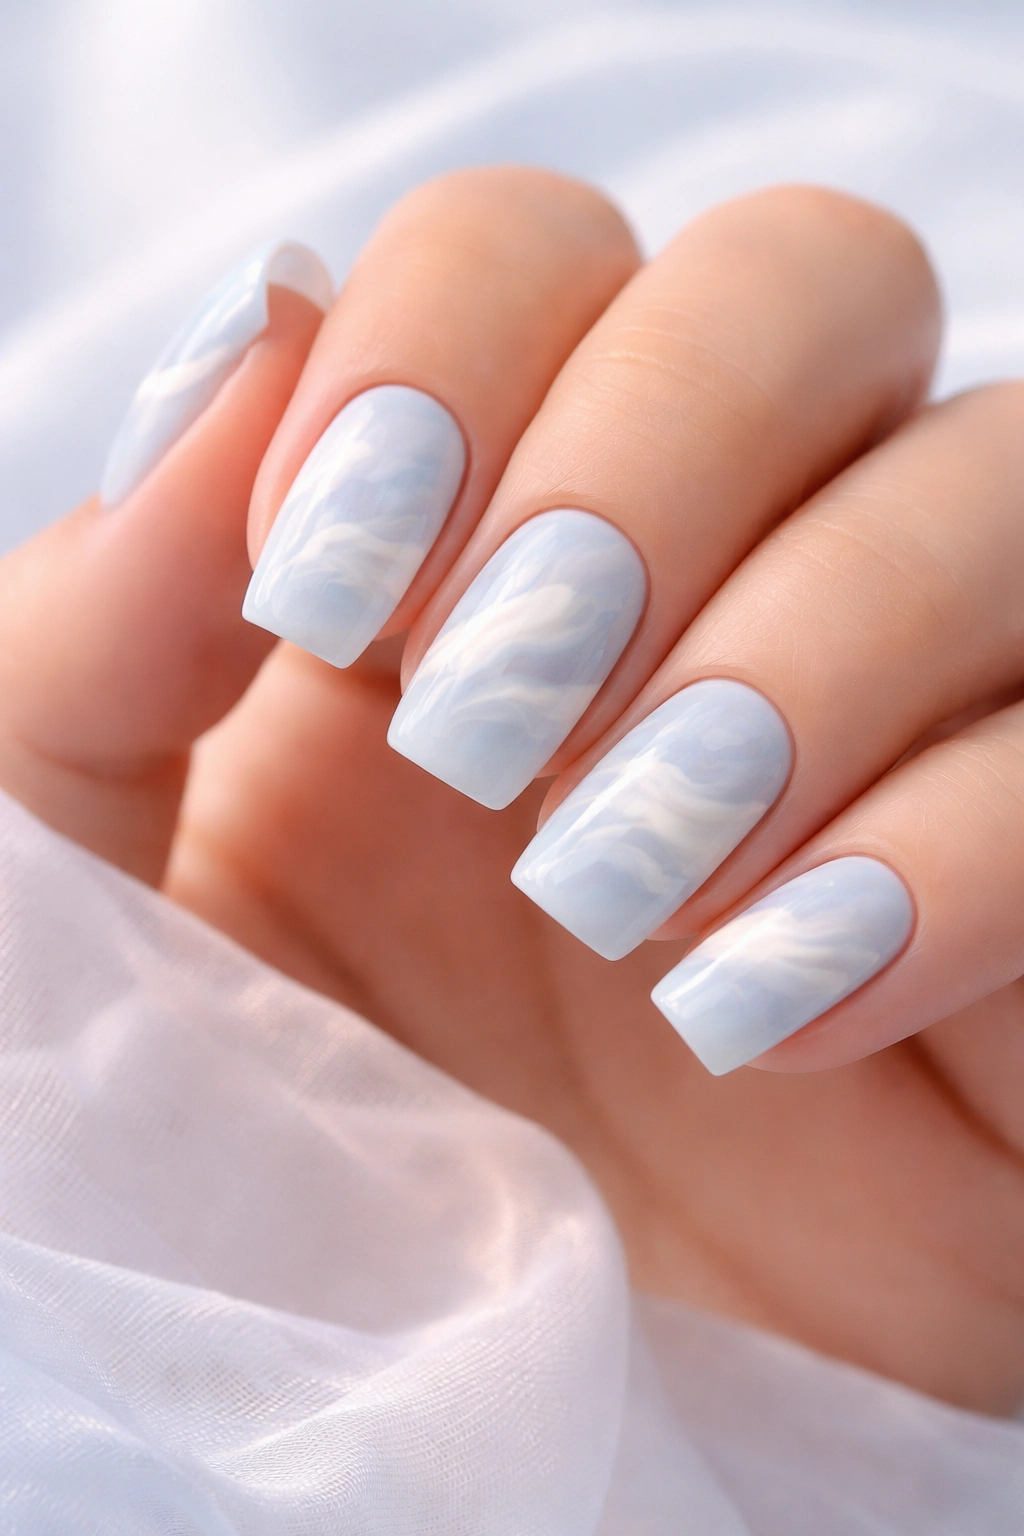
This dreamy design mimics the appearance of soft, billowing clouds using swirled patterns of white, cream, gray, and soft blue on a pale sky-blue or soft lavender base. The swirls are organic and flowing, created with gentle brush strokes or a marbling tool that blend colors together without clear boundaries between them.
The Calming Effect of Soft Swirls
Cloud-like designs feel inherently peaceful and artistic. The soft square shape is perfect for cloud designs because the rounded corners mirror the soft edges of actual clouds. Using primarily pastel colors keeps the design feeling gentle rather than dramatic. This is one of the few abstract designs that can be slightly imperfect and actually look more realistic and charming.
Creating Soft Cloud Swirls
- Start with a pale sky blue or soft lavender base in two thin coats
- Mix white and pale gray to different opacity levels
- Using a medium round brush, paint soft, billowing swirl shapes across the nail
- Let colors blend slightly where they overlap but not so much they muddy together
- Use white for highlights on some clouds and gray on the shaded side for dimension
- A dotting tool can help create soft cloud highlights
- Blend colors slightly with a clean, barely damp brush if needed
- Finish with a glossy top coat that enhances the soft, dreamy appearance
Real talk: Cloud nails benefit from being slightly imperfect—perfectly blended clouds look less realistic than those with subtle color transitions and undefined edges.
10. Negative Space Abstract Shapes
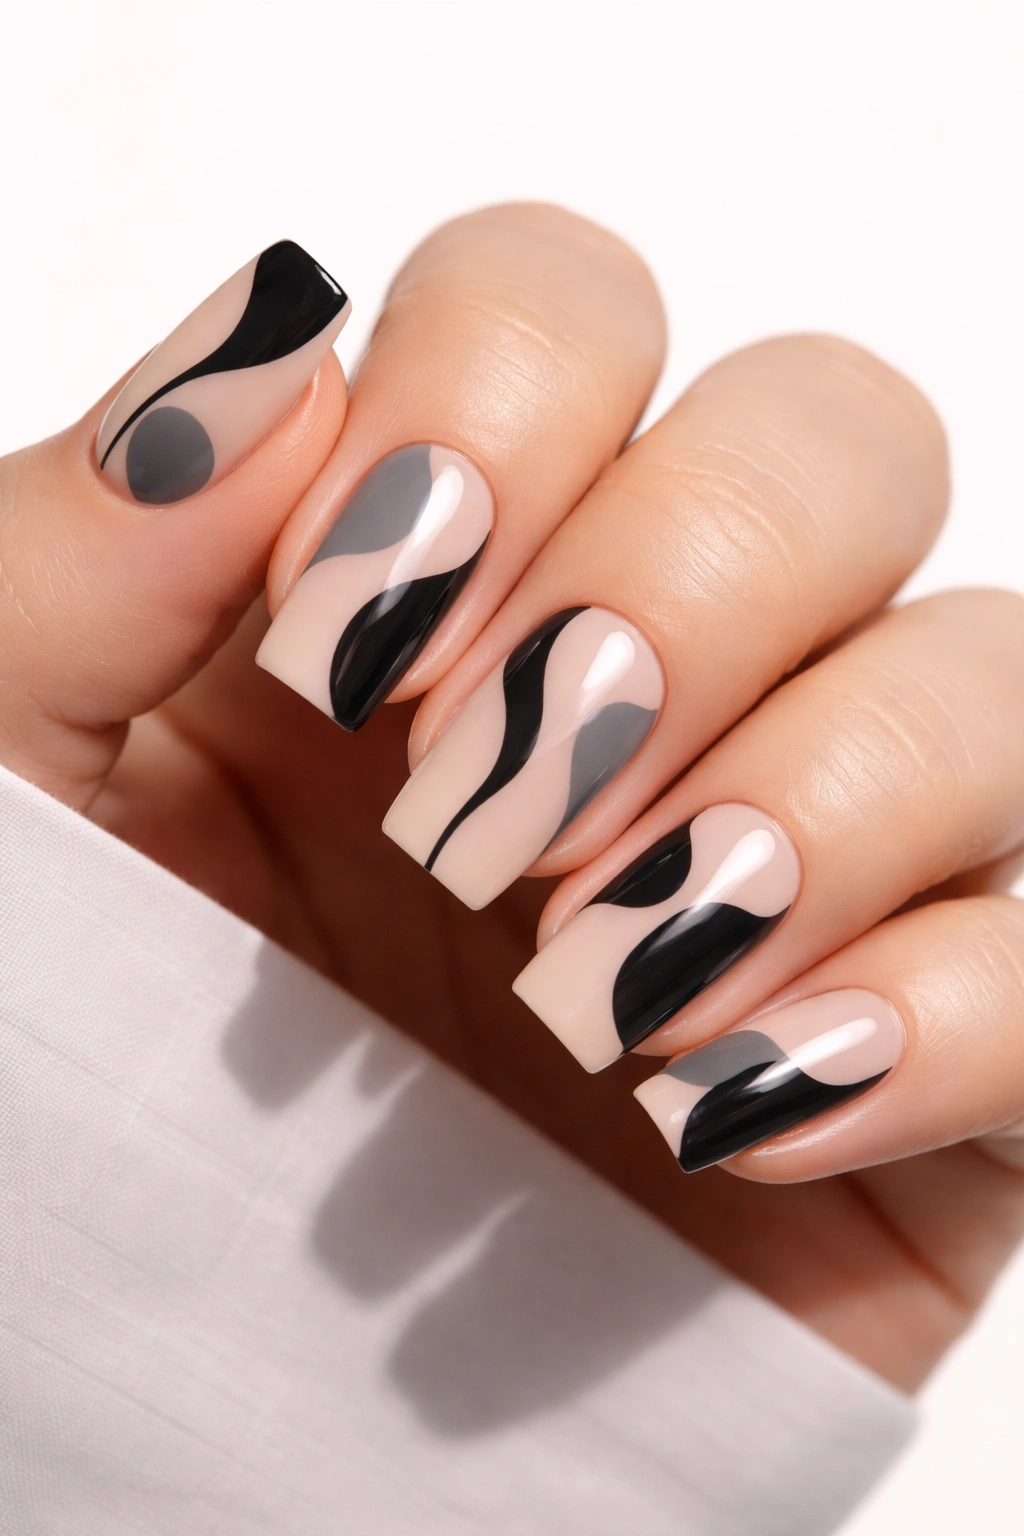
This sophisticated design uses the base color as part of the design by creating abstract geometric or organic shapes with negative space. You paint solid color shapes—perhaps in black, deep gray, or a jewel tone—directly on a portion of the nail, leaving the cream or nude base color visible in planned areas. The contrast between the solid shapes and the empty space creates an artistic, modern look.
Power of Intentional Emptiness
Negative space design is all about what you don’t paint being as important as what you do. This approach feels incredibly intentional and gallery-worthy on soft square nails. The shapes don’t need to be perfectly rendered or symmetrical—irregular, organic shapes feel more artistic than precise ones. The design reads as sophisticated because it requires restraint and confidence in composition.
Executing Negative Space Design
- Start with a soft cream or pale nude base in two opaque coats
- Decide what shapes you want to emphasize—these will be painted, while the rest is base color
- Paint abstract shapes in black, deep gray, forest green, or jewel tones using a medium round or angled brush
- Keep some shapes filled solid and let others remain just an outline
- You can layer shapes or let them exist independently across the nail
- Ensure there’s enough negative space that the base color is clearly part of the design
- Finish with a glossy or matte top coat depending on the mood you’re going for
Insider note: Negative space design actually looks more impressive when you use fewer colors and more restraint—one or two solid colors create stronger visual impact than multiple colors competing for attention.
Final Thoughts
Soft square abstract nail art is the sweet spot between artistic expression and everyday wearability. These designs prove that you don’t need glitter, rhinestones, or intricate detail work to create nails that feel genuinely special and intentional. The soft square shape itself does much of the heavy lifting by providing a generous canvas that feels modern and elegant without demanding bold, high-contrast designs.
The beauty of abstract nail art is that it embraces imperfection as part of the aesthetic. A watercolor bleed that goes slightly off-course, a brush stroke that’s not perfectly straight, or a splatter that lands unexpectedly—these aren’t mistakes, they’re evidence of the artistic process. That human touch is what makes abstract designs feel authentic and personal rather than mass-produced.
Whether you’re doing your own nails or working with a technician, any of these approaches can be adapted to match your technical skill level and personal taste. Start with whichever idea calls to you most, then experiment with color combinations and variations. Abstract nail art rewards confidence and personal expression far more than technical perfection, which means you’re free to make these designs entirely your own.
