

The coffin nail shape has become a modern manicure staple—and for good reason. It’s elongated, tapered, and offers the perfect canvas for showing off beautiful nail art. When you pair that sleek silhouette with the smooth, blended transitions of ombre, you get something truly special: a look that feels elevated, intentional, and effortlessly chic. The ombre effect adds depth and visual interest without requiring intricate detailing, making it an accessible choice whether you’re doing your nails at home or heading to the salon.
What makes ombre coffin nails so versatile is how they work across every mood and season. Soft, subtle blends feel polished and professional for everyday wear. Bold, saturated gradient effects make a statement for special occasions. Whether you’re drawn to neutral minimalism, vibrant color play, or artistic embellishments, there’s an ombre coffin nail design waiting to match your aesthetic.
The best part? You don’t need to figure out the designs from scratch. The ombre technique itself does most of the visual heavy lifting, creating dimension and movement on your nails naturally. Add the structured sophistication of the coffin shape, and you’ve got a manicure that looks expensive and intentional—regardless of your skill level.
Let’s explore some of the most inspiring ombre coffin nail ideas that deserve a spot on your inspiration board.
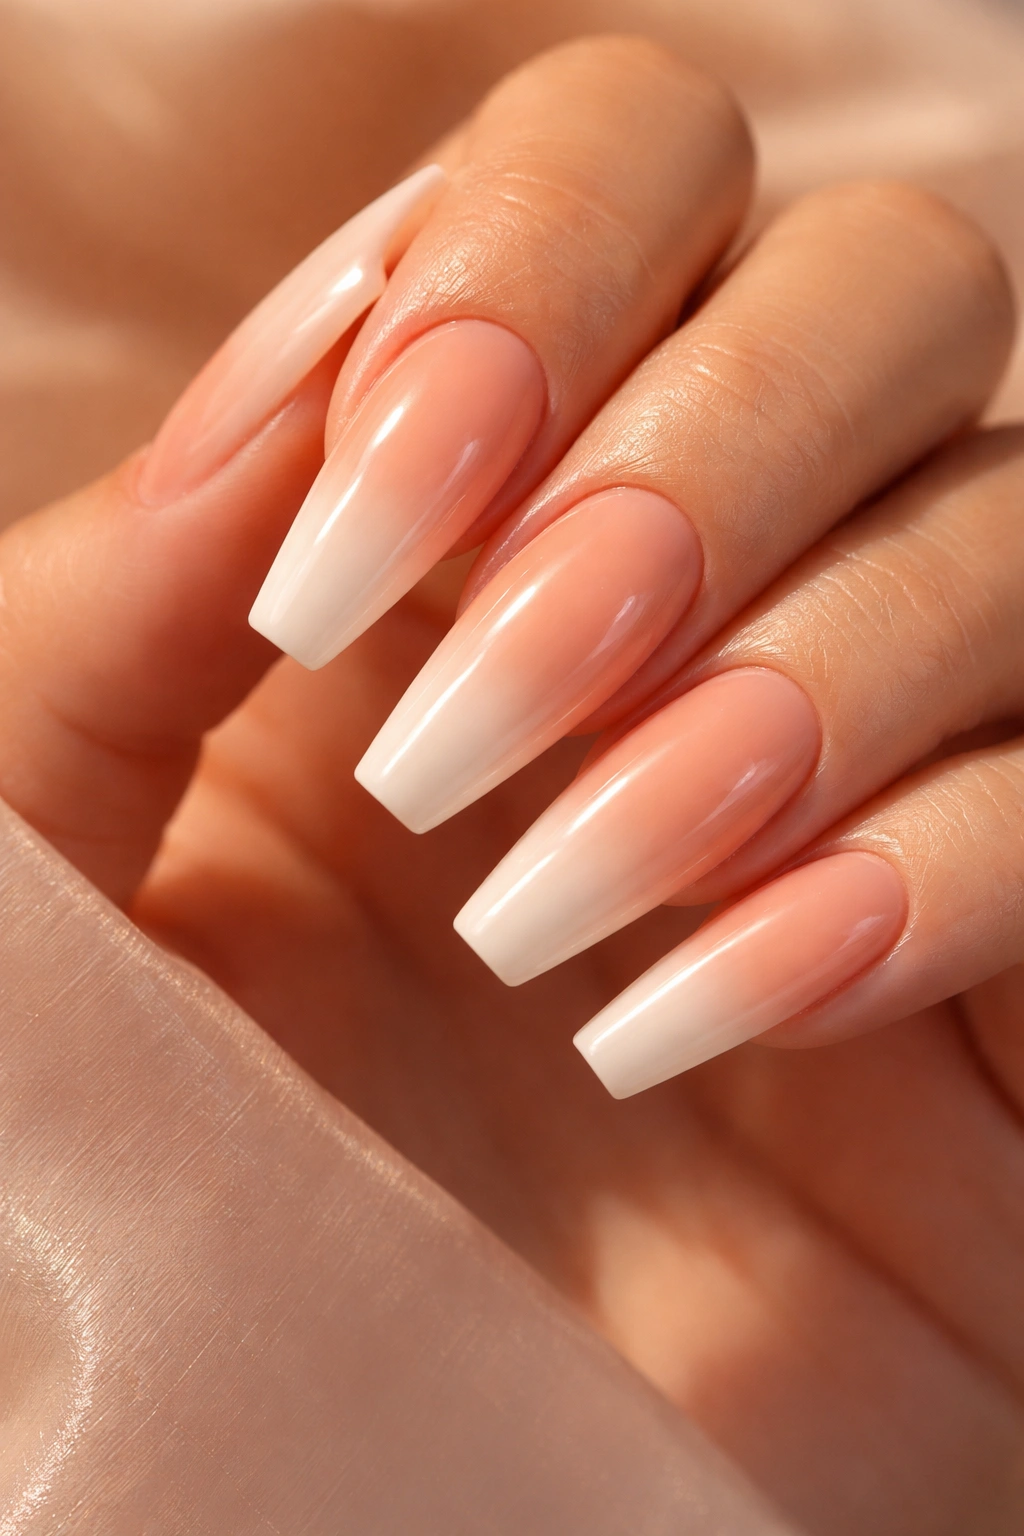
1. Soft Blush Milky Ombre
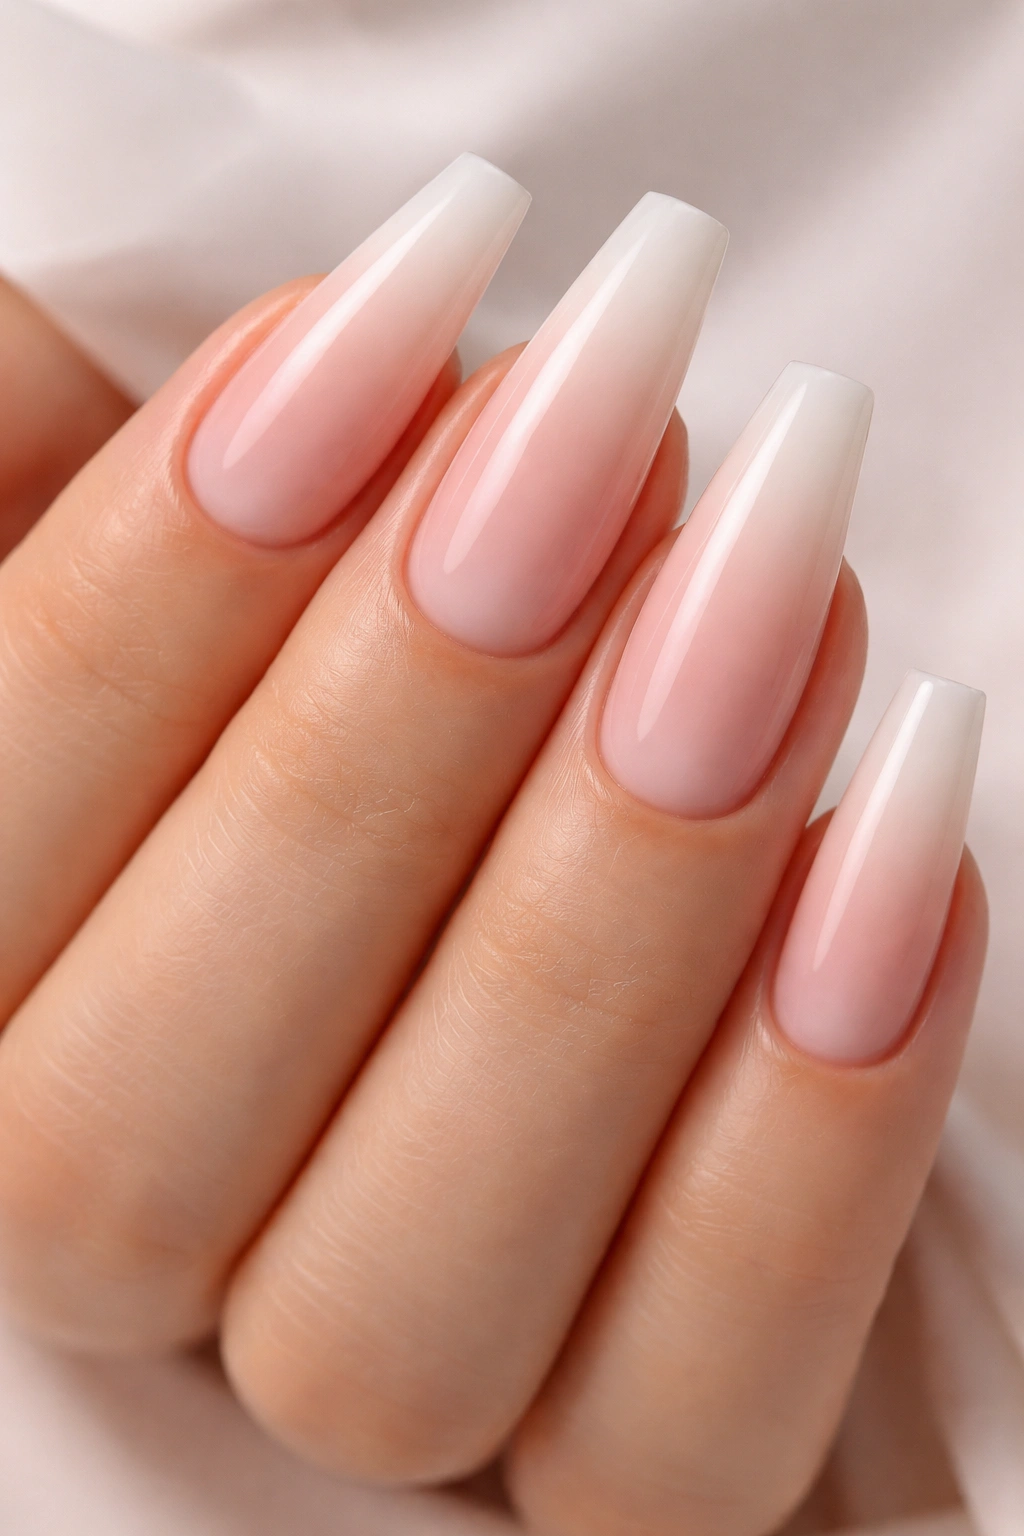
This gentle design proves that understated elegance is always in style. A delicate blush pink at the base transitions seamlessly into a creamy milky white toward the tips, creating a soft, romantic effect that flatters virtually every skin tone. The beauty lies in the smoothness of the gradient—there shouldn’t be any harsh lines or sudden color shifts, just a dreamy fade.
Why This Design Works
The blush-to-white combination is timelessly feminine without feeling juvenile or overly delicate. The milky finish adds a contemporary twist that feels modern and intentional, especially when paired with a high-gloss topcoat that gives the nails a polished, salon-fresh appearance. This is the kind of manicure that works for everything from a casual dinner to a wedding—it’s sophisticated without being trying-too-hard.
How to Achieve This Look
- Opt for acrylic extensions if you want maximum control over the gradient
- Use gel polish for smoother blending than traditional lacquer
- Apply the darker shade first, then gradually feather in lighter tones
- Seal with a glossy topcoat to enhance the luminous quality
- Keep the ombre concentrated on the length of the nail, with the tips being predominantly white
Pro tip: If you’re nervous about blending, ask your nail artist to use the sponge-gradient technique rather than a brush blend—it gives a softer, more forgiving fade.
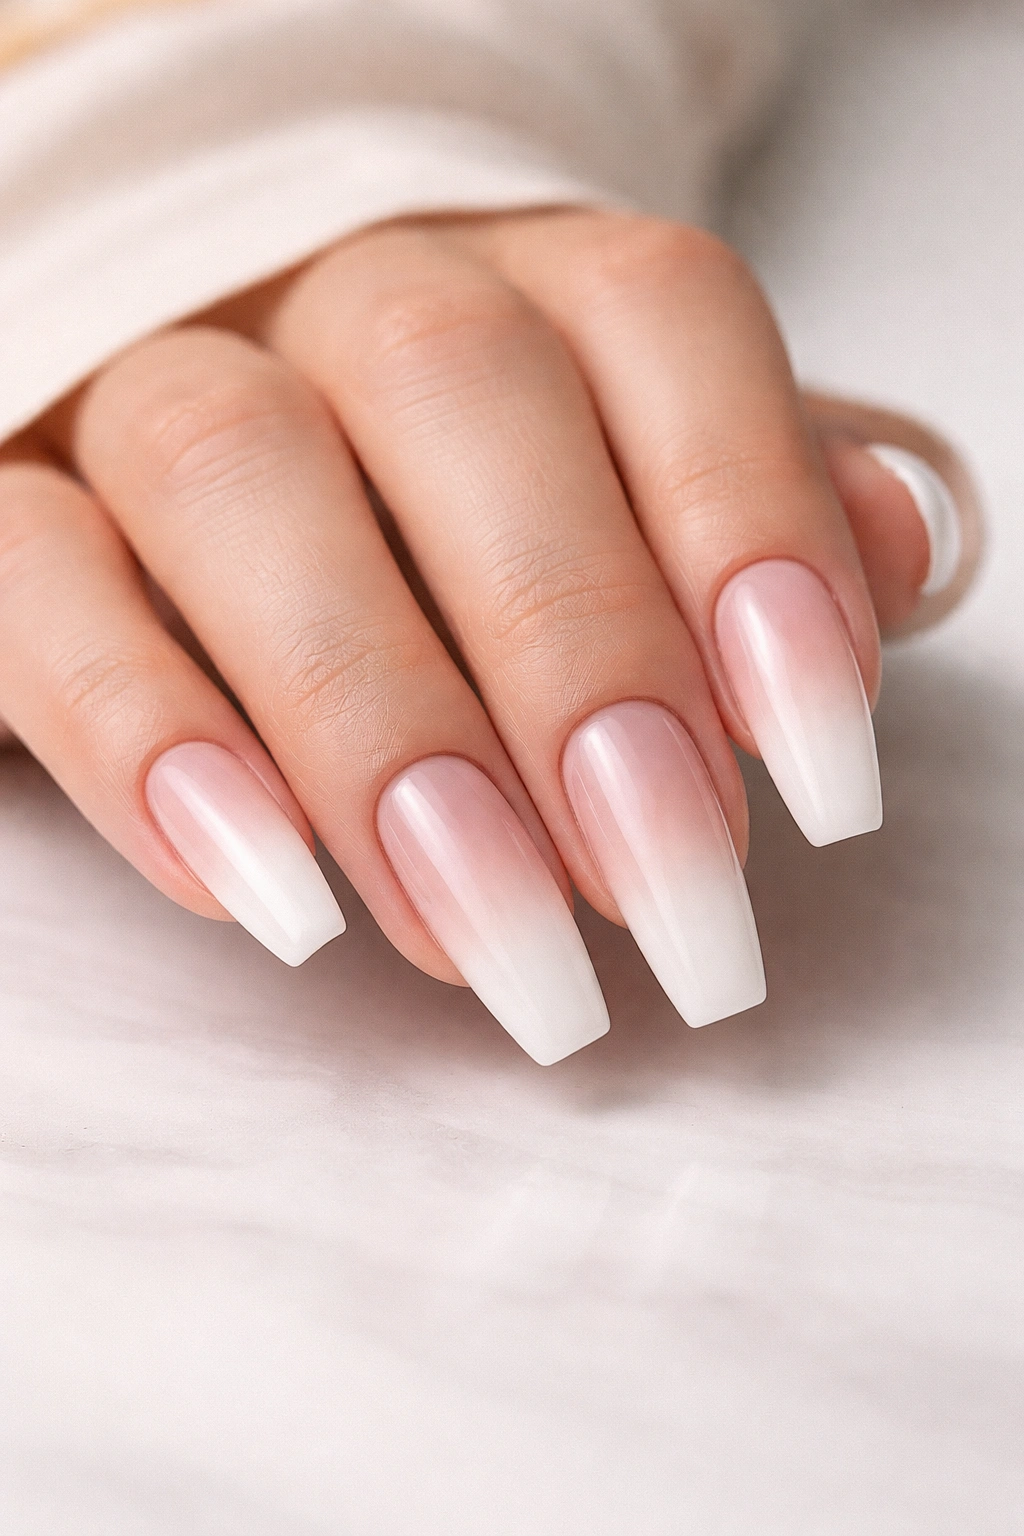
2. Classic Nude-to-White Ombre
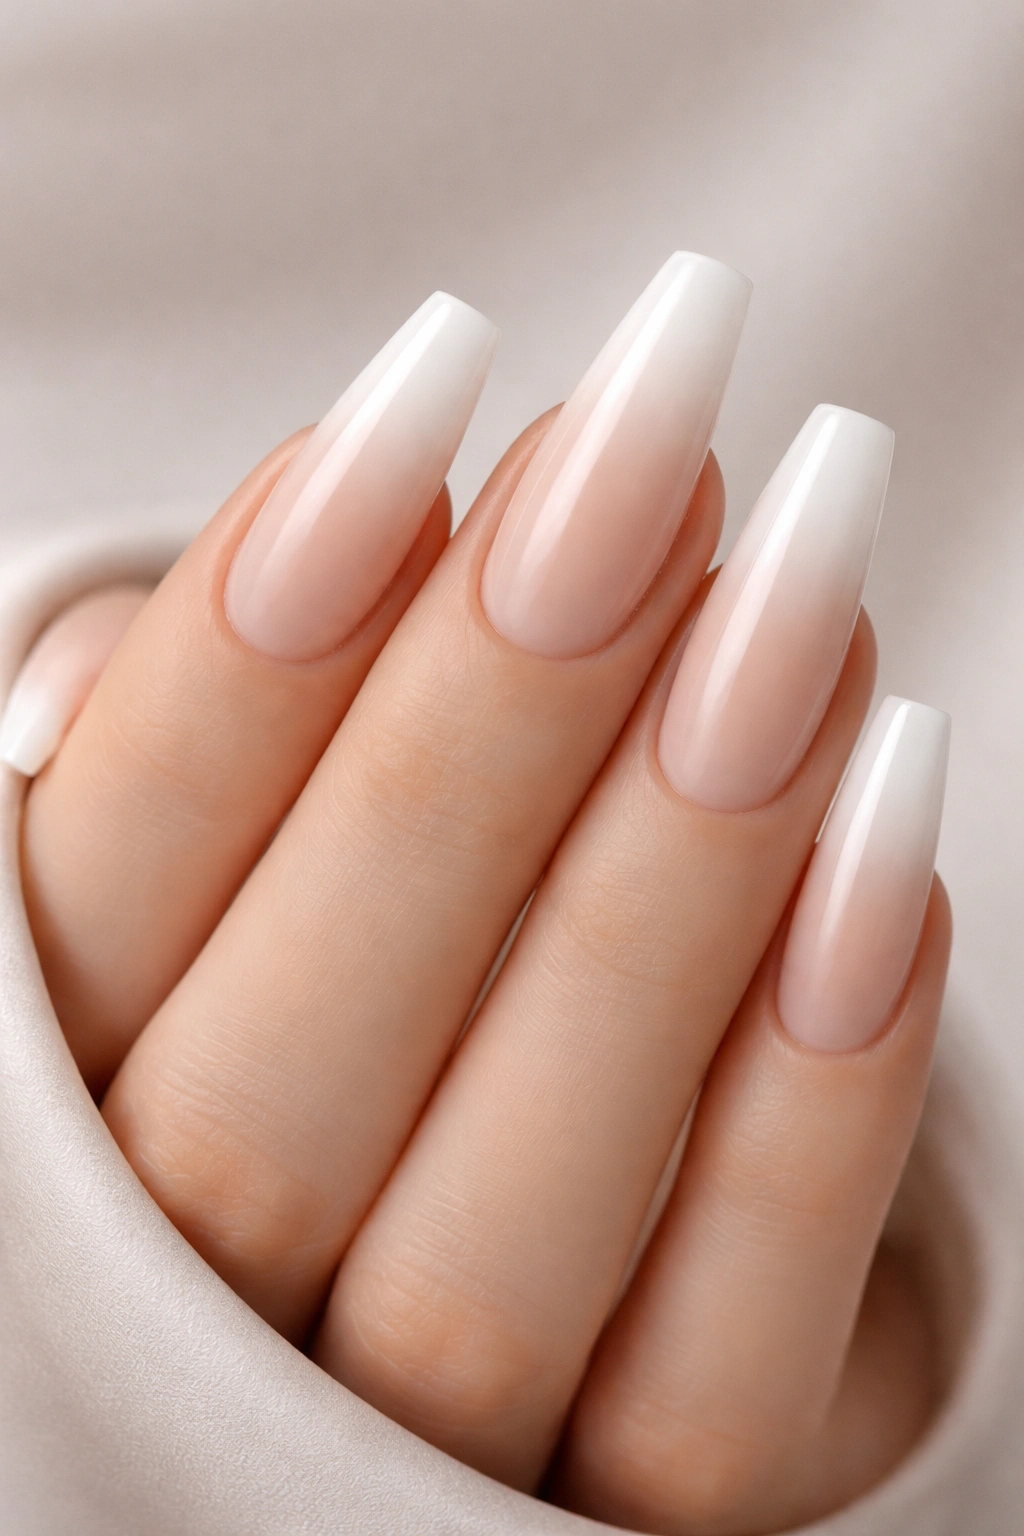
You can’t go wrong with a neutral palette, and the nude-to-white ombre is proof. This timeless look starts with a barely-there nude shade at the base and transitions into crisp white tips, mimicking a refined French manicure with added dimension. The result feels both classic and contemporary, never dated.
The Versatility of Neutral Ombre
Neutral ombre coffin nails work seamlessly with any outfit, any season, and any occasion. The gradient effect adds visual interest to what could otherwise be a plain manicure, while the muted palette keeps the look grounded and elegant. This is the manicure equivalent of a white button-up shirt—fundamentally practical but undeniably stylish.
Styling Tips for Maximum Impact
- Choose a nude shade that matches your specific skin tone for the most flattering effect
- Ask for a high-shine gloss topcoat to emphasize the smooth gradient
- Keep the coffin shape slightly longer for maximum elegance
- Maintain sharp, even corners on the tip for a polished finish
- Pair with minimal jewelry to let your nails do the talking
Worth knowing: This design actually becomes more striking the longer you wear it—as your natural nail grows out, the contrast between the nude base and the white tips becomes even more pronounced.
3. Rose Pink Ombre with High-Gloss Finish
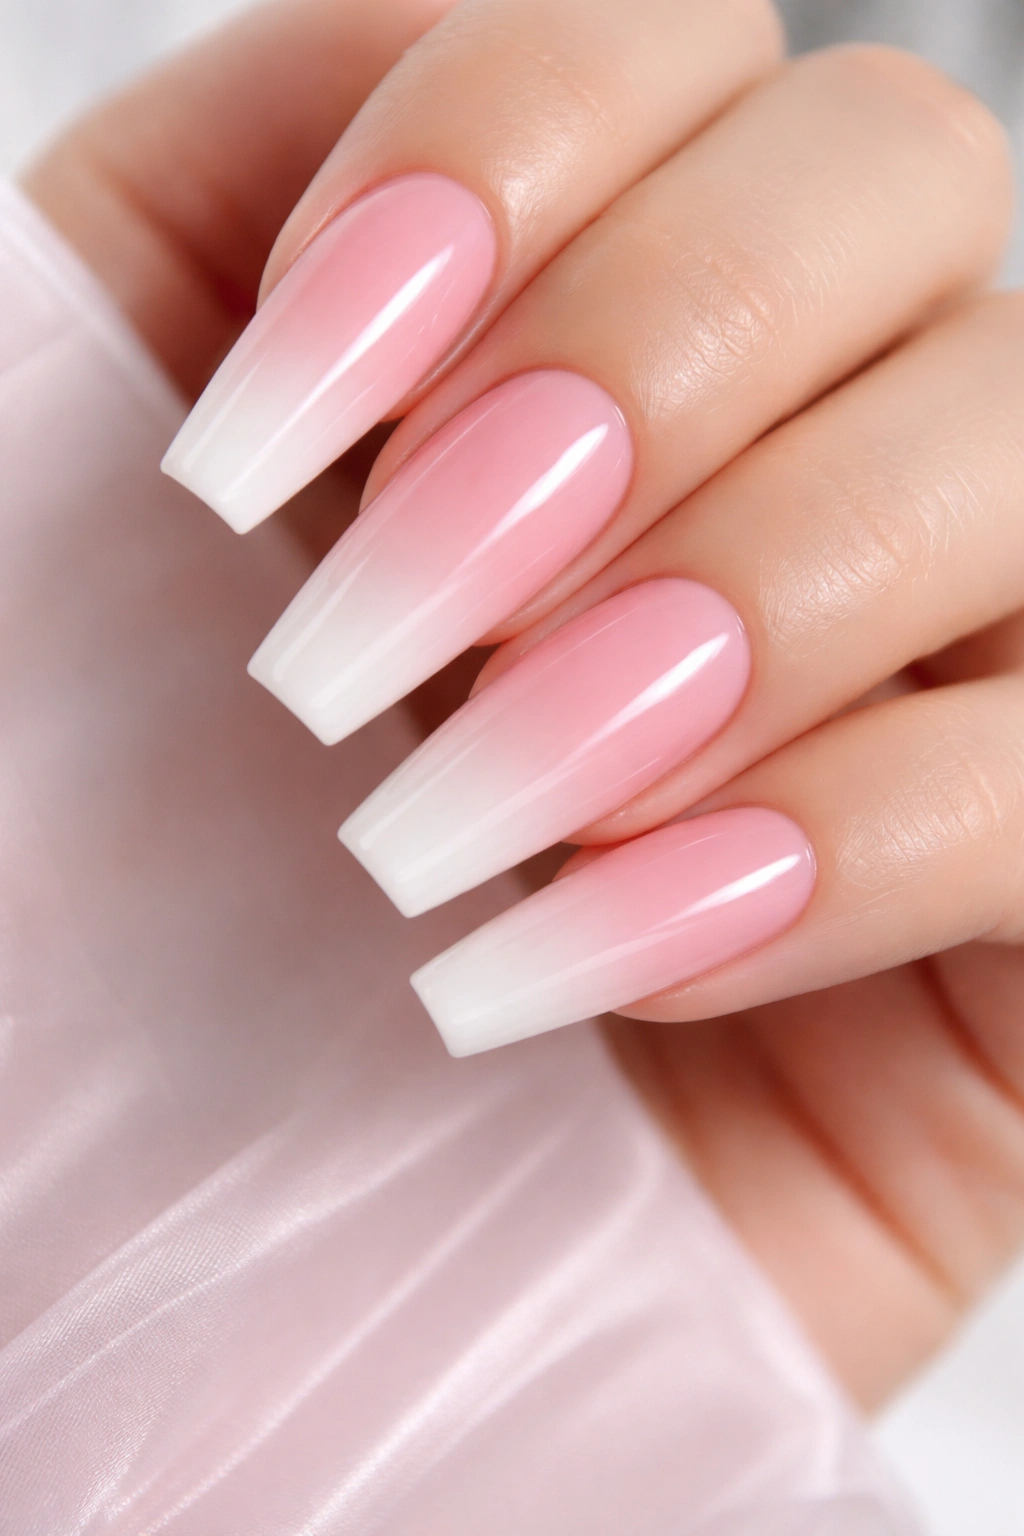
If you love pink but want something more sophisticated than a single solid color, rose pink ombre delivers. A delicate rose shade at the nail bed fades into a soft white tip, creating a romantic gradient that catches the light beautifully. The high-gloss finish elevates this from sweet to genuinely luxurious.
Why Rose Pink Stands Out
Rose pink sits in that perfect middle ground—it’s warm and flattering without being bubblegum bright. The ombre gradient makes it feel more refined than a standard pink manicure, while the gloss finish gives it a polished, expensive appearance. This design particularly suits those with cooler undertones, though it’s genuinely universally flattering.
Application Techniques That Matter
- Use a thin, quality makeup sponge for the most seamless blend
- Apply multiple thin layers rather than one thick coat
- Feather the color transition gradually across the middle of the nail
- Build the white tip gradually—it’s easier to add more than to correct if it’s too opaque
- Finish with a thick, clear topcoat for that coveted glossy shine
Insider note: This design actually photographs beautifully in natural light, making it perfect if you love sharing your nails on social media.
4. Pink Ombre with Glitter-Tipped Accents
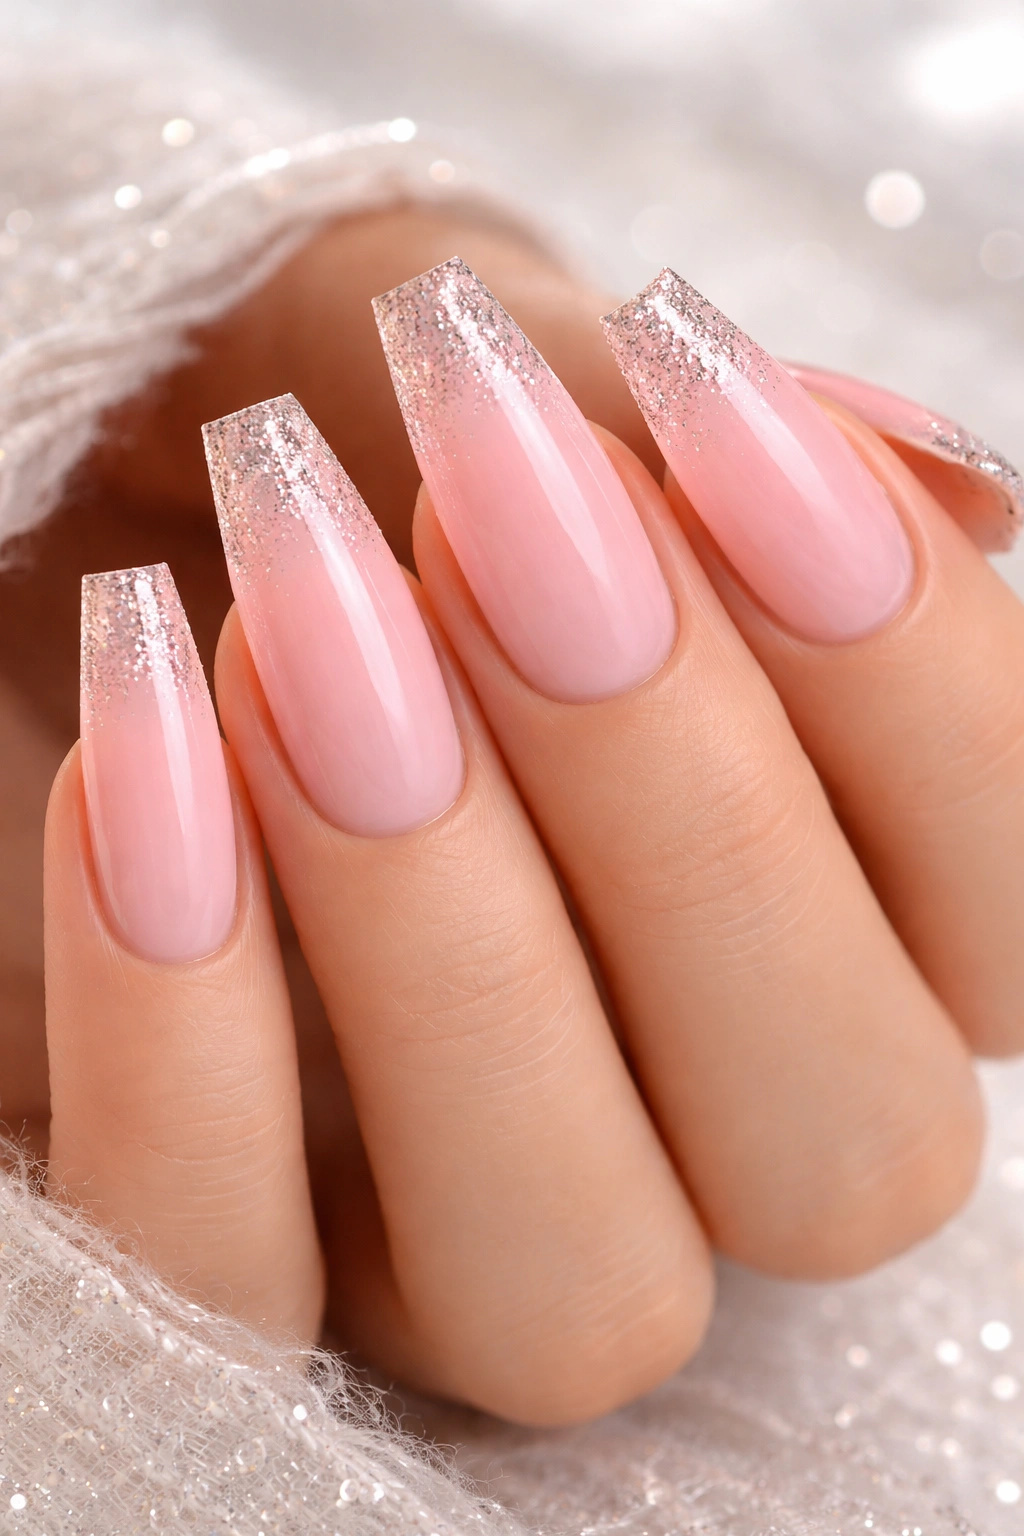
Take the pink ombre formula and add sparkle for a design that feels celebratory without being over-the-top. A soft pink gradient builds across the nail, with glitter concentrated at the tips—either fine shimmer particles or larger glitter flakes, depending on your preference. The combination adds texture and visual depth while maintaining the ombre’s elegance.
Glitter Application That Looks Professional
The key to pulling off glitter accents is restraint and precision. Rather than covering the entire nail in sparkle, concentrate the glitter specifically at the tips where the lightest color sits. This creates a graduated effect where the glitter becomes denser toward the edges, adding visual drama without overwhelming the design.
Design Variations You Can Try
- Use silver glitter for a cool, icy effect against pink
- Try rose gold glitter for warmth and sophistication
- Mix fine and chunky glitter for textural interest
- Apply glitter to just one or two accent nails for subtlety
- Use glitter gel for longer wear and a more polished finish
Real talk: Glitter nails shed—it’s just part of the territory. If this bothers you, ask your nail artist about encapsulated glitter, which is sealed inside the gel layers and won’t shed as readily.
5. Sunset Ombre: Orange, Yellow, and Pink Blend
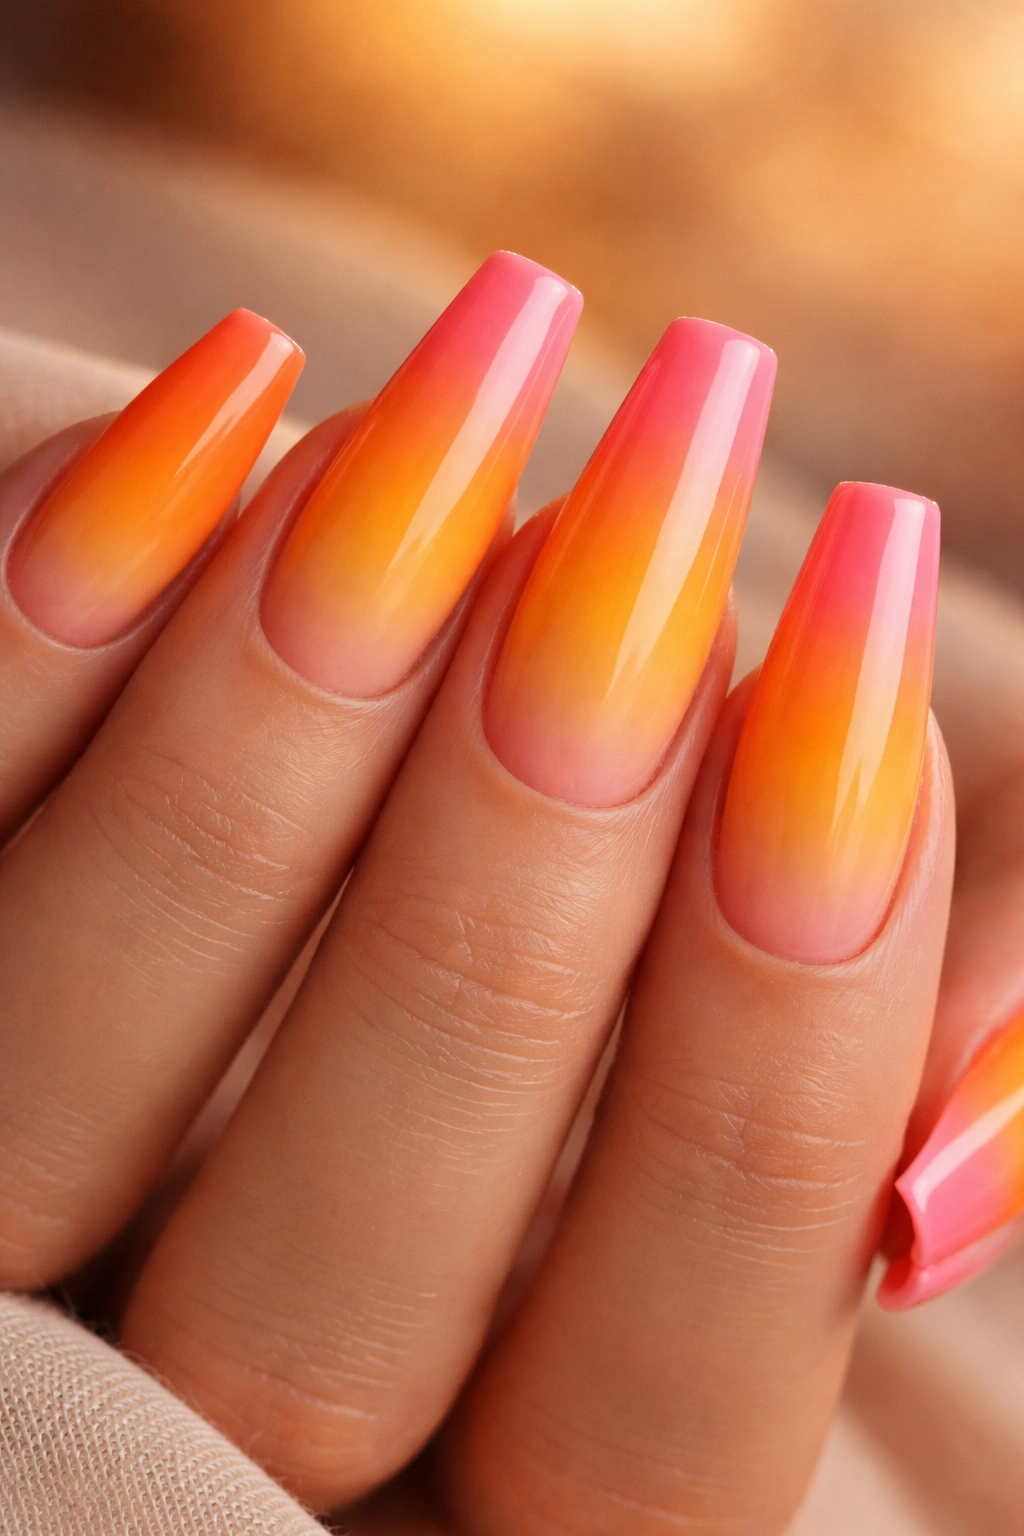
Capture the warmth of a golden hour with a multi-color ombre that blends orange, golden yellow, and soft pink across the nail. This design creates movement and visual richness, transitioning through warm tones that evoke that magical moment when the sun dips below the horizon. It’s bold without being loud, colorful without feeling chaotic.
Why Sunset Colors Feel Special
Warm-toned ombres have an inherent romantic quality—they’re associated with beautiful moments and positive energy. A sunset gradient specifically feels both energetic and calming simultaneously, making it perfect for anyone who wants their nails to feel like a mood booster. The multi-color approach also allows for more forgiving application, since slight variations feel intentional rather than like mistakes.
Creating a Harmonious Gradient
- Start with the warmest tone (orange or deep yellow) at the base
- Transition through mid-tones in the middle of the nail
- End with the coolest/lightest tone (soft pink) at the tip
- Allow each color to blend naturally into the next without harsh lines
- Use three separate applications rather than trying to blend all colors at once
Pro tip: If you’re doing this at home, try creating the gradient on a makeup sponge first, then pressing it onto the nail. This gives you more control than trying to blend directly on your nail.
6. Black Ombre with Starry Glitter Effect
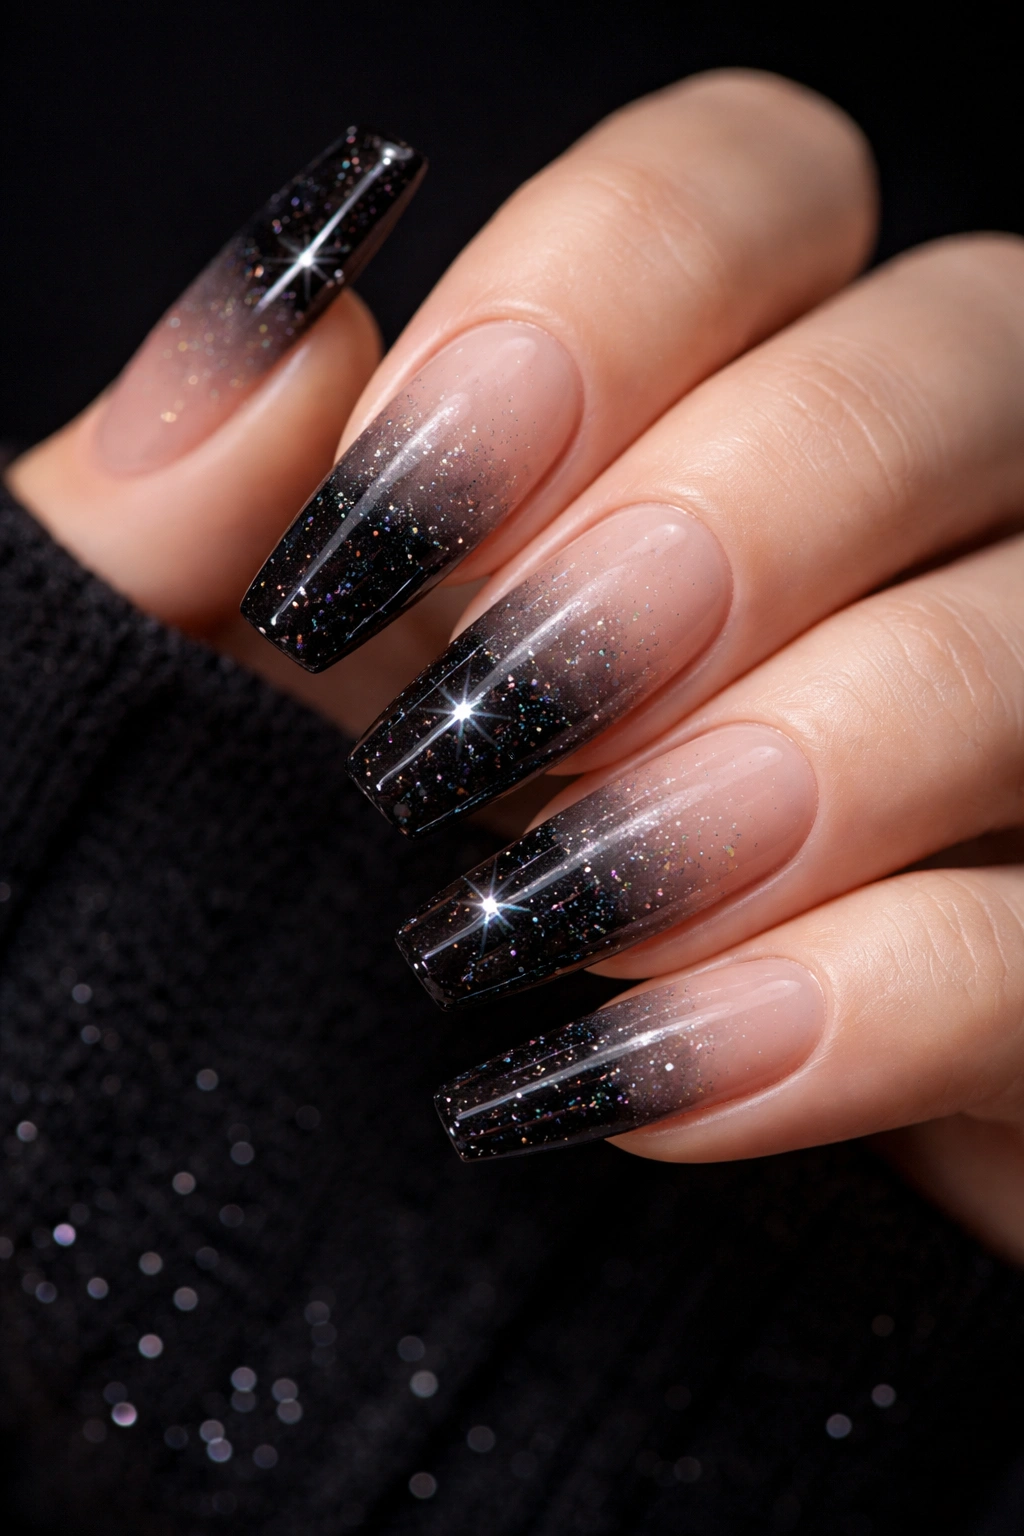
For those who love dramatic, moody aesthetics, black ombre coffin nails deliver serious impact. A deep black at the tips gradually transitions to a lighter shade (often nude, gray, or even translucent) at the base. Adding tiny flecks of glitter scattered across creates a “starry night” effect that feels mysterious and elegant rather than heavy.
Making Black Ombre Feel Luxe Rather Than Gothic
The trick to pulling off black ombre is using a lighter base color so it doesn’t feel entirely dark and heavy. A nude-to-black gradient is far more wearable than black-to-black, and the glitter accents add visual interest that prevents the design from feeling flat or one-note. The overall effect is sophisticated rather than severe.
Execution Details That Elevate the Look
- Choose black gel polish rather than traditional lacquer for richer pigmentation
- Use a matte topcoat for the most dramatic effect, or glossy for sophistication
- Apply glitter strategically rather than uniformly—concentrate it toward the tips
- Consider adding a metallic accent (gold, silver, or chrome) for extra dimension
- Keep the coffin shape sharp and well-defined to maximize the design’s impact
Worth knowing: Black ombre actually works beautifully on all skin tones when the base color is chosen correctly—don’t shy away from it if you have darker skin. The contrast becomes even more striking.
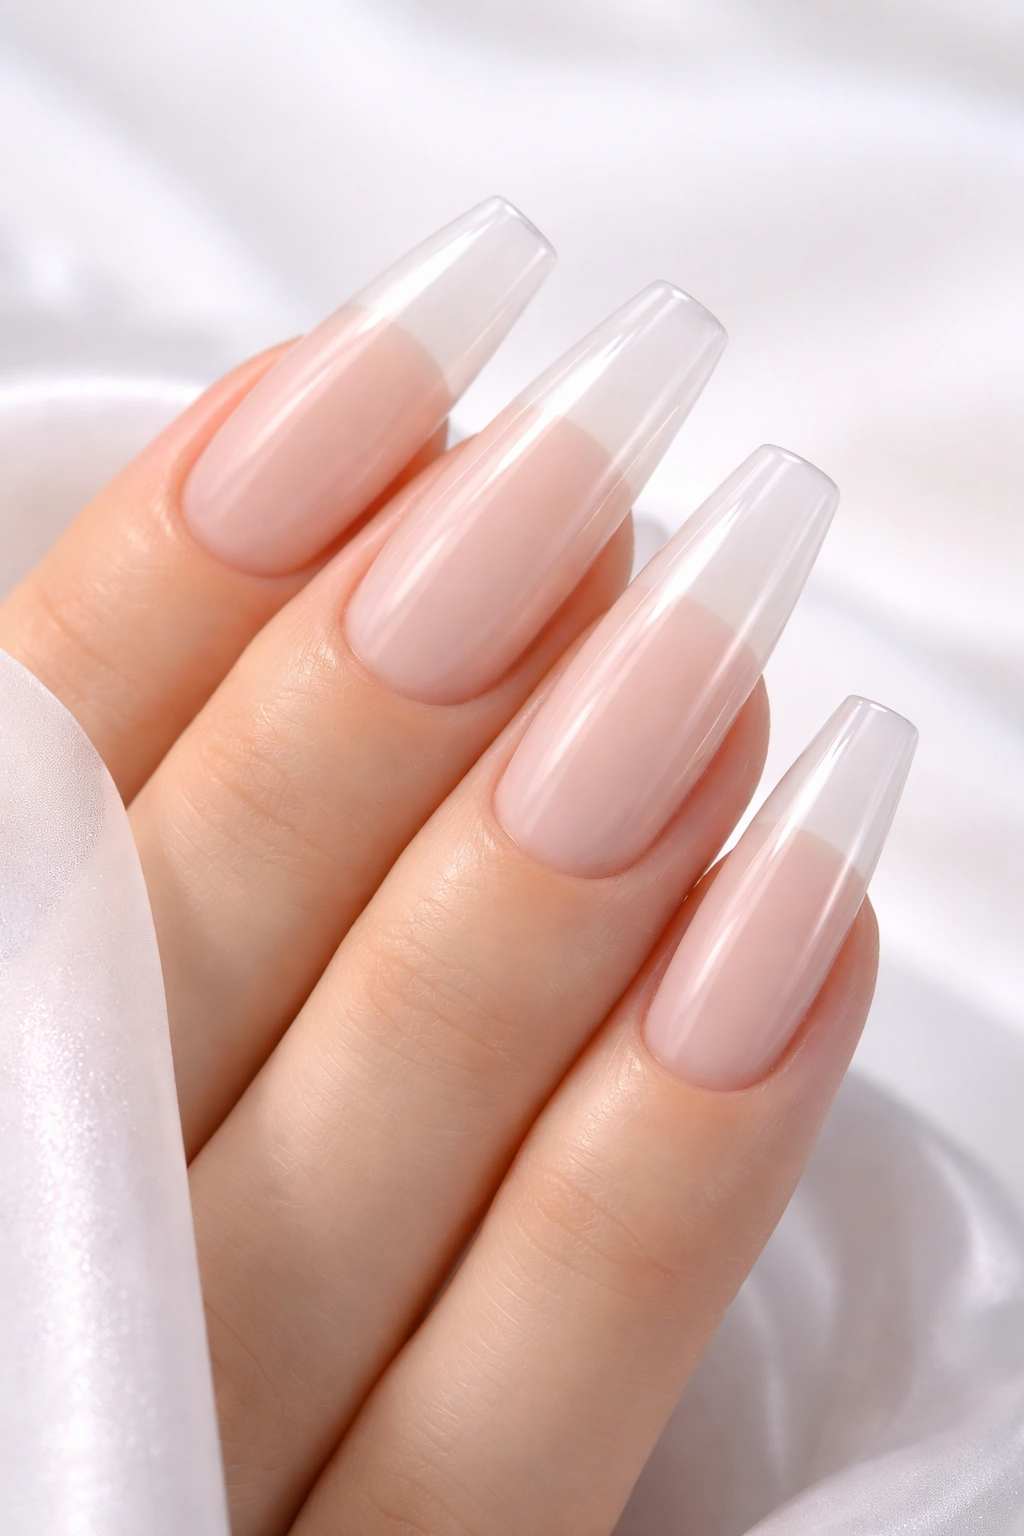
7. French-Inspired Nude Ombre with Precision
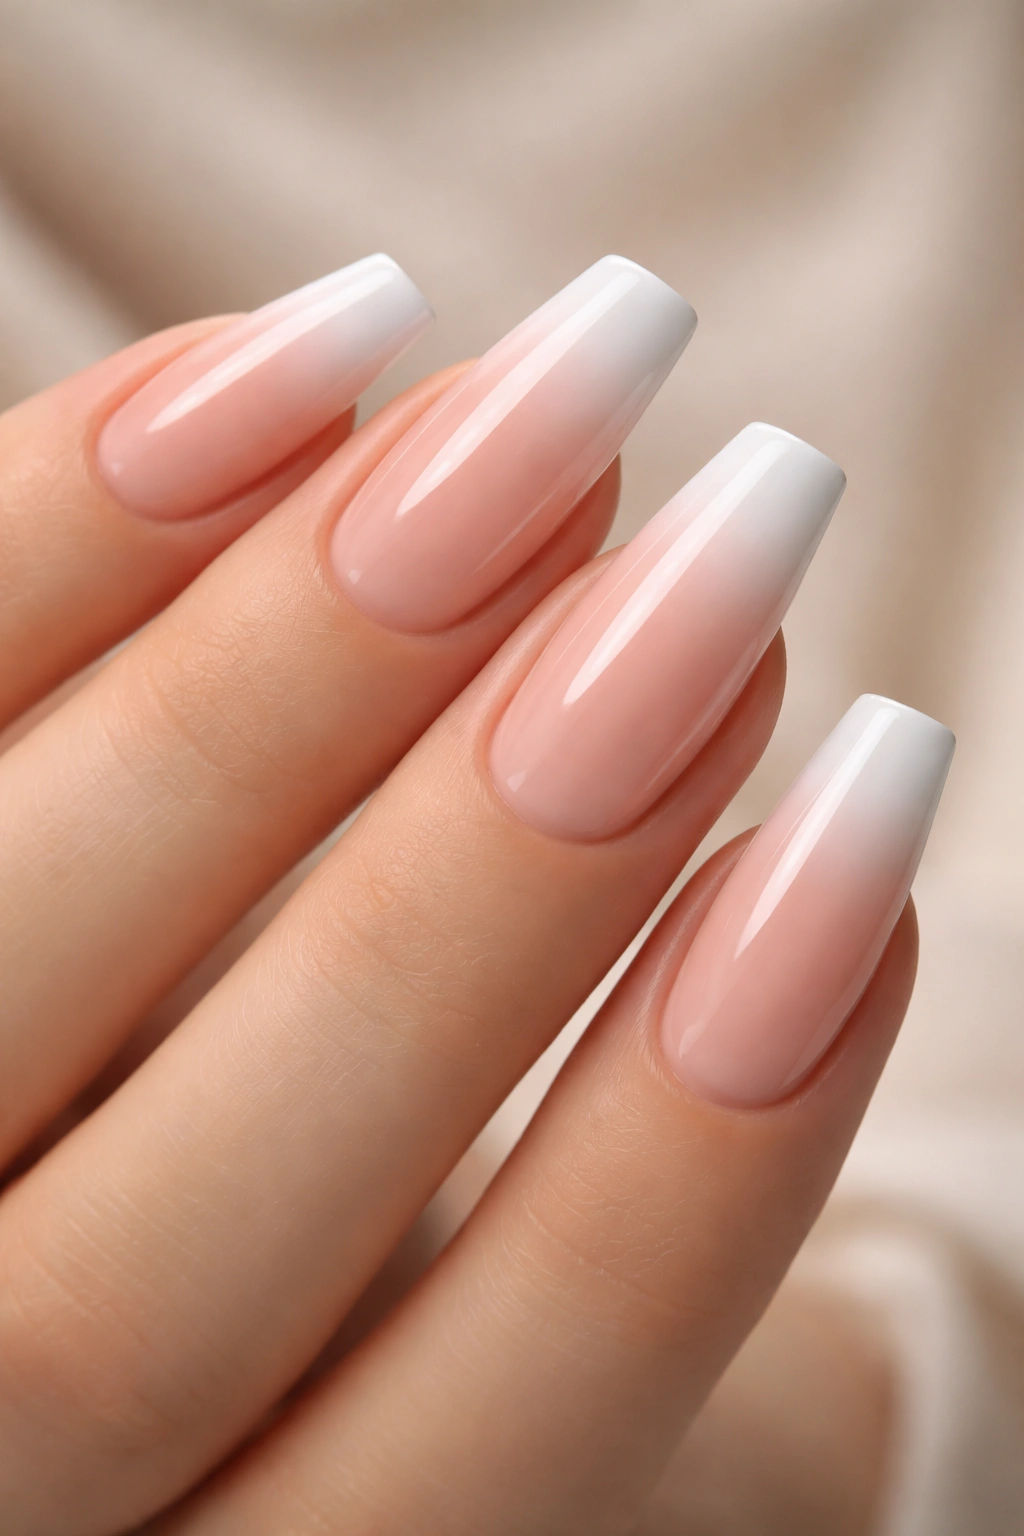
Take the elegance of a traditional French manicure and modernize it with an ombre technique. This design uses a sheer pink or nude base that gradually transitions into clean white at the tips, creating a gradient French manicure that feels contemporary and refined. The precision of the white tip combined with the soft ombre base creates visual sophistication.
Why French Ombre Feels Timeless
The French manicure is iconic for a reason—it’s flattering, versatile, and works with everything. By adding an ombre gradient, you’re updating a classic without losing its essential elegance. Modern French ombre feels like a step forward while still honoring the original design’s sophistication.
Achieving Crisp French Tips
- Apply the base color (sheer pink or nude) to the entire nail first
- Use a thin brush or precision tape to define where the white begins
- Build the white color gradually for a cleaner line
- Allow the ombre to happen in that transition zone between base and tip color
- Finish with a glossy topcoat for maximum polish
Insider note: This design is particularly forgiving if you’re new to ombre—the precision of the French tip’s white area actually helps define where your color transition should be.
8. Ocean Ombre: Light Blue to Deep Teal
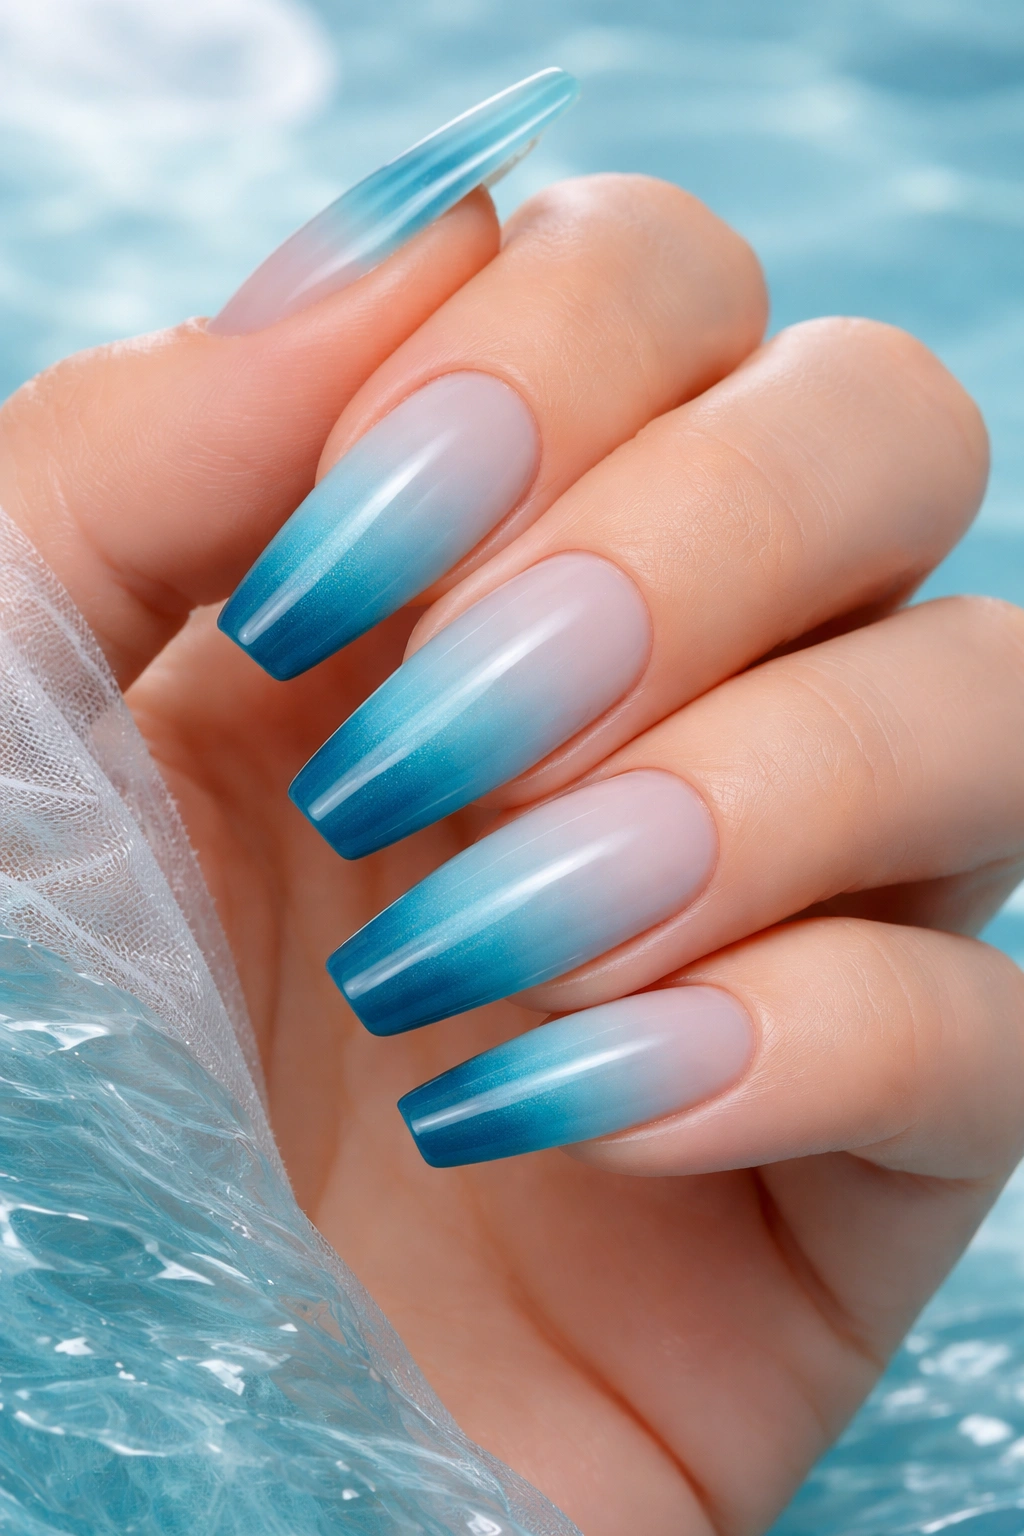
Create a coastal vibe with an ombre that transitions from pale, almost-translucent blue at the base through various shades of blue and into deep teal or navy at the tips. This multi-tonal gradient evokes the ocean’s depth—shallow, sun-warmed waters near the surface fading to darker depths below. It’s calming and beautiful, perfect for anyone drawn to water and nature.
The Psychology of Blue Ombre
Blue ombres feel soothing and sophisticated simultaneously. They work beautifully on all skin tones, though the specific shades you choose will depend on whether you have warm or cool undertones. The multi-shade approach prevents the design from feeling flat, creating visual dimension that draws the eye.
Color Layering for Depth
- Begin with a very pale blue or baby blue at the cuticle
- Transition through medium blue shades in the middle sections
- Deepen to teal or navy at the tips for dramatic contrast
- Consider adding metallic accents in chrome or silver for extra dimension
- Use a glossy finish to enhance the watery, luminous quality
Pro tip: If you want the ocean effect to be even more pronounced, your nail artist can add subtle white or silver lines that mimic light reflecting off water.
9. Peach Nude Ombre with Luminous Finish
Warmth meets sophistication with a peach-to-nude ombre that flatters nearly every skin tone. This gradient uses peachy, warm-toned nude shades that transition from deeper peach at the base to pale ivory or white at the tips. The luminous, glossy finish enhances the gradient’s smoothness and creates an expensive-looking sheen.
Why Peach Works for Everyone
Peach is one of those rare colors that genuinely suits a wide range of skin tones. When used in an ombre format, peach feels modern and thoughtful rather than trendy or dated. The softness of the color paired with the coffin shape’s definition creates a beautifully balanced aesthetic.
Nailing the Peach-to-Nude Transition
- Start with a true peachy tone with warm undertones at the base
- Transition through lighter peachy-beige shades in the middle
- End with pale ivory or almost-white at the tips
- Use a makeup sponge to create the smoothest possible blend
- Apply a thick, glossy topcoat that catches the light beautifully
Worth knowing: This design actually improves slightly as your nails grow out—the longer length allows for an even more gradual color transition.
10. Pink Ombre with Delicate Floral Nail Art

Combine the softness of ombre with the elegance of hand-painted florals for a design that feels both romantic and artistic. A pink ombre provides the base gradient—perhaps blush pink fading to white—while delicate flowers (cherry blossoms, roses, or daisies) are painted across the nails. The ombre creates depth while the florals add personality and dimension.
Balancing Ombre with Detailed Art
The key to pulling off this combination is ensuring the ombre serves as a sophisticated backdrop rather than competing with the art. Keep the floral designs relatively small and delicate, allowing the ombre gradient to remain the dominant visual element. The flowers should feel like an enhancement rather than a separate design entirely.
Floral Execution Tips
- Choose flowers that complement the ombre color palette
- Use thin brushes for detailed, precise linework
- Consider outlining flowers in gold or rose gold for extra elegance
- Apply florals after the ombre is complete and fully set
- Seal everything with a clear topcoat that doesn’t yellow the design
Real talk: Floral designs require skilled hand-painting, so this is one where professional application really shows in the final result.
11. Matte White Ombre with Modern Edge
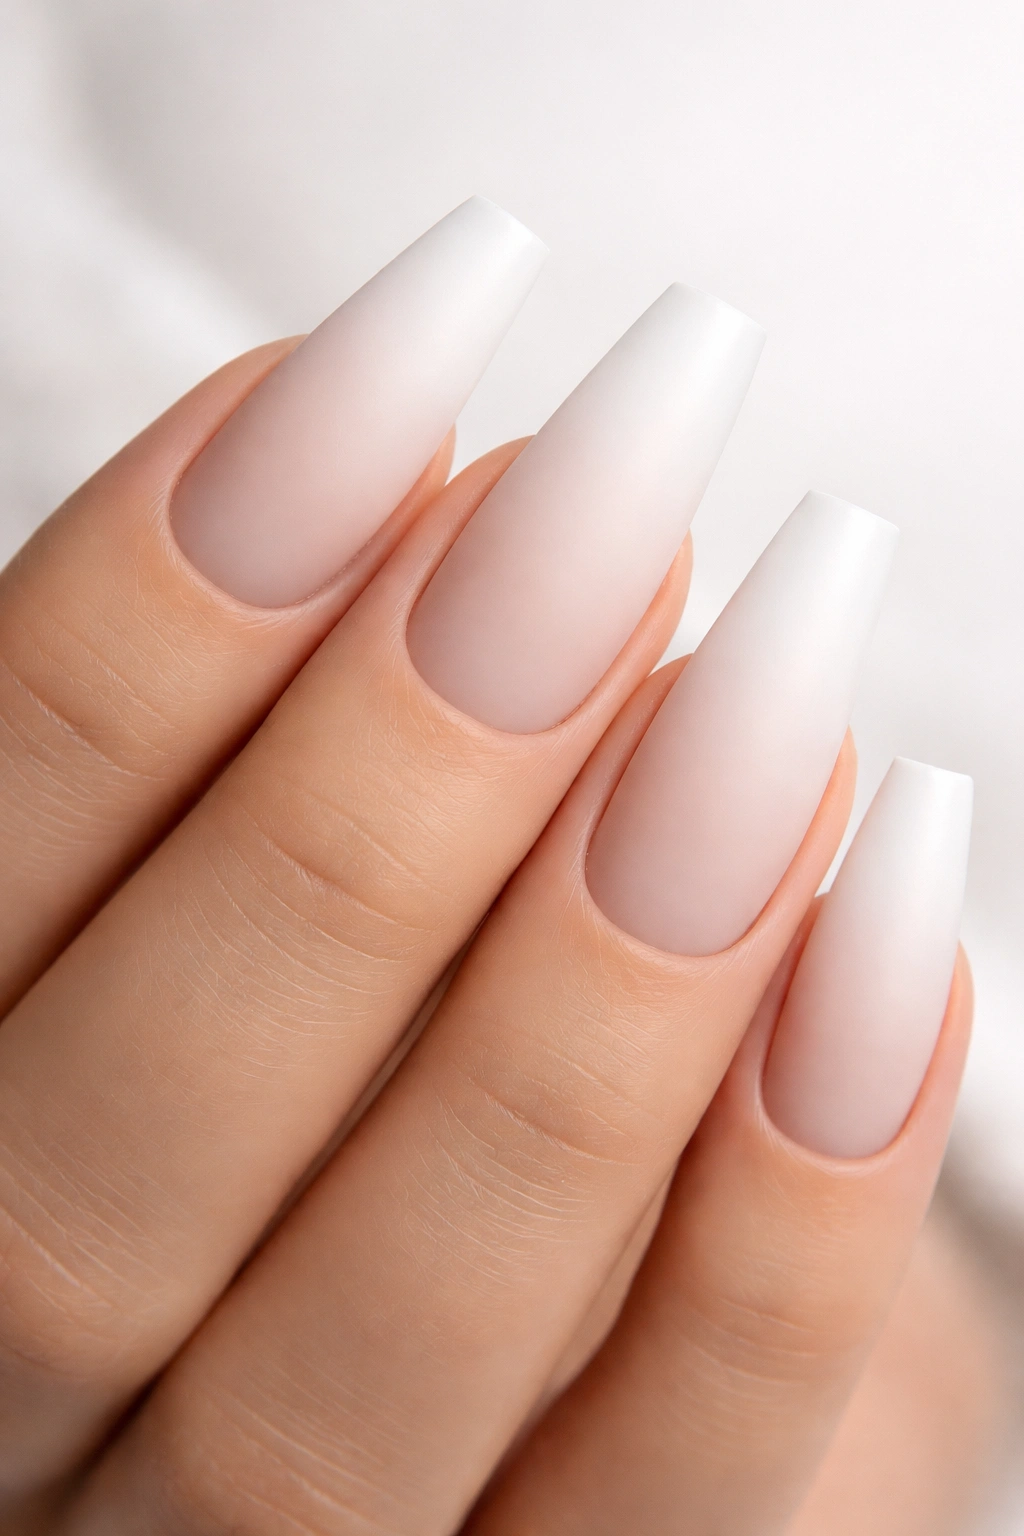
Trade gloss for matte and create something unexpectedly contemporary. A matte white ombre—transitioning from slightly warmer or tinted white at the base to pure white at the tips—feels editorial and fashion-forward. The matte finish adds texture and keeps the design from feeling overly feminine or delicate, leaning instead into minimalist sophistication.
The Appeal of Matte Finishes
Matte finishes are having a moment, and for good reason—they feel intentional, modern, and slightly edgy compared to the traditional gloss. A matte ombre creates visual interest through subtle color variation rather than reflective shine, making it perfect for those who prefer understated elegance.
Creating Matte Ombre That Works
- Use matte gel polish or apply a matte topcoat over regular gel
- Ensure the ombre gradient is smooth and deliberate—matte finishes show imperfections more readily
- Consider adding a single accent nail in high-gloss white for contrast
- Keep coffin shapes sharp and precise—the structured shape complements the modern matte aesthetic
- Avoid any sparkle or shimmer that would contradict the minimalist vibe
Pro tip: If you love the look of matte but worry about durability, ask your artist for a glossy topcoat on just the tips, which protects them from chipping while maintaining the matte aesthetic on most of the nail.
12. Clear Ombre with Subtle Gradient Pigmentation
For the ultimate in understated elegance, try a clear or nearly-clear ombre with just a hint of color pigmentation. This design uses translucent base with barely-there color gradually transitioning to slightly more pigmented tips. The result is so subtle it’s almost imperceptible at first glance, but it creates a sophisticated, barely-there effect that feels modern and clean.
The Art of Subtlety
This design requires restraint and precision—the gradient should be so gentle that it might take a moment for someone to realize your nails aren’t just clear gel polish. The appeal lies in its minimalism and the illusion of effortless perfection. It’s perfect for professional settings where you want nails to look immaculate without drawing excessive attention.
Application for Maximum Subtlety
- Use barely-tinted clear gel in the lightest tone available
- Build color gradually across multiple thin applications
- The gradient should be almost imperceptible in indoor lighting
- Works best in natural sunlight where the subtlety shines through
- Pair with a very high-gloss topcoat for a glass-like appearance
Insider note: This design actually looks incredible in photographs with natural lighting, creating an ethereal, almost ethereal effect.
13. Green Ombre: Mint to Forest Depths
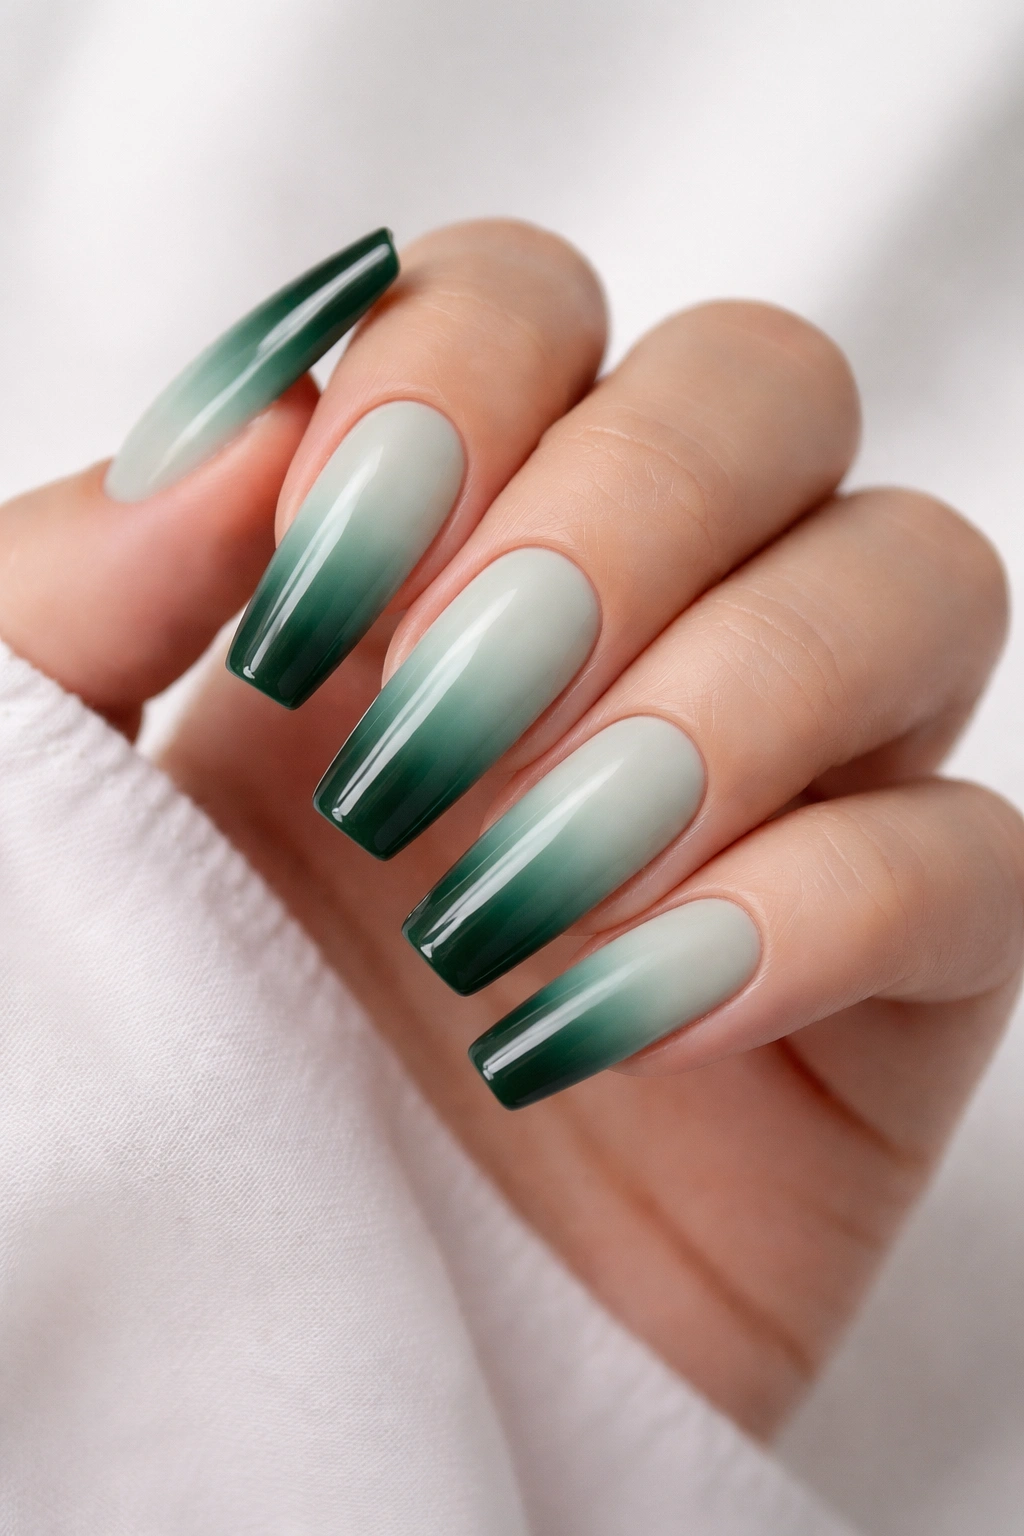
Bring nature-inspired beauty to your nails with a green ombre that transitions from pale, fresh mint at the base to rich, deep forest green at the tips. This palette feels calming and earthy while still being visually striking. The multiple shades of green create complexity and depth without requiring additional art or embellishments.
Why Green Ombre Feels Special
Green ombres are less common than pink or blue, making them feel fresh and distinctive. The color palette works beautifully on all skin tones when the right shades are selected—cooler greens suit cool undertones, while warmer sage-greens flatter warm undertones. The gradient approach prevents the color from feeling flat or one-dimensional.
Selecting the Right Green Shades
- Begin with pale mint or seafoam green at the base
- Transition through medium sage or pistachio tones
- Deepen to forest green, hunter green, or teal-green at the tips
- Consider the undertone of each shade to ensure they blend harmoniously
- A glossy finish enhances the jewel-tone quality of the deeper greens
Worth knowing: Green ombre pairs beautifully with metallic accents in gold, copper, or bronze if you want to elevate the design further.
14. Burgundy Wine Ombre for Rich Sophistication
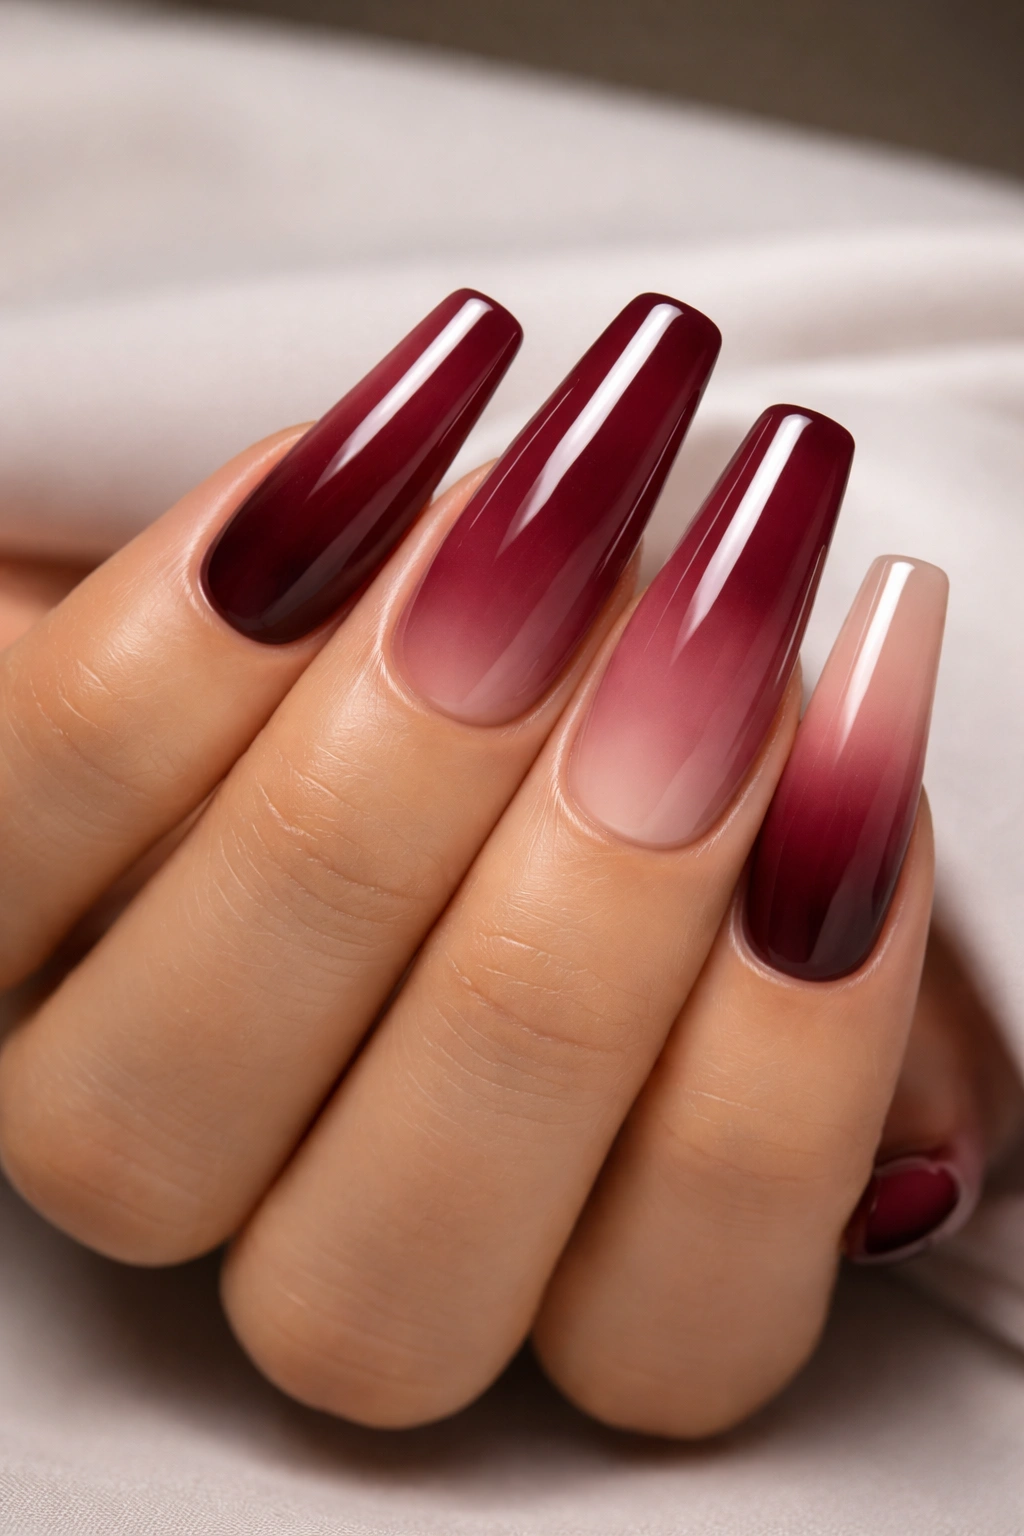
Channel deep elegance with a burgundy-to-nude ombre that feels both luxurious and wearable. This design starts with a rich burgundy or wine shade at the base and gradually lightens to nude or pale pink at the tips. The result is a sophisticated, jewel-toned manicure that works beautifully for both everyday wear and special occasions.
The Versatility of Burgundy Ombre
Burgundy is inherently sophisticated—it’s a shade worn by everyone from minimalists to maximalists, and it flatters an incredibly wide range of skin tones. An ombre approach prevents it from feeling heavy or overwhelming, instead creating a graduated effect that transitions beautifully into lighter, more neutral tips.
Executing Burgundy Ombre Perfectly
- Start with a true burgundy (not too red, not too brown) at the base
- Transition through lighter wine and mauve tones
- End with nude, pale pink, or ivory at the tips
- Use a makeup sponge for the smoothest possible blend
- A glossy topcoat enhances the richness of the burgundy shades
Pro tip: This design actually looks better the slightly longer you wear it—the contrast between grown-out natural nail and the gradient becomes visually interesting.
15. Glitter Gradient Ombre with Concentrated Sparkle
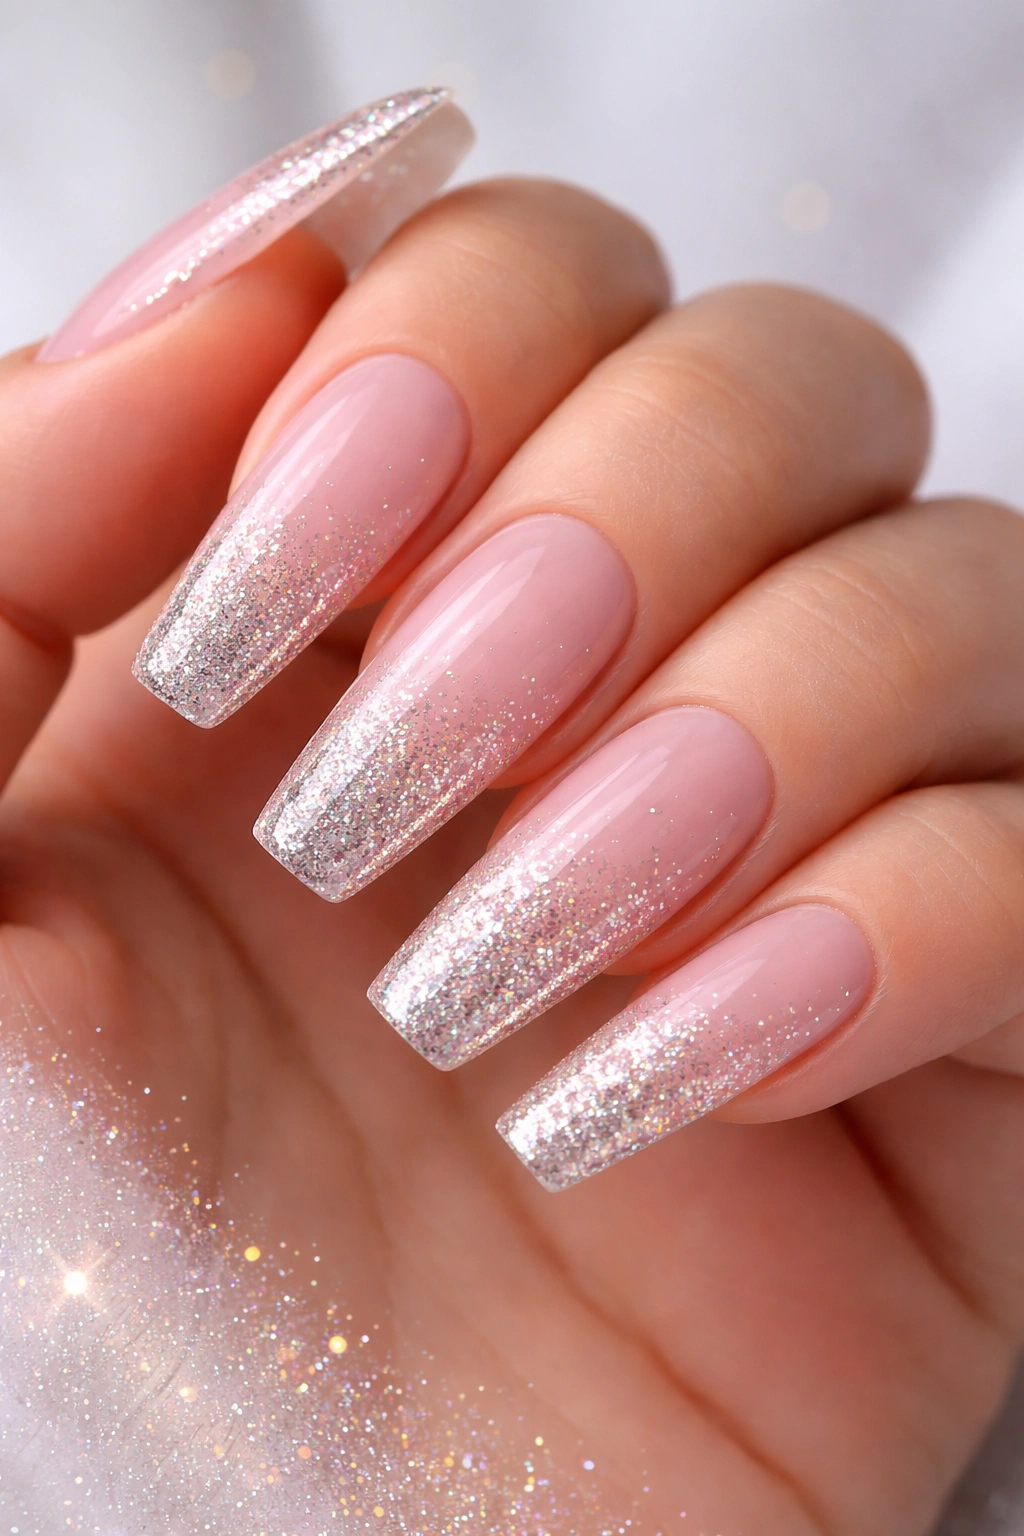
End your inspiration list with pure glitter magic—an ombre that builds in glitter density as it moves toward the tips. This design starts with a solid color base (nude, pink, or any shade) with minimal to no glitter, then gradually incorporates more and more glitter particles as it fades into the tips, creating a dazzling, graduated sparkle effect.
Making Glitter Work Without Overdoing It
The key to this design is the gradation—starting with a clean, non-glittery base and slowly increasing the sparkle prevents the design from feeling costume-y or overwhelming. By the time you reach the tips, you’ve got concentrated, eye-catching glitter that feels intentional and glamorous.
Building Glitter Density Successfully
- Apply a solid base color to the entire nail first
- Begin adding fine glitter particles about halfway down the nail
- Increase glitter concentration gradually toward the tips
- Use larger glitter pieces mixed with fine shimmer for textural interest
- Seal everything with a glossy topcoat that holds the glitter securely
Real talk: Glitter ombre is high-maintenance compared to solid ombres, but it’s absolutely worth it if you love sparkle and don’t mind the extra shine.
Final Thoughts
Ombre coffin nails offer something special—they combine technical sophistication with visual impact in a way that elevates your entire look. Whether you’re drawn to soft, romantic palettes or bold, saturated gradients, there’s an ombre coffin design that matches your personal aesthetic. The beauty of ombre is that it feels effortlessly luxurious without requiring intricate detailing, making it accessible whether you’re a DIY enthusiast or a professional manicure devotee.
The coffin shape itself provides structure and elegance, transforming even simple color gradients into something that feels intentional and designer-quality. When you invest time in choosing the right color combination and ensuring smooth, careful blending, the results are genuinely stunning. Your nails become a canvas for self-expression and style without competing with your outfit or personality.
Next time you’re planning a manicure, consider choosing one of these ombre coffin designs. You might be surprised by how a beautifully executed gradient, combined with the sharp sophistication of the coffin shape, becomes something people actually notice and compliment. That’s the real magic of this particular nail trend—it manages to be both understated and undeniably impressive simultaneously.
