

Drip nail art has become one of the most playful and expressive ways to showcase your personality through your manicure. There’s something incredibly satisfying about the look of melting paint cascading down your nails—it’s artistic, edgy, and surprisingly versatile. Whether you’re drawn to bold, vibrant hues or prefer soft, dreamy pastels, the drip effect offers endless possibilities for customization.
What makes this trend so appealing? It’s the perfect blend of controlled chaos. You get to create something that looks effortlessly cool while still maintaining a polished finish. The contrast between a smooth base color and those liquid-like drips creates visual interest that’s hard to ignore. Plus, you don’t need to be a professional nail artist to pull it off—with a dotting tool, a thin brush, or even a toothpick, you can achieve stunning results at home.
The beauty of drip nail art lies in its adaptability. You can dress it up with metallics and glitter for a night out, keep it spooky with blood-red drips for Halloween, or go sweet and whimsical with pastel ice cream-inspired designs. Each variation tells a different story and works for different occasions. From minimalist single-nail accents to full-on rainbow explosions across all ten fingers, there’s a drip design that fits every mood and style.
Ready to let your creativity flow? Here are ten drip nail art ideas that’ll have your nails looking like a melting masterpiece.
1. Classic Blood Drip Nails
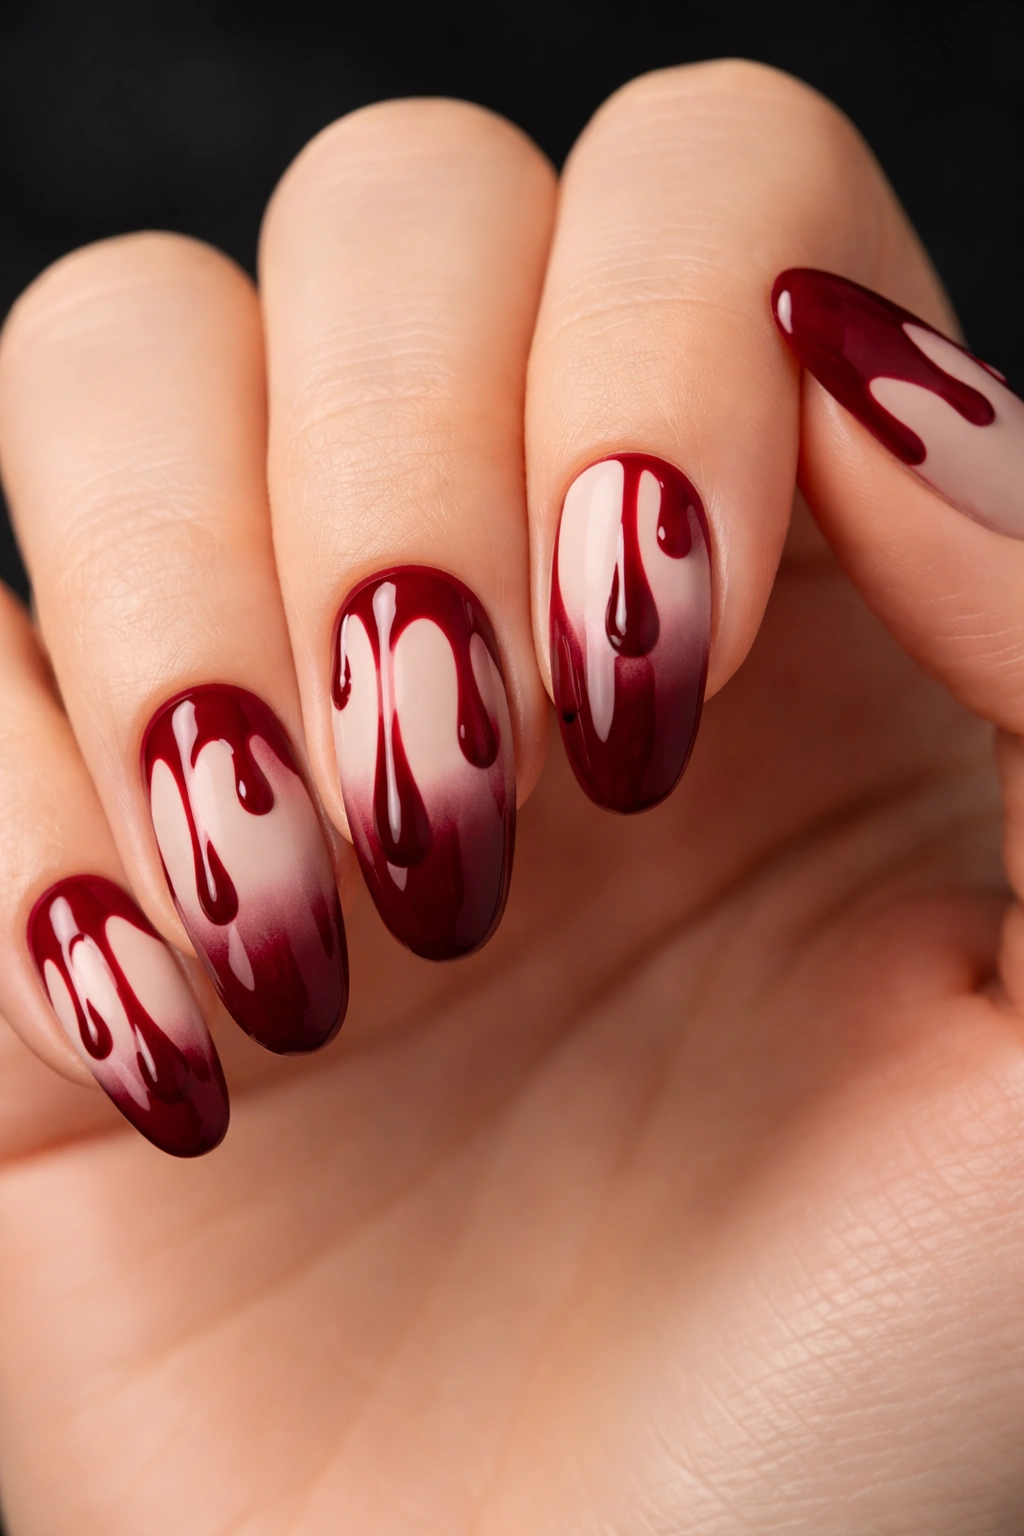
Nothing says drama quite like blood drip nails. This design has become a Halloween staple, but honestly, it’s too good to reserve for one season. The deep red polish cascading down a neutral or black base creates an instantly striking look that’s both edgy and sophisticated.
Why This Design Works
Blood drip nails tap into that perfect balance between spooky and stylish. The key is choosing the right shade of red—you’ll want something with depth, like a burgundy or crimson, rather than a bright cherry red. This gives the “blood” a more realistic appearance. Pairing it with a matte nude or white base makes the drips pop even more, creating that wet, freshly dripped effect.
The technique itself is forgiving. Start by painting small dots of red polish near your cuticle or at the nail tip, then use a thin brush or dotting tool to drag the polish downward. The drips don’t need to be uniform—in fact, varying the lengths and thickness makes the design look more natural and organic.
Pro Styling Tips
- Apply a matte top coat to your base color and a glossy top coat only over the drips to enhance the wet paint illusion
- Mix two shades of red (one darker, one lighter) for added dimension
- Keep drips on just one or two accent nails if you prefer a subtler approach
- Pair with dark, vampy outfits or use as a conversation starter at themed parties
Fun fact: You can create different drip styles by adjusting where you place your initial dot—start at the tip and drip toward the cuticle for an upside-down effect, or keep it traditional with drips flowing toward the tip.
2. Chrome Drip Nails
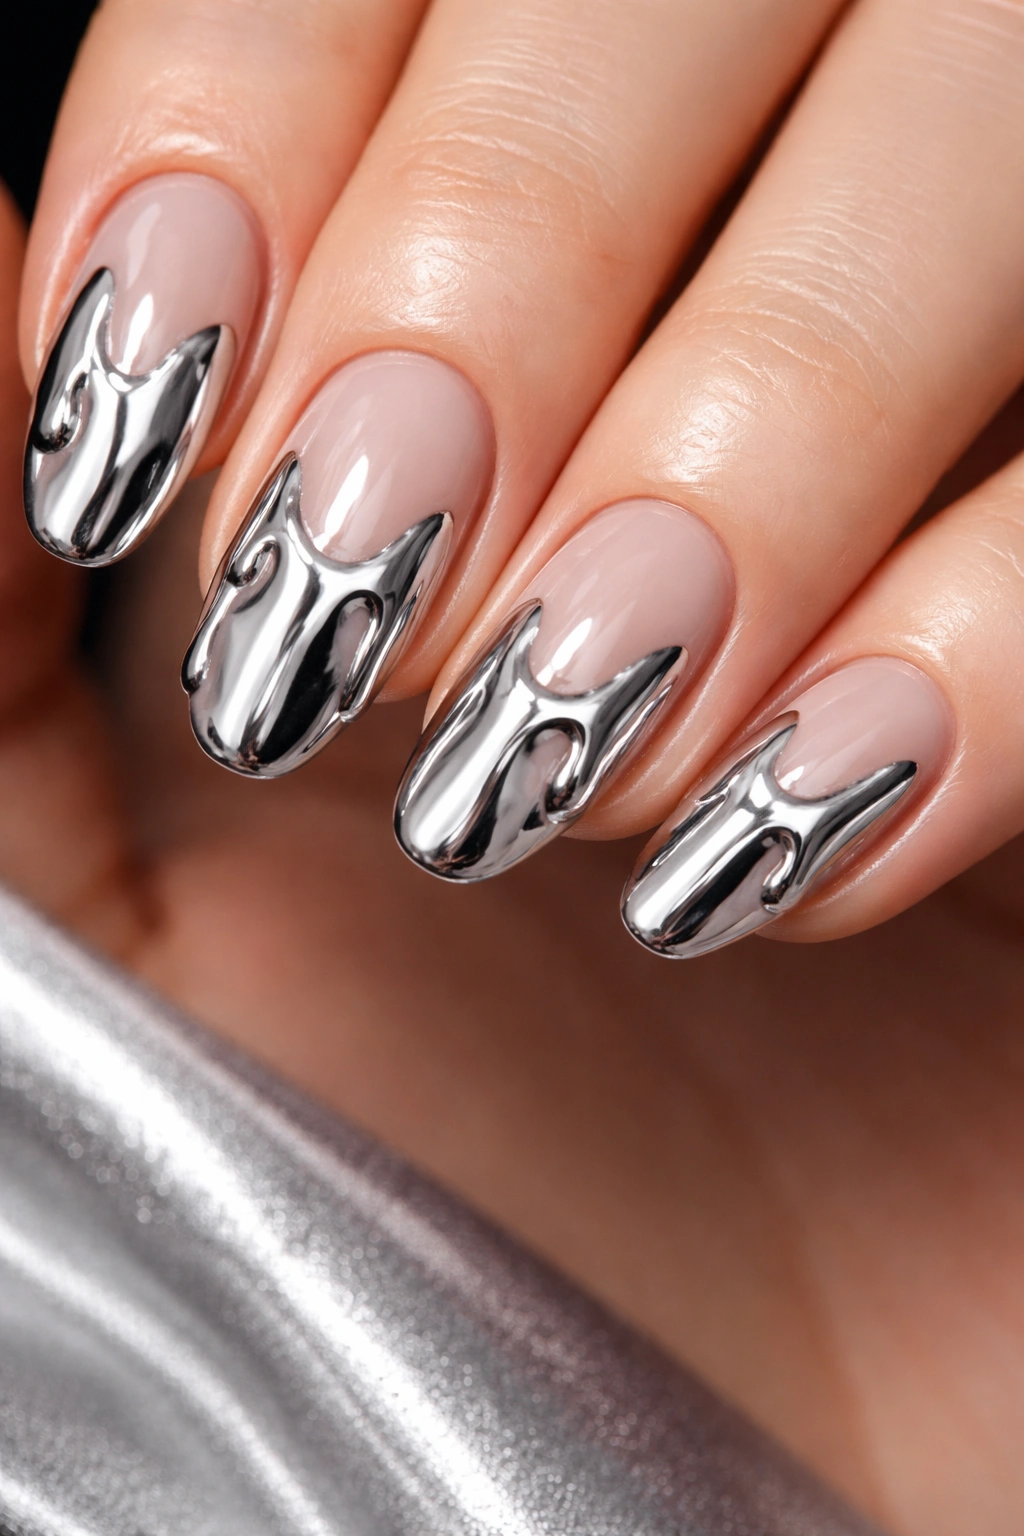
Want to add some serious glamour to your fingertips? Chrome drip nails bring a futuristic, high-shine twist to the melting paint trend. The reflective quality of chrome polish makes these drips look almost liquid metal, catching light from every angle.
What Makes Chrome Drips Special
Chrome nail polish has this incredible mirror-like finish that elevates any design. When used in a drip pattern, it creates the illusion of melted silver, gold, or rose gold flowing across your nails. The contrast between a matte or regular polish base and the ultra-shiny chrome drips is absolutely stunning.
This design works beautifully with neutral bases—think soft pinks, nudes, or even black. The chrome element adds just enough edge without being over the top. Gold chrome drips on a deep chocolate brown base? Chef’s kiss. Silver drips on midnight blue? Gorgeous. Rose gold on blush pink? Elegant perfection.
Application Techniques
Chrome polish can be a bit tricky to work with since it has a different consistency than regular polish. Use a fine brush to create your drip shapes, working slowly and deliberately. You might need to build up the chrome effect with multiple thin coats rather than one thick application.
- Start with completely dry base color before adding chrome drips
- Use a small detail brush for precision
- Seal everything with a quality top coat to protect the chrome finish
- Consider using chrome powder instead of polish for an even more intense metallic effect
The best part? Chrome drip nails transition seamlessly from day to night, making them perfect for anyone who wants a statement manicure that’s still office-appropriate.
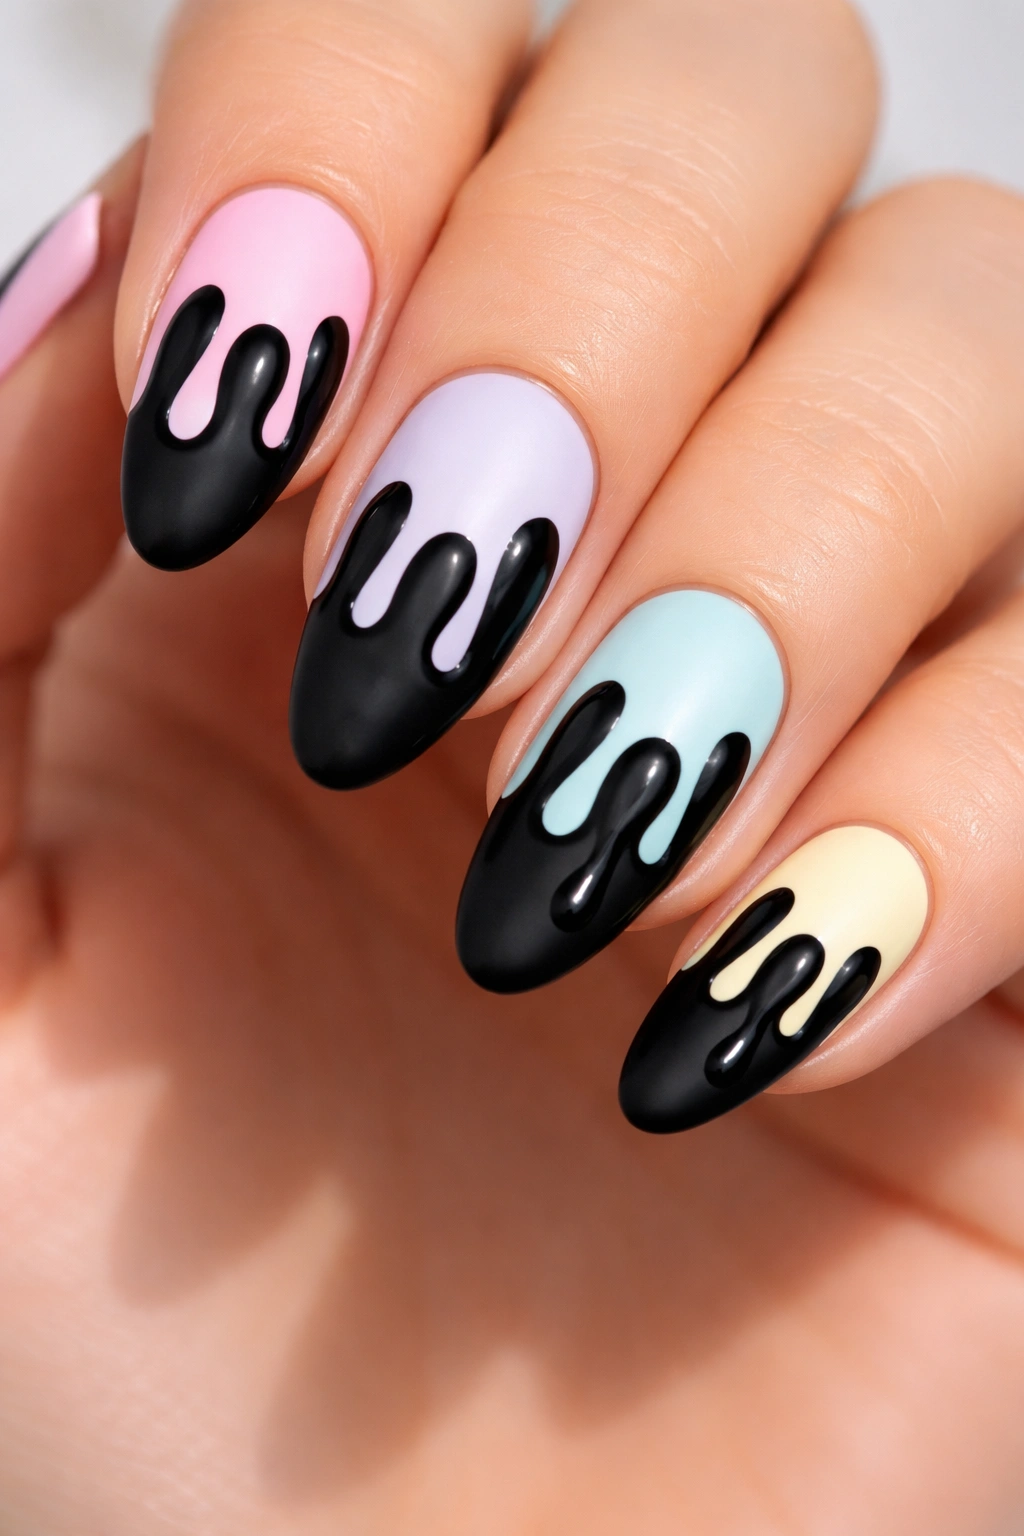
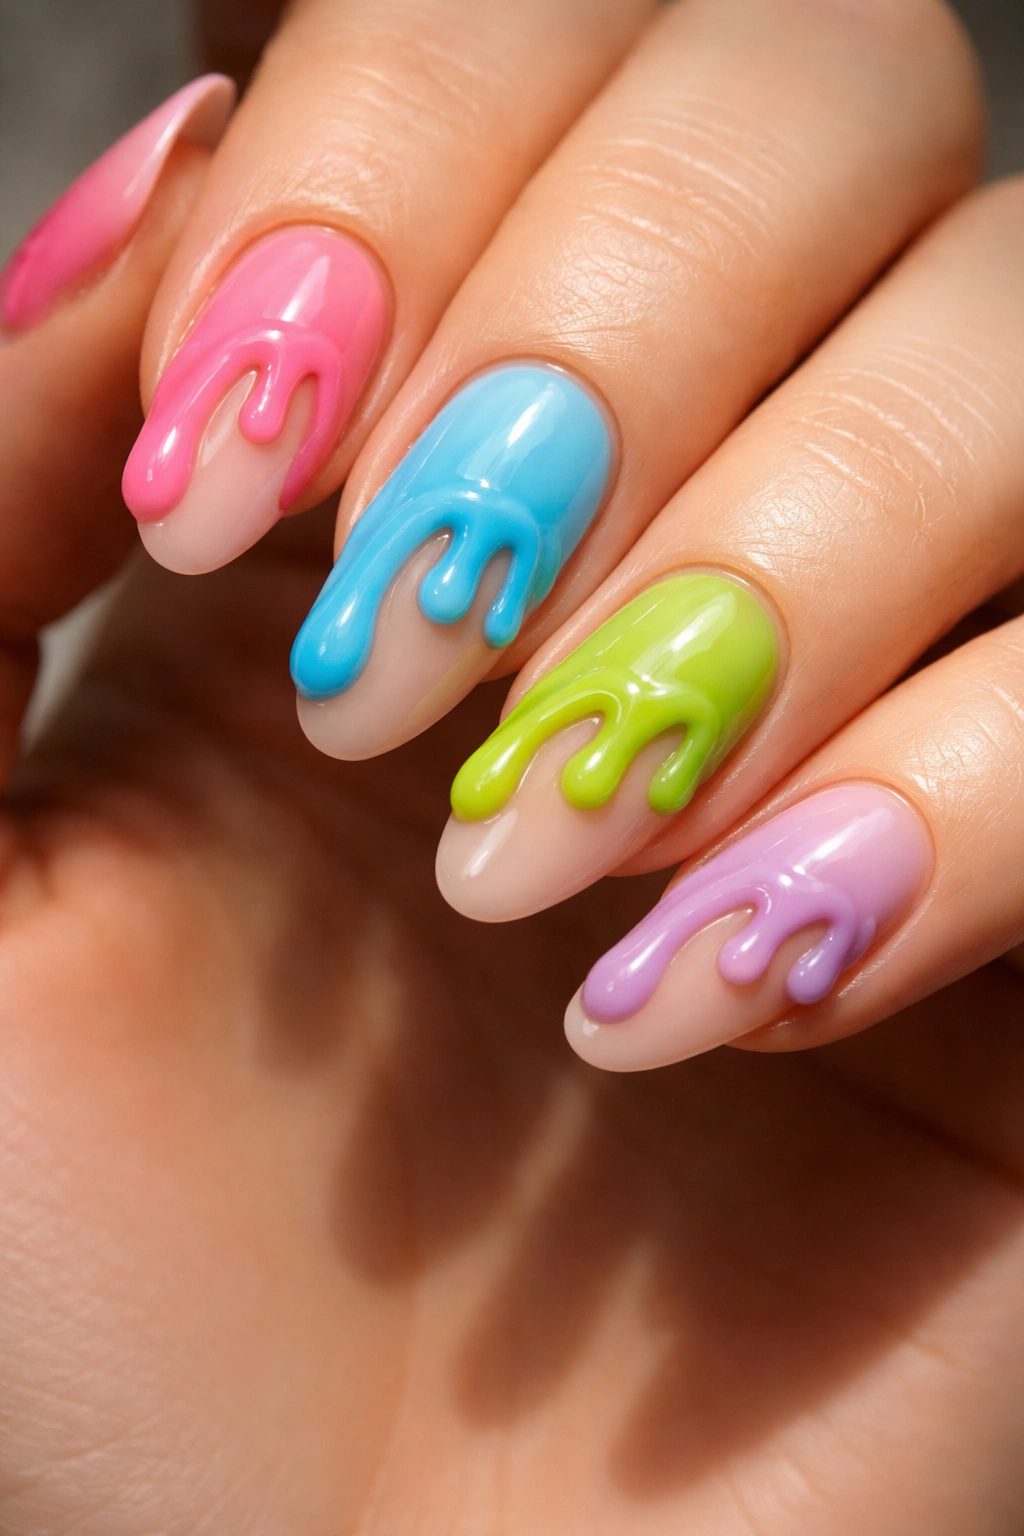
3. Ice Cream Drip Nails

If blood drips are too intense for your taste, ice cream drip nails offer the same eye-catching effect with a much sweeter vibe. These playful designs mimic the look of melting ice cream or frosting, making them absolutely perfect for summer or anytime you’re feeling whimsical.
Creating That Sweet Look
The magic of ice cream drip nails lies in color choice. Think soft pastels like mint green, baby blue, lavender, peachy pink, and buttery yellow. These shades instantly evoke that creamy, frozen treat aesthetic. You can create single-flavor nails or mix and match different colors across your fingers for a full ice cream parlor effect.
The technique mirrors other drip styles, but the vibe is completely different. Start with a white or very light pastel base, then add your colorful drips. The key is keeping everything soft and dreamy—no harsh contrasts here. Some people even add tiny rhinestones or glitter to mimic sprinkles, which takes the design to the next level of adorable.
Design Variations
There are several ways to approach ice cream drip nails. You can do a French tip style where the drips start at the tip and cascade down. Or create the look of an ice cream cone by painting a small cone at the base of one nail and adding drips flowing from it.
- Use glossy top coat liberally to create that melted, sticky appearance
- Mix in some white drips with your pastel colors for a cream-on-cream effect
- Try gradient bases before adding drips for extra dimension
- Add small dots of polish in contrasting colors to create a sprinkle effect
This design is guaranteed to make you smile every time you look at your hands. It’s fun without being childish, and it works for all nail lengths and shapes.
4. Neon Drip Nails
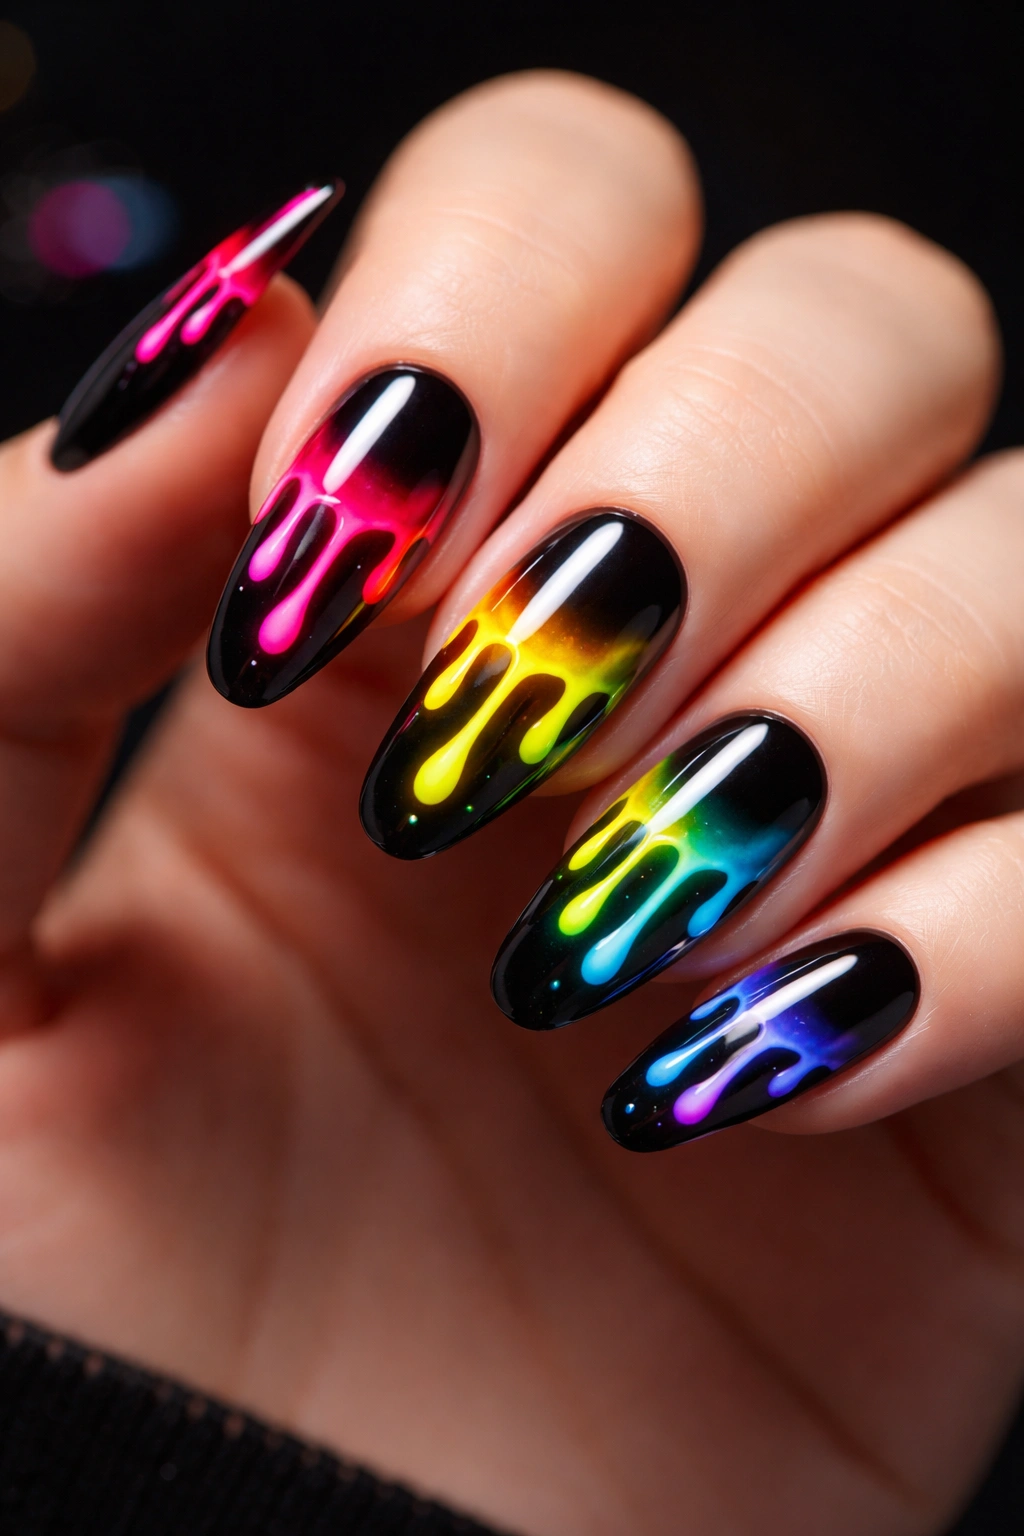
Ready to make a statement? Neon drip nails are bold, electric, and impossible to ignore. These vibrant designs practically glow, bringing an energetic, festival-ready vibe to your fingertips.
The Power of Neon
Neon polishes have this unique ability to command attention. When used in a drip design, they create this incredible visual pop that regular colors just can’t match. The beauty of neon drips is that they work on virtually any base color, though they look especially striking against black, white, or nude backgrounds.
You can go full rainbow with multiple neon shades across different nails, or stick to one electric color for a more cohesive look. Neon pink drips on white? Fresh and fun. Neon yellow and orange on black? Edgy and cool. Neon green on hot pink? Absolutely wild in the best way.
Making Neon Pop
Neon polishes often have a slightly different consistency than regular lacquers, so you might need to adjust your technique. They can be a bit sheer, which means you may need multiple coats to achieve that eye-searing brightness.
Here’s how to get the best results:
- Apply a white base coat first to make neon colors more vibrant
- Build up color with thin layers rather than one thick coat
- Work in good lighting since neon can look different in various light conditions
- Seal with top coat, but know that some neons may dull slightly (a small trade-off for that incredible color)
Pro tip: Neon drip nails look amazing under blacklight, making them perfect for concerts, clubs, or any nighttime adventure. They’re also fantastic for music festivals, summer parties, or anytime you want your nails to match your energetic mood.
5. Rainbow Drip Nails
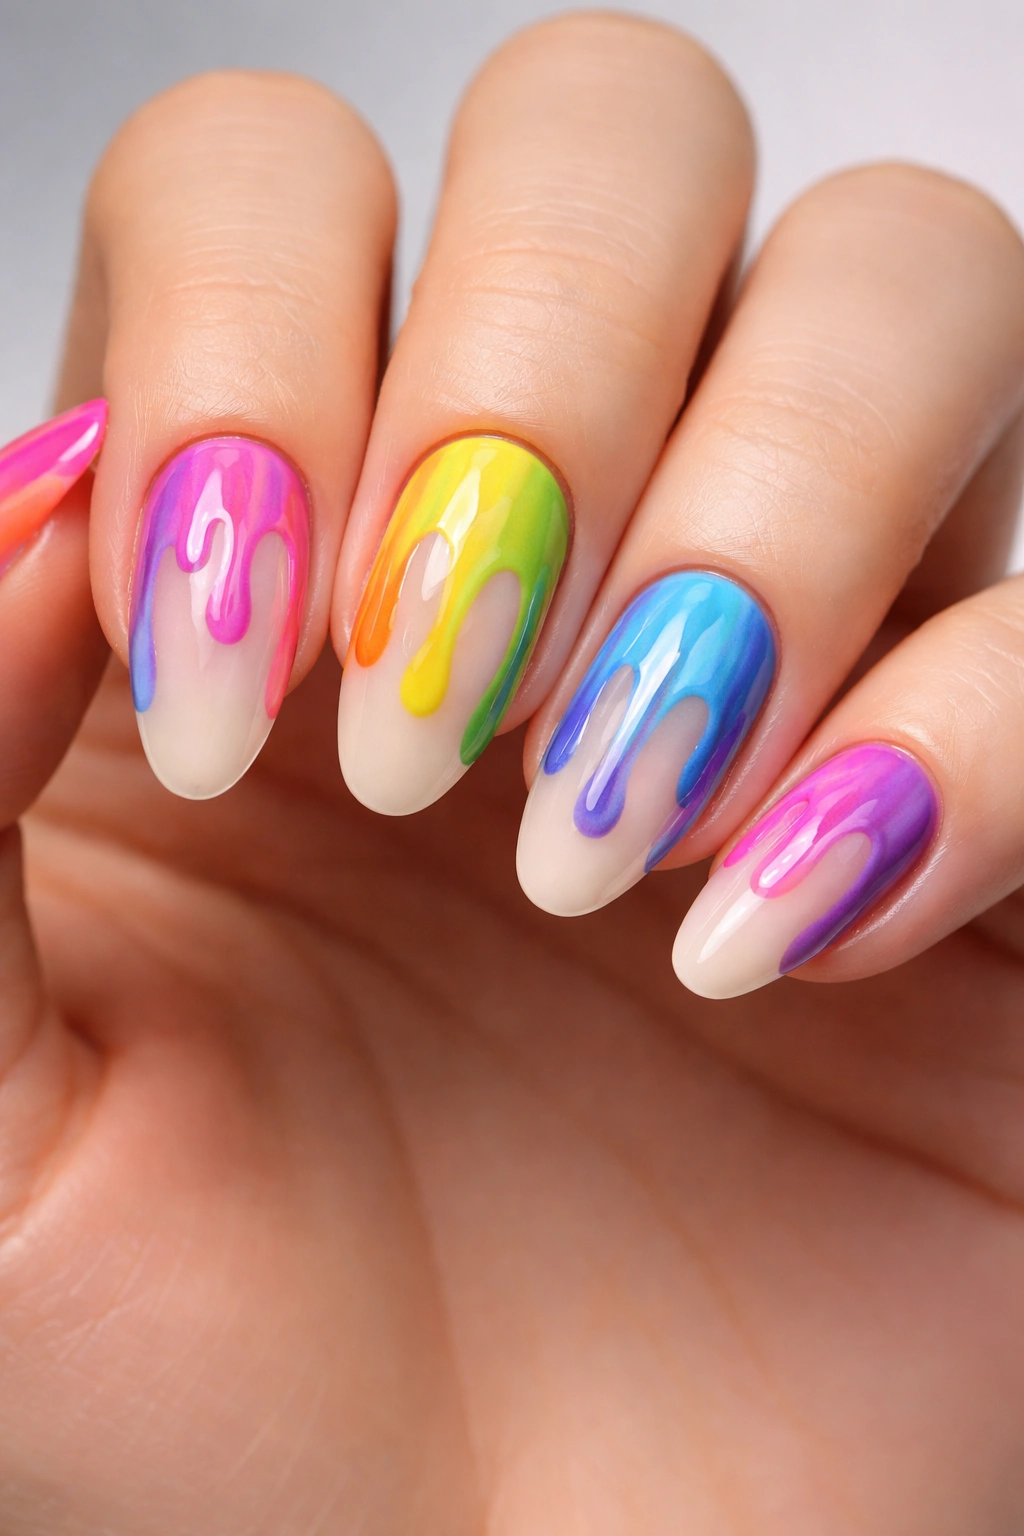
Why choose one color when you can have them all? Rainbow drip nails bring together the entire color spectrum in one joyful, artistic design. This style celebrates color in all its glory and creates a manicure that’s genuinely unique every single time.
Building Your Rainbow
The trick to successful rainbow drip nails is color placement. You’ll want to think about how colors interact with each other—warm tones next to cool tones, complementary colors for contrast, or go full spectrum from red through violet. Some people prefer a more organized rainbow approach, while others love the chaotic beauty of randomly placed colors.
Start with a neutral base—white, cream, or light gray works beautifully—to let those colors shine. Then create your drips using different colors on each nail or multiple colors per nail. The varied colors create this incredibly dynamic look that seems to shift and change as you move your hands.
Creating Color Harmony
While “anything goes” can be tempting, a little color theory goes a long way. Consider these approaches:
- Gradient approach: Transition through the rainbow from thumb to pinky
- Complementary pairs: Use colors opposite each other on the color wheel for maximum impact
- Monochromatic rainbow: Use different shades of similar colors for a more subtle rainbow effect
- Primary power: Stick to red, blue, and yellow for a bold, graphic look
The beauty of rainbow drips is that they work for any occasion. Heading to Pride celebrations? Perfect. Want to brighten up a gray day? Ideal. Need something that expresses your colorful personality? You’ve found it.
Quick note: Let each color dry before adding the next if they’re close together, or you’ll end up with muddy mixing rather than distinct drips.
6. Black Drip Nails on Pastel Base
Sometimes the most striking designs come from unexpected contrasts. Black drip nails on a pastel base create this gorgeous juxtaposition between soft and edgy, sweet and dramatic. It’s like combining two different aesthetics into one cohesive, utterly cool design.
The Contrast Factor
There’s something captivating about the way black drips look against baby pink, mint green, or lavender bases. The contrast is bold without being harsh. The pastel softens the intensity of the black, while the black adds edge to what might otherwise be an overly sweet color palette.
This design has serious versatility. It can lean gothic when paired with darker makeup and clothing, or it can feel modern and artistic with more neutral styling. The black drips add just enough drama to keep pastel nails from feeling too precious or juvenile.
Technique Considerations
Black polish is wonderfully opaque, which makes it perfect for drip designs. You’ll get solid, defined drips without needing multiple coats. The key is creating varied drip lengths and widths to keep things interesting visually.
- Use a matte pastel base with glossy black drips for maximum contrast
- Try different pastel colors on each nail for a softer rainbow effect
- Keep drips minimal (one or two per nail) for a more sophisticated look
- Add tiny white dots within the black drips to create a cartoon-style effect
This design proves that you don’t need bright, loud colors to make an impact. Sometimes the most memorable manicures come from thoughtful contrast and restrained color choices.
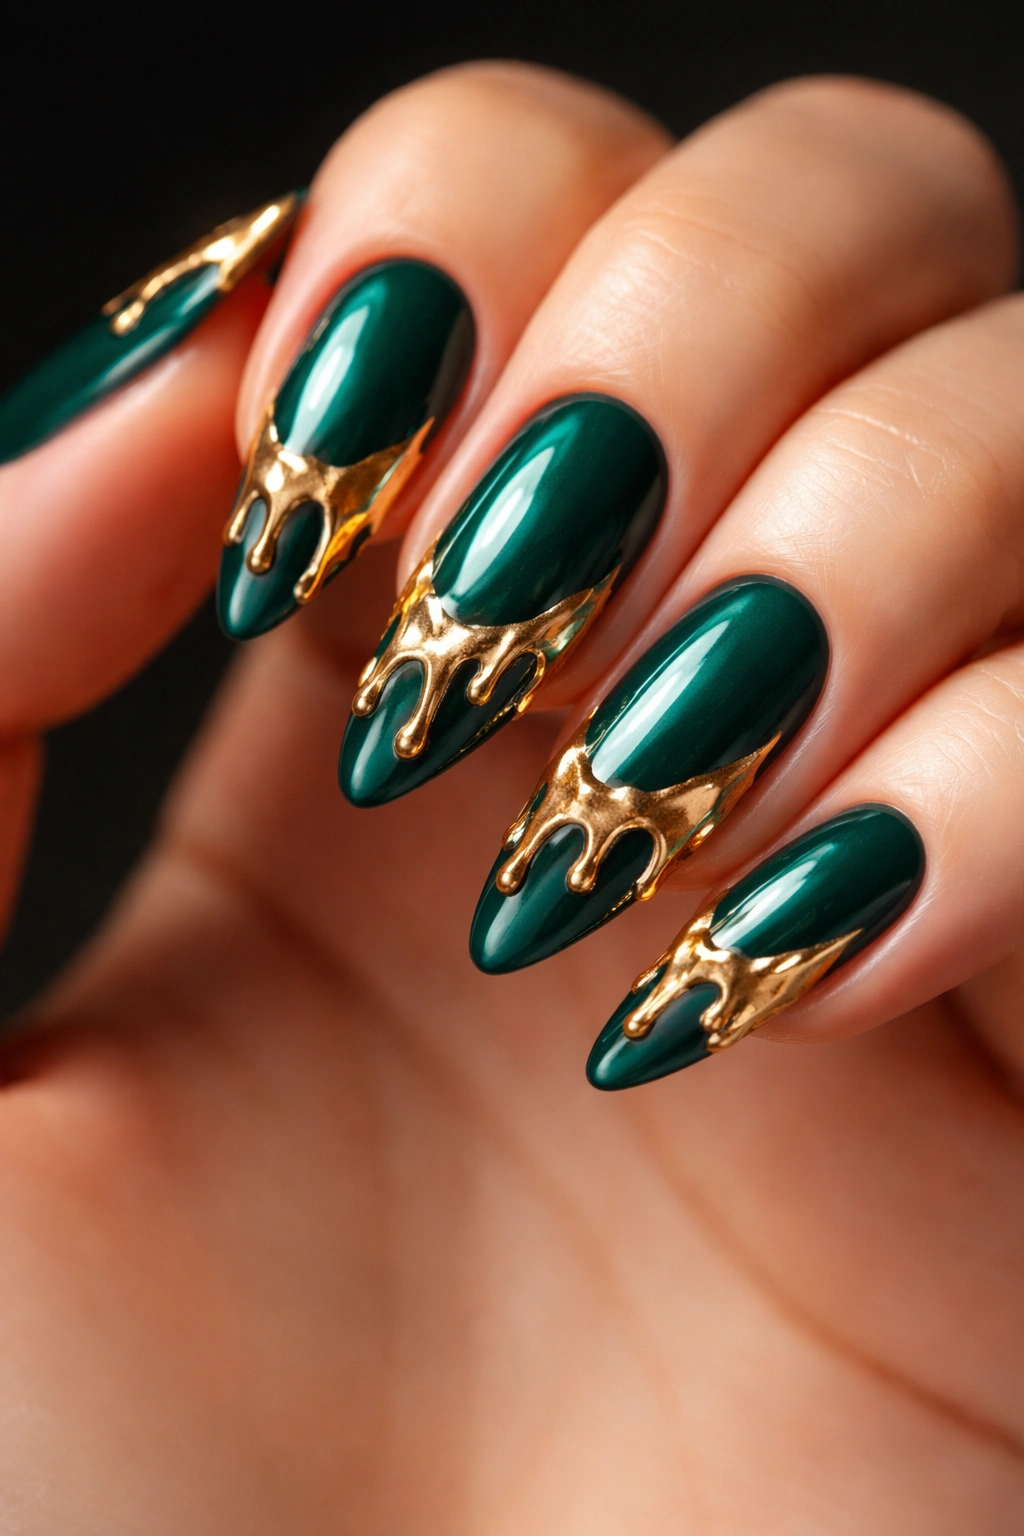
7. Gold Drip Nails
Luxury meets artistry with gold drip nails. This design brings an element of opulence to the drip trend, making it perfect for special occasions or when you simply want to feel a bit fancy in your everyday life.
Creating Liquid Gold
Gold drip nails work beautifully on a wide range of base colors. Deep jewel tones like emerald green, sapphire blue, or burgundy provide a rich backdrop for gold drips. Neutral bases like nude, cream, or chocolate brown create a more understated elegance. Even black makes gold drips pop in a dramatic, high-contrast way.
The type of gold matters too. You can choose warm, yellow gold for a classic look, rose gold for something more romantic and modern, or even champagne gold for a softer effect. Each variation creates a completely different mood while maintaining that luxurious feel.
Layering Techniques
Gold drips can be created with regular gold polish, but using metallic gel polish or even gold foil can create an even more stunning effect. The goal is achieving that molten metal appearance—like liquid gold slowly flowing down your nails.
Here’s how to elevate your gold drips:
- Layer different gold shades for depth and dimension
- Add gold drips to an ombre base for extra visual interest
- Pair with rhinestones or gold studs for full glamour
- Try gold chrome powder for the most intense metallic effect
Gold drip nails walk the line between artistic and elegant. They’re fancy enough for weddings, New Year’s Eve, or any celebration, but they’re also subtle enough to wear to dinner or other semi-formal occasions. It’s that rare design that feels special without trying too hard.
8. Glitter Drip Nails
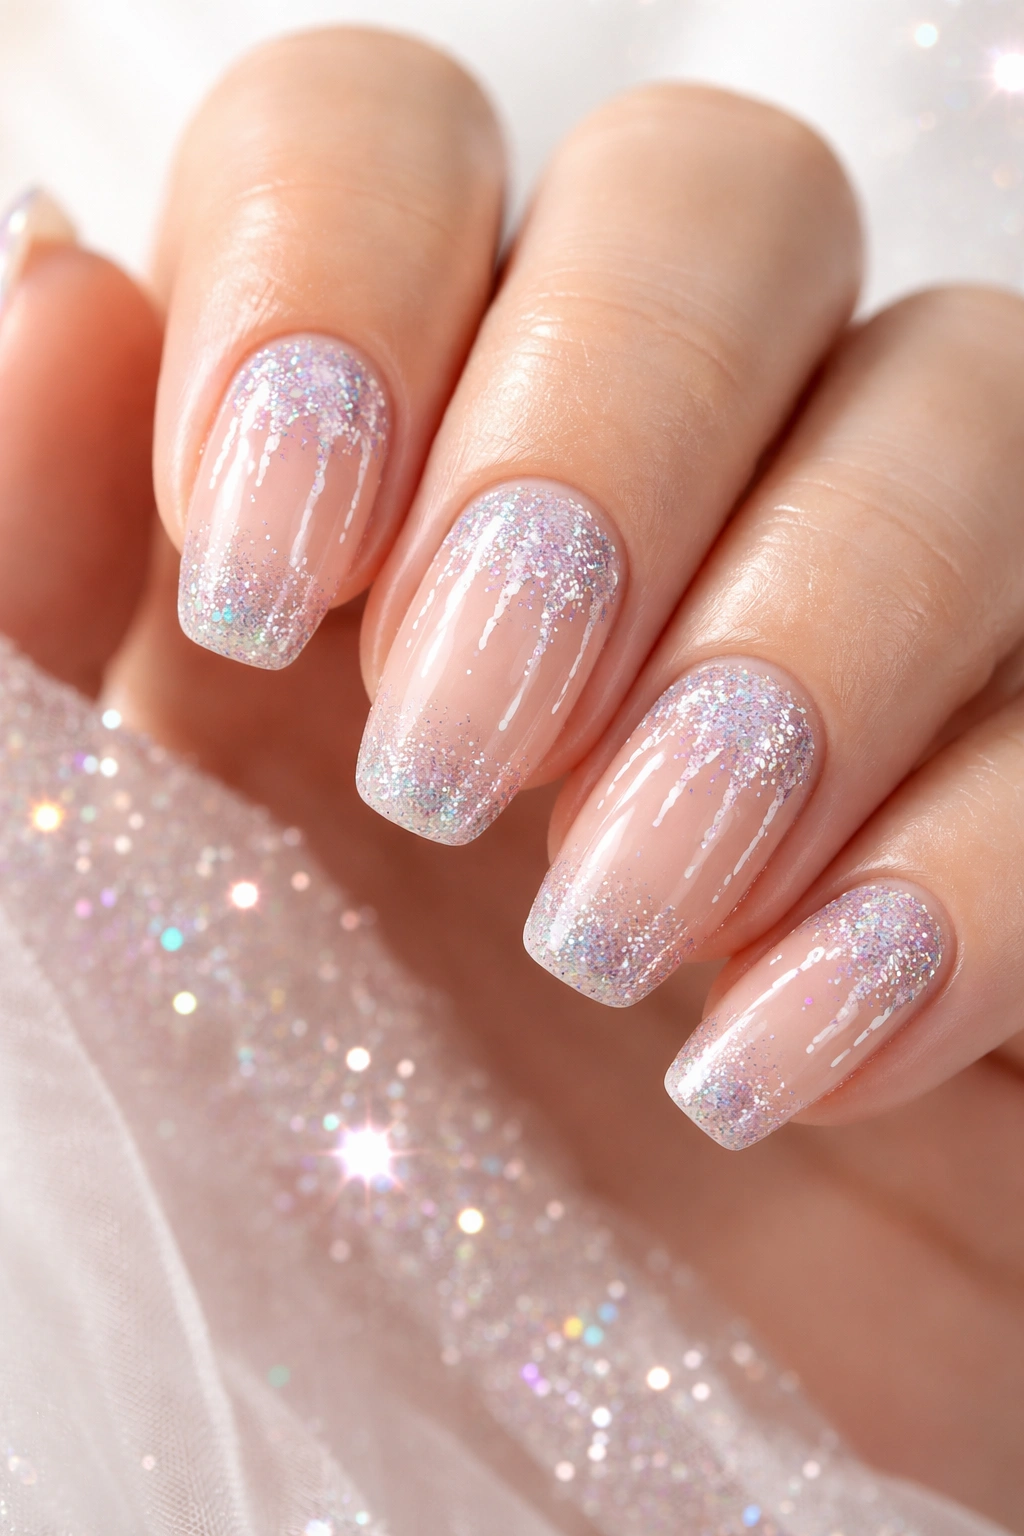
Want your drips to sparkle? Glitter drip nails bring serious shimmer to the melting paint trend. The way light catches those glittery drips creates constantly shifting sparkle that’s absolutely mesmerizing.
Sparkle Strategy
Glitter nail polish comes in countless varieties—fine glitter, chunky glitter, holographic, iridescent, you name it. Each type creates a different effect when used in drip designs. Fine glitter gives a more subtle shimmer, while chunky glitter creates dramatic, party-ready nails.
The base color you choose affects how the glitter reads. Darker bases make glitter pop more dramatically, while lighter bases create a softer, more ethereal sparkle. You can also layer glitter over colored drips for an extra dimension of shine.
Application Tips
Glitter polish can be thicker and more challenging to work with than regular polish. It doesn’t flow quite as smoothly, so creating clean drip shapes requires a bit more patience and precision.
- Use a thin detail brush rather than a dotting tool for better control
- Build up glitter coverage with multiple thin layers
- Mix glitter polish with clear polish if it’s too thick to create drips
- Seal everything with a thick, glossy top coat to smooth out glitter texture
Style note: Glitter drips work for any occasion depending on your color choices. Silver glitter on red for the holidays. Rainbow glitter on white for birthday celebrations. Rose gold glitter on nude for wedding nails. The versatility is endless.
Don’t forget: Glitter drip nails pair beautifully with other embellishments like rhinestones, pearls, or metallic accents if you’re going for full glamour.
9. Monochrome Drip Nails
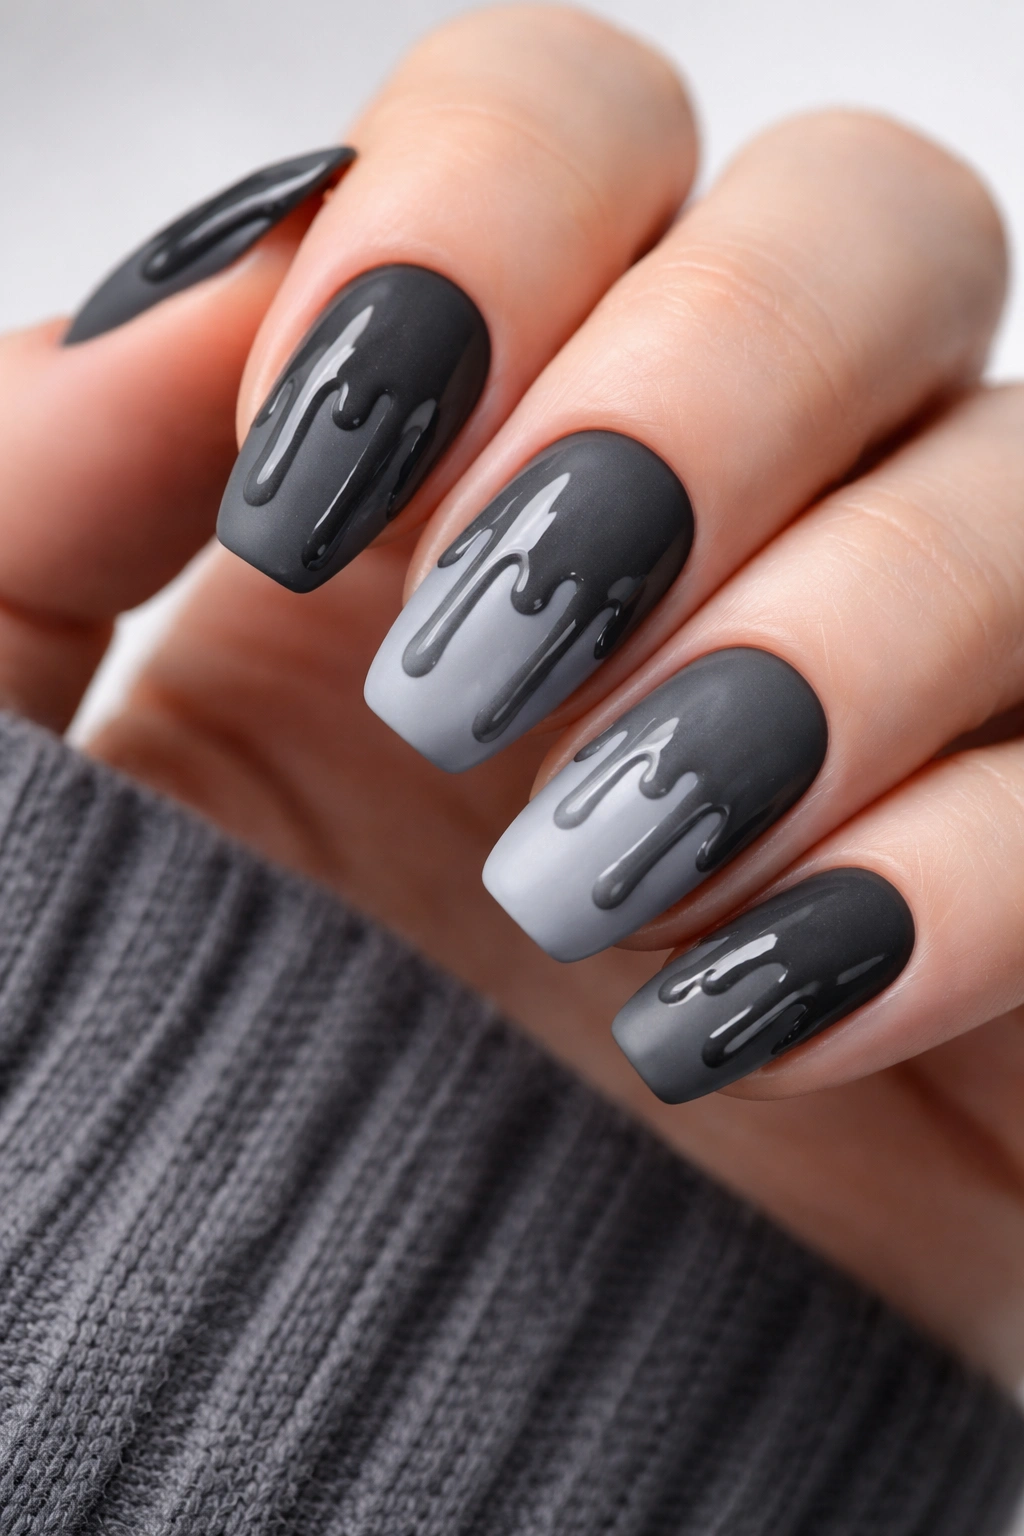
Who says drip nails need multiple colors? Monochrome drip designs use different shades of the same color family to create sophisticated, tonal nail art that’s subtle yet impactful.
The Tonal Approach
Monochrome drip nails rely on varying shades and finishes rather than contrasting colors. Imagine light gray drips on a charcoal base, or cream drips on taupe. The effect is elegant, modern, and surprisingly complex despite the limited color palette.
This approach works with any color family. Blues ranging from powder to navy create a serene, oceanic feel. Pinks from blush to deep rose offer romantic sophistication. Greens from sage to forest bring an earthy, natural vibe. The key is choosing shades with enough contrast that the drips remain visible while maintaining that cohesive, monochromatic aesthetic.
Finish Mixing
One of the most effective techniques for monochrome drips is mixing finishes—matte with glossy, metallic with cream, or shimmer with flat. This creates visual interest without introducing new colors.
- Matte base with glossy drips creates the classic wet paint illusion
- Metallic drips on matte base add subtle glamour
- Shimmer drips on cream base catch light beautifully
- Mix all three finishes in different shades for maximum dimension
Monochrome drip nails prove that you don’t need a rainbow to make a statement. Sometimes sophistication comes from restraint and thoughtful color selection. This design is perfect for people who want to participate in the drip trend without going too bold or colorful.
10. 3D Drip Nails
Ready to take drip nail art to the next dimension? 3D drip nails use builder gel, acrylic, or thick gel polish to create actual raised drips that you can feel. These aren’t just painted—they’re sculpted, creating an incredibly realistic melting effect.
Creating Dimension
3D drip nails require more advanced techniques and materials than standard polish drips. You’ll need builder gel or thick gel polish that holds its shape when applied, plus a UV or LED lamp to cure it. The process involves applying the gel product and manipulating it before curing to create that perfect drip shape.
The dimensional aspect makes these drips look almost alarmingly realistic. They cast tiny shadows, catch light differently than the rest of the nail, and genuinely look like paint or liquid that’s frozen mid-drip. The effect is undeniably cool and definitely a conversation starter.
Technical Approach
Creating 3D drips takes practice, but the results are worth it. You’ll apply a small amount of builder gel or thick polish, use a thin tool to pull it into a drip shape, then cure it under your lamp. Multiple layers might be needed to build up the desired thickness and length.
Here’s what you need to know:
- Work slowly—gel gives you time to shape before curing
- Keep drips proportional to your nail size (too big looks bulky)
- Smooth any rough edges with a file after curing
- Seal with glossy top coat for that wet appearance
Important consideration: 3D drips add height to your nails, which can catch on things more easily than flat nail art. They’re amazing for photos and special events but might be less practical for everyday wear if you type frequently or work with your hands.
Drip nail art offers something for everyone—from minimalist monochrome designs to full-on glitter explosions. The melting paint effect brings an artistic, creative element to your manicure that stands out from standard nail art. Whether you’re drawn to spooky blood drips, sweet ice cream designs, or luxurious gold flows, there’s a drip style that matches your personality.
The best part? You don’t need professional skills to create these looks. With basic tools like dotting implements, thin brushes, or even toothpicks, you can achieve stunning drip effects at home. Experiment with different color combinations, try mixing finishes, and don’t worry about making each drip perfect. The beauty of this trend lies in its organic, slightly unpredictable nature.
So grab your favorite polishes and let your creativity flow. Your next melting masterpiece is just a few drips away.
