

Rhinestone nails are the ultimate hack for transforming any manicure from ordinary to extraordinary in seconds flat. These tiny, glittering gems catch light from every angle and instantly elevate your entire look, whether you’re heading to a casual brunch, a night out dancing, or a special celebration. The beauty of rhinestone nail art is that it works with literally any aesthetic—from soft, minimalist elegance to bold, maximalist sparkle that screams confidence. You don’t need to be a professional nail artist to pull off these designs either; with a steady hand and the right tools, you can create these looks yourself at home or discuss them with your nail technician for flawless execution.
What makes rhinestones such a game-changer for nail design is their sheer versatility. Unlike trendy techniques that come and go, rhinestone embellishments have remained a beloved choice for decades because they genuinely work with everything. A simple nude base suddenly feels luxe with a strategic placement of crystals. French tips get a modern upgrade with scattered gems. Even avant-garde designs reach new heights when paired with the right rhinestone placement and color combinations. The way these gemstones refract light creates dimension and texture on your nails that flat polish alone simply can’t achieve.
Beyond aesthetics, rhinestones offer you creative freedom that few other nail embellishments can match. You’re not locked into one specific look or season—rhinestones work in spring, summer, fall, and winter. They suit every occasion, from professional settings (when applied subtly) to party nails that demand attention. Whether you’re drawn to delicate, barely-there sparkle or full-coverage glam that makes your nails literal jewelry, there’s a rhinestone style waiting for you. Let’s explore fifteen stunning rhinestone nail ideas that’ll have you ready to glam up your next manicure.
1. Classic French Mani with Rhinestone Accents
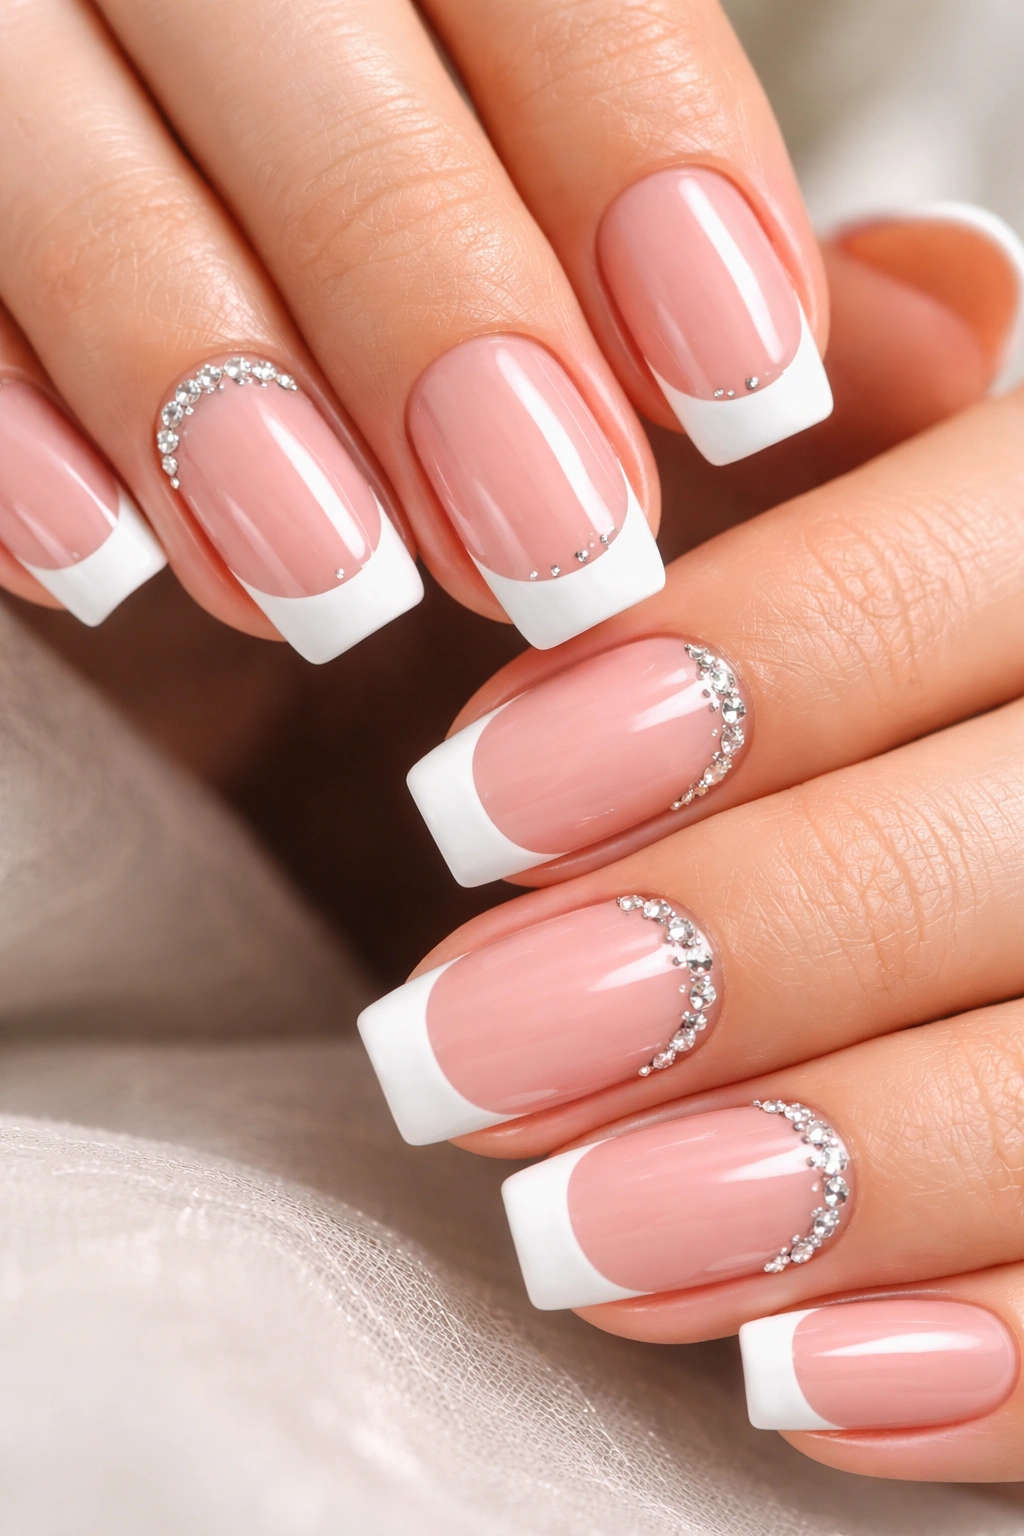
The timeless French manicure gets a luxe makeover when you add rhinestones to the mix. This combination keeps the elegance of the original design while adding that undeniable sparkle factor that transforms it from everyday professional to special-occasion-ready. The key is restraint—you’re not covering the entire nail in gems, but rather strategically placing them to enhance the French tip without overwhelming it.
Why This Works for Every Occasion
A rhinestone-studded French manicure strikes the perfect balance between subtle and statement-making. The white or nude base keeps things classic and office-appropriate, while the gems add just enough glam to feel elevated. You can wear this look to work on Monday and to dinner on Friday without feeling like you need to change your nails. The versatility is what makes this such an enduring choice among nail enthusiasts who want something that looks intentional and polished without being over-the-top.
How to Customize Your Design
- Place a single rhinestone at the arch of each French tip for an elegant, understated look
- Create a rhinestone border along the entire white tip for more dramatic effect
- Mix rhinestone sizes—use larger stones at the center and graduate to smaller ones on the sides
- Experiment with colored rhinestones (soft pink, champagne, or clear) to coordinate with your outfit or skin tone
Pro tip: Use gel sealer instead of nail glue for rhinestones on a French manicure—it holds them securely without the risk of seeping under the white polish and creating cloudiness.
2. Soft Pink Base with Scattered Rhinestones
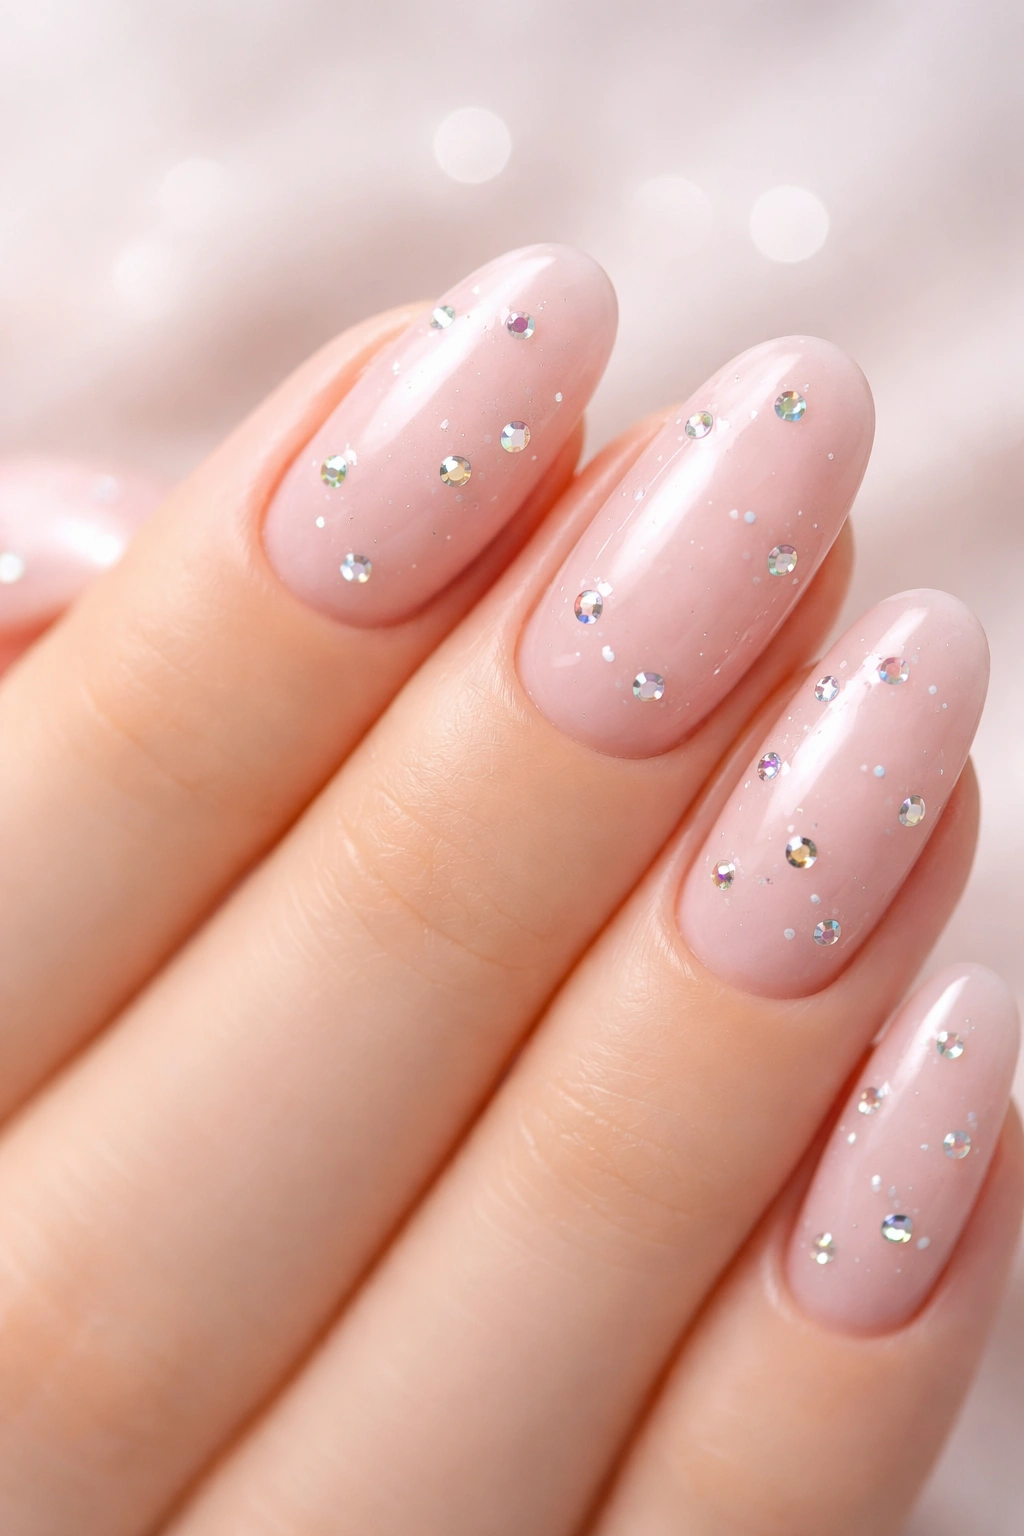
This gentle, romantic look combines a milky or soft pink base with rhinestones scattered across the nail in an organic, scattered pattern rather than a strict design. It’s the perfect choice if you love the idea of rhinestones but want something that feels more understated and less structured. The soft color creates a dreamy backdrop that lets the gems absolutely catch the light without feeling aggressive or too bold.
The Psychology of Pink and Sparkle
Pink is inherently flattering to nearly every skin tone, and when you pair it with the reflective quality of rhinestones, you create a look that literally glows. This combination has been beloved by everyone from brides (who opt for a more delicate, romantic vibe on their wedding day) to everyday nail enthusiasts who simply want something that feels special without the commitment of a full design. The scattered placement means there’s no wrong way to do it—the randomness is actually the whole point.
Application Tips for Best Results
- Start with a milky pink or soft ballet-tone base and let it cure completely
- Use a wax pen picker to gently place rhinestones across the nail bed, avoiding getting too close to the cuticle
- Vary the size of stones slightly to create visual interest and dimension
- Leave some negative space—you want scattered gems, not a completely covered nail
- Seal everything with a top coat applied carefully around (not over) each rhinestone to prevent dulling their sparkle
Worth knowing: This design works beautifully on any nail length, though it’s particularly striking on longer almond or oval shapes where you have more surface area to work with.
3. Ombre Rhinestone Gradient
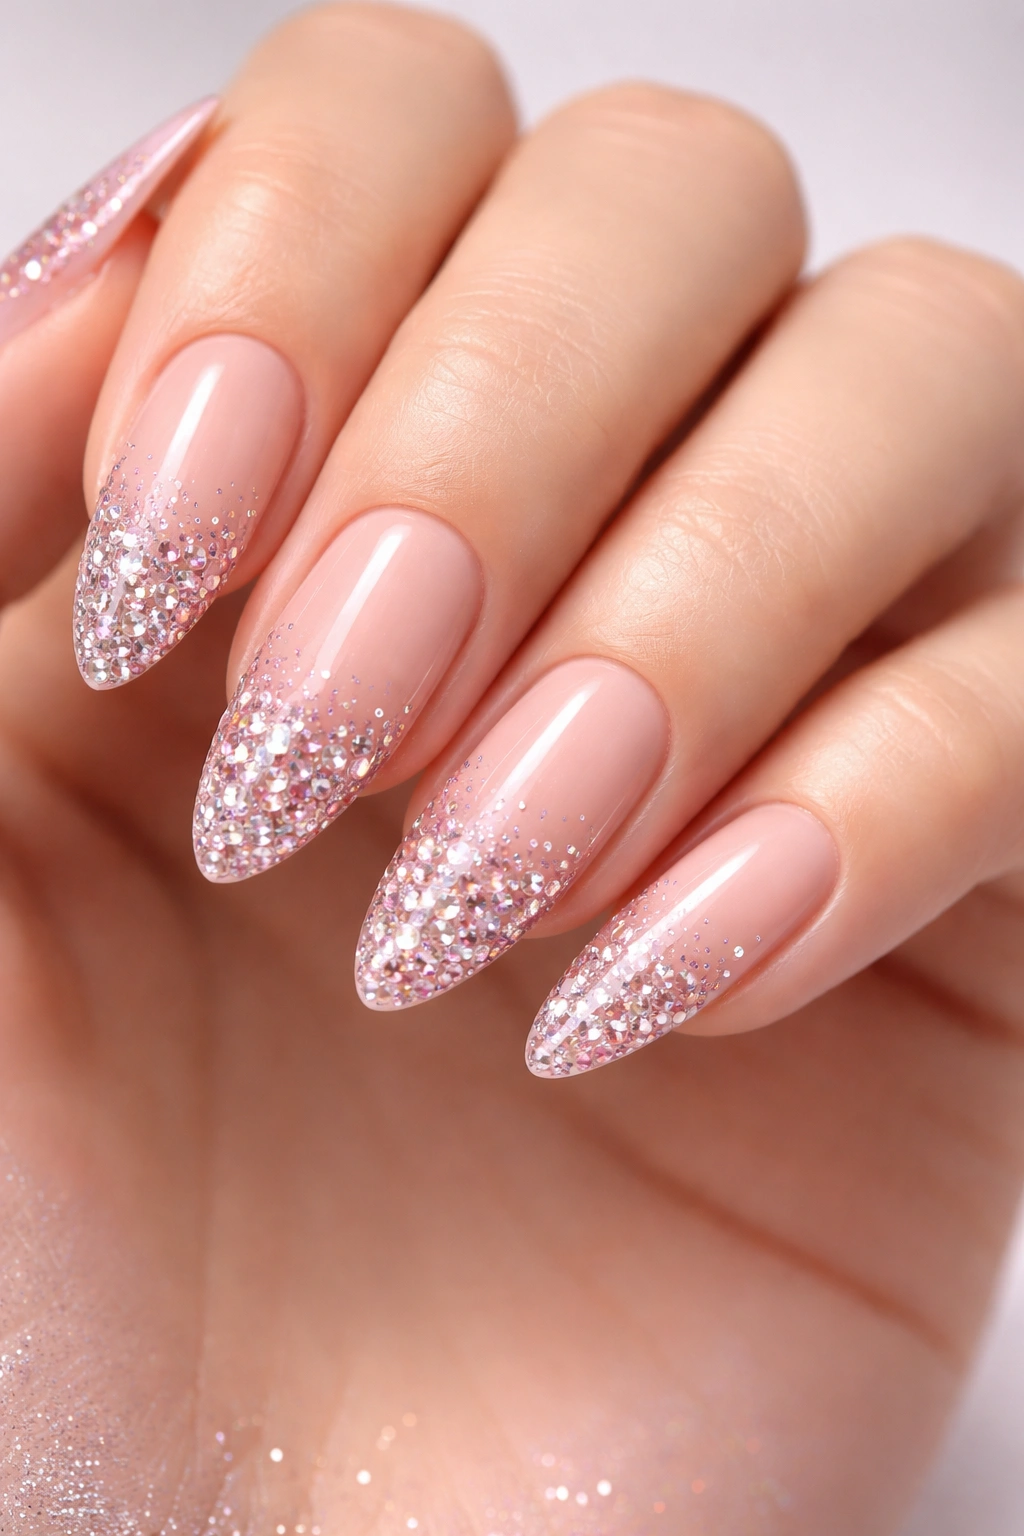
An ombre effect with rhinestones concentrated at the tip creates a breathtaking visual that’s somehow both elegant and eye-catching. You start with a lighter shade (white, nude, or pale pink) and gradually intensify it toward the free edge, then place your rhinestones strategically where the color transition happens or concentrate them entirely at the gem-heavy tip. The gradient draws the eye downward along the nail while the stones add dimensional sparkle that photographs beautifully.
Mastering the Ombre-to-Rhinestone Transition
The real magic happens in how you place your stones in relation to the color gradient. Some nail artists create a sharp line where the color shifts and place stones right along that boundary. Others prefer to scatter stones throughout both the light and dark zones for a more flowing, ethereal appearance. The ombre itself—whether it’s a pink-to-hot-pink fade, nude-to-burgundy, or any other color combination—should be smooth and blended before you add a single rhinestone.
Color Combinations That Shine
- White-to-clear: The most minimalist and versatile option, works with any outfit
- Soft pink-to-deep rose: Romantic and flattering, perfect for date night
- Nude-to-bronze: Creates warmth and suits all skin tones
- Lavender-to-purple: A softer alternative to darker jewel tones, great for creative expression
Insider note: After applying your rhinestones, use a top coat that’s been thinned slightly (mixed with a tiny bit of gel top coat thinner) and apply it carefully to seal the base of each stone without running over the top and dulling the sparkle. Two thin coats work better than one thick coat.
4. Rhinestone-Encrusted Accent Nail
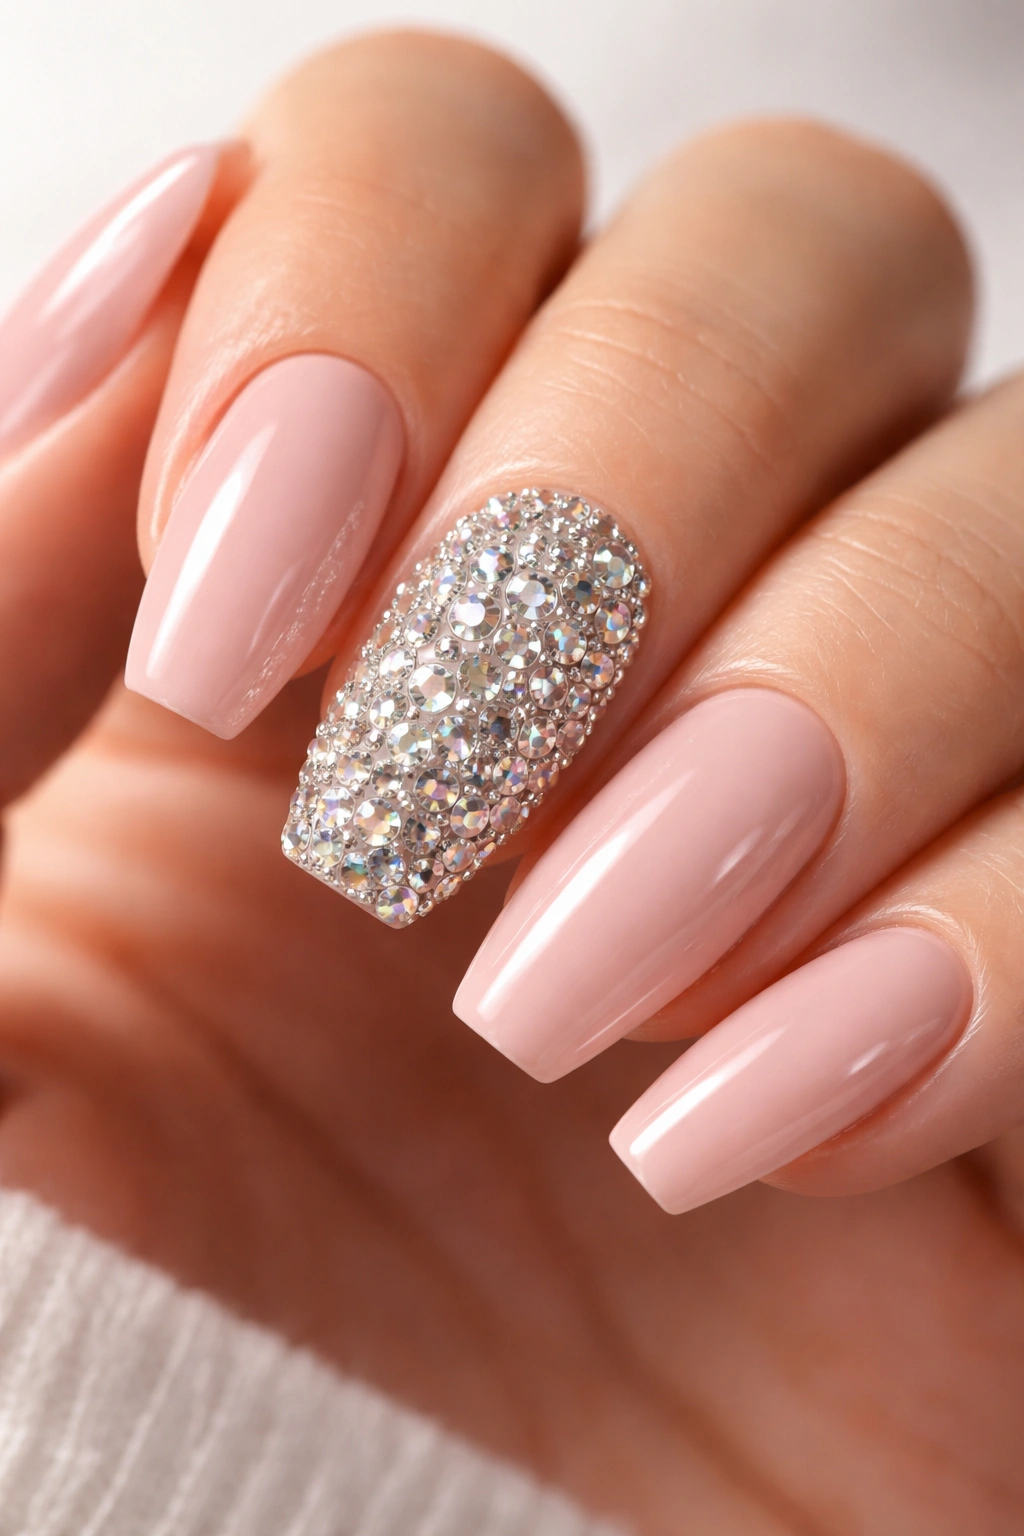
Sometimes the most impactful look is the simplest one: a single accent nail absolutely covered in rhinestones while the rest of your nails remain a solid, complementary color. This approach gives you maximum impact without the commitment of full rhinestone coverage on all ten nails. The contrast between the solid nails and the heavily bedazzled accent nail makes the gems pop even more dramatically and creates a focal point that’s undeniably striking.
Choosing Your Base and Accent Colors
The success of this look depends entirely on choosing colors that work in harmony. A nude or soft pink base allows a jewel-toned or metallic accent nail to absolutely shine. A bold color like deep burgundy or emerald as your base color works beautifully with clear or AB (aurora borealis) rhinestones that sparkle with rainbow reflections. Consider your skin tone, the occasion, and what colors make you feel confident when selecting your palette.
Rhinestone Placement Strategy
- Cover the entire nail in rhinestones for a full chandelier effect
- Create a gradient where rhinestones are densest at the tip and fade toward the cuticle
- Form a half-moon shape of rhinestones at the base for a modern, artistic look
- Arrange stones in a geometric pattern like a sunburst radiating from the center
Real-world advantage: An accent nail rhinestone mani requires less time at the salon (or less time on your hands if you’re doing it yourself) compared to full rhinestone coverage, which means lower cost and faster application without sacrificing that wow factor.
5. Black Matte Nails with Rhinestone Stripe

The contrast between matte black polish and sparkly rhinestones is absolutely stunning and feels inherently sophisticated. By creating a thick vertical or horizontal stripe of rhinestones down the center of a matte black nail, you’re combining two opposing finishes—matte and reflective—in a way that’s both modern and timeless. The matte background actually makes the gems appear even more brilliant because there’s no competing shine from the polish.
Why Matte Makes Rhinestones Pop
Matte finishes absorb light, which means any reflective element placed on top seems to glow more intensely by comparison. This is pure color theory at work on your nails. The gems literally stand out more because they’re the only things catching and reflecting light. This creates a nail look that’s simultaneously edgy (because of the black matte base) and glam (because of the crystalline sparkle), appealing to anyone who loves mixing contradictory aesthetics.
Creating the Perfect Stripe
- Apply your black matte base and cure it fully before adding rhinestones
- Use a straightedge or guide (even a thin strip of tape) to keep your rhinestone stripe perfectly aligned
- Apply gem sealer gel in a thin, even line and place your rhinestones while it’s still tacky
- Choose stones of the same size for a clean, linear look, or mix sizes for more organic appeal
- The width of your stripe should be roughly one-third the width of your nail for best visual balance
Worth knowing: Clear, white opal, or light-catching AB rhinestones work best for this design because they create maximum contrast with the dark background.
6. Minimalist Single-Stone Elegance

Sometimes less is literally more, and nowhere is this truer than with a minimalist rhinestone approach. A single, well-placed stone on an otherwise unadorned nail creates an impact that’s utterly sophisticated. This could be one rhinestone per nail positioned at the center, or one larger stone on a single accent nail. The restraint speaks volumes and creates a look that’s both modern and eternally elegant.
The Art of Strategic Placement
A single rhinestone positioned at the exact center of the nail creates perfect symmetry and balance. Placing it off-center, perhaps near the cuticle or along one side, creates visual interest and a more contemporary feel. The size of your stone matters enormously—a large, impressive rhinestone makes a bolder statement, while a petite stone creates delicate, understated sparkle. Consider your nail length and shape; longer nails can accommodate larger stones, while shorter nails suit smaller gems that don’t overwhelm the space.
Why Minimalism Feels Luxurious
Minimalist design reads as intentional and high-fashion because it requires confidence. You’re not filling every millimeter with sparkle; you’re making a deliberate choice about where that sparkle lives. This restraint is actually what luxury nail art often looks like—calculated, precise, and perfectly balanced rather than maximalist and overwhelming.
Pro tip: Pair a single rhinestone with a neutral, high-shine base (like a clear gel or milky nude) and finish with a glossy top coat that makes the entire nail gleam. The combination of polish shine and stone sparkle is absolutely mesmerizing.
7. Multicolor Gem Mani with Mixed Stone Sizes
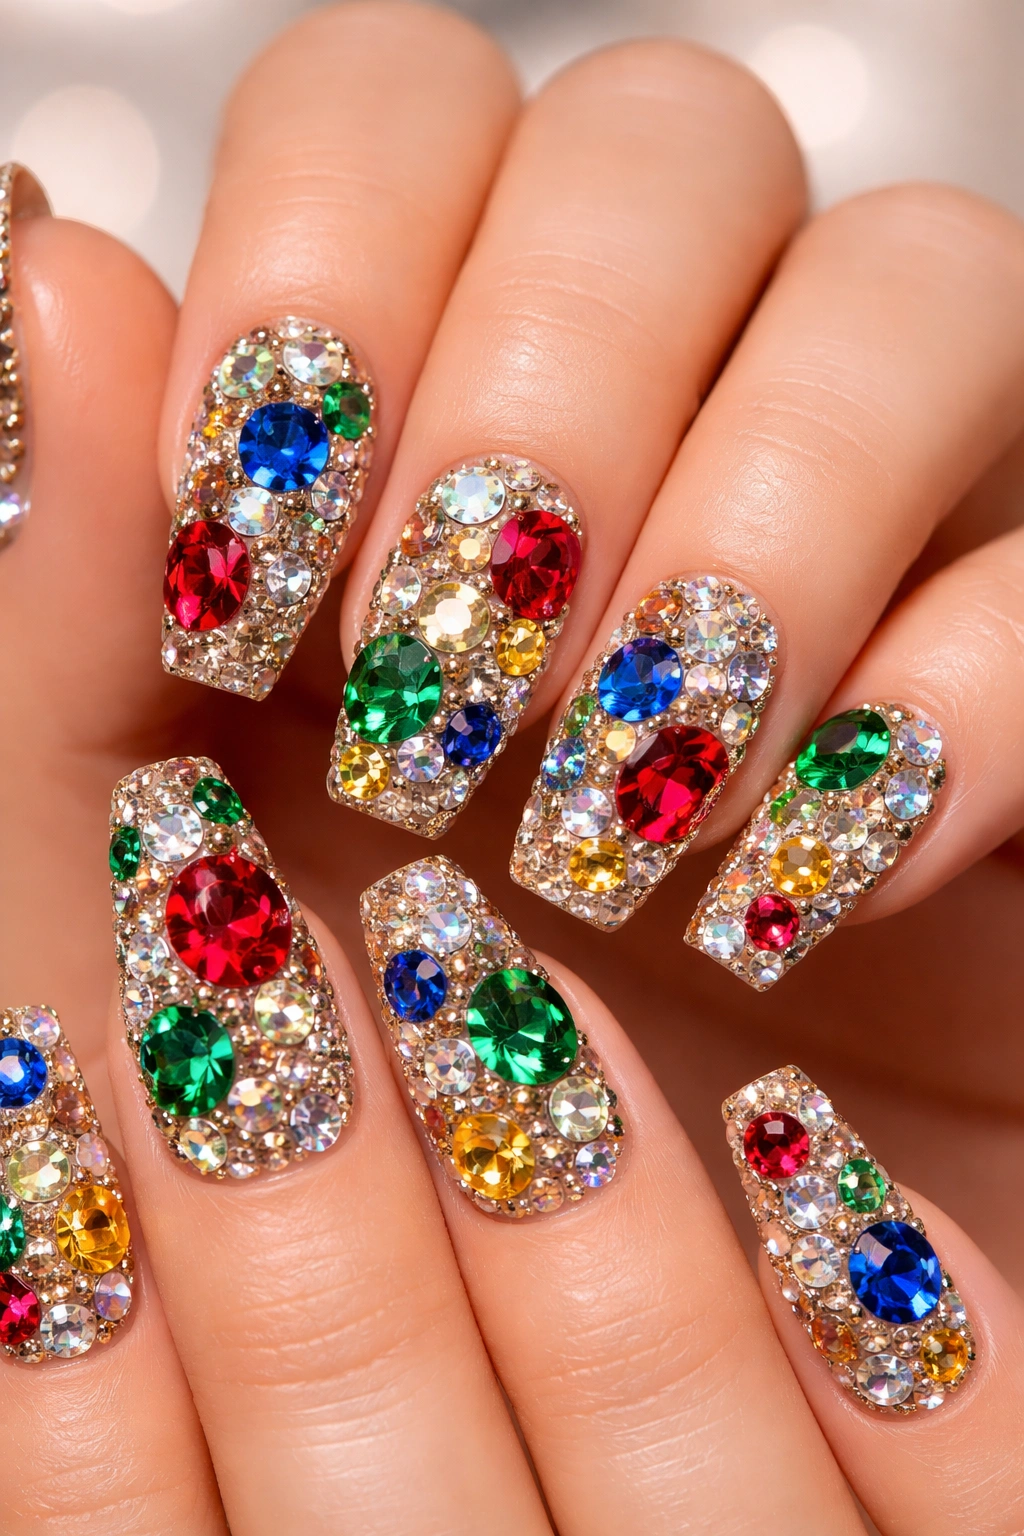
If you’re a maximalist at heart and you want your nails to absolutely sparkle with intention, a multicolor gem mani with varied stone sizes is your answer. This design uses rhinestones in different colors (ruby red, sapphire blue, emerald green, citrine yellow, and clear crystals) and different sizes all on the same nail or distributed across your set. The effect is luxe, dimensional, and unapologetically glamorous.
Color Selection and Harmony
The key to pulling off a multicolor rhinestone mani without it looking chaotic is choosing colors that work together as a palette. Jewel tones (emerald, sapphire, ruby, and amethyst) naturally complement each other because they share similar saturation and richness. Alternatively, you could go with all warm tones (gold, citrine, amber, and rose) or all cool tones (silver, sapphire, aquamarine, and diamond). Mixing in clear or AB rhinestones helps tie everything together and prevents the look from feeling too heavy.
Strategic Stone Placement
- Create a focal point by clustering your largest and most vivid stones toward the center or tip
- Arrange stones in a pattern or let them fall naturally across the nail
- Graduate from larger stones in the center to smaller ones toward the edges for a cohesive look
- Leave some nude or clear base visible between stones to prevent the nail from looking muddy
- Mix matte and glossy finishes on your base polish to add additional dimension
Real insight: Nail artists often describe this look as “intentional excess” because every stone placement is deliberate and curated, even though it appears abundant.
8. Jewel-Tone Base with Clear Rhinestones
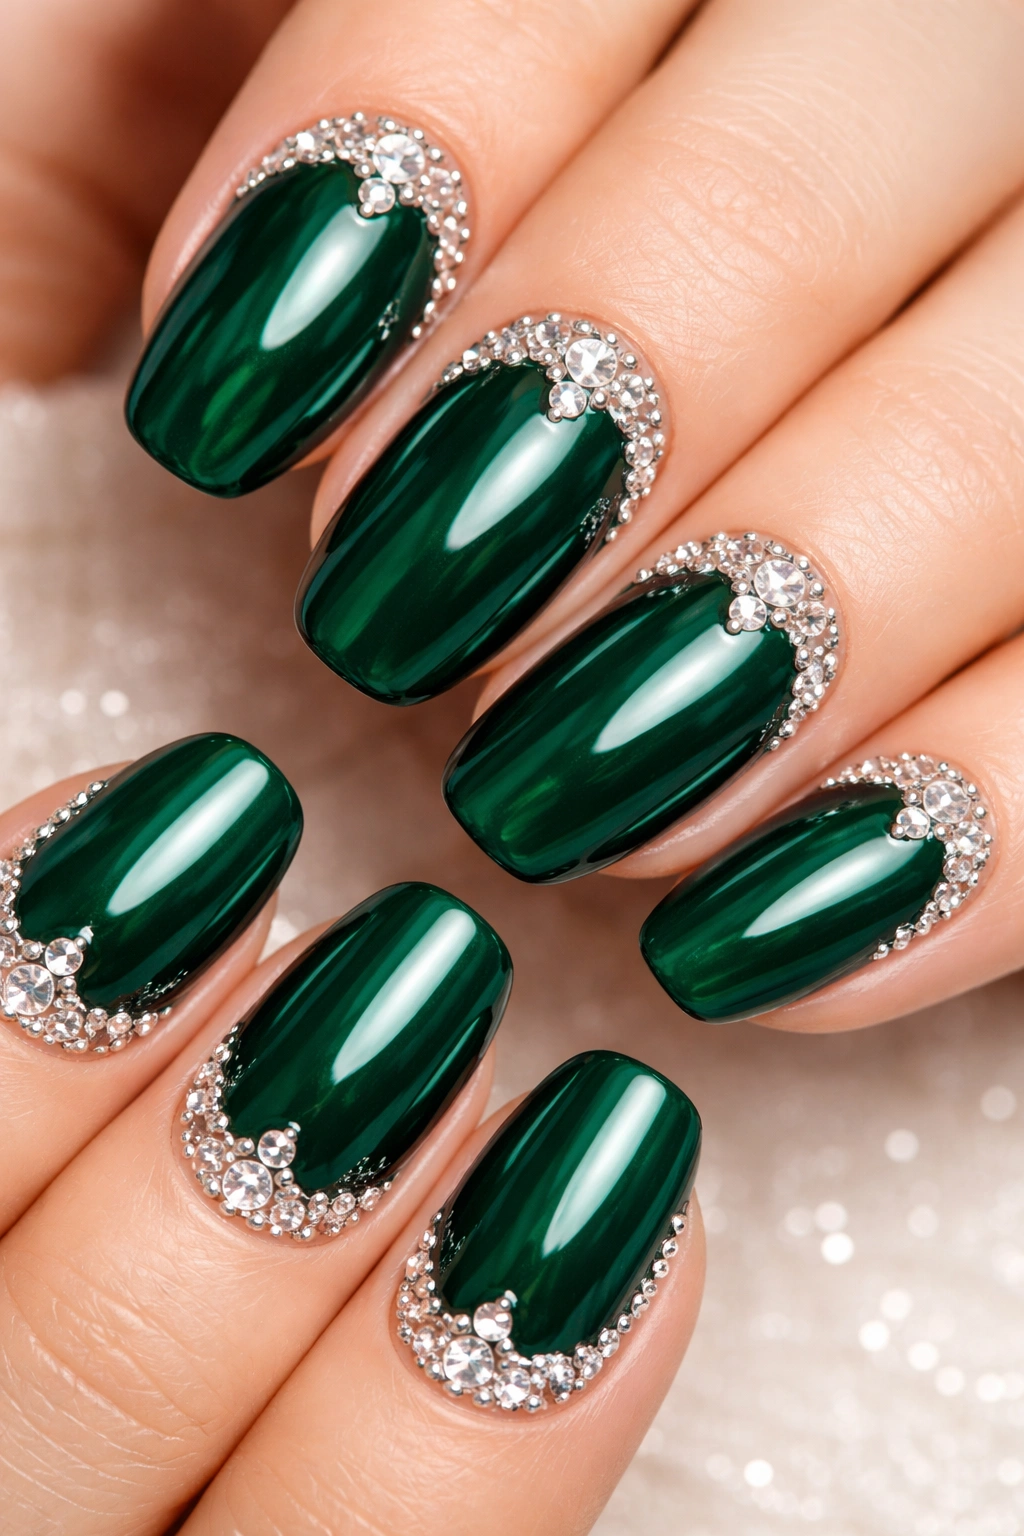
A rich, saturated jewel-tone base color (deep emerald, sapphire blue, or ruby red) paired with clear or white-opal rhinestones creates a look that’s simultaneously bold and refined. The solid color provides impact and personality while the clear stones add universal sparkle that complements any jewel tone without competing for attention. This combination works beautifully for evening events, celebrations, or anytime you want to feel absolutely luxurious.
Why Clear Stones Amplify Color
Clear rhinestones act as a multiplier for your base color rather than a distraction from it. Because there’s no competing color in the gems themselves, all the visual weight remains with your polish. This is why clear stones work with absolutely any nail color and are the most versatile choice for rhinestone designs. They add sparkle and dimension without changing the fundamental color story you’re telling with your manicure.
Applying Stones to Dark Polish
- Use gem sealer gel instead of liquid nail glue on dark polish—it prevents the polish from showing through as cloudiness around the stone bases
- Apply stones while the gel is still tacky for best adhesion
- Consider the placement more carefully on darker bases since stones will be visible from all angles
- A scattered or gradient placement looks less formal than arranged patterns on jewel tones
Worth knowing: Jewel-tone nails with clear rhinestones photograph beautifully because the combination creates stunning light-catching effects in flash photography.
9. Celestial Design with Star Rhinestones
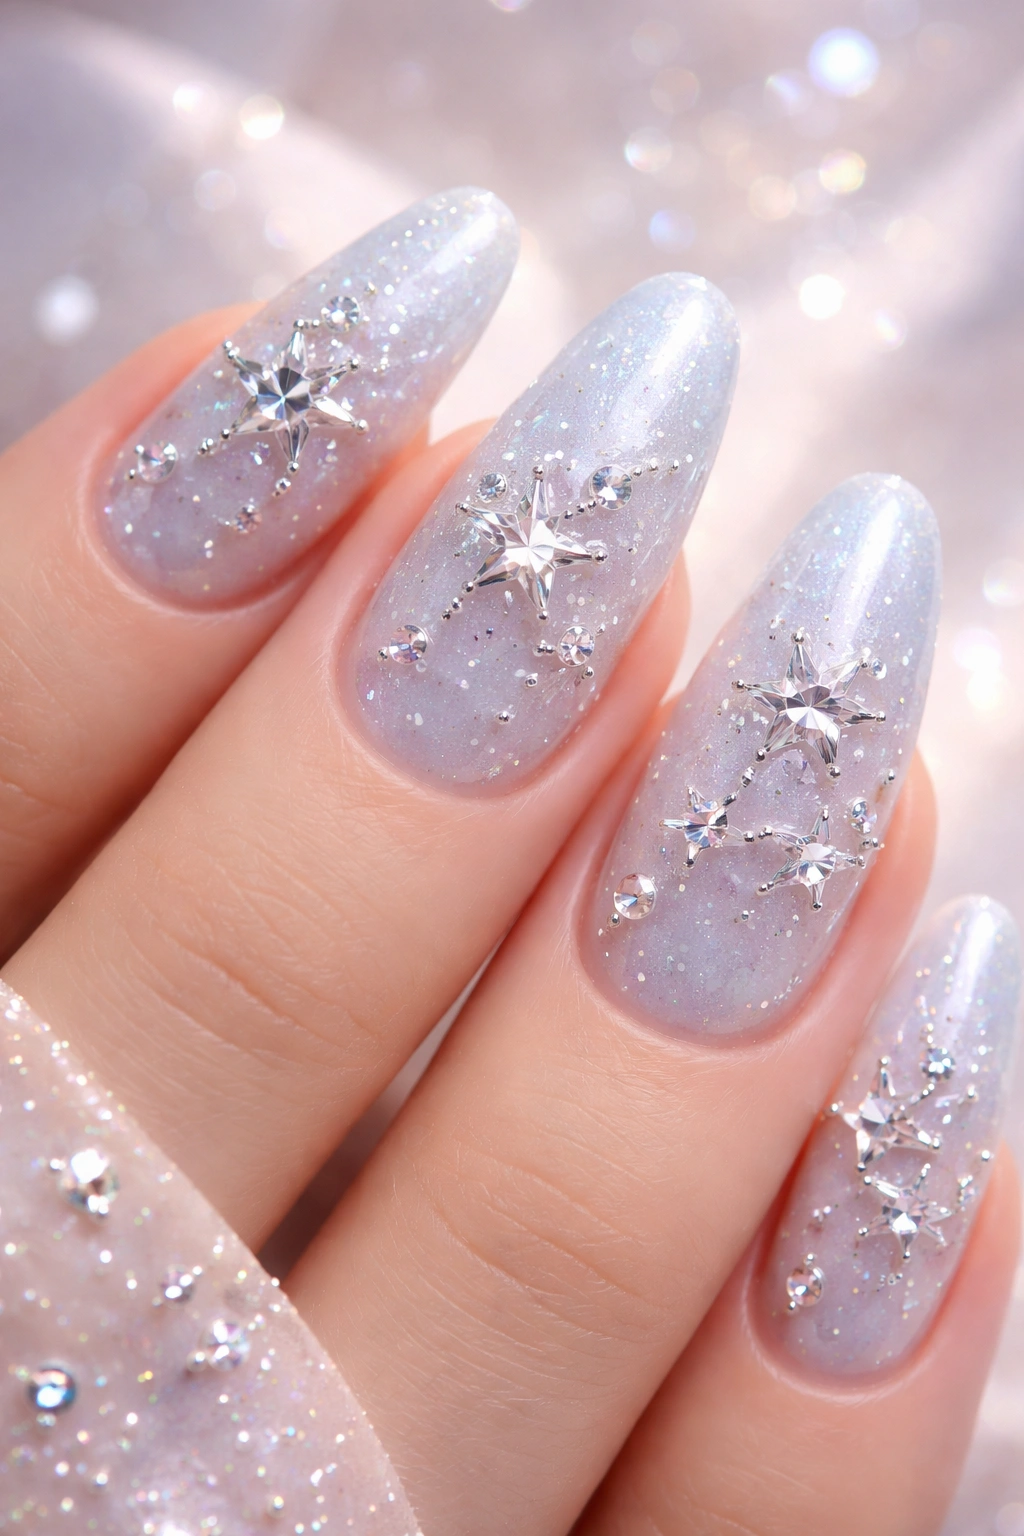
Stars, moons, and cosmic elements have become increasingly popular in nail art, and pairing them with rhinestones adds an ethereal, dreamy quality. You can use star-shaped rhinestones as your focal design, or paint celestial elements and add round rhinestones at strategic points (like the centers of stars, along crescents, or scattered throughout). This design appeals to anyone who loves mystical aesthetics or simply wants something that feels magical and special.
Creating Celestial Cohesion
A soft, neutral base (milky white, pale blue, or soft pink) works beautifully as a backdrop for celestial imagery. You could paint delicate stars and crescent moons with gold or silver gel polish, then anchor them with rhinestones. Alternatively, use rhinestones to create the celestial shapes entirely—arranging small stones in a star pattern or a crescent curve. The key is balancing the painted elements with the gemstone elements so neither overwhelms the other.
Color Palettes for Cosmic Vibes
- Soft white or cream base with gold details and clear or champagne rhinestones: ethereal and romantic
- Midnight blue base with silver elements and white or AB rhinestones: mystical and modern
- Pale lavender base with iridescent rhinestones throughout: dreamy and whimsical
Insider note: Using metallic gel pens or thin brushes to paint stars creates finer, more delicate lines than traditional gel polish application, which gives your celestial design a more intricate, intentional appearance.
10. Pink Chrome with Rhinestone Accents
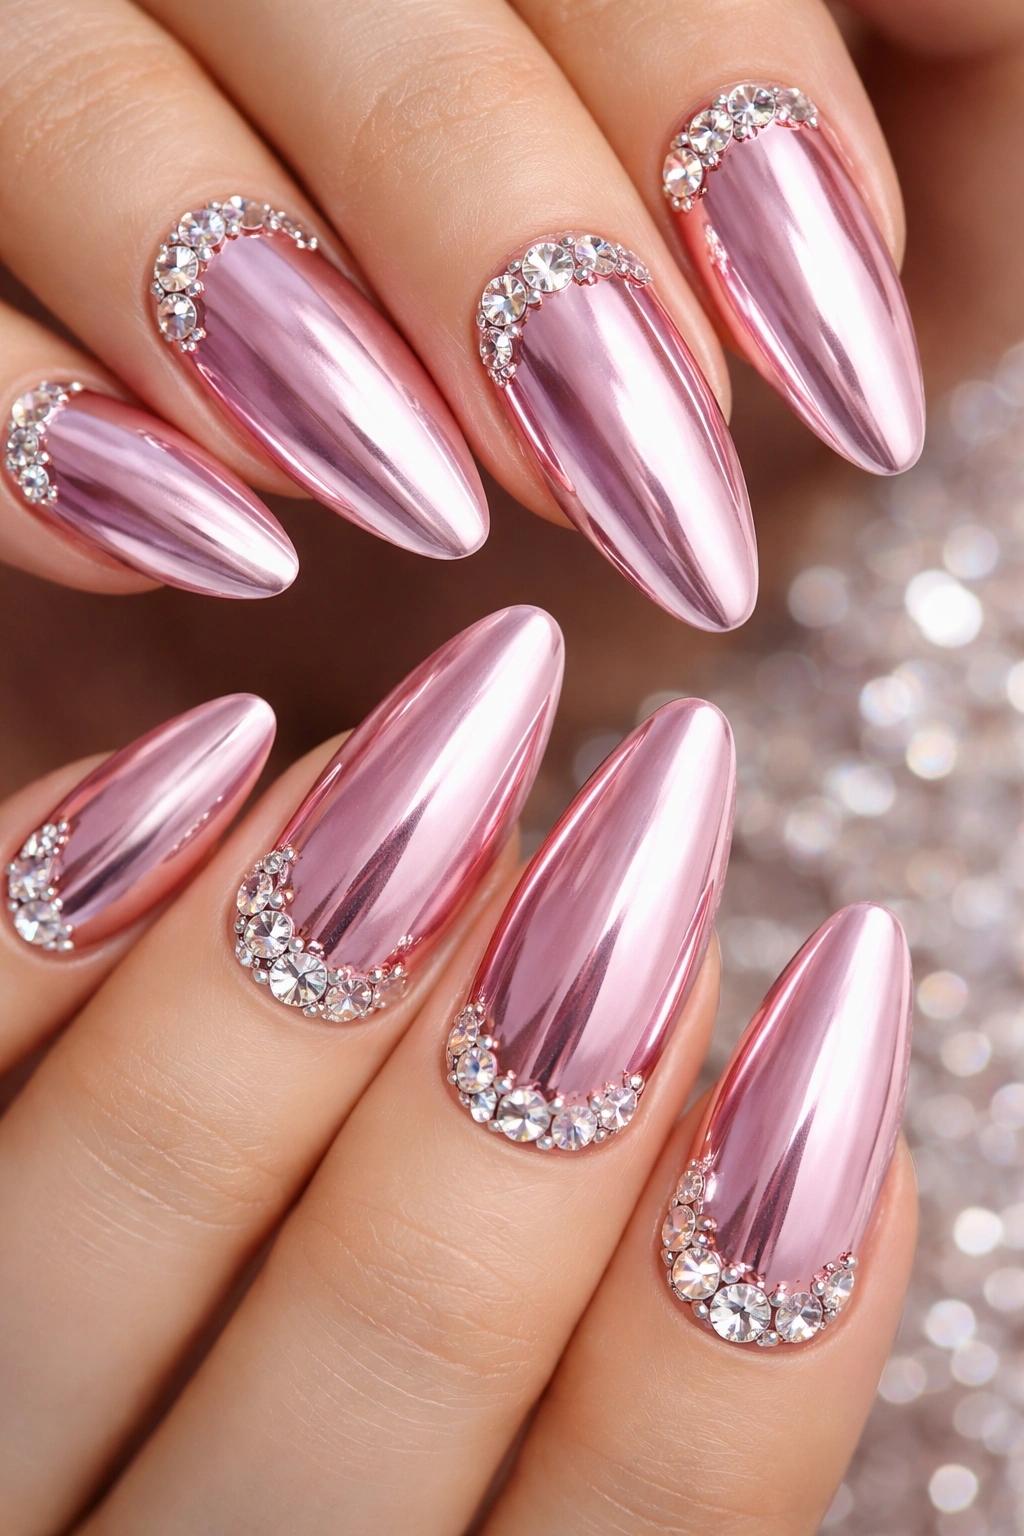
Chrome finishes have had a major moment in nail design, and they pair beautifully with rhinestones because both reflect light brilliantly. A pink chrome base (ranging from baby pink to hot pink depending on your preference) combined with strategically placed rhinestones creates a look that’s absolutely luxe and feels fashion-forward. The chrome itself provides metallic shine, while the rhinestones add multidirectional sparkle and dimensional interest.
Understanding Chrome Finishes
Chrome is achieved using powder pigments that reflect light in a specific way, creating a mirror-like or metallic effect. When you layer rhinestones on top of chrome polish, you’re creating multiple layers of light reflection—the chrome bounces light in one way while the facets of the rhinestones refract it in countless others. The result is a nail that literally seems to change as you move your hands.
Placement Techniques for Chrome Nails
- Apply rhinestones while the chrome powder is still setting for optimal adhesion
- Concentrate stones at the tip for an ombré effect from solid chrome to gem-encrusted
- Create a half-moon or geometric section of rhinestones against the chrome base
- Use clear or iridescent stones to let the chrome color shine through
- Seal everything carefully with gel top coat to prevent stone displacement
Pro tip: Pink chrome with clear rhinestones is particularly flattering because it creates a rosy, luminous glow that brightens the entire hand.
11. Floral Design with Rhinestone Centers
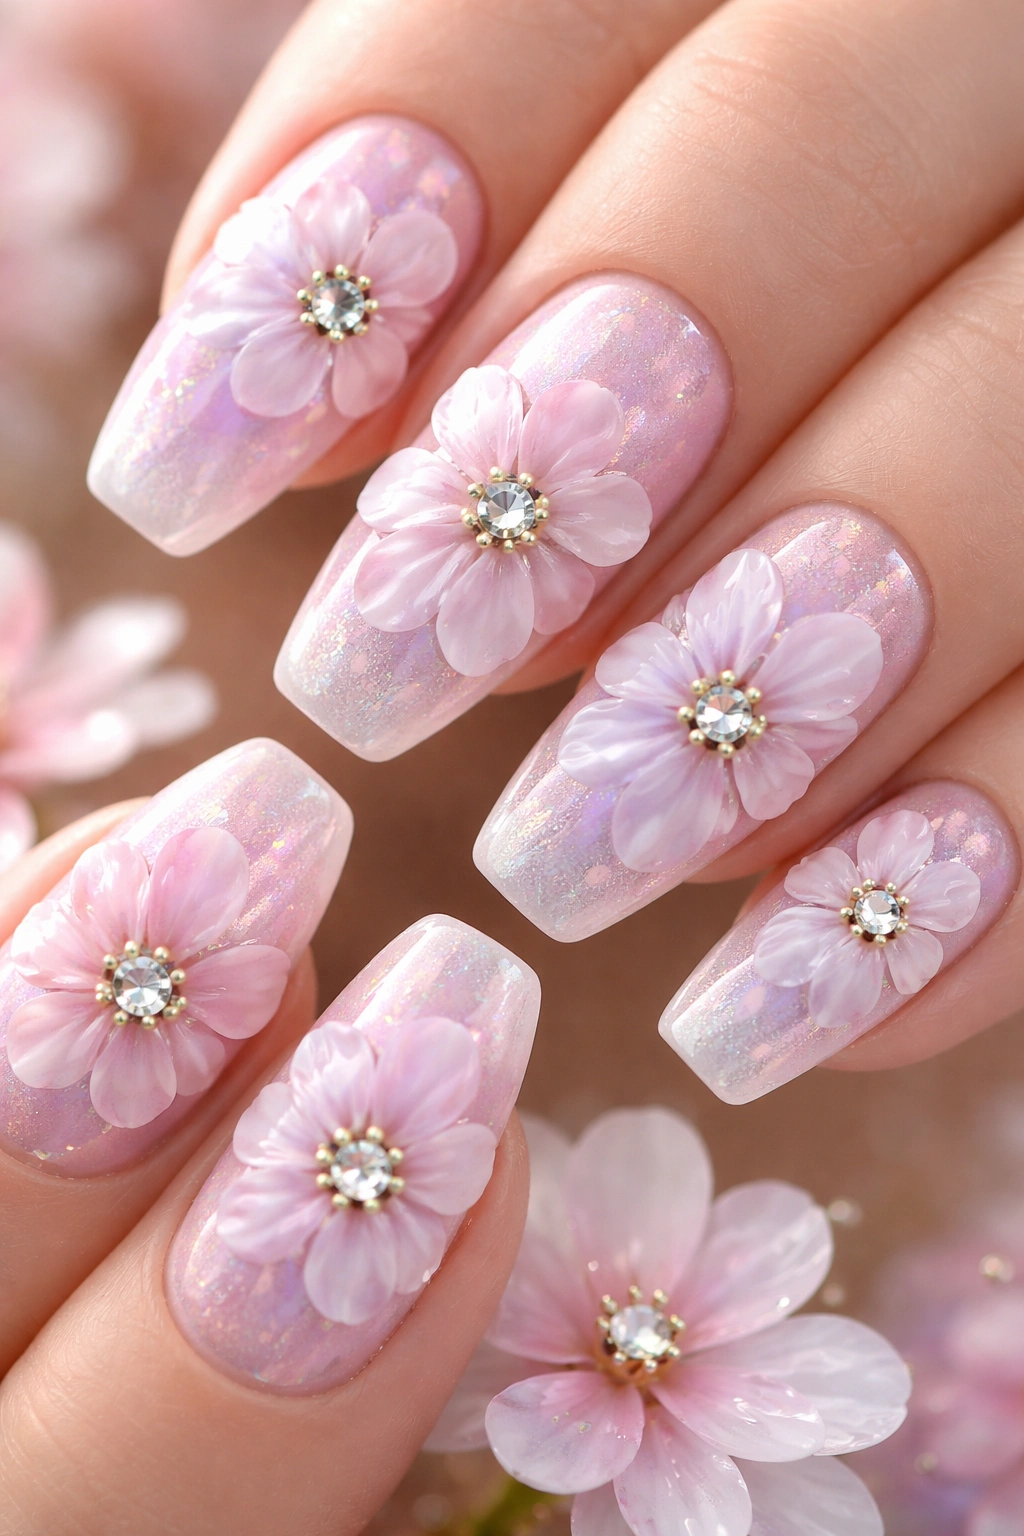
Floral nail art becomes even more special when you incorporate rhinestones as the centers of your flowers. Paint delicate petals in shades that coordinate with your theme (soft pastels for spring, jewel tones for luxury, etc.), then place rhinestones in the heart of each bloom. The gems add dimension and luxury to what might otherwise be a simple floral design. This approach works beautifully for special occasions like weddings, anniversaries, or springtime celebrations.
Creating Dimension in Florals
The traditional approach to floral nail art is entirely two-dimensional—painted petals and painted centers. By introducing rhinestones, you’re adding actual physical texture and three-dimensional interest. The gems catch light differently than any painted element could, creating a manicure that’s as interesting to touch as it is to see. Larger rhinestones work for focal flowers, while smaller stones can form delicate flower clusters across the nail.
Floral and Rhinestone Color Combinations
- Nude or soft pink base with white or pale pink floral petals and clear diamond-cut rhinestones in the centers
- Cream base with coral or peach petals and peachy or champagne rhinestone centers
- White base with emerald green foliage elements and ruby red or pink rhinestone flower centers
- Soft lavender base with purple petals and purple or clear rhinestone centers
Real-world advantage: Floral rhinestone nails feel both artistic and glamorous, making them perfect for anyone who wants nail art with personality rather than pure sparkle.
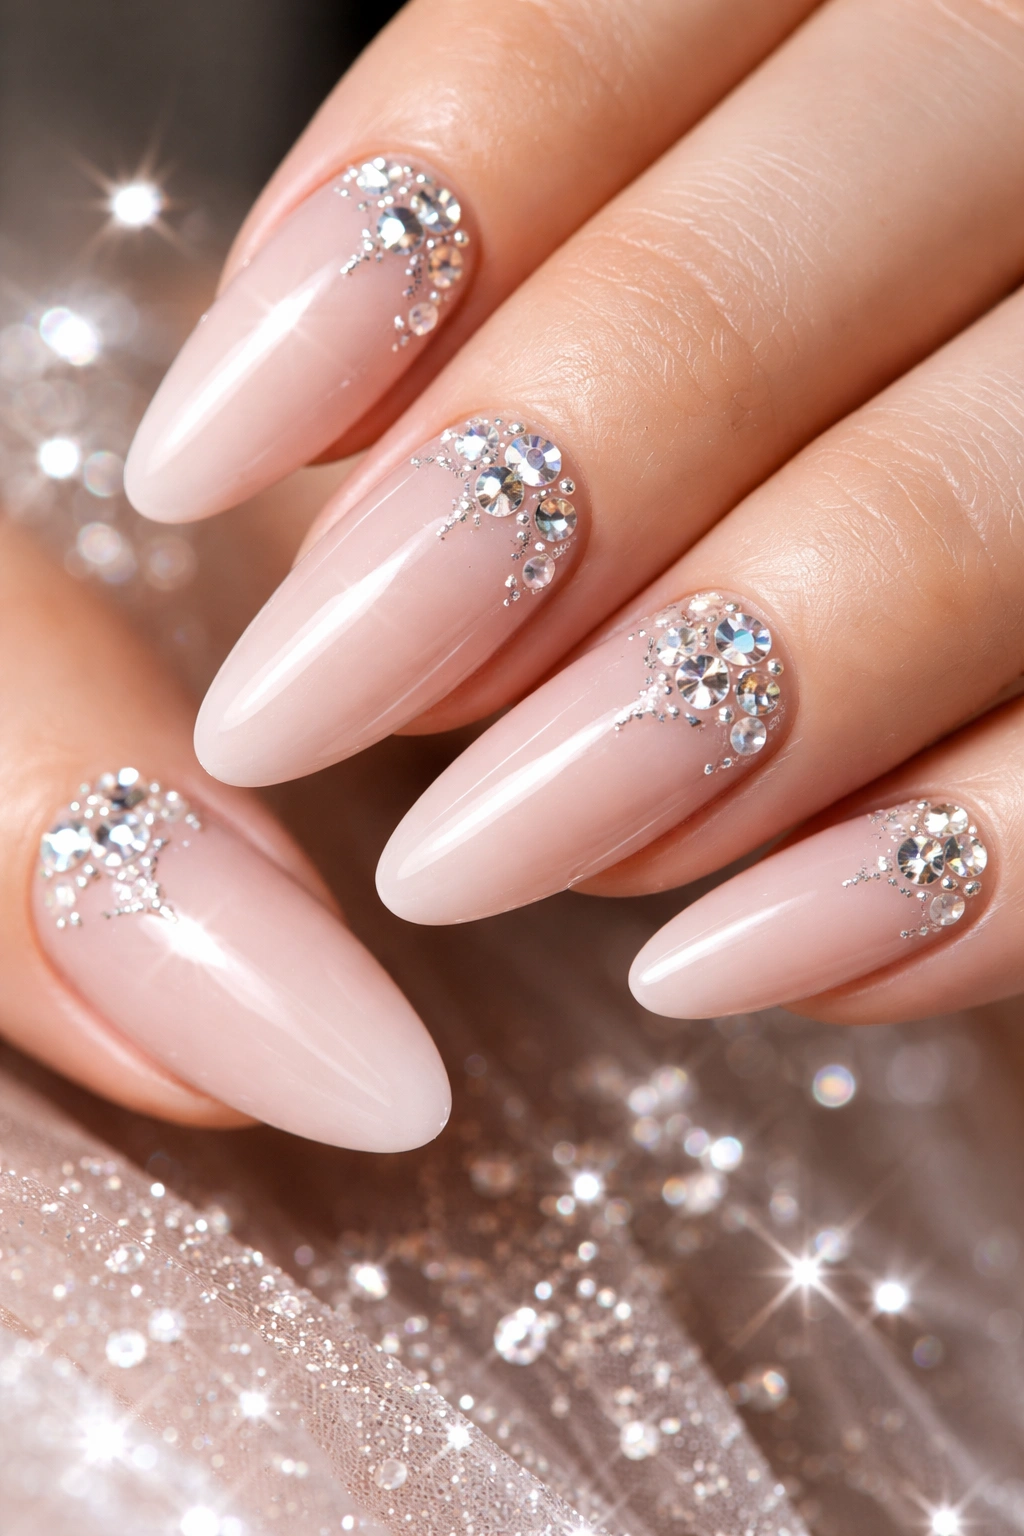
12. White Rhinestone Nails with Negative Space

White or clear rhinestones on nude or neutral nails with deliberate negative space (areas of the nail left completely unadorned) creates a look that’s modern, artistic, and undeniably chic. The negative space gives your eye somewhere to rest while the rhinestone placement becomes the art. This design feels gallery-level intentional because it demonstrates restraint and consideration rather than maximum coverage.
Understanding Negative Space in Nail Design
Negative space—the parts of the nail you leave bare—is just as important as the decorated sections. It prevents the design from feeling cluttered and helps the rhinestone placement feel like art rather than random embellishment. You might leave the entire top third of the nail bare while clustering rhinestones toward the cuticle, or create a geometric negative-space shape (like a triangle or half-moon) filled with gems.
Achieving Modern Minimalism
- Keep your base a soft, neutral shade that reads as “unfinished” rather than intentional
- Place rhinestones in a specific, recognizable pattern (a line, a gradient, a geometric shape)
- Leave at least one-third to one-half of each nail completely bare of polish or stones
- Use larger stones rather than tiny ones—the fewer gems you use, the more impactful each one becomes
- Finish with a glossy top coat only on the rhinestone areas, leaving the bare areas matte
Worth knowing: This design is surprisingly sophisticated and photographs beautifully because the contrast and clean lines create visually interesting composition.
13. Gold Accents with Multicolor Rhinestones
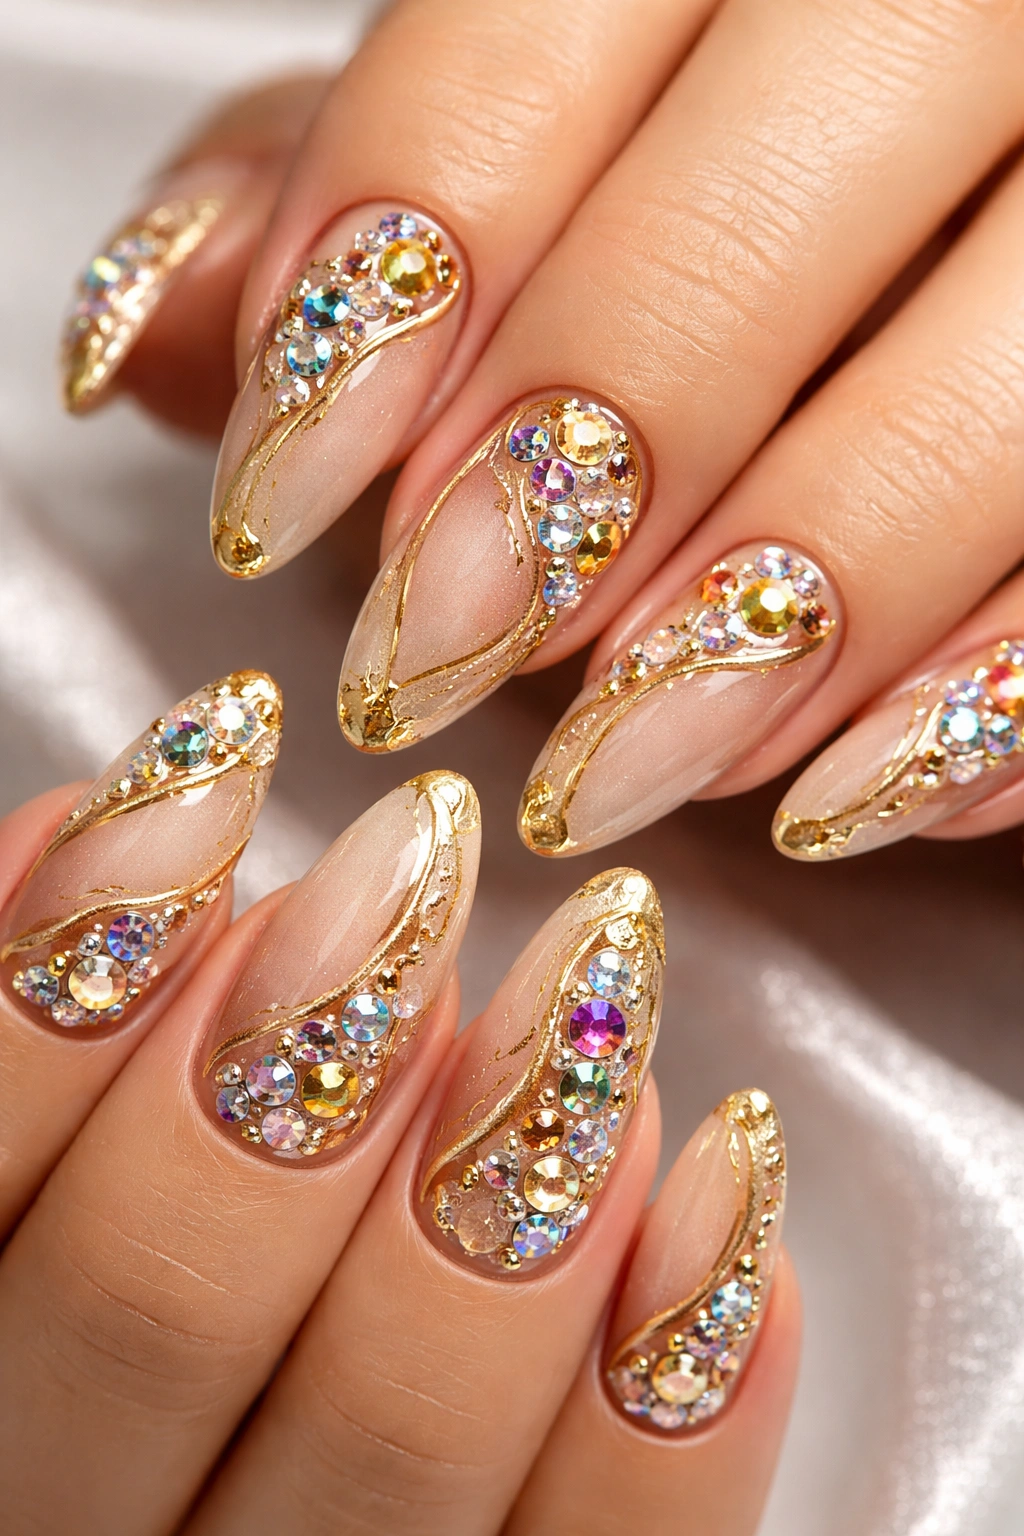
Combining warm metallic elements (gold gel details, gold foil, or gold chrome) with colorful rhinestones creates a look that feels luxe, artistic, and undeniably expensive. Gold acts as a unifying element that ties together rhinestones in multiple colors that might otherwise clash. Add some hand-painted gold details, gold foil accents, or a gold chrome finish, then layer in multicolor rhinestones, and you’ve created nail art with genuine artistic depth.
Why Gold Ties Everything Together
Gold has the magical property of complementing virtually any color. Because of its warmth and luminosity, gold makes jewel tones appear richer and makes pastels appear more sophisticated. Using gold elements alongside multicolor rhinestones prevents the design from feeling overwhelming or chaotic—the gold acts as visual breathing room and helps organize the composition.
Integrating Gold with Multiple Stone Colors
- Paint fine gold details (swirls, geometric lines, accents) and place rhinestones around them
- Use gold chrome or metallic powder as your base and scatter multicolor rhinestones across it
- Create a half-and-half design with gold metallic on one side and rhinestones on the other
- Use gold foil in geometric shapes and place colorful stones within or around those shapes
- Combine gold glitter with opaque stone colors for warm, rich sophistication
Pro tip: When mixing multiple rhinestone colors with gold, choose stones that are all similar in saturation level (all vibrant jewel tones, or all soft pastels) rather than mixing vibrant and muted stones, which can feel chaotic.
14. Swarovski Crystal Statement Nails

Swarovski crystals are the luxury option in the rhinestone world—they’re precision-cut, incredibly brilliant, and made with superior materials compared to standard rhinestones. If you want your rhinestone nails to look absolutely investment-level glamorous, Swarovski crystals are the way to go. These stones have a specific sparkle and clarity that’s instantly recognizable and worth the additional cost for truly special occasions.
The Difference Swarovski Makes
Standard rhinestones are functional and beautiful, but Swarovski crystals are art. They’re cut with mathematical precision to maximize light refraction, and the materials they’re made from are superior to cheaper alternatives. The difference is most noticeable in how they catch light—Swarovski stones seem to glow from within rather than just reflecting surface light. If you’re investing time in a detailed nail design, premium stones make sense.
When to Invest in Swarovski
- Wedding nails, engagement photos, or other once-in-a-lifetime events
- Important professional events where you want maximum impact
- Any occasion where someone might be photographing your hands professionally
- When you want a lasting design that you’ll love forever
- For statement accent nails where the entire focus is on the gems themselves
Worth knowing: Swarovski crystals are available in hundreds of colors and finishes, including AB (aurora borealis), which creates rainbow light-catching effects that are particularly stunning.
15. Bling It Up: Full Rhinestone Encrusted Nails
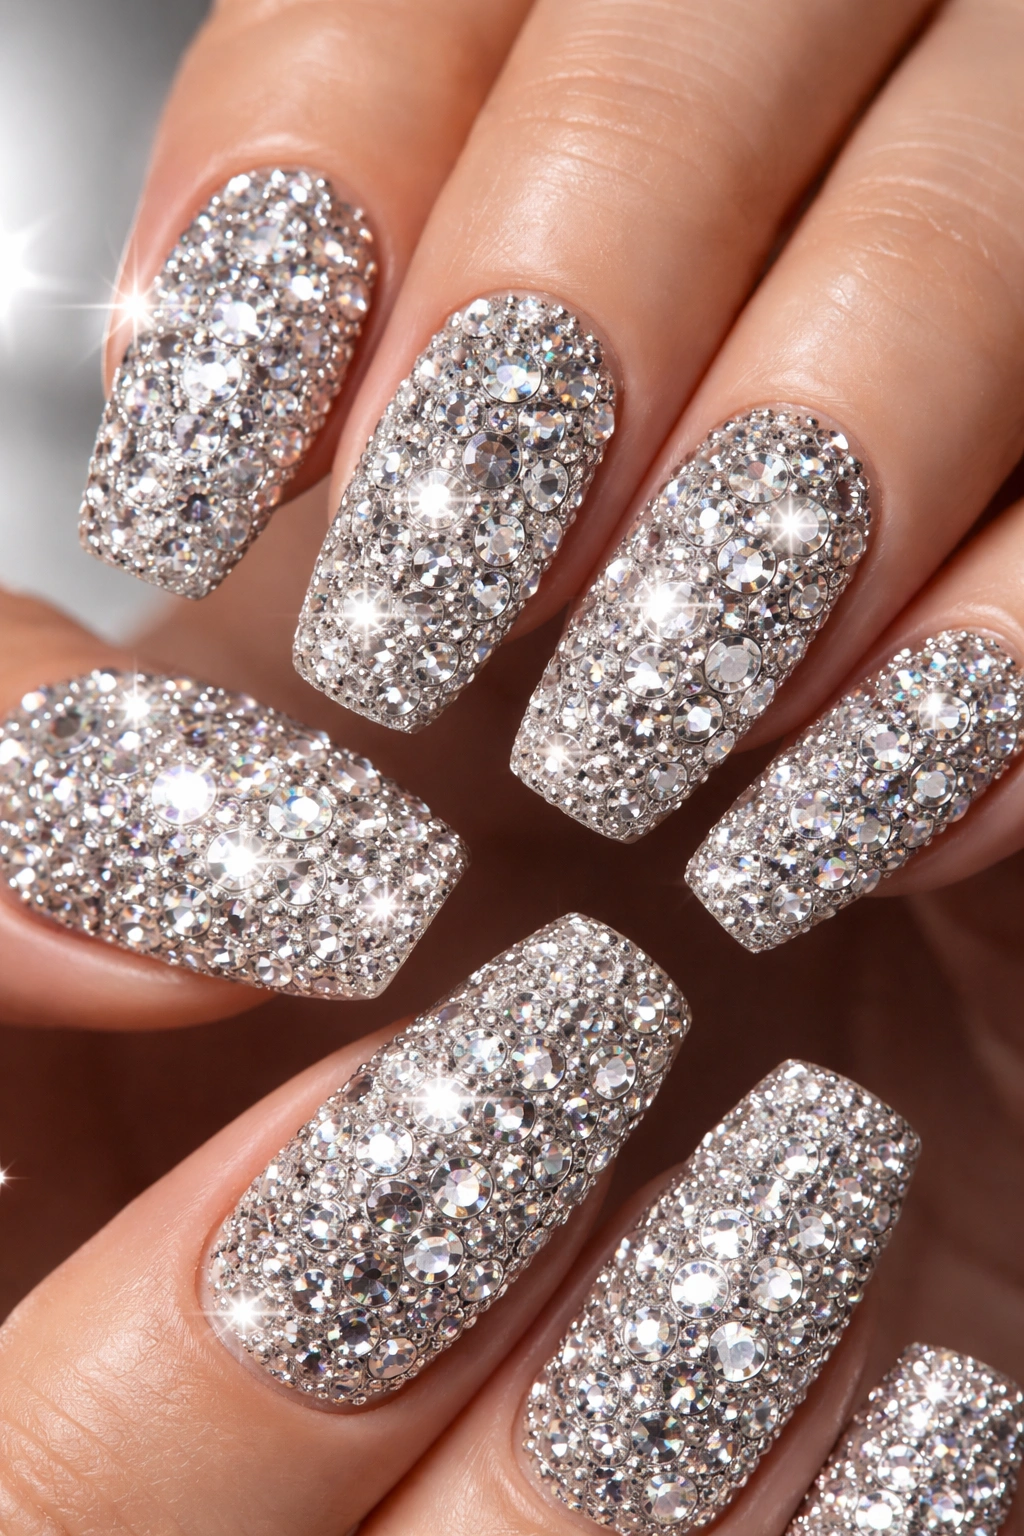
For those who firmly believe more is more, full rhinestone encrusted nails are the ultimate expression of glamorous excess. Every millimeter of the nail is covered in sparkling gems, creating a look that’s maximalist, bold, and absolutely show-stopping. This design is perfect for anyone who loves high-fashion nails, special events where you want to make a dramatic statement, or anyone who simply can’t get enough sparkle.
Achieving Full Coverage Without Looking Chaotic
The secret to making fully encrusted nails look polished rather than cluttered is using stones that work together harmoniously. You can choose all stones in a single color family, use graduated stone sizes (larger ones in the center, graduating to smaller toward the edges), or select stones in complementary colors. The base layer is also crucial—a matte or metallic base helps the stones pop, while multiple thin layers of sealer gel are essential for durability.
Making Maximum Sparkle Feel Intentional
- Select 2-3 coordinating rhinestone colors rather than every color available
- Vary the sizes of your stones intentionally—use the largest stones as focal points
- Leave minimal base color visible, but don’t completely eliminate it as the gems need something to adhere to
- Use matte base colors (like matte black, matte nude, or matte jewel tones) under your rhinestones for better contrast
- Seal with multiple thin layers of gel sealer rather than one thick layer
- Consider the shape of your nails—longer nails provide more surface area for stones
Real insight: Professional nail artists who specialize in rhinestone work often spend 45 minutes to an hour on a single fully encrusted nail because precision placement and secure adhesion are essential.
Final Thoughts
Rhinestone nails represent the intersection of artistry, luxury, and personal expression. Whether you choose a single strategically-placed stone or full coverage in multicolored gems, you’re creating something that catches light, turns heads, and makes you feel confident. The beauty of rhinestone designs is that there’s no single right way to do them—your preferences, occasion, and style aesthetic should guide your choices.
The most important thing to remember is that rhinestones work best when they feel intentional rather than random. Whether you’re going for minimalist elegance or maximalist glamour, think through your color palette, consider where you want the eye to travel, and choose stones that coordinate with your overall design vision. These sparkling gems are incredibly forgiving because they’re inherently glamorous, but taking just a little extra time to plan your placement transforms a good rhinestone mani into an absolutely stunning one.
Start with one of these fifteen designs or use them as inspiration to create your own rhinestone nail art. Visit a skilled nail technician who specializes in gem work, or gather your supplies and try DIY application at home. Either way, get ready to experience the joy of having literal jewelry on your fingertips. Your nails are about to sparkle.
