

Hot pink has always been the ultimate statement nail color—bold enough to command attention, but versatile enough to work with almost any aesthetic you’re going for. When you combine that electric energy with the playful, dimensional trend of duck nails (those gorgeous coffin-shaped acrylics with extra length), you get endless possibilities for designs that feel both current and deeply personal. Duck nails with hot pink as your foundation give you the perfect canvas for everything from minimalist elegance to full-on artistic expression, and the longer length means you have serious room to play with dimension, texture, and decorative elements.
The beauty of hot pink duck nails lies in how adaptable they are. Whether you’re imagining something sleek and monochromatic, or you want to layer in second colors, metallics, and intricate nail art, hot pink reads as confident and intentional. It photographs beautifully, translates well across different skin tones, and honestly feels good to look at every single time you glance at your hands. The duck nail shape elongates your fingers and creates this naturally luxe feel that pairs perfectly with hot pink’s inherent drama.
What makes these 12 ideas special is that they range from surprisingly wearable to show-stopping, so whether you’re thinking about something for everyday wear or a special occasion, you’ll find inspiration that actually speaks to your style. Each design leverages the duck nail shape in a different way, showcasing exactly why this particular shape has become such a favorite among nail artists and enthusiasts. Let’s dive into the designs that will have everyone asking for your nail artist’s contact information.
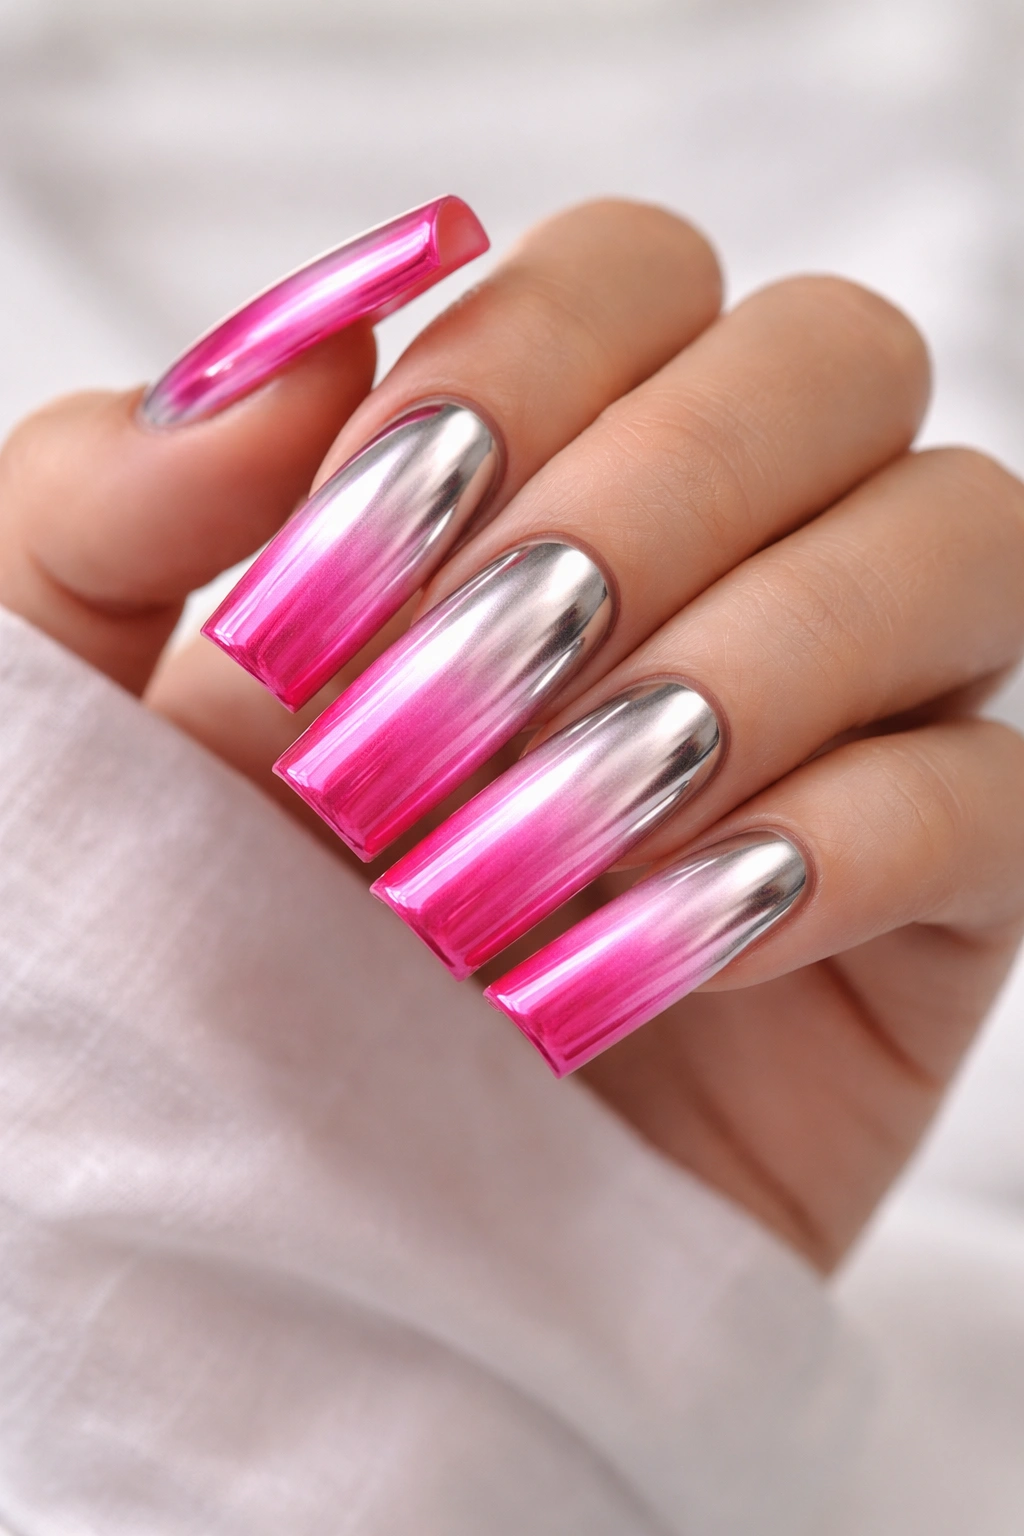
1. Glossy Hot Pink with Chrome Gradient Fade
This design embraces pure elegance through minimal intervention—hot pink as your main event, with a subtle chrome gradient that catches light and movement. The glossy finish ensures maximum shine and makes the color feel almost liquid on your nails, while the chrome fade (usually transitioning to a peachy or lighter pink tone toward the tips) adds dimension without overwhelming the design.
Why This Works
The chrome gradient is all about letting light play across your nail rather than creating a stark color division. This approach feels modern and sophisticated because it respects the hot pink as the star while using the chrome as a supporting player. The glossy finish on duck nails has this inherent luxury appeal—the longer shape means more surface area to reflect light, which amplifies that premium nail salon feeling.
How to Execute It
- Use a quality hot pink base coat and apply 2-3 thin layers until opacity is perfect
- Apply chrome powder to the tips with a soft brush or applicator sponge, working it in a circular buffing motion
- The chrome should blend gradually into the hot pink base, not create a harsh line
- Seal everything with a high-shine topcoat, preferably a thick, wet-looking formula
- The gradient should be noticeable but subtle—think of it as a whisper of shimmer rather than a bold stripe
Real talk: This design absolutely depends on the quality of your topcoat. A cheap or thin topcoat will dull the chrome effect and the overall shine. Invest in a good one here—it makes all the difference.
2. Matte Hot Pink with Geometric Line Art
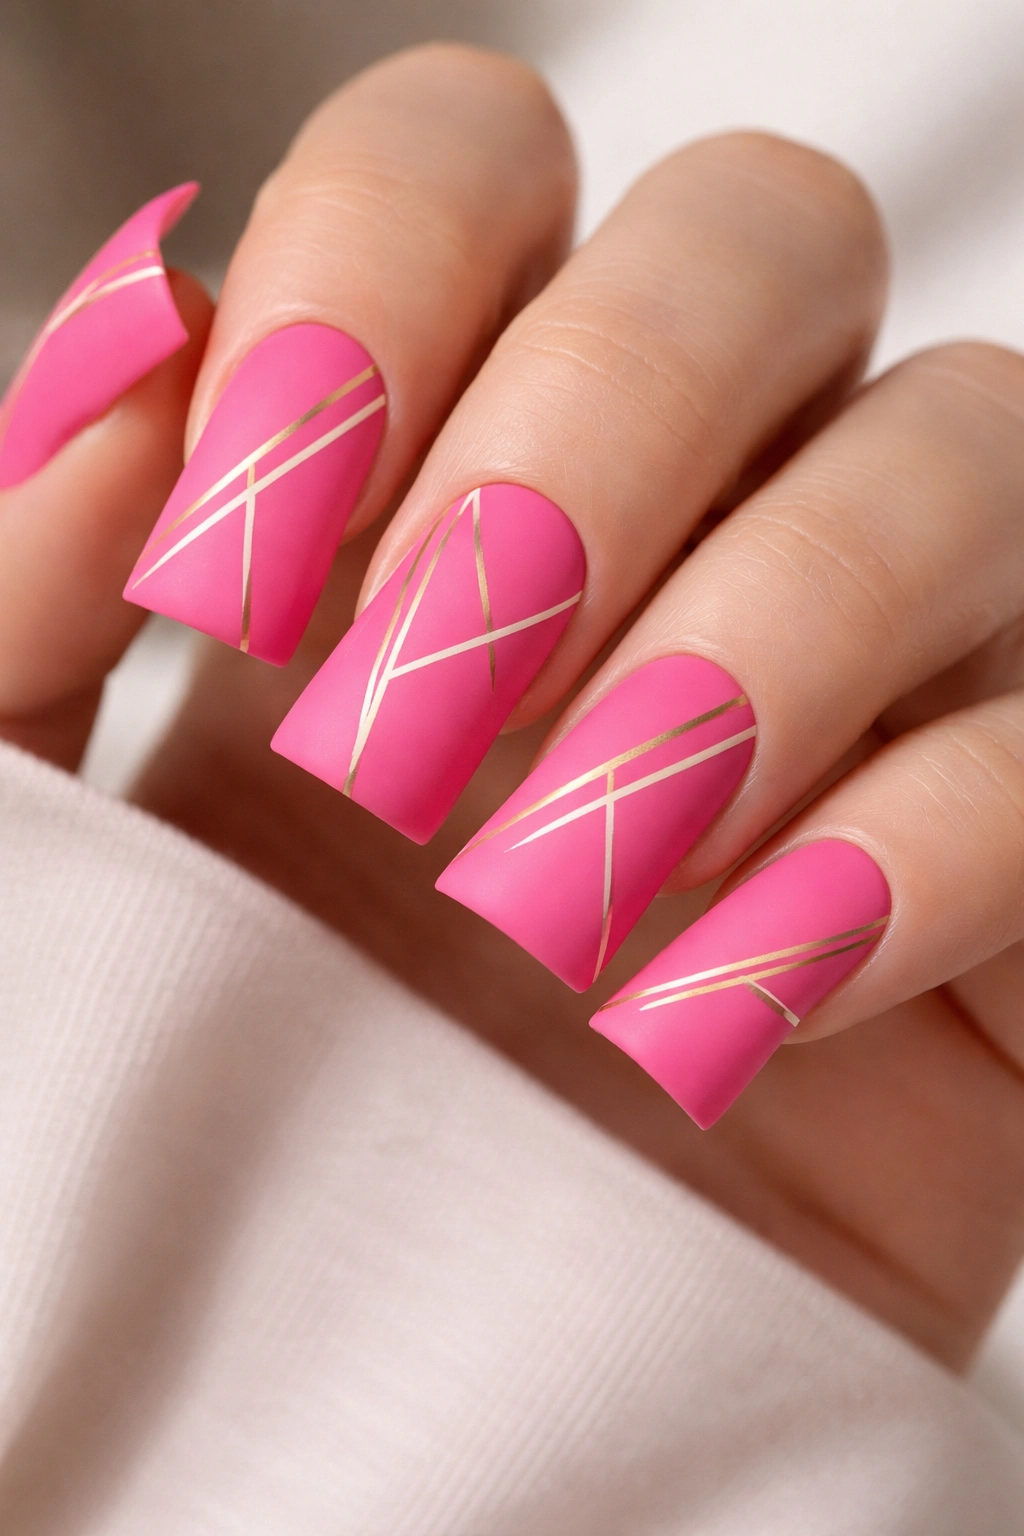
Matte hot pink creates a completely different mood than glossy—it feels edgier and more fashion-forward. Pair that velvety finish with thin geometric line art in white, black, or metallic gold, and you’ve got a design that feels current and intentional. The geometric shapes can be simple (straight lines, triangles, asymmetrical patterns) or more complex (angular shapes, abstract compositions).
The Contrast That Works
Matte finishes have become the sophisticated counterpoint to ultra-glossy nails. Hot pink in matte feels less candy-sweet and more statement-making. When you add geometric elements on top, you’re creating visual interest that doesn’t rely on sparkle or dimension—just clean, confident design. The duck nail shape is wide enough that even tiny geometric patterns read clearly and feel intentional rather than accidental.
Design Ideas to Consider
- A single vertical stripe running down the center of each nail in contrasting color
- Angular shapes (triangles, chevrons) positioned at different points on each nail
- An asymmetrical pattern where each nail features a slightly different arrangement
- Negative space designs where you’re essentially cutting geometric shapes out with color
- Minimal lines creating an abstract, almost architectural feel
Pro tip: Use a thin striping brush or a nail art pen for geometric work. The duck nail’s width gives you plenty of space to be precise without needing professional steadiness—just work slowly and use a toothpick or dotting tool to fix any wobbles before the polish dries.
3. Hot Pink Ombre with White Tips
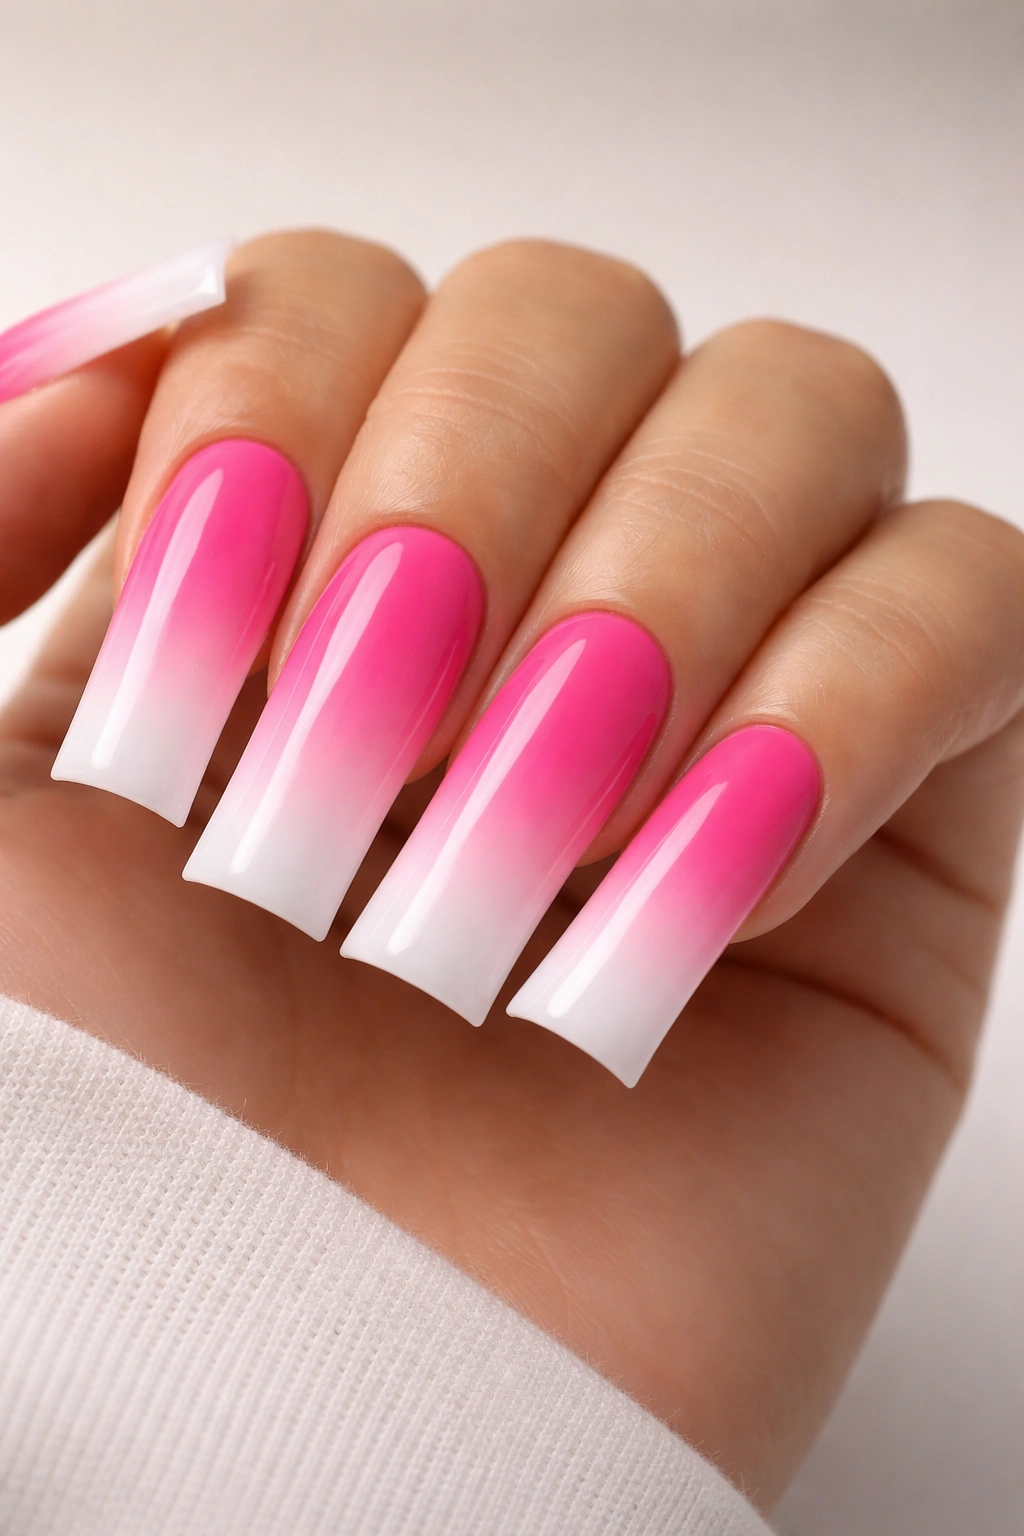
The classic ombre gradient from hot pink to white feels fresh when executed on duck nails because the extra length gives you real room to show the color transition. This isn’t just a simple fade—it’s a deliberate gradient where hot pink starts deep at the base and gradually lightens through the middle before landing in crisp white tips. It feels like a more modern take on the French manicure concept.
Technique Breakdown
An ombre effect on acrylics requires a bit of patience, but it’s more achievable than you might think. You’re essentially blending polish layers where they overlap, letting each layer fade into the next. The key is working with translucent or semi-translucent shades during the blending stage—using solid colors and trying to blend them creates muddy results.
Step-by-Step Process
- Start with a white base on the entire nail (this gives you a lighter foundation to work with)
- Paint hot pink on the base and lower third of the nail
- Use a clean, dry sponge to tap and blend the hot pink where it meets the unpainted section
- Gradually build up the gradient by adding layers and sponging, letting each layer dry slightly before the next
- The gradient should feel smooth and intentional, not patchy
- Seal with a glossy topcoat to amplify the ombre effect
The beauty here is that you can adjust the gradient’s intensity by how many blending passes you do. Fewer passes give you a bolder, more color-blocked look. More passes create an almost imperceptible fade that feels ethereal and refined.
4. Hot Pink with 3D Dimensional Designs
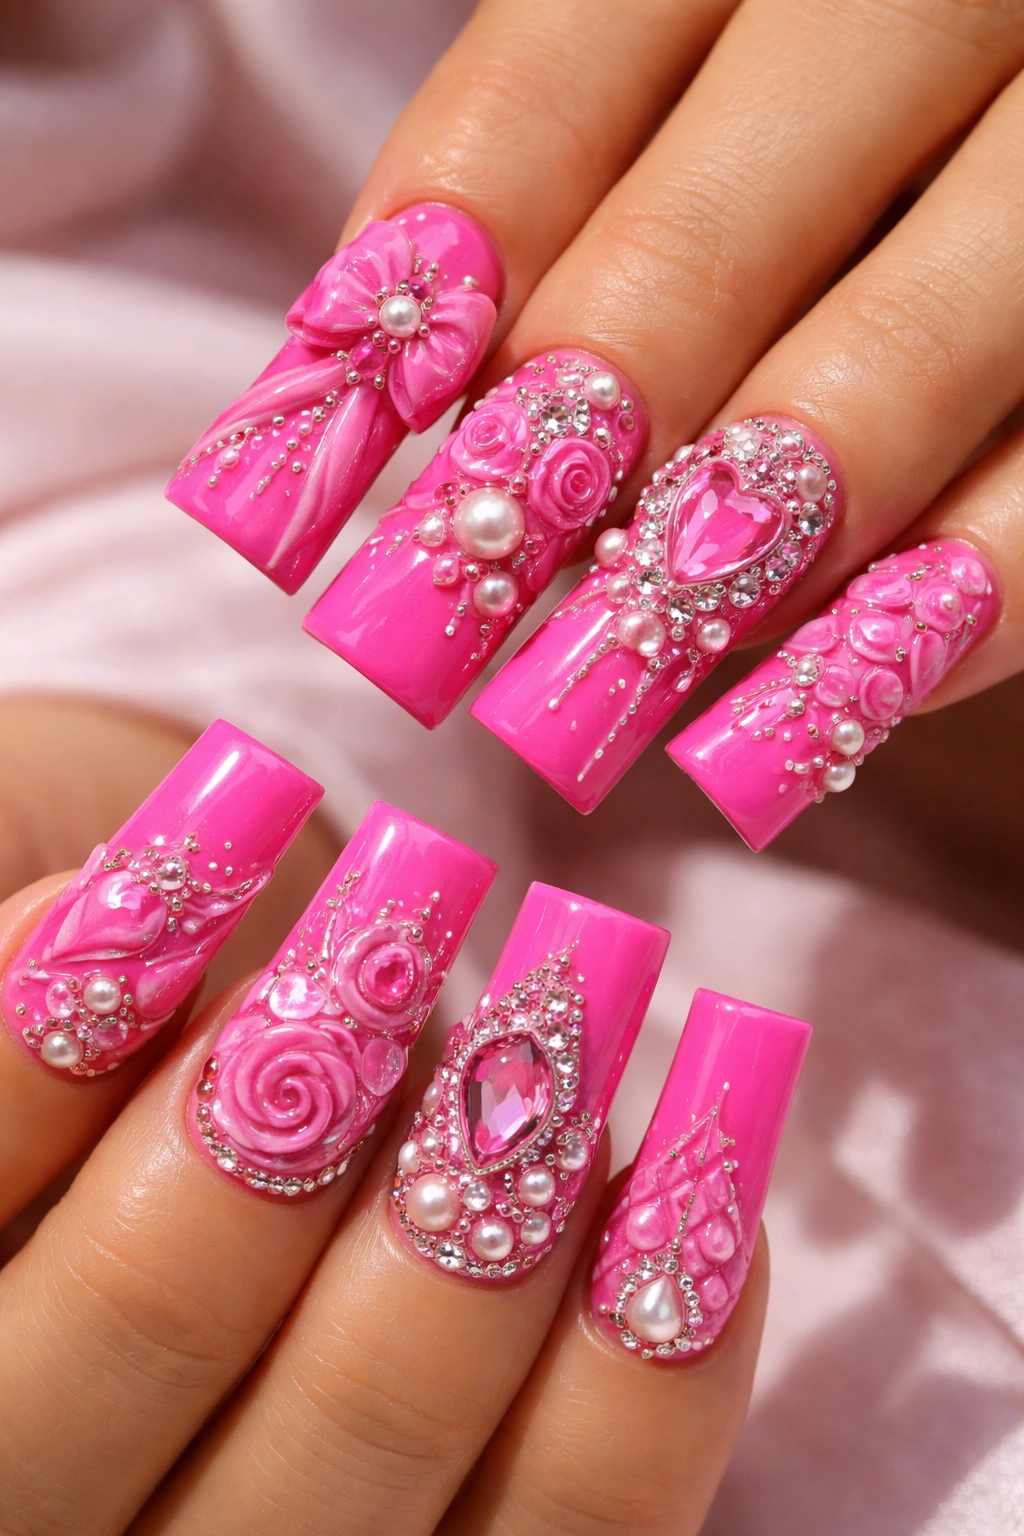
This is where duck nails absolutely shine as a canvas. The length and width give you genuine space for dimensional elements—think small sculptural accents, raised details, rhinestones, or mixed media elements that actually create shadow and depth. Hot pink as your base provides that punchy backdrop that makes dimensional elements pop visually and physically.
Creating Real Dimension
True 3D nail art uses actual sculpted elements or carefully stacked materials. This might mean building up clear gel in specific shapes, adding structured pieces like small beads or charms, or using textured elements like caviar beads or micro balls. The hot pink base makes these elements feel intentional rather than accidental—they’re clearly meant to be there.
Ideas for Dimensional Accents
- Small sculptural roses or flowers on one or two nails
- Pyramid studs or dome accents arranged in a pattern
- A miniature scene or landscape element on an accent nail
- Layered geometric shapes that extend outward from the nail surface
- Mixed media with gems, pearls, and small metallic accents
- Textured finishes using crushed glass, sand, or holographic powders in small sections
Worth knowing: Dimensional elements do require some care—they’re not suited for everyday heavy-use situations. But if you’re willing to be slightly more careful with your hands and remove them after a week or two, the wow factor is entirely worth it.
5. Hot Pink with Negative Space Designs
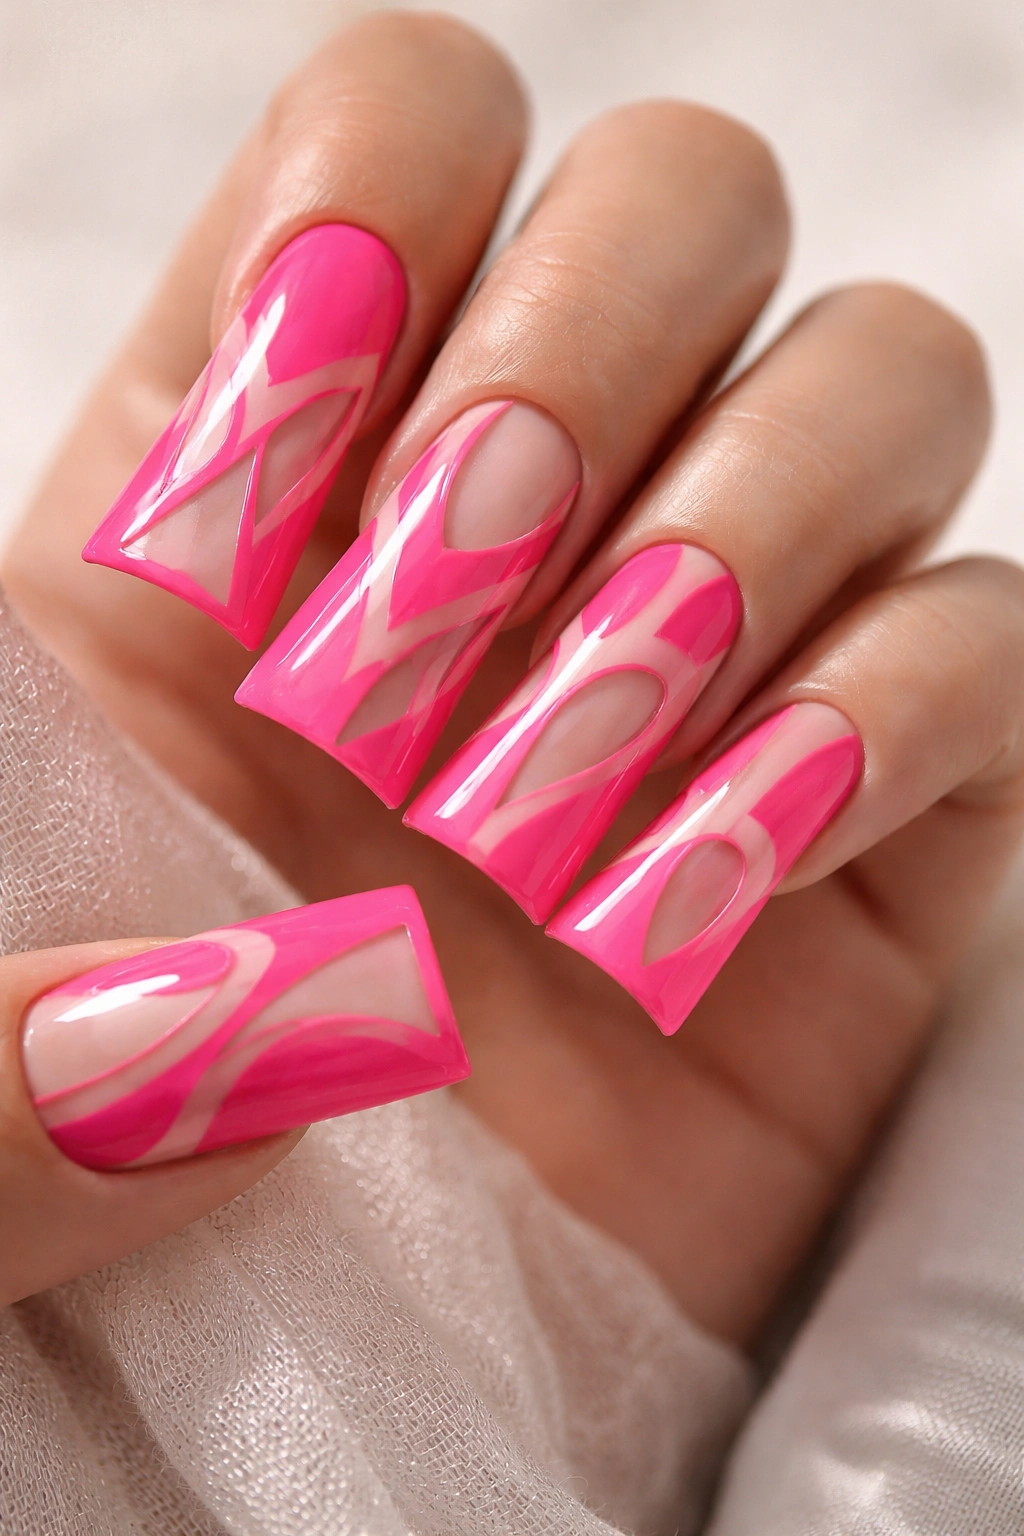
Negative space nail art (where you intentionally leave parts of the nail base showing through the design) feels surprisingly chic and modern, especially on hot pink. You’re painting around shapes, creating patterns where the nail itself becomes part of the design. This approach works beautifully on duck nails because the elongated shape gives you a larger canvas to play with spatial relationships.
How Negative Space Transforms a Design
Negative space designs feel less busy than fully decorated nails, which is why they read as sophisticated. When you work with hot pink, you’re probably leaving some of the natural nail, the base layer, or a lighter color showing through. This contrast between the hot pink and what lies beneath creates visual interest without feeling chaotic. It’s pattern-making through subtraction rather than addition.
Negative Space Concepts Worth Trying
- Geometric cutout patterns where specific shapes are left bare or in a lighter shade
- Parallel lines or wave patterns that snake across the nail, leaving white or nude spaces between them
- Window-like designs where you frame sections of the nail with color
- Asymmetrical shapes on different nails that create a cohesive overall pattern
- Minimalist designs where just 20-30% of the nail gets color or decoration
- Linear patterns (stripes, dots, dashes) that create rhythm through spacing
The key to making negative space work is precision. These designs rely on clean lines and intentional empty space, so sloppy execution reads as unfinished rather than artistic.
6. Hot Pink with Gold Leaf Accents
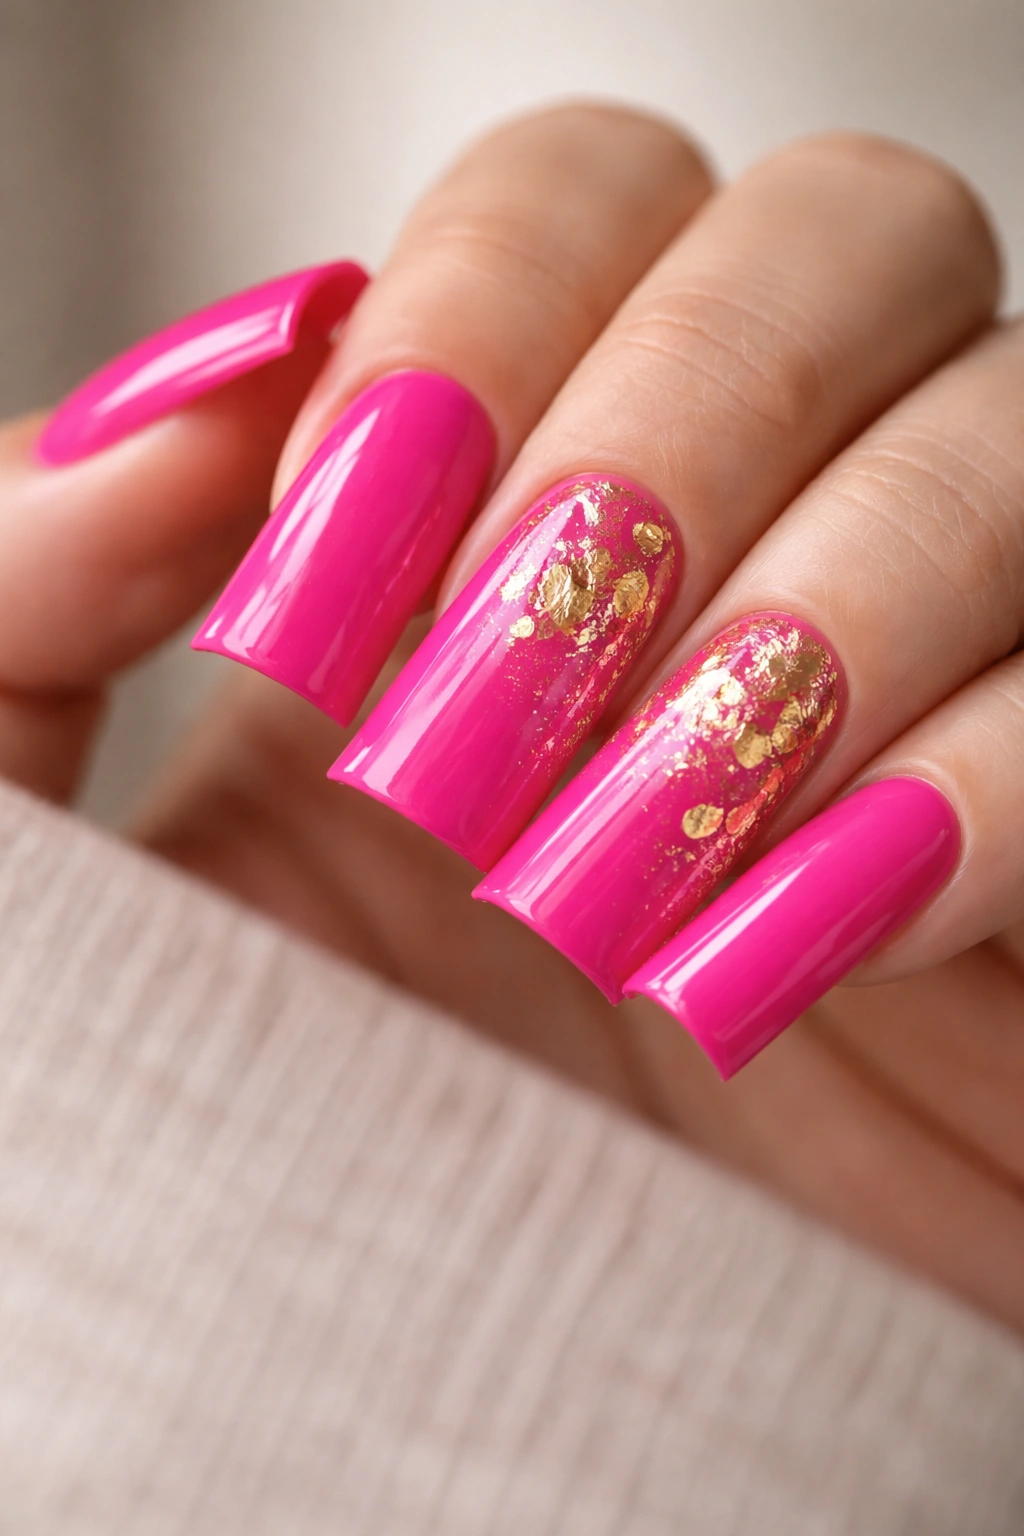
Gold leaf brings an instant luxury factor to hot pink nails. This combination—vibrant hot pink with actual gold leaf flakes or sheets—feels expensive, glamorous, and surprisingly wearable if you execute it correctly. The gold catches light and creates texture without feeling over-the-top, especially when you use it strategically rather than covering the entire nail.
Applying Gold Leaf Successfully
Gold leaf is surprisingly easy to work with once you understand the basic concept. You’re applying it over a sticky base (usually a tacky gel or a specific adhesive), pressing it down gently, and sealing it with topcoat. The trick is not overworking it—gold leaf wants to stay intact and visible, so gentle handling is key.
Gold Leaf Placement Ideas
- Scattered flakes across one or two accent nails, creating a delicate, almost confetti effect
- A concentrated patch at the base of the nail, like gold dusting upward
- Positioned along one edge for an asymmetrical accent
- Creating a geometric pattern with deliberate placement of gold leaf pieces
- Combined with other finishes (matte hot pink with glossy gold leaf accents) for textural contrast
Insider note: Buy quality gold leaf from a nail supply source rather than craft stores. Professional nail gold leaf is actually designed to stick and seal properly, whereas craft gold leaf often flakes off and looks dusty. The quality difference is genuinely noticeable and worth the slightly higher cost.
7. Marbled Hot Pink with Contrasting Colors
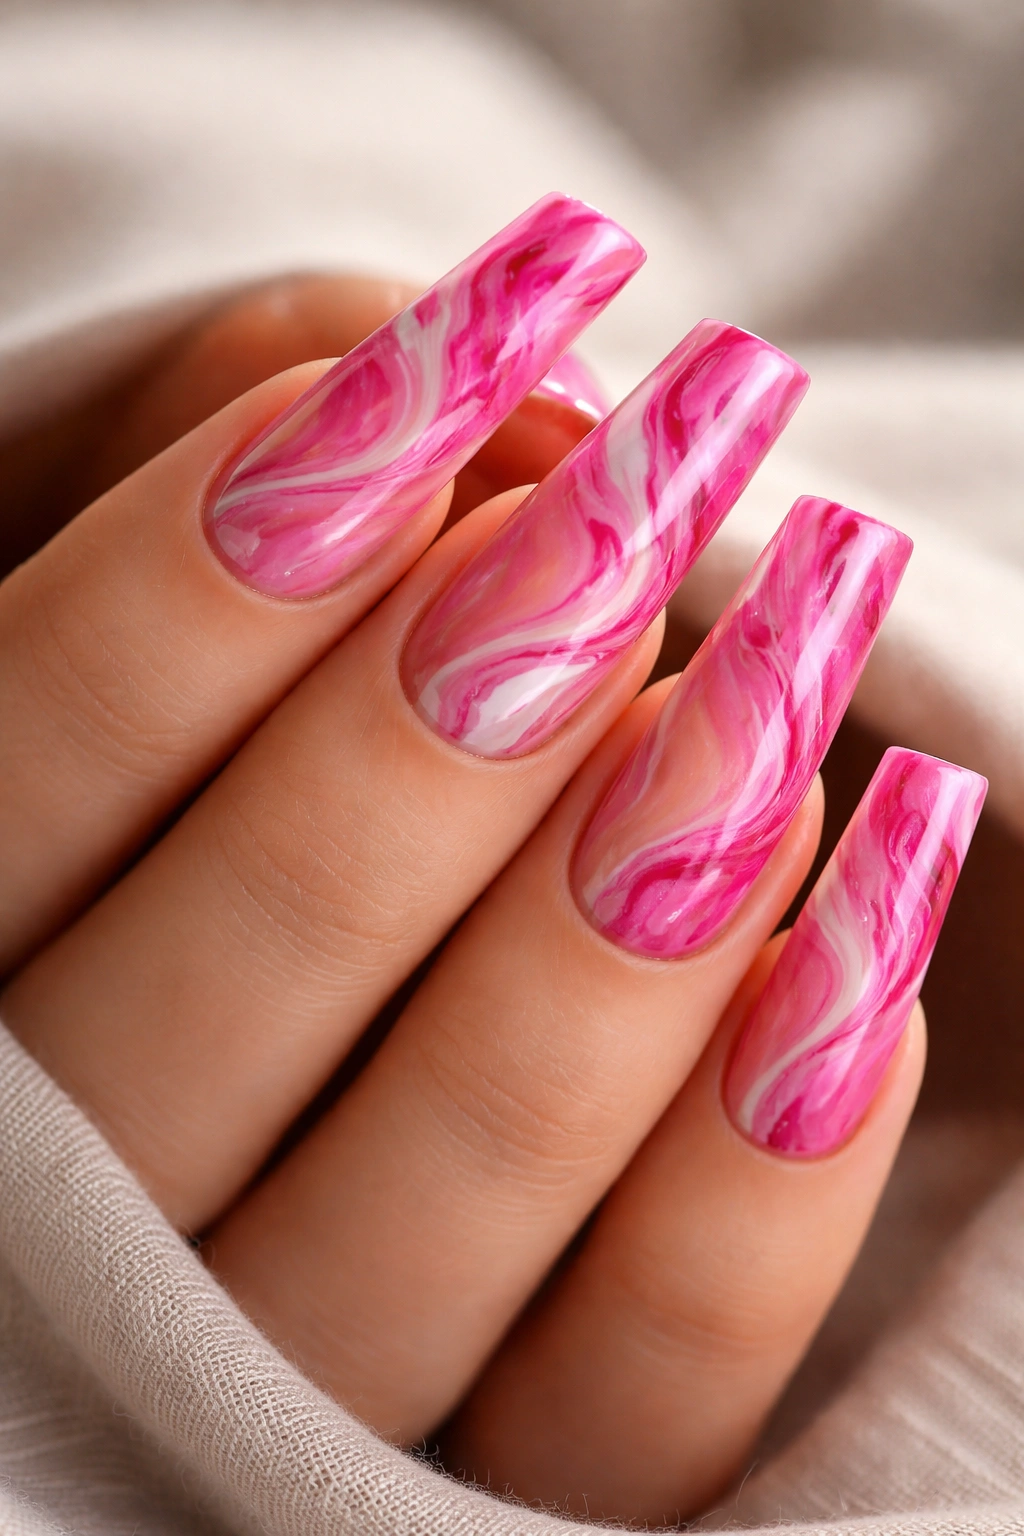
Marble effects have been nail-design gold for years, and they look absolutely stunning on duck nails. Creating a hot pink base marbled with swirls of white, nude, or even deeper magenta tones creates this luxurious, organic effect that feels artistic without requiring actual freehand painting skills. You’re essentially creating a pattern through the marbling process itself.
The Marbling Technique
True water marbling (using actual water and polish) is tricky and temperamental on acrylics. A more reliable approach for durable manicures is using gel polish and creating marble effects through overlapping colors and swirling motions with a thin brush, or using specialty marble tools that are specifically designed for this effect.
Marble Effects Worth Exploring
- Hot pink as the dominant color with white marble veins running through
- A blend of hot pink, coral, and white for a subtle ombre-marble hybrid
- Hot pink marbled with a deeper berry tone for dimension within the same color family
- Incorporating gold or silver into the marble effect for added glamour
- Using a matte topcoat on a marbled design for a sophisticated, less-glossy finish
- Keeping the marble subtle on some nails while going bolder on accent nails
The beauty of marble is that it’s forgiving—slight imperfections actually enhance the organic feel rather than detracting from it. This makes it a great choice if you want an intricate-looking design without requiring steady-hand precision.
8. Hot Pink Duck Nails with Sparkle Ombre
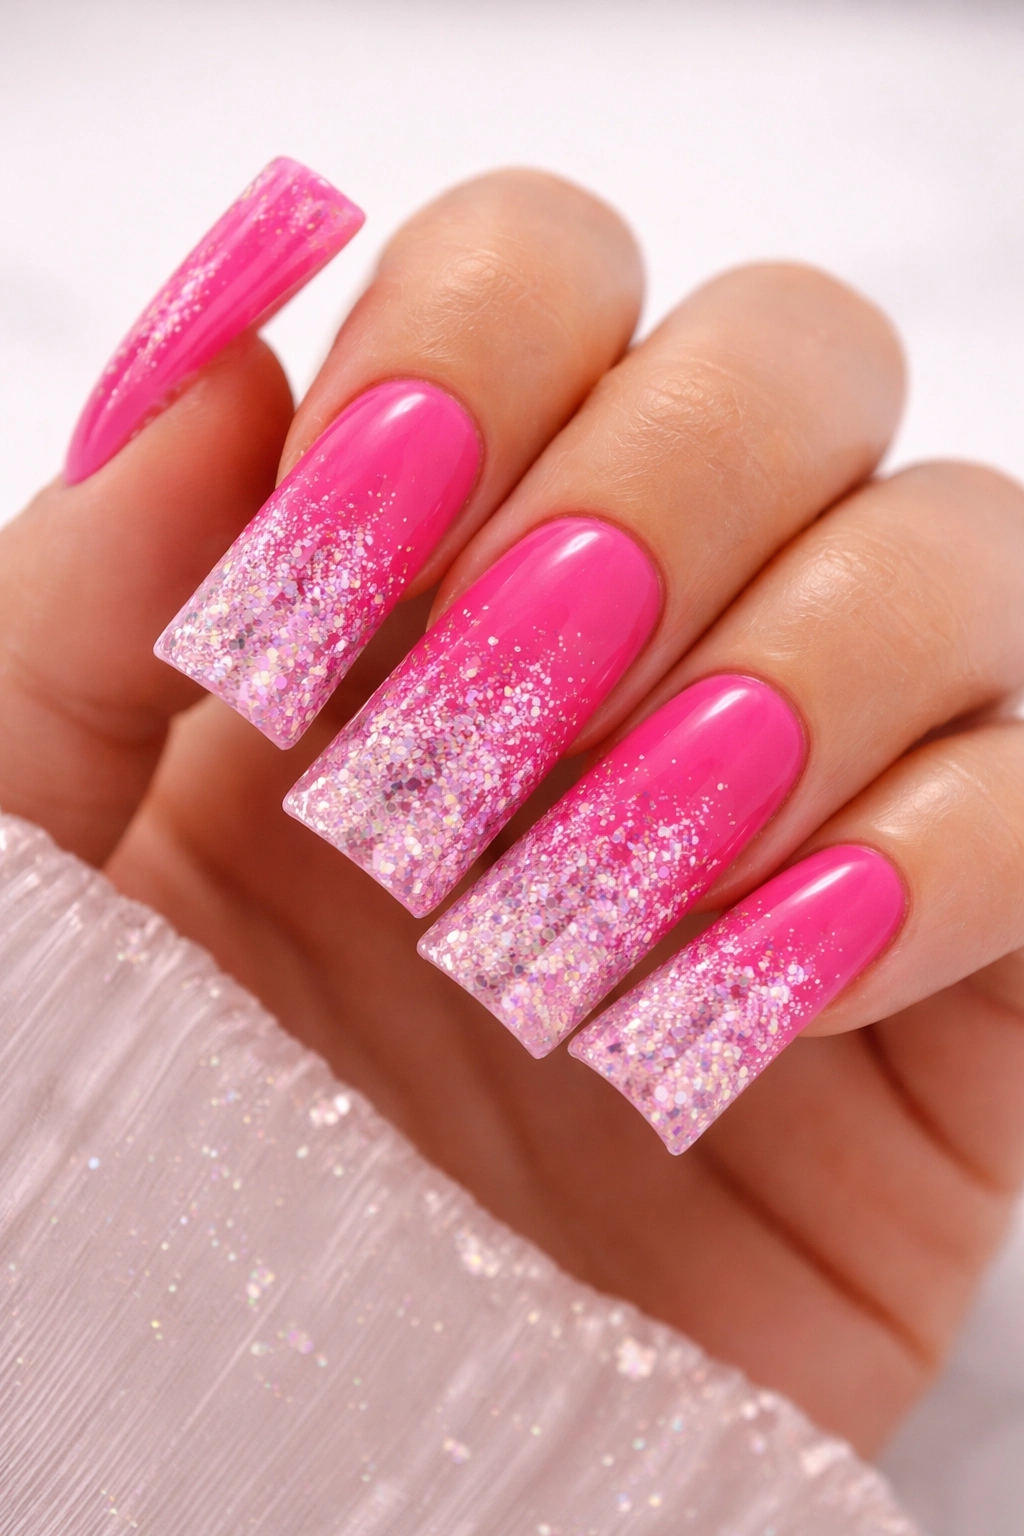
Sparkle ombre combines glitter intensity with an ombre gradient, so you’re getting dimension through both color transition and shimmer density. The design typically starts with minimal glitter at the base (just hot pink or hot pink with subtle sparkle) and gradually increases glitter concentration toward the tips, creating a crescendo effect. It’s celebratory and eye-catching without reading as costume-y.
Building a Sparkle Gradient
The key here is using glitter in varying sizes or concentrations. You might start with a fine shimmer, move to medium-sized glitter in the middle section, and finish with chunky glitter pieces at the tips. Each layer should partially cover the previous one, creating a gradient effect where the sparkle intensity builds gradually.
Sparkle Ombre Approaches
- Fine glitter that transitions to confetti-style chunky pieces
- A base of hot pink with just shimmer, building toward actual glitter particles
- Rainbow glitter that catches in hot pink, creating prismatic light effects
- All-over hot pink with glitter concentrated only in a gradient strip down the center
- Using different glitter colors (pink, gold, holographic) that all coordinate with the hot pink base
- Matte hot pink base with progressively glossier layers as the sparkle builds
Real talk: Glitter-heavy manicures are stunning in photos and gorgeous in person, but removal can be tedious. Budget extra time when it’s time to take them off, or be prepared to let them grow out and remove them at the nail salon.
9. Hot Pink with Fine Line Florals
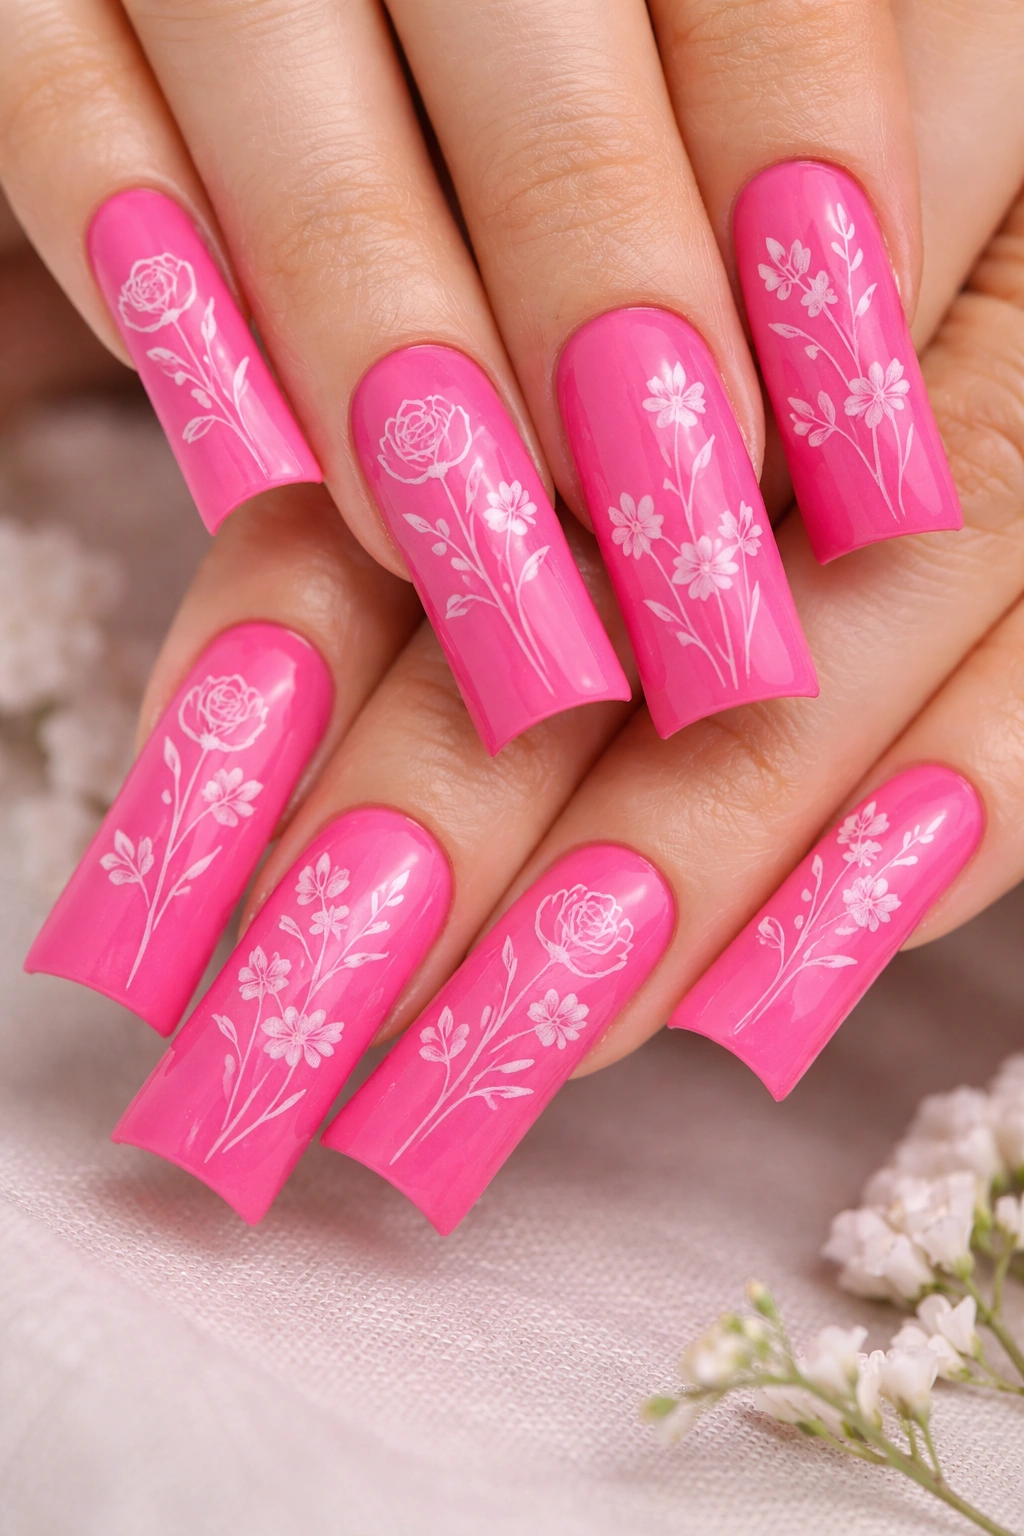
Floral designs and hot pink are a natural pairing—the color already has that feminine, botanical energy. When you execute florals as fine line art (using thin brushes to create delicate flowers rather than filled-in blooms), the result feels refined and artistic. Duck nails give you enough space to create actual detailed flowers rather than simplified floral silhouettes.
Fine Line Floral Execution
Fine line florals require either a thin striping brush and a steady hand, or using a nail artist pen designed specifically for detailed work. The goal is creating recognizable flower shapes through line work alone—roses with spiral petals, daisies with individual petals, wildflowers with delicate stems.
Floral Possibilities for Hot Pink
- Dainty scattered flowers across all nails in white or nude for a garden vibe
- One statement flower on an accent nail, rendered in detailed line work
- A vertical garden concept where flowers and stems flow up the nail
- Botanical line art combining flowers with leaves and branches
- Watercolor-style florals that intentionally have soft, bleeding edges (different technique but similar aesthetic)
- Monochromatic florals (hot pink flowers with darker pink or burgundy line work) for subtlety
- Mixed florals on different nails, creating variety within cohesion
The magic of fine line florals is that they feel delicate and artistic while still being quite doable without professional artist skills—you’re just drawing lines to create shapes, not worrying about shading or color blending.
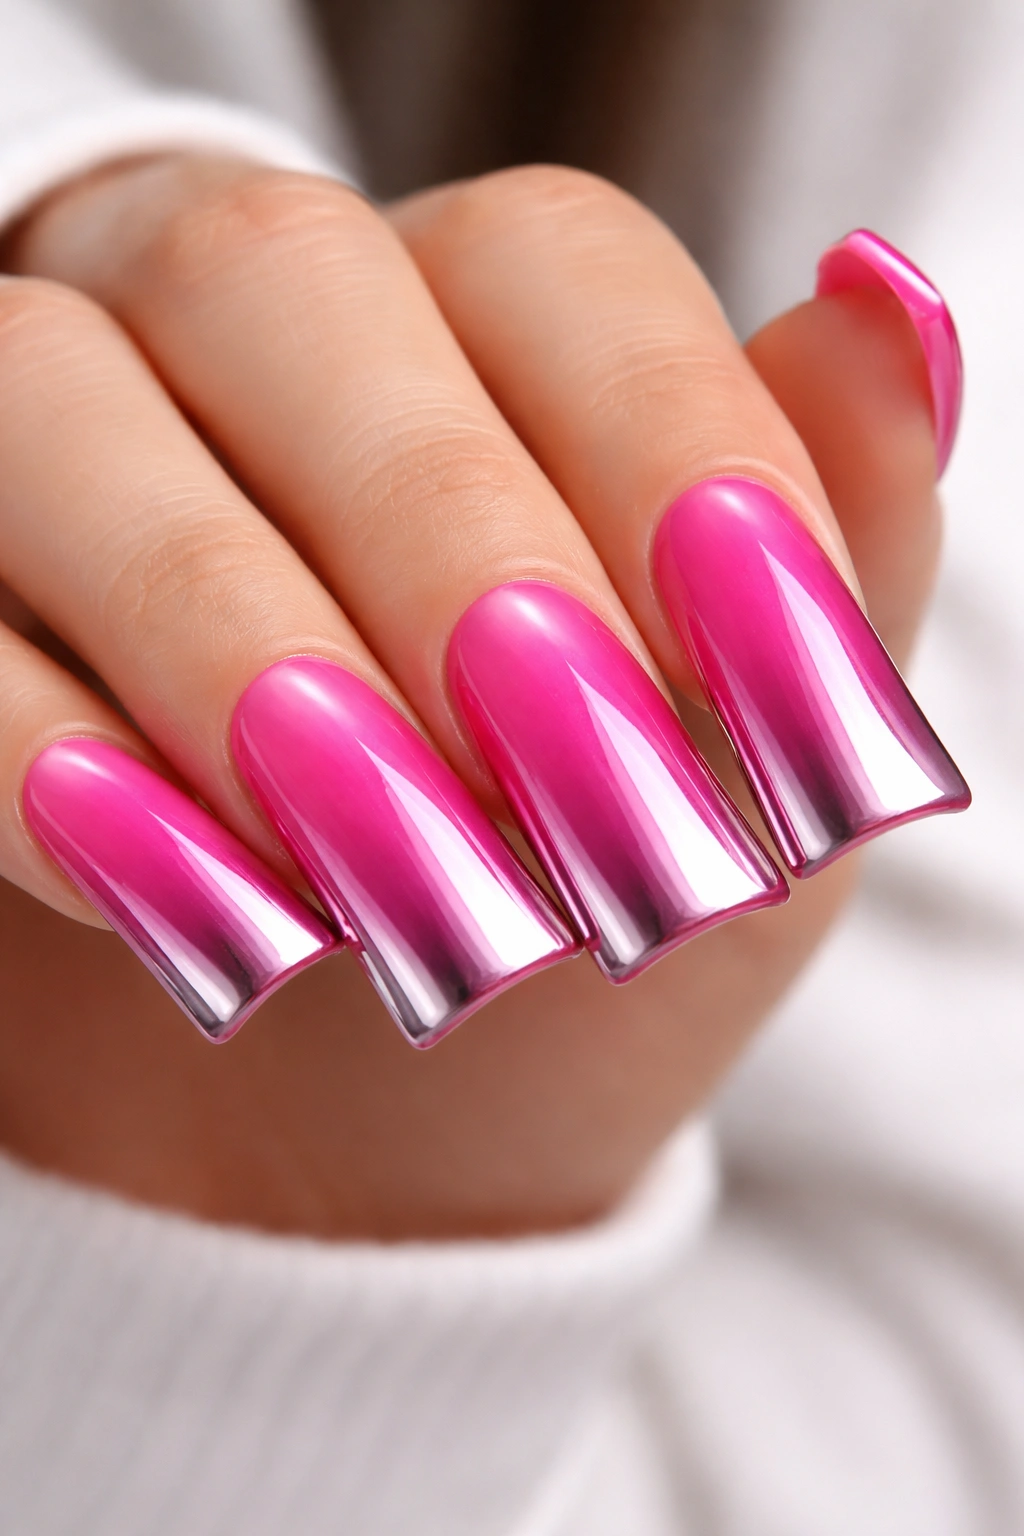
10. Hot Pink with Chrome Reverse Ombre
Instead of traditional ombre where hot pink fades to white, reverse ombre brings chrome or metallic finishes into play, creating an effect where the chrome is most concentrated at the base and gradually fades into solid hot pink at the tips. It’s visually striking because it goes against what we typically expect from ombre direction, making it feel fresh and unconventional.
Creating the Reverse Effect
A reverse ombre requires building up the effect in layers, allowing each layer to partially cure or dry before applying the next. You’re creating an intentional gradient that moves from metallic intensity to solid color, which is the opposite of most gradient designs.
Reverse Ombre Variations
- Chrome base that transitions to classic hot pink at the tips
- A holographic or mirror finish at the base, transitioning upward to hot pink
- Metallic gold or silver starting point with a hot pink finish
- A color-shifting chrome that naturally transitions colors before meeting hot pink
- Matte hot pink tips contrasting with glossy metallic base for textural interest too
- Using different types of chrome effects (chrome powder, mirror finish, foil) for varied sparkle
This design requires precision in the application but creates a genuinely head-turning result that feels both modern and unexpected.
11. Minimalist Hot Pink with Thin White Border Detail
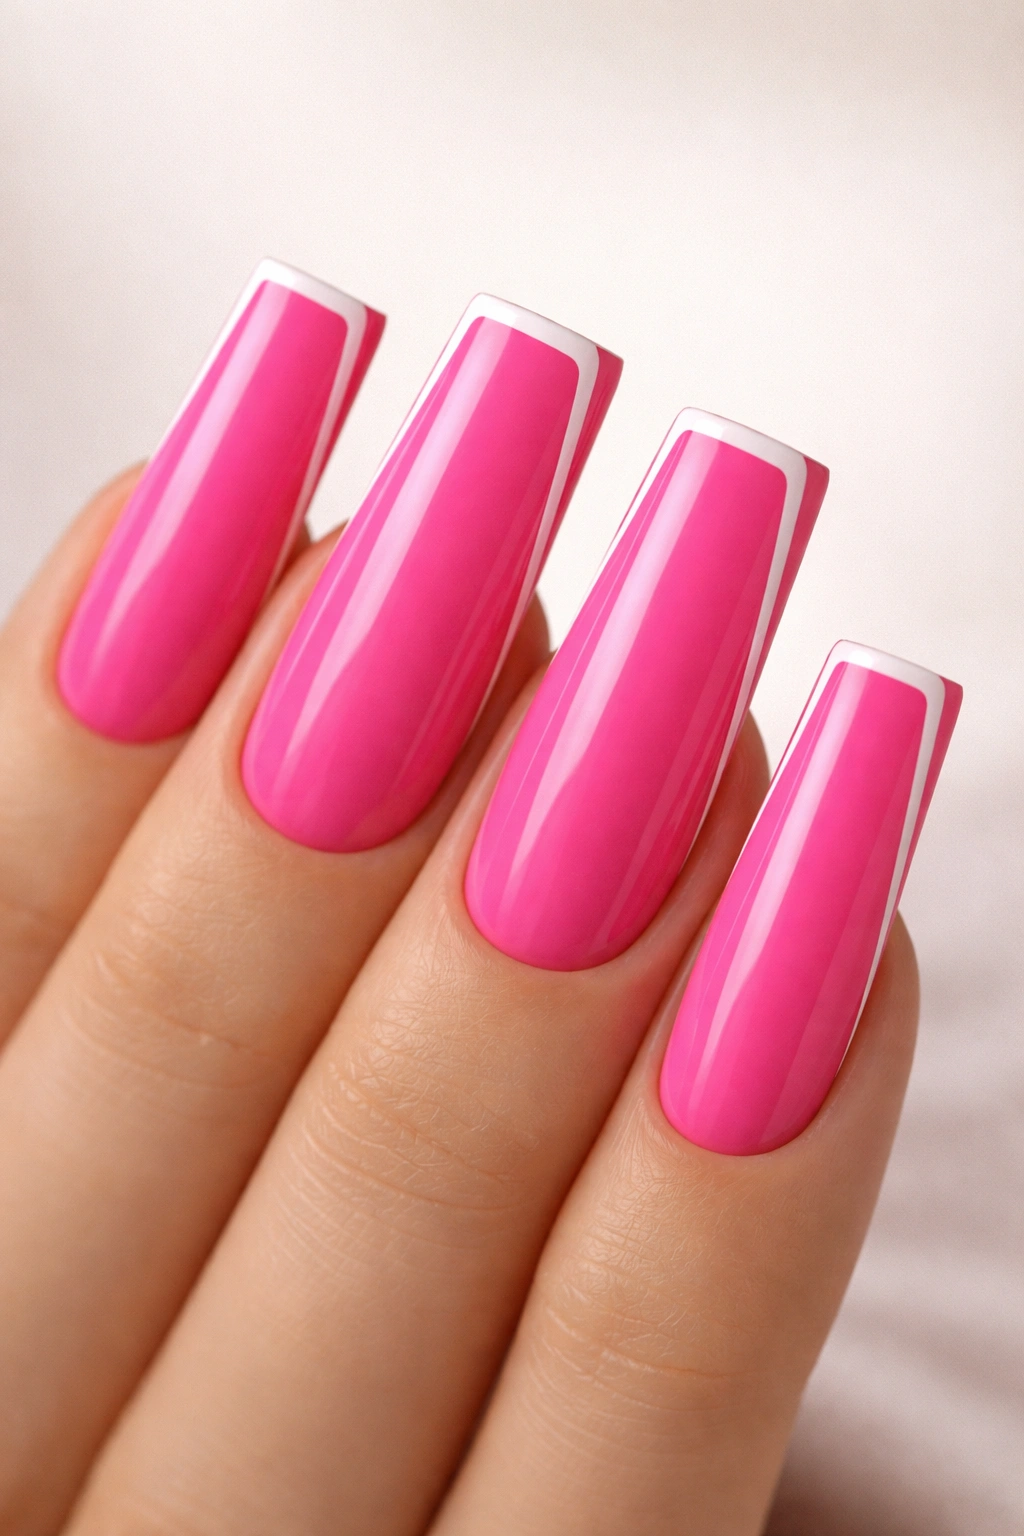
Sometimes the most elegant approaches are the simplest. A solid hot pink duck nail with nothing more than a thin white line or border creates a look that’s clean, intentional, and eternally stylish. The border might run along the edge of the nail, frame the tip, or create a subtle geometric division—but the restraint is what makes it work.
Why Simplicity Impacts
A hot pink nail already commands attention because of the color itself. When you add minimal detailing, you’re respecting that and enhancing rather than competing with it. The duck nail shape is dimensional enough on its own—you don’t need to fill it with art to make it look complete. This design approach reads as confident because it trusts the color and shape to do the heavy lifting.
Minimal Border Ideas
- A thin white line running down the center of each nail, creating a subtle division
- Delicate borders around the edge—just a pinline on the sides and tip
- A minimalist tip design where just the very edge gets a geometric element
- A horizontal stripe near the center, creating visual interest through placement rather than complexity
- Reverse borders where white forms the dominant feature and hot pink creates the accent
- Understated negative space framed with clean white lines
This style never goes out of fashion because it’s based on proportion and restraint rather than trend elements.
12. Hot Pink Glitter Dip Gradient with Clear Tips
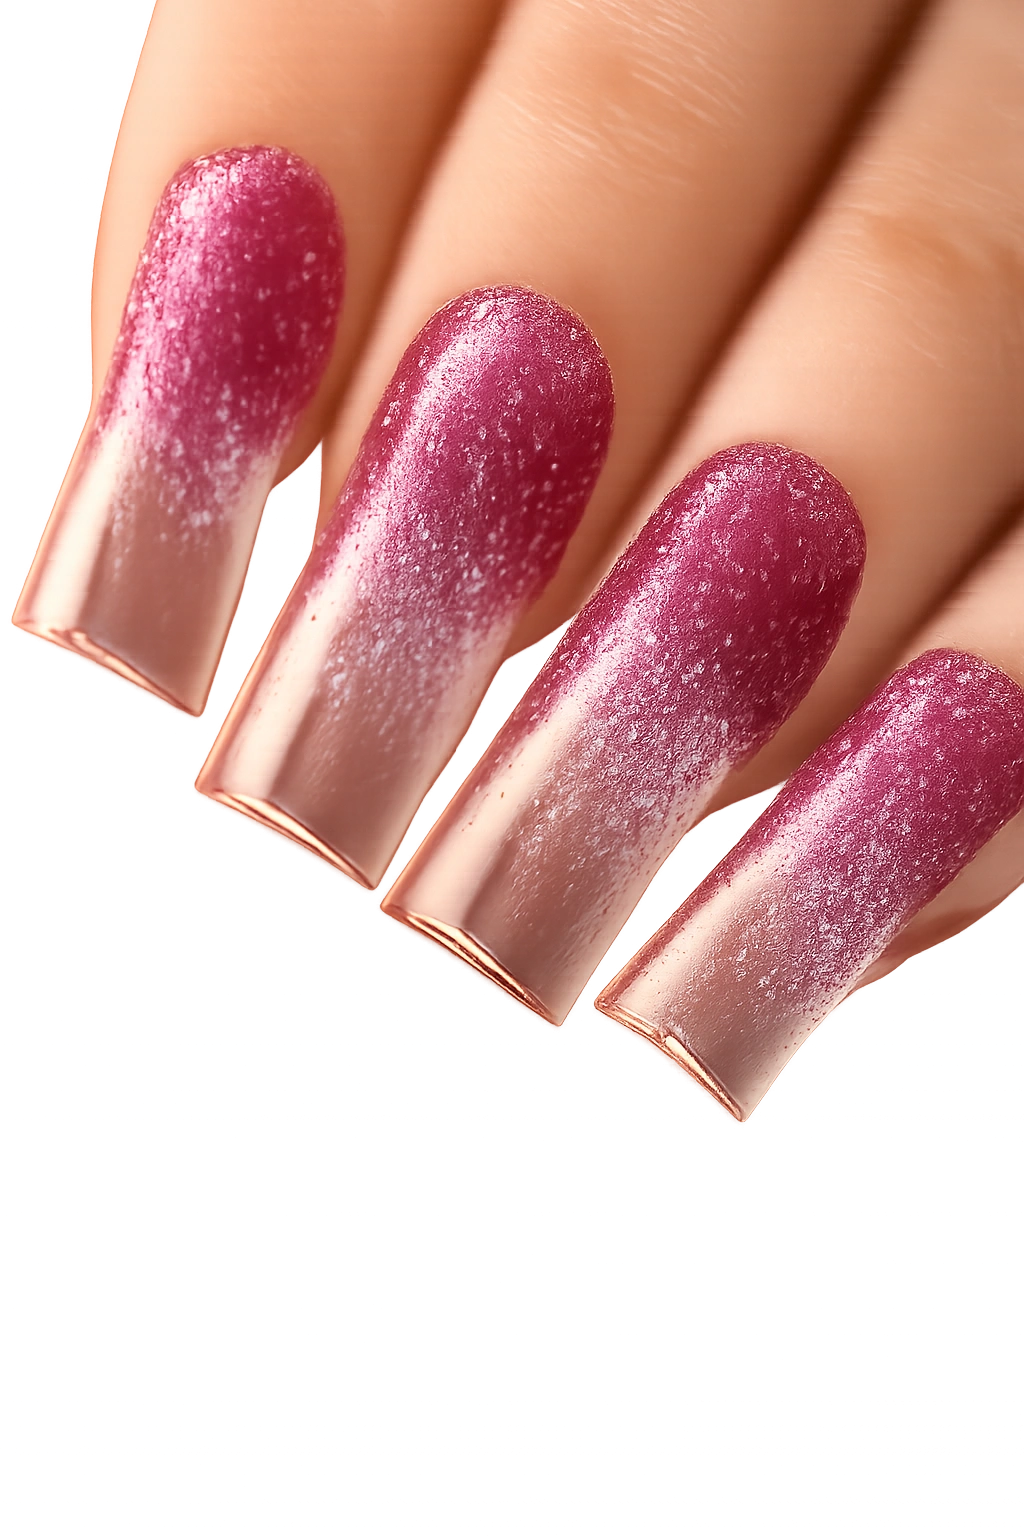
Glitter dip creates a unique texture—it’s applied like powder, creating a grainy, almost sand-like finish that catches light differently than traditional glitter. When combined with an ombre effect moving from concentrated glitter at the base to clear tips, you get a design that’s textural, dimensional, and visually complex without requiring brush skills.
The Glitter Dip Process
Glitter dip involves applying a sticky base, dipping the nail into powder pigment or glitter powder, and sealing it. For a gradient effect, you’d apply the sticky base to the lower section first, dip it in hot pink glitter, allow it to cure or dry, then apply base to the middle section and dip it in a finer shimmer or lighter glitter, and finally finish the tips with clear or translucent topcoat without any powder addition.
Glitter Dip Gradient Concepts
- Hot pink glitter at the base creating a heavy texture, transitioning to fine shimmer in the middle, clear tips
- Using glitter dip in varying colors (hot pink, coral, nude) that create an ombre effect through color variety as well as texture
- Keeping hot pink glitter dense and intentional, with the gradient movement toward clear being quite subtle
- Combining glitter dip with regular polish (one nail in glitter dip, the others in solid hot pink) for mixed textures
- Using holographic or color-shifting glitter dip that changes appearance depending on lighting
- Pairing this with a matte topcoat for a completely different look from glossy versions
The advantage of glitter dip is durability and impact—the texture creates genuine dimension and the effect lasts throughout your entire manicure without chipping or peeling.
Final Thoughts
Hot pink duck nails are genuinely one of those nail combinations that hits differently—the color commands attention while the shape adds elegance and elongation. Whether you’re drawn to maximalist designs packed with dimension, texture, and embellishment, or you prefer understated approaches that trust the color and shape to do the work, there’s a hot pink duck nail design that’s exactly right for your aesthetic.
The beauty of hot pink specifically is that it works across seasons, skin tones, and dress codes. You can make it work for a conservative office environment by choosing minimal, refined designs, or you can fully lean into the drama with sparkle, dimension, and artistic details. The designs outlined here are genuinely just starting points—once you find an artist who understands your vision and can execute these techniques, you’ve got countless personalization options.
Your next appointment is the perfect time to bring one of these ideas to your nail artist, or to use them as springboards for something entirely your own. Either way, hot pink duck nails deserve the excitement you’re probably already feeling about them.
