

Squoval nails have quietly become the go-to shape for people who want something more interesting than basic rounds but don’t need the drama of almond or stiletto nails. If you’re new to nail care or simply prefer an understated look that doesn’t demand constant maintenance, short squoval nails might be exactly what you’ve been searching for. The beauty of this shape is that it works with almost any hand size and nail bed, makes everyday tasks manageable, and looks polished without screaming for attention.
The term “squoval” is exactly what it sounds like—a hybrid between a square and an oval. You get the clean, structured look of a square nail with the softer, slightly rounded edges of an oval. For beginners, this is genuinely forgiving because the shape is naturally flattering and doesn’t require nail extensions to look good. The low-key aesthetic we’re exploring here strips away busy designs and complex nail art, replacing them with elegant simplicity that actually works in professional settings, casual hangouts, or anywhere in between.
What makes a squoval nail “low key” is the restraint in design. These aren’t nails covered in rhinestones or intricate hand-painted art. Instead, they’re about clean bases, subtle textures, minimalist accents, and letting the nail shape itself be the statement. A beginner can absolutely achieve these looks without visiting a salon every two weeks or investing in advanced nail art tools. Most require just a base color, possibly a top coat, and in some cases, a single thin line or tiny detail that takes genuine confidence, not technical skill.
The following ten designs prove that you don’t need complicated nail art to look intentional and put-together. Each one is achievable at home with basic supplies, kind to your natural nails, and designed to actually last without constant touch-ups. Whether you’re growing out your natural nails for the first time or you simply prefer short nails, these designs will help you understand how to work with color, texture, and restraint to create something that feels authentically yours.
1. Soft Pink with Matte Finish
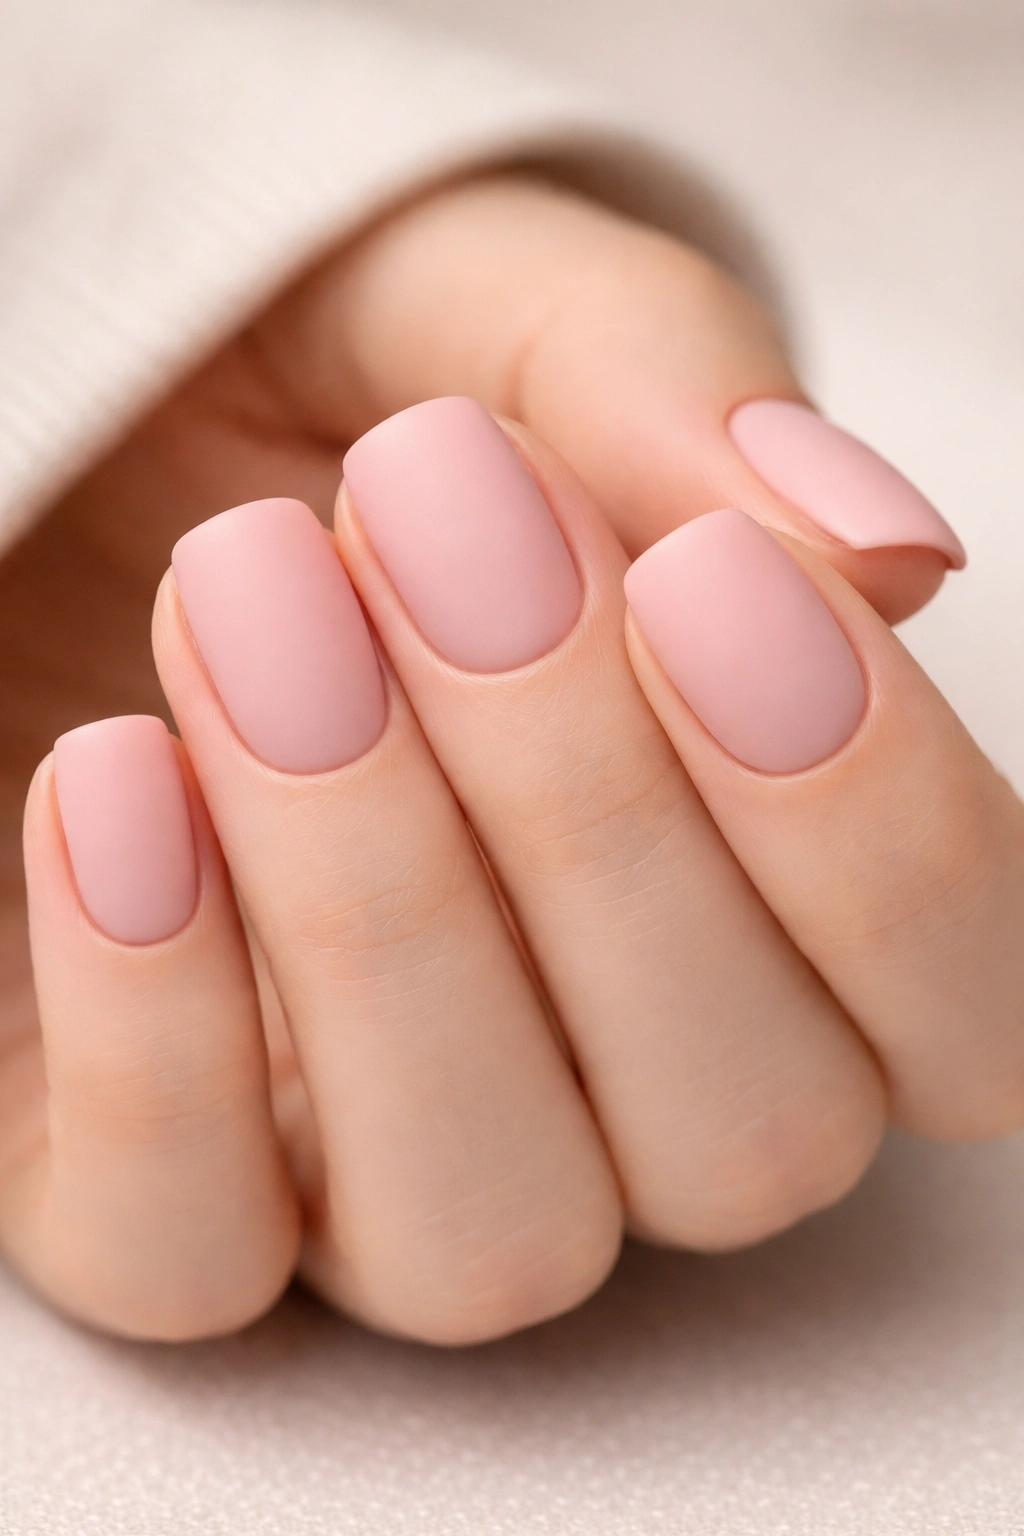
Soft pink might sound painfully basic, but there’s a reason this color has stayed relevant across decades of nail trends. The key to making it feel intentional rather than accidental is choosing the exact shade and finish that work for your undertones. A matte finish—rather than glossy—instantly elevates a simple pink from predictable to deliberate.
Why This Works for Beginners
Matte finishes are extraordinarily forgiving because they don’t highlight imperfections the way shiny top coats do. If your application is slightly uneven or your brushstrokes aren’t perfectly smooth, a matte finish camouflages these details beautifully. The texture itself becomes the design element, so you can skip nail art entirely and still have a finished look that feels intentional and modern. Matte also doesn’t need as much maintenance between manicures—it doesn’t chip visibly the way glossy finishes do, and regrowth becomes nearly invisible against the soft color.
What to Look For When You Buy
- A pink shade that matches your skin undertone (warm pinks for warm skin, cool pinks for cool skin—this is what makes it look expensive rather than cheap)
- A dedicated matte top coat designed for nail polish (not a regular matte spray, which applies unpredictably)
- Avoid thick, chalky formulas that require three coats; one or two coats from a good-quality pink is always better
- Test the matte finish on one nail first if you’re unsure about committing to all ten
The actual process is straightforward: base coat, two thin coats of your chosen pink, then one coat of matte top coat. The matte finish sets in about thirty minutes. What makes this design genuinely low key is that it looks effortlessly put-together without requiring any special skill—just the right color and finish doing the heavy lifting.
2. Clean White Tips in Modern French Style
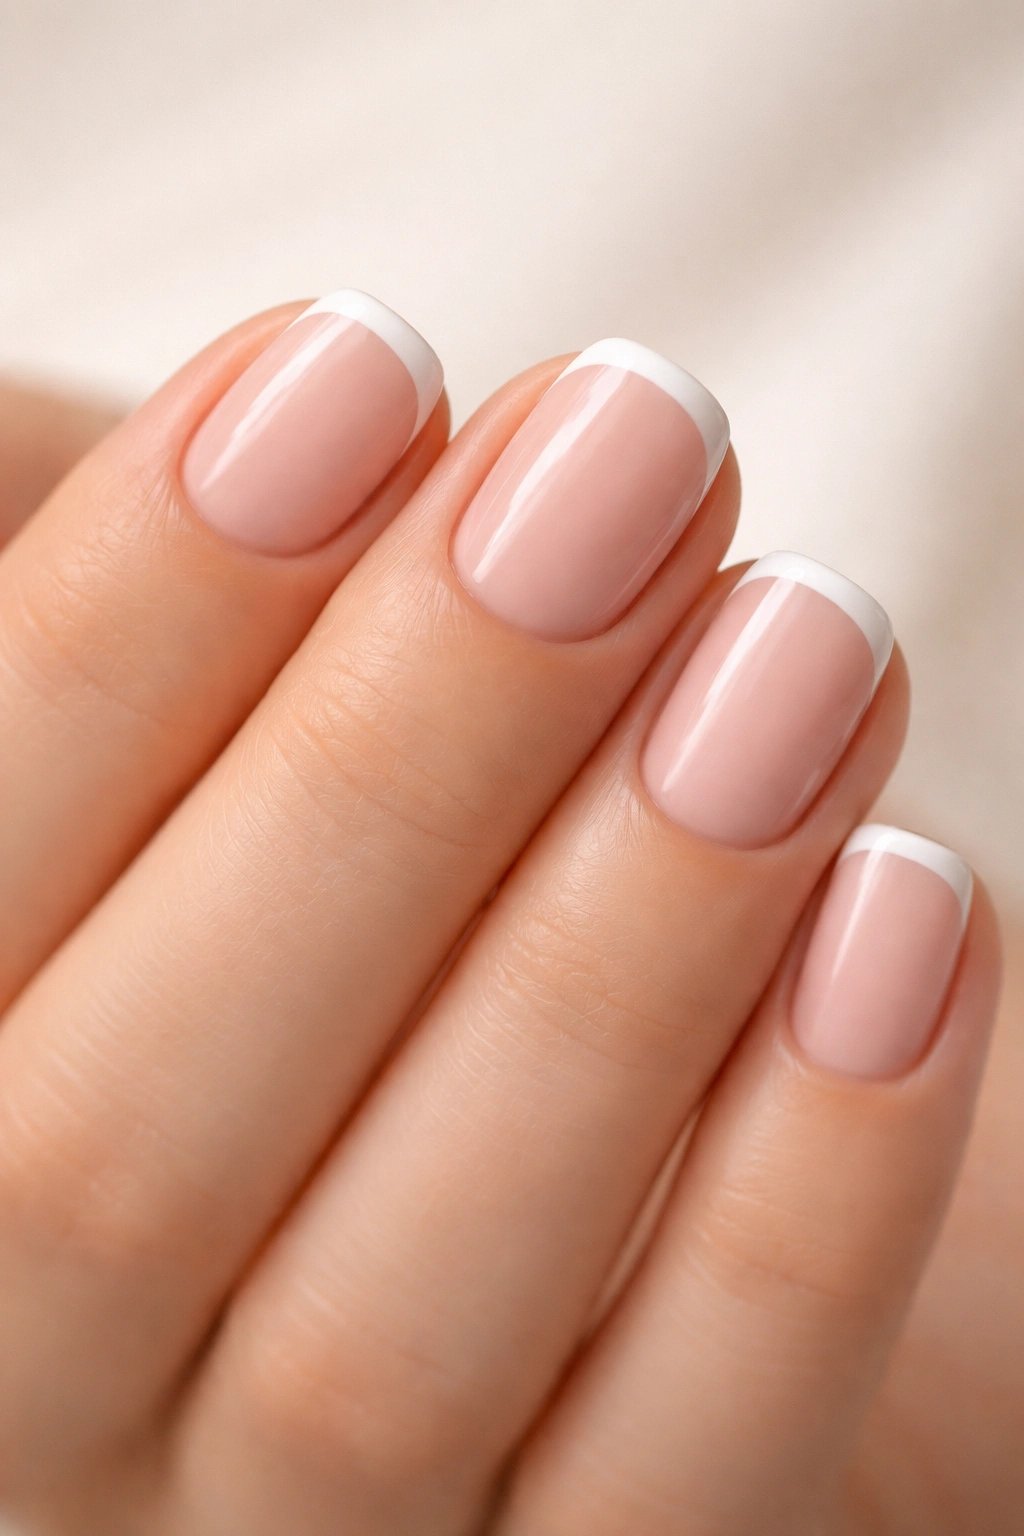
The classic French manicure has evolved, and the modern version is nothing like the thick, opaque white tips you might remember from the early 2000s. Instead, contemporary French squoval nails feature a thin, subtle white line that’s barely-there—more suggestion than statement. This is beginner-friendly because the thinness actually makes imperfect lines look intentional.
How to Achieve the Thin White Tip Look
The secret to this design is using a thin striping brush or a fine liner nail pen rather than your standard polish brush. These tools give you precise control and let you create that delicate line without it looking heavy or childish. Many nail pen brands now make incredibly fine tips specifically for this effect, and they’re usually cheaper than buying multiple striping brush sizes. If you’ve never used a striping brush, start with a nail pen—they’re more intuitive and more forgiving than brushes.
Step-by-Step Application Process
- Apply a clear base coat or nude-toned base coat (this determines whether your French shows up stark white or softer and more blended)
- Once dry, use your thin white tool to draw a delicate line across the edge where your pink nail bed ends and your white tip would start
- The line should be barely wider than a pencil line—if it looks thick, it’s too thick
- Let each nail dry before moving to the next one so you don’t smudge
- Seal with a clear glossy top coat to protect the white line
The low-key appeal here is that this design reads as effortlessly elegant. It’s professional, it’s timeless, and it doesn’t try too hard. Regrowth is also invisible because the white tip sits at the very edge of your nail, so the space between your nail bed and the white line grows out naturally.
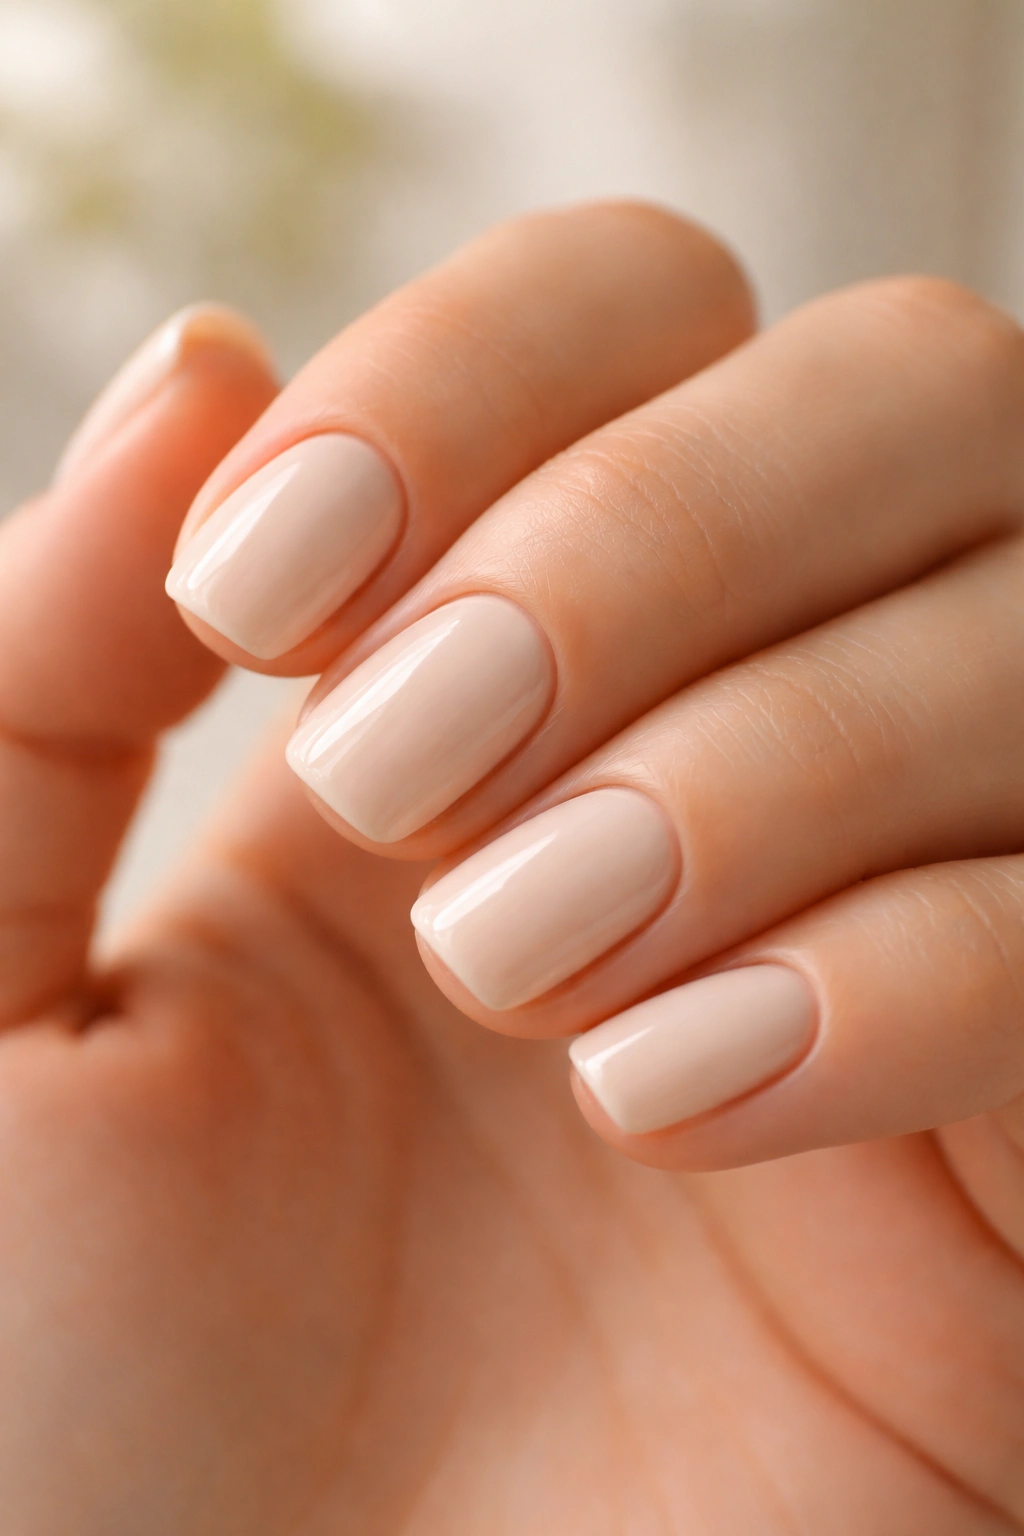
3. Nude Base with Thin Line Art
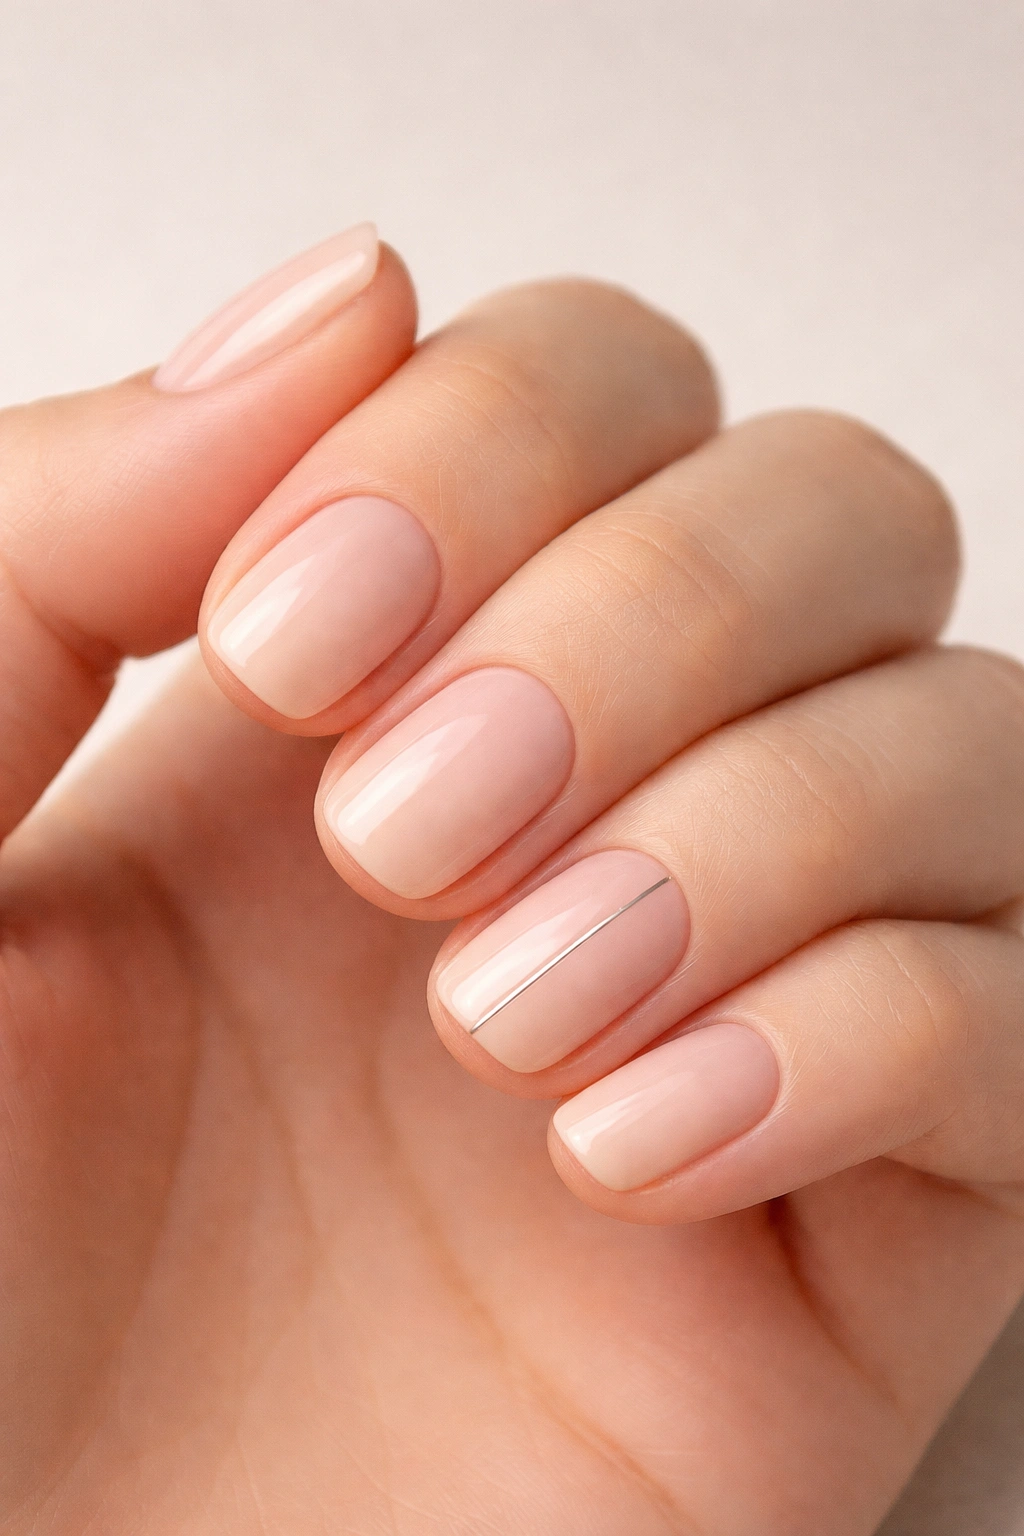
Line art doesn’t have to mean elaborate designs. A single thin line running vertically down the center of your nail, or a minimal geometric shape on one accent nail, transforms a nude base from plain into intentional. This design proves that restraint is its own form of sophistication.
The Minimalist Line Art Approach
The most beginner-friendly line art uses straight lines rather than curves, because straight lines are infinitely easier to execute. A vertical line down the center of your nail, a thin horizontal line, or even just a tiny dot on one corner counts as design. What matters is that you’re breaking up the solid color with an intentional accent. Use a nail pen with an ultra-fine tip (0.5mm or thinner) and work slowly—there’s no rush, and a slow, deliberate line always looks better than a quick one.
Best Nude Shades for Line Art
- Peachy nude (works on almost every skin tone and makes line art pop without being loud)
- Cool taupe (sophisticated and modern-looking, especially with black line art)
- Warm beige (universally flattering and forgiving of imperfect lines)
- Classic nude-pink (the original neutral, still works beautifully)
The beauty of line art on squoval nails is that your nail shape is already interesting, so you don’t need busy designs. One thin line is genuinely enough. You can do this line art on all ten nails in matching positions, or choose just one accent nail—both approaches read as intentional rather than incomplete. This design feels effortlessly sophisticated precisely because it’s so restrained.
4. Pale Lavender Elegance
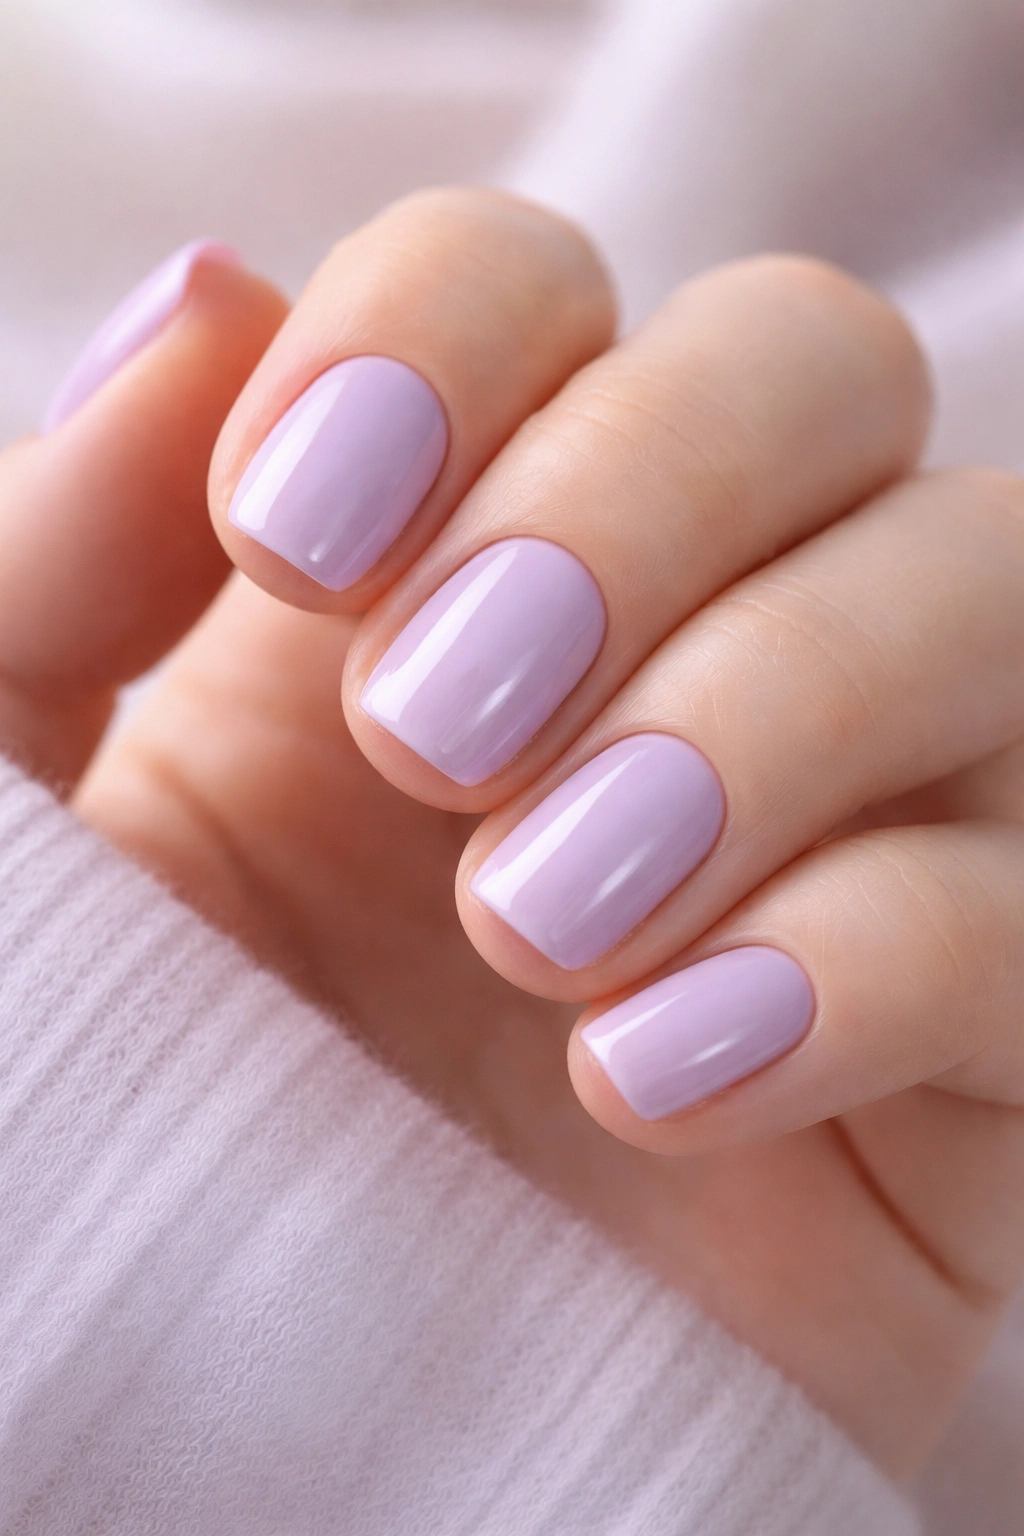
Pale lavender sits in a sweet spot between purple (which can feel bold) and pink (which feels safe). It reads as cool-toned and calming while still being a color choice that feels deliberate. For short squoval nails, pale lavender has an inherently elegant quality that doesn’t require anything fancy to feel complete.
Why Pale Lavender Works for Beginners
Lavender nails are forgiving because the color itself is soft and feminine without being saccharine. It works across seasons, it photographs beautifully, and it pairs well with both warm and cool skin undertones depending on the specific shade you choose. Unlike trendy colors that feel dated within months, pale lavender has a timeless quality. It’s classic enough that you see it on nail boards from a decade ago and it still looks current, but it’s not so predictable that it feels boring.
How to Find Your Perfect Pale Lavender
- Swatch multiple pale lavender shades in natural light before buying—they vary wildly from nearly white-lavender to more saturated purple-lavender
- If you’re new to color, err toward the paler, whiter side—pale lavender is more forgiving than deeper purple
- Some formulas are more opaque than others; one-coat lavenders exist, but two-coat lavenders are typically easier for beginners because the first coat doesn’t need to be perfect
- Test on one nail first if you’re worried about the color being too pale or too purple on your specific skin tone
Pale lavender with a glossy top coat feels naturally elegant. Some people add a tiny shimmer top coat (just a light gloss with subtle sparkle, not glitter) for extra sophistication, but glossy is perfectly complete on its own. The color does most of the work, and that’s exactly what low-key design is about.
5. Natural Looking with Just a Clear Coat
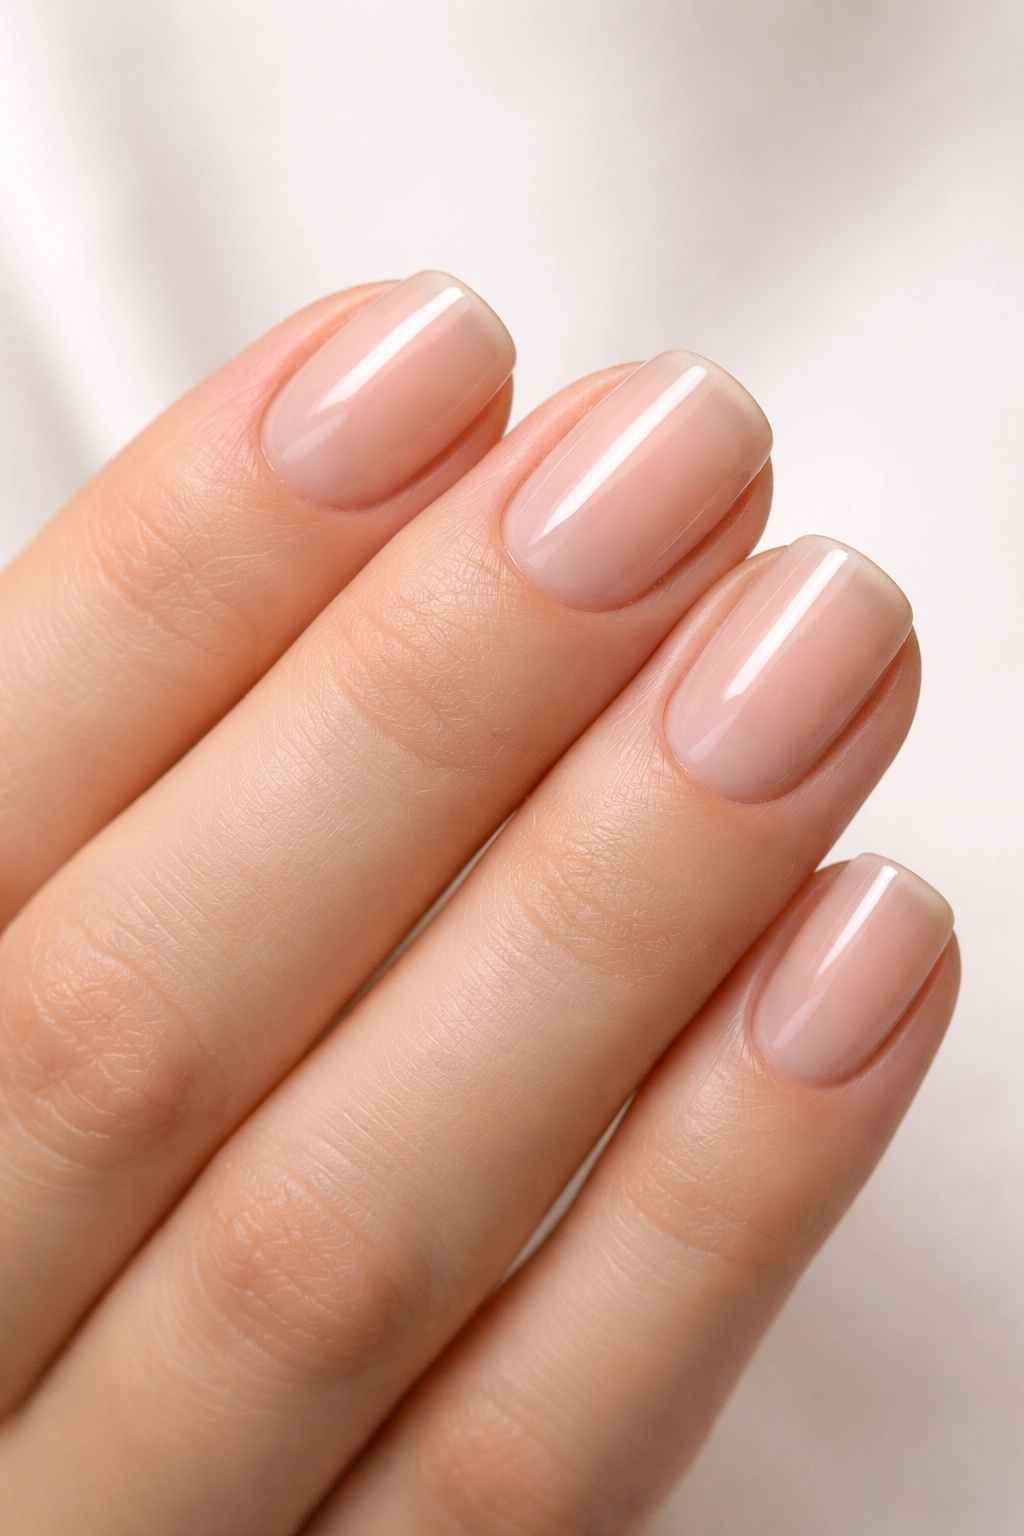
Sometimes the lowest-key design is no design at all. Healthy, well-maintained natural nails with a clear top coat represent a form of confidence that busy nail art simply cannot match. This approach works best when your nails are genuinely healthy, your nail beds are even in tone, and you’re not dealing with significant discoloration or visible ridges.
Prepping Your Nails for the Bare Look
Clear coat over natural nails requires preparation that other designs don’t. File your nails into that perfect squoval shape—not too rounded, not too square, just that balanced in-between. Use a nail buffer to smooth out any ridges or texture on the surface of your nail. Push back your cuticles gently so the nail bed looks clean and intentional. File any rough edges at the tip of your nail so they won’t catch on fabric or hair. The goal is that your nails look polished through their own health and shape, not through color or art.
Making Natural Nails Actually Look Intentional
- Use a strengthening base coat designed to protect natural nails from staining and damage
- Apply just one thin coat of clear top coat for a subtle, barely-there shine
- Keep a nail file with you and maintain the shape weekly—even slight grow-out makes natural nails look less intentional
- Moisturize your cuticles daily with cuticle oil or hand cream, which makes your nail beds look healthier and more vibrant
This approach requires more maintenance than a dark color (which hides imperfections) but less maintenance than nail art. It says: your nails are healthy enough that they don’t need disguising. That’s a statement in itself.
6. Warm Beige with Subtle Texture
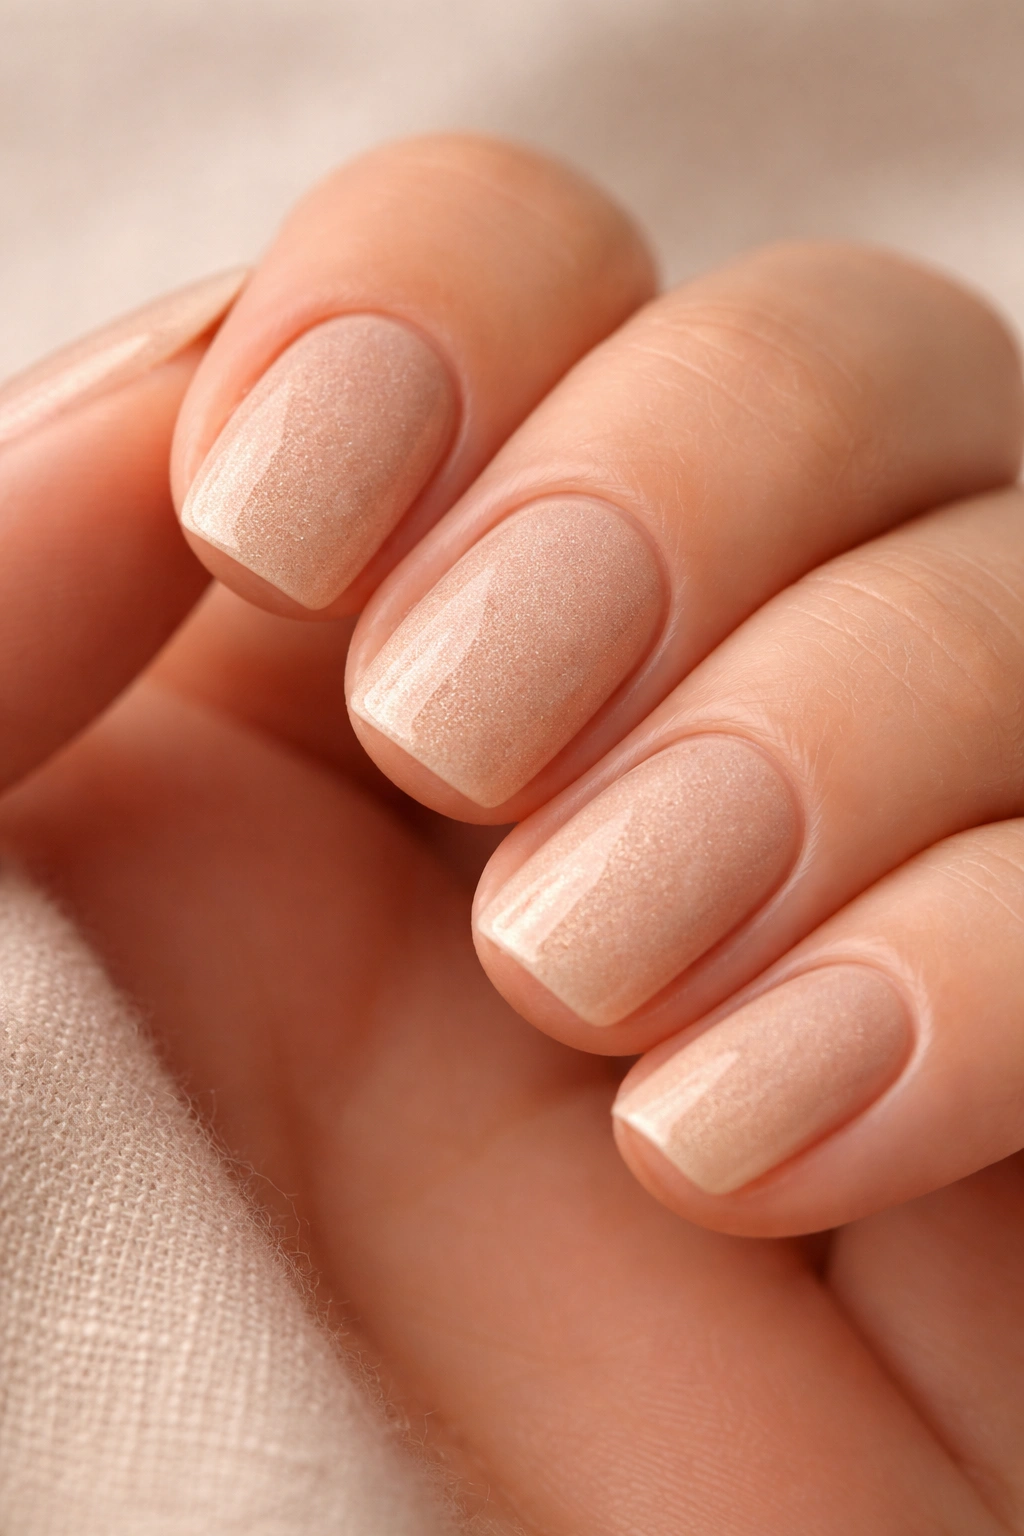
Beige walks a line between nude and tan—it has visible color without being a strong statement. Adding a subtle texture (think light grainy finish, not bumpy glitter) creates visual interest while maintaining that low-key aesthetic. You get depth and intentionality without any actual design work.
Understanding Textured Finishes
Textured finishes come in several types: matte (which we covered), grainy (like sand or fine sugar), speckled (tiny dots), and shimmery (microscopically fine sparkle). For low-key nails, grainy and speckled textures are your best options because they add dimension without being loud. Shimmery can work too, but only if it’s subtle enough that it reads as sophisticated rather than party-ready.
How to Apply Textured Polish
Most textured polishes apply exactly like regular polish—base coat, two coats of textured color, top coat. Some brands add a matte top coat over texture for a softer finish, while others seal with glossy to enhance the sparkle. Experiment with what works for your texture preference. If you’re applying texture unevenly, that’s actually fine—slight variations in the grainy finish read as organic rather than sloppy.
Warm Beige + Texture Combinations
- Warm beige with fine gold speckles (gives an expensive, subtle luxury feel)
- Warm beige with a grainy matte texture (sophisticated and tactile)
- Warm beige with delicate silver shimmer (modern and understated)
- Warm beige with barely-visible copper undertones (warm without being orange)
The genius of texture on squoval nails is that it gives you visual interest without requiring precision or skill. Your nail shape is clean and intentional, and the texture does the rest. Even if your application is imperfect, texture hides minor issues while creating an intentionally textured look.
7. Soft Coral Minimalist
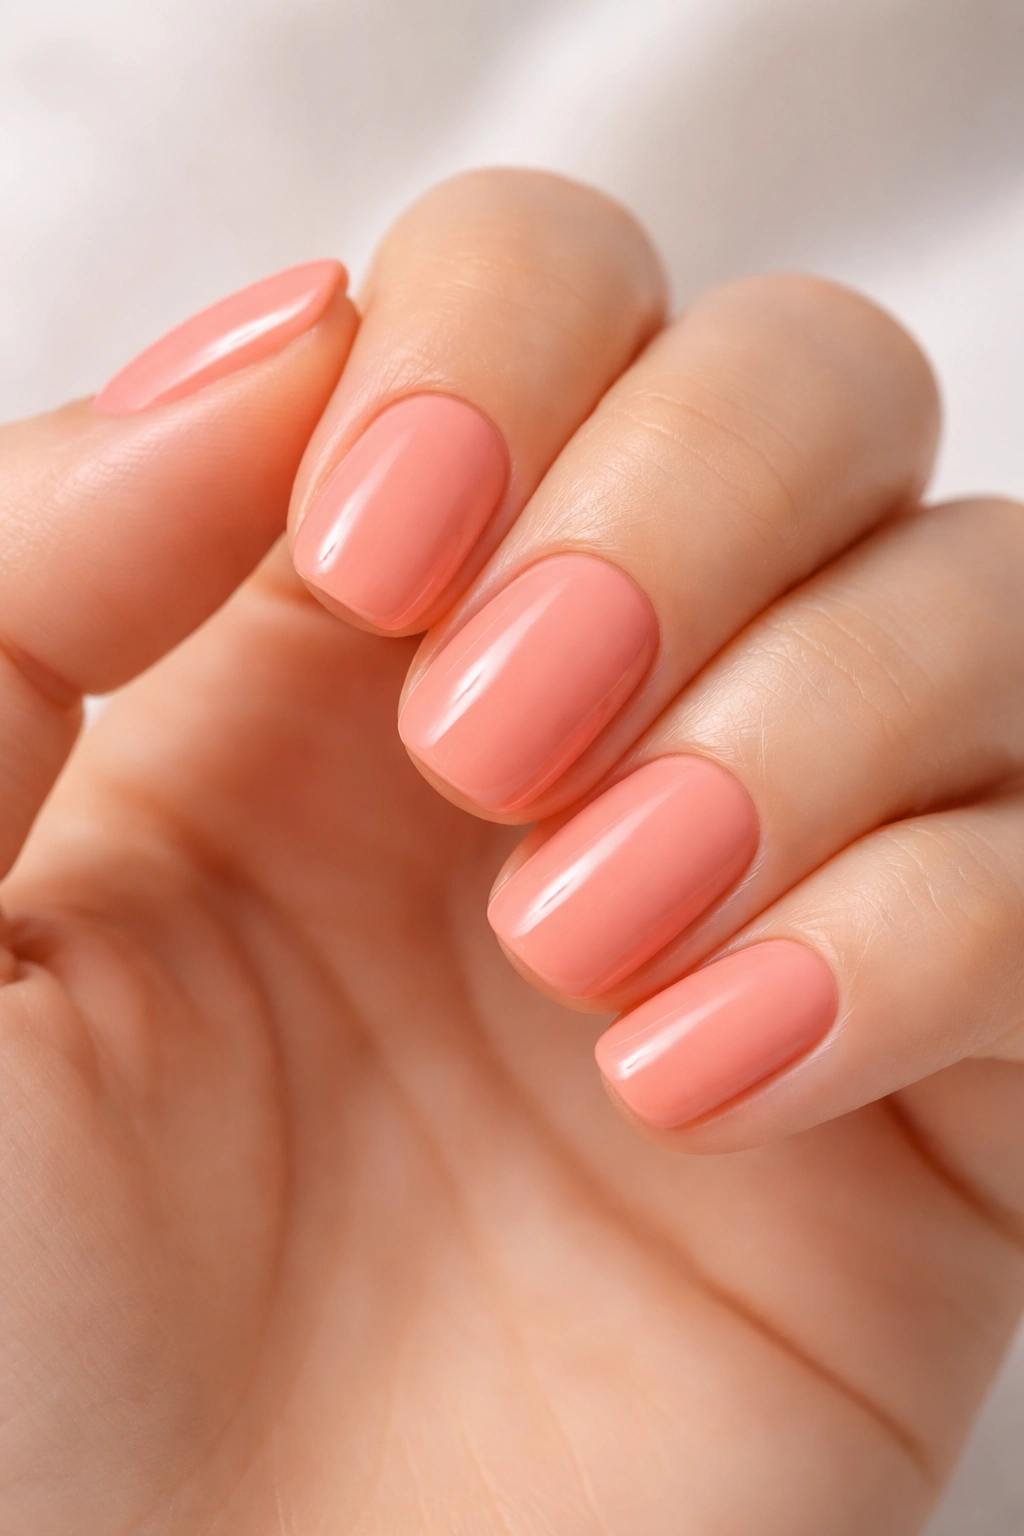
Soft coral bridges warm and cool tones and works across multiple skin undertones when you find the right shade. Unlike bright coral (which demands attention), soft coral whispers. It’s warm enough to feel friendly and approachable, but muted enough to be professional and refined.
Identifying Your Perfect Soft Coral
Coral varies wildly in how warm or cool it leans. A warm, peachy coral works on warm undertones; a cooler, more muted coral works on cool undertones. The difference between “I look healthy” and “I look tired” can genuinely come down to choosing the right coral depth. Test swatches on your skin in natural daylight, not under indoor lighting. The coral should blend into your skin tone rather than contrasting sharply against it.
Keeping Soft Coral Low Key
The minimalist approach to soft coral means trusting the color itself without adding design elements. No white tips, no line art, no glitter. Just a clean base coat, two coats of your soft coral, and a glossy or matte top coat depending on your preference. Soft coral looks fresher with a glossy finish (which catches light and makes the color seem more vibrant), but matte creates a softer, more vintage-inspired look.
What Makes This Design Work for Beginners
Soft coral is forgiving because it doesn’t show regrowth dramatically—it’s not as stark as dark colors or white, so the line between your coral nail and your natural nail that grows back isn’t jarring. It’s also a color that works in every season and every setting. It reads as intentional without requiring explanation or defense. You just look like someone who chose a flattering color and executed it well, which is exactly what low-key design accomplishes.
8. Cool Gray with Sophisticated Depth
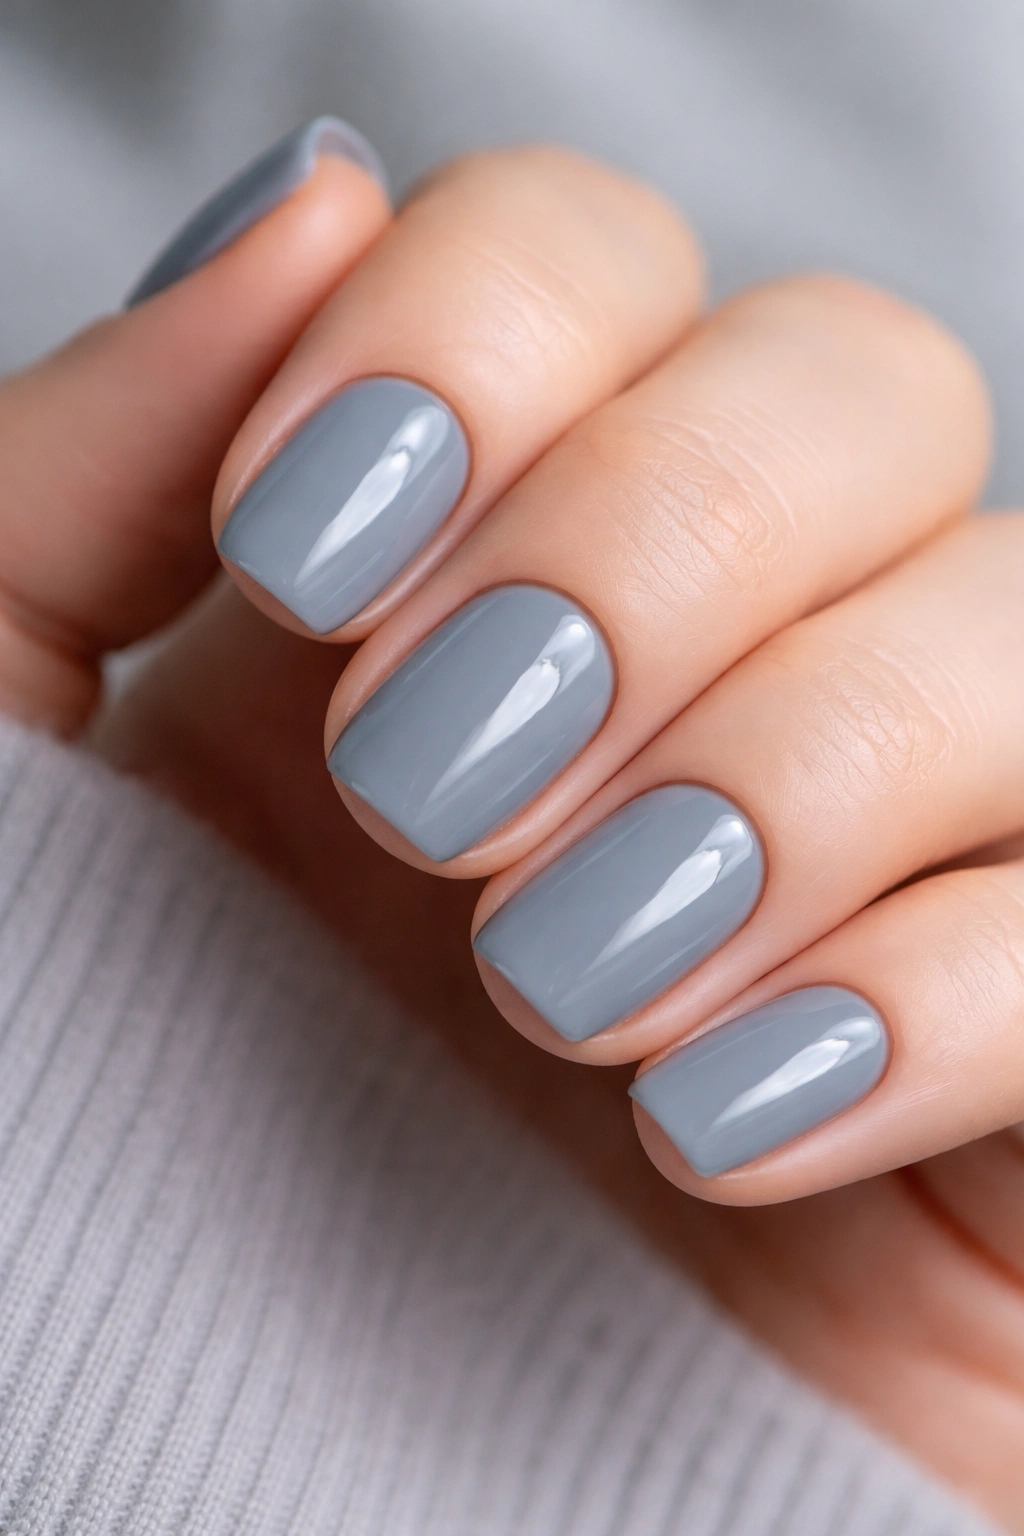
Gray often gets dismissed as boring, but a cool gray on short squoval nails reads as incredibly sophisticated and modern. The key is finding a gray that’s distinctly cool (leaning blue, not green) and has enough opacity that it covers in two coats without looking murky.
Why Cool Gray Outperforms Warm Gray for Nails
Cool grays create visual contrast against most skin tones, which makes them pop in photographs and in person without being loud. Warm grays (more taupe or beige-gray) can wash out certain skin tones and look unfinished. A true cool gray—one that has blue undertones—looks intentional and deliberate. This is the color you see on minimalist nail boards and professional manicures, and that’s not coincidental.
Gray + Accent Options
While the minimalist approach is to wear gray alone, gray pairs beautifully with subtle accents if you want to add minimal design:
- Gray base with a single thin black line on one accent nail
- Gray all-over with a tiny silver dot on each nail’s corner
- Gray with a matte finish for an understated, velvety look
- Gray with a glossy finish for sleek, modern sophistication
Gray also pairs exceptionally well with jewelry and works across seasons. It reads as intentional without trying, which is what separates low-key design from lazy design. You clearly chose gray for a reason, and that choice reads as confident.
The Practical Beauty of Gray Nails
Gray is incredibly forgiving for chipped edges because chips blend in rather than showing up as stark white spots. This makes gray excellent for people with active lifestyles who don’t want to maintain their nails constantly. You can go two weeks between manicures without gray looking obviously chipped, whereas white tips or bright colors become obviously worn.
9. Translucent with Light Shimmer
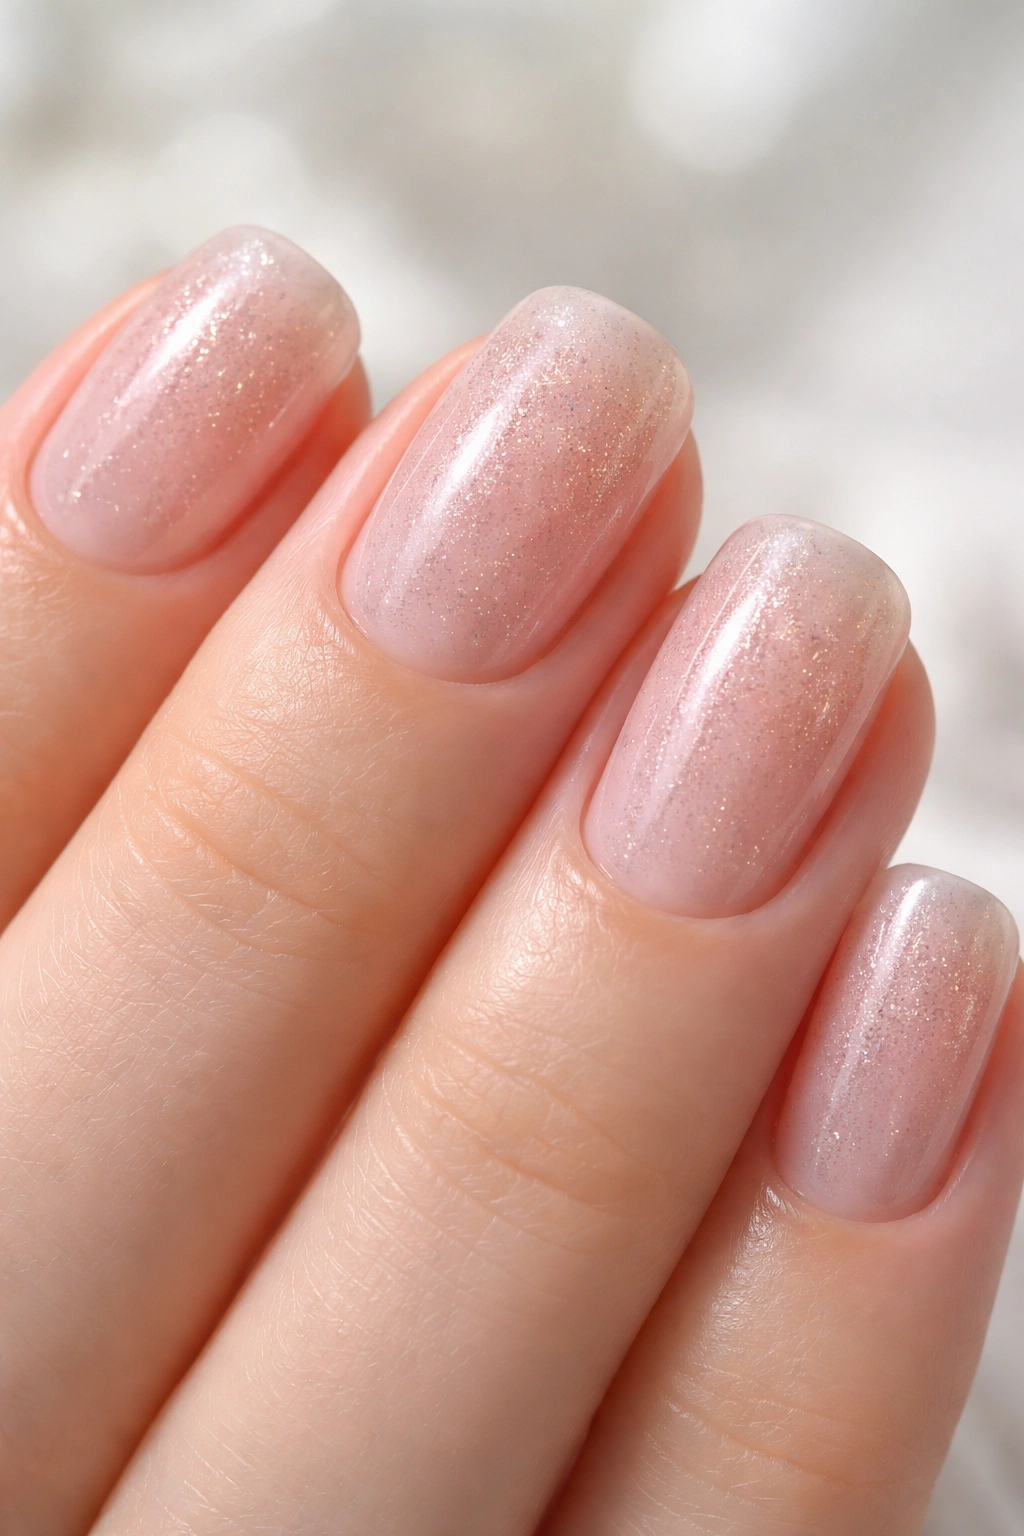
A translucent base lets your natural nail color show through while a light shimmer adds depth and catches the light. This design sits at the intersection of “barely-there” and “intentionally designed,” making it perfect for people who want visual interest without obvious effort.
Understanding Translucent Polish
Translucent polish is partially see-through—not totally clear, but not opaque either. When applied, you see your actual nail bed color beneath it, modified by the tint or shimmer of the polish. This creates an incredibly natural look that feels like an enhancement rather than a makeover. Translucent polish ranges from nearly clear to noticeably tinted; for short squoval nails, a lightly tinted translucent is usually more interesting than nearly-clear.
Best Translucent + Shimmer Combinations
- Translucent pink with rose-gold shimmer (romantic and polished)
- Translucent peach with light gold shimmer (warm and approachable)
- Translucent lavender with silver shimmer (cool and elegant)
- Translucent nude with barely-visible champagne shimmer (luxurious and subtle)
The shimmer in translucent polish should be fine enough that it reads as an elegant finish rather than chunky glitter. You want light-catching shimmer, not visible sparkle. The polish should feel sophisticated when you move your hands in natural light, not clubby or theatrical.
Application Tips for Success
Translucent polish requires a clean base because imperfections show through—your nails should be filed smooth and your cuticles pushed back before application. Apply in thin coats rather than one thick coat; two thin coats of translucent always look better than one thick coat. The shine from the shimmer does most of the work, so your application doesn’t need to be flawless; minor texture variations are actually hidden by the semi-transparent nature of the formula.
10. Cream with Minimal Nail Art Accent
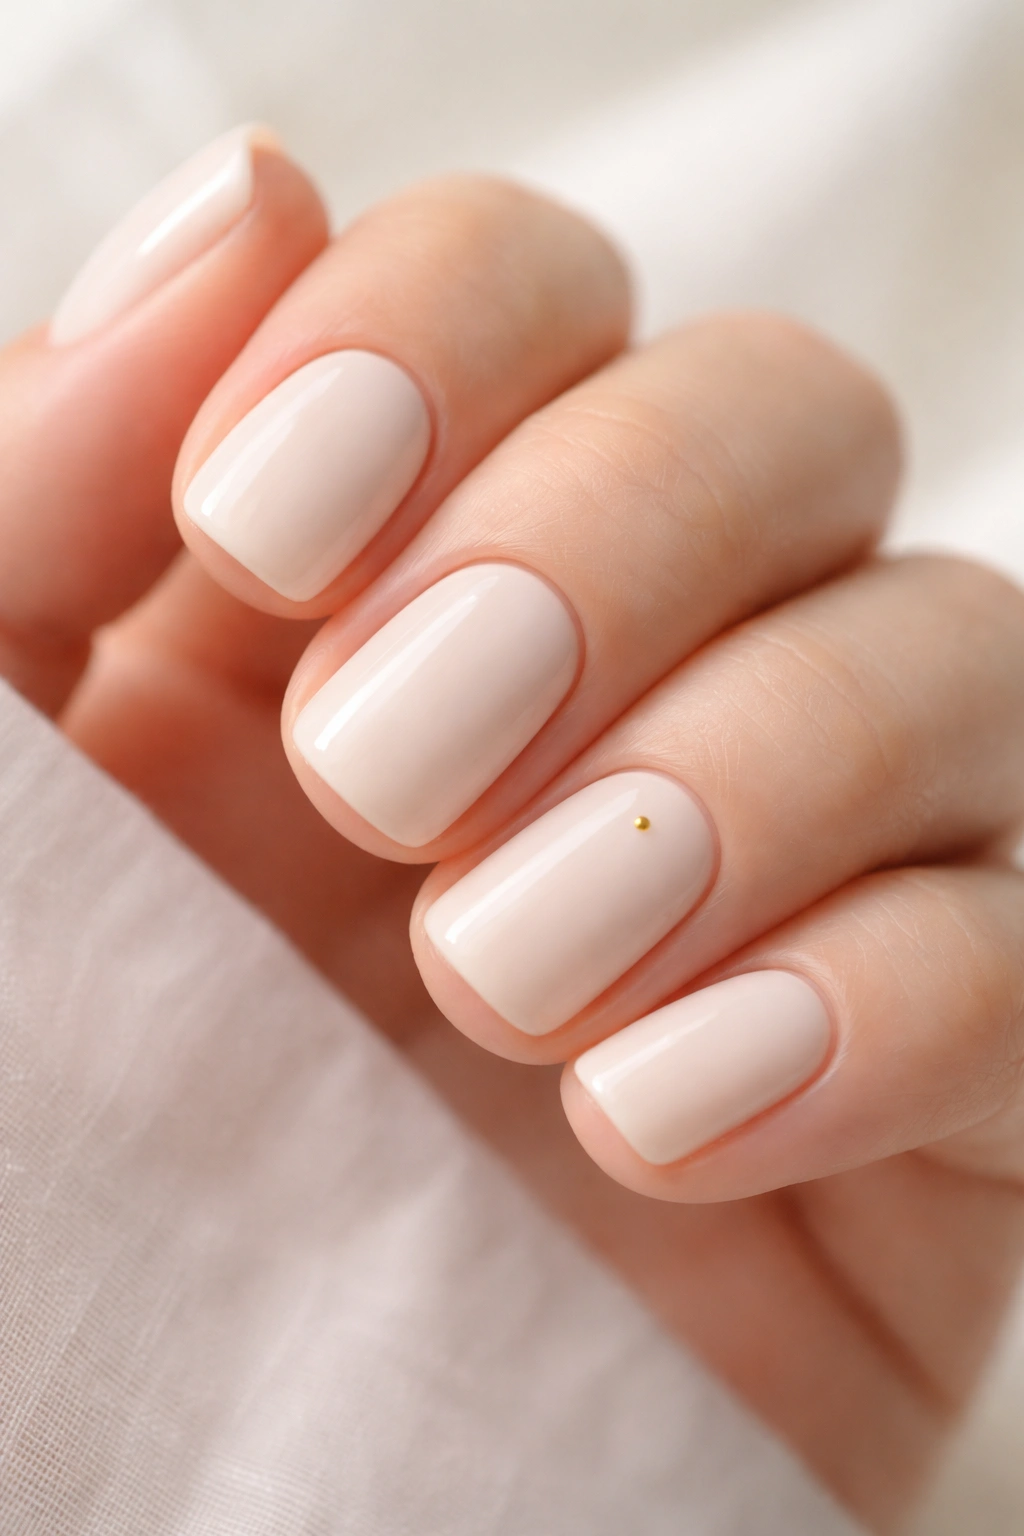
Cream is the warmer cousin of nude—it’s more obviously white or ivory-tinted, giving you a softer-looking base than bare skin tone. Paired with minimal nail art (think one tiny detail rather than a full design), cream becomes an elegant canvas for a single meaningful accent.
Why Cream Works as a Canvas
Cream is light enough that any dark color reads clearly against it, so your minimal art actually stands out rather than blending in. It’s not so pale that regrowth shows obviously, and it’s not so white that it reads as stark. Cream feels intentionally chosen—you picked a color that makes you feel polished and put-together, which is exactly what confidence looks like in nail design.
Minimal Art Ideas That Actually Work
- One tiny dot on your accent nail in a complementary color (rose-gold on cream, forest green on cream, navy on cream)
- A thin black line creating a geometric shape on just one nail (a triangle, a single angle, or a small rectangle)
- A delicate line of color around your nail’s edge (like a thin border frame)
- A single thin stripe down one accent nail in a color that complements your cream base
- The tiniest handwritten initial, letter, or symbol on one nail (requires a steady hand or a nail pen, but reads as incredibly personal)
The genius of pairing cream with minimal art is that your art becomes the statement because it has breathing room. You’re not competing with multiple designs or busywork. One tiny intentional accent on a cream background feels deliberate, artistic, and sophisticated.
Making Your Accent Actually Minimalist
The temptation with accent nails is to make them bigger or more elaborate. Resist this. The smaller and simpler your accent is, the more elegant the overall effect becomes. You want viewers to notice you’ve done something intentional with your nails, not to be able to immediately describe exactly what art you have on them. Subtlety is the entire point.
Key Takeaways
Short squoval nails give you the best of both worlds—a shape that’s interesting enough to feel intentional but practical enough for everyday life. Whether you choose solid colors, subtle textures, minimalist line art, or nearly-bare natural nails, the principle remains the same: restraint is what makes low-key design work.
The designs in this list prove that you don’t need intricate nail art, extensions, or a salon appointment every week to look polished and put-together. A thoughtfully chosen color, a carefully executed shape, and an understanding of what makes a design feel intentional rather than lazy—these are the actual building blocks of elegant nails. Start with whichever design resonates most, take your time with the application, and remember that beginner nails don’t need to be perfect; they need to be intentional.
Your nails are something you see constantly, and so does everyone you interact with. Investing in a design that genuinely reflects your aesthetic means you’ll get more value from your manicure than if you’d just picked whatever was trendy that week. Low-key nails might not photograph dramatically, but they photograph well—and more importantly, they feel good to wear.
