

Duck nails have become a delightful way to add personality and charm to your manicure, whether you’re going for playful whimsy or sophisticated cuteness. These adorable nail designs range from realistic waterfowl renderings to cartoonish rubber ducky styles, offering something for every skill level and aesthetic preference. The beauty of duck-inspired nail art lies in its versatility — you can go bold and colorful or keep things subtle and minimalist, depending on your mood and occasion. What makes duck nails particularly appealing is that they work surprisingly well across different nail shapes, lengths, and color palettes. Whether you’re a nail art enthusiast looking for your next creative project or someone who appreciates quirky, fun manicure ideas, duck nails deliver personality in spades. The designs translate beautifully whether you’re painting them yourself at home or bringing inspiration to a professional manicurist. Let’s explore ten adorable duck nail ideas that’ll have you quacking with joy every time you look at your hands.
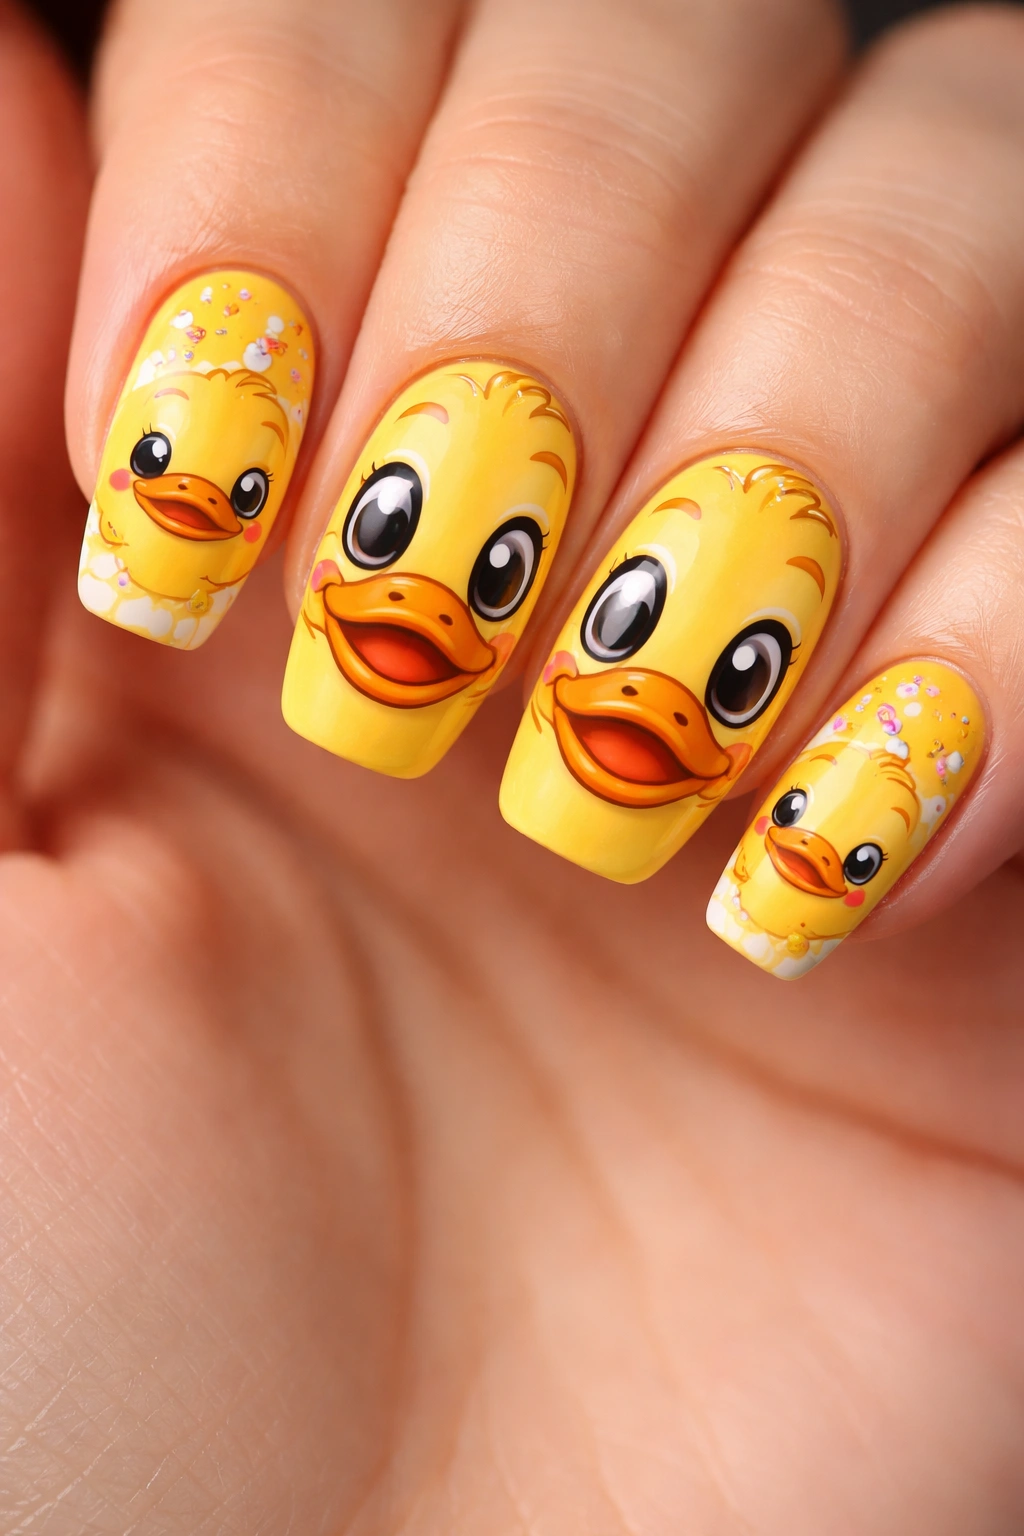
1. Yellow Duck Face Design
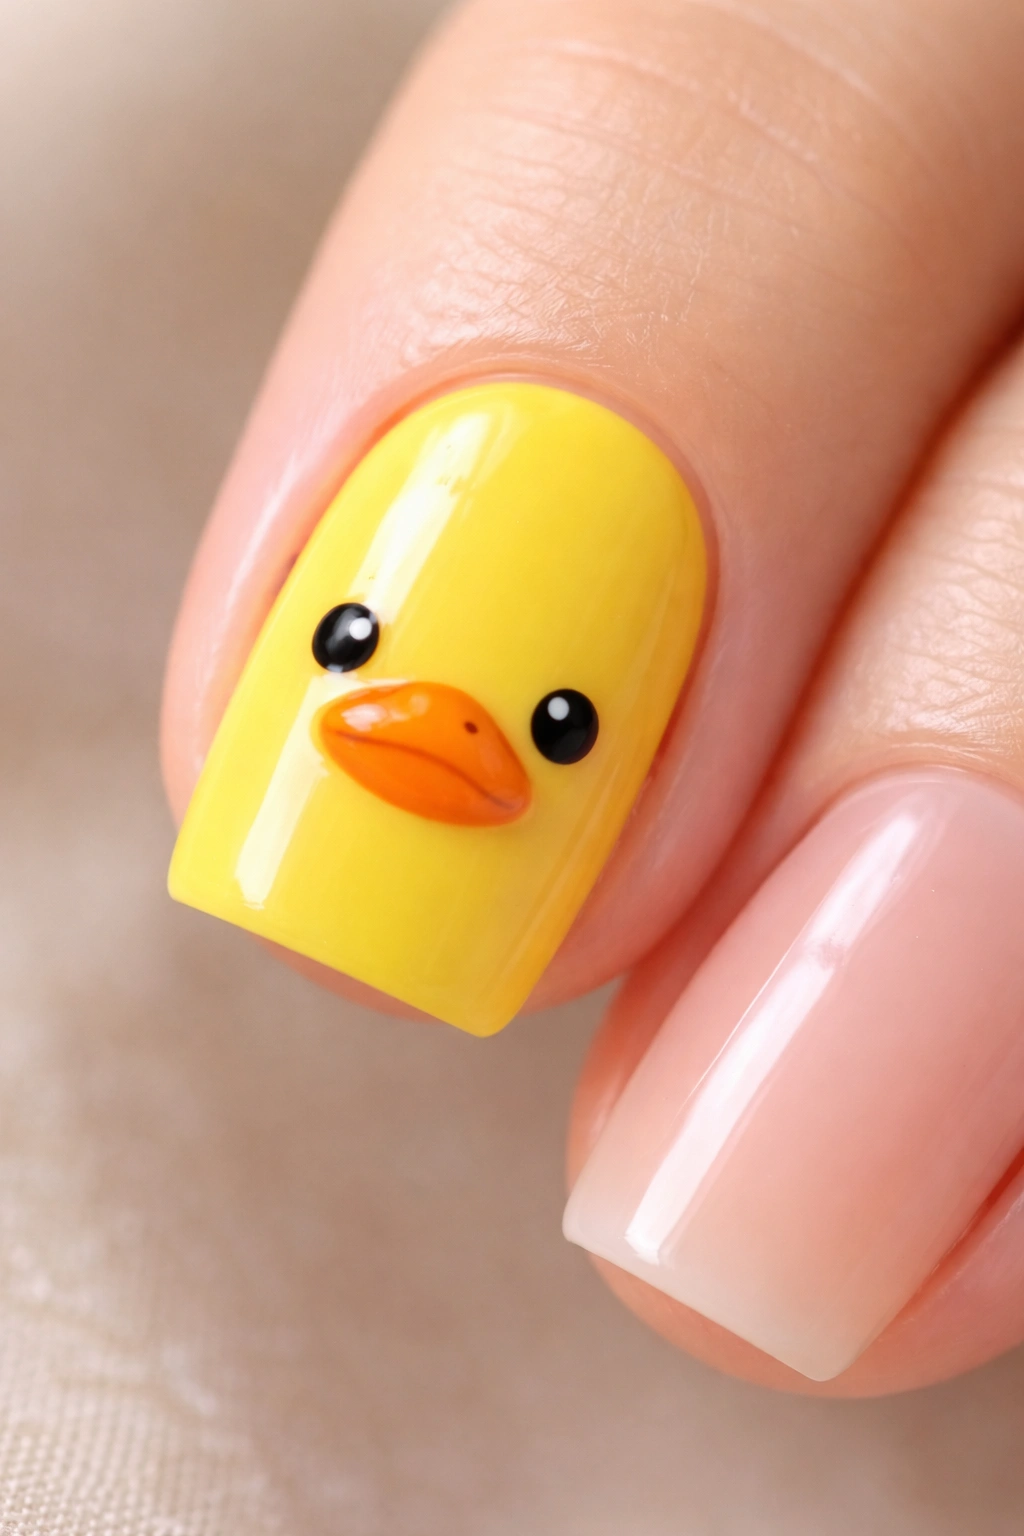
The classic yellow duck face is the quintessential choice for anyone wanting instantly recognizable cuteness on their nails. This design features a simple, charming duck profile rendered in bright, cheerful yellow with a small orange or red beak and tiny dot eyes. It’s the kind of design that makes people smile when they see your nails — there’s something inherently joyful about the combination of that sunny yellow and the duck’s sweet expression. This style works beautifully on short to medium-length nails and doesn’t require advanced painting skills to pull off convincingly.
Why It’s an Instant Classic
The yellow duck face captures the essence of what people love about ducks without overcomplicating things. The simplicity is actually what makes it so charming — a duck doesn’t need intricate details to be recognizable and cute. You can paint this design on every nail for maximum impact, or do an accent nail approach where just one or two nails feature the full duck face while others are solid yellow or white. The design also pairs beautifully with neutral base colors that let the duck really pop without clashing.
How to Create It
- Use a bright yellow nail polish as your base and let it dry completely
- With a thin nail art brush or dotting tool, paint a small circle for the duck’s head in the center of the nail
- Add a slightly smaller circle slightly below for the body (optional, but adds dimension)
- Paint a tiny triangle pointing outward for the beak in orange or red
- Use a thin brush or toothpick to add two tiny black dots for eyes
- Seal with a clear topcoat to protect your design
- Consider adding a thin black outline around the duck’s head for definition
Pro tip: If freehand painting feels intimidating, use nail stickers as a base and paint over them, or use a nail stamp to create uniform duck faces across all your nails.
2. Rubber Ducky Bath Time Theme
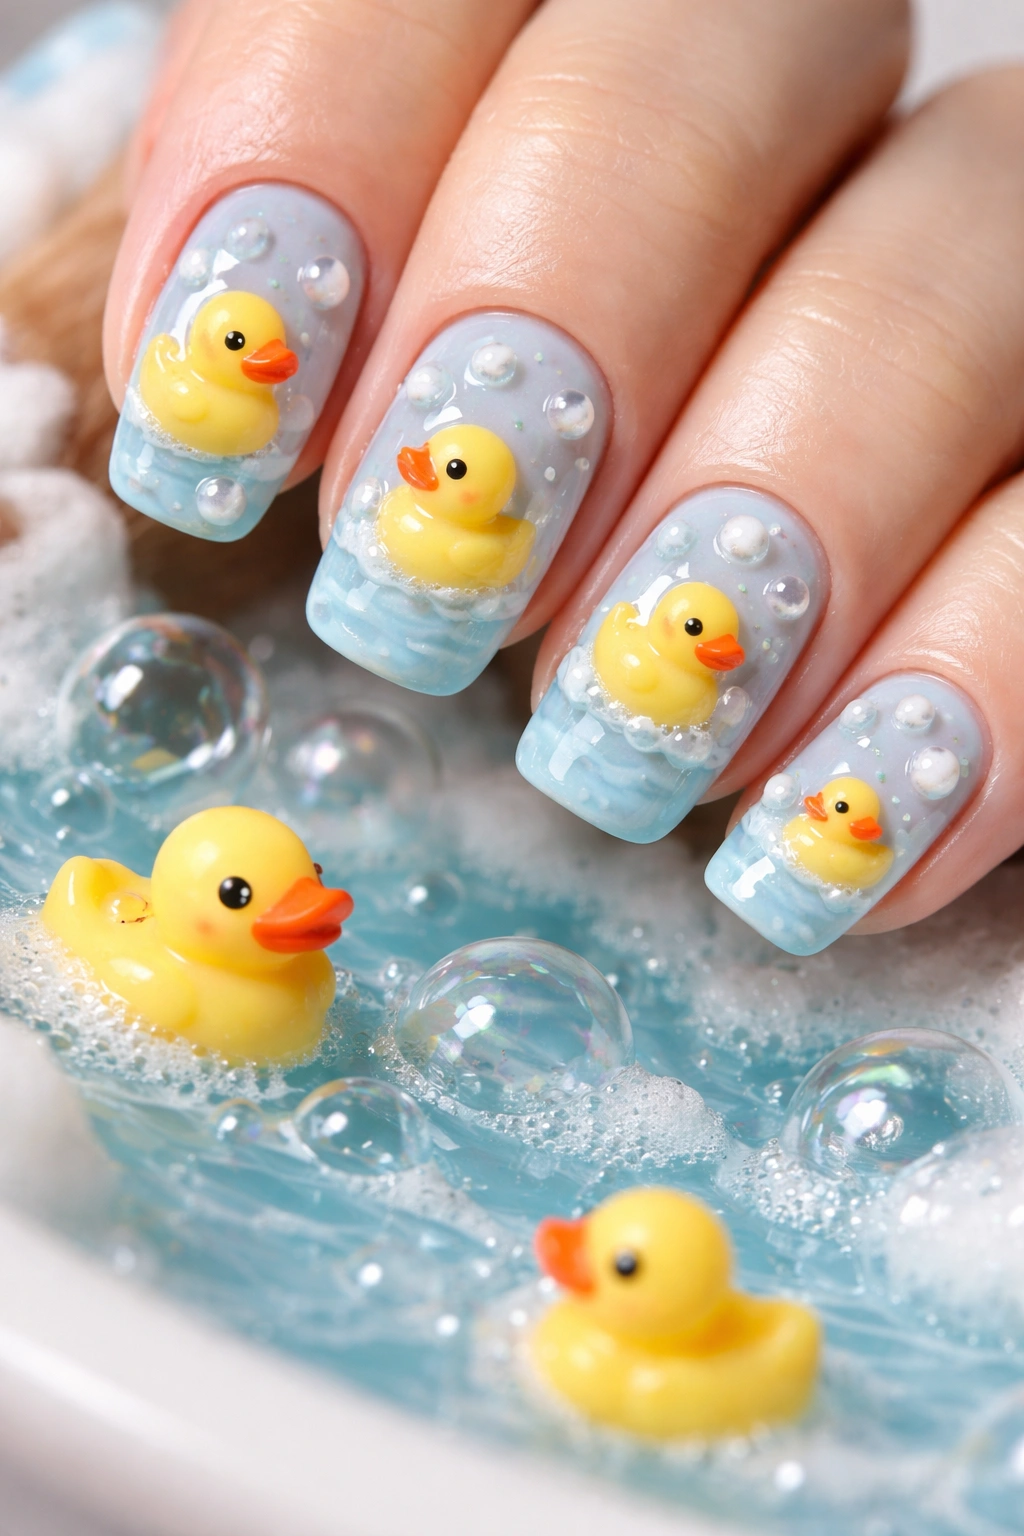
This playful design transports your nails directly to a cozy bath scene, complete with water, bubbles, and cheerful rubber duckies. The rubber ducky bath theme captures that nostalgic, comforting feeling of childhood bath time, making it perfect for anyone who loves whimsical, storybook-inspired nail art. The design typically features a soft blue or turquoise base representing bathwater, floating rubber duckies in bright yellow, and white bubble details scattered across the nail surface. It’s visually engaging and tells a little story on your fingertips, which is part of what makes it so charming.
Why This Design Stands Out
The bath time theme gives you permission to be playful and whimsical while maintaining a cohesive, thoughtful design aesthetic. Unlike a simple duck face, this approach creates an entire miniature scene that draws the eye and sparks conversation. The layering of elements — water, ducks, and bubbles — creates visual depth that makes each nail feel like its own little artwork. It’s the kind of design that makes you genuinely happy to look at your hands throughout the day.
Creating Your Bath Scene
- Start with a soft blue or turquoise base polish covering the entire nail
- Once dry, use white polish and a dotting tool to paint 3-4 small circles scattered across the nail (these are your bubbles)
- Paint 1-2 yellow rubber duckies in the center or corners of the nail using a thin brush
- Add tiny black dots for the duckies’ eyes
- Layer some bubbles at different heights for a three-dimensional effect by adding smaller white dots on top of larger ones
- Optionally, add a thin white wavy line at the “waterline” to suggest the water’s surface
- Finish with a glossy topcoat to enhance the water effect
Worth knowing: This design works particularly well on medium to longer nails where you have more space to paint your bath scene without it feeling cramped or cluttered.
3. Duck Feet Crossing Nails
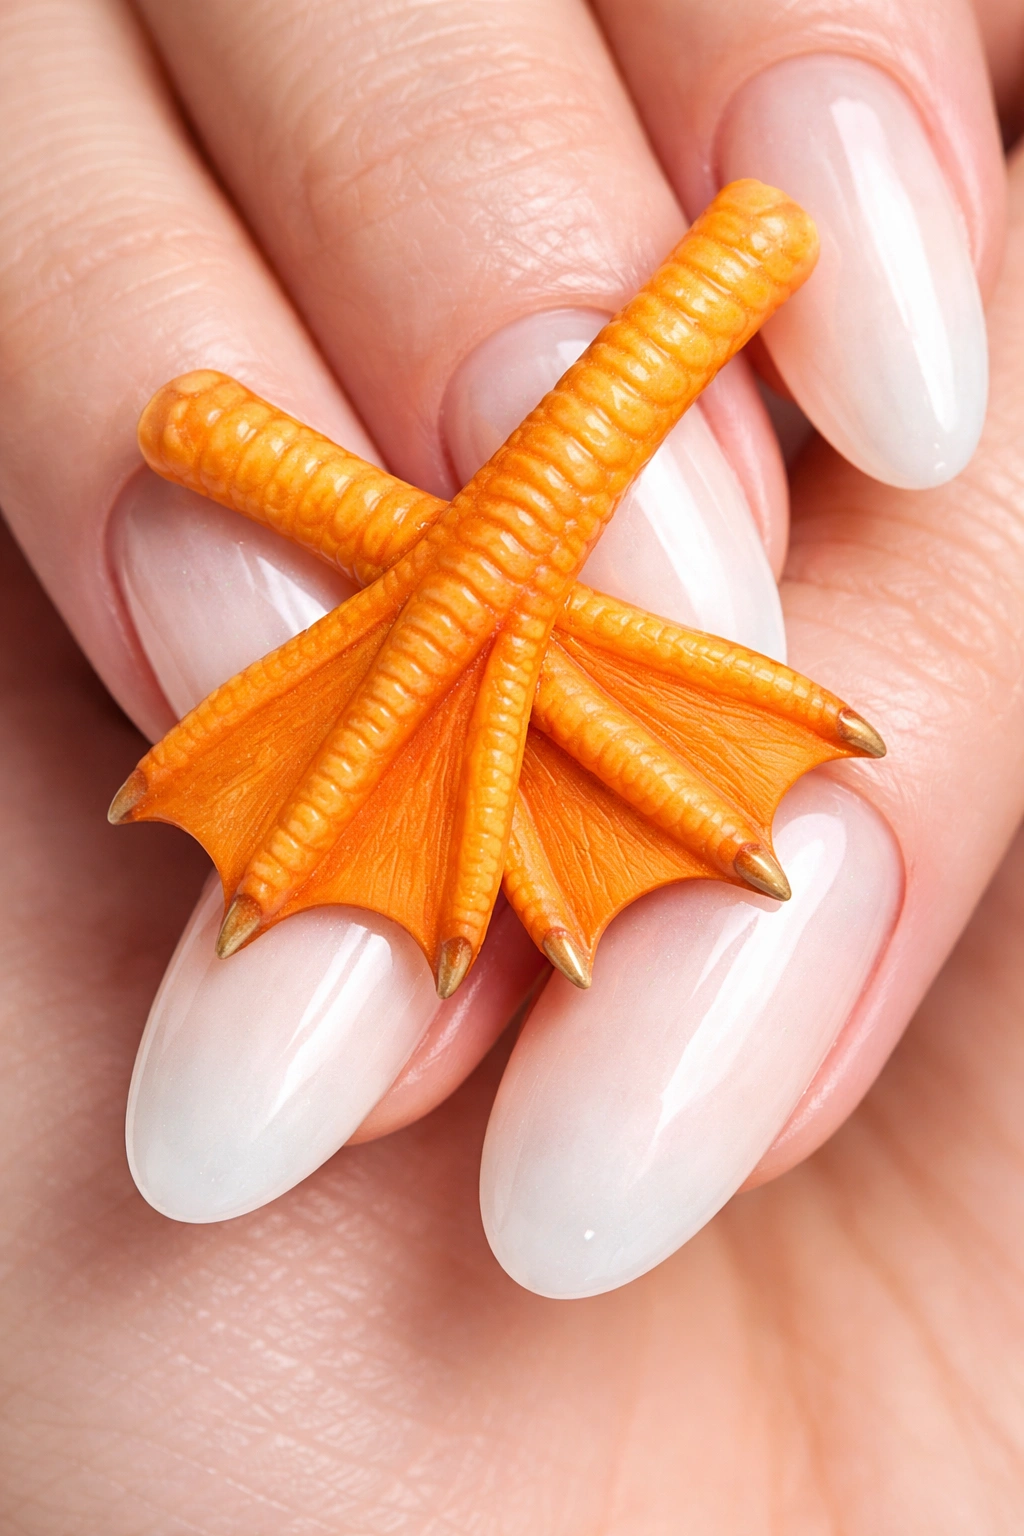
This clever and unexpected design features duck feet crossing diagonally across your nail in a minimalist, modern style. Instead of painting the entire duck, you focus solely on the distinctive webbed feet, creating an artistic negative space design that’s both cute and surprisingly sophisticated. The feet are typically rendered in orange or red against a contrasting base — think white, navy, black, or soft pastels. This design appeals to anyone who appreciates clever, slightly unconventional takes on animal nail art.
What Makes It Different
The duck feet crossing design demonstrates that you don’t need to paint the whole animal to convey the idea — just one distinctive feature instantly communicates “duck” to anyone who sees it. It’s a design that rewards a second look because the simplicity is so elegant. The crossing feet create natural diagonal lines that are flattering on the nail shape and draw attention to your hands in an understated way. It’s the kind of design that nail art enthusiasts particularly appreciate because it shows creative thinking beyond the obvious.
Step-by-Step Creation
- Apply a solid base color (white, navy, or your choice of pastel) and let it cure or dry completely
- With a thin nail art brush, paint a webbed foot shape — three toes with connecting webbing — in orange or red
- Paint a second webbed foot crossing the first one diagonally across the nail
- Add small details like tiny lines inside the webbing for realism if you’re feeling confident
- Keep the lines clean and precise — this design depends on sharp lines for its modern aesthetic
- Seal with topcoat for protection and shine
Insider note: Use a nail art pen or very thin brush for the most precise lines, and don’t feel pressured to achieve perfect symmetry — slight variations actually make the design feel more artistic and less computer-generated.
4. Pastel Duck Silhouettes
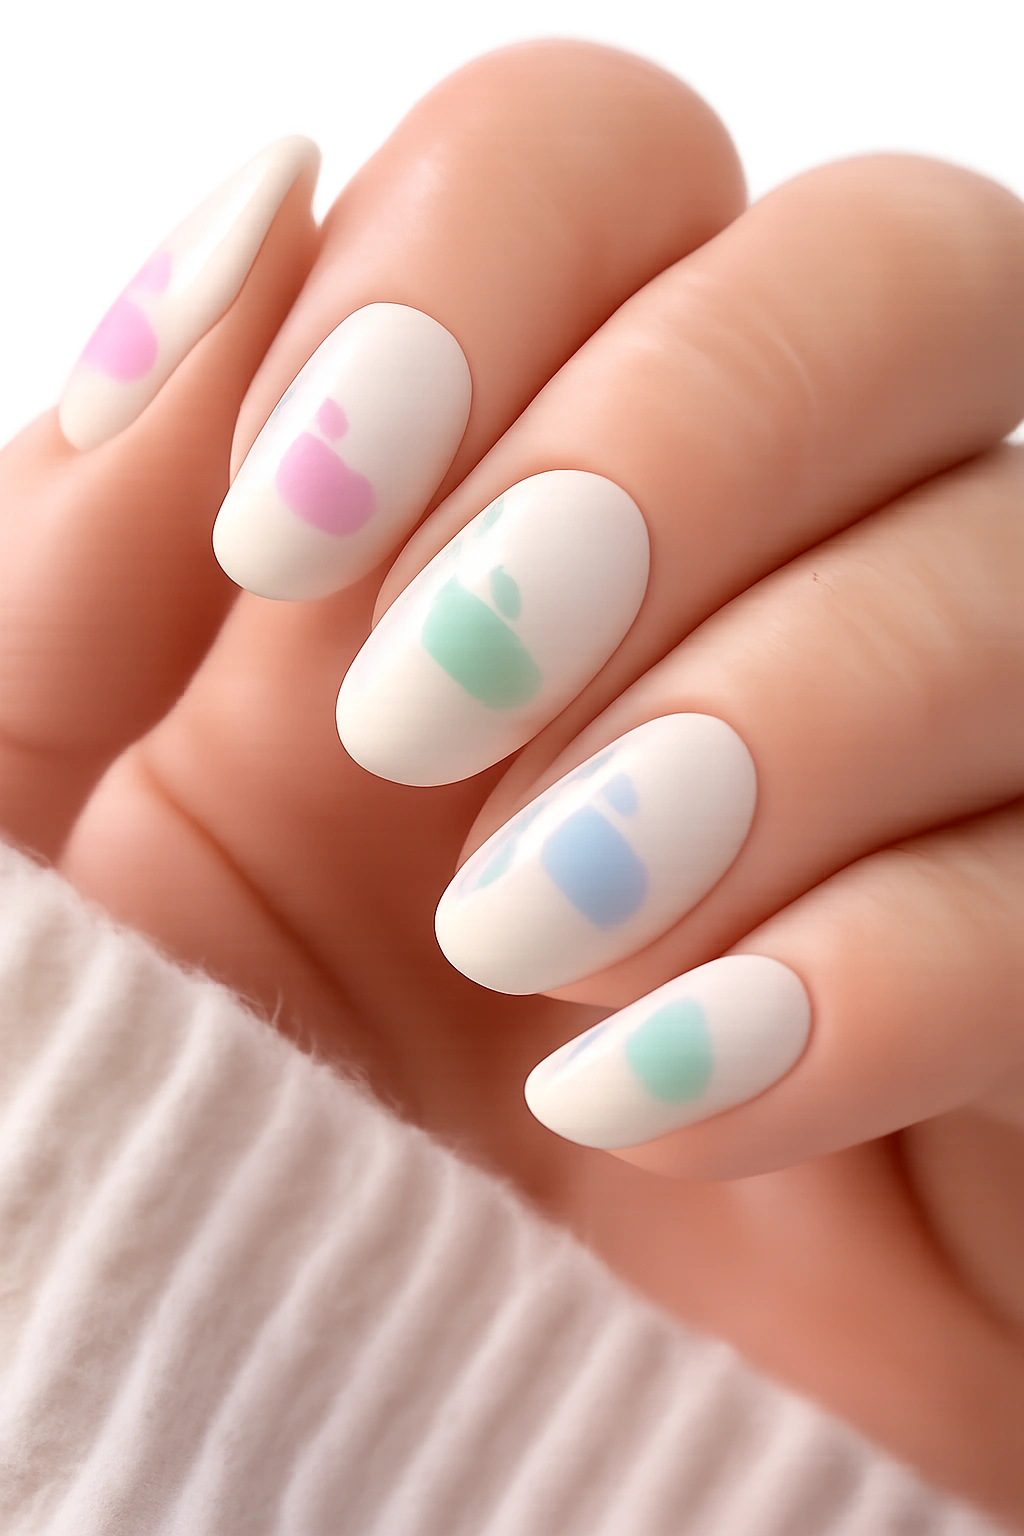
Pastel duck silhouettes offer a soft, dreamy aesthetic that’s perfect for anyone who loves gentle colors and understated elegance. This design features simple duck outlines or silhouettes rendered in various pastel shades — soft pink, lavender, baby blue, mint green, and pale yellow — scattered across white or cream nails. The silhouettes are solid shapes without internal details, which creates a clean, modern look that’s surprisingly versatile. You can wear this design to casual outings, work settings, or special events without it feeling out of place.
Why Pastels Make It Special
Pastels inherently feel softer and more sophisticated than bright, saturated colors, which elevates duck nails from purely playful to genuinely elegant. The muted tones work beautifully together without creating visual chaos, allowing you to add multiple duck silhouettes without the design feeling overwhelming. Pastel nails also photograph beautifully and don’t show dirt or wear as quickly as darker designs. They’re the perfect choice if you want cute without loud, or whimsical without cartoonish.
Painting Pastel Silhouettes
- Apply a white or cream base coat and let it dry thoroughly
- Load a thin brush with a pastel color (start with soft pink or lavender)
- Paint a simple duck profile — a circular head, a slightly larger teardrop or oval for the body, and a pointed beak
- Keep the duck shape as a solid silhouette with no interior details
- Paint additional ducks in different pastel shades on the same nail or distribute them across your manicure
- Vary the duck sizes and angles so they don’t all look identical
- Add a matte topcoat for a more sophisticated, modern finish (glossy works too, but matte feels more chic)
- Consider leaving some white space on the nail rather than covering it completely
Pro tip: If you want extra dimension, add a thin outline in a slightly darker shade of the same pastel color to make each silhouette pop subtly against the background.
5. Cartoon Duck Character Nails
This design celebrates iconic cartoon ducks and playful character styles, perfect for anyone with a sense of humor and love for animation. You can draw inspiration from beloved duck characters — think exaggerated expressions, colorful outfits, or distinctive personality traits rendered in a fun, illustrative style. The cartoon approach gives you freedom to be expressive and less concerned with realism or precision. These nails practically beg people to comment on them and ask about the characters depicted, making them fantastic conversation starters.
Character Design Options
The cartoon duck approach opens up endless possibilities: a duck wearing sunglasses and a baseball cap, a duck with an oversized smile and rosy cheeks, a duck in different silly costumes on different nails, or even duck characters with human expressions and poses. The key is exaggeration and personality — cartoon ducks succeed because they have clear, readable expressions and distinctive features. Think big eyes, prominent beaks, and expressive body language that conveys emotion instantly. The style works beautifully on medium to longer nails where you have space to add character details.
Creating Cartoon Characters
- Choose a white or light-colored base to make the cartoon characters really pop
- Sketch your duck character lightly with a pencil if freehand painting feels risky
- Use multiple colors to bring the character to life — the more vibrant and varied, the more cartoonish it becomes
- Pay special attention to the eyes and expression, as these convey most of the character’s personality
- Add details like clothing, accessories, or small items the duck is holding to establish personality
- Don’t worry about perfect proportions — cartoon characters often have intentional imbalances that make them charming
- Seal with a glossy topcoat to enhance the playful, illustrative quality
Worth knowing: Bold outlines in black or dark gray around your cartoon character make them read more clearly and give the design that classic cartoon comic strip feeling.
6. Duck Pond Landscape Scene
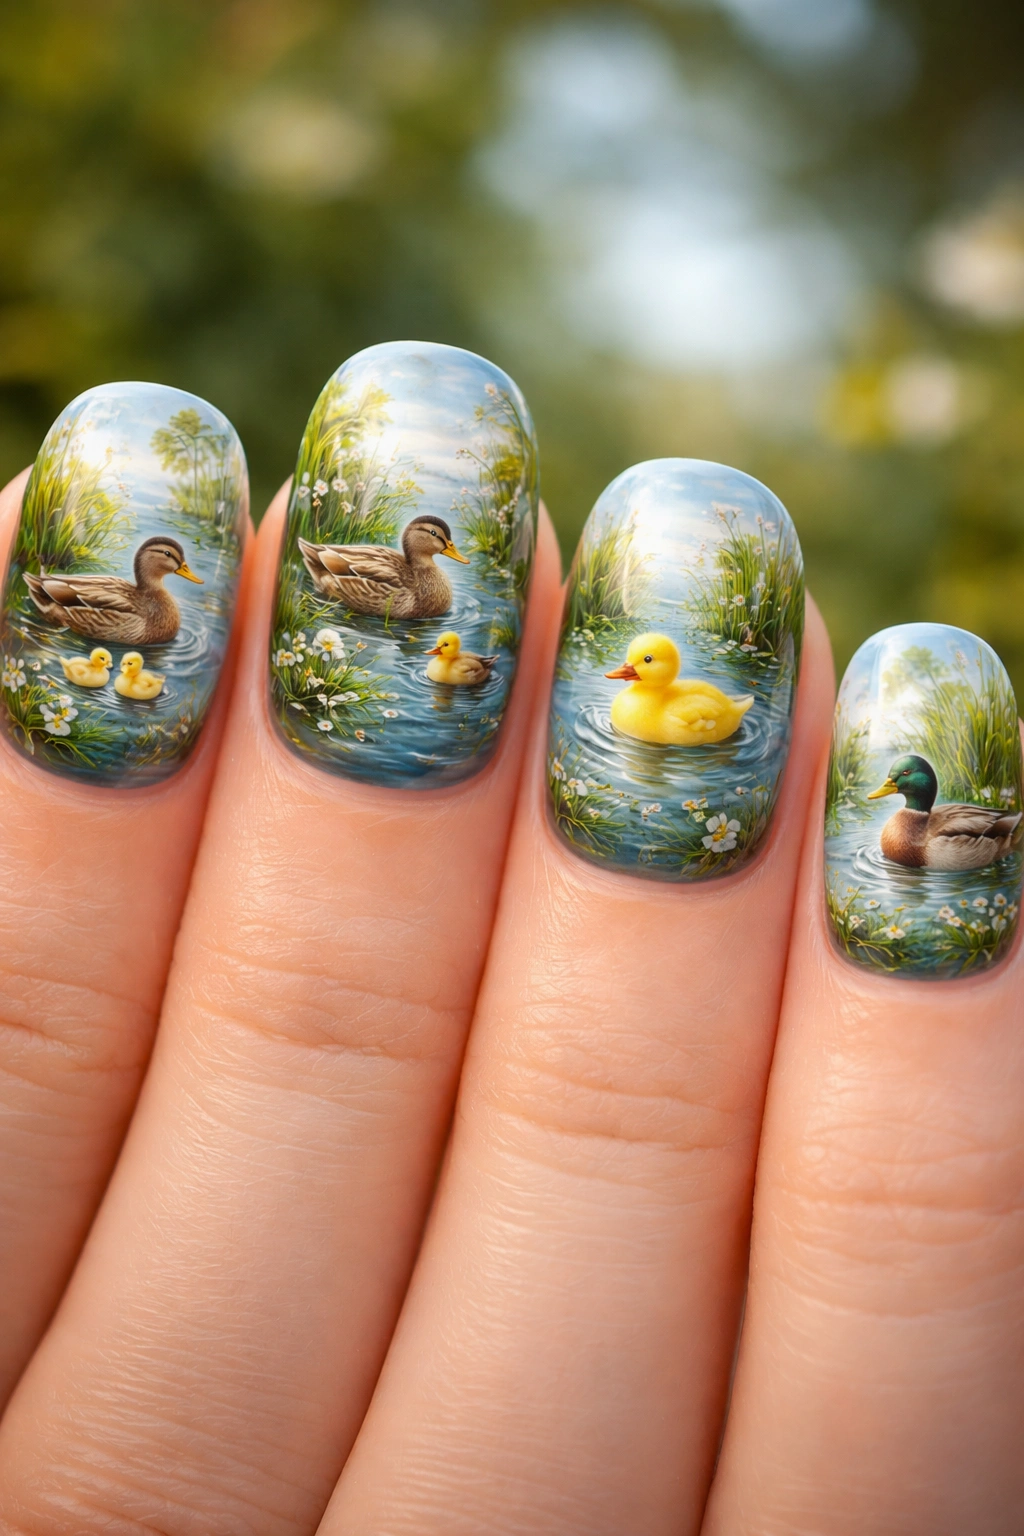
The duck pond design transforms your nail into a miniature natural scene, complete with water, vegetation, and ducks enjoying their habitat. This is a more complex design that features layered elements: a blue base representing water, green plants or lily pads, perhaps a few ducks swimming or wading, and maybe some clouds or sky at the top of the nail. It’s landscape painting on a tiny scale, which challenges your artistic skills but produces genuinely impressive results. Anyone who loves nature-inspired nail art or miniature artwork will appreciate the detail and composition involved.
Creating a Complete Landscape
The duck pond scene succeeds when it has clear foreground, middle ground, and background elements, even on a tiny nail canvas. The water occupies the lower portion, green vegetation rises from the edges or floats on the surface, ducks position themselves at various points in the scene, and the sky or clouds fill the upper space. Using perspective tricks — like making distant ducks smaller and foreground plants larger — creates depth that makes the scene feel three-dimensional. This is the kind of design that rewards spending extra time and really considering composition.
Building Your Pond Scene
- Apply a sky-colored base (pale blue, white, or even a gradient from blue to white)
- While still wet or with another layer, paint a deeper blue water line across the lower portion of the nail
- Add white highlights or clouds in the sky area with a dotting tool
- Paint green vegetation along the shore or floating lily pads in the water using a thin brush
- Position ducks at different points — some swimming, some wading, some on lily pads
- Add tiny details like water ripples, grass tufts, or small flowers in your vegetation
- Use slightly different shades of blue and green to create natural variation
- Finish with a glossy topcoat that will make the “water” portion shine beautifully
Insider note: Take inspiration from actual landscape paintings and photography when planning your composition — this isn’t about realism but about creating pleasing visual balance and depth.
7. Minimalist Duck Outline
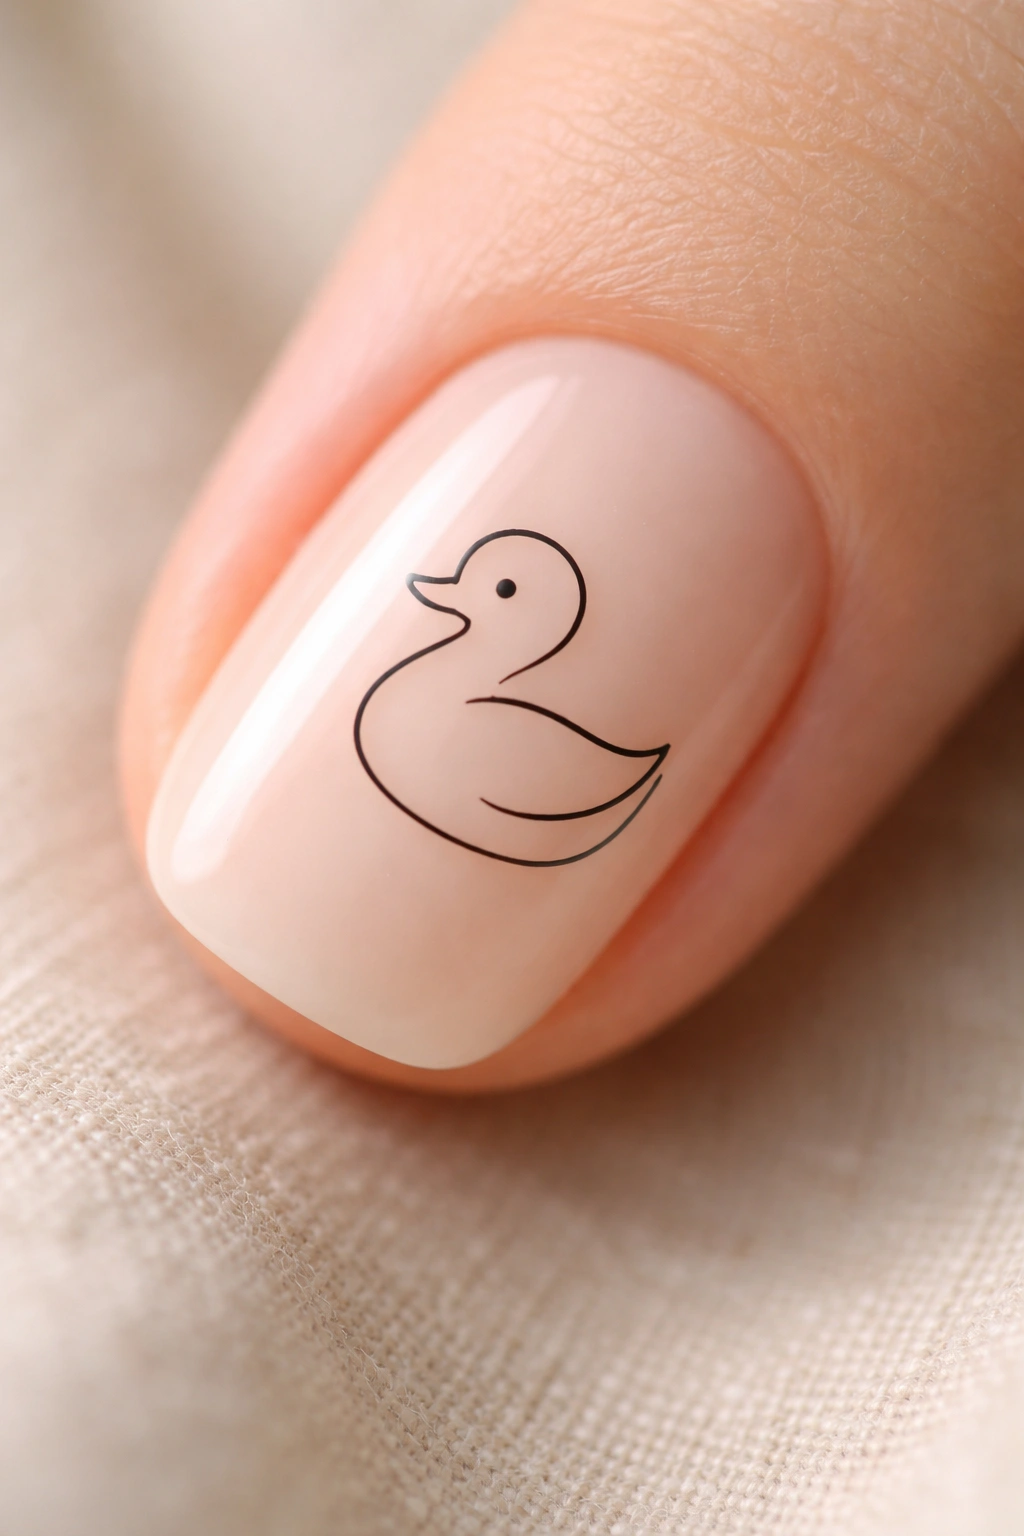
The minimalist duck outline represents the absolute essence of duck nails stripped down to the simplest possible execution. This design features just a single-line duck drawing, rendered in a thin, continuous outline in black, dark gray, or a contrasting color against a neutral or pastel base. There’s something deeply satisfying about minimalist line art — it’s elegant, modern, and surprisingly expressive despite its simplicity. This style appeals to anyone who loves contemporary art aesthetics or prefers subtle nail designs that don’t demand attention but reward close observation.
The Appeal of Line Art Simplicity
Minimalist designs work because they rely on clean execution and positive use of negative space rather than complexity and color. A single well-drawn duck outline communicates the entire concept clearly and feels intentional and thoughtful. This style also works beautifully on any nail length and translates well across different nail shapes. It’s the kind of design you can wear to formal events, professional settings, or casual outings without anyone questioning whether it’s “appropriate” — it reads as artistic rather than playful.
Executing Perfect Line Art
- Apply a neutral base — white, cream, soft gray, or pale pink all work beautifully
- Use a very thin nail art liner or a fine-tipped brush in black or dark gray
- Draw a duck profile in one continuous line, using smooth, confident strokes
- The outline should include the head, body, neck line, and beak but skip internal details
- Keep the duck relatively centered on the nail with balanced white space around it
- Consider varying the line weight slightly — a slightly thicker beak or head outline creates visual interest
- You can add a single tiny dot for the eye if it helps clarify the design, or leave it completely blank
- Seal with matte topcoat for a more artistic, gallery-quality finish
Pro tip: Practice the duck outline on paper or a practice wheel first, as line art rewards confidence and smooth, continuous strokes rather than tentative, sketchy lines.
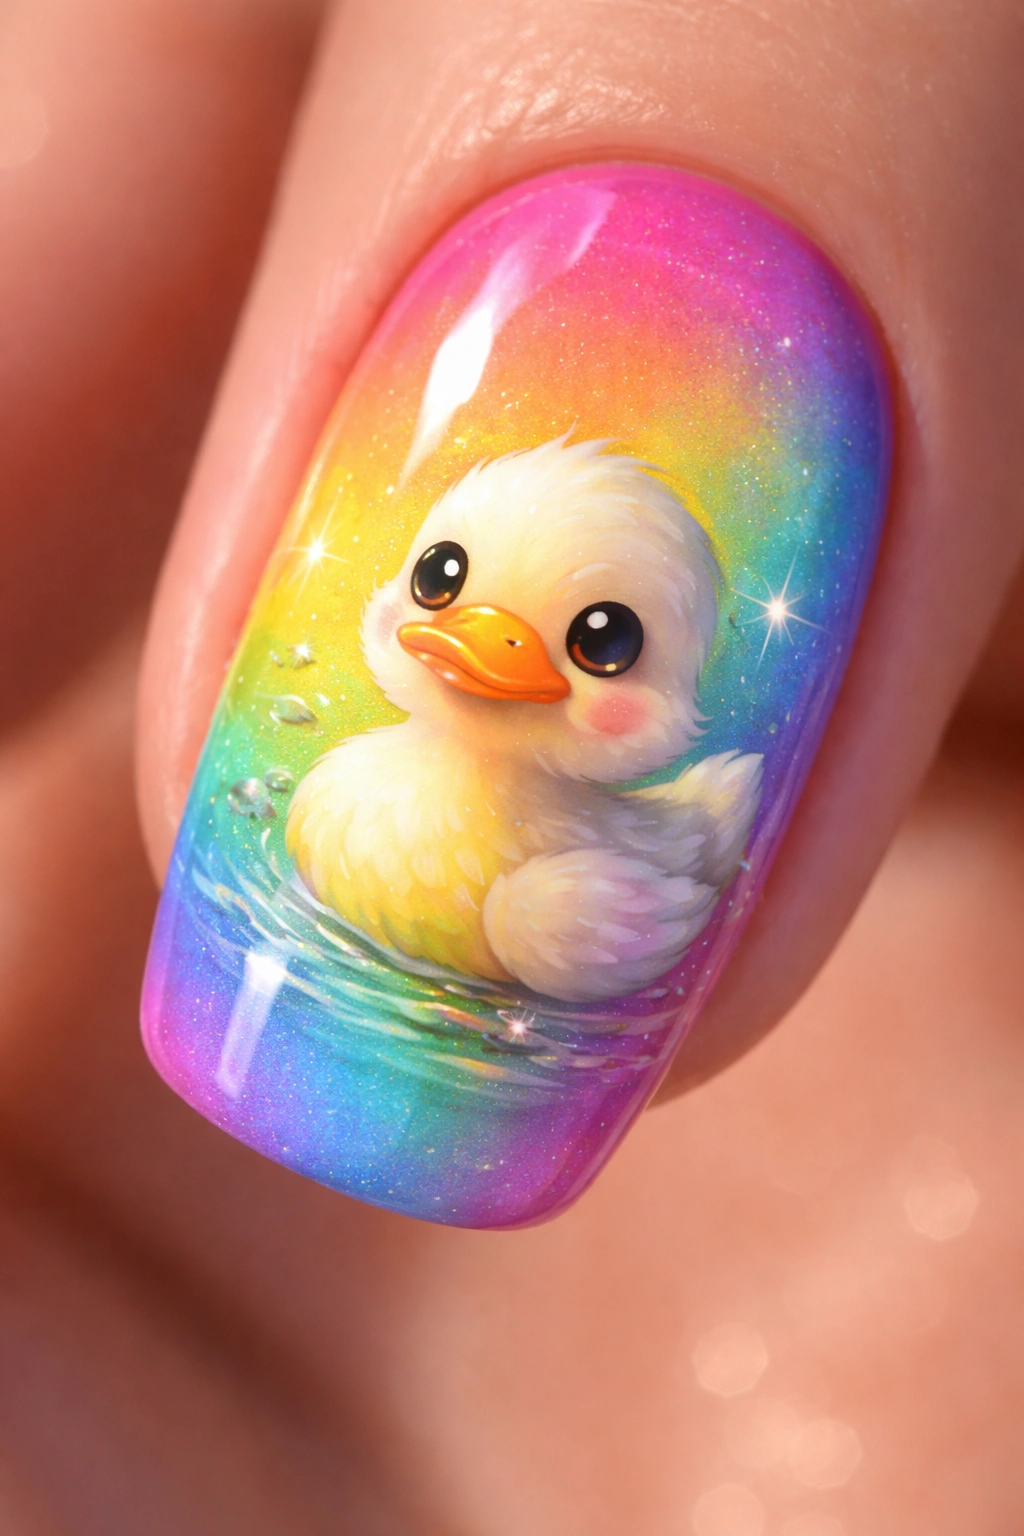
8. Glitter Duckling Design
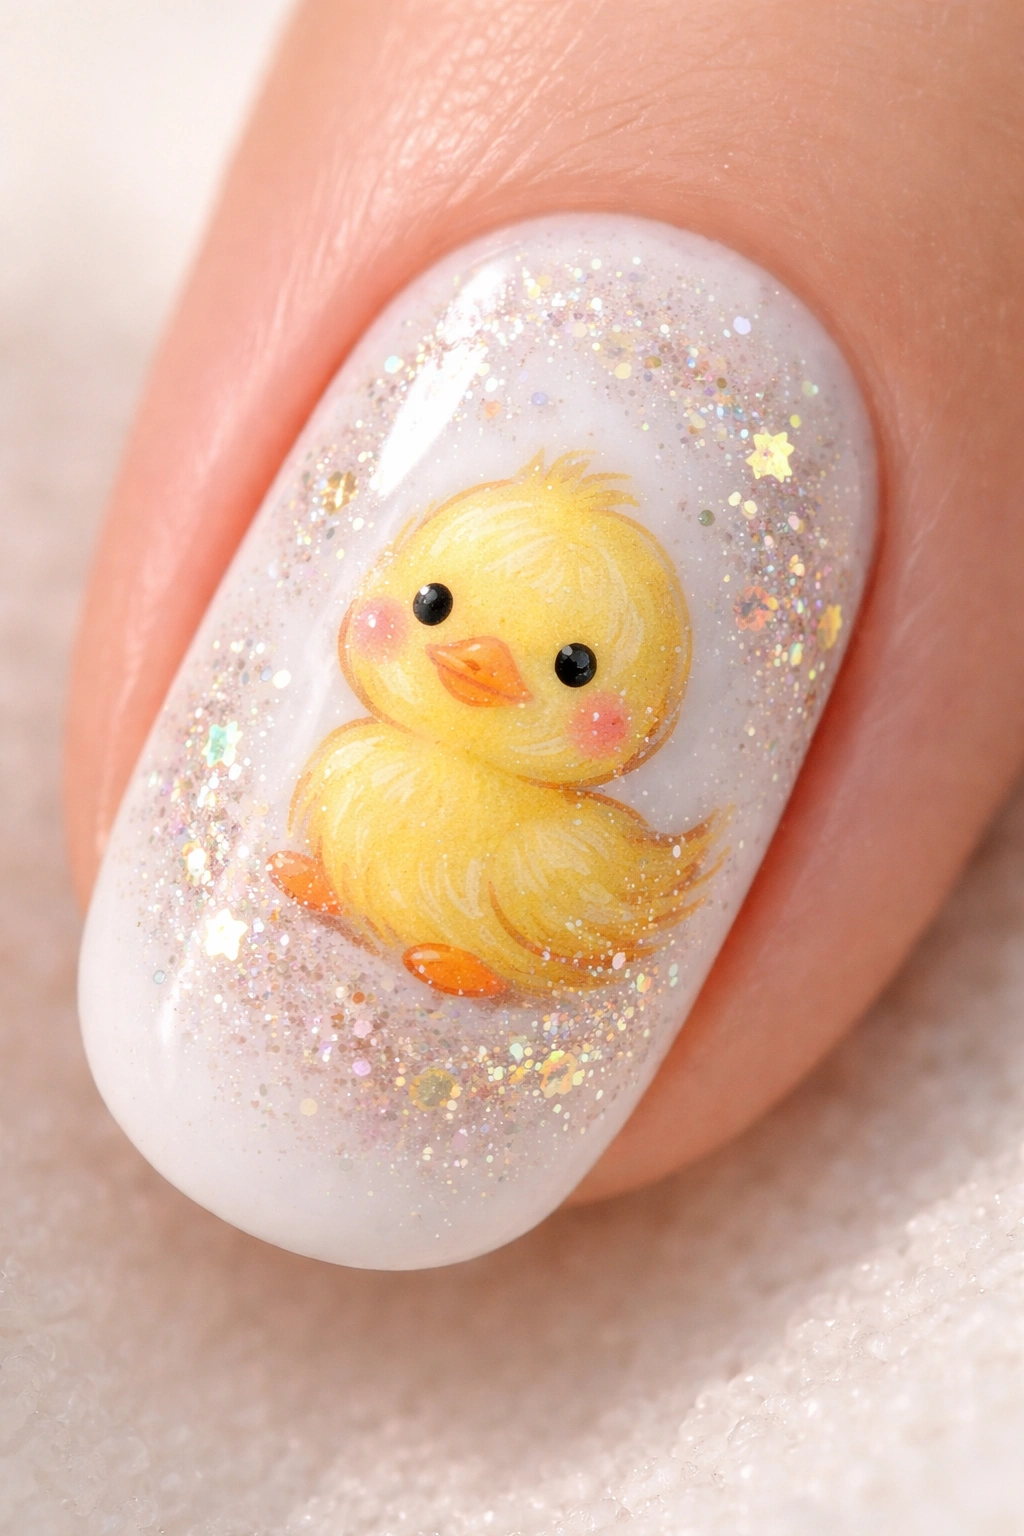
This design combines a simple duckling illustration with glitter accents, creating a design that’s cute, sparkly, and playful without feeling overwhelming. You might paint a yellow duckling on a white or cream base and add glitter polish to the wings, the water around it, or scattered across the nail for a magical shimmer effect. You could also use glitter gradient techniques or glitter ombre effects. The glitter adds movement and light-catching properties that make the design feel more dynamic and celebratory than a flat illustration alone.
Why Glitter Elevates the Design
Glitter instantly transforms a simple design into something more special and festive-feeling, even though the core concept remains straightforward. The sparkle draws attention and creates dimension, making a basic duckling seem more sophisticated and intentional. Glitter also adds texture and catches light differently depending on how you move your hands, which keeps the design interesting. This approach works particularly well if you want cute nails that feel appropriate for special occasions without requiring intricate painting skills.
Adding Sparkle to Your Duckling
- Paint a simple yellow duckling on a white or cream base and let it dry completely
- Select a glitter polish in coordinating colors — gold, iridescent, or clear with holographic glitter all work beautifully
- Apply glitter carefully to specific areas: around the duck’s feet (suggesting water and sparkle), across the wings, or as an ombre effect fading from the duck outward
- Alternatively, use a clear topcoat with loose glitter mixed in and apply it over the whole design for all-over sparkle
- For a more polished look, apply glitter only to designated areas rather than covering the whole nail
- Seal everything with a thick topcoat to smooth the glitter and create a glass-like finish
- Consider adding a drop of glitter gel topcoat for extra shine and protection
Worth knowing: Fine glitter tends to read more sophisticated than chunky glitter, and iridescent or holographic glitter works with almost any color palette without clashing.
9. 3D Duck Charm Nails
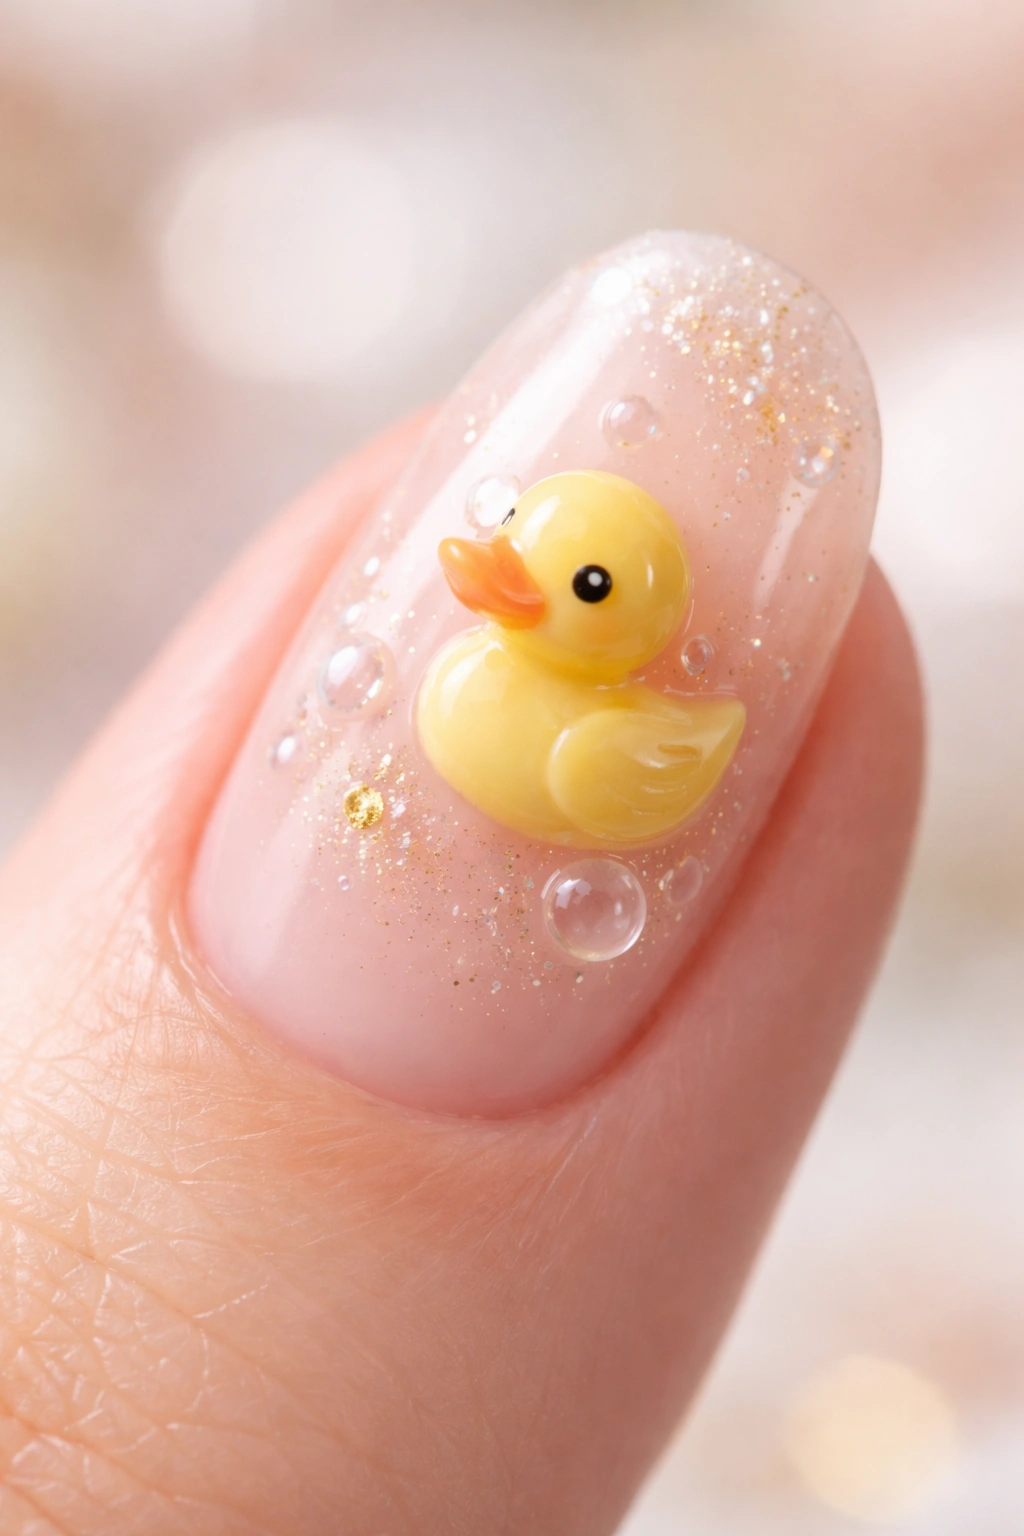
3D duck charm nails take the concept beyond typical nail polish and into actual three-dimensional territory, featuring small duck charms or sculptured elements attached to the nail surface. These might be tiny resin ducks glued to the nail, hand-painted duckling shapes built up with gel or acrylic, or even small metal duck charms. The 3D element creates visual interest and texture that flat designs can’t achieve, and there’s something genuinely delightful about having touchable, dimensional details on your nails. This approach requires slightly more advanced nail skills or access to pre-made charms, but the payoff is a truly unique manicure.
Creating Dimension on Your Nails
The 3D approach transforms your nails from flat artwork into sculptural pieces. You could build small duck shapes from white or yellow gel, sculpting tiny wings and beaks before curing. You could alternatively purchase small resin duck charms and adhere them to a base color with nail glue or builder gel. The base nail becomes a canvas for displaying these three-dimensional elements — you might keep it simple with a solid color or add subtle complementary designs around the charms. The effect is eye-catching and feels more like wearable jewelry than standard nail art.
Two Approaches to 3D Ducks
- DIY Sculpted Method: Build up layers of gel or acrylic in yellow or white, sculpting details like wings and beaks before curing. This requires steady hands and practice but creates completely unique charms.
- Purchased Charm Method: Source pre-made duckling resin charms online, apply them to the nail surface using builder gel or strong nail glue, and reinforce with additional topcoat. This eliminates sculpting skills but requires finding quality charms.
Pro tip: If you’re gluing on charms, apply them near the center or edge of the nail rather than the very tip, as constant contact and pressure in these areas can cause them to loosen over time.
10. Rainbow Duck Gradient
The rainbow duck gradient combines a beloved duck illustration with a stunning ombre or gradient effect that transitions through multiple colors. You might paint a duck illustration on one end of the nail (perhaps the thumb or accent nail) and create a gradient background that shifts from one color to another, or you could create a gradient across all your nails with a small duck on each one. The gradient effect feels contemporary and visually striking while the duck element keeps things playful and cute. This design works beautifully for anyone who loves color and wants a manicure that genuinely stands out.
Building a Stunning Gradient
A successful gradient requires understanding color progression — whether you’re moving through a monochromatic series (light to dark), complementary colors (blue to orange), or a full rainbow spectrum (red through violet). The gradient itself becomes the star of the design, and the duck serves as a charming accent element within it. You can create gradients using traditional sponging techniques with multiple nail polishes or apply pre-made gradient nail wraps. The gradient creates natural flow and movement across your nails that coordinates beautifully with a duck element.
Techniques for Rainbow Gradients
- Sponge Method: Dab multiple polish colors onto a makeup sponge in your desired order, then press onto the nail and dab repeatedly to blend the colors together.
- Gradient Polish: Use specially formulated gradient polishes that shift color across the nail naturally with minimal effort.
- Nail Art Pen Technique: Color in sections of your nail with different polish colors while they’re still wet, then blend with a damp sponge or brush.
- Once your gradient base is complete and dry, paint a duck illustration on top using contrasting colors
- Seal everything with a thick topcoat to blend and smooth the gradient
- Consider adding glitter to the gradient effect for extra shimmer and dimension
Worth knowing: Gradients work best on longer nails where you have space for color transition to be visible and readable, but shorter nails can accommodate gradients too with slightly more concentrated color shifts.
Final Thoughts
Duck nails prove that animal-inspired nail art can be simultaneously adorable, artistic, and surprisingly sophisticated depending on how you approach the design. Whether you’re drawn to the cheerful simplicity of yellow duck faces, the playful whimsy of cartoon characters, the natural appeal of landscape scenes, or the contemporary elegance of minimalist line art, there’s a duck nail style that perfectly matches your aesthetic and skill level.
The beauty of duck-inspired designs lies in their versatility and the joy they bring both to you and to anyone who sees your nails. You’re not limited to any single technique or style — feel free to mix approaches, combine elements from different ideas, or create your own unique takes on duck nail art. What matters most is that your nails make you smile and express your personality.
Start with designs that match your current nail art confidence level, then gradually challenge yourself with more complex techniques as you grow more comfortable. The duck nails community is wonderfully supportive and full of inspiring artists sharing their creative interpretations, so don’t hesitate to seek out ideas and guidance. Your next manicure could be the cute, personality-filled duck nails that become your new favorite design.
