

Long oval nails have become a favorite canvas for nail technicians and clients alike, offering the perfect balance between elegance and practicality. Unlike shorter shapes that limit design possibilities, long ovals provide ample space for creative nail art while maintaining a sophisticated silhouette that flatters virtually every hand shape and skin tone. Whether your clients prefer minimalist designs, bold statements, or intricate artwork, the elongated oval shape adapts beautifully to any aesthetic vision. The gentle curves and elongated lines of this shape also tend to make fingers appear slimmer and more refined—a visual benefit that keeps clients coming back for more.
The versatility of long oval nails lies in their universal appeal. They work equally well for professional settings, special occasions, and everyday wear. Your nail tech can showcase their full range of skills and creativity with this shape, from delicate line work and micro-designs to full-coverage color blocking and dimensional nail art. If you’re looking to expand your portfolio, spark inspiration, or give clients fresh ideas, these thirty long oval nail designs span every style imaginable. Each design demonstrates a different approach to color, technique, and artistic expression—all structured to help you communicate possibilities to your clients and build your confidence with diverse nail art styles.
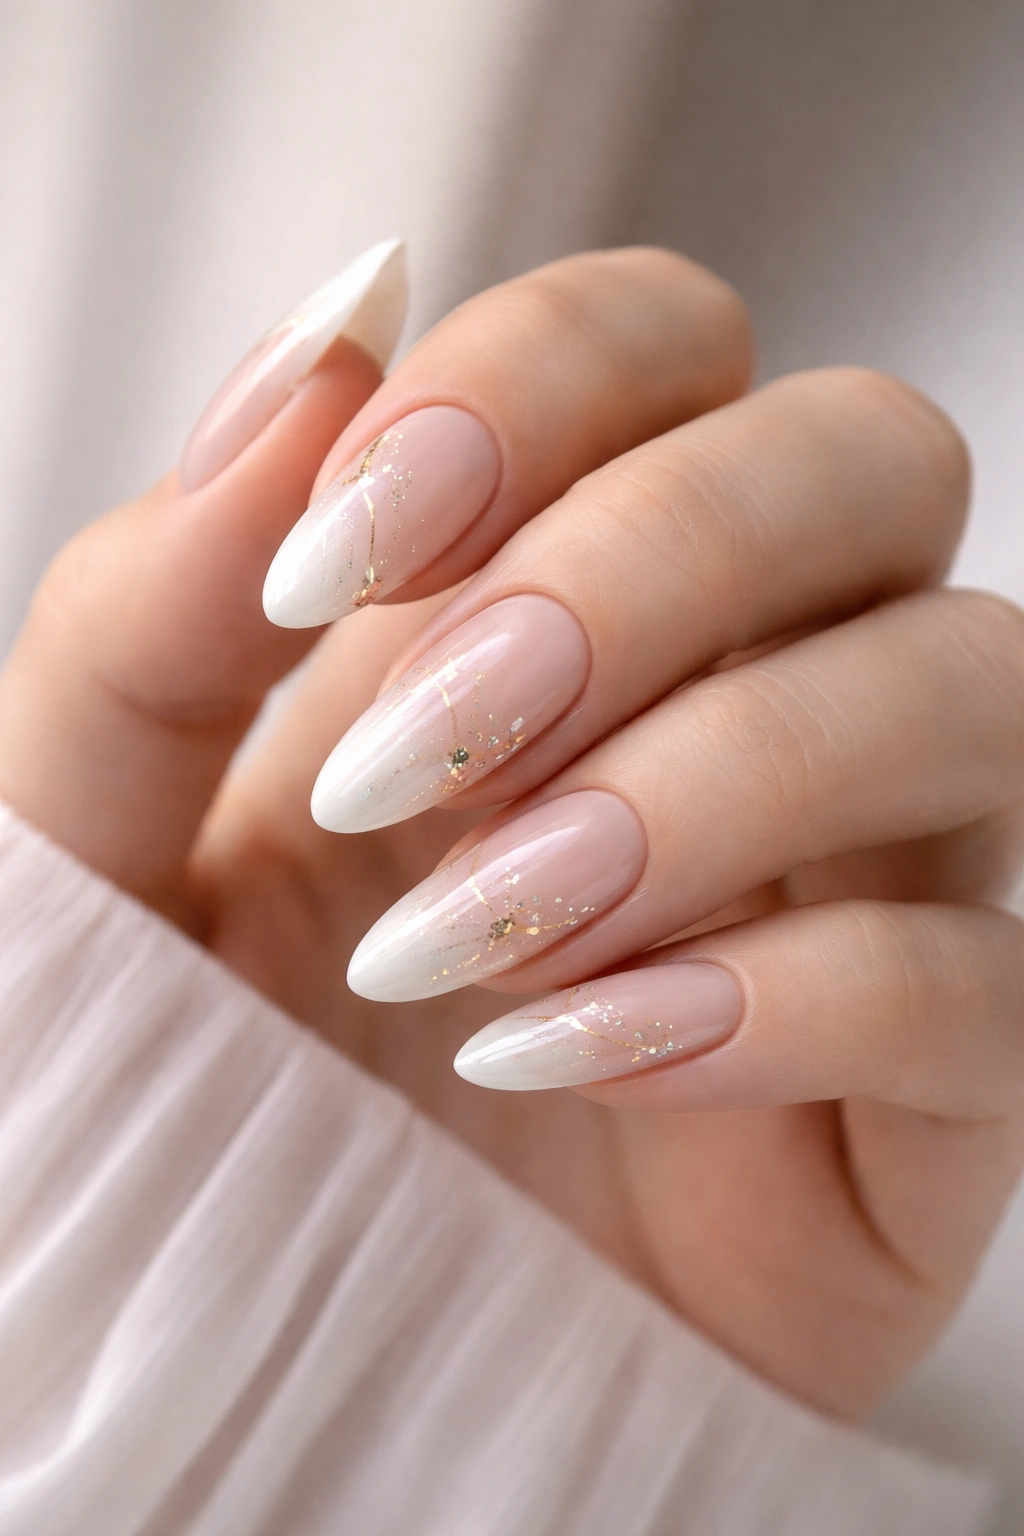
1. Classic French Manicure with Soft Pink Base
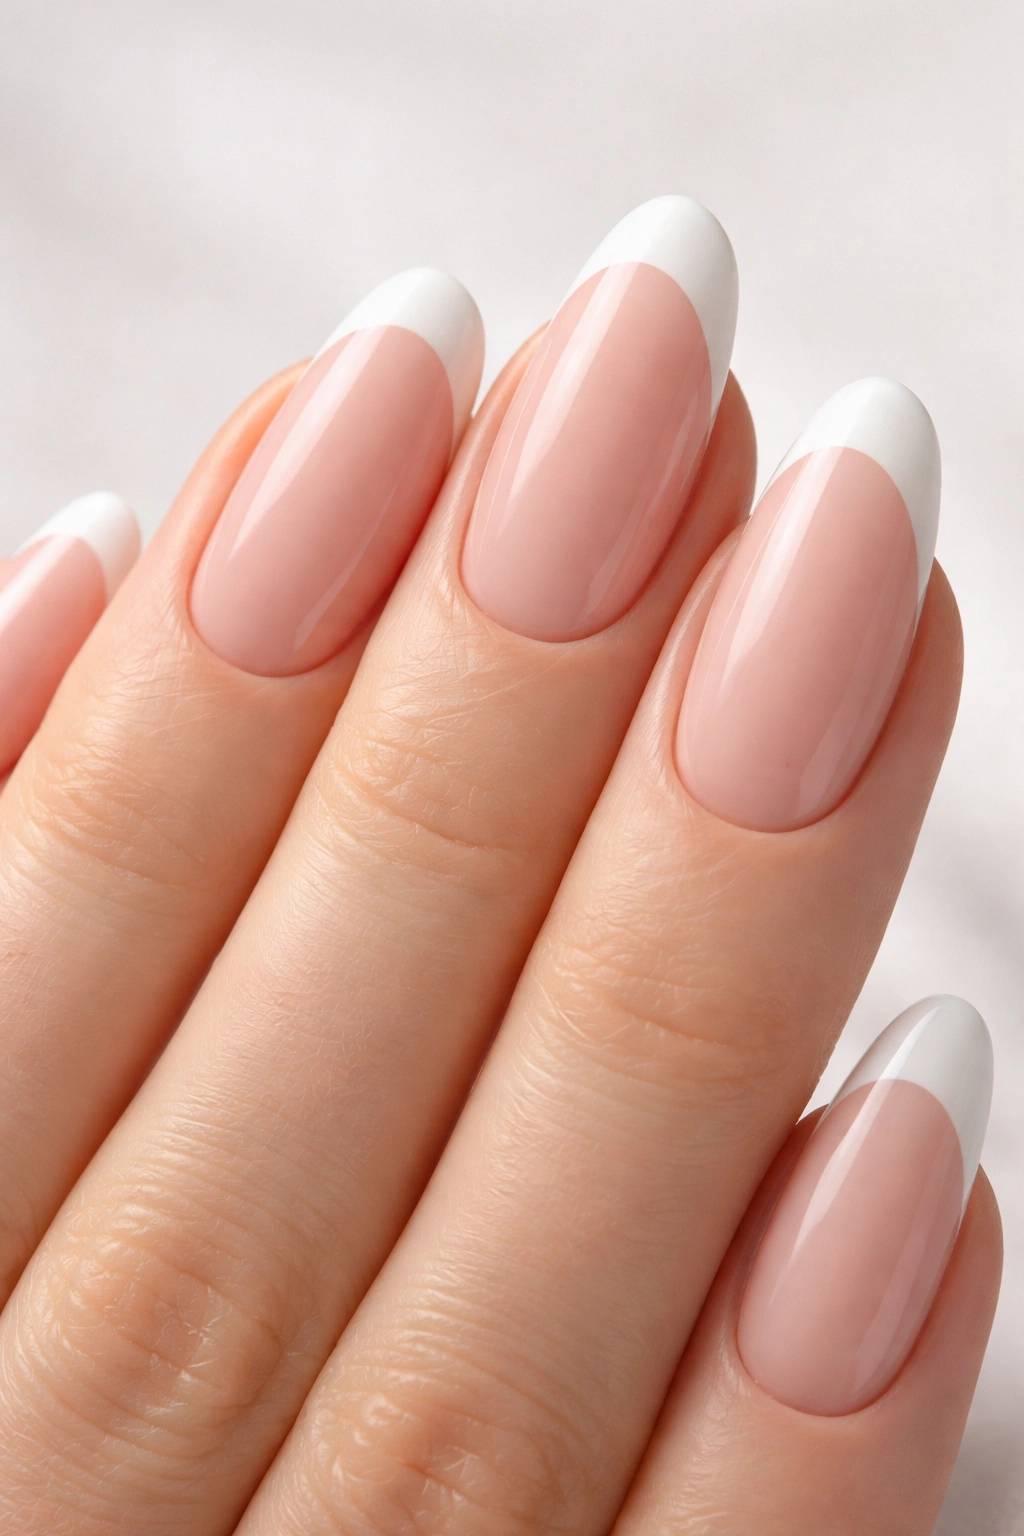
The timeless French manicure remains a gold standard for a reason. A soft, creamy pink base paired with clean white tips creates an understated elegance that works for every occasion and never goes out of style. This design proves that long oval nails don’t need elaborate artwork to look polished and professional.
Why It Works for Long Ovals
The length of oval nails makes the French tip proportionally balanced and visually striking. The white line sits naturally at the edge without appearing too dramatic or overdone, and the soft pink creates a flattering complement to most skin tones.
Pro Tips for Perfect Execution
- Use a soft pink gel or polish that’s slightly warm-toned for a more modern feel than bright white
- Keep the white tip line clean and slightly curved to follow the natural nail contour
- Add a subtle sparkle or chrome accent to the white tip for clients who want a modern twist on the classic
2. Deep Burgundy with Gold Geometric Lines

Rich burgundy creates a luxurious, moody backdrop for precise gold geometric detailing. This design appeals to clients who want sophistication with a hint of edge—it’s dramatic without being over-the-top.
The Color Story
Burgundy works especially well on long ovals because the depth of color emphasizes the nail’s elongated shape without overwhelming the hand. Gold lines add luxury and refinement that elevates the entire design.
Design Elements to Include
- Thin gold lines running vertically down the center of a few nails
- A small gold geometric shape (triangle or hexagon) on the accent nail
- Semi-gloss finish to let the burgundy glow without looking sticky
3. Nude Gradient with Chrome Ombre Tips
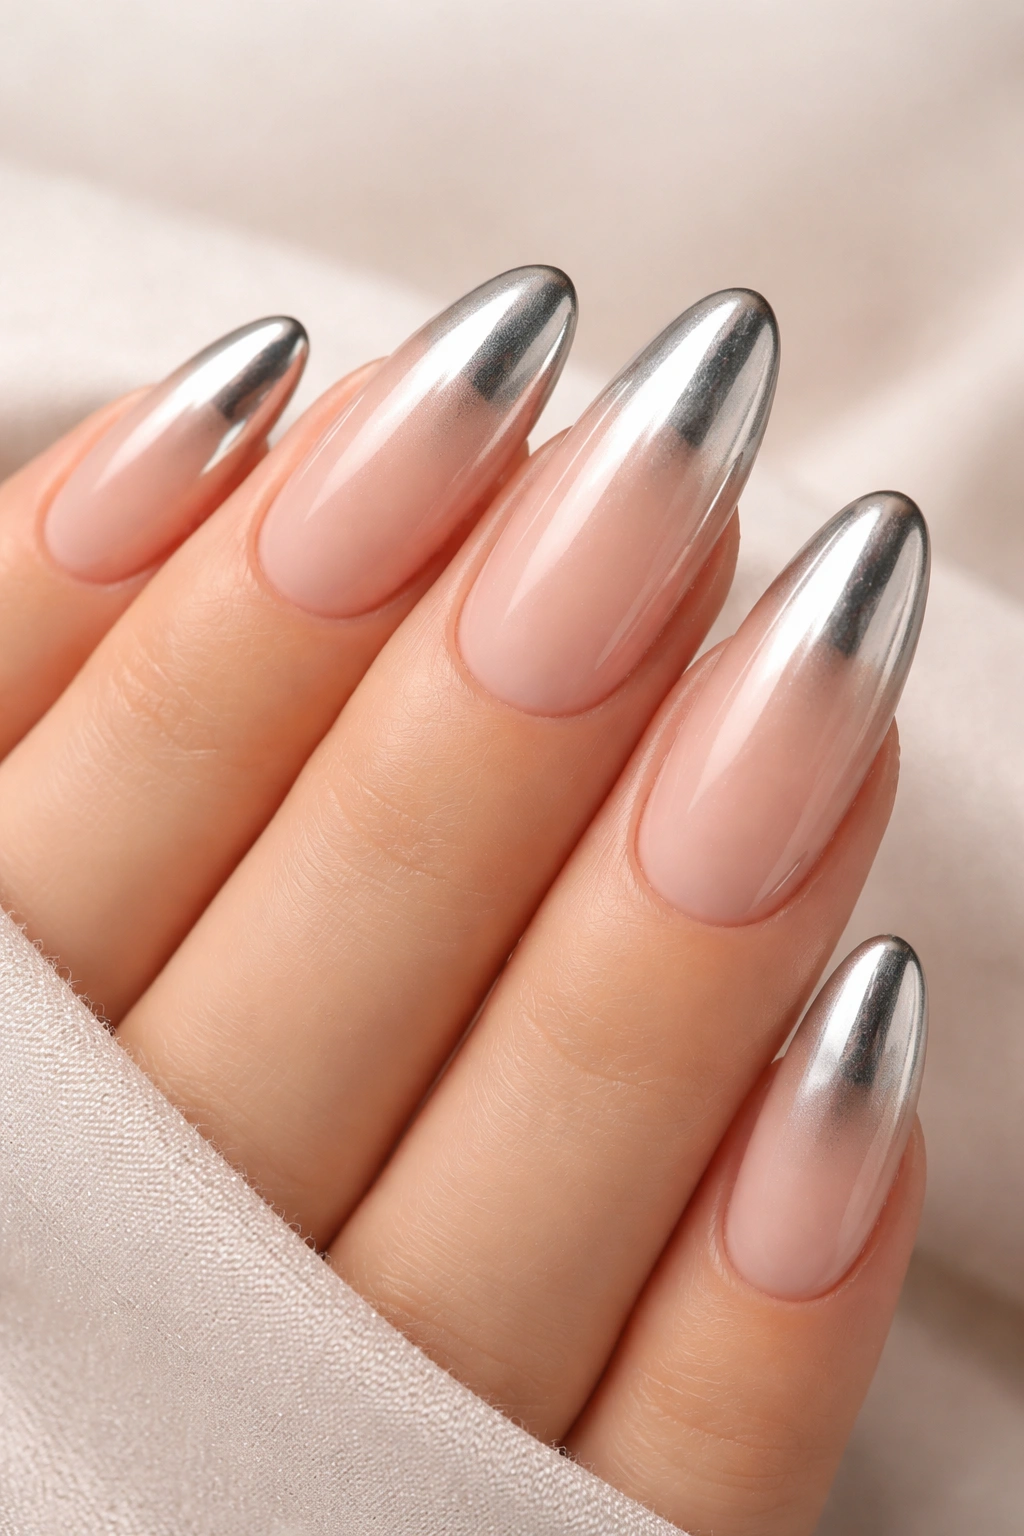
A gradient that moves from soft nude at the base to shimmering chrome at the tips creates a contemporary, editorial look. This design is perfect for clients who appreciate subtle sophistication with an unexpected metallic payoff.
Application Technique
Layer translucent nude gel with micro-sized chrome powder, building the intensity gradually toward the tip. The gradient should be seamless and soft, not blocky.
Finishing Touches
- Use a matte top coat on the nude section and a glossy coat on the chrome for textural contrast
- Keep the chrome concentrated primarily on the tip to maintain the gradient effect
- This works beautifully on 20-25mm oval lengths
4. Lavender Base with Delicate Hand-Painted Flowers
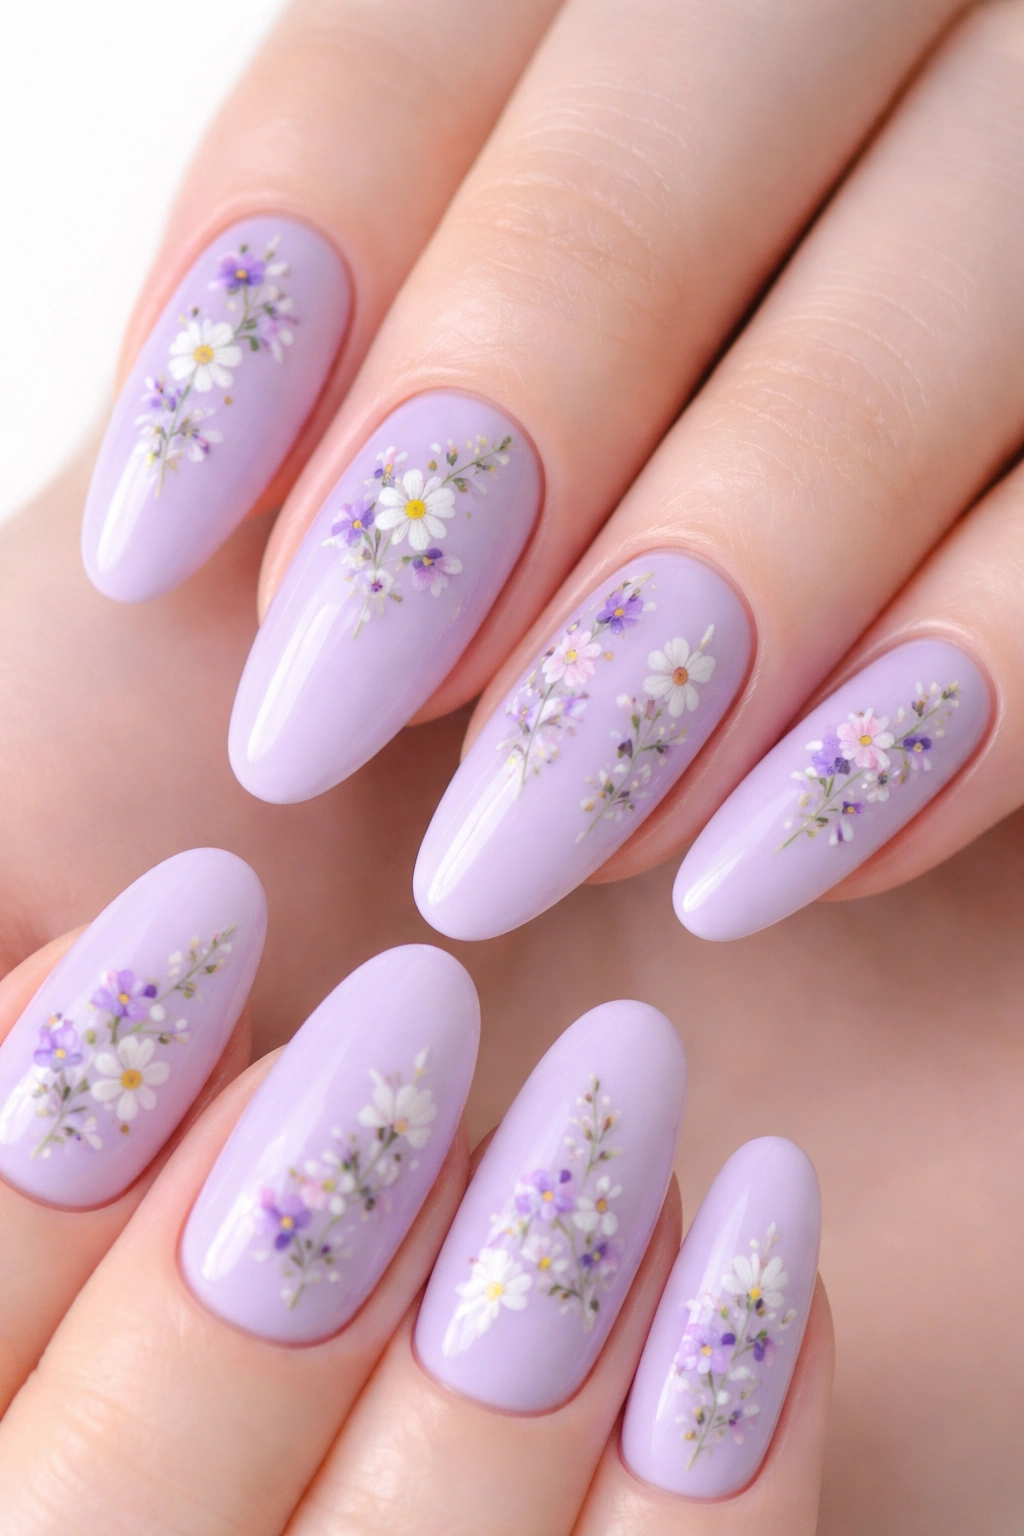
Soft lavender provides a calming base for tiny, hand-painted wildflowers scattered across the nail surface. This romantic design celebrates the artist’s technical skill while maintaining an approachable, wearable aesthetic.
Creating the Floral Details
Use a fine detail brush to paint miniature flowers—small roses, daisies, or wildflowers—in coordinating purples, whites, and soft greens. Each flower should be proportional to the nail size and spaced deliberately for visual balance.
Why This Design Shines
- The length of oval nails gives enough space for multiple small florals without crowding
- Hand-painted details demonstrate genuine technical skill to potential clients
- The design feels fresh and artistic rather than trendy or temporary
5. Matte Black with White Negative Space Lines
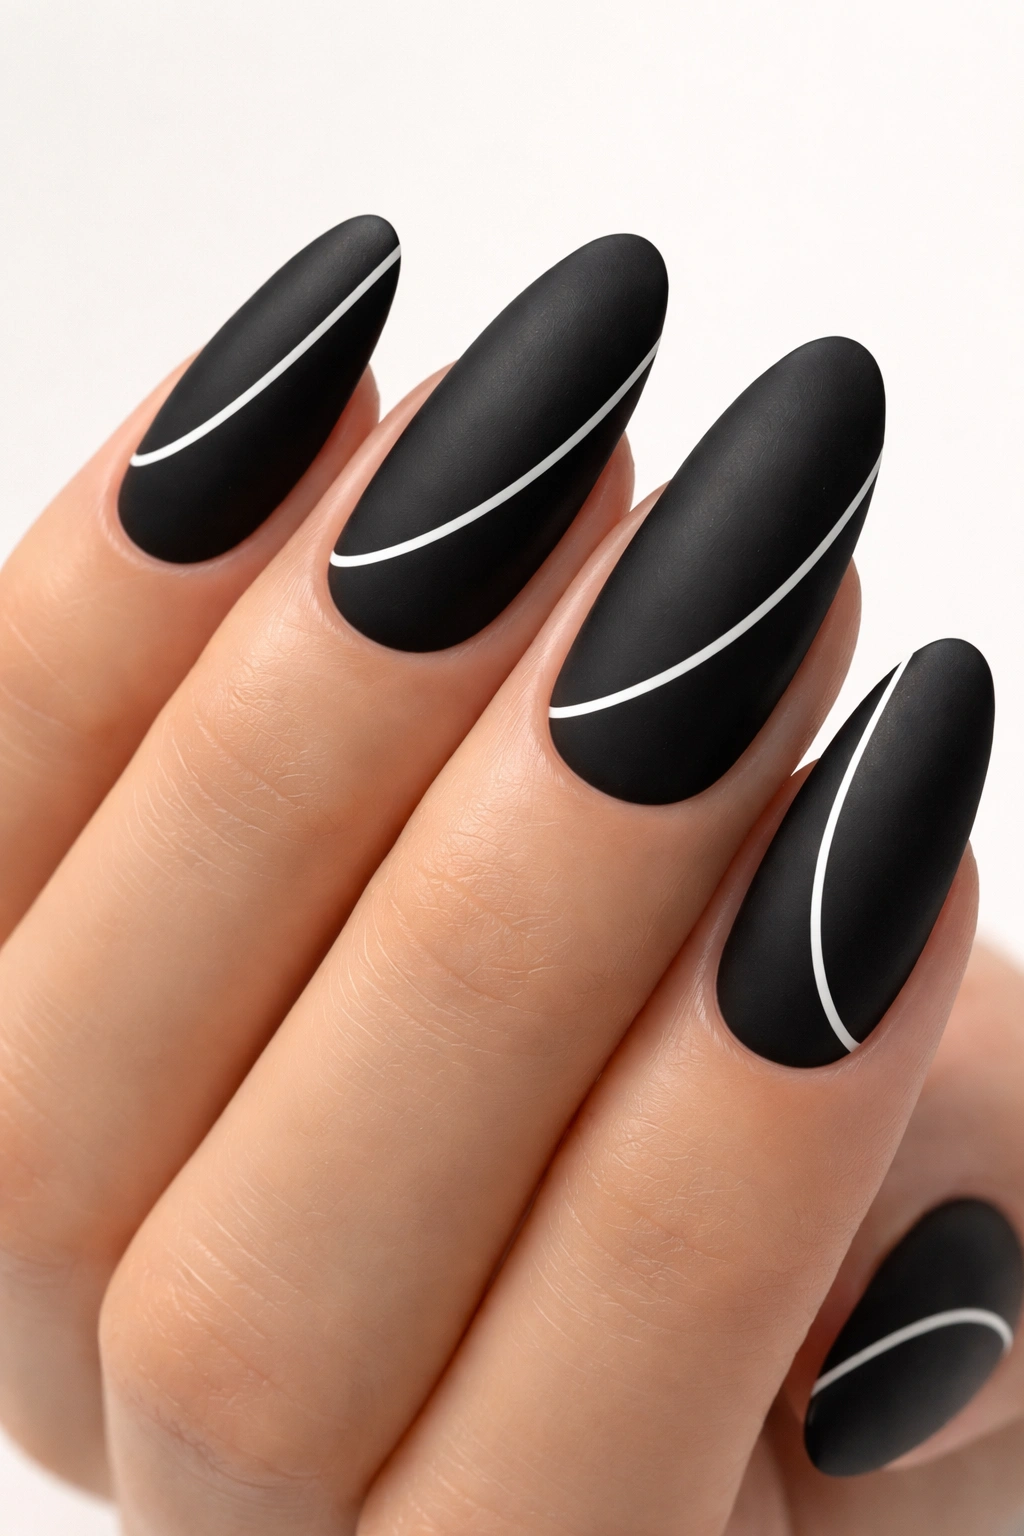
Bold, minimalist, and undeniably chic—matte black nails with precise white negative space lines create high impact with clean geometry. This design appeals to clients who love modern art and understated luxury.
Execution Details
Paint nails in matte black gel, then carefully apply white lines using a thin liner brush or nail art striping tool. Negative space (areas where you intentionally leave the nail bare) should follow the natural curves of the oval shape.
Making It Your Own
- Vary line thickness from hair-thin to slightly bolder for visual interest
- Consider adding a single small detail—perhaps a tiny dot or crossing lines—on the accent nail
- The matte finish is critical; glossy black with white lines reads differently
6. Translucent Peachy Base with Micro Beads
A barely-there peach tone allows tiny glass beads to take center stage, creating tactile interest and subtle sparkle. This design works beautifully for clients who want something delicate but textured.
Bead Placement Strategy
Apply beads in a scattered pattern across the nail, concentrating them toward the tip or creating a vertical line down the center. Keep the placement deliberate—every bead should have a reason for being there.
Pro Considerations
- Ensure beads are fully encapsulated under top coat for durability and comfort
- This design photographs beautifully because of the light-catching qualities of the beads
- Works best on nails at least 22mm long so the texture doesn’t overwhelm the design
7. Deep Navy with Gold Foil Abstract Shapes
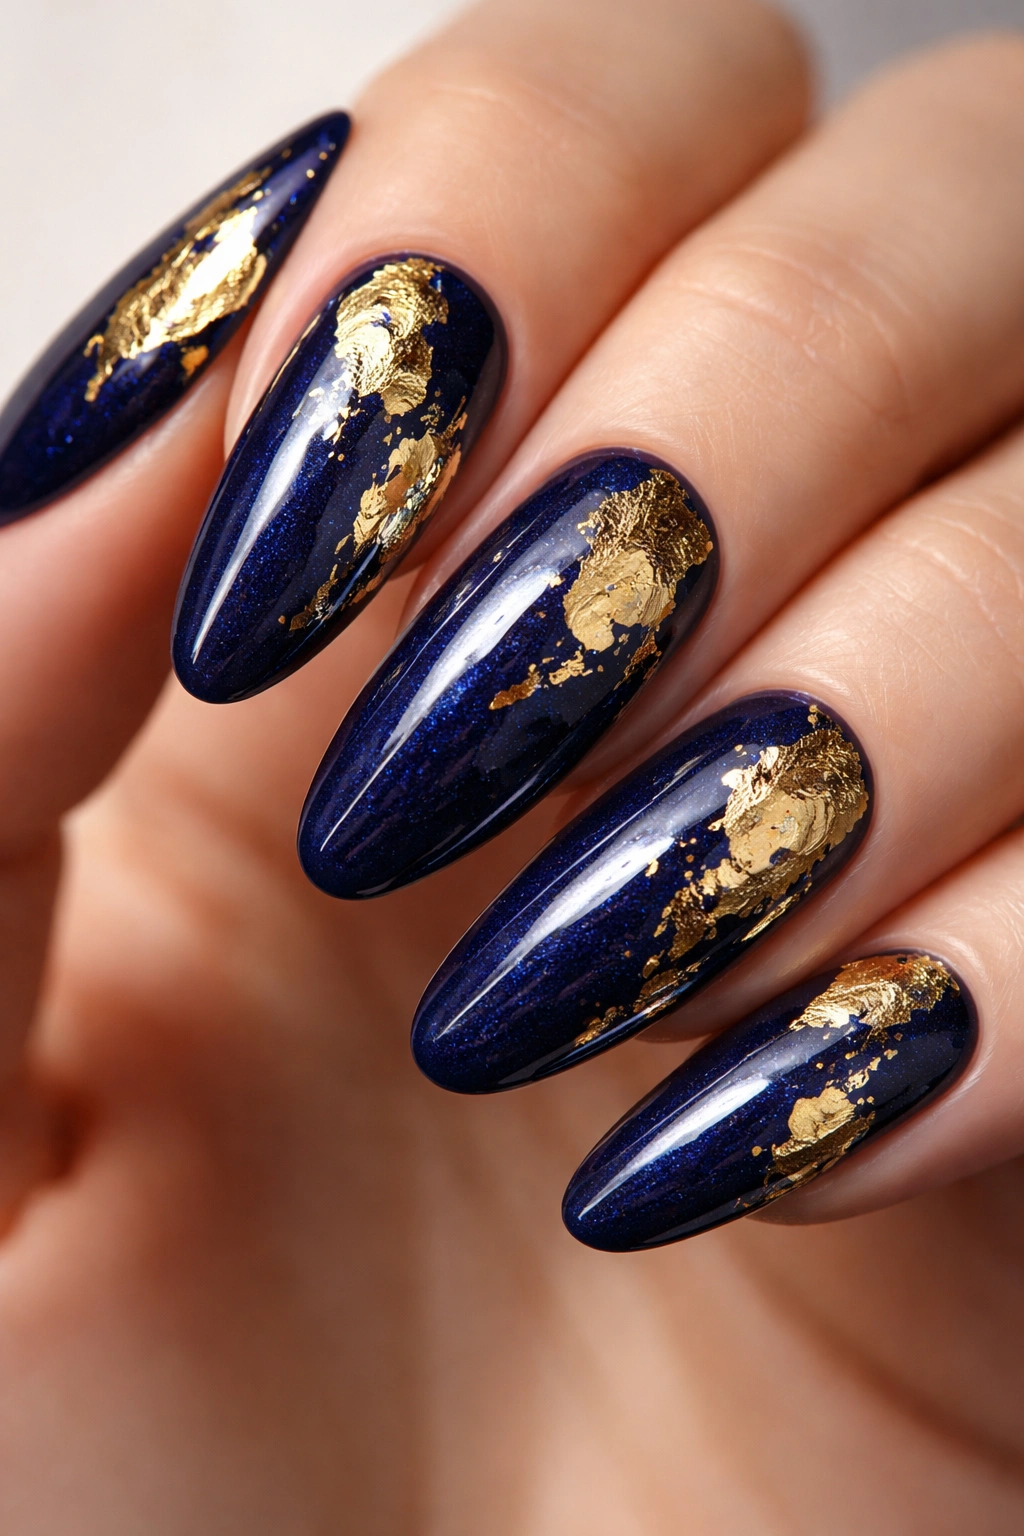
Deep navy acts as a rich backdrop for irregular gold foil shapes that look almost like torn gold leaf accents. This design balances structure and spontaneity in an appealing way.
Creating the Foil Effect
Apply gold foil pieces irregularly across the navy base, using foil adhesive or a thick glitter gel as the bonding layer. Vary the size and placement so the design feels artistic and intentional rather than random.
Visual Impact
- The contrast between the cool navy and warm gold is naturally striking
- Abstract placement makes the design feel modern and editorial
- This works on all skin tones and pairs well with various outfit styles
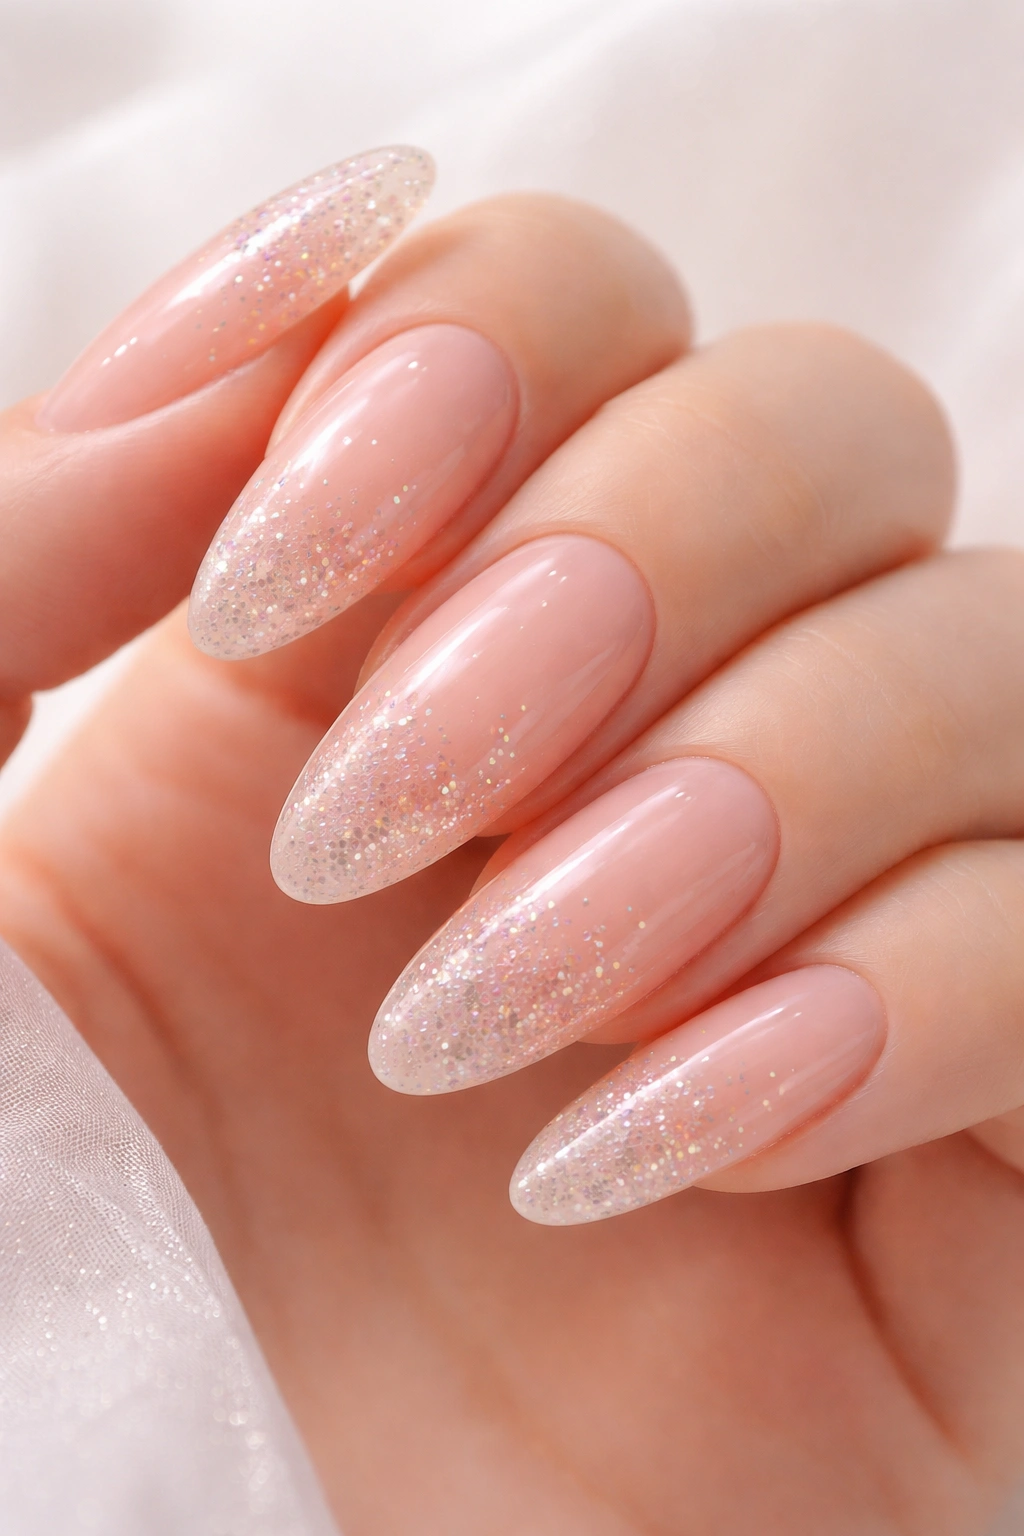
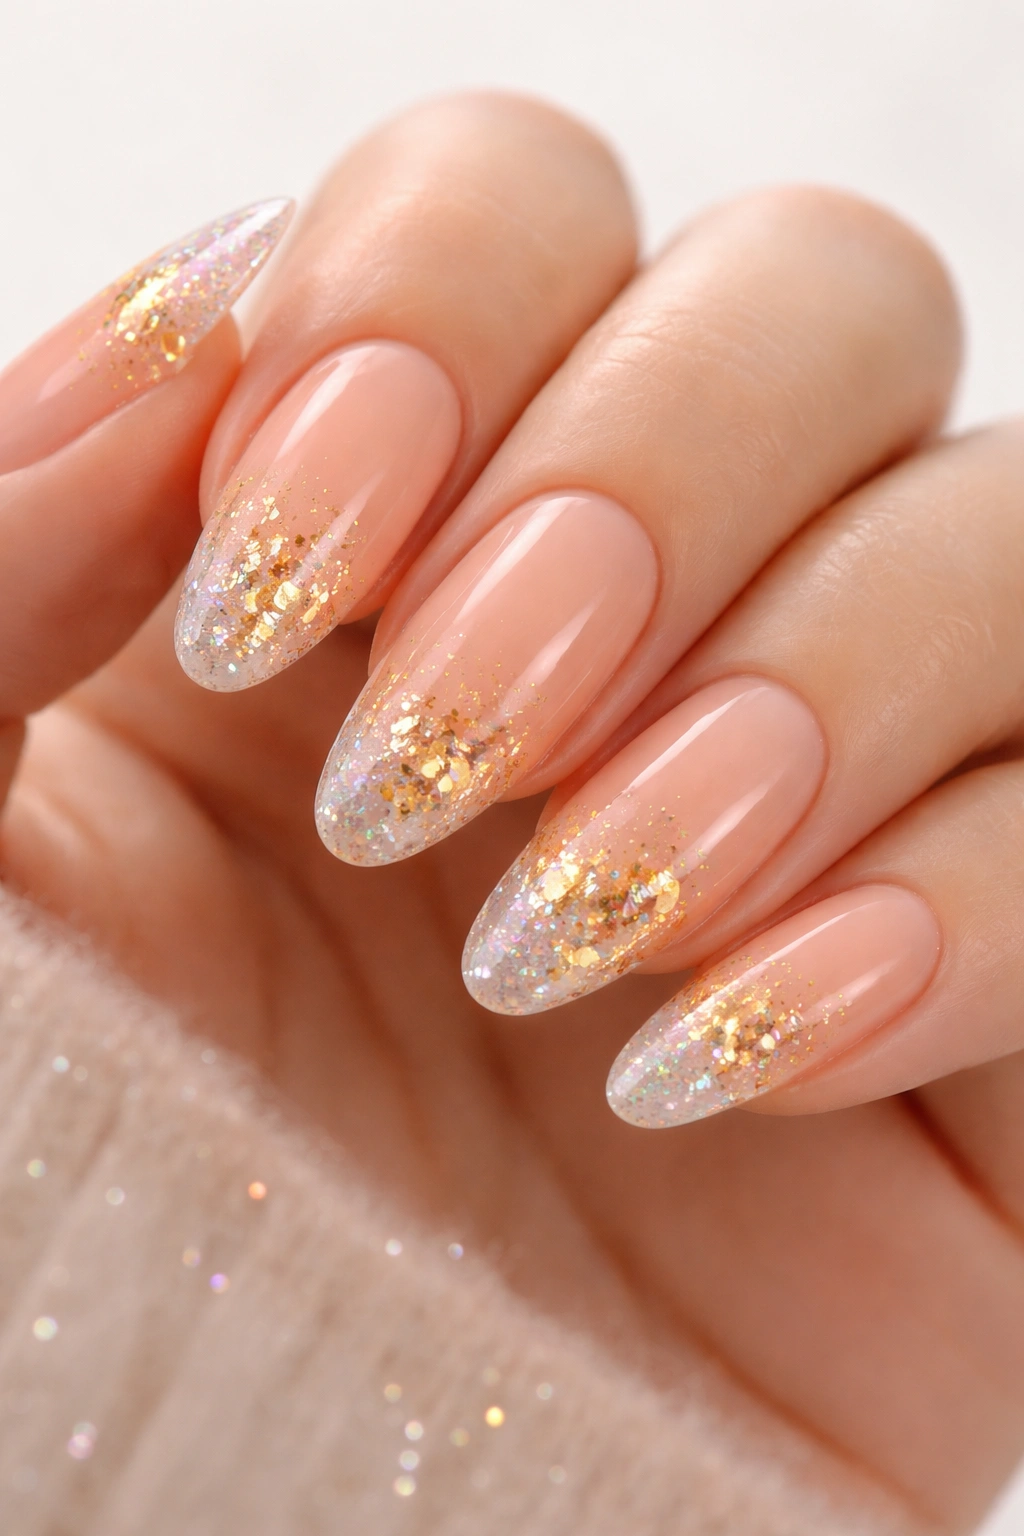
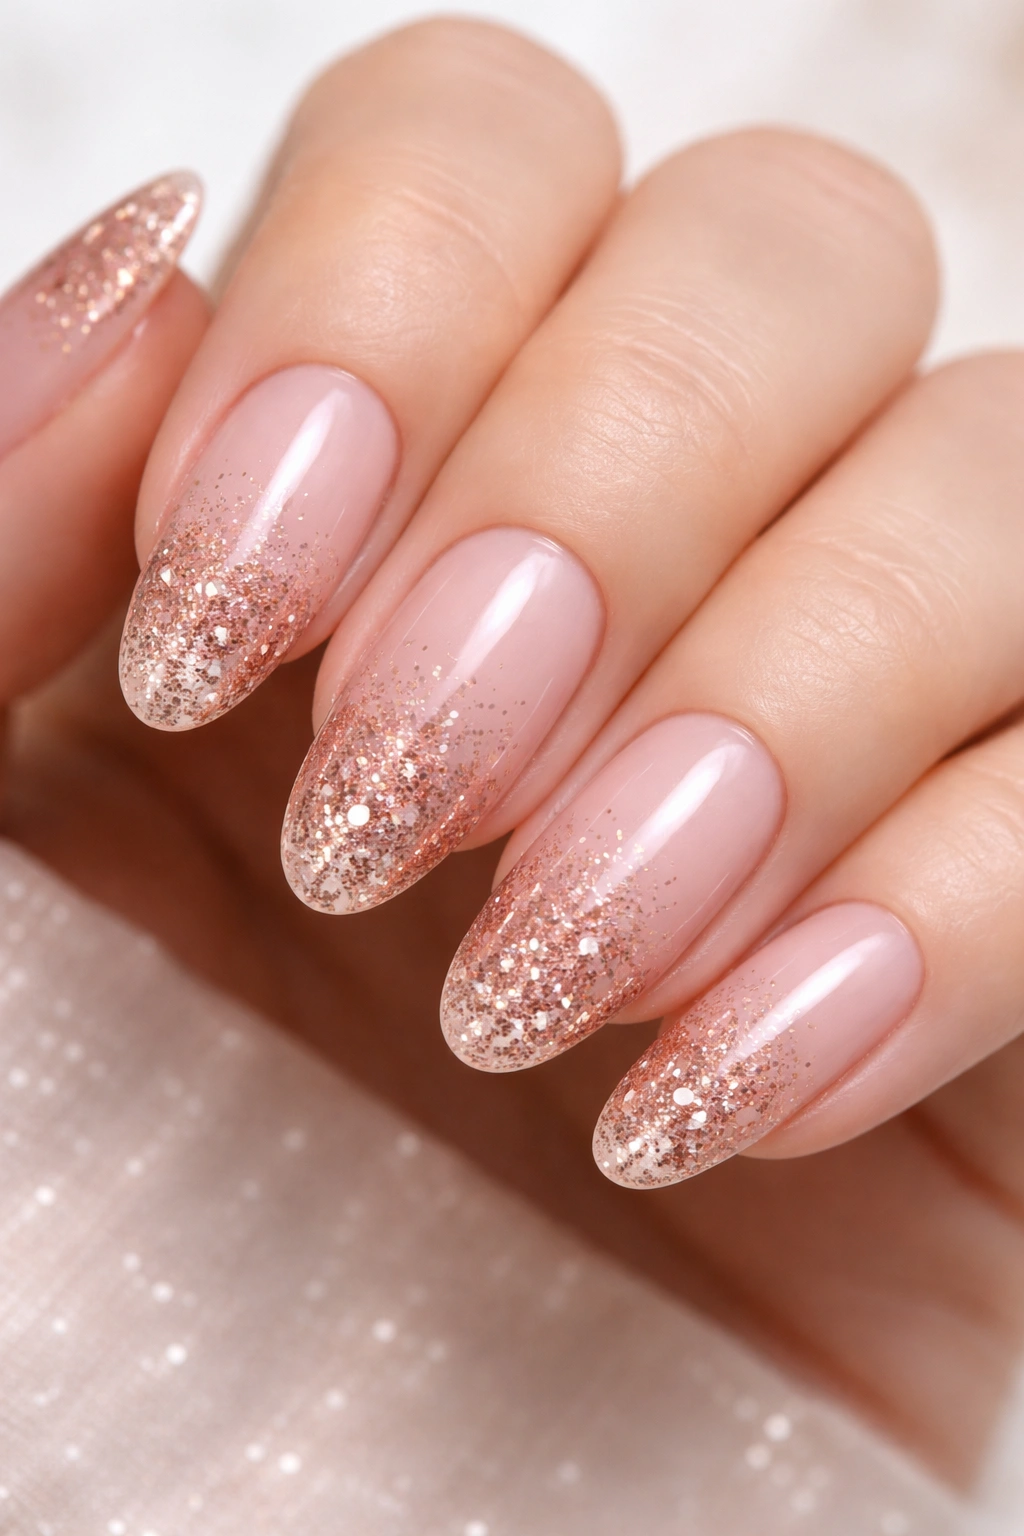
8. Blush Pink with Subtle Ombré Glitter Fade
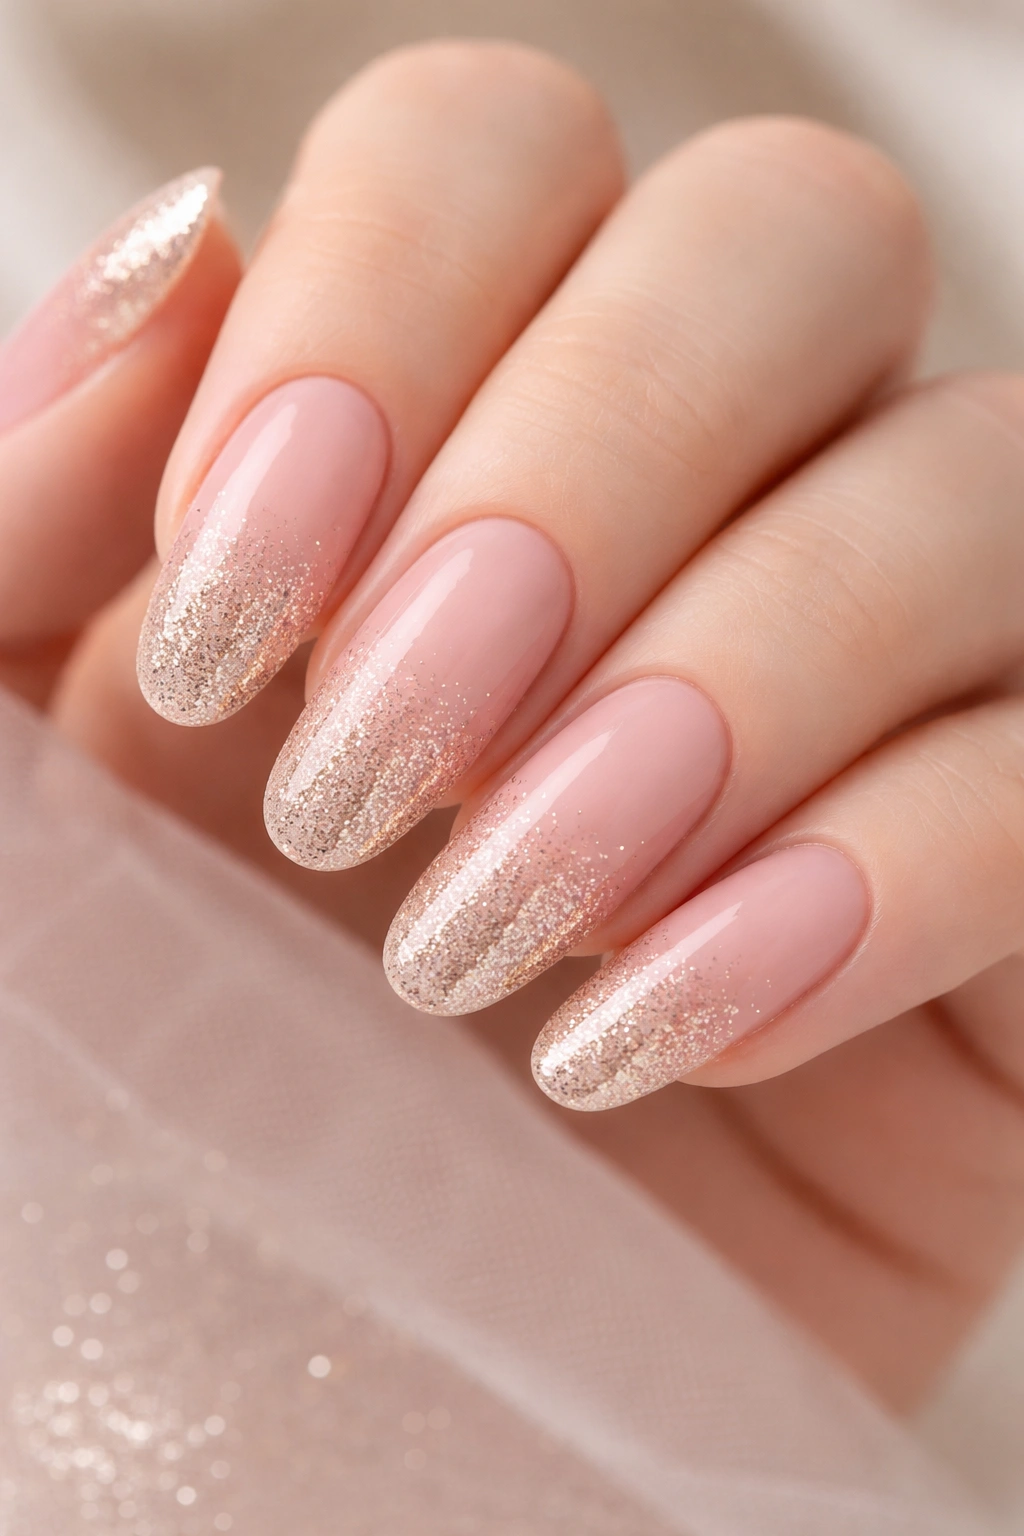
Blush pink nails that fade gradually into champagne glitter at the tips create a soft, romantic look that’s still visually interesting. This design is perfect for clients seeking feminine elegance.
Building the Ombré
Start with opaque blush pink at the base, then blend progressively smaller amounts of champagne glitter toward the tip, leaving the very tip mostly clear with just glitter hints. The transition should take up about the middle third to half of the nail.
Why This Works
- The glitter fade draws attention to the nail tip without being overwhelming
- Works beautifully on every skin tone
- The design is cohesive enough for everyday wear but special enough for events
9. Forest Green with Silver Foil Marble Swirl
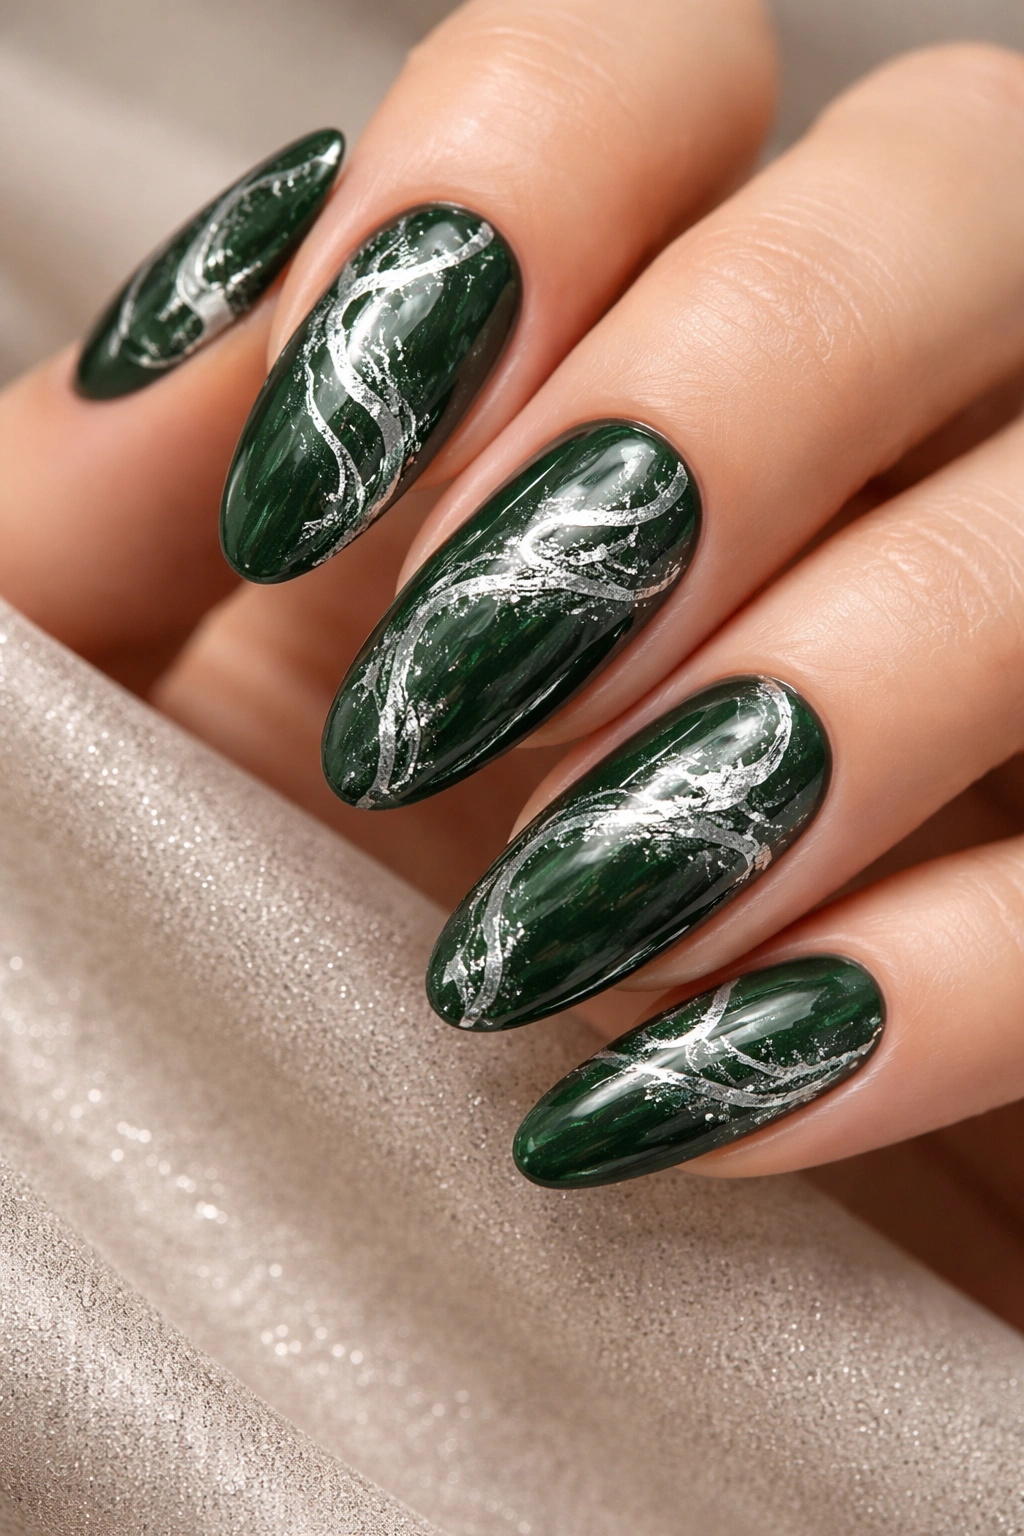
Forest green provides an earthy, luxurious base for delicate silver foil swirls that look like natural marble veining. This design appeals to clients who love nature-inspired aesthetics with a touch of glamour.
Creating Marble Effect
While the base is still tacky, apply silver foil pieces and use a thin brush to create swirl patterns that mimic natural marble movement. Keep lines organic and flowing rather than geometric.
Design Advantages
- Forest green is trendy without being overly trendy—it’s a color that wears well year-round
- The marble effect makes each nail unique while maintaining visual cohesion
- Flatters warm and cool undertones equally
10. White Base with Tiny Black Line Work Minimalist Art
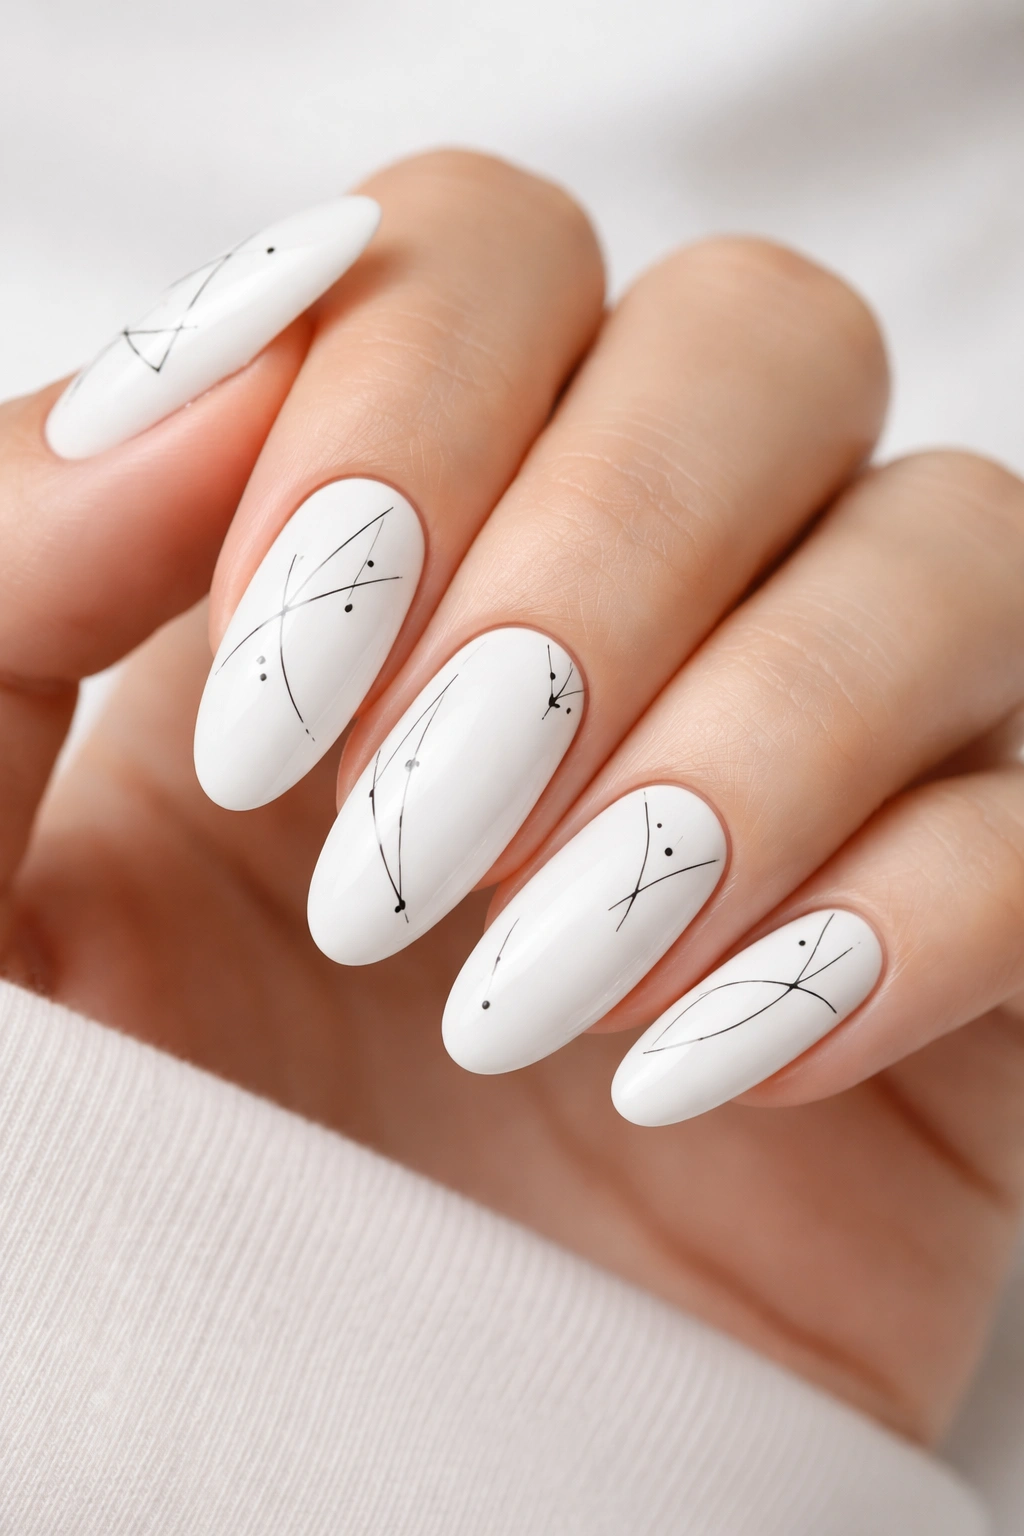
Clean white nails with minimal black line-work designs create a Scandinavian-inspired aesthetic. Think simple geometric shapes, tiny abstract faces, or single-line drawings scattered across the nails.
Line Work Details
Use a fine detail brush or liner to create simple shapes—small triangles, circles, wavy lines, or abstract faces with minimal strokes. Leave plenty of white space so the design feels intentional rather than busy.
Why Minimalism Works Here
- The length of oval nails prevents the design from feeling sparse or unfinished
- Black line work is timeless and photographs beautifully
- Easy to customize based on client preferences (geometric, abstract, figurative)
11. Champagne Base with Pearl Accents and Subtle Glitter
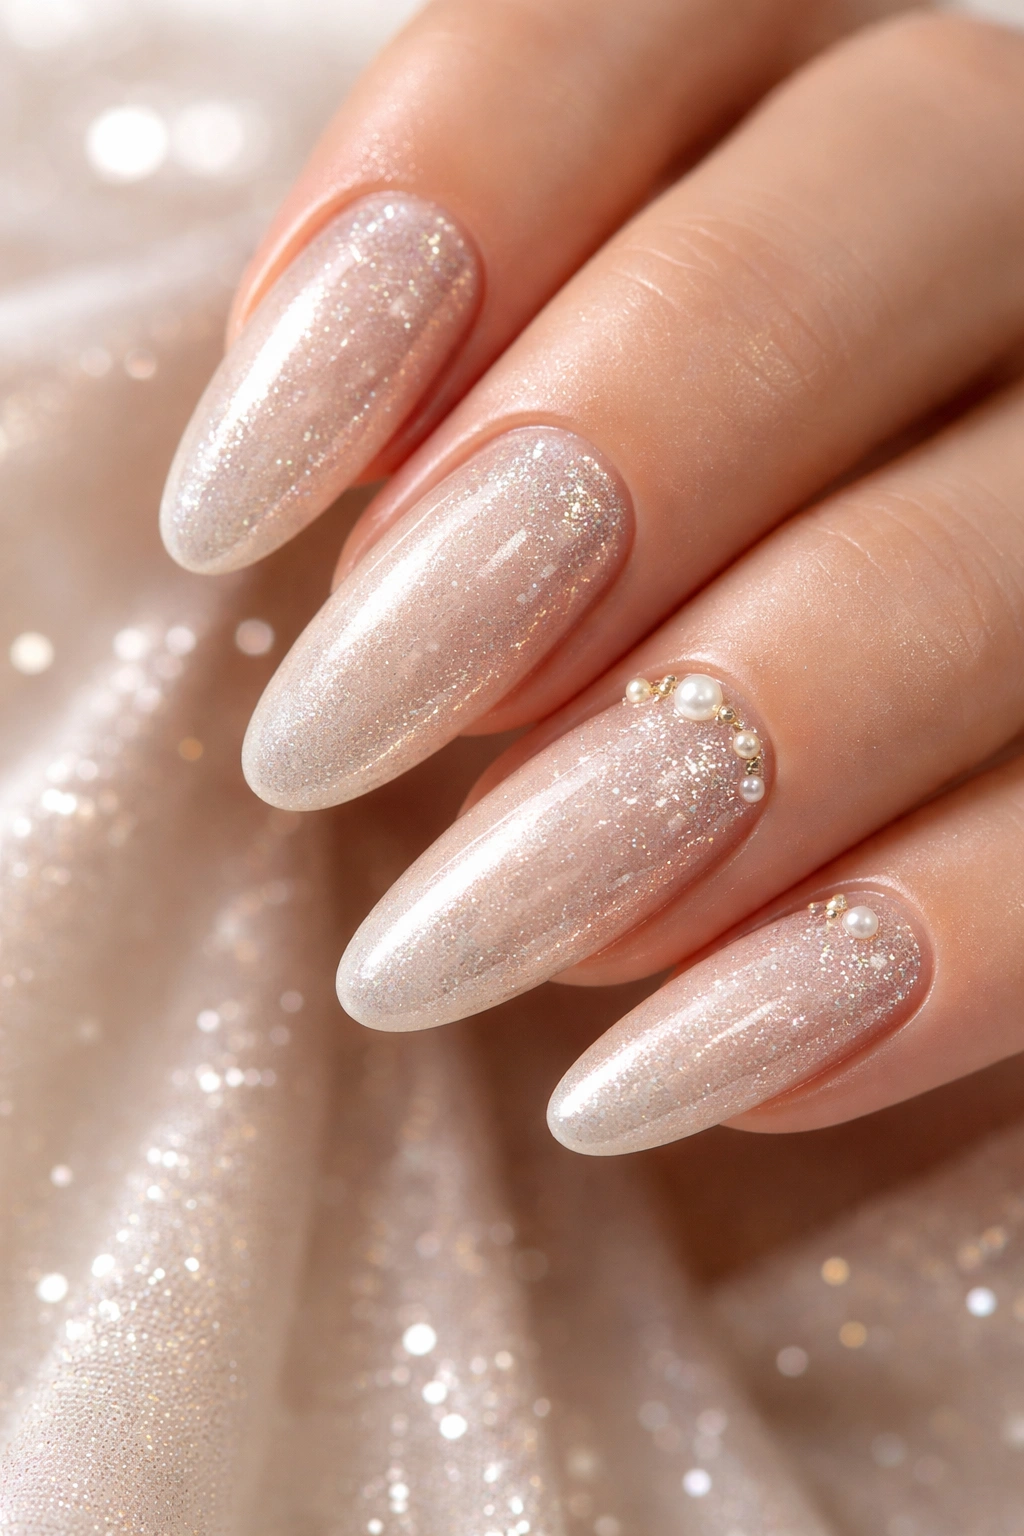
Warm champagne acts as the foundation for pearl-toned accents and fine glitter that create dimension without drama. This design is sophisticated enough for formal events but works beautifully as an everyday luxury look.
Layering for Dimension
Apply an opaque champagne base, then add small concentrations of pearl powder in strategic spots (perhaps the tip or one accent nail), and incorporate fine glitter that catches light without glinting obviously.
When to Recommend This Design
- Clients seeking professional elegance
- Those who love subtle sparkle over bold shine
- Pairs beautifully with warm skin undertones
12. Coral with Ombré Fade to White Tips
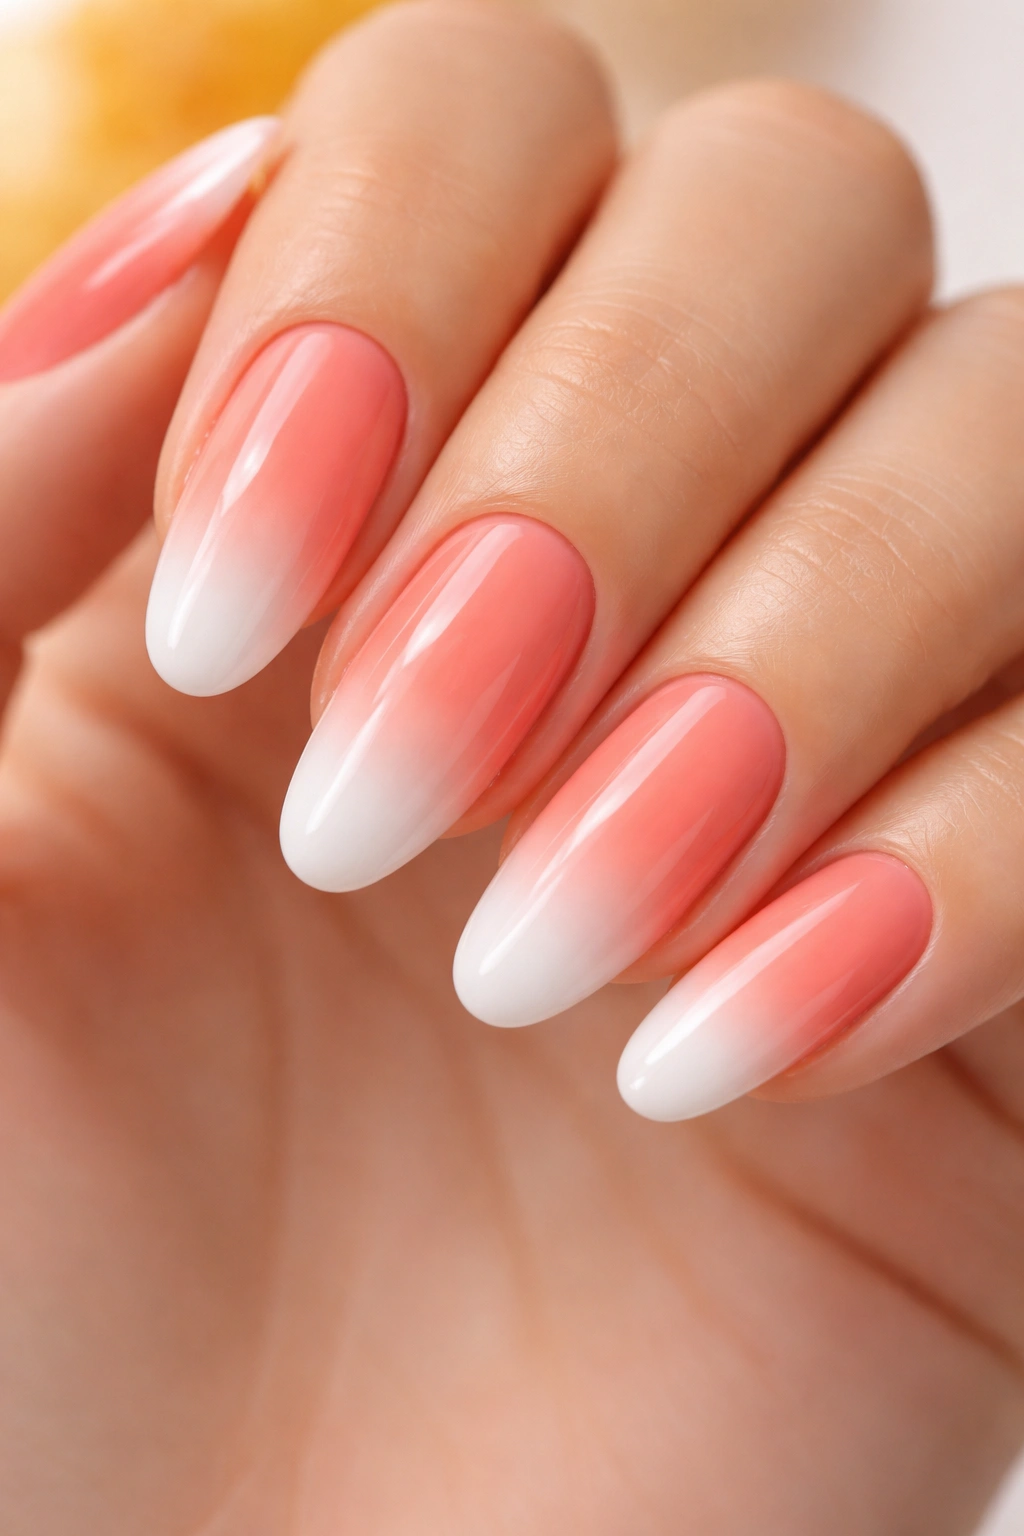
A coral base that gradually fades from the middle of the nail into white at the tips creates a fresh, summery look with unexpected sophistication. This design captures warmth and brightness without being juvenile.
Achieving the Gradient
Use sponging technique to blend coral gel into white, starting the fade about midway down the nail. The transition zone should be gradual—avoid harsh lines between colors.
Perfect for These Occasions
- Spring and summer months or warm climates
- Clients with warm undertones
- Anyone wanting a cheerful yet refined design
13. Black Base with Holographic Rainbow Micro Glitter
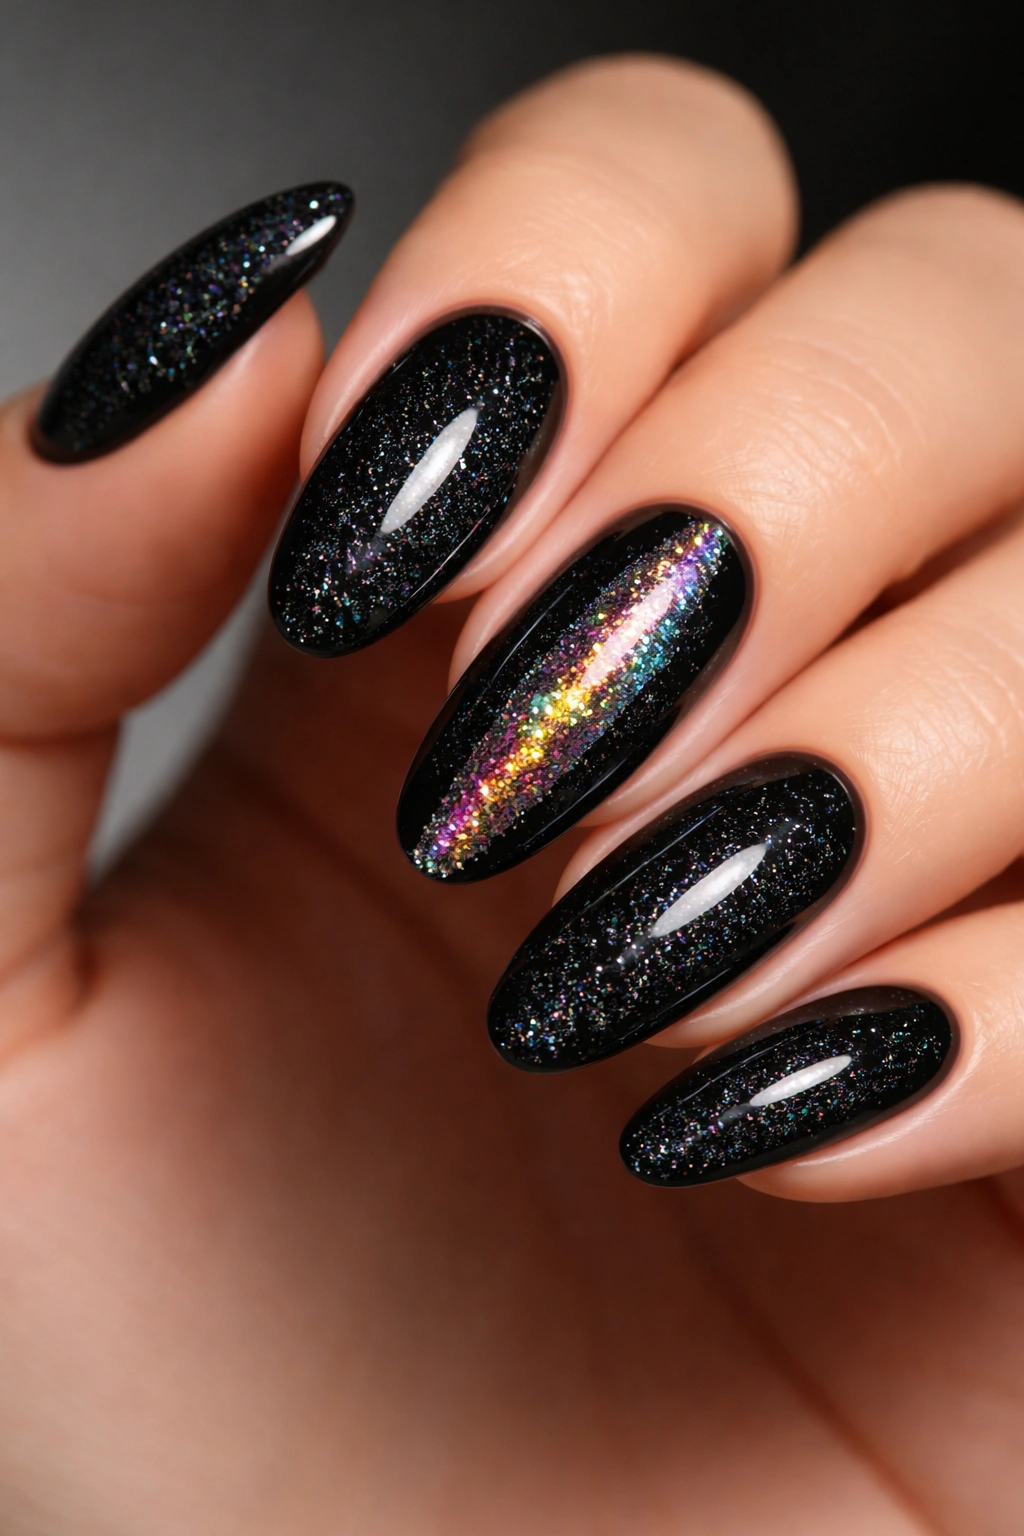
A stark black base makes holographic micro glitter absolutely pop, creating a magical rainbow effect that shifts in different lighting. This design is bold, artistic, and perfect for clients who love dimension and light-play.
Application Tips
Apply black gel base, then strategically place holographic micro glitter (not full nail coverage—selective placement looks more intentional). Concentrate sparkle on one accent nail or create a vertical line down the center.
Why This Design Stands Out
- The contrast between matte black and rainbow sparkle is visually stunning
- Works beautifully in photographs and real life
- Suitable for clients of all ages who appreciate artistic nail designs
14. Soft White with Rose Gold Line Details
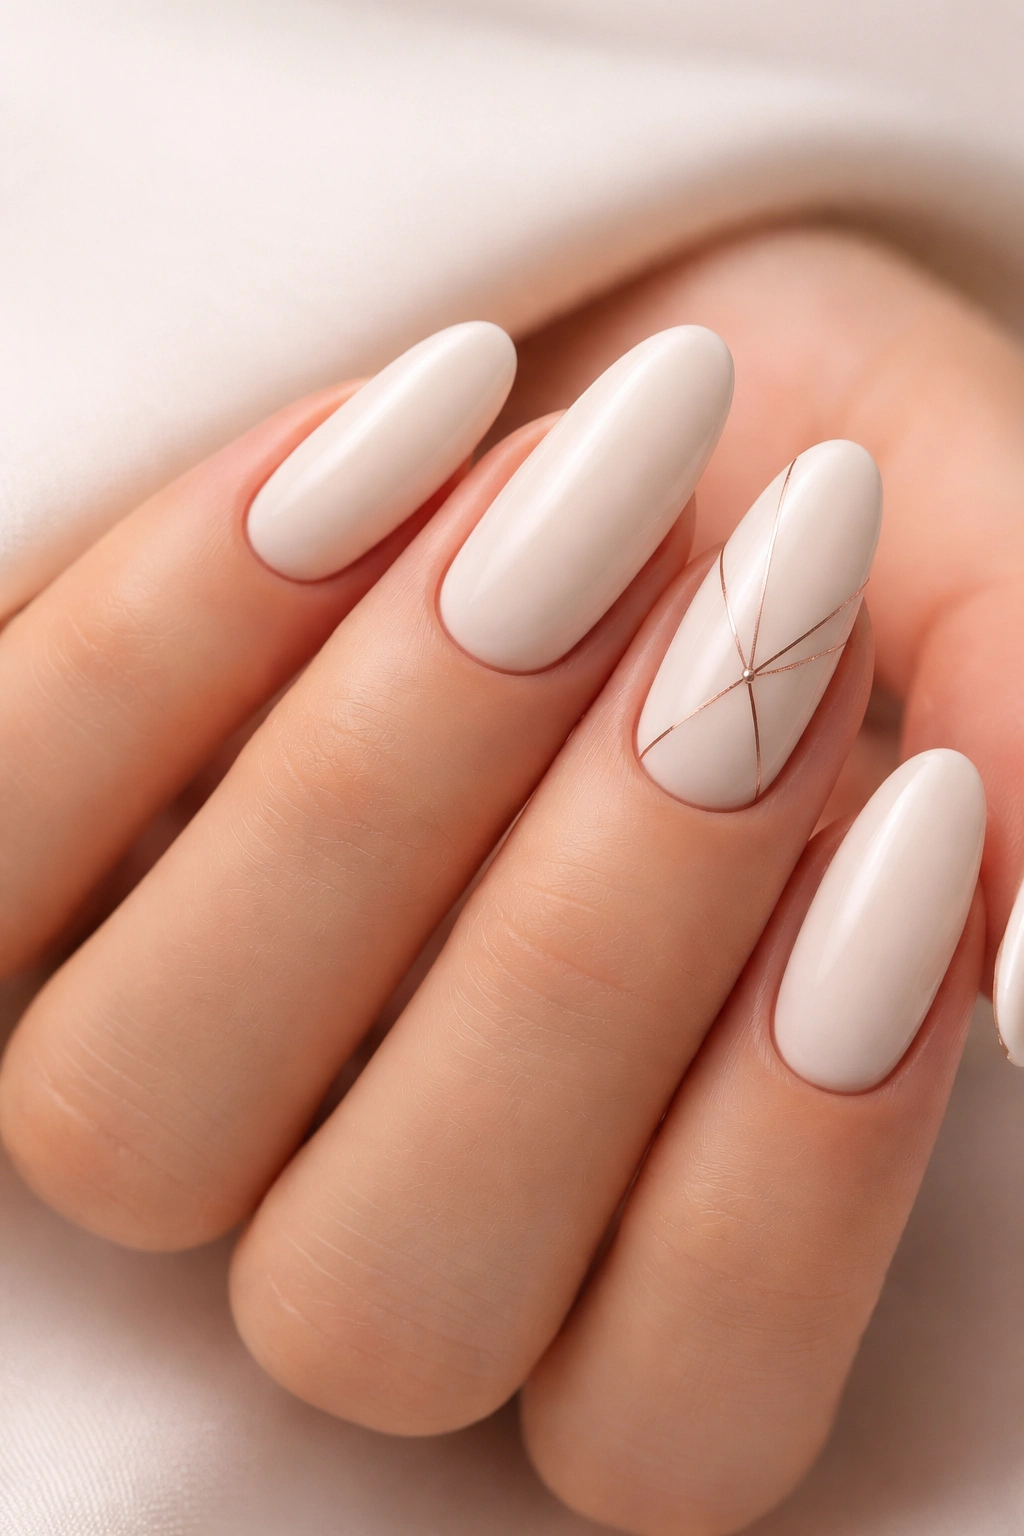
Delicate rose gold lines create subtle geometric patterns on a creamy white base. This design balances warmth and coolness in a way that feels contemporary and refined.
Line Pattern Ideas
Create geometric shapes with rose gold lines—perhaps a small polygon on the accent nail, or thin lines framing the edges of each nail. Keep the pattern consistent but not overly complicated.
Who This Design Suits
- Clients who appreciate minimalist luxury
- Professional settings where understated elegance is preferred
- Anyone seeking a versatile design that works with multiple outfit colors
15. Deep Plum with Holographic Chrome Tips
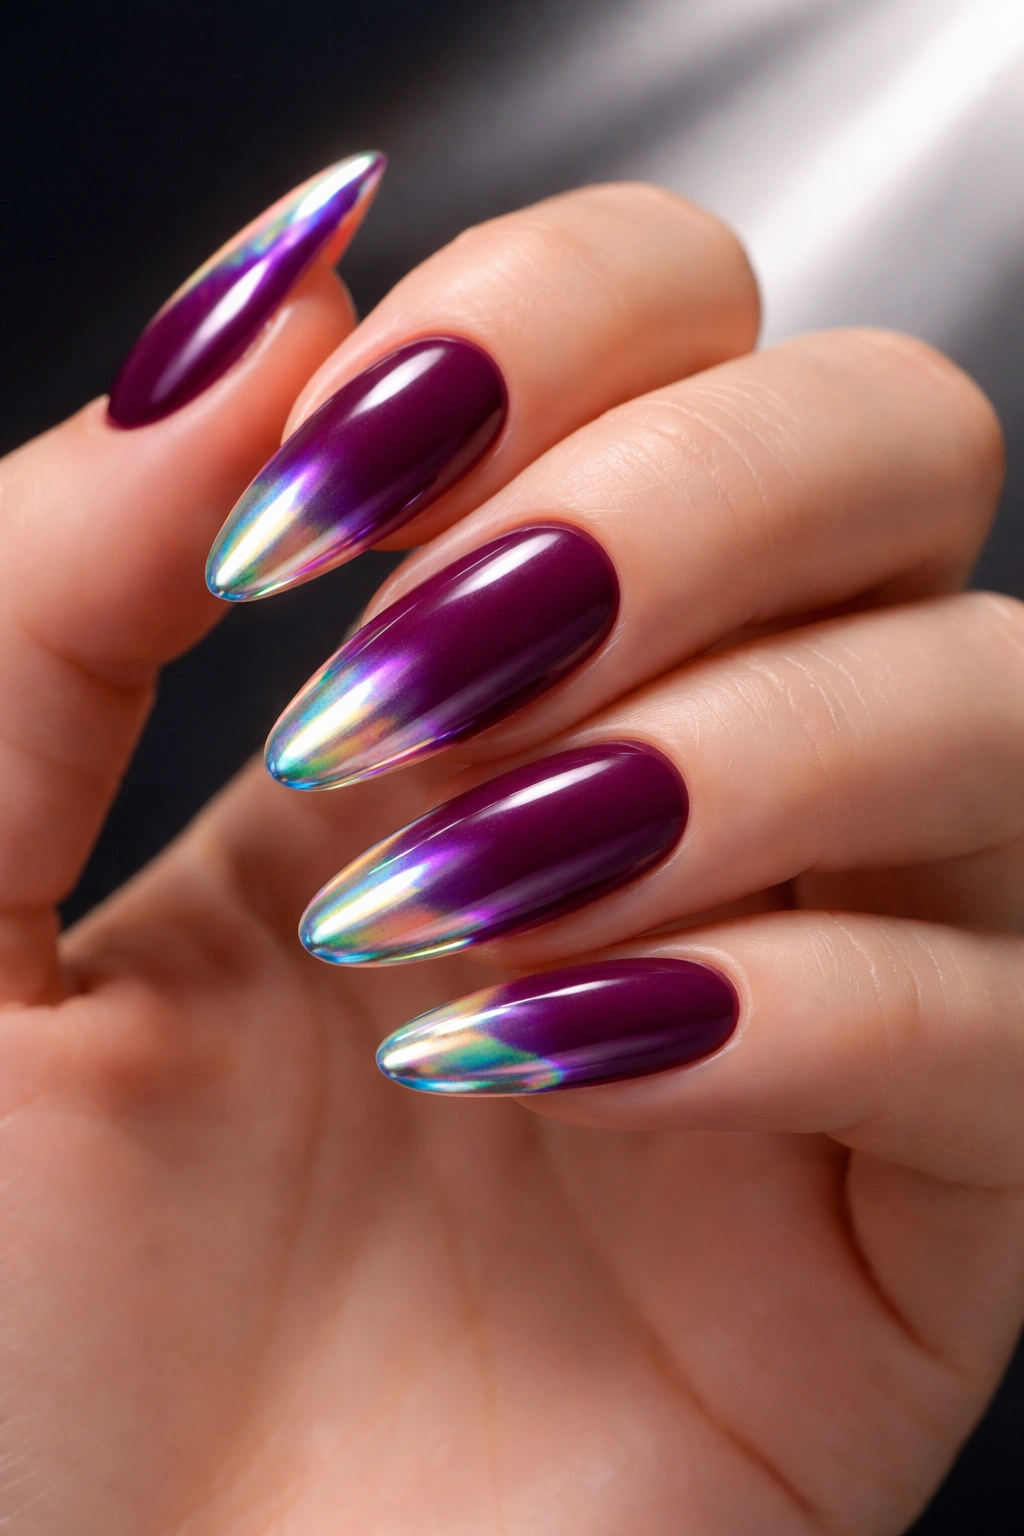
A mysterious deep plum transitions into holographic chrome tips that shimmer and shift. This design feels editorial and bold while maintaining sophistication through its color choices.
Creating the Chrome Transition
The chrome should start where the nail curves toward the tip, creating a natural visual transition. Use holographic chrome powder rather than standard chrome for extra dimension and color-shifting properties.
Design Confidence
This design shows confidence and artistic vision—perfect for clients who want to make a statement without abandoning elegance.
16. Cream Base with Delicate Pressed Flowers
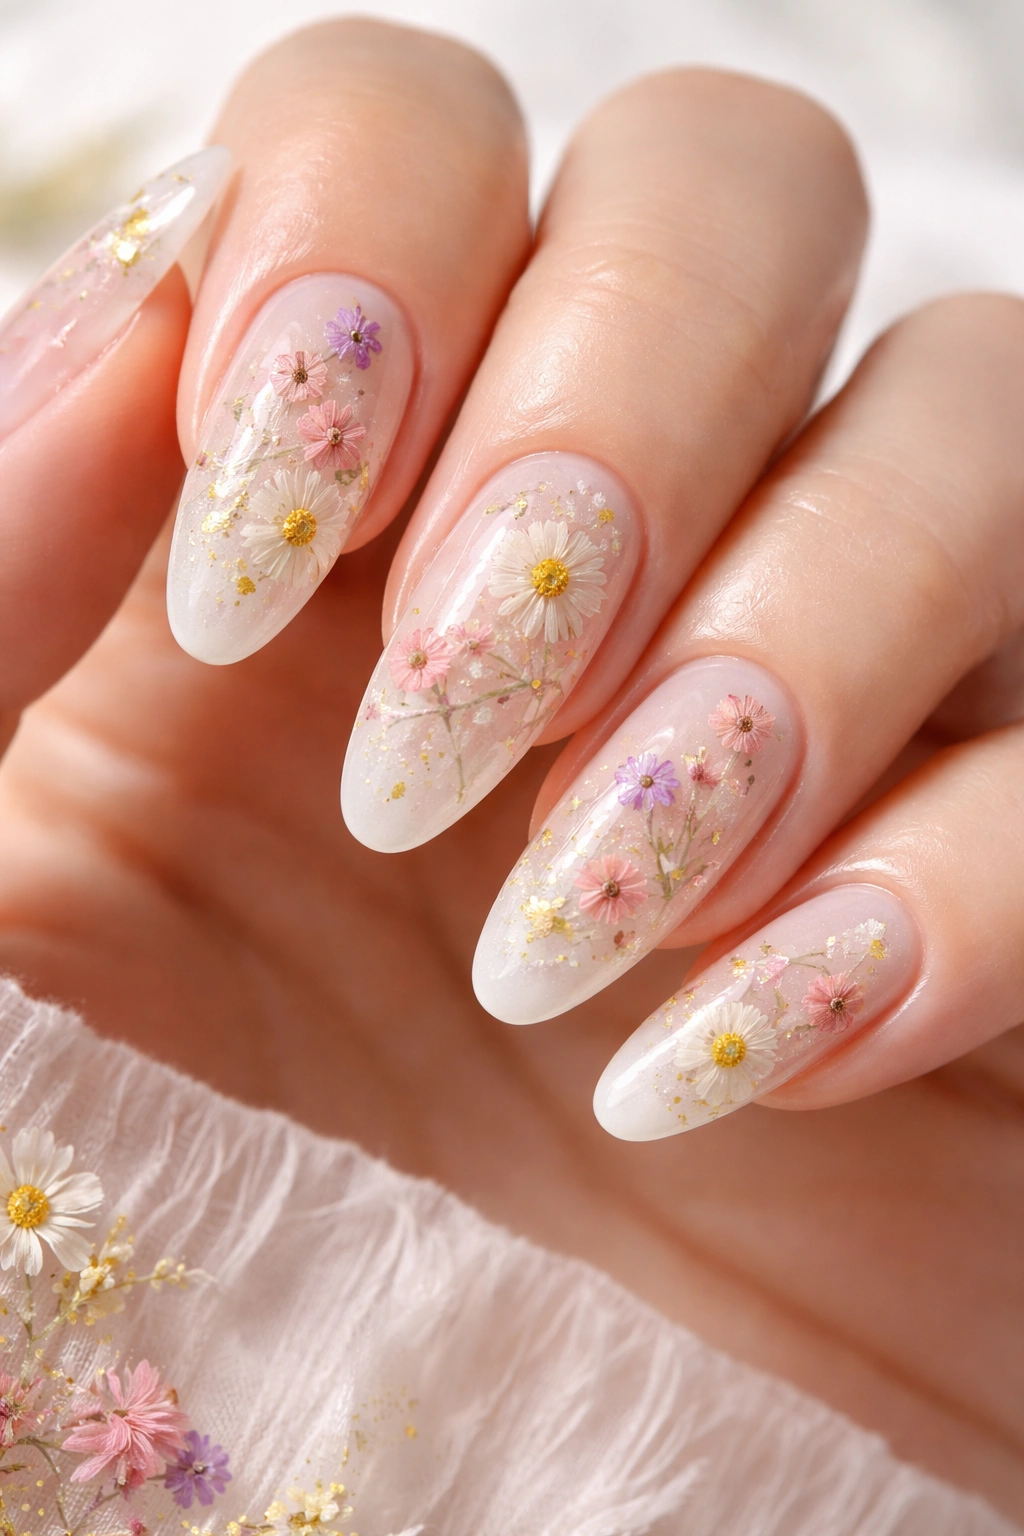
Real or realistic pressed flowers embedded under gel create a botanical, artistic look. This design is uniquely beautiful because no two nails look exactly identical.
Sourcing and Application
Either use actual dried flowers (pressing them between gel layers) or create realistic painted versions. Keep the flower selection cohesive—perhaps all daisies, or a mix of complementary wildflowers.
Why Clients Love This Design
- It’s genuinely unique and artistic
- Each nail tells a slightly different story
- Works beautifully in natural light and photographs
17. Nude with Thin Gold Striping and Metallic Dots
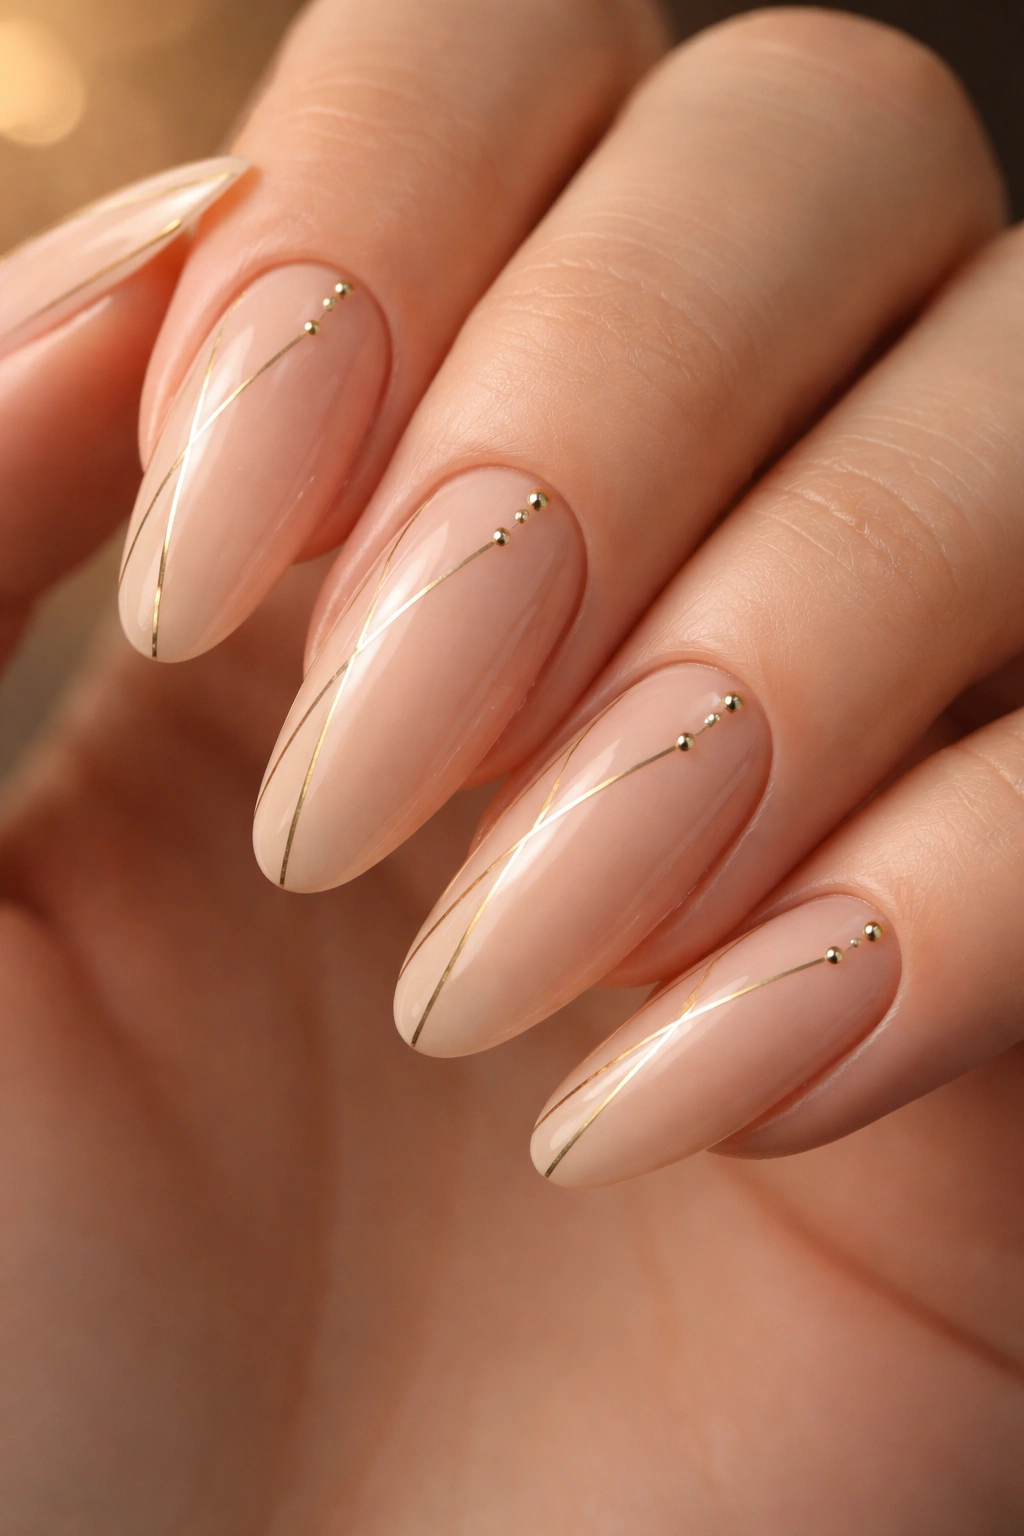
Nude nails adorned with thin gold lines and tiny metallic dots create refined, jewelry-like detailing. This design elevates a neutral base into something special through precise, delicate work.
Placement Strategy
Gold lines can follow the contour of the nail or create geometric shapes, while metallic dots should be placed thoughtfully—perhaps at the intersections of lines or scattered in a pattern.
For Which Clients
Professional clients, wedding attendees, and anyone seeking elegant understatement.
18. Emerald Green with Gold Leaf Accents
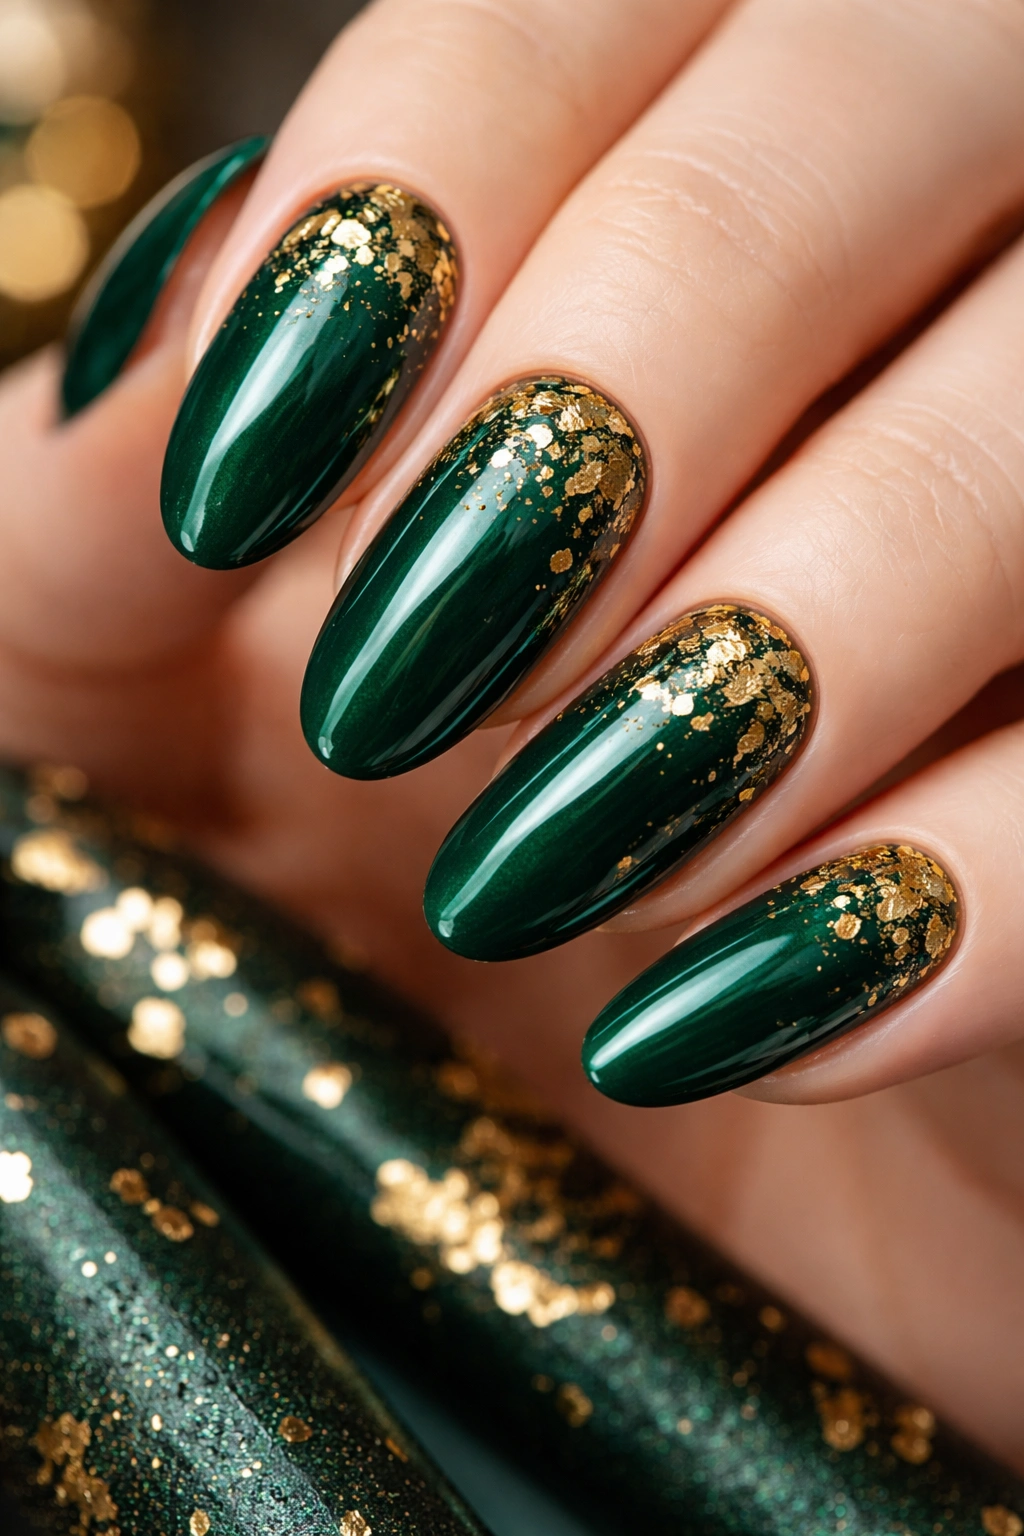
Rich emerald green provides a jewel-tone luxury backdrop for real or faux gold leaf scattered across the surface. This design feels expensive and intentional.
Applying Gold Leaf
Gold leaf can be applied while the base is tacky (for easier adhesion) or adhered with a special foil adhesive. Layer it deliberately across the nail for an organic, luxe appearance.
Visual Characteristics
- Emerald gold is a classic, timeless combination
- Works beautifully on all skin tones
- The design feels special without being costume-like
19. Pale Pink with Encapsulated Confetti
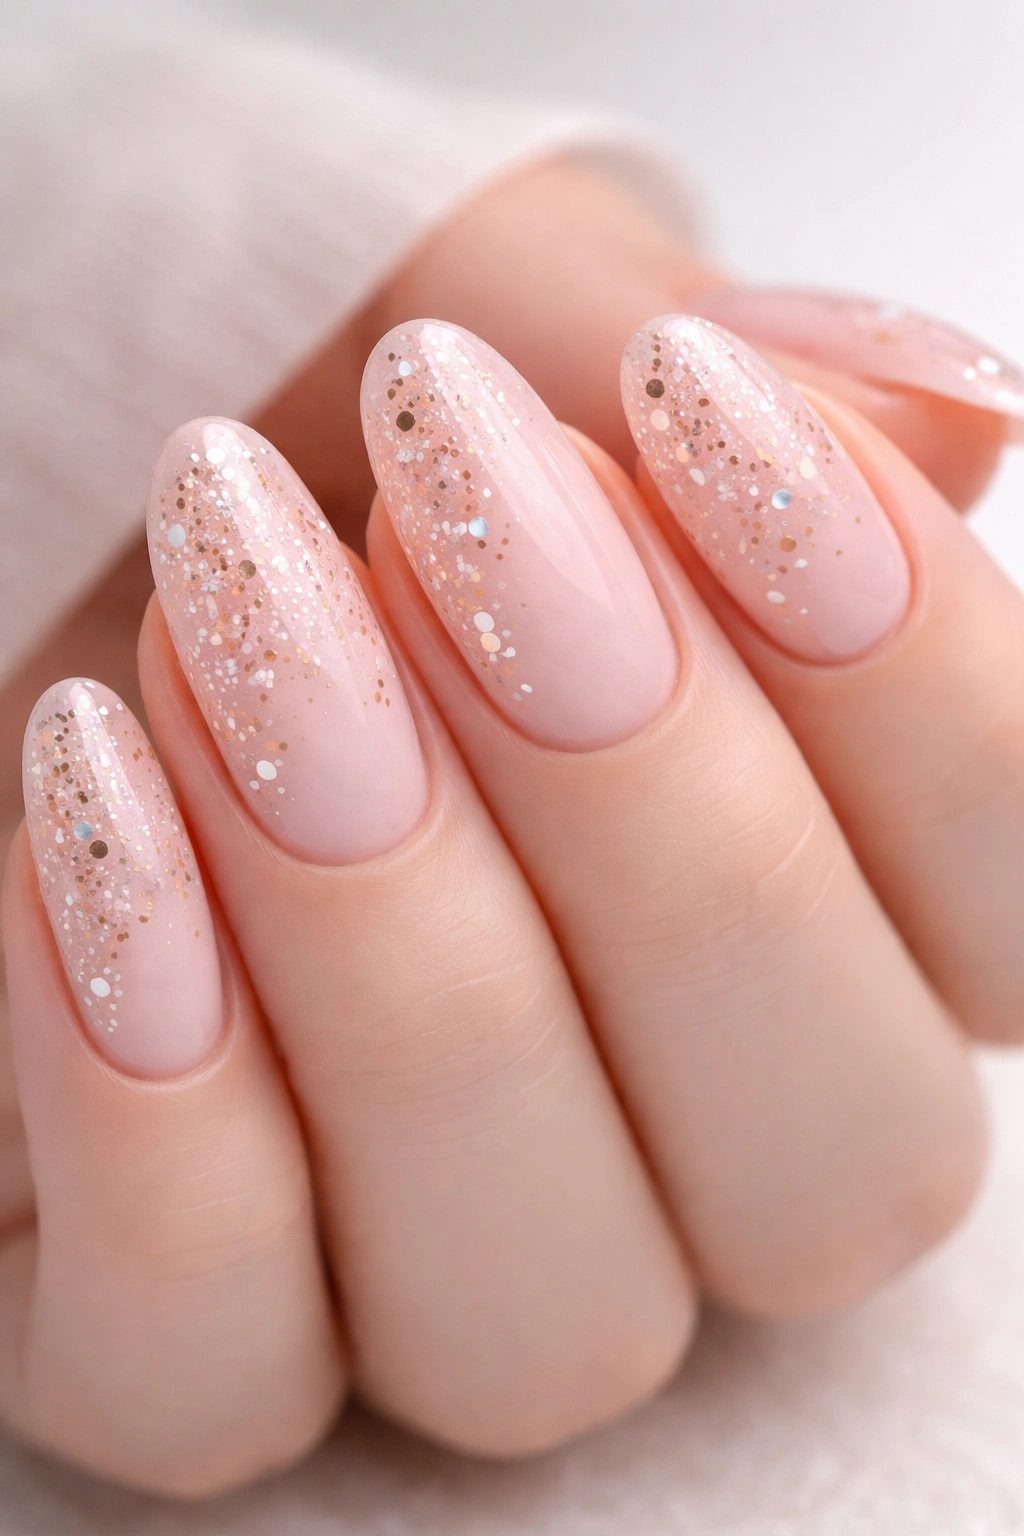
Pale pink gel with encapsulated confetti creates a celebratory yet wearable design. The confetti sits safely under layers of gel, so it’s durable and comfortable.
Confetti Selection
Choose confetti in complementary colors—perhaps white, rose gold, and blush—and ensure pieces are small enough to look intentional rather than chaotic.
Perfect Timing
- Celebrations and special occasions
- Clients who want playful elegance
- Works beautifully for weddings, parties, or milestone events
20. Silver Base with 3D Nail Art Studs and Rhinestones
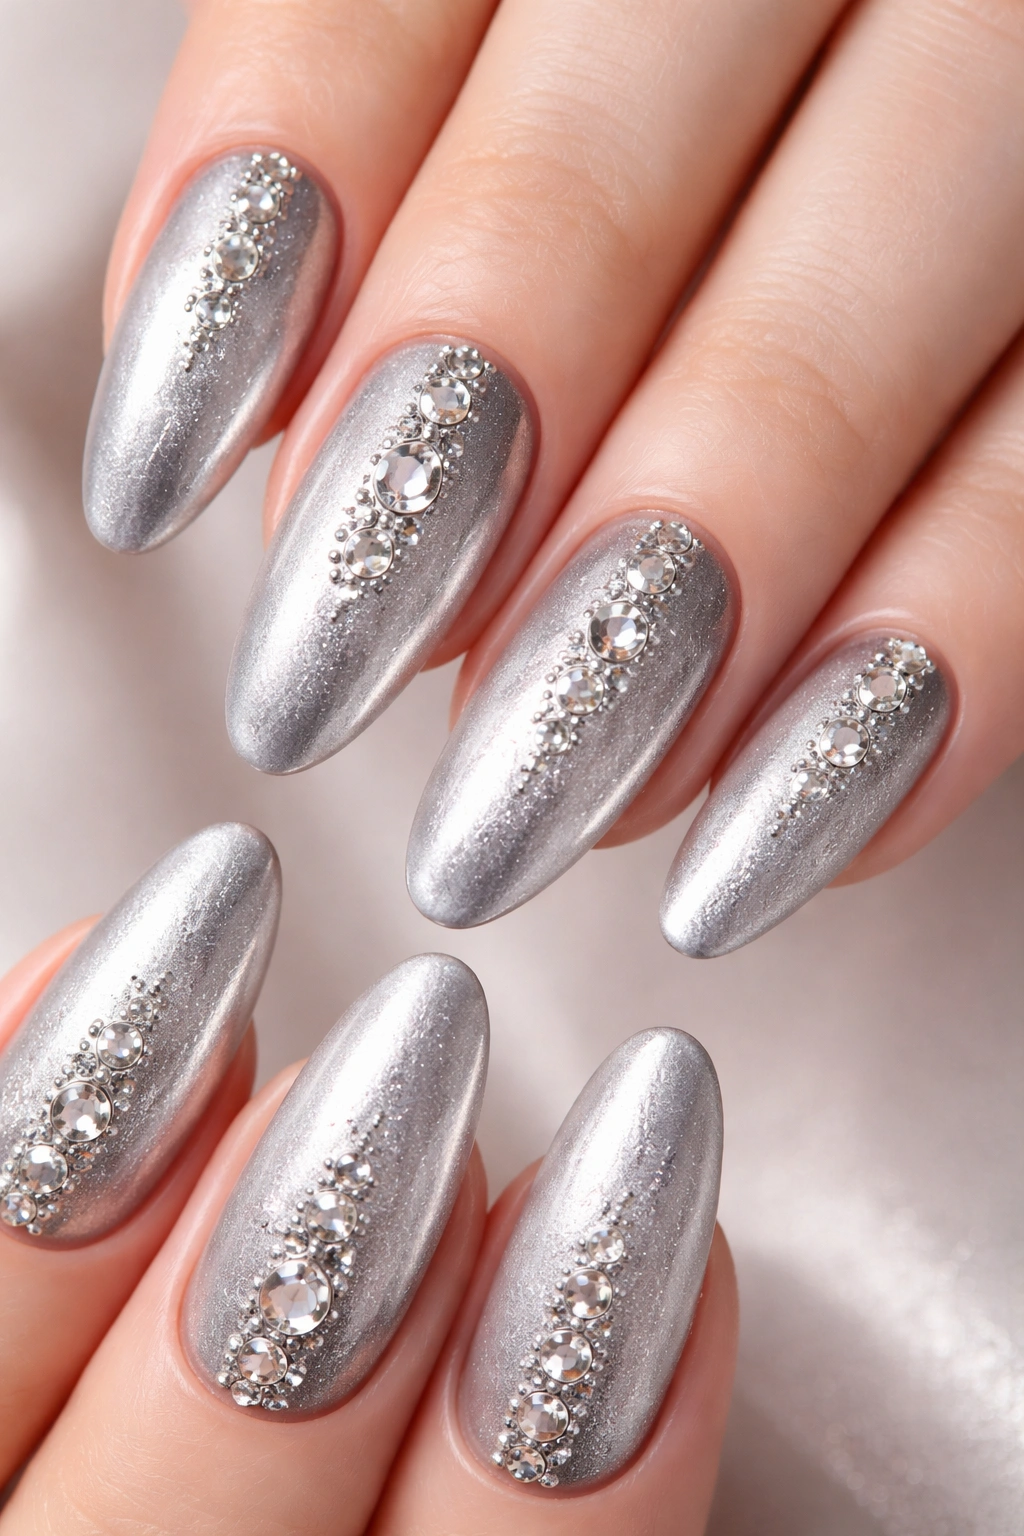
A neutral silver base showcases dimensional studs and carefully placed rhinestones that create depth and glamour. This design requires technical skill to place each element with precision.
Design Composition
Arrange studs and rhinestones in a balanced pattern—perhaps a vertical line on the accent nail, or a gradient of increasing sparkle toward the tips. Larger stones work better on longer nails.
When to Recommend
- Clients attending formal events
- Those who love maximum sparkle and dimension
- Anyone seeking a design that commands attention
21. Dusty Rose with Matte Texture and Glossy Accent Nail
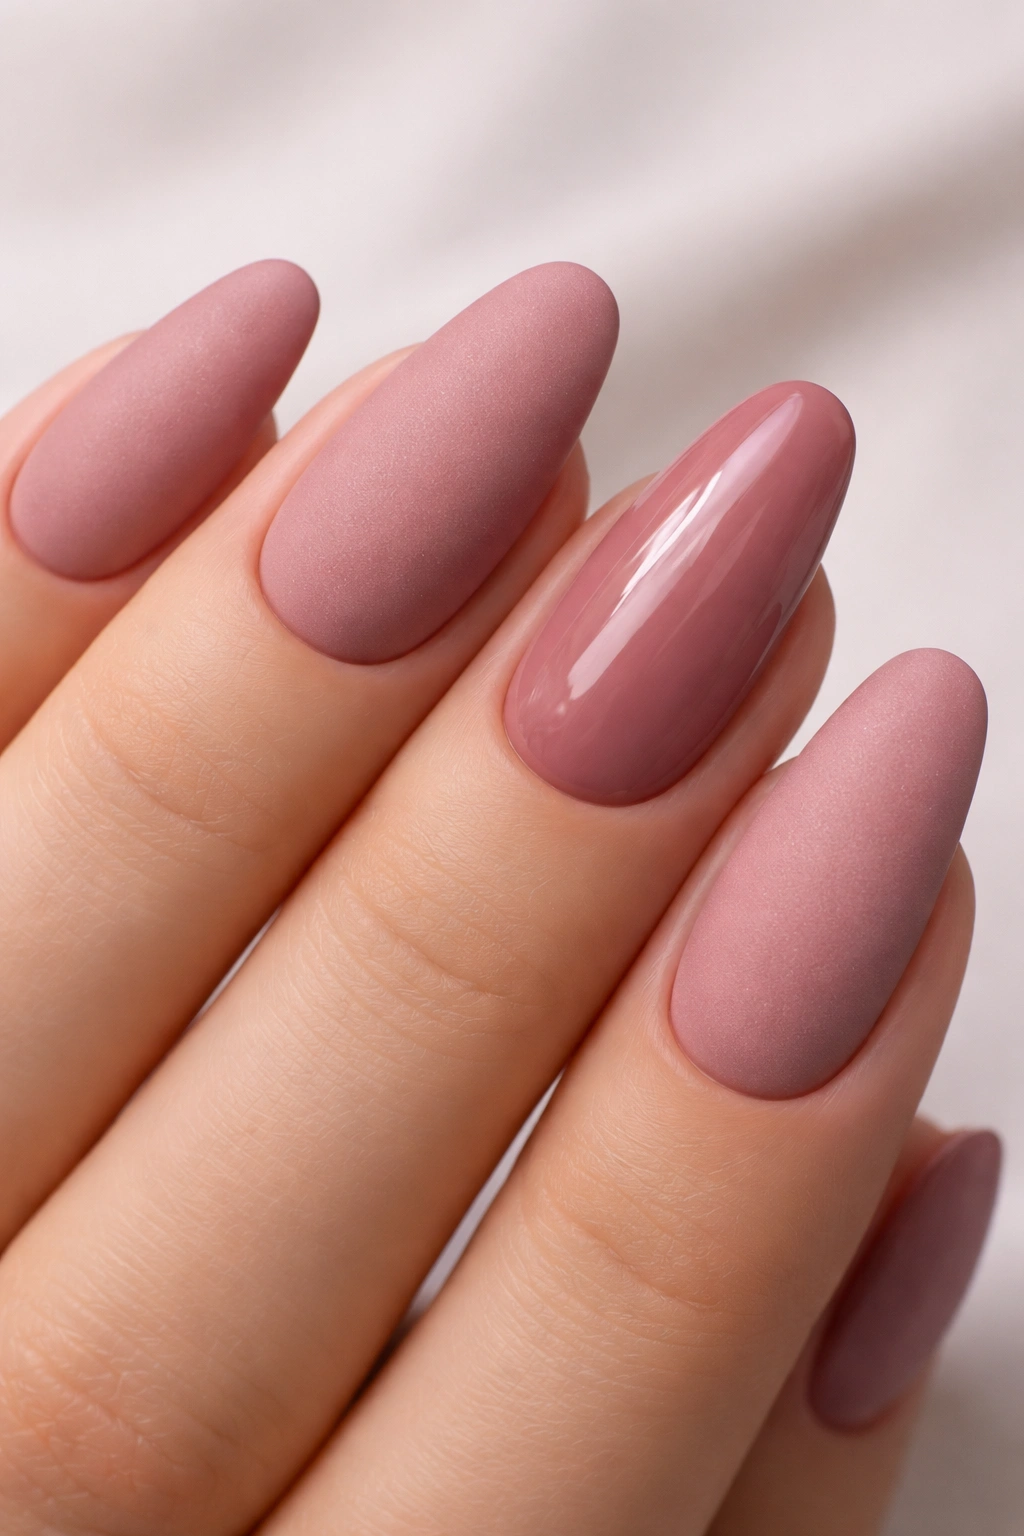
Dusty rose matte nails with one glossy accent nail create textural contrast and visual interest. The matte finish is unexpected and modern while maintaining a soft, romantic color palette.
Texture Application
Apply matte top coat to four nails, leaving the accent nail glossy to catch light differently. The contrast between finishes is subtle but visually sophisticated.
Design Strength
This design demonstrates understanding of finish choices and their visual impact—a hallmark of a skilled nail tech.
22. Pale Nude with Tiny Constellation Designs
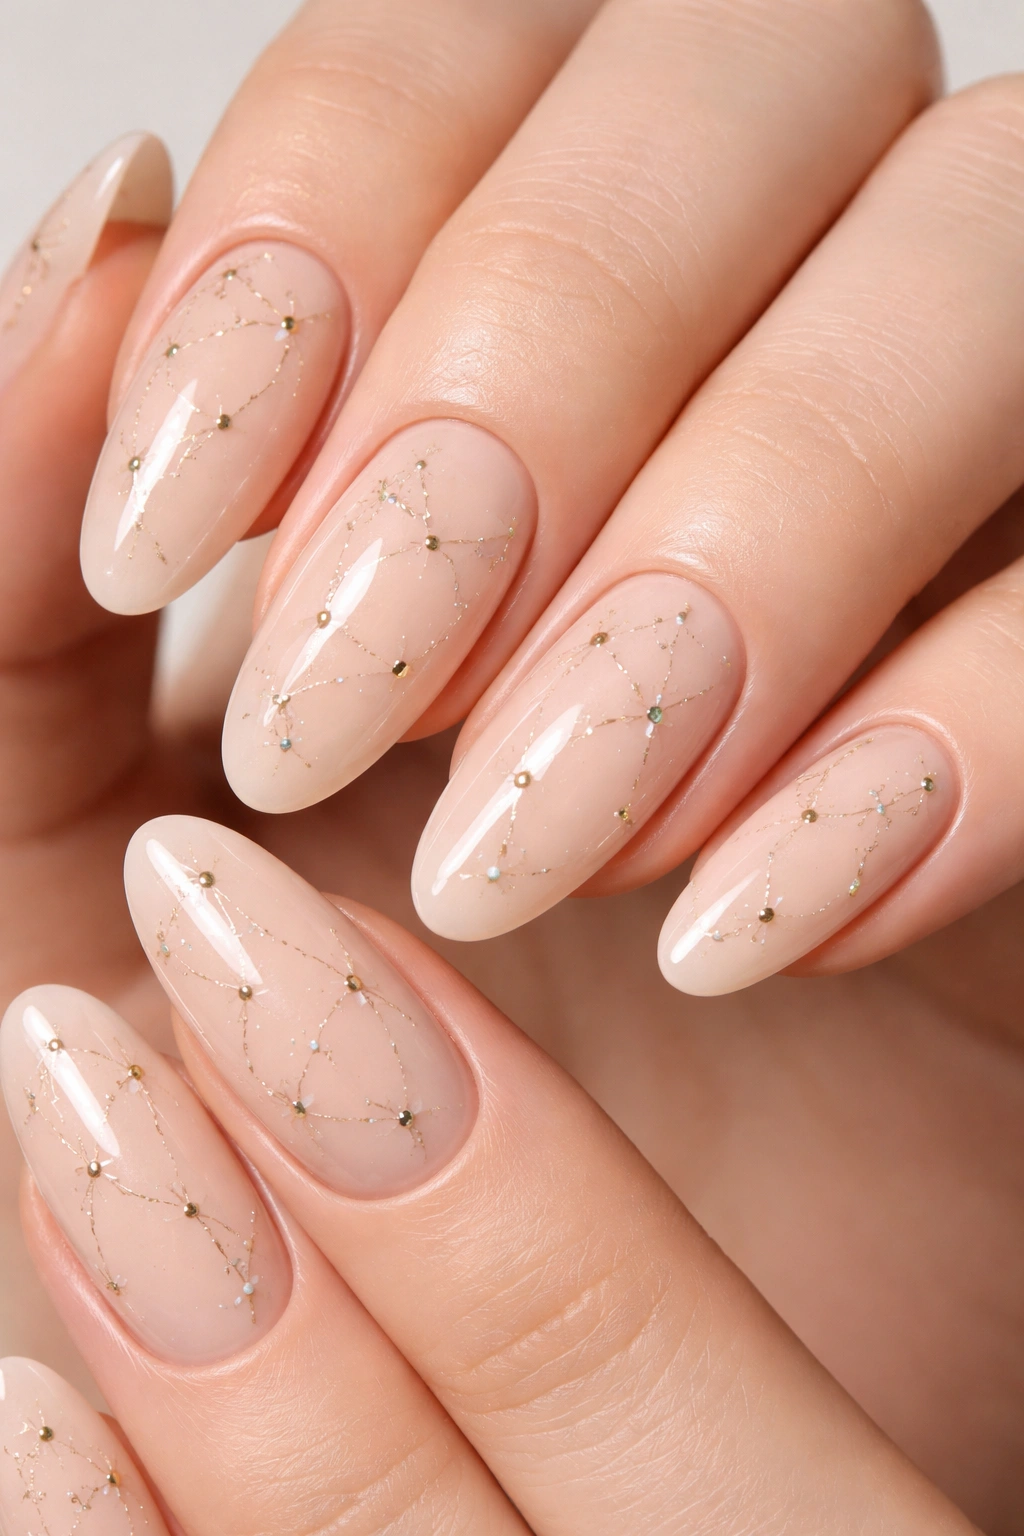
Delicate constellation patterns connect tiny dots across pale nude nails, creating an celestial, dreamy aesthetic. This design is personal and artistic without being elaborate.
Creating Constellations
Research actual constellations or create simple versions. Use a fine liner brush to place tiny dots and connect them with thin lines. Scatter different constellations across different nails.
Appeal
Clients who love personalized, meaningful designs often gravitate toward this style. It demonstrates genuine artistic ability rather than reliance on decals.
23. Oxblood Red with Black Negative Space Lines
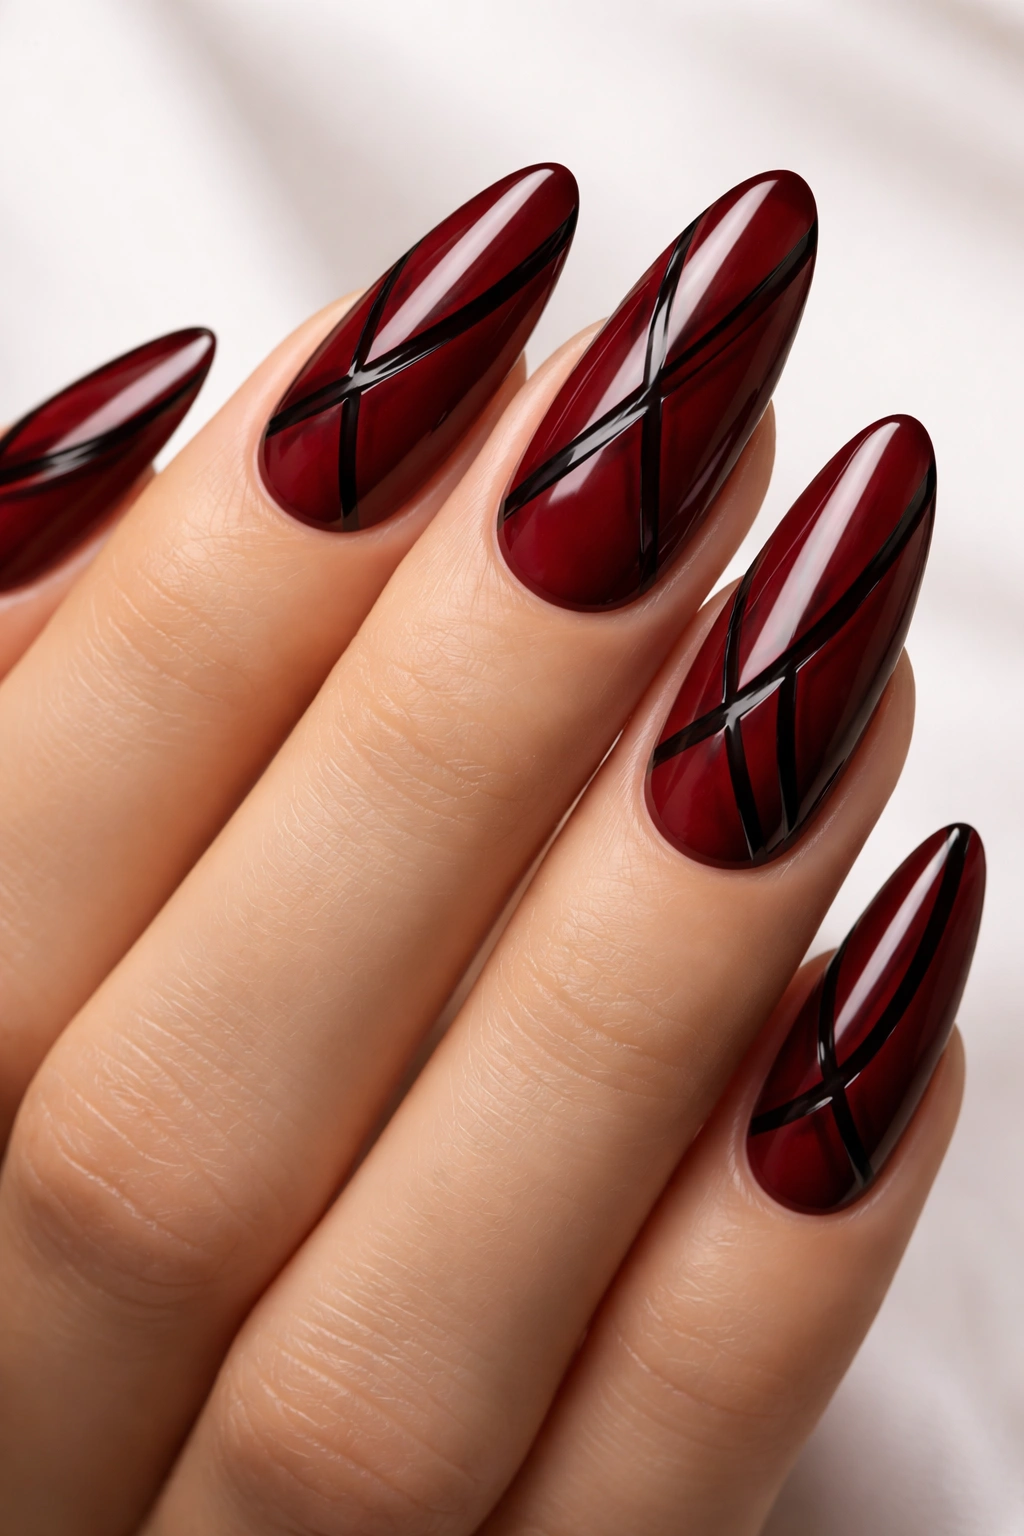
Deep oxblood red with precise black negative space lines creates a striking, editorial look. The geometric contrast between the warm red and cool black is visually magnetic.
Line Composition
Black lines should follow intentional geometric patterns—perhaps angular shapes or structured line work. Keep the design balanced across the hand.
Who Loves This Style
- Clients with fashion-forward sensibilities
- Those seeking bold designs that feel artistic
- Professional clients wanting a statement that’s still refined
24. Soft Peach with Encapsulated Gold Leaf and Holographic Sparkle
Soft peach combined with encapsulated gold leaf and holographic sparkle creates warmth, luxury, and light-catching dimension. This design balances multiple elements without appearing overdone.
Layering Technique
Base layer is soft peach, then add encapsulated gold leaf pieces, then top with holographic sparkle concentrated toward the tip. Each layer adds sophistication.
Versatility
This design works for clients seeking feminine elegance with contemporary sparkle. It’s appropriate for multiple occasions and styling options.
25. Midnight Blue with Silver Geometric Negative Space
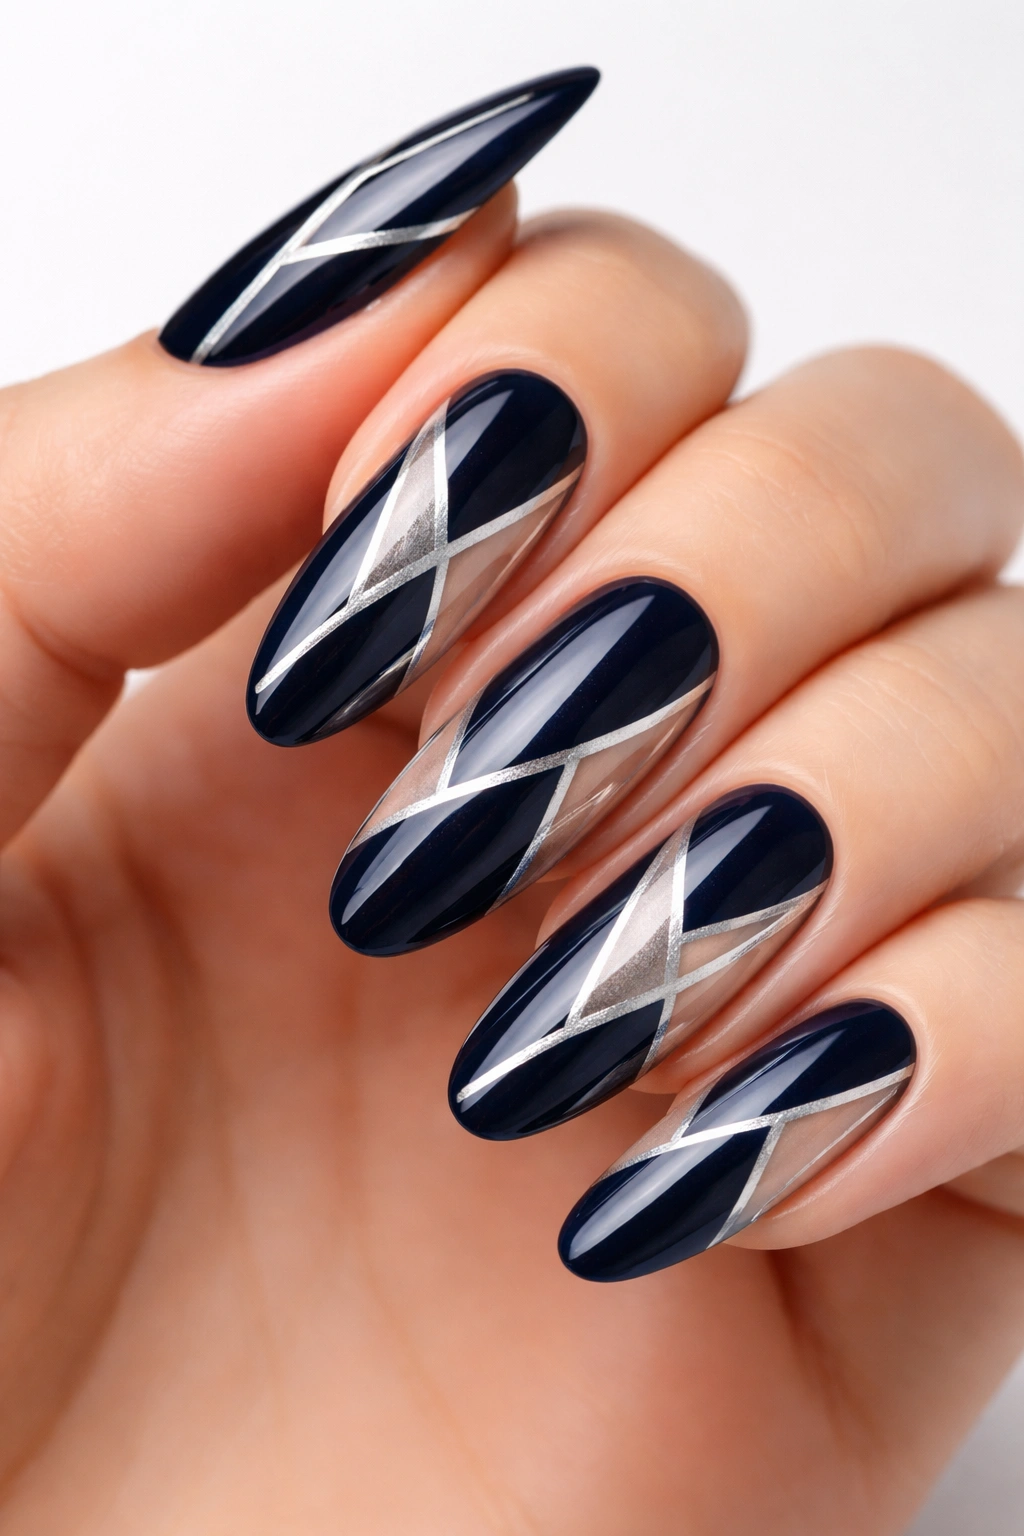
Midnight blue nails with silver geometric shapes created through negative space look modern and intentional. The midnight base provides a rich backdrop for precise geometric work.
Creating Geometric Shapes
Use negative space (filed or shaped areas) to create geometric forms—triangles, hexagons, or abstract angular shapes. The contrast between blue and the natural nail color underneath is striking.
Why Negative Space Works
It demonstrates technical skill and creates visual interest through subtraction rather than addition—a mark of professional design.
26. Blush with Encapsulated Rose Gold Glitter Ombré
Blush base with encapsulated rose gold glitter that transitions from subtle at the base to concentrated at the tips creates elegant dimension. The glitter sits safely under gel, ensuring longevity.
Building the Ombré
Layer rose gold glitter gel gradually, starting with thin concentration near the cuticle and building toward heavy sparkle at the tip. The transition should be smooth and intentional.
Client Appeal
- Feminine clients seeking sparkle without gaucheness
- Wedding or special occasion guests
- Anyone wanting romantic elegance with visual interest
27. Sage Green with Cream Line Details and Negative Space
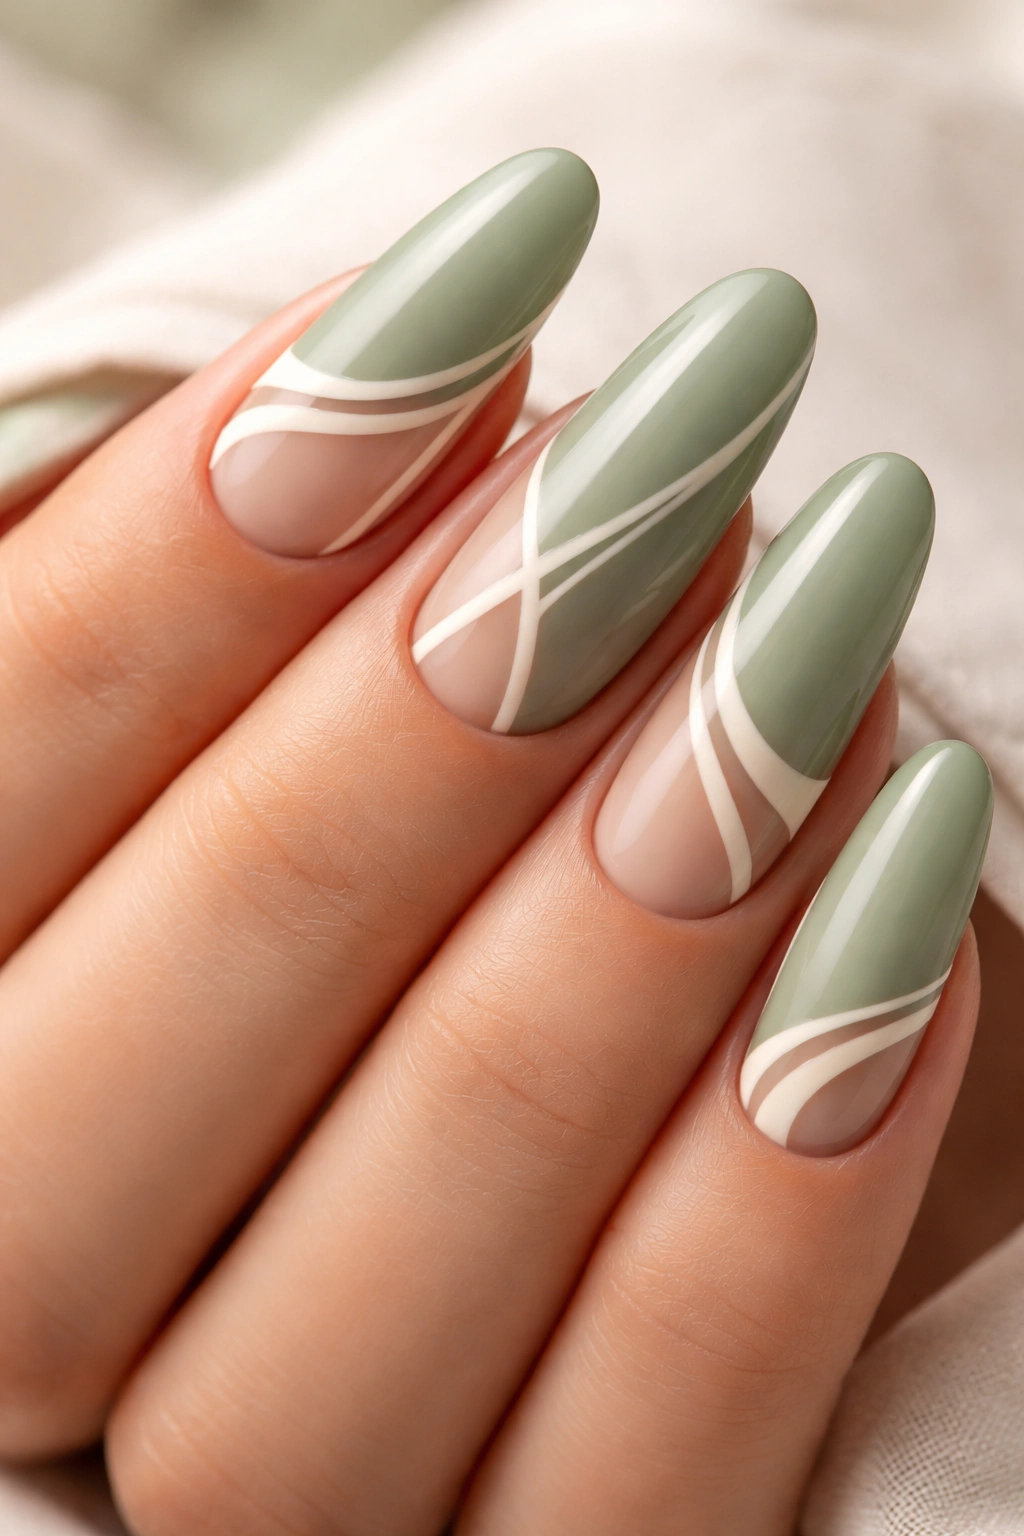
Sage green provides an earthy, sophisticated base for cream-colored line work and strategic negative space cutouts. This design feels organic and intentionally modern.
Design Execution
Create thin cream lines across the sage base, perhaps in geometric patterns or following the nail’s natural contours. Add negative space shapes that complement the line work.
Versatility and Appeal
Sage green works across seasons and pairs beautifully with many outfit colors. The cream detailing keeps the design from feeling heavy or masculine.
28. Soft White with Iridescent Glitter Gradient
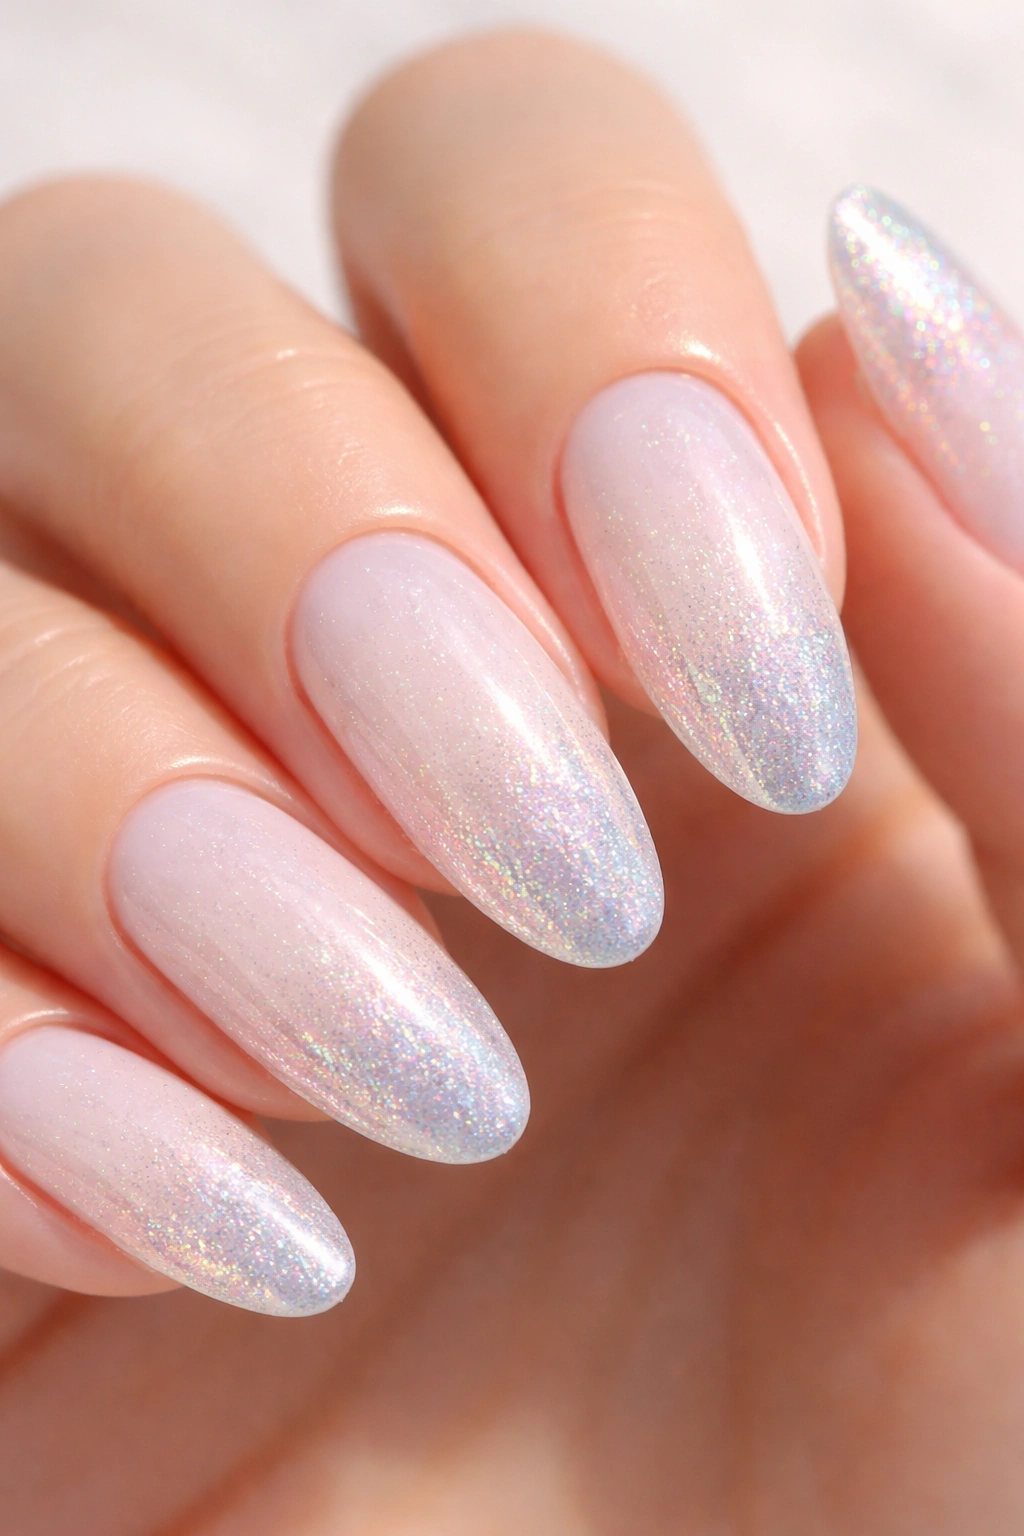
Soft white nails with iridescent glitter that becomes more concentrated toward the tips create a subtle rainbow effect. This design is ethereal and dimensional without being loud.
Applying Iridescent Glitter
Iridescent glitter catches different colors depending on lighting and angle. Concentrate it toward the tips and edges where it catches light most dramatically.
Why Clients Request This
It’s visually interesting in natural light, indoor lighting, and photographs. The iridescence provides constant subtle color-shifting.
29. Rich Burgundy with Micro Pearl Texture and Matte Finish

Deep burgundy with micro pearl texture creates subtle dimension while the matte finish keeps the design refined and sophisticated. Texture adds visual interest without relying on glitter or sparkle.
Creating Micro Pearl Effect
Micro pearl powders mixed into matte top coat create a velvety texture that catches light softly. Apply evenly across the nail surface.
Design Sophistication
This design demonstrates understanding of texture as a design element—something many clients don’t immediately consider but absolutely love.
30. Peachy Nude with Delicate Rainbow Ombré Tips
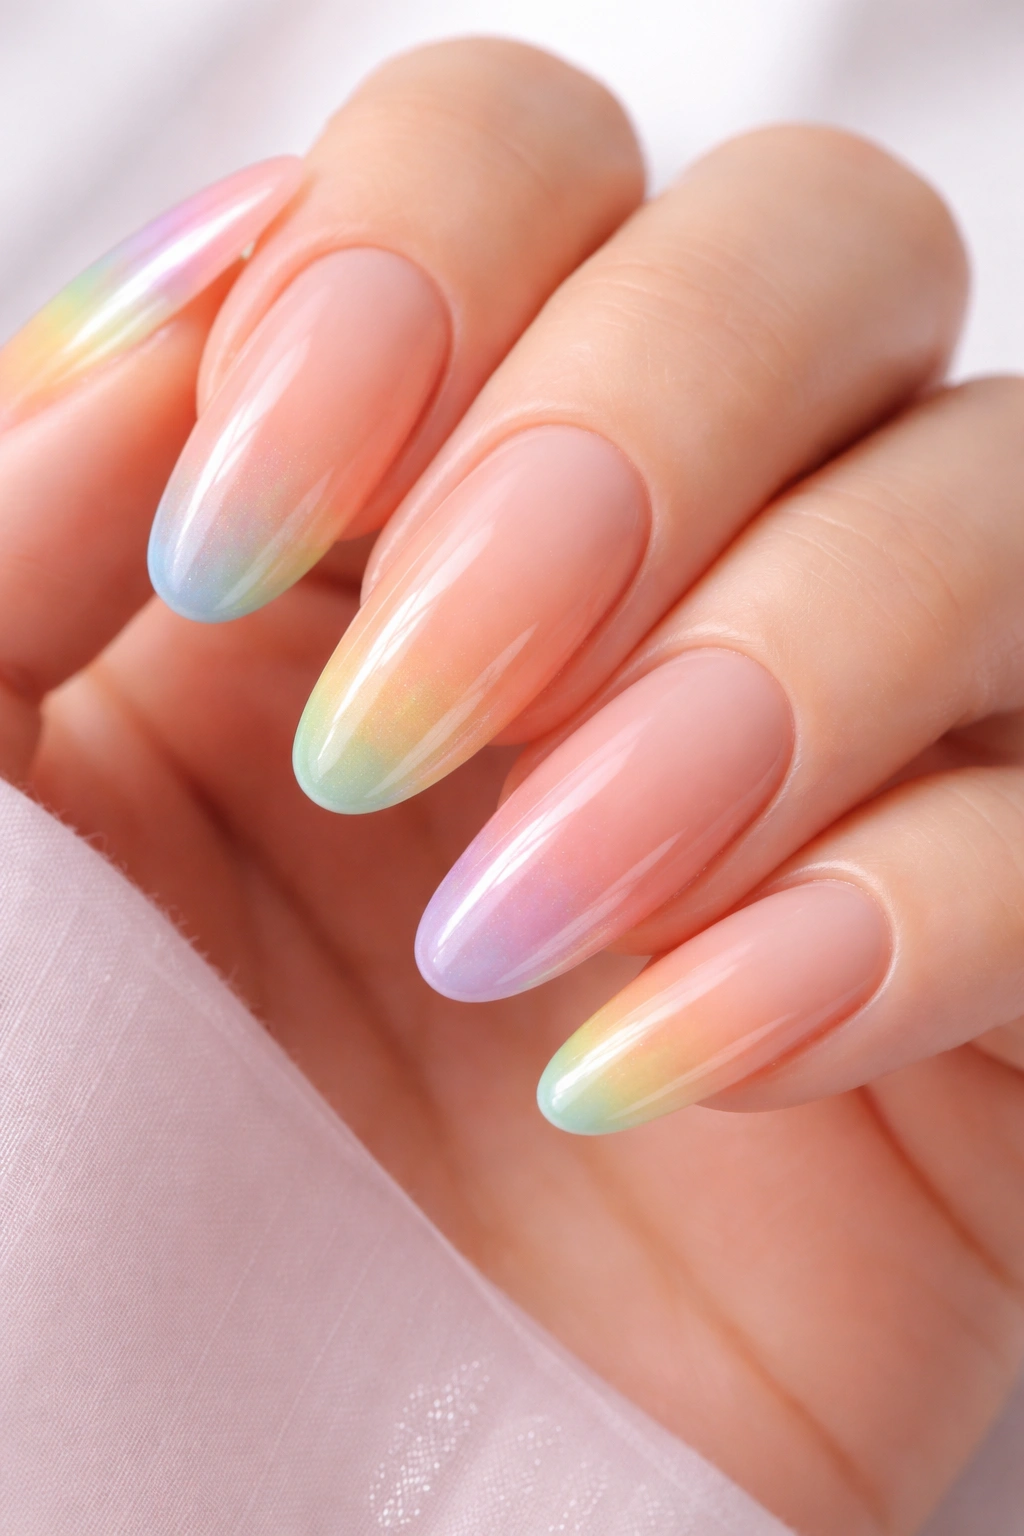
Peachy nude base transitioning into soft rainbow ombré at the tips creates a joyful, artistic design that feels sophisticated rather than costume-like. Each color of the rainbow appears as a thin band moving toward the tip.
Creating Rainbow Ombré
Layer thin sections of different colors—starting with peach at the base, then moving through coral, yellow, green, blue, and purple at the very tip. Use sponging technique to blend slightly where colors meet.
Perfect For
- Clients seeking colorful designs without overwhelming vibrancy
- Artists and creative professionals
- Anyone wanting a design that captures joy and creativity
Final Thoughts
Long oval nails represent the goldilocks of nail shapes—they’re long enough to showcase detailed, artistic designs while remaining practical and wearable for everyday life. Each of these thirty designs demonstrates a different approach to color, technique, and artistic expression, proving that there’s genuinely something for every client personality and style preference within this one shape.
The key to presenting these designs successfully is understanding what makes each one special. Don’t just show pictures; explain the technique, the color story, and why it works particularly well on long ovals. When you can confidently articulate the “why” behind each design—why that specific glitter placement works, why that color transition matters, why that texture adds value—clients feel your expertise and trust your recommendations.
Use these ideas as jumping-off points for your own creative variations. Your unique artistic voice is what keeps clients returning and referring friends. Whether you lean toward minimalist elegance, maximum sparkle, botanical themes, or geometric precision, long oval nails give you the canvas to explore every direction. Building a strong portfolio of varied long oval designs positions you as a versatile artist capable of bringing any client’s vision to life.
