

Short squoval nails are having a serious moment—and for good reason. This nail shape sits at the sweet spot between practical and polished, combining the durability of short nails with the elegance of a slightly elongated shape. The squoval (square-with-rounded-corners) aesthetic is inherently sophisticated, and when paired with refined color palettes and minimalist designs, it becomes the kind of manicure that works everywhere: the office, a dinner date, a casual weekend run. You get that finished, intentional look without the commitment of lengthy acrylics, and your nails actually stay intact when you’re living a real life.
The beauty of this nail shape is how forgiving it is. Short squoval nails flatter virtually every hand shape and skin tone, they’re low-maintenance, and they photograph beautifully. But here’s what matters most: the designs you choose determine whether your manicure reads as trendy or timeless, boring or brilliant. A classy short squoval manicure isn’t about flashy embellishments or loud patterns—it’s about intentional color choices, subtle texture, negative space, and restraint. The most sophisticated nails are often the ones that whisper rather than shout.
If you’ve been scrolling through nail inspiration and feeling overwhelmed by options, or if you’re tired of designs that look dated after two weeks, these 18 short squoval nail designs will give you exactly what you’re looking for. Each one is designed to look effortlessly chic, work across multiple occasions and seasons, and remain visually interesting the moment you put them on. Let’s dive in.
1. Classic White Oval Tips with Soft Nude Base
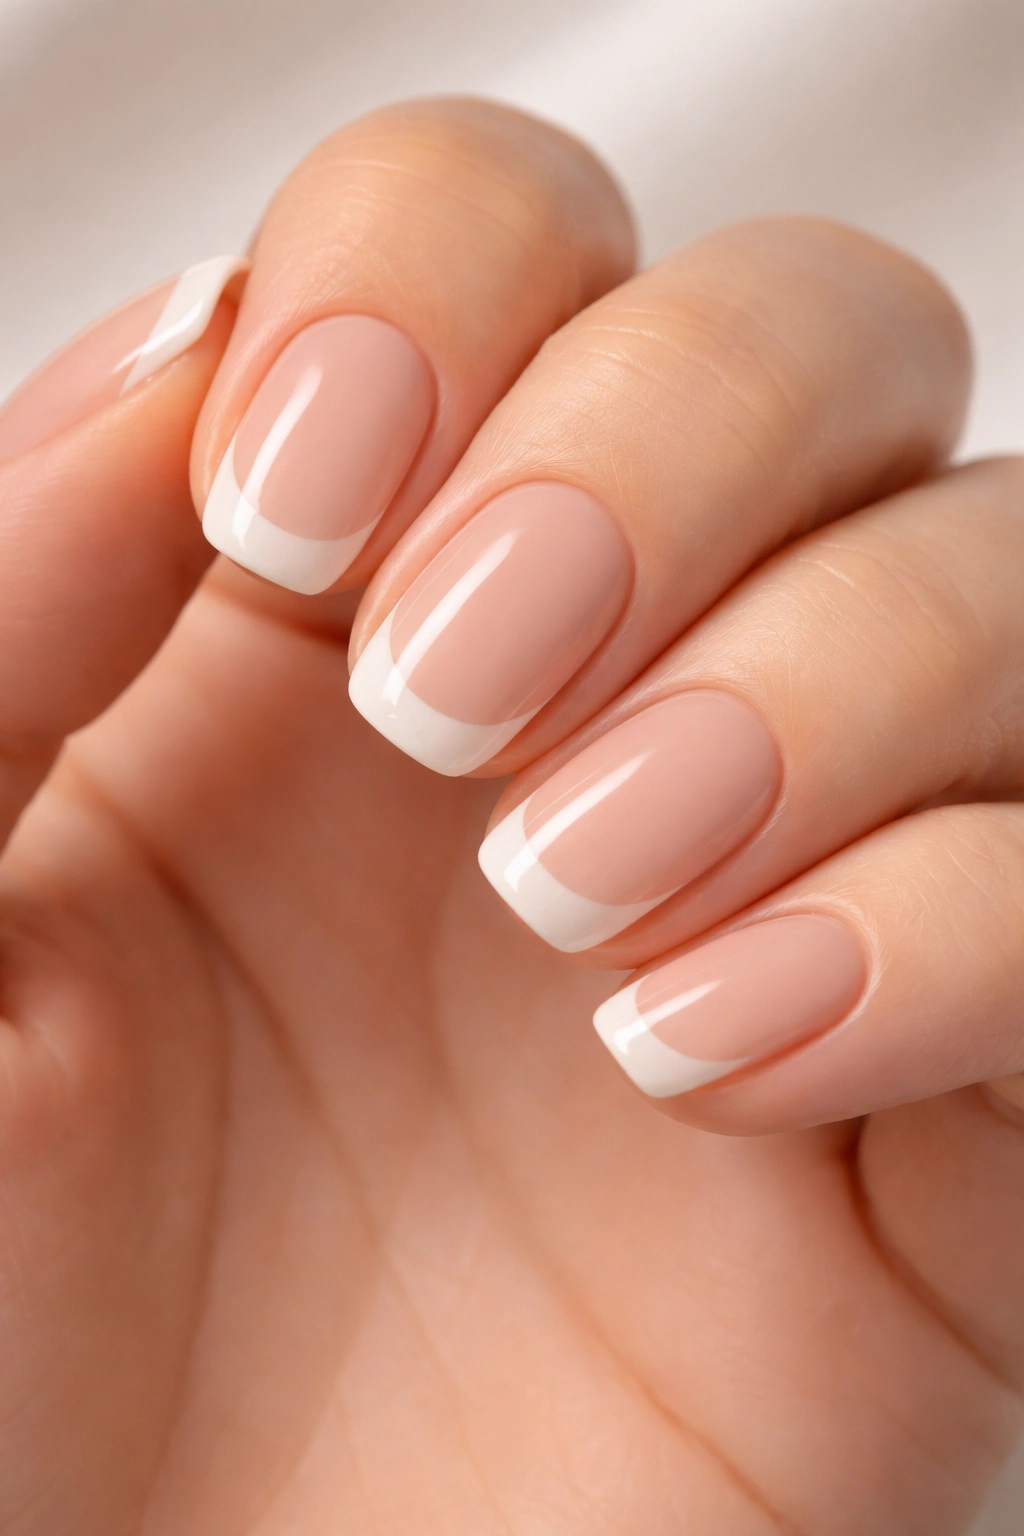
This is the timeless French manicure reimagined for short squoval nails—and it never fails. A soft, warm nude base creates a subtle gradient toward clean white tips, elongating the nail visually while keeping the overall look refined and professional.
Why It’s Instantly Elegant
The optical illusion this design creates is brilliant. The white tips make your nails appear slightly longer than they actually are, while the nude base keeps everything proportional and natural-looking. This isn’t a stark, ’90s French manicure; the white should be creamy and soft, not pure bright white. The nude base does the heavy lifting here, so choose one that complements your skin undertone—warm nudes for golden undertones, cooler mauves for pink undertones.
How to Make It Work Year-Round
- Spring and summer: Keep the white tips thicker (about one-third of the nail) and the nude very pale for a fresh, airy look
- Fall and winter: Deepen the nude base slightly and narrow the white tips for a more sophisticated vibe
- The absolute essential: Invest in a quality white polish that doesn’t require three coats to be opaque—one thick coat should do it
Pro tip: This design works beautifully with a glossy top coat, but you can also experiment with a matte nude base paired with a glossy white tip for subtle textural contrast.
2. Soft Peachy Nude with Brushed Gold Accent Stripe
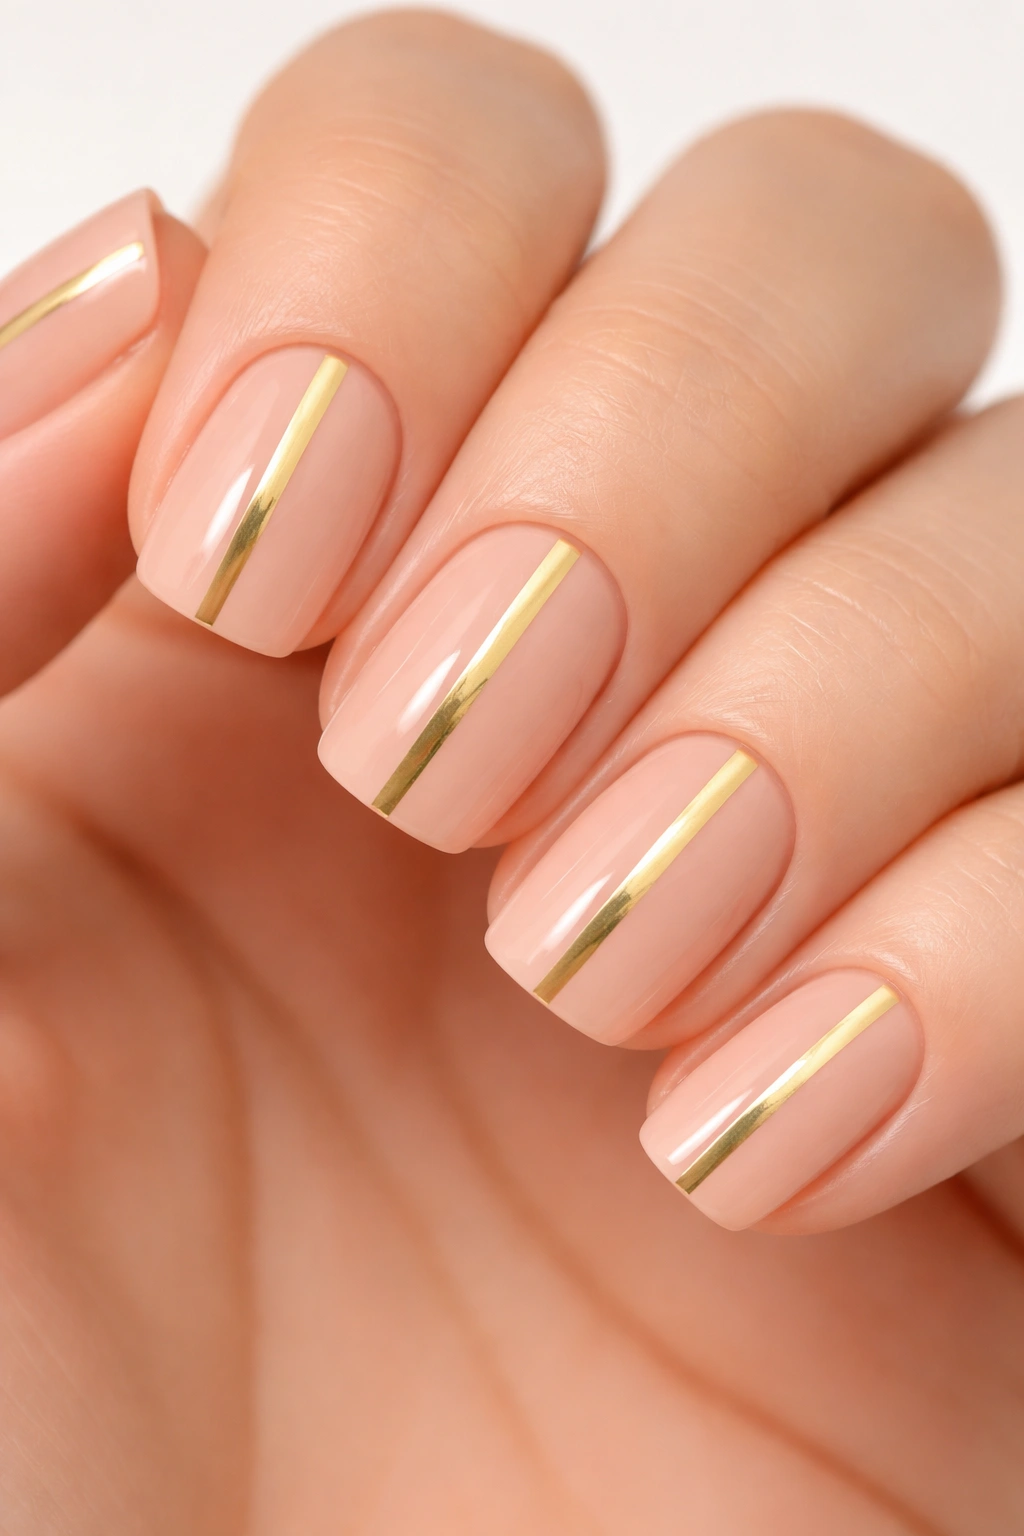
A brushed gold vertical stripe down the center of each nail transforms an otherwise simple peachy-nude base into something distinctly elevated. It’s minimal enough to pair with anything in your wardrobe, but intentional enough to show you’ve thought about your look.
The Design Elements That Make It Work
The peach-nude is warm and flattering on most skin tones—it bridges the gap between pink and beige in a way that feels modern. The gold stripe should be applied with a thin, angled brush and positioned perfectly centered. This isn’t glitter or sparkle; you’re aiming for a clean, almost architectural line. The brushed gold texture (as opposed to shiny) prevents it from looking costume-y and keeps the overall effect sophisticated.
Application Tips for Beginners
- Apply the nude base first and let it cure completely (or dry if you’re using regular polish)
- Use a thin angled or detail brush and a metallic gold polish with good opacity
- Steady your hand by resting your pinky and ring finger against your other hand for stability
- If the line isn’t perfect, you can clean it up with a thin brush dipped in rubbing alcohol before the top coat
The beauty of this design is that imperfect lines actually read as intentional and artistic, not sloppy. Slight waviness gives it personality.
3. Matte Taupe with Glossy Metallic Silver Stripe
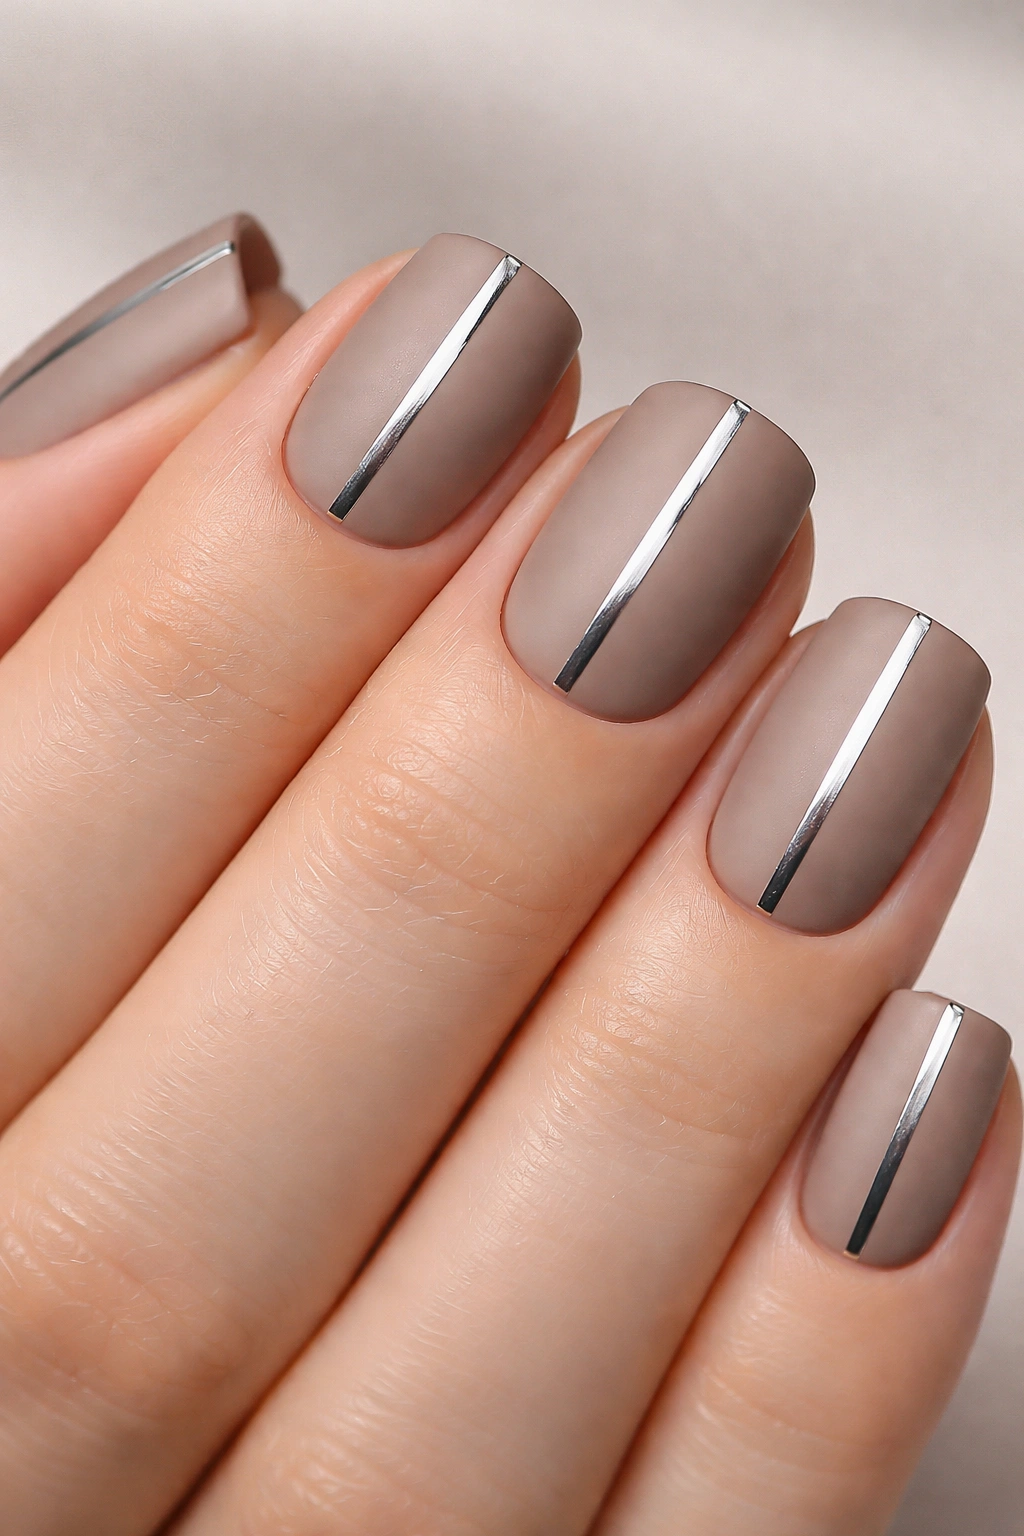
Texture contrast creates visual interest without adding complexity. A warm, earthy matte taupe paired with a single glossy silver stripe down the center gives you understated drama and modern sophistication in one design.
Why Texture Matters as Much as Color
Matte finishes are inherently elegant because they diffuse light rather than reflecting it, creating a soft, velvety appearance. Pairing this with a single glossy element creates a focal point and breaks up the flatness. The silver stripe should be thin—about the width of a toothpick—and perfectly vertical. This design photographs exceptionally well and catches light in subtle, flattering ways.
Making It Your Own
- Taupe works beautifully across all skin tones; adjust the undertone slightly based on whether you lean warm or cool
- The silver stripe can be applied with metallic gel or regular metallic polish—gel gives a more mirror-like finish
- If you don’t trust your hand-steadiness with a brush, thin metallic striping tape exists and works perfectly for this design
- Top coat the glossy stripe to seal it; the contrast between matte and glossy will remain visible
Worth knowing: This design stays elegant longer than glossy-only designs because the matte base doesn’t show oil residue or fingerprints as obviously.
4. Pale Pink and Soft Lavender Gradient Fade
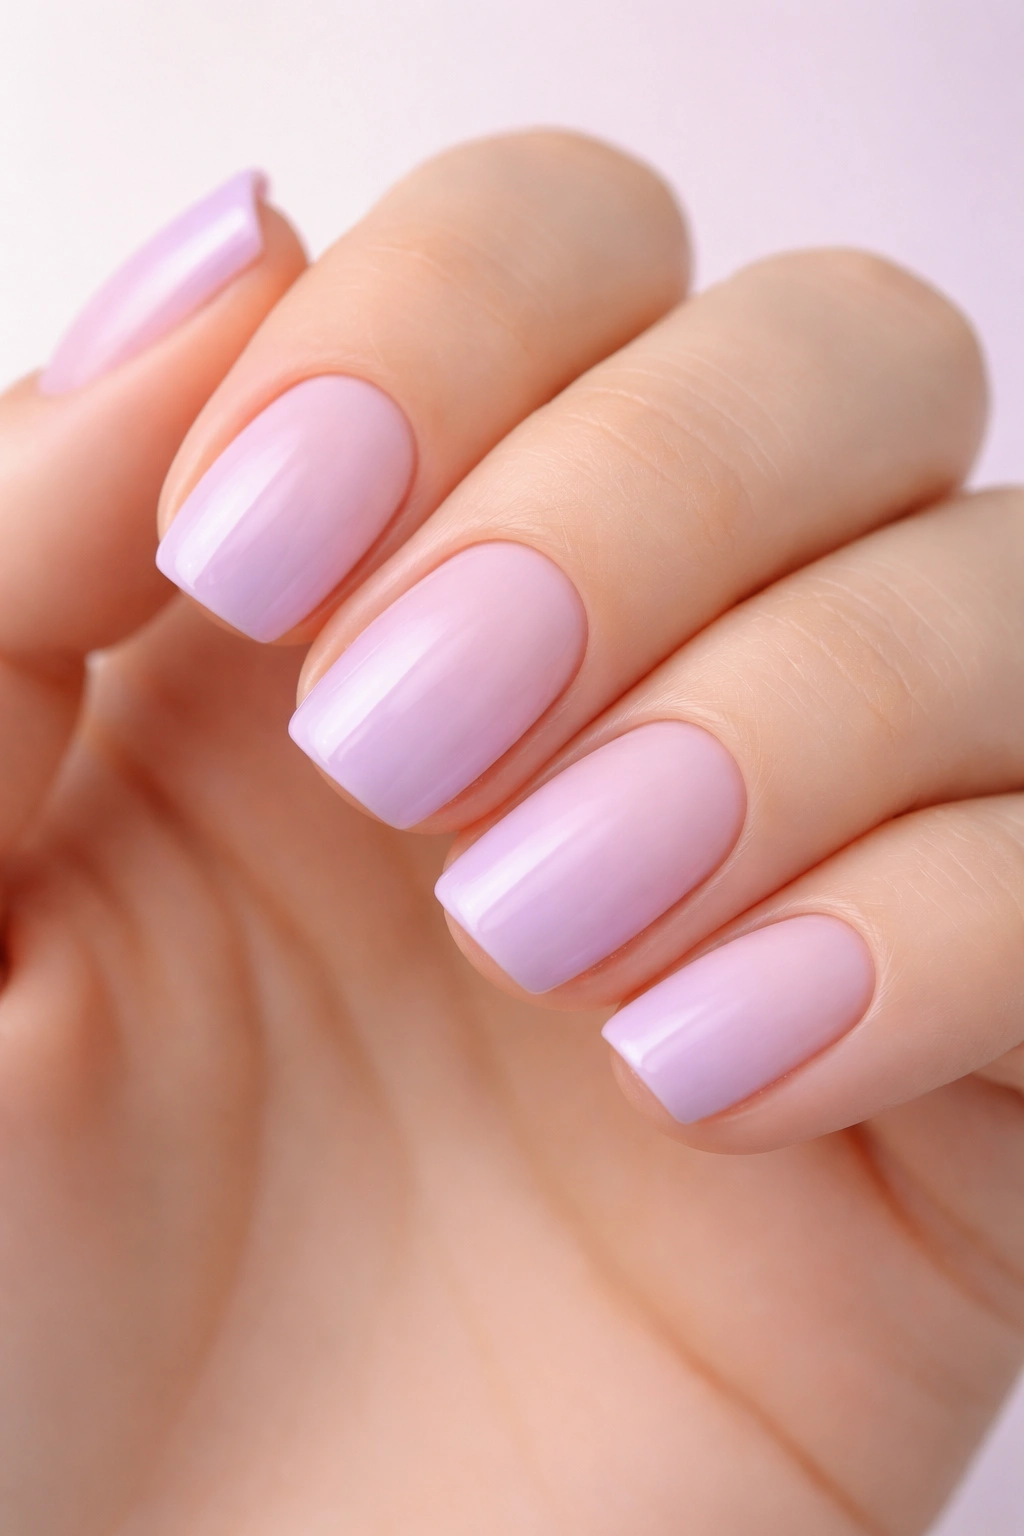
A gentle gradient from pale pink on the thumb and index fingers to soft lavender on the ring and pinky creates movement and visual depth without looking busy. This is a design that looks complicated but is surprisingly achievable.
Building the Gradient
The secret to a non-streaky gradient is using a makeup sponge and multiple thin layers. Start with pale pink on one side of the nail and soft lavender on the other, then use the sponge to blend the middle section with light dabbing motions. The colors should transition gradually, not sharply. This works particularly well on short squoval nails because the smaller surface area means less room for mistakes.
Color Combinations That Always Work
- Pale pink to lilac (the most classic and universally flattering)
- Blush to dusty rose (more mature and sophisticated)
- Pale peach to soft terracotta (warm and unexpected)
- Light mauve to pale grey (cooler and more modern)
The key is keeping both colors in the pastel family—neither should be saturated or bright. You’re aiming for watercolor softness.
5. Deep Burgundy with Elegant Silver Glitter Tips
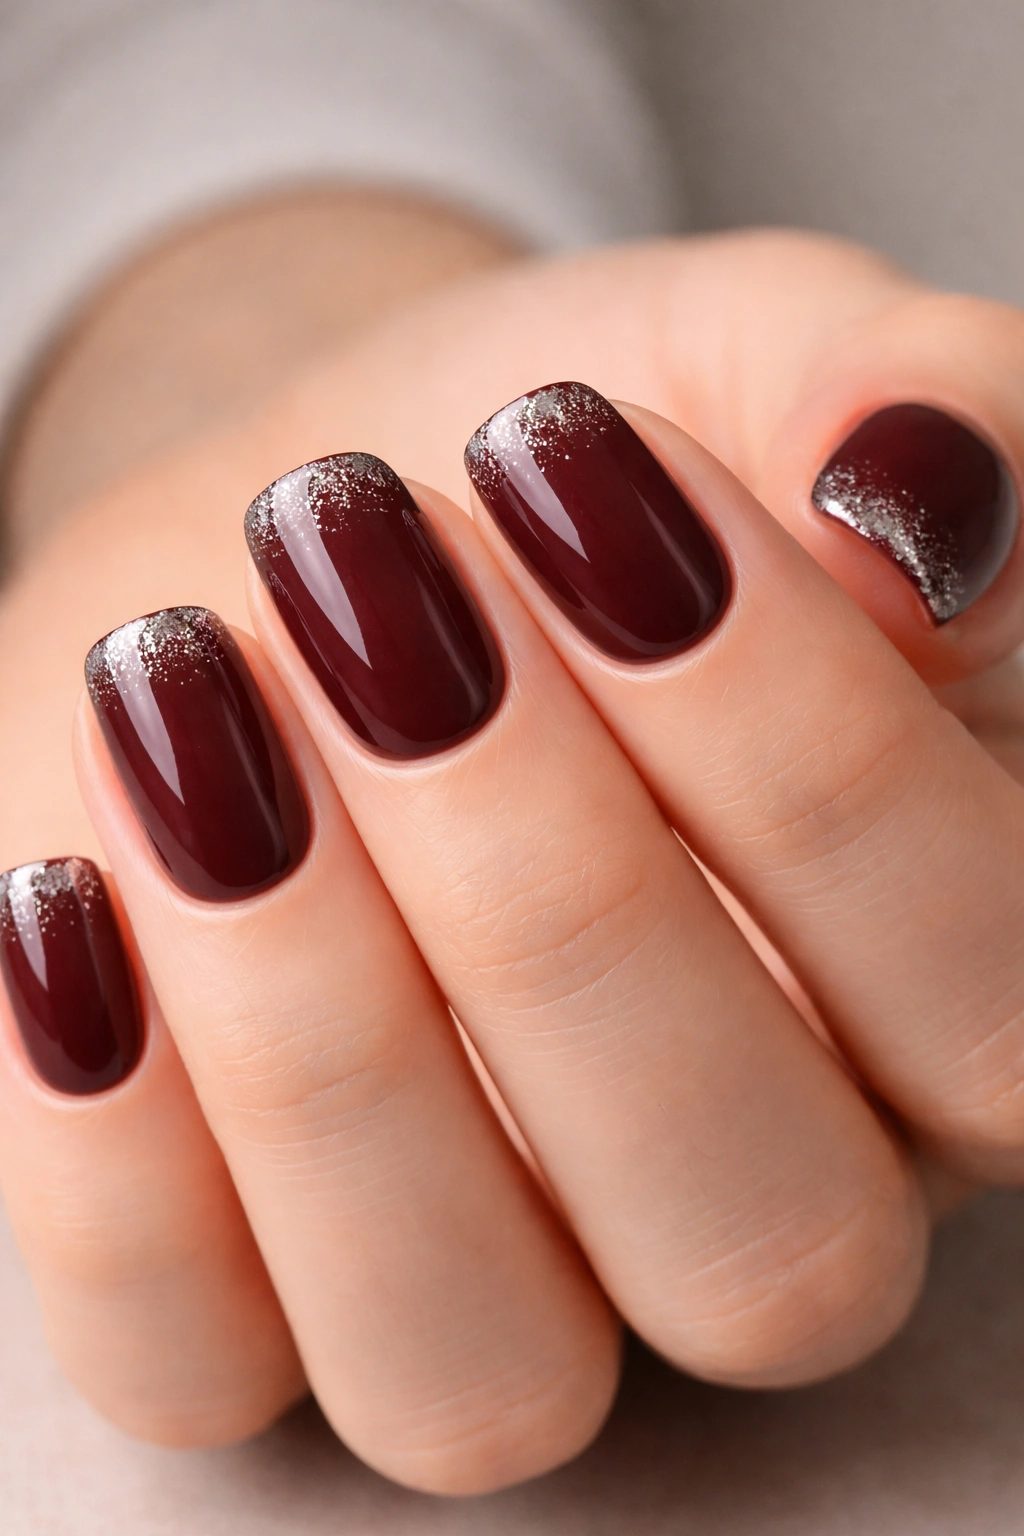
A rich burgundy base with a subtle glitter gradient toward the tips bridges the gap between understated and special. It’s perfect for someone who wants a touch of shimmer without looking overtly festive.
Getting the Glitter Placement Right
Apply the deep burgundy base first, then use a makeup sponge with silver glitter polish to create a gradient that’s heaviest at the tips and fades toward the base. The glitter should appear primarily on the last quarter of the nail, creating an ombré effect. This is where short squoval nails truly shine—you get that glitter impact without the weight and maintenance of long nails.
When and Where to Wear It
This design is sophisticated enough for professional settings if the glitter is subtle and fine, but it’s equally stunning for evening events or date nights. The burgundy is warm enough to work across seasons, and it complements both cool and warm undertones beautifully. Pair it with any jewel tone or neutral outfit, and it immediately elevates your look.
Pro Application Tips
- Use a glitter polish with fine, light-catching particles rather than chunky confetti pieces
- Apply one layer of burgundy, let it fully set, then apply the glitter gradient over it
- A glossy top coat unifies the look and seals the glitter in place
- If your glitter is patchy after one layer, do a second layer—it’s better to build gradually than to oversaturate
6. Marble Effect in Cool Greys and Whites

A marble effect in neutral tones is the definition of quiet luxury. Soft grey with veins of white and silver creates the illusion of stone and reads as exponentially more sophisticated than it actually is to create.
Creating Marble Without It Looking Chaotic
The trick is using only 2-3 colors maximum and keeping them tightly related on the color wheel. Start with a light grey base as your foundation. Use a thin brush and white polish to create organic, irregular lines—these are your marble veins. Add occasional lines in pale silver for added shimmer and depth. The lines should be connected and flowing, not random splatters.
Color Palettes That Read as Elegant
- Light grey with white veins and silver accents (cool and modern)
- Warm taupe with cream and gold veins (softer and more romantic)
- Pale grey with charcoal and platinum details (higher contrast and bolder)
The marble effect works because it mimics natural stone, which our brains automatically perceive as expensive and refined. Even if your execution isn’t perfectly aligned, the natural randomness of marble actually makes slight imperfections work in your favor.
Insider note: Seal your marble effect with a thick glossy top coat—this not only protects the design but gives it dimensional depth that makes the marble veins pop.
7. Simple White with Fine Black Line Art Accent
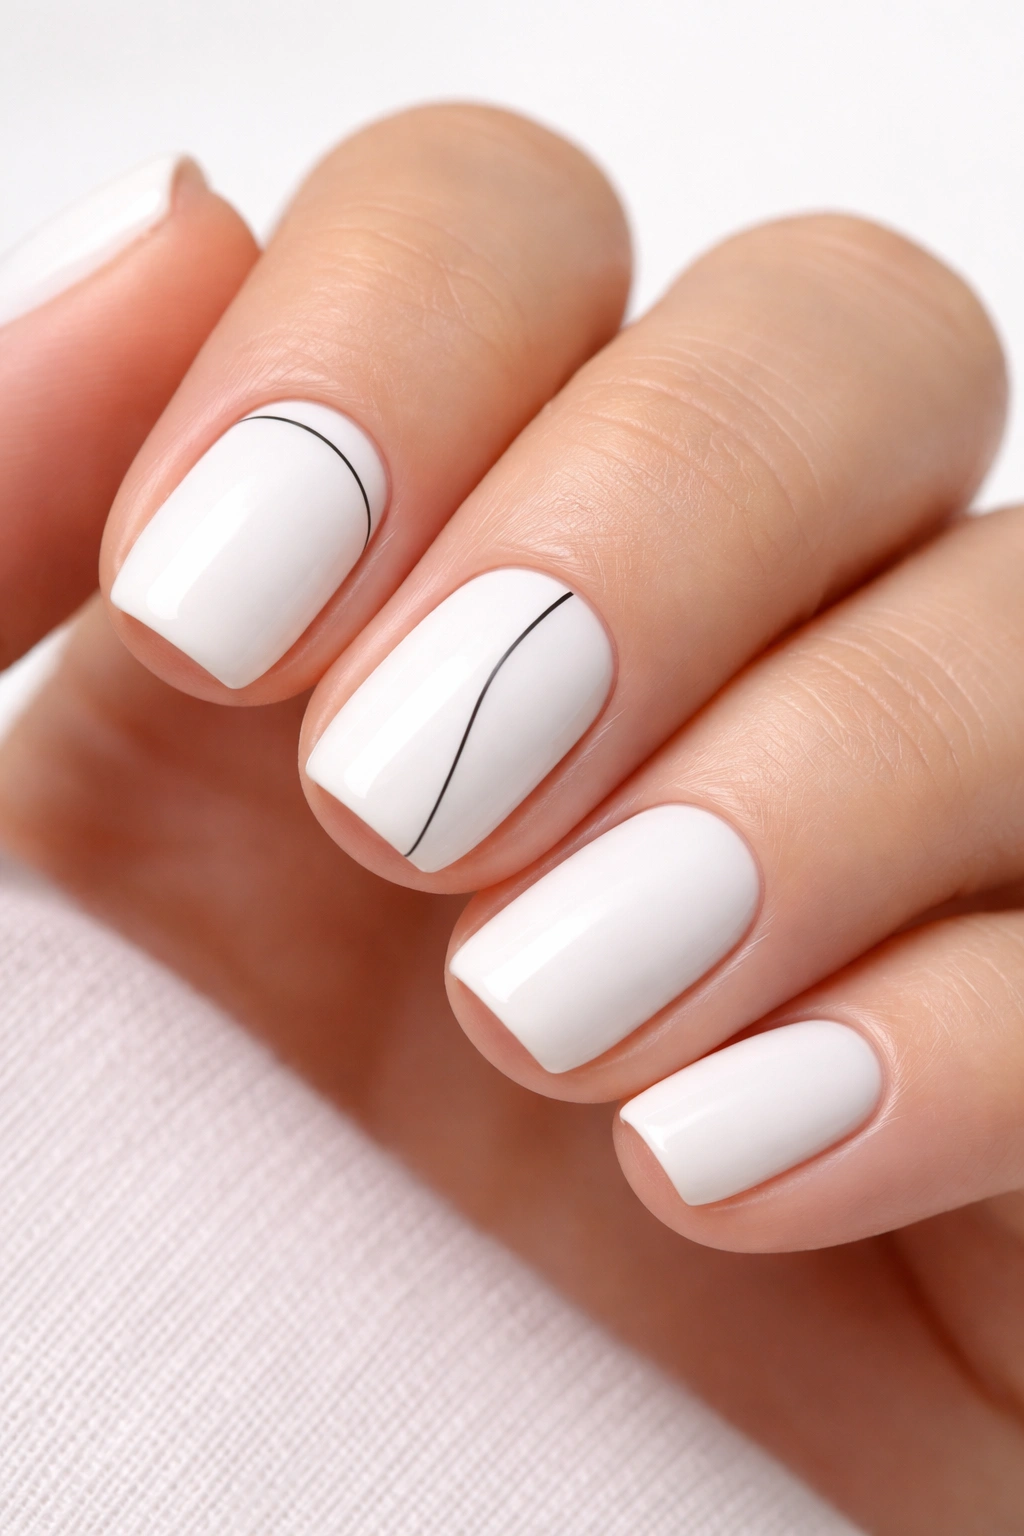
Minimalist line art on a clean white base is peak sophistication. A single thin black line forming a subtle geometric shape or organic curve on one or two nails creates an artistic statement without overwhelming the design.
Line Art Ideas That Elevate Short Nails
- A single curved line running vertically down the center of the nail
- A thin arc across the lower portion (suggests a horizon or moon)
- Connected angles forming an abstract geometric shape
- An organic, flowing wave that complements the nail’s natural curve
The key is restraint. You’re adding one accent line, not a whole illustration. This forces you to be intentional about placement and shape. The white base should be perfectly opaque and bright—cool white, not off-white or cream. The black line should be sharp and clean, applied with a thin detail brush or nail art pen.
Making It Foolproof
- If you’re nervous about freehand line work, use a thin striping tape placed at your desired angle
- Let the white base fully cure before applying the black line
- Apply the black line in one smooth motion rather than multiple small strokes
- A matte or glossy top coat both work beautifully here—matte softens the design slightly, glossy makes it pop
This design is endlessly versatile. It reads as artistic and intentional in professional settings, but it’s equally chic for casual wear. The simplicity means it never looks dated.
8. Warm Beige with Rose Gold Flecked Finish
A warm beige base with strategically scattered rose gold flecks creates gentle glamour without being over-the-top. This is the design you reach for when you want to feel put-together without visible effort.
Achieving the Perfect Fleck Distribution
Rather than covering the entire nail with flecks, place them selectively—a few near the tips, a few scattered across the middle, leaving some areas of clean beige. Use a dry brush technique by dipping your brush in rose gold polish and tapping excess onto a paper towel, then lightly tapping it onto the nail. This creates natural-looking texture rather than opaque coverage.
Why Warm Beige is Universally Flattering
Beige sits between pink, gold, and brown, making it work beautifully on warm undertones, cool undertones, and everything in between. It’s not “boring”—it’s intentionally understated. The rose gold flecks add just enough warmth and shimmer to prevent the design from feeling flat or plain. This combination works for every season and every occasion.
Color Adjustments Based on Your Undertone
- Warm undertones: Go for a slightly warmer, slightly darker beige and use warm rose gold flecks
- Cool undertones: Choose a lighter, slightly cooler beige and use pinker rose gold flecks
- Neutral undertones: The classic warm beige with standard rose gold will be stunning
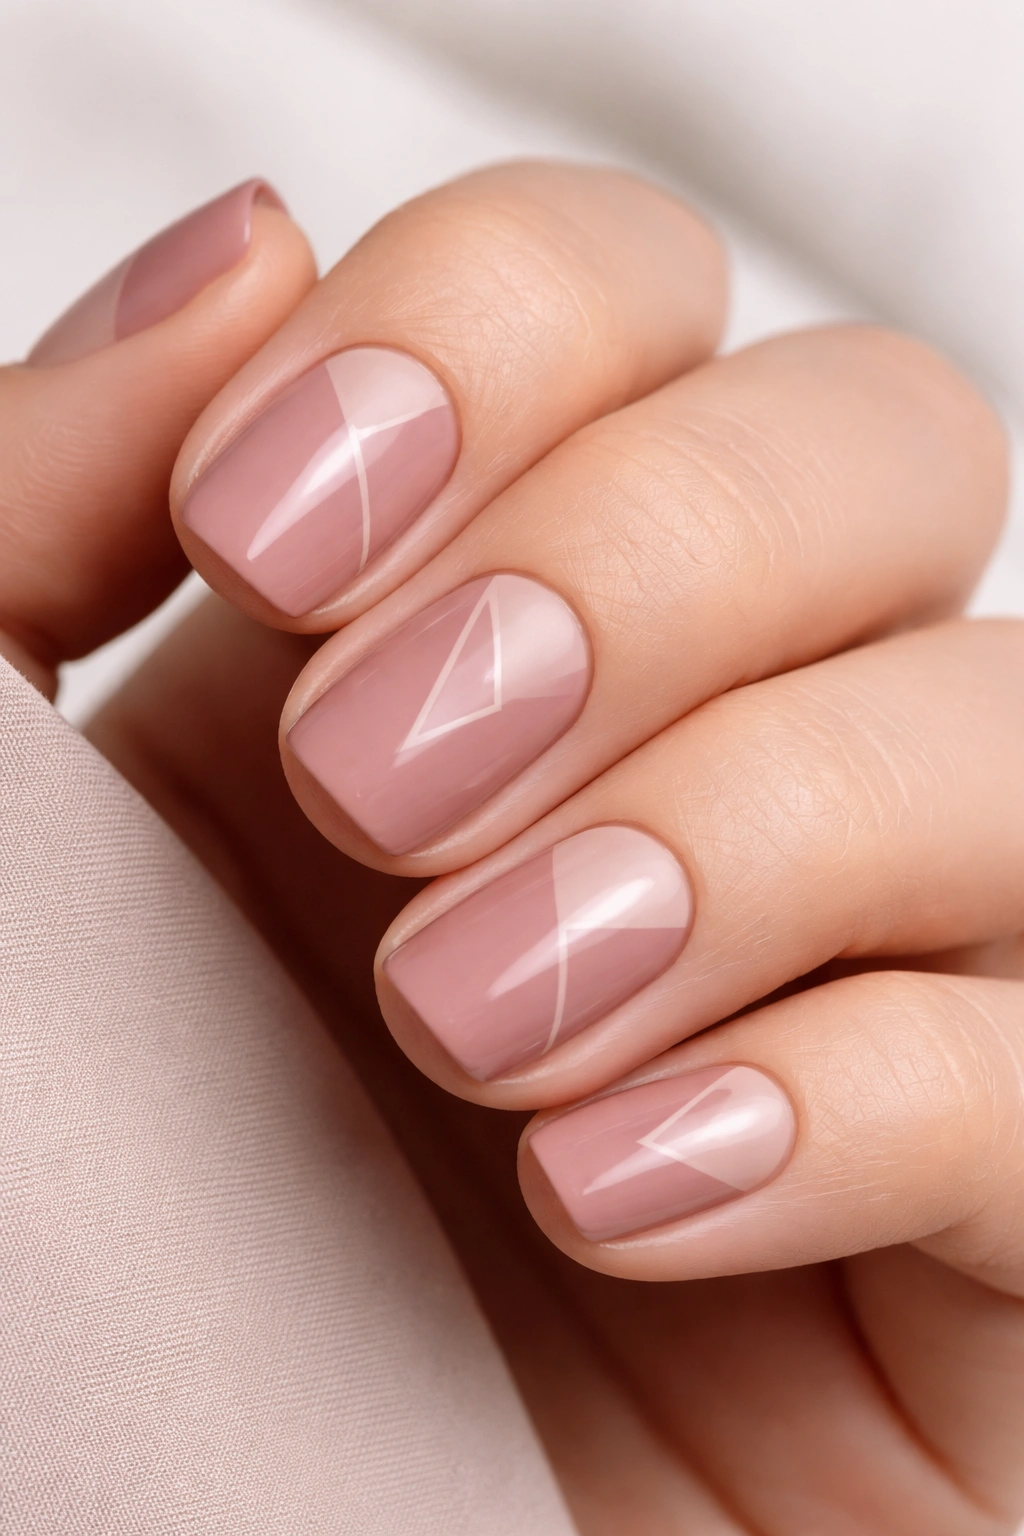
9. Soft Grey with Minimalist Geometric Negative Space
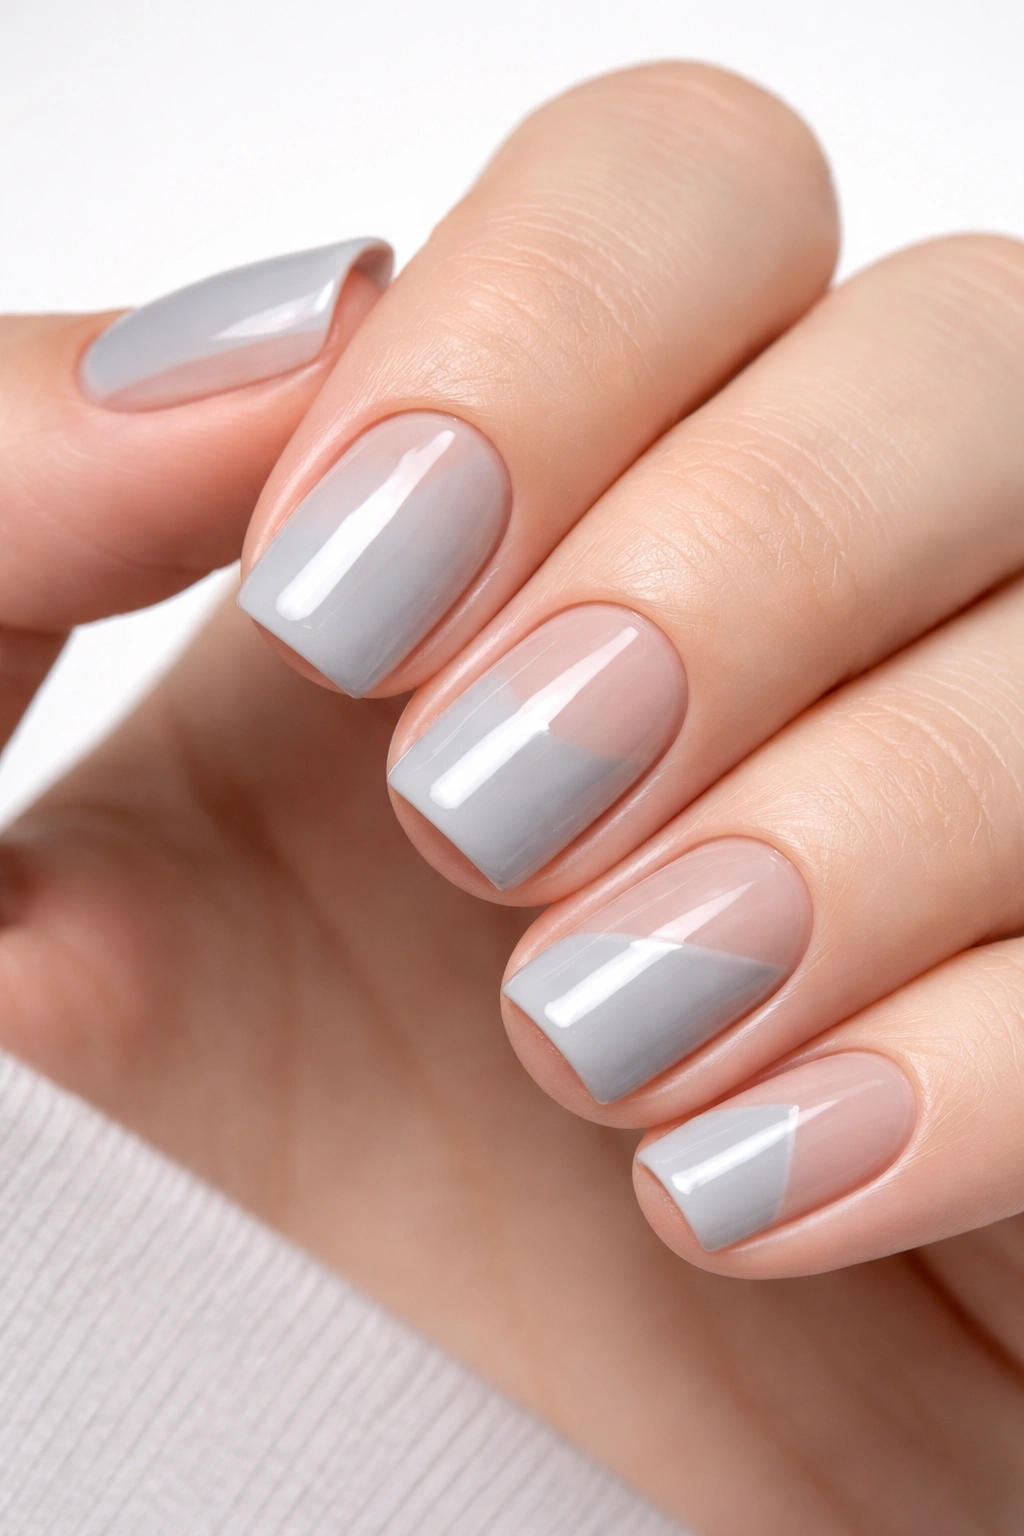
A muted soft grey with carefully placed negative space (where no polish is applied, revealing the natural nail) creates modern artistry. Usually, this involves leaving geometric sections bare—a thin vertical section down the center, or a triangular section at the tip.
Nailing the Negative Space Technique
Negative space works best when the removed area is clean, defined, and intentional. Create a stencil or use tape to mark out exactly where the bare nail will be, apply your grey polish around it, and remove the tape immediately before the polish sets. The contrast between the grey and the natural nail tone creates visual interest without any additional polish color.
Why It Works on Short Squoval Nails
Short nails mean your nail beds are proportionally visible, making negative space designs particularly effective. You’re using the nail’s natural tone as part of your design palette, which automatically creates sophistication. The grey acts as a frame for the natural nail rather than covering it completely.
Design Variations Worth Trying
- A thin vertical line of negative space down the center (geometric and modern)
- A triangular section at the tip (suggests an arrow or architectural element)
- Asymmetrical negative space (intentionally uneven sections on different nails)
- A thin horizontal line across the middle (divides the nail into two sections)
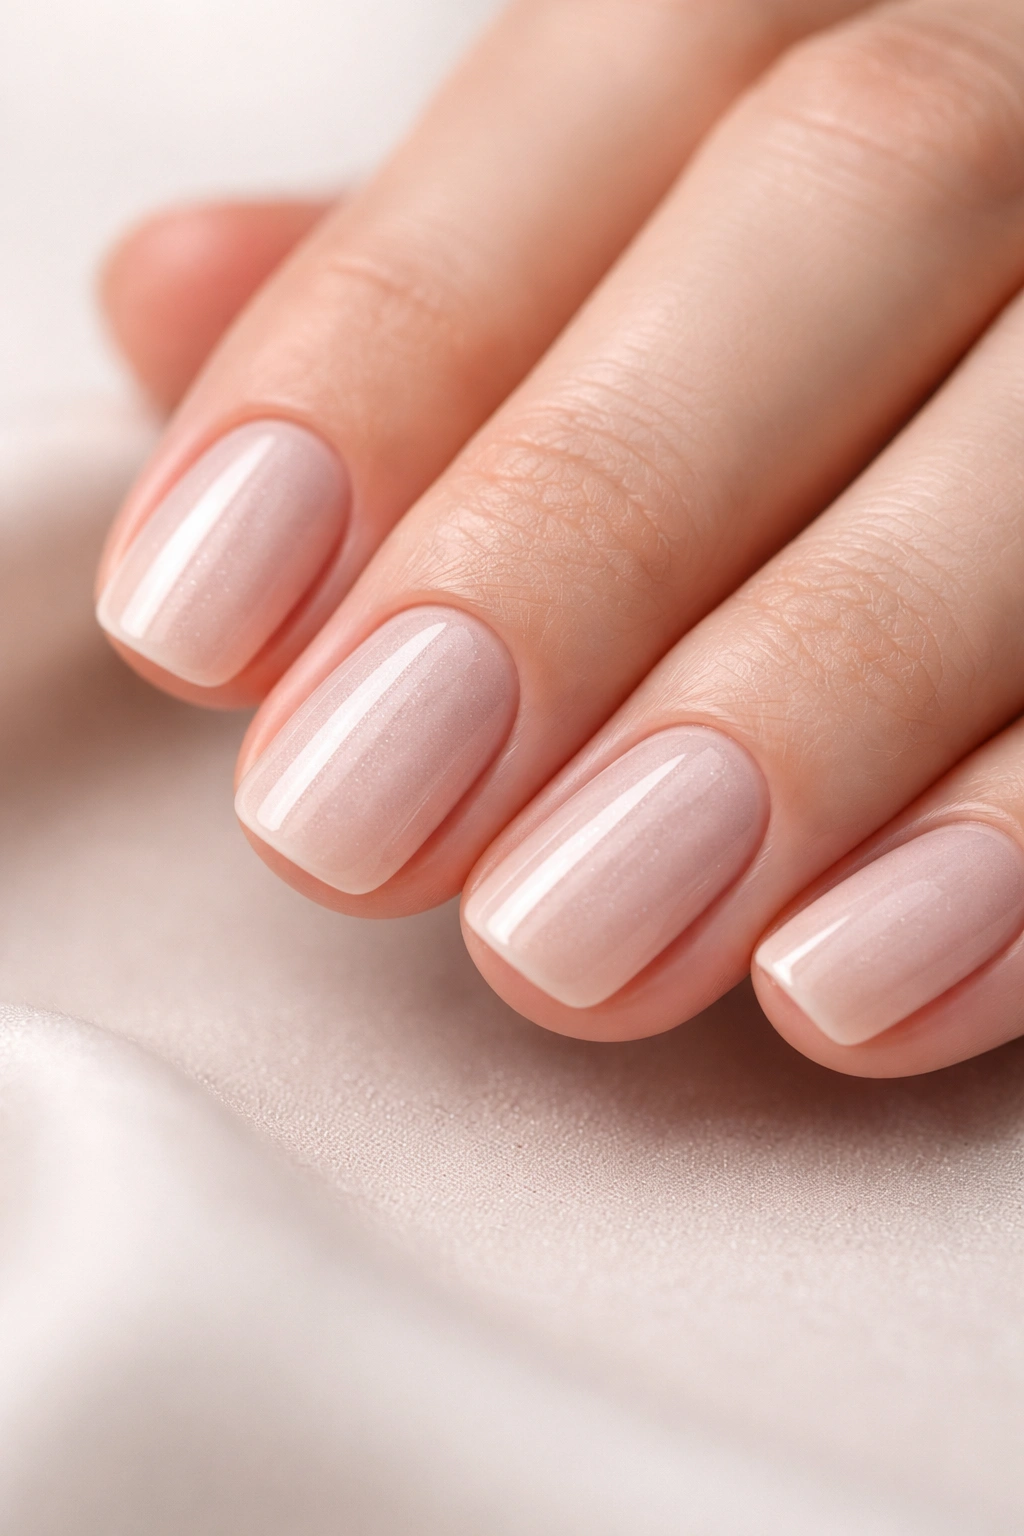
10. Champagne with Pearl Finish and Glossy Top Coat
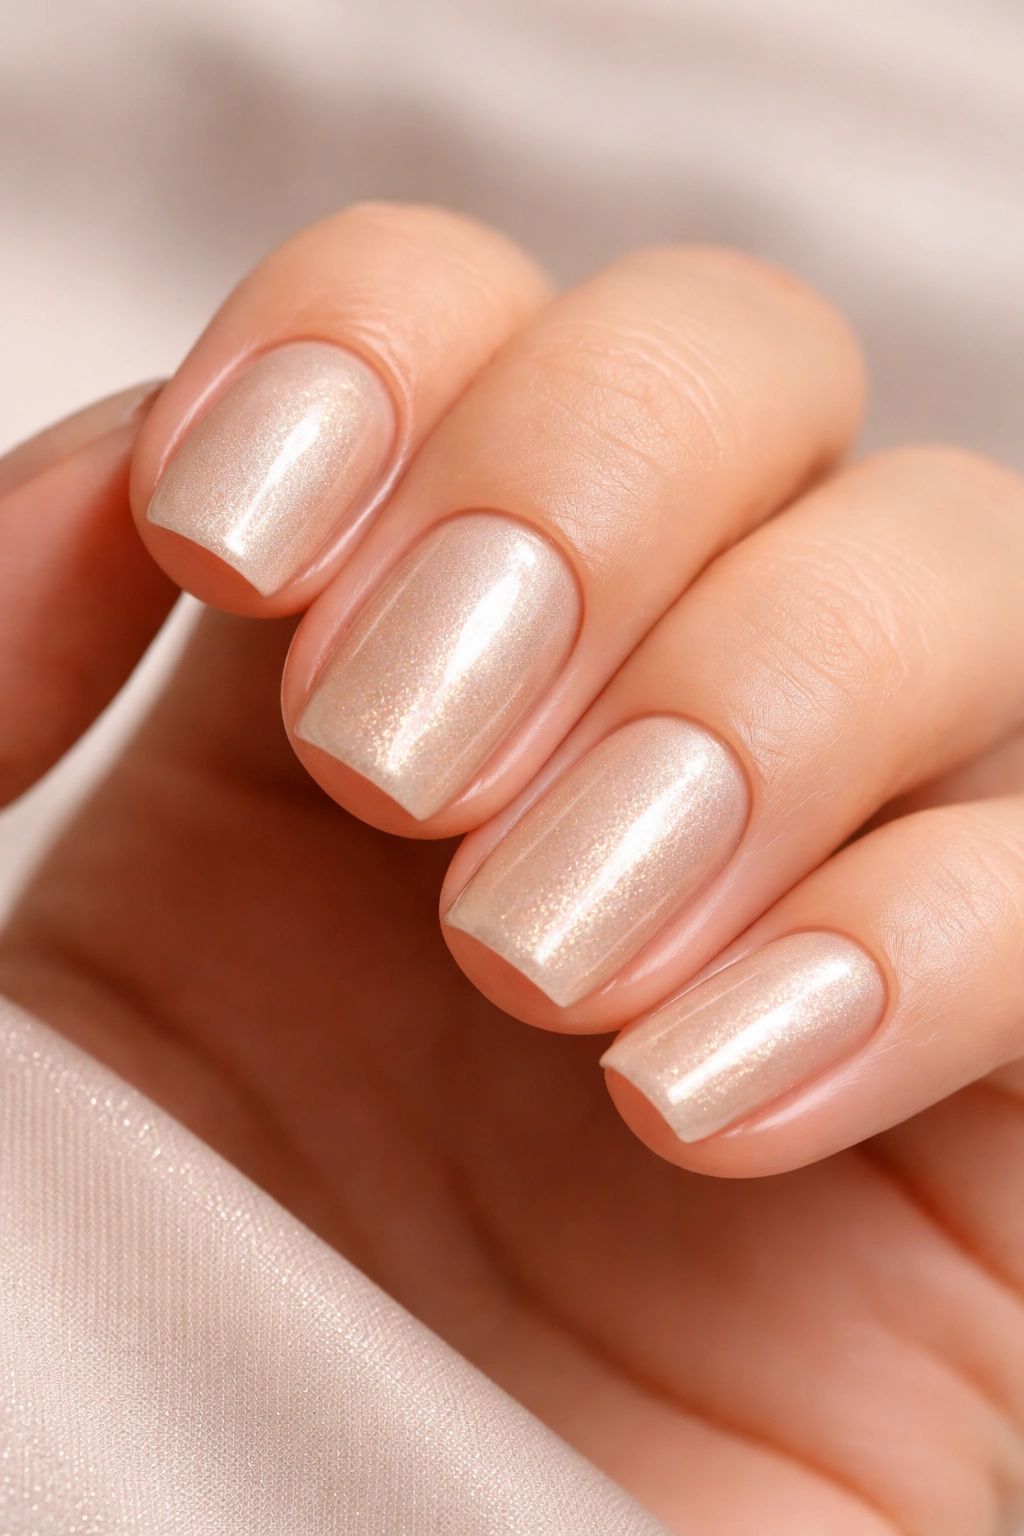
A champagne shimmer base with a luminous pearl finish creates subtle luxury. This is a “barely there” design that looks expensive and effortlessly elegant, perfect for someone who prefers maximum polish versatility.
Creating the Pearl Effect
Use a champagne or pale gold shimmer polish as your base—something with fine, light-catching particles. Once it’s fully set, apply a pearl or luminescence top coat that shifts subtly as light hits it. The combination creates an iridescent quality that reads as premium and expensive. The effect is most visible in natural light and photographs beautifully.
Occasions and Outfit Combinations
This design pairs with literally everything—neutrals, jewel tones, black, white, metallics. It’s the manicure you wear when you want your nails to look intentionally beautiful without drawing attention. The subtle shimmer means it’s appropriate for professional settings, formal events, and everyday wear.
Quality Matters More Than Quantity
This is one design where investing in better polish makes a visible difference. Cheaper champagne polishes often look flat or yellowy; premium versions have true shimmer and better color payoff. One or two coats should be sufficient, and the pearl top coat is what makes the entire design sing.
Worth knowing: This design is ideal for short nails because the shimmer doesn’t emphasize length—instead, it emphasizes luminosity and light play.
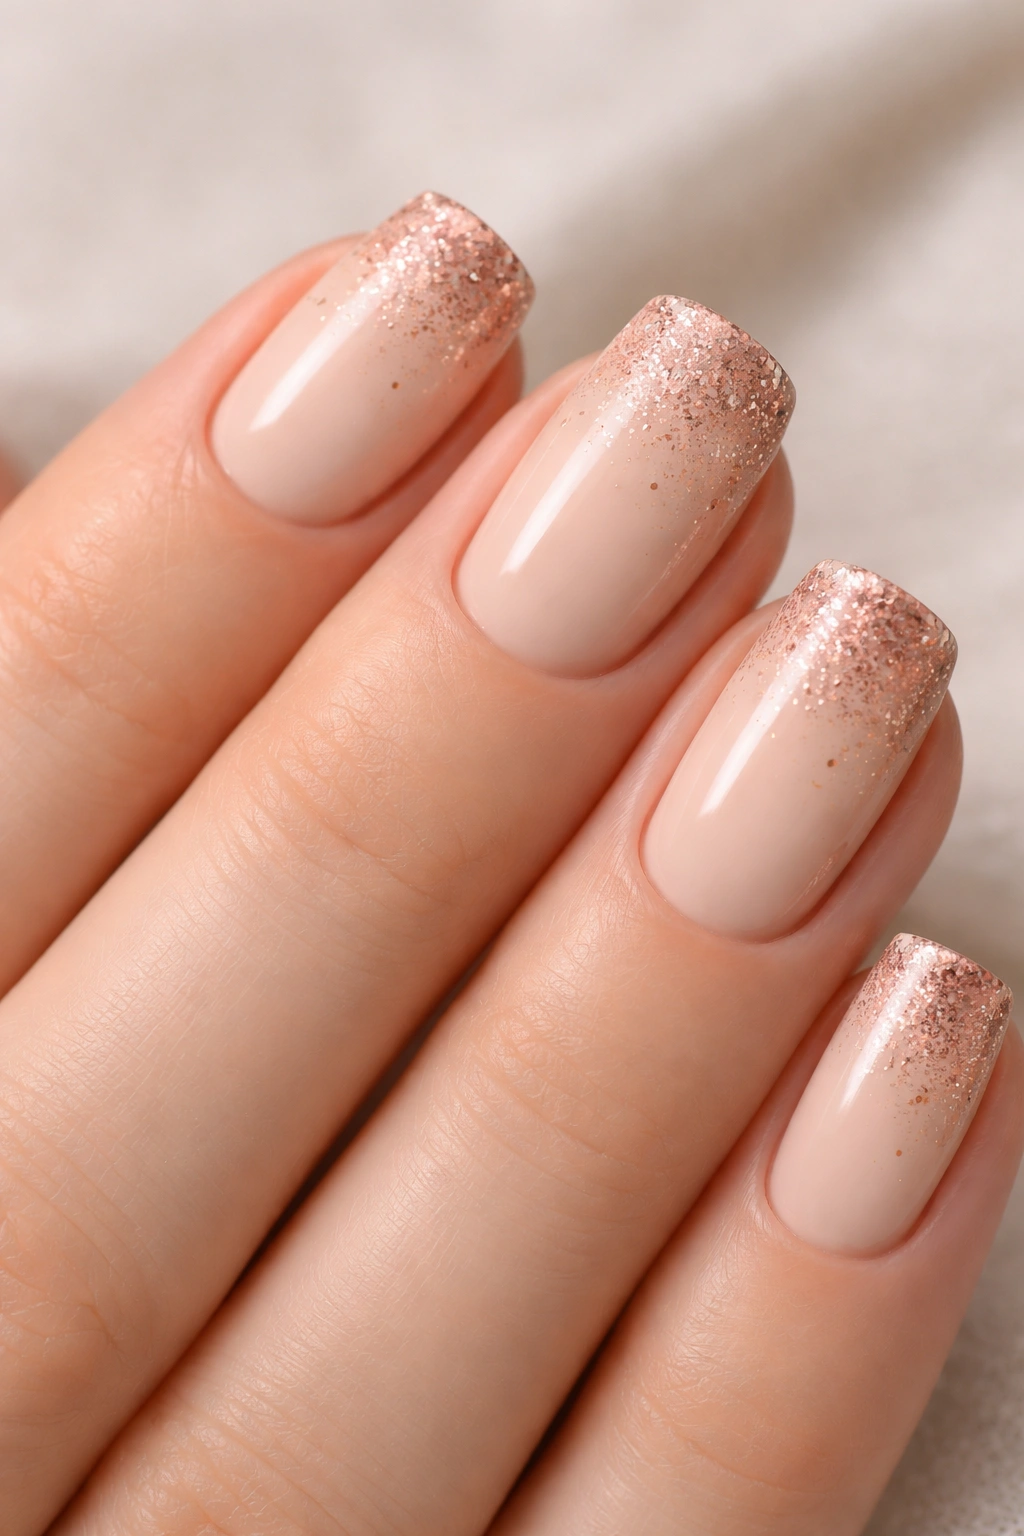
11. Blush Pink with Subtle Glitter Gradient from Mid-Nail to Tip
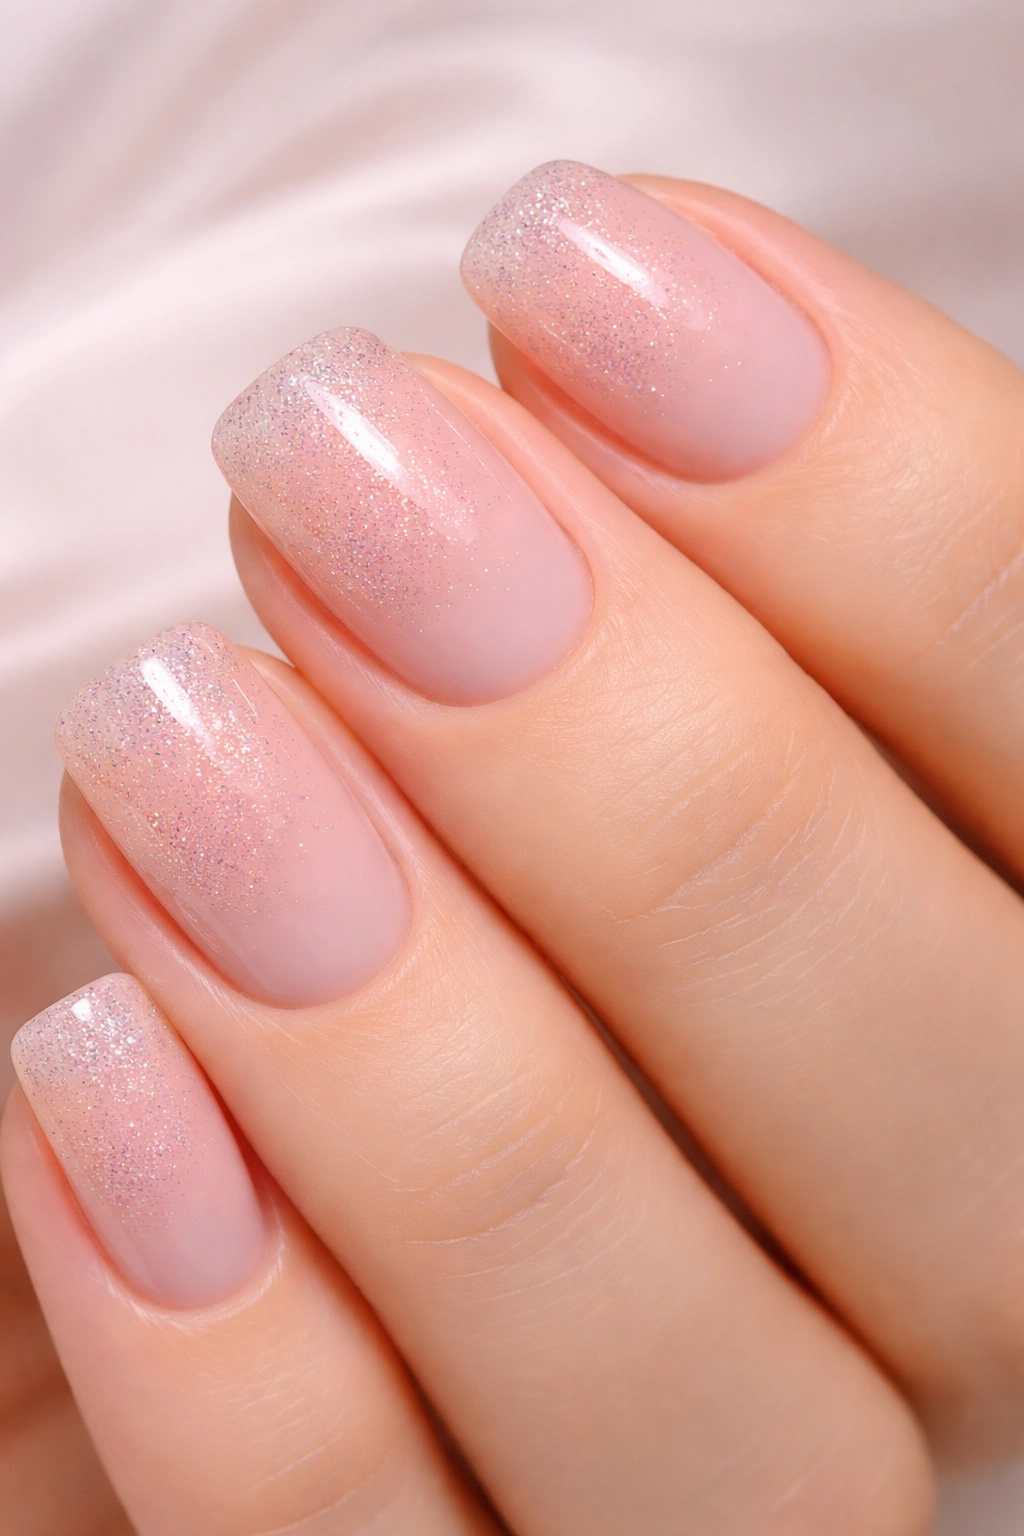
A soft, wearable blush pink with glitter concentrated primarily on the tips creates dimension and visual interest. This design manages to feel both romantic and modern, delicate but not overly cute.
Building the Gradient Properly
Apply your blush pink base first and let it cure completely. Then, mix a small amount of fine glitter polish with clear gel or top coat to create a slightly translucent glitter mixture. Apply this mixture starting from the mid-nail point, making it heaviest at the tips. The gradient should be subtle—the glitter visible but not overwhelming. You’re enhancing the blush pink, not replacing it.
Glitter Choices That Elevate Rather Than Cheapen
- Fine rose gold or champagne glitter (warm and romantic)
- Pale pink or white glitter (creates a frosted effect)
- Iridescent glitter in minimal quantity (catches light beautifully without looking costume-y)
- Avoid chunky, colorful glitter—stick to metallics and shimmers in the warm family
The beauty of this design is how wearable it is. It’s formal enough for special occasions but soft enough for everyday wear. The blush pink is universally flattering, and the glitter gradient ensures it never reads as boring.
12. Creamy Ivory with Thin Metallic Gold Border
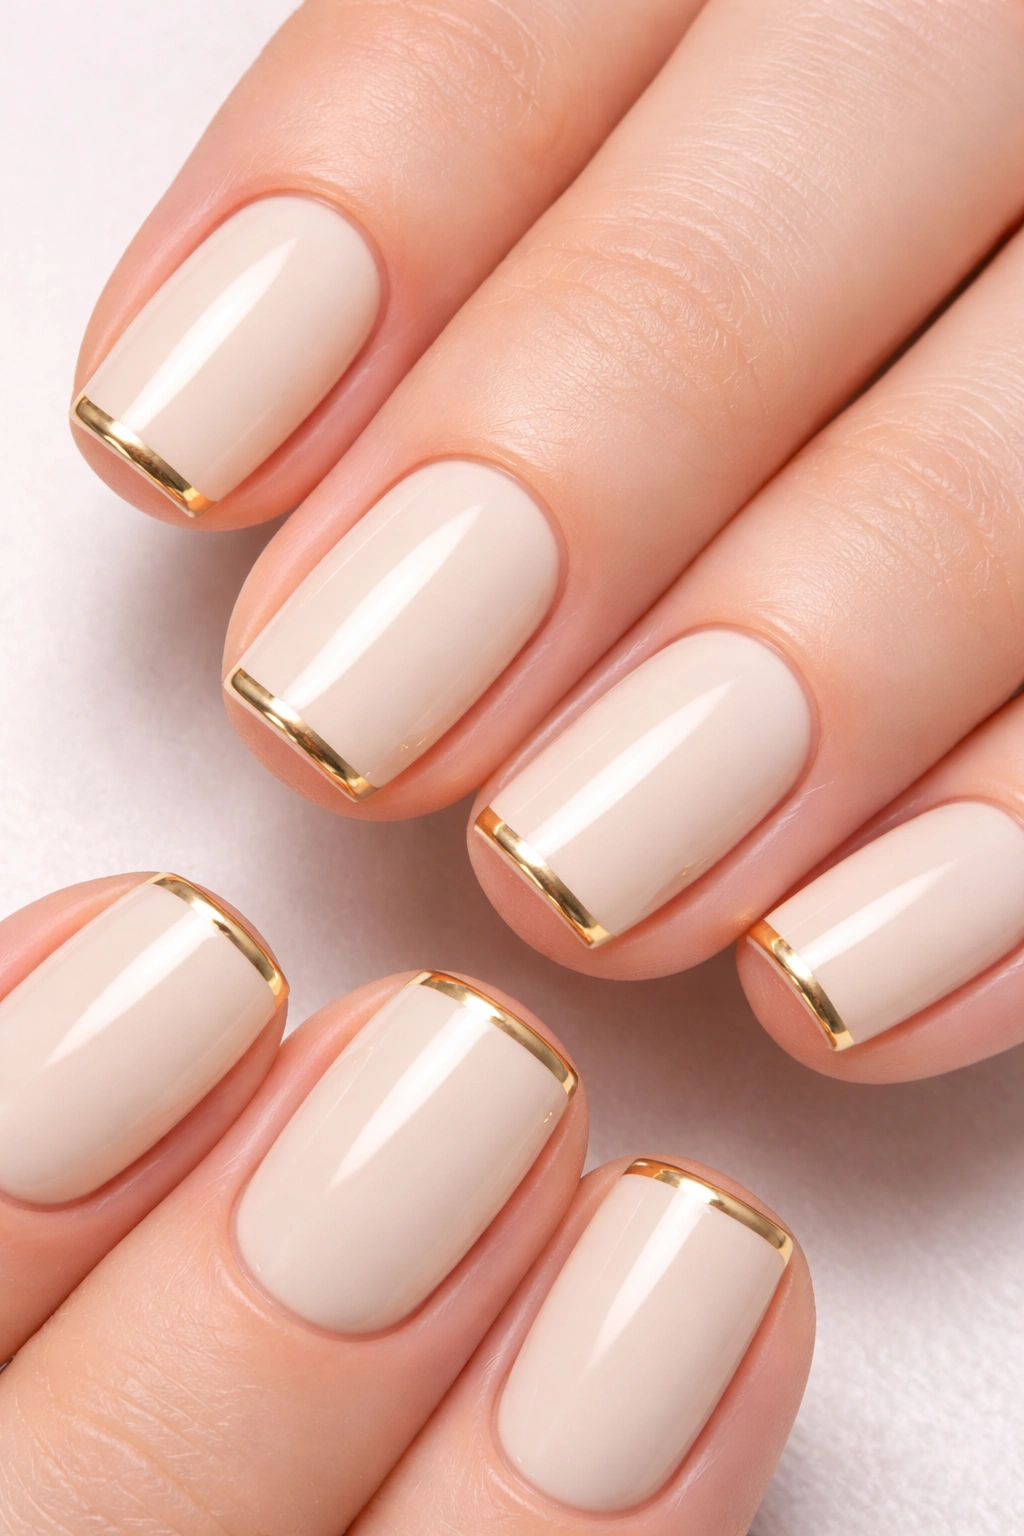
A creamy ivory base with a perfectly thin metallic gold line running along the free edge (the tip of the nail) creates architectural elegance. It’s a variation of the French manicure, but more refined and unexpected.
Executing the Gold Border Flawlessly
The gold line should be applied to the very edge of the nail—think of it as framing the tip. Use a thin striping brush and metallic gold polish to create a clean, even line. The thickness is critical; it should be noticeable but not chunky. On short nails, a line about 1-2mm thick is perfect. Let the ivory fully set before applying the gold to avoid smudging.
Why Ivory Rather Than White
Ivory is warmer and creamier than white, making it more universally flattering. It reads as more sophisticated and less stark. The gold border against ivory creates just enough contrast to be visually interesting without looking harsh. This combination feels elevated and intentional.
Application Success Strategies
- Use a creamy ivory rather than stark white—it matters for the overall effect
- Metallic gold should be a true gold, not yellow or brassy
- If your hand isn’t steady enough for freehand gold lines, use striping tape
- Let everything fully set before applying your top coat
- A glossy finish emphasizes the gold border beautifully
13. Pale Blue with White Cloud Detail on One Accent Nail
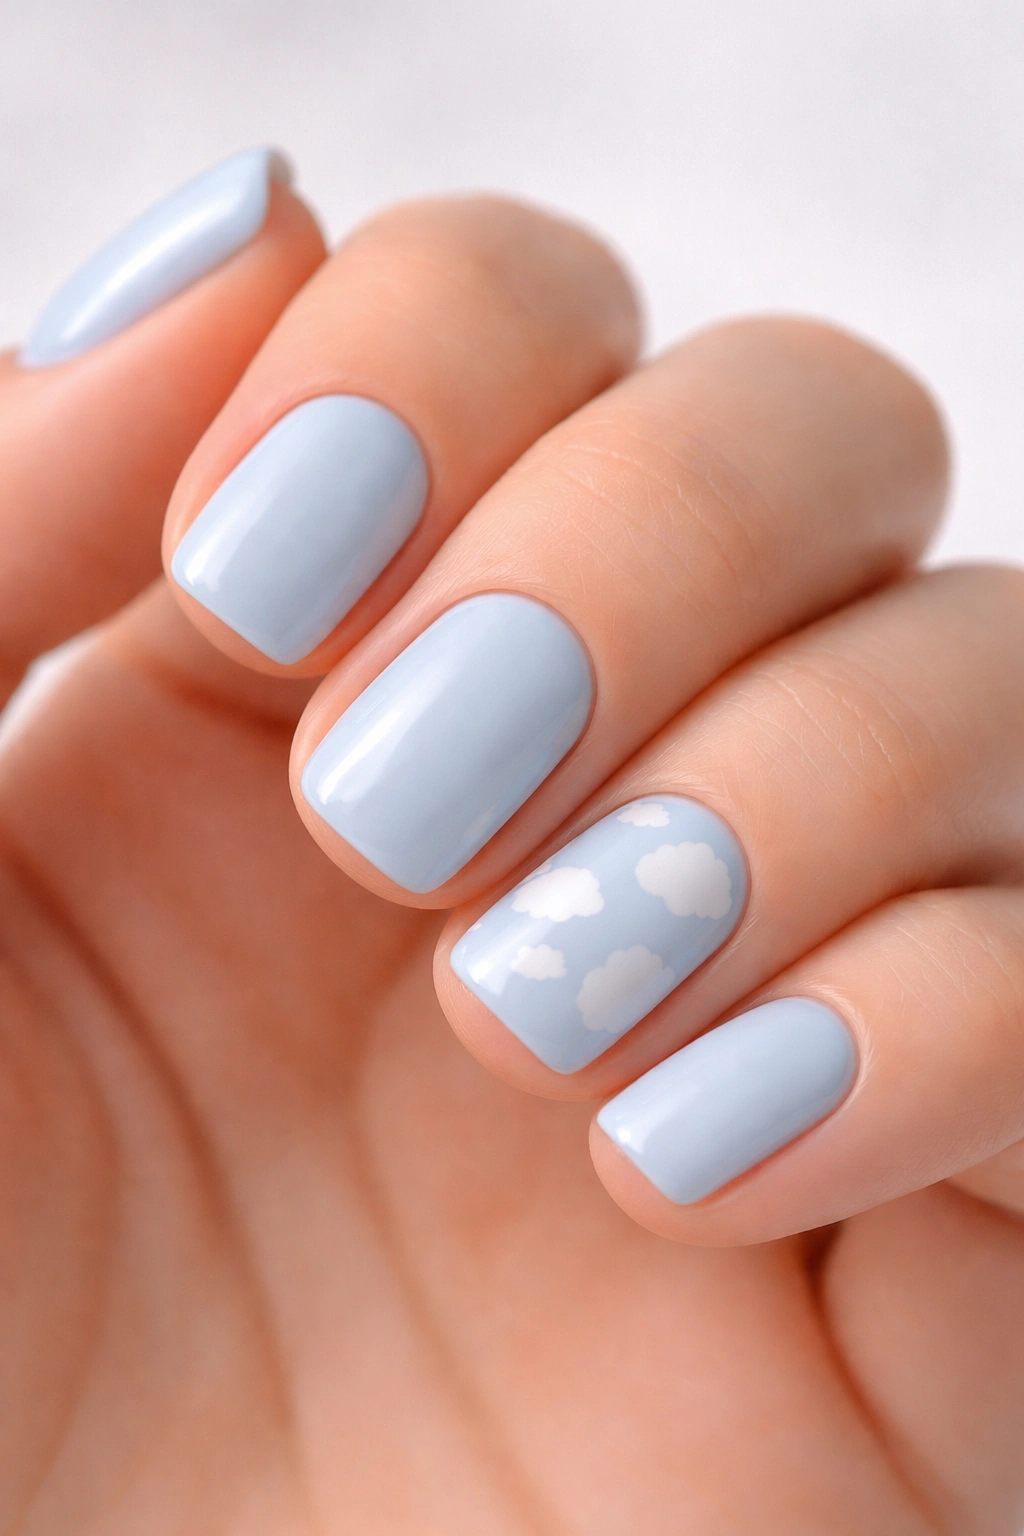
A soft, almost-pastel pale blue with a delicate white cloud illustration on one accent nail (usually the ring finger) is whimsical without being childish. It’s charming and artistic in a way that feels intentional and sophisticated.
Creating Clouds That Look Intentional
Use white polish and a thin brush to paint soft, organic cloud shapes on one or two nails. The clouds should be slightly irregular and fluffy-looking—not perfectly symmetrical. You’re aiming for gentle, dreamy aesthetics. Keep the clouds to one or two nails maximum; covering all five would be overwhelming. The remaining nails stay solid pale blue, which balances the design and keeps it from feeling too whimsical.
Color Combinations That Work
- Pale sky blue with white clouds (literal and lovely)
- Soft dusty blue with cream clouds (softer and more romantic)
- Pale blue-grey with pale yellow clouds (unexpected and unique)
This design works because of its restraint. You’re adding artistic detail without covering every nail, which keeps the overall look sophisticated rather than playful. The pale blue base is calming and flattering on most skin tones.
Technique Tips
- Paint the blue base first and let it fully cure
- Use white polish that has good opacity; you might need two coats for the clouds to be visible
- Paint cloud shapes by dragging the brush in soft, slightly curved motions
- Imperfect clouds actually look more natural and intentional than perfectly smooth ones
14. Nude Base with Thin Black Line Accent Down the Center
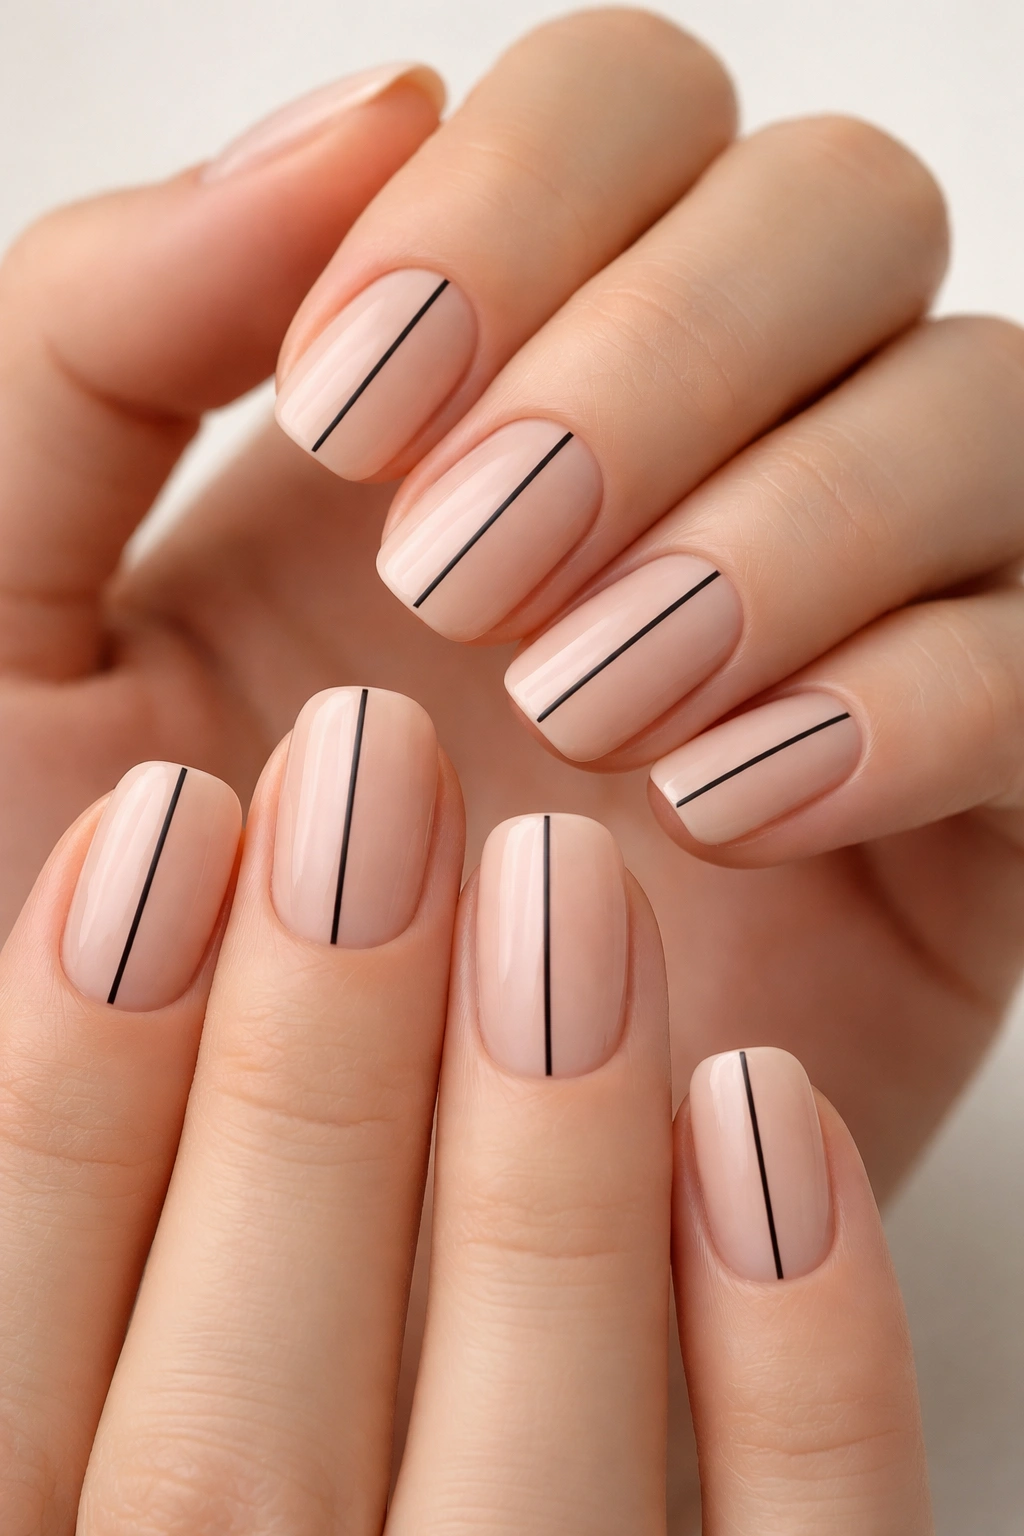
A barely-there nude base with a single thin black vertical line running down the center of each nail creates striking minimalist elegance. It’s architectural without being cold, simple without being boring.
Why Nude Is the Perfect Base for This Design
Nude lets the black line do all the visual heavy lifting. The contrast is clean and modern. Choose a nude that matches your skin tone perfectly—the goal is for the nail to almost disappear into your hand, with only the black line providing visual focus. This creates an illusion of longer, more slender nails.
Making the Black Line Perfect
- Measure the line as best you can to ensure it runs through the center of each nail
- Use a thin detail brush or nail art pen for precision
- Apply the line in one smooth motion—multiple strokes create a less clean effect
- Let the nude base fully set before applying the black line
- The line should extend from the base to just before the tip, not all the way to the edge
This design is infinitely more sophisticated than a plain nude manicure because the line creates intentionality and focus. It’s simple enough that it reads as effortless elegance rather than trying too hard. The restraint is what makes it special.
15. Soft Sage Green with Rose Gold Dot Details
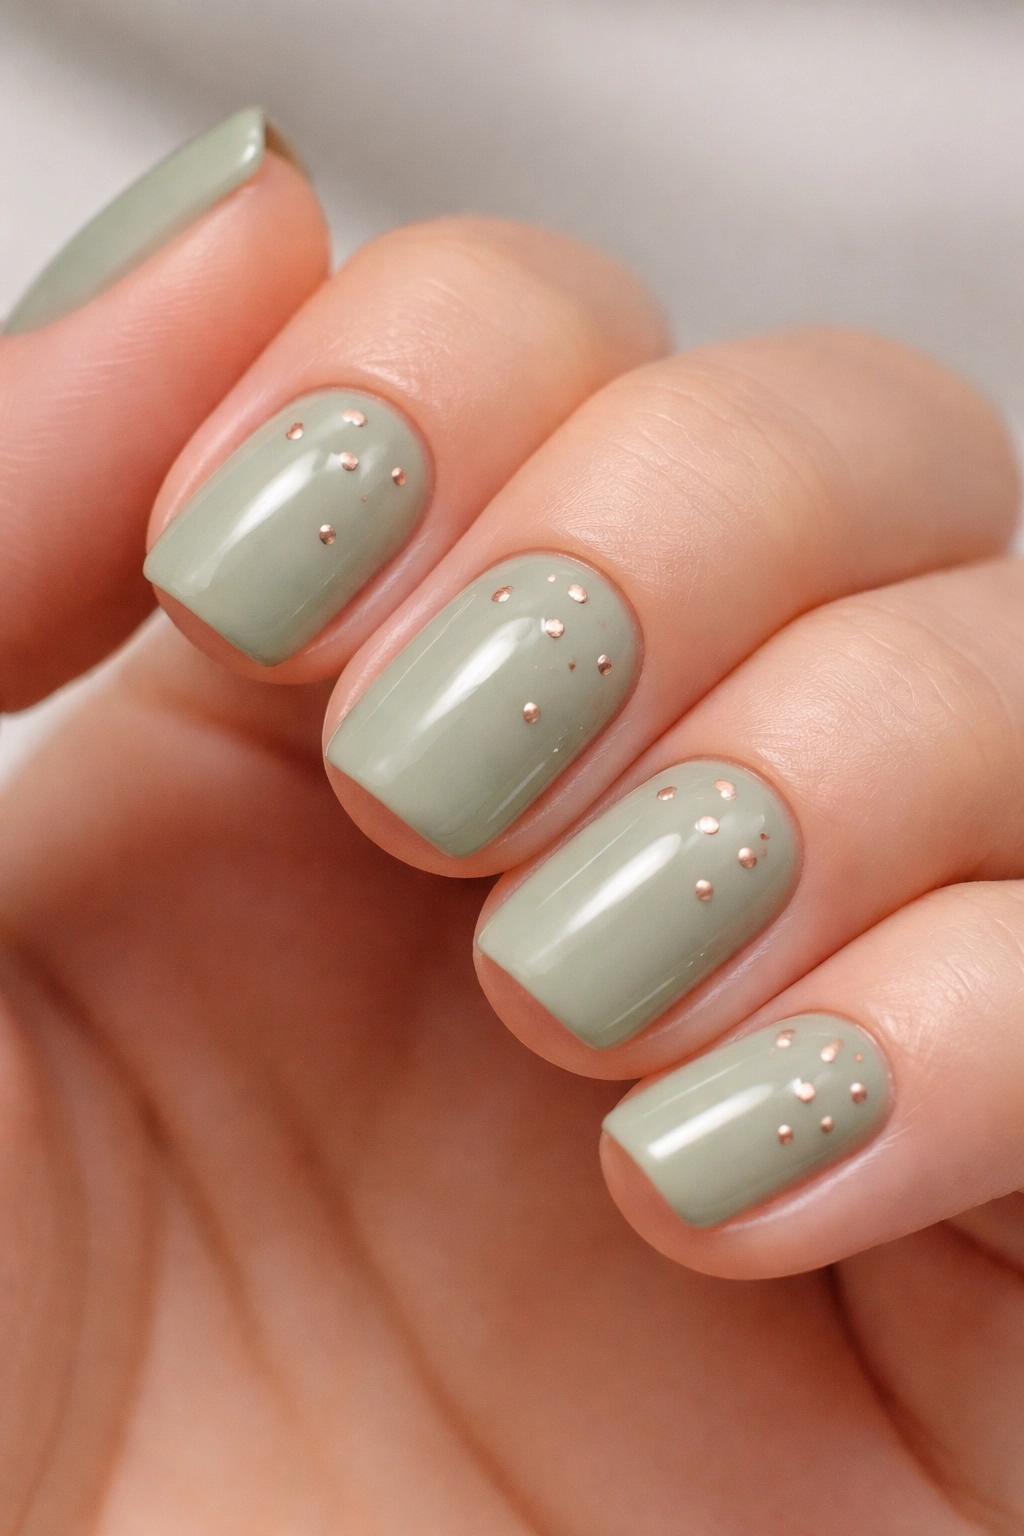
A soft, muted sage green with small rose gold dots scattered strategically across the nail creates understated nature-inspired beauty. This color combination feels organic and harmonious without being matchy or heavy-handed.
Placing Dots for Maximum Impact
Rather than covering the nail with dots, place them intentionally—three or four dots positioned in a subtle pattern across each nail. Use a dotting tool or the end of a thin brush dipped in rose gold polish to create uniform, small circles. The dots should be small enough that they accent rather than dominate. This creates texture and visual interest without overwhelming the sage green base.
Why Sage Green Is So Flattering
Sage green is one of those colors that works beautifully on warm undertones, cool undertones, and everything in between. It’s calming and elegant without being obvious. Paired with rose gold, it creates warmth and luxury. The combination feels natural and effortless, like you’re wearing a piece of jewelry that happens to match the forest.
Customizing the Dot Placement
- Asymmetrical placement (dots in different locations on each nail) feels more artistic
- A small cluster of dots on the accent nail creates focus
- Dots lined up horizontally creates a more structured, deliberate look
- Random spacing feels more organic and natural
Pro tip: If your dots aren’t uniform on the first try, you can add a second layer of dots slightly offset from the first, which actually creates an intentional-looking detail rather than a mistake.
16. Warm Caramel with Matte Top Coat Finish
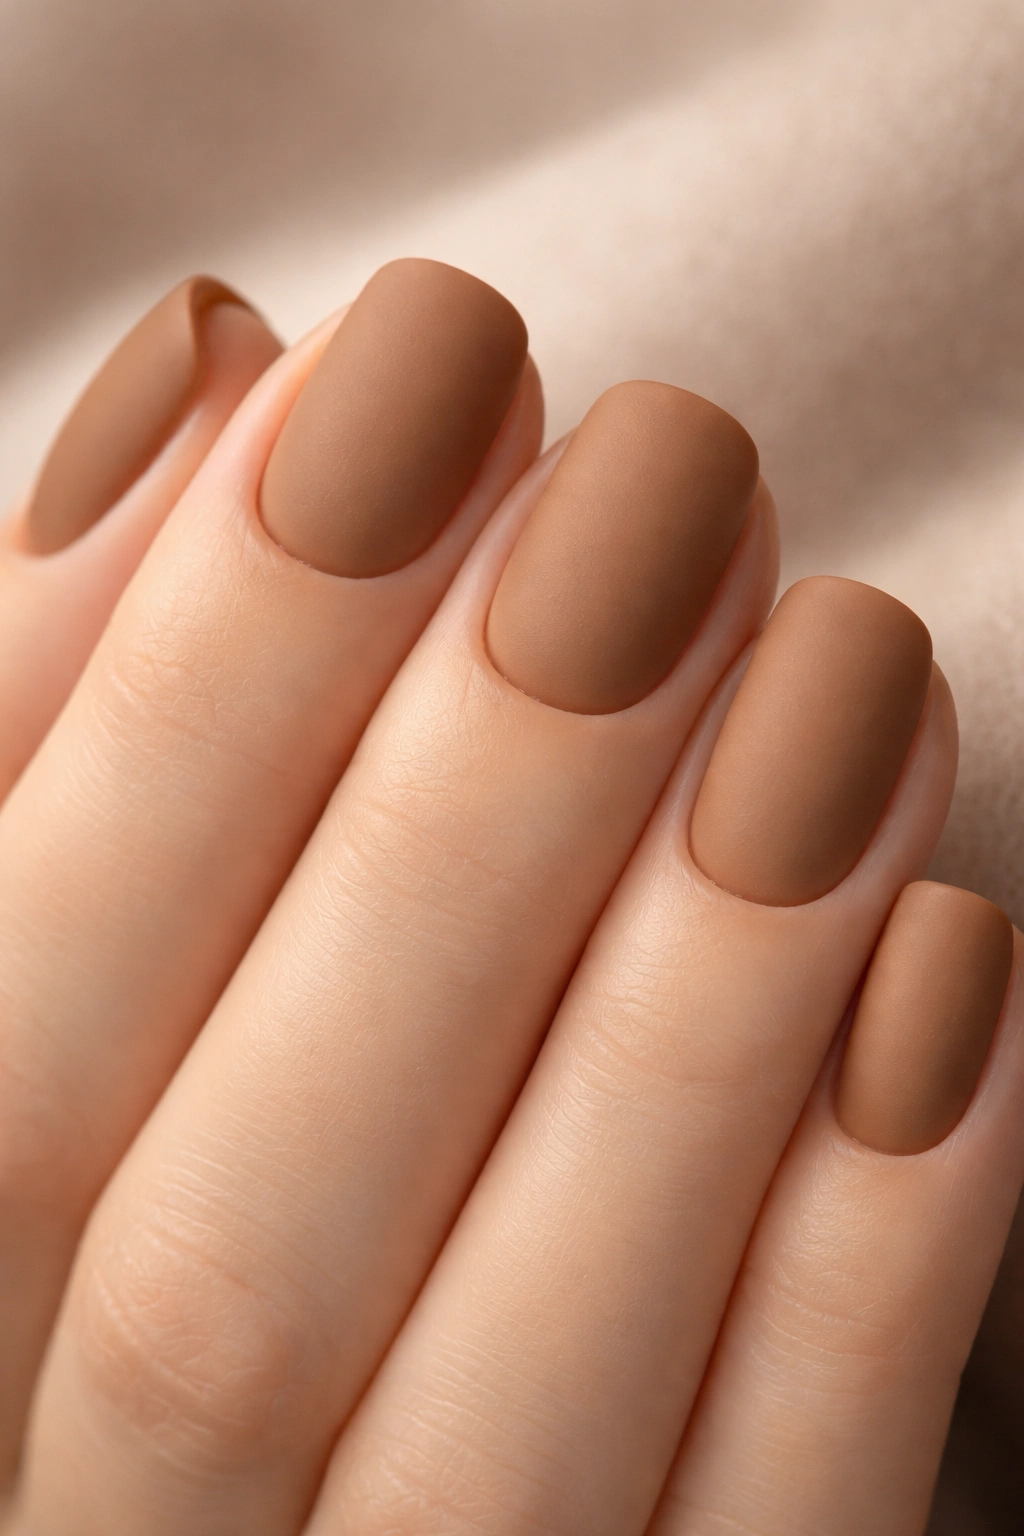
A warm caramel brown with a matte top coat is pure sophistication. The lack of shine makes the color read as more interesting and expensive, and the warmth is universally flattering. This is the anti-boring neutral.
Why Matte Changes Everything
A glossy caramel can read as ordinary or flat, but the same color in matte becomes nuanced and refined. Matte finishes have a velvety quality that’s inherently elegant. They show color depth without reflecting light harshly, making them ideal for warm, rich tones. This design photographs beautifully and holds up well over time.
Caramel Tone Variations Based on Your Undertone
- Warm, golden undertone: Go for a caramel with red undertones
- Cool undertone: Choose a caramel that leans slightly cooler or more chocolate-toned
- Olive or green undertone: A balanced caramel between warm and cool works beautifully
Pairing With Your Wardrobe
This design pairs with literally every color—neutrals, jewel tones, pastels, blacks, whites. It’s the ultimate chameleon manicure. The warmth means it complements gold jewelry beautifully, but it works with silver too. The matte finish is professional enough for any setting while being interesting enough that it reads as intentional and sophisticated rather than plain.
Worth knowing: Matte finishes can feel slightly drying to nails, so make sure you’re using quality polish and keeping your cuticles well-moisturized.
17. Cloud-Like Ombre in Whites, Greys, and Soft Blues
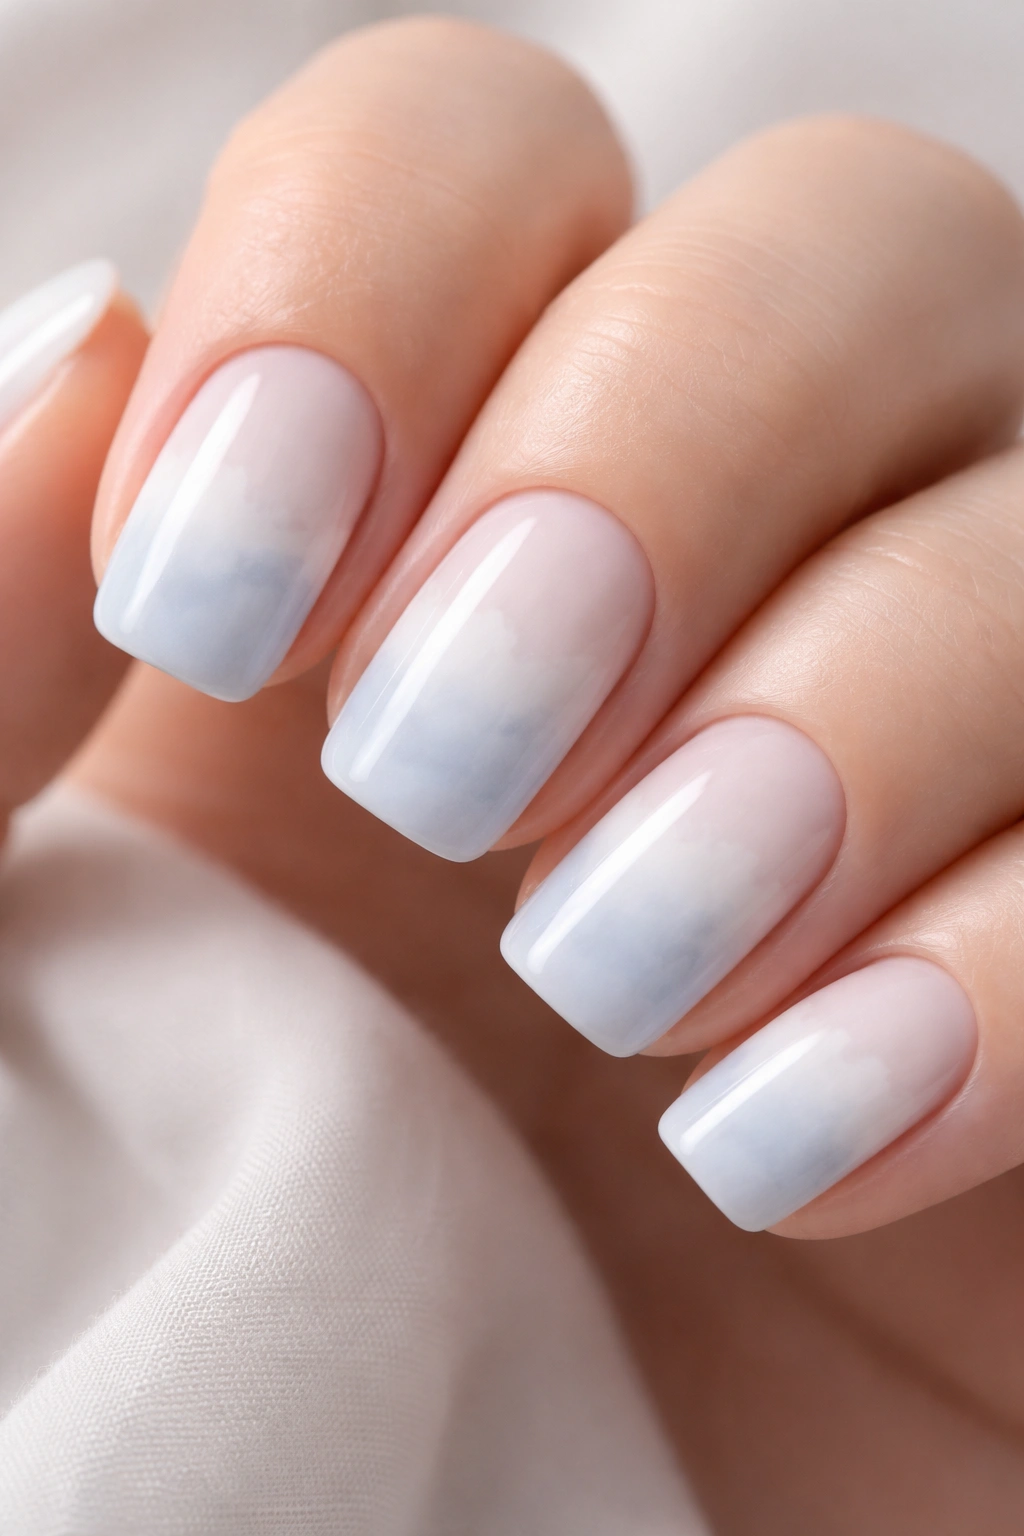
A gradient that transitions from soft white on the base through pale grey to pale blue on the tips creates a dreamy, ethereal effect. This design is artistic and unique while remaining wearable and elegant.
Creating a Cloud Ombre That Looks Professional
Use three colors that sit next to each other on the color spectrum: white or very pale pink, pale grey, and soft blue. Apply each color to a makeup sponge in bands, then sponge them onto the nail, overlapping the sections to create a gradient. The transitions should be soft and blended, not sharp. This takes practice, but the effect is worth it. Multiple thin layers blend better than one thick application.
Color Combinations Worth Exploring
- White, pale grey, soft blue (cool and calming)
- Pale pink, soft mauve, pale grey (cooler and more romantic)
- Cream, warm grey, dusty blue (warmer and more subtle)
- White, pale yellow, pale peach (warm and gentle)
The ombre effect creates movement and visual interest without using bold colors. Each nail becomes its own miniature artwork, which is particularly beautiful on short squoval nails where the proportions are perfect for gradient work.
Achieving Smooth Transitions
- Use a fine-textured makeup sponge (denser sponges create streakier results)
- Apply colors in thin layers, building gradually rather than applying everything at once
- Blend the middle section multiple times with a barely-damp sponge
- Seal with a thick glossy top coat to unify the gradient and smooth the sponge texture
18. Dusty Rose with Negative Space Geometric Design
A muted dusty rose with clean negative space creating geometric shapes (usually triangles or angular patterns) marries romantic color with modern design. This is a design that feels both current and timeless.
Designing Negative Space Geometrics
Plan your geometric shape before you start. This might be a triangle at the nail tip, angular sections running vertically, or asymmetrical angular shapes. Use tape to create clean edges for the negative space area, apply your dusty rose polish around it, and remove the tape immediately. The contrast between the dusty rose and the natural nail creates visual impact without additional polish colors.
Why Dusty Rose Is Perfect for This Technique
Dusty rose is romantic and sophisticated, but adding geometric negative space immediately modernizes it. The combination prevents the design from feeling too soft or overly feminine. It’s elegant with an edge, which is the definition of classy understated style.
Geometric Patterns That Translate to Short Nails
- A triangular section at the tip (suggests an arrow or elegant point)
- A vertical negative space line down the center (modern and architectural)
- Asymmetrical angular sections (intentional and artistic)
- Small triangular shapes clustered on the accent nail (creates focus and interest)
This design works beautifully on short nails because the limited surface area makes the geometric shapes more impactful. You’re not diluting the design across a large canvas; every element is intentional and visible. The dusty rose provides warmth and wearability, while the geometric negative space keeps it contemporary and sophisticated.
Insider note: If your tape isn’t leaving clean edges, try rubbing the tape edges with a cuticle pusher before applying polish—this seals the tape more tightly and prevents polish from seeping underneath.
The Bottom Line
Short squoval nails are the perfect canvas for sophisticated design. The shape is inherently elegant, and the length keeps everything practical for real life. Whether you choose a barely-there shimmer, a minimalist line accent, a subtle gradient, or a bold geometric negative space design, these 18 options will serve you across every season and occasion.
The through-line connecting all of these designs is restraint and intentionality. The most classy nails aren’t the ones loaded with embellishments—they’re the ones where every design choice has purpose. Color, texture, placement, and finish all matter. Each detail contributes to an overall effect that reads as elevated and polished rather than trying too hard.
The beauty of these designs is their versatility. You can wear the same design for professional meetings, casual outings, and special events, simply adjusting how you style the rest of your look. These aren’t trendy nails that’ll look dated in six months; they’re designs built on timeless principles of color, proportion, and visual balance. Pick the one that resonates with you, take your time with the application, and enjoy the quiet confidence that comes with genuinely beautiful nails.
