

Long oval nails have become the ultimate statement of polished sophistication—and for good reason. The elongated shape flatters virtually every hand shape, creates an elegant visual line from fingertip to nail bed, and provides a generous canvas for everything from minimalist designs to intricate nail art. Unlike stiletto or coffin shapes that can feel aggressive or dramatic, oval nails strike a perfect balance between contemporary and timeless, making them the go-to choice for anyone who wants their nails to look expensive, intentional, and put-together.
What makes long oval nails so versatile is their ability to work across any aesthetic—whether you’re drawn to classic elegance, trendy maximalism, or understated minimalism. The shape itself is inherently flattering because it elongates the fingers and creates an illusion of length and grace. This means the nail design you choose has room to breathe and isn’t fighting against a complicated shape. A deep burgundy looks regal on oval nails. A soft nude looks sophisticated. Even bold patterns and intricate artwork seem more wearable when they’re displayed on this smooth, curved canvas.
The real magic happens when you pair the right design with the long oval shape. Some looks are elevated by those extra millimeters of length, some benefit from the gentle curve, and some designs work because they take advantage of how light plays across an oval surface differently than it would on a shorter or more angular nail. Whether you’re looking for something fresh for an upcoming event, wanting to switch up your everyday look, or simply hunting for inspiration to show your nail technician, the designs ahead cover every mood, season, and occasion.
1. Classic French Manicure with Modern Twist
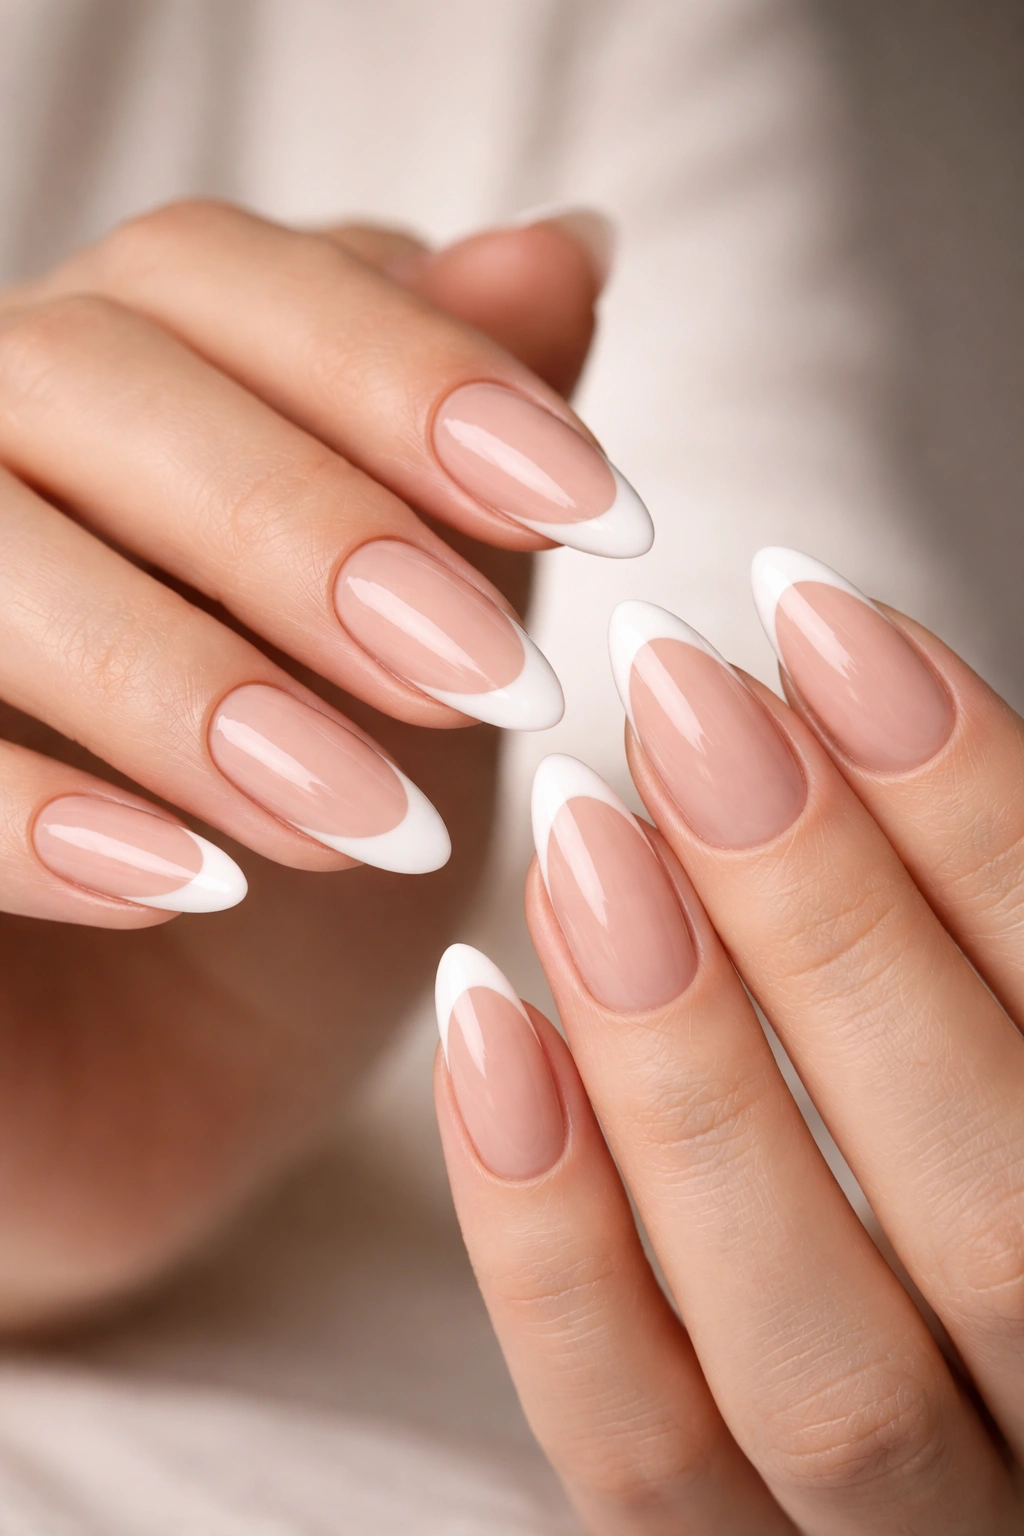
The original French manicure never goes out of style, but on long oval nails it takes on a refined elegance that shorter shapes simply can’t achieve. The elongated nail bed provides the perfect foundation for a crisp white tip, while a nude or soft pink base creates an understated sophistication that reads as effortlessly polished.
Why This Design Works Beautifully
The French manicure’s clean lines are enhanced by the gentle curve of an oval nail. The shape naturally frames the white tip, making it appear more intentional and carefully executed. This design translates across every setting—it’s equally appropriate in a boardroom, at a wedding, or with a casual everyday outfit.
Elevated Variations to Try
- Ombre the white tip into the base color instead of using a sharp line for a softer, more modern interpretation
- Add a ultra-thin gold or rose gold stripe between the white and the base color for subtle glamour
- Use a slightly thicker-than-traditional white tip for a bolder, more contemporary feel
- Try a sheer or translucent white for a barely-there French that reads more minimalist
Pro tip: Ask your technician to angle the white tip slightly upward at the sides rather than perfectly straight across—this follows the natural contour of a long oval nail and looks more intentional.
2. Deep Burgundy with Gold Foil Accents
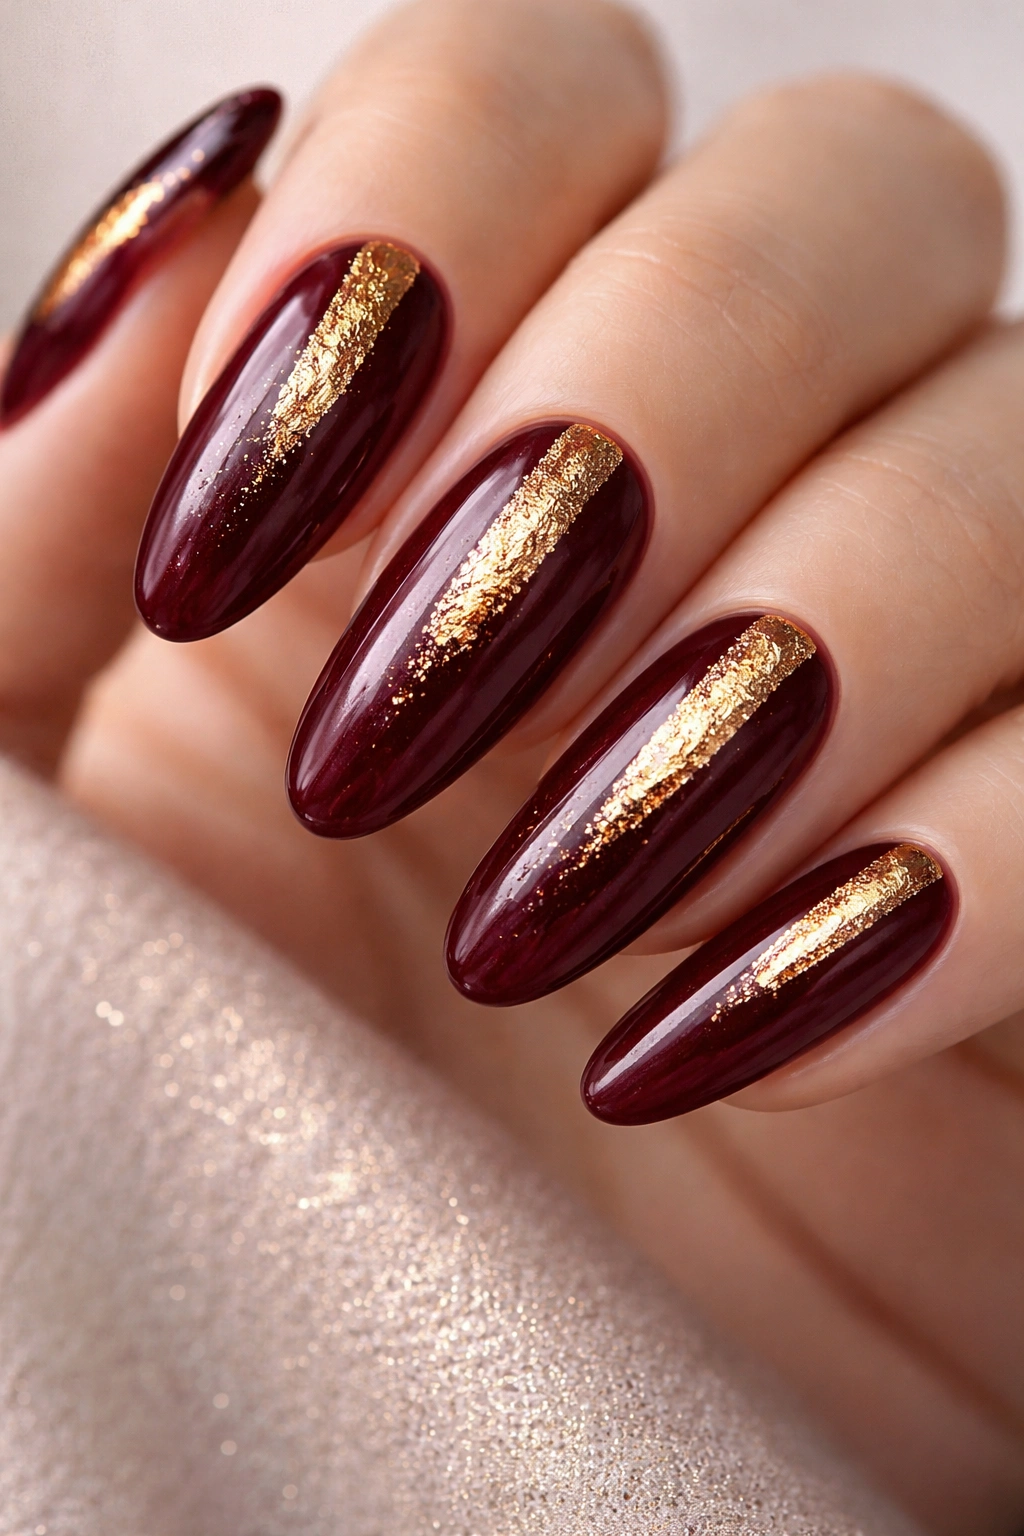
Burgundy is the color of luxury and depth, and when you add gold foil details to long oval nails, you create a design that looks like it belongs on the hand of someone with impeccable taste. The jewel tone provides richness while the gold breaks up the depth and adds a hint of glamour without tipping into costume territory.
The Psychology of Burgundy
This deep wine shade has a way of making nails look expensive because it’s bold enough to feel intentional but sophisticated enough to pair with virtually any outfit or skin tone. Gold foil catches the light in a way that other metallic accents don’t, creating movement and visual interest across the nail.
Styling Ideas for This Look
- Keep gold foil concentrated in the center of the nail for a focus point
- Create a thin vertical gold stripe down the middle for an Art Deco vibe
- Scatter small flecks of gold across the entire surface for a more integrated look
- Layer gold foil only on one accent nail while the rest stay solid burgundy
Worth knowing: Burgundy tones can be warm-leaning (brownish) or cool-leaning (more purple). If you have warm undertones in your skin, go warm-burgundy. If you’re cooler-toned, a more purple-burgundy will harmonize better with your natural coloring.
3. Glossy Black with Scattered Rhinestones
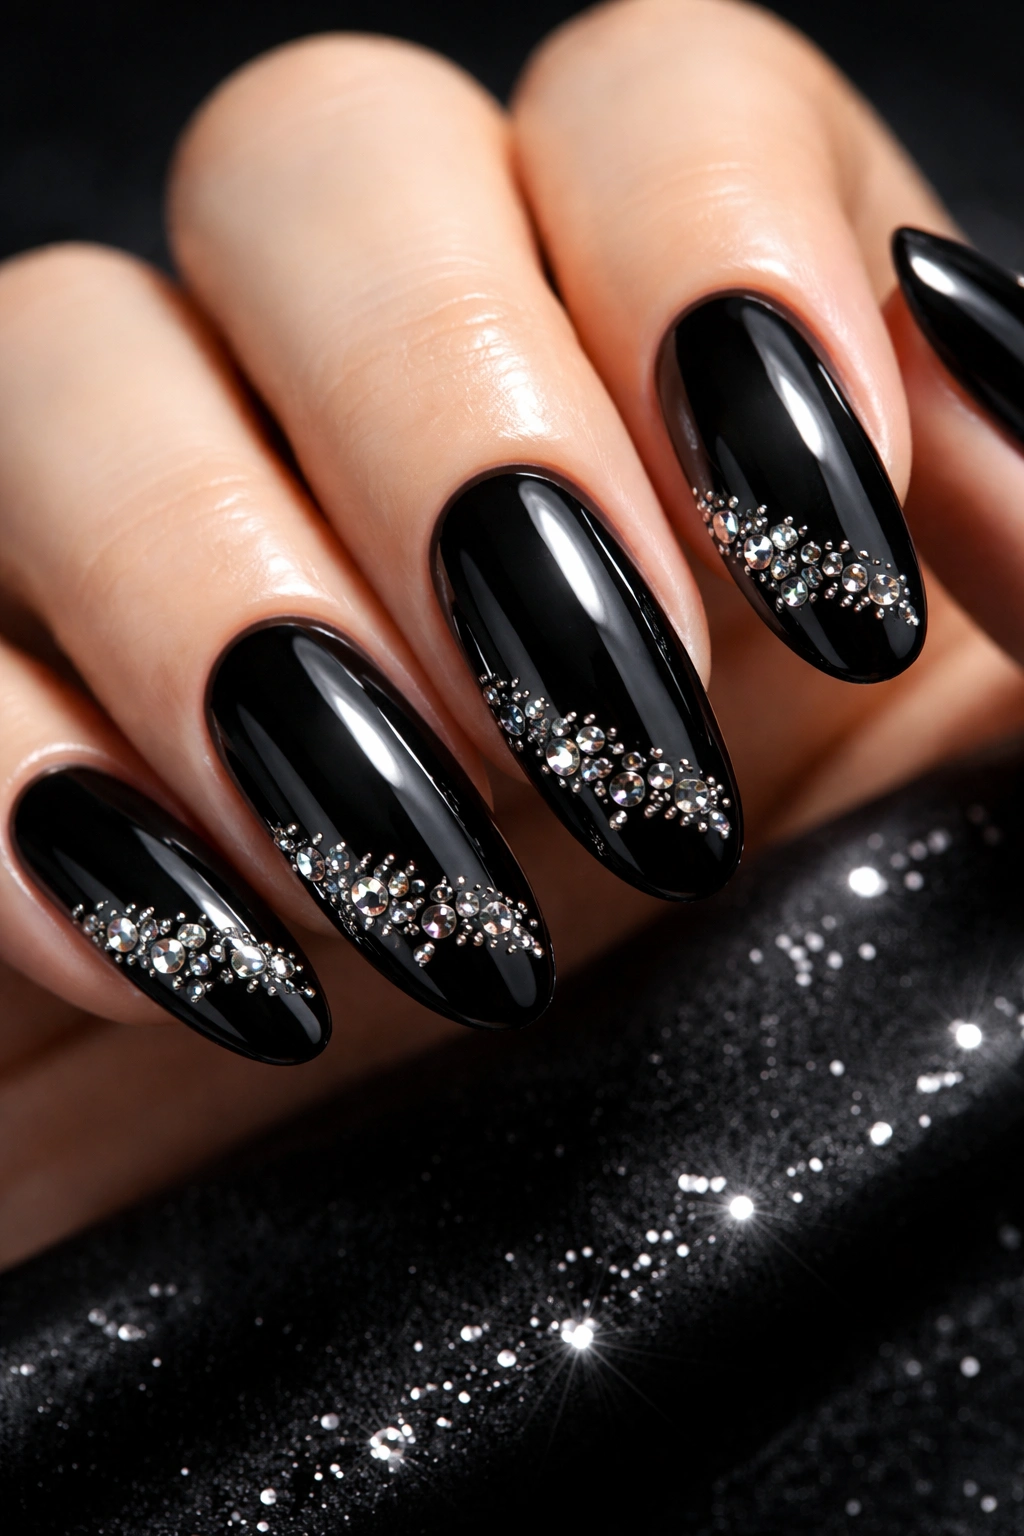
Black nails create drama and contrast, and when that black is ultra-glossy—almost a mirror-like shine—it becomes the perfect backdrop for rhinestone placement. The rhinestones catch light against the darkness, creating a necklace-like effect that adds dimension without requiring actual nail art skill.
Why Black Amplifies Sparkle
Black is the ultimate neutral when it comes to making other elements stand out. Rhinestones of any color—clear, champagne, colored—will appear more brilliant and eye-catching against a black background. The glossy finish means light bounces off both the nail and the stones, creating maximum visual impact.
Placement Strategies That Elevate This Design
- Create a diagonal line of rhinestones from the outer edge up toward the tip
- Cluster rhinestones only on the bottom third of the nail for an understated approach
- Place one larger rhinestone on each nail in a different spot for asymmetrical interest
- Create a frame of rhinestones around the outer edge, leaving the center clear
Pro tip: Use a clear or nude topcoat over the rhinestones to lock them in place and prevent them from snagging on fabric or coming loose during daily wear.
4. Soft Pink Ombre with Gradient Fade
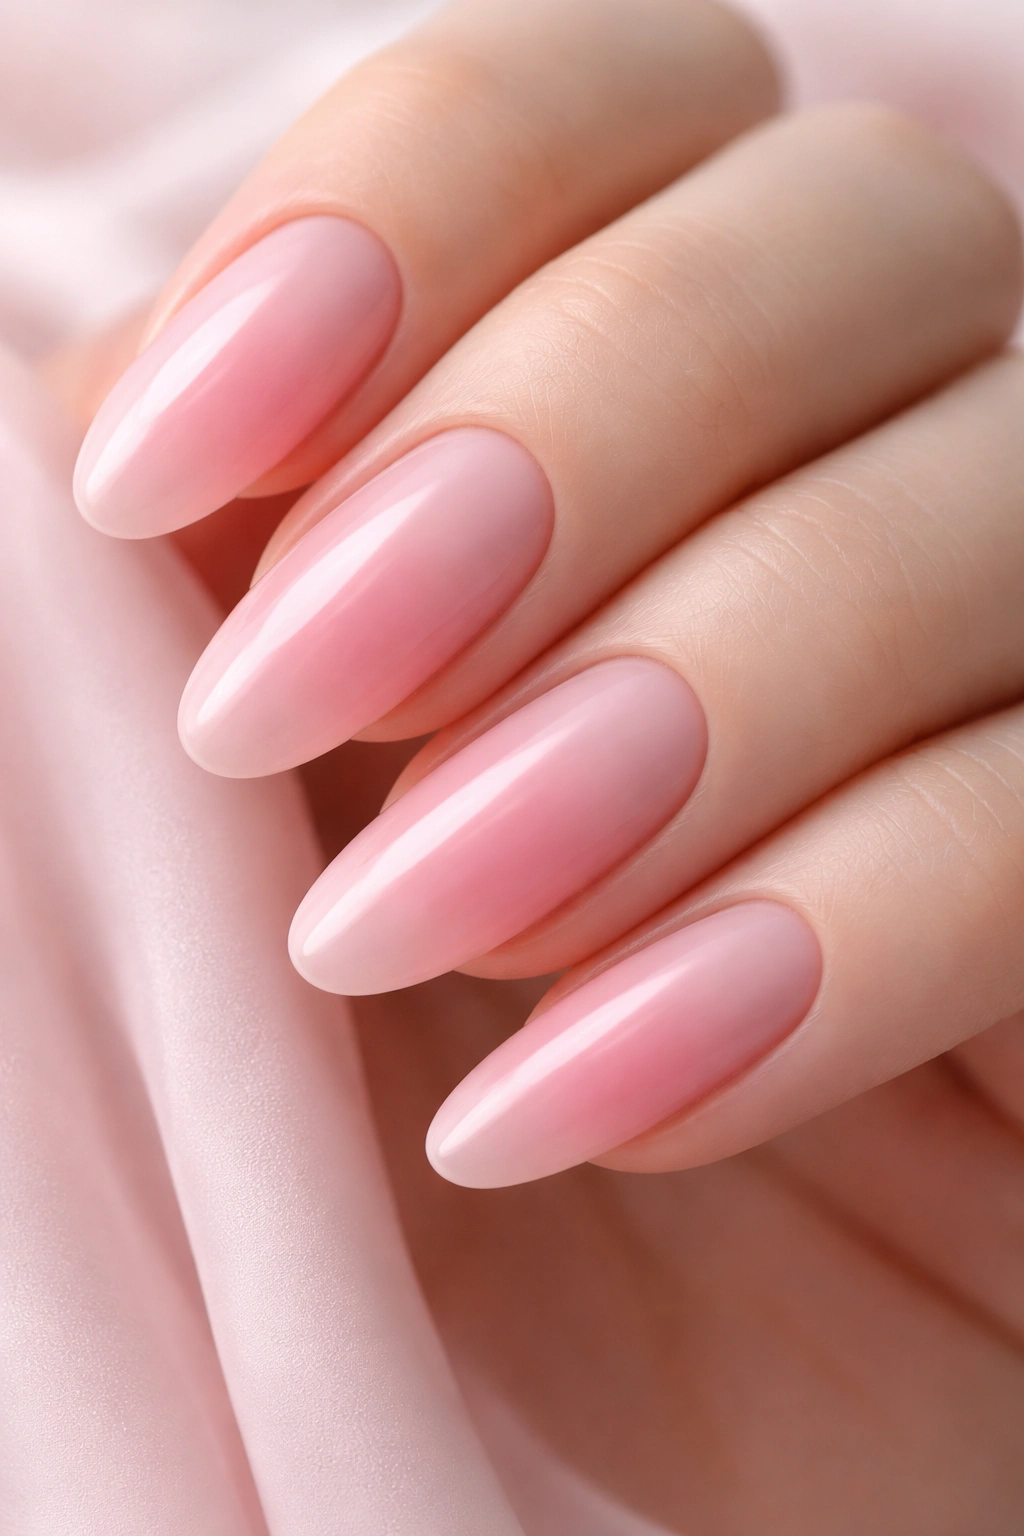
An ombre effect on long oval nails creates an illusion of even more length because the color transition draws the eye from base to tip. A soft pink ombre—starting pale at the base and deepening toward the tip—is the definition of wearable elegance that works for any age, any profession, and any occasion.
The Technique Behind a Flawless Ombre
A true ombre requires a sponge application method that blends the colors seamlessly. The gradient should be so smooth that you can’t quite tell where one shade ends and another begins. On long ovals, this creates a watercolor effect that’s sophisticated without being matchy-matchy or overly decorated.
Color Combinations to Explore
- Pale ballet pink to dusty mauve for a cool-toned gradient
- Soft peachy pink to coral for warmth and dimension
- Barely-there blush to deep rose for maximum impact
- White-pink to soft pink for an almost-invisible gradient that reads as luminous
Quick tip: Ask for matte instead of glossy to give an ombre a softer, more fashion-forward appearance. The matte finish actually makes the gradient appear more blended and intentional.
5. Matte White with Geometric Black Lines
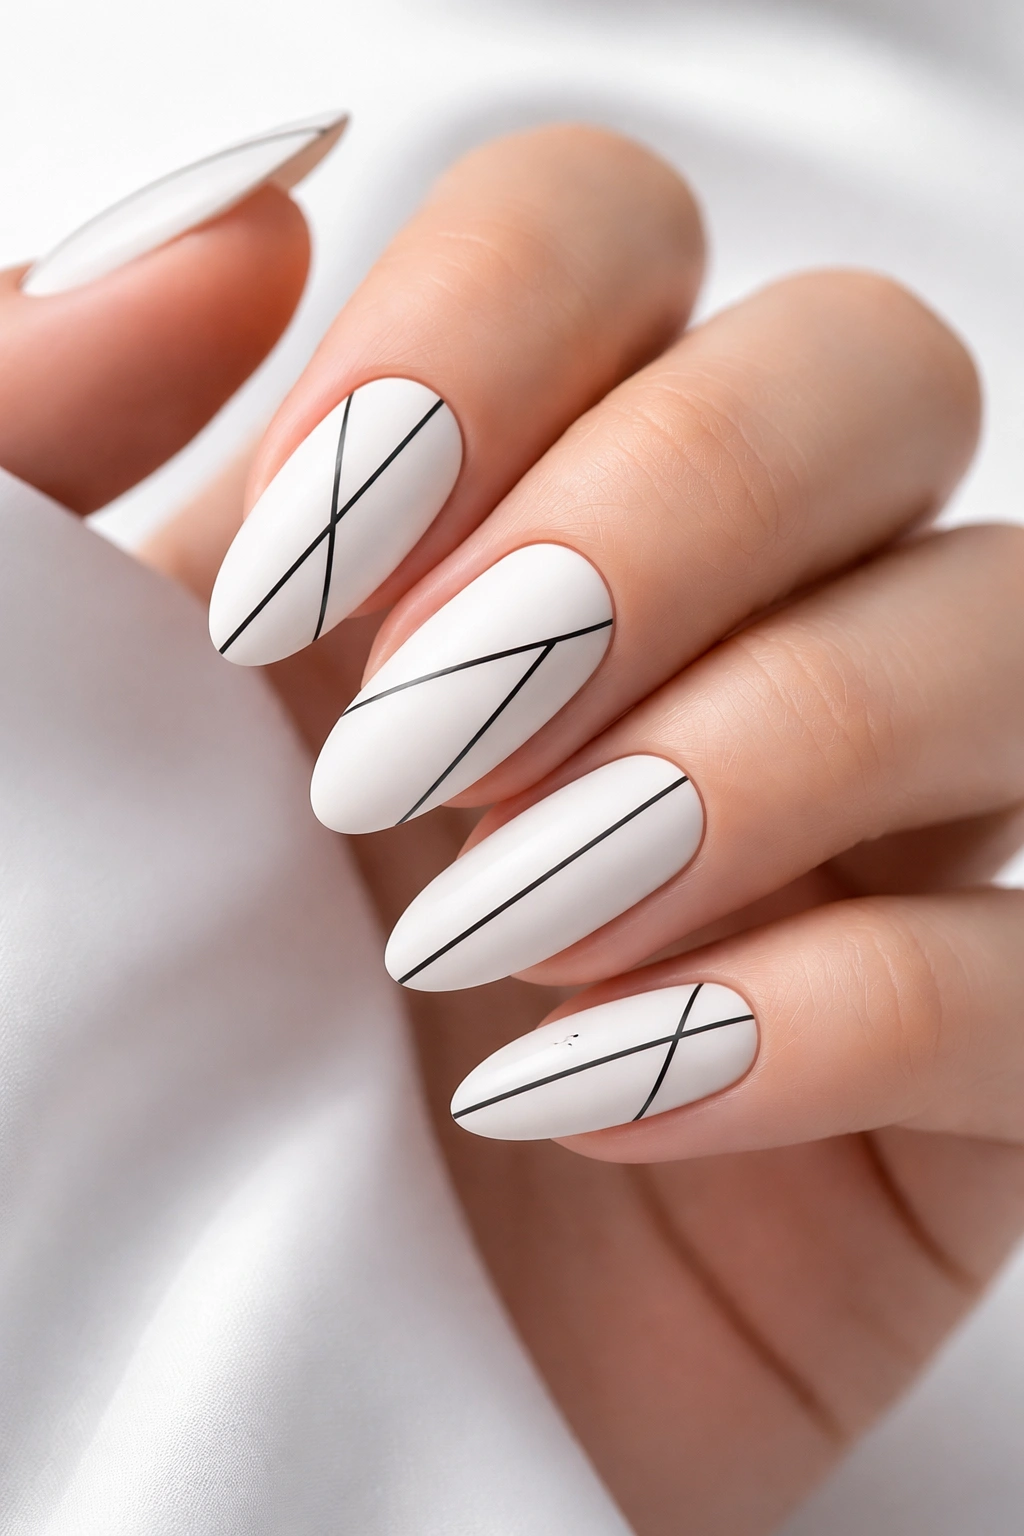
Minimalism meets geometry in this striking combination. Matte white serves as a clean canvas while thin black lines—whether straight, angular, or abstract—create visual interest without overwhelming the nail. This design works because it’s bold enough to be noticed but refined enough to be worn anywhere.
Why Geometry Works on Long Ovals
The elongated shape of an oval nail is perfect for linear design elements. Vertical lines emphasize the length. Diagonal lines create movement. Horizontal lines can be placed at different heights to create rhythm. The smooth curve of the oval contains these geometric elements beautifully without them feeling chaotic.
Geometric Patterns Worth Trying
- Simple vertical lines on each nail with one nail featuring a horizontal accent
- Angular zigzag patterns that follow the contour of the nail
- Broken horizontal lines that create a striped effect with gaps
- Corner triangles or corner squares that frame the nail subtly
Insider note: The thickness of your black lines matters enormously. Thicker lines look more modern and bold. Ultra-thin lines read as more minimalist and delicate. Choose based on your personal aesthetic.
6. Champagne Base with Glitter Gradient to Clear
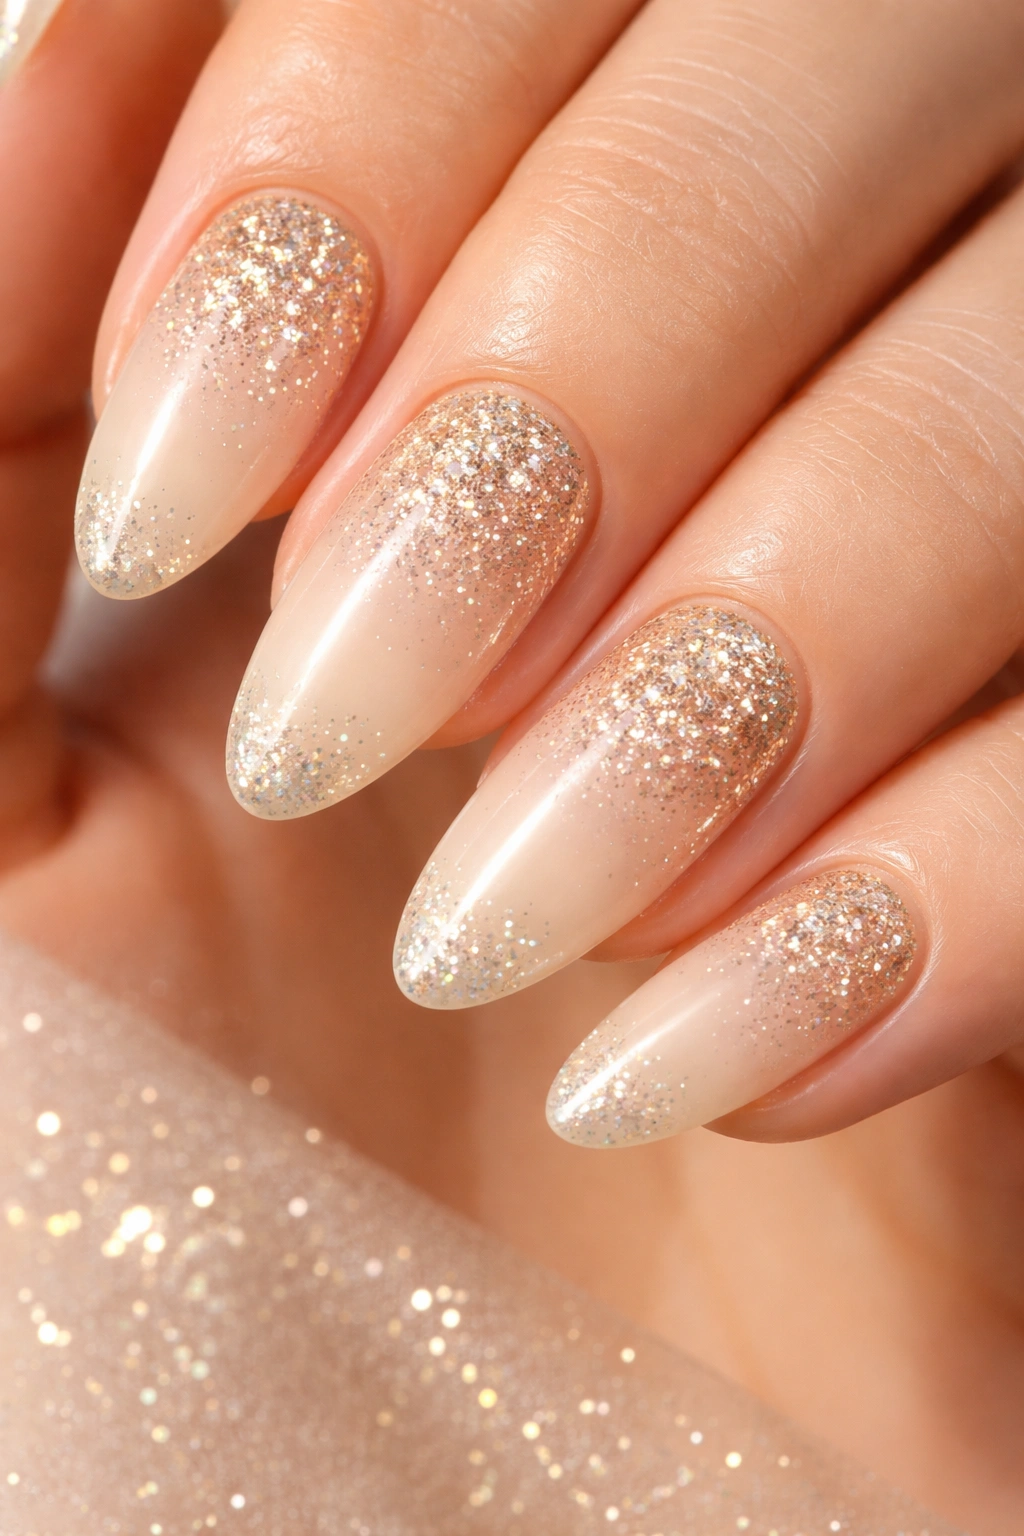
Champagne is the color of celebration and femininity, and when you layer glitter that transitions from dense to sparse toward the tip, you create a design that catches light beautifully. This is the nail equivalent of wearing a sequined dress—it sparkles, it’s feminine, and it makes you feel like you’re celebrating.
Building the Perfect Champagne Glitter Gradient
Start with a creamy champagne base coat applied to full coverage. Once dry, apply glitter polish in a dense concentration near the base, then use a clean sponge to press the glitter into the polish while gradually removing more glitter toward the tip. The goal is a seamless transition from heavily glittered near the base to clear and shimmery at the tip.
Champagne and Glitter Combinations
- Gold glitter for warm, classic glamour
- Silver glitter for cool-toned sparkle
- Rose gold glitter for a blended warm and cool shimmer
- Mixed champagne and nude glitter for subtle dimension
Important detail: Use a quality topcoat to seal glitter nails properly. Cheap topcoat can make glitter appear dull or cause it to shift and separate over time. A good topcoat keeps the gradient looking intentional and polished.
7. Emerald Green with Gold Veining Effect
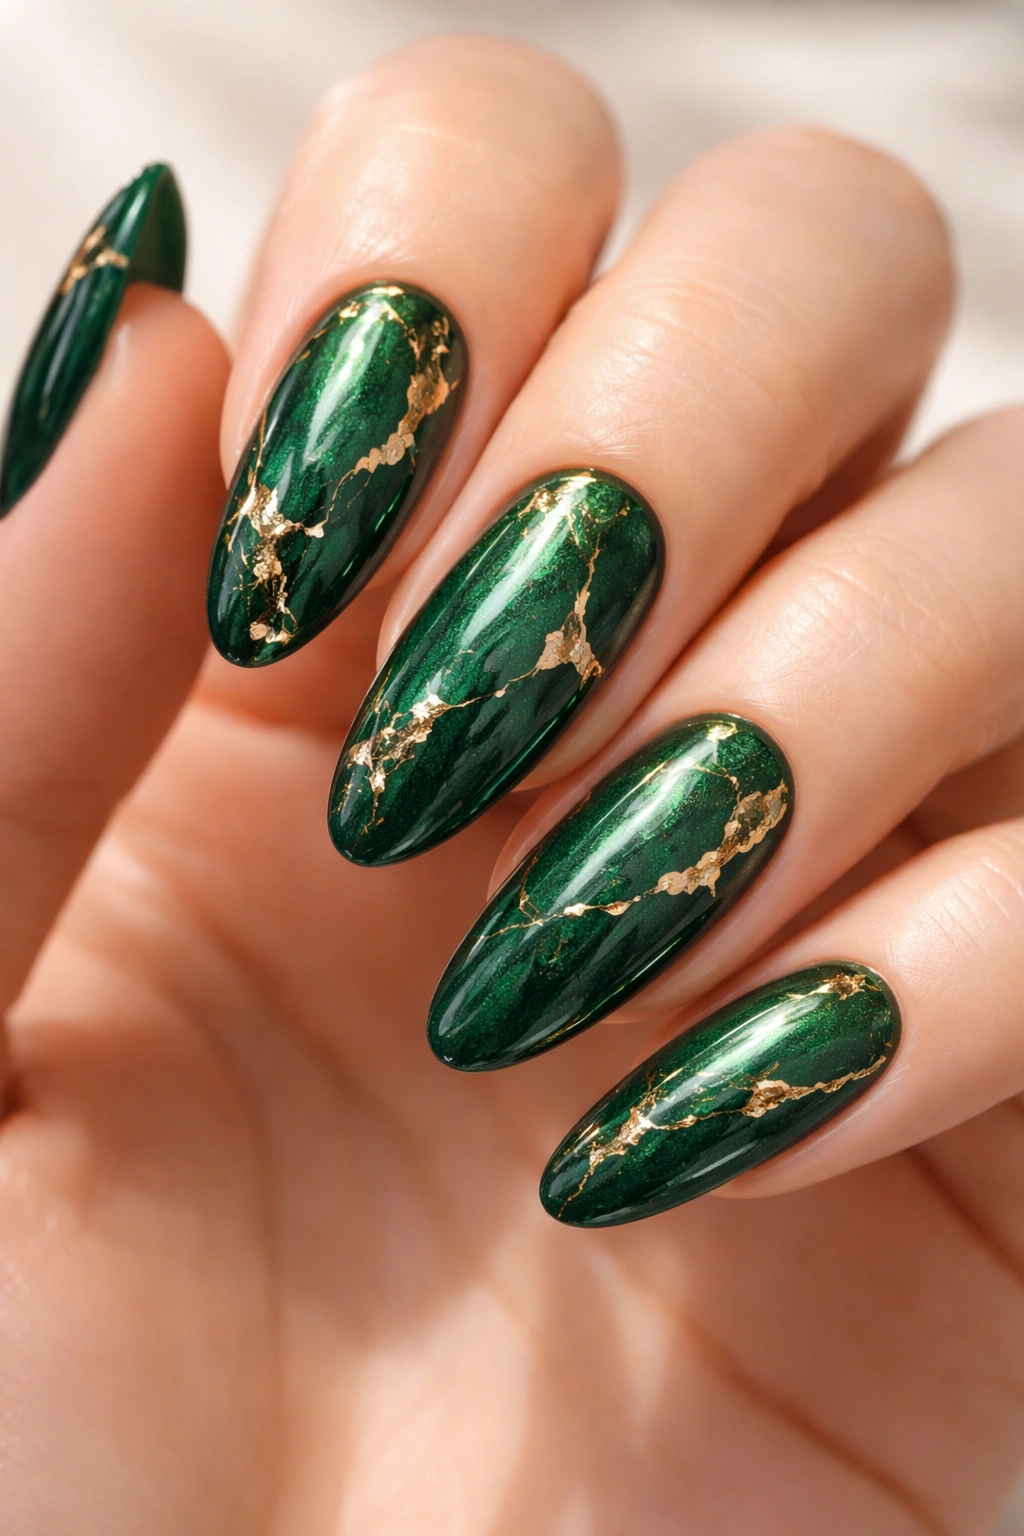
Emerald green is the color of luxury, wealth, and timeless elegance—think of the green velvet chairs in high-end hotels or the jeweled gowns in classic films. When you add delicate gold veining to emerald nails, you’re creating a design that looks like polished stone or precious gemstone. This is sophisticated nail art that still feels wearable.
The Art of Gold Veining
Gold veining mimics the natural patterns found in real gemstones and marble. The lines should be organic and somewhat irregular—not perfectly straight or geometric. They should seem to flow across the surface rather than serving a specific structural purpose. Thin gold striping lines work best for this effect.
Creating Emerald with Gold Veining
- Use a thin gold nail art brush to hand-paint delicate vein lines across the emerald base
- Apply gold leaf in organic shapes across the emerald surface for a more textured look
- Layer thin gold lines both vertically and horizontally for an intersecting vein pattern
- Add sparse gold details rather than creating a covered-in-veining effect
Real-world consideration: Emerald paired with gold reads as upscale and luxe, making it perfect for special events, formal occasions, or when you want your nails to convey refinement and intention.
8. Marble Effect with Multiple Colors
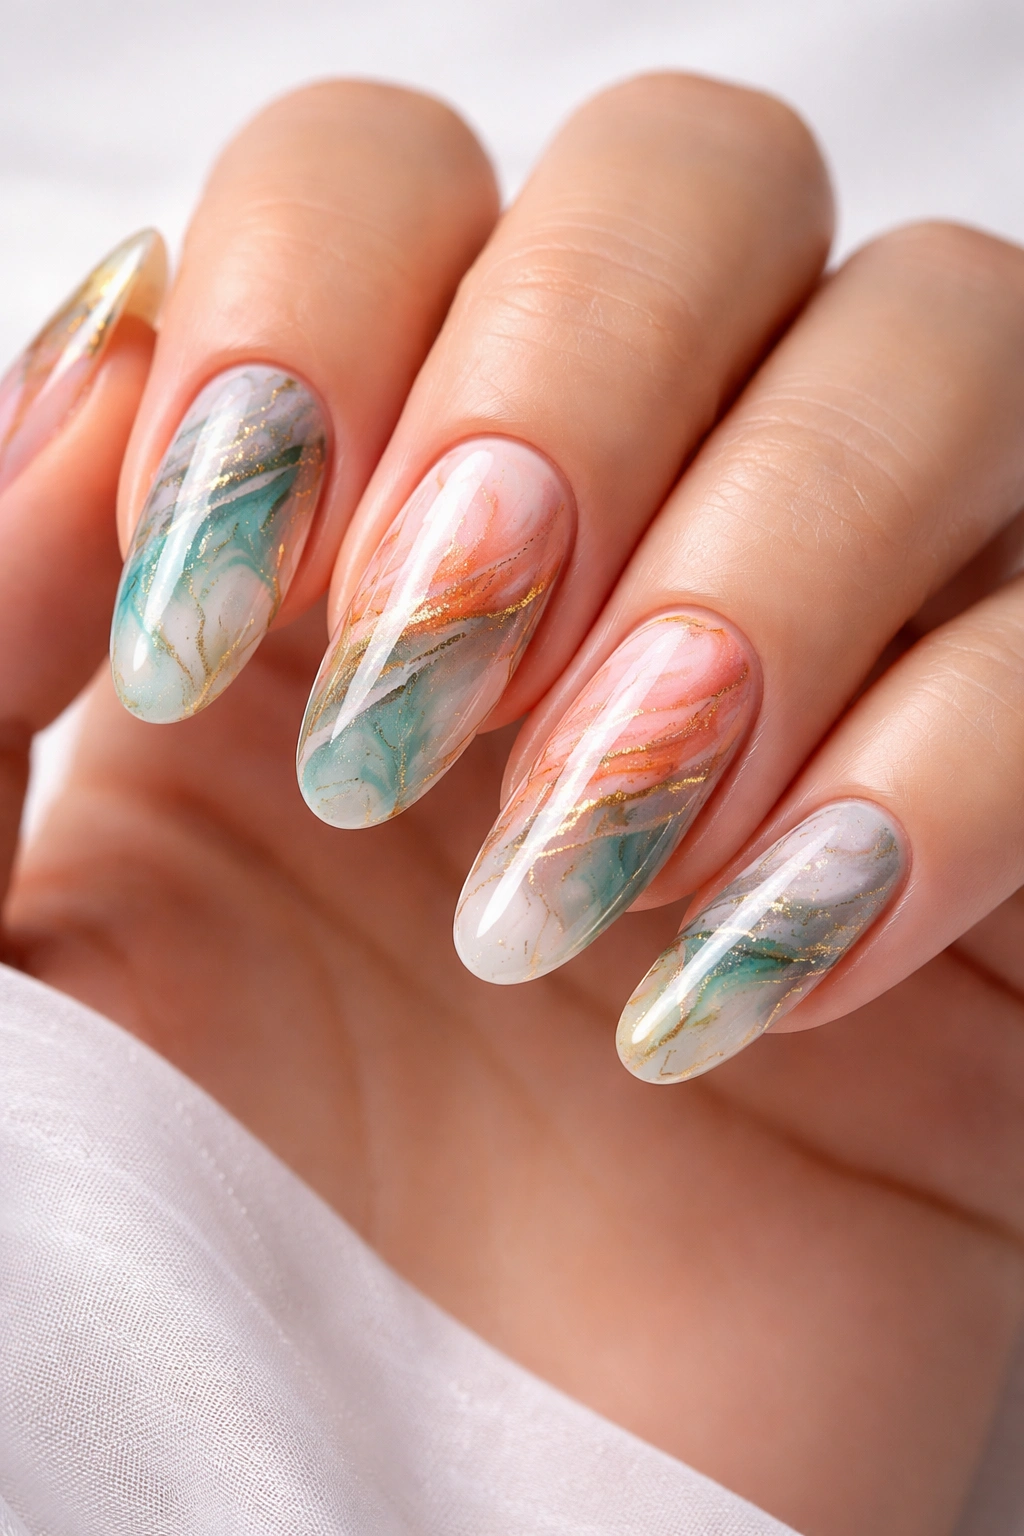
Marble nails create the illusion that each nail is a tiny work of art. When executed with multiple colors on long oval nails, the marble effect becomes even more striking because there’s more surface area for the swirled pattern to develop. Each nail can be a unique variation on the marble theme, or they can follow a cohesive color story.
Achieving Authentic-Looking Marble
True marble effect uses 2-3 complementary colors that blend together with one predominant base color and accent colors creating veining and swirls. The pattern should look organic—like you’re looking at an actual cross-section of marble stone—rather than perfectly even or symmetrical. The key is creating variation across the nails rather than making each nail identical.
Marble Color Combinations Worth Exploring
- White base with black and gray veining for classic Carrara marble
- Nude base with white, gray, and taupe for warm stone effect
- Soft pink base with white and rose gold for romantic marble
- Black base with white and silver for bold, modern impact
Pro tip: You can create marble effect with water marbling (traditional method), hand-painting with thin brushes, or using specialty marble nail polishes that are pre-designed to look like stone. Each method has a slightly different outcome.
9. Nude with Ultra-Thin Gold Line Down the Center
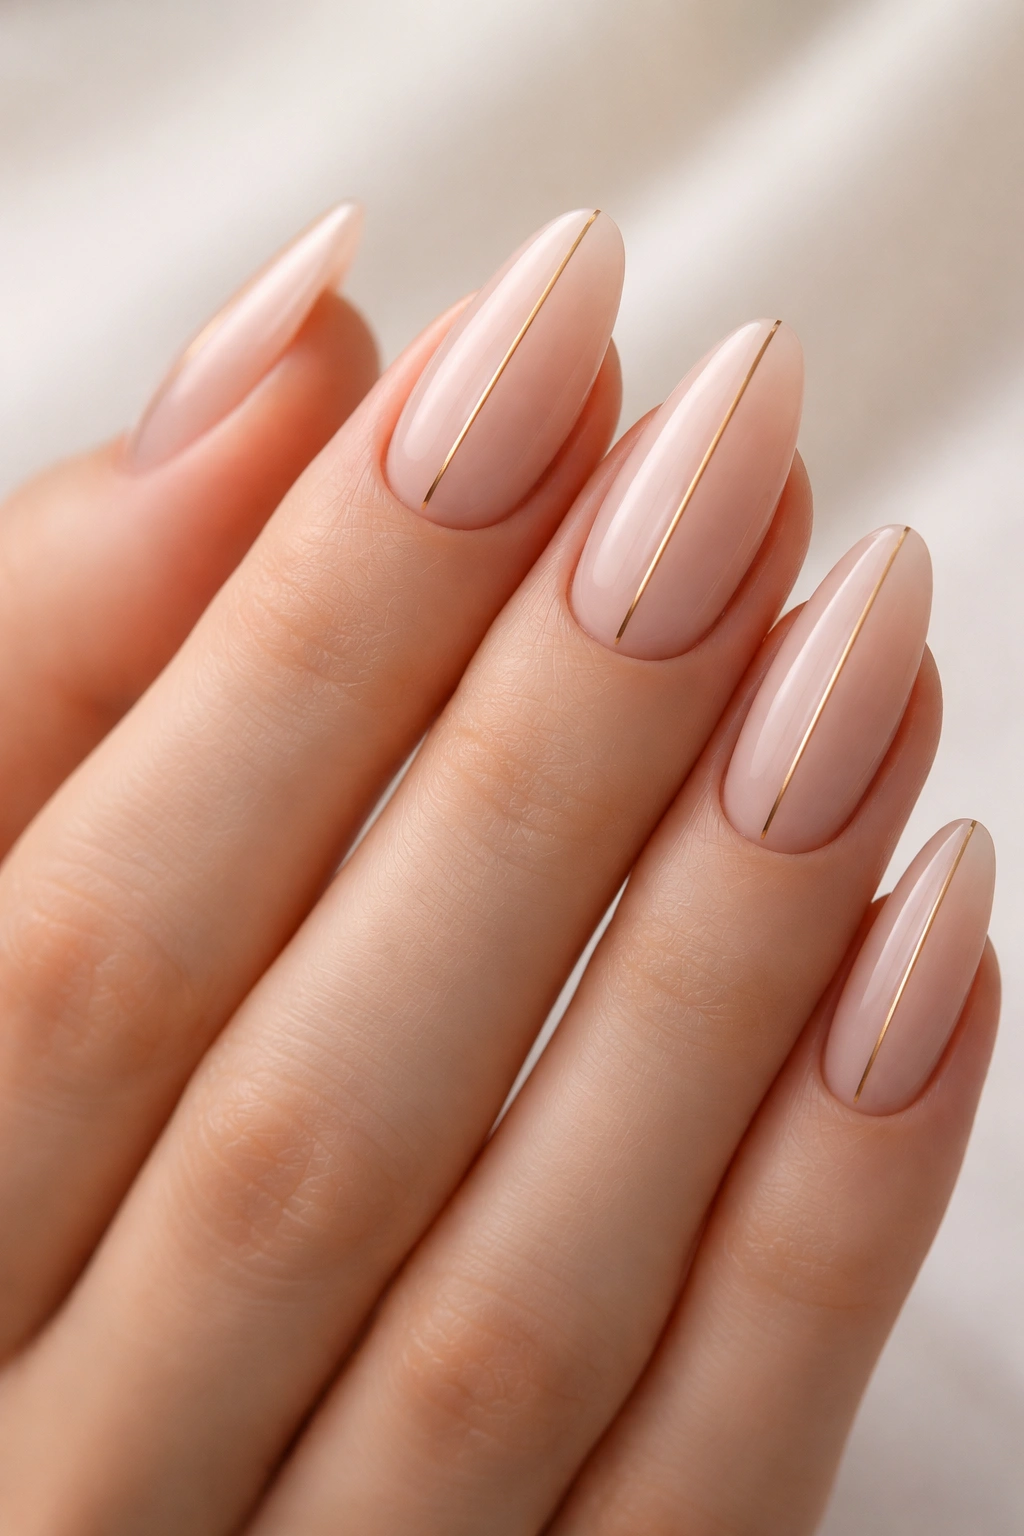
Sometimes the most sophisticated designs are the simplest ones. A nude base that matches your skin tone elongates the finger even further, and an ultra-thin gold line running down the center of each nail adds a geometric accent that’s barely there but completely elevates the entire look. This design reads as intentional without screaming for attention.
Why This Combination Works Across All Situations
Nude nails on their own are timeless but sometimes feel a bit plain. A single thin gold line transforms them into something more thoughtful and curated. The gold catches the light when your hands are in motion, creating subtle sparkle that’s visible without being glittery or over-the-top.
Variations on the Gold Line Concept
- Place the gold line slightly off-center for asymmetrical interest
- Use rose gold instead of yellow gold for warmer skin tones
- Add a thin gold line only on accent nails while others stay solid nude
- Create two or three parallel lines for a more graphic effect
Quick fact: The thickness of the line is critical—it should be thin enough that it looks like an intentional accent line rather than a thick stripe. Ask your technician to use a thin precision brush.
10. Rich Plum with Metallic Tips
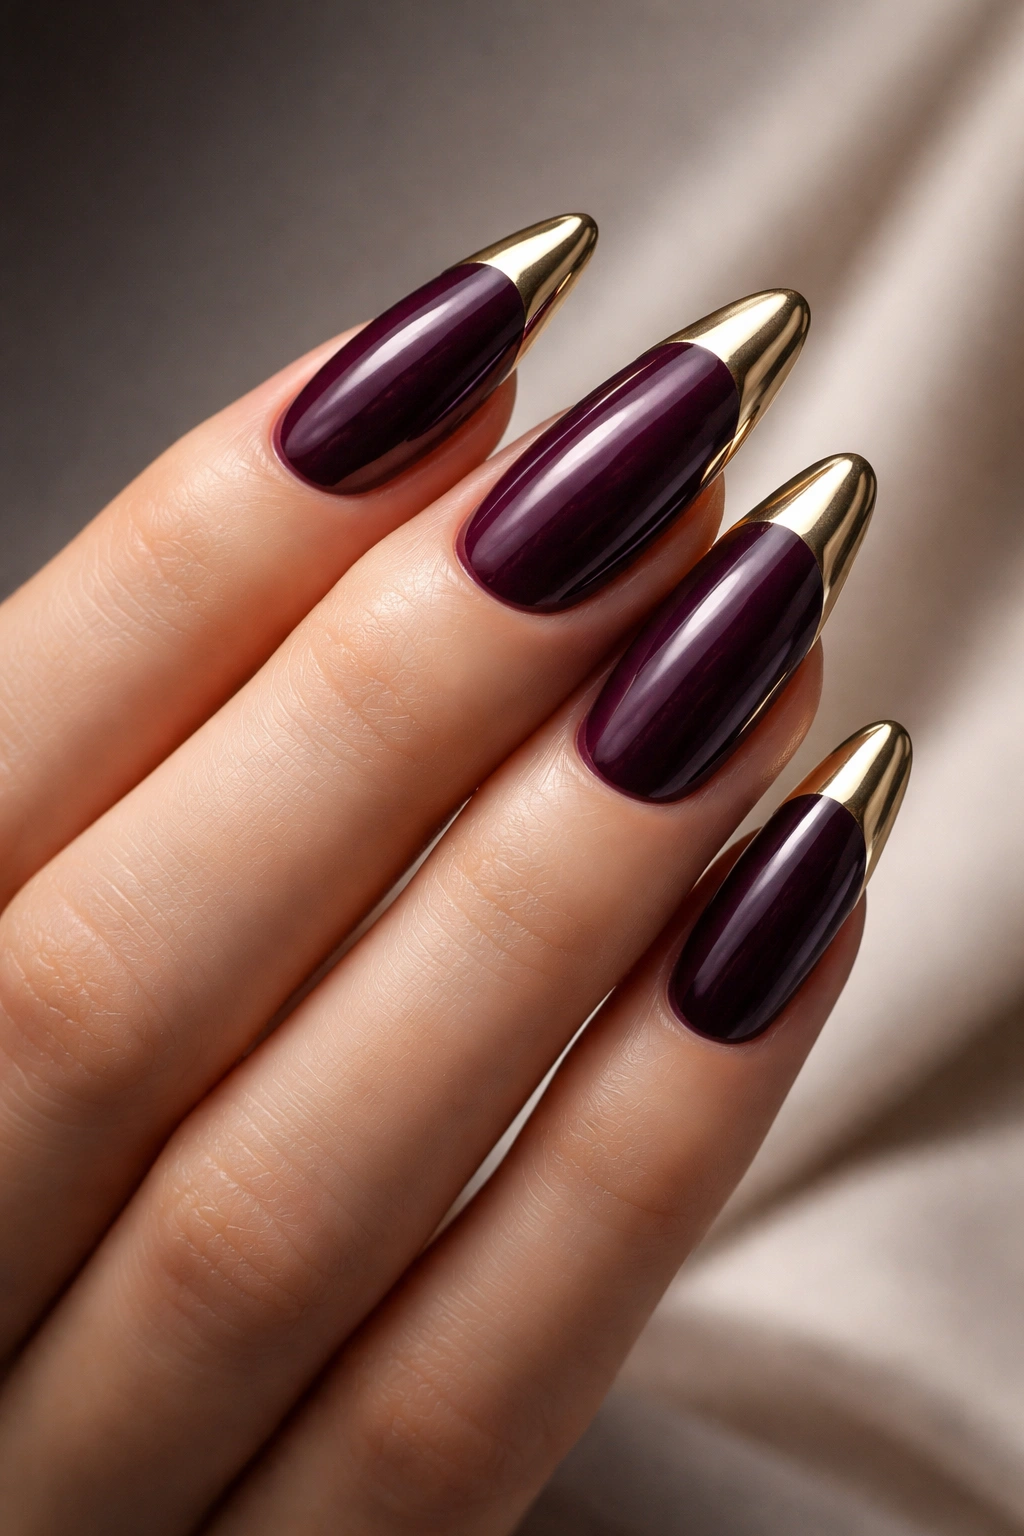
Plum is the color of mystery and depth, and when you add metallic tips—whether gold, silver, or rose gold—you create a design that straddles the line between elegant and trendy. The plum base is sophisticated enough for formal events, while the metallic tips add just enough modern edge to feel current and interesting.
Why Plum Flatters Every Skin Tone
Plum is a cool-toned purple with brown undertones, which means it harmonizes beautifully with both warm and cool skin tones. It’s deeper and more luxurious than a standard purple, and it reads as more intentional and less playful. Paired with metallics, plum becomes downright glamorous.
Metallic Tip Styles to Consider
- Full metallic coverage on the tips for bold, defined contrast
- Ombre fade from plum into the metallic color for a softer effect
- Metallic accent on only one side of the tip for asymmetrical interest
- Thin metallic line separating the plum and the tip (like a French manicure variation)
Worth knowing: Plum can range from more brownish (mauve) to more purple (true plum) to more blue-toned (deep plum). Choose the undertone that best complements your skin tone and the metallic shade you prefer to pair it with.
11. Coral Peach with Gradient Effect
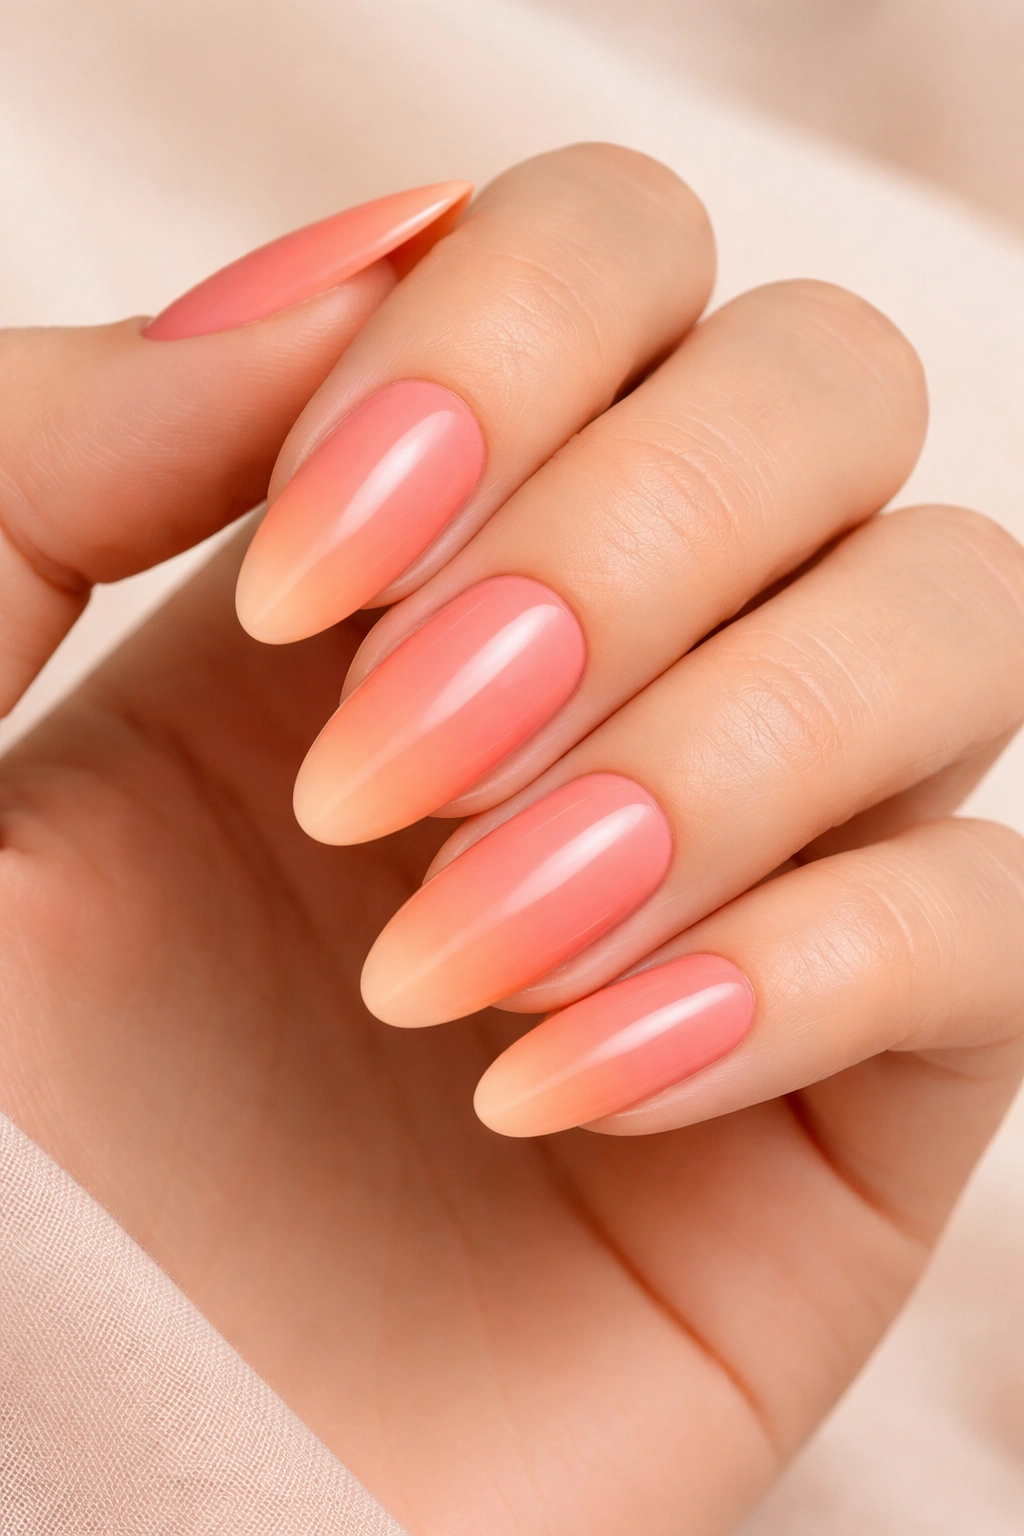
Coral and peach tones bring warmth and optimism to long oval nails. A gradient effect where the color deepens from base to tip creates dimension and visual interest while keeping the overall look fresh and summery. This is the nail equivalent of a sunset—warm, beautiful, and full of movement.
The Psychology of Peachy Coral Tones
These warm, sunset hues naturally feel uplifting and energetic. They work beautifully on warm skin tones and can also look gorgeous on cool skin tones if chosen carefully. A peachy coral gradient is approachable and friendly without being juvenile or over-the-top.
Gradient Variations with Peachy Tones
- Pale peach to deep coral for maximum warmth
- Soft coral to burnt orange for earthiness
- Peachy nude to coral for subtler gradient
- Reverse gradient (deep at base, pale at tip) for a different effect
Pro tip: Peachy coral tones can sometimes look too pale or washed out depending on your skin tone. Ask your technician to test the shade on your nail before committing—the shade should appear warm and intentional, not dull or muddy.
12. Soft Nude with Glitter Tips Only
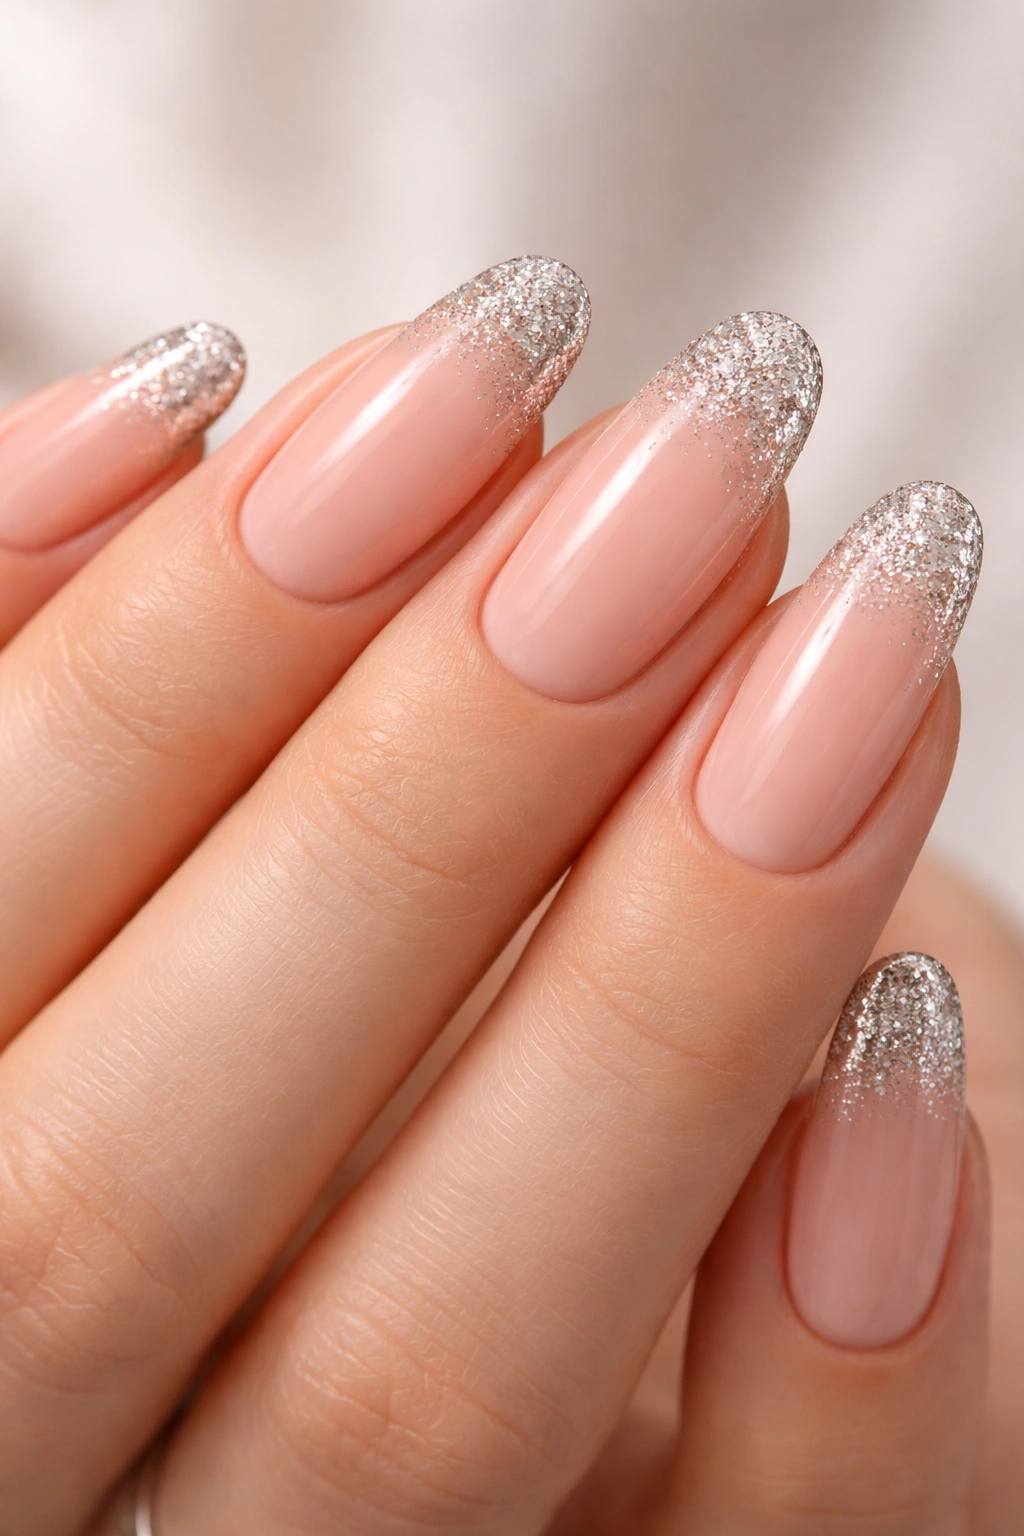
This design takes the classic French manicure concept and upgrades it with glitter instead of white. The nude base keeps things subtle and elegant, while glitter concentration only on the tips adds a subtle sparkle that catches light when your hands move. It’s festive without being over-the-top, elegant without being boring.
Why Glitter on the Tips Works
Glitter tips draw attention to your fingertips—the part of your nail you see most frequently in daily use. The concentration of shimmer on the tips means the rest of the nail stays clean and streamlined, creating a balanced design that doesn’t feel heavy. This design works for both everyday wear and special occasions.
Glitter Options for This Design
- Gold glitter for warm, classic sparkle
- Silver or clear glitter for subtle shimmer
- Rose gold glitter for warm and cool balance
- Multi-colored glitter for added dimension
Design note: The amount of glitter concentration matters. Dense glitter tips look fun and festive. Sparse glitter scattered only on the very tip looks more minimalist and refined. Choose based on the occasion and your personal style.
13. Navy Blue with Constellation Design
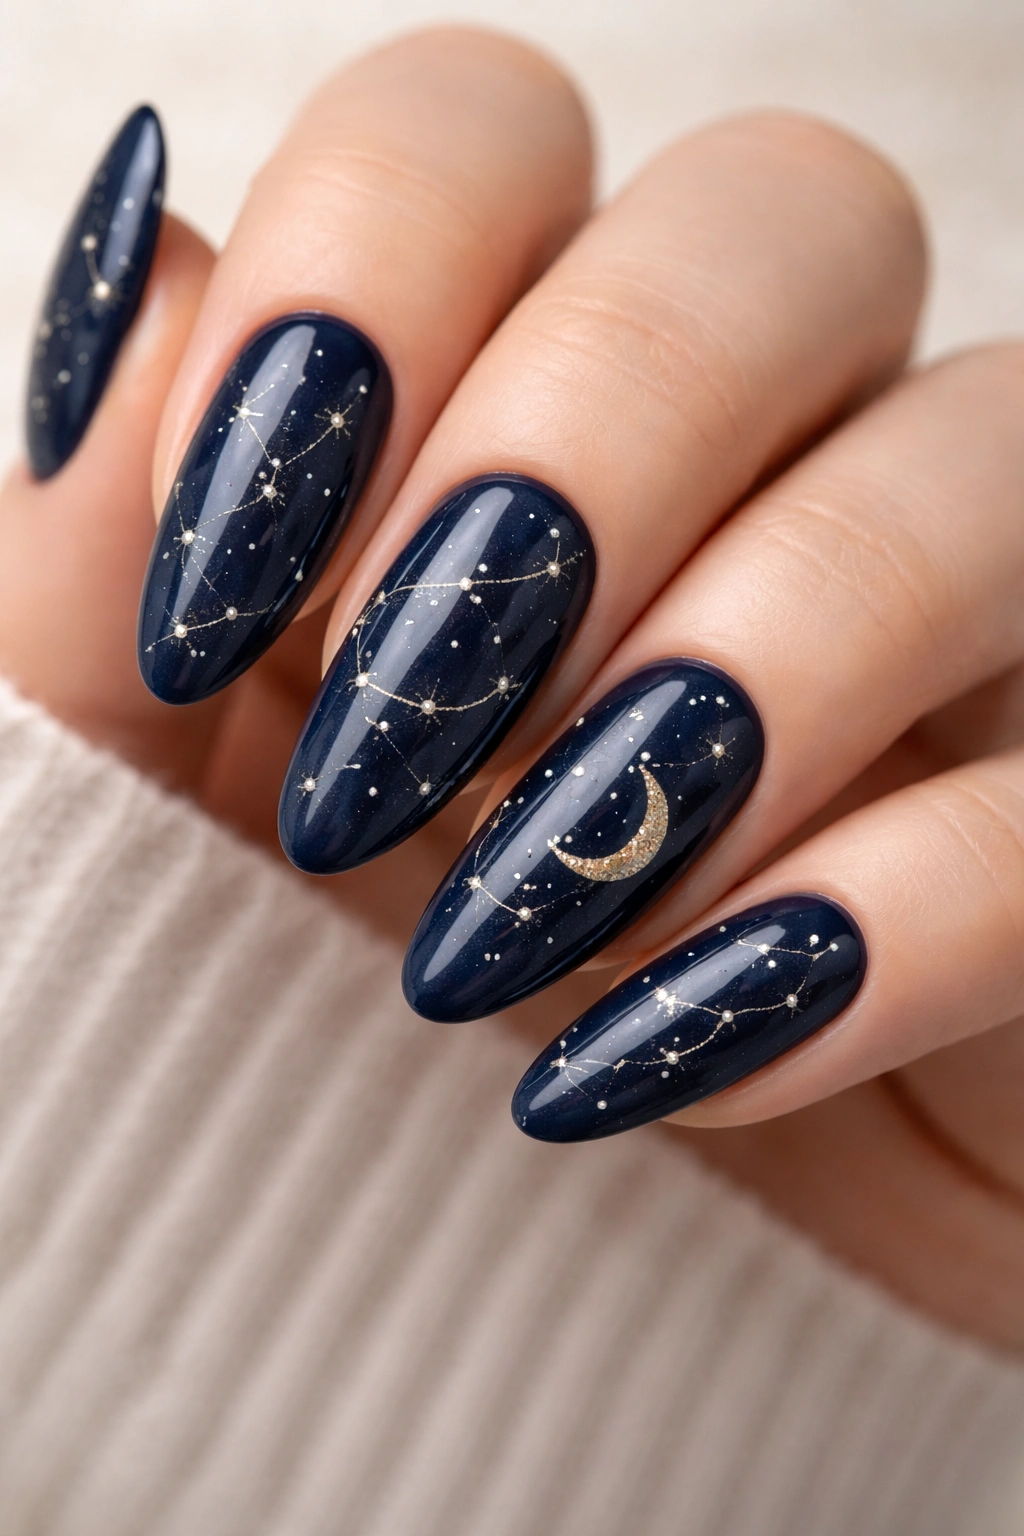
Navy blue serves as a canvas for celestial designs on long oval nails. A constellation pattern—whether recognizable constellations or abstract star arrangements—adds an artistic, thoughtful element. The deep blue creates contrast with the white or gold stars, making the design pop without being garish.
Creating Constellation Patterns
Constellations work beautifully because the lines are thin and the dots (representing stars) are small, so they don’t overwhelm the nail. You can use recognizable constellations (Big Dipper, Orion, etc.) or create abstract star patterns that just look beautiful without representing specific constellations.
Design Details for Constellation Nails
- Use white or gold dots connected with thin lines to represent stars
- Create patterns that flow across multiple nails rather than isolated on single nails
- Vary the size and spacing of dots for a more organic, authentic astronomical look
- Consider adding a crescent moon on one accent nail
Quick fact: Constellations read as more sophisticated and intentional than random star designs because they tell a story and show effort. This makes them perfect for special occasions or when you want nails that spark conversation.
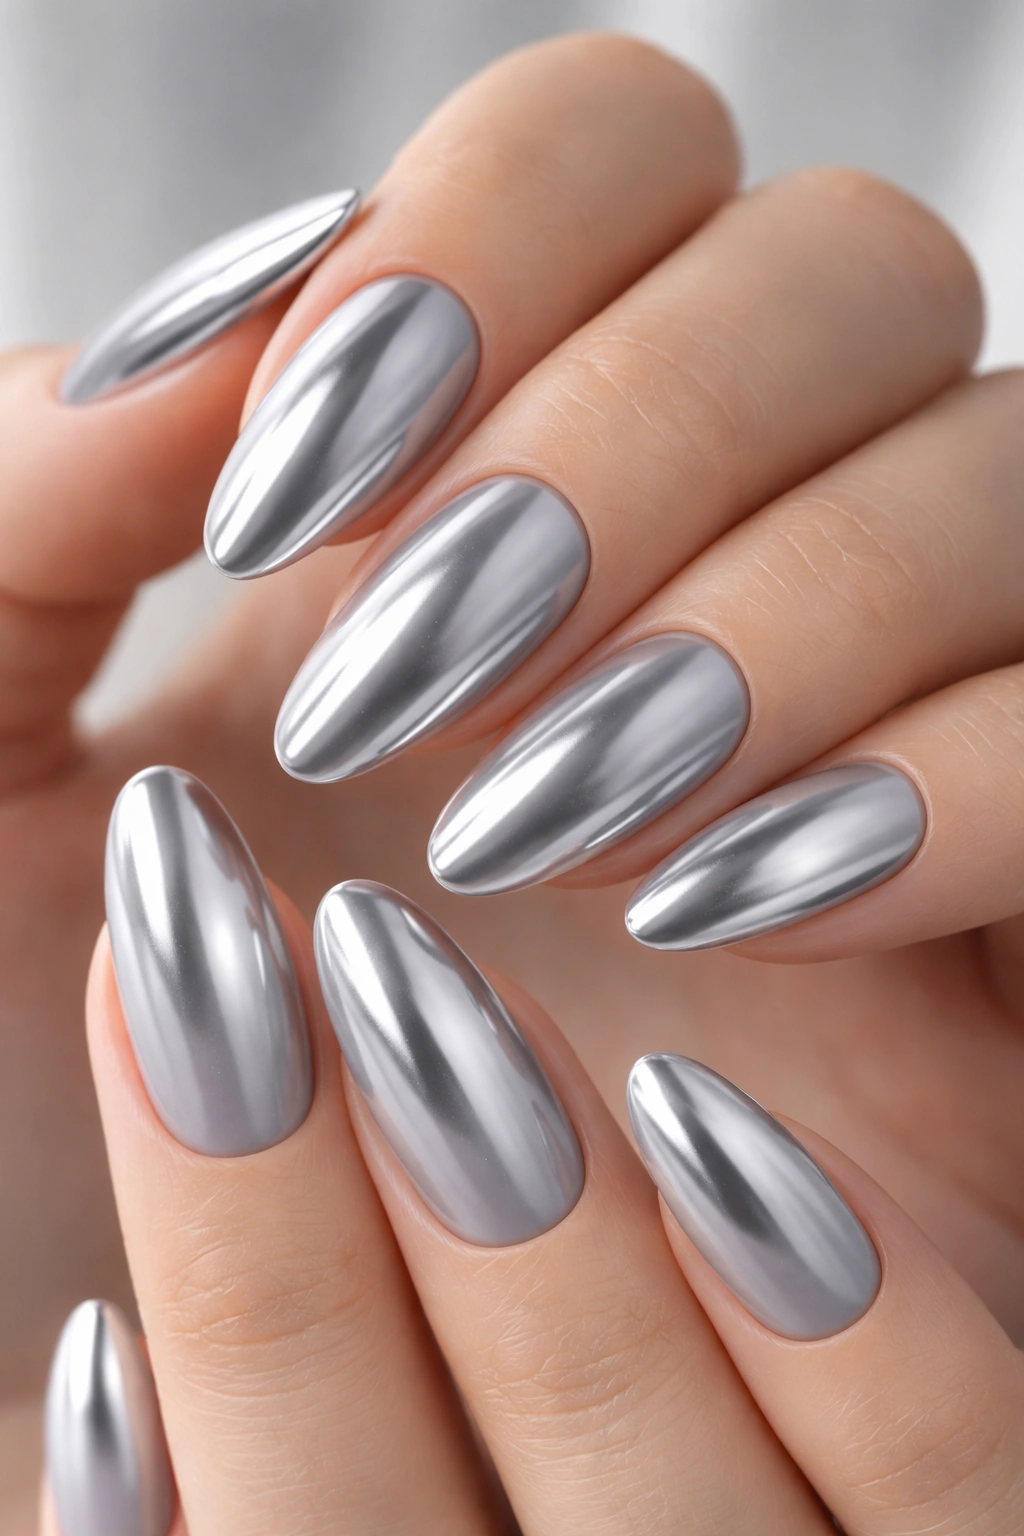
14. Rose Gold with Chrome Effect
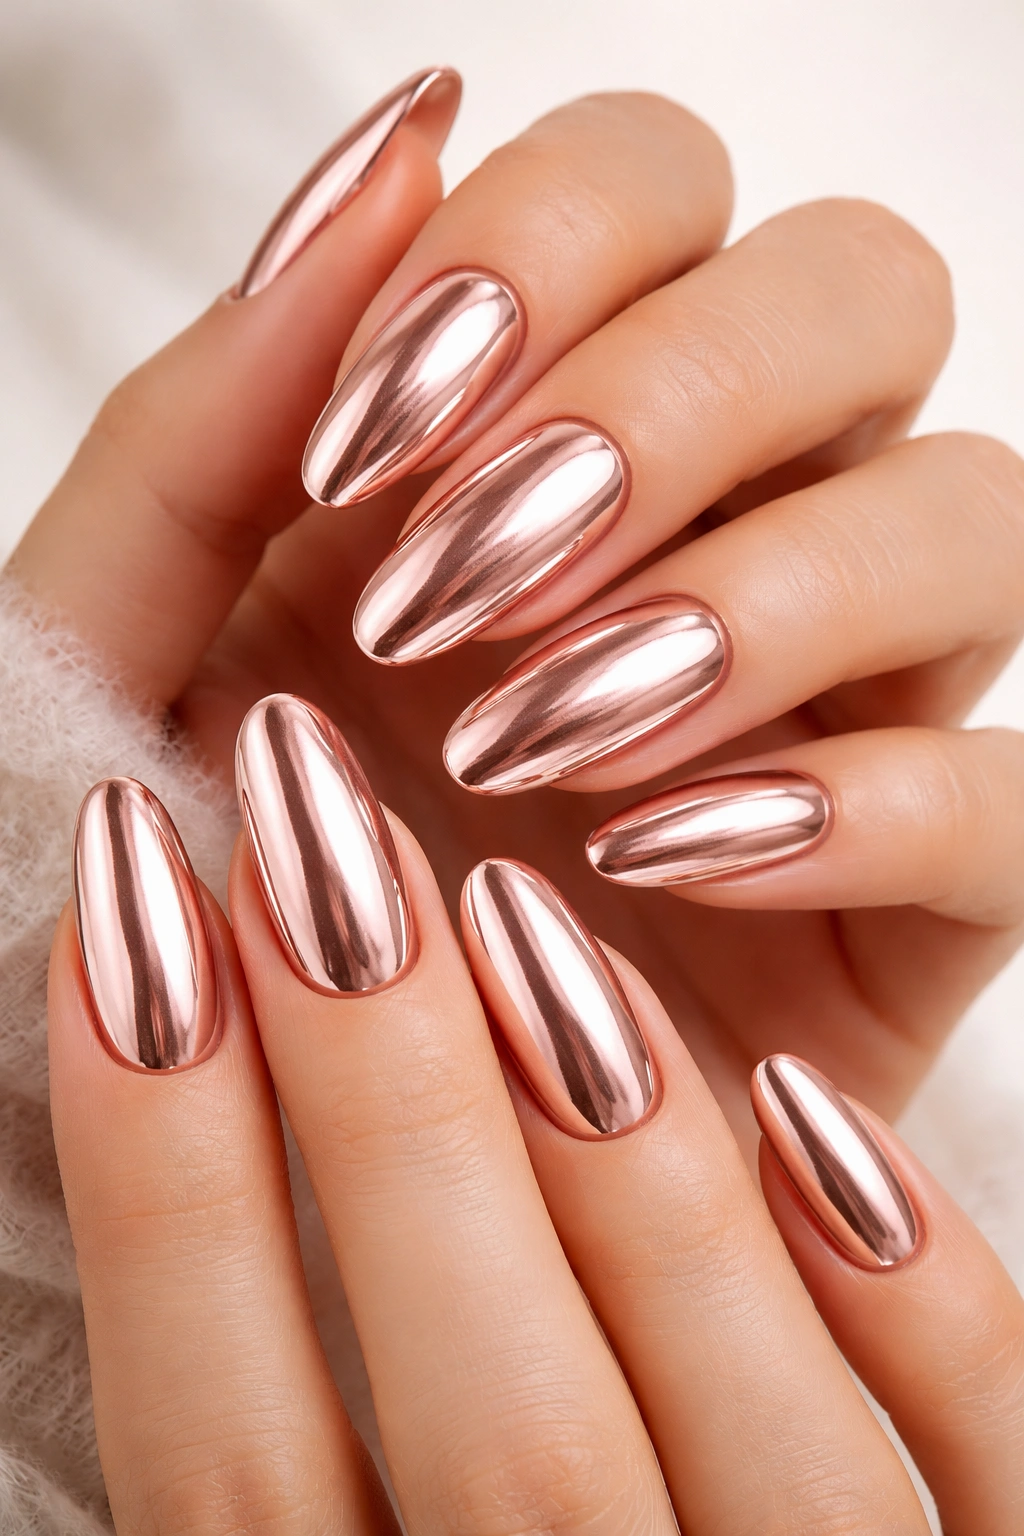
Rose gold on its own is lovely, but rose gold with a chrome effect becomes something else entirely—lustrous, shimmery, and distinctly modern. The chrome effect creates a mirror-like, almost liquid appearance that makes long oval nails look almost otherworldly and expensive. This is the nail equivalent of wearing a rose gold gown.
Understanding Chrome Effect Polish
Chrome effect polish contains metal particles that create an almost metallic, mirrored finish. When applied properly, it catches light in multiple directions and appears to shift and shimmer. On rose gold, this effect is particularly stunning because rose gold already has natural warmth and glamour—the chrome effect amplifies it.
Rose Gold Chrome Variations
- Full chrome coverage for maximum impact
- Chrome effect concentrated only on the tips for a reverse ombre effect
- Matte rose gold base with chrome on half the nail for texture contrast
- Chrome effect only on accent nails for statement impact
Important note: Chrome polish typically requires a specific basecoat and application method to achieve the full effect. Ask your technician to use quality chrome polish and proper preparation for best results.
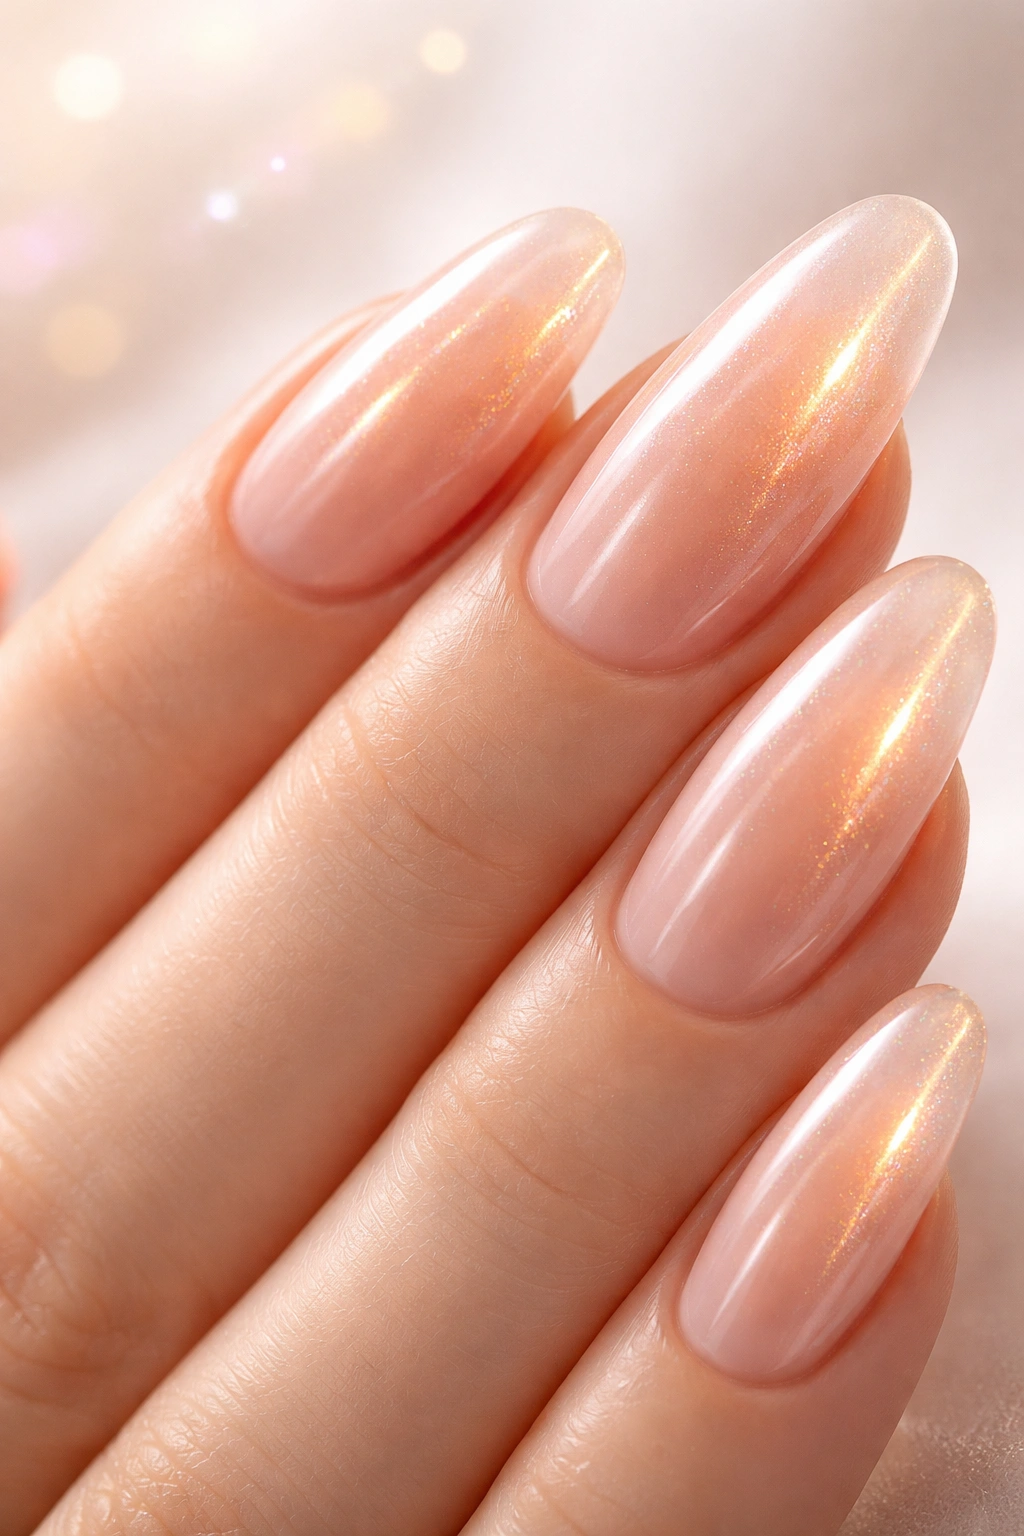
15. Blush Pink with Pearl Finish
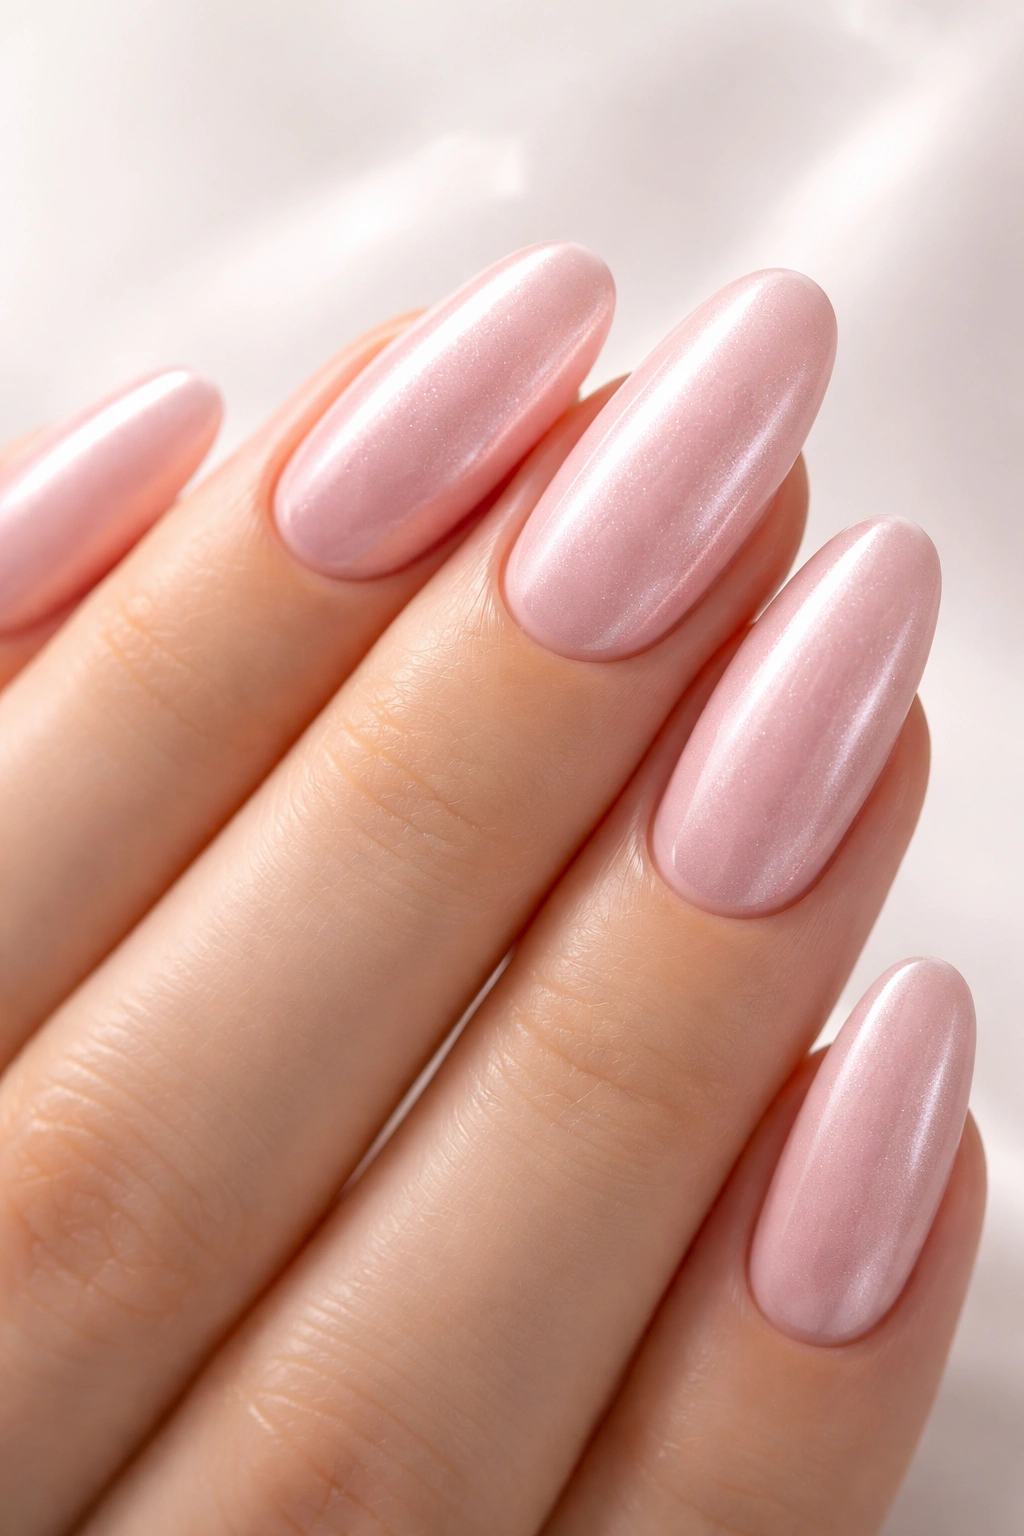
Blush pink—that soft, barely-there pink tone—becomes even more sophisticated when given a pearl finish. The pearlescence creates subtle dimension and makes light dance across the nail surface. This design is gentle, romantic, and timelessly elegant. It reads as the nail equivalent of a pearl necklace—classic and refined.
The Appeal of Pearl Finish
Pearl finish nail polish contains fine shimmer particles that create dimension rather than obvious sparkle. The effect is sophisticated and understated. You notice the shimmer when light hits it directly, but from a distance, the nails appear to be a clean, solid color. This makes it perfect for situations where you want something special without broadcasting it.
Blush Pearl Combinations
- Blush pink with standard pearl finish for soft sparkle
- Blush pink base with heavier pearl concentration on tips
- Blush pink with opal-effect finish for more color-shifting properties
- Blush pink and nude pearl for a barely-there ombre
Real-world note: Pearl finish nails photograph beautifully because the shimmer creates interesting light play in photos. This makes it a particularly good choice if you want nails that look special in pictures.
16. Chocolate Brown with Gold Flakes
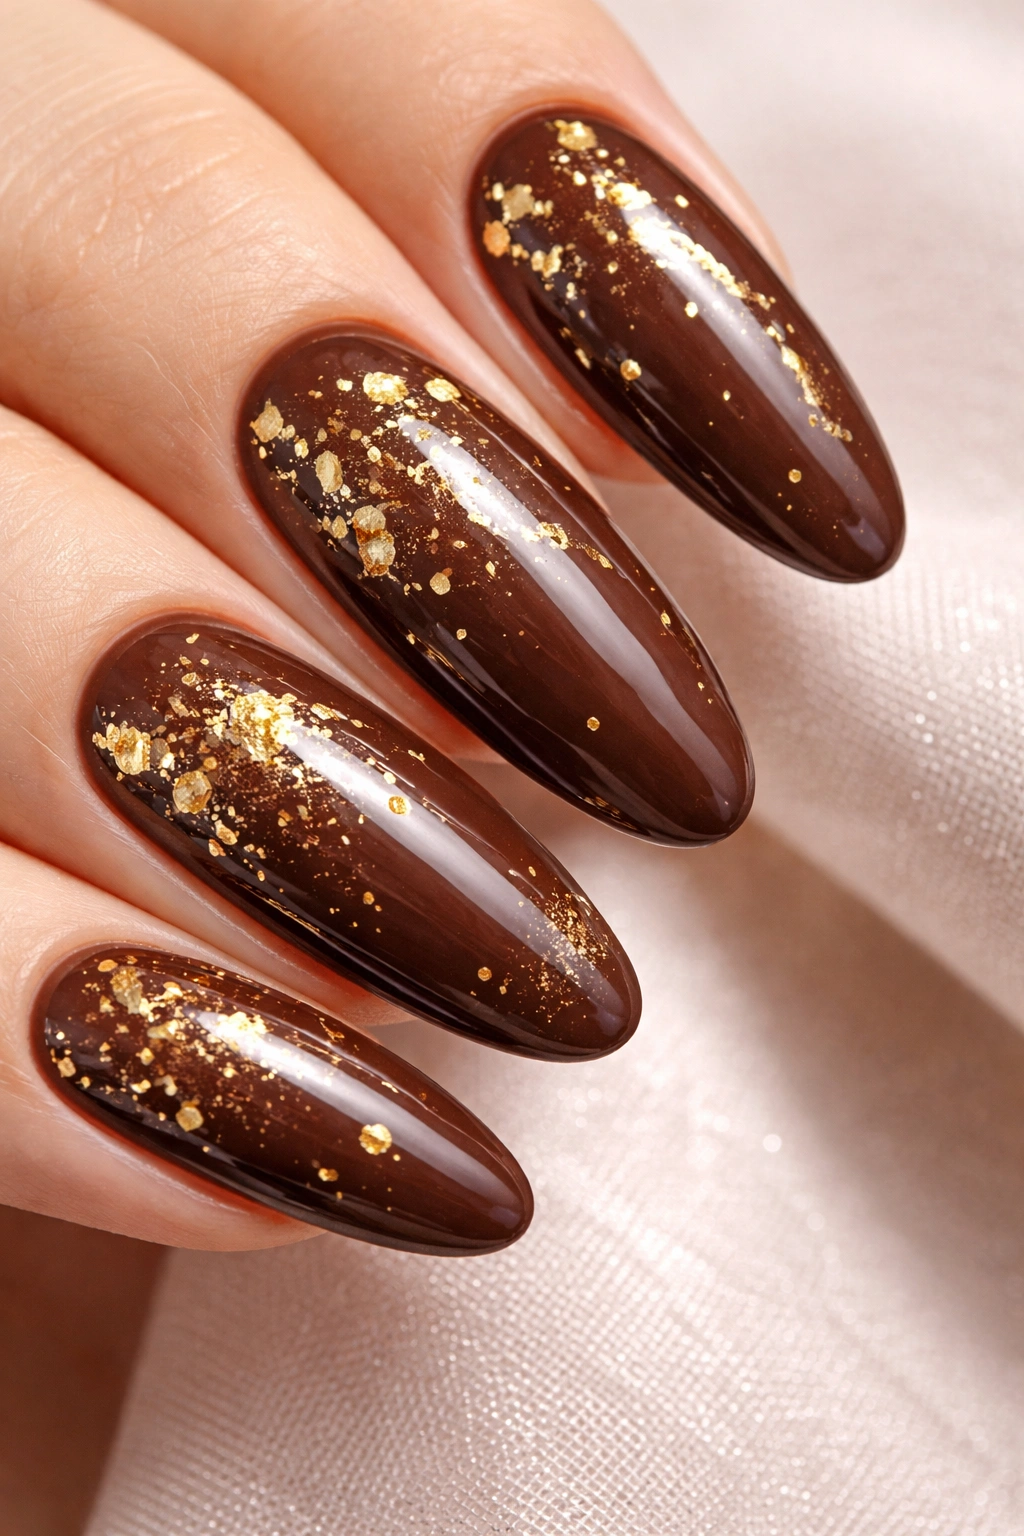
Chocolate brown is an underrated nail color that conveys luxury, warmth, and sophistication. When you scatter gold flakes across a chocolate brown base, you’re adding richness and glamour. The gold creates the illusion of embedded precious metal, making these nails look like they should cost significantly more than a standard manicure.
Why Brown Gets Overlooked
Brown is often dismissed as boring, but on nails it’s actually quite sophisticated. It pairs beautifully with virtually any outfit because it’s neutral but has more depth and character than gray or beige. Chocolate brown specifically—a warm, rich brown with slight reddish undertones—is luxurious and intentional.
Gold Flake Placements
- Scattered throughout for an all-over effect
- Concentrated near the tips for a gradient feel
- Placed only on the bottom third for subtle interest
- Create one solid gold stripe down the center with flakes scattered around it
Pro tip: The size of the gold flakes matters. Larger flakes look more dramatic and intentional. Smaller flakes create a more integrated, refined effect. Choose based on how bold or subtle you want the design to be.
17. Soft Lavender with Butterfly Design

Lavender is the color of calm and creativity, and when you add a delicate butterfly design—whether a single butterfly on an accent nail or butterflies scattered across all nails—you create something whimsical and thoughtful. The lavender base keeps things sophisticated while the butterflies add personality and visual interest.
Creating Butterfly Details
Butterfly designs work on long oval nails because the shape provides enough space for wing details to be visible and intricate. The elongated nail shows off the butterfly silhouette beautifully. Whether you go with a realistic butterfly design or a more abstract, geometric representation, the visual impact is significant.
Butterfly Design Options
- Single butterfly on an accent nail with solid lavender on others
- Butterflies scattered across all nails in varying sizes
- One large butterfly spanning from the base to the tip area
- Abstract butterfly silhouettes in darker purple or gold
Quick fact: Butterflies are one of the most wearable designs because they’re delicate, universally recognized, and work across various styles and occasions. They’re more sophisticated than typical nail art because they suggest intentionality and creativity.
18. Cream with Delicate Floral Art
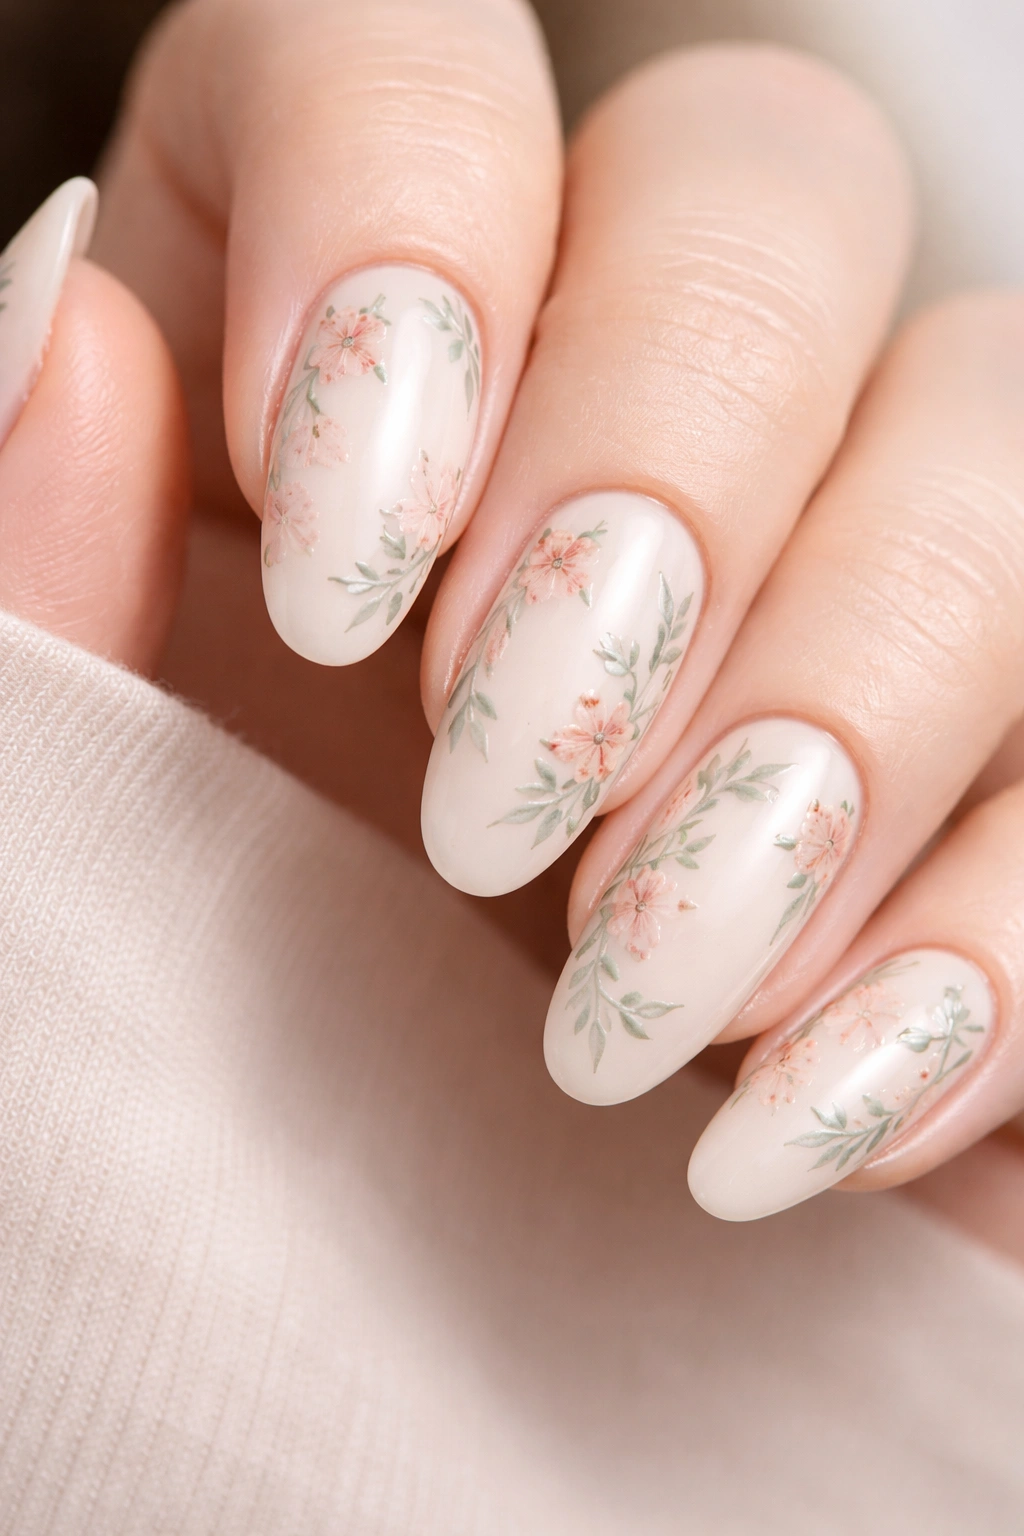
A cream base provides a soft, warm neutral canvas for delicate floral artwork. Tiny flowers, vines, or botanical elements painted in muted tones—dusty rose, sage green, soft peach—create a romantic, garden-inspired aesthetic. The cream keeps everything soft and wearable while the florals add personality and charm.
Floral Design Considerations
Floral designs work best when they’re detailed but not overly busy. Tiny flowers with fine line work look elegant and intentional. Large, bold florals can feel costume-like on nails. The key is choosing floral designs that are proportionate to the nail surface and don’t overwhelm the shape.
Floral Arrangement Options
- Wildflower cluster on the outer edge of each nail
- Single flower on one accent nail with vines on others
- Scattered tiny flowers across all nails
- Botanical arrangement that wraps around the side of the nail
Design note: Floral art reads as more sophisticated on long oval nails than on shorter nails because there’s more room for detail and the elongated shape complements the delicate nature of flowers.
19. Midnight Black with Holographic Finish

Midnight black provides a dramatic, high-contrast base for holographic finish, which refracts light into rainbow colors. The result is nails that look otherworldly and futuristic while still being wearable. The holographic effect is most visible when light hits the nails at different angles, creating movement and dimension.
Understanding Holographic Effect
Holographic nail polish contains special light-refracting particles that break light into rainbow colors. The effect is most visible in bright or direct light and creates a multi-colored sheen even though the base color is black. This creates a dynamic visual that changes depending on lighting conditions.
Holographic Effect Styles
- Full holographic coverage for maximum effect
- Holographic on tips with solid black base for a gradient effect
- Holographic on one or two accent nails for statement impact
- Holographic combined with matte black for texture contrast
Real consideration: Holographic effects can sometimes wash out or be difficult to see in indoor lighting. They look most dramatic in natural light or in photography. Choose this design if you want nails that are particularly special and dynamic in varied lighting.
20. Sage Green with Matte Finish
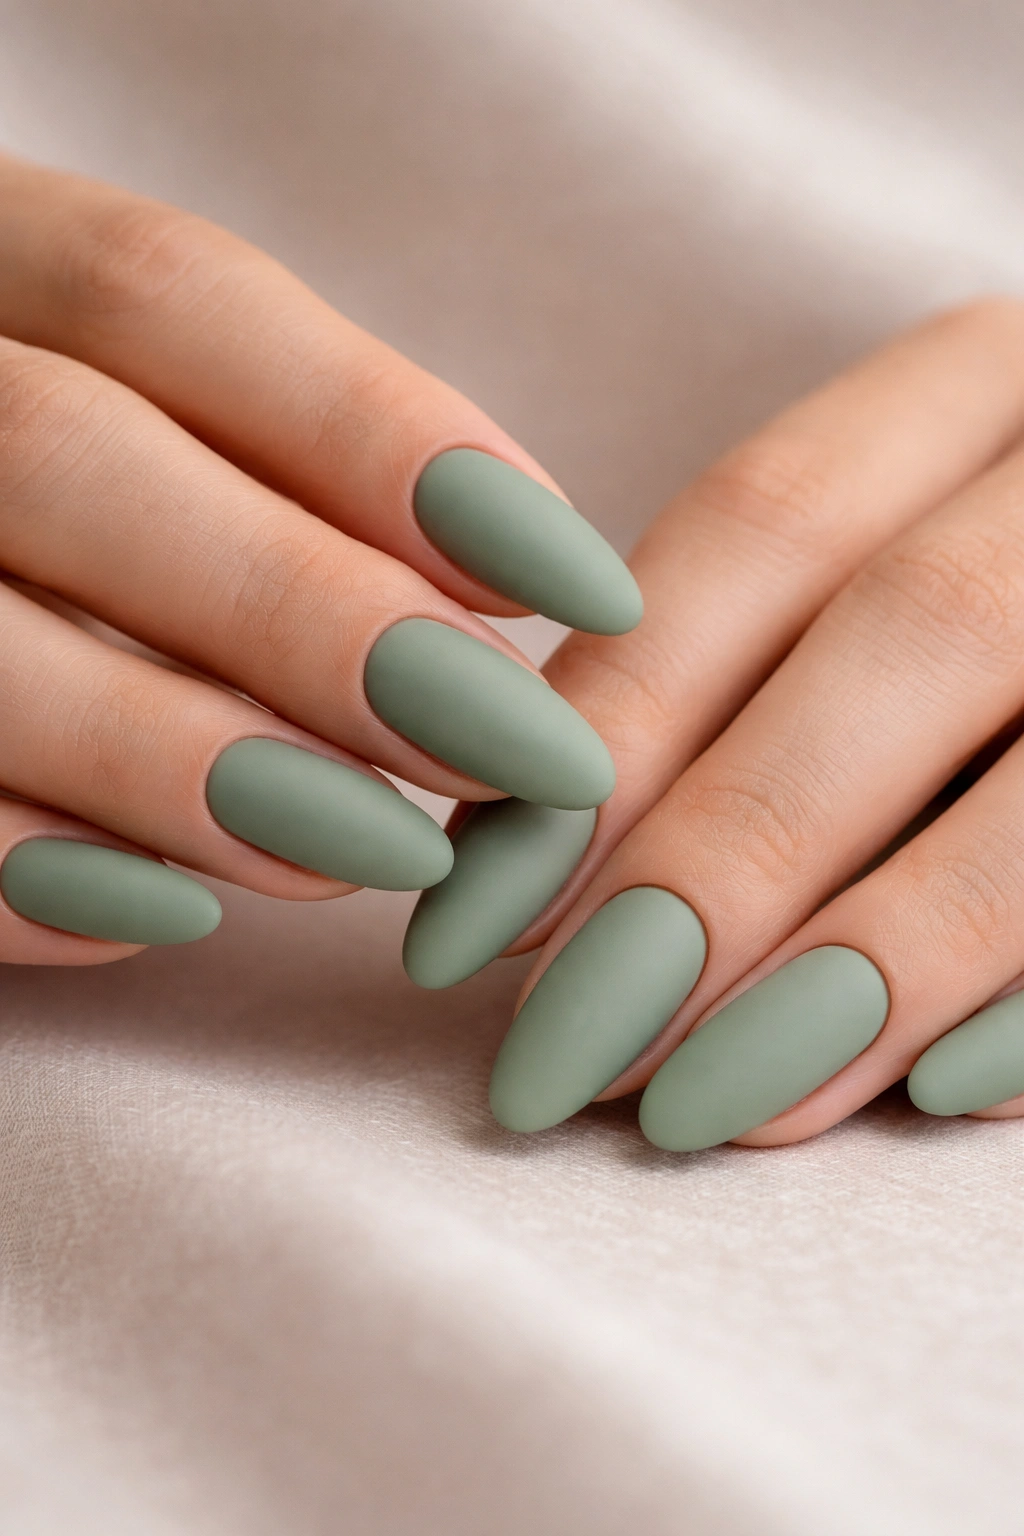
Sage green is the color of nature, calm, and understated sophistication. A matte finish amplifies this effect by removing shine and creating a velvety texture. Matte sage green on long oval nails is extremely wearable—it works with virtually every outfit and reads as intentional and thoughtful without being attention-grabbing.
Why Matte Changes Everything
Matte finishes change the perceived depth and richness of a color. They feel less shiny and more like a solid texture, which gives matte nails a more premium, almost luxe appearance. Sage green in matte is particularly sophisticated because it appears deeper and more intentional than glossy sage green.
Sage Green Matte Applications
- Solid matte sage green on all nails for cohesive elegance
- Matte sage on most nails with glossy sage on one accent nail
- Matte sage with a subtle texture (like a suede effect) for added interest
- Matte sage green base with thin gold line accent
Pro tip: Matte finishes require proper topcoat and maintenance to keep the matte texture intact. Ask your technician about the best topcoat for your chosen matte polish to ensure longevity.
21. Warm Caramel with Ombre Gradient
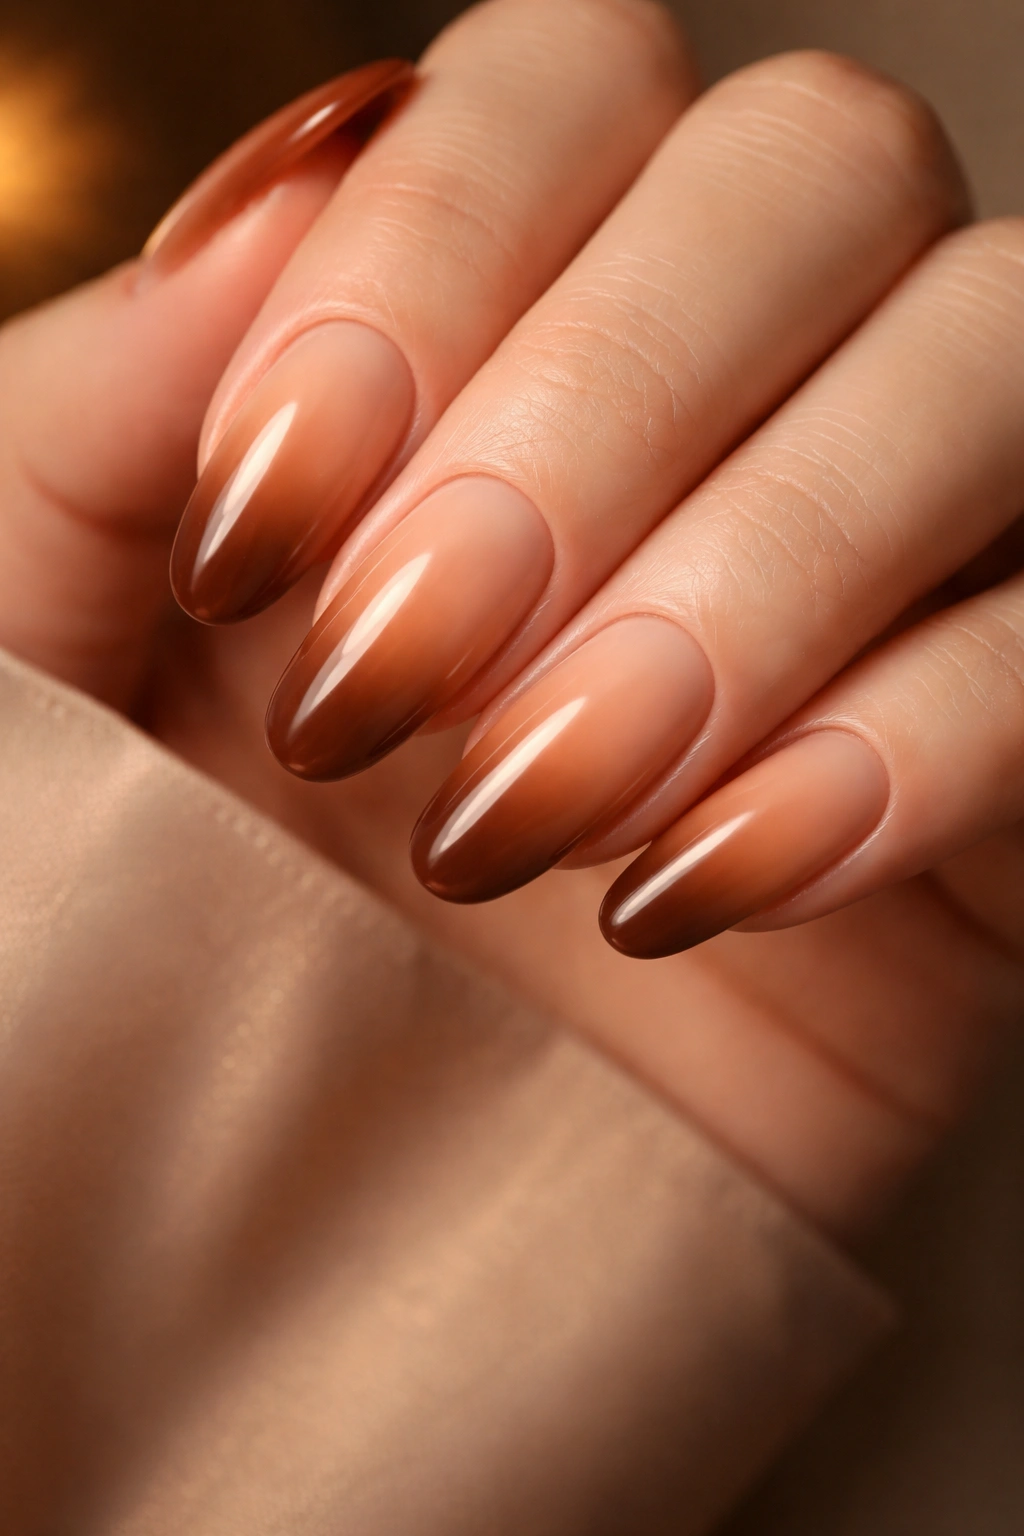
Caramel is warm, rich, and deeply flattering. An ombre gradient starting with a pale caramel at the base and deepening to a rich chocolate caramel at the tip creates incredible depth and dimension. This design is warm, luxurious, and works beautifully on long oval nails where the ombre can develop gradually across the elongated surface.
Building a Caramel Ombre
A proper ombre requires blending two to three shades seamlessly. With caramel, you’re working within a warm color family, so the transition appears unified rather than contrasting. The gradient should be so smooth that it’s impossible to point to exactly where one shade ends and another begins.
Caramel Ombre Shade Progressions
- Pale champagne caramel to deep chocolate caramel
- Light golden caramel to rich burnt caramel
- Vanilla caramel to toffee caramel
- Caramel to amber for additional depth
Quick detail: The warmth of a caramel ombre makes it particularly flattering on warm skin tones, but it can work beautifully on cool skin tones if you lean slightly toward the more golden versions rather than the brown ones.
22. White with Minimalist Line Design

White nails provide a pristine canvas for minimalist line design. Whether you choose one single line down the center, multiple geometric lines, or abstract line work, white keeps everything clean and sophisticated. Minimalist designs work particularly well on long oval nails because the shape accommodates line-based designs beautifully.
The Power of Minimalism on White
White amplifies the impact of line work because the lines appear in sharp contrast. Even a single thin line becomes a statement on a white nail. This means you can achieve a sophisticated, intentional look without requiring complicated or time-consuming nail art. Simplicity becomes elegance.
Line Design Options
- Single vertical line down the center
- Two parallel vertical lines creating a frame
- Horizontal line at a specific height
- Angular or abstract lines that suggest movement
- Minimal geometric shapes (small triangle, small rectangle) on tips
Design note: The color of the lines matters—black creates the most contrast and appears most graphic. Gray creates a softer effect. Colored lines (gold, rose gold) add warmth while maintaining the minimalist aesthetic.
23. Deep Red with Gold Leaf Accents
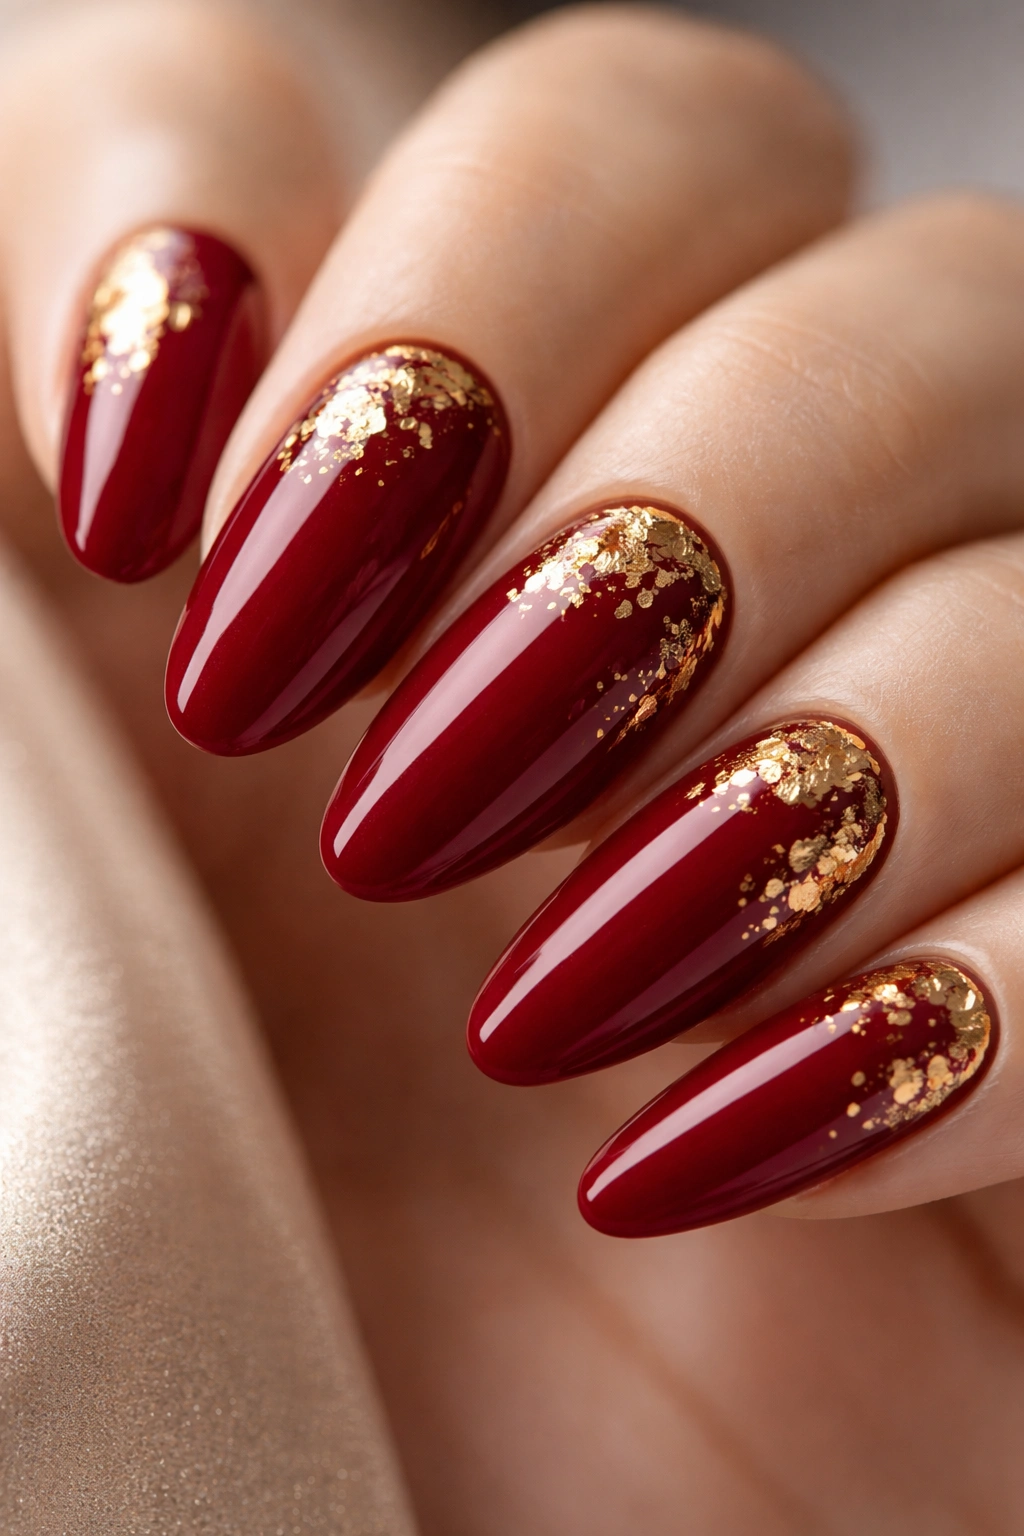
Deep red—true red with depth and richness, not bright cherry red—is the ultimate glamorous color. When you add gold leaf accents in organic placements, you create nails that look like they belong to someone elegant and put-together. Deep red with gold screams luxury, intention, and confidence.
Choosing the Right Red Undertone
Reds can range from orange-based (warm red) to blue-based (cool red) to brown-based (deep burgundy-red). Choose a red that harmonizes with your skin tone. Warm skin tones generally look better in orange-based or warm reds. Cool skin tones are often flattered by blue-based reds. Deep reds tend to work across multiple skin tones because of their inherent richness.
Gold Leaf Placement Ideas
- Scattered organic placements across all nails
- Concentrated in the center of each nail
- Gold leaf only on the tips for a half-and-half effect
- Gold leaf creating a scattered pattern that flows across multiple nails
Real-world note: Deep red with gold is essentially formal wear for your nails. It’s perfect for special occasions, evening events, or when you want to convey elegance and intention.
24. Pale Pink with Tiny Diamond Studs

Pale pink on long oval nails is inherently elegant, and when you add tiny diamond studs (or rhinestones that resemble diamonds), you create a design that’s subtle enough for everyday wear but special enough for elegant occasions. The diamonds catch light and add sparkle without creating an over-the-top effect.
Why Studs Work Better Than Scattered Stones
Studs—rhinestones applied in specific, intentional placements—look more refined and designed than scattered rhinestones. Whether you place studs along the tip edge, in a cluster on an accent nail, or in a single line down the center, the intentional placement elevates the design from decorative to curated.
Stud Placement Options
- Single diamond stud on each nail in the same location
- Stud cluster on one accent nail only
- Diamond studs along the tip edge like a tiny necklace
- Two or three diamond studs in a diagonal line
Pro tip: Tiny studs look more elegant and refined than large ones. The scale should feel proportionate to the nail rather than overwhelming it. This is one of those designs where “less is more” is absolutely true.
25. Soft Gray with Silver Chrome Effect
Gray is the ultimate sophisticated neutral, and when you pair it with a silver chrome effect, you create something that reads as upscale and modern. The chrome effect transforms what could be a plain gray into something lustrous and dimensional. This is office-appropriate glamour.
The Neutrality of Gray
Gray can sometimes read as boring or sad, but soft gray with chrome effect reads as intentional, modern, and sophisticated. The chrome element ensures the nails feel special and intentional rather than like you didn’t make a decision about color. It’s the nail equivalent of wearing a neutral designer outfit.
Gray Chrome Variations
- Soft dove gray with subtle silver chrome
- Slightly warmer gray with cool silver chrome for contrast
- Matte gray with chrome on just the tips
- Gray with white chrome effect instead of silver chrome
Real consideration: Chrome effects are particularly striking on gray because gray provides the perfect neutral backdrop for the light-refracting properties of chrome. The effect appears more dramatic than it would on warmer colors.
26. Peachy Nude with Glow-Up Effect
Peachy nude is flattering on virtually every skin tone, and when you add a glow-up effect—a luminous, almost iridescent shimmer—you create nails that look radiant and expensive. The glow effect makes the nails appear to emanate light, creating an almost dewy, radiant appearance.
Creating a Glow Effect
Glow effect comes from specific shimmer polishes or layering translucent shimmers over a solid base. The result is a nail that appears to glow from within rather than just reflecting light from the surface. On peachy nude, this creates a healthy, radiant appearance.
Glow Effect Applications
- Full glow effect over peachy nude base
- Glow concentrated on the center of the nail with matte edges
- Glow on tips only with solid peachy nude at base
- Subtle glow that just adds luminosity without being sparkly
Quick fact: Glow effects photograph incredibly well because the luminosity translates beautifully in photos, making nails look especially radiant and special in images.
27. Charcoal with Rose Gold Speckles
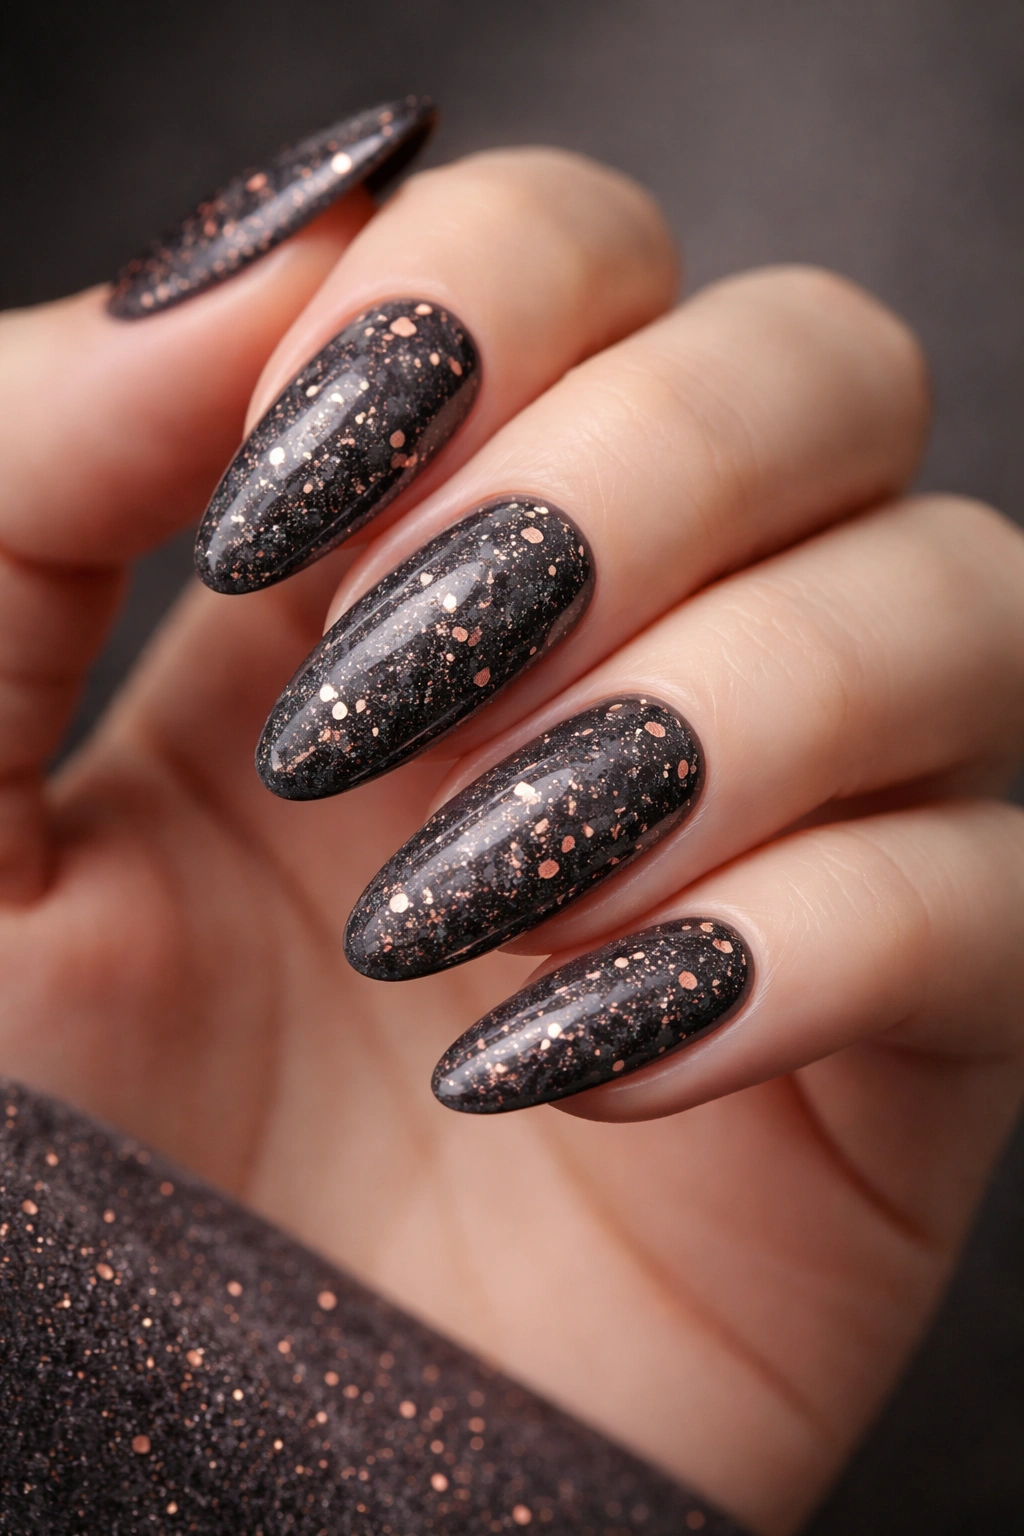
Charcoal is deeper and more sophisticated than regular gray, creating a dramatic, moody backdrop. Rose gold speckles scattered across the surface add warmth, glamour, and light. The speckles create the illusion of embedded precious metal, making these nails look luxurious and intentional.
The Appeal of Charcoal Base
Charcoal is dark enough to make lighter accent colors pop but not as harsh as black. It reads as more refined and intentional than black, and it provides a beautiful neutral backdrop for metallic accents. Charcoal with rose gold is particularly striking because the warm rose gold contrasts beautifully with the cool charcoal.
Rose Gold Speckle Patterns
- Scattered throughout for an all-over glittery effect
- Concentrated on tips for a gradient appearance
- Placed only on the lower third of the nail
- Create geometric patterns with rose gold speckles
Design detail: The density of speckles affects the overall appearance. Dense speckles create a more glamorous, attention-getting effect. Sparse speckles create a more refined, understated look.
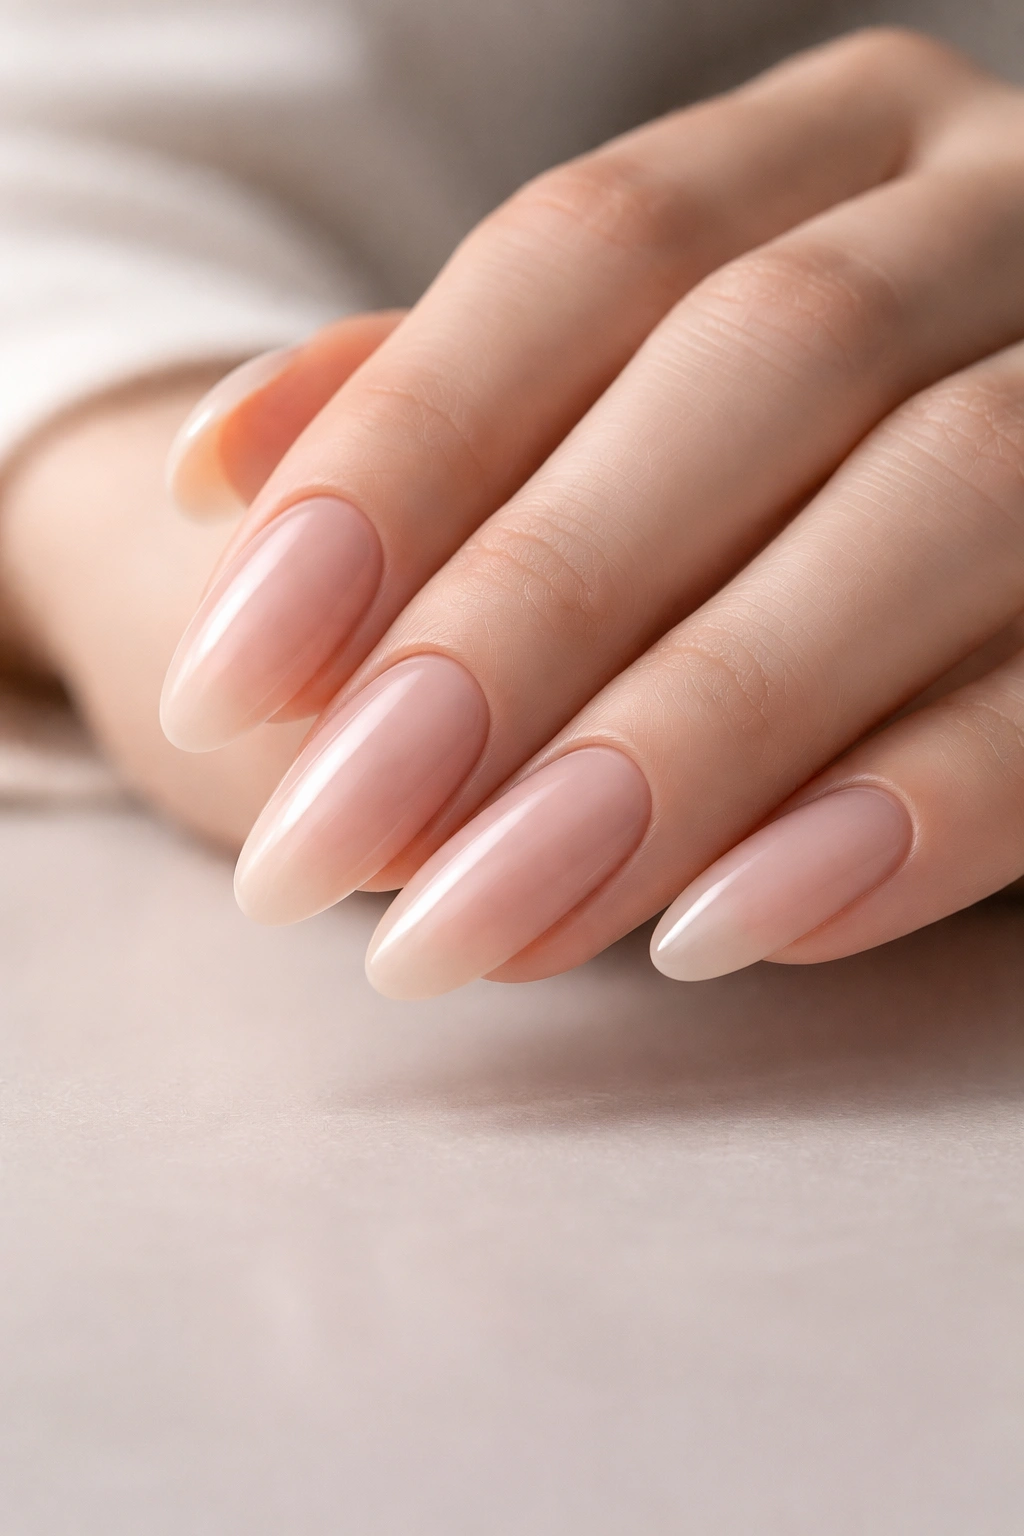
28. Light Nude with Nude Ombre Gradient
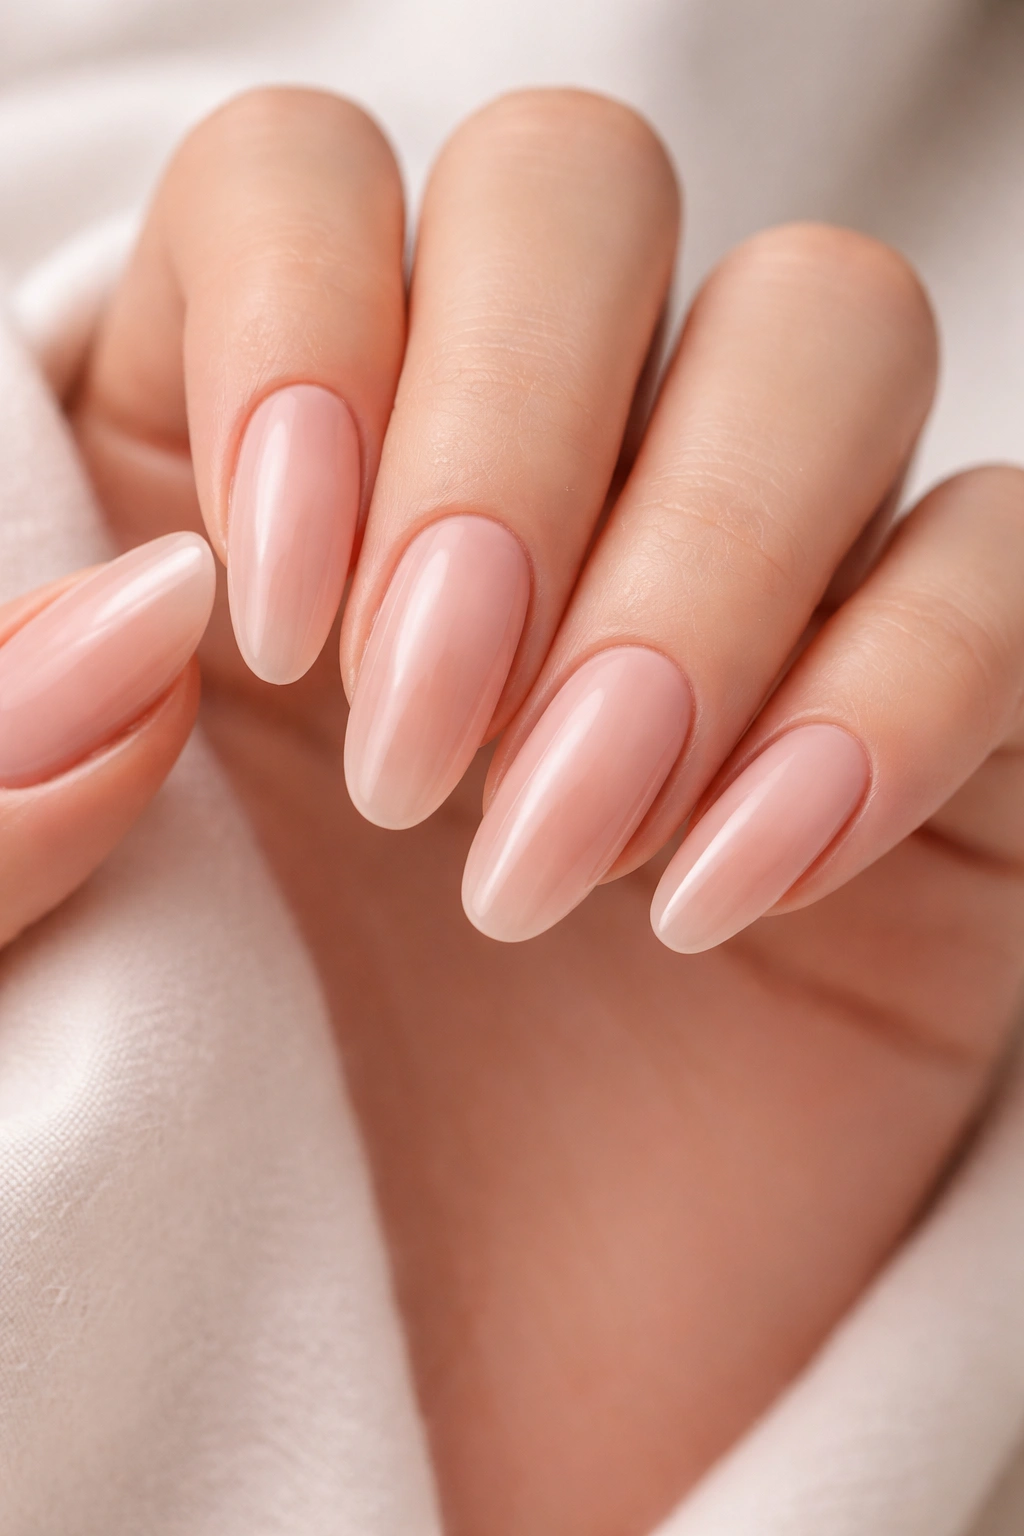
When every element of the design stays within the nude color family, you create something surprisingly sophisticated. A light nude base with a subtle ombre gradient to a slightly deeper nude creates luminosity, dimension, and visual interest while maintaining a completely neutral, universally flattering appearance. This design is the ultimate “expensive looking” manicure.
Why Monochromatic Ombres Work
Ombre designs within the same color family are harder to execute than designs with contrasting colors, but when done well, they appear more sophisticated and intentional. The gradient creates visible dimension and depth while maintaining color coherence. On long oval nails, this creates an elongated line of graduated color that’s visually stunning.
Nude Ombre Variations
- Barely-there white-nude to soft nude
- Soft peachy nude to warmer caramel nude
- Cool beige nude to warmer tan nude
- Translucent nude to opaque nude for subtle depth
Pro tip: Nude ombre is hardest to see and appreciate in person—it photographs beautifully and looks most striking when light hits it at certain angles. This makes it perfect if you want something special that doesn’t broadcast itself loudly.
29. Dusty Rose with Matte Texture
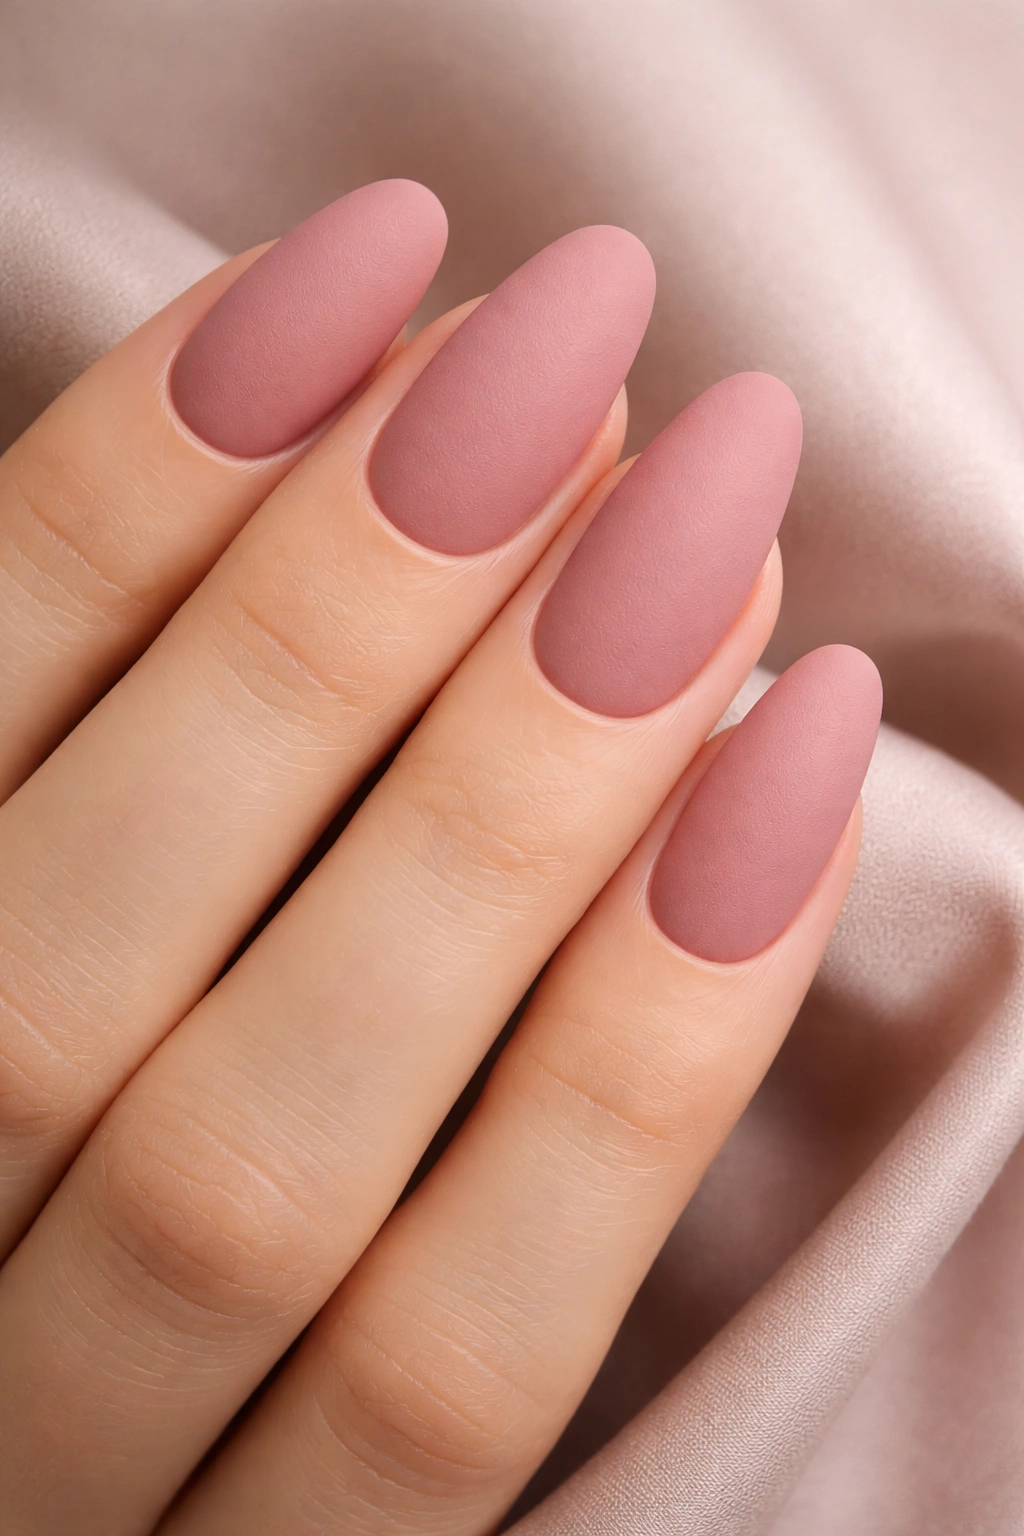
Dusty rose is pink with brown and gray undertones, making it sophisticated and muted in the best way. A matte finish on dusty rose creates a velvety texture that reads as premium and intentional. This is the color of romance and elegance without being juvenile or overly feminine.
The Sophistication of Dusty Tones
Dusty rose belongs to a family of tones that include dusty mauve, dusty purple, and dusty coral—all characterized by subdued, muted beauty. These tones feel more grown-up and intentional than bright, pure versions of colors. Dusty rose specifically bridges femininity and neutrality beautifully.
Matte Dusty Rose Applications
- Solid matte dusty rose on all nails for cohesive elegance
- Matte dusty rose with one glossy accent nail for contrast
- Matte dusty rose with minimal accent details
- Matte dusty rose with subtle texture variation
Worth knowing: Dusty rose can appear different depending on lighting conditions—it might appear more mauve in some light and more pink in others. This adds to its sophisticated, complex appearance.
30. Champagne with Subtle Sparkle
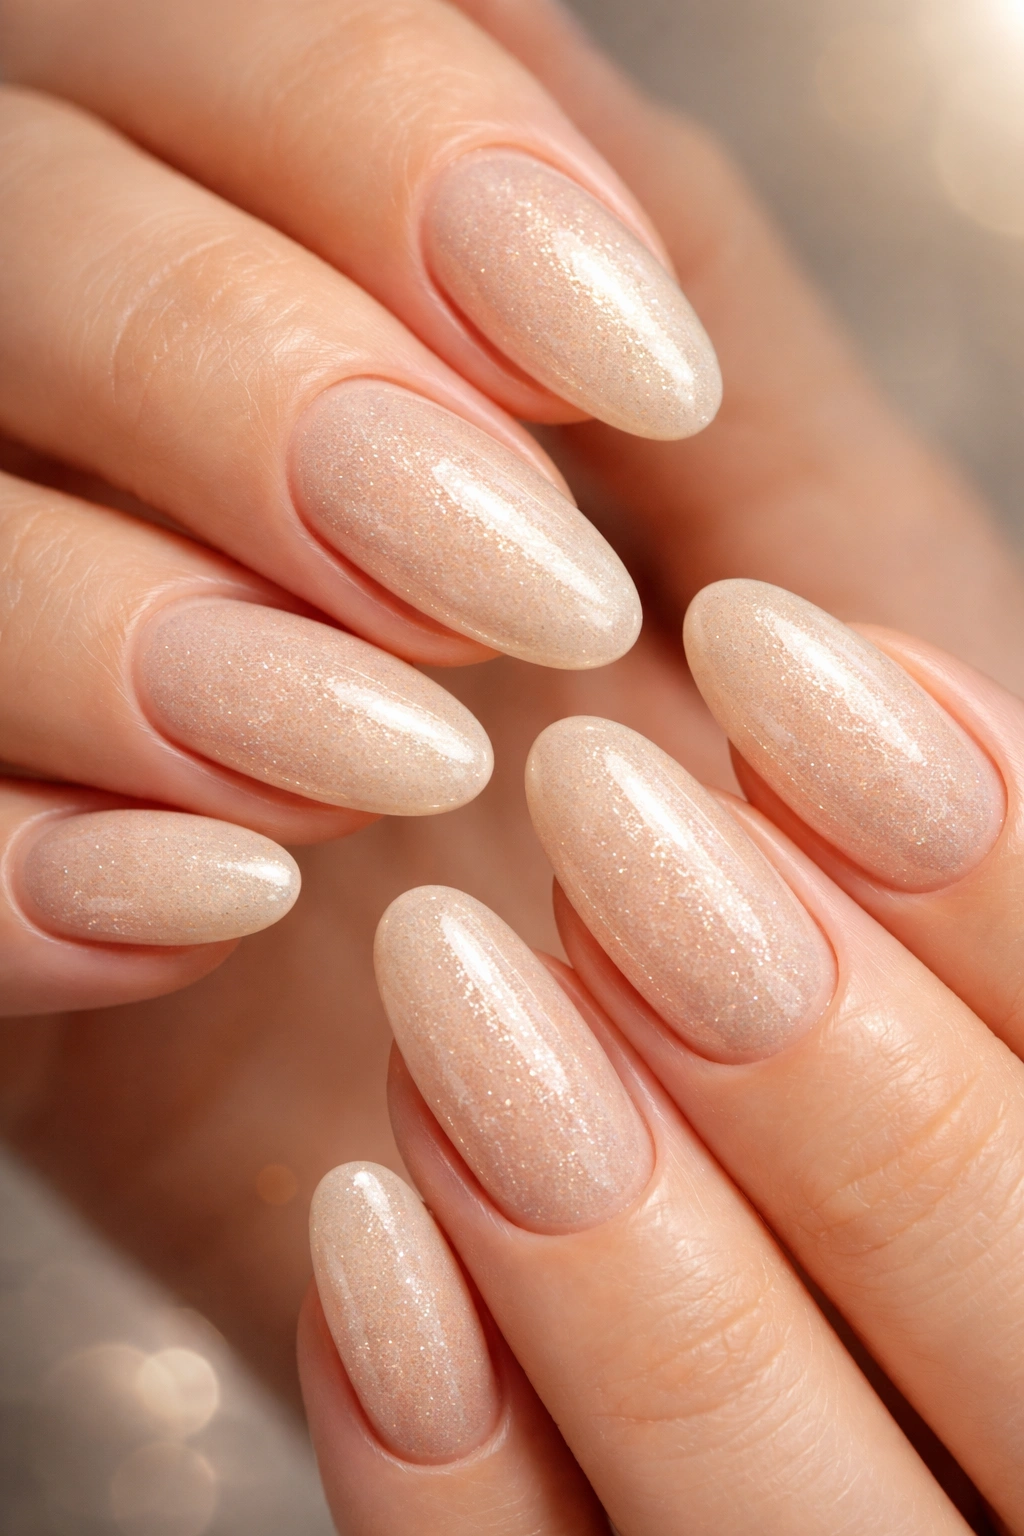
Champagne is the ultimate celebration color—warm, luxurious, and universally flattering. When you add subtle sparkle—not glitter, but a gentle shimmer that catches light without being obvious—you create nails that feel special for any occasion. This is champagne in the traditional sense: refined, celebratory, and timelessly elegant.
The Universal Appeal of Champagne
Champagne works beautifully on every skin tone because it’s warm without being yellow, neutral without being boring, and shimmery without being loud. Subtle sparkle enhances this effect by adding luminosity and dimension while maintaining the elegant, sophisticated feel of the color.
Champagne Sparkle Styles
- Uniform subtle sparkle throughout the nail
- Sparkle concentrated on tips for a gradient effect
- Champagne base with glossy finish and tiny sparkle flecks
- Champagne with pearl finish for understated shimmer
Final thought: Champagne with subtle sparkle is wearable for virtually any occasion—from everyday wear to formal events. It’s a safe choice that never fails to look polished and intentional, making it perfect when you want something reliable that you know will look great.
Final Thoughts
Long oval nails provide the perfect canvas for expressing your personal style, whether you’re drawn to classic elegance, modern minimalism, or creative artistic designs. The shape itself is flattering and versatile—it elongates your fingers, looks expensive, and works across virtually every aesthetic and occasion.
The designs explored here represent just a fraction of the possibilities available when working with this beautiful nail shape. The key is choosing designs that resonate with your personal style and the image you want to project. Whether you opt for something timeless and neutral or bold and artistic, long oval nails will frame your chosen design beautifully.
Start with an inspiration image when you visit your technician. Share clearly what appeals to you about each design—the colors, the finish (matte vs. glossy), the specific details. The more specific your communication, the more likely your technician can recreate exactly what you’re envisioning. Long oval nails are forgiving and gorgeous—use them to your advantage and enjoy having nails that feel polished, intentional, and completely you.
