

Long oval nails have become the ultimate canvas for nail art that feels both elegant and modern. The elongated shape naturally draws the eye upward, creating a flattering silhouette on your hand while giving you plenty of real estate for creative designs. Whether you’re drawn to sophisticated minimalism, bold patterns, or shimmery embellishments, the oval shape flatters them all—and that’s what makes this nail style so enduringly popular.
The beauty of long oval nails isn’t just about the shape itself, but about what you can do with it. The length gives you breathing room for intricate details without the sharp points of stiletto nails, while the curve feels organic and timeless rather than trendy. You’ll find that many high-fashion looks, red carpet moments, and social media inspiration boards center on this exact shape because it photographs beautifully and feels comfortable to wear in real life.
The designs below cover everything from barely-there minimalist looks to glamorous jewel-toned statements. Each one works beautifully on the oval shape and translates well whether you’re painting at home or bringing reference photos to a salon. The key to pulling off any of these designs is choosing quality products—a good base coat, highly pigmented polish, and a strong topcoat make all the difference in how long your nails look fresh.
1. Soft Pink French Tips
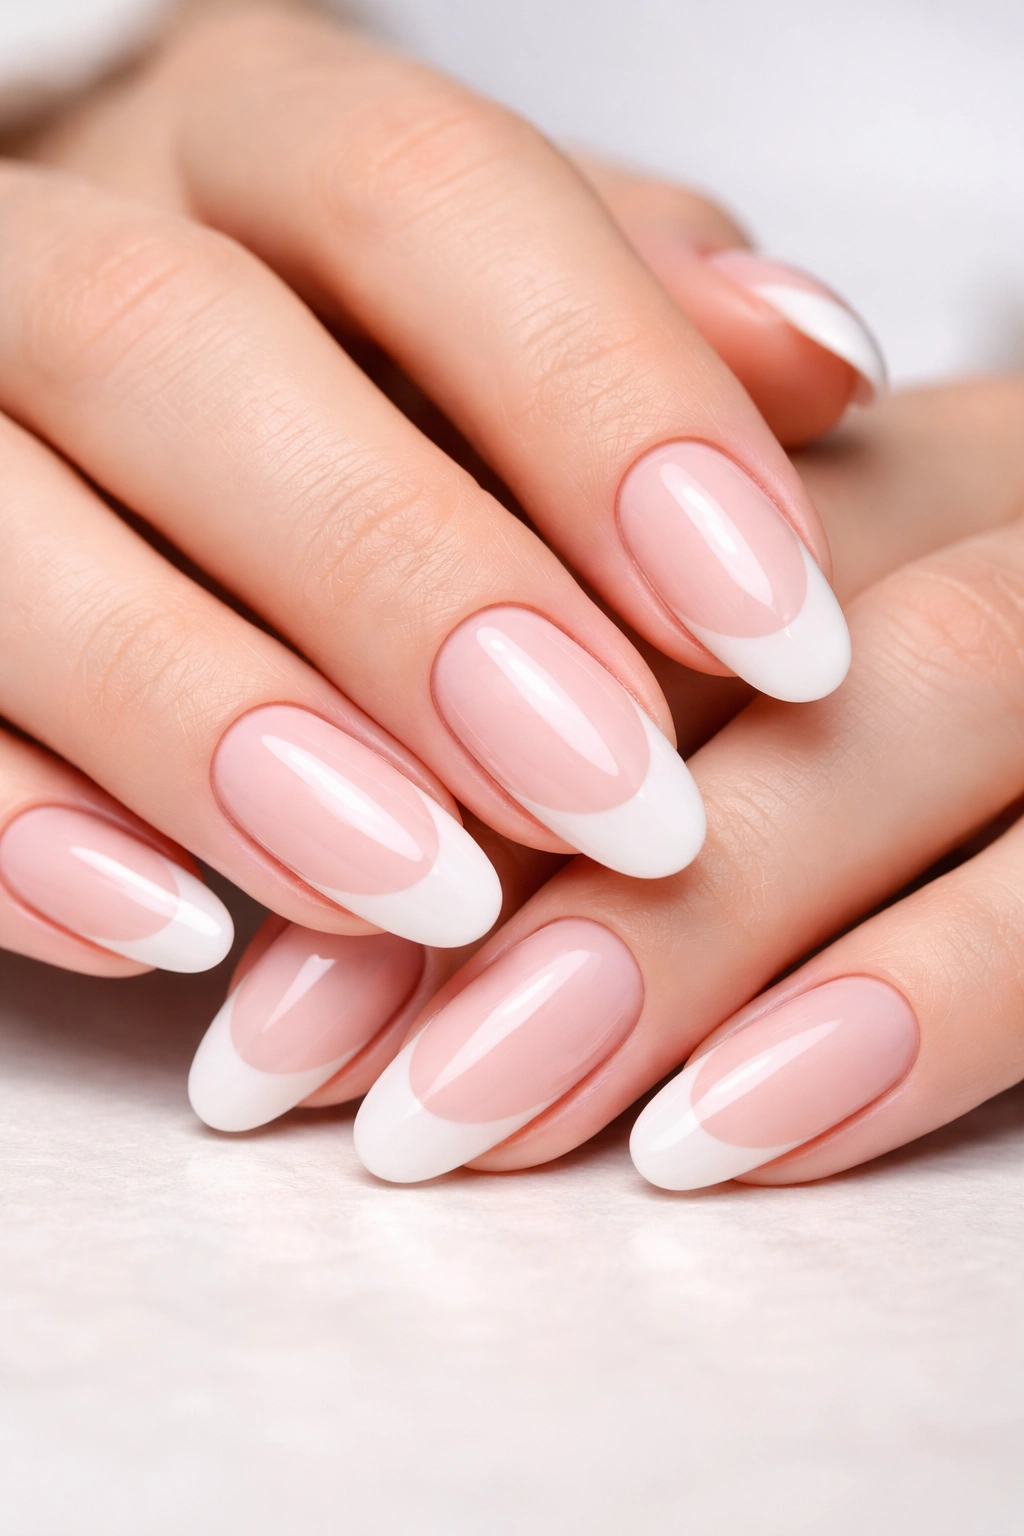
This is where timeless elegance lives. The classic French tip gets a modern refresh when you use a soft, creamy pink as your base and paint the tips in pristine white or cream. The subtle variation between traditional white tips and softer, warmer off-white creates a look that feels contemporary rather than dated.
Why This Design Works So Well
The soft pink French tip plays beautifully with the elongated oval shape because the vertical line of contrast draws attention up the nail and creates an illusion of even greater length. The design is professional enough for any setting—boardrooms, weddings, everyday life—while still feeling intentional and polished. It’s genuinely one of the most versatile nail designs you can wear.
How to Achieve the Look
- Use a pale pink or nude-pink base polish as your foundation (two coats for full coverage)
- Apply a thin, even white or cream stripe across the tip of each nail, keeping the lines clean and straight
- Use a thin liner brush or a nail tape guide to create sharp, defined edges
- Seal with a glossy or matte topcoat depending on your preference
- If you’re not confident with freehand lines, stamping plates designed for French tips make this foolproof
Pro tip: Paint your tips first, then do your base color around them—this prevents smudging and gives you cleaner lines than trying to paint tips over a finished base.
2. Nude Ombre with Glitter
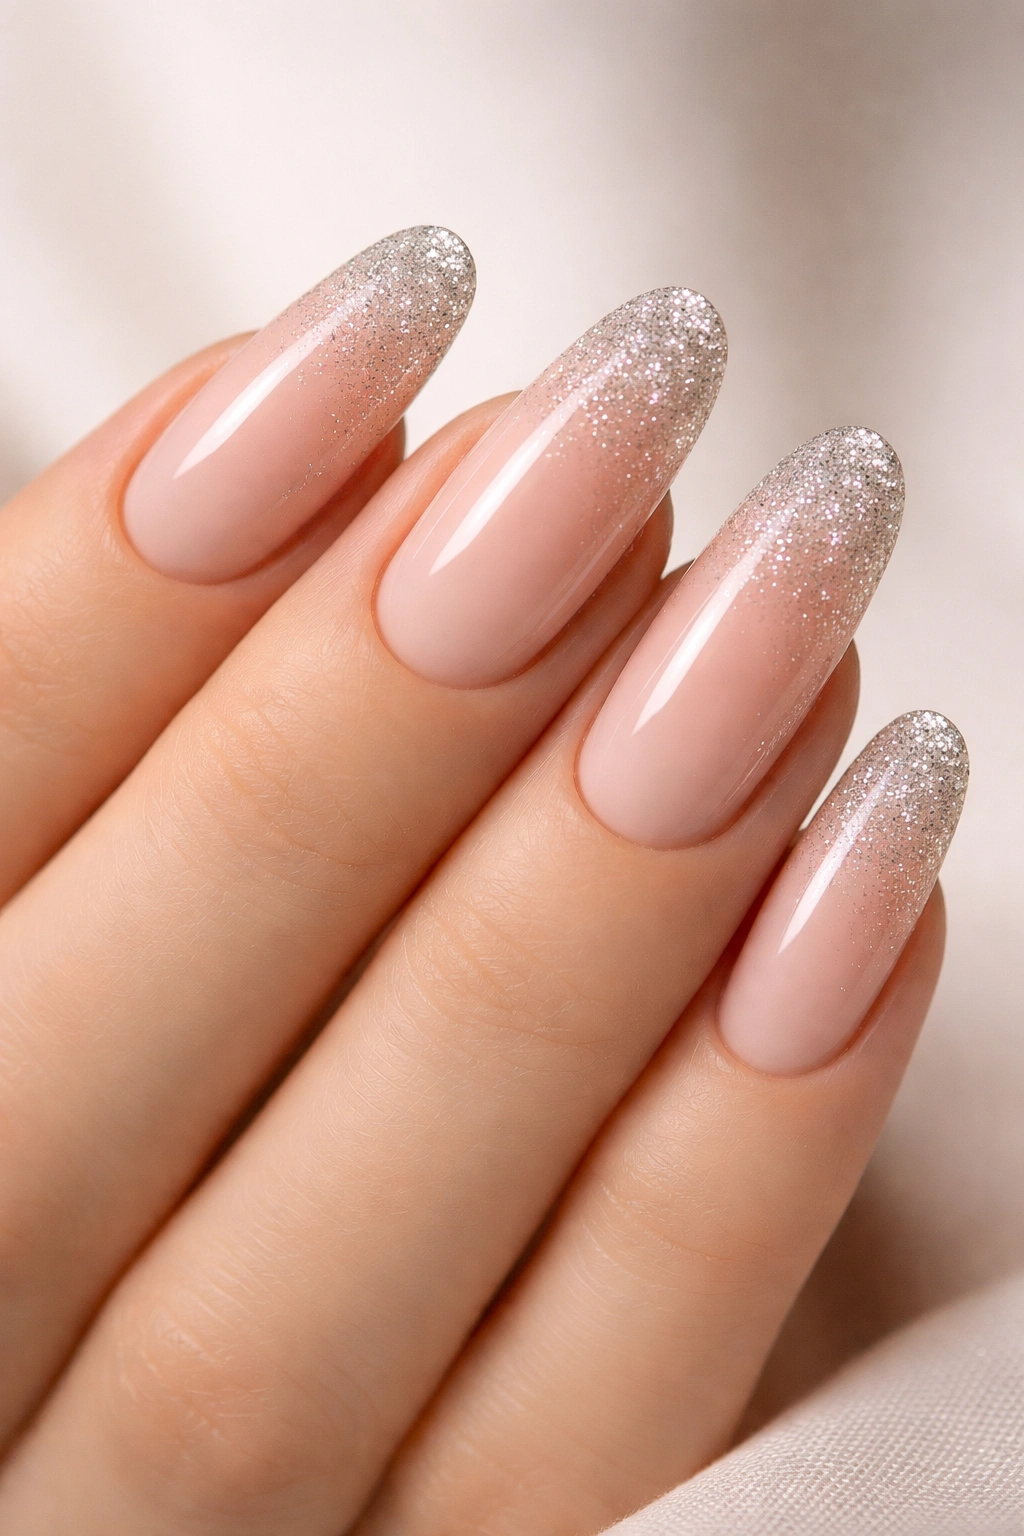
This design walks the perfect line between understated and eye-catching. You start with a neutral nude shade at the nail bed and gradually blend it into shimmering glitter as you move toward the tip, creating an ombré effect that catches light as you move your hands.
The Gradient That Makes This Special
Nude ombre works because it’s subtle enough to wear every day but interesting enough that people actually notice and compliment it. The glitter concentration increases toward the tips, so you get that sparkle where it’s most visible. Long oval nails show this gradient beautifully—the length gives the color transition plenty of space to breathe.
Building Your Ombre
- Start with a nude or warm tan base color as your foundation
- Apply a slightly more shimmer-heavy version of that shade in the middle section
- Blend glitter polish or loose glitter suspended in clear gel into the upper third
- Use a sponge to dab and blend the transition between shades for a seamless gradient
- The key is multiple thin layers rather than one thick layer—this prevents a muddy appearance
- Seal everything with a shiny topcoat that holds the glitter securely in place
A light peachy nude works especially well on this design—it keeps everything warm and cohesive while the glitter adds just enough interest to feel special.
3. Marble and Metallic Mix
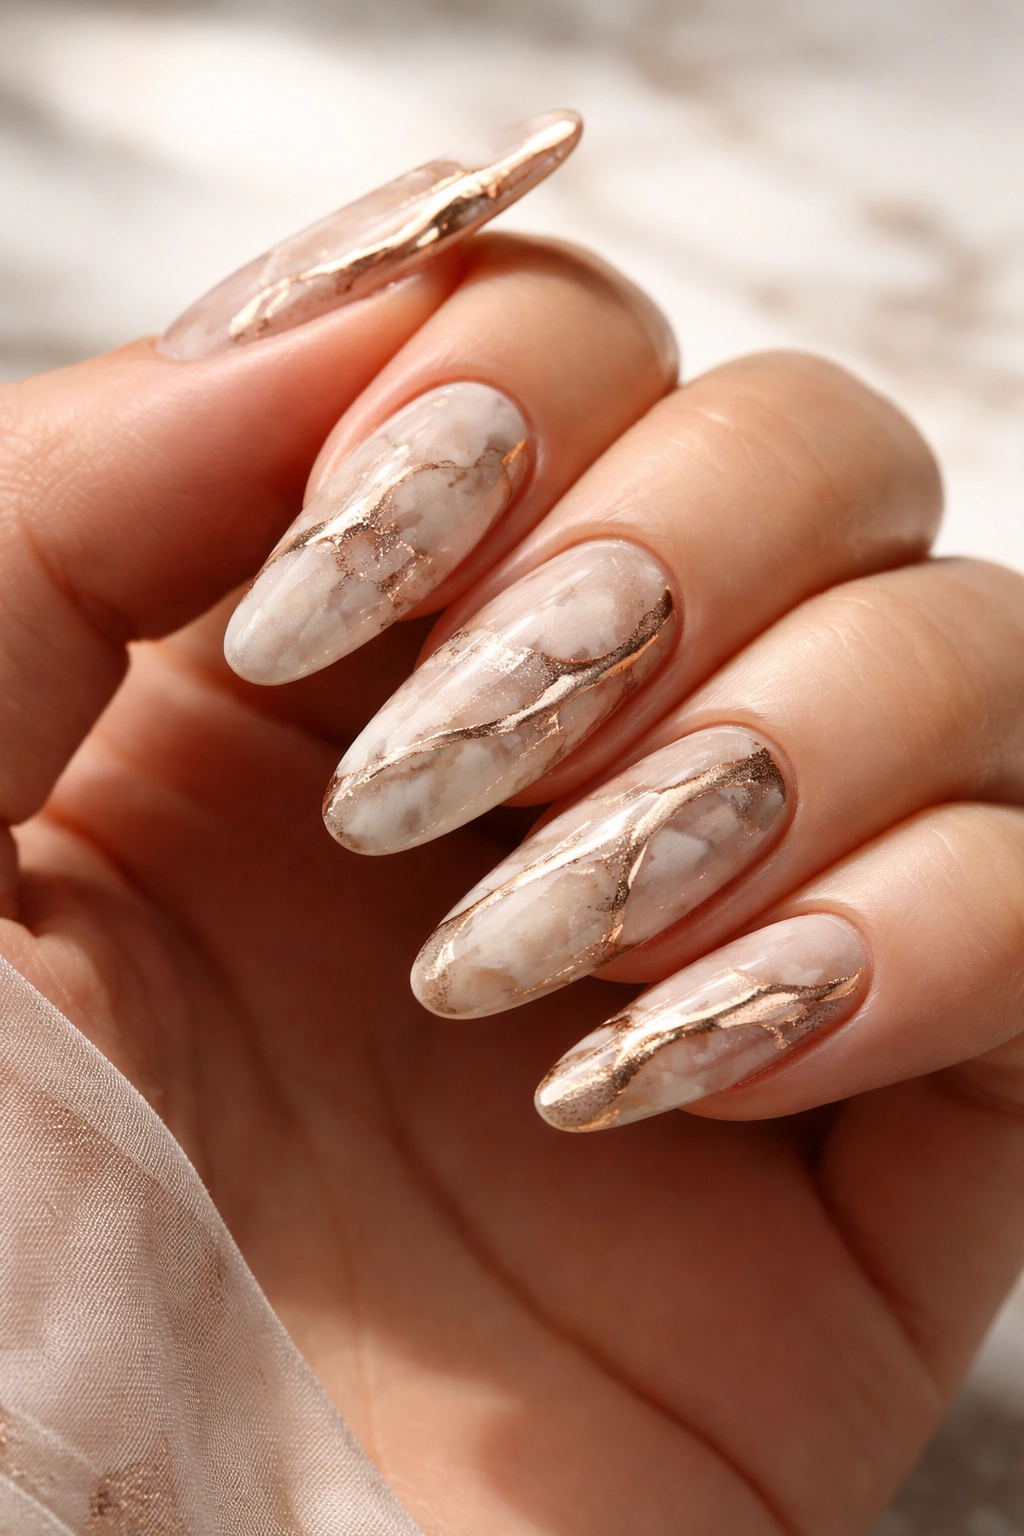
Combining cool marble veining with warm metallic accents creates a design that feels artistic and high-end. You’ll paint a neutral base, add dramatic black or gray marble lines, and accent with gold or rose gold metallic details for a design that genuinely looks like it came from a luxury salon.
Why Marble Feels So Sophisticated
Marble patterns feel inherently upscale because they mimic natural stone—and natural materials always feel more expensive than flat colors. Pair the marble with metallic touches and you’ve got a design that looks like several techniques came together intentionally. On long oval nails, the marble pattern has room to truly shine without feeling cramped.
Executing the Marble Effect
- Apply a light neutral or white base polish (two coats, fully cured)
- Thin your dark gray or black polish so it flows smoothly
- Use a thin brush or toothpick to draw irregular, branching lines across the nail
- Allow the lines to overlap and flow naturally—marble is organic, not geometric
- Add rose gold or gold metallic strokes that follow the natural lines
- The metallic lines should complement the marble without overwhelming it
- Finish with a thick, glossy topcoat
Worth knowing: If your first attempt at marble doesn’t look perfect, that’s actually in your favor—real marble has variation and imperfection, which is what makes it beautiful.
4. Classic Red Elegance
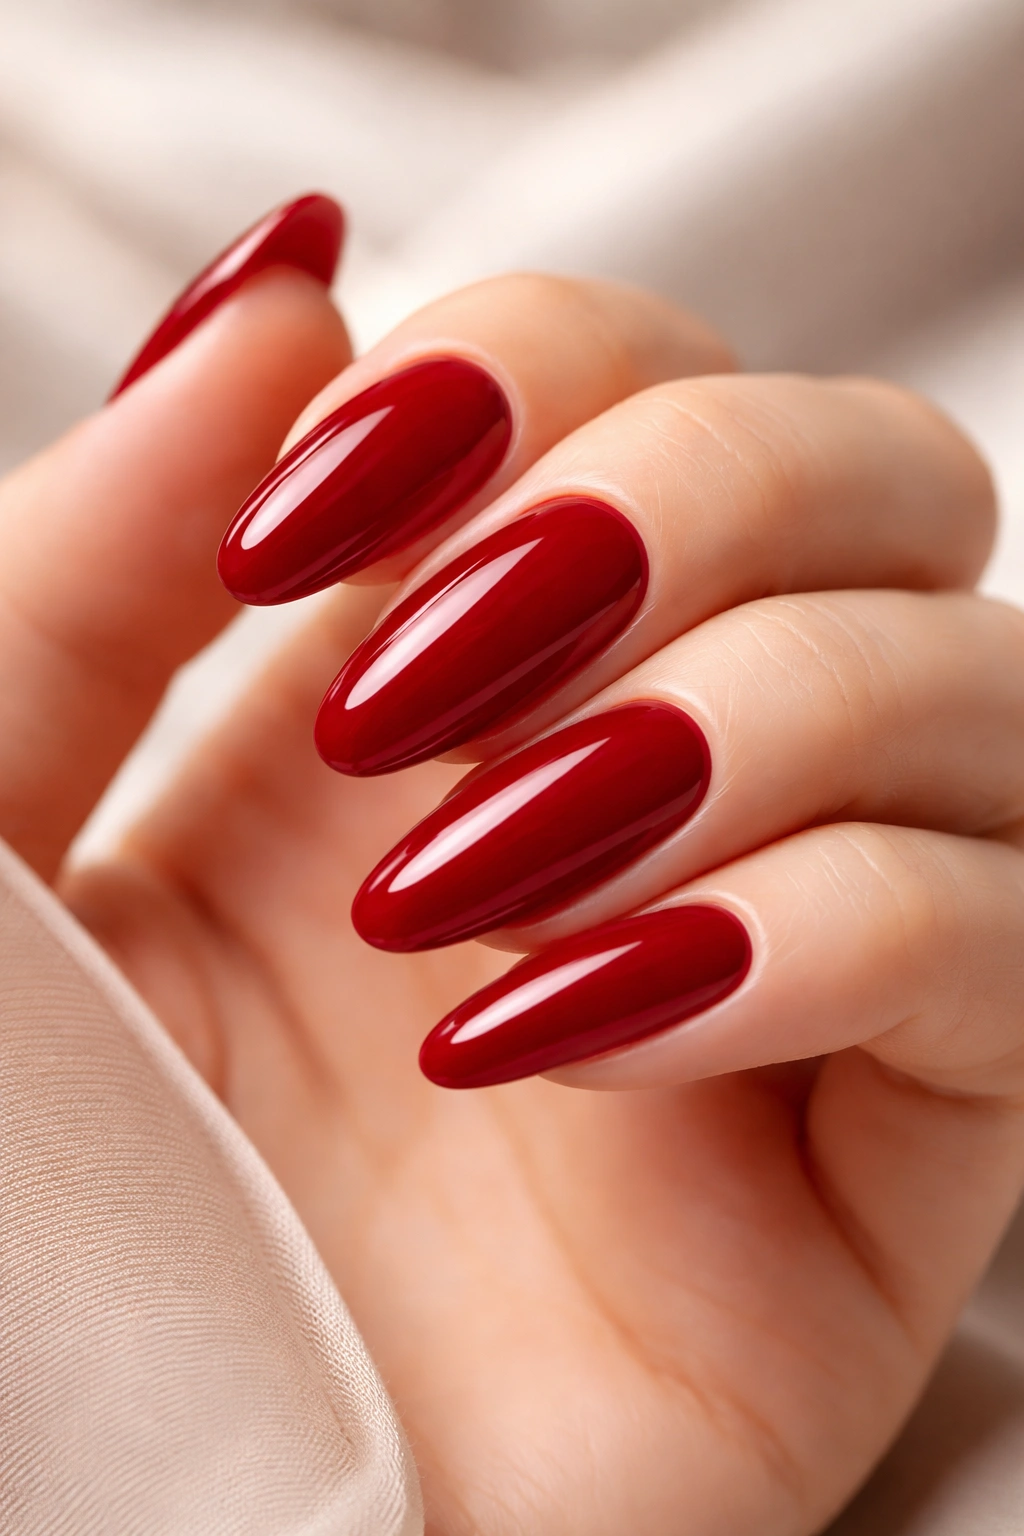
A deep, rich red is the ultimate power move on long oval nails. This design is simply a flawless application of a high-quality red polish—no patterns needed. The elegance comes from the clean execution, perfect finish, and the dramatic impact of the color itself against the nail shape.
Why Red Deserves Its Own Spotlight
Red nails have been chic for over a century, and there’s a reason they never go out of style. On long oval nails, they feel sophisticated and intentional—not overdone or costume-like. A true red (not orange-toned or blue-toned) flatters the widest range of skin tones and works in virtually any context.
Achieving Red Perfection
- Choose a red polish with excellent pigmentation—cheap reds often look patchy
- Apply a white base coat to ensure the red color appears as true and vibrant as possible
- Use thin, even brush strokes and let each layer dry completely before applying the next
- Most good reds need three coats to achieve full opacity without streaking
- Seal with a high-shine topcoat that emphasizes the depth and richness of the color
- Keep your cuticles impeccably groomed—red nails are more noticeable, so perfection matters
The oval shape elongates your fingers and makes the red look even more striking, which is precisely why this combination is so effective.
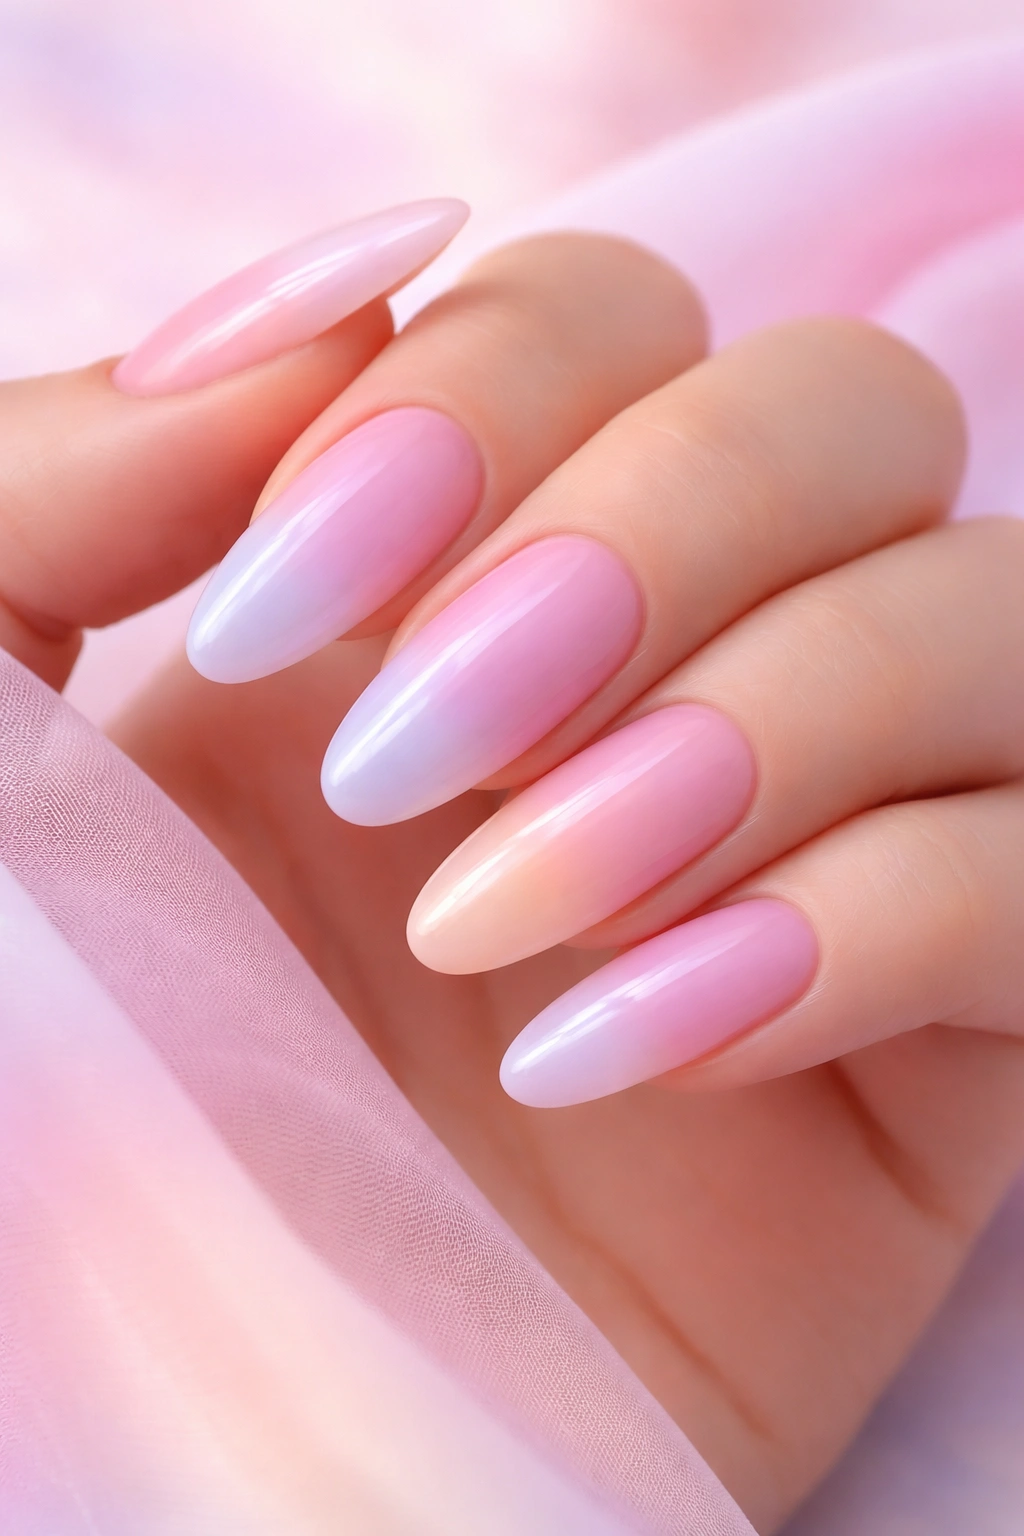
5. Pastel Gradient
Create a soft, dreamy effect by blending multiple pastel colors together on each nail—perhaps moving from pale pink to light lavender to soft peach. The gradient flows smoothly from one shade to the next, creating a look that’s gentle, romantic, and surprisingly trendy.
The Appeal of Soft Blending
Pastel gradients feel playful without being juvenile, and the long oval shape gives the color transitions plenty of space. This design works beautifully for spring and summer occasions but translates well year-round because pastels never feel dated—just soft and approachable.
Creating Your Pastel Blend
- Choose 2-3 complementary pastel shades (pink, lavender, and peach work beautifully together)
- Apply your first pastel shade to the base of each nail
- Use a makeup sponge to apply your second shade to the middle section
- Dab your third shade near the tips
- Use a clean, damp sponge to gently blend the colors together at their edges
- The sponge is your tool for seamless transitions—the more you blend, the softer the effect
- Apply a glossy topcoat that emphasizes the smooth gradient
Insider note: If you’re doing this at home, use a sponge designed specifically for makeup application—regular sponges leave too much texture behind.
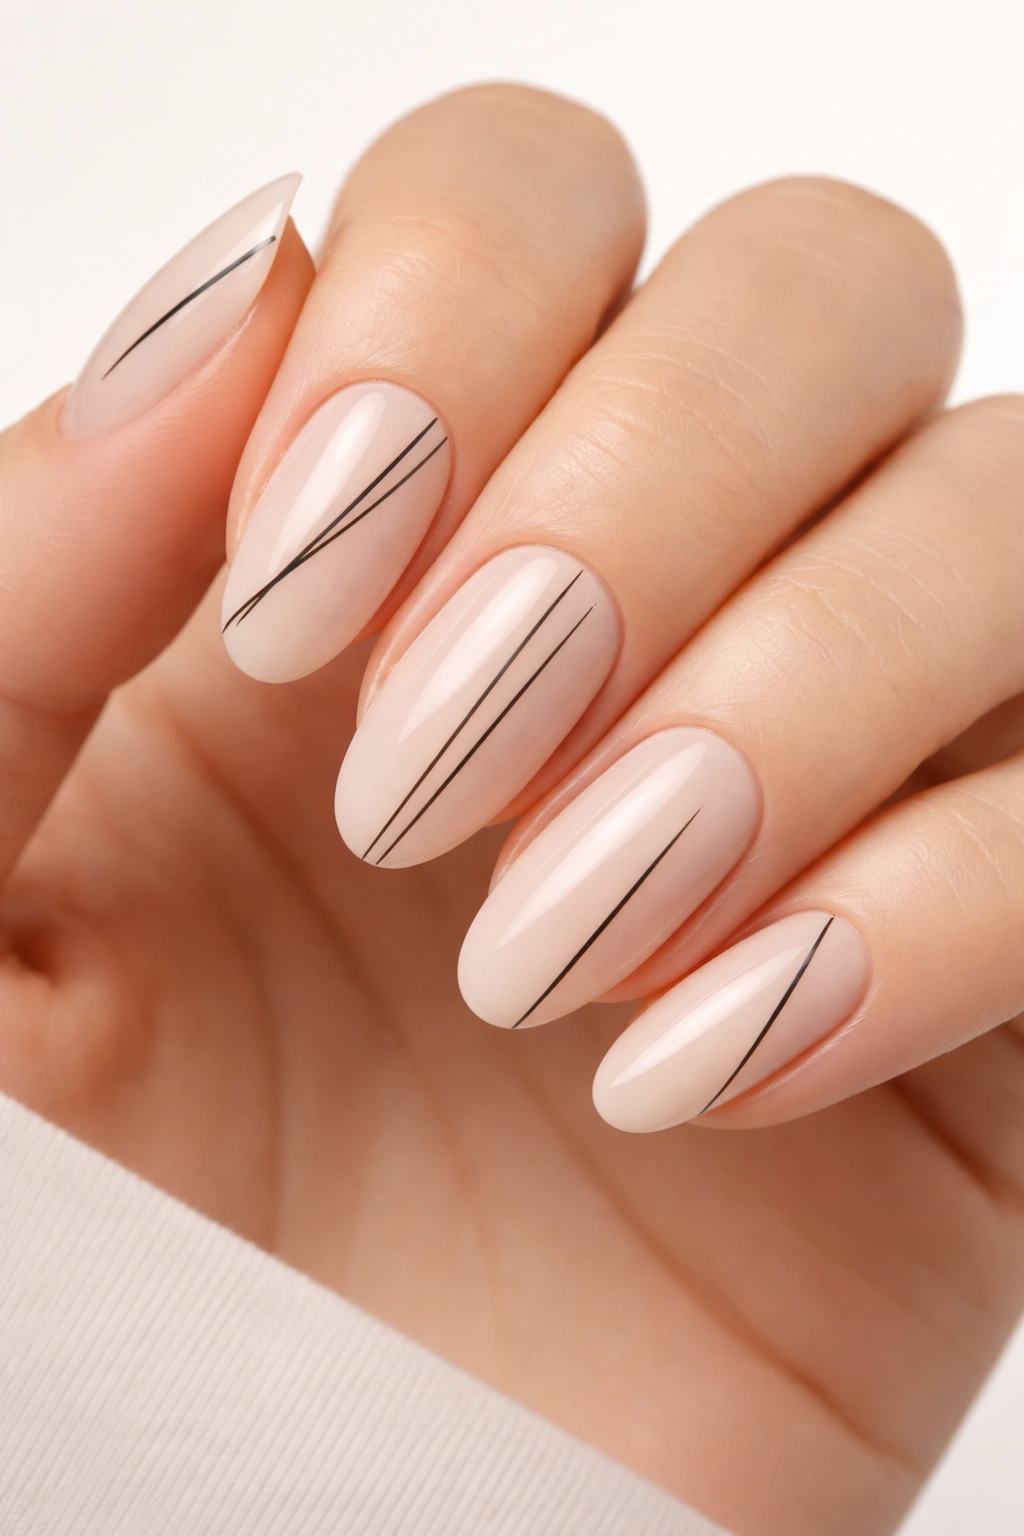
6. Minimalist Line Art
Simple, elegant lines in black or dark gray create sophisticated geometric designs across your nails. These aren’t complex patterns but rather intentional negative space with carefully placed lines that create movement and visual interest without overwhelming the nail.
Why Less Actually Looks Like More
Minimalist design feels elevated because it shows restraint and precision. Every line has a purpose, and nothing is wasted. On long oval nails, single vertical lines, subtle angles, or paired lines create an almost architectural effect that draws the eye upward.
Building Your Minimalist Statement
- Start with a clean, neutral base—white, cream, or soft nude works beautifully
- Use a thin nail art brush or liner to draw your lines with confident, even strokes
- Vertical lines are most flattering on oval nails because they elongate the shape further
- You might also try diagonal lines angled from the inner corner outward, or paired vertical lines
- Keep your design to one or two lines maximum per nail—restraint is the whole point
- Finish with a matte topcoat for a modern, gallery-like feel, or glossy if you prefer shine
The beauty of this design is that it’s completely customizable—one line, two lines, different angles—while remaining unmistakably sophisticated.
7. Floral Garden Design

Delicate flowers painted across your nails create a romantic, feminine design that feels hand-painted and artistic. Think small roses, tiny daisies, or wild florals scattered across a soft neutral or white base. The design feels like you’re wearing a miniature garden on your fingertips.
Making Florals Feel Fresh
Floral designs can feel dated if they’re too heavy-handed, but on long oval nails, you have space to distribute flowers naturally. A few blooms near the tips, perhaps a leaf or two, and empty space that lets the design breathe—this is what makes florals work in modern nail art.
Painting Your Floral Garden
- Start with a cream, soft pink, or white base coat (two coats)
- Use a fine detail brush to paint small flowers—tiny roses, simple daisies, or wildflowers
- Start with the main color of the flower, then add darker shades for dimension
- Paint thin green stems that connect some of the flowers for a cohesive look
- Add tiny leaves at random points—they don’t need to be perfect
- Space your flowers intentionally, leaving breathing room and negative space
- A glossy topcoat makes the florals appear to have dimension
Pro tip: If freehand florals intimidate you, nail stamp plates with floral designs give you the look with zero freehand skill required.
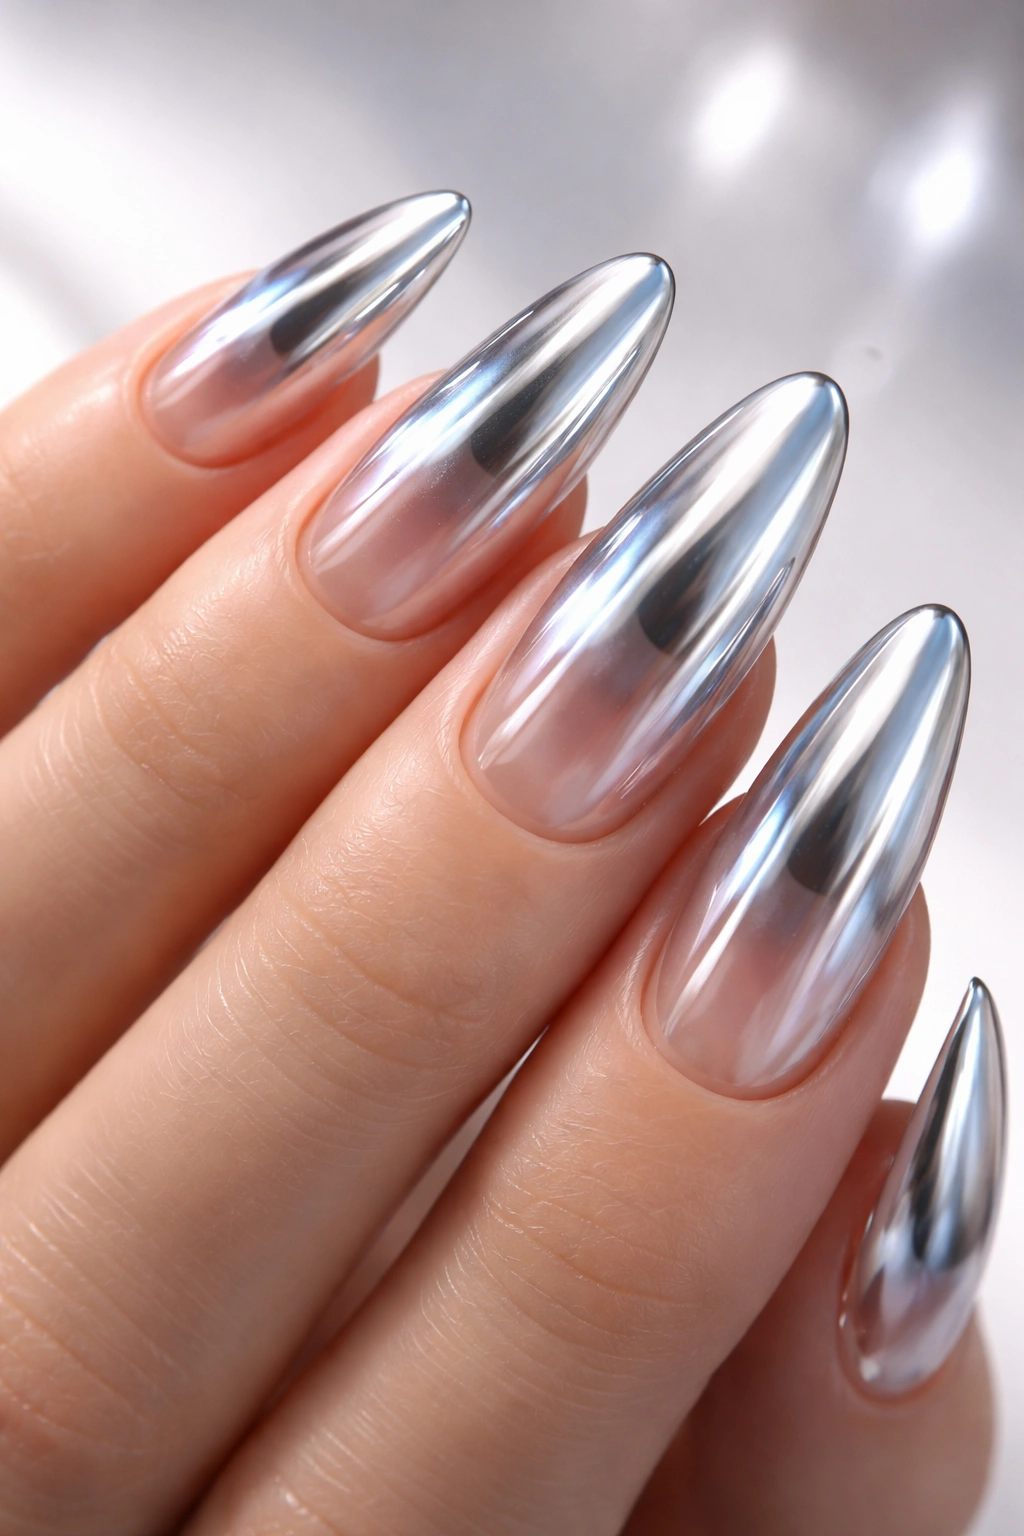
8. Chrome and Glass Effect
Ultra-modern and eye-catching, chrome and glass effects create a design that looks almost holographic or reflective. Using special chrome powders, glass effect polishes, or metallic finishes, you create a nail surface that literally looks like it’s made of metal or ice.
Why Chrome Looks So Futuristic
Chrome finishes catch light in multiple directions and seem to shift color depending on the angle and lighting. On long oval nails, this effect is stunning because the added length maximizes the reflective surface area. The result looks expensive and editorial.
Achieving the Chrome Look
- Apply a smooth, even base color (often a dark shade like black or deep burgundy works best)
- Use a special chrome powder and a velvet applicator pad to apply the powder over wet topcoat
- Press the powder into the topcoat firmly, then brush away excess
- The powder particles catch light and create a metallic mirror finish
- Seal with a clear topcoat to lock everything in place
- For glass effects, use a clear gel or specific glass effect polish that creates a translucent, icy appearance
- Both effects require precision application but deliver seriously impressive results
Chrome nails photograph beautifully and feel genuinely luxurious to wear, which is why this technique has become so popular on long nails.
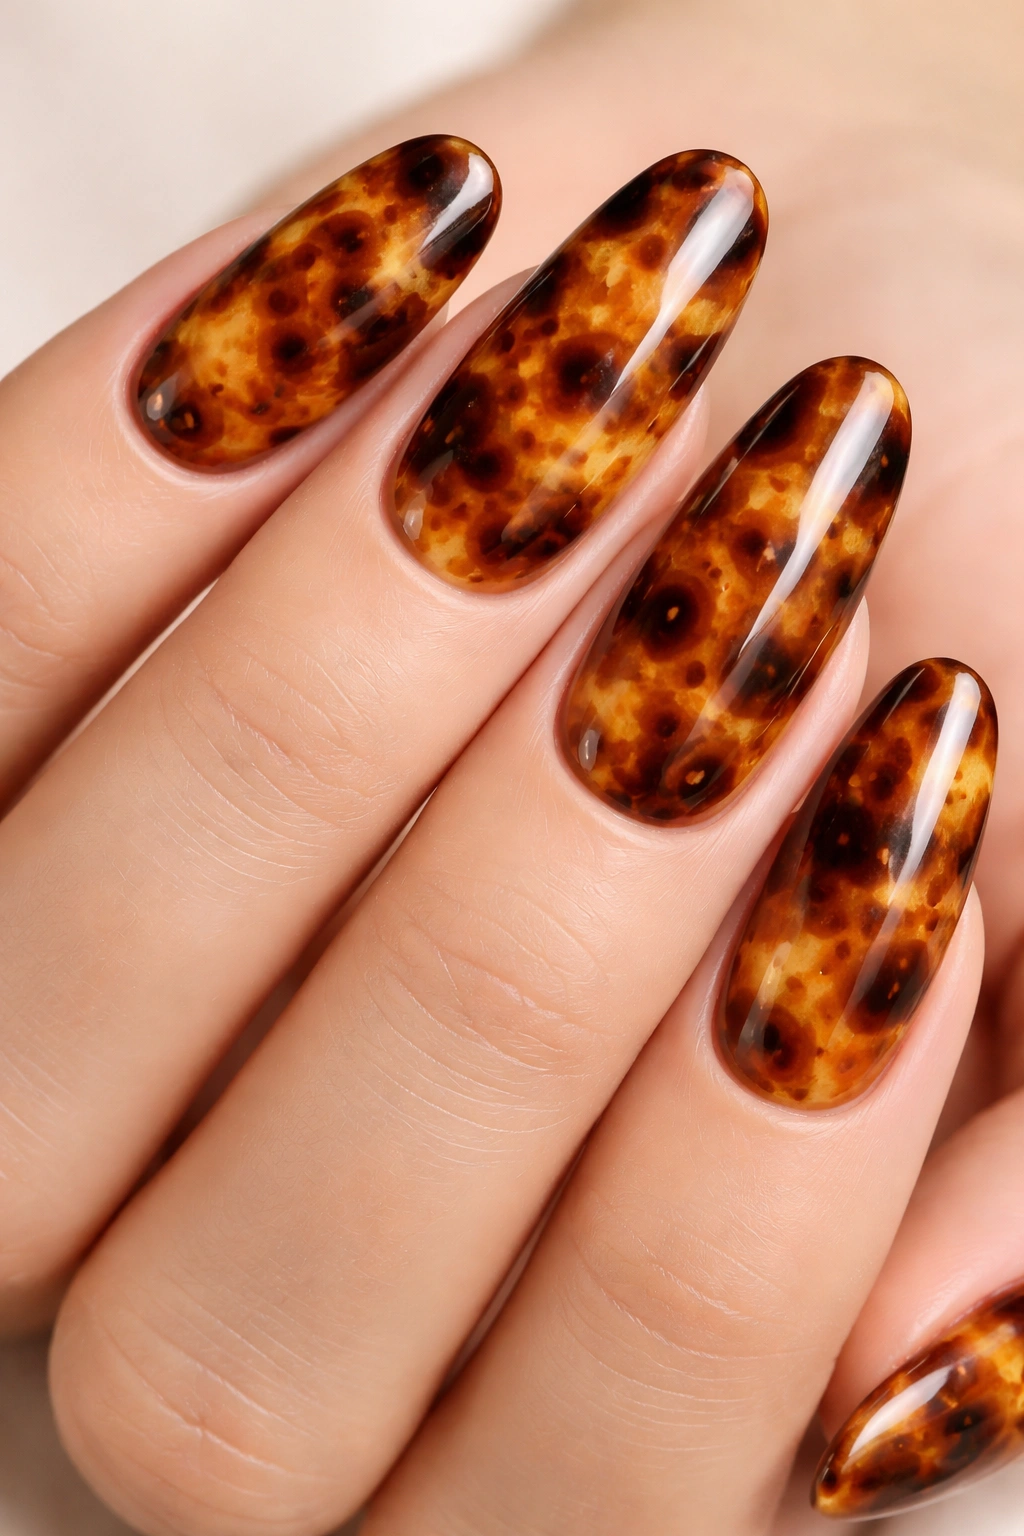
9. Tortoiseshell Pattern
Create an animal-print effect with warm browns, golds, and amber tones blended together in an organic, natural pattern. Tortoiseshell feels earthy and luxe simultaneously—it’s a design that works in casual settings but feels upscale enough for special occasions.
The Warmth of Tortoiseshell
Tortoiseshell works beautifully on oval nails because the organic pattern doesn’t require perfect symmetry. Each nail can look slightly different, and that variation is exactly what makes tortoiseshell authentic. The warm color palette flatters a wide range of skin tones and feels timeless rather than trendy.
Creating Your Tortoiseshell Effect
- Start with a light cream or tan base coat
- Apply warm brown, golden amber, and burnt orange polish in random patches
- Don’t aim for perfect precision—tortoiseshell is meant to look organic
- Use a thin brush to add darker brown lines that separate and define different color sections
- Blend some colors slightly at their edges using a sponge for a more integrated look
- Add touches of gold metallic in select areas for extra richness
- The pattern should feel warm and natural, not muddy
- Finish with a glossy topcoat that emphasizes the depth of the colors
Tortoiseshell looks expensive because it mimics a natural material, and natural materials always feel more sophisticated than uniform colors.
10. Nude with Pearl Accents
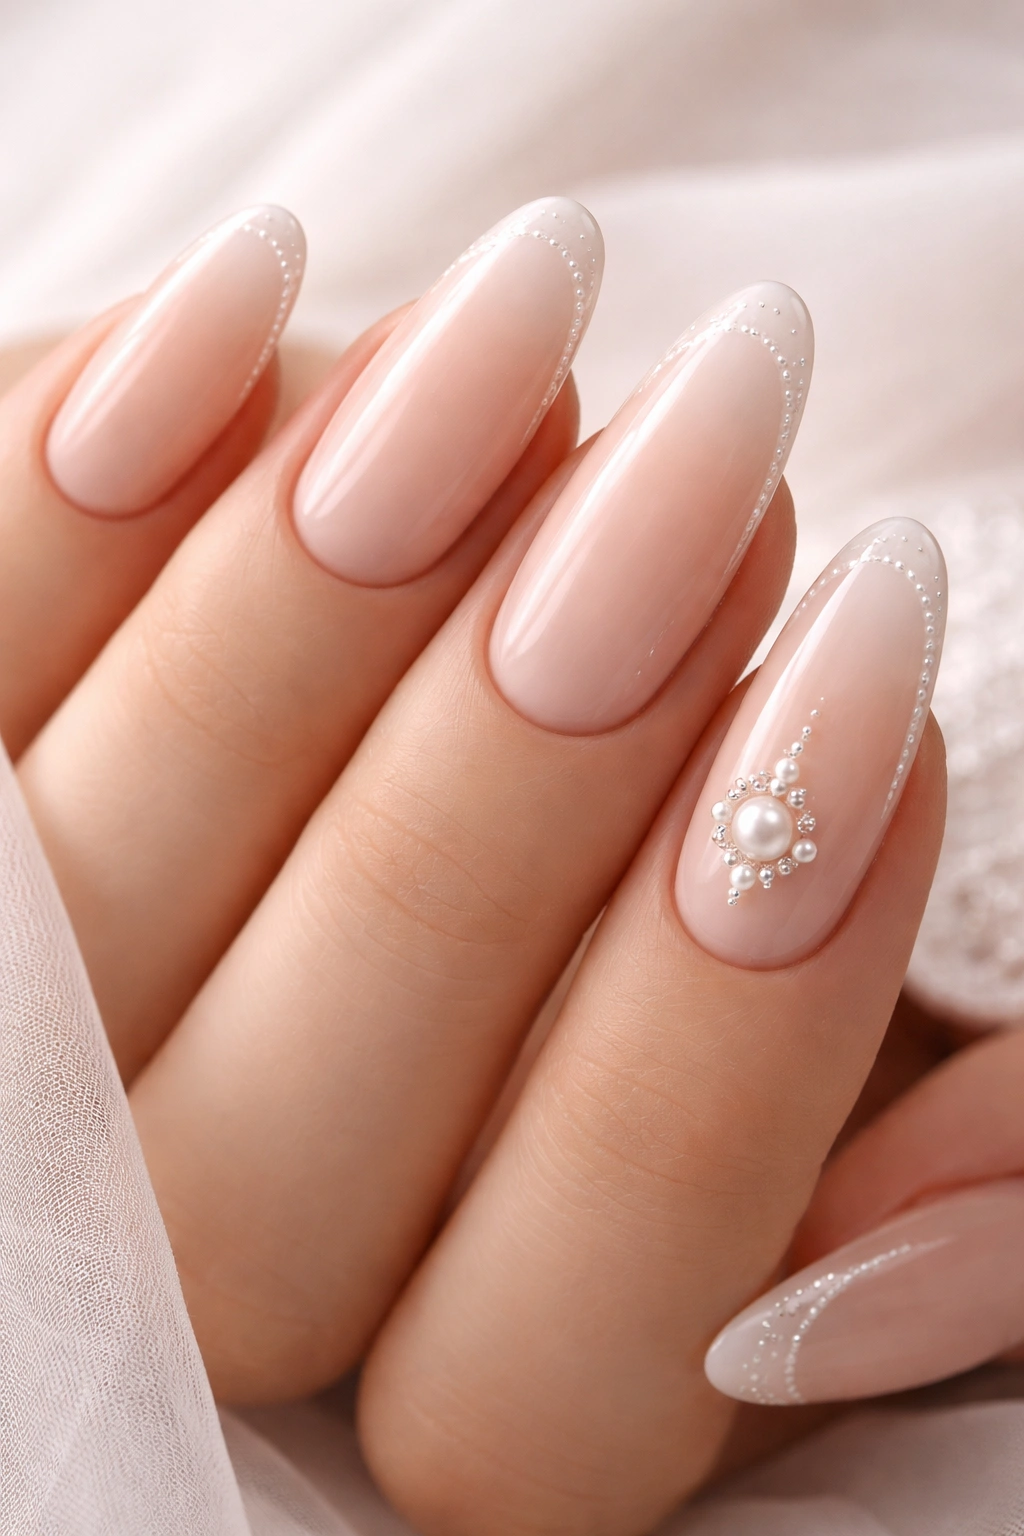
Keep things elegant and understated by pairing a soft, neutral nude base with subtle pearl or iridescent accents. Perhaps pearl strokes along the tip, pearl dots scattered across the base, or a pearl accent nail among nudes—the restraint makes it feel high-end.
The Quiet Luxury of Pearl
Pearl is inherently elegant because it suggests sophistication without announcing itself. On long oval nails, pearl accents feel like jewelry—refined and intentional. You’re adding interest without creating a busy or chaotic look.
Building Your Pearl Design
- Choose a neutral nude shade that matches or is slightly lighter than your natural nail tone
- Apply two even coats for full coverage
- Add pearl elements using a pearl or iridescent polish—perhaps a thin stripe along the tip
- Alternatively, create pearl dots or small accents scattered across the base
- Pearl looks best when it has contrast, so make sure your base shade is noticeably different from the pearl
- Use a single accent nail in pure pearl if you want something more dramatic
- Finish with a glossy topcoat that makes the pearl luminescence really glow
Worth knowing: The best pearl effects come from high-quality polishes specifically labeled as pearl or iridescent—drugstore versions often look muddy rather than lustrous.
11. Deep Burgundy Drama

Go bold with a rich, sophisticated burgundy that feels dramatic without being costume-like. Deep burgundy is the perfect shade for someone who wants color and presence but in a refined, wearable format. On long oval nails, it’s undeniably elegant.
Why Burgundy Feels So Premium
Burgundy is perceived as sophisticated because it’s a color associated with luxury, wine, and formal occasions. Unlike bright reds, burgundy feels slightly muted and earthy, which makes it more versatile for daily wear. The depth of the color creates drama on its own without any additional designs needed.
Executing Burgundy Perfection
- Look for a burgundy shade with good pigmentation—some lean too brown or too purple, so find your perfect tone
- Apply a base coat that helps the color stick and prevents staining
- Use thin, even strokes and build the color with multiple coats for richness and opacity
- Most deep colors require three thin coats rather than two thick ones
- Pay special attention to the edges and tips—any streakiness shows more on dark colors
- Seal with a topcoat that adds shine and depth
- Keep your cuticles clean and your nails well-shaped—dark nails show every detail
The long oval shape makes burgundy look even more striking because the extended length emphasizes the color’s richness.
12. Confetti Burst
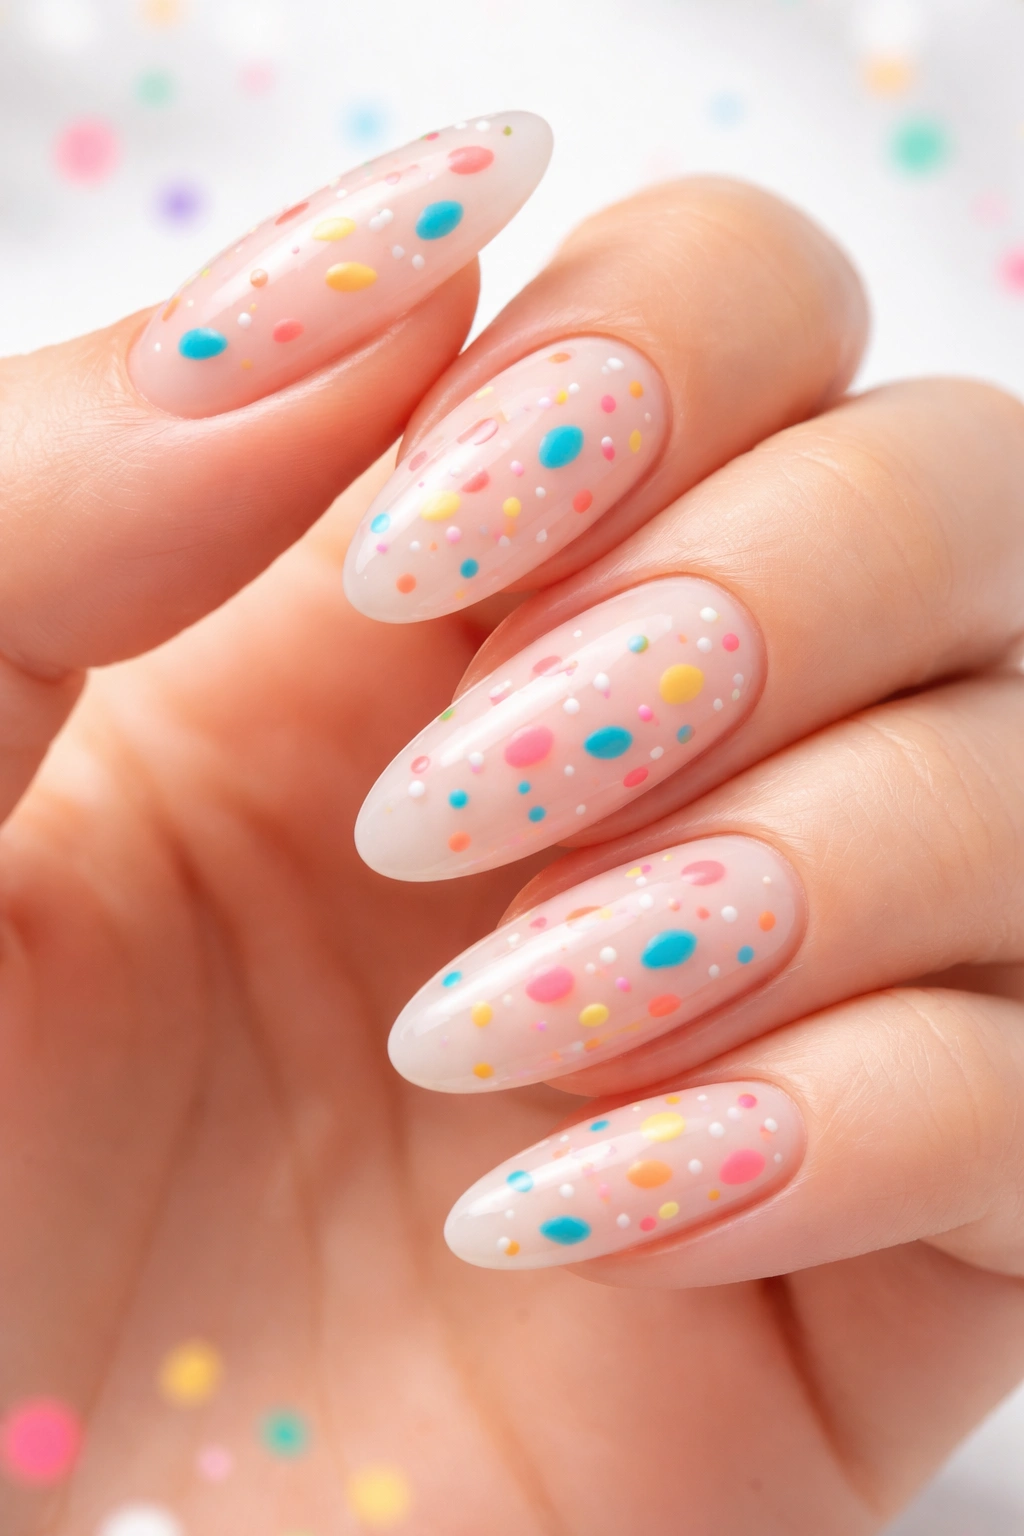
Add playful energy with colorful confetti-like details scattered across a neutral base. Small dots, dashes, and pops of color create a design that’s joyful without feeling chaotic. It’s perfect for someone who wants something different but still wearable.
The Joy of Confetti
Confetti designs feel celebratory and fun, but when executed with restraint on a neutral base, they feel modern and intentional rather than childish. The long oval shape gives you plenty of space to scatter confetti naturally without it feeling crowded.
Creating Your Confetti Look
- Start with a clean white, cream, or soft nude base
- Choose 3-4 complementary colors (pastels, jewel tones, or metallic shades all work)
- Use a dotting tool or thin brush to create small dots and dashes in your chosen colors
- Vary the sizes of your dots slightly—some should be tiny, some medium
- Distribute the colors randomly across the nail rather than in a pattern
- The spacing is important—leave plenty of negative space so it doesn’t feel overwhelming
- Add a few confetti pieces near the tip and a few scattered on the base, but nothing in between
- Finish with a glossy topcoat
Confetti designs photograph beautifully and feel special without requiring advanced nail art skills.
13. Soft Sage and Gold
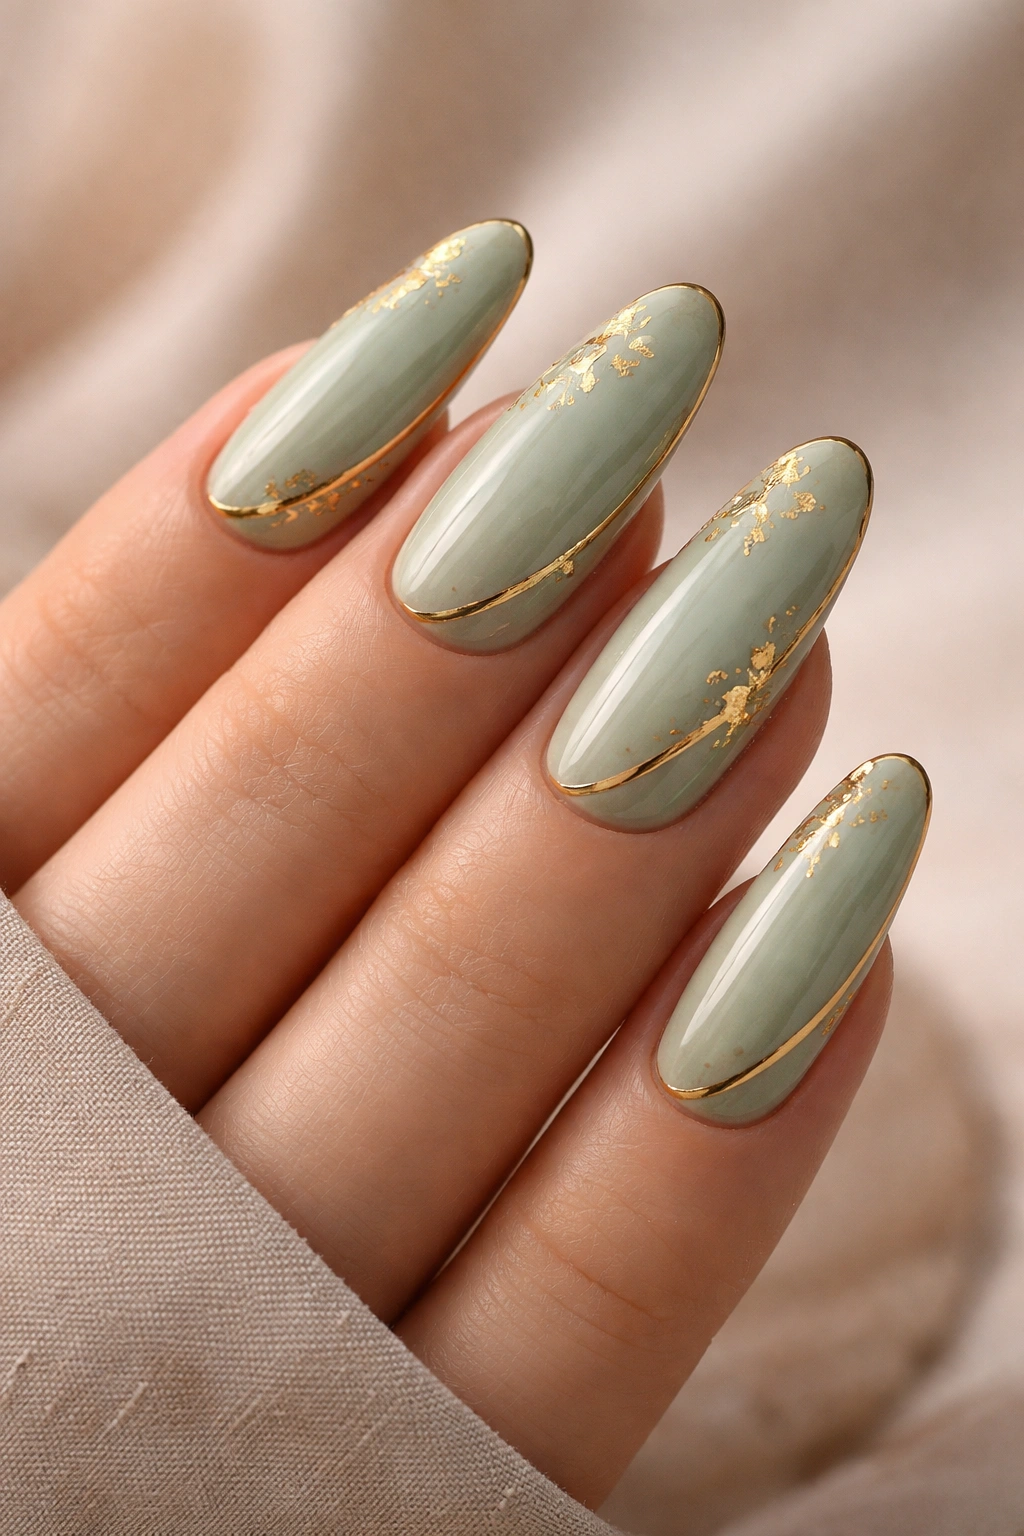
Pair a muted sage green with warm gold accents for a design that feels earthy, sophisticated, and naturally beautiful. Perhaps gold lines, gold tips, or gold leaf details combined with a soft sage base create an organic, nature-inspired aesthetic.
Why This Color Combination Works
Sage and gold feel inherently luxurious because both shades are calming and premium-feeling. Gold adds warmth to the cool sage, creating balance. This combination works year-round but feels especially lovely during fall and winter when earth tones are everywhere.
Pairing Sage with Gold
- Apply a soft sage or muted eucalyptus-green base coat (two coats)
- Add gold accents however appeals to you—delicate lines along the tip, a stripe down the center, or scattered gold leaf details
- Gold leaf creates the most organic, natural-looking effect—press small pieces of gold leaf into wet topcoat
- Alternatively, use a gold liner brush to paint fine lines or geometric accents
- Keep the gold placement intentional—perhaps just the tips or just one accent nail
- The combination should feel balanced, not like one element is overpowering the other
- Finish with a glossy or slightly matte topcoat depending on your preference
This design whispers elegance rather than shouting it, which is exactly what makes it so appealing.
14. Artistic Brushstroke
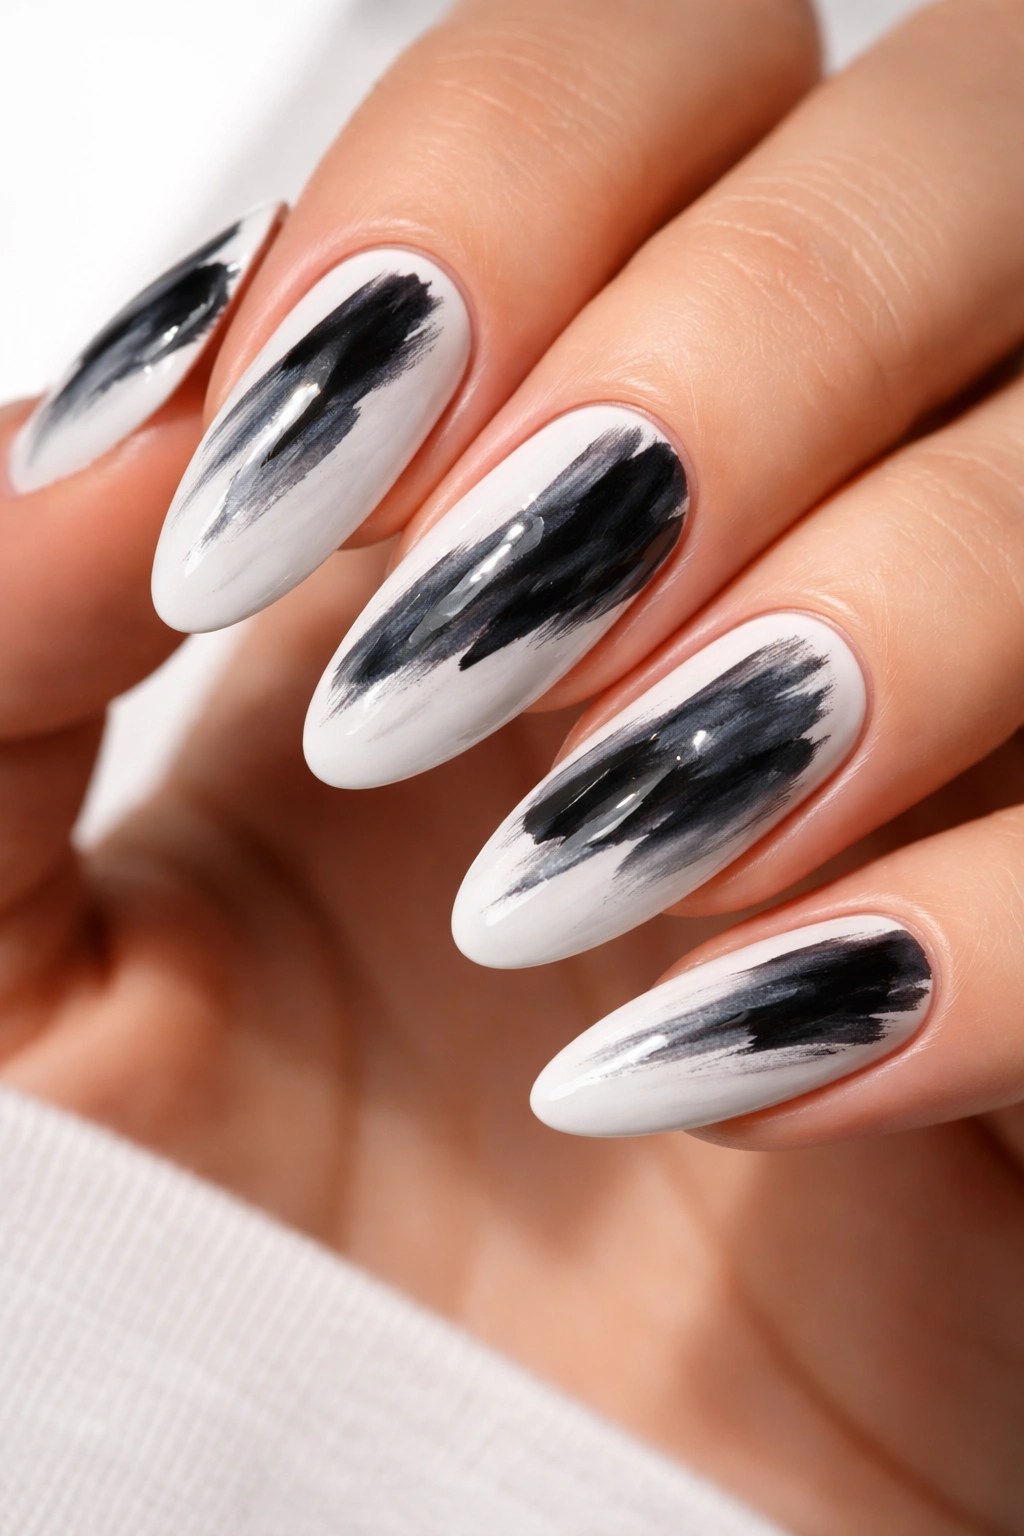
Create an abstract, artistic design using bold brushstrokes in contrasting colors. Think confident black or dark gray strokes across a cream or white base, or jewel-toned strokes across a light background. Each nail can have different brushstrokes, celebrating the uniqueness of art.
The Beauty of Intentional Imperfection
Artistic brushstrokes don’t need to be perfect—in fact, they shouldn’t be. The beauty comes from the confident application and the impression of intentional movement. Each nail becomes a mini canvas, and long oval nails give you perfect proportions for this kind of artistic expression.
Making Your Brushstrokes Count
- Start with a clean, neutral base—white, cream, soft gray, or pale pink
- Use a medium-sized flat brush or angled brush for your strokes
- Make bold, confident movements—hesitant strokes look uncertain, while confident ones look intentional
- Your brushstrokes can be vertical, diagonal, or curved depending on your vision
- Use contrasting colors to make the strokes really stand out
- Keep some nails simpler than others for visual balance
- The design should feel like wearable art, not a chaotic mess, so leave plenty of negative space
- Finish with a matte topcoat for a gallery-like effect
This design is perfect for people who appreciate abstract art and want their nails to reflect that aesthetic.
15. Jewel-Toned Sophistication
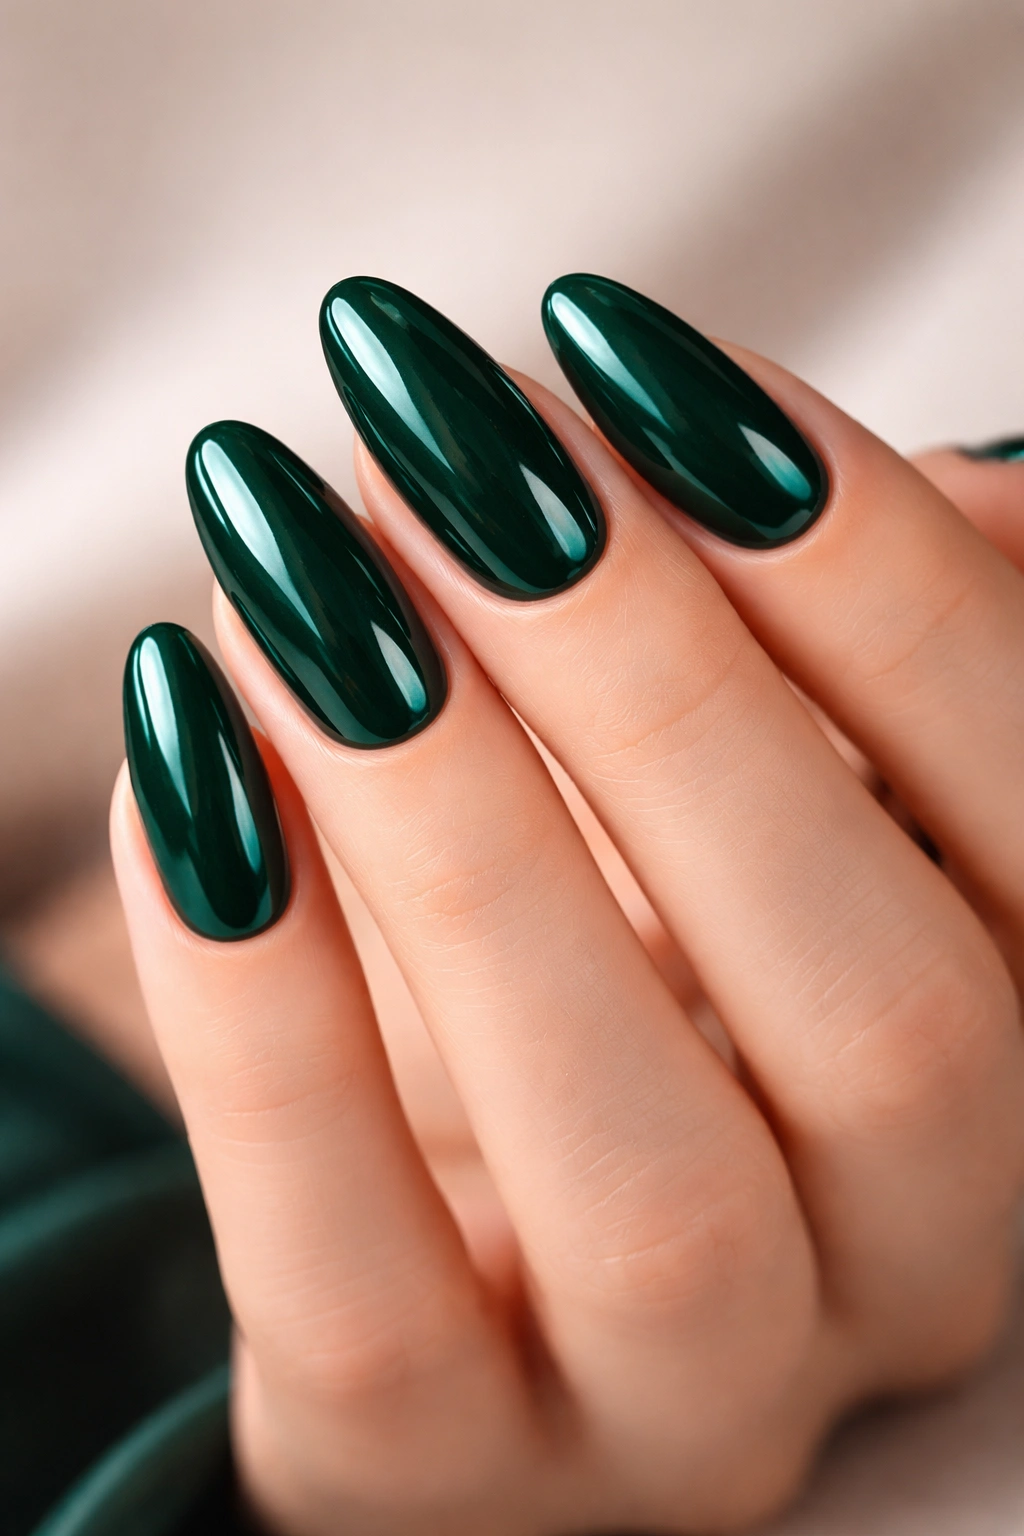
Choose a single deep jewel tone—emerald, sapphire, amethyst, or ruby—and apply it beautifully to create instant luxury. No patterns needed; the richness of the color itself provides all the interest you need. Long oval nails make jewel tones look absolutely regal.
Why Jewel Tones Feel Expensive
Jewel tones are associated with precious gems and wealth, which is exactly why they feel so luxurious. A single, perfectly applied jewel-toned shade can look more sophisticated than a complex design because it shows confidence in color. On elongated nails, the depth and richness of jewel tones are maximized.
Applying Your Jewel Tone
- Choose a jewel tone with good saturation—you want genuine depth, not a watered-down version
- Apply a base coat to protect your nails and help with color adhesion
- Use thin, even strokes and layer the polish to build opacity gradually
- Most jewel tones need three coats to achieve true richness and prevent streaking
- Pay special attention to achieving clean edges—any unevenness shows on solid colors
- A high-shine topcoat emphasizes the jewel-like quality of the color
- Pair with simple grooming and clean lines for maximum impact
The long oval shape is the perfect showcase for jewel tones because the extended length lets the color really shine.
16. Cream with Delicate Dots
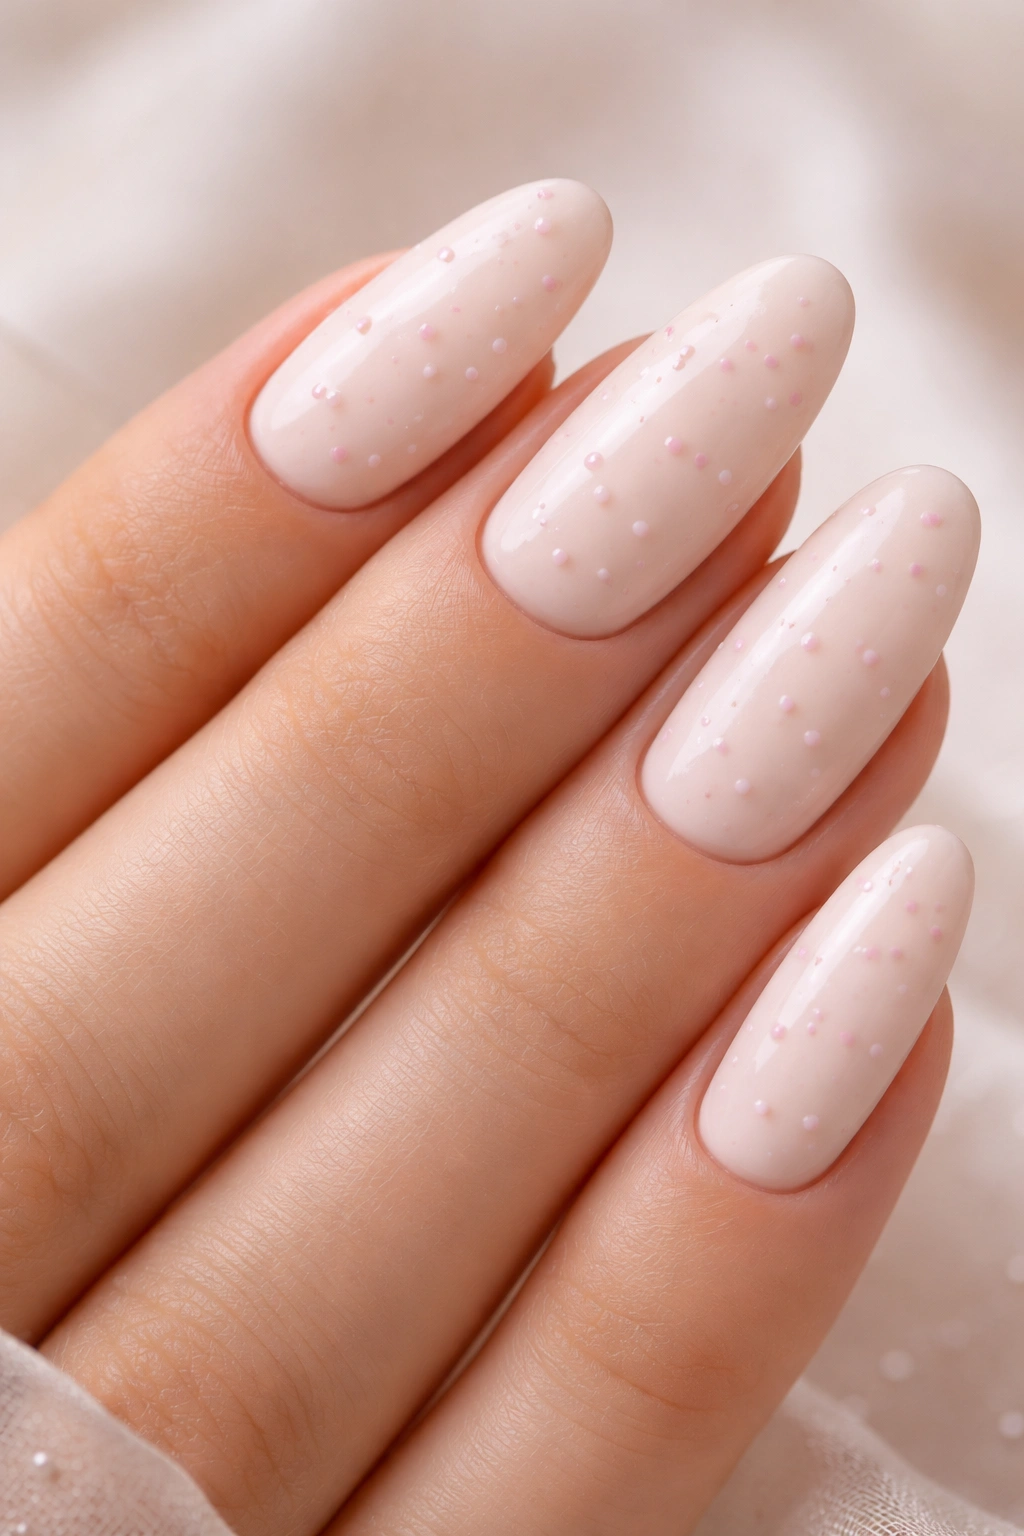
Keep things timeless and sweet with a creamy white or off-white base scattered with tiny, delicate dots in a coordinating shade. This design is subtle enough for everyday wear but intentional enough that it feels designed, not accidental.
The Charm of Simplicity
Delicate dot designs feel vintage and charming without being dated. The long oval nail shape lets you space the dots naturally without them feeling crowded. This is a design that works in absolutely any context because it’s universally flattering and understated.
Creating Delicate Dots
- Start with a cream or soft off-white base coat (two coats for coverage)
- Choose a coordinating shade for your dots—soft pink, blush, pale gold, or light gray all work beautifully
- Use a dotting tool to create tiny, consistent dots across the nail
- The dots should be small enough that they feel delicate, not prominent
- Vary the spacing slightly so it doesn’t feel like a rigid pattern
- You might create a denser concentration of dots near the tips and sparser dots on the base
- Alternatively, create a thin row of dots along the tip for a more defined accent
- Finish with a glossy topcoat
This design is perfect for anyone who finds bold colors or complex patterns intimidating but still wants something thoughtfully designed.
17. Rose Gold Shimmer

Combine rose gold metallic tones with warm peachy or blush undertones for a design that feels warm, feminine, and genuinely luxurious. Whether you use rose gold shimmer as your entire base or as accents over a softer shade, the warmth of rose gold is flattering on virtually everyone.
Why Rose Gold Feels So Premium
Rose gold has been associated with luxury jewelry for years, so it carries inherent sophistication. On nails, rose gold feels warm and flattering while still feeling modern and trendy. The shimmer catches light beautifully on long oval nails, creating movement and visual interest.
Building Your Rose Gold Look
- You can go full rose gold with a rose gold shimmer polish as your base color
- Or start with a soft pink, peach, or nude base and add rose gold accents
- Rose gold works beautifully with ombre—start with a softer shade at the base and build to concentrated shimmer at the tips
- Apply rose gold as metallic strokes, tips, or accent nails for a more subtle approach
- The shimmer should be visible in different lighting conditions, which is what makes it special
- Finish with a glossy topcoat that enhances the luminescence
Rose gold feels equally at home at casual occasions and formal events, which is why it’s so versatile.
18. Nude with Negative Space
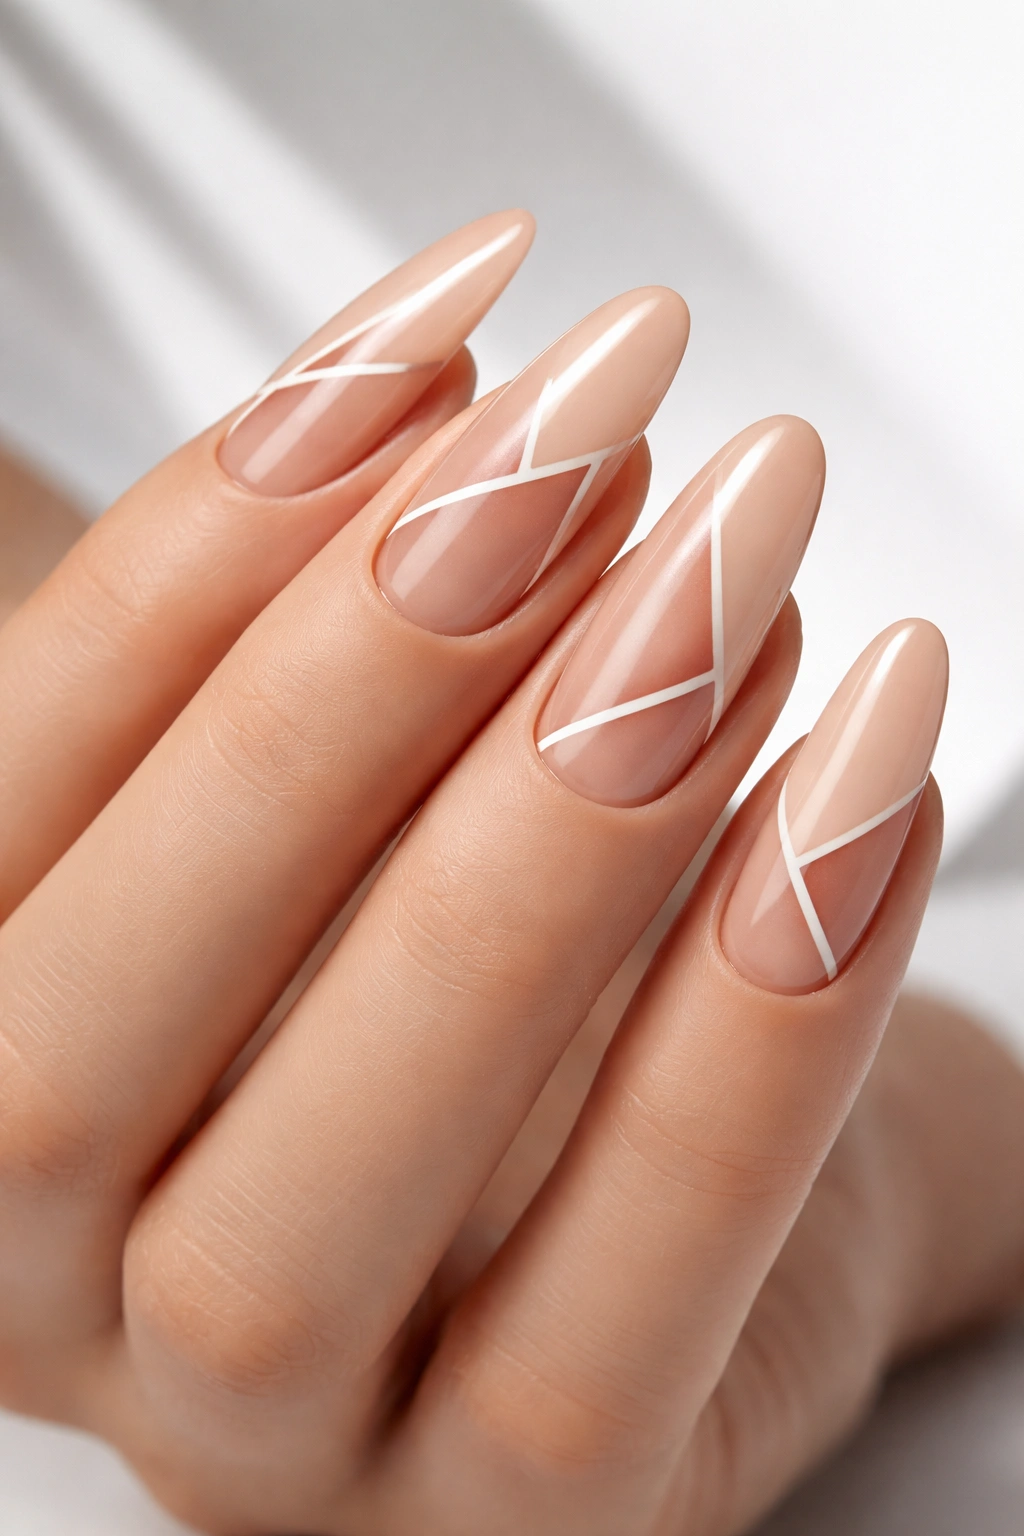
Create geometric interest by leaving strategic areas bare (negative space) while painting other areas in a neutral shade. Perhaps unpainted triangles at the tips, stripes down the center, or geometric cutouts create an architectural, modern effect.
The Sophistication of Negative Space
Negative space designs feel editorial and high-fashion because they break traditional nail art rules. By intentionally leaving areas unpainted, you’re creating visual interest through absence rather than addition. It’s confident and artistic.
Executing Negative Space
- Choose a neutral shade that coordinates with your natural nail color
- Design your negative space pattern before you start—perhaps triangles, stripes, or geometric shapes
- Paint your chosen color around the negative space areas, leaving the bare nail visible
- The contrast between the matte natural nail and the glossy polish creates visual interest
- Straight lines are easier than curves—use painter’s tape as guides if needed
- The unpainted areas should look intentional, not like mistakes
- Finish with topcoat over the painted areas only—you want the negative space to remain bare
- Keep the overall design clean and geometric for maximum impact
This design works beautifully on long oval nails because the extended length gives you space to create interesting negative space patterns.
19. Soft Blush and Mauve
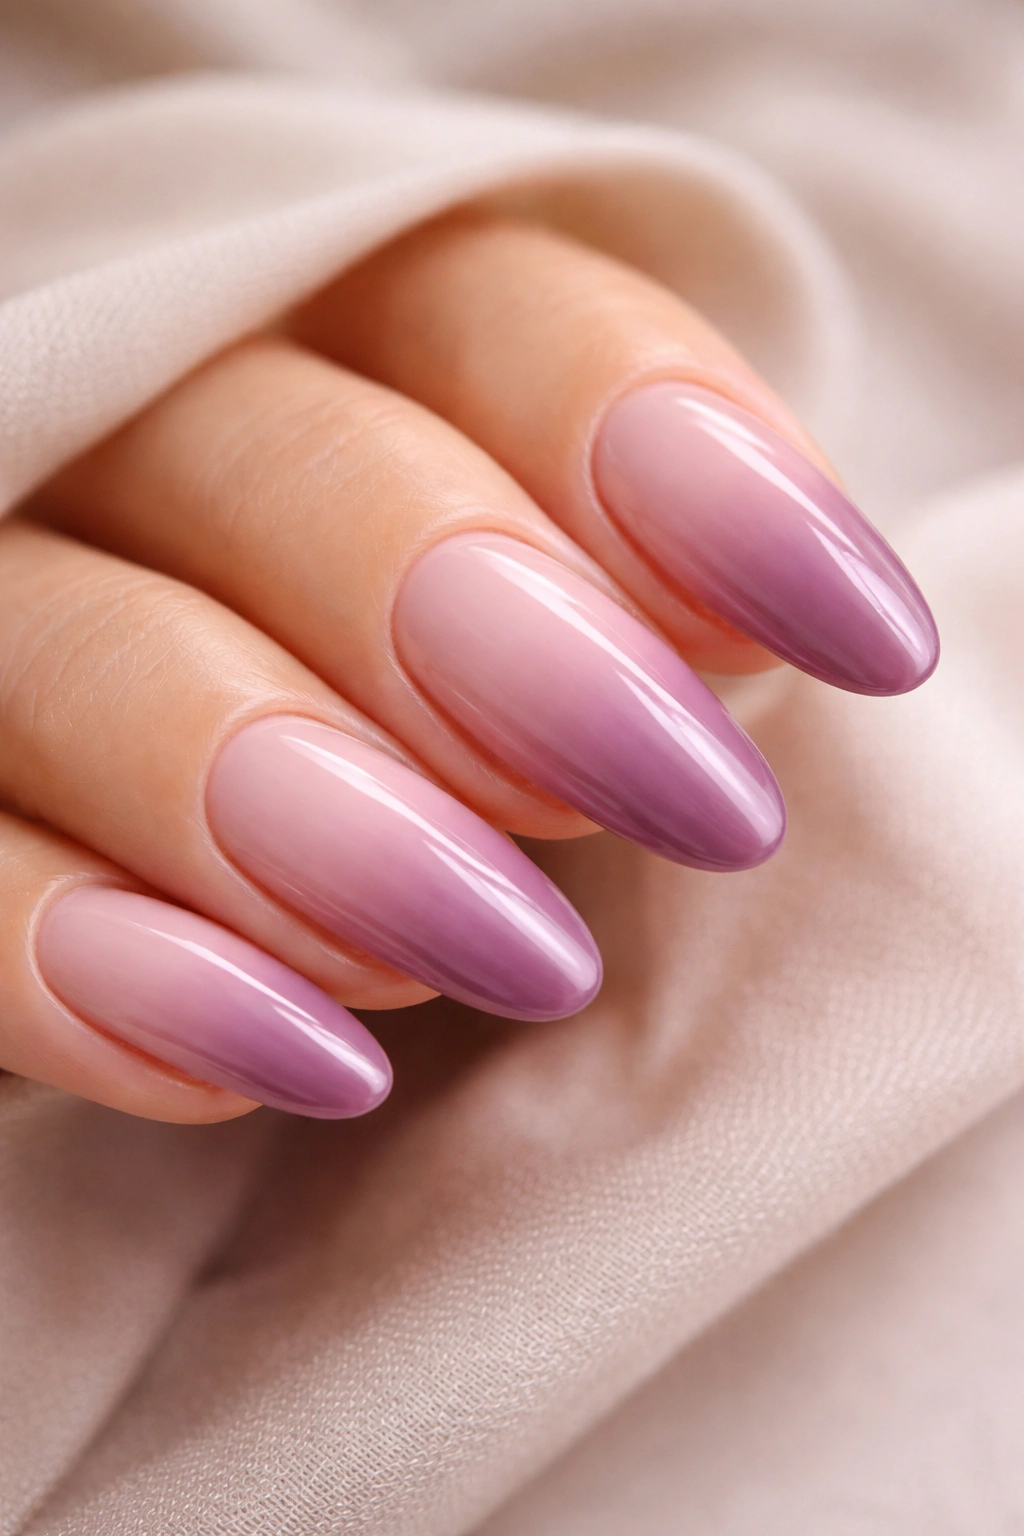
Create a monochromatic or nearly monochromatic design using soft, complementary shades of blush and mauve. Perhaps your base is blush with mauve ombre tips, or you create mauve stripes over a blush base. The soft color palette feels romantic and ethereal.
The Elegance of Soft Tones
Blush and mauve are traditionally romantic shades, but when used thoughtfully, they feel sophisticated and modern rather than overly girly. The long oval shape gives these soft tones plenty of space to shine without feeling delicate or fragile.
Blending Blush and Mauve
- Start with a blush or light pink base coat
- Add mauve as an ombre effect gradually building toward the tips
- Alternatively, create thin mauve stripes vertically down the nail
- You might paint one accent nail in pure mauve while keeping others blush
- Use a sponge to blend the colors at their edges for a seamless transition
- Mauve should be slightly deeper than your blush base to create visible contrast
- Finish with a glossy topcoat that emphasizes the soft, romantic feel
This design is perfect for romantic occasions, but wears beautifully in everyday life too because the soft palette is universally flattering.
20. Metallic Matte
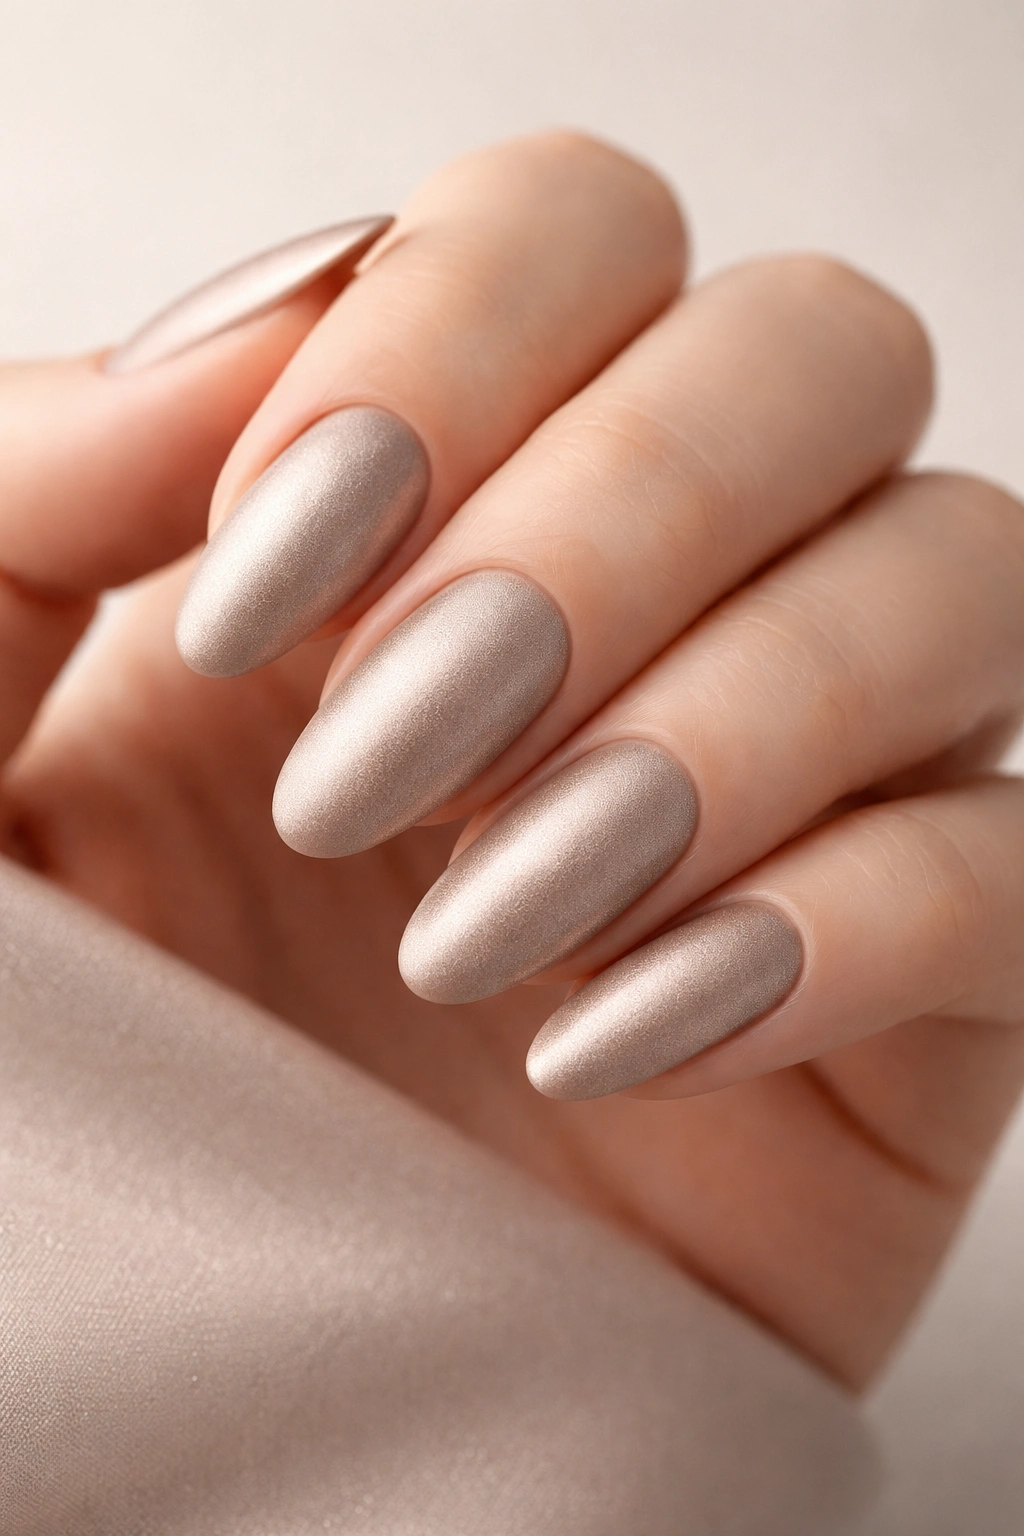
Create a modern, edgy look by using a matte topcoat over a metallic or shimmer base. The contrast between the metallic pigments and the matte finish creates visual interest and texture without being over-the-top. Think rose gold matte, champagne matte, or bronze matte for sophisticated impact.
Why Matte Metallics Feel So Current
Matte finishes are contemporary and unexpected—most people expect metallics to be glossy and shiny, so the matte finish feels fresh and original. The metallic pigments still provide visual interest and luxury, but the matte surface keeps things feeling grounded and modern.
Achieving Matte Metallic Perfection
- Choose a quality metallic or shimmer polish in your preferred shade
- Apply your metallic base color in thin, even coats (typically two to three coats for full opacity)
- Once fully cured, apply a matte topcoat over the entire nail
- The matte topcoat will dull the shine while keeping the metallic particles visible
- This creates a sophisticated, understated look that still catches light
- Make sure your matte topcoat is high quality—cheap matte topcoats can look streaky
- The finished result should look intentionally designed, not like your polish lost its shine
- The contrast between metallic and matte is what makes this design work
Long oval nails showcase matte metallics beautifully because the extended surface area lets you really see the unique texture and finish.
Final Thoughts

Long oval nails offer an incredible foundation for nail art—the shape is universally flattering, works in any setting, and gives you plenty of room to express yourself. Whether you’re drawn to the absolute simplicity of a single classic red, the artistry of hand-painted florals, or the futuristic edge of chrome effects, there’s a long oval design that fits your aesthetic perfectly.
The key to pulling off any of these designs is taking your time with application and using quality products. A good topcoat makes every design last longer and look better, and a solid base coat prevents staining while improving adhesion. These aren’t shortcuts—they’re actually the foundations that make nail art look professional rather than amateurish.
If you’re getting your nails done professionally, bring photos of designs that appeal to you and don’t hesitate to ask your nail technician questions about durability, maintenance, and whether certain designs work better for your lifestyle. If you’re painting at home, start with designs that match your current skill level—there’s no shame in mastering French tips or simple nail art before attempting complex marble effects or intricate brushwork. You’ll be amazed at how much your skills improve with practice, and every design you try teaches you something useful for the next one.
The most important thing is choosing designs that make you feel confident and happy when you look at your hands. Your nails are something you see constantly throughout your day, so they deserve to be something that brings you joy.
