

Extra long oval nails have become the ultimate power move for anyone who wants their manicure to do all the talking. There’s something undeniably striking about nails that extend beyond your fingertips with that perfectly rounded silhouette—it’s bold, it’s elegant, and it absolutely commands attention. Whether you’re drawn to maximalist nail art, sleek minimalism, or something entirely unexpected, extra long oval nails create a stunning canvas that transforms your entire look from ordinary to absolutely unforgettable.
The beauty of this nail length and shape combination is that it works across virtually every aesthetic and occasion. You can rock them in a corporate boardroom, at a weekend wedding, or just living your everyday life with serious style. Long oval nails have a way of making even the simplest designs feel sophisticated, and they give you the space to really express your personality through nail art. The shape itself is incredibly flattering—it elongates your fingers and creates an elegant line that softer than a coffin shape but more dramatic than a standard almond.
What makes extra long oval nails so compelling right now is the sheer versatility available. You’re not limited to any single aesthetic or color palette. Some of the most striking nail designs incorporate unexpected textures, three-dimensional elements, negative space, bold color blocking, or intricate hand-painted details that simply wouldn’t have the same impact on a shorter nail. The extra length gives you room to tell a story with your nails, whether that’s through gradient effects, chrome finishes, gemstone embellishments, or artistic patterns that would look cramped on anything shorter.
1. Deep Burgundy With Gold Leaf Accents
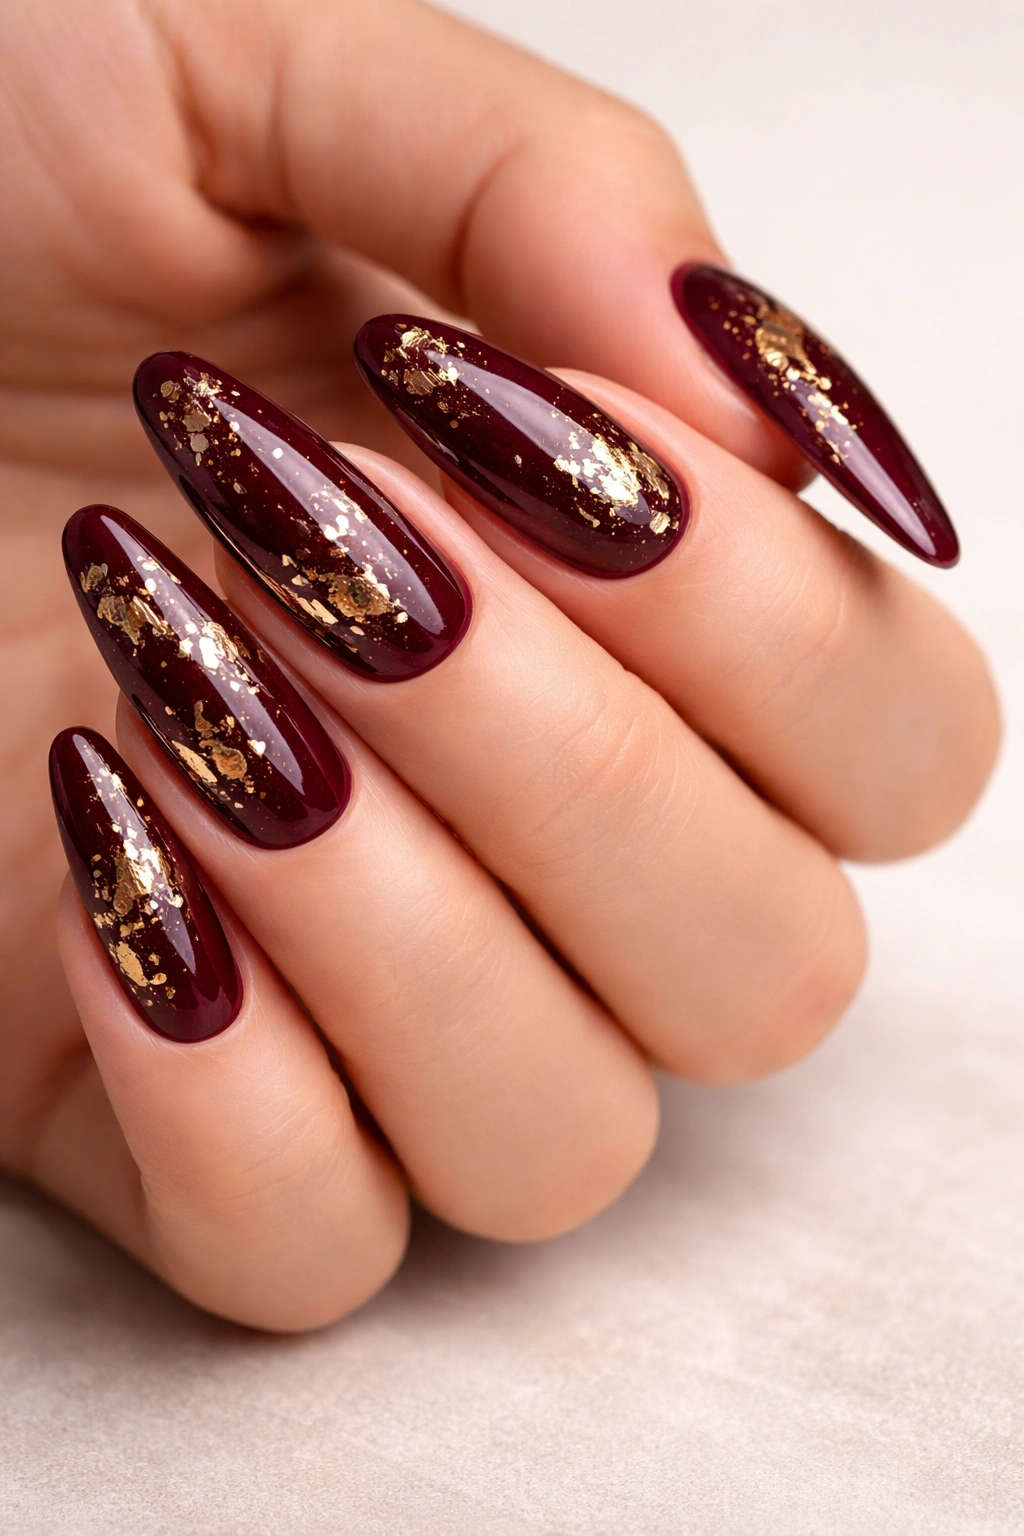
Deep burgundy is one of those rich, sophisticated colors that instantly elevates any look, and on extra long ovals, it becomes absolutely luxurious. The color is moody and elegant without being dark enough to feel heavy, and it creates the perfect backdrop for metallic detailing that catches the light with every movement of your hands.
Why This Design Stands Out
The pairing of burgundy with gold leaf is an unconventional combination that somehow feels both classic and contemporary. Gold leaf scattered across the nail surface—particularly concentrated along one edge or scattered randomly—creates dimension and visual interest that plain color simply cannot achieve. The metallic accents catch light differently depending on your angle, making your nails look like wearable art rather than just a manicure.
What to Know About This Look
- The gold leaf application requires a slightly tacky gel base or a thin layer of nail glue to adhere properly; professional application ensures the pieces stay put for the full duration of your manicure
- Burgundy photographs beautifully in natural light and artificial light alike, making this design perfect if your job involves video calls or public appearances
- Sealing the design with a thick top coat is absolutely essential—this protects the delicate gold leaf from peeling or catching on anything
- You can intensify the luxe factor by adding tiny diamonds or rhinestones where the gold leaf clusters, creating focal points on a few nails rather than all ten
- This design pairs beautifully with metallic jewelry, particularly gold bracelets and rings that echo the nail accents
Pro tip: Have your nail tech apply a matte top coat over the burgundy but a glossy top coat over just the gold leaf sections. The contrast between matte and glossy creates depth and makes the metallics pop even more dramatically.
2. Ombré Pink to White Gradient
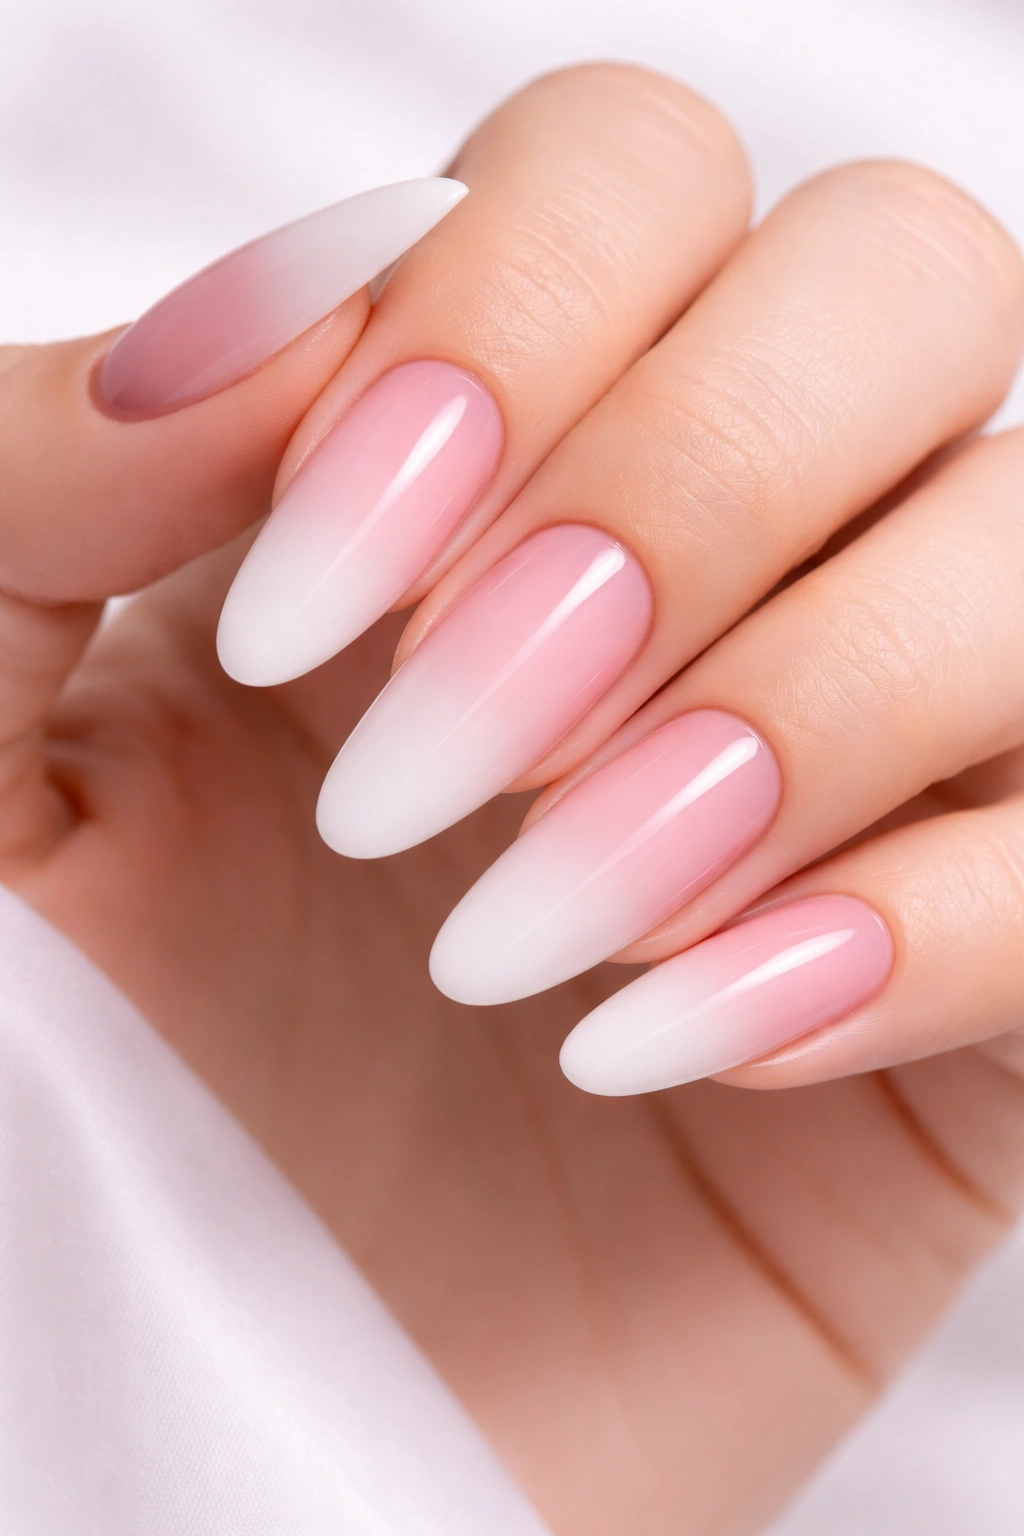
An ombré gradient from soft pink to crisp white is the kind of design that looks effortless but actually requires serious skill to execute. On extra long ovals, this gradient creates an elongating effect that makes your fingers look even more elegant, and the soft color progression feels modern and refined.
How the Gradient Creates Visual Impact
A true ombré effect—where colors blend seamlessly from one shade into another rather than having a hard line—demands careful layering and blending. On longer nails, you have more surface area to work with, which actually makes it easier to create smooth transitions. The pink-to-white gradient works particularly well because pink is universally flattering and white adds a clean, sophisticated element that prevents the design from feeling too soft or one-dimensional.
Design Elements That Complete the Look
- Start with a nude or pale pink base coat that will serve as your transition color between deeper pink and white
- Use a dry brush blending technique where you apply darker pink at the base, white at the tip, and blend them together in the middle with a slightly damp brush
- Add a single thin line of white along the very tip of each nail to create a subtle French ombre effect rather than a full gradient
- Consider adding a glitter gradient overlay—barely visible glitter particles that increase in density toward the tip
- Seal everything with a thick, glossy top coat that makes the gradient look almost wet and freshly painted
This design feels especially beautiful on extra long nails because the length gives you space to really showcase the gradient transition.
3. Glossy Black With Minimalist Chrome Line
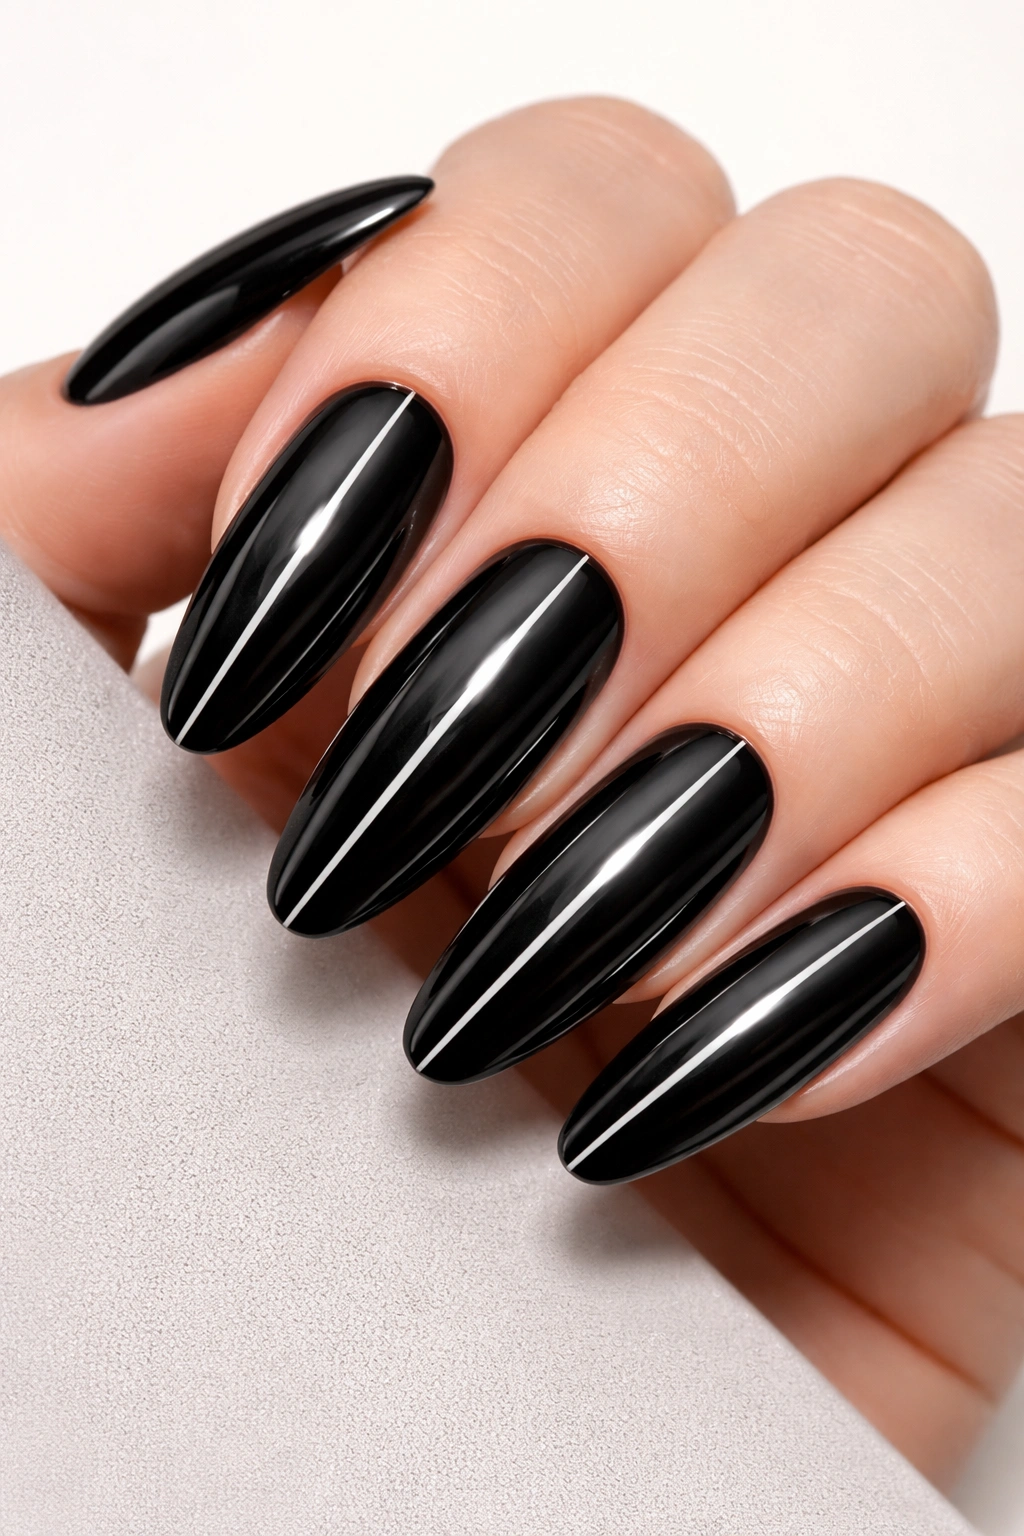
Black nails hit different when they’re extra long and shaped in a perfect oval. Add a single thin line of chrome running down the center of each nail, and you’ve got a design that’s simultaneously edgy and refined. This is the kind of manicure that makes a statement without being loud about it.
The Minimalist Appeal of Strategic Metal
One of the biggest nail trends involves doing less rather than more, and a single chrome line exemplifies that philosophy perfectly. The chrome catches light and creates a metallic stripe effect that draws the eye without overwhelming the nail. On extra long ovals, this stripe elongates your fingers even further, creating an almost hypnotic visual effect when your hands are in motion.
Pro Tips for Executing This Design
- Glossy black should be opaque in two coats; three coats if you’re using a lighter black formula
- The chrome line works best applied with a thin chrome brush or even a toothpick dipped in chrome powder mixed with gel
- If precision isn’t your strong suit, use thin striping tape to create a perfectly straight line, then remove the tape before curing
- The line can be perfectly centered, slightly off-center, or running along the side edge of the nail—each placement creates a different vibe
- Pair this with a very thick, ultra-glossy top coat that makes the black look like glass and amplifies the chrome’s reflective properties
Worth knowing: This design looks stunning under UV light or in low-light settings where the chrome creates unexpected glimmers of brightness against the black background.
4. Nude Base With Intricate Lace Design
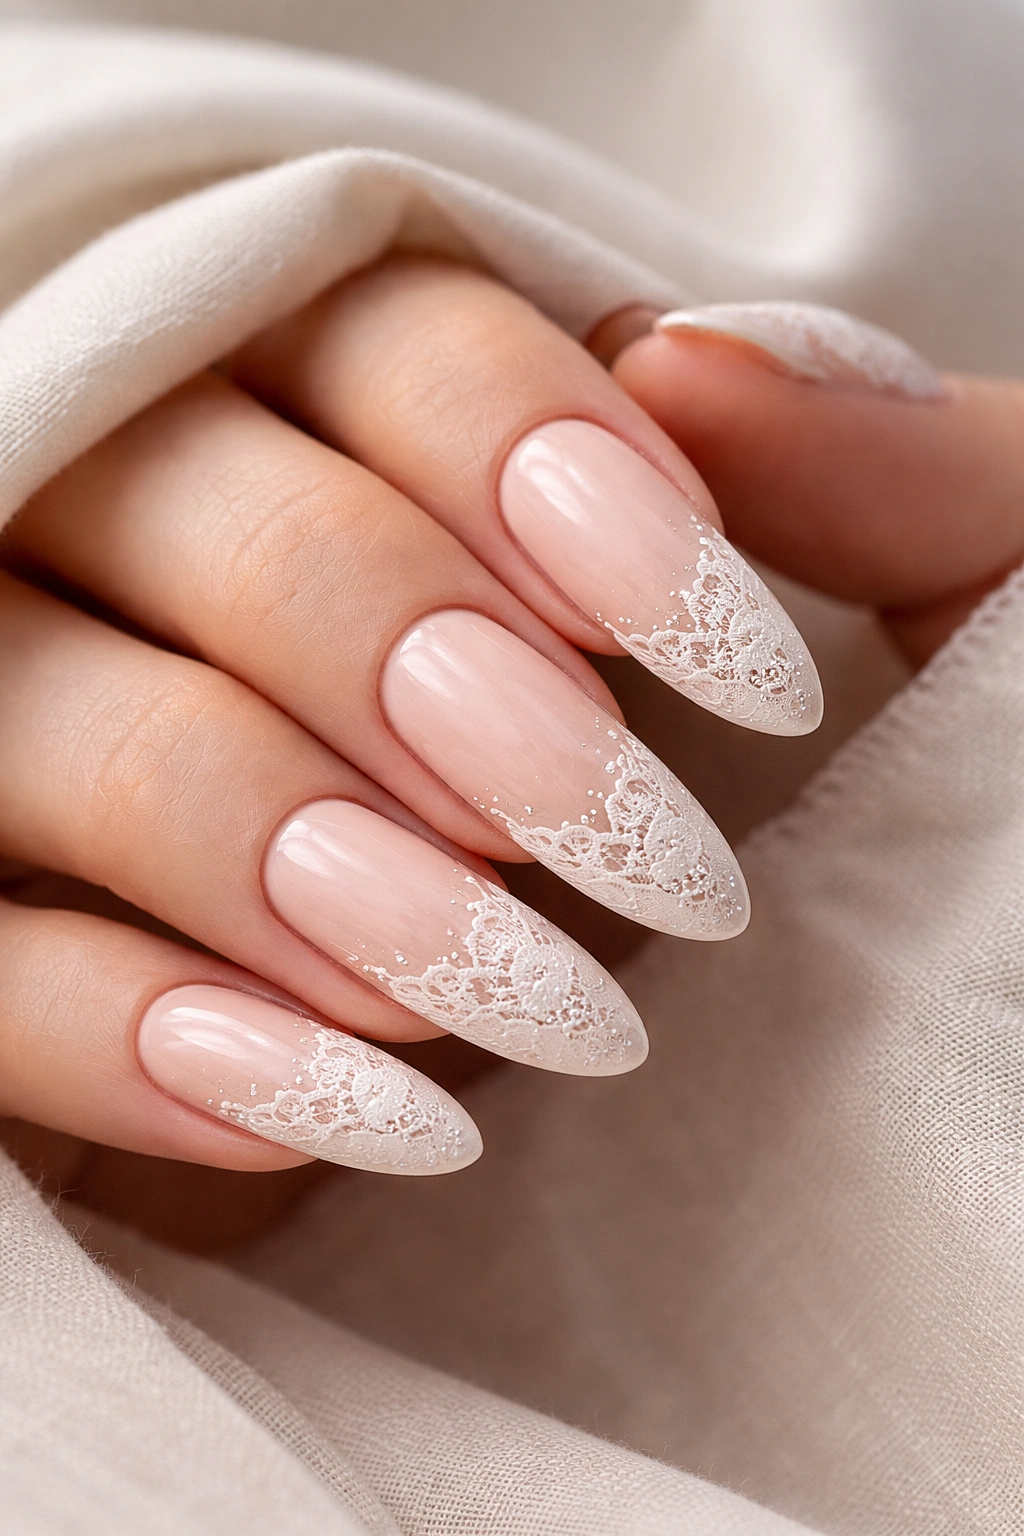
Lace detailing on nails is having a major moment, and extra long ovals provide the perfect canvas for these delicate, intricate patterns. A nude or nude-pink base keeps the focus on the lace work while feeling universally flattering and timeless. This design screams sophistication and works for literally any occasion.
Why Lace Details Feel So Elevated
Lace patterns instantly add a sense of elegance and intentionality to a manicure. The detailed nature of lace—all those tiny loops and intersecting lines—creates visual complexity that looks almost impossible to replicate by hand. Even if it’s actually hand-painted or stamped, the result looks incredibly refined and special. On long ovals, the extra surface area lets the lace pattern breathe and really showcase its intricate details.
How to Achieve Lace Detailing
- Hand-painting lace requires a very thin brush and steady hands; most people opt for stamping plates designed specifically for lace patterns
- White or cream lace works beautifully against nude, soft pink, or even pale peach bases
- Consider placing the lace design only on the tips of your nails (like a French manicure variation) rather than covering the entire nail
- Black lace against a nude base creates a more dramatic, Gothic-inspired aesthetic
- Add a touch of sparkle by using glitter polish for the lace lines instead of a solid color—this catches light and creates unexpected shimmer
The lace design works especially beautifully on ring fingers and pinkies for a focal point effect, leaving other nails solid for balance.
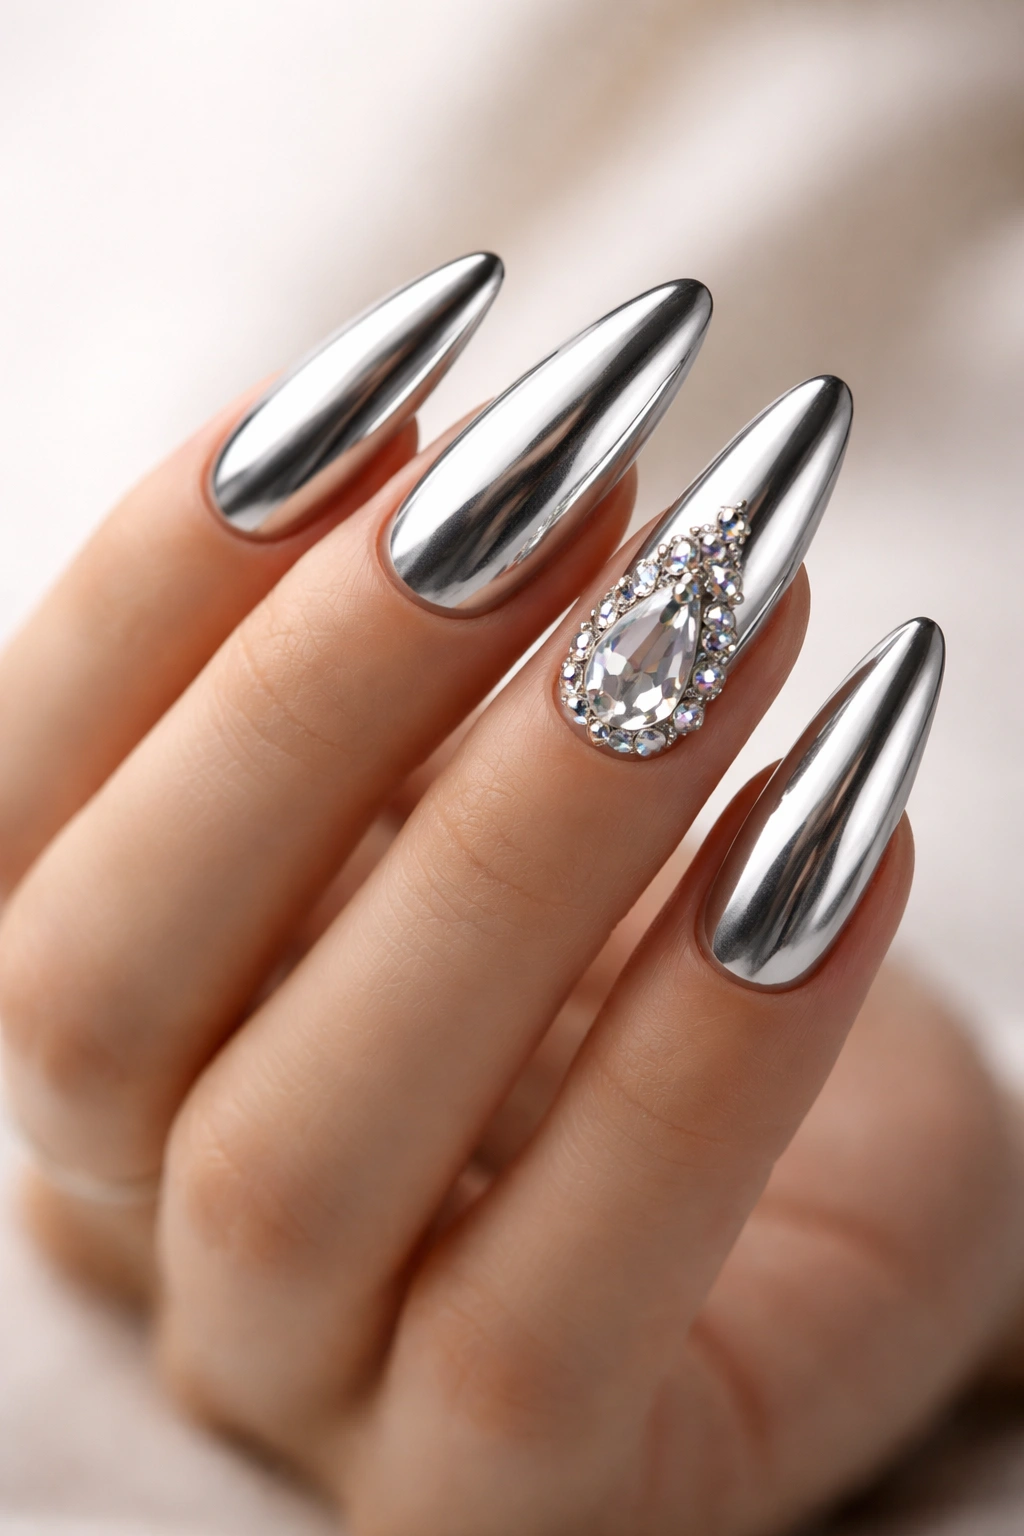
5. Jewel-Tone Emerald With 3D Gemstone Clusters
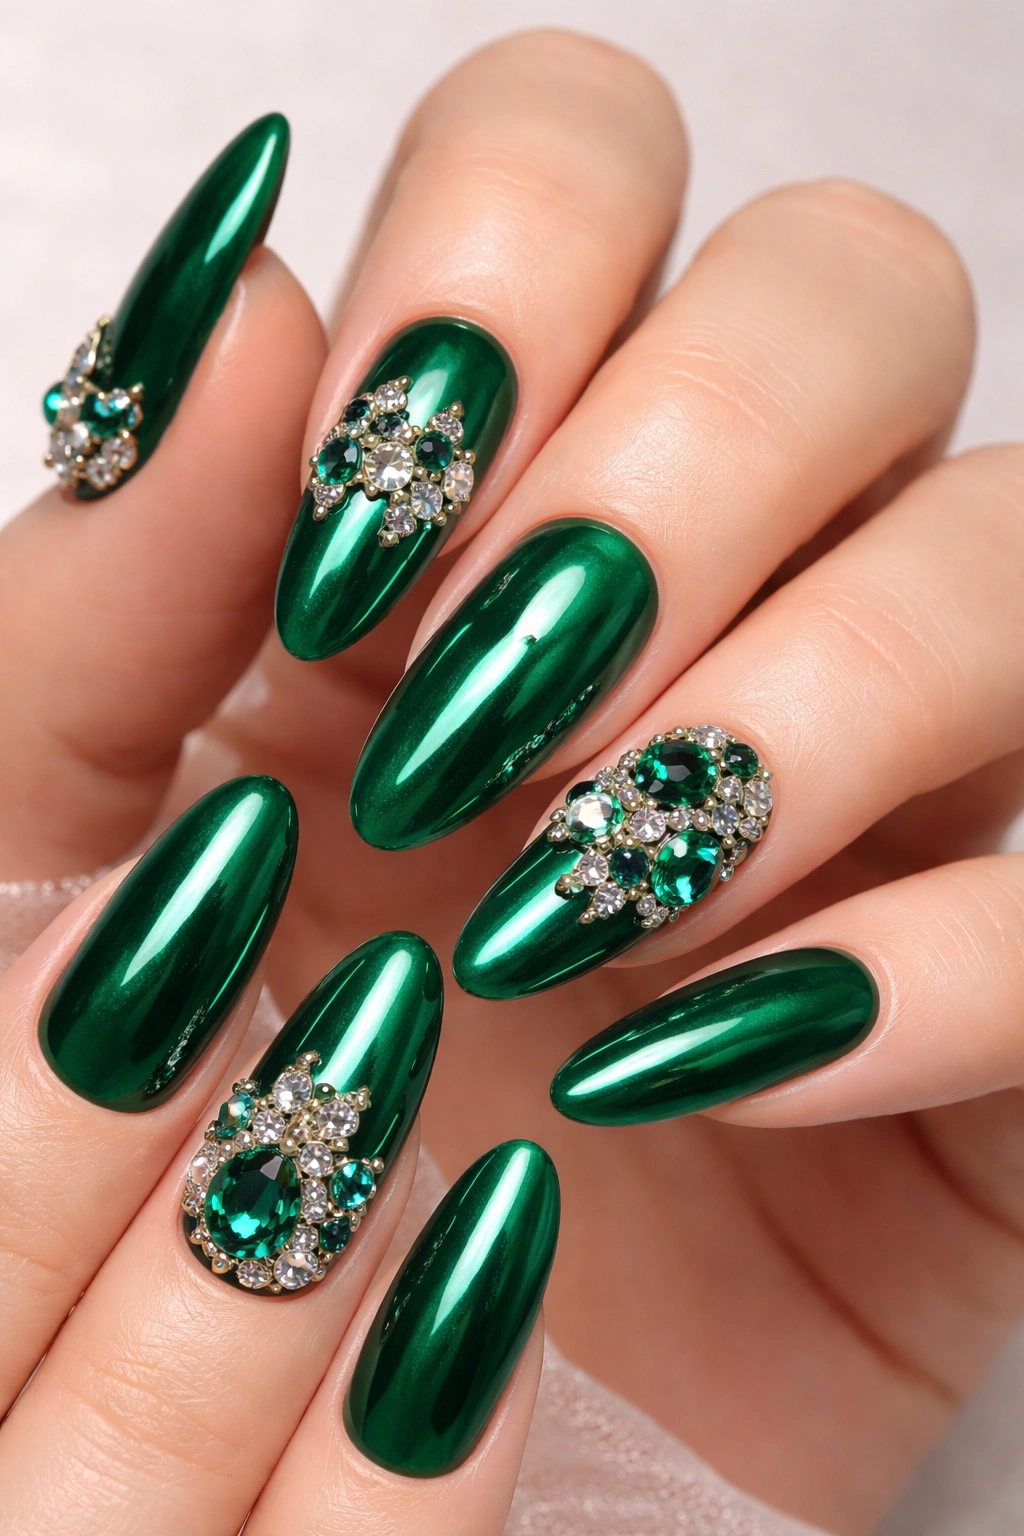
Emerald green is one of the most luxurious colors you can choose for extra long nails, and when you add dimensional gemstone embellishments, you’re creating something that looks like actual jewelry for your hands. This is the design for people who want their manicure to feel high-impact and celebratory.
The Luxury Factor of 3D Elements
Three-dimensional gemstones, rhinestones, and crystal clusters take nail art from flat decoration to genuine sculptural art. On extra long ovals, these elements don’t overwhelm the nail because the length distributes the visual weight differently. You can create designs where stones are clustered in one corner, arranged in a linear pattern, or scattered artfully across the surface without the nail looking chunky or uncomfortable to wear.
Building a 3D Gemstone Design
- Use a thick builder gel or polygel as your base to create a slightly raised surface that helps 3D elements adhere better
- Emerald green should be opaque and rich; look for gel polishes with good pigmentation that don’t require multiple coats
- Invest in higher-quality rhinestones and crystals—cheaper ones can appear cloudy or fall off easily
- Arrange stones before fully curing your base so you can shift them if needed, then cure everything together
- Smaller stones clustered densely create elegance; larger statement stones placed sparingly create boldness
- Top with a thick layer of clear builder gel or thick top coat that encases the stones and protects them
Pro tip: Place the densest cluster of stones on your ring finger and index finger, leaving middle finger and pinky with just one or two accent stones for visual balance.
6. Soft Blush Pink With Negative Space Art
Negative space—where you intentionally leave part of the nail bare or showing your natural nail—is one of the most sophisticated approaches to nail design. When executed on extra long ovals, negative space creates visual breathing room while still feeling intentional and artistic. A soft blush pink with strategic negative space designs feels modern, elegant, and unexpectedly bold.
How Negative Space Changes Perception
Negative space works by subtraction rather than addition. Instead of covering your nail completely, you’re using the bare nail as part of the actual design. On longer nails, this can create stunning geometric patterns, abstract lines, or sculptural shapes that frame the remaining polish beautifully. The contrast between the blush pink and the natural nail color creates an optical illusion that’s both sophisticated and eye-catching.
Creating Intentional Negative Space
- Start with a blush or pale pink base that’s opaque and smooth
- Use striping tape or thin brushes to paint geometric shapes (triangles, trapezoids, half-moons) leaving negative space
- Wave patterns work beautifully on long nails—paint curved lines that follow the natural contour of your nail, leaving the interior bare
- Linear negative space (painting just one or two thin parallel lines and leaving the rest bare) creates a minimalist aesthetic
- The contrast is more dramatic if your natural nail is significantly lighter or darker than the blush pink you choose
This design feels particularly striking on pointer and ring fingers, where slightly more complex patterns show better than on pinkies.
7. Chrome Silver With Smoke Effect Swirl
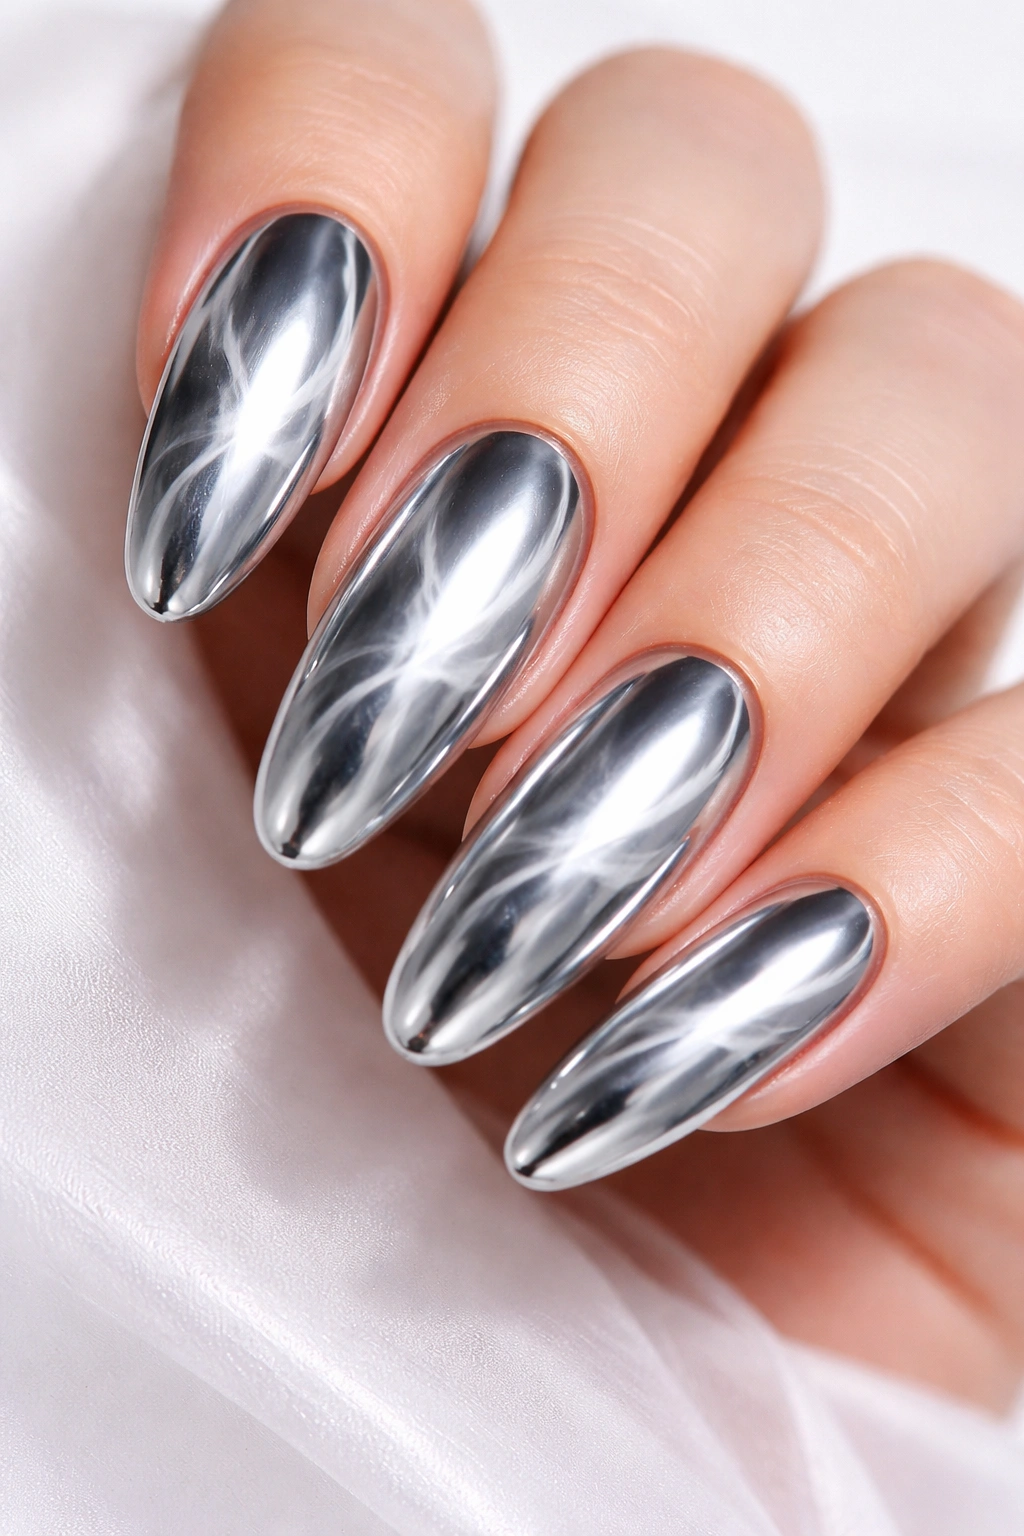
A full chrome finish is absolutely show-stopping on extra long nails, and adding a smoke effect swirl—where lighter shades appear to drift across the surface like actual smoke—elevates it to next-level artistry. This design is edgy, contemporary, and impossible to ignore.
Why Chrome Demands Extra Length
Chrome powder creates a mirror-like finish that demands proper light reflection, which means you need ample surface area. Extra long ovals provide exactly that canvas. The smoke effect swirl—achieved through layering different shades of gel before applying chrome—adds depth and movement to what could otherwise be a flat, one-dimensional design. The result looks three-dimensional and almost otherworldly.
Achieving a Flawless Chrome Smoke Effect
- Lay down a clear builder gel base that will be your foundation for layering colors
- Mix or layer grey and white gels to create the “smoke” effect—darker greys toward one edge, lighter smoke fading toward the other
- Apply chrome powder using a buffing technique where you gently rub the powder across the wet gel, creating that signature reflective finish
- The key is applying chrome to wet gel, not dry—this creates better adhesion and a more even finish
- Seal with a thick top coat that doesn’t dull the chrome shine; some chrome-specific top coats work better than standard ones
Worth knowing: This design looks absolutely stunning in photos and under flashlight, where the chrome creates almost holographic effects that photographs can barely capture.
8. Baby Blue With Subtle Cloud Designs
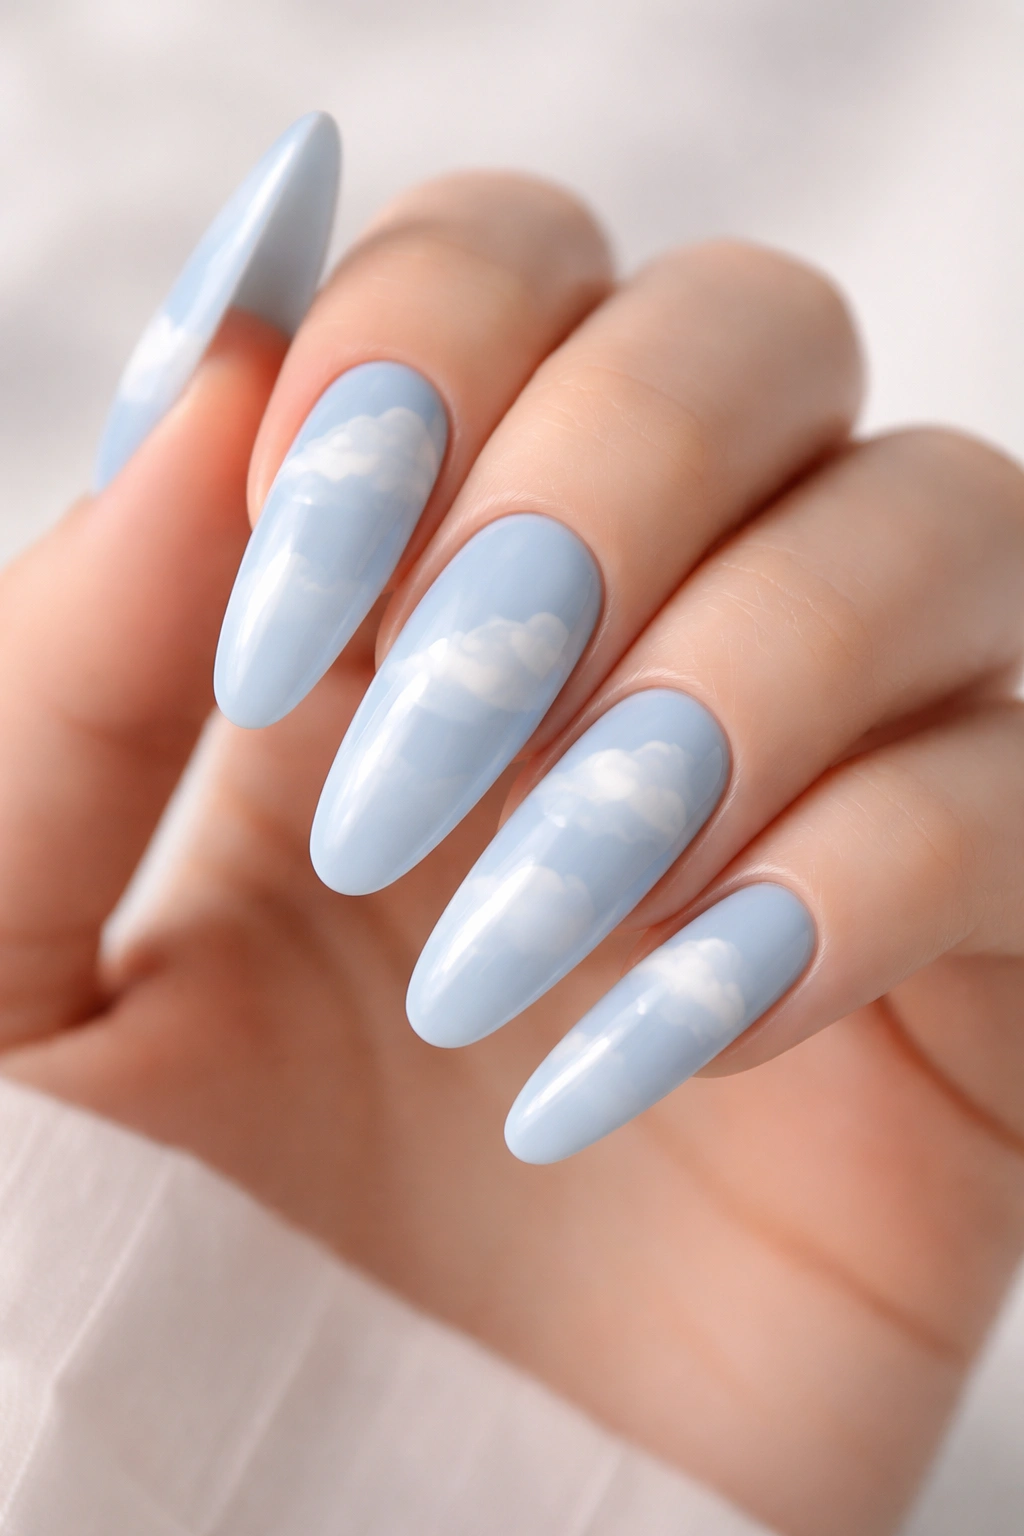
Cloud designs might seem soft and whimsical, but on extra long baby blue nails, they become modern and deliberately artistic. This design walks the line between cute and cool, making it perfect for people who want their nails to feel personal without being overly themed or character-driven.
The Modern Approach to Cloud Designs
Traditional cloud designs are usually white puffy shapes, but the contemporary approach is far more sophisticated. Instead of cartoon clouds, think delicate, wispy cloud silhouettes created with thin lines and soft shading. On baby blue, these look almost like a sky landscape, and the length of extra long ovals lets you create a real composition rather than just scattered decorations.
How to Paint Realistic Cloud Details
- Start with a pale, opaque baby blue base—almost a sky blue, not too saturated or bright
- Use white or off-white gel with a very thin brush to paint cloud outlines and soft shadows rather than filled shapes
- Add subtle grey shading on the bottom edges of clouds to create dimension and depth
- Consider painting clouds only on some nails (like your index, middle, and ring fingers) rather than all ten for a more modern gallery-like approach
- Negative space clouds (where you leave the blue bare and paint around cloud shapes) create a contemporary feel
This design pairs beautifully with a matte finish top coat rather than glossy, which enhances the sky-like aesthetic.
9. Rich Burgundy With Shattered Glass Effect
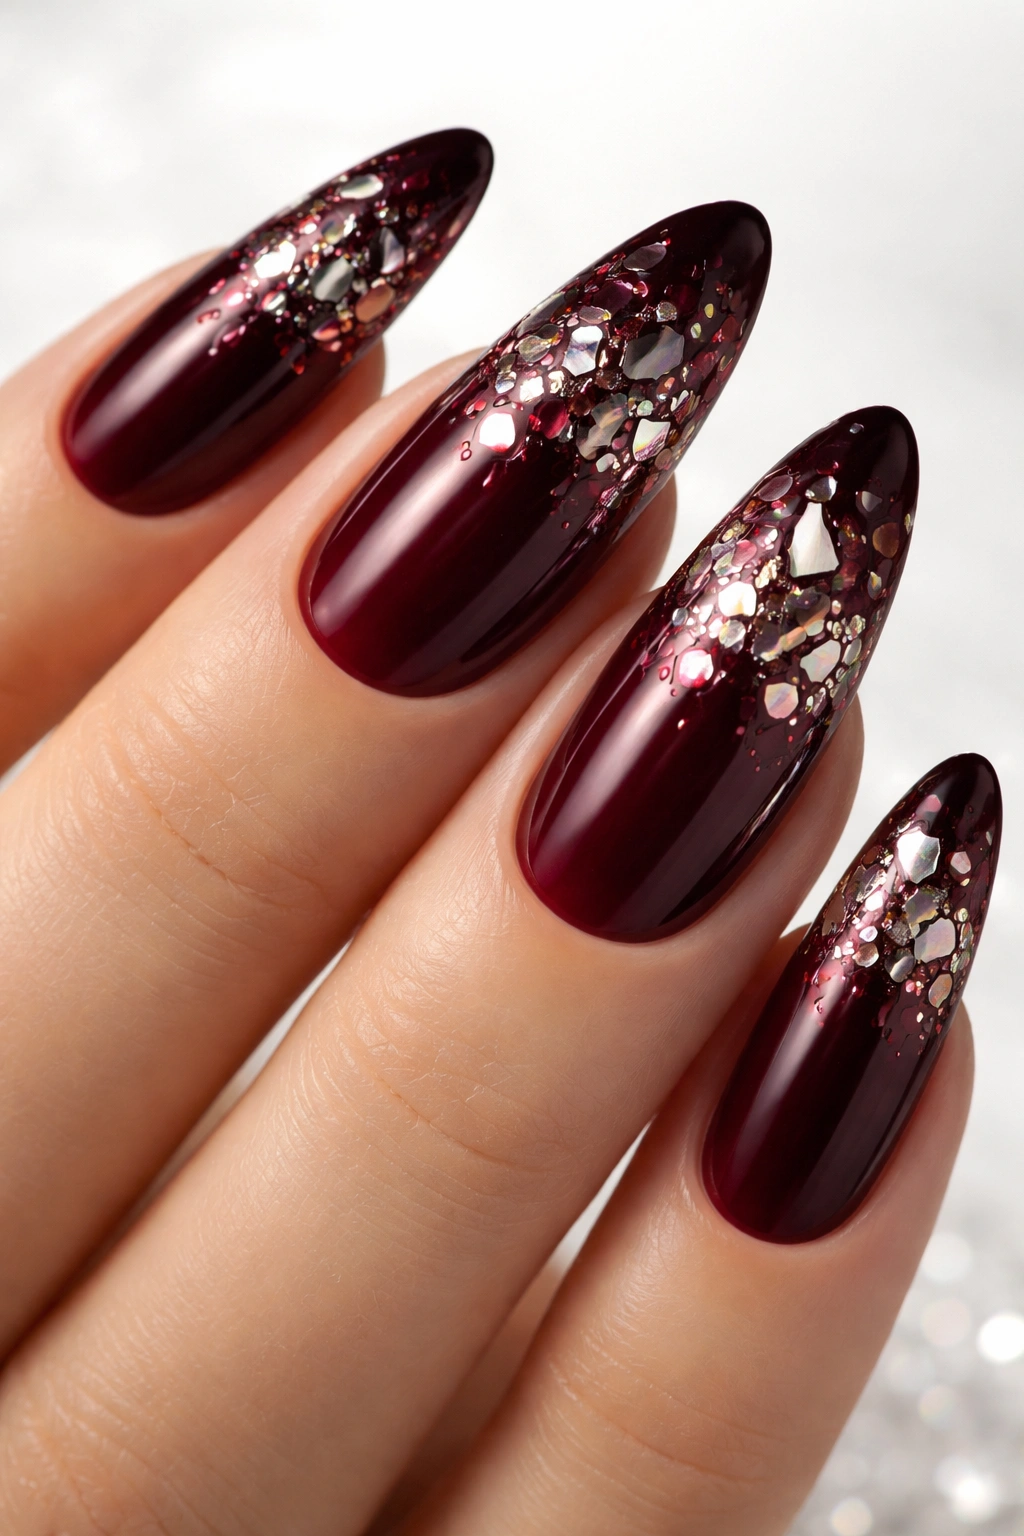
Burgundy and shattered glass effects create an almost artistic, gallery-quality manicure. The shattered glass (also called the “shatter effect”) involves applying chrome or glitter in broken, irregular patterns that look like glass has fractured across the surface. On extra long ovals, this creates a design that’s sophisticated yet undeniably bold.
Understanding the Shattered Glass Technique
The shattered glass effect is created by carefully applying chrome powder or foil effects to specific areas using intentional broken patterns rather than solid coverage. It’s not random—each “shard” is placed with purpose to create visual interest and a sense of movement. The contrast between the rich burgundy and metallic shattered areas is absolutely striking, especially when light hits the metallic sections from different angles.
Executing the Shattered Glass Effect
- Base with opaque burgundy in at least two coats to ensure full coverage
- Use a chrome powder application or foil sheets cut into irregular shapes that vaguely resemble glass shards
- Apply shards in a concentrated pattern (perhaps clustered toward one corner or along the nail edge) rather than scattered everywhere
- The gaps between shards should show the burgundy base, which is what creates the illusion of glass breaking on top of color
- A thick, crystal-clear top coat makes the chrome shards appear to be embedded in the surface
Pro tip: The shattered glass effect looks even more dramatic with a matte top coat over the burgundy and gloss only over the metallic shards—the contrast between finishes emphasizes the “shattering.”
10. Soft Pink With Hand-Painted Botanical Details
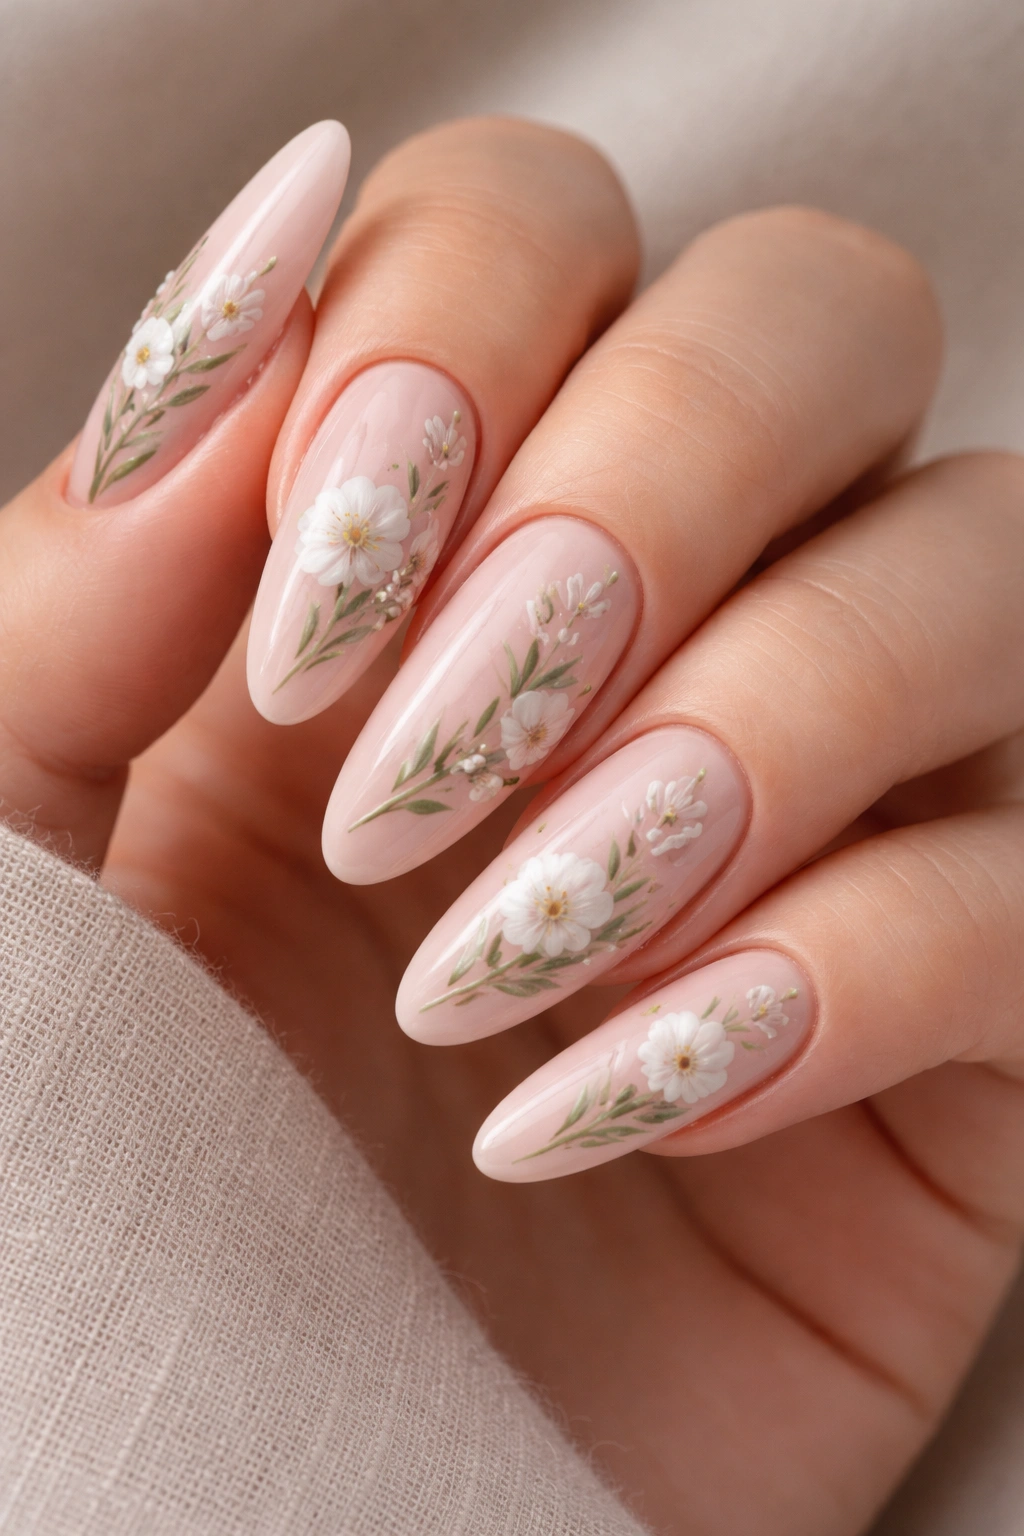
Hand-painted botanical designs—delicate flowers, leaves, and stems rendered in soft colors on a gentle pink base—create an artistic, gallery-quality manicure that feels entirely unique. On extra long ovals, these designs have room to really shine and showcase genuine artistic skill. This is nail art as wearable fine art.
Why Botanical Details Feel So Current
Nature-inspired designs have staying power because they feel organic and timeless rather than trendy. When done with restraint and artistic sensibility, hand-painted botanicals elevate a manicure from cute to genuinely compelling. The soft pink base keeps everything feeling cohesive and feminine without being saccharine, and the botanical elements add complexity and depth that make people genuinely curious about your nails.
Creating Hand-Painted Botanical Details
- Work with a professional nail artist for truly beautiful hand-painted designs, or develop your painting skills with practice
- Small delicate flowers (like wildflowers or simple daisies) work better than large, detailed blooms that can look cartoonish
- Green leaves and stems create a natural flow and balance against the pink base
- Negative space matters—don’t cover every inch of the nail with botanicals; leave breathing room
- Additional touches like tiny gold lines where stems meet flowers, or subtle shading on petals, elevate the design from nice to stunning
- Matte or semi-matte finish often works better for botanical designs than high-gloss
This design is especially beautiful when you consider the composition across all ten nails—perhaps different flowers on different nails rather than identical patterns repeated.
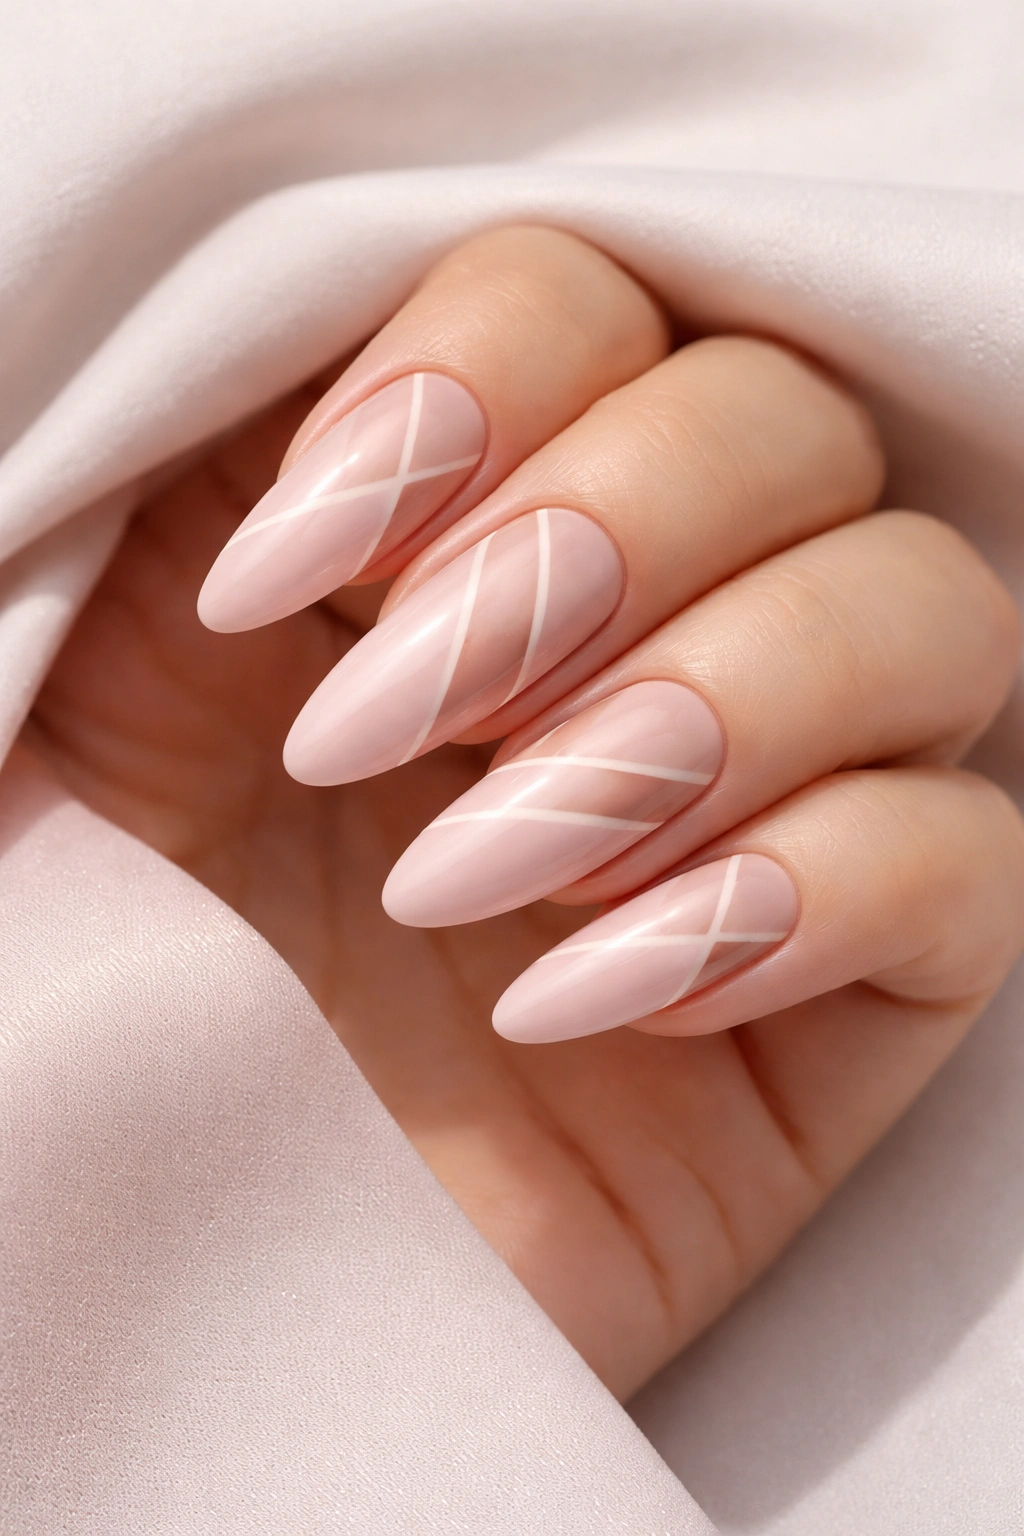
11. Glossy Nude With Geometric Line Art
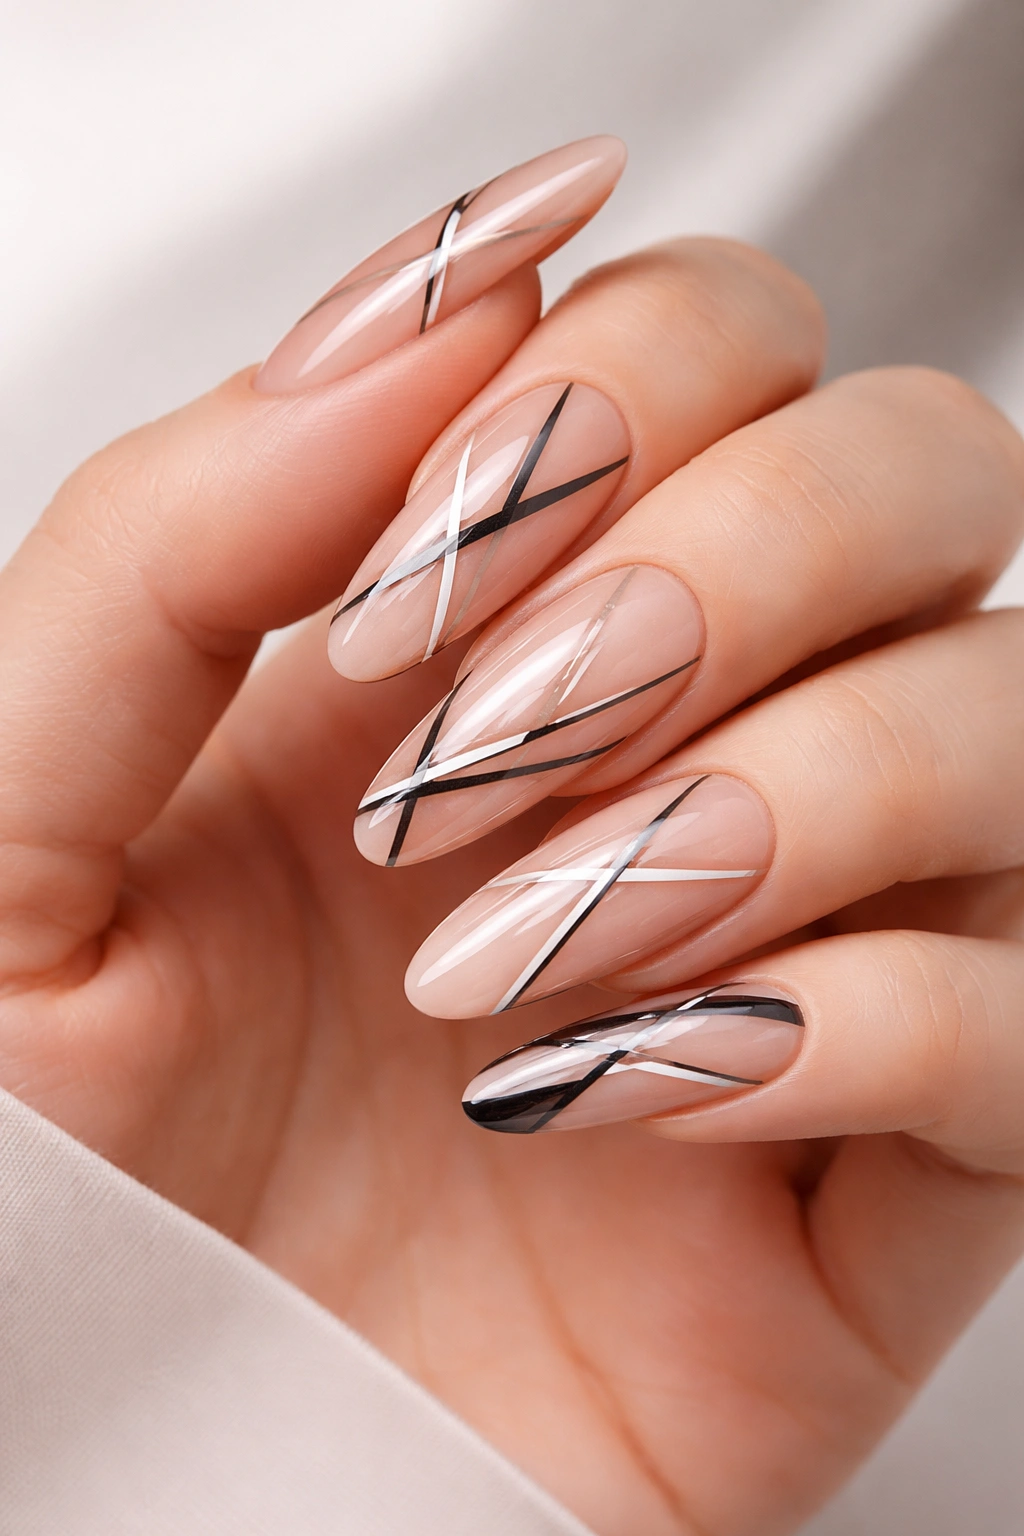
Geometric line art on a glossy nude base is the definition of modern elegance. Think clean lines, precise angles, minimalist shapes—triangles, hexagons, parallel lines—rendered in white, black, or metallics on a nude foundation. On extra long ovals, the geometry has room to create actual compositions rather than just patterns.
The Precision and Balance of Geometric Design
Geometric designs demand precision, which is why they look so impressive when executed flawlessly. The clean lines feel contemporary and intentional, and on longer nails, you can create more complex compositions. A single geometric element on each nail (rather than the same pattern repeated) allows for actual artistic variation while maintaining visual cohesion across all ten nails.
Applying Geometric Line Art
- A nude or nude-pink base should be perfectly opaque and smooth—imperfections show clearly against geometric lines
- Use striping tape for perfectly straight lines, or invest in a thin striping brush for hand-painted precision
- Black or white lines create the strongest contrast; metallics create a subtler, more sophisticated look
- Vary the geometric elements across nails rather than repeating the same shape on every nail
- Consider where elements intersect or overlap to create depth and visual interest rather than isolated shapes
- Glossy finish enhances the modern feel and makes geometric lines appear crisp and sharp
Worth knowing: Geometric designs photograph incredibly well, especially in strong natural light where the clean lines cast subtle shadows that add dimension.
12. Deep Plum With Constellation Star Pattern
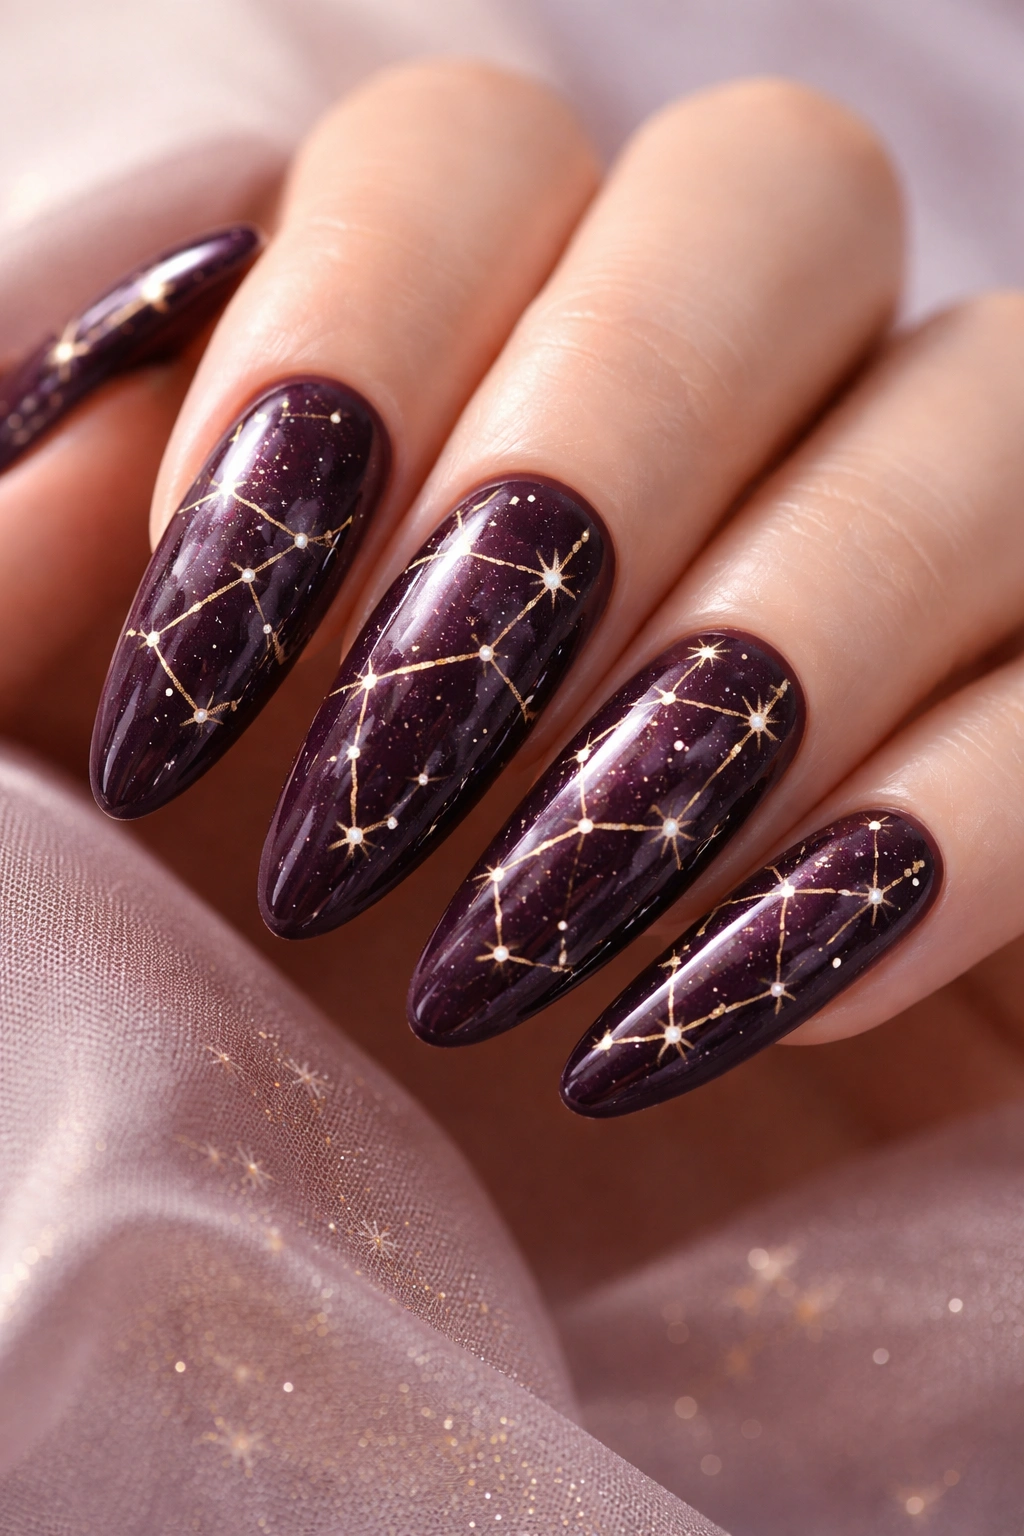
A deep plum base with constellation star patterns creates a design that’s simultaneously mystical and sophisticated. Tiny stars connected by thin lines create recognizable (or made-up) constellations, and the combination of the rich plum color with white or gold stars feels elegant and decidedly bold. This is the design for dreamers and people who want something genuinely unique.
Why Constellation Designs Feel So Special
Constellation designs tap into something romantic and cosmic while remaining subtle and sophisticated. Unlike cartoon-like celestial designs, constellation patterns are minimalist by nature—just dots and connecting lines. On extra long ovals, these designs have room to create actual constellation compositions that feel like wearable astronomy rather than generic star themes.
Creating Beautiful Constellation Patterns
- Deep plum—think eggplant or royal purple—provides a rich backdrop that makes stars pop without being too dark
- Tiny white or cream dots represent individual stars; white creates high contrast, while cream feels softer and more romantic
- Connect stars with super-thin white or gold lines to create constellation shapes—keep lines minimal for an elegant effect
- Research actual constellations (like Orion or Cassiopeia) or create your own made-up constellations for a personal touch
- Place constellation patterns on specific nails (perhaps just your index and ring fingers) rather than every nail for focal point emphasis
- A glossy top coat makes stars shimmer, especially under artificial light
The constellation design feels especially beautiful as a focal point on one or two nails, with the remaining nails solid plum for balance and elegance.
Final Thoughts
Extra long oval nails aren’t just about length—they’re about creating a statement with intentionality and style. Whether you choose a minimalist approach like geometric line art or a maximalist design with full chrome and gemstone embellishments, the canvas these nails provide is genuinely spectacular. The oval shape ensures your design remains elegant rather than edgy, while the length gives you creative freedom that shorter nails simply can’t match.
What makes these designs work so beautifully is that they translate across virtually every setting and season. You can wear rich burgundy with gold leaf to a formal event or soft pink botanicals to casual weeknight plans. The versatility of extra long oval nails means you’re not limited to one aesthetic or season—you can pivot your design whenever your mood shifts without changing your nail length.
The real power of committing to extra long oval nails is the confidence they inspire. There’s something undeniably self-assured about choosing a bold nail length and backing it up with a thoughtful, beautiful design. Your hands become part of your overall style statement, and that matters more than most people realize. Whether you’re drawn to bold colors and maximalist designs or prefer minimalist refinement, extra long ovals provide the perfect foundation for nails that genuinely deserve attention.
