

Long nails have a way of transforming how your hands look, making them appear more elegant, elongated, and sophisticated. But here’s the thing — not every nail shape works the same way for everyone. The difference between a square and round shape might seem subtle, but it completely changes the vibe of your manicure and how it photographs. Long nails give you the canvas to explore bold designs, delicate finishes, and unexpected color combinations that shorter nails simply can’t pull off. Whether you’re drawn to the sharp lines of a square shape or the softer curves of a round shape, there’s a long-nail look waiting for you that will feel authentically you.
The nail looks below represent some of the most wearable, stunning combinations of length and design that work across different seasons, occasions, and personal styles. Some are understated and work for everyday life, while others make a genuine statement. What they all share is the ability to look polished, intentional, and well-maintained — which is honestly the foundation of any great manicure. Let’s explore the styles worth considering for your next salon visit or at-home manicure.
1. Long Square Nude with Warm Undertones
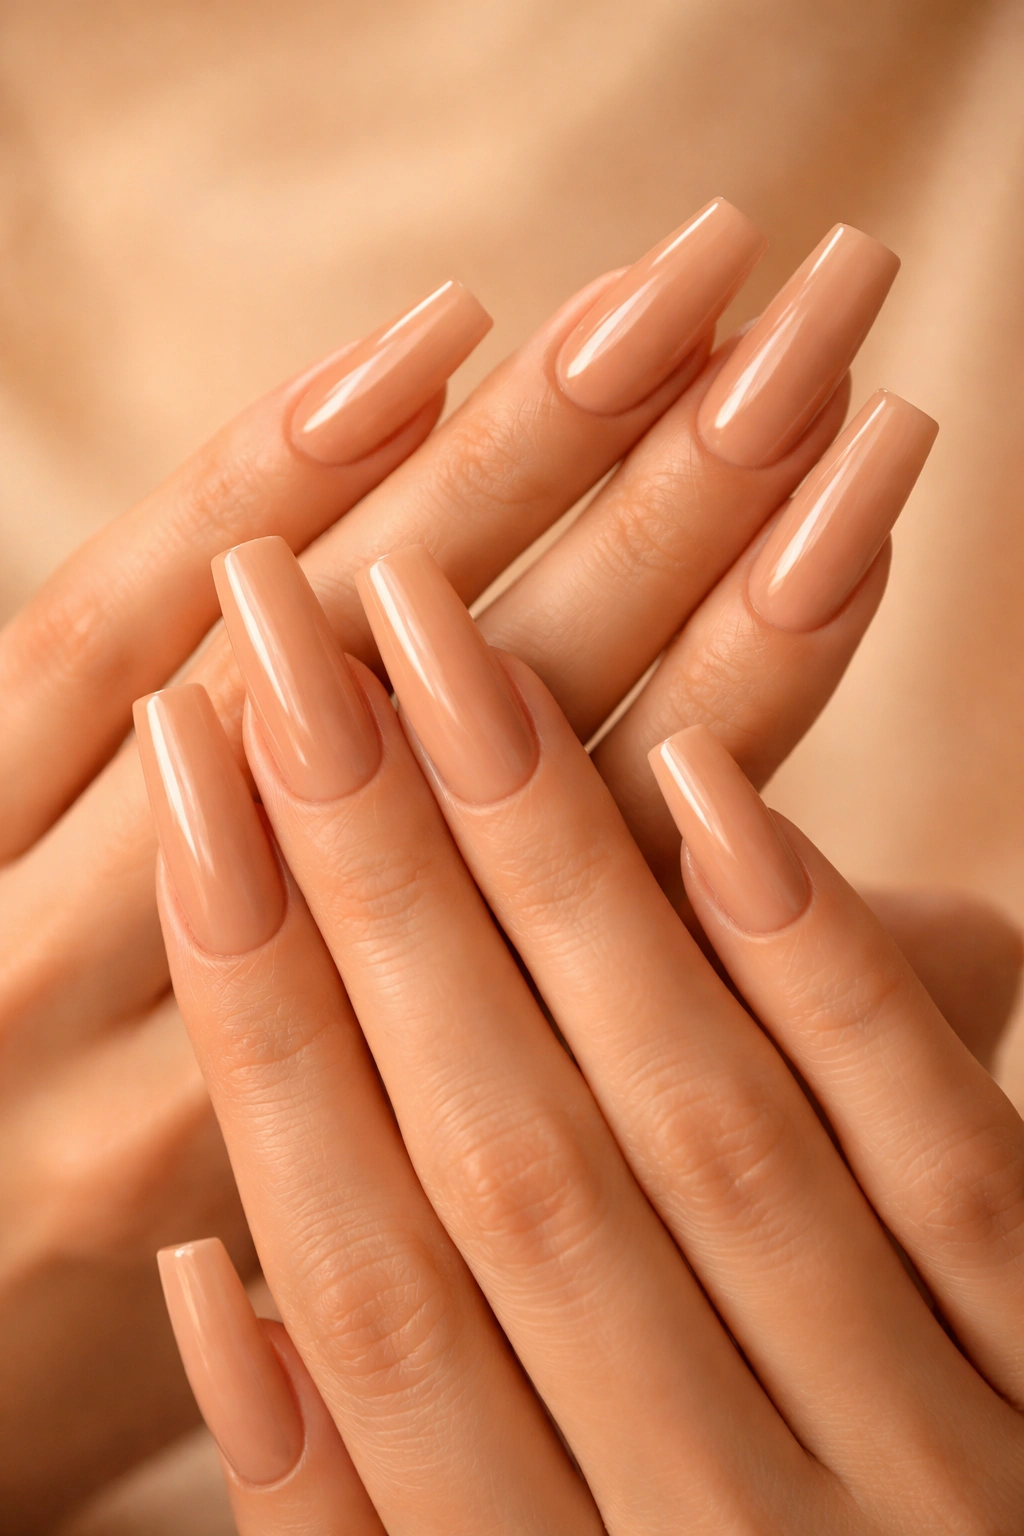
The classic long square nail in a warm nude shade is the definition of timeless elegance. This look works because it’s flattering to every skin tone when you choose the right undertone — warmer nudes have hints of peach, caramel, or golden brown that complement deeper skin tones, while cooler nudes lean toward pink and ivory for fairer complexions. The length gives you presence without the drama, and the square shape creates crisp, clean lines that read as intentional and put-together.
Why This Works for Everyone
A warm nude on long square nails is the manicure equivalent of a white button-down shirt. It’s the foundation piece that works alone or as the base for nail art. The length prevents the shade from looking washed out or dull against your skin. The square shape is structured enough to look professional in any setting while still feeling modern and current. You’re not trying to make a statement — you’re letting your hands speak for themselves with quiet confidence.
What Makes This Look Special
- Length should extend about ¼ inch past your fingertip for true drama without crossing into impractical
- The shade should match the midtone of your skin for the most flattering effect
- Square tips should be filed straight across with sharp corners for maximum impact
- Warm undertones photograph beautifully in natural light and don’t appear yellow under fluorescent lighting when chosen correctly
Pro tip: Apply a glossy top coat rather than matte to add dimension and make the shade appear richer and more three-dimensional.
2. Long Round Blush Pink Ombre
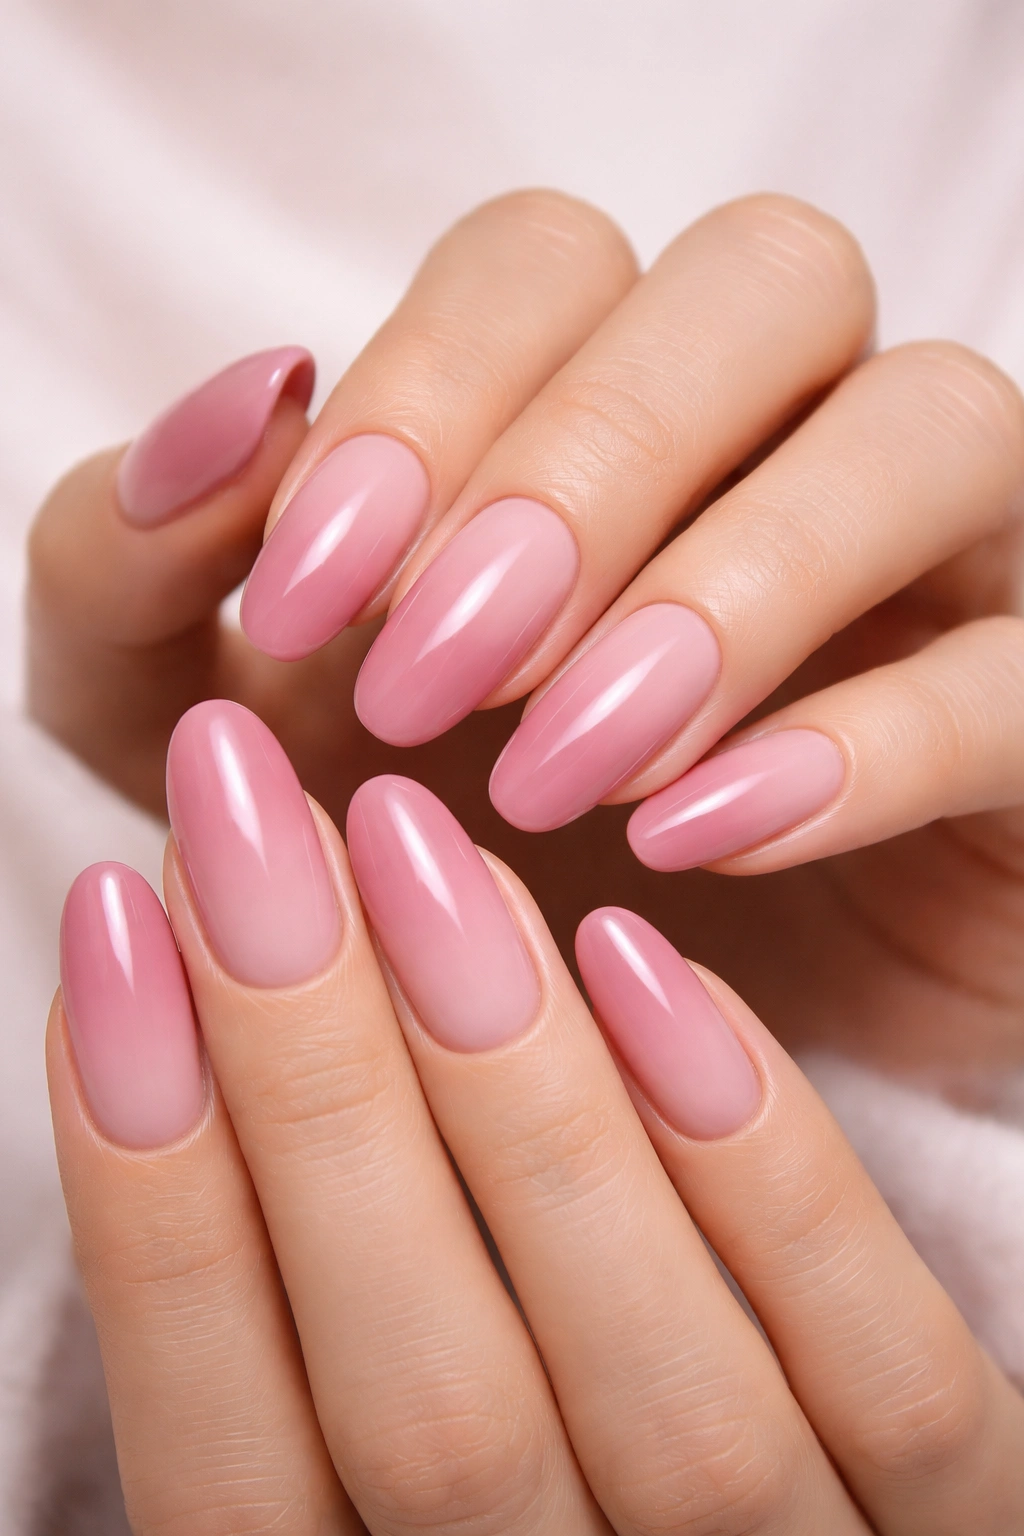
An ombré effect on long round nails creates a soft gradient that feels both trendy and timeless. Starting with a pale pink at the base and deepening to a dusty rose or mauve at the tips gives you the illusion of even longer nails because the eye follows the color transition. Round shapes soften the effect, making it feel romantic and refined rather than edgy or bold.
The Beauty of the Gradient Effect
The ombré design works because it’s technically sophisticated but emotionally simple. You’re not picking one color — the transition itself becomes the focal point. Long round nails paired with this effect create an almost ombré effect, where your nail appears to have dimension and depth. The roundness prevents the design from feeling too sharp or angular, which would break the softness of the gradient.
Making the Ombre Look Professional
- Blend three shades minimum — a base, a middle tone, and a tip shade — for a smooth, gradient appearance
- Use a makeup sponge dabbed with polish to blend the colors on the nail rather than trying to hand-paint a perfect gradient
- Seal everything with a thick glossy top coat to help the colors appear as one unified design
- The gradient should take up about two-thirds of the nail for maximum impact without looking sloppy
Worth knowing: Ombré designs tend to show growth more dramatically than solid colors, so plan for touch-ups every two weeks if you want to maintain the perfect gradient effect.
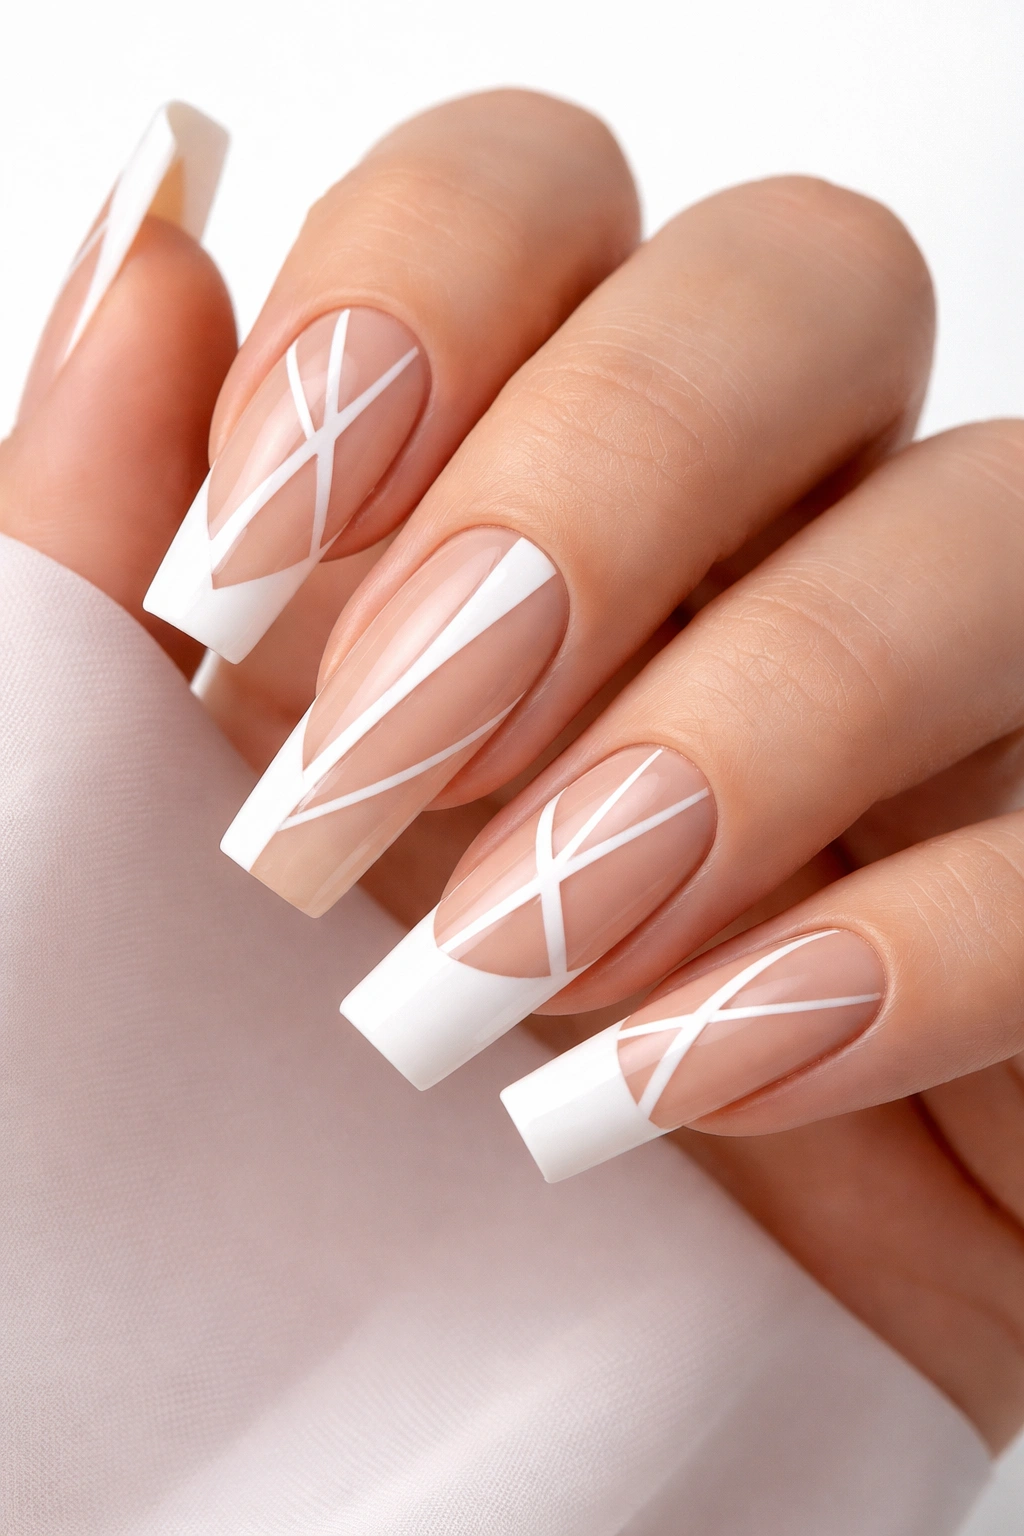
3. Long Square French Tips with Tapered Edge
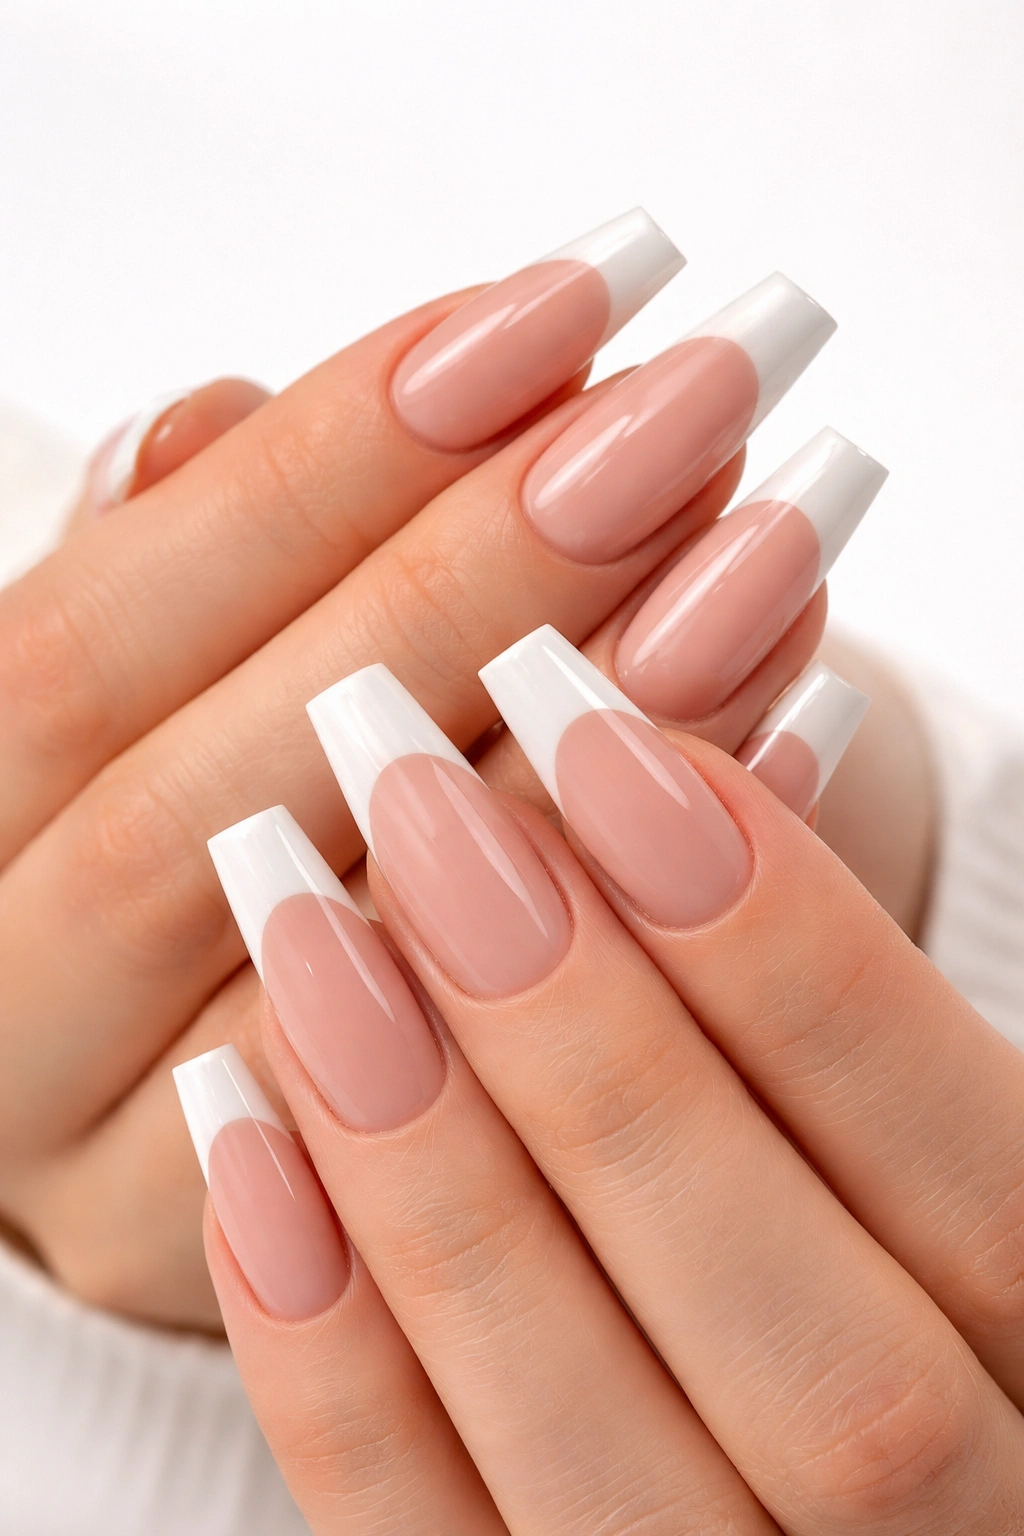
The French manicure gets a modern upgrade when you pair it with long square nails and a tapered edge — creating a hybrid that’s sharper at the sides but softer at the tip. This look hits a sweet spot between classic and contemporary. The white or cream tip remains crisp and clean, but the tapered shape at the very edge prevents it from looking too severe or outdated.
Why the Tapered Edge Changes Everything
A traditional French tip on a perfectly square nail can feel a bit formal or old-fashioned, especially if you’re younger. Adding a slight taper — keeping the sides square but softening the actual tip point — modernizes the entire look without sacrificing the elegance that makes French tips so timeless. The length emphasizes the contrast between the nude base and the white tip, making the design pop.
Tips for a Flawless Tapered French Manicure
- The white or cream tip should cover about one-quarter of the nail length for balance
- Paint the base in a nude that’s one or two shades warmer than your skin tone for the most flattering effect
- Use a thin, steady hand or a nail art brush to create a smooth line where the tip begins
- The taper is subtle — only about 2-3 millimeters narrower at the very center than at the sides of the square shape
- Seal with a high-shine top coat to emphasize the contrast between the nude and white
Quick thought: This is the perfect look for someone who wants to appear polished at work but doesn’t feel comfortable with bold color or elaborate designs.
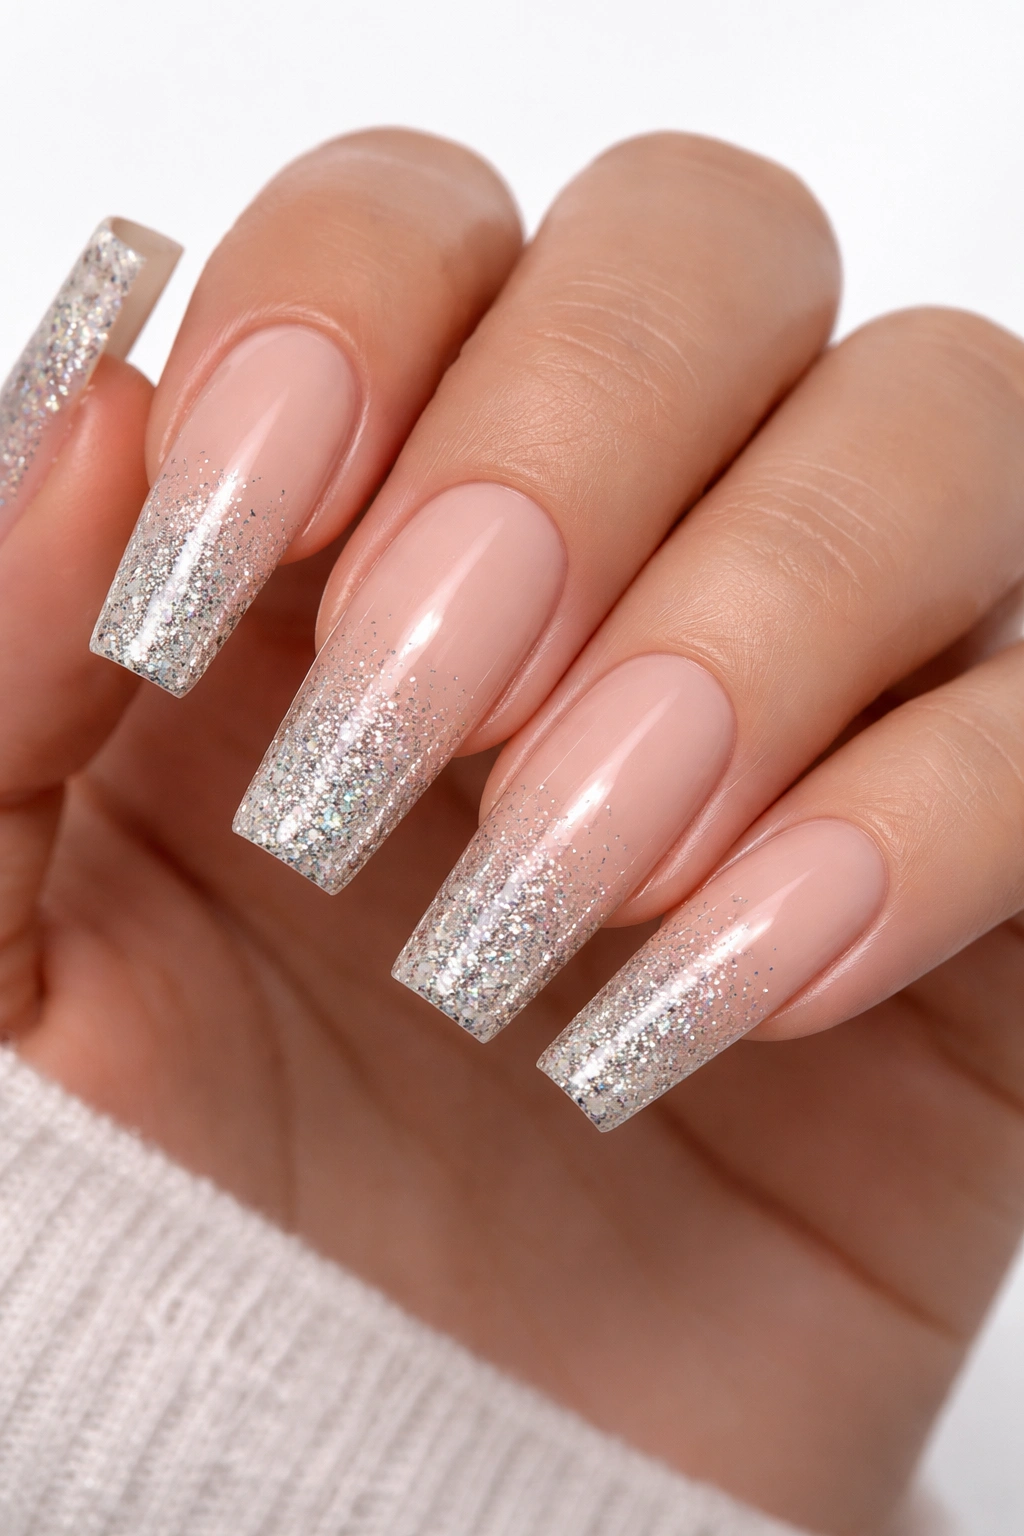
4. Long Round Glitter Gradient from Base to Clear
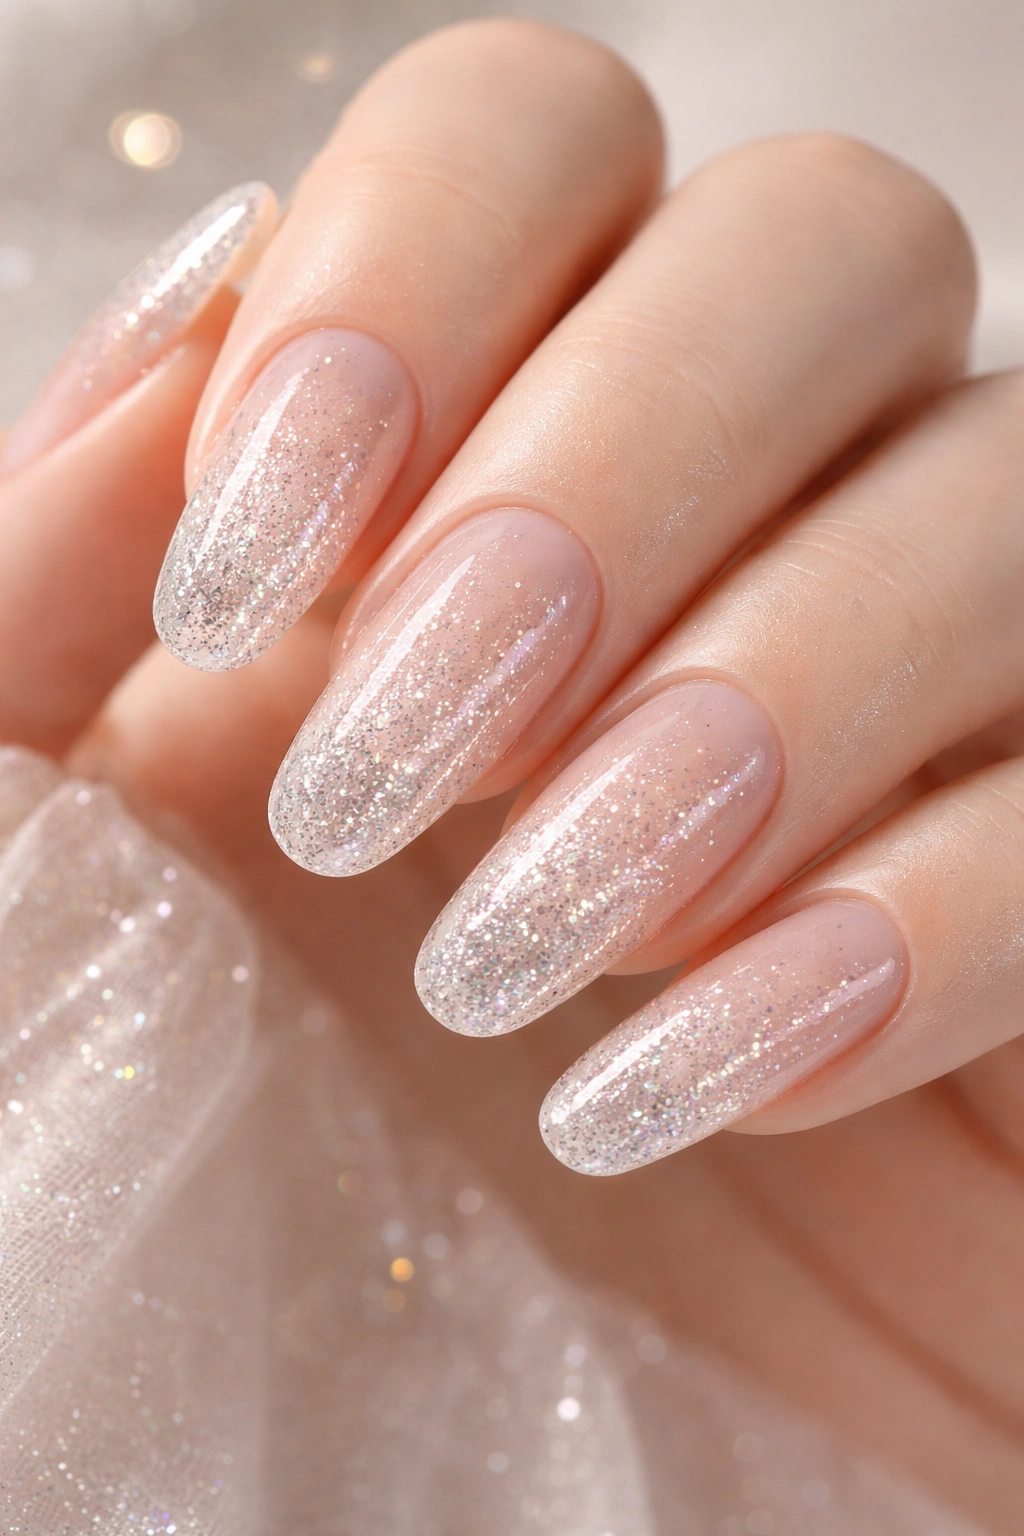
Glitter embedded in a gradient from an opaque shade at the base to pure clear at the tips creates an ethereal, almost magical effect on long round nails. The round shape softens the sparkle, making it feel romantic rather than loud, while the gradient ensures you’re not overwhelming your fingers with glitter. This is a look that catches light beautifully without screaming for attention.
The Magic of Transparency in Design
When glitter gradually disappears as it moves toward the tips of your nails, you create an optical illusion that your nails are dissolving or fading. Paired with the gentle curves of round nails, the effect feels organic rather than artificially applied. The round shape means there are no sharp corners to catch and reflect harsh light unevenly — the sparkle distributes beautifully across the curved surface.
How to Build the Glitter Gradient
- Start with a solid opaque base color — champagne, rose gold, or soft nude work beautifully
- Layer a glitter top coat over the full nail, then use a lint-free wipe with rubbing alcohol to gently remove glitter from the top one-third of the nail
- Repeat the process to create an even more gradual fade, removing glitter from the top half until you reach clear at the very tips
- Use a thick, clear top coat to seal everything and add shine without adding more glitter particles
- The gradient should transition smoothly over about half the length of the nail for the most sophisticated effect
Pro tip: Use iridescent or holographic glitter rather than chunky sparkle for a more refined, expensive-looking result.
5. Long Square Almond Hybrid with Negative Space Design
Here’s where you get creative with shape: instead of purely square or purely almond (tapered and pointed), you blend them. The sides stay relatively straight like a square, but the tip comes to a gentle point like an almond — think of it as the sophisticated middle ground. Pair this hybrid shape with negative space design — where you leave parts of the nail bare to show your natural nail or a contrasting base — and you’ve got something genuinely unique.
The Power of Negative Space
Negative space design has moved beyond a trend into a permanent part of sophisticated nail aesthetics. By leaving areas of your nail bare or in contrasting colors, you create visual interest without relying on complex art or full coverage. The almond-square hybrid shape is perfect for this because it gives you geometric lines to play with — you can create clean angles and unexpected cutouts that wouldn’t work as well on a purely round shape.
Building Your Negative Space Manicure
- Choose a base color that will be your background — this should be darker or more saturated than the negative space color
- Use nail tape or a thin brush to paint geometric shapes (stripes, triangles, corner cutouts) in a contrasting nude or white
- The negative space pattern should cover about 30-40% of the nail for balance — too much and it looks incomplete, too little and it disappears
- The almond-square hybrid tip should be pointed enough to feel intentional but not so sharp that it feels fragile
- A glossy top coat unifies the design and makes both the color and bare nail appear intentional rather than like you forgot to paint parts of your nail
Worth knowing: Negative space designs show every speck of dust or debris on your natural nail, so this look requires hands that are genuinely clean and well-maintained.
6. Long Round Chrome Finish with Metallic Depth
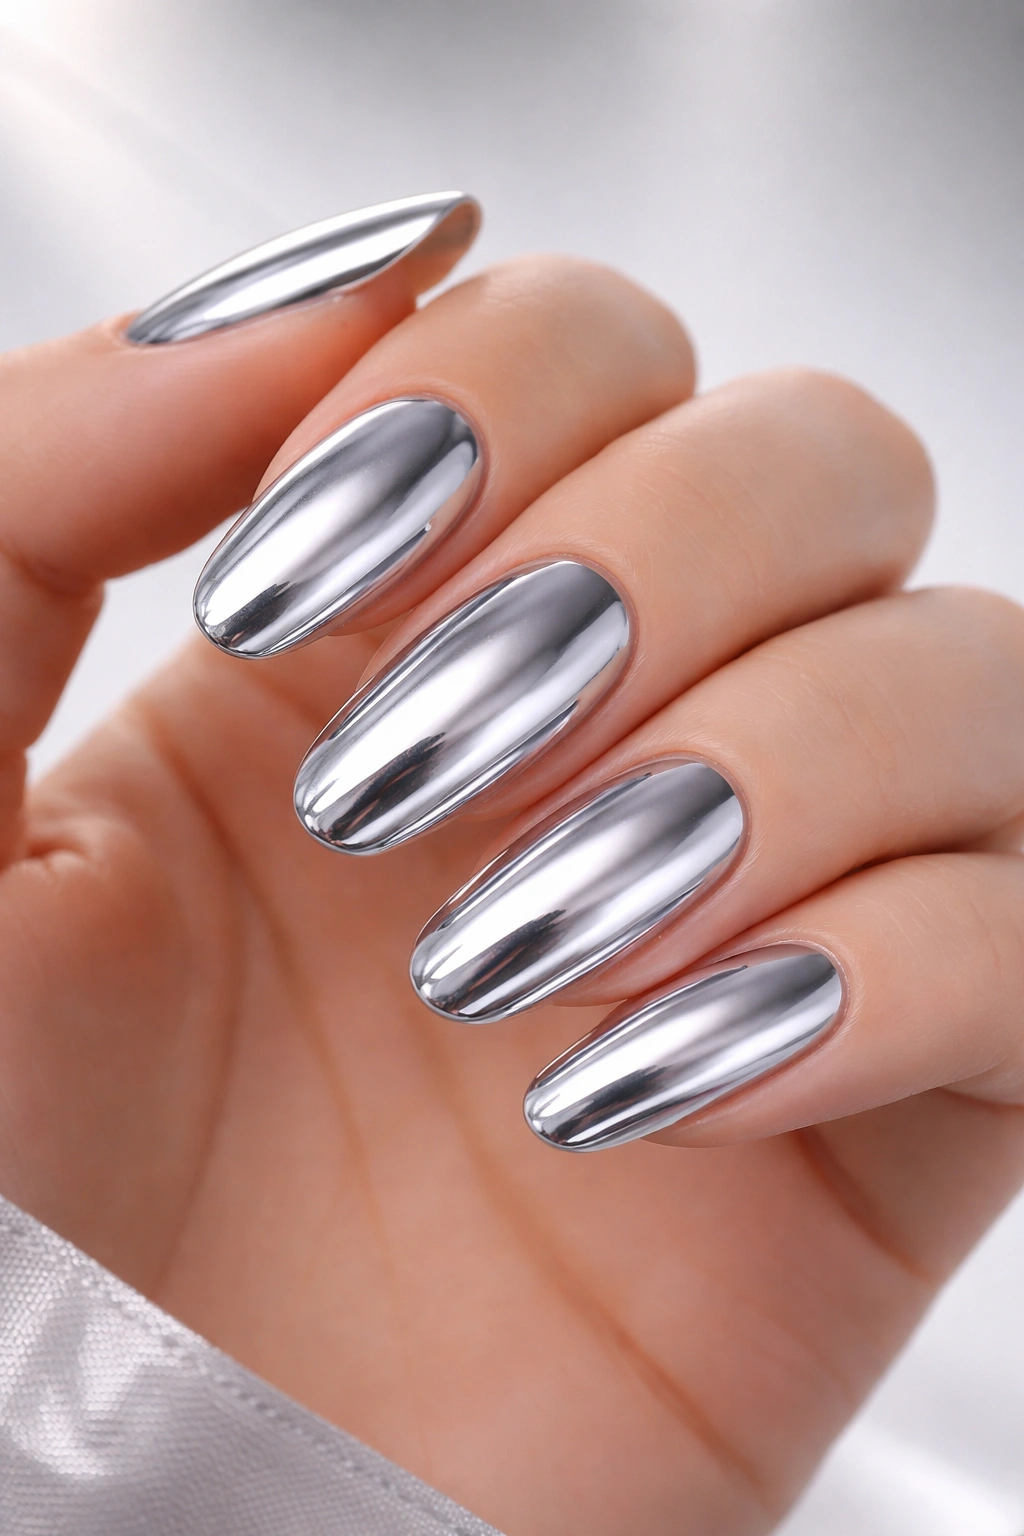
Chrome nails on long round shapes create a mirror-like effect that feels futuristic and luxe. The reflective finish catches light from every angle, creating an almost 3D effect. Paired with the soft curves of round nails, chrome doesn’t feel harsh or cold — instead, it reads as sleek and intentional. This is the look for someone who wants to stand out without resorting to bright colors or complex designs.
Why Chrome Works on Round Nails
The round shape prevents chrome from looking too industrial or severe. The curves of your nails reflect light continuously as you move your hands, creating an almost hypnotic effect. Chrome is technically a finish rather than a color, so it works over any base shade you choose — rose gold chrome, blue chrome, or even classic silver. The reflective quality actually makes long round nails appear even longer because the light reflection draws the eye along the length of the nail.
Application Tips for Chrome Success
- Start with a tacky base coat designed for chrome — this gives the special powder something to grip
- Apply chrome powder with a velvet applicator, working in one direction for an even, mirror-like finish
- The powder should be applied generously for a reflective effect that’s visible from a distance, not just up close
- Seal with a shiny top coat to protect the chrome finish and add extra shine
- Round nails should be filed smooth with no ridges or imperfections, as chrome emphasizes every line and flaw in the nail surface
Pro tip: Chrome finishes look most impressive in natural daylight or well-lit spaces where they can reflect light dramatically. In dim lighting, they may appear darker and less reflective than you’d expect.
7. Long Square Marble Design with Veined Effect
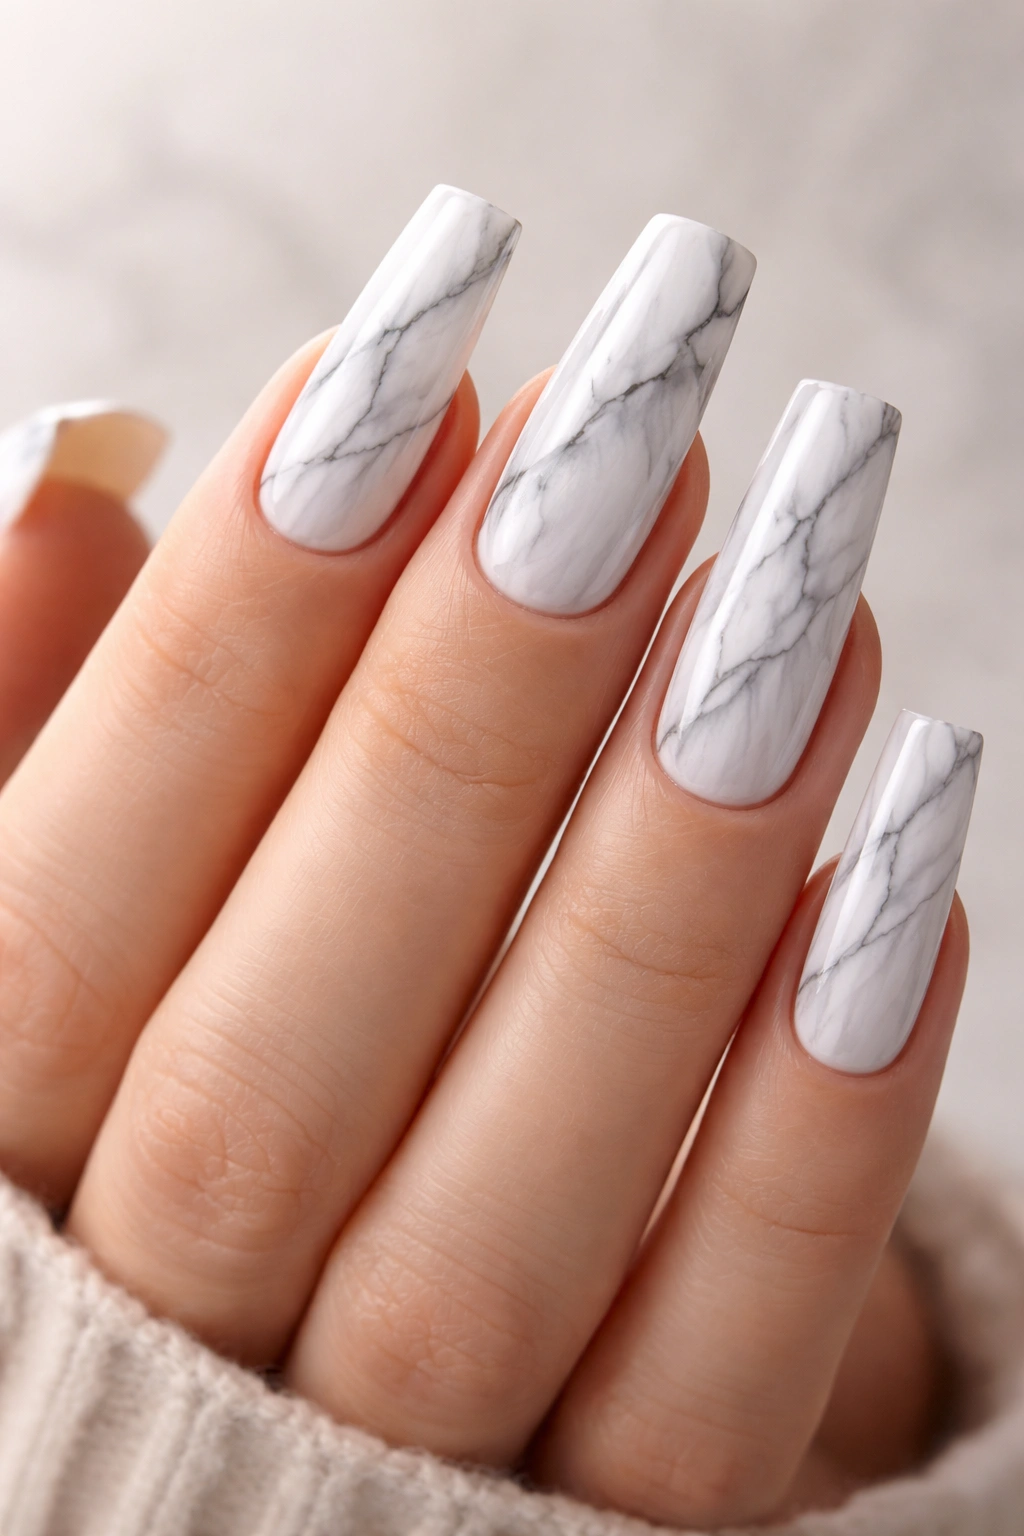
Marble nails create the illusion of expensive stone on your fingertips. When done on long square nails, the geometric shape emphasizes the marble veining patterns, creating visual movement across the surface. The marble design works because it looks both artistic and elegant — you could wear this to a gallery opening or casual brunch, and it would feel appropriate either way.
Creating Realistic Marble Veining
True marble nails use a veining technique where thin lines of contrasting color create the appearance of natural stone. On long square nails, these veins should follow the length of your nail for the most flattering effect, as this visually elongates your fingers even more. The square shape means your veins have straight edges to work against, creating crisp, defined patterns rather than soft, blurred lines.
Marble Technique Step-by-Step
- Start with a solid base — white, grey, or black creates the most striking marble effect
- Mix thin lines of contrasting color (black on white, white on black, grey on cream) using a very thin brush or toothpick
- The lines should be somewhat random and organic, not perfectly parallel — real marble has natural variations
- Some veins should extend the full length of the nail, while others should be shorter fragments for authenticity
- Use a soft brush to gently blur some lines while keeping others sharp, creating depth and dimension
- Seal with a high-shine top coat to make the design appear as if you’re looking at actual polished stone
Quick thought: The beauty of marble design is that imperfection makes it look more realistic, so don’t stress about making perfectly uniform veins.
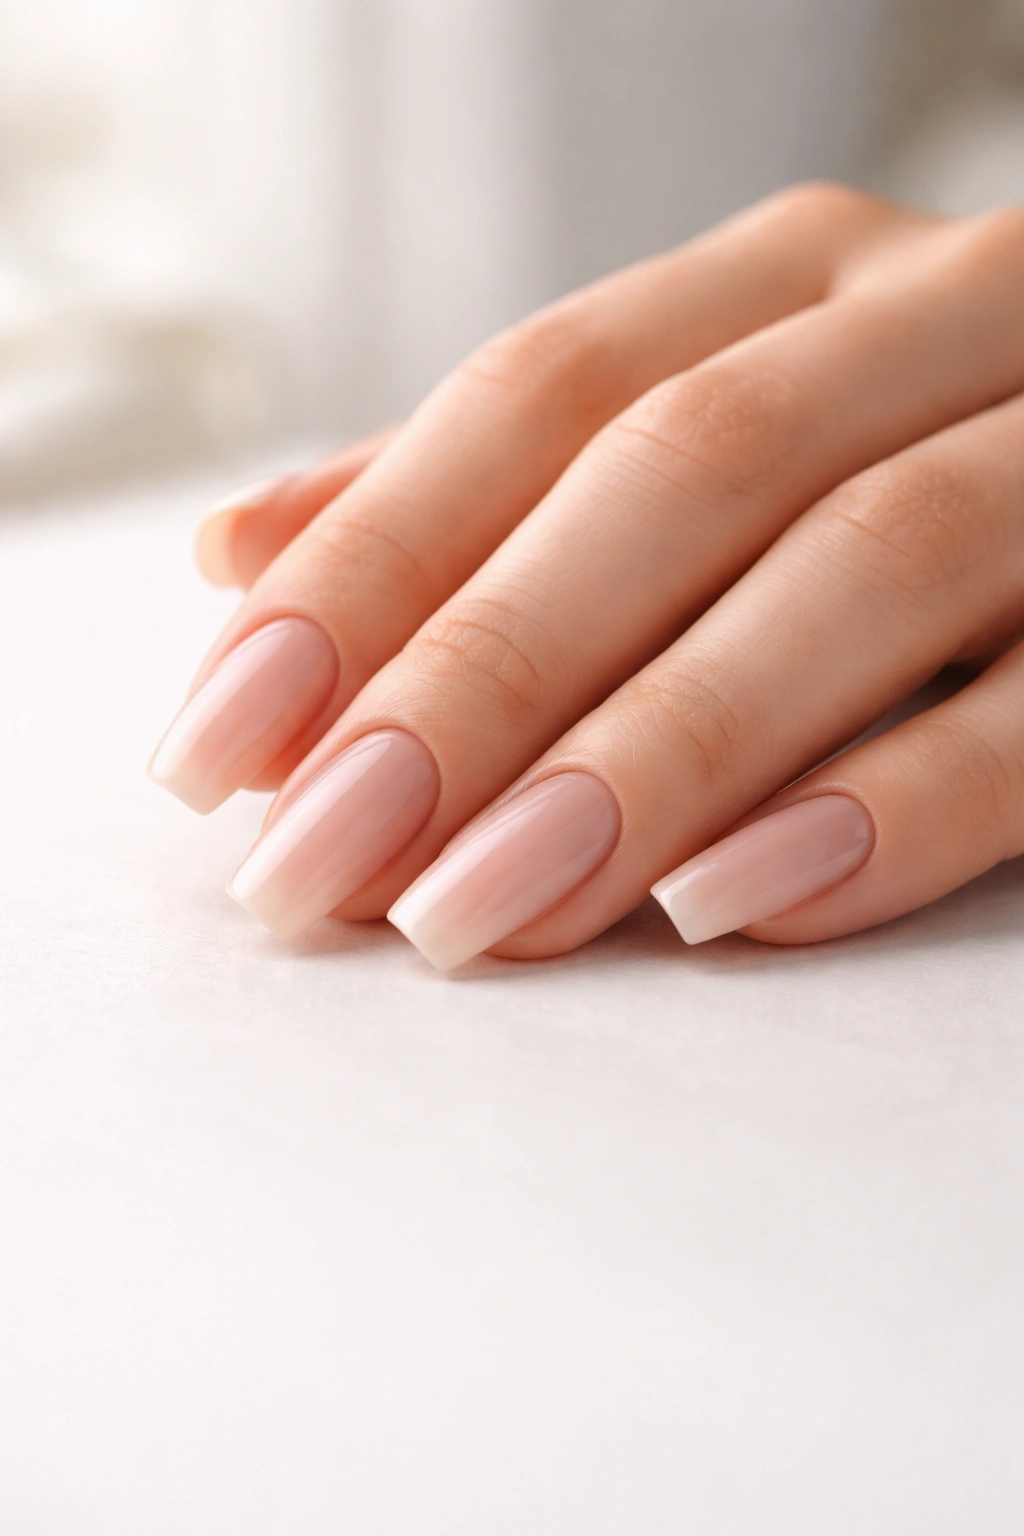
8. Long Round Soft Gel with Natural Shine
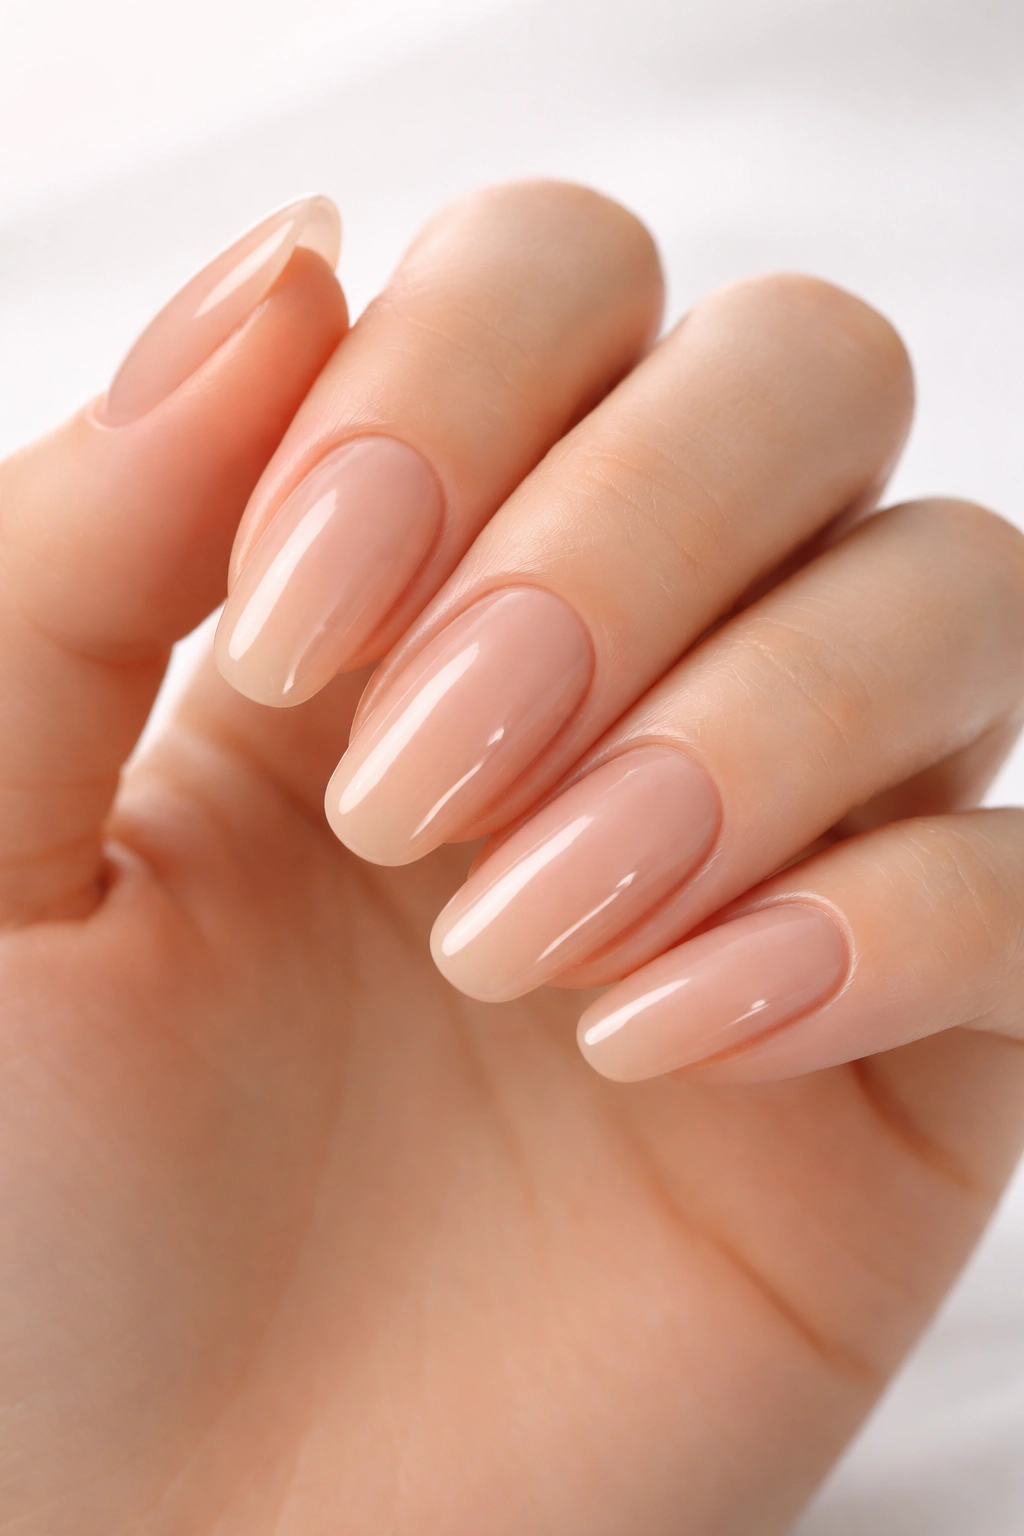
Soft gel manicures on long round nails deliver a clean, natural look with a subtle shine that lasts for weeks. Unlike hard gel, soft gel removes more easily and feels less rigid, but it still provides durability and a professional finish. The round shape emphasizes the natural curve of your nail bed, creating an elegant line from cuticle to tip. A neutral soft gel shade lets your nail shape do the talking.
The Advantage of Soft Gel for Length
Growing and maintaining truly long nails requires a strong canvas, and soft gel provides that while still looking natural. The formula soaks off rather than requiring filing or buffing to remove, which means less trauma to your natural nail. Soft gel on long round nails creates the illusion of pristine, naturally healthy nails — which is honestly harder to achieve than it looks. The slight shine of the gel finish adds polish and intentionality without screaming “I have a manicure.”
What Makes Soft Gel Last
- Your nail technician should do a proper prep — remove oils and dead skin, file gently, apply a thin base coat
- The soft gel formula should be cured under an LED lamp for the exact time recommended by the product brand
- A glossy top coat sealed with UV light provides extra protection and adds dimension
- Soft gel typically lasts 2-3 weeks before needing a fresh set or a fill if your natural nail has grown significantly
- Avoid excessive water exposure for the first 24 hours after application to ensure the gel fully hardens
Worth knowing: Soft gel doesn’t require as much maintenance as hard gel, but you still need to be thoughtful about how you use your hands — long nails of any kind are more prone to breakage during normal activities.
9. Long Square Coffin Hybrid with Graduated Glitter
A coffin shape is technically square sides with a tapered, rounded center at the tip — basically a hybrid between square and rounded. When you add graduated glitter (more concentrated at the tips, fading toward the base), you get a manicure that’s both structural and softly beautiful. The coffin hybrid prevents the look from feeling too sharp while maintaining the sophistication of the square shape.
Why the Coffin Hybrid Reads as Modern
The coffin shape hit mainstream nail trends and stayed because it genuinely flatters a wide range of hand shapes and personal styles. It’s edgier than a round nail but softer than a pure square, making it the Goldilocks option. Combined with graduated glitter that gets progressively denser toward the tips, you create an ombré effect that emphasizes the length and shape of your nails while adding glamour.
Building the Graduated Glitter Look
- Choose a base color — nude, blush, or champagne — that will show the glitter clearly
- Apply a thin layer of glitter polish to the very tip of the nail, about one-quarter of the nail length
- Blend upward with a damp brush or sponge to create a gradient effect where glitter particles decrease in density
- The transition from glittery to clear should take up about half the nail length for a smooth, professional effect
- The coffin hybrid shape should be filed so the sides are relatively straight and the tip has a slight rounded point
Pro tip: Use fine glitter rather than chunky sparkle for a more refined effect that photographs beautifully without looking costume-like.
10. Long Round Minimalist with Single Line Detail
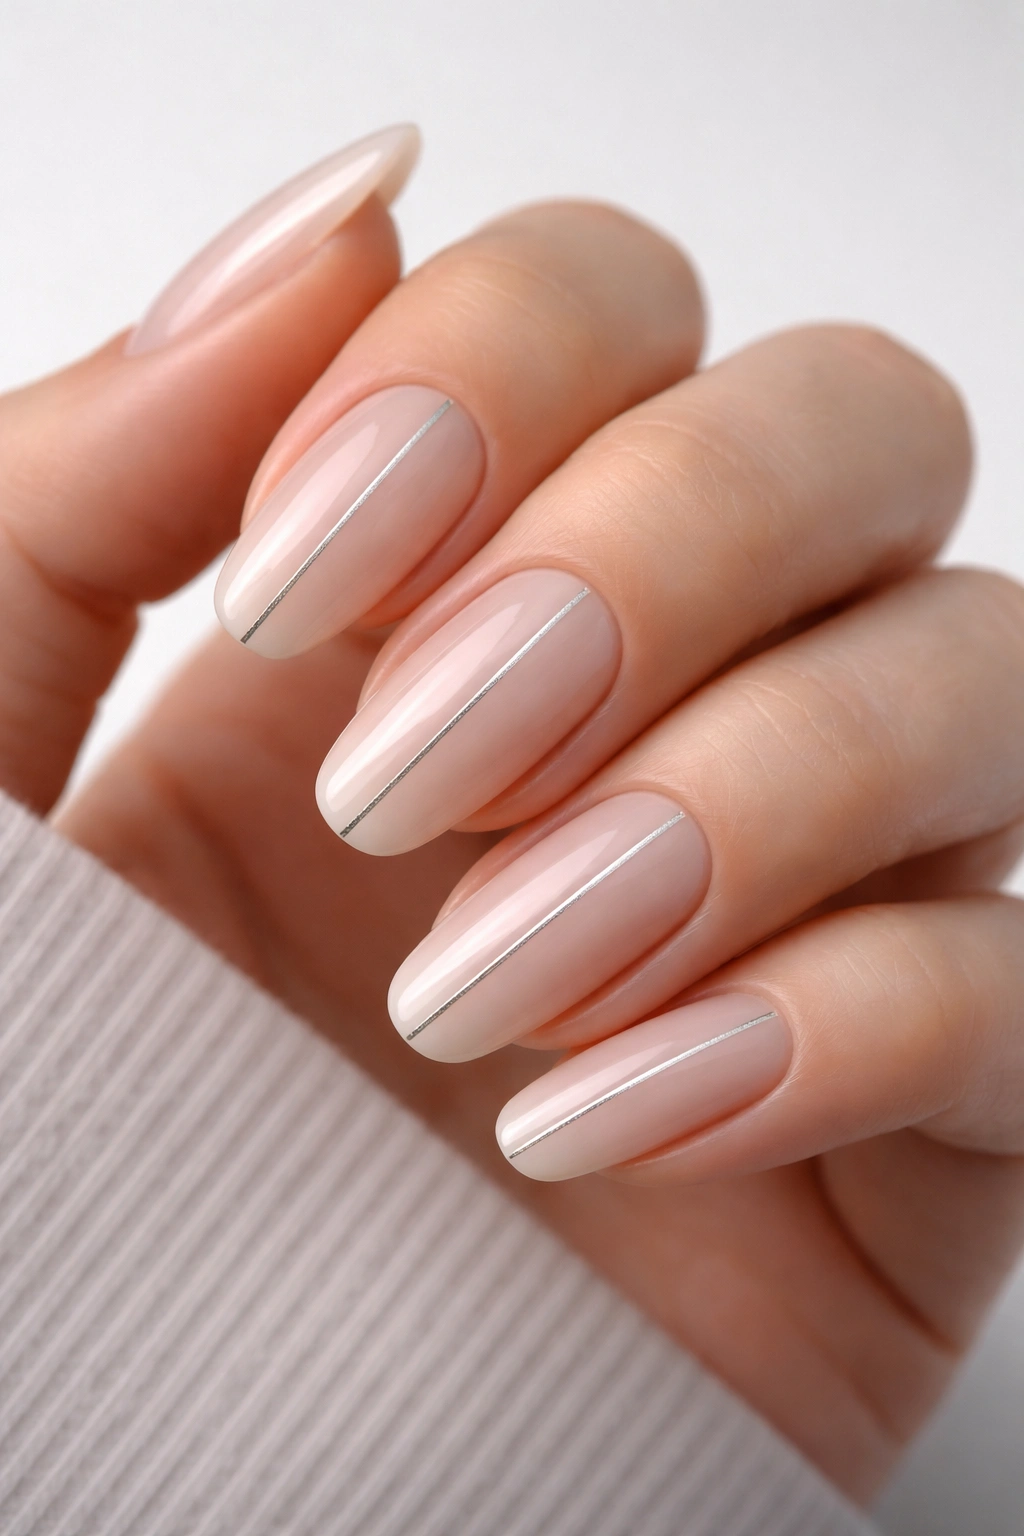
Sometimes less is genuinely more, and a minimalist design on long round nails proves this completely. A single thin line — perhaps in a contrasting color or metallic finish — running vertically down the center of your nail creates interest without overwhelming. This look works because it emphasizes the shape of your nails rather than competing with it, and round nails are genuinely beautiful when they’re clean and simple.
The Elegance of Restraint
Minimalist design has become more popular because people realize that a thoughtfully done simple look often impresses more than an elaborate one. A thin gold, silver, or contrasting color line down the center of a long round nail draws the eye and creates visual interest while maintaining an understated, sophisticated appearance. This is the manicure for someone who appreciates quality over flash, simplicity over complexity.
Executing Minimalist Design Perfectly
- The base color should be a solid neutral — nude, soft pink, white, or grey work beautifully
- The line should be applied with a thin brush or even a toothpick for precision — the thinner the better
- The line should run from just above the cuticle to just shy of the tip, creating an elongating effect
- You can use a contrasting color, a metallic (gold, silver, rose gold), or even a darker shade of your base color for subtle contrast
- Round nails should be filed completely smooth with no ridges for a pristine, premium appearance
- Seal with a glossy top coat that enhances the shine of the base while making the line pop with definition
Worth knowing: This look is hardest to maintain because any dust or debris on the bare nail area becomes visible, so dedication to cleanliness is required.
11. Long Square Sparkle in Jewel Tones
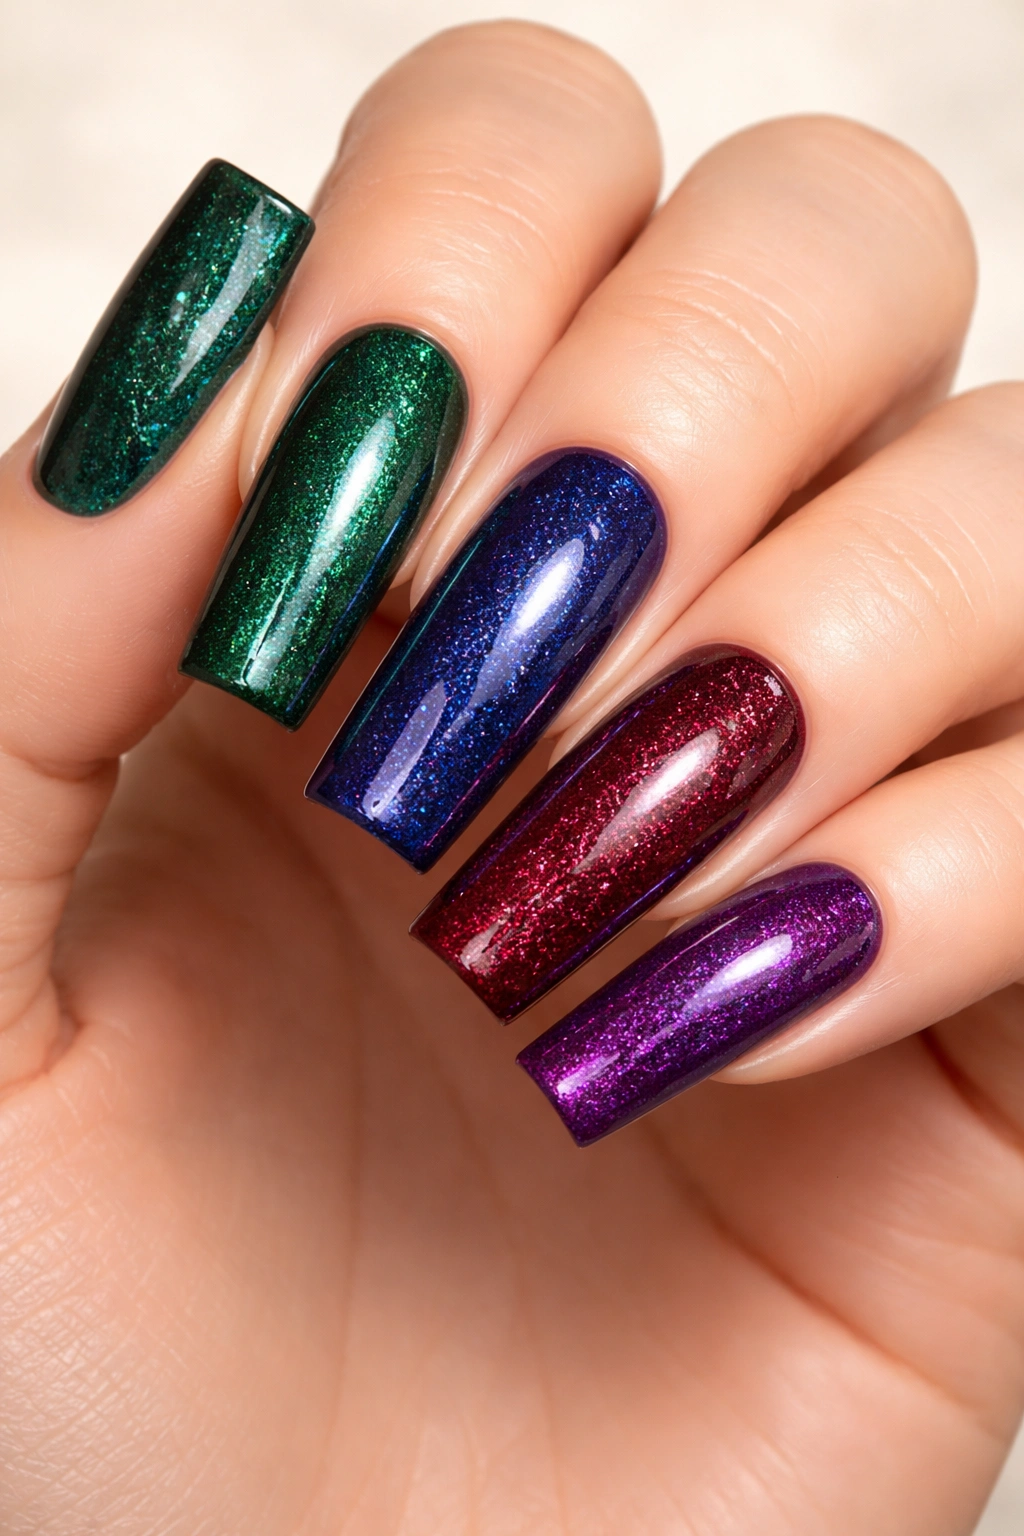
Take sparkly polish in jewel tones — deep emerald, sapphire blue, rich burgundy, or amethyst purple — and apply it to long square nails for a manicure that feels luxurious and intentional. The square shape creates crisp edges that make the sparkle appear more defined and purposeful. This is the look for someone who wants color and glamour without going full-on nail art.
Why Jewel Tones Sparkle Better
Sparkle in jewel tones reads differently than sparkle in pastels or neutrals. Because the base color is already rich and saturated, the glitter particles embed themselves visually within the color rather than sitting on top of it. This creates an almost gemstone effect where your nails appear to be made of actual jewels. The long square shape emphasizes this effect because the geometric edges create a contained, intentional look rather than a soft, diffused one.
Making Jewel Tone Sparkle Work
- The base polish should be a true jewel tone — not a tinted neutral, but an actual saturated color
- Layer a sparkly top coat over the base for maximum impact, or choose a sparkly polish in the same jewel tone family
- The sparkle should be visible but not overwhelming — if the glitter is so chunky that individual particles are visible from a distance, it risks looking costume-like
- Square nails should be filed with crisp, sharp corners for a polished, intentional appearance
- A glossy top coat adds shine and makes the glitter appear more integrated into the color
Pro tip: Jewel tone sparkle manicures photograph beautifully in indoor lighting and flash, making them perfect if you enjoy taking photos of your nails or posting on social media.
12. Long Round Natural with Enhanced Cuticles
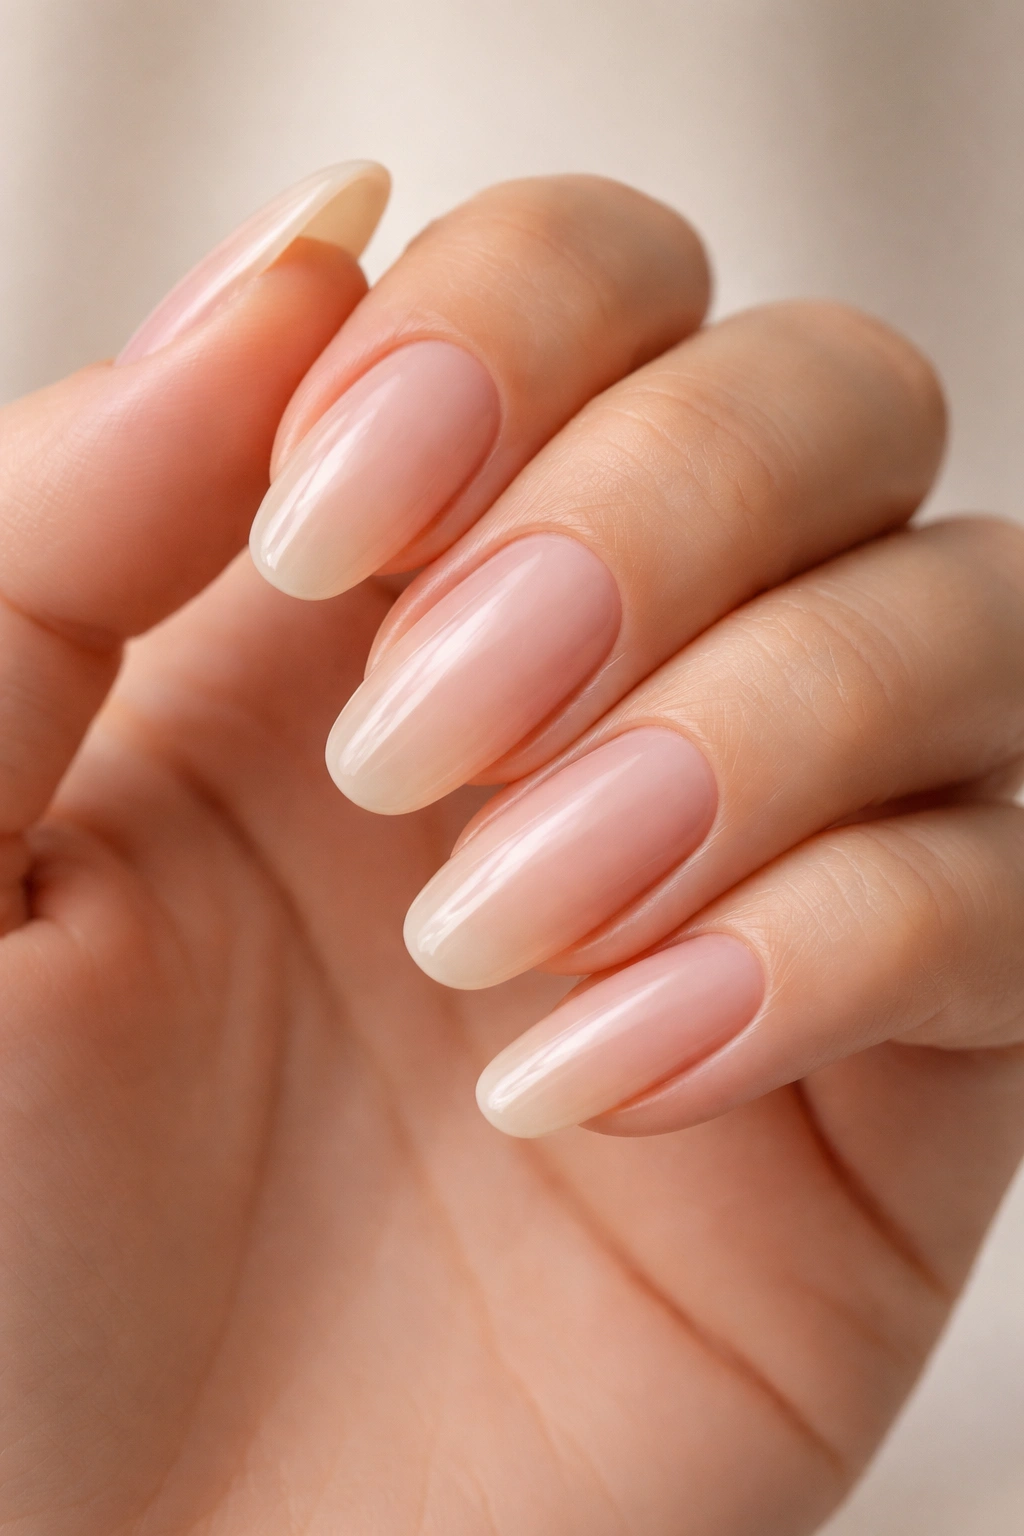
This might sound simple, but a truly well-maintained manicure on long round nails with no color at all is genuinely striking. The focus here is on the shape, the health of your nails, and the care of your cuticles. Your natural nail beds should be visible and healthy-looking, with clean, well-moisturized cuticles that enhance rather than distract from your nail shape.
The Power of Natural Beauty
Not everyone wants to wear color or design on their nails, and that’s completely valid. When you let your natural nails be the star, the emphasis shifts to their actual health and appearance. Long round nails in their natural state look elegant and can work in any professional or casual setting. The time and care you invest in growing healthy nails becomes visible in a way that’s both practical and beautiful.
Maintaining Long Natural Nails
- Keep cuticles soft and moisturized — this prevents the hangnails and rough edges that make nails look neglected
- File nails to a smooth, rounded shape with no ridges or imperfections in the surface
- Use a nail buffer to create a subtle shine without any artificial products
- Apply cuticle oil daily to keep the skin around your nails soft and healthy-looking
- Avoid harsh chemicals and excessive water exposure, which can weaken long nails and cause peeling
- Your nail beds should appear healthy and pink, which indicates good blood flow and nail health
Worth knowing: Growing long natural nails takes genuine time and consistent care — you’re looking at several months of daily maintenance for truly impressive length.
13. Long Square Geometric with Bold Lines
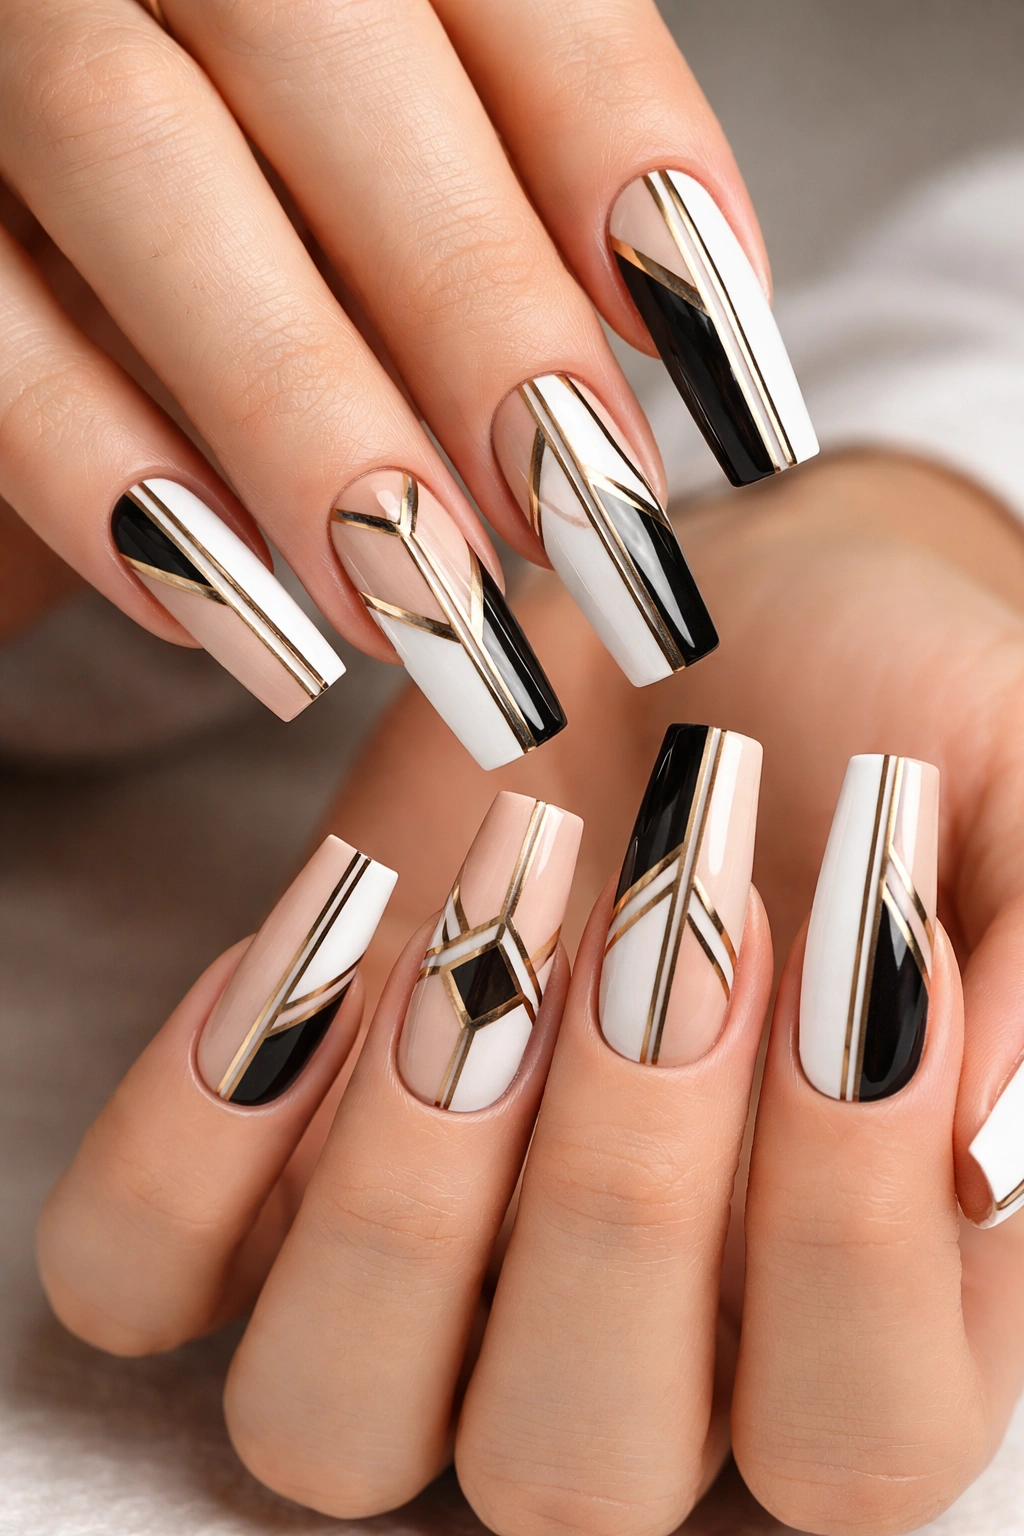
Geometric design on long square nails creates visual interest through structured lines, angles, and shapes. This could mean simple stripes, triangles, hexagons, or more complex abstract patterns — the key is that everything follows crisp, intentional lines. The square shape of your nails provides the perfect canvas for geometric designs because your nail itself is a geometric shape, creating a cohesive, intentional look.
Geometric Design as Art
Geometric design works because it feels modern and artistic without requiring freehand skill or steady hands. You can use nail tape to create clean lines, or work with a thin brush and high precision. The square shape of long nails means the geometric lines extend the full length of your nail, creating an elongating effect while the design keeps everything feeling structured and intentional.
Building Geometric Designs Successfully
- Choose 2-3 colors maximum to prevent the design from feeling chaotic — typically a base and one or two accent colors
- Geometric lines should be crisp and clean — use nail art tape for perfectly straight lines and sharp angles
- The design should cover about 50-60% of the nail, leaving some base color visible to ground the design
- Triangles, stripes, and hexagons are the easiest geometric shapes to execute cleanly
- The square shape of your nails means the geometric lines have natural edges to work against, so let them guide your design
Pro tip: Use a toothpick or thin brush to create geometric lines freehand if you have a steady hand, or invest in nail art tape to guarantee perfectly clean edges.
14. Long Round Gradient Fade in Complementary Colors
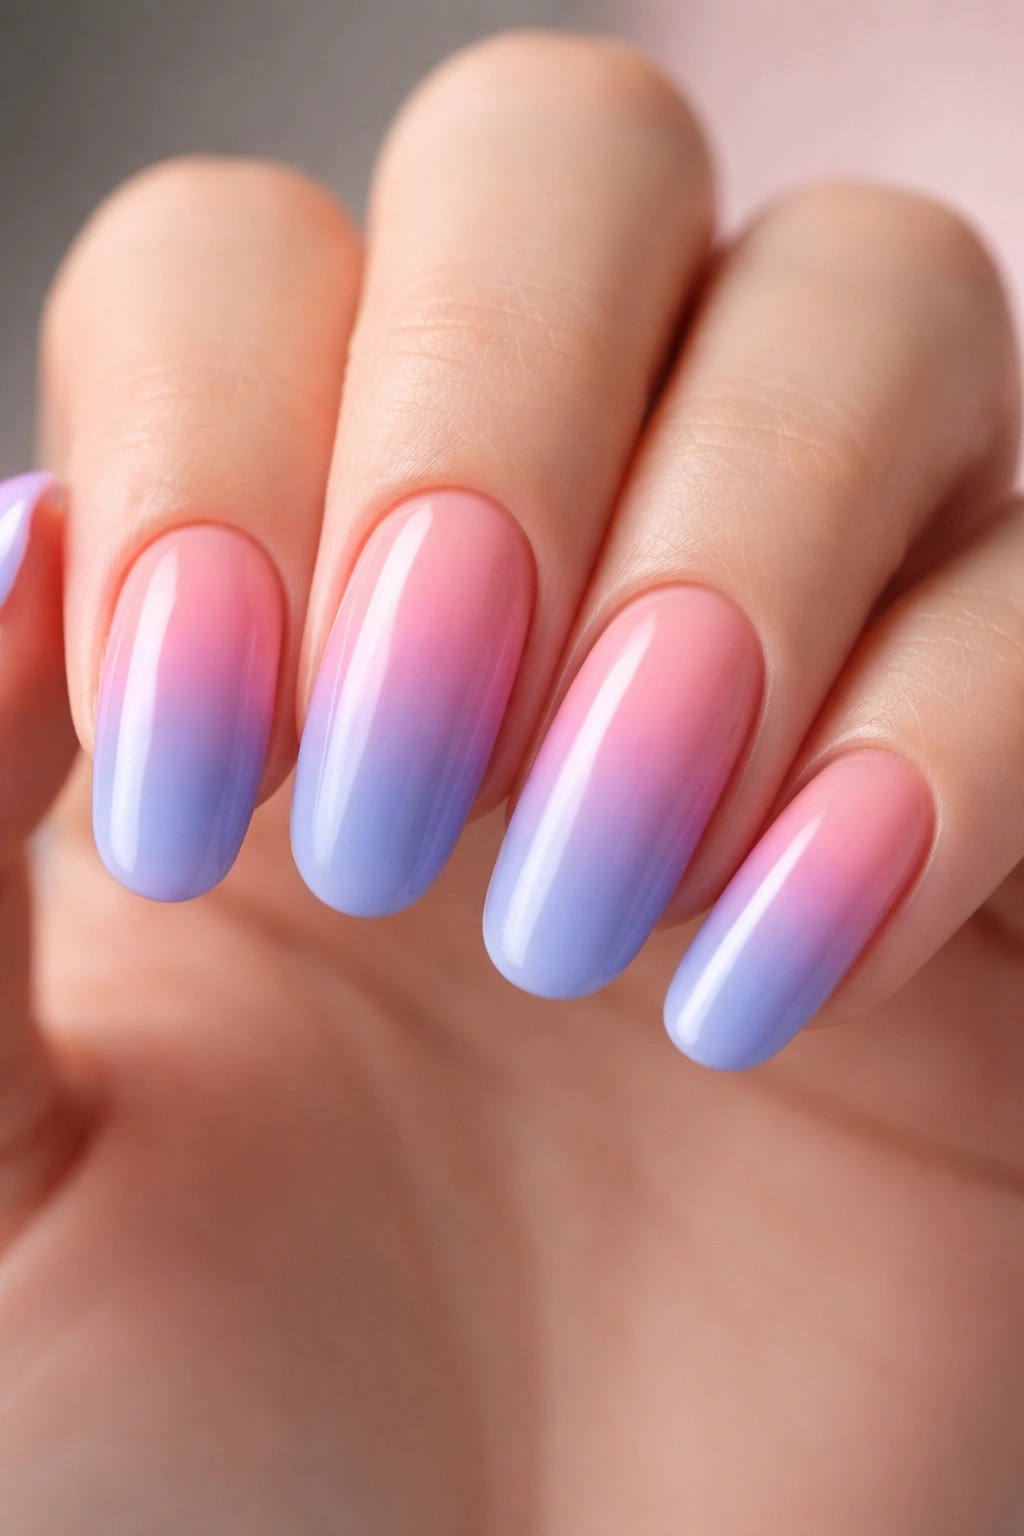
A gradient fade using two complementary colors creates a manicure that feels both playful and sophisticated. For example, blending from soft pink at the base to soft blue at the tips, or from coral at the base to peach at the tips — colors that sit near each other on the color wheel transition smoothly. The round shape softens what could be a jarring color transition into something gentle and beautiful.
The Art of Color Transition
Complementary gradients work on long round nails because the curves of your nail distribute color evenly from side to side, creating a smooth transition. The length of your nail gives the gradient plenty of space to transition gradually, so the change feels organic rather than abrupt. Round nails paired with a soft gradient create an almost three-dimensional effect where your nail appears to have subtle depth and movement.
Technique for Seamless Gradients
- Choose two colors that sit relatively close to each other on the color wheel — analogous colors blend more smoothly than contrasting colors
- Apply the first color to about two-thirds of the nail, starting from the base
- Apply the second color to the tips, overlapping slightly with the first color
- Use a clean, damp sponge or blending brush to gently merge the two colors where they overlap
- Blend in one direction (from base to tip) for the most seamless, professional effect
- A thick glossy top coat seals the gradient and adds shine
Worth knowing: Gradient fades can look slightly different depending on the lighting you’re in, which is part of their charm — they shift subtly throughout your day.
15. Long Square Stiletto Edge with Metallic Accent
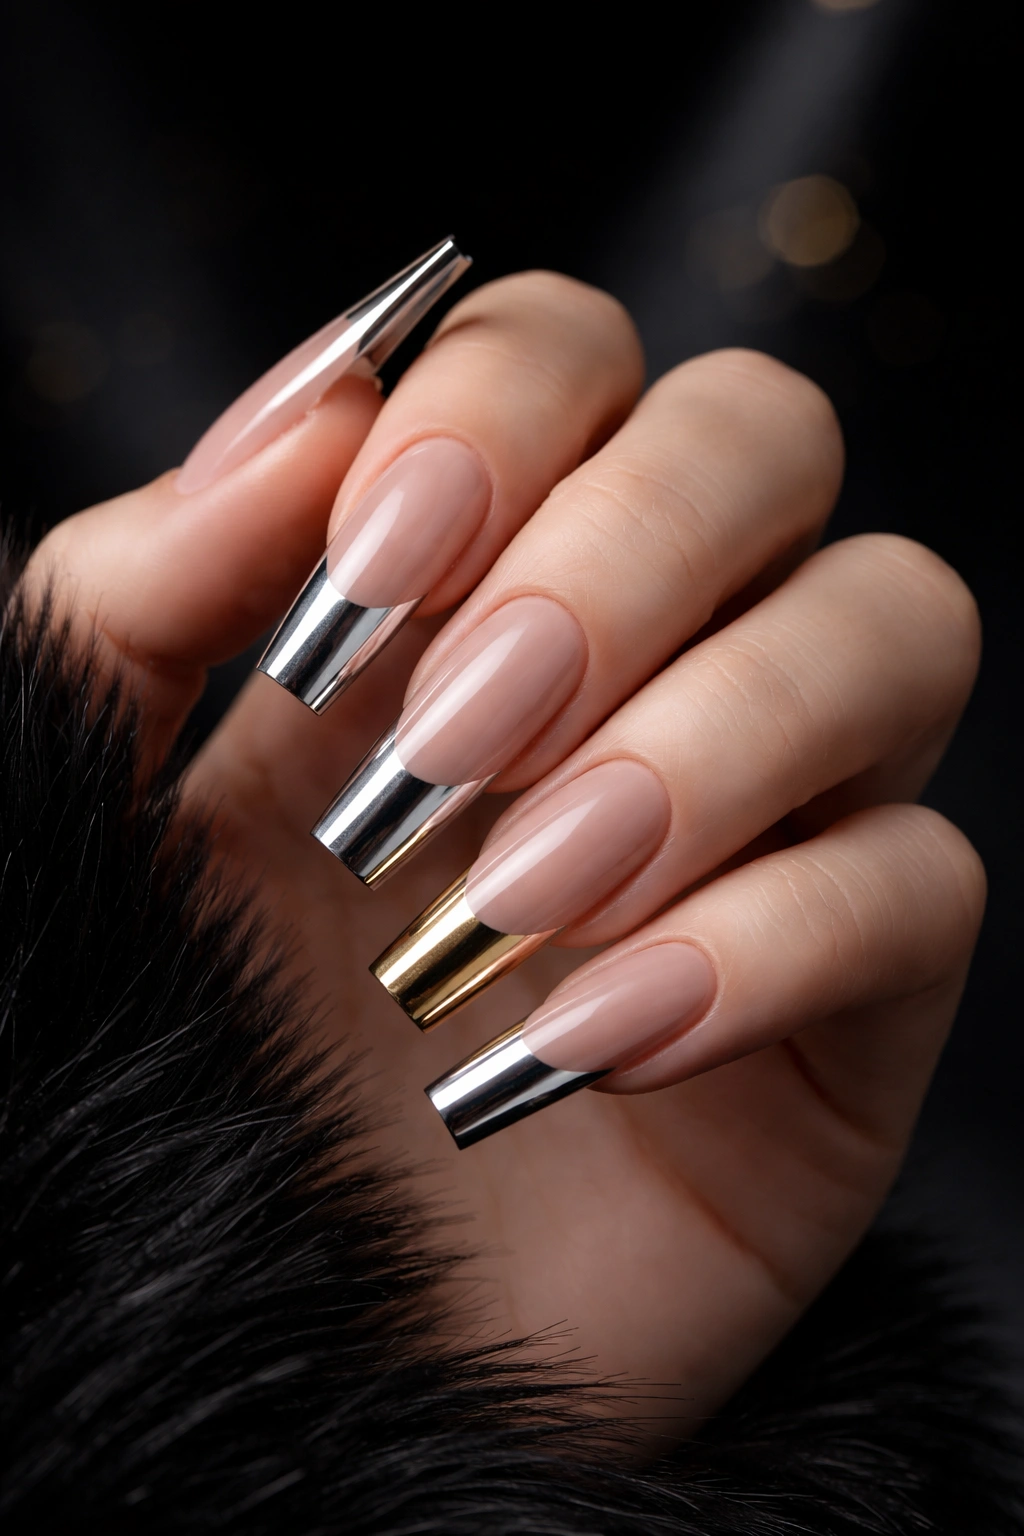
For those who want maximum drama, a long square nail with a stiletto point edge combined with a metallic accent creates a show-stopping manicure. Instead of a traditional stiletto shape (which is fully pointed), you keep the sides relatively straight and square but create a sharp, pointed edge at the very tip. Add a metallic accent — perhaps a gold or chrome finish on the tip or a vertical stripe — and you’ve got a look that’s undeniably bold and glamorous.
Taking Square Shape to the Extreme
The stiletto edge hybrid bridges the gap between the drama of a true stiletto and the practicality of a square shape. Your nail sides remain structured and relatively strong, but the pointed tip creates maximum visual impact and elongation. Adding metallic accents — whether it’s a shiny chrome finish, gold leaf, or a metallic stripe — elevates this to full-on statement territory. This is the manicure for someone who’s confident, intentional, and doesn’t apologize for wanting their nails to be noticed.
Achieving the Stiletto Edge Look
- File the sides of your nail relatively straight, like a traditional square
- Taper the very tip into a point using a fine-grit file, creating an edge that’s sharp enough to make a visual statement
- The point should be about one-eighth of an inch long — practical enough not to catch on things constantly but pointed enough to be impressive
- The metallic accent should cover about one-quarter of the nail length at the tip, creating a gradient from your base color to the metallic shine
- This shape requires regular maintenance as the pointed tips can bend or break with regular use
- Use a thick top coat to protect the point and add shine
Pro tip: A stiletto edge works best on longer nails — you need at least one-quarter inch of length past your fingertip to achieve the full effect without looking stubby or strange.
Final Thoughts
Long nails are a statement, whether that statement is subtle or bold, and the shape you choose — square, round, or a hybrid between them — completely changes how that statement reads. Each of these fifteen looks works because it pairs intentional design with a shape and length that flatters and elongates your hands. The beauty of long nails is that you have room to experiment, play with color and design, and truly make your manicure your own.
The key to any of these looks working beautifully is consistency in maintenance. Long nails require genuine care, from keeping edges smooth and filed to moisturizing cuticles and avoiding harsh chemicals. When you commit to that maintenance, every manicure you get looks better because it’s working with a healthy foundation. Choose the look that speaks to you most, whether that’s the quiet elegance of a natural nude or the bold glamour of metallic chrome, and own it completely.
