

Squoval nails have become the go-to shape for anyone caught between wanting the edgy sophistication of a square and the graceful elongation of an oval. They’re not quite one shape or the other—they’re beautifully both, hitting that perfect sweet spot where practicality meets glamour. If you’ve been scrolling through nail inspiration and feeling like the classic square feels too harsh or pure ovals feel too safe, squoval might just be your shape-shifting solution.
The appeal of long squoval nails runs deeper than just looks. This hybrid shape offers unexpected versatility that suits different hand shapes, lifestyle needs, and aesthetic preferences. You get the durability and clean lines of a square while enjoying the softness and elegance that ovals bring to the table. When you go long with squoval, the effect becomes even more striking—the elongation emphasizes the nail’s length while the squared edges create definition and structure that prevents the look from feeling too delicate or fragile.
What makes squoval nails particularly exciting is how they showcase nail art and color in ways that pure squares or ovals sometimes can’t quite manage. The transitional shape gives nail technicians and DIY enthusiasts a larger canvas without the commitment of coffin or stiletto shapes. Whether you’re drawn to minimalist designs, bold patterns, glitter accents, or classic solid colors, long squoval nails provide the ideal foundation. They work equally well with subtle, professional finishes for everyday wear or dramatic, eye-catching designs for special occasions.
Below are 15 stunning long squoval nail designs that capture everything this versatile shape can do—from timeless elegance to modern edge, soft pastels to jewel tones, understated refinement to full-on glamour.
1. Classic French Manicure with Extended Tips
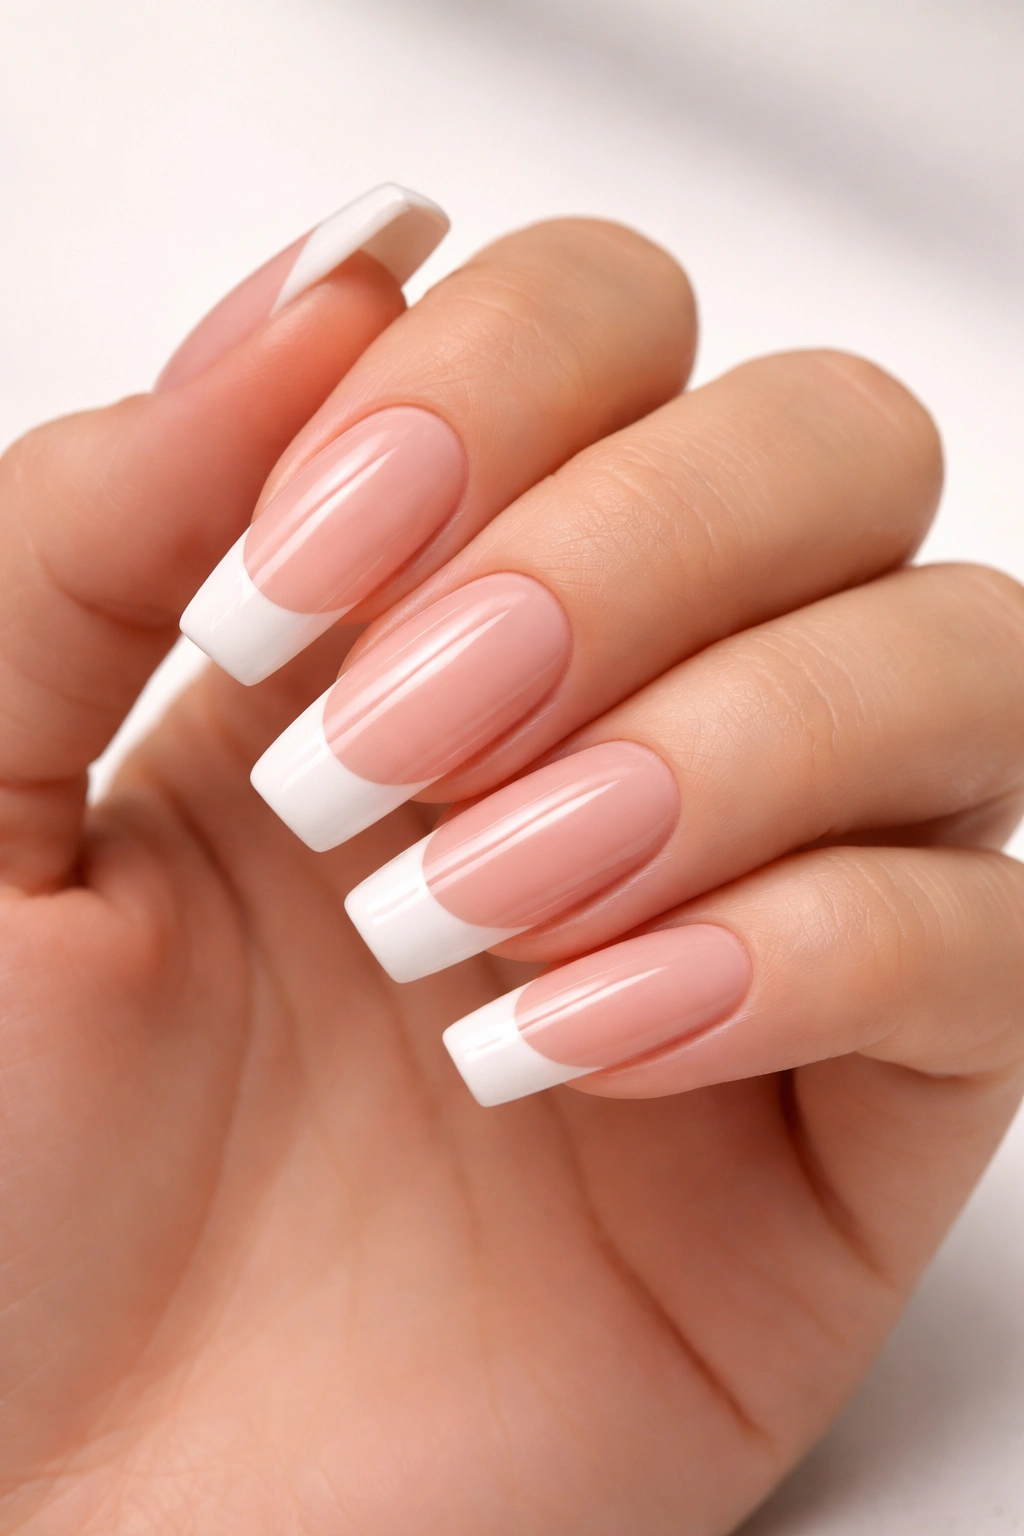
The French manicure is a timeless choice that feels fresh and sophisticated on long squoval nails. Instead of the traditional short nail French mani, extending the white tip line across the length of the nail creates a striking, elongated effect that emphasizes the squoval shape beautifully. The contrast between the nude or pale pink base and the crisp white tip draws the eye down the nail’s length, making your fingers appear longer and more elegant.
Why It Works on Squoval Nails
The rectangular white tip transforms the oval elements into a more defined frame, while the softened corners prevent the look from feeling too geometric or severe. This hybrid approach gives you the best of both worlds—structure from the white line, softness from the rounded edges. The clean lines feel modern and intentional rather than retro, especially when you extend the tips generously.
How to Nail This Look
- Use a high-quality white polish that doesn’t yellow or crack easily
- Create the tip line at approximately 1/4 to 1/3 the length of the nail for maximum impact
- Keep the base color neutral and creamy for professional polish
- Seal everything with a strong topcoat to prevent chipping
The French manicure works beautifully as a standalone design or as the foundation for subtle embellishments like a thin gold stripe or delicate pearl accents along the white line.
2. Deep Burgundy with Gold Leaf Accents
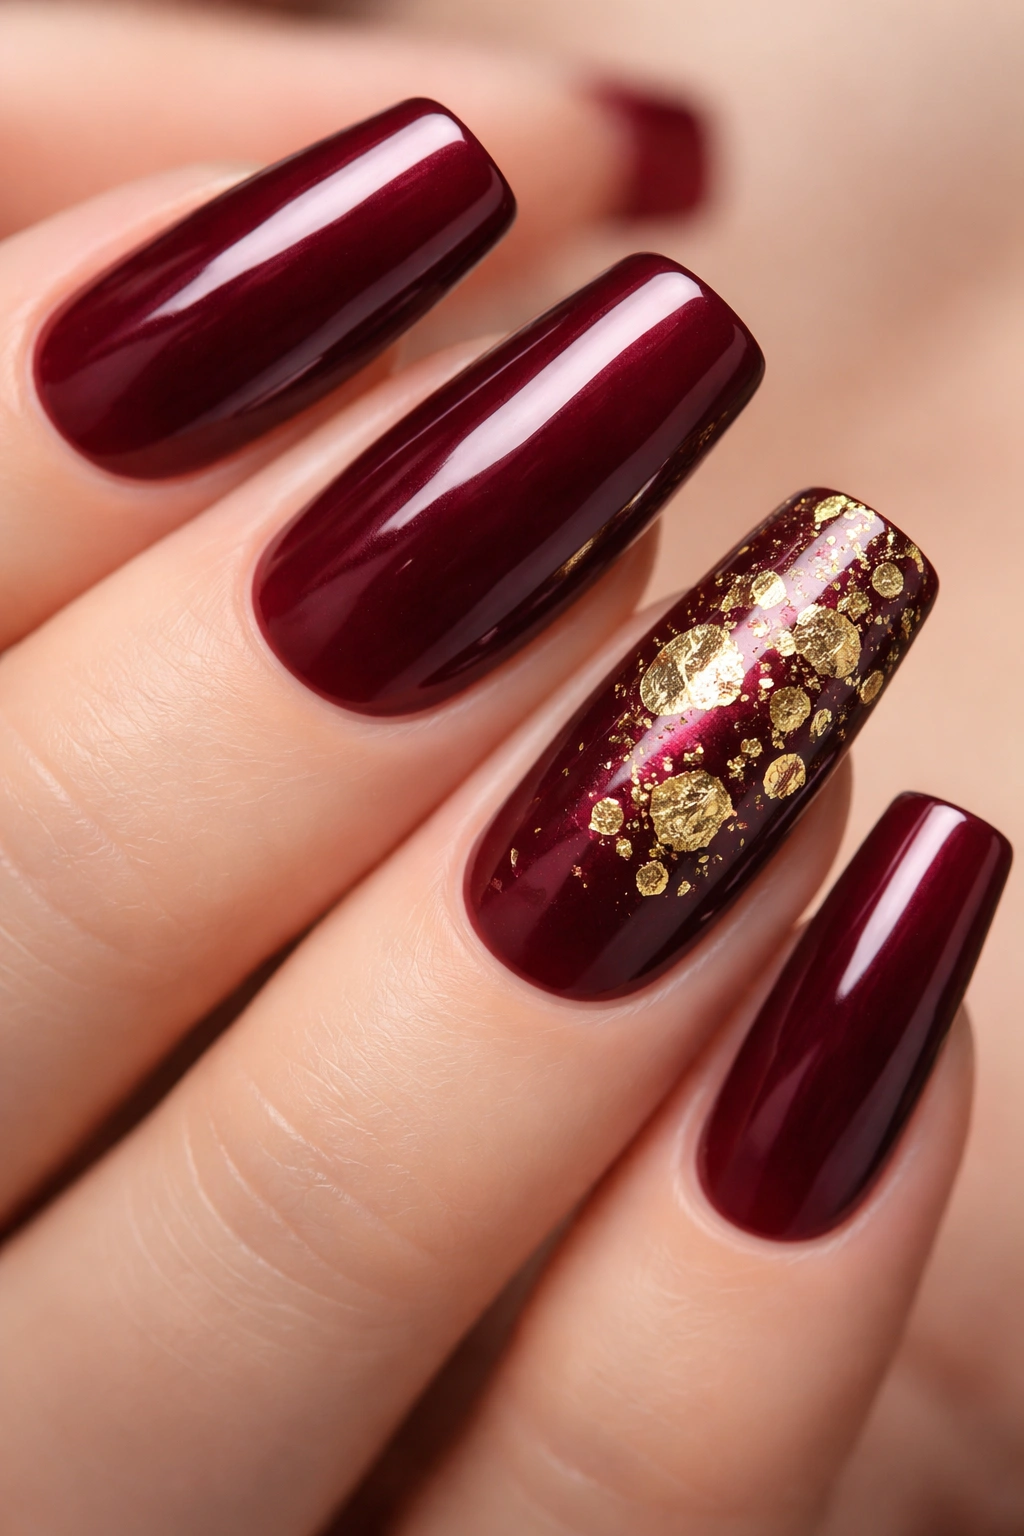
Rich burgundy is one of those shades that commands attention while still feeling sophisticated and timeless. On long squoval nails, deep burgundy creates a luxurious foundation that instantly elevates your entire look. Adding scattered gold leaf flakes—especially concentrated on the accent nail or trailing across a few nails—brings dimension and an almost jewel-like quality that feels expensive and intentional.
The Visual Impact
Burgundy’s depth makes it forgiving; it hides minor imperfections and maintains its richness even as your manicure grows out. The gold leaf catches light beautifully and doesn’t feel overwhelming against the dark base. This combination reads as polished and put-together without being overly trendy or difficult to wear with various outfits.
Application Tips for Best Results
- Apply burgundy in thin, even coats to prevent streaking
- Use a matte topcoat first if you want the burgundy to feel more velvety
- Add gold leaf before the final topcoat to secure the flakes in place
- Focus leaf application on the tips and middle sections for visual balance
- Seal with a glossy topcoat for dimension and durability
This design works beautifully for fall and winter, but burgundy’s sophistication makes it genuinely year-round appropriate.
3. Soft Pink Ombre with Rhinestone Half-Moon Accent
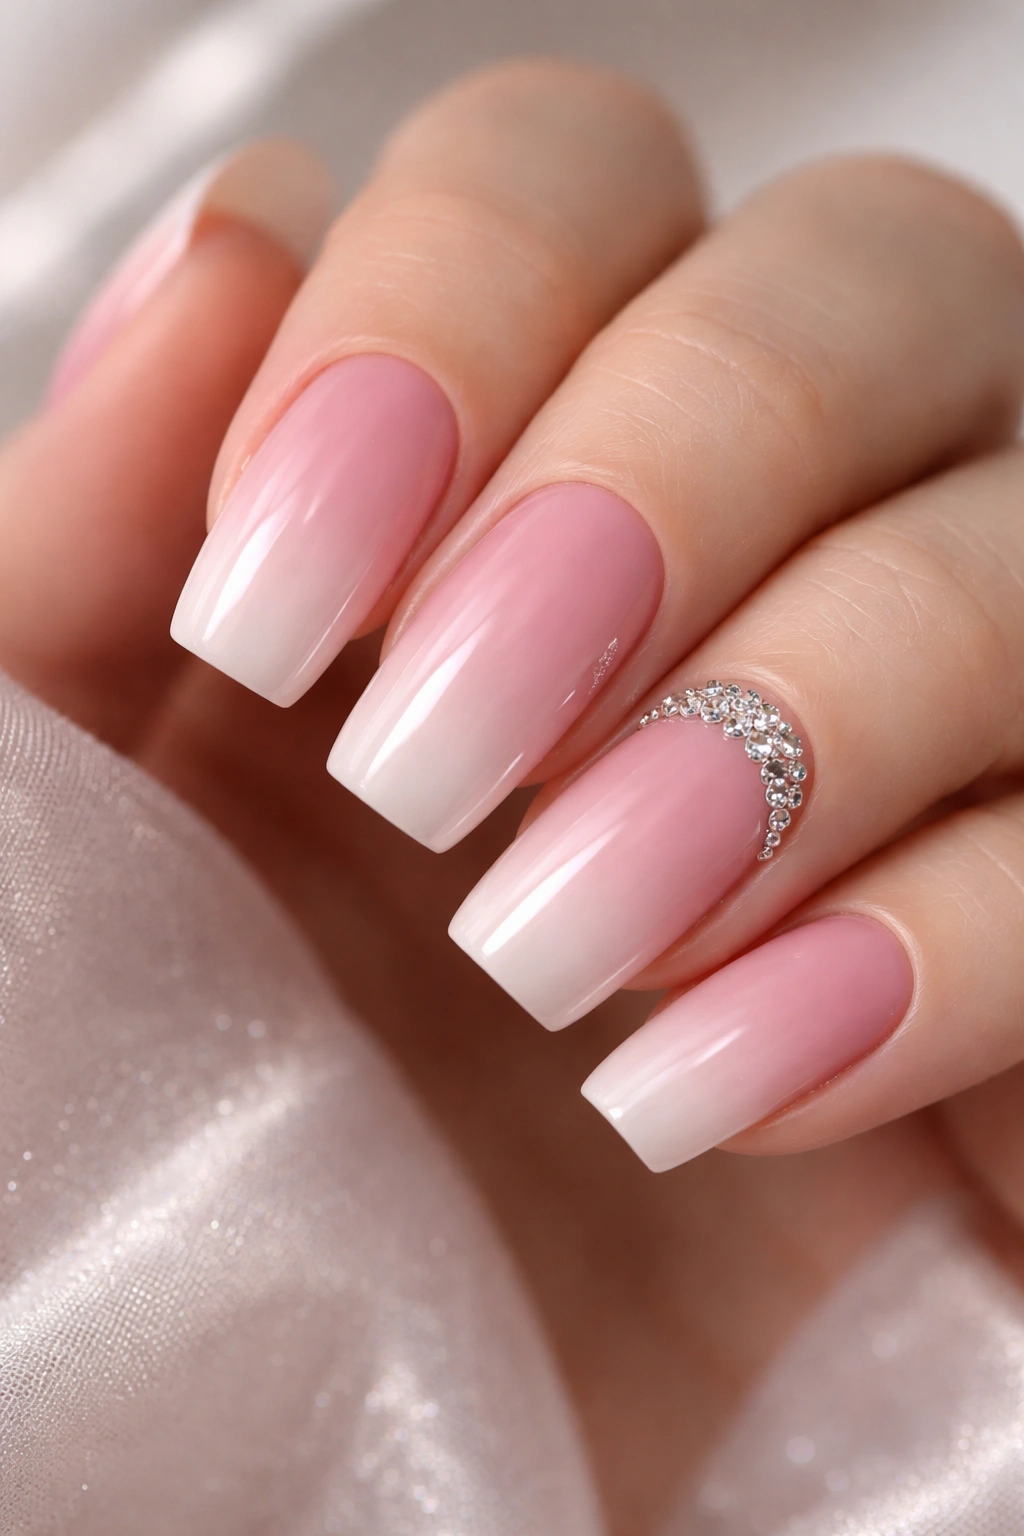
An ombre that transitions from pale pink at the base to a deeper rose or mauve at the tips feels both romantic and modern. Adding a subtle rhinestone half-moon design—using a careful arrangement of small stones in the center of one accent nail—creates an elegant focal point without overwhelming the soft gradient. Long squoval nails provide the perfect proportion for this type of detailed embellishment.
Creating the Ombre Effect
Rather than a harsh color transition, blend your pinks gently using a makeup sponge or blending brush. The squoval shape’s tapered sides naturally guide the gradient downward, creating an effect that feels intentional and flattering. The gradient should feel soft enough that it almost appears like a single color from a distance, with the depth revealing itself as you move your hand.
Rhinestone Placement Strategy
- Use tweezers or a rhinestone picker for precise placement
- Create the half-moon shape using 3-5 rows of progressively larger stones
- Position the design in the center of your accent nail for balance
- Use a rhinestone glue or gel base to ensure stones stay put
- Leave a small clear border around the design to keep it feeling intentional rather than cluttered
This design suits special events, romantic occasions, or anyone who loves an injection of subtle glamour into their everyday aesthetic.
4. Matte Black Base with Metallic Line Design
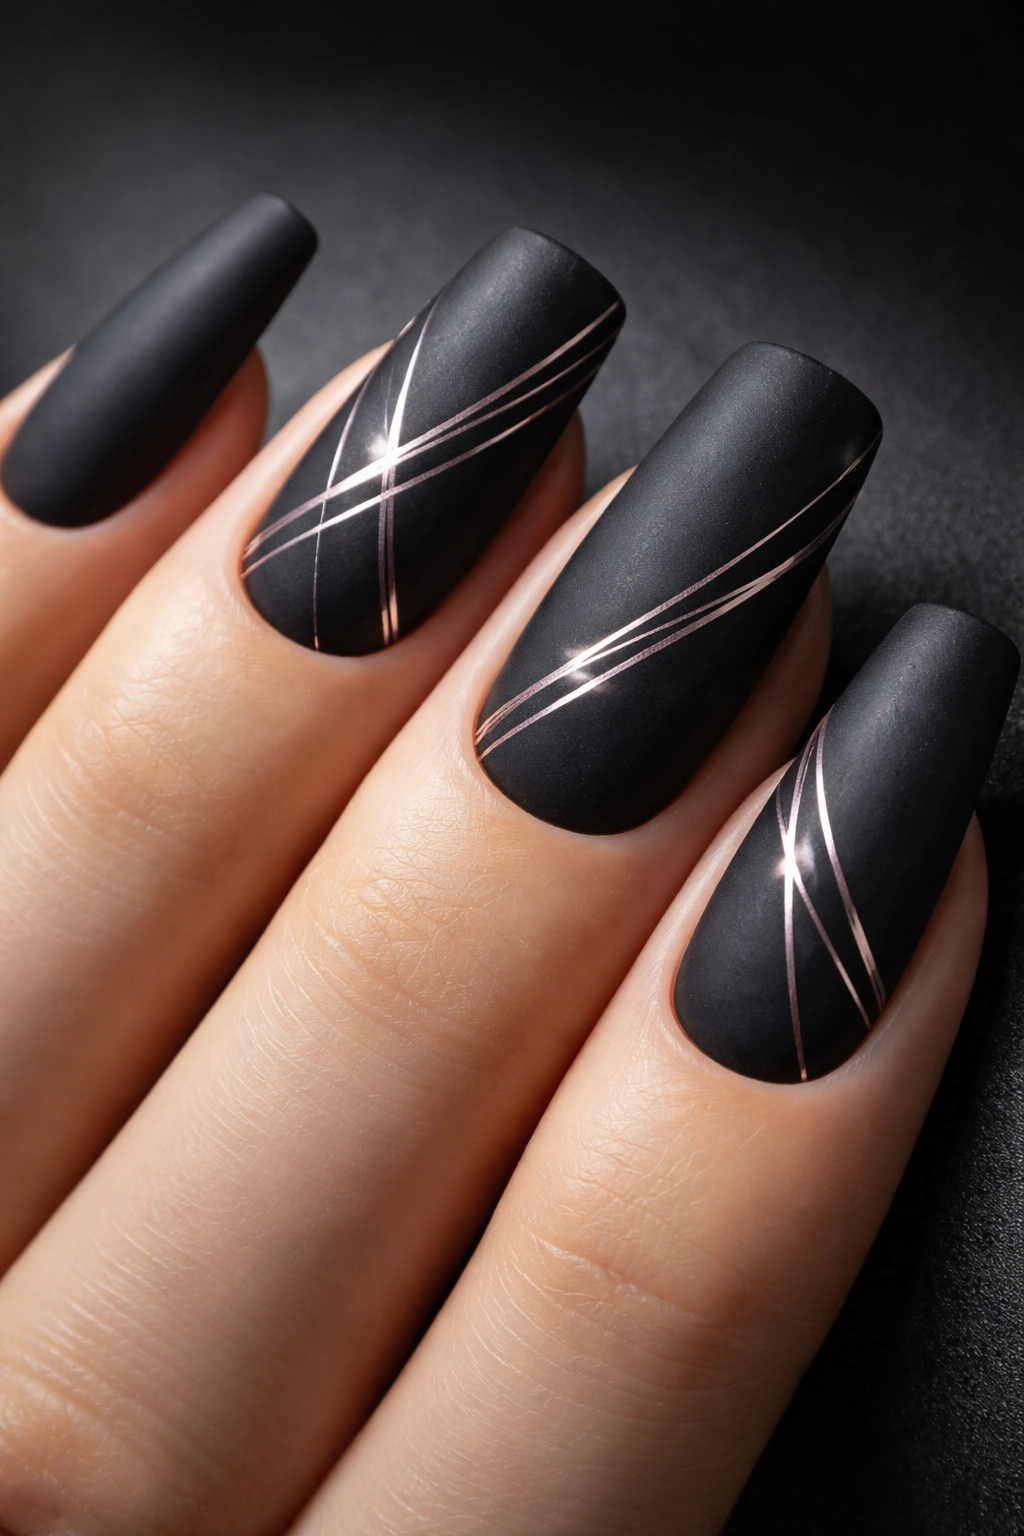
Matte black is sleek, modern, and surprisingly versatile. On long squoval nails, it creates a chic backdrop for metallic line work. Thin chrome lines, rose gold accents, or silver geometric patterns overlay the matte finish and feel contemporary without being trend-dependent. The contrast between matte and metallic creates visual interest while the long squoval shape ensures every design element has proper breathing room.
Why Matte Finish Matters
Matte finishes eliminate shine and create a velvety appearance that feels intentionally sophisticated. Unlike glossy black, which can appear heavy or dated, matte reads as editorial and fashion-forward. The softer finish also makes tiny imperfections less visible, so this design is forgiving if you’re doing it yourself.
Designing Your Metallic Details
- Use thin metallic striping tape for perfectly straight lines
- Paint metallic accents freehand for a more organic, intentional look
- Try geometric patterns like chevrons, triangles, or stacked lines
- Keep metallic elements on just 2-3 nails rather than all five for a curated appearance
- Apply a glossy topcoat over metallic accents to create shine contrast with the matte base
This look is ideal for anyone with a minimalist or modern aesthetic who wants their nails to feel like an extension of a carefully curated personal style.
5. Dusty Rose with Subtle Floral Watercolor
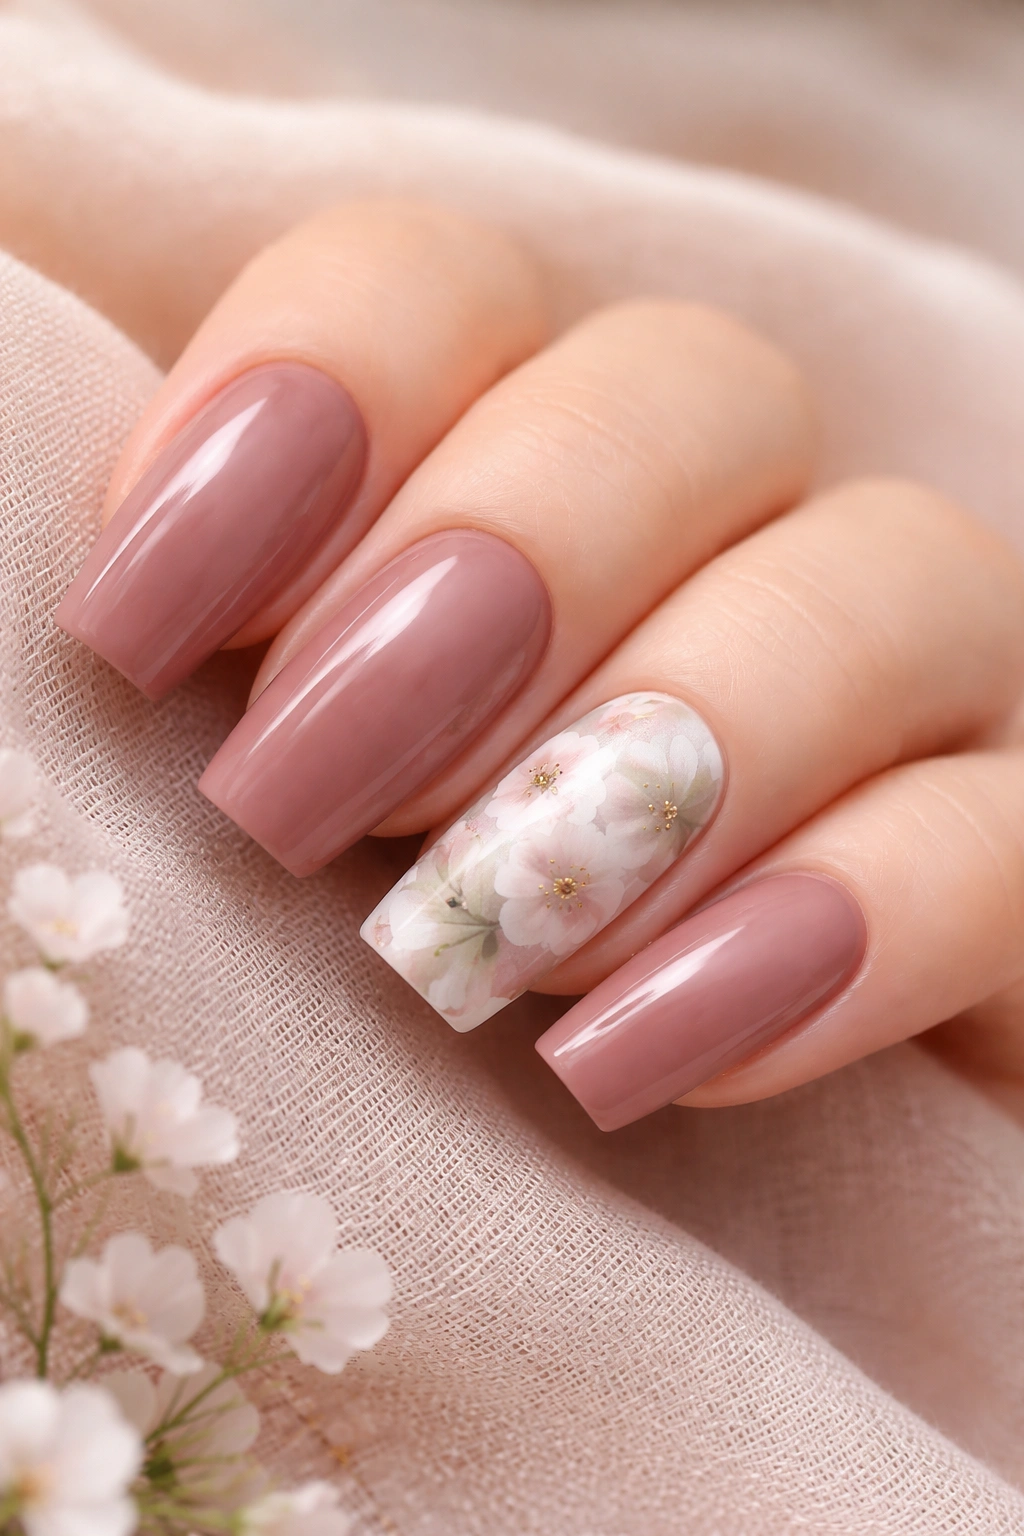
Dusty rose—that soft, muted pink with gray undertones—creates a calming, sophisticated base. Add delicate watercolor florals in whites, soft greens, and dusty purples, and you’ve got a design that feels romantic without being precious. The long squoval shape gives you enough real estate to paint small flowers on a couple of nails and keep the design from feeling crowded or overwhelming.
Achieving the Watercolor Effect
True watercolor on nails requires a light hand and patience. Instead of fully opaque strokes, allow colors to blend and fade slightly into the base shade. This creates the impression of flowers without requiring perfect detail or technical precision. The looser, more organic quality is actually what makes watercolor designs feel artistic and intentional.
Placement and Balance
- Paint florals on your accent nails and the pinky of each hand
- Keep the thumb and most fingers in the dusty rose base
- Space flowers out so they feel like scattered moments of interest rather than a full design
- Use a clear topcoat to integrate the watercolor effect into the nail’s surface
This design works beautifully for spring and summer but feels equally appropriate as an everyday design because dusty rose is neutral enough to pair with most wardrobes.
6. Chrome Silver with Holographic Glitter
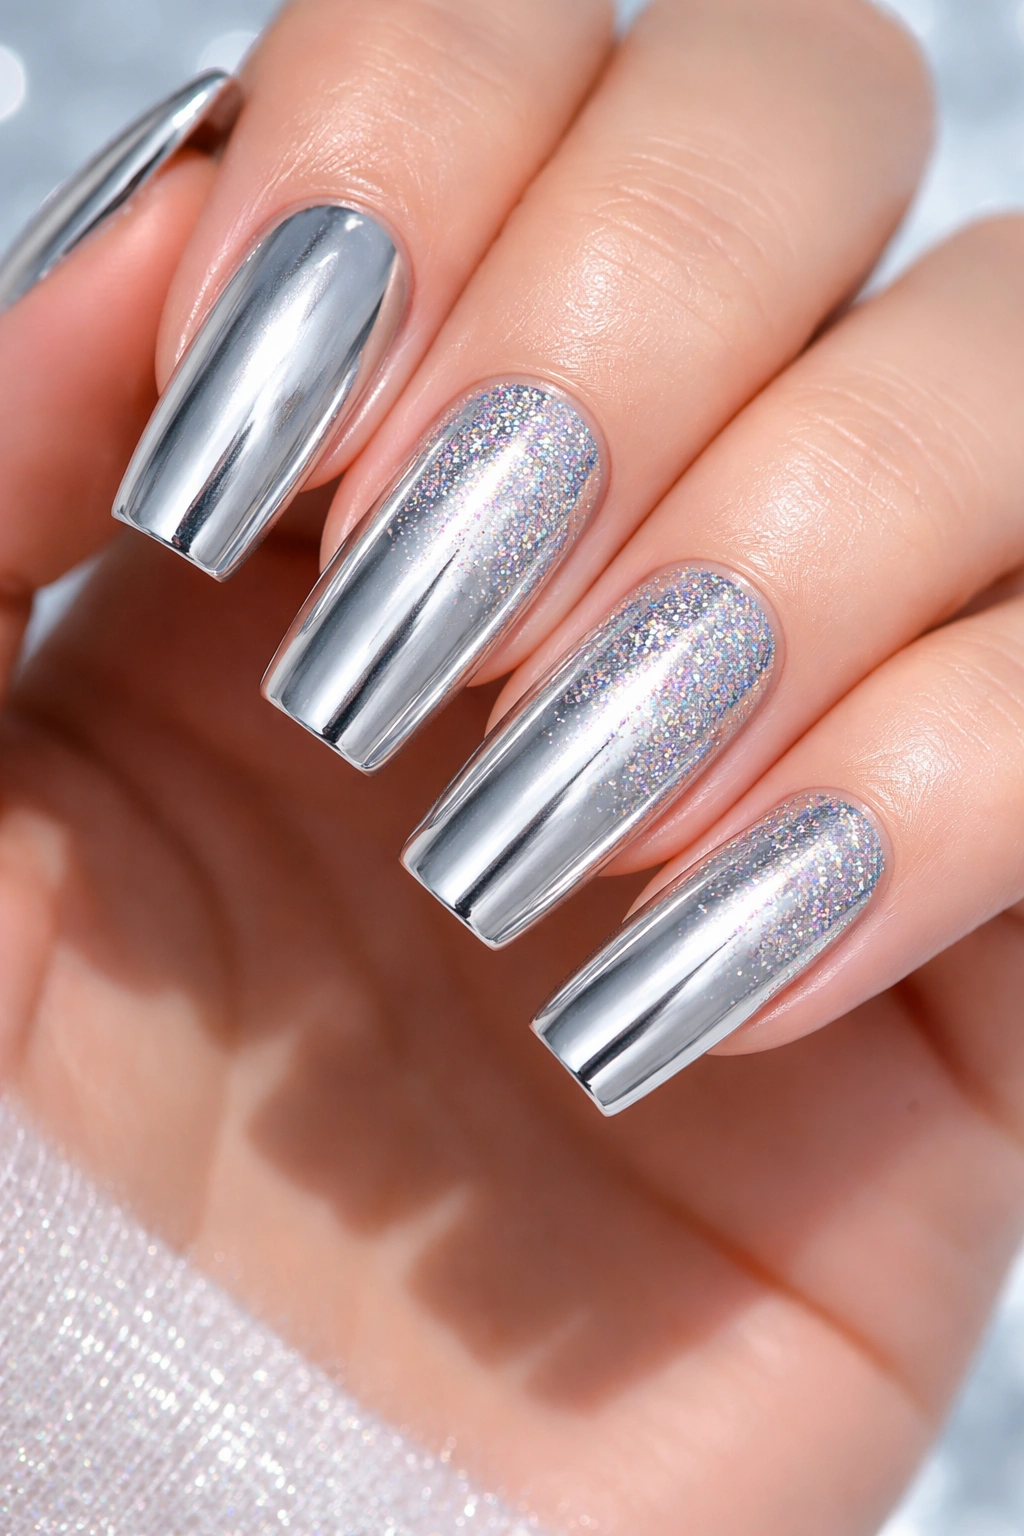
Chrome silver creates that liquid mercury effect that feels ultra-modern and eye-catching. Layer holographic glitter across the surface—either in a full gradient or concentrated in a diagonal or geometric pattern—and the interplay between the smooth chrome finish and the prismatic sparkle creates depth and movement that’s genuinely captivating. Long squoval nails maximize the surface area for this dramatic finish.
Applying Chrome for a Flawless Result
- Use a special chrome powder applied over a sticky gel base for the smoothest result
- Alternatively, use chrome metallic polish for an easier (though slightly less dramatic) effect
- Buff the surface gently until the chrome finish is completely opaque and mirror-like
- Seal everything with a clear topcoat before adding glitter
Glitter Placement Strategy
- Apply holographic glitter while the base is still slightly tacky for secure adhesion
- For a gradient effect, concentrate glitter at the tips and fade toward the base
- For a geometric approach, create a diagonal stripe, chevron, or diagonal half-moon of glitter
- Use a mix of glitter sizes to create more visual interest and dimension
Chrome silver with holographic elements works for bold personalities who love a statement nail or anyone attending an event where sparkle is celebrated.
7. Nude Base with Negative Space Geometric Lines
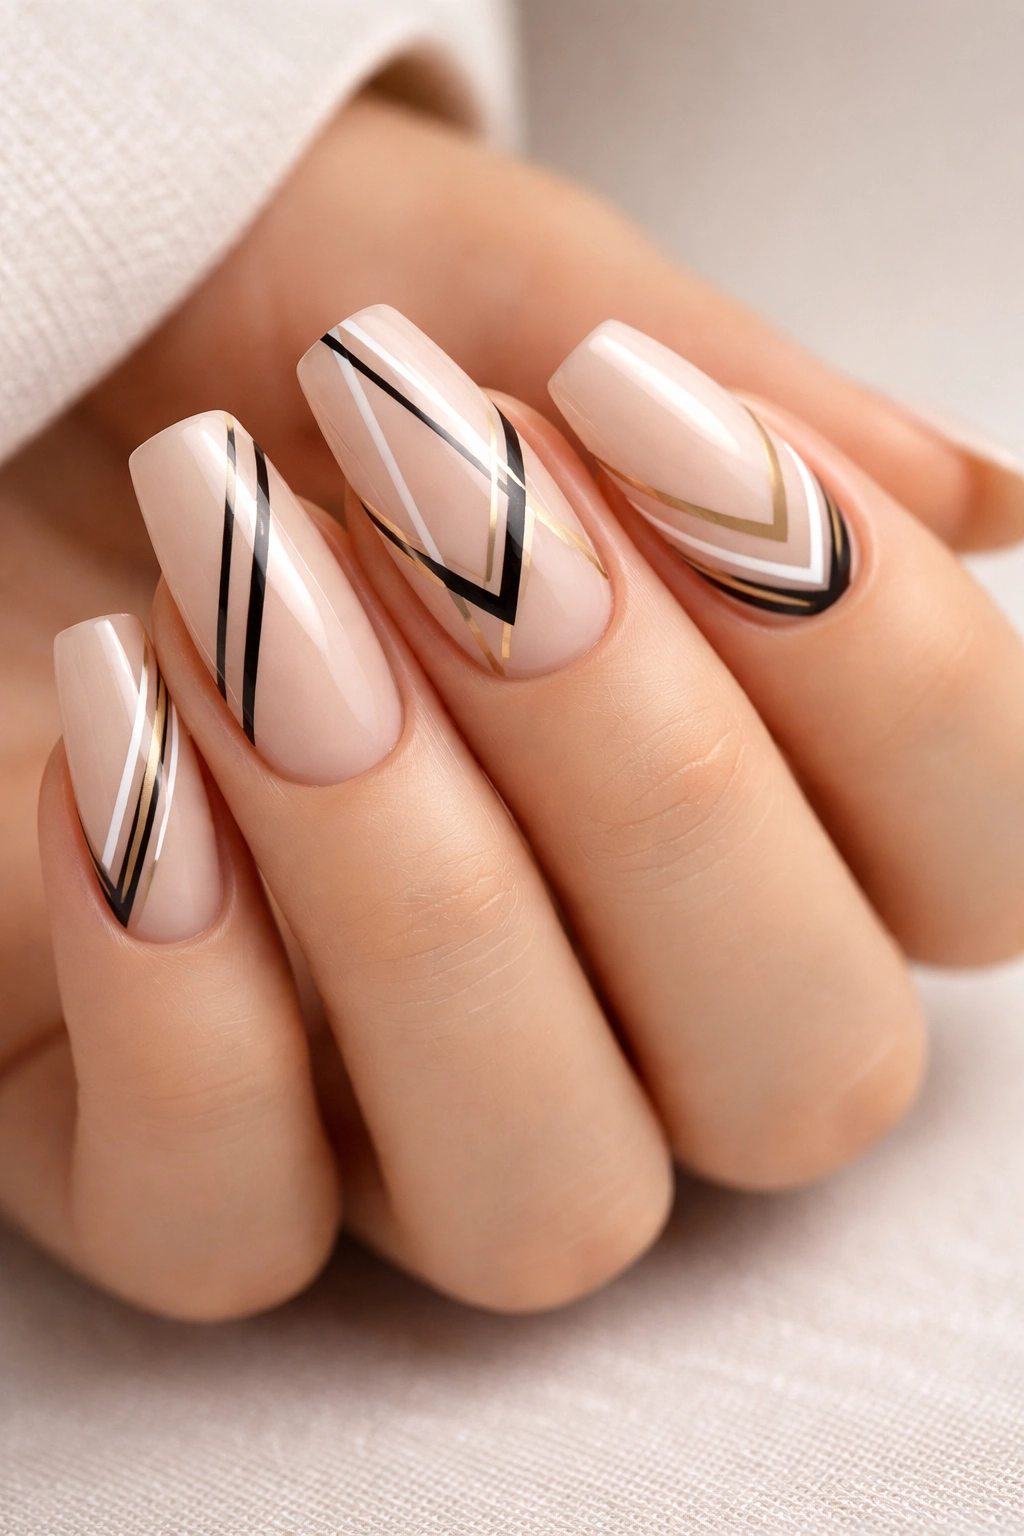
Nude base colors are versatile workhorses, but they’re far from boring when paired with negative space designs. Using only your natural nail as the design, paint geometric lines, triangles, or chevrons in thin black, white, or gold lines across the nude base. The beauty of negative space is that the design feels modern and intentional—the spaces you don’t paint become as important as the design itself.
Why Negative Space Works on Squoval Shapes
The clean lines of a squoval shape create perfect boundaries for geometric designs. The slight softness of the oval tip keeps geometric patterns from feeling too harsh, while the square sides provide structure for clean lines. This balance is exactly what makes negative space designs feel artistic rather than mathematical.
Design Ideas for Maximum Impact
- Create a symmetrical geometric pattern across all five nails for cohesion
- Use a single accent nail with a larger geometric design and minimal detail on other nails
- Try stacked triangles, chevrons, or angular lines that follow the contour of the nail
- Stick with one color accent (black is most striking) to keep the design feeling refined
This style suits professionals and anyone who appreciates minimalist design—it’s elegant without being flashy.
8. Emerald Green with Gold Foil Details
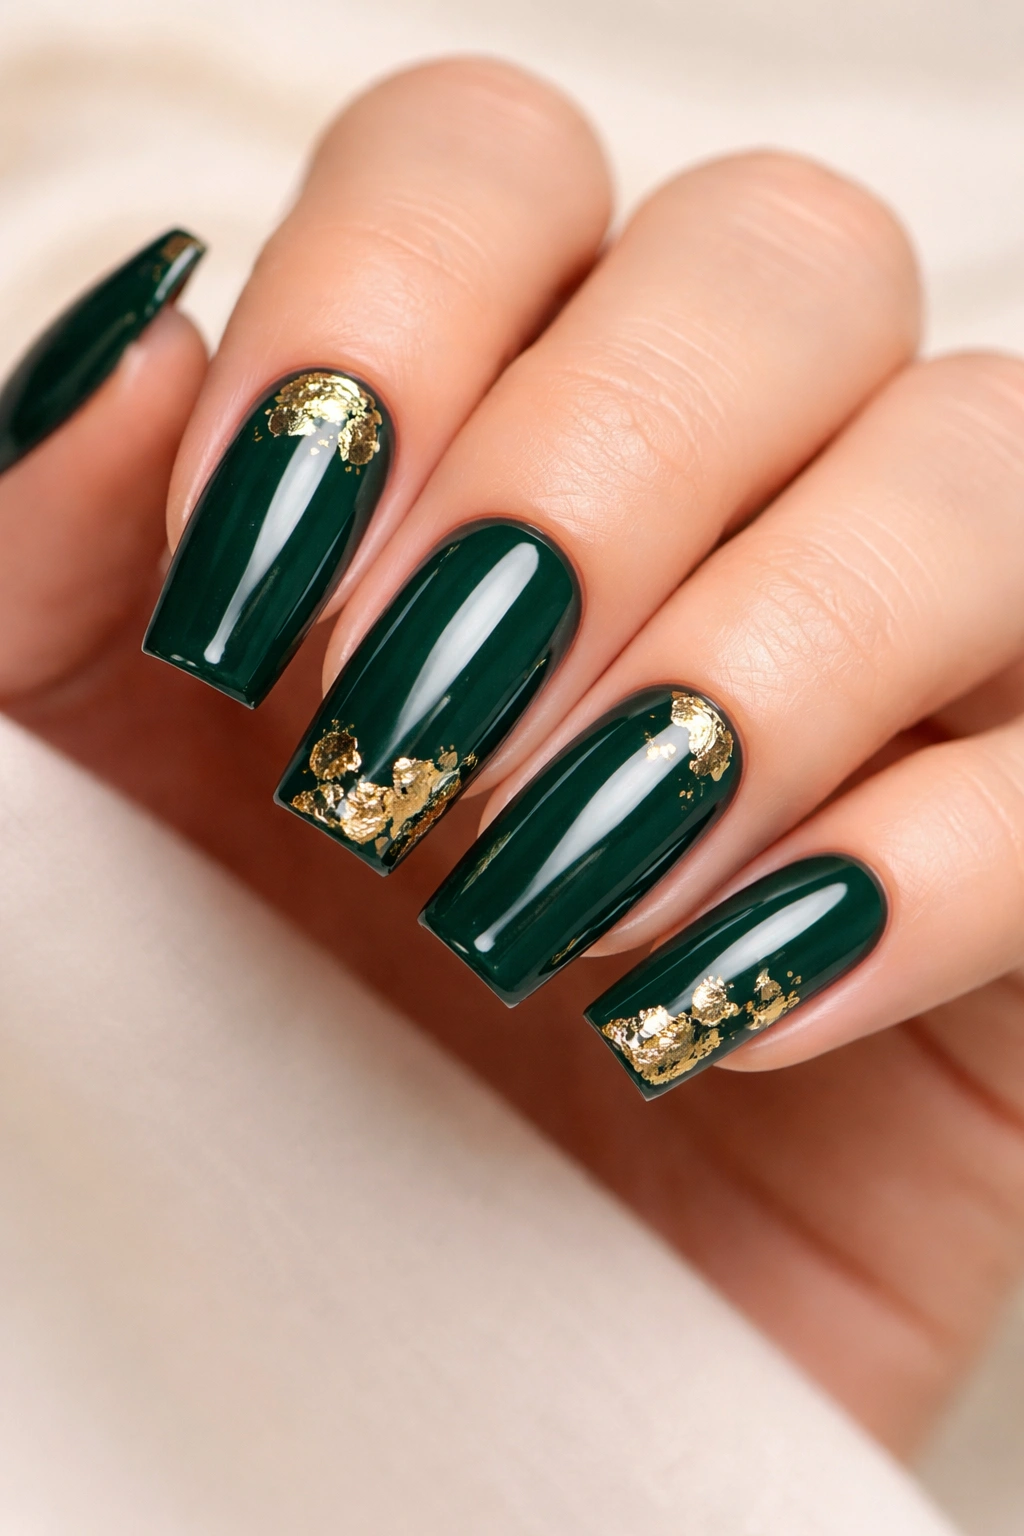
Emerald is the jewel-tone that never stops working. On long squoval nails, emerald creates a luxurious foundation that feels expensive and intentional. Add gold foil details—either scattered across the surface like flecks of treasure or concentrated in a specific pattern like a half-moon or stripe—and the emerald becomes something genuinely special. The contrast between the deep jewel tone and bright gold creates richness without feeling heavy.
Achieving the Emerald Richness
- Use a quality emerald polish that has true depth rather than appearing flat
- Apply in thin, even coats to prevent streaking or thickness
- Consider a cream finish (rather than shimmer) for maximum sophistication
- Seal with a glossy topcoat for intensity
Gold Foil Application Methods
- Press loose gold foil onto a sticky gel base before sealing with topcoat
- Apply gold foil flakes suspended in a special foil polish
- Use striping tape to create defined gold patterns against the emerald base
- Concentrate foil in specific areas (tips, half-moon, or center stripe) rather than overall coverage
Emerald with gold reads as luxury and works beautifully for special occasions, holiday gatherings, or anyone who loves wearing their confidence visibly.
9. Coral with White Striping and Minimalist Nail Art
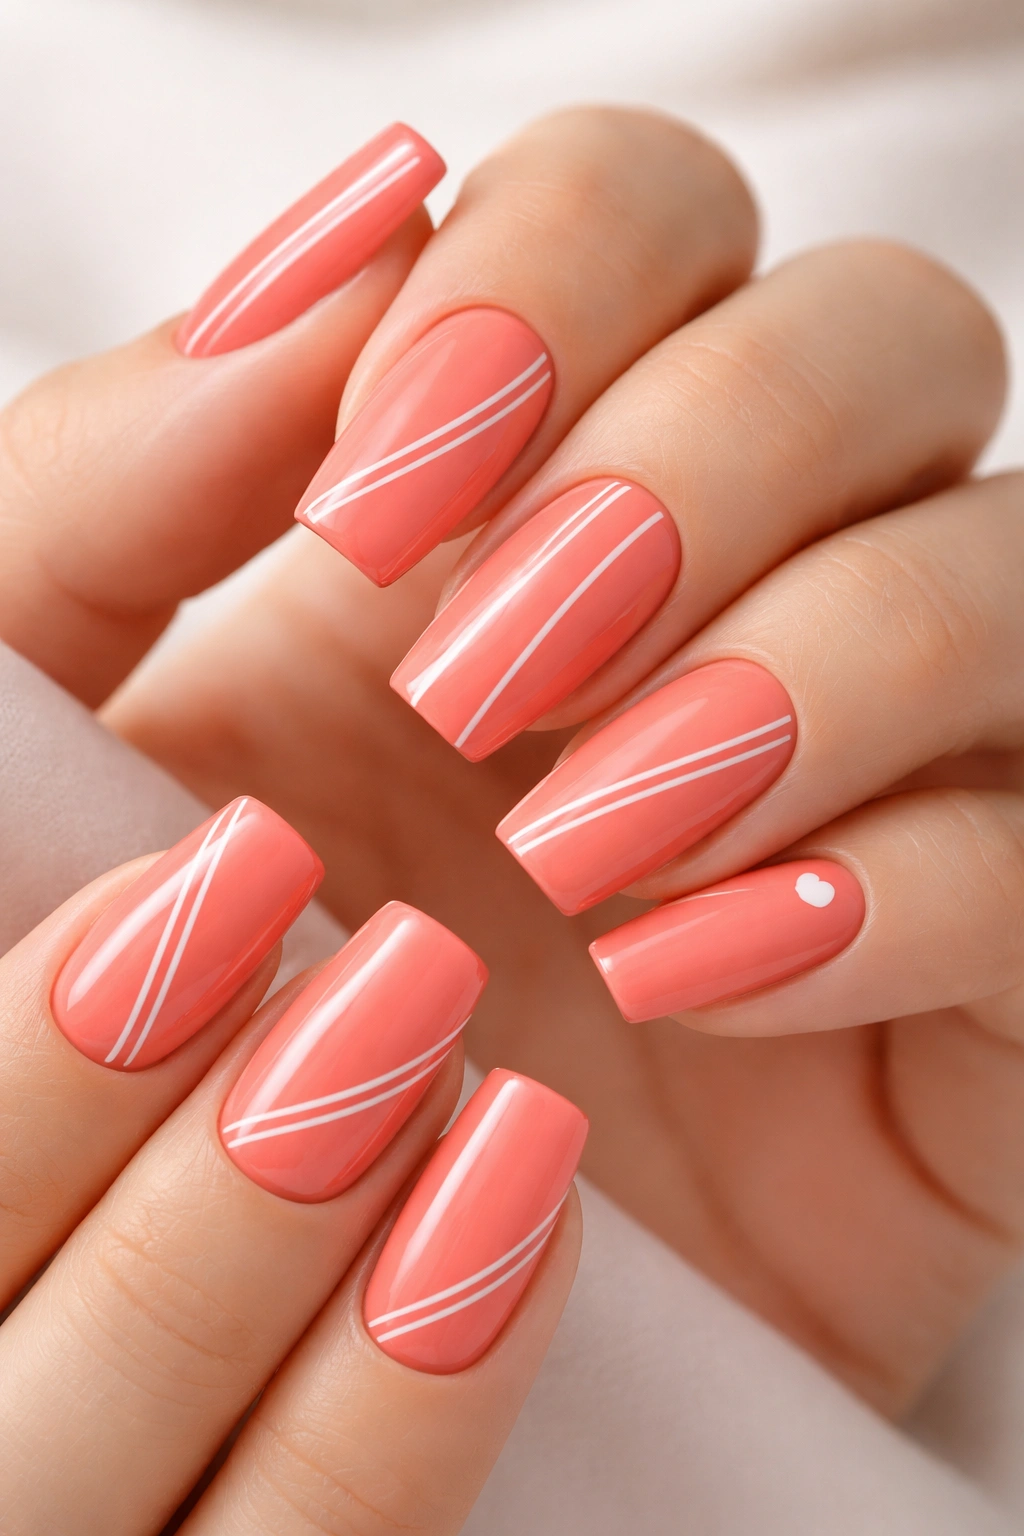
Coral is one of those shades that feels happy and approachable while still being vibrant and interesting. Add clean white stripes—either vertical, horizontal, or diagonal—and suddenly you have a design that’s playful but polished. Keep the overall aesthetic minimalist by limiting yourself to just one or two stripes per nail and reserving more complex art for your accent nail. Long squoval nails carry this cheerful energy beautifully without the design feeling juvenile or cartoonish.
Color Combination Magic
Coral and white is a combination that works across seasons and styles. The coral feels fresh and friendly while the white provides visual clarity and prevents the design from becoming overwhelming. This pairing especially suits those with warm or olive undertones, as coral’s warmth complements these skin tones beautifully.
Stripe Placement for Balance
- Keep stripes thin (about 1-2mm) for a refined rather than bold appearance
- Use striping tape for perfectly straight, clean lines
- Vary stripe direction across different nails to keep the design dynamic
- Reserve your accent nail for a small motif—perhaps a tiny geometric pattern or single detailed flower
This design is perfect for spring and summer but works year-round for anyone with a naturally upbeat, positive aesthetic.
10. Pale Lavender with Opalescent Top Coat Finish

Lavender is inherently soothing and elegant, and when you apply an opalescent topcoat over a pale lavender base, something magical happens. The topcoat shifts subtly between pink, purple, and blue tones depending on the angle and light, creating an almost iridescent effect that feels expensive and ethereal. Long squoval nails showcase this shifting quality beautifully—as you move your hand, the color appears to change and deepen, creating movement and intrigue.
Choosing the Right Base Shade
- Select a pale lavender that’s cool-toned rather than warm
- Avoid anything too saturated or dark, which will muddy the opalescent effect
- Consider a creamy finish (rather than shimmer) as your base for the opalescent topcoat to truly shine
Applying Opalescent Effects
- Use a dedicated opalescent topcoat designed specifically for shifting color effects
- Apply in thin, even layers for the most striking iridescence
- Build up layers slightly rather than applying one thick coat
- Seal with a glossy topcoat to intensify the effect
This design suits anyone who loves subtle luxury and those with cool undertones. It’s especially beautiful for those who appreciate color-shifting effects and jewelry that plays with light.
11. Blush Pink with Rose Gold Accent Nail Design
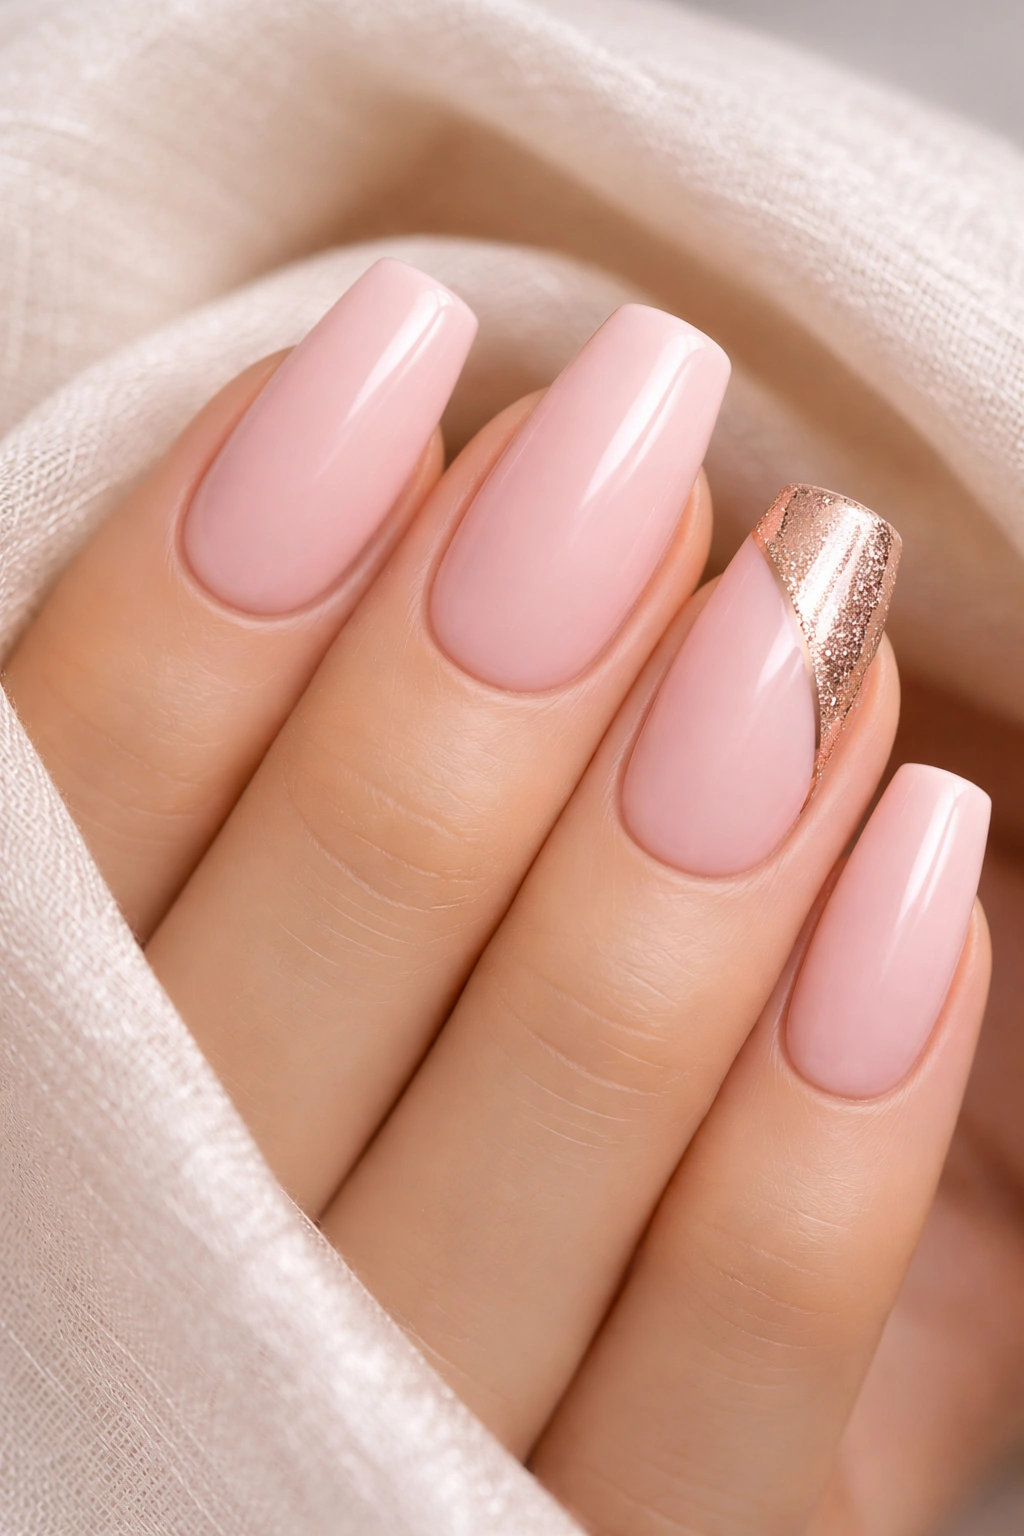
Blush pink is flattering on virtually every skin tone and creates a universally romantic, soft aesthetic. Keep four nails in pure blush pink with a clean, high-shine finish. On your accent nail (usually your ring finger), create a rose gold design—this might be a thin rose gold stripe, a rose gold half-moon, a geometric pattern filled with rose gold, or scattered rose gold glitter. The contrast between the soft pink and warm rose gold creates elegance without feeling matchy-matchy.
Why This Combination Works
Blush and rose gold is one of the most foolproof color pairings in nail design. Blush pink is soft and approachable, while rose gold adds a touch of glamour and warmth. The combination feels elevated and intentional without requiring complex nail art skills. Long squoval nails showcase both colors beautifully without either feeling overwhelming.
Accent Nail Ideas
- A single vertical or diagonal rose gold stripe down the center
- A rose gold half-moon shape at the base or tip
- A thin rose gold border around the nail perimeter
- Small rose gold dots arranged in a purposeful pattern
- A rose gold gradient that transitions from the accent nail’s base
This design works for virtually any occasion and pairs well with most wardrobe styles, making it an excellent choice for those who want nails that feel special but subtle.
12. Deep Navy with White Polka Dots and Clean Lines
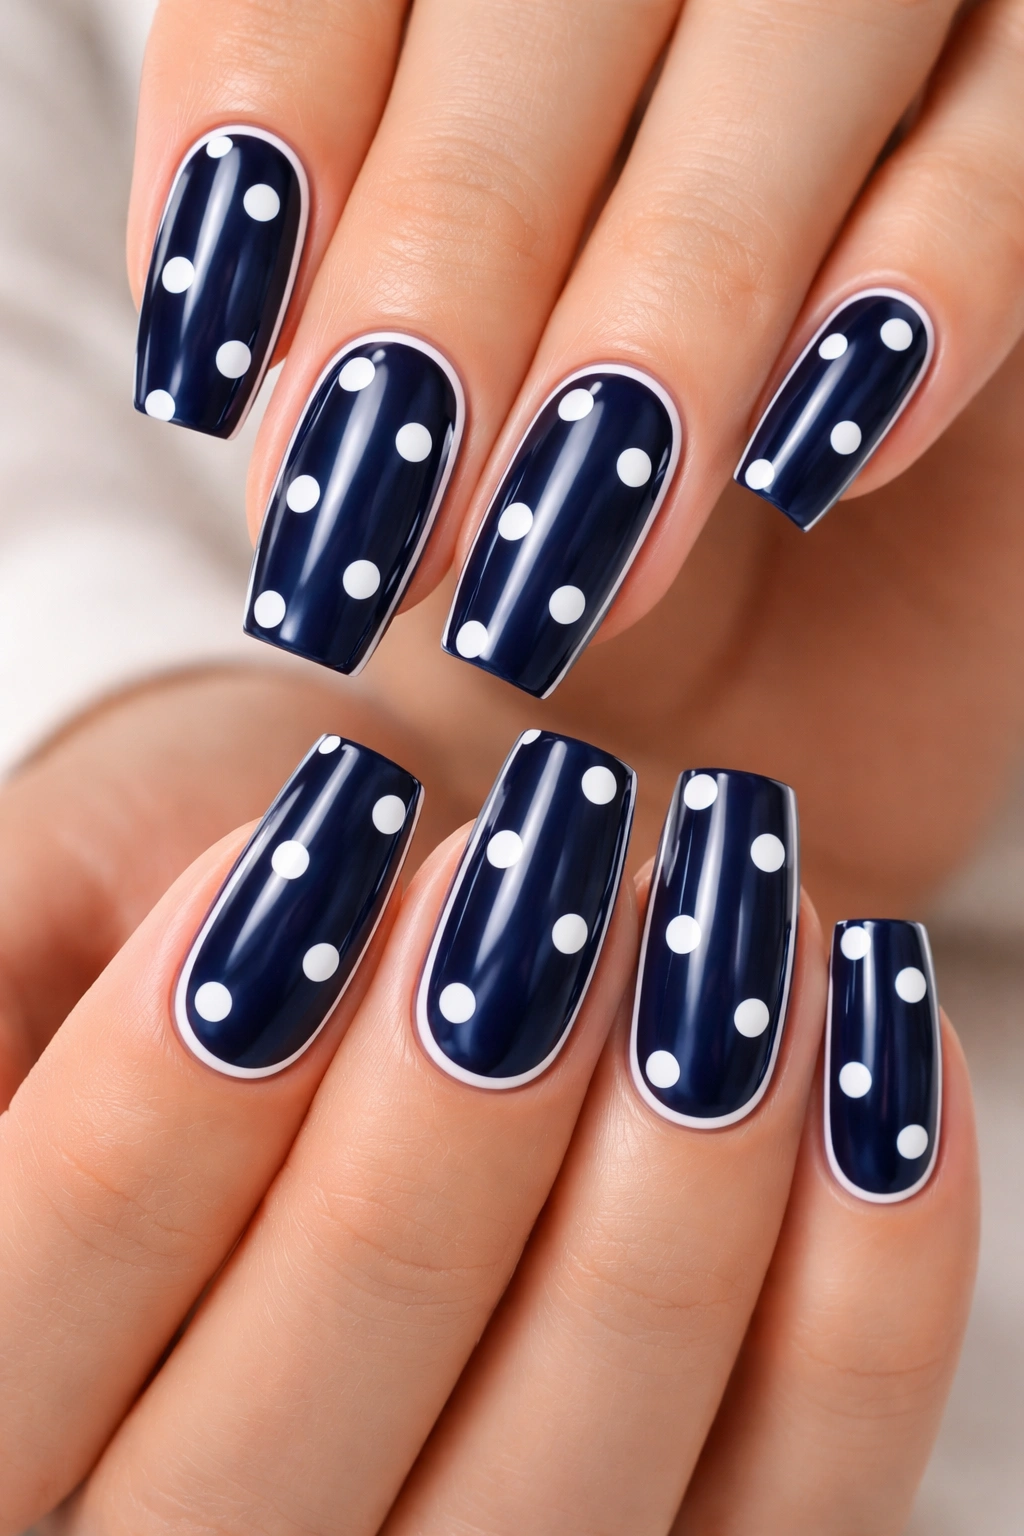
Navy is sophisticated, practical, and surprisingly versatile. Create a base of deep, rich navy blue and add a simple white polka dot pattern—not chaotic, just strategically placed across each nail. Add thin white lines (perhaps following the contour of the squoval shape) to create additional structure and prevent the design from feeling too casual. This combination feels retro-inspired but modern when executed cleanly on long squoval nails.
Achieving Perfectly Rounded Dots
- Use a dotting tool rather than a toothpick for consistent dot size
- Create dots while the base polish is slightly tacky for better adhesion
- Make dots about 2-3mm in diameter to feel intentional rather than accidental
- Space dots evenly for a designed appearance rather than random placement
Line Work Precision
- Use striping tape for perfectly straight lines
- Consider a line that follows the curved edge of the nail’s side for a more organic look
- Keep lines thin—just 1-2mm—to maintain sophistication
- Use white or a metallic gold line to add visual interest
Navy with white polka dots works beautifully for professional settings while still feeling playful and personality-filled.
13. Translucent Nude with Encapsulated Gold Leaf
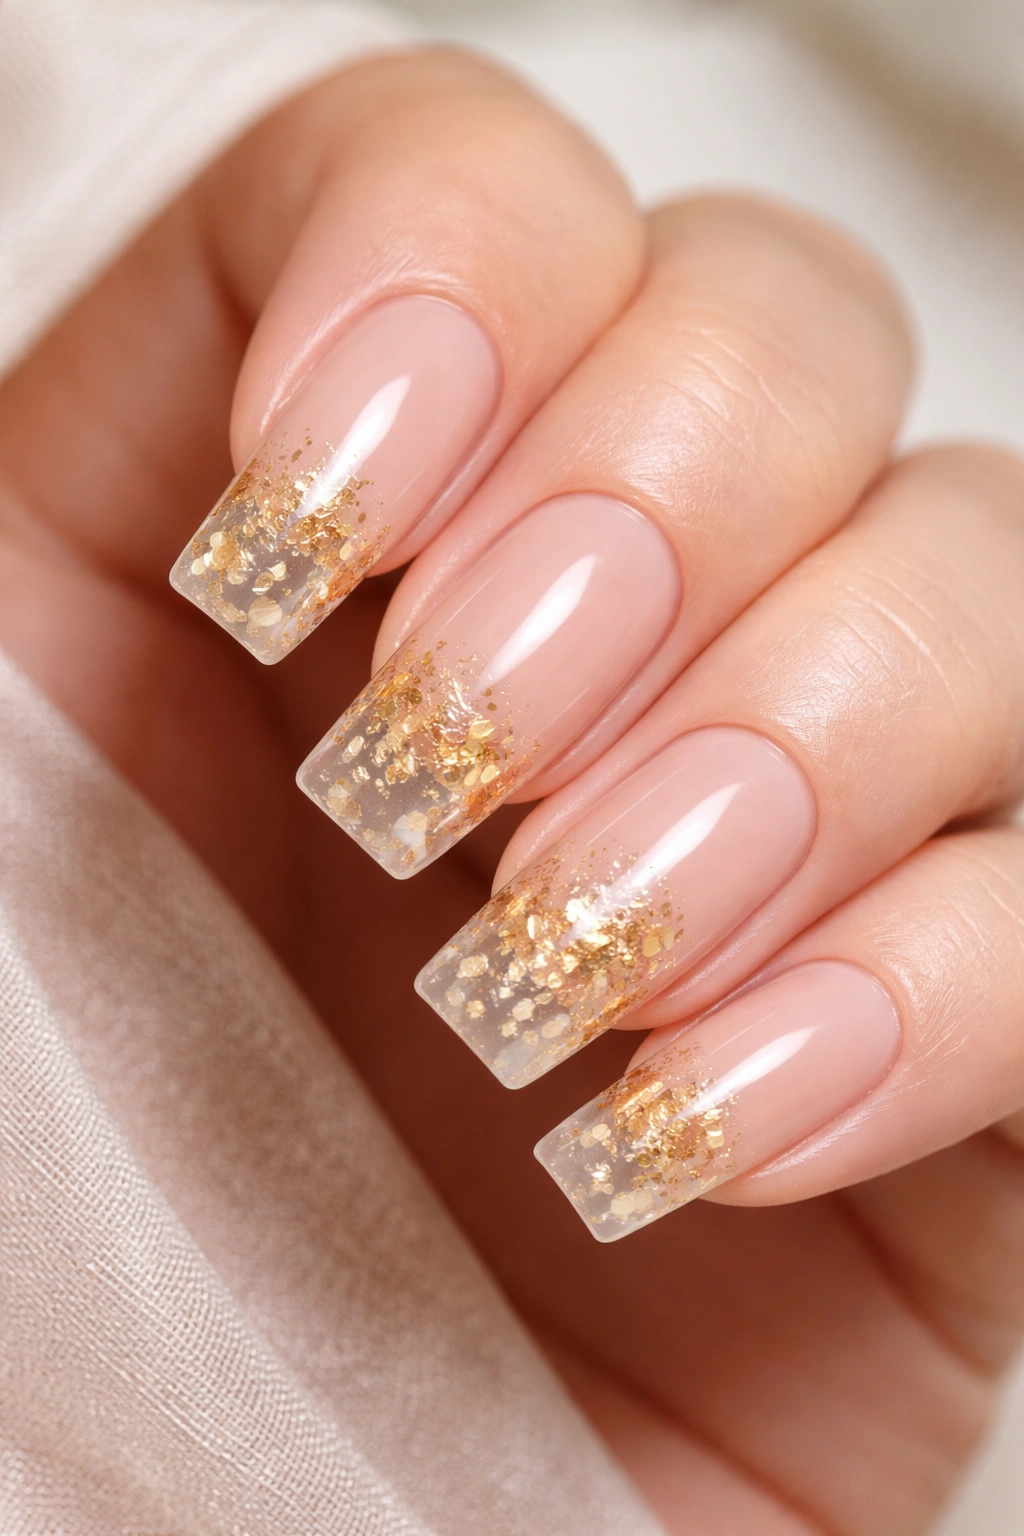
Encapsulated nail designs—where elements like gold leaf are sealed between layers of polish—create depth and dimension that feels luxurious. Start with a translucent nude base that’s almost sheer, allowing your natural nail to show through subtly. Encapsulate scattered gold leaf pieces or geometric patterns within the polish layers. The result feels like you’re wearing something precious and carefully crafted, not just painted nails.
Understanding Encapsulation Technique
- Build your base polish in thin layers, allowing each to dry completely
- Add encapsulated elements (gold leaf, glitter, metallic flakes) on the second or third layer
- Continue building layers over the encapsulated elements to seal them in
- Use clear or translucent polish for layers so the elements remain visible
Gold Leaf Placement Strategies
- Create a scattered, organic pattern that feels like accidentally beautiful treasure
- Build a concentrated design on your accent nail with subtle hints on other fingers
- Arrange leaf pieces to follow the nail’s natural contours
- Use different sizes of leaf pieces for more visual interest
This design feels high-end and works beautifully for special occasions where you want your nails to feel like genuine jewelry.
14. Soft Cream with Delicate Gold Striping and Gem Accents
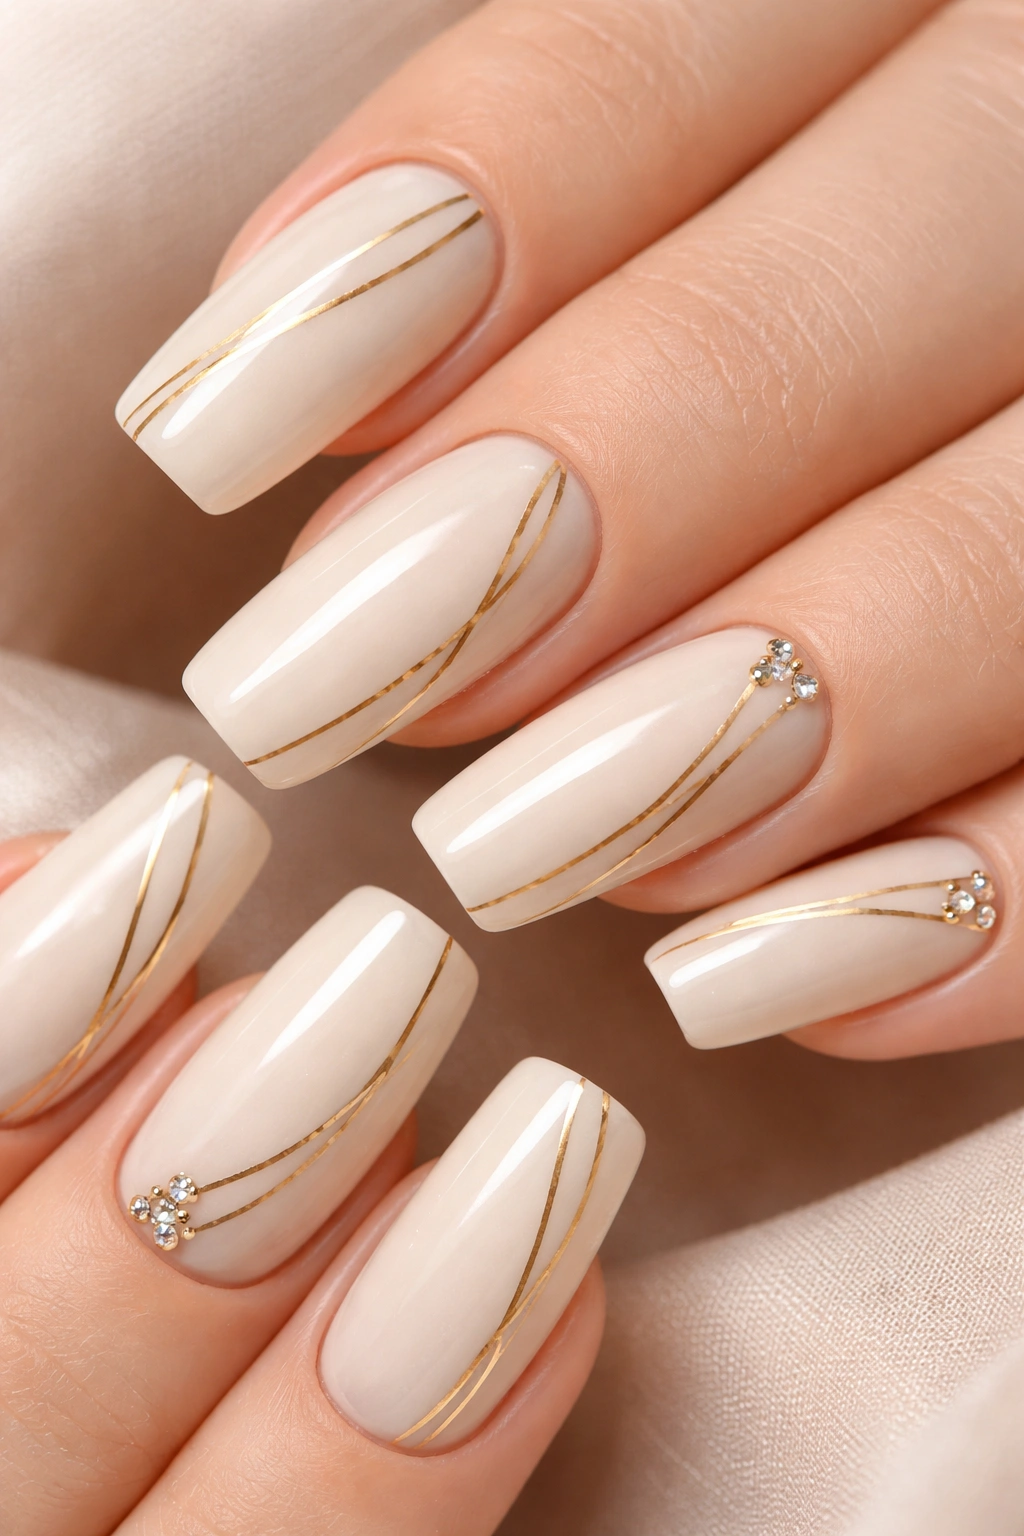
Sometimes the most elegant designs are the simplest. A soft cream base provides a blank canvas that feels warm and approachable. Add thin gold stripes—either vertical lines down the center, horizontal stripes at the tips, or geometric patterns—and place one or two small gems at the base or in a corner. The restraint here is what creates sophistication; you’re not covering the entire nail, just accenting it strategically.
Selecting Your Cream Shade
- Choose a cream that’s slightly warmer than pure white for versatility
- Avoid anything too pale or it will disappear; you want subtle presence
- Test the shade under different lighting to ensure it reads as intentional rather than blank
Gold Striping Technique
- Use thin striping tape for perfectly straight lines
- Apply just 1-2 stripes per nail for an understated look
- Consider staggering stripe placement across different nails for visual interest
- Use 14k gold or a warm metallic gold rather than bright yellow gold
Gem Placement Guidelines
- Use small, understated gems rather than large statement stones
- Place one gem per nail or concentrate them on accent nails
- Ensure gems are secured with a reliable adhesive or gel base
- Allow gems to feel like purposeful accents rather than random decoration
This design works for professional environments, everyday wear, or anyone who appreciates quiet elegance over drama.
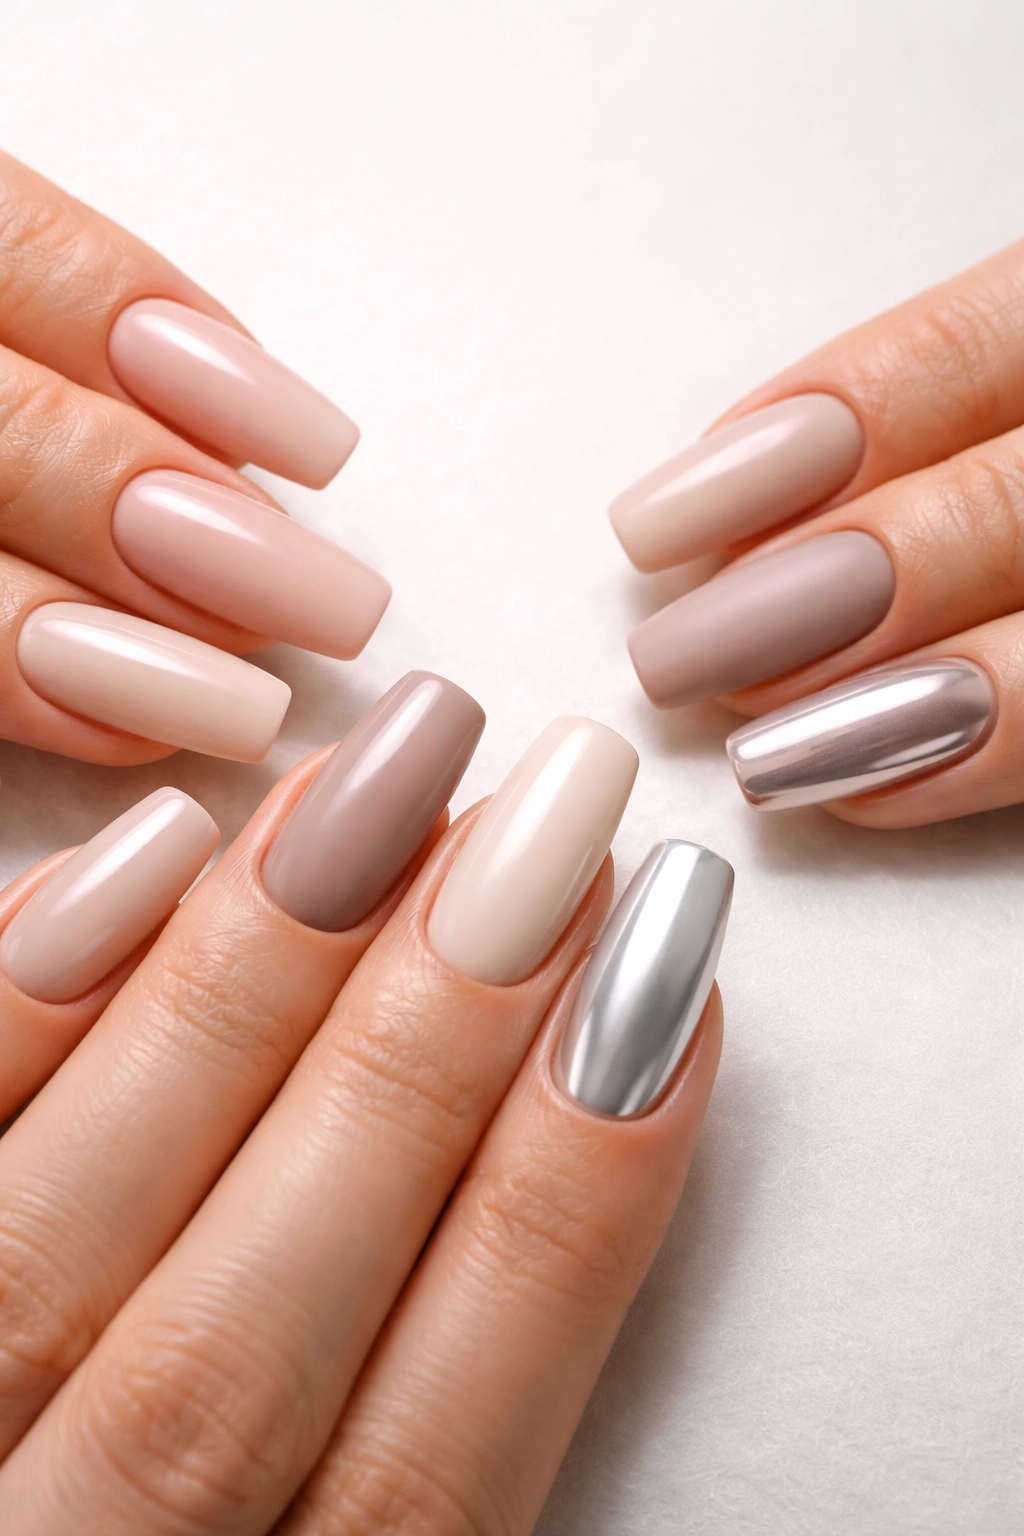
15. Smoky Gray with Chrome Tips and Matte Finish

Smoky gray is a sophisticated neutral that feels both modern and timeless. Create a base in matte smoky gray, then apply a chrome finish only to the tips—either stopping at the traditional French manicure line or creating a geometric transition. The matte-to-chrome contrast creates depth and visual interest without requiring complex nail art. Long squoval nails showcase this finish combination beautifully, with the chrome tips emphasizing the nail’s length.
Achieving the Matte Finish
- Use a dedicated matte topcoat or matte polish for this effect
- Ensure even application so the finish looks intentional rather than unfinished
- Consider the elegance of matte finishes for everyday wear—they’re less flashy but endlessly sophisticated
Chrome Tip Application
- Create a clean line separating matte and chrome using painter’s tape
- Apply chrome powder over a sticky gel for the smoothest result, or use chrome polish as an alternative
- Keep the chrome concentrated on the tips rather than blending it back (the contrast is the point)
- Seal matte sections with matte topcoat and chrome sections with glossy topcoat
This design reads as editorial and fashion-forward while remaining practical for professional or everyday settings.
Final Thoughts
Long squoval nails are endlessly adaptable, which is exactly why they’ve become such a beloved choice. Whether you’re drawn to classic elegance, bold color, metallic accents, or minimalist design, the squoval shape provides a flattering foundation that works with virtually every aesthetic. The hybrid nature of the shape means you’re never choosing between a practical, durable nail or a graceful, elongated one—you’re getting both.
The key to making any squoval design truly shine is understanding that the shape itself is doing significant work. The softened corners prevent even bold designs from feeling aggressive, while the defined sides provide enough structure that minimalist designs don’t feel incomplete. Your personal style, skin tone, lifestyle needs, and the occasion all play a role in choosing which of these designs resonates with you.
Start with whatever speaks to you most—whether that’s the timeless sophistication of a French manicure, the jewel-tone luxury of emerald and gold, or the editorial modernity of matte and chrome. Once you’ve tried one design, you’ll develop an intuition for how to adapt these ideas to match your mood, your wardrobe, and your personal taste. Long squoval nails are genuinely a shape that grows with you.
