

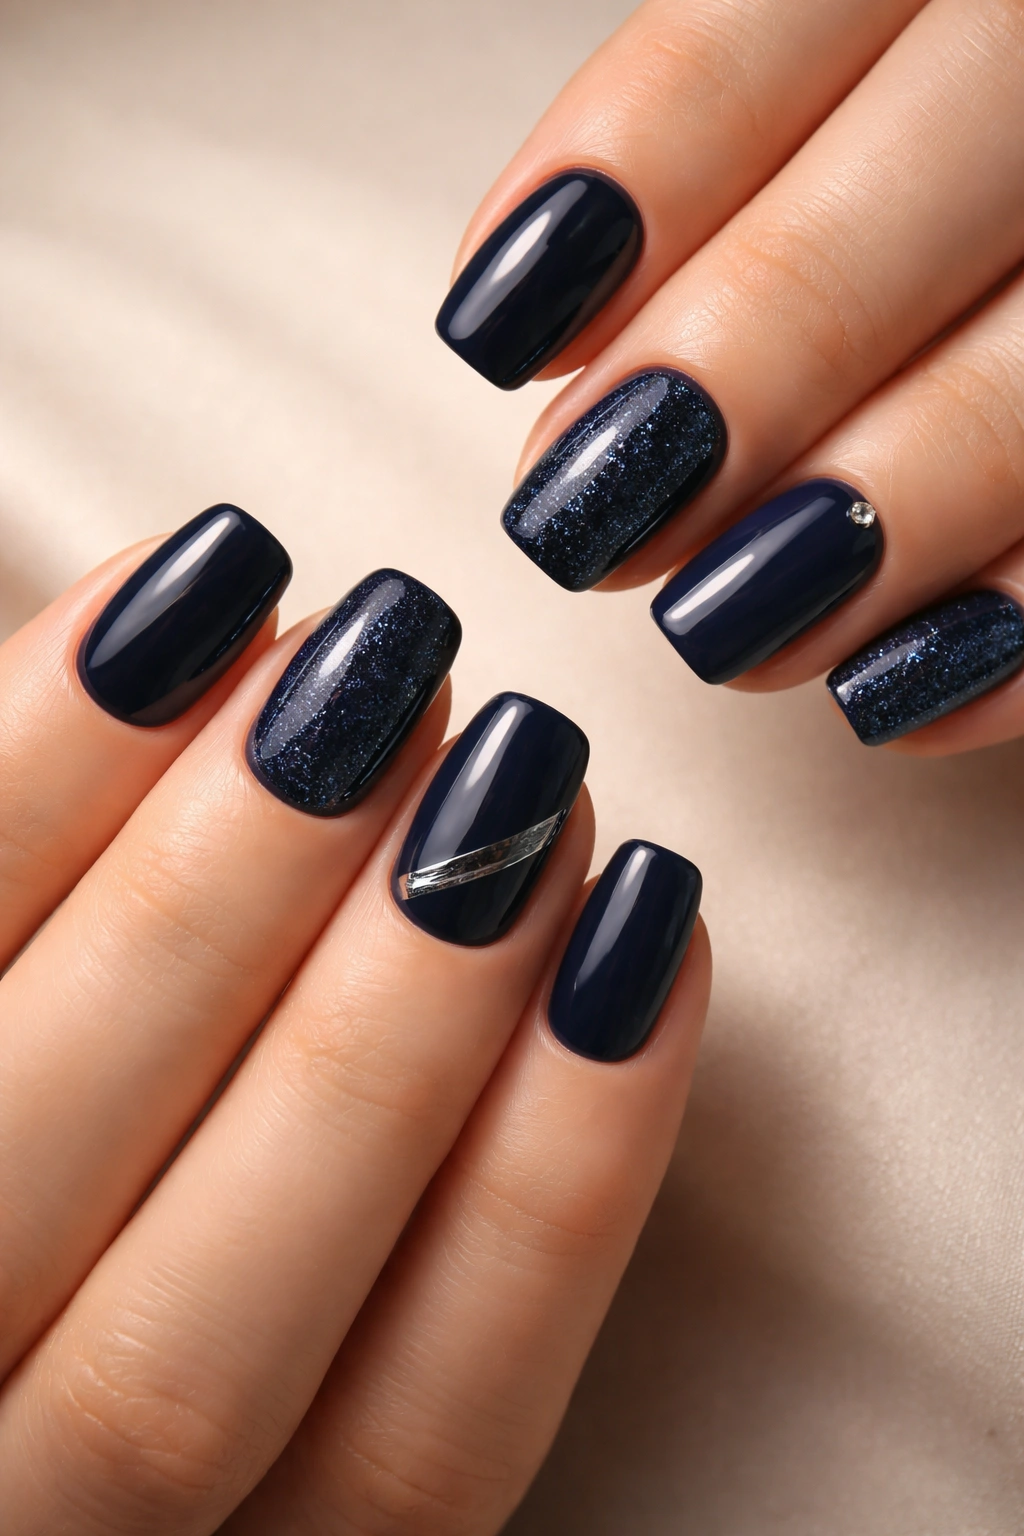
Navy blue is that rare nail color that works everywhere—polished enough for the office, chic enough for a night out, and calming to look at every single day. It’s the kind of shade that refuses to go out of style because it’s just fundamentally flattering on almost every skin tone, and it pairs beautifully with virtually any outfit in your closet.
The squoval shape is where the real magic happens, though. It sits right in that sweet spot between the practical durability of a square and the elegant softness of an oval. Your nails have enough length to look intentional and feminine without the fragility that comes with longer shapes. They’re strong enough to survive real life—typing, cooking, opening things—but still feel like you actually tried. That’s why squoval nails have become the go-to shape for people who want nails that feel both sophisticated and wearable.
When you combine navy blue with squoval shape, you’ve got a foundation that’s endlessly versatile. You can take it in a minimalist direction with just a rich solid color, dress it up with metallics and sparkle, add geometric patterns, or create something delicate and artistic. The depth of navy means it can handle complexity without feeling chaotic, and it also looks stunning on its own with zero embellishment.
What makes these 15 designs so worth trying isn’t just that they look incredible—it’s that they’re all achievable whether you’re a DIY nail person or someone who trusts their nail tech. You don’t need advanced technique experience to recreate most of these at home, and if you do take them to a salon, they’re straightforward enough that even a new tech can nail them. Let’s walk through each one and find your next favorite look.
1. Classic Navy with Subtle Gold Accents
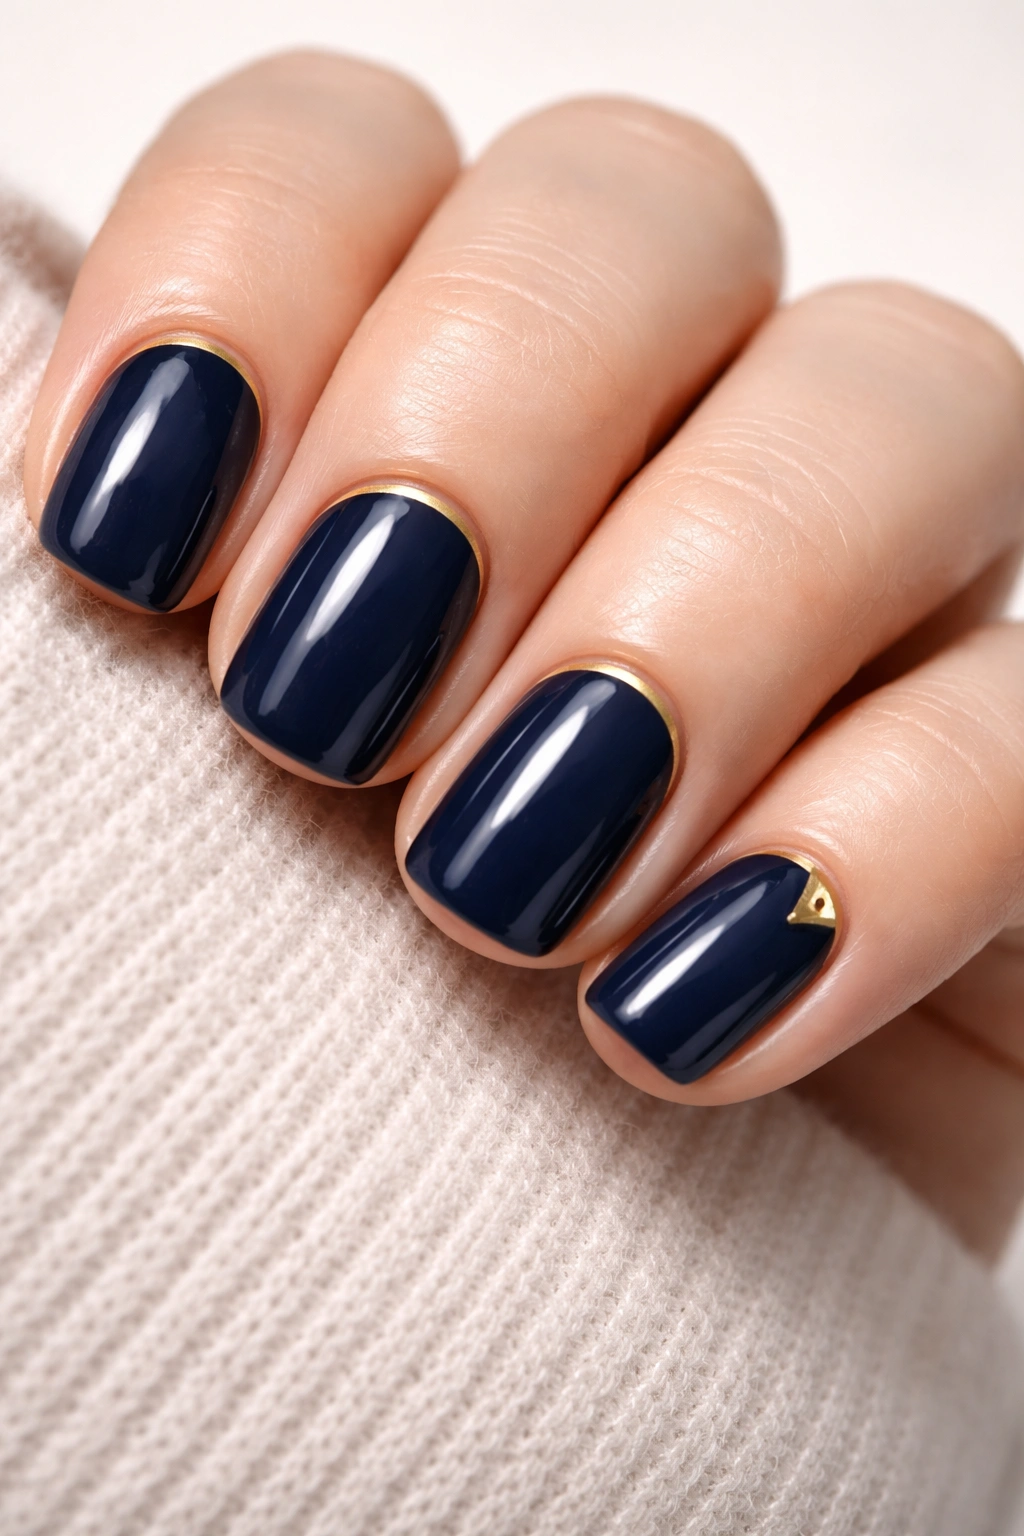
There’s something undeniably elegant about keeping things simple, and this design proves it. You’re working with a rich, opaque navy base—something deep enough that it looks luxurious but not so dark that it disappears on your nails. The gold accents are where the sophistication lives: think a thin line of gold running along the cuticle area, or maybe a delicate geometric shape in one corner of the nail.
Why This Design Stands Out
This combination feels inherently expensive because it works with negative space. You’re not trying to do too much; you’re letting the navy breathe and letting the gold catch light. Gold against navy reads as timeless, whereas other color combinations might trend harder. It’s the kind of mani you’ll wear for months without getting tired of it because it’s genuinely versatile with everything.
How to Execute It
- Use a high-quality navy polish for your base (two coats for opacity)
- Let the base dry completely before adding gold details
- Apply gold using a thin striping brush or nail pen for precision
- Keep the gold placement intentional—less is always more here
- Seal with a glossy top coat that makes both colors pop
Pro tip: If you’re doing this at home, thin gold striping tape (the kind nail techs use) is your secret weapon. It’s way easier to get clean lines with tape than trying to hand-paint, and the results look professionally done.
2. Matte Navy with Glossy Tips

This design plays with texture contrast, which is one of the easiest ways to make a simple mani feel more interesting. You’re creating a two-tone effect where most of the nail is matte and just the tips stay glossy and shiny. The result is modern, a little bit artsy, and somehow feels like it belongs in a high-end salon even though it’s surprisingly simple to execute.
What Makes It Stand Out
The texture play makes your nails look more dimensional than they actually are. Matte finishes make colors appear more saturated and sophisticated, while the glossy tips catch light and draw attention to your nail shape. It’s a subtle hack that elevates a basic navy base without adding any extra decoration or detail work.
Creating the Effect at Home
- Paint all nails with navy polish using a matte topcoat (one or two coats depending on opacity)
- Once completely dry, apply a glossy top coat to just the tip area
- Use a thin brush or a tapered brush for the glossy application
- The line between matte and glossy can be precise or slightly blended, depending on your preference
- You can make the glossy section anywhere from a thin line to a half-moon shape
Worth knowing: If you can’t find matte top coat, you can also use regular polish on the tips and just skip the top coat on the matte section. Just be careful not to touch that matte area once it’s dry—matte finishes are more fragile than gloss until they’re sealed.
3. Navy and White French Manicure Twist
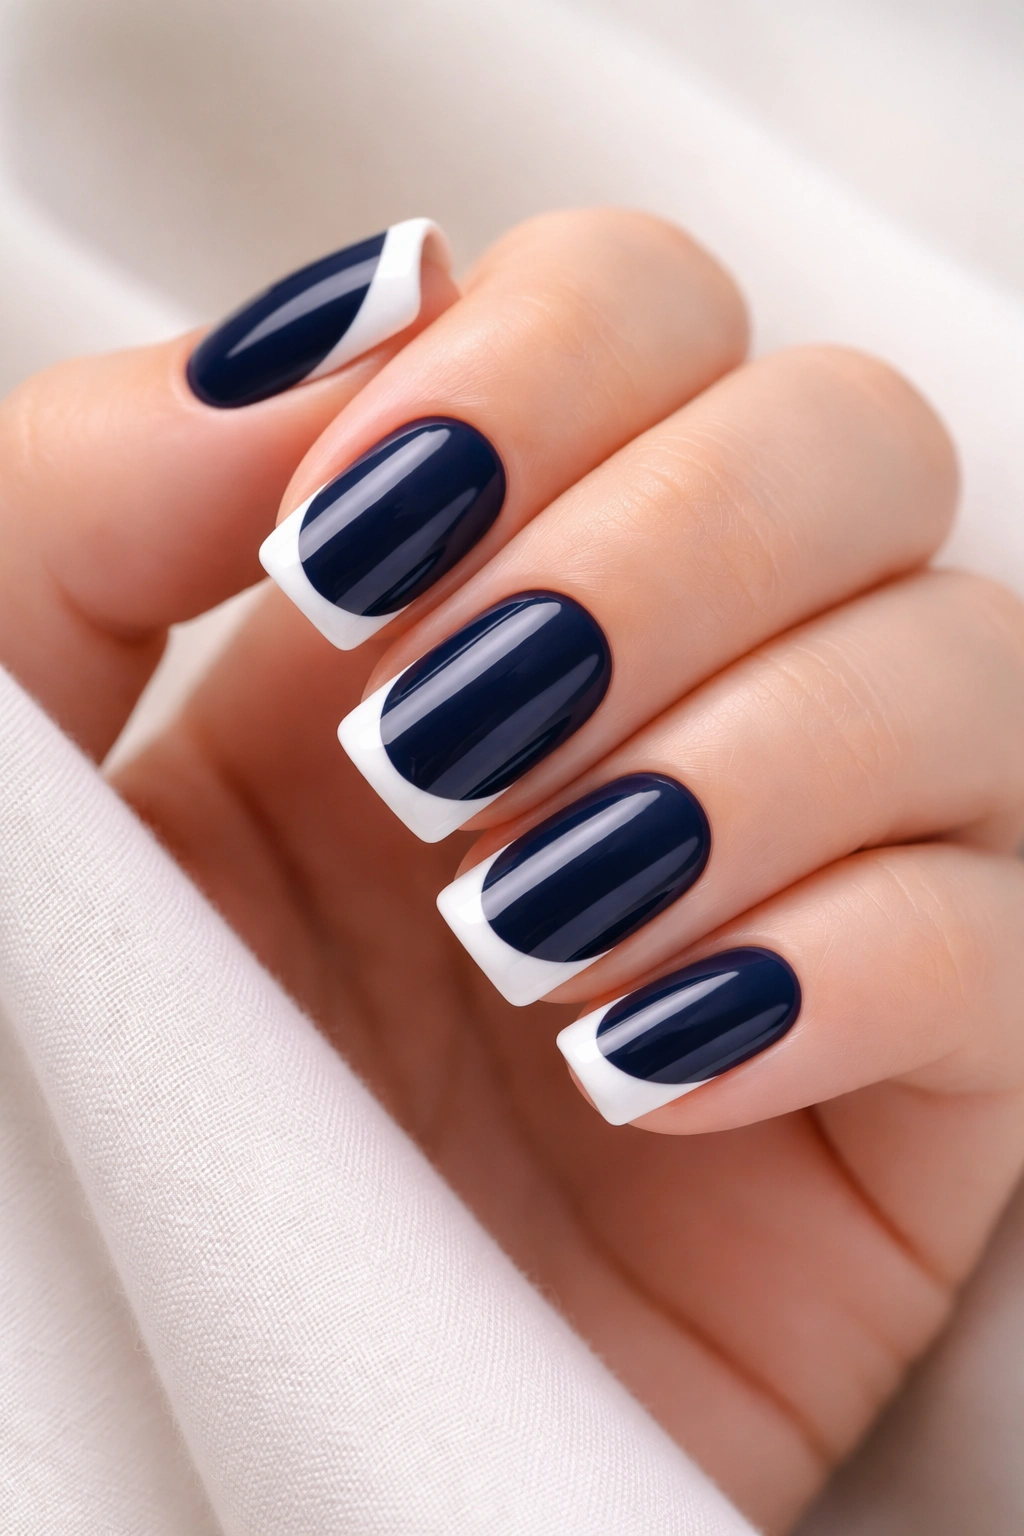
The classic French manicure never really goes away, and for good reason. But instead of the traditional white-and-pink, you’re swapping the base to a deep, rich navy and keeping the white tips. This gives you something that feels both timeless and modern at the exact same time, which is a pretty rare combination.
Why This Version Works So Well
Regular French manis can feel dated or overly formal depending on your style, but navy-and-white feels fresh and current. White against navy has the perfect contrast—it’s crisp and clean without being clinical. The design is also incredibly forgiving because you’re not trying to hand-paint anything complicated; the white tips do all the visual heavy lifting.
How to Get Clean Results
- Apply two coats of navy as your base color
- Use a French manicure guide (the curved sticker kind) or steady hand to apply white to the tips
- The white line doesn’t have to be perfectly thin—a slightly thicker white tip actually feels more current
- Seal everything with a top coat for protection and shine
- If your line isn’t perfect, a tiny correction with a dotting tool fixes it in seconds
Insider note: The width of your white tip matters more than perfect straightness. A white tip that covers about 1–2mm of the nail looks classic, while 3–4mm feels more fashion-forward and modern.
4. Navy with Delicate Floral Designs

If you want to add artistry without it feeling over-the-top, tiny floral designs scattered across a navy base are the answer. You’re painting small flowers—maybe tiny roses, simple daisies, or minimalist blooms—in white, light pink, or gold on a navy background. The flowers can be on every nail or just on accent nails, depending on your preference.
What Makes Florals on Navy Special
Flowers look incredibly delicate against navy because of the contrast, but they also feel meaningful in a way that abstract patterns sometimes don’t. Navy as a background is also forgiving for florals because it lets them breathe visually. You don’t need perfect painting skills either—even slightly imperfect florals look intentional and charming rather than like a mistake.
Painting Florals That Look Good
- Start with your navy base, fully dried and sealed
- Use a very thin brush or dotting tool for flower petals
- Paint simple five-petal shapes in white or pastel colors
- Add a tiny contrasting center (gold dot, darker color dot)
- You can also do minimalist line drawings of flowers instead of filled-in blooms
- Scatter them randomly or place them intentionally—both approaches work
Pro tip: If hand-painting makes you nervous, water decal nail stickers exist for exactly this reason. They look hand-painted, they’re durable, and they eliminate the pressure of having to be perfect.
5. Navy and Metallic Silver Stripes
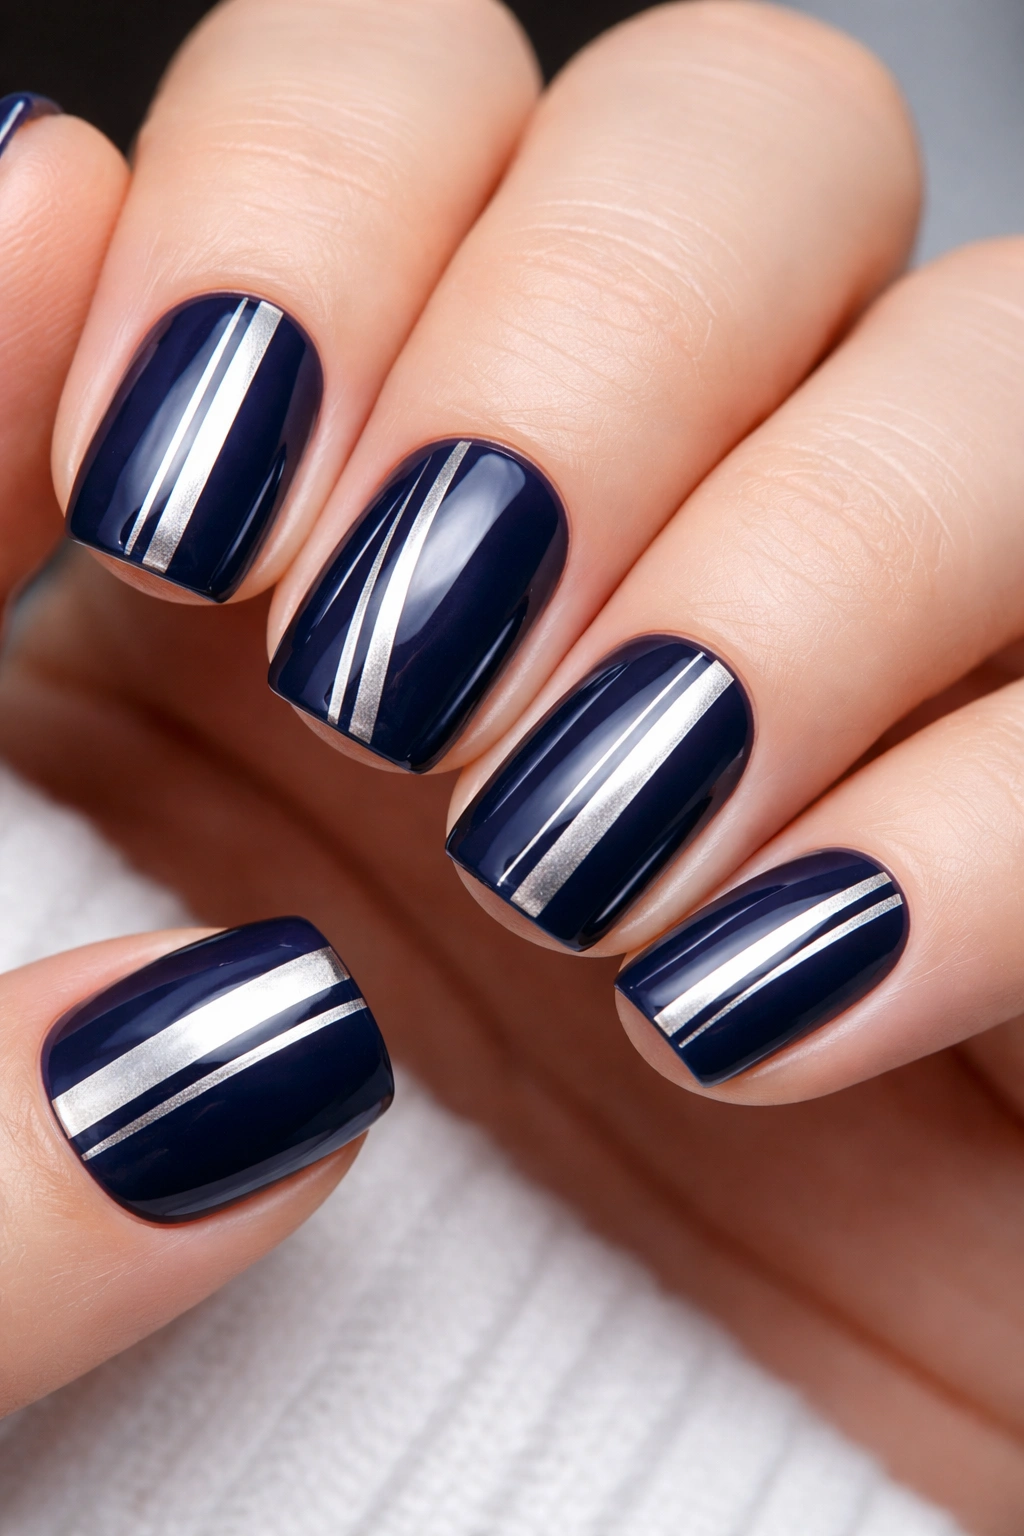
This design is pure geometry and visual impact. You’re creating vertical or diagonal stripes in a shiny metallic silver against your matte or glossy navy base. The stripes can be thin (just a few on each nail) or thicker and bolder depending on how much visual weight you want. It feels contemporary and works beautifully on squoval nails because the shape gives the stripes something clean to follow.
Why Silver Stripes Elevate Navy
Silver is more modern than gold in many contexts, and the metallic finish creates shine that bounces light. Against navy, silver stripes feel high-fashion and intentional. The simplicity of the pattern also means you can wear it anywhere and it’ll feel appropriate—it’s sophisticated enough for professional settings but contemporary enough that it doesn’t feel stuffy.
Creating Perfectly Straight Stripes
- Paint your navy base and let it dry completely
- Use metallic silver striping tape for the easiest results
- Apply strips vertically, diagonally, or in any pattern you prefer
- Press gently but firmly so the tape adheres fully
- Remove the tape while the top coat is still tacky for the cleanest lines
- If you’re free-handing, use a very thin striping brush and move slowly
Worth knowing: Metallic polishes can be thick and hard to control. If you’re painting stripes, thin your metallic polish slightly with a drop of thinner to make application smoother and more precise.
6. Deep Navy with Sparkle Gradient
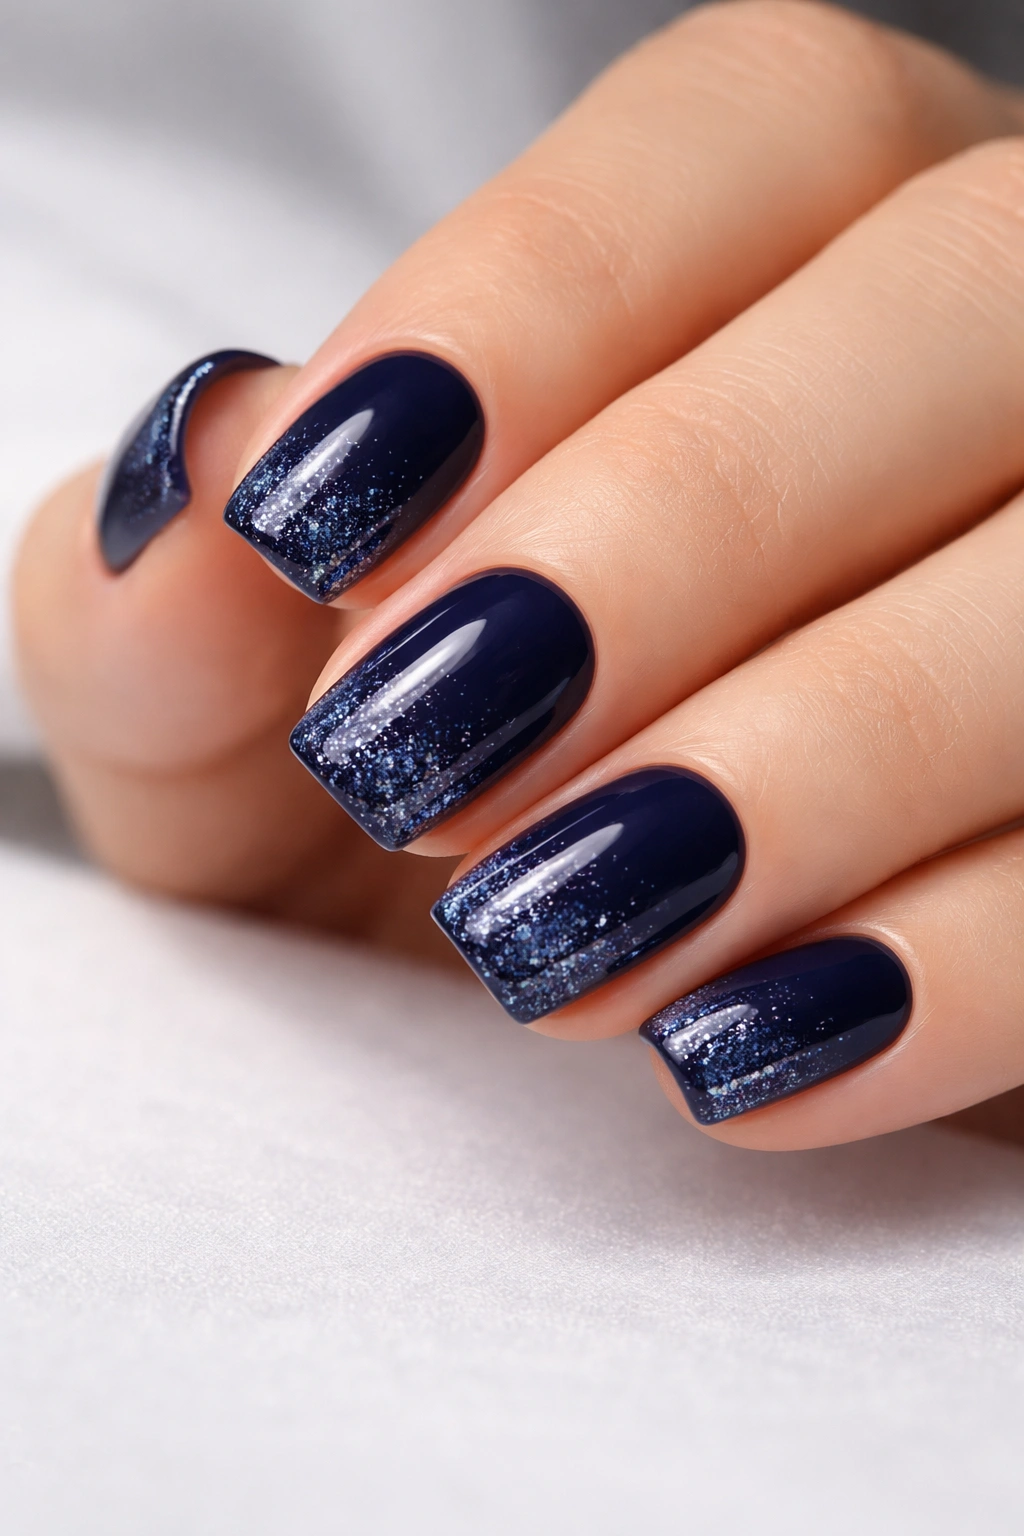
This design plays with depth and light. You’re starting with solid navy at the base of the nail and gradually adding more sparkle and shimmer as you move toward the tip, creating a gradient effect that looks like light is dancing across your nails. It’s eye-catching but sophisticated because you’re working within a very limited color palette.
What Makes Gradient Sparkle Work
Gradient effects inherently look professional and high-effort, even when they’re simpler than they appear. By keeping it all within the navy-and-sparkle realm, you’re creating cohesion. The result feels elegant rather than flashy because everything is still reading as one color family. It’s the kind of design that makes your nails look fancy from across a room.
Building the Gradient
- Paint two coats of your deep navy base
- Apply a coat of glitter topcoat to just the tip area
- Blend the line by applying a less-concentrated version slightly higher
- You can also use a clear polish mixed with loose glitter, painted on in layers
- The more layers of sparkle near the tip, the more dramatic the effect
- Top coat seals everything and adds extra shine
Insider note: You don’t need actual ombre technique for this to work beautifully. A simple gradient where the tips are sparkly and the base isn’t gives you 80% of the visual impact with a fraction of the effort.
7. Navy Marbled with White
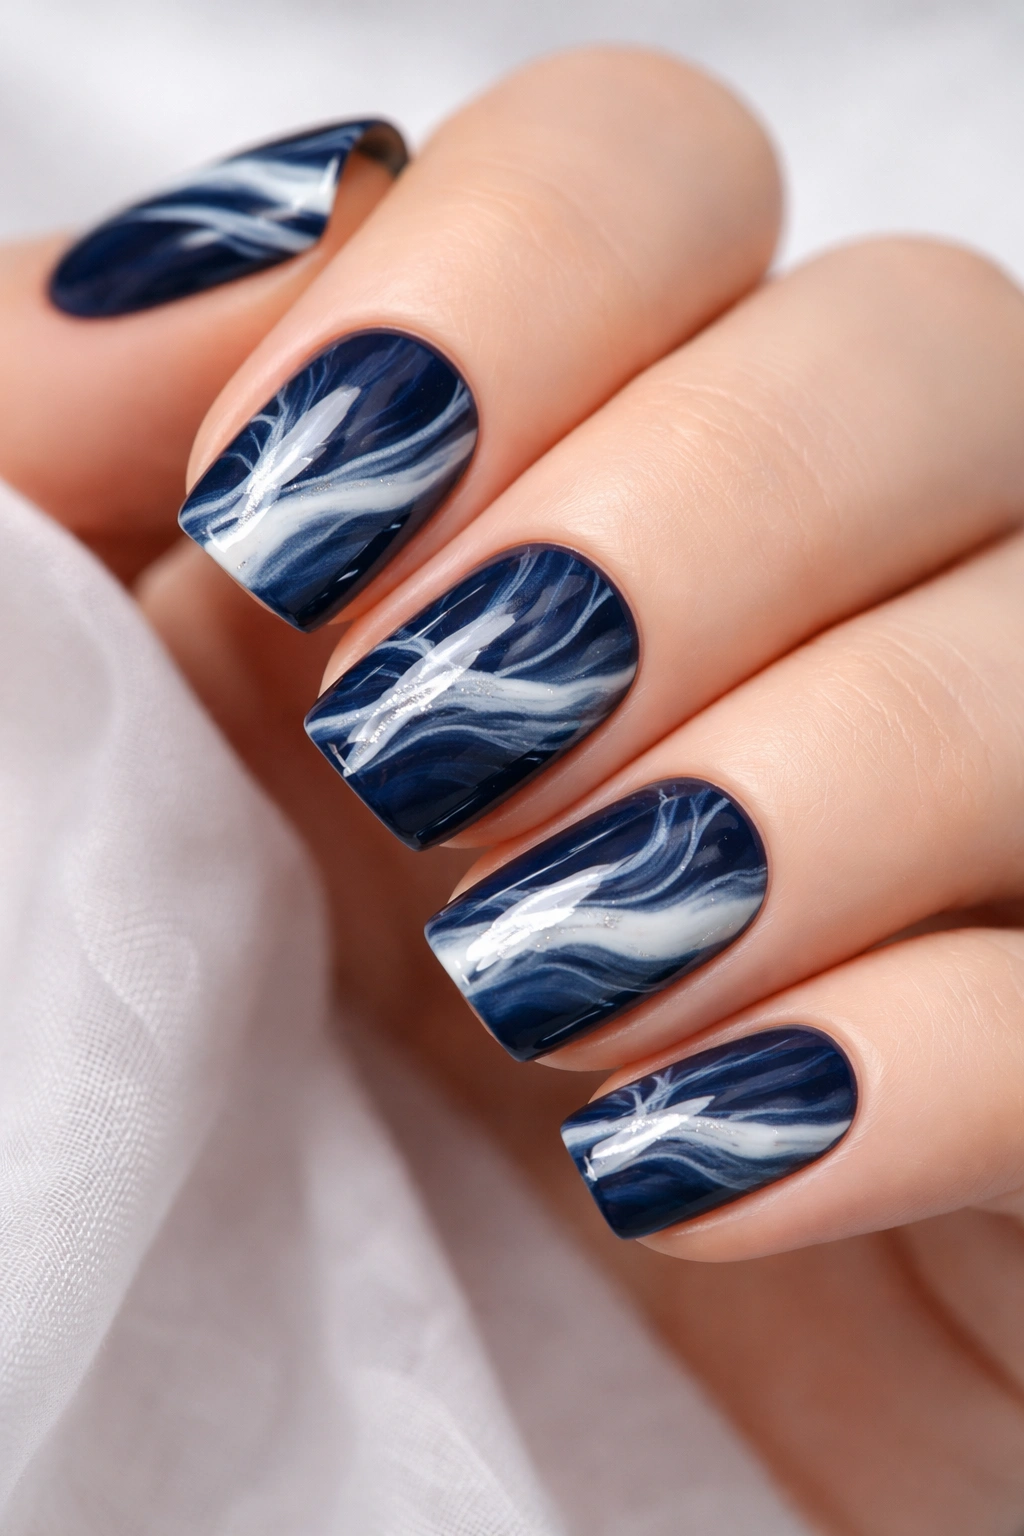
Marble designs feel artistic and high-end, and navy-and-white marble specifically feels modern and Scandinavian-inspired. You’re creating organic, swirled patterns across the nail that mimic stone or marble texture. The soft organic lines feel intentional even when they’re somewhat random, which is what makes marbling so appealing for home manicures.
Why Marbled Navy Works So Well
Marbling looks complicated but is actually quite forgiving because there’s no “wrong” way to do it—abstract patterns by definition can’t be imperfect. Navy and white create maximum contrast, so the pattern reads clearly and looks defined. The design also works on every nail without feeling repetitive because you can vary the pattern placement on each nail.
Creating Marble Effects
- Paint a solid navy base on all nails
- Drop small amounts of white polish onto the nail or into a dish
- Drag a thin tool through the polish to create swirls and patterns
- Move the swirls in different directions for organic movement
- You can also use a thin brush to paint white veins directly on the dried navy base
- Seal with topcoat to protect the design and add shine
Pro tip: Marbling is easier in a shallow dish where you can swirl polish and then drag your nail through it. If you’re doing it directly on the nail, work quickly before polish dries.
8. Navy with Geometric Line Art
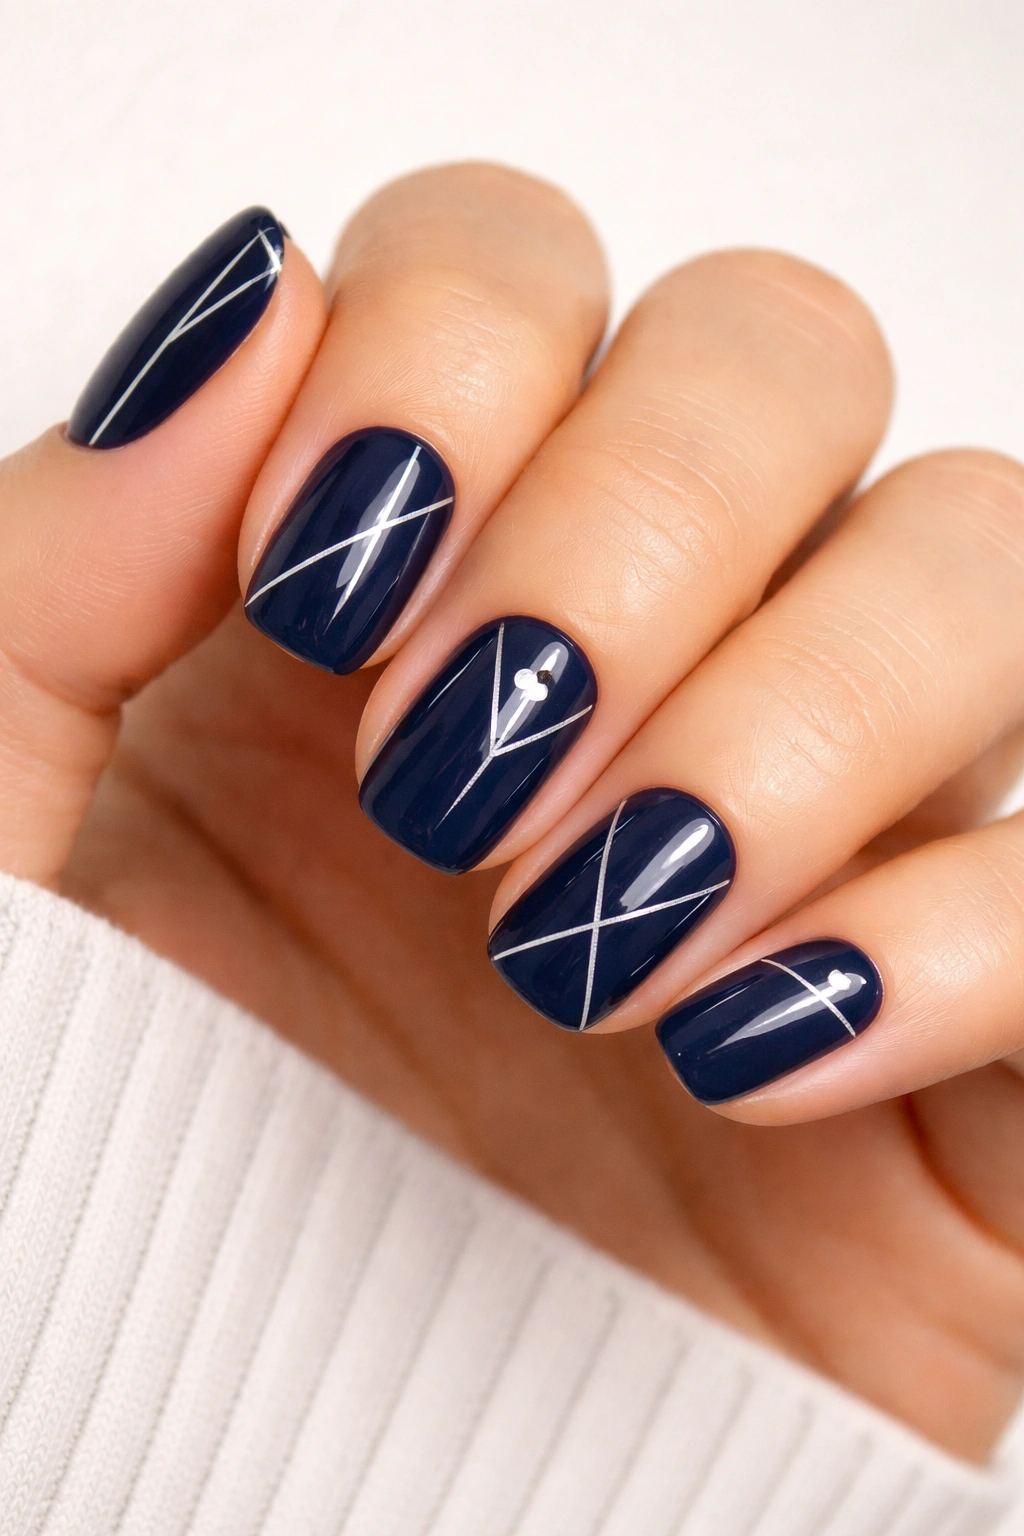
Clean geometric lines on a navy base create a very contemporary, almost architectural look. You might do simple triangles, thin straight lines that intersect, hollow circles, or minimalist shapes scattered across the nail. The simplicity of the design makes it feel intentional and modern, and it works especially well on squoval nails where the shape gives the geometry something to play against.
What Makes Geometric Designs Stand Out
Geometry feels less dated than florals or other designs because it’s always coming back into style. It also feels versatile—equally at home with professional outfits and creative, casual styles. The lines don’t need to be perfectly precise for the design to work; slight imperfections actually add to the hand-drawn, artisanal appeal.
Executing Geometric Patterns
- Start with your navy base, completely dry
- Use a thin striping brush or nail pen for lines
- Paint simple shapes: triangles, squares, intersecting lines, hollow circles
- Keep designs to one or two shapes per nail for maximum impact
- You can do all nails identically or vary the pattern slightly on each one
- Metallic or contrasting colors (white, gold, silver) show up beautifully against navy
Worth knowing: If you’re worried about shaky lines, a ruler or straightedge helps. You can hold it gently against the nail and paint along it, or use it as a visual guide for where your line should go.
9. Navy and Nude Two-Tone Design

This design is subtle elegance at its finest. You’re splitting the nail or creating a color block where half is navy and half is a warm nude or beige tone. It’s sophisticated without being loud, and the contrast is just enough to create interest without overwhelming the nail. This design works beautifully for people who prefer understated nails but still want something that feels intentional.
Why Navy-and-Nude Works for Professionals and Creatives Alike
This combo is incredibly wearable. Navy reads as professional and polished, while nude is warm and approachable. Together they create something that feels elevated without being bold. It’s also a design that doesn’t date itself—it’ll work five years from now exactly as well as it works today.
Creating the Two-Tone Split
- Paint one half of each nail navy and one half nude (you can split vertically down the middle or diagonally)
- Use a striping tape to create a clean line between colors, or freehand if you prefer a slightly softer division
- Paint two coats of each color for even coverage
- Seal with topcoat
- If your line is slightly imperfect, it actually adds to the hand-made appeal
Pro tip: Nude is technically any color that’s close to your skin tone, so experiment with warm beiges, soft taupes, or even a very pale pink. The exact shade you choose changes the vibe slightly.
10. Navy with Pearl and Chrome Accents
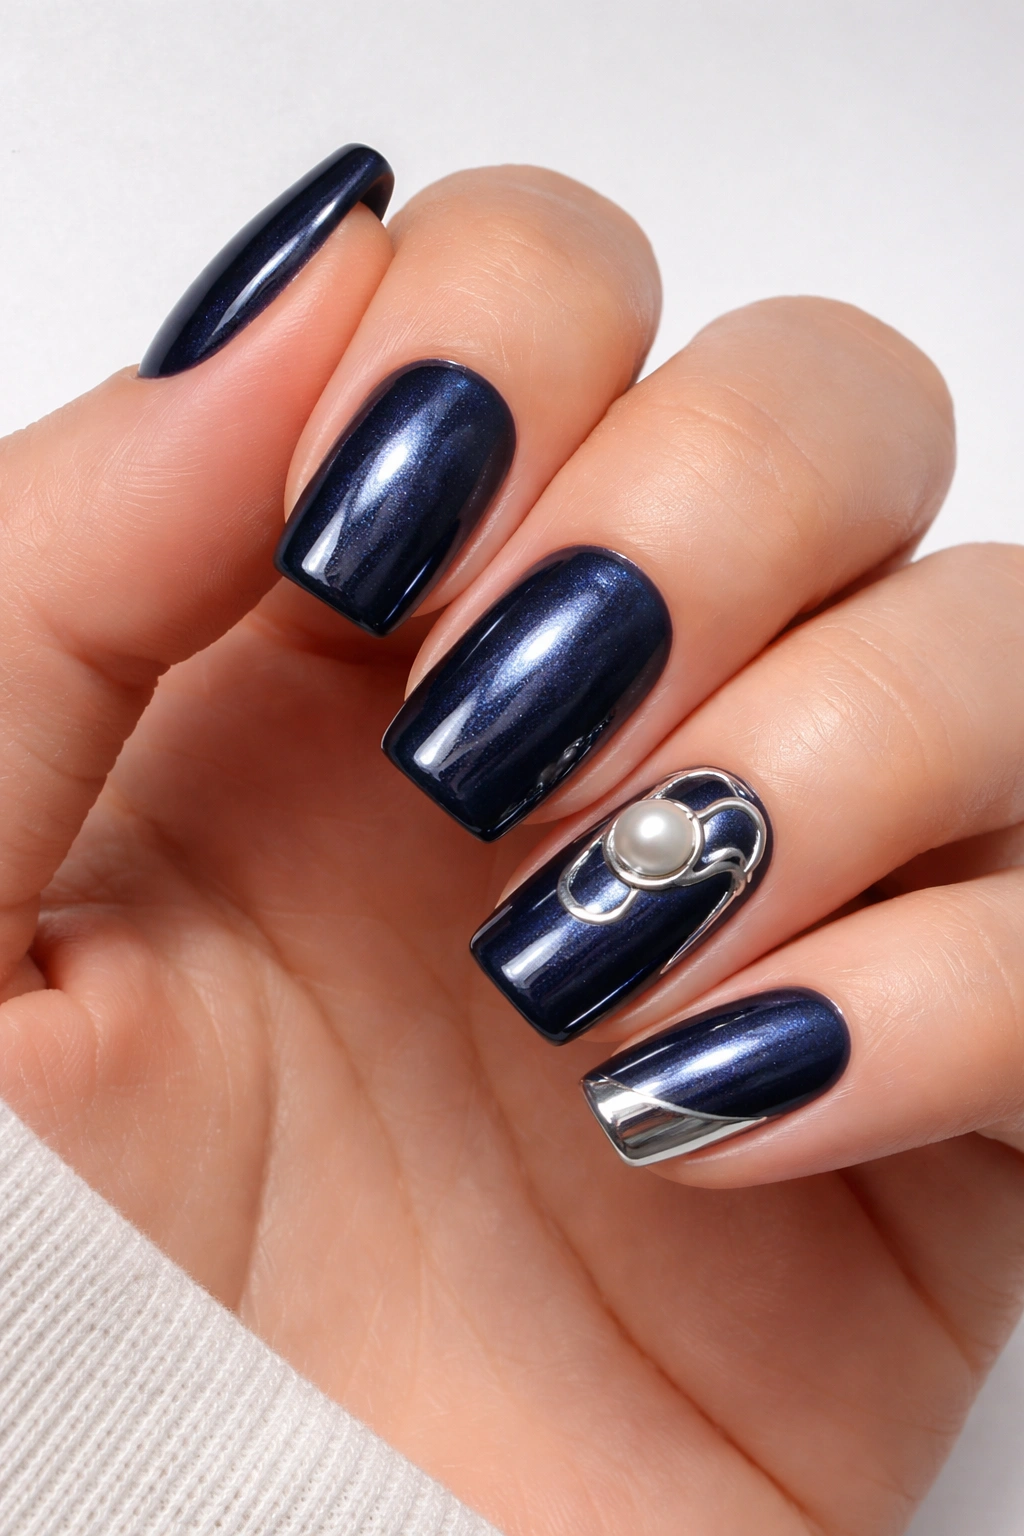
This design combines luxury vibes with contemporary styling. You’re layering navy with pearlescent accents and maybe a touch of chrome (the mirror-finish metallic that looks like liquid metal). The combination feels rich and special without being over-the-top. Chrome especially looks incredibly modern and futuristic, but paired with classic navy it feels grounded.
What Makes This Design Feel Luxury
Chrome and pearl both catch light in distinctive ways, creating visual depth. When combined with a muted, classic navy base, they read as sophisticated rather than flashy. It’s the kind of design you’d expect to see on someone who has excellent taste and isn’t trying too hard—the hallmark of real style.
Applying Pearl and Chrome Details
- Start with your navy base, fully dried
- Apply pearlescent polish or topcoat to create subtle shimmer, or use pearl flakes
- For chrome accents, use chrome powder applied with a applicator brush (this requires sealing with topcoat afterward)
- Keep chrome to small areas—accent nails or just the tips—so it doesn’t overwhelm the look
- The combination of textures is what makes this feel high-end
- Multiple topcoats keep everything sealed and protected
Insider note: Chrome powder is easier than you’d think if you have the right tools, but if you’re not comfortable with it, chrome topcoats exist and give a similar effect with way less technique required.
11. Navy Ombre to Black
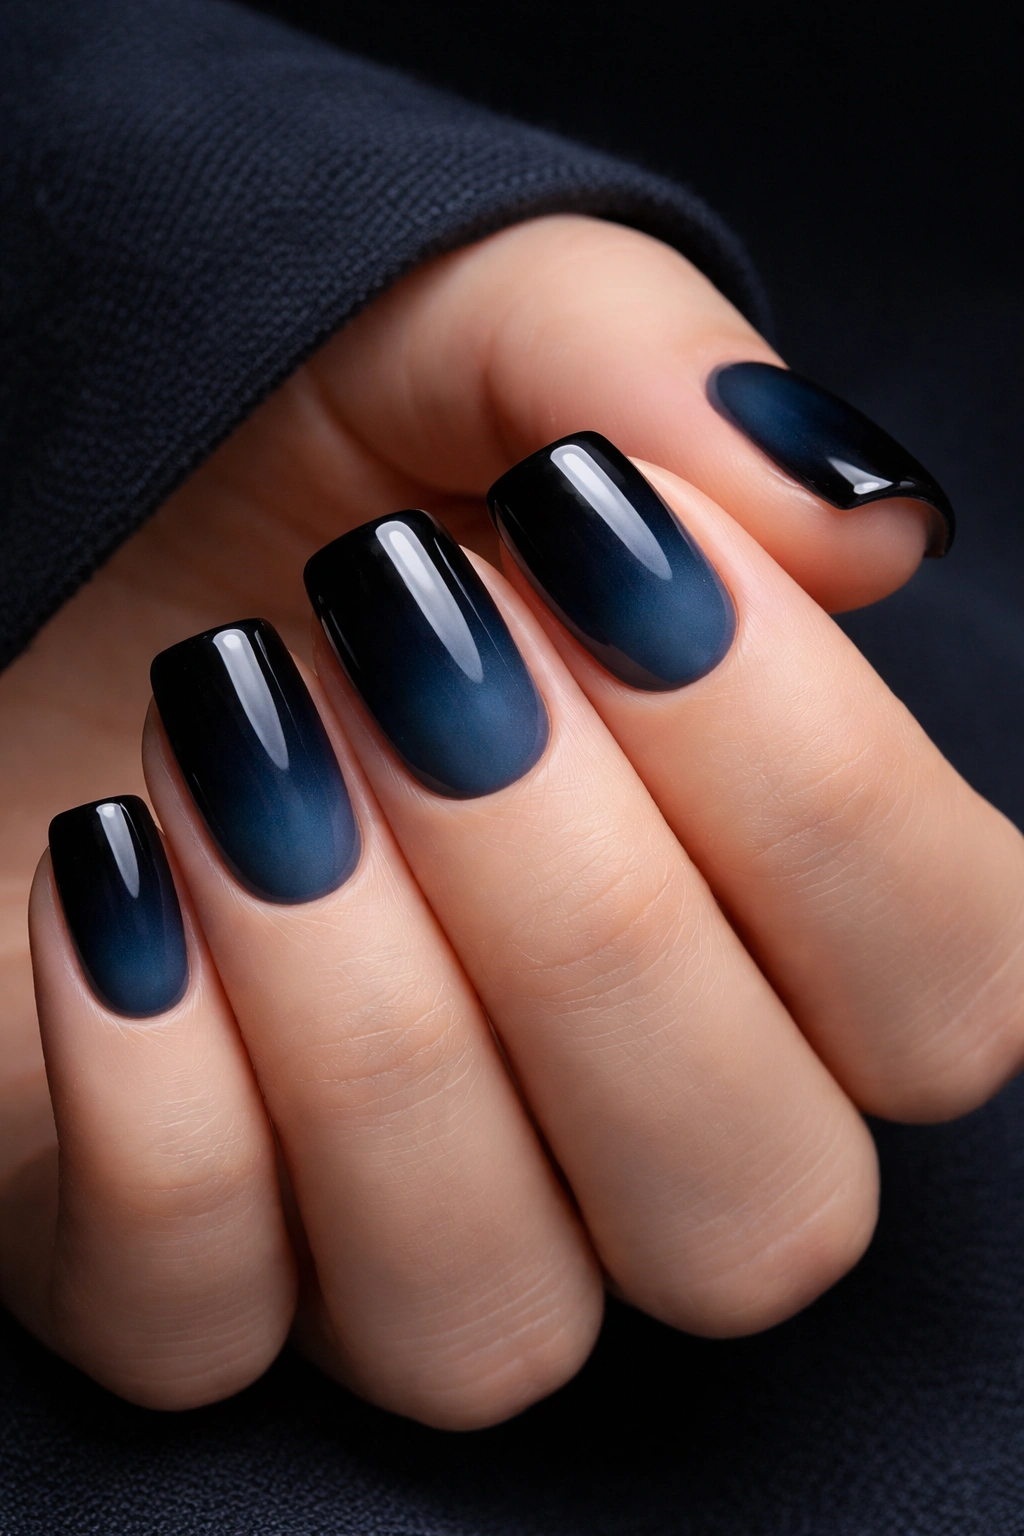
This design is moody and sophisticated, creating a gradient from navy at the base to true black at the tips. It’s like watching the sky darken into night. The effect is dramatic but refined because you’re working within a very limited color range—basically just different depths of the same family. On squoval nails, this gradient looks especially polished.
Why Ombre to Black Feels Contemporary
This design has a modern edge to it. It’s darker and moodier than a simple navy, which appeals to people who want nails that feel a bit edgier without going full goth. The gradient effect adds complexity, making it feel more intentional and artistic than a solid color would.
Creating a Navy-to-Black Ombre
- Paint your base color (the lighter navy) on all nails
- Apply a darker navy or black to just the tips
- Blend where the two colors meet using a damp makeup sponge or blending brush
- The transition doesn’t need to be perfectly smooth—slight variation looks natural
- You can also use thin layers to gradually deepen the color
- Top coat seals everything and adds shine
Worth knowing: The ombre effect is all about the blend. The softer and more gradual your transition, the more polished it looks.
12. Navy with Tiny Star Confetti
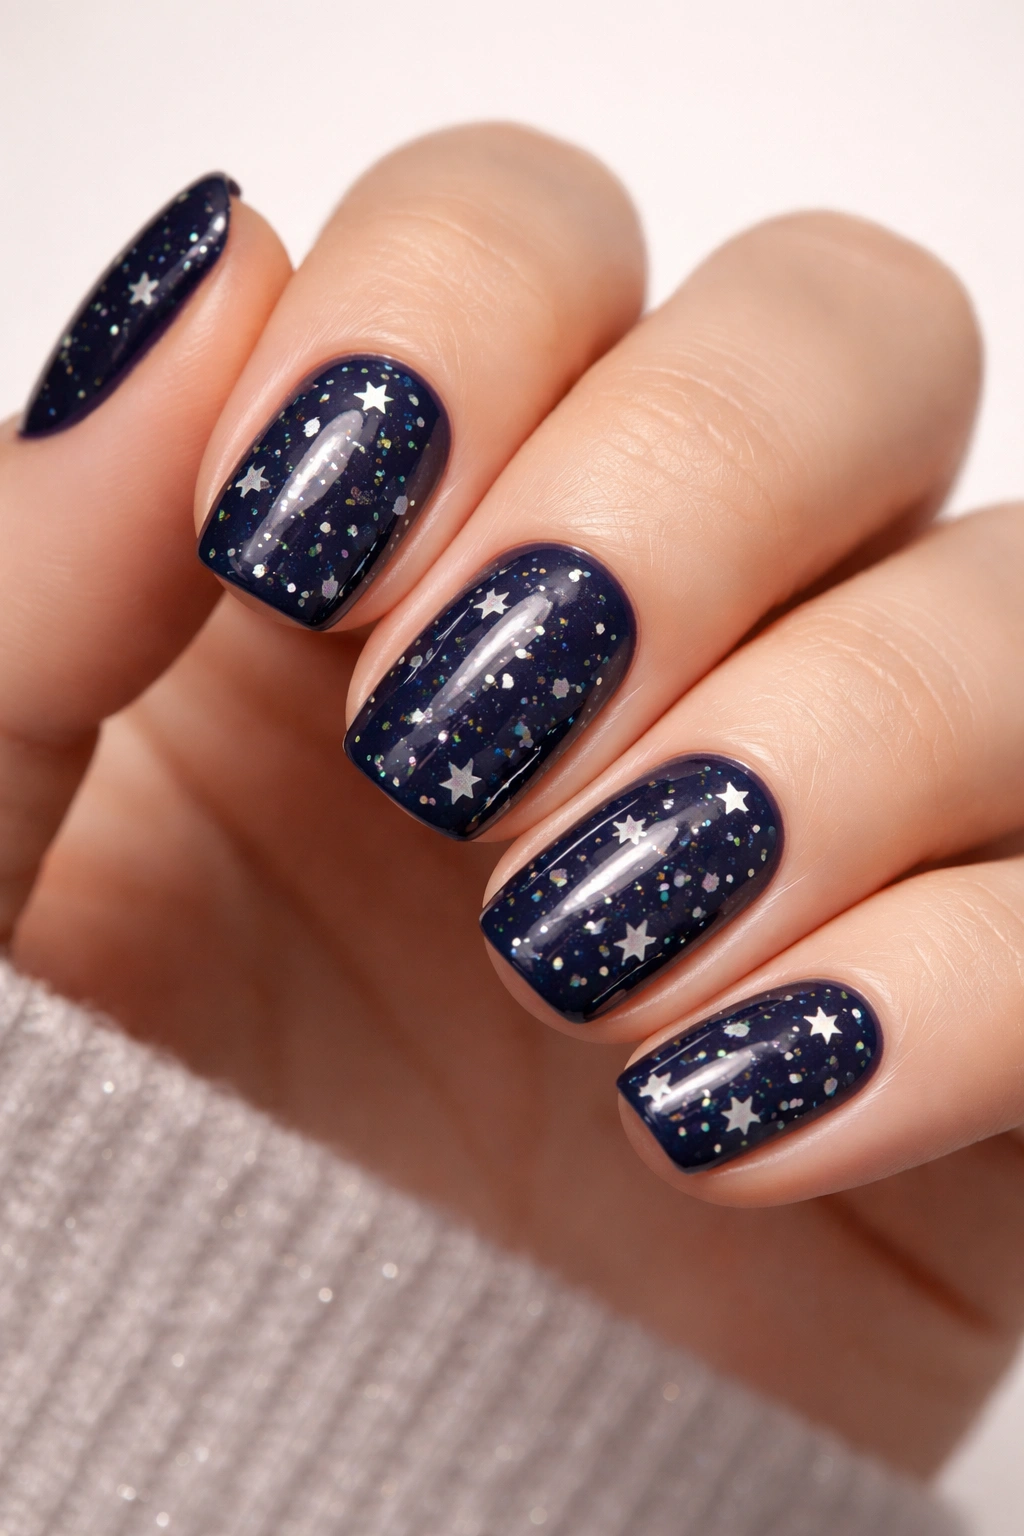
This design brings a playful energy to classic navy. You’re adding small star shapes scattered across the nail, almost like confetti. The stars can be white, gold, silver, or even a contrasting accent color. It’s fun and whimsical without being juvenile—the navy keeps it grounded and sophisticated.
What Makes Stars Feel Elevated on Navy
Stars can read childish on certain colors, but on navy they feel more whimsical than immature. The sophistication of the navy base elevates the playfulness of the stars. It’s a design that shows you have personality without compromising on polish.
Adding Stars to Your Nails
- Use a dotting tool to create small star shapes in your accent color
- A five-pointed star is simplest: one dot for center, four dots around it in a cross pattern
- Scatter stars randomly across nails or concentrate them on accent fingers
- You can also use star-shaped stickers for zero-fuss application
- Keep star size small so they feel like accent details rather than the main event
- Topcoat protects the design and adds shine
Pro tip: If you’re not confident in your dotting skills, there are tiny star nail stamps that transfer the image perfectly in seconds.
13. Navy and Rose Gold Luxury Look
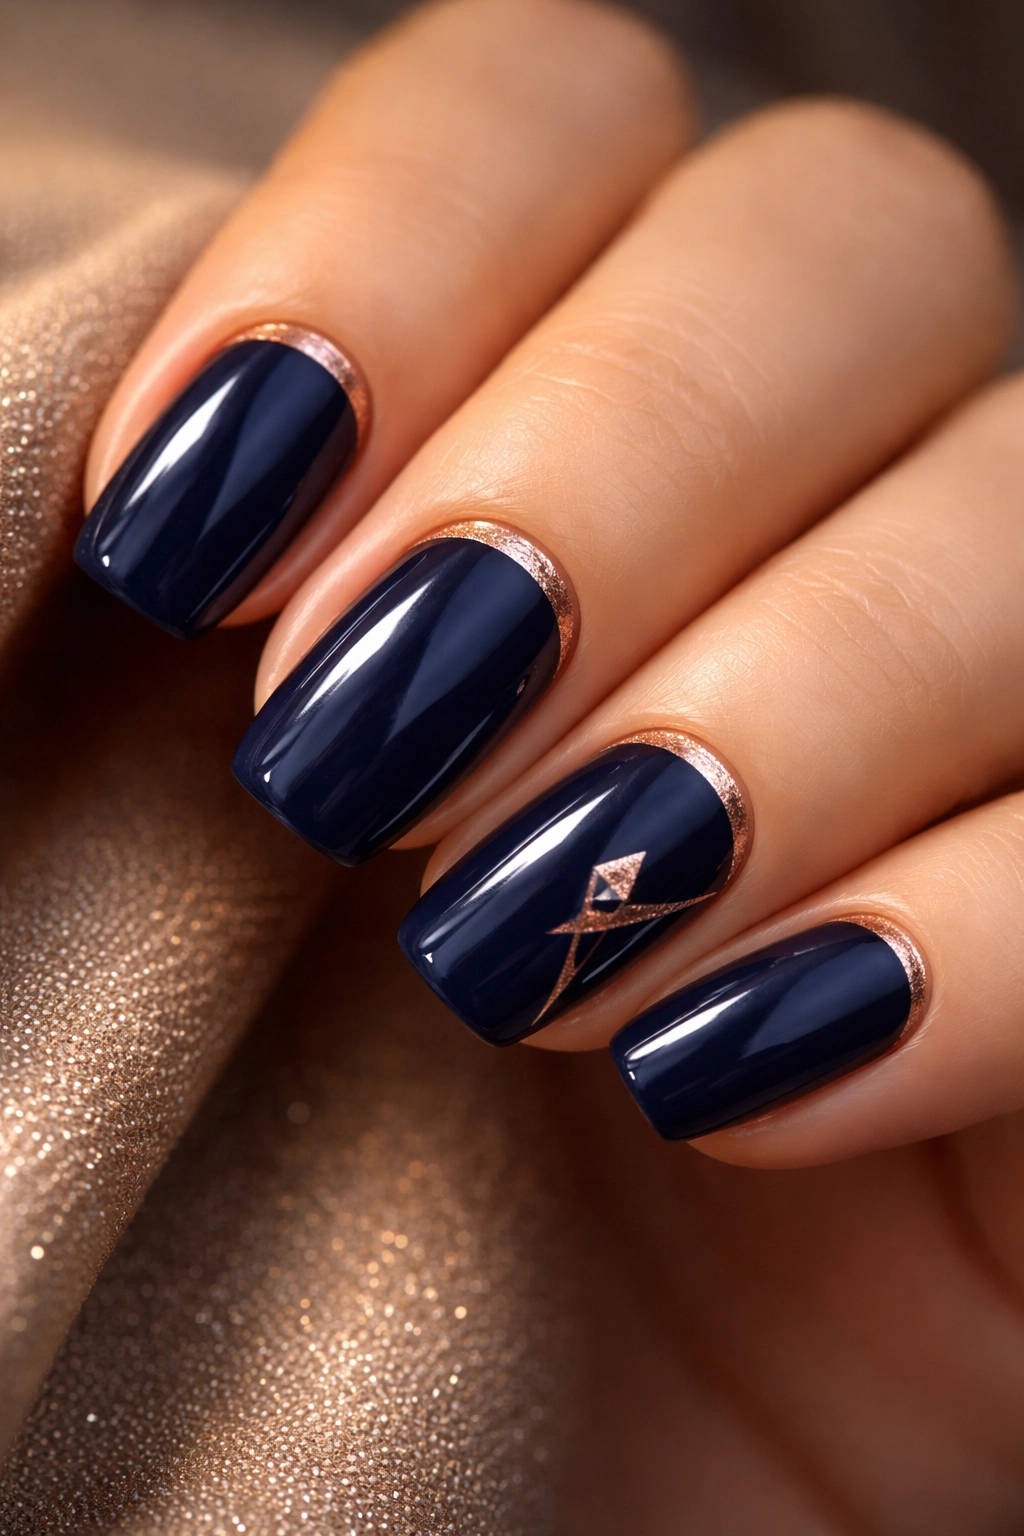
This is the design if you want something that feels genuinely luxe and a little bit feminine. Navy base with rose gold accents creates a color combination that feels expensive and thoughtfully put together. Rose gold is warmer than traditional gold, which gives it a contemporary feel, and against navy it creates a gorgeous contrast that reads as intentional styling.
Why Navy and Rose Gold Feel High-End
Rose gold has feminine, warm energy while navy has structured, cool energy. Together they create balance. The pairing is also current enough that it doesn’t feel dated, but classic enough that it’ll work for years. It’s the kind of color combination that looks better the more you look at it.
Incorporating Rose Gold
- Paint your solid navy base with two coats
- Apply rose gold as a thin accent line near the cuticle, on the tips, or as a geometric shape
- You can also use rose gold foil for a extra-reflective effect
- Keep rose gold to just one or two elements per nail so the navy stays the star
- If using rose gold powder or chrome, seal thoroughly with topcoat
- The subtle shine of rose gold against matte navy is especially gorgeous
Insider note: Rose gold looks even better under warm lighting, so if you’re going to wear this design somewhere with good lighting, you’ll get maximum impact.
14. Navy with Minimalist Nail Art
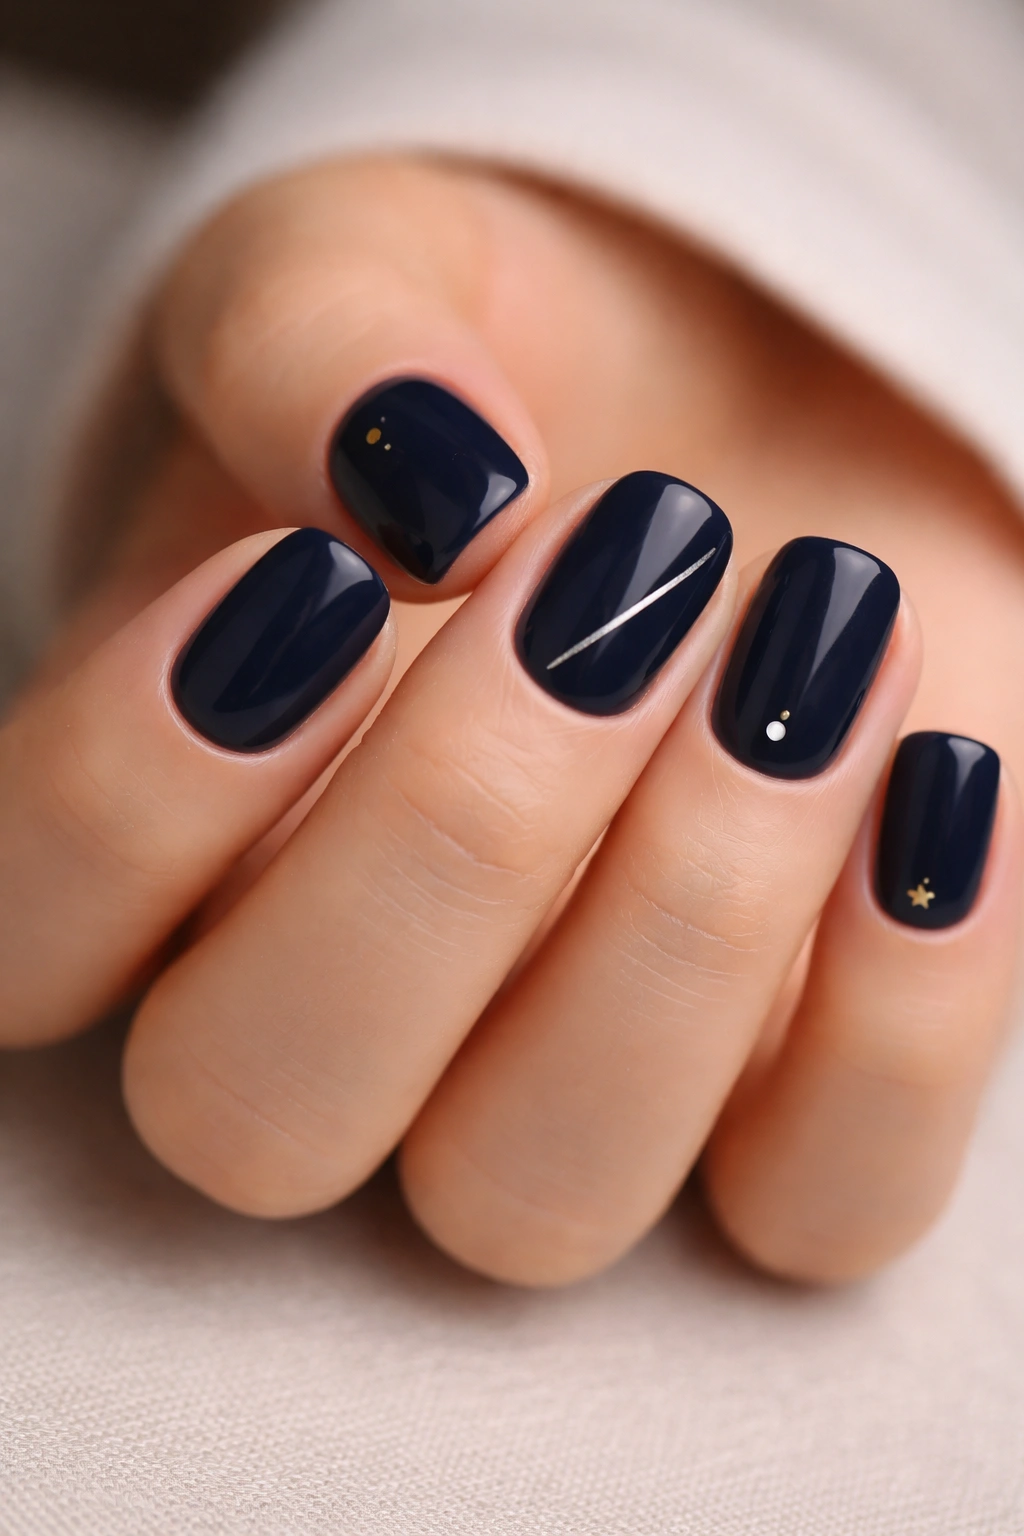
Sometimes less is more, and this design proves it. You’re keeping your navy base and adding just one tiny detail per nail—maybe a single line, a small circle, a tiny initial, or a dot. The restraint is what makes it feel intentional and artistic. This design appeals to people who love nail art but prefer something subtle enough for everyday wear.
What Makes Minimalism Feel Like Intentional Art
Minimalist design is actually harder to pull off than maximalist design because every element has to count. When you nail it (pun intended), the result feels sophisticated and considered. It’s the design equivalent of a well-tailored outfit with one perfect accessory.
Creating Minimalist Nail Art
- Start with your navy base, fully dried
- Choose one tiny design element per nail
- Use a thin brush or pen to add your detail
- Keep it simple: one line, one shape, one letter
- The design should take up maybe 5% of the nail’s surface area
- Topcoat seals your art and adds shine
Pro tip: If you’re adding an initial or letter, practice on paper first. The steadier your hand, the more polished the result.
15. Navy with Glitter Border Detail
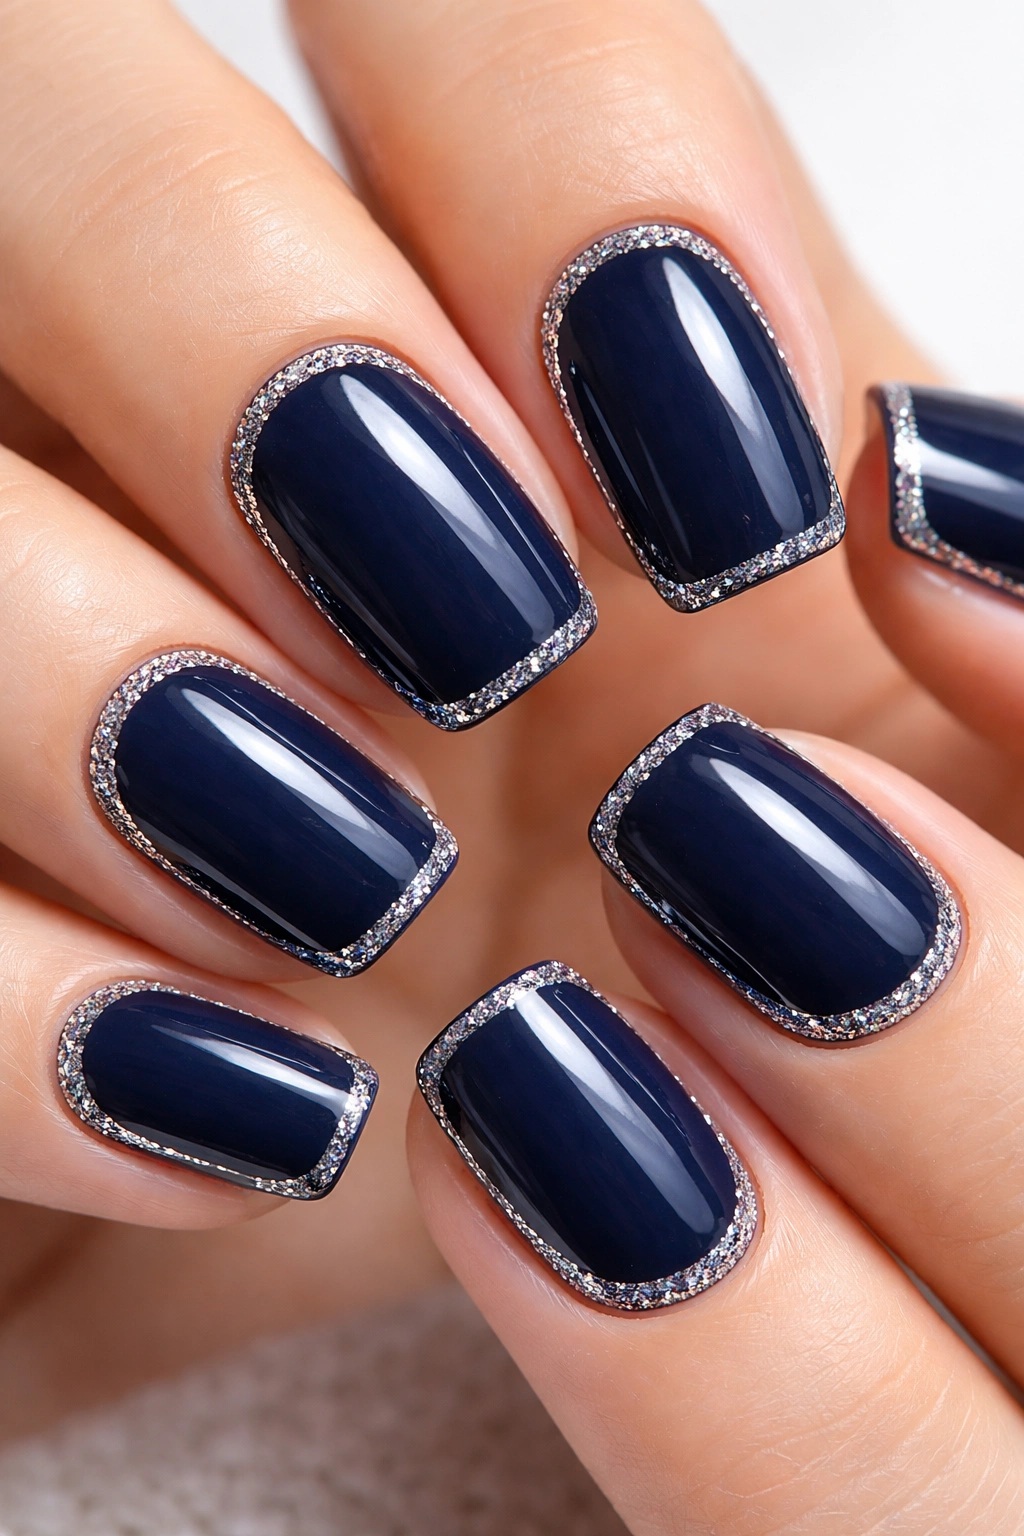
This final design adds just enough sparkle to feel celebratory without being over-the-top. You’re creating a thin or medium-width border of glitter around the edge of the nail—this might be a glitter line at the cuticle, along the tip, or framing the entire nail. Navy with a glitter border feels festive but still refined, making it work for everything from casual to formal occasions.
Why Glitter Borders Feel Sophisticated
Glitter borders are a genius way to incorporate sparkle without covering the entire nail. The navy still dominates the visual space, but the glitter adds shine and draws attention to your nails. It’s a design that feels intentionally styled rather than overdone.
Applying a Glitter Border
- Paint your solid navy base first
- Apply a thin line of glitter topcoat or glitter polish along your chosen border area
- A thin striping brush gives you precise control
- You can do the same glitter color on all nails or vary it slightly
- Let the glitter polish dry completely before topcoating
- The topcoat seals everything and smooths any rough edges
Worth knowing: Chunky glitters look more festive, while fine glitter looks more sophisticated. Choose your glitter size based on the vibe you’re going for.
Final Thoughts
Navy blue is endlessly versatile, and pairing it with a squoval shape gives you the perfect canvas for exploration. Whether you go minimal with just solid color, add geometric patterns, incorporate metallic accents, or create textured effects, navy nails always look polished and put-together.
The beauty of these 15 designs is that they’re not intimidating—they’re all accessible whether you’re doing them yourself or taking them to a nail tech. Most of them require just basic tools that you probably already have or can pick up for a few dollars. That means you can actually experiment and try different designs rather than sticking with the same mani forever.
Start with whichever design speaks to you most. If minimalism is your style, go with the simple geometric or solid navy designs. If you love a bit of sparkle and glamour, the chrome, glitter, and rose gold options are your answer. The point is that you get to decide what navy nails mean for you, and you’ve got plenty of gorgeous options to choose from.
