

Lavender nails are having a moment—and for good reason. There’s something about this soft, calming purple shade that works for nearly everyone, flatters every skin tone, and somehow feels both elegant and effortlessly cool at the same time. When you pair lavender with the soft square nail shape, you get the perfect balance of sophisticated and modern. Soft square nails—those slightly rounded corners that sit somewhere between a blunt square and an almond—are incredibly flattering because they elongate your fingers without the drama of pointed shapes, and they’re far more wearable for everyday life than a sharp edge.
The beauty of lavender is its incredible versatility. You can wear it minimalist and understated, go full glam with sparkle and embellishments, add intricate nail art designs, or play with texture and finishes. Whether you’re looking for something to elevate your everyday aesthetic, impress at a special occasion, or just find your next favorite nail inspo, lavender soft square nails deliver on all fronts. These twelve designs showcase the range of what’s possible—from clean, creamy lavender to gradient blends, ombre effects, foil accents, and detailed artwork that transforms your nails into tiny pieces of art.
Each design here is tested, achievable either at home or at your favorite nail salon, and absolutely worth trying. Let’s dive into the designs that will have you booking your next manicure or reaching for your polish bottles immediately.
1. Creamy Lavender with Gold Foil Details
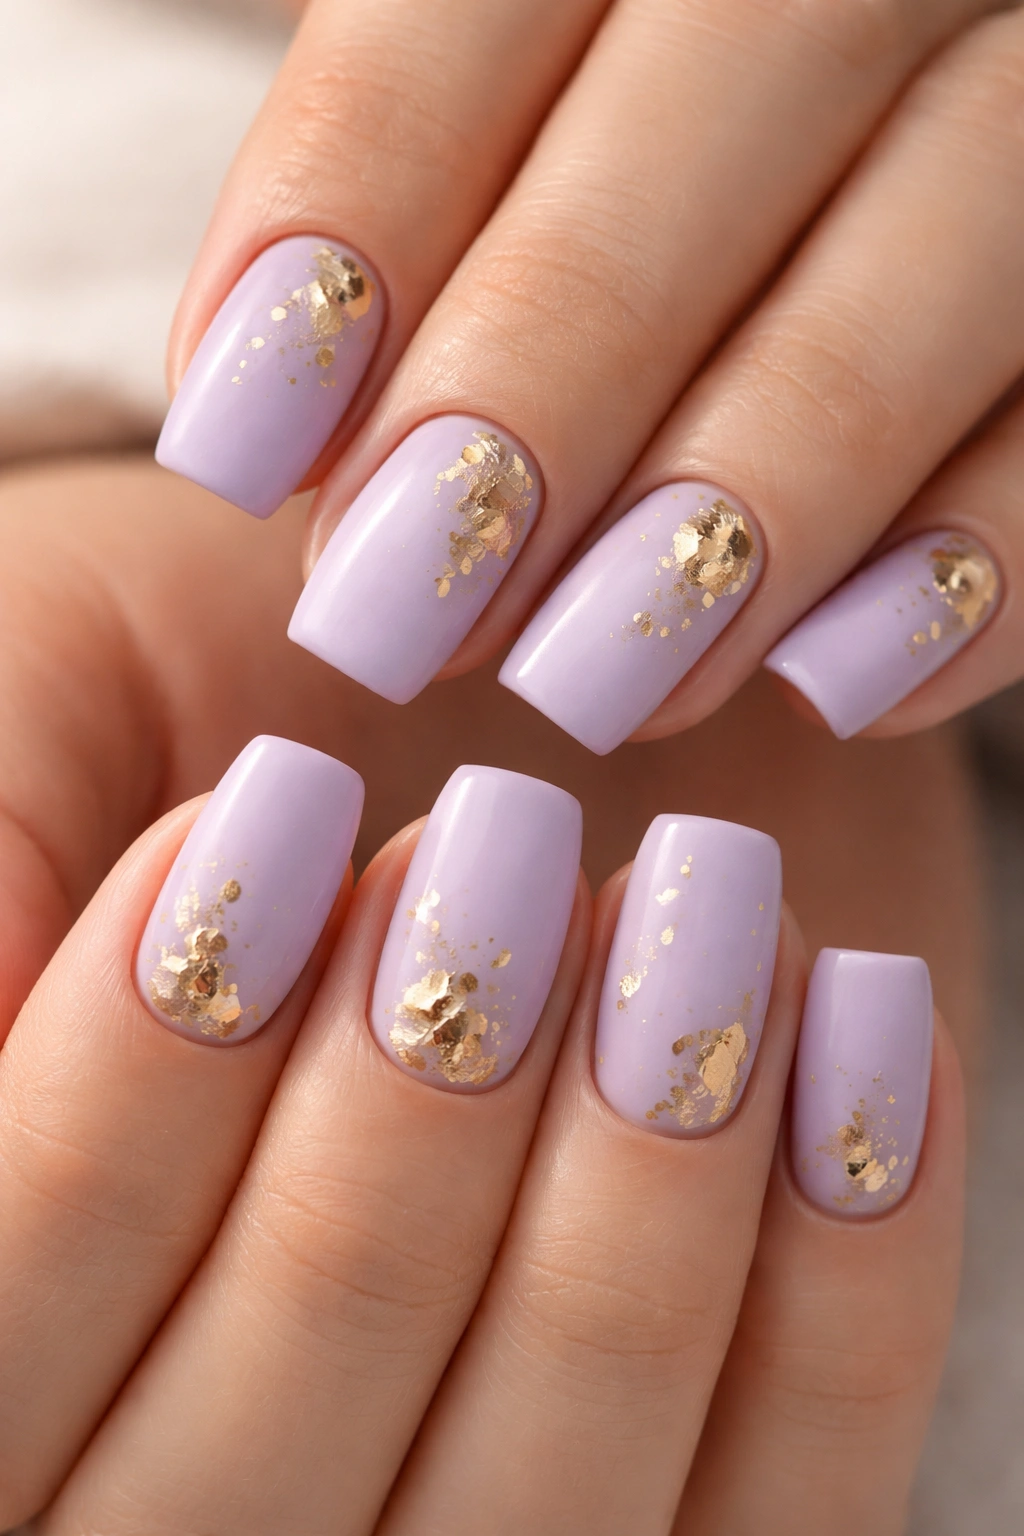
This is the design that bridges minimalist and glamorous in the most effortless way possible. Start with a creamy, soft lavender base—think of a color that’s warm and slightly muted, not bright or neon. Once your base is fully set, use gold foil to create small abstract shapes or delicate lines. The foil catches light and adds dimension without overwhelming the calming lavender underneath.
Why This Design Works So Well
The contrast between matte lavender and reflective gold creates visual interest while keeping the overall look polished and intentional. Gold is universally flattering against lavender because it’s warm and complements the cooler purple tones beautifully. The abstract placement means you can customize the foil pattern to match your personal style—go heavy on some nails and minimal on others, or create asymmetrical patterns that feel artistic rather than matchy-matchy.
Quick Application Tips
- Apply your base coat and two coats of creamy lavender, allowing each to dry completely
- Cut small pieces of adhesive gold foil and press onto the tacky layer under your top coat, or apply foil with a special foil adhesive before sealing with a glossy top coat
- If foil feels too advanced, try gold leaf instead for a softer, more organic appearance
- A high-shine top coat amplifies the foil’s reflective quality and makes the whole manicure pop
Pro tip: This design looks especially stunning on nails with a slightly longer length—the soft square shape gives you just enough canvas for the foil details to feel intentional without being fussy.
2. Ombre Lavender to White Gradient
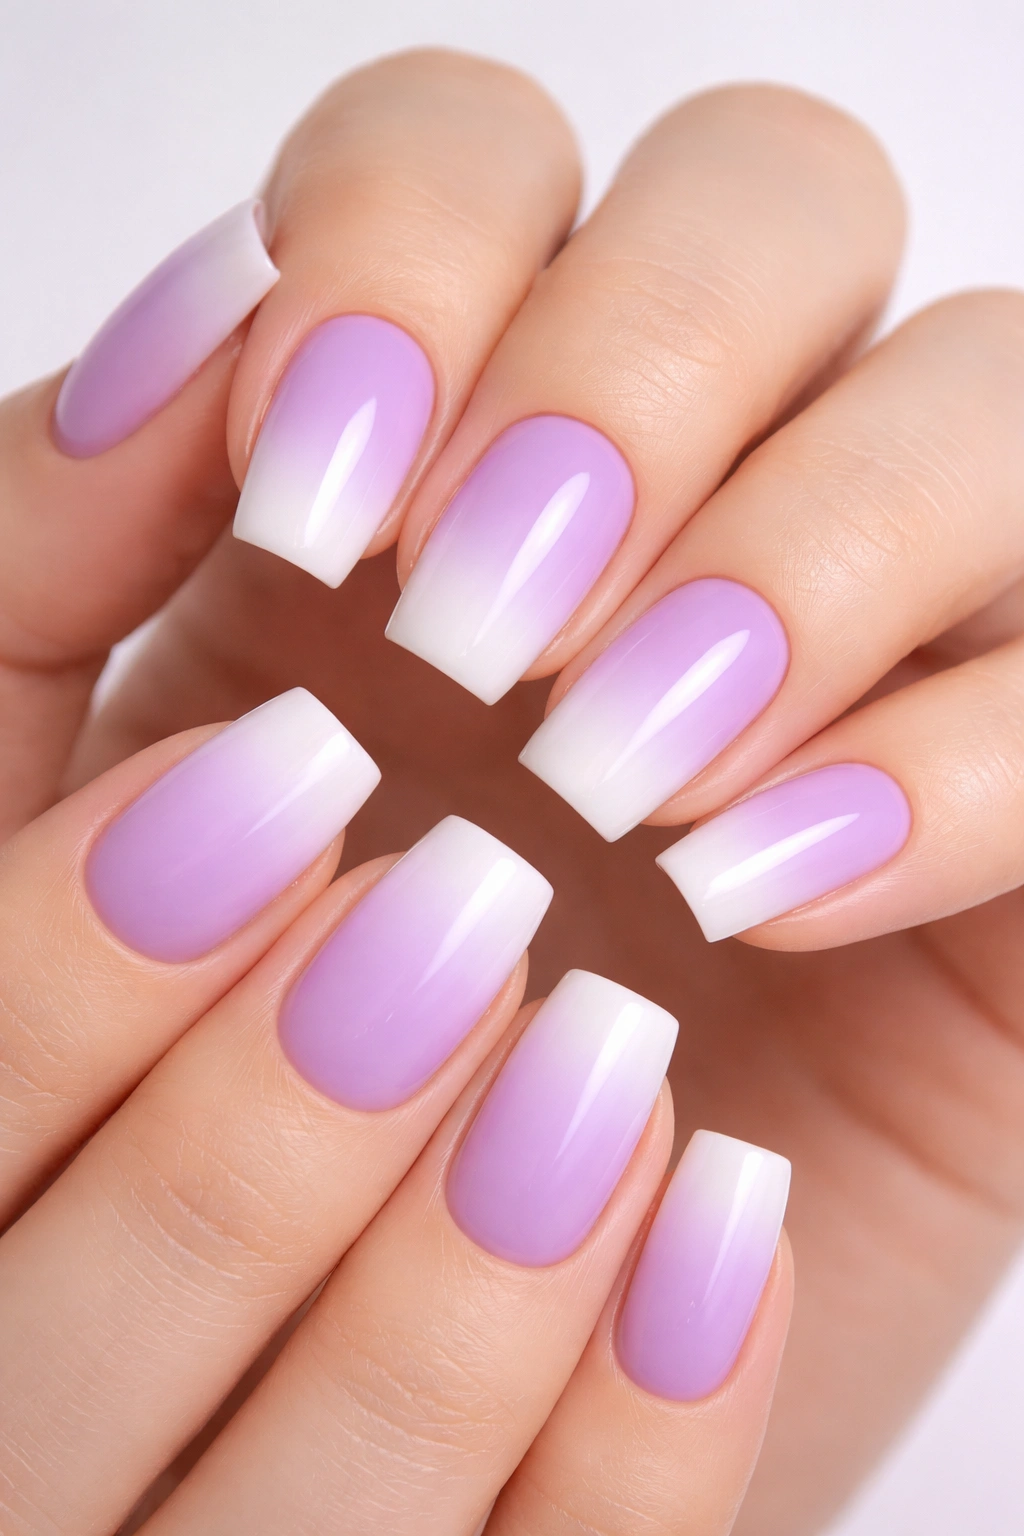
The ombre effect is timeless for a reason: it’s inherently flattering, creates the illusion of longer nails, and feels sophisticated whether it’s subtle or bold. For this design, your gradient starts at the cuticle in soft lavender and transitions through the middle to pure white at the tip.
The Magic of Gradient Transitions
What makes this design work is the smooth, seamless blend between colors. The gradient doesn’t need to be sharp or defined—in fact, the softer the transition, the more luxe it feels. This ombre effect works beautifully on soft square nails because the shape itself has gentle curves that naturally complement the flowing color transition. The result is a manicure that feels organic and naturally elegant.
How to Achieve This Look
- Start with a base coat and prime your nails with a light pink or nude base
- Use a makeup sponge or gradient tool to blend lavender and white polish together
- Sponge the colors onto the nail in vertical motions, layering until the transition is smooth
- Seal everything with a glossy or matte top coat depending on your preference
- White at the tips creates a clean, almost French-ombre effect that feels modern and fresh
Worth knowing: The sponge-blending method takes practice, so don’t stress if your first attempt isn’t perfectly seamless. Even slightly blended gradients look intentional and beautiful, and you’ll improve with each manicure.
3. Lavender with Delicate White Line Art
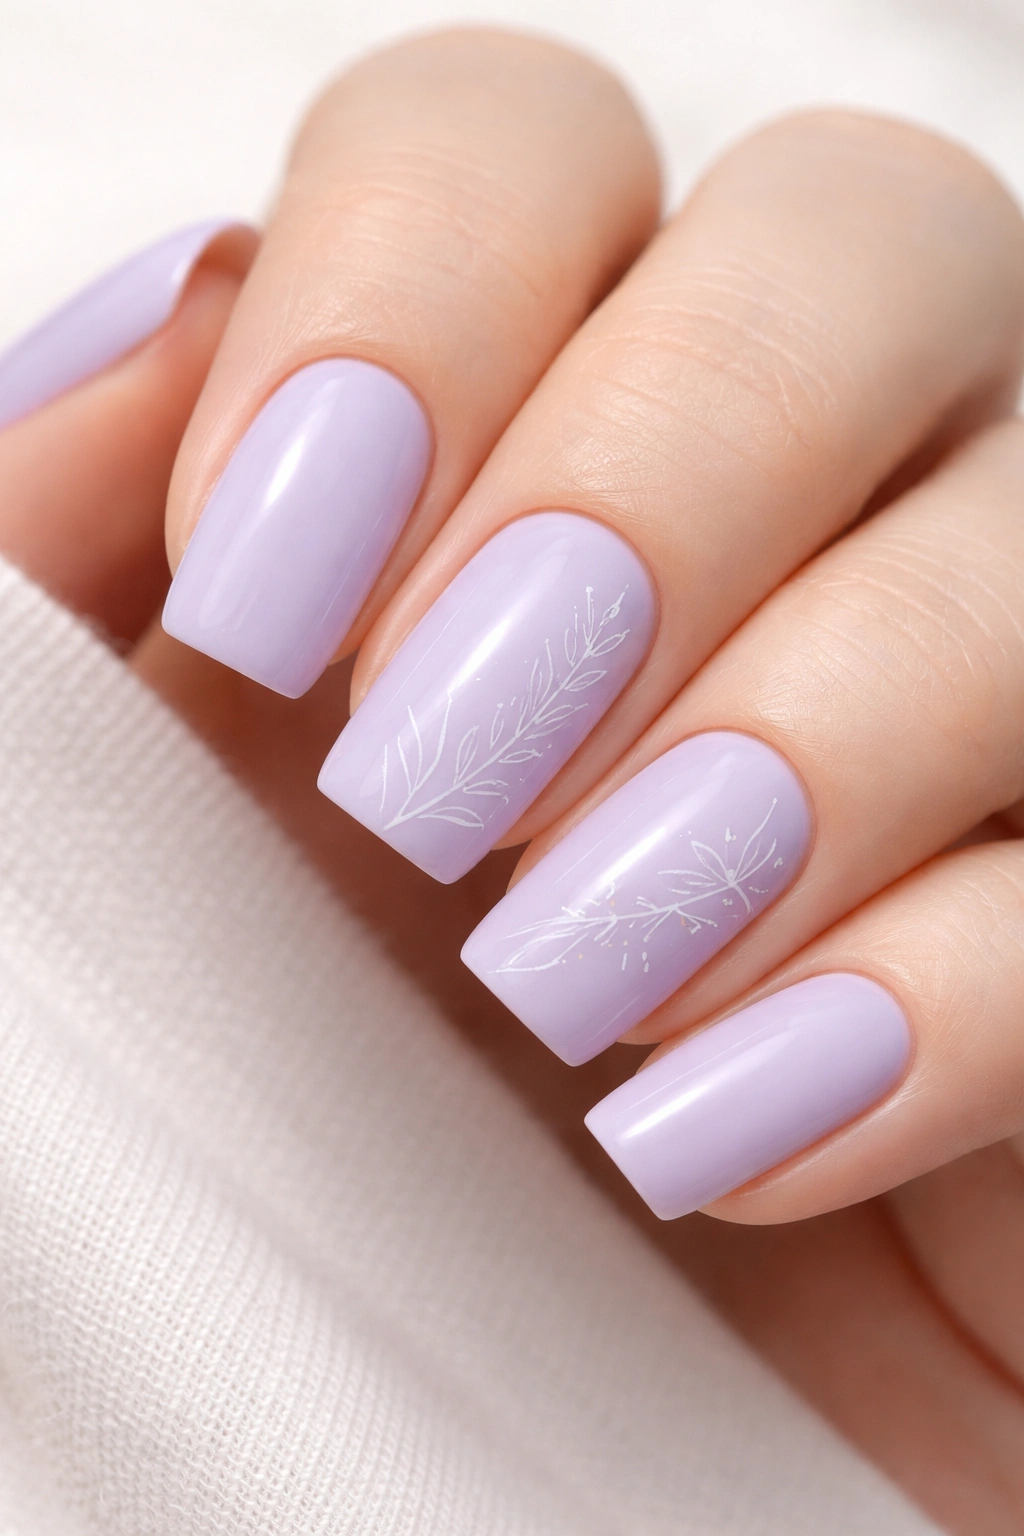
This design brings together minimalism and artistry. Picture a soft lavender base with super thin, delicate white lines creating simple geometric patterns, botanical outlines, or abstract designs on one or two accent nails. Think thin strokes forming tiny leaves, branches, or geometric shapes that feel more like modern art than traditional nail art.
Why Line Art Feels Elevated
Line art on nails strikes the perfect balance between “I put effort into this” and “I’m not trying too hard.” The white against lavender creates enough contrast to be visible and interesting, but the thin lines keep the overall effect refined and elegant. This design works especially well if you love nail art but want something subtle enough for professional settings.
Creating Sharp, Clean Lines
- Use a thin liner brush or a nail art pen for precision—these give you much more control than regular brushes
- Start with your lavender base and allow it to fully cure
- Practice your design on a nail wheel or fake tips first if you’re new to nail art
- The key is a very light touch and steady hand—let the brush do the work rather than pressing hard
- Seal with a glossy or matte top coat that complements your design intent
Pro tip: If freehand feels too risky, use nail guides or decals to outline your design, then hand-paint inside the lines for a hybrid approach that takes pressure off perfect execution.
4. Soft Lavender with Pearl Finish
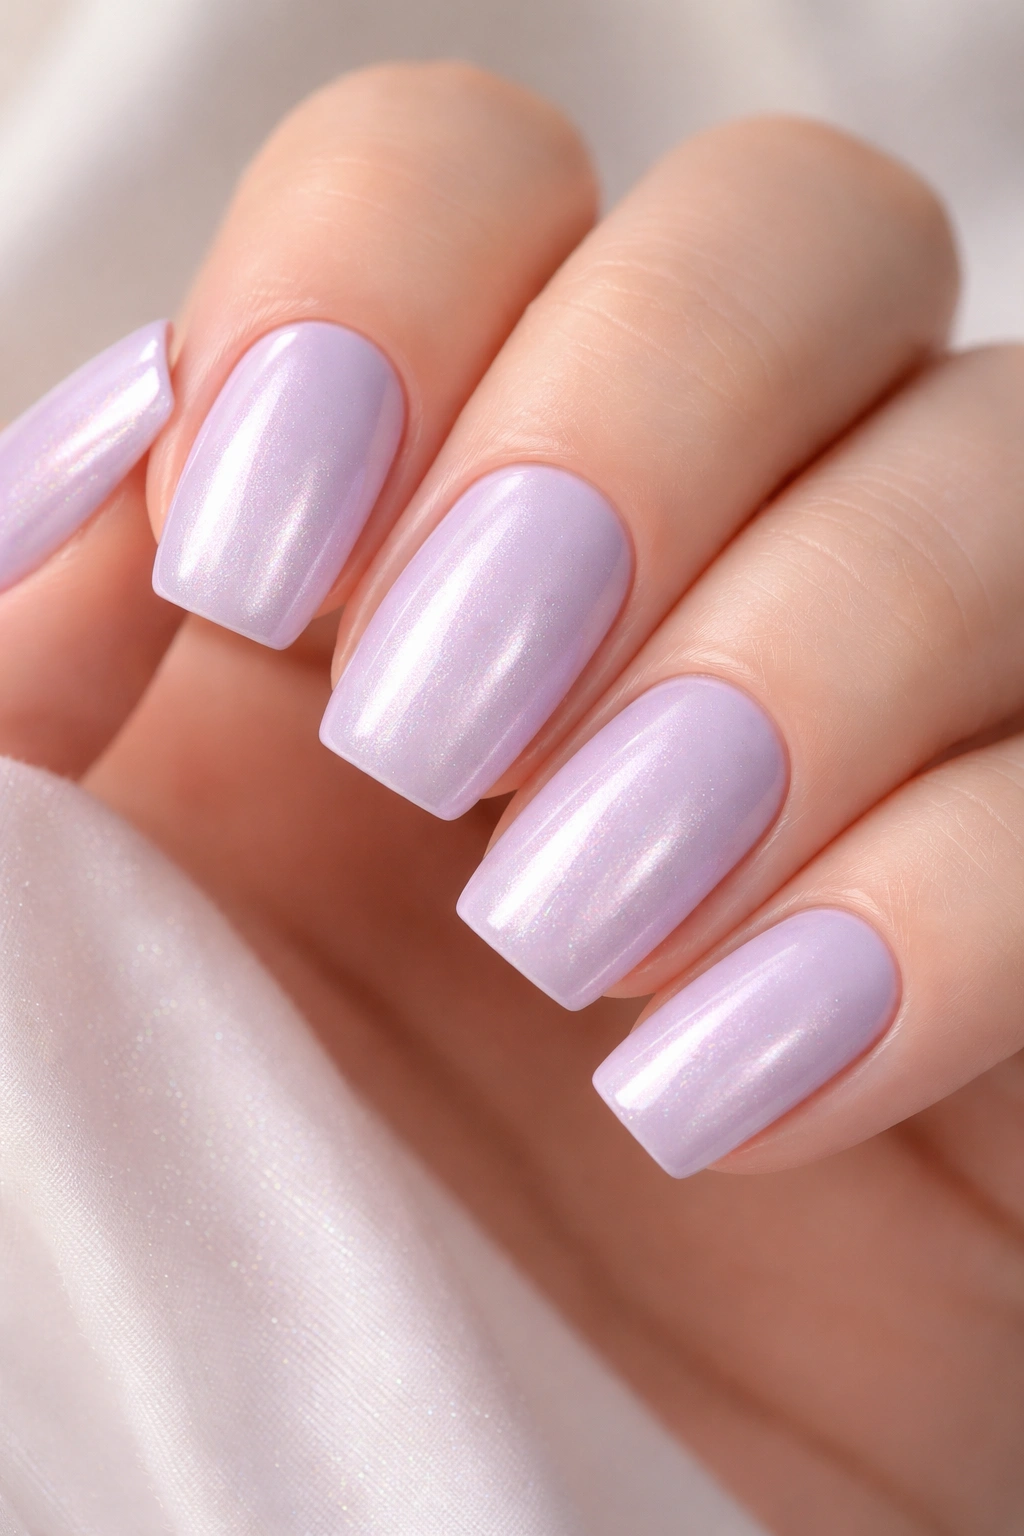
Pearl finishes are having a major moment because they’re sophisticated, dimensional, and catch light in subtle, magical ways. A pearl lavender gives you soft color with built-in shimmer and depth—it’s like wearing highlighter on your nails without any of the glitter or sparkle intensity.
The Pearl Advantage Over Regular Shimmer
Pearl finishes have micro particles that reflect light in every direction, creating an iridescent quality that’s incredibly flattering. Unlike glitter, which can feel chaotic or casual, pearls feel refined and elegant. The lavender-pearl combination is particularly stunning because the color remains calm and meditative while the finish adds unexpected sophistication.
Application and Longevity
- Pearl polishes are typically thicker than regular formulas, so apply in thin, even coats
- Two coats usually provides full opacity and maximum pearl effect
- Allow extra time between coats for these finishes to set properly
- A high-shine top coat intensifies the pearl’s reflective qualities
- Pearl finishes tend to chip slightly faster than standard formulas, so the top coat is especially important
Real talk: Pearl polishes can sometimes feel a bit thick or gloopy if you’re used to regular formulas, but the finished look is so worth the slightly different application feel.
5. Lavender Base with Tiny Metallic Accents
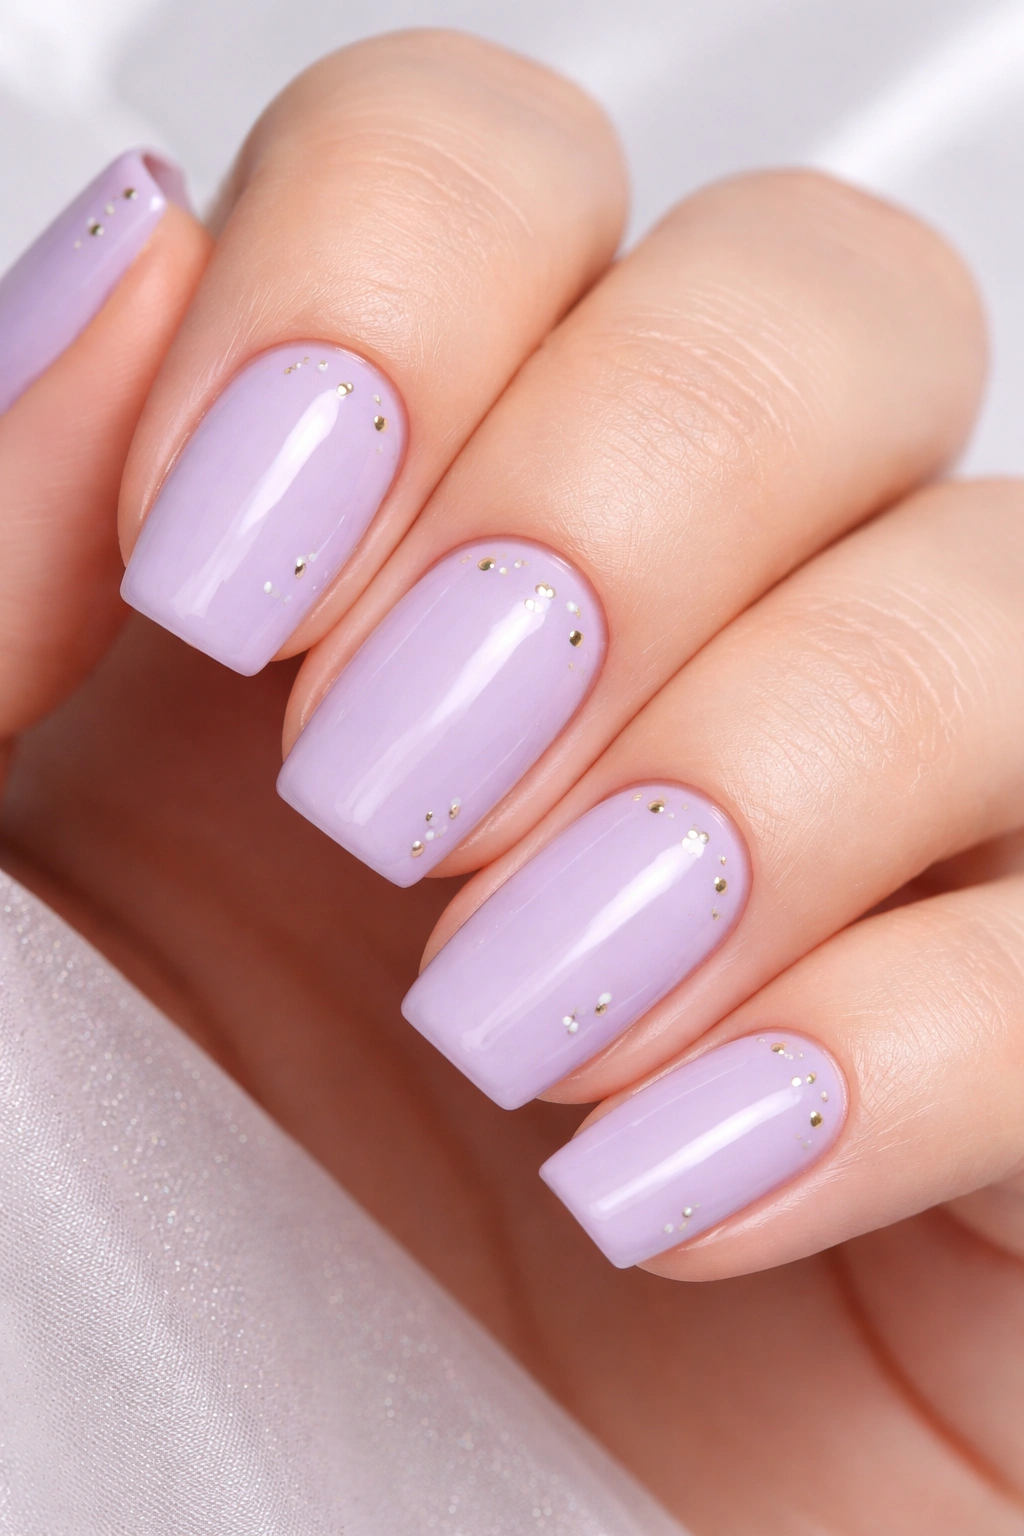
This is the “just polished but make it special” design—a clean lavender base with precisely placed tiny gold, silver, or rose gold metallic details. The accents might be small dots at the cuticle line, tiny stripes along the side, or microscopic shapes scattered randomly for an artful feel.
Creating Micro Details That Matter
The power of tiny metallic accents is that they catch light and draw attention without dominating the overall look. On soft square nails, these small touches feel proportionate and intentional. You’re essentially adding a whisper of glamour rather than a shout, which is exactly what many people want in their everyday manicure.
Placement and Precision
- Use a thin liner brush or toothpick for absolute precision with metallic polish
- Create accents on every nail for cohesion, or focus them on an accent nail for asymmetry
- The metallic polish may need 3-4 thin coats to achieve full opacity, so plan accordingly
- Metallic finishes work beautifully over matte lavender bases for maximum contrast
- A clear top coat protects the metallic details and keeps everything looking fresh
Insider note: If you’re not steady with a brush, try metallic stickers or thin metallic tapes designed specifically for nails—they’re foolproof and look professionally executed.
6. Lavender with Pressed Flower Details
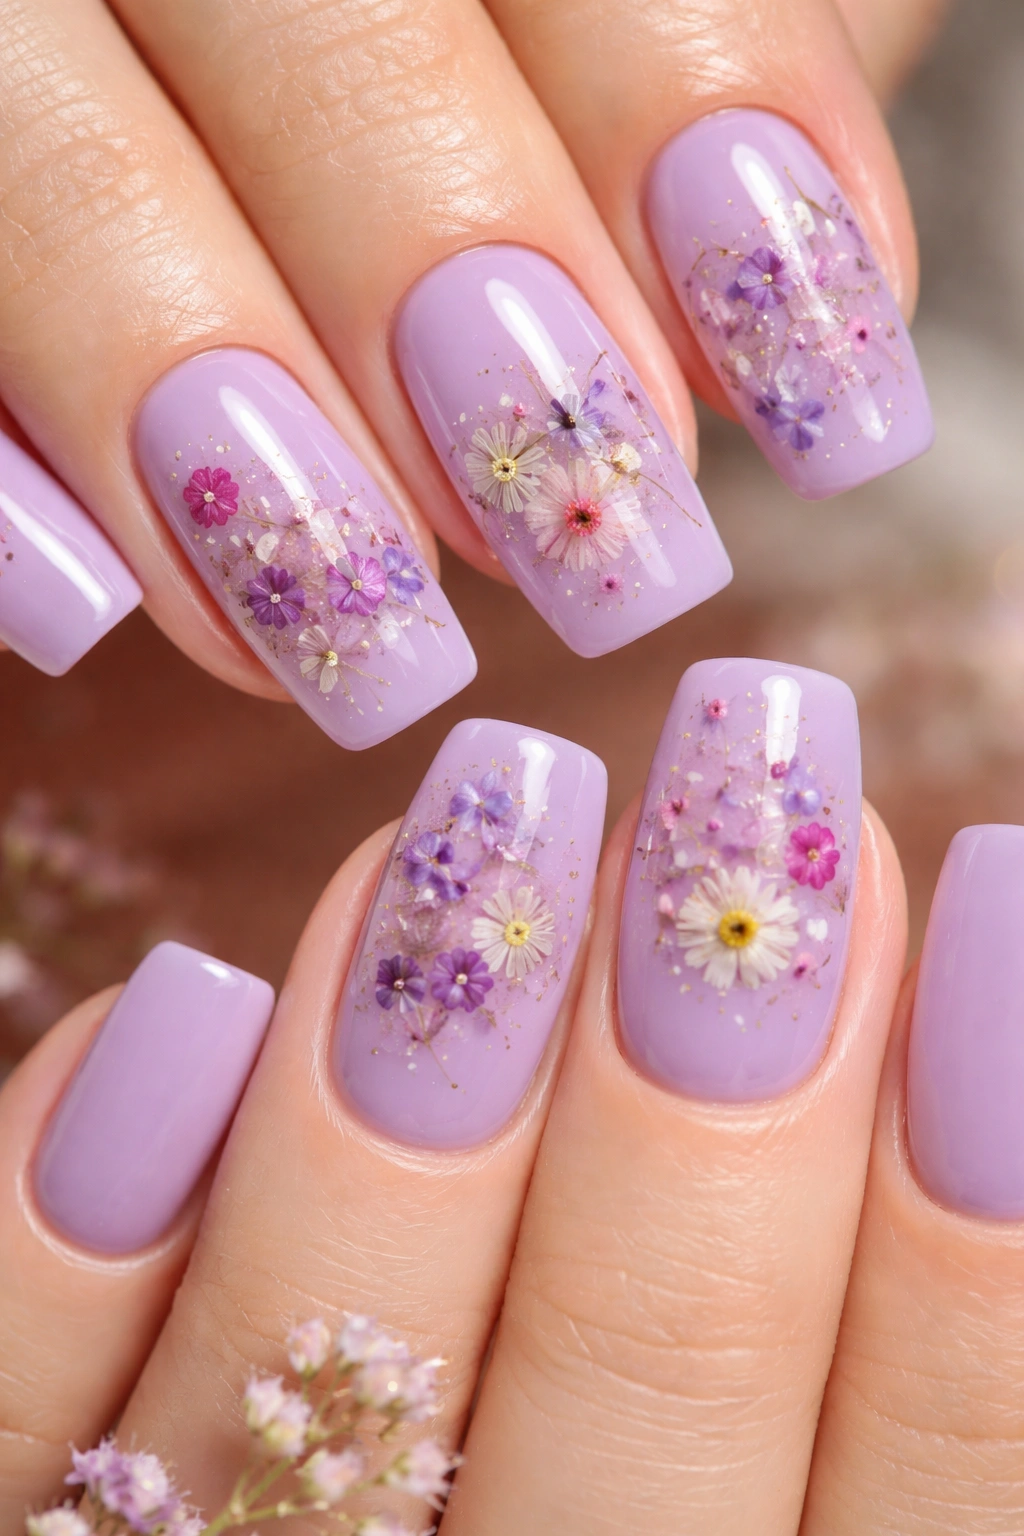
Nothing says “I care about the artistic details” like actual pressed flowers embedded in your nail design. This could be real tiny flowers—think baby’s breath or forget-me-nots—sealed under clear polish over your lavender base, or hand-painted flowers so realistic they look pressed.
The Romance of Botanical Elements
Pressed flowers or floral imagery paired with lavender creates an inherently romantic, artistic aesthetic. It’s a design that works for weddings, special occasions, or anyone who wants their nails to feel like a wearable art piece. The soft square shape provides just enough surface area for detailed floral work without feeling cramped or overwhelming.
Methods for Flower Details
- For actual pressed flowers: apply your lavender base, then carefully place tiny dried flowers, and seal with clear gel or builder gel to protect them
- For painted flowers: use white, pink, or even lavender shades to paint tiny botanical designs over your base color
- A magnifying lamp helps tremendously if you’re painting detailed flowers at home
- The flowers become a focal point, so keep the rest of the nail clean and simple
Worth knowing: If you’re using real pressed flowers, they’ll be most durable when completely sealed with gel rather than traditional polish, since gel provides a thicker protective layer.
7. Matte Lavender with Glossy Top Accent Nail
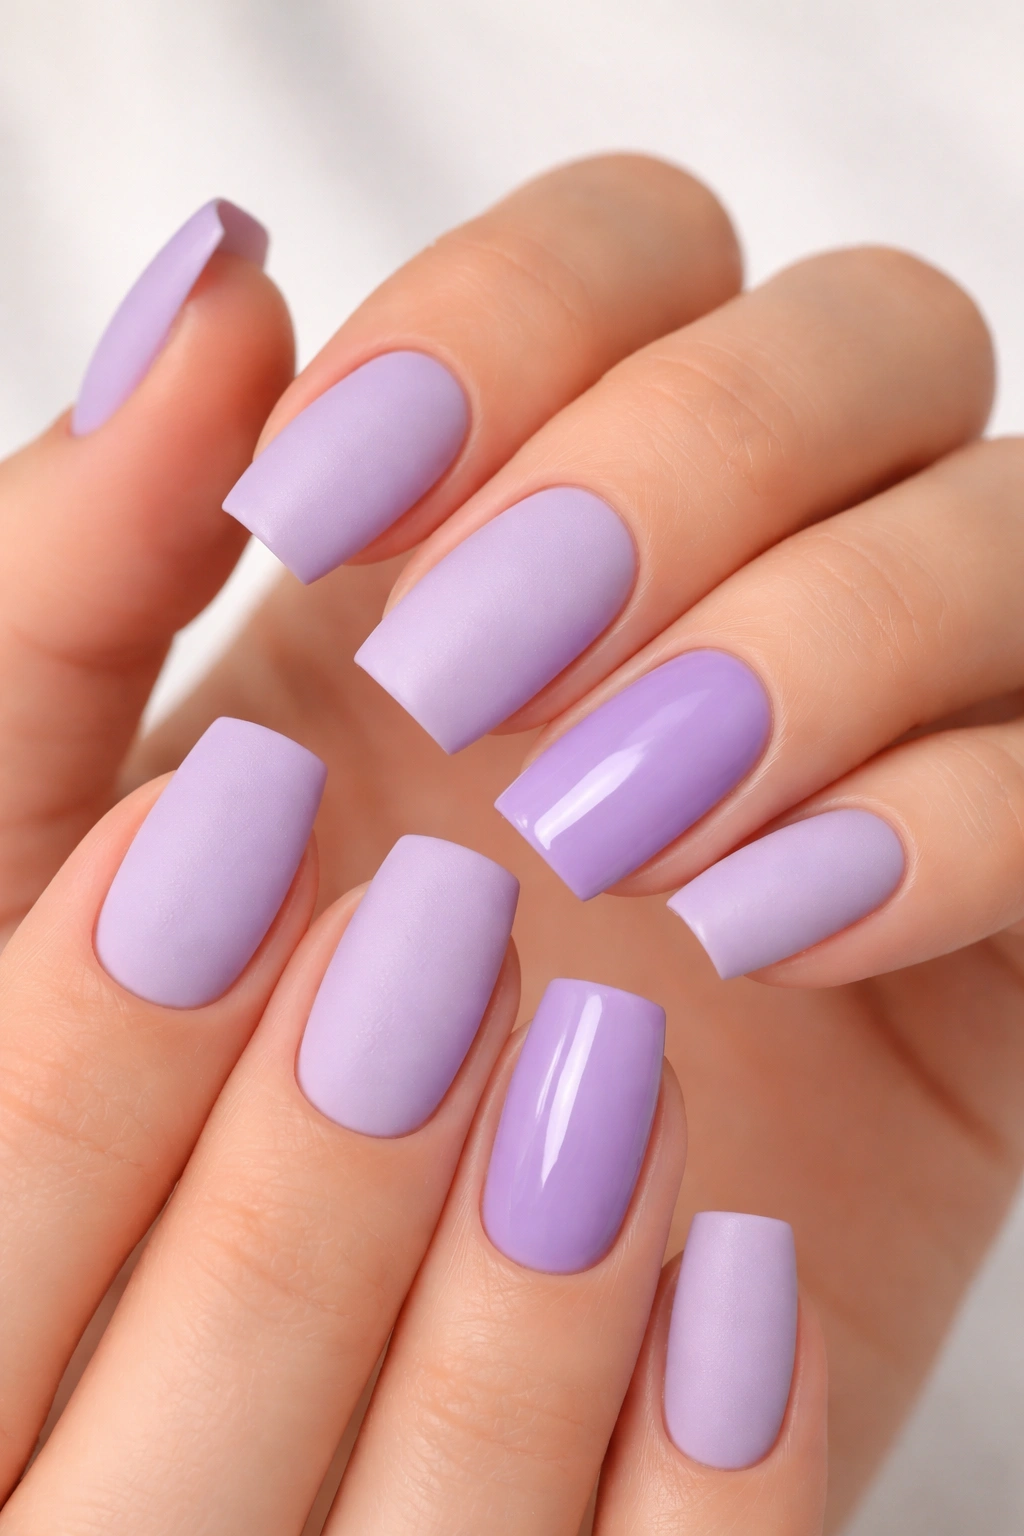
Here’s a textural approach that’s incredibly easy but looks intentional and sophisticated. Paint all nails matte lavender, then paint one accent nail with the same lavender but in a high-gloss finish. The contrast between matte and glossy on the same color creates dimension and visual interest.
Why Texture Contrast Matters
When you only change the finish rather than the color, you’re creating a subtle but impactful design choice. The matte nails feel soft and calming; the glossy accent feels like a moment of light and reflection. This design is perfect for people who love minimal aesthetics but want something more interesting than a flat single color.
Achieving Matte and Gloss Together
- Apply two coats of matte lavender polish to all nails except your accent nail
- Use a matte top coat on these nails to set the finish and add durability
- On your accent nail, apply two coats of the same lavender color in regular formula
- Seal the accent nail with a glossy, high-shine top coat
- The contrast will be subtle but noticeable once the lights hits your hands
Pro tip: The accent nail works best on your ring finger or pinky—somewhere your eye naturally lands when you look at your hands, making the textural difference more noticeable.
8. Lavender with Chrome or Mirror Finish

Chrome and mirror finishes are the current peak of nail technology—they create a metallic, almost liquid-mercury effect that’s absolutely mesmerizing. A lavender chrome finish transforms your nails into something otherworldly and sculptural, catching light from every angle.
The Chrome Effect Explained
Chrome and mirror finishes use specialized powders that reflect light in such a way that your nails look like polished metal. They’re applied over a base color—in this case, lavender—and create a color-shifting, iridescent effect. The result is futuristic, high-impact, and utterly conversation-starting.
Application Requirements for Chrome
- Chrome requires a specific polish or powder system—it’s not something you can DIY with regular polish
- Most chrome effects are available through gel systems or specialty brands
- Professional application is highly recommended for the best results, though advanced DIYers can achieve this at home with practice
- The chrome effect typically requires proper curing and sealing, so you’ll need a UV or LED lamp
- Chrome finishes are more durable than regular polish and can last 3-4 weeks with proper application
Real talk: Chrome nails are a commitment because they really do require professional-grade products and application. But if you’re willing to invest, the results are stunning and turn heads immediately.
9. Lavender Gradient with Gold Dust
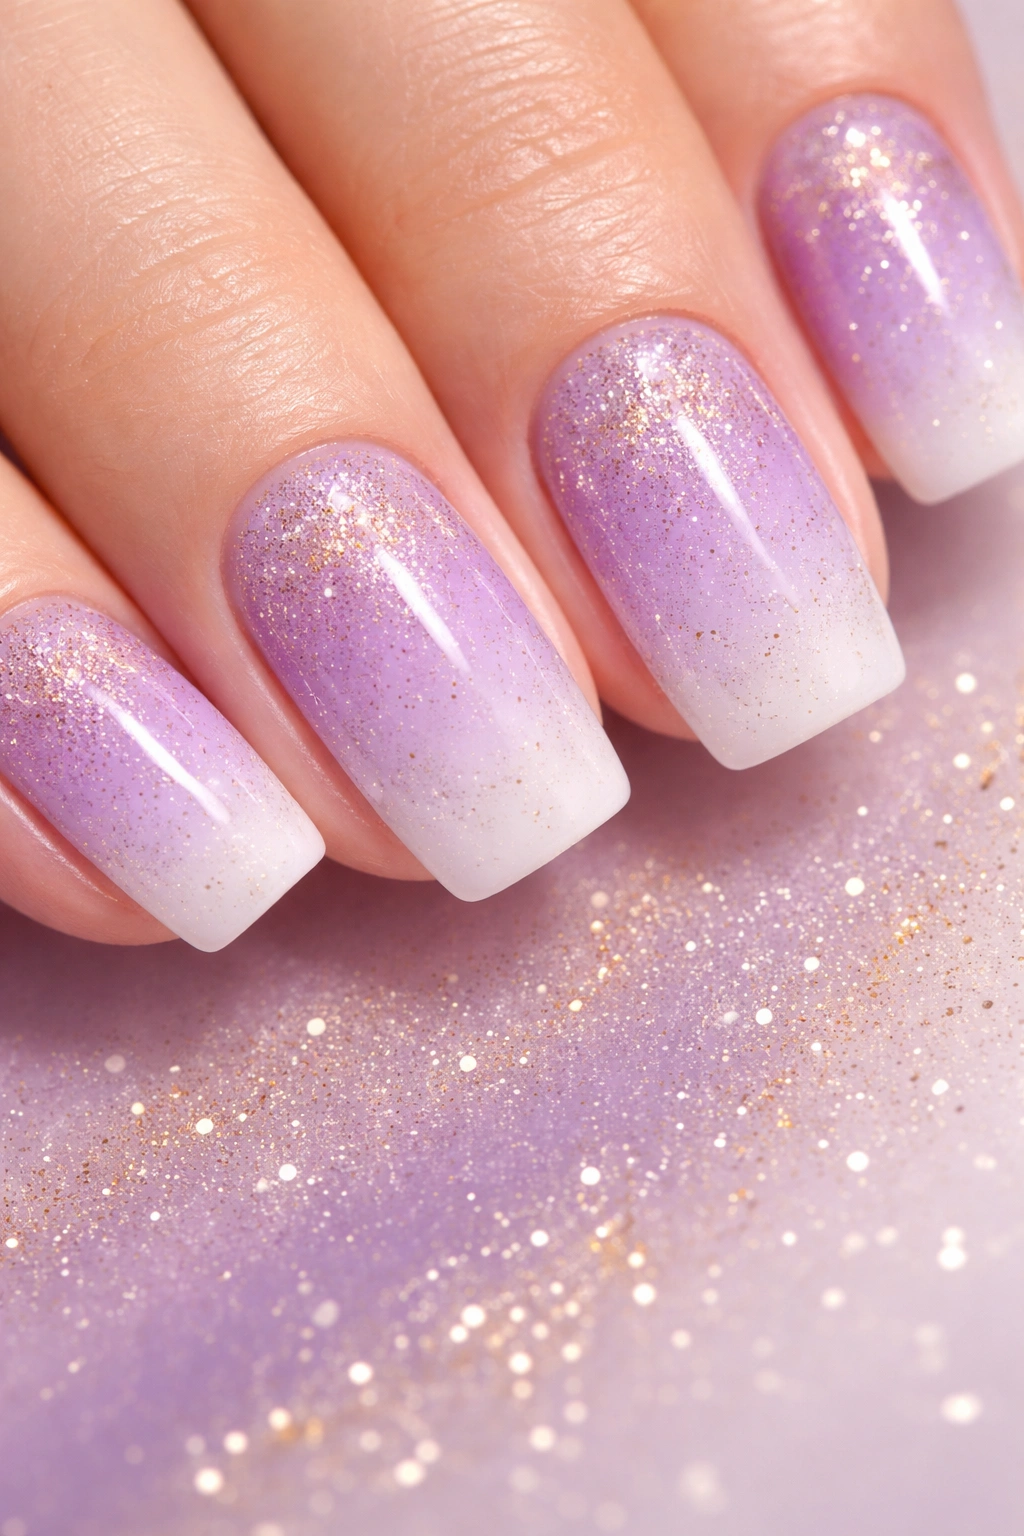
Combine two techniques for maximum impact: a lavender-to-white gradient base with ultra-fine gold dust particles scattered across the surface. This creates a design that has movement (the gradient), sparkle (the gold dust), and sophistication (lavender as the main color).
Layering Techniques for Complex Designs
Building this design involves strategic layering. You’ll create your gradient first, seal it, then add the gold dust elements, and seal again. Each layer adds dimension and prevents elements from muddy together. The soft square shape provides enough surface area for this complexity without feeling crowded.
Step-by-Step for Gradient Plus Sparkle
- Create your lavender-to-white gradient using the sponge method
- Allow to dry completely and apply a glossy base coat
- Use an ultra-fine gold dust or pigment powder and a soft brush to dust across the entire nail
- Press gently so the dust adheres to the tacky polish layer
- Seal everything with a clear top coat to protect the dust and create a smooth finish
Worth knowing: The order matters—if you try to add dust before your gradient is sealed, the layers will mix and muddy. Always seal between major technique steps.
10. Lavender with Delicate Geometric Patterns
Geometry pairs beautifully with soft, calming colors. Tiny triangles, hexagons, lines, or dots in white, gold, or even darker purple create a modern, artistic design that feels intentional and sophisticated. The patterns can be random or symmetrical depending on your preference.
Geometry as Wearable Art
Geometric designs feel contemporary and polished—they’re the kind of thing you’d see in a high-end nail salon. On soft square nails, geometric patterns look balanced and intentional. The shapes create visual movement without being chaotic or busy, and they work beautifully in both minimalist and maximalist versions.
Creating Geometric Precision
- Use nail guides or tape to create perfectly straight lines and precise angles
- A thin liner brush or nail art pen gives you the control you need for geometric accuracy
- Plan your pattern beforehand on paper to visualize how it’ll look on your nail shape
- Geometric patterns work best when they have consistent spacing and sizing
- A glossy top coat makes the geometric lines pop and feel defined
Pro tip: If freehand geometry feels intimidating, start with simple dots in a organized pattern—they’re harder to mess up but still create visual interest and feel intentional.
11. Soft Lavender with 3D Nail Charms or Embellishments
Take lavender soft square nails to a statement level by adding 3D elements—tiny charms, rhinestones, studs, or dimensional designs that literally rise above the surface of your nail. These could be small dangling charms, raised rhinestones in a pattern, or dimensional gel designs.
The Impact of Dimensional Elements
3D elements automatically elevate a manicure from “nice” to “wow.” They catch light, create shadow, and add tactile interest. Lavender provides the perfect neutral, calming base for statement 3D elements because it won’t clash or compete with the focal points you’re creating.
Applying and Maintaining 3D Nails
- 3D elements are most durable when applied with gel polish and fully cured under a lamp
- Rhinestones and studs should be applied with a strong adhesive or incorporated into builder gel
- Dimensional designs take longer to apply than traditional nail art, so professional application is often the best route
- These nails require careful wear—avoid rough activities that might snag or break the 3D elements
- The longevity depends on how well the elements are adhered and how you care for your hands
Real talk: 3D nails are gorgeous but need more maintenance and care than traditional polish. They’re perfect for special occasions or people who don’t do a lot of manual labor with their hands.
12. Lavender with Subtle Ombre to Purple
Create depth with a soft lavender base that gradually darkens to a richer, deeper purple at the tips or edges. This ombre uses colors that are closely related rather than contrasting dramatically, creating a sophisticated, tonal look that feels luxe and cohesive.
Tonal Gradients vs. Color Gradients
Tonal gradients (moving from light to dark in the same color family) feel more refined than dramatic color-shifting ombres. This approach works beautifully on lavender because you’re essentially creating a gradient within the purple family, which feels naturally harmonious. The effect is like watching color deepen and intensify rather than shift into something completely different.
Creating a Subtle Tonal Ombre
- Choose a lavender as your light color and a rich, dusty purple for your dark color
- Use the sponge blending method to create the gradient, starting light at the cuticle and building toward the darker shade at the tip
- The transition should feel gradual and natural, not sudden or harsh
- Allow adequate drying time between sponging layers—rushing this step leads to muddy, unblended results
- A glossy top coat enhances the gradient and makes the color variation more visible
Insider note: This design looks especially stunning in natural light because the tonal shift is subtle enough to feel sophisticated rather than obvious, but noticeable enough that the design reads as intentional and well-executed.
Final Thoughts
Lavender soft square nails offer something genuinely special: they’re calming and sophisticated, flattering and modern, minimal and detailed all at once depending on how you style them. Whether you go for creamy simplicity with a touch of gold foil, bold chrome and mirror finishes, romantic pressed flowers, or geometric statement designs, lavender provides the perfect canvas for creating a manicure that feels entirely you.
The soft square shape makes every one of these designs more wearable than pointed shapes while still feeling contemporary and intentional. The key to any of these designs is starting with a quality base coat, taking your time with application, and finishing with a top coat that protects your work and makes the colors pop. Whether you’re creating these at home or bringing this inspiration to your favorite nail technician, any of these twelve designs will leave you with nails you genuinely can’t stop looking at.
Lavender is having a moment for a reason—it’s the color you return to again and again because it works, it soothes, and it somehow makes everything feel just a little bit more put-together. Pick your favorite design, book that appointment or gather your supplies, and get ready to fall in love with lavender soft square nails.
