

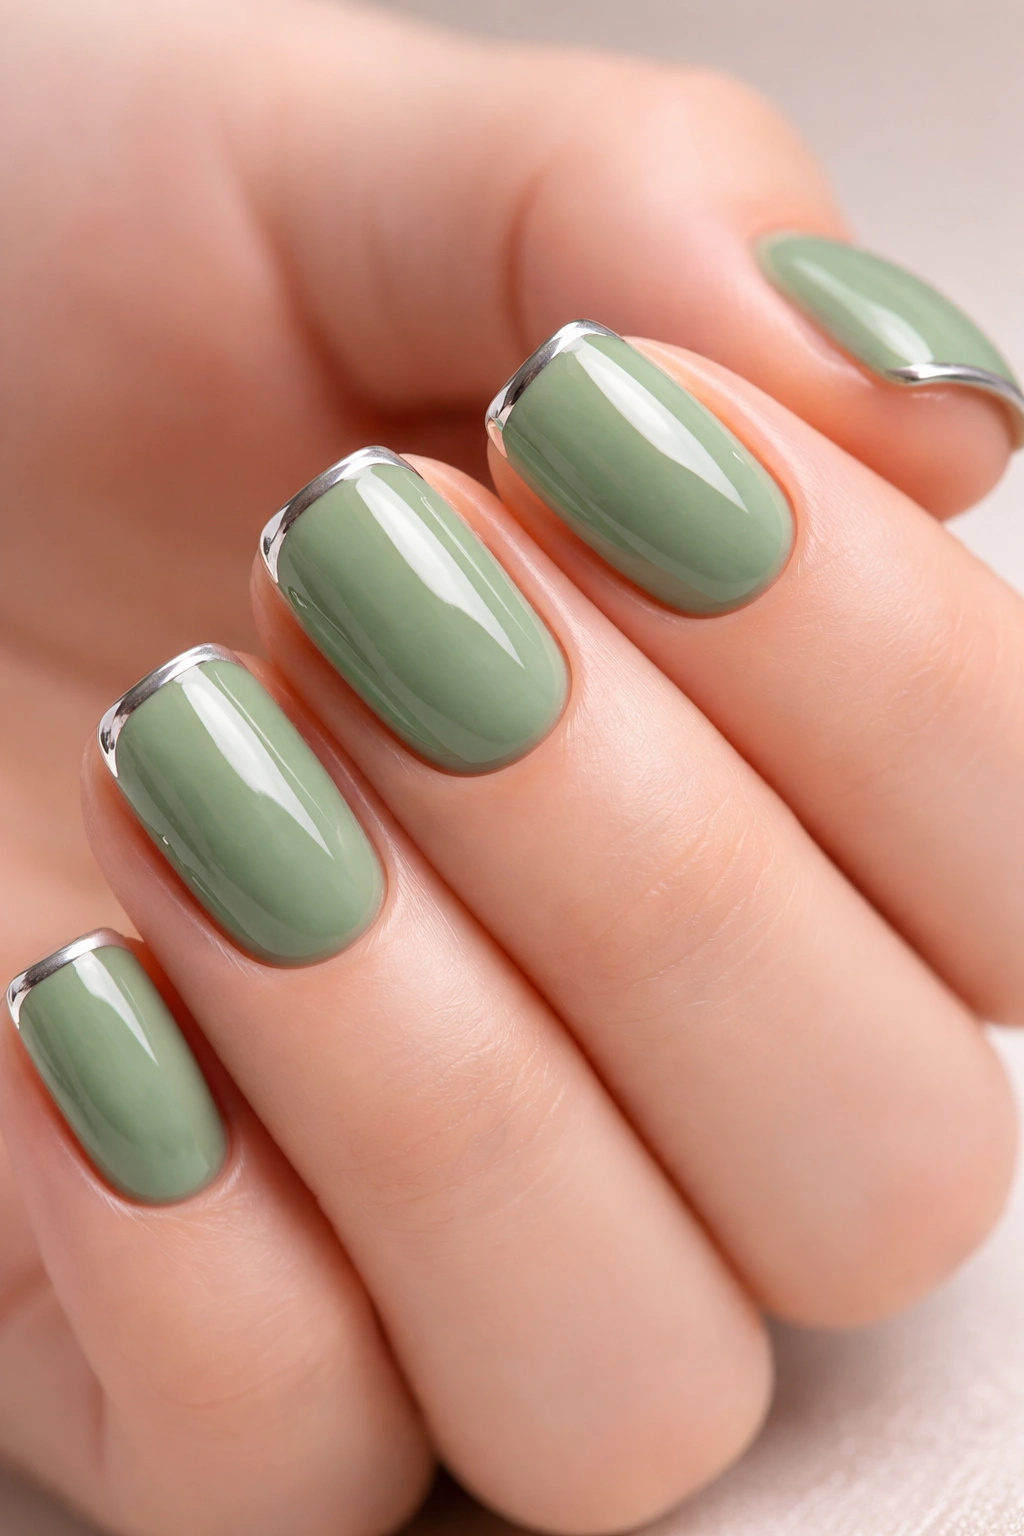
Sage green is one of those colors that’s practically impossible to mess up. It sits at that perfect intersection of calming and sophisticated—sophisticated enough to wear to the office, calming enough that it somehow makes every day feel a little more peaceful. Short squoval nails are the shape that makes any color look intentional and effortless; they’re short enough to be practical, but the slight squaring at the tips gives them an edge that feels modern and polished. Combine sage green with that shape, and you’ve got the foundation for something genuinely special.
The beauty of sage green is how it works with everything—matte finishes feel earthy and understated, while glossy versions read as more refined and contemporary. Add metallic accents, texture, or geometric patterns, and suddenly you’ve got a look that’s entirely your own. Whether you’re drawn to minimal elegance, bold details, or something in between, sage green on short squoval nails adapts to your style without losing its inherent sense of calm sophistication. These fifteen designs showcase the full range of what’s possible with this versatile color, from barely-there minimalism to statement-making details that still feel understated and wearable.
1. Dusty Sage Minimalist
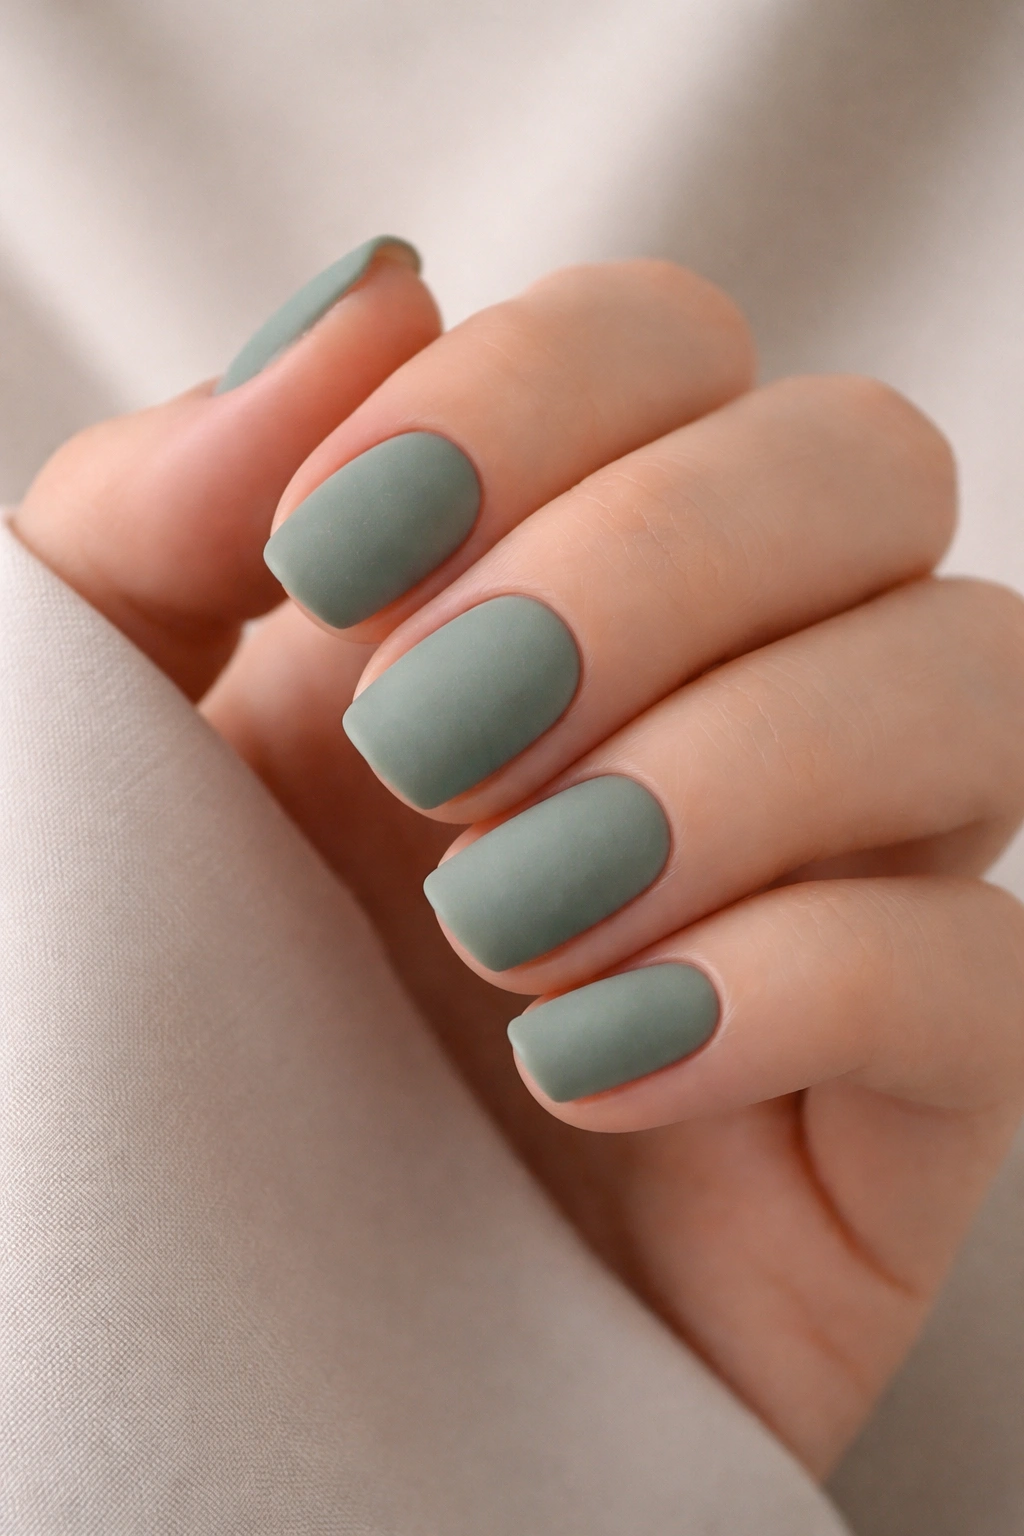
There’s something deeply satisfying about a single, perfect shade with nothing else competing for attention. Dusty sage in a soft, slightly muted finish is the definition of “less is more”—it’s the nail equivalent of wearing a high-quality linen shirt in an elevated neutral. The short squoval shape amplifies this minimalism; the slightly squared tips give your hands a neat, intentional appearance without any fussiness.
Why This Works
A clean, single-color manicure stops looking boring the moment the color is precisely right. Dusty sage has enough depth and complexity that it reads as thoughtful rather than basic—there’s a sophistication in choosing something this restrained. The matte finish adds another layer of refinement; matte colors feel more deliberate and editorial than shine.
How to Nail This Look
- Choose a dusty sage with slight grey undertones rather than one that leans too green or too yellow
- Apply a base coat, two coats of the sage polish, and a matte topcoat for a velvety finish
- File nails straight across the sides, then slightly round the very tip for the squoval shape
- Keep your cuticles neat and your skin around the nails well-moisturized—with a minimal design, everything shows
Pro tip: A dusty sage with grey undertones actually makes your hands look slightly longer and more refined, which is one reason this shade has become a favorite for professional settings.
2. Sage Green with Gold Leaf Accents

Gold leaf is having a moment, and for good reason—it catches light beautifully and adds a layer of luxury without tipping into over-the-top territory. On short squoval nails, a few strategically placed gold leaf accents on a sage green base create visual interest that still feels balanced and wearable. Think of it as jewelry for your nails—it dresses up the look without compromising the clean, modern shape.
The Appeal of Metallic Accents
Gold and sage green are a classic pairing because gold’s warmth complements sage’s cool-toned greenness perfectly. The metal pulls the eye without overwhelming the base color, and on shorter nails, this restraint is exactly what keeps the design from feeling costume-y or overdone.
Application Tips
- Start with two coats of sage green polish and let it fully dry
- Using a thin brush or a gold leaf adhesive pen, apply a small amount of adhesive to one or two nails—consider placing it along the side edge or clustered in the corner
- Press real gold leaf onto the adhesive, working gently to avoid tearing the delicate material
- Seal everything with a strong topcoat to protect the leaf and prevent peeling
- If you’re nervous about real gold leaf, metallic gold nail foils are a more forgiving alternative
Worth knowing: Real gold leaf is surprisingly affordable and creates a more authentic, high-end appearance than metallic polish, even though it seems like it shouldn’t.
3. Matte Sage Ombre with Cream Tips
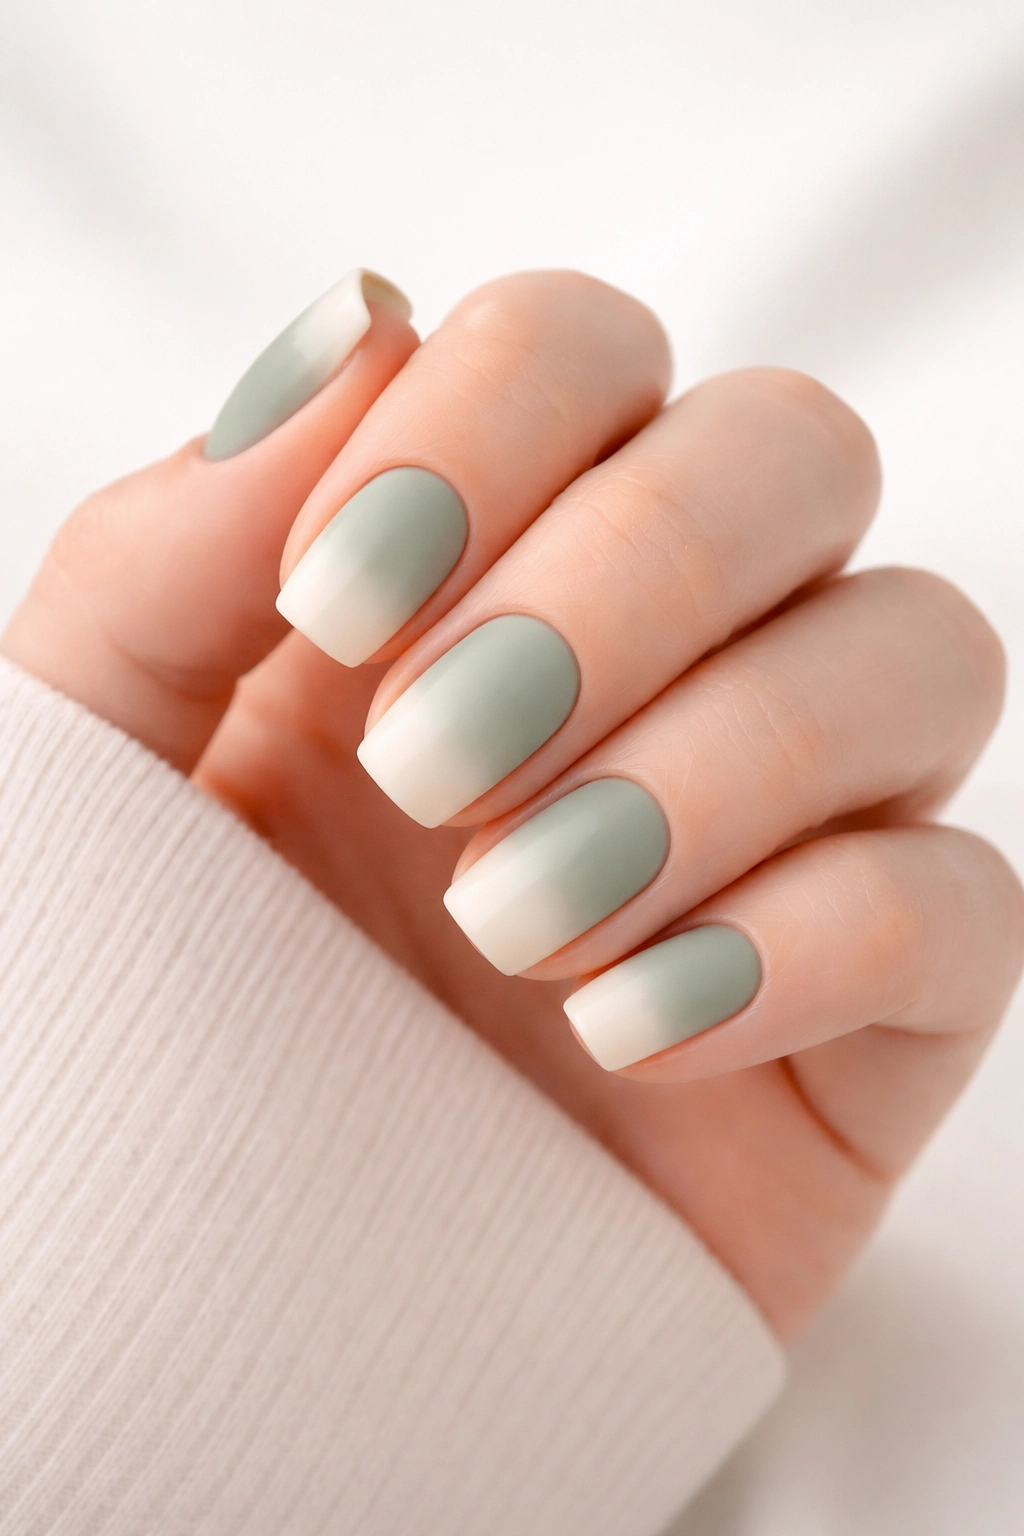
An ombre that fades from sage green into soft cream creates a subtle gradient that feels more modern and polished than a bold color-block design. The squoval shape actually complements ombre beautifully because the squared tips allow the color transition to be visible and intentional rather than disappearing into a rounded edge.
Why Ombre on Short Nails Works Better Than You’d Think
Ombre designs have a reputation for being fussy and difficult, but on short squoval nails, the compact size actually makes the gradient easier to control and blend. There’s less nail real estate to cover, which means less room for uneven transitions. The design reads as intentional and artistic rather than like something that didn’t turn out quite right.
Creating a Smooth Ombre
- Paint your entire nail in sage green and let it dry completely
- Using a makeup sponge (the small ones are perfect), dab cream or off-white polish onto the sponge in a line
- Gently press and bounce the sponge onto the tips of your nails where you want the ombre to fade
- Repeat, moving the sponge slightly each time to build an even transition
- Apply a topcoat to seal and blend the edges slightly
- If the result looks harsh, add a thin brushstroke of sage across the very edge where the colors meet to soften the transition
Quick fact: Sponging creates softer, more blended ombre effects than brushing, which is why most nail artists use this technique for gradient designs.
4. Sage Green and Cream Geometric Design
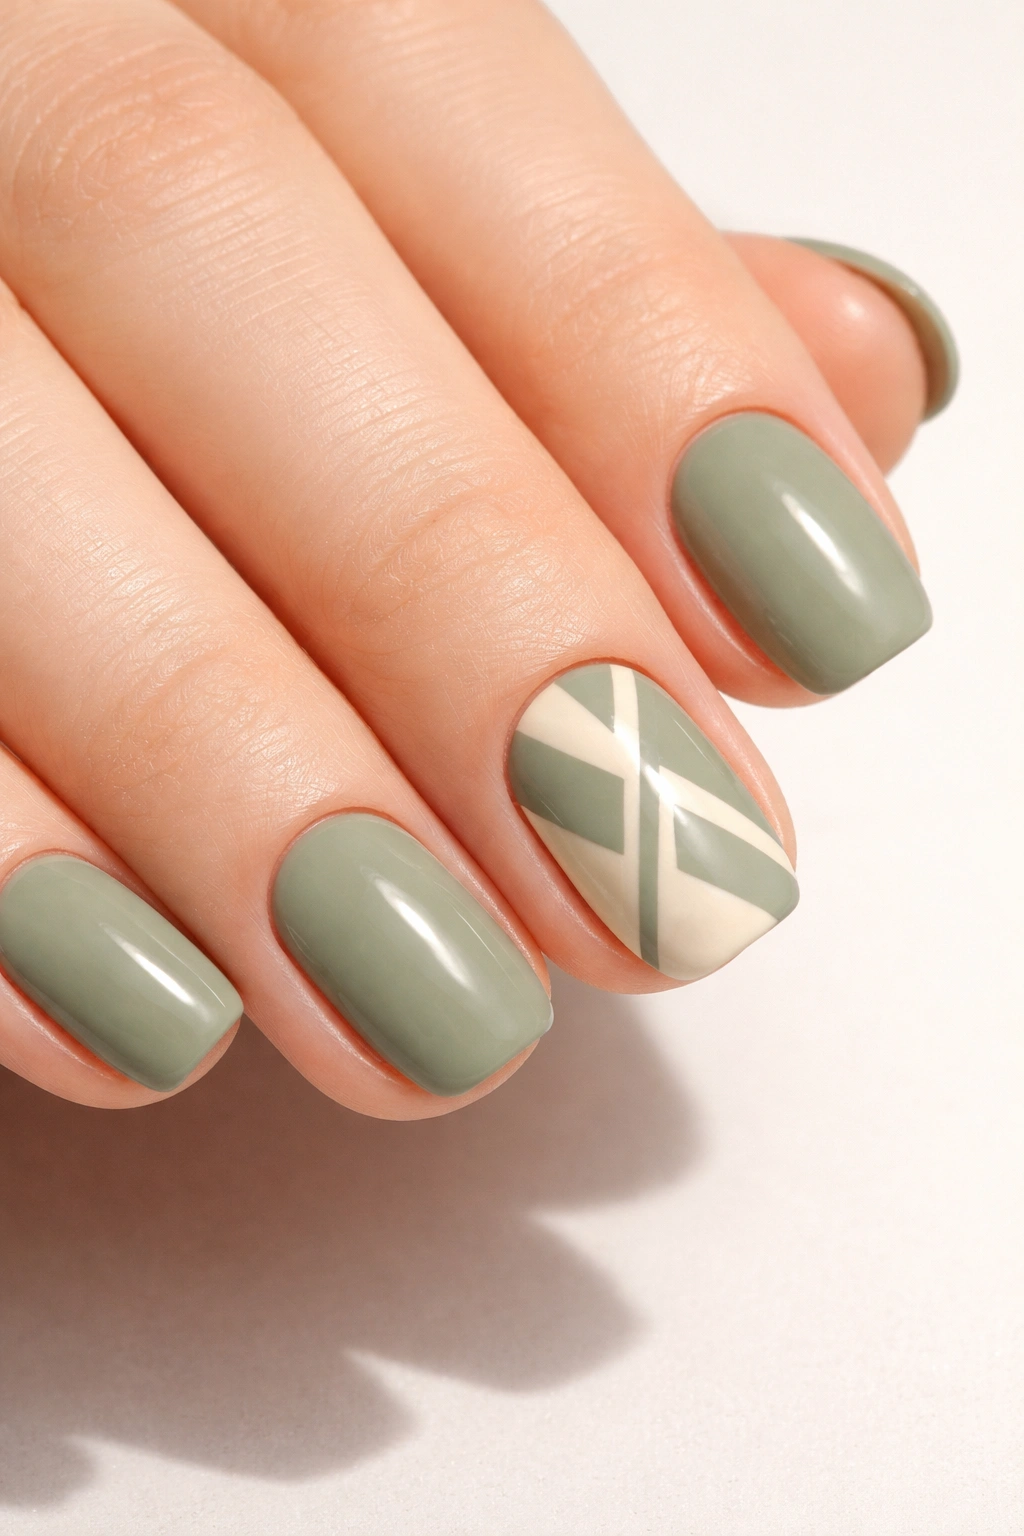
Geometry on nails feels modern and intentional, and combining sage green with a crisp cream color in clean lines creates a design that works for absolutely any occasion. Simple triangles, stripes, or a color-blocked shape on one accent nail keep the look from feeling too busy while still delivering visual interest that catches light and draws attention.
Making Geometric Designs Look Professional
The key to geometric nail designs that don’t look homemade is precision. Tape is your friend here—painter’s tape or specialized nail-art tape holds lines steady and prevents the polish from bleeding underneath. On short squoval nails, a single geometric accent nail is often more impactful than covering all five nails with pattern.
Step-by-Step Application
- Paint all nails in sage green and allow to dry
- On your accent nail (often the ring finger), apply painter’s tape in the shape you’re going for—a diagonal line down the middle, a triangular shape in the corner, or a stripe along the side
- Carefully paint the cream color into the exposed section, working deliberately to keep the line crisp
- Remove the tape while the polish is still slightly wet (not fully dried, but not wet either—tacky-wet is ideal)
- Seal with topcoat
- If the edge isn’t perfectly sharp, a very fine brush dipped in acetone can clean up the line
Pro tip: Nail art tape comes in different widths—thinner tape creates more delicate lines, while thicker tape makes bold, architectural shapes.
5. Sage Green with Fine Line Detailing
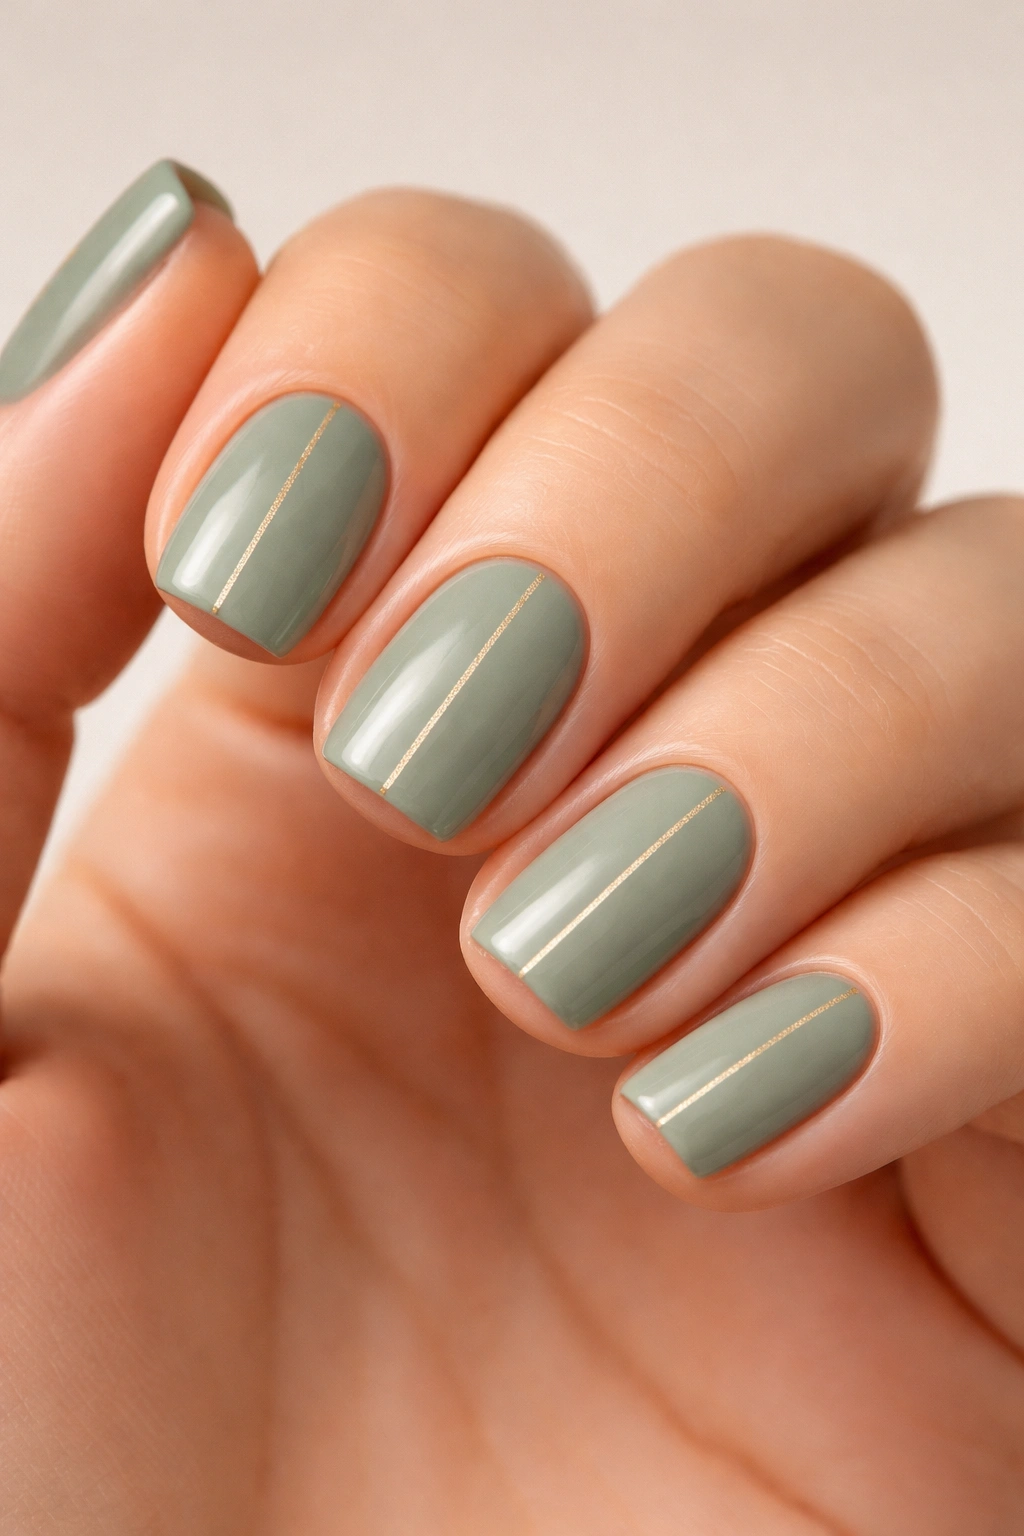
Some of the most sophisticated nail designs are the simplest—a base of sage green with one or two delicate lines painted in gold, white, or a darker sage create the impression of intricate detail without being labor-intensive or fussy. Thin lines feel more intentional and editorial on short nails than heavy detailing would.
The Psychology of Line Work
Lines on nails draw the eye vertically, which visually elongates even shorter nails. A single fine line down the center of the nail creates a clear focal point without competing with the base color. This is exactly why minimalist line designs have become a favorite for people who want their nails to feel intentional without being loud about it.
Painting Clean Lines
- Use the thinnest brush you can find—nail art brushes come in sizes as small as 0000, which is ideal for this technique
- Dip the brush in your line color and use your other hand to stabilize the brush hand by resting your pinky on the nail
- Paint with a single, confident stroke rather than multiple tentative strokes
- If the line isn’t perfectly straight, thin lines are actually forgiving—slight imperfections read as intentional rather than sloppy
- Consider pairing a vertical line down the center with a small horizontal line near the tip for a subtle cross design
Worth knowing: Gel polish actually makes fine line work easier because it doesn’t dry as quickly, giving you more time to correct and adjust your stroke.
6. Sage Green Marble Effect
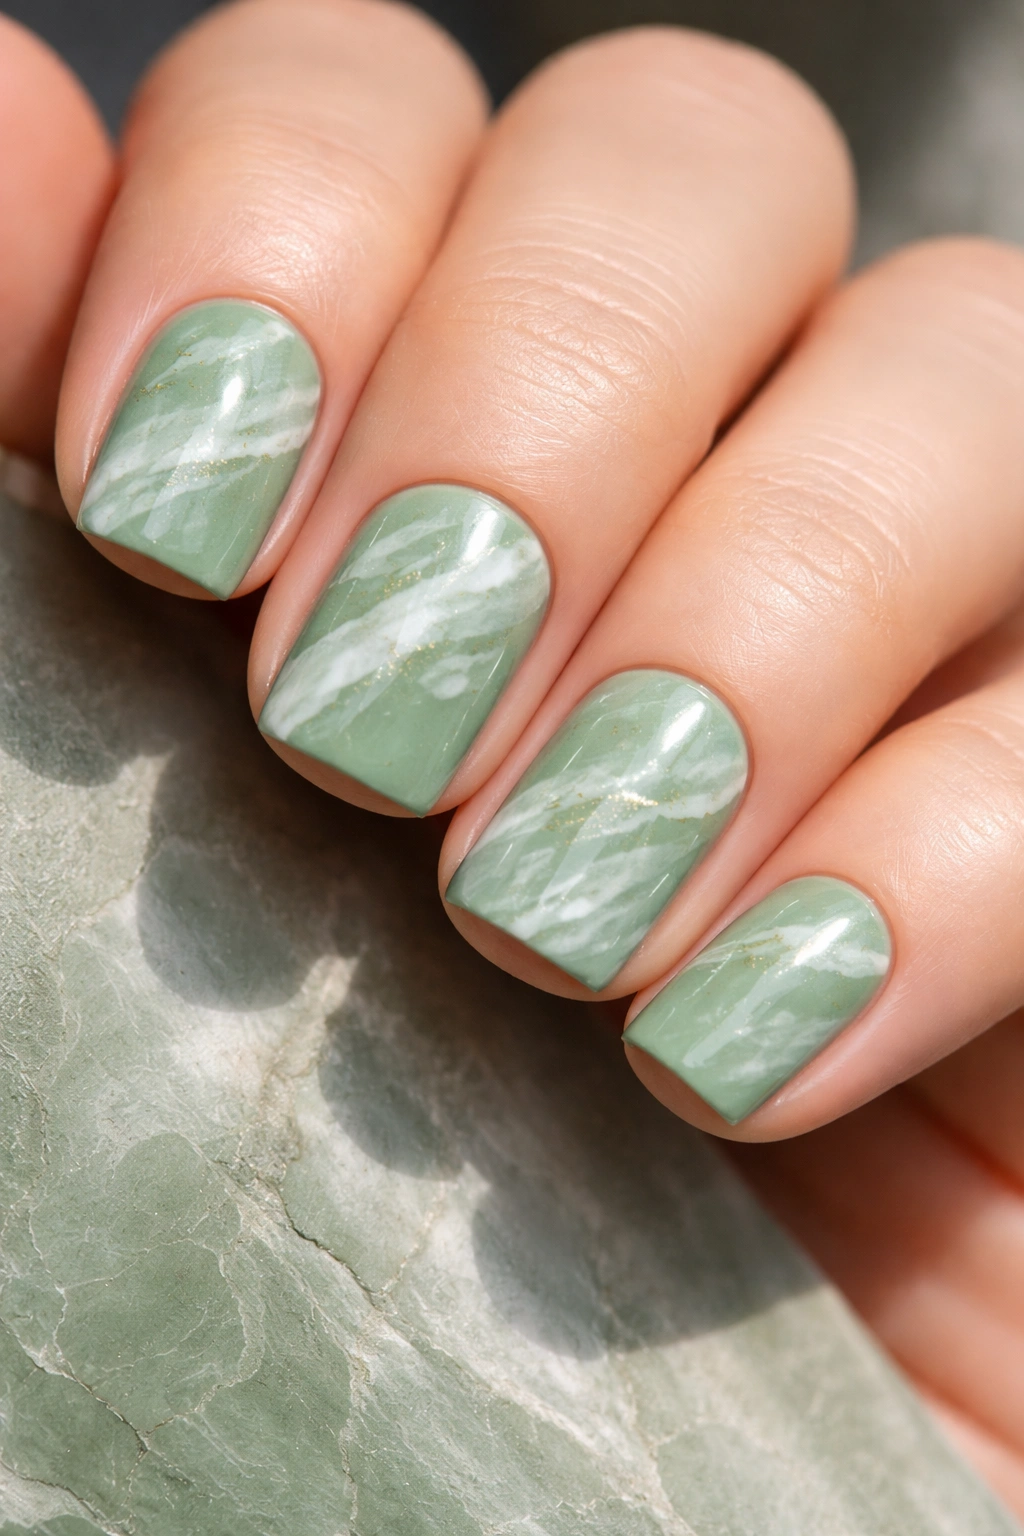
A marble effect sounds complicated, but it’s actually one of the most forgiving techniques in nail art—the point is to create the impression of randomness and movement, which means imperfection is built into the design. On sage green, a white or cream marble effect adds visual texture and a luxe, natural-stone feeling that reads as high-end.
The Marbling Technique Demystified
The classic marbling method uses water and multiple colors, but there’s a simpler approach that works beautifully on short nails: sponging one color unevenly over the base to create a speckled, stone-like effect rather than trying to create actual veining.
Creating Marble Without Water
- Paint all nails in sage green and let them dry
- Pour a small amount of white or cream polish onto a flat surface (a ceramic plate works well)
- Using a makeup sponge, dab randomly into the white polish
- Press the sponge onto your nails in different angles and positions, reloading the sponge frequently for varied coverage
- The result should look textured and uneven, like a stone surface
- Seal with topcoat—this seals in the texture and makes it feel more intentional
Quick fact: If you want actual marble veining rather than a speckled effect, you can use a thin brush to hand-paint delicate lines after sponging for a hybrid approach.
7. Sage Green and White French Manicure
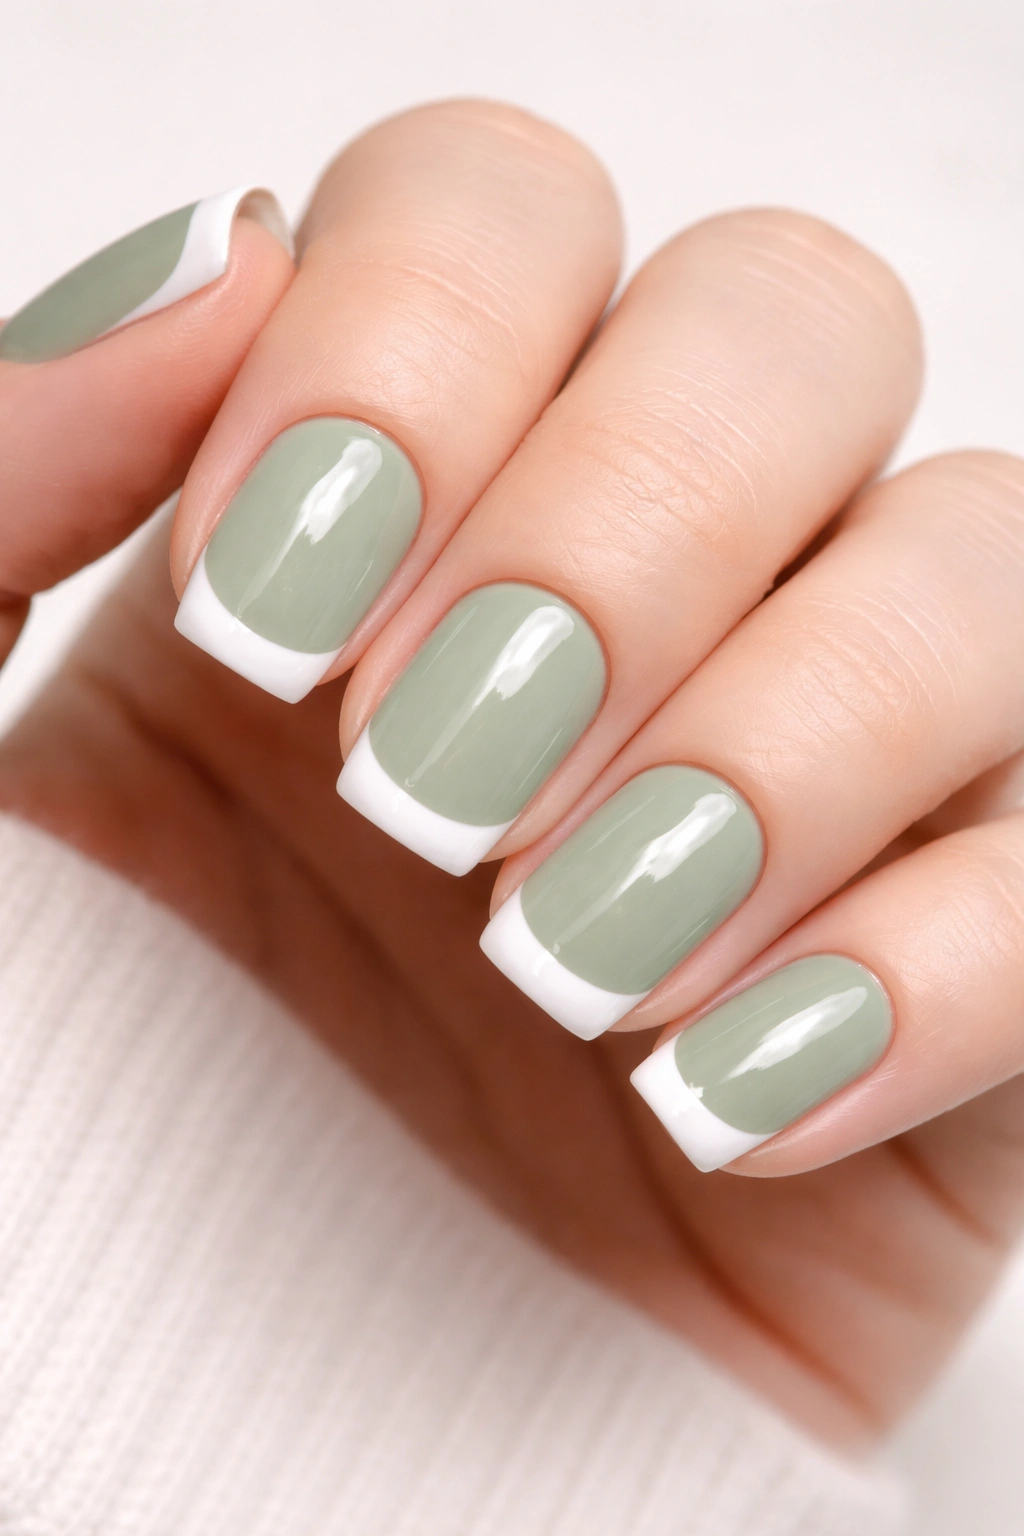
The French manicure is timeless, and a sage-and-white version feels fresher and more contemporary than the traditional pink-and-white without sacrificing any of the elegance. The contrast between the cool sage and the bright white creates a clean, modern aesthetic that’s simultaneously classic and current.
Why Sage Green Elevates the French
The traditional French manicure uses a warm pink or natural tone for the base, which is beautiful but predictable. Sage green base brings something unexpected while maintaining the refined, polished feeling that makes French manicures so universally flattering. The white tips read as crisper against sage than against warmer tones, making the contrast feel more dramatic and intentional.
Applying a Sage-White French
- Paint all nails in sage green and let dry
- Using a curved nail guide (these are thin, flexible stickers shaped like the French manicure curve), position it just below where you want your white tip to begin—typically about 1/8 inch from the edge
- Paint the tips white with a steady hand, using the guide as your boundary
- Remove the guide while the polish is slightly tacky
- If the curve looks too sharp or artificial, soften it by using a thin brush with a tiny amount of sage polish to blend the line very slightly
- Seal with topcoat
Pro tip: A slightly thicker white tip (about 1/4 inch) reads as more modern and intentional than a very thin traditional line.
8. Sage Green with Glitter Gradient
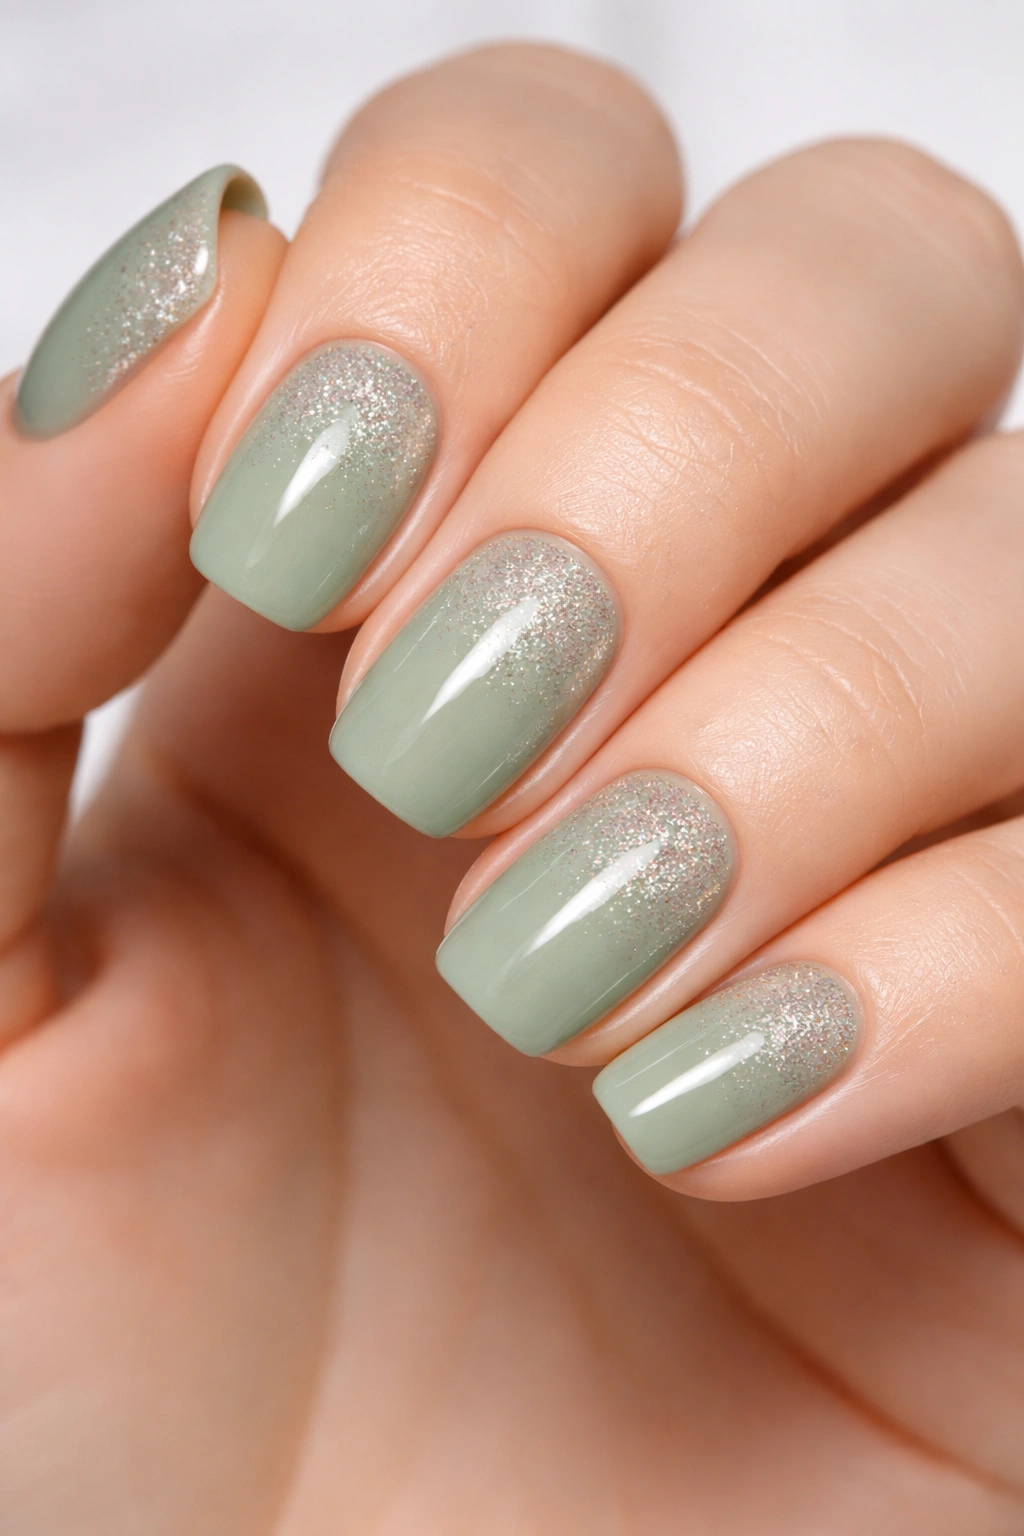
Glitter doesn’t have to mean “party nail”—a subtle gradient of tiny, refined glitter fading from clear at the base to denser glitter at the tips creates a sophisticated effect that catches light beautifully. On sage green, fine glitter in silver or champagne adds shimmer without overwhelming the base color.
Applying Glitter Without the Mess
Pre-mixed glitter polishes are your easiest option, but if you want to blend loose glitter into a base, the sponge method works beautifully. The key to a sophisticated result is using very fine glitter and keeping the concentration light at the base.
Gradient Glitter Method
- Paint all nails in sage green—this is your base, so make sure you have full coverage
- Mix glitter polish (or loose glitter mixed into clear polish) at a ratio of about 60% clear polish to 40% glitter for the tips
- Dip a makeup sponge into this glitter mix and press it onto just the tip portion of your nail
- Repeat, making each application slightly denser toward the very edge
- Build the gradient gradually so it fades naturally into the solid sage base
- You may need 3-4 applications to build a visible gradient without the tips looking overly heavy
- Seal with a thick layer of topcoat to smooth the glitter texture
Worth knowing: Champagne and rose gold glitter looks warmer against sage green, while silver glitter reads as cool and crisp.
9. Sage Green Velvet or Textured Finish
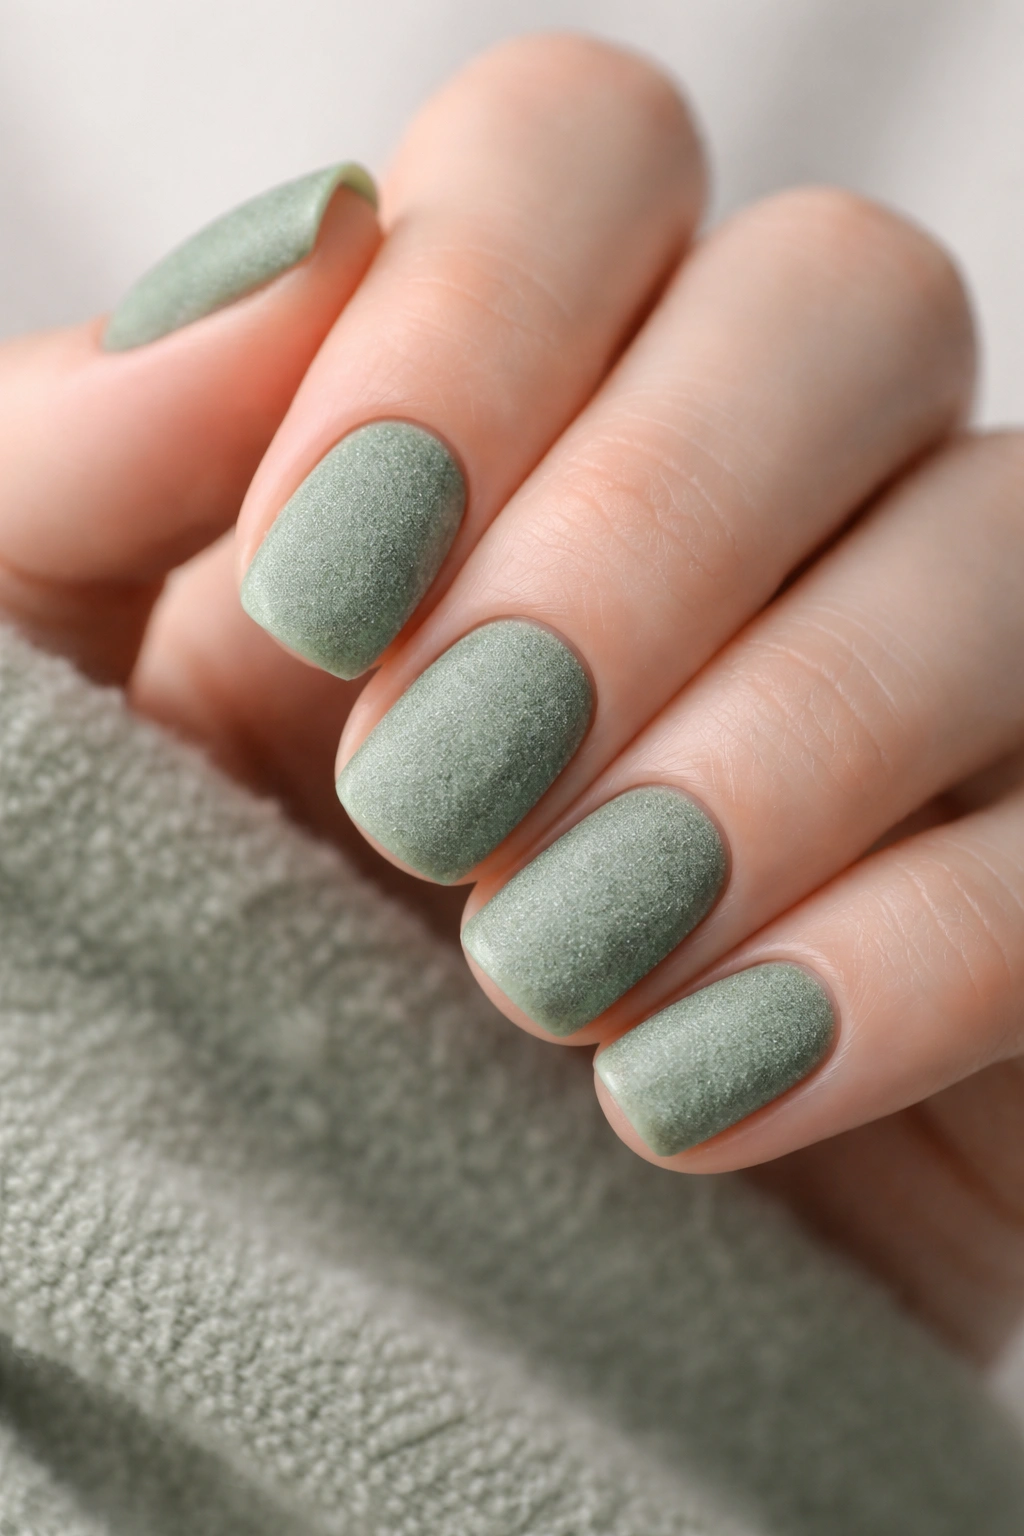
Velvet or textured nail polish creates a suede-like, velvety finish that feels tactile and luxurious—it’s genuinely different from traditional polish, and on sage green, the texture adds another dimension to an already sophisticated color. The short squoval shape lets the texture be the star without fighting for attention against an elaborate design.
Understanding Textured Finishes
Velvet and suede finishes typically require a special topcoat or matte topcoat applied over regular polish, or they come pre-made as textured polish. The texture is subtle but genuinely noticeable—it changes not just how the nail looks but how it feels. People literally want to touch velvet nails, which makes it a conversation starter without being loud.
Achieving the Velvet Look
- Apply two coats of sage green polish and let dry
- Apply a velvet topcoat according to the product instructions—usually this means a standard topcoat application, but some brands require you to sprinkle special velvet powder while the topcoat is still wet
- If using velvet powder, use a soft brush to remove excess powder after drying
- If using velvet topcoat, simply apply and let cure
- Avoid gel polish for this look—velvet finishes work much better with traditional polish
Quick fact: Velvet nails do require more careful maintenance than traditional polish because the texture is less slick and can catch on things more easily, but they last just as long.
10. Sage Green with Rhinestone Accents
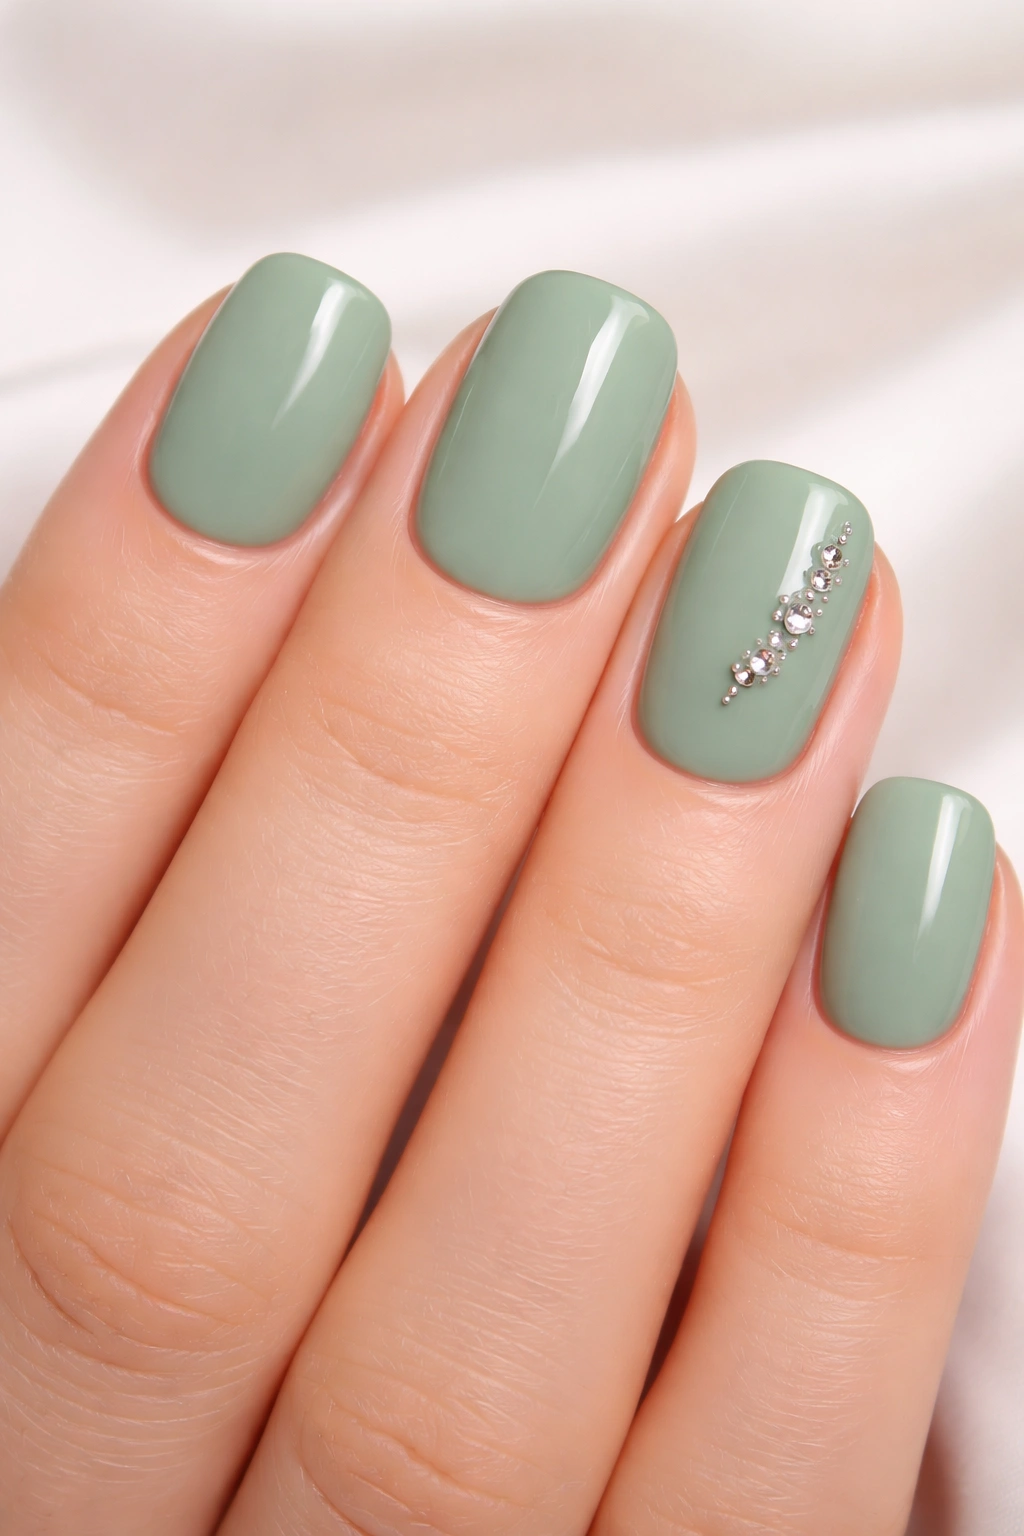
Rhinestones add glamour and sparkle without requiring fussy design work—you’re literally just placing small gems on your nails and letting them do the work. On sage green, rhinestones in clear, silver, or champagne create a look that’s polished and intentional without being over-the-top, especially if you place them with deliberate spacing rather than covering the entire nail.
Using Gems to Create Focus
A strategically placed rhinestone or small cluster of gems on one accent nail draws the eye and creates visual interest in a way that feels intentional. On shorter nails, restraint is key—a few well-placed gems read as luxury, while covering the nail in rhinestones can look costume-y.
Application and Adhesion
- Paint all nails in sage green and let dry
- Choose your adhesive: nail glue works fine for regular rhinestones, but there are also specialized gem glues that bond faster
- Using a small brush or the applicator that comes with the adhesive, apply a tiny dot to the back of the rhinestone
- Press firmly onto the nail in your chosen location, holding for 3-5 seconds
- Allow the adhesive to set fully (check product instructions, usually 24 hours) before getting your nails wet
- A thick topcoat layer over (not around) the gems helps secure them further
- If a gem pops off during normal wear, reglue it—it’s a quick fix
Pro tip: Placing gems in a small cluster along the side edge or in a diagonal line across the nail creates a more sophisticated look than scattering them randomly.
11. Sage Green Two-Tone Negative Space Design

Negative space—where you leave portions of the nail bare (showing your actual nail bed or a base color underneath)—creates a modern, architectural look that’s surprisingly simple to execute. A sage green design with negative space cutouts in a geometric shape feels contemporary and intentional without requiring advanced nail art skills.
Why Negative Space Reads as Modern
Negative space designs feel artistic and intentional because they require planning. The eye is drawn to both the color and the empty space equally, creating a visual balance that’s more sophisticated than a solid or fully covered nail. On short squoval nails, negative space designs make the shape of the nail itself part of the aesthetic.
Creating a Negative Space Design
- Start with no base coat or a clear base coat so the nail bed shows through in your negative space area
- Apply nail guides (thin stickers) to create the boundary of where your sage polish will go
- Paint the sage polish in the exposed areas and let dry
- Remove the guides carefully
- If desired, paint a thin outline around the negative space in a contrasting color (white, black, or dark sage) to make the cutout more defined
- Seal with topcoat
Worth knowing: You can buy pre-made nail stickers in various geometric shapes, or you can freehand a simple design using painter’s tape.
12. Sage Green with Fine Floral Detailing
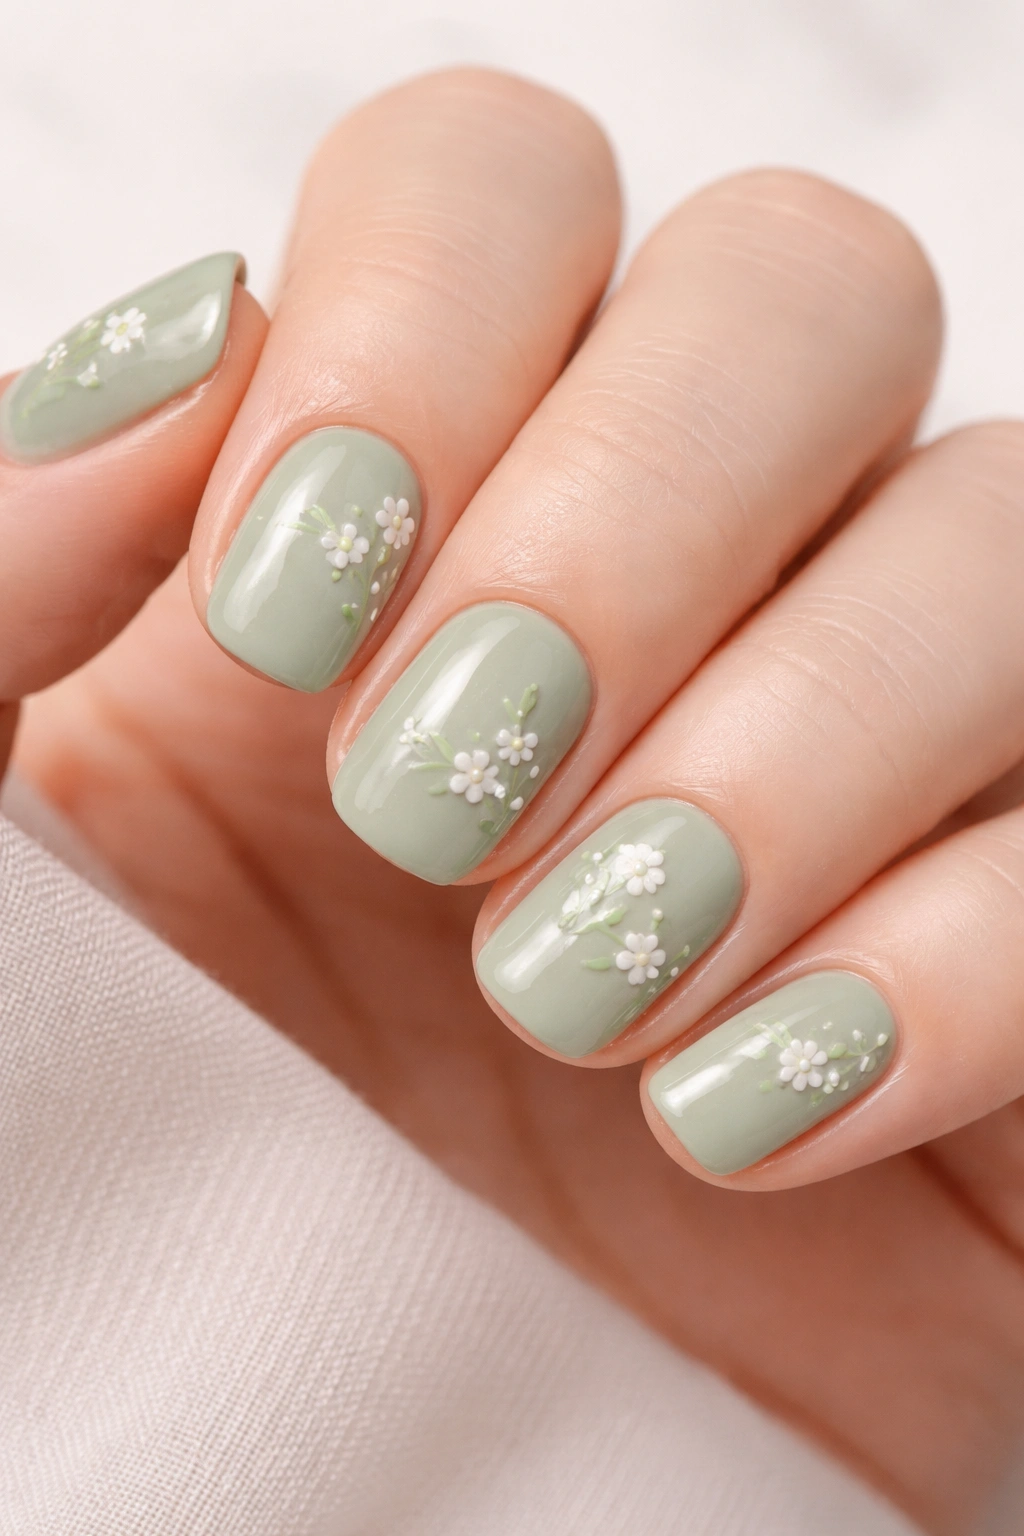
Delicate floral artwork on nails sounds like something that requires a professional artist, but small, simple flowers are actually achievable with practice and the right brushes. A tiny sage green base with miniature white or cream flowers scattered across creates a design that’s romantic without being precious or overly cute.
Hand-Painting Florals: A Beginner’s Guide
Simple flowers can be created with just a few brush strokes—you don’t need photorealism. A small circle or dot for the center with five tiny petals around it creates a perfectly charming flower, and the imperfection of hand-painted work actually adds to the charm. On short nails, one or two small flowers per nail is usually enough.
Painting Simple Flowers
- Using the finest brush you have, dip into white or cream polish
- Paint a tiny circle or dot for the flower center
- With a slightly larger brush, paint five small ovals or teardrop shapes around the center
- If the petals look too solid, add a tiny highlight in white to one side of each petal for dimension
- Allow to dry and seal with topcoat
- If the flowers don’t look perfect, they actually look more like “artfully hand-painted” that way
Quick fact: Gel polish is more forgiving for floral detailing because it doesn’t dry while you’re working, giving you time to adjust and add details.
13. Sage Green with Metallic Gold or Rose Gold Tips
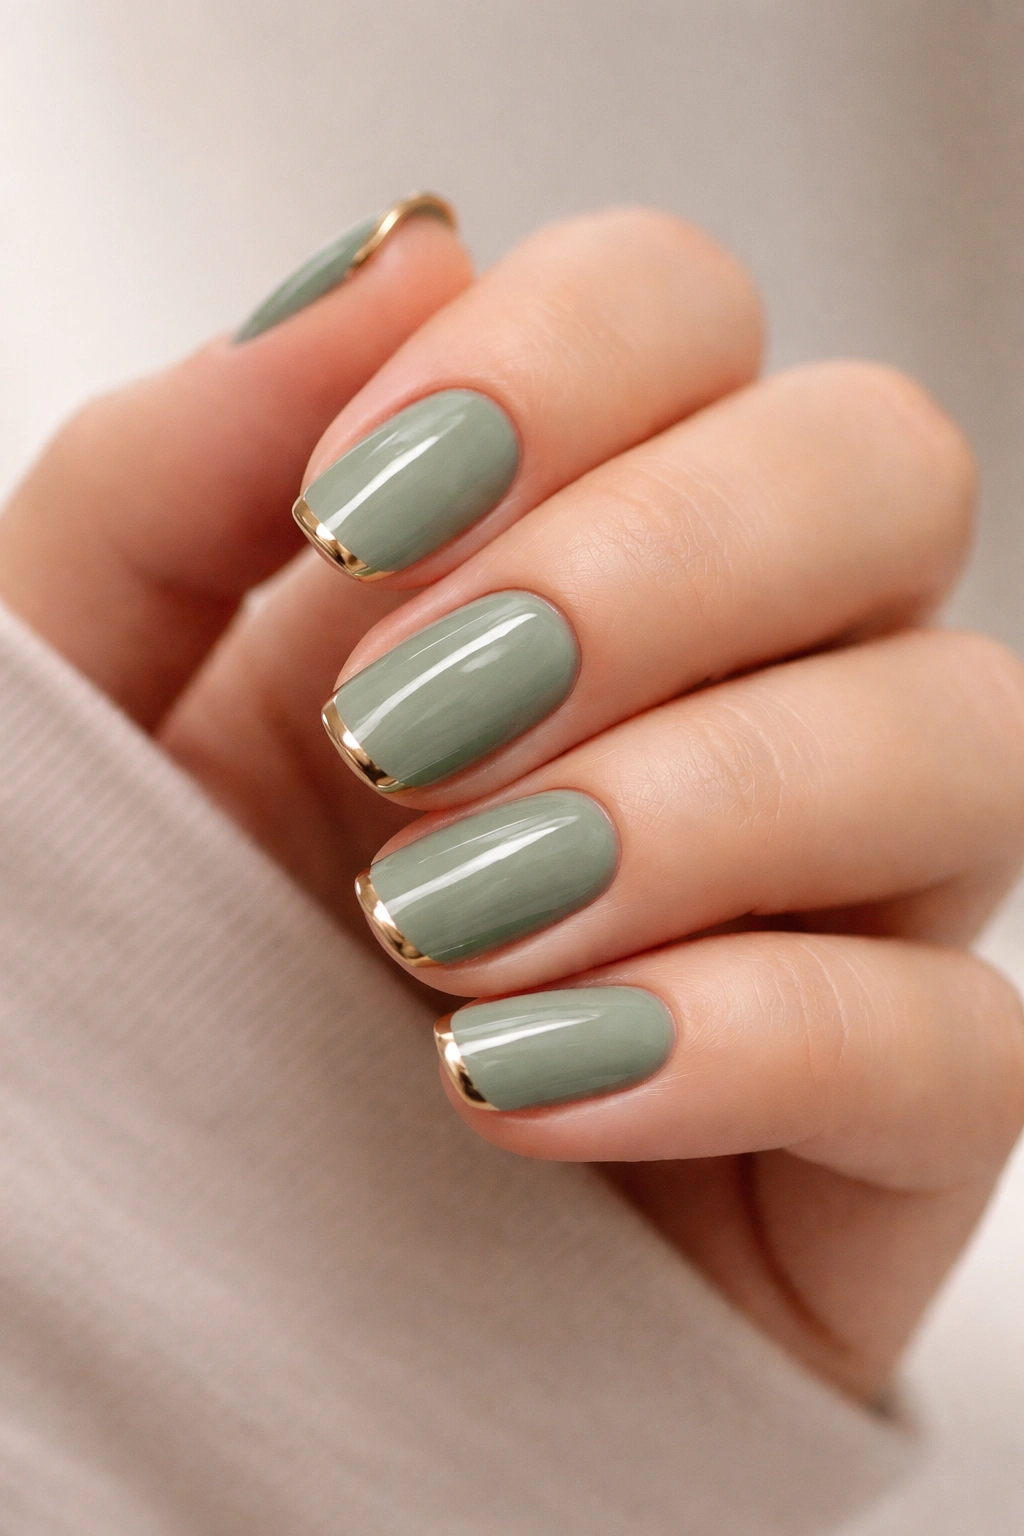
A crisp metallic tip (like a French manicure, but with metallicshine instead of matte white) creates luxury without being loud. Metallic finishes are inherently attention-grabbing, so a small application—just the tips—provides interest without the entire nail feeling costume-y.
Metallic Tips That Feel Elevated
The key to metallic tips that read as sophisticated rather than novelty is clean edges and restraint. A thin, precise metallic line reads as luxury; a thick, uneven line reads as overdone. Consider this the modern, upscale cousin of the traditional French manicure.
Applying Metallic Tips
- Paint all nails in sage green and let dry completely
- Choose your metallic color—gold reads warm and classic, while rose gold feels more contemporary
- Apply guides or use painter’s tape to create a clean boundary where the metallic will begin
- Paint the metallic polish carefully into the tips, working slowly for a crisp edge
- Remove guides while still slightly tacky
- If the edge is harsh, use a very thin brush with a tiny amount of sage polish to blend the line
- Seal with topcoat—this flattens and smooths metallic finishes, making them look more refined
Pro tip: Thin metallic tips (about 1/8 inch) actually look more expensive than thick ones because they feel refined rather than heavy.
14. Sage Green with Thin Striped Pattern
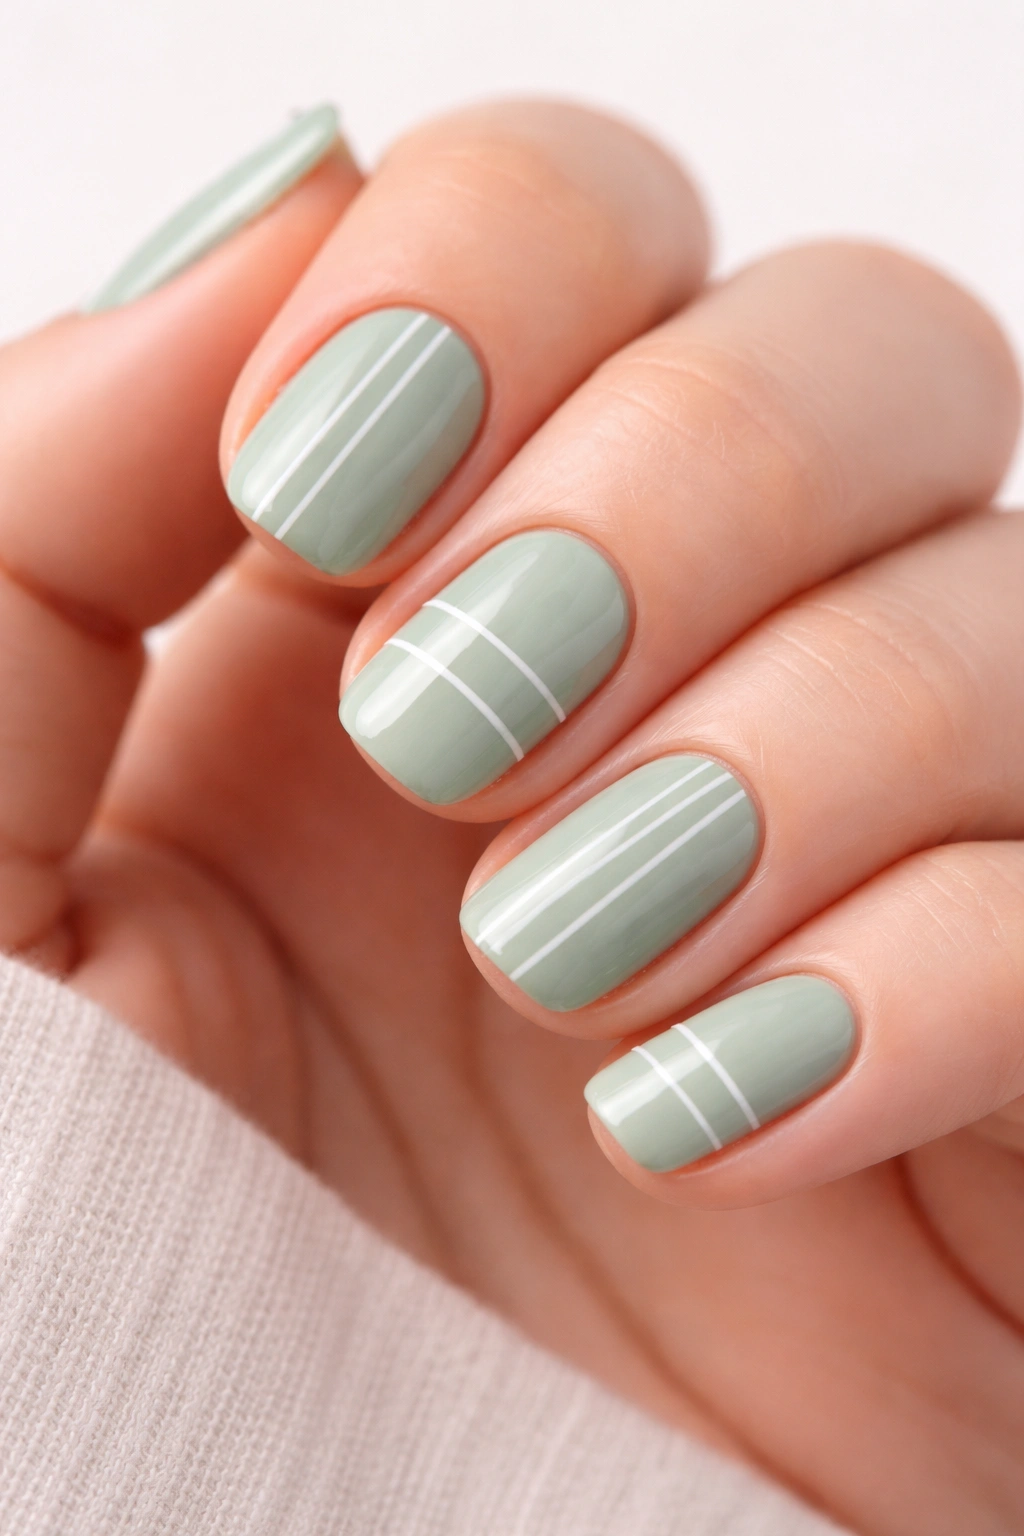
Stripes can feel preppy or bold depending on how you execute them, but thin, delicate stripes in white, cream, or a darker sage over a lighter sage base create a subtle pattern that reads as polished rather than loud. Horizontal, vertical, or diagonal stripes all work beautifully, depending on your preference.
Planning Striped Designs
Stripes have an inherent sense of movement and energy, which makes them ideal if you want something more interesting than solid color but less busy than an all-over pattern. On short squoval nails, stripes actually look crisper and more intentional than on longer nails because the canvas is smaller and every element shows.
Painting Clean Stripes
- Paint your base coat of lighter sage and let dry
- Using painter’s tape, apply thin strips across your nail at your desired angle—vertical, horizontal, or diagonal
- Use a stripe brush (these are specialized narrow brushes) or a thin nail art brush to paint your contrasting stripe color
- Work within the tape boundaries for clean edges
- Remove tape while still slightly tacky
- Build multiple stripes by overlapping your tape application
- Seal with topcoat to protect the stripes
Worth knowing: Very thin stripes (about 1-2mm wide) read as intentional and refined, while thick stripes can look more casual or playful.
15. Sage Green with Glossy Shine and Subtle Chrome Accents
A high-gloss sage green polish creates a mirror-like shine that feels luxurious and contemporary, and adding just a touch of chrome—traditionally a full-coverage silver mirror effect, but here used as a subtle accent—creates visual interest without overwhelming the sage base. This is all about letting the color shine literally and figuratively.
Chrome as Accent, Not Main Event
Chrome powder creates an intensely reflective, mirror-like finish that’s stunning but can be overwhelming on the entire nail. Using it strategically—perhaps on just the tips or as a small accent corner—lets you enjoy the effect without the design feeling costume-y or overly trendy.
Applying Chrome Accent to Glossy Sage
- Paint all nails in high-gloss sage green and let cure (use gel for best shine, or a glossy traditional topcoat for traditional polish)
- If using gel, apply your chrome powder to just the tips before curing, using a slightly damp brush to press the powder into the gel surface
- If using traditional polish, apply a tacky gel or specialized chrome base to just the tips, then press chrome powder into it, sealing with topcoat
- The chrome should show through as a shimmering, reflective accent rather than complete coverage
- If using regular polish, a high-shine topcoat amplifies the reflectiveness of the entire nail
- Seal everything with a strong, clear topcoat
Pro tip: The glossier your base color, the more any additional shine will pop—this is why chrome accents look so stunning on high-gloss backgrounds.
Final Thoughts

Sage green on short squoval nails is the kind of combination that works for literally anyone—the color is universally flattering, the shape is practical yet polished, and the design possibilities range from barely-there minimalism to statement-making details that still feel grounded. Whether you’re drawn to the simplicity of a single, perfect shade or you want to layer in metallics, textures, and accents, sage green adapts beautifully to whatever direction you take it.
The beauty of this color and shape combination is that it doesn’t feel like you’re making a bold statement, even when you absolutely are. A sage green manicure reads as elevated, intentional, and put-together without requiring any apologies or explanations. You’re not following a trend so much as choosing something timelessly sophisticated that happens to be exactly what your nails needed. Pick whichever of these fifteen designs speaks to your style, commit to clean application and a strong topcoat, and enjoy the countless compliments that come with nails that look this good.
