

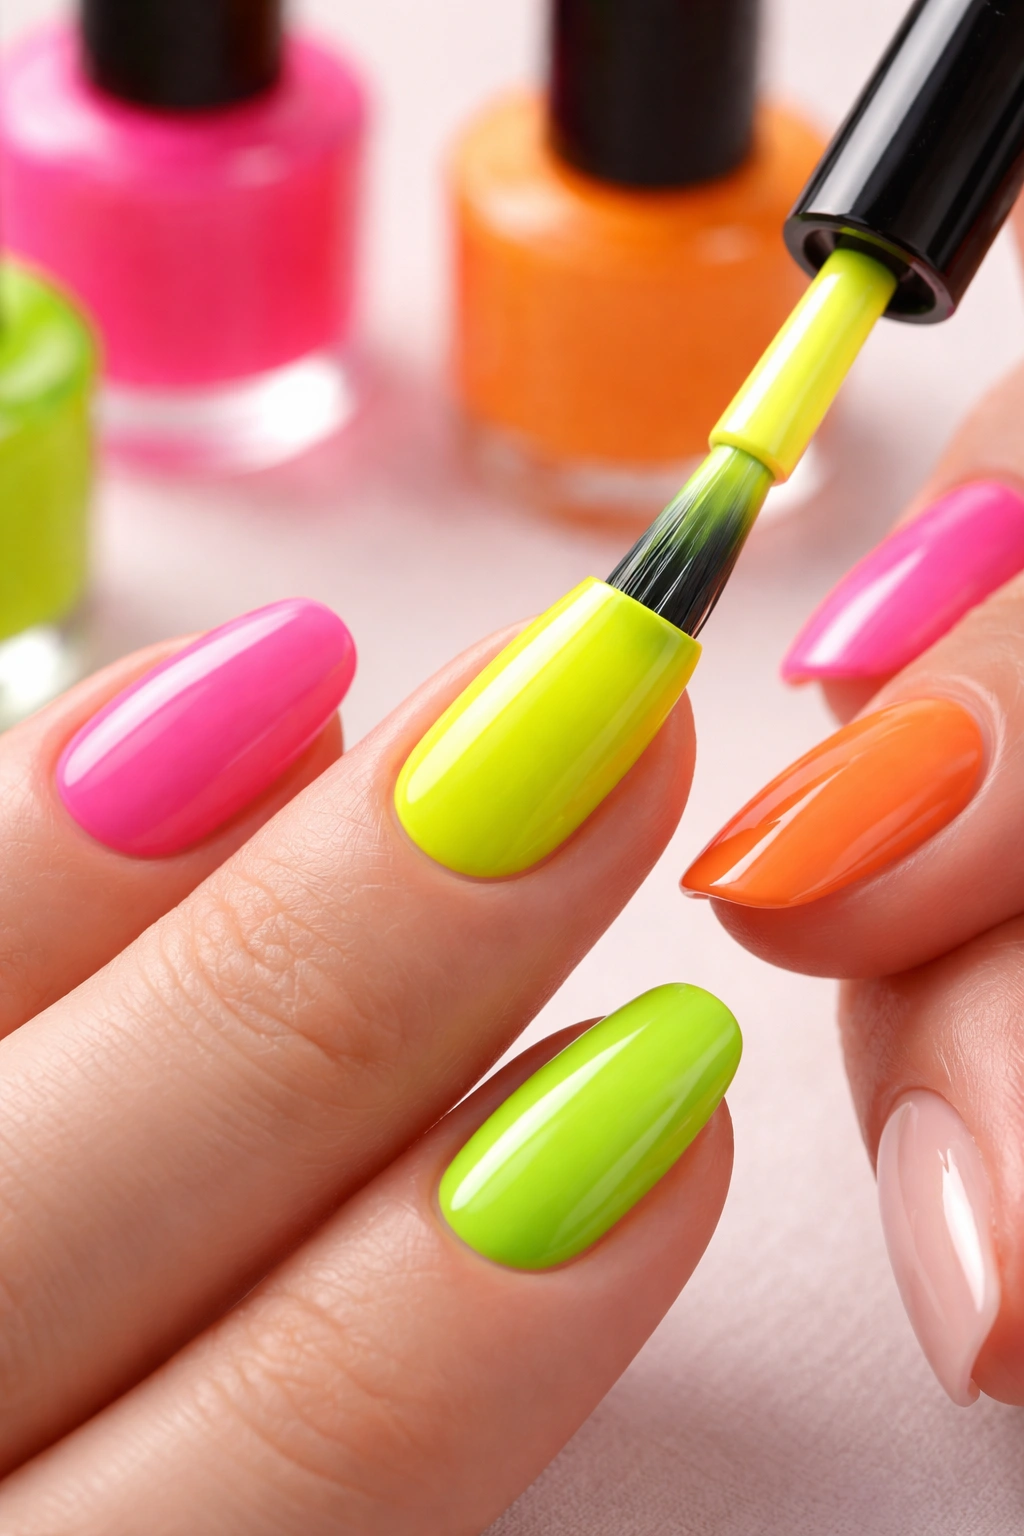
There’s something about neon that instantly lifts your mood and turns heads everywhere you go. Whether you’re hitting the beach, heading to a summer festival, or just want to inject some serious color into your everyday look, neon nails deliver that bold pop without apology. These aren’t subtle, whisper-quiet manicures—they’re confident, electric, and unapologetically fun. The beauty of neon is that it works on every skin tone when you choose the right shade, and there’s a neon nail design for every personality and occasion. From soft pastel neons that walk the line between delicate and daring to full-saturation fluorescent designs that literally glow, the options are endless. If you’ve been hesitant about committing to neon because it feels too bold, this guide proves that neon nails can be approachable, achievable, and absolutely stunning. Let’s explore 18 neon nail ideas that’ll have you ditching neutral tones and embracing the electric side of manicure art.
1. Classic Neon French Tips
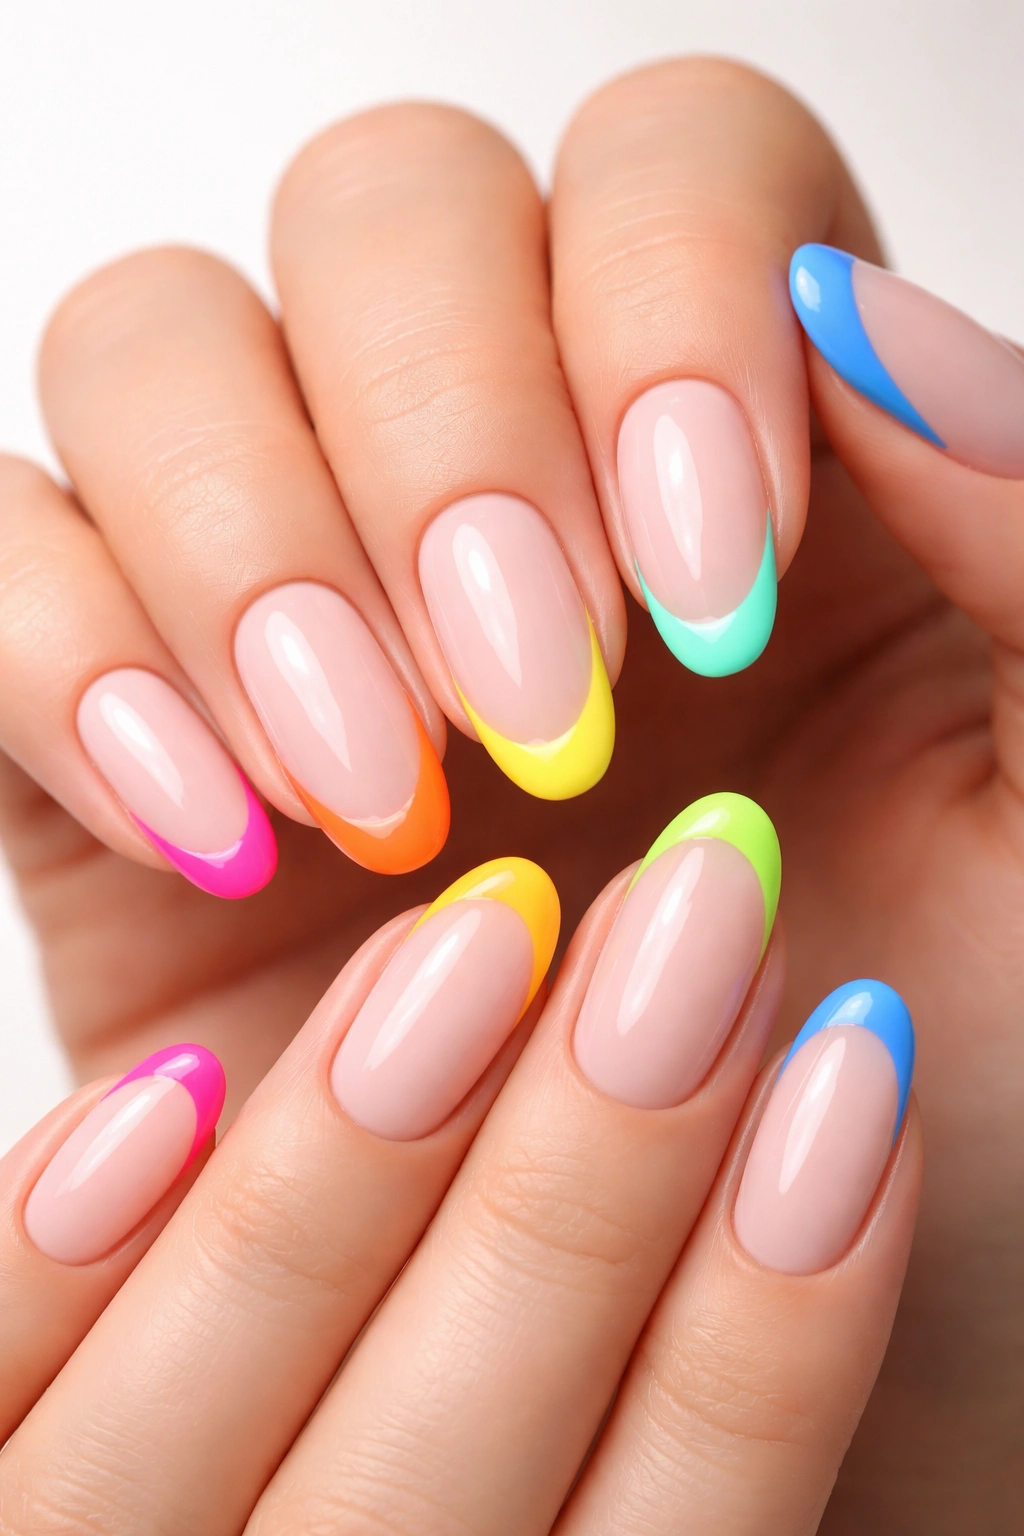
The neon French tip is the gateway drug to bright nail art—it’s bold where it counts and familiar enough to feel wearable. You’re keeping the timeless French manicure silhouette, but instead of pale pink and white, you’re swapping in electric hues. A nude or milky white base keeps the overall look grounded while the neon tip (whether hot pink, lime green, or cobalt blue) does all the talking.
Why This Design Works So Well
Neon French tips strike the perfect balance between classic and contemporary. You get the sophistication of a traditional French manicure combined with the playfulness of neon color. This means you can wear them almost anywhere—to work, on vacation, or out for dinner—without feeling like your nails are screaming for attention. The negative space created by your natural nail showing through tones down the intensity of the fluorescent color, making it feel intentional rather than overwhelming.
How to Create Neon French Tips at Home
Start with a clean, buffed nail and apply two coats of a milky nude or sheer pink base. Once dry, use a thin nail art brush or striping tape to apply your neon shade along the tip. Keep the line clean and sharp by using steady, deliberate strokes or by letting the tape guide your brush. Seal with a glossy top coat for that refined, salon-finished look.
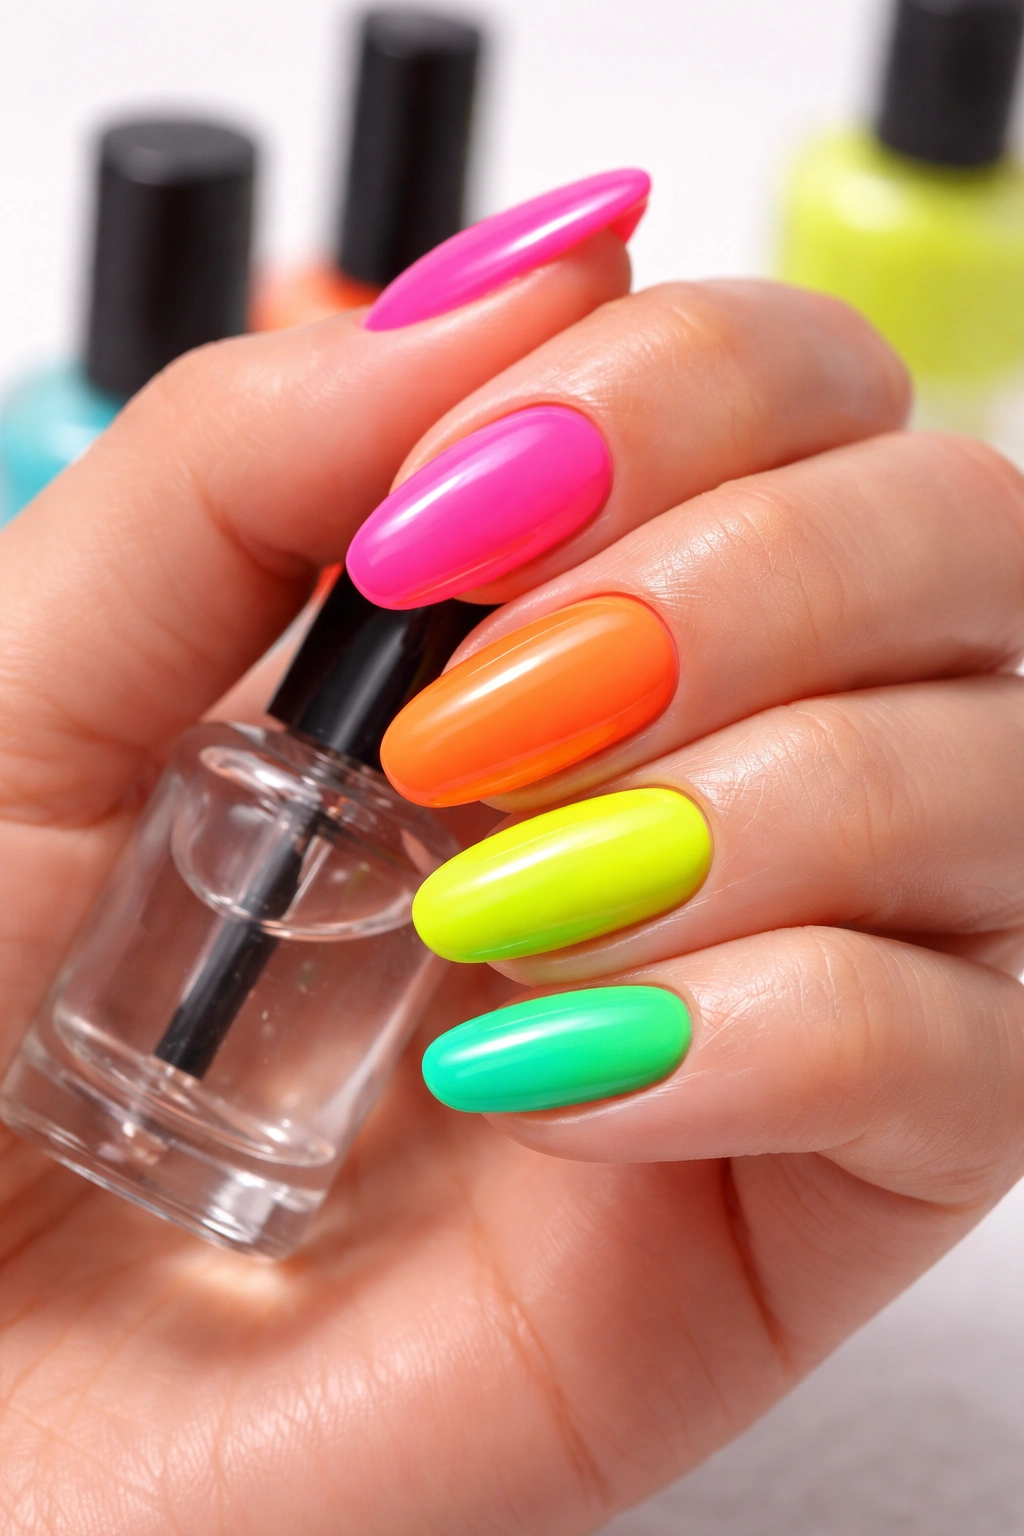
2. Neon Ombre Gradient Nails
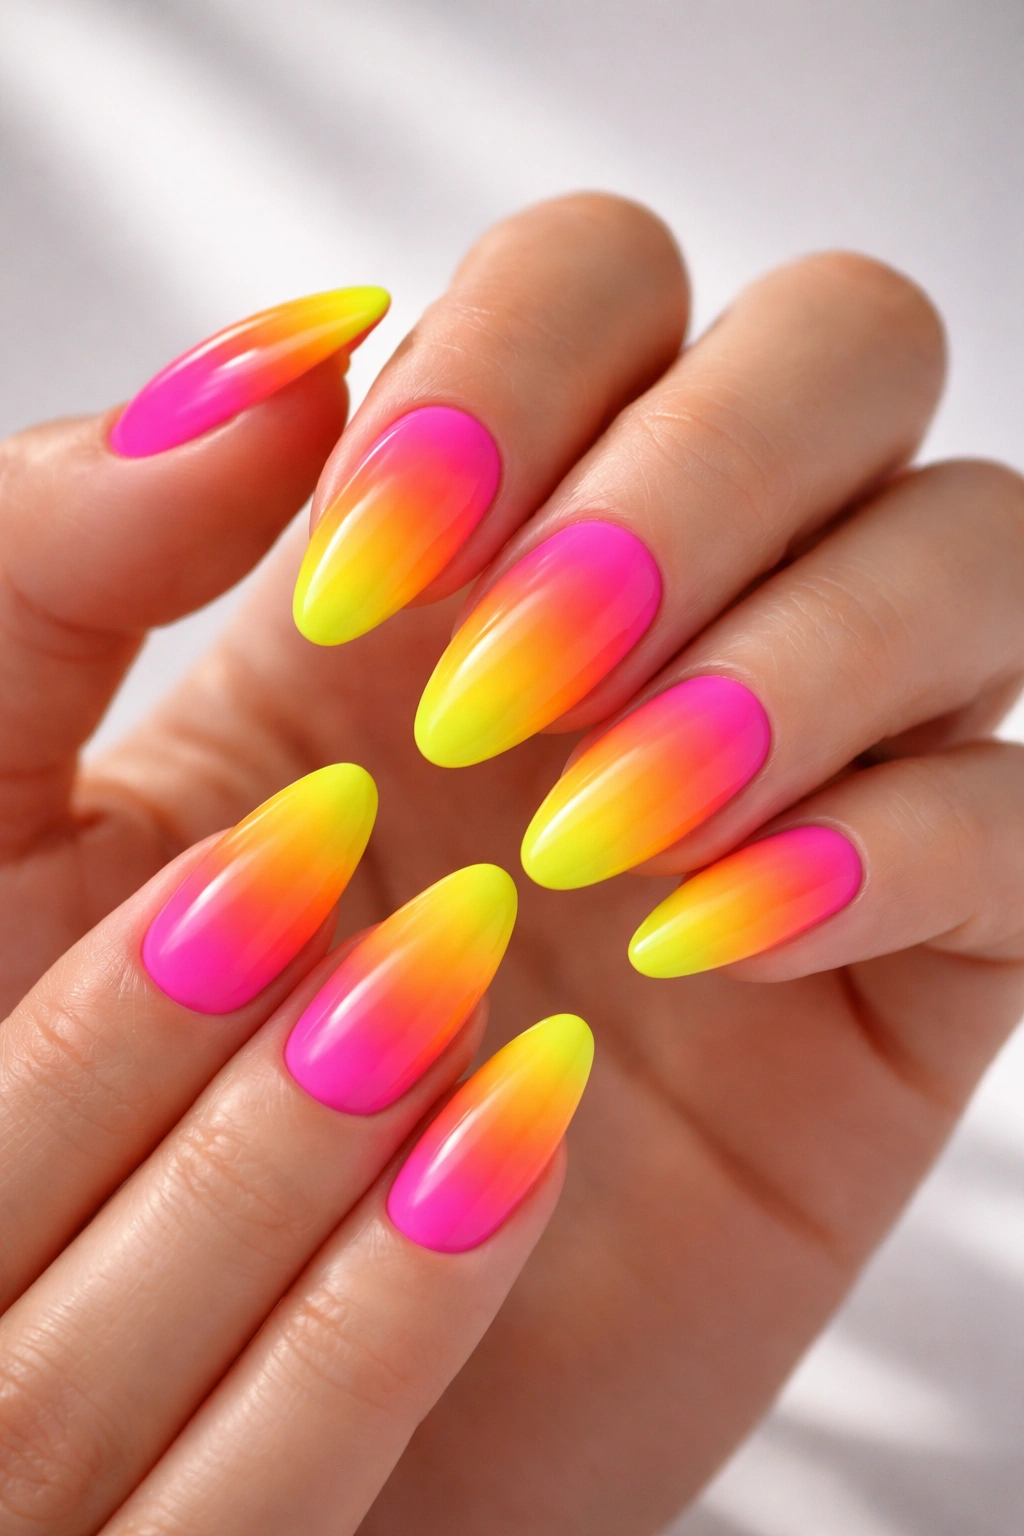
If you can’t choose just one neon color, an ombre gradient lets you blend multiple shades into one stunning display. The beauty of this design is watching the colors transition smoothly from one nail to the next—or even within a single nail if you’re feeling adventurous. Think neon pink melting into hot orange, then shifting into highlighter yellow, all in one fluid sweep across your fingertips.
The Visual Impact of Ombre Neons
Ombre designs create depth and movement that solid colors can’t quite achieve. Your nails catch light differently at each point in the gradient, which means they’re constantly changing appearance depending on your angle and the lighting around you. Ombre also feels intentional and artistic rather than accidental, which automatically elevates the look.
The Easiest Ombre Technique
Grab a makeup sponge and several neon polishes in colors that flow together naturally. Paint thin stripes of each color onto the sponge, then bounce the sponge gently onto your nail (don’t swipe—this isn’t blending, it’s transferring). The sponge texture does most of the work for you, creating that soft, blended appearance without requiring a steady hand. If you prefer precision, use a gradient brush specifically designed for this purpose, which gives you more control over where each color lands.
3. Neon Leopard Print Nails
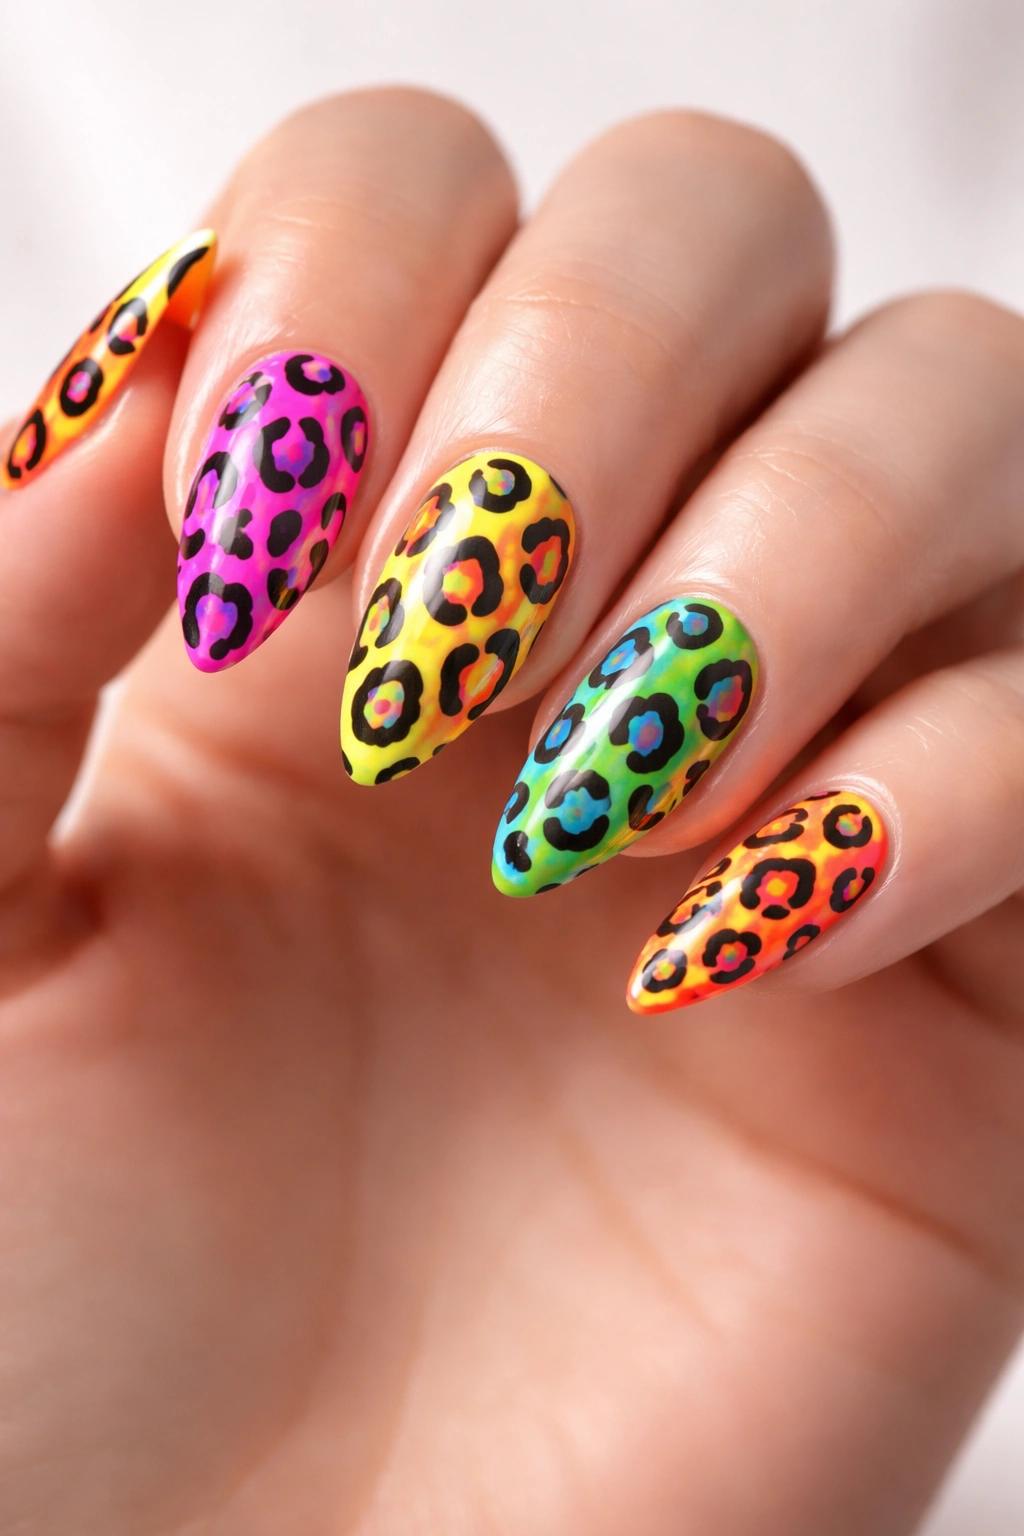
Animal prints are a timeless nail art staple, and neon versions take them from standard to spectacular. Combine a bright neon base (lime green, electric pink, or vibrant orange works beautifully) with contrasting leopard spots in a complementary or coordinating neon shade. The irregular shapes of leopard spots mean there’s zero pressure to be perfectly precise—the wobblier your dots, the more authentic the look.
Why Neon Leopard Print Feels Fresh
Traditional leopard print in browns and tans is undeniably chic, but neon versions feel playful and fashion-forward. The contrast between two electric hues creates visual interest that keeps people looking. It’s bold enough to be a statement but structured enough (with the organized leopard pattern) to feel intentional rather than chaotic.
DIY Leopard Spot Application
Use a dotting tool or the end of a bobby pin to create the spots. Apply larger dots first to establish the general spacing, then fill in smaller dots around them to create that organic leopard pattern. Don’t overthink placement—authentic leopard print is naturally irregular. If you mess up a spot, use a thin brush dipped in nail polish remover to clean it up before the polish dries.
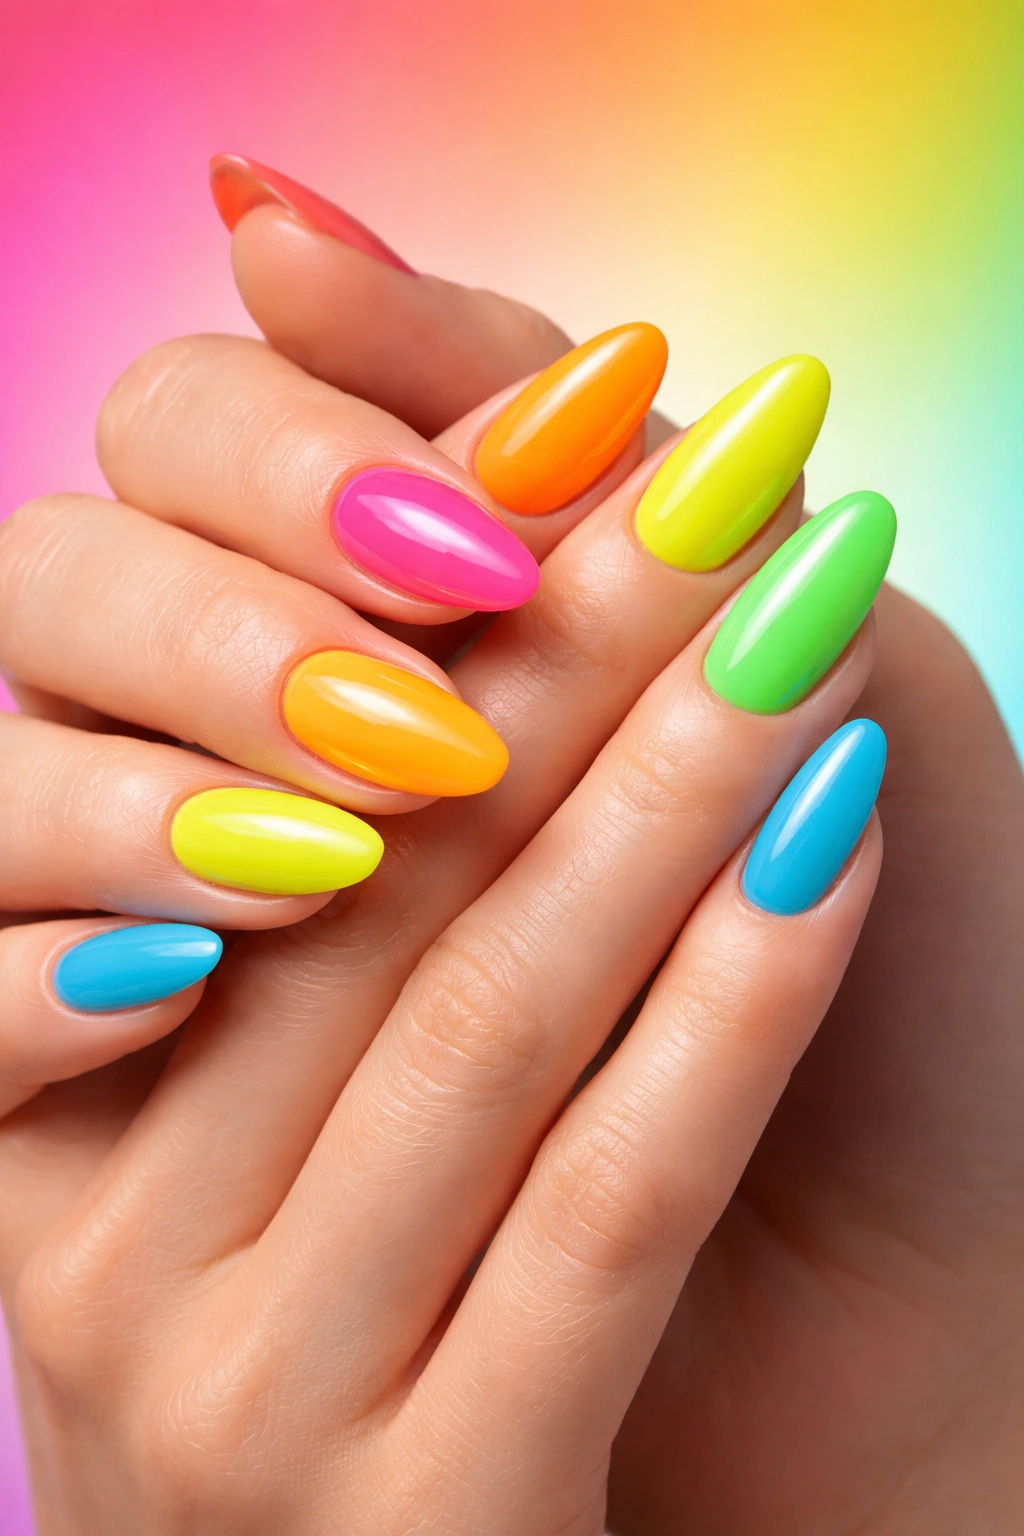
4. Neon Rainbow Skittle Nails
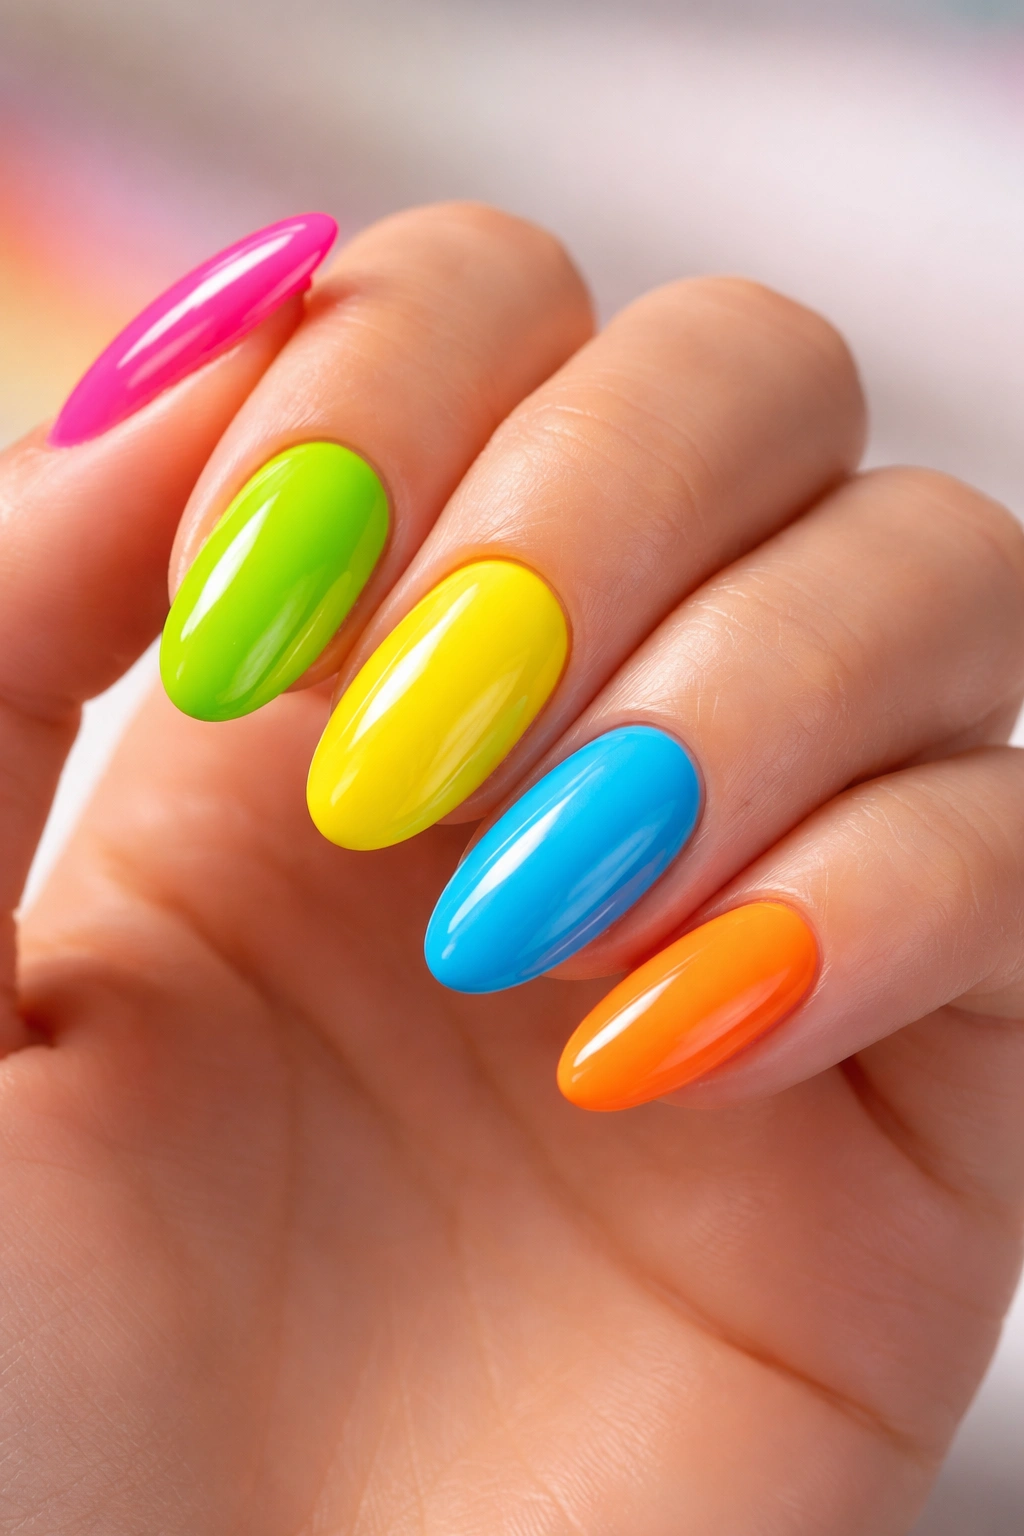
The Skittles mani remains one of the easiest and most satisfying nail designs, and when you execute it in neons, it becomes instant vacation vibes. Each nail gets its own neon color—hot pink on your pinky, lime green on your ring finger, electric yellow on your middle, neon blue on your index, and neon orange on your thumb. It’s colorful, fun, and screams confidence.
The Psychology Behind Skittle Nails
There’s something joyful about having five different colors at once. Skittle nails feel playful and unapologetically happy. They give off main character energy because you’re not trying to match or coordinate—you’re simply celebrating color in its purest form. This design works for anyone who loves color but finds traditional nail art intimidating because there’s literally nothing to mess up.
Executing Perfect Skittle Nails
Choose five neon shades that complement each other (you can go rainbow order or pick your favorites). Apply a base coat to all nails, then simply paint each nail in a solid neon color. Two coats per nail ensures full opacity. Finish with a glossy or matte top coat depending on your preference. That’s literally it—no nail art required.
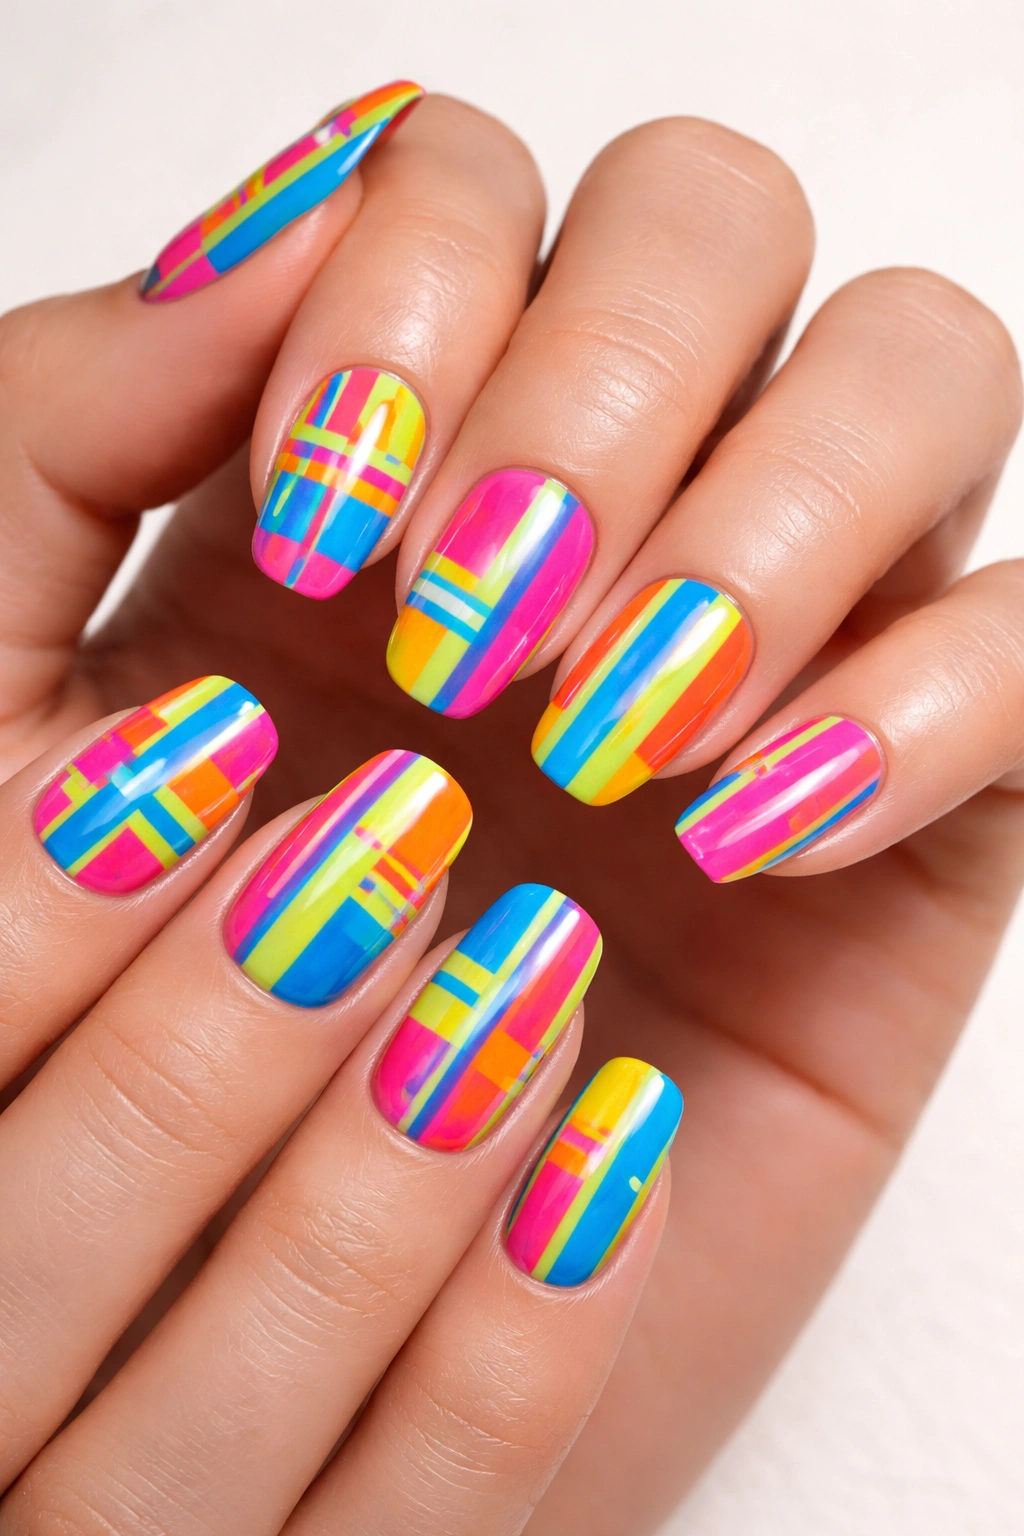
5. Neon Abstract Geometric Design
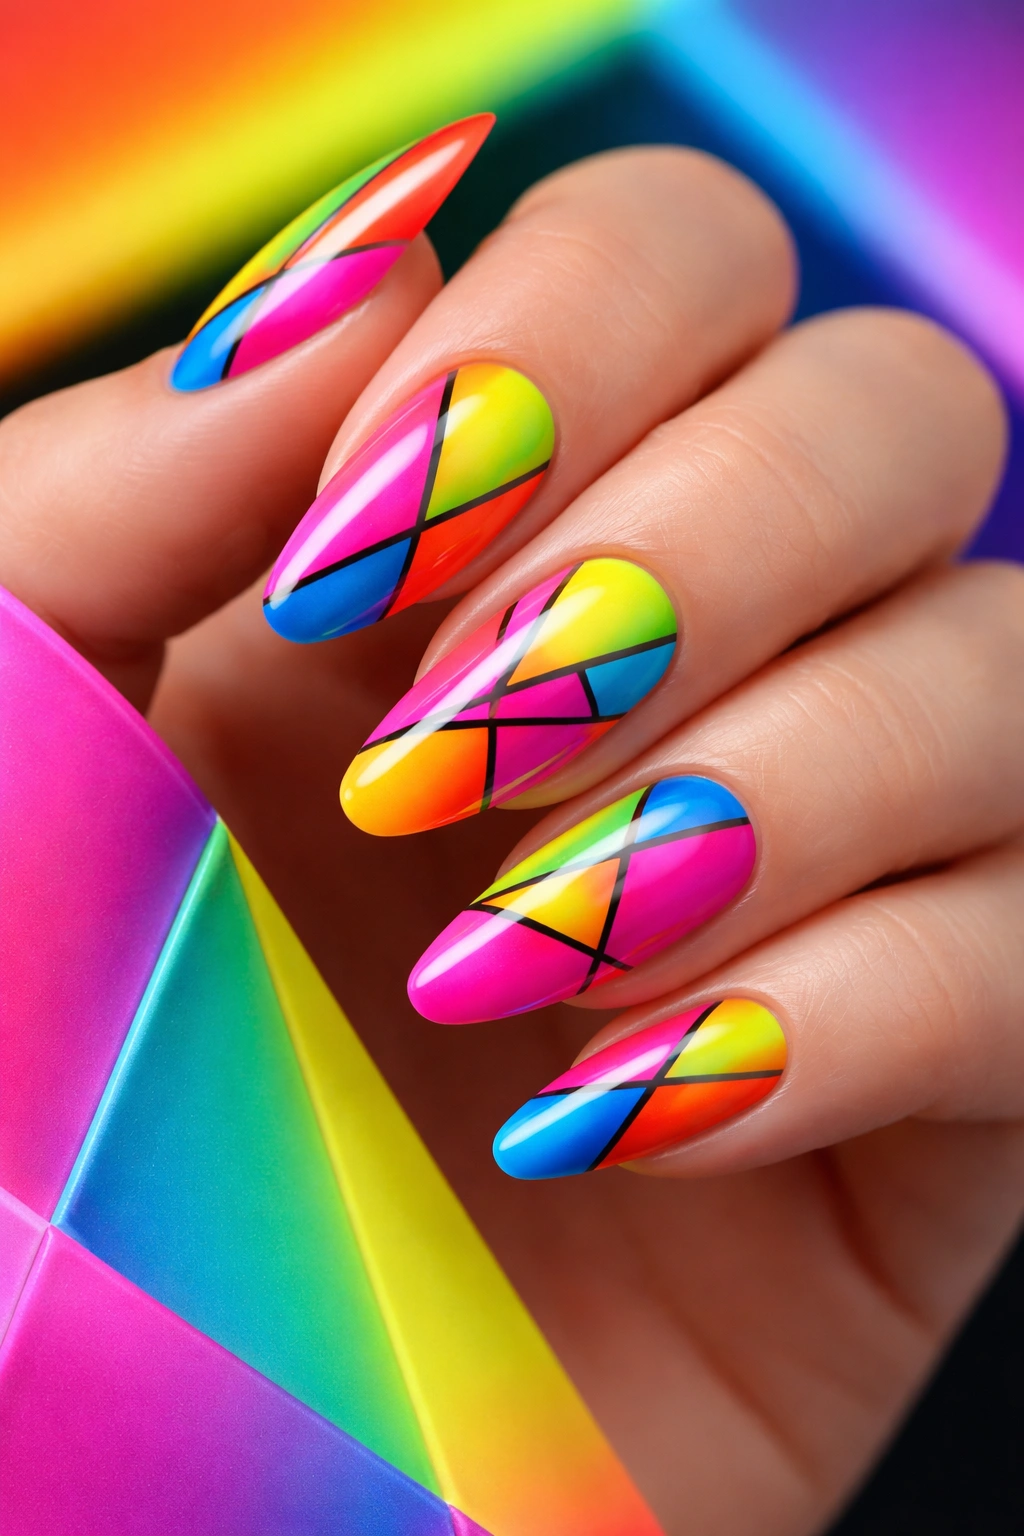
Geometric shapes feel modern and deliberate, and when executed in multiple neon hues, they become genuinely striking. Think triangles, squares, and angular lines in contrasting bright colors creating a modern art vibe on your nails. The negative space between shapes keeps it from feeling busy, and the clean lines give it an intentional, curated appearance.
Making Geometric Art Look Intentional
The key to geometric nail art is using painter’s tape to create crisp, straight lines. Apply your base color first, let it dry completely, then tape off the areas where you want your second color. This ensures perfectly clean edges that look professional. Even if your freehand painting isn’t flawless, the tape work makes everything look polished and deliberate.
Geometric Pattern Ideas
Try creating a color-block design where your nail is divided into sections, each in a different neon shade. Or paint angular stripes that extend from one corner to another. Triangles pointing up and down create visual rhythm. Squares can be arranged in a checkerboard pattern for a Y2K vibe. The possibilities are genuinely endless, and you can customize based on how much time and patience you have.
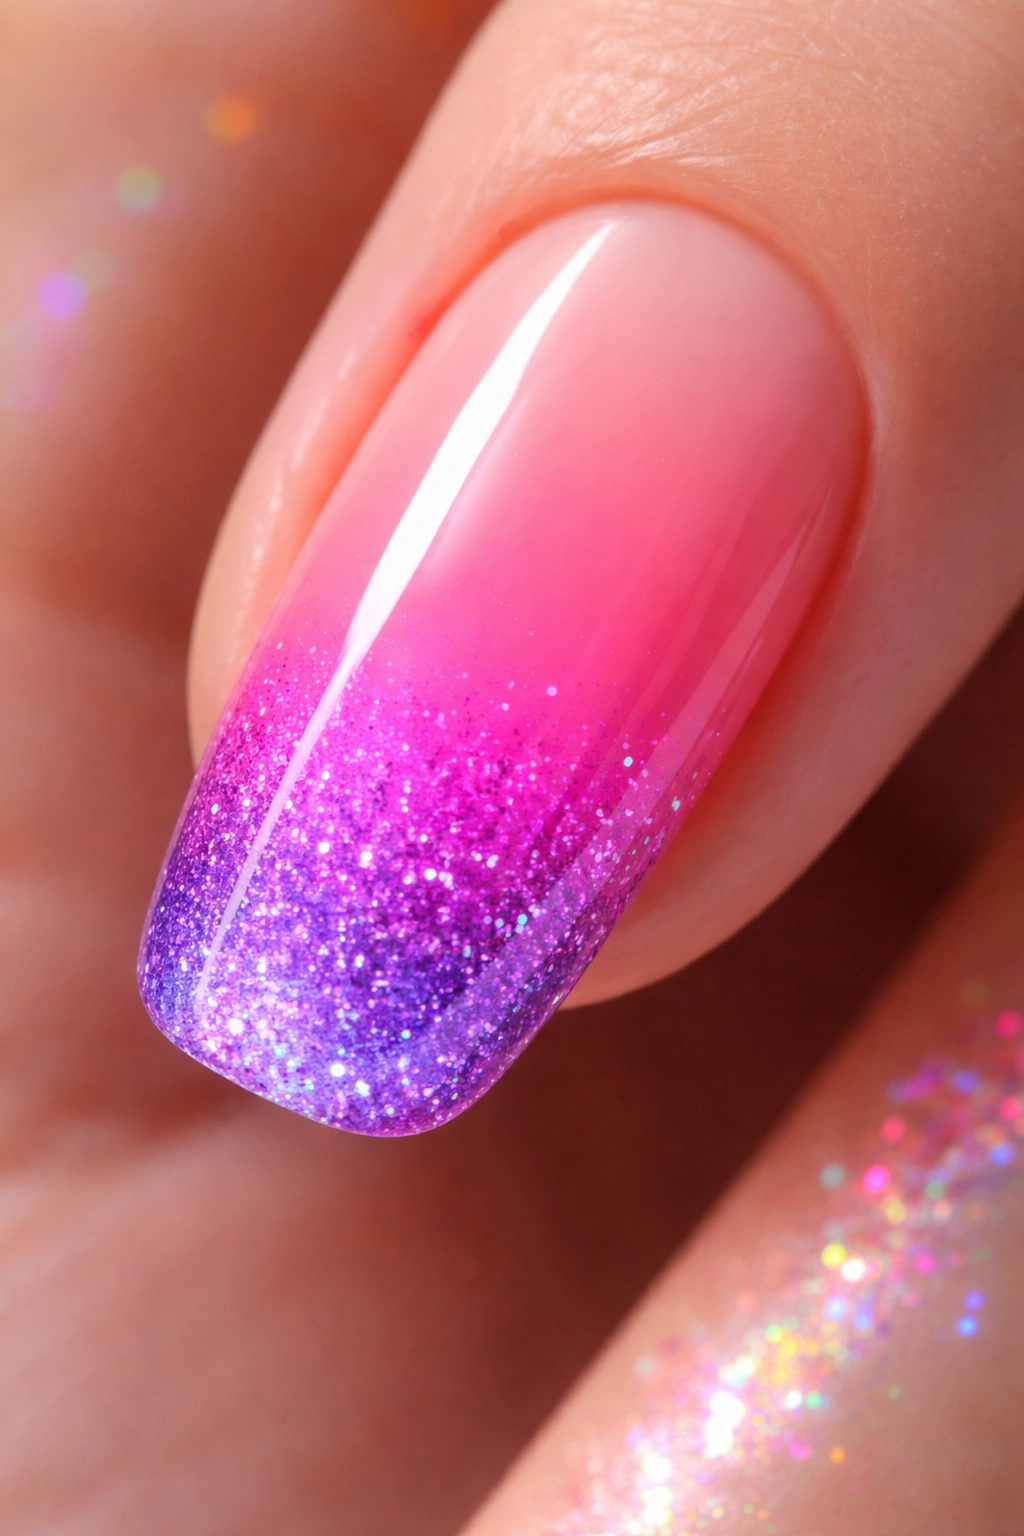
6. Neon Glitter and Sparkle Nails
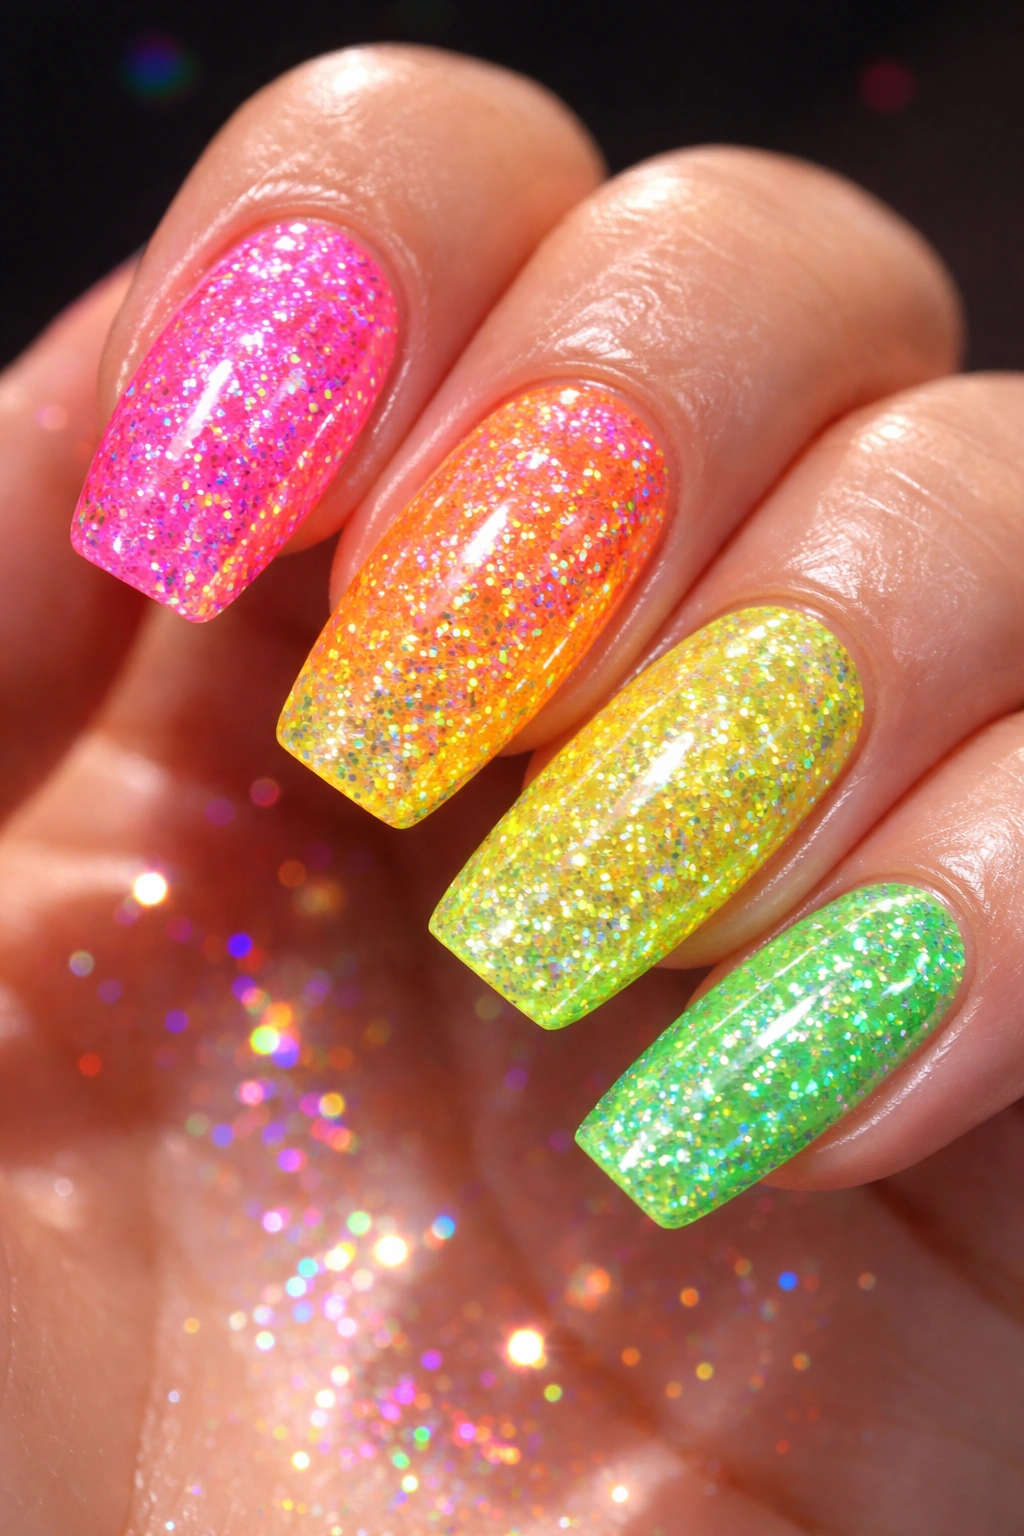
If you want neon but also crave that extra glamorous, eye-catching quality, layering neon polish with glitter takes it to the next level. A solid neon base topped with holographic glitter, chunky glitter pieces, or fine sparkle dust transforms your manicure from bold to absolutely showstopping. The way light reflects off the glitter amplifies the already-bright neon color.
The Texture Factor
Glitter adds tactile dimension to your nails. People can see it from farther away, and it catches light in constantly changing ways. Neon plus glitter equals maximum impact—this is the design you wear when you want your hands to be the focal point of your entire outfit.
Application Technique for Glitter Nails
Paint your neon base color in two coats and let it dry completely. Then apply a clear or slightly tinted gel or polish layer as a sticky base. Immediately dip your nail into loose glitter or sprinkle it on and gently press it down. Alternatively, use a glitter-heavy top coat that has sparkle suspended throughout. Seal everything with a shiny top coat for protection and shine.
7. Neon Pink and Green Color Blocking
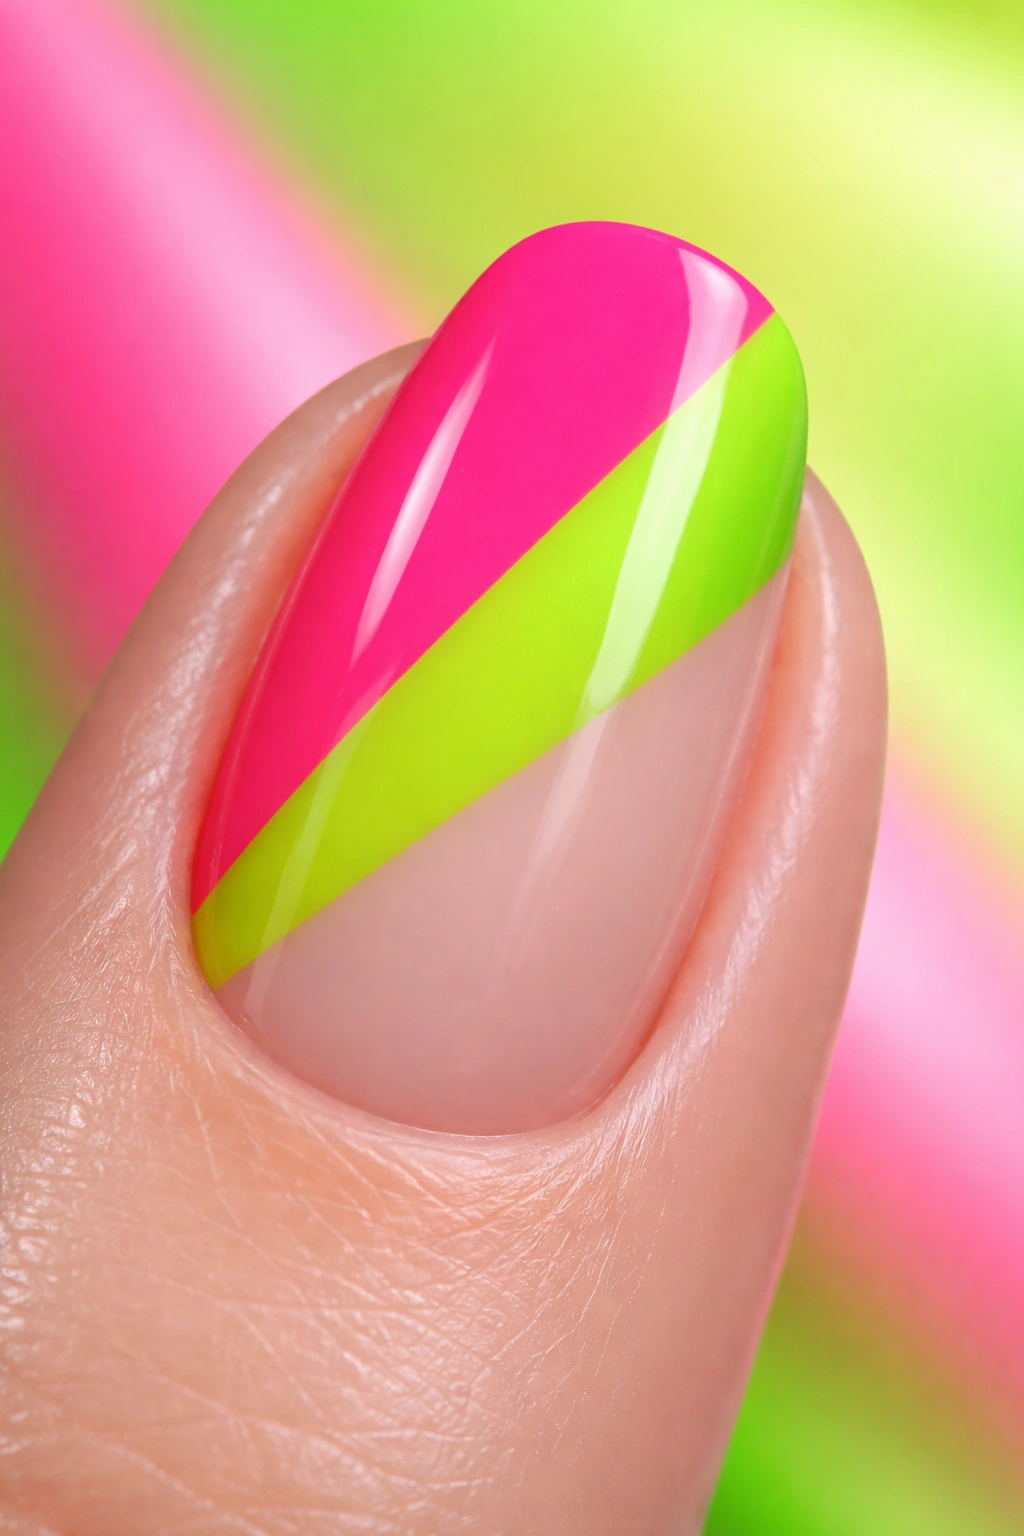
Pairing neon pink with neon green creates a color combo that feels modern, energetic, and unapologetically fun. Color-blocking means dividing your nail into distinct sections and assigning each section a different color. You might do a diagonal split, a vertical stripe down the middle, or even a geometric shape in one color while the rest of the nail is another.
Why This Color Combination Works
Pink and green might seem like an unusual pairing, but in neon form, they’re complementary in energy and brightness. Neither color dominates the other—they exist in equal harmony, which creates visual balance. This combo feels playful without being childish, and it works across multiple skin tones because both neons have enough saturation to pop.
Color-Block Execution
Decide how you want to split your nail—horizontal, vertical, or diagonal sections work best. Use painter’s tape to define your line or shape. Paint one color on one section, remove the tape carefully, let it dry, then tape off and paint the second color. Take your time with tape application to ensure straight, crisp edges.
8. Neon Ombre with Glitter Transition
Combining ombre and glitter creates depth and movement that neither technique achieves alone. Start with your ombre gradient (transitioning from one neon to another), then add glitter concentrated more heavily at one end, fading to less glitter at the other. This creates a gradient of sparkle that mirrors the color gradient, doubling down on the sense of movement and transition.
The Advanced Appeal
This design reads as intentional and artistic. It’s not complicated, but it looks complicated, which automatically elevates your nail game. The glitter gradient makes your nails look like they’re literally glowing and shimmering with life.
Layering Technique
Create your ombre base first and let it set completely. Then apply a glossy top coat or sticky gel layer. While still tacky, apply fine glitter heavily at the tip and gradually less toward the base. You can sprinkle loose glitter and then seal it, or use a pre-made glitter gradient top coat that does the work for you.
9. Neon Outline and Negative Space Design
This design proves that you don’t need to fill every millimeter of your nail to make a statement. Instead, use thin black or white lines to create outlines of shapes, leaving most of your nail bare (or in a neutral shade) with just the outline in bold neon. Lightning bolts, geometric shapes, hearts, or even abstract squiggles work beautifully with this approach.
The Power of Less
Negative space designs feel sophisticated and intentional. By leaving nail bare, you’re actually making the neon lines stand out more dramatically than if you’d filled in every space. This design is perfect if you want neon but find full coverage too intense. It’s bold and subtle simultaneously, which is a genuinely rare combination.
Creating Clean Outline Work
Use the thinnest nail art brush you can find, preferably one designed for detail work and line art. A neon color in thin lines over a clear or nude base creates maximum impact. Take your time and don’t worry about perfection—slightly irregular lines often look more artistic and intentional than perfectly straight ones. Seal with a glossy top coat to protect your detail work.
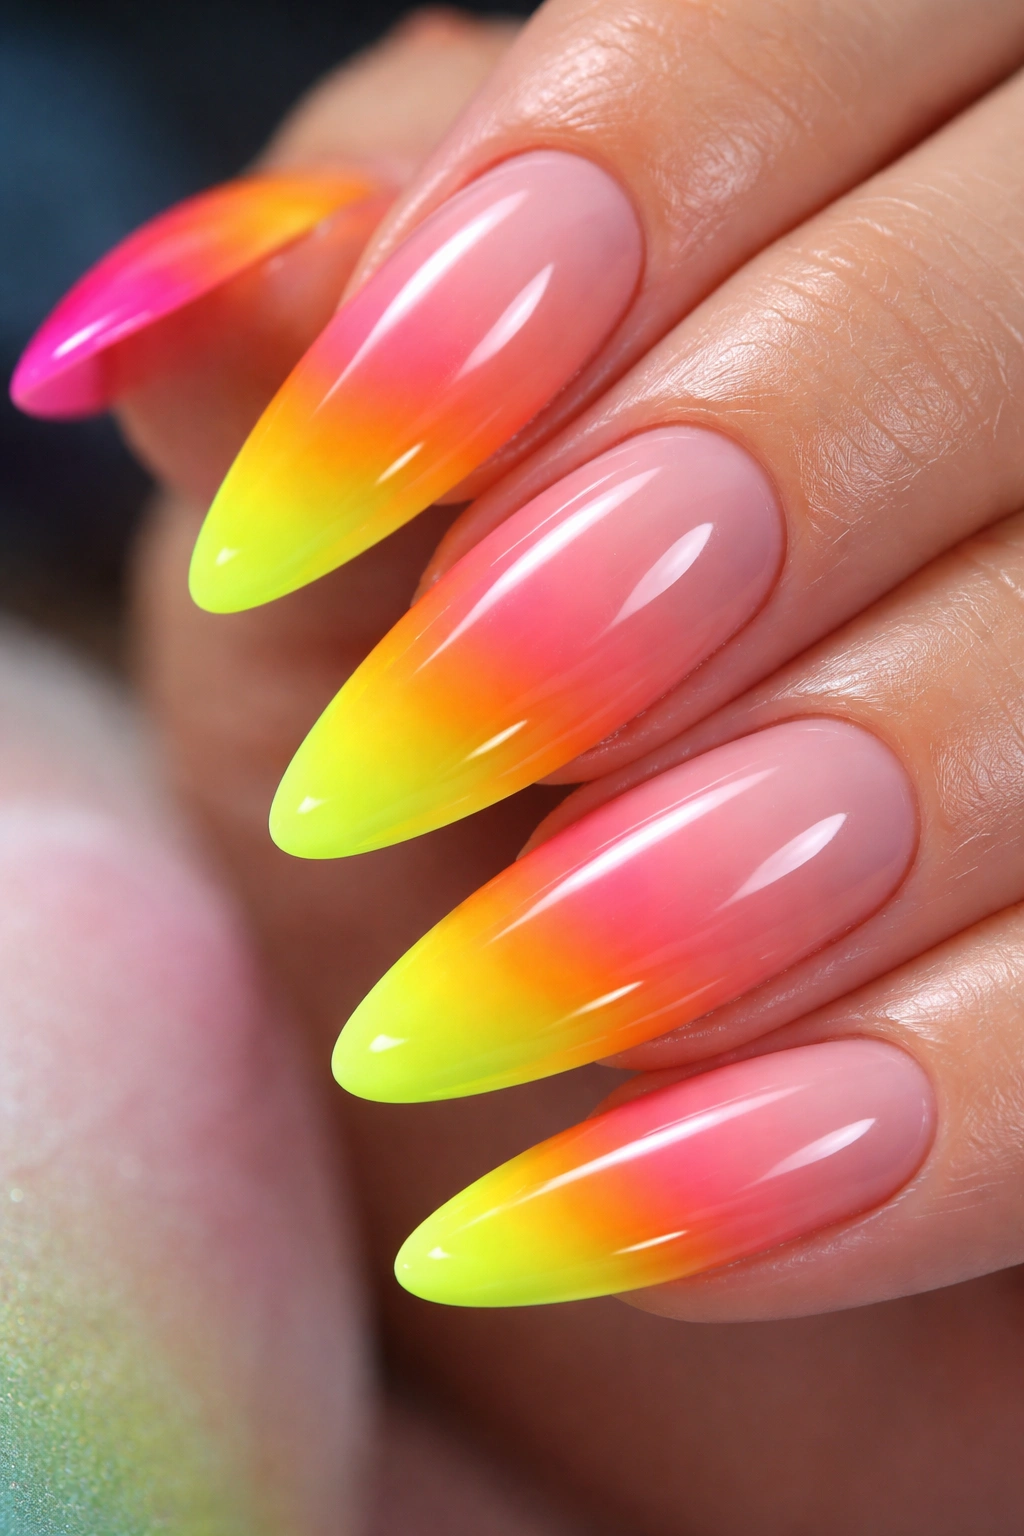
10. Neon Ombre French Tip
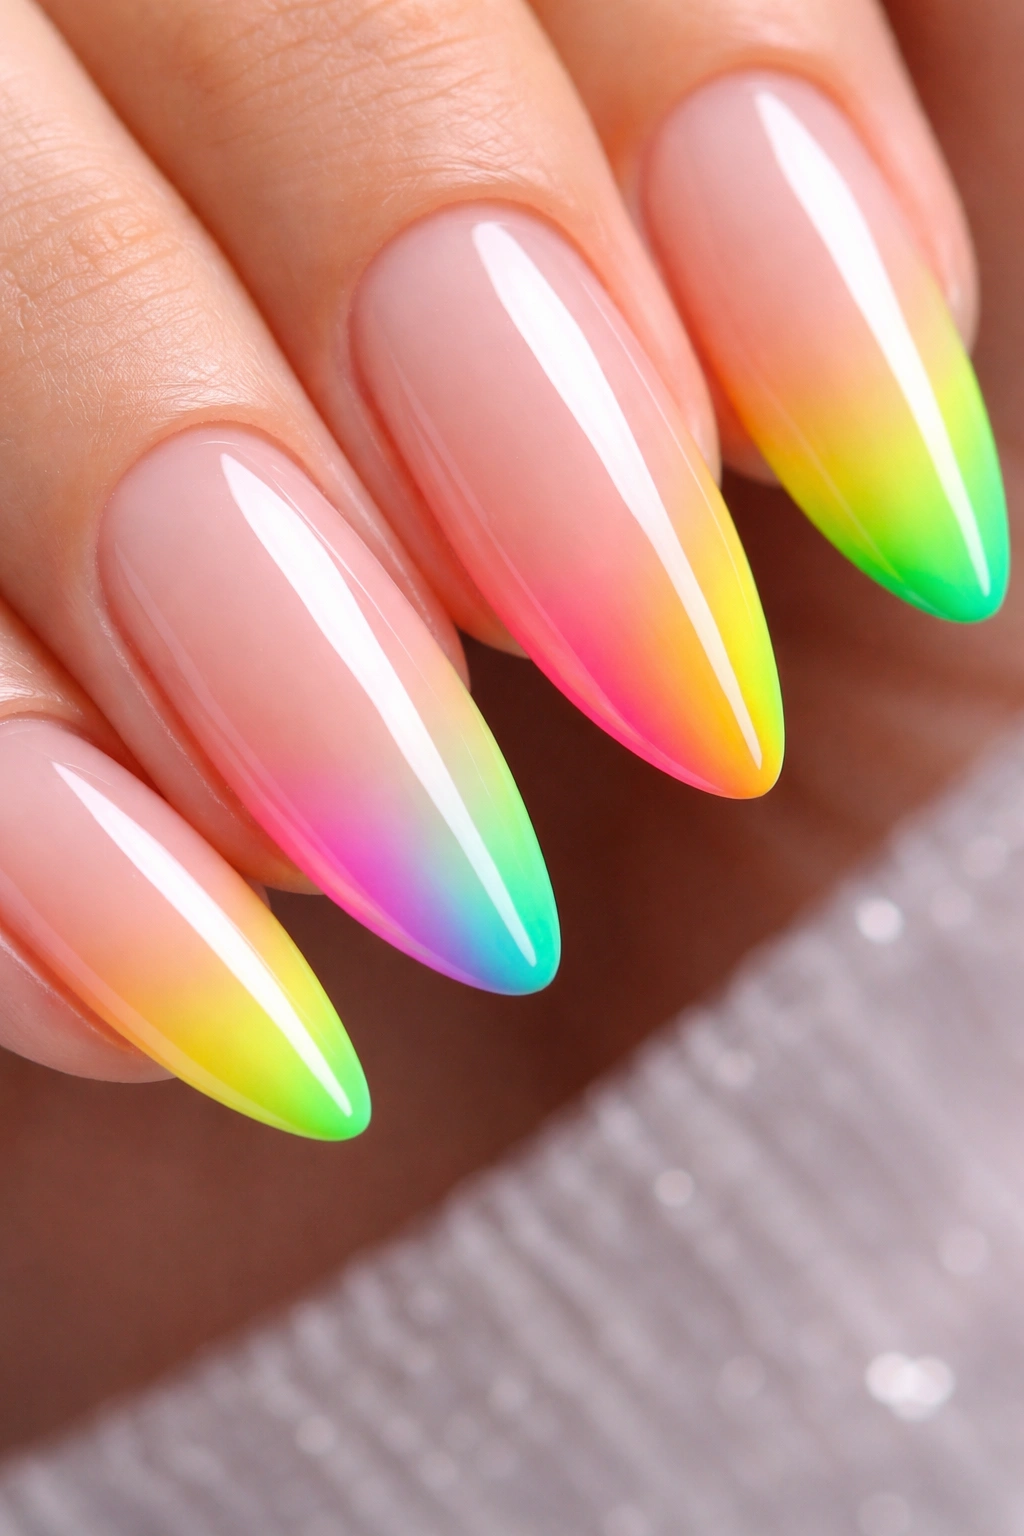
This design combines the elegance of French tips with the gradient effect of ombre. Instead of a crisp line separating base from tip, you create a soft, blended transition from your base color (or nude) into an ombre gradient of neon shades concentrated at the tip. It feels refined, modern, and distinctly more interesting than a traditional French manicure.
Modern French Manicure Evolution
The ombre French tip feels fresh because it respects the classic French manicure structure while updating the execution. It’s professional enough for formal settings but modern enough to feel current and fashion-forward. You’re not abandoning elegance—you’re elevating it with color and technique.
Ombre Gradient Technique for French Tips
Paint your nude or pale base color on the entire nail. Once dry, use a sponge to create an ombre gradient specifically at the tip area. Start with your palest neon shade at the edge where the tip meets the nail bed, then transition to deeper, brighter neon shades at the very tip. The sponge technique naturally creates soft blending, so this is actually easier than it looks.
11. Neon Marble Nail Art
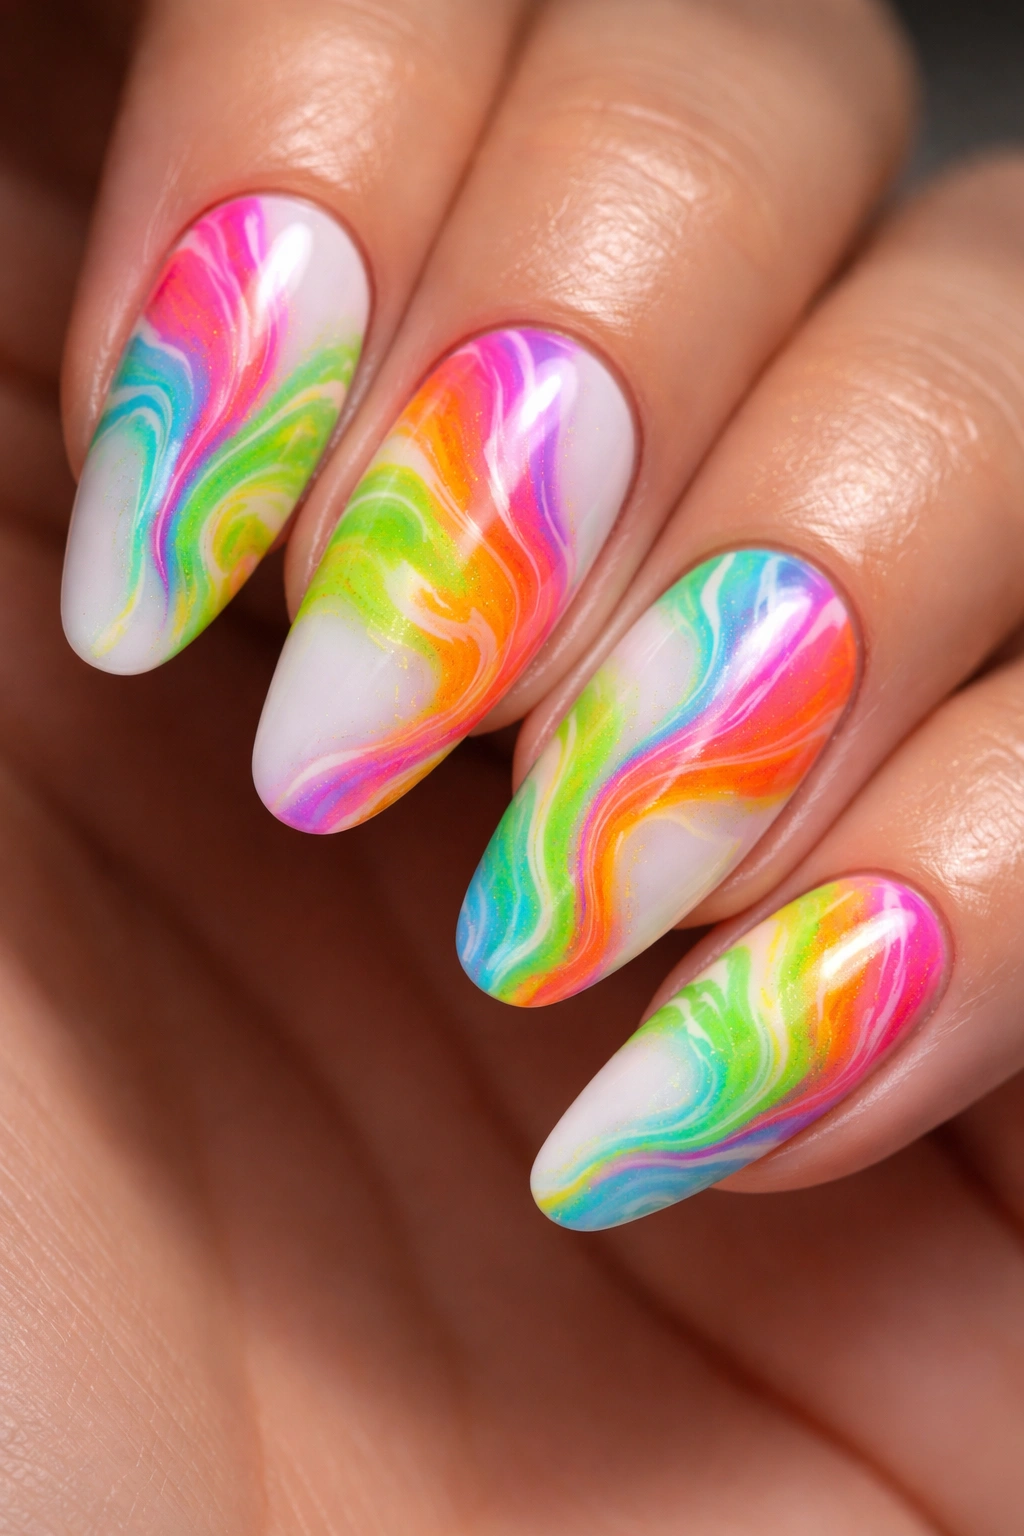
Marble designs have that naturally organic, one-of-a-kind quality that makes nails feel intentional and artistic. When you execute marble in neons, you get the sophistication of marble combined with the energy of bright color. Swirl multiple neon shades together over a white or nude base, creating those signature marble veining patterns that look chaotic but feel completely intentional.
The Artistic Quality of Marble
Marble designs are forgiving because they’re supposed to look organic and irregular. You’re not trying to create perfection—you’re creating the appearance of natural stone with intentional color swirls. Every marble manicure looks slightly different, which means your nails are literally one-of-a-kind.
Water Marble Technique
Fill a cup with room-temperature water. Drop your neon polish colors into the water in circles (they should float on the surface). Use a toothpick to swirl the colors together into a marbled pattern. Dip your nail into the water at an angle to pick up the design. This takes practice, but once you get it, it’s genuinely satisfying. Alternatively, use a marbling nail art brush to swirl colors directly on your nail.
12. Neon Thermal or Color-Changing Nails
Thermal polish changes color based on temperature, creating an interactive design element that’s genuinely fun. In neon shades, this means your nails shift between different bright hues depending on how warm or cold your hands are. Cold temperatures might show neon blue, while warmth brings out neon pink or purple. It’s like having two (or three) manicures in one.
The Interactive Element
Thermal nails are conversation starters because people notice when your nails change color. It feels almost magical, like your nails are responding to the world around you. This design is perfect for people who love neon but also like having options and visual interest that evolves throughout the day.
Application Process
Thermal polish works exactly like regular polish—apply a base coat, then two coats of thermal polish, then a top coat. The magic happens naturally as temperatures fluctuate. Neon thermal polishes tend to shift between bright complementary hues, so you get the best of multiple neon shades simultaneously.
13. Neon Striped and Lined Nail Design
Parallel stripes in different neon shades create rhythm and movement that feels dynamic and modern. Whether you go with thick stripes that take up significant nail real estate or thin pinstripe details that feel delicate, striped designs are bold without being busy. Horizontal, vertical, or diagonal stripes all work beautifully with neon colors.
Pattern Psychology
Stripes have an inherently organized, intentional quality. Even when you’re using multiple bright neon colors, the stripe pattern keeps everything feeling deliberate rather than chaotic. Stripes also create the illusion of direction and movement, making your nails feel alive and dynamic.
Creating Crisp Stripes
Painter’s tape is your best friend for striped designs. Decide on your stripe width and direction, apply tape in parallel lines, then paint your neon colors between the tape. Once dry, carefully remove the tape to reveal perfectly crisp lines. You can also use striping tape specifically designed for nail art, which creates even more precision.
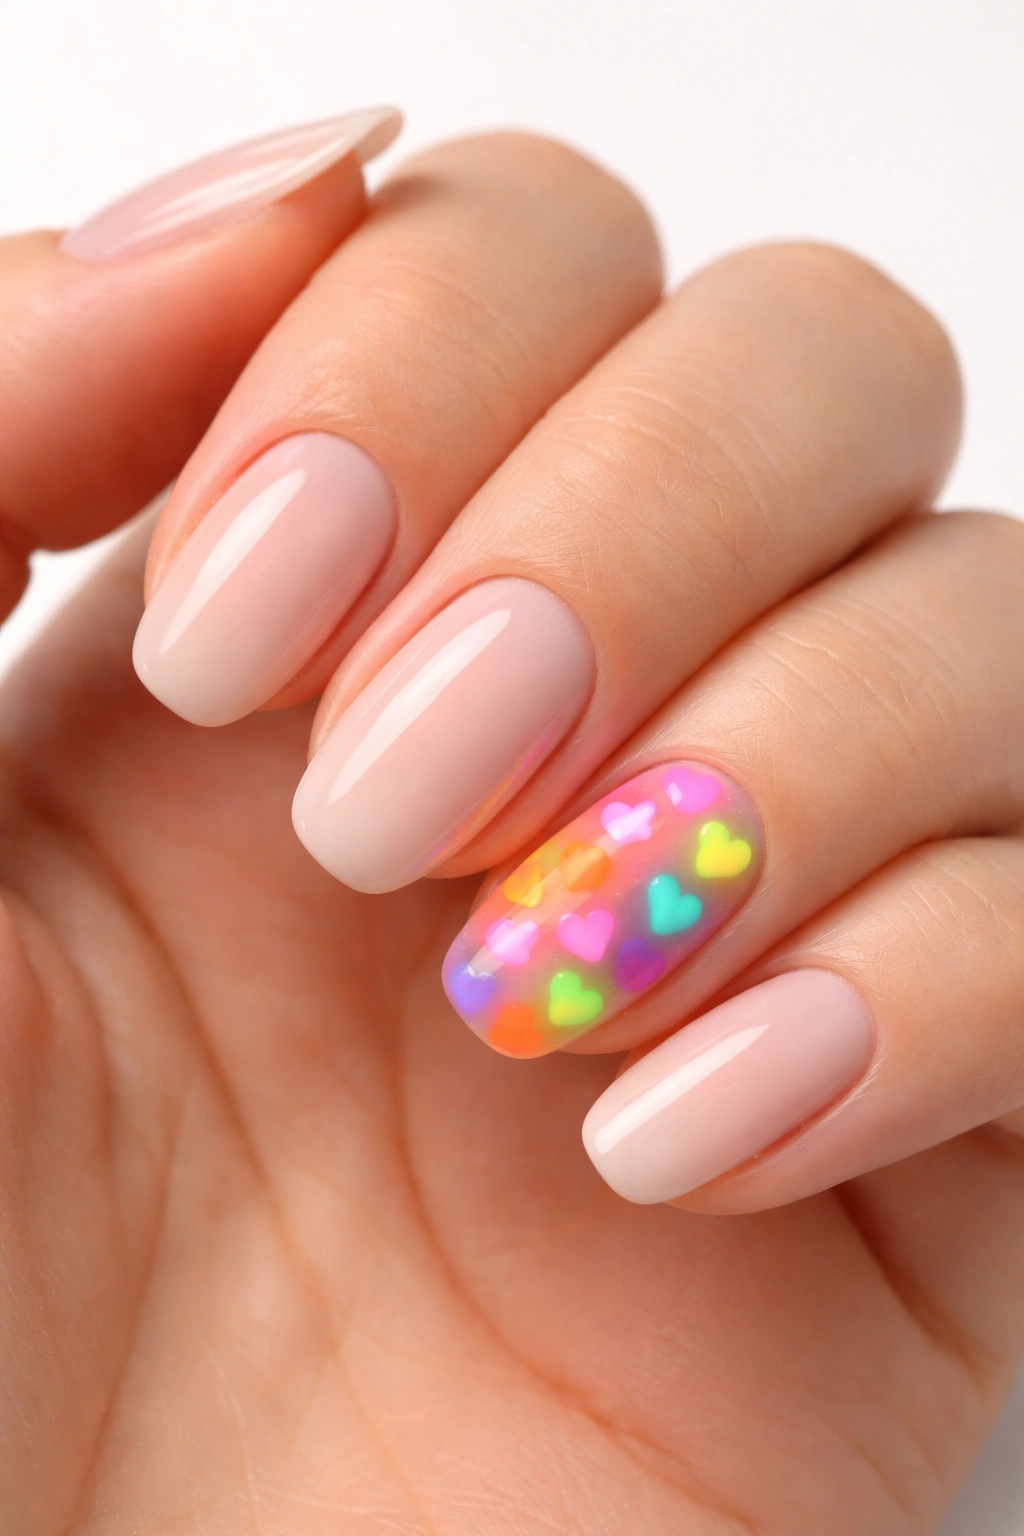
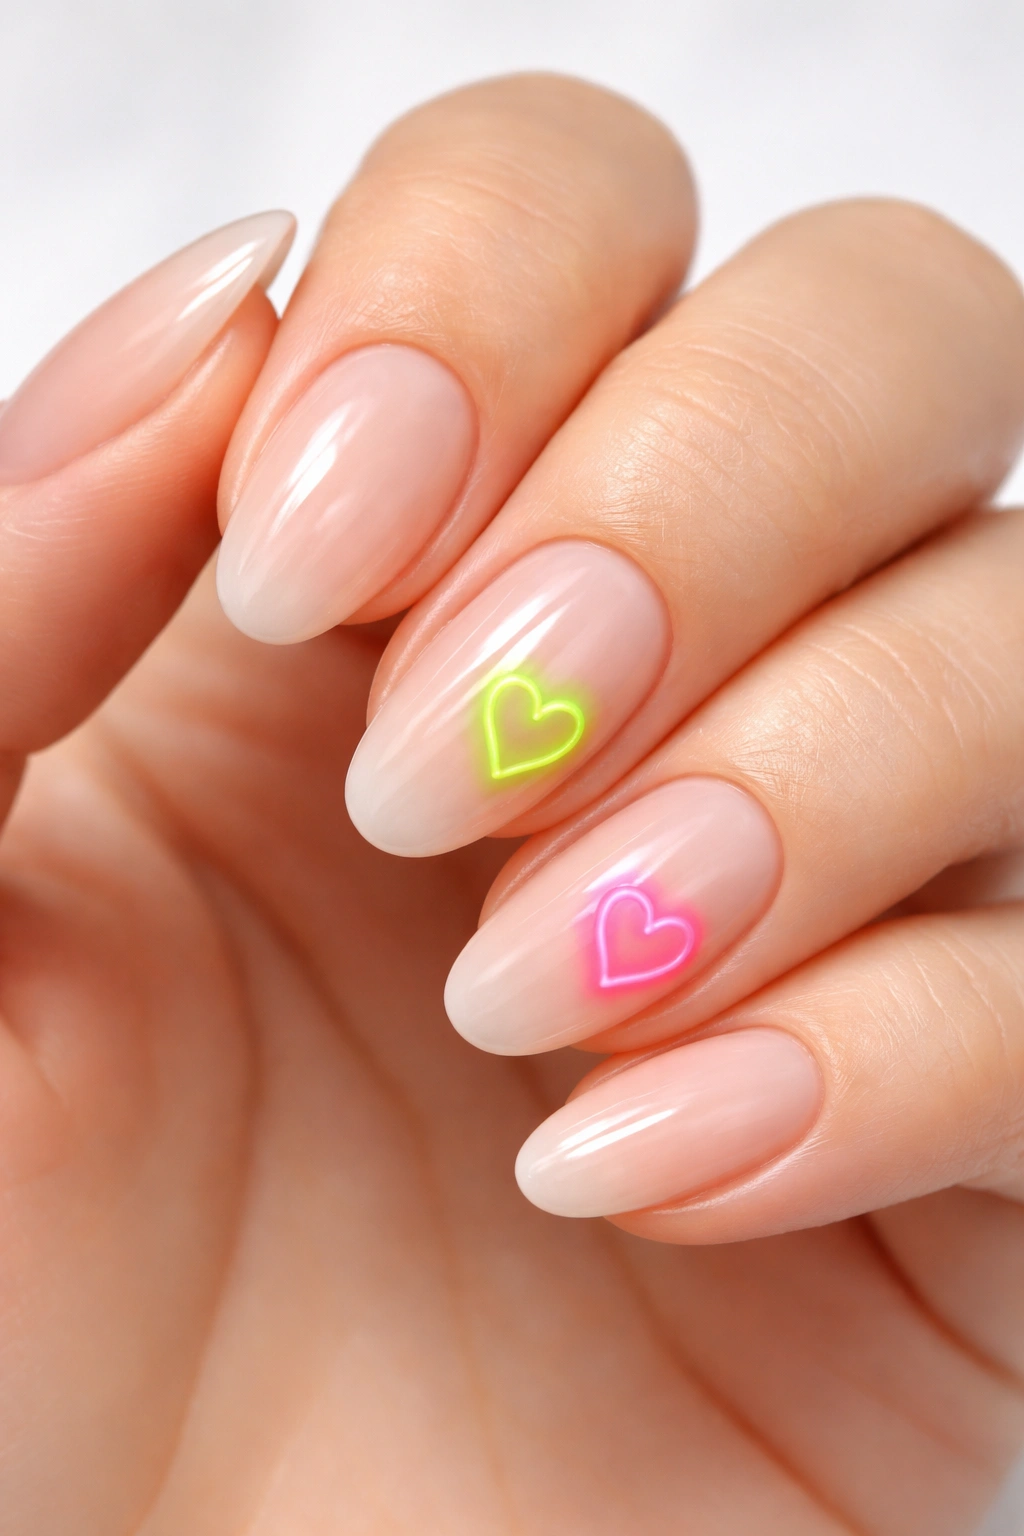
14. Neon Heart Accent Nails
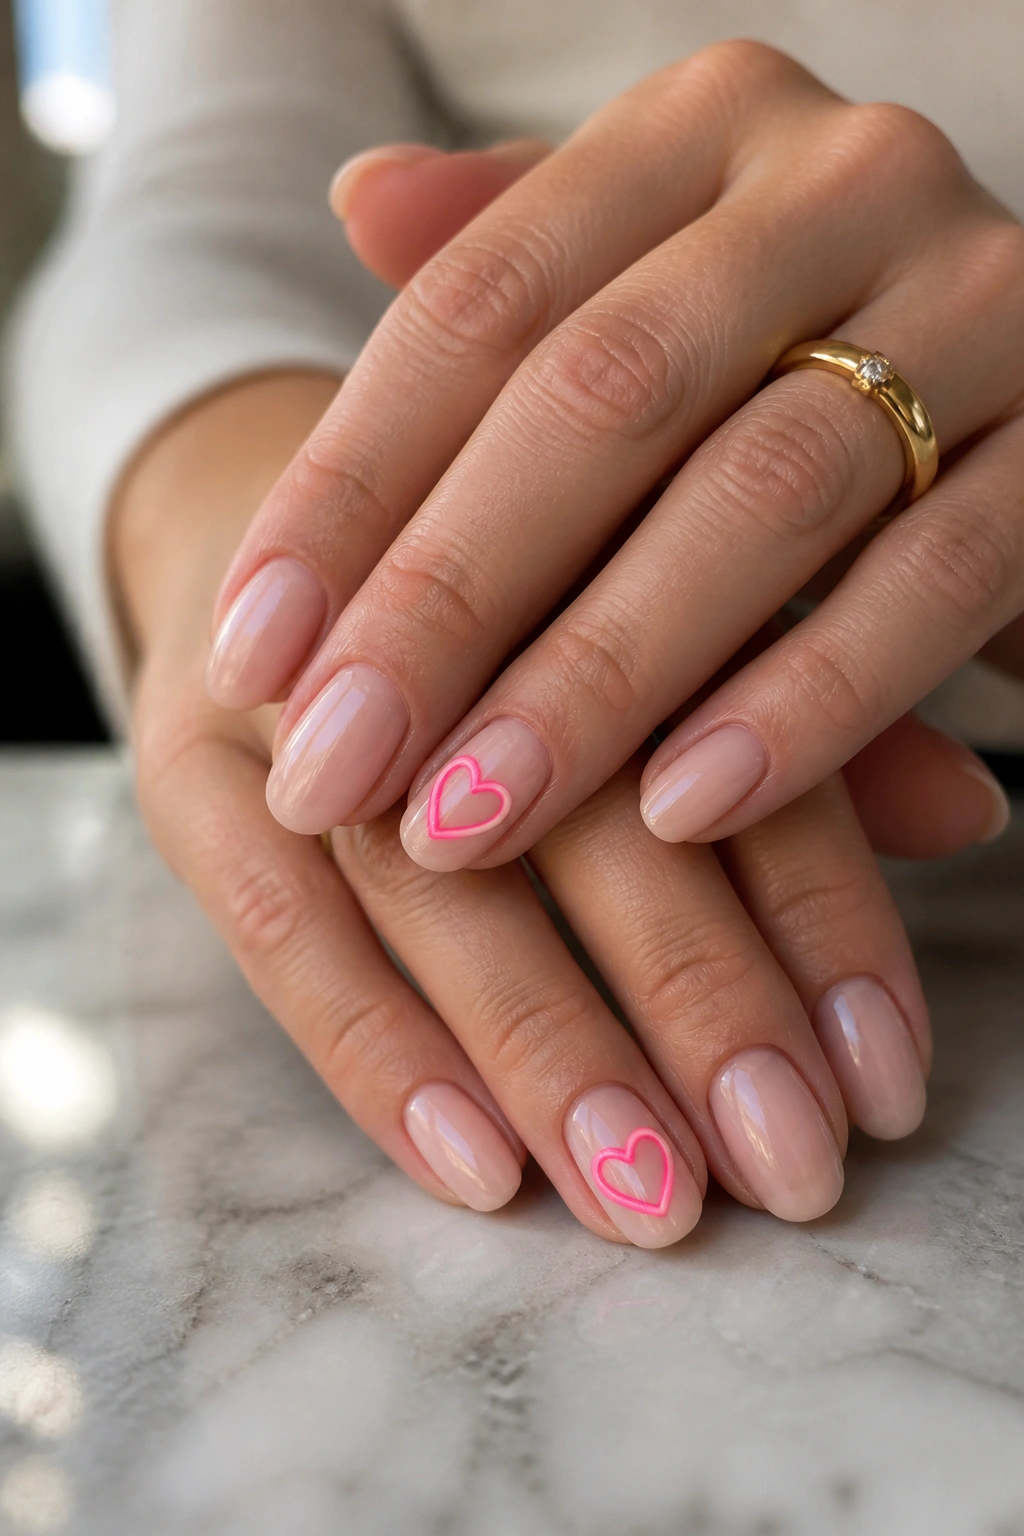
If full neon coverage feels intimidating, neon hearts as accents on neutral nails offer a sweet, approachable entry point. Paint most of your nails in a neutral shade like nude, white, or soft pink, then add one or two neon hearts on accent nails. It’s romantic with an edge, playful without being over-the-top.
The Accent Nail Advantage
Accent nails let you experiment with bold colors without the commitment of covering all ten digits. They draw attention without demanding it, which makes them perfect for work settings or situations where you want your nails to be a whisper rather than a shout. Neon hearts specifically add personality and charm while staying grounded in the neutral base.
Heart Application
Use a dotting tool or thin brush to paint neon hearts. Start with a wider line at the top for the rounded part, then angle downward to create the two pointed bottoms. Don’t stress about perfection—slightly imperfect hearts look charming and handmade. You can create single hearts or clusters depending on your design preference.
15. Neon Y2K Abstract and Squiggle Design
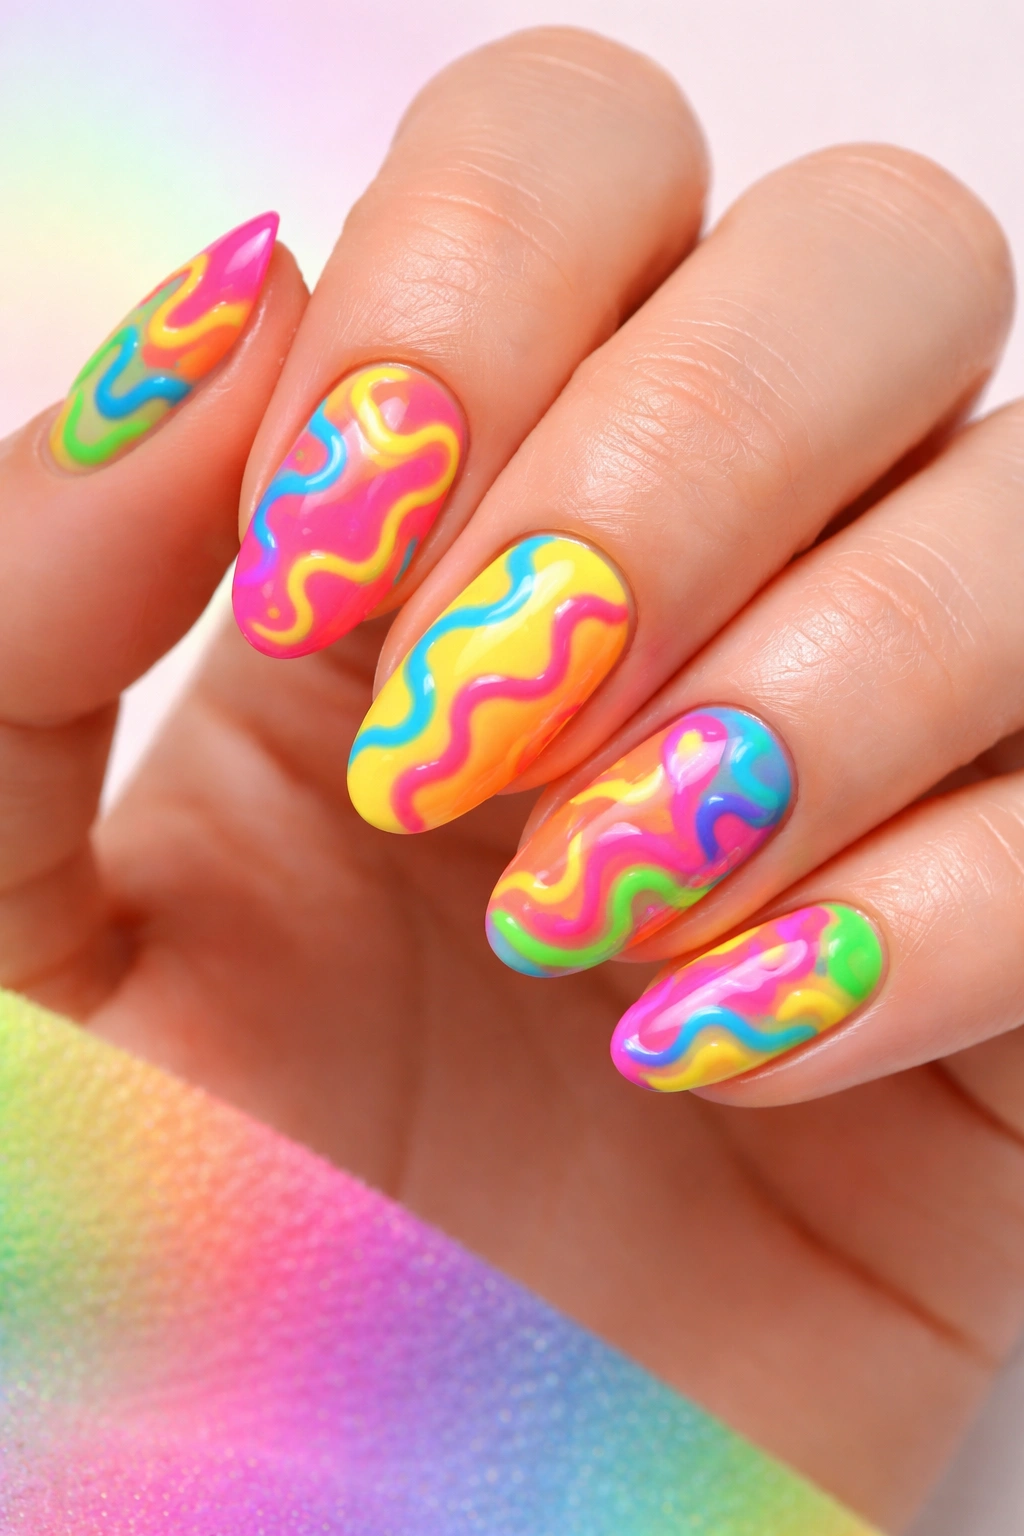
The early 2000s aesthetic is having a moment, and neon Y2K nail art brings all that fun, chaotic energy to your fingertips. Abstract squiggles, wavy lines, and irregular shapes in multiple neon colors feel retro-futuristic and playful. It’s the opposite of refined—it’s intentionally imperfect and celebrates that imperfection as part of the charm.
Embracing Intentional Chaos
Y2K design is all about breaking rules and having fun. There’s no “right” way to execute this design, which makes it liberating. You’re not trying to create perfection or even recognizable patterns. You’re creating a vibe, and that vibe is colorful, fun, and unapologetically playful.
Creating Squiggle Art
Use a thin nail art brush and just start painting. Wavy lines, loops, dots, and irregular shapes all work. Mix multiple neon colors on the same nail for that true Y2K energy. There’s no precision required here, which means even if your hand isn’t steady, the design looks intentional.
16. Neon Chrome or Mirror Finish Nails
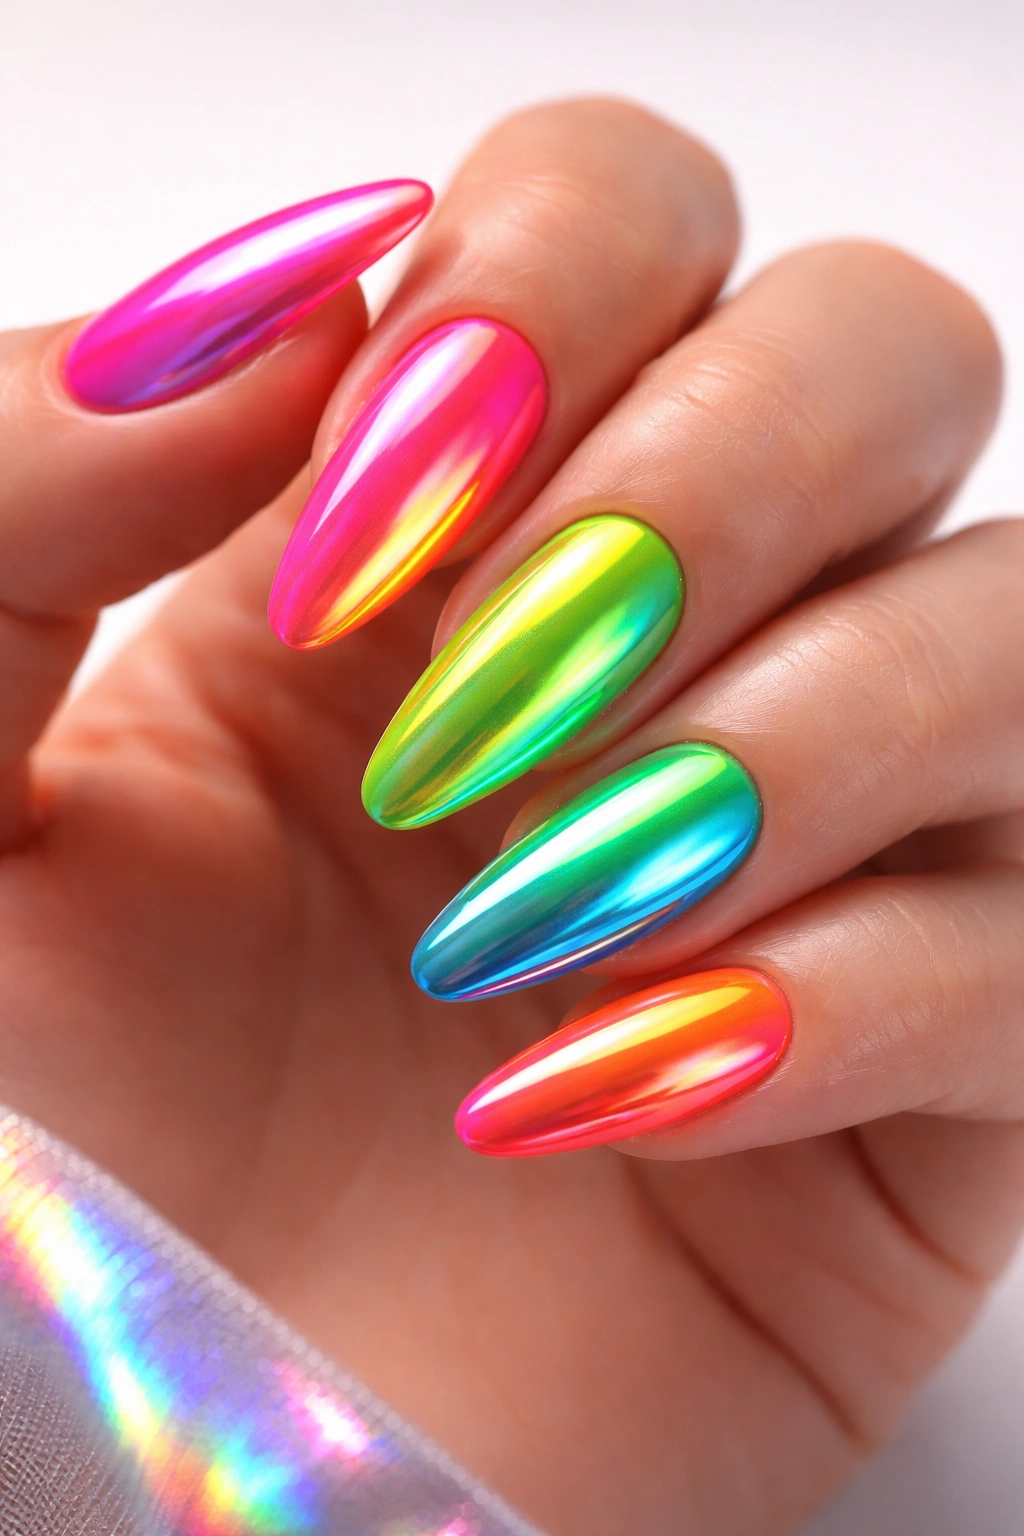
Chrome powder creates a mirror-like, ultra-reflective finish that makes neon colors even more striking. When you apply chrome powder over a neon base, the reflective quality amplifies the brightness and creates an almost metallic appearance. It’s advanced-level nail art, but the visual payoff is genuinely stunning.
The Mirror Effect
Chrome finishes catch and reflect light constantly, making your nails visible from almost any angle. Combined with neon’s inherent brightness, chrome neon nails are literally impossible to miss. It’s the nail art equivalent of turning your hands into glow sticks.
Chrome Application
Apply two coats of neon polish and let dry completely. Apply a thin layer of gel or chrome base (formulated specifically for chrome powder adherence). While sticky, use a velvet chrome powder applicator to press the powder onto your nail surface. The powder adheres to the sticky base, creating that mirror-like finish. Seal with a top coat once satisfied with coverage.
17. Neon Pastel Blend (Soft Neons)
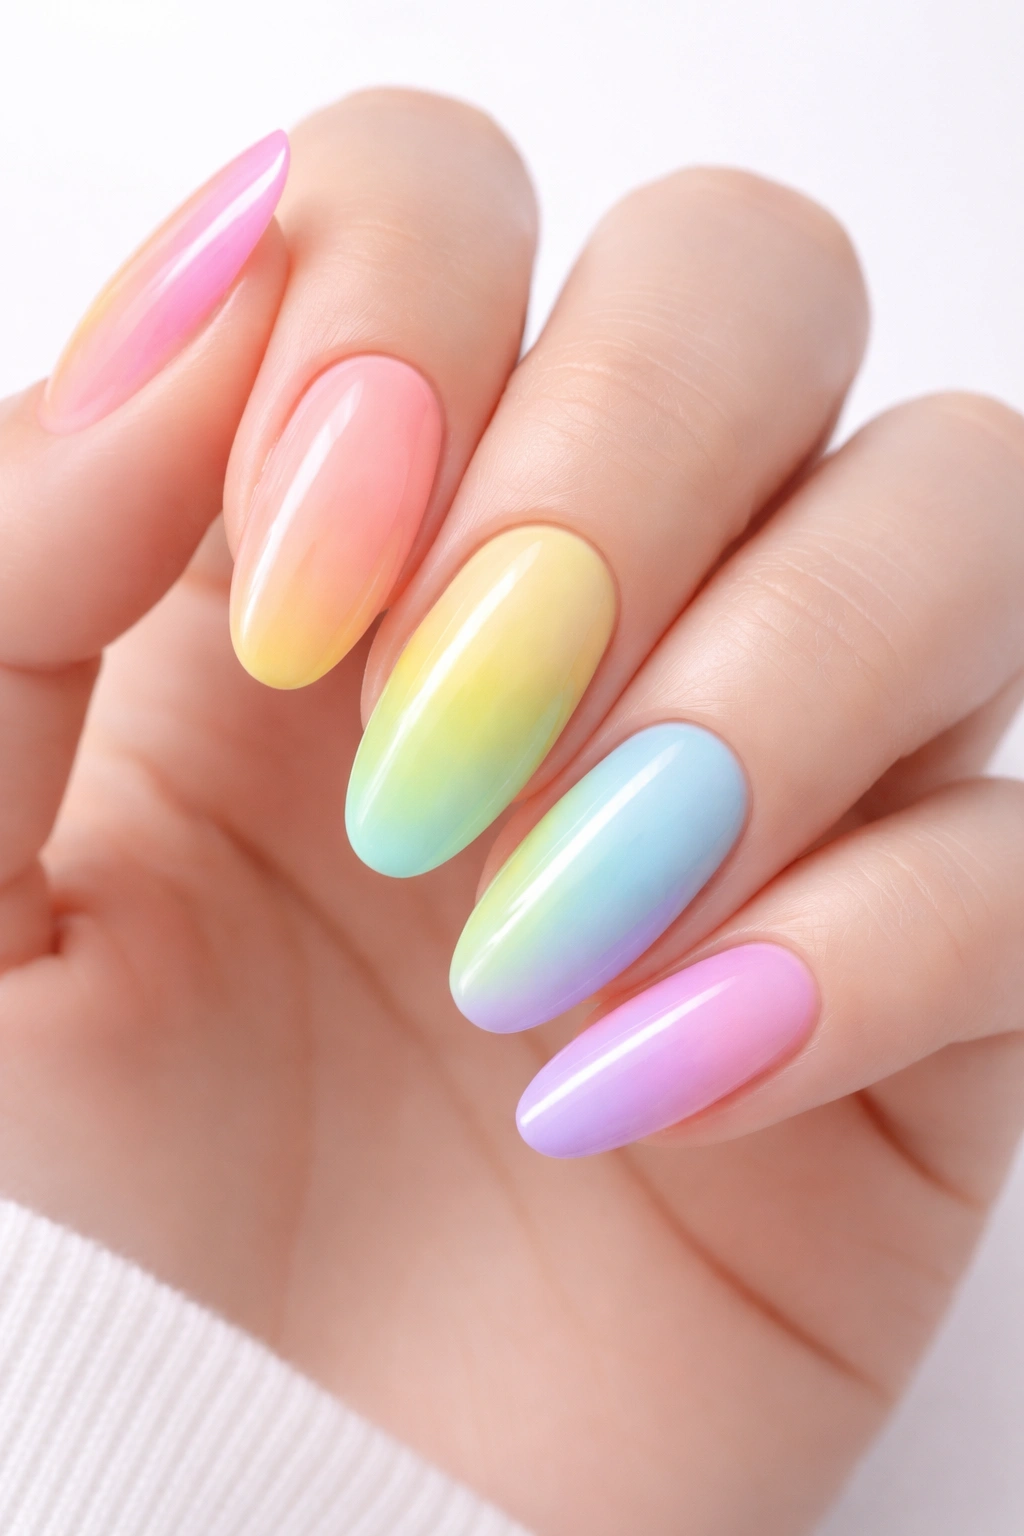
If traditional neon feels too intense, soft pastel neons offer that electric energy with a gentler, more delicate appearance. These polishes maintain the fluorescent quality of neon (they still glow and pop under light) but with less saturation, creating a look that’s bright without being overwhelming. Pair them with each other or layer them with neutrals for maximum versatility.
The Gentle Approach to Neon
Pastel neons prove that you don’t need maximum saturation to make a statement with color. These shades work beautifully in professional settings, with formal wear, and for everyday looks. They’re neon for people who want to experiment with bright colors but prefer a more subtle approach.
Selecting Pastel Neon Shades
Look for neon polishes that are slightly desaturated compared to their full-intensity counterparts. A soft neon yellow will be brighter than traditional pale yellow but less harsh than highlighter yellow. These shades often come in collections specifically labeled as “pastel neon” or “soft neon” if you’re shopping online. They blend beautifully with each other and with neutral shades.
18. Neon Holographic and Iridescent Design
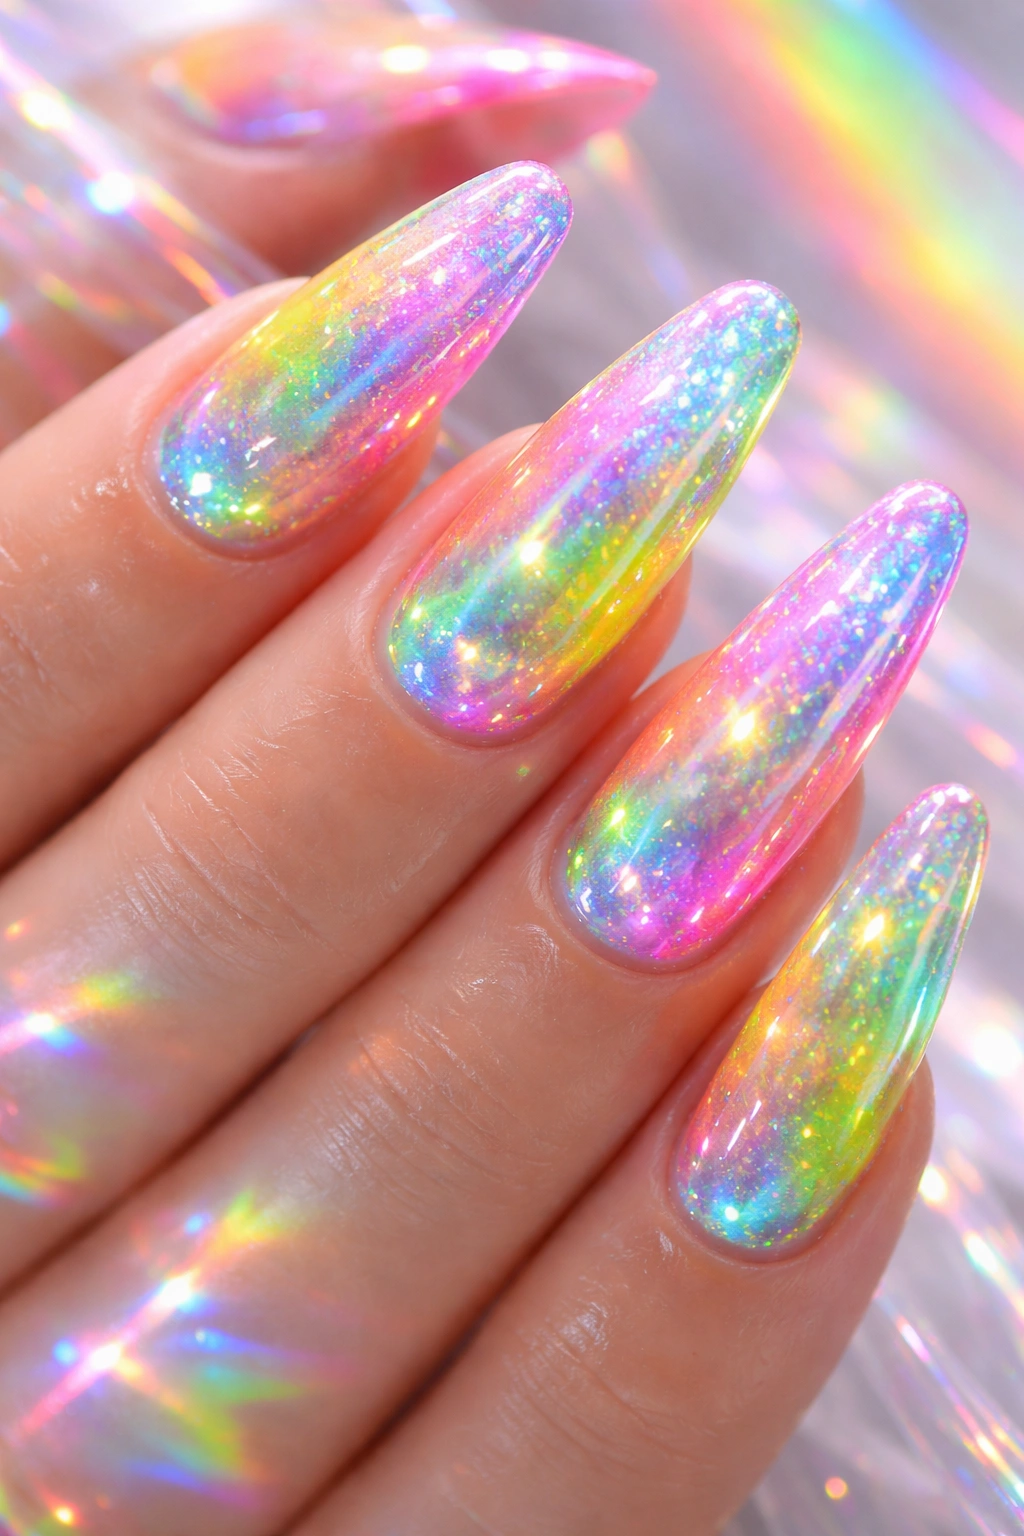
Holographic polish contains reflective particles that create rainbow effects in the light, and when layered over neon bases, the result is genuinely magical. Neon holographic nails literally shift colors depending on the angle and lighting, creating an iridescent, otherworldly quality. It’s the most advanced-looking neon design in terms of visual impact.
Multi-Dimensional Visual Interest
Holographic finishes create depth and movement that solid colors can’t achieve. Your nails don’t look the same twice—they constantly shift and change based on light and angle. Combined with neon’s inherent brightness, holographic neon nails become mesmerizing, which is exactly what you want when you’re going for maximum impact.
Creating Holographic Neon Nails
Paint your neon base color in two coats and let dry completely. Apply a top coat or holographic base layer formulated to work with holographic polishes. While still slightly tacky, apply holographic polish or layer holographic particles. The combination of neon plus holographic creates that stunning rainbow-reflective quality.
Neon Nail Tips and Application Tricks
Getting neon right goes beyond just choosing a color—your application technique dramatically impacts the final result. Start with properly prepped nails: file them smooth, push back your cuticles, and buff the nail surface lightly so polish adheres better. A good base coat is genuinely essential with neon because these pigments are highly concentrated, and direct contact with your nail plate can stain. Apply two thin coats of neon polish rather than one thick coat, letting each layer dry between applications. Thin coats adhere better and create smoother, more even color. Always finish with a quality top coat to seal your design and add shine.
The key to neon longevity is protecting it from chips and fading. Avoid using your nails as tools, and consider keeping your neon manicure shorter if you’re hard on your hands. Neon colors stay truer and brighter when you minimize sun exposure, though this doesn’t mean you can’t wear them outside—just know that extended UV exposure can fade the brightness slightly over time. If you’re doing neon nail art at home, invest in quality brushes and tools. A thin detail brush costs just a few dollars and makes hand-painted designs dramatically easier to execute.
Which Neon Shades Work Best for Different Skin Tones
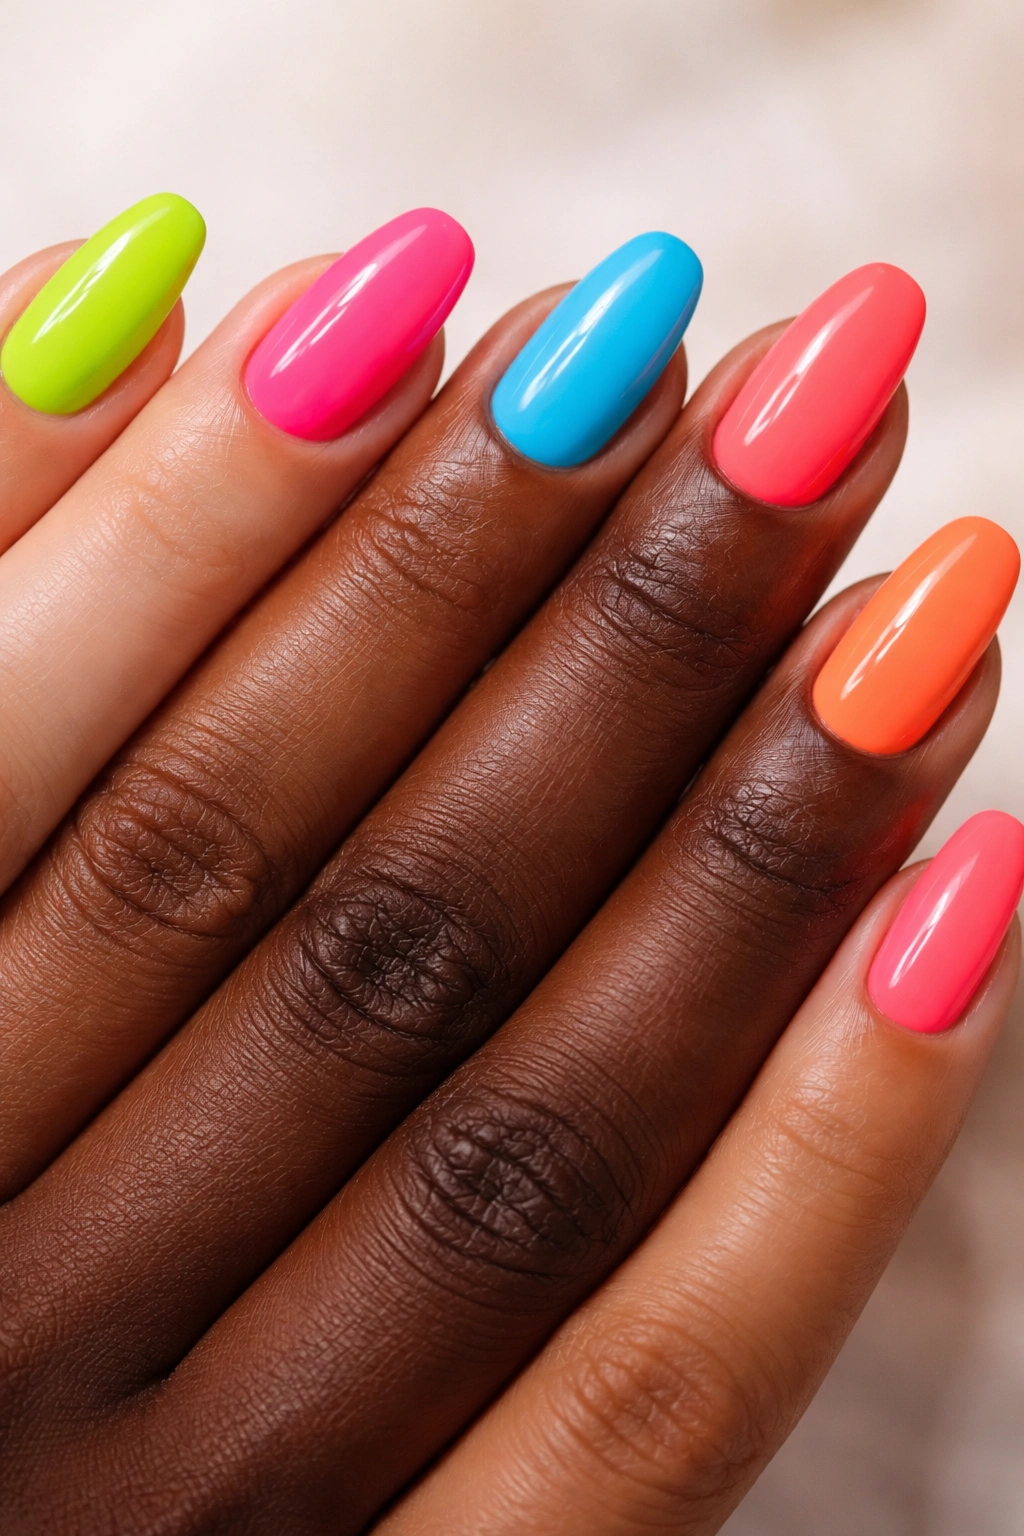
The myth that certain people “can’t wear neon” is completely false—every skin tone can rock neon, but the specific shades that look most stunning vary. Fair skin tones tend to absolutely glow with lime green, hot pink, and electric blue neons. These shades create high contrast against pale skin, making them pop visually. Medium skin tones are incredibly versatile and look stunning with practically every neon shade, though neon coral, neon yellow, and neon orange often feel particularly complementary. Deeper skin tones have the advantage of making saturated neon colors look even more vibrant and rich—neon green, neon pink, and neon orange all sing against deeper complexions.
That said, the most important factor isn’t your skin tone—it’s what makes you feel confident. If you love a particular neon shade, wear it. Confidence is the best accessory, and it transforms how any color looks on you.
Neon Nail Maintenance and Longevity
Neon polish actually lasts just as long as any other color if you protect it properly. The brightness might fade slightly if your nails spend extended time in direct sunlight, but the polish itself won’t deteriorate faster than regular shades. Applying a UV-protective top coat helps maintain brightness if you know you’ll be in the sun frequently. Remove neon polish gently using a non-acetone remover if possible, as acetone can be slightly drying to your nails. Non-acetone remover takes a bit longer but is gentler and still removes neon polish effectively. After removal, moisturize your nails with cuticle oil or hand cream.
If you notice your neon starting to chip, resist the urge to pick at it. This can damage your nail plate underneath and make your next manicure more challenging. Instead, file down any rough edges and apply a quick touch-up coat, or simply remove the polish and apply a fresh manicure when you have time.
Final Thoughts
Neon nails represent pure joy and confidence in a format you carry with you everywhere. Whether you choose bold, full-coverage neons or subtle neon accents, these designs let you express yourself in a way that neutral shades simply cannot. The variety of neon nail designs means there’s genuinely an option for every personality, occasion, and comfort level. Start with whichever design speaks to you most strongly—if that’s classic neon French tips, go there. If it’s full rainbow Skittles nails, embrace it. Your nails should make you happy every time you look at them, and neon polish delivers that happiness without compromise. The trend isn’t going anywhere because people fundamentally love color and brightness, especially when it comes in such a wearable, visible form. Paint your nails neon and let that glow become part of your signature style.
