

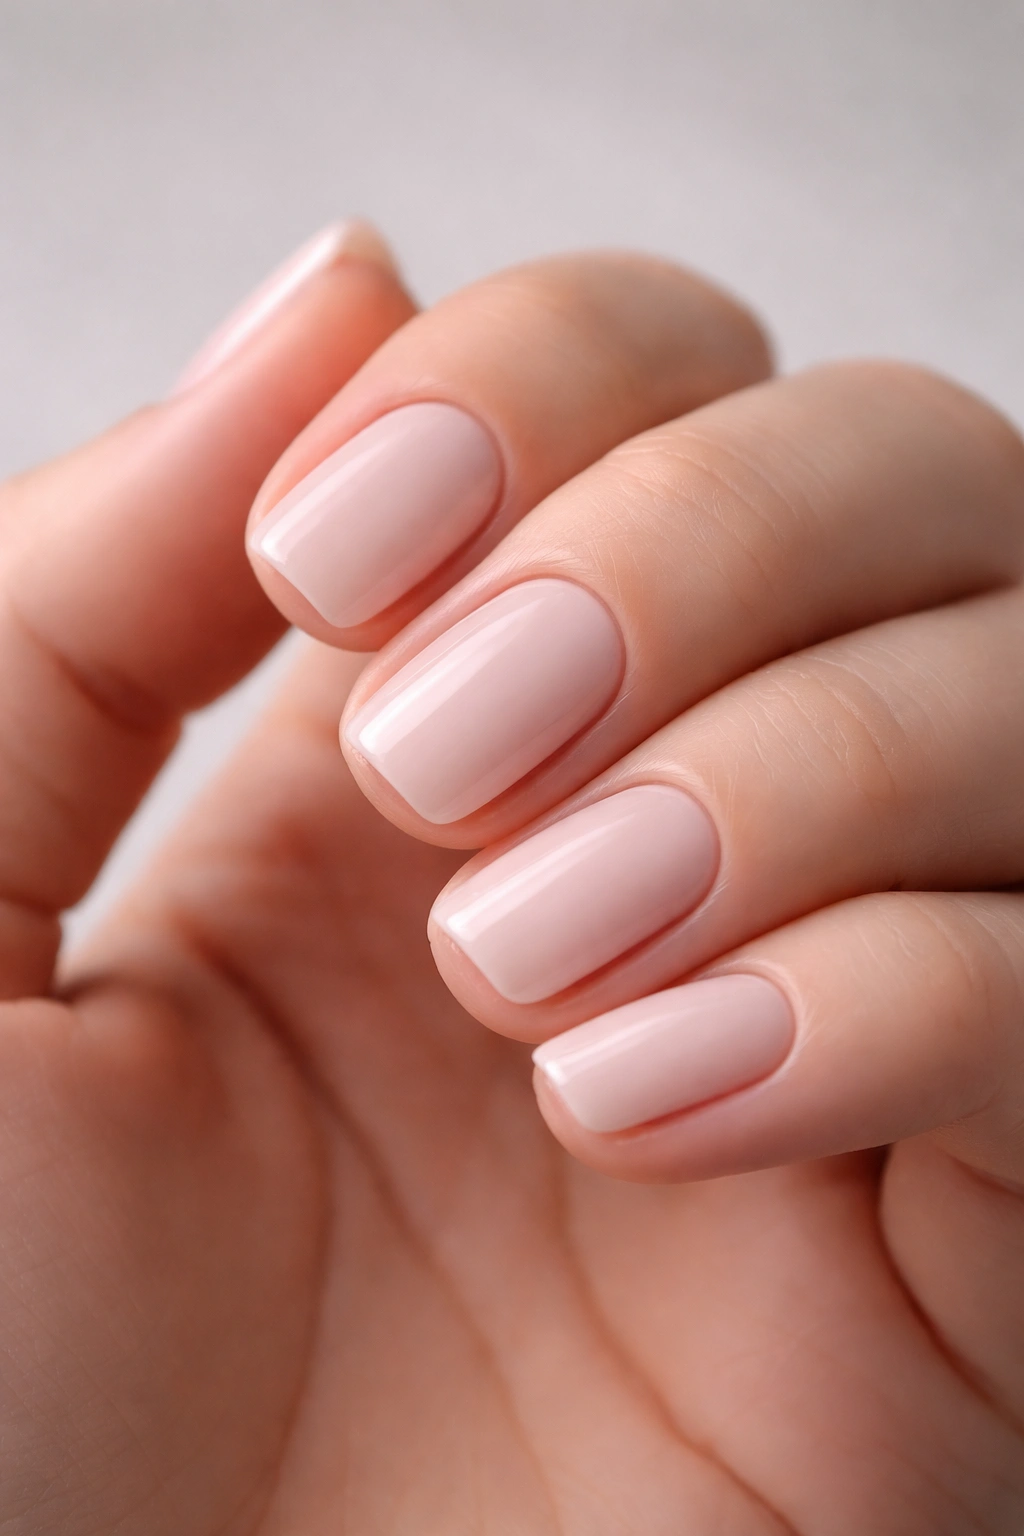
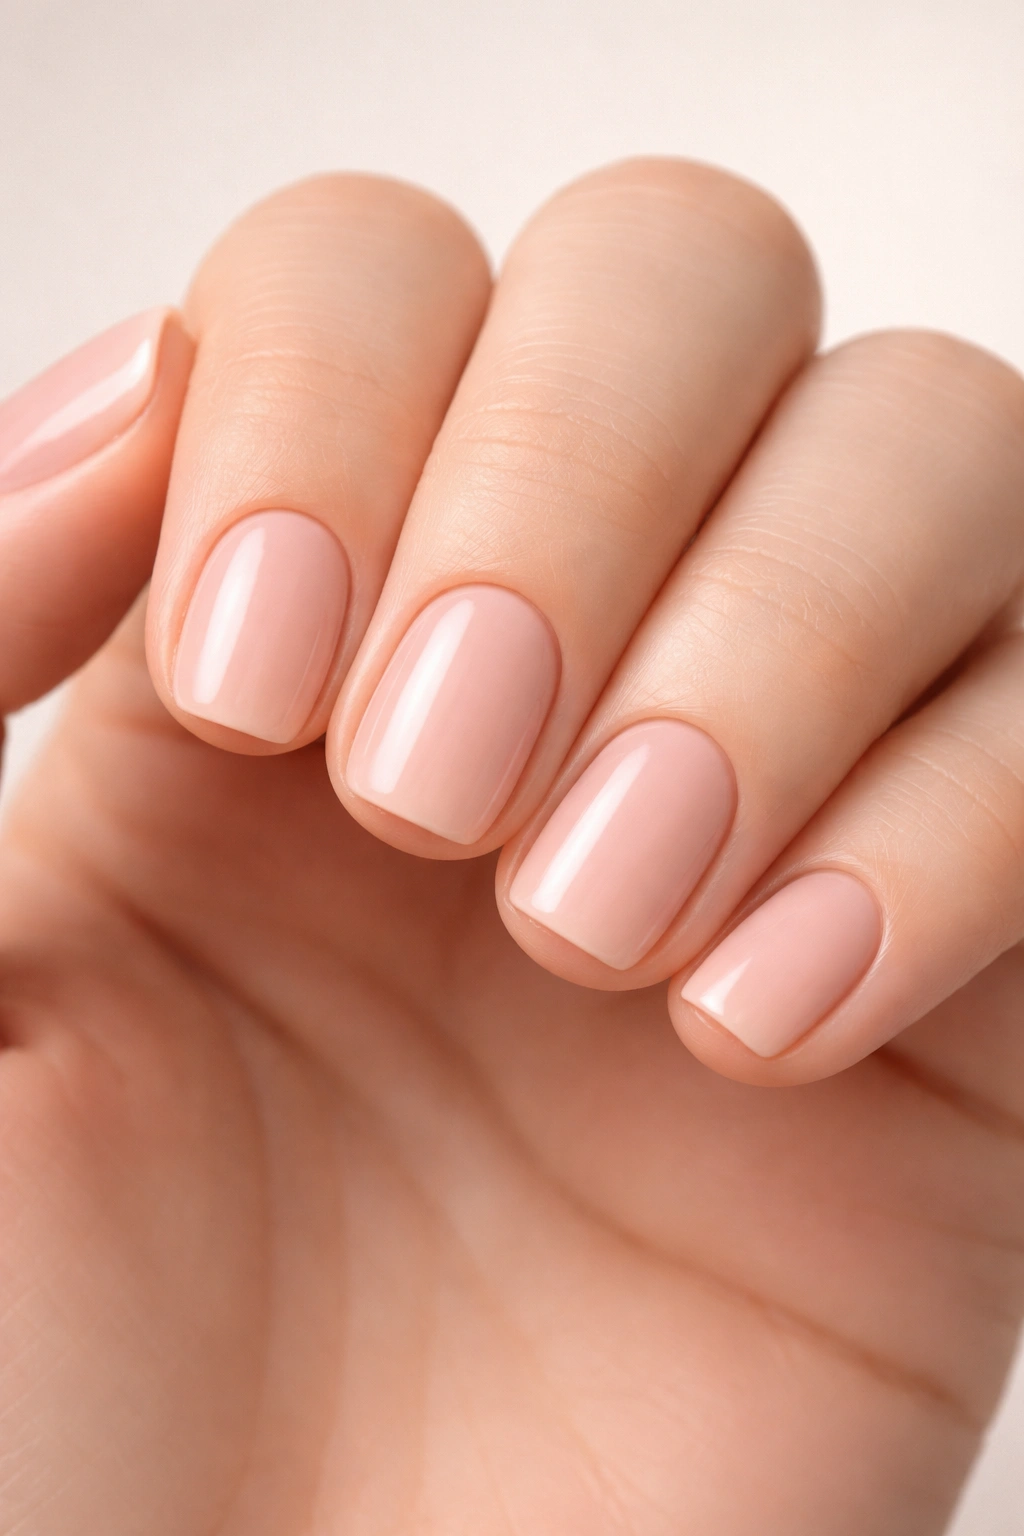
Short squoval nails might seem like an impossible mission if you love bold, statement nail designs. The shape is undeniably gorgeous—combining the sleek sophistication of a square with the gentle femininity of an oval—but keeping them short feels like you’re giving up the drama, the detail work, and the visual impact that makes nail art so satisfying. The truth? You’re not giving up anything. Very short squoval nails are actually where some of the most chic, wearable, and surprisingly eye-catching designs happen.
The real advantage of going short with this shape is that you stop fighting your nail beds and start working with them. Short squovals sit close to your fingertips, which means they’re practical for people who work with their hands, type constantly, or simply prefer nails that don’t catch on everything. More importantly, this length forces nail artists and enthusiasts to get creative with color blocking, minimalist patterns, texture, and negative space—the techniques that actually look expensive and intentional rather than overdone. You’re not hiding behind length; you’re highlighting the shape and the details that matter most.
If you’ve been hesitant about short nails because you thought they’d look boring or babyish, these 15 designs will completely shift your perspective. Each one proves that short squoval nails can be sophisticated, creative, and absolutely stunning when styled with intention.
Why Squoval Is The Perfect Shape for Short Length
Squoval as a shape exists in that magical intersection between practical and flattering. The straight edges of a square give your fingertips definition and make your hands look longer—a visual trick that actually matters more when your nails are short, since you need every advantage. The rounded corners, borrowed from the oval, keep the look from feeling too harsh or masculine, and they’re far less likely to break or catch than sharp square corners are.
When you combine this shape with short length, something interesting happens. The width-to-length ratio becomes more balanced, which means even a conservative nail bed looks intentional rather than stubby. Short squovals photograph beautifully, don’t interfere with your daily activities, and give you a clean canvas for creative designs that wouldn’t work on longer nails. The shape naturally draws attention to the nail itself rather than making length do all the visual work.
The Practical Side of Keeping Them Short
Short nails fundamentally change your relationship with maintenance. You’re not filing every few days to maintain a sharp point or spending money on fills every two weeks. Short squovals stay pristine longer because there’s less nail extending past your fingertip for daily life to damage. For people with active careers, hobbies that involve their hands, or who simply get annoyed by clicking keyboard sounds, short is genuinely the better choice—not a compromise.
The Aesthetic Advantage
Design-wise, short squovals force you to think differently about what makes a nail beautiful. You can’t rely on length for impact, so you lean into color, finish, texture, and pattern. This usually means the designs end up looking more intentional, more fashion-forward, and more sophisticated than they would on longer nails.
1. Creamy Vanilla with Gold Minimalist Lines
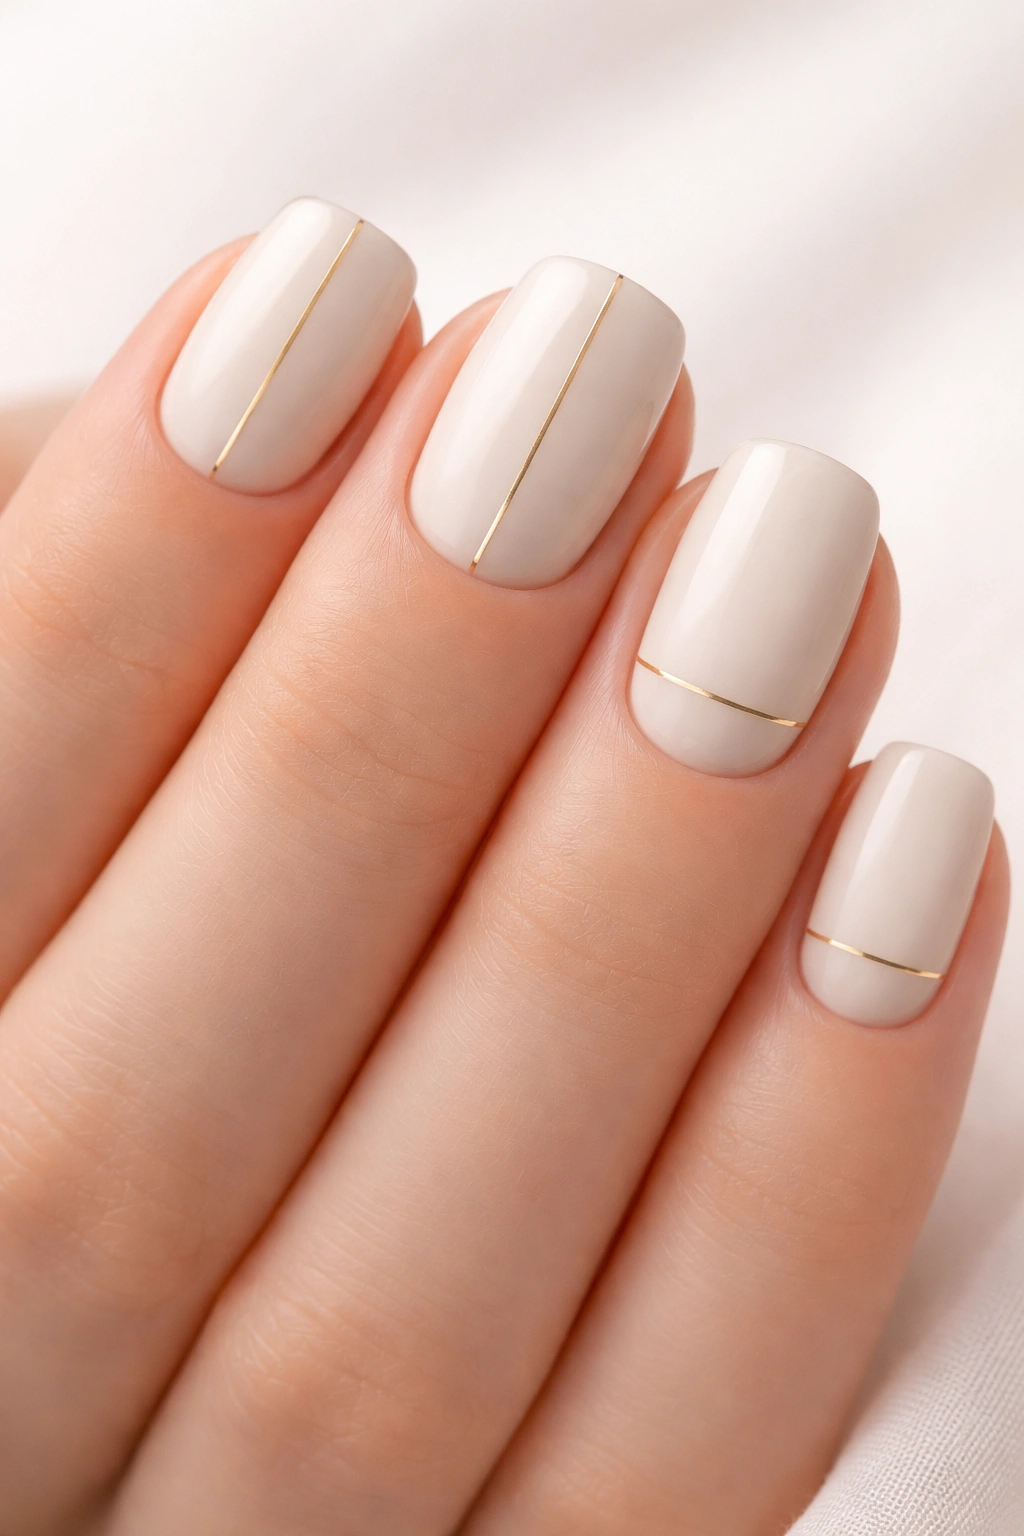
Soft, barely-there nail color paired with geometric precision is a combination that looks both calming and intentional. A creamy vanilla or warm off-white base creates an instantly elegant backdrop that elongates your fingertips while feeling modern rather than boring. The magic happens with thin, hand-painted or striping-tape gold lines—usually one clean vertical stripe down the center of each nail, or a thin horizontal line just below the free edge.
Why This Works on Short Nails
Minimalist geometry thrives on short squovals because the lines become the focal point. There’s no competing with length or competing designs—just clean color and precise contrast. The gold catches light beautifully and adds a touch of sophistication that feels intentional without being loud.
Application and Customization
- Use a creamy vanilla or warm taupe base coat as your foundation
- Wait for complete dryness before applying gold stripe details
- Consider varying the stripe placement nail-to-nail for visual interest—vertical on some, horizontal on others, diagonal on a few
- A matte topcoat over the vanilla with a glossy finish on just the gold lines creates beautiful dimensional contrast
- Pro tip: If hand-painting feels shaky, use thin gold striping tape (available at any beauty supply store) and seal it with topcoat for perfectly crisp lines.
2. Deep Burgundy Velvet with Matte Finish
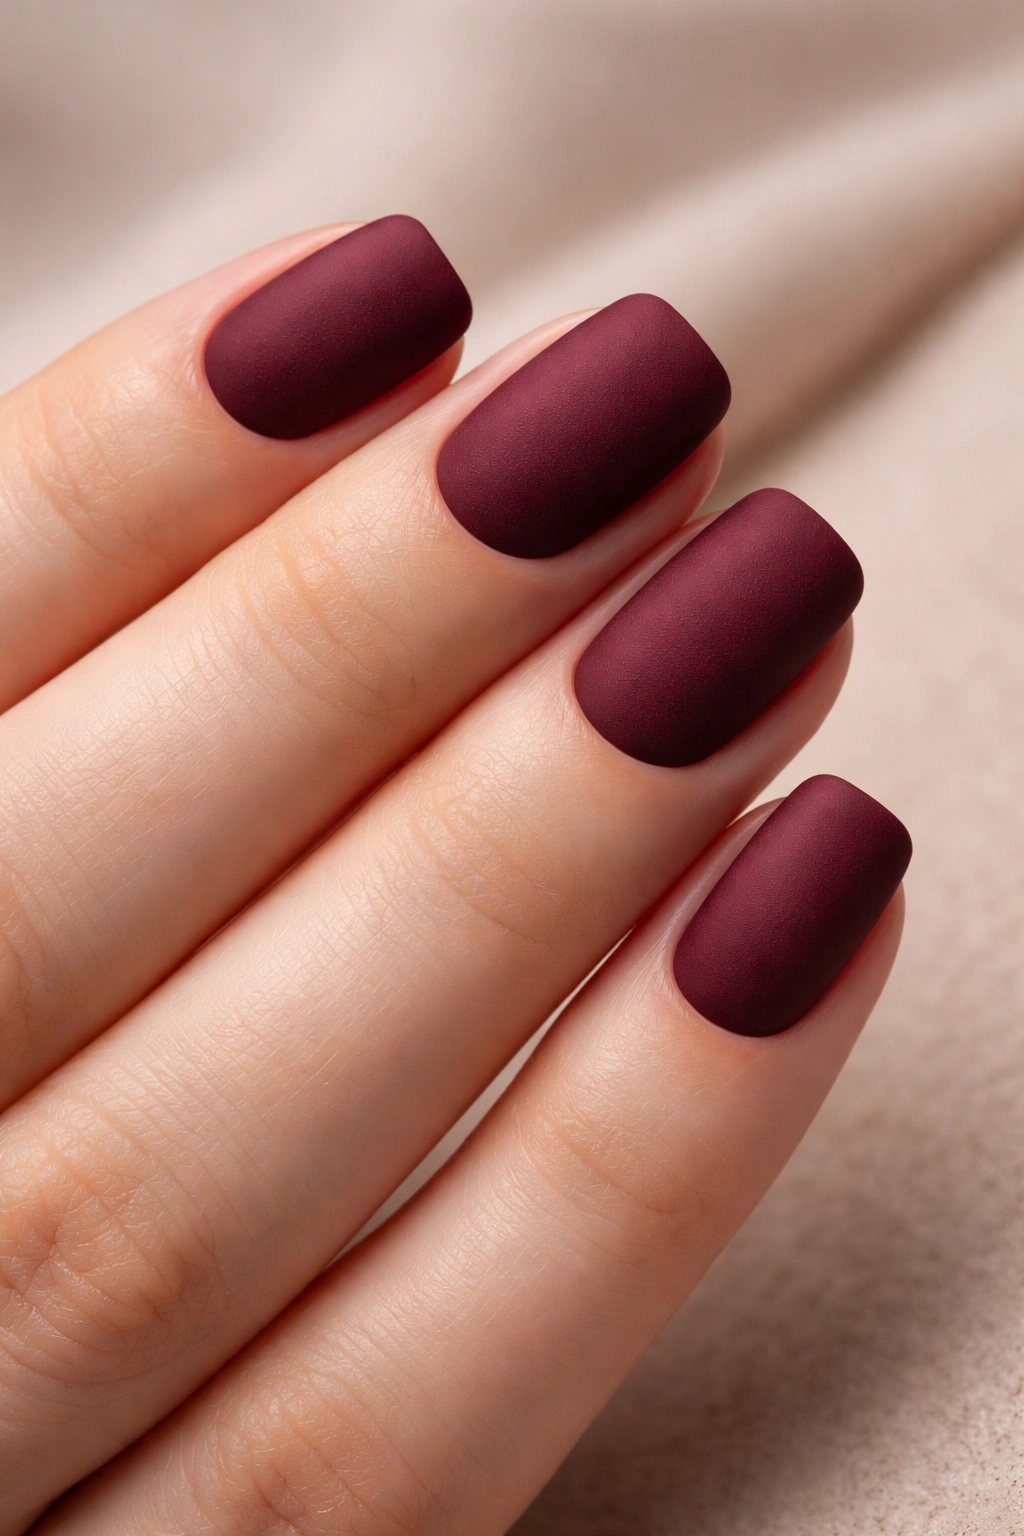
There’s something about deep burgundy on short nails that reads as polished and intentional rather than trying too hard. This color sits in that sweet spot between warm and cool, dramatic and wearable. Pair it with a matte topcoat and the nails immediately feel luxe—like something you’d see on a luxury brand’s creative director or at a high-end event.
The Texture Element
Matte finishes are where short nails truly shine because texture becomes visible in a way it can’t on longer nails where glossy shine dominates. The velvety, almost suede-like appearance of a matte burgundy feels premium and intentional. It’s not a color that works hard—the finish does the styling work.
How to Achieve This Look
- Choose a true burgundy shade rather than maroon or brown-leaning reds
- Apply two thin coats of regular burgundy polish for depth
- Finish with a quality matte topcoat, not a matte polish
- Keep cuticles pushed back and nail edges perfectly smooth—the matte finish shows every tiny imperfection
- Refresh with matte topcoat every 5-7 days as it can wear dull spots
3. Soft Pink Ombre into Pearl White
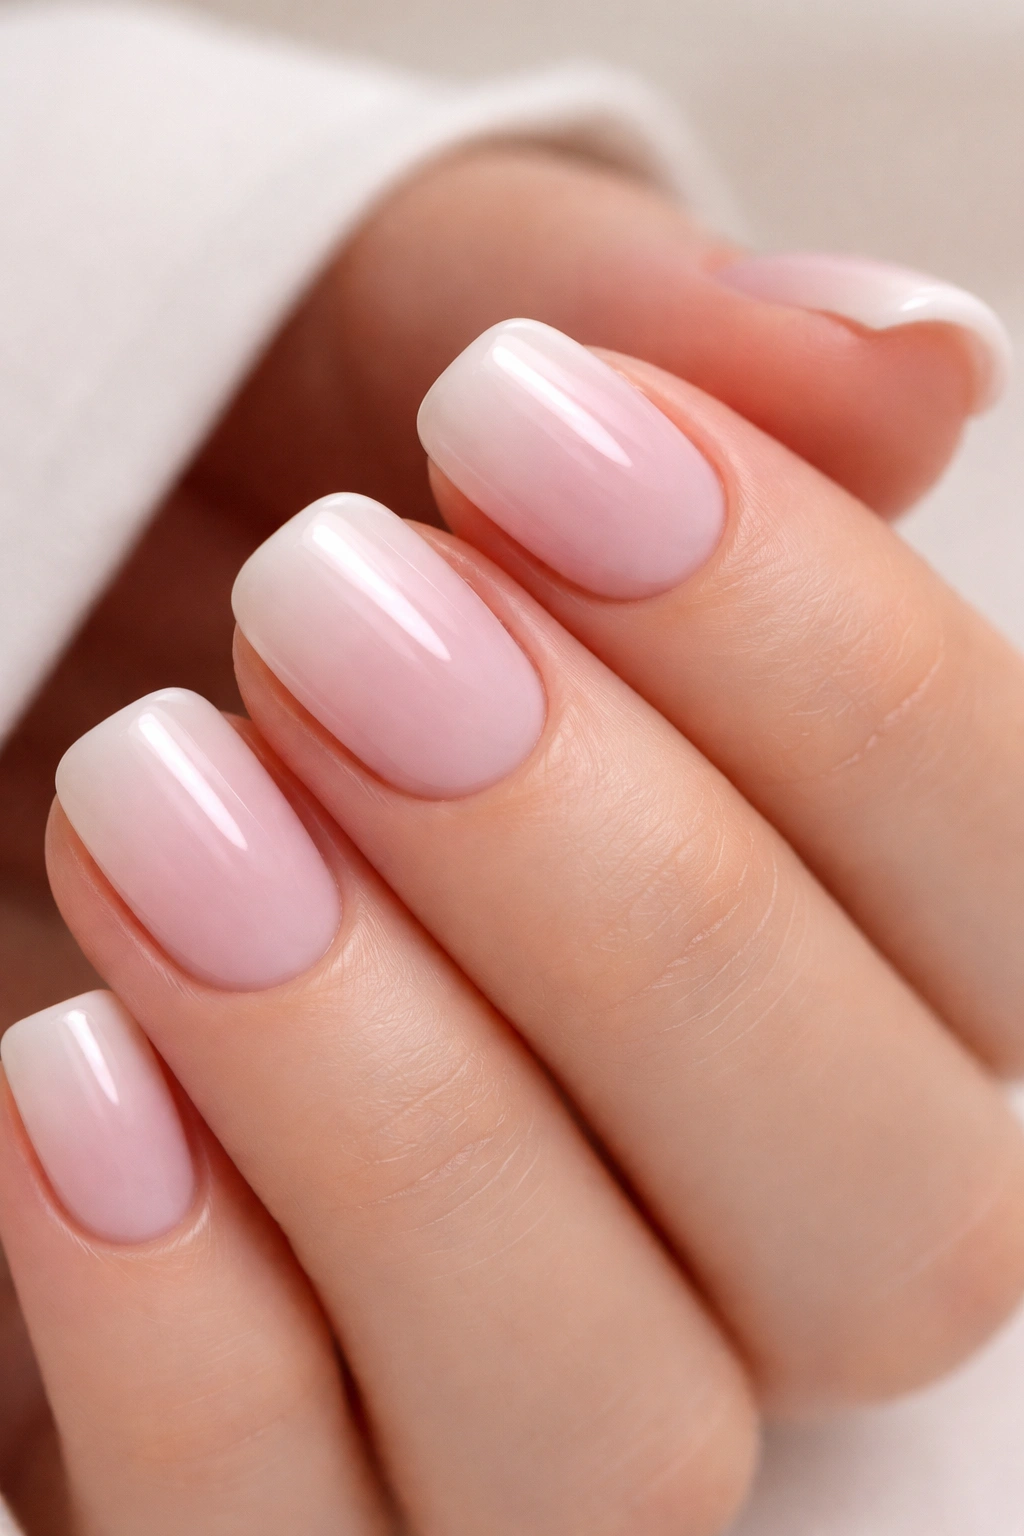
Gradient nails—or ombre nails as they’re more commonly called—are where short length becomes an actual advantage. The gradient happens over a smaller surface area, which means the color transition can be more dramatic and visible without looking accidental. A soft pink that fades into pearl white from the cuticle to the free edge creates depth and dimension that tricks the eye into seeing length where there isn’t any.
Creating the Gradient Effect
Ombre is easier than most people think, especially on short nails where you’re working with less real estate. You can use a sponge to dab and blend two colors, creating a naturally soft transition. The sponge method gives you control over where the fade happens and how blended it looks.
Step-by-Step Application
- Paint a thin layer of soft pink across the entire nail as your base
- Soak a makeup sponge corner in pearl white polish
- Press and dab the sponge onto the tip and free edge of each nail
- Repeat on a separate sponge section to blend and soften the transition
- Seal everything with a quality topcoat for smoothness
- The ombre works best when the colors are close in tone rather than highly contrasting
4. Nude Base with Delicate Floral Line Art
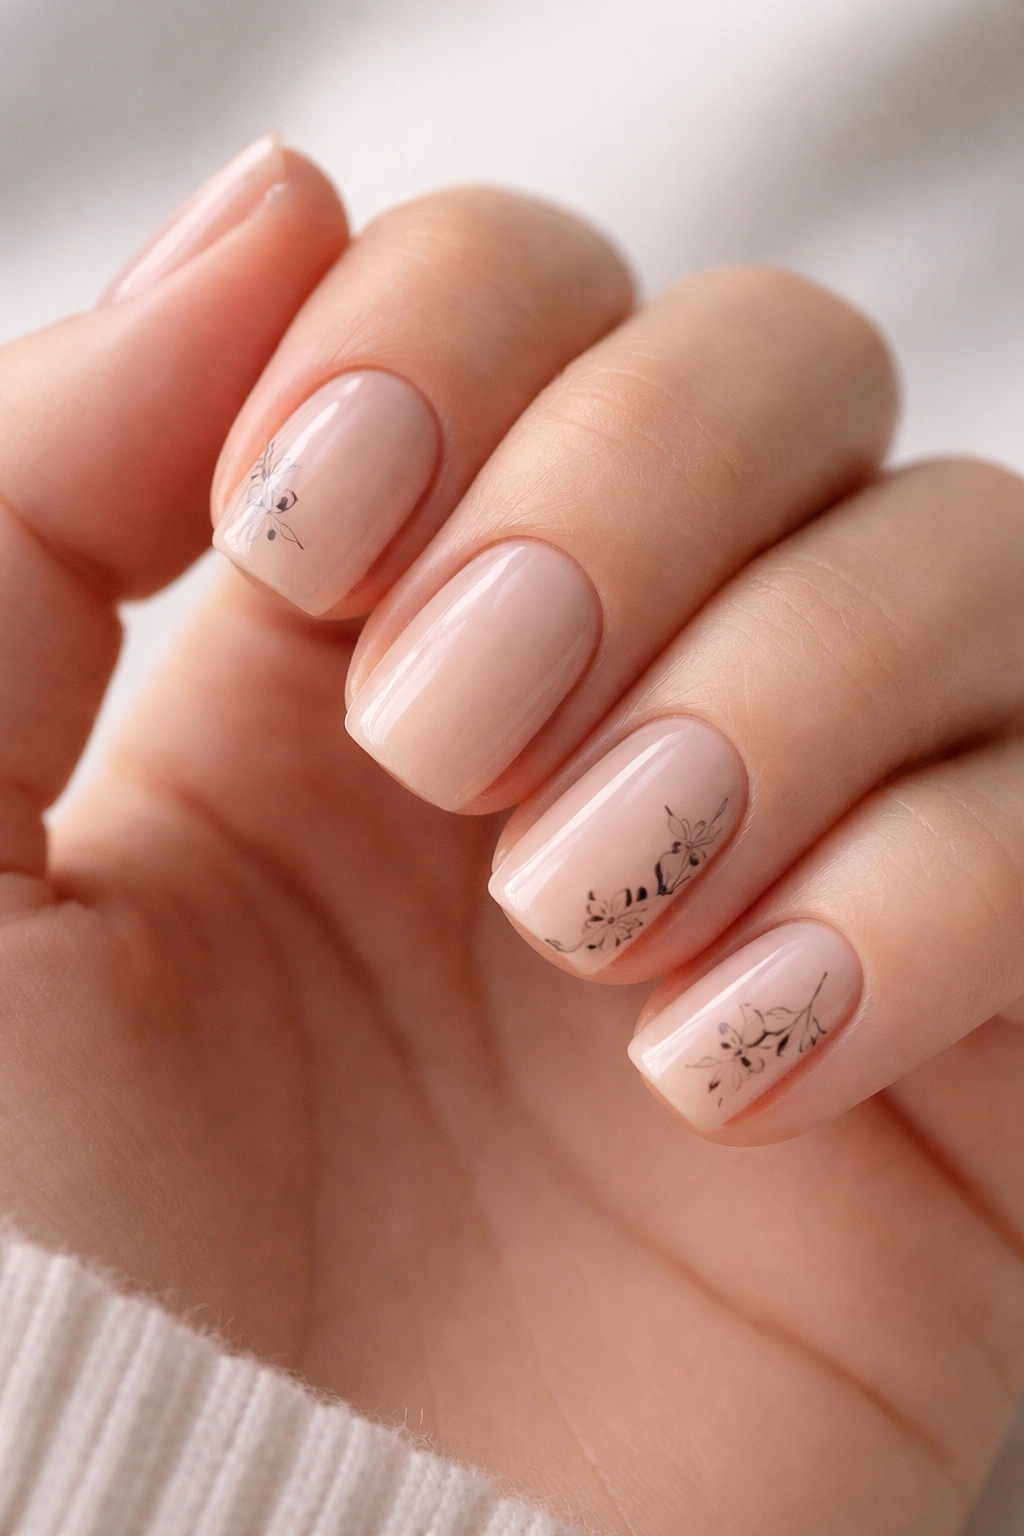
Short nails create the perfect canvas for single-line botanical drawings. Tiny hand-painted flowers or leaves in a darker shade—usually black, deep brown, or navy—look intentional and artistic on very short nails rather than cramped. A neutral nude base color keeps the focus on the delicate linework while elongating your fingertips visually.
The Line Art Technique
Single-line art is easier than it appears if you use the right tools. A thin detail brush or a fine-tip polish pen creates clean lines without the need for professional artistry. The designs work best when they’re simple and organic rather than trying to be photo-realistic.
Design Ideas That Translate Well to Short Nails
- A single stem with three small leaves climbing up one side of each nail
- Tiny wildflower outlines positioned in the corner or along the free edge
- Minimalist botanical line drawings in one corner only (leaving most of the nail neutral)
- Delicate branch or vine motifs that flow from one nail to the next across your hand
5. Glossy Cherry Red with Chrome Gold Tips
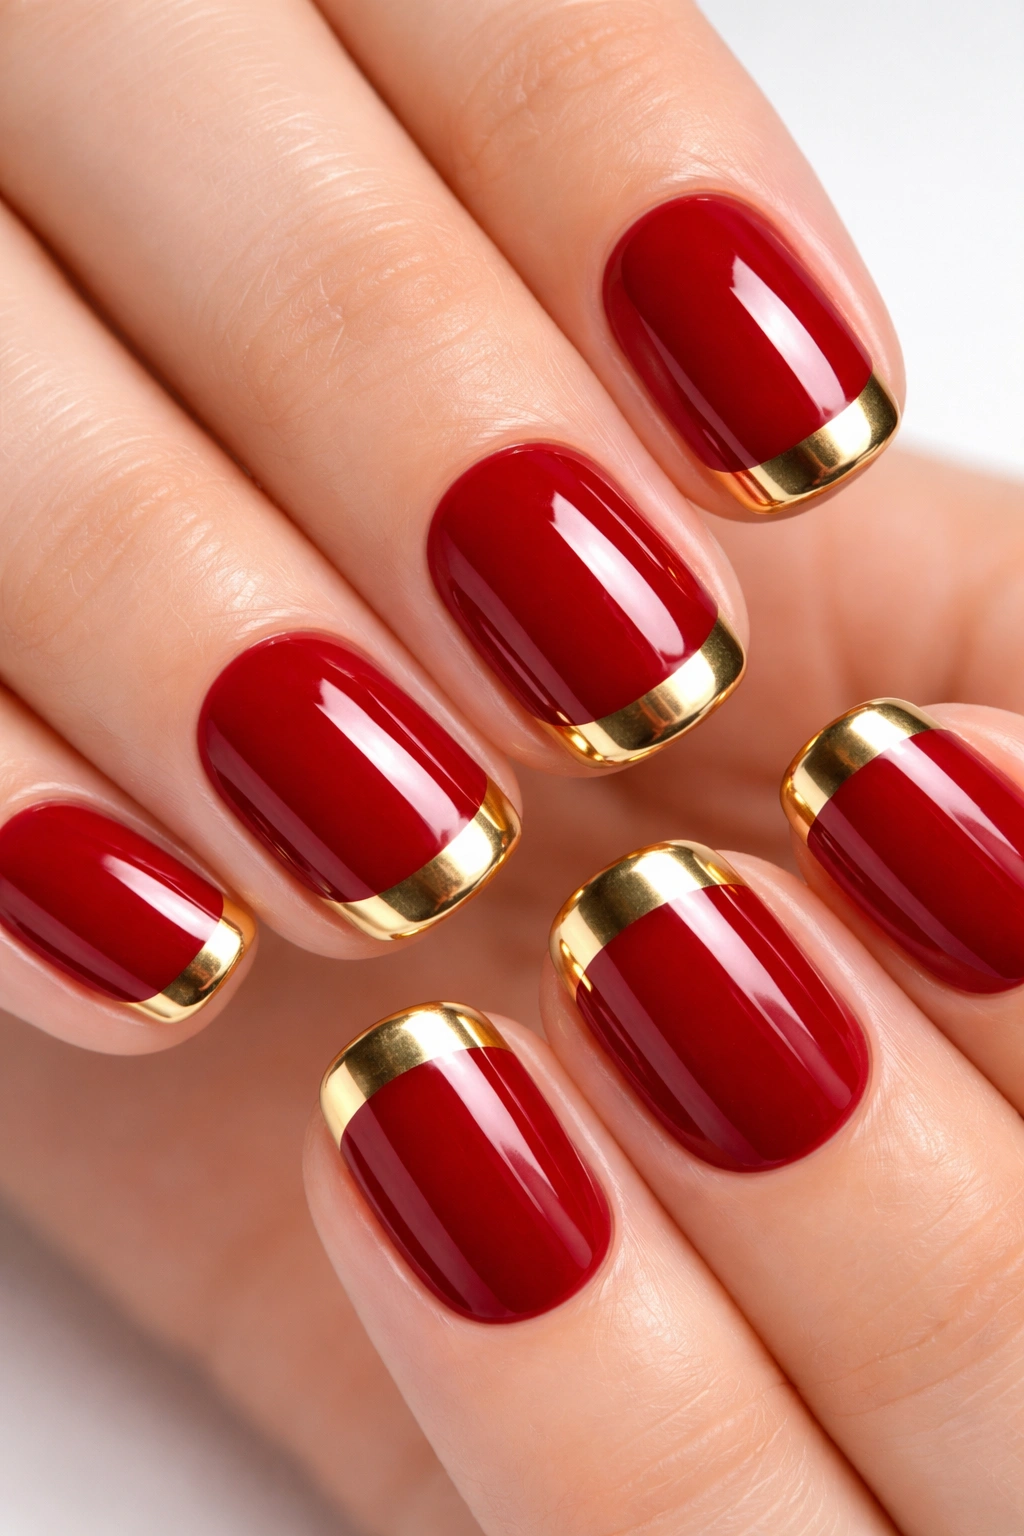
The classic red nail never goes out of style, but pairing it with a chrome or metallic gold tip creates a look that feels fresh and contemporary rather than retro. The chrome gold sits right at the edge where the red meets the white of your free edge, creating a sophisticated French-ombre hybrid. This works beautifully on short squovals because the chrome detail adds visual interest and the red appears deeper.
Why Chrome Finishes Elevate Simple Colors
Chrome or mirror-finish polishes reflect light in a way that creates an almost three-dimensional effect. On short nails, this reflective quality adds the visual impact that length usually provides. The metallic catches light as you move your hands, making a simple color combination look far more complex.
Achieving the Ombre-French Hybrid
- Start with two coats of glossy cherry red across the entire nail
- Use a small angled brush to apply chrome polish to just the free edge area
- Blend the edge between the red and chrome slightly with a sponge for a gradient effect
- Seal with a clear topcoat to smooth the chrome texture and add shine
- This look works better with regular topcoat than with a matte finish
6. Soft Beige with Negative Space Geometric Cutouts

Negative space designs work exceptionally well on short squovals because the shape is already clean and defined. Instead of covering the entire nail with color, you paint a soft beige base and then create small geometric cutouts or sections where you leave the nail bare. Triangles, squares, or simple lines carved out strategically make the design feel modern and intentional.
Why Negative Space Feels Intentional
When you subtract color rather than add it, the design reads as more sophisticated. It’s a classic design principle—sometimes what you don’t paint is more interesting than what you do. On short nails, this restraint looks especially chic.
Creating Geometric Cutouts
- Paint soft beige as your base and let it dry completely
- Plan your negative space pattern (usually one geometric element per nail, or a repeating pattern across all nails)
- Use a thin detail brush and topcoat (not polish) to paint the outline of your shape
- Allow the topcoat outline to set just slightly, then carefully peel it away, taking the polish beneath with it
- Alternatively, use liquid latex as a mask before painting, then peel it away to reveal negative space
- Finish with matte topcoat for a sophisticated, understated look
7. Classic White with Fine Black Pinstripe Detail
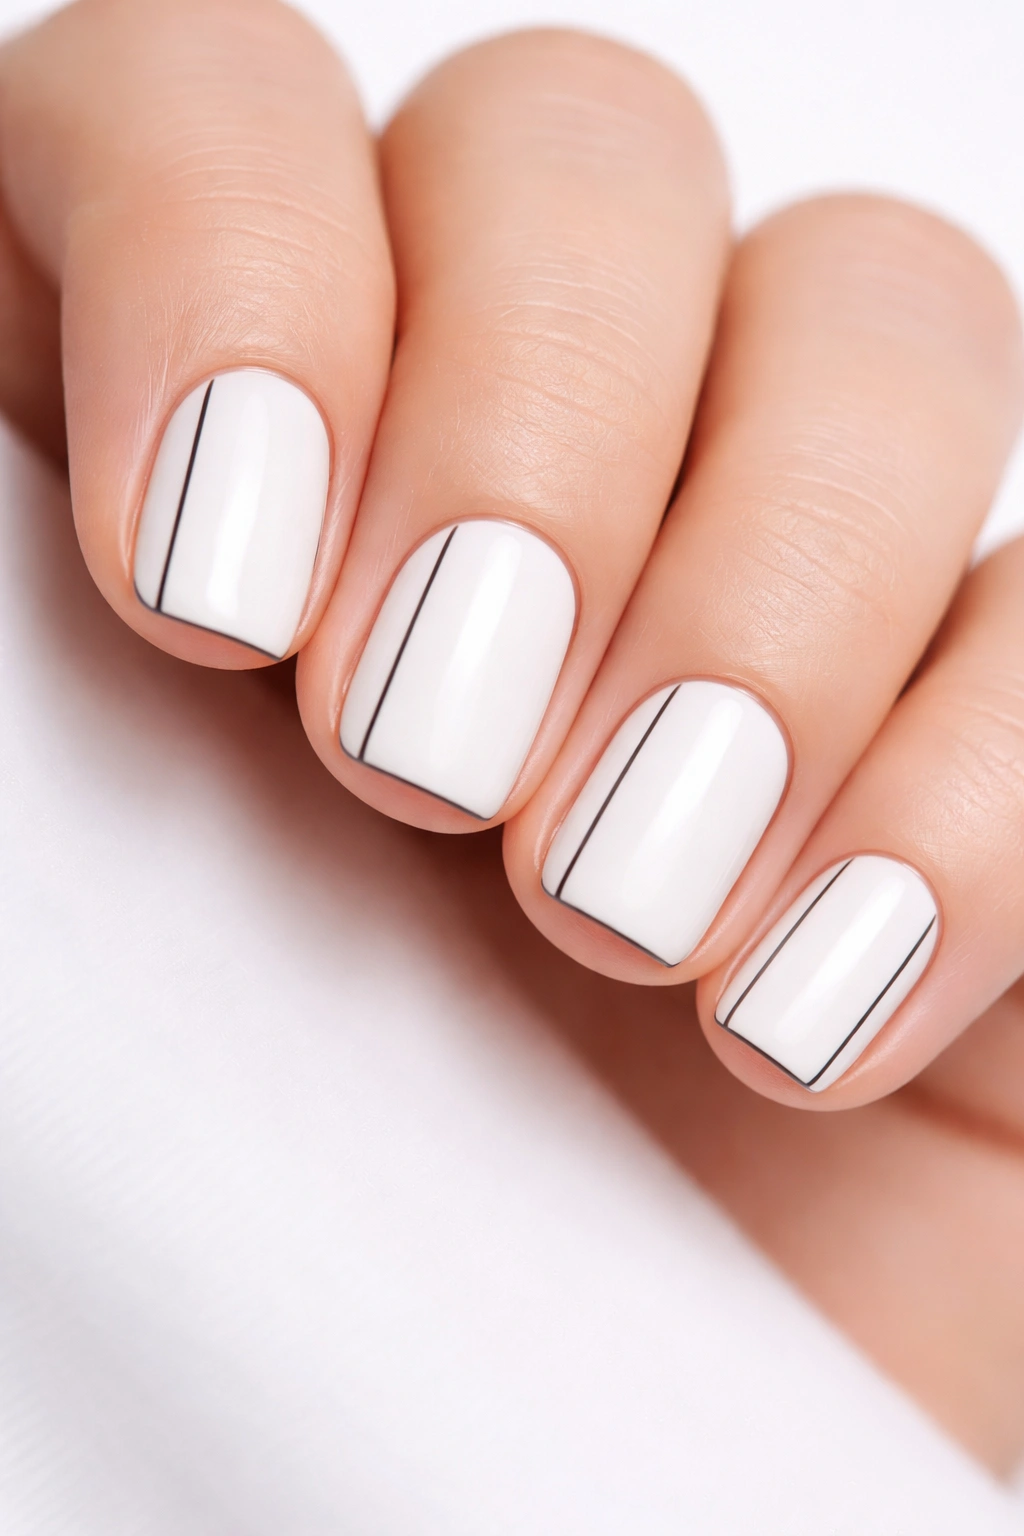
Timeless, elegant, and never dated—white nails with precise black pinstripes represent the height of polish and restraint. The pinstripes might be single lines down the center of each nail, or thin horizontal stripes stacked across the width. Either way, the design feels intentional rather than minimal because the black-on-white contrast is so clean.
The Power of Restraint
Short nails can feel boring if they’re completely solid color, but add one or two thin black lines and suddenly the design feels curated. There’s a reason this combination appears on high-end nail art and fashion week manicures—it works because it’s effortlessly sophisticated.
Execution Tips
- Use a pure white (not off-white or cream) for maximum contrast against black
- Black pinstripes must be perfectly straight—use striping tape for precision
- Apply stripes after your base color fully sets
- Keep lines as thin as possible; they should feel delicate rather than bold
- Works beautifully as a mix across your hand (some nails with vertical stripes, some with horizontal, some plain white)
8. Peachy Nude with Minimalist Leopard Spots
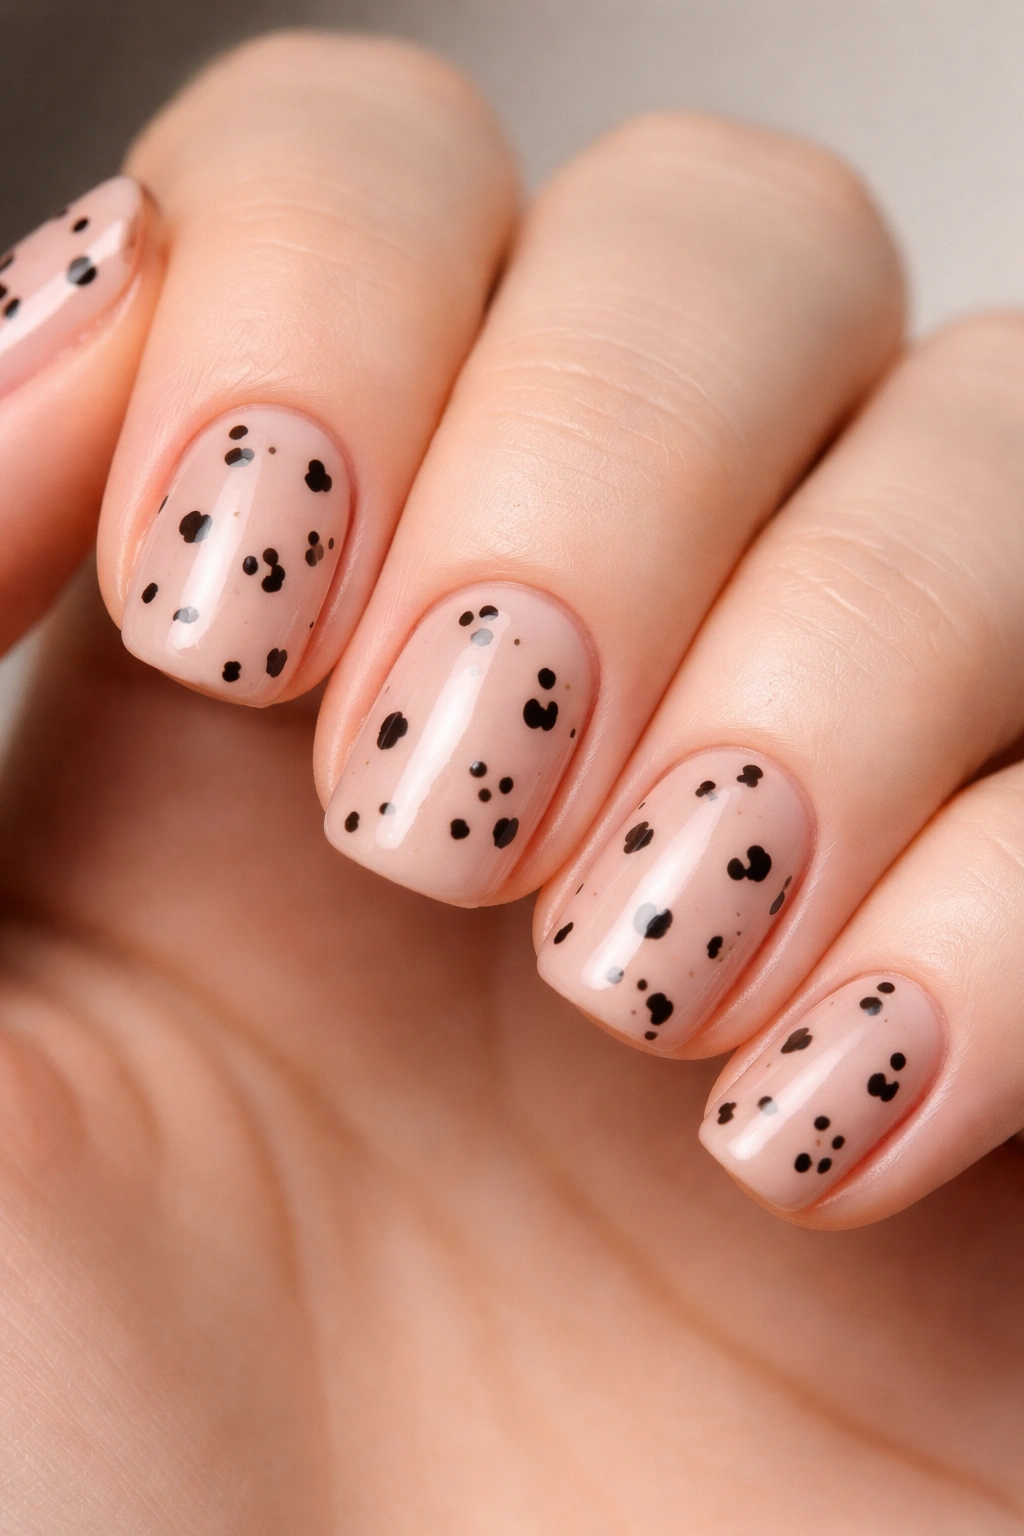
Animal prints get a bad reputation for being overdone or tacky, but when executed minimally on short nails, they feel fashion-forward. Tiny leopard spots in dark brown or black on a peachy-nude base create a design that’s recognizable but restrained. The spots might be scattered across all nails or concentrated in one corner, but the effect is always intentional.
Scaling Animal Prints Down
The secret to making animal prints work on short nails is simplicity. Don’t try for photo-realistic detail—instead, embrace the abstract. Three to five irregular circular shapes per nail, filled in with dark color and maybe a tiny dot or curve inside, is sufficient. The design doesn’t need to look like an actual leopard; it just needs to suggest the pattern.
Creating Minimalist Spots
- Start with peachy-nude base color and full dryness
- Use a thin detail brush or dotting tool to create circles in dark brown or black
- Make circles irregular in size and placement—uniformity looks less natural
- Add a single tiny dot inside some circles for depth
- Keep the overall design light (maybe 40% of the nail colored, 60% negative space)
- Finish with glossy topcoat to let the nude color shine
9. Soft Gray with Rose Gold Geometric Sections
Gray on its own can feel cool and impersonal, but pair it with rose gold accents in geometric arrangements and it becomes sophisticated and warm. Divide each nail into sections using rose gold metallic lines—maybe a triangle in one corner, a diagonal split, or concentric shapes—and fill alternating sections with rose gold. The contrast creates visual interest without chaos.
Geometric Color Blocking
Color blocking works beautifully on short nails because the geometry forces you to stay organized and intentional. Rather than abstract designs that might look muddy on small canvas, geometric shapes have clear boundaries and maximum impact.
How to Execute Geometric Sections
- Paint soft gray base across all nails and let dry
- Plan your geometric layout lightly with pencil first (yes, nail pencil, which you can find online)
- Use striping tape or thin brush to paint rose gold lines creating your geometric sections
- Fill alternating sections with rose gold metallic polish (some nails might be half-and-half, others might have small triangular or diamond sections)
- The key is consistency—if you do a specific pattern on one nail, repeat it on at least two others for cohesion
- Finish with glossy topcoat to enhance the metallic gleam
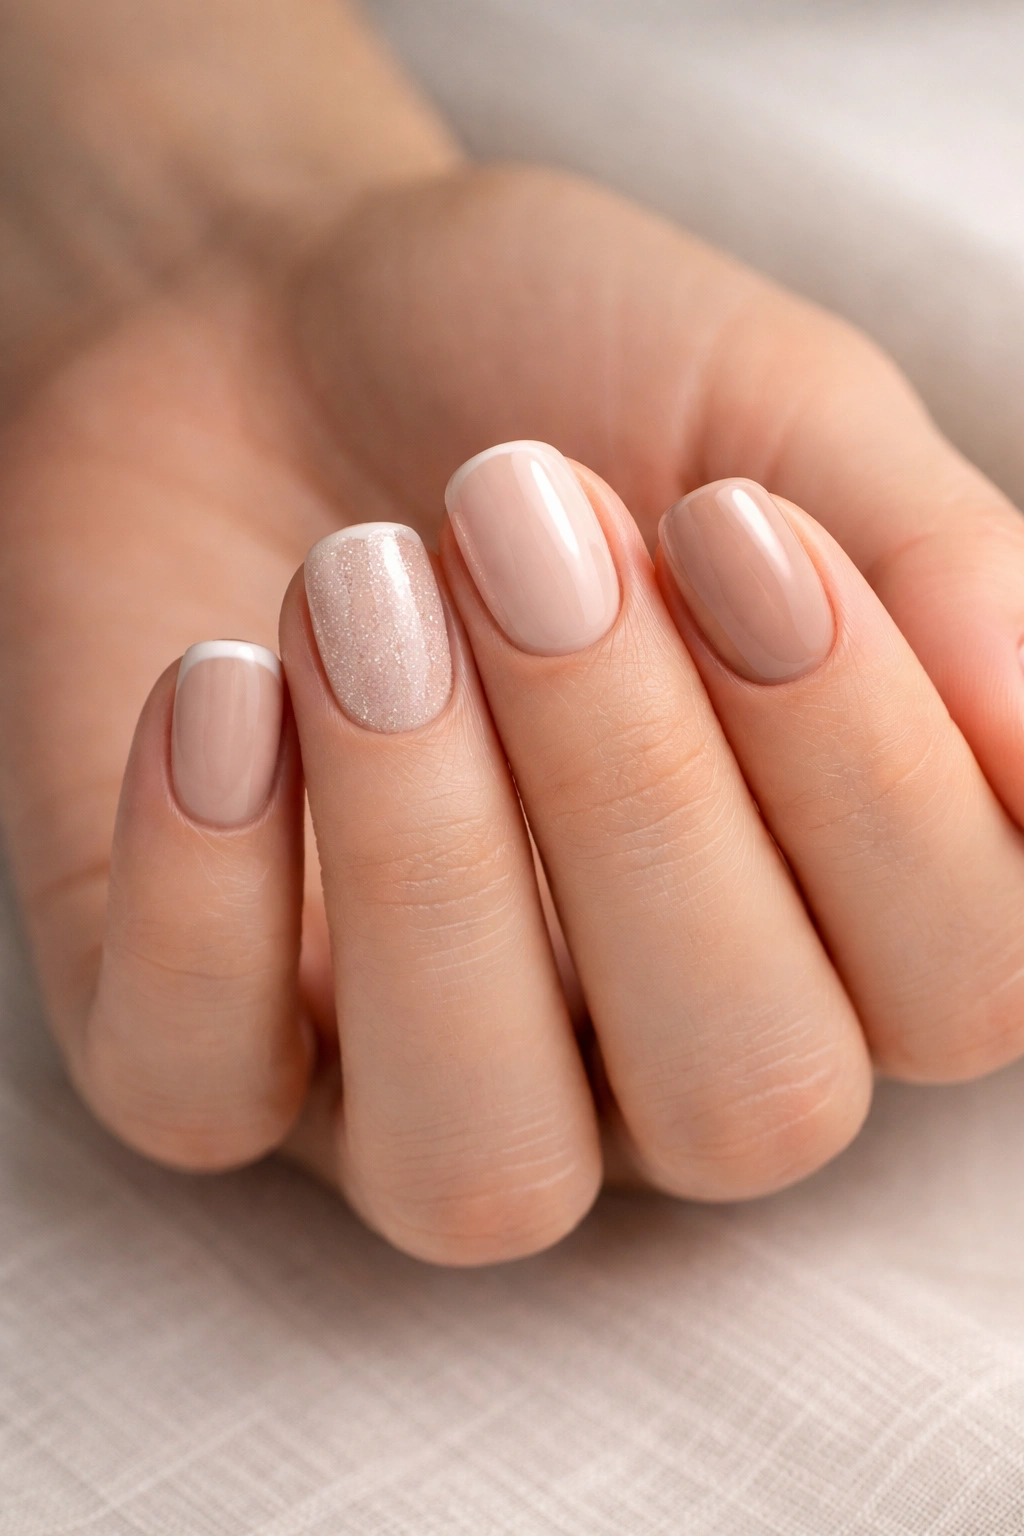
10. Ballet Pink with Barely-There Sparkle
There’s a reason ballet pink is considered universally flattering—it suits every skin tone and pairs with almost every outfit. When you add barely-there sparkle (a few tiny glitter flecks, not a full glitter gradient), you get a design that’s wearable for any occasion but still feels slightly special. On short nails, this restraint reads as elegantly understated.
Adding Sparkle Intentionally
Most glitter manicures go overboard, especially on short nails where a little glitter can feel like a lot. The trick is using clear topcoat dotted with occasional sparkle rather than full glitter polish. This gives you maximum control over the sparkle placement and intensity.
Creating Minimal Sparkle Effect
- Paint two coats of ballet pink as your base
- Use a toothpick dipped in clear topcoat to place individual glitter pieces strategically (one to three per nail, usually positioned along the free edge or in one corner)
- Alternatively, use a clear topcoat with ultra-fine glitter mixed in very lightly
- The sparkle should catch light only when you move your hand, not be immediately obvious
- Finish with glossy topcoat sealed over everything for seamless finish
11. Warm Taupe with Chestnut Striped Accents
Warm, earth-toned combinations feel sophisticated and fashion-forward without requiring bold color or complicated techniques. Taupe is neutral enough to work with any outfit, while chestnut stripes add warmth and definition. This combination works beautifully on short nails because the warm tones make hands feel more elegant.
The Warmth Factor in Nail Color
Warm neutrals beat cool neutrals on short nails because they read as more intentional. Cool grays can feel clinical; warm taupes feel curated. The tiny accent stripe in a darker warm tone (chestnut, chocolate, or burnt orange) creates enough contrast to feel deliberate without requiring elaborate design work.
Warm Taupe with Chestnut Striping
- Apply two coats of warm taupe to all nails as your base
- Once fully dry, use either striping tape or thin brush to add a single chestnut stripe
- The stripe might run vertically down the center of each nail, or horizontally across the lower third
- You could also create a thin chestnut line at the cuticle like a minimalist base of a French manicure
- Keep the stripe placement consistent across multiple nails for a cohesive look
- Seal with glossy topcoat
12. Pale Lavender with Silver Foil Accents
Pale lavender is soft and dreamy without being juvenile—it reads as sophisticated when combined with metallic accents like silver foil. The foil catches light beautifully and adds dimension to a soft base color. On short nails, this combination creates an ethereal, almost mystical quality.
Working with Foil Details
Foil polish or foil fragments require a special approach. Unlike regular polish, foil needs a sticky base (usually a specialized foil base or clear topcoat) to adhere properly. The results are worth the extra step because foil creates a truly unique, eye-catching texture.
Applying Lavender with Silver Foil
- Paint pale lavender as your base and allow full dryness
- Apply a specialized foil base (sticky topcoat designed for foil) to the area where you want foil to stick
- Press silver foil pieces onto the wet base while it’s still tacky, using a soft brush or fingertip
- The foil adheres wherever there’s base applied; clean away excess
- You can apply foil to the entire nail for maximum impact, or just the free edge and lower third for restraint
- Seal everything with clear topcoat (not the foil base again) for protection
- Foil designs benefit from glossy finish to enhance the reflective quality
13. Deep Emerald with Negative Space Moon Detail
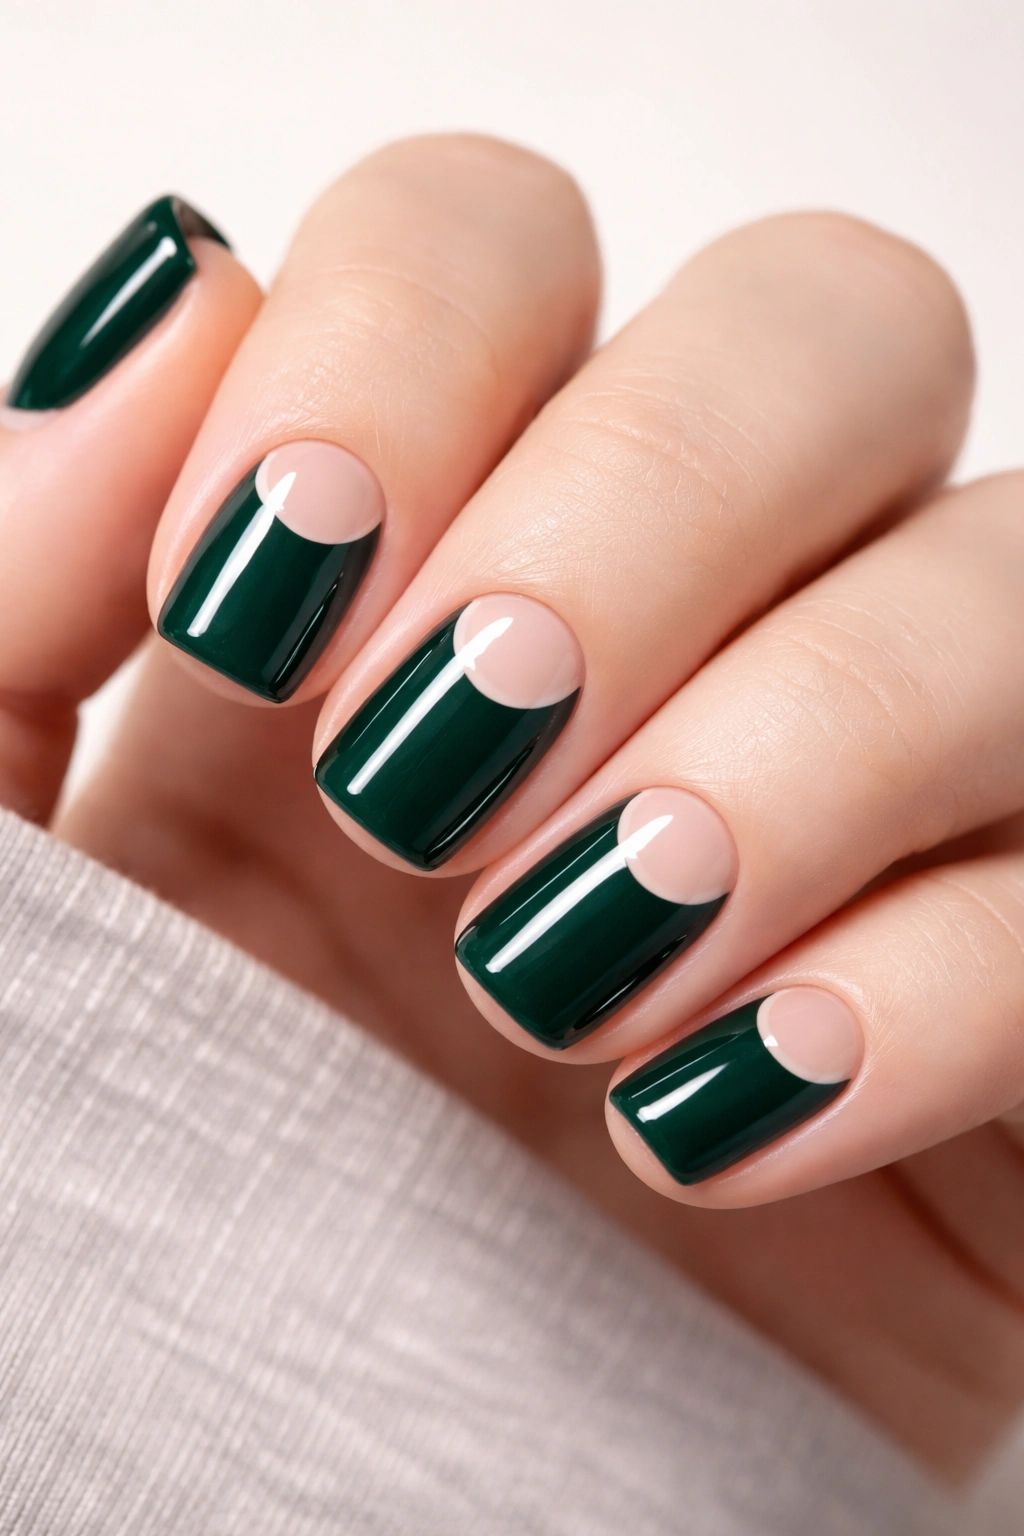
Emerald is one of those colors that photographs beautifully and makes hands look expensive and intentional. When paired with a negative space cutout—perhaps a crescent moon shape where the natural nail shows through—the design reads as modern and artistic. Short squovals are the perfect canvas for this because the shape gives you clear lines to work within.
Negative Space Cutouts
Creating a clean negative space cutout requires either a stencil approach using liquid latex or extremely careful freehand work. The result is worth the effort because a clean, defined negative space shape looks far more intentional than a messy or uneven one.
Creating an Emerald Moon Cutout
- Apply deep emerald base polish and allow full dryness
- Paint liquid latex around the area where you want negative space (use a stencil or paint freehand creating a moon shape)
- Allow liquid latex to dry completely (usually 2-3 minutes)
- Apply topcoat over the entire nail, including the latex area
- Once topcoat sets, carefully peel away the latex, taking the polish beneath with it
- The natural nail shows through where the latex was
- Finish with final clear topcoat over everything
- The negative space moon might be small (one crescent per nail) or larger (half the nail width), depending on your preference
14. Soft Ivory with Delicate Gold Floral Accents

Ivory is more sophisticated than white and warmer than cream—it’s the nail color equivalent of an expensive linen fabric. When decorated with delicate gold botanical details (leaves, small flowers, branches), the overall effect feels like wearable art. On short nails, these delicate details feel intricate rather than cramped.
Hand-Painting Tiny Florals
You don’t need artistic ability to hand-paint tiny flowers if you use the right techniques. A dotting tool for circular elements (flower centers and petals) combined with a thin brush for leaves creates believable florals quickly.
Painting Botanical Details on Ivory
- Start with soft ivory base polish, two coats, fully dry
- Use a thin detail brush or liner brush to paint tiny leaves in gold
- Create small flower centers using a dotting tool and gold polish (just a circle or small irregular shape)
- Add petals around the center using the dotting tool or brush (three to five petals depending on flower type)
- Keep the overall design light and airy—maybe one or two flowers per nail
- Scatter design across multiple nails for visual interest, or concentrate florals on an accent nail
- Seal with clear glossy topcoat
15. Warm Caramel with Espresso Marble Swirls
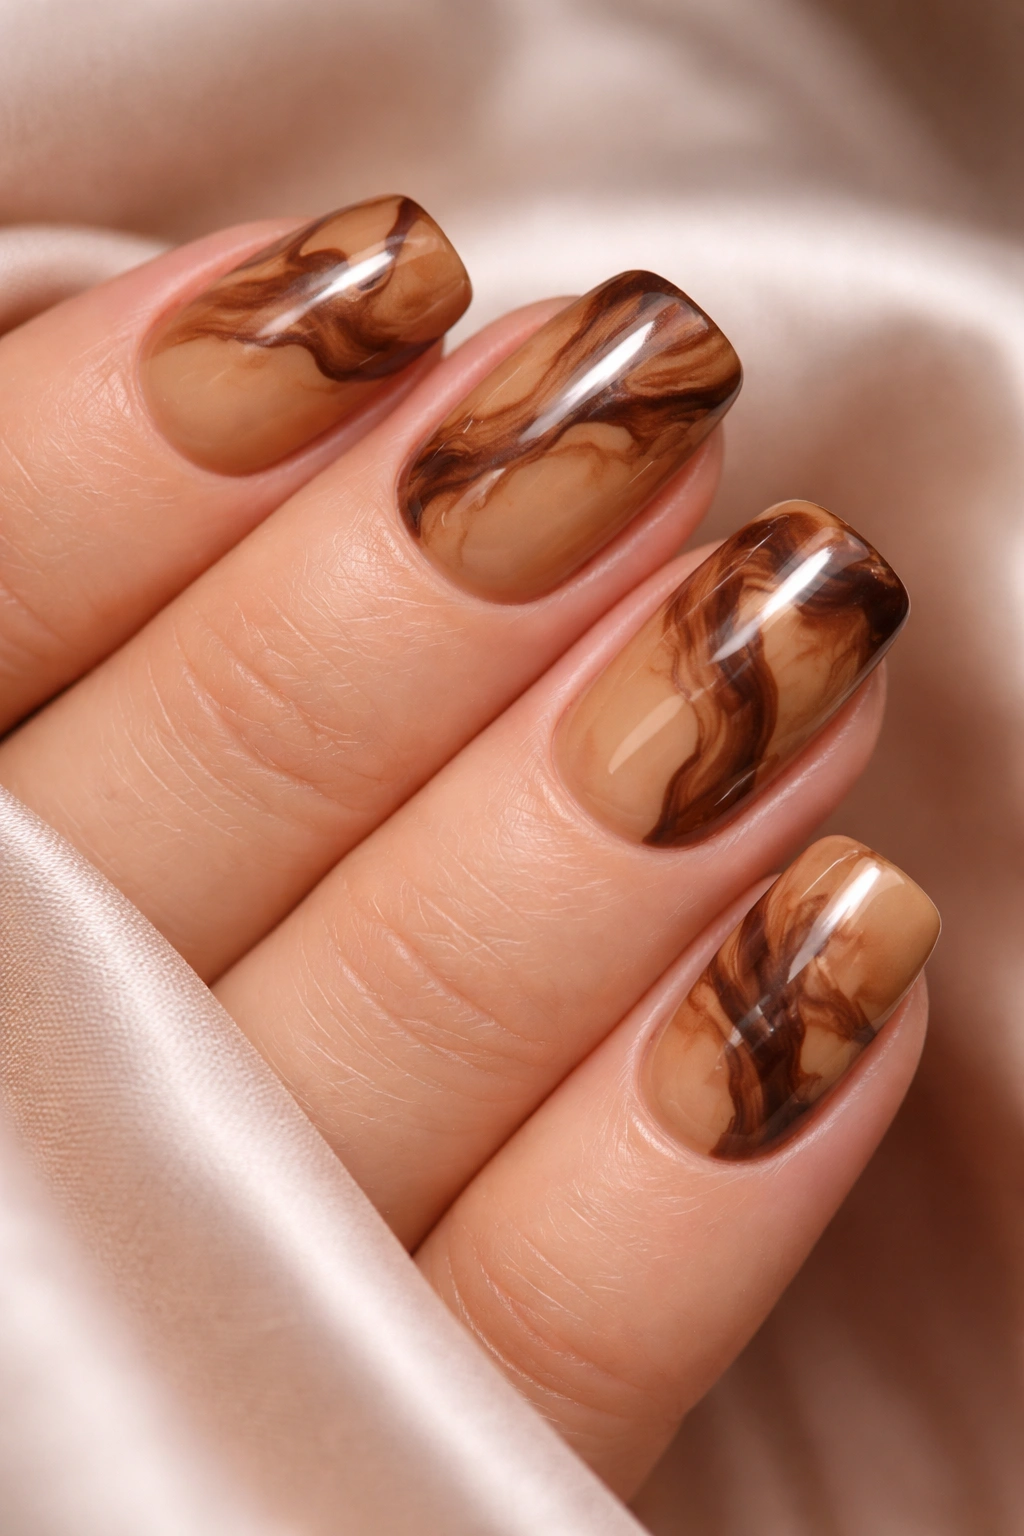
Marble effects are easier than they appear and create a look of sophisticated complexity that actually requires minimal effort. Warm caramel paired with deep espresso marble swirls creates an effect that looks expensive and fashion-forward. On short squovals, the marble fits perfectly within the nail boundaries.
Creating Marble Effects
The water marble technique is one way to achieve this, but it’s messy and inconsistent on short nails. Instead, use the sponge or freehand swirl method: dab two polish colors onto a sponge and press onto the nail, then use a thin brush to create marble-like swirls. The result is intentional-looking without requiring special equipment.
Warm Caramel with Espresso Marble
- Paint warm caramel as your base and allow full dryness
- Have espresso or dark brown polish ready
- Either sponge dab espresso onto the nail randomly, or use a thin brush to paint thin, irregular lines and swirls
- While espresso is still wet, gently drag a clean brush through the color to create marble-like streaks
- The key is keeping it loose and organic—marble shouldn’t look perfectly symmetrical
- Allow to dry completely, then seal with topcoat
- This design benefits from a slight matte finish to enhance the stone-like quality, or glossy if you prefer shine
Short Squoval Nail Care Essentials
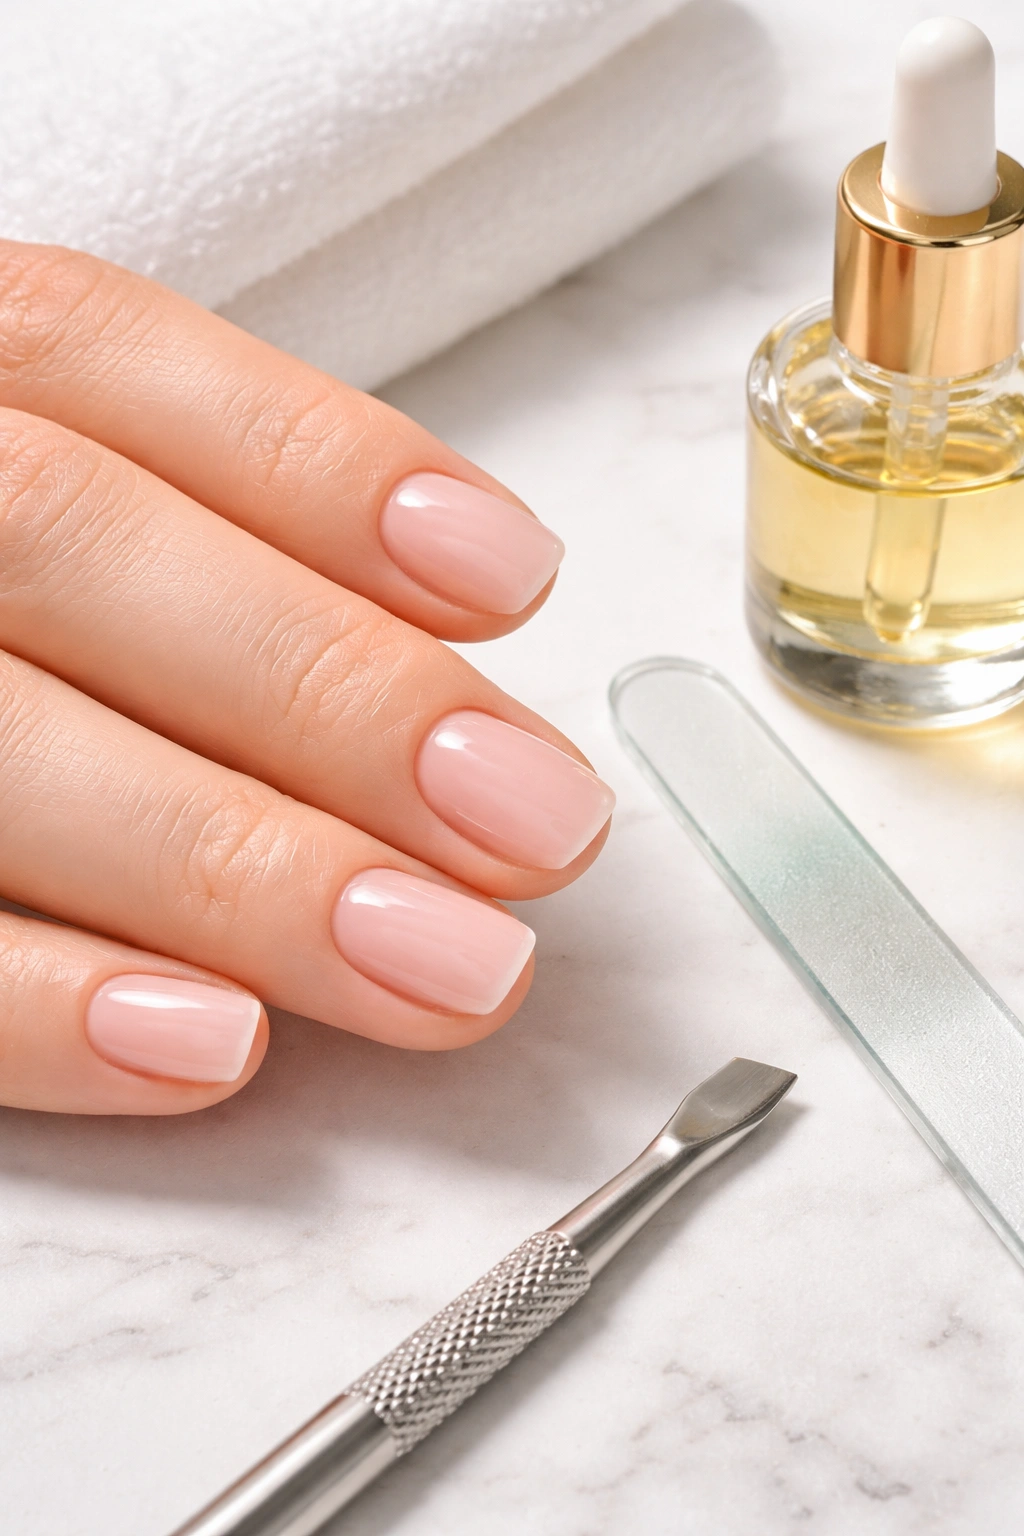
Short nails require different maintenance than longer nails, but they’re actually easier to keep healthy and beautiful. The biggest difference is that problems have less time to develop, and chips or breaks are instantly visible, so addressing them immediately becomes more important.
The shape itself is naturally protective—the rounded corners are less likely to catch and break than sharp square corners, which means your manicure stays flawless longer. Keeping your nail edges smooth is non-negotiable with short nails, because any rough edge becomes immediately noticeable against your skin tone. Invest in a quality nail file (a glass file is gentler than metal and less likely to cause splintering) and file gently in one direction rather than saw-like back-and-forth motions.
Cuticles deserve attention with short nails because the nail beds are more visible. A well-maintained cuticle line makes even the simplest design look intentional. Push back cuticles gently two to three times per week with a wooden stick, and use a nourishing cuticle oil daily to keep them soft and healthy. Dry, damaged cuticles age your hands.
Styling Short Squovals with Your Wardrobe
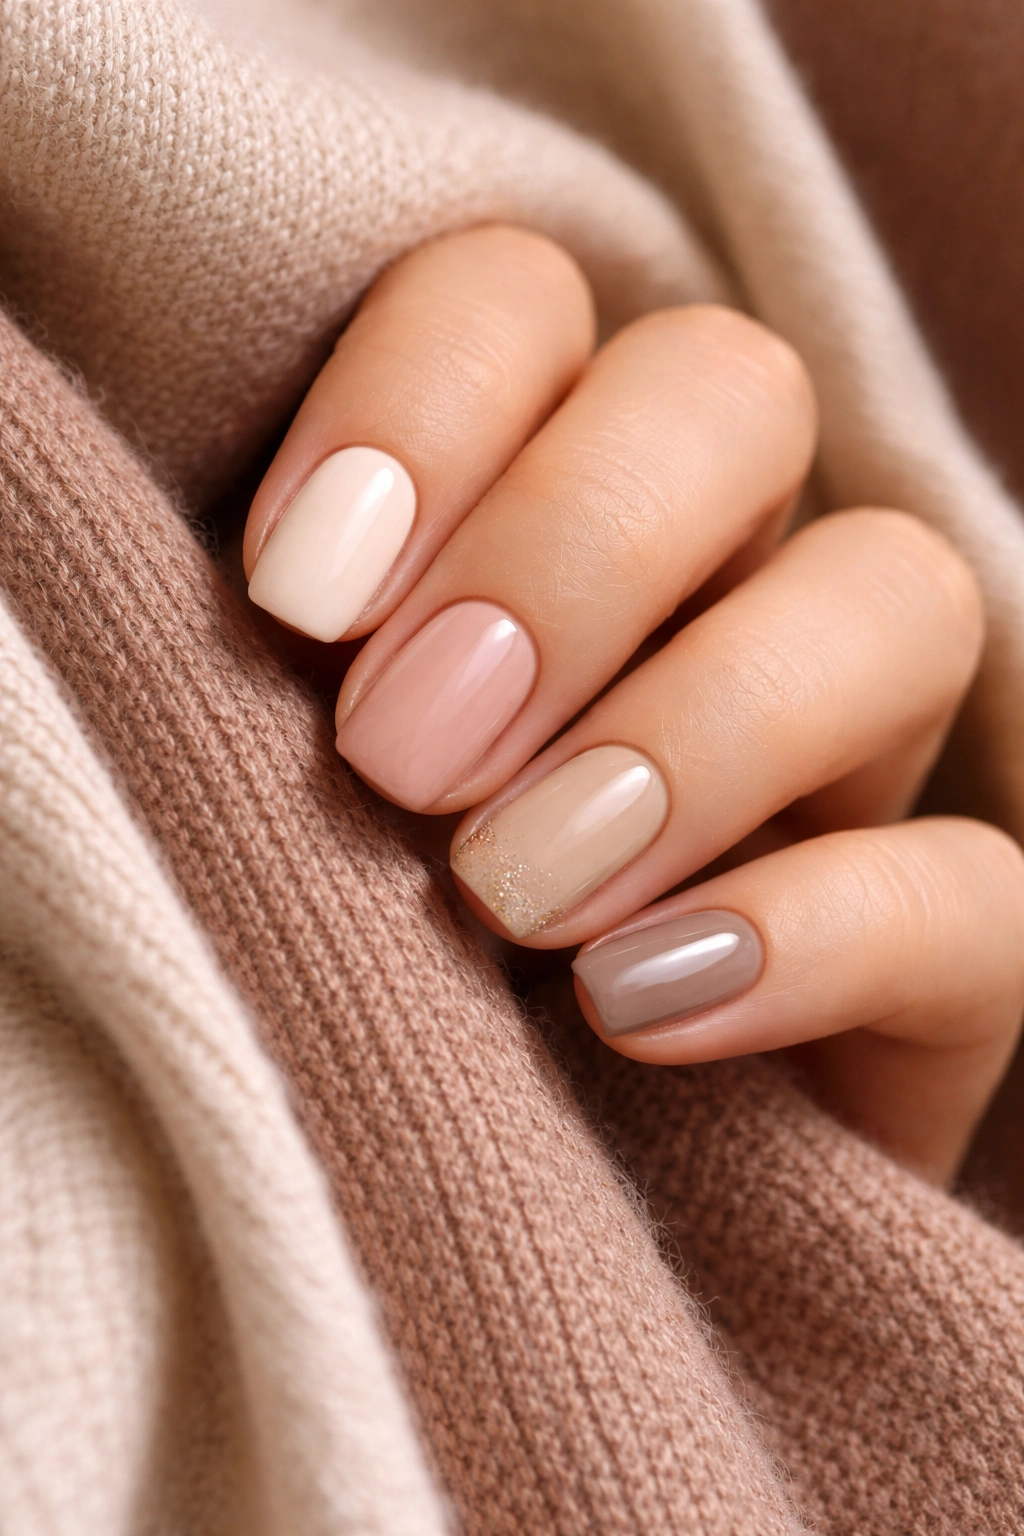
One advantage of short squovals that often gets overlooked is versatility. They work with absolutely every style—from casual weekend wear to professional meetings to formal events. A short squoval manicure reads as “I’m put-together and intentional” rather than flashy or trying hard.
For professional settings, stick with the classics: clear or nude, soft pink, or cream with minimal accent details. Matte finishes and minimalist designs feel more serious than high-shine or glittery options. Your nails should complement your outfit, not compete with it.
With casual outfits, you have more freedom to play with color and design. Deep jewel tones pair beautifully with denim and sweaters. Warm neutrals feel effortless and elevated with linen and white button-ups. Pastels work for spring and light fabrics, while deep burgundy and forest green suit fall and winter textures.
For special occasions and events, metallic accents (gold, silver, or rose gold) automatically elevate any design. The reflection catches light and reads as more intentional than flat color. Chrome finishes, foil accents, or glossy finishes paired with elegant base colors create that “you took time” feeling without requiring complicated design work.
Making Your Manicure Last Longer

The lifestyle difference between short nails and long nails is significant when it comes to daily wear and tear. Short nails are more resistant to breaking, but they’re still vulnerable to chipping, especially at the free edge. Being intentional about how you use your hands extends manicure longevity considerably.
Avoid using your nails as tools—not because you’ll damage the nail itself (short nails are pretty resilient), but because any damage becomes immediately visible and breaks the design. If you’re opening packages, scraping labels, or doing similar tasks, use a tool instead. Your manicure will stay flawless longer.
Wear gloves when doing dishes or cleaning, even though short nails are more practical for these tasks. Water and harsh soaps soften polish and shorten manicure lifespan. A simple pair of rubber gloves adds days to how long your design stays pristine.
The free edge—the white part of your nail extending past your fingertip—is the most vulnerable part of any manicure, especially on short nails where it’s closer to your daily activity. Keep the edge smooth with gentle filing and sealed with glossy topcoat. Check your polish coverage at the edge regularly and touch up with topcoat as needed. A thin coat of topcoat on the edge weekly extends the manicure lifespan considerably.
Transitioning from Long to Short Nails

If you’ve been wearing longer nails and want to transition to short squovals, expect an adjustment period both physically and mentally. Your hands will feel strange and free without the weight and length you’re used to. Typing, texting, and daily tasks will suddenly require less force and precision. Some people find this incredible liberating; others miss the visual impact.
Give yourself at least two to three weeks before deciding whether short nails are right for you. In those first weeks, your brain is adjusting to the physical difference, so you might experience phantom sensations of nails catching or breaking (they’re not—this is just your nervous system recalibrating).
Psychologically, short nails require you to invest more intentionally in design because length isn’t doing the work. If you choose solid color, it needs to be a considered choice rather than a default. If you choose design, it needs to be thoughtful because there’s no room for accident or experiment. This isn’t a bad thing—it usually results in better-looking manicures—but it does require a shift in how you approach nail design.
The practical advantages of short nails often convince people who were initially skeptical. No more snagging on sweaters, breaking while sleeping, or struggling with basic tasks. Your hands feel lighter, stronger, and more capable. For people with active lifestyles, this practical improvement often outweighs any nostalgia for longer length.
Understanding Squoval Dimensions for Your Hand Shape
Squoval is a universally flattering shape, but the exact proportions matter. The width of the nail at the base should be proportional to the length of your nail—a short squoval that’s too wide looks stubby, while one that’s too narrow looks pinched.
For very short nails, aim for the width of your nail bed to be approximately equal to the length of the nail extending past your fingertip. This creates visual balance and makes your fingertips look longer than they actually are. If your nail beds are naturally narrow, short squovals look even longer and more elegant. If your nail beds are wide, you might need slightly more length to avoid the stubby appearance, but you can still keep them short—just not micro-short.
The rounded corners should be a subtle curve rather than a dramatic U-shape. Imagine you’re rounding off sharp corners—not creating a full oval at the tip. This maintains the “squoval” aesthetic rather than drifting into full oval territory, which reads differently and photographs differently.
Final Thoughts
Short squoval nails represent the sweet spot between practical and beautiful—a shape that works with your life rather than against it. These fifteen designs prove that you’re not choosing between function and style; you’re getting both simultaneously. Whether you prefer minimalist geometry, warm neutral tones, bold jewel colors, or textured finishes, short squovals accommodate every aesthetic while remaining wearable and sustainable.
The designs that work best on short squovals are the ones that embrace the shape’s definition and natural balance rather than trying to add visual length or drama. A thoughtful color choice, a precise detail, a textured finish, or a bold decision about what not to paint—these are the elements that make short squoval nails feel intentional and curated rather than minimal or compromised.
Start with a design that resonates with you immediately, give yourself permission to try it, and notice how your hands look over the next two weeks. Short nails grow fast enough that if a design doesn’t work for you, you’ll have the opportunity to try something completely different very soon. That freedom to experiment without long-term commitment is actually one of the biggest advantages of keeping them short. Your perfect short squoval manicure is just a design choice away.
