

You’ve probably scrolled past stiletto nail designs online and thought, “That’s cute, but I don’t know how to actually make that work.” The sharp, elongated shape of stilettos is inherently dramatic—but that’s exactly what makes them the perfect canvas for creative, eye-catching designs that feel way more personalized than a basic manicure. Whether you’re drawn to minimalist sophistication, bold patterns, or playful artistic touches, stiletto nails give you the real estate to express genuine style.
The beauty of stilettos isn’t just about the length—it’s about how designs interact with that distinctive tapered silhouette. A simple gradient feels entirely different on stilettos than on rounded nails. A tiny floral accent becomes a statement piece. Colors that might feel subtle elsewhere pop with intensity and elegance on the elongated canvas. The key is choosing a design that complements the nail shape itself rather than fighting against it.
What makes these ideas genuinely wearable—not just Pinterest fantasies—is that they range from styles you can rock at a professional office to statement looks perfect for nights out. Some of these designs take serious skill or require a talented nail technician, while others are totally manageable at home with steady hands and decent brushes. I’ve focused on designs that work across different occasions, skill levels, and aesthetic preferences, so you’ll find something that clicks with your personal style.
1. Soft Pink Ombre With Gold Foil Accents
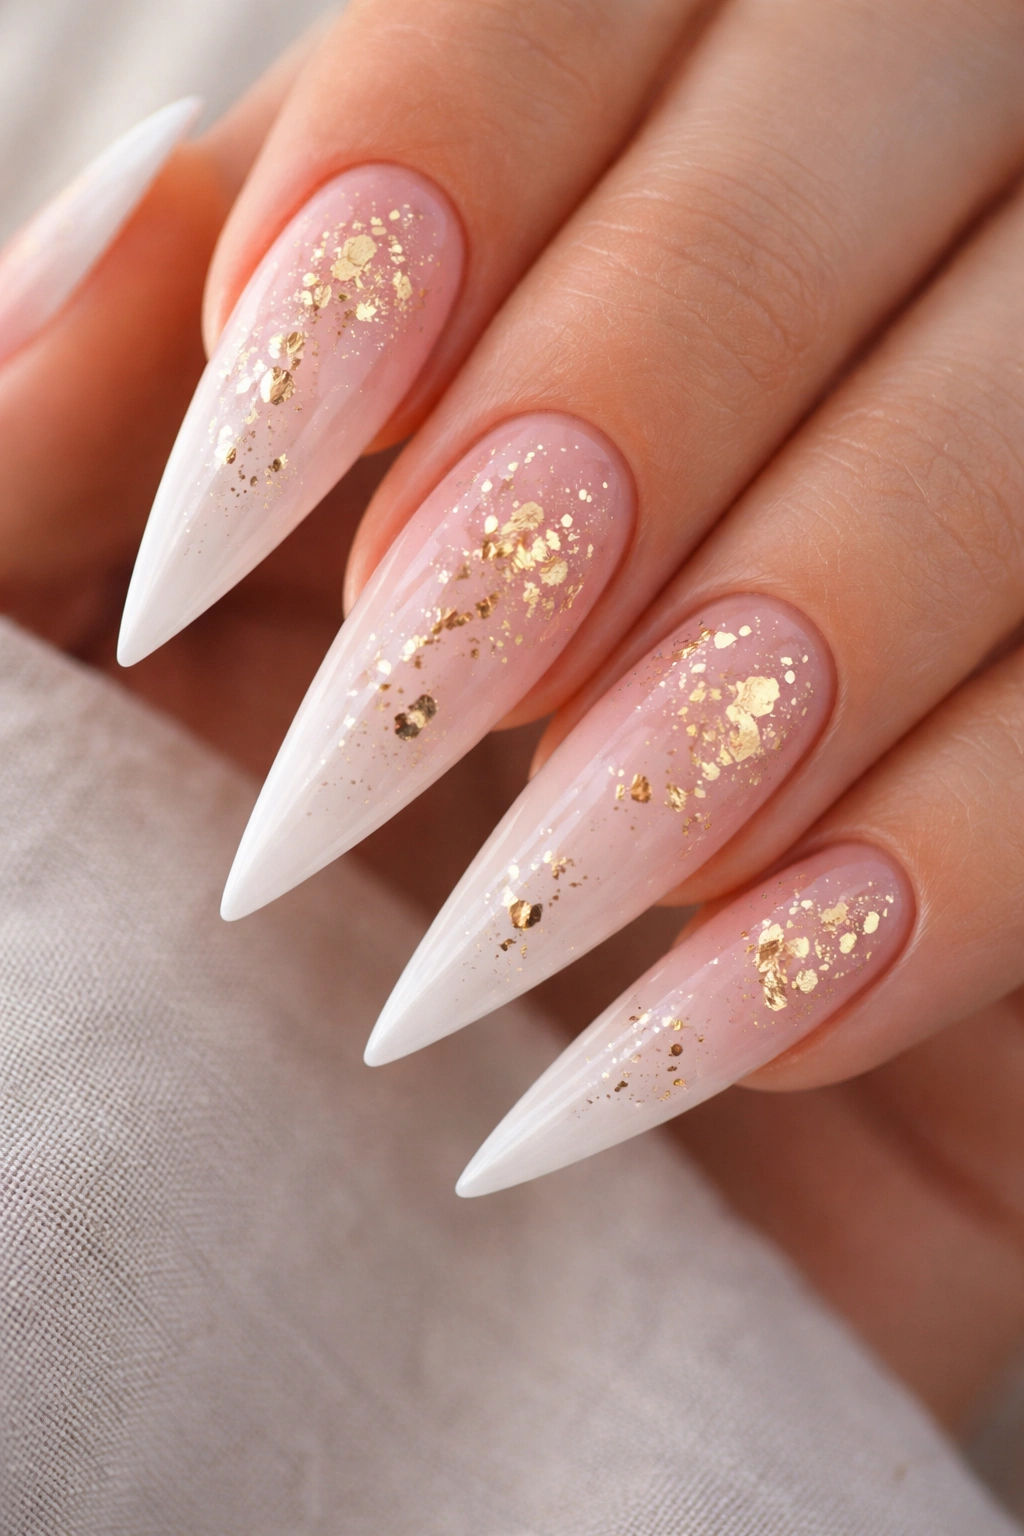
This design balances elegance with just enough shimmer to feel special without screaming for attention. You’re working with a gradient that flows from pale blush pink at the cuticle to an almost-white tone at the tips, creating a soft, elongating effect that flatters the stiletto shape beautifully.
Why This Design Works So Well
The ombre technique on stilettos creates an illusion of extra length because the eye follows the color transition upward. The gold foil comes in as scattered pieces rather than continuous lines—think tiny geometric shards randomly placed across the gradient. This approach feels curated and sophisticated rather than glittery, which is the sweet spot for a design that works both professionally and on weekends.
How to Make It Look Polished
- Apply a base coat, then use a makeup sponge to dab two to three shades of pink from darkest to lightest across the nail
- Seal it with a clear topcoat before adding foil—this prevents the foil from shifting
- Use foil flakes in champagne, rose gold, or warm gold, pressing them gently into wet topcoat in the final coat
- Focus foil placement on the center and tips to draw focus downward and create visual balance
Pro tip: This design looks infinitely more expensive if you use high-quality foil rather than craft-store sequins. The foil actually adheres to the topcoat and stays put, whereas loose glitter will migrate with every hand movement.
2. Classic Red With Black Tips
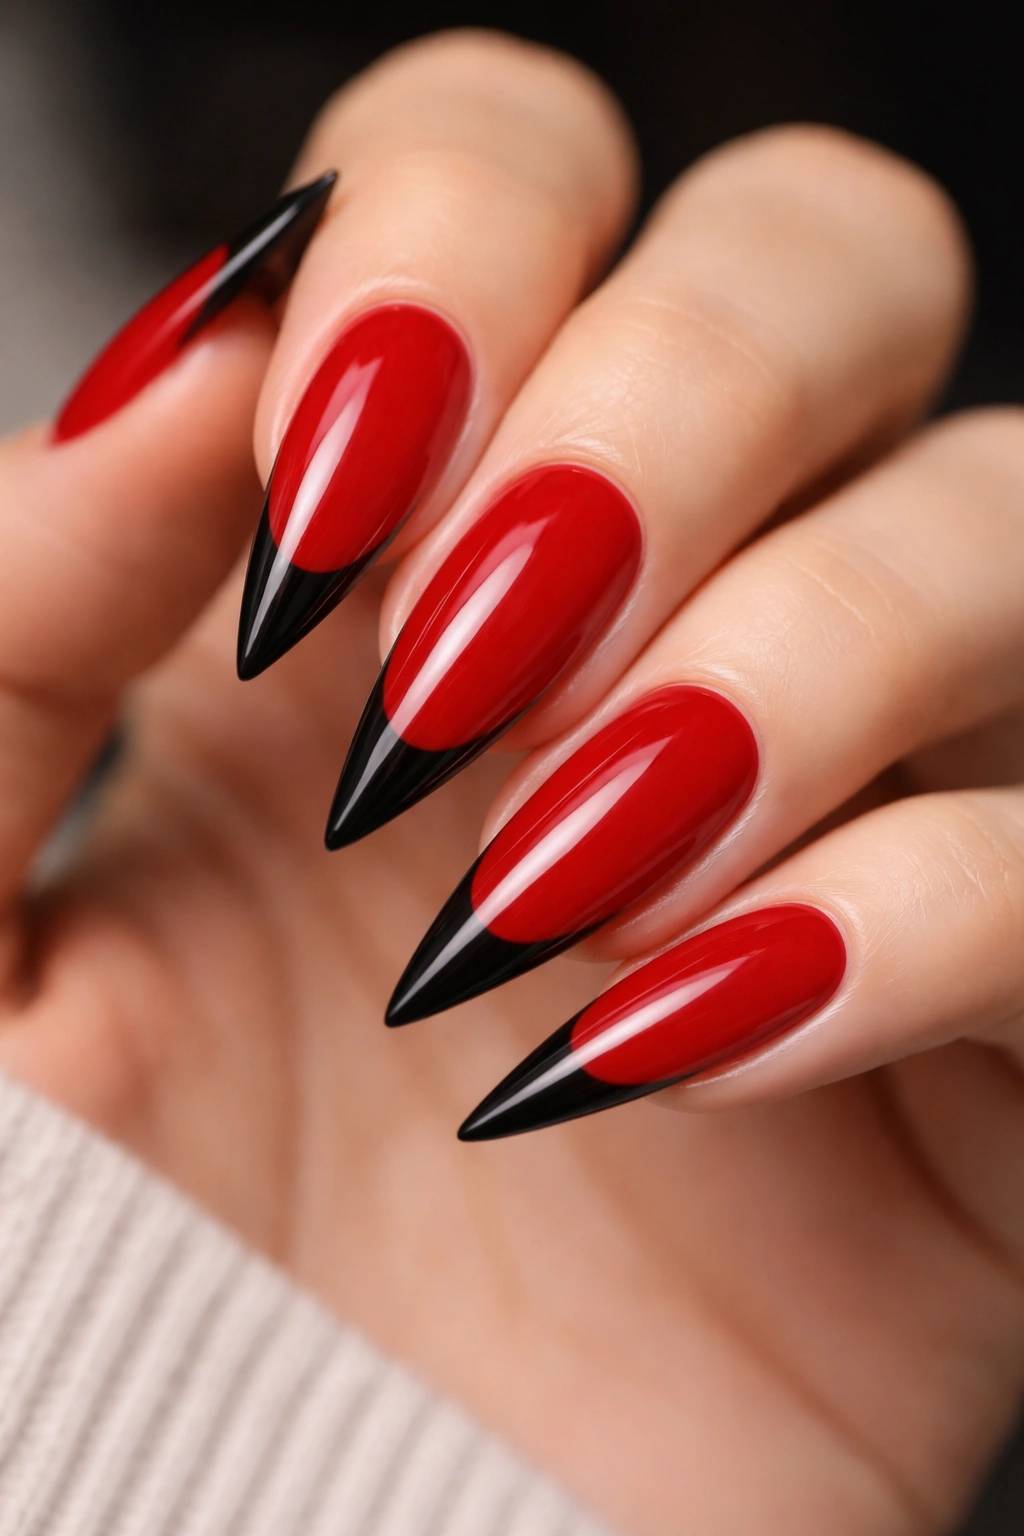
This is a modern take on the timeless French manicure, and it’s stunning on stilettos because the sharp tip shape makes the color-blocking feel intentional and architectural. The contrast between crisp red and bold black creates visual drama while staying understated in its execution.
What Makes This Design Chic
Traditional French tips use white, which can feel dated. Black tips against a red base reads as confident and polished—it’s the nail equivalent of a power outfit. The geometric sharpness of the stiletto tip means the black line sits perfectly at the very edge, creating a defined frame that’s almost graphic in its precision.
Steps to Achieve This Look
- Paint the entire nail in a true red—not orange-red or burgundy-red, but a classic crimson that photographs well
- Once dry, use a thin nail art brush or striping brush to paint a clean black line across the very tip
- If your first line isn’t perfectly straight, paint a second coat of black; the layering actually strengthens the effect
- Seal with a glossy topcoat for maximum shine and color intensity
Insider note: The most polished version of this look uses a gel formula with a thick topcoat. The shine under UV light amplifies the contrast and makes both colors look richer and more intentional.
3. Nude Base With Detailed Lace Patterns
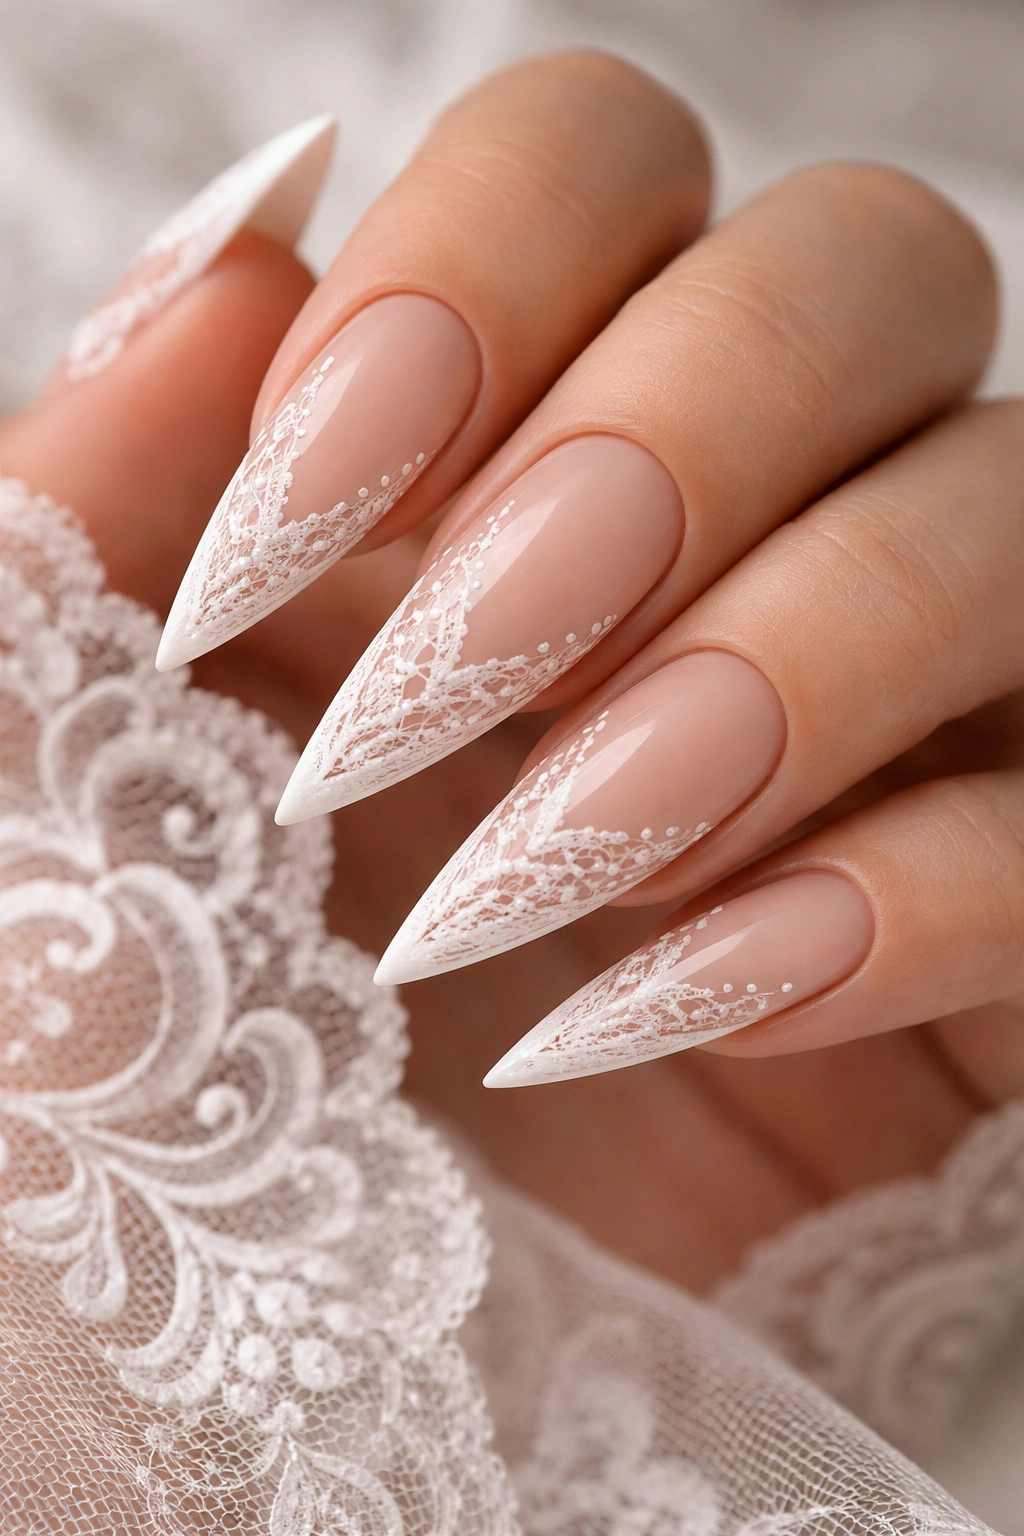
This design brings intricate, delicate line work onto stilettos without overwhelming them—the nude base keeps things neutral while white or pale pink lace detailing adds texture and visual interest. It’s one of the easiest ways to look like you have serious nail art skills even if you’re working from home.
The Appeal of Lace on Stilettos
The elongated canvas of a stiletto nail gives you room to replicate actual lace patterns without making them feel cramped or messy. You can add a full lace sleeve up the center of the nail, or frame the edges with a delicate border. The nude base ensures the white line work pops without creating too much visual weight.
Creating the Lace Effect
- Start with a nude or pale pink base that complements your skin tone
- Use a white gel pen or ultra-thin nail art brush to draw fine lines that mimic lace patterns
- Common lace patterns include interlocking circles, repeating scallop shapes, diagonal crossing lines, or flower-inspired motifs
- Keep your hand as still as possible—use a dotting tool or toothpick as a straightedge to guide your lines
- Seal with a matte topcoat instead of glossy; matte finishes make line work appear more defined
Worth knowing: If freehand lace feels intimidating, you can use lace nail decals (tiny pre-printed lace transfers) pressed onto the wet base coat, then seal over them. They’re not cheating—they’re being strategic about your time.
4. Marble Effect In Black and White
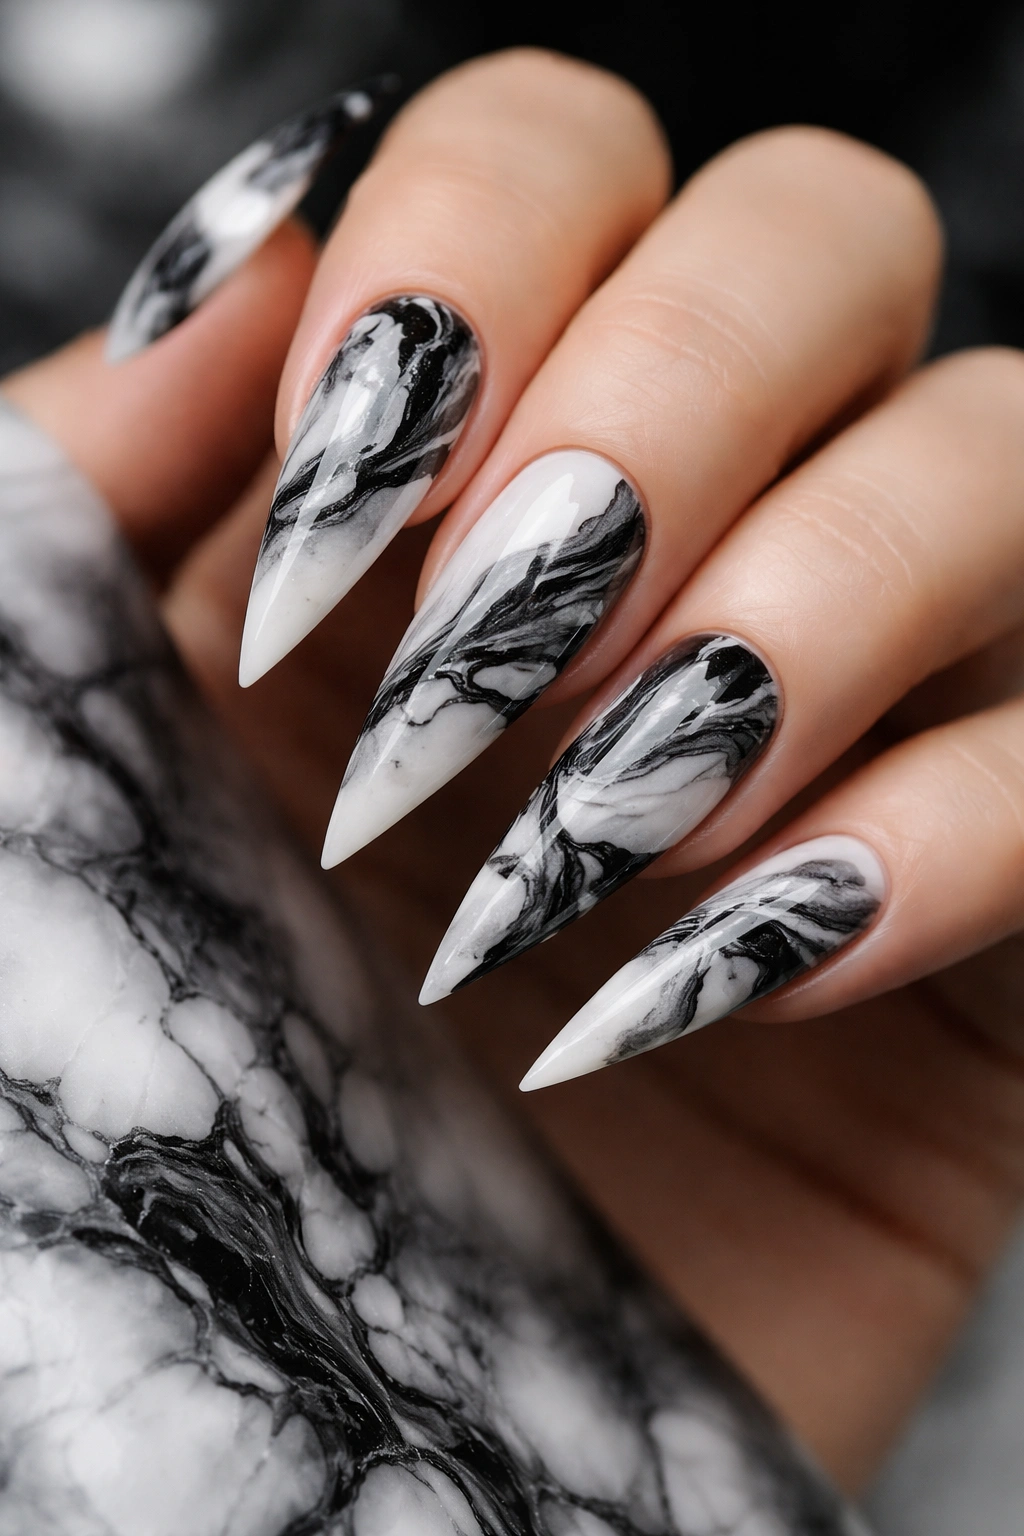
Marble is a technique that looks intimidating but is actually forgiving because the whole point is for it to look organic and imperfect. Black and white marble on stilettos reads as sophisticated and modern without requiring the precision of other nail art styles.
Why Marble Works on Stilettos
The abstract nature of marble patterns means they actually work better on longer nails where the swirls and veins have room to develop. The color combination of stark black and clean white creates high contrast that reads well from a distance, making this a design that looks impressive in person and in photos.
The Marble Technique Broken Down
- Paint a clean white or black base (depending on which color you want to dominate) and let it dry completely
- Drop small amounts of the contrasting color onto a non-absorbent surface and create a design by dragging a toothpick through it
- Press the nail onto the design, or use a toothpick dipped in the pattern color to swirl lines directly onto the nail
- The key is using fresh topcoat between sections so the colors blend slightly without becoming muddy
- Seal everything with a thick glossy coat to enhance the veining and create depth
Pro tip: Practice on full-nail stickers first to understand how the pattern flows and behaves. Real marble in nature has a direction and flow, so your nail art marble should too—not random chaotic lines everywhere.
5. Pastel Rainbow Gradient
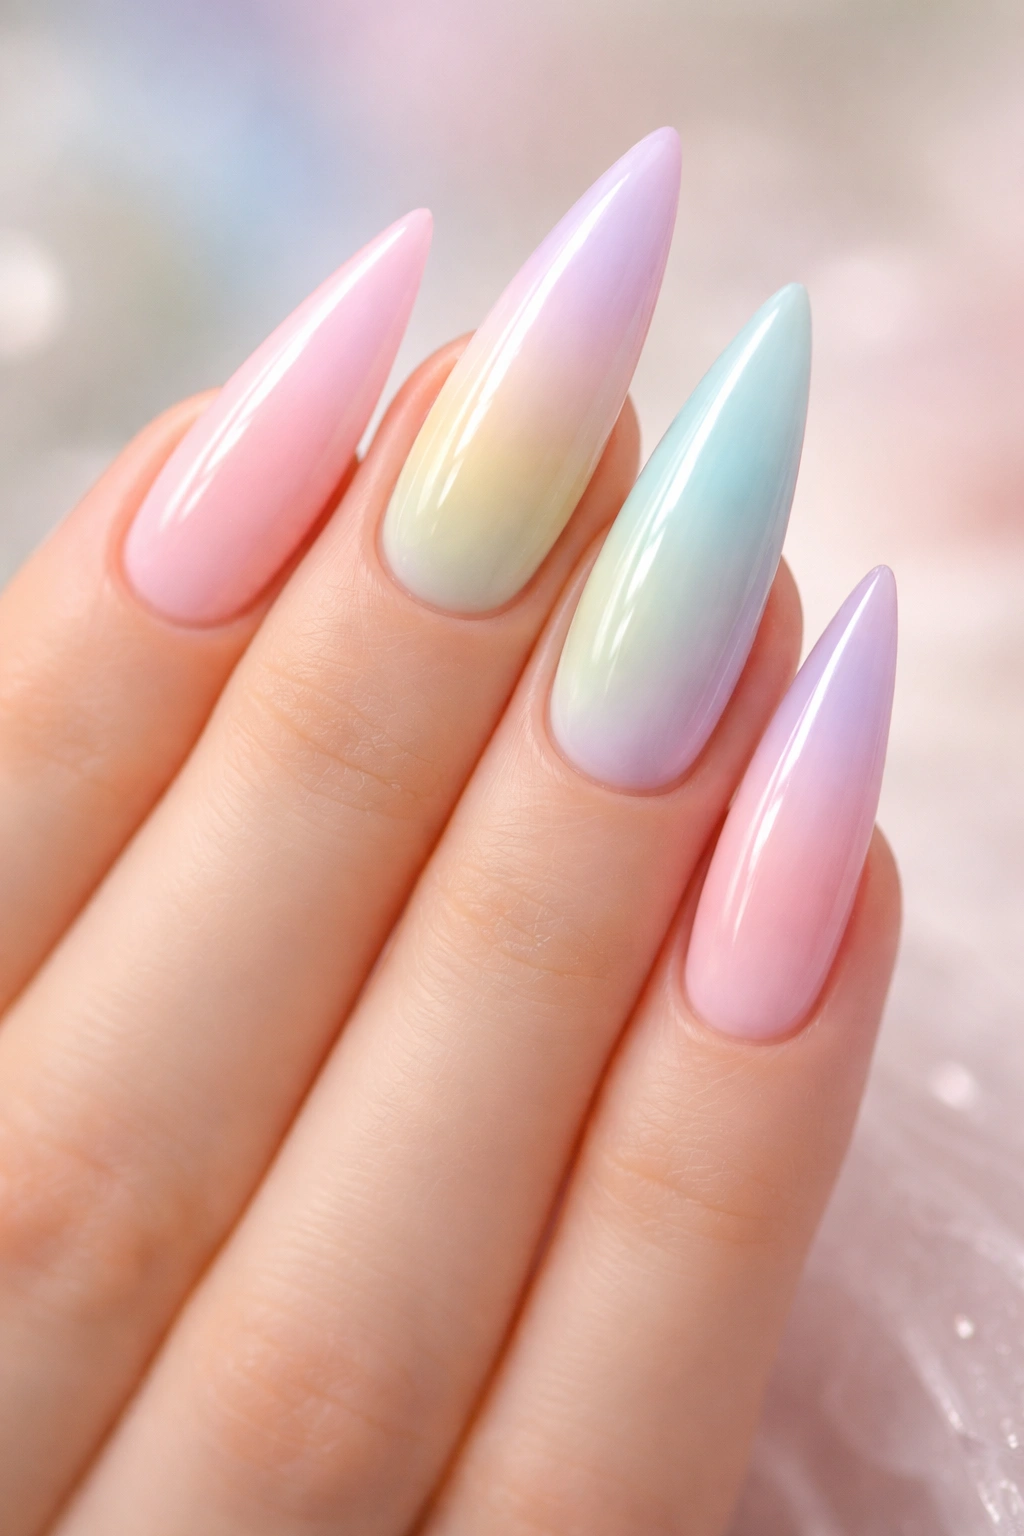
This design feels playful without being childish because of how you execute the gradient. Each color flows seamlessly into the next in a soft, blended progression that takes advantage of the stiletto’s length to create a mini rainbow effect from cuticle to tip.
What Makes This Wearable
The key to an adult-appropriate rainbow is using pastels instead of primary or neon colors. We’re talking baby pink, pale yellow, lavender, mint green, and soft peach—colors that blend harmoniously rather than clash. The gradient approach means the colors merge at their edges, creating a cohesive look rather than distinct bands.
Executing a Smooth Gradient
- Start with a white or very pale base coat to make all pastels appear true
- Use a makeup sponge to dab-blend each color in order: pink at the cuticle area, then yellow, then lavender, then green at the tip
- Use a dry makeup sponge (not damp) to blend the seams between colors until transitions feel smooth
- It’s okay if the colors aren’t perfectly sharp—soft is actually better
- Seal with a clear glossy topcoat to lock everything in place
Insider note: This design photographs beautifully and feels surprisingly elegant in person. It’s the rare playful design that also reads as intentional and curated rather than random.
6. Deep Burgundy With Negative Space Design
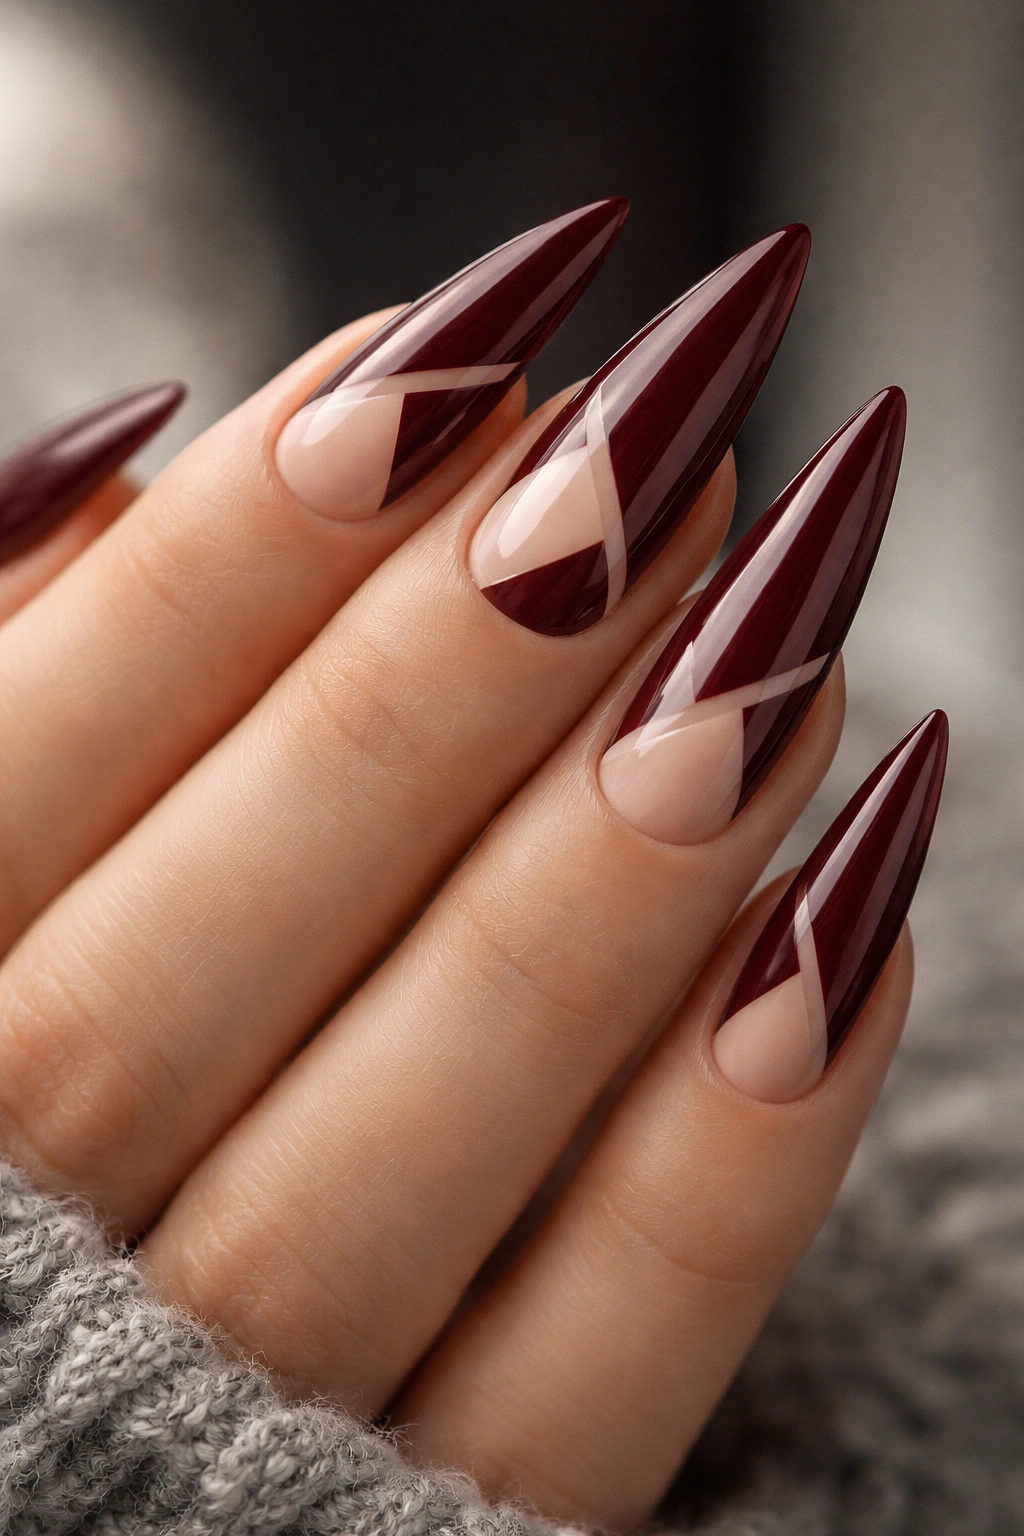
Negative space design means leaving portions of the nail bare (showing your natural nail or base layer) to create a pattern. On burgundy stilettos, strategic cutouts create geometric interest while maintaining an overall sophisticated vibe—perfect for someone who wants nail art that’s visible without being loud.
Why Negative Space Reads So Well
When you remove color to create a design, the pattern automatically looks intentional and modern rather than accidental. Deep burgundy makes negative space feel even more striking because the contrast between the rich color and bare nail is so pronounced. The stiletto shape means geometric patterns sit perfectly within the tapered canvas.
Creating Clean Negative Space
- Paint a full base of deep burgundy and let dry completely
- Use nail stickers or carefully apply painter’s tape in your desired pattern (geometric shapes work best)
- Paint the entire nail white or nude to fill the exposed areas
- Remove the stickers or tape immediately while the paint is still slightly wet to prevent peeling
- Seal with topcoat, focusing extra layers on the edges where patterns meet to prevent chipping
Worth knowing: The cleaner your edges, the more expensive this design looks. Invest in quality nail stickers and painter’s tape designed for nails rather than general craft tape—the difference in execution quality is noticeable.
7. Chrome Mirror Finish With Rose Gold Ombre
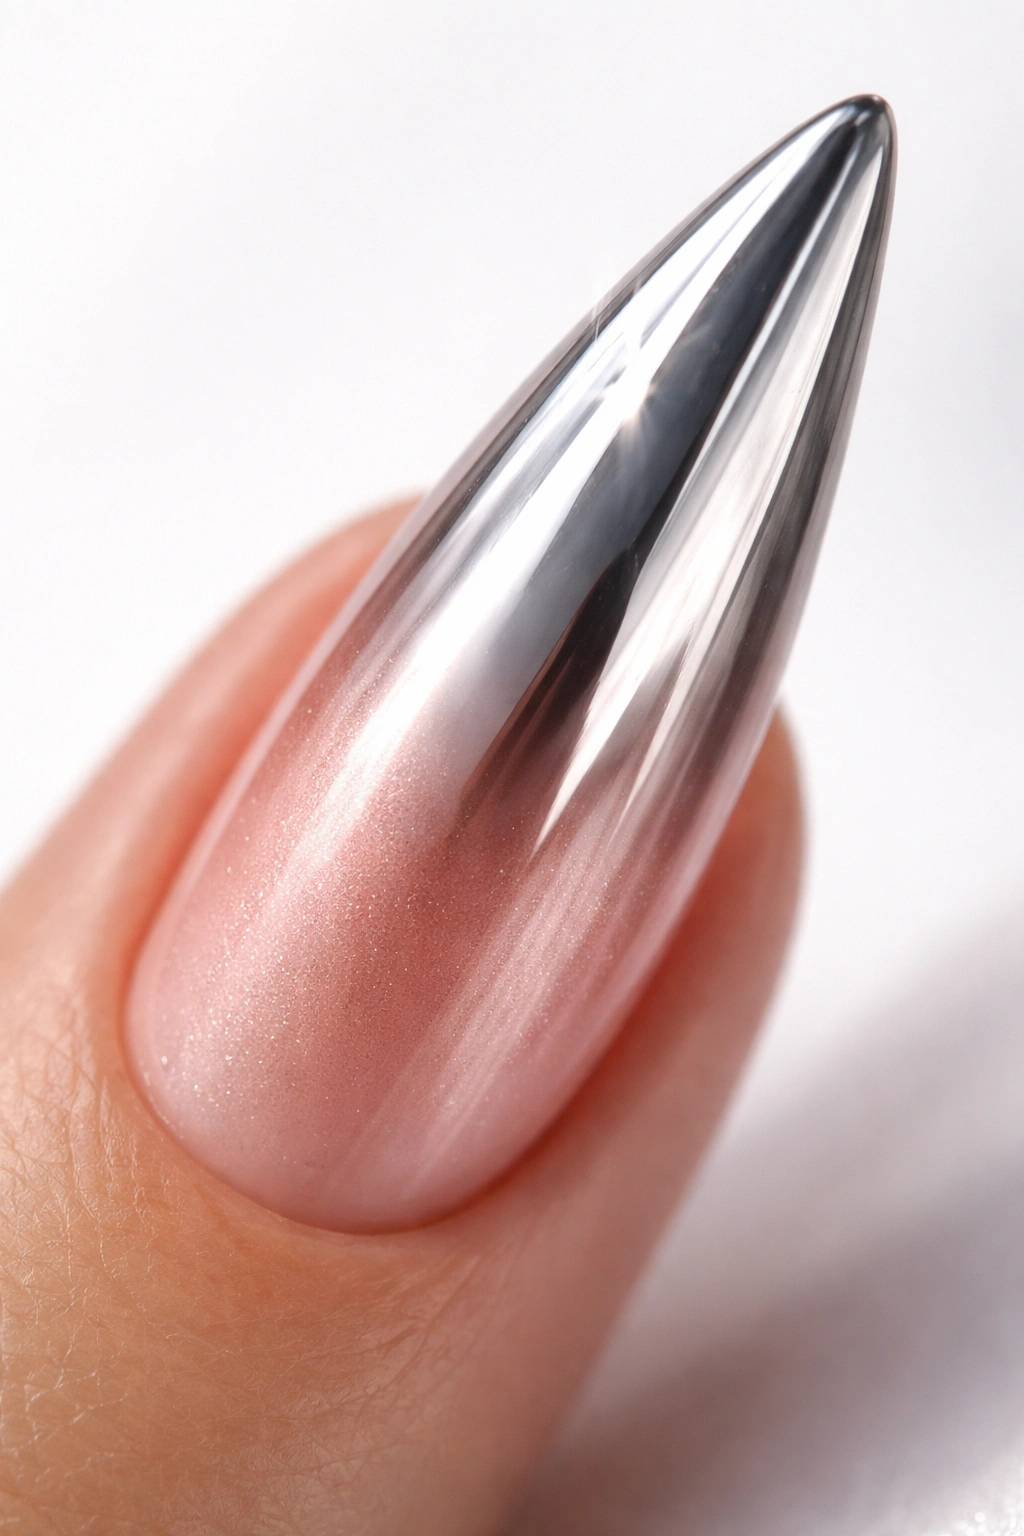
Chrome finishes are ultra-modern and create an almost 3D metallic effect that’s mesmerizing in person. Blending chrome with a rose gold ombre base creates dimension and prevents the design from feeling too cold or plastic.
The Magic of Chrome on Stilettos
Chrome powders create a mirror-like reflective surface that shifts with movement and light. On elongated stilettos, this creates a light-catching effect that draws attention to the nail shape itself. Combining chrome with ombre keeps the look from feeling harsh or costume-like—the warm rose gold balances the cool metallicism.
Building the Chrome Effect
- Apply a creamy rose gold or blush metallic base coat and seal with topcoat
- Use a fine applicator brush or buffing tool to apply chrome powder in one direction along the nail
- Work section by section, buffing with a soft brush between applications for that mirror finish
- The powder will resist slightly on the topcoat, so be patient and let each layer set
- Seal with a UV-protective topcoat to prevent the chrome from oxidizing or dulling over time
Pro tip: Chrome powder requires a very specific application technique and honestly works better with gel formulas than regular polish. If you’re trying this at home, start with a chrome stick—it’s easier to apply evenly than loose powder.
8. White Base With Black Line Art Accents
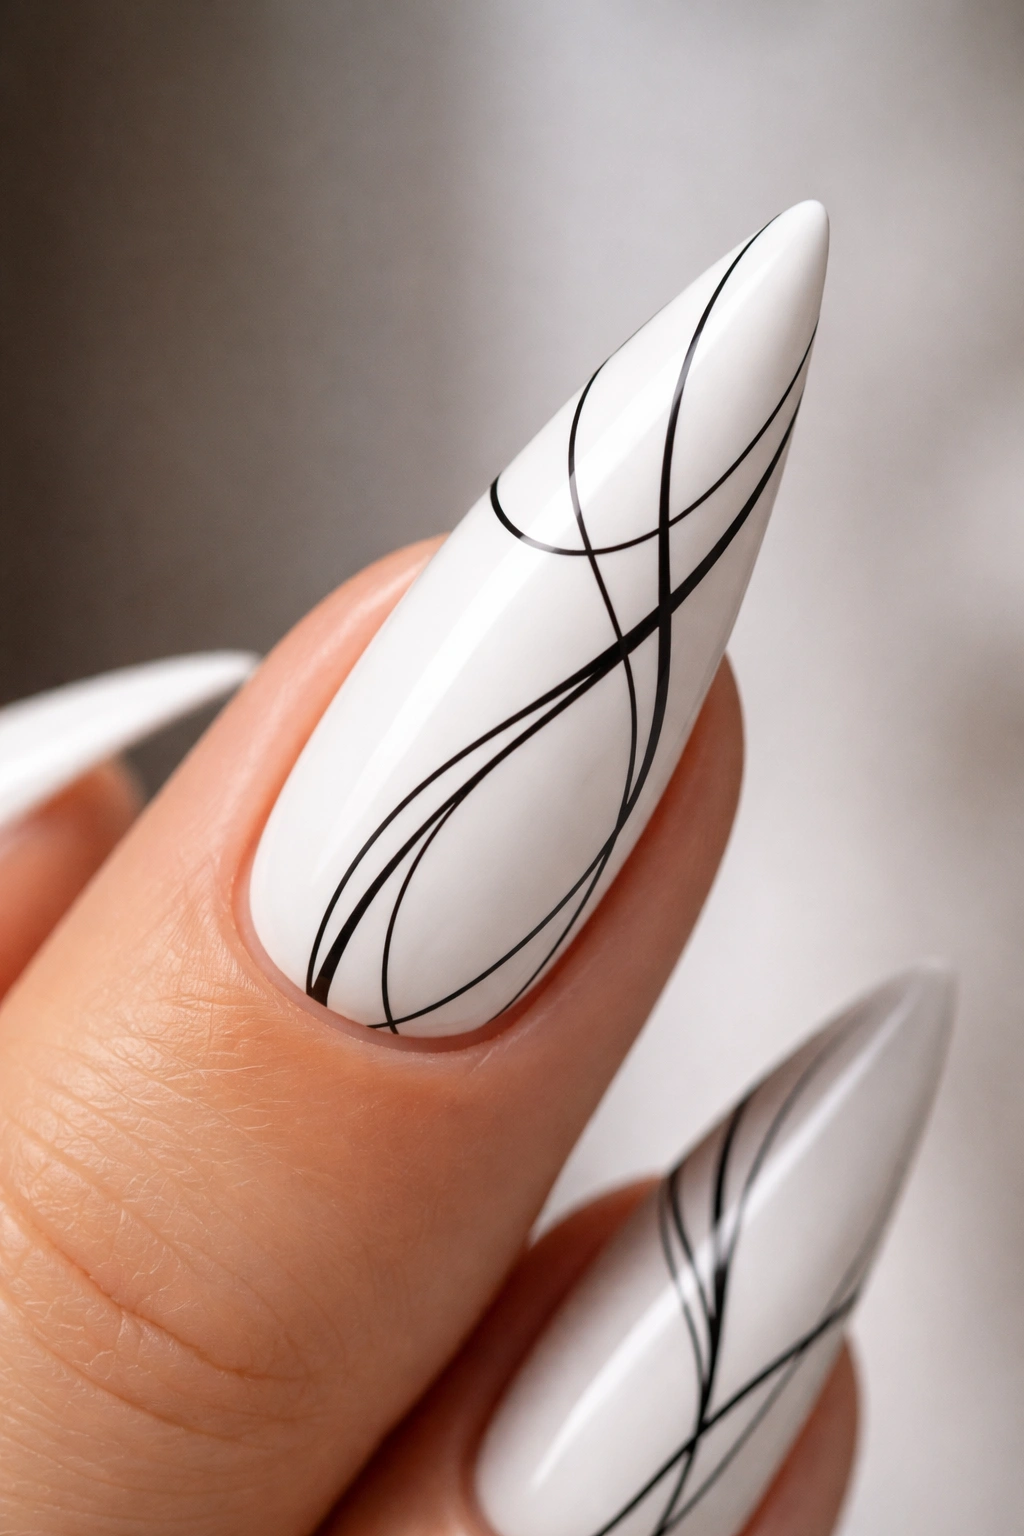
This design uses thin, precise line work in black to create abstract art, florals, or geometric shapes on a pristine white base. It’s minimalist but distinctly artistic—like wearing a tiny piece of nail art that feels gallery-worthy.
Why This Combination Is So Striking
White and black is the highest contrast available, which means even very delicate line work reads clearly and beautifully. The white base keeps the nails feeling clean and professional while the black art adds personality. On stilettos, this combination feels contemporary and intentional rather than basic.
Line Art Ideas to Consider
- Fine botanical drawings: delicate stems, leaf outlines, or minimalist flower designs
- Abstract geometric: intersecting lines, small shapes, or dot patterns
- Hand-drawn details: tiny animals, symbols, or personalized elements
- Linear accents: delicate lines running down the center or around the edge of each nail
Execution tip: Use a gel pen or ultra-thin art brush for black details. Regular nail polish brushes are too thick for truly delicate line work. Practice the pattern on paper first to build muscle memory, then transfer it to nails.
9. Emerald Green With Gold Geometric Patterns
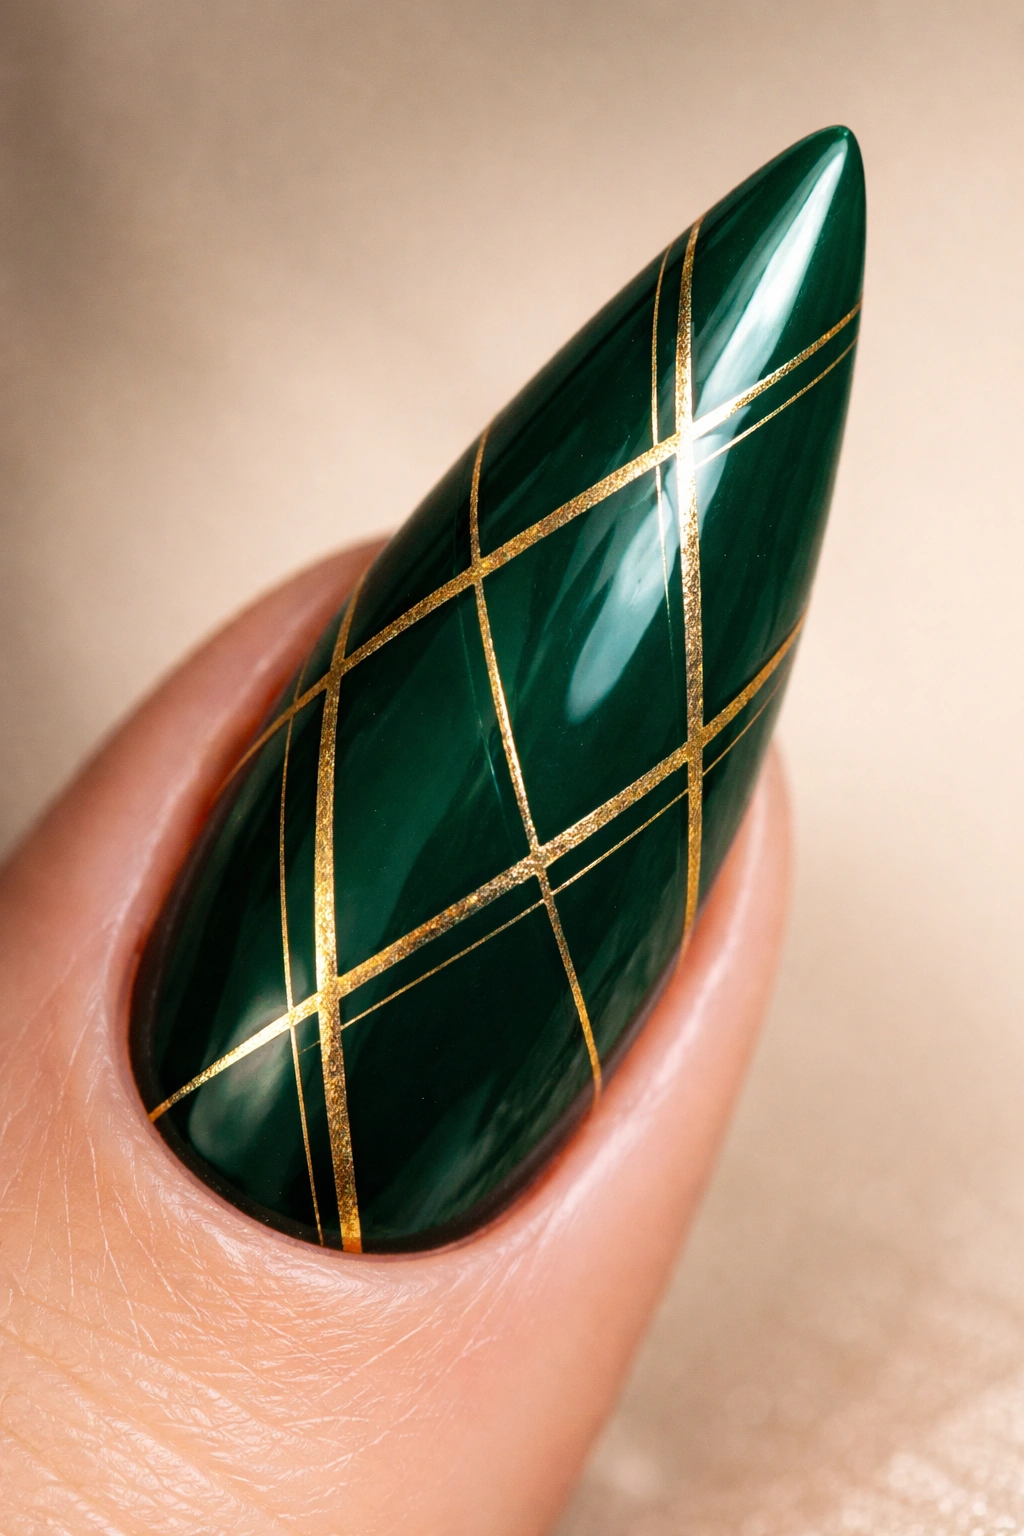
Emerald green is a rich, jewel-tone color that feels luxurious on its own, but adding geometric gold patterns elevates it into evening-ready territory. The combination screams sophistication and pairs perfectly with the stiletto shape.
The Psychology of Emerald and Gold
This pairing feels inherently luxe because both colors read as expensive and intentional. Emerald green has historically been associated with prestige and richness, and gold reinforces that perception. On stilettos, the color combination looks polished enough for formal events but distinctive enough to feel personal rather than generic.
Creating Geometric Patterns
- Paint a full, rich emerald green base and seal with topcoat
- Use a thin gold brush or gold striping tape to create patterns
- Option 1: Thin gold lines creating a geometric grid or stripes
- Option 2: Small gold triangles or chevrons arranged in a repeating pattern
- Option 3: Gold leaf or metallic accents placed at the tips
- Seal with a protective topcoat, making sure edges are fully sealed to prevent peeling
Insider note: The deeper and richer your emerald base, the more dramatic the gold will appear. Don’t skimp on quality with either color—cheap emerald can look murky, and cheap gold looks brassy.
10. Soft Peach With Delicate Floral Details
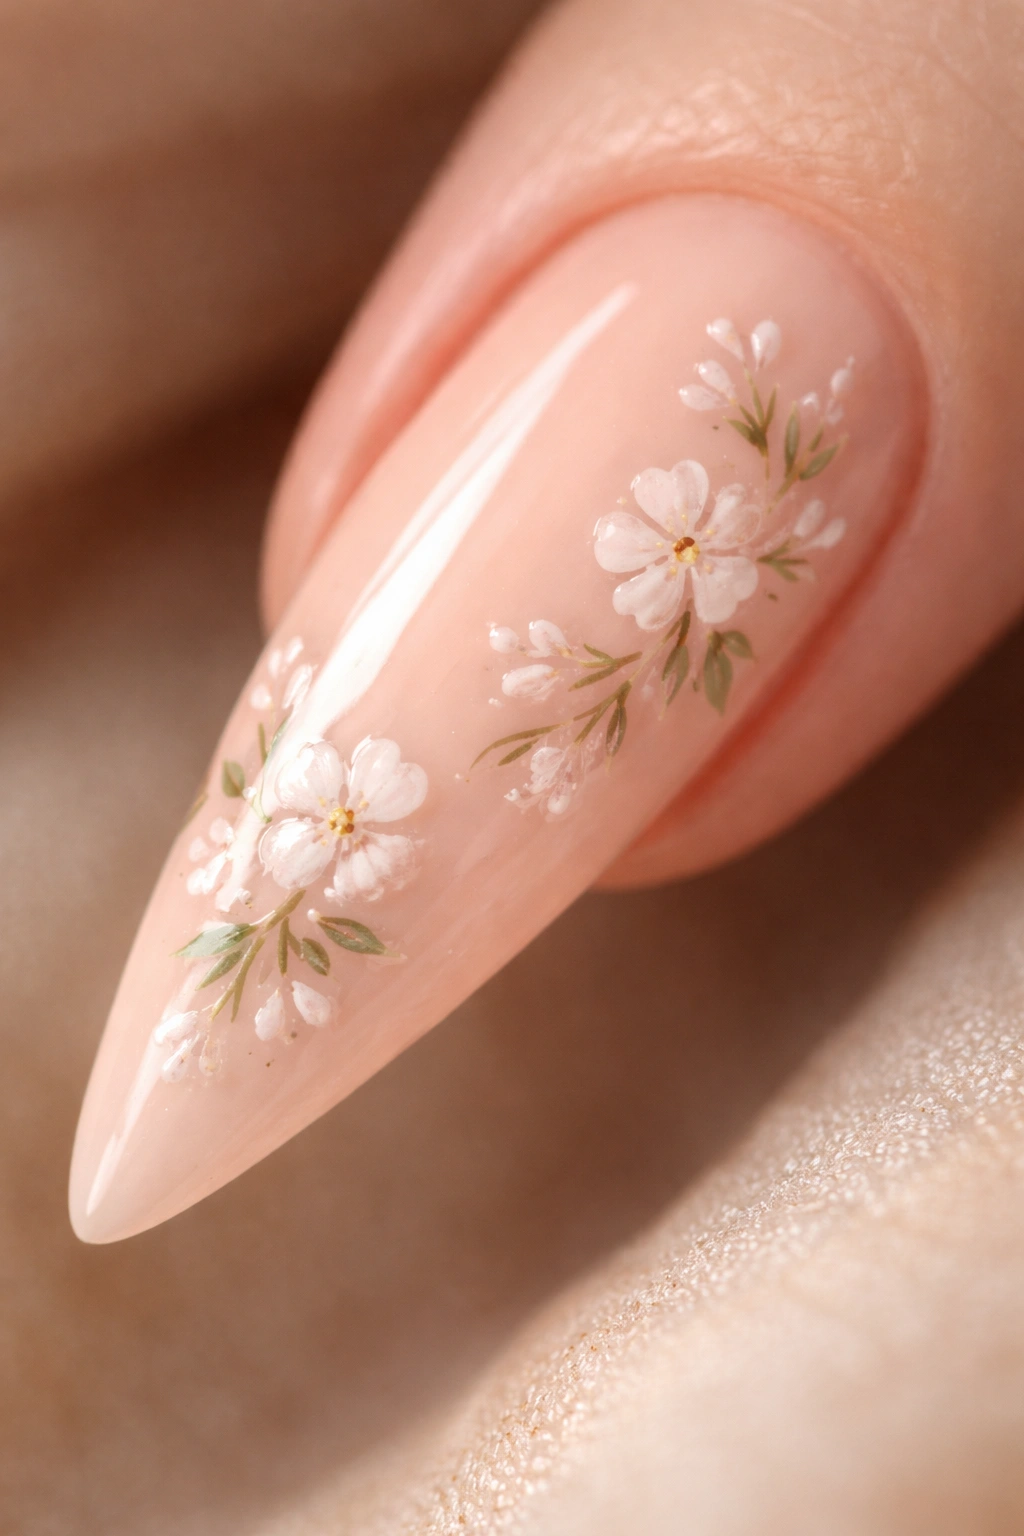
Peach is a universally flattering color that doesn’t require a specific skin tone to work, and adding hand-painted florals transforms it from simple into thoughtfully designed. Florals on stilettos feel romantic without being over-the-top because you’re working with a longer canvas.
Why Peach Reads as Effortlessly Elegant
Peach occupies a sweet spot between pink and orange that feels soft and approachable. It’s warm enough to feel intimate but neutral enough to work with any outfit or occasion. Hand-painted florals on this base feel like you spent serious time on your nails—and you probably did.
Painting Wearable Florals
- Choose a soft peach base that complements your skin tone
- Paint delicate flowers using multiple colors: white or cream for petals, pale green for stems and leaves, soft pink or coral for depth
- Keep flowers small and spaced out rather than crowded across every nail
- Focus florals on one or two accent nails and leave others with just the base color
- Use a fine brush and let each color dry before layering to prevent muddiness
Worth knowing: You don’t need to be a professional artist for florals to look good. Loose, organic shapes actually read as more intentional and artistic than perfect roses. Small daisies, lavender sprigs, or abstract petal shapes are easier to execute than realistic flowers.
11. Classic French With Glitter Gradient Tips
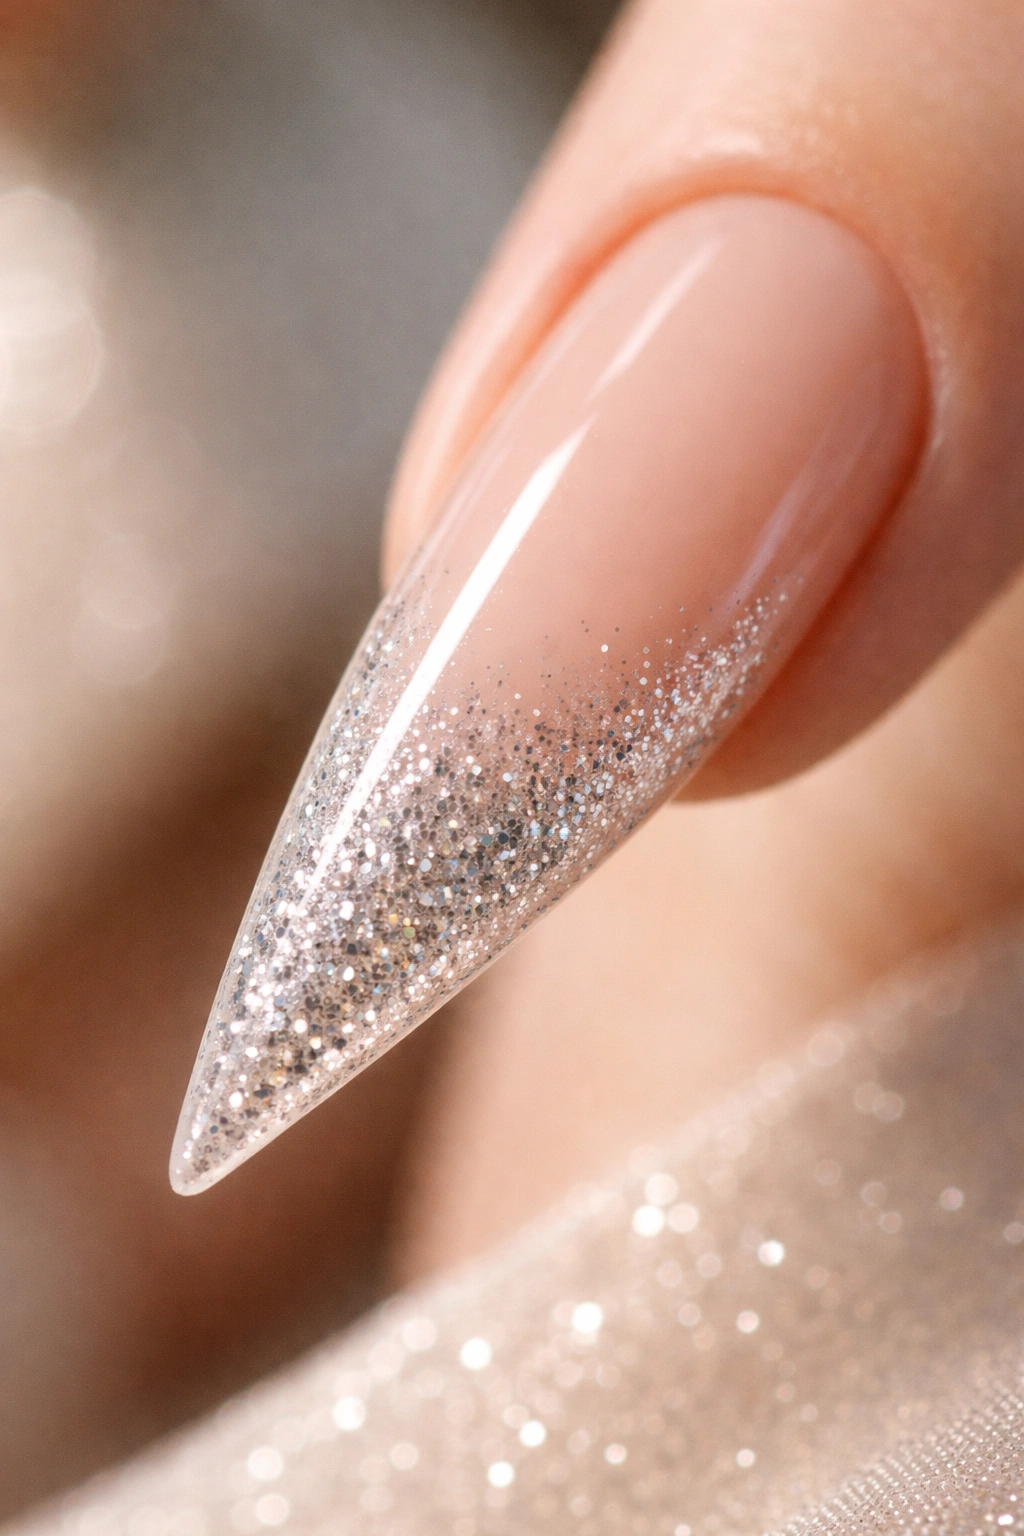
This takes the timeless French manicure and adds contemporary shimmer by creating a gradient where the glitter gets denser toward the very tip. It’s nostalgic but updated, familiar but special.
Why This Update Works So Well
Classic French manicures can feel dated, but the glitter gradient approach modernizes the concept instantly. The gradient effect—where glitter starts sparse and becomes concentrated—creates visual depth and prevents the design from feeling like you just grabbed whatever was on the drugstore shelf. On stilettos, the extra length makes the glitter gradient effect more pronounced and dramatic.
Building a Glitter Gradient Tip
- Paint the entire nail in soft nude or pale pink and let dry
- Along the tips only, apply a layer of clear topcoat mixed with very fine glitter
- Add a second layer of topcoat with a higher concentration of glitter just to the very edge
- Use a sponge to blend the glitter concentration from sparser near the white tip line to denser at the very edge
- Seal with a clear topcoat to prevent glitter migration
Pro tip: Buy pre-made glitter topcoat rather than mixing glitter into plain topcoat—the formulation is engineered so glitter suspends evenly and doesn’t sink to the bottom of the bottle between applications.
12. Navy Blue With Tiny Gold Stars
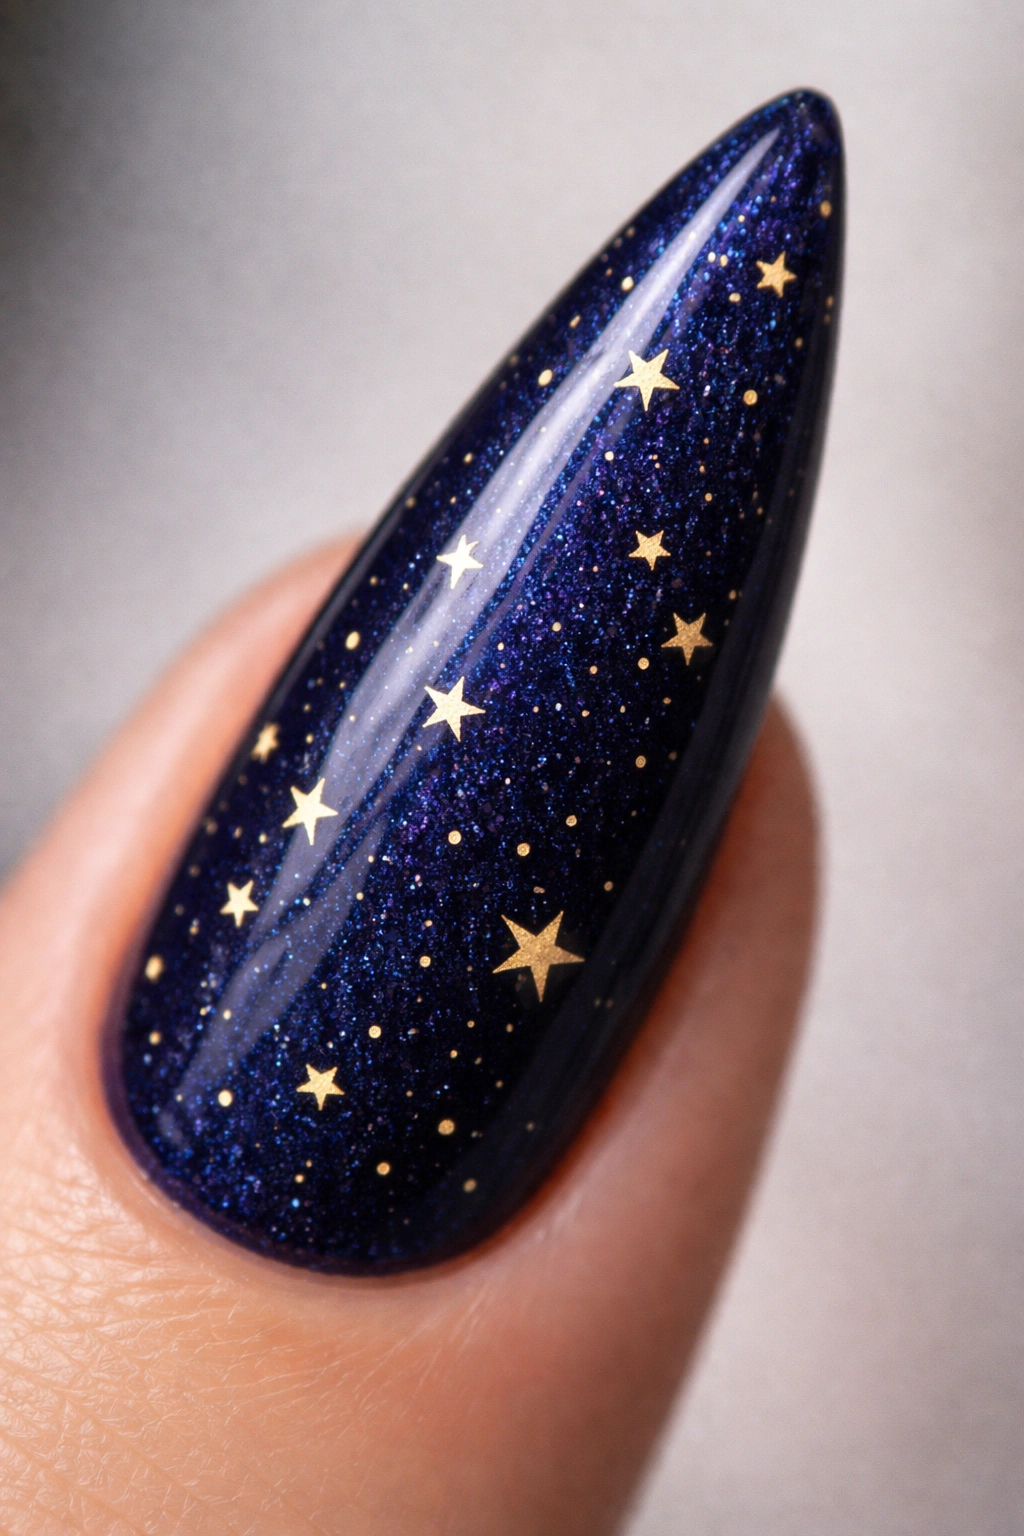
This design combines a deep, calming base color with scattered delicate details that add visual interest without overwhelming the nail. It’s sophisticated enough for professional settings while feeling creative and personalized.
The Appeal of Navy With Celestial Details
Navy blue works on every skin tone and pairs beautifully with nearly every outfit. Adding tiny gold stars creates a subtle celestial theme that’s whimsical without being juvenile. The stars act as focal points that draw the eye across the entire nail, making the design feel intentionally balanced rather than thrown together.
Painting Tiny Stars
- Paint a rich, saturated navy base and seal with topcoat
- Use a toothpick dipped in gold polish or gold gel to create five-pointed stars scattered across the nail
- Stars should be tiny—thumbnail-sized or smaller
- Vary placement so stars aren’t in perfectly aligned rows
- Add one or two stars to each nail with a bit more concentration on the accent nail
- Seal everything with a protective topcoat
Insider note: If freehand stars feel shaky, use a dotting tool (it’s easier to control than a toothpick) or consider gold nail decals shaped like stars. Pressed onto wet topcoat and sealed, they look hand-painted.
13. Blush Pink Base With Ombré Tips to Nude
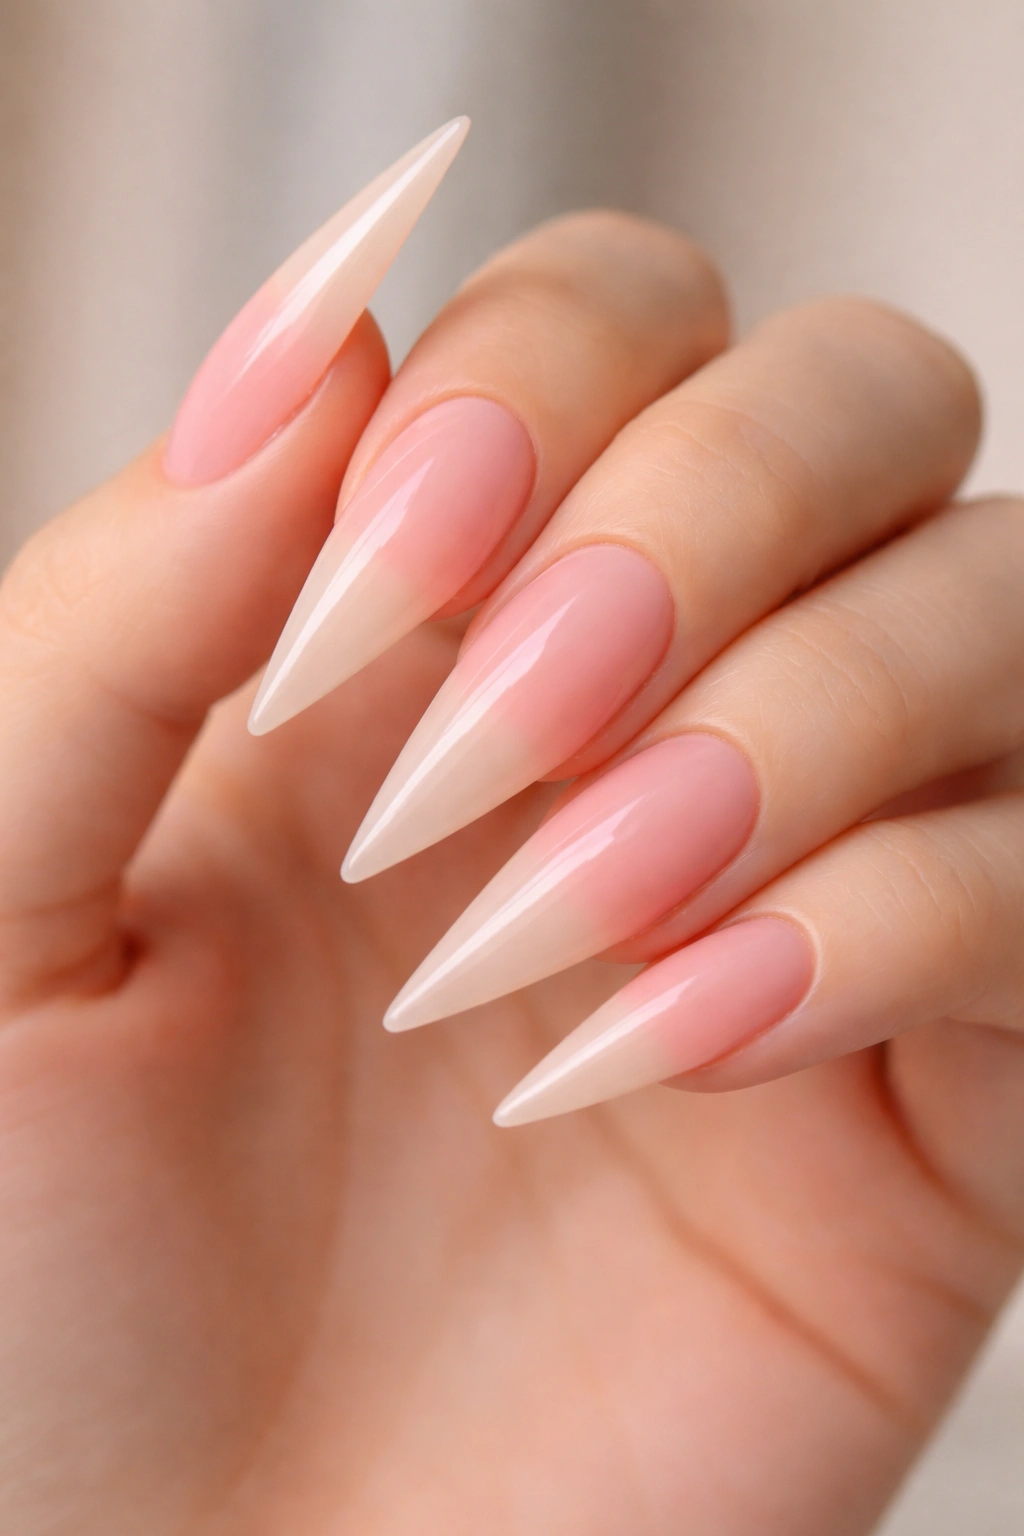
This design creates a soft, elongating effect by transitioning from saturated color at the base to nearly nude at the tips. It’s flattering, sophisticated, and works with virtually every outfit and occasion because the colors are so complementary and neutral.
Why Ombré Tips Flatter Stilettos
The ombré technique visually extends the nail because the eye follows the color transition. On stilettos specifically, this creates an illusion of extra length and elegance. The blush-to-nude transition feels natural and organic, like your nails are glowing from within rather than painted.
Creating a Seamless Ombré
- Paint the full nail in blush pink (a mid-tone dusty pink works best)
- Create a gradient by using a makeup sponge to dab a lighter pink or nude shade at the tips
- Work the sponge back and forth to blend the transition from blush to light
- The blend should take up roughly the middle third to half of the nail
- Use a damp sponge to soften any harsh edges between colors
- Seal with a glossy topcoat that enhances the gradient effect
Worth knowing: This design photographs beautifully and reads as intentional and curated even though the execution is relatively straightforward. It’s a high-impact, low-difficulty design.
14. Black Stilettos With Rhinestone Accent Details

Rhinestones add sparkle and dimension without requiring artistic skill—you’re essentially placing stones on sticky topcoat rather than hand-painting details. On black stilettos, rhinestones catch light and create eye-catching focal points that feel glamorous and intentional.
Why Rhinestones Rock on Stilettos
The elongated canvas gives you room to arrange rhinestones in a pattern rather than just scatter them randomly. On black nails, even modest-quality rhinestones sparkle with impressive brightness. This approach reads as glam and intentional, perfect for special occasions or whenever you want extra shine.
Placing Rhinestones Strategically
- Paint a glossy black base and seal with topcoat
- Apply a thin layer of sticky topcoat (or use rhinestone glue) to just the areas where you want stones
- Place rhinestones using a dotting tool or tweezers, pressing gently until they’re secure
- Create a pattern: a diagonal line, a cluster near the tips, or a geometric shape
- Let topcoat dry completely before adding a final seal coat (but skip the topcoat on the very tip to prevent the weight of stones causing them to slide)
- Add a single crystal to each nail for understated sparkle, or go for a more concentrated pattern on accent nails
Pro tip: Invest in higher-quality crystals (Swarovski if your budget allows)—they refract light more beautifully than cheap rhinestones and read as more expensive and intentional.
15. Soft Lilac With Subtle Shimmer Throughout
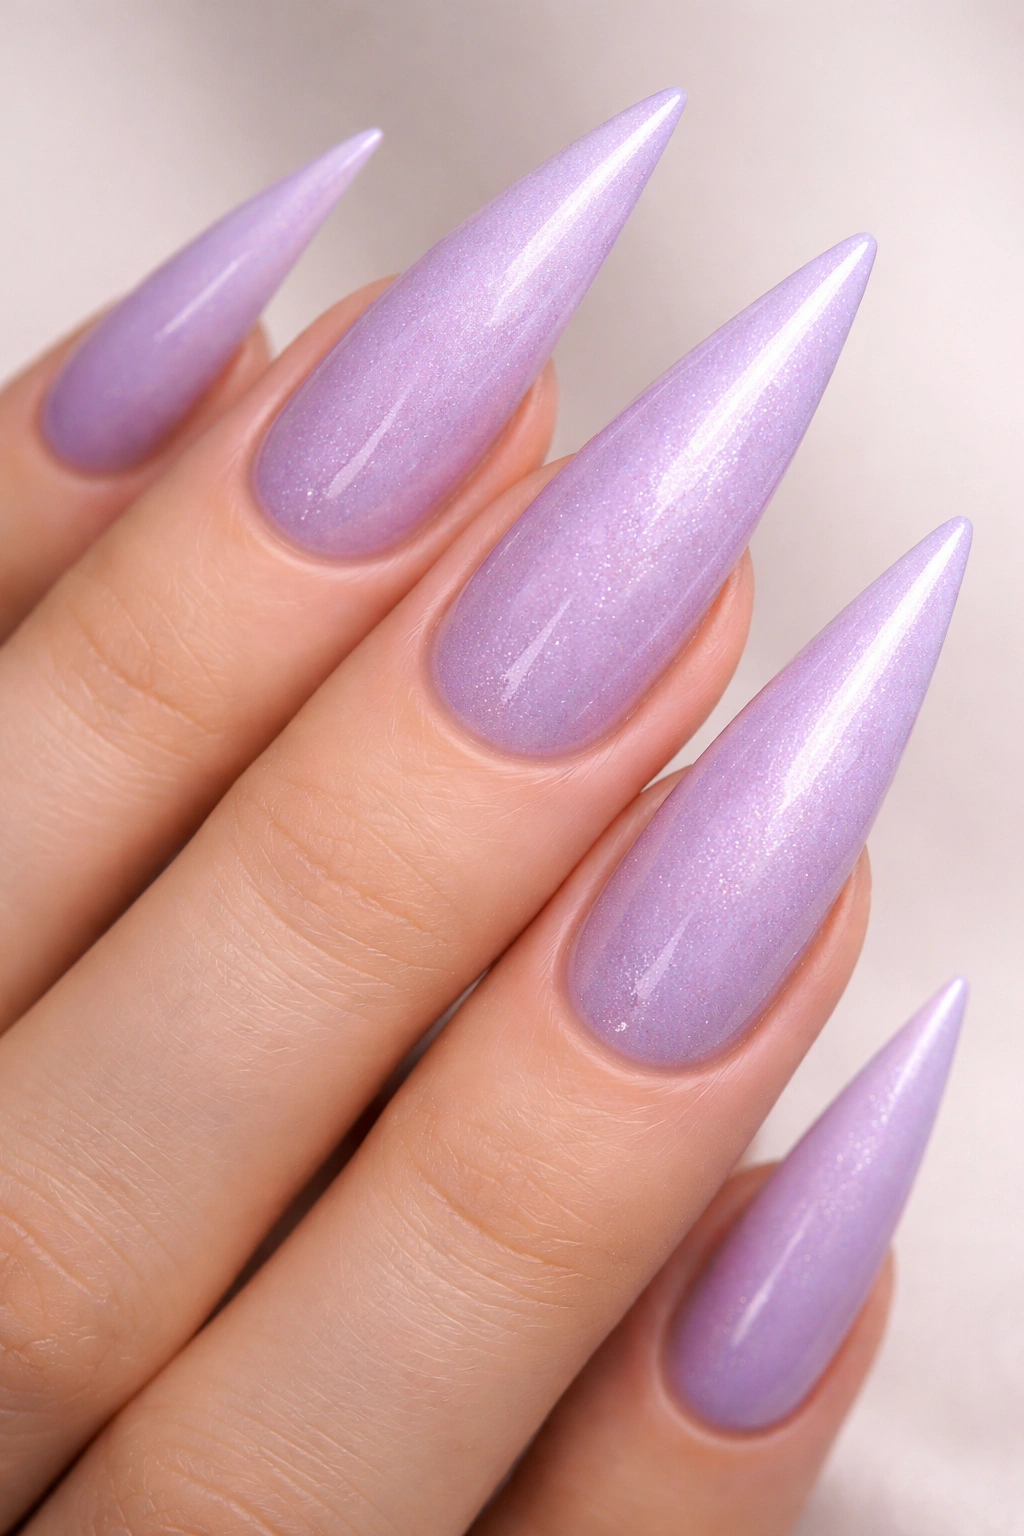
This design uses a shimmery base formula rather than adding embellishments on top, creating a cohesive, elevated look that feels luxurious without demanding attention. Lilac is an underrated color that works surprisingly well on most skin tones when formulated with the right undertones.
Why Shimmer Lilac Feels Grown-Up
Lilac can read as juvenile if it’s too bright or pale, but a soft lilac with integrated shimmer feels romantic and sophisticated. The shimmer catches light subtly rather than creating obvious sparkle, which reads as more refined. On stilettos, the shimmer effect is amplified by the extra surface area, making the nails seem to glow.
Choosing the Right Lilac Shimmer Formula
- Look for lilacs with slight gray or mauve undertones rather than bright purple undertones
- The shimmer should be fine and integrated into the polish, not loose glitter on top
- You want the light-catching effect to feel organic, like the shimmer is part of the color itself
- Apply thin coats and build coverage rather than applying one thick coat
- Seal with a glossy topcoat to enhance the shimmer’s reflective properties
Worth knowing: Some of the best lilac shimmer polishes come from indie polish makers rather than big commercial brands. Don’t assume the expensive option is automatically better—read reviews and look at actual photos from people wearing the color.
16. Nude With Delicate Gold Leaf Accents
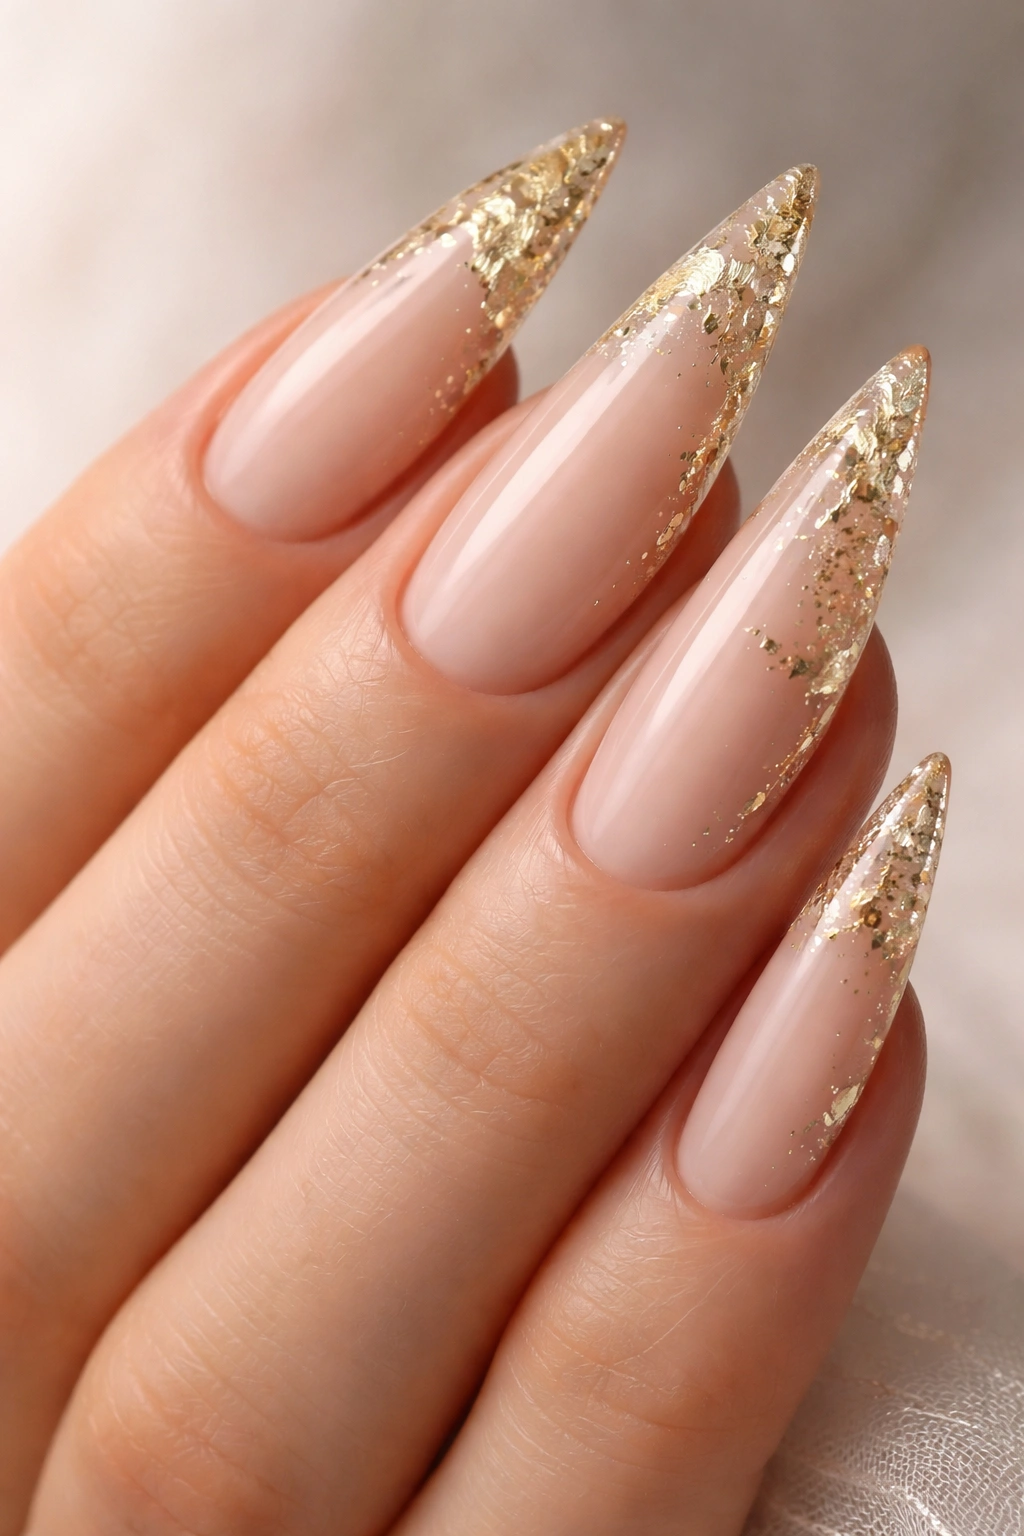
Gold leaf creates an organic, luxe effect without requiring precise brushwork or artistic skill. Tiny pieces of gold leaf pressed onto a nude base create dimension and interest while maintaining an overall sophisticated appearance.
The Luxury of Gold Leaf
Gold leaf naturally fractures and creates unique patterns, which means each nail looks intentionally designed yet slightly different. The organic quality of leaf patterns feels more artisanal than perfectly symmetrical designs. On nude nails, gold leaf creates just enough visual interest to feel special without being overwhelming.
Applying Gold Leaf Like a Pro
- Paint a creamy nude base and seal with a thin topcoat layer
- Use tweezers to pick up tiny pieces of gold leaf
- Press each piece gently onto the wet topcoat, positioning strategically (along edges, near tips, or scattered across the nail)
- The gold will adhere to the topcoat and stay put as it cures
- Seal with additional topcoat layers, being very gentle so you don’t shift the leaf pieces
- Work one nail at a time so topcoat doesn’t dry before you’ve positioned all pieces
Insider note: Real gold leaf is surprisingly affordable and creates a far more luxe effect than gold foil or metallic stickers. You can buy gold leaf intended for craft projects—it works perfectly for nails.
17. Gradient From Coral to Peachy Pink to Cream
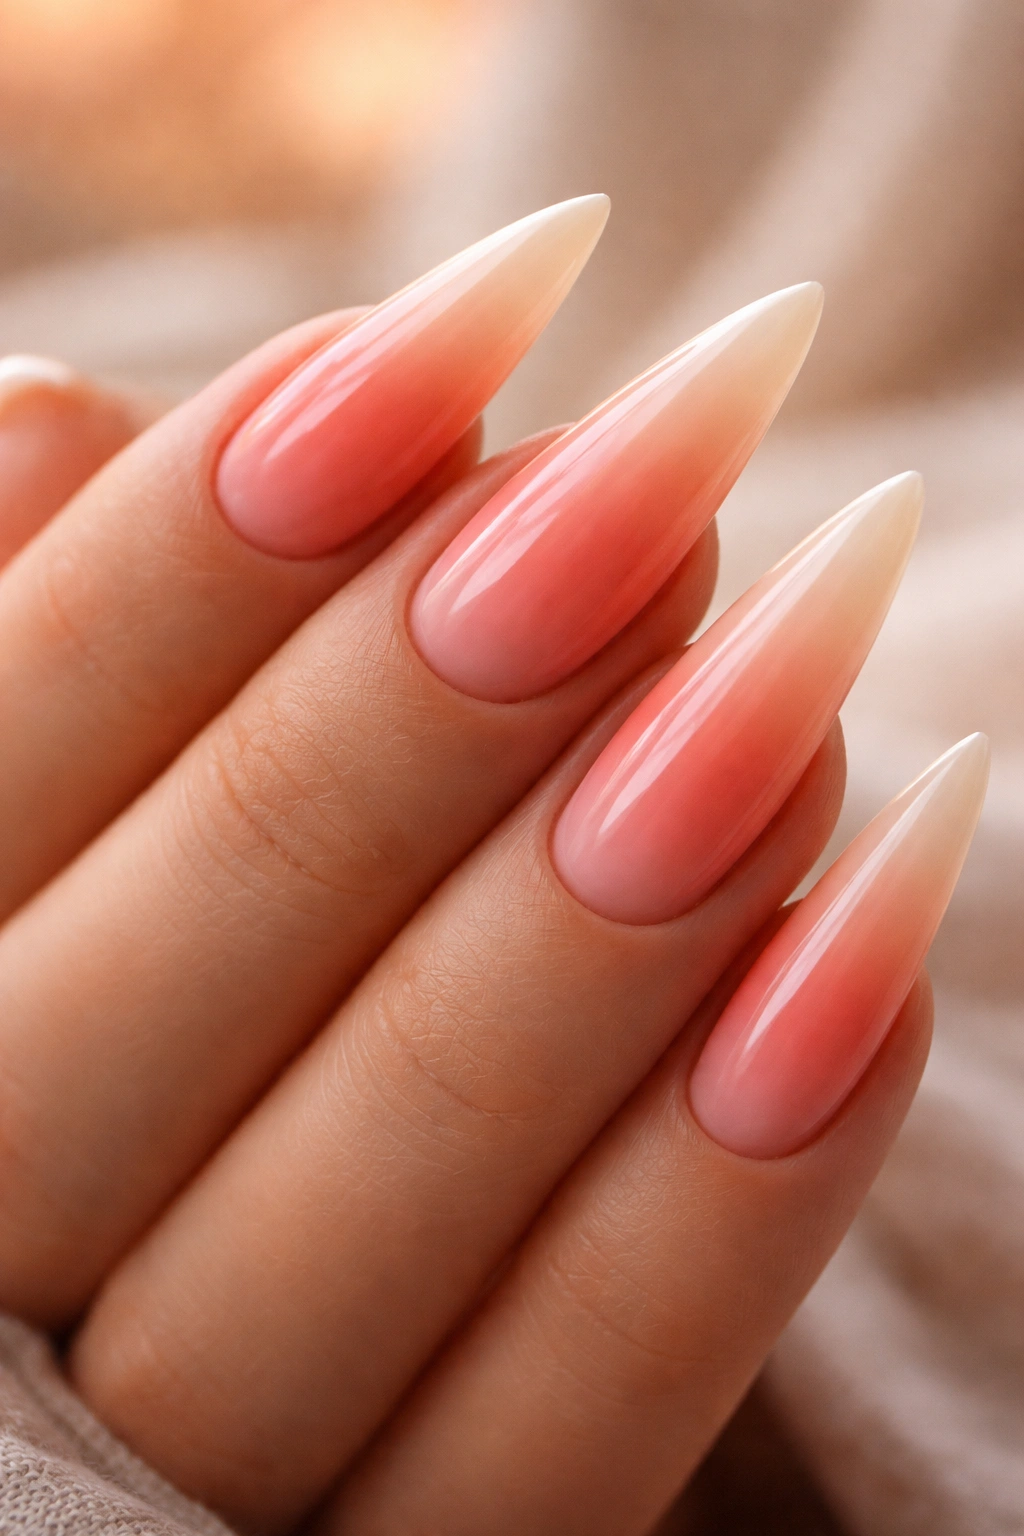
This multi-color gradient creates a sunset effect that’s inherently romantic and flattering. Each color flows naturally into the next, and the combination of warm tones feels both summery and sophisticated.
Why Warm Gradients Flatter
Warm color gradients mimic natural light and create a universally flattering effect on different skin tones. The progression from deeper coral through peachy pink to pale cream creates visual depth and dimension. On stilettos, the gradient makes the nails appear even longer because the eye travels upward through the color transition.
Blending Multiple Colors Smoothly
- Start with a coral base (deepest color) at the cuticle area
- Create a thin line of peachy pink in the middle section
- Add pale cream or ivory at the tips
- Use a makeup sponge and light dabbing motions to blend the seams between colors
- Work back and forth between colors multiple times until transitions feel smooth
- It’s okay if colors slightly mix at the edges—that’s where the beauty of the gradient lives
- Seal with a glossy topcoat to enhance depth
Pro tip: This design works particularly well if you use shimmer or slightly metallic versions of each color—the shimmer adds luminosity that makes the gradient effect even more dimensional.
18. Classic White With Thin Black Outline Details
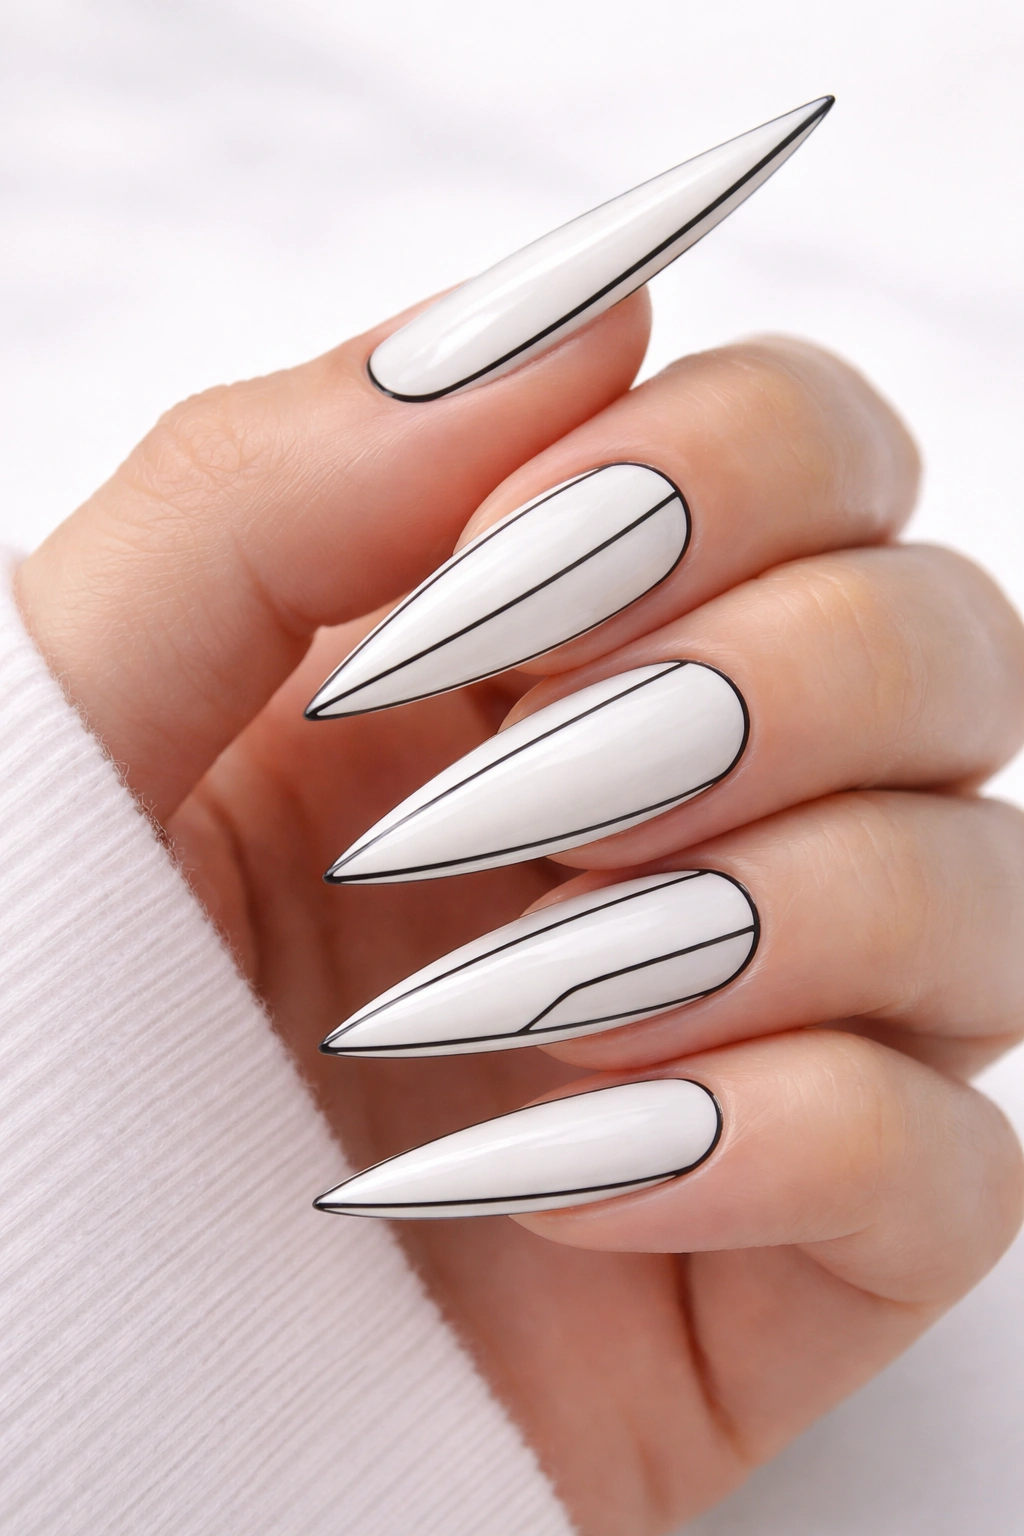
This minimalist design uses negative space and line work to create definition and interest on white stilettos. It’s clean, contemporary, and feels intentional in its simplicity—a design that reads as curated rather than rushed.
Why Minimalism Works on Stilettos
The elongated shape of stilettos means minimalist designs don’t feel sparse or boring—they feel intentional and design-forward. A thin black outline framing or detailing white nails creates architectural interest. This approach works professionally and socially because it reads as sophisticated rather than plain.
Creating Clean Outline Details
- Paint a bright white base and let it cure completely (if using gel, cure under UV light)
- Use a thin striping brush or nail art pen to create fine black lines
- Options for black outlines: frame the entire perimeter of the nail with a thin line, create geometric shapes (triangles, rectangles) within the white space, or add linear details running down the center of the nail
- Keep lines as thin and precise as possible—the delicacy is what makes this design special
- Seal with topcoat, making sure not to smudge your black lines before it dries
Worth knowing: This design photographs beautifully and reads differently in different light—in natural light it feels clean and minimal, under fluorescent light it reads as graphic and design-forward. It’s a versatile design that actually improves with age as the black outline becomes slightly softer.
Final Thoughts
The beauty of stiletto nails is that they give you genuine flexibility to express different moods and styles while maintaining an overall sophisticated silhouette. Whether you gravitate toward the subtle elegance of ombré and shimmer designs or the bold statement of rich colors with metallic accents, there’s a stiletto nail design that matches your personality and lifestyle.
The key to making any of these designs actually feel wearable—not just beautiful in photos—is choosing colors and details that genuinely appeal to you, not just designs that look impressive. A nude with delicate florals might be perfect if you prefer understated elegance, while emerald green with geometric gold patterns might be exactly right if you love making a statement. None of these designs require professional-level artistry if you take your time and use quality materials. Many of them actually look better with a slightly hand-painted, organic quality rather than perfect precision.
Start with designs that match your skill level and build from there. If freehand art intimidates you, lean into gradient designs, solid colors with metallic finishes, or rhinestone embellishments—all of which create impressive results without requiring a steady brush hand. Once you feel confident, challenge yourself with line work, florals, or more complex patterns. The most important part is enjoying the process rather than treating your nails as a performance—that genuine pleasure is what makes any design actually feel special.
