

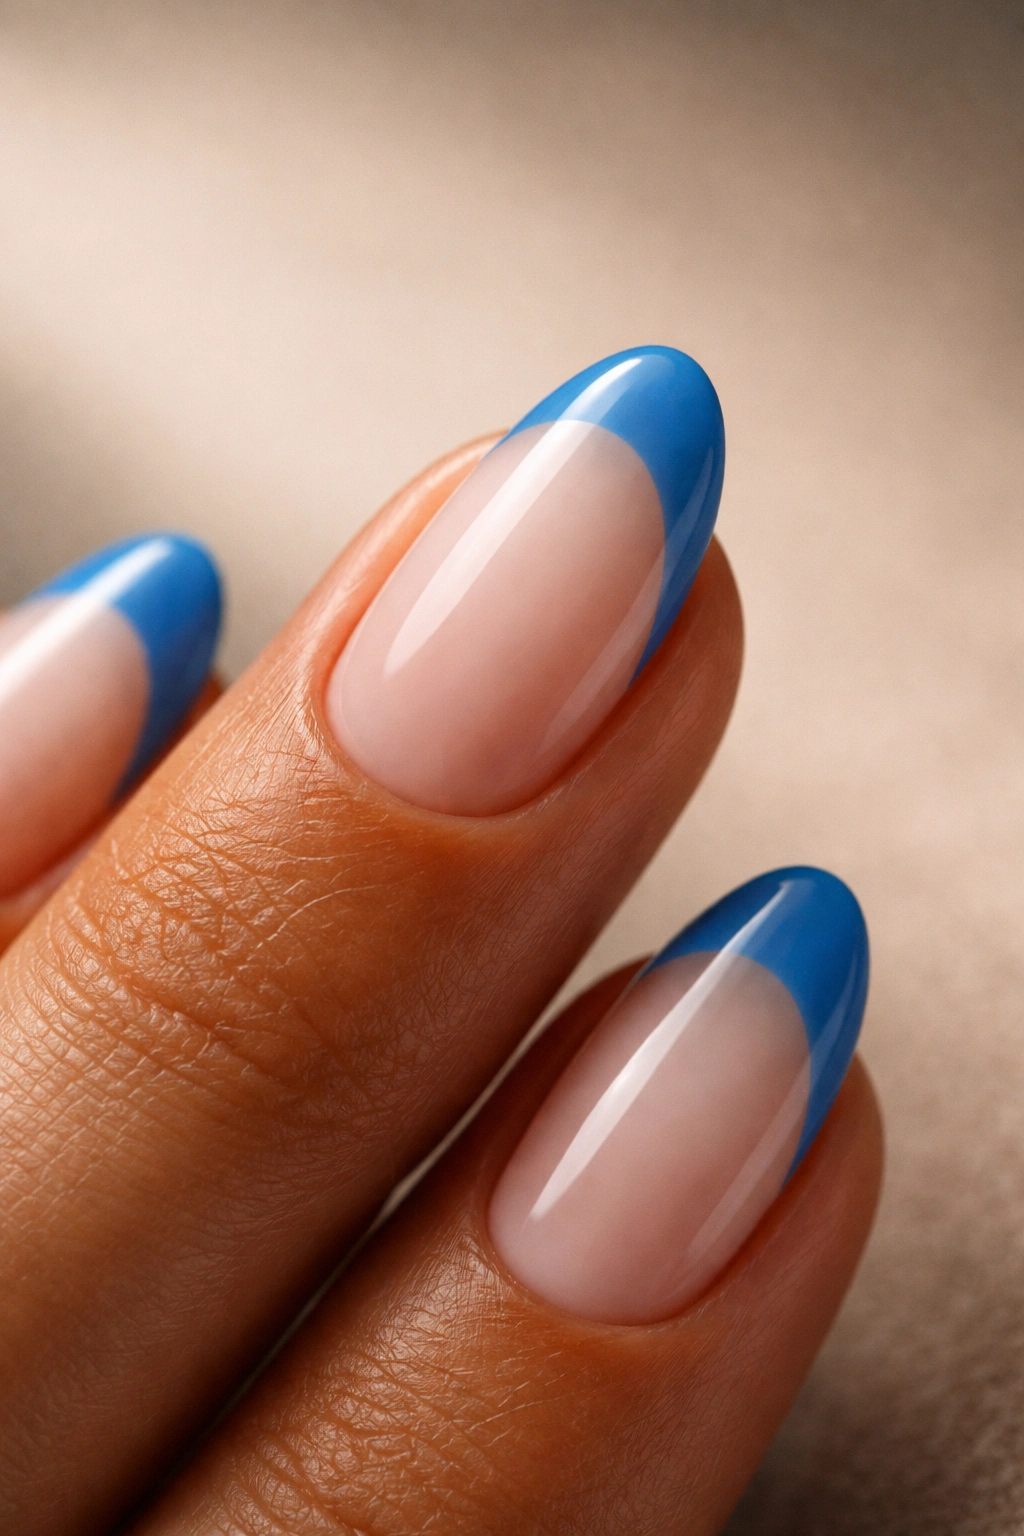
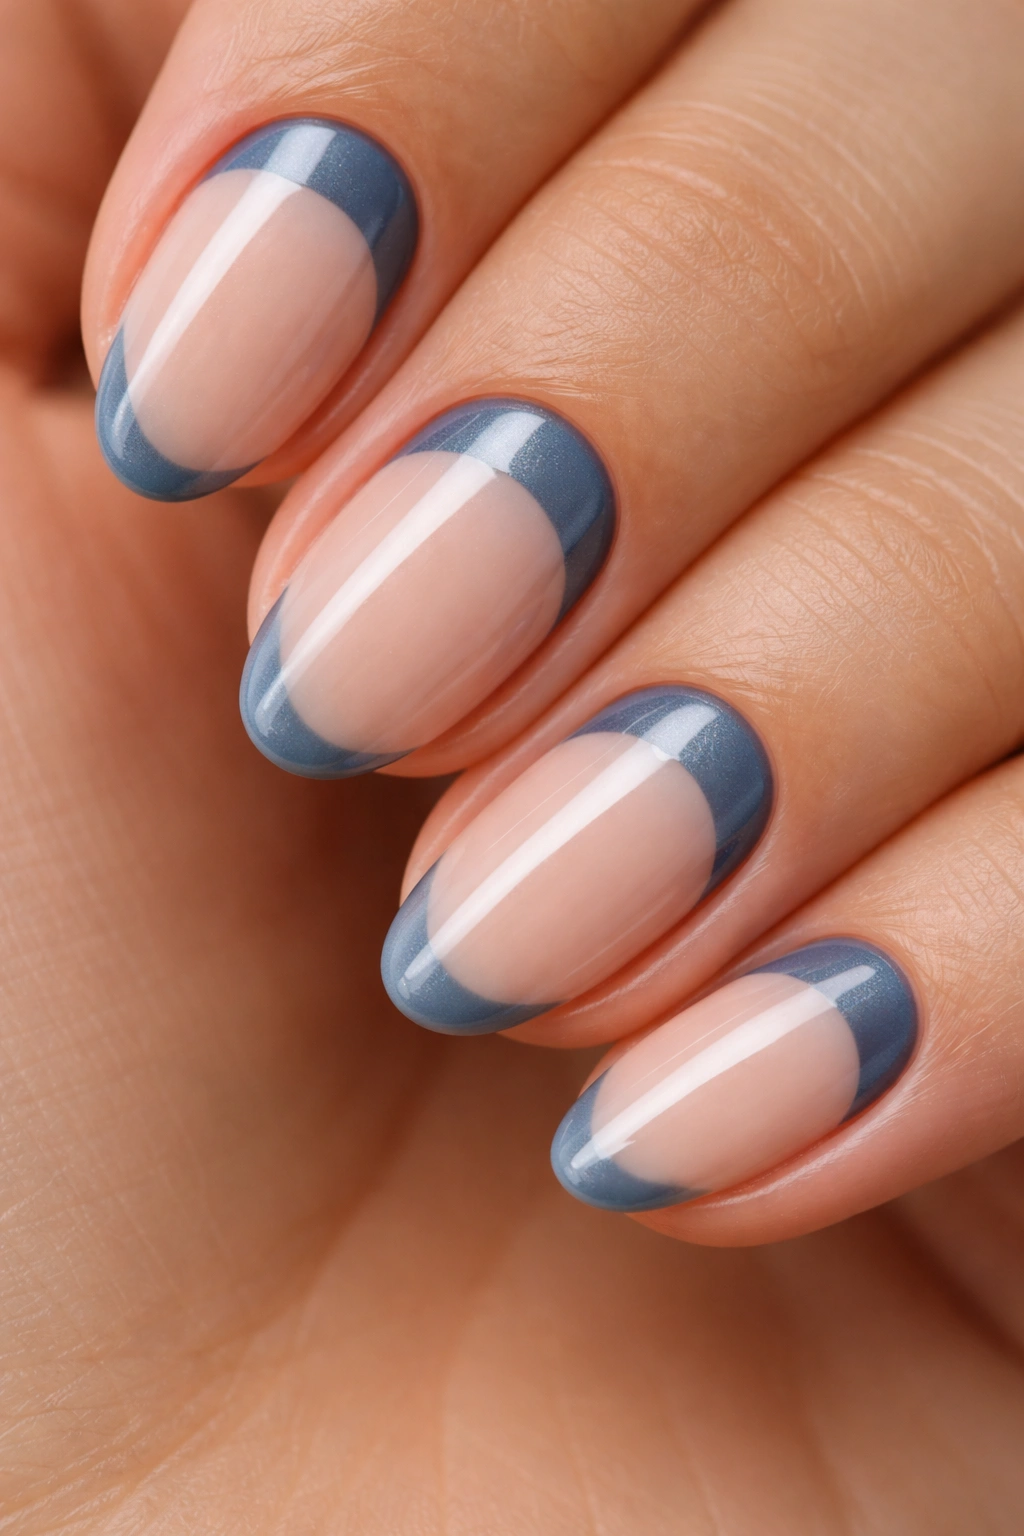
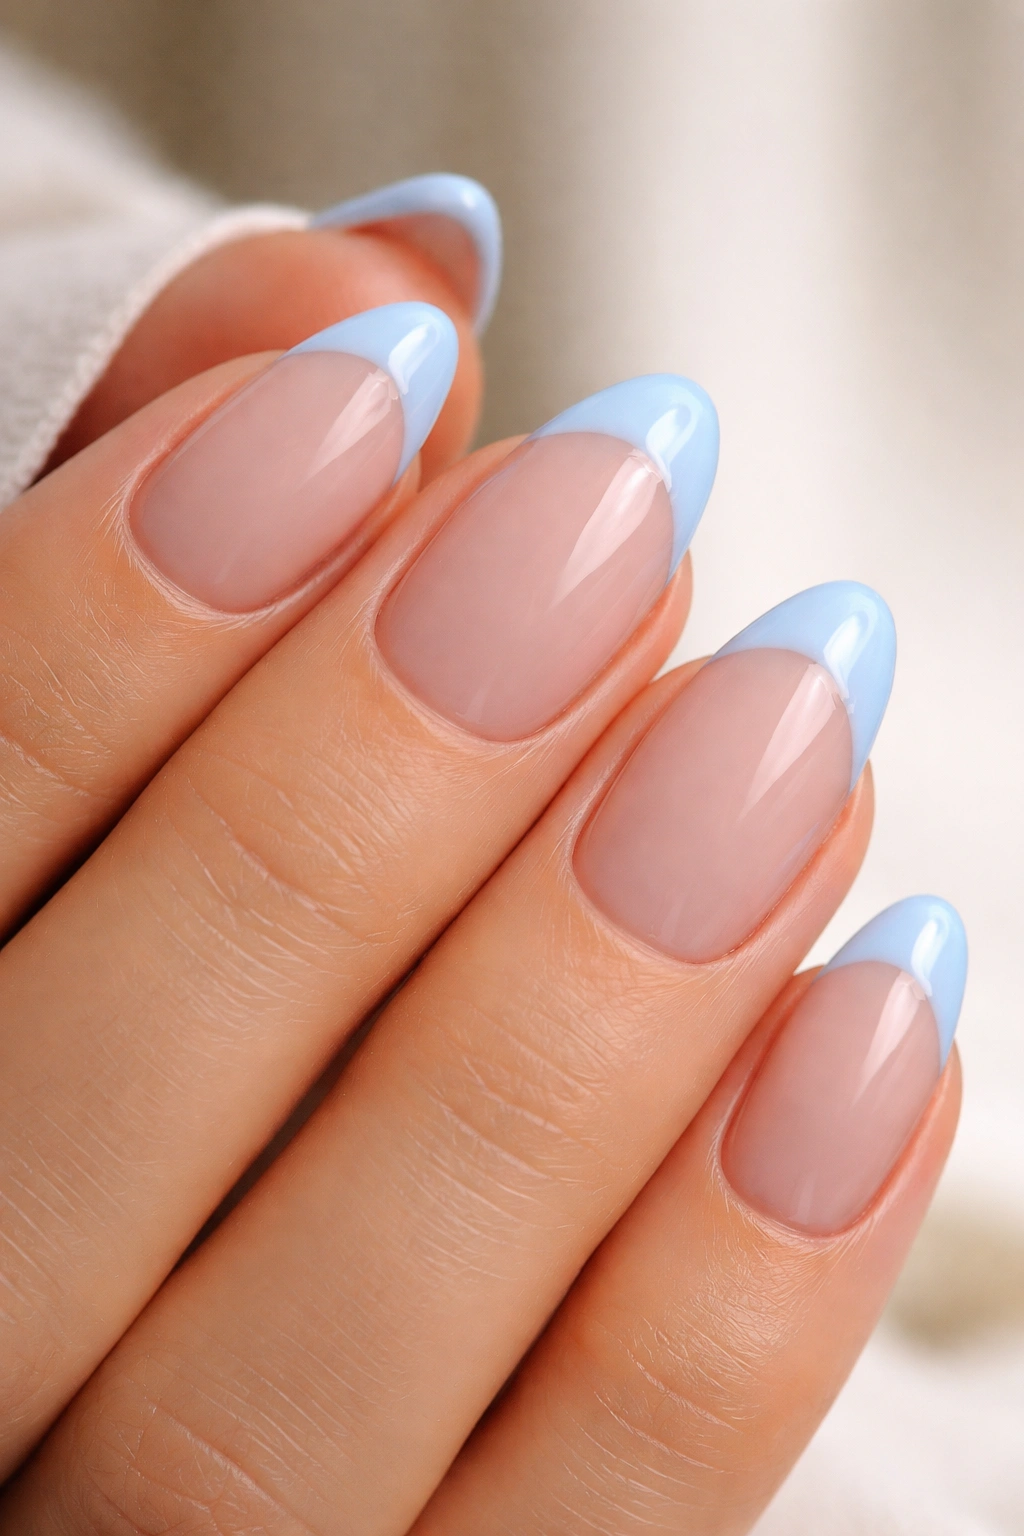
Something about short almond nails and blue French tips is just right. The tapered shape creates the illusion of length without a single millimeter of extension, and when you add a blue tip instead of the traditional white, the whole nail tells a completely different story. It goes from classic to considered. From a default salon choice to something you actually planned.
Blue French tips on almond nails aren’t a passing idea — not tied to any single trend cycle, but rooted in the fact that the color works in ways that white simply doesn’t. Blue has depth. It has range. You can go as soft as a barely-there powder blue against a nude base, or as bold as an electric cobalt that reads like a statement from across the room. The almond shape contains all of that range beautifully because the curved tip softens even the most saturated shades.
Short nails in particular benefit from this combination more than most people expect. A short almond shape — filed to that gentle, slightly pointed oval, typically kept within 2-3mm past the natural fingertip — is arguably the cleanest canvas for French tip work. There’s less real estate to fill, which means every detail shows. The tip line matters more. The base color matters more. The finish matters more. And that’s a good thing, because it pushes the design toward precision.
The 15 looks below run the full spectrum from minimal and understated to layered and textured. Each one works specifically on short almond nails — and that distinction matters more than it sounds.
Why the Short Almond Shape Makes French Tips Look More Expensive
A square nail with a French tip reads functional. A round nail with a French tip reads casual. But an almond nail — even a short one — gives the French tip a frame that makes it look architectural.
The curved sides of the almond shape naturally direct your eye toward the tip, which means the blue tip line becomes the focal point of the entire nail. On longer nails, the negative space of the bare or nude base does a lot of visual work. On short almond nails, the proportions compress in a way that makes the tip look deliberately placed rather than tacked on.
There’s also a practical advantage. Short almond nails have a gentler taper than their longer counterparts, which means the tip area is slightly wider. That gives you more room to work with when applying color — a 2-3mm tip on a short almond nail is easier to keep crisp than the same width on a coffin or squoval shape, where the edges are straight and unforgiving.
Nail technicians who specialize in French work often prefer almond shapes for exactly this reason. The natural curve at the free edge creates a visual guide that helps both the technician and the DIY-er know where the tip should start and stop.
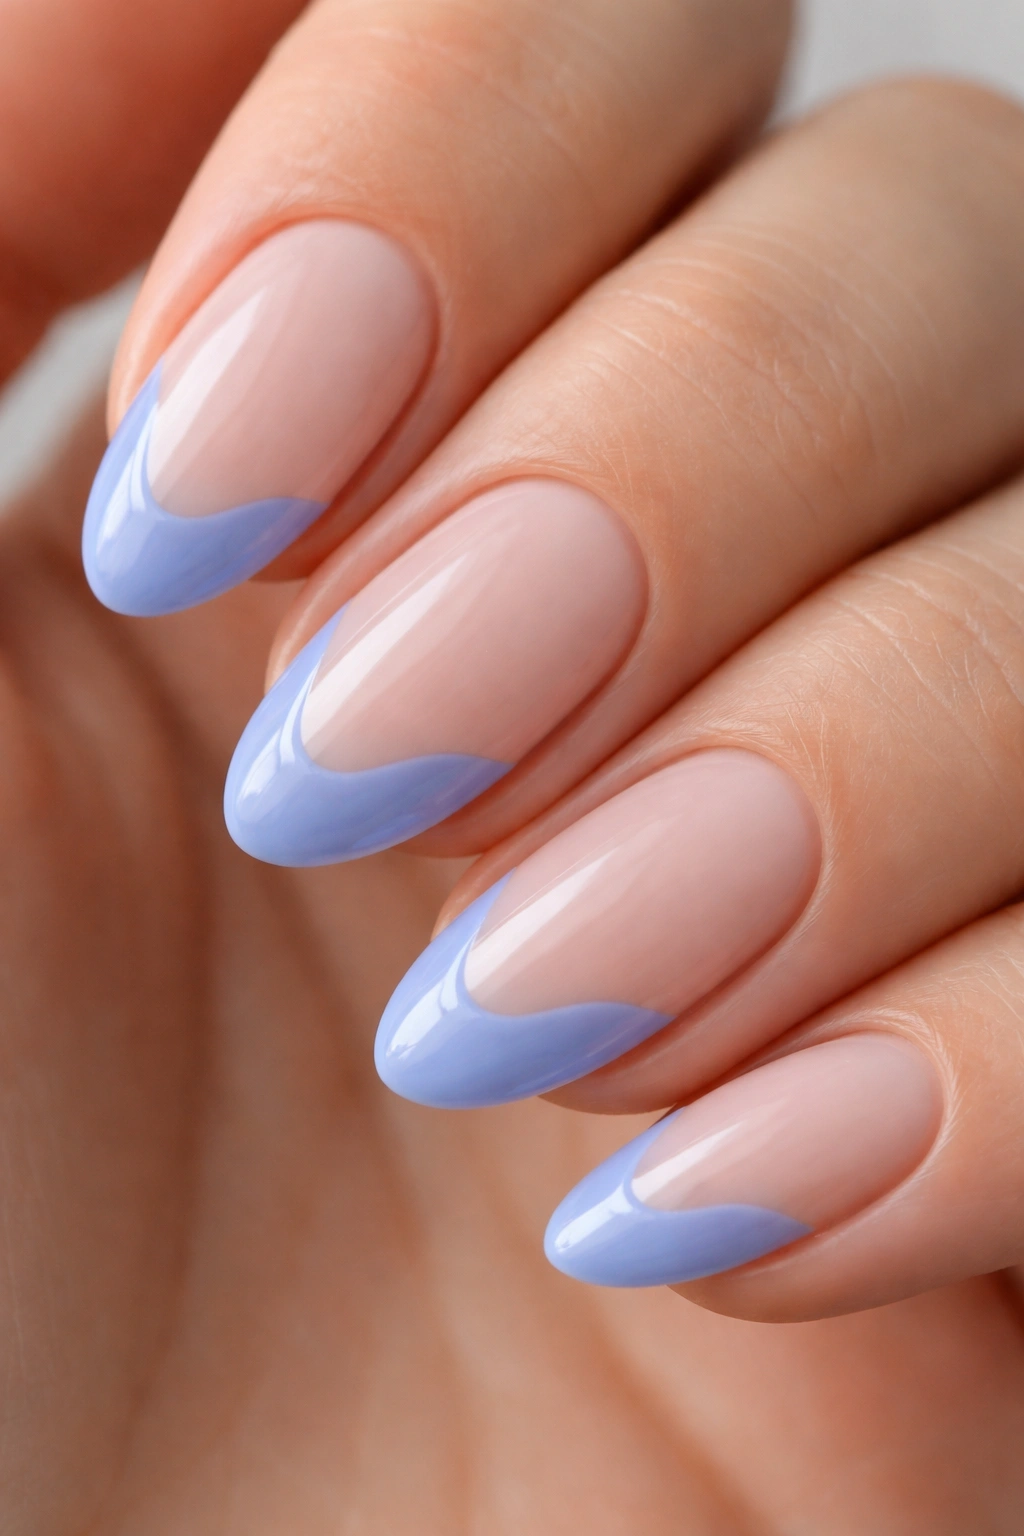
Choosing a Blue Shade That Actually Suits Your Skin Tone
Not all blues behave the same way on nails, and the base color you pair them with changes everything. Worth understanding before you commit to a specific look.
Cool-toned skin tends to handle icy blues, periwinkle, and navy without issue — these shades pull from similar undertones and read as cohesive. Warm-toned skin often looks better with teal-leaning blues or dusty, muted shades rather than stark ice blues, which can wash out against golden or olive skin. Neutral skin tones have the widest range — cobalt, baby blue, royal blue, and steel blue all tend to land well.
The base color matters just as much as the tip. A warmer nude base (think peach or warm beige) can balance cooler blue tips on warm skin tones. A cooler milky base or sheer pink amplifies the blue tip’s impact on cool and neutral skin.
One more thing worth knowing before you browse the designs: matte finishes make blue look darker and more saturated than glossy finishes. If you want a soft, airy look, go glossy. If you want drama from a lighter shade, a matte top coat is one of the easiest ways to deepen the effect without touching the color at all.
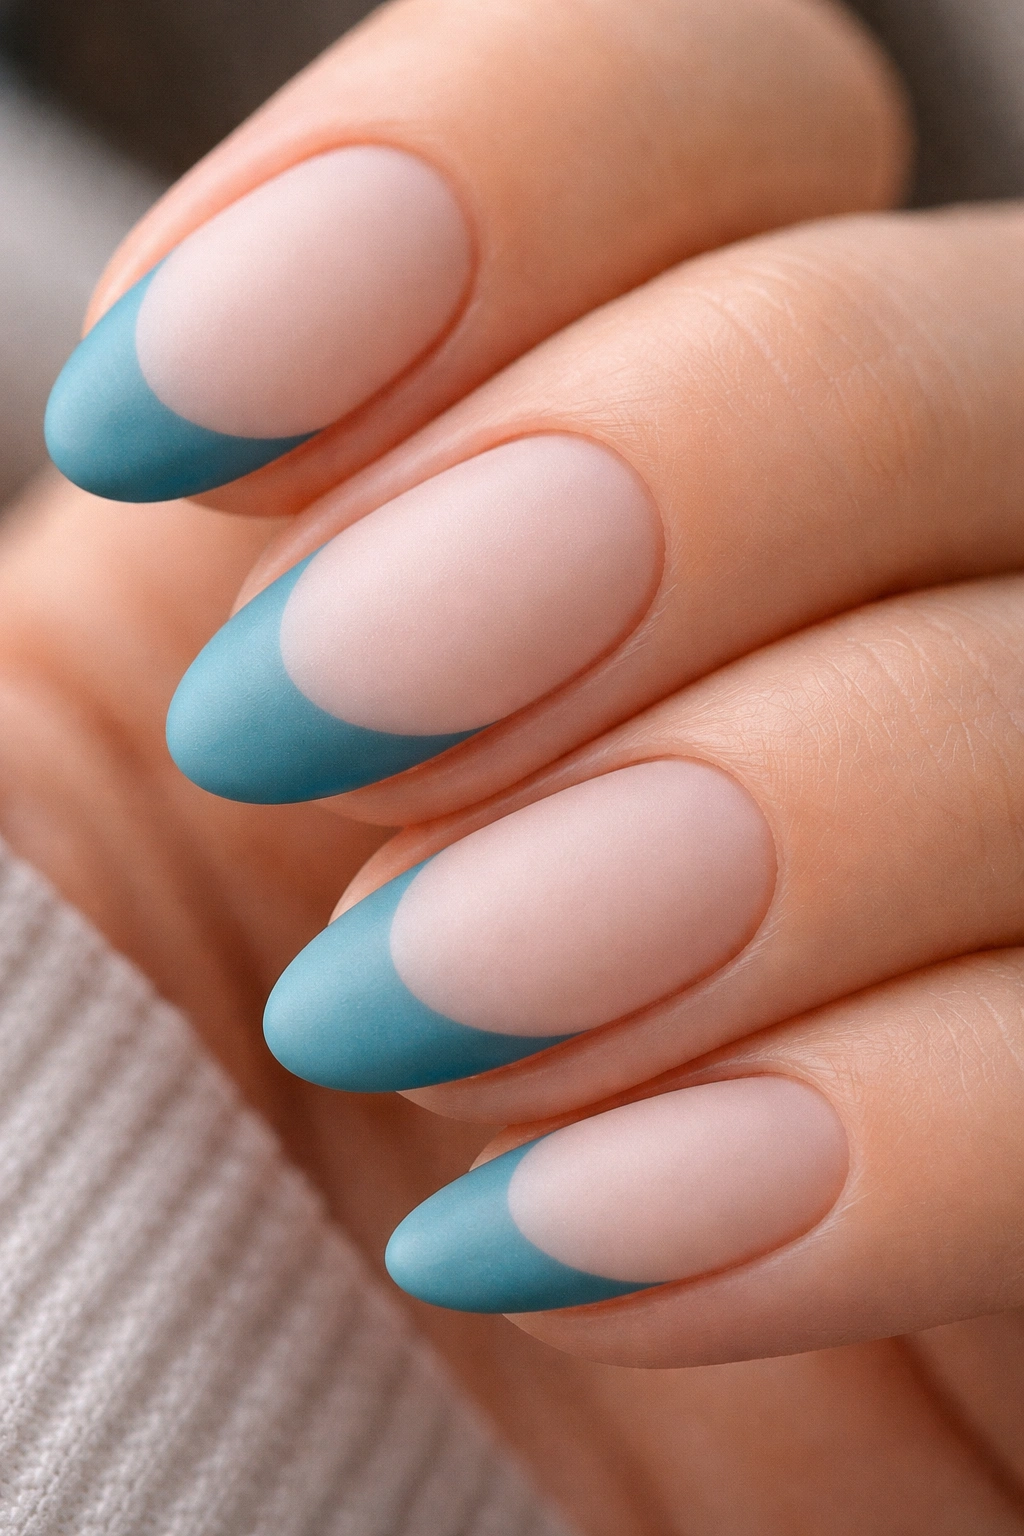
1. Classic Baby Blue with a Clean Nude Base
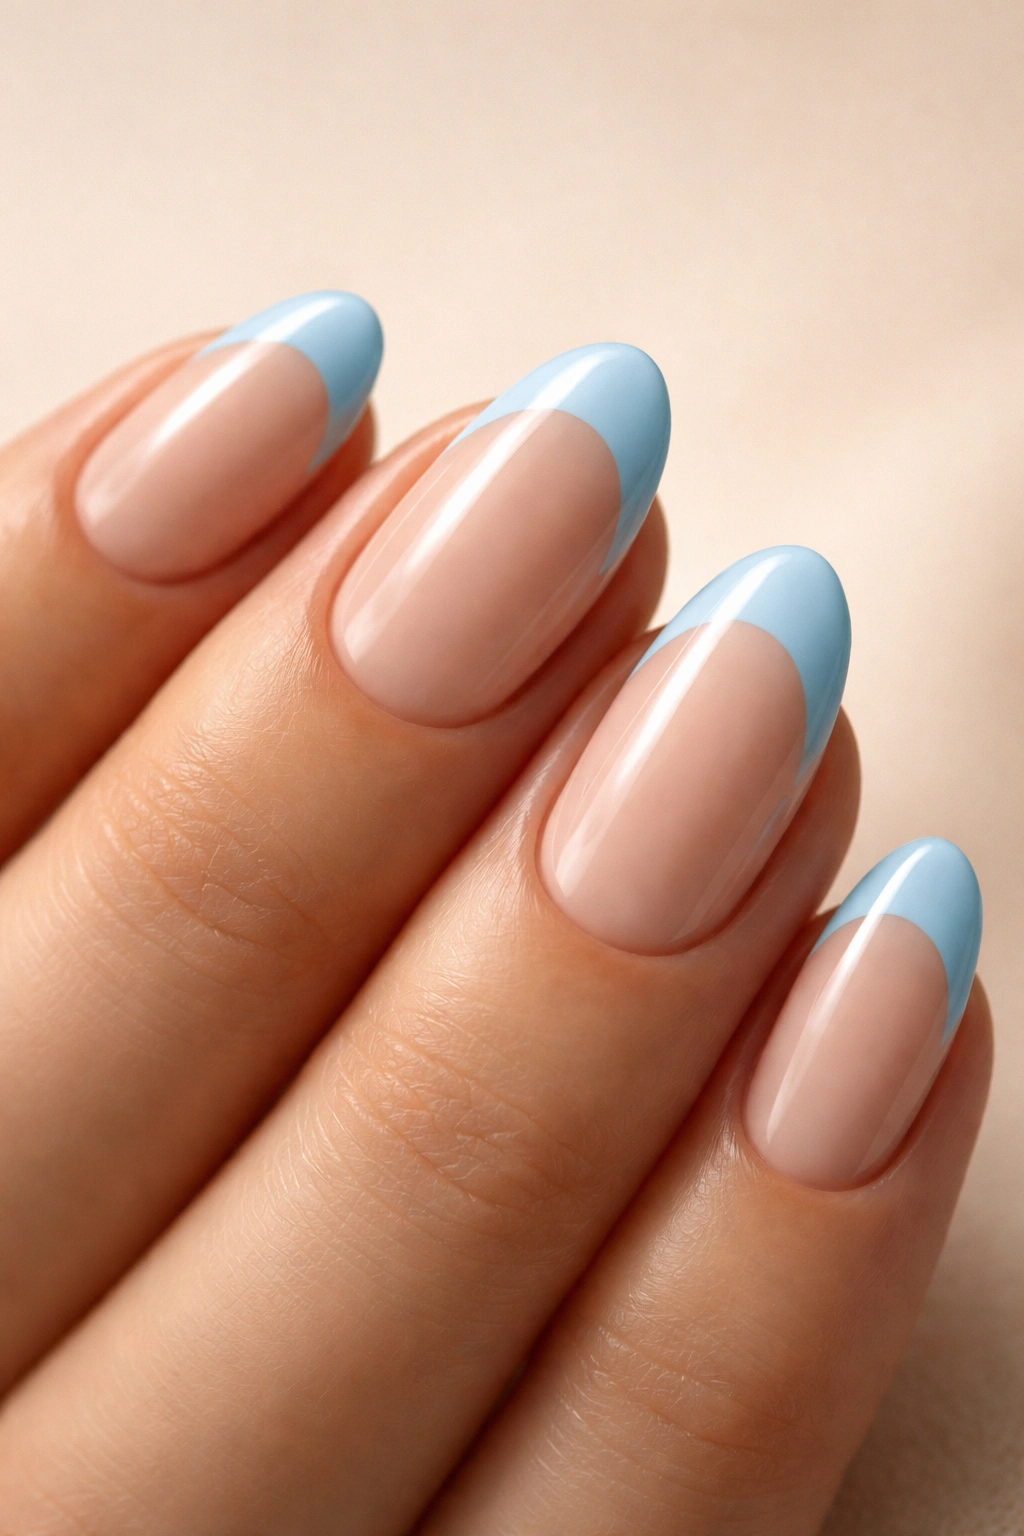
Baby blue is one of those shades that photographs clean and feels effortless in person — it sits somewhere between cornflower and sky, with just enough grey in it to stop it from looking childish. On a short almond nail with a nude base, it has a quiet precision that works equally well at a desk job or a weekend brunch.
Why the Base Color Makes or Breaks This Design
The key to making classic baby blue feel intentional rather than accidental is the base. A true nude — matching close to your natural skin tone — lets the blue tip do all the talking without competing. Go too light on the base (chalk white, for instance) and the whole nail reads as a children’s palette. Go too warm (peachy nude) and the blue tip pulls slightly green, which is its own look but not the one you’re aiming for here.
For the tip line, aim for a width of about 2-3mm on short almond nails. Any wider and it starts to overwhelm the nail bed. Any thinner and it reads more like an accent than a French tip.
Quick Details to Know
- Baby blue shades with a slight grey undertone — sometimes labeled “steel baby blue” — hold up better against yellowing than pure, bright baby blues
- The tip line looks cleanest when applied in two thin coats rather than one thick one — one coat at the edge, wait 60 seconds, then a second coat to fill in any gaps
- A glossy top coat over baby blue keeps the color looking fresh for 5-7 days before visible tip wear appears
Pro tip: Use a thin French tip brush — about 2mm wide — rather than the polish brush that comes with the bottle. The smaller tool gives you far more control around the curved edge of an almond tip.
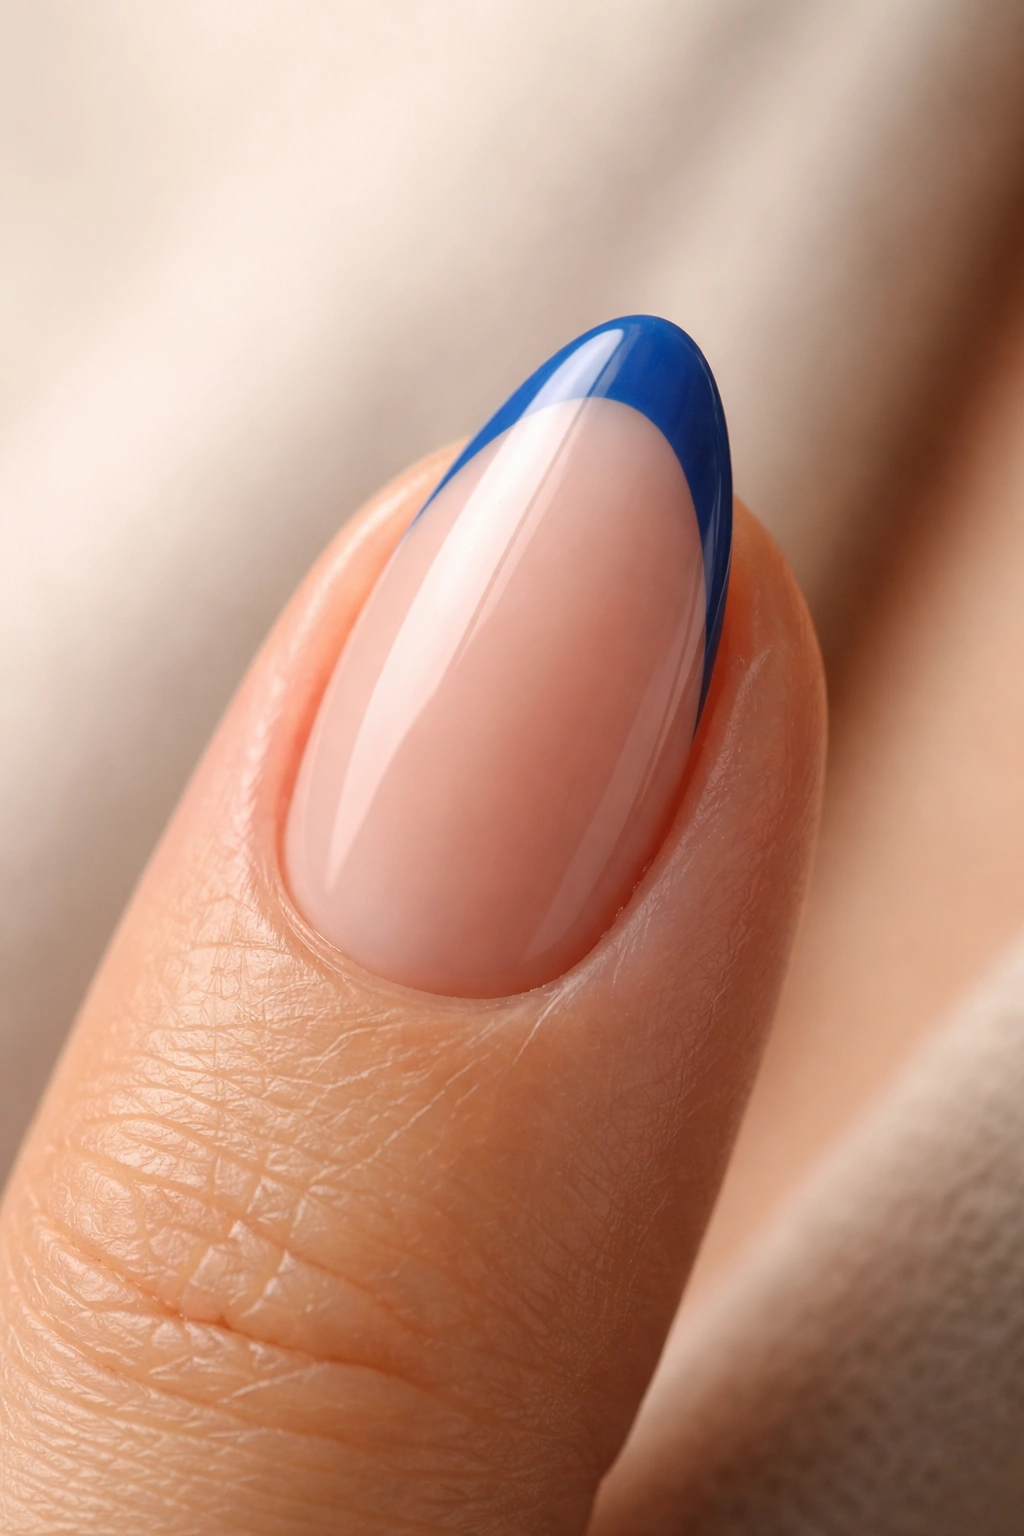
2. Navy Blue Thick Tip on a Sheer Pale Base
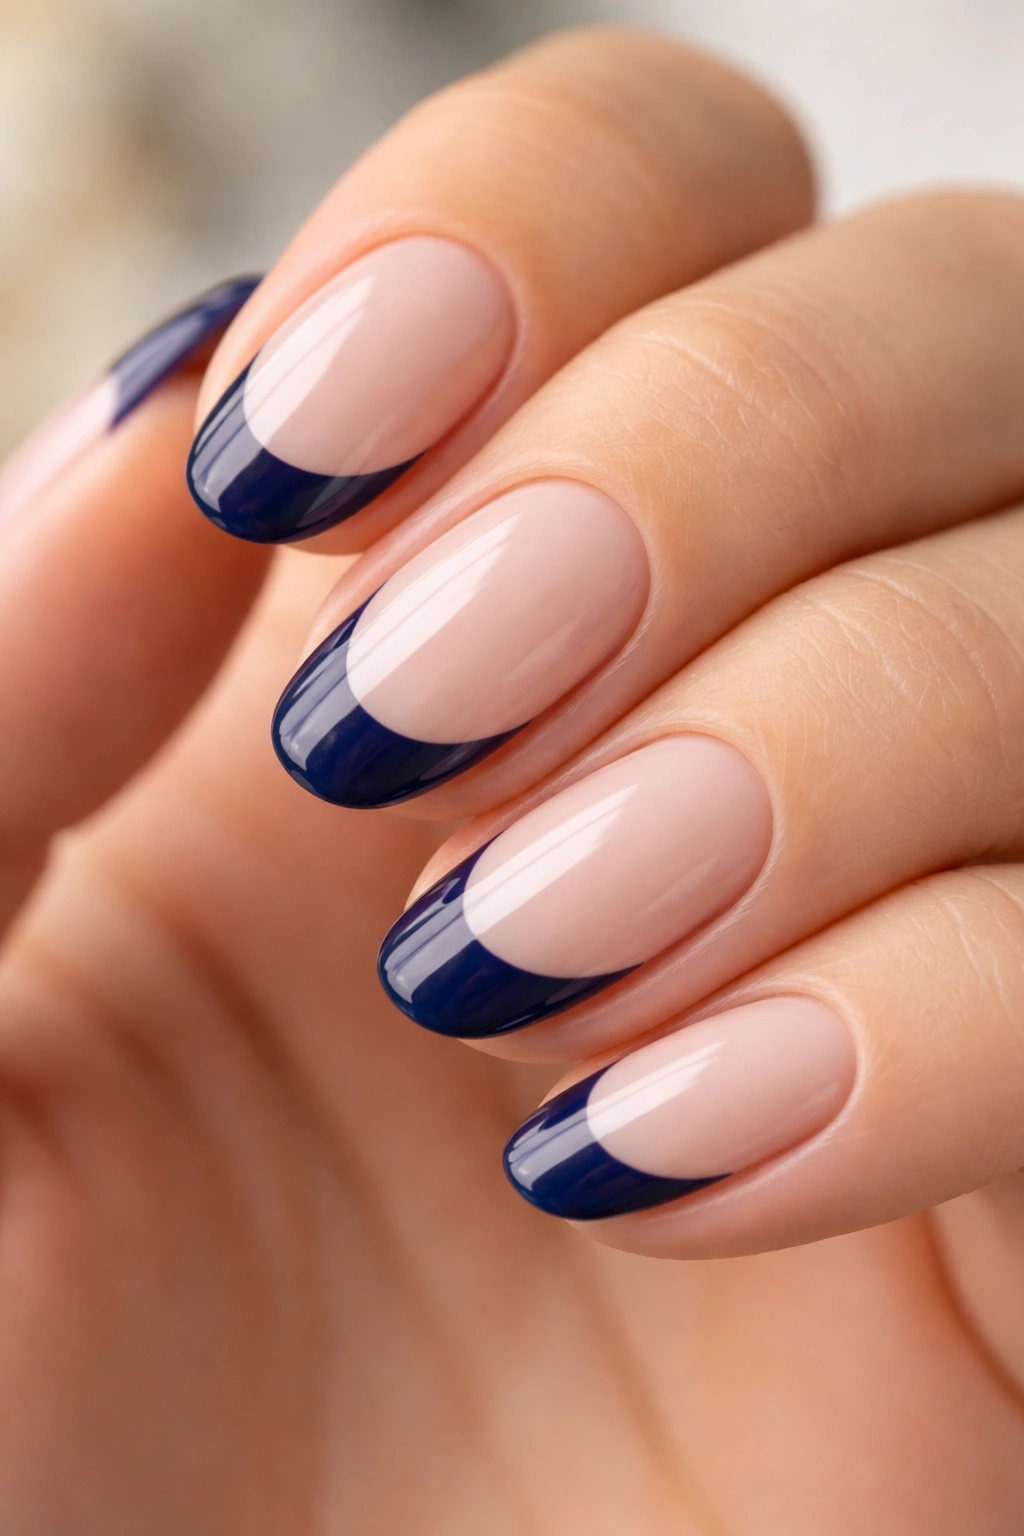
Navy blue French tips are not subtle. That’s the point.
A thick navy tip — 4-5mm rather than the standard 2-3mm — on a short almond nail reads like a design decision rather than a nail treatment. The depth of navy against a sheer pale pink or nude base creates a contrast that’s almost crisp, like the edge of a pressed white collar against dark fabric. There’s structure to it.
Short nails actually handle wide French tips better than longer nails because the proportions are compressed. On a nail with 5mm of free edge, a 4mm tip looks outsized. On a short almond nail where the full nail bed is roughly 10-12mm from cuticle to free edge, a 4mm tip fills about a third of the nail — which hits the sweet spot between bold and balanced.
The sheer base here is non-negotiable. A fully opaque base color competes with the navy and muddies the design. A sheer pink or translucent nude lets the nail bed show through slightly, which softens the whole look just enough to make the bold tip wearable every day rather than reserved for weekends only.
Polish-wise, look for navy shades described as “true navy” rather than “dark blue” — the distinction matters because true navy reads as a blue-black in most lighting, while dark blues can shift purple or teal depending on the formula. If you’re working in gel, two thin coats of navy get you the full-coverage opacity that makes the tip line look rich and solid rather than streaky.
3. Soft Blue Ombre Gradient French Tip
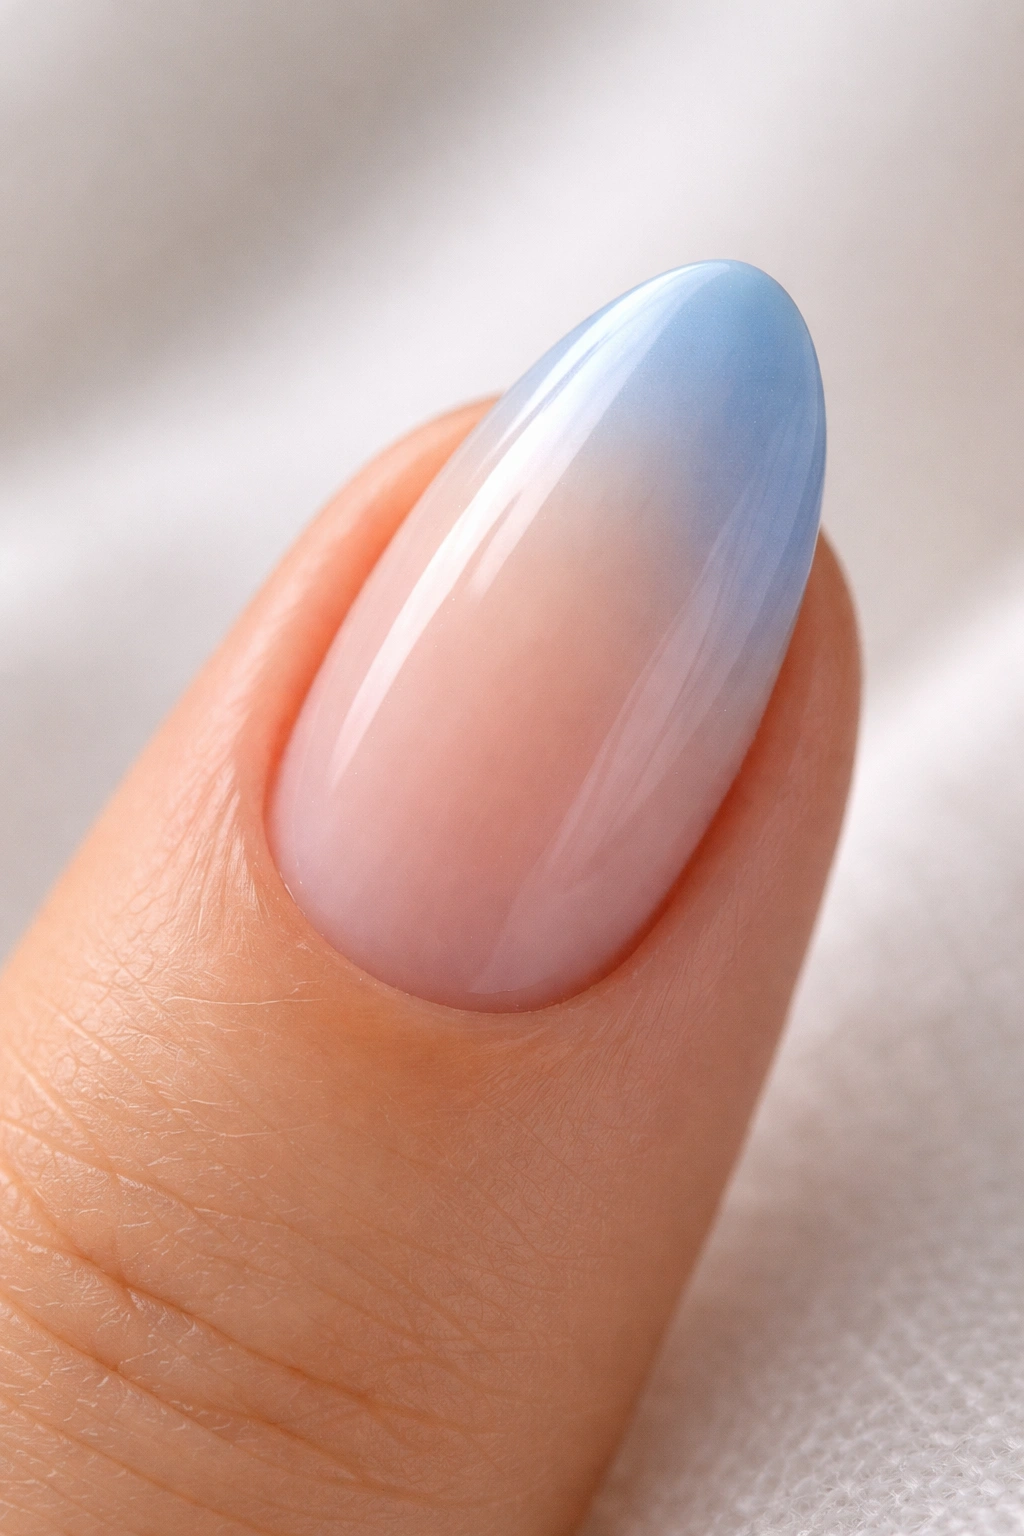
Why do ombre French tips work better on almond nails than on any other shape? Because the tapered edge blends naturally with a gradient that gets lighter toward the center of the nail. The shape does part of the work for you.
A soft blue ombre tip starts with the most saturated blue at the very edge of the free tip, then fades toward a sheer or milky center. On a short almond nail, this fade happens across just 4-6mm — a narrow zone, but enough for the eye to register the gradient clearly.
The technique that works best at home: apply the blue shade to a small piece of makeup sponge, dab off the excess on a paper towel until the coverage looks splotchy rather than solid, then press the sponge lightly against the tip area. Repeat three or four times, letting each layer dry briefly before the next. The final result should look like a mist of color at the tip that breathes into nothing by the center of the nail.
Seal it immediately with a thick glossy top coat — the kind with a slightly gel-like formula. On ombre work, a thick top coat smooths the texture left by the sponge and gives the gradient a seamless appearance that holds together rather than looking like a blending accident. Powder blue ombre tips are the softest version of this look. Cornflower blue gives you slightly more definition at the tip. Either way, keep the base milky or sheer — an opaque base cuts the gradient off too sharply and kills the effect entirely.
4. Glitter-Packed Cobalt French Tip
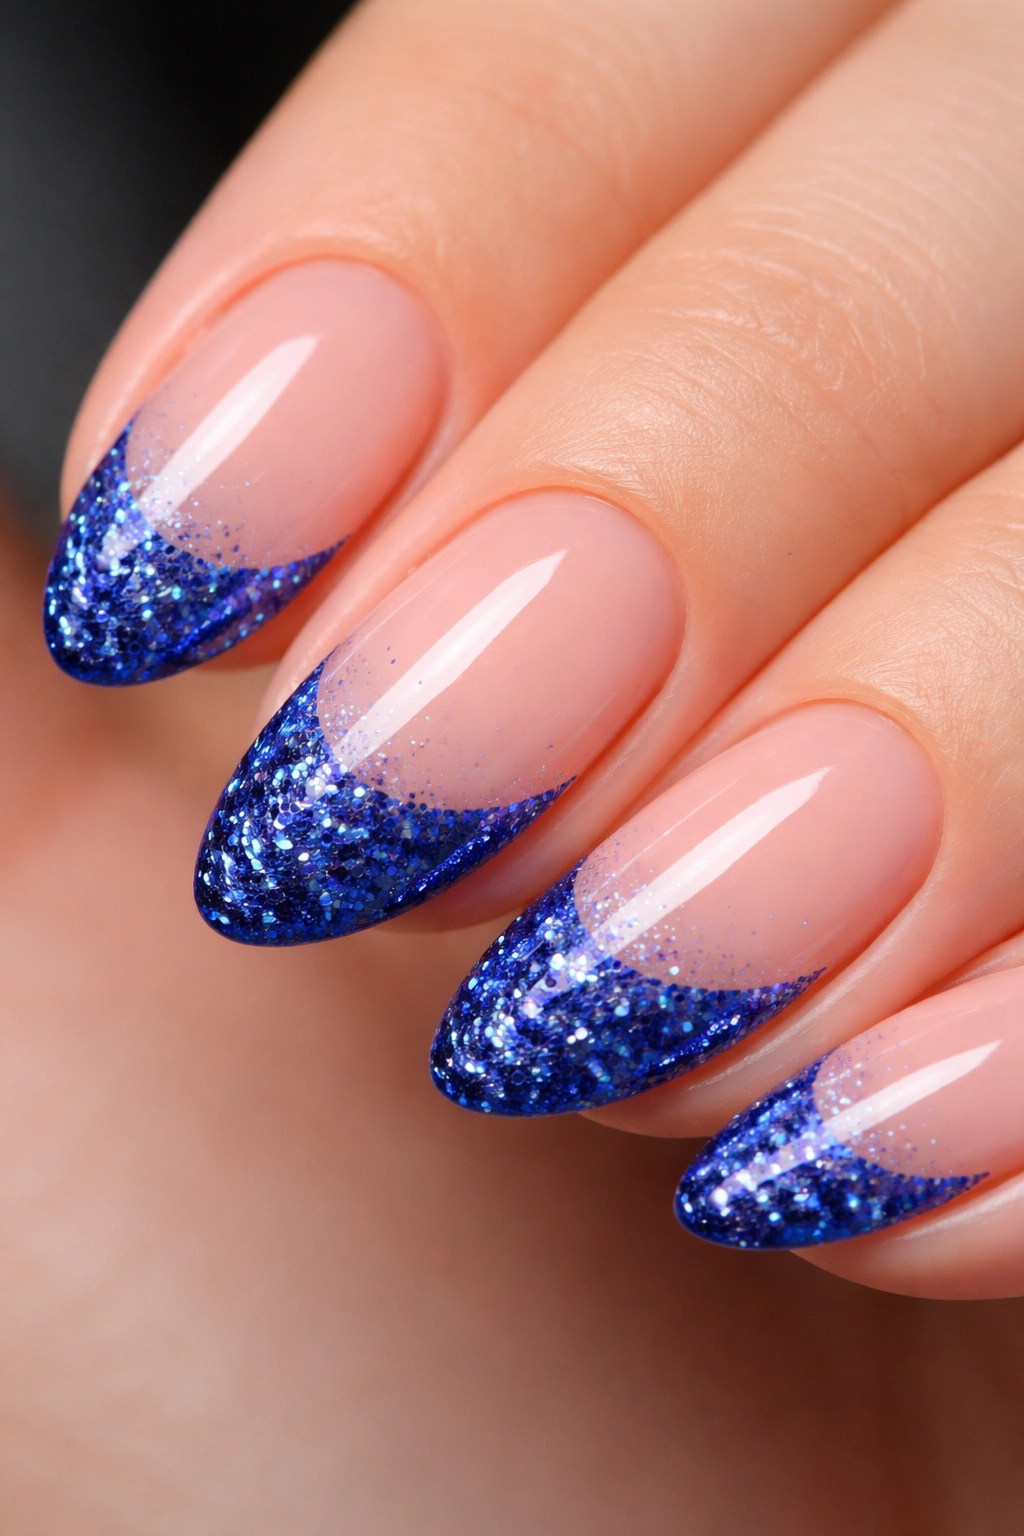
Picture this: you’ve just done your nails in a perfectly neutral nude, and the only thing at the tip is an edge that catches light like crushed sapphire. That’s what a glitter cobalt French tip does, and it does it reliably every time.
The distinction between this and a standard glitter tip matters. A scattered glitter application looks unfinished on short nails — there’s not enough nail surface for glitter to read as intentional. A packed glitter tip, where the color is dense and almost opaque at the edge, reads as a deliberate design. You want coverage, not confetti.
Getting the Density Right
To achieve fully packed glitter at the tip:
- Apply a layer of clear gel or polish at the tip first — this gives the glitter something to grip
- Press cobalt glitter onto the wet layer using a flat silicone tool or a small brush, working from the edge inward
- Layer a second application while the first is still tacky to build full opacity
- Seal with two coats of gel top coat to encapsulate the glitter completely and prevent any texture snag
The glitter particle size changes the whole feel of this look. Fine hex glitter gives you a smooth, almost chrome-like density. Larger chunky glitter reads more festival than French tip. For a polished effect on short nails, fine to medium-fine particles work best.
The detail most people skip: cap the very edge of the tip with top coat by running the brush directly along the free edge, not just across the face of the nail. This is what stops glitter tips from lifting and peeling at the edge within the first two days.
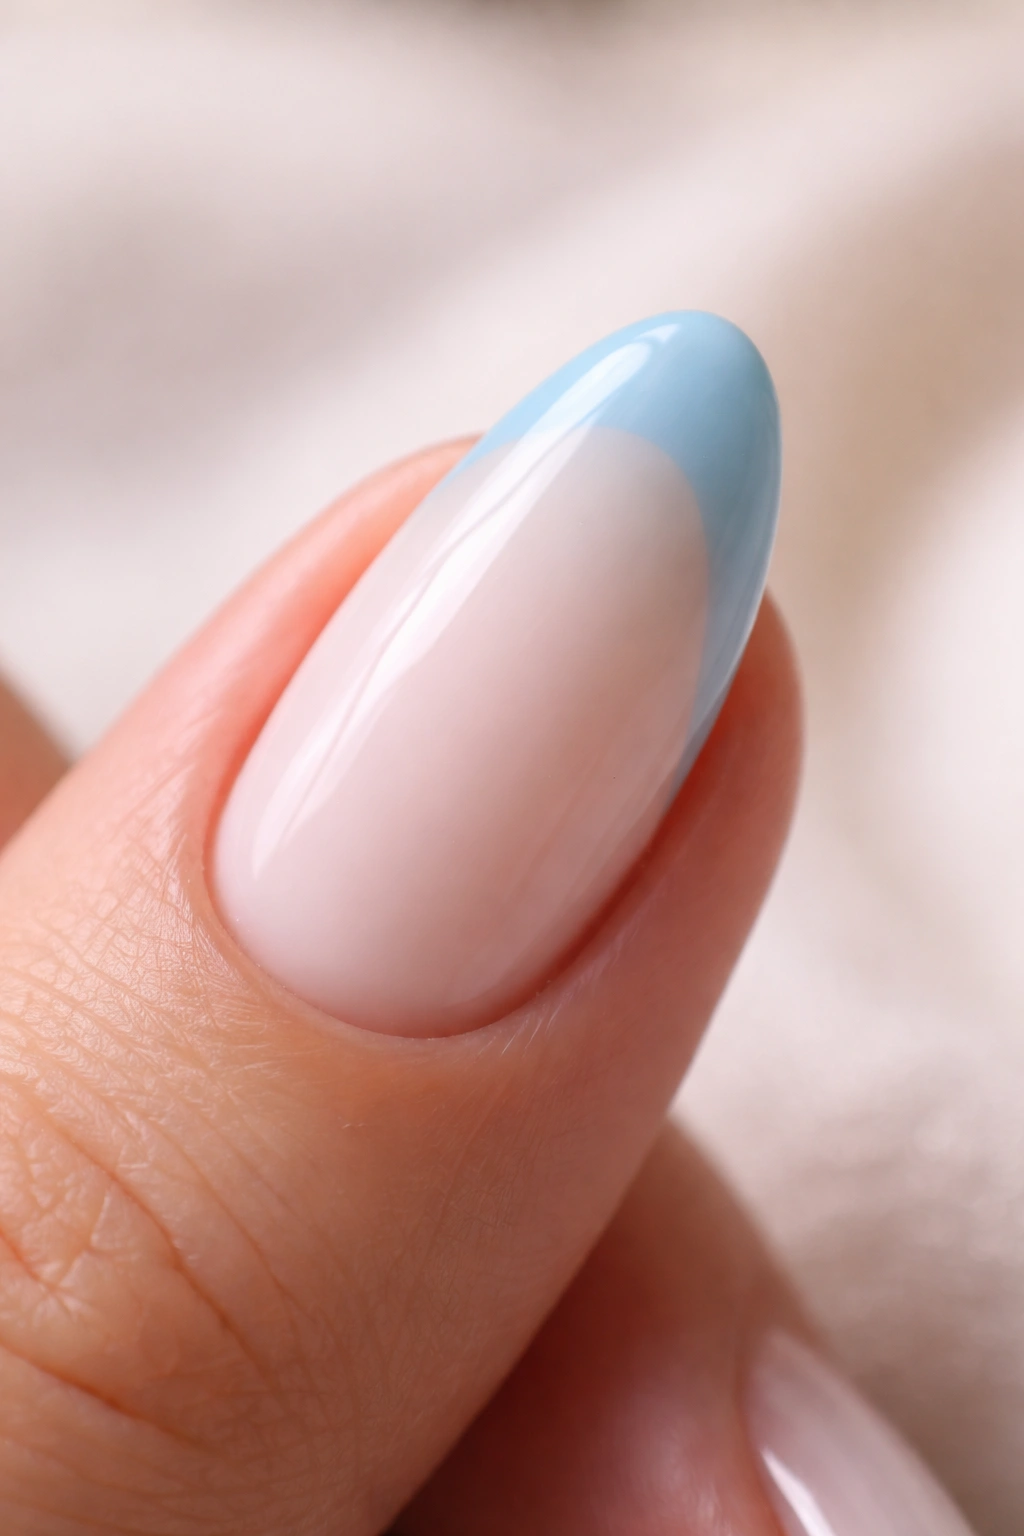
5. Micro Thin Sky Blue Hairline French Tip
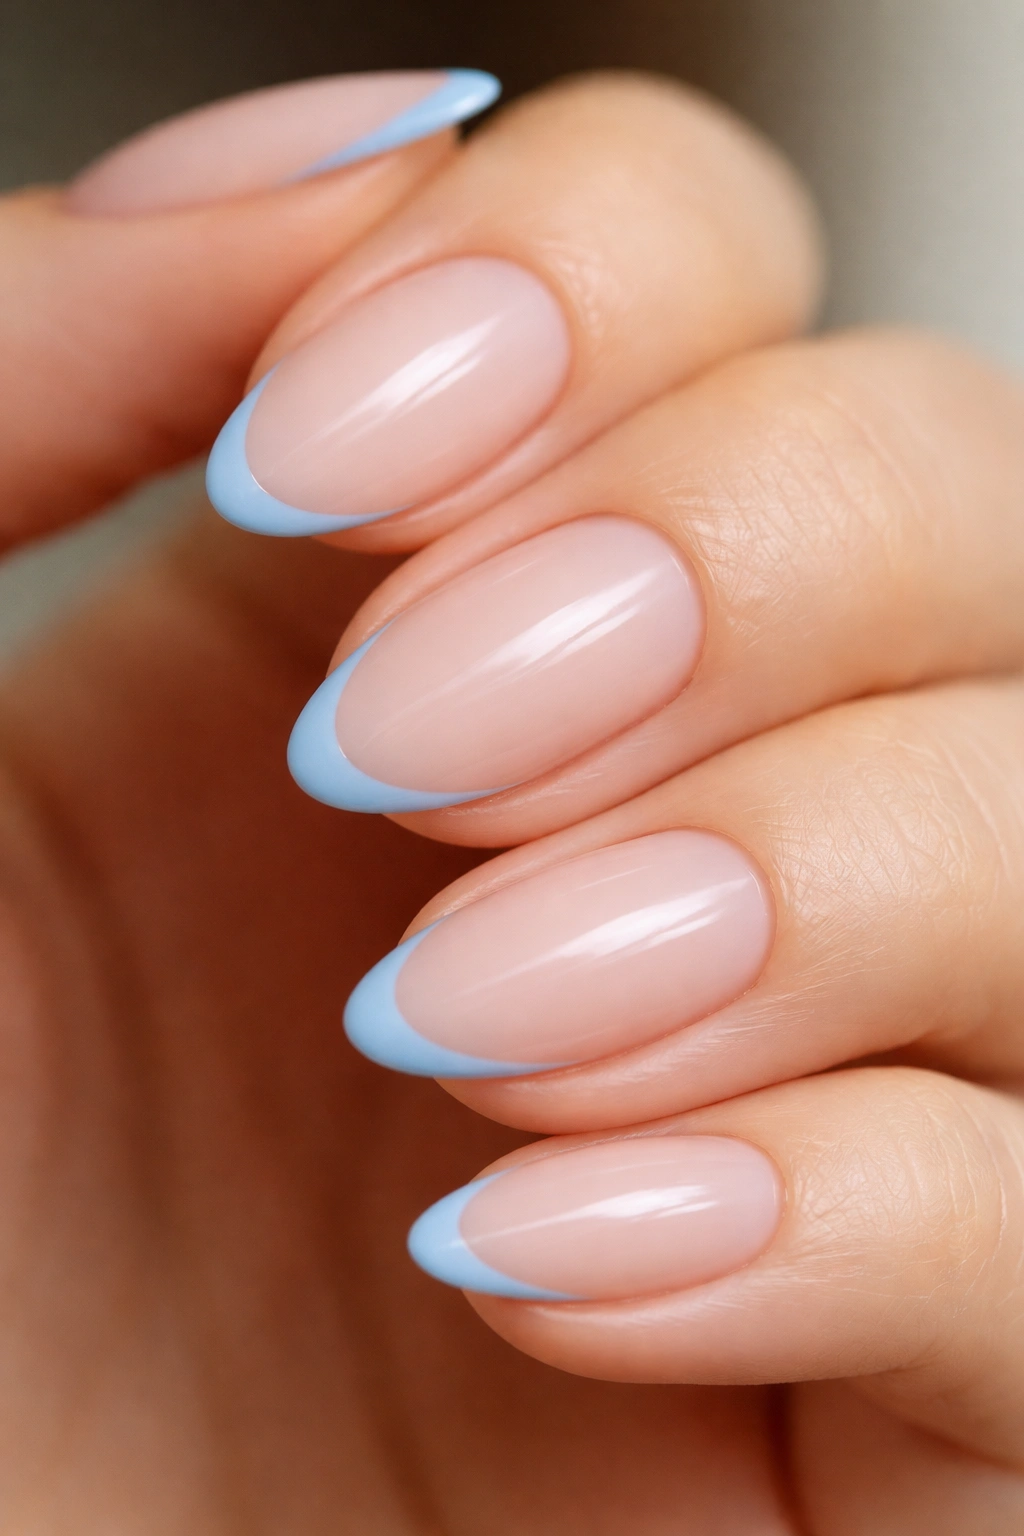
Unlike the standard French tip — which sits at a visible 2-4mm width — the micro French tip is a single, deliberate line of color no wider than 1-1.5mm. It’s closer to a painted stripe than a tip. And on a short almond nail, it looks almost architectural in its restraint.
Sky blue is the ideal shade for this because it’s light enough to read as a distinct color without being so saturated that the narrow line becomes overwhelming. You want the eye to take a moment to notice it, then appreciate it. A 1mm sky blue line at the tip of a nude almond nail does exactly that — it rewards closer looking.
The tool that makes or breaks this look is a striping brush. A standard polish brush cannot produce a consistent 1-1.5mm line across the curved edge of an almond tip without wavering. A good striping brush has a long, narrow head of about 15-20 bristles — thin enough to maintain consistent width around the curve, long enough to complete each nail in a single stroke without reloading.
Application angle matters too. Hold the nail at roughly 45 degrees rather than flat, and rest your brush hand lightly against your opposite hand for stability. Pull the brush across the curved tip from one side to the other in one fluid motion. If the line wavers, clean the edges immediately with a thin detail brush dipped in acetone while the polish is still wet. That fix takes 10 seconds and the improvement is dramatic.
6. Powder Blue on a Milky White Base
There’s something almost otherworldly about powder blue against a milky white base. The combination reads like a winter sky on a calm day — nothing harsh, nothing stark, just two near-neutral shades layered in a way that feels calm and considered.
What Makes This Pairing Work
Powder blue occupies a strange and useful part of the color wheel — it’s blue enough to read as blue, but desaturated enough that it sits quietly. Against a milky white base (not stark white — look for “cloud white” or “fresh milk” finishes with a slight warmth to them), the powder blue tip almost glows rather than contrasts. The effect is softer than any other blue French tip combination on this list.
How to Build This Look at Home
Start with two coats of your milky base and let it cure or dry fully — this step is not one to rush. Any tackiness in the base causes the powder blue tip to feather at the edges.
For the tip itself:
- Apply one coat of powder blue at the tip and let it dry fully before touching it
- Add a second coat immediately to build opacity — powder blues are often sheer on the first coat and need the second to read clearly
- Seal with a glossy top coat that has a leveling formula, which smooths out brush strokes (these show more on light shades than on darker ones)
The width can go slightly wider here — up to 3-4mm — because the soft nature of the color means a wider tip still reads delicately. This is one of the few designs on this list where more tip width actually helps rather than overwhelms.
7. Midnight Blue with a Gold Chrome Liner
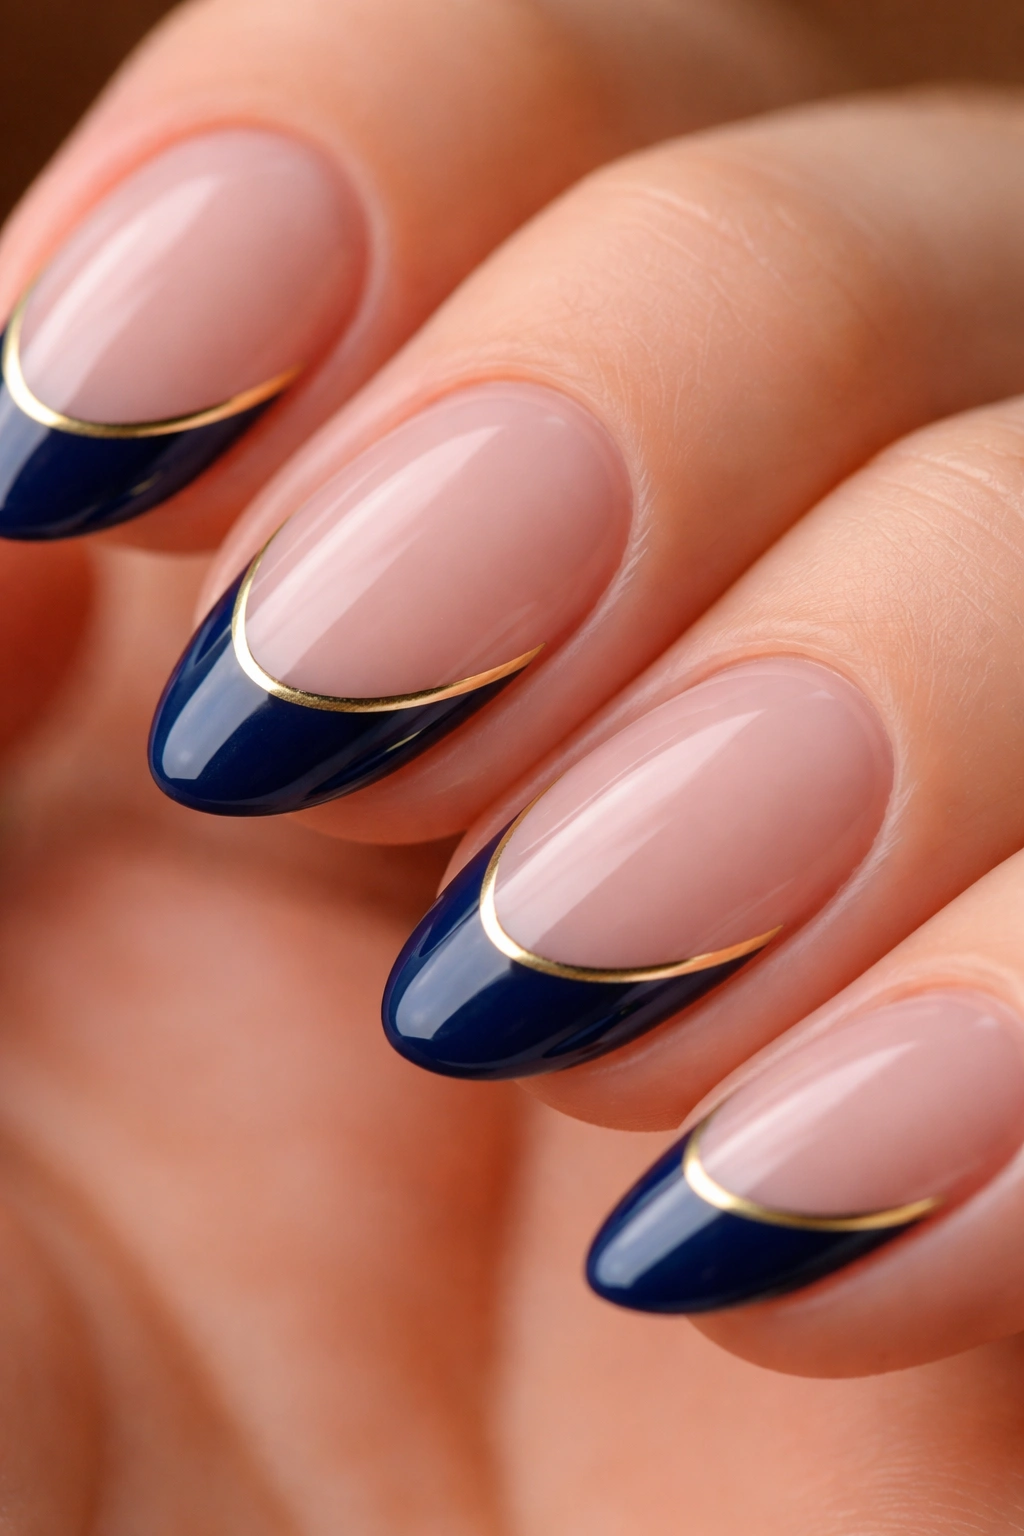
This is the design that gets noticed from across the table.
Midnight blue on a short almond nail is already striking — it sits in that dense, almost-black territory where the color only reveals itself as blue in direct light. Add a hair-thin gold chrome liner between the nude base and the midnight blue tip, and the whole design changes register. It moves from a cool, moody nail to something that reads as genuinely crafted.
The gold chrome liner sits exactly at the boundary where the blue tip meets the base. Typically 0.5-1mm wide — barely there in terms of size, but visually it acts as a frame that sharpens the edge and adds warmth to what would otherwise be a fully cool design. The contrast between the warm gold line and the cool midnight blue is the whole point.
Gold chrome powder applied with a silicone brush gives the most mirror-like result. Chrome nail strips — pre-cut foil strips — are the easier at-home option. Press the strip along the tip boundary before applying top coat, then seal everything under two layers of gel top coat. Either method works; the key is sealing properly so the chrome doesn’t lift at the edges within the first few days.
For the midnight blue tip itself, apply it over a layer of black gel if your chosen blue shade struggles to reach full opacity on its own — the dark base helps midnight blue hit full saturation in two coats rather than four.
8. Teal Blue French Tip with a Matte Finish
Teal sits right at the edge of blue and green, and that’s what makes it interesting on a nail. On a short almond nail with a matte top coat, a teal French tip looks nothing like any of the other designs on this list. The color has warmth that pure blue doesn’t, and the matte finish strips out the shine that usually softens nail color. The result is unexpectedly graphic — almost like a printed design rather than a painted one.
Matte finishes deserve far more attention in French tip design than they typically get. Most discussions stay in glossy territory, but matte changes the texture of color completely. A teal tip that looks medium-intensity under a glossy coat looks deeper and more saturated under matte — the same shade reading differently based entirely on finish.
The base needs thought. Applying matte top coat over the base color too (not just the tip) creates a fully cohesive look where both zones share the same texture. A glossy base under a matte teal tip creates a deliberate contrast — glossy nude base, matte teal tip — which some people prefer because it highlights the tip as a distinct element.
One watch-out: matte top coats are sensitive to oils from your skin. Avoid touching the nails for at least 10-15 minutes after application, and skip hand cream for the first hour. Matte finishes that come into contact with oil before they’ve fully set will develop glossy patches that are nearly impossible to fix without reapplying the entire top coat.
9. Periwinkle Blue Wavy French Tip
The wavy French tip breaks the one rule that traditional French tips follow: the perfectly straight or evenly curved tip line. Instead of a clean arc of color at the tip, the boundary undulates slightly — small, deliberate waves that follow the general curve of the nail but add a playful irregularity that looks intentional rather than accidental.
Periwinkle is the ideal shade for this because its blue-purple balance makes the wavy line read as artistic rather than sloppy. A saturated cobalt or navy with a wavy edge can look like a mistake. Periwinkle is soft enough that the irregular line reads as a design choice immediately.
Freehand is really the only reliable way to achieve this. Here’s what the process actually looks like: load a thin nail art brush with periwinkle polish, then trace the tip of the nail in a gentle S-motion from one side to the other — not dramatic peaks and valleys, but subtle rises and dips of about 1-2mm above and below the standard tip boundary. The curved edge of the almond nail helps guide the motion naturally.
Two coats of periwinkle fill in the wave after the line is drawn, and the result looks organic rather than geometric. For anyone who loves the French tip concept but finds rigid straight lines too stiff, this is the variation that fixes that without abandoning the format.
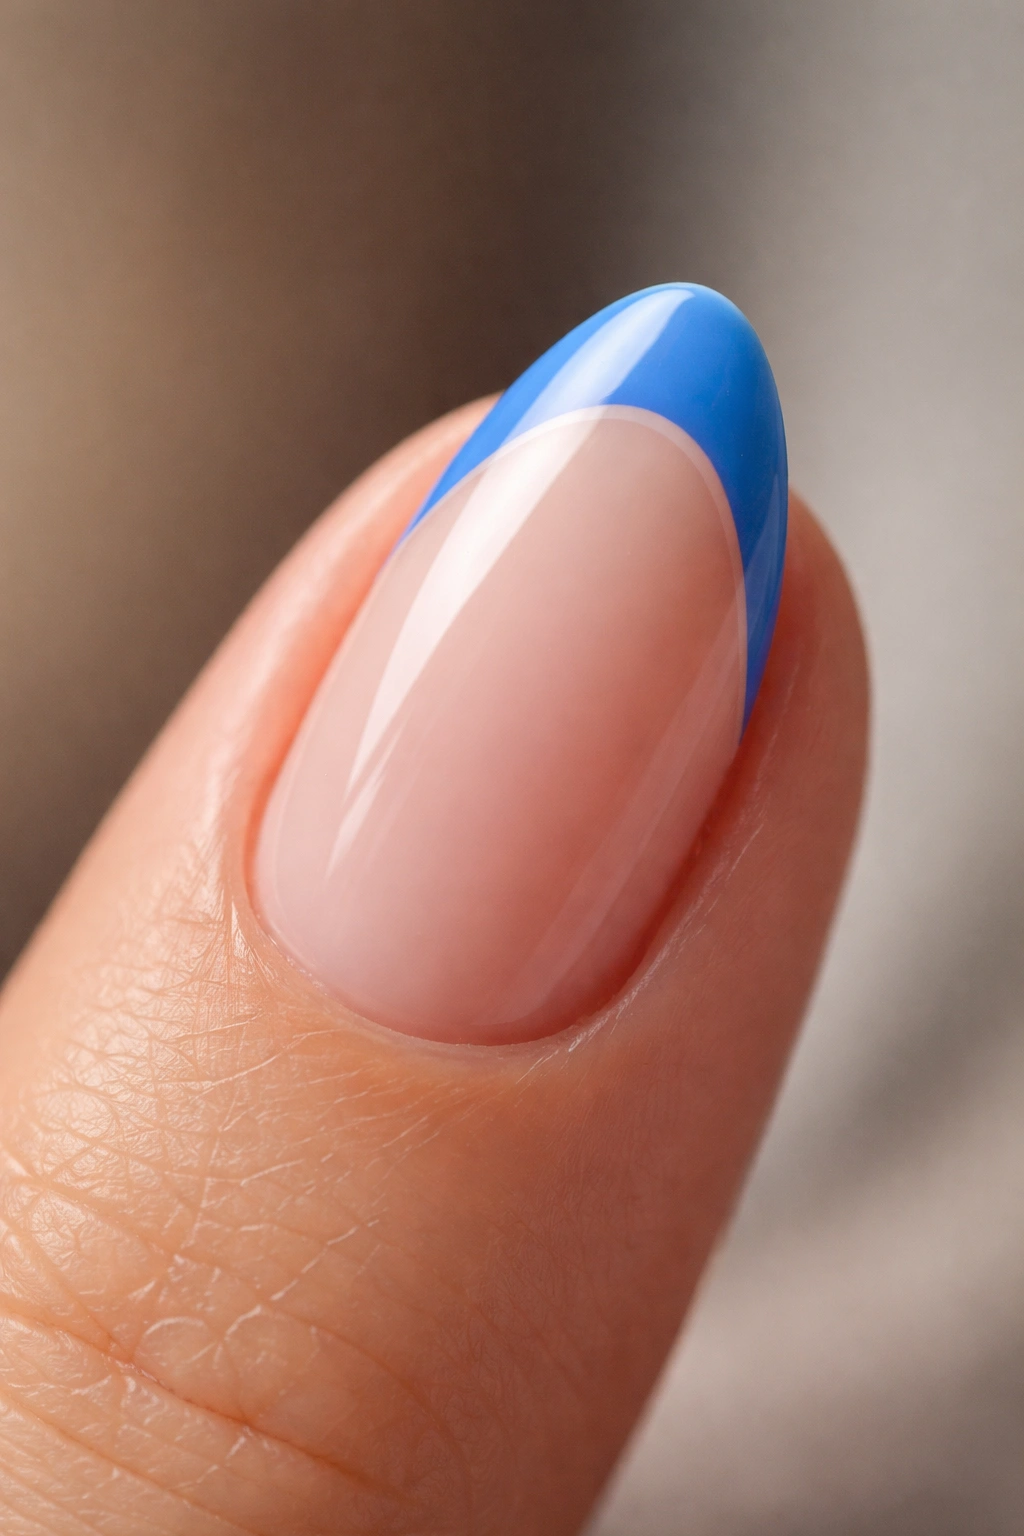
10. Electric Blue Negative Space French Tip
Electric blue is not a shy color. It’s the kind of blue that reads as almost neon — highly saturated, nearly buzzing — and on a short almond nail, it needs some management. The negative space approach does that managing brilliantly.
What Negative Space French Tips Actually Look Like
Instead of covering the entire nail surface with a base color, the negative space French tip leaves part of the nail bare (just a clear top coat over the natural nail). The electric blue tip sits at the edge, and a strip of bare nail just below it creates a visual break — typically 1-2mm — before the color resumes in a sheer or clear base coat. The natural nail shows through, lightening the whole design visually.
Why This Works for Bold Shades
The bare strip acts as a buffer. It keeps the electric blue from overwhelming the short nail by containing it to the top third of the nail only. A shade that might look aggressive on a full opaque nail bed instead reads as controlled and deliberate. The natural nail showing through also adds subtle variation in tone that makes the design look layered.
How to Create the Effect
- Apply a thin clear base coat over the full nail and let it dry fully
- Apply electric blue at the tip, building the tip to approximately 3mm in from the free edge
- Leave a 1-2mm bare strip directly below the colored tip
- Apply a sheer clear polish from below the bare strip to the cuticle
A thin piece of striping tape placed at the lower boundary of the electric blue tip keeps the bare strip perfectly uniform. Remove it slowly at a 45-degree angle while the polish is still slightly wet — the edge stays clean and crisp.
11. Dusty Blue French Tip with a Pressed Flower Accent
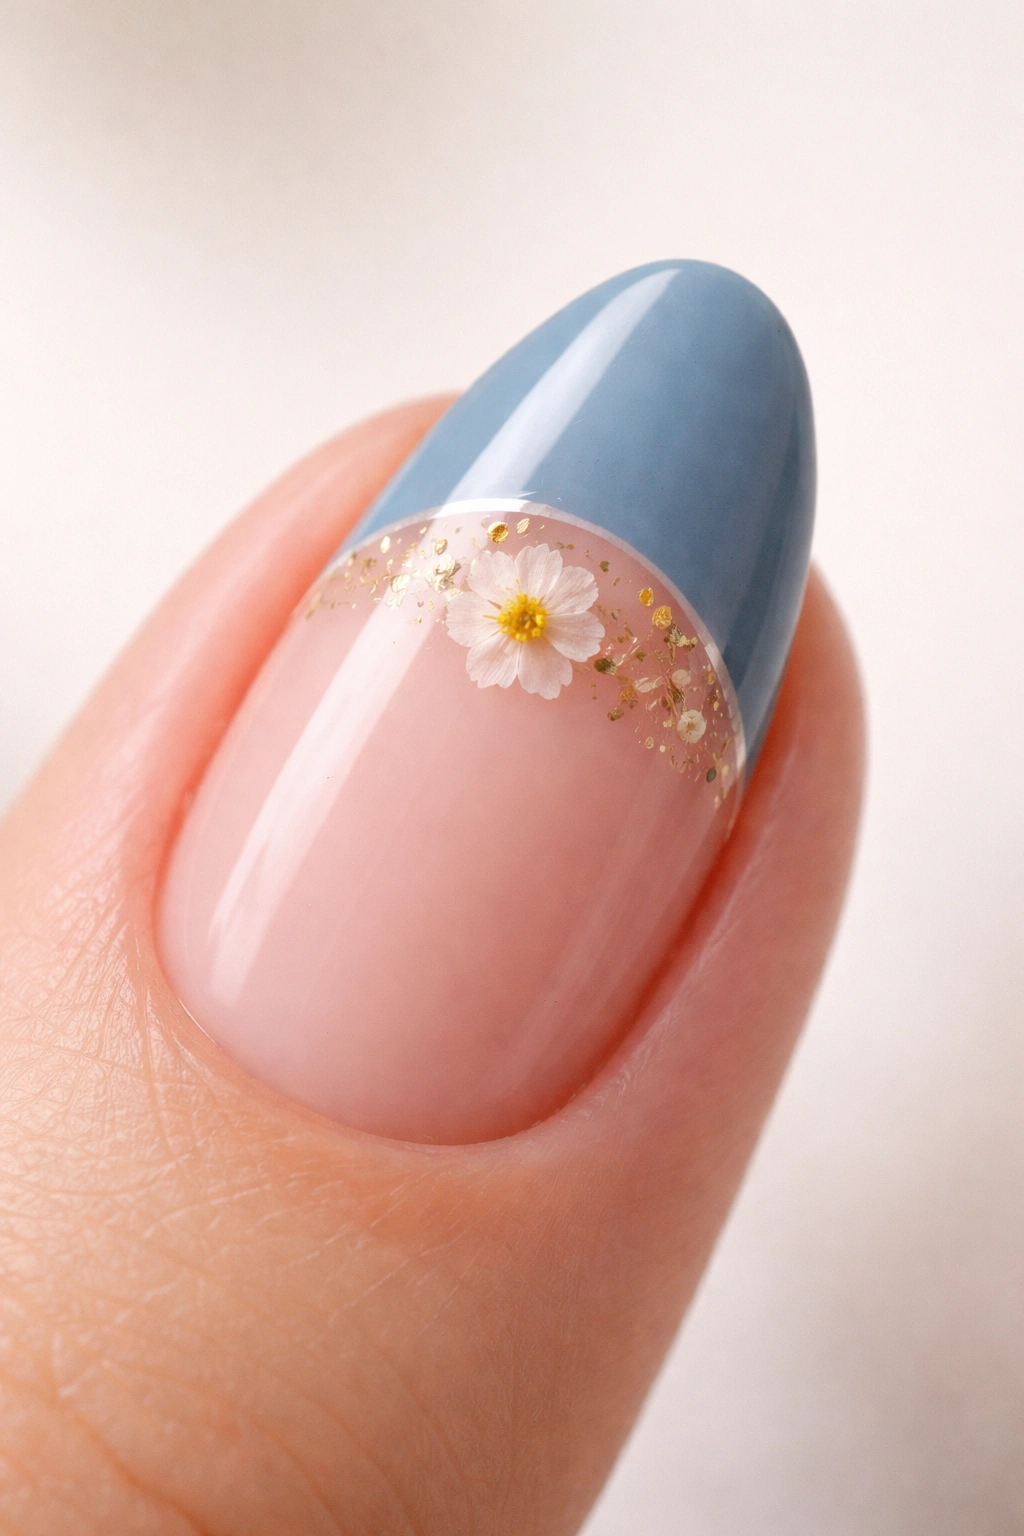
Dusty blue is the muted, smoky cousin of baby blue — it looks like blue that’s been mixed with a touch of grey and left in soft light for a while. Quieter than most blues on this list, and that quietness is exactly what makes space for a pressed flower accent to work without competing.
The accent placement here matters: a single small flower — typically a dried violet, forget-me-not, or larkspur — positioned just below the tip line at the center of the nail, sitting right at the boundary between the dusty blue tip and the base. It functions almost like punctuation at the end of a sentence. Small. Deliberate. Placed rather than scattered.
Unlike bolder designs where a floral element might fight for attention with a saturated color, dusty blue gives the flower room. The muted tone lets the organic texture and natural color of the dried flower show clearly rather than getting lost in the background.
For application: the flower goes down before the final top coat, pressed gently into a layer of wet gel or clear polish. A thin, flat silicone tool or a toothpick positions it accurately without disturbing the surrounding polish. Once flat against the nail, cure the gel layer, then apply two full coats of top coat over the entire nail to encapsulate the flower completely. Any exposed edge of the flower will catch and lift within days if left unsealed.
Nail decals with printed flowers work well here too — they’re more consistent and easier to apply than real pressed flowers, though the texture difference is noticeable up close.
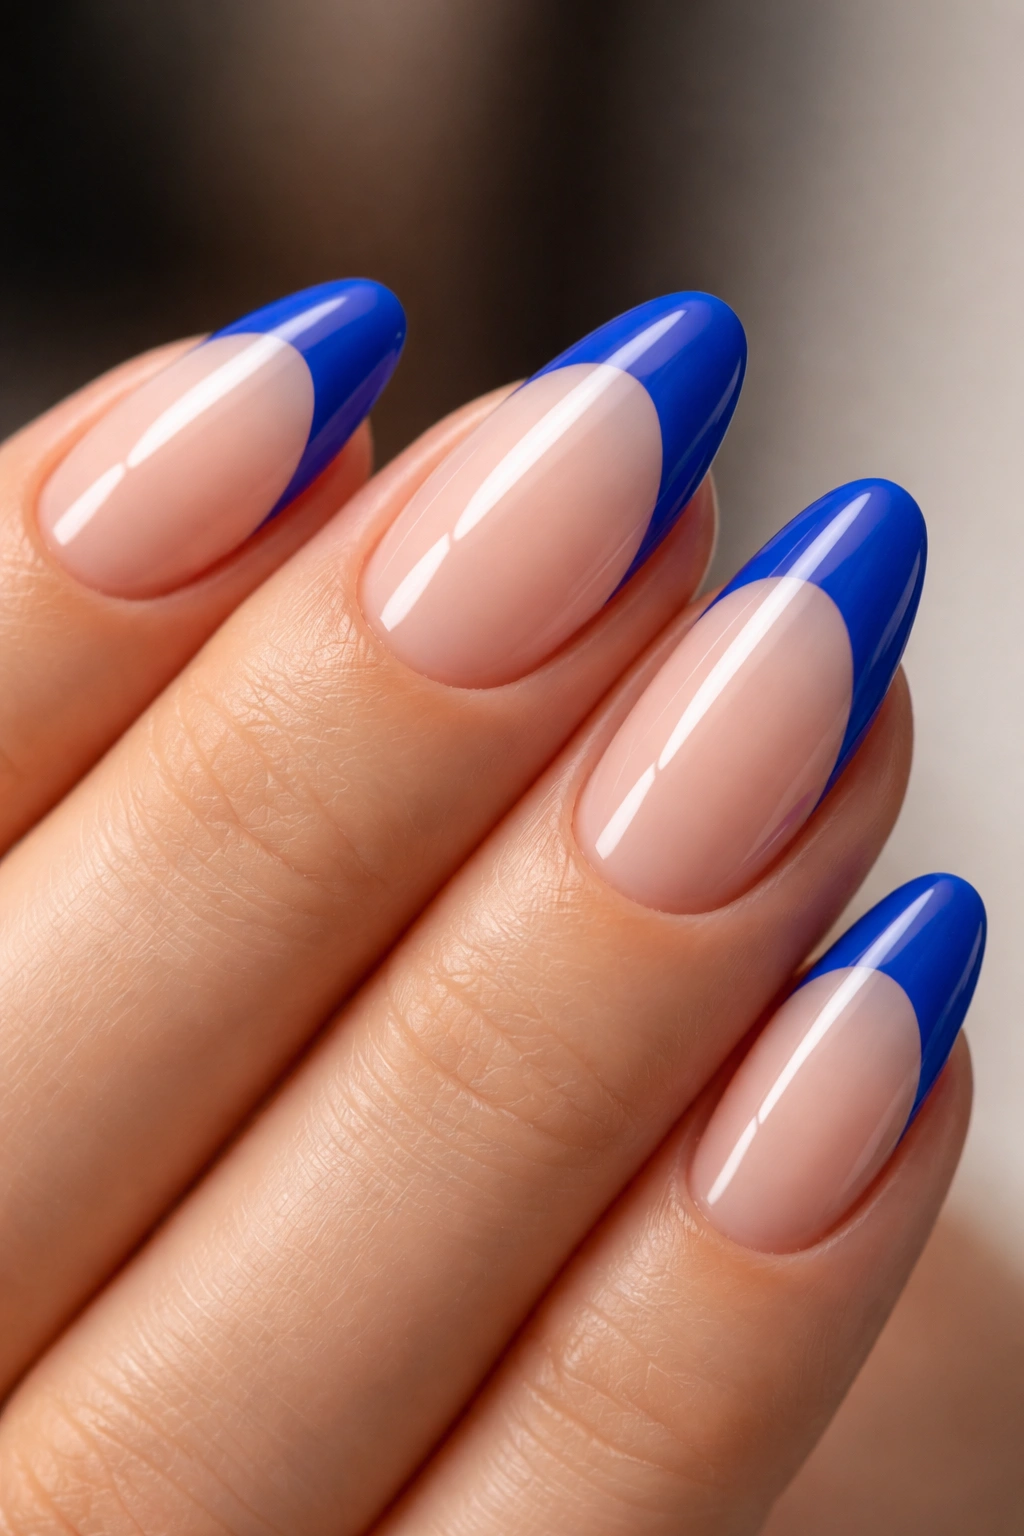
12. Royal Blue Double French Tip

Two parallel lines of royal blue at the tip. That’s it. But the effect is surprisingly graphic on a short almond nail — it looks architectural in a way that a single tip line doesn’t.
The double French tip works by creating two distinct color bands at the free edge rather than one. The outer line, at the very edge of the tip, is typically 1.5-2mm wide. A 1-1.5mm gap of bare or nude nail separates it from the second inner line, which mirrors the first at the same width. The total span of both lines plus the gap takes up about 5-6mm of the tip — roughly the top quarter of a short nail, which hits the sweet spot between bold and balanced.
Royal blue earns its place here because it has the opacity and saturation to read clearly in a narrow line. A lighter blue would require thicker lines to register visually, which throws off the proportions on a short nail. Royal blue reads distinctly even at 1.5mm because the color is dense enough to show itself even in a thin application.
Striping tape is the most reliable method for getting both lines parallel and even. Apply the outer line first, let it cure, then place tape at the lower boundary of that outer line and the upper boundary of where the inner line will go. Fill in the inner line, remove the tape while the polish is still slightly wet, and seal both lines under top coat. The gap between the lines should stay bare or covered with only a clear base — any color in that gap reads as a third element and muddies the design.
13. Ice Blue with Crystal Rhinestone Detail
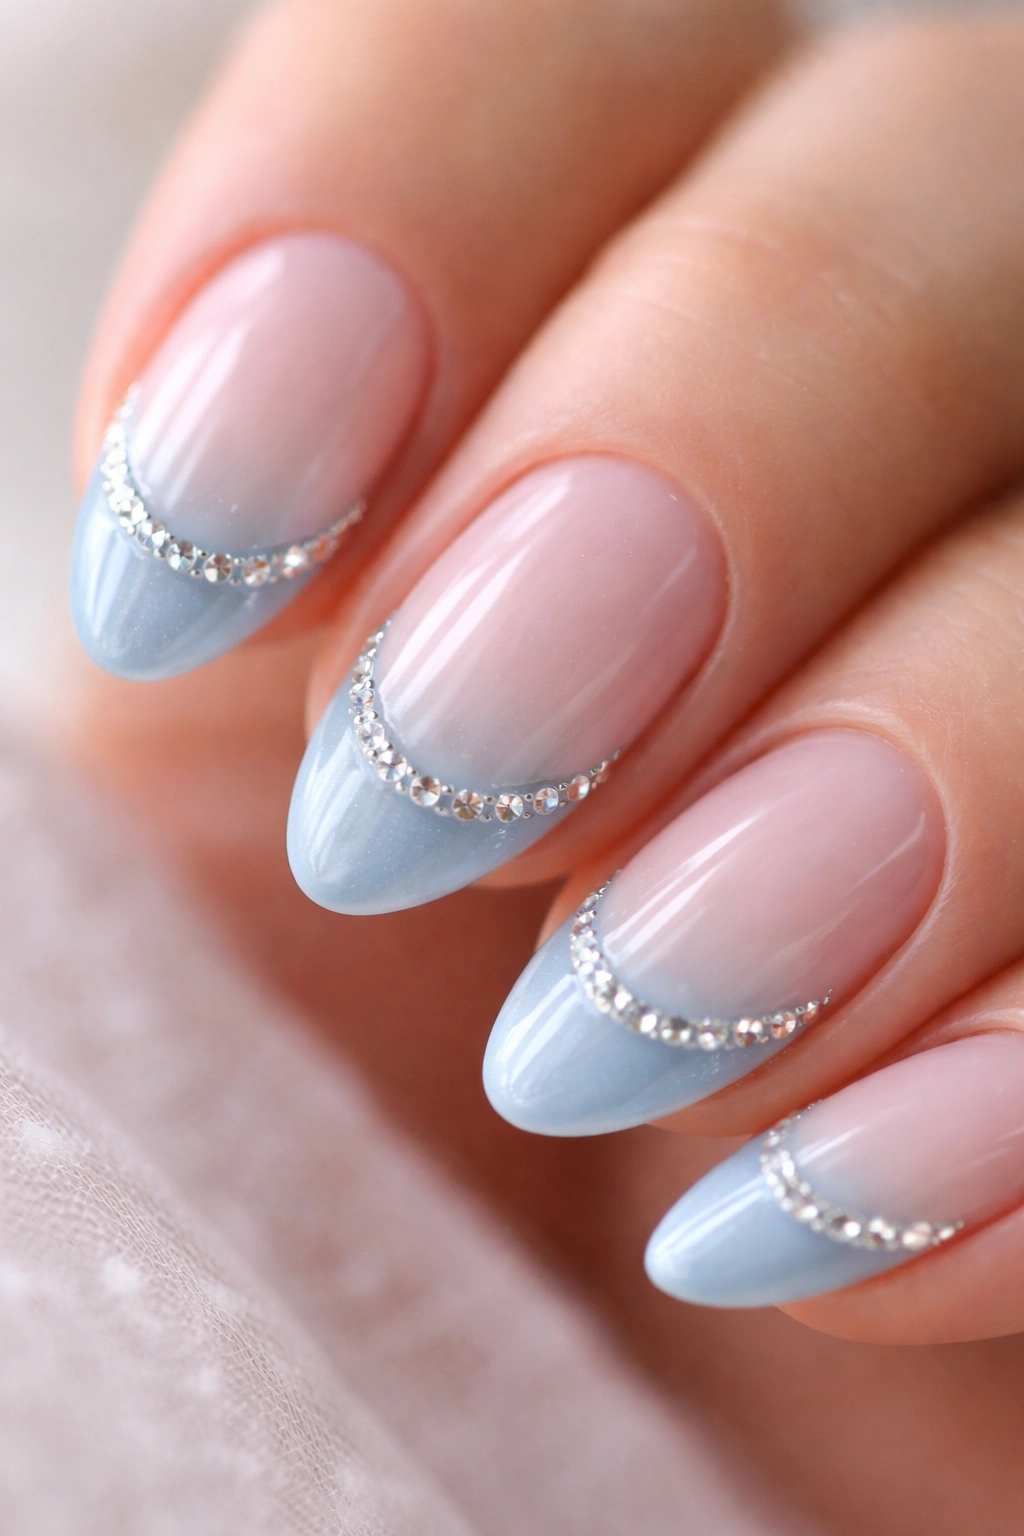
An ice blue French tip — pale, almost translucent, with hints of silver in the formula — is already refined on its own. Add a line of flat-back crystal rhinestones along the tip boundary and the result moves into a completely different category.
Ice blue reads almost like a cool shimmer rather than a solid color. Most ice blue polishes and gels have a pearlescent quality built into the formula — the color shifts between white and pale blue depending on the angle of the light. That optical movement pairs naturally with rhinestones, which also shift and flash with every hand gesture.
The rhinestone placement that works best on short almond nails: a single row of SS5 flat-back crystals — the smaller size, approximately 1.7mm each — placed directly along the lower edge of the ice blue tip. You don’t need many. Six to eight stones per nail is enough to trace the curved boundary completely. More than that and the stones feel heavy and out of scale with a short nail.
Application tool: a dotter or a toothpick tip with a tiny bit of clear wax picks up individual rhinestones accurately and places them without disturbing the surrounding polish. Press each stone gently into a thin layer of gel top coat before curing — this locks them in place more reliably than nail glue alone, which tends to let stones shift slightly before it sets.
Seal with a thick gel top coat, but avoid burying the very tops of the rhinestones. A thin coat skims over them and preserves the sparkle; a coat that’s too thick buries them and mutes the whole effect.
14. Steel Blue Reverse French Tip
Most people think of French tips as color at the free edge. The reverse French tip flips that — the blue goes at the cuticle instead, creating a half-moon arc of color at the base rather than the top.
Steel blue is an interesting shade: it sits between navy and slate, cooler than either, with a metallic undertone that gives many formulas an almost industrial quality. At the cuticle in a reverse French tip, it creates a half-moon shape that mirrors the natural lunula line where the nail meets the skin. On short almond nails, this reverse curve reads as elegant because the almond shape’s taper draws the eye toward both ends of the nail equally — cuticle and tip each become a point of visual interest.
The execution is simpler than it sounds. After applying and drying your base color, apply the steel blue in a careful half-moon arc at the cuticle. A circular nail form or a small hole-punch reinforcement sticker placed over the cuticle area acts as a mask — peel it away after the blue is applied and before it fully dries. The result is a clean, curved color boundary that’s difficult to achieve freehand on a consistent basis.
Steel blue works well here in gel formula specifically because the slow curing time gives you a chance to clean up the edges with a thin acetone-dipped detail brush before committing to the cure. Standard polish dries too quickly for that kind of precision at the cuticle.
Keep the cuticle arc narrow — 3mm at its widest point — and leave the rest of the nail in a clean, complementary nude. The design should feel like a detail. When it starts to look like a costume piece, the arc has gone too wide.
15. Ocean Blue French Tip Over a Tortoiseshell Base
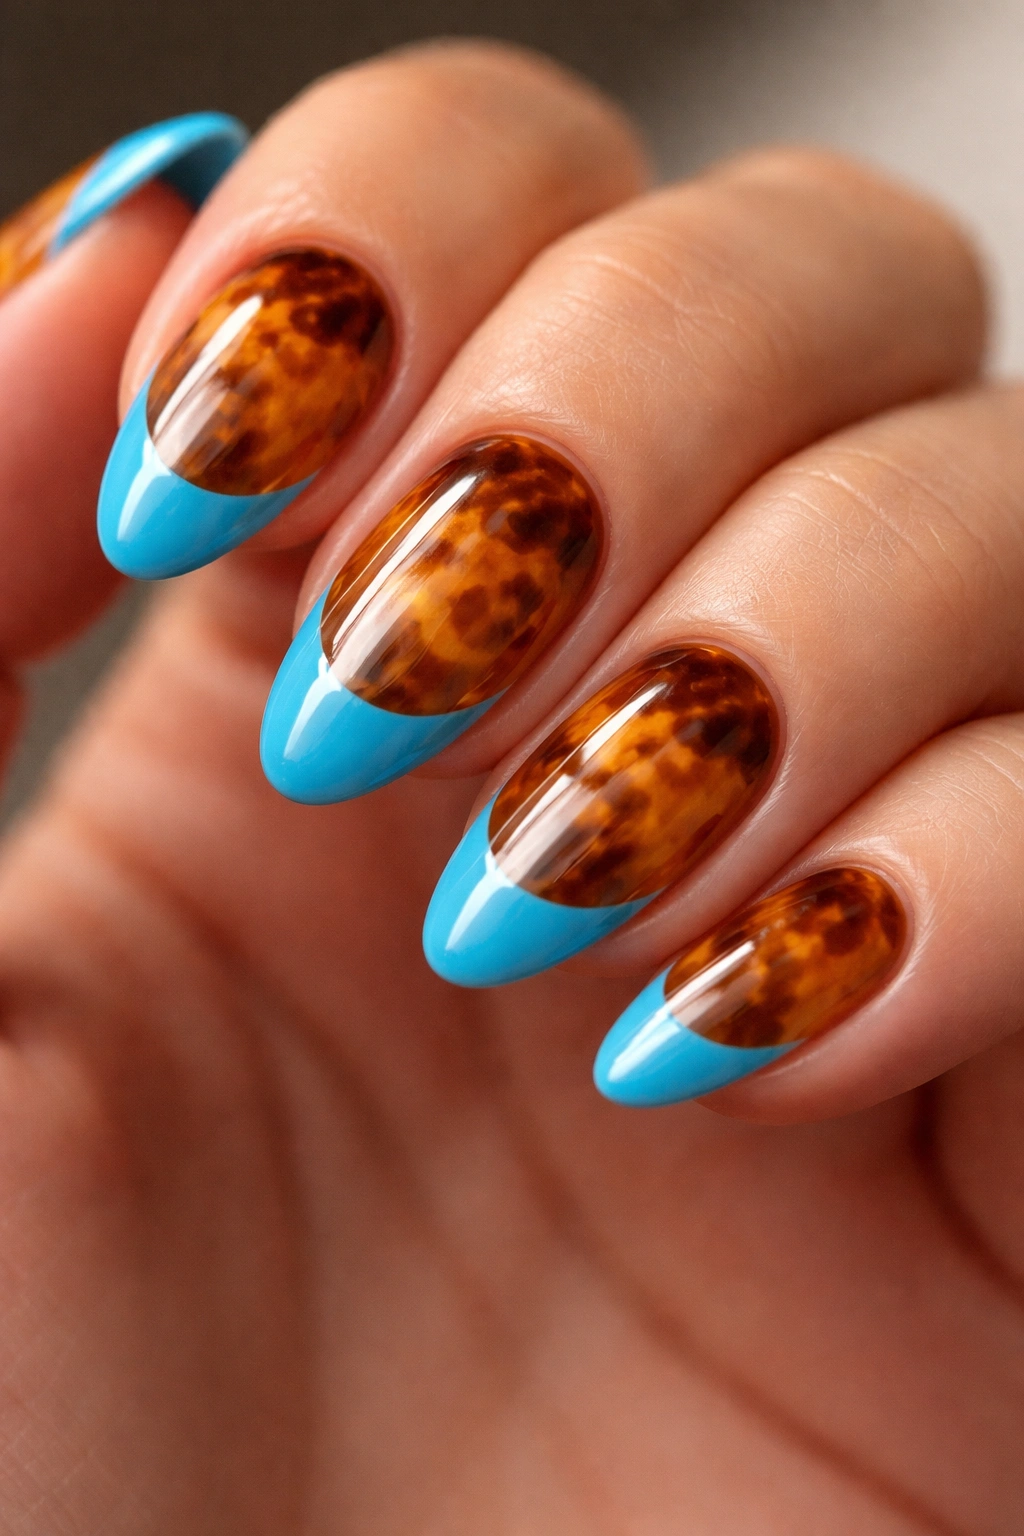
This one is genuinely different from everything else on this list.
Instead of the standard nude, milky, or sheer base, this look pairs an ocean blue French tip with a tortoiseshell base — amber, warm brown, and translucent honey swirled together. The ocean blue tip landing over that warm, earthy base creates an unexpected contrast that somehow resolves into something cohesive. Blue and warm brown shouldn’t work as well as they do together. But ocean blue — which carries teal in it, more green than a pure blue — bridges the gap between cool and warm naturally.
Creating the Tortoiseshell Base
The tortoiseshell effect on nails requires deliberate layering:
- Start with two coats of a warm amber or honey gold base and cure fully
- While a fresh thin layer of amber is still wet, drop small dots of translucent warm brown and black gel onto the nail surface
- Use a thin brush or dotting tool to swirl the drops in short, diagonal strokes — diagonal, not circular, to mimic the pattern’s natural direction
- Cure immediately after swirling to lock in the movement before it settles flat
Adding the Ocean Blue Tip
The ocean blue tip goes on after the tortoiseshell is fully cured and sealed under a thin layer of top coat. Apply the blue tip at 2.5-3mm using a French tip guide strip or striping tape pressed along the boundary line. Two coats of ocean blue over the sealed tortoiseshell give full coverage without the warm base bleeding through into the tip.
The final result rewards close attention. At a glance it reads as an elegant French tip over a warm base. Under direct light, the tortoiseshell pattern and the ocean blue tip play off each other in a way that few other nail combinations manage.
How to Get a Sharp French Tip Line Without Salon Help
The biggest frustration with DIY French tips — regardless of color — is the line. That boundary between the tip color and the base is where most home attempts fall apart. But there are actual techniques that fix this, and they’re worth knowing regardless of which look you choose from this list.
Tape is more reliable than French tip guides. French tip guide stickers (the crescent-shaped adhesive strips) are a reasonable starting point, but they’re molded for square or slightly rounded nails, not almond shapes. The curved edge of an almond nail means the sticker doesn’t hug the nail surface perfectly, leaving small gaps where color bleeds under. Thin striping tape, cut to match the specific curve of your nail, conforms more closely and gives you a cleaner line.
For the sharpest edges possible: apply your tape or guide after your base color is fully dry — not just surface-dry, but hardened. That’s about 30 minutes for regular polish, or 5 minutes after a UV cure for gel. Apply the tip color in two thin coats, then remove the tape while the second coat is still slightly wet. Clean any bleed immediately with a thin detail brush dipped in acetone. This cleanup step takes about 2 minutes and the improvement is significant.
One more technique worth having in your toolkit: the flood method. Apply the tip color slightly past the intended tip boundary, let it dry completely, then draw the boundary line by removing the excess with an acetone-dipped detail brush. You’re subtracting color to create the line rather than trying to paint it precisely. For short almond nails where the tip area is small, this approach often produces cleaner results than trying to paint a 2mm line accurately in a confined space.
Making Blue French Tip Almond Nails Last Longer
Blue polish — lighter shades especially — is one of the more unforgiving colors when it comes to tip wear. The color shift is more visible on blue than on nudes or pinks, which means wear that you might not notice on a neutral shade is obvious on baby blue or powder blue within days.
The single most effective habit: seal the free edge with every top coat layer. After each coat of polish or gel, run the brush across the very tip of the nail — not just across the face. Hold the brush perpendicular to the nail and drag it directly along the edge. This encapsulates the tip rather than just coating the surface, and it’s the primary reason salon gel manicures outlast home ones. Most people apply top coat only to the flat face of the nail and skip the edge entirely.
Blue polish is also sensitive to staining from cleaning products and sunscreen. Wearing gloves for dishes and housework extends the life of a blue French tip significantly — not out of vanity, but because the chemicals in cleaning products break down the top coat at the tip first. That’s the zone you most need intact.
For gel French tips: book your first fill or remove-and-redo at the 3-week mark rather than pushing to four weeks. By week four on a short nail, the natural nail growth creates a noticeable gap at the cuticle and the tip seal is usually compromised. Refreshing at week three while it still looks pristine keeps the look intentional rather than grown-out.
Final Thoughts
Short almond nails and blue French tips work together on a fundamental level — the almond taper focuses the eye toward the tip, and blue at that tip delivers more visual information than white ever could. The shape earns the color. The color earns the shape.
The 15 designs above span the full range from barely-there (the micro thin sky blue hairline, the soft powder blue on milky white) to genuinely striking (the electric blue negative space tip, the glitter cobalt, the ocean blue over tortoiseshell). What they share is that each one respects the proportions of a short nail. None of them ask the nail to be something it isn’t.
Pick the design that matches the occasion, or ignore the occasion entirely and pick the one you keep coming back to. That’s usually the right answer.
